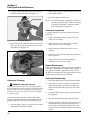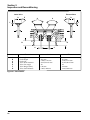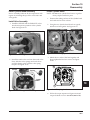
1
SERVICE MANUAL COURAGE XT-6, XT-7 VERTICAL CRANKSHAFT Contents Section 1. Safety and General Information ............................................................................. Section 2. Tools and Aids ......................................................................................................... Section 3. Troubleshooting ...................................................................................................... Section 4. Air Cleaner and Air Intake System ......................................................................... Section 5. Fuel System and Governor..................................................................................... Section 6. Lubrication System ................................................................................................. Section 7. Electrical System and Components ...................................................................... Section 8. Disassembly............................................................................................................. Section 9. Inspection and Reconditioning .............................................................................. Section 10. Reassembly............................................................................................................ 1 2 3 4 5 6 7 8 9 10 Section 1 Safety and General Information 1 Section 1 Safety and General Information Safety Precautions To ensure safe operation please read the following statements and understand their meaning. Also refer to your equipment manufacturer's manual for other important safety information. This manual contains safety precautions which are explained below. Please read carefully. WARNING Warning is used to indicate the presence of a hazard that can cause severe personal injury, death, or substantial property damage if the warning is ignored. CAUTION Caution is used to indicate the presence of a hazard that will or can cause minor personal injury or property damage if the caution is ignored. NOTE Note is used to notify people of installation, operation, or maintenance information that is important but not hazard-related. For Your Safety! These precautions should be followed at all times. Failure to follow these precautions could result in injury to yourself and others. WARNING WARNING Accidental Starts can cause severe injury or death. Rotating Parts can cause severe injury. Disconnect and ground spark plug leads before servicing. Stay away while engine is in operation. Accidental Starts! Disabling engine. Accidental starting can cause severe injury or death. Before working on the engine or equipment, disable the engine by disconnecting the spark plug lead. Rotating Parts! Keep hands, feet, hair, and clothing away from all moving parts to prevent injury. Never operate the engine with covers, shrouds, or guards removed. WARNING Hot Parts can cause severe burns. Do not touch engine while operating ȱȱĞȱǯ Hot Parts! Engine components can get extremely hot from operation. To prevent severe burns, do not touch these areas while the engine is running, or immediately Ğȱȱȱȱěǯȱȱȱ the engine with heat shields or guards removed. 1.1 Section 1 Safety and General Information WARNING WARNING ([SORVLYH)XHOFDQFDXVH¿UHVDQG severe burns. Carbon Monoxide can cause severe nausea, fainting or death. ȱȱęȱȱȱȱ ȱȱ engine is hot or running. Avoid inhaling exhaust fumes, and never run the engine in a closed ȱȱęȱǯ Explosive Fuel! ȱȱ¡¢ȱĚȱȱ its vapors can explode if ignited. Store gasoline only in approved containers, in well ventilated, unoccupied ǰȱ ¢ȱȱȱȱĚǯȱ ȱȱęȱȱȱȱ ȱȱ engine is hot or running, since spilled fuel could ignite if it comes in contact with hot parts or sparks from ignition. Do not start the engine near spilled fuel. Never use gasoline as a cleaning agent. WARNING Cleaning Solvents can cause severe injury or death. Use only in well ventilated areas away from ignition sources. Flammable Solvents! Carburetor cleaners and solvents are ¡¢ȱĚǯȱȱǰȱ Ěǰȱȱȱȱȱȱ away from the area. Follow the cleaner manufacturer’s warnings and instructions on its proper and safe use. Never use gasoline as a cleaning agent. 1.2 Lethal Exhaust Gases! Engine exhaust gases contain poisonous carbon monoxide. Carbon monoxide is odorless, colorless, and can cause death if inhaled. Avoid inhaling exhaust fumes, and never run the ȱȱȱȱȱȱęȱ area. CAUTION Electrical Shock can cause injury. Do not touch wires while engine is running. Electrical Shock! Never touch electrical wires or components while the engine is running. They can be sources of electrical shock. Section 1 Safety and General Information (QJLQH,GHQWL¿FDWLRQ1XPEHUV When ordering parts, or in any communication involving an engine, always give the Model, ęǰȱȱȱ of the engine. 1 ȱęȱȱȱȱȱȱ Ĝ¡ȱȱȱȱǯȱȱȱŗȬŗǯȱȱ ¡ȱȱȱȱȱ ȱȱȱŗȬŘǯ ,GHQWL¿FDWLRQ/DEHO )LJXUH,GHQWL¿FDWLRQ/DEHO A. Model No. XT 7 Courage Vertical Shaft Engine Numerical Designation B. Spec. No. Engine Model Model XT-6 XT-7 C. Serial No. XT173-0001 )LUVWVSHFL¿FDWLRQ written in this model series 3723500328 Year Manufactured Code Code Year 37 2007 38 2008 Factory Code )LJXUH([SODQDWLRQRI,GHQWL¿FDWLRQ1XPEHUV 1.3 Section 1 Safety and General Information Oil Recommendations Fuel Recommendations Using the proper type and weight of oil in the engine is extremely important, as is daily checking of oil level ȱȱȱ¢ǯȱȱȱȱȱȱ oil, or using dirty oil, will cause premature engine wear and failure. Oil Type Use high quality detergent oil of ȱǻȱ ȱǼȱȱȱȱȱ. Select the viscosity based on the air temperature at the time ȱȱȱ ȱȱȱŗȬřǯ RECOMMENDED SAE VISCOSITY GRADES 10W-30, SAE 30 10W-30 °F -20 °C -30 0 -20 20 -10 32 0 40 60 10 80 20 30 100 40 TEMPERATURE RANGE EXPECTED BEFORE NEXT OIL CHANGE Figure 1-3. Viscosity Grades Table. NOTE: Using other than service class SJ or higher oil or extending oil change intervals longer than recommended can cause engine damage. ȱȱȱ¢ȱȱȱȱęȱȱȱ ȱȱȱȱ¢ȱǯȱȱȱŗȬŚǯȱ 10W-30 SJ API RVIC E SE Figure 1-4. Oil Container Logo. Refer to Section 6, Lubrication System, for detailed oil check and oil change procedures. 1.4 WARNING: Explosive Fuel! ȱȱ¡¢ȱĚȱȱȱȱȱ¡ȱ if ignited. Store gasoline only in approved containers, in well ventilated, unoccupied buildings, away from sparks or Ěǯȱȱȱęȱȱȱȱ ȱȱȱȱȱȱ running, since spilled fuel could ignite if it comes in contact with hot parts or sparks from ignition. Do not start the engine near spilled fuel. Never use gasoline as a cleaning agent. General Recommendations Purchase gasoline in small quantities and store in clean, approved containers. A container with a ¢ȱȱŘȱȱȱȱ ȱȱȱȱȱ recommended. Such a container is easier to handle and helps eliminate spillage during refueling. To ensure easy starting and minimize gum deposits in ȱȱ¢ǰȱȱȱȱȱĞȱȱȱȱ previous season. Do not add oil to the gasoline. Do not ęȱȱȱDzȱȱȱȱ¡ǯ Fuel Type ȱȱǰȱȱ¢ȱǰȱǰȱȱ gasoline with a pump sticker octane rating of 86 or ǯȱȱȱȱȱȱǰȱȱ should be 90 octane minimum. Unleaded gasoline is recommended, as it leaves less combustion chamber deposits. Leaded gasoline may be used in areas where unleaded is not available and exhaust emissions are not regulated. Be aware however, using unleaded gasoline will require more frequent cylinder head servicing. Gasoline/Alcohol Blends ȱǻȱȱŗŖƖȱ¢ȱǰȱşŖƖȱȱ gasoline by volume) is approved as a fuel for Kohler ǯȱȱȦȱȱȱŘŖȱ and E85 are not to be used and are not approved. Any failures resulting from use of these fuels will not be warranted. Gasoline/Ether Blends Methyl Tertiary Butyl Ether (MTBE) and unleaded ȱȱǻȱȱ¡ȱȱŗśƖȱȱ¢ȱ volume) are approved as a fuel for Kohler engines. Other gasoline/ether blends are not approved. Section 1 Safety and General Information Periodic Maintenance WARNING: Accidental Starts! Disabling engine. Accidental starting can cause severe injury or death. Before working on the engine or equipment, disable the engine by disconnecting the spark plug lead. Maintenance Schedule These required maintenance procedures should be performed at the frequency stated in the table. They should also be included as part of any seasonal tune-up. Frequency ¢ȱȱȱȱ Yearly or Every 25 Hours Yearly or Every 50 Hours ¢ȱȱ¢ȱŗŖŖȱ Maintenance Required ȱȱǯ Check oil level. ȱȱȱȱȱDzȱȱȱ¢ǯŵ ȱȱȱȱȱǻȱǼǯŵ ȱȱȱȱȱ¢ǰȱȱȱȱǯŵ ȱȱęǰȱȱǯ Change oil. Replace spark plug and set gap. ȱȱȱǯŵ ¹Perform these maintenance procedures more frequently under extremely dusty, dirty conditions. Storage ȱȱȱ ȱȱȱȱȱȱ ȱȱȱ more, use the following storage procedure: ȱ Śǯȱ Remove the spark plug. Add one tablespoon of engine oil into the spark plug hole. Reinstall the plug, but do not connect the plug lead. Crank the engine two or three revolutions. ȱ ŗǯȱ ȱȱ¡ȱȱȱȱǯ ȱ Řǯȱ ȱȱȱ ȱȱȱȱȱ ȱ ȱǯȱȱȱǰȱȱ Section 6, Lubrication System. ȱ řǯȱ ȱȱȱȱȱȱȱȱȱȱ completely emptied, or the gasoline must be treated with a stabilizer to prevent deterioration. ȱ¢ȱȱȱȱȱ£ǰȱ ȱȱ ȇȱǯȱȱȱȱ tank with clean, fresh gasoline, and run the ȱȱŘȬřȱȱȱȱ£ȱȱȱ the carburetor. 5. Remove the spark plug. Cover the spark plug hole with your thumb and turn the engine over until the piston is at the top of its stroke (pressure against the thumb is greatest). Reinstall the spark plug, but do not connect the plug lead. 6. Store the engine in a clean, dry place. Never store the machine or fuel container where there is an ȱĚǰȱǰȱȱȱȱȱȱȱȱ water heater or on other appliances. 1.5 1 Section 1 Safety and General Information (IF EQUIPPED) (IF EQUIPPED) Dimensions in millimeters. Inch equivalents shown in parentheses. Figure 1-5. Typical Engine Dimensions. 1.6 Section 1 Safety and General Information *HQHUDO6SHFL¿FDWLRQVï 1 ȱ ȱǻȓȱřŜŖŖȱǼ XT-6 ................................................................................................................. ŘǯŜȱȱǻřǯśȱ Ǽ XT-7 ................................................................................................................. řǯŚȱȱǻŚǯśȱ Ǽ ȱȱȱǻȓȱŘŜŖŖȱǼ XT-6 ................................................................................................................. ŞȱȉȱǻśǯşȱĞǯȱǯǼ XT-7 ................................................................................................................. şǯśȱȉȱǻŝȱĞǯȱǯǼ Bore XT-6 .................................................................................................................. ŜśȱȱǻŘǯśŜȱǯǼ XT-7 .................................................................................................................. ŝŖȱȱǻŘǯŝśȱǯǼȱ Stroke XT-6 .................................................................................................................. ŚśȱȱǻŗǯŞȱǯǼ XT-7 .................................................................................................................. ŚśȱȱǻŗǯŞȱǯǼ Displacement XT-6 .................................................................................................................. ŗŚşȱȱǻşǯŗȱǯȱǯǼ XT-7 .................................................................................................................. ŗŝřȱȱǻŗŖǯŜȱǯȱǯǼ Compression Ratio XT-6 .................................................................................................................. ŞǯřDZŗ XT-7 .................................................................................................................. ŞǯśDZŗ Dry Weight XT-6 .................................................................................................................. ŗŖǯŞȱȱǻŘŚȱǯǼ XT-7 .................................................................................................................. ŗřǯŗȱȱǻŘşȱǯǼ ȱ¢ȱǻęǼ XT-6 ................................................................................................................. ŖǯŜŖȱȱǻŘŖȱ£ǯǼ XT-7 ................................................................................................................. ŖǯŜŖȬŖǯŜśȱȱǻŘŖȬŘŘȱ£ǯǼ ȱȱȱȬȱ¡ȱǻȱȱȱǼȱȱ................ ŘśǚȱĴ Air Cleaner Base ȱȱȱȱ ...................................................................... ŞȱȉȱǻŝŗȱǯȱǯǼ ȱȱȱȱȱȱ............................................... ŞȱȉȱǻŝŗȱǯȱǯǼ Blower Housing ȱ ȱȱ........................................................................... ŗŖȱȉȱǻŞŞȱǯȱǯǼ Brake ȱȱȱ .................................................................... şǯśȱȉȱǻŞŚȱǯȱǯǼ Breather Cover ȱȱȱ ..................................................................... ŗŖȱȉȱǻŞŞȱǯȱǯǼ Camshaft End Play.................................................................................................................. ŖǯŘȬŖǯŞȱȱǻŖǯŖŖŝŞȬŖǯŖřŗŚȱǯǼ Running Side Clearance ....................................................................................... ŖǯŗśȬŖǯśŗȱȱǻŖǯŖŖśşȬŖǯŖŘȱǯǼ Carburetor ȱȱȱ .................................................................... 9.0 N·m (80 in. lb.) 1.7 Section 1 Safety and General Information Connecting Rod ȱȱȱŶ .................................................................. ŗŘǯśȱȉȱǻŗŗŖȱǯȱǯǼ Connecting Rod-to-Crankpin Running Clearance New............................................................................................................... ŖǯŖŘśȬŖǯŖŚśȱȱǻŖǯŖŖŖşȬŖǯŖŖŗŝȱǯǼ Connecting Rod-to-Crankpin Side Clearance................................................ ŖǯŗřȬŖǯřŝȱȱǻŖǯŖŖśŗȬŖǯŖŗŚśȱǯǼ Connecting Rod-to-Piston Pin Running Clearance....................................... ŖǯŖŖŞȬŖǯŖŘśȱȱǻŖǯŖŖŖřȬŖǯŖŖŖşȱǯǼ ȱȱȱǯǯ New............................................................................................................... ŗŞǯŖŖŜȬŗŞǯŖŗŝȱȱǻŖǯŝŖŞŞȬŖǯŝŖşřȱǯǼ ȱȱĞȱȱǯǯȱ New............................................................................................................... ŜǯŖŖŖȬŜǯŖŗŞȱȱǻŖǯŘřŜŘȬŖǯŘřŜşȱǯǼȱ ȱȱȱȱȱ ............................................. 8 N·m (70 in. lb.) Crankshaft End Play (free) .................................................................................................... ŖǯŘŘśȬŗǯŗŚśȱȱǻŖǯŖŖŞŞȬŖǯŖŚśŖŝȱǯǼ Ğȱȱȱȱǯǯ New.............................................................................................................. ŘŚǯşşŚȬŘśǯŖŖŖȱȱǻŖǯşŞŚŖȬŖǯşŞŚŘȱǯǼȱ Ğȱȱȱȱȱǯǯ New.............................................................................................................. ŘśǯŚŖŖȬŘśǯŚŘŗȱȱǻŖǯşşşşȬŗǯŖŖŖŞȱǯǼȱ ¢ ȱȱȱȱȱǯǯ O.D. – Max. Wear Limit ............................................................................ ŘŚǯşŝśȬŘŚǯşŞşȱȱǻŖǯşŞřŘȬŖǯşŞřŞȱǯǼȱ Max. Taper .................................................................................................. ŖǯŖŘśȱȱǻŖǯŖŖŖşȱǯǼ Max. Out of Round .................................................................................... ŖǯŖŘśȱȱǻŖǯŖŖŖşȱǯǼ PTO End Main Bearing Journal O.D. New ............................................................................................................. ŘśǯřŝŖȬŘśǯřŞśȱȱǻŖǯşşŞŞȬŖǯşşşŚȱǯǼ Max. Taper .................................................................................................. ŖǯŖŘśȱȱǻŖǯŖŖŖşȱǯǼ Max. Out of Round .................................................................................... ŖǯŖŘśȱȱǻŖǯŖŖŖşȱǯǼ Ğȱȱȱȱȱȱȱ New.............................................................................................................. ŖǯŖŗśȬŖǯŖśŗȱȱǻŖǯŖŖŖśȬŖǯŖŖŘȱǯǼ Crankcase ȱȱĞȱȱǯǯȱ New............................................................................................................... ŜǯŖŖŖȬŜǯŖŗŞȱȱǻŖǯŘřŜŘȬŖǯŘřŜşȱǯǼ Ğȱȱȱȱȱȱ New.............................................................................................................. ŖǯŖŖśȬŖǯŖŘśȱȱǻŖǯŖŖŖŘȬŖǯŖŖŖşȱǯǼ Connecting Rod Journal O.D. New.............................................................................................................. ŘşǯşŞśȬŘşǯşşśȱȱǻŗǯŗŞŖśȬŗǯŗŞŖşȱǯǼ Max. Taper .................................................................................................. ŖǯŖŗŖȱȱǻŖǯŖŖŖŚȱǯǼ Max. Out of Round .................................................................................... ŖǯŖŗŖȱȱǻŖǯŖŖŖŚȱǯǼ 1.8 Section 1 Safety and General Information Cylinder Bore ¢ȱȱǯǯ New.............................................................................................................. ŝŖǯŖŖŖȬŝŖǯŖŗśȱȱǻŘǯŝśśŞȬŘǯŝśŜŚȱǯǼ Max. Taper .................................................................................................. ŗŘǯŝȱȱǻŖǯŖŖŖśȱǯǼ Max. Out of Round .................................................................................... ŗŘǯŝȱȱǻŖǯŖŖŖśȱǯǼ 1 Cylinder Head ¢ȱ ȱȱŶ .................................................................... ŘŝǯŞ ȉȱǻŘŚŜȱǯȱǯǼȱ ¡ǯȱȬȬ ........................................................................................ ŖǯŖŞȱȱǻŖǯŖŖřŗȱǯǼ ȱȱȱȱŶ ........................................................................ şǯśȱȉȱǻŞŚȱǯȱǯǼ ȱȱȱŶ ................................................................................ ŗřǯŜȱȉȱǻŗŘŖȱǯȱǯǼ Dipstick Tube Fastener ȱȱȱȱ....................................................................... ŞȱȉȱǻŝŗȱǯȱǯǼ Engine Cover ȱȱȱȱȱȱ............................................. ŘǯŞȱȉȱǻŘśȱǯȱǯǼ ȱȱȱȱȱȱȱ ............................... ŘǯřȱȉȱǻŘŖȱǯȱǯǼ Fan/Flywheel ¢ ȱȱ........................................................................................ śŗǯśȱȉȱǻŚśŜȱǯȱǯǼ Fuel Tank Tank Bracket to Crankcase Stud Torque ........................................................ ŞȱȉȱǻŝŗȱǯȱǯǼ ȱȱȱȱȱ ........................................................... ŚǯśȱȉȱǻŚŖȱǯȱǯǼ Governor ȱȱĞȬȬȱȱ ............................ ŖǯŖŘŖȬŖǯŖśŞȱȱǻŖǯŖŖŖŝȬŖǯŖŖŘŘȱǯǼ ȱȱȱ .................................................................... şǯśȱȉȱǻŞŚȱǯȱǯǼ ȱȱȱ...................................................................... şǯśȱȉȱǻŞŚȱǯȱǯǼ ȱȱĞȱǯǯ New.............................................................................................................. śǯşŜȬśǯşŞȱȱǻŖǯŘřŚŜȬŖǯŘřśŚȱǯǼ ȱȱĞȬȬȱȱȱ ..................... ŖǯŖşȬŖǯŗşȱȱǻŖǯŖŖřśȬŖǯŖŖŝŚȱǯǼ ȱȱĞȱǯǯ New ............................................................................................................. ŜǯŖŗȬŜǯŖřȱȱǻŖǯŘřŜŜȬŖǯŘřŝŚȱǯǼ Ignition Spark Plug Type (Champion® or equivalent)................................................ ŗŘȱǻ®) Spark Plug Gap ................................................................................................. ŖǯŝŜŘȱȱǻŖǯŖřŖȱǯǼ Spark Plug Torque ............................................................................................ ŘŚǯśȱȉȱǻŘŗŝȱǯȱǯǼ ȱȱȱ ................................................................................. ŖǯŘśŚȱȱǻŖǯŖŗŖȱǯǼ ȱȱȱ ................................................................... ŗŖȱȉȱǻŞŞȱǯȱǯǼȱ 1.9 Section 1 Safety and General Information 0XIÀHU Exhaust Stud Torque ........................................................................................ 9.0 N·m (80 in. lb.) ¡ȱȱȱȱ........................................................................ ȱşǯśȱȉȱǻŞŚȱǯȱǯǼ Oil ȱȱ ȱŶ ...................................................................................... ȱŗŘǯřȱȉȱǻŗŖşȱǯȱǯǼ Oil Drain Plug Torque³...................................................................................... ŗřǯśȱȉȱǻŗŘŖȱǯȱǯǼ Piston, Piston Rings, and Piston Pin ȱȱȱǯǯ New.............................................................................................................. ŗŞǯŖŖŖȬŗŞǯŖŖŞȱȱǻŖǯŝŖŞŜȬŖǯŝŖŞşȱǯǼ Piston Pin O.D. New.............................................................................................................. ŗŝǯşşŖȬŗŝǯşşŜȱȱǻŖǯŝŖŞŘȬŖǯŝŖŞśȱǯǼ Top Compression Ring-to-Groove Side Clearance ...................................... ŖǯŖŘȬŖǯŖŜȱȱǻŖǯŖŖŖŝȬŖǯŖŖŘřȱǯǼ Middle Compression Ring-to-Groove Side Clearance ................................ ŖǯŖŘȬŖǯŖŜȱȱǻŖǯŖŖŖŝȬŖǯŖŖŘřȱǯǼ Top and Middle Compression Ring End Gap New Bore..................................................................................................... ŖǯŖŘśȬŖǯŖŚŖȱȱǻŖǯŖŖŖşȬŖǯŖŖŗśȱǯǼ ȱȱȱǯǯ New ............................................................................................................ ŜşǯşŜȬŜşǯşŞȱȱǻŘǯŝśŚřȬŘǯŝśśŗȱǯǼ ȱȱȬȬ¢ȱȱȱ New.............................................................................................................. ŖǯŖŘŖȬŖǯŖśśȱȱǻŖǯŖŖŖŝȬŖǯŖŖŘŗȱǯǼ Recoil ȱȱȱ .................................................................. ŞȱȉȱǻŝŗȱǯȱǯǼ Speed Control ȱȱȱ¢ȱȱ ......................................ŞȱȉȱǻŝŗȱǯȱǯǼȱ Valve Cover ȱȱȱ........................................................................... ŞȱȉȱǻŝŗȱǯȱǯǼ Valves and Valve Lifters ȱȱŚ ............................................................................................. ŖǯŖŝŜŘȬŖǯŗŘŝȱȱǻŖǯŖŖřȬǯŖŖśȱǯǼ Exhaust Valve LashŚ .......................................................................................... ŖǯŖŝŜŘȬŖǯŗŘŝȱȱǻŖǯŖŖřȬǯŖŖśȱǯǼ ȱȱȱĞȱǻȱȱǼ............................................... śǯŘŖŖȱȱǻŖǯŘŖŚŝȱǯǼ ¡ȱȱȱĞȱǻȱȱǼ............................................ śǯŘŚŝȱȱǻŖǯŘŖŜśȱǯǼ Nominal Valve Seat Angle ............................................................................... ŘśǚǰȱŚśǚǰȱŜŖǚȱǻřȱǼ 1.10 Section 1 Safety and General Information Valves and Valve Lifters (continued) 1 ȱȱȬȬȱȱȱ ............................... ŖǯŖŘŖȬŖǯŖŚŝȱȱǻŖǯŖŖŖŝȬŖǯŖŖŗŞȱǯǼ Exhaust Valve Stem-to-Valve Guide Running Clearance ............................ ŖǯŖśśȬŖǯŖŞŘȱȱǻŖǯŖŖŘŗȬŖǯŖŖřŘȱǯǼ ȱȱȱǯǯ New.............................................................................................................. śǯśŖŖȬśǯśŗŘȱȱǻŖǯŘŗŜśȬŖǯŘŗŝŖȱǯǼ ȱȱȱȱ New.............................................................................................................. śǯŚŜśȬśǯŚŞŖȱȱǻŖǯŘŗśŗȬŖǯŘŗśŝȱǯǼ ¡ȱȱȱǯǯ New.............................................................................................................. śǯśŖŖȬśǯśŗŘȱȱǻŖǯŘŗŜśȬŖǯŘŗŝŖȱǯǼ Exhaust Valve Stem Diameter New.............................................................................................................. śǯŚřŖȬśǯŚŚśȱȱǻŖǯŘŗřŝȬŖǯŘŗŚřȱǯǼ ŗ Values are in metric units. English equivalents are shown in parentheses. Do not lubricate threads unless otherwise indicated. Ŷ¢ȱȱȱȱȱȱ¢ǯȱȱȱDZȱŗŖȬřŖȱȱǰȱȱ¢ȱȱ ǻǛȱŚśŖřŖŚǼǰȱȱȬŗŖȱǻǛȱŖřŖŗřŗŖŚǼǰȱȱȬŚŖ®. ³Apply thread sealant around three full threads before assembly. No excess sealant allowed on inside or outside of joint. ȱ ȱȬȱȱȱȱȱȱȱȱȱǯȱȱȱȱȬȱ ȱŗśŖǰȱ ȬȱȱŗŗśǰȱȬȱ ȱŗŘŖǰȱȬȱ ȱŗŘŜǯ Ś ȱȱȱ¢ȱŘŖŖȱDzȱȱȱǯ 1.11 Section 1 Safety and General Information General Torque Values Metric Fastener Torque Recommendations for Standard Applications Tightening Torque: N·m (in. lb.) + or - 10% Property Class Size M4ȱ M5ȱ M6ȱ M8ȱ 4.8 5.8 8.8 10.9 12.9 Noncritical Fasteners Into Aluminum ŗǯŘȱǻŗŗǼȱ ŘǯśȱǻŘŘǼȱ ŚǯřȱǻřŞǼȱ ŗŖǯśȱǻşřǼȱ ŗǯŝȱǻŗśǼȱ řǯŘȱǻŘŞǼȱ śǯŝȱǻśŖǼȱ ŗřǯŜȱǻŗŘŖǼȱ ŘǯşȱǻŘŜǼȱ śǯŞȱǻśŗǼȱ şǯşȱǻŞŞǼȱ ŘŚǯŚȱǻŘŗŜǼȱ ŚǯŗȱǻřŜǼȱ ŞǯŗȱǻŝŘǼȱ ŗŚǯŖȱǻŗŘŚǼȱ řřǯşȱǻřŖŖǼȱ śǯŖȱǻŚŚǼȱ şǯŝȱǻŞŜǼȱ ŗŜǯśȱǻŗŚŜǼȱ ŚŖǯŝȱǻřŜŖǼȱ ŘǯŖȱǻŗŞǼ ŚǯŖȱǻřśǼ ŜǯŞȱǻŜŖǼ ŗŝǯŖȱǻŗśŖǼ 10.9 12.9 Noncritical Fasteners Into Aluminum ŜŜǯŚȱǻŚşǼȱ ŗŗŜǯŜȱǻŞŜǼȱ ŗŞŚǯŚȱǻŗřŜǼȱ ŞŗǯŚȱǻŜŖǼȱ ŗřşǯŝȱǻŗŖřǼȱ ŘŗşǯŝȱǻŗŜŘǼȱ Tightening Torque: N·m (ft. lb.) + or - 10% Property Class Size M10 M12 M14 4.8 5.8 ŘŗǯŝȱǻŗŜǼȱ řŜǯŜȱǻŘŝǼȱ śŞǯřȱǻŚřǼȱ ŘŝǯŗȱǻŘŖǼȱ ŚŝǯśȱǻřśǼȱ ŝŜǯŚȱǻśśǼȱ 8.8 ŚŝǯśȱǻřśǼȱ ŞŘǯŝȱǻŜŗǼȱ ŗřŗǯśȱǻşŝǼȱ Oil Drain Plug Tightening Torque: N·m (English Equiv.) Size 1/8" NPT 1/4" 3/8" 1/2" 3/4" X-708-1 1.12 Into Cast Iron – ŗŝǯŖȱǻŗśŖȱǯȱǯǼ ŘŖǯřȱǻŗŞŖȱǯȱǯǼ ŘŝǯŗȱǻŘŖȱĞǯȱǯǼ řřǯşȱǻŘśȱĞǯȱǯǼ ŘŝǯŗȦřřǯşȱǻŘŖȦŘśȱĞǯȱǯǼ Into Aluminum ŚǯśȱǻŚŖȱǯȱǯǼ ŗŗǯřȱǻŗŖŖȱǯȱǯǼ ŗřǯŜȱǻŗŘŖȱǯȱǯǼ ŗŝǯŜȱǻŗřȱĞǯȱǯǼ ŘŗǯŝȱǻŗŜȱĞǯȱǯǼ ŘŝǯŗȦřřǯşȱǻŘŖȦŘśȱĞǯȱǯǼ řřǯşȱǻŘśǼ ŜŗǯŖȱǻŚśǼ şŚǯşȱǻŝŖǼ Torque Conversions ȉȱƽȱǯȱǯȱ¡ȱŖǯŗŗř ȉȱƽȱĞǯȱǯȱ¡ȱŗǯřśŜ in. lb. = N·m x 8.85 Ğǯȱǯȱƽȱȉȱ¡ȱŖǯŝřŝ Section 2 Tools & Aids Section 2 Tools & Aids 2 ȱ¢ȱȱȱȱȱȱȱęȱ¢ǰȱǰȱȱ¢ȱǯȱ¢ȱ ȱȱȱȱȱǰȱȱȱȱȱȱǰȱǰȱȱǯȱȱǰȱȱ ȱȱȱȱ ȱȱȱ¢ȱȱȱ ǯ Here is the list of tools and their sources: Separate Tool Suppliers: Kohler Tools Contact your local Kohler ȱȱ¢ǯȱ SE Tools Śŗśȱ ȱǯ ǰȱȱȱŚŞŚŚŜ DZȱŞŗŖȬŜŜŚȬŘşŞŗȱȱ ȱDZȱŞŖŖȬŜŜŚȬŘşŞŗȱ ¡DZȱŞŗŖȬŜŜŚȬŞŗŞŗ ȱ¢ȱǯ ŝŜŞȱȱȱ ǰȱȱȱŜŖśśş DZȱŜřŖȬşŘŖȬŗřŖŖ Tools Description Cylinder Leakdown Tester ȱȱȱȱȱȱ¢ǰȱǰȱǰȱȱȱȱ ǯ Flywheel Strap Wrench ȱȱĚ¢ ȱȱǯ Ignition System Tester ȱȱȱȱȱ¢ǰȱ¡ȱǯ ȱȱȱȱȱȱǻǼȱȱ¢ǯ Tachometer (Digital Inductive) For checking operating speed (RPM) of an engine. Vacuum/Pressure Tester Alternative to a water manometer. Source/Part No. ȱŘśȱŝŜŗȱŖśȬ ȱȱȬŞŘŚŖş ȱŘśȱŚśśȱŖŗȬ ȱŘŚȱŚśśȱŖŘȬ Design Technology Inc. DTI-110 Kohler 25 761 22-S Aids Description Source/Part No. ĞȱȱǻȱŜŗřǼ ȱŘśȱřśŝȱŗŚȬ Dielectric GreaseȱǻȦȱŜŜŗǼ ȱŘśȱřśŝȱŗŗȬ RTV Silicone Sealant Ȭȱ ȱŗśŖ Ȭȱȱŗŗś Ȭȱ ȱŗŘŖ Ȭȱ ȱŗŘŜǯ 2.1 Section 2 Tools & Aids 2.2 Section 3 Troubleshooting Section 3 Troubleshooting 3 Troubleshooting Guide When troubles occur, be sure to check the simple ǰȱ ȱȱęȱ¢ȱȱȱȱȱȱ considered. For example, a starting problem could ȱȱ¢ȱȱ¢ȱȱǯ ȱȱ¢ȱȱȱȱȱȱ below. Use these to help locate the possible cause(s). Engine Cranks But Will Not Start ȱ ŗǯȱ ¢ȱȱǯ ȱ Řǯȱ ȱǰȱȱȱ ȱȱȱ¢ǯ ȱ řǯȱ ȱȱǯ 4. Spark plug lead disconnected. ȱ śǯȱ ȱ ȱȱěȱǯ ȱ Ŝǯȱ ¢ȱȱǯ ȱ ŝǯȱ ¢ȱȱǯ ȱ Şǯȱ ȱȱȱǻȱǼǯ ȱ şǯȱ ȱȱȱǻȱǼǯ Engine Starts But Does Not Keep Running ȱ ŗǯȱ ȱȱȱȱǯ ȱ Řǯȱ ȱǰȱȱȱ ȱȱȱ¢ǯ ȱ řǯȱ ¢ȱȱ¢ȱȱȱȱĴȱ ǰȱǻȱǼǯ 4. Loose wires or connections short ignition module's kill terminal to ground. ȱ śǯȱ ¢ȱ¢ȱȱǯ ȱ Ŝǯȱ ¢ȱǯ ȱ ŝǯȱ ȱ¢ȱǯ Engine Starts Hard ȱ ŗǯȱ ȱǰȱȱȱ ȱȱȱ¢ǯ ȱ Řǯȱ ȱȱǯ ȱ řǯȱ ȱȱ¢ȱ ȱȱǯ ȱ Śǯȱ ¢ȱȱ¢ȱȱȱȱĴȱ ȱǻȱǼǯ ȱ śǯȱ ¢ȱȱǯ 6. Low compression. 7. Weak spark. ȱ Şǯȱ ȱDzȱȱȱǯ ȱ şǯȱ ¢ ȱ¢ȱǯ ȱŗŖǯȱ ȱ¢ȱǯ Engine Will Not Crank ȱ ŗǯȱ ȱȱ¢ȱ ȱȱǯ ȱ Řǯȱ ¢ȱ¢ȱ ȱȱȱ ǯ 3. Seized internal engine components. Engine Runs But Misses ŗǯȱ ȱȱ ȱȱȱ¢ǯ Řǯȱ ȱȱ¢ȱȱǯ ȱřǯȱ ȱ¢ȱȱǯ 4. Spark plug lead boot loose on plug. ȱ śǯȱ ȱ ȱȱȱĴ¢ȱȱ the ignition module's kill terminal to ground. ȱ Ŝǯȱ ȱǯ ȱ ŝǯȱ ¢ȱȱȱȱ¢ȱǯ ȱ Şǯȱ ȱȱ¢ǯ Engine Will Not Idle ȱ ŗǯȱ ȱȱ ȱȱȱ¢ǯ ȱ Řǯȱ ȱȱȦȱȱȱǯ ȱ řǯȱ ¢ȱȱǯ ȱ Śǯȱ ȱ¢ȱǯ ȱ śǯȱ ȱȱȱȱ¢ȱǯ ȱ Ŝǯȱ ȱȱȱ ȱ¢ȱǯ 7. Low compression. ȱ Şǯȱ ȱȱȱȱǯ ȱ şǯȱ ȱDzȱȱ¢Ȧȱȱ problem. Engine Overheats ȱ ŗǯȱ ȱǰȱȱǰȱȱęǰȱȱȱ shroud clogged. ȱ Řǯȱ ¡ȱȱǯ ȱ řǯȱ ȱȱȱǯ ȱ Śǯȱ ȱȱȱǯ ȱ śǯȱ ¢ȱǯ ȱ Ŝǯȱ ȱȱ¡ǯ 3.1 Section 3 Troubleshooting Engine Knocks ȱ ŗǯȱ ¡ȱȱǯ ȱ Řǯȱ ȱȱȱǯ ȱ řǯȱ ȱȱȱȱ¢ǯ 4. Internal wear or damage. ȱ śǯȱ ¢ȱȱǯ ȱ Ŝǯȱ ȱȱȱǯ Engine Loses Power ȱ ŗǯȱ ȱȱȱǯ ȱ Řǯȱ ȱȱȱǯ ȱ řǯȱ ¢ȱȱȱǯ ȱ Śǯȱ ȱȱ ȱȱȱ¢ǯ ȱ śǯȱ ¡ȱȱǯ ȱ Ŝǯȱ ȱǯ ȱ ŝǯȱ ¢ȱȱǯ 8. Low compression. 9. Exhaust restriction. ŗŖǯȱ ȱȱĴǯ Engine Uses Excessive Amount of Oil ȱ ŗǯȱ ȱȱ¢ȱȱ¢ǯ ȱ Řǯȱ ǰȱȱȱȱǯ 3. Worn or broken piston rings. ȱ Śǯȱ ȱ¢ȱǯ ȱ śǯȱ ȱȱȱȱȱǯ ȱ Ŝǯȱ ȱęǯ ȱ ŝǯȱ ȱȱDzȱǯ Oil Leaks from Oil Seals, Gaskets ȱ ŗǯȱ ǰȱȱȱȱǯ 2. Worn or broken piston rings. ȱ řǯȱ ȱ ¢ǰȱȱ¢ȱǯ 4. Restricted exhaust. ȱ Ȋȱ ȱȱȱȱȱȱȱȱǰȱ ȱȱȱȱęȱȱǯ ȱ Ȋȱ ȱȱȱȱǯȱȱȱǰȱ ǰȱȱȱȱȱǰȱ ȱȱȱȱȱ ȱęȱ ȱȱȱǯȱȱȱȱȱȱȱ ¢ȱȱǯȱȱȱȱȱ maintenance. ȱ Ȋȱ ȱȱȱȱȱǯȱȱȱȱ ȱȱȱȱȱȱȱȱ ȱȱȱ¢ǯ ȱ Ȋȱ ȱȱȱȱȱȱ ȱȱȱ ȱȱȱǯȱȱȱȱǰȱěȱȱ gasoline odor. ȱ Ȋȱ ȱȱȱȱȱǯȱȱȱȱȱ ȱDzȱȱȱĚ ȱ¢ǯȱȱȱȱ ȱȱȱȱǯ ȱȱȱȱ¢Ȭȱȱǰȱȱ ȱȱȱȱȱǯȱ¡ȱ ȱȱȱȱȱDZȱ ȱ ȱ¢ȱȱ ȱȱȱ ȱǰȱȱȱ ȱ ȱȱȱȱȱǰȱȱȬ ȱȱ¡ǰȱȱȱ ȱǰȱȱȱȱ ȱ possible causes. NOTEDZȱ ȱȱȱȱȱȱȱȱȱȱ ¢ȱȱȱ ǯȱȱȱȱ ȱ ȱȱȱȱǯ Cleaning Engine External Engine Inspection ȱȱȱȱȱǰȱȱȱ ȱȱȱȱ¡ȱȱȱ ǯȱȱȱȱȱȱȱ ȱ ȱȱȱȱȱȱǻȱȱǼȱ when it is disassembled. ȱ Ȋȱ ȱȱȱȱȱȱȱȱȱ ǰȱȱęǰȱȱǰȱȱȱ ¡ȱǯȱȱȱȱȱȱȱ ȱȱǯ ȱ Ȋȱ ȱȱȱȱȱȱȱ ǯȱ¡ȱȱȱȱȱ ȱȱȱȱǰȱ ȱȱ ȱȱȱǰȱȱȱǯ 3.2 Ğȱȱȱ¡ȱȱȱȱǰȱ ȱȱȱ¢ȱȱȱǯȱ ȱȱȱȱȱȱȱȱ ǯȱ¢ȱȱȱȱȱ¢ȱ ȱȱȱȱ ȱȱǯȱȱ ȱ¢ȱ¢ȱȱȱȱ ȱ ¢ȱȱǰȱǰȱȱȱȱȱ parts. When such a cleaner is used, follow the manufacturer’s instructions and safety precautions carefully. ȱȱȱȱȱȱȱȱȱȱ the engine is reassembled and placed into operation. ȱȱȱȱȱȱȱ¢ȱ ȱ ȱȱȱȱȱȱǯ Section 3 Troubleshooting Basic Engine Tests Crankcase Vacuum Test ȱȱȱȱȱȱȱȱ crankcase when the engine is operating. Pressure ȱȱȱǻ¢ȱȱ¢ȱȱȱȱ ¢ȬȱǼȱȱȱȱȱȱ ȱȱȱȱǰȱǰȱȱȱȱǯ ȱȱȱȱȱ ȱȱ ȱ ȱȱȦȱȱǯȱȱ Section 2, Tools and Aids. Complete instructions are ȱ ȱȱǯ ȱ ȱ ǯȱȱȱȱȱȱȱȱȱȱ ȱ ȱ ȱȱ10.2 cm (4 in.)ȱȱȱȱȱȱ ȱǯȱȱȱȱȱȱȱȱȱȱ ȱȱȱȱȱǻȱǼǰȱȱȱȱȱ ȱȱȱȱ ȱȱȱȱȱȱȱ ȱǻǼǰȱȱȱȱȱȱȱ table below. 4. Close the pinch clamp before stopping the engine. 3 ȱȱȱȱȱ ȱȱȦȱDZȱ 1. Insert the stopper as in Step 1. ȱȱȱȱ ȱȱȱȱ DZ ȱ ŗǯȱ ȱȱȱȱȱȱȱęȱǯȱ Be sure the pinch clamp is installed on the hose and use the tapered adapters to connect ȱȱ ȱȱȱȱȱȱȱ ȱǯȱȱȱȱȱȱȱ ȱǯȱȱȱȱ ȱȱȱȱ manometer is at the “0” line. Make sure the pinch clamp is closed. ȱ Řǯȱ ȱȱȱȱȱȱȬȱȱȱ speed (2800 to 3750 RPM). ȱ řǯȱ ȱȱȱȱȱȱ ȱȱȱ ȱȱŘǯȱȱȱȱȱȱȱęĴȱȱȱȱȱȱ stopper. Be sure the gauge needle is at “0.” ȱȱřǯȱ ȱȱǰȱȱȱȱŘǰȱȱȱȱ ȱǯȱȱȱȱȱĞȱ ȱȃŖȄȱȱȱǰȱȱȱȱȱȱ ȱȱǯȱȱȱȱŗŖǯŘȱȱ ȱ ȱ ǻŚȱǯǼȱȱȱȱȱǯ Compression Test ȱȱȱȱ ȱȱȱ compression release (ACR) mechanism. Because ȱȱȱǰȱȱȱĜȱȱȱȱ accurate compression reading. As an alternate, use the leakdown test described on Page 3.4. Incorrect Vacuum in Crankcase Possible Cause ȱ ŗǯȱ ȱȱȱȱǯ ȱ Řǯȱ ȱȦȱȱǯȱȱȱ ¢ȱȱǯ ȱ řǯȱ ȱ ¢ȱȱ¢ȱǯȱęȱ ȱ ¢ȱ ȱǯ 4. Restricted exhaust. Solution ȱ ŗǯȱ ȱǰȱȱȱ¢ǰȱ reassemble, and recheck pressure. 2. Replace all worn or damaged seals and gaskets. ȱȱȱȱȱȱ¢ǯȱ ȱȱȱȱȱȱ ȱ¢ǯ ȱ řǯȱ ȱǰȱǰȱ¢ȱǰȱǰȱ ȱȱǯ ȱ Śǯȱ ȱȱȱȱĝȦ¡ȱ ¢ǯ 3.3 Section 3 Troubleshooting Cylinder Leakdown Test ȱ¢ȱ ȱȱȱȱȱȱȱ ȱȱȱǯȱ¢ȱ£ȱȱȱ ȱȱȱ¡ȱȱǰȱ¢ȱȱ ȱȱȱȱȱȱȱǰȱȱ ȱ ¢ǯ ȱ¢ȱ ȱȱȱȱ¢ȱǰȱ ¡ȱ ȱȱȱȱǯȱ ȱȱȱȱȱȱȱȱ Ĵȱȱȱȱȱȱȱǯ Leakdown Test Instructions ȱ ŗǯȱ ȱȱȱȱřȬśȱȱȱ ȱȱǯ ȱ Řǯȱ ȱȱȱǯ ȱ řǯȱ ȱȱĞȱȱȱȱȱȱȱ ȱȱǻǼȱȱȱȱǯȱȱ will need to hold the engine in this position while testing. The holding tool supplied with the tester ȱȱȱȱȱȱȱȱȱĞȱȱ accessible. ȱ ȱ ȱȱȱȱȱȱĞǰȱȱ ȱȱ ȱȱȱȱȱȱȱȱ ȱǰȱȱȱȱȱȱĞǯȱ ȱȱřȦŞȈȱȱȱȱȱȱȱȱ holding tool, so it is perpendicular to both the ȱȱȱĞǰȱȱȱȱȱ bolt through the slot and thread it into the mounting hole. ȱ ȱ ȱȱĚ¢ ȱȱȱȱǰȱ¢ȱȱȱ ȱȱȱȱȱȱȱĚ¢ ȱȦ screw to hold it in position. ȱ ȱ ȱ¢ȱȱȱȱȱȱȱȱ ȱȱǯȱȱȱȱȱȱȱȱ ȱȱǰȱ¢ȱ¢ȱȱȱȱȱȱ¢ȱ ȱȱ ȱȱȱǯȱȱȱ ȱȱȱȱȱȱěȱȱȱȱ either direction. 4. Install the adapter into the spark plug hole, but ȱȱĴȱȱȱȱȱȱȱǯ ȱ śǯȱ ȱȱȱȱȱǻŞŖȬŗŖŖȱǼȱȱȱ tester. 6. Turn the regulator knob in the increase (clockwise) direction until the gauge needle is in ȱ¢ ȱȱȱȱȱ ȱǻǼȱȱȱȱ scale. ȱ ŝǯȱ ȱȱȱȬȱȱȱ ǯȱȱȱȱȱȱȱȱ escaping air at the carburetor inlet, exhaust outlet, Ȧȱȱǯ ȱ Şǯȱ ȱ¢ȱȱȱȱȱȱ DZ Leakdown Test Results ȱȱȱȱ ................................................ȱȱȱ ȱ¢ȱ ǯ ȱȱȱ¡ȱ¢ ......................................................ȱ¡ȱǯ ȱȱȱ ...............................................................ȱȱǯ Gauge reading in low (green) zone .....................................................ȱȱȱ¢ȱȱȱǯ ȱȱȱȱǻ¢ Ǽȱ£.........................................Engine is still usable, but there is some wear ǯȱȱȱȱȱȱ ȱȱǯ Gauge reading in high (red) zone........................................................ȱȦȱ¢ȱȱȱ ǯȱ Engine should be reconditioned or replaced. 3.4 Section 4 Air Cleaner and Air Intake System Section 4 Air Cleaner and Air Intake System Air Cleaner This engine is equipped with a replaceable, high density paper air cleaner. An optional foam precleaner may also be included. See Figure 4-1. Intake air is drawn in through the blower housing, and passes through the precleaner (if equipped), the paper element and then into the carburetor. The outer air cleaner cover is secured by one knob, and removed by turning the knob counterclockwise. Check the air cleaner assembly daily or before starting the engine. Check for any buildup of dirt and debris, as well as loose or damaged components. See Figure 4-1. NOTE: Operating the engine with loose or damaged ȱȱȱȱ ȱęȱ air in, resulting in premature wear and failure. Air Cleaner Element Air Cleaner Cover Air Cleaner Base Optional Foam Precleaner Figure 4-1. Air Cleaner Assembly (Exploded View). Service Precleaner Wash or replace the optional precleaner yearly or every 25 hoursȱȱDzȱȱĞȱȱ extremely dusty or dirty conditions. Follow these instructions to service: 3. Rinse the precleaner thoroughly until all traces of detergent are eliminated. Squeeze out excess water (do not wring), and allow the precleaner to air dry. 4. Reinstall the precleaner. 1. Loosen the air cleaner cover knob and remove the cover. See Figure 4-1. 5. Reinstall the air cleaner cover and tighten the knob securely. 2. Remove the precleaner and wash with detergent in warm water. 4.1 4 Section 4 Air Cleaner and Air Intake System Service Paper Element Check the paper element for dirty, loose or damaged parts every 25 hoursȱȱDzȱȱĞȱȱ extremely dusty or dirty conditions. Yearly or every 100 hours of operation replace the paper element. Follow these instructions to service: 1. Loosen the air cleaner knob and remove the cover. Remove the paper air cleaner element and the precleaner (if equipped). See Figure 4-1. 2. Do not wash the paper element or use pressurized air, as this will damage the element. Replace a dirty, bent, or damaged element with a genuine Kohler element. 3. When servicing the air cleaner, check the air cleaner base. Make sure it is secured and not damaged. Also, check the air cleaner cover for ȱȱȱęǯȱȱȱȱȱ cleaner components. Figure 4-2. Breather Hose. ȱ Śǯȱ ȱȱ ȱ¡ȱĚȱȱȱȱ mounting studs which secure the air cleaner base, carburetor, and gaskets. Remove the third hex ȱĴȱȱȱȱȱǯȱ 5. Remove the air cleaner base by swinging it out ȱȱĞȱȱȱȱȱȱǻȱ equipped) from the carburetor. See Figure 4-3. 4. If any loose dirt or debris fell into the air cleaner when the element was removed, carefully remove it and wipe the base clean. 5. Check the condition of the rubber seal on the paper element. If the condition is questionable in any way, replace the element. 6. Reinstall the paper element and the optional ǰȱȱǯȱĴȱȱǯ Disassembly The following procedure outlines complete disassembly of the air cleaner assembly. Since removal ȱȱȱȱȱȱěȱȱȱ and governor adjustment, Step 4 should only be performed if required. For further information see the Dissassembly and Reassembly sections of this manual. 1. Loosen the air cleaner cover retaining knob and remove the air cleaner cover. 2. Remove the foam precleaner (if equipped), and the paper air cleaner with the formed rubber seal. 3. Disconnect the breather hose from the crankcase. See Figure 4-2. Figure 4-3. Primer Bulb Hose. Inspect Air Cleaner Components Whenever the air cleaner cover is removed, or the paper element or precleaner are serviced, inspect the following areas: Outer Air Cleaner Cover - Make sure the air cleaner cover is in good condition, not cracked, damaged, ȱȱȱȱǰȱ ȱȱěȱȱ sealing ability of the air cleaner element. Air Cleaner Base - Make sure the base is properly secured and not cracked or damaged. It is extremely important that the fasteners securing this component are tight at all times. Primer Bulb Hose - Make sure the hose is not cracked ȱȱǰȱȱĴȱȱȱȱȱ cleaner base and the carburetor. See Figure 4-3. 4.2 Section 4 Air Cleaner and Air Intake System NOTE: Before reinstalling an air cleaner base that has been removed, make sure the metal bushings in the base mounting holes are present. The bushings prevent damage to the base and help maintain the proper mounting torque. Reassembly The following procedure outlines complete reassembly of all air cleaner components. 1. Reconnect the primer bulb hose (if equipped). See Figure 4-3. Air Intake/Cooling System Clean Air Intake/Cooling Areas To ensure proper cooling, make sure the grass screen, ȱęǰȱ ȱǰȱȱȱ¡ȱ surfaces of the engine are kept clean at all times. Under extremely dusty or dirty conditions, pay extra Ĵȱȱȱǯ NOTE: Operating the engine with a blocked grass ǰȱ¢ȱȱȱȱęǰȱȦȱ cooling shrouds removed, will cause engine damage due to overheating. 2. Install the air cleaner base onto the mounting studs. ȱ řǯȱ ȱȱȱȱȱ ȱȱ ȱ¡ȱĚȱ nuts and the hex screw. Torque all three to 8.1 N·m (72 in. lb.). 4. Reconnect the breather hose. See Figure 4-2. 5. Install the air cleaner element with the pleated side out. 6. Install the precleaner (if equipped) into the air cleaner cover. 7. Reinstall the air cleaner cover and secure with the cover knob. NOTE: Damaged, worn, or loose air cleaner ȱȱ ȱęȱȱȱ the engine causing premature wear and failure. Tighten or replace all loose or damaged components. 4.3 4 Section 4 Air Cleaner and Air Intake System 4.4 Section 5 Fuel System and Governor Section 5 Fuel System and Governor Fuel Recommendations WARNING: Explosive Fuel! ȱȱ¡¢ȱĚȱȱȱȱȱ¡ȱ ȱǯȱȱȱ¢ȱȱȱǰȱȱ Ȭǰȱȱǰȱ ¢ȱȱȱ ȱĚǯȱȱȱęȱȱȱȱ ȱȱȱȱȱ ȱǰȱȱȱȱȱȱȱȱȱȱ ȱ ȱȱȱȱȱȱǯȱȱȱ ȱȱȱȱȱǯȱȱȱȱȱȱ ȱǯ General Recommendations Purchase gasoline in small quantities and store in clean, approved containers. A container with a capacity of 2 gallons or less with a pouring spout is recommended. Such a container is easier to handle and helps eliminate spillage during refueling. To minimize gum deposits in your fuel system and to ensure easy starting, do notȱȱȱĞȱȱ from the previous season. Do not add oil to the ȱȱęȱȱȱǯȱȱȱȱȱȱ for the fuel to expand. Gasoline/Ether Blends ¢ȱ¢ȱ¢ȱȱǻǼȱȱȱ ȱȱǻȱȱȱ¡ȱȱŗśƖȱȱ¢ȱ volume) are approved as a fuel for Kohler engines. Other gasoline/ether blends are not approved. Fuel System The typical fuel system and related components ȱȱȱǰȱȬȱȱęȱǻȱǼǰȱ carburetor, and fuel lines. Operation ȱȱȱȱȱȱȱȱȱȬȱ ęȱȱȱȱ¢ȱ¢ǯȱȱȱȱȱ ȱĚȱ ȱȱȱȱȱȱȱ ¢ǯȱǰȱȱȱȱ¡ȱ ȱǯȱȱȬȱ mixture is then burned in the engine combustion chamber. Fuel Filter (Optional) ȱȱȱęȱyearly or every 50 hours of ǯȱȱȱȱȱęȱ ȱ ȱ ¢ȱȱȱȱȱęǯȱȱȱśȬŗǯ Fuel Type For best results, use only clean, fresh, unleaded ȱ ȱȱȱȱȱȱȱŞŝȱȱ higher. In countries using the Research method, it should be 90 octane minimum. Unleaded gasoline is recommended, as it leaves less combustion chamber deposits. Leaded gasoline may be used in areas where unleaded is not available ȱ¡ȱȱȱȱǯȱȱ ȱ however, using unleaded gasoline will require more frequent cylinder head servicing. Gasoline/Alcohol blends Gasohol (up to 10% ethyl alcohol, 90% unleaded gasoline by volume) is approved as a fuel for Kohler engines. Other gasoline/alcohol blends including E20 ȱŞśȱȱȱȱȱȱȱȱȱǯȱ¢ȱ failures resulting from use of these fuels will not be warranted. Fuel Filter Figure 5-1. Replacing Fuel Filter (Air Cleaner Off). Troubleshooting Use the guide on the following page to determine if fuel is reaching the combustion chamber. 5.1 5 Section 5 Fuel System and Governor Fuel System Test Guide Test Conclusion ŗǯȱȱ ȱȱȱ DZ ȱ ǯȱ ȱȱȱȱǰȱȱȱȱǯ ȱ ǯȱ ȱȱȱȱȱȱǯ 1. Řǯȱȱ ȱ ǯȱ ȱ ǯȱ c. ȱ ǯȱ ȱȱȱȱȱǯ ȱȱȱȱȱǯ ȱȱȱǻȱǼǯ Turn engine over several times. ȱȱȱȱȱȱȱȱǯ Řǯȱȱ ȱȱȱȱȱȱȱȱǰȱȱȱȱ the combustion chamber. řǯȱȱ ȱȱĚ ȱȱȱȱȱȱęǯ ȱ ǯȱ ȱȱȱȱęȱǻȱǼǯ řǯȱȱ ȱȱȱĚ ȱȱȱǰȱȱȱȱ ȱȱ¢ȱȱęȱǻȱřǼǯ ȱ ǯȱ ȱȱȱ ȱȱȱȱȱĚ ǯ ȱ ȱ ȱȱȱȱĚ ȱȱȱǰȱȱȱ ȱȱȱȱȱȱǯ Śǯȱȱ ȱȱȱĚ ȱȱǯ a. Remove fuel line from carburetor. ȱ ǯȱ ȱȱęȱȱȱȱȱȱȱ spraying fuel into carburetor. ȱ ǯȱ ȱȱȱȱȱȱȱǯ Śǯȱȱ ȱȱȱĚ ȱȱȱǰȱȱȱ¢ȱ carburetor or clogged fuel line. If the fuel line is ǰȱȱȱȱȱ¢ȱȱȱȱ replaced. If no fuel spray is entering carburetor, replace primer bulb or primer hose. Gasoline components oxidize over time resulting ȱȱ¢ǰȱȱȱȱĜǯȱ Replace old gas with fresh gas. ȱ ȱ ȱȱȱȱȱȱȱȱǰȱȱȱȱ Ě ȱȱȱȱǻȱřǼǯ Carburetor ȱȱȱȱȱ ȱȱȱȱȱȱǯȱȱȱśȬŘȱȱśȬřǯȱ WARNING: Explosive Fuel! ȱȱ¡¢ȱĚȱȱȱȱȱ¡ȱȱǯȱȱȱ¢ȱȱȱǰȱȱ ȱ ǰȱȱǰȱ ¢ȱȱȱȱĚǯȱȱȱȱȱȱȱǯ Figure 5-2. Carburetor With Primer. Figure 5-3. Carburetor With Choke. Troubleshooting — Fuel System ȱȬ¢ȱȱȱǰȱȱȱ ȱȱȱĴȱȱȱȱȱȱ carburetor. ȱ Ȋȱ ȱ Ȋȱ ȱ Ȋȱ ȱ Ȋȱ • ȱ Ȋȱ 5.2 ȱȱȱęȱ ȱǰȱȱǯ ȱȱȱȱȱȱȱȱ¢ǯ ȱȱȱȱȱȬȱȱęȱǻȱǼȱȱȱǯ ȱȱǰȱǰȱȱȱȱ¢ȱȱȦȱȱȱǯ Air cleaner element is clean, and all air cleaner components are fastened securely. ȱ¢ǰȱ¡ȱ¢ǰȱȱĴȦȱȱȱȱ¢ǯ Section 5 Fuel System and Governor Fuel System Troubleshooting Guide 1. Engine starts hard, runs rough or stalls at idle. 1. Engine is out of fuel. ȱ ȱ ȱęȱȱDzȱȱȱǯ ȱ ȱ ȱȱȱ¢Dzȱȱȱȱȱǯ Řǯȱȱ ȱȱȱǻȱ¢ȱȱ¢ȱ ǰȱęǰȱȱȱȱȱ ǰȱȱ governor hunting). Řǯȱȱ ȱęȱȱDzȱȱȱǯ ȱ ȱ ȱȱ¢Dzȱȱȱǯ řǯȱȱ ȱȱȱǻȱ¢ȱęǰȱȱȱ speed and power, governor hunting). řǯȱȱ ȱȱ¢Dzȱȱȱǯ ȱ ȱ ȱȱDzȱȱȱǯ Śǯȱȱ ȱȱȱǯ 4. Dirt or debris in carb. Disassemble and clean. Loose fuel bowl or drain screw. Disassemble and ȱ ȱ ȱȱǯ Carburetor Adjustments While this carburetor is designed to deliver the ȱȬȬȱ¡ǰȱȱȱ¢ȱȱ necessary. Engines with Primer Bulb ȱ ŗǯȱ ȱȱȱȱȱȱȱȱ ȱȱȱȱȱǰȱȱ ȱȱ ȱǯȱȱȱśȬśǯ DZȱ ȱȱĞȱȱȱ ȱǯ Idle Adjustment Screw Do not tampered with this screw on engines with a primer bulb, since these models operate only at full speed, and do not idle. On engines with a ȱȱȱȱ ȱȱȱȱęȱȱ ȱǯȱȱȱȱȱǰȱȱ ȱ ȱ ȱȱȱȱǰȱȱ ȱȱ ȱȱǯȱȱȱśȬŚǯ Idle Adjustment Screw Figure 5-5. Engine Speed Adjustment Tab. Engines With Choke ȱ ŗǯȱ ȱȱȬȱȱ ȱ ȱ ȱȱȱȱȱ ȱȱ ȱǯȱȱȱśȬŜǯȱ Figure 5-4. Idle Adjustment Screw. High-Speed (RPM) Adjustment ȱȱ¡ȱȬȱȱȱ (RPM) for most engines is 3300 RPM. The actual speed depends on the application. WARNING: Overspeed is Hazardous! ȱȱȱ£ȱȱȱȱȱ¢ǯ Speed Control Screw (Hidden From View) Figure 5-6. Speed Control Screw. 5.3 5 Section 5 Fuel System and Governor Carburetor Removal NOTE:ȱȱȱȱȱ¢ȱȱȱȱǯȱ WARNING: Explosive Fuel! ȱȱ¡¢ȱĚȱȱȱȱȱ¡ȱȱǯȱȱȱ¢ȱȱȱǰȱȱ ȱ ǰȱȱǰȱ ¢ȱȱȱȱĚǯȱȱȱȱȱȱȱǯ ȱ ŗǯȱ ȱȱȱȱȱȱǯȱ 2. Remove foam precleaner (if equipped) and paper element. ȱ řǯȱ ȱ ȱ¡ȱĚȱȱȱ¡ȱĚȱ ȱȱȱȱǯ ȱ Śǯȱ ȱȱǰȱȱǰȱȱȱǯ ȱ śǯȱ ȱǰȱȱȱǯȱȱȱśȬŝǯȱ +HDW'HÀHFWRU*DVNHW Carburetor Square Gasket Notched Gasket Cylinder Head Spacer Figure 5-7. Carburetor Gasket Sequence (Exploded View). Carburetor Disassembly ȱ ŗǯȱ ȱȱȱ ȱ ǰȱȱ ǰȱȬȱ ȱĚȱǯȱȱȱśȬŗŘǯ ȱ řǯȱ ȱȱȱȱȱȱȱ ǯȱ A light tap on the tower will dislodge the ȱǯȱȱȱśȬşǯ ȱ Řǯȱ ȱȱȬȱȱȱȱȱȱ ȱĚǯȱȱȱśȬŞǯȱ Emmulsion Tube Tower Fuel-Inlet Needle Figure 5-9. Emmulsion Tube Removal. Figure 5-8. Fuel Inlet Needle Removal. 5.4 Section 5 Fuel System and Governor ȱ Śǯȱ ȱȱĴȬȱ ǰȱȱĴȱ ǰȱȱȱȱȱĴȱĞǰȱȱ ĴȱȱǯȱȱȱśȬŗŖȱȱśȬŗŘǯ ȱ śǯȱ ȱȱȱ¢ǰȱȱȱȱ plate and the carburetor body with a waterproof ǯȱȱȱśȬŗŗǯȱ Choke Lever Throttle Shaft Choke Spring Choke Shaft Choke Plate Figure 5-10. Throttle Shaft Removal. DZȱ ĴȱĞȱ ȱȱ¢ȱȱ by corresponding wear to the carburetor ¢ǰȱȱȱǯȱȱȱ ȱȱȱȱĴȱĞȱȱ ǯ Throttle Lever Throttle Plate Screw Choke Lever Pilot Jet Throttle Shaft Choke Shaft Throttle Adjustment Screw Choke Spring Primer Vent 5 Figure 5-11. Mark Choke Plate and Carburetor. Throttle Plate Screw Throttle Plate Tower Throttle Plate Tower Choke Plate Fuel Inlet Needle Fuel Inlet Needle Emmulsion Tube Main Jet Float Pin Float Float Pin O-Ring Drain Screw Fuel Bowl Screw Carburetor with Primer Carburetor with Choke Figure 5-12. Carburetor (Exploded View). 5.5 Section 5 Fuel System and Governor ȱ Ŝǯȱȱ ȱȱȱȱ ȱȱȱȱȱȱ ȱȱȬȱĞǯȱȱȱśȬŗřǯ ȱ Ȋȱ ȱȱǰȱȱȱȱȱȱ¢ǰȱȱ inlet needle and seat. • ǰȱĚȱȱȱȱ ǯ Choke Plate DZȱ ȱȱȱȱȱȱȱȱ ȱ ȱǰȱęǰȱǰȱȱȱ ȱȱȱǯȱȱȱ may damage these components. Carburetor Inspection Complete carburetor inspection should include the DZȱ ȱ Ȋȱ ȱȱ¢ȱȱǰȱǰȱȱ other wear or damage. Figure 5-13. Choke Plate Removal. ȱ ŝǯȱȱ ȱȱȱĞȱȱȱȱȱ return spring, noting their positions for accurate ¢ǯȱȱȱśȬŗŚǯ Choke Return Spring ȱ Ȋȱ ȱĚȱȱȱȱǯȱȱĚȱ hinge and pin for wear or damage. • Inspect fuel inlet needle and seat for wear or damage. ȱ Ȋȱ ȱȱȱ ȱǰȱȬȱȱȱ wear or grooves. ȱ Ȋȱ ȱĴȱȱȱĞȱȱȱ assemblies for wear or excess play. Gasket Replacement Figure 5-14. Choke Return Spring Removal. ¢ȱȱ ȱȱ ȱȱȱȱ ǯȱȱȱȱȱ ȱȱ ȱȱȱȱǯȱ ¢ȱȱȱ the Kohler Parts Manual for the engine being serviced ȱȱȱȱȱȱȱǯ Carburetor Reassembly Carburetor Cleaning WARNING: Flammable Solvents! ȱȱȱȱȱ¡¢ȱĚǯȱ ȱǰȱĚǰȱȱȱȱȱȱ ¢ȱȱ ȱǯȱ ȱȱȱȂȱ ȱȱ ȱȱȱȱȱȱǯȱȱȱȱ ȱȱȱǯ All carburetor parts should be cleaned thoroughly ȱȱȱȱǯȱȱȱȱ ȱȱȱȱȱȱ ȱDZ • 5.6 Carburetor body and bore, especially areas where ĴȱȱȱĞȱȱǯ ȱ ŗǯȱ ȱȱĴȱĞȱȱȱȱ¢ǯ 2. Apply thread sealant around three full threads ȱȱĴȱȱ ȱȱĴȱȱ ȱȱȱĴȱĞǯȱȱ ¢ȱ¢ȱ¡ȱ sealant. ȱ řǯȱ ĴȱȱȱȱȱȱȱȱĞȱ (if equipped). ȱ Śǯȱ ȱȱȱĞȱȱȱȱ¢ǯ ȱ śǯȱ ȱȱȱȱȱȱȱȱȱ ȱȱǰȱȱȱȱȱȱ ȱȱȱȱȱĞǯȱȱȱśȬŗŗǯȱȱ ȱȱȱȱȱĞȱ¢ȱȱȱȱȇȱ surface. Section 5 Fuel System and Governor ȱ Ŝǯȱ Ĵȱȱȱȱȱȱȱȱ ¢ǰȱȱȱȱȱĞǯȱ ȱ Řǯȱ ȱȱȇȱȱȱȱȱȱ proper start position. ȱ ŝǯȱȱ ȱȱȱȱȱȱ ȱȱȱ ȱǯȱȱȱśȬşǯ ȱ řǯȱ ȱȱȱȱȱȱ ȱȱǰȱ steady motion until the engine has started. ȱ Şǯȱȱ ȱȱȱȱǰȱĚǰȱĚȱǰȱȬȱ ȱȱ ǯȱȱȱśȬŗŘǯ Starting Engine With Manual Choke Control High Altitude Operation ȱȱȱȱȱȱȱŗśŘśȱ ȱǻśŖŖŖȱĞǯǼǰȱȱȱȱ¡ȱȱȱ become too rich. When the mixture is too rich it ȱȱȱȱȱǰȱ¢ȱ¡ȱ ǰȱęǰȱȱȱȱȱ ǰȱȱȱ economy, and poor or slow governor response. ȱȱȱȱěȱȱȱǰȱȱȱ ȱȱȱȱȱǯȱ ȱȱȱ ȱȱȱȱ ȱȱȱȱȱȱ¢ȱ ǯȱ 1. For a Cold Engine, pȱȱȱȱ control into the ON position. For a warm engine ȱȱȱǯȱȱȱȱȱȱ instructions of the equipment this engine powers. ȱ Řǯȱ ȱȱȇȱȱȱȱȱȱ proper start position. ȱ řǯȱ ȱȱȱȱȱȱ ȱȱǰȱ steady motion until the engine has started. ȱ Śǯȱ Ğȱȱȱǰȱȱȱȱȱ from the ON position to the OFF position. Choke Cable Installation DZȱ ȱȱȬȱȱȱȱǰȱȱ ȱȱȱȱȱȱȱȱ size before it is operated at lower altitudes, or overheating and engine damage may result. ȱ ŗǯȱ ȱȱ ȱȱȱȱȱȱ ȱȱȱȱȱȱǯȱȱ ȱśȬŗŜǯ Engine Starting Starting Engine With Primer Bulb 1. For a Cold Engineǰȱę¢ push the primer bulb řȱǯȱȱȱśȬŗśǯȱȱȱȱȱ ȱ¢ȱȱȱĚȱȱǯȱȱȱ ȱ engine no priming is required. Also refer to the operating instructions of the equipment this engine powers. Bowden Cable Wire Mount Control Arm Figure 5-16. Connect Bowden Cable. ȱ Řǯȱ ȱȱȱȱȱȱȱȱ engine powers to the OPEN or OFF position. ȱ řǯȱ ȱȱȱ ȱȱȱȱȱ ȱǯȱȱȱśȬŗŜǯ Figure 5-15. Primer Bulb. 5.7 5 Section 5 Fuel System and Governor Install Throttle/Choke Control Cable Governor ȱȱȱȱ ȱȱȱĴȦȱ ȱǯȱȱ ȱȱȱȱȱ ȱĴȱȱȱǯ These engines are equipped with a centrifugal Ě¢ ǰȱȱǰȱȱȱȱ the engine speed constant under changing load ǯȱȱȱȦĚ¢ ȱȱ ȱȱȱȱȱȱȱȱǰȱȱȱ ȱěȱȱȱȱȱĞǯȱȱȱȱśȬŗŞǯ Dual Throttle/Choke Control Installation 1. Loosen the cable clamp and insert the cable ȱȱȱǯȱȱȱśȬŗŝǯȱ Control Arm Bowden Cable Governor Gear Sheath Cable Clamp Figure 5-17. Bowden Cable Connection. ȱ Řǯȱ ȱȱ ȱȱȱȱȱȱ ȱȱȬȱǯȱȱȱȱ selection, refer to the operating instructions of the equipment this engine powers. See Figure śȬŗśǯ ȱ řǯȱ ȱȱĴȱȱȱȱȱȱ ȱȱȱȱȬȱǯȱ DZȱ ȱȱȱȱȱ¢ȱȱȱ Ĵȱȱ¢ȱȱȱȱ ǯȱȱȱĴȱȱȱȱȱ a designated CHOKE position, be sure to ȱĜȱĴȱȱȱȱȱ ȱǯȱȱ ȱȱȱȱȱ be placed ON. ȱ Śǯȱ ¢ȱȱȱȱȱȱ ȱȱ ȱȱȱȬȱ ǯ ȱ śǯȱ ȱȱȱȱȱȱȱĴȱȱ ȱȱȱ¢ȱǯȱ ȱ Ŝǯȱ ȱȱȱȱ¢ǯ 5.8 Flyweights Governor Shaft Figure 5-18. Governor Assembly. Operation As the governor gear rotates, centrifugal force causes ȱĚ¢ ȱȱȱ ȱȱȱǯȱ ȱȱĚ¢ ȱǰȱ¢ȱȱȱȱȱ to protrude out. The regulating pin contacts the tab ȱȱȱĞǰȱȱȱĞȱȱǯȱȱ ȱȱȱȱĞȱȱȱȱȱ ȱȱǯȱȱȱȱȱȱȱ ȱȱȱȱȱĞȱȱȱ ȱ ȱȱȱĴȱȱȱȱǰȱȱ¢ȱ ȱȱȱĞȱȱȱȱ ȱȱĴȱǯ ȱȱȱȱȱȱȱȱĴȱȱȱ ȯȱȱ ȱȱę¡ȬȱȱǻȱǼȱȯȱȱȱ ȱȱȱȯȱȱ ȱȱȬȱȱ ȯȱȱȱȱȱȱȱȱȱĴȱ plate open. When the engine is operating, and the governor gear assembly is rotating, the force applied ¢ȱȱȱȱȱȱȱĞȱȱȱ ȱȱĴȱǯȱȱȱȱ tension and the force applied by the regulating pin are in equilibrium during operation, holding the engine speed constant. When load is applied, and the engine/ governor gear speed decreases, the governor spring ȱȱȱȱȱȱȱȱĴȱ plate wider. This allows more fuel into the engine, ȱȱǯȱȱȱȱȱ¢ȱ Section 5 Fuel System and Governor rapidly, so a reduction in speed is hardly noticed. As ȱȱȱȱȱĴǰȱȱȱ spring tension and the force applied by the regulating pin will again be in equilibrium. This maintains the engine speed at a relatively constant level. The ȱȱĴȱȱȱ¢ȱȱȱ ȱȱĴȱǯȱȱȱȱȱȱǰȱ depending on the application. 2. Move the governor lever away from the ȱǻ ȱȱĴǼǯȱȱȱśȬŗşǯȱ Do notȱ¢ȱ¡ȱȱȱ¢ȱĚ¡ȱȱȱ ȱĴȱǯ ȱ řǯȱ ȱȱȱĞȱ ȱȱȱȱȱȱ Ğȱclockwise as far as it will go. Then torque the hex nut to 9.5 N·m (84 in. lb.)ǯȱȱȱśȬ 20. Initial Governor Adjustment ȱȱȱȱ ȱȱȱ ȱȱȱȱȱȱȱȱĞǯȱȱ ȱȱǰȱȱȱȱĴȱ ȱȱȱȱȱȱȱȱȱȱ Ĵȱȱȱȱǯȱ ȱ ŗǯȱ ȱȱȱȱȱ ǯȱȱ ȱśȬŗşǯȱ 5 Figure 5-20. Adjust Governor Lever. Figure 5-19. Loosen Governor Lever. 5.9 Section 5 Fuel System and Governor 5.10 Section 6 Lubrication System Section 6 Lubrication System Oil Recommendations Check Oil Level Using the proper type and weight of oil in the crankcase is extremely important. So is checking oil daily and changing oil regularly. Failure to use the correct oil, or using dirty oil, causes premature engine wear and failure. The importance of checking and maintaining proper oil level in the crankcase cannot be overemphasized. Oil Type Use high-quality detergent oil of API (American Petroleum Institute) service class SJ or higher. Select the viscosity based on the air temperature at the time of operation. See Figure 6-1. RE CO M M E N D E D S A E VIS C OS IT Y GR A D E S Check oil BEFORE EACH USE as follows: 1. Make sure the engine is stopped, level, and cool so the oil has had time to drain into the sump. ȱ Řǯȱ ȱȱȱȱȱȱęȱȦȱȱ keep dirt and grass clippings out of the engine. ȱ řǯȱ ȱȱȱȱȱęȱȦDzȱ ȱěȱǯȱȱȱȱȱȱȱ ȱȱȱȱęȱȱȱȱǯȱȱȱ screw the cap into the tube. See Figure 6-3. 10W-30, SAE 30 10W-30 °F -20 °C -30 20 0 -20 -10 32 0 40 60 10 80 20 30 100 40 TEMPERATURE RANGE EXPECTED BEFORE NEXT OIL CHANGE Figure 6-1. Viscosity Grades Table. NOTE: Using oil other than service class SJ or higher, or extending oil change intervals longer than recommended can cause engine damage. ȱȱȱ¢ȱȱȱȱęȱȱȱ service class and SAE viscosity grade. See Figure 6-2. 10W-30 SJ API RVIC E SE Figure 6-3. Oil Fill Cap/Dipstick. ȱ Śǯȱ ȱȱȱȱȱȱȱȱ level. Oil should be up to, but not over the "F" or FULL mark on the dipstick. See Figure 6-4. ȱ śǯȱ ȱȱȱȱ ǰȱȱȱȱ¢ȱȱȱȱȱ the FULL mark on the dipstick. Always check the level with the dipstick before adding more oil. ȱ Ŝǯȱ ȱȱȱęȱȦȱȱȱ securely. Figure 6-2. Oil Container Logo. 6.1 6 Section 6 Lubrication System ȱ řǯȱ Ğȱȱȱȱ¢ȱǰȱȱȱ engine back to level. Full Mark Operating Range Low Mark Figure 6-4. Dipstick. NOTE: To prevent extensive engine wear or damage, always maintain the proper oil level in the crankcase. Never operate the engine with the oil level below the "L" or LOW mark, or over the FULL mark on the dipstick. Oil Change Oil can be changed on this engine by either draining it from the dipstick tube, or from the drain plug. Change ȱȱĞȱȱęȱȱȱęȱȱȱ. Ğȱǰȱȱȱȱyearly or every 50 hours of ǯȱęȱ ȱȱȱęȱȱȱ¢ȱ Grades Table, Figure 6-1. 4. Fill the crankcase with new oil of the proper type to the FULL mark on the dipstick. See Figure 6-4. Always check the oil level with the dipstick ȱȱȱǯȱȱȱ ȱȱȱ in when checking oil level. 5. Test run the engine to check for leaks. Stop the engine, allow a minute for the oil to drain down and recheck the level on the dipstick. Add more oil, if necessary, so the oil level is up to but not over the FULL mark. ȱ Ŝǯȱ ȱȱȱęȱȦȱȱȱ securely. Drain Oil Via Crankcase Plug (If Accessible) ȱ ŗǯȱ ȱȱȱ¢ȱȱȱȱ plug. ȱ Řǯȱ ȱȱȱęȱȦǯ ȱ řǯȱ ȱȱȱȱȱȱĴȱȱȱ engine and drain oil into an approved container. See Figure 6-6. Change the oil while the engine is still warm. The oil ȱĚ ȱȱ¢ȱȱ¢ȱ ¢ȱȱǯȱ Drain Oil from Dipstick Tube Change the oil as follows: 1. To keep dirt, grass clippings, and other debris out ȱȱǰȱȱȱȱȱȱȱęȱ Ȧǰȱȱȱȱǯ 2. Tilt the engine on its side with the air cleaner ȱǯȱȱȱŜȬśǯȱȱȱȱȱ approved container. Crankcase Plug Figure 6-6. Crankcase Plug. Air Cleaner Up Oil Flow Figure 6-5. Tilted Engine With Air Cleaner Up. 6.2 4. Apply thread sealant around three full threads of the drain plug. Clean up any excess sealant on the inside or outside of the joint. Threads with pre-applied sealant do not require the use of additional sealant. Approved sealants include Ȭȱ ȱŗśŖǰȱȬȱȱŗŗśǰȱȬ ȱ ȱŗŘŖǰȱȬȱ ȱŗŘŜǯȱ ȱ śǯȱ ȱȱȱȱȱȱȱ13.6 N·m (120 in. lb.). Section 6 Lubrication System 6. Fill the crankcase with the recommended oil to the FULL mark on the dipstick. See Figure 6-4. Always check the oil level with the dipstick ȱȱȱǯȱȱȱ ȱȱȱ when checking oil level. ȱ ŝǯȱ ȱȱȱęȱȦȱȱȱ securely. Splash Lubrication System Operation This engine uses splash lubrication to deliver oil for internal lubrication. The governor gear, located near ȱĴȱȱȱȱǰȱȱȱȱȱȱȱȱ that dip into crankcase oil and splash it onto internal engine parts. 8. Test run the engine to check for leaks. Stop the engine, allow a minute for the oil to drain down, and recheck the level on the dipstick. Add more oil, as necessary, so the oil level is up to, but not over the FULL mark. 6 6.3 Section 6 Lubrication System 6.4 Section 7 Electrical System and Components Section 7 Electrical System and Components This section covers the operation, service, and repair of the electrical system and electrical system components. WARNING: Electrical Shock Never touch electrical wires or components while the engine is running. They can be sources of electrical shock. Spark Plug ȱęȱȱȱȱȱĞȱȱ ¢ȱȱȱȱȱȱȱȱȱȱȱȱ ȱȱĴǯ Feeler Gauge Spark Plug ȱȱȱȱ ȱȱ ȱȱDZ Type: Gap: Thread Size: Reach: Hex Size: Champion® RC12YC 0.762 mm (0.030 in.) 14 mm (0.551 in.) 19.1 mm (3/4 in.) 15.9 mm (5/8 in.) Spark Plug Service Yearly or every 100 hours of operation, remove the ȱǰȱȱȱǰȱȱȱȱȱȱ ȱ ȱȱ ȱȱȱ¢ǯȱ ȱ ŗǯȱ ȱȱȱȱǰȱȱȱȱ ȱȱȱȱȱȱȱȱȱȱ ȱȱȱȱǯ ȱ Řǯȱ ȱȱȱȱȱȱǯȱȱ ȱȱȱ ȱȱȱȱǯ DZȱ ȱȱȱȱȱȱȱȱȱ ȱȱǯȱȱȱȱȱ ȱȱȱȱȱȱȱȱ ȱ¡ȱ ȱȱǯ 7 Ground Electrode Gap Figure 7-1. Spark Plug Gap. ȱ Śǯȱ ȱȱȱȱȱȱ¢ȱǯȱȱ ȱȱȱȱ24.5 N·m (217 in. lb.). Inspection ȱȱȱȱȱȱȱȱȱȱȱ the cylinder head. The deposits on the tip are an indication of the general condition of the piston rings, ǰȱȱǯ ȱ¡ȱȱȱȱȱȱȱ ȱȱȱȱȱȱ ȱǯ ȱ řǯȱ ȱȱȱȱȱȱȱǯȱȱ ȱŝȬŗǯȱȱȱȱ¢ȱ¢ȱȱ ȱȱǯȱȱȱȱȱȱ0.762 mm (0.030 in.). 7.1 Section 7 Electrical System and Components Normal:ȱȱȱȱȱȱȱȱȱ ȱȱ ȱȱȱȱȱ¢ȱȱ ǯȱȱȱȱȱȱȱ ǰȱȱȱȱ ȱȱȱȱȱȱȱǯ Carbon Fouled:ȱĞǰȱ¢ǰȱȱȱȱ ȱǯȱȱȱ¢ȱȱ¢ȱȬȱ ǰȱ ȱǰȱȱȱǯȱȱ ȱȱǯ Worn: ȱȱ ȱǰȱȱȱȱ ȱȱȱ ȱȱȱ ȱȱȱǯŖŗŖȈȱȱȱȱȱȱ ǯȱȱȱ ȱȱȱ¢ǯ Wet Fouled:ȱȱ ȱȱȱȱ¢ȱ¡ȱȱȱȱȱ ȱȱǯȱ¡ȱȱȱȱȱ¢ȱ ȱȱȱ ȱȱȱȱȱȱ¢ȱȱ ęǯȱȱȱȱȱȱȱ¢ȱȱ¢ȱ ȱȱȱȱȱǯȱȱȱȱȱȱ ȱȱǰȱȱȱȱǯ Chalky White Deposits: ¢ȱ ȱȱȱ ȱǯȱȱȱȱ¢ȱȱ ¢ȱ¡ȱȱǯȱȱȱǰȱȱ ęǰȱȱȱȱȱȱȱȱǯȱ ȱȱȱǯ 7.2 Section 7 Electrical System and Components Electronic Ignition System ȱȱȱȱ ȱȱȱȱǯȱȱȱȱȱ¢ǰȱȱ¢ȱ ȱȱ¢ȱȱȱȱ ȱȱȱȱȱȱĚ¢ ȱȱȱȱǯȱ ȱ¢ȱȱȱȱȱȱȱǯȱȱȱ¢ȱȱȱȱȱȱȱȱ ȱ ǯȱȱȱȱȱȱȱȱ¢ȱȱȱȱȱȱȱȱȱȱ ȱȱ¢ȱǰȱȱȱǯȱȱȱȱȱȱȱȱȱȱȱ Ȃȱȱ ȱȱȱȬȱ¡ȱȱȱȱǯȱ ȱ¢ȱȱȱȱȱȱ ȱȱǰȱȱȱȱǻǼǰȱȱȱȱȱǻǼǯȱȱȱŝȬŘȱȱ ŝȬřǯ Spark Plug Boot Spark Plug Terminal (C) Air Gap 0.254 mm (0.010 in.) Ignition Module Spark Plug Magnets Lamination (A) Kill Terminal 7 Flywheel Ignition Module (Enlarged View) Kill Switch or Off Position of Key Switch Figure 7-2. Capacitive Discharge Ignition System (CDI). CDI Module Operation ȱȱĚ¢ ȱȱȱȱȱȱȱȱ ȱǰȱȱȱęȱȱȱ ȱȱȱǯȱȱȱȱȱęȱ¢ȱȱ ȱȱȱȱȱȱȬȱǯȱ ȱȱȱȱȱǰȱȱȱȱ¢ȱ ȱȱȱȱ¢ȱȱĚ¢ ȱȱȱ ȱȱȱ ǰȱȱ¢ȱȱ the charged capacitor to the primary coil of the ǯȱȱȱȱȱ¢ǰȱȱ ȱȱȱȱ¢ȱ ȱȱȱ ȱȱȱȱȱ¢ȱ ȱȱȱ ǯȱȱȱȱȱȱȱȱȱȱ ȱǰȱ ȱȱȱȱȱȱȱȱ ȱȱȱȱȱȱǯ ȱ¢ȱȱȱȱ ȱDZ ȱ Ȋȱ ǰȱ¢ȱĜ¡ȱȱĚ¢ ǯ ȱ Ȋȱ ȱȱ ȱȱǯ ȱ Ȋȱ ǰȱȱȱȱȱ ȱȱȱǯȱ ȱ Ȋȱ ȱ ȱǻȱ¢ȱ ǼDzȱȱȱȱ stop engine. ȱ Ȋȱ ȱǰȱȱȱȱȱǯ 7.3 Section 7 Electrical System and Components Spark Plug Boot Air Gap 0.254 mm (0.010 in.) Ignition Module Spark Plug Spark Plug Terminal (C) Lamination (A) Magnets Flywheel Kill Switch or Off Position of Key Switch Ignition Module (Enlarged View) Kill Terminal Figure 7-3. Inductive Discharge Ignition System. IDI Module Operation ȱȱĚ¢ ȱȱȱȱȱȱȱȱ ȱǰȱȱȱęȱȱȱ ȱȱ¢ȱǯȱȱȱ¢ȱȱȱȂȱ ȱǯȱȱȱȱȱȱ ȱǰȱȱȱȱȱȱȱȱǰȱ ȱȱȱȱȱȱ ǯȱȱ ȱȱ¢ȱȱȱęȱȱ ȱ¢ȱȱȱǯȱȱȱȱęȱ ȱȱǰȱȱȱȱȱȱȱȱ ȱ¢ǯȱȱȱȱȱȱȱ ȱȱȱ¢ȱȱȱȱ¢ǯȱȱ ȱȱȱȱȱ ȱȱȬȬȱ ¡ȱȱȱȱȂȱǰȱȱȱȱȱ ȱȱȱȱȱȱǯ ȱ¢ȱȱȱȱ ȱDZ ȱ Ȋȱ ǰȱ¢ȱĜ¡ȱȱĚ¢ ǯ ȱ Ȋȱ ȱȱ ȱȱǯ ȱ Ȋȱ ǰȱȱȱȱȱ ȱȱȱǯȱ 7.4 ȱ Ȋȱ ȱ ȱǻȱ¢ȱ ǼDzȱȱȱȱ stop engine. ȱ Ȋȱ ȱǰȱȱȱȱȱȱȱǯ Troubleshooting and Testing Ignition ȱȱȱȱĞȱȱȱȱȱȱ ǯȱȱȱ¢ȱȱȱ ȱȱ¡ȱ ǯȱȱȱȱȬȱ ȱȱǰȱȱȱȱȱęȱ ¢ǯȱȱȱȱȱ ȱȱȱȱȱ position. ȱȱȱȱȱȱ¢ȱȱȱ ȱȱȱȱȱȱȱȱȱǯȱȱȱ ¢ȱȱȱȱȱȱǰȱ ȱȱȱȱȱȱ¢ȱȱ ǯȱȱȱȱ¢ȱȱ ȱȱȱȱǯȱ ȱ¢ȱȱ¢ȱȱȱȱ ǰȱ ǰȱȱȱ ȱȱ information is provided to help systematically ȱȱȱȱȱȱǯ Section 7 Electrical System and Components Ignition System Troubleshooting Guide Problem Test ŗǯȱȱ ȱȱȱȱȱȱ ȱȱȱȱǯ Conclusion ŗǯȱȱ ȱȱȱȱȱȱǯ Řǯȱȱ ȱȱȱȱǯȱȱ 2. ȱȱȱȱ 0.762 mm (0.030 in.). ȱȱȱȱȱǰȱȱȱȱȱ ȱ¢Dzȱȱǯ řǯȱȱ ȱȱȱ ȱȱǯȱ ȱȱȱȱȱareȱǰȱ ȱȱȱǯȱȱȱȱȱ ȱare notȱDZȱ 3. Engine Will Not Start a. ȱȱȱȱȱ connect to post terminal of tester. ȱȱŝȬŚǯȱȱȱȱ ǰȱȱȱȱǯ a. ȱȱȱ ǰȱȱ ȱȱ¢ȱ ȱȱȱȱȱǯ ǯȱ ȱ ȱȱȱȱȱ and other components for accidental ȱȱȱǯ DZȱȱȱȱ ȱȱȱǰȱ ȱȱȱȱǯ c. ȱ ȱȱȱȱǰȱȱ ȱȱ¢ȱ¢ȱȱȱȱ ǯȱȱȱȱȱȱ ohmmeter (Test 4). ǯȱ ȱȱȱ ȱȱ ȱȱȱȱǯ ǯȱ ȱ¢ȱ ȱǻȱ¡DZȱȬ ȱȱ Ǽȱand other components for ȱǯ c. ȱȱȱȱȱśŖŖȱ ǰȱȱȱǯȱȱ ȱȱȱȱȱ ǯ DZȱȱȱǰȱȱȱȱ ȱȱȱȱȱȱ ȱ ǯ ǯȱ ȱ ȱȱȱǯȱ ȱȱȱȱ ȱȱǯ Śǯȱȱ ȱȱȱȱȱ ¢ȱȱȱǯȱȱ ȱŝȬśǼǯ 4. If the resistance is ȱȱę¢ȱ, the ȱ¢ȱȱǯȱȱȱǯ1 ȱȱȱǯȱ Connect one ohmmeter lead to ȱǻǼǯȱȱȱȱ ȱȱȱȱȱȱ ǻǼȱȱȬȱǯȱȱ ohmmeter leads connected in this ǰȱȱȱȱȱȱ ¢ȱȱȱ4000 to 12,000 ohmsǯȱȱȱȱȱȱ ¢ȱȱȱ2700 to 8600 ohms. DZȱ ȱȱȱȱ ȱȱȱ ȱȱęȱȱȱǯ If the resistance is low or 0 ohmsǰȱȱȱ ¢ȱȱǯȱȱȱǯ1 ȱȱȱȱ ȱȱęȱǰȱȱ ȱ¢ȱȱǯ 1 ȱȱȱ¢ȱȱ¢ȱȱ ȱȱȱȱȱȱȱ ǯ 7.5 7 Section 7 Electrical System and Components Figure 7-4. CDI and IDI Ignition Module Tester. 7.6 Figure 7-5. Testing CDI or IDI Ignition Modules. Section 8 Disassembly Section 8 Disassembly WARNING: Accidental Starts! Disabling engine. Accidental starting can cause severe injury or death. Before working on the engine or equipment, disable the engine by disconnecting the spark plug lead. The following sequence is a step-by-step guide for complete engine disassembly. This procedure may vary depending on the options included. Thoroughly clean all engine parts during the disassembly process. This allows for more accurate inspection and gauging of the engine for wear or damage. Use a commercial cleaner to remove grease, oil, and grime from engine parts. When such a cleaner is used, follow the manufacturer’s instructions and safety precautions carefully. Remove all traces of cleaners before the engine is reassembled and placed into operation. Even small amounts of these cleaners can quickly break down the lubricating properties of engine oil. Basic Disassembly Sequence 1. 2. 3. 4. 5. 6. 7. 8. şǯȱ ŗŖǯȱ ŗŗǯȱ 12. 13. 14. 15. 16. 17. 18. Disconnect spark plug lead. Ensure fuel tank is empty. Remove fuel cap. Drain oil from crankcase. Remove engine cover insert. Remove engine cover. Remove recoil. Remove blower housing. ȱĝȱǯ ȱĝȱȱȱĚȱǯ ȱȱȱȱȱęǻǼǯ Disconnect breather hose. Remove air cleaner base. Disconnect primer hose. Disconnect fuel line. Remove carburetor. Disconnect carburetor linkage. Remove carburetor gaskets. 19. 20. 22. 23. 24. 25. ŘŜǯȱ Řŝǯȱ 28. Řşǯȱ 30. 31. 32. řřǯȱ 34. 35. 36. 37. 38. 39. 40. 41. 42. 43. ŚŚǯȱ 45. ŚŜǯȱ 47. 48. 49. śŖǯȱ Remove governor spring. Remove speed control bracket. Remove governor lever. Remove fuel tank. Disconnect kill lead from ignition module. Remove ignition module. ȱĚ¢ ȱȱǯ ȱĚ¢ ȱȱȱȱǯ Remove fan. ȱĚ¢ ǯ Remove breather cover. Remove breather spring, disc and screen. Remove spark plug. ȱĚ¢ ȱȱ¢ǯ Remove valve cover and gasket. Remove jam nuts and rocker arm pivots. Remove rocker arms Remove push rods. Remove guide plate. Remove rocker studs. Remove cylinder head. Remove valves. Remove dipstick tube. Remove oil pan and gasket. ȱĞǯ Remove governor gear and retainer. ȱȱȱȱĞǯ Remove tappets. Remove connecting rod cap. Remove piston with connecting rod. ȱĞǯ 8 8.1 Section 8 Disassembly Detailed Disassembly Sequence ȱ Śǯȱ Ğȱȱȱȱ¢ȱǰȱȱȱ engine back to level. WARNING: Explosive Fuel! ȱȱ¡¢ȱĚȱȱȱȱȱ¡ȱ ȱǯȱȱȱ¢ȱȱȱǰȱȱ ȱǰȱȱǰȱ ¢ȱȱȱȱ Ěǯȱȱȱȱȱȱȱǯ Drain Oil Via Crankcase Plug (If Accessible) 1. To keep dirt, grass clippings, and other debris out ȱȱǰȱȱȱȱȱȱȱęȱ cap/dipstick, and then remove it. Disconnect Spark Plug ȱ Řǯȱ ȱȱȱȱȱȱĴȱȱȱ engine. See Figure 8-2. 1. Disconnect the spark plug lead. Empty Fuel Tank 1. Ensure the fuel tank is empty by running the engine until it stops, and is completely out of fuel. 2. Remove the gas cap. Drain Oil NOTE: There are two ways to drain oil from this engine: by inverting the dipstick tube, and by removing the crankcase drain plug. Drain Oil from Dipstick Tube 1. To keep dirt, grass clippings, and other debris out ȱȱǰȱȱȱȱȱȱȱęȱ cap/dipstick. Crankcase Plug Figure 8-2. Crankcase Plug. 3. Drain the oil into an approved container. Remove Engine Cover Insert and Cover 1. Remove the four Torx screws securing the engine cover insert. See Figure 8-3. ȱ Řǯȱ ȱȱȱęȱȦǯ 3. Tilt the engine on its side with the air cleaner facing up. See Figure 8-1. Drain the oil into an approved container. Cover Insert Air Cleaner Up Figure 8-3. Removing Engine Cover Insert Oil Flow Figure 8-1. Draining Oil from Dipstick Tube. 8.2 Section 8 Disassembly Remove Blower Housing ȱ Řǯȱ ȱȱȱ¡ȱĚȱȱȱ ȱ¡ȱ Ěȱ ȱȱȱȱȱǯȱȱ Figure 8-4. ȱ ŗǯȱ Ğȱěȱȱ ȱȱȱȱȱȱ stud spacers. See Figure 8-6. 3. Remove the engine cover. .001 Figure 8-6. Removing Blower Housing. Figure 8-4. Removing Engine Cover. 5HPRYH0XIÀHU$VVHPEO\ Remove Recoil Starter ȱ ŗǯȱ ĞȱěȱȱȱǯȱȱȱŞȬśǯ ȱ ŗǯȱ ȱ ȱ¡ȱĚȱȱȱȱȱ guard to the cylinder head. See Figure 8-7. 8 .001 Figure 8-5. Removing Recoil. )LJXUH5HPRYLQJ0XIÀHU+HDW*XDUG 8.3 Section 8 Disassembly ȱ Řǯȱ ȱȱȱĝȱěȱȱǯȱȱȱŞȬŞǯ Hex Nuts Hex Flange Screw Figure 8-10. Removing Air Cleaner Base. )LJXUH5HPRYLQJ0XIÀHU 4. Detach the breather hose from the crankcase. See Figure 8-11. ȱ řǯȱ ȱȱȱĚȱȱȱȱ exhaust studs, noting orientation. Remove Air Cleaner Assembly 1. Unscrew the knob on the air cleaner assembly and remove the cover. See Figure 8-9. Figure 8-11. Detaching Breather Hose. 5. Remove the air cleaner base and detach the ȱȱȱȱȱǻȱȱ ȱȱ¢ǼǯȱȱȱŞȬŗŘǯ Air Cleaner Base Gasket Figure 8-9. Removing Air Cleaner Cover. 2. Remove the paper element and the foam ȱǻȱǼǯ Primer Hose ȱ řǯȱ ȱȱ ȱ¡ȱȱȱȱ¡ȱĚȱ screw securing the air cleaner base to the cylinder head and the crankcase. See Figure 8-10. Figure 8-12. Disconnecting Primer Hose. 6. Remove the air cleaner base gasket from the carburetor, noting orientation. See Figure 8-12. 8.4 Section 8 Disassembly Remove Carburetor Assembly NOTE: Ensure the fuel tank is empty by running the engine until it stops, and is completely out of fuel. Spring Linkage Rod Linkage Remove Choke-less Carburetor 1. Squeeze the hose clamp and slide it and the fuel ȱěȱȱǯȱȱȱŞȬŗřǯȱ Throttle Lever Figure 8-15. Disconnecting Carburetor Linkage. ȱ Śǯȱ ȱěȱȱȇȱȱǰȱȱǰȱ and spacer gasket, noting the sequence. See Figure 8-16. Hose Clamp Figure 8-13. Disconnecting Fuel Line. 2. Slide carburetor to the end of the intake studs. See Figure 8-14. Spacer Gasket ȱ Řǯȱ ȱȱĴȱȱȱĴǰȱȱ ȱȱȱȱȱěȱȱǯȱȱ Figure 8-15. Head Spacer Heat Shield 8 Figure 8-16. Carburetor Gasket Sequence. Remove Carburetor with Choke 1. Squeeze the hose clamp and slide it and the fuel ȱěȱȱǯȱȱȱŞȬŗŝǯ Figure 8-14. Removing Carburetor. ȱ řǯȱ ȱȱĴȱȱ ȱȱȱǯ Gently push the rod and spring linkages up ȱȱȱȱȱĴȱǯȱȱ Figure 8-15. Figure 8-17. Disconnecting Fuel Line. 8.5 Section 8 Disassembly 2. Slide carburetor to the end of the intake studs. See Figure 8-14. Remove Governor Spring 1. Disconnect the governor spring from the speed control bracket. See Figure 8-20. ȱ řǯȱ ȱȱĴȱȱ ȱȱȱǯ Gently push the rod and spring linkages up ȱȱȱȱȱĴȱǯȱȱ Figure 8-15. 4. Rotate the carburetor until the choke linkage can be disconnected from the carburetor. See Figure 8-18. Figure 8-20. Removing Governor Spring. Remove Speed Control Bracket ȱ ŗǯȱ ȱȱ ȱ¡ȱĚȱ ȱȱȱ speed control bracket. See Figure 8-21. Choke Linkage Figure 8-18. Disconnecting Choke Linkage. ȱ śǯȱ ȱěȱȱȇȱȱǰȱȱǰȱ and spacer gasket, noting the sequence. See Figure 8-19. Figure 8-21. Removing Speed Control Bracket. Spacer Gasket Head Spacer Heat Shield Figure 8-19. Carburetor Gasket Sequence. 8.6 NOTE: The fuel hose connecting the carburetor and the fuel tank is held in place by a plastic ring, mounted on the back of the speed control bracket. If the bracket is removed from the crankcase, it will ȱĴȱȱȱȱȱ¢ȱ ȱȱęȱǻȱȱȱ Ǽǯȱȱȱȱȱ speed bracket be required, disconnect ȱȱęȱȱȱȱȱěȱ the hose. Do not disconnect the fuel hose from the fuel tank. Section 8 Disassembly Remove Governor Lever 1. Loosen the governor lever hex nut and slide the ȱěȱȱȱĞǯȱȱȱŞȬŘŘǯ Figure 8-24. Removing Fuel Tank. Governor Lever Hex Nut Figure 8-22. Removing Governor Lever. Remove Ignition Module 1. Disconnect the kill lead from the ignition module. See Figure 8-25. Remove Fuel Tank 1. Ensure the fuel tank is empty by running the engine until it stops, and is completely out of fuel. 2. Detach the fuel tank from the crankcase bracket ¢ȱȱȱ ȱ¡ȱĚȱ ǯȱȱ Figure 8-23 8 Bracket Screws Hex Nut Bracket Figure 8-25. Disconnecting Kill Lead. ȱ Řǯȱ ȱȱ¡ȱĚȱ ȱȱȱȱ securing the ignition module. Mark the stud for ęȱȱ¢ǯȱȱȱŞȬŘŜǯ Figure 8-23. Detaching Fuel Tank Bracket. 3. Remove the two studs securing the top of the fuel ȱȱĞȱěȱȱǯȱȱȱŞȬŘŚǯ NOTE: Disassembly does not require the fuel tank ȱȱȱȱȱĴȱȱȱ tank. If removal is to be performed, unscrew the two hex bracket screws. See Figure 8-23. Figure 8-26. Removing Ignition Module. 8.7 Section 8 Disassembly Disconnect Flywheel Brake Spring ȱ ŗǯȱ ȱȱȱȱȱĚ¢ ȱȱȱ ȱ a pliers and stretch it to disconnect it. See Figure 8-27. Figure 8-29. Removing Flywheel (Top View). ȱ Śǯȱ ȱȱĚ¢ ȱ¢ȱȱȱĞǯȱ See Figure 8-30. Remove Breather Assembly Figure 8-27. Disconnecting Flywheel Brake Spring. Remove Flywheel ȱ ŗǯȱ ȱȱĚ¢ ȱȱ ȱȱȱȱ Ě¢ ȱȱǰȱȱȱ¡ȱȱȱȱ drive cup. See Figure 8-28. ȱ ŗǯȱ ȱȱ ȱ¡ȱĚȱ ȱȱȱ breather cover. See Figure 8-30. Remove cover. Flywheel Key Breather Cover Figure 8-30. Removing Breather Cover. Drive Cup 2. Remove the breather spring, disc and screen. See Figure 8-31. Figure 8-28. Removing Flywheel Nut (Top View). ȱ Řǯȱ ȱȱȱȱȱĞȱěȱȱǰȱȱ ȱȱȱĚ¢ ȱȱ¢ǯ ȱ řǯȱ ȱĚ¢ ȱȱȱȱȱȱĞǯȱȱ ȱǰȱȱȱȱȱȱȱȱęȱ ǰȱ ¢ȱěȱȱȱȱĚ¢ ǯȱȱȱŞȬ 29. Figure 8-31. Removing Spring, Disc, and Screen 8.8 Section 8 Disassembly Remove Spark Plug 1. Remove the spark plug from the cylinder head. See Figure 8-32. Remove Valve Cover ȱ ŗǯȱ ȱȱȱ¡ȱĚȱ ȱȱȱȱ cover. 2. Remove the cover and the gasket. See Figure 8-34. Figure 8-32. Removing Spark Plug. Figure 8-34. Removing Valve Cover. Remove Flywheel Brake Assembly ȱ ŗǯȱ ȱȱ ȱ¡ȱĚȱ ȱȱȱ Ě¢ ȱȱ¢Dzȱȱȱǯȱȱ Figure 8-33. Remove Jam Nuts and Pivots 1. Use a socket and wrench to remove the jam nuts and the rocker-arm pivots from the rocker studs. See Figure 8-35. 8 Figure 8-33. Removing Flywheel Brake Assembly. Figure 8-35. Removing Jam Nuts and Pivots. 8.9 Section 8 Disassembly Remove Rocker Arms ȱ ŗǯȱ ȱǰȱĞȱȱȱȱěȱȱȱ rocker studs. See Figure 8-36. Remove Rocker Studs 1. Unscrew and remove the rocker studs from the cylinder head. See Figure 8-38. Figure 8-36. Removing Rocker Arms. Figure 8-38. Removing Rocker Studs. Remove Push Rods 1. Remove the push rods and mark them for reinstallation. See Figure 8-37. Figure 8-37. Removing Push Rods. 8.10 Remove Guide Plate 1. Remove the guide plate from the rocker studs. See Figure 8-39. Figure 8-39. Removing Guide Plate. Section 8 Disassembly Remove Cylinder Head ȱȱŗǯȱ ȱȱȱ¡ȱĚȱ ȱȱȱ cylinder head. See Figure 8-40. Figure 8-42. Removing Valve Spring Keepers. Figure 8-40. Removing Cylinder Head. 2. Remove the cylinder head, noting the positioning of the dowels. See Figure 8-41. ȱ řǯȱ ȱȱȱȱȱȱȱǻȱŞȬŚŘǼȱȱ ȱȱȱȱǻȱŞȬŚřǼǰȱȱȱ both valves from the opposite end of the head ǻȱŞȬŚŚǼǯȱȱȱȱȱȱ EXHAUST for reinstallation. DZȱ ¢ȱȱ¢ȇȱȱȱȱ a seal. There is no valve seal on the exhaust side. Intake Valve End Valve Seal Dowels Gasket Figure 8-41. Cylinder Head Dowels. 3. Remove the head gasket and discard. See Figure 8-40. Figure 8-43. Removing Valve Seal, Intake Valve Remove Valve Assembly 1. Push down on the valve spring keepers to release the valve springs from the valve stems. See Figure 8-42. 2. Remove the valve spring keepers and springs. Figure 8-44. Removing Valves. 8.11 8 Section 8 Disassembly Remove Dipstick Tube ȱ ŗǯȱ ȱȱ¡ȱĚȱ ȱȱȱ dipstick tube. See Figure 8-45. Remove the tube. Figure 8-47. Separating Oil Pan from Crankcase. 3. Remove the old gasket and discard. Figure 8-45. Removing Dipstick Tube. Remove Oil Pan and Gasket Remove Camshaft ŗǯȱ ȱȱĞȱȱȱǯȱȱ Figure 8-48. ȱ ŗǯȱ ȱȱ¡ȱ¡ȱĚȱ ȱȱȱȱ pan. See Figure 8-46. Figure 8-48. Removing Camshaft. Figure 8-46. Removing Oil Pan Screws. ȱ Řǯȱ ȱȱĚȱ ȱȱȱ ǰȱ carefully separate the oil pan from the crankcase. See Figure 8-47. 8.12 Remove Governor Gear and Shaft ŗǯȱ ȱȱ¡ȱĚȱ ȱȱȱȱ securing the governor gear. See Figure 8-49. Section 8 Disassembly Remove Connecting Rod Cap Retainer ȱ ŗǯȱ ȱȱĞȱȱ ȱȱȱȱ ȱ ¡ȱĚȱ ȱȱȱȱȱǯȱȱ Figure 8-52. Remove the screws and cap. Gear Figure 8-49. Removing Governor Gear, Retainer. ȱ Řǯȱ ȱȱȱȱȱȱĞǯȱ See Figure 8-50. Figure 8-52. Removing Connecting Rod Cap. Remove Piston Hitchpin ȱ ŗǯȱ ¢ȱȱȱȱȱȱĴȱ connecting rod out of the cylinder bore. See Figure 8-53. Governor Shaft 8 Figure 8-50. Removing Governor Hitchpin, Shaft. Remove Tappets ȱ ŗǯȱ ȱȱǯȱȱȱȱȱȱ EXHAUST for reinstallation. See Figure 8-51. Figure 8-53. Removing Piston. Remove Crankshaft ȱ ŗǯȱ ȱȱĞǯȱȱȱŞȬśŚǯ Figure 8-51. Removing Tappets. Figure 8-54. Removing Crankshaft. 8.13 Section 8 Disassembly 8.14 Section 9 Inspection and Reconditioning Section 9 Inspection and Reconditioning This section covers the operation, inspection, and repair/reconditioning of major internal engine components. The following components are not covered in this section. They are covered in sections of their own: Air Cleaner, Section 4 Carburetor and Governor, Section 5 Ignition, Section 7 Clean all parts thoroughly. Only clean parts can be accurately inspected and gauged for wear or damage. There are many commercially available cleaners that will quickly remove grease, oil, and grime from engine parts. When such a cleaner is used, follow the manufacturer’s instructions and safety precautions carefully. Use gasket remover to remove old material from the valve cover, cylinder head, crankcase, and oil pan. Do not scrape the gasket surfaces, as this could cause damage resulting in leaks. Make sure all traces of cleaning solvents are removed before the engine is reassembled and placed into operation. Even small amounts of these cleaners can quickly break down the lubricating properties of engine oil. Crankcase Inspection and Service Check all gasket surfaces to make sure they are free of gasket fragments and deep scratches or nicks. ȱȱ¢ȱ ȱȱǯȱȱȱǰȱȱȱȱȱȱȱěȱȱȱȱ cylinder wall. Without lubrication, the piston rings would make metal to metal contact with the wall, causing Ĝȱȱǯȱȱȱȱ¢ȱ ȱȱȱȱȱ¢ȱ£ȱȱȱȱȱȱ ęȱȱȱȱȱȱǯ Flywheel Inspection ȱȱĚ¢ ȱȱȱȱȱȱ¢ ¢ȱȱ ȱȱǯȱȱȱĚ¢ ȱȱǯȱȱȱ Ě¢ ȱ¢ȱȱȱȱȱ¢ ¢ȱȱǰȱȱȱĞǰȱĚ¢ ǰȱȱ¢ǯ ȱȱȱȱȱȱȱǯȱȱȱȱȱȱ¢ǯȱȱȱĚ¢ ȱȱȱ ring gear is damaged. Cylinder Head and Valves Inspection and Service Carefully inspect the valve mechanism parts. Inspect the valve springs and related hardware for excessive wear ȱǯȱȱȱȱȱȱȱȱȱȱȱĴǰȱǰȱȱǯȱȱ ȱ diagram outlines valve running clearances between the valve stems and guides. 9.1 9 Section 9 Inspection and Reconditioning Intake Valve Exhaust Valve E D A E A D F F B B C Dimension A B C D E F G ȱ Guide Depth Guide I.D. Valve Head Diameter ȱȱ Valve Margin (Min.) ȱȱ Figure 9-1. Valve Details. 9.2 C Intake 90° 22.6 mm 5.500/5.5.12 mm 25.875/26.125 mm 45° 0.80 mm 5.465/5.480 mm Exhaust 90° 20.5 mm 5.500/5.5.12 mm 23.875/24.125 mm 45° 0.80 mm 5.465/5.480 mm Section 9 Inspection and Reconditioning Hard starting, or loss of power accompanied by high fuel consumption, may be symptoms of faulty valves. ȱȱ¢ȱȱȱȱĴȱȱ ȱǰȱȱȱȱȱȱęǯȱĞȱ removal, clean the valve heads, faces, and stems with a power wire brush. Then, carefully inspect each valve for ȱȱȱ ȱǰȱ¡ȱǰȱȱ ȱȱǯȱȱȱȱȱȱȱȱǯȱ ȱȱȱȱȱȱȱȱȱ ȱȱȱ¢ȱǯ Normal:ȱȱĞȱȱȱȱȱȱȱ can be reconditioned and reused if the face and margin are in good shape. If a valve is worn to where the margin is less than 1/32" do not reuse it. The valve shown was in operation for almost 1000 hours under controlled test conditions. Leakage:ȱȱȱȱȱȱȱȱȱȱ ȱ allow leakage, resulting in a valve burned on one side only. 9 Bad Condition: The valve depicted here should be replaced. Note the warped head; margin damaged ȱȱ ǯȱȱȱȱȱĴȱ to excessive hours or a combination of poor operating conditions. Coking: Coking is normal on intake valves and is not harmful. If the seat is good, the valve could be reused Ğȱǯ 9.3 Section 9 Inspection and Reconditioning Excessive Combustion Temperatures: The white deposits seen here indicate very high combustion temperatures, usually due to a lean fuel mixture. Stem Corrosion: Moisture in fuel or from condensation are the most common causes of valve stem corrosion. Condensation occurs from improper preservation during storage and when engine is repeatedly stopped before it has a chance to reach ȱȱǯȱȱȱ valves. Gum: Gum deposits usually result from using stale ǯȱȱȱȱĞȱȱȱȱ ȱȱȱȱȱȱȱȱȱȱěȱ season. Gum is a prevalent cause of valve sticking. The cure is to ream the valve guides and clean or replace the valves, depending on their condition. Overheating:ȱȱ¡ȱȱȱȱȱ will have a dark discoloration in the area above the valve guide. Worn guides and faulty valve springs ¢ȱȱȱǯȱȱȱȱȱȱ ǰȱȱȱęȱ ȱȱȱȱǯ 9.4 Section 9 Inspection and Reconditioning Valve Guides ȱȱȱȱȱ ȱ¢ȱęǰȱȱ ȱ not guide the valve in a straight line. This may result in burned valve faces or seats, loss of compression, and excessive oil consumption. To check valve guide-to-valve stem clearance, thoroughly clean the valve guide and, using a splitball gauge, measure the inside diameter. Then, using an outside micrometer, measure the diameter of the valve stem at several points on the stem where it moves in the valve guide. Use the largest stem diameter to calculate the clearance. If the intake clearance exceeds 0.047 mm (.0018 in.) or the exhaust clearance exceeds 0.082 mm (.0032 in.), determine whether the valve stem or guide is responsible for the excessive clearance. Maximum (I.D.) wear on the intake valve guide is 5.512 mm (0.2170 in.), while 5.512 mm (0.2170 in.) is the maximum allowed on the exhaust guide. The guides are not removable. If the guides are within limits but the valve stems are worn beyond limits, replace the valves. Valve Seat Inserts Hardened steel alloy intake and exhaust valve ȱȱȱȱęĴȱȱȱ¢ȱǯȱ The inserts are not replaceable, but they can be ȱȱȱȱ¢ȱĴȱȱǯȱȱ the seats are cracked or badly warped, the cylinder head should be replaced. Valve Seat Cutter Pilot .001 Figure 9-2. Typical Valve Seat Cutter. Lapping Valves ȱȱ ȱȱȱȱȱǰȱȱ provide a good seal. Use a hand valve grinder with ȱȱȱęȱǯȱ¢ȱȱȱȱ ȱęȱȱȱȱǰȱȱȱ valve on seat with grinder. Continue grinding until smooth surface is obtained on seat and on valve face. Thoroughly clean cylinder head in soap and hot water ȱȱȱȱȱȱǯȱĞȱ drying cylinder head, apply a light coating of engine oil to prevent rusting. ȱȱȱȱȱ ȱȱ ȱȱ ȱȱȱȱĴȱȱ ǯȱȱ¢ȱĴȱȱ ȱȱȱşȬŘǯȱȱęȱ ȱȱȱȱ ȱȱşŖǚȱĴȱȱęȱȱ the valve seat angle in Figure 9-1. With the proper 45° valve face angle, and the valve seat cut properly (44.5° as measured from center line when cut 90°) this would result in the desired 0.5° (1.0° full cut) interference angle where the maximum pressure occurs on the valve face and seat. 9 9.5 Section 9 Inspection and Reconditioning 9.6 Section 10 Reassembly Section 10 Reassembly The following sequence is a step-by-step guide for complete engine reassembly. This procedure assumes that all components are new or have been reconditioned, and all component subassembly work has been completed. This procedure may vary to accommodate engine options or special equipment. NOTE: Properly clean all components BEFORE reassembly. NOTE: Remove all traces of cleaners before the engine is reassembled and placed into operation. Even small amounts of these cleaners can quickly break down the lubricating properties of engine oil. NOTE:ȱ ȱȱȱȱȱęȱ torque values, tightening sequences, and ǯȱȱȱȱęȱ could cause severe engine wear or damage. NOTE: Always use new gaskets. Typical Reassembly Sequence ȱ ŗǯȱ 2. ȱ řǯȱ 4. ȱ śǯȱ 6. 7. 8. 9. 10. ȱĞǯ Install piston and connecting rod. Ĵȱȱȱǯ Install tappets. ȱĞǯ Install governor gear. Install crankcase dowels and gasket. Install oil pan cover. Install valves (if removed). Install cylinder head. 11. 12. 13. 14. 15. 16. 17. 18. ŗşǯȱ 20. Řŗǯȱ ŘŘǯȱ 23. 24. 25. 26. Řŝǯȱ 28. 29. 30. 31. 32. 33. 34. 35. 36. 37. řŞǯȱ 39. ŚŖǯȱ 41. 42. Install guide plate. Install rocker studs. Install push rods. Install rocker arms. Install rocker pivots. Install jam nuts. Install valve cover gasket and cover. Install spark plug. ȱĚ¢ ȱȱ¢ǯ Install breather cover. ȱĚ¢ ȱ¢ǯ ȱĚ¢ ǯ Install fan. Install ignition module. Install fuel tank bracket (if removed). Install fuel tank. ȱĚ¢ ȱȱǯ Install governor. Install speed control bracket. Install governor. spring Install carburetor gaskets. Install carburetor. Reconnect carburetor linkage. Reconnect fuel line. Install primer hose (if equipped). Install air cleaner base. Reconnect breather hose. ȱȱęǻǼȱȱǯ Install dipstick tube. ȱĝȱ¢ǯ Install blower housing. Install recoil. 10 10.1 Section 10 Reassembly Install Crankshaft ȱ ŗǯȱ ¢ȱȱȱĞȱȱȱȱ through the front seal, and fully seat into place. ȱȱŗŖȬŗǯȱȱȱĞȱȱȱ journal for the connecting rod is away from the cylinder. 3. Aim the triangle on top of the piston towards the push rod chamber. See Figure 10-3. Triangle Figure 10-3. Piston Orientation (After Installation). 4. Carefully guide the connecting rod, with piston ĴǰȱȱȱǯȱȱȱŗŖȬŚǯȱ Figure 10-1. Installing Crankshaft. Install Piston and Connecting Rod NOTE: Proper orientation of the piston and connecting rod inside the engine is extremely important. Improper orientation can cause extensive wear or damage. 1. Stagger the piston rings in the grooves until the end gaps are 120° apart. Lubricate the cylinder ǰȱĞȱǰȱȱȱǰȱ piston, and rings with engine oil. 2. Compress the piston rings using a piston ring compressor. See Figure 10-2. Figure 10-4. Installing Piston. ȱ śǯȱ ȱȱȱȱȱĞǰȱȬȱȱȱ tap the piston into the bore. See Figure 10-5. Figure 10-2. Compressing Piston Rings. Figure 10-5. Tapping Piston. 10.2 Section 10 Reassembly ȱ Ŝǯȱ ȱȱĞȱȱȱ ȱȱȱ rod. Align the rod cap and connecting rod to match the marks. Torque the screws to 12.5 N·m (110 in. lb.). See Figure 10-6. Timing Marks Match Marks Figure 10-8. Aligning Timing Marks. Install Governor Gear Assembly Figure 10-6. Aligning Match Marks. 1. Install the governor gear and retainer, and torque ȱ¡ȱĚȱ ȱȱ9.5 N·m (84 in. lb.). See Figure 10-9. Retainer Install Tappets 1. Install the INTAKE and the EXHAUST tappets into their respective positions, as previously marked. See Figure 10-7. Governor Gear Figure 10-9. Installing Governor Gear. ȱ Řǯȱ ȱȱȱȱĞȱȱȱȱ ȱ the hitch pin. See Figure 10-10. 10 Figure 10-7. Installing Tappets. Hitch Pin Install Camshaft ȱ ŗǯȱ ȱȱĞȱȱȱȱȱ with light grease or oil. Shaft ȱ Řǯȱ ȱȱĞȱȱȱȱȱǯȱ See Figure 10-8. Figure 10-10. Installing Governor Shaft, Hitch Pin. 10.3 Section 10 Reassembly Install Oil Pan 1. The sealing surfaces of the crankcase and oil pan should be clean, dry and free of any nicks or burrs. 6. Using the torque sequence shown in Figure 10-13. 1 3 2. Install the two crankcase dowels into the crankcase. See Figure 10-11. 6 Dowels 5 2 4 Figure 10-13. Torque Sequence. 7. Torque the oil pan screws to 12.3 N·m (109 in. lb.). See Figure 10-14. Figure 10-11. Installing Crankcase Dowels. 3. Using the crankcase dowels as a guide, install a new oil pan gasket onto the crankcase. 4. Ensure the gasket, oil pan, and governor gear assembly have been accurately matched with the crankcase. Guide the oil pan onto the crankcase, ȱȱĞȱȱȱȱȱ ȱȱȱǯȱȱȱĞȱ slightly to help engage the governor gear. ȱ śǯȱ ȱȱęȱȱȱ¡ȱ¡ȱĚȱ screws, securing the oil pan to the crankcase. See Figure 10-12. Figure 10-12. Installing Oil Pan Screws. 10.4 Figure 10-14. Torquing Oil Pan Screws. Section 10 Reassembly Install Cylinder Head Assembly Install Cylinder Head Prior to assembly, lubricate all the components with engine oil, including the tips of the valve stems and valve guides. NOTE: Do not reuse cylinder head screws or gasket. Always replace with new parts. Install Valve Assembly 1. Install the INTAKE and the EXHAUST valves into their respective positions in the cylinder head. See Figure 10-15. 1. Examine the sealing surfaces of the cylinder head and crankcase for nicks or burrs. 2. Using the two cylinder head dowels as a guide, install a new head gasket. See Figure 10-17. Gasket Dowels Figure 10-17. Installing Cylinder Dowels. Figure 10-15. Installing Valves. 2. Install the intake valve seal onto the intake valve. Next, slide the valve springs onto both valves and lock them in place with the valve spring keepers. See Figure 10-16. Keeper 3. Match the two sides of the head together and ęȱȱȱȱ¡ȱ ǯȱȱȱ 10-18. 3 2 Spring Intake Seal 10 1 Figure 10-16. Installing Valve Assembly. 4 Figure 10-18. Torquing the Screws. 4. Follow the torque sequence in Figure 10-18 and torque the head screws to 27.8 N·m (246 in. lb.). 10.5 Section 10 Reassembly Install Push Rod Assembly 1. Install the rocker studs through the guide plate. See Figure 10-19. Figure 10-21. Installing Rocker Arms. Figure 10-19. Installing Guide Plate and Studs. 6. Loosely install the pivots and the jam nuts onto the rocker studs. See Figure 10-22. 2. Torque the rocker studs to 13.6 N·m (120 in. lb.). 3. Install the push rods into the intake and exhaust positions, as previously marked. See Figure 1020. NOTE: Installation and seating of the push rods into the tappet recesses during this sequence is critical. To aid with proper installation of the push rods and rocker arms, and for adjusting the valve lash, position the engine with the cylinder head up. When properly installed the push rods extend approximately 1 in. (25.4 mm) above the guide plate. Figure 10-22. Installing Pivots. 7. With the piston at top dead center of the compression stroke, insert a 0.1 mm (.004 in.)ȱĚȱ feeler gauge between one valve stem and rocker arm. See Figure 10-23. Figure 10-20. Installing Push Rods. 4. Apply grease to the contact surfaces of the rocker arms and the pivots. 5. Install the rocker arms onto the rocker studs. Match the rocker arm dimples with the round push rod ends. See Figure 10-21. 10.6 Figure 10-23. Setting Valve Lash. 9DOYH&OHDUDQFH6SHFL¿FDWLRQV Intake Valve 0.0762-0.127 mm (0.003-0.005 in.) Exhaust Valve 0.0762-0.127 mm (0.003-0.005 in.) Section 10 Reassembly 8. Tighten the rocker pivot with a wrench until a slight drag is felt on the feeler gauge. See Figure 10-23. Hold the nut in that position and torque the jam nut to 9.5 N·m (84 in. lb.). Perform the same adjustment procedure on the opposite valve. Install Flywheel Brake Assembly 1. Install the two spacers onto the two brake assembly screws. 2. Torque them to 9.5 N·m (84 in. lb.). See Figure 10-25. 9. Position a new valve cover gasket on the cylinder head. ȱŗŖǯȱ ȱȱȱȱȱęȱȱȱȱ screws. 11. Using the sequence shown in Figure 10-24, torque the cover screws to 8 N·m (71 in. lb.). 2 3 Figure 10-25. Installing Flywheel Brake Assembly. Install Breather Assembly 1. Install the breather screen, spring, and disc. See Figure 10-26. 1 4 Figure 10-24. Valve Cover Torque Sequence. Install New Spark Plug 1. Set the gap on a new Champion® RC12YC (or equivalent) to 0.762 mm (0.030 in.). 2. Install the spark plug and torque it to 24.5 N·m (217 in. lb.). 10 Figure 10-26. Installing Screen, Spring, and Disc. 2. Install the breather cover and torque it to 10 N·m (88 in. lb.). See Figure 10-27. 10.7 Section 10 Reassembly ȱ ŗǯȱ ȱȱ¢ȱȱȱĞȱ¢ ¢ǯȱȱ sure key is fully seated. See Figures 10-27 and 10-28. Flywheel Key Breather Cover ȱ Řǯȱ ȱȱĚ¢ ȱȱȱĞȱȱ the keyway with the key. See Figure 10-28. Keyway Teardrop Figure 10-27. Installing Breather Cover. Install Flywheel Assembly :$51,1*'DPDJLQJ&UDQNVKDIWDQG Flywheel can Cause Personal Injury! ȱȱȱȱȱȱĚ¢ ȱȱȱ ȱȱȱĞȱȦȱĚ¢ ǯȱȱȱ¢ȱ causes extensive engine damage, but can also cause personal ¢ǰȱȱȱȱȱȱ ȱȱȱ ǯȱ ¢ȱȱȱȱȱ ȱȱ ȱȱ ȱȱȱĚ¢ ǯ DZȱ ȱȱȱĚ¢ ȱȱȱȱ ĞȱȱȱĚ¢ ȱȱȱǰȱ dry and completely free of lubricants. The ȱȱȱȱȱȱĚ¢ ȱ to be over stressed and damaged when the ȱȱȱȱȱęǯ Figure 10-28. Installing Flywheel. 3. Align the teardrop slot on the fan with the raised ȱȱȱĚ¢ ǯȱȱȱȱȱȱ ȱĚ¢ ǰȱȱȱȱȱȱȱ nut. ȱ Śǯȱ ȱȱĚ¢ ȱȱ ǰȱȱȱĚ¢ ȱ still while simultaneously torquing the nut to 51.5 N·m (456 in. lb.). See Figure 10-29. DZȱ ȱȱȱĚ¢ ȱ¢ȱȱȱ ¢ȱȱȱ¢ ¢ǯȱȱĚ¢ ȱȱ become cracked or damaged if the key is not properly installed. DZȱ ¢ȱȱȱĚ¢ ȱȱ ȱȱȱ ȱĚ¢ ȱ ȱȱȱĚ¢ ȱ fastener. Do not use any type of bar or ȱȱȱȱĚ¢ ȱȱǰȱ as these parts could become cracked or damaged. Figure 10-29. Torquing Flywheel Nut. 10.8 Section 10 Reassembly Install Ignition Module ȱ ŗǯȱ ȱȱĚ¢ ȱȱȱȱȱȱ away from the ignition module legs. Position the ignition module on the legs with the kill tab down. See Figures 10-30 and 10-32. 4. Set the air gap by placing a 0.254 mm (0.010 in.) plastic feeler gauge between the magnet and the module. Loosen the stud and let the magnet draw the module against the feeler gauge. See Figure 10-32. Torque the fasteners to 10 N·m (88 in. lb.). Magnets Ignition Module Feeler Gauge Leg Kill Tab Figure 10-30. Positioning Ignition Module/Magnets 2. Loosely thread the stud in a mounting leg and ȱ¡ȱĚȱ ȱȱȱǯȱȱȱ ŗŖȬřŗǯȱȱȱȱ ¢ȱȱȱĚ¢ ȱ and tighten the stud to hold it in place. Rotate the Ě¢ ȱȱȱȱȱȱȱ ȱ the module. NOTE: If the stud for mounting the ignition module was not kept segregated from the two studs for mounting the fuel tank, compare their lengths and choose the short one. Figure 10-32. Feeler Gauge. ȱ śǯȱ ȱȱĚ¢ ȱȱȱȱȱǰȱ and check that the module does not come in contact with the magnet. Recheck the air gap. 6. Connect the kill lead to the ignition module. See Figure 10-32. Install Fuel Tank ȱ ŗǯȱ Ĵȱȱȱȱȱȱȱȱǻȱ removed) with the two bracket screws. See Figure 10-33. Torque the screws to 4.5 N·m (40 in. lb.). Hex Flange Screw Stud Spacer Bracket Screws 10 Bracket Figure 10-31. Tightening Ignition Module Stud. 3. Install the spacer onto the ignition module stud. See Figure 10-31. Bracket Nut Figure 10-33. Attaching Fuel Tank Bracket. ȱ Řǯȱ ¢ȱĴȱȱȱȱȱȱȱ ȱ ȱȱ¡ȱĚȱǯȱȱȱ 10-33. 10.9 Section 10 Reassembly 3. Secure the top of the fuel tank to the crankcase by installing the two threaded studs. Torque the studs to 10 N·m (88.5 in. lb.). See Figure 10-34. Stud Spacer Shaft Figure 10-36. Installing Governor Lever. ȱ Řǯȱ ĴȱȱĴȱȱȱȱȱȱ the top of the governor lever. See Figure 10-37. Throttle Linkage Figure 10-34. Installing Fuel Tank Studs. 4. Install spacers on both studs. See Figure 10-34. 5. Secure the fuel tank bracket to the crankcase by ȱȱ¡ȱĚȱȱȱ8 N·m (71 in. lb.). See Figure 10-33. Install Flywheel Brake Spring ȱ ŗǯȱ ȱȱǰȱĴȱȱĚ¢ ȱȱȱ onto the bracket hook. See Figure 10-35. Linkage Spring Figure 10-37. Attaching Governor Linkage. Install Speed-Control Bracket ȱ ŗǯȱ ¢ȱĴȱȱȬȱȱȱȱ crankcase using the two shorter hex screws. The ȱ¡ȱ ȱ ȱȱȱȱȱĴȱ of the air cleaner body. See Figure 10-38. Hook Spring Figure 10-35. Attaching Flywheel Brake Spring. Install Governor Assembly ȱ ŗǯȱ ȱȱȱȱȱȱȱĞȱ with the lever section up. See Figure 10-36. 10.10 Figure 10-38. Installing Speed Bracket. Section 10 Reassembly DZȱȱ ȱȱȱěȱȱȱȱȱȱǯȱȱŗŖȬřşǰȱŗŖȬŚŖǰȱȱŗŖȬŚŗȱ¢ȱ ȱěȱȱȱȱȱ ȱȱ ȱǯ Throttle Linkage Linkage Spring Speed Control Bracket Throttle Lever Governor Spring Governor Lever Figure 10-39. Fixed Speed with Primer (No Choke). Throttle Lever Linkage Spring Throttle Linkage Speed Control Bracket Choke Lever Choke Linkage Governor Lever Governor Spring Figure 10-40. Fixed Speed with Choke. Throttle Lever Linkage Spring Throttle Linkage 10 Dual Throttle/ Choke Control Choke Lever Choke Linkage Speed Control Screw Governor Lever Speed Control Bracket Governor Spring Figure 10-41. Variable Speed with Choke. 10.11 Section 10 Reassembly Install Governor Spring 1. Install the governor spring between the governor lever and the speed control bracket. See Figure 10-42 and 10-39. Install Carburetor with Primer 1. With the carburetor not yet mounted on the studs, rotate it slightly to allow connection of the ĴȱȱȱȱȱȱȱĴȱ lever. See Figure 10-44. Spring Linkage Throttle Linkage Throttle Lever Figure 10-42. Installing Governor Spring. Install Carburetor Gaskets 1. Place the spacer gasket, cylinder head spacer and ȱȱĚȱȱȱȱȱȱ in the order shown in Figure 10-43. Figure 10-44. Installing Throttle Linkage. 2. Slide the carburetor onto the mounting studs. See Figure 10-45. Install the air cleaner gasket onto the studs. Spacer Gasket Head Spacer Heat Shield Figure 10-45. Installing Carburetor (Primer Model). Figure 10-43. Installing Carburetor Gaskets Install Carburetor Linkage DZȱ ȱȱȱěȱ ¢ȱȱĴȱ the carburetor linkage depending on the carburetor and speed bracket used. For more detailed illustrations, refer to Figures 10-39, 10-40, and 10-41. 10.12 Install Carburetor with Choke 1. With the carburetor not yet mounted on the studs, rotate it slightly and slot the elbow, at the end of the linkage, into the choke lever. See Figure 10-46. Section 10 Reassembly Connect Fuel Line 1. Slide the fuel line tight up against the carburetor, and secure the connection with a hose clamp. See Figure 10-48. Figure 10-46. Attaching Choke Linkage. ȱ Řǯȱ ȱȱĴȱȱȱȱȱ ȱȱĴȱȱȱȱǯȱȱȱ 10-44. 3. Slide the carburetor onto the mounting studs. See Figure 10-45. Adjust Governor 1. Move the governor lever away from the carburetor to the limit of its travel (wide-open ĴǼǰȱȱȱȱȱǯȱȱȱǰȱ Ě¡ȱȱȱȱǯȱȱȱȱĞȱ ȱȱȱȱȱȱĞȱ ȱȱȱ as it will go, while simultaneously tightening the hex nut. See Figure 10-47. Torque the hex nut to 9.5 N·m (84 in. lb.). Figure 10-48. Connecting Fuel Hose. Install Air Cleaner Assembly ȱ ŗǯȱ Ĵȱȱȱȱȱȱȱǻȱ equipped). See Figure 10-49. 2. Slide the air cleaner gasket onto the carburetor studs. See Figure 10-49. Air Cleaner Base Gasket Primer Hose 10 Figure 10-49. Installing Primer Hose (If Equipped). Figure 10-47. Adjusting Governor. 10.13 Section 10 Reassembly 3. Slide the air cleaner base onto the carburetor ǯȱĴȱȱȱ¢ȱ¢ȱ ȱȱ ȱ¡ȱȱȱȱǰȱȱȱ¡ȱĚȱ screw into the crankcase. See Figure 10-50. 6. Install the paper element and the foam precleaner (if equipped) into the air cleaner body. See Figure ŗŖȬśŘǯȱĴȱȱȱȱȱǯ Hex Nuts Hex Flange Screw Figure 10-50. Installing Air Cleaner Base. Figure 10-52. Installing Air Cleaner. ȱ Śǯȱ Ĵȱȱȱȱȱȱǯȱȱ Figure 10-51. Install Dipstick Tube 1. Install the dipstick tube to the crankcase. See Figure 10-53. ȱ Řǯȱ ȱȱ¡ȱĚȱ ȱ 8 N·m (71 in. lb.). Figure 10-51. Attaching Breather Hose. 5. Secure the air cleaner base by torquing the two ¡ȱȱȱȱ¡ȱĚȱ ȱȱ 8 N·m (71 in. lb.). Figure 10-53. Installing Dipstick Tube. 10.14 Section 10 Reassembly ,QVWDOO0XIÀHU$VVHPEO\ ȱ ŗǯȱ ȱȱȱĚȱȱȱȱ¡ȱ mounting studs, with the gasket folds facing the cylinder head. See Figure 10-54. )LJXUH,QVWDOOLQJ0XIÀHU+HDW'HÀHFWRU ȱ Řǯȱ ȱȱĝȱȱȱ¡ȱǯȱȱ Figure 10-55. Install Blower Housing 1. Install the blower housing onto the studs. See Figure 10-57. Figure 10-57. Installing Blower Housing. Install Recoil 1. Place the recoil onto the studs protruding from the blower housing. See Figure 10-58. )LJXUH,QVWDOOLQJ0XIÀHU ȱ řǯȱ ȱȱĝȱȱȱȱ¡ȱǯȱ See Figure 10-56. Torque to 9.5 N·m (84 in. lb.). Figure 10-58. Installing Recoil. 10 )LJXUH,QVWDOOLQJ0XIÀHU*XDUG 10.15 Section 10 Reassembly Install Engine Cover 1. Install the engine cover and secure it with the ȱ¡ȱȱȱ ȱ¡ȱĚȱ ǯ Install Fuel Cap 1. Screw the fuel cap tightly onto the fuel tank. See Figure 10-61. 2. Torque the nuts to 2.8 N·m (25 in. lb.). See Figure 10-59. Figure 10-61. Installing Fuel Cap. Figure 10-59. Installing Engine Cover. 2. Install the engine cover insert onto the engine cover, and secure with the four Torx screws. See Figure 10-60. Torque to 2.3 N·m (20 in. lb.). Figure 10-60. Installing Engine Cover Insert. 10.16 FORM NO.: TP-2601 ISSUED: 3/08 REVISED: LITHO IN U.S.A. FOR SALES AND SERVICE INFORMATION IN THE U.S. AND CANADA, CALL 1-800-544-2444 KohlerEngines.com ENGINE DIVISION, KOHLER CO., KOHLER, WISCONSIN 53044