1
UTILUS
FRS"
FIBERGLASS D.E. FILTER
INSTALlATION, OPERATION & SERVICE MANUAL
WARNING
THIS MANUAL CONTAINS
IMPORTANT SAFETY INFORMATION WHICH MUST BE
FURNISHED TO THE END
USER. FAILURE TO READ
AND FOLLOW INSTRUCTIONS COULD RESULT IN
SERIOUS PERSONAL INJURY AND/OR MAIOR
PROPERTY DAMAGE.
TABLE OF CONTENTS
A. How Your Filler Works
2
B. Inllallation
C. InitIal Slart-Up
3
" .. 4
D. Filter DlslssemblyfAssembly
E. Cleaning Frequency
F. Fitter Backwa.h ProeedullI
CORPORATE OFFICE
S.nlord, Ne
(I") 774_4151
........ _ W U T
..... "" - . - . C'
"..-,.,
4,5
6
6
G. Manu,l Filter Cleaning
H. Chemical Cleaning
I. Winterizing Procltdur
8,7
8
8
J. R.~.cemenl Part•.................... 9,10
K. Trouble.hooting Guide
".. 11
NAUTILUS" FNS MANUAL
Thill filter operates under prell9ure. When clOlled
properly and operated witho\lt air in the water
system, this filler will operate in a safe manner.
Warning label, should be affixed to the top of
the filter and on the clamp bands 8t all times.
Keep Bafety labels in good oondition. Replace
mining or damaged safety labels. (For free Iii\).
els call 1·919-774-4151).
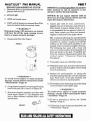
A. HOW YOUR FILTER WORKS
YOliT vemca1ll'rid diatomaceous earth (D.E.)
filter;8 designed to operate for yeaTS with proper
maintenance. The filter housing ia made of corrosion resistant materials and when installed,
operated and maintained in accordance with
these instructions, your filter will provide years
of service.
Your filter must be charged with D.E. 81 initial start·
up. This D.E. will cover the vertical filter grid
cloth within the filter with a thin coating. Dirty
water flows from the pool through the control
valve on the side of the filter and into the lower
side connection of the filter (part 32). The dirty
water flows through the vertical grid elementa
(part 17) where dirt is filtered out by the D.E.
Coating. All grid elementa channel cleaned water
into a manifold system (part 16) which exita at
the upper side connection (part 28) and through
the control valve to return back to the pool. By
continuously diluting the dirty pool water with
clean water, the entire pool becomes gradually
cleaned. Your filter and pump should be sized to
circulate from 2 to 4 times the volume of water in
the entire pool through the filter every day to
accomplish the cleaning.
As dirt is collected in the coating of D.E. in the
filter, the pressure will rise and the flow of water
PAGE 2
to the, pool will be reduced. See other sections in
the manual to determine when to clean the filter
and how to choose the appropriate cleaning
method. Thia filter will only remove luspended
matter and docs not sanitize the pool. The pool
must be sanitited and PH balanced for sparkling
clear water. Your filtration Iystem mUlt be con·
figured and siz.ed to meet your local health coc!eI.
'Part no's in parenthesis refer to the replacement parts as shown in the exploded drawing
at the end of the manual.
•• WARNING"
"'ailure to run your filter or inadequate
filtration can result in pool water clarity
that could obstruct visability and allow
diving into or on top of obscured objects
which can cause serious personal injury
or drowning.
Clear water is the result of proper filtration
well 8S proper water chemistry. Pool chern·
istry is a specializ.ed area and you should con·
suIt your local pool service specialist for specific help or instructions. In general proper
pool sanitation requires a free chlorine level of
1 to 2 PPM and a PH range of 7.2 to 7,6.
8S
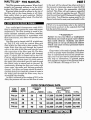
FILTER OPERATIONAL DATA
6 Hrs•
• Hrs.
10 Hrs•
12 Hr••
24
- ..-
36
48
17,280
23,040
28,800
34,560
FNS 36
3.
54
72
25,920
34,560
43,200
51,840
FNS 48
48
72
34,560
46,080
57,800
69,120
FNS 60
60
90
••
43,200
57,600
72,000
86,400
Fllna
Fltna
"""'"
MOO"
NUMlll
ISq. fl·1
FNS24
flOW un
TURNOVlI CAPACITY
1_ _1-..;1...
............1
(GPM)
•,.-.r....... ... -.r.......
12.
(l~l~'lj~IJJ'1'§1:II
NAUTILUS'· FNS MANUAL
B. I!'IiSTALLA TID'
"WARNING"
FILTERSSHQULDNEVERBETESTED
OR SUBJECTED TO AIR OR GAS
UNDER PRESSURE. ALL GASES ARE
COMPRESSIBLE AND UNDER
PRESSURE CREATE A DANGER.
SEVERE BODILY INJURY OR PROP·
ERTY DAMAGE COULD OCCUR IF
THE FILTER IS SUBJECTED TO AIR
OR GAS PRESSURE.
1. Check carton for any evldenee ofdaml!l,edue
to rou,h handlin, in ahipmenL If carton or
any filter component.. are damagtd. notify
miaht carrier immediately.
2. After inapection, carefully remove filter com.
ponent.. (rom carton.
3. Mount filter on a permanent IIlab, p~rerably
oonCl'flte poured in III fonn or on a platform
con,trllete<! of concrete block or brick. DO
NOT use sand to level the filter or for pump
mountin,. 81 it will wash away.
4. Provide apace and lighting for routine main.
tenance l!lcee8l1. Do not mO\lnt electrical oon·
trol. over filter. In Iftpect.forthepotential(or
injury fl"l)m any pl'eQurhed .y.tem, it it a
good common sen.e precaution to alway.
.tand dear of the ruter whenever ltartini' the
pump.
5. I{ you have a Multi-port Valve, aaaemble the
valve to tank, being .ure "0" rini" on valve
fittinl' are in place and are clean. Ute a lubricant applied li,htly, .uch u petroleum jelly,
.i1icone frUte, Mytilube or .imilar product
on "0" rinp and "0" ring i'1'OOves prior to
&Nembly.
6. I{ you have a two JIO'ition .lide valve, align
the valve with tank M that the handle it
toward the top of the tank, pu.h valve into
porU and tum the valve nutl.nui'ly on tank
fittinll.1t i. notneceuary tocinc:h val venuti
to tank fittinl beyond hand tightneet.
7. A'lemble piping and pipe fitting. to pump
and valve. All piping mu.t conform to local
and .tate plumbing and sanitary codel.
PA&l3
8. Ule teflon tape or plaltojoint ltick on all male
connectiolll of pipe and fittinll. Ute oniy
pipe compound. luited for plutic pipe. Support pipe to prevent.trainaon filter, pump or
valve.
9. Lonl piping I'WI' and elba_ rettriet flow.
For best efficiency UN the fewest pouible fitr
Ungl, l8TJe diamete:r pipe (at leut J.lI2",
preferably 2") &: locate equipment .. close to
the pool .. pouible.
10. A cheek valve it ..-nmended between the
filter and heater to prevent hot water "'back
up" which will damale the filter and valve.
Another check valve it recommended between
the mter and the pump to prevent D.E. from
migrating back to the pool when the filter it
off.
11. The maximum operatinl preelureofth~unit
i.50 pound. per square inch. Never operate
thi. filter above thil pl'eQun or attach a
pump to thi. mter that hal more than 50 pli
.hut off preSlure.
or
12. Never install a chlorinator upsl.«am
the
filter ·alway. down'l.«am and with a check
valve in between the chlorinator and filter.
13. A potitive .hutoffv.lve it not recommended
at the outlet of the filterinl .y.tell'. I{ the
.ystem ill ever run with .uch a valve dOted,
the internal air relief .y.tem becomes inoper·
ative and an uploeive .itu.tion could exist.
Additionally, running the .yatem with no
flow will leriou.ly dam.ge the equipment.
14. A pofIitive .hut off valve it alto not recom·
mended at the wute port of the valve. U the
.ystem is ever 1'1,1n with .uch a valve doaed,
the filter pTelllure will 10 abnormally high
and incrUlIe the ritk of v_I separation.
Additionally, runninl the .yatem with no
flow willterioualy damale the equipment.
15. Never .tore pool chemicalt within 10 ft.. of
your pool filter and pump. Pool chemicala are
colTOllive and .hould alwaya be .to~ in a
cool, dry and well ventilated area.
PAGE 4
NAUTILUS'· FNS MANUAL
.. WARNING·'
Chemical (urnes and/or spill, can cause
severe corrosive attack
the filter and
pump .tructural metallic components.
to
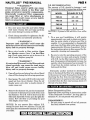
D.E. RECOMMENDATION
The amount of D.E. should be between 1 and
1·1/2 poun d s tor eac h 10 8Quare tee t 0 ffilte rea
0',
Structurally weakened filter components
can cause filter or valve attachments to
,
POUNDS OF D.E.
blow off and could cause severe bodily
injury or property damage.
FNS 24
2.5 • 3.5
FNS36
3.5 • 5.5
C. IMTIAL START·UP
FNS 48
5·7
1. On a new pool, clean the pool before filling
with water. Excess dirt and large particles
can cause damage to pump and filter.
"
MODel
FNS 60
,.,
NOTICE: 1/2 pound of DE Will fill a 130z. coffee
~".
2. Check clamp assembly for tightness. See fil·
Ler disalJ.!lembly and assembly p~ures.
•• WARNING"
Improper tank assembly could cause the
tank top to blow orland cause severe bodily
injury and/or property damage.
3. Move vslve handle to filter position. Open
air bleeder screw (Item I) on the filter
top. Check pump strainer pol to be sure it is
full of water. Replace pump lid.
.. WARNING"
Air enteri ng filter 8 nd/ or the filter u nit not
closed correctly can cause the tank top to
blow off and could cause severe bodily
injury and/or property damage.
4. Open allsudion and return line valves. Stand
clear of filter during the following operations.
5. Start pump. The tank will fill with water and
expel! air from the air bleeder. Close the air
bleeder screw only after a steady stream of
water cornell out.
6. Remove the skimmer lid, put the recommend·
ed amount of diatomaceous earth (D.E.) into
the skimmer. The D.E. will be drawn into the
filter and deposited evenly upon the grid elemenl.ll. Now the filter is providing the pool
with bright, clean water.
NOTICE: Do not operate filter without D.E.
charge for more than two minutes. Do not use
more than the recommended amount of D.E. in
your filter.
7. On a new pool installation, it will require
approximately one week to obtain and main·
tain the water clarity of which your filter is
capable. It is recommended to disassemble
and clean the filter after initial pool clean up
(approximately 48 hours of operation). Follow
the instructions given in this manual for dis·
assembly. cleaning and reassembly.
8. Be sure to note the operating pressure of the
filter when it is clean and properly charged
with D.E. As the filter remOVell dirt from the
pool, the pressure will gradually increase. As
a guide, when the pressure has increased 7 to
10 psi from the initial reading, it is time to
backwash the filter.
Alternately another method for determining
when to backwash the filter is by judging a drop
in the amount of water flowing from the filter by
observing the flow from the inlet fittings in the
wall of the pool. As a general rule, backwashing
is needed when the flow rate becomes about 213
the rate of a clean filter.
D. FILTER DISASSEMBLY/ ASSEMBLY
Before Disassembling Filter.
Backwash filter according to instructions under
"Filter Backwash Procedure" but stop after in·
struction if7. Do not precoat with new D.E.
DISASSEMBLY:
I. Be sure pump is turned off and all pressure
haa been released from system.
NAUTILUS'· FNS MANUAL
3.
··WARNING ..
Rele.sin, damp with prel8ure on IYltem
will caule tank lid to blow off, cauling
severe injury or major property damage!
NEVER adjust, ti,hten or loosen "V" band
clamp when tank III under preuure!
4.
face could have .harp edge. which can
cause bodily Injury if improperly handled.
Please ulle caution when performing the
follow!nl procedures.
~.
Carefully install tank seal and upper laIIk ihcll.
CAUTION; Be sure up!M'r tank shell contacts tank seal
liUrfllCf fl'enly and seal II'fll is dean and fret from dirt,
S.
3. Loosen damp nu\.8 altemately until one ia
removed. Remove spring and washers noting
part orientation. Lift clamp assembly off of
filter. NOTE· Filters manufactured in 1992
may not <:Qnta;n .pring and washers on
clamp.
...
4. Tank halves may have a tendency to stick
together. In order to separate \.ank halves, it
may be necl1uary to strike the tank top using
the palm ofyour hand with aglancingupward
movement (Figure A). Proc~d gradually
around the tank using this motion until the
top lllOllens.
7.
~
5. Being careful not to damage tank aeal, lift
upper tank shell off of lower tank sl1ell.
ASSEMBLY;
l. Thoroughly dean airrelieffllter scr~n on top
of manifold EVERY time filter is opened. Be
sure to remove all debris from screen.
2. Inspect tank seal (Item 22) for cuts, nicks, etc.
If damaged, replace with a new one.
......
Apply a small amount of sllicoM based lubricant to
Note; PAC·FAB rt:commenw silicone lubricanls
bocausc they an: insoluable in walcr and thetefOft! pr0vide luoo.:-tion for utendcd periods. an: nonllUic and
are compalible with nearly all plaslics Illd da.stomcr
materials (excepls;liCQIIC rubber). ElIcc:llentlubrican15
inchlde: • 00101 Coming 'Ill. 14. or 17 (Can 00101
Coming at 1-800-243-2481 for product a.ailability,
pricin. or leCtmical information) • Parker SU!M'r.Q·
Lube (Do not use PaO;er O-Lube). This prodUCt is
widely available at most dlwibutors of rubber prod.
CA UTION: Clamp hardware and filter sur-
\ 0
Clean tanlt seal :area of tank !.hell (boIh halves) and
the laIIk seal.
2. Remove filter drain plug and drain all water
from tank.
'IGIJI' . .
_...
PA&l5
6.
[Mtail clamp springs. lOIuhcrs and nut!. TIghten nUl!
evenly and allernalely until spring ooils louch each
0Ibcr. Tap clamp aroorod laIIk with rubber hamrrtCf tel
lSSi$! SClting of clamp. If filter is an earlier model
lOIithoul spring clamp tighten each nutlO 120 in·lbf.
Use only those componenl! JUpplied lOIilh filler 0<
PAC.FAB n:placement pam lOI1>1:n iJ.caling 1OI;lh the
bands and $piing teMioning devices.
"WARNING"
UK of non original equipment parIS on band damps
IOIillt spring Ie.woning devices m.ay cause lbfSf leMilln_
Ing duices 10 mal-fundion, resulting In improper
clamp Installalion. Improper damp Installalion could
cause lite llller lOp 10 blow 01T and callSoC SfVCn' !M'nonallnJury andIor property damage.
CAUTION: Do nOI over light~n lhe clamp band.
Tightening the clamp band beyood recommended proce.
dures may damage the clamp barod and cause une~pected
failun:. sudden n:lease of prcssun: .rod injW')' or damage.
o.~r lightening may also deform lanl; seal, causing leakage
at band clamp. Corroded componcnl! ClJlnot be n:paired
and must be n:placul. If you are e~peric:lICin. corrosion.
coosoll your pool ~icc company or (kal.....
"WARNING-Alway •• isually In~pfCt filler compon~nl' during
nonnal servicing 10 insure structural safely. Replace
any ikm which is col'Ttllied, bent or otherwi$c visually
defectlve. Defecllve nller components Can allow lhe
roller lap or attachments to blow 01T and could cause
seVen' bodily ll'ljury or property damage.
NAUTILUS'· FNS MANUAL
E.
Cl[..\~I~G
FREQl [~C\:
The filter on a new pool,hould be backw..hed,
diu
mbled and cleaned after approIimately
ll5e
48 houri of operation to clean O\It platter dUll
andlor conltn>etion debn..
Once a new pool haa been established, the din
oollected will gradually increase the filter pno:s'UN!. When the filt.erpre"urfl IntTealle. 710 10 Pi;
over the initial prellaure or when the now hal
been reduced by about 1/3 from when the filter
wal clean, it i. time to backwalh the filter. Dil·
(enol art.. and water conditiolUl will have dif·
ferent nonnal cleaning intvvala.
I{ at any time the starlio, preuure after back·
washing the filter india," 2 to 6 psi higher than
normal .UU'tinc pre&llUlt, it i. time to perfonn a
manual filter cleaning or " chemical cleaning
procedure in the worst cases.
1l i. II good idea to dia'8ll('mble the filter and
perform a chemical cleaning procedure twice a
year to remove accumulated body oila, ele.
In areas that have freezing winter lempera·
turn protect equipment by backwalihing and
either manually cleaning or chemically cleaning
hefon winteT ltoragle. Beliureall waleri.drained
from the filtv uaing the drain plug. The air
bleeder must be opened a. well u an other
valves.
F. FILTER BACKWASH PROCEDlRE
CAUTION: To prevent equipment dllmage
and possible injury. turn pump OFF before
changing valve position.
NOTICE, When backwashing with a separation tank, -.ee Separation Tank Owner'.
manual for inlltruction•.
I. SlOp pump. En.ure that the backwash line i.
open and any valving ill adjusl.ed to allow the
free flow of water.
2. Chanlle valve po!Iitionl.
a·If u.ing Multi·port Valve, tet to backwash
polIition.
b.1f u.in, Two-Position Slide Valve, r~
handle to fully es:lended polIition.
3. Stand de... of filter.
'A&l6
4. Start pump, thil will circulate water bad;·
wardt thfO\lgh the filter to flush D.E. cake
and contaminantl into the teparation tank or
to waste.
5. If .y.tem ha. a Bight gl.... backwath until
water in gla... nlDli dear.
6. If lIystem dOH not have a .illht glalll:
a·Backwash one minute.
b-Stop pump and change valve poliition.
1) If USinll Multipart V.lve, tet to rinse
poaition.
2) If u.ing Tw<>.Position IUde valve, push
handle down to filter poaition.
CAUTION: Stop pump before changing
valve settings!
c.Stand clear of filter.
d·Restart pump, run for one minute.
l!'"Repeat stepa a,b.e and d three times.
Cyelinll is effective when cake and contaminanu
are dlNieultlO bruk and f1ulh out of the filter.
NOTICE; Do not vacuum pool wbile backWIShing filter.
7. Stop pump.
8. Open air bleeder screw and release all pre&'
lIure from tank and system.
9. Follow "Initial Slart·Up·' proeedl,lre IOrelitart
system.
10. Compare preuure nadine on gSllge with
reading recorded afiB initial Iltaf't.-lIp. The
two read inca Ihould be very clO6t!; if not, do
"Manual Filter Cleanine Plocedure~.
G. MAJ'liUAL FILTER CLEA!'III!'IiG
NOTICE: At least once a year, diaullemble
and clean niter regardle.. of operatine
prelillure readinga. Thi. can be done conveniently whi.le winterizing pool in cold climate•. Use this metbod regularly if no
meaD. ofbackw. .bing i, available.
NAUTILUS'· FNS MANUAL
BEFORE DISASSEMBLING FILTER:
1. Backwash filter .s recommended but do not
precast with new D.E.
2. STOP PUMP.
PAGl7
NOTlCE:Toavoiddamagingf.abric,donotallow
filter element to f'Ub on concrete or any
abrasive sudace during cleaning.
NOTICE: Do Dot expose element cloth to
dire<:t sun for long periods. Dire<:t sun will
cause the cloth to deteriorate.
3. OPEN air bleeder screw.
4. WAIT until all preSllure i, released from filter
tank and lyaUrn before lOO3ening clamp.
"WARNING"
Releasing clamp with pre8Sure on system
will blow lid of£ the tank, cau8ing severe
injury or major property damage!
.
5. Dia8.6llemble filter (See Page 4)
'IGU.II.
~~
~~
. ,
"
8. Inspect grid clotb for tears. calcification,
plugged areas. etC. If necessary, soak element in
filter cleanser to remove buildup of oils, etc. It
b recommended tbat an approved cleaner be
used. Please contact your local pool cbemical
supplier or retail store for the proper clealler.
Mi" a solution following the manufacturer's
instructions on the label. Placetheentire grid
assembly in a plastic container and add the
solution so the entire grid 811l1embly is aub·
merged. Allow to stand overnigbt (12 houl"8).
The following day wash with a hoae and
remove all of the solution from the grida ao it
dOl'll not return to the pool. If calcified, perform the chemical cleansing procedure described under "Chemical Cleaning
Procedures".
9. Thoroughly clean air relief filter screen.
10. With filter drain open, hosedown the internal
portion offilter and thoroughly clean sealing
area of tank halves.
11. Replace the grid·asaembly by setting the
•• WARNING"
To avoid severe injury or major property
damage, exactly follow instructions under
"Disassembly" (Page 4)!
6. Graspelementasaembly alt.op manifold using
hand holds and lift to remove it (Figure B).
7. Hose down element assembly and clean with
bottle brush (Figure C). Use detergent 801ution or filter cleanser available from a pool
service store.
FIGUREC.
manifold opening directly over the connector
pipe. Push down on the grid assembly and
check to see that it is seated properly.
12. Thoroughly clean drain plug seal and sealing
area and replace and tighten plug.
•• WARNING··
To avoid severe injury or major property
damage, exactly follow instructions under
"Assembly" (Page 5)!
13. If unit is returning to semce, see "Initial
Startup" (Page 4).
14. If cleaning is part of seasonal shutdo....n, see
"Winterizing" (Page 8).
NAUTILUS~
FNS MANUAL
PAGE.
10. Rinse each element grid thoroughly with
water.
II. CIIE:\IICALCI_EA~I~G PROCEDl RE
1. STOP PUMP.
1L Reassemble element grids.
2. OPEN air bleeder screw.
12. Inspect inside of filter tank and remove all
debris remaining after backwashing.
3. WAIT until all pressure is released from filter
tank and system before loosening clamp.
"WARNING"
Releasing clamp with presaure on system
will blow lid off of tank, causing severe
injury or major property damage.
13. Thoroughly clean air relief screen on top of
manifold. Be sure to remove all debris from
screen.
I
14. Follow filter assembly procedure (Page 4).
NOTICE, Do not expose element cloth to
directsunlight for longperiods. Direct sun·
light will cause the cloth to deteriorate.
"WARNING"
To avoid ,evere injury or major property
damage, exactly follow inttructions under
"Assembly" (Page 5)!
NOTICE: To avoid damaging fabric, do not
allow filter element to rub on concrete or
any abrasive surface during cleaning.
15. If unit is returning to service,
Startup" (page 4).
4. DisaS8emble Filter.
"WARNING"
To avoid severe injury or major property
damage, exactly follow instructions under
"Disassembly" (Page 4)1
5. Disassemble and inspect element grid S8Bem·
blies for tears and worn areas. Replace as
needed.
6. Rinse each grid thoroughly with water.
7. Wash each grid with a mild soap solution. If
necessary, soak element grids in filter cleanser
to remove buildup of oils, el.c.
8. Rinse thoroughly to remove all soap film.
9. To remove mineral buildup from filter cloth,
soak each element grid two to four hours in a
solution of one part muriatic acid to ten parta
water. Some foaming may occur.
"WARNING"
'Follow manufacturer', instruction"
Danger of burns or explosion. Do not add
water to acid, alway, add acid to water. Do
not allow acid to touch your tkin. Donot ute
acid without eye protection and rubber
,love,.
s~
"Initial
16. If cleaning it part of seasonal shutdown, see
"Winterizing" procedures below.
I. WI1''TERIZING PROCEDL:RE
1. Backwash and manually clean the filter fol·
lowing the recommended procedures.
2. We recommend removing the internal grid
assembly and store in a dry area
3. Reassemble the filter following the recom·
mended procedures.
4. Open air bleeder valve. Open all system
valves. Position multiport valve between port
positions (winterize position) to allow pas·
sage to all porta and relieve prellsure on the
sealing gasket.
5. Remove drain plugs from filter, separation
tanka and pumps.
6. Drain system piping.
7. We recommend covering the equipment with
II tarpaulin or plastic sheet to inhibit deterioration from the weather.
NAUTILUS" FNS MANUAL
PAGE.
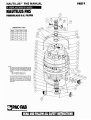
J. Rt:PL\CDIE:'IiT P,\RTS
UunLUS FilS'
.._DOl ASS D.L IFILIUl
-.. .---.-...... ..
lllfIIUISlONAL ToUUI.
~.
.. .-.
,•••
'
D'
•
0
~
•
"
•• •
...
-.....__
.._-_
__.•. .._.....
_-_--. - . -'_
.•.
.........
-..._."*---_.
__
_
..
.
,
----_
--_
_-....
."'
_ .•. ..,.
_""
~.
'H>OI.'~'
_ _ _ _If< . . Oli. 1;10
'"
~PAC·FAB
_
..
...
..
"
,
"
"
"
_.,- ...... ..
PAGE 10
NAUTILUS" FNS MANUAL
,,,
,,,
,
,•"
••
,,•
,,
,,,
•
""
"
••"
•
,•
•
,•
~
--- ----, ------ ...........
.... --..-- -----..-- --_
...
_
..
..- _..._...
_...-..- _.---- --=------ -_r.. . .
,
,""
,,.,,.-
-~~_""'/f
W'I'lICD'l_ _
.~-
- . . r 1 l..... llI.
~-
'_""'_rr......._
,_""'_IT......._
'_""_11""",_
-, '_""'_"_!O.I
'_"",_u..
,-""_
'_ltP_UWUf."_
,.lO.I
... _
.- '_1!lI'_UIOUT
,_ltP.............._
-,
"
"""losn_...
~_Il
.... DIO
_osn.............
,,•
-~~
, ••
•• ..........,....
••
•• .,.
.~
U·.-zar>.. lIIl
,,.t1'II"'I,,UUTI(B -..0
•• .•• .•• .-
... " UJJIfIUI -..0
,. . .,.. ... _
.......... -..0
, .... ITlI ..... ,,..JJIfIUI-...:l
,,,,,m.,,,,_,
'001100 _ _ 1Ul
,.
,.
,.
,.
• .- ,.
•• ."' o.
,.,
•• •• ,.
.,••
••
,• -,
•, .••
100_ .......
'001100 _ _ ...
>ooT
IOOT«> _ _. .
/<101II1I;I _ _ ''''
flXIIlOO_IID,..
OOQTIOI;I _ _ ' ..
1'OOf1Ol;l _ _' .
~
_
..." 1 -
~
~,-
.......ulIIUI
~.-
111;1
_ _ r ..
-"- ... _-_ ..
,,
,,,
,
0
,,,
~.
,
,,,
,,,
,,
,,
0
,,
,,
,,,
,,
,,
,,
,,,
,,,
,,
,,
,,
,,
,,
,,
,,
,,
,
" " - ' ' ' ' - - " , _ , , _ , , _ _ 01
••
-
I
"j
]
0
0
0
0
" -.... _ _ .. 0>00_ .._ ,..
_"
/
i
-"
_
.
-,••• ..••"-_. ._.•• ..
••
..
•• ..
••
• ..
•
••
~.
----,,-- ----'-
••
,,
,
•
_'""'"111'-•
.....
u:n
0
1llWIrI..
_
IIN'II"Q<."I' ............
~_O['T
1Ql.W>;Il........... -
IItD61I'1lD
11' ..
...........
_
_
II
"
•
.0
•• ••
• ••
~-
""' ....(lIfI.lTl_
"", ....uaoIlTI_
.....o:w.m_
•
.......~,•
•• .- "'1IlUIF _ _'
•
•••
" •• ••
~
»
»
,,
,,
,
,,
,
0
0
0
0
0
0
0
_ =~'"
_ e - ...
II,IU(FIILUS ......._
•
•
•
•
,
..•
•
•J ..
--
~.
-
•
• ••••
_
• ••
• • •......
lit . . lit Too lit
NAUTILUS" FNS MANUAL
PAGlII
K. TRot 8l.f:SfJOOTI:'liG GLIDE
PROIILEM
IlL L - , _
CAUSE
1........ _
10 ....
....... _ .
_OL _ _ oI'p
I.'
,_."'0"....._--...
1. _ _ . . . , .. _
-_.. ..
~
•
, ; ... _
= '"10_
_
,-
1tiIII
1 .'
[ ' , _ ........ " ' _ .....
.'
_
-... I.
fill.,
........
_""0'
.It.
D.I....
:1. _ _ ....... _ _...........
4.,..-, _ _ .......111
__ 10,.... .,.._41-
looo _ _•
10_
' _
It 0Ml0......, ill _
. . ""' ......_ .
.....
·.·a
'
-....-,-- .....
$
a
'
-
-
-
_
.
. ., _ _ ......
0.-
'
'10_
,*--_.._-
- '---_.
..
_.DoL
-._-_
........ _.
,._---..::..-:-'••- _.-2._ '"
:1.01' .._ 1 0 _ ...... _
L ....... _
1._
$
,
CloM _ _"' _ _" " . ·
"""
.100I ........_
....
.'
,
$ 51
-.-,_.
--.-
.. IlL
a.-_III .... -
2.01 ...._ 1 0 _
--
_ -- .... ",.-....•
.l.,~
_00101 ...
_
~_
1.",' _ _
"i
.....
.................. "0'" ....
~
1._'
,.
$
e.-
""""
t. .......
-
_0....
.......
AEMEDY
1._-"".....
~~'::=.:$.~
. " 0..... _
~. . . . . . . V
.....
'Pi _ . - . . .
NAUTILUS"' FN$ MANUAL
NOlES
,.......,
_....'
'lGII2