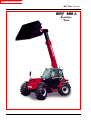
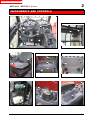
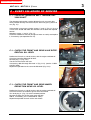
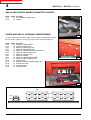
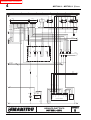
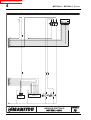
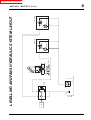
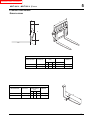
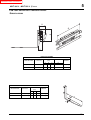
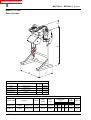
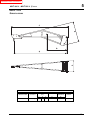
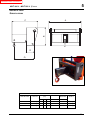
1
INTRODUCTION TO SAFETY
MANITOU NORTH AMERICA, INC.
6401 IMPERIAL DRIVE
Waco, TX 76712--6803
For Parts Orders contact your Manitou North America Dealer or call:
Manitou North America, Parts Dept. 800--425--3727 or (254) 799--0232
Parts Dept. Fax: (254) 867--6504
Email: [email protected]
MHT860
EVOLUTION
-- E3 --
OPERATOR/SERVICE
MANUAL
THIS OPERATOR’S MANUAL MUST BE KEPT IN THE LIFT TRUCK. IT MUST BE READ AND
UNDERSTOOD BY THE LIFT TRUCK OPERATOR.
CATALOG 648434AS
R11-10
INTRODUCTION TO SAFETY
INTRODUCTION TO SAFETY
MHT 860 L Evolution
MHT 860 L
Evolution
Turbo
INTRODUCTION TO SAFETY
MHT 950 L Evolution
MHT 950 L
Evolution
Turbo
INTRODUCTION TO SAFETY
- INTRODUCTION TO SAFETY -
- ROUGH TERRAIN FORKLIFT TRUCK
GENERAL SAFETY STANDARDS - - - - - - - - - - - I
- SAFETY MESSAGES - - - - - - - - - - - - - - - - - - - - - - - - - - - - - - - - - - VII
- SAFETY DECALS - - - - - - - - - - - - - - - - - - - - - - - - - - - - - - - - - - - - - VIII
- TABLE OF CONTENTS - - - - - - - - - - - - - - - - - - - - - - - - - - - - - - - - - - 1
INTRODUCTION TO SAFETY
INTRODUCTION TO SAFETY
ROUGH TERRAIN FORKLIFT TRUCK
GENERAL SAFETY STANDARDS
I
INTRODUCTION TO SAFETY
ROUGH TERRAIN FORKLIFT TRUCK GENERAL SAFETY STANDARDS
STUDY THE OPERATOR/SERVICE MANUALS
The information in this manual provides general instructions for the safe operation and maintenance of your
forklift truck. This information is vital and must be clearly understood by the operator and serviceman. Study
this manual and the Rough Terrain Forklift Safety Manual (part no. 422494) thoroughly and carefully before
operating or servicing your forklift. Contact your dealer or Manitou North America, Inc. if you have any questions concerning your forklift, its operation, service or parts. Keep both manuals in the literature box on the
forklift available for reference. If either manual becomes illegible or is missing, contact your dealer for replacements immediately. This manual cannot cover every situation that might result in an accident. It is the responsibility of the operator to always remain alert for potential hazards and be prepared to avoid them!
ADDITIONAL RECOMMENDED LITERATURE:
ANSI / ITSDF B56.6 is the national consensus standard for rough terrain forklift trucks. It contains rules about
forklift safety, maintenance, safe operation, training, and supervision. Forklift owners should learn this standard and make it available for their operators, service personnel, and supervisors. These standards can be
obtained, free of charge, from the Industrial Truck Standards Development Foundation (ITSDF) on their website at www.itsdf.org. The following references are examples from the standard, addressing forklift operators:
A.) OPERATOR TRAINING QUALIFICATIONS
1.) The user shall ensure that operators understand that safe operation is the operator’s responsibility. The
user shall ensure that operators are knowledgeable of, and observe, all safety rules and practices.
2.) Create an effective operator training program centered around user company’s policies, operating conditions, and rough terrain forklift trucks. The program should be presented completely to all new operators and
not be condensed for those claiming previous experience.
3.) Information on operator training is available from several sources, including rough terrain forklift truck manufacturers, users, government agencies, etc.
4.) An operator training program should consist of the following:
a.) careful selection of the operator, considering physical qualifications, job attitude, and aptitude;
b.) emphasis on safety of stock, equipment, operator, and other personnel;
c.) citing of rules and why they were formulated;
d.) basic fundamentals of rough terrain forklift truck and component design as related to safety, e.g.,
in.-lb (N-m) loading, mechanical limitations, center of gravity, stability, etc.;
e.) introduction to equipment, control locations, and functions. Explain how they work when used
properly and problems when used improperly.
f.) supervise practice on operating course remote from normal activity and designed to simulate
actual operations, e.g., lumber stacking, elevating shingles to the roof, etc.;
g.) oral, written, and operational performance tests and evaluations during and at completion of the
course;
h.) refresher courses, which may be condensed versions of the primary
course, and periodic “on job” operator evaluation;
i.) understanding of nameplate data and operator instructions and warning information appearing on
the rough terrain forklift truck.
B.) GENERAL SAFETY PRACTICES
1.) Rough terrain forklift trucks can cause injury if improperly used or maintained.
2.) Only authorized operators trained to adhere strictly to all operating instructions shall be permitted to operate rough terrain forklift trucks. Unusual operating conditions may require additional safety precautions, training, and special operating instructions.
3.) Modifications and additions which affect capacity or safe operation shall not be preformed without the manufacturer’s prior written approval. Where such authorization is granted, capacity, operation, and maintenance
instruction plates, tags, or decals shall be changed accordingly.
4.) If the rough terrain forklift truck is equipped with front end attachment(s) or optional forks, the user shall see
that the truck is marked to identify the forks or attachment(s), show the approximate weight of the truck and
fork or attachment combination, and show the capacity of the truck with forks or attachment(s) at maximum
elevation with load laterally centered.
5.) The user shall see that all nameplates and caution and instruction markings are in place and legible.
6.) The user shall consider that changes in load dimension may affect rough terrain forklift truck capacity.
II
INTRODUCTION TO SAFETY
ROUGH TERRAIN FORKLIFT TRUCK GENERAL SAFETY STANDARDS (cont.)
B.) GENERAL SAFETY PRACTICES (cont.)
7.) Where steering can be accomplished with either hand and the steering mechanism is of a type that prevents road reactions from causing the handwheel to spin (power steering or equivalent), steering knobs may
be used. When used, steering knobs shall be of a type that can be engaged by the operator’s hand from the
top and shall be within the periphery of the steering handwheel.
8.) Experience has shown that rough terrain forklift trucks which comply with stability requirements are stable
when properly operated. However, improper operation, faulty maintenance, or poor housekeeping may contribute to a condition of instability and defeat the purpose of the requirements.
9.) Users shall give consideration to special operating conditions. The amount of forward and rearward tilt to
be used is governed by the application. Although the use of maximum rearward tilt is allowable under certain
conditions, such as traveling with the load lowered, the stability of a rough terrain forklift truck as determined
by standardized tests does not encompass consideration for excessive tilt at high elevations or the operation
of trucks with excessive off-center loads.
10.) Some of the conditions which may affect stability are ground and floor conditions, grade, speed, loading
(rough terrain forklift trucks equipped with attachments behave as partially loaded trucks even when operated
without a load on the attachment), dynamic and static forces, improper tire inflation, and the judgement exercised by the operator.
C.) OPERATING SAFETY RULES AND PRACTICES
1.) Safe operation is the responsibility of the operator.
2.) This equipment can be dangerous if not used properly. The operator shall develop safe working habits and
also be aware of hazardous conditions in order to protect himself, other personnel, the rough terrain forklift
truck, and other material.
3.) The operator shall be familiar with the operation and function of all controls and instruments before undertaking to operate the rough terrain forklift truck.
4.) Before operating any rough terrain forklift truck, truck operators shall have read and be familiar with the
operator’s manual for the particular truck being operated.
5.) Before starting to operate the rough terrain forklift truck:
a.) be in operating position and fasten seat belt;
b.) place directional controls in neutral;
c.) apply brakes;
d.) start engine.
6.) Do not start or operate the rough terrain forklift truck, any of its functions, or attachments from any place
other than the designated operator’s position.
7.) Keep hands and feet inside the operator’s designated area or compartment. Do not put any part of the
body outside the operator compartment of the rough terrain forklift truck.
8.) Never put any part of the body into the mast structure or between the mast and the rough terrain forklift
truck.
9.) Never put any part of the body within the reach mechanism of the rough terrain forklift truck or other attachments.
10.) Understand rough terrain forklift limitations and operate the truck in a safe manner so as not to cause injury
to personnel.
11.) Do not allow anyone to stand or pass under the elevated portion of any rough terrain forklift truck, whether
empty or loaded.
12.) Do not permit passengers to ride on rough terrain forklift trucks.
13.) Check clearance carefully before driving under electrical lines, bridges, etc.
14.) A rough terrain forklift truck is attended when the operator is less than 25 ft (7.6m) from the truck, which
remains in his view.
15.) A rough terrain forklift truck is unattended when the operator is 25ft (7.6m) or more from the truck, which
remains in his view, or whenever the operator leaves the truck and it is not in his view.
16.) Before leaving the operator’s position:
a.) bring rough terrain forklift truck to a complete stop;
b.) place directional controls in neutral;
c.) apply the parking brake;
d.) lower load-engaging means fully, unless supporting an occupied elevated platform;
e.) stop the engine;
f.) if the rough terrain forklift truck must be left on an incline, block the wheels;
g.) fully lower the load-engaging means.
17.) Maintain a safe distance from the edge of ramps, platforms, and other similar working surfaces.
18.) Do no move railroad cars or trailer with a rough terrain forklift truck.
III
INTRODUCTION TO SAFETY
ROUGH TERRAIN FORKLIFT TRUCK GENERAL SAFETY STANDARDS (cont.)
C.) OPERATING SAFETY RULES AND PRACTICES (cont.)
19.) Do not use a rough terrain forklift truck for opening or closing railroad car doors.
20.) In areas classified as hazardous, use only rough terrain forklift trucks approved for use in those areas.
21.) Report all accidents involving personnel, building structures, and equipment to the supervisor or as
directed.
22.) Do not add to, or modify, the rough terrain forklift truck.
23.) Do not block access to fire aisles, stairways, and fire equipment.
24.) For rough terrain forklift trucks equipped with a differential lock, the lock should not be engaged when driving on the road or at high speeds or when turning. If the lock is engaged when turning, there could be loss of
steering control.
25.) Observe all traffic regulations including authorized speed limits. Under normal traffic conditions, keep to
the right, maintain a safe distance, based on speed of travel, from the truck ahead; and keep the truck under
control at all times.
26.) Yield the right-of-way to pedestrians and emergency vehicles such as ambulances and fire trucks.
27.) Do not pass another truck traveling in the same direction at intersections, blind spots, or at other dangerous locations.
28.) Slow down and sound the audible warning device(s) at cross-aisles and other locations where vision is
obstructed.
29.) Cross railroad tracks at an angle wherever possible. Do not park closer than 6 ft (1.8m) to the nearest rail
of a railroad track.
30.) Keep a clear view of the path of travel and observe other traffic, personnel, and safe clearances.
31.) If the load being carried obstructs forward view, travel with the load trailing.
32.) Ascend or descend grades slowly and with caution.
a.) When ascending or descending grades in excess of 5%, loaded rough terrain forklift trucks
should be driven with the load upgrade.
b.) Unloaded rough terrain forklift trucks should be operated on all grades with the load-engaging
means downgrade.
c.) On all grades, the load and load-engaging means shall be tilted back, if applicable, and raised
only as far as necessary to clear the road surface.
d.) Avoid turning, if possible, and use extreme caution on grades, ramps, or inclines; normally
travel straight up or down.
33.) Under all travel conditions, operate the rough terrain forklift truck at a speed that will permit it to be brought
to a stop in a safe manner.
34.) Travel with load-engaging means or load low and, where possible, tilted back. Do not elevate the load
except during stacking.
35.) Make starts, stops, turns, or direction reversals in a smooth manner so as not to shift load and/or overturn
the rough terrain forklift truck.
36.) Do not indulge in stunt driving or horseplay.
37.) Slow down for wet and slippery surfaces.
38.) Before driving over a dockboard or bridge plate, be sure that it is properly secured. Drive carefully and
slowly across the dockboard or bridge plate, and never exceed its rated capacity.
39.) Do not drive rough terrain forklift trucks onto any elevator unless specifically authorized to do so.
Approach elevators slowly, and then enter squarely after the elevator car is properly leveled. Once on the elevator, neutralize the controls, shut off engine, and set brakes. It is advisable that all other personnel leave the
elevator before truck is allowed to enter or leave.
40.) Avoid running over loose objects on the roadway surface.
41.) When negotiating turns, reduce speed to a safe level, and turn steering handwheel in a smooth sweeping
motion. Except when maneuvering at a very low speed, turn the steering handwheel at a moderate, even rate.
42.) Use special care when traveling without load, as the risk of lateral overturning is greater.
43.) Improper use of stabilizer controls (if so equipped) could cause rough terrain forklift truck upset. Always
lower the carriage before operating stabilizer controls.
44.) For rough terrain forklift trucks equipped with lateral leveling:
a.) Always level the frame before raising the boom or mast, with or without a load.
b.) Lateral leveling should not be used to position an elevated load; instead, lower the load and
reposition the rough terrain forklift truck.
45.) Handle only stable or safely arranged loads.
a.) When handling off-center loads which cannot be centered, operate with extra caution.
b.) Handle only loads within the capacity of the rough terrain forklift truck.
c.) Handle loads exceeding the dimensions used to establish rough terrain forklift truck capacity
with extra caution. Stability and maneuverability may be adversely affected.
IV
INTRODUCTION TO SAFETY
ROUGH TERRAIN FORKLIFT TRUCK GENERAL SAFETY STANDARDS (cont.)
C.) OPERATING SAFETY RULES AND PRACTICES (cont.)
46.) When attachments are used, extra care shall be taken in securing, manipulating, positioning, and transporting the load. Operate rough terrain forklift trucks equipped with attachments as partially loaded trucks
when not handling a load.
47.) Completely engage the load with the load-engaging means. Fork length should be at least two-thirds of
load length. Where tilt is provided, carefully tilt the load backward to stabilize the load. Caution should be used
in tilting backward with high or segmented loads.
48.) Use extreme care when tilting load forward or backward, particularly when high tiering. Do not tilt forward
with load-engaging means elevated except to pick up or deposit a load over a rack or stack. When stacking
or tiering, use only enough backward tilt to stabilize the load.
49.) The handling of suspended loads by means of a crane arm (boom) or other device can introduce dynamic forces affecting the stability of a rough terrain forklift truck. Grades and sudden starts, stops, and turns can
cause the load to swing and create a hazard if not externally stabilized. When handling suspended loads:
a.) do not exceed the truck manufacturer’s capacity of the rough terrain forklift truck as equipped
for handling suspended loads.
b.) only lift the load vertically and never drag it horizontally;
c.) transport the load with the bottom of the load and the mast as low as possible;
d.) with load elevated, maneuver the rough terrain forklift truck slowly and cautiously, and only to
the extent necessary to permit lowering to the transport position;
e.) use tag lines to restrain load swing whenever possible.
50.) At the beginning of each shift and before operating the rough terrain forklift truck, check its condition,
giving special attention to:
a.) tires and their inflation pressure
b.) warning devices
c.) lights
d.) lift and tilt systems, load-engaging means, chains, cables, and limit switches
e.) brakes
f.) steering mechanism
g.) fuel system(s)
51.) If the rough terrain forklift truck is found to be in need of repair or in any way unsafe, or if it contributes to
an unsafe condition, the matter shall be reported immediately to the user’s designated authority, and the truck
shall not be operated until it has been restored to safe operating condition.
52.) If during operation the rough terrain forklift truck becomes unsafe in any way, the matter shall be reported
immediately to the user’s designated authority, and the truck shall not be operated until it has been restored to
safe operating condition.
53.) Do not make repairs or adjustments unless specifically authorized to do so.
54.) When refueling, smoking in the area shall not be permitted, the engine shall be stopped, and the operator shall not be on the rough terrain forklift
truck.
55.) Spillage of oil or fuel shall be carefully and completely absorbed or evaporated and fuel tank cap replaced
before restarting engine.
56.) Do not use open flames when checking electrolyte level in storage batteries, liquid level in fuel tanks, or
the condition of LPG fuel lines and connectors.
57.) Do not lift personnel with the forklift. If the forklift must be used to lift people, precautions for the protection of the personnel must be taken (see ITSDF B56.6, chapter 5.15 Elevating Personnel).
V
ROUGH TERRAIN FORKLIFT TRUCK GENERAL SAFETY STANDARDS (cont.)
D.) SUSPENDED LOADS
A jib or truss boom should ONLY be used to lift and place loads when the machine is stationary and the frame
is level. Transporting suspended loads must ALWAYS be done slowly and cautiously, with the boom and load
as low as possible. Use taglines to restrict loads from swinging, to avoid overturn.
The handling of suspended loads by means of a truss boom or other similar device can introduce dynamic
forces affecting the stability of the machine that are not considered in the stability criteria of industry test
standards. Grades and sudden starts, stops and turns can cause the load to swing and create a hazard.
Guidelines for “Free Rigging / Suspended Loads”
1.
DO NOT exceed the rated capacity of the telescopic handler as equipped for handling suspended
loads. The weight of the rigging must be included as part of the load.
2.
During transport, DO NOT raise the load more than 12 inches (305 mm) above the ground, or raise
the boom more than 45 degrees.
3.
Only lift the load vertically – NEVER drag it horizontally.
4.
Use multiple pickup points on the load when possible. Use taglines to restrain the load from swinging
and rotating.
5.
Start, travel, turn and stop SLOWLY to prevent the load from swinging. DO NOT exceed walking
speed.
6.
Inspect rigging before use. Rigging must be in good condition and in the U.S. comply with OSHA
regulation §1910.184, “Slings,” or §1926.251, “Rigging equipment for material handling.”
7.
Rigging equipment attached to the forks must be secured such that it cannot move either sideways or
fore and aft. The load center must not exceed 24 inches (610 mm).
8.
DO NOT lift the load with anyone on the load, rigging or lift equipment, and NEVER lift the load over
personnel.
9.
Beware of the wind, which can cause suspended loads to swing, even with taglines.
10.
DO NOT attempt to use frame-leveling to compensate for load swing.
WARNING
U.S. OSHA regulations effective November 8, 2010 (29 CFR Part 1926, Subpart CC - Cranes and Derricks in
Construction) include requirements for employers that use powered industrial trucks ("forklifts") configured
to hoist (by means of a winch or hook) and move suspended loads horizontally. In particular, this regulation
applies to any rough-terrain forklift (e.g., "telescopic handler") equipped with a jib or truss boom with a
hook (with or without a winch), or a hook assembly attached to the forks. [Note: This regulation is in
addition to the OSHA regulation that requires specific forklift operator training: §1910.178(l).]
When a forklift / telescopic handler is configured and used for hoisting, the employer must ensure that:
1.
Forklift, lift equipment and rigging have been inspected (each shift, month and year) and are in
good, safe condition and properly installed.
2.
An operator's manual and applicable load charts are on the forklift.
3.
Work zone ground conditions can support the equipment and load. Any hazardous conditions in the
work area have been identified, and the operator notified.
4.
Equipment is being used within its rated capacity and in accordance with the manufacturer's
instructions.
VI
5.
Operator and crew members have been trained in the safe use and operation of the equipment,
including how to avoid electrocution.
6.
During use, no part of the equipment, load line or load will be within the minimum clearance
distance specified by OSHA [10 feet (3.0 m), and more for lines rated over 50 kV] of any energized
power line, and any taglines used are non-conductive.
7.
In addition, for lift equipment with a rated capacity greater than 2000 lbs. (907 kg), the employer
must ensure that:
a.) An accessible fire extinguisher is on the forklift;
b.) Monthly and annual inspections are performed and documented, and records retained (three
months for monthly, one year for annual);
c.) Before November 10, 2014, operators must have had the additional training and qualification /
certification required by OSHA regulations §1926.1427 and §1926.1430.
Note: Refer to the full text of the OSHA crane regulation (29 CFR Part 1926, Subpart CC) for a detailed
description
VII
ROUGH TERRAIN FORKLIFT TRUCK GENERAL SAFETY STANDARDS (cont.)
CONCLUSION:
1.) ATTEND OPERATOR TRAINING CLASSES
The forklift operator must clearly understand all instructions concerning the safe operation of the forklift and all
safety rules and regulations of the work site. They must have successfully completed a training coarse in
accordance with the Powered Industrial Truck Standard (29 CFR 1910.178) as described by the Occupational
Safety and Health Administration (OSHA). They must be qualified as to their visual, hearing, physical, and
mental ability to operate the equipment safely. NEVER use drugs or alcohol while operating a forklift! NEVER
operate or allow anyone to operate a forklift when mental alertness or coordination is impaired! An operator
on prescription or over-the-counter drugs must consult a medical professional regarding any side effects of the
medication that may impair their ability to safely operate the forklift.
2.) CREATE A MAINTENANCE PROGRAM
OSHA recommends a maintenance log, listing repairs requested and completed, for each forklift. Also, “lock
out tag procedures” should be utilized. If the forklift malfunctions; park it safely, remove the key, tag “Do Not
Use”, and report the problem to the proper authority or authorized service personnel immediately.
ROUGH TERRAIN FORKLIFT TRUCK GENERAL SAFETY STANDARDS (cont.)
2.) CREATE A MAINTENANCE PROGRAM (cont.)
For the best forklift performance and operation, a maintenance program is required. Use the hour meter on
the instrument panel to keep maintenance properly scheduled (see SECTION TWO - “Servicing Schedule”).
For repairs on major components (engine, transmission, etc.), contact your nearest dealer for a Repair Manual.
Do not operate a forklift that is damaged or does not function properly. Only authorized personnel may make
repairs or adjustments to the lift truck. After repairs, the lift truck must be tested for safe operation before
returning to service.
3.) FORKLIFT KNOWLEDGE
Forklift trucks can cause serious injury if improperly used or maintained. Study all of the manuals provided for
your forklift model. Learn the locations and meanings of all safety decals. If any decals are illegible or missing, have them replaced immediately. Make sure all safety features provided by the original manufacturer are
in place and function properly. Do not operate a forklift with damaged, missing or unsafe components. Have
it repaired by authorized service personnel. Learn the functions of all controls, gauges, indicator lights, etc. on
the forklift. Know the speed/gear ranges, braking and steering capabilities, load ratings and clearances. When
referring to the location of forklift components, the terms “left”, “right”, “front”, and “rear” are related to the operator seated normally, facing forward in the operator’s seat. If you have any questions about the forklift, consult your supervisor. Failure to fully understand or obey safety warnings can result in serious injury or death!
4.) WORK SITE KNOWLEDGE
Before operating on a work site, learn the rules for movement of people, forklifts and all other traffic. Check
the size, weight, and condition of the loads you will be expected to handle. Verify that they are properly
secured and safe to transport. Learn where the loads are to be placed, planning your route for a safe
approach, watching for hazardous conditions. Will a signal man be required to help place the load? Remove
any debris which may cause tire damage or rupture. Plan your route around problem areas or have them corrected. Inform the supervisor of any unsafe conditions observed at the site. Examples of hazards: power
lines, cables, low clearance structures, garage doors, telephone pole guide lines, fencing, loose lumber, building materials, drop-offs, trenches, rough/soft spots, oil spills, deep mud, steep inclines, railroad tracks, curbs,
etc.. NEVER approach power lines, gas lines or other utilities with the forklift! Always verify that local,
state/provincial and federal regulations have been met. Report any accidents involving personnel, building
structures, and equipment to the supervisor immediately. Always remain alert - conditions are constantly
changing at the work site!
TECHNICAL SUPPORT
All data provided in this manual is subject to production changes, addition of new models, and improved product designs. If a question arises regarding your forklift, please consult your dealer or K-D Manitou, Inc. for the
latest information. When ordering service parts or requesting technical information, be prepared to quote the
applicable Model/Serial Numbers.
VIII
SAFETY MESSAGES
NOTE THE SAFETY ALERT SYMBOL (SHOWN BELOW). IT IDENTIFIES POTENTIAL
HAZARDS WHICH, IF NOT AVOIDED MAY RESULT IN INJURY OR DEATH! Also, observe
the safety messages places throughout this manual; providing special instructions, telling you when to take precautions
and to identify potential hazards. The safety messages are highlighted and outlined in a box similar to those shown in the
examples below.
SAFETY ALERT SYMBOL
NOTE or NOTICE
Provides information, special instructions or references about the lift truck.
IMPORTANT
Precautions which must be taken to avoid damage to the lift truck.
CAUTION
Indicates a potentially hazardous situation which, if not avoided, may result in minor or
moderate injury. May also alert unsafe practices.
WARNING
Indicates a potentially hazardous situation which, if not avoided, may result in death or
serious injury!
DANGER
Indicates an imminently hazardous situation which, if not avoided, will result in death or
serious injury.
CALIFORNIA PROPOSITION 65 WARNING
Diesel Engine Exhaust and some of its constituents are known to the State of California
to cause cancer, birth defects or other reproductive harm.
WARNING: Battery posts, terminals and related accesories and related accessories
contain lead and lead compounds. Wash hands after handling.
IX
INTRODUCTION TO SAFETY
SAFETY DECALS
The purpose of this chapter is to introduce you to the safety messages, decals, and nameplates found on
your forklift truck. The decals are identified by name, part number, location, and a brief description. (The
forklift model logos, and other misc. decals not shown, can be found in your forklift parts manual.) The
decals illustrated may not be exactly the same as those installed on your forklift; installation of the decals
varies depending on the forklift model, series, decal updates, etc.. The size and location of some decals
limit the amount of information that can be placed upon it. For this reason, additional detailed information
not found on the decals is provided through-out this manual.
Every decal placed on the lift truck is important; they are constant reminders of safety and instructions that
should never be taken for granted. Even experienced operators can be seriously injured or killed by ignoring, refusing to enforce, or forgetting to follow safe operating procedures! Do not assume you know all safety issues concerning the decals. Before operating the lift truck; learn the meaning(s) of the decals as
described in this manual. If any decal becomes illegible or missing, have it replaced immediately! Always
replace decals using the same decal part no., unless otherwise specified by the manufacturer. For replacement decals not found in your parts manual, contact your nearest dealer. If you have any questions, contact
your supervisor or nearest dealer for advice before operating your forklift!
801011
Before Starting - 801011
(Boom equipped models). Location: on the brake fluid cover panel (to
the left and below the dash panel).
Safety Instructions - 420792
(Mast equipped models). Location: on or near the operator manual
storage case, and/or on the dash panel.
Instructions for the forklift operator; before operating the forklift.
Use of Seat Belt - 801012
(Boom equipped models). Location: to the right of the
operator, near the hydraulic control lever.
Instructs the operator to always wear the seat belt during
operations, and never jump from an over-turning forklift.
X
INTRODUCTION TO SAFETY
SAFETY DECALS
Emergency and Parking Brake - 801010
Location: near the park brake lever.
Identifies the Emergency/Parking Brake Lever.
Alarm Must Sound - 496162
Location: on the dash, in direct view of the operator.
The backup alarm must sound when the forklift is placed in reverse gear.
No Riders - 420732
Location: on the cab entrance(s), and on or near wheel fenders and engine
cover.
Informs: riders are not allowed on the forklift.
Clear of Raised Boom - 801006
(Boom equipped models). Location: on both sides
of the boom nose.
Keep away from unsupported boom.
Clear of Power Lines - 801007
(Boom equipped models). Location: on both sides
of the boom nose.
Keep away from power lines.
XI
INTRODUCTION TO SAFETY
SAFETY DECALS
Use of Frame Leveling - 801013
(Boom equipped models). Location: to the right of
the operator near the hydraulic control lever.
Frame leveling notice; load must be lowered.
Attachment and Boom Safety - 801009
(Boom equipped models). Location: on both sides of the
boom nose.
Important reminders of attachment and boom safety.
Hydraulic Coupling - 234805
Location: near the quick-disconnect adapters.
Stop the engine and release hydraulic pressure before changing
attachments.
Rotating Fan and Belt(s) - 801008
Location: on the radiator near the fan, and on any fan belt/pulley cover(s).
Keep hands and clothing away from rotating fan and belts.
XII
INTRODUCTION TO SAFETY
SAFETY DECALS
Gear Shift Pattern - 33460
(4-speed transmission models). Location: near the gear shift lever.
Identifies the gear shift pattern of the forklift transmission.
Steering Mode - 184276
(4 wheel steer equipped models). Location: near the steering mode selection lever.
Identifies the steering mode selection.
221322
Mineral Oil (Brake Reservoir) - 221322 or 234800 has
been replaced by 164091.
Location: near the brake fluid reservoir where applicable.
Refer to the Operator/Service Manual for the correct brake fluid
(mineral oil) to be used in the brake system.
234800
XIII
INTRODUCTION TO SAFETY
SAFETY DECALS
Hydraulic Oil - 234798 or 76573
Location: on the hydraulic tank or filler cap.
Identifies the hydraulic reservoir (tank) or filler cap.
Hydraulic Oil - 61024
Location: on the hydraulic tank.
Identifies the hydraulic reservoir (tank).
Anti-Freeze - 234799
Location: on the radiator, near the radiator filler cap.
Indicates required minimum to maximum anti-freeze protection (-220F to -400F).
Diesel Fuel - 161101
Location: on the fuel tank, near the filler cap.
Identifies the fuel tank, and use of diesel fuel.
No Step - 496735
Location: varies, depending on the forklift model.
Instructs personnel not to use the designated area as a step.
Do Not Tow - 494918
(Hydrostatic equipped models). Location: on the
dash, in view of the operator.
Towing the forklift will damage the transmission;
refer to the operator’s manual.
XIV
INTRODUCTION TO SAFETY
SAFETY DECALS
Attachment Warning - 421016
(Boom equipped models). Location: on the boom coupler,
near where the retaining shaft is installed.
Reminder to operator; install attachment retaining shaft and
safety pin before operations.
Hook Here - 24653
Location: at points provided on the forklift, where straps or chains may be attached to
secure the forklift to a trailer during transport.
Fork Safety - 426641
(Mast equipped models). Location: on the front and back side of the mast’s outer rails,
at eye level (4 required).
Instructs personnel not to travel beneath or upon the lift truck forks.
Pinch Point, Large, 2.5 x 4.5 in. - 426643
Pinch Point, Small, 1.5 x 2.75 in. - 426642
(Mast equipped models). Location: on the front and rear sides
of the mast cross bracing.
Keep fingers away from the mast
crossbracing.
HAND THROTTLE DANGER - 804784
(Boom equipped models, option). Location: Near the hand throttle mechanism.
Reminder to operator; set parking brake before operating hand throttle.
Disengage hand throttle before leaving the forklift.
XV
INTRODUCTION TO SAFETY
SAFETY DECALS
Acid in Battery - 801014
Location: in or near the battery
storage compartment.
Addresses battery hazards.
Jump Start Battery - 801015
Location: in or near the battery storage
compartment.
Jump start instructions.
Attachment Plate - 425995
Location: on the optional removeable forklift attachment.
Important manufacturer information about the attachment. Record this information for use
when contacting the maufacturer for parts and service.
Overhead Guard Data Plate - B6109
Location: attached to the overhead guard.
Overhead guard conformity.
496550
Forklift Data Plate - 496550
(Boom equipped models)
Forklift Data Plate - 496538
(Mast equipped models)
Location: within the operator’s compartment.
Important forklift truck identification. Record
this information for use when contacting the
manufacturer for parts and service.
XVI
496538
INTRODUCTION TO SAFETY
MHT 860 L - MHT 950 L Evolution
CONTENTS
1 - INSTRUCTIONS
- ORIGINAL SPARE PARTS AND EQUIPMENT
- OPERATING INSTRUCTIONS FOR THE FORK LIFT TRUCK OPERATOR
- Warnings
- General instructions
- Recommendations for using the lift truck
- Driving instructions
- Handling instructions
- Handling a load
- INSTRUCTIONS FOR LIFT TRUCK MAINTENANCE
- BEFORE STARTING UP A NEW LIFT TRUCK
2 - DESCRIPTION
-
FEATURES
DIMENSIONS
LOAD CHARTS
CONTROL AND COMMAND INSTRUMENTS
3 - MAINTENANCE
- FILTER ELEMENTS AND BELTS
- LUBRICANTS
- MAINTENANCE SCHEDULE
A - Daily or every 10 hours of service
B - Every 50 hours of service
C - Every 250 hours of service
D - Every 500 hours of service or yearly
E - Every 1000 hours of service or yearly
F - Every 2000 hours of operation or every 2 years
G - Occasional maintenance
4 - ELECTRIC AND HYDRAULIC SYSTEM
- ELECTRICAL SYSTEM
- Starter motor
- Alternator
- Lighting
- Battery
- Fuse box and relay
- Fuse box and relay board
- Relays and diodes under cigarette lighter compartment
- Relays and fuses in engine compartment
- Wiring diagram
- HYDRAULIC SYSTEM
- Movements hydraulic system layout
- Steering and brakes hydraulic system layout
- Levelling and Fans hydraulic system layout
- Hydrostatic transmission system layout
5 - OPTIONAL ACCESSORIES ADAPTABLE TO THE RANGE
- INTRODUCTION
- GENERAL RECOMMENDATIONS FOR USING THE LIFT TRUCK
- ACCESSORY WITHOUT HYDRAULIC SYSTEM AND MANUAL BLOCK
- ACCESSORY WITHOUT HYDRAULIC SYSTEM AND HYDRAULIC BLOCK (OPT)
- ACCESSORY WITH HYDRAULIC SYSTEM AND MANUAL BLOCK (OPT)
- ACCESSORY WITH HYDRAULIC SYSTEM AND HYDRAULIC BLOCK (OPT)
- USING THE FEM TYPE FORK-HOLDER
- TECHNICAL SPECIFICATIONS OF ACCESSORIES
- LOAD CHART
1
INTRODUCTION TO SAFETY
MHT 860 L - MHT 950 L Evolution
INTRODUCTION
Our telescopic lift trucks have been designed to ensure simple
manoeuvres and easy maintenance.
Before starting up the lift truck for the first time, the operator must read
and understand the various topics discussed in this Manual: these
instructions are meant to provide all the information required for plant
conduction and maintenance. The operator must follow these instructions to get the best out of his telescopic lift truck.
The terms “right” and “left”, “front” and “rear” used in this Manual refer
to positions as seen by the operator normally in the driver’s seat.
Always state the following information when ordering spare parts or
requesting technical information:
Manufacturer’s data plate (FIG.A)
- Model ______________________________
- Series ________________________________
- Serial No. ____________________________
- Chassis No. ___________________________
- Year of manufacture ___________________
A
On internal combustion engine (FIG.B)
- Engine No. _________________________
B
On hydrostatic pump (FIG.C)
- MANITOU reference No. ______________
- Serial No. ___________________________
C
2
INTRODUCTION TO SAFETY
MHT 860 L - MHT 950 L Evolution
On hydrostatic engine (FIG.D)
- MANITOU reference No. ______________
- Serial No. ___________________________
D
On front axle (FIG.E)
- Axle type and model __________________________
- Serial No.of front axle __________________
E
On rear axle (FIG.F)
- Axle type and model __________________________
- Serial No.of rear axle _________________
On cab (FIG.G)
F
Cab No. ________________________________
Write all these numbers immediately in the empty spaces provided.
Since the MANITOU policy is ongoing improvement of our products,
our range of telescopic lift trucks may be subject to modifications without any obligation for us to give advance warning to our customers.
G
3
INTRODUCTION TO SAFETY
INTRODUCTION TO SAFETY
1 - I N S T RU C T I O N S
INTRODUCTION TO SAFETY
INTRODUCTION TO SAFETY
MHT 860 L - MHT 950 L Evolution
1
O R I G I N A L S PA R E PA RT S A N D TO O L I N G
ALWAYS USE ORIGINAL PARTS FOR MAINTENANCE OF YOUR LIFT TRUCK.
BY AUTHORIZING THE USE OF NON-ORIGINAL PARTS, YOU RUN
THE RISK
- of becoming legally involved in case of an accident.
- of becoming technically involved for causing operating problems to the
life of the truck.
If the manufacturer uses counterfeit parts or components that are not
homologated, this can put an end to the warrantee according to the
terms of the contract and induce the manufacturer to withdraw the
Certificate of Conformity.
USING ORIGINAL PARTS DURING MAINTENANCE OPERATIONS
WILL PROTECT YOU LEGALLY
- The user who looks for alternate suppliers does so at his own risk.
- The user who modifies or gets third parties to modify the lift truck must
be aware of the fact that a new item is issued on the market and this
also involves his responsibility.
- The user who copies or has copies made of original parts exposes himself to legal risk.
- The Certificate of Conformity implies the manufacturer’s responsibility
only for the parts selected or processed under his control.
- The practical maintenance conditions are fixed by the manufacturer.
Failure by the user to respect these conditions, will free the the manufacturer of all responsibility.
THE MANUFACTURER MUST PROVIDE THE USER WITH
- His know-how and skill.
- Guarantee of the quality of all the jobs done.
- Original spare parts.
- Preventive maintenance service.
- Effective diagnostics service.
- Improvements due to exchange of experiences.
- Training of personnel concerned.
- Only the manufacturer understands the truck design in detail and therefore the best technological capacity to ensure maintenance.
THE ORIGINAL SPARE PARTS ARE DISTRIBUTED
EXCLUSIVELY BY MANITOU AND THE NETWORK OF
DEALERS.
The list of dealers can be obtained by calling our Spare Parts Sevice
at:
TEL : 0033240091011
1
INTRODUCTION TO SAFETY
1
MHT 860 L - MHT 950 L Evolution
INSTRUCTIONS FOR THE LIFT TRUCK DRIVER
WARNINGS
REMEMBER THAT THIS SYMBOL MEANS:
ATTENTION! BE CAREFUL! YOUR SAFETY AND THAT OF
YOUR TRUCK IS AT STAKE.
- Most accidents linked to the use, maintenance and repair of the lift
truck are due to failure to apply and observe the elementary safety regulations. Identifying all the risks you are exposed to and taking all the
necessary precautions will help avoid these accidents.
- All the operations or movements not described in the instruction
Manual must be avoided; anyone using another method must first of all
ensure his own safety and that of others and the good working order
of the lift truck.
- Since it is impossible to foresee all hazard situations, the manufacturer’s instructions and safety regulations regarding the lift truck included
in this Manual cannot be considered as complete.
Failure to observe the safety regulations and use, maintenance and
repair instructions can result in serious accidents, sometimes even
death.
Draws the user’s attention to the possible risks of driving at speeds
exceeding those imposed by road travel restrictions, especially:
- Risk of losing control on bad roads.
- Increased braking space.
The user must always be in a position to control the lift truck
and therefore:
- Adapt the speed to every situation to ensure his own safety, that of
others and his materials.
- Judge the braking space constantly.
2
INTRODUCTION TO SAFETY
MHT 860 L - MHT 950 L Evolution
1
Experience shows that there may be certain contraindications for the
use of the lift truck. These abnormal uses (the main ones are indicated subsequently) are strictly forbidden.
- Expected abnormal working resulting from routine negligence but not
due to intentional incorrect use of material.
- Reflected behavior of a person in case of defective functioning, accident, breakdown, etc. while using the lift truck.
- Behaviour resulting from application of "law of minimum stress" while
carrying out a function.
- For certain machines, the expected behaviour of certain persons
such as apprentists, adolescents, disabled persons, beginners
tempted to drive a lift truck, operators tempted to place bets regarding the use, competition, or personal experience.
The person responsible for the material must take these criteria into
account while evaluating a person’s driving attitude.
- Become familiar with the telescopic lift truck on the terrain where it
will be used.
- Carry the load in a low position with the telescopic arms fully retracted.
- Set the fork arms perpendicular to the load to be lifted.
- Drive the truck at a speed suited to the ground conditions in question.
- Never drive too fast or brake sharply with a load.
- When picking up a load, check that the ground is as even as possible.
- Never attempt operations that are beyond the capacity of the lift
truck.
- Never lift a load that is heavier than the truck capacity and never
increase the size of the counterweight.
- Drive around obstructions.
- Be careful when there are electric cables, ditches, freshly dug soil or
recently filled excavations.
- Never leave the engine running when the truck is unattended.
- Use the parking brake to deposit a difficult load or on sloping ground.
- Never ever leave the truck parked with a raised load.
- Never authorize anyone to come near or walk under a load.
- Always bear safety in mind and only carry well balanced loads.
- Never lift a load by a single fork arm.
- Drive carefully and with prompt reflexes.
- When the lift truck is not being used, lower the fork arms to the
ground and engage the hand brake.
- Never leave the ignition keys in the truck whilst the driver is absent.
3
INTRODUCTION TO SAFETY
1
MHT 860 L - MHT 950 L Evolution
- Never leave the truck loaded with the hand brake engaged on slopes
exceeding a 15% gradient.
- When lifting a load, take care to make sure there is no obstacle to the
movements and avoid making false movements.
- Comply with the values given in the load curves.
- Never transport passengers on the lift truck.
At every tool change,
to avoid damaging the hydraulic connections:
- stop the combustion engine
- turn the key contact to position I
- discharge pressure from the circuit by means of the knob.
- Check to make sure these connections are always clean.
4
INTRODUCTION TO SAFETY
MHT 860 L - MHT 950 L Evolution
1
GENERAL INSTRUCTIONS
A - INSTRUCTION MANUAL
- Read the Instruction Manual carefully and understand it.
- The Instruction Manual must always be kept in its place in the lift truck,
and it must be in the driver’s language.
- Observe the safety regulations and the instructions described for the
lift truck.
- Replace all rating plates and stickers that become illegible or damaged.
B - DRIVING PERMIT
(Comply with the legislation applicable in the country of use)
- Only specially trained qualified personnel can use the lift truck. The lift
truck can only be used with a driver’s permit issued by the Manger of
the factory where the vehicle is used.
- The driver must always carry the driving permit while on duty.
- The driver must not entrust another person to drive the lift truck.
- The use of the lift truck must conform to the rules of professional skills.
C - ROUTINE MAINTENANCE
- If the user finds that his lift truck does not work correctly or does not
comply with the safety regulations, he must inform the person in charge immediately.
- The driver must not carry out repairs or make adjustments himself,
unless he has been trained for the tasks. He must keep the lift truck for
which he is responsible in perfect condition.
- Daily maintenance must be carried out (see Chapter: A - DAILY OR
EVERY 10 HOURS OF SERVICE in part : 3 - MAINTENANCE).
- The tyres must be checked to make sure they are suitable for the type
of terrain (See surface of tyres in contact with the ground, Chapter:
SPECIFICATIONS in part : 2 - DESCRIPTION).
Tyres may be of different types:
. Tyres for SAND.
. Tyres for AGRICULTURAL TERRAIN.
. Snow chains.
Other options are available; for more information, contact your agent
or dealer.
Do not use worn or damaged tyres.
Do not use tyres inflated with polyurethane foam: it is not guaranteed
by the manufacturer except without authorization.
5
INTRODUCTION TO SAFETY
1
MHT 860 L - MHT 950 L Evolution
- For your safety and that of others, avoid modifying the structure or
making adjustments to the various lift truck components, (hydraulic
pressure, calibration of the limiters, engine speed, supplementary tooling assembly, etc.). The same applies to deactivation or modification
of safety systems. In such cases the manufacturer shall be freed of all
responsibility.
Periodic checks are compulsory to keep the lift truck in “state of
conformity”. The checking frequency is defined by the regulations
applicable in the country of use.
Maintenance or repairs not included in part: 3 - (MAINTENANCE)
must be carried out by qualified personnel (Contact your agent or dealer for more information) in compliance with the safety conditions to
guarantee your own safety and that of others.
D - ENVIRONMENTAL OPERATING CONDITIONS
- Equip the lift truck with an extinguisher if it is used in a place devoid
of extinguishing means. For information regarding the optional solutions available, please contact your agent or dealer.
- Always take into account the climatic and atmospheric conditions of
the place in which the machine is used.
Lubricant is filled at the factory using lubricants suitable for average climatic conditions, i.e.: - 15° C to + 35° C. For use in more severe conditions, before starting up the truck, drain out the lubricant and fill with
lubricants suitable for operation at these temperatures. The same
applies to the cooling liquid. (Please contact your agent or Dealer for
more information).
. Protection from frost (See Chapter: LUBRICANTS AND
FUELS in part : 3 - MAINTENANCE).
. Use of suitable lubricants (Please contact your agent or Dealer
for more information).
. Engine filters.
. Lights (Work light).
For more information regarding the options available, please contact
your agent or dealer.
Do not use the lift truck in protected areas
(Such as: Refineries, explosive atmosphere). Special optional equipmen is available for use in such spaces. Please contact your agent or
dealer.
PLEASE CONTACT YOUR AGENT OR DEALER IF NECESSARY.
6
INTRODUCTION TO SAFETY
1
MHT 860 L - MHT 950 L Evolution
RECOMMENDATIONS FOR USING THE TRUCK
LEVELLING DEVICE
The MHT 860 LT - MHT 950 LT Evolution machines
are provided with a device for levelling the chassis
with respect to the ground and therefore raise the
boom to the required height.
This device is used to correct the level by 8° to the
right and 8° to the left.
IMPORTANT
Using the device
Level the machine before raising the boom using
the spirit level provided as reference.
The levelling operation can only be carried out with
the boom less than 2 metres above the ground.
If the machine is not level, lower the boom again
and repeat the levelling operation.
8°
Take great care while moving the machine with the boom raised with
or without load; if possible, carry out the load deposit operations with
the machine stopped.
7
INTRODUCTION TO SAFETY
1
MHT 860 L - MHT 950 L Evolution
DRIVING INSTRUCTIONS
A - DRIVING SEAT
- Wear suitable clothing for driving the truck, and avoid loose clothing.
- Never drive with hands or footwear wet or dirty with grease.
- For greater comfort, adjust the driver’s seat and assume a correct position.
- Always maintain the normal driving position.
Do not put your arms or legs and, in general, any part of the body, outside the lift truck driving seat.
- Always fasten the seat belt.
- The controls must never be used for purposes other than those for
which they are meant (For example: Getting into and out of the lift
truck, hang clothing, etc.).
- When the control instruments are provided with a forced operation
device (lever lock) it is forbidden to leave the driver’s seat without setting these commands in neutral.
- Never allow passengers on the lift truck or in the driver’s seat.
B - BEFORE STARTING THE LIFT TRUCK
- If the lift truck is new, refer to Chapter: BEFORE STARTING UP A NEW
LIFT TRUCK in part: 1 - SAFETY INSTRUCTIONS AND REGULATIONS.
- Check the condition and pressure of the tyres (See Chapter: SPECIFICATIONS in part: 2 - DESCRIPTION).
- Before startup, check the various levels:
. Combustion engine oil.
. Hydraulic tank oil.
. Gear oil.
. Cooling liquid.
. Brake fluid.
- Also check the lift truck for oil, fuel and liquid leakage.
- Ensure correct closure and locking of the engine hood.
- Whatever his level of experience as a lift truck operator, the user must
familiarize himself with the position and use of the instruments and
controls, before starting up the lift truck.
8
INTRODUCTION TO SAFETY
MHT 860 L - MHT 950 L Evolution
1
C - STARTING UP THE LIFT TRUCK
SAFETY REGULATIONS
The lift truck can only be started up or operated with the driver in the
driver’s seat, with the seat belt on and adjusted.
- Do not start the lift truck by towing or pushing it.
This operation can result in serious damage to the gears. If the lift
truck is to be towed, turn the gear to neutral (See Chapter: H - OCASSIONAL MAINTENANCE in part :3 - MAINTENANCE).
INSTRUCTIONS
- Check to make sure the reverse gear lever is in neutral.
- Turn the ignition key to position I to allow electric contact.
- Check the fuel level on the indicator.
- Turn the ignition key to position II to allow preheating and wait for 15
seconds (if the environmental conditions require it).
Do not run the starter motor for more than 15 seconds, and allow
preheating for 10 seconds between the various attempts made.
- Press the accelerator and turn the ignition key all the way, the engine
must start. Release the ignition key and let the engine run at low speed.
- Before operating in very cold climatic conditions, wait for the combustion engine and the hydraulic systems to heat up correctly.
- Observe all the control instruments immediately after start up, with the
engine hot, to detect and solve problems rapidly, if necessary.
- If one of the instruments shows a fault, switch the engine off and carry
out the necessary operations immediately.
9
INTRODUCTION TO SAFETY
1
MHT 860 L - MHT 950 L Evolution
D - DRIVING THE LIFT TRUCK
SAFETY RULES
- Always carry out lift truck movements with the fork arms or accessory
about 12 in. off the ground, i.e. in the transport position.
- Practice driving the lift truck on terrain where work is to be carried
out.
- Check the service brakes and horn to make sure they are in perfect
working order.
- Drive correctly at a speed suitable for the conditions and type of terrain.
- Slow down before turning.
- Have complete control over the lift truck and its speed, under all circumstances.
- Drive slowly over damp, slippery or uneven ground.
- Brake gradually, avoiding sudden braking.
- Use the lift truck reverse gear only with the machine stopped to avoid
sudden movements.
- Always remember that a hydraulic steering is very sensitive to driving
wheel movements, therefore steer gradually, without jerks.
- Never leave the engine running if the driver is not in the seat.
- Always look in the direction of movement and maintain correct visibility of the path. Use the side rearview mirrors frequently, and check their
condition, cleaning and adjustment.
- Do not use the truck in dark or poorly lit places.
- At night, ensure that the lift truck is fitted with work lights. For more
information regarding the options available, contact your agent or dealer.
- Drive around obstacles.
- Do not position yourself on a loading bridge unless you have checked
to ensure that:
. it is positioned and fixed correctly.
. the means to which it is connected (wagon, truck, etc.) cannot
move.
. the bridge can handle the total weight of the lift truck and its
load, if any.
. the width of the bridge is suitable for the lift truck.
- Never enter a gangway, a flatbed or hoists, without first ensuring that
these are suitable for the lift truck weight and dimensions and its load,
if any, and are in good condition.
Pay special attention to loading wharfs, trenches, scaffolding, freshly
dug ground or filled excavations.
- The road speed of the lift truck with load must never exceed 10 km/h,
under any circumstances whatsoever.
INSTRUCTIONS FOR MOVEMENT
- Check the transmission oil level.
- Position the fork arms or accessory in the transport position, i.e.
about 12 in. off the ground.
- Engage the selected gear (See Chapter: INSTRUMENTS AND CONTROLS in part: 2 - DESCRIPTION).
- Select the required steering mode.
- Set the reverse gear lever in the required position.
- Release the parking brake and accelerate slowly to allow the lift truck
to move.
10
INTRODUCTION TO SAFETY
MHT 860 L - MHT 950 L Evolution
1
E - STOPPING THE LIFT TRUCK
SAFETY REGULATIONS
- Before stopping the lift truck after a heavy job, leave the combustion
engine running for a few moments at minimum speed to let the cooling
liquid and oil lower the temperature of the engine and transmission.
This precaution must be strictly observed in case of frequent stopping
of the combustion engine.
- Never leave the ignition key in the lift truck in the absence of the driver.
- When the fork lift truck is stopped, lower the fork or accessory to the
ground, set the reverse gear lever in neutral and apply the parking
brake.
- If the driver needs to leave his seat even momentarily, the reverse gear
lever must be turned to the neutral position and the parking brake must
be applied.
- Make sure the lift truck is parked in such a manner that it does not
obstacle movements and is at least one metre away from railway lines.
- If the lift truck is to be left parked for long periods, protect it from bad
weather, particularly frost (Check the antifreeze level), close the rear
window, lock the cab door and the engine hood.
INSTRUCTIONS FOR STOPPING THE LIFT TRUCK
- Park the lift truck on level ground or a slope less than 15 %.
- Set the reverse gear lever in the neutral position.
- Apply the parking brake.
- Retract the boom completely.
- Lower the fork arms or accessory to the ground, completely level.
- Switch the combustion engine off.
- Remove the ignition key.
- Check to make sure the door, rear window and engine hood are
locked.
Before leaving the driver’s seat, make sure all the operations for stopping the lift truck have been carried out correctly, to ensure your own
safety and that of others.
11
INTRODUCTION TO SAFETY
1
MHT 860 L - MHT 950 L Evolution
F - DRIVING THE LIFT TRUCK ON THE ROAD
SAFETY REGULATIONS
- The general road traffic rules must be observed for driving a lift truck
on roads.
- The lift truck must conform to the general road safety rules applicable
in the country of use. Optional solutions are available, if necessary.
Please contact your agent or dealer for more information.
It is forbidden to transport loads along roads and the accessories
mounted on the lift truck must be fitted with equipment according to
regulations or must be dismantled.
INSTRUCTIONS FOR DRIVING ALONG ROADS
- Check to make sure the flashing light is installed and in working
order.
- Low beams must also be used on roads and at times when the use
of visual signals or lights is not obligatory.
- Check the headlights, direction lights and windscreen wipers to make
sure they are clean and in working order.
- Check the position of the rearview mirrors.
- Check wheel alignment and select the ROAD TRAVEL steering
mode.
- Position the rear axle steering mechanical block.
- Make sure there is sufficient fuel.
- Fit all the accessories required for road travel (depending on the
model and the country).
- Retract the boom and the accessory to about 12 in. off the ground.
- Level the machine with the chassis parallel to the ground using the
inclination corrector.
- Exclude the operating system commands by means of the swicht
“5P” (See Chapter: INSTRUMENTS AND CONTROLS in part: 2 DESCRIPTION on page 18).
- The vehicle can only be used without load on roads.
- Do not transport company personnel as passengers on the vehicle.
Do not set the reverse gear in neutral while driving on roads to have
the lift truck engine brake always ready for use.
12
INTRODUCTION TO SAFETY
MHT 860 L - MHT 950 L Evolution
1
G - DRIVING THE LIFT TRUCK WITH TRAILER ON ROADS
- For using a trailer, observe the regulations applicable in the country
of use (maximum permitted speed, braking system, maximum trailer
weight, etc.).
- Remember to connect the lift truck electrical system to that of the
trailer.
- Do not use a trailer if the unit weight of the load is greater than that
permitted by road rules.
- Do not use a braked trailer if the lift truck is devoid of a trailer braking
system.
- Remember to connect the lift truck braking system to that of the trailer.
- The permitted total carriage road weight must not exceed the maximum limit authorized by the manufacturer (See lift truck manufacturer’s plate).
H - DRIVING THE LIFT TRUCK WITH A FRONT ACCESSORY ON
ROADS
- For driving the truck with an accessory on roads, consult the regulations applicable in the country of use.
- The accessory must not exceed the maximum width of the lift truck.
- Do not block the area illuminated by the front headlights.
- Fit the covers on the accessories installed, consult the regulations
applicable in the country of use.
- If necessary, place the spacer block on the lift cylinder.
- The front dimensions of the fittings must be marked on the three
sides by means of alternate red and white retroreflecting stripes, 10
cm high, inclined at 45° (follow the indications specific to each fitting).
IF NECESSARY, CONTACT YOUR AGENT OR DEALER.
13
INTRODUCTION TO SAFETY
1
MHT 860 L - MHT 950 L Evolution
HANDLING INSTRUCTIONS
A - GENERAL INFORMATION
- Check the lift truck accessories to make sure they are in working order.
- Do not carry out operations which exceed the capacity of the lift truck
or the accessory.
- Do not increase the counterweight whatever the accessory used.
- Do not transport or lift persons using the lift truck, unless the vehicle is
equipped for the purpose and is accompanied by a conformity certificate regarding lifting passengers.
- Avoid travelling long distances in reverse gear.
- Carry out slow, gradual movements for raising and lowering the telescopic boom; even without load.
B - ACCESSORY
- Check to make sure the accessory is installed and locked correctly on
its support.
- Comply with the load diagram limits.
- Check to make sure the pallets, crates, etc., are in good condition and
suitable for the load to be lifted.
- Keep the fork arms perpendicular to the load to be lifted, taking into
account the position of the load’s centre of gravity.
- Never lift a load using a single fork arm.
- Never lift a slung load by a single fork arm or using a plank. For more
information regarding the optional solutions available, please contact
your agent or dealer.
- If the accessory is not used, keep it horizontal on the ground (Prop
unstable accessories properly).
- Check to make sure the hydraulic quick-release couplings of the
accessory circuit are clean and protected.
- Before each change of accessory operated hydraulically, prevent deterioration of the quick-release hydraulic couplings by:
- switching off the I.C.engine
- turn the contact key to position I
- drain pressure from the circuit by means of the knob
C - ENVIRONMENTAL OPERATING CONDITIONS
- Check to make sure there is adequate lighting.
- Take care while lifting a load, making sure there is nothing or no one
that can be an obstacle to the operations being carried out correctly
and avoid false movements.
- If work is being carried out near overhead electric lines, make sure the
safety distance between the operating area and the power line is sufficient.
Contact your local power supply Company for information.
14
INTRODUCTION TO SAFETY
MHT 860 L - MHT 950 L Evolution
1
You run the risk of being electrocuted or seriously injured if you work
or park the lift truck very close to electric cables. It is therefore important to make sure the safety rules applied at the work site conform to
the local regulations applicable for the type of operations carried out in
the vicinity of electric lines.
- Do not let anyone approach the lift truck operating area or walk under
a load.
- For using the lift truck on sloping ground, before raising the boom,
check to make sure the truck is horizontal. Lift trucks provided with
level correctors and/or stabilisers can be used on transverse slopes,
as long as this inclination is corrected (See paragraph: G - HORIZONTALITY OF LIFT TRUCK in the HANDLING A LOAD Chapter).
- Moving on longitudinal slopes:
• Move forward and brake gently.
• Movement without load: The fork arms and accessory facing
downwards.
• Movement with load: The fork arms and accessory facing
upwards.
- Check to make sure the scaffolding, loading surface or the stack can
support the load.
- Ensure the stability and compactness of the ground before depositing
the load.
15
INTRODUCTION TO SAFETY
1
MHT 860 L - MHT 950 L Evolution
D - HANDLING OPERATIONS
- Always observe the safety rules, always transport loads balanced and
placed correctly to avoid risk of tilting over.
- Insert the forks all the way under the load and move to the transport
position (The forks 12 in. off the ground, the boom completely retracted and the fork arms inclined backwards).
- For obvious reasons of stability of the lift truck and good visibility, move
the lift truck only when the boom is in the transport position.
- Move the lift truck with the boom raised only in exceptional cases, and
operate with great care, at very low speeds and by braking very gently. Make sure visibility is good, and have someone else guide you if
necessary.
- Keep the load stable when the lift truck is moving.
- Never move too fast, and avoid braking suddenly with a load.
- During handling operations, drive the lift truck at very low speeds.
- Supervise the load, especially on bends, and in particular if it is bulky.
- A sling must be used for unstable loads.
- Handle loads carefully, at low speeds, without jerks, especially while
lifting to great heights and with considerable jerks.
In case of strong winds or a storm, avoid movements that may be
potentially dangerous for the stability of the lift truck and the load.
- Do not change direction suddenly and at high speeds.
If the lift truck tilts over, do not try to get out of the cab during the accident.
ALWAYS DRIVE WITH THE SAFETY BELT ON. STAY INSIDE THE
CAB WITH THE SAFETY BELT ON AS THIS IS THE BEST WAY TO
PROTECT YOURSELF.
- Use the parking brake to deposit or raise a difficult load or on sloping
ground.
- Never ever leave the truck parked with a raised load.
- Never leave the truck, whether empty or with load, with the parking
brake applied, on a slope exceeding 15 %.
16
INTRODUCTION TO SAFETY
MHT 860 L - MHT 950 L Evolution
1
E - VISIBILITY
- Always ensure good visibility of the path, both direct and indirect with
panoramic rear view mirrors, to check for the presence of a person,
animal, holes, obstacles, change in slope, etc.
- There is possible of the visibility being reduced on the right side when
the boom is raised: therefore ensure good visibility of the path before
raising the boom and starting movements.
- If visibility in front is not sufficient owing to the size of the load, move
in reverse. This is an exceptional operation and must only be used for
very short distances.
- Ensure good visibility (Clean windows, sufficient lighting, rearview mirror adjusted, etc.).
- The lift truck signals and lights must be suitable for the conditions of
use. Standard machine lighting is not sufficient for use in poorly lit
areas or at night. Various options are available in addition to the standard equipment mounted on the lift truck. Please contact your agent or
dealer for more information.
CONTACT YOUR AGENT OR DEALER, IF NECESSARY.
17
INTRODUCTION TO SAFETY
1
MHT 860 L - MHT 950 L Evolution
A
HANDLING A LOAD
A - WEIGHT OF THE LOAD AND THE CENTRE OF GRAVITY
500 mm
24
in.
Do not raise or transport a load heavier than the rated capacity of the
lift truck or accessory.
B
- The weight of the load and the centre of gravity must be known before
lifting the load.
- The load chart relative to your lift truck is valid for a load for which the
centre of gravity is 24 in. from the fork heel (Fig. A). For a centre of
gravity that is farther away, contact your agent or dealer.
- For uneven loads, determine the centre of gravity transversally before
making each movement (Fig. B).
C
For loads with mobile centre of gravity (for example: liquids), take into
account the variations in centre of gravity to determine the load to be lifted (contact your agent or dealer), and take great care to limit these
variations as far as possible .
B - PICKING UP A LOAD FROM THE GROUND
- Bring the lift truck perpendicularly close to the load, with the boom
retracted and the forks horizontal (Fig. C).
- Adjust the difference and centring of the forks with respect to the load
(Fig. D) (For information regarding the optional solutions available, please contact your agent or dealer).
D
Pay attention to pinching or crushing of the limbs during manual adjustment of the forks. Always maintain the same distance between the
forks and central axis of the plant to ensure perfect load stability .
E
- Move lift truck (1) forwards slowly, and bring the forks against load (Fig.
E), raise boom (2) slightly, if necessary, while picking up the load.
- Apply the parking brake and set the reverse gear lever in the neutral
position.
- Raise load (1) carefully, incline fork arms (2) backwards in the transport
position (Fig. F).
1
2
F
2
Incline the load backwards sufficently to ensure stability (load lost
during braking) taking care to maintain the balance.
18
1
INTRODUCTION TO SAFETY
1
MHT 860 L - MHT 950 L Evolution
C - PICKING UP A LOAD FROM HEIGHTS ON TYRES
G
Do not pick up a load unless the lift truck is on level ground (See paragraph: G - HORIZONTALITY OF THE LIFT TRUCK in Chapter:
HANDLING A LOAD).
- Check to make sure the forks pass easily under the load.
- Raise and extend boom (1) (2) to position the forks level with the load.
If necessary, move lift truck (3) (Fig. G) forwards, gently and carefully
(See paragraph: E - VISIBILITY in Chapter: HANDLING INSTRUCTIONS relative to path visibility) .
H
Always maintain the necessary distance to insert the fork under the
load, between the stack and lift truck (Fig. G), using the minimum possible length of the boom.
I
2
- Bring the forks against the load (Fig. H). Apply the parking brake and
set the reverse gear lever in neutral.
- Lift load (1) slightly and incline fork arm (2) backwards to stabilize load
(Fig. I).
Incline the load backwards sufficently to ensure stability (load lost
during braking) taking care to maintain the balance.
1
J
1
2
- If possible, lower the load without moving the lift truck. Raise boom (1)
to move the load away, retract (2) and lower boom (3) to bring the
load to the transport position (Fig. J).
- If this is not possible, move the lift truck backwards. Move very gently
and carefully (See paragraph: E - VISIBILITY in Chapter: HANDLING
INSTRUCTIONS concerning visibility of the path), move lift truck (1)
away from the load, retract (2) and lower boom (3) to bring the load to
the transport position (Fig. K).
3
K
2
3
1
19
INTRODUCTION TO SAFETY
1
MHT 860 L - MHT 950 L Evolution
D - DEPOSITING A LOAD AT A HEIGHT ON TYRES
L
Do not deposit the load unless the lift truck is non a level surface (See
paragraph: G - HORIZONTALITY OF THE LIFT TRUCK, in chapter:
HANDLING A LOAD).
- Bring the load to the transport position in front of the stack (Fig. L).
- Raise and extend boom (1) (2) so that the load is above the stack,
moving lift truck (3) forwards if necessary (Fig. M), gently and carefully (See paragraph: E - VISIBILITY in chapter: HANDLING INSTRUCTIONS regarding visibility of the path). Apply the parking brake and set
the reverse gear lever in neutral.
- Position the load horizontally and place it on the stack, lower and
retract boom (1) (2) to position the load correctly (Fig. N).
- Release the forks, retracting and raising boom (3) alternately (Fig. N),
or, if possible, reversing the lift truck (3) (See paragraph: E - VISIBILITY in chapter: HANDLING INSTRUCTIONS relative to visibility of the
path). Then bring the boom to the transport position.
M
2
1
3
E - PICKING UP A LOAD WITHOUT PALLET
N
- Incline fork arm (1) forwards and extend boom (2) at the same time
inclining fork arm (3) backwards to insert the forks under the load (Fig.
O) taking care to ensure the longitudinal and lateral stability of the load.
Wedge the load, if necessary.
3
1
2
F - LOAD SAFETY CONTROL DEVICE
3
- Always observe the load status indicator during handling operations.
O
2
When the load status indicator enters alarm condition, do not:
A - Extend the boom.
B - Lower the boom.
3
1
In the event of a load status indicator alarm, carry out the the operations
described below (Fig. P) :
P
1 - Retract the boom all the way.
2 - Raise the boom if necessary.
3 - Lower the boom to deposit the load.
2
1
3
The device reading may be false if the steering is turned all the way or
if the rear axle oscillates all the way. Before lifting a load, always make
sure the steering is not turned all the way and that the rear axle is not
completely oscillated.
20
INTRODUCTION TO SAFETY
MHT 860 L - MHT 950 L Evolution
1
G - HORIZONTALITY OF THE LIFT TRUCK
FORK LIFT TRUCK WITH LEVELLING
Apart from the transverse slope of the ground, other parameters can
affect the horizontality of the lift truck.
• The condition and pressure of the tyres.
• Stability of the ground.
• Load balance.
• Strong wind and storm.
- Correct the inclination by acting on the hydraulic control and check the
levelling using the spirit level before raising the boom (See chapter:
INSTRUMENTS AND CONTROLS, in part: 2 - DESCRIPTION).
Before each movement, check the conditions listed above and make
sure the lift truck is perfectly horizontal (check the spirit level).
8°
21
INTRODUCTION TO SAFETY
1
MHT 860 L - MHT 950 L Evolution
INSTRUCTIONS FOR LIFT TRUCK MAINTENANCE
MAINTENANCE INSTRUCTIONS
A - GENERAL INSTRUCTIONS
- Read and understand the instruction manual.
- Switch off the combustion engine before carrying out any operation on
the lift truck.
- Wear clothing suitable for the lift truck maintenance operations, and
avoid jewellery and loose clothing. Tie and protect your hair, if necessary.
- Make sure the area is sufficiently ventilated, before starting up the lift
truck.
Pay special attention to disposal of consumables and worn parts,
ensuring this is done in maximum safety and in an eco-friendly manner.
- Carry out the necessary repairs, however minor, immediately.
- Repair leaks, however minimum, immediately.
- Do not attempt to slacken the unions, hose pipes or hydraulic components with the circuit pressurized.
Modifying the adjustments and dismantling the balancing valves and
safety valves sometimes fitted on the lift truck jacks can be dangerous. A balancing valve must only be dismantled with the lift jack
concerned deactivated and the pressure discharged from the hydraulic circuit.
This operation must only be performed by authorized personnel.
- Never smoke or expose the lift truck to naked flames with the fuel tank
open or while it is being filled.
- Take care as there is risk of burns (Exhaust, radiator, combustion engine, etc.).
- Disconnect the negative wire terminal (-) of the battery before carrying
out welding operations on the lift truck.
- For electric welding on the lift truck, place the negative welding gun on
the part to be welded, to prevent strong currents from passing through
the alternator.
22
INTRODUCTION TO SAFETY
MHT 860 L - MHT 950 L Evolution
1
B - MAINTENANCE
- Maintenance and maintaining the conformity of the lift truck are obligatory.
- Carry out daily maintenance (See Chapter: A - DAILY OR EVERY 10
HOURS OF SERVICE under: 3 - MAINTENANCE).
- Do not operate the combustion engine without the air filter or if there is oil,
water or fuel leakage.
Wait for the combustion engine to cool down before removing the radiator
cap.
Replace the filter cartridges (See replacement frequency in Chapter FILTER
ELEMENTS AND BELTS in: 3 - MAINTENANCE).
C - LEVELS
- Use the recommended lubricants (Never use used lubricants).
- Do not fill the fuel tank with the combustion engine running.
- Refuelling operations must be carried out exclusively in the areas meant for
the purpose.
D - WASHING
- Clean the lift truck or at least the part concerned, before every operation.
- Remember to shut the cab door and the rear window.
- During washing, avoid wetting the electrical joints, components and connections.
If necessary, protect components which run the risk of being damaged by
water, steam and detergents, especially the electric components and connections and the injection pump.
- Clean the lift truck to remove all traces of fuel, oil and grease.
FOR ALL OPERATIONS THAT ARE NOT INCLUDED UNDER SCHEDULED MAINTENANCE, CONTACT YOUR AGENT OR DEALER.
23
INTRODUCTION TO SAFETY
1
MHT 860 L - MHT 950 L Evolution
B E F O R E S TA RT I N G U P A N E W L I F T T R U C K
INTRODUCTION
- Our lift trucks are designed to ensure the driver simple manoeuvres
and easy maintenance.
- However, before starting up the truck for the first time, the user must
have read and understood this manual which is prepared to provide all
the information concerning driving and maintenance. By complying
with these indications, the user will be able to get the best performances from his vehicle.
- Before using the lift truck, the user must become familiar with the position and functions of the various instruments and controls.
Never start up a lift truck without having made the following inspections :
GREASING
- Check the various lubrication points and different levels, consult:
MAINTENANCE SCHEDULE under: 3 - MAINTENANCE and proceed
with topping up, if necessary.
The trucks are delivered filled with lubricant at the factory, using lubricant suitable for average user conditions, i.e. -15°C to + 35°C. For use
in extreme conditions, before start up, drain and fill with fresh lubricant
using the lubricant suitable for such temperatures. The same applies
to cooling liquids (Contact your agent or dealer for more information).
DRY AIR FILTER
- Make sure the filter is in good condition and not fouled.
- Tighten the bolts, if necessary.
Never use the lift truck without its air filter or if the filter is damaged.
COOLING CIRCUIT
- Never start the truck without checking the cooling liquid level.
HYDRAULIC CIRCUIT
- Check to make sure there is no oil leakage on the connections, hose
pipes, pipes and unions. Tighten or check the defective connections, if
necessary.
- Check the oil level in the tank.
24
INTRODUCTION TO SAFETY
MHT 860 L - MHT 950 L Evolution
1
BRAKING SYSTEM
- Check to make sure there is no oil leakage on the connections, hose
pipes, pipes and unions. Tighten or check the defective connections, if
necessary.
- Check the oil level in the tank.
Use only the recommended types of oil as otherwise there is risk of
damaging the braking system (see Chapter on LUBRICANTS in part:
3 - MAINTENANCE).
WHEELS AND TYRES
- Check to make sure the wheel nuts are tightened correctly (See
Chapter: A - DAILY OR EVERY 10 HOURS OF SERVICE in part: 3 MAINTENANCE) and check the tyre pressure (See chapter: SPECIFICATIONS in part: 2 - DESCRIPTION).
FUELLING SYSTEM
- Check to ensure that the fuel lines are sealed tight.
- If necessary, drain the fuel filter and fuel feed system.
ELECTRICAL CIRCUIT
- Check the level of electrolyte in the battery (See chapter: B - EVERY
250 HOURS OF SERVICE in part: 3 - MAINTENANCE).
- Check the various components of the electrical circuit, the relative connections and contacts.
CONTACT YOUR AGENT OR DEALER, IF NECESSARY.
25
INTRODUCTION TO SAFETY
INTRODUCTION TO SAFETY
2 - DESCRIPTION
INTRODUCTION TO SAFETY
INTRODUCTION TO SAFETY
2
MHT 860 L - MHT 950 L Evolution
S P E C I F I C AT I O N S
Engine (E2)
- Type
- Number of cylinders
- Strokes
- Injection system
- Firing order
- Displacement
- Bore
- Stroke
- Compression ratio
- Rated speed
- Idle speed
- Power rating ISO/TR 14396
- Maximum torque
PERKINS 1104D-E44TA
4
4
direct
1.3.4.2.
4400 cm3
105 mm
127 mm
16.2 : 1
2200 min-1
800 min-1
144 HP / 106 kW
556 Nm 1400 min-1
Cooling System
- Type
- Intake fan
Water cooled
1760 min-1
No. of blades
- Diameter
7
550 mm
Thermostat
- Complete opening
82° C
Electrical System:
- Earth
- Battery
- Alternator
- Voltage regulator
- Starting
Negative
12 v - 140 Ah
12 v - 120 A
built into alternator
12 v
Brakes:
- Type
- Service brake
- Parking brake
Disk in oil bath
Pedal-operated, acts on front and rear wheels
Hydraulic, with negative action, acts on front axle
service brakes
1
INTRODUCTION TO SAFETY
2
MHT 860 L - MHT 950 L Evolution
Transmission Unit
- Type
- Type
Hydrostatic
with continuous speed adjustment.
Variable displacement pump and engine with inching
- Gear
- No. of forward gears
- No. of reverse gears
- Reverser
Hydraulic operation
2
2
Electrohydraulic
Hydraulic circuit
Boom movements
- Type of pump
- Flow rate
- Pressure
with pistons
140 l/min
275 bar
Steering circuit
- Type of pump
- Flow rate
- Pressure
Load sensing
140 l/min
175 bar
Levelling circuit
- Type of pump
- Flow rate
- Pressure
with gears
25 l/min
205 bar
Cooling system
Water and hydraulic oil by means of fan with hydraulic motor
- Type of pump
- Flow rate
- Pressure
with gears
25 l/min
175 bar
Intercooler
- Electric fans
N° 2
Front and rear tyres:
Standard:
- Type
- Operating pressure
18x22,5 16PR MPT-06 TL
5 bar
Optional:
- Type
- Operating pressure
445/65 R22,5 AR01
8 bar
2
INTRODUCTION TO SAFETY
2
MHT 860 L Evolution
Specifications MHT 860 L Evolution
- Maximum speed
Forwards/Backwards - without load
Forwards/Backwards - with load
30 km/h
10 km/h
- Lifting speed
without load with boom retracted
30.6 m/min (9.8 sec)
- Descent speed without load
with boom retracted
38.5 m/min (7.8 sec)
- Extension speed without load
17 m/min (11.3 sec)
- Boom retraction speed without load
28.6 m/min (6.7 sec)
- Upward inclination time without load
33 °/sec (4.1 sec)
- Downward inclination time without load
38.5 °/sec (3.5 sec)
- Fork dimensions
(length x width x thickness)
1200 x 200 x 60 mm
- Max. boom ext. distance from fork
1750 mm
- Distance from centre of gravity
24 in.
- Standard lifting height
8100 mm
- Rated capacity with standard equipment
6000 kg
- Weight with standard equipment and forks
11580 kg
- Distribution of wt. along axle with standard equipment
Front axle - no load
Rear axle - no load
4400 kg
7180 kg
- Weight loaded with standard equipment and forks
17580 kg
- Wt. loaded with boom retracted and forks 20 cm off the ground
Front axle
Rear axle
/ kg
/ kg
- Towing capacity
No load
With load
9200 daN
10500 daN
- Vibrations
Acceleration of upper limbs
Acceleration of body (feet or seated part)
≤ 2.5 m/s2
≤ 0.5 m/s2
- Noise
The noise level guaranteed
LwA 105 dB
(in accordance with Directive 2000/14/CE modified by Directive 2005/88/CE)
Noise level in driving seat (in accordance with EN 12053)
LpA 80.8 dB
3
INTRODUCTION TO SAFETY
2
MHT 950 L Evolution
Specifications MHT 950 L Evolution
- Maximum speed
Forwards/Backwards - without load
Forwards/Backwards - with load
30 km/h
10 km/h
- Lifting speed
without load with boom retracted
30.6 m/min (10.8 sec)
- Descent speed without load
with boom retracted
38.5 m/min (8.6 sec)
- Extension speed without load
17 m/min (12.7 sec)
- Boom retraction speed without load
28.6 m/min (7.5 sec)
- Upward inclination time without load
33 °/sec (4.1 sec)
- Downward inclination time without load
38.5 °/sec (3.5 sec)
- Fork dimensions
(length x width x thickness)
1200 x 150 x 50 mm
- Max. boom ext. distance from fork
1320 mm
- Distance from centre of gravity
24 in.
- Standard lifting height
8800 mm
- Rated capacity with standard equipment
5000 kg
- Weight with standard equipment and forks
10650 kg
- Distribution of wt. along axle with standard equipment
Front axle - no load
Rear axle - no load
3970 kg
6680 kg
- Weight loaded with standard equipment and forks
15650 kg
- Wt. loaded with boom retracted and forks 20 cm off the ground
Front axle
Rear axle
/ kg
/ kg
- Towing capacity
No load
With load
8500 daN
10500 daN
- Vibrations
Acceleration of upper limbs
Acceleration of body (feet or seated part)
≤ 2.5 m/s2
≤ 0.5 m/s2
- Noise
The noise level guaranteed
LwA 105 dB
(in accordance with Directive 2000/14/CE modified by Directive 2005/88/CE)
Noise level in driving seat (in accordance with EN 12053)
LpA 80.8 dB
4
INTRODUCTION TO SAFETY
2
MHT 860 L Evolution
D I M E N S I O N S M H T 8 6 0 L Evolution
N
G2
G1
24°
G
24°
Z
34°
L
Y
M
U
J
F
C
B
W
I
D
A
V
1
E
T
R
V2
O
K
V
S
A
B
C
D
E
F
G
G1
G2
I
J
K
L
M
N
O
R
S
T
U
V
V1
V2
W
Y
Z
1200
2730
1540
5365
6565
1930
410
450
410
1095
865
1750
60
1700
1845
200
3800
8135
4360
2460
5330
1375
4035
2400
11°
123°
mm
5
INTRODUCTION TO SAFETY
2
MHT 950 L Evolution
D I M E N S I O N S M H T 9 5 0 L Evolution
N
G2
G1
24°
G
24°
Z
34°
L
Y
M
U
J
F
C
B
W
I
D
A
V
1
E
T
R
V2
O
K
V
S
A
B
C
D
E
F
G
G1
G2
I
J
K
L
M
N
O
R
S
T
U
V
V1
V2
W
Y
Z
mm
6
1200
2730
1940
5765
6965
1930
410
450
410
1095
865
1320
50
1700
1845
150
3800
8535
4545
2460
5520
1375
4035
2400
11°
125°
INTRODUCTION TO SAFETY
2
MHT 860 L Evolution
L O A D C H A RT M H T 8 6 0 L Evolution
LOAD CHART WITH FORKS
600 mm
MHT 860
6000
8,1 m
Kg
N°211742
Forks
716290
7
INTRODUCTION TO SAFETY
2
MHT 950 L Evolution
L O A D C H A RT M H T 9 5 0 L Evolution
LOAD CHART WITH FORKS
MHT 950
Forks
5000
500 mm
8,8 m
Kg
10
8,8
9
8
7
6
500
mm
0 k
g
500
4000 kg
N°211742
2
1850 kg
1500 kg
3
2400 kg
4
3000 kg
5
1
0
7
6
5,5
8
5
4
3
4,9
4
3,2
2
2,5
1,9
1
0 m
610026
INTRODUCTION TO SAFETY
2
MHT 860 L - MHT 950 L Evolution
INSTRUMENTS AND CONTROLS
3
16
4
7
5
17
5
27
23
18
6
8
26
9
33
13
12
23
13
28
2
22
24
27
5
1
24
19
20
20
10
14
15
5
4a
25
11
9
INTRODUCTION TO SAFETY
2
MHT 860 L - MHT 950 L Evolution
DESCRIPTION
1 2 3 4 4a 5 6 7 8 9 10 11 12 13 14 15 15a
16 17 18 19 20 21 22 23 24 25 26 27 28 29 30 31 32 33 -
Operator seat
Safety belt
Control instruments and indicator lights panel
Load status control and safety device
Safety system exclusion key
Switches panel
Lights control lever, horn and direction indicators
Anterior windscreen and rear window wiper-washer control lever
Key switch
Access guard to brakes oil tank and windscreen-wiper liquid tank.
Brakes oil tank
Windscreen-wiper liquid tank
Guard for access to fuses and relays
Accelerator pedal, service brake and inching
Reversing control
Electro-hydraulic movements controls
- Decompression of optional circuit
Red emergency stop pushbutton
Description of controls and load diagrams
Level gauge
Heating controls
Air conditioning (optional)
Air inlet nozzles
Ceiling light
Sunshade (optional)
Tools and documents compartment
Cigarette lighter
Cab door closure
Upper half-door lock
Rear window opening lever
Tow hook
Head lights
Tail lights
Rotary warning beacon
Steering wheel adjuster lever
RECOMMENDATIONS
However experienced the driver may be in this field, he must become fully familiar with the location and function
of all the instruments and controls before operating the lift truck.
When the contact key is turned without switching on the diesel engine, an instruments test is carried out automatically: all the indicators light up and the buzzer starts sounding. These stop when the diesel engine is
switched on.
Check all instruments on board immediately after having started the truck when the engine has warmed up and
at regular intervals during use. This will help identify faults immediately and proceed with prompt remedies. If an
instrument fails to give the right indication, switch off the engine and take the necessary measures to restore
correct operation.
Using the lift truck without due regard for the above recommendations could be dangerous.
10
INTRODUCTION TO SAFETY
2
MHT 860 L - MHT 950 L Evolution
1 - DRIVER’S SEAT (STANDARD)
THE SEAT CAN BE ADJUSTED IN DIFFERENT WAYS TO MAKE IT MORE
COMFORTABLE.
ADJUSTING THE WEIGHT
Adjust the weight with the seat empty.
- Take notch “A” of the seat as reference.
- Turn knob “B” according to the driver’s weight.
A
B
NOTE: To avoid health problems, before starting up the lift truck, check the
weight and adjust if necessary.
ADJUSTING THE HEIGHT
Bring the seat to the required position until it clicks into place. If the seat is
raised beyond the last click, it returns to the lower position.
ADJUSTING THE INCLINATION
The seat inclination can be adjusted to suit individual needs.
- Press the LH button and simultaneously push or release the seat to get the
correct position.
ADJUSTING THE DEPTH
The seat depth can be adjusted to suit individual needs.
- Press the RH button and push the seat forwards or backwards to get the
correct position.
BACKREST EXTENSION
- The height of the backrest extension can be adjusted by raising it until it
clicks to a stop (you can hear the clicks).
- The backrest extension can be removed by pulling it beyond the last stop
notch.
LUMBAR ADJUSTMENT
This helps to improve comfort and makes it possible for the driver to move
freely in the seat.
- Turn the knob to the right or the left to adjust the height and depth of thelumbar support.
11
INTRODUCTION TO SAFETY
2
MHT 860 L - MHT 950 L Evolution
ADJUSTING THE BACKREST
- With your back against the backrest, pull the lever and move the backrest
to the required position.
If the backrest is not held in place during the adjustment, it will tilt forwards
completely.
LONGITUDINAL ADJUSTMENT
- Insert the locking lever in the required position. Once blocked the seat will
not move .
CLEANING
Dirt can affect proper working of the seat. It must therefore be kept clean.
- To clean or change the cushions, just remove them from the seat frame.
Risks of accident increase when the back-rest is not locked perfectly!
Avoid wetting the cushions while cleaning them. First check the fabric to
make sure it is resistant to normal detergents for plastic fabrics and materials, by testing in a concealed area.
2 - SEAT BELTS
-
Sit correctly in the seat.
Check to make sure the seat belt is not twisted.
Wear the belt around the waist and not the stomach.
Fasten the seat belt and check to make sure it is secured properly.
Adjust the belt to your body and avoid pressing against the hip.
2
Never use the fork lift truck with the seat belt damaged under any circumstances whatsoever (Fixing, blocking, seams, straps, etc.). Repair or
replace the seat belt immediately.
12
INTRODUCTION TO SAFETY
2
MHT 860 L - MHT 950 L Evolution
3 - CONTROL INSTRUMENTS AND INDICATOR LIGHTS PANEL
A
C
B
15
10
RPM x 100
20
E
D
C1
5
25
12
0
9
30
3
6
CONTROL INSTRUMENTS
A - -SPEEDOMETER AND REVOLUTION COUNTER
B - I.C. ENGINE WATER TEMPERATURE
Temperature zones
B1 – Blue zone (0° - 50°)
B2 – Green zone (50° - 100°)
B3 – Black/red zone (100° - 105°)
B4 – Red zone (105° - 120°)
NOTE: The red indicator lights
up between the B3 and B54 zones.
C - FUEL LEVEL INDICATOR
The red zone C1 indicates that the fuel tank is in reserve and wont last long.
D - CLOCK DIAL
E - EMERGENCY LIGHTS SWITCH
Pressing this switch will activate all the direction indicators simultaneously.
To deactivate the indicators, press the switch again.
INDICATOR LIGHTS
On inserting the electric contact of the fork lift truck, all the red indicator lights and the buzzer of the panel must switch on,
thereby indicating that they are working correctly. If one of these does not work, carry out the necessary repairs.
INDICATOR LIGHT NOT USED
INDICATOR LIGHT NOT USED
BRAKES FLUID LEVEL RED INDICATOR LIGHT
If the indicator and buzzer switch on while the forklift truck is in operation, switch the I.C. engine off immediately and
check the brakes fluid level.
If the level is relatively low, contact your agent or dealer.
PARKING BRAKE RED INDICATOR LIGHT
The indicator lights up indicating that the parking brake has been activated.
ALTERNATOR ENERGIZATION RED INDICATOR LIGHT
If the indicator and buzzer switch on while the forklift truck is in operation, switch the I.C. engine off immediately and
check the electrical system and the alternator belt.
13
INTRODUCTION TO SAFETY
2
MHT 860 L - MHT 950 L Evolution
I.C. ENGINE OIL PRESSURE RED INDICATOR LIGHT
If the indicator and buzzer switch on while the forklift truck is in operation, switch the I.C. engine off immediately and
look for the cause of the problem (see engine crank casing oil level).
I.C. ENGINE OIL TEMPERATURE RED INDICATOR LIGHT
If the indicator and buzzer switch on while the forklift truck is in operation, switch the I.C. engine off immediately and
check the cooling circuit for the cause of the problem.
AIR FILTER CLOGGED RED INDICATOR LIGHT
The indicator and buzzer switch on when the air filter cartridge is clogged. Switch off the forklift truck and carry out
the necessary repairs (see the cleaning and replacement schedules in Chapter: 3 - MAINTENANCE: FILTER ELEMENTS AND BELTS).
DIRECTION INDICATORS GREEN INDICATOR LIGHT
POSITION LIGHTS GREEN INDICATOR LIGHT
This indicator lights up when the position lights are working.
DIPPED HEADLIGHTS GREEN INDICATOR LIGHT
This indicator lights up when the dipped headlights are switched on.
MAIN BEAMS BLUE INDICATOR LIGHT
This indicator lights up when the main beams are working.
I.C. ENGINE PRE-HEATING YELLOW INDICATOR LIGHT (OPTIONAL)
This indicator lights up during preheating of the I.C. engine in case of temperatures below 0° C.
Wait for the indicator to switch off completely before starting up the I.C. engine.
I.C. ENGINE PROBLEM ATTENTION YELLOW INDICATOR LIGHT
If the indicator lights up during the working of the forklift truck, consult the I.C. engine faults Monitoring Table and
contact your agent or dealer.
STOP
I.C. ENGINE PROBLEM STOP RED INDICATOR LIGHT
If the indicator lights up during the working of the forklift truck, consult the I.C. engine faults Monitoring Table, switch
off the I.C. engine, if necessary, and contact your agent or dealer.
HYDROSTATIC POWER STEERING OIL PRESSURE RED INDICATOR LIGHT (OPTIONAL)
If the indicator lights up during the working of the forklift truck, switch off the I.C. engine immediately and contact your
agent or dealer.
I.C. ENGINE FAULTS MONITORING TABLE
STOP
STATO DELLA
SPIA
Descrizione dello stato della spia
Stato del motore
ACCESA
ACCESA
Verifica della spia
Quando si ruota il commutatore a chiave di avviamento
(8) entrambe le spie si accendono per 2 secondi.
Il motore è ancora spento.
SPENTA
SPENTA
Nessun guasto
Nessun codice diagnostico attivo.
Il motore funziona normalmente.
ACCESA
SPENTA
Codice
E' stato rilevato un codice diagnostico attivo.
diagnostico attivo
Il motore funziona normalmente.
ACCESA
LAMPEGGIANTE
Codice
E' stato rilevato un codice diagnostico attivo grave ed è
diagnostico attivo stata avviata una riduzione della potenza del motore.
Il motore funziona normalmente ma a
potenza ridotta.
LAMPEGGIANTE
SPENTA
LAMPEGGIANTE LAMPEGGIANTE
ACCESA
14
ACCESA
Allarme
E' stato superato uno o più dei valori di protezione del
motore.
Riduzione della
E' stato superato uno o più dei valori di protezione del
potenza e allarme motore.
Il motore funziona normalmente.
Il motore funziona normalmente ma a
potenza ridotta.
E' stato superato uno o più dei valori di protezione del
Il motore è stato arrestato o l'arresto è
Arresto del motore motore oppure è stato rilevato un codice diagnostico attivo
imminente.
grave.
INTRODUCTION TO SAFETY
2
MHT 860 L - MHT 950 L Evolution
4 - LOAD CONTROL AND SAFETY DEVICE
The load control and safety device makes it possible for the operator to know the
condition of the lift truck in relation to the maximum permitted load.
A
C
WORKING
When the lift truck electric contact is activated, a test is carried out automatically.
- Correct working: All the LEDs and alarm sound function continuously for 2 seconds
- Defective working: All the LEDs and alarm sound function intermittently (Switch off
the lift truck and contact your agent or dealer; never attempt to
carry out repairs yourself)
A - LED (VISUAL ALARM) (Fig. 4/1 - Fig. 4/2)
A1- 4 green LEDs: The lift truck is operating in complete safety.
A2- 2 yellow LEDs: The lift truck is approaching the maximum permitted load
limit.
A3- 1° red LED:
The lift truck has reached the maximum permitted load
limit.
The alarm sound is activated simultaneously slowly and
intermittently.
A4- 2° red LED:
The lift truck is overloaded. The alarm sound is activated
slowly, intermittently and rapidly. Carry out the hydraulic
movements in the following sequence: retract and lower
the boom.
B
4/1
A4
A3
A2
TEST
B1
A1
When the A4 - 2° red LED switches on the hydraulic commands are blocked
automatically. Only boom retraction and inclination of the forks are permitted.
Do not turn key “4a” to disconnect automatic blocking of the movements; this
must only be used in operating conditions using the shovel.
4/2
B - ALARM SWITCH (Fig. 4/1 - Fig. 4/2)
Allows or inhibits use of the alarm sound. If it is not used, the red indicator light B1
indicates that the alarm sound is deactivated and only the visual alarm is working.
C - TEST INDICATOR (Fig. 4/1)
Press the switch at any time to check the correct working of the load status indicator
device.
- Correct operation: All the LEDs and alarm sound function in continuous mode.
- Defective operation: All the LEDs and alarm sound function intermittently
(Switch off the lift truck and contact your agent or dealer; never
attempt to carry out repairs yourself)
4/3
D - STRAIN GAUGE (Fig. 4/3)
Disassembly or adjustment of the strain gauge is prohibited, this must only be done
by specially trained personnel, consult your dealer.
4 a - SAFETY SYSTEM INHIBIT KEY (Fig. 4/4)
This key has two positions: “1” - “0”.
In position “1” the safety system is enabled.
In position “0” the safety system is disenabled, and a red LED “5D” (pag. 16) lights
up.
ATTENTION : The safety system can be inhibited only when operating with a
shovel, by turning key “4a”.
With the system inhibited, there is nothing to prevent tilting or
overloading of the lift truck.
4/4
15
INTRODUCTION TO SAFETY
2
MHT 860 L - MHT 950 L Evolution
5 - SWITCHES PANEL
A - DIRECTION SELECTION SWITCH
Before selecting one of the three steering options, align the four wheels
in relation to the forklift truck axis.
E
B
A1
A
E3
D
A1 - Front and rear steering wheels in opposite directions (Short or
concentric steering).
A2 -Front steering wheels (Road travel).
A3 -Front and rear steering wheels in the same direction (crab steering).
*Wheel alignment procedure:
Press the steering mode selection switch on “A1”, turn the steering
wheel until the rear wheels are aligned, press the steering mode selection switch on “A2”, and turn the steering wheel until the front wheels are
aligned.
When the front and rear wheels are aligned, one of the three steering
modes mentioned above can be selected.
A2
E2
E1
E4
C
A3
G
F
I1
I3
I2
J
I
H
The wheels coordination may be lost with use; carry out realignment of the wheels every 20 hours of service by
following the procedure described above.
B - CONCENTRIC STEERING GREEN LIGHT
The green light indicates that concentric steering is selected.
C - LATERAL OR CRAB STEERING GREEN INDICATOR LIGHT
The green light indicates that lateral or crab steering is selected.
D - SAFETY SYSTEM DISENABLED RED INDICATOR LIGHT
The red indicator light indicates that key “4a” (page 15) is turned to position “0” and the safety system is disenabled.
In this condition, with the system excluded, there is nothing to prevent the truck from tilting over or
overload.
E - FANS ROTATION INVERSION TIMED CONTROL SWITCH (OPTIONAL)
The 3-position switch can by activated to invert the rotation of the water cooler fan and intercooler radiator in
the engine compartment, after a few seconds.
In this situation, the direction of fan rotation is alternated periodically (“E2” lights up to indicate that the system
is activated).
- When the switch is pressed, “E2” (green light On), the fan rotation inversion function is activated.
- When the switch is pressed, “E3” (green light Off), the fan rotation inversion function is deactivated.
- When the switch is in position “E4” the fan rotation inversion function is forced. When the switch is released,
the fan rotation inversion timed control is reset.
The switch can also be activated with the forklift truck running.
IMPORTANT
When the forklift truck is travelling on roads,
the fan rotation inversion system must be deactivated (switch pressed in position “E3”).
F - TRANSMISSION RESET PUSHBUTTON LIGHT ON
During normal use, the pushbutton light is On.
For more detailed information regarding its working, see point “K - SPEED SELECTOR (SLOW-FAST)”.
16
INTRODUCTION TO SAFETY
2
MHT 860 L - MHT 950 L Evolution
G - FRONT WHEELS ALIGNMENT GREEN INDICATOR LIGHT
Indicates alignment of the front wheels with respect to the vehicle axis.
When the wheels are aligned, the indicator lights up.
(See point “A” : *wheels alignment procedure).
H - REAR WHEELS ALIGNMENT YELLOW INDICATOR LIGHT
Indicates alignment of the rear wheels with respect to the vehicle axis.
When the wheels are aligned, the indicator lights up.
(See point “A” : *wheels alignment procedure).
I - PARKING BRAKE SWITCH
Two-position luminous switch with safety block.
The parking brake acts on the front axle.
- To release the brake, press the pushbutton in position “I1”.
- To lock the brake, press the pushbutton in position “I2”.
To release the brake from “I2” to “I1”, while pressing the switch, act on safety lock “I3”.
J - REAR FOG LIGHT SWITCH
Two-position luminous switch.
K - SPEED SELECTOR (SLOW-FAST)
The machine can run at two speeds:
- Slow (for work site)
- Fast (for road travel)
To change the speed, follow the instructions given below:
- stop the forklift truck movement completely
- keep the i.c. engine running at minimum speed
- position the reverse gear in idle (see point 15 on page. 22)
- push the brake pedal all the way and press the slow-fast pushbutton
“M” until the respective lights “L” or “M” light up.
K1
M
K
K2
L
N
If the forward/reverse movement is not activated, follow the instructions given below:
- position the reverse switch as required (Forwards - Reverse)
- discharge pressure from the brake pedal
- Press the “F” “TRANSMISSION RESET” pushbutton to obtain the connection in the required direction.
- If the vehicle does not move, start accelerating the internal combustion engine slowly and gradually until the
truck starts moving.
These indications must be followed for proper working of the transmission.
L - SLOW SPEED GREEN INDICATOR LIGHT
The green light indicates that slow speed is selected.
M - FAST SPEED GREEN INDICATOR LIGHT
The green light indicates that fast speed is selected.
N - OPERATING MODE
Activating the two-position switch will activate the operating system concerned to work slowly and accurately.
The switch can also be turned on with the lift truck in motion.
17
INTRODUCTION TO SAFETY
2
MHT 860 L - MHT 950 L Evolution
O - OPTIONAL DISCONNECT SWITCH (accessories hydraulic block)
The two-position switch is used for activating or deactivating the
optional.
With the switch pressed in pos. “O1” (red indicator light On) the
Optional/accessories hydraulic block function is activated.
With the switch pressed in pos. “O2” (red indicator light Off) the
Optional/accessories hydraulic block function is deactivated.
O2
P
O1
P - STOPPING HYDRAULIC MOVEMENTS
While travelling on roads, it is advisable (compulsory in Italy and
Germany) to stop all hydraulic movements.
The indicator lights up when the movements are being used.
R
Q1
Q
O1
Q2
Q - LEVELLING CONTROL PUSHBUTTON
The pushbutton has two positions; it controls the truck level correction movements to the right and left.
- pressing the button in position “Q1” will level the truck on the left
- pressing the button in position “Q2” will level the truck on the right
Verify the correct levelling using the sprit level placed in the cab (see point “17” on page 23 “Spirit level”)
N. B.: The levelling operation is not possible when the telescopic boom is inclined beyond approx. 30° from the
ground.
R - 2°/3° HYDRAULIC EXTENSION SWITCH (OPTIONAL)
The switch has two or three positions depending on the machine setup.
It is used for switching the hydraulic control for making two or three hydraulic movements using the accessory.
S - ROTARY BEACON SWITCH
Two-position switch for turning the rotary beacon light on/off.
T - FRONT AND REAR WORK LIGHTS SWITCH (OPTIONAL)
Three-position switch for turning the work lights On/off.
U - SWITCH FOR WORK LIGHT AT THE TOP OF THE BOOM
(OPTIONAL)
V - SWITCH FOR DEFROSTING REAR WINDOW (OPTIONAL)
Z - SWITCH FOR ROOFTOP WINDOW WIPER (OPTIONAL)
18
S
T
U
V
Z
INTRODUCTION TO SAFETY
2
MHT 860 L - MHT 950 L Evolution
6 - LIGHTS, HORN, AND TURN INDICATOR LIGHTS CONTROL LEVER
The lever commands visual and sound signals.
A - Lights are switched off, direction lights not working.
B - RH direction lights working.
C - LH direction lights working.
D - Position lights On.
E - Low beams and position lights On.
F - High beams and position lights On.
G - Flashing.
F
E
G
D
A
B
G
A
C
G
Press the tip of the lever to sound the horn.
6
7 - FRONT AND REAR WINDSCREEN WIPER SWITCH
This switch controls the operation of the front and rear windscreen wipers.
A - Front windscreen wiper off.
B - Front windscreen wiper low speed setting.
C - Front windscreen wiper high speed setting.
D - Front windscreen wiper intermittent setting.
E - Rear windscreen wiper off.
F - Rear windscreen wiper on.
NOTE: These functions will only work when the ignition is switched on.
D
A
F
D
B
D
C
E
7
8 - KEY SWITCH
The key switch has 4 positions:
O
I
II
III
- Electric contact and switching off the combustion engine.
- Electric contact.
- //
- Start up and return to position “I” as soon as the key is released.
I
II
O
III
Before starting up the I.C. engine, make sure the forwards/backwards selector is in the idle position and that the emergency stop button is released.
8
19
INTRODUCTION TO SAFETY
2
MHT 860 L - MHT 950 L Evolution
9 - GUARD FOR ACCESS TO BRAKE FLUID AND WINDSCREEN
WASHER LIQUID TANKS
Slacken screw “A” and remove the guard to access the brake fluid and windscreen washer liquid tanks.
A
A
9
1 0 - BRAKES FLUID TANK
10
11 - WINDSCREEN WASHER LIQUID TANK
To the operator’s LH. Remove cap “B”; make sure the container is always full.
Liquid to be used: water + detergent (use anti-freeze in winter).
B
11
1 2 - GUARD FOR ACCESS TO FUSES AND RELAYS
Release and pull block “C” to remove the guard for access to the fuses and
relays.
C
12
20
INTRODUCTION TO SAFETY
2
MHT 860 L - MHT 950 L Evolution
1 3 - ACCELERATOR PEDAL, SERVICE BRAKE AND INCHING PEDALS
Pedal “A” is used to change the lift truck speed by acting on the combustion
engine rpm.
Pedal “B” acts on the front wheels and makes it possible to slow down and
block the lift truck. The brake pedal in the first 20 mm of travel works as the
inching pedal allowing precise, slow movements, and during the rest of the
travel produces the braking effect.
A
B
13
1 4 - REVERSING CONTROL
The lift truck gear reversal must be done at low speeds without accelerating.
FORWARD : Push the knob forward (position C).
REVERSE : Pull the knob backwards (position D).
NEUTRAL : The knob must be in the intermediate position to start the lift
truck (position E).
E
D
C
NOTE: The reversing lights indicate that the fork lift truck is moving in
reverse. A reversing buzzer is also present.
If the forward/reverse movement is not activated, see point “5F” on page
16.
14
These indications must be followed for proper working of the transmission.
SAFETY FOR MOVING THE LIFT TRUCK
Authorisation to move the lift truck is controlled by an electronic unit. The
operator must observe the following sequence to move the truck forwards or
backwards:
1 - sit down correctly in the driver’s seat,
2 - release the parking brake,
3 - engage forward or reverse movement.
To stop the lift truck, he must observe the following sequence:
1 - set the reversing gear in neutral,
2 - engage the parking brake,
3 - get out of the lift truck.
NOTE: If the operator leaves the driver’s seat for a short time with the forward or reverse movement activated, the vehicle will continue to
move.
If the operator leaves the driving seat for a long period with the forward or reverse movement activated, the vehicle will set itself in
idle mode, the operator will have to return to the driver’s seat,
restore the inverter to idle and activate the forward or reverse
movement to continue with the movement.
21
INTRODUCTION TO SAFETY
2
MHT 860 L - MHT 950 L Evolution
1 5 - ELECTRO-HYDRAULIC CONTROLS
The truck has a multi-purpose, single-lever manipulator with proportional electro-hydraulic control, to the right of the operator, and
is provided with two rollers “A” and “B” (Fig.15).
To enable the movements, at least one of the two enable pushbuttons “C” (Fig.15/1) must be kept pressed.
A
- to raise the load, pull the lever backwards (Fig.15/2)
- to lower the load, push the lever forwards (Fig.15/2)
- to incline the forks downwards, push the lever to the right
(Fig.15/2)
- to incline the forks upwards, push the lever to the left (Fig.15/2)
- to extend the boom, rotate roller “A ” forwards (Fig.15/2)
- to retract the boom, rotate roller “A ” backwards (Fig.16/2)
- to use the optional command, rotate roller “B” forwards or backwards (Fig.15/2) (pushbutton “D” (Fig.15/1) pressed and red indicator light On, see point “5O” page 18).
B
15
Do not attempt to modify the hydraulic pressure of the system.
In case of problems, contact your agent or dealer.
MANIPULATIONS WILL INVALIDATE THE WARRANTEE.
D
C
1 5 / A - DECOMPRESSION OF OPTIONAL CIRCUIT
C
This operation must be carried out each time a lift truck supplementary accessory is to be connected or disconnected.
1) Switch the combustion engine off and turn ignition key “8” to
position “I”.
2) Rotate roller “B” forwards and backwards (pushbutton “D”
(Fig.15/1) pressed and red indicator light On, see point “5O”
page 18).
15/1
When the operation is complete, the optional is depressurized; it
will therefore be easier to connect/disconnect the quick-release
couplings on the top of the boom.
OK
N. B. The operations must be carried out immediately after the
combustion engine is switched off, and not for more than 3 seconds for each command.
OK
A
B
15/2
774619
22
INTRODUCTION TO SAFETY
2
MHT 860 L - MHT 950 L Evolution
1 6 - EMERGENCY STOP RED PUSHBUTTON
This pushbutton stops the I.C. engine.
A
NOTE: PRESS THE BUTTON ONLY IN CASE OF EXTREME NEED TO
STOP THE I.C. ENGINE.
To stop the I.C. engine, press the red pushbutton “A”.
To re-enable the switching on of the I.C. engine, turn the red pushbutton “A”
clockwise.
16
1 7 - LOAD CHART FILE
This file includes the description of the hydraulic controls and the load charts
of the attachments used on the lift truck.
17
1 8 - SPIRIT LEVEL
It is situated at the top inside the cab, in front of the operator, and is used
for levelling operations to check the inclination of the lift truck with respect
to the ground (see point “5R” page 18 “Levelling control pushbutton”).
1 9 - HEATING CONTROLS
18
A) FAN KNOB
This 3-speed knob is used to supply cold/hot air to the diffusers.
B) TEMPERATURE REGULATOR KNOB
This knob is used to adjust the temperature inside the cab.
“C” - The valve is closed, the fan supplies cold air.
“D” - The valve is completely open, the fan supplies hot air.
The intermediate positions are used to adjust the temperature.
D
C
B
A
19
23
INTRODUCTION TO SAFETY
2
MHT 860 L - MHT 950 L Evolution
2 0 - AIR CONDITIONING (OPTIONAL)
A) COMPRESSOR SWITCH
This switch has 2 positions:
“A0” - Off (indicator switched off)
“A1” - On (compressor, and indicator light switched on)
B0
B1
B3 B2
N.B. The lights indicates that the compressor is switched on.
A0
ATTENTION:
The compressor can only be switched on with the fan knob turned
to the “B1”, “B2”, or “B3” position.
If the fan knob is in the “B0” position,
the compressor will not switch on.
A1
B) Knob
Adjusts the air flow in the supplementary air vents behind the driver’s
seat.
“B0” - Off
“B1” - 1st speed
“B2” - 2nd speed
“B3” - 3rd sped
20/1
C
C
C
Adjust the direction of the vents present behind the driver’s seat “C”
Fig. 20/2.
20/2
2 1 - AIR VENTS
These vents direct the ventilation inside the cab; they are present in the
upper part of the cab “D” (Fig. 21/1) and at the operator’s feet “E” (Fig.
21/2).
D
D
21/1
E
E
21/2
24
INTRODUCTION TO SAFETY
2
MHT 860 L - MHT 950 L Evolution
2 2 - CEILING LIGHT
The switch is built into the ceiling light.
It has two positions: continuous lighting and Off.
22
2 3 - SUNSHADE (OPTIONAL)
Front sunshade
Adjust the height of the sunshade pulling handle “A” downwards (Fig. 23/1).
Press lever “B” (Fig. 23/1) to the RH to rewind the shade.
Rooftop sunshade
Pull the sunshade backwards, locking it in the hooks provided “C” (Fig. 23/2).
B
A
23/1
C
C
23/2
2 4 - TOOLS AND DOCUMENTS COMPARTMENT
In the back of the driver’s seat, there is a documents compartment “A”, make
sure the instruction manual is always present in it.
NOTE: A water-tight document holder is also available as OPTIONAL.
B
Cover “B” can be lifted to access the tool compartment.
A
24
25
INTRODUCTION TO SAFETY
2
MHT 860 L - MHT 950 L Evolution
2 5 - CIGARETTE LIGHTER
The cigarette lighter is present to the RH of the driver.
25
2 6 - DOOR LOCK
Outer lock “A” (Fig. 26) : To open the door, grip the handle and pull outwards.
The lift truck is provided with two keys for locking the cab.
Inner lock “B” (Fig. 26) : To open the door, grip the handle and pull it inwards.
A
2 7 - TOP HALF-DOOR LOCK
B
Closed position : To open, press lock “A” (Fig. 27/1) downwards.
To close, pull handle “B” (Fig. 27/1) inwards.
Open position: Push the door towards the cab to lock key “C” (Fig. 27/2).
To release, press knob “D” (Fig. 27/3) or use lever “E” (Fig. 27/2).
26
B
A
27/1
C
E
D
27/2
26
INTRODUCTION TO SAFETY
2
MHT 860 L - MHT 950 L Evolution
2 8 - REAR WINDOW OPENING LEVER
To open the rear window, pull lever “A” clockwise to the right and push the
glass.
A
28
2 9 - HITCH
The hitch is present on the rear part of the lift truck and is used for a trailer.
The capacity for each lift truck is limited by the total permitted carriage
weight, the pulling force and the maximum vertical force on the drawbolt.
These data are indicated on the manufacturer’s plate affixed on every lift
truck.
N.B. : Optional solutions are available for towing; for more information,
please contact your agent or dealer.
- Travelling on roads with a trailer is only permitted for homologated agricultural tractors.
- Check the braking system and trailer signalling system and connect these
to the lift truck.
- Reduce the lift truck speed.
- Follow the road rules of the country of use.
29
Ensure that the split pin is fitted correctly on the hitch.
3 0 - FRONT LIGHTS
A - Left front indicator.
B - Left front dipped headlight.
C - Left front main beam.
D - Left front sidelight.
E - Right front indicator.
F - Right front dipped headlight.
G - Right front main beam.
H - Right front sidelight.
G
C
E
H
F
A
D
B
30
27
INTRODUCTION TO SAFETY
2
MHT 860 L - MHT 950 L Evolution
3 1 - REAR LIGHTS
A - Left rear indicator.
B - Left rear stoplight.
C - Left tail light.
D - Left rear reverse light.
E - Left rear fog light.
F - Right rear indicator.
G - Right rear stoplight.
H - Right tail light.
I - Right rear reverse light.
L - Right rear fog light.
A
B
C
D
E
L
I
H
G
F
31
3 2 - ROTARY TOWER LIGHT
The rotary tower light may be inclinded, if necessary, to reduce the lift truck
dimensions; it can also be dismantled to avoid theft.
- Unscrew nut “A” and remove the rotary tower light.
- Protect support “B” with cover “C”.
C
A
B
32
3 3 - STEERING WHEEL ADJUSTMENT LEVER
This lever is used for adjusting the inclination and height of the steering
wheel.
- Pull lever “A” (Fig. 33/1) to slacken and adjust the steering wheel (Fig. 33/2).
A
- Push lever “A” (Fig. 33/1) to lock the steering wheel in the selected position.
⇪
33/1
⇪
33/2
28
INTRODUCTION TO SAFETY
3 - MAINTENANCE
INTRODUCTION TO SAFETY
INTRODUCTION TO SAFETY
3
MHT 860 L - MHT 950 L Evolution
F I LT E R E L E M E N T S A N D B E LT S
DESCRIPTION
50 H / 100 H
REFERENCE
REPLACEMENT
SCH.
(WITHIN 3 MON.)
(COUPON)
1 Engine oil filter
476 954
Replace
Every 500 H
2 Air filter cartridge 775 479
Clean
Every 500 H
3 Transmission oil filter
485 695
Replace
Every 500 H
4 Fuel pre-filter cartridge with water separator
745 032
Check
Every 500 H
5 Fuel filter cartridge
747 351
Replace
Every 500 H
6 Engine base vent cartridge
743 204
/
Every 500 H
7 Hydraulic oil filter cartridge (exhaust)
673 203
Replace
Every 500 H
8 Hydraulic oil tank vent
448 269
Clean
Every 500 H
9 Hydraulic oil tank venting plug
659 917
/
Every 1000 H
10 Hydraulic oil filter cartridge (intake)
513 752
Check
Every 1000 H
11 Safety air filter cartridge 775 480
Check
Every 1000 H
12 Cyclone pre-filter
773 433
/
/
13 Engine belt
503 965
Check
Every 1000 H
14 Cab ventilation filter cartridge
225 052
Clean
Every 500 H
: In extremely dusty environments, reduce the interval and make replacements sooner.
1
2
3
4
5
6
7
9
14
13
8
10
11
12
1
INTRODUCTION TO SAFETY
3
MHT 860 L - MHT 950 L Evolution
COMPULSORY REPORT (50 - 100 HOURS OF SERVICE WITHIN 3 MONTHS)
List of operations to be performed
-
COMBUSTION ENGINE
Change oil
Replace oil filter
Replace fuel filters
Clean air filter
Check seals: injection-supply
Check cooling circuit
Check belt tension
Adjust valves
-
HYDROSTATIC TRANSMISSION
Replace intake filter
Clean return filter (depending on assembly)
Check oil level
Check transmission control adjustment
-
AXLES / GEAR BOX
Replace differential oil/brakes casing
Change reduction gear oil
Grease pins, articulations and commands
Grease oscillation
Change gear box oil
-
HYDRAULIC CIRCUIT
Replace return filter
Check oil level
Check seals
-
BRAKING CIRCUIT
Check working of service and parking brakes
Check brake fluid level (depending on assembly)
-
TELESCOPIC BOOM
Grease the outriggers
Grease all the trunnions
Check locking of sliding pads
-
MANISCOPIC SAFETYSYSTEM
Check the working and adjustment, if necessary
-
ACCESSORIES / OPTIONS
Check the working
-
CAB
Check the dashboard and all the instruments.
Check controls, heating and air conditioning (if present)
-
ELECTRIC CIRCUIT
Check battery level
Check working of lights
-
WHEELS
Check tightening of wheels
Check tyre pressure
-
GENERAL MACHINE LUBRICATION
-
WORKING OF THE MACHINE
Hydraulic function with rated load
Road test: steering and braking
2
INTRODUCTION TO SAFETY
3
MHT 860 L - MHT 950 L Evolution
LUBRICANTS
PARTS TO BE LUBRICATED
Combustion engine
Rear wheels reduction gear
Front wheels reduction gear
Front axle differential
Gear box
Rear axle differential
VOLUME
RECOMMENDED PRODUCT
7L
Shell: Rotella 15w40Engine oil
Citgo: C-600
15w40
MANUTOU
500 (API CH4)
0,8 L
0,8 L
Shell: Spirax DH80w90
MANITOU Oil
Citgo: PremSpecial
Gear MP
80w90 brakes
immersed
10 - 11 L
2,5 L
10 - 11 L
Shell: Donax TD
Oil
Citgo: Trans Trac MANITOU
Hyd FL (THF)
Special immersed brakes
Hydraulic oil tank
140 L
Shell: Tellus T46
Oil THF
MANITOU
ISO 46
Citgo: Transgard
Lo-Temp
Braking circuit
0,8 L
Shell: Donax TG Dexron III
MAUNITOU
Mineral
Citgo: Oil
Transgard
ATF Dexron
III brake fluid
General lubrication
Shell: Rentinax Am
Grease HD NLGI 2
Citgo: Lithoplex CM-2
Greasing telescopic
boom
Shell: Rentinax Am
Grease NLGI 2
Citgo: Lithoplex CM-2
Cooling circuit
25 L
120 L
Fuel tank
MANITOU
ANTIFREEZE (-25°)
Tulco 50/50
Anti-freeze
MANITOU ANTIFREEZE (-30°)
Diesel *
Fuel oil (*)
*FEATURES OF FUEL
Use good quality fuel to obtain the best performance out of the I.C. engine.
FEATURES OF THE RECOMMENDED FUEL :
• DERV in accordance with EN590
• BS2869 Class A2
• ASTM D975 - 91 Class 2D
• JIS K2204 (1992) Degrees 1, 2, 3 and Special Degree 3.
The hydrostatic transmisson filter, hydraulic filter, oil and engine filter
must be replaced after the first 50 hours of service to guarantee safety
3
INTRODUCTION TO SAFETY
3
MHT 860 L - MHT 950 L Evolution
MAINTENANCE SCHEDULE
A - DAILY OR EVERY 10 HOURS OF SERVICE
A1
A2
A3
A4
A5
A6
A7
-
Check engine oil level.
Check cooling circuit filling
Check fuel level.
Check and drain the fuel filter with water separator.
Clean the cyclonic filter.
Check tyre pressure and locking of wheel nuts.
Check telescopic boom pads.
B - EVERY 50 HOURS OF SERVICE
B1 - Clean air filter cartridge .
B2 - Check hydraulic oil level.
B3 - Clean radiator grilles.
B4 - Check brake circuit oil level.
B5 - Clean and grease telescopic boom pads .
B6 - Clean and grease cab door pins.
B7 - Clean and grease front and rear wheels pivot pins.
B8 - Clean and grease telescopic boom articulation pin.
B9 - Clean and grease quick release articulation pin.
B10 - Clean and grease lift jack base and rod pins.
B11 - Clean and grease compensation jack base and rod pins.
B12 - Clean and grease slewing jack base and rod pins.
B13 - Clean and grease levelling jack base and rod pins.
B14 - Clean and grease two front axle oscillation bushings.
B15 - Clean and grease two rear axle oscillation bushings.
B16 - Clean and grease cross journals and cardan shaft.
C - EVERY 250 HOURS OF SERVICE
C1
C2
C3
C4
C5
-
Check
Check
Check
Check
Check
alternator belt tension/driving shaft.
front and rear axle differential oil level.
front and rear wheels reduction gear oil level.
transmission box oil.
battery.
D - EVERY 500 HOURS OF SERVICE OR YEARLY D1 - Drain and change engine oil.
D2 - Replace engine oil filter.
D3 - Replace air filter cartridge .
D4 - Change the motor base vent cartridge.
D5 - Replace fule filter cartridge.
D6 - Change cartridge of the fuel filter with water condenser.
D7 - Replace transmission oil filter.
D8 - Replace hydraulic oil filters (exhaust).
D9 - Replace the hydraulic and transmission oil vent filter.
D10- Replace cab ventilation filter .
4
INTRODUCTION TO SAFETY
MHT 860 L - MHT 950 L Evolution
3
E - EVERY 1000 HOURS OF SERVICE OR YEARLY E1 E2 E3 E4 E5 E6 E7 E8 E9 E10 E11 -
Replace air filter safety cartidge .
Drain and change hydraulic oil.
Replace hydraulic oil suction filter cartridge.
Drain and change front and rear axle differential oil.
Drain and change front and rear wheels reduction gear oil.
Change transmission box oil.
Drain and clean fuel tank.
Replace alternator belt/engine shaft.
Replace transmission hydraulic oil filler and vent plug.
Check telescopic boom pads for wear *.
Check engine valves clearance *.
F - EVERY 2000 HOURS OF OPERATION OR EVERY 2 YEARS F1
F2
F3
F4
F5
-
Check alternator and starter motor *.
Check turbo compressor *.
Check radiator *.
Check water pump and thermostat *.
Change cooling circuit liquid.
G - OCCASIONAL MAINTENANCE G1
G2
G3
G4
G5
G6
- Changing a wheel.
- Towing the fork lift truck.
- Slinging the fork lift truck.
- Transporting the fork lift truck on a platform.
- Adjusting head lights.
- Air conditioning *.
* For these operations, consult your agent or dealer.
To be performed once a year if the lift truck has not completed the
required number of operating hours.
: In extremely dusty environments, reduce the interval and make
replacements sooner.
: Every 50 hours up to the first 250 hours and periodically, every
1000 hours of service.
: In case of use in extremely dusty or oxidising environments, reduce this frequency to 10 hours of operation or daily.
: After the first 500 hours of operation and periodically every 1000
hours of operation.
5
INTRODUCTION TO SAFETY
3
MHT 860 L - MHT 950 L Evolution
A - D A I LY O R E V E RY 1 0 H O U R S O F S E R V I C E
A 1 - CHECK ENGINE OIL LEVEL
Before checking the oil level, make sure the combustion engine is switched off and the lift truck is parked on a level horizontal surface.
For precise indications, wait a few minutes after the engine stops to
allow the oil to flow into the crankcase.
Remove dipstick “1” (Fig. A1/1) clean it and check the oil level.
Top up through the filler hole “2” (Fig. A1/2) , if necessary.
1
A1/1
2
A1/2
A 2 - CHECK COOLING CIRCUIT FILLING
Refer to point F5 for the cooling circuit filling procedure. If necessary,
add cooling fluid during maintenance, and let the engine cool down
before proceeding. Remove the filler plug carefully as there is serious
risk of coolant splashing out if the system is still pressurized and the
liquid itself is still hot.
The cooling liquid added in the maintenance phase must be the same
as that originally used for filling the circuit.
A2
6
INTRODUCTION TO SAFETY
3
MHT 860 L - MHT 950 L Evolution
A 3 - CHECK FUEL LEVEL
Position the lift truck on a horizontal surface, with the combustion engine switched off.
To reduce the condensate due to atmospheric conditions to a minimum,
keep the fuel tank filled as far as possible.
3
- Remove plug “3” (Fig. A3).
- Fill the tank with fuel oil through the filler plug taking care to avoid
impurities entering the tank.
- Refit plug “3” (Fig. A3).
A3
Do not smoke or approach the machine during fuelling operations or
with the tank open. Never carry out fuelling operations with the combustion engine running.
A 4 - CHECK AND DRAIN THE FUEL FILTER WITH
WATER TRAP
Make sure the engine is stationary before carrying out maintenance or
repairs on it.
Place a suitable container under the condensate trap to collect the fuel
that flows out.
Wipe the fuel that leaks out.
Install a suitable tube on outlet “4” (Fig. A4).
Open drainage outlet “5” (Fig. A4).
Let the liquid flow out into the container.
Close drainage outlet “5” (Fig. A4) tightening it only manually.
Remove the tube and dispose off the drained liquid in accordance with
the regulations applicable in the country of use.
6
7
5
Do not smoke near or approach the machine with the flame while filling
the tank or when the tank is open.
4
A4
Never refuel with the engine running.
If the tank has been empty for a while or the vehicle has run dry without
fuel, run the priming pump “6” (Fig. A4) until the glass cup fills up “7”
(Fig. A4).
Switch the engine on and check for leaks.
7
INTRODUCTION TO SAFETY
3
MHT 860 L - MHT 950 L Evolution
A 5 - CLEAN THE CYCLONIC PREFILTER
The cleaning frequency given here is purely indicative, the prefilter must,
however, be cleaned as soon as the impurities reach the MAX level visible on cup “8” (Fig. A5).
- Slacken nut “9” (Fig. A5), remove cover “10” (Fig. A5) and drain cup
“8” (Fig. A5).
- Wipe the prefilter with a clean dry cloth and refit it.
9
10
8
A5
While cleaning, take special care
to prevent impurities from entering the dry air filter.
A 6 - CHECK TYRE PRESSURE AND LOCKING OF
WHEEL NUTS
Check the tyre pressure and adjust, if necessary (see the
"Specifications" Chapter).
Check the tyres for cuts, protruberances, wear, etc..
Check the locking of the wheel bolts (see TABLE Fig. A6).
Follow these warnings to avoid rupture as it can result in accidents.
A 7 - CHECK THE TELESCOPIC BOOM PADS
Remove the telescopic boom completely and make sure the telescopic boom
pads are greased correctly (if greasing is required, see point B5).
8
A6
WHEEL NUTS
TIGHTENING TORQUE
FRONT WHEELS
REAR WHEELS
630 ft/lb
Nm
465
630
Nm
465 ft/lb
INTRODUCTION TO SAFETY
3
MHT 860 L - MHT 950 L Evolution
B - E V E RY 5 0 H O U R S O F S E R V I C E
B 1 - CLEAN AIR FILTER CARTRIDGE
Never wash an air filter cartidge.
1
1
2
1
Release blocks “1” (Fig. B1/1) and remove cover “2” (Fig. B1/1).
Remove cartridge “3” carefully (Fig. B1/2), to reduce dust dispersal to
the minimum.
Do not remove the safety cartridge.
Clean the filter cartridge using a jet of compressed air, always directing
the jet outwards from inside.
Wipe the inside of the filter with a damp, clean cloth that does not leave
residue, after covering the combustion engine inlet pipe.
Check the condition of the cartridge.
Cartridges that are no longer efficient must be replaced immediately.
Insert cartridge “3” (Fig. B1/2) in the filter rod, pressing the cartridge
around the edges, not in the middle.
Refit cover “2” (Fig. B1/1) orienting the valve correctly (for correct
working of the valve, do not exceed the inclination of approx. 20°) and
tighten blocks “1” (Fig. B1/1).
B1/1
3
B1/2
B 2 - CHECK THE HYDRAULIC OIL LEVEL
Position the lift truck on a level surface with the combustion engine switched off and the telescopic boom retracted and lowered all the way
down.
Check indicator “4” (Fig. B2/1).
The oil level is correct when it is slightly below the maximum level.
Add oil, if necessary (see the “LUBRICANTS” Table) through filler hole
“5” (Fig. B2/2).
Always keep the oil level maximum for optimum performance.
4
B2/1
5
B2/2
9
INTRODUCTION TO SAFETY
3
MHT 860 L - MHT 950 L Evolution
B 3 - CLEAN THE RADIATOR GRILLES
Check the radiator (intercooler Fig. B3/1; water Fig. B3/2; oil Fig. B3/3)
for: damaged fins, corrosion, dirt, grease, insects, leaves, oil or other
debris.
The compressed air can cause accidents.
While using compressed air, wear a protective device for the face and
protective clothing.
The maximum pressure of the compressed air at the nozzle outlet must
be 2 bar (30 PSI).
B3/1
Direct the compressed air jets in the direction of the arrows.
Keep the air nozzle at a distance of about 6mm from the radiator fins.
Also use pressurized water to soften mud or solid debris. The maximum
water pressure must be less than 2.7 bar (40 PSI).
To remove oil and grease, use a degreaser and steam. Clean both
sides of the radiator mass. Wash the radiant mass with detergent and
boiling water. Rinse the radiant mass thoroughly with clean water.
After cleaning the radiator/s, start the I.C. engine, keeping it running at
minimum for about five minutes. Bring the I.C. engine to maximum operating speed without load (this operation helps to remove debris and to dry
the radiant mass). Gradually reduce the I.C. engine speed to the minimum and stop it. Use a light to check behind the radiant mass to see if it
is clean. If necessary, clean again.
B3/2
Check to see if fins are damaged. Bent fins can be straightened using a
“comb”.
Check to make sure the following elements are in good condition. welded parts, mounting brackets, piping, connections, clamps and gaskets.
Carry out repairs, if necessary.
B3/3
B 4 - CHECK BRAKE CIRCUIT OIL LEVEL
Position the truck on a flat level surface with the engine switched off.
- Remove the guard for access to the brake oil tank.
- The oil level in the tank must be at the maximum level.
- Add oil, if necessary, through the filler hole “6” (Fig. B4) (see the
“LUBRICANTS” Table).
6
In case of abnormal drop in level, consult your agent or dealer.
B4
10
INTRODUCTION TO SAFETY
MHT 860 L - MHT 950 L Evolution
3
B 5 - CLEAN AND GREASE TELESCOPIC BOOM
PADS
This operation must be carried out every 50 hours up to the first 250
hours of service and then every 1000 hours of service, subsequently.
- Extend the boom completely.
- Using a brush apply a layer of grease (see: 3 - MAINTENANCE: LUBRICANTS AND FUEL) on all four sides of the telescopic boom (fig. B3).
- Extend and retract the boom a number of times to distribute the grease
uniformly.
- Remove excess grease.
B5
Must be done every week if the lift truck has not completed
50 hours of weekly service.
If used intensively in extremely dusty and oxidising
environments, reduce this frequency to
10 HOURS of service or daily.
B 6 - CLEAN AND GREASE CAB DOOR PINS
B 7 - CLEAN AND GREASE FRONT AND REAR
WHEEL PIVOT PINS
B6
B7
11
INTRODUCTION TO SAFETY
3
MHT 860 L - MHT 950 L Evolution
B 8 - CLEAN AND GREASE THE TELESCOPIC
BOOM ARTICULATION PIN
B 9 - CLEAN AND GREASE QUICK RELEASE ARTI CULATION PIN
B 10 - CLEAN AND GREASE LIFT JACK BASE
(Fig.B10/1) AND ROD (Fig.B10/2) PINS
B8
B9
12
B10/2
B10/1
INTRODUCTION TO SAFETY
MHT 860 L - MHT 950 L Evolution
3
B 11 - CLEAN AND GREASE COMPENSATION
JACK BASE (Fig.B11/1) AND ROD
(Fig.B11/2) PINS
B 12 - CLEAN AND GREASE SLEWING CYLINDER BASE (Fig.B12/1) AND ROD (Fig.B12/2) PINS
B12/1
B11/2
B12/2
B11/1
13
INTRODUCTION TO SAFETY
3
MHT 860 L - MHT 950 L Evolution
B 13 - CLEAN AND GREASE LEVELLING JACK
BASE (Fig.B13/1) AND ROD (Fig.B13/2) PINS
B 14 - CLEAN AND GREASE THE TWO FRONT
AXLE OSCILLATION BUSHINGS (Fig.B14/1 Fig.B14/2)
B 15 - CLEAN AND GREASE THE TWO REAR AXLE
OSCILLATION BUSHINGS (Fig.B15/1 Fig.B15/2)
B 16 - CLEAN AND GREASE CROSS JOURNALS
AND CARDAN SHAFT (Fig.B16/1 - Fig.B16/2)
B13/1
B13/2
B14/1
B14/2
B15/1
B15/2
B16/1
14
B16/2
INTRODUCTION TO SAFETY
3
MHT 860 L - MHT 950 L Evolution
C - E V E RY 2 5 0 H O U R S O F S E R V I C E
C 1 - CHECK ALTERNATOR BELT TENSION/ DRI VING SHAFT
The alternator belt tension must be adjusted in such a manner that,
when pressed normally with the thumb, the belt must give by about 10
mm (Fig. C1).
1
If the tension is not correct, slacken screws “1” and “2” (Fig. C1) by 2 or
3 turns of the thread and rotate the alternate unit to obtain the required
tension.
Retighten screws “1” and “2” (Fig. C1).
Check the condition of the belt (for signs of wear or cracks) and replace
it, if necessary (see operation No. E8).
2
2
C1
C 2 - CHECK THE FRONT AND REAR AXLE DIFFE RENTIAL OIL LEVEL
4
3
Position the lift truck on a level surface, with the engine switched off.
Check the front axle differential oil level.
Remove plug “3” (Fig. C2/1).
The oil level must reach the hole.
If necessary, add oil through filler hole “4” (Fig. C2/1). (see the “LUBRICANTS“ Table).
Repeat this operation for the rear axle differential (Fig. C2/2).
C2/1
4
3
C 3 - CHECK THE FRONT AND REAR WHEEL
REDUCTION GEAR OIL LEVEL
C2/2
Position the lift truck on a level surface, with the engine switched off.
Check the level on the reduction gear of each front wheel.
Turn level plug “5” (Fig. C3) to the horizontal position.
Remove the plug: the oil level must reach the hole.
Add oil, if necessary (see “LUBRICANTS” Table).
Repeat the operation for each of the rear wheels.
5
5
C3
15
INTRODUCTION TO SAFETY
3
MHT 860 L - MHT 950 L Evolution
C 4 - CHECK THE TRANSMISSION BOX OIL
Position the lift truck on a horizontal surface, with the combustion engine
switched off.
- Remove level plug “6” (Fig. C4), the oil must reach the level of the opening.
- Top up with oil, if necessary (See the “LUBRICANTS” Table).
- Refit and retighten level plug “6” (Fig. C4).
6
C4
C 5 - CHECK THE BATTERY
Check the electrolyte level in the battery (if the battery specifications
require it).
-
In high environmental temperatures, check the level more frequently.
7
+
Maintenance:
7
- Check connecting terminals “7” (Fig. C5).
- Check the electrolyte level regularly and, if necessary, top up with
demineralized or distilled water; never add sulphuric acid (strictly follow the indications on the battery).
- If the voltage at the battery poles is less than 12.3 V, recharge the battery.
- Disconnect the battery if the truck is to remain unused for long
periods.
Charging the battery:
- Remove the caps “8” (Fig. C5) (if possible).
- Only direct current must be used for recharging the battery.
- Connect the positive wire (+) of the battery charger to the positive
pole(+) of the battery and the negative wire (-) of the battery charger
to the negative pole (-) of the battery.
- Charge using a current 1/10 of the battery’s rated capacity (Ah).
- When charging is complete, switch off the battery charger before
disconnecting the battery.
- Check the electrolyte level.
16
8
C5
INTRODUCTION TO SAFETY
3
MHT 860 L - MHT 950 L Evolution
D - E V E RY 5 0 0 H O U R S O F S E R V I C E O R Y E A R LY
D 1 - DRAIN OUT AND CHANGE COMBUSTION
ENGINE OIL
D 2 - REPLACE THE ENGINE OIL FILTER
Position the lift truck on a level surface, let the engine run at minimum
speed for a few minutes and then switch it off.
Emptying the engine oil pan
Place a container under drain plug “1” (Fig. D2/1) and unscrew the plug.
Remove filler plug “2” (Fig. D2/2) to facilitate drainage.
1
Replacing the filter
Remove oil filter “3” (Fig. D2/1), reject the filter and its gasket.
Wipe the filter support with a clean cloth.
Lubricate the new gasket lightly.
Fit a new filter having identical specifications (“FILTER ELEMENTS
AND BELTS”).
3
D2/1
Tighten the oil filter manually and turn it through a quarter of a turn to
lock it in place.
Dispose off the filter and used oil according to the regulations in force in
the country of use.
Filling the engine oil pan
Refit and tighten drain plug “1” (Fig. D2/1).
Fill oil as shown in the Table (“LUBRICANTS”) through filler hole “2”
(Fig. D2/2).
Wait for a few minutes to allow the oil to flow down into the pan.
Start up the engine and leave it running for a few minutes.
Check for leakage from the drain hole and the oil filter.
Stop the engine, wait for a few minutes and check the level using rod
“4” (Fig. D2/3).
Top up, if necessary.
2
D2/2
4
D2/3
17
INTRODUCTION TO SAFETY
3
MHT 860 L - MHT 950 L Evolution
D 3 - REPLACE THE AIR FILTER CARTRIDGE
The air used for combustion of the fuel is purified by a dry air filter;
never use the lift truck with the air filter dismantled or damaged.
Release blocks “5” (Fig. D3/1) and remove cover “6” (Fig. D3/1).
Remove cartridge “7” (Fig. B3/2) very carefully to reduce dust leakage
to the minimum and dispose it according to the regulations in force in
the country of use.
Do not remove the safety cartridge.
Wipe the inside of the filter with a damp, clean cloth that does not leave
residue.
5
5
6
5
D3/1
Never wash an air filter cartridge.
Fit a new cartridge “7”(Fig. D3/2) having identical features (see Table
“FILTER ELEMENTS AND BELTS”) inserting it on the filter rod, pressing the cartridge along the edges, not in the middle.
Refit cover “6” (Fig. D3/1) orienting the valve correctly (for correct
working of the valve, do not exceed an inclination of approx. 20°) and
tighten the blocks “5” (Fig. D3/1).
7
D3/2
D 4 - REPLACE ENGINE BASE VENT CARTRIDGE
Make sure the engine is stopped before carrying out maintenance or
repairs on it.
To access the engine base vent cartridge, remove the intercooler radiator partitions “8” and “9” (Fig. D4/1) using a 10 mm hex wrench.
Place a container under the vent cartridge “10” (Fig. D4/2).
Using a suitable tool, remove the engine base vent cartridge “10” (Fig.
D4/2).
Lubricate the O-ring of the new cartridge with clean engine oil.
Insert the new cartridge (see Table “FILTER ELEMENTS AND BELTS”)
and screw it in manually by applying a torque not greater than 12 Nm.
Dispose off the used cartridge and oil contained in it in accordance with
the regulations in force in the country of use.
8
9
D4/1
10
D4/2
18
INTRODUCTION TO SAFETY
3
MHT 860 L - MHT 950 L Evolution
D 5 - REPLACE THE FUEL FILTER CARTRIDGE
The combustible materials of certain engine components (such as the
seals) can be extermely dangerous if burnt. Never allow such material to
come in contact with the skin or the eyes.
Check to make sure the ignition key is turned off before carrying out
maintenance or repairs on the fuel supply system, since the pump will
start supplying fuel if the engine is switched on.
Do not let impurities enter the fuel supply system. Before disconnecting
a union, clean the surrounding surface carefully. After disconnecting
one of the components, fit a suitable cover on all open unions.
11
D5
Make sure the engine is stationary before carrying out maintenance or
repairs on it.
After the engine is stopped, before carrying out maintenance and repair
operations on the fuel pipes, wait for 60 seconds to allow pressure to
be discharged.
Eliminate leaks, if any, from the supply system.
Replace the fuel piping that has leaks.
- Place a suitable container under the fuel filter unit to collect the fuel
that flows out.
- Clean the outer surfaces of the fuel filter thoroughly.
- Use a suitable tool to dismantle the used fuel filter “11” (Fig. D5) from
the engine.
- Dispose off the used cartridge and the liquid contained in it in accordance with the regulations in force in the country of use.
- Make sure dirt cannot enter the new fuel filter (see Table “FILTER
ELEMENTS AND BELTS”).
Do not fill the new fuel filter before assembly.
Do not lubricate the sealing ring on the new fuel filter.
- Insert the new filter.
Do not use a tool to insert the filter.
Tighten the filter manually.
Remove the container and dispose off the liquid in accordance with the
regulations applicable in the country of use.
Refit the two intercooler radiator partitions “12” and “13” (Fig. D5/2)
using a 10 mm hex wrench.
12
13
D5/2
19
INTRODUCTION TO SAFETY
3
MHT 860 L - MHT 950 L Evolution
D 6 – REPLACE THE FUEL FILTER CARTRIDGE
WITH WATER SEPARATOR
- Place a suitable container under the fuel filter with water separator
“14” (Fig. D6/1) to collect the liquid that flows out.
- Clean the outer surfaces of the filter thoroughly.
- Install a suitable tube on outlet “15” (Fig. D6/2).
- Open drainage outlet “16” (Fig. D6/2) and let the liquid drain out completely into the container.
- Close the drainage opening “16” (Fig. D6/2) tightening it only manually
and remove tube “15” (Fig. D6/2).
- Slacken screw “17” (Fig. D6/2) holding the glass cup “18” steady (Fig.
D6/2).
- Remove the glass cup “18” (Fig. D6/2) from cartridge “19” (Fig. D6/2).
- Use a suitable tool to remove cartridge “19” (Fig. D6/2).
- Dispose off the used cartridge “19” (Fig. D6/2) and the old gaskets “20
- 21” (Fig. D6/3) according to the regulations in force in the country of
use.
- Clean the glass cup “18” (Fig. D6/2) using a clean cloth that does not
leave residues.
- Make sure dirt cannot enter the new fuel filter (see Table “FILTER
ELEMENTS AND BELTS”).
Do not lubricate the sealing ring on the new fuel filter.
- Insert the new filter “22” (Fig. D6/3).
Do not use a tool to insert the filter.
Tighten the filter manually.
- Insert the new sealing ring “20” (Fig. D6/3) on fixing screw “23” (Fig.
D6/3).
- Insert the new sealing ring “21” (Fig. D6/3) on glass cup “24” (Fig.
D6/3).
- Align the glass cup “24” (Fig. D6/3) with filter “22” (Fig. D6/3).
- Insert fixing screw “23” (Fig. D6/3).
- Remove the container and dispose off the liquid in accordance with
the regulations applicable in the country of use.
Manual priming pump (on fuel filter with water separator)
To bleed air from the supply system, proceed as follows:
- Make sure the supply system is in good working condition.
- Activate priming pump “25” (Fig. D6/1) until it is blocked.
- The supply system must now be primed and the engine must be able
to start up.
- Activate the starter motor.
Once the engine starts up, let it run at minimum speed without load for
at least five minutes immediately after having bled the air from the
supply system.
Note: This will ensure that no air is present in the supply system.
25
14
D6/1
19
18
16
17
15
D6/2
22
23
21
24
20
D6/3
20
INTRODUCTION TO SAFETY
3
MHT 860 L - MHT 950 L Evolution
D 7 - REPLACE TRANSMISSION OIL FILTER
Using a collar wrench, remove the transmission oil filter “26” (Fig. D7)
and dispose it off together with the gasket in accordance with the regulations in force in the country of use.
Wipe the filter support with a clean cloth that does not leave residue.
Fit a new filter having identical features (see Table “FILTER ELEMENTS
AND BELTS”) using only your hands making sure the gasket is positioned correctly after lubricating it.
Start up the lift truck and check for leaks.
Check the working efficiency of the filter on indicator “27” (Fig. D7).
26
27
D 8 - REPLACE HYDRAULIC OIL FILTERS
(EXHAUST)
D7
Using a box wrench, dismantle the two hydraulic oil filters “28” (Fig. D8)
and discard them together with the gaskets.
Wipe the filter supports with a clean cloth that does not leave residue.
Fit the new filters having identical features (see Table “FILTER ELEMENTS AND BELTS”) using only your hands making sure the gasket
is positioned correctly after lubricating it.
Start up the lift truck and check for leaks.
28
D 9 - REPLACE THE TRANSMISSION AND
HYDRAULIC OIL TANK VENT FILTER
28
D8
Slacken vent “29” (Fig. D9) on the back of the cab and replace it with a
new one having identical features; see Table “Filter elements and
belts”).
Fit the new vent, tightening it manually.
29
D 10 - REPLACE THE CAB VENTILATION FILTER
CARTRIDGE
D9
Remove guard “30” (Fig. D10).
Remove cab ventilation filter “31” (Fig. D10).
Clean the filter using a jet of compressed air.
Check thje condition of the filter and, if necessary, replace the cartridge
with a new one having identical features (see Table “FILTER ELEMENTS AND BELTS”).
Refit the filter and guard.
30
31
D10
21
INTRODUCTION TO SAFETY
3
MHT 860 L - MHT 950 L Evolution
E - E V E RY 1 0 0 0 H O U R S O F S E R V I C E O R Y E A R LY
E 1 - REPLACE THE AIR FILTER SAFETY CARTIDGE
Dismantle the air filter (see operation D3).
Remove cartridge “1” (Fig. E1) very carefully to reduce dust leakage to
the minimum and dispose it according to the regulations in force in the
country of use.
Wipe the inside of the filter with a damp clean cloth that does not leave
residue, protecting the combustion engine inlet pipe.
1
Never wash an air filter cartridge.
Fit a new cartridge “1”(Fig. E1) having identical features (see Table
“FILTER ELEMENTS AND BELTS”) in place of the one removed, inserting it on the filter rod, pressing the cartridge around the edges, not in
the middle.
Refit the assembly (see operation D3).
E1
E 2 - DRAIN AND CHANGE THE HYDRAULIC OIL
Before carrying out these operations, make sure the lift truck is parked
on a level surface, with the engine switched off.
Place a container under the flanges with connecting tube “2” (fig. E2/1).
To unscrew the 12 screws and to remove the flanges with connecting
tube “2” (fig. E2/1).
To hasten drainage, remove filler plug “3” to let air in (fig. E2/2).
When the tank is empty, refit the flanges with connecting tube “2” (fig.
E2/1) tightening the 12 fixing screws 12 and proceed with dismantling
the hydraulic oil filter cartridge (suction side) (See operation E3).
Dispose off the used oil according to the regulations in force in the
country of use.
2
2
E2/1
3
E2/2
22
INTRODUCTION TO SAFETY
3
MHT 860 L - MHT 950 L Evolution
E 3 - REPLACE HYDRAULIC OIL SUCTION FILTER
CARTRIDGE
Drain out the hydraulic oil tank (see E2).
Remove hydraulic oil filter cartridge holder flange “4” (Fig. E3/1).
Remove the hydraulic oil suction filter cartridge “5” (Fig. E3/2) from the
flange and replace it with a new one having identical features (see
Table “FILTER ELEMENTS AND BELTS”).
Dispose off the used filter according to the regulations in force in the
country of use.
Refit hydraulic oil filter cartridge holder flange “4” (Fig. E3/1), ensuring
the correct positioning.
4
E3/1
Filling the tank
Check to make sure the flanges with connecting tube “6” (fig. E3/3) are
locked tight.
Fill theoil tank (see Table “OILS - GREASE - FLUIDS - FUELS - FILTERS”) through filler hole “7” (Fig. E3/4) till the oil level reaches the
marking on level indicator “8” (Fig. E3/5).
Check for leakage from the flanges with connecting tube “6” (fig. E3/3)
and flange “4” (Fig. E3/1).
Refit the tank cap “7” (fig. E3/4).
5
E3/2
Use filtered uncontaminated oil.
It may sometimes be necessary to leave the combustion engine running
at low speed for a few minutes to bleed the pumps inlet circuits, if an air
bubble has been formed during drainage. If air bubbles persist, consult
your agent or dealer.
8
6
6
E3/3
7
E3/5
E3/4
23
INTRODUCTION TO SAFETY
3
MHT 860 L - MHT 950 L Evolution
E 4 - EMPTY AND CHANGE THE FRONT AND REAR
AXLE DIFFERENTIAL OIL
Park the lift truck on a level surface, with the engine switched off and the
differential oil still warm.
Drain out the front axle differential oil.
Place a container under drain plugs “9” (Fig. E4) and let the oil drain
out.
Remove level plug “10” (Fig. E4) and filler plug “11” (Fig. F4) to ensure
complete drainage.
Refit and tighten plugs “9” (Fig. E4).
Fill oil (see Table “LUBRICANTS”) through filler hole “11” (Fig. E4).
The level is correct when the oil reaches the level hole “10” (Fig. E4).
Check for leakage from the drain plugs.
Refit and tighten level plug “10” (Fig. E4) and refit plug “11” (Fig. E4).
Repeat the operation for the rear axle differential.
Dispose off the used oil according to the regulations in force in the
country of use.
10
11
9
9
10
9
E4
E 5 - EMPTY AND CHANGE THE FRONT AND REAR
WHEEL REDUCTION GEAR OIL
Park the lift truck on a level surface, with the engine switched off and the
differential oil still warm.
Drain each front wheel reduction gear.
Turn the drain and level plug “12” (Fig. E5/1) downwards to position “A”.
Place a container under the drain plug and unscrew the plug.
Let all the oil flow out.
Turn the drain and level hole to horizontal position “B” (Fig. E5/2) i.e. in
the level position.
Fill oil (see Table “LUBRICANTS”) through drain and level hole “13”
(Fig. E5/2).
The level is correct when the oil reaches hole “13” (Fig. E5/2).
Refit drain and level plug “13” (Fig. E5/2) and tighten it.
Repeat the operation for each of the rear wheel reduction gears.
Dispose off the used oil according to the regulations in force in the
country of use.
12
A
E5/1
13
B
E5/2
24
INTRODUCTION TO SAFETY
3
MHT 860 L - MHT 950 L Evolution
E 6 - CHANGE THE TRANSMISSION BOX OIL
The lift truck must be parked on a level horizontal surface, with the
combustion engine switched off and the gear oil still warm.
Place a container under drain plug “14” (Fig. E6) and let all the oil flow
out.
Remove level and filler plug “15” (Fig. E6) to make sure the tank is
completely drained.
Screw oil drain plug “14” (Fig. E6).
Fill oil (see Table “LUBRICANTS”) through filler hole “15” (Fig. E6).
Check for leakage through drain plugs.
Dispose off the used oil according to the regulations in force in the
country of use.
15
14
E6
E 7 - EMPTY AND CLEAN FUEL TANK
During this operation, avoid smoking or using a flame.
- Position the lift truck on a level horizontal surface;
the combustion engine must be switched off.
- Inspect the parts subject to leakage on the fuel circuit and the tank.
- Contact your agent or dealer, in case of leakage.
16
E7/1
Never try to carry out welding or other operations yourself: this can
result in an explosion or fire.
- Place a container under drain plug “16” (Fig. E7/1) and unscrew the
plug.
- Remove filler plug “17” (Fig. E7/2).
- Let all the fuel flow out and rinse with 10 litres of clean fuel poured
through the filler hole.
- Refit and tighten drain plug “16” (Fig. E7/1).
- Fill the tank with clean fuel filtered through a suction rose or a clean
cloth that does not leave residue; then refit the filler plug “17” (Fig.
E7/2).
- Before operating the starter motor, run the suction pump for one minute to bleed air from the filter.
- Let the engine run in neutral for a few minutes at minimum speed.
17
E7/2
25
INTRODUCTION TO SAFETY
3
MHT 860 L - MHT 950 L Evolution
E 8 - REPLACE THE ALTERNATOR BELT/
DRIVING SHAFT
18
Position the lift truck on a level surface with the combustion engine switched off.
Unscrew the alternator fixing screws “18” and belt-tightener lever retainer bolt “19” (Fig. E8) through 2 or 3 turns of the thread and turn the
alternator position to slacken the belt tension to remove it from the pulley.
Replace the belt with a new one having identical features, see Table
“FILTER ELEMENTS AND BELTS”), turn the alternator position to tighten the belt correctly.
Tighten the belt-tightener retainer bolt “19” (Fig. E8) and alternator
fixing screws “18” (Fig. E8).
Check the belt tension again to make sure it is correct.
It is advisable to check the belt tension again after 20 hours of operation following replacement (see operation No. C1).
19
19
E8
E 9 - REPLACE TRANSMISSION HYDRAULIC OIL
FILLER AND VENT PLUG
Unscrew the transmission hydraulic oil filler and vent plug “20” (Fig. E9)
in the back of the cab and replace it with a new one having identical
features (see Table “FILTER ELEMENTS AND BELTS”).
Fit the new transmission hydraulic oil filler and vent plug and tighten it
manually.
20
E9
E 10 - CHECK THE TELESCOPIC BOOM PADS FOR
WEAR
For these operations, contact your agent or dealer.
E 11 - CHECK THE ENGINE VALVES CLEARANCE
This operation must be carried out after the first 500 hours of operation
and periodically every 1000 hours of operation.
For these operations, contact your agent or dealer.
26
INTRODUCTION TO SAFETY
MHT 860 L - MHT 950 L Evolution
3
F - EVERY 2000 HOURS OF OPERATION OR EVERY 2 YEARS
F 1 - CHECK THE ALTERNATOR AND STARTER
MOTOR
F 2 - CHECK THE TURBO COMPRESSOR
F 3 - CHECK THE RADIATOR
F 4 - CHECK WATER PUMP AND THERMOSTAT
FOR THESE OPERATIONS CONSULT YOUR AGENT OR DEALER.
27
INTRODUCTION TO SAFETY
3
MHT 860 L - MHT 950 L Evolution
F 5 - REPLACE COOLING CIRCUIT LIQUID
This series of operations must be carried out whenever it is necessary
or at least once every two years before the winter. Position the fork lift
truck on level ground with the I.C. engine switched off and cold.
Do not drain the coolant liquid when the engine is hot and the coolant
is under pressure, since there is risk of a dangerous jet of boiling hot
liquid being thrown out.
Position the forklift truck on a horizontal surface, stop the I.C. engine
and leave it to cool.
1
Place a container under the rubber hose pipe “1” (fig. F5/1) of the radiator and drainage plug “2” (fig. F5/2) of the engine block. Remove the
rubber hose pipe “1” (fig. F5/1) and slacken the drainage plug “2” (fig.
F5/2).
Remove the filler plug “3” (Fig. F5/3) of the radiator.
Drain out the cooling circuit completely, ensuring that the openings are
not obstructed.
Check the condition of the hose pipes and their fittings. replace them,
if necessary.
Clean the system with clean water and use a detergent product, if necessary.
F5/1
To avoid damage caused by frost, ensure that all the coolant liquid is
removed from the engine. This is important in case the system is
drained after being rinsed with water or in case a very weak anti-freeze
solution is used to protect the system from frost.
F5/2
Refit and tighten the rubber hose pipe “1” (Fig. F5/1) and the drainage
plug “2” (fig. F5/2) tightening torque 40 Nm.).
Prepare the cooling liquid (see Table F5/4).
Fill the cooling system slowly up to 12 mm below the filler neck.
Refit the filler plug “3” (Fig. F5/3).
Leave the engine running at minimum speed for a few minutes.
Check for leaks.
Check the level and add more liquid, if necessary.
Dispose off the used liquid according to the regulations in force in the
country of use.
2
The engine has no anticorrosion elements and must be kept filled
throughout the year with a mixture with a minimum 25% content of
anti-frost.
3
TABLE F5/4
FREEZING POINT DEPENDING
ON % OF ANTIFREEZE
Antifreeze
(MANITOU ANTIFREEZE)
25%
33%
40%
50%
28
Temperature
-12°
-19°
-26°
-38°
F5/3
INTRODUCTION TO SAFETY
3
MHT 860 L - MHT 950 L Evolution
G - OCCASIONAL MAINTENANCE
G 1 - CHANGING A WHEEL
If the wheel needs replacement while travelling on the road, proceed
as described below:
- If possible, stop the lift truck on level, compact ground.
- Switch the lift truck off (see: 1 - SAFETY INSTRUCTIONS AND REGULATIONS: INSTRUCTIONS FOR DRIVING WITH AND WITHOUT
LOAD).
- Turn the emergency lights On.
- Apply wedges to block the lift truck in both directions on the axle opposite the wheel to be replaced.
- Slacken the bolts of the wheel to be replaced so that they can be removed without much effort.
- Fit and adjust jack “1” (fig. G1/1) under the axle shaft, as close as possible to the wheel.
- Raise the wheel off the ground and position safety support “2” (Fig.
G1/2) under the axle.
1
G1/1
The use of a safety support is compulsory for carrying out this
operation.
- Unscrew the wheel bolts completely and remove them.
- Remove the wheel using to-and-fro movements and turn it on the side.
- Place the new wheel on the hub.
- Screw the bolts manually, lubricating with grease, if necessary.
- Remove the safety support and lower the lift truck by means of the
jack.
- Tighten the wheel bolts completely using a dynamometric wrench (see:
3 - MAINTENANCE: A - DAILY OR EVERY 10 HOURS OF SERVICE,
for tightening torque).
2
G1/2
29
INTRODUCTION TO SAFETY
3
MHT 860 L - MHT 950 L Evolution
G 2 - TOWING THE LIFT TRUCK
Towing must be done at very low speeds for short distances.
- Set the reverse gear lever in neutral.
- Disengage the parking brake.
- Switch on the emergency lights.
1
1
2
- Position the gear in neutral manually:
a) disconnect and plug the hydraulic hoses “1” (Fig. G2/1) from the
slow/fast gear box cylinder;
b) lever on rod “2” (Fig. G2/1) of the gear box to pull it out and bring
it to the neutral position (intermediate position between the two
successive “clicks”).
G2/1
- Deactivate the negative brake:
a) screw nuts with lock nuts 3 (Fig. G2/2) on the two sides of the
front axle box until they rest against the piston.
b) then rotate through one turn.
3
Attention
The opposite screws must be tightened to the same extent.
- In the absence of hydraulic servo-assistance of direction and brakes,
act slowly but firmly on these two commands.
Avoid sudden, jerky movements.
30
3
G2/2
INTRODUCTION TO SAFETY
3
MHT 860 L - MHT 950 L Evolution
G 3 - SLINGING THE LIFT TRUCK
- Take into consideration the position of the truck’s centre of gravity for
lifting (Fig. G3/1).
- Position the belts in the anchoring seats provided (Fig. G3/2) and
(Fig. G3/3).
G3/2
G3/3
D
C
A
MHT 860 L
A = 1663 mm
B = 1067 mm
C = 2785 mm
D = 2405 mm
G = Position of centre of gravity
B
MHT 950 L
A = 1712 mm
B = 1018 mm
C = 2855 mm
D = 2425 mm
G = Position of centre of gravity
G3/1
31
INTRODUCTION TO SAFETY
3
MHT 860 L - MHT 950 L Evolution
G 4 - TRANSPORTING THE LIFT TRUCK ON A
PLATFORM
Check to ensure that the safety instructions regarding the transport
platform are applied correctly before loading the lift truck on it, and
make sure the truck driver is familiar with the dimensional features and
weight of the lift truck (See Chapter: TECHNICAL SPECIFICATIONS in
part 2 - DESCRIPTION).
Ensure that the dimensions and loading capacity of the platform are
sufficient for transporting the lift truck. Also check the contact pressure
with the ground authorized for the platform with respect to the lift truck.
For lift trucks provided with a turbo compressed engine, plug the
exhaust to prevent rotation, without lubrication, of the turbo shaft when
the convoy is in motion.
LOADING THE LIFT TRUCK
- Block the transport platform wheels.
- Fix the platform loading ramp, in such a manner as to obtain the
smallest possible angle to allow the truck to climb on the platform.
- Load the lift truck parallel to the platform.
- Switch off the lift truck (see chapter: DRIVING INSTRUCTIONS in
part: 1 - SAFETY INSTRUCTIONS AND REGULATIONS).
G4/1
SLINGING THE LIFT TRUCK
- Fix the wedges in front and at the back of each tyre (Fig. G4/1).
- Also fix wedges on the inner sides of each tyre (Fig. G4/2).
- Fix the lift truck on the platform with sufficiently resistant ropes, on
the front of the lift truck at the anchoring points “1” (Fig. G4/3), and
on the rear part in the tow pin “2” (Fig. G4/4).
- Tighten the ropes (Fig. G4/5).
G4/2
1
1
2
G4/3
32
G4/5
G4/4
INTRODUCTION TO SAFETY
3
MHT 860 L - MHT 950 L Evolution
G 5 - ADJUST THE HEADLIGHTS
RECOMMENDATIONS FOR THE ADJUSTMENTS
(In accordance with standards ECE-76/756 76/761 ECE20)
Adjust the low beam by -2% with respect to the horizontal axis of the
headlight.
ADJUSTMENT PROCEDURE
- Set the lift truck, without load, in the transport position, perpendicular
to a white wall, on level, horizontal ground (Fig. G5).
- Check the tyre pressure (See chapter: A5 - CHECK TYRE PRESSURE AND LOCKING OF WHEEL NUTS in part: 3 - MAINTENANCE).
- Turn the reverse gear to neutral and apply the parking brake.
CALCULATING THE HEIGHT OF THE LOW BEAM LIGHTS (h2)
h1 = Height of low beam light with respect to the ground.
h2 = Height of adjusted beam.
I = Distance between low beam lights and the white wall.
h2 = h1 - (l x 2/100)
+%
-%
-2%
h1
h2
I
G5
G 6 - AIR CONDITIONING
Change the gas if the air is not as cool as required:
- use 1 kg of “134 FREON”.
- in case of leakage or parts replacements, change the oil using 60 g
of special oil for Air Conditioning compressor.
33
INTRODUCTION TO SAFETY
INTRODUCTION TO SAFETY
4 - ELECTRIC AND
H Y D R AU L I C
S YS T E M
INTRODUCTION TO SAFETY
INTRODUCTION TO SAFETY
MHT 860 L - MHT 950 L Evolution
4
ELECTRIC SYSTEM
STARTER MOTOR
The starter motor is fitted to the left of the engine and it needs no
maintenance apart from cleaning and tightening of the terminals.
Contact your agent or dealer if the starter motor does not work correctly.
ALTERNATOR
The alternator is mounted on the left of the engine. The alternator and
the regulator are designed to function in a system polarized in one
direction only, it is therefore necessary to take the following precautions while working on the battery charge circuit as it can otherwise
cause serious damage to the electrical equipment:
Do not activate the alternator with the circuit open, but make sure all
the terminals are tightened.
Do not dismantle the terminals on the back of the alternator with the
combustion engine running, as it can otherwise damage the alternator.
When installing a battery, make sure the connections are polarized
correctly. The wire marked (+) must be connected to the positive terminal (+) of the battery and the wire marked (-) must be connected to the
negative terminal (-) of the battery, and it must be earthed.
If a second battery is used to start up the combustion engine, always
connect terminals having the same polarity (Fig. A). Mount a battery
having the same voltage as that on the truck.
If an outside charger is used, always connect the (+) wire of the charger to the (+) terminal of the battery and the (-) wire of the charger to
the (-) terminal of the battery and earthing.
Never short circuit the alternator terminals or earth them.
Never invert the alternator connections on the battery.
Never dismantle or change an electric connection with the engine running.
In case of electric welding on the truck, connect the negative cable of
the welder directly to the part to be welded to prevent high voltage current from passing through the alternator and then disconnect the battery.
A
1
INTRODUCTION TO SAFETY
4
MHT 860 L - MHT 950 L Evolution
LIGHTING
A fused bulb must be replaced immediately.
Never handle a new bulb with bare or dirty hands, since traces of
grease, oil or sweat will evaporate when the bulb is heated and thus
stain the reflector.
Never touch or try to polish the reflector. Open the headlight only to
change the bulb.
BATTERY
The battery efficiency is proportional to the
the reduction
reduction in
in temperature
temperature
and finally ceases at -40°F.
-40°C.
Never try to use the starter
starter motor
motor ifif the
the battery
battery isis exposed
exposedto
toaa tempetemperature
rature
around -29°C.
around
In
such -20°F.
cases, heat the battery by immersing it in warm water, to a
In such
cases,
heat the battery
level
of 5
cm below
covers. by immersing it in warm water, to a
level
of 2ofin.
below
covers.
In
case
very
low the
temperatures,
remove the battery from the truck
In case
of itvery
temperatures,
and
store
in alow
warm
place until itremove
is used.the battery from the truck
and store it in a warm place until it is used.
2
INTRODUCTION TO SAFETY
MHT 860 L - MHT 950 L Evolution
4
FUSE HOLDER AND RELAYS BOARD
The truck is provided with a fuse holder and relays board (Fig. B)
which protects the electric circuit.
This fuse holder and relays board is screwed on a base plate in the
cab, under the dashboard.
To change a fuse, remove and replace with a new fuse having the
same quality and calibration.
In case of a power failure, check all the fuses and see if there has
been a short circuit.
Never attempt to repair a blown fuse.
B
3
INTRODUCTION TO SAFETY
4
K16
MHT 860 L - MHT 950 L Evolution
K5
K7
K9
K11
K13
K4
K6
K8
K10
K12
K14
K15
K2
K1
K3
SCATOLA FUSIBILI E RELE’
MHT 860 L - 950 L
4
INTRODUCTION TO SAFETY
MHT 860 L - MHT 950 L Evolution
4
FUSE-BLOCK AND RELAY BOARD
Code
F1
F2
F3
F4
F5
F6
F7
F8
F9
F10
F11
F12
F13
F14
F15
F16
F17
F18
F19
F20
F21
F22
F23
F24
F25
F26
F27
F28
F29
F30
K1
K2
K3
K4
K5
K6
K7
K8
K9
K10
K11
K12
K13
K14
K15
K16
K17
K18
Sheet Function
8.1 15A fuse: main beams
4.4 10A fuse: sensors power supply
7.3 15A fuse: work lights
7.3 7.5A fuse: rotary beacon switch power supply
8.3 5A fuse: RH position light
8.3 5A fuse: LH position light
6.2 5A fuse: RC2 diagnostics power supply
8.4 10A fuse: light switch power supply
8.5 10A fuse: warning
7.3 10A fuse: ceiling light
7.3 7.5A fuse: front windscreen wiper switch
7.2 7.5A fuse: rear windscreen wiper switch
7.2 7.5A fuse: seat compressor power supply
8.4 5A fuse: indicator lights and instruments
8.5 7.5A fuse: stop micro switch
6.3 10A fuse: optional power supply
6.3 10A fuse: bucket switch power supply
8.5 7.5A fuse: warning
6.3 15A fuse: boom work lights switch
7.1 25A fuse: heating
8.1 15A fuse: dipped beams
8.2 15A fuse: buzzer
4.2 7.5A fuse: operating mode switch power supply
5.4 7.5A fuse: anti-tilting device
3.1 10A fuse: operation micro switch power supply
3.3 10A fuse: emergency mushroom-shaped button
7.2 10A fuse: air conditioning
6.2 10A fuse: ARB control unit power supply
2.5 5A fuse: optional
6.2 7.5A fuse: RC2 control unit power supply
4.4
7.2
4.5
3.3
8.1
3.2
3.2
5.3
8.2
5.4
8.2
3.4
8.5
8.3
4.3
5.3
4.2
8.4
Relay with diode
Air conditioning relay
Relay with diode
Running enable relay
Main beams relay
Reverse movement relay
Forwards movement relay
Anti-tilting relay
Buzzer relay
ARB forcing key power supply relay
Dipped beams relay
Neutral position relay
Trailer brake relay
Stop micro switch relay
Speed change relay
Sagelet relay
Working mode control unit relay
Warning relay
5
INTRODUCTION TO SAFETY
4
MHT 860 L - MHT 950 L Evolution
RELAY AND DIODES UNDER CIGARETTE LIGHTER
Code
K181
K182
Sheet Function
7.5 Air conditioner enable relay
7.4 Diodes
FUSES AND RELAY IN ENGINE COMPARTMENT
C
To access the fuses and relays placed in the engine compartment, slacken
the six screws (spanner 10 mm) (Fig. D) and remove the plate (Fig. E).
Function
30A fuse: Perkins power
5A fuse: ignition input
50A fuse: electric fan relay
40A fuse: spark plugs relay
50A fuse: electro-mechanical control unit
30A fuse: start-up panel relay
50A fuse: services relay
30A fuse: heating
30A fuse: optional power supply
30A fuse: start-up panel relay
Start-up relay
Perkins control unit power supply relay
Electric fans relay
Preheating relay
Services relay
K147
K145
K143
D
K142
Sheet
1.3
1.3
1.1
1.1
1.1
1.1
1.1
1.1
1.2
1.2
1.2
1.3
1.3
1.5
1.4
K148
Code
F144
F146
FG1
FG2
FG3
FG4
FG5
FG6
FG7
FG8
K142
K143
K145
K147
K148
E
X139
F146
F144
6
5A
30 A
X140
FG3
50 A
40 A
FG2
FG7
30 A
30 A
FG6
FG4
30 A
50 A
FG1
FG8
30 A
50 A
FG5
Code Sheet Function
A30
5.1 Sagelec control unit
A86
2.1 Indicators check control unit
A141
1.4 Perkins control unit
A201
2.3 Accelerator pedal
A205
9.4 Machine functions control unit
A207
7.3 Car radio
A210
6.3 ARB control unit
A280
6.5 OBD diagnostics socket
A365
6.2 Rexroth diagnosis
A367
6.1 RC2 control unit
B39
3.3 Gear reset micro switch
B105
8.2 Buzzer
B106
4.4 Rear axle alignment sensor
B112
4.3 Front axle alignment sensor
B124
3.2 Parking brake pressure switch
B154
1.2 Air filter clogged
B197
4.1 Stop pedal pressure switch
B214
5.3 Boom retracted micro switch
B215
5.3 Boom lowered micro switch
B236
1.3 Fuel level indicator
B238
5.3 Three metres micro switch
B281
2.3 Steering fault pressure switch
E101
8.2 RH front light
E116
8.5 RH rear light
E119
8.3 LH rear light
E123
8.2 RH front side light
E194
8.1 LH front light
F1
8.1 15A fuse : main beams
F2
4.4 10A fuse: sensors power supply
F3
7.3 15A fuse: work lights
F4
7.3 7.5A fuse: rotary beacon switch
power supply
F5
8.3 5A fuse: RH position light
F6
8.3 5A fuse: LH position light
F7
6.2 5A fuse: RC2 diagnostics power supply
F8
8.4 10A fuse: light switch power supply
F9
8.5 10A fuse: warning
F10
7.3 10A fuse: ceiling light
F11
7.3 7.5A fuse: front windscreen wiper
switch
USERS LEGEND
ELECTRICAL SYSTEM
MHT 860 L - 950 L
FG4
FG5
FG6
FG7
FG8
G1
G158
H108
H120
H127
H129
H130
H178
F144
F146
FG1
FG2
FG3
F29
F30
F27
F28
F26
F24
F25
F15
F16
F17
F18
F19
F20
F21
F22
F23
F14
F13
F12
7.2 7.5A fuse: rear windscreen wiper
switch
7.2 7.5A fuse: seat compressor power
supply
8.4 5A fuse: indicator lights and instruments
8.5 7.5A fuse: stop micro switch
6.3 10A fuse: optional power supply
6.3 10A fuse: bucket switch power supply
8.5 7.5A fuse: warning
6.3 15A fuse: boom work lights switch
7.1 25A fuse: heating
8.1 15A fuse: dipped beams
8.2 15A fuse: buzzer
4.2 7.5A fuse: operating mode switch
power supply
5.4 .7.5A fuse: anti-tilting device
3.1 10A fuse: operation micro switch
power supply
3.3 10A fuse: mushroom-shaped emergency pushbutton
7.2 10A fuse: air conditioning
6.2 10A fuse: ARB control unit power
supply
2.5 5A fuse: optional
6.2 7.5A fuse: RC2 control unit power
supply
1.3 30A fuse: Perkins power
1.3 5A fuse: ignition input
1.1 50A fuse: electric fan relay
1.1 40A fuse: spark plugs relay
1.1 50A fuse: electro-mechanical control
unit
1.1 30A fuse: start-up panel relay
1.1 50A fuse: services relay
1.1 30A fuse: heating
1.2 30A fuse: optional power supply
1.2 30A fuse: start-up panel relay
1.1 Battery
1.1 Alternator
8.2 RH front side light
8.4 Reversal Buzzer
8.4 License plate light
8.4 LH rear side light
8.5 RH rear side light
7.5 Cigarette lighter socket / 12 V power
2.3
4.3
4.3
4.3
4.3
2.4
2.4
10.1
9.3
2.4
5.4
7.3
7.3
/
/
/
4.4
7.2
4.5
3.3
8.1
3.2
3.2
5.3
8.2
5.4
8.2
3.4
8.5
8.3
4.3
5.3
4.2
8.4
1.2
1.3
1.3
1.5
1.4
7.5
7.4
7.2
7.4
7.3
H198
H214
H215
H218
H219
H223
H224
H225
H226
H229
H310
HA4
HA5
J1
J2
J3
K1
K2
K3
K4
K5
K6
K7
K8
K9
K10
K11
K12
K13
K14
K15
K16
K17
K18
K142
K143
K145
K147
K148
K181
K182
M27
M59
M72
socket
Brakes fluid pressure low indicator
Slow speed indicator
Fast speed indicator
Rear axle alignment indicator
Front axle alignment indicator
Concentric steering indicator
Crab steering indicator
Trailer brake indicator
Fans inversion indicator
Road steering indicator
Safety devices forced Buzzer
LH rear loudspeaker
RH rear loudspeaker
Sagelec control unit connector
Sagelec control unit connector
Sagelec control unit connector
Relay with diode
Air conditioning relay
Relay with diode
Running enable relay
Main beams relay
Reverse movement relay
Forwards movement relay
Anti-tilting relay
Buzzer relay
ARB forcing key power supply relay
Dipped beams relay
Neutral position relay
Trailer brake relay
Stop micro switch relay
Speed change relay
Sagelet relay
Working mode control unit relay
Warning relay
Start-up relay
Perkins control unit power supply
relay
Electric fans relay
Preheating relay
Services relay
Air conditioner enable relay
Diodes
A/C Compressor
Front windshield wiper
Seat compressor
INTRODUCTION TO SAFETY
MHT 860 L - MHT 950 L Evolution
4
7
8
9.5
9.5
1.1
7.5
5.5
6.3
6.4
6.5
4.2
4.4
3.2
3.3
8.1
2.3
9.3
8.4
10.4
5.3
5.3
3.4
S170
S172
S187
S204
S208
S209
S211
S212
S213
S216
S217
S220
S221
S222
S227
S235
S237
S364
S366
S483
/
/
/
3.4
S169
Air conditioner Optional
Intercooler 1 electric fan
Intercooler 2 electric fan
Engine start-up
Windshield wiper pump
Fuel pump
Heating panel
Clock
Fuel level instrument
Rev counter
Engine water temperature instrument
Ignition plug
Can-bus resistance
47 OHM Resistance
Heating
Stop micro switch
Opt exclusion switch
Steering column switch
Mushroom-shaped emergency pushbutton
Mushroom-shaped emergency pushbutton
ARB forcing key
Seat micro switch
Start-up panel
Air conditioning switch
Boom movements enable switch
Shovel function switch
Mixer bucket switch
2° and 3° output switch
Cylinder capacity change switch
Speed change switch
Gear reset switch
Parking brake switch
Rear fog light switch
Steering switch
Fans inversion switch
Warning switch
Levelling switch
Capacity regulation pushbutton
Manipulator
Pushbutton for cutting hydraulic
movements
Fuses relay control unit connector
Fuses relay control unit connector
Fuses relay control unit connector
/
7.4
/
/
/
/
/
/
/
X186
X191
X192
X193
X199
X201
/
/
/
X141
X152
X160
X180
X182
X185
/
X135
/
/
/
/
/
/
/
/
/
/
/
/
7.5
/
/
X126
X128
X161
X162
X163
X164
X165
X167.1
X167.2
X167.3
X174
X175
X176
X177
X178
/
/
/
/
/
/
/
/
/
/
/
X4
X5
X6
X7
X8
X9
X10
X11
X117
X118
X121
Fuses relay control unit connector
Fuses relay control unit connector
Fuses relay control unit connector
Fuses relay control unit connector
Fuses relay control unit connector
Fuses relay control unit connector
Fuses relay control unit connector
Fuses relay control unit connector
Fan inversion connector
Trailer socket connector
Driving seat line interface chassis
line connector
Trailer brake kit connector
Driving seat line interface chassis
connector
Driving seat interface engine line
connector
Perkins control unit connector
Electric fan inversion kit connector
Driving seat interface engine connector
Can-bus resistance connector
Boom line connector
Optional power supply connector
Cab roof line connector
Cab roof line connector
Manipulator connector
Manipulator connector
Manipulator connector
Heating unit connector
Heating panel connector
Heating panel connector
Heating panel connector
Cigarette lighter socket /12 V current
socket connector
Air conditioner optional connector
Diodes connector
Driving seat line interface dashboard
line connector
Driving seat line interface dashboard
line connector
Light switch-arrows connector
Gear switch connector
Switch connector
Fans inversion optional connector
Accelerator pedal connector
H : GREY
L : DARK BLUE
M : BROWN
N : BLACK
R : RED
S : PINK
V : GREEN
Z : VIOLET
Note: the colour of double colour wires is indicated
by the composition of the codes indicated above,
for example:
G/V = YELLOW/GREEN (transverse colouring)
G-V = YELLOW/GREEN (longitudinal colouring)
A : BLUE
B : WHITE
C : ORANGE
G : YELLOW
COLOUR OF WIRES
/ Driving seat line interface dashboard
line connector
X228
/ Indicator check control unit connector
X229
/ Can link connector
X232
/ Indicators connector
X256.p
/ Basket provision connector
X256.s
/ Basket provision by-pass connector
X280
/ OBD diagnosis socket connector
X360
/ Resistances connector
X361
/ Condenser connector
X365
/ Rexroth diagnosis connector
X367
/ RC2 control unit connector
Y103
9.3 Solenoid valve DA2
Y104
4.1 2° cylinder capacity solenoid valve
Y109 10.3 RH levelling solenoid valve
Y110 10.4 LH levelling solenoid valve
Y111
3.3 Parking brake solenoid valve
Y125
9.3 Controls block solenoid valve
Y131
2.1 Concentric steering solenoid valve
Y132
2.1 Crab steering solenoid valve
Y133
4.2 Slow speed solenoid valve
Y134
4.3 Fast speed solenoid valve
Y136
3.1 Forwards solenoid valve
Y137
3.1 Reverse solenoid valve
Y239
5.2 ARB solenoid valve
Y367
5.1 Extension/retraction proportional
solenoid valve
Y368
5.2 Optional proportional solenoid valve
X206
4
X1
X2
X3
7.2
1.4
1.3
1.1
7.5
6.2
7.4
1.4
1.3
1.2
1.3
1.2
1.4
2.1
7.1
8.3
5.4
3.1
3.4
M130
M150
M151
M156
M196
M237
P175
P230
P231
P233
P234
R153
R161
R484
S74
S107
S166
S167
S168
INTRODUCTION TO SAFETY
MHT 860 L - MHT 950 L Evolution
INTRODUCTION TO SAFETY
4
MHT 860 L - MHT 950 L Evolution
3
WARNING LIGHT
3
S187
2
3
4
5
WATER TEMP.
INSTRUMENT
+ S IL
WATCH
CAPACITOR
10
X232
X232 X232 X232 X232
S-N1
B1
50a
R1
17
G1
19
S-G1
1
X361
2
X361
1
2
9
4
5
6
7
8
X360
X360
30
G-L1
A-G1
C-N1
H/L1
H/L1
H/L1
B1
H/L1
H/L1
C-N1
A-G1
2
N1
1
15/54
1
0
FUEL LEVEL
INSTRUMENT
+ S IL
N1
X232
+
5
P230
H/L1
-
N1
H/L1
C1
G1
+ S -M +
Z-B1
H/L1
H/L1
-
Z1
-
P234
G1
SPEEDMETER
IL
L4
4
P231
R1
N1
G1
2
P233
N1
H/L1
1
2.1
2.1
2.1
2.1
B1
2.1
3.1
X229
2
2.1
Z1
3
A/G1
Z-B1
A-G1
H-L1
G-R1
A-R1
R1
N1
S-N1
G1
4
8
1
X229
G0.5 CAV01
N0.5 CAV01
SCH1
Z1 CAV01
S-N1
S-G1
X185
X185
1
X206
N1
2.1
Sal34
17 18 19
X185
X185 X185 X185
S-G1
N0.5 CAV06
G0.5 CAV06
G0.5 CAV04
N0.5 CAV04
Z-B1
X186
5
9
CAN LINK
X229
15 16
X229
6
8.1
5
3
8.1
2.3
2.1
2.1
6.1
Sal20
Sal29
6.1
6.1
Sal33
SCH CAV06
G0.5 CAV05
N0.5 CAV05
Sal30
SCH1 CAV05
Sal31
Sal32
6.1
6.1
6.1
3.1
6.1
Z1
H/L1
R2.5
UNIT
+15 KEY
+30
G0.5 CAV01
N0.5 CAV01
Z1
SCH1 CAV01
S-N1
+15
B-V1
M
B1
15
9
X128
X135
X135
1
Sal18
22
X135
16 17 18
X160
X135
X135 X135
CAVO3 G0.5
CAVO3 N0.5
Z1
V/N1
R4
13
X135
B10
10
X135
L/B1
14
X135
S-N1
8
X135
B-V1.5
7
X135
Z-B1
6
X135
L/B1
R4
R4
C1
2.1
Sal17
1
F146
X146
5A
2
X140
X140
X140
FG6
F1
FG7
F2
FG8
50A
40A
50A
30A
50A
30A
30A
30A
K142
86
87
K143
COM
X139
87
30
85
86
K148
87
86
87
N1
30
85
30
85
30
K147
86
87
85
30
A
X140
R25
R6
H-R1
B
X161
K145
R161
85
COM
R25
86
CAVO1 G0.5
CAVO1 N0.5
X140
FG5
M10
F4
X139
FG4
R10
F3
X139
FG3
S-N1
L1
F4
X139
FG2
H-R1
F2
R10
F3
X139
FG1
R4
F1
R4
R10
R4
X146
X161
F1b
X144
F144
Sal14
30A
A
B
R25
Sal16
F1a
Sal12
M
G158
30
D+
G
31
R153
A
1
X159
U
M156
X154.1
B154
p
A
X151
X150
1
2
3
X141
B236
M151
7
8
9
Sal13
Sal15
Z1
H-R1
V1
B1
X236
F
W
OPT. SUPPLY
BOOM
3
N1
N1
N1
50
H6
30
12Vcc
N16
2
G1
A2.5
A2.5
R6
L4
R70
C1
R16
M1
M1
N1
N1
M1
M1
CAVO1 G0.5
CAVO1 N0.5
X144
10 15 16 20 21 22 40 57 62
X141
M150
M
M
PERKINS ELECTRONIC UNIT
A141
1
X154.2
N1
N1
N1
N70
3
X236
B
B
X151
X150
31
IMPIANTO ELETTRICO
MHT 860 L - 950 L
2.1
TAVOLA
1
9
INTRODUCTION TO SAFETY
4
MHT 860 L - MHT 950 L Evolution
6
1
5
9
9
X223
9
9
X224
H224
X224
H239
10
N1
10
10
10
X223
X224
X224
N1
7
N1
3
H-R1
8
C/N1
N1
S-B1
4
H-R1
S222
11 12 13 14 15 16
X232
B-L1
V-N1
S-N1
B1
9
Z-B1
G1
N1
S-N1
1.4
1.5
1.5
1.5
2
0
H223
N1
B4 B5 B6 B7 B8 C1 C2 C3
8
X228
X232
A7 A8 B1 B2
X228
B-L1
V-N1
L/B1
G1
H1
V1
N1
S-B1
X228
1
2
p
G1
G1
L/B1
L/B1
V1
V1
H1
H1
A1 A2 A5
X228
H/L1
N1
B-L1
X228
B281
H198
N1
WARNING LIGHTS
UNIT 01171090
LIGHTS CHECK
5
G/R1
A86
G/R1
4
H/L1
3
M/B1
2
H-R1
1
N1
1.5
N1
N1
B1
H/L1
H/L1
3
4
X206
X206
X186
10
8
X185
X206
7
9
10
6
3
19
4
X206
X206
X206
X186
X185
X186
X185
H-R1
H1
V-N1
H/L1
G1
L/B1
V1
4.1
8.1
3.1
8.1
8.1
8.1
8.1
N1
V-N1
13
5.4
C/N1
H-R1
M/B1
V-N1
B-L1
H/L1
N1.5
47 OHM
G1
R484
H/L11
1.4
1.5
3.1
4.3
1.5
1.5
1.5
G-L1
A-G1
C-N1
UNIT
21
20
+15 KEY
1
F29
X185 X185 X186
5A
1.4
13
7
1
2
7
4
6
X7
X6
X6
X4
X4
X6
X6
B-V1
B1
K
L
20
23
18
16
15
17
X128
X128
X160
X160
X160
X160
X160
X160
G-N0.5
M-B0.5
Y132
X141
33
43
53
59
60
63
X201
X141
1
3
4
A-R0.5
H-N0.5
L-N0.5
L-R0.5
2
5
6
X201
1
A201
ACCELERATING PEDAL
N1.5
2
X132
N1
2
X131
31
31
IMPIANTO ELETTRICO
MHT 860 L - 950 L
10
10.1
10.1
2
2
N1
M-B0.5
G-N0.5
G-L1
A-G1
C-N1
L-R1
H-N1
A-R1
1
X132
PERKINS UNIT
1.5
6.1
C/N1
M/B1
1
X131
1
Y131
10.1
G-L1
A-G1
C-N1
L-R0.5
A-R1
H-N1
M/B1
C/N1
L-N1
3.1
TAVOLA
2
INTRODUCTION TO SAFETY
4
MHT 860 L - MHT 950 L Evolution
1
2
3
4
5
H/L1
G1
V-B1
9.1
2
A1
A1
N1
S1
1
X167.3
2
5
1
0
S220
6
X167.2
7
2
Z/N1
H/L1
S168
S169 S483
8
5
6
M-V1
N1
2.5
10.1
10.1
N-Z1
1
10
A1
1
A1
1
M-N1
5
X167.1 X167.1
C-B1
9
5
N1
S217
1
S1
JOYSTICK
0
N1
1
L/G1
9.1
3
L/G1
2
S1
Z-N1
4
X167.1 X167.1 X167.1
4.1
H1
Z/N1
C-B1
2.5
4.1
N1
4.1
9
4
6
X206
6
X185
S1
X185
X206
15
14
X206
X206
H1
7
X186 X186
S1
H-L1
A-G1
1.4
1.4
9.1
S/N1
C1
C-B1
A-G1
9.1
9.1
10.1
10.1
N-Z1
M-V1
H/L1
B-R1
V-N1
S-L1
Z/B1
B/V1
V-N1
2.5
9.1
9.1
9.1
5.1
H-B1
S/N1
S1
C-B1
8
X206
S/N1
2
X185
G-V1
13
B-R1
B/V1
S-L1
Z/B1
A1
S-G1
M-N1
5
5
16
15
12
1
11
2
4
X7
X4
X7
X8
X7
X8
X8
X8
X4
UNIT
2
8.3
F26
10A
+15 KEY
F25
K7
86 87a
10A
K6
87
86 87a
K4
87
86 87a
K12
87
86 87a
87
+15 KEY
85
30
85
30
85
30
85
30
1
D3
5.2
D4
3
14
4
15
3
2
9
1
2
2
X7
X7
X7
X7
X6
X7
X4
X7
X2
X6
2
X135
3
X135
20
15
14
X121
X121
X121
5
6
X121
X121
G-R1.5
G-R1.5
8.1
L/G1
L/G1
B-G1
V/N1
A/B1
V/B1
10.1
10.1
8.1
B-R1
L/G1
V-N1
G-R1.5
A/B1
V/B1
B-G1
L/G1
Z-B1
1
1
X136
X111
1
B39
2
1
Y111
2
2
N1
X111
N1
X137
N1
N1
B124
p
2
1
2
2
X136
2.5
1
X137
Y137
Y136
31
31
IMPIANTO ELETTRICO
MHT 860 L - 950 L
4.1
TAVOLA
3
11
INTRODUCTION TO SAFETY
4
MHT 860 L - MHT 950 L Evolution
1
3
8.1
H/L1
M-B1
1
1 0 2
2
8
9
4
10
S216
N1
7
3
N1
H218
9
A-N1
A-N1
H215 H214 H219
10
M-B1
8
6
C/B1
2
N1
7
5
N1
1
N1
0
S213
N1
N1
8.1
H-R1
N1
7
16
X185
8
X186
H-R1
A-N1
M-B1
A-B1
19
X186
12
X185
X185
G-M1
17
X186 X186
C/B1
18
Z/B1
H-R1
H-R1
M-B1
A-N1
2.5
G-M1
2.5
5
H/L1
1
3.5
4
M-V1
H/L1
3.5
2
H/L1
N1
3.5
5
7
X8
X8
UNIT
+15 KEYK17
+15
K15
F23
86 87a
53M
T
53S
15
31
7.5A
85
F2
87
K1
86 87a
10A
30
85
K3
87
86 87a
30
85
87
30
6
1
5
8
10
13
9
3
2
1
12
7
11
6
5
4
X8
X11
X2
X5
X5
X5
X5
X5
X5
X5
X5
X5
X5
X5
X5
X5
11
18
X121
X121
N0.35
G-M1
1
1
M0.35
L0.35
X134
Y134
1
1
B197
Sal2
M0.35
L0.35
1
X133
Y133
Sal32
Sal31
A-N1
M-B1
Z/B1
M-V1
1
X104
Y104
S-G1
A-B1
10
X121
A-B1
31
X121
N0.35
H
X128
S-G1
8
X121
A-N1
M-B1
Z/B1
H-L1
8
X8
2
2
X104
B112
2
2
2
p
B106
2
X133
X134
3.5
N1
N1
N1
N1
N1
31
31
IMPIANTO ELETTRICO
MHT 860 L - 950 L
12
5.1
TAVOLA
4
INTRODUCTION TO SAFETY
4
MHT 860 L - MHT 950 L Evolution
2
3
5
1
0
S166
2
3
4
4
6
2
4
3
1
J4 J4
X366
1
2
3
4
X366
A
B
1
0
10
5
9
S208
C
X364
X365
X364
1
9
X365
1
2
X171
H/L1
6.1
C-R1
H-L1
X171
C-R1
N1
N1
N1
Z-B1
Z-B1
Z-B1
A-R1
G-V1
C-N1
H-V1
Z-B1
R-N1
Z-B1
L-N1
1
J3 J3 J3 J3
10
H/L1
11 12 13 14
8
6
S-B1
9
N1
8
2
C-L1
4
N1
3
N1
2
Z-B1
1
J2 J2 J2 J2 J2 J2 J2 J2 J2 J2
Z-B1
16
C-N1
8
B1
7
N-Z1
S-B1
L/B1
5
J1 J1 J1 J1
7
5
H/L1
1
M-N1.5
H310
S-B1
CAPACITY
REGULATION
SWITCH
JOYSTICK
SAGELEC ELECTRONIC UNIT
N1
N1
S364
A30
G/N1
S366
4
B1
1
7
9
4
X203
5
10
11
X203 X203 X203
C-N1
L/N1
X203
G/N1
M-N1
1
X203 X203
L/B1
2
X203
C-R1
6
X203
S-N1
M-N1
N-Z1
N1
C-N1
N1
3.5
C-R1
L/N1
H-L1
7
6
X7
7
X7
6
2
X11 X11
X11
3
4
X11
17
X7
X11
9.1
6.2
9.1
10.1
M-N1.5
M-N1
L/N1
H-L1
R-N1
R-N1
9.1
9.1
8
X7
18
X7
D1
UNIT
+15 KEY
K8
86 87a
85
87
86 87a
30
85
87
30
K10
86 87a
85
F24
87
7.5A
30
K16
25
21
L-N1
3
4
1
3
4
Y368
3
1
X368 X368 X368 X368
3
X114
X239
L/N1
3
X115
X238
Y239
B214
B215
B238
2
1
Y367
2
19
X121 X121
M/N1
G/N1
2
X367 X367 X367
26
10.2
R-N1
N1
C-L1
Z-N1
S-N1
M-V1
N1
Z-B1
1
X367
P
X121 X121 X128
C-R1
X128
S-N1
S-N1
A
X128
L/N1
N
6.1
C-R1
M/N1
G/N1
3.4
1
2
4.5
1
X114
1
X115
1
X238
N1
N1
X239
31
31
IMPIANTO ELETTRICO
MHT 860 L - 950 L
6.1
TAVOLA
5
13
INTRODUCTION TO SAFETY
4
MHT 860 L - MHT 950 L Evolution
1
3
4
5
H/L1
H-N1
9
1
2
5
S211
10
2
6
1
5
9
4
8
3
7
10
0
S212
N1
H-N1
1
0
H-N1
1
N1
10
H-N1
S209
9
5
N1
H-V1
N1
1
0
B0.5
H0.5
H-N0.5
G-R0.5
1
H-V1
X210 AX210 BX210 C
A H C D E B
X365
C-R1
C1
H1
G-N1
24 27 28 31 32 33 41 42 46 47 49 50 51 17 52
X367
M-B1
2
A1
N1
Z-N1
A1
N1
B/N1
N1
S-G1
A1
A1
L-N1
N0.5 CAV05
G0.5 CAV04
40 1
DIAGNOSI REXROTH
N1
RC2 ELECTRONIC UNIT
39
A210
BOOM
ECU
A365
L/N1
A367
L/N1
5.5
L/N1
H-V1
H-N1
Sal32
2
X186
M-B1.5
C-R1
N1.5
A1
Z-N1
Sal33
Z1
10.1
9.1
9.1
H-N1.5
Sal32
G-N1
2.5
M-B1
2.5
G0.5 CAV05
N0.5 CAV05
Z1
S-G1
L-N1
7.1
7.1
11
2
3
3
9
5
X1
X1
X2
X3
X3
X11
G-R1
H-N1.5
G-R1
H-V1
M-B1.5
R1
A1
1.5
1.5
1.5
1.4
2.5
8.1
H/L1
H/L1
5.5
2
M/N1
H/L1
5.4
+15
F16
F19
F17
10A
15A
15A
10A
1
9
2
12
R1
H1
4
X280 X280 X280
H-N1
+15
F28
Z-N1
+15
F7
5A
G-R1
+15 KEY
G-R1
C0.5
UNIT
13
16
X280 X280 X280 X280
A280
OBD DIAGNOSTICK
3
11
X280
5
X280
X280
+15 KEY
6
X1
G0.5 CAV06
N0.5 CAV06
B/N1
1.5
1.5
27
X121
B-G1.5
B-G1.5
S-G1.5
R-N1
A-R1.5
R2.5
1
X237
X163
1
2
3
4
1
2
3
4
5
6
7
8
9
10
1
M1.5
2
3
OPT
BOOM
TO BOOM HARNESS
N1
N1.5
N1.5
N1.5
N1.5
N2.5
N2.5
N1
N1.5
12
Opt. braccio
Opt. braccio
Opt. braccio
Gnd
Gnd
Gnd
Gnd
Ev. benna mix
Out 3a uscita
Out 2a uscita
Alim. fari lavoro braccio
2
Alim. fari lavoro braccio
OPTIONAL
SUPPLY
X237
5.5
11
X162 X162 X162 X162 X162 X162 X162 X162 X162 X162 X162 X162 X207 X207 X207
M237
M
S1.5
B1.5
R2.5
B/N1
1.5
B-G1.5
B-G1.5
S-G1.5
7.1
7.1
31
31
IMPIANTO ELETTRICO
MHT 860 L - 950 L
14
7.1
TAVOLA
6
6.5
D
E
X174 X174 X174 X174 X174 X174
F
Heating
N1
A-B1.5
A
B
Conditioner
Optional
X180 X180 X180
C
M27
M
M130
X157
A
1
M72
X157
B
X72
7
HA4
7.5A
F11
8
X200
10
15
5
17
9
10
X3
X1
X3
X1
X1
X1
+15
15A
F3
+15
X200
X200
1
+30
6
1
3
4
5
X10 X4
X4
X4
X3
X6
X207
8
4
7
2
X72
2
X200
85
30
87
87a
86
X182
X182
X182
X182
X182
A207
1X183
1X184
M
HA5
1
53
53a
M
IMPIANTO ELETTRICO
MHT 860 L - 950 L
V1.5
LAVAVETRO POSTERIORE
15/54
SECONDA VELOCITA'
PRIMA VELOCITA'
HEATING
PANEL
4
M59
4
53b
31b
6
AC
SWITCH
X175 X175 X175 X175
5
1
X188 X188 X188 X188
X188
3
1
10A
30
2
M196
A1
P175
S1
3
N2.5
1
N1.5
INTERMITTENZA
+ ALTOPARLANTE POST. DX
+ ALTOPARLANTE POST. DX
- ALTOPARLANTE POST. SX
- ALTOPARLANTE POST. SX
Alim. fari braccio
Alim. int fari lav. braccio
Alim. fari braccio
Gnd
Gnd
Alim. tergi post.
+30
Comando tergi post.
Ritorno tergi posteriore
LAVAVETRO ANTERIORE
0
C-B1.5
A1.5
TERGICRISTALLO
POSTERIORE
LAVAVETRO ANTERIORE
TERGICRIASTALLO ANTERIORE
M-B1.5
N1.5
N1.5
L-G1
R1
M-N1.5
L-G1
B-N1.5
Z1
4
K181
X196
1
X196
2
G-M1
R1.5
2
1
V1
+15
M-B1
F4
X193
X192
R1
7.5A
S-N1.5
5
Z1
+15
1
B-N1.5
F12
7.5A
X193
C-B1.5
+15
X192
S-N1.5
F13
7.5A
8
M-N1.5
+15
X192 X192
V2.5
M-B1
M-B1
10A
7
B/V1
F27
R1
85
87
L-G1
S-N1.5
X192
R0.75
86 87a
4
N0.75
+15
A/B1
L-G1
3
R0.75
K2
3
N0.75
B/V1
25A
2
B/V1
C1.5
S/N1
R/N1
X165
1
L-N1.5
C1.5
F20
12 13 14 15 16
6
N1.5
C
H-G1.5
1
10 11
A2.5
A-G1
9
X192
N1
B
8
X192
N1.5
S74
7
9
N1
A
Alim. int. fari lav. post.
Alim. int. Girofaro
Fari lavoro braccio
6
3
Stabilizer relay
1
A/B1
TO CABIN HARNESS
Rear fan
X177
R-V1.5
Gnd
Tergi post e laterale.
5
2
N2.5
1
4
N1
X176
B-V1.5
M-B1.5
X164 3
C-B2.5
G2.5
6.5
G2.5
6.5
6.5
HEATING PANEL
V2.5
G2.5
1
N1.5
N1.5
N2.5
HEATING PANEL
INTRODUCTION TO SAFETY
MHT 860 L - MHT 950 L Evolution
4
5
X192
4
S204
X204.1 X204.2 X204.3 X179 X179
1
1
85
R1
X178
2
X192
2
B-G1.5
B-G1.5
M-B1.5
6.5
UNIT
F10
K182
86 87a
30
87
X135
11
R1
1
31
31
8.1
G-N1
8.1
H178
X178
3
31
M
X178
2
8.1
TAVOLA
7
15
INTRODUCTION TO SAFETY
4
MHT 860 L - MHT 950 L Evolution
1
2
3
4
5
H/L1
9.1
5
8
7
X191
54d
L
56
2
8
5
4
6
3
1
7
0
S235
N1
10
C-L1
1.5
N1
9
X191
54s
1
58
0
S221
3
56b
10
M-V1
4
X191 X191
56a
M-V1
2
X191
57/58
L1
1
30
A1
31
C-R1
49
C-R1
6
X191
Z-B1
9
A/G1
0
H/L1
1
B/R1
5
1
A/G1
A1
L1
H/L1
Z-B1
4.5
3.5
R1
Z-B1
N1
5
21
20
X206
X186
A-B1
H/L1
H/L1
R1
2.5
9.1
R1
1
X186
H-R1.5
A-B1
C-L1.5
S/N1
H/L1
H/L1
19
X186 X82
A/G1
C-L1.5
2.5
6.5
L/B1
Z1
B/N1
2.5
1.2
5
X185
9.1
R1
14
X185
M-V1
2
X185
C-R1
12
X186
M-V1
C-R1
N1
N1
4.5
8
20
8
11
5
9
11
8
17
1
16
2
21
16
14
1
X4
X7
X3
X3
X1
X8
X7
X1
X8
X9
X1
X9
X7
X8
X1
X1
10.1
9.1
10.1
B/R1
UNIT
86 87a
15A
30
85
87
86 87a
30
87
85
K14
F22 F6 F5
15A
5A
86 87a
5A
30
F8
87
85
F14
10A
30
+15
+15
+15
+15
86 87a
F18
87
85
F9 F15
7.5A
10A
7.5A
30
+15
+15
+30
7
10
12
9
6
13
2
10
1
7
4
3
3
4
12
14
X3
X7
X1
X7
X3
X1
X3
X8
X3
X1
X8
X8
X1
X1
X8
X8
G-N1
H1.5
H1
G1
19
X7
V1.5
4
X2
V1
1
X2
C
1
2
9
12
X121
X121 X121
29
J
G
30
X121 X128 X128
X121 X121
3
X121
C-B1
A1
G-N1
G1
L1
13
R-G1
R-V1
H-L1.5
H-N1.5
V-N1.5
28
B-G1
N1.5
V1
H1
G1
G-N1
X121 X128
4
X121
16
X121
X121
N1
C-B1
A1
G-R1.5
G1
B/R1
R-G1
G-N1
G-R1.5
L1
3.5
+15
K13
2
3.4
2.5
2.5
2.5
7.5
K18
5A
53M
15
85
K9
K11
F21
87
53S
86 87a
31
T
F1 K5
15A
G1
G-R1
C-B1
A1
L1
G-N1
G1
A1
L1
G-N1
G-N1
R-G1
R-G1
2
1
X120
2
6
7
1
X130
H130
1
2
N1
X130
N1.5
X120
N1
N1
2
X127
N1
2
X129
31
31
IMPIANTO ELETTRICO
MHT 860 L - 950 L
16
10.1
G1
B/R1
A1
R-G1
5
10.1
E116
E119
1
4
10.1
31
31
H129 H127 H120
3
X116 X116 X116 X116 X116 X116 X116
55
1
X127
G-R1
G1
G-R1
G1
1
X129
54
7
59c
6
R
5
G-N1
B/R1
L1
G-R1
R-G1
4
X107
N1
2
X105
N1.5
N1
3
58R
S107
31
2
X123
N1.5
N1
2
57
1
X119 X119 X119 X119 X119 X119 X119
55
B105
G-N1
1
X107
54
1
X105
L
5
59c
4
R-V1
H-L1.5
B-G1
A1
G-N1
3
E101
2
X108
N1.5
V1.5
H1.5
H108 E123
E194
7.5
2
X101 X101 X101 X101 X101
58L
L
58
1
31
56a
1
X123
57
1
X108
R
5
58
4
56a
2
56b
3
X194 X194 X194 X194 X194
56b
G-N1
G1
H-N1.5
V-N1.5
1
L1
G1
B/R1
10.1
10.1
10.1
10.1
10.1
9.1
TAVOLA
8
INTRODUCTION TO SAFETY
4
MHT 860 L - MHT 950 L Evolution
1
2
3
4
7
8
9
10 11 12 13 14 15 16 17 18 19 20 21
4
A-G0.5
B1
3
S227
3.5
3.5
6.5
3.5
3.5
8.5
3.2
5.5
5.5
3.2
3.5
5.5
8.5
N1
S-N1
B-N1
B1
A/G1
A1 A2 A3 A4 A5 A6 A7 A8 B1 B2 B3 B4 B5 B6 B7 B8 C1 C2 C3 C4 C5 C6 C7 C8
9
X186
A-B0.5
10
X186X186
H-N1
S/N1
M-N1
C1
Z/B1
H-V1
S1
S-G1
Z-B1
V-B1
H-L1
G/N1
Z-N1
A1
C-R1
H/L1
H/L1
10.1
Z/N1
Z/N1
8.5
A-G0.5
A-B0.5
H/R1
A/R1
G/R1
M/G1
H-R1
A-V1
L-B1
L-G1
C-L1
H-L1
Z-N1
B1
A/N1
N1
H-N1
13 14 15
5.5
X205
N1
X186
6.5
S170
MACHINE FUNCTION UNIT
10
X199
6.5
A205
H-V1
6
H226
H-G1
5
9
Z-B1
V-B1
H-L1
G/N1
Z-N1
A1
H-G1
C-R1
G-V1
H/L1
N1
4
8
S1
S-G1
3
2
H-V1
2
7
M-N1
M1
M-N1
Z/N1
C1
Z/B1
1
1
1 0 2
H/L1
INVERSION FAN
OPTIONAL
8.5
5
H/L1
A/N1
8.5
10 11 12 13 14
X160
X160
D
7
X121
2 SOLENOID VALVE
1
2
3
4
X138
FAN
REVERSE
SOLENOID VALVE
X117
1
2
4
1
X117
X103
Y103
FAN
INVERSION
Z/N1
M1
B1
3
1
1
X125
Y125
X172
S172
N1
INVERSION KIT
X138
2
2
2
X103
X125
X172
31
H/L1
6
X152
INTERCOOLER
8.5
24
X121
S-N1
B-N1
X128
1
5
B
2
4
F
N1
3
E
1
2
X128
2
1
X160
S-N1
B-N1
H-R1
A-V1
L-B1
L-G1
C-L1
H-L1
X152
21 25
A/G1
9
A/R1
5
X135 X160 X160 X160 X160 X160
H/R1
4
G/R1
M/G1
H-R1
A-V1
L-B1
L-G1
C-L1
H-L1
X135
31
IMPIANTO ELETTRICO
MHT 860 L - 950 L
10.1
TAVOLA
9
17
INTRODUCTION TO SAFETY
4
MHT 860 L - MHT 950 L Evolution
4
1 0 2
7
2
3
8
4
9
10
PLATFORM CABLE
1
2 3
1
2
3
4
4
5
5
6
6
7
7
8
8
X256.p
9
9
X256.p
M-N1
S-N1
S237
1
5
L/G1
H1
B1
L/N1
R-N1
A-B1
A-G1
C-B1
B-G1
H225
H/L1
3
H-B1
2
H-G1
1
11
X185
H/L1
L/G1
H1
B1
L/N1
R-N1
A-B1
A-G1
C-B1
B-G1
H/L1
5.5
S-N1
M-N1
9.5
3.5
3.5
2.5
6.5
5.5
8.5
3.5
3.5
3.5
8.5
17
X121
22
X121
H-B1
1
X109
1
Y109
TRAILER
CONNECTOR
TRAILER BRAKE
VALVE KIT
1
X110
Y110
1
X118 3X118 5X118 7X118 4X118 1X118 2X118 6X118 8
C
2
B
X126 X126 X126
2
A
B/R1
R-G1
H-G1
L1
G-R1
G1
A1
M-N1
G-N1
B/R1
G-R1
C-B1
A1
L1
G1
G-N1
R-G1
C-B1
8.5
8.5
8.5
8.5
8.5
8.5
8.5
8.5
23
X121
2
2
9.5
N1
N1
X110
N1.5
N1
X109
31
IMPIANTO ELETTRICO
MHT 860 L - 950 L
18
TAVOLA
10
PF
S
B
FA
E.V.S.
X
L
T
P
10
MICRONS
2b
R
FR
1
2
3
T
P
DLS
4
M
275
bar
LS
LS
D
CSD
V1
y
pat
B1
V2
300b
C2
120
l/mn
C1
A1
120
l/mn
300b
PA
120
B2
300b
bar
A
280
B
A3
bar
T
V1
200
T
b B3
CPD
l/mn
bar
C2
300b
V2
CSP
C1
l/mn
220
B
A2
C1
V1
VC
T
V2
300b
C2
VL
C2
b B4
V2
300b
A4
V1
C1
CSP
21
bar
D
MHT 860 L - MHT 950 L Evolution
VSLR
PI(G)
EFS
A
0,7 LITRE
23 BAR
E.E.M.
P
l/mn
T
l/mn
MCM
120
VI
120
VC
120
VT
120
l/mn
MOVEMENTS HYDRAULIC SYSTEM LAYOUT
INTRODUCTION TO SAFETY
4
HYDRAULIC SYSTEM
19
120
l/mn
INTRODUCTION TO SAFETY
4
MHT 860 L - MHT 950 L Evolution
LEGEND OF MOVEMENTS HYDRAULIC SYSTEM LAYOUT
A
CPD
CSD
CSD
D
EEM
EFS
EVS
F.A.
F.R.
MCM
P.
P.A.
P.F.
PI (G)
R
VL
VI
VC
VSLR
VT
20
=
=
=
=
=
=
=
=
=
=
=
=
=
=
=
=
=
=
=
=
=
Accumulator
Relief and balancing valve
Double relief valve
Piloted relief valve
Distributor
Manipulator exclusion solenoid valve
Parking brake solenoid valve
Anti-tilting solenoid valve
Intake filter
Exhaust filter
Manipulator
Gear pump
Optional socket
Brake pump
G connection of hydrostatic pump
Oil tank
Lift cylinder
Inclination cylinder
Compensation cylinder
Slow-fast selector valve
Extension cylinder
FA
X
L
0
P
B
S
VSLR
P
B
PI (G)
A
10
P
T
B
R
FR
A
MICRONS
2b
EFS
LS
T
175b
200 cm3/tr
225b
R
1
225b
P
L
P
A
2
PD
T
B
T
P
DLS
3
M
VCLR
bar
275
T
LS
LS
D
y
FDAV
CFS
FDAV
pat
120
l/mn
B1
CS
A1
120
l/mn
1
P.I.
120
B2
l/mn
120
220
bar
B
A2
T
S
T
200
bar
B
b B3
P.I. (G)
PF
120
2
l/mn
D3
120
280
bar
A
A3
l/mn
l/mn
T
STEERING AND BRAKES HYDRAULIC SYSTEM LAYOUT
b B4
120
l/mn
A4
FDAR
CS
FDAR
21
bar
D
INTRODUCTION TO SAFETY
MHT 860 L - MHT 950 L Evolution
4
T
21
120
l/mn
INTRODUCTION TO SAFETY
4
MHT 860 L - MHT 950 L Evolution
LEGEND - STEERING AND BRAKES HYDRAULIC SYSTEM LAYOUT
C.F.S.
C.S.
D
D.3.
EFS
F.A.
FDAR
FDAV
F.R.
P.
P.D.
P.F.
PI
PI (G)
R.
S.
VCLR
VSLR
22
=
=
=
=
=
=
=
=
=
=
=
=
=
=
=
=
=
=
Parking brake cylinder
Steering cylinder
Distributor
Steering distributor
Parking brake solenoid valve
Intake filter
Rear axle brake disks
Front axle brake disks
Exhaust filter
Gear pump
Hydraulic powered steering
Brake pump
Connection to hydrostatic pump
G connection of hydrostatic pump
Oil tank
Brake oil tank
Slow-fast control cylinder
Slow-fast selector valve
M
S
B
FA
S
B
205 bar
FR
10
MICRONS
2b
PVD
R
2
Ø 1.2
V.L.
0
1
Ø 1.2
E.C.L.
A
B
175bar
L
M.V.R.O.
A
B
175bar
L
M.V.R.A.
LEVELLING AND FANS HYDRAULIC SYSTEM LAYOUT
INTRODUCTION TO SAFETY
MHT 860 L - MHT 950 L Evolution
4
23
INTRODUCTION TO SAFETY
4
MHT 860 L - MHT 950 L Evolution
LEGEND - LEVELLING AND FANS HYDRAULIC SYSTEM LAYOUT
E.C.L.
F.A.
F.R.
M.
M.V.R.A.
M.V.R.O.
P.V.D.
R.
V.L.
24
=
=
=
=
=
=
=
=
=
Levelling control solenoid valve
Intake filter
Exhaust filter
I.C. engine
Water radiator fan motor
Oil radiator fan motor
Double fan pump
Oil tank
Levelling cylinder
M.
3 bar
T1
P.I.
R
P.F.
T2
b
X1
X2
a
450 bar
PI (G)
G
PS
VSLR
EFS
EEM
PF
S
A
B
F.A.
MA
MB
M.I.
R
F.R.
T2
A
B
T1
U
S.C.
b
G
X1
HYDROSTATIC TRANSMISSION SYSTEM LAYOUT
X3
a
INTRODUCTION TO SAFETY
MHT 860 L - MHT 950 L Evolution
4
Vg min
Vg max
25
INTRODUCTION TO SAFETY
4
MHT 860 L - MHT 950 L Evolution
LEGEND – HYDROSTATIC TRANSMISSION SYSTEM
LAYOUT
EEM
EFS
F.A.
F.R.
M.
M.I.
P.F.
P.I.
PI (G)
S.C.
R.
VSLR
26
=
=
=
=
=
=
=
=
=
=
=
=
Manipulator exclusion solenoid valve
Parking brake solenoid valve
Intake filter
Exhaust filter
I.C. engine
Hydrostatic motor
Brake pump
Hydrostatic pump
G connection of hydrostatic pump
Radiator
Oil tank
Slow-fast speed selector valve
INTRODUCTION TO SAFETY
5 - OPTIONAL
AC C E S S O R I E S
AVA I L A B L E
INTRODUCTION TO SAFETY
INTRODUCTION TO SAFETY
5
MHT 860 L - MHT 950 L Evolution
INTRODUCTION
- The manufacturer provides you with a large range of perfectly adaptable accessories (with guarantee) for
your lift truck.
- The accessories are delivered together with a load chart relative to your lift truck. The instruction booklet and
load chart must be kept in the lift truck. The use of possible accessories depends on the instructions in this
Manual.
Certain specific uses require adaptation of accessories not included as optionals in the list.
Other solutions are available; for more information, please contact your agent or dealer.
Only accessories that are homologated and “CE” certified by the manufacturer can be used on your lift trucks.
The manufacturer shall not be liable for unauthorized modifications or use of accessories.
Manitou assures oneself about the employement’s capacity of this machine in normal conditions of working
foreseen in the user’s manual, with a static test coefficient of 1.33 and a dynamic test coefficient of 1, foreseen
in the harmonized rules EN 1459 for the truck with variable capacity and EN 1726-1 for the forklift.
Do not use interchangeable accessories not originally included in the machine supply.
For subsequent requests for implementation of machine functions using other accessories, before starting up
the machine, the user must request inspection for suitability for use by an authorized MANITOU technician,
who will check the correct working and updating of the documentation necessary for using the new accessory.
It is only after this inspection that a new “CE” conformity certificate will be issued for the machine indicating
only the new accessories installed.
1
INTRODUCTION TO SAFETY
5
MHT 860 L - MHT 950 L Evolution
- RECOMMENDATIONS FOR USING THE LIFT TRUCK
REMEMBER THAT THIS SYMBOL MEANS:
ATTENTION ! BE CAREFUL ! YOUR SAFETY AND THAT OF YOUR
LIFT TRUCK ARE AT STAKE.
- Abide by the data indicated on the load charts. Never attempt to lift loads exceeding those permitted on the
load charts enclosed with the machine.
- Carry the load in a low position, with the telescopic boom fully retracted.
- Drive the truck at a speed suited to the ground conditions in question.
- When driving the truck without load, keep the telescopic boom low and fully retracted.
- Never drive too fast or brake sharply with a load.
- When the load is lifted, check to make sure no one can hamper the operation, and avoid incorrect manoeuvres.
- Never attempt operations that are beyond the capacity of the lift truck.
- Pay attention to electric cables.
- Never leave the truck parked with a raised load.
- Never allow anyone to come near or walk under a load.
- Always bear safety in mind and carry only well balanced loads.
- Never leave the lift truck loaded with the parking brake engaged on slopes with gradient exceeding 15%.
- For using a hoist or equipment with the load hanging from a hook:
- Position the hoist perpendicular to the load to be lifted.
- The hook without load must descend gradually (gently) since, if released rapidly, the rope will wind around
the drum resulting in serious damage to the rope, the limit stop, etc...
- If the rope starts twisting on the block, unhook the fixed hook, pull the rope and turn it in the opposite direction to eliminate the twisting and then rehook.
- Handle the control level gently to avoid jerking the load and eventual winding of the rope around the drum.
- Lift the load vertically, avoiding oscillation and oblique lifting.
- Check the rope daily and replace it immediately if it is worn, damaged or even just one string is broken (see
ISO 4309), (consult your dealer).
- Check the working of the hydraulic ascent/descent limit stops daily and the braking with load applied.
- Lubricate rotating parts of the hook with oil periodically.
- Check the rope winding around the drum, periodically.
- The following accessories are not meant for lifting systems or for transferring persons.
- Before using the hoist, or any other equipment that hangs the load by a hook, inform the inspection authorities responsible (ISPEL) in your area (for Italy only).
- Remember to ask for an inspection by your local health authorities every year (for Italy only).
It is forbidden to lift hanging loads using fork accessories or other supports not meant
for this function (Contact your agent or dealer).
2
INTRODUCTION TO SAFETY
MHT 860 L - MHT 950 L Evolution
5
Before you start using the hoist on the lift truck, ensure the compatibility of the machine and its safety system
with the type of hoist required.
ATTENTION
Non conforming calibration of the safety system can be very hazardous for your safety: therefore contact your
dealer immediately in case of doubt.
Certain accessories, owing to their dimensions, and with the boom lowered and retracted, run the risk of interfering with the front tyres and damaging them if the accessory is inclinded downwards.
TO ELIMINATE THIS RISK, EXTEND THE TELESCOPIC BOOM TO A SUFFICIENT LENGTH ACCORDING
TO THE FORK LIFT TRUCK AND ACCESSORY, SO THAT THERE IS NO INTERFERENCE.
The maximum loads are defined by the lift truck capacity, also taking into account the weight and centre of gravity of the accessory. If the accessory capacity is lower than that of the lift truck, never exceed this limit.
Before starting up operation with an accessory on the lift truck, ensure the capacity of the machine and safety
system calibration concerning the accessory used.
3
INTRODUCTION TO SAFETY
5
MHT 860 L - MHT 950 L Evolution
ACCESSORY WITHOUT HYDRAULIC SYSTEM AND MANUAL BLOCK
PICKING UP THE ACCESSORY
- Check to make sure the accessory is in a position to facilitate connection of the quick-release coupling. If it is not oriented correctly,
take the necessary precautions to shift it to the maximum safety conditions.
- Check to make sure the check pin is inserted in its support on the
chassis.
- Position the lift truck with the boom lowered in front and parallel to
the accessory and incline the quick-release coupling forwards
(Fig.A).
- Bring the quick-release coupling under the accessory coupling tube,
raise the boom slightly and incline the coupling backwards to position the accessory (Fig.B).
- Disengage the accessory from the ground to facilitate blocking.
A
MANUAL BLOCK
- Take the check pin on the support and block the accessory (Fig.C).
Remember to fit the split pin.
MANUAL RELEASE
- Repeat the MANUAL BLOCK operation in reverse taking care to refit
the check pin in the support on the chassis.
REMOVING (AND PLACING) THE ACCESSORY
- Repeat the ACCESSORY PICKUP operation in reverse order, taking
care to place it in a safe position on compact, level ground.
B
C
4
INTRODUCTION TO SAFETY
5
MHT 860 L - MHT 950 L Evolution
ACCESSORY WITHOUT HYDRAULIC SYSTEM AND HYDRAULIC BLOCK (OPTION)
PICKING UP THE ACCESSORY
- Check to make sure the accessory is in a position to facilitate connection of the quick-release coupling. If it is not oriented correctly,
take the precautions necessary to shift it to maximum safety conditions.
- Check to make sure the blocking jack rods are retracted.
- Position the lift truck with the boom lowered in front and parallel to
the accessory and incline the quick-release coupling forwards
(Fig.A).
- Bring the quick-release coupling under the accessory coupling tube,
raise the boom slightly and incline the coupling backwards to position the accessory (Fig.B).
- Disengage the accessory from the ground to facilitate blockage.
HYDRAULIC BLOCK AND RELEASE (OPTION)
- Blocking and releasing an accessory is done by means of an optional command (command which can be activated by means of a special pushbutton or the manipulator itself, depending on the type of lift
truck in your possession). For more information, refer to the lift truck
Use and Maintenance Manual.
A
REMOVING (AND PLACING) THE ACCESSORY
- Repeat the ACCESSORY PICKUP operation in reverse order, taking
care to place it in a safe position on compact, level ground.
B
5
INTRODUCTION TO SAFETY
5
MHT 860 L - MHT 950 L Evolution
ACCESSORY WITH HYDRAULIC SYSTEM AND MANUAL BLOCK (OPTION)
PICKING UP THE ACCESSORY
- Check to make sure the accessory is in a position to facilitate connection of the quick-release coupling. If it is not oriented correctly,
take the necessary precautions to shift it to the maximum safety conditions.
- Check to make sure the check pin is inserted in its support on the
chassis.
- Position the lift truck with the boom lowered in front and parallel to
the accessory and incline the quick-release coupling forwards
(Fig.A).
- Bring the quick-release coupling under the accessory coupling tube,
raise the boom slightly and incline the coupling backwards to position the accessory (Fig.B).
- Disengage the accessory from the ground to facilitate blockage.
A
MANUAL BLOCKING AND CONNECTION OF THE ACCESSORY
- Take the check pin on the support and block the accessory (Fig.C).
Remember to fit the split pin.
- Switch off the combustion engine.
- Suppress the pressure in the accessory hydraulic circuit by means of
the optional command (refer to the pages concerning the commands
in the Use and maintenance manual).
- Connect the quick-release couplings according to the description of
the accessory’s hydraulic movements..
Keep the quick-release couplings clean and plug unused holes for protection.
B
REMOVING (AND PLACING) THE ACCESSORY
- Repeat the ACCESSORY PICKUP operation in reverse order, taking
care to place it in a safe position on compact, level ground.
C
6
INTRODUCTION TO SAFETY
MHT 860 L - MHT 950 L Evolution
5
ACCESSORY WITH HYDRAULIC SYSTEM AND HYDRAULIC BLOCK (OPTION)
PICKING UP THE ACCESSORY
- Check to make sure the accessory is in a position to facilitate connection of the quick-release coupling. If it is not oriented correctly,
take the precautions necessary to shift it to maximum safety conditions.
- Check to make sure the blocking jack rods are retracted.
- Position the lift truck with the boom lowered in front and parallel to
the accessory and incline the quick-release coupling forwards
(Fig.A).
- Bring the quick-release coupling under the accessory connection
tube, raise the boom slightly and incline the coupling backwards to
position the accessory (Fig.B).
- Disengage the accessory from the ground to facilitate blockage.
HYDRAULIC BLOCK AND RELEASE (OPTION)
- Blocking and releasing an accessory is done by means of an optional command (command which can be activated by means of a special pushbutton or the manipulator itself depending on the type of lift
truck in your possession). For more information, refer to the relevant
pages in the lift truck Operation and Maintenance Manual.
A
Remember to carry out decompression of the optional circuit each
time a supplementary accessory is to be connected to or
disconnected from the lift truck; this will make it easier to connect and
disconnect the quick-release couplings at the top of the boom.
B
REMOVING (AND PLACING) THE ACCESSORY
- Repeat the ACCESSORY PICKUP operation in reverse order, taking
care to place it in a safe position on compact, level ground.
7
INTRODUCTION TO SAFETY
5
MHT 860 L - MHT 950 L Evolution
USING THE FEM TYPE FORK-HOLDER
PICKING UP THE ACCESSORY
- Check to make sure the accessory is in a position to facilitate connection of the quick-release coupling. If it is not oriented correctly,
take the precautions necessary to shift it to maximum safety conditions.
- Check to make sure the check pin is inserted in the support provided
on the chassis.
- Position the lift truck with the boom lowered in front and parallel to
the accessory and incline the quick-release coupling forwards
(Fig.A).
- Bring the quick-release coupling under the accessory coupling tube,
raise the boom slightly and incline the coupling backwards to position the accessory (Fig.B).
- Disengage the accessory from the ground to facilitate blockage.
- Check to make sure that the safety screw is present and blocked
perfectly on the fork-holder (Fig.C).
Fig. A
MANUAL BLOCK
- Take the check pin on the support and block the accessory.
Remember to fit the split pin (Fig.D).
MANUAL RELEASE
- Repeat the MANUAL BLOCK procedure in reverse order taking care
to refit the check pin in the support on the chassis.
REMOVING (AND PLACING) THE ACCESSORY
- Repeat the ACCESSORY PICKUP procedure in reverse order, taking
care to place it in a safe position on compact, level ground.
Fig. B
Fig. C
Fig. D
8
INTRODUCTION TO SAFETY
MHT 860 L - MHT 950 L Evolution
5
ADJUSTING THE OPENING OF THE FORKS
- Raise the lever of the forks check pin (Fig. A).
- Move the forks manually to the required operating width.
- Lower the check pin rod (Fig. B) and move the forks until they are
inserted in the locking notch present on the fork carriage (Fig. C).
When lifting loads with the lift truck, first check to make sure the fork
check pin is inserted in the notch present on the fork carriage.
Fig. A
PERIODIC INSPECTION OF THE FORKS
- Check the thickness at the fork heel to make sure it is not less than
90% of the original thickness, which, for forks with constant section,
corresponds to the shoulder thickness (see ISO standard 5057).
- Check for permanent deformation or alignment defects, if any, in conformity to ISO standard 5057. The difference in height of the tips
must be less than 3% of the length of the horizontal part of the fork.
The permanent deformations must be checked by checking the
angle or diagonal between the fork tip and shoulder.
- Visually check the forks to make sure there are no cracks near the
heel or the fork hook. In case of doubt, proceed with penetrant liquid
testing. Repairs, if any, are only permitted is carried out in conformity
with the indications of ISO standard 5057 and documented accordingly.
Fig. B
Fig. C
9
INTRODUCTION TO SAFETY
5
MHT 860 L - MHT 950 L Evolution
DISASSEMBLING THE FORKS
- Remove the fork safety screw from the fork-holder (Fig. A). - Shift the
fork manually towards the centre of the fork-holder, lift it manually by
the tip and position it slightly away from the centre on the side, resting it on the lower guide (Fig. B). - Lower the boom and slew it forwards to rest the forks on the ground and detach them from the forkholder upper guide (Fig. C).
ATTENTION DANGER
Take great care to prevent the forks from falling to the side.
Fig. A
Fig. B
Fig. C
10
INTRODUCTION TO SAFETY
MHT 860 L - MHT 950 L Evolution
ASSEMBLING THE FORKS
- Position the lift truck in such a manner that the forks are in front,
aligned longitudinally to the truck (Fig. A).
- Incline the fork-holder forwards, push against the forks and then
hook them in the upper guide by slewing the boom backwards and
raising it (Fig. B).
- With the forks raised off the ground, move them manually towards
the centre of the fork-holder to insert them in the lower guide and
then move them outwards to the required operating width (Fig. C),
making sure that they are inserted correctly in the upper and lower
guides.
- Fit the fork safety screw in the fork-holder, blocking it by means of
the lock nut (Fig. D).
5
Fig. A
Fig. B
Fig. C
Fig. D
11
INTRODUCTION TO SAFETY
5
MHT 860 L - MHT 950 L Evolution
TECHNICAL SPECIFICATIONS OF ACCESSORIES
DESCRIPTION
NAME
860
950
INDEX
PAGE
PF FLOTT / L 1030
Floating fork-holder (4999 kg)
13
PF FLOTT / L 1430
Floating fork-holder (7500 kg)
13
PF FEM 3 / 1320
Fem fork-holder (4999 kg)
14
PF FEM 4 / 1750
Fem fork-holder (7500 kg)
14
PF FEM 4 / 2000
Fem fork-holder (7500 kg)
14
TDL FEM 3 / 1320
Fem fork holder with transfer device (4999 kg)
15
TDL FEM 4 / 1750
Fem fork holder with transfer device (7500 kg)
15
F FLOTT
Floating forks (2500 kg)
13
F FLOTT
Floating forks (3750 kg)
13
F FEM 3
Fem forks (2500 kg)
14-15
F FEM 4
Fem forks (3750 kg)
14-15
ARGANO 3T
3 Ton Winch
16
ARGANO 5T
5 Ton Winch
16
P 600
Arm P 600
17
PT 600
Arm PT 600
18
P 1200
P Arm 1200
19
PT 1200
PT Arm 1200
20
PC 30
Arm with hook
21
PC 40
Arm with hook
21
PC 50
Arm with hook
21
PC 60
Arm with hook
22
P 4000
Arm
23
MIX 350
Mixer bucket
24
MIX 500
Mixer bucket
24
MIX 750
Mixer bucket
24
GL 400
Bucket for concrete
25
GL 600
Bucket for concrete
25
GL 800
Bucket for concrete
25
GL 1500
Bucket for concrete
25
CBC 1500 L2500
Shovel for building construction
26
CBR 1500 L2500
Reclaim shovel
27
CBA 2000 L2500
Agricultural shovel
28
CBA 3000 L2500
Agricultural shovel
29
12
INTRODUCTION TO SAFETY
5
MHT 860 L - MHT 950 L Evolution
FLOATING FORK-HOLDER
SPECIFICATIONS
D
B
A
C
SPECIFICATIONS
DESCRIPTION
DIMENSIONS
(mm)
CAPACITY
A
B
C
ACCESSORY
WEIGHT
D
PF FLOTT / L 1030
4999 Kg
1127 1130 263
190 mm
456 Kg
PF FLOTT / L 1430
7500 Kg
1545 1325 270
300 mm
565 Kg
FORK SPECIFICATIONS
CAPACITY
WEIGHT
A
B
C
F FLOTT
2 X 2500 Kg
150
60
1200
141 Kg
F FLOTT
2 X 3750 Kg
200
60
1200
198 Kg
a
c
b
DIMENSIONS
(mm)
DESCRIPTION
13
INTRODUCTION TO SAFETY
5
MHT 860 L - MHT 950 L Evolution
FEM FORK-HOLDER
SPECIFICATIONS
D
B
A
C
SPECIFICATIONS
DIMENSIONS
(mm)
ACCESSORY
DESCRIPTION
CAPACITY
C
D
PF FEM 3 / 1320
4999 Kg
1404 745
229
149 mm
340 Kg
PF FEM 4 / 1750
7500 Kg
1800 630
300
220 mm
850 Kg
PF FEM 4 / 2000
7500 Kg
2050 870
320
200 mm
980 Kg
A
B
WEIGHT
FORK SPECIFICATIONS
DESCRIPTION
CAPACITY
DIMENSIONS
(mm)
A
B
C
WEIGHT
2 X 2500 Kg
150
50
1200
104 Kg
F FEM 4
2 X 3750 Kg
200
60
1200
195 Kg
a
b
F FEM 3
14
c
INTRODUCTION TO SAFETY
5
MHT 860 L - MHT 950 L Evolution
FEM FORK HOLDER
SPECIFICATIONS
WITH TRANSFER DEVICE
D
B
A
C
SPECIFICATIONS
DESCRIPTION
CAPACITY
DIMENSIONS
(mm)
A
B
ACCESSORY
C
D
WEIGHT
TDL FEM 3 / 1320
4999 Kg
1404 618
118
200 mm
490 Kg
TDL FEM 4 / 1750
7500 Kg
1800 755
140
200 mm
1130 Kg
FORK SPECIFICATIONS
CAPACITY
DIMENSIONS
(mm)
A
B
C
WEIGHT
F FEM 3
2 X 2500 Kg
150
50
1200
104 Kg
F FEM 4
2 X 3750 Kg
200
60
1200
195 Kg
a
c
b
DESCRIPTION
15
INTRODUCTION TO SAFETY
5
MHT 860 L - MHT 950 L Evolution
B
D
WINCH 3 - 5 TON
SPECIFICATIONS
A
C
LUBRICATION
DESCRIPTION
RECOMMENDED PRODUCT
QUANTITY
3 Ton / 5 Ton
FREQUENCY
ROPE
GREASE HD NLGI 2
/
30 HOURS
BLOCK
GREASE NLGI 2
/
30 HOURS
WINCH RED.GEAR
OIL MANITOU ISO 46
0,25 L / 1,3 L
250 HOURS
HOOK ROTATION
OIL AT 40
/
30 HOURS
SPECIFICATIONS
HOOK
SPEED
DESCRIPTION
CAPACITY
ROPE
WINCH 3T
3000 Kg WITH
1500 Kg
2 ROPES
DIRECT TYPE
Ø 10 mm
x 46 m
24 m/min
WINCH 5T
5000 Kg WITH
2500 Kg
2 ROPES
DIRECT TYPE
Ø 12 mm
x 46 m
18 m/min
WEIGHT
D
Q
HYDRAULIC 1070 1830 900
200
5 TON
400 Kg
HYDRAULIC 1070 1830 900
200
5 TON
420 Kg
A
16
“CE”
HOOK
DIMENSIONS
(mm)
LIMIT
STOP
B
C
INTRODUCTION TO SAFETY
5
MHT 860 L - MHT 950 L Evolution
ARM P 600
SPECIFICATIONS
B
C
D
A
Q
SPECIFICATIONS
DESCRIPTION
CAPACITY
P 600
600 Kg
DIMENSIONS
(mm)
A
830
B
C
815 4027
ACCESSORY
HOOK
DISTANCE
D
Q
1320 mm
3910 mm
WEIGHT
210 Kg
17
INTRODUCTION TO SAFETY
5
MHT 860 L - MHT 950 L Evolution
ARM PT 600
SPECIFICATIONS
B
C
D
A
Q
LUBRICATION
DESCRIPTION
RECOMMENDED PRODUCT
QUANTITY
FREQUENCY
ROPE
GREASE HD NLGI 2
/
30 HOURS
BLOCK
GREASE NLGI 2
/
30 HOURS
WINCH RED.GEAR
OIL MANITOU ISO 46
0,3 L
250 HOURS
HOOK ROTATION
OIL AT 40
/
30 HOURS
SPECIFICATIONS
DESCRIPTION CAPACITY
ROPE
HOOK
SPEED
LIMIT
STOP
DIMENSIONS
(mm)
A
PT 600
18
600 Kg
Ø 7 mm
x 30 m
45 m/min
IDRAULICO
830
B
C
815 4027
ACCESSORY
HOOK
DISTANCE WEIGHT
D
Q
1170 mm
3840 mm
320 Kg
INTRODUCTION TO SAFETY
5
MHT 860 L - MHT 950 L Evolution
ARM P 1200
SPECIFICATIONS
B
C
D
A
Q
SPECIFICATIONS
DESCRIPTION
CAPACITY
P 1200
1200 Kg
DIMENSIONS
(mm)
A
830
B
C
868 2944
ACCESSORY
HOOK
DISTANCE
D
Q
1100 mm
2500 mm
WEIGHT
165 Kg
19
INTRODUCTION TO SAFETY
5
MHT 860 L - MHT 950 L Evolution
ARM PT 1200
SPECIFICATIONS
B
C
D
A
Q
LUBRICATION
DESCRIPTION
RECOMMENDED PRODUCT
QUANTITY
FREQUENCY
ROPE
GREASE HD NLGI 2
/
30 HOURS
BLOCK
GREASE NLGI 2
/
30 HOURS
WINCH RED.GEAR
OIL MANITOU ISO 46
0,3 L
250 HOURS
HOOK ROTATION
OIL AT 40
/
30 HOURS
SPECIFICATIONS
DESCRIPTION CAPACITY
ROPE
HOOK
SPEED
LIMIT
STOP
DIMENSIONS
(mm)
A
PT 1200
20
1200 Kg
Ø 6 mm
x 46 m
23 m/min
IDRAULICO
830
B
C
868 2944
ACCESSORY
HOOK
DISTANCE WEIGHT
D
Q
910 mm
2450 mm
323 Kg
INTRODUCTION TO SAFETY
5
MHT 860 L - MHT 950 L Evolution
ARM WITH HOOK
SPECIFICATIONS
C
B
A
D
Q
SPECIFICATIONS
DESCRIPTION
CAPACITY
DIMENSIONS
(mm)
ACCESSORY
HOOK
DISTANCE
A
B
C
D
Q
WEIGHT
PC 30
3000 Kg
810
470
610
175 mm
470 mm
115 Kg
PC 40
4000 Kg
810
470
610
175 mm
470 mm
115 Kg
PC 50
5000 Kg
810
470
610
175 mm
470 mm
115 Kg
21
INTRODUCTION TO SAFETY
5
MHT 860 L - MHT 950 L Evolution
ARM WITH HOOK
SPECIFICATIONS
C
A
B
D
6000 KG
Q
SPECIFICATIONS
DESCRIPTION
PC 60
22
CAPACITY
6000 Kg
DIMENSIONS
(mm)
ACCESSORY
HOOK
DISTANCE
A
B
C
D
Q
815
520
425
210 mm
260 mm
WEIGHT
130 Kg
INTRODUCTION TO SAFETY
5
MHT 860 L - MHT 950 L Evolution
ARM P 4000
SPECIFICATIONS
C
B
A
1200 KG
4000 KG
Q
D
Q'
SPECIFICATIONS
DESCRIPTION
CAPACITY
P 4000
4000 Kg
DIMENSIONS
(mm)
A
830
B
C
467 2832
ACCESSORY
HOOK DISTANCE
D
Q’
Q
900 mm
710 mm
2710 mm
WEIGHT
210 Kg
23
INTRODUCTION TO SAFETY
5
MHT 860 L - MHT 950 L Evolution
C
MIXER BUCKET
SPECIFICATIONS
A
B
SPECIFICATIONS
DESCRIPTION
CAPACITY
DIMENSIONS
(mm)
A
24
B
INLET OPENING
WEIGHT
C
MIX 350
350 L
1570 1080 1120
HYDRAULIC
540 Kg
MIX 500
500 L
1570 1080 1120
HYDRAULIC
540 Kg
MIX 750
750 L
1570 1080 1120
HYDRAULIC
540 Kg
INTRODUCTION TO SAFETY
5
MHT 860 L - MHT 950 L Evolution
BUCKET FOR CONCRETE
SPECIFICATIONS
A
B
D
C
SPECIFICATIONS
DESCRIPTION
CAPACITY
DIMENSIONS
(mm)
A
B
ACCESSORY WEIGHT
C
GL 400
400 L / 880 Kg 1200 1285 850
480 mm
157 Kg
GL 600
600 L / 1320 Kg 1540 1435 1070
560 mm
277 Kg
GL 800
800 L / 1760 Kg 1540 1635 1070
550 mm
308 Kg
GL 1500
1500 L / 330 Kg 1790 1745 1135
613 mm
375 Kg
25
INTRODUCTION TO SAFETY
5
MHT 860 L - MHT 950 L Evolution
CONSTRUCTION
B
SHOVEL FOR BUILDING
SPECIFICATIONS
A
C
D
SPECIFICATIONS
CAPACITY
DIMENSIONS
(mm)
DESCRIPTION
LEVEL
CBC 1500 L 2500
26
1020 L
NOMINAL MAXIMUM
1336 L
1700 L
A
B
ACCESSORY
WEIGHT
404 mm
370 Kg
C
2500 1041 1272
INTRODUCTION TO SAFETY
5
MHT 860 L - MHT 950 L Evolution
B
RECLAIM SHOVEL
SPECIFICATIONS
A
C
D
SPECIFICATIONS
CAPACITY
DIMENSIONS
(mm)
DESCRIPTION
LEVEL
CBR 1500 L 2500
750 L
NOMINAL MAXIMUM
1190 L
1500 L
A
B
ACCESSORY
WEIGHT
426 mm
800 Kg
C
2500 1035 1141
27
INTRODUCTION TO SAFETY
5
MHT 860 L - MHT 950 L Evolution
B
AGRICULTURAL SHOVEL
SPECIFICATIONS
C
A
D
SPECIFICATIONS
CAPACITY
DIMENSIONS
(mm)
DESCRIPTION
LEVEL
CBA 2000 L 2500
28
1550 L
NOMINAL MAXIMUM
2005 L
2150 L
A
B
ACCESSORY
WEIGHT
469 mm
790 Kg
C
2500 1037 1371
INTRODUCTION TO SAFETY
5
MHT 860 L - MHT 950 L Evolution
B
AGRICULTURAL SHOVEL
SPECIFICATIONS
C
A
D
SPECIFICATIONS
CAPACITY
DIMENSIONS
(mm)
DESCRIPTION
LEVEL
CBA 3000 L 2500
2330 L
NOMINAL MAXIMUM
3003 L
3200 L
A
B
ACCESSORY
WEIGHT
461 mm
940 Kg
C
2500 1260 1626
29
INTRODUCTION TO SAFETY
5
MHT 860 L Evolution
LOAD CHART
WINCH 5 TON
Winch
MHT 860
5000
7,7 m
Kg
731876
The capacity diagrams are only valid if the safety system is activated.
30
INTRODUCTION TO SAFETY
5
MHT 860 L Evolution
LOAD CHART
ARM P 1200
P 1200
MHT 860
1200
8,55 m
Kg
736811
The capacity diagrams are only valid if the safety system is activated.
31
INTRODUCTION TO SAFETY
5
MHT 860 L Evolution
LOAD CHART
ARM WITH HOOK PC 50
Jib 5T
MHT 860
5000
8,2 m
Kg
736726
The capacity diagrams are only valid if the safety system is activated.
32
INTRODUCTION TO SAFETY
5
MHT 860 L Evolution
LOAD CHART
ARM WITH HOOK PC 60
Jib 6T
MHT 860
6000
8,2 m
Kg
724115
The capacity diagrams are only valid if the safety system is activated.
33
INTRODUCTION TO SAFETY
5
MHT 860 L Evolution
LOAD CHART
ARM P 4000
P 4000
MHT 860
4000
8,1 m
Kg
741590
The capacity diagrams are only valid if the safety system is activated.
34
INTRODUCTION TO SAFETY
5
MHT 860 L Evolution
LOAD CHART
ARM P 4000
P 4000
MHT 860
1200
8,2 m
Kg
741591
The capacity diagrams are only valid if the safety system is activated.
35
INTRODUCTION TO SAFETY
5
MHT 950 L Evolution
LOAD CHART
ARM P 600
P 600
MHT 950
600
9,25 m
Kg
740152
The capacity diagrams are only valid if the safety system is activated.
36
INTRODUCTION TO SAFETY
5
MHT 950 L Evolution
LOAD CHART
ARM PT 600
PT 600
MHT 950
600
8,7 m
Kg
740149
The capacity diagrams are only valid if the safety system is activated.
37
INTRODUCTION TO SAFETY
5
MHT 950 L Evolution
LOAD CHART
ARM P 1200
P 1200
MHT 950
1000
9,2 m
Kg
708205
The capacity diagrams are only valid if the safety system is activated.
38
INTRODUCTION TO SAFETY
5
MHT 950 L Evolution
LOAD CHART
ARM WITH HOOK PC 30
Jib 3T
MHT 950
3000
9m
Kg
730011
The capacity diagrams are only valid if the safety system is activated.
39
INTRODUCTION TO SAFETY
5
MHT 950 L Evolution
LOAD CHART
ARM WITH HOOK PC 40
Jib 4T
MHT 950
4000
9m
Kg
689284
The capacity diagrams are only valid if the safety system is activated.
40
INTRODUCTION TO SAFETY
5
MHT 950 L Evolution
LOAD CHART
ARM WITH HOOK PC 50
Jib 5T
MHT 950
5000
9m
Kg
687718
The capacity diagrams are only valid if the safety system is activated.
41
INTRODUCTION TO SAFETY
5
MHT 950 L Evolution
LOAD CHART
ARM P 4000
P 4000
MHT 950
4000
8,8 m
Kg
708581
The capacity diagrams are only valid if the safety system is activated.
42
INTRODUCTION TO SAFETY
5
MHT 950 L Evolution
LOAD CHART
ARM P 4000
P 4000
MHT 950
1200
9m
Kg
708580
The capacity diagrams are only valid if the safety system is activated.
43
INTRODUCTION TO SAFETY