1
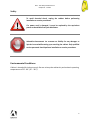
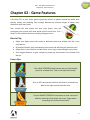
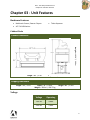
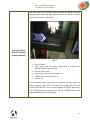
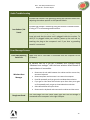
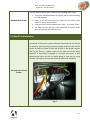
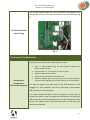
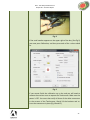
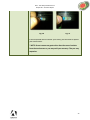
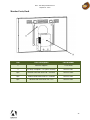
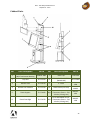
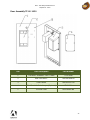
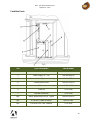
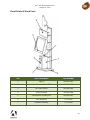
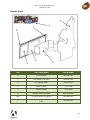
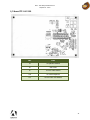
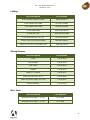
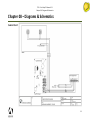
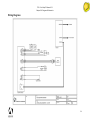
TFX1 – Fruit Ninja FX Operation & Service Manual Version 1.1 * Read this manual before use TFX1 - Fruit Ninja FX Manual V1.1 General Remark If you encounter any difficulties or if you need support on how to update and/ or install your TFX1 product, we invite you to contact your local distributor or reach us at [email protected] or by calling our support line +1-450-824-1671 Adrenaline Amusements Team Adrenaline Amusements 1150 Levis, Suite 302 Terrebonne, Qc Canada J6W 5S6 2 TFX1 - Fruit Ninja FX Manual V1.1 Table of Contents Contents General Remark .................................................................................................. 2 Table of Contents................................................................................................ 3 Chapter 01 - Preface ........................................................................................... 5 Precaution for Game Operation .................................................................................................. 5 Safety ........................................................................................................................................... 6 Environmental Conditions ........................................................................................................... 6 FCC Notices (United States) ........................................................................................................ 7 Chapter 02 - Game Features................................................................................ 8 How to Play ................................................................................................................................. 8 Power Ups ................................................................................................................................... 8 Chapter 03 - Unit Features .................................................................................. 9 Hardware Features ...................................................................................................................... 9 Cabinet Facts ............................................................................................................................... 9 Voltage ........................................................................................................................................ 9 Chapter 04 - Unit Installation ............................................................................ 10 Assembling your TFX1 Unit ....................................................................................................... 10 Chapter 05 - Operator Menu, Game Setup ........................................................ 11 The Operator Menu .................................................................................................................. 11 Chapter 06 - Service & Repair............................................................................ 14 Computer Connections, ADR-11-1002 ...................................................................................... 14 Troubleshooting ........................................................................................................................ 15 Video Troubleshooting........................................................................................................................ 15 Monitor Troubleshooting.................................................................................................................... 16 Audio Troubleshooting ....................................................................................................................... 19 Error Message Screens........................................................................................................................ 19 3 TFX1 - Fruit Ninja FX Manual V1.1 I/O Board Troubleshooting ................................................................................................................. 20 Touchscreen Troubleshooting ............................................................................................................ 21 Chapter 07 - Parts ............................................................................................. 24 Screen Assembly TF-00-1010 .................................................................................................... 24 Monitor Parts, Back ................................................................................................................... 25 Cabinet Parts ............................................................................................................................. 26 Door Assembly TF-00-1020 ....................................................................................................... 27 Cash Box Parts ........................................................................................................................... 28 Decal Prints & Wood Parts ........................................................................................................ 29 Header Parts .............................................................................................................................. 30 I/0 board TF-04-1200 ................................................................................................................ 31 Cabling ....................................................................................................................................... 32 Wiring Harness .......................................................................................................................... 32 Misc. Parts ................................................................................................................................. 32 Chapter 08 – Diagrams & Schematics ................................................................ 33 Control Card .............................................................................................................................. 33 Wiring Diagrams ........................................................................................................................ 34 4 TFX1 - Fruit Ninja FX Manual V1.1 Chapter 01 - Preface Chapter 01 - Preface Please read this page before preparing your TFX1 product for game play. The following safety instructions apply to all game operators and service personnel. Specific warnings and cautions will be included throughout this manual. Use the following safety guidelines to help protect the system from potential damage and to ensure your personal safety: Electronic components in the game cabinet run on 110V AC 60Hz (220V/ 50Hz in most of Europe, the Middle East and the Far East delivered units). To help prevent electric shock, plug the system into a properly grounded power source. These cables are equipped with 3-prong plugs to help ensure proper grounding. Do not use adapter plugs or remove the grounding prong from a cable. If you must use an extension cable, use a 3-wire cable with properly grounded plugs. To help protect your system from sudden increases and decreases in electrical power, use a surge suppressor, line conditioner or Uninterruptible Power Supply (UPS). Be sure nothing rests on the system’s cables and that the cables are not located where they can be stepped on or tripped over. Keep your system far away from radiators and other heat sources. Do not block cooling vents. Precaution for Game Operation Adrenaline Amusements Inc. assumes no liability for injuries incurred while playing our games. Operators should be aware that certain health and physical conditions may make people susceptible to injury when playing video games. 5 TFX1 - Fruit Ninja FX Manual V1.1 Chapter 01 - Preface Safety To avoid electrical shock, unplug the cabinet before performing installation or service procedures. If a power cord is damaged, it must be replaced by the equivalent power cord available from your distributor. Adrenaline Amusement Inc. assumes no liability for any damages or injuries incurred while setting up or servicing the cabinet. Only qualified service personnel should perform installation or service procedures. Environmental Conditions Cabinet is intended for indoor use only. Be sure to keep the cabinet dry and maintain operating temperatures of 59° - 86° (15° - 30°C). 6 TFX1 - Fruit Ninja FX Manual V1.1 Chapter 01 - Preface FCC Notices (United States) Electromagnetic Interference (EMI) is any signal or emission radiated in free space or conducted along power or signal leads, that endangers the functioning of radio navigation or other safety service, or that seriously degrades, obstructs, or repeatedly interrupts a licensed radio communications service. Radio communications services include, but are not limited to, AM/FM commercial broadcast, television, cellular services, radar, air-traffic control, pager, and Personal Communication Services (PCS). These licensed services, along with unintentional radiators such as digital devices (Including computer systems) contribute to the electromagnetic environment. Electromagnetic Compatibility (EMC) is the ability of items of electronic equipment to function properly together in the electronic environment. While this computer system has been designed and determined to be compliant with regulatory agency limits for EMI, there is no guarantee that interference will not occur in a particular installation. If this equipment does cause interference with radio communications services, which can be determined by turning the equipment off and on, you are encouraged to try to correct the interference by one or more of the following measures: Re-orient the receiving antenna Relocated the cabinet relative to the receiver Plug the game into a different outlet so that the computer and the receiver are on different branch circuits If necessary, consult a Regulatory EMC representative of Adrenaline Amusements Inc or an experienced radio/television technician for additional suggestions. You may find the FCC interference Handbook to be helpful. It is available from the U.S. Government Print Office, Washington, DC 20402. This device has been tested and complies with the limits for a Class A digital device pursuant to Part 15 of the FCC Rules. These limits are designed to provide reasonable protection against harmful interference when the equipment is operated in a commercial environment. This equipment generates, uses, and can radiate radio frequency energy. If not installed and used in accordance with the instruction manual, it may cause harmful interference with radio communications. Operation of this equipment in a residential area is likely to cause harmful interference, in which case you will be required to correct the interference at your own expense. Operation is subject to following conditions: This device may not cause harmful interference. This device must accept any interference received, including interference that may cause undesired operation. . 7 TFX1 - Fruit Ninja FX Manual V1.1 Chapter 02 - Game Features Chapter 02 - Game Features Fruit Ninja FX is a juicy action game enjoyed by millions of players around the world, with squishy, splatty and satisfying fruit carnage! Become the ultimate bringer of sweet, tasty destruction with every slash. Your success will also please the wise ninja Sensei, who will accompany your journey with wise words and fun fruits facts. Fruit Ninja FX is the messiest and most satisfying fruit game ever! How to Play Swipe your fingers across the screen to deliciously slash and splatter fruit like a true ninja warrior. Be careful of bombs, they are explosive to the touch and will drop your precious score. Swipe three or more fruits in one quick slice to do a juicy combo and gain more points. Slice magical bananas to gain temporary power-ups and become the ultimate fruit warrior. Power Ups Slice a BLUE STRIPPED double banana and you’ll gain double points for a limited time. Time to rack up those combos! Slice an ICE freeze banana and time will slow for a limited time. Wait for the right moment and then slice. Slice an ORANGE STRIPPED frenzy banana to send a stream of delicious, bomb-less fruits down the screen. Forget about everything else and slice those fruits! 8 TFX1 - Fruit Ninja FX Manual V1.1 Chapter 03 - Machine Features Chapter 03 - Unit Features Hardware Features Multitouch Screen, Detects 6 inputs 46’’ Full HD Monitor Ticket dispenser Cabinet Facts Cabinet Dimensions Height = 105.6’’ / 2.66m Length = 48’’ / 1.2m Depth = 24’’ / 0.6m Shipping Dimensions Length = 48’’ / 1.2m Depth = 36’’ / 0.92m Weight = 350 lbs. / 158.75 kg Height = 88’’ / 2.25m Voltage Voltage Operating 110V AC 4 AMP 220V AC 2 AMP 9 TFX1 - Fruit Ninja FX Manual V1.1 Chapter 04 - Machine Installation Chapter 04 - Unit Installation Assembling your TFX1 Unit 1. Carefully remove the Cabinet from the shipping container, giving yourself enough space. 2. Move the cabinet to the desired location. 3. Install the monitor on its support. Insert the 4 bolts on each side of the metal support (See Fig. 1). Make sure the monitor is at the right height before tightening the bolts. 4. Connect the USB, network and power cables from the computer, on the back of the monitor, to the cabinet. 5. Install the LED header at the top of the unit; insert the 4 bolts on each side of the metal support (See Fig. 2). 6. Connect the power cord from the header to the cabinet, on top of the left tube. 7. Plug in the power cord on the back of the cabinet. Fig. 1 Fig. 2 10 TFX1 - Fruit Ninja FX Manual V1.1 Chapter 05 - Operator Menu, Game Setup Chapter 05 - Operator Menu, Game Setup This chapter describes how to use and navigate the Operator Menu to set up your product and adjust all of the game’s parameters. The Operator Menu To access the Admin Menu, use the Operator Button located inside the coin door. To navigate the menu, press the option you want to change, it will highlight in yellow. You can then use the arrows on the right side of the menu to change the highlighted option’s value. 11 TFX1 - Fruit Ninja FX Manual V1.1 Chapter 05 - Operator Menu, Game Setup Operator Menu Values What it does Credits per Game 0 – 20 Adjusts the number of credits required to play. “0” puts the unit in free play mode. Game Audio Volume 0 - 10 Adjusts the in-game audio volume. “0” will mute the game. Attract Mode Volume 0 - 10 Adjusts the audio volume of the attract loop. “0” will mute the attract loop. Countdown Attract Video 5 - 60 Adjusts the countdown between attract mode loops, in seconds. Countdown Join Game 5 – 60 Adjusts the countdown of the “Join Game” screen, in seconds. Countdown Blade Selection 0 – 30 Adjusts the countdown of the “Blade Selection” screen, in seconds. Countdown Results Screen 5 – 60 Adjusts the countdown of the “Results” screen, in seconds. Countdown Enter your Name 5 – 60 Adjusts the countdown of the “Enter your Name” screen, in seconds. Redemption 0–2 Adjusts the redemption mode. “0” = No Redemption, “1” = Tickets and “2” = Coupons. This will change the in-game text accordingly. Single Player Points Divider 1 - 99 Adjusts the value by which the final score is divided to determine ticket redemption. Multiplayer Winner Tickets 1 - 100 Adjusts the number of tickets dispensed to the winner of a multiplayer game. Multiplayer Draw Tickets 0 – 100 Adjusts the number of tickets dispensed to both players in case of a draw in a multiplayer game. Multiplayer Loser Tickets 0 – 20 Adjusts the number of tickets dispensed to the loser of a multiplayer game. Fixed Ticket Payout 0 – 100 Adjusts the number of tickets dispensed per play. If this value is greater than “0”, then all other redemption options are ignored. TCP Port N/A This value is related to the communications in multiplayer matches, DO NOT CHANGE IT. 12 TFX1 - Fruit Ninja FX Manual V1.1 Chapter 05 - Operator Menu, Game Setup UDP Port N/A This value is related to the communications in multiplayer matches, DO NOT CHANGE IT. Card Reader 0–1 Changes the credit type. “0” = Coins and “1” = Card Reader. This will change the in-game text accordingly. Time per Round 30 - 90 Adjusts the length of a game, in seconds. Redemption Unit Value 1–2 Adjusts the value of physical tickets. Physical tickets are either worth “1” ticket or “2” tickets Language 0- 2 Sets the language of the unit. “0” = English, “1” = Japanese and “2” = Chinese. Reset High Score N/A Resets the high scores. Back to Game N/A Exits the Operator Menu and returns to the game. Quit to Windows N/A Exits the game and returns to the Windows desktop. 13 TFX1 - Fruit Ninja FX Manual V1.1 Chapter 06 – Service & Repair Chapter 06 - Service & Repair Computer Connections, ADR-11-1002 Network to Router Touchscreen HDMI to Monitor Sound to Speaker Blue Dongle USB to I/O Board Power Button 120V / 240V Selection AC Inlet Power Switch 14 TFX1 - Fruit Ninja FX Manual V1.1 Chapter 06 – Service & Repair Troubleshooting * NOTE: When requesting a warranty replacement you will be asked to give the unit’s serial number from the back of the unit. Video Troubleshooting Power problem, check the power to the monitor. There are loose or faulty connections between the monitor and the computer. Make sure the HDMI cable is connected properly to both the computer and the LCD# monitor. No power to computer. No Picture and Sound Verify the computer is ON. Remove computer bottom cover and press the RED or WHITE power button. Make sure that the power plug is well connected. The Bios settings have changed, If the computer does not power automatically when the unit is powered on, follow these steps: Remove computer bottom cover and plug a USB keyboard in one of the remaining USB ports. Press and hold the “Delete” key on the keyboard and then turn the computer on. Keep holding the “Delete” key until the Bios screen appears. Using the arrows, select the “Advanced” tab. Using the arrows, scroll down to the ACPI Configuration option and press the “Enter” key. 15 TFX1 - Fruit Ninja FX Manual V1.1 Chapter 06 – Service & Repair Using the arrows, scroll down to the Restore on AC/Power Loss option and press the “Enter” key. Using the arrows, select the Power On option and press the “Enter” key. Press the “F10” key then the “Enter” key to exit the Bios screen. Unplug the keyboard and put the bottom cover back on. The best way to verify the cause is to try and disconnect both USB cables from the computer itself and restart the unit. If the shuttering is still present then the hard drive is usually the cause of this issue. Picture Shutters, Freezes If the shuttering went away just plug back the USB cables one at a time and restart the computer every single time. This will eventually Momentarily point you into the right direction. Sometimes the USB cables get pulled or squeezed, this causes a power surge back to the computer thus the shuttering issue. Bypassing the USB cable using another one to test your issue will tell you which one to replace. Monitor Troubleshooting First, identify your monitor model. Check the back of the monitor’s casing. If there’s a label in the lower-left corner or in the lower right corner, you have a TFT monitor (See Fig 3). Identifying your Monitor Fig.3 16 TFX1 - Fruit Ninja FX Manual V1.1 Chapter 06 – Service & Repair If there’s a label in the lower left corner, you have an Effinet monitor (See Fig 4). Fig. 4 If there is no label on the back of your monitor you have a Samsung monitor. You will to use your monitor’s remote control to adjust its settings. Framing Problems, Wrong TV Settings / TFT Monitors. Framing Problems, Wrong TV Settings / Effinet Monitors. * NOTE: Use ONLY the purple buttons when dealing with model A monitors. Press Display / Input Gain / +3 Bass : 78 Treble : 78 Volume : 100 There are no means of adjusting the settings of an Effinet monitor. If problems persist, you will need to replace your monitor. 17 TFX1 - Fruit Ninja FX Manual V1.1 Chapter 06 – Service & Repair You must place your remote control straight up against the glass aiming down in the lower right hand corner of the screen, usually 6 inches from the corner (See Fig 5). Framing Problems, Wrong TV Settings / Samsung Monitors. Fig. 5 Source/ HDMI 4 Press “Menu”, find Eco Solution under Mode or Plug and Play depending on the model you have. Reset all timers to OFF. Plug and Play / General / Game Mode / On P.Mode on your remote / Screen Fit Volume : 95 If you encounter other issues with your monitor you may reset it to factory settings. Press “EXIT” for about 30 seconds then OK your monitor will shut OFF. Turn it on set Language to English, Home Use, D, D, D (blue button on remote) then OK. Set to HDMI4 then set to required settings on top of this page. 18 TFX1 - Fruit Ninja FX Manual V1.1 Chapter 06 – Service & Repair Audio Troubleshooting Increase the volume in the game by pressing the Operator Button and adjusting the volume options in the Operator Menu. Low Volume / No Sound Increase the monitor’s volume by using the monitor’s remote control. If using a TFT or a Samsung model monitor. Verify that the 1/8’’ plug is plugged in the computer’s green sound input jack and that the other end is plugged inside the monitor. To verify if it’s plugged inside your monitor, power up the unit and try touching the plug at the computer’s end. If you hear a grounding sound it is connected. Error Message Screens Error when Opening Serial Port Make sure that a USB cable is connected from the computer to the I/O board. At machine start up if you get a windows error message saying “Windows boot manager” then the boot selection failed because a required device is inaccessible. Windows Boot Manager Dongle not found Disconnect the usb cable between the cabinet and the screen then, connect a keyboard. Disconnect power and reconnect it to restart the computer. Press F8 repeatedly until you get to the windows boot selection. If you get to a blue boot disk selection press Enter then press again on F8 repeatedly until you get to the windows boot selection. Select Normal boot then press Enter. Disconnect the keyboard and reconnect the cabinet and the screen. The USB Dongle can’t be found. Make sure that the USB Dongle is connected to the computer in the right USB port. 19 TFX1 - Fruit Ninja FX Manual V1.1 Chapter 06 – Service & Repair You will need to restore your hard drive by following these steps. Windows Blue Screen Unplug the USB cable between the monitor and the cabinet and plug in a USB keyboard. Power up the unit and press “F11” when the first splash screen appears to access the boot menu. Using the arrows on the keyboard select: USB: …, then press “Enter”. The restore process will start; it will take about 20 minutes, when done the computer will restart by itself. I/O Board Troubleshooting Verify if the USB cable between the cabinet and the computer is connected. In the event it seems to be well connected and you still get no response you may verify your power supply inside the cash cabinet access. It needs to output 5 volts and 12 volts in the proper outputs (See Fig 6). There is a plastic screw on the side and can be easily adjusted. If everything is plugged in correctly and power is well adjusted and there are still no credits going in, you may try using another USB cable to connect the board straight to the computer. The Unit won’t Accept Credits Fig. 6 20 TFX1 - Fruit Ninja FX Manual V1.1 Chapter 06 – Service & Repair This usually happens when the 4 pin connectors are swapped in the wrong order or one of the fuses has blown on the I/O board (See Fig 7). The Ticket Distributer Keeps Turning Fig. 7 Touchscreen Troubleshooting If you have an issue with your touchscreen you must: Touchscreen is Irresponsive or Doesn’t Work Properly Plug in a USB keyboard using the USB connector between the cabinet and the monitor. Press the letter “Q” if in the game, to quit the game. Swap the keyboard for a mouse. Double click on the Multitouch Platform icon. When the window opens up, verify if you see the serial number of the touchscreen appearing in the upper right corner of the window. If it does not appear, you must verify if your USB connector is still plugged in to your computer. You can try and swap it with another USB connection on the computer. If it’s well inserted and there is still no response, you will have to remove the monitor cover to expose the touchscreen and verify the USB connection at that end along with the 12 volt connector pin (See fig 8). If the power cord is hot, please disconnect it and have your touchscreen replaced. 21 TFX1 - Fruit Ninja FX Manual V1.1 Chapter 06 – Service & Repair Fig. 8 If the serial number appears on the upper right of the box, (See Fig 9) you must press Calibration, and then press each of the + when asked to. Fig. 9 If you cannot finish the calibration up to the end you will need to remove the monitor cover to expose the Touchscreen. Make sure the power is OFF. You must then verify all three of the white connectors in the corners of the Touchscreen. Gently lift the brackets and reinsert the connectors in place (Fig 10 and 11). 22 TFX1 - Fruit Ninja FX Manual V1.1 Chapter 06 – Service & Repair Fig. 10 Fig. 11 If those methods do not resolve your issues, you will need to replace your touchscreen. * NOTE: Do not remove any parts other than the corner brackets from the touchscreen or you may void your warranty. They are very expensive. 23 TFX1 - Fruit Ninja FX Manual V1.1 Chapter 07 - Parts Chapter 07 - Parts Screen Assembly TF-00-1010 Ref Part Description Part Number 1 Monitor Back Frame TF-01-1020 2 46’’ Monitor ADR-10-1001 3 Tempered Glass TF-10-1220 4 Multitouch Overlay ADR-10-1002 5 Monitor Front Frame TF-01-1030 6 Cooling Fan TF-05-1250 7 Computer – FN (2011 Version) ADR-11-1002 8 Computer Back Cover TF-01-1040 24 TFX1 - Fruit Ninja FX Manual V1.1 Chapter 07 - Parts Monitor Parts, Back Ref Part Description Part Number 1 Monitor Support TF-01-1050 2 PC-BOX, Computer – FN (2012 Version) ADR-11-1007 N/A Restore USB Flash Drive FN – AT5IONT ADR-11-2010 N/A Restore USB Flash Drive FN – E350MI ADR-11-2011 N/A Restore USB Flash Drive FN – A75 ADR-11-2012 25 TFX1 - Fruit Ninja FX Manual V1.1 Chapter 07 - Parts Cabinet Parts Ref Part Description Part # Ref Part Description Part # 1 46’’ Monitor with Enclosure (W/O Touchscreen Overlay) ADR-10-1003 7 Plastic Top TF-07-100 2 Top Tube TF-01-1470 8 Plastic Back Panel PTEG (Behind #10) TF-07-1100 3 Bottom Tube TF-01-1070 9 2’’ Collar 4 Bracket Link 2 Module TF-01-1170 10 Green Plastic (Per Foot) 5 Plastic Support TF-07-1060 N/A 6 Plastic Foot Right TF-07-1070 N/A 6 Plastic Foot Left TF-07-1080 T5-21 Watt 6400K 34-1/2’’ Fluorescent Fixture – 220 Volt Set (3-Prong Unit) T5-21 Watt 6400K 34-1/2’’ Fluorescent Fixture – 110 Volt Set (3-Prong Unit) ADR-011200 ADR-PC13-062 ADR-051221 ADR-051220 26 TFX1 - Fruit Ninja FX Manual V1.1 Chapter 07 - Parts Door Assembly TF-00-1020 Ref Part Description Part Number 1 Coin Door - Standard – Coin + Ticket TF-01-1090 2 Dual Front Plate… ADR-40-0168-00 3 Ticket Feeder ADR-42-1337-00 4 Blank Panel for Coin Acceptor (Optional) TF-04-001 5 LED Low Ticket ADR-L20691-ND 27 TFX1 - Fruit Ninja FX Manual V1.1 Chapter 07 - Parts Cash Box Parts Ref Part Description Part Number 1 Low Ticket Switch ADR-95-4255-00 2 Power Supply 5V / 12V ADR-80-0064-00 3 Miniature Switch (Operator Mode) ADR-49-0577-01 4 Cashbox Black Plastic ADR-42-1102-10 5 I/O Board ADR-04-1200 6 Ticket Bin TF-01-1280 7 Cash Box Protection TF-01-1500 N/A Meter with Bracket 12V DC 7 Digits ADR-42-0754-07 N/A D-Link DSL / Cable 4P Router ADR-11-1003 N/A Coin Door-Coin + Bill Validator TF-01-1091 28 TFX1 - Fruit Ninja FX Manual V1.1 Chapter 07 - Parts Decal Prints & Wood Parts Ref Part Description Part Number 1 Logo A ADR-09-1001 2 Logo Adrenaline Floor TFX1 ADR-09-1003 3 FN Tickets Sticker ADR-09-1006 4 TouchFX Sticker ADR-09-1008 5 Decal Backlit Fruit Ninja FX ADR-09-1013 6 Floor Assembly TF-02-2000 7 Cash Box Assembly TF-02-2010 29 TFX1 - Fruit Ninja FX Manual V1.1 Chapter 07 - Parts Header Parts Ref Part Description Part Number 1 LED Strip Light ADR-08-1005 2 Top Header Fruit Ninja ADR-09-1016 3 LED Signage Panel ADR-09-1017 4 Plaque Display TF-01-1480 5 Support Display TF-01-1452 6 Mocap Corner LED Panel ADR-VCC9459 N/A LED Strip Light Y Connector ADR-08-1025 7 Lexan Fruit Ninja Header (2011 Version) TFX1 ADR-09-1010 30 TFX1 - Fruit Ninja FX Manual V1.1 Chapter 07 - Parts I/0 board TF-04-1200 Ref Link J4 To Operator Button J8 Not Used J6 To Low Ticket Switch J10 To Ticket Dispenser J11 To Coin Door and Meters 31 TFX1 - Fruit Ninja FX Manual V1.1 Chapter 07 - Parts Cabling Part Description Part Number RJ45 Female to Female Coupler ADR-CN-RJ45-FF 3 Feet Cate5e RJ45 Cable ADR-CAT5E-03BK 7 Feet Cate5e RJ45 Cable ADR-CAT5E-07BK 6 Foot HDMI Cable ADR-HDMI-140-06 10 Feet USB “AB” ADR-USB-AB1-10BK 3 Feet USB Extension “AA” MF ADR-USB-AA3-03 2 Feet C14 to 2xC13 Power Splitter ADR-PW-200B-02 8 Feet IEC-C13 to IEC-C14 Power Cord ADR-PW-100-08 Wiring Harness Part Description Part Number Ticket TFX-03-4010 Coin Acceptor TFX-03-4020 Low Ticket TFX-03-4030 Keypad TFX-03-4050 Power 5-12 Cabinet TFX-03-4071 Power Unit EMI Filter to C13 TFX-03-4090 Power for Power Supply 12/5 Volt TFX-03-4091 Reset Computer TFX-03-4092 Misc. Parts Part Description Part Number Diamond-Fusion Step 1 – 2.5 ml TF-15-1001 Diamond-Fusion Step 2 – 2.5 ml TF-15-1002 32 TFX1 - Fruit Ninja FX Manual V1.1 Chapter 08 – Diagrams & Schematics Chapter 08 – Diagrams & Schematics Control Card 33 TFX1 - Fruit Ninja FX Manual V1.1 Chapter 08 – Diagrams & Schematics Wiring Diagrams 34