1
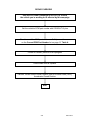
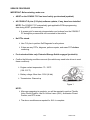
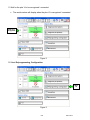
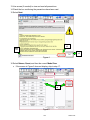
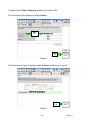
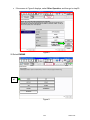
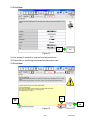
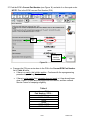
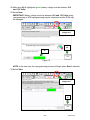
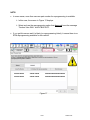
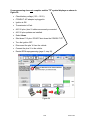
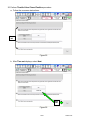
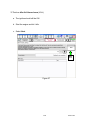
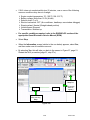
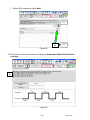
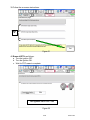
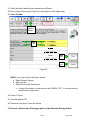
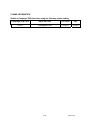
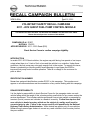
Reference:
D at e:
NTB12-022a
April 12, 2012
VOLUNTARY SAFETY RECALL CAMPAIGN
2011 - 2012 QUEST FUEL PUMP CONTROL MODULE
This bulletin has been amended. The NHTSA # and OWNER’S LETTER have been added.
Please discard all previous versions of this bulletin.
CAMPAIGN I.D. #: R1207
NHTSA #: 12V-076
APPLIED VEHICLE: 2011 - 2012 Quest (E52)
Check Service Comm to confirm campaign eligibility.
INTRODUCTION
In certain 2011-2012 Quest vehicles, the engine may stall during low speeds or low torque
output when there is a ¼ tank of fuel or less and the vehicle is on a decline. Under these
conditions, the fuel pump may not supply enough fuel to the engine. To remedy this issue,
Nissan is conducting a voluntary safety recall campaign to reprogram the ECM for
improved fuel pump control module operation. There is no charge to the customer for
parts or labor.
IDENTIFICATION NUMBER
Nissan has assigned identification number R1207 to this campaign. This number must
appear on all communications and documentation of any nature dealing with this campaign.
DEALER RESPONSIBILITY
It is the dealer’s responsibility to check Service Comm for the campaign status on each
vehicle falling within the range of this voluntary safety recall which for any reason enters the
service department. This includes vehicles purchased from private parties or presented by
transient (tourist) owners and vehicles in a dealer’s inventory. Federal law requires that
new vehicles in dealer inventory which are the subject of a safety recall must be
corrected prior to sale. Failure to do so can result in civil penalties by the National
Highway Traffic Safety Administration. While federal law applies only to new vehicles,
Nissan strongly encourages dealers to correct any used vehicles in their inventory before
they are retailed.
1/28
REPAIR OVERVIEW
Use Service Comm (campaign ID # R1207) to confirm
the vehicle you’re working on is affected by this campaign
Get the vehicle’s ECM part number with CONSULT-III plus
Check to see if the ECM part number on C-III plus matches one
on the Current ECM Part Number list on page 12, Table A
If there is a match, perform ECM reprogram
Clear codes from all systems
Perform Throttle Valve Closed Position, Idle Air Volume Learn (IAVL),
Accelerator Closed Position
END
2/28
NTB12-022a
SERVICE PROCEDURE
IMPORTANT: Before starting, make sure:
•
ASIST on the CONSULT PC has been freshly synchronized (updated).
•
All CONSULT-III plus (C-III plus) software updates, if any, have been installed.
NOTE: The CONSULT PC automatically gets applicable ECM reprogramming
data during ASIST synchronization.
¾ A screen print for warranty documentation can be done from the CONSULT
PC during this process while still connected to the vehicle.
•
No DTCs stored.
¾ Use C-III plus to perform Self Diagnosis for all systems.
¾ If there are any DTCs, diagnose, perform repairs, and erase DTCs before
continuing.
•
For in-stock vehicles only: Extended Storage Switch engaged (pushed in).
•
Confirm the following conditions are met (the vehicle may need to be driven to meet
these conditions):
¾ Engine coolant temperature: 70 - 100°C
(158 - 212°F)
¾ Battery voltage: More than 12.9V (At idle)
¾ Transmission: Warmed up
Figure 1
NOTE:
¾ After reprogramming is complete, you will be required to perform Throttle
Valve Closed Position, Idle Air Volume Learn (IAVL), Accelerator Closed
Position, and DTC erase.
¾ The above conditions are required for IAVL to complete.
3/28
NTB12-022a
Reprogramming Procedure
1. With the vehicle parked, the transmission in Park, and the steering wheel in the neutral
(straight ahead) position, connect the plus Vehicle Interface (plus VI) to the vehicle.
•
Make sure to use the correct VI for C-III plus (plus VI).
CAUTION: Make sure the plus VI is securely connected. If the plus VI connection is
loose during reprogramming, the process will be interrupted and the ECM may be
damaged.
2. Connect the AC Adapter to the CONSULT PC.
CAUTION: Be sure to connect the AC Adapter. If the CONSULT PC battery voltage
drops during reprogramming, the process will be interrupted and the ECM may be
damaged.
3. Connect a battery charger to the vehicle battery:
•
Set the battery charger at a low charge rate.
NOTE: The GR-8 (Battery and Electrical Diagnostic Station) set to “Power Supply”
mode is recommended.
CAUTION: Be sure the battery charger is connected securely to the battery. Make
sure the battery voltage stays between 12.0V and 15.5V during reprogramming. If
the battery voltage goes out of this range during reprogramming, the ECM may be
damaged.
4. Turn off all external Bluetooth® devices (e.g., cell phones, printers, etc.) within
range of the CONSULT PC and the plus VI.
CAUTION: Make sure to turn off all external Bluetooth® devices. If Bluetooth® signal
waves are within range of the CONSULT PC and the plus VI during reprogramming,
reprogramming may be interrupted and the ECM may be damaged.
4/28
NTB12-022a
5. Customer vehicles only: Verify the Extended Storage Switch is engaged (pushed in).
6. In-stock vehicles only: Engage (push in) the Extended Storage Switch.
NOTE: The Extended Storage Switch will be disengaged (pulled out) at the end of
the service procedure.
7. Turn the ignition ON with the engine OFF.
•
The engine must not start or run during the reprogramming procedure.
8. Turn OFF all vehicle electrical loads such as exterior lights, interior lights, HVAC,
blower, rear defogger, audio, NAVI, seat heater, steering wheel heater, etc.
IMPORTANT: Make sure to turn OFF all vehicle electrical loads. Make sure the
battery voltage stays between 12.0V and 15.5V during reprogramming. If the battery
voltage goes out of this range during reprogramming, the ECM may be damaged.
9. Open / start ASIST on the CONSULT PC.
10. Select / open C-III plus.
5/28
NTB12-022a
11. Wait for the plus VI to be recognized / connected.
•
The serial number will display when the plus VI is recognized / connected.
plus VI is
recognized
Figure 2
12. Select Re/programming, Configuration.
Step
12
Figure 3
6/28
NTB12-022a
13. Use arrows (if needed) to view and read all precautions.
14. Check the box confirming the precautions have been read.
15. Select Next.
Step
13
Step
14
Step
15
Figure 4
16. Select Nissan, Quest, and then the correct Model Year.
•
If the screen in Figure 5 does not display, skip to step 17.
Step
16
Figure 5
7/28
NTB12-022a
17. Make sure the VIN or Chassis # matches the vehicle’s VIN.
18. If the correct VIN is displayed, select Confirm.
Step
17
Step
18
Figure 6
19. If the screen in Figure 7 displays, select Confirm, and then go to step 20.
Step
19
Figure 7
8/28
NTB12-022a
•
If the screen in Figure 8 displays, select Other Operation, and then go to step 20.
Figure 8
20. Select ENGINE.
Step
20
Figure 9
9/28
NTB12-022a
21. Select Reprogramming.
Step
21
Figure 10
22. Select Save.
Step
22
Figure 11
10/28
NTB12-022a
23. Select Next.
Step
23
Figure 12
24. Use arrows (if needed) to view and read all precautions.
25. Check the box confirming the precautions have been read.
26. Select Next.
Step
24
Step
25
Step
26
Figure 13
11/28
NTB12-022a
27. Find the ECM’s Current Part Number (see Figure 14) and write it on the repair order.
NOTE: This is the ECM’s current Part Number (P/N).
Step
27
If ECM P/N
matches,
select Next
Figure 14
a. Compare the P/N you wrote down to the P/N in the Current ECM Part Number
list in Table A below.
•
If there is a match, this bulletin applies. Continue with the reprogramming
procedure by selecting Next.
•
If there is not a match, this campaign does not apply or it has already been
done. Close C-III plus and disconnect from the vehicle, and then recheck
Service Comm for campaign eligibility.
Table A
Current ECM
Part Number: 23710 1JA2A
1JA3A, 1JA3B
1JR5A
1JR6A
1JR5B, 1JR5C
1JR6B, 1JR6C
12/28
NTB12-022a
28. Make sure OK is highlighted green (battery voltage must be between 12.0
and 15.5 Volts).
29. Select Next.
IMPORTANT: Battery voltage must stay between 12.0 and 15.5 Volts during
reprogramming or ECM reprogramming may be interrupted and the ECM may
be damaged.
Monitor battery
voltage here
Step
29
Step
28
Figure 15
NOTE: In the next step, the reprogramming process will begin when Start is selected.
30. Select Start.
Monitor battery
voltage here
Step
30
Figure 16
13/28
NTB12-022a
NOTE:
•
In some cases, more than one new part number for reprogramming is available.
¾ In this case, the screen in Figure 17 displays.
¾ Select and use the reprogramming option that does not have the message
“Caution! Use ONLY with NTBXX-XXX”.
•
If you get this screen and it is blank (no reprogramming listed), it means there is no
ECM reprogramming available for this vehicle.
xxxxx-xxxxx
xxxxx-xxxxx
xxxxxxxxxxxxxxxxxxxxxx
xxxxx-xxxxx
xxxxx-xxxxx
xxxxxxxxxxxxxxxxxxxxxx
Figure 17
14/28
NTB12-022a
NOTE: If the message shown in
Figure 18 appears, there is data
stored in the plus VI. Select Yes
to proceed with reprogramming.
Figure 18
31. Wait for both progress bars to complete.
Step
31
Figure 19
15/28
NTB12-022a
32. When the screen in Figure 20 displays, the reprogramming is complete.
NOTE: If the screen in Figure 20 does not display (reprogramming does not complete),
refer to the information on page 17-19.
33. Disconnect the battery charger from the vehicle.
34. Select Next.
Step
34
Figure 20
35. Wait for system call to complete.
Step
35
Figure 21
NOTE: Additional steps/operations are required before C-III plus will provide
the final reprogramming confirmation report. Continue with the reprogramming
procedure on page 20.
16/28
NTB12-022a
If reprogramming does not complete and the “!?” symbol displays as shown in
Figure 22:
•
Check battery voltage (12.0 - 15.5V).
•
Ignition is ON.
•
External Bluetooth® devices are OFF.
•
All electrical loads are OFF.
•
Select Retry and follow the on screen instructions.
NOTE: Retry may not go through on the first attempt and can be
selected more than once.
Figure 22
17/28
NTB12-022a
If reprogramming does not complete and the “X” symbol displays as shown in
Figure 23:
•
Check battery voltage (12.0 - 15.5V).
•
CONSULT A/C adapter is plugged in.
•
Ignition is ON.
•
Transmission in Park.
•
All C-III plus / plus VI cables are securely connected.
•
All C-III plus updates are installed.
•
Select Home.
•
Shut down C-III plus. DO NOT shut down the CONSULT PC.
•
Turn the ignition OFF.
•
Disconnect the plus VI from the vehicle.
•
Connect the plus VI to the vehicle.
•
Restart ECM reprogramming (page 5, step 10).
Figure 23
18/28
NTB12-022a
If reprogramming does not complete and the “X” symbol displays as shown in
Figure 24:
•
Check battery voltage (12.0 – 15.5V).
•
CONSULT A/C adapter is plugged in.
•
Ignition is ON.
•
Transmission in Park.
•
All C-III plus / plus VI cables are securely connected.
•
All C-III plus updates are installed.
•
Select Home.
•
Shut down C-III plus. DO NOT shut down the CONSULT PC.
•
Turn the ignition OFF.
•
Disconnect the plus VI from the vehicle.
•
Connect the plus VI to the vehicle.
•
Restart ECM reprogramming (page 5, step 10).
Figure 24
19/28
NTB12-022a
36. Perform Throttle Valve Closed Position procedure.
a. Follow the on-screen instructions.
Step
36a
Figure 25
b. After Time out displays, select Next.
Time out
Step
36b
Figure 26
20/28
NTB12-022a
37. Perform Idle Air Volume Learn (IAVL).
a. The ignition should still be ON.
b. Start the engine and let it idle.
c. Select Next.
Step
37c
Figure 27
21/28
NTB12-022a
d. Select Start.
Step
37d
Figure 28
e. Wait for IAVL to complete.
Step
37e
Figure 28a
22/28
NTB12-022a
•
If IAVL does not complete within two (2) minutes, one or more of the following
common conditions may be out-of-range:
¾
¾
¾
¾
¾
¾
¾
Engine coolant temperature: 70 - 100°C (158 - 212°F)
Battery voltage: More than 12.9V (At idle)
Selector lever: P or N
Electric load switch: OFF (Air conditioner, headlamp, rear window defogger)
Steering wheel: Neutral (Straight-ahead position)
Vehicle speed: Stopped
Transmission: Warmed up
•
For specific conditions required, refer to the ENGINE>EC section of the
appropriate Quest Electronic Service Manual (ESM).
•
Select Stop.
•
When the Information screen (similar to the one below) appears, select Yes,
and then make sure all conditions are met.
•
By selecting Yes, this will take you back to the screen in Figure 27, page 21.
Restart the IAVL procedure (page 21, step 37c).
Information
Select
Stop first
No
Yes
(this screen
will then
appear)
Select Yes
after selecting
Stop
Figure 28b
23/28
NTB12-022a
f. When IAVL completes, select Next.
Step
37f
Figure 29
38. Follow the on-screen instructions to complete Accelerator Pedal Close Position
Learning.
Step
38
Figure 30
24/28
NTB12-022a
39. Follow the on-screen instructions.
Step
39
Figure 31
40. Erase all DTCs as follows:
a. Turn the ignition OFF
b. Turn the Ignition ON.
c. Wait for DTC erase to complete.
ON
Turn ignition ON > OFF > ON
Figure 32
25/28
NTB12-022a
41. Verify the before and after part numbers are different.
42. Print a copy of this screen (Figure 33) and attach it to the repair order.
43. Select Confirm.
See
NOTE ‘a’
below
Step
41
Step
42
Step
43
Figure 33
NOTE: If you can not print the above screen:
a. Select Screen Capture.
b. Name the file.
c. Save the file in My Documents.
•
A copy of the screen is now saved in the CONSULT PC. It can be retrieved
and printed at a later time.
44. Close C-III plus.
45. Turn the ignition OFF.
46. Disconnect the plus VI from the vehicle.
47. In-stock vehicles only: Disengage (pull out) the Extended Storage Switch.
26/28
NTB12-022a
CLAIMS INFORMATION
Submit a Campaign (CM) line claim using the following claims coding:
Campaign (CM) I.D #
DESCRIPTION
OP CODE
FRT
R1207
Reprogram ECM
R12071
0.5 hrs
27/28
NTB12-022a
OWNER’S LETTER
Dear Nissan Quest Owner:
This notice is sent to you in accordance with the requirements of the National Traffic
and Motor Vehicle Safety Act. Nissan has decided that a defect which relates to motor
vehicle safety exists in 2011-2012 Model year Nissan Quest vehicles. Our records
indicate that you own or lease the Nissan vehicle identified by the VIN on the inside of
this notice.
Reason for Recall
On certain 2011-2012 Model Year Quest vehicles, there is an issue with the Fuel Pump
Control Module (FPCM) which may cause the engine to stop running without warning
under the following conditions: (1) the fuel tank has one quarter or less of fuel; and
(2) the vehicle is driving at slow speeds or idling on a decline. If the engine stops
without warning on your vehicle, this may increase the risk of a crash.
What Nissan Will Do
Your Nissan dealer will reprogram the Engine Control Module (ECM), free of charge,
which will update the software contained in the FPCM. This free service should only
take an hour to complete, but your Nissan dealer may require your vehicle for a longer
period of time based upon their work schedule.
What You Should Do
Please maintain the fuel level in your vehicle so that the fuel gauge reads
above the one quarter position. Contact your Nissan dealer at your earliest
convenience in order to arrange an appointment to have your vehicle repaired. Please
bring this notice with you when you keep your service appointment.
If the dealer fails to, or is unable to make the necessary repairs free of charge, you
may contact the National Consumer Affairs Department, Nissan North America, Inc.
P.O. Box 685003, Franklin, TN 37068-5003. The toll free number is 1-800-NISSAN1
(1-800-647-7261). You may also submit a complaint to the Administrator, National
Highway Traffic Safety Administration, 1200 New Jersey Avenue, SE., Washington, DC
20590; or call the toll-free Vehicle Safety Hotline at 1-888-327-4236 (TTY: 1-800-4249153); or go to http://www.safercar.gov.
Federal law requires that any vehicle lessor receiving this recall notice must
forward a copy of this notice to the lessee within ten days.
Thank you for your cooperation. We are indeed sorry for any inconvenience this may
cause you.
28/28
NTB12-022a