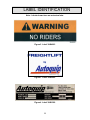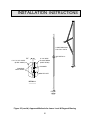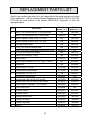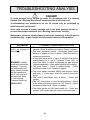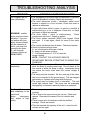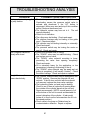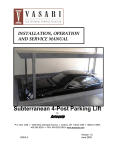
1
INSTALLATION, OPERATION AND SERVICE MANUAL FREIGHTLIFT Model FLH P.O. Box 1058 1058 West Industrial Avenue Guthrie, OK 73044-1058 888-811-9876 405-282-5200 FAX: 405-282-3302 www.autoquip.com 830FLH Version 3 June 2012 TABLE OF CONTENTS Introduction & Company Contact Information 3 Inspection & Identification of Parts 4 Responsibility of Owners/Users 5 Safety Signal Words 6 Safety Practices 7 Safety Features 14 Label Identification 18 Specifications 21 Blocking Instructions 22 Installer Guidelines & Responsibilities 24 Installation Instructions 29 Operating Instructions 68 Routine Maintenance 73 General Maintenance 76 Replacement Parts List 93 Troubleshooting Analysis 94 Glossary of Terms 98 Appendix – Inspection Checklist 100 Warranty 103 Please record the following information and refer to it when calling your dealer or Autoquip. Model Number:________________Serial Number: ___________________ Installation Date _____/_____/_____ 2 INTRODUCTION CODE REQUIREMENTS VRCs are NOT elevators. This lift is designed for the transfer of material only from one level to another. Absolutely NO RIDERS! VRCs have their own national safety code (ANSI/ASME B20.1) and are specifically exempt from the National Elevator Code. Some states require special components and have specific guidelines regarding how the equipment must be installed, inspected, and tested. The owner is ultimately responsible for understanding these requirements for the specific job location, and Autoquip will incorporate any special requirements into the order as requested and approved by the customer. Call Autoquip Corporation at (405) 282-5200 or 1-888-811-9876 with any questions you may have concerning VRC code requirements. IMPORTANT Autoquip Corporation has designed and manufactured the FREIGHTLIFT to safely and efficiently move materials between multiple floors or levels. It has been built to provide many years of dependable service. INSTALLERS - Proper installation of this equipment is vital to both the efficiency of the unit and the ultimate satisfaction of the end user. It is vital for the installers to read and understand this manual! These instructions have been prepared and organized to assist the installers and it is important for these individuals to carefully follow the steps in the order they are presented! OPERATORS - Please read and understand this manual prior to operation of this Freightlift. Failure to do so could lead to property damage and/or serious personal injury. Situations may arise which are not covered in this manual. If you have questions, please call Autoquip Customer Service at (405) 282-5200 or 1-888-811-9876. NOTE: Unless otherwise stated, mechanical installation does not include unloading, permits, seismic calculations, or extensive acceptance testing. The requirements of each contract should be carefully reviewed for possible conflicts of interpretation. PLANNED MAINTENANCE PROGRAM A local Autoquip representative provides a Planned Maintenance Program (PMP) for this equipment using qualified and experienced personnel. Call a local representative or Autoquip Corporation at 1-888-811-9876 or 405-282-5200 for more information. 3 INSPECTION & IDENTIFICATION Your FREIGHTLIFT arrives packaged as follows: The two (2) masts with cylinders/sheaves/cable, and platform come banded together, you also receive parts crates/boxes which normally contain the smaller of the following items: The following items are typically shipped within each FREIGHTLIFT order: A. Two Carriage Upright Assemblies B. Four Carriage Side Guards (Handrails) C. Two Upper & Two Lower Guide Wheel Assemblies D. Two Tension Roller Assemblies E. One Overhead Channel F. One Mast Cross Channel G. Two (minimum) Horizontal Brace Channels (and miscellaneous lengths of channel for bracing) H. One Hydraulic Power Unit, One Control Panel, Two (min.) P/B I. Three 20' lengths of Pressure Hose and Fittings J. One 50' length of Breather Tube and Fittings (and miscellaneous Hardware, Manuals, and Signs) NOTE: The “Bill of Lading” will state the number of pieces shipped. TWO ITEMS MAY BE BANDED TOGETHER AND COUNT AS ONE PIECE. Upon receipt of the shipment, check for exposed damage or shortages and make note of it on the trucking company Bill of Lading or the Shipping Papers. Reports of concealed damage to items contained in crates must be reported within 48 hours. DO NOT destroy the crating while opening it to inspect the contents. If damage is suspected or found, report it directly to the carrier. DO NOT contact Autoquip Corporation!! All shipments are FOB from the Autoquip plant. Any claims for damage must be filed with the carrier. Any parts shipped from Autoquip that are intended to replace damaged or lost items will be invoiced to the ordering party. Assuming no damage has occurred to the crate, check the components against the packing list. This will provide assurance that every item shipped has been received. Everything needed for the installation should be available. If not, report any shortages to Autoquip Corporation within 10 days. (Autoquip is not responsible for parts lost, stolen or damaged during transportation, storage, installation, or during any other circumstances or conditions that may be beyond Autoquip’s control.) 4 RESPONSIBILTY OF OWNERS/USERS CODE COMPLIANCE Ultimate responsibility for gaining state and local code approval is the responsibility of the buyer of the VRC. Please acquaint yourself with the permitting and/or licensing expenses and requirements of the local regulatory agencies in the installation area. . INSPECTION & MAINTENANCE The lift shall be inspected & maintained in proper working order in accordance with this manual and with other applicable safe operating practices. REMOVAL FROM SERVICE Any lift in service which is not in safe operating condition such as, but not limited to, excessive leakage, missing rollers, pins, or fasteners, any bent or cracked structural members, cut or frayed electric or hydraulic lines, damaged or malfunctioning controls or safety devices, etc. shall be removed from service until repaired to original manufacturer’s standards. REPAIRS All repairs shall be made by qualified personnel in conformance with Autoquip’s instructions. OPERATORS Only trained personnel and authorized personnel shall be permitted to operate the lift. BEFORE OPERATION Before using the lift, the operator shall have: Read and/or had explained, and understood, the manufacturer’s operating instructions and safety rules. Inspected the lift for proper operation and condition. Any suspect item shall be carefully examined and a determination made by a qualified person as to whether it constitutes a hazard. All items not in conformance with Autoquip’s specification shall be corrected before further use of the lift. DURING OPERATION The lift shall only be used in accordance with this Manual. Do not overload the lift. Do not allow any portion of the load to overhang the perimeter of the carriage. Ensure that all safety devices are operational and in place. MODIFICATIONS OR ALTERATIONS Modifications or alterations to industrial lifting equipment shall be made only with written permission of Autoquip. Autoquip does not foresee and does not anticipate unauthorized modifications, and these changes or alterations are grounds for voiding all warranties. 5 SAFETY SIGNAL WORDS SAFETY ALERTS (Required Reading!) The following SAFETY ALERTS are intended to create awareness of owners, operators, and maintenance personnel of the potential safety hazards and the steps that must be taken to avoid accidents. These same alerts are inserted throughout this manual to identify specific hazards that may endanger uninformed personnel. Identification of every conceivable hazardous situation is impossible. Therefore, all personnel have the responsibility to diligently exercise safe practices whenever exposed to this equipment. ____________________________________________________________ DANGER! Identifies a hazardous situation which, if not avoided, will result in death or severe personal injury. _____________________________________________________________ WARNING! Identifies a hazardous situation which, if not avoided, could result in death or serious personal injury. CAUTION! Identifies a hazardous situation which, if not avoided, may result in minor or moderate personal injury. _____________________________________________________________ NOTICE Identifies a situation or practice not related to personal injury. 6 SAFETY PRACTICES DANGER! High voltage! May cause personal injury or death. Repairs should only be performed by a qualified service/control technician. DANGER! Never go under a platform! To avoid personal injury or death, always be sure the load has been removed from the platform and that it has been adequately blocked from underneath. See “Blocking Instructions” section. DANGER! Qualified personnel only!! Only qualified personnel should perform procedures labeled as “dangerous”. service DANGER! Be sure of equipment stability! To avoid personal injury or death, check for stability. If the supports seem unstable, do not operate! Contact Autoquip immediately at 888-811-9876. DANGER! Turn off power! To avoid personal injury or death, be sure the power is off and is locked out at the primary power disconnect switch per OSHA Lock-Out, Tag-Out procedures. 7 SAFETY PRACTICES DANGER! Practice field safety procedures! To avoid personal injury or death, utilize all applicable precautions for steel erection and equipment assembly in addition to OSHA Lock-Out, Tag-Out procedures. DANGER! Support all beams and components! Illustrations in this manual may show them unsupported. This is done in order to make the equipment and its installation clearly understood. Be sure to properly secure all lift beams and components on the actual unit. DANGER! Secure platform when attempting to free a jammed carriage! Do not walk out onto carriage or attempt to access or remove a jammed load unless the carriage has been secured to prevent unexpected movement or uncontrolled descent. (See “Blocking Instructions” section) WARNING! No riders! The FREIGHTLIFT is provided for the sole purpose of transporting goods between floor elevations. At no time should it be used to transport personnel. 8 SAFETY PRACTICES WARNING! Slack cables require factory help! Do not attempt to repair slack cable conditions alone! Always contact the local representative or call the Autoquip Service Department at 888-811-9876. WARNING! Never run the unit with the gates or doors open! Do not operate unit with doors open or with the interlocks “defeated” (bypassed)! Serious injury or death could result. WARNING! Never go under platform carriage! Use a long-handled broom or similar implement to remove debris that may accumulate. WARNING! Secure unit before making static inspections! Make sure the platform is fully lowered and the power is turned off (disconnected at the safety disconnect switch) before performing static inspections. Place signs at all gates, doors, controls, etc. indicating the system is temporarily out of service for routine maintenance per OSHA Lock-Out, Tag-Out procedures. WARNING! Close all gates when not in use! Never leave the FREIGHTLIFT unattended with gates left open. 9 SAFETY PRACTICES WARNING! Never operate unit when parts are broken or damaged! Do not operate this equipment when non-factory approved or damaged parts are in use! Contact the local FREIGHTLIFT Service Representative to rectify all such situations. WARNING! Velocity fuse lock-up requires factory help! Contact your local FREIGHTLIFT representative or call Autoquip Service Department if hydraulic velocity fuses should lock up! WARNING! Do not weld on the guide flanges of the masts! Interfering with the free travel of the wheel guides could cause permanent damage to the lift and prevent safety devices from operating as intended. WARNING! Use properly rated hoses only! Never use fittings or hoses that are not properly rated for the intended use. 10 SAFETY PRACTICES WARNING! The velocity fuse (VF) must be properly installed! The VF is attached to the elbow fitting in the rod port of the cylinder. If the VF is installed improperly, it will not lock the carriage in place in the event of a catastrophic hydraulic line break! WARNING! Do not over travel! Mechanical stops must be in place to prevent the carriage from over traveling. Over-traveling can cause permanent damage to the carriage or failure of the lifting cables. WARNING! Attach velocity fuse with solid fitting! Do not use a swivel fitting between the velocity fuse and the cylinder. If accidentally broken at the swivel, the velocity fuse will not prevent the carriage from falling to the floor. CAUTION! Do not attempt cylinder removal alone! cylinder requires two people. 11 Be aware that removing a SAFETY PRACTICES CAUTION! The hydraulic cylinder-retaining strap must be in place! A secure strap will prevent the cylinder from falling after the cable is removed! NOTICE Purge air in the system! The presence of air in the system can lead to a lock-up of the velocity fuses. (Air reacts like a spring when it is compressed.) NOTICE Automatic cylinder retraction possible! Be aware that the cylinder rod may retract into the cylinder body automatically when the hydraulic hose is disconnected. NOTICE Use appropriate fluids! Do not use automatic transmission fluid (ATF), hydraulic jack oil, hydraulic fluids, or brake fluids in the power unit or hosing system. NOTICE Keep power unit filled! Do not run the hydraulic power unit dry. Damage to the pump and motor may result. 12 SAFETY PRACTICES NOTICE Protect cylinder rods, hydraulic ports and lines at all times! Welding splatter and dust from grinding operations can cause severe damage to this equipment. NOTICE Do not damage the pump or motor! If the motor needs to run during the installation process and the electrical work is not complete, only do so for a second or two after the mechanical stop is pressed. Longer activation could cause damage to the pump or the motor. If the electrical control system is complete, the motor will stop because of the pressure switch setting. NOTICE Cables must be seated before raising lift! Be sure the cables are seated in the load sheaves above the platform carriage prior to raising the lift. 13 SAFETY FEATURES There are several primary active safety features and devices to help protect personnel, property, and the equipment. MECHANICAL LOCKING SAFETY CAMS Each wire rope is terminated at the platform carriage in a clevis, which is attached to a tension spring loaded steel safety cam. This safety cam pivots on a high strength steel pin which is chrome plated. The safety cam has serrated teeth cut into one of its faces that are adjacent to the guideway flange. Should the wire rope become slack for any reason, the spring tension would cause the serrated teeth of the safety cam to engage the guideway. The teeth bite into the guideway and a wedging effect takes place between the safety cam and the guideway. The result is a positive halt to downward movement. The only way to release the safety cam is to correct the malfunction that caused the slack rope and exert upward tension on the rope through the hydraulic cylinder and cable sheaves. Either of the two cams will support the loaded platform carriage at any point in the vertical travel. WARNING! Slack ropes require factory help! Do not attempt to repair slack wire rope conditions alone! Always contact the local representative or call the Autoquip Service Department. ZERO DRIFT FEATURE A zero drift feature has been incorporated into the hydraulic FREIGHTLIFT. The zero drift utilizes a pressure switch in the electrical circuit. If the pressure switch closes due to a pressure drop or leak, the motor will start momentarily to build pressure until the pressure switch shuts the motor off. This keeps the platform from drifting downward from the upper level. When the operator closes all gates and energizes the down pushbutton, the zero drift circuit is disabled and the carriage will lower. 14 SAFETY FEATURES HYDRAULIC VELOCITY FUSES Each hydraulic cylinder has a hydraulic velocity fuse (HVF) installed in the cylinder ports. These HVFs are installed in the predetermined hydraulic oil flow velocity as the oil returns to the reservoir. Should a catastrophic rupture or breach occur in the hydraulic system and oil flows through the breach that exceeds the HVF rating, the HVF will trigger and lock up. This lock up will occur within one to two inches of downward movement of the platform carriage. NOTE: Air in the system will also cause a lock up. Air acts like a spring when compressed. To remove air from the system, see “Air Bleeding Procedures” in the General Maintenance section. NOTE: Small, slow fitting leaks will not trigger the HVFs. In an air-free system, the breach must be large enough to cause an uncontrolled or destructive lowering speed. Should a triggering and lock up occur, it can only be released by applying upward hydraulic flow in a functional system. WARNING! Never run the unit with the gates or doors open! Do not operate the unit with the doors open or with the interlocks “defeated” (bypassed)! SAFETY RELEASE BYPASS VALVE (SRBV) The SRBV is a part of the hydraulic system. Should the system pressure exceed the predetermined pressure setting, the SRBV will bypass the pump output back to the oil reservoir. The SRBV is factory set to the proper pressure, which will prevent damage to the mechanical, hydraulic, and electrical systems due to overloading, obstruction, or other circumstances. 15 SAFETY FEATURES CONTROL TRANSFORMER SECONDARY FUSE This fuse is attached to the electrical control transformer and protects the 115 volt control circuit from damage should a fault occur which would result in excessive electric current flow. Should the fuse activate (blow), it will prevent the operation in either direction and the interlock circuit will not operate. These fuses are located in the control enclosure. DANGER! High voltage! May cause personal injury or death. Repairs should only be performed by a qualified electrician or service technician and OSHA requirements for Lock-Out, Tag-Out must be followed!! MOTOR STARTER OVERLOADS (MSO) These are current sensing devices that are located in the three legs of the electric motor primary power circuit (208, 230, or 460 volt). They protect the motor from excessive current draw if it becomes overloaded, experiences low line voltage, or has a short circuit. Should any leg sense an over-current situation, the element will heat up and trip the heat sensitive device housed in the motor starter coil circuit. Power is removed to the coil and the three line power contacts are opened in the motor primary power circuit. This will stop the motor from rotating until the overloads are reset and/or the fault is cleared which caused the trip condition. NOTE: The MSO will only affect the “UP” circuit. The platform carriage can be lowered if the MSO trips. PERSONNEL GUARDS Depending on the application, one or more of the following personnel protection features is included in the design of this equipment (different states may vary on the exact design and orientation of these features – IT IS IMPORTANT TO BECOME FAMILIAR WHICH THE SPECIFIC CODE REQUIREMENTS OF YOUR STATE): - - GATES & ENCLOSURES: Required per ASME B20.1 to protect personnel from inadvertent physical contact with a moving lift & moving load at all lift landings. CARRIAGE RAILINGS & SNAP CHAINS: Required per ASME B20.1 to protect personnel whenever personnel walk onto the lift carriage when in the raised position. Railings or side guards protect non-operating sides, snap chains protect operating sides. CARRIAGE BACK-STOP PANELS: Additional safety feature recommended at all upper levels to provide additional fixed guarding 2” (max.) away from & across all unused, operating sides of the lift (typical with non-shaftway “Z” & 90 degree load patterns). 16 SAFETY FEATURES SAFETY INTERLOCKS/LATCHES - GATES OR DOORS (where applicable) These are electro/mechanical devices that prevent operation of the FREIGHTLIFT when the gates or doors are left open on any level. They also prevent the gates or doors from being opened at any level unless the platform carriage is in place at that floor level. WARNING! Never run the unit with the gates or doors open! Do not operate unit with doors open or with the interlocks “defeated” (bypassed)! SHAFTWAY DOOR BARRIER BARS (where applicable) Shaftway door barrier bars are designed to provide a secondary means of personnel protection at the upper level landing of an FLH shaftway installation. When the carriage is not present at the upper level, the two barrier bars rest in permanent brackets attached to both sides of the door frame on the outside (shaft side) of the upper level door. The barrier bars form rigid barriers at approximately 24” and 48” above floor level. In the unlikely event that the upper level door is able to be opened when the carriage is not at the upper landing, the bars provide an additional means of personnel protection against stepping or backing into the shaftway where the carriage could be assumed to be present. When properly installed, the barrier bars are lifted up and along their tracks by the carriage as it approaches the upper landing until it is completely above the load height as the lift stops. As the lift moves to the lower level, it carries the bars back to their stationary brackets attached to the outside of the door. WARNING! Shaftway door barrier bars are not intended to be used as a primary means of personnel protection. It is the responsibility of the operator to ensure that all gate/door interlocks have been installed and are functioning properly. Serious injury or death could result if upper level gates/doors can be opened when the lift is not present at that level. 17 LABEL IDENTIFICATION 1 4 2 ITEMS #4 IS LOCATED ON BOTH FRONT AND BACK SIDE OF OVERHEAD CHANNEL 3 ITEMS #1 & #2 ARE 1 LOCATED ON BOTH 2 FRONT AND BACK SIDE OF UPRIGHTS 6 5 6 Field-locate & apply one “WARNING – Do Not Tamper” label adjacent to (within 6”-12”) each sensing device (limit switches, door status switches, door interlocks, etc.) in a location that is visible to the operator. 4 Figure 1 Label Placement Diagram for FLH Item # Qty. Description 1 4 Warning – No Riders 36404093 2 4 FREIGHTLIFT by Autoquip Logo 36402680 3 1 Serial Number Nameplate 36401560 4 4 Capacity 36401586 5 2 Caution – Familiarize Yourself . . . 36401487 6 4 Warning – Handrails and Snap Chains 36403715 7 varies Warning – No Riders (Pushbutton Stations) 36405705 18 Part No. LABEL IDENTIFICATION Note: Labels shown here are not actual size. Figure 2 Label 36404093 Figure 3 Label 36402680 Figure 4 Label 36401560 19 LABEL IDENTIFICATION Figure 5 Label 36401586 Figure 7 Label 36403720 Figure 8 Label 36405705 20 GENERAL SPECIFICATIONS FLH Standard Models Model Max Travel Capacity (pounds) Platform (Min) WxL Platform (Max) WxL HP (Min) Speed (FPM) FLH-1 30’ 1000 4’ x 4’ 8’ x 12’ 5 25 FLH-2 30’ 2000 4’ x 4’ 8’ x 12’ 5 25 FLH-3 30’ 3000 4’ x 4’ 7’ x 7’ 5 25 FLH-4 30’ 4000 4’ x 4’ 8’ x 12’ 5 25 FLH-5 30’ 5000 4’ x 4’ 8’ x 12’ 5 25 FLH-6 30’ 6000 4’ x 4’ 6’ x 6’ 5 25 FLH-6HD 30’ 6000 6’ x 6’ 8’ x 10’ 5 22 DO NOT EXCEED RATED CAPACITY OF THE LIFT. Loading the lift beyond its rated capacity is unsafe, will shorten the operational life of the lift, and will void its warranty. WARNING! Do not make modifications to the lift without authorization from the manufacturer! Unauthorized and unforeseen carriage, lift structure, or support bracing attachments added in the field could create an unsafe operating condition which could result in severe personal injury or death. LIFT DUTY Autoquip standard lift designs as described in the specifications are designed to “cycle” (one complete “up” and one complete “down” lift operation) no more frequently than every two minutes – or approximately 10,000 times (cycles) per year. This is considered “normal” duty. It is the responsibility of the user to notify Autoquip whenever a specific application is likely to demand “above normal” duty from the lift - in excess of 10,000 cycles per year. Above normal duty typically requires supplemental design features to enhance the serviceable life of the lift & to avoid loss of warranty. 21 BLOCKING INSTRUCTIONS WARNING ! Only authorized personnel should perform inspection or maintenance and service procedures. Unauthorized personnel attempting these procedures do so at the risk of personal injury or death. DANGER ! Failure to properly adhere to lift these Blocking Instructions is to risk the sudden and uncontrolled descent of the lift carriage during maintenance or inspection. A falling carriage can cause severe injury or death. I. ROUTINE MAINTENANCE (Carriage is completely lowered) 1. Remove any load from the unit. 2. Raise the platform to a convenient height. A. B. Press the UP button and then press the EMERGENCY STOP button when the desired height is reached, OR Use a fork truck or other lifting device to raise the platform carriage, taking care not to damage the carriage or cylinder. 3. Depending on the size of the platform carriage, insert 2, 3, or 4 empty 55-gallon steel drums, which are in good condition and of equal height, under the platform carriage to create a stable and crush-proof support. Be sure to remove any debris that may interfere with the bottom of the drums with a long-handled broom. 4. Lower the platform carriage onto the drums (or other solid, stable, and structurally adequate supports). 5. Lock out and tag the electrical disconnect. DANGER! To avoid personal injury or death, turn off the power and lock out the power at the primary power disconnect switch before service or maintenance per OSHA Lock-Out, Tag-Out procedures. 22 BLOCKING INSTRUCTIONS DANGER ! If for any reason you are unable to lower the lift completely onto the drums, stop immediately and consult the factory at 888-811-9876. Failure to use a system of adequately stable and strong lift blocking devices could result in severe injury or death. II. BLOCKING FOR EMERGENCY REPAIR or INSPECTION Whenever the carriage has stopped at any elevation besides the fully lowered position and will not move using the operator pushbutton stations, the carriage must be secured against downward movement prior to beginning any inspection or troubleshooting activities that require the gates/doors to be open. In particular, a carriage which has become wedged in the guide beams, or has become jammed by interfering with surrounding structure (landings, floor opening, door headers, backstop assemblies, etc.), may have damaged or broken the wire ropes or other critical components that are supporting the carriage. Therefore, when a carriage becomes wedged or jammed DO NOT walk out onto the carriage or attempt to physically free the carriage until the carriage has been adequately supported from beneath. In any of these emergency conditions, safe lift blocking can be accomplished using one of these approved alternate methods while following steps I.1 through I.5 above: 1. Use a series of adequately sized adjustable jack stands around the underside perimeter of the lift carriage to provide a level, stable support 2. Use a fork truck with adequate travel, capacity, and fork width/length to provide a level, stable support NOTE: Whenever a wedged or jammed carriage condition occurs, you should call an authorized Autoquip dealer or representative to conduct a comprehensive inspection of the lift for structural and component damage before placing it back into service. 23 INSTALLER GUIDELINES/RESPONSIBILITIES Proper installation of Vertical Reciprocating Conveyors (VRCs) is vital to the safety of the operators, the efficiency of the unit, and the ultimate satisfaction of the end user. These guidelines have been prepared by member companies of the Material Handling Industry’s VRC Subcommittee to assist the VRC installers in understanding their role and responsibility in providing customers with a safe and reliable VRC. 1. PRE-INSTALLATION ACTIVITY A. Whenever possible, make a pre-installation visit or call someone at the site. Installers must be familiar with everything relative to proper installation of this equipment. It is the installer’s responsibility to check the site for problems and work out solutions with the appropriate people – preferably before installation begins. B. Check floor-to-floor dimensions on the general arrangement drawings to make sure that they match on-site conditions. VRC’s are designed and built to individual applications and specific customer requirements. It is difficult and expensive to modify the lift after it arrives for installation. C. Installation may or may not include unloading, permits, seismic calculations, or extensive acceptance testing. The requirements of each contract should be carefully reviewed for possible conflicts of interpretation. D. Each state, county, or municipality may have unique codes governing the installation and acceptance of VRC’s. Acquaint yourself with the permitting and/or licensing requirements (and expenses) of the local regulatory agencies. Note also that some agencies may require inspection or testing before and/or after lift start-up. E. Make sure there is adequate ingress/egress to the installation site. Verify that the equipment can get through the existing doorways, halls, and shaft openings. Think through how the lift will be unloaded, carted/moved, raised into position, and accessed for installation, operation & maintenance. F. Verify the construction and integrity of building columns, joists, walls, or mezzanines that will be used to help support the VRC mast guide beams. 2. SHIPMENT & INITIAL INSPECTION A. Upon receipt of the shipment, check for exposed damage or shortages and make note of it on receiving paperwork from the trucking company, any claims for damage must be filed with the carrier. Unless otherwise stated, the VRC Manufacturer is not responsible for parts lost, stolen or damaged during transportation, storage, or installation. 24 INSTALLER GUIDELINES/RESPONSIBILITIES B. Assuming no damage has occurred to the crate, check the components against the packing list. This will provide assurance that every item shipped has been received. C. Make sure you have a copy of the latest version of the general arrangement and electrical drawings before beginning installation, changes could have been made since original purchase order submittal and order entry. D. Read and understand the Installation & Service manual thoroughly prior to starting the installation. 3. EQUIPMENT LAYOUT A. Make sure pit and/or lift are properly squared and vertically aligned with upper landings to ensure that the carriage will clear the upper landings by the required distance. B. Be sure to take into consideration any other obstructions (pipes, ductwork, ceiling joists/beams, etc.) that may be located around the lift. C. Inspect the installation for any overhanging floor landing or other obstruction (pipes, ductwork, ceiling joists/beams, etc.) which could potentially jam a load that is slightly overhanging the carriage deck as it raises to the next floor level. Any potential jam point should have some type of slanted or beveled guarding placed beneath the obstruction to push the overhanging load back onto the carriage. 4. STRUCTURAL INSTALLATION A. Follow the bracing recommendations shown on the general arrangement drawings and in the Installation & Service manual. Site conditions may also require customization to standard anchoring and bracing. The installers are ultimately responsible for the proper and safe anchoring and bracing of the equipment and should consult the manufacturer if there is any doubt as to the structural integrity of the installation. B. When anchoring guide beams to walls, you must be sure that the walls can support the reaction loads imparted on them. C. If spliced masts are provided, be sure to assemble and field install them exactly to the Manufacturer’s recommendations. Failure to do so will reduce the safety and performance of the VRC. D. Make sure guide beam pairs are plumb, parallel, and straight after you are finished with all welding. E. Do not modify any component of the lift without expressed written consent from the Manufacturer. 25 INSTALLER GUIDELINES/RESPONSIBILITIES 5. MECHANICAL INSTALLATION A. Most work can be done with the lift carriage fully lowered. Never work under the lift carriage unless it is blocked in place per the Installation and Service manual. B. Never allow a person to ride on the carriage of the lift. C. Use only the hardware supplied by the Manufacturer to assemble the lift. hardware is often high grade, some hardware is metric. This D. Use only the carriage lifting cables and attachment hardware supplied by the Manufacturer. 6. HYDRAULIC INSTALLATION A. Most work can be done with the lift carriage fully lowered. Never work under the lift carriage unless it is blocked in place per the Installation and Service manual. B. Never use Teflon tape on threaded connections. Teflon tape does not dissolve and, if introduced into hydraulic system, may contaminate the oil and cause valving to malfunction. C. Never adjust a relief valve setting, these are factory set to meet design and code requirements. D. Carefully bleed all air out of the hydraulic system before running lift to full travel per Manufacturer’s procedure in the Installation and Service manual. E. Make sure that the oil level in the reservoir is sufficient for running lift to full travel. F. Use only hydraulic fluid recommended by the Manufacturer in the Installation and Service manual. G. Make sure all pressure in the system is relieved before cracking open or disassembling any pressurized fitting or hose. 7. ELECTRICAL INSTALLATION A. Ensure that the supplied voltage matches the motor supplied. B. Make sure customer-supplied electrical disconnect is installed and adequately fused. 26 INSTALLER GUIDELINES/RESPONSIBILITIES C. All electrical work must meet the requirements of ASME B20.1 as well as all state and local codes. D. Make sure that only qualified electricians perform all wiring and that they are familiar with the electrical drawings shipped with the equipment. E. Do not operate the lift until the carriage is leveled and the guide beams are plumbed and secure. F. Never operate the lift by “manualling” the electrical controls (using the contactors located inside the control panel). All safety devices are by-passed in this mode of operation and lift damage or severe personal injury could occur. G. Do not operate the lift using the operator pushbuttons prior to having all safety devices and/or gate interlocks wired and in the circuit. Never by-pass any safety device and/or interlock. H. Operator pushbutton stations must not be operable from the carriage with the gate(s) or door(s) closed, or must be located at least 6 feet away from the carriage platform. I. Per OSHA requirements, the control panel must be mounted in a location that is visible from the lift. J. Always follow OSHA lock-out, tag-out procedures when the lift being maintained, serviced, or inspected. 8. PERSONNEL & EQUIPMENT SAFETIES A. ASME B20.1 requires that all VRC installations be completely guarded to prevent injury from inadvertent contact with the lift or its load. ASME also requires that doors or gates at all unloading stations be interlocked so that these doors can only be opened when the lift carriage is stopped at that level & that the carriage is incapable of being operated or moved so long as these doors or gates remain open. It is the responsibility of the installer to ensure that the installation meet these requirements, regardless of who (manufacturer, customer, architect, general contractor, etc.) provides the doors/gates and means of enclosure. Consult the manufacturer whenever there is a question as to whether or not the gate & enclosure installation meets ASME B20.1. B. Where the application requires personnel to walk onto the carriage in the raised position, the installer must ensure that the carriage is adequately provided with railings, guards, and snap chains that are a minimum of 42” high. 27 INSTALLER GUIDELINES/RESPONSIBILITIES C. Ensure proper operation and engagement of carriage brake assemblies. 9. TESTING A. Test up and down speeds. B. Test all limiting devices, gate interlocks, gate status switches, sensors, and any other safety features or devices as outlines by the Installation and Service manual. C. Some states or municipalities may require testing of the carriage free-fall arrest system (carriage brakes) – consult the local regulatory agency or the manufacturer. 10. CLEAN-UP & HAND-OFF A. Ensure that all necessary adjustments to the interlocks, gate status switches, upper & lower lift status limit switches allow proper operation of the lift and its safeties per the manufacturers requirements. B. Apply proper signage to all locations of the installation per the guidelines in the Installation and Service manual. Consult the manufacturer if labels appear to be missing or damaged. C. Clean up any spilled oil from the area. D. Train key personnel on the operation of the system and all safety features and procedures. 28 INSTALLATION INSTRUCTIONS THE TOOLS REQUIRED FOR INSTALLATION Listed below are some of the tools needed to install the FREIGHTLIFT in a professional and prompt manner. Individual site situations and a basic variation in the types of units may dictate the need for additional items. Welding Machine and Equipment Cutting Torch with Full Tanks Fire Extinguisher Forklift Chain Fall Come-A-Long Cables or Hook Chains with 1,000# Cap. Disk Grinder “C” Clamps (12” opening) Socket Set (1/2” drive, sockets to 1 1/8”) Pinch Bar Hammer Drill & Bits for 1/4”, 3/8” and 1/2” anchors Hack Saw, Sawzall, or Portable Band Saw Drill and Drill Bits Extension Cords Sledge Hammer Open or box end wrench Drift Punch Carpenter’s Square Chalk Line Plumb Bobs 4’ Level 25’ / 100’ Measuring Tapes Broom The following supplies will also be needed: *Concrete anchors (16 minimum) sized for the required minimum pullout of the base floor channels and upper level bracing. Refer to the approval drawing since the size of the anchors can vary for each installation. *Concrete anchors for accessories, such as enclosures, approach ramps, etc. (Usually 1/4” diameter anchors and at least 12 anchors, minimum.) *Shim stock for the floor channel, platform carriage corners, and/or approach ramp (if a part of this installation) *Hydraulic oil (see oil recommendations “General Maintenance” section) *Paint (Autoquip Blue: available in 1 and 5 gallons, as well as spray cans) *3” x 3” steel angle iron or 4” channel for additional bracing ALSO - BEFORE YOU BEGIN : 1. Beams are too heavy to lift manually and require lifting equipment. Check for availability of overhead attachment of chain fall or of fork truck before you start. 2. Before you will be able to complete the installation the unit must be operated, therefore power to the motor is required. Arrange for power before starting installation. 29 INSTALLATION INSTRUCTIONS MAST CROSS CHANNEL MAST ASSEMBLY CYLINDER OVERHEAD CHANNEL CARRIAGE UPRIGHT WELDMENT HAND RAIL CARRIAGE WELDMENT Figure 9 – Identification of Parts, FLH 30 INSTALLATION INSTRUCTIONS NOTE: All illustrations contained in this manual are for reference purposes only. Specific applications and site conditions may require different anchoring and bracing procedures. The ultimate responsibility for the anchoring and bracing rests with the installation crew. A. LAYING OUT CARRIAGE POSITION & MARKING FLOORS FOR ALLIGNMENT 1. Refer to Figures 11 - 16 to lay out and mark the reference lines so that the lift will clear the upper landing and any obstructions that may be located around the lift (the General Arrangement Record Drawings should indicate the necessary clearance needed for the particular application). a. Figure 11 - Layout the position of the lift at the second level landing/opening, marking the center of the carriage first – then both outside edges of the carriage. b. Figures 12 & 13 - Drop a plumb line from the center marking of the carriage position at the second floor holding the plumb line one inch out from the edge of the landing (one inch is a standard distance for clearance - deviations may occur), or point A, down to the first floor and mark point B as the carriage center (check the GA drawing for any other special considerations). NOTE: To ensure carriage clearance between floors, remove any protrusions from the floor, wall, etc., or move the plumb lines out beyond the protrusions. c. Figure 14 - Drop plumb lines from the upper level to the lower level using the two markings identifying the outside edges of the carriage platform. Again, the plumb line must be held 1” out from the edge of the mezzanine or opening at the second floor to provide adequate clearance. d. Figure 15 - Using a chalk line, snap a line between C and D. NOTE: The carriage will be aligned to this point. Also, always check the pit and floor openings for correct dimensions and squareness. 31 INSTALLATION INSTRUCTIONS Mark Center Line Here Determine the location or position of lift at upper level. SECOND FLOOR Locate the center of tie opening or position and clearly MARK IT. Figure 11 Marking the 2nd Floor for Carriage Position (Front View) 1" Block SECOND FLOOR A B Figure 12 Locating Center of Carriage Edge on the First Floor (Side View) 32 INSTALLATION INSTRUCTIONS Opening or Lift Position A Plumb Line Center Line of Carriage Mark This Point B Figure 13 Locating Center of Carriage Edge on the First Floor (Front View) SECOND FLOOR Plumb Lines Mark This Point Mark This Point Figure 14 Locating Outside Edges of Carriage at the First Floor (Front View) 33 INSTALLATION INSTRUCTIONS C B D Figure 15 Chalking the Edge of the Carriage at the First Floor (Front View) C L Figure 16 Aligning the Carriage with the Chalk Lines 34 INSTALLATION INSTRUCTIONS OVERHEAD CHANNEL RUBBER STOP BAR CARRIAGE UPRIGHT WELDMENT HAND RAIL CARRIAGE WELDMENT Figure 17 Carriage Assembly 35 INSTALLATION INSTRUCTIONS B. CARRIAGE ASSEMBLY (Reference Figures 16 through 18) Items needed: Qty Description 1 Carriage Weldment (pre-drilled), OR 2 Carriage Weldment Halves (when carriage is split) 2 Carriage Upright Weldments 1 Overhead Channel (with holes pre-drilled) 2-4 Handrails or Expanded Metal Side Guards 1 End Rail (when ordered – for “C” load pattern) 1-2 Snap Chains – lengths vary with platform width 12 3/8” grade 8 Hex Head Cap Screws, Nuts, Beveled & Flat Washers, Lock Washers 24 – 32 1/2" x 1-1/2”L grade 8 Hex Head Cap Screws, Washers & Nuts 2 Rubber Stop Bars, 2” x 5-5/8”L 4 1/4" grade 5 Hex Head Cap Screws, Nuts, Flat & Lock Washers 2 Carriage Tie Channels (when carriage is spliced) varies Hardware Kits for Spliced Carriages 1. Block platform weldment at a convenient work height to permit access to the underside of the carriage. 2. Attach the Carriage Upright weldments to the carriage deck with the 1/2" grade 8 bolts, nuts and washers provided. Upright weldments are identical – there is no right and left. Torque bolts to 99 ft. lbs. 3. Attach Overhead Channel to the top, carriage upright gusset plates with the 3/8” grade 8 bolts, nuts, bevel washers, flat and lock washers provided. Torque to 26 ft. lbs. 4. Attach the rubber stop bars to the top of the overhead channel as shown in Fig. 17 using the 1/4" grade 5 bolts, nuts, flat and lock washers provided. Torque to 26 ft. lbs. 5. Attach handrails or side guard panels by positioning as shown in Fig. 17 and/or the General Arrangement drawing, and welding into place with a minimum 1/4" fillet, 2” on 10”. Grind welds and touch up the paint where necessary. 6. Attach snap chain(s) across open operating ends by using the repair link to permanently attach one end of the snap chain assembly to the open link welded to the handrail. 7. Set the carriage onto the floor at the lower level position as shown on the General Arrangement (GA) Drawing. The center of the carriage must be aligned with the centerline mark (refer to Figure 16). Make sure carriage is level, shim as necessary. 36 INSTALLATION INSTRUCTIONS 8. For Pit Mounted Lifts - the pit has been poured 1/2" – 3/4" deeper than the total thickness of the carriage platform for shim and grout as required. 9. For Through-Floor or Shaft Installations – when clearances are tight, you may choose to position the carriage after the beams have been assembled and raised into place. For these installations, refer to Figure 18 to see how to properly lay out and locate the beams prior to setting the carriage. CENTER OF MAST BEAM WEB 1/2 x CARRIAGE LENGTH + 1.0" DETERMINED BY INSTALLATION ANGLE PIT OR SHAFT OPENING Figure 18 Layout of Mast Foot Plates Prior to Setting Carriage (When necessary for some Pit/Shaft installations) 37 INSTALLATION INSTRUCTIONS C. POSITIONING WHEEL GUIDE ASSEMBLIES (Reference Figures 19 and 20) Items Needed: Qty Description 2 Mast Beams – Left & Right 2 Upper Wheel Guides – left & right (“L” & “R” on the assembly) 2 Cable Adaptors 4 Cotter Pins 2 Cable Adaptor Pins (with cotter pin holes) 1. Place the upper wheel guide assemblies in the beam as shown in Figure 19a by sliding them into the beam running space from below the guide angle near the bottom of the mast beam. NOTE: This step must be done first due to the limited access space once the wheel guides are inside the guide beams & behind guide angles. 2. Attach the lifting cables to the cable adaptors and the cable adaptors to the upper wheel guide locking cams using the high strength adaptor pins and cotter pins provided as shown in Figure 19b. 3. Pull on the cable where it attaches to the wheel guide assembly. Slide the wheel guide assembly down the beam until it is approximately seven (7) feet from the bottom of the beam. The upper wheel guide blocks should then be positioned so that they will align with the uppermost sets of holes in the carriage uprights once the beam is raised into position. NOTE: The safety cams will attempt to engage as you move them down the beam. Rotate and hold them in a disengaged position while you slide them into position. NOTE: Oil may be released when cylinders are extended. 38 INSTALLATION INSTRUCTIONS GUIDE ANGLE WHEEL GUIDE ASSEMBLY LOCKING CAM MAST BEAM Figure 19a Upper Wheel Guide Assembly in Mast Beam (Top View) LIFTING CABLE OR CHAIN ADAPTOR ADAPTOR PINS / COTTER PINS LOCKING CAM MAST BEAM Figure 19b Upper Wheel Guide Assembly in Mast Beam (Side View) 39 INSTALLATION INSTRUCTIONS D. RAISING THE BEAMS & WHEEL GUIDES (Reference Figures 21 through 23) Items Needed: Qty Description 2 Lower Wheel Blocks (left & right) 2 Wheel Tensioner Assemblies with Metric mounting bolts 1 Installation Angle (with bolts in each end) – if needed varies 1/2" x 1-1/2”L grade 8 Hex Head Cap Screws, Washers & Nuts 1. Raise the beams into position (see Figure 21). The mast beam assemblies are designated either “left hand side” or, “right hand side” (there is a welded “L” or “R” marked on the mast beam base plate). The left hand side is to your left and the right hand side to your right as you stand at the upper level (or with your back against the bracing wall) facing the beams (the guide angles are always towards you). 2. Install one wheel tensioner assembly per side using the dedicated metric bolts, torque to 63 ft. lbs. as shown. Roller is oriented away from the mast guide angle when rotated into position for bolting 3. Position the lower wheel blocks into their respective beams by tipping the blocks and allowing the rollers to fit inside the guide angles. Then, insert the guide wheel into the opening at the bottom of the beams. 4. Slide the right hand beam into position along side the carriage. Both upper and lower wheel guide assemblies should align with their respective mounting holes on the carriage uprights. Bolt the wheel guide assemblies to the uprights using the 1/2" x 1-1/2”L grade 8 bolts and the 1/2" washers that have been provided. Torque all these bolts to 99 ft. lbs. as shown in Figure 22. NOTE: Make absolutely sure the beam is secure with chain or temporary bracing. WARNING! Do not depend on the carriage uprights and wheel blocks to support the beam! Use other means to support and secure the beams in the raised position during installation and prior to final bracing. Improperly or inadequately supported beams could fall and cause serious injury to adjacent personnel or permanent damage to the equipment. 5. Repeat the previous step to position and secure the left hand beam. 6. The installation angle shipped with your unit can be used to properly space the two beams apart temporarily, prior to setting the carriage or securing beams to floor. 40 INSTALLATION INSTRUCTIONS SPLICED BEAMS (when used) 1. Set the upper mast on its respective lower mast (plates & beams are marked) in the orientation shown on Figure 23, taking necessary precautions not to bend or damage transition plates. 2. Verify that both beams are true, straight, and plumb within 1/8” over any 10 foot span and not to exceed 3/8” over the entire length of the beam. NOTE: This tolerance may not be exceeded or immediate & permanent damage to the hardened wheel guide wheels will occur. (Shim material by installer). 3. Once both beams are verified to be straight & plumb as specified as above, permanently weld the upper & lower mast assemblies together as shown. Weld distortion to the beams must be minimized to hold the required tolerance to beam straightness. NOTE: Care should be exercised not to distort the masts from welding, and alignment is critical. Grind the guide beam to provide a smooth surface for the guide wheels and rollers. NOTE: Beams must be plumb and parallel within 3/8” overall before proceeding with permanent bracing. The beams MUST be within this tolerance or the guide wheel assemblies will fail prematurely. 41 INSTALLATION INSTRUCTIONS Figure 21 Raising the Mast Beams 42 INSTALLATION INSTRUCTIONS BOLTS FOR UPPER & LOWER WHEEL GUIDE ASSEMBLIES – TORQUE TO 99 FT-LBS. A DETAIL - A TENSIONER MTG BOLT (METRIC THREAD) TORQUE TO 63 FT - LBS. B BOLTS FOR UPPER & LOWER WHEEL GUIDE ASSEMBLIES – TORQUE TO 99 FT-LBS. DETAIL - B Figure 22 Wheel Block & Spring Tensioner Mounting Detail 43 INSTALLATION INSTRUCTIONS TOP MAST WELDMENT TOP MAST WELDMENT TYP TYP BOTTOM MAST WELDMENT 1/4 1/4 1/4 BOTTOM MAST WELDMENT Figure 23 Mast Splice Detail 44 INSTALLATION INSTRUCTIONS E. SECURING THE MASTS Items needed: Qty Description 1 6” Mast Cross Channel, pre-drilled 6 1/2" x 1-1/2”L Grade 8 Hex Head Cap Screw, Washer, and Nuts 1. Raise the mast cross channel into position above the mast beams in the orientation shown in Figure 24 and bolt into place using the hardware provided. Torque to 99 ftlbs. NOTE: Alignment of the main beams is very important! Check the guide angle dimension (from bottom to top) against the GA drawing. 2. Recheck the position of the beams and ensure that the beams are not twisted or turned, and that they are also plumb, parallel, square, and level (beam pairs mounted in pit floors must be checked closely for level because pit floors may not be poured level). To maintain proper positioning of the beams – shim under each mast foot plate as required to fill any gaps between the foot plate and the floor which may have been created during the plumb-square-level process. Torque bolts on the mast cross channels to 99 ft-lbs. NOTE: Beams must be plumb and parallel within 3/8” over the entire length of beam before proceeding with permanent bracing. The beams MUST be within this tolerance or the guide wheel assemblies will fail prematurely. 3. Remove the installation angle (if used). 4. Lag the beams to the floor using four (4) bolts for each mast beam plate – sized to withstand the pull-out force specified on the GA drawing. Torque to 99 ft-lbs. 45 INSTALLATION INSTRUCTIONS MAST CROSS CHANNEL Figure 24 Mast Cross Channel 46 INSTALLATION INSTRUCTIONS F. BRACING THE BEAMS (Reference Figure 25) All illustrations on the GA drawing for bracing preferences are for reference only. Site conditions may require different anchoring and bracing. The installers are ultimately responsible for the proper and safe anchoring and bracing of the equipment. Autoquip Corporation supplies material for bracing on standard applications, but special bracing may be required by the installer on non-standard models. The special materials for anchoring and bracing of the lift and gates are not the responsibility of Autoquip. NOTE: For all field welding of braces, use 1/4" fillet – all around. Items needed: Qty Varies varies varies varies Description Horizontal Brace Channel Diagonal Channel Brace (when applicable) Brace Plates – with (4) 9/16” dia. holes each Side Channel Brace (when applicable) HORIZONTAL / UPPER LEVEL BRACING 1. Attach the horizontal channel brace to the upper floor landings with either lags or by welding (it has been assumed that you will have a solid floor face to attach to for your installation). When attaching the floor to beam brace, use bolts which have been properly sized to withstand the horizontal pull-out force shown on the GA drawing. CAUTION! Never use concrete anchor bolts on a cinderblock or brick wall! (Ref. Fig. 25) The wall will not withstand the pull force developed by the lift. Use only recommended anchoring and bracing methods illustrated in this manual. Equipment damage or personal injury could result. 2. Add side bracing as necessary for your particular installation in order to prevent the beams from flexing or swaying sideways during operation. 3. Weld additional mast cross bracing to keep mast beams from spreading, quantity depends on travel (refer to GA drawing). Take necessary precautions to minimize beam movement resulting from the heating & cooling of welds. Recheck and confirm guide angle dimension. DIAGONAL BRACING (when used) 4. Install upper and lower diagonal bracing per the GA drawing for your installation in order to prevent bowing of the beams during operation. 47 INSTALLATION INSTRUCTIONS WARNING! Do not weld on the guide flanges of the masts. The field welding of any structural steel member into or across the guide beams in the path of the wheel guides is strictly forbidden. Interfering with the free travel of the wheel guides could create severe structural damage or cause the lifting chains to over-stress and fail resulting in permanent lift damage and/or severe injury to personnel 48 INSTALLATION INSTRUCTIONS ANCHORING TO BLOCK WALLS USE BACKUP PLATES WRONG WELD TO CURB ANGLE ANCHORING TO FACE OF FLOOR RIGHT WRONG WOODEN FLOORS PREFERRED THROUGH BOLTING POOR Figure 25 Approved Methods for Upper Level Mast Bracing 49 INSTALLATION INSTRUCTIONS THROUGH A CUTOUT OR OVERSIZED HOLE Figure 25 (cont’d) Approved Methods for Lower Level & Diagonal Bracing 50 INSTALLATION INSTRUCTIONS LOWER BRACING FOR TALL UNITS SEE DETAIL A 3/4" 6" X 6" WIDE FLANGE BEAM (MAST BEAM) 3" X 2" X 3/8" ANGLE (GUIDE ANGLE) 4" CHANNEL DIAGONAL MAST BRACE BRACE PLATE DETAIL A FRONT VIEW Figure 25 (cont’d) Approved Methods for Lower Level & Diagonal Bracing 51 INSTALLATION INSTRUCTIONS TO A MEZZANINE Figure 25 (cont’d) Approved Methods for Lower Level & Diagonal Bracing 52 INSTALLATION INSTRUCTIONS G. HYDRAULIC INSTALLATION DETAILS Items needed: Qty Description 1 50’ length of 3/8” low pressure rubber tubing 3 20’ lengths of 3/8” high pressure wire braided hose & misc. fittings 1. Locate the power unit behind the lift or beside either mast beam (the lift is supplied with an extra 20-foot connecting hose for the cylinder furthest away from the power unit – if required). The power unit can be mounted on the floor or on the wall, contact the Autoquip Customer Assurance department if special mounting brackets are required. 2. Plumb each lifting cylinder as show in Figure 26, taking care to note correct orientation of the velocity fuses (arrows are stamped on the side of the fuse to show the direction of the flow you are trying to control). WARNING! The velocity fuse (VF) must be properly installed! The VF is attached to the elbow fitting in the rod port of the cylinder. If the VF is installed improperly, it will not lock the carriage in place in the event of a catastrophic hydraulic line break! WARNING! Attach velocity fuse with solid fitting! Do not use a swivel fitting between the velocity fuse and the cylinder. If accidentally broken at the swivel, the velocity fuse will not prevent the carriage from falling to the floor. 3. Attach the high pressure, braided hoses from the high pressure port of the power unit to the cylinders as shown in Figure 27. WARNING! Use properly rated hoses only! Never use fittings or hoses that are not properly rated for the intended use. 4. Cut the required lengths of 3/8” low pressure, rubber bleeder tubes and connect from the reservoir of the power unit to the cylinders as shown in Figure 27. 53 INSTALLATION INSTRUCTIONS 5. Fill the power unit with oil. Do not over-fill! The oil level should be approximately 2” from the top of the tank (See “Oil Specifications” in the General Maintenance section). 6. Connect electrical power to the power unit. 7. Remove any air from the hydraulic system per the “Bleeding Air from the System” instructions found in the General Maintenance section. Do not operate the lift yet! NOTICE Purge air in the system! The presence of air in the system can lead to a lock-up of the velocity fuses. (Air reacts like a spring when it is compressed.) 8. Adjust the mechanical stops to make contact with the carriage overhead channel when in the fully raised position (refer to Figure 28). WARNING! Do not over travel! Mechanical stops must be in place to prevent the carriage from over traveling. Over-traveling can cause permanent damage to the carriage or failure of the lifting cables. 54 INSTALLATION INSTRUCTIONS CYLINDER HOSING WARNING! The velocity fuse must be installed as illustrated. Never use a swivel fitting between velocity fuse and cylinder. The velocity fuse should always be attached to a cylinder with a solid fitting. Street Elbow 3/8 mp x 3/8 fp Hex Nipple, Straight 3/8 mp x 3/8 mp Velocity Fuse Staight Swivel 3/8 mp x 3/8 fps Braided High Pressure Hose 3/8-2W x 240", swivel (1) end. Brass Elbow 3/8 tube flare x 3/8 mps Push-on brass hose swivel Low-Pressure Rubber Hose, 3/8" push-on (Cut to length) Figure 26 Cylinder Hosing 55 FLOW INSTALLATION INSTRUCTIONS 3/8" SWIVEL 3/8" X 240" HIGH PRESSURE HOSE 3/8" PUSH-ON LOW PRESSURE RUBBER HOSE DETAIL - "A" DETAIL - "B" 3/8" X 240" HIGH PRESSURE HOSE B A 3/8" PUSH-ON LOW PRESSURE RUBBER HOSE (CUT TO LENGTH) Figure 27a Connection of Cylinders, Models FLH-1, 2, 3 56 3/8" FLARE FITTING INSTALLATION INSTRUCTIONS 3/8" PUSH-ON LOW PRESSURE RUBBER HOSE 3/8" SWIVEL 3/8" X 240" HIGH PRESSURE HOSE 3/8" PUSH-ON LOW PRESSURE RUBBER HOSE DETAIL - "A" 3/8" FLARE FITTING 3/8" X 240" HIGH PRESSURE HOSE 3/8" PUSH-ON LOW PRESSURE RUBBER HOSE Figure 27b Connection of Cylinders, Models FLH-4, 5, 6 57 A INSTALLATION INSTRUCTIONS ADJUSTABLE MECHANICAL STOP LOCATED ON EACH MAST BEAM Figure 28 Adjustable Mechanical Stops 58 INSTALLATION INSTRUCTIONS H. INSTALLING LEVEL/LIFT STATUS LIMIT SWITCHES Items needed: Qty Description Varies 1 N.O. – 1 N.C. Limit Switch Kits (depends on interlock style & Qty) Level limit switch Kits (quantity depends on application – typically one (1) 1N.O.-1N.C. switch on all levels equipped with solenoid interlocks), including field-located limit switch striker / cam assemblies, have been shipped loose to be field mounted, wired, and adjusted to sense the status/position of the lift carriage per Figure 29. 1. Locate & weld the limit switch cam assembly to the carriage bracing in the orientation & location shown. 2. Find & assemble the adjustable limit switch kits as shown, including the Unistrut mounting channel. 3. Once assembled, orientate and field weld the Unistrut channels in such a way as to allow the limit switch arm to make contact with the limit switch cam when the carriage is at that corresponding level – leaving room for adjustment. 4. For best results in adjusting position of the switch, loosen the mounting bolts that hold the switch to the Unistrut channel just enough so that the switch can be lightly “tapped” into position. It is extremely difficult to loosen the bolts completely and adjust the switch. DANGER! Never go under a platform! To avoid personal injury or death, be sure the platform has been blocked from underneath! See “Blocking Instructions.” 59 INSTALLATION INSTRUCTIONS CAM CARRIAGE BRACE CARRIAGE BRACE CAM UNISTRUT MAST SIDE VIEW CAM CARRIAGE BRACE Field-locate & apply one “WARNING – Do Not Tamper” label adjacent to (within 6”-12”) each sensing device (limit switches, door status switches, door interlocks, etc.) in a location that is visible to the operator. FRONT VIEW (Actual Size 1” x 2” ) Figure 29 Level Status Switch Location 60 INSTALLATION INSTRUCTIONS UniStrut Nut & Spring UniStrut Channel Switch Arm Switch Actuator Rotate Switch Head 90 Deg per Fig.32 Mounting Angle Hardware Switch Body 10-24 Socket Head Cap Screws Mounting Angle Figure 30 Level Limit Switch Kit Assembly (Solenoid Interlocks only) 61 INSTALLATION INSTRUCTIONS Loosen 8-32 socket head cap screw to adjust arm in and out, then re-tighten Loosen 8-32 socket head cap screw to adjust arm rotation, then re-tighten Loosen (4) flat head machine screws to rotate head, then re-tighten Switch actuator Figure 31 Sensing Switch Adjustments (Solenoid Interlocks only) 62 INSTALLATION INSTRUCTIONS I. TEST RUN (EMPTY) & MAKE ADJUSTMENTS DANGER! Never go under a platform! To avoid personal injury or death, be sure the platform has been blocked from underneath! See “Blocking Instructions.” WARNING! Never operate the lift by “manual-ing” the electrical controls (using the contactors located inside the control panel). All safety devices are bypassed in this mode of operation and lift damage or severe personal injury could occur. NOTE: Because the lift is equipped with Call-Send style operator pushbutton stations at the landings, you will have to press the red Emergency Stop button In order to stop the lift carriage in mid-travel (UP or DOWN). 1. Check that all cables are properly seated in the sheaving system. 2. Turn on power and press the UP button to raise the carriage 6-12” (you must press E-Stop button to stop the lift) and check for: a. Correct rotation/direction of the motor b. running clearance of the carriage in the guides c. any unexpected noise, vibration, rubbing, interferences, etc. d. level carriage deck surface NOTICE All cables must make contact with the running surface of the sheaves before operation begins. Cables that are misaligned with, and come off of, the sheaves during tensioning can cause permanent damage to the lift. 3. Re-set the E-Stop button and press the DOWN push button and lower the lift. Is the platform carriage stopping level at the bottom landing? 63 INSTALLATION INSTRUCTIONS NOTICE The pressure switch is not functional with temporary power! The power unit will continue to run as long as the contact button is pressed. Permanent damage to the lift may result if power to the electric motor is not shut off once the carriage makes contact with the stop bolts. NOTICE Take extreme caution when running the unit before mechanical stops are installed and adjusted properly! Lift over-travel can cause severe damage. 4. Raise the Freightlift 3-6 feet (again, you must stop the lift using the E-Stop button) above the floor. Is everything okay? Any unusual noises? Are masts stable or do they need additional bracing? 5. If you are satisfied with the alignment and structural integrity of the unit, cycle the platform carriage higher & higher until the top landing is eventually reached, continuing to check the smoothness of operation. Be sure that at least 1” clearance is present between the carriage and all building structures, and other site constraints. 6. Lower the Freightlift a few feet (you must stop the lift using the E-Stop button) and bring it back up. If the carriage is above or below the floor, 7. Lower the FREIGHTLIFT a few feet and raise it back to its full travel. Run it hard against the mechanical stops and check carriage alignment once more. Adjust level switch arm as needed. (Solenoid Interlocks - Reference Fig. 31 for adjustment). J. GATE & ENCLOSURE INSTALLATION NOTE: If the personnel guards are not purchased from Autoquip it is the responsibility of the Owner to make sure that the personnel guards are in compliance with the requirements set forth in ASME B20.1. 1. Install the gate and enclosures following the layout on the GA drawing provided with the enclosure package and referring to the Gate & Enclosure Installation Manual that has been sent separately for this particular application. 64 INSTALLATION INSTRUCTIONS 2. All gates or doors accessing the lift must have electrical contacts and mechanical locks to prevent the lift from operating if a gate is left open. The gate should lock until the carriage is at the nearest landing. There are many variables that can affect your installation: the type of gate; the type of door; conditions unique to a specific site. One (1) to four (4) electrical sensing or signaling devices are supplied with each gate that incorporates the standard interlock design. K. SHAFTWAY BARRIER BAR KIT (for shaftway applications) Figure 32 illustrates the contents and installation details for the shaftway barrier bar system supplied for units in 2-level shaftway applications. The barrier bar system is designed to leave (1) mid and (1) top rail across the door opening at the upper level when the carriage is called to the lower level. L. BACK-STOP KIT (when ordered) Figure 33 illustrates the contents and installation details for the back-stop kit. Installer must ensure that the finished distance between the edge of carriage and the inside of the back-stop panels does not exceed 2 inches. M. INSTALLATION WRAP-UP 1. After the unit is completely wired, make all necessary and final adjustments to ensure proper operation of the lift and its safeties as required by the schematic. 2. Refer to the Inspection Checklist located in the Appendix of this Manual, and confirm the safe and correct condition of each component/feature listed to ensure that the lift is ready to be given to the User in proper & safe working condition. This includes, but is not limited to functionality of gate interlocks, gate status switches, lift level/status limit switches, and pressure switch. 3. Ensure that the appropriate person signs off on the Warranty Registration Card and receives one Operation & Service Manual per lift. 4. Install all WARNING SIGNS AND DECALS provided with the unit which may have been shipped loose for field installation (gate panel, etc.). Refer again to Figure 1. 5. Clean up the area, paint and touch-up as needed. 6. Conduct Operator training before handing off the lift to the customer. manual as reference for this training & familiarization process. 65 Use this INSTALLATION INSTRUCTIONS Figure 32 Barrier Bar Installation Details (when required) 66 INSTALLATION INSTRUCTIONS Figure 33 Backstop Panel Kit (when required) 67 OPERATING INSTRUCTIONS DANGER! To avoid personal injury or death, do not operate this equipment with substandard, defective, or missing parts or equipment supports. Contact a local FREIGHTLIFT service representative if a deficiency is found. WARNING! No riders! The FREIGHTLIFT is provided for the sole purpose of transporting goods between floor elevations. At no time should it be used to transport personnel. WARNING! All gates and/or doors of the FREIGHTLIFT are electrically interlocked and must be closed to permit operation the lift. Do not operate unit with doors open or with the interlocks or other safety devices “defeated” (bypassed)! Serious injury or death could result. WARNING! Never operate the lift by “manualling” the electrical controls (using the contactors located inside the control panel). All safety devices are bypassed in this mode of operation and lift damage or severe personal injury could occur. NOTE: In order for the lift to operate: All gates/doors guarding the lift must be closed. Loads cannot hang over the edge or sides of the carriage. The load must be within the specified load capacity of the lift. All electrical safeties, sensors, and switches must be in their “closed” condition UP 1. When an UP button on a push button station is pressed & released, the control (secondary) circuit to the motor starter (motor contactor) is completed. The coil of the motor starter magnetically closes the high (primary) voltage contacts completing the power circuit to the motor. Auxiliary contacts also close and act as holding contacts to maintain the UP circuit. NOTE: Per ASME B20.1, operator pushbutton stations must be located such that they can not be activated while standing on the carriage 68 OPERATING INSTRUCTIONS 2. The rotating motor shaft is mechanically coupled to a positive displacement gear pump. The pump will rotate, drawing oil from the reservoir, pressurizing it, causing flow through the check valve, and out to the cylinders through high pressure hoses. The incoming volume of oil flows to the rod side of the cylinder pistons, causing the rods to retract into the cylinders. 3. Attached to the cylinder rods are double sheave clevis blocks. In the sheaves are wire ropes (one on each of the masts). One end of the wire rope is terminated at the upper mast, reeved through the five sheaves, with the other end terminated on the platform carriage (this is called “4 part reeving”). Therefore, for every inch that the rods retract into the cylinders, the carriage is raised 4”. The platform carriage is guided in the two vertical masts by rollers that are captured on opposite sides of the mast flange. 4. When the carriage arrives at the upper landing, the top channel of the carriage makes contact with the adjustable stops and the hydraulic system builds pressure. The pressure switch senses this increase in pressure, and shuts off the motor. NOTE: The locking cams mounted to the carriage will be engaged only if the cable breaks. WARNING! Do not over travel! Mechanical stops must be in place to prevent the carriage from over traveling. Over-traveling can cause permanent damage to the carriage or failure of the lifting cables. DOWN 1. Pressing the DOWN push-button will permit 115-volt control power to be applied to the down solenoid coil that is on the control valve. 2. The coil causes the core plunger to move outward, allowing the down valve to open and the pressure-compensated down speed regulator to regulate the degree of the valve opening. This is dictated by the weight of the load placed on the platform carriage. The cylinders extend as the loaded carriage descends under its own weight and oil is forced out of the rod end of the cylinders through the down flow controls and back to the storage tank. As the cylinder extends, it also allows cable to be fed back through the reeving system and hold the carriage as it descends. 69 OPERATING INSTRUCTIONS 3. The carriage will come to a stop when it reaches the lower stops or the floor level. At this point, there is no pressure remaining in the hydraulic system and there is no flow through the down valve, even though the valve remains open. One of two things can happen at this point in the operation of the lift. a. The programmed timer can “time-out” and allow the down valve to close, OR b. The “UP” button can be pushed, which will interrupt the timer circuit causing the down valve to close. Either condition will close the controlled breach in the hydraulic pressure system and pressure will be developed, which will raise the platform carriage when the motor is started. WARNING! Velocity fuse lock-up requires factory help! Contact your local FREIGHTLIFT representative or call Autoquip Service Department if hydraulic velocity fuses should lock up! EMERGENCY STOP Press the red emergency stop button to stop all vertical movement of the FREIGHTLIFT at any time for any reason. 1. The emergency stop button will interrupt all electrical control functions when it is activated. Movement of the carriage will cease, regardless of its direction. 2. After the emergency stop button has been reset (twist), any level button may be pressed to continue travel. NOTE: Always find out why the E-Stop button may have been pressed, and be sure to correct the problem (malfunction, interference, etc.) before making the lift operational again. 70 OPERATING INSTRUCTIONS PREVENTING DAMAGE TO THE LIFT 1. Exceeding the Capacity of the Lift The load capacity rating is stamped on a metal serial number plate attached to the lift. This figure is a net capacity rating for a lift furnished with the standard platform. The hydraulic relief valve (HRV) has been set to raise the weight, plus a small amount for overload. Where conveyors, guarding, fixtures, etc, are installed on the lift after leaving the plant, deduct the weight of these from the load rating to obtain the net capacity. Loading the lift beyond its rated capacity is unsafe, will shorten the operational life of the lift, and will void its warranty. 2. Fork Truck Traffic The end user is responsible for preventing damage to the lift carriage and structure by fork truck traffic, and fork truck loading & unloading (where applicable) by establishing and enforcing safe and effective loading procedures, and by installing appropriately sized barriers around the lift to minimize the likelihood of damage by fork truck impact (i.e. pipe bollards, steel barriers, fencing, etc.). Operating the lift with a bent or damaged carriage or guide beams is unsafe, will shorten the operational life of the lift, and will void its warranty. 3. Jammed Loads Permanent lift damage can result when loads that are placed on the lift are allowed to hang over one or more edges of the carriage, and the carriage then sent to upper level landings past obstructions/features which could potentially jam the overhanging load. These features include shaft door openings, protruding landings, building joists/beams, backstop panels, ductwork, pipe, etc.. Care should be taken to eliminate jams by: a. Securing wheeled loads (pallet jacks, carts, racks, etc.) by braking or chocking the wheels to prevent the load from “walking” towards & over the edge of the carriage during lift travel. b. Inspecting the loads placed on the carriage to make they are well within the perimeter of the carriage before sending the load to another level . c. Making sure that all snap chains (or drop bars – in some cases) are secured across all loading/unloading sides prior to sending the load to an upper level. d. Placing permanent visual aids on the carriage deck surface for fork truck operators to know where to place loads within the perimeter of the carriage. WHEN A CARRIAGE JAM OCCURS: A jammed carriage may have damaged or broken the lifting cables or other critical components that are supporting the carriage. Therefore: 71 OPERATING INSTRUCTIONS A. DO NOT walk out onto the carriage or attempt to physically free the jam until the carriage has been safely supported from beneath per instructions given in the “Lift Blocking” section of this manual. B. Call Autoquip (888-811-9876) to provide assistance in discovering the source & acceptable remedy for the carriage jam. C. Call an authorized Autoquip dealer or representative to conduct a comprehensive inspection of the lift for structural and component damage before placing it back into service. WARNING! Close all gates when not in use! Never leave the FREIGHTLIFT unattended with the gates left open! WARNING! Never operate unit when parts are broken or damaged! Do not operate this equipment when non-factory approved or damaged parts are in use! Contact the local FREIGHTLIFT Service Representative to rectify all such situations. 72 ROUTINE MAINTENANCE DANGER! To avoid personal injury or death, all maintenance procedures described in this section should only be performed by qualified service personnel. DANGER! To avoid personal injury or death, do not operate this equipment with substandard, defective, or missing parts. Contact a local FREIGHTLIFT service representative if a deficiency is found. WARNING! To avoid serious injury or death, GUARDS, INTERLOCKS, and SAFETY DEVICES must be restored to correct operation when installing parts or making repairs. INSPECTION & MAINTENANCE SCHEDULE The following inspection & maintenance schedule is based on an average annual usage of approximately 5,000 hours per year. Special applications such as high cycle, extreme temperatures, outdoor or wash-down applications, corrosive environments, and contaminated environments will require more frequent maintenance – and possibly different lubricants. Special ordered lift features may also require maintenance and are not included in the following schedules. If you have any questions or problems, please feel free to contact you local service representative or the Autoquip Service Department for assistance (888-811-9876). Every Month (300-400 hours of operation): 1. Check all components for signs of noise, vibration, erratic movement, and any other abnormal behavior. 2. Check overall condition of unit (i.e. bends, breaks, loose or missing bolts, etc. 3. Check that all the hydraulic fittings are secure and dry. 4. Check the oil level in the power unit reservoir. The oil should be 1 ½” to 2” below the top of the tank when the carriage is fully lowered. 5. Using a long handled broom or other implement, remove any debris from under the platform carriage or in the enclosed area. 73 ROUTINE MAINTENANCE DANGER! To avoid personal injury or death, before performing any static inspections, make sure the platform carriage is fully lowered and the power has been disconnected at the safety disconnect switch. Also, put signs at all gates, doors, controls, etc. indicating that the system is out of service for maintenance per OSHA Lock-Out, Tag-Out procedures. Inspection List – Every 3 Months (1,000-1,200 hours of operation): 1. Inspect cables for damage, unusual wear, or fraying 2. Inspect sheaves for bending or binding, ensure cable runs smoothly in sheaves and that sheaves rotate freely 3. Inspect carriage guide rollers for wear, binding, or other indication of non-rotation 4. Inspect all gate/door interlocks and status switches for proper operation 6. Inspect all gates/doors for wear or damage 7. Look for any unusual rub marks on the guides, wall, platform carriage, masts, etc, which might indicate misalignment of the components due to overloading, misuse, or something out of tolerance. 5. Check that the cylinder is clean and un-nicked. There may be a small amount of oil accumulating near the rod clevis block and around the rod seal due to the normal wiping action of the rod wiper. Wipe the area clean. NOTE: Do not mistake normal lubricating weeping for a leak. If oil is running down the outside of the cylinder barrel and is dripping on the floor after everything has been wiped clean during the last maintenance, there may be a rod seal or a bleed screw leak. Inspection List – Every 6 Months (2,000-2,500 hours of operation): 1. Inspect all cable sheaves for wear or damage 2. Make sure that the platform carriage is lined up with the upper floor. Adjust the stop bolts, if required. 3. Check that the platform carriage is actuating the limit switches correctly (for gates with solenoid interlocks). Adjust limit switch arms, if required, per procedure in the “Installation” section. 4. Thoroughly inspect all Locking Cam assemblies, immediately replace any components which exhibit excessive wear, including but not limited to: a. Locking Cam – any tooth edge which feels rounded or flattened in any way NOTE: Locking cams are a critical component in the free-fall arrest safety system and become less effective after multiple engagements. Wheel guides / locking cams should be replaced after being engaged under full or partial load more than twice. 74 ROUTINE MAINTENANCE b. Locking Cam Spring – any broken, rusted, bent, or damaged springs or spring mounting bolts c. Locking Cam Back-up Bar – a bent bar, or any damaged or missing mounting bolts, or bolts which are not Grade 8 d. Cable Adaptors (the “Yoke” transition piece between the cable and the locking cam) – a holding pin missing retaining/cotter pins on either end, any damaged or slightly bent retaining pin, or any sign of wear or “egging” of the pin holes in the adaptor piece Inspection List – Every 12 Months (4,000-5,000 hours of operation): 1. Conduct a full inspection of the unit by using the comprehensive Inspection Checklist found in the Appendix of this manual. 75 GENERAL MAINTENANCE DANGER! To avoid personal injury or death, the procedures described in this section should only be performed by qualified service personnel. WARNING! Never operate the lift by “manualling” the electrical controls (using the contactors located inside the control panel). All safety devices are bypassed in this mode of operation and lift damage or severe personal injury could occur. OIL RECOMMENDATIONS The FREIGHTLIFT operates efficiently utilizing high quality oil products that are readily available in all areas. These oil products contain additives that are desirable for optimum performance of the equipment. Follow the recommendations below that apply to the circumstances most similar to your installation. Environment (Ambient Temperature) Recommended Oil Indoor locations with variable temperatures: 30 - 100 degrees F 5W 30 or 5W 40 Multiviscosity Motor Oil Indoor locations with constant temperatures: 60 - 80 degrees F Permissible to use SAE 20 Motor Oil Outdoor locations: 30 - 120 degrees F 5W 30 or 5W 40 Multiviscosity Motor Oil Outdoor locations: 10 degrees F below 0 to 100 degrees F 5W 20 or 5W 30 Multiviscosity Motor Oil Cold Storage Warehouse: 10 - 40 degrees F Contact local Autoquip Service Rep. NOTE: All oils above are detergent type. OIL CAPACITY: Reservoir capacity for the steel “vertical” tank is approximately 11 gallons. reservoir capacity for “contractor” (polyethylene) tank is approximately 5 gallons. 76 The GENERAL MAINTENANCE The oil level in the reservoir should be 1” to 1 ½” below the top of the reservoir with the lift in the fully lowered position. NOTICE Use approved fluids only! Use of unauthorized fluids may cause damage to seals and hosing. DO NOT USE: Automatic Transmission Fluid (ATF) Hydraulic Jack Oil Hydraulic Fluids Brake Fluids 77 GENERAL MAINTENANCE NOTES: 1. Industrial hydraulic oils formulated for high pressure uses and of the proper viscosity contain anti-wear, anti-foaming, anti-rust additives making them acceptable. However, it is best to contact Autoquip Customer Service for advance approval! 2. Use of improper oil will VOID the FREIGHTLIFT warranty! 3. The unit must be fully lowered to perform the filling operation. POWER UNIT FLUSHING PROCEDURE In high use or severe applications, it may be necessary to flush the entire hydraulic. The parts and procedures are as follows: Parts Required 5 – 10 gallons of proper oil (depends on tank size - see “Oil Recommendations”) 1 gallon of mild cleaning solvent Lint free rags A new pump (FLH1, 2, 3) or Deltatrol valve (FLH4, 5, 6) A new suction filter DANGER! To avoid personal injury or death, turn off the power and lock out the power at the primary power disconnect switch before service or maintenance per OSHA Lock-Out, Tag-Out procedures. 78 GENERAL MAINTENANCE DANGER! To avoid personal injury or death, all maintenance procedures described in this section should only be performed by qualified service personnel. Flushing Procedure 1. Lower the carriage completely to the floor. 2. Lock out and tag the electrical disconnect. 3. Remove the hydraulic hoses and either pump or Deltatrol valve. 4. Drain the hydraulic tank. 5. Remove the suction filter. 6. Flush the hoses with the cleaning solvent. 7. Wipe out the tank with the cleaning solvent. 8. Install the new suction filter and either pump or Deltatrol valve. 9. Install the hoses and fill the tank with fresh oil. 10. Turn on the electrical power. 11. Bleed the system of air and check for leaks (see “Bleeding Air From the System” instructions – this section). NOTE: Please call the Autoquip Customer Assurance Department for any assistance or questions. 79 GENERAL MAINTENANCE BLEEDING AIR FROM THE SYSTEM NOTICE Avoid air in the system! The presence of air in the system can lead to a lock-up of the velocity fuses. (Air reacts like a spring when it is compressed.) 1. Fully extend the cylinder rods to expend air from the cylinder barrel after the FREIGHTLIFT has been lowered. 2. Carefully loosen the bleeder bolt (located in the 90° elbow) to allow all air to escape. 3. Press the “UP” button and let the motor run briefly, then press the Emergency Stop Button. 4. Let the oil escape until clear oil (no bubbles) appears from the bleeder bolt. 5. Tighten the bolt. 6. Repeat Steps 1 – 5 on each cylinder. 7. Clean up any spilled oil. 8. Do not reuse the oil that was bled from the system! Any oil should be immediately discarded because it may have flushed contaminates which were present in the line. NOTE: A small amount of air may remain in the cylinder, but it will be flushed back into the reservoir after a few operations of the system. WARNING! To avoid serious injury or death, GUARDS, INTERLOCKS, and SAFETY DEVICES must be restored to correct operation when installing parts or making repairs. 80 81 RESERVOIR Figure 34 Hydraulic Schematic, Models FLH(C)-1, 2 & 3 THE FREIGHTLIFT IS DESIGNED AND FABRICATED TO THE ORDER. IT IS NOT A STANDARD PRODUCTION PRODUCT THAT CAN BE REPLACED IN STOCK FOR FUTURE SALE. THE COST OF WORK IS FAR MORE EXPENSIVE THAN INITIAL PRODUCTION. CANCELLATION CHARGES WILL REFLECT THAT COST. THE CHARGES WILL BE CALCULATED ON TOTAL LIST PRICE OF ORDER. ALL FREIGHTLIFT INSTALLATIONS REQUIRE ENCLOSURES IN ACCORDANCE WITH ANSI B20.1 INCLUDING EITHER INTERLOCKED GATES OR, IN THE CASE OF CONVEYOR APPLICATIONS, APPROVED LOADING TUNNEL ENCLOSURES. SUCTION LINE FILTER DOWN FLOW CONTROL DRAIN PRESSURE LINE P.SW. HYDRAULIC SCHEMATIC DOWN SOL. VALVE CANCELLATION CHARGES 5% AFTER RECEIPT OF ORDER PRIOR TO SUBMITTING APPROVAL DRAWINGS. 20% AFTER APPROVAL DRAWINGS CREATED. 50% AFTER APPROVED DRAWINGS RETURNED TO 3 WEEKS BEFORE SHIPPING. 100% WITHIN 3 WEEKS OF SCHEDULED SHIPPING DATE. ALL GATES AND ENCLOSURES ARE SUBJECT TO 100% CANCELLATION CHARGE 1 WEEK AFTER APPROVED DRAWINGS ARE RETURNED. RELIEF VALVE CHECK VALVE DOWN SOLENOID PUMP ASSEMBLY PROVIDES THE COMPLETE FUNCTION OF CHECK, RELIEF, AND 1 VELOCITY FUSE RESERVOIR - PUMP - MOTOR - POWER UNIT: 6 GALLONS (APPROX.) SELF- CONTAINED. GEAR TYPE 60 CYCLE 3 PHASE 5 HORSEPOWER 208-230-460 VOLT CYLINDER DRAIN LINE GENERAL MAINTENANCE RELIEF VALVE RESERVOIR Figure 35 Hydraulic Schematic, Models FLH(C)-4, 5, & 6 82 THE FREIGHTLIFT IS DESIGNED AND FABRICATED TO THE ORDER. IT IS NOT A STANDARD PRODUCTION PRODUCT THAT CAN BE REPLACED IN STOCK FOR FUTURE SALE. THE COST OF WORK IS FAR MORE EXPENSIVE THAN INITIAL PRODUCTION. CANCELLATION CHARGES WILL REFLECT THAT COST. THE CHARGES WILL BE CALCULATED ON TOTAL LIST PRICE OF ORDER. ALL FREIGHTLIFT INSTALLATIONS REQUIRE ENCLOSURES IN ACCORDANCE WITH ANSI B20.1 INCLUDING EITHER INTERLOCKED GATES OR, IN THE CASE OF CONVEYOR APPLICATIONS, APPROVED LOADING TUNNEL ENCLOSURES. SUCTION LINE FILTER CANCELLATION CHARGES 5% AFTER RECEIPT OF ORDER PRIOR TO SUBMITTING APPROVAL DRAWINGS. 20% AFTER APPROVAL DRAWINGS CREATED. 50% AFTER APPROVED DRAWINGS RETURNED TO 3 WEEKS BEFORE SHIPPING. 100% WITHIN 3 WEEKS OF SCHEDULED SHIPPING DATE. ALL GATES AND ENCLOSURES ARE SUBJECT TO 100% CANCELLATION CHARGE 1 WEEK AFTER APPROVED DRAWINGS ARE RETURNED. DRAIN PRESSURE LINE P.SW. HYDRAULIC SCHEMATIC DOWN SPEED RESTRICTOR DOWN VALVE WITH PRESSURE COMPENSATED FLOW CONTROL. RETURN LINE FILTER DELTATROL VALVE PROVIDES THE COMPLETE FUNCTION OF CHECK, RELIEF, PRESSURE COMPENSATED FLOW CONTROL, SOLENOID LOWERING VALVE AND RETURN LINE FILTRATION. CHECK VALVE 1 2 VELOCITY FUSE RESERVOIR - 11 GALLONS (APPROX.) SELF- CONTAINED. GEAR TYPE DELTATROL PUMP - 5 HORSEPOWER 208-230-460 VOLT 60 CYCLE 3 PHASE 1 VALVE - MOTOR - POWER UNIT: CYLINDER DRAIN LINE GENERAL MAINTENANCE GENERAL MAINTENANCE PIPE THREAD SEALANT Loctite PST #567 pipe thread sealant or equivalent is recommended. Do not use Teflon tape. Tape fragments can cause malfunctioning of the hydraulic system. VELOCITY FUSE REPLACEMENT DANGER! Do not attempt to remove the velocity fuse until the lift is securely supported with the lift blocking devices and all hydraulic pressure has been removed from the lifting cylinders and hydraulic hoses. Failure to follow these instructions could result in personal injury or death! Never attempt to take a velocity fuse apart and repair it. These are precision devices that are factory assembled under exacting conditions. Velocity fuses should always be replaced. 1. The arrow on the exterior surface of the velocity fuse shows the direction of the restriction to the oil flow. The arrow should always point away from the cylinder. 2. Do not use Teflon tape on the threaded connections of a velocity fuse. Tape fragments can cause malfunctioning of the fuse. 3. Check all fitting connections for hydraulic leaks and tighten as necessary. WARNING! To avoid serious injury or death, GUARDS, INTERLOCKS, and SAFETY DEVICES must be restored to correct operation when installing parts or making repairs. 83 GENERAL MAINTENANCE CYLINDER REMOVAL AND REPACKING 1. Press the “DOWN” button and lower the carriage to the fully down position. Continue to hold the button for five to ten seconds to relieve all hydraulic pressure and cable tension. 2. Cut off the electricity to the power unit (lock out-tag out). 3. Disconnect the hydraulic hose from the power unit and place the loose end of the hose in the fill hole of the power unit for draining oil. 4. Remove the cylinder clevis pin at the base of the cylinder and allow the cylinder to hang from the cable attached to the sheaves. 5. Remove the cotter pin from the end of the rod that fits into the sheave mounting block. 6. Hold the cylinder securely and remove the nut from the threaded end of the cylinder rod inside the sheave mounting block. 7. Once free from the sheaves, push the piston rod into the cylinder to eject as much oil as possible into the power unit or another container. 8. Insert a Spanner wrench and turn the upper bearing assembly clockwise until the tip of the retainer appears in the slot. Place a small screwdriver under the retainer and turn it until the retainer is completely removed. 9. Be sure the hose port is open to allow air into the cylinder. Pull the piston rod out to remove the upper bearing. 10. After all of the internal components have been removed, use a bright light to inspect the inner walls of the barrel. Use a cylinder hone to remove any apparent nicks or scratches. Clean and flush the barrel after honing. 11. Remove the piston head nut from the rod. The thread or cotter pin hole may be used to prevent rotation of the rod while loosening. Remove the old piston. 12. Inspect the groove for nicks or scratches that could affect the seal or barrel walls; remove as necessary. 13. Install the new piston seals and rod wiper. 84 GENERAL MAINTENANCE 14. Check the piston head nut for tightness and torque to 600-650 ft. lbs on 3 ½” bore cylinders or 850-950 ft. lbs. on 4” bore cylinders. The thread or cotter pin hole may be used to prevent the rotation of the rod while tightening. 15. Liberally lubricate the piston and seal with CLEAN grease or oil. 16. Reinsert the piston into the barrel, taking care not to pinch or nick the new seal. 17. Slip the bearing assembly into place and align the retainer hole with the slot in the barrel. 18. Turn the bearing with the Spanner wrench until the retainer is reinserted completely. 19. Pull up the rod and reinstall the cylinder by reversing steps 4 - 6. 20. Reconnect the cylinder hose to the power unit. 21. Check the security of all the pins and other mechanical and hydraulic components. 22. Restore the oil level (see oil recommendations in the “Routine Maintenance” section. 23. Turn on the electrical power and press the “UP” button. It may take a few seconds to fill the empty cylinders. Raise the lift approximately 12 inches. 24. Follow the steps given in “Bleeding Air From the System” – this section. 26. Check the oil level (see “Oil Requirements” section). 27. Clean the oil fill breather cap. ADJUSTING LEVEL LIMIT SWITCH (Gates with Solenoid Interlocks) To ensure proper setting and performance of the Level Limit Switch, follow the procedure set forth in Paragraph J of the “Installation” section. NOTE: Should you have any questions or need assistance please call Autoquip Customer Service (888-811-9876). 85 GENERAL MAINTENANCE POWER UNIT A. “Vertical” Heavy Duty Power Unit – Models FLH-4 thru FLH-6 DANGER! HIGH VOLTAGE!! Disconnect and/or lock out the electrical supply to the power unit prior to any maintenance being performed per OSHA Lock-Out, Tag-Out procedures. 1. The “vertical” unit utilizes a heavy duty 5 HP/208, 230, or 460 Volts/60 hertz/3 phase motor coupled to a high-pressure positive displacement gear pump, and Autoquip Corporation’s patented Deltatrol valve assembly. It is also available with a 230 Volts/60 hertz/single-phase motor as an option. 2. The following should be referenced in connecting the standard heavy-duty motors to power sources. Remember that heavy wire must be used all the way to the power source. Power Unit 208 Volts 230 Volts 460 Volts Standard Three Phase 16 AMPS 15.2 AMPS 7.6 AMPS Standard Single Phase N/A 28 AMPS N/A NOTE: All amperage draws shown are full-load amperages. B. Contractor Remote Power Unit – Models FLH-1 thru FLH-3 DANGER! HIGH VOLTAGE!! Disconnect and/or lock out the electrical supply to the power unit prior to any maintenance being performed per OSHA Lock-Out, Tag-Out procedures. 1. The Contractor Power Unit utilizes a “Super-Torque” intermittent duty (one full lift cycle per four minute period) 5 HP/208/230/460 Volts/60 hertz/3 phase motor driving a high pressure positive displacement pump assembly with internal relief check and dump valves. 86 GENERAL MAINTENANCE 2. Because Autoquip "Super-Torque" motors actually deliver substantially more horsepower than their nameplate rating, they must always be wired for heavier current-draw than standard motors of the same nameplate rating. However, because of the "Super-Torque" motor’s starting efficiency and superior running characteristics, circuit components do not have to be as large as for standard motors of equal delivered horsepower. The following chart should be referenced in connecting these motors to power sources, remembering that heavy wire must be used all the way to the power-source. 5 HP Full Load Amperages 208 Volts 15.8 AMPS 230 Volts 14.8 AMPS 460 volts 7.4 AMPS WARNING! To avoid serious injury or death, GUARDS, INTERLOCKS, and SAFETY DEVICES must be restored to correct operation when installing parts or making repairs. 87 GENERAL MAINTENANCE 64306660 1 OF 1 PRESSURE PORTS (ONLY ONE USED FOR THE FREIGHTLITE) PRESSURE SWITCH RESERVOIR PRESSURE GAUGE MOTOR DOWN SOLENOID DOWN FLOW CONTROL PUMP NO. This drawing is the sole property of Autoquip Corp, and cannot be used for design and construction without permission of Autoquip Corp. DESCRIPTION REFERENCE DRAWING: DRAWING TITLE: APPROXIMATE WEIGHT: DRAWN BY: <1k ORDER NO: FREIGHTLIFT CONTRACTOR POWER UNIT TC DATE: QTY REQ'D: 8/21/01 PAGE: 1 OF 1 Figure 36 Contractor Power Unit – Models FLH-1, 2 & 3 88 DATE BY JOB NAME: C 2001 COPYRIGHT RESERVED AUTOQUIP CORPORATION REV. DRAWING NUMBER: 64306660 A SIZE: GENERAL MAINTENANCE 64305022 1 OF 1 MOTOR PRESSURE SWITCH DOWN SOLENOID PRESSURE PORTS DELTATROL VALVE PRESSURE GAUGE NO. This drawing is the sole property of Autoquip Corp, and cannot be used for design and construction without permission of Autoquip Corp. DESCRIPTION BY REFERENCE DRAWING: DRAWING TITLE: APPROXIMATE WEIGHT: DRAWN BY: <1k FLH VERT PWR UNIT TC DATE: QTY REQ'D: 8/21/01 PAGE: REV. DRAWING NUMBER: 1 OF 1 Figure 37 Vertical Heavy Duty Power Unit – Models FLH-4, 5, & 6 89 DATE ORDER NO: JOB NAME: C 2001 COPYRIGHT RESERVED AUTOQUIP CORPORATION 64305022 A SIZE: GENERAL MAINTENANCE CABLE (WIRE ROPE) ADJUSTMENT PROCEDURE (Figures 38 & 39) DANGER!!! To avoid personal injury or death, this procedure should only be performed by qualified service personnel. 4½" of adjustment is available in 1½" increments for the lifting cables. Adjustment is made by changing the clevis pin between four sets of holes in the dead head clevis and mounting bracket. The mounting bracket is located on the outside of the masts, at the top, near the masthead. The carriage should be at the lowest floor level when this adjustment is performed. WARNING! To avoid serious injury or death, GUARDS, INTERLOCKS, and SAFETY DEVICES must be restored to correct operation when installing parts or making repairs. 90 GENERAL MAINTENANCE TO CARRIAGE TO MAST Figure 38 Cable Routing Diagram 91 GENERAL MAINTENANCE ADJUSTMENT POSITIONS Figure 39 Cable Adjustment Bracket 92 REPLACEMENT PARTS LIST Specific part numbers vary from job to job, depending on the model and options chosen for the application. Call the Autoquip Service Department at 888-811-9876 or 405-2825200 with the serial number of the specific FREIGHTLIFT equipment to order the appropriate parts. QTY 1 Description Motor, 5 HP 208/230/460 Volt 3 PH straight shaft Motor, 5 HP 208/230/460 Volt 3 PH tang shaft FLH(C) Models 1, 2, 3 FLH(C) Models 4, 5, 6 N/A 30600449 30600613 N/A 1 Motor Coupling, Lovejoy L-095, 1 1/8” bore N/A 20000154 1 Pump Coupling, Lovejoy L-095, 7/16” bore N/A 20000030 1 Coupling Rubber Spider N/A 20000162 1 Pump, 2.25 GPM with straight shaft N/A 40300162 40200650 N/A Pump, 2.99 GPM w/ tang shaft & internal relief, check 2 ¼” Dyna-Seal Washer for Deltatrol N/A 45901014 1 Return Pipe Assembly, 6” long N/A 41050485 1 Sump Strainer 41050139 47700075 1 Hose, Pump to Deltatrol, 3/8” x 18” long w/ 1 swivel N/A 46100020 1 Deltatrol Kit N/A 41050880 1 Down Solenoid, 115 Volt 32701300 32701370 1 Filler/Breather Cap Assembly 47701640 47700208 1 Oil Reservoir, 16” x 16” x 10” N/A 64000813 Oil Reservoir, polyethylene 64201020 N/A 1 Control Panel, 460 VAC/24 VAC controls 35107920 35107920 1 Control Panel, 208-230 VAC/24 VAC controls 35108110 35108110 1 Control Signal; Pushbutton – “UP”/”DOWN” 65900045 65900045 1 Flow Control Valve 41502840 N/A 1 Pressure Gauge 41901943 41901943 1 Pressure Switch 36301260 36301260 2 Flanged Load Runners 20013060 20013060 2 Cylinder, low travel 42400760 42600950 2 Cylinder, high travel 42400770 42600960 2 Seal Kit 45502720 45502730 93 TROUBLESHOOTING ANALYSIS DANGER! To avoid personal injury, NEVER go under the lift platform until it is securely blocked (See "Blocking Instructions" section) and the load is removed. Troubleshooting and maintenance on the lift should only be performed by qualified service technicians!! Never walk out onto a jammed carriage until it has been properly blocked or secured from further movement (See “Blocking Instructions” section) Maintenance personnel should always speak to the operator(s) of the lift prior to troubleshooting – to gain insight into the potential cause(s) of the problem. PROBLEM Freightlift will not raise (motor not running or “humming”). WARNING! a safety device may have been activated – if you are not familiar with how safety devices interact with the operation of the lift, you must find someone who does. Or, call Autoquip Customer Service at 888-811-9876. POSSIBLE CAUSE AND SOLUTION The emergency stop button may be depressed or jammed. Check all pushbutton stations. Repair / replace. The main disconnect switch / distribution panel circuit breaker is tripped or a fuse is blown. Check and reset or replace as necessary. A door with status switch is open, or switch or interlock is malfunctioning or is out of tolerance. Close door, or check and repair or adjust as required per gate manual (shipped separately – when gates supplied by Autoquip) The push button / circuit is malfunctioning. Check components and circuit. Repair or replace. The motor starter overloads (MSO) have tripped. Check and reset. If it trips again, check for cause in the motor circuit. The control transformer fuse is blown. Check and replace. The “UP” push button or circuit is malfunctioning. Check at the other push button station for “UP” function. Check components and circuit. Repair or replace. The motor starter coil (MI) has burned out. Check and replace. (Will usually blow the control transformer fuse.) 94 TROUBLESHOOTING ANALYSIS PROBLEM Freightlift will not raise (motor is running or “humming”). WARNING! a safety device may have been activated – if you are not familiar with how safety devices interact with the operation of the lift, you must find someone who does. Or, call Autoquip Customer Service at 888-811-9876. POSSIBLE CAUSE AND SOLUTION WARNING! The lifting cables may be disconnected or broken. Check while standing near (but NOT on) the lift carriage and correct as necessary – once carriage has been blocked in place. The load may exceed the rated capacity of the lift. Remove any excess load. Rotation on the 3-phase motor may be reversed. Reverse any two motor electrical leads. The 3-phase motor may be single-phasing (humming). Check wiring, fuses, etc. Check for a hydraulic oil leak. Correct as necessary. Check for oil shortage in the reservoir and add oil as necessary. The breather cap on the reservoir may be clogged. Remove and clean. The suction screen may be clogged, starving the pump. The screen is attached to the suction line in the tank. Remove and clean. Drain and replace oil. Suction line may be leaking air due to a loose fitting, causing cavitation. Check fittings. Bleed air from the system. The “DOWN” valve may be energized by faulty wiring or it may be stuck in the open position. Remove the solenoid and check. The voltage at the motor terminals may be too low to run the pump with the existing load. Check by measuring the voltage at the motor terminals (or as near as possible) while the pump is running under load. Reading the source voltage or pump idling voltage is meaningless. Inadequate or incorrect wiring can starve the motor when the source voltage is ample. Correct as necessary. The pump may be seized if the motor is humming, blowing fuses or overloads. Remove the pump (with the platform in the lowered position). The shaft should be able to be turned by hand. Check for cracks in the housing. Heavy Duty PU - The manual down valve may be pulled open. Turn 90 deg. & spring back in Contractor PU – The down valve may be stuck open. Replace down valve cartridge. 95 TROUBLESHOOTING ANALYSIS PROBLEM The Freightlift will not lower (electrically). WARNING! a safety device may have been activated – if you are not familiar with how safety devices interact with the operation of the lift, you must find someone who does. Or, call Autoquip Customer Service at 888-811-9876. Motor labors or heats excessively. The Freightlift does not raise completely to the upper level (press “emergency stop” button to stop motor.) POSSIBLE CAUSE AND SOLUTION The emergency stop button may be depressed or jammed. Check all pushbutton stations. Repair as necessary. The main disconnect switch / distribution panel circuit breaker is tripped or a fuse is blown. Check and reset or replace as necessary. A door with status switch is open, or switch or interlock is malfunctioning or is out of tolerance. Close door, or check and repair or adjust as required. The push button / circuit is malfunctioning. Check components and circuit. Repair or replace. The motor starter overloads (MSO) have tripped. Check and reset. If it trips again, check for cause in the motor circuit. The control transformer fuse is blown. Check and replace. Check for tripped velocity fuses. A - air in the system will cause a lockup B - heavy oil will cause a lockup. C - Cold temperatures of -10 F or lower will cause a lockup. NOTE: CONTACT THE AUTOQUIP SERVICE DEPARTMENT BEFORE ATTEMPTING TO REPAIR THIS PROBLEM!! The voltage may be low. Check at the motor terminals while the pump is running under load. Do not check at the line source or while the pump is idling. Inadequate wiring can starve the motor even when the source voltage is ample. The wiring may be incorrect. Be sure one leg of the motor line is not connected to the ground prong. This can happen particularly on 3-phase units using twist-lock plugs. The pump may be binding from oil starvation. This can cause high internal heat. The pump can be irreparably damaged by oil starvation and may have to be replaced! The carriage stops at the upper level are not adjusted correctly The oil level in the reservoir may be too low. Check and replace. Determine the cause of the oil condition and repair. There is some sort of interference with the platform carriage. Check and correct. The load exceeds the capacity of the unit. Lower the unit, unload, and try again. 96 TROUBLESHOOTING ANALYSIS PROBLEM Unit operates in a “spongy” or jerky fashion. The Freightlift lowers too slowly with a load. Freightlift raises, then lowers back slowly. POSSIBLE CAUSE AND SOLUTION The load may exceed the stated capacity of the unit. Overloading causes the pressure switch valve to activate and deactivate if the “UP” button is depressed. (Motor may start and stop if this condition exists.) Remove the excess load. The hydraulic system may have air in it. The unit requires bleeding. Check for oil starvation. The rollers may be binding. Check and repair. The platform carriage may be binding in the guide ways. Check and repair. The cylinder may be binding internally or externally. Check and repair. The pressure switch may be turning the motor on and off. Check and repair. Check for a pinched hose or tubing. The “DOWN” valve may be malfunctioning. Check and replace control valve. The “DOWN” valve solenoid mounting is loose, preventing the valve from opening completely. Check and repair. Oil is extremely heavy for the application, or low temperature is causing a thickening of the oil. The “DOWN” valve solenoid may be weak and not pulling in completely (it will usually “chatter”). Check the control voltage. Check and repair or replace. The “DOWN” solenoid valve may be energized in the “OPEN” position. Remove the solenoid coil and recheck. If the lift does not hold with the solenoid coil removed, replace the down valve cartridge. The hydraulic cylinder rod seal may be leaking. Check to see if there is hydraulic oil running down the outside of the cylinder barrels at the rod end. Repair as necessary. (NOTE: a small amount of oil at the bottom of the rod is normal and desirable for proper lubrication of the cylinder. A leak would cause oil to flow from the rod area when the lift is in the raised position.) Check valve in the pump or Detatrol may be contaminated or defective. Repair or replace. 97 GLOSSARY OF TERMS TERM DEFINITION Anchors Bolts used to fix masts to the floor ATF Automatic transmission fluid Autotrol A seven-function valve block that performs the hydraulic functions of Freightlifts. Back frame The vertical portion of the carriage on the cantilever Freightlift Cable Wire rope that is used in lifting the carriage Cable Reeving The path of the wire rope beginning at the connection to the carriage, over the sheaves, and ends at the top of the masts. Cantilever A style of Freightlift where the carriage rides along two masts that are mounted on the same side of the carriage. This style of lift will accommodate all three loading patterns. Capacity The maximum load the Freightlift will lift Carriage The entire assembly that travels on the mast and carries the load Controls Any electrical device used in the operation of a Freightlift, which normally includes push button stations, control boxes, limit switches, interlocks, etc. Cylinder A mechanical hydraulic means that transmits lifting force through the use of cables and sheaves. Cycle The lift is considered to have operated one cycle any time the motor starts. Down solenoid An electrical mechanical device that, when electrically energized, opens the down valve. Enclosure A structure surrounding the Freightlift to prevent anything from interfering with normal operation of the lift, and to protect personnel. Typically eight-foot high panels made of expanded metal that will prevent a two-inch diameter ball from passing through. This is a requirement of the conveyor code (ANSI-B20.1) Gate A device that opens and closes to allow access to the carriage for loading and unloading. Normally a swing, sliding, or vertical acting device constructed of similar expanded metal as the enclosure. Hydraulic Operation by movement and force of liquid Interlock An electrical mechanical system for doors or gates to prevent operation of the lift if all the gates are not closed or if the lift platform is not level. Limit Switch An electrical device by which the movement of the Freightlift may be controlled within predetermined limits. Load height The maximum height of the material a carriage can accommodate. Load pattern A method to describe how a Freightlift will be loaded at different levels. Masts The vertical members between which the carriage is guided throughout its vertical travel. Motor starter An electrical controller for accelerating a motor from rest to normal speed. 98 GLOSSARY OF TERMS TERM DEFINITION Mechanical stop A mechanical means of stopping travel at a predetermined spot or to prevent overtravel of a lift. Nonoperating end The side(s) of the platform not used for loading/unloading. Handrails with midrails and kick plates are supplied as minimum safety protection. Operating end The side(s) of the platform used for loading/unloading. A safety chain is supplied as minimum safety protection. Platform The horizontal surface of the carriage where the load is placed. Power unit An assembly including, but not limited to the motor, pump, reservoir, and the Autotrol valve. Pressure relief valve A valve that can be set to a predetermined pressure. If the pressure is exceeded, the valve will open to prevent damage to the hydraulic system. Pressure switch A switch that can be set to a predetermined pressure. When this pressure is reached, it will open, thus turning off the power. Roll off panel A structure used on the upper levels to prevent personnel/products from falling off the platform when loading. Sheave A pulley used in directing a cable. Slack cable safety stops A spring loaded safety cam directly connected to the cable that engages into the guideway should the cable become slack for any reason. Snap chain A length of chain with a clasp on the end to close off the operating end of a carriage. Straddle A style of Freightlift in which the carriage ides between two masts that are mounted on opposite sides of the carriage. This style will accommodate both “C” and “Z” loading patterns. Swaged end An eyelet that is compressed onto the end of the cable by means of cold-rolling the metal VRC Vertical reciprocating conveyor Vertical travel The distance from the lowest point of infeed or discharge to the highest point of infeed or discharge Zero drift A pressure-sensing feature that keeps the platform from drifting from an upper level. 99 APPENDIX INSPECTION CHECKLIST This checklist is intended to assist qualified maintenance and inspection personnel to inspect Freightlift installations for proper installation and maintenance concerns. The lift should be run several times, and carriage sent to each loading level, in unloaded condition for static inspection, and loaded condition during the dynamic inspection. In this way, a wider variety of issues will present themselves as actual operating conditions are duplicated as closely as possible. Inspection personnel should have at their disposal the tools and aids necessary to access and observe all the components mentioned in the checklist, and be trained to safely make these observations. If deficiencies are identified, they must be fixed and/or reported to the owner. Y N A. GENERAL 1 Is the Lift being used as it was sold to be used? (load capacity, edge/wheel loading, load frequency, no riders, etc.) 2 Do you suspect there have been unauthorized modifications of any kind made to the Lift since installation ? (pp.5,21) Describe 3 Any unusual noises being generated as it is operated? (rubbing, scraping, humming, squealing, popping, etc) Source? 4 Is the Lift operating path/pit free of debris & obstructions? 1 2 3 4 5 6 7 8 9 10 11 B. STRUCTURAL Lift carriage deck bent / damaged / modified in any way? (possible overloading or jamming of loads between floors) Carriage uprights bent / damaged / modified in any way? (possible falling and/or wedging of carriage inside guide beams) Carriage overhead channel bent / damaged / modified? (possible over-travel of lift where carriage contacts drive base) Lift mast cross channel bent/damaged/modified in any way ? (possibly pressure switch not turning off power unit at full travel) Guide beams braced/secured as recommended? (pp.47-52) (anchored to resist rated loads, no movement during carriage travel) Guide beams plumbed and straight as recommended? (pp.41,45) (1/8” over any 10 ft length, not to exceed 3/8” overall) Distance between guide beams is consistent throughout travel? (also referred to as mast setting dimension) Guide beam flanges/guide angles show signs of excessive wear? (look for metal shavings, snap rings, etc. on ground near mast foot) Unauthorized structural members added in field – especially to the guide beams/angles? (pp. 10,25,48) Any broken or cracked bolts or welds otherwise observed? Any other wear marks on any component of the lift? (p.74) Describe 100 APPENDIX 1 2 3 4 1 2 3 4 5 6 7 8 9 C. MECHANICAL Lifting cables are installed properly (pp. 26,63,90-92) a. correctly fed through the reeving path & running in sheaves? b. cable adaptor/pins/swages are factory-supplied & undamaged? c. Are lifting cables frayed or damaged ? d. Are the sheaves undamaged and turning freely ? Guide wheels – turn smoothly & square to beams? (pp.38-40) Carriage top-stop bolts are even & undamaged ? (p.54) All field-bolting – grade 8 bolts, tightened per spec (pp.36,40,75) a. Carriage to uprights? (99 ft-lbs) (p.36) b. Uprights to wheel guide blocks? (99 ft-lbs) (p.40,43) c. Uprights to overhead channels? (26 ft-lbs) (p.45) D. HYDRAULIC Is the reservoir oil level and color acceptable? (p.26,54,76,77) Any cut/damaged/frayed hydraulic hoses ? Are all hoses and fittings rated for high pressure service? Power unit or components modified in any way? Are there visible leaks at any hydraulic connections? Evidence of Teflon tape used at threaded joints/fittings? (p.26,83) Is the suction filter clogged ? Do the cylinders show signs of leaking? Is the relief valve set to open at 3000-3200 psi ? (p.15) 101 Y N APPENDIX 1 2 3 4 5 6 7 8 9 1 2 3 4 5 6 7 8 9 10 11 12 13 E. ELECTRICAL Operator P/B stations undamaged & functional? (pp.63,64) (call/send from all levels, all E-stops, key switches, etc.) Operator P/B stations at least 6 ft. from Lift carriage? (pp.27,68) Main disconnect & motor control panels unaltered? (pp.27, NEC) Disconnect & motor control panel visible from Lift?(pp.27, NEC) Any evidence that safeties are being bypassed inside the panel? Does the location of the disconnect & control panels meet NEC ? Any cut/damaged/ frayed electrical conduit or wires? (p.5) Other electrical connections meet NEC? Does the pressure switch start the motor at 2600-2800 psi? F. PERSONNEL & EQUIPMENT SAFETIES Have all operators been formally trained to use this lift? (and do they have a copy of the manual) Are gates & enclosures installed around lift per ASME B20.1? (p.27) (are they secure, stable, able to keep out personnel?) Do all Gate interlocks function properly? (pp.65,68,74) (gate must NOT open if carriage is NOT at that level) Are all Safety Labels on the carriage? (pp. 18-20,65) All Safety Labels at each landing per VRC Application Guidelines? Will lift operate with any landing gates/doors open? (pp.65,68,74) Lift stops at a safe load transfer elevation at every level? (p.54,64) On-carriage rails, guards & snap chains in place? (p.27) On-carriage rails, guards & snap chains at least 42" high? (p.27) Are carriage back-stop panels across all elevated, non-operating sides of carriage – maximum 2” from edge of carriage? (p.65) Platform locking cams are in good condition (p.74,75) a. Locking cam teeth are sharp, not rounded or flattened? b. Locking cam springs are not rusted, bent, damaged, or broken? c. Locking cam back-up bar not bent or missing bolts? Pressure switch functional & holds carriage at upper level? (pg.14) Do the door thresholds which protrude into shaft (or away from wall) have a beveled slope on underside to push away loads which may overhang the carriage as it travels up to that level (prevents jams)? (pg.25) 102 Y N LIMITED WARRANTY The user is solely responsible for using this equipment in a safe manner and observing all of the safety guidelines provided in the Owner’s Manual and on the warning labels provided with the lift. If you are unable to locate either the manual or the warning labels, please contact Autoquip or access www.autoquip.com for replacement downloads or information. Autoquip Corporation expressly warrants that this product will be free from defects in material and workmanship under normal, intended use for a period of One (1) Year for all electrical, mechanical, and hydraulic components, parts or devices. Ninety (90) days Labor warranty, extended to One (1) year with a Planned Maintenance Contract in place. Autoquip Corporation also warrants the structure of the lift against breakage or failure for a period of Five (5) years. The warranty period begins from the date of shipment. When making a claim, immediately send your dealer or Autoquip notice of your claim. All claims must be received by Autoquip within the warranty time period. The maximum liability of Autoquip, under this Limited Warranty, is limited to the replacement of the equipment. This warranty shall not apply to any Autoquip lift or parts of Autoquip lift that have been damaged or broken in transit/shipping, or due directly or indirectly to misuse, abuse, vehicle impact, negligence, faulty installation, fire, floods, acts of God, accidents, or that have been used in a manner contrary to the manufacturer’s limitations or recommendations as stated in the manual, or that have been repaired, altered or modified in any manner outside of Autoquip Corp’s manufacturing facility or which have not been expressly authorized by Autoquip. Autoquip Corporation makes no warranty or representation with respect to the compliance of any equipment with state or local safety or product standard codes, and any failure to comply with such codes shall not be considered a defect of material or workmanship under this warranty. Autoquip Corporation shall not be liable for any direct or consequential damages resulting from such noncompliance. Autoquip Corporation’s obligation under this warranty is limited to the replacement or repair of defective components at its factory or another location at Autoquip Corp’s discretion at no cost to the owner. This is owner’s sole remedy. Replacement parts (with exception of electrical components) will be warranted for a period of ninety (90) days. Except as stated herein, Autoquip Corporation will not be liable for any loss, injury, or damage to persons or property, nor for direct, indirect, or consequential damage of any kind, resulting from failure or defective operation of said equipment. All parts used to replace defective material must be genuine Autoquip parts in order to be covered by this Limited Warranty. . AUTOQUIP CORP P.O. Box 1058, Guthrie, OK 73044-1058 Telephone: (888) 811-9876 · (405) 282-5200 Fax: (405) 282-8105 www.autoquip.com 103