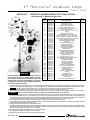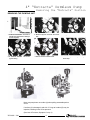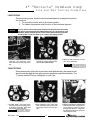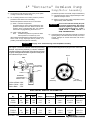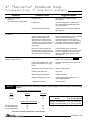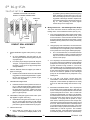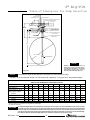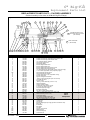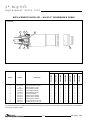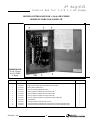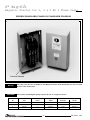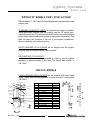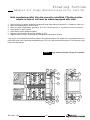
1
RED JACKET
Petroleum Products
Service Manual
RJ 5190 3/93
It is imperative that time is taken in reading
and understanding this manual thoroughly
before installing and using Red Jacket
Petroleum Equipment.
The following defined terms are used throughout this manual to bring attention to the presence of
hazards of various risk levels, or to important information concerning the life of the product.
DANGER
indicates presence of a hazard which will
cause severe personal injury, death or substantial property damage if ignored.
WARNING
indicates presence of a hazard which can
cause severe personal injury, death or substantial property damage if ignored.
CAUTION
NOTICE
indicates presence of a hazard which will
or can cause minor personal injury or
property damage if ignored.
indicates special instructions on installations, operation, or maintenance which are
important but not related to personal injury hazards.
For Technical Assistance Call:
1-800-2-MARLEY (262-7539)
NOTICE
Specifications and/or installation instructions are subject to
change per manufacturer’s recommendations.
T able of Contents
Description
Section
Page No.
4" “Extracta”/4" “AG” Petroleum Pumps ..................................................................................................... 1
Petroleum Pump (Prior to 1963) ............................................................................................................................................ 2
“Extracta” Petroleum Pump - Parts List ................................................................................................................................. 3
“AG” Petroleum Pump - Parts List ......................................................................................................................................... 4
Pump/Motor Assembly ........................................................................................................................................................... 5
Piping/Seals ........................................................................................................................................................................... 6
Discharge Manifold Assembly/Functional Element ................................................................................................................ 7
Check Valve/Troubleshooting ................................................................................................................................................ 8
Removing the “Extracta” Portion ............................................................................................................................................ 9
Packer Seals .......................................................................................................................................................................... 10
Line and Tank Testing Guidelines ......................................................................................................................................... 11
Control Box ............................................................................................................................................................................ 12
Pump/Motor Assembly Wiring ............................................................................................................................................... 13
Pump/Motor Assembly Troubleshooting ................................................................................................................................ 14
Replacing the Pump/Motor Assembly .................................................................................................................................... 15
Wiring Diagrams .................................................................................................................................................................... 16
Capacitor ................................................................................................................................................................................ 17
Dimensions and Pump Length ............................................................................................................................................... 18
6" Big-Flo® Petroleum Submersible Pump .................................................................................................... 2
Installation .............................................................................................................................................................................. 20
Wiring Diagrams .................................................................................................................................................................... 24
Manifold Dimensions ............................................................................................................................................................. 26
Pump Dimensions .................................................................................................................................................................. 27
Cutaway View ........................................................................................................................................................................ 28
Troubleshooting/Electrical Data ............................................................................................................................................. 29
Three Phase Unbalance ........................................................................................................................................................ 30
Replacement Parts List .......................................................................................................................................................... 31
Control Box ............................................................................................................................................................................ 33
Magnetic Starter .................................................................................................................................................................... 34
Pump/Motor Assembly ........................................................................................................................................................... 35
Syphon Systems. ............................................................................................................................................ 3
Engineering Report - Installation/Testing ............................................................................................................................... 38
Parts List ................................................................................................................................................................................ 43
Illustration ............................................................................................................................................................................... 44
Troubleshooting ..................................................................................................................................................................... 45
Floating Suction and Manifolded Pumps ...................................................................................................... 4
Recommended Installation .................................................................................................................................................... 48
Adapter for pre-1982 Pumps ................................................................................................................................................. 49
Dual Pumps 4" ...................................................................................................................................................................... 50
Dual Pumps 6" ...................................................................................................................................................................... 51
Warranty ........................................................................................................................................................... 5
Warranty Statement ............................................................................................................................................................... 54
Date Codes ............................................................................................................................................................................ 55
RJ 5190© 3/93
i
®
Introduction
®
The information and recommendations contained
in the “Troubleshooting” sections of this manual are
presented as a suggested guide to expedient solutions of problems specified. No attempt has been
made to identify all possible problems. Even as to
problems discussed, the information available to
you may dictate different procedures and solutions.
Our liability with respect to the product and information herein is limited solely to the product warranty
set forth in the Red Jacket Warranty Manual #5194
and on page 54 of this manual.
SOLVENT PUMPS
(4" Extracta and 6" Big-Flo)
The design of these units is basically the same as the petroleum
pump. However, modifications are made including utilization of
appropriate seals.
The product, which the unit was designed to pump, is specified on the
pump identification nameplate.
See applicable petroleum pump sections for technical data.
For specific information on solvent pumps, see the following
literature:
#5174
4" Solvent Pump
#051-116
4" Solvent Pump Parts & Installation
#5174
6" Solvent Pump
#051-121
6" Solvent Pump Parts & Installation
#5179
Solvent Specification Sheet
®
ii
RJ 5190© 3/93
1
Section
4" “Extracta”/4"“AG” Petroleum Pump
“Extracta” Model Numbers:
P33R1 — 1/3 HP
P75S1 — 3/4 HP
P150S1 — 1-1/2 HP
NOTICE
Usage:
• Standard fuels Gasoline & Diesel
- up to 10% MTBE
- up to 10% Ethanol
- up to 10% Methanol
“Extracta” model pumps can be identified by their red paint.
“AG” Model Numbers:
Usage:
AG/P33R1 - 1/3 HP
AG/P75S1 - 3/4 HP
AG/P150S1 - 1-1/2 HP
•
•
•
•
NOTICE
RJ 5190© 3/93
100% Gasoline
100% Ethanol
100% Methanol
Any combination
of the above
• 100% Diesel
• Up to 15% MTBE
“AG” model pumps can be identified by their orange paint.
1
4" Petroleum Pump
(Manufactured prior to June 1963)
PARTS LIST - REMOTE PETROLEUM PUMP UNITS
(Models P33E1-6/6S, P33E1-8/8S, P50F1-6/6S, P50F1-8/8S &
other length pump units with E or F in the model number)
UPPER END
4
31 1
2 26 10 11
25 5
6
19 18 22
21
15
30
8
Key
No.
24
1
2
5
6
10
11
15
17
18
19
21
24
25
26
9 15 29 32
EXPANSION RELIEF VALVE
ON BOTTOM SIDE OF PACKER
(NOT SHOWN)
LOWER END
28
29
30
31
Description
No.
Req’d.
Junction Box Complete ............................................... 1
Conduit Seal Assembly ............................................... 1
1" Approved Conduit — Obtain Locally ....................... 1
3/8"-16 x 3/4" Sq. Hd. Cup Point Set Screw ............... 2
Packing Nut ................................................................. 1
Gasket ......................................................................... 1
“O” Rings ..................................................................... 2
“O” Rings (Replaces 72-76) ........................................ 2
Check Valve Spring .................................................... 1
Check Valve Disc & Holder ......................................... 1
Syphon Check Valve Assembly .................................. 1
“O” Ring for Check Valve Seat .................................... 1
1/4" Galvanized Pipe — Obtain Locally ...................... 1
#10-32 x 1/4" Brass Binding Hd. Mach. Screw ............
(for check valve seat not shown) ................................ 2
Tube Fitting 1/4" Pipe x 3/8" Tube .............................. 1
Syphon Injector Body & Tube Assembly ..................... 1
Expansion Relief Valve (not shown) ........................... 1
Cover only for Junction Box ........................................ 1
PARTS LIST - MOTOR CONTROL FOR ABOVE PUMPS
Key
No.
Description
No.
Req’d.
1
2
3
4
6
8
Overload & Capacitor Assembly .................................
Starting Capacitor Only (50Mfd.-250V AC) .................
Overload Protector Only (“Klixon” MTA 1104) ............
Motor Starting Relay* (RBM91255-452-230V-5 HP)* .
Pilot Light Only (General Electric NE51) .....................
ON-OFF Switch (2 pole) ..............................................
1
1
1
1
1
1
2
4
4
6
8
8
Starting Capacitor (50Mfd.-250V AC) .........................
Motor Starting Relay* (RMB91255-452-230V-5 HP)* .
Motor Starting Relay—2 Pole**(GE3ARR3BH3V2)** .
Pilot Light Only (General Electric NE51) .....................
ON-OFF Switch (2 pole) ..............................................
ON-OFF Switch (3 pole) ..............................................
1
1
1
1
1
1
In June of 1963, pump models P33E1, 1/3 HP, and P50F1, 1/2 HP, were
discontinued. Both of these old models have been replaced with the new
P33R1 and P75S1 pumps, and the pump/motor assemblies are interchangeable with the old models.
A 111-092 run capacitor is needed when replacing the old P33E1 and
P50F1 pump/motors with either of the new models. The new P33R1 has
nearly the same flow rate as the old P50F1. Where capacity is vital, the
old P50F1 should be replaced with a new P75S1, 3/4 HP. The 1/3 HP
replacement pump/motor model number is UMP33R1 and the 3/4 HP
replacement unit model number is UMP75S1.
After disconnecting power supply, connect the 111-092 capacitor
across RED and BLACK terminals in the control box as shown. Insulate
the two connections on the capacitor with electrical tape and lay in the
bottom of the control box.
NOTICE
Only various “O” Rings remain available for the above model. No other parts are available. However, current UMP
complete pump-motor assemblies are interchangeable with above models. For instructions and modifications,
please turn to p. 15.
2
RJ 5190© 3/93
4" “Extracta” Petr
oleum Pumps
Parts List
PARTS LIST — “EXTRACTA” MODELS (RED) P33R1, P75S1 & P150S1
(Current Models — Manfactured after 1963)
Key
No.
1
2
3
4
5
6
7
8&9
10
11
12
13
15
16
17
18
19
20
21
22
23
24
25
26
26A
27
28
29
WARNING
Failure to follow all instructions in proper order can
cause personal injury or death. Read all instructions before installing. All installation work must
comply with local code requirements. If no other
codes apply, the latest issue of the National Electrical Code should be followed.
Part No.
Part Description
139-040-4
017-165-5
027-086-3
026-176-1
188-079-5
141-062-5
027-031-1
144-183-5
080-125-1
188-238-4
172-003-5
113-084-5
113-085-5
113-319-5
072-190-1
113-098-5
111-092-5
113-105-5
313-002-5
176-033-5
026-205-3
108-496-5
151-002-4
Eye Bolt Assembly
Diaphragm (see p. 7)
Galv. Steel Pipe Plug
Steel Hex Hd. Cap Screw
Syphon Check Valve Assy.
Functional Element Assy. w/“O” Rings
Galv. Steel Pipe Plug
call Red Jacket
N/S
N/S
30
N/S
N/S
N/S
076-382-1
072-189-1
065-149-3
144-090-5
144-091-5
026-355-3
031-136-1
852-004-5
852-005-5
852-044-5
144-087-5
072-195-1
136-056-5
136-057-5
166-169-5
144-106-5
N/S
N/S
N/S
N/S
N/S
N/S
072-106-1
078-522-3
072-196-1
076-146-1
066-794-1
072-106-1
Stainless Steel Check Valve Kit (incl. check VIV. & spring)
Spring
Stainless Check Valve
Functional Element “O” Ring Pkg.
1/3 HP Capacitor Cover Assy w/“O” Ring
3/4 HP Capacitor Cover Assy w/“O” Ring
1-1/2 HP Capacitor Cover Assy w/“O” Ring
“O” Ring Capacitor Cover Assy.
Capacitor Clip & Screw Pkg.
Capacitor
Connector Snap Ring Type
Connector Yoke Assy.
Contractors Plug Assy.
Steel Hex Hd. Cap Screws
Conduit Junction Box
Manifold Assy.
Complete Packer/Manifold Assy.
Packer Discharge Seal
“O” Ring - Packer Manifold
Riser Pipe (Specify Length)
Plug & Lead Assy.
Plug & Lead Assy. 17 ft.
Stainless Steel Hex Hd. Cap Screws
Discharge Head Gasket
1/3 HP Pump & Motor
3/4 HP Pump & Motor
1-1/2 HP Pump & Motor
Conduit Seal Assy.
Connector Yoke Snap Ring
1-1/2" Discharge Head Assy.
2" Discharge Head Assy.
Manifold Cover
Syphon RetroFit Kit
(when not ordered w/pump)
“O” Ring
Conduit Sleeve
Conduit Sleeve “O” Ring
Vent Closing Screw
Orange Cap
“O” Ring for Vent Closing Screw
Qty.
Req’d.
1
1
2
2
1
1
2
1
1
1
1
1
1
1
1
1
1
1
1
1
2
1
1
1
1
1
1
1
1
4
1
1
1
1
1
1
1
1
1
1
1
1
1
1
1
1. Red Jacket gasoline pumps are designed and U. L. listed to pump gasoline or diesel fuels only, having a maximum specific gravity of .95 and maximum viscosity
of 70 S.S.U. at 15°C (the approximate weight and viscosity of diesel fuel). Red Jacket bears no responsibility if the installation is outside these parameters.
NOTICE Accessories and parts of models P33R1, P75S1, and P150S1 are not intended to be used in AG model pump applications.
2. Units should be installed with manholes or with the packer head above grade to allow for ease in servicing. Refer to p. 18.
3. Unit is cooled and lubricated by product pumped. Minimum flow required is 10% of maximum capability (1/3 HP-4 GPM, 3/4 HP-6 GPM, 1-1/2 HP-8 GPM).
WARNING
Red Jacket line leak detection systems do not function if the submersible pump runs continuously.
Never wire a submersible pump to run continuously at less than minimum flow rate. The units are designed to operate continuously at or above minimum flow
rate, or with an intermittent duty cycle, not to exceed 20 on/off cycles per hour. Should it be necessary to operate a unit continuously or when the demand is at
a rate less than required per the paragraph above, a bypass pipe should be installed in the piping to allow for continual product recirculation back into the storage
tank. Regulation of the bypass flow back to the tank can be accomplished by correct sizing of the bypass line or use of a gate valve.
4. Red Jacket gasoline pumps are not designed to handle abrasives or foreign particles in the product being pumped.
5. Product temperature must never exceed 85°F as the submersible motors are equipped with thermal overload protection. Product temperature higher than 85°F
may result in tripping of the thermal overload protector.
6. Pumping water will overload the motor and damage the bearings.
7. Standard-type line check valves should not be used, as the pump is equipped with a built-in check valve. Use of this type check valve will negate the pressure
relief function of the pump and the effectiveness of the leak detector. However, whenever two pumps are manifolded together to the same discharge piping, check
valves with expansion relief are required. (See p. 50 for details).
8. Red Jacket gasoline pumps are designed for Class 1 Group D atmosphere.
9. Red Jacket gasoline pumps are designed to run at 3450 RPM.
10. Maximum pressure applied to line when testing should not exceed 50 psi.
RJ 5190© 3/93
3
4" “AG” Petroleum Pump
Parts List
PARTS LIST — “AG” MODELS (ORANGE) AG/P33R1, AG/P75S1 & AG/P150S1
Key
No.
1
2 (N/S)
3
4
6
7
8
9
10
11
WARNING
Failure to follow all instructions in proper order can
cause personal injury or death. Read all instructions before installing. All installation work must
comply with local code requirements. If no other
codes apply, the latest issue of the National Electrical Code should be followed.
12
13
15
16
17
18
19
20
21
22
22A
23
24
25
26
26A
27
27A
28
29
30
N/S
N/S
N/S
N/S
Part No.
139-041-4
017-526-1
027-225-3
026-176-1
233-025-5
027-031-5
188-240-4
080-125-1
144-184-5
144-150-5
113-479-5
113-480-5
113-481-5
072-555-5
113-098-5
111-092-5
113-105-5
313-015-5
176-067-5
026-205-3
108-549-5
151-044-4
164-138-4
264-132-4
076-370-1
072-556-5
065-149-3
144-161-5
144-162-5
026-355-3
026-435-3
031-136-1
852-083-5
852-084-5
852-085-5
136-339-5
144-163-5
072-492-1
079-980-3
072-536-1
Qty.
Part Description
Req’d.
Eyebolt Assembly
1
Diaphragm (see p. 7)
1
Pipe Plug 2" NPT
2
Plated Hex Head Cap Screw
2
Precision Functional Element Assy
w/O-Rings (see p. 6)
1
Pipe Plug 1/4" NPT
2
Stainless Check Valve
1
Spring
1
Stainless Check Valve Kit (incl. check vlv & spring)
1
O-Ring Kit for Precision Functional Element
1
1/3 HP Capacitor Cover Assy w/O-Ring
1
3/4 HP Capacitor Cover Assy w/O-Ring
1
1-1/2 HP Capacitor Cover Assy w/O-Ring
1
O-Ring Capacitor Cover Assy (B401)
1
Capacitor Clip & Screw Pkg.
1
Capacitor
1
Connector Snap Ring Type
1
Connector Yoke Assy
1
Contractors Plug Assy
1
Plated Hex Head Cap Screws
2
Conduit Junction Box
1
Manifold Assembly
1
Packer (casting only)
1
Complete Packer/Manifold Assy
Seal — Packer Discharge
1
O-Ring — Packer Manifold
1
Riser Pipe (specify length)
1
Plug & Lead Assy 13'
1
Plug & Lead Assy 17'
1
Hex Head Cap 5/16"-18"
4
Lockwashers 5/16"
4
Discharge Head Gasket
1
1/3 HP AG Pump & Motor
1
3/4 HP AG Pump & Motor
1
1-1/2 HP AG Pump & Motor
1
Discharge Head Assy
1
Conduit Seal Assy
1
Connector Yoke Snap Ring
1
Conduit Sleeve
1
Conduit Sleeve O-Ring
1
1. Red Jacket AG model pumps are designed and U.L. listed to pump 100% gasoline, methanol, ethanol and any combination of these, 100% diesel and up to 15%
MTBE. These fuels must have a maximum specific gravity of .95 and maximum viscosity of 70 S.S.U. at 15°C (the approximate weight and viscosity of diesel
fuel). Red Jacket bears no responsibility if the installation is outside these parameters.
2. Units should be installed with manholes of sufficient size to allow access for servicing. Refer to p. 18.
3. Unit is cooled and lubricated by product pumped. Minimum flow required is 10% of maximum capability (1/3 HP-4 GPM, 3/4 HP-6 GPM, 1-1/2 HP-8 GPM).
WARNING
Red Jacket line leak detection systems do not function if the submersible pump runs continuously.
Never wire a submersible pump to run continuously at less than minimum flow rate. The units are designed to operate continuously at or above minimum flow
rate, or with an intermittent duty cycle, not to exceed 20 on/off cycles per hour. Should it be necessary to operate a unit continuously or when the demand is at
a rate less than required per the paragraph above, a bypass pipe should be installed in the piping to allow for continual product recirculation back into the storage
tank. Regulation of the bypass flow back to the tank can be accomplished by correct sizing of the bypass line or use of a gate valve.
4. Red Jacket AG model pumps are not designed to handle abrasives or foreign particles in the product being pumped.
5. Product temperature must never exceed 85°F as the submersible motors are equipped with thermal overload protection. Product temperature higher than 85°F
may result in tripping of the thermal overload protector.
6. Pumping water will overload the motor and damage the bearings.
7. Standard-type line check valves should not be used, as the pump is equipped with a built-in check valve. Use of this type check valve will negate the pressure
relief function of the pump and the effectiveness of the leak detector. However, whenever two pumps are manifolded together to the same discharge piping, check
valves with expansion relief are required. (See p. 50 for details).
8. Red Jacket AG model pumps are designed for Class 1 Group D atmosphere.
9. Red Jacket AG model pumps are designed to run at 3450 RPM.
10. Red Jacket AG model pumps are orange in color (castings and intake) for easy identification.
11. Red Jacket AG model pumps are in accord with Rule 1170 (c) (1) of the South Coast Air Quality Management District.
4
RJ 5190© 3/93
4" Petroleum Pump
Pump/Motor Assembly
Column Pipe
Conduit Pipe
“O” Ring for
Pigtail Body
Std. Model: 072-106-1
AG Model: 072-528-1
Current pump motor intake since second
week of October, 1990.
Discharge
Head Gasket
031-136-1
(Both Std. & AG Models)
Pump End
From 9/1/82 through 10/5/90
Pump End
Prior to 9/1/82
RJ 5190© 3/93
5
4" “Extracta” Petr
oleum Pump
Piping/Seals
#3
Conduit
Seal Assy.
Top seal is accomplished as follows: column
pipe threads into discharge manifold while
conduit (2-5/8" longer) seals into manifold via
“O” ring No. 072-196 on conduit sleeve No.
078-094, prior to 6/6/84 or No. 078-522 after
6/6/84. If failure of this seal (“O” ring) should
occur, product could flow into conduit. This
may result in the appearance of product in the
capacitor cavity.
Std. Model
144-087-5
AG Model
144-163-5
In order to present the most favorable conditions for maintaining an efficient seal when
field adjusting the length of the pump, beginning 6/6/84 (date code 10684), we are using a
new, longer conduit sleeve seal. Part No.
078-522-3 on petroleum pumps (prior to
6/6/84, No. 078-094-3) and No. 079-980-3 on
AG and solvent pumps (prior to 6/6/84, No.
079-772-3). The “O” ring used on the conduit
sleeve seal for petroleum pumps is No.
072-196-1 for AG and for solvent pumps is
VITON 072-536-1 or EPR 072-424-1.
Riser:
Not schedule
40 Pipe—must
clear 4-1/64"
Max. I.D.
Conduit
Sleeve
#2
Column
Pipe: 1-1/2"
Steel Pipe
Conduit:
1/2"
Std. Model
Prior 6/6/84
Std. Model 078-094
After 6/6/84
Std. Model 078-522
AG Model
079-980-3
Conduit
Sleeve
“O” Ring
Std. Model
072-196
AG Model
072-536-1
While the sleeve seal used prior to 6/6/84 (No.
078-094-3 petroleum or No. 079-772-3 solvent) can be used on all units regardless of
date of manufacture, we recommend the use
of appropriate new sleeve seal (No. 078-522-3
petroleum, No. 079-980-3 solvent).
However, it may be necessary, when using the
new sleeve seal on units built prior to 6/6/84
(date code 10684) to shorten the conduit 1/4"
in order to prevent the conduit seal (bottom
plate or compression screws) from bottoming
out on the conduit sleeve seal. This could
result in an inadequate seal.
Aluminum
AG Model
Black Steel
#1
“O” Ring
Std. Model
072-106-1
AG Model
072-528-1
NOTICE
6
For troubleshooting information regarding
the seals shown on this page, see page 8,
section E.
RJ 5190© 3/93
4" “Extracta” Petr
oleum Pump
Discharge Manifold Assembly/Functional Element
TOP VIEW OF DISCHARGE MANIFOLD
Syphon
Check
Valve
Port
Lockdown Bolt
Line
Test
Port
Lifting Eyebolt
Junction Box Cover
Optional
Leak Detector
Opening
Tank Test Port
Lockdown Bolt
Capacitor Cover
Leak
Detector
Port
Bayonet
Electrical
Connector
6
10
7
5
Excess line pressure
To Discharge Line
9
8
AG MODEL
PRECISION FUNCTIONAL ELEMENT
ASSEMPlug
066-794-1
BLY
Spring
STANDARD MODEL
FUNCTIONAL ELEMENT ASSEMBLY
Spring
080-125-1
080-125-1
3
2
"O" Ring/Relief Valve
072-106-1
"O" Ring/Venturi
072-535-1
"O" Ring/Functional Element
072-192-1
"O" Ring/Relief Valve
072-528-1
"O" Ring/Functional Element
072-533-1
To remove functional element assembly: disconnect syphon tubing
(if syphon installation). Remove two 3/8" cap screws. Disassemble to
check and clean. Reassemble by carefully aligning diaphragm into
cap recess and diaphragm tabs into body recess. Tighten all screws
until cap is metal to metal with the body.
To remove functional element assembly: disconnect syphon
tubing (if syphon installation). Remove two cap screws. Disassemble to check and clean.
RJ 5190© 3/93
1
Diaphragm
017-526-1
1
2
Screw
076-146-1
3
Screw
076-146-1
Diaphragm
017-165-1
4
Poppet
066-796-1
4
Poppet
066-796-1
"O" Ring/Venturi
072-133-1
Plug
066-794-1
7
4" “Extracta” Petr
oleum Pump
Check V alve/Troubleshooting
All Red Jacket submersible petroleum pumps manufactured prior to November 7, 1984 (Date code 21184) were supplied
with a brass check valve. After this date, pumps were supplied with plastic check valves. Effective February 1993, pumps
are supplied with a stainless steel check valve. Replacement should be as follows:
•
•
•
•
Replace a brass check valve with a brass check valve #138-056.
Replace a plastic check valve (white or red) with a red check valve #188-214.
Replace a grey check valve with a grey check valve #144-143-5. (AG Pump PPM 4000 and RLM 9000)
After February 1993 the stainless steel check valve was introduced:
— 144-183-5 replaces 138056 and 188214 in standard pumps.
— 144-184-5 replaces 144184-5 and replaces 144143-5 in AG pumps and Line Pressure Kits.
Symptom
Probable Cause
A. Total or partial loss of vacuum
and/or build up of pressure.
Suggested Action
Obstruction in product flow path through functional element and
“S” tube.
—In port from check valve to cavity over nozzle (#1, p. 7)
—Nozzle and/or venturi (#2, p. 7)
—“S” Tube/Air Eliminator Tube (#8, p. 7)
—Vent screw not all the way up (#4, p. 7)
Do not screw vent screw down with excesNOTICE
sive torque. Always replace dust cap.
B. Excess Line Pressure
of Line Pressure
C. Loss
*(Static—Pump off, all
See above (*Static)
Pump oversized for application.
Line type check valve installed in discharge line.
(Expansion or pressure equalizing type is acceptable—not standard type.)
dis-
charge outlets closed.)
Loss of Line Pressure
Remove functional element, clean out passageway, including
nozzle and venturi, and reinstall.
Use caution when disassembling functional
NOTICE
element as spring, boot and shims contained in cap are loose (#10, p. 7).
Run flexible wire down “S” tube and air eliminator tube.
Adjust to full up position.
* Excessive sediment on the bottom of the tank can cause
reoccurance of this problem. Turbulence occuring during filling
of the tank places this sediment in suspension, allowing it to be
drawn into the functional element or syphon check valve via the
vacuum line or the pressure relief system. Removal of sediment from tank bottom may be necessary.
Refigure head loss and check performance curve.
Remove.
Failure of Seal
(#5, p. 7) “O” Ring under functional element.
(#6, p. 7) “O” Ring on vent screw.
(#7, p. 7) Check valve seal.
(#9, p. 7) Seal at top of discharge, between packer and manifold.
Check valve can be isolated by closing same
NOTICE
via vent closing screw.
Thermal Contraction
Examine seal and surface involved.
Clean surfaces and replace seals if necessary.
Leaking Check Valve
Check Valve Isolation
1. Install gauge in line test port.
2. Energize pump—Observe pressure reading on gauge.
3. Close vent screw.
4a. If pressure drops off, this is an indication that there is a leak
down-stream of the functional element (2" Packer-Discharge
O-ring, or a possible leak in the product line).
b. If pressure holds, shut off submersible.
5. If pressure then drops, re-energize the submersible.
6. If system re-pressurizes, this is an indication that the check
valve is faulty.
Pressure drop, after drop provided by presNOTICE
sure relief valve (to approx. 8-14 psi), will
probably be slower with thermal contraction
than by faulty seal.
Check and clean area and reinstall.
Plunger over diaphragm binding (#10, p. 7).
Same as above, plus if surface on discharge manifold is
scratched, apply Permatex to area under “O” Ring.
D. Motor runs, but partial or no
Vent screw not up all the way (#4, p. 7).
Prevents full opening of check valve.
Back vent screw full up.
E.
Fuel in Capacitor Housing
Leaking seals or incorrect re-assembly after length of pump was
altered in the field. (Seals #1, #2 and/or #3 shown on p. 6).
If pump is still in warranty period and length has not been altered,
send unit back for warranty consideration. If pump is out of
warranty period or length has been altered, the seals shown on
page 6 will require replacement.
F.
Excess Line Pressure
(Pump not running)
Standard line type check valve installed in discharge line. Only
expansion or pressure equalizing type check valves can be used
if a check valve is installed in the line.
Dispenser pressure relief not operating or blocked.
Hydraulic Hammer Pump oversized for application.
Remove check valve from line and install the proper type check
valve (expansion or pressure equalizing type).
output by pump.
Excess Line Pressure
(Pump running)
8
Recalculate head loss in system and check performance curve.
RJ 5190© 3/93
4" “Extracta” Petr
oleum Pump
Removing the “Extracta” Portion
REMOVING THE PUMPING UNIT
1. ALWAYS DISCONNECT and LOCK or
TAG OUT the power before starting to
service the pump.
2. Backout bayonet electrical disconnect
bolt.
3. Swing electrical connector aside.
4. IF SYPHON SYSTEM:
syphon tubing.
5. Remove the two lockdown bolts.
6. Lift unit. Replace unit by reversing
these steps.
Disconnect
Never rest pump/motor on surface (A) when pulling extractable portion
of unit.
If surface (A) is damaged, seal with “O” rings at location (B) may be
impaired, resulting in loss of line pressure.
(See Loss of Pressure, Symptom C on p. 8)
RJ 5190© 3/93
9
4" “Extracta” Petr
oleum Pump
Packer Seals
7" Packer-Manifold O-ring
Std. Model #072-189-1
AG Model #072-556-5
2" Packer-Discharge Seal
Std. Model #076-382-1
AG Model #076-370-1
WARNING
Careful attention must be paid to cleaning both
the 2" sealing surface and the 7" sealing surface.
Any foreign object, on either surface, will not
allow either surface to seal properly.
Any damage, mars or scratches on the 2" surface
may not allow a good seal of the 2" seal.
INSTALLATION OF THE SEAL RING (Std. Model 076-382-1 or AG Model 076-370-1)
When installing the seal ring, first lay the seal flat. The seal has two different degrees of thickness. The thickest
part of the seal angled inward with a retaining lip is the top of the seal. The narrowest or thinnest part of the seal
is the bottom. (See drawing below). To install the seal, place the top part of the seal with the retaining lip into
the bottom of the packer having the top of the seal facing away from the pump motor. A mating recess in the
retaining sleeve will hold the seal in place while the pump is being lowered onto the packer. If the seal is not
properly installed it will not maintain product line pressure and will release product back inside the tank.
CAUTION
The 7" Packer-Manifold O-ring is designed to
keep water out of the Packer-Manifold assembly.
If pressurizing the tank, for a tank tightness
test, no more than 5 psi should be applied to
this seal.
RETAINING LIP
TOP
BOTTOM
10
RJ 5190© 3/93
4" “Extracta” Petr
oleum Pump
Line and Tank Testing Guidelines
LINE TESTING
The vent closing screw, located on the functional element, is designed to perform
two functions.
1. To secure the check valve in its closed position.
2. To disable the pressure relief function of the functional element.
NOTICE
The use of this vent closing screw allows the technician to pressurize the
fuel piping system against the submersible pump. It is important to note
that the 2" packer-discharge seal is still an active part of the piping system.
A leak in this 2" seal will show up as a leak in the piping system.
1. TO TEST PIPING. Block lines at each
dispenser. (Trip dispenser shear
valve.) Remove line test plug for this
test.
2. Close pump check valve by turning the
vent closing screw as far down as possible. DO NOT OVER TORQUE.
3. Apply line test pressure at line test
port. (50 psi maximum.)
CAUTION
TANK TESTING
Excessive pressure (above normal test pressure of 50-55 psi)
may damage check valve seat
and other system components.
When pressurizing a fuel tank to perform a tank tightness test, that pressure will
also be seen through the riser pipe and into the packer-manifold assembly. The
7" packer-manifold O-ring is designed to hold 5 psi.
4. TO TEST TANK. Close pump check
valve by turning the vent closing screw
as far down as possible. Apply tank
test pressure at tank test port.
CAUTION Excessive pressure (above nor-
5. After completion of line and/or tank
tests, release pressure by turning the
vent closing screw as far up as possible.
mal test pressure of 50-55 psi)
may damage check valve seat.
RJ 5190© 3/93
11
6. After the installation is completed and
tests have been made, purge system of
air by pumping at least 15 gallons
through each dispenser. Begin with
the dispenser furthest from pump and
work toward the pump.
4" Petroleum Pump
Contr ol Box
(PRIOR 4/1/81)
(AFTER 4/1/81)
1/3 & 3/4 HP CONTROL BOX
1/3 & 3/4 HP CONTROL BOX
Key
No.
1
2
3
4
5
6
880-002
Built Prior
To 4/1/81
Part No.
108-321
010-050
147-004
079-250
080-037
008-202
NOTICE
880-029-5
Built After
4/1/81
Part No.
108-514-4
247-001-5
079-425-1
080-064-1
008-202-1
1/3 & 3/4 H.P. 230 VOLT REMOTE CONTROL BOX
Part Description
Control Box
115V Bulb (NE-51)
Pilot Light Assy.
Line Contactor Relay
Toggle Switch
Terminal Block
Qty.
Req’d.
1
1
1
1
1
1
PILOT
LIGHT
3 P.S.T.
TOGGLE
SWITCH
LOAD CENTER
208 OR 230 VOLT
1 PHASE, 3 WIRE
15A-2P SWITCHED
NEUTRAL BRKR.
LINE STARTER
L1
L2
EXTERNAL
PILOT
LIGHT
(115 VOLTS)
25 WATT
MAX.
WIRING ELECTRICAL INTERLOCK
TROUGH
TO OTHER DISPENSER
(MAX. TOTAL OF
6 DISPENSERS)
Approved component only—Total system installed shall comply with all local codes.
DISPENSER LIGHTS
DISPENSER
OPTIONAL
SOLENOID
VALVE
(76 VOLT AMPS MAX.)
15A-3P SWITCHED
NEUTRAL BRKR.
PACKER
CONTINUOUS
DUTY
CAPACITOR
JUNCTION
BOX
IN
MANIFOLD
INTERNAL
OVERLOAD
PROTECTOR
MOTOR
1-1/2 HP CONTROL BOX
1-1/2 HP, 230 VOLT REMOTE CONTROL BOX
PILOT
LIGHT
2 P.S.T.
TOGGLE
SWITCH
1-1/2 HP CONTROL BOX
LOAD CENTER
208 OR 230 VOLT
1 PHASE 3 WIRE
LINE STARTER
L1
L2
EXTERNAL
PILOT
LIGHT
(115 VOLTS)
25 WATT
MAX.
MAKE GROUND CONNECTION
IN ACCORDANCE WITH
LOCAL CODES
15A-3P SWITCHED
WIRING
NEUTRAL BRKR.
TROUGH ELECTRICAL INTERLOCK
PACKER
CONTINUOUS
DUTY
CAPACITOR
Key
No.
1
2
3
4
5
6
880-002
Built Prior
To 4/1/81
Part No.
108-321
010-050
147-004
079-425
080-062
008-202
JUNCTION
BOX IN
MANIFOLD
OPTIONAL
SOLENOID VALVE
(76 VOLT AMPS MAX.)
NOTICE
INTERNAL
OVERLOAD
PROTECTOR
880-030-5
Built After
4/1/81
Part No.
108-514-4
247-001-5
079-425-1
080-062-1
008-202-1
Part Description
Control Box
115V Bulb (NE-51)
Pilot Light Assy.
Line Contactor Relay
Toggle Switch
Terminal Block
Qty.
Req’d.
1
1
1
1
1
1
Approved component only—Total system installed shall comply with all local codes.
MOTOR
12
RJ 5190© 3/93
4" “Extracta” Petr
oleum Pump
Pump/Motor Assembly
A)
The permanent split capacitor motor gives you the option
of using a control box or direct wiring.
B)
An on-winding thermal over-current protector prevents
premature motor failure from overheating.
(To determine position of overload, see procedure below.)
(1) Overload protector opens at approximately this temperature and stops motors.
(2) Motor is continuous duty rated. Temperature rises to
approximately 120°F and holds.
Ambient temperature overload can occur as follows:
(1) 205°F = Overload Temperature
Overload protector opens at approximately this temperature and stops the motor. When the motor temperature drops to approximately 85°, the overload
switch will re-engage allowing the motor to run.
CAUTION
(2) 120°F = Motor Heat Rise
85°F
If ambient temperature or product is above
this temperature, overload may occur.
D) Unit is designed to pump petroleum fuels with a maximum
specific gravity of .95 and maximum viscosity of 70 S.S.U.
at 60°F. Attempts to exceed these limits will result in
overheating.
(Check amperage draw before accepting this as cause for
motor cut-off. If high amperage draw is present, it is
probably not ambient temperature overload.)
NOTICE
Unit is cooled and lubricated by the product it pumps. Approximately 10% of maximum flow capability is required to properly cool and lubricate unit (i.e., 1/3 HP —
4 GPM, 3/4 HP — 6 GPM, 1-1/2 HP — 8
GPM). NEVER RUN DRY.
See page 14 for Troubleshooting of the Pump/Motor Assembly.
Per Figure 1, when the inherent overload (on-winding
thermal over-current protector) is closed, resistance
readings will be per chart below. If the inherent overload
is open, readings between black & yellow or red & yellow
will indicate an open circuit.
Pin and lead arrangement on plug to motor connection.
Black
Black
L1
PUMP
JUNCTION
BOX
PACKER
OIL FILLED
CAPACITOR
L2
Red
Yellow
INHERENT
OVERLOAD
PROTECTOR
Yellow
(Overload)
Yellow to Black 240V
Red to Yellow 300V
Red to Black
370V
Red
(Start winding)
MOTOR
ELECTRICAL SERVICE INFORMATION
Model
No.
P33R1
P75S1
P150S1
HP
1/3
3/4
1-1/2
Volts
Max. Load
Min.
Max.
Amps
200
250
4.0
200
250
6.5
200
250
10.5
50 Hz Single Phase Models
P75S3-2
3/4
200
P75S3-3
3/4
200
P150S3-3
1-1/2
200
RJ 5190© 3/93
250
250
250
Locked
Rotor Amps
13
22
42
4.6
5.8
10.0
14.3
18.6
34.5
13
Winding Resistance (Ohms)
Blk-Yellow
Red-Yellow Black-Red
7.4-8.3
16.1-17.9
23.5-26.2
3.6-4.1
9.6-10.6
13.2-14.6
2.0-2.1
5.2-5.6
7.2-7.7
5.8-6.2
4.5-4.9
2.2-2.4
12.2-13.5
11.7-13.0
7.9-8.7
18.0-20.0
16.2-17.9
10.1-11.2
4" “Extracta” Petr
oleum Pump
T roubleshooting: 4" Pump/Motor Assembly
Symptom
Probable Cause
Pump/motor will not start.
May Hum
May Show High Amperage Draw
Pump/motor runs & pumps
intermittently
Motor runs, but pump output
partially or totally impaired.
NOTICE
Suggested Action
Capacitor Failure
Test capacitor — Replace if needed.
(See Page 17)
Locked Rotor
Check amperage draw — replace pumpmotor if amperage draw indicates locked
rotor. (See Page 13)
Improper Electrical Connection
Check wiring for continuity and impedance.
(See Page 13)
Improper Electrical Connection
(See Above)
Binding of pump due to foreign
object in impeller/diffuser area.
(Abnormal noise usually present
with this problem.) This will cause
overheating of motor and subsequent
cut-off by overload protector. (See
Page 13 “B”)
Remove extractable portion of unit. Remove
center end cap from pump/motor
assembly (friction fit). Check freedom &
continuity of rotation of rotor shaft. Replace
pump/motor if findings indicate resistance to
free rotation or excessive play or wobble.
Excessive or erratic bearing wear.
(Usually caused by running unit dry
or continuously.) Will affect overload
and noise level as stated above.
Check amperage draw*. (Intermittent
excessive amperage draw may occur.) Also
see above suggestion on checking shaft
rotation and appropriate actions to take.
*See Page 13.
Impeller Wear (Pump/Motor)
Check static pressure of pump ( NOTICE below).
Replace unit if findings warrant.
Foreign material obstruction. Intake
ports or pump impellers. (i.e. rags,
paper)
Investigate appropriate area for same and
remove.
Vent closing screw not all the way up.
Adjust to full-up position.
Partially closed gate valve.
Open same.
Malfunctioning Solenoid Valve
Replace if defective.
Improper Voltage (High or Low)
Check voltage. Must be within 10%± of
rated voltage (208/230V).
Clogged filter or strainer.
Clean or replace.
Pump performance can be checked by installing a pressure gauge in the line test port in the discharge
manifold.
Approximate Normal Operating Pressure
Model
1/3 HP
3/4 HP
1-1/2 HP
PSI Gas
25
27
29
PSI Diesel
31
34
36
50 Hz Single Phase Models
3/4 HP/2 stage/50 Hz
3/4 HP/3 stage/50 Hz
1-1/2 HP/3 stage/50 Hz
21
30
32
26
37
39
Model
Shipping
Number
HP Length Weight
UMP33R1 or AG/UMP33R1
1/3 15-1/2" 30 lbs.
UMP75S1 or AG/UMP75S1
3/4 17-1/2" 32 lbs.
UMP150S1 or AG/UMP150S1 1-1/2 20-1/2" 38 lbs.
1o — 60 Hz — 208/230V
Previous to assuming motor failure, check capacitor.
14
RJ 5190© 3/93
4" “Extracta” Petr
oleum Pump
Replacement of Pump/Motor Assemblies
(All require 4" openings.) All units are interchangeable, only the length varies.
Maintain proper clearance from tank bottom — 5" optimum, 3" minimum.
NOTICE
Due to fluid incompatibilities, the standard UMP cannot be used to replace AG/UMP units.
PROCEDURE
Please note the brand name and manufacture dates below:
Manufacturer
Motor Used
Date First Mfg.
Red Jacket
Bennett
Bowser/Keene
Gilbarco
A.O. Smith
Wayne-Dresser
Tokheim
Red Jacket
Franklin
Red Jacket
Red Jacket
Franklin
Franklin
Franklin
June 1, 1963
1963
October, 1965
October, 1964
1963
October, 1963
October, 1972
3/4 HP, or UMP150S1 — 1-1/2 HP. These units are
interchangeable (only the length varies). Maintain
proper clearance off the tank bottom, optimum 5"
minimum 3".
A 111-092 split phase capacitor will be needed, see
steps 1 through 5 in Section A and steps 12, 13 & 14 in
Section B
SECTION A
On these units, the R.J. pump motor assembly is a direct
replacement & requires no other parts.
1. Disconnect power.
2. Remove extractable portion of old pump from tank.
3. Remove old pump-motor assembly.
4. Replace the old gasket with the new one provided.
5. Align the positioning dowel of new pump-motor into the
hole in the discharge head, push the new pump-motor
as far as possible against the discharge head, insert
the four cap screws and retighten.
6. Reinstall extractable portion in tank and test.
A. For units with the above manufacture dates or later,
see Section “A”.
B. For units with manufacture dates prior to the above,
see Section “B”.
C. For a Red Jacket unit with manufacture date prior to the
above, see the following:
In June of 1963, models UMP33E1 1/3 HP and
UMP50F1 1/2 HP were discontinued. These can be
replaced by either UMP33R1 — 1/3 HP, UMP75S1 —
1. Remove the four screws holding
motor to the head casting.
2. Rock unit while pulling away from
discharge head until free.
SECTION B
These units commonly used Reda, Leland, or General
Electric Motors. The following Red Jacket parts will be
needed to make the conversion:
One (1) UMP33R1, UMP75S1 or UMP150S1;
One (1) 111-092 Capacitor;
One (1) 144-090 Plug & Lead Assembly;
One (1) 136-056 (1-1/2") or 136-057 (2") Discharge Head.
1. Disconnect power.
2. Remove extractable portion of old pump from tank. (It
is recommended that conversion be done at the workshop).
3. Remove old pump-motor assembly.
4. Disconnect wires in packer assembly at top of unit.
5. Remove discharge head casting from column pipe &
pull conduit & lead assembly from inside column pipe.
Noting how it comes out will assist you in reinstalling
the new wires.
6. Remove old wire and plug from conduit and remove
conduit from discharge head.
7. Thread 1/2" conduit into 136-056 (1-1/2") or 136-057
(2") discharge head casting. (1/2" conduit must be
used.) Thread discharge head onto column pipe, makRJ 5190© 3/93
8.
9.
10.
11.
12.
13.
14.
15
3. TO RE-ASSEMBLE: Replace gasket,
align dowel pin, draw in place with cap
screws.
ing sure slip-fit connector at top end of conduit is
secured properly. Use proper pipe dope on all male
threads.
Insert new plug and lead wire assembly through conduit from discharge head to the packer assembly at the
top of the unit.
Apply the new gasket (provided) to the discharge head.
Align the positioning dowel of the new pump-motor into
the hole in the discharge head. Push the new pumpmotor up against the discharge head as far as possible.
Insert the four cap screws and retighten.
Resplice the three wires (red, black, yellow) to the
existing wires in the packer assembly, following the
existing color coding.
To convert the old control box, remove everything but
the terminal strip, insert the new #111-092 capacitor,
and make connections per wiring diagram on top of
page 16.
Incoming power lines should run through a circuit
breaker or a fused disconnect.
Test the system.
4" “Extracta” Petr
oleum Pump
Suggested W iring Diagrams
WIRING AFTER CONVERTING CONTROL BOX
CONTROL BOX
111-092
CAPACITOR
TERMINAL STRIP
BLACK
RED
ORANGE
DISPENSER SWITCHES
WIRES TO PUMP MOTOR
L1 N L2
230 VOLTS POWER SUPPLY
Suggested wiring diagram WITHOUT optional control box.
LOAD CENTER
230V 10 3 WIRE
Combination of 2 pole dispenser
switches or external pilot light.
• Rated for twice the full load current of the
motor:
1/3 HP - 8 amps, 3/4 HP - 13 amps,
1 1/2 HP - 21 amps.
• Rated for handling locked rotor current of the
motor:
1/3 HP - 13 amps, 3/4 HP - 22 amps,
1 1/2 HP - 42 amps.
L1
15 AMP 3 POLE
SWITCH
(N.E.C. REQUIRES
DISCONNECT BREAK
ALL WIRES TO
DISPENSERS)
DISPENSER
LIGHTING FROM
SEPARATE
CIRCUIT
L2
WIRING TROUGH
115 VOLT EXT
PILOT LIGHT
BY
CONTRACTOR
MAKE GROUND CONNECTION IN
ACCORDANCE WITH LOCAL CODES
PUMP
JUNCTION
BOX
PACKER
OIL FILLED
CAPACITOR
INHERENT
OVERLOAD
PROTECTOR
MOTOR
2 POLE DISPENSER SWITCHES
Suggested wiring diagram WITH optional control box.
1/3 & 3/4 H.P. 230 VOLT REMOTE CONTROL BOX
PILOT
LIGHT
3 P.S.T.
TOGGLE
SWITCH
LOAD CENTER
208 OR 230 VOLT
1-1/2 HP, 230 VOLT REMOTE CONTROL BOX
1 PHASE, 3 WIRE
15A-2P SWITCHED
NEUTRAL BRKR.
PILOT
LIGHT
2 P.S.T.
TOGGLE
SWITCH
LOAD CENTER
208 OR 230 VOLT
1 PHASE 3 WIRE
LINE STARTER
LINE STARTER
L1
L2
L1
EXTERNAL
PILOT
LIGHT
(115 VOLTS)
25 WATT
MAX.
L2
EXTERNAL
PILOT
LIGHT
(115 VOLTS)
25 WATT
MAX.
WIRING ELECTRICAL INTERLOCK
TROUGH
TO OTHER DISPENSER
(MAX. TOTAL OF
6 DISPENSERS)
DISPENSER LIGHTS
DISPENSER
OPTIONAL
SOLENOID
VALVE
(76 VOLT AMPS MAX.)
15A-3P SWITCHED
NEUTRAL BRKR.
PACKER
CONTINUOUS
DUTY
CAPACITOR
MAKE GROUND CONNECTION
IN ACCORDANCE WITH
LOCAL CODES
JUNCTION
BOX
IN
MANIFOLD
15A-3P SWITCHED
WIRING
NEUTRAL BRKR.
TROUGH ELECTRICAL INTERLOCK
PACKER
CONTINUOUS
DUTY
CAPACITOR
JUNCTION
BOX IN
MANIFOLD
INTERNAL
OVERLOAD
PROTECTOR
OPTIONAL
SOLENOID VALVE
(76 VOLT AMPS MAX.)
MOTOR
INTERNAL
OVERLOAD
PROTECTOR
MOTOR
NOTICE
16
Use control box if solenoid in dispenser is
rated at less than 1-1/2 HP.
RJ 5190© 3/93
4" “Extracta” Petr
oleum Pump
Capacitor
REPLACING THE CAPACITOR
NOTICE
Capacitor is 370V, 17.5 MFD,
continuous duty.
DANGER
1. ALWAYS DISCONNECT the power
Remove the capcaitor cover.
2. Remove retaining clip. Pull
quick-connectors
3. Remove capccitor. TO REPLACE:
reverse these steps.
The permanent split phase capacitor motor gives you the option of using a control box or direct wiring. Values — 370V
17.5 MFD.
Symptom
Motor will not start.
— May hum
— May show high amperage draw.
Probable Cause
Suggested Action
Capacitor failure.
*Test capacitor — replace if needed.
(Also see Pump/Motor Assembly, page 14.)
*Testing the 111-092 Capacitor
1. Place volt ohmmeter at x1000 range.
2. Place test leads on capacitor terminals (one on each). Needle should go all the way up and slowly fall back.
3. Reverse test leads on capacitor terminals. Reaction should be the same as in Step 2.
4. If needle on volt ohmmeter does not rise, or if it does not fall back, capacitor has failed and should be replaced.
WIRING
DANGER
ALWAYS DISCONNECT
and LOCK or TAG OUT the
power before starting to
service the unit.
1. Connect electrical conduit through approved fittings to junction box.
RJ 5190© 3/93
2. Remove cover from junction box. Remove compression seal. Provision has
been made for 2 wire, or 3rd wire optional ground. Pull wires from power
supply through seal and replace.
Tighten seal securely.
17
3. Connect wires from power supply to
wire in the junction box. Make waterproof splice. Replace cover using waterproof thread sealant. Install optional
ground wire if applicable.
4" “Extracta” Petr
oleum Pump
Dimensions
TABLE OF DIMENSIONS FOR PUMP SELECTION
TO
D PUMP
COVER
1-1/2"
MANHOLE & COVER
BY RED JACKET
OPTIONAL LEAK DETECTOR BY RED JACKET
LEAK DETECTOR INSTALLATION AND
MANIFOLD DIMENSIONS
±6"
Pump
2" PIPING BY
CONTRACTOR
Red Jacket
Leak Detector
±4"
20"
8"
11"
4-1/2"
B BURY
DEPTH
1-1/2"
CONDUIT BY
CONTRACTOR
±6"
E RISER
LENGTH
20"
4" RISER BY
RED JACKET
Driveway
Grade
Red Jacket
Leak Detector
12"
C PUMP
LENGTH
13"
A TANK
DIA.
Red Jacket
Submersible Pump
Electrical
Conduit
5-5/8" ±1/8"
4" Riser
Flex Connector
Tank
20" x 20" Manhole
Red Jacket
Leak Detector
10"
13"
BOTTOM APPROX.
CLEARANCE 5"
Red Jacket
Submersible Pump
NOTICE
NOTICE
"B"
Bury
Depth
2’0"
24"
2’6"
3’0"
36"
3’6"
42"
4’0"
48"
4’6"
54"
Distance between center line of pump motor and center
line of bottom fill tube should be 3' minimum. Air
locking of pump after product delivery may occur at
distances less than this.
Use this table for single wall tank applications only that
do not involve manways or sumps.
“A” Tank Diameter
“C” Pump Length
“D” Pump to Cover
“E” Riser Length
“C” Pump Length
“D” Pump to Cover
“E” Riser Length
“C” Pump Length
“D” Pump to Cover
“E” Riser Length
“C” Pump Length
“D” Pump to Cover
“E” Riser Length
“C” Pump Length
“D” Pump to Cover
“E” Riser Length
“C” Pump Length
“D” Pump to Cover
“E” Riser Length
WARNING
42"
3’6"
0409
4
9
0501
6
13
0509
4
21
0601
6
25
0609
4
33
0701
6
37
46"
3’10"
0501
4
9
0507
4
15
0601
4
21
0607
4
27
0701
4
33
0707
4
39
48"
4’0"
0501
6
7
0509
4
15
0601
6
19
0609
4
27
0701
6
31
0709
4
39
64"
5’4"
0607
4
9
0701
4
15
0707
4
21
0801
4
27
0807
4
33
0901
4
39
72"
6’0"
0701
6
7
0709
4
15
0801
6
19
0809
4
27
0901
6
31
0909
4
39
75 1/2"
6’3 1/2"
0707
4
9
0801
4
15
0807
4
21
0901
4
27
0907
4
33
1001
4
39
2" Outlet
To Dispensers
Tank
8' Fiberglass
Tanks
84"
7’0"
0801
6
7
0809
4
15
0901
6
19
0909
4
27
1001
6
31
1009
4
39
90"
7’6"
0809
4
9
0901
6
13
0909
4
21
1001
6
25
1009
4
33
1101
6
37
92"
7’8"
0809
6
7
0901
8
11
0909
6
19
1001
8
23
1009
6
31
1101
8
35
8' Steel
Tanks
95"
7’11"
0901
5
8
0907
5
13
1001
5
20
1007
5
26
1101
5
32
1107
5
38
96"
8’0"
0901
6
7
0909
4
15
1001
6
19
1009
4
27
1101
6
31
1109
4
39
99 1/2"
8’3 1/2"
0907
4
9
1001
4
15
1007
4
21
1101
4
27
1107
4
33
1201
4
39
108"
9’0"
1001
6
7
1009
4
15
1101
6
19
1109
4
27
1201
6
31
1209
4
39
120"
10’0"
1101
6
7
1109
4
15
1201
6
19
1209
4
27
1301
6
31
1309
4
39
126"
10’6"
1109
4
9
1201
6
13
1209
4
21
1301
6
25
1309
4
33
1401
6
37
A variety of tank types with various materials of construction are currently in use. The inside diameter, (I.D.) which is critical to
determining correct pump length, can differ appreciably though outside diameters may be similar. Red Jacket Pumps are built
to order to accommodate individual tank and bury depth requirements. Accurate tank and site measurements are critical to
achieve the proper pump length and avoid damage to the pump or tank which can result in environmental damage. Petro Express
Bulletin, RJ 23-25 (10/90) explains the information required for proper pump sizing.
18
RJ 5190© 3/93
Section
®
6" Big-Flo
Petroleum Submersible Pump
Model Numbers:*
P100H1-1MB**
P150H1-1HB
P200H1-2MB
P200H3-2MB
P300H3-1K
P300H3-2HB
P500H3-2K
1 HP
1-1/2 HP
2 HP
2 HP
3 HP
3 HP
5 HP
2
1Ø, 1 stage
1Ø, 1 stage
1Ø, 2 stage
3Ø, 2 stage
3Ø, 1 stage
3Ø, 2 stage
3Ø, 2 stage
*An “S” at the end of the model number designates pump includes syphon capability.
**This model was discontinued February, 1988.
The Big-Flo® pumping system includes the following elements:
1. Discharge Manifold Assembly — installed below grade (NEC/Class I, Group D, Division I area)
2. Motor/Pump Unit Assembly — installed below grade (NEC/Class I, Group D, Division I area)
3. Controls
A. Single phase units require use of the appropriate control box:
for Model P150H1-1HB use Control Box No. 108-402-1
for Model P200H1-2MB use Control Box No. 108-403-1
B. Three phase units require use of the appropriate magnetic starter:
Models: P200H3-2MB
P300H3-1K
use Starter No. 279-231-5
P300H3-2MB
P500H3-2K
When starter is ordered, we will supply the appropriate heaters. All of the above are U.L. Listed when used as a
complete system. An “all inclusive” nameplate will be found attached to the extractor nipple seal and can be
inspected by removing the manhole cover directly over the pump. An additional nameplate will be found on the
control box.
NOTICE
It is important to give the model number and serial number of this pump when corresponding with
the factory for any reason.
RJ 5190© 3/93
19
®
6" Big-Flo
Installation
WARNING
1.
2.
3.
4.
5.
6.
7.
Failure to follow all instructions in proper order can cause personal injury or death. Read
all instructions before installing. All installation work must comply with local code
requirements. If no other codes apply, the latest issue of the National Electrical Code should
be followed.
Installation of Red Jacket Petroleum Equipment should be performed only by personnel
who are trained and qualified to do so.
Units should be installed with manholes, or with discharge manifold casting above grade, to allow for ease in servicing.
Red Jacket line leak detection systems do not function if the submersible pump runs
WARNING
continuously. Running a pump continuously will cause line leak detection, death or
property damage.
Never wire a submersible pump to run continuously at less than minimum flow rate. The units are designed to operate
continuously at or above minimum flow rate, or with an intermittent duty cycle, not to exceed 20 on/off cycles per hour.
Should it be necessary to operate a unit continuously or when the demand is at a rate less than required per the
paragraph above, a bypass pipe should be installed in the piping to allow for continual product recirculation back into
the storage tank. Regulation of the bypass flow back to the tank can be accomplished by correct sizing of the bypass
line or use of a gate valve.
Single Stage Units
Two Stage Units
P150H1-1HB=10 GPM
P200H1-2MB=15 GPM
P300H3-1K=20 GPM
P200H3-2MB=15 GPM
P300H3-2HB=20 GPM
P500H3-2K=25 GPM
Red Jacket submersibles are not designed to handle abrasives or foreign particles in the product being pumped.
Product temperature must never exceed 85°F as the submersible motors are equipped with thermal overload
protection. Product temperature higher than 85°F may result in tripping of the thermal overload protector.
Pumping water will overload the motor and damage the motor bearings.
These units are designed for use in Class I, Group D atmospheres.
Install pumping system in accordance to applicable codes.
Proper motor protection must be used on the 2, 3, and 5 H.P. three phase pump models, or
motor warranty is void. To maintain warranty, the magnetic starters used must be
supplied by Red Jacket, or have equivalent protection features defined as follows: 3 leg
protection, properly sized quick trip heaters, and ambient temperature compensated
overloads.
FOLLOW DIRECTIONS CAREFULLY
A. Installing Pumping Unit
Packer
CAUTION
Check these points before installing:
a.
Discharge
Manifold
Power supply against equipment voltage rating. For 3
phase units, request power company identify and tag
service wires for L1-L2-L3 phase sequence. All pumps
are designed for use with 208, 220, 230 or 240 nominal
system voltages.
b. Be certain that pump with syphon valve is installed in
proper tank.
c. Check equipment received against table on Fig. VII for
tank diameter and bury depth.
Use waterproof non-setting thread sealant
CAUTION
approved for gasoline service on all
threads.
2.
Install 6" Riser and Flange into tank opening.
3.
Apply gasket compound to gasket and place on riser flange.
Place Discharge Manifold on gasket to line up outlets as
desired. Insert and tighten four cap screws.
4.
Install piping from Discharge Manifold outlets to Dispensers and/or loading rack. One or both outlets can be used.
Fig. I
20
RJ 5190© 3/93
®
6" Big-Flo
Installation
NOTICE
5.
6.
Installation of a Ball Valve is recommended on
the discharge side of the pump or discharge of
the Big Flo leak detector housing if used. This
will aid in troubleshooting and line testing.
Line check valves are not required as the pump
is equipped with a built-in Check Valve. However, whenever two pumps are manifolded together to the same discharge piping, check
valves with expansion relief are required and
should be installed in the piping in discharge of
each pump, as close to pump housing as possible.
Install 1-1/4" Conduit.
a.
On some installations, the short piece of 1-1/4" conduit furnished with the pump is of proper length.
b.
If not of proper length, a new piece of 1-1/4" conduit must be cut
and threaded. Measure the length of the 8" diameter extractor
nipple pipe. Cut and thread the 1-1/4" conduit 1-1/2" longer than
the 8" diameter extractor nipple pipe. Thread the new piece of 11/4" conduit into the packer and tighten. Thread sealant should
be used. Tighten the two set screws in the packer securely
against the 1-1/4" conduit.
Install Pumping Unit.
a.
Apply a small amount of lubricating oil to each “O” ring on
Packer. Also lubricate the “O” ring sealing surfaces inside the
Discharge Manifold.
b.
Install the Pumping Unit through the Discharge Manifold. Care
should be taken to lower the unit as near vertical as possible, and
slowly to prevent damage to “O” rings or expansion relief valves.
c.
Refer to Figures I, II and III. The two “stops” on the locking
ramps at the top of the packer must be lined up with the
corresponding “tabs” at the top of the discharge manifold (see
Fig. I).
Lower the pumping unit through the manifold using rocking
force, if needed, until the packer is down as far as possible (see
Fig. II).
Fig. II
Using a pipe wrench on the 1-1/4" conduit, turn counter-clockwise (to the left when viewed from the top), to lock the pumping
unit in.
As soon as the locking ramps engage under the “tabs” the unit
is locked in place and does not require any further tightening
(see Fig. III).
NOTICE
The locking action does not cause the “O” rings
to make a seal; the weight of the unit maintains
the sealing of the “O” rings.
NOTICE
LOCK PUMP
AS SHOWN
IN FIG. III
Fig. III
RJ 5190© 3/93
21
®
6" Big-Flo
Installation
by tightening box if possible (not loosening box).
When tightening Junction Box, hold 1-1/4" conduit secure with pipe wrench to prevent unlocking packer in discharge manifold. Replace rubber seal into bottom of Junction Box as shown on
Fig. IV. After positioning as shown, tighten
screws firmly to form a tight seal.
SCREWS SHOULD BE TIGHTENED
EVENLY TO INSURE PROPER SEAL.
JUNCTION
BOX
B. Wiring Instructions — 208-230V Single Phase Pumps
The motor control box must be located away from the
loading rack in a non-hazardous location (see Fig. Va).
1.
Connect the single phase 208 or 230V power supply
from the distribution panel to terminals L1 and L2 in the
motor control box. Each control box should be wired
through a separate fused disconnect switch or circuit
breaker (including neutral, when used), furnished by
customer.
2.
Using properly color coded wires, connect wires from
terminals red, black and orange on motor control box
terminal strip to the corresponding color coded wires
in the junction box of the proper submerged pump.
MOTOR
LEADS
CONDUIT SEAL ASSEMBLY
Fig. IV
7.
8.
Pumps with Built-In Syphon Valve (see Fig. VI, page
9).
a.
On some installations, the short piece of 1/4"
vacuum pipe furnished with the syphon pumps is
of proper length.
b.
If not of the proper length, replace with length of
1/4" pipe, 1" longer than the 8" diameter Extractor Nipple. Cover top of 1/4" pipe to keep clean
during installation.
Position the end with set screws onto the rubber
ring gasket on the Discharge Manifold. Tighten
the four set screws evenly to pull the 8" pipe
down on the ring gasket.
On 1 HP pumps, connect wires from terminals D1 and
D0 in motor control box to dispenser control switches
(if dispensers are used) and “on-off” controls at loading rack, as shown on Fig. Va and Vc. The “on-off”
control station must be of explosion-proof construction. Where loading racks and dispensers are served
by the same submerged pump, the 2-wire switches
must be connected in parallel so the submerged
pump can be controlled from any dispenser or any
loading rack.
4.
On 1-1/2 and 2 HP pumps, connect wires from
terminal Blue-1 and terminal 3 in motor control box to
dispenser control switches (if dispensers are used)
and “on-off” switch at loading rack as shown in Fig.
Va.
5.
Manual Overload Reset Switch. The 1 HP pump has
an automatic reset overload protector built into the
motor. Power to the pump must be shut off 5 minutes
to permit the protector to reset. The 1-1/2 and 2 HP
pumps are equipped with a no-liquid, over-temperature switch in the motor and an overload switch in the
motor control box which will cut out if the motor is
overloaded. If the pump fails to operate, or stops,
when there is sufficient product in the storage tank,
check the manual overload reset switch in the control
box cover. Wait 10 minutes for the overload protector
to cool off and then press the reset button. If the reset
button will not stay in position this indicates an overloaded motor, or a short or ground. This condition
must be corrected. If the reset button stays in but the
motor will not pump or continue to run, the tank is dry.
Install Extractor Nipple Seal.
a.
Install the extractor seal in position as shown on
Fig. VI. After this seal is in place, tighten the four
bolts to force the sealing rings against the extractor nipple and the conduit. Tighten nut which
compresses the gasket around the 1/4" vacuum
pipe on syphon pumps.
10. Install Elbow, Fittings & Syphon Check Valve. (This
step applies to syphon units only.)
a.
Install elbow and syphon check valve on top of
the 1/4" vacuum pipe and then run 3/8" copper
tubing from the elbow to the bushing at the high
point of the syphon manifold shown on page 41.
11. Install Junction Box.
a.
Next, install the Junction Box on top of the
conduit. If necessary to readjust position, do so
22
On 1-1/2 and 2 HP units, run two blue wires from
two blue terminals on motor control box terminal
strip, and connect to two blue wires in the junction box of the pump.
3.
Install 8" Diameter Extractor Nipple (see table on
page 27 for length).
a.
9.
a.
RJ 5190© 3/93
®
6" Big-Flo
Installation
CAUTION
6.
If the reset button will not stay in position
this indicates an overloaded motor, or a
short to ground. This condition must be
corrected. If the reset button stays in but
the motor will not pump or continue to
run, the tank is dry.
NOTICE
If an external pilot light is desired to indicate when the
submerged pump is operating, wire as shown in Fig.
Va. Should this light continue to burn when all
switches at dispensers and loading racks are off, this
indicates that one of the dispenser switches is out of
adjustment. On installations with no external pilot
light, the submerged pump should be checked to
make sure it is not operating when all switches are
turned off.
WARNING
2.
1.
On some installations “phase converters” are used to obtain a three phase
power supply from a single phase power
source. The use of phase converters may
cause an imbalance between the three
phases and cause damage to the motor.
For this reason, warranty coverage will
not be extended on units installed with
phase converters.
Connect the three phase 208 or 230V power
supply from the master panel to terminals L1, L2
and L3 in the magnetic starter.
b.
Using properly color coded wires, connect a
black wire from terminal T1 in the magnetic
starter to the black motor lead, in the junction box
of the proper submerged pump. Connect an
orange wire from starter terminal T2 to the orange
motor lead and a red wire from terminal T3 to the
red motor lead. (See Fig. Ve and Vf.)
c.
There are two remaining blue wires in the submerged pump junction box. Connect either blue
wire to terminal L3 in the Magnetic Starter. Connect the other blue wire to one side of the “on-off”
controls. The “on-off” controls, if furnished by
customer, must be of explosion proof construction.
d.
e.
Next, reverse power leads at L1 and L2. Repeat either
head or capacity tests, as described above. If results
are higher than the first test, the rotation of the second
test is correct. If the second test gives lower performance than the first, reconnect the power leads to L1
and L2 (as under test 1) for correct rotation.
Where the power supply has been properly marked
L1, L2 and L3 in accordance with accepted phase
rotation standards, it is possible to predetermine the
proper rotation of these units. The motor power leads
are color coded black, orange and red, and if connected through the magnetic starter to L1, L2 and L3
respectively, the motor pump unit will rotate in the
correct direction. (See Fig. Ve.) It is recommended,
however, that the performance tests always be made
whether or not the power supply has been properly
“phased out”.
D. Starting the System and Completing the Installation
Installations using dispensers must be connected for 2-wire control as shown on Fig. Vb and
Ve. Connect a black wire from the other side of
the “on-off” switch to terminal 3 in the magnetic
starter.
Installations using loading racks only, may be
connected for two or three wire control. (See Fig.
Ve and Vf.) For three wire control, connect a
black wire from terminal 3 in the magnetic starter
to the “on-off” switch. Connect a red wire from
terminal 2 in the magnetic starter to the “on-off”
switch.
RJ 5190© 3/93
Motor Rotation.
Connect the pump motor leads to terminal T1, T2 and
T3 of the magnetic starter observing color code shown
in Fig. Ve. With gasoline in the tank and the system
purged of air, start the motor and make a pressure
gauge reading of the system pressure with the discharge valves closed; or, open one valve and calculate pumping rate.
Installations where magnetic starter is located away
from the loading rack in a non-hazardous location.
(See Fig. Vb.)
a.
Installations with the magnetic starter
in a hazardous location require explosion proof starters. The wiring is the
same as for general purpose enclosures.
Where it is not convenient to predetermine the power
supply phase rotation, proper rotation can be determined by pump performance. Pump head pressure
and capacity will be considerably less than rated
when rotating backwards.
C. Wiring Instructions — 208-230V Three Phase Pumps
CAUTION
3-wire control requires the use of an
auxiliary contact in the magnetic starter.
This auxiliary contact is not standard
equipment in the starters supplied by
Red Jacket, and must be ordered as an
option.
23
1.
Do not start pumps unless ample product is in the
storage tanks.
2.
Pump sufficient product through each dispenser (150
gallons each is recommended) to purge the entire
system of air. If all air is not purged, the computers
may “creep” slightly when the dispenser switch is
turned on, but no product has been dispensed.
3.
On pumps equipped with built-in syphon, it is necessary to run the submerged pump at least 10 to 20
®
6" Big-Flo
W iring Diagrams
SINGLE PHASE SCHEMATIC
115/230V., 1Ø SUPPLY
1HP, 230V., 1Ø
CONTROL BOX
L1
NEUT
L2
L1
ORANGE
L2
BLACK
PILOT LIGHT
115 VOLT
50 WATT MAX.
RED
BLACK
DIAL AND
DOME LIGHTS
BLUE
ORANGE
GREY
BLACK
RED
BLUE
BLUE
RED
D1
BLUE
BLUE
BLUE1
D0
2
EXT
PILOT
3
NEUT.
EXT
PILOT
ON-OFF
SWITCH
BLACK
TO NEUTRAL OF
115/230V. SUPPLY
115V. LIGHTING CIRCUIT
(WHERE NEEDED) FROM
DISTRIBUTION PANEL
GREY (NEUT)
DISPENSERS
MOTOR CONTROL AND
PILOT LIGHT CIRCUIT
TO NEUTRAL OF
115/230V. SUPPLY
CUSTOMER’S 115V. EXTERNAL
PILOT LIGHT, 50 WATT MAX.
LOADING RACK
LIGHTING
CIRCUIT
local codes for
proper grounding
procedures.
ORANGE
RED
BLACK
CUSTOMER’S 115V.
PILOT LIGHT, 50 WATT MAX.
WHITE
D0 OR BL1
(BLUE)
BLACK
BLACK
ORANGE
DOUBLE POLE
MOTOR SWITCH
WARNING The control box must be grounded
for personal
Refer to the
WARNING:
The controlsafety.
box
must National
be groundedElectrical
for
Codes and appersonal safety. Refer
local codes for proper
to theplicable
National Electrical
grounding
procedures.
Codes
and applicable
230 VOLTS FROM
1-1/2 & 2HP, 230V, 1Ø
115/230V, 1Ø , SUPPLY
CONTROL BOX
BLUE
SEAL
LOCATE SEALS WHERE
REQUIRED BY LOCAL CODE
PUMP
MOTOR
SEAL
D1 OR 3
(BLACK)
REPRESENTATIVE WIRING DIAGRAM, 1Ø, TWO WIRE CONTROL
Fig. Va
SINGLE PHASE SCHEMATIC
NOTICE
WARNING
If 115V is not available from power
supply, pilot lights may be operNOTE: IF 115V IS NOT AVAILABLE FROM
ated from any
115V
lighting
POWER
SUPPLY,
PILOT circuit
LIGHTS MAY BE
OPERATED
FROM ANY
LIGHTING
by controlling
with
a 115V
4-pole
CIRCUIT BY CONTROLLING WITH A 4-POLE
STARTER. OTHERWISE,
PILOT LIGHTS
starter. Otherwise,
230V230V
pilot
MUST BE USED.
lights must be used
120/208 V. OR 115/230 V. THREE
PHASE (4-WIRE) POWER SUPPLY
(SEE NOTE)
The control box must be grounded for personal
safety. Refer to the National Electrical Codes
and applicable local codes for proper grounding
WARNING:
The control box must
be procedures.
grounded for personal safety.
Refer to the National Electrical
Codes and applicable local codes
for proper grounding procedures.
230 V.
COIL
DOUBLE POLE
MOTOR SWITCH
DOME AND
DIAL LIGHTS
NEUT
BLACK
REMOTE DISPENSER
LIGHTING CIRCUIT
JUNCTION BOX
GREY (PILOT LT. NEUT.)
RED
ORANGE
BLACK
ON-OFF
SWITCH
BLUE
BLACK
DISPENSER
PILOT LIGHT
120 VOLT
BLUE
BLUE
NO LIQUID PROTECTOR
CIRCUIT
BLUE
BLACK
(2-WIRE SHOWN)
BLACK
115 V. LIGHTING
CIRCUIT (WHERE
REQUIRED) FROM
DISTRIBUTION
PANEL.
BLUE
SEAL
LOCATE SEALS
WHERE REQUIRED
BY CODES.
MOTOR CONTROL AND
PILOT LIGHT CIRCUIT
SEAL
THERMAL
OVERLOAD
REPRESENTATIVE WIRING DIAGRAM, 3Ø, TWO WIRE CONTROL
WARNING
Fig. Vb
The warnings on this page and throughout this manual indicate the presence of a hazard which can cause severe
personal injury, death or substantial property damage if ignored.
24
RJ 5190© 3/93
®
6" Big-Flo
W iring Diagrams
SINGLE PHASE SCHEMATICS
WARNING
The control box must be grounded
for personal safety. Refer to the National Electrical Codes and applicable local codes for proper grounding procedures.
CONTACTOR COIL
LINE 1
LINE 2
ORANGE
ORANGE
BLACK
RED
MOTOR
L2
L1
230 V
115 V
THERMAL OVERLOAD
PROTECTOR
BLACK
STARTING
CAPACITOR
RUNNING
CAPACITOR
RED
BLUE
BLUE
115 V
WHITE
NEUT
BLUE
BLUE
LINE 1
BLUE
1
WHITE
STARTING RELAY
WHITE
2
TWO WIRE
CONTROL
WHITE
3
BLACK
LINE 2
YELLOW
THERMAL
OVERLOAD
STARTING RELAY
5
2
ORANGE
6
4
BLACK
BLACK
115 V EXTERNAL
PILOT LIGHT
(50 WATT MAX)
BLACK
1
BLACK
BLACK
MOTOR
EXT
PILOT
TO NEUTRAL OF
115/230 V SUPPLY
BL
AC
K
ORANGE
BLUE
1
3 POLE
SWITCH
RED
RED
RED
DISPENSER CONTROL SWITCHES
RED
2
THREE WIRE
CONTROL
STARTING
CAPACITOR
BLUE
D1
3
CONTROL
SWITCH
BLUE
D0
BROWN
EXT
PILOT
WHITE
WARNING
BROWN
NEUT
115 V EXT
PILOT LIGHT
PEDESTAL
PILOT LIGHTS
WHITE
(50 WATT MAX)
MOTOR CONTROL BOX WIRING DIAGRAM - 1 H.P.
(5 TERMINAL RELAY)
(DISCONTINUED FEBRUARY, 1988)
The control box must be grounded
for personal safety. Refer to the National Electrical Codes and applicable local codes for proper grounding procedures.
MOTOR CONTROL BOX WIRING DIAGRAM
1-1/2 & 2 H.P.
Fig. Vc
Fig. Vd
Fig. V
THREE PHASE SCHEMATICS
The control box must be grounded
for personal safety. Refer to the National Electrical Codes and applicable local codes for proper grounding procedures.
WARNING
208/230V, 3 PHASE
POWER SUPPLY
L1
L2
WARNING
208/230V, 3 PHASE
POWER SUPPLY
BLUE
L3
L1
L2
The control box must be grounded
for personal safety. Refer to the National Electrical Codes and applicable local codes for proper grounding procedures.
BLUE
L3
SWITCH AT LOADING RACK
STOP
BLACK
230V
COIL
BLUE
RED
SWITCHES AT LOADING
RACKS AND/OR IN
DISPENSERS CONNECTED
IN PARALLEL
BLACK
START
230V
COIL
NOTICE
BLUE
T1
T2
T1
T3
T2
T3
BLUE
BLUE
TO EXIT
PILOT LITE
115V SUPPLY
TO EXIT
PILOT LITE
115V SUPPLY
RED
BLACK
BLACK
NOTE:
OBSERVE COLOR CODE L1, L2,
L3 PHASE SEQUENCE FOR
PROPER ROTATION OF MOTOR.
208/230V, 3 PHASE
POWER SUPPLY
THERMAL
OVERLOAD
NOTE:
208/230V, 3 PHASE
POWER SUPPLY
THERMAL
OVERLOAD
3 PHASE MOTOR WIRING DIAGRAM
Fig. Vf
Fig. Ve
RJ 5190© 3/93
OBSERVE COLOR CODE L1, L2,
L3 PHASE SEQUENCE FOR
PROPER ROTATION OF MOTOR.
THREE WIRE CONTROL
TWO WIRE CONTROL
3 PHASE MOTOR WIRING DIAGRAM
WARNING
RED
ORANGE
ORANGE
3-wire control requires the use of an
auxiliary contact
in the magnetic
starter. Furnas interlock kit or
49D221251 or equivalent.
The warnings on this page and throughout this manual indicate the presence of a hazard which can cause severe
personal injury, death or substantial property damage if ignored.
25
®
6" Big-Flo
Manifold Dimensions
BIG-FLO® PACKER/MANIFOLD ASSEMBLY WITH SYPHON ATTACHMENTS
PULL ELBOW
SYPHON CHECK VALVE
CONDUIT JUNCTION BOX
EXPANSION UNION
EXTRACTOR NIPPLE SEAL
3/8 " VACCUUM PIPE
LOCATE SEAL WHERE
REQUIRED BY LOCAL CODE
1 1/4" CONDUIT
1/4" VACCUUM PIPE
PACKER ASSEMBLY
DISCHARGE LINE TO
LOADING RACK OR
TO DISPENSERS
8" EXTRACTOR NIPPLE
FIG. V1
6" RISER & FLANGE
BIG-FLO® LEAK DETECTOR SUGGESTED INSTALLATIONS MANIFOLD DIMENSIONS
24" x 24" Steel Manholes
116-036-5
Leak Detector as Pilot Valve
Electrical Conduit
(5 Wires)
24"
Grade
250 G.P.M. Leak Detector (3") Diaphragm Valve
Model 116-039-5 (Incl. 116-036-5)
Pump Discharge Outlet to Leak
Detector (Usually 3" or 4")
Red Jacket “Big-Flo”
Submersible Pump
Concrete
Blocks
6" Riser
Discharge To Dispensers
or Loading Rack, etc.
3" Diaphragm Valve
Submerged Pump Junction Box
Storage Tank
Flex Connector
Pit a Cover By Contractor
(Depth Of Pit Varies With Tank Bury Depth)
Electrical Conduit
116-036-5 Leak
Detector as Pilot Valve
24"
(Recommended
Minimum)
Pump
250 G.P.M. Leak Detector
3" Flanged Diaphragm Valve
Model 116-039-5
(Incl. 116-036-5)
Discharge Line
Flex Connector
(Usually 3")
6"
11"
6"
10-5/8"
8"
Storage Tank
6" Pump Riser & Flange
42" (Recommended Minimum)
26
RJ 5190© 3/93
®
6" Big-Flo
Table of Dimensions for Pump Selection
MALE UNION
ELBOW
EXPANSION UNION
REDUCER
008-168 CONDUIT BOX BY RED JACKET
10"
176-026 NIPPLE SEAL BY
RED JACKET
4"
3/4"
“E”
COVER
DEPTH
6-3/4"
CONDUIT BY CONTRACTOR
CONDUIT
BY CONTRACTOR
“C” 8" EXTRACTOR NIPPLE
#60169 BY RED JACKET
3" PIPING BY CONTRACTOR
3-1/16"
“D”
SEAL
BY CONTRACTOR
151-001 DISCHARGE MANIFOLD
BY RED JACKET
PLUG IF
NECESSARY
“D” 6" RISER & FLANGE #60303
BY RED JACKET
“B”
“A”
TANK DIA.
PUMP & MOTOR
NOTICE
4"
Distance between center line of
pump motor and center line of bottom fill tube should be 3' minimum.
Air locking of pump may occur at
distances less than this distance.
Fig. VII
NOTICE
Use this table for single wall tank applications only that do not involve manways or sumps.
Example: An 8' dia. steel tank buried 3'-0" will require a 99" long pump, 7" long riser & 13" long extractor nipple.
Diameter Storage Tank “A”
Pump Length “B”
Riser Length “D”
Extractor Nipple “C” Length
When Tank is Covered:
2'-0" Bury
2'-6" Bury
3'-0" Bury
3'-6" Bury
4'-0" Bury
5'-4"
5'-3"
5"
TABLE OF PUMP RISER & EXTRACTOR NIPPLE LENGTHS FOR
VARIOUS TANK DIAMETERS & VARIOUS BURY DEPTHS
6'-0"
6'-3 1/2"
7'-0"
7'-6"
8'-0"
8'-3 1/2"
9'-0"
10'-0"
6'-3"
6'-3"
7'-3"
8'-3"*
8'-3"
8'-3"
9'-3"
10'-7"
7"
4"
7"
13"
7"
4"
7"
11"
5"
10"
16"
22"
28"
5"
7"
13"
19"
25"
5"
10"
16"
22"
28"
5"
7"
13"
19"
25"
5"**
5"**
7"
13"
19"
5"
7"
13"
19"
25"
5"
10"
16"
22"
28"
5"
7"
13"
19"
25"
5"
5"
10"
16"
22"
10'-6"
10'-7"
5"
11'-0"
11'-3"
7"
12'-0"
12'-3"
7"
5"
10"
16"
22"
28"
5"
7"
13"
19"
25"
5"
7"
13"
19"
25"
* Pump length for 2' bury will be 7'-7" long with a 5" riser length.
** 5" nipple not required.
WARNING
A variety of tank types with various materials of construction are currently in use. The inside diameter, (I.D.) which is critical
to determining correct pump length, can differ appreciably though outside diameters may be similar. Red Jacket Pumps
are built to order to accommodate individual tank and bury depth requirements. Accurate tank and site measurements are
critical to achieve the proper pump length and avoid damage to the pump or tank which can result in environmental damage.
Petro Express Bulletin, RJ 23-25 (10/90) explains the information required for proper pump sizing.
RJ 5190© 3/93
27
®
6" Big-Flo
Cutaway V iew
SYPHON
CHECK
VALVE
PACKER
SEALS
SYPHON
NOZZLE &
VENTURI
3
1
CHECK
VALVE
4
PACKER
SEALS
3
AIR
ELIMINATOR
TUBING
2
EXPANSION
RELIEF
VALVE
5
NOTICE
See page 29 for Troubleshooting Instructions.
28
RJ 5190© 3/93
®
6" Big-Flo
T roubleshooting/Electrical Data
Symptoms
Probable Cause
Suggested Action
Total or partial loss of vacuum and/or
pressure reading at vacuum line.
Obstruction in syphon nozzle/venturi (#1) or air eliminator tubing (#2) is clogged. O.D. of this tubing must be
3/8" min.
Remove nozzle/venturi, clean and reinstall. Run flexible wire down air eliminator tubing. Replace tubing if
it’s too small.
Loss of line pressure. *(Static —
pump off all discharge outlets
closed.) Should be 25-35 PSI.
Failure of packer assembly seals (#3) or check valve
seal (#4).
Thermal contraction (see par. XIV & XV “Report on
Leak Detectors” pg 51).
Expansion relief valve not sealing (#5). Should relieve
static line pressure to approx. 20-35 PSI.
Remove and inspect areas to ascertain that cause for
failure is not still present (i.e., burr or damaged seal
surface). Replace seal.
Excess line pressure.
Failure of expansion relief valve (#5) (*Static)
Pump oversized for applications.
Line type check valve installed in discharge line. (Expansion or pressure equalizing type is acceptable, not
standard type.)
Remove, clean and reinstall or replace.
Refigure head loss and check performance curve.
Remove same.
Low pump output on new installation
of 3-phase unit.
Motor running in reverse.
Switch any two power leads L1, L2 or L3 at starter.
Pump/motor runs and pumps intermittently.
Binding of pump due to foreign object in impeller/
diffuser area. (Abnormal noise usually present with this
problem.) This will cause overheating of motor and
subsequent cut-off by overload protection device.
Overload opens at 113°F, closes at 87°F-90°F. Do not
operate pump with an ambient temperature higher than
132°F.
Excessive or erratic bearing wear. (Usually caused by
running unit dry or continuously.)
Improper electrical connection or voltage.
Check amperage draw. (Constant or intermittent excessive amperage draw may occur. See Electrical
Data below.)
Replace unit if findings dictate.
Repetitive premature motor failure.
Motor runs, but pump output partially
or totally impaired.
(see above)
If 3ø unit, possible phase unbalance is present.
Short in power supply leads to pump.
Slight power drain via break in power lead wire insulation.
Foreign material obstructing intake ports or pump impellers (i.e., rags, paper).
Partially closed gate valve.
Malfunctioning solenoid valve.
Improper voltage.
Clogged filter or strainer.
Confirm that motor is a two stage unit instead of a single
stage unit. (A two stage motor unit is needed on any
application involving a dispenser).
NOTICE
Remove, clean and reinstall or replace.
Check wiring for continuity and impedance (see below). Voltage must be within 10% ± of rated voltage.
See p. 30.
Check for ground with ohmmeter.
Check with 500V megger. Reading should be greater
than 100,000 ohms to ground.
Investigate appropriate area for same and remove.
Open same.
Replace if defective.
Check voltage, must be within 10% ± of rated voltage
(208/230V).
Clean or replace.
Check output PSI of pump to determine motor unit
type. A single stage unit will have approximately onehalf the output PSI of a two stage unit.
Pump performance can be checked by installing a pressure gauge at the discharge side of unit.
Model
1 HP, 1 Stage
1-1/2 HP, 1 Stage
2 HP, 2 Stage
APPROXIMATE NORMAL OPERATING PRESSURE
PSI Gas
PSI Diesel
Model
19
24
3 HP, 1 Stage
15
18
3 HP, 2 Stage
38
48
5 HP, 2 Stage
PSI Gas
16
30
36
PSI Diesel
21
37
44
ELECTRICAL DATA
Service
Factor Cur.
HP
Volts
Phase
(Amps)
1
208-230
1
7.5
1-1/2
208-230
1
9.5
2
208-230
1
12.0
2
208-230
3
7.2
3
208-230
3
10.5
5
208-230
3
17.2
*Appropriate heaters are supplied with starters.
RJ 5190© 3/93
Locked
Rotor Cur.
(Amps)
35
47
61
45
62
96
Idle
(Amps)
4.4
4.6
5
4.2
6
8.3
29
Branch Ckt.
Fusetron
(Amps)
15
15
20
15
15
25
Protection
Ckt. Brkr.
(Amps)
15
15
20
15
20
30
Overload
Heaters*
NA
NA
NA
K-43
K-53
K-61
®
6" Big-Flo
Thr ee Phase Unbalance
Three phase current unbalance is a factor which can result in
premature motor failure. It causes reduced starting torque,
excessive and uneven heating and excessive motor vibration.
Therefore, it is important that the electrical load to the submersible motor be balanced. The purpose of this service information
is to describe how to check and correct phase unbalance, and
what to do if it cannot be corrected.
1.
1st Connection
T1 = 51 Amps
T2 = 46 Amps
T3 = 53 Amps
Divide the total by three to obtain the average:
150 ÷ 3 = 50 Amps
Check for correct motor rotation by installing a pressure
gauge in the discharge line. Start the pump and make a
mental note of the pressure reading. Turn off the pump and
change any two of the red, yellow or black leads in the
control box. Restart the pump and again note the pressure
reading. The rotation that gives the highest pressure is
always the correct one.
Calculate the greatest Amps difference from the average:
50 - 46 = 4 Amps
Divide this difference by the average to obtain the percentage
of unbalance:
4 ÷ 50 = .08 or 8%
In this case, the current unbalance for the 1st connection is 8%.
Using the same procedure, the maximum current unbalance for
the 2nd connection is 4%, and for the 3rd connection is 2%. By
comparing the percentage of unbalance on the three possible
connections, connection #1 exceeds 5% and therefore should
not be used. The 2nd and 3rd connections are less than 5%
unbalance and therefore either is satisfactory. Since the 3rd
connection had the lowest percentage of unbalance, it should
be used to obtain maximum motor efficiency and reliability.
When the correct motor rotation is established, the amount
of current unbalance between the three legs of the power
supply should be calculated.
Current unbalance between legs should not exceed 5%.
The percent of current unbalance is defined and calculated
as follows:
Percent Current Unbalance =
Max. current diff.
average current x 100
Average Current
By observing where the highest current reading is on each leg
on the various connections, you can determine if the unbalance
is caused by the power source or the submersible motor. In the
above example, the highest Amp reading was always on the
same incoming power leg, L3. This indicates that most of the
unbalance was from the power source.
Current readings in amps should be checked on each leg using
the three possible connections shown in the illustration below.
The best connection is the one that has the lowest percentage
of unbalance.
If the high current were on a different incoming leg each time the
motor leads were changed, this indicates the motor, or a poor
connection, caused most of the unbalance.
To prevent changing motor rotation when taking these readings, the motor leads should be moved across the starter
terminals by always moving them in the same direction, as
shown in the illustration below.
If an unbalance problem appears to be in the power supply and
none of the three possible connections will reduce the percentage of unbalance to 5% or below, the power company should
be contacted for additional aid in correcting the current unbalance to an acceptable level.
The following is an example of current readings at maximum
pump load (highest gpm) of each leg of the three-wire connection.
1st Connection
=
=
L
1
L
2
=
L
3
=
T
2
T
1
3rd Connection
2nd Connection
L
1
=
L
2
=
L
3
=
=
L
1
L
2
T
3
=
L
3
Supply
Starter
T
3
T
1
T
3
3rd Connection
T2 = 50 Amps
T3 = 49 Amps
T1 = 51 Amps
Begin by adding the three readings for the 1st connection.
T1 = 51 T2 = 46 T3 = 53 Total = 150 Amps
CAUTION Remember, before working inside the control
box, always disconnect the power supply.
2.
2nd Connection
T3 = 50 Amps
T1 = 48 Amps
T2 = 52 Amps
T
2
T
2
30
T
1
Motor
RJ 5190© 3/93
®
6" Big-Flo
Replacement Parts List
REPLACEMENT PARTS LIST — PACKER ASSEMBLY
(Packer Assembly is the same on All Model Big-Flo® Pumps)
Upper End
5
4
39
40
35
34
33
32
31
30
29
19
36
28
27
37
26
EXPANSION RELIEF VALVE
25 ON BOTTOM SIDE OF PACKER
(NOT SHOWN)
24
1
2
3
14 38
6
7
9
8
10 11 12
13
16
15
Key No.
Part No.
2
3
3
4
5
6
7
8
9
9
10
11
N/S
12
13
14
15
16
17
18
19
20
21
22
23
24
25
26
27
28
29
30
31
32
33
34
35
36
37
38
39
40
N/S
N/S
N/S
N/S
008-168-1
110-038-4
110-039-4
027-065-1
060-048-3
031-097-1
031-106-1
031-105-1
176-026-5
176-025-5
065-073-1
013-047-1
164-045-5
164-046-5
026-219-1
188-079-5
058-029-3
072-110-1
026-414-1
008-167-3
072-108-1
151-011-5
031-108-1
085-100-x
013-145-x
882-2xx-x
208-271-5
013-882-3
072-107-1
076-085-3
026-627-1
079-161-1
111-065-4
138-049-5
072-104-1
072-129-3
060-057-3
882-2xx
027-068-1
027-138-1
031-107-1
066-164-3
144-056-5
026-198-1
064-025-3
144-186-5
RJ 5190© 3/93
18
17
19
20
19
21
22
PUMP TANK RISER
(NOT SHOWN)
23
7
Description
Conduit Junction Box with Cover
Conduit Seal Assembly, All Models Except P100H1-1MB
Conduit Seal Assembly, Model P100H1-1MB
1/4 x 3/8 Fitting Syphon Take Off
Packing Nut Syphon Tube
Packing Nut Gasket
Extractor Nipple Gasket Outer
Extractor Nipple Gasket Inner
Extractor Nipple Seal Assembly Non-Syphon
Extractor Nipple Seal Assembly Syphon
1/4" Galvanized Syphon Pipe (Obtain Locally or Specify Length)
1-1/4" Conduit Pipe (Obtain Locally or Specify Length)
Packer Assembly without Syphon
Packer Assembly with Syphon
Locking Capscrew 3/4 x 16 x 3/8 (Obtain Locally)
Syphon Check Valve
Syphon Packing Nut and Nozzle
“O” Ring - Syphon Packing Nut (5/8 x 13/16 x 3/32)
Hex Head Cap Screw
Syphon Venturi
“O” Ring - Packer Assembly (5-1/2 x 6 x 1/4)
Discharge Manifold
Gasket - Mainfold to Riser
Air Eliminator Tube (Specify Length)
3" Column Pipe (Specify Length)
Pump Riser (Specify Length)
Expansion Relief Valve
3/4" Alum. Conduit (Specify Length)
“O” Ring - Check Valve Seat (3-1/4 x 3-1/2 x 1/8)
Check Valve Seat
Check
Machine Screws (1/4 x 20 x 1/2)
Valve
Check Valve Spring
Components
Cap & Stem Assembly Check Valve
Disc & Holder Assembly for Check Valve
“O” Ring - Seal Conduit (1 x 1-1/4 x 1/8)
Locking Ring
Packing Nut
Extractor Nipple (Specify Length) (Includes 1 Gasket 031-106)
Elbow 3/8"
Brass Elbow
Bolt Gasket
Top Plate
Syphon Conversion Kit
Manifold Screw
Packer Casting Only
Check Valve Kit
31
No. Req’d.
1
1
1
1
1
1
2
1
1
1
1
1
1
1
2
1
1
1
4
1
3
1
1
1
1
1
1
1
1
1
2
1
1
1
2
1
1
1
1
1
4
1
1
4
1
1
®
6" Big-Flo
Replacement Parts List
REPLACEMENT PARTS LIST — BIG-FLO® SUBMERSIBLE PUMPS
Lower End
1
6
2
4
3
8
7
9
P300H3-2HB
P500H3-2K
Motor Head 1
Cap Screw (Obtain Locally)
Washer (Obtain Locally)
Plug & Pigtail Assembly
Plug & Pigtail Assembly
Plug & Pigtail Assembly
Discharge Casting
Floating Suction Adaptor
Floating Suction Adaptor
Floating Suction Adaptor
“O” Ring (5-5/8 x 5-7/8 x 1/8)
“O” Ring (1-7/8 x 2-1/8 x 1/8)
P300H3-1K
036-043-3
3/8 x 16 x 2
3/8
213-064-5
213-065-5
213-069-5
011-143-1
001-157-3
001-026-3
001-158-3
072-109-1
072-578-1
P200H3-2MB
1
2
3
4
4
4
6
7
7
7
8
9
Description
P200H1-2MB
Part No.
P150H1-1HB
Key No.
P100H1-1MB
Number Required
1
4
4
1
—
—
1
—
—
1
2
1
1
4
4
—
1
—
1
1
—
—
2
1
1
4
4
—
1
—
1
1
—
—
2
1
1
4
4
—
1
—
1
—
—
1
2
1
1
4
4
—
1
—
1
—
1
—
2
1
1
4
4
—
1
—
1
1
—
—
2
1
4
4
—
—
1
1
—
1
—
2
1
Only the above listed parts are available for repairs of the lower end of pump. If any other parts need replacing, order Red Jacket pump-motor assemblies.
See page 35 for ordering numbers.
32
RJ 5190© 3/93
®
6" Big-Flo
Contr ol Box for 1-1/2 & 2 HP Pumps
MOTOR CONTROL BOX FOR 1-1/2 & 2 HP PUMPS
MODELS P150H1-CB & P200H1-CB
DIMENSIONS:
15-1/4" Height
10-1/8" Width
4" Depth
Key No.
Part No.
1
108-402-1
P150H1-CB Complete General Purpose Motor Control Box
1
1
108-403-1
P200H1-CB Complete General Purpose Motor Control Box
1
2
071-047-1
Starting Relay (3ARR3-J3V2)
1
3
071-061-1
Line Contactor Relay (RMB #109152-8)
1
4
011-402-1
Starting Capacitor (160MFD-250 Volt) P150H1-CB)
1
4
011-085-1
Starting Capacitor (200MFD-250 Volt) (P200H1-CB)
1
5
012-253-1
Running Capacitor (10MFD-330 Volt) (P150H1-CB)
1
5
012-253-1
Running Capacitor (15MFD-370 Volt) (P200H1-CB & P200H1CB)
1
6
008-180-1
Terminal Block
1
7
071-062-1
Overload Protector (Cutler Hammer 10-2149)
1
8
023-008-1
Overload Protector Heater Element (Cutler Hammer 10177H-30A) (P150H1-CB)
1
8
023-009-1
Overload Protector Heater Element (Cutler Hammer 10177H-33A) (P200H1-CB)
1
RJ 5190© 3/93
Description
33
No. Req'd.
®
6" Big-Flo
Magnetic Starter for 2, 3 & 5 HP 3 Phase Pumps
MODELS P200H3-2MB, P300H3-1K, P300H3-2HB, P500H3-2K
Overload Heaters
NOTICE
WARNING
The only parts that are available for the Magnetic Starter from Red Jacket are the Overload
Heaters. (See chart below)
Three phase model Big-Flo pumps require the use of a magnetic starter.
HP
Volts
Phase
Magnetic
Starter
2
208-230
3
279231-5
K-43
036-072-1
3
208-230
3
279231-5
K-53
036-076-1
5
208-230
3
279231-5
K-61
036-080-1
34
Overload Heaters
Heater No.
Part No.
RJ 5190© 3/93
®
6" Big-Flo
Pump/Motor Assembly
Ordering
Model
Number
Number
HP
Volts
Phase
Pump Motor Pump Motor
Assy. Length
Assy. Weight
882-841
882-839
882-840
882-209
882-842
882-211
UMP150H1-1HB
UMP200H1-2MB
UMP200H3-2MB
UMP300H3-1K
UMP300H3-2HB
UMP500H3-2K
1.5
2
2
3
3
5
230
230
230
230
230
230
1
1
1
3
3
3
28-3/4"
32-1/8"
29-5/8"
31-5/8"
34-5/16"
42-1/2"
106#
116#
116#
120#
120#
162#
PROCEDURE FOR REMOVAL OF PLUG-IN TYPE
PUMP-MOTOR ASSEMBLY
1.
2.
3.
4.
5.
6.
7.
8.
9.
10.
11.
Remove Red Jacket Pump from product storage tank.
Lay pump in horizontal position.
Block pump so that pump end is two inches above surface.
Remove four 3/8" cap screws.
Using hands, grip pump at extreme bottom and rock in arch not exceeding 1/4" path. This allows pump to free
past dowel pin.
Slide pump away from column. Watch to be sure electrical (bayonet type) plug-in separates.
If plug-in does not disconnect, continue sliding pump motor until plug-in is exposed for hand separating.
Assemble new pump motor in reverse order. Check plug-in connection and dowel pin location.
Use new pump seal “O” ring which is supplied with pump motor assembly.
Lubricate pump “O” ring with silicone lubricant.
When drawing up 3/8" cap screws, be sure to draw evenly.
CONVERSION DATA
1 Atmosphere =
=
1 Barrel
=
1 Cu. Ft.
=
1 Cu. Meter
=
1 Ft. Water
=
14.7 PSI
29.92 In. Hg.
42 Gals. (oil)
7.48 Gals.
264.17 Gals.
.433 PSI
1 Imperial Gal.
1 Inch Hg.
1 Kilogram
1 Liter
1 Meter
=
=
=
=
=
=
1.20 U.S. Gals.
.491 PSI
2.2 Pounds
.264 U.S. Gals.
3.28 Ft.
39.37 Inches
1 PSI
1 Lb.
1 Kg./Sq. CM
1 U.S. Gal.
=
=
=
=
=
=
2.04 In. of Hg.
.0703 Kg./Sq. CM
.4536 Kg.
14.22 PSI
.833 Imp. Gal.
3.79 Liters
HEAD EQUIVALENTS
1 PSI
=
=
=
=
1 In. Hg. =
=
=
=
2.31 Feet of Water
3.2 Feet Gasoline
(.72 Sp. Gr.)
2.9 Feet Kerosene
(.80 Sp. Gr.)
2.6 Feet Heating Oil (.89 Sp. Gr.)
1.13 Feet Water
1.57 Feet Gasoline
1.42 Feet Kerosene
1.27 Feet Heating Oil
(.72 Sp. Gr.)
(.80 Sp. Gr.)
(.89 Sp. Gr.)
ELECTRICAL DATA
Model Number
Pump Motor
Assembly
UMP100H1-1MB
UMP150H1-1HB
UMP200H1-2MB
UMP200H3-2MB
UMP300H3-1K
UMP300H3-2HB
UMP500H3-2K
Winding Resistances (OHMS)
HP
Volt
Phase
1
1.5
2
2
3
3
5
208-230
208-230
208-230
208-230
208-230
208-230
208-230
1
1
1
3
3
3
3
Yellow to Red
9.5-10.5
7.2-8.3
5.4-6.2
2.3-3.2
1.7-2.3
1.7-2.3
.9-1.2
Yellow to Blk
3.0-3.6
2.0-2.5
1.5-2.0
2.3-3.2
1.7-2.3
1.7-2.3
.9-1.2
Red to Blk
12.5-14.1
9.2-10.8
6.9-8.2
2.3-3.2
1.7-2.3
1.7-2.3
.9-1.2
Blue to Blue
—
0-0.1
0-0.1
0-0.1
0-0.1
0-0.1
0-0.1
The above readings do not include the added resistance of the power supply wires to the submersible pump. Therefore, in order for the readings to fall within the above
limits, the resistance should be checked at the submersible pump junction box. If the resistance readings are taken at the control box or magnetic starter, they will be slightly
higher. Always make a complete power disconnect before taking resistance readings.
RJ 5190© 3/93
35
®
6" Big-Flo
Notes
36
RJ 5190© 3/93
Section
Syphon Systems
RJ 5190© 3/93
37
3
Syphon Systems
Engineering Report
in the pump tank falls below the end of this tube. The end of this
tube is roughly 27 inches off the bottom of the tank.
While syphon systems for submersible gasoline pumps have
become fairly common, problems are still encountered with the
priming and maintenance of prime. An outline is herein provided
of the system, its proper operation, and means of checking when
the system is not working.
Situations Which Cause Loss of Prime
The indication of an improperly operating system is the fact
that the fluid levels of the tanks do not drop together. A series of
relatively simple tests can be made to isolate the problem which
can be categorized into five areas:
(1) The submersible pump syphon primer not working.
(2) A syphon check valve not holding.
(3) A leak in the tube, fittings, or pipe of the syphon loop.
(4) One of the syphon pipes shorter than specified, causing
the syphoning to cease operating at a given level.
(5) Blockage of the syphon pipe due to foreign material,
such as a rag, or due to caving in of the tank bottom (or
top) such that it can block the syphon loop pipe.
Proper Installation
A syphon loop in the form of an inverted “U” is connected
between two or more tanks. The syphon primer on the submersible pump is connected to the high point of the “U” loop so that air
or vapor can be continually removed while the submersible pump
is operating. The horizontal pipe should be provided with minimum of 1/8 inch per foot of rise to the primer connection, or more
where room allows, to allow for settling of the tanks. The ends of
the syphon loop, terminated in the tanks, should be between two
and five inches off the bottom of the tank. If they are closer than
this, it is possible to pull dirt or water from the bottom, or even to
have the ends sealed off against the bottom if the tank should be
flattened due to handling or backfilling.
A minimum number of fittings and pieces of pipes should be
used to reduce the number of joints where a leak can occur.
NOTICE
Troubleshooting Syphon System
CAUTION
Disable Power To The Pump
Install the valves and vacuum gauge* assembly (Fig. 1)
between the syphon check valve and the syphon loop.
Special care should be taken to pretest this assembly to
make sure that all of the fittings and valve bonnets are tight.
Note the use of clear plastic (Ti-gon). This can save many
hours of troubleshooting.
Occasionally, a syphon loop will be connected between tanks of different grades
and isolated by a valve so that the auxiliary tanks can be shifted to store different products. Many states’ weights and
measure authorities do not allow such a
connection, but where it is allowed, care
should be taken to see that the bonnets
of the valves are tight and there is no
possibility of a leak.
Steps for Isolating Problems When Clear Plastic Tube is
Used Wtih Test Assembly
1. Syphon Primer
Start pump, leave dispenser nozzle closed, open valve No.
2, and observe the gauge. 10 to 25 inchesof mercury is
considered normal. A reading below 10 inches may indicate
a partially plugged nozzle or venturi in the pump or the
passage leading to or from these parts, or a significant leak
in the vacuum line. A zero pressure reading indicates a
completely inoperative primer, or a completely plugged line
from the primer to the valve assembly, or a plugged air
eliminator 1/4-inch pipe which runs down to the submersible
motor. A significant leak in the vacuum line connected to the
pump will also cause the same indication.
Operation of Syphon Primer
All remote submersibles of today use a nozzle-venturi combination for creating vacuum used for priming the syphon loop.
Depending upon the design, this nozzle-venturi combination will
develop a vacuum of 10 to 25 inches of mercury by injecting
some of the fluid of the discharge from the pump through the
nozzle into the venturi causing a low pressure area (vacuum).
One inch of mercury is equal to approximately 1.5 feet of
gasoline; therefore, these primers are capable of priming gasoline syphon systems a vertical distance of 15-20 feet, depending
on the vapor pressure of the product.
Again, depending on design, the depth of gasoline, the size
of the tanks, and the size of the pipe and its length, the empty loop
priming time will take from less than two minutes to as much as
ten minutes for large tanks, nearly empty. Once the loop is
primed, the purpose of the primer is to continue to remove any
bubble of vapor or dissolved air which come out of the gasoline
and form in top of the loop due to the low pressure in the loop.
The syphon primer system requires a syphon check valve to
prevent the back flow of gasoline and the entrance of air when the
pump is turned off. This check valve becomes necessary when
the lower end of the syphon air-eliminator tube is above the level
of liquid. Without the check valve, air would enter the tube and
break the vacuum in the syphon loop.
It should be noted that most manufacturers extend the
syphon-priming air-elimination discharge tube down to the head
of the pump motor. With this arrangement, the leaking check
valve will not cause loss of prime in the syphon loop until the level
38
2.
Leaving valve No. 2 closed, turn off the submersible pump.
The system should hold the vacuum (10 to 25 inches) for at
least 15 minutes. If it fails immediately, recheck all the test
fittings and, if tight, then the syphon check valve is not
holding and should be replaced with a new one.
It may be that the check valve will hold adequately under
a high vacuum, but may leak under a low vacuum. It is
recommended that if it holds satisfactorily at the higher
reading, then the vacuum should be bled off and a retest
made to see if the check valve will hold properly at five
inches.
See Operation of Syphon Primer.
NOTICE
*A compound gauge is recommended as
a plugged primer valve can cause pressure under certain conditions.
3.
Syphon Loop
Start the pump, then open both valve No. 1 and No. 2; leave
RJ 5190© 3/93
Syphon Systems
Engineering Report (cont.)
the dispenser nozzles closed and observe the gauge for ten
minutes. Normal priming will take from two to ten minutes.
It will be noted that at first the vacuum gauge will indicate
zero; after a while it will begin to show some vacuum.
Remember, for every one inch of mercury vacuum, the level
in the pipes above the fluid level in the tanks is about 1-1/2
feet. As the fluid rises in the pipes, the vacuum increases
accordingly. Therefore, the maximum primer reading of 10
to 25 inches will not be obtained on this test.
When fluid enters the primer tube, it will first appear
mixed with bubbles. It will be noticed that the gauge needle
will dance as the mixture of air bubbles and gasoline passes
through the test assembly. As the bubbles disappear and
only fluid is in the tube, the gauge will settle down to a slightly
higher value than was obtained just before fluid entered the
plastic tube.
These bubbles should disappear in less than five minutes, if the system is tight, although it might take a little longer
if the fluid levels in the tanks are considerably unequal. If
bubbles continue to appear (the gauge needle will continue
to dance) after 20 minutes, it can be definitely ascertained
that there is a leak in the syphon loop, the tube, or in the
connection to the loop.
With the above tests, the main causes of syphon trouble
should have been isolated. If all of the tests appear positive
and there is no indication of leaks or malfunction, then a
period of time (see chart No. 1) should be used to gauge the
levels in the tanks to see if the fluid is transferring after the
system has primed. If the tanks level in the estimated period
of time, it can be assumed that the system is operating
properly at the time of the check. If the priming system
appears to work properly but the tanks do not level within the
expected amount of time, it may be assumed that the
syphon “U” is plugged.
If the problem cannot be located, it might be caused by
a leak below the present level of fluid in the tanks or due to
a short vertical syphon pipe in one or both tanks. It is
possible to determine this roughly by the test indicated
“Pressure Method of Testing.”
When the horizontal pipe is finally drained, then the fluid will
begin to lower in the vertical pipes and the vacuum will begin to
fall off as indicated by the gauge. It should be noted that the
higher the level of fluid in the tanks, the longer the period of time
required for this action to take place. With nearly full tanks, it will
be almost impossible to accurately determine this without visual
observation, as could be obtained with a plastic tube.
If there is no change in the vacuum reading, after one hour,
then attention should be directed to the syphon check valve. The
valve No. 1 can then be opened and if the gauge begins dropping
shortly after, then the syphon check valve is suspected and may
be operating erratically. This test should be repeated, but the
long period of time is not necessary and both valves should
remain open. If the loss of vacuum occurs in a much shorter
period of time than the original test, then it is very likely that there
is a leak inside the syphon check valve and it should be replaced.
Pressure Testing the Syphon Loop
If the storage tanks are nearly full, it may be difficult to locate
a leak in the syphon “U” with the vacuum tests. An alternate
method is suggested using pressure. For this test it is necessary
to have an accurate pressure gauge with 1/2-psi-or-finer divisions. (The maximum reading in a 12-foot tank will be less than
4 psi.)
Connect the gauge to the syphon primer system and install.
Connect a tube with a “Shroeder” valve so that air pressure can
be applied and held, as shown in figure 2.
Apply air until it bubbles from the bottom of the syphon “U.”
Stop the air and read the gauge. The gauge reading in psi x 3.1
(gasoline sp. gr. 0.74) indicates the feet of gasoline over end of
the vertical pipe with the least submergence. Observe the gauge
for one hour. If the gauge drops, then levels off at a value above
zero, there is a leak in the vertical “U” pipe under fluid at the new
psi reading x 3.1 feet under the gasoline levels. If the gauge drops
to zero, there is a leak above the fluid levels.
For Example:
Two six-foot storage tanks connected by a syphon “U” with
ends four inches off the bottom and tank levels at 68 and 60
inches (above the bottom) would give an initial psi reading of 1.5
psi.
(60" - 4" = 56")
= 1.5 psi
12"/ft. x 3.1 ft.
psi
Syphon Test Made Without a Clear Plastic Tube
If clear plastic has not been used in the test set-up, then an
additional series of tests are necessary to isolate the problem, as
follows:
Repeat steps No. 1 and 2 under “Steps for Isolating Problems…” Next, repeat step No. 3 and as soon as the system is
primed, as indicated by a sharp change in the gauge reading or
needle dancing momentarily or continuously, allow the system to
continue to operate for approximately 20 minutes. If the needle
continues to dance, it is strong evidence that air is continually
being pulled in. To further verify this, valve No.1 between the
gauge and the syphon primer check valve is then closed. The
reading on the gauge will indicate approximately the height of the
fluid in the loop above that in the tanks to the gauge. This should
be observed for at least 30 to 40 minutes. The gauge will hold
constant for a while, even if there is a leak in the loop. This is
because all of the fluid must drain out of the horizontal pipes first,
and since there is not appreciable fall in level, it will be hardly
noticed by the gauge reading.
RJ 5190© 3/93
If the pressure gradually fell to .75 psi and held, it would
indicate a loose joint or crack approximately 28 inches down from
the fluid surface in either of the vertical pipes. (If there is more
than one leak, accurate determination becomes very difficult) .75
psi x 3.1ft./psi = 2.3 feet = 28" under the surface of the tank level.
This would place it at 40 inches above the bottom of tank No. 1
(68-inch level) or 32 inches above bottom of tank No. 2 (60-inch
level).
Eliminating a Troublesome Syphon Check Valve Problem
Experience has shown that on a few installations the syphon
check valve cannot be made to hold consistently. This could be
in a station located near a subway or heavy truck traffic. The
constant vibration of the check valve prevents its seating consistently. It could also be a condition where an extreme amount of
dirt is being pulled into the check valve. This is only a problem
39
Syphon Systems
Engineering Report (cont.)
after the fluid level drops below the end of the combination aireliminator syphon-priming tube just above the motor, and is
further aggravated in cases where only two or three feet of
gasoline are normally kept in the storage tank.
If the dealer reports, “The syphon works fine until the level
drops below about 27 inches in the pump tank, the product won't
come over then from the other tank,” this is a clue that the syphon
check isn’t holding at the time when the bottom end of the aireliminator syphon-purge tube is above the liquid, and air goes up
the tube and the vacuum in the loop is broken. (It could also be
a short syphon loop pipe.) Once it is broken, the submerged
pump usually must be run continuously to re-purge the loop and
be kept running until the tank is level.
Where the replacement of the syphon check valve still does
not cure the complaint, and a short syphon pipe has been
eliminated as the cause, the solution is to eliminate the need for
the syphon check. One is never needed if the air-eliminator
syphon-purge tube is extended to the bottom of the tank, or at
least to a point below the submerged pump intake. This is not a
simple task since the pump-motor and tube will not pass through
the riser at the same time. However, it can be done by following
these instructions.
1) Turn off the power and remove submerged pump from
storage tank.
2) Take off the 1/4-inch air-eliminator syphon-purge tube
which terminates near top of the motor. (1/8-inch copper
tubing was used on some pumps.)
3) Obtain a piece (about 30 inches) of high grade, gasoline
resistant rubber tubing, such as driveway alarm bell
hose. Clamp this securely to the end of the 1/4-inch
tubing.
4) Insert the pump back into the tank, just far enough to
pass the motor through the top of the tank, and hold the
pump right there.
5) Insert the rubber tubing down alongside the 1-1/2 inch
vertical pipe and into the tank, also.
6) Now, replace the upper end of the 1/4-inch tube back into
position from which it was removed.
7) Securely clamp the 1/4-inch pipe to the 1-1/2 inch pipe
at both top and bottom ends.
8) Next, lower the submersible pump all the way into the
tank and lock it in place securely by replacing all bolts,
etc. In so doing, the rubber end of the air-eliminator
syphon will extend to, or near, the bottom of the tank.
9) Turn on power supply and pump five or ten gallons
through each dispenser to purge air from the system.
10) Repeat test No. 2. Check the Syphon Check Valve. With
the rubber tube extension hanging below the pump
intake and possibly right on the bottom of the tank, the
vacuum on the vacuum gauge will hold a value equal to
the fluid column indefinitely, with the pump turned off,
and assuming there are no leaks in the piping.
Approximate Transfer Rates in GPM Between Tanks at
Various Differential Levels
Chart No. 1
(Assume: 25 feet pipe, two 90° elbows)
Tank Level
Differential—Feet
1/4
1/2
1
2
3
4
5
6
8
Transfer Rate—GPM
1-1/2" Pipe 2" Pipe
2-1/2" Pipe
8
16
25
11
23
35
16
33
50
23
46
70
28
56
86
32
64
100
35
70
112
40
80
125
45
90
150
Approximate time for Tanks to Equalize
For a rough approximation of the time necessary to equalize
the level in two tanks, the means average flow rate may be used:
e.g.,
Two 6000-gallon tanks
6'3" diameter
Connect with two-inch pipe
No. 1 tank
24-inch fluid
(1740 gallons)
No. 2 tank
60-inch fluid
(5300 gallons)
Differential level (H) = 36 inches = 3 feet
Flow rate at 3 feet differential head = 56 GPM
Average flow rate = 56/2 = 28 GPM
Gallons to equalize
Time to level (approx.)
5300-1740 = 1780 gallons
2
1780 gal. = 64.5 min.
28 g/m
This solution assumes velocity and therefore flow rate to be
linear, which it is not. It is actually parabolic, but for estimating
purposes the linear assumption will give an adequate answer.
Approximate Priming Time
The time shown in the chart is based on two-inch piping, two
tanks, ten feet of horizontal syphon piping, and the fluid levels
approximately equal. If the levels are not equal, an average may
be used for estimating purposes.
Chart No. 2
Distance to Fluid Level-Feet
1.0'
2.0'
3.0'
4.0'
5.0'
6.0'
7.0'
8.0'
40
Time to Prime-Minutes
2.0
2.3
2.7
3.0
3.3
3.7
4.0
4.3
RJ 5190© 3/93
Syphon Systems
Engineering Report (cont.)
SYPHON LINE MUST PITCH UPWARD
A MIN. OF 1/8" PER FT. OF LINE FROM
ADDITIONAL TANKS TO POINT OF
CONNECTING TUBING
BUSHING FOR CONNECTION OF TUBING
FILL PIPE
TUBE MUST BE CONNECTED
TO HIGH POINT OF SYPHON
MINIMUM 3/8" TUBING & FITTINGS
FURNISHED BY CUSTOMER
VENT LINE
1 1/2" SYPHON LINE (MINNIMUM)
FILL PIPE
REMOVE 3/8" PIPE PLUG FROM
SYPHON CHECK VALVE &
INSTALL COPPER TUBING TO
HIGH POINT OF SYPHON
VENT LINE
SUBMERSIBLE PUMP
PUMP DISCHARGE
OUTLET LINE TO
DISPENSERS
SYPHON "U"
VERTICAL PIPE
SYPHON LINE FROM
ADDITIONAL TANKS
WHERE REQUIRED
3"
RJ 5190© 3/93
41
Syphon Systems
Engineering Report (cont.)
VACUUM GAUGE IN HG
VALVE NO 1
VALVE NO 2
To High Point of
Syphon Loop
To Syphon Connection
of Pump
CLEAR PLASTIC
SHROEDER VALVE
FIGURE 1 — VACUUM TEST
ACCURATE PRESSURE GAUGE
VALVE NO 2
VALVE NO 1
To High Point of
Syphon Loop
To Syphon Connection
of Pump
SHROEDER VALVE
FIGURE 2 — PRESSURE TEST
42
RJ 5190© 3/93
Syphon Systems
Parts List
“EXTRACTA” MODELS P33R1, P75S1 & P150S1
Effective March 1, 1991, the following changes were implemented on the
subject units.
STANDARD “EXTRACTA” UNITS are shipped less syphon capability
unless specifically ordered (less the coupling, and the 1/4" syphon pipe,
that is attached to the “S” pipe leading from the bottom of the manifold and
to the column pipe by steel bands, as well as the syphon check valve). This
does not affect the operation of the unit in non-syphon installations.
Syphon capability is an optional add-on.
UNITS ORDERED WITH SYPHON will be shipped with the syphon
coupling, pipe and syphon check valve complete.
FIELD RETROFIT SYPHON KIT
A field retrofit syphon kit is available in order to provide syphon
capability to pumps already in the field. The retrofit part number is
144-106-5.
BIG-FLO® MODELS
UNITS ORDERED WITH SYPHON will be shipped with items listed
below. These items are also available in a field retrofit kit, part number
144-056-5.
SYPHON CHECK VALVE
1
3/8" ELBOW
1/4" X 3/8" REDUCER
BUSHING
BRASS ELBOW
PACKING NUT
EXTRACTOR
NIPPLE SEAL
EXTRACTOR
NIPPLE
GASKET
1/4" X 11-1/2" PIPE
PACKER
SYPHON INJECTOR NOZZLE
O-RING
PACKER
MANIFOLD
RJ 5190© 3/93
SYPHON INJECTOR BODY
Item
1
2
3
4
5
6
7
8
9
10
11
12
13
Description
Brass Elbow
Syphon Check Valve
3/8" Elbow
Reducer Bushing
3/8" Coupling
Packing Nut
Gasket
1/4" x 11-1/2" Nipple
Syphon Nozzle
O-Ring
Syphon Injector Body
Reducer Coupling
3/8" x 24" Pipe
Packer O-Rings
43
Part No.
027-138-1
188-079-5
027-068-1
027-065-1
027-122-1
060-048-1
031-097-1
065-073-1
058-029-3
072-110-1
008-167-3
027-027-1
065-523-3
072-108-1
2
3
4
8
12
6
13
7
5
8
13
5
13
9
10
11
Syphon Systems
Illustration
SYPHON CHECK VALVE
PACKER ASSEMBLY
MANIFOLD
“S” PIPE
COUPLING
RISER PIPE
1/4" SYPHON PIPE
STEEL BAND & CLIP
DISCHARGE HEAD
44
RJ 5190© 3/93
Syphon Systems
T roubleshooting
Symptom
NOTICE
Probable Cause
Suggested Action
Use of the test apparatus (Fig. #1, Pg. 42) with the instructions (beginning Pg. 38) are recommended as the
most efficient method of determining the cause for malfunction.
Total or partial loss of vacuum and/or
pressure reading at vacuum line.
Vacuum will not hold.
Obstruction in syphon nozzle, venturi (#1)
or air flexible wire down air eliminator tubing.
Remove nozzle & venturi clean &
reinstall. Run eliminator tubing (#2).*
4" Vent closing screw on functional
element not all the way up (#3).
Adjust to full-up position.
Malfunction syphon check valve (#4).*
Test same, replace if defective.
(See engineering report pg. 38.)
*Excessive sediment on the bottom of the tank can cause reoccurrence of this problem. Turbulence occurring during filling of the tank
places this sediment in suspension, allowing it to be drawn into the functional element via the vacuum line or the pressure relief system.
Removal of sediment from tank bottom may be necessary.
RJ 5190© 3/93
45
Syphon Systems
Notes
46
RJ 5190© 3/93
Section
4
Floating Suction & Dual Pumps
Manifolded to Same Discharge System
RJ 5190© 3/93
47
Floating Suction
Recommended Installation
RECOMMENDED FLOA
TING
SUCTION INST ALLA TION
Manhole:
Should be larger than manhole
welded on tank. Keep area
open down to tank.
Red Jacket supplies the
adapter only; not the apparatus.
NOTICE
Red Jacket petroleum and
solvent pumps are centrifugal type pumps and as such
are not designed to pump
product when the level is
below the bottom end of the
pump/motor assembly.
Opening for Gauging
and Adjusting Cable
14" Approx.
4" Approx.
•
NOTICE
1-1/2" Nipple
1-1/2" by 2" Bell Reducer
2" Nipple
•
The floating suction arm can be mounted to
pump previous to installing in tank.
Easy service access is provided by unbolting
manhold lid through which pump is mounted and
removing entire assembly.
See example of adaptation to floating suction
assembly below.
14"
1-1/2"
N.P.T.
Female
Thread
3" N.P.T.
Male
Thread
14"
Bottom of the Tank
Bottom of the Tank
4" Petroleum Adapter
6" Petroleum Adapter
Adaptation to Floating Suction Assembly
(use standard NPT threaded fittings).
Use proper thread sealant and insert gasket between flanges of floating suction and pump.
48
RJ 5190© 3/93
Floating Suction
Adapter for Pumps Manufactured Prior to9/1/82
Units manufactured after this date cannot be retrofitted. If floating suction
adapter is desired, unit must be ordered equipped with same.
1.
2.
3.
4.
5.
6.
7.
Remove cap (A) (no longer needed) by inserting tool under edge and prying upware (i.e., screwdriver, chisel, etc.).
Remove all screws (B & C); save for reuse.
Remove in order of appearance, spacers (D, E, F) last. The solid ring (G) “O” ring retainer is not to be removed.
Place gasket* on top of (G) ring.
Place floating suction adapter on gasket.
Replace in reverse order, as removed, spacers (F, E, D).
Replace screws (C & B) in original position and tighten as specified on drawing.
*Use ring (G) as a template and construct gasket of any gasoline resistant 1/8" gasket stock. A good improvision is to
remove the center from a discharge head gasket part no. 031-136, shown as item 28 on page 3 of 4" Petroleum Pump
Parts List in this manual.
Apply sealant to threads. Torque 27-33 inch/lbs.
NOTICE
G
F
G
E
F
E
D
D
B
B
A
C
C
G
F
RJ 5190© 3/93
49
E
D
D
G
F
E
Dual Pumps
4" Pump Installation
Installing dual submersibles manifolded in the same system.
Fig. 2
This type of system is often used when greater flow rates are
needed. If installed according to the illustration below (Fig. 1),
manifolded systems offer back-up support in that operations
could continue should one unit fail.
WARNING
Proper check valves, with pressure relief,
must be installed in the discharge line of
each pump to prevent product from being
pumped through the pressure relief system of the adjacent pump when it is not
running. Check valves must be compatible with the fuel blend being pumped.
This diagram (Fig. 2) shows the wiring allowing both
submersibles to operate simultaneously with any combination
of dispensers turned on. To operate individually, the appropriate toggle switch, located externally on the side of the control
box must be turned off manually. The check valves and 220/240
volt relay are not available from Red Jacket and should be
purchased locally.
115 V. RELAY
ALLEN BRADLEY
700-C201
DISPENSER SW
Suggested diagram for wiring dual manifold system.
Fig. 1
PRESSURE RELIEF
TYPE CHECK VALVES
(Set at approximately
40 PSI on 4" pumps)
NOTICE
50
The drawing shown here is to
illustrate the requirement for
in-line pressure relief type
check valves. It is not a recommended guide for installation
of piping downstream of the
check valves.
RJ 5190© 3/93
Dual Pumps
®
6" Big-Flo
Pump Installation
INST ALLING DUAL BIG-FLO ® SUBMERSIBLES
MANIFOLDED IN THE SAME SYSTEM
This type of system is often used when greater flow rates
are needed. If installed according to the illustration below
(Fig. IX), manifolded systems offer back-up support in
that operations could continue should one unit fail.
the expansion relief valve operates at below pump pressures. If check valves without pressure relief were used,
there would be no provision for thermal expansion between the valves and the dispensers.
The check valves shown installed in the discharge line of
each pump are necessary to prevent product from being
pumped through the pressure relief system of the adjacent pump, if that pump is not running. This is because
It is preferable that the wiring allow both submersibles to
operate simultaneously with any combination of dispensers turned on. To operate individually, the appropriate
switch could be turned off manually.
Fig. IX
PRESSURE RELIEF
TYPE CHECK VALVES
(Set at approximately
50 PSI on 6" pumps)
NOTICE
RJ 5190© 3/93
51
The drawing shown here is to
illustrate the requirement for
in-line pressure relief type
check valves. It is not a recommended guide for installation
of piping downstream of the
check valves.
Floating Suction & Dual Pumps
Notes
52
RJ 5190© 3/93
Section
5
W arranty
For complete details
on Red Jacket’s
Warranty Policy and Procedures,
see Manual #5194.
RJ 5190© 3/93
53
W arranty
Procedur es
OUR PROMISE OF QUALITY:
The Marley Pump Company, a division of the Marley Company, guarantees Red Jacket products as to workmanship,
material, and performance when they are properly installed, used and cared for.
OUR COMMITMENT WITHIN THE CONTINENTAL UNITED STATES:
Should any part(s) fail within the parts period specified below, it will be repaired or replaced and returned, free of
charge, provided the part(s) is returned to Red Jacket’s point of manufacture transportation prepaid.
Should any part(s) fail within the labor period specified below, Red Jacket will also pay for the reasonable services
of an authorized service representative for on-site repair or replacement of the defective part(s).
SCHEDULE OF WARRANTY PERIODS:
Parts
From Date of
Manufacture
Labor
From Date of
Installation*
Submersibles
Except:
Solvent Pumps
18 Months
12 Months
6 Months
3 Months
Leak Detectors
18 Months
6 Months
Retractors
6 Months
None
Electronic Systems
Except:
Vapor Probes
18 Months
6 Months
6 Months
None
Product
* Installation date will revert to the Date of Manufacture without a previously submitted Installation Report #WAF01 which was received
within 15 days after the installation. Regardless of installation date, under no condition can labor warranty extend beyond the parts
warranty.
EXCLUSIONS:
Normal (Routine) Maintenance:
Normal or routine maintenance such as cleaning, lubricating or adjusting components and assemblies or for
replacing consumable items such as paper, ribbons, filters, bulbs, etc., are excluded from this warranty.
Transportation Damage to Equipment:
Should equipment be damaged in transit or handling, it is the responsibility of the distributor or customer to file a
damage claim with the responsible carrier. Latent damage must be reported to the carrier within 14 days of the date
of delivery and an inspection by the carrier must be requested. Damage caused in transit or by handling is not the
responsibility of Red Jacket and is not covered.
WARRANTY DISCLAIMER AND LIMITATION OF LIABILITY:
THE ABOVE WARRANTIES ARE IN LIEU OF ALL OTHER WARRANTIES, EXPRESSED OR IMPLIED, AND ALL
IMPLIED WARRANTIES OF MERCHANTABILITY AND FITNESS FOR A PARTICULAR PURPOSE WHICH
EXCEED THE AFORESAID EXPRESSED WARRANTIES ARE HEREBY DISCLAIMED AND EXCLUDED FROM
THIS AGREEMENT.
MANUFACTURER EXPRESSLY DISCLAIMS AND EXCLUDES ANY LIABILITY FOR CONSEQUENTIAL OR
INCIDENTAL DAMAGES FOR BREACH OF ANY EXPRESS OR IMPLIED WARRANTY ARISING IN CONNECTION WITH THIS PRODUCT, INCLUDING WITHOUT LIMITATION PURCHASER’S LOSS OF STORED LIQUIDS
OR DAMAGE TO THE GROUND, UNDERGROUND OR ENVIRONMENT, WHETHER ARISING UNDER THEORIES OF TORT, NEGLIGENCE, STRICT LIABILITY, CONTRACT OR OTHERWISE.
Some states do not allow the exclusion or limitation of incidental or consequential damages or limitation on the
duration of implied warranties so the above limitation or exclusion may not apply to you. This warranty gives you
specific legal rights and you may also have other rights which vary from state to state.
54
RJ 5190© 3/93
W arranty
Location of Date Codes
DATE CODES PRIOR TO JANUARY 1, 1978
The location of the date code stamp is shown on the opposite side of this letter. On pumps manufactured prior
to January 1978, the date code was stamped as shown below, using a letter code system.
Year
1972
1973
1974
1975
1976
1977
J
AG
AH
AK
AL
AM
AN
F
BG
BH
BK
BL
BM
BN
M
CG
CH
CK
CL
CM
CN
A
DG
DG
DK
DL
DM
DN
M
EG
EG
EK
EL
EM
EN
J
FG
FG
FK
FL
FL
FN
J
GG
GH
GK
GL
GM
GN
A
HG
HH
HK
HL
HM
HN
S
KG
KH
KK
KL
KM
KN
O
LG
LH
LK
LL
LM
LN
N
MG
MH
MK
ML
MM
MN
D
NG
NH
NK
NL
NM
NN
DATE CODES AFTER JANUARY 1, 1978
To eliminate the necessity of checking the above cross-reference table, all pumps manufactured after January
1, 1978, use the following date code system.
Example — 1
01
78
Year of Manufacture
(1978)
Month of Manufacture
(January)
Week of Month of Manufacture
RJ 5190© 3/93
(1st Week)
55
W arranty
Notes
For Additional Assistance,
Contact theTechnical Support Group-Petroleum Products
The Marley Pump Company
5800 Foxridge Drive
Mission, KS 66202
Phone: 1-800-2-MARLEY
(1-800-262-7539)
56
RJ 5190© 3/93
W arranty
Notes
RJ 5190© 3/93
57
W arranty
Notes
58
RJ 5190© 3/93
Section
4
Floating Suction & Dual Pumps
Manifolded to Same Discharge System
RJ 5190© 3/93
47
Floating Suction
Recommended Installation
RECOMMENDED FLOA
TING
SUCTION INST ALLA TION
Manhole:
Should be larger than manhole
welded on tank. Keep area
open down to tank.
Red Jacket supplies the
adapter only; not the apparatus.
NOTICE
Red Jacket petroleum and
solvent pumps are centrifugal type pumps and as such
are not designed to pump
product when the level is
below the bottom end of the
pump/motor assembly.
Opening for Gauging
and Adjusting Cable
14" Approx.
4" Approx.
•
NOTICE
1-1/2" Nipple
1-1/2" by 2" Bell Reducer
2" Nipple
•
The floating suction arm can be mounted to
pump previous to installing in tank.
Easy service access is provided by unbolting
manhold lid through which pump is mounted and
removing entire assembly.
See example of adaptation to floating suction
assembly below.
14"
1-1/2"
N.P.T.
Female
Thread
3" N.P.T.
Male
Thread
14"
Bottom of the Tank
Bottom of the Tank
4" Petroleum Adapter
6" Petroleum Adapter
Adaptation to Floating Suction Assembly
(use standard NPT threaded fittings).
Use proper thread sealant and insert gasket between flanges of floating suction and pump.
48
RJ 5190© 3/93
Floating Suction
Adapter for Pumps Manufactured Prior to9/1/82
Units manufactured after this date cannot be retrofitted. If floating suction
adapter is desired, unit must be ordered equipped with same.
1.
2.
3.
4.
5.
6.
7.
Remove cap (A) (no longer needed) by inserting tool under edge and prying upware (i.e., screwdriver, chisel, etc.).
Remove all screws (B & C); save for reuse.
Remove in order of appearance, spacers (D, E, F) last. The solid ring (G) “O” ring retainer is not to be removed.
Place gasket* on top of (G) ring.
Place floating suction adapter on gasket.
Replace in reverse order, as removed, spacers (F, E, D).
Replace screws (C & B) in original position and tighten as specified on drawing.
*Use ring (G) as a template and construct gasket of any gasoline resistant 1/8" gasket stock. A good improvision is to
remove the center from a discharge head gasket part no. 031-136, shown as item 28 on page 3 of 4" Petroleum Pump
Parts List in this manual.
Apply sealant to threads. Torque 27-33 inch/lbs.
NOTICE
G
F
G
E
F
E
D
D
B
B
A
C
C
G
F
RJ 5190© 3/93
49
E
D
D
G
F
E
Dual Pumps
4" Pump Installation
Installing dual submersibles manifolded in the same system.
Fig. 2
This type of system is often used when greater flow rates are
needed. If installed according to the illustration below (Fig. 1),
manifolded systems offer back-up support in that operations
could continue should one unit fail.
WARNING
Proper check valves, with pressure relief,
must be installed in the discharge line of
each pump to prevent product from being
pumped through the pressure relief system of the adjacent pump when it is not
running. Check valves must be compatible with the fuel blend being pumped.
This diagram (Fig. 2) shows the wiring allowing both
submersibles to operate simultaneously with any combination
of dispensers turned on. To operate individually, the appropriate toggle switch, located externally on the side of the control
box must be turned off manually. The check valves and 220/240
volt relay are not available from Red Jacket and should be
purchased locally.
115 V. RELAY
ALLEN BRADLEY
700-C201
DISPENSER SW
Suggested diagram for wiring dual manifold system.
Fig. 1
PRESSURE RELIEF
TYPE CHECK VALVES
(Set at approximately
40 PSI on 4" pumps)
NOTICE
50
The drawing shown here is to
illustrate the requirement for
in-line pressure relief type
check valves. It is not a recommended guide for installation
of piping downstream of the
check valves.
RJ 5190© 3/93
Dual Pumps
®
6" Big-Flo
Pump Installation
INST ALLING DUAL BIG-FLO ® SUBMERSIBLES
MANIFOLDED IN THE SAME SYSTEM
This type of system is often used when greater flow rates
are needed. If installed according to the illustration below
(Fig. IX), manifolded systems offer back-up support in
that operations could continue should one unit fail.
the expansion relief valve operates at below pump pressures. If check valves without pressure relief were used,
there would be no provision for thermal expansion between the valves and the dispensers.
The check valves shown installed in the discharge line of
each pump are necessary to prevent product from being
pumped through the pressure relief system of the adjacent pump, if that pump is not running. This is because
It is preferable that the wiring allow both submersibles to
operate simultaneously with any combination of dispensers turned on. To operate individually, the appropriate
switch could be turned off manually.
Fig. IX
PRESSURE RELIEF
TYPE CHECK VALVES
(Set at approximately
50 PSI on 6" pumps)
NOTICE
RJ 5190© 3/93
51
The drawing shown here is to
illustrate the requirement for
in-line pressure relief type
check valves. It is not a recommended guide for installation
of piping downstream of the
check valves.
Floating Suction & Dual Pumps
Notes
52
RJ 5190© 3/93
Section
5
W arranty
For complete details
on Red Jacket’s
Warranty Policy and Procedures,
see Manual #5194.
RJ 5190© 3/93
53
W arranty
Procedur es
OUR PROMISE OF QUALITY:
The Marley Pump Company, a division of the Marley Company, guarantees Red Jacket products as to workmanship,
material, and performance when they are properly installed, used and cared for.
OUR COMMITMENT WITHIN THE CONTINENTAL UNITED STATES:
Should any part(s) fail within the parts period specified below, it will be repaired or replaced and returned, free of
charge, provided the part(s) is returned to Red Jacket’s point of manufacture transportation prepaid.
Should any part(s) fail within the labor period specified below, Red Jacket will also pay for the reasonable services
of an authorized service representative for on-site repair or replacement of the defective part(s).
SCHEDULE OF WARRANTY PERIODS:
Parts
From Date of
Manufacture
Labor
From Date of
Installation*
Submersibles
Except:
Solvent Pumps
18 Months
12 Months
6 Months
3 Months
Leak Detectors
18 Months
6 Months
Retractors
6 Months
None
Electronic Systems
Except:
Vapor Probes
18 Months
6 Months
6 Months
None
Product
* Installation date will revert to the Date of Manufacture without a previously submitted Installation Report #WAF01 which was received
within 15 days after the installation. Regardless of installation date, under no condition can labor warranty extend beyond the parts
warranty.
EXCLUSIONS:
Normal (Routine) Maintenance:
Normal or routine maintenance such as cleaning, lubricating or adjusting components and assemblies or for
replacing consumable items such as paper, ribbons, filters, bulbs, etc., are excluded from this warranty.
Transportation Damage to Equipment:
Should equipment be damaged in transit or handling, it is the responsibility of the distributor or customer to file a
damage claim with the responsible carrier. Latent damage must be reported to the carrier within 14 days of the date
of delivery and an inspection by the carrier must be requested. Damage caused in transit or by handling is not the
responsibility of Red Jacket and is not covered.
WARRANTY DISCLAIMER AND LIMITATION OF LIABILITY:
THE ABOVE WARRANTIES ARE IN LIEU OF ALL OTHER WARRANTIES, EXPRESSED OR IMPLIED, AND ALL
IMPLIED WARRANTIES OF MERCHANTABILITY AND FITNESS FOR A PARTICULAR PURPOSE WHICH
EXCEED THE AFORESAID EXPRESSED WARRANTIES ARE HEREBY DISCLAIMED AND EXCLUDED FROM
THIS AGREEMENT.
MANUFACTURER EXPRESSLY DISCLAIMS AND EXCLUDES ANY LIABILITY FOR CONSEQUENTIAL OR
INCIDENTAL DAMAGES FOR BREACH OF ANY EXPRESS OR IMPLIED WARRANTY ARISING IN CONNECTION WITH THIS PRODUCT, INCLUDING WITHOUT LIMITATION PURCHASER’S LOSS OF STORED LIQUIDS
OR DAMAGE TO THE GROUND, UNDERGROUND OR ENVIRONMENT, WHETHER ARISING UNDER THEORIES OF TORT, NEGLIGENCE, STRICT LIABILITY, CONTRACT OR OTHERWISE.
Some states do not allow the exclusion or limitation of incidental or consequential damages or limitation on the
duration of implied warranties so the above limitation or exclusion may not apply to you. This warranty gives you
specific legal rights and you may also have other rights which vary from state to state.
54
RJ 5190© 3/93
W arranty
Location of Date Codes
DATE CODES PRIOR TO JANUARY 1, 1978
The location of the date code stamp is shown on the opposite side of this letter. On pumps manufactured prior
to January 1978, the date code was stamped as shown below, using a letter code system.
Year
1972
1973
1974
1975
1976
1977
J
AG
AH
AK
AL
AM
AN
F
BG
BH
BK
BL
BM
BN
M
CG
CH
CK
CL
CM
CN
A
DG
DG
DK
DL
DM
DN
M
EG
EG
EK
EL
EM
EN
J
FG
FG
FK
FL
FL
FN
J
GG
GH
GK
GL
GM
GN
A
HG
HH
HK
HL
HM
HN
S
KG
KH
KK
KL
KM
KN
O
LG
LH
LK
LL
LM
LN
N
MG
MH
MK
ML
MM
MN
D
NG
NH
NK
NL
NM
NN
DATE CODES AFTER JANUARY 1, 1978
To eliminate the necessity of checking the above cross-reference table, all pumps manufactured after January
1, 1978, use the following date code system.
Example — 1
01
78
Year of Manufacture
(1978)
Month of Manufacture
(January)
Week of Month of Manufacture
RJ 5190© 3/93
(1st Week)
55
W arranty
Notes
For Additional Assistance,
Contact theTechnical Support Group-Petroleum Products
The Marley Pump Company
5800 Foxridge Drive
Mission, KS 66202
Phone: 1-800-2-MARLEY
(1-800-262-7539)
56
RJ 5190© 3/93
W arranty
Notes
RJ 5190© 3/93
57
W arranty
Notes
58
RJ 5190© 3/93