1
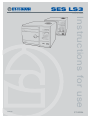
SES LS3
A UTOCLAVE
Instructions for use
490346
ST-IM29h
Read these Instructions before use
Introduction
Keep these ‘Instructions for use’ in a safe convenient place for future reference.
Warnings and
information
Preparation
and loading
Sterilizing
and drying
Cleaning and care
Maintenance
Technical data
Eschmann After Sales Service Department
The Eschmann After Sales Service Department is staffed and equipped to provide advice and
assistance during normal office hours. To avoid delays when making enquires, please quote the
Model and Serial Number of your Autoclave (NOTE: For location of the Serial Number Plate
see Fig.1. Item 19).
For Customers on the Mainland of England, Scotland and Wales, or on the Isle of Wight :When you receive your Little Sister 3 Autoclave ensure that you complete your Service Guarantee
and Registration Card, and then FREEPOST it to Eschmann Equipment. Failure to return this
card means you will not benefit from our FREE installation service, which will ensure your Autoclave
is correctly installed, plus two FREE service visits during the following 12 months.
Instructions for use
For further information visit www.eschmann.co.uk
All correspondence relating to the after sales service of Eschmann Equipment to be addressed to :
UK Customers
Eschmann Equipment, Peter Road, Lancing, West Sussex BN15 8TJ, England.
Tel: +44 (0) 1903 765040. Fax: +44 (0) 1903 762006.
Overseas Customers
Contact your local distributor. In case of doubt contact Eschmann Equipment.
Patents and Trade marks
The ESCHMANN name and logo are registered trade marks of Eschmann Holdings Limited.
“Eschmann Equipment” is a trading name of Eschmann Holdings Limited.
“Little Sister”, “SES”, and “LS3” are trade marks of Eschmann Holdings Limited.
Patents : Patents Pending plus - Pat. US5090033 and Pat. GB2238407
Copyright © 2002
All rights reserved. This booklet is protected by copyright. No part of it may be reproduced, stored in a
retrieval system or transmitted in any form or by any means, electronic, mechanical, photocopying,
recording or otherwise without written permission from Eschmann Holdings Limited.
The information in this publication was correct at the time of going to print. The Company, however,
reserves the right to modify or improve the equipment referred to.
If the CE mark is affixed to the product, it indicates compliance with Council Directive
93/42/EEC of 14 June 1993 concerning medical devices.
ST-IM29h October 2003
SES LS3
AUTOCLAVE
CONTENTS
INTRODUCTION
There are four versions of the Little Sister 3 Autoclave,
Short and Long chamber both with and without printer. For
Introduction . . . . . . . . . . . . . . . . . . . . . . . . . . . . . . . 3 instructions on how to use the printer (if fitted) see the
Water quality caution . . . . . . . . . . . . . . . . . . . . . . . 3 special section towards the end of this booklet.
INTRODUCTION
WARNINGS
Hazards . . . . . . . . . . . . . . . . . . . . . . . . . . . . . . . .
Limitations . . . . . . . . . . . . . . . . . . . . . . . . . . . . . .
Electrical safety . . . . . . . . . . . . . . . . . . . . . . . . . .
General safety . . . . . . . . . . . . . . . . . . . . . . . . . . .
User notes . . . . . . . . . . . . . . . . . . . . . . . . . . . . . .
INFORMATION
Safety Features . . . . . . . . . . . . . . . . . . . . . . . . . .
Declaration . . . . . . . . . . . . . . . . . . . . . . . . . . . . . .
Conditions of safe use . . . . . . . . . . . . . . . . . . . . .
Warning markings . . . . . . . . . . . . . . . . . . . . . . . . .
INITIAL PREPARATION FOR USE
These instructions apply to the following Autoclaves:4 SES LITTLE SISTER 3 STANDARD
4 (from Serial Number LCB8B0000, or LSK8B0000 for non-CE).
4
without printer : 87-020-05 87-022-01
4
87-022-17
4
with printer :
87-020-13 87-022-09
87-022-25
SES LITTLE SISTER 3 LONG
5 (from Serial Number LLCB8B0000, or LLSB8B0000 for non-CE).
5
without printer : 87-020-21 87-022-49
5
87-022-66
5
with printer :
87-020-29 87-022-58
87-022-74
The Accessories listed below are available:Tray . . . . . . . . . . . . . . . . . . . . . . . . REF 87-040-07
Tray lifter . . . . . . . . . . . . . . . . . . . . . REF 87-040-90
LOADING THE AUTOCLAVE
Chiropody tray . . . . . . . . . . . . . . . . . REF 87-041-12
Loading the autoclave . . . . . . . . . . . . . . . . . . . . . . 6
Tray - Long . . . . . . . . . . . . . . . . . . . . REF 87-040-19
Cassette (tray with lid) . . . . . . . . . . . REF 87-040-87
STERILIZING AND DRYING
Printer spares pack . . . . . . . . . . . . . REF 87-034-05
Sterilizing and drying . . . . . . . . . . . . . . . . . . . . . . . 6
Service Manual
Initial preparation for use . . . . . . . . . . . . . . . . . . . . 6
CLEANING AND CARE
A Service Manual containing technical description,
Cleaning and care . . . . . . . . . . . . . . . . . . . . . . . . . 7 complete maintenance procedures and an illustrated list
of spare parts is available on request from the Eschmann
SAFETY CHECKS
After Sales Service Department.
Weekly . . . . . . . . . . . . . . . . . . . . . . . . . . . . . . . . . . 7
Annually . . . . . . . . . . . . . . . . . . . . . . . . . . . . . . . . . 7 Reservoir Water Quality Caution
UK Guidance . . . . . . . . . . . . . . . . . . . . . . . . . . . . . 7 a. Eschmann recommend filling the reservoir with ‘Sterile
Water for Irrigation’. This is low in dissolved solids and
MAINTENANCE
has a low microbial count. In the U.K. the Department
Fuse renewal . . . . . . . . . . . . . . . . . . . . . . . . . . . . 7
of Health recommend that ‘Sterile Water for Irrigation’
Preventative Maintenance Agreement . . . . . . . . . 7
is used in bench-top Autoclaves (NHS Estates
Error Correction . . . . . . . . . . . . . . . . . . . . . . . . . . 8
document HTM2031).
Overheating . . . . . . . . . . . . . . . . . . . . . . . . . . . . . 8 b. If ‘Sterile Water for Irrigation’ is not being used then
Cleaning Filter . . . . . . . . . . . . . . . . . . . . . . . . . . . . 8
Eschmann strongly recommend the use of either
TABLE 1
Fault finding . . . . . . . . . . . . . . . . . . . . . . . . . . . . . . 9
OPERATING INSTRUCTIONS FOR PRINTER
Printer output . . . . . . . . . . . . . . . . . . . . . . . . . . .
Front Panel Controls . . . . . . . . . . . . . . . . . . . . . .
Paper Roll Renewal . . . . . . . . . . . . . . . . . . . . . .
Ribbon Cartridge Renewal . . . . . . . . . . . . . . . . .
Spares pack . . . . . . . . . . . . . . . . . . . . . . . . . . . .
Setting Time and Date . . . . . . . . . . . . . . . . . . . . .
Illustrations for Printer . . . . . . . . . . . . . . . . . . . . . .
c.
10
10
10
10 d.
10
11
11
TECHNICAL DATA
Technical data . . . . . . . . . . . . . . . . . . . . . . . . . . . 12
ST-IM29h
distilled water, deionized water, purified water or
water treated by the reverse osmosis process. These
types of water are low in dissolved solids and can help
reduce the effects of tap water detailed below.
DO NOT USE TAP WATER, this is high in dissolved
solids and can deposit lime scale, block filters and
cause damage to the pressure vessel.
Eschmann also recommend changing the water in the
reservoir on a weekly basis, with the type of water
detailed in ‘a’ (or ‘b’) above. This will reduce the build-up
of contaminants in the water that may cause blocked
filters and/or damage to the pressure vessel. Your local
Health Authority may suggest that you change the
reservoir water more frequently. Eschmann advise you
to follow your local Health Authority’s recommendations.
P3/12
WARNING
READ NOTES (1-5) BEFORE USE
The use of this autoclave should be under the
control of a responsible Person with sterilization
training. The user remains responsible for ensuring
that the load is suitable for the process adopted.
Note 1.
THE USER SHOULD BE AWARE OF THE FOLLOWING
POSSIBLE HAZARDS
a.
b.
c.
d.
Burns to the user caused by hot accessible surfaces
of the load, burns to the user caused by high
temperature internal surfaces of the chamber, scalds
to the user caused by hot water and/or steam from the
reservoir, scalds to the user caused by hot water from
the chamber on opening the door, scalds to the user
caused by hot water and/or steam from overfilling the
reservoir.
The hazard of scalds and burns from contact with hot
surfaces are greater during validation with the cover
removed which also exposes the risk of electric
shock. Validation should therefore only be carried out
by a qualified engineer.
Infection, caused by contact with water in the reservoir
if the reservoir is not drained, left to dry and recharged
at regular intervals as described in these instructions
for use (see paragraph 22) to prevent possible
contamination.
The autoclave indicates a successful cycle, but the
load remains non-sterile because the load is not
suitable for the steam sterilization cycle. All loads and
loading conditions must be validated. It is
recommended that the user consults the instructions
for use of the items to be autoclaved and if in doubt
consult a qualified microbiologist or Authorized Person.
g.
regarding the maximum temperature the instrument
can withstand. This is necessary as the sterilizing
temperature for 121ºC cycles may be exceeded
(typically to peaks of 130°C) during the drying phase
under certain conditions such as small loads.
The Autoclave will discharge steam during and at the
end of some cycles. Ensure the autoclave is not
positioned close to heat or smoke detectors as these
may be activated by the release of steam.
Note 3.
THE USER SHOULD FOLLOW THESE ELECTRICAL
SAFETY MEASURES
a. This equipment must be earthed.
b. Switch ‘off’ unit and disconnect from mains power
supply before renewing fuses.
c.
Switch ‘off’ unit and disconnect from mains power
supply before checking and cleaning the autoclave.
d. Do not attempt to service this equipment internally.
Note 4.
THE USER SHOULD FOLLOW THESE GENERAL
SAFETY MEASURES
a. Do not fill the reservoir during a sterilizing cycle.
b. Do not cover the ventilation louvres.
c.
Do not use abrasive powders, chemicals, or solutions
containing chlorine to clean the autoclave.
d. Always allow unit to cool before attempting to open
the chamber door.
e. If an error display appears during a cycle, do not
switch-off power until discharge of hot water or steam
into the reservoir has stopped. Do not attempt to open
chamber door until unit has cooled and internal
pressure has fallen sufficiently to release pressure
safety bolt. Also see ‘Safety Checks’ page 7.
Note 2.
THE USER SHOULD BE AWARE OF THE FOLLOWING Note 5.
LIMITATIONS DURING USE
GENERAL POINTS TO REMEMBER DURING USE
a. Never use trays or cassettes without perforations as a. Close the chamber door properly before selecting the
required programme.
this will result in a non-sterile load.
b.
Always
leave the chamber door slightly open after
b. Do not process wrapped, sealed or porous goods or
use.
fluids in this autoclave.
Never use tap water see section 6 and ‘Reservoir
c.
Not to be used in zones of risk associated with c.
Water Quality Caution’ on page 3.
flammable anaesthetics.
d. The Little Sister 3 is designed to sterilize instruments, d. Ensure instruments are free from debris before placing
them in sterilizer chamber.
NOT TO WASH THEM. If instruments are not cleaned
e.
Use
the ‘tray lifter’ to remove the sterilized load.
this may compromise the efficiency of the sterilization
process.
f.
Keep chamber trays and chamber face clean.
e. These Autoclaves are not suitable for instruments or g. Clean door seal and chamber face with a lint-free
items with narrow lumens.
cloth at weekly intervals.
f.
When sterilising instruments not of solid metal h. Regular maintenance (every three months is
construction, the manufacturer of the instrument must
recommended) is required to ensure continued safety
be consulted about its suitability for autoclaving,
and reliability
P4/12
ST-IM29h
SES LS3
AUTOCLAVE
GENERAL INFORMATION NOTES
IMPORTANT
The design of the autoclave pressure vessel is
approved by a third party to PD5500 Cat.3. The
pressure vessel is constructed and tested to BS3970
Parts 1 and 4. In order to ensure safety and to
comply with UK regulations, the vessel and fittings
should be inspected by a ‘competent person’ at
intervals of no more than 14 months. This can be
carried out by an Eschmann trained engineer.
Conditions of Safe Use:a.
b.
c.
d.
e.
f.
Indoor Use.
Altitude up to 2000 metres.
Temperature 5°C to 40°C.
Maximum relative humidity 80% for temperatures up
to 31°C, decreasing linearly to 50% relative humidity
at 40°C.
Mains supply voltage fluctuations not to exceed ±10%
of the normal voltage.
No other voltage fluctuations specified by the
manufacturer.
The Little Sister 3 Autoclave (Standard and Long) is designed
for the sterilization of unwrapped instruments, utensils and Note: If it is required to operate this Autoclave outside of
other items. It operates automatically at the touch of a single these conditions, contact Eschmann Equipment at the
programme selector touch button, and has four programmes address given in these instructions.
134°C and 121°C, both with and without drying (see Important
IMPORTANT NOTE:
Note below right). The Autoclave is capable of 4 cycles per
UK Customers should arrange for this equipment
hour when the ‘134°C Without drying’ programme is selected.
to be installed by an Eschmann Trained Engineer
For sterilization cycle times, refer to the ‘TECHNICAL DATA’
before use. (For free installation and service details
section on page 12.
see page 2). Also see ‘Safety Checks’ page 7.
Little Sister 3 Autoclave, safety features:-
The preset sterilizing temperature for your Little Sister 3
Pressure Door Lock. The door is mechanically locked Autoclave is displayed on a temporary label affixed to the
front of the unit. All programmes can be deactivated or
at pressures above 0.14 bar.
b. Door Interlock Switch. This prevents programme reactivated by an Eschmann Trained Engineer, on request.
starting if door is not properly closed.
WARNING MARKINGS
c. Electrical Door Lock. This prevents the door being
The warning markings on this equipment have the
opened inadvertently by the operator once the cycle
following meanings
has started and holds the door closed until the end of
the cycle. It will also keep the door closed under all
Caution; refer to accompanying documents
fault conditions.
(i.e. these Instructions for Use).
This symbol, adjacent to the door knob, warns
d. Pressure Relief Valve (safety valve). This valve safely
the user of the possible escape of steam and
releases excess pressure (i.e. above 2.6 bar).
hot water when the door is opened.
e. Microcomputer. The microcomputer constantly
monitors all key functions. If an error arises, it
Caution; refer to accompanying documents
immediately stops the cycle, discharges pressure,
(i.e. these Instructions for Use).
and causes the appropriate message to be displayed
This symbol, adjacent to the overheat light at
(See Error Correction para. 27).
the bottom of the control panel, warns the user
f.
Overheat Control. The microcomputer operates in
of overheating of the sterilizing chamber.
conjunction with an independent manual reset
thermostat to protect the heating element from
Caution; hot surface.
overheating. The autoclave is also fitted with a fusible
This symbol warns the user of high surface
link which, should overheating occur, will cut all power
temperatures on the outside of the equipment.
to the heating element and microcomputer and operate
the manual reset thermostat, leaving only the red
Caution; refer to accompanying documents
overheat warning lamp illuminated on the front panel.
(i.e. these Instructions for Use).
This symbol on the serial number label (rating
Declaration
plate), and on the lid of the unit, warns the user
The design of the autoclave pressure vessel is approved
that it is necessary to read the Instructions for
by a third party to PD5500 Cat.3. The pressure vessel is
Use before using the equipment.
constructed and tested to BS3970 Parts 1 and 4.
a.
Note: This equipment is defined as:
Installation Category 2 (Overvoltage Category 2)
Pollution Degree 2 (in accordance with IEC664).
ST-IM29h
P5/12
INITIAL PREPARATION FOR USE
1.
2.
3.
4.
5.
6.
When lifting or moving the Little Sister 3 Autoclave
(preferably with two people), place the hands under
the base at each side of the unit. Place the autoclave
on a flat, level surface and ensure there is a working
clearance of 150 mm all round for adequate ventilation.
Do not cover the ventilation louvres. Also see Note 2
part ‘g’ on page 4.
Check that the plug fuse is appropriate for the voltage
of the equipment (see rating plate on back of cabinet).
Connect unit to mains power supply (Warning this
equipment must be earthed) and switch on by
selecting unit power switch ‘0-I’ to ‘I’ (Fig. 1). Display
STERILIZING & DRYING THE LOAD
will go to ‘LS3’ followed by cycle count then door/test.
Note: If the door knob is turned to the fully closed 15. Select required programme by pressing the
position the chamber door cannot be opened until
appropriate button on control panel (Fig. 5). The
power is switched on.
indicator lamp for the selected programme remains
Open chamber door (Fig. 2). Remove tissue paper
illuminated. The sterilizing cycle will now proceed
from the door; autoclaving trays, tray lifter; reservoir
automatically and the printer (if fitted) will commence
lid, drip tray and feet adjustment pack. Discard all
printing. As the cycle progresses various displays will
packing pieces.
appear in the display window (Fig. 1 item 3) to indicate
programme status.
Fit reservoir cover and place plastic drip tray at front
of unit, below door. Fit feet adjustment pack
Note: Select only from the programmes at the preset
components as follows:
sterilizing temperature (see Important Note, page 5).
a. Plastic cups to protect work surface from rubber
16. The display sequence during the sterilizing cycle is:
feet marks.
b. If work surface is not level, place spacers, as
Display
Interpretation
required, inside cup(s).
Remove reservoir lid (Fig. 1) and fill reservoir up to
‘MAX’ mark (Fig. 3) with ‘Sterile Water for Irrigation’.
DO NOT USE TAP WATER, see ‘Reservoir Water
Quality Caution’ on page 3. Refit the reservoir lid.
LOADING THE AUTOCLAVE
7.
Check you have read the limitations on use page 4
and technical Specification page 12.
8.
Check that water level in reservoir is between ‘MAX’
and ‘MIN’ marks (Fig. 3). DO NOT FILL DURING
CYCLE.
9.
11. Do not overload trays, and avoid ‘bunching’ items
together.
12. Do not use trays or cassettes without holes and
ensure that the load does not block the holes in the
perforated trays and cassettes.
13. Load trays and place them in the sterilizing chamber
(Fig. 4 and 4a). All items must be positioned so that
they drain freely and do not trap rising air bubbles.
14. Close the chamber door by first ensuring the door
handle is turned fully open (counter-clockwise) before
shutting the door and locking by turning the handle
180° clockwise (Fig. 2).
With chamber door open (para. 3, Note), select mains
‘on/off’ switch to ‘I’ (on) (Fig. 1). This will initiate a single
audible signal followed by the display ‘LS3’, then the
number of cycles, the time of day (see note below) and
the flashing green indicators for the preset cycles.
Note: For units without a printer ‘rEAdy’ is displayed
not the time of day.
10. Before loading instruments into trays or cassettes
they should be pre-washed, preferably in an ultrasonic
cleaner to remove amalgam, debris, etc., then rinsed
to remove all traces of proprietary cleaners, chemicals
or disinfectants, before being placed in the sterilizer
chamber. Residue from these products could result in
a blockage of the water recycling system.
P6/12
door/tESt
(Flashing
alternately)
Test door interlock switch (para. 14)
door
Sterilizing chamber door open
time of day
(e.g. 11-45)
Programme can now be selected
Note: for units without a printer
‘rEAdy’ is displayed.
FiLL
Chamber being filled
HEAt
Heater temperature below 92°C
92 to 136
Heating to sterilizing stage
S135.5
‘S’ flashing, indicates sterilizing begun
and timing started
cond
Steam being discharged and
condensed
dry
Load being dried
End
Cycle complete
Ser
Service set to display at 1500 cycles.
This will not inhibit the use of the
autoclave, but, do arrange a service.
ST-IM29h
SES LS3
AUTOCLAVE
17. If a cycle “With Drying” is selected then commencement SAFETY CHECKS
of the drying phase is indicated by the display ‘dry’
accompanied by a rapid intermittent audible signal. 24. Users should ensure that the following periodic safety
When this signal is heard, maximum drying will be
checks are carried out at the stated intervals:achieved if the chamber door is opened halfway and
then closed until it touches the metal catch on the front Weekly
¬ Check that the door opens and closes easily
fascia panel, leaving a small gap (approx. 1cm) for
¬ Check the door seal for any signs of damage
ventilation. Instruments can be taken out any time
¬ Check that the secondary door catch latches
during the drying phase, but best results will be
effectively
achieved by waiting until the automatic cycle is
¬ Check for any obvious escape of steam or water
complete.
during a cycle (i.e. other than is normal from the top
18. On completion of a sterilizing cycle ‘without drying’,
of the reservoir)
the display ‘End’ will appear, accompanied by a brief
audible signal. When the door is opened to remove
CAUTION
load the display will change to ‘door’.
Annual inspections should only be
19. On completion of a sterilizing cycle ‘with drying’ (where
undertaken by a Competent Person.
chamber door is opened slightly during the drying
phase), the display ‘End’ will appear briefly Annually
¬ Check the pressure relief valve operates freely
accompanied by an audible signal and followed, after
and at the set pressure
a few seconds by ‘door’.
¬ Inspect the Pressure System for integrity
20. Open door fully and remove load USING THE TRAY
¬ Check Door micro-switches and interlocks
LIFTER and leave the door open slightly when not in
¬ Check Door locking mechanism for integrity
use.
¬ Check Pressure indicators for correct operation
¬ Check overheat devices for function
AUTOCLAVE CLEANING & CARE
WARNING
Chlorine, even in the concentrations found in tap
water, can cause stainless steel to crack and could
damage the chamber. Disconnect from the mains
electrical supply before cleaning the Autoclave.
UK Guidance
Inspections can be arranged by contacting the Eschmann
After Sales Service Department, see inside cover for contact
details. Eschmann can also provide comprehensive service
contracts, which cover preventive maintenance to ensure
trouble free operation of your autoclave as well as an annual
inspection of the pressure system to satisfy the requirements
of the Pressure Systems Safety Regulations 2000.
21. Keep chamber trays, door seal and chamber face
clean. These should only be cleaned with a lint-free
MAINTENANCE
cloth. Clean the outside of the autoclave by wiping
down with a cloth dampened with a 70% solution of (Ensure you have read pages 3-5)
industrial methylated spirit (IMS) and water. Allow to
Fuse Renewal
dry by evaporation.
Note: Do not use abrasive powders, chemicals, or 25. Fuses are fitted at the back of the autoclave (Fig. 1,
solutions containing chlorine to clean the autoclave.
detail). For fuse ratings refer to ‘TECHNICAL DATA’.
22. The reservoir must be drained weekly and be allowed
To extract a fuse switch ‘off’ the unit and disconnect
to dry (Fig. 6). When refilling see section 6 and
from the mains power supply, insert a screwdriver or
‘Reservoir Water Quality Caution’ on page 3, DO
small coin in the slot of the fuse holder and twist it
NOT USE TAP WATER. Regular cleaning of the
counter-clockwise. After inspecting or renewing a fuse,
reservoir will reduce the effects of excessive handpiece
reverse the above procedure to re-secure fuse holder.
lubricant which could be detrimental to the function of
Preventive Maintenance Agreement
the autoclave.
23. Attention to the following will increase the life of the 26. We would strongly recommend that a ‘P.M.A.’ is taken
out on your Little Sister 3 Autoclave. Although the
your Little Sister 3 Autoclave:
autoclave requires minimal maintenance, it is important
a. After use leave chamber door slightly open.
to have the autoclave checked and calibrated at
b. At weekly intervals, lightly clean door seal and
regular intervals. This ensures that the exacting
chamber face with a lint-free cloth.
conditions necessary for sterilization are maintained
throughout the unit’s working life.
ST-IM29h
P7/12
Error Correction
27. If, after switching ‘on’ power there is no visual display,
or audible tone, first check power supply connections.
Also check all 3 fuses at rear of unit (see Fuse Renewal).
If any error occurs during a cycle (i.e. any time after
selecting a programme), the cycle will abort and provided
power supply to the unit is maintained, the error will be
indicated by one of the visual displays shown in Table 1.
If power fails during a cycle, check supply conditions,
fuses, and connections as indicated in this paragraph.
Overheating
28. In the unlikely event of overheating, the red overheat
warning lamp (Fig. 1) will illuminate. If this happens,
first allow approximately 10 to 15 minutes for the
autoclave to cool, then check the water level in
reservoir. When the water level is correct, press the
button marked ‘PRESS TO RESET’ at the rear of the
cabinet (Fig.1, detail) and re-start the cycle in the
normal way. If the fault persists, switch off the unit and
call an Eschmann trained engineer.
Note: Should the ‘press to reset’ thermostat operate
in a nil water condition, the chamber temperature is
below 138°C. The maximum chamber temperature
on overheat, to melt the thermal fuse is 250°C.
Cleaning the Filter
29. The Little Sister 3 Autoclave is fitted with a filter which
will require cleaning by a qualified service engineer.
This should be carried out at least annually.
P8/12
ST-IM29h
SES LS3
AUTOCLAVE
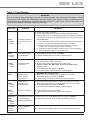
Table 1 Fault Finding
WARNING
If an error display appears during a cycle, do not switch-off power until discharge of hot water or steam
into reservoir has stopped. Do not attempt to open the chamber door until the unit has cooled and internal
pressure has fallen sufficiently to release the pressure safety bolt. Loads whose cycles are aborted by one
of these error displays should be treated as non-sterile.
DISPLAY
CAUSE
REMEDY
a. Check local supply conditions
b. Check supply plug wiring and power cable for possible breaks.
c. Because there can be no guarantee that the load has been sterilised,
‘ELECt’ will continue to be displayed after power has been restored.
ELECt
(+ audible
signal)
Temporary failure in
the mains supply to
unit.
ERR2
(+ audible
signal)
Door switch faulty
or maladjusted.
LoH2O
(+ audible
signal)
Insufficient water
in reservoir
ERR3
Water failed to
enter chamber
from reservoir
To re-start cycle:
i. Wait until discharge of water or steam into reservoir has stopped.
ii. Switch ‘off’ power and wait approximately 10 seconds.
iii. Push and hold-in any one of the four programme selection
buttons and, at the same time, switch ‘on’ power.
iv. Release programme selection button as soon as ‘LS3’ appears.
v. Select required programme to re-start cycle.
a. To re-start cycle see remedy for ELECt.
b. If ‘ERR2’ persists call an Eschmann trained engineer.
WARNING: Do Not Open Door
a. For safety reasons, switch ‘off’ power.
b. Check water level in reservoir is above ‘MIN’ mark.
If water is above the ‘MIN’ mark, do not fill to ‘MAX’ mark
during a cycle.
c. To re-start cycle see remedy for ELECt.
d. If ‘LoH2O’ persists call an Eschmann trained engineer.
WARNING: Do Not Open Door
a. Allow unit to cool, there may be hot water in the chamber.
To re-start cycle see remedy for ELECt.
b. If these errors persist call an Eschmann trained engineer.
Water level in
chamber has
dropped slightly.
a. Wait for any discharge of water or steam into reservoir to cease.
b. Switch ‘off’ power and carry out water level check, as for ‘LoH2O’.
c. To re-start cycle see remedy for ELECt.
d.If ‘H2O’ persists call an Eschmann trained engineer.
ERR5
(+ audible
signal)
Heater not working
a. Check RESET button (see para 28).
b. If ‘ERR5’ persists call an Eschmann trained engineer.
ERR6,7,8,9
ERR8
ERR9
(+ audible
signal)
Temperatures outside
pre-programmed
limits for sterilization
a. Allow unit to cool. To re-start cycle see remedy for ELECt.
b. If these errors persist call an Eschmann trained engineer.
door/tESt
Flashing
alternately
Door closed with
power on.
ERR4
(+ audible
signal)
ST-IM29h
a. Leave door open slightly when not in use before removing power.
P9/12
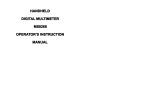
Renew paper roll as follows:
a. Open autoclave chamber door to provide more access.
b. Push door latch button (Fig. 7,2) sideways, in direction of
arrow and pull door open to expose paper roll (Fig. 7,4).
Printer Output
c.
If any paper remains in the printer, tear end off against
The printer output gives the following information:
paper tear bar (Fig. 7,8) and carefully withdraw the
remaining paper backwards from the rear of printer
¬ Manufacturer’s name
Eschmann Equipment
mechanism (Fig. 7,5).
¬ Machine type
SES Little Sister 3
¬ Serial number
Alpha numeric code
d. Compress paper roll spring-loaded retainer button
¬ Cycle type
e.g. 134°C no drying
(Fig. 7,6) and withdraw empty paper spool from spindle.
¬ Time and date started
hh:mm:ss on dd:mm:yy
e. Take new roll of paper, separate paper end from the roll.
¬ Counter reading
Five digits with leading zeros
Remove any damaged or gummed part of the paper.
¬ Time/temp information
Time every 22 secs
f.
Compress paper roll spring-loaded retainer button
(approx.) + temp. + graph
(Fig. 7,6) and locate new paper roll on spindle with
of temperature.
paper unrolling counter-clockwise as seen from open
¬ Cycle ended message
The ‘cycle end’ is defined
end of spindle (Fig 7).
as the end of the
g.
Using
scissors, trim end of paper roll at an angle of
sterilizing phase.
approximately
30° (Fig. 8) and insert this end of the
¬ Time and date ended
hh:mm:ss on dd:mm:yy
paper into the paper insert slot (Fig. 8,1). Press paper
If an error occurs during the cycle, it is recorded with date
feed actuator arm (Fig. 7,7) until mechanism grips
and time on the printout and the message ‘CYCLE FAILED’.
paper and pulls it through to front of printer door.
Errors are designated by error codes as follows:
h. Turn paper roll by hand to take up any slack paper
i.
Close the printer door. Check paper feed by pressing
ERR1 - Faulty temperature sensor/channel
paper feed button (Fig. 7,3) until the end of the
detected (‘ELECt’ on display)
trimmed paper is clear of the tear bar. Ensure that the
ERR2 - Door open during cycle
paper feeds freely from the printer.
ERR3 - Chamber did not fill with water
Ribbon Cartridge Renewal
ERR4 - Water loss early in cycle
ERR5 - No heat
Renew ribbon cartridge as follows:
ERR6 - Control temperature low
a. Remove paper roll.
ERR7 - Control temperature high
b. Support door with left hand and press upwards with
right hand on bottom of printer mechanism chassis
ERR8 - Monitor temperature low
(Fig. 9) and separate chassis from door.
ERR9 - Monitor temperature high
OPERATING INSTRUCTIONS
FOR PRINTER
CAUTION:
These error codes will generally require investigation by
an Eschmann trained engineer.
Front Panel Controls
Do not pull printer mechanism chassis from
door until catch has been released.
c.
All controls for the printer are on the front of the panel.
a. Door Latch Button - To open door (Fig. 7,1) push the d.
door latch (Fig. 7, 2) sideways, in the direction of
arrow, and pull the door open to expose paper roll
e.
(Fig. 7,4).
b.
Paper Feed Button - Ensure the sterilizer mains ‘on/
off’ switch is in the ‘I’ (on) position. Press lower part of
f.
paper feed button (Fig. 7,3) to activate paper feed,
which will continue for as long as the button is
depressed.
g.
Paper Roll Renewal
CAUTION:
DO NOT USE ALTERNATIVE PAPER ROLLS
The quality and size of paper rolls used in the printer,
can only be supplied by Eschmann Equipment.
P10/12
Leaving printer door fully open, expose printer
mechanism and ribbon cartridge (Fig. 10,1).
Pinch the end of ribbon cartridge marked ‘PUSH’
(Fig. 10,1) and remove cartridge.
Install new cartridge, checking that left hand side of
cartridge is correctly located on drive shaft, and
CAREFULLY press cartridge into place.
Ensure ribbon is taut. If necessary tighten ribbon by
turning faceted disc (Fig. 10,2) on cartridge, clockwise,
using finger or fingernail.
Fit paper roll as described above.
Spares Pack
A spares pack is available comprising:
¬ Five paper rolls
¬ Two ribbon cartridges
The spares pack is available from Eschmann Equipment
under catalogue number 87-034-05.
ST-IM29h
SES LS3
AUTOCLAVE
Setting Date and Time
1.
2.
To change the clock setting (e.g. from GMT to BST or
the reverse) proceed as follows:
a. Select mains ‘on/off switch to ‘0’ (off).
b. Refer to Fig. 11, push and hold down buttons
SW1 and SW4 simultaneously then select ‘on/
off’ switch to ‘I’ (on).
c. The display will read ‘01’.
d. Then proceed as described in paragraph 2 (a)
to (g).
To set the date and time proceed as
a. If closed, open chamber door.
b. Display reads ‘01’. Push and hold down button
SW1 (Fig.11). Observe that number changes to
02,03 etc. through to 12. Also note that pushing
and holding SW2 makes the number decrease.
Use SW1 and SW2 to set the number corresponding to the month (01=January etc.). Push
SW3 to retain selection.
c. Display reads ‘dy01’. Again use SW1 and/or
SW2 to display the day of the month (push SW3
to retain the day).
Note: The computer will prevent entry of dates
such as 31st November.
d. Display reads ‘yr00’. Use SW1/SW2 to set any year
from 00 to 99 e.g. 97. Then push SW3 to retain it.
e. Display reads ‘hr00’. Use SW1/SW2 to set the
hour - the system utilises a 24 hour clock. Push
SW3 to retain.
f.
Display reads ‘in00’ (minutes). Use SWI/SW2 to
show current minutes and push SW3 to retain it.
g. The clock is now set.
1
2
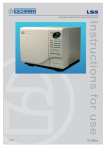
1.
2.
Paper Insert Slot
Printer Mechanism Chassis
Fig. 8. Paper Feed
Fig. 9. Ribbon Cartridge
1
2
8
1.
2.
3
4
5
2
6
Fig. 10. Ribbon Cartridge in Position
7
1
1.
2.
3.
4.
5.
6.
7.
8.
Fig. 7. Printer
ST-IM29h
Ribbon Cartridge
Faceted Disc
Printer Door
Door Latch
Paper Feed Button
Paper Roll
Printer Mechanism
Spring-Loaded Retainer Button
Paper Feed Actuator Arm
Paper Tear Bar
Programmes
without drying
Programmes
with drying
{
{
SW1
134°C
SW2
121°C
SW3
134°C
SW4
121°C
Fig. 11. Setting Date and time
P11/12
TECHNICAL DATA
ELECTRICAL
Supply
220V/230V,
50/60 Hz a.c.
For use with alternating current
Loading
Volts
220V
230V
Standard
1.9kW
2.0kW
Long
2.4kW
2.6kW
Fuses
Standard
220V - 13A (Pt.No.380002) (x2)
230V - 10A (Pt.No.380003) (x2)
Long
230V - 15A (Pt.No.301871) (x2)
220V - 15A (Pt.No.301871) (x2)
All versions F400mA (Pt.No.696181) (x1)
SAFETY STANDARDS
IEC 1010-1 (1990) - Standard version only
IEC 601-1 (1977)
BS5724:Part 1 (1979)
ESCHLE (Second Edition 1986)
EN 61010-1 (1993) inc. Amendment 2 (1995)
EN 61010-2-041 (1996)
STERILIZING
Time
At 134/137°C - 3min 20sec
At 121/124°C - 15min
Typical overall cycle times without drying at 2kW
134°C - 13min
121°C - 24min
Drying time when selected
up to 17 minutes after sterilizing cycle
Operating pressure
137°C - 2.32 bar
134°C - 2.03 bar
124°C - 1.25 bar
121°C - 1.03 bar
Maximum Load per Tray
1.5kg Standard
3.5kg Long
WATER RESERVOIR
Capacity 2.0 litre
WEIGHT (approx.)
Net
Shipping
P12/12
27.5kg Standard
32.0kg Standard
35.5kg Long
40.0kg Long
ST-IM29h
OPEN THIS PAGE OUT FROM
THE OTHER SIDE TO GAIN
EASY ACCESS TO THE
ILLUSTRATIONS WHILST
READING THE TEXT.
ST-IM29h
OPEN HERE
TO GAIN
ACCESS TO
ILLUSTRATIONS
15
1
14
19
13
2
3
4
16
5
6
12
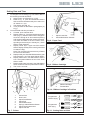
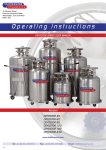
1.
2.
3.
4.
Reservoir lid
Analog Pressure Gauge
Display Window
Programme Indicator
Lamps
5. Programme Selection
Touch Buttons
Unlocked
11
10
9
6.
7.
8.
9.
8
Mains on/off Switch
Printer (if fitted)
Overheat Warning Lamp
Sterilising Trays (4 on
Standard, 2 on Long)
10. Door Interlock Switch
11. Door Seal
7
12.
13.
14.
15.
16.
17.
17
18
Chamber Door
Electric Door Bolt
Pressure Door Bolt
18. Fuses
Door Safety Catch
19. Serial Number Plate
Overheat Reset Button
Power Supply Cable
Fig. 1. Little Sister 3 Autoclave
(Long Version + Printer)
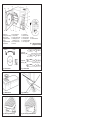
Locked
134°C
Programmes
without drying
Programmes
with drying
Programme Selection Touch Buttons
121°C
134°C
Programme Indicator Lamps
121°C
To Open
Fig. 2. Door Controls
Fig. 5. Control Panel
Fig. 3. Water Reservoir
Fig. 6. Drain Tap
Fig. 4. Sterilising Chamber Long
Fig. 4a. Sterilising Chamber Standard