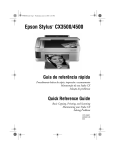
1
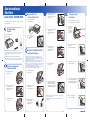
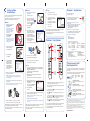
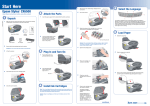
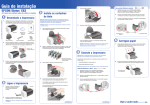
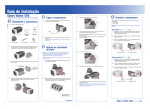
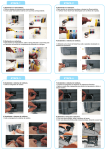
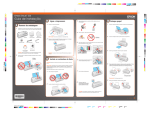
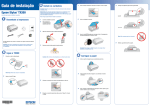
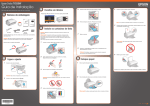
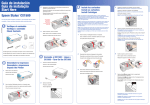
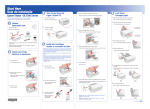
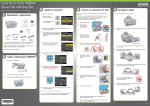
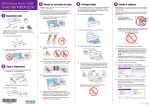
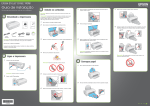
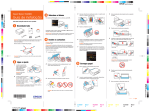
Guia de instalação
Start Here
3
®
Epson Stylus CX3500/4500
1
Leia este guia antes de utilizar o produto. • Please read these instructions
Ligue a Stylus CX
Turn On the Stylus CX
4
Coloque os cartuchos no suporte
correspondente a cada cor.
5
Insert the cartridges in the holder
for each color.
1
Conecte o cabo de eletricidade.
Connect the power cable.
2
Desembale tudo
Unpack
5
Pressione os cartuchos até que eles
"cliquem" no lugar.
2
Pressione o botão
Abra a bandeja
de saída e a
sua extensão.
Open the output
tray and pull out
its extension.
Press the cartridges down until
they click.
Remova toda a fita adesiva.
Remove all the tape.
Abra o suporte para papel e as suas extensões.
Open the paper support and pull up its extensions.
before using the printer.
1
Carregue o papel
Load Paper
Bandeja de saída
On.
4049428-00 XXX
button.
4 cartuchos de tinta
4 ink cartridges
3
6
Se faltar alguma peça, entre em contato com a Epson® como descrito aqui.
4
Nota: As ilustrações mostradas são da Stylus CX4500, mas as instruções
também se aplicam à Stylus CX3500, a não ser quando se indicar o
contrário.
If anything is missing, contact Epson® as described on the back.
Note: The illustrations in this sheet show the Epson Stylus CX4500, but the
instructions are the same for the Epson Stylus CX3500 except where noted.
1
Destrave a impressora
Unlock the Printer
Feche a tampa do suporte e
pressione-a para baixo.
Nota: Os cartuchos de tinta que vieram com a impressora terão um
rendimento menor devido ao processo de inicialização da cabeça de
impressão. Este processo só ocorre a primeira vez que ligar o equipamento
e garante o seu melhor desempenho.
Cuidado: Mantenha os cartuchos de tinta longe do alcance das crianças e
não beba a tinta. Não coloque papel antes de instalar os cartuchos.
1
Flip the feeder guard forward.
Close the ink cartridge cover
and press it down.
Instale os cartuchos de tinta
Install Ink Cartridges
Note: The ink cartridges included with this product have a lower yield due
to the ink charging process. This process is carried out the first time you
turn on your printer and guarantees a better performance.
Caution: Keep ink cartridges out of the reach of children and don’t drink
the ink. Don’t load paper before installing the ink cartridges.
Mova o condutor do alimentador
para a frente.
4
7
Feche a unidade do scanner.
Deslize a guia para a esquerda.
Slide the edge guide left.
Close the scanner.
Abra a unidade do scanner.
Abra a unidade do scanner.
Lift up the scanner.
Lift up the scanner.
5
8
2
Remova a fita adesiva do suporte
dos cartuchos de tinta.
2
Remove the tape from the ink
cartridge holder.
Abra a tampa do suporte dos
cartuchos de tinta.
Press the ink button to charge ink.
Charging takes about 2 minutes.
Open the ink cartridge cover.
Feche a unidade do scanner.
Close the scanner.
Carregue o papel contra a borda direita
e deslize a guia esquerda contra ele.
Load paper against the right edge guide
and slide the left edge guide over.
Pressione o botão de tinta para
carregar a tinta. O carregamento
leva aproximadamente 2 minutos.
Cuidado: Não desligue a Stylus CX enquanto a luz On estiver piscando
ou você desperdiçará tinta.
3
Paper support
Output tray
Press the
2
Suporte de papel
3
Balance os cartuchos de tinta,
depois desembale-os.
Shake the ink cartridges,
then unpack them.
Caution: Don’t turn off the Stylus CX while the On light is flashing or
you’ll waste ink.
6
Retorne o condutor para trás.
Flip the feeder guard back.
6
Instale o software
Install Software
Macintosh
1
Perguntas? • Any Questions?
Mac OS 9
1
Coloque o CD Stylus CX na unidade
do computador.
Abra o Seletor no menu Apple®.
Procure por informações aqui:
Look here for answers:
Access the Chooser in the Apple® menu.
Insert the Stylus CX CD.
O software é compatível com Windows® 98SE, Me, 2000 e XP, e Macintosh®
OS 9.1 a 9.2.2 e OS X 10.2.x a 10.3.x.
Your software works with Windows 98SE, Me, 2000, and XP, and
Macintosh® OS 9.1 to 9.2.2 and OS X 10.2.x and 10.3.x.
®
2
Windows
1
2
Clique no ícone do CD-ROM da
Epson na sua área de trabalho e
depois clique no ícone da Epson
.
Select your Stylus CX, your USB
port, and Background Printing On.
Open the Epson CD-ROM desktop
icon and click the
Epson icon.
Certifique-se de que a Stylus CX
NÃO ESTÁ CONECTADA
ao computador.
3
Guia de referência rápida • Quick Reference book
Informações básicas de uso da Stylus CX.
Basic steps for using the Stylus CX.
Selecione sua Stylus CX, a sua
porta USB e ative a Impressão em
segundo plano.
3
Manual eletrônico Guia do usuário • On-screen
Reference Guide
Clique no ícone na sua área de trabalho para acessar
facilmente informações a respeito da Stylus CX.
Click the desktop shortcut for easy access to
Stylus CX information.
Feche o Seletor.
Selecione Português.
Quit the Chooser.
Select English.
Nota: Caso veja uma janela como
esta, clique em Cancelar e
desconecte o cabo USB. Não é
possível instalar o software
desta maneira.
4
Agora está tudo pronto para copiar, imprimir e escanear! Veja o seu Guia de
referência rápida ou o manual eletrônico Guia do usuário.
Clique em Instalar e siga as
instruções na tela. A instalação do
software demora vários minutos.
You’re ready to copy, print, and scan! See the Quick Reference book or your
on-screen Reference Guide.
Click Install and follow the
on-screen instructions. Software
installation takes several minutes.
Make sure the Stylus CX
is NOT CONNECTED
to your computer.
5
Note: If you see a screen like this,
click Cancel and disconnect the
USB cable. You can’t install your
software that way.
Conecte o cabo USB. Use
qualquer porta USB disponível
no seu computador.
Problemas? • Any Problems?
Connect the USB cable. Use any open USB port.
luz do
interruptor
2
Coloque o CD da Stylus CX na
unidade do computador.
On
light
Insert the Stylus CX CD.
luz de
erro
Selecione Português.
6
Select English.
Remova o CD e reinicie o seu Macintosh.
7
Clique em Instalar e siga
as instruções na tela. A
instalação do software
demora vários minutos.
5
Precisa de papel e tinta?
Need Paper and Ink?
Mac® OS X
1
Nota: Se a instalação não continuar depois de um momento,
certifique-se de que conectou o cabo corretamente e de que a
Stylus CX está ligada.
When prompted, connect the USB cable. Use any open USB port on
your computer.
Vá até o Centro de Impressão (Print Center) ou até o Printer Setup
Utility (Utilitário de configuração de impressora) na pasta Aplicativos
(Applications) > Utilitários (Utilities).
Access Print Center or the Printer Setup Utility in
Applications > Utilities.
Quando lhe for pedido, conecte o cabo USB. Use qualquer porta USB
disponível no seu computador.
2
Para obter os melhores resultados de impressão e cópia, use papéis e tintas
genuínos Epson. Você pode adquiri-los através do seu revendedor Epson
mais próximo.
botão
Start Color
For the best prints and copies, use genuine Epson ink and paper. Get them
from your local store or contact Epson for dealer referal.
Start Color
button
Siga qualquer instrução apresentada na tela para adicionar a
impressora Stylus CX.
T046120
Preta
Black
Follow any on-screen instructions to add the Stylus CX printer.
3
Note: If installation doesn’t continue after a moment, make sure you
securely connected and turned on the Stylus CX.
CX3500
Quando esta tela aparecer, selecione
EPSON USB no alto da tela e Stylus
CX mais abaixo.
• Se a luz vermelha de erro
ligá-la para corrigir o erro.
Feche o Centro de Impressão (Print Center) ou o Printer Setup Utility
(Utilitário de configuração de impressora).
Note: If you print with Classic Mode applications, install your software
on OS 9 too.
Agora está tudo pronto para copiar, imprimir e escanear! Veja o seu Guia de
referência rápida ou o manual eletrônico Guia do usuário.
Agora está tudo pronto para copiar, imprimir e escanear! Veja o seu Guia de
referência rápida ou o manual eletrônico Guia do usuário.
You’re ready to copy, print, and scan! See the Quick Reference book or your
on-screen Reference Guide.
You’re ready to copy, print, and scan! See the Quick Reference book or your
on-screen Reference Guide.
continue
Premium Bright White Paper
Ultra-smooth white paper perfect for everyday use.
If the red
the error.
continue
DURABrite® Ink Glossy Photo Paper
Papel de maior gramatura para ampliações e fotos
de maior duração.
estiver acesa, desligue a Stylus CX e volte a
Error light is on, turn the Stylus CX off and then on to clear
DURABrite® Ink Glossy Photo Paper
Heavier weight paper for long-lasting enlargements
and snapshots.
• Se a luz vermelha de erro
ainda estiver acesa ou piscando, cheque o
papel carregado e os cartuchos de tinta, também procure por qualquer
fita adesiva que possa ainda estar no equipamento.
Quit Print Center or the Printer Setup Utility.
Quando terminar, remova o CD e reinicie o seu computador.
When you’re done, remove the CD and restart your computer.
T047420
Amarela
Yellow
Clique em Adicionar.
Nota: Se for imprimir com aplicativos no modo clássico, também
instale o software em OS 9.
6
T047320
Magenta
Premium Bright White Paper
Papel branco super liso, perfeito para o uso do
dia-a-dia.
If the green On light is flashing, just wait until it stops before pressing any
control panel buttons.
Click Add.
5
T047220
Ciano
Cyan
CX4500
• Se a luz verde (On) estiver piscando, aguarde até que ela pare antes de
pressionar qualquer botão no painel de controle.
At this screen, select EPSON USB at
the top and Stylus CX below.
4
(52-55) 532-84-008
(1-800) 506-07-00
(51-1) 224-2336
(58-212) 240-1111
Copy
window
Selecione a impressora conforme descrito a seguir.
Select your printer as described below.
Click Install and follow the
on-screen instructions.
Software installation takes
several minutes.
• Suporte telefônico • Telephone Support
Argentina
(54-11) 4346-0300
México
Brasil
(55-11) 4196-6350
México, D.F.
Chile
(56-2) 230-9500
Resto del país
Colombia
(57-1) 523-5000
Perú
Costa Rica
(50-6) 210-9555
Venezuela
(1-800) 377-6627
janela Copy
(Cópia)
Remove the CD and restart your Macintosh.
4
Suporte técnico • Technical Support
• Internet
http://www.epson.com.br
http://www.latin.epson.com
Suporte técnico do software • Software Technical Support
• ArcSoft PhotoImpression™
• EPSON Smart Panel™
(510) 445-8616
(510) 440-9901
Fax: (510) 445-8601
Web: www.arcsoft.com
Web: www.newsoftinc.com
E-mail: [email protected]
E-mail: [email protected]
Error
light
3
Ajuda na tela • On-screen help with your software
Selecione Ajuda ou ? quando estiver usando o software.
Select Help or ? when you’re using your software.
If the red
Error light is still on or flashing, check your paper loading and
ink installation, and look for remaining packing material.
Veja o seu Guia de referência rápida ou o manual eletrônico Guia do usuário
para maiores informações a respeito de resolução de problemas.
See your Quick Reference book and on-screen Reference Guide for more
problem-solving information.
Epson e Epson Stylus são marcas registradas e EPSON Smart Panel é uma marca comercial da Seiko
Epson Corporation. DURABrite é uma marca registrada da Epson America, Inc.
Aviso geral: outros nomes de produtos são aqui usados apenas com o fim de identificação e podem
ser marcas comerciais de seus respectivos donos. A Epson nega todo e qualquer direito sobre essas
marcas.
Epson and Epson Stylus are registered trademarks and EPSON Smart Panel is a trademark of Seiko
Epson Corporation. DURABrite is a registered trademark of Epson America, Inc.
General Notice: Other product names used herein are for identification purposes only and may be
trademarks of their respective owners. Epson disclaims any and all rights in those marks.
© 2004 Epson America, Inc. 6/04
País de impressão: XXXXXX XX.XX-XX
Printed in XXXXXX XX.XX-XX
CPD-18254
6
Instale o software
Install Software
Macintosh
1
Perguntas? • Any Questions?
Mac OS 9
1
Coloque o CD Stylus CX na unidade
do computador.
Abra o Seletor no menu Apple®.
Procure por informações aqui:
Look here for answers:
Access the Chooser in the Apple® menu.
Insert the Stylus CX CD.
O software é compatível com Windows® 98SE, Me, 2000 e XP, e Macintosh®
OS 9.1 a 9.2.2 e OS X 10.2.x a 10.3.x.
Your software works with Windows 98SE, Me, 2000, and XP, and
Macintosh® OS 9.1 to 9.2.2 and OS X 10.2.x and 10.3.x.
®
2
Windows
1
2
Clique no ícone do CD-ROM da
Epson na sua área de trabalho e
depois clique no ícone da Epson
.
Select your Stylus CX, your USB
port, and Background Printing On.
Open the Epson CD-ROM desktop
icon and click the
Epson icon.
Certifique-se de que a Stylus CX
NÃO ESTÁ CONECTADA
ao computador.
3
Guia de referência rápida • Quick Reference book
Informações básicas de uso da Stylus CX.
Basic steps for using the Stylus CX.
Selecione sua Stylus CX, a sua
porta USB e ative a Impressão em
segundo plano.
3
Manual eletrônico Guia do usuário • On-screen
Reference Guide
Clique no ícone na sua área de trabalho para acessar
facilmente informações a respeito da Stylus CX.
Click the desktop shortcut for easy access to
Stylus CX information.
Feche o Seletor.
Selecione Português.
Quit the Chooser.
Select English.
Nota: Caso veja uma janela como
esta, clique em Cancelar e
desconecte o cabo USB. Não é
possível instalar o software
desta maneira.
4
Agora está tudo pronto para copiar, imprimir e escanear! Veja o seu Guia de
referência rápida ou o manual eletrônico Guia do usuário.
Clique em Instalar e siga as
instruções na tela. A instalação do
software demora vários minutos.
You’re ready to copy, print, and scan! See the Quick Reference book or your
on-screen Reference Guide.
Click Install and follow the
on-screen instructions. Software
installation takes several minutes.
Make sure the Stylus CX
is NOT CONNECTED
to your computer.
5
Note: If you see a screen like this,
click Cancel and disconnect the
USB cable. You can’t install your
software that way.
Conecte o cabo USB. Use
qualquer porta USB disponível
no seu computador.
Problemas? • Any Problems?
Connect the USB cable. Use any open USB port.
luz do
interruptor
2
Coloque o CD da Stylus CX na
unidade do computador.
On
light
Insert the Stylus CX CD.
luz de
erro
Selecione Português.
6
Select English.
Remova o CD e reinicie o seu Macintosh.
7
Clique em Instalar e siga
as instruções na tela. A
instalação do software
demora vários minutos.
5
Precisa de papel e tinta?
Need Paper and Ink?
Mac® OS X
1
Nota: Se a instalação não continuar depois de um momento,
certifique-se de que conectou o cabo corretamente e de que a
Stylus CX está ligada.
When prompted, connect the USB cable. Use any open USB port on
your computer.
Vá até o Centro de Impressão (Print Center) ou até o Printer Setup
Utility (Utilitário de configuração de impressora) na pasta Aplicativos
(Applications) > Utilitários (Utilities).
Access Print Center or the Printer Setup Utility in
Applications > Utilities.
Quando lhe for pedido, conecte o cabo USB. Use qualquer porta USB
disponível no seu computador.
2
Para obter os melhores resultados de impressão e cópia, use papéis e tintas
genuínos Epson. Você pode adquiri-los através do seu revendedor Epson
mais próximo.
botão
Start Color
For the best prints and copies, use genuine Epson ink and paper. Get them
from your local store or contact Epson for dealer referal.
Start Color
button
Siga qualquer instrução apresentada na tela para adicionar a
impressora Stylus CX.
T046120
Preta
Black
Follow any on-screen instructions to add the Stylus CX printer.
3
Note: If installation doesn’t continue after a moment, make sure you
securely connected and turned on the Stylus CX.
CX3500
Quando esta tela aparecer, selecione
EPSON USB no alto da tela e Stylus
CX mais abaixo.
• Se a luz vermelha de erro
ligá-la para corrigir o erro.
Feche o Centro de Impressão (Print Center) ou o Printer Setup Utility
(Utilitário de configuração de impressora).
Note: If you print with Classic Mode applications, install your software
on OS 9 too.
Agora está tudo pronto para copiar, imprimir e escanear! Veja o seu Guia de
referência rápida ou o manual eletrônico Guia do usuário.
Agora está tudo pronto para copiar, imprimir e escanear! Veja o seu Guia de
referência rápida ou o manual eletrônico Guia do usuário.
You’re ready to copy, print, and scan! See the Quick Reference book or your
on-screen Reference Guide.
You’re ready to copy, print, and scan! See the Quick Reference book or your
on-screen Reference Guide.
continue
Premium Bright White Paper
Ultra-smooth white paper perfect for everyday use.
If the red
the error.
continue
DURABrite® Ink Glossy Photo Paper
Papel de maior gramatura para ampliações e fotos
de maior duração.
estiver acesa, desligue a Stylus CX e volte a
Error light is on, turn the Stylus CX off and then on to clear
DURABrite® Ink Glossy Photo Paper
Heavier weight paper for long-lasting enlargements
and snapshots.
• Se a luz vermelha de erro
ainda estiver acesa ou piscando, cheque o
papel carregado e os cartuchos de tinta, também procure por qualquer
fita adesiva que possa ainda estar no equipamento.
Quit Print Center or the Printer Setup Utility.
Quando terminar, remova o CD e reinicie o seu computador.
When you’re done, remove the CD and restart your computer.
T047420
Amarela
Yellow
Clique em Adicionar.
Nota: Se for imprimir com aplicativos no modo clássico, também
instale o software em OS 9.
6
T047320
Magenta
Premium Bright White Paper
Papel branco super liso, perfeito para o uso do
dia-a-dia.
If the green On light is flashing, just wait until it stops before pressing any
control panel buttons.
Click Add.
5
T047220
Ciano
Cyan
CX4500
• Se a luz verde (On) estiver piscando, aguarde até que ela pare antes de
pressionar qualquer botão no painel de controle.
At this screen, select EPSON USB at
the top and Stylus CX below.
4
(52-55) 532-84-008
(1-800) 506-07-00
(51-1) 224-2336
(58-212) 240-1111
Copy
window
Selecione a impressora conforme descrito a seguir.
Select your printer as described below.
Click Install and follow the
on-screen instructions.
Software installation takes
several minutes.
• Suporte telefônico • Telephone Support
Argentina
(54-11) 4346-0300
México
Brasil
(55-11) 4196-6350
México, D.F.
Chile
(56-2) 230-9500
Resto del país
Colombia
(57-1) 523-5000
Perú
Costa Rica
(50-6) 210-9555
Venezuela
(1-800) 377-6627
janela Copy
(Cópia)
Remove the CD and restart your Macintosh.
4
Suporte técnico • Technical Support
• Internet
http://www.epson.com.br
http://www.latin.epson.com
Suporte técnico do software • Software Technical Support
• ArcSoft PhotoImpression™
• EPSON Smart Panel™
(510) 445-8616
(510) 440-9901
Fax: (510) 445-8601
Web: www.arcsoft.com
Web: www.newsoftinc.com
E-mail: [email protected]
E-mail: [email protected]
Error
light
3
Ajuda na tela • On-screen help with your software
Selecione Ajuda ou ? quando estiver usando o software.
Select Help or ? when you’re using your software.
If the red
Error light is still on or flashing, check your paper loading and
ink installation, and look for remaining packing material.
Veja o seu Guia de referência rápida ou o manual eletrônico Guia do usuário
para maiores informações a respeito de resolução de problemas.
See your Quick Reference book and on-screen Reference Guide for more
problem-solving information.
Epson e Epson Stylus são marcas registradas e EPSON Smart Panel é uma marca comercial da Seiko
Epson Corporation. DURABrite é uma marca registrada da Epson America, Inc.
Aviso geral: outros nomes de produtos são aqui usados apenas com o fim de identificação e podem
ser marcas comerciais de seus respectivos donos. A Epson nega todo e qualquer direito sobre essas
marcas.
Epson and Epson Stylus are registered trademarks and EPSON Smart Panel is a trademark of Seiko
Epson Corporation. DURABrite is a registered trademark of Epson America, Inc.
General Notice: Other product names used herein are for identification purposes only and may be
trademarks of their respective owners. Epson disclaims any and all rights in those marks.
© 2004 Epson America, Inc. 6/04
País de impressão: XXXXXX XX.XX-XX
Printed in XXXXXX XX.XX-XX
CPD-18254