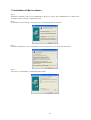
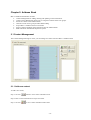
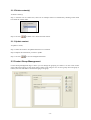
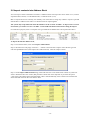
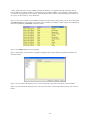
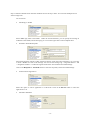
1
MoCo™ SMS Suite
User’s Manual
-1-
Chapter 1: Setting & Starting Up MoCo ................................................................................................................ 5
1.1 Hardware Setup ............................................................................................................................................ 5
1.1.1 USB GSM modem................................................................................................................................. 5
1.1.2 USB GSM Modem Driver Installation for Win2000/Win2003 ............................................................. 6
1.1.3 USB GSM Modem Driver Installation for WinXP................................................................................ 8
1.1.4 USB GSM Modem Driver Installation for Win Vista ......................................................................... 10
1.2 Installation of MoCo software .................................................................................................................... 12
1.3 Uninstalling MoCo application................................................................................................................... 14
1.4 Starting up MoCo ....................................................................................................................................... 15
1.4.1 Running MoCo Professional/Agent/Server on Windows Vista........................................................... 15
1.4.2 Automatic Start up............................................................................................................................... 16
1.4.3 Manually starting MoCo...................................................................................................................... 17
Chapter 2: Address Book...................................................................................................................................... 18
2.1 Contact Management .................................................................................................................................. 18
2.1.1 Add new contact .................................................................................................................................. 18
2.1.2 Delete contact(s) .................................................................................................................................. 19
2.1.3 Update contact ..................................................................................................................................... 19
2.2 Contact Group Management....................................................................................................................... 19
2.2.1 Add new contact group ........................................................................................................................ 20
2.2.2 Delete contact group ............................................................................................................................ 20
2.2.3 Update contact group........................................................................................................................... 20
2.3 Search the Address Book............................................................................................................................ 21
2.4 Generate Virtual Group .............................................................................................................................. 22
2.5 Export Address Book to file ....................................................................................................................... 22
2.6 Import contacts into Address Book ............................................................................................................ 23
2.7 Built-in Referal and Membership Points System........................................................................................ 25
Chapter 3: Search Engine ..................................................................................................................................... 27
3.1 Text Search ................................................................................................................................................. 27
3.2 Selection Search ......................................................................................................................................... 27
3.3 Date Search................................................................................................................................................. 28
3.4 Select Search Result ................................................................................................................................... 29
Chapter 4: Sending SMS ...................................................................................................................................... 30
4.1 Select Recipients using Advanced Recipient Selection.............................................................................. 31
Chapter 5: Scheduler ............................................................................................................................................ 33
5.1 Adding, Deleting and Updating Schedule .................................................................................................. 33
5.1.1 Add new Schedule ............................................................................................................................... 33
5.1.2 Delete Schedule ................................................................................................................................... 35
5.1.3 Updating Schedule............................................................................................................................... 35
5.2 Scheduling for sending SMS at regular interval ......................................................................................... 35
5.3 Scheduler Calendar..................................................................................................................................... 36
Chapter 6: Template Editor .................................................................................................................................. 37
6.1 Add new Template...................................................................................................................................... 37
6.2 Delete Template.......................................................................................................................................... 37
6.3 Updating Template ..................................................................................................................................... 38
6.4 Message Tags ............................................................................................................................................. 38
Chapter 7: Transaction Manager .......................................................................................................................... 40
7.1 Search Transaction Database ...................................................................................................................... 40
7.1.1 All Transaction Records ...................................................................................................................... 40
7.1.2 Today’s Transaction ............................................................................................................................ 40
7.1.3 Set Query Parameter ............................................................................................................................ 40
7.2 Transaction Report Generation................................................................................................................... 41
7.3 Management of Transaction Records ......................................................................................................... 42
7.3.1 View Transaction Detail ...................................................................................................................... 42
7.3.2 Transaction Outbox Options................................................................................................................ 42
7.3.3 Transaction Inbox Options................................................................................................................... 43
7.3.4 Delete multiple records........................................................................................................................ 44
Chapter 8: Event Manager .................................................................................................................................... 45
8.1 Add new Event ........................................................................................................................................... 45
8.1.1 Add new Event based on Specific Date............................................................................................... 45
8.1.2 Add new Event based on Address Book.............................................................................................. 46
-2-
8.2 Delete Event ............................................................................................................................................... 47
8.3 Updating Event ........................................................................................................................................... 48
Chapter 9: Automatic Response System............................................................................................................... 49
9.1 Add new Rule ............................................................................................................................................. 50
9.2 Delete Rule ................................................................................................................................................. 56
9.3 Updating Rule............................................................................................................................................. 56
Chapter 10: Campaign Manager ........................................................................................................................... 57
10.1 Add new Campaign .................................................................................................................................. 57
10.2 Delete Campaign ...................................................................................................................................... 58
10.3 Updating Campaign .................................................................................................................................. 59
10.4 How it Works............................................................................................................................................ 59
10.4.1 Create an ARS Rule........................................................................................................................... 59
10.4.2 Wait for incoming SMS..................................................................................................................... 60
10.4.3 View Campaign Result ...................................................................................................................... 60
10.4.4 Making use of Campaign Result........................................................................................................ 61
Chapter 11: eVoucher Management System......................................................................................................... 63
11.1 Add new eVoucher Campaign.................................................................................................................. 63
11.2 Delete eVoucher Campaign ...................................................................................................................... 64
11.3 Updating eVoucher Campaign.................................................................................................................. 65
11.4 How it Works............................................................................................................................................ 65
11.4.1 Create an ARS Rule........................................................................................................................... 65
11.4.2 Wait for incoming SMS..................................................................................................................... 66
Chapter 12: Appointment Book............................................................................................................................ 67
12.1 Adding, Deleting and Updating Appointment .......................................................................................... 67
12.1.1 Add new Appointment....................................................................................................................... 67
12.1.2 Delete Appointment........................................................................................................................... 69
12.1.3 Updating Appointment ...................................................................................................................... 69
12.1.4 Changing Appointment Date ............................................................................................................. 69
12.2 Check Response........................................................................................................................................ 70
12.3 Automatic Appointment Confirmation ..................................................................................................... 70
12.4 View Appointment History....................................................................................................................... 71
12.5 Import Appointment List .......................................................................................................................... 72
Chapter 13: Agent Manager.................................................................................................................................. 74
13.1 Add new Agent......................................................................................................................................... 74
13.2 Delete Agent ............................................................................................................................................. 74
13.3 Updating Agent......................................................................................................................................... 75
13.4 View Agent Connection Status................................................................................................................. 75
Chapter 14: Configuration Settings ...................................................................................................................... 76
14.1 Basic Configuration Setting...................................................................................................................... 76
14.1.1 General Settings................................................................................................................................. 76
14.1.2 Address Book Settings....................................................................................................................... 77
14.1.3 Scheduler Settings ............................................................................................................................. 78
14.1.4 Auto Response Settings ..................................................................................................................... 79
14.1.5 Appointment Book Settings............................................................................................................... 80
14.2 Device Settings ......................................................................................................................................... 81
14.2.1 GSM Terminal Settings ..................................................................................................................... 81
14.3 Enterprise Settings.................................................................................................................................... 83
14.3.1 Server Settings ................................................................................................................................... 83
14.3.2 Agent Settings.................................................................................................................................... 84
Chapter 15: Other Features................................................................................................................................... 85
15.1 Delete SIM Card Messages....................................................................................................................... 85
15.2 Printing ..................................................................................................................................................... 85
15.2.1 Print Label ......................................................................................................................................... 85
15.2.2 Print Appointment List ...................................................................................................................... 86
15.2.3 Print Receipt ...................................................................................................................................... 87
15.3 Accounts System ...................................................................................................................................... 89
15.3.1 Add New Transaction ........................................................................................................................ 89
15.3.2 Manage existing account items.......................................................................................................... 90
15.3.3 Query Account System ...................................................................................................................... 90
15.3.4 Accounts Config and Settings............................................................................................................ 91
-3-
15.3.5 Save Accounts Sheet and Cash Book ................................................................................................ 91
15.4 Backup and Restore MoCo Database ....................................................................................................... 92
15.4.1 Backup MoCo Database .................................................................................................................... 92
15.4.2 Restore MoCo Database .................................................................................................................... 92
15.5 Real Time Traffic Monitor ....................................................................................................................... 93
-4-
Chapter 1: Setting & Starting Up MoCo
1.1 Hardware Setup
1.1.1 USB GSM modem
Step 1:
Insert SIM card. Close SIM slot cover. Ensure the SIM door is closed.
Note:
1.
2.
3.
Always ensure the SIM slot cover is closed for normal operation.
When the GSM modem is operational, the yellow LED light will blink at a constant rate.
If MoCo fails to detect the GSM terminal upon starting up, disconnect the terminal, reconnect
and then restart the program.
-5-
1.1.2 USB GSM Modem Driver Installation for Win2000/Win2003
Step 1:
Insert MoCo’s installation CD into CD-Drive.
Step 2:
Connect the GSM modem to the computer’s USB port, using the supplied USB cable. Upon connecting the
GSM modem to the computer’s USB port, the operating system will automatically search for hardware device
driver.
Step 3:
On the Found New Hardware Wizard dialog, click next to proceed.
Step 4:
Select option “Search for a suitable driver for my device (recommended)”. Click “Next” to proceed.
Step 5:
Select option “CD-ROM Drives” only and click “Next” to proceed.
Step 6:
Click “Next” to proceed.
-6-
Step 7:
Click “Yes” to continue the installation in the Digital Signature Not Found dialog.
Step 8:
Wait for Windows to copy all the needed files into your computer. Upon completing the installation, click
“Finish” on the dialog box to complete installation.
-7-
1.1.3 USB GSM Modem Driver Installation for WinXP
Step 1:
Insert MoCo’s installation CD into CD-Drive.
Step 2:
Connect the GSM modem to the computer’s USB port, using the supplied USB cable. The operating system will
automatically search for hardware device driver.
Step 3:
On the Found New Hardware Wizard dialog, select “No, not this time” option. Click next to proceed.
Step 4:
Select “Install the software automatically (Recommended)”. Click next to proceed.
Step 5:
Windows will find iTegno GPRS Wireless Modem driver. Click “Continue Anyway” to proceed.
-8-
Step 6:
Wait for Windows to copy all the needed files into your computer. Upon completing the installation, click
“Finish” on the dialog box to complete installation.
-9-
1.1.4 USB GSM Modem Driver Installation for Win Vista
Step 1:
Insert MoCo’s installation CD into CD-Drive.
Step 2:
Connect the GSM modem to the computer’s USB port, using the supplied USB cable. The operating system will
automatically search for hardware device driver.
Step 3:
On the Found New Hardware Wizard dialog, select “Locate and install driver software” option.
Step 4:
On the “Found New Hardware – USB-Serial Controller” Wizard dialog, select “Don’t search online” option.
- 10 -
Step 5:
The dialog box below will be displayed. Click “Next” button.
Step 6:
Window Vista will show the below dialog box. Select “Install this driver software anyway” option.
Step 7:
Wait for Windows to copy all the needed files into your computer. Upon completing the installation, click
“Close” button on the dialog box to complete installation.
- 11 -
1.2 Installation of MoCo software
Step 1:
With MoCo installation CD in your CD-ROM drive. Browse or explore the CD-ROM directory. Double-click
on Setup.exe file to run MoCo’s application setup.
Step 2:
On the MoCo welcome dialog, click “Next” to proceed with application installation.
Step 3:
Carefully read and Click “Yes” on the Software License Agreement to proceed on with installation.
Step 4:
Click “Next” to install MoCo to default destination folder.
- 12 -
Step 5:
Click “Next” to add MoCo program icon to the program folder.
Step 6:
Wait for all files to be copied into your computer. Click “Finish” to complete the setup.
- 13 -
1.3 Uninstalling MoCo application
The following procedure will uninstall MoCo from your system and remove all files including the database.
Step 1:
Choose Start->Setting->Control Panel. The Windows Control Panel dialog appears.
Step 2:
Double-click ADD/Remove Programs, select MoCo from the list of programs, and click Remove. The
InstallShield Wizard appears.
Step 3:
Follow the InstallShield Wizard to uninstall the Mobile Communicator software.
- 14 -
1.4 Starting up MoCo
Before you start MoCo application, make sure that the USB GSM terminal is properly connected to your
computer. Check and make sure the LED on the terminal is blinking constantly.
1.4.1 Running MoCo Professional/Agent/Server on Windows Vista
If you are running MoCo Professional / Agent / Server on Windows Vista, you will need to specifically
register the Dayview.dll component in order to use the Day View feature of the Appointment Book. This is
because the security feature of Window Vista does not allow MoCo to perform automatic registration of
components. If you are using other versions of Windows, such as Win 2000/2003 or Win XP, you can skip
this section.
The following two ways can be used to register the Dayview.dll component, AFTER installation of MoCo:
1.
Automatic – This method only works if you are running MoCo for the first time after installation. If
you have been using MoCo for some time, see the Manual method below.
Step 1:
After MoCo’s successful installation, there will be a MoCo icon on your desktop. Right-click on the icon, and
select “Run As Administrator” to run MoCo for the first time.
2.
Manual
Step 1:
Click Start Button -> All Programs -> Accessories
Step 2:
Right click Command Prompt and select "Run As Administrator". A DOS Command window opens.
Step 3:
Type the following:
regsvr32 “c:\Program Files\Lexel Technologies\MoCo\DayView.dll”
and press Enter.
- 15 -
Step 4:
You will see the following Dialog box indicating the registration of component is successful.
Step 5:
Close the Dialog box by clicking Ok. Close the Command window. You can now run MoCo normally.
1.4.2 Automatic Start up
Once MoCo is fully installed, when you reboot your computer, MoCo will automatically start up every time you
reboot your computer.
MoCo’s user interface is minimised on the status bar. To restore MoCo’s user interface, double click on MoCo’s
icon.
Double click
here to open
MoCo
- 16 -
1.4.3 Manually starting MoCo
If MoCo is not running, you can start MoCo by: 1.
2.
Double click on the MoCo’s desktop icon, or
Run MoCo from,
Start->Programs->Lexel Technologies->MoCo
MoCo’s user interface is minimised on the status bar. To restore MoCo’s user interface, double click on MoCo’s
icon.
Double click
here to open
MoCo
- 17 -
Chapter 2: Address Book
MoCo’s Address Book feature includes:
• Contact Management for adding, deleting and updating contact information.
• Contact-Group Management allows user to categorize related contacts into groups.
• Search for contacts in the Address Book.
• Generate virtual contact group for Mass SMS sending.
• Export MoCo’s Address Book to external file.
• Import contact information from external file into the Address Book.
• Built-in Referral and Membership Points System
2.1 Contact Management
The Contact Management Page is where you can manage all contacts stored in MoCo’s Address Book.
2.1.1 Add new contact
To add a new contact,
Step 1: Click on
button to clear contact information area.
Step 2: Enter contact information into respective fields.
Step 3: Click on
to save contact information when done.
- 18 -
2.1.2 Delete contact(s)
To delete contact(s),
Step 1: From the List of Contacts box, select one or multiple contacts to be deleted by checking on the check
box beside the contact name.
Step 2: Click on
to delete one or all the selected contacts.
2.1.3 Update contact
To update a contact,
Step 1: Select the contact to be updated from the List of Contacts.
Step 2: Replace the information you want to update.
Step 3: Click on
to save the changed information.
2.2 Contact Group Management
Contact Group Management Page is where you can manage the grouping of contacts. User can create contact
group and assign contacts to each group. Each contact can be assign to zero or more groups. Once the group is
created, user can send SMS to all users belonging to the group.
- 19 -
2.2.1 Add new contact group
To add a new contact group,
button to clear contact group information area.
Step 1: Click on
Step 2: Enter contact group information into respective fields.
Step 3: In the Members List box, select contacts for the contact group by clicking the check box next to the
names.
Click on
to save the contact group.
2.2.2 Delete contact group
To delete contact group,
Step 1: From the List of Contact Group box, select the contact group to be deleted.
Step 2: Click on
to delete.
Step 3: A Delete Contact Group dialog will appear to ask you for confirmation on the action. In the dialog, you
can check the “Delete all contacts within this contact group” option and all the contacts stored within this group
will be deleted also.
2.2.3 Update contact group
To update contact group information, remove or add more contacts into the group,
Step 1: Select the contact group to be updated from the List of Contact Group box.
Step 2: Replace the information to be updated or select more contacts to be included into this group.
Step 3: Click on
to save the changed information.
- 20 -
2.3 Search the Address Book
Step 1: To search the address book, click on
to open search dialog box.
Step 2: Select the field name, search type and enter the parameter. Click Search button to search the database.
Step 3: If any match is found, the result will be return in the list box.
Step 4: Click on the name in the list box to jump to the record in the database.
Select the field to do a
search in the database
Select the search type
for the selected field
Enter the search
parameter here. Some
field does not need a
parameter
Click Search button to
search database
Click on the name to
jump to that record
For more information on the Search Engine, please refer to “Chapter 3 Search Engine”.
- 21 -
2.4 Generate Virtual Group
You can generate mobile phone number in group of 1000 contacts for sending mass SMS. Upon creating the
virtual group, new contact records and group will be added to the Address Book.
The contact information and group can be added, updated or deleted just like a normal contact.
To create a virtual group,
Step 1: From the Tools menu, click on Generate Virtual Group.
Step 2: Enter the group name and description. Enter the first mobile and last mobile number.
Note: the phone number range must be within 1000.
Step 3: Click OK to complete action.
2.5 Export Address Book to file
The entire address book can be exported to either a csv (comma-separated values) file, a tab-delimetered file or
a Microsoft Excel file. You can choose which field within the database to export out.
To Export Address Book,
Step 1: From the File menu, click on the Export Address Book
Step 2: On the Export Address Book dialog, check the individual field name checkbox to select the export
content. Click on the Browse button to select the location and file name of the saved file.
Step 3: Select the type of output file by choosing the delimeter type. You can choose either “Comma” or “Tab”
or “MS Excel”.
Step 4: If you wish to include contact group information in the exported file, checked the “Include contact group
information” option.
Step 5: Click Export button to complete operation.
- 22 -
2.6 Import contacts into Address Book
You can import contacts information into MoCo’s Address Book. The import file can be either in csv (commaseparated-values) format, or a tab-delimited file, or a MS Excel file (*.xls).
MoCo’s import function is extremely user friendly. You will be able to assign any column to import a specified
field in MoCo’s address book. There is no fixed structure for importing data.
The system only accept Microsoft Excel file which are of the versions “97-2003”. To import newer version
of Excel file, you need to save it as “97-2003” version inside the MS Excel first before doing the import.
For illustration purpose, below is a snapshot of a typical MS Excel database file to be imported into MoCo:
To import the file into address book,
Step 1: From the File menu, click on the Import Address Book
Step 2: The below box will popup. Click the “…” button to select the file to import. Select the file type and
enter the SpreadSheet name (if the import file is MS Excel file). Click the “Import” button.
Step 3: On the Import Address Book dialog, match and select the correct field of each column. If you do not
select a field name above the column, that particular column will not be imported. If you select the option
“Auto-retrieve First Name from Full Name field”, MoCo will automatically retrieve the first word of the Full
Name field and insert into the “First Name” field.
- 23 -
* Note: Fields that consist of only numbers normally would have “.0” append to the end of the field. This is
because MS Excel tends to append “.0” to fields that are considered “Number”. For example, a mobile number
“91112222” may appeared as “91112222.0” on the dialog box above. MoCo will automatically trim off the “.0”
for you so you do not have to worry about that.
Step 4: If one of the column of your database contains the name of the contact group, you can select the option
“Contact Group” for that column. For contacts who are members of multiple contact groups, the contact group
names are separated by semicolons within the column.
Step 5: Click Import button to start importing.
Step 6: A dialog box as shown below will appear, displaying the contacts that are imported successfully and
those that failed.
Step 7: To save result of the import process, click “Save Result”. The result is saved into a text document.
Step 8: To proceed with the import process, click “Proceed” button. To abort the import process, click “Cancel”
button.
- 24 -
2.7 Built-in Referal and Membership Points System
MoCo has a built-in Referal and Membership Points System to assist user in managing their membership
system. If you do not wish to have a Referal System, or do not wish MoCo to manage your Referal System,
you may skip this section.
To configure the amount of Membership Points for each referral, select Menu Item “Tools->Configuration
Settings”. The below display box will popup:
Take note of the bottom part labelled “Membership Points System”. Here, you would be able to set the amount
of Membership points to be added to a particular contact for each new member he/she introduced. Click “OK”
after you make the changes.
Now, go back to the Address Book. Below is a snapshot of the data fields inside the Address Book:
Each contact inside the Address Book has the following fields which are used to compute their Membership
points:
- User ID
- Membership Points
- Referrer Mobile
- 25 -
-
Referrer ID
Whenever a new contact is added to the sytem, whether by “Add Contact” button or “Import Address Book”,
MoCo will check the “Referrer Mobile” and “Referrer ID” fields of the newly added contact. If the “Referrer
ID” field of the newly added contact is not empty, MoCo will search the entire Address Book for the contact
whose “User ID” match the “Referrer ID” field of the newly added contact. If a match is found, the found
contact is deemed as the referrer of the newly added contact, and it’s “Membership Points” field will increment
by the amount previously configured at the Configuration Settings.
If the “Referrer ID” field of the newly added contact is empty, MoCo will check the “Referrer Mobile” field of
the newly added contact instead. If the “Referrer Mobile” field of the newly added contact is not empty, MoCo
will search the entire Address Book for the contact whose “Mobile Number” match the “Referrer Mobile” field
of the newly added contact. If a match is found, the found contact is deemed as the referrer of the newly added
contact, and it’s “Membership Points” field will increment by the amount previously configured at the
Configuration Settings.
The Referal System concept is a very simple yet effective way of encouraging your customers to introduce new
customers to you. Your customers can be entitled to different levels of discounts according to their Membership
Points, which is directly affected by the number of new customers/members they introduced.
- 26 -
Chapter 3: Search Engine
MoCo has an integrated search engine that enables users to search for contacts according to their individual
fields. The search engine basically performed the search using the following 3 search types:
• Text Search
• Selection Search
• Date Search
3.1 Text Search
Text Search is the type of search that can be performed on text-based fields. Under this category, the user can
perform the following types of search:
•
Begin With – Search for any records that has the values beginning with the text entered in “Parameter”. In
the below example, the search will retrieve all records that has “Name” begin with “D”.
•
•
•
•
•
•
End With – Search for any records that has values ending with the text entered in “Parameter”.
Contains – Search for any records that has values containing the text entered in “Parameter”.
Match Exact – Search for any records that has values matching exactly with the text entered in “Parameter”.
Greater Than – Search for any records that has values greater than the text entered in “Parameters”.
Smaller Than – Search for any records that has values smaller than the text entered in “Parameters”.
Greater Than (Numeric) – Search for any records that has values greater than the text entered in
“Parameters”. In this case, the values are compared as though they are numbers.
Smaller Than (Numeric) – Search for any records that has values smaller than the text entered in
“Parameters”. In this case, the values are compared as though they are numbers.
•
3.2 Selection Search
Selection Search is the type of search that can be performed on fields that contains a few options to be selected.
Under this category, the user can perform the following types of search:
- 27 -
•
Includes – Search for any records that has the value as shown in the “Parameter” column. For the below
example, the search will retrieve all records that has the value “male” as their “gender”.
•
Excludes – Search for any records that does not have the value as shown in the “Parameter” column. For the
below example, the search will retrieve all records that does not have their gender specified as “male”.
3.3 Date Search
Date Search is the type of search that can be performed on fields that are stored as date type. Under this
category, the user can perform the following types of search:
•
•
•
•
•
•
•
•
Is Today – Search for any records that has value equals to today’s date. No parameter is required for this
search.
Is within current month – Search for any records that has value that falls within current month. No
parameter is required for this search.
Is within next month – Search for any records that has value that falls within next month. No parameter is
required for this search.
Number of months before today – Search for any records that has value which is x number of months
before today’s date. The x value is the number you entered in the “Parameter” box.
Today is anniversary – Search for any records that has the same day and month value as today’s date. You
can use this search to retrieve records of customers who birthday falls on today. No parameter is required
for this search.
Current month is anniversary – Search for any records that has the same month value as today’s date. You
can use this search to retrieve records of customers who birthday falls on current month. No parameter is
required for this search.
Next month is anniversary – Search for any records that has the same month value as the following month
of today’s date. You can use this search to retrieve records of customers who birthday falls on next month.
No parameter is required for this search.
Number of years before today – Search for any records with the year value equals to x number of years
before today’s date. The x number is the value you entered in the “Parameter” column. For the below
- 28 -
example, the search will retrieve all records whose “date of birth” is 30 years before today. Thus, all
contacts who are 30 years old will be retrieved from this search.
The search can also retrieve records within a range of values. For the below example, the search will
retrieve all records whose “date of birth” is between 30 to 35 years before today. Thus, all contacts who are
between 30 to 35 years old will be retrieved from this search.
3.4 Select Search Result
Upon clicking the “Search” button, the search result will be displayed in the lower portion of the dialog box.
There are two ways of selecting the results:
•
•
Select All – By clicking the “Select All” button, all records within the search results shall be selected.
Selected Contacts – You can select a few contacts within the search results by pressing “Ctrl” key and
clicking on the name of the contacts. The selected contacts will have their names highlighted as shown
below. Click “Selected Contacts” button to proceed with the selection.
- 29 -
Chapter 4: Sending SMS
To send SMS,
Step 1: From “Tools” menu, select “Send SMS” option. You can also click the
alternatively.
button on the toolbar
Step 2: A dialog box as shown below will appear. Type in the message you want to send in the message box
provided. The text on the left indicates the number of characters within the message. For “Normal Text”
message, one SMS allows 160 characters. For “Unicode (Chinese Text)” message, one SMS allows 70
characters. If the number of characters exceeds the limit, it shall be broken into multiple SMSes before sending
out. At the recipient end, the multiple SMSes will be merged and read as one single message.
Step 3: Alternatively, you can select from a list of message templates by right-clicking the mouse inside the
message box. A context box will appear. Move the mouse to “Insert Template” option to select a pre-defined
message template. See “Template Editor” section on how to create a new message template.
Step 4: Select the Message Type and Priority of the message you wish to send. If your message contains chinese
text, you must select “Unicode (Chinese Text)” option. You can select either “High Priority” or “Normal” as the
message’s priority level. High priority messages will be sent out before normal messages in the queue of the
system.
Step 5: Select recipients by clicking the “Recipient” button. A dialog box as shown below will appear. Select the
contacts or/and contact groups you wish to send SMS to, and click “OK”. You can use the “Filter” above the
contact list to further filter the contact list according to their contact group. You can also enter the mobile
numbers directly into the “Mobile Number” box. Alternatively, you can also retrieve a list of mobile numbers
from a MS Excel file. The retrieval process is similar to the Import Address Book process, except that you only
need to select the “Mobile Number” field.
- 30 -
Step 6: Click “Send” button to send the SMS.
4.1 Select Recipients using Advanced Recipient Selection
In the previous example, we select the recipients from a list of contact groups and contacts. Alternatively, we
can use the integrated search engine to search for a list of recipients that we wish to send SMS to.
Step 1: Instead of clicking the “Recipient” button, we shall now click the “Advanced” button.
Step 2: The “Advanced Recipient Selection” dialog box will appear. In this dialog box, you can enter your
search query (see chapter 3 Search Engine), and then click “Search” button to retrieve the search result. For
example as shown below, you can target your SMS recipients to be males who are between 30 to 40 years old.
- 31 -
Step 3: Upon clicking the “Search” button, the result shall be displayed on the lower portion of the dialog box.
Step 4: Click “Select All” button to select all the contacts retrieved from the search. You can also select a few of
the contacts by pressing “Ctrl” key and click on their individual names, then click “Selected Contacts” button.
Step 5: Click “Send” button to send the SMS.
- 32 -
Chapter 5: Scheduler
MoCo’s Scheduler allows user to manage scheduled SMS sending. If a SMS message is to be send out at a later
date, it can be scheduled for sending with a specific date and time using MoCo’s Scheduler.
MoCo’s Scheduler features:
• Add, Delete and Update scheduled SMS sending.
• Repeat SMS sending at regular interval.
• Calendar view for consolidated view of all Schedules.
5.1 Adding, Deleting and Updating Schedule
5.1.1 Add new Schedule
To add a new Schedule,
Step 1: Click on
button to clear Schedule information area.
Step 2: Enter schedule information into respective fields:
- 33 -
Step 3: For message content, you can type the text directly into the message box, or right-click to select the
message template.
Step 4: You can insert dynamic tags into the message content by right-clicking the mouse and then select “Insert
Message Tag” to insert message tag into relevant location of the message.
Message tags are temporary placeholders that allows the program to insert appropriate content at the
time of SMS sending.
In the current example, the message
“Hi all sales personnel, please come for the sales meeting at <<SpecificDate>>, <<SpecifcTime>>.”
will be translated into the following SMS when sending:
“Hi all sales personnel, please come for the sales meeting at 19/3/2007, 16:00.”
Step 5: Select the “Message Type” and the recipients to be sent.
Step 6: Check on the Specific Date/Time box to specify the Schedule date and time. If the SMS is to be sent out
before this date/time, you can increase the “Days before” counter.
Step 7: Click on
to save Schedule.
- 34 -
When a Schedule is created successfully, the Schedule name will appear on the List of Schedules box.
5.1.2 Delete Schedule
To delete a schedule,
Step 1: From the List of Schedules box, select the Schedule to be deleted by clicking on the Schedule name. A
blue highlight will appear.
Step 2: Click on
to delete the highlighted Schedule.
5.1.3 Updating Schedule
To update an Schedule,
Step 1: Select the Schedule to be updated from the List of Schedules box.
Step 2: Replace the information to be updated.
Step 3: Click on
to save the changed information.
5.2 Scheduling for sending SMS at regular interval
SMS can be sent on a regular basis to the selected recipient with MoCo’s Scheduler. To create a regular interval
schedule:
Step 1: Click on
button to clear Schedule information area.
Step 2: Enter Schedule information (Schedule name, Messsage, Message Type and Recipients) into respective
fields.
Step 3: Check on the Regular Interval box. Select either Daily, Weekly, Monthly, Annually or Customized for
periodic sending.
Step 4: Set the “Start Date/Time” and “End Date/Time”. In the above example, the SMS will be sent out daily,
at 2pm, between 10th March 2007 and 20th March 2007.
Step 5: Click on
to save Schedule.
- 35 -
5.3 Scheduler Calendar
Scheduler Calendar offers a consolidated view of all Schedules stored inside MoCo’s Scheduler database.
To access MoCo’s Scheduler Calendar,
Step 1: Click on “Scheduler Calendar” button on the Scheduler page.
Calendar date selector
Display options
Scheduled items
Day/Date
Select from the Calendar Display Management to: •
•
•
Show Schedule – display all schedules
Show Active SMS Reminder – show schedules that are still active
Show Completed SMS Reminder – show completed schedules
- 36 -
Chapter 6: Template Editor
MoCo’s Template Editor allows user to create reusable SMS messages. Frequently used SMS can be saved as
template and recalled when needed. User will be able to access the created template by right-clicking of the
mouse button in all “Message” text boxes, and then choosing from the options “Insert Template” or “Append
Template” to include a template into the message.
The Template Editor feature includes:
•
Add, delete and update templates.
6.1 Add new Template
To add a new template,
Step 1: Click on
button to clear Template Information area.
Step 2: Enter template information (template name and content) into respective fields.
Step 3: Click on
to save template.
When a template is created successfully, the template name will appear on the List of Templates box.
6.2 Delete Template
To delete a template,
Step 1: From the List of Templates box, select the template to be deleted by clicking on the template’s name. A
blue highlight will appear.
- 37 -
Step 2: Click on
to delete the highlighted template.
6.3 Updating Template
To update a template,
Step 1: Select the template to be updated from the List of Templates box.
Step 2: Replace the information to be updated.
Step 3: Click on
to save the changed information.
6.4 Message Tags
MoCo supports the use of “Message Tags” for creating dynamic message content. There are two types of
message tags: Normal Message Tags and Address Book Tags.
- 38 -
You can insert message tags into templates by right-clicking of the mouse, and then select “Insert Message
Tag” or “Insert Address Book Tag” to insert the appropriate message tags.
Currently, MoCo supports the use of the following message tags:
• Recipient’s Name – This tag shall be used to insert the name of individual recipients at the time of sending.
• Recipient’s Number – This tag shall be used to insert the mobile phone number of individual recipients at
the time of sending.
• Originator’s Name – This tag is only used in the “Forward to selected Recipients” action of the “Automatic
Response System”. It shall insert the name of the originator of SMS into the message.
• Originator’s Number – This tag is only used in the “Forward to selected Recipients” action of the
“Automatic Response System”. It shall insert the mobile number of the originator of SMS into the message.
• Specific Date – This tag is only used in the Scheduler. It shall insert the specific date of the scheduled SMS
sending into the message.
• Specific Time – This tag is only used in the Scheduler. It shall insert the specific time of the scheduled SMS
sending into the message.
• Appointment Date – This tag is only used in the Appointment Book. It shall insert the appointment date into
the message.
• Appointment Time – This tag is only used in the Appointment Book. It shall insert the appointment time
into the message.
• Appointment Name – This tag is only used in the Appointment Book. It shall insert the appointment name
into the message.
• eVoucher Serial Number – This tag is only used in the eVoucher Management System. It shall insert the
eVoucher’s serial number into the message.
• eVoucher Valid From – This tag is only used in the eVoucher Management System. It shall insert the
eVoucher’s valid start date into the message.
• eVoucher Valid Till – This tag is only used in the eVoucher Management System. It shall insert the
eVoucher’s valid end date into the message.
Other than the above message tags, the system can also “Address Book Tags” into the outgoing SMS. All fields
of a contact is available for selection as “Address Book Tags” to be inserted into the outgoing SMS.
- 39 -
Chapter 7: Transaction Manager
MoCo’s Transaction Manager keeps track of all incoming and outgoing SMS. Transactions can be track and
lookup using the search query in Transaction Manager. Transaction records can also be output into a report file
with the Generate Report button.
The Transaction Manager features include:
•
•
•
Easy & flexible search on transaction database
Generate transaction report from search result
Management of transaction records
7.1 Search Transaction Database
7.1.1 All Transaction Records
To display all transactions in the MoCo transaction database select this option and click on the Search button.
All the previous transactions will be listed out in their respective Outbox and Inbox.
7.1.2 Today’s Transaction
Select this option to list out all transaction sent and received today.
7.1.3 Set Query Parameter
Select this option if you want to list the transaction according to some query parameters.
- 40 -
Under the “Message sent” group box:
• Message sent – Checked this option to select all SMS sent out of MoCo
• To recipients / Advanced / Mobile number – Use either buttons to limit the query to specific recipient (s)
• SIM Card IMSI – If you have multiple gsm modems, you can key in the 15-digit IMSI (International
Mobile Subscriber Identity) of your SIM card to limit the query to a particular card. This option is useful to
keep track of the amount of outgoing sms sent via each SIM card, if you are using multiple modems.
• Originator – This option is only useful in MoCo Enterprise Edition. You can keep track of the number of
outgoing SMS sent by a particular MoCo Agent by keying in the Agent Name into the box provided.
• From: / To: - You can limit the query to a particular time frame by setting these two date/time options.
Under the “Message received” group box:
•
•
•
•
•
Message received – Checked this option to select all incoming SMS received by MoCo
From sender / Advanced / Mobile number – Use either buttons to limit the query to specific sender (s)
SIM Card IMSI – If you have multiple gsm modems, you can key in the 15-digit IMSI (International
Mobile Subscriber Identity) of your SIM card to limit the query to a particular card. This option is useful to
keep track of the amount of incoming sms received via each SIM card, if you are using multiple modems.
Route To – This option is only useful in MoCo Enterprise Edition. You can keep track of the number of
incoming SMS received by a particular MoCo Agent by keying in the Agent Name into the box provided.
From: / To: - You can limit the query to a particular time frame by setting these two date/time options.
7.2 Transaction Report Generation
After searching the database using the Search button, a report can be generated from the search result, by
clicking on the Generate button to save result into a text file.
Step 1: Search the transaction database for the records to be saved into file.
Step 2: When the result is displayed in the Inbox and Outbox, click on the Generate button to save into file.
- 41 -
Step 3: A dialog box as shown above will display. Select the file name and type. Click “Generate Report”.
7.3 Management of Transaction Records
7.3.1 View Transaction Detail
Individual transaction in both the Inbox and Outbox can be displayed in detail by double clicking the
sender/recipient of each transaction in their respective box. A transaction dialog will appear with all the
transaction information. Click the Ok button to close the dialog box.
7.3.2 Transaction Outbox Options
The following options are available when you right-click on any records in the Transaction Manager OutBox:
- 42 -
•
•
•
•
Resend to Recipient – A dialog box will appear for you to resend other SMS to the selected recipient.
Forward message – A dialog box will appear for you to forward the message to other recipients.
Recipient Info in Address Book – Select this option will direct you to the contact’s information inside
Address Book.
Delete Records – Use this option to delete one or more records. Alternatively, you can use the “Delete” ket
to perform deletion.
7.3.3 Transaction Inbox Options
The following options are available when you right-click on any records in the Transaction Manager InBox:
•
•
•
•
•
Reply to Sender – A dialog box will appear for you to send reply to the selected sender.
Forward message – A dialog box will appear for you to forward the message to other recipients.
Sender Info in Address Book – Select this option will direct you to the contact’s information inside Address
Book.
Delete Records – Use this option to delete one or more records. Alternatively, you can use the “Delete” key
to perform deletion.
Confirm / Cancel Appointment – This option is only available in MoCo Professional or Enterprise Edition.
A dialog box will appear, displaying a list of appointments of the sender.
To confirm/cancel any appointment, just click on the item and then click “Confirm Appointment” or
“Cancel Appointment” buttons. This feature is useful in updating the Appointment Book when customers
make appointment confirmation via phone call rather than sms.
- 43 -
7.3.4 Delete multiple records
To delete more than one record, you can either use the Shift or Ctrl key on your keyboard to select the records to
be deleted.
Use the Shift key if you want to select continuous records at one go. Use the Ctrl key if you want to select
multiple records that are not continuous.
Note: Deleting records are permanent! Please backup by choosing “Generate Report” before deleting if you
want to keep a backup of it.
- 44 -
Chapter 8: Event Manager
MoCo’s Event Manager allows user to create periodic event to send SMS. With Event Manager, greeting
messages like Birthday, New Year, Christmas and Anniversary can be created and SMS will be send
automatically once the date is reached.
Event Manager is only available in MoCo Marketeer, Professional and Enterprise editions.
8.1 Add new Event
8.1.1 Add new Event based on Specific Date
To add a new event based on Specific Date,
Step 1: Click on
button to clear Event information area.
Step 2: Enter event information into respective fields.
- 45 -
•
•
•
•
•
•
•
•
•
Event Name – Enter a name for the event.
Message Content – The SMS content to be sent when the event’s date is reached. You can use template
and message tags here also.
Message Type – Indicate the type of message to be sent. Options are “Normal”, “8-Bit Data” and
“Unicode (Chinese Text)”.
Event Status – Suspend or Active. If event status is “Suspend”, sms will not be sent even if the event’s
date is reached.
Specific Date – The date at which the sms will be sent.
Period – Annually or Monthly. In above example, if “Annually” is selected, the sms will be sent out
every year on 31st December. If “Monthly” is selected, the sms will be sent out on the 31st of every
month.
Preferred time to SMS – Indicate the preferred time of the day to send out sms. SMS will only be sent
out when both the event’s date and the preferred time is reached.
Everyone in Address Book – Select this option if the sms is to be sent to everyone within the Address
Book.
Selected Recipients – Select this option if you only want to send event sms to selected recipients. You
can use the Advanced Search Engine for selection of recipients, or simply select from a list of contacts
and/or contact groups.
Step 3: Click on
to save event.
When an event is created successfully, the event name will appear
on the List of Events box.
8.1.2 Add new Event based on Address Book
To add a new event based on Address Book,
Step 1: Click on
button to clear Event information area.
Step 2: Enter event information into respective fields.
- 46 -
•
•
•
•
•
•
•
•
•
Event Name – Enter a name for the event.
Message Content – The SMS content to be sent when the event’s date is reached. You can use template
and message tags here also.
Message Type – Indicate the type of message to be sent. Options are “Normal”, “8-Bit Data” and
“Unicode (Chinese Text)”.
Event Status – Suspend or Active. If event status is “Suspend”, sms will not be sent even if the event’s
date is reached.
Address Book Field – Select the field of the Address Book on which the event is based. In the above
example, the event is based on the “Date of Birth” field of the Address Book.
Period – Annually or Monthly. In above example, if “Annually” is selected, sms will be sent out every
year on the birthday of the customer. If “Monthly” is selected, sms will be sent out on the day of the
“Date of Birth” every month.
Preferred time to SMS – Indicate the preferred time of the day to send out sms. SMS will only be sent
out when both the event’s date and the preferred time is reached.
Everyone in Address Book – Select this option if the sms is to be sent to everyone within the Address
Book.
Selected Recipients – Select this option if you only want to send event sms to selected recipients. You
can use the Advanced Search Engine for selection of recipients, or simply select from a list of contacts
and/or contact groups.
8.2 Delete Event
To delete an event,
Step 1: From the List of Events box, select the event to be deleted by clicking on the event name. A blue
highlight will appear.
Step 2: Click on
to delete the highlight event.
- 47 -
8.3 Updating Event
To update an event,
Step 1: Select the event to be updated from the List of Events box.
Step 2: Replace the information to be updated.
Step 3: Click on
to save the changed information.
- 48 -
Chapter 9: Automatic Response System
MoCo’s Automatic Response System (ARS) allows user to create rules with message pattern matching
capabilities. When MoCo received an incoming message, it will match the message content to the entire ARS
rules database. When a match is found, the appropriate action(s) assigned to that rule will be executed.
Automatic Response System is only available in MoCo Marketeer, Professional and Enterprise editions.
The ARS features include:
•
•
•
•
Add, Delete and Update rules.
Sender matching options.
Multiple message pattern matching options.
Multiple actions execution.
- 49 -
9.1 Add new Rule
To add a new rule,
Step 1: Click on
button to clear rule information area.
Step 2: Enter rule name. The rule name is used to identify each rule. Select the status of the rule. Status can be
“Active” or “Suspend”. If a rule’s status is “Suspend”, the rule will be ignored by the system.
Step 3: Select the Sender Condition of the rule. Each incoming sms will be matched against the sender
condition before deciding whether to trigger the corresponding action.
Options available are:
•
All (including those not in address book)
When this option is selected, anyone who sends a SMS to MoCo will satisfy the sender condition.
MoCo will just proceed to match the SMS’s messages pattern to determine if any action is to be
triggered.
•
Everyone in address book
When this option is selected, if an incoming sms is sent by a sender whose phone number is stored in
MoCo’s Address Book, that incoming sms will satisfy the sender condition. MoCo will then proceed to
the pattern matching condition.
•
Select from list of contacts / contact groups
Select this option when you want the rule to only applies to certain contacts / contact groups.
Step 4: Enter the message pattern for matching incoming SMS that will trigger an action. Multiple message
patterns are allowed.
Options available are:
•
•
•
Begins with – If incoming sms message begins with the text in the box provided.
Ends with – If incoming sms message ends with the text in the box provided.
Contains – If incoming sms message contains the text in the box provided.
**Note: You can also specify multiple phrase for each pattern checking by separating them using “;”
(semicolon). For example, you can enter “Where;Location;Place” into the “Begins with” box. Any
incoming sms that begins with either “Where” or “Location” or “Place” will satisfy the condition.
- 50 -
Step 5: Select the desired action when the conditions are met in Step 3 and 4. You can select multiple actions
within a single rule.
List of Actions:
•
Auto Reply to Sender
Send a SMS reply back to the Sender. Under the Action Parameter, you can specify the message to
send back to the Sender, and its message type. You can also right-click to insert templates here.
•
Forward to Selected Recipients
Forward the message content to other selected recipients. Under the Action Parameters, you can select
to insert a Header or Footer to the message. You can use the message tag <<Originator Name>> and
<<Originator Number>> to indicate original sender of the sms inside the forwarded message.
Click on the Recipients or Advanced button to select the recipient(s) of the forwarded message.
•
Invoke External Application
Select this option to run an application or a batch file. Click on the Browse button to select the
application to run.
•
Automatic Shutdown
- 51 -
Select this option if you want to Logoff, Reboot or Shutdown the computer where MoCo is running.
Shutdown command can be activated after a specified number of minutes if you indicate in the
“Activation after” box.
•
Export to Text Document
Incoming SMS can be saved into a text file when this option is selected. The text file will store the
sender mobile phone number, name and message content. You can select the directory that you want to
save the file. The filename for the text document will be in MoCoLogDDMMYY.txt.
DD – Day
MM – Month
YY – Year
When you create different rules that export to text document, you can specify different directory so that
each rule will save into a different file.
•
SMS Subscription
Select this option to subscribe / unsubscribe to SMS. When a contact is indicated as “unsubscribe to
SMS”, future sms will not be sent to the contact.
To reverse the subscription status, you need to go to the Address Book, and update the “SMS
Subscription” field of the particular contact.
•
Register Contact
Select this option to register a contact into Address Book. In the above example, if the sender condition
is “All” and the message pattern is “Begin with ‘Register’ ”, and an incoming sms is received with the
content:
Register,David Tan,S7012345A,[email protected]
- 52 -
The contact information will be saved into the Address Book automatically. This action is useful for
automatic registration of membership.
•
Confirm / Cancel Appointment
Select this option to confirm / cancel appointment. If an incoming sms matches the sender and message
pattern conditions, MoCo will look for the “Appointment Name” within the message content and
perform automatic appointment confirmation / cancellation.
For example, let say a rule is created such that the sender condition is “All”, and the message pattern
condition is “Begin with: Confirm”, and the Action “Confirm/Cancel Appointment” is selected.
An incoming sms is received with the content:
“Confirm A357”
Since both the sender and message pattern conditions are met, the action “Confirm/Cancel
Appointment” will be triggered. MoCo will look for an appointment with the Appointment Name
“A357” and set the status of the sender to “Confirmed”.
•
SMS Vote/Contest/Survey
Select this option to indicate that an incoming sms corresponds to a particular campaign.
For more information on this action and Campaign Manager, see “Chapter 10 Campaign Manager”.
•
Information Retrieval
Select this option to retrieve information from a Microsoft Excel sheet and reply back to sender.
- 53 -
Parameters:
o MS Excel File – Specify the full path of the MS Excel document to retrieve information from.
o SpreadSheet – Specify the name of the spreadsheet within the excel document.
o Match Column A with – Specify which word within the sms message to match against column A
of the MS Excel spreadsheet. You can choose to match sender’s mobile number against column A
instead.
o Match Column B with – Specify which word within the sms message to match against column B
of the MS Excel spreadsheet. You can choose to match sender’s mobile number against column B
instead.
o Column number for retrieval – The column number of the field to be retrieved. Column A
corresponds to column 1.
o Optional Message Header – Message header for the sms reply.
For better illustration, let’s consider the Excel spreadsheet “TestResult.xls” contains the following
content:
Now, let’s say we create a rule with sender condition set as “All”, and message pattern condition set as
“Begin With: Average”, and a corresponding “Information Retrieval” action as shown above.
Imagine an incoming SMS is received from the number +6593334444 with the following content:
“Average S7533344Z”
This incoming SMS will satisfy both the sender and message pattern conditions. Thus, the
“Information Retrieval” action will be triggered. Upon triggered, MoCo will try to match Column A of
the spreadsheet with the second word of the message (S7533344Z) and Column B of the spreadsheet
with the sender’s number (+6593334444). When a matched record is found, MoCo will retrieve the
Column 7 of the record (the value 91), and reply the following content back to the sender:
“The result is : 91”
This action is useful for retrieving information from spreadsheet via SMS.
•
Information Insertion
Select this option to insert information from an incoming SMS into a Microsoft Excel sheet.
Parameters:
o MS Excel File – Specify the full path of the MS Excel document to insert information into.
o SpreadSheet – Specify the name of the spreadsheet within the excel document.
- 54 -
o
o
o
o
•
Insert Column A with – Specify which field within the incoming sms message to insert into
column A of the MS Excel spreadsheet. You can choose to insert the sender’s mobile into column
A instead.
Insert Column B with – Specify which field within the incoming sms message to insert into
column B of the MS Excel spreadsheet. You can choose to insert the sender’s mobile into column
B instead.
Insert Column C with – Specify which field within the incoming sms message to insert into
column C of the MS Excel spreadsheet. You can choose to insert the sender’s mobile into column
C instead.
Delimeter between fields – The delimeter within the incoming sms that separates the fields. MoCo
accepts Comma, Space and Semi-colon as valid delimeters.
Claim eVoucher
Select this option to indicate that an incoming sms corresponds to the claiming of an eVoucher. Select
the name of the eVoucher inside the Action Parameters. For more information on eVoucher, please see
the “eVoucher Management System” section.
Step 6: Click on
to save rule.
When a new rule is created successfully, the rule name will appear on the List of Rules.
- 55 -
9.2 Delete Rule
To delete a rule,
Step 1: From the List of Rules box, select the rule to be deleted by clicking on the rule name. A blue highlight
will appear.
Step 2: Click on
to delete the highlight rule.
9.3 Updating Rule
To update an rule,
Step 1: Select the rule to be update from the List of Rules.
Step 2: Replace the information to be update.
Step 3: Click on
to save the changed information.
- 56 -
Chapter 10: Campaign Manager
MoCo’s Campaign Manager allows user to create SMS campaigns such as voting, contest or survey. With
Campaign Manager, you can create your own e-campaign to consolidate sms feedbacks or surveys in the form
of graphical representation.
Campaign Manager is only available in MoCo Marketeer, Professional and Enterprise editions.
10.1 Add new Campaign
To add a new campaign,
Step 1: Click on
button to clear Campaign information area.
Step 2: Enter campaign information into respective fields.
- 57 -
•
•
•
•
•
Campaign Name – Enter a name for the campaign
Campaign Description – Text description on the campaign. This information is just for your own
reference purpose.
Maximum no. of votes allowed per SMS – Specify the maximum number of votes allowed within one
incoming SMS. If this option is 1 and an incoming SMS is “Vote B1 B2 B3”, then only the vote for B1
is considered. If this option is 2 and an incoming SMS is “Vote B1 B2 B3”, then only votes for B1 and
B2 will be considered.
Take into account only the latest vote of each mobile number – Select this option if you only want to
take into account the latest vote of each mobile number. If this option is selected and if a certain mobile
number send in multiple voting SMS, then only his latest SMS will be considered as a valid vote.
Available Options – Enter the acceptable code names (Eg. B1, B2, B3, B4) for the campaign. Each
code name represent a particular selection, in this case for the Beverage Survey, B1 represent Green
Tea, B2 represent Red Tea, etc.
Step 3: Click on
to save the campaign.
When a campaign is created successfully, the campaign name will appear on the List of Campaigns box.
10.2 Delete Campaign
To delete a campaign,
Step 1: From the List of Campaigns box, select the campaign to be deleted by clicking on the campaign name. A
blue highlight will appear.
Step 2: Click on
to delete the highlighted campaign.
- 58 -
10.3 Updating Campaign
To update an campaign,
Step 1: Select the campaign to be updated from the List of Campaigns box.
Step 2: Replace the information to be updated.
Step 3: Click on
to save the changed information.
10.4 How it Works
10.4.1 Create an ARS Rule
After you have created a campaign using the Campaign Manager, the next thing to do is to create a rule for that
campaign using the Automatic Response System.
Following the example on the Beverage Survey, you can now go to the Automatic Response System page and
create a new rule called “Beverage Survey” (or any other name you prefer).
Select “All” for the sender condition and “Begin with: Bev” as the message pattern condition, as shown in above
screen shot.
Select the “SMS Vote/Contest/Survey” action and key in “Beverage Survey” as the campaign name. Once all
these information is keyed in, you can add the new rule to the system.
- 59 -
10.4.2 Wait for incoming SMS
Once you have created the campaign and its corresponding rule, the only thing you need to do is to wait for
incoming sms.
For example, the following message content would be considered as a valid vote for this campaign:
“Vote B2”
When MoCo received the above-mentioned sms, it would consider it as a valid vote for the campaign “Beverage
Survey”, as a vote towards the option “Sprite”.
10.4.3 View Campaign Result
To view the result of a particular campaign,
Step 1: Select the campaign from the List of Campaigns box.
Step 2: Click on
to view the result of the campaign.
Step 3: A dialog box will appear, displaying the result of the campaign.
The left-hand side portion of the dialog box will show the graphical representation of the campaign result. The
right-hand side portion will show the campaign description, summary information and display option. You can
scroll down to view the detailed information below the graph.
- 60 -
Under the “Detailed Information”, a context box will appear if you right-click the mouse on any of the vote:
•
•
Flag as Valid – Select this option to manually flag this particular vote as a valid vote.
Flag as Invalid – Select this option to manually flag this particular vote as an invalid vote.
The option “Ignore duplicated votes” under the “Display Option” section can be used to ignore multiple votes
on the same item from the same mobile phone number. For example, if this option is selected and the mobile
number “91112222” send in multiple voting sms to vote for the same option “B2” multiple times, then only one
vote is taken into account. This option is useful if one wishes to implement a one-man-one-vote system.
You can save the result into a Text file, a HTML file or a Microsoft Excel file.
10.4.4 Making use of Campaign Result
Under “Summary Information”, you can right-click the mouse on any option name and a context box will
appear.
•
Send SMS to All
A dialog box as shown above will appear for you to send SMS to all the voters who have selected the
option.
- 61 -
•
Select Winner
A dialog box as shown above will appear for you to select winner(s) from a list of voters who selected the
option.
Simply enter the number of winners and click “Pick Winner” button to randomly select a winner(s).
Upon selecting the winner, you can also send a message to the winner(s) by keying in the message and then
clicking the “Send SMS to Winners” button.
- 62 -
Chapter 11: eVoucher Management System
With MoCo’s eVoucher Management System, user will be able to create and manage eVouchers. User can
create eVoucher item via the eVoucher Manager, and then create a corresponding rule inside the Auto Response
System. Customers can then send in SMS to claim the eVouchers.
eVoucher Management System is only available in MoCo Marketeer, Professional and Enterprise
editions.
eVoucher Manager’s features includes:
•
•
Add, Delete and Update eVoucher Item.
View the details of the claimed eVouchers
To access the eVoucher Manager, select “Tools” from the top menu, and then select “eVoucher System”.
11.1 Add new eVoucher Campaign
To add a new eVoucher campaign,
Step 1: Click on “Clear Entries” button to clear eVoucher information area.
Step 2: Enter eVoucher information into respective fields.
- 63 -
•
•
•
•
•
•
•
•
eVoucher Name – Enter a name for the eVoucher campaign.
Status – Either “Active” or “Suspend”.
Total number of vouchers – Total number of eVouchers to be claimed for this campaign.
Maximum vouchers per person – Maximum number of eVouchers a single mobile number can claim.
Valid Period – The validity period of this eVoucher campaign
Voucher Serial number begins with – The eVouchers’ serial number will be auto-generated in
incremental order. This field allows you to append a string in front of the auto-generated serial number
for each eVouchers.
Current serial number – Read-only field indicating the current serial number.
eVoucher Content – The SMS eVoucher message to be sent to the customers when they send in a SMS
to claim the eVouchers. You can insert message tag such as <<eVoucher serial num>>, <<eVoucher
valid from>> and <<eVoucher valid till>> into this field. For example, in the above figure, when a
customer send in a valid claim for the eVoucher via SMS, MoCo will reply the customer with a
eVoucher that looks like the below:
“eVoucher Serial Num: E0001
Valid from 26/02/2013 to 15/03/2013.
Please present this eVoucher at the counter to enjoy 10% discount.”
Step 3: Click on “Add eVoucher” button to save the eVoucher campaign.
When a eVoucher campaign is created successfully, the eVoucher campaign name will appear on the List of
eVouchers box.
11.2 Delete eVoucher Campaign
To delete an eVoucher campaign,
Step 1: From the List of eVouchers box, select the eVoucher campaign to be deleted by clicking on the
eVoucher campaign name. A blue highlight will appear.
- 64 -
Step 2: Click on “Delete eVoucher” button to delete the highlighted eVoucher campaign.
11.3 Updating eVoucher Campaign
To update an eVoucher campaign,
Step 1: Select the eVoucher campaign to be updated from the List of eVouchers box.
Step 2: Replace the information to be updated.
Step 3: Click on “Update eVoucher” button to save the changed information.
11.4 How it Works
11.4.1 Create an ARS Rule
After you have created an eVoucher campaign using the eVoucher Manager, the next thing to do is to create a
rule for that eVoucher campaign using the Automatic Response System.
Following the example on the “Annual Sales Voucher” campaign, you can now go to the Automatic Response
System page and create a new rule called “eVoucher Claim Rule” (or any other name you prefer).
Select “All” for the sender condition and “Begin with: Claim” as the message pattern condition, as shown in
above screen shot.
Select the “Claim eVoucher” action and select the name of the eVoucher campaign to attach. Once all these
information is keyed in, you can add the new rule to the system.
- 65 -
11.4.2 Wait for incoming SMS
Once you have created the eVoucher campaign and its corresponding rule, the only thing you need to do is to
wait for incoming sms. Inform your customers/members to send in SMS to claim the limited number of
eVouchers. You can inform your customers/members about the eVoucher campaign via SMS (using MoCo) or
other traditional medium such as newspaper, magazines, or even social medium such as facebook, twitter, etc.
Your customers/members can then send in SMS to claim the eVoucher. The format to claim the eVoucher in the
above example is simply a SMS like “Claim”.
When MoCo received the above-mentioned sms, it would first check whether it as a valid claim for the
eVoucher campaign “Annual Sales Voucher” by checking the validity period, the maximum eVoucher a mobile
number can claim, and the total number of eVouchers for this campaign. If the claim is valid, MoCo will reply
the customer with a SMS eVoucher that looks like the below:
“eVoucher Serial Num: E0001
Valid from 26/02/2013 to 15/03/2013.
Please present this eVoucher at the counter to enjoy 10% discount.”
Upon receiving this eVoucher, your customer can present it at your counter and enjoy the corresponding
discount.
- 66 -
Chapter 12: Appointment Book
With MoCo’s Appointment Book, user will be able to schedule appointment and send SMS reminder to selected
recipients. Once the recipient received the SMS reminder, they are able to reply via SMS to MoCo for
confirmation of appointment instantly.
Appointment Book is only available in MoCo Professional and Enterprise editions.
Appointment Book feature includes:
•
•
•
•
•
Add, Delete and Update Appointment.
View calendar in Monthly, Weekly or Daily view.
View response (Automatic Appointment Confirmation)
View Appointment History
Import Appointment from csv file
12.1 Adding, Deleting and Updating Appointment
12.1.1 Add new Appointment
To add a new appointment,
Step 1: Select the Appointment Book within which you wish to add new appointment. For information on how
to add new Appointment Book, see “Chapter 14 Configuration Settings”.
- 67 -
Step 2: Double click on the screen calendar date that you want to create the appointment. A dialog box for
adding new appointment will appear.
Step 3: Enter information for the appointment.
•
•
•
•
•
•
•
•
•
•
•
Appointment Name - Appointment name will be used to confirm appointment when recipient reply with
SMS message.If the Config Setting for Automatically Insert Appointment Name is set, the appointment
name will be auto filled by MoCo.
Priority – You can select from low, medium, high and very high. The priority will reflect as a color
highlight for the appointment subject when you look at the main calendar. Low and medium priority
appointment will be treated as normal message when they are sent out. High and very high priority
appointment will be treated as high priority message when they are sent out.
Subject – A brief description of the appointment. The subject text will be displayed on the main calendar.
Start / End Time – The appointment start and end time. Note that the appointment start time can be
automatically inserted into the SMS content using message tag <<Appt Time>>.
Remarks – Additional (optional) remarks.
SMS Reminder – Click this checkbox to enable sending of SMS reminder.
Recipients/Advanced – Select the recipients for the appointment reminder SMS. You can select from a list
of contacts/contact groups (using Recipient button), or via querying the Address Book (using Advanced
button).
1st/2nd/3rd SMS Reminder – Click this checkbox to enable sending of first/second/third SMS reminder.
Preferred time to SMS – The preferred time to send out reminder SMS. You can set the number of
days/weeks before the actual appointment date to send the reminder sms.
Message Type – Select from Normal Text, 8-Bit Data and Unicode (Chinese Text). For normal english sms,
choose Normal Text. For content containing chinese text, choose Unicode.
Message Content – Actual message content to be sent. You can insert template or type in directly.
You can insert template into the Message Content box. Message tags such as <<Appt Date>>, <<Appt
Time>> and <<Appt Name>> can be used in conjunction with the Appointment Book.
A typical reminder message can look like this:
- 68 -
“Hi please be reminded that <<Recipient Name>> has an appt with Kee Dental Surgery at <<Appt
Date>>, <<Appt Time>>. To confirm, pls reply sms "Confirm <<Appt Name>>".”
The recipient would receive a reminder SMS that looks like the below:
“Hi please be reminded that Jane has an appt with Kee Dental Surgery at 07/03/2013, 09:00. To confirm,
pls reply sms "Confirm A1".”
Step 4: Click on
to create appointment.
When an appointment is created successfully, the appointment’s start date, end date and subject will appear on
the main calendar.
12.1.2 Delete Appointment
To delete an appointment,
Step 1: From the calender view, double click on the appointment entry to be deleted. Alternatively, from the
Appointment dialog, select the appointment to delete from List of Appointments.
Step 2: Click on
to delete the highlight appointment.
12.1.3 Updating Appointment
To update an appointment,
Step 1: From the calender view, double click on the appointment entry to be updated. Alternatively, from the
Appointment dialog, select the appointment to update from List of Appointments.
Step 2: Replace the information to be updated.
Step 3: Click on
to save the changed information.
12.1.4 Changing Appointment Date
To change an appointment,
Step 1: From the calender view, double click on the appointment entry to be updated. Alternatively, from the
Appointment dialog, select the appointment you wish to change date of from the List of Appointments.
Step 2: Click on
to change the appointment’s date.
Step 3: A dialog box shown below will appear. Enter the new Appointment Book name, Appointment Date,
Appointment Start and End Time. Then click “Ok”.
- 69 -
12.2 Check Response
To check a confirmation response,
Step 1: Double click on the appointment.
Step 2: Click on
to open the response dialog. Check under the Response column for result.
Upon right-clicking on the appointment recipient’s name, a context box appear displaying the following options:
•
•
•
Reply to Sender – Select this option to invoke a dialog box for you to send sms reply to the sender.
Confirm Appointment – Do a manual appointment confirmation. This option is useful if the customer
confirm his appointment via phone call or other means instead of sms.
Cancel Appointment – Do a manual appointment cancellation. This option is useful if the customer
cancel his appointment via phone call or other means instead of sms.
To save the response information into a HTML report, just click “Save Response to HTML” button.
12.3 Automatic Appointment Confirmation
To set up MoCo for Automatic Appointment Confimation,
Step 1: At Auto Response System page, create a new rule:
- 70 -
Set the sender condition to “All”, and message pattern to “Begin with: Confirm”.
Select the “Confirm/Cancel Appointment” action, with type of message set to “Confirmation”.
Click “Add New Rule” button to add the new rule.
Step 2: Wait for incoming sms.
According to the above rule, a valid confirmation sms would look something like this:
“Confirm A23” - where ‘A23’ is the appointment name.
Upon receiving an incoming sms as above, MoCo will check that it satisfies the conditions in the “Appt
Confirmation” rule, and trigger the “Confirm Appointment” action. The response status of the sender will be set
to “Confirm” automatically:
12.4 View Appointment History
Step 1: Click on
. A dialog box will appear for you to view appointment history.
- 71 -
Step 2: Select the name of the contact. Click the Search button.
Step 3: To save the appointment history to file, click “Export to File” button.
12.5 Import Appointment List
Step 1: Click the
. An Open File dialog box will appear for you to load to Appointment list file. MoCo
expects a csv (comma-separated-values) file for importing appointment.
A typical Appointment Import file (*.csv) should contain the following fields (not in any order):
• Customer Name
• Customer Mobile Number
• Appointment Start Time (in 24-hour format HH:MM)
• Appointment Book Name (Optional)
• Appointment Duration in minutes (Optional)
All records within a single Appointment Import file should belong to the same appointment date. Each of these
fields shall be separated by a comma, and each record separated by a carriage return.
Step 2: Upon selecting the Appointment Import file (*.csv), a dialog box as shown below will appear, displaying
all the columns within the import file.
- 72 -
Step 3: Select the field names (Eg. Recipient Name, Appt. Book Name, etc) for the columns that you wish to
import.
Step 4: At the “General Appointment Information” portion on the left, enter the following information:
•
•
•
•
•
•
Appointment Date – The appointment date for the appointments to be imported.
Default Priority – Priority level of the appointments to be imported. You can use the default value.
Duration – The appointment duration in minutes. If your appointment import file does not contain any
information on appointment duration, you can set a standard duration here for all the appointments to
be imported.
Preferred SMS Time – The time and number of days/weeks before appointment which you wish to
send out SMS.
Message Type – Select from Normal Text, 8-Bit Data or Unicode (Chinese Text). For normal english
content, use Normal Text. If content contains chinese characters, use Unicode.
Message Content – The actual message content to be send out via SMS. You can insert template here
or key in the text directly.
Step 5: Under the “Import Process Logger” portion, you can save a report of the import process of checking
“Save import process report” checkbox. You can also specify the folder which you wish to save the import
process report.
Step 6: Once all the information are checked to be correct, you can click the “Import” button to proceed with the
import process. Upon successful import, you will see the below message box.
- 73 -
Chapter 13: Agent Manager
MoCo’s Agent Manager allows user to manage the MoCo Agents connected to the MoCo Server. For a MoCo
Agent to successfully connect to MoCo Server, user must first add the relevant MoCo Agent names to MoCo
Server using the Agent Manager.
Agent Manager is only available in the MoCo Server software of the MoCo Enterprise editions.
13.1 Add new Agent
To add a new agent,
Step 1: Click on
button to clear Agent information area.
Step 2: Enter agent name and description (optional).
Step 3: Click on
to save Agent information.
13.2 Delete Agent
To delete a agent,
Step 1: From the List of Agents box, select the agent to be deleted by clicking on the agent name. A blue
highlight will appear.
- 74 -
Step 2: Click on
to delete the highlighted agent.
13.3 Updating Agent
To update an agent,
Step 1: Select the agent to be updated from the List of Agents box.
Step 2: Replace the information to be updated.
Step 3: Click on
to save the changed information.
13.4 View Agent Connection Status
Step 1: Click on
to view current Agent connection status. A dialog box as shown below will appear.
The following information is available for checking:
• Agent Name – Name of MoCo Agent connected
• IP Address – IP address of the MoCo Agent
• Status – Connection status of the MoCo Agent
• Last Heartbeat – The latest heartbeat message received by MoCo Server from the particular MoCo
Agent. Upon connecting to the MoCo Server, each MoCo Agent will send a heartbeat message over to
MoCo Server at a regular interval. The heartbeat indicates whether the MoCo Agent is still ‘alive’.
- 75 -
Chapter 14: Configuration Settings
MoCo’s Configuration Settings allows user to set their preference when using MoCo.
To access the Configuration Settings dialog, click on the
from the Tools menu.
icon on the toolbar or select Configuration Settings
14.1 Basic Configuration Setting
14.1.1 General Settings
On the “General” page, user can configure the following settings:
•
Display upon Startup
With the Full Screen option selected, every time MoCo is started, user will be able to see the full interface
on the their monitor. Upon selecting the Hidden In System Tray option, MoCo will be running without the
full interface but minimise into the system tray area. To maximise MoCo, simply double click on the
MoCo’s icon.
Double click
here to open
MoCo
System tray
- 76 -
•
Do Not Send SMS Period
You can set a time period within which MoCo will temporarily suspend the sending of SMS.
•
Application Title
You can customize your MoCo’s Application title by entering a text string into the Application Title field.
With MoCo running, you will be able to see your customized title appearing on the top left hand of the
Windows application.
•
Membership Points System
You can set the amount of Membership Points increment for each new member your customer introduced.
For information on Referal and Membership Points System, see Chapter 2 Address Book.
14.1.2 Address Book Settings
On the Address Book configuration page, users can configure the following settings:
•
Auto-insert Area Code
To automatically insert an area code into the mobile number field, tick the check box Auto-Insert Area
Code and enter the area that you are in. When entering the mobile Phone number into the address book, if a
‘+’ sign is added to the mobile phone number, MoCo will not fill in the auto-insert area code. This feature is
to allow user to enter mobile phone number other than the area they are in even when the Auto-Insert Area
Code option is selected.
•
Default SMS Subscription
If the SMS Subscription field in MoCo’s Address Book is left blank, the “Default SMS Subscription”
setting will determine whether MoCo can send SMS to that contact. If the option “By Default Subscribe To
- 77 -
SMS” is selected, MoCo will be able to send SMS to all the contacts’ whose SMS Subscription field is
empty. For the option “By Default Do Not Subscribe to SMS”, MoCo will not send SMS to contacts whose
SMS Subscription field is empty.
•
Default Import Address Book Delimeter
User can select under this option, whether the default file type used when importing Address Book is
“Comma” or “Tab” or “MS Excel”.
•
Duplication Check
Check this selection to enable/disable duplication check during adding/updating of contacts into the
Address Book. When duplication check is enabled, the following error message box will appear if you try
to add a contact with the same mobile number as any existing ones in the Address Book.
•
Auto-generate User ID
Every contact in the Address Book has a “User ID” field. You can select this option to auto-generate User
ID for every newly added contact.
User ID starts with – Set a string to place in front of each User ID that the system auto-generated. You can
also leave this box empty.
User ID Offset – Set a base number which the User ID starts from. When porting customer database from
an existing system to MoCo, the contacts may already have existing User IDs. In this case, you can set this
field to instruct MoCo to auto-generate User ID from this number onwards.
14.1.3 Scheduler Settings
- 78 -
Default settings for Scheduler Calender :
•
•
•
Show Schedule – Show the entire saved schedule and display in the Scheduler Calender View.
Show Active SMS – Show scheduled SMS that are still waiting to be sent.
Show Completed SMS – Show those scheduled SMS that are sent by MoCo’s Scheduler.
14.1.4 Auto Response Settings
On the Auto Response configuration page, users can configure the following settings:
•
Auto-Reply when receiving empty sms
Set this option to configure MoCo to send SMS when it receives an empty SMS.
•
Auto-Reply when incoming sms fits no rules
Set this option to configure MoCo to send SMS when an incoming SMS does not match with any rules
inside the Auto Response System.
•
Auto-Reply when receiving incoming voice calls
Set this option to configure MoCo to send SMS when it receives an incoming voice call.
- 79 -
14.1.5 Appointment Book Settings
On the Appointment Book configuration page, users can configure the following default parameters:
•
Default Settings
User can set the default values of :
o
o
o
o
•
Appointment Start / End Time
Preferred time to SMS
Date for SMS Reminder
Priority level
Send Subsequent SMS Reminders
User can determine how MoCo handle subsequent SMS reminders:
o Send subsequent reminders irregardless of response – Subsequent SMS reminders shall be
sent out no matter the recipients reply back or not
o Send subsequent reminders to confirmed recipients only – Subsequent SMS reminders shall
only be sent out if the recipients confirmed their appointments (either manually or
automatically)
o Do not send reminders to confirmed / cancelled recipients – Subsequent SMS reminders shall
not be sent out if the recipients has confirmed or cancelled their appointments (either manually
or automatically)
•
Automatically insert appointment name
Upon creation of new appointment in the MoCo’s Appointment Book, an appointment name has to be
given. To auto fill the appointment name, check the box “Automatically Insert Appointment Name” and
- 80 -
type the name given to each appointment. MoCo will use this name and append a running number at the end
to make each appointment name unique.
•
Multiple Appointment Book Configuration
By clicking the “Multi-Appt Book Configuration” button, the above dialog box will appear for you to add /
delete / update appointment books.
14.2 Device Settings
14.2.1 GSM Terminal Settings
- 81 -
On the GSM Terminal configuration page, user is able to configure the following settings :
•
Number of Retries
This field is to determine the number of times MoCo will resend a SMS if there is an error during sending.
•
Support Concatenation
Select this field to indicate support for concatenation of long SMS. By default, this field is selected. You
can also set the maximum number of sub-SMS the system can concatenate.
•
Load Balance Scheme
User can select the desired load balance scheme for each SIM card :
o
None – No load balance scheme for this SIM card.
o
Number Range – Enter the range of mobile numbers to be sent using this SIM card. For multiple
ranges, each range is separated using semicolon.
For example, you can set “91110000-92220000;93330000-94440000” as the desired number range
for a particular SIM card. If a recipient has the mobile number “91112222”, any sms sent to him
shall be using this particular SIM card.
o
Quota-based – You can select quota type as either “Per Month” or “Per Day”. Then enter the quota
value. MoCo will keep track of the amount of quota left for each SIM card. Any SIM card with
free quota will get priority.
SIM card with “Per Day” free quota will have higher priority than those with “Per Month” free
quota.
All other field on this page is for user information. They are:
•
•
•
•
•
•
•
•
•
•
Number Of GSM Terminals – indicates the number of GSM terminal MoCo currently detected
Terminal Index Number – Use this combo box to select the GSM terminal if there is more than one
terminal
Port Number – the communication port the GSM terminal is using
Baud Rate – transfer rate between the PC/Laptop and the GSM terminal
Data Bit – number of data bit
Stop Bit – number of stop bit
Parity – odd, even or no parity
OutBox queue – The number of outgoing SMSes currently queued at the terminal
Signal Strength – GSM terminal signal strength level. Range from 0 to 30. Pass signal strength is
typically 12.
IMSI – The 15-digit International Mobile Subscription Identity for the SIM card
- 82 -
14.3 Enterprise Settings
14.3.1 Server Settings
The Enterprise Settings are only available in MoCo Enterprise Edition. User can set the following configuration
for the Server Settings if you are using MoCo Server :
•
Network Settings – You can change the port number that connects to the MoCo Agents here. Normally,
user should not change the port number unless there are conflicts with other software.
•
Server Configuration
o Route unclassified incoming SMS to all agents – Select this option if you wish to route all
unclassified incoming SMS to all agents. Normally, an incoming SMS will have the Agent
Name as the first word of message. MoCo Server will route the incoming SMS to the relevant
MoCo Agent by matching the first word of message with the available Agent Names. If no
match is found, and this option is selected, the incoming sms will be routed to all Agents.
o
Validity period for incoming SMS – Incoming SMS will be stored in MoCo Server and
forwarded to relevant MoCo Agents. If the MoCo Agent is not connected to MoCo Server at
the moment when SMS is received, the SMS will be stored in a waiting buffer within the
MoCo Server for a period indicated by this option. Once the MoCo Agent is connected, the
stored SMS will be forwarded to it.
SMSes that are within the waiting buffer beyond the validity period will be deleted without
forwarding. However, a copy of the SMS will still be stored inside the Transaction Manager
of the MoCo Server.
- 83 -
14.3.2 Agent Settings
User can set the following configuration for the Agent Settings if you are using MoCo Agent :
•
Agent Settings
User can change the Agent Name here. Any changes will only take effect after restart of MoCo.
•
Server Settings
User can set the port number for connecting to MoCo Server. User can also set the Computer Name or IP
address of the MoCo Server. Any changes will only take effect after restart of MoCo.
•
Agent Connection Status
User can view the connection status and last heartbeat here. When the MoCo Agent is connected to MoCo
Server, the connection status shall display “Connected”. The last heartbeat shall also reflect the time of the
latest heartbeat response from MoCo Server.
- 84 -
Chapter 15: Other Features
15.1 Delete SIM Card Messages
MoCo allows user to manually delete the SMSes stored inside the SIM card.
To manually delete the SMSes stored inside the SIM card, click on the
SIM card messages” from the Tools menu.
icon on the toolbar or select “Delete
The above dialog box will appear for user to delete SIM card messages. You can select the gsm terminal you
want, and the options available. Then click “OK” to delete.
15.2 Printing
15.2.1 Print Label
MoCo allows user to perform label printing on standard label type 1029.
To perform label printing, select “Print Label” from the File menu. A dialog box as shown below will appear.
Step 1: Select the contact who you wish to print the label of.
Step 2: Make sure the type of label is “Label No. 1029”.
Step 3: Select the position within label for printing. Click “OK”. The below Print dialog box will appear.
- 85 -
Step 4: Select the appropriate printer name. Click “Properties” button to set the paper size.
Step 5: A dialog box as shown above will appear. Note that for different printer, a different kind of dialog will
appear.
Step 6: Go to Page Setup and set the Page Size to “A5”.
Step 7: Click “OK”. You will return to the previous Print dialog box.
Step 8: Click “OK” to proceed with the printing.
15.2.2 Print Appointment List
MoCo allows user to perform print appointment list on standard A4 paper.
To perform appointment printing, select “Print Appointment Book” from the File menu. A dialog box as shown
below will appear.
Step 1: Select the appointment book name which you wish to print.
Step 2: Select the starting/ending dates of appointments to print.
Step 3: Select the priority level of appointments to be printed.
Step 4: Click Print. A Print dialog box as shown below will appear.
- 86 -
Step 5: Select the appropriate printer name. Click “Properties” button to set the paper size.
Step 6: A dialog box as shown above will appear. Note that for different printer, a different kind of dialog will
appear.
Step 7: Go to Page Setup and set the Page Size to “A4”.
Step 8: Click “OK”. You will return to the previous Print dialog box.
Step 9: Click “OK” to proceed with the printing.
15.2.3 Print Receipt
MoCo allows user to perform receipt printing on ‘A5’ size paper.
To perform receipt printing, select “Print Receipt” from the File menu. A dialog box as shown below will
appear.
Step 1: Enter the reference number of the account you want to print.
- 87 -
Step 2: Click “OK”. The below Print dialog box will appear.
Step 3: Select the appropriate printer name. Click “Properties” button to set the paper size.
Step 4: A dialog box as shown above will appear. Note that for different printer, a different kind of dialog will
appear.
Step 5: Go to Page Setup and set the Page Size to “A5”.
Step 6: Click “OK”. You will return to the previous Print dialog box.
Step 7: Click “OK” to proceed with the printing.
- 88 -
15.3 Accounts System
MoCo has a built-in Accounts System for user to perform some simple accounting tasks.
To invoke the Accounts System, select “Accounts System” from the Tools menu. A dialog box as shown below
will appear.
15.3.1 Add New Transaction
Step 1: Click “Add New Transaction” button. A dialog boz as shown below will appear.
Step 2: Key in the accounts information. For expenses, you can add a minus sign in front of the Amount Paid
value.
Step 3: Click “Save” button to add the account.
- 89 -
15.3.2 Manage existing account items
To manage existing account item, right-click on the item and a context menu will appear for the following
options:
•
•
•
Modify – Select this option to modify the information of the account item.
Delete – Select this option to delete the account item.
Print Receipt – Select this option to print receipt for this account item. Remember to set the paper size
as ‘A5’.
15.3.3 Query Account System
At the Display Options, select the query parameters and click “Search” button. The list of account items that
satisfy the query parameters will be displayed, together with the calculated balances.
- 90 -
15.3.4 Accounts Config and Settings
By clicking the Accounts Config button on the Accounts System dialog box, the above dialog box will appear.
You can preset the “Accounts Item Description”, “Accounts Type” and “Payment Type” here. All your preset
configurable items would be available for selection when you add/modify an account transaction. For example,
if you add a payment type named “Credit Card”, the “Credit Card” option will be available as a payment type
selection when you add a new transaction.
By clicking the Setttings button on the Accounts System dialog box, the above dialog box will appear. You can
set the individual timings and click Save button. The timings shall affect the calculations of individual balances.
15.3.5 Save Accounts Sheet and Cash Book
By clicking the “Save Account Sheet” button on the Accounts System dialog box, you can save the currently
displayed account sheet to a HTML file.
By clicking the “Save Cash Book” button on the Accounts System dialog box, you can categorized your
earnings according to different payment type and save the report to a HTML file.
- 91 -
15.4 Backup and Restore MoCo Database
15.4.1 Backup MoCo Database
To backup MoCo’s database,
Step 1: From the File menu, click on the Backup Database option.
Step 2: A dialog box shown below will appear. Select the destination folder where you want to store the backup
database. Click “Backup” button.
Step 3: A “Success in Backup DB” dialog box will display when the backup is done. A copy of the MoCo
database will be stored in a sub-folder “MoCo Database Archive YYYY-MM-DD” inside the destination folder
you specified earlier on. The YYYY-MM-DD is the date which the backup is performed.
15.4.2 Restore MoCo Database
To restore from a previously backed-up MoCo’s database,
Step 1: From the File menu, click on the Restore Database option.
Step 2: A dialog box as shown below will appear. Select the folder that contains the database you wish to
restore. The folder should be in the form “MoCo Database Archive YYYY-MM-DD”, where YYYY-MM-DD
is the date which the database is being backup.
Step 3: Click “Restore” button.
Step 4: A dialog box as shown below will appear. To load the newly restored database, close MoCo and start
MoCo again.
- 92 -
15.5 Real Time Traffic Monitor
To invoke the Real-Time Traffic Monitor, select “Real-time Traffic Monitor” from the Tools menu. A dialog
box as shown above will appear.
You can monitor the queue of outgoing SMS for each gsm modem attached to MoCo. You can also pause and
resume the sending of SMS of each gsm modem.
- 93 -