1
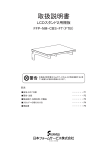
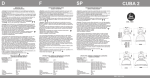
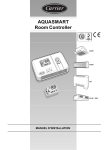
SP
FARO
- Achtung! Die Sicherheit im Umgang mit dem Strahler ist nur gewaehrleistet, wenn
die folgenden Instruktionen strikt befolgt und eingehalten werden.
- Achtung! Bevor der Strahler angeschlossen, das Leuchtmittel eingesetzt oder
gewechselt wird, vergewissern Sie sich, dass der Strahler vom Stromnetz getrennt ist.
- Achtung! Hochspannung inerhalb des Strahlers.
- Attention! La sécurité du projecteur est garantie seulement par l'observance
des instructions suivantes, donc il est nécessaire de les conserver.
- Attention! Avant d'exécuter les connexions au réseau, pendant l'assemblage ou
substitution de la lampe, s'assurer d'avoir enlevé tension.
- Attention! Haute tension dans l’appareil.
¡Atención! La seguridad del proyector es garantizada sólo por la observancia de las
siguientes instrucciones, por tanto es necesario conservarlas.
¡Atención! Antes de ejecutar las conexiones de red, durante el montaje o
sustitución de la lámpara, cerciorarse de haber sacado tensión.
¡Atención! Presencia de alta tensión en el aparato.
- Für Einsetzung und Wechsel des Leuchtmittels
befolgen Sie bitte die Hinweise des Leuchtmittelherstellers, welche der Lampe
beiliegen sollte.
- Der Strahler soll nur mit Abdeckglas betrieben werden. Es handelt sich um ein
temperaturwechselbeständiges Sicherheitsglas. Bitte da Glas sofort ersetzen, wenn
es defekt ist.
- Wenn der Strahler eingeschaltet ist, bitte den Abstand zur zu beleuchtenden
Fläche von 1 mtr. einhalten (Siehe Abb. 1).
1m
Den Strahler nicht direkt an die Decke oder Wand richten.
- Beachten Sie die Betriebsposition, wie abgebildet in Bild 1.
- Der Strahler ist nicht für die Deckenmontage geeignet.
- Der Strahler ist nicht geeignet für „Tandem-Installation“.
- Der Strahler ist geeignet für Aussen- und Innenanwendung.
- Strahler geeignet für die Montage an normal entflammbaren Untergründen.
- Installationhoehe: beliebig.
- Installation:
Befestigen Sie den Bügel des Strahlers mit Hilfe der beiden Schrauben M12 durch
die äusseren Bohrungen am Strahler (Abbildung 2). Nach Ausrichtung des Strahlers
die beiden M12 Schrauben mit Drehmoment 60Nm anziehen. Das leuchtmittel kann
von vorn durch Öffnen des Glases mit 4 Clipsen eingesetzt werden.
- Der Strahler ist nicht geeignet zum direkten Anschluss mit der
Stromversorgung.
- Zur verkabelung des Strahlers benutzen Sie ein kabel vom typ H07 RN-F oder
FROR 450/750V mit mindestens 3x2,5mm² D. 10-14mm.
- Faro1000W (Bild 3): Montieren Sie die versorgungsbox auf der Rückseite des
Strahlers und beachten Sie die kabelverschraubungen: sie müssen auf der Seite
platziert sein, wo die Kabel aus dem Strahler kommen.
Folgen sie der Anleitung des Blocks, um die Kabel anzuschliessen.
> Montieren sie die beiden L-Bügel an den oberen Punkten, indem Sie die
mitgelieferten M10 –Schrauben mit 40Nm anziehen.
> Setzen Sie die beiden Muttern M10 in die am Strahler vorhandene Führung ein.
> Schieben sie die L-Bügel in die Führungslöcher A und ziehen die M8-Schrauben
mit Nm40 an.
> Beenden Sie die Blockmontage durch Anziehen der M10-Schrauben mit 40Nm.
- Faro 2000W und Spezialversion von Faro 1000W mit seperatem Block (bild 4).
Verbinden Sie das Anschlusskabel zwischen Block und Strahler in der
Anschlussklemme in der Anschlussbox. Ungeachtet, welche Versorgungseinheit
verwendet wird, verbinden Sie immer den braunen Draht mit mit auskommenden
braunen oder schwarzen Draht und den blauen Draht mit dem auskommenden
blauen oder weissen Draht. Ziehen sie die kabelverschraubung CH27 an. Ziehen sie
die 4 Schrauben der Anschlussboxabdeckung kreuzweise fest an.
- Pour le montage ou le remplacement de
la lampe, suivre les instructions données par le constructeur, jointes à la lampe.
-L’appareil doit être utilisé seulement si complet de l’écran de protection. Il est un
verre float trempé. Remplacer immédiatement l’écran de protection s’il est
endommagé.
- Pendant l’usage du projecteur, s'assurer que la distance entre la lampe et l'objet
éclairé n’est pas inférieure à 1 mètre et n’orienter pas
1m
le projecteur vers la paroi ou le plafond (fig. 1).
- Respecter les positions de fonctionnement indiquées dans la figure 1.
- Le projecteur n’est pas fait pour l’installation au plafond.
- Le projecteur n’est pas fait pour l’installation en cascade (tandem).
- Appareil apte au fonctionnement à l’intérieur et à l’extérieur.
- Appareil apte à l’installation directe sur surfaces inflammables.
- Hauteur d’installation quelconque.
- Para el montaje o sustitución de la lámpara,
seguir las instrucciones dadas del constructor, juntas a la lámpara.
-El proyector tiene que ser utilizado solamente con pantalla de protección.
Cristal float templado. Sustituir inmediatamente la pantalla de protección si daňada.
-Durante el uso del proyector, asegurese que la distancia mínima entre la lámpara y
el objeto iluminado no sea inferior a 1m y no orientar
1m
el proyector hacia la pared o al techo (img. 1).
-Respetar las posicciones de funcionamiento indicadas en img.1.
- Proyector no idóneo a la instalación al techo.
- Proyector no idóneo a la instalación en catarata (tandem).
- Proyector idóneo al funcionamiento en ambientes externos o internos.
- Proyector idóneo a la instalación directa sobre superficies inflamables.
- Cualquiera altura de instalación.
- Installation:
Fixer la bride de support du projecteur par minimum 2 vis M12 positionnées dans
les deux trous extrêmes (fig. 2).
Après avoir réglé l’orientement du projecteur, serrer les 2 vis M12 qui les unissent
à la bride avec une torque de 60 Nm.
Accéder à la lampe en ouvrant le verre antérieur par 4 clips.
- Le projecteur n'est pas fait pour la connexion directe au réseau
d'alimentation.
- Pour le câblage du projecteur utiliser un câble H07 RN-F ou FROR 450/750V
avec section min. 3x2,5mm² Ø10÷14mm.
- Faro 1000W (fig. 3): installer le block d’alimentation directement derrière le
projecteur et positionner les presse-étoupes où le câble sort du projecteur.
Pour le câblage au group d’alimentation, voir “instructions block”.
> Monter les 2 brides à L dans la partie supérieure du block en utilisant les vis et
les écrous fournis (torsion Nm 40).
> Introduire les 2 écrous M10 dans les trous qui sont sur le projecteur.
> Visser les brides à L dans les trous A sur le projecteur par vis M8 (torsion Nm 40).
- Instalación :
Fijar la lira de soporte del proyector por medio de 2 tornillos M12 mínimo
posicionados en los dos agujeros externos (img.2).
Después de haber regulado la orientación del proyector, cerrar los 2 tornillos M12
que los unen a la lira por un par de apriete de 60 Nm.
Acceder a la lámpara abriendo el cristal anterior por 4 clips.
- Proyector no idóneo a la conexión directa a la red de alimentación.
- Para cablear el proyector utilizar un cable H07 RN-F o FROR 450/750V con
sección mínima 3x2,5mm² Ø10÷14mm.
- Faro 1000W (img. 3): instalar el block de alimentación directamente detrás el
proyector posicionando los prensa estopas al lado del cable que sale del proyector.
Para cablear el grupo de alimentación ver “instrucciones Block”.
> Montar las 2 liras a L en la parte superior del block con el uso de los tornillos y las
tuercas M10 suministradas (par de apriete 40 Nm).
> Insertar 2 tuercas M10 en agujero sobre el proyector.
> Atornillar las liras a L en el agujero sobre el proyector A por tornillos M8 (par de
apriete 40 Nm).
> Completar la fijación del block apretando los 2 tornillos M10 (par de apriete 40
Nm).
- Faro 2000W y versiones speciales Faro 1000W con block separado (img. 4):
cablear el cable de conexión entre block y aparato en la caja de borneo para el
cableado. Cablear siempre, indiferentemente de la tipología de block de
alimentación, el conductor marrón al polo donde se encuentra el cable negro
(o marrón) y el conductor azul al polo donde se encuentra el cable blanco (o azul).
Apretar el prensaestopas CH27. Apretar los 4 tornillos de la caja para el cableado
con un apriete gradual y cruzado.
FLUTLICHTSTRAHLER FÜR HALOGEN-METALLDAMPF- UND
NATRIUMDAMPF-LAMPEN
MODELL: FARO 1000W
- Leistung, Type-Lampen und Fassung:
1000W MD 230V~ 9,5A
1000W ST 230V~ 10,3A
1000W MT 230V~ 8,2A
1000W MT 230V~ 9,5A
- Schutzklasse :
I
- Schutzart :
IP65
- Gewicht:
Kg 28
- Windlast:
0,40m²
0,13m²
PROJECTEURS POUR LAMPES AUX HALOGENURES METALLIQUES
ET SODIUM HAUTE PRESSION
MODELE: FARO 1000W
- Puissance, type de lampe et duille :
1000W MD 230V~ 9,5A
Câble
1000W ST 230V~ 10,3A E40
1000W MT 230V~ 8,2A
E40
1000W MT 230V~ 9,5A
E40
MODELL: FARO 2000W
- Leistung, Type-Lampen und Fassung:
- Schutzklasse :
- Schutzart :
- Gewicht:
- Windlast:
2000W MD 380V~ 10,3A
I
IP65
Kg 15
0,33m²
0,10m²
Kable
E40
E40
E40
Kable
> Compléter le fixage du block en serrant les 2 vis M10 (torsion Nm 40).
- Faro 2000W et versions spéciales Faro 1000W avec block séparé (fig. 4):
câbler le câble de connexion entre le block et l’appareil éclairant à la borne dans
le coffret de raccordement. Câbler toujours, indifféremment de la typologie du
block d’alimentation, le conducteur marron au pôle où se trouve le câble noir
(ou marron) et le conducteur bleu au pôle où se trouve le câble blanc (ou bleu).
Serrer le presse-étoupe CH27. Serrer les 4 vis du couvercle du coffret de
raccordement en faisant un serrage graduel et croisé.
- Classe d’isolement :
I
- Degré de protection :
- Poids :
- Surface exposée au vent :
IP65
Kg 28
0,40m²
MODELE: FARO 2000W
- Puissance, type de lampe et duille :
2000W MD 380V~ 10,3A
- Classe d’isolement :
I
- Degré de protection :
- Poids :
- Surface exposée au vent :
IP65
Kg 15
0,33m²
0,13m²
0,10m²
Câble
PROYECTOR PARA LÁMPARAS A VAPORES DE ALOGENUROS METÁLICOS
Y SODIO ALTA PRESIÓN
MODELO: FARO 1000W
- Potencia, tipo de lámpara y portalámpara:
1000W MD 230V~ 9,5A
Cable
1000W ST 230V~ 10,3A
E40
1000W MT 230V~ 8,2A
E40
1000W MT 230V~ 9,5A
E40
- Clase de aislamiento :
I
- Grado de protección :
IP65
- Peso :
Kg 28
- Superficie expuesta al viento:
0,40m²
0,13m²
MODELO: FARO 1000W
- Potencia, tipo de lámpara y portalámpara:
- Clase de aislamiento :
- Grado de protección :
- Peso :
- Superficie expuesta al viento:
2000W MD 380V~ 10,3A
I
IP65
Kg 15
0,33m²
0,10m²
DAL 1960
FARO 1000W
215
590
660
INSTRUCCIONES DE INSTALACIÓN, EMPLEO Y MANUTENCIÓN
380
608
FARO 2000W
685
590
215
660
INSTRUCTIONS D'INSTALLATION, USAGE ET ENTRETIEN
730
MONTAGE- UND WARTUNGSANLEITUNG
545
F
545
D
535
Cable
REV. 00 09/12
I
INSTALLAZIONE
INSTALLATION
ISTRUZIONI DI INSTALLAZIONE, USO E MANUTENZIONE
MIN
0,5m
FARO 1000W
2x M10
(Nm40)
+20°
MINIMUM
1m
-5°
2x M8
(Nm40)
A
A
2x M10
(Nm40)
Fig. 3
FARO 2000W
Fig. 1
BLACK
BROWN
YELLOW/GREEN
N
H07 RN-F
FROR 450/750V
3X2,5mm2
Ø10÷14mm
BLUE
WHITE
M12
(Nm60)
M12
(Nm60)
318
14
286
Ordine di serraggio
(serrare a fondo, min 2Nm)
Tightening sequence
(tighten deeply, min 2Nm)
1-2-3-4
1
3
Ø21
2x min M12
4
Fig. 2
UK
2
Fig. 4
INSTALLATION, USE AND MAINTENANCE INSTRUCTIONS
- Attenzione! La sicurezza dell’apparecchio è garantita solo con l’uso appropriato delle
seguenti istruzioni, pertanto è necessario conservarle.
- Attenzione! Prima di eseguire le connessioni di rete, durante il montaggio o
sostituzione di lampade, assicurarsi di aver tolto la tensione.
- Attenzione! Presenza di alta tensione nell’apparecchio.
- Warning! Safety of this floodlight is guaranteed only if the following instructions are
properly respected. It is therefore necessary to preserve them.
- Warning! Before connecting to the main network, during positioning or
replacement of lamps, ensure the tension has been disconnected.
- Warning! High tension inside the floodlight.
- Per il montaggio o sostituzione della lampada, eseguire le istruzioni date dal
costruttore allegate alla lampada stessa.
- L’apparecchio deve essere utilizzato solo se completo del suo schermo di protezione.
Trattasi di vetro float temperato. Sostituire immediatamente lo schermo di protezione se
danneggiato.
- Nell’uso dell’apparecchio, assicurarsi che la distanza tra la lampada e
1m
l’oggetto illuminato non sia inferiore a 1 m e non orientare il proiettore
verso la parete o il soffitto (Fig.1).
- Rispettare le posizioni di funzionamento indicate in Fig. 1.
- Il proiettore non è idoneo per l’installazione a plafone.
- Il proiettore non è idoneo al collegamento in cascata.
- Apparecchio idoneo al funzionamento in interni ed esterni.
- Apparecchio idoneo al montaggio diretto su superfici normalmente
infiammabili.
- Altezza d’installazione qualsiasi.
- For positioning or replacement of lamps,follow the instructions
given by the lamp’s manufacturer, which should be supplied with the lamp itself.
- The floodlight can be used only with the protective glass diffuser.
It is a float tempered sodic-calcic glass. Replace immediately the glass
diffuser whenever cracks are found.
- When the floodlight is on, ensure that a minimum distance of 1m
1m
between the lamp and the illuminated surface is respected (pic.1)
do not aim the reflector towards the wall or the ceiling.
- Follow the working positions indicated in picture 1.
- The floodlight is not suitable for ceiling installation.
- The floodlight is not suitable for “tandem” installations.
- The floodlight is suitable for outdoor and indoor use.
- Floodlight suitable for installation on normally inflammable surfaces.
- Installation height: any.
- Installazione:
Fissare la staffa di supporto del proiettore mediante, come minimo, n°2 viti da M12
posizionate nei due fori estremi (Fig.2).
Dopo aver regolato l’orientamento del proiettore, serrare le n°2 viti da M12 che lo
uniscono alla staffa con un momento torcente di 60Nm.
Accedere alla lampada mediante l’apertura del vetro anteriore aprendo le n°4 clips.
- Il proiettore non è idoneo alla connessione diretta alla rete di alimentazione.
- Per il cablaggio del proiettore utilizzare un cavo tipo H07 RN-F oppure FROR
450/750V avente sez. minima 3x2,5mm² Ø 10÷14mm.
- Faro 1000W (Fig. 3): applicare il Block d’alimentazione direttamente sul retro del
proiettore avendo cura di posizionare i pressacavi dal lato del cavo uscente dal
proiettore. Per il cablaggio al gruppo d’alimentazione vedere ‘Istruzioni Block’.
> Montare le n. 2 staffette a L sui piedini superiori del block utilizzando le viti e dadi M10
forniti (momento torcente Nm40).
> Inserire n.2 dadi M10 nelle asole preposte sul proiettore.
> Avvitare le staffette a L nei fori A sul proiettore tramite n. viti M8 (momento
torcente Nm40).
> Completare il fissaggio del block serrando le n.2 viti M10 (momento torcente Nm40).
- Faro 2000W e versioni speciali Faro 1000W con Block separato (Fig. 4): cablare il
cavo di connessione tra block ed apparecchio illuminante alla morsettiera nella scatola
di cablaggio. Cablare sempre, indifferentemente dal tipo di block di alimentazione,
il conduttore marrone al polo avente in uscita un cavo nero (o marrone) e il conduttore
blu al polo avente in uscita un cavo bianco (o blu). Stringere a fondo il pressacavo
CH27. Serrare a fondo le n°4 viti del coperchio scatola di cablaggio applicando un
serraggio graduale ed incrociato.
- Installation:
Fix the supporting bracket of the floodlight by means of (at least) n°2 screws M12,
positioned in the outer holes of the brackets (pic.2).
After adjusting the floodlight’s aiming, tighten the 2 screws M12 which fix if to the
bracket, with 60 Nm torque.
The lamp is accessible from the front glass that can be opened by 4 clips.
- The floodlight is not suitable for direct connection to the electrical feeding
network.
- For cable connections of the floodlight use a cable type H07 RN-F or FROR 450/750V
with min.section 3x2,5mm² Ø10÷14mm.
- Faro 1000W (pict. 3): install the gear box at the back of the floodlight and pay attention to the cable glands: they have to be placed on the side of the cable that comes out
from the floodlight. Follow the “block instructions” for the wiring to the feeding group.
> Install the n°2 L brackets on the upper anchor points using the supplied screws and
nuts M10 (Nm40 torque).
> Insert the n°2 nuts M10 into the existing slots placed on the floodlight.
> Screw the L brackets in the holes A using the n° M8 screws (Nm40 torque).
> Complete the fixing of the block tightening the n°2 M10 screws (Nm40 torque).
- Faro 2000W and special versions of Faro 1000W with separate block (picture 4):
connect the feeding cable between the block and floodlight in the terminal board
inside the connexion box.
Regardless of the electrical gear unit, always connect the brown wire to the pole having
outcoming wire brown or black colour, and the blue wire to the pole having outcoming
wire blue or white. Tighten deeply the cable gland CH27. Tighten the n.4 screws of the
connection box cover in a gradu
al and cross-wise way.
APPARECCHIO PER LAMPADE A VAPORI DI ALOGENURI E
SODIO ALTA PRESSIONE
SERIE BASE: FARO 1000W
- Potenza, tipo di lampada, attacco : 1000W MD 230V~ 9,5A
Cavo
1000W ST 230V~ 10,3A E40
1000W MT 230V~ 8,2A
E40
1000W MT 230V~ 9,5A
E40
- Classe d’isolamento :
I
- Grado di protezione :
IP 65
- Peso max:
28Kg
- Superficie esposta al vento :
0,40m²
0,13m²
FLOODLIGHT FOR METAL HALIDE AND
HIGH-PRESSURE SODIUM LAMPS
MODEL: FARO 1000W
- Power, lamp’s type, lampholder : 1000W MD 230V~ 9,5A
1000W ST 230V~ 10,3A
1000W MT 230V~ 8,2A
1000W MT 230V~ 9,5A
- Insulation class :
I
- Protection degree :
IP 65
- Max weight :
28Kg
- Surface exposed to wind :
0,40m²
0,13m²
SERIE BASE: FARO 2000W
- Potenza, tipo di lampada, attacco :
- Classe d’isolamento :
- Grado di protezione :
- Peso max :
- Superficie esposta al vento :
MODEL: FARO 2000W
- Power, lamp’s type, lampholder :
- Insulation class :
- Protection degree :
- Max weight :
- Surface exposed to wind :
2000W MD 380V~ 10,3A
I
IP 65
15Kg
0,33m²
0,10m²
Cavo
2000W MD 380V~ 10,3A
I
IP 65
15Kg
0,33m²
0,10m²
Cable
E40
E40
E40
Cable