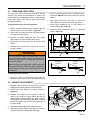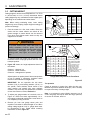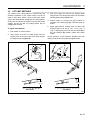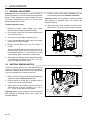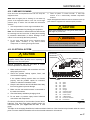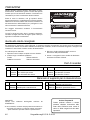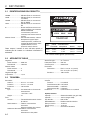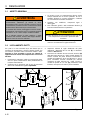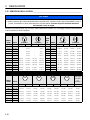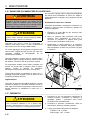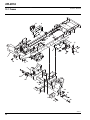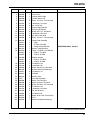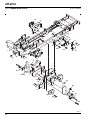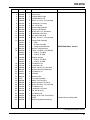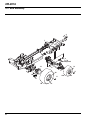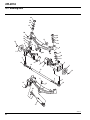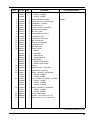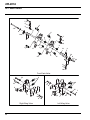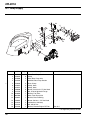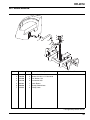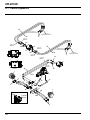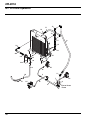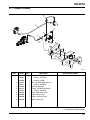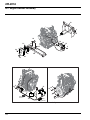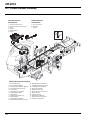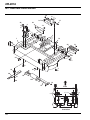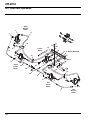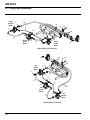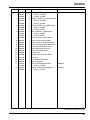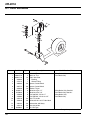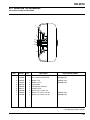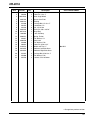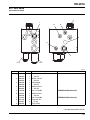
1
4228362-IT-Rev A 6 5 9 11 16 15 13 7 8 18 1 - INCLUDES ITEMS 3 - 16 17 19 3 10 4 Parts & Maintenance Manual Manuale parti e manutenzione HR 9016 Turbo™ Rotary Mower Tosaerba rotativo HR 9016 Turbo™ 70538 – 70539 – 70540 – 70541 – Kubota V3800DICR-T-E3B, 4WD* Kubota V3800DICR-T-E3B, 4WD with ROPS Kubota V3800DICR-T-E3B, 4WD EC with ROPS Kubota V3800DICR-T-E3B, 4WD EC* 70538 – 70539 – 70540 – 70541 – Kubota V3800DICR-T-E3B, 4WD* Kubota V3800DICR-T-E3B, 4WD con struttura ROPS Kubota V3800DICR-T-E3B, 4WD EC con struttura ROPS Kubota V3800DICR-T-E3B, 4WD EC* *- These units must have a certified ROPS/cab installed by the Dealer before the mower can be put into service and registered for warranty coverage. *- Queste unità devono avere una cabina certificata o una struttura ROPS installata dal concessionario prima che il tosaerba possa essere messo in servizio e registrato per la copertura della garanzia. WARNING WARNING: If incorrectly used this machine can cause severe injury. Those who use and maintain this machine should be trained in its proper use, warned of its dangers and should read the entire manual before attempting to set up, operate, adjust or service the machine. AVVERTENZA AVVERTENZA: Questa macchina può causare gravi infortuni se viene utilizzata in modo errato. Prima di accingersi ad approntare, usare, mettere a punto o eseguire la manutenzione di questa macchina, coloro che la utilizzano ed i responsabili della manutenzione devono essere addestrati all’impiego della macchina, devono essere informati dei pericoli, e devono leggere l’intero manuale. GB IT United Kingdom Italy When Performance Matters.™ FORWORD This manual contains adjustment, maintenance, troubleshooting instructions and parts list for your new Jacobsen machine. This manual should be stored with the equipment for reference during operation. ® A Textron Company CHARLOTTE, NC Before you operate your machine, you and each operator you employ should read the manual carefully in its entirety. By following the safety, operating, and maintenance instructions, you will prolong the life of your equipment and maintain its maximum efficiency. If additional information is Jacobsen Dealer. MADE IN U.S.A. ® 11524 WILMAR BLVD, CHARLOTTE, NC 28273 PRODUCT OF U.S.A. needed, contact your kg A Textron Company 1-800-848-1636 (US) kW The serial plate is located on the left frame rail. Jacobsen recommends you record these numbers for easy reference. Suggested Stocking Guide To Keep your Equipment fully operational and productive, Jacobsen suggests you maintain a stock of the more commonly used maintenance items. We have included part numbers for additional support materials and training aids. To order any of the following material: 3. Order by the quantity desired, the part number, and the description of the part. 1. Write your full name and complete address on your order form. 4. Send or bring the order to your authorized Jacobsen Dealer. 2. Explain where and how to make shipment: q UPS q Regular Mail q Overnight q 2nd Day Service Parts Qty. Part No. Description Qty. Part No. 4251803 Engine Oil Filter 5003370 Engine Air Filter 4230980 Engine Fuel Filter Description 4251726 Water Separater Element 5003691 Hydraulic Charge Filter 5002693 Hydraulic Return Filter Service Support Material Qty. Part No. Qty. Part No. Description 4228361 Safety and Operation Manual 4228362 Parts and Maintenance Manual 4228360 Engine Parts Catalog 4263110 Technical Repair Manual These are the original instructions verified by Jacobsen, A Textron Company. © 2012, Jacobsen, A Textron Company/Textron Innovations Inc. “All rights reserved, including the right to reproduce this material or portions thereof in any form.” en-2 Description Litho In U.S.A. 2-2012 Proposition 65 Warning This product contains or emits chemicals known to State of Cal ifornia to cause cancer and birth defects or other reproductive harm. Table of Contents 1 1.1 1.2 2 2.1 2.2 2.3 2.4 2.5 2.6 2.7 3 3.1 3.2 3.3 3.4 3.5 3.6 3.7 3.8 3.9 3.10 3.11 3.12 3.13 3.14 3.15 Safety Operating Safety .................................................. 4 Important Safety Notes .........................................5 Specifications Product Identification............................................ 6 Cutting Units .........................................................6 Mower ...................................................................6 Engine ..................................................................7 Weights and Dimensions ......................................7 Accessories & Support Literature .........................7 Declaration of Conformity .....................................8 Adjustments General............................................................... 10 Leveling Decks ...................................................10 Servicing Front Deck ..........................................11 Winglet Adjustment ............................................11 Cutting Height .....................................................12 Lift Limit Switches ...............................................13 Neutral Adjustment .............................................14 Neutral Sensing Switch ......................................14 Forward Sensing Switch .....................................15 Parking Brake .....................................................15 Parking Brake .....................................................16 Traction Pedal ....................................................16 Steering Toe-In ...................................................16 Steering Stop Bolts .............................................17 Torque Specification ...........................................18 4 4.1 4.2 4.3 4.4 4.5 4.6 4.7 4.8 4.9 4.10 4.11 4.12 4.13 4.14 4.15 4.16 4.17 4.18 4.19 4.20 4.21 4.22 4.23 5 5.1 6 6.1 6.2 7 7.1 7.2 7.3 Maintenance General .............................................................. 19 Inspecting Blades ...............................................19 Sharpening Blades .............................................20 Engine ................................................................21 Engine Oil ...........................................................21 Muffler and Exhaust ...........................................21 Air Filter ..............................................................22 Fuel ....................................................................22 Fuel System .......................................................23 Battery ................................................................23 Jump Starting .....................................................23 Charging Battery ................................................24 Hydraulic Hoses .................................................24 Hydraulic Oil .......................................................25 Hydraulic Filters .................................................25 Radiator & Oil Cooler .........................................26 Tires ...................................................................26 Care and Cleaning .............................................27 Electrical System ................................................27 EFI Diagnostic Check .........................................29 Wheel Mounting Procedure ................................29 Rollover Protection Structure (ROPS) ................30 Storage ...............................................................30 Troubleshooting General .............................................................. 31 Maintenance and Lubrication Charts Maintenance Chart............................................. 32 Lubrication Chart ................................................33 Parts List How To Use The Parts Catalog ......................... 34 To Order Parts ...................................................34 Parts Catalog Table of Contents ........................35 en-3 1 SAFETY 1 SAFETY 1.1 OPERATING SAFETY ______________________________________________________ ! WARNING EQUIPMENT OPERATED IMPROPERLY OR BY UNTRAINED PERSONNEL CAN BE DANGEROUS. Familiarize yourself with the location and proper use of all controls. Inexperienced operator’s should receive instruction from someone familiar with the equipment before being allowed to operate the machine. 1. Safety is dependent upon the awareness, concern, and prudence of thos e who operate or service the equipment. Never allow minors to ope rate any equipment. 11. Never operate equipment that is not in per fect working order or i s without decals, guards, shields, discharge deflectors, or other protective devices securely fastened in place. 2. It is your responsibility to r ead this manual and all publications associated with this equipment (Safety and Operation Manual, Engine Manual, ac cessories and attachments). If the operator can not read English, it is the owner’s responsibility to ex plain the material contained in this manual to them. 12. Never disconnect or bypass any switch. 3. Learn the proper use of the machine, the location and purpose of all the controls and gauges before y ou operate the equipment. Working with unfamiliar equipment can lead to accidents. 4. Never allow anyone to operate or service the mac hine or its attachments without proper training and instructions, or while under the influence of alcohol or drugs. 5. Wear all the necessary protective clothing and personal safety devices to protect your head, eyes, ears, hands, and feet. Operate the machine only in day light or in good artificial light. 6. Evaluate the terrain to determine what accessories and attachments are needed to proper ly and safely perform the job. Only use accessories and att achments approved by Jacobsen. 7. Stay alert for hol es in the terr ain and other hi dden hazards. 8. Inspect the area where the equipment will be used. Pick up all the debris you can find before ope rating. Beware of ov erhead obstructions (low tree l imbs, electrical wires, etc.) and also underground obstacles (sprinklers, pipes, tree roots, etc.). Enter a new area cautiously. Stay alert for hidden hazards. 9. Never direct discharge of material toward bystanders, nor allow any one near the machine while in operation. The owner/operator can prevent and is responsible for injuries inflicted to thems elves, to by standers, and damage to property. 10. Do not carry passengers. Keep bystanders and pets a safe distance away. 13. Do not change the engine gov overspeed the engine. ernor setting or 14. Carbon monoxide in the ex haust fumes can be fatal when inhaled. Never operate the eng ine without proper ventilation or in an enclosed area. 15. Fuel is highly flammable, handle with care. 16. Keep the engine clean. Allow the engine to cool before storing and always remove the ignition key. 17. Disengage all drives and engage parking brake before starting the engine (motor) . Start the engine onl y when sitting in operator’s seat, never while standing beside the unit. 18. Equipment must comply with the latest federal, state, and local requirements when driven or transported on public roads. Watch out for tr affic when crossing or operating on or near roads. 19. Local regulations may restrict the age of the operator. 20. Operate the mac hine up and down the face of s lopes (vertically), not across the face (horizontally). 21. To prevent tipping or loss of control, do not s tart or stop suddenly on slopes. Reduce speed when making sharp turns. Use caution when changing directions. 22. Always use the s eat belt when oper ating mowers equipped with a Roll Over Protective Structure (ROPS). Never use a seat belt when operating mowers without a ROPS. Accessory operator protective structures will continue to be offered for all equipment currently covered. This allows for the out fitting of any machines without previous ROPS installations or replacement of damaged structures. 23. Keep legs, arms, and body inside the compartment while the vehicle is in motion. seating 24. Disconnect batteries before performing any welding on this mower. This machine is to be operated and maintained as specified in this manual and is intended for the professional maintenance of specialized turf grasses. It is not intended for use on rough terrain or long grasses. en-4 SAFETY 1.2 1 IMPORTANT SAFETY NOTES ________________________________________________ This safety alert symbol is used to alert you to potential hazards. DANGER - Indicates an imminently hazardous situation which, if not avoided, WILL result in death or serious injury. WARNING - Indicates a potentially hazardous situation which, if not avoided, COULD result in death or serious injury. CAUTION - Indicates a potentially hazardous situation which, if not avoided, MAY result in minor or moderate injury and property damage. It may also be used to alert against unsafe practices. NOTICE - Indicates a potentially hazardous situation which, if not avoided, MAY result in property damage. It may also be used to alert against unsafe practices. For pictoral clarity, some illustrations in this manual may show shields, guards or plates open or removed. Under no circumstances should this equipment be operated without these devices securely fastened in place ! WARNING The Interlock System on this mower prevents the mower from starting unless the brake pedal is engaged, mower switch is OFF, and traction pedal is in Neutral. The system will stop the engine if the operator leaves the seat without engaging the parking brake or setting the mower switch OFF. NEVER operate mower unless the Interlock System is working. ! WARNING 1. Before leaving the operator’s position for any reason: a. b. c. d. e. Return traction pedal to Neutral. Disengage all drives. Lower all implements to the ground. Engage parking brake. Stop engine and remove the ignition key. 2. Keep hands, feet, and clothing away from moving parts. Wait for all movement to stop before you clean, adjust, or service the machine. 3. Keep the area of operation clear of all bystanders and pets. 4. Never carry passengers, unless a seat is provided for them. 5. Never operate mowing equipment without the discharge deflector securely fastened in place. By following all instructions in this manual, you will prolong the life of y our machine and maintain its maximum efficiency. Adjustments and maintenance should always be performed by a qualified technician. If additional information or service is needed, contact your Authorized Jacobsen Dealer who is kept informed of th e latest methods to service this equipment and can provide prompt and efficient service. en-5 2 2 2.1 SPECIFICATIONS SPECIFICATIONS PRODUCT IDENTIFICATION_________________________________________________ 70538H ........................... HR 9016 Turbo, 4 Wheel Drive 70539 .............................. HR 9016 Turbo, 4 Wheel Drive with ROPS 70540 .............................. HR 9016 Turbo, 4 Wheel Drive with ROPS EC 70541H ........................... HR 9016 Turbo, 4 Wheel Drive EC H ..................................... 70538 and 70541 units must have either a certified cab or ROPS installed by the Dealer before the mower can be registered or put into service. Serial Number ................ An identification plate, like the one shown, listing the serial number, is attached to the frame of the mower and is located to the operator’s right just over the rear axle. Always provide the serial number of the unit when ordering replacement parts or requesting service information. 2.2 MADE IN U.S.A. 7053801651 11524WILMAR BLVD, CHARLOTTE, NC 28273 ® PRODUCT OF U.S.A. A Textron Company xxxx xxxx kg kW 1-800-848-1636 (US) xxxx 7054001651 Product Sound Pressure EEC Sound Level Operator Power Ear Vibration M/S2 Arms Body 70540 105 dba 91 dba 3.15±1.4 0.21±0.08 70541 105 dba 91 dba 3.15±1.4 0.21±0.08 Cutting Height................. 1-5.5 in. (25 - 140 mm) Blade size ....................... 21 in. (533 mm) Tip speed ........................ 16,500 ft./min. (5029 m/min.) Tires Size........................... Ten 11 x 4.00 - 5.0 (4 ply) Two 13 x 6.50 - 6.0 (4 ply) Pressure ................... 20-25 psi (1.38-1.73 BAR) MOWER _________________________________________________________________ Tires: Front ........................ 29 x 14 - 15: 12 ply Rear ......................... 24 x 12 -12: 6 ply Pressure ................... 20-22 psi (1.38-1.52 BAR) Battery: Type .......................... Two Maintenance Free 12 Volt Batteries 720 CCA @ 0°F (-18°C) Group ........................ 75 Brakes: Service ..................... Dynamic braking through traction circuit. Parking...................... Mechanical front wheel drum Hand lever actuated Turn-assist ................ Mechanical front wheel drum Two pedal actuation en-6 CHARLOTTE, NC CUTTING UNITS___________________________________________________________ Width Front Deck ................ 92 in. (2336 mm) Side Decks................ 59 in. (1499 mm) Number of Blades Front Deck ................ 5 Side Decks................ 3 Overall Cutting Width ...... 16 ft. (2.4 m) 2.3 ® A Textron Company Speed: Mow ......................... 0 - 8.5 mph (13.6 kph) Transport - 2 WD ...... 0-20 mph (32.2 kph) Reverse - 2WD ......... 0-5.5 mph (8.9 kph) Reverse - 4 WD ........ 0 - 3 mph (4.8 kph) Production ...................... 16.5 acres per hour @ 8.5 mph Hydraulic System: Capacity.......................... 55 U.S. gal. (208 liters) System Reservoir ........................ 33 U.S. gal. (125 liters) Fluid Type ....................... ISO VG 68 Cooling ........................... Hydraulic Oil Cooler Charge Filter................... 10 micron Return Line Filter ............ 10 micron Steering ......................... Hydrostatic power steering SPECIFICATIONS 2.4 ENGINE __________________________________________________________________ Make ............................... Kubota Model .............................. V3800 DICR-T-E3B Horsepower..................... 96.4 hp (71.9 kW) @ 2600 rpm Note: Actual sustained horsepower will likely be lower than listed in specifications due to operating limitations and enviromental factors. Displacement .................. 230 cu. In. (3.769 liter) Torque ............................. 242 ft. lbs. (328 Nm) @ 1500 rpm Fuel: Type .......................... Low or Ultra Low Sulfur No. 2 Diesel (CUNA NC 630.01) Rating........................ Min. cetane rating 45 Capacity .................... 35 U.S. Gal. (132.5 liters) Governor Setting: 2.5 High Idle.................... 2700 rpm Low Idle .................... 1050 rpm Lubrication: Capacity.................... 3.5 gal. (13.2 l) Type .......................... SAE 15 W40 API Classification ..... CF 4, CD-II, CE Air Filter .......................... Dry type with evacuator valve and service indicator Alternator ........................ 60 amp Engine Cooling System Fluid .......................... 50/50 mixture of ethylene glycol based anti-freeze and water Capacity.................... 3.7 gal. (14 l) WEIGHTS AND DIMENSIONS ________________________________________________ Dimensions: Inches Length - Front deck down ............................. 174 Height - Top of Steering Wheel ...................... 60 Height - Top of ROPS ..................................... 94 Width - Mow .................................................. 198 Width - Transport ............................................ 95 2.6 2 (mm) (4420) (1524) (2388) (5029) (2413) Weights: Lbs. Overall (less operator) 70538 .......................................................... 6392 70539 .......................................................... 6607 70540 .......................................................... 6392 70541 .......................................................... 6607 (kg) (2899) (2996) (2899) (2996) ACCESSORIES & SUPPORT LITERATURE _____________________________________ Contact your area Jacobsen Dealer for a complete listing of accessories and attachments. ! CAUTION Use of othe r than Jacobsen authorized parts and accessories may cause personal injury or damage to the equipment. Orange Touch-up Paint (12 oz. spray) .................... 4184140 2-Post ROPS with Seat Belt ....................................... 78138 l All Weather Cab w ROPS and Seat Belt............ See Below l Air Conditioner Kit .............................................. See Below Leaf Mulching Kit ........................................................ 71055 High Lift Blade......................................................... 3007759 Light Harness Kit..................................................... 5003564 Road Light Kit (Requires 5003564)............................. 78154 Work Light Kit (Requires 5003564)..............................78155 Canopy / Sunshade .....................................................68083 Rear Steering Wheel Weight Kit ..............................2812307 Carefree Tire Kit (11 x 4” tires only) ......................... 2811453 Hood Locking Latch .................................................1004049 Cruise Control..............................................................67888 u Snowthrower......................................................See Below s Rotary Broom .....................................................See Below l Contact: Jodale Perry Corporation Box 990, 300 Route 100 Morden, Manitoba, Canada R6M 1A8 Phone: (204) 822-9100 Fax: (204) 822-9111 s Contact: u Contact: Loftness Specialized Equipment, Inc. South Highway 4 Hector, MN 55342 Phone 800-828-7624 Fax (320) 848-6269 ATTN Doug Haley M-B Companies, Inc. 1200 S. p Street, Box 148 Chilton, WI 53014 Phone: (888) 558-5801 Fax: (920) 898-4588 en-7 2 2.7 SPECIFICATIONS DECLARATION OF CONFORMITY ____________________________________________ DECLARATION OF CONFORMITY ▪ ДЕКЛАРАЦИЯ ЗА СЪОТВЕТСТВИЕ ▪ PROHLÁŠENÍ O SHODĚ ▪ OVERENSSTEMMELSESERKLÆRING ▪ CONFORMITEITSVERKLARING ▪ VASTAVUSDEKLARATSIOON ▪ VAATIMUSTENMUKAISUUSVAKUUTUS ▪ DECLARATION DE CONFORMITE ▪ KONFORMITÄTSERKLÄRUNG ▪ ΔΗΛΩΣΗ ΣΥΜΜΟΡΦΩΣΗΣ ▪ MEGFELELŐSÉGI NYILATKOZAT ▪ DICHIARAZIONE DI CONFORMITÀ ▪ ATBILSTĪBAS DEKLARĀCIJA ▪ ATITIKTIES DEKLARACIJA ▪ DIKJARAZZJONI TAL-KONFORMITÀ ▪ DEKLARACJA ZGODNOŚCI ▪ DECLARAÇÃO DE CONFORMIDADE ▪ DECLARAŢIE DE CONFORMITATE ▪ VYHLÁSENIE O ZHODE ▪ IZJAVA O SKLADNOSTI ▪ DECLARACIÓN DE CONFORMIDAD ▪ DEKLARATION OM ÖVERENSSTÄMMELSE Business name and full address of the manufacturer ▪ Търговско име и пълен адрес на производителя ▪ Obchodní jméno a plná adresa výrobce ▪ Producentens firmanavn og fulde adresse ▪ Bedrijfsnaam en volledig adres van de fabrikant ▪ Tootja ärinimi ja täielik aadress ▪ Valmistajan toiminimi ja täydellinen osoite ▪ Nom commercial et adresse complète du fabricant ▪ Firmenname und vollständige Adresse des Herstellers ▪ Επωνυμία και ταχυδρομική διεύθυνση κατασκευαστή ▪ A gyártó üzleti neve és teljes címe ▪ Ragione sociale e indirizzo completo del fabbricante ▪ Uzņēmuma nosaukums un pilna ražotāja adrese ▪ Verslo pavadinimas ir pilnas gamintojo adresas ▪ Isem kummerċjali u indirizz sħiħ tal-fabbrikant ▪ Nazwa firmy i pełny adres producenta ▪ Nome da empresa e endereço completo do fabricante ▪ Denumirea comercială şi adresa completă a producătorului ▪ Obchodný názov a úplná adresa výrobcu ▪ Naziv podjetja in polni naslov proizvajalca ▪ Nombre de la empresa y dirección completa del fabricante ▪ Tillverkarens företagsnamn och kompletta adress Jacobsen, A Textron Company 11524 Wilmar Blvd. Charlotte, NC 28273, USA Product Code ▪ Код на продукта ▪ Kód výrobku ▪ Produktkode ▪ Productcode ▪ Toote kood ▪ Tuotekoodi ▪ Code produit ▪ Produktcode ▪ Κωδικός προϊόντος 70540 ▪ Termékkód ▪ Codice prodotto ▪ Produkta kods ▪ Produkto kodas ▪ Kodiċi tal-Prodott ▪ Kod produktu ▪ Código do Produto ▪ Cod produs ▪ Kód výrobku ▪ 70541 Oznaka proizvoda ▪ Código de producto ▪ Produktkod Machine Name ▪ Наименование на машината ▪ Název stroje ▪ Maskinnavn ▪ Machinenaam ▪ Masina nimi ▪ Laitteen nimi ▪ Nom de la machine ▪ Maschinenbezeichnung ▪ Ονομασία μηχανήματος ▪ Gépnév ▪ Denominazione della macchina ▪ Iekārtas nosaukums ▪ Mašinos pavadinimas ▪ Isem talMagna ▪ Nazwa urządzenia ▪ Nome da Máquina ▪ Numele echipamentului ▪ Názov stroja ▪ Naziv stroja ▪ Nombre de la máquina ▪ Maskinens namn HR 9016 4WD with ROPS HR 9016 4WD Designation ▪ Предназначение ▪ Označení ▪ Betegnelse ▪ Benaming ▪ Nimetus ▪ Tyyppimerkintä ▪ Pažymėjimas ▪ Bezeichnung ▪ Χαρακτηρισμός ▪ Megnevezés ▪ Funzione ▪ Apzīmējums ▪ Lithuanian ▪ Denominazzjoni ▪ Oznaczenie ▪ Designação ▪ Specificaţie ▪ Označenie ▪ Namen stroja ▪ Descripción Lawnmower, Article 12, Item 32 ▪ Beteckning Serial Number ▪ Сериен номер ▪ Sériové číslo ▪ Serienummer ▪ Serienummer ▪ Seerianumber ▪ Valmistusnumero ▪ Numéro de série ▪ Seriennummer ▪ Σειριακός αριθμός ▪ Sorozatszám ▪ Numero di serie ▪ Sērijas numurs ▪ Serijos numeris ▪ Numru Serjali ▪ Numer seryjny ▪ Número de Série ▪ Număr de serie ▪ Sériové číslo ▪ Serijska številka ▪ Número de serie ▪ Serienummer 7054001651-7054002500 7054101651-7054102500 Engine ▪ Двигател ▪ Motor ▪ Motor ▪ Motor ▪ Mootor ▪ Moottori ▪ Moteur ▪ Motor ▪ Μηχανή ▪ Modulnév ▪ Motore ▪ Dzinējs ▪ Variklis ▪ Saħħa Netta Installata ▪ Kubota V3800-DICR-T-E3B Diesel Silnik ▪ Motor ▪ Motor ▪ Motor ▪ Motor ▪ Motor ▪ Motor Net Installed Power ▪ Нетна инсталирана мощност ▪ Čistý instalovaný výkon ▪ Installeret nettoeffekt ▪ Netto geïnstalleerd vermogen ▪ Installeeritud netovõimsus ▪ Asennettu nettoteho ▪ Puissance nominale nette ▪ Installierte Nettoleistung ▪ Καθαρή εγκατεστημένη ισχύς ▪ Nettó beépített teljesítmény ▪ Potenza netta installata ▪ Paredzētā tīkla jauda ▪ Grynoji galia ▪ Wisa’ tal-Qtugħ ▪ Moc zainstalowana netto ▪ Potência instalada ▪ Puterea instalată netă ▪ Čistý inštalovaný výkon ▪ Neto vgrajena moč ▪ Potencia instalada neta ▪ Nettoeffekt 72 kW @ 2600 RPM Cutting Width ▪ Широчина на рязане ▪ Šířka řezu ▪ Skærebredde ▪ Maaibreedte ▪ Lõikelaius ▪ Leikkuuleveys ▪ Largeur de coupe ▪ Schnittbreite ▪ Μήκος μισινέζας ▪ Vágási szélesség ▪ Larghezza di taglio ▪ Griešanas platums ▪ Pjovimo plotis ▪ Tikkonforma mad-Direttivi ▪ Szerokość cięcia ▪ Largura de Corte ▪ Lăţimea de tăiere ▪ Šírka záberu ▪ Širina reza ▪ Anchura de corte ▪ Klippbredd 488 cm Conforms to Directives ▪ В съответствие с директивите ▪ Splňuje podmínky směrnic ▪ Er i overensstemmelse med direktiver ▪ Voldoet aan de richtlijnen ▪ Vastab direktiividele ▪ Direktiivien mukainen ▪ Conforme aux directives ▪ Entspricht Richtlinien ▪ Ακολουθήστε πιστά τις Οδηγίες ▪ Megfelel az irányelveknek ▪ Conforme alle Direttive ▪ Atbilst direktīvām ▪ Atitinka direktyvų reikalavimus ▪ Valutazzjoni tal-Konformità ▪ Dyrektywy związane ▪ Cumpre as Directivas ▪ Respectă Directivele ▪ Je v súlade so smernicami ▪ Skladnost z direktivami ▪ Cumple con las Directivas ▪ Uppfyller direktiv 2004/108/EC 2006/42/EC 2000/14/EC, 2005/88/EC 2006/66/EC Conformity Assessment ▪ Оценка за съответствие ▪ Hodnocení plnění podmínek ▪ Overensstemmelsesvurdering ▪ Conformiteitsbeoordeling ▪ Vastavushindamine ▪ Vaatimustenmukaisuuden arviointi ▪ Evaluation de conformité ▪ Konformitätsbeurteilung ▪ Διαπίστωση Συμμόρφωσης ▪ Megfelelőség-értékelés ▪ Valutazione della conformità ▪ Atbilstības novērtējums ▪ Atitikties įvertinimas ▪ Livell tal-Qawwa tal-Ħoss Imkejjel ▪ Ocena zgodności ▪ Avaliação de Conformidade ▪ Evaluarea conformităţii ▪ Vyhodnotenie zhodnosti ▪ Ocena skladnosti ▪ Evaluación de conformidad ▪ Bedömning av överensstämmelse 2006/42/EC Annex VIII Measured Sound Power Level ▪ Измерено ниво на звукова мощност ▪ Naměřený akustický výkon ▪ Målte lydstyrkeniveau ▪ Gemeten geluidsniveau ▪ Mõõdetud helivõimsuse tase ▪ Mitattu äänitehotaso ▪ Niveau de puissance sonore mesuré ▪ Gemessener Schalldruckpegel ▪ Σταθμισμένο επίπεδο ηχητικής ισχύος ▪ Mért hangteljesítményszint ▪ Livello di potenza sonora misurato ▪ Izmērītais skaņas jaudas līmenis ▪ Išmatuotas garso stiprumo lygis ▪ Livell tal-Qawwa tal-Ħoss Iggarantit ▪ Moc akustyczna mierzona ▪ Nível sonoro medido ▪ Nivelul măsurat al puterii acustice ▪ Nameraná hladina akustického výkonu ▪ Izmerjena raven zvočne moči ▪ Nivel de potencia sonora medido ▪ Uppmätt ljudeffektsnivå 105 dB(A) LWA Guaranteed Sound Power Level ▪ Гарантирано ниво на звукова мощност ▪ Garantovaný akustický výkon ▪ Garanteret lydstyrkeniveau ▪ Gegarandeerd geluidsniveau ▪ Garanteeritud helivõimsuse tase ▪ Taattu äänitehotaso ▪ Niveau de puissance sonore garanti ▪ Garantierter Schalldruckpegel ▪ Εγγυημένο επίπεδο ηχητικής ισχύος ▪ Szavatolt hangteljesítményszint ▪ Livello di potenza sonora garantito ▪ Garantētais skaņas jaudas līmenis ▪ Garantuotas garso stiprumo lygis ▪ Livell tal-Qawwa tal-Ħoss Iggarantit ▪ Moc akustyczna gwarantowana ▪ Nível sonoro farantido ▪ Nivelul garantat al puterii acustice ▪ Garantovaná hladina akustického výkonu ▪ Zajamčena raven zvočne moči ▪ Nivel de potencia sonora garantizado ▪ Garanterad ljudeffektsnivå 105 dB(A) LWA Conformity Assessment Procedure (Noise) ▪ Оценка за съответствие на процедурата (Шум) ▪ Postup hodnocení plnění podmínek (hluk) ▪ Procedure for overensstemmelsesvurdering (Støj) ▪ Procedure van de conformiteitsbeoordeling (geluid) ▪ Vastavushindamismenetlus (müra) ▪ Vaatimustenmukaisuuden arviointimenettely (Melu) ▪ Procédure d’évaluation de conformité (bruit) ▪ Konformitätsbeurteilungsverfahren (Geräusch) ▪ Διαδικασία Αξιολόγησης Συμμόρφωσης (Θόρυβος) ▪ Megfelelőség-értékelési eljárás (Zaj) ▪ Procedura di valutazione della conformità (rumore) ▪ Atbilstības novērtējuma procedūra (troksnis) ▪ Atitikties įvertinimo procedūra (garsas) ▪ Proċedura tal-Valutazzjoni tal-Konformità (Ħoss) ▪ Procedura oceny zgodności (poziom hałasu) ▪ Processo de avaliação de conformidade (nível sonoro) Procedura de evaluare a conformităţii (zgomot) ▪ Postup vyhodnocovania zhodnosti (hluk) ▪ Postopek za ugotavljanje skladnosti (hrup) ▪ Procedimiento de evaluación de conformidad (ruido) ▪ Procedur för bedömning av överensstämmelse (buller) 2000/14/EC Annex VI, Part 1 UK Notified Body for 2000/14/EC ▪ Нотифициран орган в Обединеното кралство за 2000/14/ЕО ▪ Úřad certifikovaný podle směrnice č. 2000/14/EC ▪ Det britiske bemyndigede organ for 2001/14/EF ▪ Engels adviesorgaan voor 2000/14/EG ▪ Ühendkuningriigi teavitatud asutus direktiivi 2000/14/EÜ mõistes ▪ Direktiivin 2000/14/EY mukainen ilmoitettu tarkastuslaitos Isossa-Britanniassa ▪ Organisme notifié concernant la directive 2000/14/CE ▪ Britische benannte Stelle für 2000/14/EG ▪ Κοινοποιημένος Οργανισμός Ηνωμένου Βασιλείου για 2000/14/ΕΚ ▪ 2000/14/EK – egyesült királyságbeli bejelentett szervezet ▪ Organismo Notificato in GB per 2000/14/CE ▪ 2000/14/EK AK reģistrētā organizācija ▪ JK notifikuotosios įstaigos 2000/14/EC ▪ Korp Notifikat tar-Renju Unit għal 2000/14/KE ▪ Dopuszczona jednostka badawcza w Wielkiej Brytanii wg 2000/ 14/WE ▪ Entidade notificada no Reino Unido para 2000/14/CE ▪ Organism notificat în Marea Britanie pentru 2000/14/CE ▪ Notifikovaný orgán Spojeného kráľovstva pre smernicu 2000/14/ES ▪ Britanski priglašeni organ za 2000/14/ES ▪ Cuerpo notificado en el Reino Unido para 2000/14/CE ▪ Anmält organ för 2000/14/EG i Storbritannien Number: 1088 Sound Research Laboratories Limited Holbrook House, Little Waldingfield Sudbury, Suffolk CO10 0TH Operator Ear Noise Level ▪ Оператор на нивото на доловим от ухото шум ▪ Hladina hluku v oblasti uší operátora ▪ Støjniveau i førers ørehøjde ▪ Geluidsniveau oor bestuurder ▪ Müratase operaatori kõrvas ▪ Melutaso käyttäjän korvan kohdalla ▪ Niveau de bruit à hauteur des oreilles de l’opérateur ▪ Schallpegel am Bedienerohr ▪ Επίπεδο θορύβου σε λειτουργία ▪ A kezelő fülénél mért zajszint ▪ Livello di potenza sonora all’orecchio dell’operatore ▪ Trokšņa līmenis pie operatora auss ▪ Dirbančiojo su mašina patiriamo triukšmo lygis ▪ Livell tal-Ħoss fil-Widna tal-Operatur ▪ Dopuszczalny poziom hałasu dla operatora ▪ Nível sonoro nos ouvidos do operador ▪ Nivelul zgomotului la urechea operatorului ▪ Hladina hluku pôsobiaca na sluch operátora ▪ Raven hrupa pri ušesu upravljavca ▪ Nivel sonoro en el oído del operador ▪ Ljudnivå vid förarens öra 91 dB(a) Leq (2006/42/EC) 8 SPECIFICATIONS 2 Harmonised standards used ▪ Използвани хармонизирани стандарти ▪ Použité harmonizované normy ▪ Brugte harmoniserede standarder ▪ Gebruikte geharmoniseerde standaards ▪ Kasutatud ühtlustatud standardid ▪ Käytetyt yhdenmukaistetut standardit ▪ Normes harmonisées utilisées ▪ Angewandte harmonisierte Normen ▪ Εναρμονισμένα πρότυπα που χρησιμοποιήθηκαν ▪ Harmonizált szabványok ▪ Standard armonizzati applicati ▪ Izmantotie saskaņotie standarti ▪ Panaudoti suderinti standartai ▪ Standards armonizzati użati ▪ Normy spójne powiązane ▪ Normas harmonizadas usadas ▪ Standardele armonizate utilizate ▪ Použité harmonizované normy ▪ Uporabljeni usklajeni standardi ▪ Estándares armonizados utilizados ▪ Harmoniserade standarder som används BS EN ISO 20643 BS EN ISO 5349-1 BS EN ISO 5349-2 BS EN 836 Technical standards and specifications used ▪ Използвани технически стандарти и спецификации ▪ Použité technické normy a specifikace ▪ Brugte tekniske standarder og specifikationer ▪ Gebruikte technische standaards en specificaties ▪ Kasutatud tehnilised standardid ja spetsifikatsioonid ▪ Käytetyt tekniset standardit ja eritelmät ▪ Spécifications et normes techniques utilisées ▪ Angewandte technische Normen und Spezifikationen ▪ Τεχνικά πρότυπα και προδιαγραφές που χρησιμοποιήθηκαν ▪ Műszaki szabványok és specifikációk ▪ Standard tecnici e specifiche applicati ▪ Izmantotie tehniskie standarti un specifikācijas ▪ Panaudoti techniniai standartai ir techninė informacija ▪ Standards u speċifikazzjonijiet tekniċi użati ▪ Normy i specyfikacje techniczne powiązane ▪ Normas técnicas e especificações usadas ▪ Standardele tehnice şi specificaţiile utilizate ▪ Použité technické normy a špecifikácie ▪ Uporabljeni tehnični standardi in specifikacije ▪ Estándares y especificaciones técnicas utilizadas ▪ Tekniska standarder och specifikationer som används B71.4 ISO 2631-1 SAE J1194 The place and date of the declaration ▪ Място и дата на декларацията ▪ Místo a datum prohlášení ▪ Sted og dato for erklæringen ▪ Plaats en datum van de verklaring ▪ Deklaratsiooni väljastamise koht ja kuupäev ▪ Vakuutuksen paikka ja päivämäärä ▪ Lieu et date de la déclaration ▪ Ort und Datum der Erklärung ▪ Τόπος και ημερομηνία δήλωσης ▪ A nyilatkozat kelte (hely és idő) ▪ Luogo e data della dichiarazione ▪ Deklarācijas vieta un datums ▪ Deklaracijos vieta ir data ▪ Il-post u d-data tad-dikjarazzjoni ▪ Miejsce i data wystawienia deklaracji ▪ Local e data da declaração ▪ Locul şi data declaraţiei ▪ Miesto a dátum vyhlásenia ▪ Kraj in datum izjave ▪ Lugar y fecha de la declaración ▪ Plats och datum för deklarationen Jacobsen, A Textron Company 11524 Wilmar Blvd. Charlotte, NC 28273, USA February 1st, 2012 Signature of the person empowered to draw up the declaration on behalf of the manufacturer, holds the technical documentation and is authorised to compile the technical file, and who is established in the Community. Подпис на човека, упълномощен да състави декларацията от името на производителя, който поддържащ техническата документация и е оторизиран да изготви техническия файл и е регистриран в общността. Podpis osoby oprávněné sestavit prohlášení jménem výrobce, držet technickou dokumentaci a osoby oprávněné sestavit technické soubory a založené v rámci Evropského společenství. Underskrift af personen, der har fuldmagt til at udarbejde erklæringen på vegne af producenten, der er indehaver af dokumentationen og er bemyndiget til at udarbejde den tekniske journal, og som er baseret i nærområdet. Handtekening van de persoon die bevoegd is de verklaring namens de fabrikant te tekenen, de technische documentatie bewaart en bevoegd is om het technische bestand samen te stellen, en die is gevestigd in het Woongebied. Ühenduse registrisse kantud isiku allkiri, kes on volitatud tootja nimel deklaratsiooni koostama, kes omab tehnilist dokumentatsiooni ja kellel on õigus koostada tehniline toimik. Sen henkilön allekirjoitus, jolla on valmistajan valtuutus vakuutuksen laadintaan, jolla on hallussaan tekniset asiakirjat, joka on valtuutettu laatimaan tekniset asiakirjat ja joka on sijoittautunut yhteisöön. Signature de la personne habilitée à rédiger la déclaration au nom du fabricant, à détenir la documentation technique, à compiler les fichiers techniques et qui est implantée dans la Communauté. Unterschrift der Person, die berechtigt ist, die Erklärung im Namen des Herstellers abzugeben, die die technischen Unterlagen aufbewahrt und berechtigt ist, die technischen Unterlagen zusammenzustellen, und die in der Gemeinschaft niedergelassen ist. Υπογραφή ατόμου εξουσιοδοτημένου για την σύνταξη της δήλωσης εκ μέρους του κατασκευαστή, ο οποίος κατέχει την τεχνική έκθεση και έχει την εξουσιοδότηση να ταξινομήσει τον τεχνικό φάκελο και ο οποίος είναι διορισμένος στην Κοινότητα. A gyártó nevében meghatalmazott személy, akinek jogában áll módosítania a nyilatkozatot, a műszaki dokumentációt őrzi, engedéllyel rendelkezik a műszaki fájl összeállításához, és aki a közösségben letelepedett személy. Firma della persona autorizzata a redigere la dichiarazione a nome del fabbricante, in possesso Della documentazione tecnica ed autorizzata a costituire il fascicolo tecnico, che deve essere stabilita nella Comunità. Tās personas paraksts, kura ir pilnvarota deklarācijas sastādīšanai ražotāja vārdā, kurai ir tehniskā dokumentācija, kura ir pilnvarota sagatavot tehnisko reģistru un kura ir apstiprināta Kopienā. Asmuo, kuris yra gana žinomas, kuriam gamintojas suteikė įgaliojimus sudaryti šią deklaraciją, ir kuris ją pasirašė, turi visą techninę informaciją ir yra įgaliotas sudaryti techninės informacijos dokumentą. Il-firma tal-persuna awtorizzata li tfassal id-dikjarazzjoni f’isem il-fabbrikant, għandha d-dokumentazzjoni teknika u hija awtorizzata li tikkompila l-fajl tekniku u li hija stabbilita fil-Komunità. Podpis osoby upoważnionej do sporządzenia deklaracji w imieniu producenta, przechowującej dokumentację techniczną, upoważnioną do stworzenia dokumentacji technicznej oraz wyznaczonej ds. wspólnotowych. Assinatura da pessoa com poderes para emitir a declaração em nome do fabricante, que possui a documentação técnica, que está autorizada a compilar o processo técnico e que está estabelecida na Comunidade. Semnătura persoanei împuternicite să elaboreze declaraţia în numele producătorului, care deţine documentaţia tehnică, este autorizată să compileze dosarul tehnic şi este stabilită în Comunitate. Podpis osoby poverenej vystavením vyhlásenia v mene výrobcu, ktorá má technickú dokumentáciu a je oprávnená spracovať technické podklady a ktorá je umiestnená v Spoločenstve. Podpis osebe, pooblaščene za izdelavo izjave v imenu proizvajalca, ki ima tehnično dokumentacijo in lahko sestavlja spis tehnične dokumentacije, ter ima sedež v Skupnosti. Firma de la persona responsable de la declaración en nombre del fabricante, que posee la documentación técnica y está autorizada para recopilar el archivo técnico y que está establecido en la Comunidad. Undertecknas av den som bemyndigad att upprätta deklarationen å tillverkarens vägnar, innehar den tekniska dokumentationen och är bemyndigad att sammanställa den tekniska informationen och som är etablerad i gemenskapen. Certificate Number ▪ Номер на сертификат ▪ Číslo osvědčení ▪ Certifikatnummer ▪ Certificaatnummer ▪ Sertifikaadi number ▪ Hyväksyntänumero ▪ Numéro de certificat ▪ Bescheinigungsnummer ▪ Αριθμός Πιστοποιητικού ▪ Hitelesítési szám ▪ Numero del certificato ▪ Sertifikāta numurs ▪ Sertifikato numeris ▪ Numru taċ-Ċertifikat ▪ Numer certyfikatu ▪ Número do Certificado ▪ Număr certificat ▪ Číslo osvedčenia ▪ Številka certifikata ▪ Número de certificado ▪ Certifikatsnummer 2006/42/EC Annex II 1.A.2 Tim Lansdell Technical Director Ransomes Jacobsen Limited West Road, Ransomes Europark, Ipswich, IP3 9TT, England 2006/42/EC Annex II 1.A.10 Vasant Godhalekar VP of Engineering Jacobsen, A Textron Company 11524 Wilmar Blvd, Charlotte, NC 28273, USA 4228362 Rev A GB BG CZ DK NL EE FI FR DE GR HU English български čeština dansk Nederlands eesti suomi français Deutsch Ελληνικά magyar IT LV LT MT PL PT RO SK SI ES SE italiano latviešu valoda lietuvių kalba Malki polski português Română slovenčina Ελληνικά Svenska slovenščina 9 3 3 ADJUSTMENTS ADJUSTMENTS 3.1 GENERAL________________________________________________________________ adjustment cannot be mad e, contact an au thorized Jacobsen Dealer. ! WARNING 2. Replace, do components. To prevent injury, lower implements to the ground, disengage all drives, engage parking brake, stop engine, and remove key from ignition switch before making any adjustments or performing maintenance. adjust, worn or damaged 3. Do not wear jewelry or loose fitting clothing when making adjustments or repairs. Make sure the mower is parked on a s olid and level surface. Never work on a mow er that is supported only by the jack. Always use jack stands. ! CAUTION Be careful to prevent entrapment of the hands and fingers between moving and fixed components of the machine. If only the front or rear of the mower is raised, place chocks in front of and behind the wheels that are not raised. 1. Adjustments and maintenance should always be performed by a qualified technician. If proper 3.2 not 4. Do not change governor settings or overspeed the engine. LEVELING DECKS_________________________________________________________ If the decks or casters have been removed for service or cutting height appears uneven, it may be nec essary to level decks. Adjust casters so cutting heights of outer blades are within 1/8 in. (3 mm) of each other. 1. Position mower and decks on a hard, flat, level surface. Position blades parallel to mower as shown. 2. Check that air pressure in all caster tires is adjusted equally. 3. Set desired cutting height of deck using the 1/2 in. (13 mm) spacers (E) provided. See Section 3.5. 4. Measure the height from the ground surface to the front edge (B) of th e two o uter blades for the wing decks and the center section of the fr ont deck. Position the 1/8 in. (3 mm) leveling washers (C) above or below caster pivot as needed to ob tain an even cutting height across decks. Keep the 1/16 in. (1.5 mm) thrust washers (D) positioned as shown, one above and one below caster pivot. B C E L L D C B B B B Figure 3A en-10 ADJUSTMENTS 3.3 3 SERVICING FRONT DECK___________________________________________________ The front deck can be raised and tilted up to improve access to the cutting unit and bl ades for service and cleaning. Be sure to disengage all drives, engage parking brake, stop engine, and remove ignition key before working around deck. To tilt front deck up to its service position: 1. Rotate anti-sway mechanism (F), located under left side floor panel, to Service position. Figure 3C 2. Start engine and raise deck until rear gauge wheels are off ground. Stop engine. arms. To prevent personal injury or damage to deck or lift arms, DO NOT allow deck to drop from service position. 2. Start engine and lower deck until it i s level and caster wheels are just above ground. Stop engine. 3. Insert height adjustment pin for rear casters to match cutting height. Figure 3F 4. Rotate anti-sway mechanism (F) to it’s operating position. Figure 3C 3. Remove cut height adjustment pins from gauge wheel bracket so yoke assembly floats freely. 4. Start engine and r aise deck to fu ll up p osition. Stop engine. 5. Manually lift and rotate front of dec k up until it is securely latched. ! WARNING A The front deck is heavy and could cause serious injury or damage if dropped. Always use proper lifting techniques when lifting or lowering the front deck to the service position. Figure 3B Operating Position When lowering deck, pulling latch out will release the full weight of the deck. Make sure anyone assisting in this procedure is made aware of this before the latch is released. Service Position F To lower deck after servicing: F Figure 3C 1. Lift up on deck and pull locking latch (A) out. Manually lower and pivot deck until supported by lift 3.4 WINGLET ADJUSTMENT ____________________________________________________ 1. Winglets must be adj usted to front deck to pr event scalping and possible damage to deck winglets. G 2. Rotate front deck blades to positions shown in Figure 3A. 3. Measure the he ight from the ground to the fr ont edge of t he center front deck blade (B) and the outside edges of winglet blades (L). Add or remove shims (G) as required between pad (H) and support bracket of winglets, until all front deck blades are at the same height. G H K 4. Store excess shims (G) above support bracket. 5. Adjust front winglet support arms (J) up or down as required until arm is resting against stop (K). J Figure 3D en-11 3 ADJUSTMENTS 3.5 CUTTING HEIGHT _________________________________________________________ Cutting height for decks can be adjusted from 1 to 5-1/2 in. (25-125 mm) in 1/2 in. (13 mm) increments. Actual cutting height may vary somewhat from the heights given depending on turf conditions and other factors. Note: When cutting undulating areas, lower cutting heights may cause scalping. Adjust height accordingly to prevent turf damage. 1. Park the mower on a flat, level surface. Raise the decks until the caster wheels are raised off the ground enough so caster wheels can be removed from deck. Place blocks under decks so they are supported on all sides. Mount Middle Upper Thrust Washer & Leveling Washer Spacers Under Mount Lower Cut Height Mount Location No. of Spacers Under Mount 1 1/2 2 Lower Lower 1 2 2 1/2 2 1/2 Lower Middle 3 0 3 3 1/2 4 Middle Middle Middle 1 2 3 4 4 1/2 Upper Upper 0 1 5 5 1/2 Upper Upper 2 3 Never reposition the thrust washer(s) (1/16" thick) and leveling washer(s) (1/8" thick) when setting cut height Figure 3E ! WARNING To prevent serious injury, lower deck until it is resting completely on the su pports. This will prevent it from accidentally lowering while making adjustments. Disengage all drives, engage parking brake, stop engine, and remove ignition key. To remove inside front caster from side decks, raise the decks to their full upright position and lock in the transport position. 2. Figure 3E shows the height adjustment decal for the casters. Column 1 - Height of cut Column 2 - Mount Location Column 3 - Arrangement of spacers Adjust spacers in quantity listed. Store extra spacers on top of spindle. If necessary, reposition wheel mount in holes indicated for height of cut. IMPORTANT: Do not reposition the thin thrust washers (1/16 in.) and leveling washers (1/8 in.) on the spindle. These washers should remain in the same position and quantity they were originally installed. They need only be repositioned if needed to level new casters or decks, Section 3.2. 3. To adjust rear gauge wheels on fr ont deck, refer to Figure 3F. Raise front deck approximately 12 in. and support underneath with blocks. Lower deck so it is completely resting on blocks 4. Remove pin from rear gauge wheel yoke and reposition in bracket for desired height of cut. When setting cutting height at 5-1/2 in., gauge wheel must be repositioned in arm. Follow wheel mounting instructions on decal, Figure 3F. en-12 C B D E A 1 Arm 5 Bracket 2 3 4 6 7 8 Cut Height Bracket Hole Arm Hole Wheel Mounting 1 1 1/2 2 2 1/2 3 3 1/2 4 4 1/2 5 5 1/2 3 1 2 3 4 5 6 7 8 8 A B C D E B C D E E F F F F F F F F F R F Wheel Mounting R Wheel Mounting Instruction 1 While rotating wheel, tighten nut until wheel is difficult to rotate. 2 Loosen nut 1/4 turn or just until wheel rotates freely. 3 lock nut into place using second nut. Do not allow first nut to rotate when tightening second nut securely. 4 Rotate wheel to check for free rotation with zero end play. Gauge Wheel Adjustment for Front Deck Figure 3F Tire pressure Check air pressure in caster tires, while tires are cool. Maintain air pressure between 20-25 psi (1.38-1.73 BAR) to improve accuracy of cutting height. Note: It is important to keep inflation pressures on all caster and gauge tires equal, within the range specified, to ensure an accurate, level cut. ADJUSTMENTS 3.6 3 LIFT LIMIT SWITCHES _____________________________________________________ The rotation of the cutting blades is controlled by limit switches positioned on the mower frame near the lift arms for each deck. When a deck is raised the switch opens and automatically disengages the cutting blades. As the deck is lowered, the switch closes and the blades engage. If a swi tch fails, the cutting blades will not engage when lowered. To adjust limit switches: 1. Park mower on a level surface. 2. Start mower and raise or lower decks until the highest point on the top corner of the deck reaches the height shown in Figure 3G. A 3. Shut OFF engine and remove key. Support decks using blocks. This will prevent them from accidently lowering while making adjustments. 4. Position switch so sensing area (C) on sw itch is centered over leading edge (A) of activator plate on lift arm. 5. Adjust gap between sensing area on s witch and activator plate on lift arm to 1/16 - 1/8 i n. (1.5 - 3 mm). To adjust gap for front lift arm use shims (D) or #10 flat washers (B) between switch and switch mount. Check operation of limit switches. Blades must stop rotating as decks are raised above heights shown. A C C B D 21 in. (61 cm) 20 5/8 in. (53 cm) Side Decks Front Deck HR028 Figure 3G en-13 3 ADJUSTMENTS 3.7 NEUTRAL ADJUSTMENT ___________________________________________________ Important: The neutral adjustment on the dr ive pump is preset at the factory on all new mowers and replacement pumps. Further adjustment is required only if the pum p has been disassembled for service or neutral lever bracket (F) has become loose. 7. Connect traction pedal linkage, Section 3.11, and install and adjust switches, Sections 3.8 and 3.9. To adjust neutral on pump: 8. Start engine and check operation of traction pedal. Wheels must not turn when pedal returns to Neutral. 1. Disconnect traction pedal linkage from pump. Remove switch mounting bracket from pump. Important: Always check operation of Interlock System after replacing or adjusting switch. (See Safety and Operation Manual) F 2. Place mower securely on jack stands so All wheels are raised off ground. 3. Check that tow valve (H) is completely closed. 4. Loosen screws (G) holding pump return arm bracket just enough so it can be moved. 5. Engage parking brake and set PTO switch to neutral. The neutral sensing switch must be closed in order to start the mower. At this point the switch may not yet be assembled to pum p. To close switch so engine can be started, place it face down on metal frame. K G HR027 Figure 3H 6. Start engine and observe wheels. Rotate bracket (F) in slotted holes until wheels do not turn. Turn OFF engine and tighten bracket in place. 3.8 H NEUTRAL SENSING SWITCH________________________________________________ The neutral sensing switch is part of the operator backup system. It is designed to prevent the mower from starting unless the traction pedal is in Neutral. If this switch fails or is out of adjustment, the mower will not start. 1. Make sure drive pump and traction pedal linkage are adjusted to neutral. Sections 3.6 and 3.11. 2. Position switch so pointer (A) on activator plate is centered over sensing area on switch. 3. Adjust switch so gap between sensing surface on switch and end of pointer is between 1/16 - 1/8 in. (1.5 - 3 mm). Secure switch in this position. Important: Always check operation of Interlock System after replacing or adjusting switch. (See Safety and Operation Manual) 1/16” - 1/8” (1.5 - 3 mm) A HR010 Figure 3I en-14 ADJUSTMENTS 3.9 3 FORWARD SENSING SWITCH _______________________________________________ The forward sensing switch allows the mower to operate in four wheel drive only with the traction pedal in it s forward position. When operating in reverse the switch opens and returns the mower to two wheel drive. If four wheel drive fails to operate, check adjustment and operation of sensing switch. Switch open - Full reverse range of pedal. 5. Connect switch to wi ring harness and check operation of four wheel drive. 1. Make sure drive pump, traction pedal linkage, and neutral sensing switch are adjusted to ne utral, Sections 3.6, 3.11, and 3.8. 2. Adjust switch so gap between sensing surface on switch and edge of activator plate is between 1/16 1/8 in. (1.5 - 3 mm). 3. Disconnect switch from wiring harness and connect a continuity meter across switch leads (B). With traction pedal in neutral, slide switch back until it opens, then forward until it c loses. Secure switch in this position. 4. With continuity meter still attached check adjustment by pressing traction pedal. B 1/16” - 1/8” (1.5 - 3 mm) Switch closed - traction pedal in neutral and during full forward range of pedal. HR012 Figure 3J 3.10 PARKING BRAKE _________________________________________________________ The brake switch is part of the Interlock System and senses when the parking brake is engaged. If this switch fails, the machine may not start and the Interlock System will not operate correctly. D C F E B To adjust switch: 1. Place the parking brake in its full upright (engaged) position. 2. Adjust switch (C) by pivoting switch mounting bracket (B). Align sensing area on switch with brake handle (D). HR020 Figure 3K 3. Adjust gap between sensing area on switch and brake lever to 1/16 - 1/8 i n. (1.5 - 3 mm). To adjust gap use shims (E) or #10 washers (F) as required between switch and switch mount. 4. When properly installed, the s witch will be closed when the parking brake is engaged and open when the brake is disengaged. Important: Always check operation of Interlock System after replacing or adjusting switch. (See Safety and Operation Manual) en-15 3 ADJUSTMENTS 3.11 PARKING BRAKE _________________________________________________________ 1. Check linkage and pi vots to ens ure they are operating smoothly. Inspect parking brake and steering assist cables. 2. Park the m ower on a 30 % slope (16.7°) near the bottom of the hill, with the front of the mower facing downhill. Engage the parking brake and stop the engine. a. The mower should stay on the hill without creeping. b. If the brakes do not hold, start the engine, disengage the brake, and drive to the bottom of the hill. ! CAUTION DO NOT disengage the brakes with the engine off. 3. With parking brake disengaged, turn adjusting knob in a clockwise direction, applying and releasing brake every quarter turn, until a defi nite “snap over center” action is achieved. 4. Repeat the test on the hill if required. Note: Over adjustment causes hard lever action, but does not increase brake efficiency. 3.12 TRACTION PEDAL_________________________________________________________ The traction pedal must be adjusted so the pump is at full stroke when the pedal is fully depressed in the forward position. 1. Make sure return arm (K-Figure 3H) on pump is adjusted to neutral, Section 3.6. 2. Push traction pedal forward (I) until it to uches floor panel and hold in this position. 3. Adjust turn buckle (J) until you feel the return arm hit the internal stop in pump. Backoff rod 2-3 turns from this position. This ensures that th e traction pedal bottoms out before the return arm. I J HR019 Figure 3L 3.13 STEERING TOE-IN _________________________________________________________ 1. Turn wheels to straight ahead position. 2. Loosen jam nuts (M) on both ends of tie rod (N). 3. Turn tie rod (N) to provide proper toe-in. Toe-in must not exceed X + 1/4 in. (6.3 mm). Tighten jam nuts (M). X M N M X + 5/32" +- 3/32" X + (4 mm +- 2.3 mm) Figure 3M en-16 ADJUSTMENTS 3 3.14 STEERING STOP BOLTS ____________________________________________________ 1. Steering toe-in must be set before adjusting stop bolts. If to e-in is changed, stop bolts must be readjusted. 2. Turn stop bolts (P and Q) out as far as possible without removing them. 3. Turn steering wheel to the right until right rear tire is at a 45° angle to steering axle. Thread stop bolt (P) in until bolt touches axle. 4. Turn steering wheel to the left until left rear tire is at a 45° angle to steering axle. Thread stop bolt (Q) in until bolt touches axle. 45 ° P Q Figure 3N en-17 3 ADJUSTMENTS 3.15 TORQUE SPECIFICATION___________________________________________________ NOTICE All torque values included in these charts are approximate and are for reference only. Use of these torque values is at your sole risk. Jacobsen is not responsible for any loss, claim, or damage arising from the use of these charts. Extreme caution should always be used when using any torque value. Jacobsen uses Grade 5 Plated bolts as standard, unless otherwise noted. For tightening plated bolts, use the value given for lubricated. AMERICAN NATIONAL STANDARD FASTENERS SIZE UNITS GRADE 5 Lubricated GRADE 8 Dry Lubricated SIZE UNITS GRADE 5 Dry Lubri- GRADE 8 Dry Lubri- cated Dry cated #6-32 in-lb (Nm) – 20 (2.3) – – 7/16-14 ft-lb (Nm) 37 (50.1) 50 (67.8) 53 (71.8) 70 (94.9) #8-32 in-lb (Nm) – 24 (2.7) – 30 (3.4) 7/16-20 ft-lb (Nm) 42 (56.9) 55 (74.6) 59 (80.0) 78 (105) #10-24 in-lb (Nm) – 35 (4.0) – 45 (5.1) 1/2-13 ft-lb (Nm) 57 (77.2) 75 (101) 80 (108) 107 (145) #10-32 in-lb (Nm) – 40 (4.5) – 50 (5.7) 1/2-20 ft-lb (Nm) 64 (86.7) 85 (115) 90 (122) 120 (162) #12-24 in-lb (Nm) – 50 (5.7) – 65 (7.3) 9/16-12 ft-lb (Nm) 82 (111) 109 (148) 115 (156) 154 (209) 1/4-20 in-lb (Nm) 75 (8.4) 100 (11.3) 107 (12.1) 143 (16.1) 9/16-18 ft-lb (Nm) 92 (124) 122 (165) 129 (174) 172 (233) 1/4-28 in-lb (Nm) 85 (9.6) 115 (13.0) 120 (13.5) 163 (18.4) 5/8-11 ft-lb (Nm) 113 (153) 151 (204) 159 (215) 211 (286) 5/16-18 in-lb (Nm) 157 (17.7) 210 (23.7) 220 (24.8) 305 (34.4) 5/8-18 ft-lb (Nm) 128 (173) 170 (230) 180 (244) 240 (325) 5/16-24 in-lb (Nm) 173 (19.5) 230 (26.0) 245 (27.6) 325 (36.7) 3/4-10 ft-lb (Nm) 200 (271) 266 (360) 282 (382) 376 (509) 3/8-16 ft-lb (Nm) 23 (31.1) 31 (42.0) 32 (43.3) 44 (59.6) 3/4-16 ft-lb (Nm) 223 (302) 298 404 315 (427) 420 (569) 3/8-24 ft-lb (Nm) 26 (35.2) 35 (47.4) 37 (50.1) 50 (67.8) 7/8-14 ft-lb (Nm) 355 (481) 473 (641) 500 (678) 668 (905) METRIC FASTENERS 4.6 SIZE 8.8 10.9 Non Critical Fasteners into Aluminum 12.9 UNITS Lubricated Dry Lubricated Dry Lubricated Dry Lubricated Dry – – – – – – 3.83 (34) 5.11 (45) M4 Nm (in-lb) M5 Nm (in-lb) 1.80 (16) 2.40 (21) 4.63 (41) 6.18 (54) 6.63 (59) 8.84 (78) 7.75 (68) 10.3 (910 4.0 (35) M6 Nm (in-lb) 3.05 (27) 4.07 (36) 7.87 (69) 10.5 (93) 11.3 (102) 15.0 (133) 13.2 (117) 17.6 (156) 6.8 (60) M8 Nm (in-lb) 7.41 (65) 9.98 (88) 19.1 (69) 25.5 (226) 27.3 (241) 36.5 (323) 32.0 (283) 42.6 (377) 17.0 (150) M10 Nm (ft-lb) 14.7 (11) 19.6 (14) 37.8 (29) 50.5 (37) 54.1 (40) 72.2 (53) 63.3 (46) 84.4 (62) 33.9 (25) M12 Nm (ft-lb) 25.6 (19) 34.1 (25) 66.0 (48) 88.0 (65) 94.5 (70) 125 (92) 110 (81) 147 (108) 61.0 (45) M14 Nm (ft-lb) 40.8 (30) 54.3 (40) 105 (77) 140 (103) 150 (110) 200 (147) 175 (129) 234 (172) 94.9 (70) en-18 2.0 (18) MAINTENANCE 4 4 MAINTENANCE 4.1 GENERAL ________________________________________________________________ ! WARNING Before you clean, adjust, or repair this equipment, disengage all drives, lower implements to the ground, engage parking brake, stop engine, and remove key from ignition switch to prevent injuries Make sure the mower is parked on a s olid and level surface. Never work on a mower that is supported only by the jack. Always use jack stands. 1. Adjustment and maintenance should always be performed by a qualified technician. If proper adjustments cannot be made, contact an Authorized Jacobsen Dealer. 2. Inspect the equipment on a regular basis, establish a maintenance schedule, and keep detailed records. b. Keep all moving parts properly adjusted and lubricated. c. Replace worn or damaged parts before operating the machine. d. Keep all fluids at their proper levels. e. Keep shields in place and all hardware securely fastened. f. Keep tires properly inflated. 3. Do not wear jewelry or loose fitting clothing when making adjustments or repairs. 4. Use the illustrations in the Parts List as reference for the disassembly and reassembly of components. 5. Recycle or dispose of al l hazardous materials (batteries, fuel, lubricants, anti-freeze, etc.) according to local, state, or federal regulations. a. Keep the equipment clean. 4.2 INSPECTING BLADES ______________________________________________________ 1. Every 50 hours of operation or whenever mower is removed from mower, carefully examine the blades to make sure they are in good operating condition. Blades showing any bends (G), grooves (H) or cracks (J) must be replaced. G H J ! CAUTION Use care when checking blades to avoid pinching hands and fingers between blade ends. HR025 Figure 4A ! WARNING Never attempt to straighten, weld, or repair a damaged blade. Always replace a damaged blade. 2. Any of th e above conditions can cause a pie ce of the blade to break away and be h urled from the mower, causing very serious injury to bystanders or property damage. 3. A bent blade could have a mi croscopic crack (G) that can grow and allow a piece of the blade to break. Bent blades will also create vibration and other stress on the machinery. 4. Dust or sand particles can wear a dangerous groove in the blade (H) between the air vanes and the flat portion of the b lade that will rapidly grow and produce a c rack (J), permitting a piece of t he vane to break off. en-19 4 MAINTENANCE 4.3 SHARPENING BLADES_____________________________________________________ 1. Place a wooden block between the blade and mower housing to stop the blade from moving. To remove blade, turn screw holding blade counterclockwise. A Maximum 1/2” (13 mm) ! WARNING The mower blades can develop sharp edges. Use caution whenever servicing and handling. B 2. When dressing or sharpening the bl ade, do not follow the original pattern of grind as shown in (A). Grind new cutting edges at an angle as shown in (B). HR024 Figure 4B If the maximum total loss of the blade reaches 1/2 in., (13 mm), do not sharpen further, replace blade. ! WARNING Resharpening the blade beyond the allowable 1/2 in., (13 mm) may allow blade tip break off and be thrown from the mower. Such an incident can cause very serious injury to bystanders and/or property damage. Bottom view of front deck in its service position 3. Make sure an equ al amount of material is removed from both sides of bla de to pr event having an unbalanced blade. An unbalanced blade will cause excessive vibration and may damage the mower. C 4. Use a blade balancer to ch eck the bl ade after sharpening. C 5. Attach blade to mo wer. Install blades so cutting edges (C) face the direction of r otation as shown in Figure 4C. Beveled cutting edge of blade must face in toward deck housing. Torque center mounting screw holding blade to 75 to 90 ft. lb. (100 to 120 Nm). C Left Side Right Side Bottom view of side decks raised to their transport position. HR015 Figure 4C en-20 MAINTENANCE 4.4 ENGINE _________________________________________________________________ IMPORTANT: A separate Engine Manual, prepared by the engine manufacturer, is supplied with this mower. Read the engine manual carefully until you are familiar with the operation and maintenance of the engine. Proper attention to the engine manufacturer’s directions will assure maximum service life of the engine. To order replacement engine manuals contact the engine manufacturer. The proper break-in of a ne w engine can make a considerable difference to the performance and life of the engine. During the break-in period, Jacobsen recommends the following: 1. During the first 50 hours of operation, a new eng ine should be allowed to reach an operating temperature of at least 140°F (60°C) prior to operation at full load. 2. Check the engine oil level twice daily during the first 50 hours of operation. Higher than normal oil 4.5 4 consumption is not uncommon during the i nitial break-in period. 3. Change engine oil and oil filter element after first 50 hours of operation. 4. Check and adjust fan and alternator belts. 5. Refer to Section 5 and Engine Manual for specific maintenance intervals and procedures. 6. Always allow the engine to be properly warmed up before operating in both cold and warm seasons. Warm up the engine at approximately half throttle without load. Failure to properly warm up the engine can shorten engine life. If the injection pump, injectors, or the fuel system require service, contact an authorized Jacobsen Dealer. Note: The mower is designed to operate and cut most efficiently at the preset governor setting. Do not change the engine governor settings or overspeed the engine. ENGINE OIL ______________________________________________________________ Check the engine oil at the start of each day, before starting the engine. If the oil level is low, remove oil filler cap and add oil as required up to MAX mark on dipstick. Perform initial oil change after first 25 hours of operation and every 250 hours thereafter. See Engine Manual. Use engine oil with API classification CD-II, CE, CF-4. See Engine Manual for complete specifications. -20˚C -4˚F +45˚C +113˚F SAE 15W-40 HR005 Figure 4D 4.6 MUFFLER AND EXHAUST___________________________________________________ ! WARNING Exhaust fumes contain carbon monoxide that is toxic and can be fatal when inhaled. NEVER operate an engine without proper ventilation. To protect from carbon monoxide poisoning, inspect the complete exhaust system regularly and always replace a defective muffler. If you notice a change in th e color or sound of the exhaust, stop the engine immediately. Identify the problem, and have the system repaired. Torque all exhaust manifold hardware evenly. Tighten or replace exhaust clamps. en-21 4 MAINTENANCE 4.7 AIR FILTER_______________________________________________________________ Check the service indicator daily. Replace air cleaner element immediately when red band becomes visible (A) Do not remove the element for inspection or cleaning. Unnecessary removal of t he filter increases the risk of injecting dust and other impurities into the engine. 5. Check all hoses and air ducts. Tighten hose clamps. B A When service is required, first clean the outside of the filter housing, then remove the old element as gently as possible and discard. 1. Carefully clean the inside of the filter housing without allowing dust into the air intake. C 2. Inspect the new element. Do n ot use a damaged element and never use an incorrect element. 3. Assemble the new element and make sure it seats properly. Reset the indicator by depressing button (B). 4. Reassemble cap making sure it seals completely around the fi lter housing. Dust evacuator (C) must be facing down. 4.8 Figure 4E FUEL ____________________________________________________________________ Handle fuel with care - it is highly flammable. Use an approved container, the spout must fit inside the fuel filler neck. Avoid using cans and funnels to transfer fuel. ! WARNING Never remove the fuel cap from the fuel tank, or add fuel, when the engine is running or while the engine is hot. Do not smoke when handling fuel. Never fill or drain the fuel tank indoors. Use4 care to avoid spilling fuel. If fuel is spilled, clean it up immediately. Never handle or store fuel containers near an open flame or any device that may create sparks and ignite the fuel or fuel vapors. Be sure to reinstall and tighten fuel cap securely. • Fill the fuel tank to within 1 in. (25 mm) below the filler neck. • Use clean, fresh, #2 Low or Ultra Low Sulfur Diesel fuel. Minimum Cetane Rating 45. Refer to Engine Manual for additional information. en-22 HR009 • Replace fuel lines and clamps at the first sign of damage. • Store fuel according to local, state, or federal ordinances and recommendations from your fuel supplier. • Never overfill or allow the tank to become empty. Read Engine Owner’s Manual for additional fueling information. MAINTENANCE 4.9 4 FUEL SYSTEM ____________________________________________________________ Refer to Section 5 for specific maintenance intervals. To change fuel filter: See Engine Manual for detailed procedures. 1. Close fuel valve on tank, then remove and discard the existing filter. Before replacing any filter, thoroughly clean the filter housing and the area around the filter. Dirt must not b e allowed to enter into fuel system. Bleed the f uel system after the fuel filter and lines have been removed, or the fuel tank has become empty. 2. Apply a l ight coat of oi l to the gasket and hand tighten new filter. 3. Fill fuel tank. Open fuel valve on tank and bleed the filter. See Engine Manual. Clean any spilled fuel immediately. 4.10 BATTERY ________________________________________________________________ Make absolutely certain the ignition switch is “OFF” and the key has been removed before servicing the battery. ! CAUTION Always use insulated tools, wear protective glasses or goggles, and protective clothing when working with batteries. You must read and obey all battery manufacturer’s instructions Tighten cables securely to battery terminals and apply a light coat of silicone dielectric grease to terminals and cable ends to pr event corrosion. Keep vent caps and terminal covers in place Keep the cable ends, battery, and battery posts clean. 1. When installing the battery, always assemble the RED, positive (+) battery cable first and the ground, BLACK, negative (-) cable last. 2. When removing the battery, always remove the ground, BLACK, negative (-) cable first and the RED, positive (+) cable last. 3. Make sure battery is properly installed and secured to the battery tray. ! WARNING Battery posts, terminals, and related accessories contain lead and lead compounds, chemicals known to the S tate of Ca lifornia to cause cancer and reproductive harm. Wash your hands after handling. Verify battery polarity before connecting or disconnecting the battery cables. 4.11 JUMP STARTING __________________________________________________________ Before attempting to “jump start” the mowe r, check the condition of the discharged battery. Section 4.10 ! WARNING Batteries generate explosive hydrogen gas. To reduce the chance of an explosion, avoid creating sparks near battery. Always connect the negative jumper cable to the fr ame of the mower with the discharged battery, away from the battery. When connecting jumper cables: 1. Stop the engine on vehicle with good battery. 2. Connect RED jumper cable to the positive (+) terminal on th e good battery and to th e positive (+) terminal on the “discharged” battery. 3. Connect the BLACK jumper cable from the negative (-) terminal on the good battery to the frame of mower with discharged battery. After cables have been connected, start the engine on the vehicle with the good battery then start the mower. en-23 4 MAINTENANCE 4.12 CHARGING BATTERY _____________________________________________________ ! WARNING Charge battery in a wel l ventilated area. Batteries generate explosive gases. To prevent an ex plosion, keep any device that may create sparks or flames away from the battery. To prevent injury, stand away from battery when the charger is turned on. A damaged battery could explode. 2. Whenever possible, remove the battery from the mower before charging. If batt ery is not sealed, check that the electrolyte covers the plates in all the cells. 3. Make sure the charger is “OFF”, then connect the charger to the battery terminals as specified in the charger’s manual. 4. Always turn the charger “OFF” before disconnecting charger from the battery terminals. 1. Refer to Section 4.10. Read the Battery and Charger’s manual for specific instructions. 4.13 HYDRAULIC HOSES _______________________________________________________ open ports. This will keep impurities out of th e hydraulic system and also prevent oil spills. ! WARNING To prevent serious injury from hot, high pressure oil, never use your hands to check for oil leaks, use paper or cardboard. Hydraulic fluid escaping under pressure can have sufficient force to penetrate skin. If fluid is injected into the skin it must be surgically removed within a f ew hours by a doctor familiar with this form of injury or gangrene may result. 1. Always lower implements to gr ound, disengage all drives, engage parking brake, stop engine, and remove key before inspecting or disconnecting hydraulic lines or hoses. 2. Check visible hoses and tubes daily. Look for wet hoses or oil spots. Replace worn or damaged hoses and tubes before operating the machine. 3. The replacement tube or hoses must be routed in the same path as the existing hose. Do not move clamps, brackets, and ties to a new location. 4. Thoroughly inspect all tubes, connections every 300 hours. hoses, and IMPORTANT: The hydraulic system can be permanently damaged if the oil becomes contaminated. Before disconnecting any hydraulic component, clean the a rea around the fittings and the hose ends to keep impurities out of the system. a. Before disconnecting any hydraulic component, tag or mark the location of each hose, then clean the area around the fittings. b. As you disconnect the c omponent, be prepared to assemble plugs or caps to the hose ends and en-24 c. Make sure “O” rings are clean and hose fittings are properly seated before tightening. d. Keep the hose from twisting. Twisted hoses can cause couplers to loosen as the hose flexes during operation resulting in oil leaks. e. Kinked or twisted hoses can restrict the oi l flow causing the system to malfunction and the oil to overheat and also lead to hose failure. MAINTENANCE 4 4.14 HYDRAULIC OIL___________________________________________________________ Refer to Section 6.2 for specific maintenance intervals. Drain and replace the hydraulic oil if you notice the presence of water or foam in the oil, a rancid odor (indicating excessive heat), or after a ma jor component failure. Always replace both hydraulic filters when oil filter light stays on or when changing oil. To change hydraulic oil: 1. Clean the area around the oil cap to pr event impurities from entering and contaminating the system. 2. Remove drain plug from bottom of tank. 3. After oil has drained install drain plug and fill with Jacobsen Hydraulic Oil. 4. Purge air from system. a. Operate all mower functions for about 5 minutes to purge air out of the system and stabilize the oil level. During this time, the oil level alarm may sound. b. Once the level has stabilized and the air is purged, fill the tank to the full mark on d ipstick. Start engine and check that oil alarm remains off. 4.15 HYDRAULIC FILTERS ______________________________________________________ The hydraulic system is protected by two 1 0 micron filters, a charge filter (B), and return line filter (A). Flow though the filters is monitored during operation. When pressure drop across the filters is too high the hydraulic oil filter warning light will come on. To ensure continued protection to the hydraulic system, replace filters as soon as possible if li ght continues to remain on ev en after hydraulic fluid has warmed up. Note: The warning light will normally come on immediately after starting mower and remain on until oil has warmed to operating temperature. Wait until oil has warmed up and light goes out before operating mower. To replace hydraulic filters: Replace filters once a y ear when changing hydraulic fluid, or when filter warning light on in strument panel remains on. The return line filter is mounted to the left side of the oil cooler. The charge filter is mounted to the l ower part of the mower frame behind the left side lift arm. 1. Remove the old filters. Note: Some hydraulic fluid will drain when removing the lower charge filter. Place a drip pan under filter before removing. 2. Install new filters. Hand tighten only. 3. Operate engine at id le speed with hydraulic system in neutral for five minutes. The oil level alarm may sound during this time. 4. Check hydraulic oil level in r eservoir and fill to full mark on dipstick. en-25 4 MAINTENANCE 4.16 RADIATOR & OIL COOLER _________________________________________________ ! WARNING To prevent serious bodily injury from hot coolant or steam blow-out, never attempt to remove the radiator cap while the engine is running. Stop the engine and wait until it is cool. Even then, use extreme care when removing the cap. To remove screen, remove end cap (A) from left side of oil cooler. Slide screen out from side and blow out f rom back side using compressed air. Oil Cooler and Radiator Inspect oil cooler and radiator daily and clean as required to maintain good air flow. 1. Remove screen (B) from front of oil cooler. ! CAUTION Do not pour cold water into a hot radiator. Do not operate engine without a proper coolant mixture. Install cap and tighten securely. 2. Unfasten knobs (C) located on to p of oi l cooler and remove plastic shield (D) from front of oil cooler. 3. Replace front screen and shields, and install knobs on top of oil cooler to secure assembly in place. Check coolant level daily. Radiator should be full and recovery bottle should be up to the cold mark. If you have to add coolant more than once a month, or add more than one quart at a time, have a J acobsen Dealer check the cooling system. C F Drain and refill annually. Remove the r adiator cap and remove the lower radiator hose. Empty and clean the recovery bottle. Mix clean water with ethylene glycol based anti-freeze for the coldest ambient temperature. Read and follow the instructions on th e anti-freeze container and engine manual. D E Keep screen, oil cooler, and radiator air passages clean. Use compressed air (30 psi (2.06 BAR) maximum) to clean the fins. Front Screen B Inspect front screen (B) daily and cl ean as required to remove grass clippings, leaves and other debris that may restrict air flow through oil cooler and radiator. A HR008 Figure 4F 4.17 TIRES ___________________________________________________________________ ! CAUTION Unless you have the proper training tools and experience, DO NOT attempt to mount a tire on a rim. Improper mounting can produce an explosion which may result in serious injury. 1. Keep tires properly inflated to prolong tire life. Check inflation pressure while the tires are cool. Inspect tread wear. en-26 2. Check pressure yearly. Use an accurate, low pressure tire gauge. 3. Keep tires inflated to proper pressure Mower: 20-22 psi (1.38 -1.52 BAR) Decks: 20-25 psi (1.38 -1.73 BAR) MAINTENANCE 4 4.18 CARE AND CLEANING _____________________________________________________ Clean the mower and implements after each use. Keep the equipment clean. Note: Shut off engine prior to cleaning. Do not wash any portion of the equipment while it is hot. Do not use high pressure spray or steam. Use cold water and automotive cleaners. 1. Clean all plastic or rubber trim with a mild soap solution or us e commercially available vinyl/rubber cleaners. Repair damaged metal surfaces and use Jacobsen touch-up paint. Wax the equipment for maximum paint protection. Use compressed air to clean engine and radiator fins. 2. Use only fresh water for cleaning your equipment. Note: Use of salt water or affluent water has been known to encourage rust and corrosion of metel parts resulting in premature deterioration or failure. Damage of this nature is not covered by the factory warranty. 3. 4. Do not spray water di rectly at the i nstrument panel, ignition switch, controller, or any other el ectrical components, or at bearing housings and seals. ! CAUTION Clean grass and debris from cutting units, drives, muffler, and engine to prevent fires. ! WARNING NEVER use your hands to clean cutting units. Use a brush to remove grass clippings from blades. Blades are extremely sharp and can cause serious injuries. 4.19 ELECTRICAL SYSTEM _____________________________________________________ ! CAUTION Always turn the igniton switch OFF and remove the negative battery cable (BLACK) before i nspecting or working on the electrical system. F1 F2 F3 F4 F5 F6 F7 F8 F9F10F11F12 General precautions that can be t aken to reduce electrical problems are listed below. 1. Make certain all terminals and connections are clean and properly secured. 2. Check the operator backup system, fuses, and circuit breakers regularly. If the operator backup system does not function properly, and the problem cannot be corrected, contact an authorized Jacobsen Dealer. 3. Keep the wire harness and all individual wires away from moving parts to prevent damage. 4. Make sure the seat switch harness is connected to the main wire harness. 5. Check the battery and battery charging circuit. 6. Do not wash or pressure spray around electrical connections and components. FUSES F1 F2 F3 F4 F5 F6 F7 F8 F9 F10 F11 F12 5A 5A 15A 15A 5A 5A 5A 15A 5A 5A 5A 15A Spare Spare Spare Spare Ignition Gauges Seat Time Delay Seat air system Cruise Control 4-WD Solenoid Deck Limit Switches Deck Valves HR006 Circuits are protected by a circuit breaker (located above Figure 4G batteries), plus fuses and relays mounted under the instrument panel (See Figure 4G and table of next page). The table on the next page identifies the location and basic functions of the electrical relays located under the control panel. For more detailed information refer to the electrical schematic in this manual. en-27 4 MAINTENANCE Always check Interlock System after servicing the electrical system! K15 K16 K17 K15 K16 LTS 4WD CRS K17 K13 Wire Harness Label Schematic Code K12 MR MC ML NT3 NT2 NT1 BK2 BK1 KYS KYA KYI K11 K10 K9 K8 K7 K6 K5 K4 K3 K2 K1 Relay Description KYA / K2 Key Switch “A” Provide power to alternator IG circuit when ignition switch is in the RUN position and operator is seated. KYI / K1 Key Switch “I” Provides power to KYS/K3 relay when power take-off switch is OFF, parking brake and neutral switches are closed. KYS / K3 Key Switch “S” Cranks starter motor when ignition switch is in the START position, power take-off switch is OFF, parking brake and neutral switches are closed. BK1 / K4 Brake -Start Part of starting circuit. Relay closes when parking brake is engaged. BK2 / K5 Brake-Run Disconnects power to cruise control relay (CRS) with parking brake engaged. Disconnects power to the alternator IG circuit when the operator leaves seat with parking brake disengaged. NT1 / K6 Neutral-Start Part of starting circuit. Relay closes when traction pedal is in Neutral. NT2 / K7 Neutral-Run Disconnects power to the alternator IG circuit when operator leaves seat with neutral switch still open (traction pedal pressed). NT3 / K8 Neutral-Cruise ML / K9 Mow -Left Deck Energizes solenoid to left side deck valve when deck is lowered and power take-off switch is ON. MC / K10 Mow-Center Deck Energizes solenoid to front deck valve when deck is lowered and power take-off switch is ON. MR / K11 Mow-RIght Deck Energizes solenoid to right side deck valve when deck is lowered and power take-off switch is ON. CRS / K12 Cruise Control Activates cruise control when cruise control switch is closed, traction pedal is pressed and parking brake is disengaged. 4WD / K13 Four Wheel Drive LTS Lights K15 Run Circuit Cutout K16 Auxilliary K17 Ignition en-28 Function Disconnects power to cruise control when neutral switch is closed (traction pedal in Neutral). Energizes solenoid to four wheel drive valve when four wheel drive switch on instrument panel and forward sensing switch on traction pump are closed. Included with light harness kit 5003564. Controls operation of lights. Disables run circuit when keyswitch is turned to START position. Provides power to ignition circuit with keyswitch in RUN position. Disables ignition circuit in START position. Provides power to gauges, mow circuit, 4WD circuit and seat switch circuit. MAINTENANCE 4 4.20 EFI DIAGNOSTIC CHECK ___________________________________________________ The electrical system is equipped with an OBD-II and Diagmaster diagnostic connectors located near the engine controller. Refer to the HR-9016 Technical Repair Manual for code descriptions. Plug an OBD-II reader into the matching connector, turn ignition switch to the ON position (do not start engine), and refer to the instructions included with the reader to retrieve diagnostic codes. 4.21 WHEEL MOUNTING PROCEDURE ____________________________________________ Mower Wheels ! WARNING Make sure the mower is parked on a s olid and level surface. Never work on a mower that is supported only by the jack. Always use jack stands. 3. To eliminate end play, tighten inner nut (G) until wheel just begins to bind then loosen it 1/4 turn. Lock inner nut in position using outer nut (H). Do not allow inner nut to rotate while tightening outer nut. 4. Repeat step 2 and check for end play. If only the front or rear of the mower is raised, place chocks in front of and behind the wheels that are not raised. G 1. Remove dirt, grease, and oil from stud thread. Do not lubricate threads. 2. Position wheel on hub and inspect to insure full contact between mounting surface of wheel and hub or brake drum. 3. Finger tighten all hardware, then torque hardware in crisis-cross order. Always tighten nuts in the to p position. H I HR021 Figure 4H ! CAUTION Check and torque lug bolts daily for the first 100 hours of operation. 4. After recieving new uni t, or if tires were removed, check and torque lug bolts daily until torque is maintained. Front Wheels............. 95-105 ft. lb. (128-142 N.m). Rear Wheels ............. 65-75 ft. lb. (88-102 N.m). Caster Wheels To extend bearing life check and adjust caster and gauge wheels every year. Lubricate bearings every 100 hours using NLGI Grade 2 grease. 1. Raise deck so wheels are off ground and can be rotated freely by hand. 2. Check wheels for end play (I). Wheels should rotate freely with zero end play. en-29 4 MAINTENANCE 4.22 ROLLOVER PROTECTION STRUCTURE (ROPS) ________________________________ A Rollover Protection System (ROPS) designed for this mower is available as an op tional accessory. If yo ur mower is equipped with this device, inspect it periodically and follow operating procedures described in Safety and Operation Manual ! CAUTION Do not loosen or remove bolts, do not weld, drill, modify, bend, or straighten a damaged structure. 1. The seat, the seat belt, mounting hardware, and any accessories within the ROPS, should be i nspected regularly, and all damaged parts replaced immediately. 2. Once the ROPS has been subjected to any form of impact it should be replaced. 3. Check and retorque all hardware. All replacement components used for the ROPS must be as specified in the Jacobsen Parts List. 4.23 STORAGE________________________________________________________________ General Cutting Units 1. Wash the mower thoroughly and lubricate. Repair and paint damaged or exposed metal. 1. Wash the cutting units thoroughly, then repair and paint any damaged or exposed metal. 2. Inspect the mower, tighten all hardware, replace worn or damaged components. 2. Lubricate all fittings and friction points. 3. Drain and refill radiator. 3. Apply a li ght coat of rust preventative oil to the sharpened edges of the blades. 4. Clean the tires thoroughly and store the mower so the load is off the tires. If mower is not on jack stands, check tires at regular intervals and reinflate as necessary. After Storage 5. Keep the machine and all its accessories clean, dry and protected from the elements during storage. Never store equipment near an open flame or spark which could ignite fuel or fuel vapors. 3. Check the radiator coolant level. Battery 5. Fill the fuel tank with fresh fuel. Bleed the fuel system. 1. Remove, clean, and store battery in upright position in a cool, dry place. 2. Check and r echarge battery every 60 to 90 da ys while in storage. 3. Store batteries in a cool, dry place. To reduce the self discharge rate, room temperature should not be above 80°F (27°C) or fall below 20°F (-7°C) to prevent electrolyte from freezing. Engine 1. While the en gine is warm, remove drain plug, drain the oil from the crankcase, and change oil filter. Install drain plug and refill with fresh oil. Torque drain plug to 22 ft. lb. (30 Nm). 2. Clean exterior of engine. Paint exposed metal or apply a light coat of rust preventative oil. 3. Add a fu el conditioner or biocide to p revent gelling or bacterial growth in fuel. See your local fuel supplier. en-30 1. Check and reinstall battery. 2. Check or service fuel filter and air cleaner. 4. Check oil level in the engine crankcase and hydraulic system. 6. Make certain that the tires are properly inflated. 7. Remove all oil from the deck blades. Readjust cutting height. 8. Start and operate the engine at 1/2 throttle. Allow enough time for the engine to become properly warmed and lubricated. ! WARNING Never operate the engine without proper Exhaust fumes can be fatal when inhaled. ventilation. TROUBLESHOOTING 5 5 TROUBLESHOOTING 5.1 GENERAL ________________________________________________________________ The troubleshooting chart below lists basic problems that may occur during start-up and operation. For more detailed information regarding the hydraulic and electrical systems contact your area Jacobsen Dealer. Symptoms Engine will not start. 1. 2. 3. 4. 5. 6. 7. 8. 9. Engine hard to start or runs poorly. Engine stops. Engine overheating. Battery not holding charge. Battery light on. Cutting units not cutting evenly. 1. Possible Causes Parking brake disengaged or power take-off switch ON. Glow plug has not timed out. Battery low on charge or defective. Fuel tank empty or dirty. Fuse blown. Relay(s) defective. Traction pedal not in Neutral. Neutral switch on drive pump not working. Forward sensing switch on drive pump not working. Fuel level low, fuel or fuel filter dirty. 1. Action Check Interlock System and start-up procedure. 2. Reset ignition switch and allow glow plug to time out before cranking engine. 3. Inspect condition of battery and battery connections. 4. Fill with fresh fuel. Change fuel filter. Bleed fuel lines. 5. Replace fuse. 6. Test and replace relay. 7. Check position of pedal. Adjust Linkage. 8. Test, adjust, or replace switch. 9. Test, adjust, or replace switch. 1. Fill with fresh fuel. Change fuel filter. Bleed fuel lines. 2. Air cleaner dirty. 2. Inspect and replace air filter. 3. Injectors, fuel pump. 3. Consult engine manual. 4. Engine problem. 4. Consult engine manual. 1. Fuel tank empty. 1. Fill with fresh fuel and bleed fuel lines. 2. Interlocks not set before leaving operator’s seat. 2. Engage parking brake and set power take-off switch to OFF. 1. Coolant level low. 1. Inspect and add coolant. 2. Air intake restricted. 2. Clean air intake at radiator. 3. Water pump belt broken or loose. 3. Tighten or replace belt. See engine manual. 1. Loose or corroded battery terminals. 1. Inspect and clean terminals. 2. Low electrolyte. 2. Refill to correct level. 3. Alternator belt loose or broken. 3. Tighten or replace belt. See engine manual. 4. Charging system defective. 4. See engine manual. 1. Cutting heights not set evenly. 1. Check that decks are level. Check and adjust cutting height. 2. Engine speed too low. 2. Check engine speed with throttle in its fast position. 3. Mow speed not adjusted for turf conditions. 3. Adjust mow speed for best cut. 4. Air pressure in caster tires not adjusted correctly. 4. Check tires and adjust to correct pressure. en-31 6 6 MAINTENANCE AND LUBRICATION CHARTS MAINTENANCE AND LUBRICATION CHARTS 6.1 MAINTENANCE CHART ____________________________________________________ For smooth operation of pivot points and other friction points, apply several drops of SAE 30 oil every 50 hours or as required. ! WARNING Before you clean, adjust, or repair this equipment, disengage all drives, lower implements to the ground, engage parking brake, stop engine, and remove key from ignition switch to prevent injuries. Remove wheels and repack bearings once a year. Recommended Service and Lubrication Intervals Daily Before Starting Air Cleaner Indicator Every 25 Hours Every 50 Hours Every 100 Hours R-AR R 4.7 I-C I-C 4.10 I-A 4.20 Caster Wheel Bearings A* L Engine Fan Belt I* I-A I-A Engine Oil Filter R* R 4.5 R* R 4.5 R Drain Water from Fuel Filter C Grease Fittings - F1 I-A R-AR 6.2 II R 4.14 IV R 4.15 4.16 I-A* I-C Radiator Coolant I-A A 4.16 Steering Assist Brakes Tires I-A* C - Clean I - Inspect * Indicates initial service for new machines ** See Engine Manual *** Clean as Required **** Check lug bolt torque daily for first 100 hours of operation R 4.16 I-A 4.20 A I**** A - Add or Adjust 4.9 II I-C*** Parking Brake Radiator Screen III 6.2 L Hydraulic Fluid FIlters I ** L Grease Fittings - F2 Oil Cooler Lubricant Type ** Fuel Filter Hydraulic Fluid See Section 4.7 Battery en-32 Every Year I Air Cleaner Element Engine Oil Every 250 Hours L- Lubricate I II III IV R - Replace AR - As Required Pack bearings with NLGI Grade 2 (Service Class GB) Manual grease gun with NLGI Grade 2 (Service Class LB) Engine Oil - See Section 4.5 Jacobsen Hydraulic Oil - VG ISO 68 MAINTENANCE AND LUBRICATION CHARTS 6.2 6 LUBRICATION CHART______________________________________________________ 1 2 4 4 3 3 4 4 1 2 6 5 5 12 1 14 11 15 12 8 13 8 7 9 7 HR014 10 10 Grease Fitting Locations F1 - 50 Hours (Every Week) 1 2 3 4 5 6 7 8 9 10 11 12 Caster Spindles Caster Wheel Axles Gauge Wheel Axles Lift Cylinder - Front Deck Lift Arm - Front Deck Side Deck Pivots Steering Cylinder Tie Rod Axle Pivot Wheel Pivot Lift Arm - Side Deck Lift Cylinder - Side Deck Qty (10) (10) (2) (4) (2) (6) (2) (2) (1) (2) (2) (4) F2 - 150 Hours 13 14 15 Drive Shaft U-Joint Drive Shaft Slip Joint Return Canister Pivot Qty (2) (1) (6) en-33 7 PARTS LIST 7 PARTS LIST 7.1 HOW TO USE THE PARTS CATALOG _________________________________________ Abbreviations Indented Items N/S - Not serviced seperately, can only be obtained by ordering main component or kit. AR -Variable quantity or measurement is required to obtain correct adjustment. Symbols such as l, next to the item number, indicate that a note exists which contain additional information important in ordering that part. Indented items indicate component parts that are included as part of an a ssembly or another component. These parts can be ordered separetely or as part of the main component. Item l 7.2 Part No. 1 2 3 4 5 123456 789012 345678 N/S 901234 Qty Description 1 1 1 1 1 Mount, Valve Valve, Lift • Handle • Seal Kit Screw, 1/4-20 x 2” Hex Head Indicates a piece part Includes Items 2 and 3 Serviced part included with Item 2 Non serviced part included with Item 2 TO ORDER PARTS_________________________________________________________ 1. Write your full name and complete address on the order. 2. Explain where and how to make shipment. 3. Give product number, name and serial number that is stamped on the name plate or serial plate of your product. 4. Order by the quantity desired, the part number, and description of the part as given in the parts list. 5. Send or bring the order to an authorized Jacobsen Distributor. 6. Inspect all shipments on receipt. If any parts are damaged or missing, file a claim with the carrier before accepting. 7. Do not return material without a letter of explanation, listing the parts being returned. Transportation charges must be prepaid. en-34 Serial Numbers/Notes PREFAZIONE Questo manuale contiene istruzioni sulla messa a punto, manutenzione, localizzazione guasti e la lista delle parti di ricambio per la nuova macchina Jacobsen. Conservarlo con l’attrezzatura per futura consultazione durante l’utilizzo. ® CHARLOTTE, NC PRODUCT OF U.S.A. Prima di usare la macchina, tutti gli operatori devono leggere attentamente e completamente il presente manuale. Osservare le istruzioni relative alla sicurezza, all’utilizzo ed alla manutenzione dell’attrezzatura per prolungarne la vita utile e mantenere la massima efficienza. ® 11524 WILMAR BLVD, CHARLOTTE, NC 28273 1-800-848-1636 (US) PRODUCT OF U.S.A. Per maggiori informazioni contattare il Concessionario Jacobsen di zona. kg kW La targa è situata sul telaio, dietro il serbatoio carburante. Jacobsen consiglia di annotare di seguito questi numeri per agevolarne l’immediata consultazione. Guida alle scorte consigliate Per mantenere la macchina in piena efficienza, la Jacobsen consiglia di conservare una piccola scorta dei materiali più comunemente utilizzati. Per facilitare l’individuazione delle parti di ricambio, accanto al materiale integrativo e di supporto alla formazione è stato inserito il relativo numero di identificazione. Per ordinare questo materiale: 1. Riportare nome e indirizzo completi sul buono d’ordine. 4. Inviare o consegnare il buono d’ordine al distributore autorizzato Jacobsen di fiducia. 2. Indicare luogo e modalità di spedizione: UPS Posta ordinaria Mattino successivo Giorno successivo 3. Nel buono d’ordine indicare quantità, numero e descrizione della parte desiderata. Parti di ricambio Qtà Ricamb. Descrizione Qtà 4251803 Filtro dell’olio motore 5003370 Filtro dell’aria per motore 4230980 Filtro carburante del motore Ricamb. Descrizione 4251726 Elemento separatore dell'acqua 5003691 Filtro idraulico di ricarica 5002693 Filtro idraulico di ritorno Materiale di supporto per la manutenzione Qtà Ricamb. Qtà Descrizione traduzioni dell’originale verificate da © 2012, Jacobsen, A Textron Company/Textron Innovations Inc. “Tutti i diritti sono riservati, ivi compreso il diritto di riprodurre questo materiale o parti dello stesso in qualsiasi forma.” it-2 Descrizione 4228360 Catalogo parti del motore 4263110 Manuale di riparazione tecnico 4228361 Manuale d’uso e sicurezza 4228362 Manuale parti e manutenzione 2006/42/EC Queste sono ACMTRAD SL. Ricamb. Avviso: Proposta 65 Questo prodotto contiene o emette sostanze chimiche riconosciute dallo Stato della California come causa di cancro e difetti congeniti od altri danni riproduttivi. Litografato negli U.S.A. 2-2012 Indice 1 1.1 1.2 SICUREZZA Sicurezza operativa.......................................... 4 Note importanti di sicurezza ............................. 5 5 2 2.1 2.2 2.3 2.4 2.5 2.6 2.7 DATI TECNICI Identificazione del prodotto .............................. 6 Apparati di taglio .............................................. 6 tosaerba ........................................................... 6 Motore .............................................................. 7 Peso e ingombro .............................................. 7 Accessori e Stampati ....................................... 7 Certificati di conformità ..................................... 8 6 3 3.1 3.2 3.3 3.4 3.5 3.6 3.7 3.8 3.9 3.10 3.11 3.12 3.13 3.14 3.15 REGOLAZIONI Aspetti generali .............................................. 10 Livellamento piatti .......................................... 10 Revisione del piatto di taglio anteriore ........... 11 Regolazione delle alette ................................. 11 Altezza di taglio .............................................. 12 Interruttori di limitazione sollevamento ........... 13 Regolazione del folle ...................................... 14 Interruttore di rilevamento del folle ................. 14 Interruttore di rilevamento marcia avanti ........ 15 Freno di stazionamento .................................. 15 Freno di stazionamento .................................. 16 Pedale della trazione ...................................... 16 Convergenza dello sterzo .............................. 16 Bulloni di arresto dello sterzo ......................... 17 Specifica della coppia .................................... 18 4 4.1 4.2 4.3 4.4 4.5 4.6 4.7 4.8 4.9 4.10 4.11 4.12 4.13 4.14 4.15 4.16 4.17 4.18 4.19 4.20 4.21 4.22 MANUTENZIONE Aspetti generali .............................................. 19 Controllo delle lame ....................................... 19 Affilatura delle lame ........................................ 20 Motore ............................................................ 21 Olio motore ..................................................... 21 Marmitta e tubo di scarico .............................. 21 Filtro dell’aria .................................................. 22 Carburante ..................................................... 22 Impianto di alimentazione .............................. 23 Batteria ........................................................... 23 Avviamento con cavi di emergenza ............... 23 Carica della batteria ....................................... 24 Flessibili idraulici ............................................ 24 Olio idraulico .................................................. 25 Filtri idraulici ................................................... 25 Radiatore e scambiatore di calore olio ........... 26 Pneumatici ..................................................... 26 Cura e Pulizia ................................................. 27 Impianto elettrico ............................................ 27 Controllo diagnostico EFI ............................... 29 Procedura di montaggio della ruota ............... 29 Struttura di protezione antiribaltamento (ROPS) ........................................................... 30 Rimessaggio .................................................. 30 4.23 5.1 LOCALIZZAZIONE E RISOLUZIONE DEI PROBLEMI Aspetti generali ...............................................31 6.1 6.2 TABELLE DI MANUTENZIONE E LUBRIFICAZIONE Schema del programma di manutenzione ......32 Tabella di lubrificazione ..................................33 7 7.1 7.2 LISTA DELLE PARTI Come usare il catalogo ricambi .......................34 Ordinazioni di ricambi .....................................34 it-3 1 SICUREZZA 1 1.1 SICUREZZA SICUREZZA OPERATIVA ___________________________________________________ ! AVVERTENZA LE APPARECCHIATURE AZIONATE IN MODO IMPROPRIO O DA PERSONALE NON ADDESTRATO POSSONO ESSERE PERICOLOSE. Familiarizzarsi con la posizione ed il corretto uso di tutti i comandi. Prima di consentire agli operatori inesperti di utilizzare la macchina, si raccomanda di farli addestrare da personale che abbia familiarità con le apparecchiature. 1. 2. 3. 4. 5. 6. La sicurezza dipende dalla preparazione, dal senso di responsabilità e dalla prudenza degli operatori e del personale addetto alla manutenzione. Non permettere mai a minorenni di usare qualsiasi attrezzatura. L'operatore ha la responsabilità di leggere il presente manuale ed ogni altra pubblicazione legata a questa attrezzatura (Manuale d’uso e sicurezza, Manuale del motore, e istruzioni per attrezzi e accessori). Se l’operatore non è in grado di leggere in italiano, il proprietario ha la responsabilità di spiegargli il materiale contenuto nel presente manuale. Prima di usare la macchina, apprenderne il giusto funzionamento, nonché la posizione e la funzione di tutti i comandi e degli indicatori. L'uso di macchine con cui non si ha dimestichezza può causare infortuni. Non permettere a nessuno di usare la macchina o gli accessori o di intervenire su di essi se non è stato adeguatamente addestrato e istruito, o se si trova in stato di intossicazione. Indossare l’abbigliamento di protezione e i dispositivi per la sicurezza personale necessari per salvaguardare il capo, gli occhi, le orecchie, le mani e i piedi. Utilizzare la macchina solamente durante le ore diurne o in buone condizioni di illuminazione artificiale. Valutare il terreno per decidere quali accessori ed attrezzi siano necessari per eseguire correttamente l’operazione in tutta sicurezza. Usare soltanto accessori ed attrezzi approvati da Jacobsen. 7. Fare attenzione a fossi nel terreno e a pericoli nascosti. 8. Ispezionare l'area dove si intende usare la macchina, e prima di utilizzarla raccogliere tutti gli oggetti presenti. Prestare attenzione sia agli ostacoli sopraelevati (rami, fili elettrici, ecc.) che a quelli sotterranei (irrigatori, tubazioni, radici ecc.). Usare la massima cautela quando si accede a una nuova area. Attenzione ai pericoli nascosti. 9. 12. Non scollegare né escludere mai alcun interruttore. 13. Non modificare l’impostazione del regolatore del motore e non aumentare il regime del motore. 14. L’ossido di carbonio presente nelle emissioni può essere micidiale se inalato. Non avviare mai il motore in ambienti non adeguatamente ventilati o in ambienti cintati. 15. Il carburante è facilmente infiammabile: maneggiarlo con cautela. 16. Mantenere pulito il motore. Lasciare raffreddare il motore prima del rimessaggio e togliere sempre la chiave di accensione. 17. Disinnestare tutte le trasmissioni e inserire il freno di stazionamento prima di avviare il motore. Avviare il motore soltanto quando si è seduti alla postazione di guida, mai quando si è in piedi a fianco del tosaerba. 18. Se il tosaerba viene guidato o trasferito su strade pubbliche, esso deve ottemperare alle norme federali, statali e locali in vigore. Prestare attenzione al traffico quando si attraversano strade o si lavora in prossimità di strade. 19. Le normative locali possono imporre limiti sull’eta` dell’operatore. 20. Sulle pendenze, procedere in salita e discesa (in verticale), non trasversalmente (in orizzontale). 21. Per impedire ribaltamenti e la perdita di controllo, in pendenza non avviare o arrestare improvvisamente il motore. Ridurre la velocità prima di eseguire curve a raggio stretto. Usare cautela quando si cambia direzione. 22. Allacciare sempre la cintura di sicurezza quando si utilizzano tosaerba dotati di struttura di protezione antiribaltamento (ROPS). Non allacciare mai la cintura di sicurezza quando si utilizza un ROPS. Non dirigere mai il materiale di scarico verso persone terze, né permettere che alcuno si avvicini alla macchina durante le operazioni. L'operatore/proprietario è in grado di prevenire, ed è responsabile di, eventuali lesioni a terzi e danni. Verranno offerte strutture accessorie di protezione operatore per tutte le attrezzature attualmente coperte. Ciò consente di equipaggiare qualsiasi macchina senza precedenti installazioni di ROPS o di sostituire le strutture danneggiate. 10. Non trasportare passeggeri. Tenere gli astanti e gli animali da compagnia a distanza di sicurezza. 23. Tenere gambe, braccia e corpo all’interno dell’abitacolo mentre il veicolo è in movimento. 11. Non utilizzare mai attrezzature che non siano in perfette condizioni di funzionamento o prive di adesivi di sicurezza, ripari, schermi, deflettori di scarico o altri dispositivi di protezione non saldamente fissati. 24. Scollegare le batterie prima di eseguire operazione di saldatura su questo tosaerba. qualsiasi Questa macchina deve essere azionata e mantenuta nel modo specificato in questo manuale ed è intesa per la manutenzione professionale di tappeti erbosi specializzati. Non è inteso per l’uso su terreni accidentati o dove l’erba è alta. it-4 SICUREZZA 1.2 1 NOTE IMPORTANTI DI SICUREZZA ___________________________________________ Questo simbolo di allarme di sicurezza viene utilizzato per indicare pericoli potenziali. PERICOLO - Indica una situazione imminentemente pericolosa che, se non evitata, PROVOCHERÀ la morte o gravi lesioni. AVVERTENZA - Indica una situazione potenzialmente pericolosa che, se non evitata, POTREBBE provocare la morte o gravi lesioni. ATTENZIONE - Indica una situazione potenzialmente pericolosa che, se non evitata, PROBABILMENTE provocherà lesioni a persone e danni, di entità da minore a moderata, a proprietà. Può essere utilizzato anche per segnalare azioni pericolose. AVVISO - Indica una condizione potenzialmente pericolosa che, se non viene evitata, PUÒ causare danni. Può essere utilizzato anche per segnalare azioni pericolose. Per chiarezza alcune illustrazioni in questo manuale possono riprodurre schermi, ripari o piastre aperti o rimossi. Questa apparecchiatura non deve mai essere utilizzata se questi dispositivi non sono correttamente fissati in posizione. ! AVVERTENZA Il sistema microinterruttori di sicurezza impedisce l’avviamento del tosaerba a meno che la leva del freno sia inserita, l’interruttore della presa di forza sia in posizione Off (disinserito) ed il pedale di trazione sia in folle. Il sistema ferma inoltre il motore se l’operatore lascia il sedile senza inserire il freno di stazionamento o disinserire l’interruttore della presa di forza. NON utilizzare il tosaerba se il sistema di sicurezza a interblocchi non funziona. ! AVVERTENZA 1. Prima di allontanarsi dalla postazione dell’operatore per qualsiasi motivo: a. b. c. d. e. Riposizionare il pedale della trazione in folle. Disinserire tutte le leve di comando. abbassare al suolo tutti gli attrezzi Inserire il freno di stazionamento. spegnete il motore e togliete la chiave di accensione. 2. Tenere mani, piedi e abiti a distanza di sicurezza dalle parti in movimento. Prima di pulire, mettere a punto o revisionare la macchina, attendere che tutte le parti in movimento si siano fermate. 3. Mantenere l’area di lavoro sgombra da persone e animali da compagnia. 4. Non trasportare mai passeggeri, a meno che non sia previsto un sedile per loro. 5. Non usare mai una macchina per falciatura senza il deflettore di scarico fissato in posizione regolare. Seguendo tutte le istruzioni fornite in questo manuale, sarà prolungata la durata della macchina e questa manterrà intatta la propria efficienza. Le messe a punto e la manutenzione devono essere sempre effettuate da un tecnico qualificato. Rivolgersi al proprio concessionario autorizzato Jacobsen, che dispone di dati sui metodi di manutenzione più recenti per mantenere quest’attrezzatura ed è in grado di fornire un’assistenza pronta ed efficiente ai clienti. L’uso di ricambi e accessori non originali Jacobsen annulla la garanzia. it-5 2 2 2.1 DATI TECNICI DATI TECNICI IDENTIFICAZIONE DEL PRODOTTO __________________________________________ 70538H ........................... HR 9016 Turbo, 4 ruote motrici 70539.............................. HR 9016 Turbo, 4 ruote motrici con ROPS 70540H ........................... HR 9016 Turbo, 4 ruote motrici EC con ROPS 70541.............................. HR 9016 Turbo, 4 ruote motrici EC H ..................................... Queste unità devono avere una cabina certificata o una struttura ROPS installata dal concessionario prima che il tosaerba possa essere messo in servizio. Numero di serie ............. Sul telaio del tosaerba, a destra dell'operatore appena sopra l'assale posteriore, è affissa una targhetta di identificazione simile a quella illustrata, su cui è riportato il numero di serie. Citare sempre il numero di serie dell’unità quando si ordinano parti di ricambio o si chiedono informazioni e assistenza. ® CHARLOTTE, NC PRODUCT OF U.S.A. 7053801651 ® 11524 WILMAR BLVD, CHARLOTTE, NC 28273 1-800-848-1636 (US) PRODUCT OF U.S.A. xxxx xxxx kg kW xxxx 7054001651 Prodotto* Livello di Livello di pressione potenza sonora all'orecchio dell'operatore sonora CEE Vibrazioni M/S2 Braccia Corpo 70540 105 dba 91 dba 3,15±1,4 0,21±0,08 70541 105 dba 91 dba 3,15±1,4 0,21±0,08 * Con il motore a 2400 giri/min (senza carico) 2.2 APPARATI DI TAGLIO______________________________________________________ Larghezza Piatto anteriore ......... 2336 mm Piatti laterali .............. 1499 mm Numero di lame Piatto anteriore ......... 5 Piatti laterali .............. 3 Larghezza di taglio complessiva ................... 2,4 m 2.3 TOSAERBA ______________________________________________________________ Pneumatici: Anteriori ................... 29 x 14 - 15: 12 tele Posteriori .................. 24 x 12 - -12: 6 tele Pressione .................. 138-152 kPa Batteria: Tipo........................... Una batteria da 12 V esente da manutenzione 720 CCA a -18°C Gruppo ...................... 75 Freni: Servizio .................... Frenata dinamica tramite circuito di trazione. Stazionamento .......... Tamburo ruota anteriore meccanico Azionato mediante leva a mano Assistenza alla svolta Tamburo ruota anteriore meccanico Azionamento a due pedali it-6 Altezza di taglio .............. 25 - 140 mm Dimensione lama............ 533 mm Velocità punta................. 5029 m/min. Pneumatici Dimensione............... Dieci 11 x 4,00 - 5,0 (4 tele) Due 13 x 6,50 - 6,0 (4 tele) Pressione.................. 138-173 kPa Velocità: Tosatura .................. 0-13,6 km/h Trasferimento-2 WD . 0-32,2 km/h Retromarcia-2WD..... 0-8,9 km/h Retromarcia-4 WD.... 0-4,8 km/h Produzione ..................... 6,5 ettari all'ora a a 13,6 km/h Impianto idraulico: Capacità ......................... Sistema da 208 litri (55 gall. USA) Capacità ......................... 125 litri (33 gall. USA) Tipo di fluido ................... ISO VG 68 Raffreddamento.............. Radiatore dell’olio idraulico Filtro per ricarica............. 10 micron Filtro di ritorno................. 10 micron Sterzo ............................ Servosterzo idrostatico DATI TECNICI 2.4 2 MOTORE _________________________________________________________________ Marca .............................. Kubota Modello ........................... V3800 DICR-T-E2B Potenza........................... 90 cv (67 kW) a 2600 giri/min Nota: I cv effettivamente sostenuti possono essere inferiori al valore pubblicato nelle specifiche, a causa delle limitazioni operative ed a fattori ambientali. Cilindrata......................... 3,769 litri Coppia............................. 328 Nm a 1500 giri/min Carburante: Tipo ........................... Gasolio n. 2 a basso o bassissimo contenuto di zolfo Diesel (CUNA NC 630.01) Cetano ...................... Min. cetano 45 Capacità.................... 132,5 Impostazione regolatore del motore: Massimo ................... 2700 giri/min Minimo ...................... 1050 giri/min Lubrificazione Capacità.................... 13,2 litri Tipo........................... SAE 15 W40 Classificazione API .. CF 4, CD-II, CE Filtro dell'aria .................. A secco con valvola di evacuazione e indicatore di servizio Alternatore ...................... 60 A Sistema di raffreddamento del motore Fluido ........................ miscela 50/50 di antigelo a base di glicole etilenico e acqua Capacità.................... 14 litri 2.5 PESO E INGOMBRO _______________________________________________________ Dimensioni: Pollici Lunghezza - Piatto anteriore abbassato ........... 174 Altezza – Parte superiore del volante ................ 60 Altezza – Sommità del roll-bar ............................ 94 Larghezza - Tosatura ........................................ 198 Larghezza - Trasferimento.................................. 95 2.6 mm (4420) (1524) (2388) (5029) (2413) Pesi: libbre Globale (senza operatore) 70538...............................................................6385 70539...............................................................6600 70540...............................................................6385 70541...............................................................6600 (kg) (2899) (2996) (2899) (2996) ACCESSORI E STAMPATI ___________________________________________________ Richiedere la lista completa di accessori e attrezzi al concessionario Jacobsen di zona. ! ATTENZIONE L’uso di ricambi e accessori non autorizzati da Jacobsen può causare infortuni o danneggiare l’attrezzatura, ed annullare la garanzia. Vernice arancione per ritocchi (a spruzzo 355 ml).. 4184140 Dispositivo antiribaltamento ROPS a 2 montanti con cintura di sicurezza .............................................. 78138 l Cabina per tutte le condizioni climatiche con ROPS e cintura di sicurezza ..................... Vedere di seguito l Kit aria condizionata.............................. Vedere di seguito Kit per mulching foglie................................................. 71055 Lama ad alto sollevamento ..................................... 3007759 Kit cablaggio fari ..................................................... 5003564 Kit fari da strada (Richiede 5003564) ......................... 78154 Kit peso volante posteriore ......................................2812307 Kit fari da lavoro (Richiede 5003564) ..........................78155 Tettuccio / Parasole .....................................................68083 Kit peso volante posteriore ......................................2812307 Kit ruote Carefree (solo ruote 11 x 4”) .....................2811453 Fermo di bloccaggio cofano.....................................1004049 Regolatore automatico della velocità...........................67888 u Sparaneve .............................................Vedere di seguito s Spazzola rotante....................................Vedere di seguito l Contatti: s Contatti: u Contatti: Jodale Perry Corporation Box 990, 300 Route 100 Morden, Manitoba, Canada R6M 1A8 Telefono: (204) 822-9100 Fax: (204) 822-9111 Loftness Specialized Equipment, Inc. South Highway 4 Hector, MN 55342 Telefono: 800-828-7624 Fax: (320) 848-6269 ATTN Doug Haley M-B Companies, Inc. 1200 S. p Street, Box 148 Chilton, WI 53014 Telefono: (888) 558-5801 Fax: (920) 898-4588 it-7 2 2.7 DATI TECNICI CERTIFICATI DI CONFORMITÀ ______________________________________________ DECLARATION OF CONFORMITY PROHLÁENÍ O SHOD OVERENSSTEMMELSESERKLÆRING CONFORMITEITSVERKLARING VASTAVUSDEKLARATSIOON VAATIMUSTENMUKAISUUSVAKUUTUS DECLARATION DE CONFORMITE KONFORMITÄTSERKLÄRUNG MEGFELELSÉGI NYILATKOZAT DICHIARAZIONE DI CONFORMITÀ ATBILSTBAS DEKLAR!CIJA ATITIKTIES DEKLARACIJA DIKJARAZZJONI TAL-KONFORMITÀ DEKLARACJA ZGODNO"CI DECLARAÇÃO DE CONFORMIDADE DECLARA#IE DE CONFORMITATE VYHLÁSENIE O ZHODE IZJAVA O SKLADNOSTI DECLARACIÓN DE CONFORMIDAD DEKLARATION OM ÖVERENSSTÄMMELSE Business name and full address of the manufacturer Obchodní jméno a plná adresa výrobce Producentens firmanavn og fulde adresse Bedrijfsnaam en volledig adres van de fabrikant Tootja ärinimi ja täielik aadress Valmistajan toiminimi ja täydellinen osoite Nom commercial et adresse complète du fabricant Firmenname und vollständige Adresse des Herstellers !"#$%& #'()*+ !*'*!& A gyártó üzleti neve és teljes címe Ragione sociale e indirizzo completo del fabbricante Uz,-muma nosaukums un pilna raot/ja adrese Verslo pavadinimas ir pilnas gamintojo adresas Isem kummer0jali u indirizz s1i1 tal-fabbrikant Nazwa firmy i pe3ny adres producenta Nome da empresa e endereço completo do fabricante Denumirea comercial4 5i adresa complet4 a produc4torului Obchodný názov a úplná adresa výrobcu Naziv podjetja in polni naslov proizvajalca Nombre de la empresa y dirección completa del fabricante Tillverkarens företagsnamn och kompletta adress Jacobsen, A Textron Company 11524 Wilmar Blvd. Charlotte, NC 28273, USA Product Code ? @ Kód výrobku Produktkode Productcode Toote kood Tuotekoodi Code produit Produktcode E#GL $%MG!%L 70540 Termékkód Codice prodotto Produkta kods Produkto kodas Kodi0i tal-Prodott Kod produktu Código do Produto Cod produs Kód výrobku 70541 Oznaka proizvoda Código de producto Produktkod Machine Name Y Z Název stroje Maskinnavn Machinenaam Masina nimi Laitteen nimi Nom de la machine Maschinenbezeichnung \%* +"&!%L Gépnév Denominazione della macchina Iek/rtas nosaukums Mainos pavadinimas Isem talMagna Nazwa urz_dzenia Nome da Máquina Numele echipamentului Názov stroja Naziv stroja Nombre de la máquina Maskinens namn HR 9016 4WD with ROPS HR 9016 4WD Designation |} Ozna~ení Betegnelse Benaming Nimetus Tyyppimerkintä Paymjimas Bezeichnung $!+$*GL Megnevezés Funzione Apzm-jums Lithuanian Denominazzjoni Oznaczenie Designação Specificaie Ozna~enie Namen stroja Descripción Lawnmower, Article 12, Item 32 Beteckning Serial Number Sériové ~íslo Serienummer Serienummer Seerianumber Valmistusnumero Numéro de série Seriennummer '$GL $)GL Sorozatszám Numero di serie S-rijas numurs Serijos numeris Numru Serjali Numer seryjny Número de Série Num4r de serie Sériové ~íslo Serijska tevilka Número de serie Serienummer 7054001651-7054002500 7054101651-7054102500 Engine Motor Motor Motor Mootor Moottori Moteur Motor +"& Modulnév Motore Dzin-js Variklis Sa11a Netta Installata Kubota V3800-DICR-T-E3B Diesel Silnik Motor Motor Motor Motor Motor Motor it-8 Net Installed Power Y istý instalovaný výkon Installeret nettoeffekt Netto geïnstalleerd vermogen Installeeritud netovõimsus Asennettu nettoteho Puissance nominale nette Installierte Nettoleistung E)$& '!'*!++ *"(L Nettó beépített teljesítmény Potenza netta installata Paredz-t/ tkla jauda Grynoji galia Wisa tal-Qtug1 Moc zainstalowana netto Potência instalada Puterea instalat4 net4 istý intalovaný výkon Neto vgrajena mo~ Potencia instalada neta Nettoeffekt 72 kW @ 2600 RPM Cutting Width } íka ezu Skærebredde Maaibreedte Lõikelaius Leikkuuleveys Largeur de coupe Schnittbreite &%L *L Vágási szélesség Larghezza di taglio Grieanas platums Pjovimo plotis Tikkonforma mad-Direttivi Szeroko cicia Largura de Corte L4imea de t4iere írka záberu irina reza Anchura de corte Klippbredd 488 cm Conforms to Directives Spluje podmínky smrnic Er i overensstemmelse med direktiver Voldoet aan de richtlijnen Vastab direktiividele Direktiivien mukainen Conforme aux directives Entspricht Richtlinien %%)&*!' *! !L \#+'L Megfelel az irányelveknek Conforme alle Direttive Atbilst direktv/m Atitinka direktyv reikalavimus Valutazzjoni tal-Konformità Dyrektywy zwi_zane Cumpre as Directivas Respect4 Directivele Je v súlade so smernicami Skladnost z direktivami Cumple con las Directivas Uppfyller direktiv 2004/108/EC 2006/42/EC 2000/14/EC, 2005/88/EC 2006/66/EC Conformity Assessment Hodnocení plnní podmínek Overensstemmelsesvurdering Conformiteitsbeoordeling Vastavushindamine Vaatimustenmukaisuuden arviointi Evaluation de conformité Konformitätsbeurteilung *!*+ G$¡*+L Megfelel¢ség-értékelés Valutazione della conformità Atbilstbas nov-rt-jums Atitikties £vertinimas Livell tal-Qawwa tal-¤oss Imkejjel Ocena zgodnoci Avaliação de Conformidade Evaluarea conformit4ii Vyhodnotenie zhodnosti Ocena skladnosti Evaluación de conformidad Bedömning av överensstämmelse 2006/42/EC Annex VIII Measured Sound Power Level ¥ @ Namený akustický výkon Målte lydstyrkeniveau Gemeten geluidsniveau Mõõdetud helivõimsuse tase Mitattu äänitehotaso Niveau de puissance sonore mesuré Gemessener Schalldruckpegel !)*% ''#% +"+!&L *"(%L Mért hangteljesítményszint Livello di potenza sonora misurato Izm-rtais ska,as jaudas lmenis Imatuotas garso stiprumo lygis Livell tal-Qawwa tal-¤oss Iggarantit Moc akustyczna mierzona Nível sonoro medido Nivelul m4surat al puterii acustice Nameraná hladina akustického výkonu Izmerjena raven zvo~ne mo~i Nivel de potencia sonora medido Uppmätt ljudeffektsnivå 104 dB(A) LWA Guaranteed Sound Power Level ¨ @ Garantovaný akustický výkon Garanteret lydstyrkeniveau Gegarandeerd geluidsniveau Garanteeritud helivõimsuse tase Taattu äänitehotaso Niveau de puissance sonore garanti Garantierter Schalldruckpegel +% ''#% +"+!&L *"(%L Szavatolt hangteljesítményszint Livello di potenza sonora garantito Garant-tais ska,as jaudas lmenis Garantuotas garso stiprumo lygis Livell tal-Qawwa tal-¤oss Iggarantit Moc akustyczna gwarantowana Nível sonoro farantido Nivelul garantat al puterii acustice Garantovaná hladina akustického výkonu Zajam~ena raven zvo~ne mo~i Nivel de potencia sonora garantizado Garanterad ljudeffektsnivå 105 dB(A) LWA Conformity Assessment Procedure (Noise) @ (@) Postup hodnocení plnní podmínek (hluk) Procedure for overensstemmelsesvurdering (Støj) Procedure van de conformiteitsbeoordeling (geluid) Vastavushindamismenetlus (müra) Vaatimustenmukaisuuden arviointimenettely (Melu) Procédure dévaluation de conformité (bruit) Konformitätsbeurteilungsverfahren (Geräusch) #* ª%G+*+L G$¡*+L («G$¬%L) Megfelel¢ség-értékelési eljárás (Zaj) Procedura di valutazione della conformità (rumore) Atbilstbas nov-rt-juma procedra (troksnis) Atitikties £vertinimo procedra (garsas) Pro0edura tal-Valutazzjoni tal-Konformità (¤oss) Procedura oceny zgodnoci (poziom ha3asu) Processo de avaliação de conformidade (nível sonoro) Procedura de evaluare a conformit4ii (zgomot) Postup vyhodnocovania zhodnosti (hluk) Postopek za ugotavljanje skladnosti (hrup) Procedimiento de evaluación de conformidad (ruido) Procedur för bedömning av överensstämmelse (buller) 2000/14/EC Annex VI, Part 1 UK Notified Body for 2000/14/EC Y® ¯ 2000/14/° Úad certifikovaný podle smrnice ~. 2000/14/EC Det britiske bemyndigede organ for 2001/14/EF Engels adviesorgaan voor 2000/14/EG Ühendkuningriigi teavitatud asutus direktiivi 2000/14/EÜ mõistes Direktiivin 2000/14/EY mukainen ilmoitettu tarkastuslaitos Isossa-Britanniassa Organisme notifié concernant la directive 2000/14/CE Britische benannte Stelle für 2000/14/EG E%%%+%L \$*GL ²% ³*'% 2000/14/E 2000/14/EK egyesült királyságbeli bejelentett szervezet Organismo Notificato in GB per 2000/14/CE 2000/14/EK AK reµistr-t/ organiz/cija JK notifikuotosios £staigos 2000/14/EC Korp Notifikat tar-Renju Unit g1al 2000/14/KE Dopuszczona jednostka badawcza w Wielkiej Brytanii wg 2000/ 14/WE Entidade notificada no Reino Unido para 2000/14/CE Organism notificat în Marea Britanie pentru 2000/14/CE Notifikovaný orgán Spojeného krá¶ovstva pre smernicu 2000/14/ES Britanski priglaeni organ za 2000/14/ES Cuerpo notificado en el Reino Unido para 2000/14/CE Anmält organ för 2000/14/EG i Storbritannien Number: 1088 Sound Research Laboratories Limited Holbrook House, Little Waldingfield Sudbury, Suffolk CO10 0TH Operator Ear Noise Level @¸ Z@ Hladina hluku v oblasti uí operátora Støjniveau i førers ørehøjde Geluidsniveau oor bestuurder Müratase operaatori kõrvas Melutaso käyttäjän korvan kohdalla Niveau de bruit à hauteur des oreilles de lopérateur Schallpegel am Bedienerohr '#% )%$(¬% *' '!%$ A kezel¢ fülénél mért zajszint Livello di potenza sonora allorecchio delloperatore Trok,a lmenis pie operatora auss Dirban~iojo su maina patiriamo triukmo lygis Livell tal-¤oss fil-Widna tal-Operatur Dopuszczalny poziom ha3asu dla operatora Nível sonoro nos ouvidos do operador Nivelul zgomotului la urechea operatorului Hladina hluku pôsobiaca na sluch operátora Raven hrupa pri uesu upravljavca Nivel sonoro en el oído del operador Ljudnivå vid förarens öra 91 dB(a) Leq (2006/42/EC) DATI TECNICI Harmonised standards used ¥ ¸ Pouité harmonizované normy Brugte harmoniserede standarder Gebruikte geharmoniseerde standaards Kasutatud ühtlustatud standardid Käytetyt yhdenmukaistetut standardit Normes harmonisées utilisées Angewandte harmonisierte Normen $%* $G! % "$+*%%&)+ Harmonizált szabványok Standard armonizzati applicati Izmantotie saska,otie standarti Panaudoti suderinti standartai Standards armonizzati u¹ati Normy spójne powi_zane Normas harmonizadas usadas Standardele armonizate utilizate Pouité harmonizované normy Uporabljeni usklajeni standardi Estándares armonizados utilizados Harmoniserade standarder som används BS EN ISO 20643 BS EN ISO 5349-1 BS EN ISO 5349-2 BS EN 836 Technical standards and specifications used ¥ ¸} ® Pouité technické normy a specifikace Brugte tekniske standarder og specifikationer Gebruikte technische standaards en specificaties Kasutatud tehnilised standardid ja spetsifikatsioonid Käytetyt tekniset standardit ja eritelmät Spécifications et normes techniques utilisées Angewandte technische Normen und Spezifikationen º'" $G! $%#$¡L % "$+*%%&)+ M»szaki szabványok és specifikációk Standard tecnici e specifiche applicati Izmantotie tehniskie standarti un specifik/cijas Panaudoti techniniai standartai ir technin informacija Standards u spe0ifikazzjonijiet tekni0i u¹ati Normy i specyfikacje techniczne powi_zane Normas técnicas e especificações usadas Standardele tehnice 5i specificaiile utilizate Pouité technické normy a pecifikácie Uporabljeni tehni~ni standardi in specifikacije Estándares y especificaciones técnicas utilizadas Tekniska standarder och specifikationer som används B71.4 ISO 2631-1 SAE J1194 The place and date of the declaration ¼ Místo a datum prohláení Sted og dato for erklæringen Plaats en datum van de verklaring Deklaratsiooni väljastamise koht ja kuupäev Vakuutuksen paikka ja päivämäärä Lieu et date de la déclaration Ort und Datum der Erklärung ºG%L +'$%+ #&*+L A nyilatkozat kelte (hely és id¢) Luogo e data della dichiarazione Deklar/cijas vieta un datums Deklaracijos vieta ir data Il-post u d-data tad-dikjarazzjoni Miejsce i data wystawienia deklaracji Local e data da declaração Locul 5i data declaraiei Miesto a dátum vyhlásenia Kraj in datum izjave Lugar y fecha de la declaración Plats och datum för deklarationen Jacobsen, A Textron Company 11524 Wilmar Blvd. Charlotte, NC 28273, USA February 1st, 2012 Signature of the person empowered to draw up the declaration on behalf of the manufacturer, holds the technical documentation and is authorised to compile the technical file, and who is established in the Community. | } , @ , ½ ¾ ¸} @ ¸} ®½ ¯. Podpis osoby oprávnné sestavit prohláení jménem výrobce, dret technickou dokumentaci a osoby oprávnné sestavit technické soubory a zaloené v rámci Evropského spole~enství. Underskrift af personen, der har fuldmagt til at udarbejde erklæringen på vegne af producenten, der er indehaver af dokumentationen og er bemyndiget til at udarbejde den tekniske journal, og som er baseret i nærområdet. Handtekening van de persoon die bevoegd is de verklaring namens de fabrikant te tekenen, de technische documentatie bewaart en bevoegd is om het technische bestand samen te stellen, en die is gevestigd in het Woongebied. Ühenduse registrisse kantud isiku allkiri, kes on volitatud tootja nimel deklaratsiooni koostama, kes omab tehnilist dokumentatsiooni ja kellel on õigus koostada tehniline toimik. Sen henkilön allekirjoitus, jolla on valmistajan valtuutus vakuutuksen laadintaan, jolla on hallussaan tekniset asiakirjat, joka on valtuutettu laatimaan tekniset asiakirjat ja joka on sijoittautunut yhteisöön. Signature de la personne habilitée à rédiger la déclaration au nom du fabricant, à détenir la documentation technique, à compiler les fichiers techniques et qui est implantée dans la Communauté. Unterschrift der Person, die berechtigt ist, die Erklärung im Namen des Herstellers abzugeben, die die technischen Unterlagen aufbewahrt und berechtigt ist, die technischen Unterlagen zusammenzustellen, und die in der Gemeinschaft niedergelassen ist. ¿%$¡& !G% 'ª%*%#%!+% !+ *(!ª+ !+L #&*+L ' $%L !% !*'*!&, % %%%L !"' !+ !'"& )'*+ "' !+ 'ª%*%#G!+*+ !ª%&*' !% !'"G ¡'% % %%%L ' #%$*%L *!+ E%G!+!. A gyártó nevében meghatalmazott személy, akinek jogában áll módosítania a nyilatkozatot, a m»szaki dokumentációt ¢rzi, engedéllyel rendelkezik a m»szaki fájl összeállításához, és aki a közösségben letelepedett személy. Firma della persona autorizzata a redigere la dichiarazione a nome del fabbricante, in possesso Della documentazione tecnica ed autorizzata a costituire il fascicolo tecnico, che deve essere stabilita nella Comunità. T/s personas paraksts, kura ir pilnvarota deklar/cijas sast/danai raot/ja v/rd/, kurai ir tehnisk/ dokument/cija, kura ir pilnvarota sagatavot tehnisko reµistru un kura ir apstiprin/ta Kopien/. Asmuo, kuris yra gana inomas, kuriam gamintojas suteik £galiojimus sudaryti i_ deklaracij_, ir kuris j_ pasira, turi vis_ technin informacij_ ir yra £galiotas sudaryti technins informacijos dokument_. Il-firma tal-persuna awtorizzata li tfassal id-dikjarazzjoni fisem il-fabbrikant, g1andha d-dokumentazzjoni teknika u hija awtorizzata li tikkompila l-fajl tekniku u li hija stabbilita fil-Komunità. Podpis osoby upowa¹nionej do sporz_dzenia deklaracji w imieniu producenta, przechowuj_cej dokumentacj techniczn_, upowa¹nion_ do stworzenia dokumentacji technicznej oraz wyznaczonej ds. wspólnotowych. Assinatura da pessoa com poderes para emitir a declaração em nome do fabricante, que possui a documentação técnica, que está autorizada a compilar o processo técnico e que está estabelecida na Comunidade. Semn4tura persoanei împuternicite s4 elaboreze declaraia în numele produc4torului, care deine documentaia tehnic4, este autorizat4 s4 compileze dosarul tehnic 5i este stabilit4 în Comunitate. Podpis osoby poverenej vystavením vyhlásenia v mene výrobcu, ktorá má technickú dokumentáciu a je oprávnená spracovaÀ technické podklady a ktorá je umiestnená v Spolo~enstve. Podpis osebe, poobla~ene za izdelavo izjave v imenu proizvajalca, ki ima tehni~no dokumentacijo in lahko sestavlja spis tehni~ne dokumentacije, ter ima sede v Skupnosti. Firma de la persona responsable de la declaración en nombre del fabricante, que posee la documentación técnica y está autorizada para recopilar el archivo técnico y que está establecido en la Comunidad. Undertecknas av den som bemyndigad att upprätta deklarationen å tillverkarens vägnar, innehar den tekniska dokumentationen och är bemyndigad att sammanställa den tekniska informationen och som är etablerad i gemenskapen. Certificate Number Y ® íslo osvd~ení Certifikatnummer Certificaatnummer Sertifikaadi number Hyväksyntänumero Numéro de certificat Bescheinigungsnummer $)GL Á*!%%+!%( Hitelesítési szám Numero del certificato Sertifik/ta numurs Sertifikato numeris Numru ta0-Âertifikat Numer certyfikatu Número do Certificado Num4r certificat íslo osved~enia tevilka certifikata Número de certificado Certifikatsnummer 2006/42/EC Annex II 1.A.2 Tim Lansdell Technical Director Ransomes Jacobsen Limited West Road, Ransomes Europark, Ipswich, IP3 9TT, England 2006/42/EC Annex II 1.A.10 Vasant Godhalekar VP of Engineering Jacobsen, A Textron Company 11524 Wilmar Blvd, Charlotte, NC 28273, USA 4228362 Rev A GB BG CZ DK NL EE FI FR DE GR HU English български čeština dansk Nederlands eesti suomi français Deutsch Ελληνικά magyar IT LV LT MT PL PT RO SK italiano latviešu valoda lietuvių kalba Malki polski português Română slovenčina 2 SI slovenščina ES SE Ελληνικά Svenska it-9 3 REGOLAZIONI 3 REGOLAZIONI 3.1 ASPETTI GENERALI _______________________________________________________ ! AVVERTENZA Prima di eseguire regolazioni o interventi di manutenzione, abbassare gli attrezzi al suolo, disinnestare tutte le leve di comando, inserire il freno di stazionamento, arrestare il motore e rimuovere la chiave dall'interruttore di accensione per evitare lesioni. 1. Le messe a punto e la manutenzione devono essere sempre effettuate da un tecnico qualificato. Se non è possibile effettuare la corretta regolazione, contattare un concessionario Jacobsen autorizzato. 2. Sostituire, non danneggiati. 3. Non indossare gioielli o abiti svolazzanti durante gli interventi di manutenzione o riparazione. Il tosaerba deve essere parcheggiato su terreno sodo e pianeggiante. Non lavorare mai su un tosaerba poggiato soltanto su un cric. Usare sempre cavalletti metallici. componenti logori o ! ATTENZIONE Prestare attenzione per non intrappolare le mani e le dita fra i componenti in movimento e quelli fissi della macchina. Se è sollevata soltanto la parte anteriore o quella posteriore del tosaerba, mettere delle zeppe davanti e dietro le ruote che non sono sollevate. 4. 3.2 modificare, Non modificare le impostazioni del regolatore del motore e non aumentare il regime del motore. LIVELLAMENTO PIATTI ____________________________________________________ Se i piatti o le ruote orientabili sono stati rimossi per un intervento di manutenzione o perché l'altezza di taglio non era uniforme, potrebbe essere necessario livellare i piatti. Regolare le ruote orientabili in modo che l'altezza di taglio delle ruote esterne sia compresa entro 3 mm l'una dall'altra. 1. Posizionare il tosaerba e i piatti su una superficie piatta, dura e in piano. Posizionare le lame parallelamente al tosaerba come illustrato. 2. Verificare che la pressione aria di tutti gli pneumatici delle ruote orientabili sia regolata equamente. 3. Impostare l'altezza di taglio desiderata del piatto utilizzando i distanziali da 13 mm (E) in dotazione. Vedere la Sezione 3.5. 4. Accertarsi che l'altezza da terra al bordo anteriore (B) delle due lame esterne per i piatti di taglio laterali e la sezione centrale del piatto anteriore. Posizionare le rondelle di livellamento da 3 mm (C) sopra o sotto il perno orientabile secondo necessità per ottenere un'altezza di taglio uniforme tra i piatti. Tenere le rondelle di spinta da 1,5 mm (D) posizionate come illustrato, una sopra e una sotto il perno orientabile. B C E L L D C B B B B Figura 3A it-10 REGOLAZIONI 3.3 REVISIONE DEL PIATTO DI TAGLIO ANTERIORE _______________________________ Il piatto di taglio anteriore può essere sollevato e inclinato per agevolare l’accesso ai fini della revisione e pulizia dell’apparato di taglio e delle lame. Prima di qualsiasi intervento sul piatto di taglio ricordarsi di disinnestare tutte le trasmissioni, inserire il freno di stazionamento, spegnere il motore e togliere la chiave di accensione. Inclinazione del piatto di taglio anteriore in posizione di revisione 1. Ruotare il meccanismo antioscillazione (F), posizionato sotto il pannello del pianale laterale sinistro, in posizione di revisione. 2. Avviare il motore e alzare il piatto fino a sollevare le ruote di regolazione dal terreno. Spegnere il motore 3. Rimuovere i perni di regolazione altezza di taglio dalla staffa delle ruote di regolazione in modo che il gruppo ruota orientabile flotti liberamente. 4. Avviare il motore e sollevare completamente il piatto. Spegnere il motore 5. Sollevare e ruotare manualmente la parte anteriore del piatto fino a bloccarlo saldamente. sollevamento, NON lasciar cadere il piatto dalla posizione di revisione. 2. Avviare il motore e abbassare il piatto fino a quando non è a livello e le ruote orientabili sono sul terreno. Spegnere il motore 3. Inserire il perno di regolazione altezza per le ruote orientabili posteriori a seconda dell'altezza di taglio. Figura 3F. 4. Ruotare il meccanismo di antioscillazione relativa posizione di funzionamento. . ! AVVERTENZA HR007 Figura 3B Posizione di funzionamento Quando si abbassa il piatto, estrarre il fermo per rilasciare completamente il peso del piatto. Prima di rilasciare il fermo, accertarsi che le persone presenti siano state avvertite. Posizione di servizio F F Per abbassare il piatto dopo la revisione: 3.4 (F) nella A Il piatto anteriore è pesante e potrebbe causare gravi lesioni o danni se fatto cadere. Utilizzare sempre le tecniche di sollevamento adeguate quando si solleva il piatto anteriore in posizione di revisione. 1. 3 HR029 Figura 3C Sollevare il piatto ed estrarre il fermo di bloccaggio (A). Abbassare manualmente il piatto di orientabile fino a quando è supportato dai bracci di sollevamento. Per evitare lesioni personali o danni al piatto o ai bracci di REGOLAZIONE DELLE ALETTE ______________________________________________ 1. Le alette devono essere regolate sul piatto anteriore per evitare lo scalping e possibili danni alle alette del piatto. 2. Ruotare le lame del piatto anteriore nelle posizioni indicate in Figura 3A. 3. Misurare l'altezza dal terreno al bordo anteriore della lama centrale del piatto anteriore (B) e ai bordi esterni delle lame delle alette (L). Aggiungere o rimuovere spessori (G) secondo necessità tra il paraurti (H) e la staffa di supporto delle alette, fino a posizionare le lame del piatto anteriore alla stessa altezza. 4. Riporre gli spessori in eccesso (G) sopra la staffa di supporto. 5. Regolare i bracci di supporto alette anteriori (J) verso l'alto o verso il basso fino a posizionare il braccio sul fermo (K). G G H K J Figura 3D it-11 3 REGOLAZIONI 3.5 ALTEZZA DI TAGLIO_______________________________________________________ L’altezza di taglio dei piatti è regolabile da 25 a 125 mm a incrementi di 13 mm. L’altezza di taglio effettiva può variare rispetto alle altezze indicate, a seconda delle condizioni del tappeto erboso e di altri fattori. dell'altezza di taglio desiderata. Quando si imposta l'altezza di taglio a 14 cm, riposizionare la ruota di regolazione nel braccio. Seguire le istruzioni di montaggio ruota indicate sull'adesivo, Figura 3F. Nota: Altezze di taglio inferiori possono causare lo scalping quando si lavora su zone ondulate. Per non danneggiare il tappeto erboso regolare l’altezza in conformità. 1. Parcheggiare il tosaerba su una superficie liscia e pianeggiante. Alzare i piatti di taglio finché le ruote orientabili non sono sollevate da terra ed è possibile toglierle dal piatto di taglio. Inserire dei blocchi sotto i piatti di taglio, in modo che siano supportati da tutti i lati. ! AVVERTENZA Per prevenire infortuni abbassare il piatto di taglio finché non poggia completamente sui supporti. Questo accorgimento impedisce che venga accidentalmente abbassato durante la messa a punto. Disinnestare tutte le trasmissioni, inserire il freno di stazionamento, spegnere il motore e togliere la chiave di accensione. Figura 3E Per rimuovere la ruota orientabile interna dai piatti anteriori, alzare i piatti nella posizione di massimo sollevamento e bloccarli nella posizione di trasferimento. 2. Figura 3E illustra l’adesivo della dell’altezza delle ruote orientabili. regolazione Colonna 1 – Altezza di taglio Colonna 2 - Posizione supporto Colonna 3 – Posizione dei distanziali Regolare i distanziali nella quantità opportuna. Conservare i rimanenti distanziali sull’albero. Se necessario, riposizionare il supporto ruota nei fori indicati per l'altezza di taglio. IMPORTANTE: Non riposizionare le rondelle di spinta sottili (1/16 in.) e le rondelle di livellamento (1/ 8 in.) sull'alberino. Queste rondelle devono rimanere nella stessa posizione e quantità dell'installazione originale. Devono essere riposizionate solo se è necessario livellare nuove ruote orientabili o piatti di taglio, Sezione 3.2. 3. Per regolare le ruote di regolazione posteriori sul piatto anteriore, vedere Figura 3F. Sollevare il piatto anteriore di circa 30 cm e sostenere la parte anteriore con dei blocchi. Abbassare il piatto in modo che si appoggi completamente sui blocchi. 4. Rimuovere il perno dalla brida della ruota di regolazione e riposizionarlo nella staffa a seconda it-12 Impostazione della ruota di regolazione per il piatto anteriore Figura 3F Pressione pneumatici Controllare la pressione aria negli pneumatici delle ruote orientabili a freddo. Mantenere una pressione compresa tra 38 e 173 kPa per migliorare la precisione dell'altezza di taglio. Nota: È importante che la pressione di gonfiaggio di tutti gli pneumatici delle ruote orientabili e di regolazione sia uguale, entro l'intervallo prescritto, per garantire un taglio preciso e uniforme. REGOLAZIONI 3.6 3 INTERRUTTORI DI LIMITAZIONE SOLLEVAMENTO _____________________________ La rotazione delle lame di taglio è controllata dagli interruttori di limitazione posizionati sul telaio del tosaerba vicino a bracci di sollevamento per ciascun piatto di taglio. Quando un piatto di taglio viene sollevato, l'interruttore di apre e disinserisce automaticamente le lame di taglio. Quando il piatto viene abbassato, l'interruttore si chiude e le lame si inseriscono. Se un interruttore non funziona, le lame di taglio non verranno inserire quando sono abbassate. Regolazione degli interruttori di limitazione: 1. Parcheggiare pianeggiante. il tosaerba su una superficie 2. Avviare il tosaerba e sollevare o abbassare i piatti di taglio fino a quando il punto più alto sull'angolo superiore del piatto di taglio raggiunge l'altezza mostrata in Figura 3L. A 3. Spegnere il motore e togliere la chiave. Sostenere i piatti di taglio con dei blocchi. Questo accorgimento impedisce che vengano accidentalmente abbassati durante la messa a punto. 4. Posizionare l'interruttore in modo che l'area di rilevamento (C) sull'interruttore sia centrata sul bordo d'attacco (A) della piastra dell'attivatore sul braccio di sollevamento. 5. Impostare la distanza tra l'area di rilevamento sull'interruttore e la piastra dell'attivatore sul braccio di sollevamento a 1,5 - 3 mm. Per regolare la distanza per il braccio di sollevamento anteriore utilizzare spessori (D) o rondelle piatte #10 (B) tra l'interruttore e il relativo supporto. Controllare il funzionamento degli interruttori di limitazione. Le lame devono smettere di ruotare quando i piatti di taglio vengono sollevati sopra le altezza indicate. A C C B D 21 poll. (61 cm) 20 5/8 poll. Piatti di taglio laterali Piatto di taglio anteriore HR028 Figura 3G it-13 3 REGOLAZIONI 3.7 REGOLAZIONE DEL FOLLE _________________________________________________ Importante: La regolazione del folle sulla pompa di trasmissione è preimpostata in fabbrica su tutti i tosaerba nuovi e le pompe di ricambio. Sono richieste ulteriori regolazioni solo se la pompa è stata smontata per un intervento di manutenzione o se la staffa della leva del folle (F) si è allentata. Pe regolare il folle sulla pompa: 1. Scollegare la tiranteria del pedale di trazione dalla pompa. Rimuovere la staffa di supporto interruttore dalla pompa. 2. Posizionare saldamente il tosaerba su dei cavalletti metallici in modo che Tutte le ruote siano sollevate da terra. 3. Controllare che la valvola completamente chiusa. di traino (H) poter avviare il motore, posizionare a faccia sotto sul telaio di metallo. 6. Avviare il motore e guardare le ruote. Ruotare la staffa (F) nei fori scanalati fino a quando le ruote non girano più. Spegnere il motore e serrare la staffa in posizione 7. Collegare la tiranteria del pedale di trazione, Sezione3.12, quindi installare e regolare gli interruttori, Sezioni 3.8 e 3.9. 8. Avviare il motore e controllare il funzionamento del pedale di trazione. Le ruote non devono girare quando il pedale ritorna in folle. F sia 4. Allentare le viti (G) tenendo la staffa del braccio di ritorno della pompa garantendo un movimento minimo. 5. Inserire il freno di stazionamento e impostare l'interruttore della presa di forza in folle. Per poter avviare il tosaerba, l'interruttore di rilevamento del folle deve essere chiuso. A questo punto, l'interruttore non può essere ancora montato sulla pompa. Per chiudere l'interruttore in modo da K G H HR027 Figura 3H 3.8 INTERRUTTORE DI RILEVAMENTO DEL FOLLE ________________________________ L'interruttore di rilevamento del folle fa parte del sistema di backup dell’operatore. È progettato per impedire l'avviamento del tosaerba quando il pedale di trazione non è in folle. Se questo interruttore non funziona o necessita di regolazione, il tosaerba non si avvierà. 1. Accertarsi che le pompa di trasmissione e la tiranteria del pedale di trazione sia in folle. Sezioni 3.6 e 3.12. 2. Posizionare l'interruttore in modo che l'indicatore (A) sulla piastra dell'attivatore sia centrato sopra l'area di rilevamento dell'interruttore. 3. Regolare l'interruttore in modo che la distanza tra la superficie di rilevamento dell'interruttore e l'estremità dell'indicatore sia compresa tra 1,5 e 3 mm. Fissare l’interruttore in questa posizione. Importante: Dopo la regolazione, controllare il funzionamento del sistema di backup dell’operatore. it-14 1/16” - 1/8” (1,5 - 3 mm) A HR010 Figura 3I REGOLAZIONI 3.9 3 INTERRUTTORE DI RILEVAMENTO MARCIA AVANTI ____________________________ L'interruttore di rilevamento marcia avanti consente al tosaerba di funzionare a quattro ruote motrici solo con il pedale di trazione nella relativa posizione di marcia avanti. Durante il funzionamento in retromarcia, l'interruttore si apre e ripristina la trazione a due ruote. Se la trazione a quattro ruote motrici non funziona, controllare la regolazione e il funzionamento dell'interruttore di rilevamento. Interruttore - pedale di trazione in folle durante la gamma di marcia avanti completa del pedale. Interruttore aperto completa del pedale. - Gamma di retromarcia 5. Collegare l'interruttore al cablaggio e controllare il funzionamento della trazione integrale. 1. Accertarsi che la pompa di trasmissione, la tiranteria del pedale di trazione e l'interruttore di rilevamento del folle sia impostati su folle, Sezioni 3.6, 3.12 e 3.8. 2. Regolare l'interruttore in modo che la distanza tra la superficie di rilevamento dell'interruttore e il bordo della piastra dell'attivatore sia compresa tra 1,5 e 3 mm. 3. Scollegare l'interruttore dal cablaggio e collegare un misuratore di continuità tra i cavi dell'interruttore (B). Con il pedale di trazione in folle, far scorrere l'interruttore indietro per aprirlo, quindi in avanti fino alla chiusura. Fissare l’interruttore in questa posizione. 4. Con il misuratore di continuità ancora collegato, controllare la regolazione premendo il pedale di trazione. B 1/16” - 1/8” (1,5 - 3 mm) HR012 Figura 3J 3.10 FRENO DI STAZIONAMENTO _______________________________________________ L'interruttore del freno fa parte del Sistema microinterruttori di sicurezza e rileva quando il freno di stazionamento è inserito. Se questo interruttore non funziona, la macchina potrebbe non avviarsi e il Sistema microinterruttori di sicurezza non funzionerà correttamente. Regolazione dell’interruttore: 1. Portare il freno di stazionamento in posizione completamente sollevata (inserito). Importante: Controllare sempre il Sistema microinterruttori di sicurezza dopo la sostituzione o la regolazione dell'interruttore. (Vedere il Manuale di sicurezza e d’uso). D C F E B 2. Regolare l'interruttore (C) orientando la staffa di supporto interruttore (B). Allineare l'area di rilevamento sull'interruttore con la leva del freno (D). 3. Impostare la distanza tra l'area di rilevamento sull'interruttore e la leva del freno a 1,5 - 3 mm. Per regolare la distanza utilizzare spessori (E) o rondelle #10 (F) secondo necessità tra l'interruttore e il relativo supporto. HR020 Figura 3K 4. Se installato correttamente, l'interruttore verrà chiuso quando il freno di stazionamento viene inserito e sarà aperto quando il freno è disinserito. it-15 3 REGOLAZIONI 3.11 FRENO DI STAZIONAMENTO _______________________________________________ 1. Verificare che la tiranteria e i perni funzionino regolarmente. Controllare i cavi del freno di stazionamento e di assistenza sterzante. 2. Parcheggiare il tosaerba su una pendenza de 30% vicino alla fine di una discesa, con la parte anteriore del tosaerba in discesa. Inserire il freno di stazionamento e spegnere il motore. a. Il tosaerba deve rimanere fermo sulla pendenza senza spostarsi da solo. b. Se i freni non tengono, avviare il motore, disinserire il freno e guidare fino in fondo alla discesa. ! ATTENZIONE NON disinserire i freni a motore spento. 3. Con il freno di stazionamento inserito, girare la manopola di regolazione in senso orario, applicando e rilasciando il freno a ogni quarto di rotazione, fino a ottenere un'azione definita di "scatto oltre il centro". 4. Se necessario, ripetere il test in pendenza. Nota: Una regolazione eccessiva indurisce l'azionamento della leva ma non aumenta l'efficienza frenante. 3.12 PEDALE DELLA TRAZIONE _________________________________________________ Il pedale di trazione deve essere regolato in modo che la pompa sia alla corsa massima quando il pedale viene completamente premuto in posizione di marcia avanti. 1. Accertarsi che il braccio di ritorno (K-Figura 3H) della pompa sia impostato su folle, Sezione 3.6. 2. Premere in avanti il pedale di trazione (I) fino al contatto con il pannello del pianale e tenerlo in questa posizione. 3. Regolare il gancio di rotazione (J) fino ad avvertire che il braccio di ritorno tocca l'arresto interno della pompa. Girare l'asta di 2-3 rotazione indietro da questa posizione. Questo, per accertarsi che il pedale di trazione raggiunga il fondo prima del braccio di ritorno. I J HR019 Figura 3L 3.13 CONVERGENZA DELLO STERZO ____________________________________________ 1. Girate le ruote direttamente in avanti 2. Allentare i controdadi (M) su entrambe le estremità del tirante (N). 3. Ruotare il tirante (N) per ottenere la convergenza corretta. La convergenza non deve superare X + 6,3 mm. Serrare i controdadi (M). X M N M X + 5/32" +- 3/32" X + (4 mm +- 2.3 mm) Figura 3M it-16 REGOLAZIONI 3 3.14 BULLONI DI ARRESTO DELLO STERZO _______________________________________ 1. La convergenza dello sterzo deve essere impostata prima della regolazione dei bulloni di arresto. Se la convergenza viene modificata, è necessario regolare nuovamente i bulloni di arresto. 2. Allentare i bulloni di arresto (P e Q) più possibile senza rimuoverli. 3. Girare il volante a destra fino a quando la ruota posteriore destra si trova a 45° rispetto all'assale dello sterzo. Serrare il bullone di arresto (P) fino al contatto con l'assale. 4. Girare il volante a sinistra fino a quando la ruota posteriore sinistra si trova a 45° rispetto all'assale dello sterzo. Serrare il bullone di arresto (Q) fino al contatto con l'assale. 45 ° P Q Figura 3N it-17 3 REGOLAZIONI 3.15 SPECIFICA DELLA COPPIA _________________________________________________ AVVISO Tutti i valori della coppia riportati nelle presenti tabelle sono approssimativi e sono intesi a puro titolo orientativo. L’utente si assume ogni responsabilità dell’utilizzo di questi valori. Jacobsen declina ogni responsabilità in caso di perdite, rivendicazioni o danni risultanti dall’uso di queste tabelle. Prestare sempre la massima attenzione nell’utilizzare i valori di coppia. Jacobsen usa bulloni placcati Tipo 5 di serie, salvo indicazione al contrario. Per il serraggio di bulloni placcati utilizzare il valore riportato per bulloni lubrificati. DISPOSITIVI DI FISSAGGIO AMERICAN NATIONAL STANDARD DIMENSIONI UNITÀ CLASSE 5 DIME NSIO NI CLASSE 8 Lubrificato Asciutto Lubrificato Asciutto UNITÀ CLASSE 5 CLASSE 8 Lubrificato Asciutto Lubrificato Asciutto #6-32 in-lb (Nm) – 20 (2.3) – – 7/16-14 ft-lb (Nm) 37 (50.1) 50 (67.8) 53 (71.8) 70 (94.9) #8-32 in-lb (Nm) – 24 (2.7) – 30 (3.4) 7/16-20 ft-lb (Nm) 42 (56.9) 55 (74.6) 59 (80.0) 78 (105) #10-24 in-lb (Nm) – 35 (4.0) – 45 (5.1) 1/2-13 ft-lb (Nm) 57 (77.2) 75 (101) 80 (108) 107 (145) #10-32 in-lb (Nm) – 40 (4.5) – 50 (5.7) 1/2-20 ft-lb (Nm) 64 (86.7) 85 (115) 90 (122) 120 (162) #12-24 in-lb (Nm) – 50 (5.7) – 65 (7.3) 9/16-12 ft-lb (Nm) 82 (111) 109 (148) 115 (156) 154 (209) 1/4-20 in-lb (Nm) 75 (8.4) 100 (11.3) 107 (12.1) 143 (16.1) 9/16-18 ft-lb (Nm) 92 (124) 122 (165) 129 (174) 172 (233) 1/4-28 in-lb (Nm) 85 (9.6) 115 (13.0) 120 (13.5) 163 (18.4) 5/8-11 ft-lb (Nm) 113 (153) 151 (204) 159 (215) 211 (286) 5/16-18 in-lb (Nm) 157 (17.7) 210 (23.7) 220 (24.8) 305 (34.4) 5/8-18 ft-lb (Nm) 128 (173) 170 (230) 180 (244) 240 (325) 5/16-24 in-lb (Nm) 173 (19.5) 230 (26.0) 245 (27.6) 325 (36.7) 3/4-10 ft-lb (Nm) 200 (271) 266 (360) 282 (382) 376 (509) 3/8-16 ft-lb (Nm) 23 (31.1) 31 (42.0) 32 (43.3) 44 (59.6) 3/4-16 ft-lb (Nm) 223 (302) 298 404 315 (427) 420 (569) 3/8-24 ft-lb (Nm) 26 (35.2) 35 (47.4) 37 (50.1) 50 (67.8) 7/8-14 ft-lb (Nm) 355 (481) 473 (641) 500 (678) 668 (905) DISPOSITIVI DI FISSAGGIO VALORI METRICI 4.6 DIMENSIONI 8.8 10.9 Dispositivi di fissaggio non critici per alluminio 12.9 UNITÀ Lubrificato Asciutto Lubrificato Asciutto Lubrificato Asciutto Lubrificato Asciutto M4 Nm (in-lb) – – – – – – 3.83 (34) 5.11 (45) 2.0 (18) M5 Nm (in-lb) 1.80 (16) 2.40 (21) 4.63 (41) 6.18 (54) 6.63 (59) 8.84 (78) 7.75 (68) 10.3 (910 4.0 (35) M6 Nm (in-lb) 3.05 (27) 4.07 (36) 7.87 (69) 10.5 (93) 11.3 (102) 15.0 (133) 13.2 (117) 17.6 (156) 6.8 (60) M8 Nm (in-lb) 7.41 (65) 9.98 (88) 19.1 (69) 25.5 (226) 27.3 (241) 36.5 (323) 32.0 (283) 42.6 (377) 17.0 (150) M10 Nm (ft-lb) 14.7 (11) 19.6 (14) 37.8 (29) 50.5 (37) 54.1 (40) 72.2 (53) 63.3 (46) 84.4 (62) 33.9 (25) M12 Nm (ft-lb) 25.6 (19) 34.1 (25) 66.0 (48) 88.0 (65) 94.5 (70) 125 (92) 110 (81) 147 (108) 61.0 (45) M14 Nm (ft-lb) 40.8 (30) 54.3 (40) 105 (77) 140 (103) 150 (110) 200 (147) 175 (129) 234 (172) 94.9 (70) it-18 MANUTENZIONE 4 4.1 MANUTENZIONE ASPETTI GENERALI _______________________________________________________ ! AVVERTENZA Prima di eseguire interventi di pulizia, regolazione o riparazione, disinnestare tutte le trasmissioni, abbassare gli attrezzi al suolo, inserire il freno di stazionamento, spegnere il motore e togliere la chiave di accensione per impedire infortuni. Il tosaerba deve essere parcheggiato su terreno sodo e pianeggiante. Non lavorare mai su un tosaerba poggiato soltanto su un cric. Usare sempre cavalletti metallici. 1. La regolazione e la manutenzione devono essere effettuate in tutti i casi da un tecnico qualificato. Se non è possibile apportare le corrette modifiche, contattare un Concessionario Jacobsen. 2. Ispezionare periodicamente l'attrezzatura, secondo un programma di manutenzione, di cui mantenere una registrazione dettagliata. 4.2 4 a. Mantenere pulita l’attrezzatura. b. Mantenere adeguatamente pulite e lubrificate tutte le parti in movimento. c. Sostituire le parti usurate o danneggiate prima di mettere la macchina in movimento. d. Mantenere tutti i fluidi al livello corretto. e. Non rimuovere i ripari e mantenere ben serrata tutta la bulloneria. f. Mantenere i pneumatici alla giusta pressione di gonfiaggio. 3. Non indossare gioielli o abiti svolazzanti durante gli interventi di manutenzione o riparazione. 4. Utilizzare le figure della Lista ricambi come riferimento per smontare e rimontare i componenti. 5. Riciclare o smaltire tutti i materiali pericolosi (batterie, carburante, lubrificanti, antigelo ecc.) nel pieno rispetto delle norme locali, statali o federali. CONTROLLO DELLE LAME _________________________________________________ 1. Ogni 50 ore di funzionamento oppure ogni qualvolta che l'unità di taglio viene rimossa dal tosaerba, controllare attentamente le lame per accertarsi che siano in buone condizioni operative. Le lame che presentano piegature (G), scanalature (H) o lesioni (J) devono essere sostituite. 4. La polvere o la sabbia può creare una scanalatura nella lama (H) tra le alette dell'aria e la parte piatta della lama con conseguente rischio che diventi una lesione (J) e il pericolo che un pezzo di aletta venga scagliato. ! ATTENZIONE Prestare attenzione quando si controllano le lame per evitare che le mani o le dita rimangano incastrate tra le estremità delle lame. G H J HR025 ! AVVERTENZA Figura 4A Non tentare mai di raddrizzare, saldare o riparare una lama danneggiata. Una lama danneggiata deve essere sempre sostituita. 2. Una delle condizioni suddette può comportare la rottura e il lancio di un pezzo di lama dal tosaerba provocando gravi lesioni agli astanti e danni materiali. 3. Una lama piegata potrebbe avere una lesione microscopica (G) che potrebbe ingrandirsi e far staccare un pezzo dalla lama. Le lame piegate creeranno vibrazioni e altre sollecitazioni alla macchina. it-19 4 MANUTENZIONE 4.3 AFFILATURA DELLE LAME _________________________________________________ 1. Posizionare un blocchetto di legno tra la lama e il telaio tosaerba per impedire alla lama di muoversi. Per rimuovere la lama, girare la vite di mantenimento lama in senso antioriario. A Massimo 13 mm ! AVVERTENZA Le lame del tosaerba posso avere bordi affilati. Prestare attenzione ogni volta si effettua un intervento di manutenzione o manipolazione. B HR024 2. Quando si leviga o affila la lama, non seguire lo schema originale di smerigliatura come mostrato in (A). Smerigliare i nuovi bordi di taglio con un'inclinazione come mostrato in (B). Figura 4B Se la perdita totale massima della lama raggiunge 13 mm, non affilare ulteriormente, ma sostituire la lama. ! AVVERTENZA L'affilatura della lama oltre la tolleranza di 13 mm potrebbe far rompere l'estremità della lama con il rischio che venga scagliata dal tosaerba. Ciò potrebbe causare lesioni molto gravi agli astanti e/o danni materiali. Vista dal basso del piatto di taglio anteriore in posizione di revisione 3. Accertarsi che la stessa quantità di materiale venga rimossa da entrambi i lati della lama per evitare di avere una lama non equilibrata. Una lama non equilibrata comporterà vibrazioni eccessive che potrebbero danneggiare il tosaerba. 4. Utilizzare un bilanciatore per lame per controllare la lama dopo l'affilatura. 5. Installare la lama sul tosaerba. Installare le lame in modo che i taglienti (C) siano rivolti nella direzione di direzione come mostrato in Figura 4C. Il tagliente smussato della lama deve essere rivolto verso l'alloggiamento del piatto di taglio. Serrare la vite di mantenimento lama a montaggio centrale a 100 - 120 Nm. it-20 C C C Lato sinistro Lato destro Vista dal basso dei piatti di taglio laterali sollevati in posizione di trasferimento. HR015 Figura 4C MANUTENZIONE 4.4 MOTORE ________________________________________________________________ IMPORTANTE: Con questo tosaerba viene fornito il Manuale del motore, pubblicato dal costruttore.. Leggere con attenzione il manuale del motore fino a che non si acquisisca dimestichezza con il funzionamento e la manutenzione del motore. La corretta osservanza delle istruzioni fornite dal costruttore del motore ne garantirà la massima durata in servizio. Per ordinare i manuali dei motori di ricambio, contattare il fabbricante del motore. Il corretto rodaggio di un motore nuovo può fare una notevole differenza in termini di prestazioni e durata del motore stesso. Durante il periodo di rodaggio, Jacobsen consiglia quanto segue: 1. Durante le prime 50 ore di servizio lasciare che il nuovo motore raggiunga una temperatura di servizio di almeno 60°C prima di utilizzarlo a pieno carico. 4.5 4 2. Controllare il livello dell’olio motore due volte al giorno durante le prime 50 ore di servizio. Durante il periodo di rodaggio iniziale, un consumo di olio superiore alla norma non è insolito. 3. Cambiare l’olio motore e l’elemento del filtro dell’olio dopo le prime 50 ore di servizio. 4. Controllare e regolare le cinghie dell’alternatore e della ventola. 5. Per le procedure e gli intervalli degli specifici interventi di manutenzione, consultare la Sezione 8. e il Manuale del motore. Per la manutenzione della pompa d’iniezione, degli iniettori e dell’impianto di alimentazione rivolgersi ad un concessionario Jacobsen autorizzato. Nota: Il tosaerba è stato progettato per funzionare e falciare nel modo più efficace secondo le impostazioni del regolatore preimpostate. Non modificare le impostazioni del regolatore del motore e non fare girare il motore a una velocità eccessiva. OLIO MOTORE ____________________________________________________________ Controllare l'olio motore all'inizio di ogni giornata, prima di avviare il motore. Se il livello dell'olio è basso, togliere il tappo di riempimento e rabboccare fino al segno MAX dell'astina a seconda delle necessità. Eseguire il cambio iniziale dell’olio dopo le prime 25 ore di servizio, ed in seguito ogni 250 ore. Leggere il manuale del motore. Usare olio motore avente una classificazione API CD-II, CE, CF-4. Per le specifiche complete, consultare il manuale del motore. -20˚C -4˚F +45˚C +113˚F SAE 15W-40 HR005 Figura 4D 4.6 MARMITTA E TUBO DI SCARICO _____________________________________________ ! AVVERTENZA I fumi di scarico contengono ossido di carbonio, gas tossico che può uccidere se inalato. NON avviare mai il motore adeguatamente ventilati. in ambienti non Per proteggersi da intossicazione da ossido di carbonio, controllare a intervalli regolari l’intero impianto di scarico, e sostituire sempre la marmitta se è difettosa. Spegnere immediatamente il motore se si nota un cambiamento nel colore o nel rumore dello scarico. Identificare il problema e fare riattare l’impianto. Serrare in modo uniforme tutta la bulloneria del collettore di scarico, e serrare o sostituire le fascette stringitubo del tubo di scarico. it-21 4 MANUTENZIONE 4.7 FILTRO DELL’ARIA ________________________________________________________ Controllare giornalmente l'indicatore di servizio. Sostituire l'elemento filtro aria immediatamente quando la fascia rossa diventa visibile (A). Non togliere l’elemento per l’ispezione o la pulizia.L’inutile rimozione del filtro aumenta il rischio di penetrazione di polvere ed altre impurità nel motore. In sede di manutenzione, pulire prima la parte esterna della sede del filtro, quindi togliere l’elemento usato con la massima cautela, e scartarlo. 1. Pulire attentamente l’interno della sede del filtro senza lasciar penetrare la polvere nella presa d’aria. 5. Controllare tutti i flessibili e i condotti d’aria. Serrare le fascette stringitubo. B A C 2. Ispezionare l’elemento nuovo. Non utilizzarlo se è danneggiato; non usare mai un elemento inadatto. 3. Montare l’elemento nuovo, verificando che sia inserito correttamente. Reimpostare l'indicatore premendo il pulsante (B). 4. Montare il tappo e verificare la perfetta tenuta attorno alla sede del filtro. L’evacuatore della polvere (C) deve essere rivolto verso il basso. 4.8 HR009 Figura 4E CARBURANTE ____________________________________________________________ Maneggiare il carburante con cautela, perché è altamente infiammabile. Usare un contenitore autorizzato provvisto di becco inseribile all’interno del collo del serbatoio. Non utilizzare lattine e imbuti per il trasferimento del carburante. ! AVVERTENZA • Riempire il serbatoio del carburante a 25 mm dalla base del collo del bocchettone di rifornimento. • Utilizzate gasolio n. 2 pulito e fresco. Numero minimo di cetano: 45. Per ulteriori informazioni consultare il manuale del motore. • al primo segno di danno, sostituirli. Non togliere mai il tappo dal serbatoio carburante, né versare del carburante, quando il motore gira o è caldo. • Conservare il carburante nel pieno rispetto dei regolamenti locali, nazionali o federali, e secondo le direttive del fornitore di carburante. Non fumare quando si maneggia il carburante. Non riempire o svuotare il serbatoio carburante in interni. • Non riempire troppo, e completamente il serbatoio. Prestare attenzione per evitare fuoriuscite di carburante. In caso di versamento, asciugare immediatamente. Leggere il Manuale d'uso del motore per informazioni aggiuntive sul rifornimento di carburante. Non maneggiare o conservare taniche di carburante in presenza di una fiamma libera o di dispositivi che possano creare scintille e incendiare il carburante o i vapori di carburante. Non dimenticare di rimontare il tappo del carburante e di serrarlo a fondo. it-22 non lasciare svuotare MANUTENZIONE 4.9 4 IMPIANTO DI ALIMENTAZIONE ______________________________________________ Le cadenze di manutenzione sono riportate nella Sezione 8.. Consultare il Manuale del motore per le procedure dettagliate. Prima di sostituire i filtri, pulire accuratamente la sede del filtro e l’area circostante. Non lasciare penetrare la morchia nell’impianto di alimentazione. Spurgare l'impianto di alimentazione se il filtro carburante e i tubi sono stati rimossi e il serbatoio carburante si è svuotato. Per sostituire il filtro carburante: 1. Chiudere la valvola carburante sul serbatoio, quindi rimuovere e mettere da parte il filtro esistente. 2. Applicare un leggere strato di olio sulla guarnizione e serrare manualmente il nuovo filtro. 3. Riempire il serbatoio carburante. Aprire la valvola carburante sul serbatoio e spurgare il filtro. Leggere il manuale del motore. Tergere immediatamente il carburante versato. 4.10 BATTERIA________________________________________________________________ Prima di eseguire la manutenzione della batteria accertarsi che l’interruttore di accensione sia in posizione “OFF” e togliere la chiave. ! ATTENZIONE Quando si lavora sulla batteria usare sempre utensili isolati, mettere gli occhiali di protezione o gli occhialoni e l’abbigliamento di protezione. Leggere tutte le istruzioni del fabbricante della batteria, e rispettarle. Serrare saldamente i cavi ai morsetti della batteria e spalmare un velo di grasso dielettrico al silicone sui morsetti e sulle estremità dei cavi per impedirne la corrosione. Non togliere i tappi di sfiato o i cappucci dei morsetti. Mantenere pulite le estremità dei cavi, la batteria e i poli. 1. In sede di montaggio della batteria, assemblare sempre prima il cavo ROSSO positivo (+) della batteria e la messa a terra, e per ultimo il cavo NERO negativo (-). 2. In sede di rimozione della batteria, togliere sempre prima il cavo NERO negativo (-), e per ultimo il cavo ROSSO positivo (+). 3. Verificare che la batteria sia correttamente montata ed ancorata al relativo supporto. ! AVVERTENZA Poli, morsetti ed accessori della batteria contengono piombo e composti, elementi chimici che secondo lo Stato della California possono causare cancro e danni alla riproduzione. Lavare le mani dopo averli toccati. Prima di collegare o scollegare i cavi della batteria controllare la polarità della batteria. 4.11 AVVIAMENTO CON CAVI DI EMERGENZA _____________________________________ Prima di tentare l’avviamento del tosaerba con cavi d’emergenza, controllare le condizioni della batteria scarica. Sezione 4.10 ! AVVERTENZA Le batterie producono idrogeno esplosivo. Per ridurre il rischio di esplosione, evitare di creare scintille in prossimità della batteria. Collegare sempre il cavo di emergenza negativo al telaio del tosaerba con la batteria scarica, lontano dalla batteria. Collegamento dei cavi d’emergenza 1. Spegnere il motore del veicolo con una batteria carica. 2. Collegare il cavo d’emergenza ROSSO al terminale positivo (+) sulla batteria carica ed al morsetto positivo (+) della batteria ‘esaurita’. 3. Collegare il cavo d’emergenza NERO dal terminale negativo (-) della batteria carica al telaio del tosaerba con la batteria scarica. Una volta collegati i cavi, avviare il motore del veicolo con la batteria carica e poi avviare il tosaerba. it-23 4 MANUTENZIONE 4.12 CARICA DELLA BATTERIA _________________________________________________ ! AVVERTENZA Caricare la batteria in un luogo ben ventilato. Le batterie producono gas esplosivi. Per impedire che esplodano, tenere la batteria lontano da fonti di scintille o fiamme. Stare lontani dalla batteria quando il caricabatterie è acceso, al fine di evitare infortuni. Una batteria avariata potrebbe esplodere. 2. Quando possibile, prima della ricarica, rimuovere la batteria dal tosaerba. Se la batteria non è sigillata, verificare che l’elettrolita copra le placche in tutti gli elementi. 3. Verificare che il caricabatterie sia spento, quindi collegare il caricabatterie ai morsetti della batteria, come indicato nel manuale del caricabatterie. 4. Spegnere sempre il caricabatterie prima di staccarlo dai morsetti della batteria. 1. Vedere la Sezione 4.10. Le istruzioni specifiche sono riportate nel manuale della batteria e del caricabatterie. 4.13 FLESSIBILI IDRAULICI _____________________________________________________ ! AVVERTENZA Per prevenire gravi infortuni a causa di olio caldo ad alta pressione, non controllare mai la presenza di fuoriuscite di olio con le mani; usare sempre carta o cartone. Il fluido idraulico che fuoriesce sotto pressione può avere una forza sufficiente da penetrare nella pelle. Se il fluido penetra nella pelle, deve essere rimosso chirurgicamente nel giro di poche ore da un medico a conoscenza di questo tipo di infortunio; in caso contrario vi è rischio di cancrena. 1. Abbassare sempre gli attrezzi al terreno, scollegare tutti i comandi, inserire il freno di stazionamento, arrestare il motore e rimuovere la chiave prima di controllare o scollegare i condotti o i flessibili idraulici. 2. Controllare ogni giorno i flessibili e i tubi visibili. Accertarsi che non vi siano flessibili umidi o macchie d’olio. Prima di utilizzare la macchina sostituire i flessibili o tubi usurati o danneggiati. 3. I flessibili e i tubi di ricambio devono seguire lo stesso percorso dei flessibili e tubi esistenti. Non cambiare la posizione di morsette, staffe o fascette stringitubo. 4. Controllare attentamente tutti i tubi, i flessibili e i raccordi ogni 300 ore. it-24 IMPORTANTE: In caso di contaminazione dell’olio, l’impianto idraulico può subire danni permanenti. Prima di scollegare qualsiasi componente idraulico, pulire l’area circostante i raccordi e le estremità del flessibile per impedire l’ingresso di impurità nell’impianto. a. Prima di scollegare qualsiasi componente idraulico, contrassegnare la posizione di ogni flessibile con un cartellino o un segno, quindi pulire la superficie circostante i raccordi. b. Quando si scollega un componente è talvolta necessario montare tappi o coperchietti sulle estremità dei flessibili e dei fori aperti. Questo accorgimento impedisce l’ingresso di impurità nell’impianto idraulico e riduce il rischio di versamenti di olio. c. Prima di serrare, accertarsi che gli o-ring siano puliti e che gli attacchi per tubi flessibili siano a posto. d. Evitare che i flessibili si attorciglino. Durante l’arieggiatura il flessibile si flette, pertanto i flessibili attorcigliati possono allentare gli accoppiatori e causare perdite di olio. e. I flessibili attorcigliati o piegati possono restringere il flusso d’olio e causare il cattivo funzionamento dell’impianto e il surriscaldamento dell’olio, con conseguente avaria dei flessibili. MANUTENZIONE 4 4.14 OLIO IDRAULICO __________________________________________________________ Le cadenze di manutenzione sono riportate nella Sezione 6.2. Spurgare l’olio idraulico e cambiarlo dopo l’avaria di un componente importante, oppure se si nota la presenza di acqua o schiuma nell’olio, o un odore rancido (indicazione di calore eccessivo). 2. Rimuovere il tappo di spurgo della parte inferiore del serbatoio. 3. Quando l’olio è defluito, montare il tappo di spurgo e riempire di Jacobsen Hydraulic Oil. 4. Spurgare l’aria dall’impianto. Cambio dell’olio idraulico a. Azionare per circa 5 minuti tutte le funzioni del tosaerba per spurgare l’aria dall’impianto e stabilizzare il livello dell’olio. Durante questo intervallo di tempo, l'allerta del livello olio potrebbe attivarsi. 1. Pulire l’area intorno al tappo dell’olio per evitare l’ingresso di impurità nell’impianto e la sua contaminazione. b. Una volta stabilizzato il livello e spurgata l’aria, riempire il serbatoio fino al segno di pieno dell'astina di livello. Avviare il motore e controllare che l'allerta olio non si attivi. Sostituire sempre entrambi i filtri idraulici quando la spia del filtro olio si accende o quando si cambio l'olio. 4.15 FILTRI IDRAULICI__________________________________________________________ L'impianto idraulico è protetto da due filtri da 10 micron, un filtro di ricarica (B), e un filtro di ritorno (A). Il flusso attraverso i filtri viene monitorato durante il funzionamento della macchina. Se la riduzione di pressione nei filtri è eccessiva, la spia del filtro olio idraulico si accende. Per garantire una protezione costante dell'impianto idraulico, sostituire i filtri prima possibile se la spia continua a rimanere accesa anche dopo il riscaldamento del fluido idraulico. Nota: Normalmente, la spia si accende normalmente subito dopo l'avvio del tosaerba e rimane accesa fino a quando l'olio non raggiunge la sua temperatura d'esercizio. Prima di utilizzare il tosaerba, attendere che l'olio si riscaldi e la spia si spegna. 1. Rimuovere i filtri usato. Nota: Parte del fluido idraulico verrà scaricato quando si rimuove il filtro di ricarica inferiore. Posizionare un contenitore apposito sotto il filtro prima di rimuoverlo. 2. Installare i nuovi filtri. Serrare soltanto a mano. 3. Fate girare il motore alla minima, con l’impianto idraulico in folle, per cinque minuti. Durante questa fase deve attivarsi l'allerta del livello olio. 4. Controllare il livello dell'olio idraulico nel serbatoio e riempire fino al segno di pieno sull'astina di livello. Sostituzione dei filtro idraulici: Sostituire i filtri una volta l'anno quando si sostituisce il fluido idraulico o quando la spia del filtro sul cruscotto rimane accesa. Il filtro di ritorno è montato sul lato sinistro dello scambiatore di calore olio. Il filtro di ricarica è montato sulla parte inferiore del telaio del tosaerba dietro il braccio di sollevamento laterale sinistro. it-25 4 MANUTENZIONE 4.16 RADIATORE E SCAMBIATORE DI CALORE OLIO _______________________________ ! AVVERTENZA Per impedire gravi ustioni causate da refrigerante bollente o da soffi di vapore, non cercare mai di togliere il tappo del radiatore mentre il motore gira. Spegnere il motore e attendere che si raffreddi. Anche allora, togliere il tappo con la massima cautela. ! ATTENZIONE Non versare acqua fredda in un radiatore caldo. Non fare girare il motore senza una miscela refrigerante adatta. Montare il tappo e serrarlo con sicurezza. Controllare ogni giorno il livello del refrigerante. Il radiatore deve essere colmo, e il vaso di caricamento deve essere colmo fino al segno cold (freddo). Se occorre aggiungere del refrigerante più spesso di una volta al mese, o aggiungere più di 0,9 litri per volta, fare controllare l'impianto di raffreddamento da un concessionario Jacobsen. Per rimuovere la griglia, togliere il tappo terminale (A) dal lato sinistro dello scambiatore di calore olio. Sfilare la griglia lateralmente e applicare aria compressa dal lato posteriore. Scambiatore di calore olio e radiatore Controllare giornalmente lo scambiatore di calore olio e il radiatore e pulirli secondo necessità per garantire un flusso aria adeguato. 1. Rimuovere la griglia (B) dal lato anteriore dello scambiatore di calore olio. 2. Aprire le manopole (C) posizionate sulla parte superiore dello scambiatore di calore olio e rimuovere la protezione di plastica dalla parte anteriore dello scambiatore di calore olio. 3. Riposizionare la griglia anteriore e le protezioni, quindi installare le manopole nella parte superiore dello scambiatore di calore olio per fissare il gruppo in posizione. C F Ogni anno spurgare e riempire di nuovo. Togliere il tappo del radiatore, aprire lo spurgo del blocco motore e quello del radiatore. Svuotare il vaso di caricamento e pulirlo. Per temperature ambienti molto fredde, preparate una miscela con acqua pulita e antigelo a base di glicole etilenico. Leggere le istruzioni sul contenitore dell’antigelo e sul manuale del motore, ed osservarle. D E Tenere puliti la griglia, lo scambiatore di calore olio e i passaggi dell'aria del radiatore. Pulire le alette con aria compressa (massimo 206 kPa). Griglia anteriore Controllare la griglia anteriore (B) giornalmente e pulirla secondo necessità per rimuovere eventuali mucchi di erba, foglie e altri detriti che potrebbero ostruire il flusso dell'aria attraverso lo scambiatore di calore olio e il radiatore. B A HR008 Figura 4F 4.17 PNEUMATICI _____________________________________________________________ ! ATTENZIONE Non tentare di montare un pneumatico sul cerchio se si è stati correttamente addestrati o non si dispone degli utensili o dell’esperienza necessari. L’errato montaggio può causare un’esplosione, e conseguenti gravi ferite. 1. Prolungare la vita dei pneumatici mantenendo la corretta pressione. Controllare la pressione di gonfiaggio quando i pneumatici sono freddi. Controllare l’usura del battistrada. 2. Controllare la pressione annualmente. Usate un manometro di precisione a bassa pressione. 3. Tenere gli pneumatici alla pressione adeguata Tosaerba: 1,38 - 1,52 Bar Piatti di taglio: 1,38 - 1,73 Bar it-26 MANUTENZIONE 4 4.18 CURA E PULIZIA __________________________________________________________ Lavate sempre il tosaerba e gli accessori dopo l’uso. Mantenere pulita l’attrezzatura. Nota: Non lavare alcuna parte del tosaerba mentre è caldo. Non lavare o spruzzare con una lancia a pressione o a vapore. Lavare con acqua fredda e un preparato per la pulizia delle automobili. 1. Pulire il motore e le alette del radiatore con aria compressa. Una pistola di soffiaggio speciale è reperibile tramite i concessionari Jacobsen. 2. Riparare le superfici metalliche danneggiate e usare la vernice per ritocchi Jacobsen. Per la massima protezione della vernice, lucidare con la cera. ! ATTENZIONE Togliere erba e corpi estranei da apparati di taglio, trasmissioni, marmitta e motore, per evitare incendi. Usare soltanto acqua dolce per la pulizia delle apparecchiature. Note: L'uso di acqua salata o di un affluente può favorire la ruggine e la corrosione delle parti metalliche, ed anticiparne il deterioramento o l’avaria. La garanzia della fabbrica non copre danni di questo genere. 3. Non spruzzare l’acqua direttamente su cruscotto, interruttore di accensione, regolatore o altro componente elettrico, sulle sedi dei cuscinetti o sulle tenute. 4. Pulire i rivestimenti in plastica o gomma con una soluzione saponosa delicata o con un preparato per vinile/gomma in commercio. ! AVVERTENZA NON pulire mai gli apparati di taglio con le mani. Utilizzare una spazzola per eliminare dalle lame i residui di erba. Le lame sono affilatissime e possono provocare gravi ferite. 4.19 IMPIANTO ELETTRICO _____________________________________________________ ! ATTENZIONE Prima di controllare l’impianto elettrico o di eseguire interventi su di esso, girate sempre l’interruttore di accensione in posizione OFF e togliete il cavo negativo della batteria (NERO). F1 F2 F3 F4 F5 F6 F7 F8 F9F10F11F12 Di seguito sono elencate le precauzioni generali consigliate per ridurre i problemi di carattere elettrico. 1. Verificare che tutti i morsetti e le connessioni siano puliti e saldamente fissati. 2. Controllare il sistema di backup dell'operatore, i fusibili e gli interruttori automatici a intervalli regolari. Se il sistema di backup dell'operatore non funziona correttamente e non è possibile correggerlo, contattate un concessionario Jacobsen autorizzato. 3. Tenere il cablaggio preassemblato e tutti i singoli conduttori lontano da parti in movimento, per evitare danni. 4. Verificare che il cablaggio preassemblato del microinterruttore del sedile sia collegato al cablaggio principale. 5. Controllare la batteria ed il relativo circuito di ricarica. 6. Non lavare o spruzzare con una lancia a pressione attorno alle connessioni ed ai componenti elettrici. FUSIBILI F1 5A F2 5A F3 15A F4 15A F5 5A F6 5A F7 5A F8 15A F9 5A F10 5A F11 5A F12 15A Parte di ricambio Parte di ricambio Parte di ricambio Parte di ricambio Accensione Indicatori Solenoide carburante, Candele a incandescenza Impianto aria sedile Regolatore automatico della velocità Solenoide 4-WD Interruttori di limitazione piatti di taglio Valvole piatti di taglio HR006 I circuiti sono protetti da un interruttore di circuito (posizionato sopra le batterie), e da fusibili e relè montati Figura 4G dietro il cruscotto (Vedere Figura 4G e la tabella riportata alla pagina successiva). La tabella riportata nella pagina seguente identifica la posizione e le funzioni di base dei relè elettrici situati sotto il cruscotto. Per altre informazioni dettagliate consultare lo schema elettrico riportato nel presente manuale. it-27 4 MANUTENZIONE Controllare sempre il sistema microinterruttori di sicurezza dopo la revisione dell'impianto elettrico! K15 K16 K17 K15 K16 LTS 4WD CRS K17 K13 Etichetta cablaggio Codice schemi K12 MR MC ML NT3 NT2 NT1 BK2 BK1 KYS KYA KYI K11 K10 K9 K8 K7 K6 K5 K4 K3 K2 K1 Relè Descrizione Funzione KYA / K2 Interruttore a chiave “A” Tiene aperta l'elettrovalvola di arresto carburante quando l'interruttore di accensione è in posizione RUN e l'operatore è seduto. Attiva il timer delle candele a incandescenza se il motore non si sta avviando. KYI / K1 Interruttore a chiave “I” Apre l'elettrovalvola di arresto carburante quando l'interruttore di accensione è in posizione START, l’interruttore della presa di forza è su OFF e gli interruttori del freno di stazionamento e del folle sono chiusi. KYS / K3 Interruttore a chiave “S” Aziona il motorino di avviamento quando l'interruttore di accensione è in posizione START, l’interruttore della presa di forza è su OFF e gli interruttori del freno di stazionamento e del folle sono chiusi. BK1 / K4 Freni - Start Parte del circuito di avviamento. Il relè si chiude quando il freno di stazionamento viene inserito. BK2 / K5 Freno - Run Scollega l'alimentazione elettrica al relè del controllo automatico della velocità (CRS) quando il freno di stazionamento è inserito. Scollega l'alimentazione elettrica alla valvola carburante quando l'operatore abbandona il sedile con il freno di stazionamento disinserito. NT1 / K6 Folle-Start Parte del circuito di avviamento. Il relè si chiude quando il pedale di trazione è in Folle. NT2 / K7 Folle-Run Scollega l'alimentazione elettrica all'elettrovalvola di arresto carburante quando l'operatore abbandona il sedile con l'interruttore del folle ancora aperto (pedale di trazione premuto). NT3 / K8 Folle-Controllo automatico della velocità Scollega l'alimentazione elettrica al controllo automatico della velocità quando l'interruttore del folle è chiuso (pedale di trazione in folle). ML / K9 Tosatura - Piatto di taglio sinistro Attiva il solenoide sul piatto di taglio laterale sinistro quando il piatto viene abbassato e l’interruttore della presa di forza è su ON. MC / K10 Tosatura - Piatto di taglio centrale Attiva il solenoide sul piatto di taglio anteriore sinistro quando il piatto viene abbassato e l’interruttore della presa di forza è su ON. MR / K11 Tosatura - Piatto di taglio destro Attiva il solenoide sul piatto di taglio laterale destro quando il piatto viene abbassato e l’interruttore della presa di forza è su ON. CRS / K12 Regolatore automatico della velocità Attiva il regolatore automatico della velocità quando il relativo interruttore è chiuso, il pedale di trazione è premuto e il freno di stazionamento è disinserito. 4WD / K13 Trazione integrale Attiva il solenoide della valvola della trazione integrale quando l'interruttore della trazione integrale sul cruscotto e l'interruttore di rilevamento marcia avanti sulla pompa di trazione sono chiusi. LTS Fari K15 Esclusione del circuito di marcia K16 Ausiliario Fornisce alimentazione elettrica al circuito di accensione con l'interruttore a chiave in posizione RUN. Disattiva il circuito di accensione in posizione START. K17 Accensione Fornisce alimentazione elettrica agli indicatori, al circuito di tosatura, al circuito 4WD e al circuito dell'interruttore del sedile it-28 In dotazione con il kit cablaggio 5003564. Controlla il funzionamento dei fari. Disattiva il circuito di marcia quando l'interruttore a chiave viene portato in posizione START. MANUTENZIONE 4 4.20 CONTROLLO DIAGNOSTICO EFI _____________________________________________ Il sistema elettrico è dotato di connettori diagnostici OBDII e Diagmaster situati vicino al regolatore del motore. Consultare il Manuale di riparazione tecnico HR-9016 per le descrizioni del codice. Inserire un lettore OBD-II nel connettore corrispondente, girare l’interruttore di accensione in posizione ON (non avviare il motore), e consultare le istruzioni incluse con il lettore per recuperare i codici diagnostici. 4.21 PROCEDURA DI MONTAGGIO DELLA RUOTA __________________________________ Ruote del tosaerba ! AVVERTENZA Il tosaerba deve essere parcheggiato su terreno sodo e pianeggiante. Non lavorare mai su un tosaerba poggiato soltanto su un cric. Usare sempre cavalletti metallici. Se è sollevata soltanto la parte anteriore o quella posteriore del tosaerba, mettere delle zeppe davanti e dietro le ruote che non sono sollevate. 1. Eliminare morchia, grasso e olio dalla filettatura del prigioniero. Non lubrificare la filettatura. 2. Posizionare la ruota sul mozzo e verificare che il contatto tra la superficie di montaggio della ruota ed il mozzo o il tamburo del freno sia perfetto. 3. Stringere manualmente tutta la bulloneria, quindi serrare la bulloneria in ordine trasversale. Serrare sempre i dati nella posizione superiore. Ruote orientabili Per estendere la durata dei cuscinetti, controllare e regolare annualmente le ruote orientabili e di regolazione. Lubrificare i cuscinetti ogni 100 ore utilizzando grasso NLGI Grade 2. 1. Alzare il piatto di taglio in modo che le ruote siano sollevate dal terreno e possano essere ruotate liberamente con le mani. 2. Verificare l'eventuale gioco assiale delle ruote (I). Le ruote devono ruotare liberamente con un gioco assiale pari a zero. 3. Per eliminare il gioco assiale, serrare il dado interno (G) fino quando la ruota non inizia a unirsi, quindi allentarlo di 1/4 di giro. Bloccare il dado interno in posizione utilizzando il dado esterno (H). Non far girare il dado interno durante il serraggio del dado esterno. 4. Ripetere il passo 2 e presenza di gioco assiale. controllare l'eventuale ! CAUTION Controllare e serrare giornalmente i bulloni ad alette per le prime 100 ore di funzionamento. G 4. Dopo la ricezione della nuova unità o se gli pneumatici sono stati rimossi, controllare e serrare giornalmente i bulloni ad alette per mantenere la coppia prescritta. Ruote anteriori .......... 128 - 41 Nm. Ruote posteriori......... 88 - 102 Nm. H I HR021 Figura 4H it-29 4 MANUTENZIONE 4.22 STRUTTURA DI PROTEZIONE ANTIRIBALTAMENTO (ROPS) _____________________ Per questo tosaerba è disponibile una struttura di protezione antiribaltamento (ROPS), come accessorio opzionale. Se il tosaerba è dotato di questo dispositivo, è importante controllarlo periodicamente e osservare le procedure operative riportate nel Manuale d’uso e sicurezza. ! ATTENZIONE Non allentare o rimuovere i bulloni, non eseguire saldature, perforazioni, modifiche, pieghe o né raddrizzare una struttura danneggiata. 1. Il sedile, la cintura di sicurezza, la bulloneria ed eventuali accessori all'interno della struttura ROPS devono essere controllati regolarmente e tutti i componenti danneggiati devono essere sostituiti immediatamente. 2. Se il ROPS ha subito un impatto di qualsiasi genere, è necessario sostituirlo. 3. Controllare e riserrare tutta la bulloneria. Tutti i componenti di ricambio utilizzati per il ROPS devono corrispondere a quanto specificato nell'elenco ricambi Jacobsen. 4.23 RIMESSAGGIO____________________________________________________________ Aspetti generali 1. Lavare con cura e a fondo la macchina e lubrificare. Riparare e verniciare i componenti metallici danneggiati o esposti. 2. Ispezionare la macchina, serrare tutti le parti di collegamento e sostituire i componenti usurati o danneggiati. 3. Spurgare il radiatore e riempirlo di nuovo. 4. Pulire accuratamente i pneumatici e riporre il tosaerba in rimessa in modo da non lasciare il carico sui pneumatici. Se il tosaerba non viene riposto su cavalletti metallici, controllare i pneumatici a intervalli regolari e all’occorrenza gonfiarli. 3. Aggiungete un condizionatore per carburante o un biocida per impedire la gelificazione o la crescita di batteri nel carburante. Rivolgetevi al fornitore di carburante di zona. Apparati di taglio 1. Lavare accuratamente gli apparati di taglio, quindi riparare e verniciare il metallo danneggiato o sverniciato. 2. Lubrificare tutti i raccordi ed i punti di attrito. 3. Spalmare un velo di olio antiruggine sui taglienti affilati delle lame. Operazioni successive al rimessaggio 1. Controllare e reinstallare la batteria. 2. Controllare o revisionare il filtro carburante e il filtro dell'aria. 3. Controllare il livello del refrigerante nel radiatore. Batteria 4. Controllare il livello dell’olio nel carter del motore e nell’impianto idraulico. 1. Rimuovere, pulire e conservare le batterie in un luogo fresco e asciutto, in posizione verticale. 5. Riempire il serbatoio del carburante con carburante fresco. Spurgare l'impianto di alimentazione. 2. Controllare e ricaricare la batteria ogni 60-90 giorni durante lo stoccaggio. 6. Verificare gonfiati. 3. Conservare le batterie in luogo fresco e asciutto. Per limitare il tasso di autoscarica, la temperatura ambiente non deve superare i 27°C né scendere al di sotto di -7° C, onde impedire che l’elettrolita geli. 7. Rimuovere qualsiasi traccia di olio dalle lame dei piatti di taglio Regolare nuovamente l'altezza di taglio. 8. Avviare il motore e farlo girare a metà regime. Attendere quanto basta perché il motore si riscaldi e si lubrifichi adeguatamente. 5. Durante il rimessaggio mantenere la macchina e tutti gli accessori sempre puliti, asciutti e protetti da intemperie. Non riporre mai il tosaerba in presenza di fiamme libere o scintille che possano fare incendiare il carburante o i vapori di carburante. Motore 1. 2. Con il motore ancora tiepido, rimuovere il tappo di scarico, fare defluire l'olio dalla coppa e cambiare il filtro dell’olio. Montare il tappo di scarico e riempire con olio fresco. Serrare il tappo di scarico a una coppia di 30 Nm. Pulire le superfici esterne del motore. Verniciare i componenti metallici esposti o applicare un velo di olio antiruggine. it-30 che i pneumatici siano correttamente ! AVVERTENZA Non avviare mai il motore in ambienti non adeguatamente ventilati. Le emissioni possono essere micidiali se inalate. LOCALIZZAZIONE E RISOLUZIONE DEI PROBLEMI 5 5.1 5 LOCALIZZAZIONE E RISOLUZIONE DEI PROBLEMI ASPETTI GENERALI _______________________________________________________ La seguente tabella di localizzazione guasti elenca le problematiche di base che possono presentarsi durante le fasi di avviamento e utilizzo. Per informazioni più dettagliate Sintomi Il motore non si avvia. sugli impianti idraulico ed elettrico contattare il distributore Jacobsen più vicino.SCHEMA DEL PROGRAMMA DI Probabili cause Azione 1. Freno di stazionamento disinserito o interruttore della presa di forza su ON. 1. Controllate il sistema microinterruttori di sicurezza e la procedura di avviamento. 2. La candela a incandescenza non si disattiva. 2. Resettare l’interruttore di accensione e lasciare disattivare la candela a incandescenza prima di avviare il motore. 3. Batteria scarica o avariata. 3. Controllate le condizioni della batteria e relativi collegamenti. 4. Serbatoio carburante vuoto o inquinato. 4. Riempire con carburante fresco. Cambiare il filtro carburante. Spurgate i tubi di alimentazione. 5. Fusibile saltato. 5. Sostituite il fusibile. 6. Relè difettoso(i). 6. Verificare e sostituire il relè. 7. Il pedale di trazione non è in folle. 7. Controllare la posizione del pedale. Regolare la tiranteria. 8. Interruttore del folle sulla pompa di trasmissione non funzionante. 8. Verificare, regolare o sostituire l'interruttore. 9. Interruttore di rilevamento marcia avanti sulla pompa di trasmissione non funzionante. 9. Verificare, regolare o sostituire l'interruttore. 1. Basso livello carburante, carburante o filtro inquinati. 1. Riempire con carburante fresco. Cambiare il filtro carburante. Spurgate i tubi di alimentazione. 2. Filtro dell’aria sporco. 2. Controllare il filtro dell’aria e sostituirlo. 3. Iniettori, pompa carburante. 3. Consultare il manuale del motore. 4. Avaria del motore. 4. Consultare il manuale del motore. 1. Serbatoio carburante vuoto. 1. Riempite con carburante fresco e spurgate i tubi di alimentazione. 2. Interblocchi non impostati prima di scendere dal sedile dell’operatore. 2. Inserire il freno di stazionamento e posizionare l'interruttore della presa di forza su OFF. 1. Basso livello del refrigerante. 1. Controllare il refrigerante e rabboccare. 2. Presa d’aria ostruita. 2. Pulire la presa d'aria sul radiatore. 3. Cinghia della pompa dell’acqua, spezzata o allentata. 3. Serrate la cinghia o sostituitela. Leggere il manuale del motore. La batteria non mantiene la carica. 1. Morsetti batteria allentati o corrosi. 1. Controllare i morsetti e pulirli. La spia della batteria è accesa. 2. Elettrolito insufficiente. 2. Riempite fino al livello opportuno. 3. Cinghia dell’alternatore allentata o spezzata. 3. Serrare la cinghia o sostituirla. Leggere il manuale del motore. 4. Impianto di ricarica avariato. 4. Leggere il manuale del motore. 1. Altezze di taglio non impostate correttamente. 1. Verificare che i piatti di taglio siano a livello. Controllare e regolare l’altezza di taglio. 2. Regime motore troppo basso. 2. Controllare il regime del motore con l'acceleratore in posizione di massima velocità. 3. Velocità di tosatura non regolata per le condizioni del tappeto erboso. 3. Regolare la velocità di tosatura per un taglio migliore. 4. Pressione aria negli pneumatici delle ruote orientabili non regolata correttamente. 4. Controllare gli pneumatici e regolare secondo la pressione corretta. Il motore si avvia con difficoltà o non funziona bene. Il motore si spegne. Il motore si surriscalda. Taglio non uniforme delle unità di taglio it-31 6 TABELLE DI MANUTENZIONE E LUBRIFICAZIONE 6 TABELLE DI MANUTENZIONE E LUBRIFICAZIONE 6.1 SCHEMA DEL PROGRAMMA DI MANUTENZIONE Per garantire il funzionamento regolare dei punti di ancoraggio e degli altri punti di attrito, applicare numerose gocce di olio SAE 30 ogni 50 ore o quando necessario. ! AVVERTENZA Prima di eseguire interventi di pulizia, regolazione o riparazione, disinnestare tutte le trasmissioni, abbassare gli attrezzi al suolo, inserire il freno di stazionamento, spegnere il motore e togliere la chiave di accensione per impedire infortuni. Rimuovere le ruote e ingrassare i cuscinetti una volta l'anno. Intervalli di ispezione e lubrificazione raccomandati Ogni giorno Prima dell' avvio Indicatore del filtro dell’aria Ogni 50 ore Ogni 25 ore Ogni 100 ore Ogni 250 ore I R-AR Batteria S 4.7 I-C I-C 4.10 I-A 4.20 Cuscinetti ruote orientabili A* L Cinghia della ventola del motore I* I-A Olio motore I-A Filtro dell’olio motore S* S 4.5 S* S 4.5 S Acqua di scarico dal filtro carburante C Raccordi d’ingrassaggio – F1 Raccordi d’ingrassaggio – F2 I-A R-AR Refrigerante del radiatore I-A A - Aggiungere o regolare S 4.14 IV S 4.15 A I-A* C – Pulire I – Ispezionare L – Lubrificare I IV S 4.16 I-A 4.17 A I**** * Indica il servizio iniziale per le macchine nuove. ** Consultare il manuale del motore *** Pulire secondo necessità **** Controllare giornalmente la coppia di serraggio dei bulloni ad alette per le prime 100 ore di funzionamento it-32 II 4.16 Freni di assistenza sterzante Pneumatici 6.2 4.16 I-A* I-C 4.9 II I-C*** Freno di stazionamento III 6.2 L Filtri del fluido idraulico I ** L Griglia del radiatore Tipo lubrificante ** Filtro carburante Fluido idraulico Vedere la Sezione 4.7 Elemento del filtro aria Radiatore dell’olio Ogni anno R – Sostituire AR – Secondo necessità Ingrassare i cuscinetti con NLGI Grade 2 (classe di servizio GB) IIPistola ingrassatrice manuale con grasso NLGI Grado 2 (Classe di manutenzione LB). IIIOlio motore - Vedere Sezione 4.5 Olio idraulico Jacobsen - VG ISO 68 TABELLE DI MANUTENZIONE E LUBRIFICAZIONE 6.2 6 TABELLA DI LUBRIFICAZIONE ______________________________________________ 1 2 6 4 4 3 3 4 4 1 2 5 5 12 1 14 15 11 12 8 13 8 7 9 7 10 10 Posizione dei raccordi di ingrassaggio F1 - 50 ore (Ogni settimana) Q.tà 1 2 3 4 5 6 7 8 9 10 11 Fusi ruote orientabili Assali ruote orientabili Assali ruote di regolazione Cilindro di sollevamento Piatto di taglio anteriore Braccio di sollevamento Piatto di taglio anteriore Perni del piatto di taglio laterale Cilindro dello sterzo Tirante Punto di articolazione dell’assale Punto di articolazione della ruota Braccio di sollevamento - (10) (10) (2) (4) (2) (6) (2) (2) (1) (2) 12 Piatto di taglio laterale Cilindro di sollevamento Piatto di taglio laterale F2 - 150 ore 13 14 15 HR014 (2) (4) Q.tà Staffa a U albero di trasmissione(2) Staffa scorrevole albero di trasmissione(1) Perno della ruota orientabile di ritorno(6) it-33 7 7 7.1 LISTA DELLE PARTI LISTA DELLE PARTI COME USARE IL CATALOGO RICAMBI _______________________________________ Abbreviazioni Item rientrati N/S - Non fornito a parte, può essere ottenuto soltanto ordinando il componente principale o l’intero corredo. AR - Quantità variabile ovvero è necessaria la misurazione per ottenere la regolazione corretta. Il simbolo l, accanto al numero del ricambio indica la presenza di una nota contenente ulteriori informazioni utili per l’ordinazione di tale ricambio. Gli item rientrati indicano componenti inclusi come parte di un gruppo o di un altro componente. Questi ricambi possono essere ordinati a parte o come parte del componente principale. Voce l 7.2 N. cat. N. Descrizione 1 2 3 123456 789012 345678 1 1 1 Attacco valvola Valvola di sollevamento • Stegola 4 N/S 1 • 5 901234 1 Vite a testa esagonale 6,3 mm x 5 mm (1/4-20 x 2 poll.) Kit tenute Indica una parte di ricambio Comprende gli item 2 e 3 Parte revisionata compresa nell’Item 2 Parte non revisionata compresa nell’Item 2 ORDINAZIONI DI RICAMBI __________________________________________________ 1. Riportare il proprio nome e indirizzo completi sull'ordine. 2. Indicare dove e come effettuare la spedizione. 3. Fornire il numero del prodotto, il nome e il numero di serie stampato sulla targhetta con il nome o su quella con il numero di serie del prodotto. 4. Ordinare indicando la quantità richiesta, il numero di catalogo e la descrizione del pezzo, come da lista dei ricambi. 5. Inviare o consegnare l’ordine al distributore Jacobsen autorizzato. 6. Controllare tutti i colli alla ricezione. In caso di ricambi danneggiati o mancanti, presentare un reclamo al corriere prima di accettarli. 7. Non rendere materiali senza includere una lettera di spiegazione, elencando i ricambi resi. Le spese di trasporto devono essere pagate anticipatamente. it-34 Numeri di serie e osservazioni PARTS LIST 7.3 7 PARTS CATALOG TABLE OF CONTENTS______________________________________ Body and Decals 1.1 ....... Decals-Mower............................................. 2.1 ....... Hood ........................................................... 3.1 ....... Cowlings and Skirts .................................... 4.1 ....... Seat Pan and Heat Shield .......................... 5.1 ....... Control Panel Mounting ............................. 36 38 40 42 44 Controls 6.1 ....... Instrument Panel......................................... 7.1 ....... Throttle Lever.............................................. 8.1 ....... Lift Valve and Controls................................ 9.1 ....... Accelerator Pedal ....................................... 10.1 ..... Steering Assist............................................ 11.1 ..... Parking Brake ............................................. 46 48 50 52 54 56 Frame 12.1 ..... Frame ......................................................... 13.1 ..... Frame With ROPS ...................................... 14.1 ..... Axle Assembly ............................................ 15.1 ..... Steering Axle .............................................. 16.1 ..... Battery Tray ................................................ 17.1 ..... Tilt Steering................................................. 58 60 62 64 66 68 Engine and Radiator 18.1 ..... Radiator ...................................................... 19.1 ..... Radiator Screen.......................................... 20.1 ..... Remote Engine Oil Filter............................. 21.1 ..... Air Cleaner and Muffler............................... 22.1 ..... Engine Mounting......................................... 23.1 ..... Engine and Pump Assembly....................... 70 72 74 76 78 80 Tanks 24.1 ..... Tank Mounting ............................................ 82 25.1 ..... Fuel Tank.................................................... 84 26.1 ..... Fuel Routing ............................................... 86 Traction Pump 27.1 ..... Pump and 4WD Valve Mounting................. 88 Lift Arms and Deck Valves 28.1 ..... Front Lift Arms and Cylinders ..................... 29.1 ..... Front Deck Latch ........................................ 30.1 ..... Side Lift Arms ............................................. 31.1 ..... Side Lift Cylinders and Return Canisters.... 32.1 ..... Deck Valves................................................ 90 92 94 96 98 Hydraulics and Electrical 33.1 ..... Side Deck Valve Supply ........................... 34.1 ..... Front Deck Valve Supply .......................... 35.1 ..... Pump Supply ............................................ 36.1 ..... Return Manifold ........................................ 37.1 ..... Traction Hydraulics................................... 38.1 ..... Oil Cooler Hydraulics................................ 39.1 ..... Return Hydraulics ..................................... 40.1 ..... 4WD Hose Clamps ................................... 41.1 ..... Charge Pressure ...................................... 42.1 ..... Lift Valve Hydraulics ................................. 43.1 ..... Power Steering Hoses.............................. 44.1 ..... Engine Harness Assembly ....................... 45.1 ..... Chassis Harness Assembly...................... 100 101 102 103 104 106 108 110 111 112 114 116 118 Decks 46.1 ..... Decals - Decks ......................................... 47.1 ..... Front Deck ................................................ 48.1 ..... Front Deck Center Section ....................... 49.1 ..... Front Deck Winglets ................................. 50.1 ..... Front Deck Hydraulics .............................. 51.1 ..... Wing Decks .............................................. 52.1 ..... Wing Deck Hydraulics .............................. 53.1 ..... Caster Assemblies.................................... 54.1 ..... Wheel and Tire Assemblies...................... 55.1 ..... Gage Wheels and Latch ........................... 120 122 124 126 128 130 132 134 135 136 Components 56.1 ..... Air Suspension ......................................... 57.1 ..... Steering Cylinder ...................................... 58.1 ..... Rear Wheel Motor .................................... 59.1 ..... Deck Return Canister ............................... 60.1 ..... Lift Valve................................................... 61.1 ..... Front Lift Cylinder ..................................... 62.1 ..... Wing Lift Cylinders.................................... 63.1 ..... Deck Valve ............................................... 64.1 ..... 4WD Valve................................................ 138 140 142 143 144 145 147 148 149 Schematics 65.1 ..... Hydraulic Schematic................................. 150 66.1 ..... Electrical Schematic ................................. 152 35 HR-9016 Serial No. All Body and Decals 4231860 1.1 Decals-Mower 3 ! 11 18 17 18 15 13 2 3 16 ® 1 13 14 7 11 3 3 5 6 4 10 8 36 HR 9016 TURBO 4WD HR-9016 Manufactured under one or more of the following U.S. patents: XXXXXXX 4181862 4125771 4 7 ® BRAKE 360053 16 1 4257090 11 4181864 3008521 5 2 ! WARNING This structure's proctective capability may be impaired by structural damage, overturn, or alteration. If any of these conditions occur, the structure must be replaced. 5002952 557844 12 4199140 4181863 3 Item 1 2 3 4 5 6 7 8 9 10 11 12 13 14 15 16 17 18 Part No. 9 6 Qty. Description 360053 1 Decal, Brake 3008521 4181863 4181862 4181864 4199140 4125771 4187681 5002952 4124692 4257090 557844 3004287 3009268 3009267 4182386 4231860 4231920 1 4 1 1 1 1 2 1 2 2 1 2 1 1 1 1 1 Decal, Traction Decal, Read Manual for Service Decal, Radiator Cap Warning Decal, Battery Danger Decal, Heat Warning Decal, Patent Decal, Jacobsen Logo Decal, ROPS Seat Belt Decal, HR-9016 Turbo 4WD Decal, Stored Energy Warning Decal, ROPS Structure Pad, Center Panel Pad, Step Pad, Floorboard Emblem, Jacobsen Decal, Control Panel Decal, Instrument Panel Serial Numbers/Notes > Change from previous revision 37 HR-9016 Serial No. All 2.1 Hood 1 12 13 17 16 3 15 14 11 4 7 18 3 21 10 7 9 8 5 16 17 8 7 6 8 7 11 21 19 20 7 8 9016-21 38 HR-9016 Item 1 2 3 4 5 6 7 8 9 10 11 12 13 14 15 16 17 18 19 20 21 Part No. Qty. Description 4256361 1 Hood 1003679 3006644 460028 440120 452008 446142 443110 354989 443112 444310 340795 402230 446128 443102 1004686 403920 3009793 4136563 800709 446116 1 2 2 4 4 8 6 2 2 8 1 2 2 2 2 8 2 1 4 8 Pivot, Hood Pin, Special Clevis Cotter pin, 1/8 x 1” Carriage Bolt, 3/8-16 x 1-1/4” Flat Washer, 3/8 Lockwasher, 3/8 Heavy Nut, 3/8-16 Hex Stop, Rubber Nut, 3/8-24 Hex Nut, #10-24 Hex Handle, Hood Screw, 1/4-20 x 1” Slotted Lockwasher, 1/4 Nut, 1/4-20 Hex Latch, Flexible Draw Screw, #10-24 x 1-1/4” Truss Head Spring, Gas Support, Rear Hood Screw, 3/8-16 x 1” Flanged Head Lockwasher, #10 Serial Numbers/Notes > Change from previous revision 39 HR-9016 Serial No. All 3.1 Cowlings and Skirts 6 A C 6 B 16 10 17 11 9 6 5 3/4 A 14 / 15 7 8 12 / 13 1 9 8 11 17 7 2 18 7 8 1 9 11 5 17 C 2 5 B 9016-24 40 HR-9016 Item 1 2 3 4 5 6 7 8 9 10 11 12 13 14 15 16 17 18 Part No. Qty. Description 447414 8 404118 3006663 3006664 352604 3005604 3007704 3005603 443110 3006915 446142 3006723 3006724 3007099 3007100 440120 452008 3008015 8 1 1 6 8 8 8 12 4 12 1 1 1 1 4 12 2 Serial Numbers/Notes Lockwasher, 3/8 External Tooth Screw, 3/8-16 x 7/8” Truss Head Left Side Cowling Right Side Cowling Grommet Receptacle, #85 1/4 Turn Stud, #85 1/4 Turn Retainer Nut, 3/8-16 Hex Bracket, Cowling Mounting Lockwasher, 3/8 Heavy Left Side Skirt Right Side Skirt Bracket, Left Side Skirt Mounting Bracket, Right Side Skirt Mounting Carriage Bolt, 3/8-16 x 1-1/4” Flat Washer, 3/8 Bracket, Front Skirt > Change from previous revision 41 HR-9016 Serial No. All 4.1 Seat Pan and Heat Shield 14 15 8 16 17 15 7 17 6 16 18 2 2 4 5 5 1 11 10 5 4 3 9 12 11 10 13 9016-25 42 HR-9016 Item Part No. 1 2 3 4 5 6 7 8 9 10 11 12 13 14 14 15 16 17 18 Qty. Description 3007032 1 400264 443110 446142 452008 5003457 404118 – 5003625 4185932 4206374 4206362 4206363 4234820 4206370 4206371 4234821 450016 446136 452006 3006880 400182 3010013 3010789 5003617 400370 446148 4186600 4 2 4 6 1 4 1 1 1 1 1 1 1 11 1 1 4 7 7 1 3 1 1 1 2 2 2 Serial Numbers/Notes Seat Pan Screw, 3/8-16 x 1-1/4” Hex Head Nut, 3/8-16 Hex Lockwasher, 3/8 Heavy Flat Washer, 3/8 Plate, Floorboard Screw, 3/8-16 x 7/8” Truss Head Seat with Air Suspension • Air Ride Suspension • Seat Assembly • • Seat Switch • • Seat Cushion • • Back Cushion • • Seat Adjuster Cushion • • Clip • • Wire Harness • • Arm Rest Assembly Screw, M8-1.25 x 40mm Hex Head Lockwasher, 5/16 Heavy Flat Washer, 5/16 Heat Shield Screw, 5/16-18 x 5/8” Hex Head Shield, Floor Shield, ROPS Floor Seat Belt Assembly Screw, 7/16-20 x 1” Hex Head Lockwasher, 7/16 Heavy Spacer, Seat See 56.1 Reference SW2, See 66.1 Used On 70538 and 70541 Used On 70539 and 70540 Used On 70539 and 70540 Used On 70539 and 70540 Used On 70539 and 70540 > Change from previous revision 43 HR-9016 Serial No. All 5.1 Control Panel Mounting 4 20 21 13 3 5 6 7 22 19 16 23 3 13 21 15 1 17 9 8 1 18 2 24 10 11 12 44 14 15 16 HR-9016 Item 1 2 3 4 5 6 7 8 9 10 11 12 13 14 15 16 17 18 19 20 21 22 23 24 Part No. Qty. Description 403745 4 Screw, #10-32 x 5/8” Hex Head 366670 453009 404022 453023 446128 443102 3009544 403860 453004 446112 444306 446134 452002 446118 444310 3001307 REF – – 400182 4234100 64251-001 452006 1 3 4 4 5 5 1 2 3 2 2 3 2 4 4 3 1 1 1 3 1 2 2 Horn Flat Washer, 5/16 Screw, 1/4-20 x 1” Truss Head Flat Washer, 1/4 Lockwasher, 1/4 Nut, 1/4-20 Hex Relay, Time Delay Screw, #8-32 x 5/8” Truss Head Flat Washer, #8 Lockwasher, #8 Heavy Nut, #8-32 Hex Lockwasher, 5/16 Flat Washer, #10 Lockwasher, #10 Nut, #10-24 Hex Relay, SPDT with Resistor Harness, Kubota Key Switch Control Panel Instrument Panel Screw, 5/16-18 x 5/8” Hex Head Controller, Engine Speed Flat Washer, M5 Flat Washer, 5/16 Serial Numbers/Notes REFERENCE U11, See 66.1 REFERENCE U2, See 66.1 REFERENCE K15, K16, K17, See 66.1 See 46.1 See 7.1 and 8.1 See 6.1 REFERENCE U1, See 66.1 > Change from previous revision 45 HR-9016 Serial No. All Controls 6.1 Instrument Panel 11 21 2 10 22 12 24 25 23 3 9 26 16 37 38 17 18 27 19 20 13 1 28 38 14 15 33 32 7 6 4 8 30 5 4 34 35 36 31 29 40 46 HR-9016 Item Part No. Qty. Description 4231940 1 Panel, Dash 14 15 16 17 18 19 20 21 22 23 24 25 26 27 28 403920 366283 3006446 4174684 3006436 3006509 2810269 N/S N/S 2811020 366751 1002679 5003091 447006 444310 3005121 447002 444304 447206 444306 365943 447002 444304 447206 444306 162723 447006 444310 4 1 2 1 1 2 1 1 1 1 2 1 1 1 1 1 3 3 2 2 1 3 3 2 2 1 1 1 Screw, #10-24 x 1-1/4” Truss Head Handle Switch, Test / 4WD-Reverse Switch, PTO 4WD Switch Hole Plug Switch, Ignition • Lockwasher • Nut • Key Indicator Light, Yellow Gauge, Warning Light • Light Bulb and Socket • Lockwasher, #10 External Tooth • Nut, #10-24 Hex Gauge, Water Temperature • Lockwasher, #6 External Tooth • Nut, #6-32 Hex • Lockwasher, #8 Internal Tooth • Nut, #8-32 Hex Gauge, Fuel Level • Lockwasher, #6 External Tooth • Nut, #6-32 Hex • Lockwasher, #8 Internal Tooth • Nut, #8-32 Hex Gauge, Hour Meter • Lockwasher, #10 External Tooth • Nut, #10-24 Hex 29 3001307 13 1 2 3 4 5 6 7 8 9 10 11 12 13 30 31 32 33 34 35 36 37 38 39 40 REF Relay, SPDT With Resistor 1 Wire harness, Console 5003278 8 • 5003281 555846 400106 446128 452002 446118 444310 403910 1004992 473208 48228-10 4 3 2 2 12 12 12 8 1 1 1 Fuse, 5 Amp (Tan) • Fuse, 15 Amp (Light Blue) • Diode Screw, 1/4-20 x 5/8” Hex Head Lockwasher, 1/4 Flat Washer, #10 Lockwasher, #10 Heavy Nut, #10-24 Hex Screw, #10-24 x 1/2” Truss Head Latch, Panel Cable Tie #18 x 4 Clamp, Harness Serial Numbers/Notes REFERENCE SW12 & SW14, See 66.1 REFERENCE SW3, See 66.1 REFERENCE SW13, See 66.1 REFERENCE SW1, See 66.1 REFERENCE L1 and L2, See 66.1 REFERENCE U5, See 66.1 REFERENCE U10, See 66.1 REFERENCE U9, See 66.1 REFERENCE U3, See 66.1 REFERENCE K1 ~ K13, K15 ~ 17, See 66.1 See 46.1 REFERENCE F1, F2, F5 ~ F7, F9 ~ F11 See 66.1 REFERENCE F3, F4, F8, F12, See 66.1 REFERENCE D1 ~ 4, See 66.1 Not Shown > Change from previous revision 47 HR-9016 Serial No. All 7.1 Throttle Lever 11 13 12 19 1 18 10 21 14 17 22 9 8 3 7 6 19 18 17 16 2 15 20 48 5 4 HR-9016 Item 1 2 3 4 5 6 7 8 9 10 11 12 13 14 15 16 17 18 19 20 21 22 Part No. Qty. Description 4231901 1 4229340 N/S 800497 446116 402006 306506 4238243 521117 64209-08 4237642 452012 64229-05 366768 3006729 400110 453023 446130 443102 558012 400116 367176 1 1 2 2 1 1 1 1 2 1 1 1 1 1 2 4 4 4 AR 2 2 Serial Numbers/Notes Panel, Lift/Throttle Control Sensor, Throttle • Magnet, Sensor Screw, #10-24 x 3/4” Hex Socket Lockwasher, #10 Screw, #6-32 x 1/2” Slotted Lockwasher, #6 Shaft, Throttle Pivot Bushing, 5/8 x 5/8” Flanged Washer, Conical Spring Lever, Throttle Flat Washer, 1/2 Nut, 1/2-13 Nylock Hex Knob, Throttle Tab, Panel Support Screw, 1/4-20 x 7/8” Hex Head Flat Washer, 1/4 Lockwasher, 1/4 Heavy Nut, 1/4-20 Hex Pad, 1” Wide Cork Screw, 1/4-20 x 1-1/2” Hex Head Spacer, Throttle Stop REFERENCE U24, See 66.1 10 Foot Roll, Cut to 5-1/2” > Change from previous revision 49 HR-9016 Serial No. All 8.1 Lift Valve and Controls 4 21 18 11 3 4 7 6 20 5 6 7 19 17 20 15 12 16 6 7 8 13 10 1 14 13 5 11 9 2 50 HR-9016 Item Part No. 1 2 3 4 5 6 7 8 9 10 11 12 13 14 15 16 17 18 19 20 21 Qty. Description 340061 2 Fitting, -6 ORFS x -6 ORB 90° 339909 339897 1003611 3006737 404022 453023 446128 443102 1004584 5003539 5003538 340062 339909 339898 340029 339910 339898 400120 1001802 340027 339909 339898 340026 339909 339897 366133 1003100 361833 3005157 367631 461356 3010082 1 1 1 1 3 5 7 7 1 1 1 1 1 1 1 1 1 4 1 2 1 1 3 1 1 3 3 1 3 2 2 1 • O-Ring, -6 ORFS • O-Ring, -6 ORB Tube, Lift Valve to Backpressure Hinge, Control Panel Screw, 1/4-20 x 1” Truss Head Flat Washer, 1/4 Lockwasher, 1/4 Nut, 1/4-20 Hex Backpressure Valve • Seal Kit • Adjusting Knob Fitting, -6 ORFS x -8 ORB 90° • O-Ring, -6 ORFS • O-Ring, -8 ORB Fitting, -8 ORFS x -8 ORB 45° • O-Ring, -8 ORFS • O-Ring, -8 ORB Screw, 1/4-20 x 2” Hex Head Lift Valve Fitting, -6 ORFS x -8 ORB 45° • O-Ring, -6 ORFS • O-Ring, -8 ORB Fitting, -6 ORFS x -6 ORB 45° • O-Ring, -6 ORFS • O-Ring, -6 ORB Chain, Master Link With Clip Lever, Lift Pin Knob Spacer Roll Pin, 3/32 x 1/2” Stop, Dash Panel Serial Numbers/Notes See 8.1 > Change from previous revision 51 HR-9016 Serial No. All 9.1 Accelerator Pedal 5 19 18 19 5 20 21 7 40 38 25 37 30 35 34 33 8 38 25 37 8 7 35 6 4 12 3 27 17 3 5 17 31 31 33 30 32 26 25 23 1 16 34 32 11 24 13 14 16 2 17 17 36 11 10 16 39 10 15 11 39 17 16 9 22 28 29 9016-08 52 HR-9016 Item 1 2 3 4 5 6 7 8 9 10 11 12 13 14 15 16 17 18 19 20 21 22 23 24 25 26 27 28 29 30 31 32 33 34 35 36 37 38 39 40 Part No. Qty. Description 1003244 1 Arm, Hydro Pedal 471214 3010305 1003071 400190 453009 446134 443106 1003145 366974 443112 445785 3006889 3006886 400268 446140 443110 3006888 3003475 3002695 3007230 3007228 3007220 452004 446128 400106 333542 400266 400262 3009026 4140149 839918 825357 839935 403746 452002 446118 444310 441606 453023 443102 3004385 444718 1 2 1 4 1 3 3 1 2 3 1 1 1 1 4 6 1 2 1 1 1 1 2 4 2 1 1 1 2 2 1 2 1 4 4 4 4 2 2 2 4 1 • Grease Fitting • Bushing Shaft Screw, 5/16-18 x 1-1/4” Hex Head Flat Washer, 5/16 Lockwasher, 5/16 Nut, 5/16-18 Hex Link, Hydro Control Rod End Nut, 3/8-24 Hex Nut, 3/8-24 Hex Left Hand Turnbuckle Threaded Rod Screw, 3/8-16 x 1-3/4” Hex Head Lockwasher, 3/8 Nut, 3/8-16 Hex Pedal, Hydro Grip, Pedal Washer Stop, Mow Speed Plate, Activator Plate, Switch Flat Washer, 1/4 Lockwasher, 1/4 Screw, 1/4-20 x 5/8” Hex Head Tie Stud Screw, 3/8-16 x 1-1/2” Hex Head Screw, 3/8-16 x 1” Hex Head Angle, Switch Switch, Proximity • Connector, 2 Wire Deustch • Pin, Deustch • Wedge Lock Screw, #10-24 x 5/8” Hex Head Flat Washer, #10 Lockwasher, #10 Heavy Nut, #10-24 Hex Carriage Bolt, 1/4-20 x 3/4” Flat Washer, 1/4 Nut, 1/4-20 Hex Seal, Rod End Locknut, 5/16-18 Center Serial Numbers/Notes REFERENCE SW6 & SW 10, See 66.1 > Change from previous revision 53 HR-9016 Serial No. All 10.1 Steering Assist 23 6 9 7 29 28 26 27 4 9 8 5 10 3 7 12 3 1 6 25 13 25 3 2 11 13 12 14 17 2 3 1 Part of Frame 24 Part of Frame 19 16 15 13 19 16 Part of Frame Part of Frame 18 20 21 17 24 22 20 16 21 22 15 13 14 16 30 54 HR-9016 Item 1 2 3 4 5 6 7 8 9 10 11 12 13 14 15 16 17 18 19 20 21 22 23 24 25 26 27 28 29 30 Part No. Qty. Description 1003794 2 Steering Assist Pedal 471214 3010305 1003245 452006 446134 443106 3006107 400188 4103163 4103161 461453 460028 1003825 1003824 364154 3008344 3008907 400262 452008 446142 443110 1006812 3009607 455048 446128 443102 440042 360970 1002769 1 4 1 1 3 3 2 3 1 1 2 4 2 2 4 2 1 2 2 2 2 2 2 2 1 1 1 1 2 • Grease Fitting • Bushing Shaft Flat Washer, 5/16 Lockwasher, 5/16 Nut, 5/16-18Hex Spring, Pedal Return Screw, 5/16-18 x 1” Hex Head Cable, Right Turn Assist Cable, Left Turn Assist Clevis Pin, 5/16 x 1” Cotter Pin, 1/8 x 1” Connector, Brake Pivot, Brake Lever • Bushing Pin, Clevis Shield, Cable Screw, 3/8-16 x 1” Hex Head Flat Washer, 3/8 Lockwasher, 3/8 Heavy Nut, 3/8-16 Hex Pad, Pedal Nut, M12-1.75 Hex Jam Flat Washer, 3/4 Lockwasher, 1/4 Nut, 1/4-20 HEX Bolt Carriage 1/4-20 X 3/4 SN Clamp-Open Wheel Motor, Front Serial Numbers/Notes See 37.1 > Change from previous revision 55 HR-9016 Serial No. All 11.1 Parking Brake 13 12 1110 2 1 7 View Rotated for clarity 4 1 5 7 6 12 11 3 6 14 8 9 15 16 17 22 56 21 18 19 20 HR-9016 Item 1 2 3 4 5 6 7 8 9 10 11 12 13 14 15 16 17 18 19 20 21 22 Part No. Qty. Description 1003838 1 N/S 545234 460004 545237 3006108 3008548 3008874 441672 453009 446134 443106 400188 461456 460016 403746 4140149 839918 825357 839935 452002 446118 444310 3009193 4182720 2 2 2 2 2 1 1 2 2 4 5 2 2 2 2 1 1 2 1 2 2 2 AR 1 Serial Numbers/Notes Parking Brake Lever • Stabilizer Bar • Clevis Pin • Cotter Pin • Spacer Cable, Parking Brake Mount, Brake Lever Plate, Switch Mount Carriage Bolt, 5/16-18 x 2-1/2” Flat Washer, 5/16 Lockwasher, 5/16 Nut, 5/16-18 Hex Screw, 5/16-18 x 1” Hex Head Clevis Pin, 5/16 x 1-5/8” Hex Head Cotter Pin, 3/32 x 1” Screw, #10-24 x 3/4” Hex Head Switch, Proximity • Connector, 2 Wire Deustch • Pin, Deustch • Wedge Lock Flat Washer, #10 Lockwasher, #10 Heavy Nut, #10-24 Hex Shim, Switch Guard, Proximity Switch REFENENCE SW7, See 66.1 > Change from previous revision 57 HR-9016 Serial No. 70538 All Serial No. 70541 All Frame 12.1 Frame 15 8 7 6 25 20 19 18 24 12 11 21 17 24 33 32 13 9 10 14 10 16 1 23 10 11 12 2 27 34 31 30 7 35 6 28 22 26 3 34 4 29 22 28 5 9016-02 58 HR-9016 Item 1 2 3 4 5 6 7 8 9 10 11 12 13 14 15 16 17 18 19 20 21 22 23 24 25 26 27 28 29 30 31 32 33 34 35 Part No. Qty. Description N/S 1 Frame 1002889 1002895 1002896 400416 446154 443118 4226721 4226720 400616 446166 443126 400406 1004938 556417 5003691 556419 3007919 340075 339912 339901 339996 339912 339901 452008 446140 400260 3007920 453017 1004691 3009197 REF 1004308 1004309 400778 452018 446178 443130 453004 409701 3010035 4228240 1 1 1 4 6 6 1 1 8 8 8 2 1 1 1 1 1 1 1 1 1 1 1 4 4 4 1 8 2 2 1 1 1 8 4 8 8 1 1 2 1 Cross Frame Cylinder Mount, Right Cylinder Mount, Left Screw, 1/2-13 x 2-1/2” Hex Head Lockwasher, 1/2 Heavy Nut, 1/2-13 Hex Bracket, Right Radiator Bracket, Left Radiator Screw, 5/8-11 x 2” Hex Head Lockwasher, 5/8 Heavy Nut, 5/8-11 Hex Head Screw, 1/2-13 x 1-1/4” Hex Head Charge Filter Assembly • Head • Oil Filter Cartridge • Charge Pressure Switch Bracket, Valve Mounting Fitting, -12 ORFS x -16 ORB 90° • O-Ring, -12 ORFS • O-Ring, -16 ORB Adapter, Straight • O-Ring, -12 ORFS • O-Ring, -16 ORB Flat Washer, 3/8 Lockwasher, 3/8 Screw, 3/8-16 x 7/8” Hex Head Bracket, Deck Valve Mounting Flat Washer, 1/2 Tie Down Bracket, Hose Plate, Serial Number Mount, Fuel Tank Rear Mount, Hydraulic Tank Rear Screw, 3/4-10 x 2-1/2” Hex Head Flat Washer, 3/4 Lockwasher, 3/4 Heavy Nut, 3/4-10 Heavy Flat Washer, #8 Screw, #8-18 x 3/8” Thread Form Plate Bracket, Sedimentor Mounting Serial Numbers/Notes REFENENCE SW15, See 66.1 > Change from previous revision 59 HR-9016 Serial No. 70539 All Serial No. 70540 All 13.1 Frame With ROPS 15 8 7 6 25 24 12 20 19 11 9 18 21 17 13 10 32 10 1 16 33 14 23 10 11 12 2 27 P/O 34 31 30 7 6 34 35 22 3 28 26 4 22 5 29 28 9016-02 60 HR-9016 Item 1 2 3 4 5 6 7 8 9 10 11 12 13 14 15 16 17 18 19 20 21 22 23 24 25 26 27 28 29 30 31 32 33 34 35 Part No. Qty. Description N/S 1 Frame 1002889 1002895 1002896 400416 446154 443118 4226721 4226720 400616 446166 443126 400406 1004938 556417 5003691 556419 3007919 340075 339912 339901 339996 339912 339901 452008 446140 400260 3007920 453017 1004691 3009197 REF 1004308 1004309 400778 452018 446178 443130 453004 409701 1002893 4228240 1 1 1 4 6 6 1 1 8 8 8 2 1 1 1 1 1 1 1 1 1 1 1 4 4 4 1 8 2 2 1 1 1 8 4 8 8 1 1 1 1 Cross Frame Cylinder Mount, Right Cylinder Mount, Left Screw, 1/2-13 x 2-1/2” Hex Head Lockwasher, 1/2 Heavy Nut, 1/2-13 Hex Bracket, Right Radiator Bracket, Left Radiator Screw, 5/8-11 x 2” Hex Head Lockwasher, 5/8 Heavy Nut, 5/8-11 Hex Head Screw, 1/2-13 x 1-1/4” Hex Head Charge Filter Assembly • Head • Oil Filter Cartridge • Charge Pressure Switch Bracket, Valve Mounting Fitting, -12 ORFS x -16 ORB 90° • O-Ring, -12 ORFS • O-Ring, -16 ORB Adapter, Straight • O-Ring, -12 ORFS • O-Ring, -16 ORB Flat Washer, 3/8 Lockwasher, 3/8 Screw, 3/8-16 x 7/8” Hex Head Bracket, Deck Valve Mounting Flat Washer, 1/2 Tie Down Bracket, Hose Plate, Serial Number Mount, Fuel Tank Rear Mount, Hydraulic Tank Rear Screw, 3/4-10 x 2-1/2” Hex Head Flat Washer, 3/4 Lockwasher, 3/4 Heavy Nut, 3/4-10 Heavy Flat Washer, #8 Screw, #8-18 x 3/8” Thread Form ROPS Bracket, Sedimentor Mounting Serial Numbers/Notes REFERENCE SW15, See 66.1 Includes Decals and Seat Belt > Change from previous revision 61 HR-9016 Serial No. All 14.1 Axle Assembly 8 15 7 9 2 6 5 4 3 3 / 10 As Required 16 9 13 3 1 18 11 17 19 62 11 20 8 21 12 14 HR-9016 Item 1 2 3 4 5 6 7 8 9 10 11 12 13 14 15 16 17 18 19 20 21 Part No. – 1003001 3006475 363766 445642 460072 400408 446152 443118 3003101 3007683 4242643 4242644 360111 453017 1002769 5003641 5003642 5003643 5003644 5003651 340074 339912 339900 400410 4242642 4242662 363233 Qty. Description 1 1 AR 1 1 1 1 21 21 AR 24 2 2 2 1 2 1 1 1 1 1 4 1 1 20 2 2 2 Steering Axle Serial Numbers/Notes See 15.1 Pivot Shaft Washer, 3/32” Thick Thrust Washer Nut, 1-1/2 -12 Slotted Hex Cotter Pin, 1/4 x 2-1/2” Screw, 1/2-13 x 1-1/2” Hex Head Lockwasher, 1/2 Nut, 1/2-13 Hex Washer, 1/32” Thick Thrust Wheel Bolt, 1/2-20 Tire, 24 x 12-12 6 Ply Grassmaster Wheel, 12 x 9.5 Valve, Inflation Flat Washer, 1/2 Wheel Motor, Front • Brake Shoe Kit • Mechanical Control Kit • Adjusting System Kit • Brake Drum • Motor Seal Kit Fitting, -12 ORFS x -12 ORB 90° • O-Ring, -12 ORFS • O-Ring, -12 ORB Screw, 1/2-13 x 1-3/4” Hex Head Tire, 29 x 14-15 12 Ply Ultra Chevron Wheel, 15 x 12 Inflation Valve > Change from previous revision 63 HR-9016 Serial No. All 15.1 Steering Axle 22 24 23 12 20 22 12 10 9 21 5 24 11 23 12 19 11 8 18 7 20 12 20 10 2 9 4 15 6 1 14 7 4 13 21 3 2 17 17 2 16 2 25 17 17 9016-38 64 HR-9016 Item 1 2 3 4 5 6 7 8 9 10 11 12 13 14 15 16 17 18 19 20 21 22 23 24 25 Part No. Qty. Description 4209060 2 Wheel Motor 460030 443842 401208 5003530 5003529 4236722 5003526 5003518 5003515 5003528 5003527 5003522 5003519 5003523 5003524 4113656 4113655 5003562 443826 471214 460035 458126 5003520 5003531 5003543 4 1 8 1 1 2 1 2 2 2 4 1 1 1 1 1 1 2 2 3 2 2 2 2 1 Cotter Pin, 1/8 x 1-1/4” Nut, 1-1/8 -12 Hex Jam Screw, 1/2-13 x 1-3/4” Grade 8 Frame, RH Wheel Motor Frame, LH Wheel Motor Hub, Wheel Axle, Center Section Washer, Thrust Washer, Thrust Bushing, Bronze Bushing, Bronze Tie Rod Nut, 1-1/8 -12 Left Hand Thread Tie Rod End, Left Hand Thread Tie Rod End, Right Hand Thread Cylinder, Steering • Seal Kit Screw, 5/8-11 Socket Head Set Nut, 5/8-11 Hex Jam Grease Fitting Cotter Pin, 1/8 x 2” Snap Ring Snap RIng, External Plug, Expansion Socket Assembly Serial Numbers/Notes See 58.1 See 57.1 > Change from previous revision 65 HR-9016 Serial No. All 16.1 Battery Tray 11 3 5 7 1 9 1 10 15 8 4 18 13 20 19 12 2 5 7 9 14 18 3 17 1 16 4 18 66 6 HR-9016 Item 1 2 3 4 5 6 7 8 9 10 11 12 13 14 15 16 17 18 19 20 Part No. Qty. 440078 4 440118 443106 443110 446134 446142 452006 453011 3008461 3010346 N/S 4133043 4230320 4133224 4231800 4136563 64163-46 800709 4138647 4138648 2 4 6 4 2 4 2 4 4 2 1 1 2 1 1 4 11 1 1 Description Serial Numbers/Notes Bolt, Carriage 5/16-18 x 3/4” Bolt, Carriage 3/8-16 x 1” Nut, 5/16-18 Hex Nut, 3/8-16 Hex Lockwasher, 5/16 Lockwasher, 3/8 Heavy Flat Washer, 5/16 Flat Washer, 3/8 Angle, Battery Clamp Terminal Bolt, Side Battery Cable, Negative Battery Cable, Positive Battery Support, Weldment Tray, Battery Support Bracket, Hood Rear Assy Washer, .388 x .880 Bolt, Flange Head 3/8-16 x 1-1/4: Battery Cable, Pos Battery Cable, Neg REFERENCE B1 and B2, See 66.1 > Change from previous revision 67 HR-9016 Serial No. All 17.1 Tilt Steering 14 8 15 13 12 9 4 7 19 5 22 11 2 21 18 20 16 A 20 18 6 17 23 21 A 3 23 24 1 25 ® 33 28 29 31 25 30 25 31 25 25 68 27 26 22 10 32 HR-9016 Item Part No. 1 2 3 4 5 6 7 8 9 10 11 12 13 14 15 16 17 18 19 20 21 22 23 24 25 26 27 28 29 30 31 32 33 Qty. Description 4253491 1 Steering Tower 4256510 4247830 4197940 64205-054 450411 4211400 4212980 443828 4201840 450168 450410 2811547 2811364 2811365 447224 5002918 4256511 450390 452418 365033 4255270 4247312 548804 400216 445795 5002919 416911 3010651 404016 445245 441677 441614 4182386 1 1 1 4 4 4 1 1 1 4 4 4 1 1 1 1 1 3 1 2 2 2 2 1 9 1 2 1 6 6 2 4 1 Bracket, Steering Pump Valve, Steering • Seal Kit Screw, M8-1.25 x 130 mm Hex Head Lockwasher, M8 Spacer, Steering Valve Shaft, Steering • Nut, 5/8-18 Hex Jam • Seal Screw, M6-1 x 12 mm Hex Head Lockwasher, M6 Washer, Steering Steering Wheel • Cap, Steering Wheel Lockwasher, 5/8 Internal Tooth Actuator, Steering Shoulder Bolt, M6-1 Flat Washer, M8 Nut, M6-1 Hex Flange Shoulder Bolt, 3/8-16 Flange Bearing Spacer, Steering Column Nut, 3/8-16 Hex Flange Screw, 5/16-18 x 2-3/4” Hex Head Nut, 5/16-18 Hex Flange Cable, Actuator Screw, #10-24 x 1/2” Thread Cutting Cover, Steering Column Screw, 1/4-20 x 5/8” Truss Head Nut, 1/4-20 Tinnerman Carriage Bolt, 5/16-18 x 1-1/2” Carriage Bolt, 5/16-18 x 1” Decal, Jacobsen Emblem Serial Numbers/Notes > Change from previous revision 69 HR-9016 Serial No. All Engine and Radiator 18.1 Radiator 26 17 24 22 26 16 To Engine 21 20 14 13 19 20 20 25 26 15 18 27 27 28 5 29 27 12 23 11 14 6 13 5 1 7 2 6 29 2 9 3 28 4 8 10 5 6 7 5 6 7 9016-12 70 HR-9016 Item 1 2 3 4 5 6 7 8 9 10 11 12 13 14 15 16 17 18 19 20 21 22 23 24 25 26 27 28 29 Part No. Qty. Description 4228260 1 440120 4226721 4226720 452008 446142 443110 4139109 440080 445781 4225780 4231020 400184 446136 443106 4239223 3007731 3009537 440082 453009 48540-01 554748 554748 4226062 4132168 4231040 326799 473142 5003216 400262 6 1 1 18 20 12 1 1 1 1 1 4 8 8 1 1 1 4 4 3 AR AR 1 1 1 4 3 AR 14 Serial Numbers/Notes Firewall, Radiator Carriage Bolt, 3/8-16 x 1-1/4” Bracket, Right Radiator Bracket, Left Radiator Flat Washer, 3/8 Lockwasher, 3/8 Heavy Nut, 3/8-16 Hex Bracket, Remote Engine Oil Filter Carriage Bolt, 5/16-18 x 7/8” Nut, 5/16-18 Whizlock Flange Radiator • Radiator Cap Screw, 5/16-18 x 3/4” Hex Head Lockwasher, 5/16 Heavy Nut, 5/16-18 Hex Mount, Overflow Tank Tank, Radiator Overflow Cap, Overflow Tank Carriage Bolt, 5/16-18 x 1” Flat Washer, 5/16 Clamp, Hose Hose, 5/16” I.D. Hose, 5/16” I.D. Shroud, Fan Hose, Upper Radiator Hose, Lower Radiator Clamp, Hose Cable Tie, 3/16 x 14” Seal, Self Adhesive Neoprene Screw, 3/8-16 x 1” Hex Head See 12.1 or 13.1 See 12.1 or 13.1 10 Foot Length, Cut to 82” 10 Foot Length, Cut to 34” 15 Foot Length, Cut to Size. > Change from previous revision 71 HR-9016 Serial No. All 19.1 Radiator Screen 5 9 8 13 10 13 9 8 11 12 18 19 11 12 20 3 14 15 16 17 7 2 21 4 4 6 3 2 1 72 HR-9016 Item 1 2 3 4 5 6 7 8 9 10 11 12 13 14 15 16 17 18 19 20 21 Part No. Qty. Description 1003942 1 3008561 409804 3009095 3008554 2810634 3010014 440082 4227161 3008563 446136 443106 4175540 4226061 440120 452008 443110 400262 446142 1003011 5002693 556419 557620 2 8 2 1 1 1 4 1 2 4 5 2 1 4 4 4 3 3 1 1 1 AR Serial Numbers/Notes Screen Guide, Screen Screw, #10-24 x 1/2” Thread Cut Seal, Neoprene Cap, Right Side Cap, Left Side Shield, Screen Carriage Bolt, 5/16-18 x 1” Angle, Cooler Top Plate, Cooler Lock Lockwasher, 5/16 Heavy Nut, 5/16-18 Hex Knob Bottom Plate Carriage Bolt, 3/8-16 x 1-1/4” Flat Washer, 3/8 Nut, 3/8-16 Hex Screw, 3/8-16 x 1” Hex Head Lockwasher, 3/8 Heavy Return Filter • Return Filter Cartridge • Switch Molding > Change from previous revision 73 HR-9016 Serial No. All 20.1 Remote Engine Oil Filter 6 1 10 12 3 7 8 22 16 18 19 20 21 9 17 15 23 14 13 25 24 74 5 4 2 11 HR-9016 Item Part No. 1 2 3 4 5 6 7 8 9 10 11 12 13 14 15 16 17 18 19 20 21 22 23 24 25 Qty. Description 450190 2 Screw, M8-1.25 x 16 Hex Head 4136120 4137099 339910 4133342 4133240 4137101 339909 4183634 4137100 339910 4137894 446140 4133241 4135261 340063 339909 339899 340070 339911 339899 4137611 367559 441618 444718 400264 446142 452008 3009860 4135761 4136646 4136647 1 1 1 1 1 1 1 1 1 1 1 2 1 1 1 1 1 1 1 1 2 2 2 2 2 2 2 1 1 1 1 Adaptor, Oil Filter Adaptor, 90°, 3/8 NPTF x -8 ORFS • O-Ring, -8 ORFS O Ring Plug, Oil Filter Adaptor, 90° 3/8 NPTF x -6 ORFS • O-Ring, -6 ORFS Cover, Oil Filter Adaptor, 90° 1/2 NPTF x -8 ORFS • O-Ring, -8 ORFS Filter, Engine Oil Lockwasher, 3/8 Reg O Ring Hose, Pump Right Side Tube Fitting, -6 ORFS x -10 ORB 90° • O-Ring, -6 ORFS • O-Ring, -10 ORB Fitting, -10 ORFS x -10 ORB 90° • O-Ring, -10 ORFS • O-Ring, -10 ORB Mounting Block, Rubber Washer, Oil Cooler Mounting Bolt, Carriage 5/16-18 x 2” Locknut, 5/16-18 Center Screw, 3/8-16 x 1-1/4” Hex Head Lockwasher, 3/8 Flat Washer, 3/8 Cooler, 3 Row Bracket, Engine Oil Cooler Hose Assembly, Inlet Hose Assembly, Return Serial Numbers/Notes Part of Engine Part of Engine Part of Engine Part of Engine Part of Engine Part of Engine > Change from previous revision 75 HR-9016 Serial No. All 21.1 Air Cleaner and Muffler 25 24 22 23 24 30 31 32 27 37 30 32 34 View rotated 180° for clarity. 18 36 28 16 17 17 36 21 31 33 13 35 20 19 14 15 7 4 5 11 6 12 22 5 6 10 17 6 5 4 8 26 9 65 4 1 1 3 76 29 5 2 7 HR-9016 Item 1 2 3 4 5 6 7 8 9 10 11 12 13 14 15 16 17 18 19 20 21 22 23 24 25 26 27 28 29 30 31 32 33 34 35 36 37 Part No. Qty. Description 4227360 2 361898 4220060 453009 446136 443106 440082 4233420 440084 4227481 366884 363385 450191 450422 3009505 1004417 5003370 5003372 5003373 813689 4227502 4227500 359615 1001752 4240203 400404 446154 365979 4135922 4226280 363485 3002042 400260 446140 452008 443110 162236 4240782 440082 453017 2 1 6 10 8 4 1 2 1 2 2 2 2 1 1 1 1 1 3 1 1 1 1 1 2 6 4 1 1 4 4 4 4 4 2 1 1 2 2 Serial Numbers/Notes Bracket, Heat Shield Screw, M8-1.25 x 16 mm Hex Head Engine, V3800 Flat Washer, 5/16 Lockwasher, 5/16 Heavy Nut, 5/16-18 Hex Carriage Bolt, 5/16-18 x 1” Heat Shield Carriage Bolt, 5/16-18 x 1-1/4” Bracket, Support Screw, M10-1.25 x 20 mm Hex Lockwasher, M10 Screw, M8-1.25 x 16 mm Hex Head Lockwasher, M8 Clamp, Air Cleaner Mount Air Cleaner • Element, Air Cleaner • Cover • Valve, Vactuator Clamp, 4-1/4” Hose Hose, Air Cleaner Intake Hose, Turbo Intake Clamp, Hose Indicator, Air Cleaner Service Bracket, Muffler Support Screw, 1/2-13 x 1” Hex Head Lockwasher, 1/2 Heavy Screw, M12-1.25 x 25 mm Hex Head Gasket, Exhaust Muffler Lockwasher, M10 Hevay Screw, M10-1.25 x 22 Socket Head Screw, 3/8-16 x 7/8” Hex Head Lockwasher, 3/8 Flat Washer, 3/8 Nut, 3/8-16 Hex Clamp, Exhaust Tailpipe Carriage Bolt, 5/16-18 x 1” Flat Washer, 1/2 Included with Engine > Change from previous revision 77 HR-9016 Serial No. All 22.1 Engine Mounting 24 3 1 2 21 29 17 16 6 8 7 10 13 5 9 28 7 8 25 27 7 26 22 15 11 10 12 8 19 25 14 26 20 11 8 7 4 10 78 14 11 20 18 12 23 12 18 23 HR-9016 Item Part No. 1 2 3 4 5 6 7 8 9 10 11 12 13 14 15 16 17 18 19 20 21 22 23 24 25 26 27 28 29 Qty. Description – 1 4261130 3008821 4136286 4136285 4132013 365979 446154 4226380 5003157 400266 446142 443110 4137616 4136227 323943 316913 452012 446166 443118 361071 362978 444762 443128 363996 400656 452016 455012 400268 446136 1 1 1 1 2 19 18 1 2 8 8 8 2 2 2 2 2 2 2 2 4 2 2 1 2 2 3 2 4 Serial Numbers/Notes Engine and Pump Assembly See 23.1 Fan Temperature Sender Engine Mount, Right Hand Engine Mount, Left Hand Engine Mount, Rear Screw, M12-1.25 x 25mm Hex Head Lockwasher, 1/2 Heavy Drive Shaft • Kit, Cross and Bearing Screw, 3/8-16 x 1-1/2” Hex Head Lockwasher, 3/8 Heavy Nut, 3/8-16 Hex Isolator, Rear Isolator, Front Washer, 2”O.D. x 17/32” I.D. Screw, 1/2-13 x 4” Hex Head Flat Washer, 1/2 Lockwasher, 5/8” Heavy Nut, 1/2-13 Hex Flat Washer, Isolator Screw, M8-1.25 x 50mm Hex Flange Locknut, 3/8-16 Center Nut, 5/8-18 Hex Switch, Temperature Warning Screw, 5/8-18 x 4” Hex Head Flat Washer, 5/8 Flat Washer, 1/2 Screw, 3/8-16 x 1-3/4” Hex Head Lockwasher, 5/16 Heavy Mounting Hardware Part of Engine REFERENCE U6, See 66.1 Included with Engine REFERENCE SW17, See 66.1 > Change from previous revision 79 HR-9016 Serial No. All 23.1 Engine and Pump Assembly 5 7 14 15 5 10 7 14 15 12 2 20 19 9 1 13 4 3 4 16 18 17 22 80 21 11 8 6 HR-9016 Item Part No. 1 2 3 4 5 6 7 8 9 10 11 12 13 14 15 16 17 18 19 20 21 22 Qty. Description 4220060 1 4137894 4138120 4230980 339989 339911 339899 362263 363485 400336 400406 446148 446154 453017 1003247 5003163 5003164 3002042 3006238 3006240 3006829 3006835 4132016 366884 363385 446130 361001 447214 362539 1 1 1 3 1 1 8 20 8 4 8 4 4 1 1 1 12 1 1 2 2 1 1 1 1 1 1 1 Serial Numbers/Notes Kubota Engine Assembly • Engine Oil Filter • Fan Belt • Fuel Filter Cartridge Fitting, -10 ORFS x -10 ORB Striaght • O-Ring, -10 ORFS • O-Ring, -10 ORB Bolt, M10-1.25 X 25 Hex Head Lockwasher, M10 Heavy Screw, 7/16-14 X 1-1/4” Hex Head Screw, 1/2-13 X 1-1/4” Hex head Lockwasher, 7/16 Heavy Lockwasher, 1/2 Heavy Flat Washer, 1/2 Pump, Triple • Seal Kit, Front Section • Seal Kit, Section Bolt, M10-1.25 X 22 Socket Head Hub Flange, 10” Fitting, 4-Bolt Flange O-Ring, 1.750 O.D. X 1.500 I.D. Flywheel Cover, Rear Screw, M 10-1.25 x 20 mm Hex Head Lockwasher, M10 Lockwasher, 1/4 Heavy Nut, M6-1 Hex Lockwasher, 5/16 Internal Tooth Nut, M8-1.25 Hex One kit required for each section > Change from previous revision 81 HR-9016 Serial No. All Tanks 24.1 Tank Mounting 2 3 8 7 5 10 1 14 16 10 14 6 17 13 18 14 11 14 11 15 15 9 11 14 10 82 12 15 4 HR-9016 Item Part No. 1 2 3 4 5 6 7 8 9 10 11 12 13 14 15 16 17 18 Qty. Description 3006264 1 Tank, Hydraulic oil 3008808 3009203 839918 825357 839935 339900 441689 3009236 4237506 452012 443118 3009980 400188 446136 362615 440088 452006 443106 3006566 339904 3006847 339904 3002397 339899 1 1 1 2 1 1 2 1 1 2 4 1 6 6 4 2 8 6 2 1 1 1 1 1 Cap, Breather Filler Sensor, Oil Level • Connector, 2 Wire Deustch • Pin, Deustch • Wedge Lock • O-Ring, SAE -12 Carriage Bolt, 1/2-13 x 8-1/2” Wall, Fender Bracket, Hose Retainer Flat Washer, 1/2 Nut, 1/2-13 Hex Fender, Right Side Screw, 5/16-18 x 1” Hex Head Lockwasher, 5/16 Heavy Washer, Special Carriage Bolt, 5/16-18 x 1-3/4” Flat Washer, 5/16 Nut, 5/16-18 Hex Strainer • O-Ring SAE -32 Fitting, -32 ORB Beaded • O-Ring SAE -32 Plug, -10 ORB Magnetic • O-Ring SAE -10 Serial Numbers/Notes REFERENCE SW11, See 66.1 > Change from previous revision 83 HR-9016 Serial No. All 25.1 Fuel Tank 9 6 8 7 2 1 3 4 5 13 14 12 11 10 11 11 13 12 11 15 10 84 13 12 11 10 HR-9016 Item 1 2 3 4 5 6 7 8 9 10 11 12 13 14 15 Part No. Qty. Description 3006265 1 Tank, Fuel 441689 3009236 452012 443118 4177480 3006639 403910 340481 400188 452006 446136 443106 3009979 362615 2 1 2 4 1 1 5 1 6 6 4 4 1 4 Carriage Bolt, 1/2-13 x 8-1/2” Wall, Fender Flat Washer, 1/2 Nut, 1/2-13 Hex Cap, Fuel Sender, Fuel Screw, #10-24 x 1/2” Truss Head Cover, Sender Screw, 5/16-18 x 1” Hex Head Flat Washer, 5/16 Lockwasher, 5/16 Heavy Nut, 5/16-18 Hex Fender Washer, Special Serial Numbers/Notes REFERENCE U4, See 66.1 > Change from previous revision 85 HR-9016 Serial No. All 26.1 Fuel Routing 36 4 34 4 37 4 38 41 4 35 40 39 4 42 30 4 4 28 10 4 4 A 33 B 32 4 31 22 B A 26 Engine Rotated 180 Degrees For Clarity 29 4 4 21 13 14 15 23 24 25 27 28 10 16 15 12 20 11 7 8 15 14 18 10 9 6 4 5 2 4 3 4 2 4 1 19 2 86 17 HR-9016 Item Part No. 1 2 3 4 5 6 7 8 9 10 11 12 13 14 15 16 17 18 19 20 21 22 23 24 25 26 27 28 29 30 31 32 33 34 35 36 37 38 39 40 41 42 Qty. Description 3006265 1 361117 2810702 48540-01 554748 4225760 4251726 400216 4228240 446134 443106 554748 3008820 400262 446140 452008 3009197 132647 443110 3003704 554748 4135918 441606 453023 446130 443102 441614 452006 446136 554748 4230960 4230980 554748 554748 4251808 4233781 4233780 554752 4138044 554752 4230820 400188 4251807 554748 3 1 18 AR 1 1 1 1 1 4 1 1 1 2 3 1 1 1 1 1 1 1 1 1 1 1 1 3 1 1 1 1 1 1 1 1 1 1 1 1 2 1 1 Tank, Fuel Bushing Valve, Needle Clamp, Hose Fuel Line, Tank to Sedimentor Sedimentor • Element, Sedimentor Filter Screw, 5/16-18 x 2-3/4” Hex Head Bracket, Sedimentor Mounting Lockwasher, 5/16 Nut, 5/16-18 Hex Fuel Line, Sedimentor to Pump Clamp, Double Hose (5/8” O.D.) Screw, 3/8-16 x 1” Hex Head Lockwasher, 3/8 Flatwasher, 3/8 Bracket, Hose Fuel Shutoff Nut, 3/8-16 Hex Valve, Overflow Fuel Line, Tee to Tank Pump, Fuel Bolt, Carriage 1/4-20 x 3/4” Flat Washer, 1/4 Lockwasher, 1/4 Heavy Nut, 1/4-20 Hex Bolt, Carriage 5/16-18 x 1” Flat Washer, 5/16 Lockwasher, 5/16 Heavy Fuel Line, Fuel Pump to Fuel Filter Fuel Filter • Cartridge, Filter Element Fuel Line, Fuel Filter to Engine Fuel Line, Engine to Tee Tee, Hose Washer Bleeder Fuel Line, Beeder to Check Valve Check Valve, Fuel Fuel Line, Check Valve to Tee Bracket, Fuel Filter Screw, 5/16-18 x 1” Hex Head Connector, Hose Fuel Line, Check Valve to Tee Serial Numbers/Notes See 25.1 10 Ft. Roll, Cut to Length, 5/16” I.D. Included with Engine 10 Ft. Roll, Cut to 37”, 5/16” I.D. See 12.1, or 13.1 10 Ft. Roll, Cut to 85”, 5/16” I.D. Included with Engine 10 Ft. Roll, Cut to 49”, 5/16 I.D. Included with Engine 10 Foot Roll, Cut to 15.5”, 5/16 I.D 10 Foot Roll, Cut to 10”, 5/16 I.D. Included with Engine Included with Engine Included with Engine 10 Foot Roll, Cut to 5”, 3/16 I.D. Included with Engine 10 Foot Roll, Cut to 2”, 3/16 I.D. See 35.1 Included with Engine 10 Foot Roll, CUt to 3”, 5/16 I.D. > Change from previous revision 87 HR-9016 Serial No. All Traction Pump 27.1 Pump and 4WD Valve Mounting 16 23 26 20 18 24 25 1 17 13 23 14 15 10 7 9 12 11 21 22 6 14 19 8 4 3 4 5 12 11 10 9 2 88 Item Part No. 1 2 3 4 5 6 7 8 9 10 11 12 13 14 15 16 17 18 19 20 21 22 23 24 25 26 Qty. Description 339999 1 Fitting, -16 ORFS x -16 ORB Straight 339913 339901 4135556 400406 446154 453017 400412 3006658 443118 440082 452006 446136 443106 3006913 446142 443110 1002927 5003034 5003432 5003433 5003544 1003248 5003165 5003166 362743 400262 446148 340077 339913 339901 340269 339900 339911 339912 340070 339911 339899 3006829 3006835 400336 1 1 1 4 6 4 2 1 2 4 4 4 4 1 4 2 1 1 1 1 1 1 1 1 1 2 4 1 1 1 1 1 1 1 2 1 1 1 1 4 • O-Ring, -16 ORFS • O-Ring, -16 ORB 4WD Valve with Oil Shuttle Screw, 1/2-13 x 1-1/4” Hex Head Lockwasher, 1/2 Heavy Flat Washer, 1/2 Screw, 1/2-13 x 2” Hex Head Bracket, Pump Support Nut, 1/2-13 Hex Carriage Bolt, 5/16-18 x 1” Flat Washer, 5/16 Lockwasher, 5/16 Heavy Nut, 5/16-18 Hex Bracket, Pump Support Lockwasher, 3/8 Nut, 3/8-16 Hex Pump, Traction • Seal Kit • Control Kit • Shaft Seal Kit • System Relief Kit Pump, Double • Seal Kit, Front Section • Seal Kit, Rear Section O-Ring Screw, 3/8-16 x 1” Hex Head Lockwasher, 7/16 Heavy Fitting, -16 ORFS x -16 ORB 90° • O-Ring, -16 ORFS • O-Ring, -16 ORB Tee, -12 ORB x -10 ORFS x -12 ORFS • O-Ring, -12 ORB • O-Ring, -10 ORFS • O-Ring, -12 ORFS Fitting, -10 ORFS x -10 ORB 90° • O-Ring, -10 ORFS • O-Ring, -10 ORB Fitting, 4 Bolt Flange O-Ring, 1-3/4” O.D. x 1-1/2” I.D. Screw, 7/16-14 x 1-1/4” Hex Head Serial Numbers/Notes See 64.1 > Change from previous revision 89 HR-9016 Serial No. All Lift Arms and Deck Valves 28.1 Front Lift Arms and Cylinders 11 11 10 10 9 17 15 5 18 8 33 33 8 26 27 28 12 8 3 14 29 30 31 8 15 13 4 16 8 3 9 34 1 5 6 9 10 32 7 23 22 35 21 13 36 20 19 2 25 24 90 10 11 14 11 10 11 HR-9016 Item 1 2 3 4 5 6 7 8 9 10 11 12 13 14 15 16 17 18 19 20 > 21 22 23 24 25 26 27 28 29 30 31 32 33 34 35 36 Part No. Qty. Description 1002785 1 1003900 342033 471214 3006490 3007091 3007092 400412 453017 446154 443118 4138587 340061 339909 339897 339979 339909 339897 3006491 1003274 1003275 3007468 403578 4140149 839918 825357 839935 452002 446118 444310 3007680 460054 400192 3004410 3009269 452006 446134 443106 455004 3010015 364830 3009193 4177701 1 4 2 4 1 1 28 4 28 28 2 2 1 1 2 1 1 4 2 2 1 2 1 1 2 1 2 2 2 2 2 2 2 2 2 2 2 2 4 AR AR 1 Serial Numbers/Notes R.H. Front Lift Arm L.H. Front Lift Arm • Bushing • Grease Fitting Bracket, Front Deck Pivot Angle, R.H. Valve Mount Angle, L.H. Valve Mount Screw, 1/2-13 x 2” Hex Head Flat Washer, 1/2 Lockwasher, 1/2 Heavy Nut, 1/2-13 Hex Front Lift Cylinder Fitting, -6 ORFS x -6 ORB 90° • O-Ring, -6 ORFS • O-Ring, -6 ORB Fitting, -6 ORFS x -6 ORB Straight • O-Ring, -6 ORFS • O-Ring, -6 ORB Bracket, Front Cylinder Pivot Pin, Front Cylinder Pin, Front Lift Arm Pivot Bracket, Switch Screw, #10-24 x 1” Hex Head Switch, Proximity • Connector, 2 Wire Deustch • Pin, Deustch • Wedge Lock Flat Washer, #10 Lockwasher, #10 Heavy Nut, #10-24 Hex Pin, Front Deck Mounting Cotter Pin, 3/16 x 1-3/4” Screw, 5/16-18 x 1-1/2” Hex Head Spacer Clamp, Wire Harness Twisted Flat Washer, 5/16 Lockwasher, 5/16 Nut, 5/16-18 Hex Flat Washer, 1” Spacer Thrust Washer Shim, Switch Bracket, Switch Guard See 61.1 REFERENCE SW8, See 66.1 > Change from previous revision 91 HR-9016 Serial No. All 29.1 Front Deck Latch 17 16 31 30 27 29 28 23 24 17 16 25 16 27 17 19 27 26 18 15 14 13 12 20 21 22 3 2 4 11 5 6 2 6 11 4 1 10 9 8 7 8 9016-05 92 HR-9016 Item 1 2 3 4 5 6 7 8 9 10 11 12 13 14 15 16 17 18 19 20 21 22 23 24 25 26 27 28 29 30 31 Part No. Qty. Description 1003483 1 Brace, Stand Up 365826 400430 1003277 446154 443118 1003484 352936 3008472 441690 453017 3008453 352435 319755 400264 446142 443110 3007297 400114 3007712 446128 443102 400194 346802 443806 444718 361723 400186 354081 446134 443106 2 1 2 1 3 1 2 1 1 2 1 1 1 1 4 4 1 2 2 2 2 1 1 1 1 3 1 1 1 1 Spacer Screw, 1/2-13 x 5-1/2” Hex Head Pin, Cylinder Rod End Lockwasher, 1/2 Heavy Nut, 1/2-13 Hex Latch, Front Deck • Bushing Spring, Torsion Carriage Bolt, 1/2-13 x 7” Flat Washer, 1/2 Stop, Anti Sway Latch Spacer Washer Screw, 3/8-16 x 1-1/4” Hex Head Lockwasher, 3/8 Heavy Nut, 3/8-16 Hex Tab, Spring Screw, 1/4-20 x 1-1/4” Hex Head Shim Lockwasher, 1/4 Nut, 1/4-20 Hex Screw, 5/16-18 x 1-3/4” Hex Head Spring, Extension Nut, 5/16-18 Hex Jam Locknut, 5/16-18 Center Stop, Rubber Screw, 5/16-18 x 7/8” Hex Head Clamp, Wire Harness Lockwasher, 5/16 Nut, 5/16-18 Hex Serial Numbers/Notes > Change from previous revision 93 HR-9016 Serial No. All 30.1 Side Lift Arms 19 26 27 25 7 28 21 / 22 10 23 / 24 9 8 10 9 29 35 8 36 10 9 6 34 30 34 37 5 1/2 3 38 17 42 4 12 4 29 11 12 16 15 16 5 19 40 18 20 13 / 14 39 41 15 43 19 32 31 33 94 34 HR-9016 Item 1 2 3 4 5 6 7 8 9 10 11 12 13 14 15 16 17 18 19 20 21 22 23 24 25 26 27 28 29 30 31 32 33 34 35 36 37 38 39 40 41 42 43 Part No. Qty. Description 1005016 1 1005017 304569 332351 471214 3006294 3006295 400412 446154 444758 2809628 3006727 1002885 1002886 471214 350800 362464 346294 446142 443110 361723 3007897 3007896 3009163 3009162 3009309 453020 460052 461408 452012 363746 3006204 401030 363572 162716 366978 3008374 1005018 2809630 3010825 2811064 444730 3010811 363746 1 4 4 6 2 2 20 20 20 2 4 1 1 2 4 16 8 8 16 8 1 1 1 1 2 2 2 2 6 AR 2 2 AR 8 2 2 2 2 2 2 8 2 AR Serial Numbers/Notes Pivot, Left Side Arm Pivot, Right Side Arm • Bushing • Bushing • Grease Fitting Plate, Side Arm Pivot Plate, Side Arm Pivot Screw, 1/2-13 x 2” Hex Head Lockwasher, 1/2 Heavy Locknut, 1/2-13 Center Pin, Side Arm Pivot Washer, Thrust Left Side Lift Arm Right Side Lift Arm • Grease Fitting • Bushing Wheel Bolt Wheel Nut Lockwasher, 3/8 Heavy Nut, 3/8-16 Hex Stop, Rubber Bracket, Left Side Deck Latch Bracket, Right Side Deck Latch Bolt, Left Side Deck Latch Bolt, Right Side Deck Latch Spring, Compression Flat Washer, 5/8 Cotter Pin, 3/16 x 1-1/2” Spring Pin, 1/4 x 1-1/2” Flat Washer, 1/2 Chain. 1/4” Collar Screw, 3/8-16 x 3-3/4” Hex Head Washer Shackle, Chain Eyebolt Spring, Extension Pin, Lift Arm Retaining Ring, Side Arm Pivot Retaining Ring, Lift Arm Plate, Left Side Bottom Locknut, 7/16-20 Hex Collar Chain. 1/4” 10 Foot Length, Cut to 15 links 10 Foot Length, Cut to 7 links > Change from previous revision 95 HR-9016 Serial No. All 31.1 Side Lift Cylinders and Return Canisters 31 32 23 33 30 28 29 27 36 35 24 34 37 25 26 7 6 9 3 2 7 4 5 8 8 1 15 16 20 21 22 13 12 12 13 14 19 96 10 14 17 18 11 10 HR-9016 Item 1 2 3 4 5 6 7 8 9 10 11 12 13 14 15 16 17 18 19 20 21 22 23 24 25 26 27 28 29 30 31 32 33 34 35 36 37 Part No. Qty. Description 5003371 2 1003823 400266 446140 443110 3009535 458039 455004 453011 3006293 400412 446154 444758 3004092 1003277 452012 4138521 340061 339909 339897 340078 339909 339897 1003272 400408 453017 441606 403578 453023 443102 444310 446118 452002 441614 354081 443106 446134 4140149 839918 825357 839935 3009026 446128 4182420 2 2 2 4 2 4 4 2 4 14 14 14 4 2 2 2 2 1 1 2 1 1 2 2 2 2 4 2 2 2 2 2 2 2 2 2 2 1 2 1 2 2 2 Canister, Deck Return Pin, Canister Mount Screw, 3/8-16 x 1-1/2” Hex Head Lockwasher, 3/8 Nut, 3/8-16 Hex Pin, Shear Retaining Ring Flat Washer Flat Washer, 3/8 Plate, Side Cylinder Mounting Screw, 1/2-13 x 2” Hex Head Lockwasher, 1/2 Heavy Locknut, 1/2-13 Center Spacer Pin, Cylinder Rod End Mounting Flat Washer, 1/2 Cylinder, Rear Lift Fitting, -6 ORFS x -6 ORB 90° • O-Ring, -6 ORFS • O-Ring, -6 ORB Fitting, -6 ORFS x -6 ORB 90° • O-Ring, -6 ORFS • O-Ring, -6 ORB Pin, Side Cylinder Mounting Screw, 1/2-13 x 1-1/2” Hex Head Flat Washer, 1/2 Carriage Bolt, 1/4-20 x 3/4” Screw, #10-24 x 1” Hex Head Flat Washer, 1/4 Nut, 1/4-20 Hex Nut, #10-24 Hex Lockwasher, #10 Heavy Flat Washer, #10 Carriage Bolt, 5/16-18 x 1” Clamp, Wire Harness Nut, 5/16-18 Hex Lockwasher, 5/16 Switch, Proximity • Connector, 2 Wire Deustch • Pin, Deustch • Wedge Lock Angle, Switch Lockwasher, 1/4 Bracket, Switch Guard Serial Numbers/Notes See 59.1 See 62.1 0.595” Orifice REFERENCE SW4 & SW9, See 66.1 > Change from previous revision 97 HR-9016 Serial No. All 32.1 Deck Valves 7 6 4 5 11 8 4 12 7 2 6 5 2 4 2 1 3 13 12 1 4 2 8 9 10 8 9 10 Front Deck Valve 14 4 7 4 10 15 9 8 4 14 7 2 1 4 8 Right Wing Valve 98 2 1 15 9 10 Left Wing Valve Item Part No. 1 2 3 4 5 > 6 7 8 9 10 11 12 13 14 15 Qty. Description 4135582 4 339989 339911 339899 441624 340070 339911 339899 340065 339910 339897 364945 363030 452008 446142 443110 401225 108138-02 3008357 365466 339897 401028 6 1 1 1 10 1 1 2 1 1 2 4 7 7 7 2 2 1 2 1 4 Valve, Deck Serial Numbers/Notes See 63.1 Fitting, -10 ORFS x -10 ORB Straight • O-Ring, -10 ORFS • O-Ring, -10 ORB Carriage Bolt, 3/8-16 x 1” Fitting, -10 ORFS x -10 ORB 90° • O-Ring, -10 ORFS • O-Ring, -10 ORB Fitting, -8 ORFS x -6 ORB 90° • O-Ring, -8 ORFS • O-Ring, -6 ORB Fitting, Diagnostic Cover, Dust Flat Washer, 3/8 Lockwasher, 3/8 Heavy Nut, 3/8-16 Hex Screw, 3/8-16 x 6-1/2” Hex Head Clamp, Double Hose Angle, L.H. Valve Mount Fitting, Diagnostic • O-Ring, -6 ORB Screw, 3/8-16 x 3-1/4” Hex Head > Change from previous revision 99 HR-9016 Serial No. All Hydraulics and Electrical 33.1 Side Deck Valve Supply 5 8 7 4 6 7 8 9 2 10 Item 1 2 3 4 5 6 7 8 9 10 11 Part No. Qty. 3 1 11 Description 400264 2 Screw, 3/8-16 x 1-1/4” Hex Head 446142 443110 4135253 4135262 4135408 339963 339911 4135259 4135260 4237362 2 2 1 1 1 2 2 1 1 1 Lockwasher, 3/8 Heavy Nut, 3/8-16 Hex Plate, Tube Mounting Hose, Pump to left Side Hose, Pump to Bracket Locknut, Bulkhead O-Ring, SAE #10 Tube, Right Side Deck Valve Supply Tube, Left Side Deck Valve Supply Bracket, Relay Mount Serial Numbers/Notes > Change from previous revision 100 HR-9016 Serial No. All 34.1 Front Deck Valve Supply 8 4 10 7 3 9 5 11 8 7 2 6 Item 1 2 3 4 5 6 7 8 9 10 11 12 Part No. Qty. 1 Description 400264 1 Screw, 3/8-16 x 1-1/4” Hex Head 452008 446142 443110 1003607 4135589 339963 339911 4135409 1003587 4135425 473144 1 1 1 1 1 2 2 1 1 1 1 Flat Washer, 3/8 Lockwasher, 3/8 Heavy Nut, 3/8-16 Hex Hose, Pump to Left Front Valve Hose, Pump to Right Front Valve Locknut, Bulkhead O-Ring, SAE #10 Tube, Right Front Valve Hose, Pump to Tube Bracket, Tube Tie Wrap (Not Shown) Serial Numbers/Notes > Change from previous revision 101 HR-9016 Serial No. All 35.1 Pump Supply 8 10 4 6 8 7 2 16 7 2 2 7 15 14 2 5 9 13 3 7 12 1 6 3 9 11 6 7 Item > 1 2 3 4 5 6 7 8 9 10 11 12 13 14 15 16 Part No. Qty. Description 4135240 1 Hose, Rear Pump Suction 4136342 4148900 4135233 4136343 359615 326112 400208 445795 4230820 3007060 4136341 400264 446142 443110 4139109 6 2 1 3 3 5 6 6 1 1 1 2 2 2 1 Clamp Hose, Rear Pump Inlet Manifold, Rear Pump Suction Plate, Clamp Clamp, Hose Clamp, Hose Screw, 5/16-18 x 4-1/2” Hex Head Nut, 5/16-18 Spiralock Flange Bracket, Fuel Filter Hose, Front Pump Inlet Bracket, Rear Plumbing Screw, 3/8-16 x 1-1/4” Hex Head Lockwasher, 3/8 Heavy Nut, 3/8-16 Hex Bracket, Remote Engine Oil Filter Serial Numbers/Notes See 18.1 > Change from previous revision 102 HR-9016 Serial No. 36.1 Return Manifold 2 7 5 4 3 7 2 4 3 6 1 Item Part No. 1 2 3 4 5 6 7 Qty. Description 1003891 1 Return Manifold 400266 452008 446140 3007061 3008820 359615 2 2 2 1 1 2 Screw, 3/8-16 x 1-1/2” Hex Head Flat Washer, 3/8 Lockwasher, 3/8 Hose, Return Clamp, Double Hose Clamp, Hose Serial Numbers/Notes > Change from previous revision 103 HR-9016S Serial No. All 37.1 Traction Hydraulics 15 To Bottom Port Right Rear Wheel Motor To Top Port Right Rear Wheel Motor 15 5 To Port 1 4WD Valve 14 To Port 3 4WD Valve To Port 2 4WD Valve To Bottom Port Left Rear Wheel Motor 3 1 A 15 14 14 14 3 15 B To Port 4 4WD Valve 5 13 Right Side 4WD Valve To Port A 4WD Valve 3 2 T To Port B 4WD Valve 4 Left Side 4WD Valve 16 13 1 4 17 2 11 7 6 12 7 2 6 8 9 8 Drain Tube 1 10 9 Traction Tubes 10 2 104 To Top Port Left Rear Wheel Motor HR-9016 Item Part No. 1 2 3 4 5 6 7 8 9 10 11 12 13 14 15 16 17 Qty. Description 1002769 2 Wheel Motor, Front 340074 339912 339900 4135556 REF 339990 339911 339900 1003307 340147 339913 340219 339913 339965 1003308 1003310 1003309 339994 339912 339900 339989 339911 339899 1003313 1003311 1003312 4 1 1 1 1 4 1 1 2 2 2 2 3 2 2 1 1 2 1 1 4 1 1 4 1 1 Fitting, -12 ORFS x -12 ORB 90° • O-Ring, -12 ORFS • O-Ring, -12 ORB 4WD Valve with Oil Shuttle Pump Assembly Fitting, -10 ORFS x -12 ORB Straight • O-Ring, -10 ORFS • O-Ring, -12 ORB Hose, Tee to Right Wheel Motor Tee, -16 ORFS Swivel Branch • O-Ring, -16 ORFS Tee, -16 ORFS Bulkhead • O-Ring, -16 ORFS Nut, Bulkhead Hose, Tee to Left Wheel Motor Hose, Traction Pump to Front Tee Hose, Traction Pump to Rear Tee Fitting, -12 ORFS x -12 ORB Straight • O-Ring, -12 ORFS • O-Ring, -12 ORB Fitting, -10 ORFS x -10 ORB Straight • O-Ring, -10 ORFS • O-Ring, -10 ORB Hose, 4WD Valve to Rear Motors Hose, Rear Tee to 4WD Valve Hose, Front Tee to 4WD Valve Serial Numbers/Notes See 14.1 See 27.1 See 27.1 > Change from previous revision 105 HR-9016 Serial No. All 38.1 Oil Cooler Hydraulics 12 17 19 13 8 14 15 18 16 20 27 21 23 10 22 9 25 6 11 10 4 4 1 24 5 4 2 106 7 26 3 Part of Cross Frame HR-9016 Item 1 2 3 4 5 6 7 8 9 10 11 12 13 14 15 16 17 18 19 20 21 22 23 24 25 26 27 Part No. Qty. Description 1003891 1 Return Manifold 1003988 339966 339911 1003862 1003860 1003861 4227982 4228980 3008673 4227984 339914 339902 340379 339913 4247790 339913 339901 340123 339913 4227983 340077 339913 339901 4227981 340243 339913 339965 4227980 340002 339913 339902 1003011 5002693 556419 3007674 339902 REF REF REF REF 1 Manifold, Cooler Inlet 1 Locknut, -20 ORFS Bulkhead 3 O-ring, SAE #10 1 Tube, Right Front Valve to Inlet 1 Tube, Right Side Valve to Inlet 1 Tube, Left Side Deck to Inlet 1 Hose, Inlet Manifold to Cooler 1 Hose, FIlter to Return Manifold 2 Clamp, Constant Torque 1 Fitting, -20 ORFS x -20 ORB 45° 1 • O-Ring, -20 ORFS 1 • O-Ring, -20 ORB 1 Fitting, -16 ORFS 90° Swivel 1 • O-RIng, -16 ORFS 1 Tee, Check Valve 1 • O-RIng, -16 ORFS 1 • O-RIng, -16 ORB 1 Fitting, Swivel Run Tee 1 • O-RIng, -16 ORFS 1 Hose, Lower Oil Cooler 1 Fitting, -16 ORFS x -16 ORB 90° 1 • O-RIng, -16 ORFS 1 • O-RIng, -16 ORB 1 Hose, Cooler to Bulkhead FItting 1 Union, -16 ORFS Straight Bulkhead 1 • O-RIng, -16 ORFS • Locknut, -16 ORFS Bulkhead 1 Hose, Bulkhead Fitting to Filter 1 Fitting, -16 ORFS x -20 ORB Straight 1 • O-RIng, -16 ORFS 1 • O-Ring, -20 ORB 1 Return Filter 1 • Return Filter Cartridge 1 • Switch 1 Fitting, -20 ORB 90° Barbed 1 • O-Ring, -20 ORB 1 Front Deck Valve Assembly 1 Right Wing Deck Valve Assembly 1 Left Wing Deck Valve Assembly 1 Radiator/Oil Cooler Assembly Serial Numbers/Notes See 36.1 60 psi Crack Pressure See 19.1 See 32.1 See 32.1 See 32.1 See 18.1 > Change from previous revision 107 HR-9016 Serial No. All 39.1 Return Hydraulics 1 21 22 9 9 18 20 6 7 25 24 Right Wing Deck Motors Case Drain Right Rear Wheel Motor Case Drain 8 19 12 Front Deck Motors Case Drain 11 18 10 Left Rear Wheel Motor Case Drain 5 2 T 4 4 3 Left Side 4WD Valve 26 Right Front Wheel Motor Case Drain 2 13 8 15 16 17 Left Front Wheel Motor Case Drain 14 108 13 Left Wing Deck Motors Case Drain HR-9016 Item Part No. 1 2 3 4 5 6 7 8 9 10 11 12 13 14 15 16 17 18 19 20 21 22 23 24 25 26 Qty. Description 1003891 1 Return Manifold 1003573 1003575 339911 340065 339910 339897 4252212 4252211 339961 340119 339909 4252210 340376 339910 340215 339909 339979 339909 339897 340119 339909 4174140 4174141 365660 339909 339972 339908 339896 4265650 1003608 339910 473144 339977 339909 339896 4257570 340239 339909 1 1 1 1 1 1 1 1 2 3 2 1 1 2 1 3 2 1 1 1 2 1 1 1 2 1 1 1 1 1 1 2 1 1 1 1 1 2 Hose, Pump to Return Manifold Hose, 4WD Valve to Pump O-Ring, SAE #10 Face Seal Fitting, -8 ORFS x -6 ORB 90° • O-Ring, -8 ORFS • O-Ring, -6 ORB Hose, Right Rear Wheel Motor Drain Hose, Right Tee to 4WD Valve Locknut, Bulkhead Tee, -6 ORFS Swivel Run • O-Ring, -6 ORFS Hose, Right Tee to Left Tee Fitting, -8 ORFS 90° Swivel • O-Ring, -8 ORFS Tee, -6 ORFS Bulkhead Run • O-Ring, -6 ORFS Fitting, -6 ORFS x -6 ORB Straight • O-Ring, -6 ORFS • O-Ring, -6 ORB Tee, -6 ORFS Swivel Run • O-Ring, -6 ORFS Hose, Tee to Return Manifold Hose, Right Motor to Left Motor Grommet O-Ring, SAE #6 Face Seal Fitting, -4 ORFS x -4 ORB Straight • O-Ring, -4 ORFS • O-Ring, -4 ORB Hose, Front Deck Motor Case Drain Hose, Back Pressure Valve Return O-Ring, SAE #8 Face Seal Tie, Wire Heavy Fitting, -6 ORFS x -4 ORB Straight • O-Ring, -6 ORFS • O-Ring, -4 ORB Hose, Left Rear Wheel Motor Drain Fitting, -6 ORFS Union Bulkhead • O-Ring, -6 ORFS Serial Numbers/Notes See 36.1 4WD Valve Port T Not Shown > Change from previous revision 109 HR-9016 Serial No. All 40.1 4WD Hose Clamps 13 / 5 7 4 4 Valve Supply Hoses Wire Harness 9 6 11 9 3 3 2 1 6 6 Rear Motor Hoses 3 12 12 Item 1 2 3 4 5 6 7 8 9 10 11 12 13 Part No. 8 Qty. Description 400210 2 Screw, 5/16-18 x 5” Hex Head 366114 3008792 3008793 366424 452006 443106 400204 444718 473144 365566 4236586 360970 2 5 4 1 3 4 1 2 2 1 2 1 Spacer Spacer Plate Clamp, Double Hose Clamp, Hose Flat Washer, 5/16 Nut, 5/16-18 Hex Screw, 5/16-18 x 3-1/2” Hex Head Nut, 5/16-18 Center Tie Wrap (Not Shown) Clamp, Wire Harness Clamp, Hose Clamp, Hose Serial Numbers/Notes Left Side Rear Wheel Motor Drain Used on rear motor hoses after clamp. Right Side Rear Wheel Motor Drain > Change from previous revision 110 HR-9016 Serial No. 41.1 Charge Pressure 8 7 4 2 3 5 6 1 9016-40 Item Part No. 1 2 3 4 5 6 7 8 Qty. Description 340069 1 Fitting, -10 ORFS x -10 ORB 90° 339911 339898 340217 339911 339963 340377 339911 1003878 1003605 1003865 1003864 1 1 1 3 1 1 1 1 1 1 1 • O-Ring, -10 ORFS • O-Ring, -8 ORB Tee, -10 ORFS Bulkhead Run • O-Ring, -10 ORFS Locknut, Bulkhead Fitting, -10 ORFS 90° Swivel • O-Ring, -10 ORFS Tube, 4WD Valve to Tee Hose, Tee to Pump Tube, Lift Valve to Filter Tube, Filter to Tee Serial Numbers/Notes > Change from previous revision 111 HR-9016 Serial No. All 42.1 Lift Valve Hydraulics To Fitting Labled Hose Destination B E D F C A 17 Right Side Cylinder Base End Right Side Cylinder Rod End Left Side Cylinder Base End Left Side Cylinder Rod End Front Lift Cylinder Rod End Tee Steering Valve AUX Port 16 A B C D E A Important: The hoses must be routed through the retaining clamp in the order shown to allow proper clearance of the heat shield. F D CF EB 1 2 15 E B 13 FD 14 9 C 5 4 A - To Steering Valve AUX Port 8 10 10 6 7 11 12 112 8 3 HR-9016 Item Part No. 1 2 3 4 5 6 7 8 9 10 11 12 13 14 15 16 17 Qty. Description 4244654 1 Hose, Right Side Cylinder Base End 1003600 1003601 1003602 340167 339909 339961 340143 339909 1003591 1003590 339909 132568 4218141 3008459 443106 4238602 REF REF 1 1 1 1 2 1 1 2 2 1 2 1 1 1 4 1 1 1 Hose, Right Side Cylinder Rod End Hose, Left Side Cylinder Base End Hose, Left Side Cylinder Rod End Fitting, -6 ORFS 90° Bulkhead • O-Ring, -6 ORFS Nut, Bulkhead Tee, -6 Swivel Branch • O-Ring, -6 ORFS Hose, Front Cylinders Rod End Hose, Lift Valve to Tee O-Ring, SAE #6 Face Seal Hose, Right Front Cylinder Rod End Hose, Left Front Cylinder Rod End Plate, Hose Retaining Clamp Nut, 5/16-18 Hex Hose, Steering Valve to Lift Valve Hydraulic Tank Assembly Lift Valve Assembly Serial Numbers/Notes See 43.1 for other end of hose. See 24.1 See 8.1 > Change from previous revision 113 HR-9016 Serial No. All 43.1 Power Steering Hoses 11 11 2 Hose (8) From Pump Hose (6) To Return Manifold 10 15 1 14 9 T P Hose (7) To Lift Valve L E R 13 Hose (5) To Steering Cylinder Hose (5) To Steering Cylinder 17 16 43 4 18 3 L R 20 5 P 8 4 T E 7 19 To Lift Valve 6 114 10 9 12 HR-9016 Item > Part No. 1 2 3 4 5 6 7 8 9 10 11 12 13 14 15 16 17 18 19 20 Qty. Description 1003876 1 Tube, RT Hose to Rod End Hose 1003875 339961 339909 1003606 1003593 4238602 1003596 339979 339909 339897 340239 339909 339961 1003597 1003595 3009272 400264 446142 452008 443110 340119 339909 339984 339910 339898 1 2 3 2 1 1 1 2 1 1 2 2 2 1 1 1 1 1 1 1 1 2 1 1 1 Tube, LT Hose to Base End Hose Locknut, Bulkhead O-Ring, -6 ORFS Hose, Valve to Cylinder Tubes Hose, Valve to Return Manifold Hose, Steering Valve to Lift Valve Hose, Gear Pump to Valve Fitting, -6 ORFS x -6 ORB Straight • O-Ring, -6 ORFS • O-Ring, -6 ORB Fitting, -6 ORFS Straight Bulkhead • O-Ring, -6 ORFS Locknut, Bulkhead Hose, LT Tube to Cylinder Base End Hose, RT Tube to Cylinder Rod End Clamp, Double Hose Screw,3/8-16 UNC x 1.250 Hex Lockwasher, 3/8 Heavy Flat Washer, 3/8 Nut 3/8-16 Hex Tee, -6 ORFS Swivel Run • O-Ring, -6 ORFS Fitting, -8 ORFS x -8 ORB Straight • O-Ring, -6 ORFS • O-Ring, -8 ORB Serial Numbers/Notes See 42.1 for other end of hose. > Change from previous revision 115 HR-9016 Serial No. All 44.1 Engine Harness Assembly 19 2 1 18 17 24 5 21 56 24 23 20 22 25 11 21 9 12 13 8 Kubota Harness 27 Chassis Harness 14 OBDII Diagmaster 12 13 7 Views rotated for clarity. 116 3 4 23 10 6 16 15 4 HR-9016 Item 1 2 3 4 5 6 7 8 9 10 11 12 13 14 15 16 17 18 19 20 21 22 23 24 25 26 27 Part No. Qty. Description 3000359 1 Circuit Breaker, 50 Amp 364774 4282031 400106 443102 446130 364190 333801 3008820 365980 446152 3002042 363485 4230260 5003280 4131299 4221100 4237362 4237462 4237463 4136563 4226061 4229561 4243802 400188 443106 400184 4221100 4167640 1 1 3 3 3 1 1 1 1 1 2 2 1 1 1 1 1 1 1 1 1 1 1 5 5 1 1 3 Boot, Protective Relay, Air Intake Heater Screw, 1/4-20 x 5/8” Hex Head Nut, 1/4-20 Hex Lockwasher, 1/4 Heavy Clamp, 1-1/2” Clamp, Harness Clamp, Double Hose Screw, M12-1.25 x 20 mm Hex Head Lockwasher, 1/2 Bolt, M10-1.25 X 22 Socket Head Lockwasher, M10 Heavy Harness, Engine • Fuse, 10A (Red) • Holder, Fuse Relay, Starter Bracket, Relay Mount Circuit Breaker, 90 Amp Boot, Protective Support, Rear Hood Bottom Plate Controller, Kubota V3800 Engine Cover, Controller Screw, 5/16-18 x 1” Hex Head Nut, 5/16-18 Hex Screw, 5/16-18 x 3/4” Hex Head Engine Main Relay Cable Tie, Fir Tree Serial Numbers/Notes REFERENCE CB1, See 66.1 REFERENCE K14, See 66.1 See 23.1 See 23.1 REFERENCE F13, See 66.1 REFERENCE K18, See 66.1 See 33.1 REFERENCE CB2, See 66.1 See 2.1 See 19.1 REFERENCE U20, See 66.1 REFERENCE K19, See 66.1 Used to secure Harness to Radiator > Change from previous revision 117 HR-9016 Serial No. All 45.1 Chassis Harness Assembly Console Harness Connections Kubota Harness Connections 1 - Throttle Position Sensor 2 - Keyswitch Harness Connections 3 - Horn 4 - Gauges 5 - Panel Switches 6 - Relays 6 4 2 4 8 9 9 - Console Harness 8 - Keyswitch 7 - Relays 2 6 1 7 8 6 7 5 3 X 5 1 N M 4 U V 3 Y Z S T P L K E H J G F R D A B C Chassis Harness Connections A - Front Limit Switch B - Cruise Magnet (Option) C - Steering Assist Switches (Option) D - Front Deck Valve Solenoids E - Fuel Sender F - Hydraulic Pressure Switch G - Parking Brake Switch H - Seat Switch J - Air Ride Seat Compressor K - Neutral Switch L - Forward Sensing Switch M - Right Wing Deck Valve Solenoid 118 N - Right Wing Deck Limit Switch P - Left Wing Deck Valve Solenoid R - Left Wing Deck Limit Switch S - Charge Filter Switch T - 4WD Valve Solenoids U - Engine Harness Connections V - Engine Ground W - Chassis Ground X - 50 Amp Circuit Breaker Y - Hydraulic Fluid Level Switch Z - Seat Time Delay Relay W HR-9016 Item Part No. 1 2 3 4 5 6 7 8 9 Qty. Description 4228700 1 Harness, Console 555846 4166721 4228681 364973 452008 400260 446142 473142 4 1 1 1 1 1 1 4 • Diode Harness, Ignition Switch Harness, Chassis Clamp, Harness Flat Washer, 3/8 Screw, 3/8-16 x 7/8” Hex Head Lockwasher, 3/8 Heavy Cable Tie Serial Numbers/Notes Connection References 1~6 Connection References 7~9 Connection References A~Z Not Shown > Change from previous revision 119 HR-9016 Serial No. All Decks 46.1 Decals - Decks 1 38 64 41 4181863 3 5 Middle Upper Thrust Washer and Leveling Washer Mount Lower Spacers Under Mount Cut Height Mount Location 1 Lower Number of Spacers Under Mount 0 1-1/2 Lower 1 2 Lower 2 2-1/2 2-1/2 3 Lower Middle Middle 3 0 1 3-1/2 4 4 Middle Middle Upper 2 3 0 4-1/2 Upper 1 5 5-1/2 Upper Upper 2 3 Never reposition the thrust washer(s) (1/16 th'k) and leveling washer(s) (1/8 th'k) when setting cut height 3009317 1 C B D E A Arm 1 5 Bracket 2 3 6 7 4 8 4257090 Cut Height Bracket Hole Arm Hole 1 3 A F 1-1/2 1 B F 2 2 C F 2-1/2 3 D F 3 3-1/2 4 5 E B F F F Wheel Mounting 4 6 C F 4-1/2 7 D F 5 5-1/2 8 8 E E F R 6 R Wheel Mounting Wheel Mounting Instructions 1. While Roatating wheel, tighten nut until wheel is difficult to rotate. 2. Loosen nut 1/4 turn or just until wheel rotates freely. 3. Lock nut into place using second nut. Do not allow first nut to rotate when tighteneing second nut securely. 4. Rotate wheel to check for free rotation with zero end play. 3009318 2 120 HR-9016 1 3 5 6 5 5 2 5 1 Left Wing Item Part No. 1 2 3 4 5 6 Front 1 Qty. 2 5 1 Right Wing 5 5 Description 3009317 5 Decal, Caster Cut Height 3009318 4181863 2 1 Decal, Gage Wheel Cut Height Decal, Read Manual for Service 4164381 4257090 7 1 Decal, Danger Decal, Crush Warning 1 Serial Numbers/Notes > Change from previous revision 121 HR-9016 Serial No. All 47.1 Front Deck 16 25 15 13 14 11 9 11 10 23 20 22 23 24 19 5 4 3 26 2 17 21 1 11 11 11 7 12 8 6 3 4 18 14 34 13 6 11 1 11 10 11 15 9 11 9016-57 122 HR-9016 Item 1 2 3 4 5 6 7 8 9 10 11 12 13 14 15 16 17 18 19 20 21 22 23 24 25 26 Part No. Qty. Description 1003430.6 8 400286 446142 444762 400264 453011 3007678 460050 3003939 3003714 3004113 453020 446152 444758 400420 1003325.6 1003321.6 441624 3008840 3009175 441606 452004 444708 – – – 12 32 32 12 20 4 4 2 2 36 4 2 2 2 1 1 8 2 2 8 2 8 1 1 1 Serial Numbers/Notes Hinge Assembly Screw, 3/8-16 x 2-3/4” Hex Head Lockwasher, 3/8 Hvy Locknut, 3/8-16 Center Screw, 3/8-16 x 1-1/4” Hex Hd Flat Washer, 3/8 Pin, Clevis Cotter Pin, 3/16 x 1-1/4” Wheel, Deck Spacer, Wheel Bushing Flat Washer, 5/8 Lockwasher, 1/2 Locknut, 1/2-13 Center Screw, 1/2-13 x 3-1/2” Hex Head Skid Assembly, Anti Scalp Skid Assembly, Anti Scalp Carriage Bolt, 3/8-16 x 1” Flap, Rear Hold Down, Drag Flap Carriage Bolt, 1/4-20 x 3/4” Flat Washer, 1/4 Locknut, 1/4-20 Center Front Deck Center Section Right Side Winglet Left Side Winglet See 48.1 See 49.1 See 49.1 > Change from previous revision 123 HR-9016 Serial No. All 48.1 Front Deck Center Section 12 8 7 6 11 9 / 10 26 7 6 23 3 12 27 7 8 2 4 1 13 12 24 25 8 7 5 8 19 20 18 16 21 22 7 8 7 15 14 15 16 12 17 Front Case Drain Case Drain Inlet Outlet Outlet Case Drain Outlet Motor Orientation 124 Inlet HR-9016 Item Part No. 1 2 3 4 5 5 6 7 8 9 10 11 12 13 14 15 16 17 18 19 20 20 21 22 23 24 25 26 27 Qty. 5003188 1 352936 4256471 5003763 2811954 4115706 557523 REF 440124 440126 453011 446142 444762 1003424.6 1003425.6 400274 400262 361723 163302 552824 455048 1003429 3007374.6 3008388 2810030 4119024 3007764 400410 3007368 3007369.6 4254550 443110 4257550 2 3 1 1 1 1 1 18 18 26 40 22 1 1 6 14 2 1 2 2 1 1 3 3 3 3 3 1 1 1 18 6 Description Serial Numbers/Notes Deck, Front Assembly • Bushing Motor, Spindle Assembly • Seal Kit • Bushing • Valve, Check • Key, 1/4 x 1/4 x 1" Serial Plate, Front Deck Carriage Bolt, 3/8-16 x 1-3/4” Carriage Bolt, 3/8-16 x 2" Flat Washer, 3/8 Lockwasher, 3/8 Hvy Locknut, 3/8-16 Center Bracket Assembly, RH Bracket Assembly, LH Screw, 3/8-16 x 2-1/2” Hex Head Screw, 3/8-16 x 1” Hex Head Stop, Rubber Roller • Bushing Flat Washer, 3/4 Shaft Assembly, Roller Plate, Shaft Support Adapter, Blade Bar, Rotary Mower Cutter Bar, Rotary Mower Cutter Washer, Blade Screw, 1/2-13 x 1-3/4” Hex Head Arm, Winglet Support Arm, Winglet Support Angle, Bulkhead Nut, 3/8-16 Hex Pad, Motor Models 70538 and 70539 Models 70540 and 70541 Models 70538 and 70539 Models 70540 and 70541 Models 70540 and 70541 Only > Change from previous revision 125 HR-9016 Serial No. All 49.1 Front Deck Winglets (Right Winglet Shown) 24 7 6 3 25 11 4 4 18 15 6 9 14 8 13 12 14 10 6 7 16 5 17 19 23 20 22 21 Inlet Case Drain Outlet Case Drain Motor Orientation Outlet Left Winglet 126 Front Inlet Right Winglet 9016-55 HR-9016 Item Part No. 1 2 3 4 5 5 6 7 8 9 10 11 12 13 14 15 16 17 18 19 20 20 21 22 23 24 25 Qty. Description 5003186 1 5003187 4256471 5003763 2811954 4115706 557523 366613 440124 440126 453011 446142 400264 366473 400262 444762 3003939 3003714 3004113 455012 446152 444758 400420 3008388 2810030 4119024 400410 3007764 3007376.6 443110 4257550 1 2 1 1 1 1 4 12 12 24 20 4 2 8 4 2 2 4 2 2 2 2 2 3 3 2 2 2 12 4 Serial Numbers/Notes Deck, RH Winglet Deck, LH Winglet Motor, Spindle Assembly • Seal Kit • Bushing • Valve, Check • Key, 1/4 x 1/4 x 1" Shim Carriage Bolt, 3/8-16 x 1-3/4” Carriage Bolt, 3/8-16 x 2" Flat Washer, 3/8 Lockwasher, 3/8 Hvy Screw, 3/8-16 x 1-1/4” Hex head Bumper, Arm Screw, 3/8-16 x 1” Hex Head Locknut, 3/8-16 Center Wheel, Deck Spacer, Wheel Bushing Flat Washer, 1/2 Lockwasher, 1/2 Locknut, 1/2-13 Center Screw, 1/2-13 x 3-1/2” Hex Head Adapter, Blade Bar, Rotary Mower Cutter Bar, Rotary Mower Cutter Screw, 1/2-13 x 1-3/4”Hex Head Washer, Blade Arm, Winglet Support, Front Nut, 3/8-16 Hex Pad, Motor Models 70538 and 70539 Models 70540 and 70541 Models 70538 and 70539 Models 70540 and 70541 Models 70540 and 70541 Only > Change from previous revision 127 HR-9016 Serial No. All 50.1 Front Deck Hydraulics Right Winglet Motor 1 11 3 A B C 2 21 22 16 6 7 D 17 15 A Center Motor B E - To Return Manifold 14 C 15 2 2 D 5 2 15 4 4 2 Right Center Motor 10 8 19 20 12 15 16 13 15 10 2 9 2 4 2 6 1 Left Center Motor 3 7 128 Left Winglet Motor HR-9016 Item Part No. 1 2 3 4 5 6 7 8 9 10 11 12 13 14 15 16 17 18 19 20 21 22 Qty. Description 340070 2 Fitting, -10 ORFS x -10 ORB 90° 339911 339899 339989 339911 339899 340061 339909 339897 340096 339909 339897 4265650 1003557 1003563 1003607 1004343 1003564 1003559 1003556 1003558 1003562 473144 363514 400188 443106 340215 339909 339961 446134 453009 1 1 8 1 1 2 1 1 3 1 1 1 2 2 1 1 2 1 1 1 1 6 3 3 2 1 3 1 3 1 • O-Ring, -10 ORFS • O-Ring, -10 ORB Fitting, -10 ORFS x -10 ORB Straight • O-Ring, -10 ORFS • O-Ring, -10 ORB Fitting, -4 ORFS x -4 ORB 90° • O-Ring, -6 ORFS • O-Ring, -6 ORB Tee, -4 ORFS x -4 ORB Branch • O-Ring, -6 ORFS • O-Ring, -6 ORB Hose, Front Deck Motor Case Drain Hose, Winglet Hose, Winglet Motor Drain Hose, Left Center to Center Motor Hose, Tee to Left Center Motor Drain Hose, Right Center and Center Drain Hose, Right Valve to Right Winglet Hose, Left Valve to Left Center Hose, Left Winglet to Left Valve Hose, Center Motor to Right Valve Tie Wrap Clamp, 1-1/8” Diameter Screw, 5/16-18 x 1” Hex Head Nut, 5/16-18 Hex Tee, -6 ORFS Bulkhead Run • O-Ring, -6 ORFS Locknut, -6 ORFS Bulkhead Lockwasher, 5/16 Flat Washer, 5/16 Serial Numbers/Notes See 39.1 > Change from previous revision 129 HR-9016 Serial No. All 51.1 Wing Decks Right Wing Shown 13 12 12 10 11 14 12 22 27 28 20 / 21 30 7 6 11 10 3 13 9 31 8 24 7 6 26 23 7 8 25 23 4 1/2 14 29 5 15 6 7 28 22 27 16 17 24 23 25 23 18 19 Inlet Outlet Case Drain Inlet Inlet Front Case Drain Outlet Outlet Inlet Outlet Inlet Outlet Case Drain Case Drain Case Case Drain Drain Outlet Left Wing 130 Inlet Motor Orientation Right Wing 8 HR-9016 Item Part No. 1 2 3 4 5 5 6 7 8 9 10 11 12 13 14 15 16 17 17 18 19 20 21 22 23 24 25 26 27 28 29 30 31 Qty. Description 5003190 1 5003189 4256471 5003763 2811954 4115706 557523 REF 440124 440126 453011 446142 444762 116686 363574 3010489 471214 363568 163306 400264 3008388 2810030 4119024 3007764 400410 1003321.6 1003325.6 400420 3004113 3003714 3003939 361723 446152 444758 441624 443110 4257550 1 6 1 1 1 1 2 36 36 48 50 14 2 2 4 6 4 4 4 6 3 3 6 6 1 1 4 8 4 4 2 4 4 8 36 6 Serial Numbers/Notes Deck, Right Wing Deck, Left Wing Motor, Spindle Assembly • Seal Kit • Bushing • Valve, Check • Key, 1/4 x 1/4 x 1" Wing Deck Serial Plate Carriage Bolt, 3/8-16 x 1-3/4” Carriage Bolt, 3/8-16 x 2" Flat Washer, 3/8 Lockwasher, 3/8 Hvy Locknut, 3/8-16 Center Deck Mount Assembly • Bushing • Bushing Fitting, Grease 1/4-28 Washer, Thrust Pin Assembly Screw, 3/8-16 x 1-1/4” Hex Head Adapter, Blade Bar, Rotary Mower Cutter Bar, Rotary Mower Cutter Washer, Blade Screw, 1/2-13 x 1-3/4” Hex Head Skid, Right Wing Anti-Scalp Skid, Left Wing Anti Scalp Screw, 1/2-13 x 3-1/2” Hex Head Bushing Spacer, Wheel Wheel, Deck Stop, Rubber Lockwasher, 1/2 Locknut, 1/2-13 Center Carriage Bolt, 3/8-16 x 1” Nut, 3/8-16 Hex Pad, Motor Models 70538 and 70539 Models 70540 and 70541 Models 70538 and 70539 Models 70540 and 70541 Models 70540 and 70541 Only > Change from previous revision 131 HR-9016 Serial No. All 52.1 Wing Deck Hydraulics Right Outside Motor 10 1 14 2 12 8 3 13 4 14 9 7 4 2 16 5 Right Center Motor 2 2 6 1 15 11 Right Inside Motor 17 Right Wing Deck Hydraulics 14 18 12 13 14 15 16 11 Left Inside Motor 2 1 9 4 7 4 6 8 2 Left Center Motor 10 2 1 5 3 2 Left Outside Motor Left Wing Deck Hydraulics 132 HR-9016 Item Part No. 1 2 3 4 5 6 7 8 9 10 11 12 13 14 15 16 17 18 Qty. Description 340070 4 Fitting, -10 ORFS x -10 ORB 90° 339911 339899 339989 339911 339899 339979 339909 339897 340096 339909 339897 1003580 1003579 1003581 1003582 1003567 1003584 1003583 359860 400206 473144 446136 443106 340215 339909 340239 339909 1 1 8 1 1 2 1 1 4 1 1 2 2 2 2 2 2 2 2 2 6 2 2 1 3 1 2 • O-Ring, -10 ORFS • O-Ring, -10 ORB Fitting, -10 ORFS x -10 ORB Straight • O-Ring, -10 ORFS • O-Ring, -10 ORB Fitting, -6 ORFS x -6 ORB Straight • O-Ring, -6 ORFS • O-Ring, -6 ORB Tee, -4 ORFS x -4 ORB Branch • O-Ring, -6 ORFS • O-Ring, -6 ORB Hose, Outside to Center Motor Hose, Inside to Center Motor Hose, Center to Inside Motor Drain Hose, Outside to Center Motor Drain Hose, Wing Motor Drain to Tee Hose, Wing Motor Pressure Hose, Wing Motor Return Clamp, Hose Screw, 5/16-18 x 4” Hex Head Tie Wrap Lockwasher, 5/16 Heavy Nut, 5/16-18 Hex Tee, -6 ORFS Bulkhead Run • O-Ring, -6 ORFS Fitting, -6 ORFS Union Bulkhead • O-Ring, -6 ORFS Serial Numbers/Notes See 39.1 See 39.1 > Change from previous revision 133 HR-9016 Serial No. All 53.1 Caster Assemblies 2 11 12 13 14 5 4 6 3 3 7 6 8 5 1 9 10 Item 1 1 2 3 4 5 6 7 8 8 9 9 10 11 12 13 14 Part No. Qty. Description 1004276.6 8 1004275.6 1004277.6 363539 471214 366593 365772 361648 4256572 4253030 441690 441689 443118 401028 446142 443110 3004894 2 10 2 1 20 30 10 8 2 8 2 20 20 20 20 10 Serial Numbers/Notes Yoke, 11” Tire Wing Decks Only Yoke, 13” Tire Tube, Yoke Pivot • Bushing • Grease Fitting Spacer, Caster Wheel Spacer, Caster Wheel Washer, Thrust Wheel and Tire, 11” Wheel and Tire, 13” Carriage Bolt, 1/2-13 x 7” Carriage Bolt, 1/2-13 x 8-1/2” Nut, 1/2-13 Hex Screw, 3/8-16 x 3-1/4” Hex Head Lockwasher, 3/8 Heavy Nut, 3/8-16 Hex Pin, Klik Type Front Deck Only Wing Decks Only, See 54.1 Front Deck Only, See 54.1 Wing Decks Only Front Deck Only > Change from previous revision 134 HR-9016 Serial No. 54.1 Wheel and Tire Assemblies Part Numbers 4256572 and 4253030 1 2 3 7 6 4 5 Item Part No. 1 1 2 2 3 4 5 6 7 7 Qty. Description Serial Numbers/Notes 4250772 1 Tire, 11 x 4-5 Smooth 4256572 Only 4253050 4256573 4253031 5003197 500534 360111 4253130 4256574 4253110 1 1 1 2 2 1 2 1 1 Tire, 13 x 6.5-6.5 Multi Rib Wheel, 5 x 3 Wheel, 6 x 4.5 Grease Seal Bearing Cup and Cone Inflation Valve Spacer, 3/4 x 1-1/8 x 1/2" Spacer, 1/2 x 3/4 x 4-11/16" Spacer, 1/2 x 3/4 x 6-11/16" 4253030 Only 4256572 Only 4253030 Only 4256572 Only 4253030 Only > Change from previous revision 135 HR-9016 Serial No. All 55.1 Gage Wheels and Latch 20 8 5 15 16 4 11 12 14 17 6 13 2 3 6 7 18 / 19 8 21 2 13 1 9 10 136 22 HR-9016 Item 1 2 3 4 5 6 7 8 9 10 11 12 13 14 15 16 17 18 19 20 21 22 Part No. Qty. Description 461495 1 Clevis pin, 1/2 x 2-1/2” 460028 1003423.6 3007442 3004113 441690 446152 443118 3007679 64173-02 1003902 3008471 453017 3008478 453009 460014 4256572 3010075 3010074 441614 452006 444718 2 2 2 4 4 2 8 2 2 1 1 1 1 1 1 2 1 1 4 4 4 Cotter Pin, 1/8 x 1” Yoke, Gage Wheel Spacer, Arm Pivot Bushing Carriage Bolt, 1/2-13 x 7” Lockwasher, 1/2 Nut, 1/2-13 Hex Clevis Pin, 5/8 x 9-5/16” Snap Ring Latch, Standup Spring, Torsion Flat Washer, 1/2 Rod, Latch Flat Washer, 5/16 Cotter Pin, 3/32 x 3/4” Wheel and Tire, 11” Deflector, Left Side Grass Deflector, Right Side Grass Carriage Bolt, 5/16-18 x 1” Flat Washer, 5/16 Locknut, 5/16-18 Center Serial Numbers/Notes See 54.1 > Change from previous revision 137 HR-9016 Serial No. All 56.1 Air Suspension Part No. 5003625 31 26 32 3 32 7 27 30 28 A 14 5 7 29 9 21 27 27 19 6 31 7 22 27 30 2 29 22 31 25 32 A 13 26 23 18 32 12 31 10 11 4 1 24 15 8 17 16 20 9016-62 138 HR-9016 Item Part No. 1 2 3 4 5 6 7 8 9 10 11 12 13 14 15 16 17 18 19 20 21 22 23 24 25 26 27 28 29 30 31 32 Qty. Description N/S 1 N/S N/S 5003627 N/S N/S N/S N/S N/S 5003628 N/S N/S N/S N/S N/S N/S 5003629 N/S N/S N/S 5003630 N/S N/S N/S 5003631 5003632 N/S N/S N/S N/S 5003633 N/S N/S N/S N/S N/S N/S N/S 1 1 1 1 1 1 4 1 1 1 1 1 1 1 1 1 1 21 6 1 1 1 1 1 1 2 1 1 1 1 2 4 2 4 2 4 4 Serial Numbers/Notes Lower Housing Scissors Upper Housing Compressor Kit • Compressor • Tie Wrap • Clamp, Compressor • Tie Wrap • Bushing, Strain Air Fitting/Tubing Kit • Braided Sleeve • Fitting, Tee • 3/16 O.D. Tubing • 3/16 O.D. Tubing • Fitting, 90° • Fitting, Straight Boot and Clip Kit • Boot with Label • Clip, Christmas Tree • Clip, Christmas Tree Airspring Kit • Airspring • Cap Screw • Cap Screw Valve Kit Damper Kit • Bearing, Flanged • Threaded Pin • Nut, Hex Lock • Damper Miscellaneous Kit • Shaft, Threaded • Bearing, Flanged • Bumper • Roller • Tether • Jam Nut • Lockwasher REF M5, See 66.1 > Change from previous revision 139 HR-9016 Serial No. All 57.1 Steering Cylinder Part No. 4113656 14 7 6 1 12 5 12 11 15 2 3 10 13 4 8 9 14 140 HR-9016 Item Part No. Qty. Description 4113655 1 Seal Kit N/S 1 • 1 1 1 1 1 1 1 1 1 1 2 1 2 1 • O-Ring, Piston • Seal, Piston • Seal, Rod • Wiper • Backup Ring, Gland • O-Ring, Gland Nut, 5/8-11 Hex Socket Assembly Piston and Rod Screw, Piston Grease Fitting Gland Nut, 7/8-14 Castle Barrel Assembly 1 2 N/S 3 N/S 4 N/S 5 N/S 6 N/S 7 N/S 8 443126 9 5003543 10 4115591 11 N/S 12 471214 13 N/S 14 N/S 15 4115590 Serial Numbers/Notes Retaining Ring > Change from previous revision 141 HR-9016 Serial No. All Serial No. All 58.1 Rear Wheel Motor Part Number 4209060 22 21 19 17 20 15 14 18 19 20 12 10 16 9 8 7 13 11 5 6 3 Included In Rear Motor Seal Kit 4178564 Included In Front Shaft Seal Kit 4200921 Item 1 2 3 4 5 6 7 8 9 10 11 12 13 14 15 16 17 18 19 20 21 22 Part No. Qty. 4 2 Description 558066 8 Screw, Torx N/S 558063 557624 557623 558064 557629 5003590 557632 557631 557633 557637 557634 557635 557636 557650 5003591 557639 557642 557640 557641 5000318 1 1 1 1 1 1 1 1 1 1 1 1 1 2 3 1 2 2 2 1 1 Front Retainer Shaft and Bearing Kit Nut, Hex Key Bearing Housing Drive Geroler Drive, Valve Plate, Valve Valve Balance Ring and Pins Seal, Inner Face Seal, Outer Face Spring Bolt, 5-3/4” Housing, Valve • Check Plug Assembly • Spring • Ball, Steel • Plug Bolt 1 Serial Numbers/Notes > Change from previous revision 142 HR-9016 59.1 Deck Return Canister Part Number 5003371 1 2 3 4 6 7 5 9016-47 Item Part No. 1 2 3 4 5 6 7 z z z Qty. Description z 1 O-Ring z z z 471214 443132 5003428 1 1 1 1 1 1 Back Up Ring Loaded U-Cup Rod Wiper Grease Fitting Nut, 3/4-16 Hex Collar Assembly 5003427 5003662 4129285 1 1 1 Seal Kit Seal Kit Seal Kit Serial Numbers/Notes Gold Star Return Canisters HDM Return Canisters Energy Return Canisters > Change from previous revision 143 HR-9016 Serial No. All 60.1 Lift Valve Part Number 1001802 1 23 15 20 ■ 17 24 18 16 21 ■ 10 19 14 7 6 5 ■ 4 3 2 ■ 14 13 22 9 12 8 11 9016-48 144 HR-9016 Item 1 2 3 4 5 6 7 8 9 10 11 12 13 14 15 16 17 18 19 20 21 22 23 Part No. Qty. 558005 1 500745 545914 500746 5001599 5001603 558004 558007 5001613 558011 5001616 545921 5001614 5001615 351122 500750 558008 545925 545926 545927 24 546112 5001612 558010 Description Serial Numbers/Notes Plug Assembly, Relief Valve 3 3 3 3 1 2 3 3 1 3 3 3 6 1 1 3 3 3 3 3 3 AR AR AR AR Plug Assembly, Port Adapter Spring, Lockout Poppet Assembly Seat Assembly Plunger, Lockout Plunger, Lockout Cap Assembly Retaining Ring Seat Spacer Spring, Spool Centering Bushing O-Ring Spring Relief Valve (Yellow) Poppet, Relief Valve Plug Assembly, Plunger Detent Spring, Detent Plunger, Detent Hex Plug Assembly Plug Assembly Washer Shim (.015 Thick) Shim (.010 Thick) Shim (.035 Thick) Disc, Plain 1 1 Detent Repair Kit Seal Kit > Change from previous revision 145 HR-9016 Serial No. All 61.1 Front Lift Cylinder Part Number 4138587 23 2 5 8 1 10 4 6 7 9 10 12 11 10 Item 1 2 3 4 5 6 7 8 9 10 11 12 z Part No. Qty. Description ● 1 PSP Seal ● ● ● ● ● ● ● ● 471214 5003415 5003566 2 1 1 1 1 1 1 1 3 1 2 Back Up Ring O-Ring O-Ring Back Up Ring Internal Snap Ring External Snap Ring Loaded U-Cup Rod Wiper Grease Fitting Bushing Bushing 4138621 1 Seal Kit Serial Numbers/Notes > Change from previous revision 146 HR-9016 Serial No. All 62.1 Wing Lift Cylinders Part Number 4138521 1 2 3 10 8 4 5 2 6 7 9 10 Item 1 2 3 4 5 6 7 8 9 10 z Part No. ● Qty. Description 1 PSP Seal ● ● ● ● ● ● ● ● 471214 2 1 1 1 1 1 1 1 2 Back Up Ring O-Ring O-Ring Back Up Ring Internal Snap Ring External Snap Ring Loaded U-Cup Rod Wiper Grease Fitting 4138592 1 Seal Kit Serial Numbers/Notes > Change from previous revision 147 HR-9016 Serial No. All 63.1 Deck Valve Part Number 4135582 2 3 4 / 5/ 6 Item Part No. Qty. Description 1 Serial Numbers/Notes 5002911 1 Relief Valve 5003579 5002912 5003554 3010199 339897 5002913 5003579 1 1 1 1 1 1 1 • Seal Kit Relief Valve • Seal Kit Plug, SAE #6 • O-Ring Solenoid Valve • Seal Kit Located opposite Diagnostic port 5 4134530 1 Coil, 12 Volt DC REFERENCE SOL2, SOL3, SOL4, SOL8, See 66.1 6 2811269 1 Nut, coil w/o-Rings 1 2 3 4 > Change from previous revision 148 HR-9016 Serial No. 64.1 4WD Valve Part Number 4135556 3 1 8 8 9 8 2 6/7 4/5 9016-52 Item Part No. 1 2 3 4 5 6 7 8 9 Qty. Description 5003342 1 Check Valve 5003582 5003344 5003582 5003346 5003583 5003348 5003583 4134530 556847 5003578 4134532 3010199 339897 5003353 1 1 1 1 1 1 1 1 1 1 1 3 3 1 • Seal Kit Shuttle, Hot Oil • Seal Kit 3-Way Spool • Seal Kit Solenoid Vlave • Seal Kit Coil, 12 Volt DC Solenoid Valve • Seal Kit Coil, 12 Volt DC Plug, SAE #6 • O-ring Plug, Orifice Serial Numbers/Notes REFERENCE SOL6 See 66.1 REFERENCE SOL7 See 66.1 > Change from previous revision 149 HR-9016 Serial No. All Schematics 65.1 Hydraulic Schematic Tow Engine Valve Mow 2400 RPM Transport CW 2700 RPM CCW 1.28 ci 1.28 ci A B 4387 psi 2.81 ci 1.28 ci 4387 psi .49 ci A B Traction Pump 313 psi .98 ci Typ (11 Places) T CP Right Wing Deck Valve A Right Wing Motors P C D D D B E T 3000 psi F 630 psi Brake G A Left Wing Deck Valve Left Wing Motors H P D D B J T 3000 psi 630 psi Brake A K Right Front Deck Valve P Three Right Front Motors B D D Oil Cooler Return Filter L M 10 Micron T 3000 psi Return Manifold 630 psi Brake 60 ± 5 psi Crack Bypass A Left Front Deck Valve Two Left Front Motors B 25 psi Crack Bypass Tank Fill Cap 10 Micron Air P D D Charge Filter 2.9 psi 10 Micron T 3000 psi 630 psi Brake 25 psi 25 psi 9016-54 150 HR-9016 DA A 12.56 ci Front Wheel Motors 2 A 12.56 ci T 1 12.5 ci 12.5 ci .031 3 B B Rear Wheel Motors DB 4 CP 4WD Valve DC C D E F G 1500 psi H P L Steering Cylinder J T E R Steering Valve Backpressure Valve K 30 ~ 275 psi Out Lift Valve L M 1500 psi In 300 psi 300 psi 300 psi .0595" .0595" Right Wing Cylinder Right Front Left Front Cylinder Cylinder Left Wing Cylinder > Change from previous revision 151 HR-9016 Serial No. All 66.1 Electrical Schematic Mow, 4WD, and Cruise Control Circuits Vt/Ye Vt/Ye Vt/Ye DGn/Og 30 K12 87A 87 Wh/Bu 86 85 Bk DGn/Og 1 2 4 Vt/Ye 5 Bk B SW5 3 DGn/Wh 6 DGn/Wh DGn/Wh DGn/Wh DGn/Wh Wh/Bu Bk 4-9 DGn/Og 2-5 A BSW19 DGn/Rd BSW18 A Gy/Bk BSW10 Wh/Bk A Gy/Bk 3-5 3-6 3-3 SOL5 DGn/Wh Bk DGn/Wh A Wh/Bk Wh/Bk Wh/Bk Gy/Bk D4 DGn/Ye DGn/Wh Gy/Bk Wh/Bk F10 1 2 4 5 SW12 Pk/Wh Pk/Wh Pk/Wh 3 6 Gy/Rd Wh/Bk Wh/Bk 30 K13 87A Gy/Bk 87 Og/Wh Gy/Bk 86 85 Bk 3-7 3-8 Pk/Wh Og/Wh SOL7 SOL6 Bk Bk Rd/Ye Rd/Ye Ye/Bk Rd/Ye Rd/Ye 1 2 SW13 DGn/Ye DGn/Ye 3 F12 Wh/Bu Bk/Wh Tn/Gn 2-4 Tn/Gn Ye/Bu Ye/Bu 1 SW3 Wh/Bu 7 4 8 NO 5 NC 9 NC C F11 2 DGn/Ye Bk/Wh NO NC C 3 C Bk NO Ye/Bk Ye/Bk Tn/Gn SW4 B Bn/Gn A 2-3 Bn/Gn Bn/Gn Ye/Bk Ye/Bk Tn/Gn SW8 B Rd/Wh A 3-1 Rd/Wh SW9 B A Bn/Wh 3-9 Bn/Wh 30 K10 87A 87 Vt/Wh 85 Bk Bk Rd/Bk Vt/Wh Rd/Wh 86 Ye/Bk Tn/Gn 30 K9 87A 87 Rd/Bk 86 85 Bk 30 K11 87A 87 Rd 85 Bk 3-2 Rd/Bk Vt/Wh Rd/Bk Vt/Wh SOL2 SOL3 Bk Bk Vt/Wh Rd Bn/Wh 86 2-2 3-10 Rd Rd SOL4 SOL8 Bk Bk Bk Bn/Wh Bn/Gn Rd/Wh 152 HR-9016 66.1 Electrical Schematic Interlock, Starting, Gauges, and Seat Control Circuits 2-9 U2 Vt/Ye K8 87A Vt/Ye 30 Wh Bn/Ye Ye/Gn Bk Og/Bu Og/Gn Og/Gn 4 3 2 1 87 85 Bk 86 Ye/Gn Og/Gn Og/Gn K7 87A 87 Rd/Bu 85 Bk Bk 86 Rd/Bu Og/Bn D1 Ye/Gn Ye/Gn 30 K5 87A Og/Bn 86 87 85 Bk Gy/Bu Og/Gn Og/Gn Og/Bu F9 30 K6 87A 86 K4 87A 30 Og/Gn 87 Gy/Bu 85 Bk Bk 86 Bk 4-11 M Gy/Wh 4-8 2-6 Gy/Wh SW6 Gy/Ye Og/Bk Bn L2 B SW7 Gy/Ye SW14 A 1 Rd/Ye Bk SW15 Wh/Rd M5 Rd/Ye Wh Bu 2-1 A Bk Wh/Rd B Og/Gn 3-4 Bu 87 Wh/Bu 85 Bk Bk Bk Og Gy/Wh Gy/Wh Bn/Ye 2-10 SW2 30 Gy/Wh Bn/Ye Bk Bk 4-12 2 3 Wh/Rd F8 Bn/Ye SW11 Wh/Bn F7 Og/Bk Rd/Ye F6 Wh/Bu Bk/Wh Bk/Wh 30 Gy/Ye Rd/Ye 30 Gy/Ye 86 86 Wh/Vt 30 87 Rd/Ye 85 Bk Gy 87 85 Bk Rd/Bu Gy 30 K3 87A 30 K2 87A DBu/Ye 86 87 85 Rd/Bu 87 Gn 85 Bk 30 K15 87A DBu/Ye 86 87 85 Bk Og Rd/Ye DBu/Ye X Y A Og Rd/Ye DBu/Ye Og D2 Wh/Bn Ye D3 Ye Ye Og/Bk Ye/Rd Ye/Bk Bu Og/Bk LBu/Bk Gy/Rd Bn F5 Og Og 86 87 85 Bk Bk Wh/Vt Wh/Vt Wh/Vt Gy/Ye Gy/Ye Ye/Rd S I B Gy/Ye Ye/Rd A B C D E F – + Wh/Vt Gy/Ye Gy/Ye 2-7 Gy/Ye Og Ye/Rd Og 3-11 3-12 Gy/Ye Og U11 Glow Plug Filter U5 Alt. Engine Oil Gy/Ye Gy/Ye S G I B Wh/Bn LBu/Bk Wh/Bn Gy K16 87A Rd/Ye Off - None SW1 Run - B+I Glow - B+I+G Start - B+I+G+S Wh/Bn L1 Gy Bk Gy/Ye Gy/Ye Wh/Vt Wh/Vt Og/Bk Gy K17 87A Wh/Vt 86 Og K1 87A Wh/Bn 2-11 6-10 Og Rd Rd Og CB1 F4 F3 Bn/Wh Bn/Gn Rd/Wh F2 Neutral R Wing Mow CAN-L CAN-H U1 Gnd +12V 1 2 3 4 5 6 7 8 Throttle Signal 9 Throttle +5V 10 L Wing Mow 11 Front Mow 12 Gy Ye Gn Bn Ye/Bk Bn Gn Wh Bu Bu Bn/Gn Rd/Wh U9 +5V Bu Bu Gnd Bk U24 Sig Gy/Rd Gy/Ye F1 Og/Gn Bn/Wh Ye Gn Bk Wh I Og/Bk S Pk G Bk B U3 G Og/Bk Bk Vt Ye Og/Bk U10 I Vt S Bk G 4-1 5-6 4-4 5-7 5-4 4-2 5-1 5-9 4-3 5-12 4-5 4-6 Gy/Rd Gy/Ye Gy/Rd Gy/Ye Gy Ye Gn Bn Ye/Bk Bn Gn Wh Gy Ye Gn Bn Ye/Bk Bn Gn Wh Vt/Wh Ye Vt/Wh Ye Gnd Pk Bk 2-8 4-10 Pk/Wh Bk Sig U4 153 HR-9016 66.1 Electrical Schematic Engine Control Circuits Wh/Bk Wh/Rd Gy/Rd Bu Ye Gn Gnd U16 Sig U15 R2 +5V +5V Sig Gnd U17 1kΩ U13 Bu/Rd Bu Gnd Sig Bk Rd Gnd Sig +5V Sig Gnd U18 Gnd U14 +5V Sig Bk U22 U21 U20 U23 Gnd Sig Rd U12 M3 M + – M4 Wh-59 Wh-59 F13 Wh-59 30 Wh-107 86 Rd 86 Bk 1-1 6-7 Gy Ye Gn Bn Ye/Bk Bn Gn Wh Wh-113 Wh-112 1-4 6-4 6-6 1-2 6-11 6-8 1-3 6-12 B Wh-44 Wh-43 Wh-47 Wh-45 Wh-35 Wh-36 Wh-32 Wh-33 Bk-1 Bk-1 K19 87 Wh-708 85 Wh-54 87 85 Wh-1 M Wh-707 Wh-706 M2 M1 7-21 Wh-60 SW16 Wh-111 Wh-709 Wh-710 Wh-603 Wh-51 Wh-310 Wh-107 Wh-708 Gnd Sig U6 CAN-H CAN-L +12V Gnd A CAN-H B CAN-L C Gnd 1 2 3 4 DiagMaster Connector 3 4 5 6 8 9 13 14 15 23 24 25 26 27 28 29 32 33 34 36 41 42 43 45 46 47 48 51 52 60 61 62 63 65 66 67 68 71 72 80 Rail Pressure Gnd Boost Sesnor Gnd Coolant Temp Sensor Gnd Crank Angle Sensor Gnd Cam Angle Sensor Sig Crank Angle Sensor Gnd Rail Pressure Sig Boost Sensor Sig Coolant Temp Sensor Sig Fuel Temp Sensor Gnd EGR Lift Sensor Gnd Air Temp Sensor Gnd Shield Gnd Cam Angle Sensor Gnd Cam Angle Sensor +5V Crank Angle Sensor Sig Rail Pressure Sig Fuel Temp Sensor Sig Air Temp Sensor Sig EGR Lift Sensor Sig Injector #2 Injector #3 Injector, #2, #3 Injector #4 Injector #1 Injector, #1, #4 Boost Sensor +5V Suction Valve Suction Valve + EGR Mtr Injector #2 Injector #3 Injector, #2, #3 Injector #4 Injector #1 Injector, #1, #4 Rail Pressure +5V Suction Valve Suction Valve + EGR Mtr + Wh-708G B S Wh-66 SW7 154 Wh-1 Wh-1 Wh-67 Wh-712 Wh-58 CN1 U8 1-8 6-1 K18 LGn U7 Wh-52 Wh-53 Wh-65 Wh-92 Wh-91 Wh-90 Wh-706 Wh-710 Wh-709 Wh-706 Wh-601 Wh-604 L S Wh-94 Wh-145 Wh-15 Wh-14 Wh-111 Wh-706 1-5 1-6 7-20 7-24 7-3 7-7 7-25 7-34 7-6 7-2 Wh-66 Bk Vt/Ye Ye 30 Gn/Og Gn/Bk Bk/Rd Gy Bk/Ye Ye/Gn Ye Bk/Rd R1 K14 Wh-59 - Gy Ye Gn Bn Ye/Bk Bn Gn Wh + Rd B2 Gy/Rd Gy/Ye Wh-57 – + B1 7-29 7-30 7-35 7-40 7-14 7-23 7-5 Wh-40 Wh-39 Wh-67 Rd Rd + M Wh-57 CB2 7-18 7-15 Wh-63 Wh-41 Wh-40 Wh-94 Wh-90 Wh-94 Wh-62 Wh-42 Wh-39 Wh-44 Wh-35 Wh-53 Wh-65 Wh-92 Wh-91 Wh-145 Wh-62 Wh-43 Wh-52 Wh-36 Wh-704 Wh-705 Wh-703 Wh-702 Wh-701 Wh-700 Wh-38 Wh-47 Wh-45 Wh-33 Wh-704 Wh-705 Wh-703 Wh-702 Wh-701 Wh-700 Wh-61 Wh-47 Wh-45 Wh-32 Wh-706 Wh-703 Wh-705 Wh-703 Wh-704 Wh-700 Wh-701 Wh-700 Wh-702 8-G 8-6 8-5 8-4 8-3 8-2 8-1 8-8 8-7 U19 +5V Gnd Sig 7-13 7-38 Wh-41 Wh-42 Wh-38 Wh-61 Wh-62 Wh-63 Wh-706 7-1 Shld LGn Ye LGn Wh/Bk Gn Rd Gn Bu/Bk Rd Wh Bk Ye Gn Bu Bk 7-9 7-33 7-41 7-26 7-28 7-39 Wh-708 Wh-54 Wh-712 Wh-603 Wh-51 Wh-310 Wh-107 Wh-111 Wh-14 Wh-709 Wh-708 Wh-706 Wh-708 Wh-54 Wh-707 Wh-60 Wh-111 Wh-15 Wh-710 Wh-708 Wh-706 Wh-706 Wh-708 Wh-706 Wh-706 Wh-708 Wh-706 Wh-706 CAN Diagnostic Connector CN2 1 3 5 6 7 9 12 13 16 17 18 20 21 23 24 29 33 36 37 38 39 40 58 59 60 78 79 80 +12V Main Relay Gnd Starter Relay Gnd Engine Oil Lamp Heater Lamp Engine Warning Start Ign CAN-L Diag CAN-L +12V Case Gnd +12V Main Relay Gnd Heater Relay Coil Oil Switch Ign CAN-H Diag CAN-H +12V Gnd Gnd +12V Gnd Gnd +12V Gnd Gnd HR-9016 Item B1 B2 CB1 CB2 D1 D2 D3 D4 F1 F2 F3 F4 F5 F6 F7 F8 F9 F10 F11 F12 F13 K1 K2 K3 K4 K5 K6 K7 K8 K9 K10 K11 K12 K13 K14 K15 K16 K17 K18 K19 L1 L2 M1 M2 Reference Illustration Part Number See 16.1 See 16.1 See 44.1 See 44.1 See 6.1 See 6.1 See 6.1 See 6.1 See 6.1 See 6.1 See 6.1 See 6.1 See 6.1 See 6.1 See 6.1 See 6.1 See 6.1 See 6.1 See 6.1 See 6.1 See 44.1 See 6.1 See 6.1 See 6.1 See 6.1 See 6.1 See 6.1 See 6.1 See 6.1 See 6.1 See 6.1 See 6.1 See 6.1 See 6.1 See 44.1 See 5.1 See 5.1 See 5.1 See 44.1 See 44.1 See 6.1 See 6.1 Not Shown See 26.1 N/S N/S 3000359 4237462 555846 555846 555846 555846 5003278 5003278 5003281 5003281 5003278 5003278 5003278 5003281 5003278 5003278 5003278 5003281 5003280 3001307 3001307 3001307 3001307 3001307 3001307 3001307 3001307 3001307 3001307 3001307 3001307 3001307 4282031 3001307 3001307 3001307 4221100 4221100 366751 366751 4251757 4135918 Description Battery Battery 50 Amp Circuit Breaker - Main 90 Amp Circuit Breaker - Engine Interlock System Diode Test Diode Alarm Diode 4WD Diode Spare 5 Amp Fuse Spare 5 Amp Fuse Spare 15 Amp Fuse Spare 15 Amp Fuse 5 Amp Fuse - Ignition Switch 5 Amp Fuse - Gauges 5 Amp Fuse - Interlock Circuit 15 Amp Fuse - Air Ride Seat 5 Amp Fuse - Cruise Control 5 Amp Fuse - 4WD 5 Amp Fuse - Deck Limit Switches 15 Amp Fuse - Mow Circuit 10 Amp Fuse - Engine Main Relay Interlock Relay Run Circuit Relay Start Circuit Relay Brake (Start) Relay Brake (Run) Relay Neutral (Start) Relay Neutral (Run) Relay Neutral (Cruise Control) Relay Left Mow Relay Center Mow Relay Right Mow Relay Cruise Control Relay 4WD Relay Pre-Heat Relay Run Circuit Cutout Relay Auxiliary Circuit Relay Ignition Circuit Relay Starter Relay Engine Main Relay Hydraulic Oil Light Check Engine Light Starter Motor Fuel Pump Serial Numbers/Notes Optional Cruise Control Kit 155 HR-9016 Item M3 M4 M5 R1 R2 SOL1 SOL2 SOL3 SOL4 SOL5 SOL6 SOL7 SOL8 SW1 SW2 SW3 SW4 SW5 SW6 SW7 SW8 SW9 SW10 SW11 SW12 SW13 SW14 SW15 SW16 SW17 SW18 SW19 U1 U2 U3 U4 U5 U6 U7 U8 U9 U10 U11 U12 U13 156 Reference Illustration Part Number Not Shown Not Shown See 56.1 Not Shown Not Shown 4251788 4251717 5003627 4251772 EGR Valve Suction Valve Seat Air Ride Compressor Heater, Intake Air Resistor, 1kΩ See 63.1 See 63.1 See 63.1 Not Shown See 64.1 See 64.1 See 63.1 See 6.1 See 4.1 See 6.1 See 31.1 Not Shown See 9.1 See 11.1 See 28.1 See 31.1 See 9.1 See 24.1 See 6.1 See 6.1 See 6.1 See 12.1 Not Shown See 22.1 Not Shown Not Shown See 5.1 See 5.1 See 6.1 See 25.1 See 6.1 See 22.1 Not Shown See 44.1 See 6.1 See 6.1 See 5.1 Not Shown Not Shown 4134530 4134530 4134530 3008975 4134530 4134532 4134530 2810269 4206374 4174684 4140149 3006442 4140149 4140149 4140149 4140149 4140149 3009203 3006446 3006436 3006446 556419 4251860 363996 3007392-1 3007392-1 4234100 3009544 162723 3006639 1002679 3008821 4251744 4229561 365943 3005121 366670 4251788 4251850 Left Wing Mow Solenoid Coil Center Mow Solenoid 1 Coil Right Wing Mow Solenoid Coil Cruise Control Magnet 4WD Solenoid Coil 4WD Reverse Solenoid Coil Center Mow Solenoid 2 Coil Ignition Switch Seat Switch PTO Switch Left Wing Limit Switch Cruise Control Switch Neutral Switch Parking Brake Switch Front Limit Switch Right Wing Limit Switch Forward Switch Hydraulic Level Switch 4WD Reverse Switch 4WD Switch Test Switch Charge Filter Switch Engine Oil Switch Temperature Switch Left Brake Pedal Switch Right Brake Pedal Switch Engine Speed Controller Seat Time Delay Relay Hour Meter Fuel Sender Light Gauge Temperature Sender Alternator Kubota ECU Fuel Gauge Temperature Gauge Alarm EGR Lift Sensor Crank Position Sensor Description Serial Numbers/Notes Included in 1004337 Deck Valve Included in 1004337 Deck Valve Included in 1004337 Deck Valve Optional Cruise Control Kit Included in 1002977 4WD Valve Included in 1002977 4WD Valve Included in 1004337 Deck Valve Optional Cruise Control Kit Optional Cruise Control Kit Optional Cruise Control Kit Included with M3 Item U14 U15 U16 U17 U18 U19 U20 U21 U22 U23 U24 Reference Illustration Part Number Not Shown Not Shown Not Shown Not Shown Not Shown Not Shown Not Shown Not Shown Not Shown Not Shown See 7.1 4251850 4251738 4251856 4251858 4251855 4251717 4251731 4251731 4251731 4251731 4229340 Description Cam Position Sensor Fuel Rail Pressure Sensor Boost Pressure Sensor Coolant Temperature Sensor External Air Temperature Sensor Fuel Temperature Sensor Fuel Injector, Cylinder 1 Fuel Injector, Cylinder 2 Fuel Injector, Cylinder 3 Fuel Injector, Cylinder 4 Throttle Position Sensor Serial Numbers/Notes Included with Fuel Rial Included with M4 157 Fluids and Compounds Hydraulic Fluid* 5001405 5001404 2500548 2500546 503409 503407 Two 2-1/2 Gallon Container of ISO VG68 Oil One 5 Gallon Pail of ISO VG68 Oil Two 2-1/2 Gallon Container of 10W30 Oil One 5 Gallon Pail of 10W30 Oil Two 2-1/2 Gallon Container of ATF Fluid One 5 Gallon Pail of ATF Fluid 2-Cycle Oil 554599 Twenty Four 8 Ounce Plastic Container Grease 5000067 One 5 Gallon Pail OO-Grease 5000068 Twenty Four 8 Ounce Tube OO-Grease Paint 4184140 2500789 546409 5002631 838140 4112764 12 Ounce Orange Aerosol Can Twelve 1 Quart Can Orange Two 1 Gallon Can Orange Hunter Green Aerolol Can 16 Ounce Ransomes Green Aerosol Can 1 Quart Can Ransomes Green 5002488 5002490 5002489 5002491 One 10 Pound Pail of 80 Grit One 25 Pound Pail of 80 Grit One 10 Pound Pail of 120 Grit One 25 Pound Pail of 120 Grit Lapping Compound Specialty Compound 365422 5001581 523248 4136736 5.3 Ounce Tube of Electrical Insulating Gel 14 Ounce Can of Lubriplate Multi Lube A Chain Lubricant Zinc Spray Corrosion Protection Biodegradable Hydraulic Fluid* 5003102 5003103 5003105 5003104 4115976 4115977 4114701 5003106 One 55 Gallon Drum Jacobsen GreensCare 68 One 5 Gallon Pail Jacobsen GreensCare 68 One 55 Gallon Drum Jacobsen GreensCare 46 One 5 Gallon Pail Jacobsen GreensCare 46 One 55 Gallon Drum Jacobsen GreensCare 32 One 5 Gallon Pail Jacobsen Greens Care 32 GreensCare Bio-Flush Twenty Four 14 Ounce Tube Greens Care Grease O-Ring Kit 5002452 5002453 5002454 SAE O-Ring Boss (3/32 ~ 2” Tube O.D.) Common O-Ring Kit O-Ring Face Seal ORFS (-4 ~ -24 ORS Tube Size) Right Start Kit for New Machines See your local Jacobsen Dealer On-Time Maintenance Kit See your local Jacobsen Dealer * Refer to the Parts & Maintenance manual for the correct hydraulic oil requirements for your machine. Jacobsen offers a High Usage Parts Catalog illustrating commonly used Parts through easy to read line Drawings. See your local Jacobsen Dealer for a copy. INDEX 1001752...................... 77 1001802...................... 51 1002679.............. 47, 156 1002769........ 55, 63, 105 1002785...................... 91 1002885...................... 95 1002886...................... 95 1002889................ 59, 61 1002893...................... 61 1002895................ 59, 61 1002896................ 59, 61 1002927...................... 89 1003001...................... 63 1003011.............. 73, 107 1003071...................... 53 1003100...................... 51 1003145...................... 53 1003244...................... 53 1003245...................... 55 1003247...................... 81 1003248...................... 89 1003272...................... 97 1003274...................... 91 1003275...................... 91 1003277................ 93, 97 1003307.................... 105 1003308.................... 105 1003309.................... 105 1003310.................... 105 1003311.................... 105 1003312.................... 105 1003313.................... 105 1003321............ 123, 131 1003325............ 123, 131 1003423.2................. 137 1003424.................... 125 1003425.................... 125 1003429.................... 125 1003430.................... 123 1003483...................... 93 1003484...................... 93 1003556.................... 129 1003557.................... 129 1003558.................... 129 1003559.................... 129 1003562.................... 129 1003563.................... 129 1003564.................... 129 1003567.................... 133 1003573.................... 109 1003575.................... 109 1003579.................... 133 1003580.................... 133 1003581.................... 133 1003582.................... 133 1003583.................... 133 1003584 .................... 133 1003587 .................... 101 1003590 .................... 113 1003591 .................... 113 1003593 .................... 115 1003595 .................... 115 1003596 .................... 115 1003597 .................... 115 1003600 .................... 113 1003601 .................... 113 1003602 .................... 113 1003605 .................... 111 1003606 .................... 115 1003607 ............ 101, 129 1003608 .................... 109 1003611 ...................... 51 1003679 ...................... 39 1003794 ...................... 55 1003823 ...................... 97 1003824 ...................... 55 1003825 ...................... 55 1003838 ...................... 57 1003860 .................... 107 1003861 .................... 107 1003862 .................... 107 1003864 .................... 111 1003865 .................... 111 1003875 .................... 115 1003876 .................... 115 1003878 .................... 111 1003891 .... 103, 107, 109 1003900 ...................... 91 1003902 .................... 137 1003942 ...................... 73 1003988 .................... 107 1004275.6 ................. 134 1004276.6 ................. 134 1004277.6 ................. 134 1004308 ................ 59, 61 1004309 ................ 59, 61 1004343 .................... 129 1004417 ...................... 77 1004584 ...................... 51 1004686 ...................... 39 1004691 ................ 59, 61 1004938 ................ 59, 61 1004992 ...................... 47 1005016 ...................... 95 1005017 ...................... 95 1005018 ...................... 95 1006812 ...................... 55 116686 ...................... 131 131905 ...................... 155 132568 ...................... 113 132647 ........................ 87 162236 ........................ 77 162716.2 ..................... 95 162723 ................ 47, 156 163302 ...................... 125 163306 ...................... 131 2809628 ...................... 95 2809630 ...................... 95 2810030 ....125, 127, 131 2810269 .............. 47, 156 2810634 ...................... 73 2810702 ...................... 87 2811020 ...................... 47 2811269 .................... 148 2811364 ...................... 69 2811365 ...................... 69 2811547 ...................... 69 2811954 ....125, 127, 131 3000359 .................... 155 3001307 ........45, 47, 155 3001435 ...................... 37 3002042 ........77, 81, 117 3002397 ...................... 83 3002695 ...................... 53 3003101 ...................... 63 3003475 ...................... 53 3003704 ...................... 87 3003714 ....123, 127, 131 3003939 ....123, 127, 131 3004092 ...................... 97 3004113 ...123, 127, 131, 137 3004287 ...................... 37 3004385 ...................... 53 3004410 ...................... 91 3004894 .................... 134 3005121 .............. 47, 156 3005157 ...................... 51 3005603 ...................... 41 3005604 ...................... 41 3006107 ...................... 55 3006108 ...................... 57 3006204 ...................... 95 3006238 ...................... 81 3006240 ...................... 81 3006264 ...................... 83 3006265 ................ 85, 87 3006293 ...................... 97 3006294 ...................... 95 3006295 ...................... 95 3006436 .............. 47, 156 3006442 .................... 156 3006446 .............. 47, 156 3006475 ...................... 63 3006490 ...................... 91 3006491 ...................... 91 3006509 ...................... 47 3006566 ...................... 83 3006639 ..............85, 156 3006644 ......................39 3006658 ......................89 3006663 ......................41 3006664 ......................41 3006723 ......................41 3006724 ......................41 3006727 ......................95 3006729 ......................49 3006737 ......................51 3006829 ................81, 89 3006835 ................81, 89 3006847 ......................83 3006880 ......................43 3006886 ......................53 3006888 ......................53 3006889 ......................53 3006913 ......................89 3006915 ......................41 3007032 ......................43 3007060 ....................102 3007061 ....................103 3007091 ......................91 3007092 ......................91 3007099 ......................41 3007100 ......................41 3007220 ......................53 3007228 ......................53 3007230 ......................53 3007297 ......................93 3007368 ....................125 3007369 ....................125 3007374 ....................125 3007376 ....................127 3007392-1 .................156 3007442 ....................137 3007468 ......................91 3007674 ....................107 3007678 ....................123 3007679 ....................137 3007680 ......................91 3007683 ......................63 3007704 ......................41 3007712 ......................93 3007731 ......................71 3007764 ... 125, 127, 131 3007896 ......................95 3007897 ......................95 3007919 ................59, 61 3007920 ................59, 61 3008015 ......................41 3008344 ......................55 3008357 ......................99 3008374 ......................95 3008388 ... 125, 127, 131 3008453 ......................93 159 INDEX 3008459.....................113 3008461.......................67 3008471.....................137 3008472.......................93 3008478.....................137 3008521.......................37 3008548.......................57 3008554.......................73 3008561.......................73 3008563.......................73 3008673.....................107 3008792.....................110 3008793.....................110 3008808.......................83 3008820...............87, 103 3008821...............79, 156 3008840.....................123 3008874.......................57 3008907.......................55 3008975.....................156 3009026.................53, 97 3009095.......................73 3009162.......................95 3009163.......................95 3009175.....................123 3009193.................57, 91 3009197.......... 59, 61, 87 3009203...............83, 156 3009236.................83, 85 3009267.......................37 3009268.......................37 3009269.......................91 3009272.....................115 3009309.......................95 3009317.....................121 3009318.....................121 3009505.......................77 3009535.......................97 3009537.......................71 3009544...............45, 156 3009607.......................55 3009793.......................39 3009860.......................75 3009979.......................85 3009980.......................83 3010013.......................43 3010014.......................73 3010015.......................91 3010035.......................59 3010074.....................137 3010075.....................137 3010082.......................51 3010199.............148, 149 3010305.................53, 55 3010346.......................67 3010489.....................131 160 3010651.......................69 3010789.......................43 3010811.......................95 3010812.......................95 3010825.......................95 304569.........................95 306506.........................49 316913.........................79 319755.........................93 323943.........................79 326112.......................102 326799.........................71 332351.........................95 333542.........................53 339896.......................109 339897..... 109, 115, 129, 133, ..... 148, 149 339898.............. 111, 115 33989983, 100, 101, 105, ..... 107, 129, 133 339900.......... 63, 83, 105 339901.......................107 339902.......................107 339904.........................83 339908.......................109 339909..... 109, 113, 115, 129, ..............133 339910.............. 109, 115 339911..... 105, 109, 111, 129, ..............133 339912................ 63, 105 339913.............. 105, 107 339914.......................107 339961..... 109, 113, 115, 129 339963...... 100, 101, 111 339965.............. 105, 107 339966.......................107 339972.......................109 339977.......................109 339979 91, 109, 115, 133 339984.......................115 339989. 81, 99, 105, 129, 133 339990.......................105 339994.......................105 339996.................. 59, 61 339999.........................89 340002.......................107 340026.........................51 340027.........................51 340029.........................51 340061.... 51, 91, 97, 129 340062.........................51 340063.........................75 340065................ 99, 109 340069 ...................... 111 340070 ...75, 89, 99, 129, 133 340074 ................ 63, 105 340075 .................. 59, 61 340077 ................ 89, 107 340078 ........................ 97 340096 .............. 129, 133 340118 ...................... 109 340119 .............. 109, 115 340123 ...................... 107 340143 ...................... 113 340147 ...................... 105 340167 ...................... 113 340215 ...... 109, 129, 133 340217 ...................... 111 340219 ...................... 105 340239 ...... 109, 115, 133 340243 ...................... 107 340269 ........................ 89 340377 ...................... 111 340379 ...................... 107 340481 ........................ 85 340795 ........................ 39 342033 ........................ 91 346294 ........................ 95 346802 ........................ 93 350800 ........................ 95 351122 ...................... 145 352435 ........................ 93 352604 ........................ 41 352936 ................ 93, 125 354081 .................. 93, 97 359615 ........ 77, 102, 103 359860 ...................... 133 360053 ........................ 37 360111 ................ 63, 135 360970 ................ 55, 110 361001 ........................ 81 361071 ........................ 79 361117 ........................ 87 361648 ...................... 134 361723 ...39, 93, 95, 125, 131 361833 ........................ 51 361898 ........................ 77 362008 ........................ 73 362263 ........................ 81 362464 ........................ 95 362539 ........................ 81 362615 .................. 83, 85 362743 ........................ 89 362978 ........................ 79 363030 ........................ 99 363233 ........................ 63 363385 .................. 77, 81 363485 ..........77, 81, 117 363514 ...................... 129 363539 ...................... 134 363568 ...................... 131 363572 ........................ 95 363574 ...................... 131 363746 ........................ 95 363766 ........................ 63 363996 ................ 79, 156 364154 ........................ 55 364830 ........................ 91 364945 ........................ 99 364973 ...................... 119 365033 ........................ 69 365466 ........................ 99 365566 ...................... 110 365660 ...................... 109 365772 ...................... 134 365826 ........................ 93 365943 ................ 47, 156 365979 .................. 77, 79 366114 ...................... 110 366133 ........................ 51 366283 ........................ 47 366424 ...................... 110 366473 ...................... 127 366593 ...................... 134 366613 ...................... 127 366670 ................ 45, 156 366751 ................ 47, 155 366768 ........................ 49 366884 .................. 77, 81 366974 ........................ 53 366978 ........................ 95 367176 ........................ 49 367559 ........................ 75 367631 ........................ 51 400106 .................. 47, 53 400110 ........................ 49 400114 ........................ 93 400116 ........................ 49 400120 ........................ 51 400182 .................. 43, 45 400184 ........................ 71 400186 ........................ 93 40018855, 57, 83, 85, 87, ..................... 129 400190 ........................ 53 400194 ........................ 93 400204 ...................... 110 400206 ...................... 133 400208 ...................... 102 400210 ...................... 110 400216 .................. 69, 87 400260 ....59, 61, 77, 119 40026253, 55, 71, 73, 87, INDEX ....... 89, 125, 127 400264... 43, 75, 93, 100, 101, .... 102, 115, 127, ............. 131 400266.... 53, 79, 97, 103 400268.................. 53, 79 400274...................... 125 400336.................. 81, 89 400370........................ 43 400404........................ 77 400406...... 59, 61, 81, 89 400408.................. 63, 97 400410 63, 125, 127, 131 400412............ 89, 95, 97 400416.................. 59, 61 400420.............. 127, 131 400430........................ 93 400616.................. 59, 61 400656........................ 79 400778.................. 59, 61 401028...................... 134 401030........................ 95 401208........................ 65 402006........................ 49 402230........................ 39 403578........................ 97 403745........................ 45 403746.................. 53, 57 403860........................ 45 403910.................. 47, 85 403920.................. 39, 47 404016........................ 69 404022.................. 45, 51 404118.................. 41, 43 409701.................. 59, 61 409804........................ 73 4103161...................... 55 4103163...................... 55 4113655.............. 65, 141 4113656...................... 65 4115590.................... 141 4115591.................... 141 4115706.... 125, 127, 131 4119024.... 125, 127, 131 4124692...................... 37 4125771...................... 37 4129285.................... 143 4131299.................... 117 4132013...................... 79 4132016...................... 81 4132168...................... 71 4133043...................... 67 4133224...................... 67 4133240...................... 75 4133241...................... 75 4133342...................... 75 4134530 .... 148, 149, 156 4134532 ............ 149, 156 4135233 .................... 102 4135240 .................... 102 4135253 .................... 100 4135259 .................... 100 4135260 .................... 100 4135261 ...................... 75 4135262 .................... 100 4135408 .................... 100 4135409 .................... 101 4135425 .................... 101 4135556 .............. 89, 105 4135582 ...................... 99 4135589 .................... 101 4135761 ...................... 75 4135918 .............. 87, 155 4135922 ...................... 77 4136120 ...................... 75 4136227 ...................... 79 4136285 ...................... 79 4136286 ...................... 79 4136341 .................... 102 4136342 .................... 102 4136343 .................... 102 4136563 ........ 39, 67, 117 4136646 ...................... 75 4136647 ...................... 75 4137099 ...................... 75 4137100 ...................... 75 4137101 ...................... 75 4137611 ...................... 75 4137616 ...................... 79 4137894 ................ 75, 81 4138044 ...................... 87 4138120 ...................... 81 4138521 ...................... 97 4138587 ...................... 91 4138592 .................... 147 4138621 .................... 146 4138647 ...................... 67 4138648 ...................... 67 4139109 .............. 71, 102 4140149 ...53, 57, 91, 97, 156 4148900 .................... 102 4164381 .................... 121 4166721 .................... 119 4167640 .................... 117 416911 ........................ 69 4174140 .................... 109 4174141 .................... 109 4174684 .............. 47, 156 4177480 ...................... 85 4178564 .................... 142 4181862 ...................... 37 4181863 .............. 37, 121 4182386 ................ 37, 69 4182720 ...................... 57 4183634 ...................... 75 4185932 ...................... 43 4186600 ...................... 43 4187681 ...................... 37 4197940 ...................... 69 4199140 ...................... 37 4200921 .................... 142 4201840 ...................... 69 4206362 ...................... 43 4206363 ...................... 43 4206370 ...................... 43 4206371 ...................... 43 4206374 .............. 43, 156 4209060 ...................... 65 4211400 ...................... 69 4212980 ...................... 69 4218141 .................... 113 4220060 ................ 77, 81 4221100 ............ 117, 155 4225760 ...................... 87 4225780 ...................... 71 4226061 .............. 73, 117 4226062 ...................... 71 4226280 ...................... 77 4226380 ...................... 79 4226720 ..........59, 61, 71 4226721 ..........59, 61, 71 4227161 ...................... 73 4227360 ...................... 77 4227481 ...................... 77 4227500 ...................... 77 4227502 ...................... 77 4227980 .................... 107 4227981 .................... 107 4227982 .................... 107 4227983 .................... 107 4227984 .................... 107 4228240 ..........59, 61, 87 4228260 ...................... 71 4228681 .................... 119 4228700 .................... 119 4228980 .................... 107 4229340 .............. 49, 157 4229561 ............ 117, 156 4230260 .................... 117 4230320 ...................... 67 4230820 .............. 87, 102 4230960 ...................... 87 4230980 ................ 81, 87 4231020 ...................... 71 4231040 ...................... 71 4231800 ...................... 67 4231860 ...................... 37 4231901 ......................49 4231920 ......................37 4231940 ......................47 4233420 ......................77 4233780 ......................87 4233781 ......................87 4234100 ..............45, 156 4234820 ......................43 4234821 ......................43 4236586 ....................110 4236722 ......................65 4237362 ............100, 117 4237462 ............117, 155 4237463 ....................117 4237506 ......................83 4237642 ......................49 4238243 ......................49 4238602 ............113, 115 4239223 ......................71 4240203 ......................77 4240782 ......................77 4242642 ......................63 4242643 ......................63 4242644 ......................63 4242662 ......................63 4243802 ....................117 4244654 ....................113 4247312 ......................69 4247790 ....................107 4247830 ......................69 4250772 ....................135 4251717 ............156, 157 4251726 ......................87 4251731 ....................157 4251738 ....................157 4251744 ....................156 4251757 ....................155 4251772 ....................156 4251788 ....................156 4251807 ......................87 4251808 ......................87 4251850 ............156, 157 4251855 ....................157 4251856 ....................157 4251858 ....................157 4251860 ....................156 4252210 ....................109 4252211 ....................109 4252212 ....................109 4253030 ....................134 4253031 ....................135 4253050 ....................135 4253110 ....................135 4253130 ....................135 4253491 ......................69 4254550 ....................125 161 INDEX 4255270.......................69 4256361.......................39 4256471.... 125, 127, 131 4256510.......................69 4256511.......................69 4256572.............134, 137 4256573.....................135 4256574.....................135 4257090...............37, 121 4257570.....................109 4261130.......................79 4265650.....................109 440042.........................55 440080.........................71 440082...... 71, 73, 77, 89 440084.........................77 440088.........................83 440120...... 39, 41, 71, 73 440124...... 125, 127, 131 441606............ 53, 87, 97 441614.... 69, 87, 97, 137 441618.........................75 441624.......................131 441672.........................57 441677.........................69 441689.......... 83, 85, 134 441690........ 93, 134, 137 44310239, 45, 49, 51, 53, ..... 55, 87, 93, 97 44310653, 55, 57, 71, 73, .... 77, 83, 85, 87, 89, . 93, 97, 110, 113, .....129, 133 44311039, 41, 43, 53, 55, .... 71, 73, 77, 79, 87, ... 89, 93, 95, 97, ......100, 101, 102, ....115, 125, 127, .....131, 134 443112...................39, 53 44311859, 61, 63, 79, 83, .. 85, 89, 93, 134, 137 443126...................59, 61 443128.........................79 443130...................59, 61 443132.......................143 443806.........................93 443826.........................65 443828.........................69 443842.........................65 444304.........................47 444306...................45, 47 44431039, 45, 47, 53, 57, ........................97 444718... 53, 75, 93, 110, 162 137 444730.........................95 444758.. 95, 97, 127, 131 444762 79, 125, 127, 131 445245.........................69 445642.........................63 445781.........................71 445785.........................53 445795................ 69, 102 446112.........................45 446116.................. 39, 49 446118 45, 47, 53, 57, 97 44612839, 45, 47, 51, 53, ........... 55, 93, 97 446130............ 49, 81, 87 44613445, 53, 55, 57, 87, ......... 93, 97, 129 44613643, 71, 73, 77, 79, .... 83, 85, 87, 89, 133 44614053, 59, 61, 75, 77, ......... 87, 97, 103 44614239, 41, 43, 55, 71, .... 73, 75, 79, 89, 93, 95, 100, 101, 102, .... 115, 119, 125, .... 127, 131, 134 446148............ 43, 81, 89 446152 63, 127, 131, 137 44615459, 61, 77, 79, 81, ..... 89, 93, 95, 97 446166............ 59, 61, 79 446178.................. 59, 61 447002.........................47 447006.........................47 447206.........................47 447214.........................81 447224.........................69 447414.........................41 450016.........................43 450168.........................69 450190.........................75 450191.........................77 450390.........................69 450410.........................69 450411.........................69 450422.........................77 452002 45, 47, 53, 57, 97 452004.........................53 45200643, 45, 55, 83, 85, . 87, 89, 110, 137 45200839, 41, 43, 55, 59, .... 61, 71, 73, 75, 77, 87, 101, 103, 115, ..............119 45201249, 79, 83, 85, 95, ....................... 97 452016 ........................ 79 452018 .................. 59, 61 452418 ........................ 69 453004 ............ 45, 59, 61 45300945, 53, 57, 71, 77, ............. 129, 137 453011 97, 125, 127, 131 45301759, 61, 63, 77, 81, ...89, 93, 97, 137 453020 ........................ 95 45302345, 49, 51, 53, 87, ....................... 97 455004 ........................ 97 455012 ................ 79, 127 455048 ................ 55, 125 458039 ........................ 97 458126 ........................ 65 460004 ........................ 57 460014 ...................... 137 460016 ........................ 57 460028 .......... 39, 55, 137 460030 ........................ 65 460035 ........................ 65 460052 ........................ 95 460072 ........................ 63 461356 ........................ 51 461408 ........................ 95 461453 ........................ 55 461456 ........................ 57 461495 ...................... 137 471214 .....53, 55, 65, 95, 131, .... 134, 143, 146, ............. 147 473142 ................ 71, 119 473144 ..... 101, 109, 110, 129, ............. 133 473208 ........................ 47 48228-10..................... 47 48540-01............... 71, 87 5000318 .................... 142 5001599 .................... 145 5001603 .................... 145 5001612 .................... 145 5001613 .................... 145 5001614 .................... 145 5001615 .................... 145 5001616 .................... 145 5002693 .............. 73, 107 5002911 .................... 148 5002912 .................... 148 5002913 .................... 148 5002918 ...................... 69 5002919 ...................... 69 5002952 ...................... 37 5003034 ...................... 89 5003091 ...................... 47 5003157 ...................... 79 5003163 ...................... 81 5003164 ...................... 81 5003165 ...................... 89 5003166 ...................... 89 5003186 .................... 127 5003187 .................... 127 5003188 .................... 125 5003189 .................... 131 5003190 .................... 131 5003197 .................... 135 5003216 ...................... 71 5003278 .............. 47, 155 5003280 ............ 117, 155 5003281 .............. 47, 155 5003342 .................... 149 5003344 .................... 149 5003346 .................... 149 5003348 .................... 149 5003353 .................... 149 5003370 ...................... 77 5003371 ...................... 97 5003372 ...................... 77 5003373 ...................... 77 5003415 .................... 146 5003427 .................... 143 5003428 .................... 143 5003432 ...................... 89 5003433 ...................... 89 5003457 ...................... 43 5003515 ...................... 65 5003518 ...................... 65 5003519 ...................... 65 5003520 ...................... 65 5003522 ...................... 65 5003523 ...................... 65 5003524 ...................... 65 5003526 ...................... 65 5003527 ...................... 65 5003528 ...................... 65 5003529 ...................... 65 5003530 ...................... 65 5003531 ...................... 65 5003538 ...................... 51 5003539 ...................... 51 5003543 .............. 65, 141 5003544 ...................... 89 5003554 .................... 148 5003562 ...................... 65 5003566 .................... 146 5003578 .................... 149 5003579 .................... 148 5003582 .................... 149 5003583 .................... 149 INDEX 5003590.................... 142 5003591.................... 142 5003617...................... 43 5003625...................... 43 5003627............ 139, 156 5003628.................... 139 5003629.................... 139 5003630.................... 139 5003631.................... 139 5003632.................... 139 5003633.................... 139 5003641...................... 63 5003642...................... 63 5003643...................... 63 5003651...................... 63 5003662.................... 143 5003691................ 59, 61 5003763.... 125, 127, 131 500534...................... 135 500745...................... 145 500746...................... 145 500750...................... 145 521117........................ 49 545234........................ 57 545237........................ 57 545914...................... 145 545921...................... 145 545925...................... 145 545926...................... 145 545927...................... 145 546112...................... 145 548804........................ 69 552824...................... 125 554748.................. 71, 87 554752........................ 87 555846........ 47, 119, 155 556417.................. 59, 61 556419... 59, 61, 73, 107, 156 556847...................... 149 557523...... 125, 127, 131 557620........................ 73 557623...................... 142 557624...................... 142 557629...................... 142 557631...................... 142 557632...................... 142 557633...................... 142 557634...................... 142 557635...................... 142 557636...................... 142 557637...................... 142 557639...................... 142 557640...................... 142 557641...................... 142 557642...................... 142 557650 ...................... 142 557844 ........................ 37 558004 ...................... 145 558005 ...................... 145 558007 ...................... 145 558008 ...................... 145 558010 ...................... 145 558011 ...................... 145 558012 ........................ 49 558063 ...................... 142 558064 ...................... 142 558066 ...................... 142 64163-46..................... 67 64173-02................... 137 64205-054 ................... 69 64209-08..................... 49 64229-05..................... 49 64251-001 ................... 45 800497 ........................ 49 800709 .................. 39, 67 813689 ........................ 77 825357 53, 57, 83, 91, 97 839918 53, 57, 83, 91, 97 839935 53, 57, 83, 91, 97 163 World Class Quality, Performance And Support Equipment from Jacobsen is built to exacting standards ensured by ISO 9001 and ISO 14001 registration at all of our manufacturing locations. A worldwide dealer network and factory trained technicians backed by Genuine Jacobsen Parts provide reliable, high-quality product support. Qualità, prestazioni e assistenza di livello internazionale Le apparecchiature prodotte da Jacobsen sono realizzate secondo standard rigorosi previsti dalla registrazione delle norme ISO 9001 ed ISO 14001 presso tutti i nostri stabilimenti. La rete internazionale di rivenditori e tecnici altamente qualificati gode del supporto esclusivo del servizio Parti Originali Jacobsen, unico per affidabilità e qualità dei prodotti. When Performance Matters.™ Jacobsen, A Textron Company 11108 Quality Drive, Charlotte, NC 28273, USA www.Jacobsen.com 800-848-1636 Ransomes Jacobsen Limited West Road, Ransomes Europark, Ipswich, IP3 9TT, Inghilterra Numero di registrazione inglese 1070731 www.ransomesjacobsen.com +44 (0) 1473 270000