1
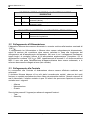
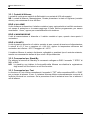
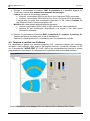
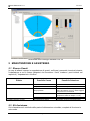
MURENA Rivelatore Doppler ad elaborazione digitale per protezioni esterne Manuale d’installazione Doppler detector with digital processing for external protection Installation Manual Edizione/Edition 1.4 CIAS Elettronica S.r.l. Ed. 1.4 INDICE 1 DESCRIZIONE ......................................................................................................................................................... 3 1.1 1.2 2 Descrizione Prodotto ............................................................................................................................................ 3 Schema a blocchi .................................................................................................................................................. 4 INSTALLAZIONE .................................................................................................................................................... 5 2.1 2.2 2.3 2.4 3 Informazioni preliminari ...................................................................................................................................... 5 Accessori .............................................................................................................................................................. 5 Preparazione del sito ............................................................................................................................................ 6 Dimensione e forma del campo protetto ............................................................................................................... 6 COLLEGAMENTI .................................................................................................................................................... 8 3.1 3.2 3.3 3.3.1 3.3.2 3.3.3 3.4 3.4.1 4 Morsettiere, connettori e Funzionalità del Circuito .............................................................................................. 8 Collegamento all’Alimentazione ........................................................................................................................ 10 Collegamento alla Centrale ................................................................................................................................ 10 Contatti di Allarme ........................................................................................................................................ 11 Connessioni per Stand-By ............................................................................................................................. 11 Connessioni per Test ..................................................................................................................................... 11 Linea Seriale RS-485 .......................................................................................................................................... 12 Connessioni per Linea Seriale RS-485 .......................................................................................................... 12 IMPOSTAZIONI E VERIFICA............................................................................................................................. 13 4.1 Taratura e verifica sul circuito ............................................................................................................................ 13 4.1.1 Operazioni sul circuito ................................................................................................................................... 13 4.2 Taratura e verifica con Software ........................................................................................................................ 16 5 5.1 5.2 6 6.1 6.2 MANUTENZIONE E ASSISTENZA .................................................................................................................... 17 Ricerca Guasti .................................................................................................................................................... 17 Kit Assistenza ..................................................................................................................................................... 17 CARATTERISTICHE ............................................................................................................................................ 18 Caratteristiche Tecniche ..................................................................................................................................... 18 Caratteristiche Funzionali ................................................................................................................................... 19 Manuale d’installazione Pag. 1 di 36 Murena/Murena-Plus24 CIAS Elettronica S.r.l. Ed. 1.4 INDEX 1 DESCRIPTION ....................................................................................................................................................... 20 1.1 1.2 2 Product Description ............................................................................................................................................ 20 Block Schematic ................................................................................................................................................. 21 INSTALLATION ..................................................................................................................................................... 22 2.1 2.2 2.3 2.4 3 Preliminary Information ..................................................................................................................................... 22 Accessories ......................................................................................................................................................... 22 Site Preparation .................................................................................................................................................. 23 Dimensions and shape of the detection field ...................................................................................................... 23 CONNECTIONS ..................................................................................................................................................... 25 3.1 3.2 3.3 3.3.1 3.3.2 3.3.3 3.4 3.4.1 4 Terminals, Connectors and Circuit Functions .................................................................................................... 25 Power Supply Connections ................................................................................................................................. 27 Connections to the Control panel ....................................................................................................................... 27 Alarm Contacts .............................................................................................................................................. 28 Stand-by Connections .................................................................................................................................... 28 Test Connections ........................................................................................................................................... 28 Serial Line RS-485 ............................................................................................................................................. 29 RS-485 Serial Line Connections.................................................................................................................... 29 SET-UP AND VERIFICATION............................................................................................................................. 30 4.1 Calibration and verification on-board................................................................................................................. 30 4.1.1 Working on the board .................................................................................................................................... 30 4.2 Calibration using Software ................................................................................................................................. 33 5 5.1 5.2 6 6.1 6.2 MAINTENANCE AND SERVICE ........................................................................................................................ 34 Fault Finding ...................................................................................................................................................... 34 Service Kit .......................................................................................................................................................... 34 CHARCTERISTICS ............................................................................................................................................... 35 Technical Characteristics.................................................................................................................................... 35 Functional Characteristics .................................................................................................................................. 36 Manuale d’installazione Pag. 2 di 36 Murena/Murena-Plus24 CIAS Elettronica S.r.l. Ed. 1.4 1 DESCRIZIONE 1.1 Descrizione Prodotto Murena è un rivelatore di intrusione volumetrico a microonde ad effetto doppler, per protezioni sia esterne sia interne. I classici rivelatori di intrusione ad effetto doppler, hanno l’intrinseco limite di poter individuare solo la velocità dell’eventuale intruso, Murena invece, è un vero RADAR (RAdio Detection And Ranging) infatti , come dice il nome, esso è in grado di rivelare mediante l’utilizzo di onde radio, la velocità e la distanza e anche la dimensione dell’intruso che si muove nel suo campo di azione. Grazie a ciò la capacità di distinguere un vero intruso da tutti i disturbi ambientali, è enormemente migliore, offrendo così una straordinaria capacità di rivelazione, accompagnata da una altrettanto ottima capacità di reiezione dei falsi allarmi. La forma e le dimensioni del campo di rivelazione, lo rendono particolarmente adatto a proteggere sia aree completamente libere da ostacoli, sia aree di forma irregolare, anche con presenza di ostacoli fissi. Murena può essere utilizzato a “ventaglio” sia in aree libere che in quelle situazioni ambientali esterne difficilmente proteggibili con altri rivelatori, a “spiovente” oppure a “tenda”, protezioni particolarmente indicate per la copertura di facciate degli edifici, assicurando un’efficace vigilanza contro l’intrusione. L’utilizzo di un potente DSC, consente di generare i dati da analizzare utilizzando le più avanzate tecniche sia nel dominio del tempo che nel dominio delle frequenze. Mediante un nutrito set di regole “Fuzzy” tali dati sono comparati e validati, un ulteriore set di Algoritmi “Fuzzy”, consente di determinare le caratteristiche dell’intruso quali dimensione, velocità e distanza e ne indica il grado di pericolosità istantaneo. Altri algoritmi “Fuzzy” valutano l’evoluzione del fenomeno e determinano o meno il prodursi di una segnalazione di allarme. Mediante il potente DSC di bordo sono effettuate anche analisi sulla condizione di funzionamento delle parti a microonde, tali da rilevare condizioni di guasto o tentativi di mascheramento del rivelatore. E’ presente inoltre una diagnostica complessiva di tutte le parti circuitali che fornisce specifici allarmi per guasto del rivelatore. Esiste infine, la possibilità di effettuare un test funzionale da remoto, in modo che la centrale di allarme possa accertarsi del buon funzionamento del rivelatore. È stata prevista la funzione della portata minima per eliminare segnali di oggetti in movimento vicini al rivelatore e portata massima per delimitare l’area di analisi del rivelatore, impostando ad esempio 8 m, il segnale del bersaglio umano che si muove a 10 m non verrà preso in considerazione per l’analisi di generazione dell’allarme. Murena è disponibile nelle seguenti versioni: - Murena - Murena Plus - Murena Plus CF1 - Murena Plus 24 Manuale d’installazione Pag. 3 di 36 Murena/Murena-Plus24 CIAS Elettronica S.r.l. Ed. 1.4 1.2 Schema a blocchi Nello schema a blocchi sono rappresentati i gruppi funzionali del rivelatore Murena. Microprocessore Leds Allarmi Leds Distanza/Massa Portata PARAMETRI DEFAULT Front-End a MW Antenna di Ricezione a MW Mixer a MW Preamplificatore di Ricezione J5 Demodulatore sincrono di Ricezione S&H Filtro Passa Banda Amplificatori Doppler PARAMETRI LAVORO Ingresso / Uscita Sincronismo Ingresso Comando Test Ingresso Comando Stand-By O.L. J2 PASSWORDS Amplificatore di Trasmissione Guasto S&H Connessioni a Centrale Tradizionale RL Antenna di Trasmissione Oscillatore a MW a MW STORICO EVENTI Allarme Modulatore RL Manomiss. MONITOR EVENTI RL INTERF. RS-485 Modulatore di Trasmissione MS2 J2 Connessione a Centrale Bus e a P.C. Remoto Connessione a P.C. Locale Fig. 1 Schema a blocchi del rivelatore Murena Manuale d’installazione Pag. 4 di 36 Murena/Murena-Plus24 CIAS Elettronica S.r.l. Ed. 1.4 2 INSTALLAZIONE 2.1 Informazioni preliminari Il rivelatore Murena è stato studiato per funzionare in ambiente esterno, esso è quindi dotato di una custodia a tenuta stagna, entro la quale è contenuta tutta la parte elettronica e di collegamento, questa custodia è poi dotata di un supporto che consente mediante un apposito snodo, anch’esso in dotazione, di montare il rivelatore mediante una staffa opzionale, ad un palo avente un diametro esterno di 60 mm o al muro. L’accesso dei conduttori avviene mediante un passacavo anch’esso a tenuta stagna ed in dotazione, se necessario è stato predisposto un secondo accesso (a sfondamento) per il montaggio del secondo passacavo. Figura 1 2.2 Accessori Gli accessori del rivelatore Murena sono i seguenti: Staffa a muro 10 cm. Staffa a muro 30 cm. Staffa a muro 40 cm Staffa da palo 10 cm. Murena-RS composto dal Tettuccio anti pioggia e dal Coperchio del fondo Convertitore di interfaccia RS-485/USB “Kit USB” Software di parametrizzazione e gestione “Wave Test2” Il tettuccio antipioggia ed il coperchio del fondo sono accessori necessari in tutti i casi in cui il rivelatore Murena non possa essere posizionato al riparo della pioggia, in modo da evitare che le gocce di acqua che si depositano e poi scorrono sul frontale possano inficiare le valutazioni. In tutti gli altri casi, infatti, la pioggia è riconosciuta e discriminata mediante uno speciale filtro (FRF Fuzzy Rain Filter) che consente il funzionamento sicuro e privo di falsi allarmi anche in caso di pioggia intensa. Manuale d’installazione Pag. 5 di 36 Murena/Murena-Plus24 CIAS Elettronica S.r.l. Ed. 1.4 2.3 Preparazione del sito Il rivelatore Murena, è un rivelatore che grazie al suo principio di funzionamento, (Effetto Doppler), non richiede una specifica preparazione del sito da proteggere, al contrario esso si presta molto bene ad essere impiegato in tutte quelle situazioni ove con altri tipi di rivelatori si incontrano gravi, se non insuperabili, difficoltà. Pertanto Murena, si può impiegare per coprire efficacemente le zone morte in un impianto a barriere, ove non vi sia la possibilità (spazio) di effettuare incroci o sovrapposizioni di tratta. Un altro impiego molto importante si ha nella protezione di facciate d’edifici o di balconi e terrazze. Occorre accertarsi che la staffa da muro o da parete sia ben fissata, che Murena non sia esposto alla pioggia (eventualmente usare gli accessori opzionali Tettuccio e Coperchio del fondo), che non sia diretto verso lampade fluorescenti, che non sia posizionato di fronte a ventole (specialmente metalliche) le quali con il movimento delle loro pale potrebbero generare segnali indesiderati. Murena può lavorare in abbinamento a tutti i rivelatori bistatici CIAS (Barriere Minermo, Ermusa, Ermo, Manta, Coral, Phytagoras) senza alcuna precauzione particolare, non risulterà alterato il funzionamento né di Murena né delle barriere sia che Murena venga posizionato in prossimità del ricevitore della barriera, sia che esso venga posizionato in prossimità del trasmettitore. 2.4 Dimensione e forma del campo protetto L’ampiezza del campo di protezione ha una forma dissimmetrica, e più precisamente per Murena e Murena Plus sul piano orizzontale si ottiene un lobo di circa 90° e sul piano verticale un lobo di circa 40°. I lobi sono rappresentati nella figura 2 7 7 6 6 5 5 4 4 3 3 2 2 1 1 0 0 1 1 2 2 3 3 4 4 5 5 6 6 7 7 0 1 2 3 4 5 6 7 8 9 10 11 0 12 Lobo di rivelazione sul piano ORIZZONTALE 1 2 3 4 5 6 7 8 9 10 11 12 Lobo di rivelazione sul piano VERTICALE Figura 2 L’altezza di installazione consigliata per Murena e Murena Plus in configurazione ventaglio è da 1 a 2m con utilizzo parametri standard Manuale d’installazione Pag. 6 di 36 Murena/Murena-Plus24 CIAS Elettronica S.r.l. Ed. 1.4 L’ampiezza del campo protetto per Murena Plus Curtain, si sviluppa sul piano orizzontale con un lobo di circa 90° e sul piano verticale con un lobo di circa 15°. I lobi sono rappresentati nella figura sottostante. 7 7 6 6 5 5 4 4 3 3 2 2 1 1 0 0 1 1 2 2 3 3 4 4 5 5 6 6 7 7 0 1 2 3 4 5 6 7 8 9 10 11 0 12 1 Lobo di rivelazione sul piano ORIZZONTALE 2 3 4 5 6 7 8 9 10 11 12 Lobo di rivelazione sul piano VERTICALE L’altezza di installazione consigliata per Murena Curtain in configurazione tenda è da 2,5 a 4m con utilizzo parametri standard. L’ampiezza del campo protetto per Murena Plus 24, si sviluppa sul piano orizzontale con un lobo di circa 45° e sul piano verticale con un lobo di circa 18°. I lobi sono rappresentati nella figura sottostante. 14 14 12 12 10 10 8 8 6 6 4 4 2 2 0 0 2 2 4 4 6 6 8 8 10 10 12 12 14 14 0 2 4 6 8 10 12 14 16 18 20 22 24 0 2 Lobo di rivelazione sul piano ORIZZONTALE 4 6 8 10 12 14 16 18 20 22 24 Lobo di rivelazione sul piano VERTICALE L’altezza di installazione consigliata per Murena Plus 24 in configurazione ventaglio è da 1 a 2m con utilizzo parametri standard Manuale d’installazione Pag. 7 di 36 Murena/Murena-Plus24 CIAS Elettronica S.r.l. Ed. 1.4 3 COLLEGAMENTI 3.1 Morsettiere, connettori e Funzionalità del Circuito DL3 MS2 DL4 DL5 1 DL6 +13,8 SW3 SW2 SW1 DEV10 DEV1 DL9 DL7 ON DL1 DL2 DL8 SW4 FUN MS1 2 3 4 1 2 GND LH LO AL AL 3 4 5 TMP TMP FLT 6 7 8 9 10 S1 FLT STBY TST GND SYNC Figura 3 Disposizione dei componenti nel circuito Murena Nelle seguenti tabelle sono indicate le funzioni delle morsettiere del circuito Murena MORSETTIERA MS1 Mors. Simbolo 1 AL 2 AL 3 TMP 4 TMP 5 FLT 6 FLT 7 STBY 8 TST 9 GND 10 SYNC Funzione Contatto Relè di Allarme (C) Contatto Relè di Allarme (NC) Contatto Relè di Manomissione (C) Contatto Relè di Manomissione (NC) Contatto Relè di Guasto (C) Contatto Relè di Guasto (NC) Ingresso Ausiliario per Comando Stand-By(Norm. Aperto da GND) Ingresso Ausiliario per Comando TEST (Norm. Aperto da GND) Uscita Ausiliaria di Massa Sincronismo (Non utilizzato) MORSETTIERA MS2 Mors 1 2 3 4 Simbolo 13,8V GND LH LO Manuale d’installazione Funzione Ingresso Positivo di Alimentazione (+13,8 V ) Ingresso Negativo per Alimentazione e per Dati (0 V ) +RS 485 Linea Dati Alta - RS 485 Linea Dati Bassa Pag. 8 di 36 Murena/Murena-Plus24 CIAS Elettronica S.r.l. Ed. 1.4 CONNETTORE J2 Connettore 10 pin per collegamento locale PC (WAVE-TEST2) Mors Simbolo Funzione 1-2-4N.C. Non Connesso 6-8-10 3 +13,8 Positivo per Alimentazione (13,8 V ) convertitore interfaccia RS-485/232 5 LO - RS 485 Linea Dati Bassa 7 LH +RS 485 Linea Dati Alta 9 GND Negativo per Alimentazione e dati (0 V ) convertitore interfaccia RS-485/232 SELETTORE 4 N° 1-2-3 4 Simbolo Funzione SW4 Riservati (Non utilizzare) Terminazione Linea Seriale (terminazione NON SW4 inserita default) Default OFF OFF LEDS N° 7 8 9 1 2 3 4 5 6 Simbolo DL7 DL8 DL9 DL1 DL2 DL3 DL4 DL5 DL6 Funzione Indicazione di Allarme Indicazione di Manomissione ed Impostazione Indicazione di Guasto ed Impostazione Visualizzazione dinamica delle Funzioni Visualizzazione dinamica delle Funzioni Visualizzazione dinamica delle Funzioni Visualizzazione dinamica delle Funzioni Visualizzazione dinamica delle Funzioni Visualizzazione dinamica delle Funzioni Default OFF OFF OFF OFF OFF OFF OFF OFF OFF SELETTORE DELLE FUNZIONI N° SW1 Simbolo Funzione FUN Posizione 0 = Fase di lavoro. Posizione 1 = Installazione Posizione 2 = Acquisizione valore di campo. Posizione 3 = Lettura/scrittura soglie di preallarme. Posizione 4 = Lettura/scrittura soglie di allarme + Walk-Test Posizione 5 = Lettura/scrittura soglie di Mascheramento. Posizione 6 = Lettura/scrittura soglia di portata min. (SR-FTD) Posizione 7 = Lettura/scrittura soglia di portata max.( LR-FTD) Posizione 8 = Lettura/scrittura Numero Dispositivo. Posizione 9 = Lettura/scrittura soglia dimensione min. Posizione A = Lettura/scrittura soglia dimensione max Posizione B = Non Utilizzare. Posizione C = Non Utilizzare. Posizione D = Non Utilizzare. Posizione E = Non Utilizzare. Posizione F = Non Utilizzare. Manuale d’installazione Pag. 9 di 36 Murena/Murena-Plus24 CIAS Elettronica S.r.l. Ed. 1.4 SELETTORI LETTURA/SCRITTURA PARAMETRI E NUMERO DISPOSITIVO N° SW3 SW2 Simbolo Funzione DEV10 Commutatore decimale per lettura o impostazione dei parametri (decine) DEV1 Commutatore decimale per lettura o impostazione dei parametri (unità) PULSANTE DI CONFERMA ALLINEAMENTO / REGOLAZIONI N° 1 Simbolo Funzione S1 Attivazione/conferma scrittura/acquisizione fase di allineamento/regolazione 3.2 Collegamento all’Alimentazione Il dispositivo Murena deve essere alimentato in corrente continua alla tensione nominale di 13,8 V Il collegamento tra l’alimentatore e Murena deve essere adeguatamente dimensionato, quindi la sezione del conduttore deve essere calcolata in base alla lunghezza del collegamento ed all’assorbimento dell’apparato. Nel caso in cui i collegamenti risultassero troppo lunghi, si consiglia l’utilizzo di un alimentatore supplementare. Connettere i fili di alimentazione continua 13,8 V e GND rispettivamente ai morsetti 1 e 2 della morsettiera MS2. Il cavo che porta l’alimentazione all’apparecchiatura deve essere schermato, e lo schermo deve essere collegato a terra (lato centrale) 3.3 Collegamento alla Centrale Le connessioni alla Centrale di elaborazione devono essere effettuate mediante cavi schermati Il rivelatore Murena dispone di tre relè statici normalmente eccitati, ciascuno dei quali fornisce un contatto normalmente chiuso libero da potenziale elettrico. Quando ciascuno di essi è diseccitato, il relativo contatto si apre. Gli eventi che provocano l’apertura di ciascun contatto sono i seguenti: - Allarme Manomissione Guasto Sono inoltre presenti 2 ingressi per attuare le seguenti funzioni: - Test - Stand-by Manuale d’installazione Pag. 10 di 36 Murena/Murena-Plus24 CIAS Elettronica S.r.l. Ed. 1.4 3.3.1 Contatti di Allarme I contatti di uscita sono costituiti da Relè statici con portata di 100 mA massimi. NB: I contatti di Allarme, Manomissione, Guasto presentano in stato di Vigilanza (contatto chiuso), una resistenza di circa 40 Ohm. RELÈ di ALLARME Il relè di allarme si diseccita e il relativo contatto si apre, ogniqualvolta si verifichi movimento nel campo di protezione e la massa raggiunge il livello minimo programmato, per essere considerato “uomo”, oppure per mascheramento del rivelatore. RELÈ di MANOMISSIONE Il relè di manomissione si diseccita e il relativo contatto si apre, quando viene aperto il contenitore. RELÈ di GUASTO Il relè di guasto si diseccita e il relativo contatto si apre, quando la tensione di alimentazione è minore di +11,5 Vcc o maggiore di +14,8 Vcc, oppure la temperatura all’interno del contenitore sia inferiore –30°C o maggiore di +65°C. Il rivelatore Murena è pertanto facilmente collegabile a qualsiasi tipo di centrale esistente, tramite una connessione stellare di tipo on/off o di tipo bilanciato. 3.3.2 Connessioni per Stand-By Per attivare la funzione di Stand-by è necessario collegare a GND il morsetto 7 “STBY” di MS1 a GND. N.B. Lo stand-by non inibisce la funzionalità della Murena ma disattiva la registrazione degli eventi nel file di storico e nel file di monitor. 3.3.3 Connessioni per Test La funzione di Test si attiva connettendo il morsetto 8 “TST” della morsettiera MS1 a “GND” per un tempo di almeno 10 sec. Il rivelatore Murena effettua automaticamente una serie di verifiche funzionali su se stesso. Se la procedura di test è andata a buon fine si attiverà il relè di allarme. Manuale d’installazione Pag. 11 di 36 Murena/Murena-Plus24 CIAS Elettronica S.r.l. Ed. 1.4 3.4 Linea Seriale RS-485 Il rivelatore doppler Murena è dotato di una interfaccia seriale standard RS-485. I parametri di comunicazione sono i seguenti: Modo: Asincrono Velocità: 9600 b/s Lunghezza del carattere: 8 bit Controllo parità: Nessuno Bit di Stop: 1 La connessione seriale tra i vari sensori installati deve essere effettuata mediante cavo schermato intrecciato a bassa capacità (< 70 pF/m) esempio: “Belden9842” La connessione seriale può essere utilizzata sia per comunicare gli eventi (Allarme, Manomissione, Guasto), e ricevere comandi (Test, Stand-by) da centrali o sistemi di cablaggio che supportano il protocollo C-ONE BUS (IB-System), sia per connettersi al software Wave Test 2 che consente la gestione dei parametri, la visualizzazione in tempo reale di alcuni parametri fondamentali relativi all’intrusione (segnale, distanza, dimensione) e l’acquisizione degli eventi di storico e monitor registrati nel rivelatore. 3.4.1 Connessioni per Linea Seriale RS-485 Il collegamento può essere di tipo “Multidrop”, possono cioè essere connessi più sensori in parallelo sulla stessa linea seriale (configurazione Bus). La connessione si effettua collegando alla morsettiera MS2 il conduttore relativo alla linea dati RS-485 negativa (RS485 -) al morsetto 4 “L0”, il conduttore relativo alla linea dati RS-485 positiva (RS-485 +) al morsetto 3 “LH”, il conduttore relativo al riferimento di massa al morsetto 2 “GND”. Per collegare questa linea seriale al PC è necessario utilizzare un convertitore RS 485/232 se il PC ha a disposizione una porta seriale RS232, oppure utilizzare il convertitore RS485/USB se il PC ha una porta USB. Cavo per connettere il rivelatore al P.C. di manutenzione con SW WAVE TEST 2 Morsettiera Connettore 25 interfaccia pin (D Type) del MS2 convertitore N° N° 1 12 2 9 3 10 4 11 Manuale d’installazione Morsettiera Convertitore RS485/USB N° 1 2 3 Simbolo +13,8 GND LH 485 LO 485 Funzione Alimentazione (13,8 V ) per convertitore 485/232 Massa dati e alim. per convertitore 485/232 Linea dati Alta per RS 485 Linea dati Bassa per RS 485 Pag. 12 di 36 Murena/Murena-Plus24 CIAS Elettronica S.r.l. Ed. 1.4 4 IMPOSTAZIONI E VERIFICA 4.1 Taratura e verifica sul circuito La Murena è dotata di un sistema di regolazione e lettura dei parametri di lavoro che rendono semplici sia le operazioni di installazione che di manutenzione periodica, senza la necessità di particolari strumenti. 4.1.1 Operazioni sul circuito Per togliere il radome (coperchio frontale) svitare le 4 viti fintanto che esse non girano a vuoto. Allontanare il radome dal fondo, questa operazione provocherà l’apertura del microinterruttore “Tamper” presente. Connettere i fili di alimentazione continua (13,8 V ) ai morsetti 1 e 2 di MS2 (fig.3) Per impostare i parametri di lavoro senza l’ausilio di alcuno strumento, procedere nel seguente modo: a) Ruotare il commutatore di funzione SW1 in posizione 1. Questa operazione attiva la fase di installazione della Murena. Sui led DL1DL6 viene mostrato il livello del segnale, ed in assenza di movimento il rumore dell’ambiente. Assicurarsi che in assenza di movimento nel campo di protezione il rumore non superi il livello di un solo led acceso. b) Ruotare il commutatore di funzione SW1 in posizione 2, Impostare i commutatori SW3 (decine) e SW2 (unità) sul valore 0, assicurarsi in questa operazione di non avere ostacoli e di non essere di fronte al rivelatore, per non aver un’acquisizione scorretta. L’acquisizione del valore di campo avviene premendo il pulsante S1, l’accensione dei led DL8 e DL9 confermano l’avvenuta acquisizione. c) Ruotare il commutatore di funzione SW1 in posizione 3, è possibile leggere e/o modificare il valore della soglia di preallarme. Quando la dimensione del bersaglio supera la soglia di preallarme in Murena vengono attivate le analisi secondo algoritmi della logica fuzzy. Sui led DL1DL6 viene mostrato il livello della dimensione del bersaglio, 3 led accesi indicano il 50 % della dimensione massima raggiungibile che costituisce la dimensione dell’uomo medio. Lettura del valore della soglia di preallarme: Ruotare il commutatore SW2 (unità) fino a che il led rosso (DL9) sia acceso Ruotare il commutatore SW3 (decine) fino a che il led rosso (DL8) sia acceso, il valore letto su questi commutatori varia da 01 a 99, il valore di default è 20 per Murena, Murena Plus e Murena Plus 24, mentre è consigliato un valore di 10 per Murena Plus Curtain. Modifica del valore attuale di preallarme: Ruotare i commutatori SW3 (decine) e SW2 (unità) sul valore desiderato. Premere S1 per confermare l’impostazione ed acquisire la nuova soglia. Se si desidera aumentare la sensibilità impostare un valore più basso, valore minimo consigliato 5. Nel normale funzionamento il valore del preallarme non deve superare il valore della soglia di dimensione minima. Manuale d’installazione Pag. 13 di 36 Murena/Murena-Plus24 CIAS Elettronica S.r.l. Ed. 1.4 d) Ruotare il commutatore di funzione SW1 in posizione 4, è possibile leggere e/o modificare il valore della soglia di allarme. La soglia di allarme serve per determinare se alla fine del processo di analisi è stata raggiunta un’entità di segnale sufficiente per determinare l’allarme. Lettura del valore attuale della soglia di allarme: ruotare il commutatore SW2 (unità) fino a che il led rosso (DL9) sia acceso. ruotare il commutatore SW3 (decine) fino a che il led rosso (DL8) sia acceso. Il valore letto su questi due commutatori varia da 01 a 99. Valore di default 50. Modifica del valore attuale della soglia di allarme: ruotare i commutatori SW2 (unità) e SW3 (decine) sul valore desiderato. premere S1 per confermare l’acquisizione e la messa in uso delle nuove soglie. Se si desidera aumentare la sensibilità, impostare un valore più basso dell’attuale soglia. Se si desidera diminuire la sensibilità impostare un valore più alto. Durante questa fase (SW1 in posizione 4) è possibile effettuare il Walk-Test, infatti ad ogni perturbazione del campo protetto che supera le caratteristiche impostate ed è convalidata dal processo di analisi si attiva il buzzer con un suono intermittente, mentre sui led DL1DL6 viene mostrato il livello raggiunto dal processo di analisi per determinare l’allarme. Quando saranno raggiunte le condizioni che determinano l’allarme il buzzer verrà attivato con un suono continuo e tutti i 6 led saranno accesi. e) Ruotare il commutatore di funzione SW1 in posizione 5, è possibile leggere e/o modificare il valore della soglia di mascheramento superiore ed inferiore. Le soglie di mascheramento sono poste una sopra ed una sotto il valore di campo memorizzato durante la fase di acquisizione Lettura del valore attuale della soglia di mascheramento: ruotare il commutatore SW2 (unità) fino a che il led rosso (DL9) sia acceso. ruotare il commutatore SW3 (decine) fino a che il led rosso (DL8) sia acceso, Il valore letto su questi due commutatori varia da 01 a 99. Valore di default 20 Modifica del valore attuale della soglia di mascheramento: ruotare i commutatori SW2 (unità) e SW3 (decine) sul valore desiderato. premere S1 per confermare l’acquisizione e la messa in uso delle nuove soglie. f) Ruotare il commutatore di funzione SW1 in posizione 6, è possibile leggere e/o modificare il valore della portata minima (SR-FTD Short Range Fuzzy Target Discrimination). La portata minima determina una zona di insensibilità in prossimità del rivelatore, anche se tutti i parametri hanno un livello tale da generare l’allarme. Il valore è espresso in m. Sui led DL1DL6 viene mostrata la distanza a cui si trova il bersaglio in movimento. Lettura del valore di portata minima: ruotare il commutatore SW2 (unità) fino a che il led rosso (DL9) sia acceso. ruotare il commutatore SW3 (decine) fino a che il led rosso (DL8) sia acceso, Il valore letto su questi due commutatori varia da 00 a 12. Valore di default 1m. Modifica del valore attuale della portata minima: ruotare i commutatori SW2 (unità) e SW3 (decine) sul valore desiderato. premere S1 per confermare l’acquisizione e la messa in uso della nuova portata minima. Se erroneamente venisse impostato un valore di soglia minima maggiore del valore di soglia massima, verranno attivati i valori di default (1 m – 8 m) Manuale d’installazione Pag. 14 di 36 Murena/Murena-Plus24 CIAS Elettronica S.r.l. Ed. 1.4 g) Ruotare il commutatore di funzione SW1 in posizione 7, è possibile leggere e/o modificare il valore della portata massima (LR-FTD Long Range Fuzzy Target Discrimination). La portata massima determina la zona di sensibilità del campo protetto, anche se tutti i parametri hanno un livello tale da generare l’allarme, ma il bersaglio in movimento si trova oltre la distanza massima impostata, non verrà generata alcuna segnalazione di allarme. Il valore è espresso in m. Sui led DL1DL6 viene mostrata la distanza a cui si trova il bersaglio in movimento. Lettura del valore di portata massima: ruotare il commutatore SW2 (unità) fino a che il led rosso (DL9) sia acceso. ruotare il commutatore SW3 (decine) fino a che il led rosso (DL8) sia acceso. Il valore letto su questi due commutatori varia da 01 a 24. Valore di default 8 m per Murena, Murena Plus e Murena Plus Curtain, mentre per Murena Plus 24 il valore di default è 16m. Modifica del valore attuale della portata massima: ruotare i commutatori SW2 (unità) e SW3 (decine) sul valore desiderato. premere S1 per confermare l’acquisizione e la messa in uso della nuova portata. h) Portando il commutatore di funzione SW1 in posizione 8 è possibile leggere e/o impostare il n° del dispositivo da utilizzare nel caso di connessione in linea seriale. Lettura del numero dispositivo assegnato: Ruotare il commutatore SW2 (unità) fino a che il led rosso (DL9) sia acceso. Ruotare il commutatore SW3 (decine) fino a che il led rosso (DL8) sia acceso, Il valore letto su questi due commutatori varia da 01 a 99. Valore di default 1. Modifica del numero dispositivo assegnato: ruotare i commutatori SW2 (unità) e SW3 (decine) sul valore desiderato. premere S1 per confermare l’acquisizione e la messa in uso delle nuove soglie i) Ruotare il commutatore di funzione SW1 in posizione 9, è possibile leggere e/o modificare il valore della dimensione minima del bersaglio da considerare pericoloso. Considerando che il bersaglio umano è stato normalizzato a circa 50, la soglia minima serve per discriminare bersagli più piccoli in modo da rendere immune Murena al passaggio di piccoli animali (volatili, ecc.) Quando la dimensione del bersaglio supera la soglia minima in Murena Plus viene attivata la registrazione dell’evento nel buffer di monitor e contemporaneamente viene inviata in linea seriale la segnalazione di preallarme. Lettura del valore di dimensione minima: ruotare il commutatore SW2 (unità) fino a che il led rosso (DL9) sia acceso. ruotare il commutatore SW3 (decine) fino a che il led rosso (DL8) sia acceso. Il valore letto su questi due commutatori varia da 01 a 99. Valore di default 20 per Murena, Murena Plus e Murena Plus 24, mentre è consigliato un valore di 10 per Murena Plus Curtain. Modifica del valore attuale della dimensione minima: ruotare i commutatori SW2 (unità) e SW3 (decine) sul valore desiderato. premere S1 per confermare l’acquisizione e la messa in uso della nuova dimensione minima Manuale d’installazione Pag. 15 di 36 Murena/Murena-Plus24 CIAS Elettronica S.r.l. Ed. 1.4 j) Ruotare il commutatore di funzione SW1 in posizione A, è possibile leggere e/o modificare il valore della dimensione massima del bersaglio . Lettura del valore di dimensione massima: ruotare il commutatore SW2 (unità) fino a che il led rosso (DL9) sia acceso. ruotare il commutatore SW3 (decine) fino a che il led rosso (DL8) sia acceso. Il valore letto su questi due commutatori varia da 01 a 99. Valore di default 70, per Murena Curtain il valore consigliato è 90. Modifica del valore attuale della dimensione massima: ruotare i commutatori SW2 (unità) e SW3 (decine) sul valore desiderato. premere S1 per confermare l’acquisizione e la messa in uso della nuova dimensione massima k) Ruotare il commutatore di funzione SW1 in posizione 0 e premere il pulsante S1. Questa operazione conclude tutte le fasi di installazione. Lasciare in questa posizione il commutatore per il funzionamento normale. 4.2 Taratura e verifica con Software Per visualizzare e gestire con estrema precisione tutti i parametri software del rivelatore, compresi i livelli analogici delle soglie e del segnale ricevuto, è possibile utilizzare un PC con il programma “WAVE-TEST 2” CIAS; riferirsi alla documentazione tecnica di questo programma per le procedure di collegamento e/o gestione delle funzionalità software. Schermata valori analogici Murena, Murena Plus e Murena Plus Curtain Manuale d’installazione Pag. 16 di 36 Murena/Murena-Plus24 CIAS Elettronica S.r.l. Ed. 1.4 Schermata valori analogici Murena Plus 24 5 MANUTENZIONE E ASSISTENZA 5.1 Ricerca Guasti In caso di allarmi impropri o segnalazione di guasti, verificare i parametri riscontrati durante l’installazione e se si notano variazioni che eccedono i limiti, rivedere i punti indicati nel capitolo 4) “Impostazioni e Verifica” Difetto Led Guasto acceso Led Allarme acceso Possibile Causa Possibile Soluzione Tensione alta e/o bassa Temperatura alta e/o bassa Movimento od ostacoli nel campo protetto Verificare la tensione di alimentazione Verificare la temperatura del rivelatore Assicurarsi che il campo protetto sia libero da ostacoli e non vi siano oggetti e/o persone in movimento Verificare l’impostazione delle soglie e acquisire il valore di campo 4.1.1 b) Sostituire il front end Verificare chiusura microinterruttore Allarme mascheramento attivo Led Manomissione acceso Front end a microonde guasto Microinterruttore aperto 5.2 Kit Assistenza Il kit di assistenza è costituito dalla parte di elaborazione circuitale, completo di front-end a microonde. Manuale d’installazione Pag. 17 di 36 Murena/Murena-Plus24 CIAS Elettronica S.r.l. Ed. 1.4 6 CARATTERISTICHE 6.1 Caratteristiche Tecniche La tabella elenca le caratteristiche tecniche del rivelatore Murena. Min Nom Max Note CARATTERISTICHE TECNICHE Frequenza di lavoro Potenza massima 9,47 GHz 10,525 GHz 10,58 GHz 20 mW EIRP 25% - Modulazione Duty-cycle on/off Portata 0m - 24 m Corrente d'alimentazione in vigilanza con leds ( mA -- ): Corrente d'alimentazione in allarme con leds ( mA -- ): Corrente d'alimentazione in vigilanza con seriale( mA -- ): 72 70 75 - 135 132 140 - - 100mA 100mA C-NC C-NC 100mA C-NC Contatto allarme intrusione Contatto manomissione (Relè Statico) (Relè Statico) Contatto di guasto (Relè Statico) Led rosso per Allarme intrusione Led rosso per Manomissione Led rosso per Guasto Sei led rossi per visualizzazione diverse funzioni - - off off off off Selettore funzioni Regolazione portata 24 steps a passi di 1m Regolazione dimensione bersaglio Regolazione soglie di Preallarme Regolazione soglie di Allarme A bordo A bordo e Sw A bordo e Sw A bordo e Sw A bordo e Sw Regolazione soglie di Mascheramento A bordo e Sw Peso Dimensioni Profondità comprese la ganascia Temperatura di lavoro Livello di prestazione: Grado di protezione dell'involucro: Manuale d’installazione Pag. 18 di 36 - 500 g - -25 °C 3° IP55 - 175 x 175 mm 115 mm +55 °C Murena/Murena-Plus24 CIAS Elettronica S.r.l. Ed. 1.4 6.2 Caratteristiche Funzionali 1) 2) 3) 4) 5) 6) 7) 8) 9) 10) Generazione Analisi Analisi Analisi Analisi Analisi Analisi Analisi Analisi Analisi Analisi Analisi Analisi Analisi Analisi 11) 12) Analisi Analisi * 13) Analisi 14) 15) Attivazione Attivazione * 16) Attivazione Attivazione 17) 18) Attivazione Disponibilità Disponibilità* Disponibilità* 19) Disponibilità * 20) Disponibilità * 21) Disponibilità 22) Disponibilità * 23) Disponibilità * Di vero segnale RADAR (RAdio Detection And Ranging) Del segnale RADAR mediante DSP E filtraggio nel dominio della frequenza (FFT) Mediante regole FUZZY della distanza del bersaglio Mediante regole FUZZY della velocità del bersaglio Mediante regole FUZZY della dimensione del bersaglio Della direzione del movimento Secondo regole FUZZY della pericolosità del bersaglio Per discriminazione pioggia da vero bersaglio Per discriminazione rumore da vero bersaglio Della distanza massima di rivelamento impostata LR-FTD Long Range Fuzzy Target Discrimination Della distanza minima di rivelamento impostata SR-FTD Short Range Fuzzy Target Discrimination Del mascheramento Della Tensione di alimentazione in corrente continua, Alta o Bassa. Della temperatura ambiente per rilevare eventuali uscite dal campo di funzionamento ammesso, e per compensare differenze di segnale dovute a cambiamenti di temperatura. della apertura dell’involucro del rivelatore (Radome). Di un ingresso di comando di Stand by, per la inibizione della registrazione dei record di storico e di monitor all’interno di Murena. Di un ingresso per il comando di Test, che provoca la attivazione di un segnale di prova all’interno di Murena ed in caso di risultato positivo l’attivazione del relè di allarme (e l’invio dello stato di allarme sulla linea seriale per Murena Plus) *. Di tre uscite a relè statico per allarme, manomissione e guasto. In seguito a polling degli stati di Preallarme, allarme, manomissione, guasto su linea seriale RS-485 per connessione con interfaccia IB-System Di tre leds di segnalazione allarme, manomissione, guasto. Di 6 led multifunzionali per mostrare la distanza o la dimensione del bersaglio o il raggiungimento della condizione di allarme. Del buzzer durante il walk test per il raggiungimento della condizione di allarme Di un set di commutatori per attuare le funzioni e definirne l’entità. Di una batteria al litio che consente di conservare i dati anche in assenza totale di alimentazione. Di un orologio calendario che consente di fornire una marcatura temporale agli eventi che sono registrati all’interno di Murena sia di monitor sia di storico. Di un archivio storico degli eventi, in grado di registrare gli ultimi 256 avvenimenti occorsi con la indicazione della data, dell’ora del tipo di evento e di valori ingegneristici (qualora ve ne siano per lo specifico evento). Questi dati possono essere Acquisiti mediante l’utilizzo del software Wave Test 2 e memorizzati in files storici i quali potranno essere visualizzati, e stampati. Di un Archivio di 256 registrazioni di 6,5 sec. ciascuna, del segnale analogico rivelato, della distanza, della velocità e della dimensione del bersaglio, quando quest’ultima supera la soglia di preallarme impostata. Di un set di parametri dei default, che sono messi in uso ogniqualvolta, Murena ne sia sprovvisto o qualora durante una autodiagnosi, sia rivelato un valore errato. Di un connettore per la connessione di un P.C. su linea seriale RS485, che consente mediante l’utilizzo del software Wave Test 2, di parametrizzare, collaudare, gestire il rivelatore Di una connessione per linea seriale RS 485, che consente di collegare tutti i rivelatori sulla linea stessa, acquisirne serialmente gli allarmi, effettuare i comandi di stand by e di test, ed effettuare la parametrizzazione e la gestione. Le funzioni contrassegnate con “*” sono attive sulla versione Murena Plus e Murena Plus 24 Manuale d’installazione Pag. 19 di 36 Murena/Murena-Plus24 CIAS Elettronica S.r.l. Ed..1.4 1 DESCRIPTION 1.1 Product Description Murena is a volumetric microwave sensor, using the Doppler effect and digital signal processing, for external protection. The size and shape of the detection field make it particularly suitable for the protection of areas completely free of obstacles or for irregular shaped areas with fixed obstacles present. Murena is available in the following versions: - Murena - Murena Plus - Murena Plus CF1 - Murena Plus 24 Murena can be used either as a “fan” pattern in open areas where the environmental situation is difficult to protect with other types of detector or as “fingers” particularly suitable for covering the front of buildings, ensuring the face of the building is protected against attack.. The interface between the microwave transmitter-receiver is designed using a special circuit which generates a modulation signal on the transmitter, demodulating and pre-amplifying the received signal using two separate channels. This special circuit, linking the new concept MW transmitter-receiver, allows the creation of a much better signal/noise ratio, especially for very low frequencies, which relate to slow movements across the lobes of protection. In this way there is a drastic reduction in the differences in sensitivity between movements longitudinal and transverse to the lobes of protection, characteristic in most Doppler effect sensors. This performance is then enhanced by subsequent signal processing which, after amplification, is digitised using an analogue/digital convertor. This passes the digitised signals to the on-board microprocessor, which analyses them, in real time as the situation evolves. Using appropriate algorithms it is possible to measure the distance and the mass of the object moving in the detection field, analysing all the received data using “Fuzzy” logic. This avant-garde approach means that most of the problems created by external environments on mono-static microwave sensors (those with the transmitter and receiver in the same head) can be overcome. The on board microprocessor also analyses the operating condition of the microwave components, detecting fault conditions and attempts to mask the detector. There is a complex diagnostic of all the circuit, which can provide specific alarms for detector faults. Finally, it is also possible to make remote functional tests, such that the proper operation of the detector can be checked centrally. The design includes a minimum range function to eliminate signals created by small objects close to the detector and a maximum range function to de-limit the detector analysis area. Set, for example, to 8m, the signal created by a human body at 10m will not be considered for analysis in the generation of alarms. Installation Manual Pag. 20 of 36 Murena/Murena-Plus24 CIAS Elettronica S.r.l. Ed..1.4 1.2 Block Schematic The block schematic shows the basic functional groups of the Murena. Microprocessore Leds Allarmi Leds Distanza/Massa Portata PARAMETRI DEFAULT Front-End a MW Antenna di Ricezione a MW Mixer a MW Preamplificatore di Ricezione J5 Demodulatore sincrono di Ricezione S&H Filtro Passa Banda Amplificatori Doppler Ingresso / Uscita Sincronismo PARAMETRI LAVORO Ingresso Comando Test Ingresso Comando Stand-By O.L. J2 PASSWORDS Amplificatore di Trasmissione Guasto S&H Connessioni a Centrale Tradizionale RL Antenna di Trasmissione Oscillatore a MW a MW STORICO EVENTI Allarme Modulatore RL Manomiss. MONITOR EVENTI RL INTERF. RS-485 Modulatore di Trasmissione MS2 J2 Connessione a Centrale Bus e a P.C. Remoto Connessione a P.C. Locale Fig. 1 Block Schematic Murena Detector Installation Manual Pag. 21 of 36 Murena/Murena-Plus24 CIAS Elettronica S.r.l. Ed..1.4 2 INSTALLATION 2.1 Preliminary Information The Murena detector is designed to operate in an external environment, and is therefore supplied in a waterproof housing, which contains all of the electronic components and interconnections. This housing is provided with clamp that allows the use of a suitable wall bracket or the optional pole bracket for mounting on a 60mm outside diameter post. Cable access is via a watertight gland and if necessary there is a second access on the base for the mounting of a second gland. Figure 1 2.2 Accessories The following accessories are available for the Murena sensor: Wall Bracket 10 cm. Wall Bracket 30 cm. Wall Bracket 40 cm Post Bracket 10 cm. Murena-RS comprising anti-rain shield and back cover Interface converter RS-485/USB “Kit USB” Management Software “Wave Test2” The anti-rain shield and extra back cover are accessories required in all situations when the Murena is not sheltered from the rain, to avoid water droplets gathering on the face of the unit and sliding down, which can affect the processing. In all other cases the rain is recognised and discriminated using a special filter (FRF Fuzzy Rain Filter) which allows secure operation and prevents false alarms, even in the heaviest rain. Installation Manual Pag. 22 of 36 Murena/Murena-Plus24 CIAS Elettronica S.r.l. Ed..1.4 2.3 Site Preparation The Murena detector is a detector that, thanks to it operating mode (Doppler effect), does nor require any specific preparation of the area to be protected. On the contrary, it lends to being used in those situations where other types of detector will face serious, if not insurmountable, difficulties. Therefore, Murena can be used to effectively cover dead zones in barrier systems, where there is insufficient space to implement cross-overs or overlaps. Another important application is in the protection of building fascias, balconies and terraces. Ensure that the wall or ceiling bracket is well fixed, that the Murena is not exposed to the rain (or use the optional rain shield and back cover accessories), that it is not looking directly at fluorescent lights and that it is not positioned in front of fans or vents (especially metal) with movable vanes that can generate unwanted signals. Murena can work in conjunction with all CIAS bi-static detectors (Minermo, Ermusa, Ermo barriers) without any particular precautions, without affecting the operation of the Murena or the barrier, whether the Murena is positioned close to either the receiver or transmitter. 2.4 Dimensions and shape of the detection field The size of the detection field is asymmetric with a horizontal detection lobe of approximately 90° and a vertical lobe of approximately 40°. The lobes are shown in figure 2. 7 7 6 6 5 5 4 4 3 3 2 2 1 1 0 0 1 1 2 2 3 3 4 4 5 5 6 6 7 7 0 1 2 3 4 5 6 7 8 9 10 11 0 12 HORIZONTAL Plane Detection Lobe 1 2 3 4 5 6 7 8 9 10 11 12 VERTICAL Plane Detection Lobe Figure 2 Using default parameters, suggested height of installation for Murena and Murena Plus, in fan mode, is from 1 to 2 mt. Installation Manual Pag. 23 of 36 Murena/Murena-Plus24 CIAS Elettronica S.r.l. Ed..1.4 The size of detection for Murena Plus Curtain has an amplitude of 90° on horizontal plane and 15° on vertical plane. Dimensions of the lobes are shown in the below figure 7 7 6 6 5 5 4 4 3 3 2 2 1 1 0 0 1 1 2 2 3 3 4 4 5 5 6 6 7 7 0 1 2 3 4 5 6 7 8 9 10 11 0 12 1 2 HORIZONTAL Plane Detection Lobe 3 4 5 6 7 8 9 10 11 12 VERTICAL Plane Detection Lobe Using default parameters, suggested height of installation for Murena Curtain is from 2,5 to 4 mt. The size of detection for Murena Plus 24 has an amplitude of 45° on horizontal plane and 18° on vertical plane. Dimensions of the lobes are shown in the below figure 14 14 12 12 10 10 8 8 6 6 4 4 2 2 0 0 2 2 4 4 6 6 8 8 10 10 12 12 14 14 0 2 4 6 8 10 12 14 16 18 20 22 24 0 2 HORIZONTAL Plane Detection lobe 4 6 8 10 12 14 16 18 20 22 24 VERTICAL Plane Detection lobe Using default parameters, suggested height of installation for Murena Plus 24, in fan mode, is from 1 to 2 mt . Installation Manual Pag. 24 of 36 Murena/Murena-Plus24 CIAS Elettronica S.r.l. Ed..1.4 3 CONNECTIONS 3.1 Terminals, Connectors and Circuit Functions DL2 DL3 MS2 DL4 DL5 DL6 1 +13,8 SW3 SW2 SW1 DEV10 DEV1 DL9 DL1 DL7 ON DL8 SW4 FUN MS1 2 3 4 1 2 GND LH LO AL AL 3 4 5 TMP TMP FLT 6 7 8 9 10 S1 FLT STBY TST GND SYNC Figure 3 Component Layout for Murena board The following table shows the terminal functions for the Murena board TERMINAL MS1 Term 1 2 3 4 5 6 7 8 9 10 Symbol AL AL TMP TMP FLT FLT STBY TST GND SYNC Function Alarm Relay Contact (C) Alarm Relay Contact (NC) Tamper Relay Contact (C) Tamper Relay Contact (NC) Fault Relay Contact (C) Fault Relay Contact (NC) Stand-by Command Input (Normally Open from GND) Test Command Input (Normally Open from GND) Ground Output Synchronisation Output/Input, for Master/Slave TERMINAL MS2 Term. Symbol 1 13,8V 2 GND 3 LH 4 LO Installation Manual Function Positive Power Supply Input (+13,8 V ) Negative Power Supply Input and for Data (0 V ) +RS 485 Data Line High - RS 485 Data Line Low Pag. 25 of 36 Murena/Murena-Plus24 CIAS Elettronica S.r.l. Ed..1.4 CONNECTOR J2 10 pin Connector for connection of local PC (WAVE-TEST2) Term Symbol Function 1-2-4N.C. Not Connected 6-8-10 3 +13,8 Power (13,8 V ) for interface converter RS-485/232 5 LO - RS 485 Data Line Low 7 LH +RS 485 Data Line High 9 GND Ground SELECTOR 4 N° 1-2-3 Symbol SW4 4 SW4 Function Reserved (don’t use) Serial Line Termination (termination NON inserted default) Default OFF OFF LEDS N° 7 8 9 1 2 3 4 5 6 Symbol DL7 DL8 DL9 DL1 DL2 DL3 DL4 DL5 DL6 Function Alarm indication Tamper indication and setting Fault indication and setting Dynamic function display Dynamic function display Dynamic function display Dynamic function display Dynamic function display Dynamic function display Default OFF OFF OFF OFF OFF OFF OFF OFF OFF FUNCTION SELECTOR N° SW1 Installation Manual Symbol FUN Function Position 0 = Working mode. Position 1 = Installation Position 2 = Acquisition of field value. Position 3 = Read/write pre-alarm thresholds. Position 4 = Read/write alarm thresholds + Walk-Test Position 5 = Read/write Masking thresholds. Position 6 = Read/write minimum range threshold (FSTD) Position 7 = Read/write maximum range threshold (FSTD) Position 8 = Read/write Device Number. Position 9 = Read/write minimum size threshold. Position A = Read/write maximum size threshold. Position B = Reserved. Position C = Reserved. Position D = Reserved. Position E = Reserved. Position F = Reserved. Pag. 26 of 36 Murena/Murena-Plus24 CIAS Elettronica S.r.l. Ed..1.4 PARAMETER READ/WRITE and DEVICE NUMBER SELECTORS N° SW3 SW2 Symbol DEV10 DEV1 Function 10 Way Switch for reading or setting parameters (Tens) 10 Way Switch for reading or setting parameters (Units) ALIGNMENT/SET UP CONFIRMATION BUTTON N° 1 Symbol S3 Function Activate/confirm writing/acquisition phase of alignment/setup 3.2 Power Supply Connections The Murena must have a direct current supply at a nominal voltage of 13.8 V . The connection between the Murena and the power supply must be of adequate dimensions, with the cross-section of the conductors calculated based on the length of the connection and the current requirements of the apparatus. For very long connections a supplementary power supply is recommended. Connect the 13.8V and GND wires respectively to terminals 1 and 2 of Terminal block MS2. The cable carrying the power supply to the apparatus should be screened, with the screen connected to ground at the power supply end only. 3.3 Connections to the Control panel Connections to the control unit should be made using a screened cable. The Murena has three normally activated relays, each of which provides a normally closed, voltage free contact. These relays will be de-activated and their contacts will open for the following events: - Alarm - Tamper - Fault There are also three inputs for activating the following functions: - Test - Stand-by Installation Manual Pag. 27 of 36 Murena/Murena-Plus24 CIAS Elettronica S.r.l. Ed..1.4 3.3.1 Alarm Contacts The output contacts are static relays with a capacity of 100mA max. NB: The Alarm, Tamper and Fault contacts have a series resistance of 40 ohm when closed (secure). ALARM RELAY The alarm relay de-activates and the contact opens each time movement is detected in the detection field and the mass passes the program level “man”, or masking of the detector. TAMPER RELAY The tamper relay de-activates and the contact opens when the housing is opened. FAULT RELAY The tamper relay de-activates and the contact opens when the power supply voltage is outside the limits of +11.5Vdc and +14.8Vdc or the internal temperature is outside the limits of 30°C and +65°C. The Murena can easily be connected to any conventional alarm control panel by using either an on/off star connection or a balanced line 3.3.2 Stand-by Connections To activate the Stand-by function it is necessary to connect terminal 7 “STBY” of MS1 to GND. N.B. Stand-by does not inhibit the normal operation of the detector. It stops the recording of events in the History and Monitor files. 3.3.3 Test Connections To activate the Test function it is necessary to connect terminal 8 “TST” of MS1 to GND for at least 10 sec. The Murena conducts a series of automatic functional self checks. If the test is successful the alarm relay contact will open. Installation Manual Pag. 28 of 36 Murena/Murena-Plus24 CIAS Elettronica S.r.l. Ed..1.4 3.4 Serial Line RS-485 The Murena detector has a standard RS-485 serial interface. The communication parameters are as follows: Mode: Asynchronous Speed: 9600 b/s Character length: 8 bit Parity Check: None Stop Bit: 1 The serial connection between the various installed detectors must use a low capacitance (< 70 pF/m) braided screen cable, for example “Belden9842” The serial connection can be used either for communicating events (Alarm, Tamper, Fault) and receiving commands (Test, Stand-by) from a control unit or cabling system that supports the C-ONE Bus protocol (IB-System), or for connection by the Wavetest 2 software. This software allows the remote management of all the operating parameters, display in real time of all the fundamental parameters relating to an intrusion (signal, distance, target size, ..) and the acquisition of the History and Monitor events stored in the detector. 3.4.1 RS-485 Serial Line Connections The connection can be of the “Multi-drop” type, making it possible to connect many detectors in parallel on the same serial line (configuration Bus). The connections are made to Terminal Block MS2, with the conductor relating to RS-485 data negative (RS-485 -) to terminal 4 “L0”, the conductor relating to RS-485 data positive (RS-485 +) to terminal 3 “LH”, and the conductor relating to the ground reference to terminal 2 “GND”. To connect this serial line to a PC it is necessary to use an RS 485/232 convertor if the PC has an RS232 port available or an RS485/USB convertor if it has a USB port. Cable for connecting the detector To a maintenance P.C. with WAVE TEST 2 SW Interface Terminals MS2 N° 1 2 3 4 25 pin Connector (D Type) of the convertor N° 12 9 10 11 Installation Manual RS485/USB Convertor Terminals N° 1 2 3 Symbol +13,8 GND LH 485 LO 485 Function Power (13,8 V ) for 485/232 convertor Data/power ground 485/232 convertor Data Line High for RS 485 Data Line Low for RS 485 Pag. 29 of 36 Murena/Murena-Plus24 CIAS Elettronica S.r.l. Ed..1.4 4 SET-UP AND VERIFICATION 4.1 Calibration and verification on-board The Murena has an in-built system for setting and reading the operating parameters which simplifies the installation and periodic maintenance, without the need for any specific test equipment. 4.1.1 Working on the board To remove the radome (front cover) release the four screws without removing them. Removing the radome from the back plate will open the “Tamper” micro-switch. Connect the power supply (13.8 Vdc) to terminals 1 and 2 of MS2 (fig.3) To set the operating parameters without using any test equipment proceed as follows: a) Rotate function switch SW1 to Position 1. This activates the installation phase of the Murena. Led DL1DL6 will display the signal level and, in the absence of movement, the ambient noise of the area. b) Rotate function switch SW1 to Position 2, Rotate switches SW3 (tens) and SW2 (units) till 0 value ensuring during this operation that there are no obstacles in front of the detector, to ensure accurate acquisition. Press button S1 to start the acquisition of the field values and DL8 and DL9 will come on to confirm acquisition. c) Rotate function switch SW1 to Position 3, and it is possible to read and/or modify the Pre-alarm threshold. When the target dimensions pass the pre-alarm threshold the Murena Plus will activate the fuzzy analysis of the signal. Led DL1DL6 will display the level of the target dimensions, 3 led on indicating 50% of the maximum dimensions achievable (the dimensions of an average size man is equivalent to about 50) To Read the pre-alarm threshold value: Rotate function switch SW2 (units) until the red led (DL9) comes on. Note the position of SW2. Rotate function switch SW3 (tens) until the red led (DL8) comes on. Note the position of SW3. The values read on these switches varies between 01 and 99 (default of 20). Murena Plus Curtain default is 10. To Modify the pre-alarm threshold value: Rotate switches SW3 (tens) and SW2 (units) to the value required. Press S1 to confirm the setting and to acquire the new threshold value. To increase the sensitivity set a lower value minimum recommended 5. During normal operation the value of the pre-alarm threshold must not be higher the value of the minimum target dimension threshold. Installation Manual Pag. 30 of 36 Murena/Murena-Plus24 CIAS Elettronica S.r.l. Ed..1.4 d) Rotate function switch SW1 to Position 4, and it is possible to read and/or modify the Alarm threshold. The alarm threshold is used to determine whether, at the end of the analysis process, there is a large enough signal to generate an alarm. To Read the alarm threshold value: Rotate function switch SW2 (units) until the red led (DL9) comes on. Note the position of SW2. Rotate function switch SW3 (tens) until the red led (DL8) comes on. Note the position of SW3. The values read on these switches vary between 01 and 99 (default of 50). To Modify the alarm threshold value: Rotate switches SW3 (tens) and SW2 (units) to the value required. Press S1 to confirm the setting and to acquire the new threshold value. To increase the sensitivity set a lower value. To decrease the sensitivity set a higher value. During this phase (SW1 in Position 4) it is possible to make a Walk-Test. Any disturbance in the protection field that exceeds the characteristics set up and validated by the analysis process will activate the buzzer with an intermittent sound, while led DL1DL6 will indicate the level reached by the alarm analysis process. When this reaches the level that will generate the alarm the buzzer will activate continuously and all six led will come on. e) Rotate function switch SW1 to Position 5, and it is possible to read and/or modify the Upper and Lower Masking threshold. The masking thresholds are set above and below the field value, memorised during the acquisition phase. To Read the masking threshold values: Rotate function switch SW2 (units) until the red led (DL9) comes on. Note the position of SW2. Rotate function switch SW3 (tens) until the red led (DL8) comes on. Note the position of SW3. The values read on these switches vary between 01 and 99 (default of 20). To Modify the masking threshold values: Rotate switches SW3 (tens) and SW2 (units) to the value required. Press S1 to confirm the setting and to acquire the new threshold value. f) Rotate function switch SW1 to Position 6, and it is possible to read and/or modify the Minimum Range (SR-FTD Short Range Fuzzy Target Discrimination). The minimum range creates an insensitive zone close to the detector, even if all the conditions are met to generate an alarm. The value is expressed in metres. Led DL1DL6 show the distance at which target movement will be detected. To Read the minimum range values: Rotate function switch SW2 (units) until the red led (DL9) comes on. Note the position of SW2. Rotate function switch SW3 (tens) until the red led (DL8) comes on. Note the position of SW3. The values read on these switches vary between 00 and 12 (default of 1m). To Modify the minimum range values: Rotate switches SW3 (tens) and SW2 (units) to the value required. Press S1 to confirm the setting and to acquire the new range value. If a minimum range value greater than the maximum range value is entered by mistake the default values will automatically be entered. Installation Manual Pag. 31 of 36 Murena/Murena-Plus24 CIAS Elettronica S.r.l. Ed..1.4 g) Rotate function switch SW1 to Position 7, and it is possible to read and/or modify the Maximum Range (LR-FTD Long Range Fuzzy Target Discrimination). The maximum range determines the sensitive area of the protection field and even if all the conditions are met to generate an alarm, but the target is at a greater distance than set, no alarm will be generated. The value is expressed in metres. Led DL1DL6 will show the distance at which target movement will be detected. To Read the minimum range values: Rotate function switch SW2 (units) until the red led (DL9) comes on. Note the position of SW2. Rotate function switch SW3 (tens) until the red led (DL8) comes on. Note the position of SW3. The values read on these switches vary between 01 and 24 (default of 8m) Murena Plus 24 default is 16m. To Modify the minimum range values: Rotate switches SW3 (tens) and SW2 (units) to the value required. Press S1 to confirm the setting and to acquire the new range value. h) Rotate function switch SW1 to Position 8 and it is possible to read and/or modify the Device Address Number to be used when connected to the serial line. To Read the minimum range values: Rotate function switch SW2 (units) until the red led (DL9) comes on. Note the position of SW2. Rotate function switch SW3 (tens) until the red led (DL8) comes on. Note the position of SW3. The values read on these switches vary between 01 and 99 (default of 01). To Modify the minimum range values: Rotate switches SW3 (tens) and SW2 (units) to the value required. Press S1 to confirm the setting and to acquire the new address. i) Rotate function switch SW1 to Position 9 and it is possible to read and/or modify the Minimum Target Size. A standard human target is around 50 and the minimum size threshold is used to discriminate against small targets and make the Murena immune to movements of small animals. When the target dimensions pass the Minimum Target Size threshold the Murena Plus will activate the recording of the event in the Monitor buffer and simultaneously send a pre-alarm indication through the serial line. To Read the minimum target size value: Rotate function switch SW2 (units) until the red led (DL9) comes on. Note the position of SW2. Rotate function switch SW3 (tens) until the red led (DL8) comes on. Note the position of SW3. The values read on these switches vary between 01 and 99 (default of 20) We suggest a value of 10 for Murena Plus Curtain. To Modify the minimum target size value: Rotate switches SW3 (tens) and SW2 (units) to the value required. Press S1 to confirm the setting and to acquire the new minimum size. Installation Manual Pag. 32 of 36 Murena/Murena-Plus24 CIAS Elettronica S.r.l. Ed..1.4 j) Rotate function switch SW1 to Position A and it is possible to read and/or modify the Maximum Target Size. To Read the maximum target size value: Rotate function switch SW2 (units) until the red led (DL9) comes on. Note the position of SW2. Rotate function switch SW3 (tens) until the red led (DL8) comes on. Note the position of SW3. The values read on these switches vary between 01 and 99 (default of 70). To Modify the maximum target size value: Rotate switches SW3 (tens) and SW2 (units) to the value required. Press S1 to confirm the setting and to acquire the new maximum size. k) Rotate function switch SW1 to Position 0 and press button S1. This concludes the installation phase. Leave the switch in this position for normal operation. 4.2 Calibration using Software For display and extremely accurate management of all the parameters of the detector, complete with analogue threshold levels and received signals, use the Wave-Test 2 software running on a PC. Refer to the software manual for connection details and detailed procedures for the management of the detector. Analogue Values screenshot for Murena, Murena Plus and Murena Plus Curtain Installation Manual Pag. 33 of 36 Murena/Murena-Plus24 CIAS Elettronica S.r.l. Ed..1.4 Analogue Values screenshot for Murena Plus 24 5 MAINTENANCE AND SERVICE 5.1 Fault Finding In case of unwanted alarms of fault indications check the parameters set during installation and if they are found to exceed the various limits review section 4 Set-up and verification. Fault Fault Led on Alarm Led on Possible Cause Possible Solution Voltage high or low Temperate high or low Movement or obstacles in the protected area Check power supply voltage Check detector temperature Ensure that the protected field is free of obstacles and that there are no objects or people moving in the field. Check threshold settings and acquire the field value 4.1.1 b) Replace the front end Close micro-switch Masking alarm active Tamper Led on Front end microwave fault Micro-switch open 5.2 Service Kit The service kit comprises the processor circuit board and complete microwave front-end. Installation Manual Pag. 34 of 36 Murena/Murena-Plus24 CIAS Elettronica S.r.l. Ed..1.4 6 CHARCTERISTICS 6.1 Technical Characteristics This table lists the technical characteristics of the Murena detector. Min Nom Max Note TECHNICAL CHARACTERISTICS Operating Frequency Maximum Power 9.47 GHz 10.525 GHz 10.58 GHz 20 mW EIRP 1/24 - Modulation Duty-cycle Range 1m - 24 m Current consumption normal with leds ( mA -- ): 72 - 135 Current consumption in alarm with leds ( mA -- ): Current consumption normal with serial ( mA -- ): 70 75 - 132 140 Intrusion Alarm Contact (Static Relay) Tamper Alarm Contact (Static Relay) Fault Alarm Contact (Static Relay) - - 100mA 100mA 100mA Red Led for Intrusion Alarm Red Led for Tamper Alarm Red Led for Fault Alarm Six Red led to display various functions - - On board Onboard/SW Onboard/SW Onboard/SW Onboard/SW Onboard/SW Weight Dimensions Installation Manual C-NC C-NC C-NC off off off off Function Selectors Range Control 24 steps of 1m each Target Size Control Pre-alarm threshold control Alarm threshold control Masking threshold control Complete depth with mount Operating Temperature Design Level: Environmental Protection: on/off - 500 g - -25 °C 3° IP55 - Pag. 35 of 36 175 x 175 mm 115 mm +55 °C Murena/Murena-Plus24 CIAS Elettronica S.r.l. Ed..1.4 6.2 Functional Characteristics 1) 2) 3) 4) 5) 6) 7) 8) 9) 10) Generation Analysis Analysis Analysis Analysis Analysis Analysis Analysis Analysis Analysis Analysis Analysis Analysis Analysis Analysis 11) 12) Analysis Analysis * 13) Analysis * 14) 15) Activation Activation * 16) Activation Activation 17) 18) Activation Availability Availability Availability 19) Availability * 20) Availability * 21) Availability 22) Availability * 23) Availability * Of a true RADAR signal (Radio Detection And Ranging) Of the RADAR signal using DSP And filtering in the time domain FFT Of the target distance using FUZZY control Of the target speed using FUZZY control Of the target size using FUZZY control Of the direction of movement Of the threat of the target according to FUZZY control For discrimination between rain and a true target For discrimination between noise and a true target Of the maximum detection distance setting LRTD Long Range Target Discrimination Of the minimum detection distance setting SRTD Short Range Target Discrimination Of masking Of the power supply voltage, High or Low. Of the ambient temperature to detect events outside the normal operating range and to compensate for differences in signal due to temperature changes. Of opening the cover (Radome). Of a Stand-by input to inhibit the recording of events in the History and Monitor internal memories of the Murena. Of a Test input which activates an internal test of the Murena and opens the alarm relay if the test is successful (it creates an alarm status on the serial line with the Murena Plus). Of three static relays for alarm, tamper and fault. Of sequential polling of the pre-alarm, alarm and tamper status on an RS485 serial line for connection with the IB-System interface. Of three leds for the indication of alarm, tamper and fault. Of 6 multi-functional led to show the distance or dimensions of the target or entering alarm condition. Of the buzzer during walk tests on reaching an alarm condition. Of a set of switches to activate the functions and to define of the entity. Of a lithium battery to maintain the data in the total absence of power. Of a clock and calendar to provide a date and time stamp for the events stored within the Murena as either history or monitor events. Of a historical event archive, able to store up to 256 events with indication of the date, time, type of event and the values (in case they are specific to the event). This data can be acquired using the Wave Test 2 software and stored in historical files that can be viewed and/or printed. Of an archive of up to 256 recordings, each 6.5 seconds long, of the detected analogue signal of the distance, speed and size of the target when this last parameter is above the pre-alarm threshold setting. Of a set of default parameters, which can be used from time to time if the Murena is not set for any reason or if, during a self diagnosis, it detects an incorrect value. Of a connector for the connection of a PC via an RS-485 serial line, which allows the use of the Wave Test 2 for configuration, test and management of the detector. Of an RS-485 serial line connection, which allows the connection of all the detectors on a common line, acquiring all the alarms over the line, issuing Stand-by and Test commands and carrying out calibration and management. The functions marked with “*” are only active on the Murena Plus and Murena Plus24 version. Installation Manual Pag. 36 of 36 Murena/Murena-Plus24 NOTE: NOTE: Con la presente, CIAS Elettronica, dichiara che questo rivelatore di intrusione “MURENA” è conforme ai requisiti essenziali ed alle altre disposizioni rilevanti della Direttiva 1999/5/CE (Art.3.1a-3.1b-3.2) Hereby, CIAS Elettronica, declares that this movement detector “MURENA” is in compliance with the essential requirement and other relevant provisions of Directive 1999/5/EC (Art.3.1a-3.1b-3.2) Informazioni direttive Europee WEEE Questo apparecchio è contrassegnato in conformità alla Direttiva Europea 2002/96/EC, Waste Electrical and Electronic Equipment (WEEE) Assicurandosi che questo prodotto sia smaltito in modo corretto, l’utente contribuisce a prevenire le potenziali conseguenze negative per l’ambiente e la salute. Il simbolo sul prodotto o sulla documentazione d’accompagnamento indica che questo prodotto non deve essere trattato come rifiuto domestico ma deve essere consegnato presso l’idoneo punto di raccolta per il riciclaggio d’apparecchiature elettriche ed elettroniche. Disfarsene seguendo le normative locali per lo smaltimento rifiuti. Lo smaltimento abusivo è punito con le sanzioni previste dalla legislazione nazionale vigente Il prodotto può essere riconsegnato al distributore/installatore a fine vita in occasione di un nuovo acquisto. This product is marked in compliance with the European Directive 2002/96/EC, Waste Electrical and Electronic Equipment (WEEE). The correct disposal of the product will prevent potential negative consequences for the environment and the human health. The symbol on the product or into the annexed documentation indicates that this product does not have to be dealt like domestic refusal but must be delivered near the suitable point of collection for the recycling of electrical and electronic equipment. The illicit disposal will be endorsed according to local l regulations. At the end of operative life the product can be given back to the vendor/installation organization in occasion of a new purchase. Copyright CIAS Elettronica S.r.l. Stampato in Italia / Printed in Italy CIAS Elettronica S.r.l. Direzione, Ufficio Amministrativo, Ufficio Commerciale, Laboratorio di Ricerca e Sviluppo Direction, Administrative Office, Sales Office, Laboratory of Research and Development 20158 Milano, via Durando n. 38 Tel. +39 02 376716.1 Fax +39 02 39311225 Web-site: www.cias.it E-mail: [email protected] Stabilimento / Factory 23887 Olgiate Molgora (LC), Via Don Sturzo n. 17