1
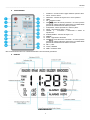
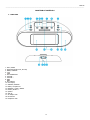
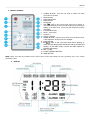
INDICE
ITALIANO
SIMBOLI..................................................................................................................................................................................... 2
AVVERTENZE GENERALI.......................................................................................................................................................... 2
PREPARAZIONE ALL’USO......................................................................................................................................................... 3
DESCRIZIONE DEI COMANDI ................................................................................................................................................. 5
FUNZIONAMENTO .................................................................................................................................................................... 6
PULIZIA E MANUTENZIONE .................................................................................................................................................... 9
RISOLUZIONE DEI PROBLEMI ................................................................................................................................................ 9
CARATTERISTICHE TECNICHE ............................................................................................................................................. 10
ENGLISG
SYMBOLS ................................................................................................................................................................................. 11
SAFETY INFORMATIONS ....................................................................................................................................................... 11
BASIC OPERATIONS............................................................................................................................................................... 12
LOCATION OF CONTROLS .................................................................................................................................................... 14
OPERATING ............................................................................................................................................................................. 16
CLEANING AND MAINTANANCE ........................................................................................................................................... 18
TROUBLE SHOOTING............................................................................................................................................................. 18
SPECIFICATIONS .................................................................................................................................................................... 19
1
ITALIANO
_______________________________________________________________________________________________________________________
SIMBOLI
Il triangolo che riporta il punto esclamativo indica all’utilizzatore che ci sono da leggere importanti
operazioni e istruzioni di cura nella documentazione che accompagna il prodotto.
Il triangolo che riporta il fulmine serve ad indicare all’utilizzatore la presenza di tensione pericolosa
all’interno dell’apparecchio, di entità tale da rappresentare un potenziale pericolo di scarica elettrica.
Il bidone barrato indica che il prodotto risponde ai requisiti richiesti dalle nuove direttive introdotte a
tutela dell’ambiente (2002/96/EC, 2003/108/EC, 2002/95/EC) e che deve essere smaltito in modo
appropriato al termine del suo ciclo di vita. Chiedere informazioni alle autorità locali in merito alle zone
dedicate allo smaltimento dei rifiuti. Chi non smaltisce il prodotto seguendo quanto indicato in questo
paragrafo ne risponde secondo le norme vigenti.
WARNING: TO REDUCE THE RISK OF ELECTRIC SHOCK, DO NOT REMOVE COVER (OR BACK), NO
USER SERVICEABLE PARTS INSIDE. REFER SERVICING TO QUALIFIED SERVICE PERSONNRL ONLY.
AVVERTENZE GENERALI
•
•
•
•
•
•
•
•
•
•
•
•
•
•
•
•
•
•
•
•
•
•
•
Leggere il manuale di istruzioni prima di collegare o accendere l’apparecchio.
Mantenere le istruzioni in buono stato. Osservare tutte le avvertenze, seguire tutte le istruzioni.
Conservare il Manuale di Istruzioni per future consultazioni.
L’apparecchio non dovrà essere esposto a sgocciolamenti o schizzi e non vi dovranno essere posizionati sopra oggetti
contenenti liquidi, come ad esempio vasi. Solo per uso in luoghi asciutti.
Non si dovrà posizionare nessun tipo di fiamma viva sul prodotto, come ad esempio candele.
I bambini dovranno essere controllati affinché non giochino con l’apparecchio.
Non si dovrà impedire la corretta ventilazione ostruendo le aperture di ventilazione.
Assicurarsi che l’unità sia collegata ad una presa a AC 240V ~50 Hz. Usare un voltaggio superiore potrebbe causare un
malfunzionamento dell’apparecchio o persino farlo infiammare. Spegnere l’apparecchio prima di scollegarlo dalla presa di
corrente per disattivarlo completamente.
Non inserire o disinserire la spina dalla presa di corrente con le mani bagnate.
Se la spina di corrente non si inserisce correttamente nella vostra presa, non forzarla.
Utilizzare esclusivamente gli accessori specificati dal fabbricante.
Utilizzare le parti di ricambio specificati dal fabbricante.
Installare l’apparecchio seguendo le istruzioni del fabbricante
Posizionare l’unità in un luogo ben ventilato. Porre il sistema su una superficie piana, dura e stabile. Non esporre a
temperature superiori a 35°C. Lasciare uno spazio di almeno 10 cm dalle parti posteriore e superiore, e di 5cm da quelle
laterali.
Premere i tasti dell’apparecchio delicatamente. Premere i tasti o lo schermo con troppa forza potrebbe danneggiare
l’apparecchio.
Smaltire le batterie utilizzate rispettando l’ambiente
Assicurarsi sempre che il prodotto sia scollegato dalla presa di corrente prima di spostarlo o pulirlo. Pulire esclusivamente
con panni asciutti.
Scollegare l’apparecchio durante forti temporali o quando non viene utilizzato per lunghi periodi.
Questo prodotto non è dotato di parti che possano essere riparate dall’utente. Non tentare di riparare questo apparecchio
da soli. La manutenzione dovrebbe essere eseguita esclusivamente da personale specializzato. Portare il prodotto in un
centro di riparazione di sua scelta per controllo e manutenzione.
Non ascoltare la musica a volumi molto elevati utilizzando le cuffie poiché ciò potrebbe danneggiare il suo udito.
I cavi delle cuffie possono essere pericolosi per i bambini piccoli. Conservare il prodotto in maniera responsabile quando non
in uso.
Assicurarsi che le cuffie siano inserite nel lettore prima di accenderlo. Inserire le cuffie ad accensione avvenuta può
potenzialmente danneggiare le stesse o il lettore.
MAI lasciare che qualcuno, specialmente i bambini, inseriscano oggetti nei fori, spazi o qualsiasi altro tipo di apertura
dell’unità poiché ciò potrebbe causare una scossa elettrica letale.
2
ITALIANO
_______________________________________________________________________________________________________________________
•
•
•
•
•
Non installare su un muro o un soffitto.
Non posizionare vicino al TV, altoparlanti o altro tipo di oggetto che potrebbe generare forti campi magnetici.
Questo apparecchio è destinato esclusivamente ad uso interno.
Non lasciare incustodito mentre è in uso.
Questo prodotto non è destinato ad un uso commerciale. Esclusivamente per uso domestico.
NOTA: quando l’unità è in modalità standby, essa continua ad utilizzare energia. Per scollegare l’apparecchio completamente,
rimuovere la spina dalla presa di corrente.
PREPARAZIONE ALL’USO
1. ACCESSORI STANDARD
Rimuovere tutti gli accessori dalla scatola. Si prega di verificare che tutti i seguenti accessori siano presenti prima di smaltire la
scatola. Non rimuovere nessuna etichetta o adesivo posti sui pannelli posteriori dell’unità principale. Posizionare la vostra unità su
una superficie piana, come un tavolo, una scrivania o uno scaffale. Svolgere l’antenna FM in tuta la sua lunghezza per ottenere
una migliore ricezione radio.
•
Manuale di istruzioni x 1
•
Telecomando x 1
2. COLLEGAMENTO ALL’ALIMENTAZIONE
Questo apparecchio è stato progettato per utilizzo con un’alimentazione di AC~240V 50Hz. Collegare questo sistema ad un
qualsiasi altro tipo di sorgente elettrica potrebbe danneggiarlo. Assicurarsi che l‘alimentatore AC sia inserito correttamente nella
presa elettrica.
Per scollegare l’unità completamente, rimuovere l’alimentatore dalla presa di corrente.
1.
Svolgere il cavo di alimentazione AC dell’alimentatore. Non inserire o disinserire il cavo di alimentazione con le mani
bagnate.
Si prega di scollegare le spine principali dalla presa AC se l’apparecchio non viene utilizzato per lunghi periodi di
2.
tempo.
Messa in funzione delle batterie (le batterie non sono incluse)
Scollegare la spina dall’apparecchio e dalla presa di corrente prima di inserire le batterie. Aprire il coperchio delle batterie posto
sulla parte posteriore dell’unità e inserire 2 batterie tipo “AAA” nel comparto batterie seguendo la corretta polarità indicata dai
simboli “+” e “-“ all’interno del comparto. Reinserire il coperchio delle batterie, assicurandosi che le stesse siano correttamente
inserite e ben ferme.
PRECAUZIONI DI SICUREZZA PER LE BATTERIE
1.
Utilizzare esclusivamente le batterie della misura e tipo specificato.
Assicurarsi che la batteria si inserita secondo la corretta polarità indicate nel comparto batterie. Se la batteria non è
2.
inserita nel modo giusto, l’apparecchio potrebbe danneggiarsi.
3.
Se l’apparecchio non viene utilizzato per lunghi periodi di tempo, rimuovere la batteria al fine di evitare danni dovuti
alle possibili perdite di liquido elettrolita dalle batterie.
Non utilizzare batterie usate insieme a batterie nuove o batterie di diverso tipo.
4.
3. COLLEGAMENTO DELLE CUFFIE
Si possono utilizzare cuffie con spina da 3.5mm (non incluse). Inserire la spina delle cuffie nella presa delle cuffie posta sulla parte
anteriore dell’apparecchio. Gli altoparlanti si isoleranno automaticamente quando si utilizzano le cuffie o gli auricolari.
AVVERTENZE: Per proteggere il vostro udito, seguire le seguenti istruzioni quando si utilizzano le
cuffie/auricolari.
1. Non utilizzare l’apparecchio a livelli di volume troppo elevati. Un ascolto continuo a livelli troppo elevati può portare a
perdite di udito permanenti.
2. Abbassare il volume prima di utilizzare le cuffie. Una volta iniziato l’ascolto, regolare il volume al livello desiderato. In
questo modo si evita di attivare improvvisamente le cuffie ad un volume elevato.
3
ITALIANO
_______________________________________________________________________________________________________________________
3. Una volta regolato il volume, non aumentarlo. Nel tempo, le orecchie si adattano al livello di volume, pertanto anche un
volume che non provoca fastidio potrebbe causare danni all’udito.
4. INSTALLAZIONE E SOSTITUZIONE DELLE BATTERIE DEL TELECOMANDO
Il telecomando necessita di una batteria al litio di tipo “CR2025” 3 Volt (inclusa). Per prolungare la durata della batteria originale
abbiamo inserito una piccola linguetta di plastica tra la batteria al litio e l’attacco della batteria. Rimuovere questa linguetta prima
di utilizzare il telecomando. Per rimuovere la linguetta, tirarla verso l’esterno.
Se il funzionamento del telecomando non è soddisfacente, sostituire la batteria originale con una nuova batteria al litio da 3 volt.
1.
2.
Far scorrere il vano batteria dal corpo del telecomando.
Posizionare una batteria CR2025 da 3 volt nel vano batteria, seguendo l’indicazione della polarità. Se la batteria è
posizionata in modo scorretto il telecomando non funzionerà.
ATTENZIONE: Smaltire la batteria vecchia in maniera adeguata. Non lasciarla incustodita dove un bambino
piccolo o un animale domestico possa giocarci o ingoiarla.
3.
4.
La batteria potrebbe esplodere o perdere liquido se non maneggiata in modo corretto. Sostituirla esclusivamente con
un tipo di batteria uguale o equivalente.
Inserire il vano batteria nel comparto batteria.
ATTENZIONE: Se la batteria non viene sostituita nel modo corretto esiste il rischio di esplosione. Sostituire
esclusivamente con un tipo di batteria uguale o equivalente.
NOTA: Se l’apparecchio non viene utilizzato per lunghi periodi di tempo, si prega di rimuovere tutte le batterie per evitare danni o
lesioni causati da eventuali perdite di liquido dalla batteria. Utilizzare esclusivamente batterie del tipo e misura specificate.
5. INSTALLAZIONE DELL’ADATTATORE PER iPOD
Per garantire che il vostro iPod funzioni correttamente, alcuni adattatori per vecchi modelli sono stati inclusi nella confezione di
questo prodotto. Controllare la base dell’adattatore per determinare quale di questi è compatibile con il vostro iPod.
1.
2.
Inserire l’adattatore
•
Scegliere l’adattatore compatibile con il vostro iPod. Usare il corretto adattatore consente un perfetto funzionamento.
•
Inserire delicatamente l’adattatore nella dock posta sul prodotto.
•
Con attenzione, inserire il proprio iPod nella dock. Rimuovere eventuali cover per iPod qualora vi fossero.
Rimuovere l’adattatore
•
Rimuovere l’iPod dalla dock station, afferrare l’adattatore e sollevarlo delicatamente dalla postazione.
4
ITALIANO
_______________________________________________________________________________________________________________________
DESCRIZIONE DEI COMANDI
1.
1
2
3
4
5
6
7
8
9
10
11
12
13
14
15
16
17
18
19
UNITA’ PRINCIPALE
Pulsante PLAY/PAUSE
Pulsante selezione FUNZIONI (Radio, iPod, AUX-IN)
Pulsante MENU/STAND BY
Tasto SKIP
Dock per iPod
Pulsante VOLUME Pulsante VOLUME +
Tasto SKIP
Tasto UP/ALARM 2
Schermo LCD
Tasto SNOOZE/DIMMER
Comparto batterie
Tasto MEMORY/CLOCK/ENTER
Tasto DOWN/ALARM 2
Altoparlante
Aux-In
Ingresso Adattatore AC
Antenna FM
Ingresso cuffie/auricolari
5
ITALIANO
_______________________________________________________________________________________________________________________
3.
TELECOMANDO
1
2
3
4
5
6
STAND BY : accende l’unità e spegne l’allarme quando è attivo
MUTE : azzera il volume
FUNCTION : seleziona la sorgente che si vuole riprodurre
MENU
OK : conferma la scelta
SKIP
: passa alla traccia precedente o se tenuto premuto
permette di navigare all’interno della traccia. In modalità Radio
permette di sintonizzarsi sulle stazioni precedenti.
PLAY/PAUSE : inizia la riproduzione e mette in pausa.
MO/ST : funzionamento mono o stereo
VOLUME +/- : incrementa o decrementa il volume di
riproduzione.
ALARM1/ALARM2 : seleziona la sveglia 1 o 2
SNOOZE :
SLEEP : spegnimento automatico
SKIP
: passa alla traccia successiva o se tenuto premuto
permette di navigare all’interno della traccia. In modalità Radio
permette di sintonizzarsi sulle stazioni successive.
PRE + / PRE CLOCK / MEMORY
DBBS : esaltazione bassi
7
8
9
10
11
12
13
14
15
16
Nota: il telecomando incluso non controlla iPod shuffle o iPod di seconda generazione.
4.
DISPLAY
FUNZIONAMENTO
6
ITALIANO
_______________________________________________________________________________________________________________________
1.
2.
3.
4.
Premere il pulsante STAND-BY per accendere l’apparecchio
Selezionare la sorgente premendo il pulsante FUNCTION (iPOD, RADIO o AUX).
Per spegnere l’apparecchio, premere il pulsante STAND BY.
Regolare il livello di volume principale mediante la manopola del volume.
1. FUNZIONAMENTO DELLA RADIO
Funzionamento di base
1. Premere il pulsante FUNCTION sull’unità o sul telecomando e selezionare la sorgente RADIO. La frequenza radio
apparirà sul display.
2. Ricercare la stazione radio desiderata mediante i pulsanti SKIP
/.
sul telecomando.
3. Per scorrere tra le frequenze premere e tenere premuto i tasti SKIP
/.
sul telecomando per 2
4.
5.
6.
secondi.
Per regolare il volume usare i pulsanti VOLUME +/- sul telecomando.
L’apparecchio può memorizzare fino a 30 stazioni radio; procedere come indicato in seguito:
•
Sintonizzarsi sulla frequenza desiderata e premere il pulsante MEMORY/CLOCK.
•
Premere UP/ALARM 2 o DOWN/ALARM 1 per selezionare la posizione in cui si vuole salvare la stazione radio.
•
Premere MEMORY per confermare il salvataggio.
In modalità RADIO premere e tenere premuto il pulsante MEMORY per 2 secondi per sintonizzare automaticamente
la stazione. La radio comincerà a scansionare le frequenze fermandosi alla prima stazione disponibile.
Antenna dell’apparecchio
Per migliorare la ricezione della radio:
FM: Estendere completamente l’antenna FM per ottenere una migliore ricezione delle stazioni FM
2. UTILIZZO DELLA DOCK STATION PER iPOD
Questo apparecchio è compatibile con i principali tipo di iPod come l’iPod Mini, l’iPod Photo, iPod video ecc. É possibile ascoltare la
musica proveniente dall’iPod attraverso gli altoparlanti dell’apparecchio.
L’unità ha anche la funzione di caricabatterie dell’iPod. Mentre il vostro iPod è inserito nell’unità, esso si ricaricherà
automaticamente fino al completamento della carica.
Questo apparecchio è stato concepito come una docking station universale. Prima di inserire il vostro iPod, inserire l’adattatore
corretto. Sono compatibili tutti i modelli di iPod con spina 30-pin.
Inserimento e rimozione del vostro iPod.
1. Premere il tasto FUNCTION per selezionare la modalità iPod
2. Inserire delicatamente il vostro iPod nella dock station dedicata. (l’iPod non deve essere inserito in una custodia)
NOTE:
1.
2.
Utilizzare l’adattatore dock iPod giusto per il vostro iPod, facendo attenzione a non danneggiare i pin di connessione.
Assicurarsi sempre di avere la massima cura quando si inserisce o si rimuove l’iPod dalla dock station.
Riproduzione e caricamento dell’iPod
1. Selezionare la modalità iPod utilizzando l’interruttore FUNCTION.
2. Inserire il vostro iPod nel dock e premere il tasto PLAY/PAUSE per avviare la riproduzione.
3. Premere nuovamente il tasto PLAY/PAUSE per mettere in pausa la riproduzione. Premere questo bottone anche per
riavviare la riproduzione.
4. Selezionare la musica desiderata e avviare l’iPod come si è soliti fare.
5. È anche possibile premere il tasto
o
sull’unità o sul telecomando per saltare al brano precedente o
successivo, o tenere premuto il tasto per cercare un passo in particolare del brano che si sta ascoltando.
6. Quando l’iPod è collegato all’unità, la batteria interna si ricarica automaticamente.
Utilizzo del
1.
2.
3.
4.
5.
3.
sistema di menu iPod
Selezionare la modalità iPod utilizzando l’interruttore FUNCTION.
Inserire delicatamente l’iPod nel dock.
Premere il tasto MENU una volta sul telecomando per entrare nel sistema di menu iPod.
Premere i tasti UP/ALARM 2 o DOWN/ALARM 1 sull’unità per scorrere su e giù, nello stesso modo in cui lo si farebbe
con i tasti di funzionamento dell’iPod.
Premere il tasto OK sul telecomando per confermare la vostra selezione.
IMPOSTARE ORA/SVEGLIA/AUTOSPEGNIMENTO
7
ITALIANO
_______________________________________________________________________________________________________________________
Impostare l’orario
1. In modalità STAND BY, premere e tenere premuto il pulsante MEMORY/CLOCK fino a quando sul display non
comparirà l’indicazione 24H. Usare i tasti
o
sull’unità per selezionare tra 24H o 12H. Premere nuovamente
MEMORY/CLOCK per confermare.
o
sull’unità per impostare l’orario corretto.
2. Premere i tasti
3. Premere MEMORY per salvare l’impostazione.
NOTA: ricordarsi di scegliere tra AM (mattino) o PM (pomeriggio) quando si selezione il formato 12H. L’icona AM/PM comparirà sul
display.
Impostare la Sveglia
L’unità supporta 2 sveglie che possono essere impostate autonomamente.
1. Per impostare la sveglia, premere e tenere premuto il pulsante ALARM1 o ALARM2 finchè l’orario lampeggerà sul
display.
2. Premere i pulsanti
/
per impostare l’orario desiderato.
3. Premere ALARM1 o ALARM2 per confermare la scelta.
NOTA: ricordarsi di scegliere tra AM (mattino) o PM (pomeriggio) quando si selezione il formato 12H. L’icona AM/PM comparirà sul
display.
4. Usare i tasti
/
per regolare il volume da 1 a 32. Quando la sveglia si attiverà, il volume crescerà fino al livello
impostato.
5. Premere nuovamente ALARM1/ALARM2 per confermare.
6. Premere ALARM1/ALARM2 per selezionare la sorgente con la quale si vuole attivare la sveglia, tra iPod, Radio e
Buzzer. L’icona corrispondente apparirà sul display.
NOTE:
• Controllare che l’icona della sorgente sia apparsa sul display quando si imposta la sveglia
• Controllare che il livello del volume sia appropriato e correttamente impostato.
Usare la sveglia
1. Per controllare l’orario della sveglia, premere ALARM1 o ALARM2 una volta e l’orario apparirà sul display.
2. Per disattivare l’allarme premere ALARM1 o ALARM2 finchè l’icona non scompare dal display.
3. Per attivarlo premere nuovamente il pulsante corrispondente.
4. Per interrompere la sveglia premere il tasto SNOOZE/DIMMER sull’unità. L’allarme si interromperà per riattivarsi dopo
circa 9 minuti. Questo ciclo può essere ripetuto fino ad 1 ora.
5. Per disinserire la sveglia premere il pulsante STAND BY. Se non viene cambiato nulla, la sveglia suonerà il giorno
successivo alla stessa ora. Se la sveglia non viene interrotta, suonerà per circa 1 ora per poi spegnersi
automaticamente. Questo ciclo si ripeterà ogni 24 ore finchè non viene modificato.
NOTE:
• Impostare l’iPod in modalità REPEAT se non è presente almeno 1 ora di musica.
• Se si seleziona la sveglia con iPod ma nessun iPod è collegato all’unità o non è presente musica nel dispositivo, si attiverà
automaticamente la sveglia con Buzzer.
• Controllare che l’iPod sia correttamente collegato all’unità principale.
• Nell’eventualità che si interrompa la corrente elettrica, l’orario della sveglia è salvato in memoria. Qualora però manchi la
corrente elettrica durante l’orario della sveglia, questa non si attiverà.
Regolare la luminosità dello schermo
Per regolare la luminosità dello schermo, premere SNOOZE/DIMMER durante l’uso. Ogni pressione cambierà il livello di luminosità
dello schermo LCD.
Funzione SLEEP (Autospegnimento)
1. Premere il pulsante SLEEP in modalità stand by o durante l’ascolto dell’iPod o della Radio. L’unità si spegnere
automaticamente all’orario indicato sul display.
2. Per regolare l’ora dello spegnimento, premere il tasto SLEEP ripetutamente e scegliere tra l’intervallo 10-90 minuti.
Premendo SLEEP quando lo spegnimento è impostato a 10 minuti, l’unità si spegnerà.
3. Per controllare l’impostazione di autospegnimento, attendere che l’unità ritorni alla modalità precedente quindi
premere SLEEP una volta. Sul display appariranno i minuti rimanenti all’autospegnimento. Premere ancora per
cambiare nuovamente l’impostazione.
4. E’ sempre possibile terminare l’ascolto premendo il pulsante STAND BY.
8
ITALIANO
_______________________________________________________________________________________________________________________
NOTA: l’unità ha un volume indipendente durante la funzione Autospegnimento e non compromette il livello di volume impostato
per la Sveglia. Il volume di Autospegnimento rimarrà lo stesso finché non viene cambiato dall’utente.
4. AUX IN
È possibile ascoltare il sono proveniente dagli apparecchi connessi esternamente attraverso gli altoparlanti del lettore. Connettere
la spina della vostra fonte audio esterna (TV, VCR, lettore DVD, lettore musicassette, lettore Mini Disc) alla presa AUX IN posta sul
pannello superiore dell’apparecchio.
NON DIMENTICARE! La funzione AUX può essere utilizzata solo quando una fonte esterna sia stata collegata alla presa AUX IN.
NON DIMENTICARE! I cavi di connessione non sono inclusi.
1.
2.
3.
Premere FUNCTION fino a selezionare la funzione AUX IN.
Accendere la vostra fonte esterna e avviarla normalmente. Il suono sarà riprodotto dagli altoparlanti.
Regolare il volume al livello desiderato.
PULIZIA E MANUTENZIONE
ATTENZIONE: Disconnettere l’apparecchio dalla fonte di corrente durante le operazioni di pulizia.
Se l’apparecchio è sporco, pulirlo con un panno anti-polvere morbido e asciutto. Utilizzare un panno morbido per pulire questo
prodotto. Non usare alcun tipo di cera, spray lucidante, o detergenti abrasivi sull’apparecchio.
ATTENZIONE: Evitare che acqua o altri liquidi penetrino nell’apparecchio durante la sua pulizia.
Smaltire le batterie usate rispettando l’ambiente.
RISOLUZIONE DEI PROBLEMI
PROBLEMI
POSSIBILI CAUSE
Nessun suono dagli altoparlanti
L’adattatore potrebbe non essere collegato correttamente.
Non c’è corrente dalla presa principale
L’iPod non collega correttamente alla dock
L’adattatore dock istallato non è quello giusto. Provare un altro adattatore. Nel
caso nessun adattatore sia utilizzabile, usare quello fornito da Apple contenuto
nella confezione del prodotto.
Ci potrebbero essere delle ostruzioni che impediscono il corretto aggancio
dell’Ipod alla dock universale. Rimuoverle e riprovare ad agganciare l’Ipod.
L’unità non riconosce l’Ipod
L’Ipod potrebbe non essere collegato correttamente. Rimuovere l’Ipod e
controllare se qualcosa ostruisce la dock. Posizionare nuovamente l’Ipod
sull’unità. Rimuovere le cover dall’Ipod qualora presenti.
L’Ipod potrebbe essere bloccato o in stand –by. Controllare che l’Ipod funzioni
correttamente prima di inserirlo. Fare riferimento al manuale d’uso del
prodotto.
Il software dell’Ipod non è aggiornato. Aggiornare il software dell’Ipod. Per
ulteriori dettagli fare riferimento al manuale d’uso o visitare la pagina Apple:
http://www.apple.com
L’Ipod è di prima o seconda generazione. L’unità non riconosce Ipod di prima
e seconda generazione. Usare l’ingresso AUX-IN per riprodurre la musica
dall’Ipod.
9
ITALIANO
_______________________________________________________________________________________________________________________
CARATTERISTICHE TECNICHE
Frequenze radio : FM 87.50-108Hz
Potenza : 1W RMS x 2
Dimensioni (L x H x P) : 198 x 74 x 100 mm
Il produttore si riserva il diritto di apportare su questo apparecchio modifiche ELETTRICHE - TECNICHE - ESTETICHE e/o sostituire parti senza
alcun preavviso, ove lo ritenesse più opportuno, per offrire sempre un prodotto affidabile, di lunga durata e con tecnologia avanzata.
MADE IN P.R.C.
Importato da: DMEDIA COMMERCE S.p.A.
Sede legale: via Aretina 25, 50065 Sieci - Pontassieve (FI) – ITALY
Sede logistica e post vendita: via A. Moro 41, 41030 Bomporto (MO) – ITALY
10
ENGLISH
_______________________________________________________________________________________________________________________
SYMBOLS
The triangle with the exclamation point, inside an equilateral triangle, reminds the user to read the
important operation and maintenance instructions in this owner’s guide.
The lightning flash with arrowhead, inside an equilateral triangle, warns the user that un-insulated
dangerous voltage inside the system may cause an electrical shock.
The dustbin means the product meets the requirements of the legislation that protects the environment
(2002/96/EC, 2003/108/EC, 2002/95/EC). This symbol indicates that when the last user wishes to
discard this product, it must be sent to appropriate facilities for recovery and recycling. By not
discarding this product along with other household-type waste, the volume of waste sent to incinerators
or landfills will be reduced and natural resources will be conserved. Dispose of the used product
promptly and responsibly. Ask to your local authorities where to find proper disposal zone.
WARNING: TO REDUCE THE RISK OF ELECTRIC SHOCK, DO NOT REMOVE COVER (OR BACK), NO
USER SERVICEABLE PARTS INSIDE. REFER SERVICING TO QUALIFIED SERVICE PERSONNRL ONLY.
T SAFETY INSTRUCTIONS
SAFETY INFORMATIONS
•
•
•
•
•
•
•
•
•
•
•
•
•
•
•
•
•
•
•
•
•
•
•
•
•
•
•
•
Read this Instruction Manual before you attempt to connect or operate the appliance.
Keep these instructions in good condition. Heed all warnings. Follow all instructions.
Save this Instruction Manual for future reference.
The apparatus shall not be exposed to dripping or splashing and no objects filled with liquids, such as vases, shall be placed
on the product. Dry location use only.
No naked flame source, such as candles, should be placed on the product.
Children should be supervised to ensure that they do not play with the appliance.
Ventilation should not be impeded by covering the ventilation openings.
Ensure that the unit is plugged into an AC 240V ~ 50 Hz power outlet. Using higher voltage may cause the unit to
malfunction or even fire catching. Turn off the unit before unplugging it from power source to completely switch it off.
Do not plug/ unplug the power plug into/ from an electrical outlet with wet hands.
If the power plug does not fit into your outlet, do not force the plug into an electrical socket if it does not fit.
Only use attachments/ accessories, which are specified by the manufacturer.
Use replacement parts, which are specified by the manufacturer.
Install the unit in accordance with the manufacturer’s instructions.
Place the unit where there is good ventilation. Place the system on a flat, hard and stable surface. Do not expose to
temperatures above 35°C. Allow at least 10 cm clearance from the rear and the top of the unit and 5 cm from each side.
Press the player’s buttons gently. Pressing them or the screen too hard can damage the player.
Dispose of used batteries in an environmental-responsible manner.
Always ensure that the product is unplugged from the electrical outlet before moving or cleaning. Clean it with dry cloth
only.
Unplug the product during lightning, storms or when it will not be used for long periods of time.
This product has no user-serviceable parts. Do not attempt to repair this product yourself. Only qualified service personnel
should perform servicing. Take the product to the electronics repair shop of your choice for inspection and repair.
Do not listen to music at very high volumes using the earphones as this can permanently damage your hearing.
Earphone cables may be hazardous to young children. Store the product carefully when it is not in use.
Ensure that your earphones are inserted into the player before it is switched on. Inserting them afterwards can potentially
damage the earphones and the player.
NEVER let anyone, especially children, push anything into holes, slots or any other openings in the unit’s casing as this
could result in a fatal electric shock.
Don’t mount this product on a wall or ceiling.
Do not place the unit near TVs, speakers and other objects that generate strong magnetic fields.
This unit is for indoor use only.
Do not leave the unit unattended when it is in use.
Domestic use only.
NOTE: when the system is switched to standby mode, it is still consuming some power. To disconnect the system completely,
remove the AC power plug from the wall outlet.
11
ENGLISH
_______________________________________________________________________________________________________________________
BASIC OPERATIONS
1. STANDARD ACCESSORIES
Carefully remove all the accessories from the display carton. Please verify that you have all the following accessories before you
dispose of the carton. Do not remove any labels or stickers on the back panels of the main unit. Place your unit on a level surface
such as a table, desk or shelf. Unwind the FM antenna and extend it to its full length to get the best FM reception.
•
Instruction manual x 1
•
Remote control x 1
2. CONNECTING POWER SOURCE
This unit was designed to operate with an AC ~240V 50Hz power supply. Connecting this system to any other power source may
cause damage to the system. Make sure the AC adaptor is fully inserted into the SAA outlet.
To switch the unit off completely, withdraw the power cord and disconnect the AC adaptor from the wall outlet.
Unwind the AC adaptor cord. Do not plug or unplug the power cable in wet hands.
1.
2.
Please disconnect the mains plug from the AC adaptor if the appliance is not going to be used for a long period of time.
Battery operation (batteries are not supplied)
Disconnect the AC Cord Set completely from the set and wall outlet before inserting batteries. Open the battery cover on the rear
of the unit and insert 2 "AAA" size batteries into the battery compartment with the correct polarity as indicated by the “+” and ”-”
symbols inside the battery compartment. Replace the battery cover, making sure the batteries are firmly and correctly in place.
The set is now ready to operate.
NOTE: When the set is only used with an “AC” supply, or it is not used for a long period of time; please remove the batteries so
as to avoid damaging the set from battery leakage.
BATTERY SAFETY PRECAUTIONS
Use only the size and type of battery specified.
Ensure that the battery is inserted according to the polarity markings on the battery compartment. If the battery is
inserted the wrong way it may damage the device.
If the device is not going to be used for a long period of time, remove the battery from the control to prevent damage
3.
or injury from possible battery leakage.
4.
Do not use old and new of different types of batteries in combination.
1.
2.
3. CONNECTING HEADPHONES
You can use headphones with a 3.5 mm plug (not included) to listen in privacy. Insert the headphones plug into the headphones
socket on the front of the unit. The unit’s speakers will cut off automatically when headphones are being used.
WARNING: To protect your hearing, follow below guidelines when you use the headphones.
1.
2.
3.
Do not listen at extremely high volume level. Extended high volume listening can lead to permanent hearing loss.
Turn the volume down before listening to headphones. Once you begin listening, adjust the volume up to your desired
sound level. This prevents the headphones suddenly activating at a high level.
Once you set the volume level, do not increase it. Overtime, your ears adapt to the volume level. So a volume level that
does not cause discomfort might still damage your hearing.
4. INSTALLING AND REPLACING THE BATTERIES ON THE REMOTE CONTROL
The remote control requires one "CR2025 type" 3-Volt lithium battery (included). To extend the life of the original battery we have
inserted a small clear plastic spacer tab between the lithium battery and the battery terminal. You must remove this
battery spacer tab before you use the remote control.
If the operation of the remote control becomes unsatisfactory, replace the original battery with a new 3-volt lithium battery.
1.
2.
Slide out the battery holder from the remote control case. (Push tab "A" towards the middle first, see diagram).
Place one 3V CR2025 battery into the battery holder, observing the polarity marking. If the battery is placed incorrectly,
the remote control will not work.
12
ENGLISH
_______________________________________________________________________________________________________________________
CAUTION: Dispose of the old battery properly. Do not leave it lying around where a young child or pet could
play with or swallow it.
3.
4.
Battery may explode or leak if mistreated. Do not attempt to recharge it or disassemble it. Do not dispose of the old
battery in a fire.
Insert the battery holder into the battery compartment.
CAUTION: Danger of explosion exists if the battery is replaced incorrectly. Replace only with the same or
equivalent type of battery.
NOTE: Please remove all of the batteries to prevent damage or injury from possible battery leakage if the unit will not be used for
a long period of time. Use only the specified size and type of battery.
5. INSTALLING THE DOCK ADAPTER
To guarantee that your iPod will fit properly into the built-in universal dock, several detachable dock adapters for old iPod players
are included with this product. Please check the bottom of dock adapters to determine compatibility with your iPod.
1.
2.
Inserting the dock adapter.
•
Choose a dock adapter that corresponds with the iPod you would like to dock. Using the correct dock adapter
ensures a proper fit.
•
Gently push the dock adapter down into the universal dock.
•
Carefully place your iPod into the universal dock. Please note that iPod must not be in a case or “Skin”. 2.
Removing the dock adapter.
•
Remove your iPod, grasp the dock adapter and lift upwards carefully.
13
ENGLISH
_______________________________________________________________________________________________________________________
LOCATION OF CONTROLS
1. MAIN UNIT
1. PLAY/ PAUSE
2. FUNCTION (Radio, iPod, AUX-IN)
3. MENU/ STANDBY
4.
5. iPod CONNECTOR
6. VOLUME –
7. VOLUME +
8.
9. UP/ ALARM 2
10. LCD Display
11. SNOOZE / DIMMER
12. Battery compartment
13. MEMORY / CLOCK / ENTER
14. DOWN / ALARM 1
15. Speaker
16. AUX-IN
17. AC Adapter Jack
18. FM Antenna
19. Headphone Jack
14
ENGLISH
_______________________________________________________________________________________________________________________
2. REMOTE CONTROL
1
2
3
4
5
6
7
8
9
10
11
12
13
STANDBY BUTTON : Turns the unit on/off or switches off alarm
when alarm is sounding.
MUTE BUTTON
FUNCTION BUTTON
MENU BUTTON
OK BUTTON
SKIP
: Skips to the previous track when iPod is playing, or
scans currently playing track toward the beginning by pressing and
holding. In the radio mode, it tunes the radio stations by pressing
and holding
PLAY/PAUSE BUTTON
MO/ST : mono/stereo
VOLUME +/ALARM1 / ALARM2
SNOOZE BUTTON : Activates snooze mode when the alarm sounds.
It also adjusts the strength of the LCD backlight.
SLEEP BUTTON
SKIP
: Skips to the next track when iPod is playing, or
scans currently playing track toward the end by pressing and
holding. In the radio mode, it tunes the radio stations by
pressing and holding.
14 PRE + / PRE –
15 CLOCK / MEMORY BUTTON
16 DBBS BUTTON
NOTE: Please note that the provided remote control cannot control iPod shuffle, the first generation iPod, or the second
generation of iPod.
4.
DISPLAY
15
ENGLISH
_______________________________________________________________________________________________________________________
OPERATING
1.
2.
3.
4.
Press the STANDBY button to switch on the unit.
Select the sound source by pressing the FUNCTION button (iPOD, RADIO or AUX).
To switch the unit off, press the STANDBY button.
Adjust the main volume level by turning the volume knob.
1. RADIO OPERATION
Basic operations
Turn the radio on, press the FUNCTION button on the unit (or on the Remote Control). Once on, the radio frequency
1.
will appear in the middle of the display.
2.
To tune in a desired station, press
or
buttons on the unit or Remote Control).
3.
To scan to the next clear station, press and hold press
or
buttons on the unit or Remote Control for 2
seconds. Press again to enter into the seek mode.
4.
To adjust the volume, press the VOLUME +/- on the unit or Remote Control.
5.
You can store up to a total of 30 radio stations in memory.
•
Tune in a desired station, then press MEMORY CLOCK button.
•
Press the UP/ALARM 2 or DOWN/ ALARM 1 button to select the desired station memory for storage.
•
Press the MEMORY button to confirm the setting. Auto Tuning Radio Station In RADIO
6.
In RADIO mode, press and hold the MEMORY button in 2 seconds. The radio will start seeking automatically and
stored when the radio station is reached.
Antenna
To improve radio reception:
FM: Extend the FM ANTENNA completely to obtain the best FM station reception.
2. USING THE iPOD DOCK
The uniti s compatible with most different kind of iPod, such as Ipod Mini, iPod Photo, iPod Touch etc. You can listen to the music
of the docked iPod through the speakers of the player. It also acts as an iPod battery charger. While your iPod is docked in, it will
automatically recharge until fully charged.
The unit is designed a universal docking station for iPod own cradle inserts. Before plugging your iPod, snap suitable dock adaptor
into the dock to product. All iPod model with 30-pin dock connector are suitable.
Insert and removing your iPod
Select iPod mode by pressing the FUNCTION button.
1.
2.
Carefully insert your iPod into the Dock the iPod must be without case).
NOTE:
1.
2.
Use the correct iPod dock adaptor for your model, taking care not to damage the connector pins.
Always ensure care is taken when inserting or removing your iPod from the connector.
Playback and recharge the iPod
1.
Select iPod mode using the FUNCTION switch.
Insert your iPod into the dock and press the PLAY/PAUSE button to start playback.
2.
3.
Press PLAY/PAUSE button to pause playback. Press this button again to resume playback.
Select your desired music and play connected iPod as usual.
4.
5.
You can also press
or
buttons on the unit or remote control to skip to the next or previous track, or press
and hold the button to search within a playing track at high speed, to locate a specific musical passage.
When your iPod is docked in the unit, the internal battery of the iPod will be charged automatically.
6.
Using the iPod menu system
1.
Select the iPod mode using the FUNCTION switch.
2.
Carefully insert your iPod unit into the dock.
3.
Press the MENU button once on the remote control to enter the iPod menu system.
4.
Press UP/ALARM2, and DOWN/ALARM1 on the unit to navigate the various features of the iPod menu system as you
would when using the iPod control buttons.
5.
Press the OK button on the remote control to confirm your selection.
16
ENGLISH
_______________________________________________________________________________________________________________________
3. SETTING TIME/ALARM/SLEEP FUNCTIONS
Setting the clock time
To set the time, first locate the MEMORY CLOCK button. Press and hold this button down until the display begins to
1.
24H. Press the
/
button to select 24HR or 12HR. Then press button to confirm.
2.
Press the
/
until the desired time is displayed.
3.
To secure the time setting, press the MEMORY CLOCK button again to confirm.
NOTE: Remember to choose the correct AM or PM setting in 12 hour time format. An icon to the left of the display indicates AM or
PM.
Setting the Alarm
This unit supports two alarm settings for dual alarm feature.
To set the Alarm, press and hold the ALARM 1 or the ALARM 2 button until the display begins to flash. Press the
1.
/
button until the desired alarm time is displayed. Then press ALARM 1 or the ALARM 2 button to confirm
then go for pre-set the volume level.
NOTE: Remember to choose the correct AM or PM setting, an icon to the left of the display indicates AM or PM.
2.
3.
4.
Press the
/
button to adjust the volume level from 1 to 32. When the Alarm(s) is (are) activated, the volume
will gradually rise from low to the pre-set setting.
Press the ALARM 1 or ALARM 2 button to confirm pre-set the volume level.
Press the ALARM 1 or ALARM 2 buttons again to select the option for desired alarm sound source: buzzer, radio or
iPod.
NOTES:
• With the Alarm set, the unit is now activated to wake you up. To ensure this setting, check to see if the alarm and wake icons
appear on the display.
• Take notice of the adjusted volume level and make sure it is set at an appropriate level for waking up.
Using the Alarm Function
1.
To preview the alarm time, press the ALARM 1 or ALARM 2 buttons once.
2.
To deactivate the alarm, press the ALARM 1 or ALARM 2 until the ALARM icon disappear.
3.
To activate the alarm, press the ALARM 1 or ALARM 2 buttons again.
4.
To snooze, press the SNOOZE / DIMMER button on the unit (or on Remote Control), following the sounding of the
alarm. The alarm will then shut off and will sound again in approximately 9 minutes. You will have the opportunity to
repeat this cycle many times during a 1 hour allotted alarm cycle.
5.
To turn the alarm off, press the STANDBY button on the unit (or on the Remote Control.) If all settings remain the
same, the alarm will turn on the following day at the same time. When the alarm is not turned off after it sounds, it
will then play for approximately 60 minutes and turn off automatically. This cycle will repeat every 24 hours unless
the settings are changed.
6.
To prevent the alarm from coming on daily, press the ALARM 1 or ALARM 2 buttons and set to off. Both the Alarm
Icon and Wake-to icon will disappear to signal that the alarm is deactivated.
NOTES:
• Set your iPod to the repeat mode if you’ve selected Wake To iPod, and your iPod has less than one hour of songs.
• If you have selected the Wake To iPod setting, yet no iPod is present or there is no music on the iPod at the alarm time, the unit
will automatically switch to the buzzer mode. If only an iPod shuffle is docked, the Wake to iPod setting will likewise switch to
the buzzer mode.
• In order to wake to your iPod, it must be appropriately placed in the built-in universal dock and powered off.
• In the event of a power outage or if AC power is disconnected, when the unit is powered by the Backup Battery, time and date
will not be displayed, however time and date settings will be temporarily saved, but the alarm won’t sound.
Adjusting the Brightness of LCD Screen
To adjust the brightness of the LCD screen, press the SNOOZE / DIMMER button during normal operation. Each press will change
the brightness level of the LCD screen.
SLEEP function
1.
To enter into the sleep mode, press the SLEEP button while the unit is during Standby or while listening to your iPod
or the radio. The unit will automatically turn off after the selected time.
2.
To adjust the sleep time, press the SLEEP button again and choose from 10 to 90 minutes. Pressing the SLEEP
button while the sleep function is set to 10 minutes will turn the unit off.
17
ENGLISH
_______________________________________________________________________________________________________________________
3.
To view the sleep time, wait until the display returns to the current time and press the SLEEP button once. It will
display the sleep time remaining. Press again to change the sleep time to the next lowest increment.
4.
To stop listening at any time, press the STANDBY button on the unit or on the Remote Control.
NOTE: The unit has the independent volume settings for the sleep mode with no effect on the alarm volume. The sleep volume
will remain at the same level until the setting is changed.
4. AUX IN
You can listen to the sound of the connected external device through your speaker. Connect the audio output socket of your
auxiliary sound source (TV, VCR, DVD Player, Cassette Deck, Mini Disc player, etc.) to the AUX IN socket on the top panel of unit.
DON’T FORGET! The auxiliary function can only be used when there is a connection made to the AUX IN socket from another
source.
DON’T FORGET! The connection cables are not included.
1.
2.
3.
Press FUNCTION button to select the AUX IN source.
Turn your auxiliary source ‘ON’ and operate it as usual. The sound from the auxiliary source can be heard through
the speakers.
Adjust the volume level to your desired listening level.
CLEANING AND MAINTANANCE
WARNING: Disconnect the appliance from the power source when cleaning.
If the unit becomes dusty, wipe it with a soft and dry duster. Use a soft cloth to clean this appliance. Do not use any wax, polish
sprays, or abrasive cleaners on the unit.
CAUTION: Never allow any water or other liquids to get inside the unit while cleaning.
Dispose of used batteries in an environmental-responsible manner.
TROUBLE SHOOTING
PROBLEMS
SOLUTIONS
The stereo speaker does not turn
on.
The AC adapter may not be connected properly. Check the connection.
The wall outlet may not function. Try another outlet.
Your iPod does not fit into the
built-in universal dock.
The installed dock adapter is not the correct one. Check whether a correct dock adapter
is installed. In case your iPod was released later than September 2006, in doubt use the
dock adapter supplied by Apple with your iPod.
There might be some obstructions on the dock. Check whether there are any obstructions
on the connector and on the dock. If everything is secured, place your iPod back into the
dock.
It does not recognize your iPod
when docked.
Your iPod may not be properly docked. Take your iPod out of the dock, and remove any
obstructions on the connector from the dock and on your iPod. Place your iPod back into
the dock. Remove any protection covers or sleeves that might obstruct a correct fitting.
Your iPod is frozen or locked up. Check whether your iPod operates correctly before
placing it back into the dock. Please refer to the owner’s instruction manual of your iPod.
The software of your iPod is outdated. Upgrade the software on your iPod. For the details
on how to upgrade the software on your iPod, please visit the Apple website:
http://www.apple.com.
You are using the first or second generation iPod. The unit does not recognize first or
second generation iPod. Use the line-in jack for the first or second generation of iPod.
18
ENGLISH
_______________________________________________________________________________________________________________________
SPECIFICATIONS
Radio frequencies : FM 87.50-108Hz
Music power : 1W RMS x 2
Dimensions (L x H x D) : 198 x 74 x 100 mm
The manufacturer and distributor has the right to modify the apparatus (technically and aesthetically) and/or replace some parts, whereas
necessary, to always offer a safe and reliable product.
MADE IN P.R.C.
Imported and Distributed by: DMEDIA COMMERCE S.p.A.
Headquarters: via Aretina 25, 50065 Sieci - Pontassieve (FI) – ITALY
Logistics and Customer Service: via A. Moro 41, 41030 Bomporto (MO) - ITALY
19