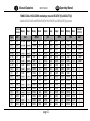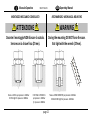
1
I MANOMETRO DIGITALE MANUALE OPERATIVO GB DIGITAL PRESSURE GAUGE OPERATING MANUAL MO.JET.544.R1 41126 Cognento (MODENA) Italy Via Bottego 33/A Tel:+39-(0)59-346441 Fax:+39-(0)59-346437 E-mail: [email protected] I Manuale Operativo MO.JET.544.R1 GB Operating Manual DICHIARAZIONE DI CONFORMITÀ DECLARATION OF CONFORMITY Costruttore: AEP transducers s.r.l Indirizzo: Via Bottego 33/A 41126 Cognento MODENA Italia Manufacturer: AEP transducers s.r.l Address: Via Bottego 33/A 41126 Cognento MODENA Italy DICHIARA CHE I SEGUENTI PRODOTTI DECLARES THAT THE FOLLOWING PRODUCTS Nome dei prodotti: JET Tipo: Manometro digitale a batteria Products name: JET Types: Battery Operated Digital Manometer Options: this declaration covers all the options specified in the manual. Opzioni: questa dichiarazione copre tutte le opzioni specificate nel manuale. SONO CONFORMI ALLE SEGUENTI DIRETTIVE: 2004/108/CE - 2006/95/CE - 2011/65/UE - 2002/96/CE (RAEE) CONFORM TO THE FOLLOWING DIRECTIVES: 2004/108/CE - 2006/95/CE - 2011/65/EU - 2002/96/CE (RAEE) SONO CONFORMI ALLE SEGUENTI NORME: EN 61010-1 (2001) EN 61326-1 (2007) CONFORM TO THE FOLLOWING NORMS: EN 61010-1 (2001) EN 61326-1 (2007) SONO CONFORMI AL REGOLAMENTO: 1907/2006 (REACH) CONFORM TO THE REGULATION: 1907/2006 (REACH) I prodotti sono stati provati nella configurazione tipica di installazione descritta nel manuale di istruzioni. I prodotti soddisfano i requisiti delle Norme citate, sulla base dei risultati delle prove e delle valutazioni descritte nel Fascicolo Tecnico. Io sottoscritto dichiaro che i prodotti sopra descritti soddisfano i requisiti delle Direttive, delle Norme e del Regolamento sopra citati. The products have been tested in the typical installation configuration, as described in the instruction manual. Above described products meet the requirements of mentioned Norms, basing on both test results and considerations listed in the technical file. I declare that the products defined above meet the requirements of the Directives, of the Norms and Regulation above mentioned. 41126 Cognento di MODENA 03/02/1014 41126 Cognento di MODENA 03/02/1014 Lioi Giovanni Direttore Tecnico page 1 Lioi Giovanni Technical Manager I Manuale Operativo INDICE GENERALE Identificazione, usi non previsti, smaltimento, trasporto. Avvertenze sulla sicurezza Introduzione Dati tecnici e opzioni Fondo scala e risoluzione Montaggio meccanico consigliato INSTALLAZIONE Messaggi di errore Programmazione dei parametri Descrizione dei tasti Menu dei parametric TEST su PRESSOSTATI (opzione) Trasmissione WIRELESS (opzione) Gestione del data logger Protocollo di comunicazione USB Manutenzione Ricarica e sostituzione della batteria Dimensioni Taratura del fondo scala (pressione) MO.JET.544.R1 Pag. 3 4 5 7 11 12 13 14 15 16 17 24 25 28 30 32 33 34 35 GB Operating Manual GENERAL INDEX Identification, unauthorized uses, disposal, transport Safety warnings Preliminary Technical data and options Full scale and resolution Recommended mechanical mounting INSTALLATION Error messages Parameters programming Keys description Parameters menu PRESSURE SWITCH test (option) WIRELESS transmission (option) Data logger management USB communication protocol Maintenance Recharge and replacement of the battery Dimensions Full scale calibration (pressure) AEP transducers si riserva il diritto di apportare eventuali modifiche al presente manuale operativo senza preavviso. I dati riportati sono indicativi e la ditta declina ogni responsabilità per errori o discordanze dal presente manuale. Page 2 4 5 7 11 12 13 14 15 16 17 24 25 28 30 32 33 34 35 AEP transducers holds the right to make any change when necessary, without notice. The data contained in this manual are just indicative and the manufacturer declines any responsibility for errors or discrepancies with respect to this manual. page 2 I Manuale Operativo GB Operating Manual MO.JET.544.R1 IDENTIFICAZIONE DEL PRODOTTO L’identificazione avviene con il nome del prodotto e del costruttore sul pannello adesivo e con il numero di serie, la portata nominale, il marchio CE e il simbolo dello smaltimento sul corpo metallico, mediante targhetta adesiva indelebile o marcatura LASER. PRODUCT IDENTIFICATION Identification is accomplished with name of product and manufacturer on adhesive front panel and with serial number, nominal load, CE mark and disposal symbol on a indelible label or LASER marked on metallic parts. USI NON PREVISTI Ambienti con atmosfera esplosiva. Ambienti con gas infiammabili o corrosivi. UNAUTHORIZED USES Environments with explosive atmosphere. Environments with inflammable or corrosive gas. SMALTIMENTO Lo strumento è una apparecchiatura professionale conforme alle Direttive 2011/65/UE (RoHS) e 2002/96/CE (RAEE). Prima di rimuovere lo strumento, togliere l’alimentazione poi scollegare i cavi. L’apparecchiatura deve essere avvolta in imballo plastico o di cartone e consegnata a ditte specializzate nello smaltimento di rifiuti elettrici ed elettronici secondo le leggi del paese dove lo strumento è commercializzato. The instrument is a professional apparatus compliant to the Directives 2011/65/EU (RoHS) and 2002/96/CE (WEEE). Before to remove the instrument, you disconnect first the power supply and after the cables. The device must be wrap in a plastic package or in a cardboard box and deliver to companies which are specialized in scrapping of electric and electronic wastes in accord to the laws of the country where the device is commercialized. TRASPORTO TRANSPORT La componentistica è elettronica. In caso di trasporto imballare adeguatamente lo strumento. Attenzione ai forti urti e all’umidità. The device is made of electronic components. In case of transport pack it carefully. Pay attention to both strong shocks and humidity. DISPOSAL page 3 I Manuale Operativo MO.JET.544.R1 GB Operating Manual Avvertenze sulla SICUREZZA SAFETY warnings L’installazione e la manutenzione del prodotto deve essere fatta solo da personale istruito e dopo aver letto il presente manuale. Dovranno inoltre essere rispettate tutte le norme di sicurezza previste dalla legislazione vigente nel paese in cui verrà installato. Il manometro è stato progettato per la misura e la visualizzazione della pressione e non dovrà essere utilizzato per scopi diversi: in caso contrario AEP transducers declina ogni responsabilità. In particolare si evidenzia che il prodotto fornito non è un dispositivo di sicurezza. Nella progettazione AEP transducers ha preso tutte le precauzioni per minimizzare i rischi per la sicurezza dell’utilizzatore, ma raccomanda ai responsabili dell’installazione l’analisi e la rimozione di eventuali rischi residui. Si ricorda che l’uso sicuro del prodotto richiede la sua completa integrità: per questo dovrà essere prestata attenzione anche al trasporto e all’immagazzinamento. The installation and maintenance of the product should be done only by trained and after reading this manual. There must also be complied all safety standards set by the law of the country where you will install it. The manometer has been designed for measure and display of pressure and should not be used for different purposes: AEP transducers otherwise won’t be responsible. In particular should be noted that the supplied product is not a safety device. In designing AEP transducers has taken precautions to minimize risks to user’s safety, but recommends persons who install it the analysis and removal of any residual risks. Please note that the safe use of the product requires its complete integrity: for this reason should be paid attention to the transport and storage. Nel seguito del manuale sono identificate le operazioni delicate e/o le possibili fonti di rischio per l’utente o l’apparecchiatura con il simbolo a fianco. page 4 Throughout this manual are identified sensitive operations and/ or possible sources of risk to the user or the equipment itself, with the symbol next to. I Manuale Operativo MO.JET.544.R1 GB Operating Manual INTRODUZIONE PRELIMINARY I manometri digitali della serie JET sono stati realizzati secondo le più moderne tecnologie per garantire un elevato livello di affidabilità, versatilità ed economicità allo stesso tempo. Le principali applicazioni si sviluppano dove è necessario monitorare processi in ambienti industriali o in campo con una classe di precisione migliore dello 0.50%. Per aumentare la praticità e rendere lo strumento completamente autonomo il manometro è alimentato da batterie interne Li-Ion ricaricabili attraverso una normale porta USB o attraverso un alimentatore dedicato. Nel menu di programmazione, accessibile da tastiera, è possibile regolare diverse funzioni quali il filtro digitale che consente di mantenere stabile la misura anche in presenza di pressioni non stabili, la risoluzione del display che permette di far incrementare la misura a step prestabiliti di 1, 2, 5, 10 e l’unità di misura che può essere variata in mbar, bar, kPa, MPa, psi, kg/cm2, mHg, mmHg, mH2O e mH2O. La comunicazione tramite porta USB e wireless (opzionale) e la funzionalità del Data Logger lo rendono particolarmente adatto in applicazioni dove sia necessario elaborare su PC le misure acquisite. Il sensore è realizzato interamente in acciaio INOX monolitico per garantire elevata stabilità nel tempo anche in presenza di pressioni altamente dinamiche. Selezionando la lettura della TEMPERATURA è possibile visualizzare sul display la temperatura del fluido che è a contatto con il sensore di pressione. The digital gauge JET series are made according to the more modern technologies in order to assure an high level of reliability, versatility and inexpensiveness at the same time. Its main applications develop in industrial fields where it is necessary to check processes or in field, with a precision class better than 0.50%. To increase the practicality and make the instrument completely autonomous, the pressure gauge is power supplied by an internal Li-Ion rechargerable battery. The battery can be recharged directly by an USB port or by using a dedicated power supply. In the programming menu, reachable through the keyboard, it is possible to adjust different functions such as: digital filter that allows to maintain the measurement steady even in presence of unsteady pressures, the display resolution which allows to increase the measurement at fixed steps (1, 2, 5, 10) and the measurement unit which can be changed into mbar, bar, kPa, MPa, psi, kg/cm2, mHg, mmHg, mH2O e mH2O. Communication via the USB port and wireless (optional) and the functionality of Data Logger makes it particularly suitable for applications where it is necessary to elaborate on the PC the acquired measurements. The sensor, entirely executed in stainless steel, is monolithic to ensure a long term high stability even in presence of highly dynamic pressures. By selecting the reading of the TEMPERATURE you can see, on display, the temperature of the fluid that is in contact with the pressure sensor. page 5 I Manuale Operativo Caratteristiche principali: • • • • • • • • • • GB Operating Manual MO.JET.544.R1 Main features: RISOLUZIONE, FILTRO DIGITALE e BAUD RATE PROGRAMMABILI Funzioni di ZERO e PICCO (positivo e negativo) USCITA USB DATA LOGGER. RETRO ILLUMINAZIONE. Misura della TEMPERATURA. Funzione BLOCCO TASTI. INDICAZIONE ANALOGICA DELLA PRESSIONE SEMPRE ATTIVA (Bar Graph) TRASMISSIONE WIRELESS DELLA MISURA (opzione) Funzione di TEST PRESSOSTATI (opzione) • • • • • • • • • • PROGRAMMABLE RESOLUTION, DIGITAL FILTER and BAUD RATE ZERO and PEAK (positive and negative) functions. USB SERIAL OUTPUT. DATA LOGGER. BACK LIGHT. Measure of TEMPERATURE. KEY BLOCK function. ANALOG PRESSURE INDICATION ALWAYS ACTIVE (Bar Graph). WIRELESS TRANSMISSION OF THE MEASURE (on request). PRESSURE SWITCH TEST (on request). Display LCD page 6 I Manuale Operativo DATI TECNICI MO.JET.544.R1 GB Operating Manual TECHNICAL DATA PRESSIONE ASSOUTA (A) Zero alla pressione di vuoto assoluto. ABSOLUTE PRESSURE (A) Zero at pressure to absolute vacuum. PRESSIONE RELATIVA (R) Zero a pressione atmosferica. RELATIVE PRESSURE (R) Zero at atmospheric pressure. LINEARITA’ e ISTERESI INDICAZIONE TEMPERATURA a) Risoluzione b) Classe RISOLUZIONE INTERNA CONVERSIONI AL SEC. (filtro 0) TEMPERATURA DI RIFERIMENTO TEMPERATURA DI ESERCIZIO TEMPERATURA DI STOCCAGGIO EFFETTO TEMPERATURA (1°C) a) sullo zero b) sulla sensibilità DISPLAY RISOLUZIONE PROGRAMMABILE USB BAUD RATE PROGRAMMABILI LINEARITY and HYSTERESIS TEMPERATURE INDICATION a) Resolution b) Class INTERNAL RESOLUTION READINGS PER SEC. (0 filter) REFERENCE TEMPERATURE SERVICE TEMPERATURE STORAGE TEMPERATURE TEMPERATURE EFFECT (1°C) a) on zero b) on sensitivity DISPLAY PROGRAMMABLE RESOLUTION USB PROGRAMMABLE BAUD RATE page 7 0.5 mbar 1 – 2.5 – 5 – 10 bar 100-250-500 mbar 1-2.5-5-10-20 bar 50-100-250-350-500 bar 700-1000-1500-2000 bar ≤ ± 0.20 % F.S. 0.1 °C ± 1 °C 65.000 div. 10 (100ms) +23 °C -10 / +70 °C -10 / +80 °C ≤ ± 0.002% ≤ ± 0.002% 13 mm (custom LCD) 1, 2, 5, 10 19200, 9600, 4800 I Manuale Operativo MO.JET.544.R1 DATI TECNICI TECHNICAL DATA FUNZIONE DI ZERO FUNZIONE DI PICCO FUNZIONE DI RETRO ILLUMINAZIONE (con con 4 LED ad alta luminosità) UNITA’ DI MISURA DI PRESSIONE ZERO FUNCTION PEAK FUNCTION BACKLIGHT FUNCTION (by using 4 high brightness LEDs) PRESSURE MEASUREMENT UNITS UNITA’ DI MISURA TEMPERATURA FUNZIONE DATA LOGGER Massima frequenza di Memorizzazione Max misure di pressione memorizzabili Max misure di pressione + temperatura TEMPERATURE UNITS DATA LOGGER FUNCTION Max Storing Frequency Max storing pressure measures Max storing pressure+ temperature USCITA DIGITALE DIGITAL OUTPUT ALIMENTAZIONE AUTONOMIA BATTERIA RICARICABILE TEMPO DI RICARICA VALORI MECCANICI LIMITE: a) pressione di servizio b) pressione limite c) pressione di rottura d) pressione altamente dinamica POWER SUPPLY AUTONOMY RECHARGE BATTERY TIME RECHERGE MECHANICAL LIMIT VALUES: a) service pressure b) max. permissible pressure c) breaking pressure d) highly dynamic pressure page 8 GB Operating Manual 50% F.S. Positivo e Negativo / Positive and Negative Programmabile 1s a 60s (0 disabilitata) Programmable from 1s to 60s (0 disabled) bar, mbar, psi, MPa, kPa, kg/cm2, mHg,mmHg, mmH2O, mH2O °C or °F 1 Measure for second 60.000 Records 30.000 Records BATTERIA interna / inside BATTERY ∼ 3 Mesi / 3 Months (Back Light and wireless disabled) Li-Ion 3.6V size 14500 ∼ 8 ours (Whit PC or USB power supply) 100% F.S. 150% F.S. >300% F.S. 75% F.S. I Manuale Operativo DATI TECNICI ATTACCO DI PROCESSO GUARNIZIONE CONSIGLIATA CHIAVE DI SERRAGGIO COPPIA DI SERRAGGIO CLASSE PROTEZIONE (EN 60529) MATERIALE SENSORE MATERIALE CONTENITORE ACCESSORI INCLUSI MO.JET.544.R1 GB Operating Manual TECHNICAL DATA PROCESS COUPLING RECOMMENDED GASKET TIGHTENING WRENCH TIGHTENING TORQUE PROTECTION CLASS (EN 60529) CASE EXECUTION MATERIAL SENSOR EXECUTION MATERIAL INCLUDED ACCESSORIES Alimentatore USB (5VDC @700mA) USB power supply (5VDC @700mA) Cavo USB USB cable Valigetta per trasporto page 9 1/2" G MALE USIT A 63-18 27mm 28Nm IP40 INOX 17-4 PH ALLUMINIO / ALUMINUM I Manuale Operativo OPZIONI TRASMISSIONE MO.JET.544.R1 OPTIONALS Wireless Wireless TRANSMISSION FREQUENZA RF: 433MHz PORTATA RF: 200m in Spazio Libero. RF FREQUENCY: 433MHz RF TRANSMISSION:200m in Free Air MAX FREQUENZA DI TRASMISSIONE 10Hz (10 trasmissioni al secondo) MAX DATA TRANSMISSION RATE 10Hz (10 transmission for seconds) ATTENZIONE: Con la trasmissione WIRELESS viene disabilitata la trasmissione seriale USB WARNING: With the WIRELESS transmission is disable the USB serial transmission. PROVA PRESSOSTATO SWITCH TEST INGRESSO CONTATTO: CONNETTORE MASCHIO M12 (5 poli) CONTACT INPUT: M12 MALE CONNECTOR (5 pins) CAVO CON CONNETTORE M12 FEMMINA CABLE WITH M12 FEMALE CONNECTOR page 10 GB Operating Manual I Manuale Operativo GB Operating Manual MO.JET.544.R1 FONDO SCALA e RISOLUZIONE standard per pressioni RELATIVE (R) e ASSOLUTE (A) Standard FULL SCALE and RESOLUTION for RELATIVE (R) and ABSOLUTE (A) pressure Nominal Pressure Type (R) (R) (A) (R) (A) (R) (A) (R) (A) (R) (A) (R) (R) (R) (R) (R) (R) (R) (R) (R) (R) (R) bar 0,1 0,25 0,5 1,0 2,5 5 10 20 50 100 250 350 500 700 1000 1500 2000 Display Resol. Display 0,0001 0,0001 0,0001 0,001 0,001 0,001 0,01 0,01 0,01 0,1 0,1 0,1 0,1 0,1 1 1 1 100,0 250,0 500,0 1000 2500 5000 10000 20000 50000 99900 99900 99900 99900 99900 99000 99000 99000 bar 0,1000 0,2500 0,5000 1,000 2,500 5,000 10,00 20,00 50,00 100,0 250,0 350,0 500,0 700,0 1000 1500 2000 Resol. mbar 0,1 0,1 0,1 1 1 1 10 10 10 100 100 100 100 100 1000 1000 1000 Display Resol. Display 0,001 0,001 0,001 0,01 0,01 0,01 0,1 0,1 0,1 1 1 1 1 1 10 10 10 0,01 0,025 0,05 0,100 0,250 0,500 1,000 2,000 5,000 10,00 25,00 35,00 50,00 70,00 100,0 150,0 200,0 psi 1,45 3,62 7,200 14,50 36,20 72,50 145,0 290,0 725,0 1450 3620 5000 7250 10000 14500 21700 29000 page 11 Resol. MPa Display Resol. Vacuum (OPTION) 0,01 0,01 0,01 0,1 0,1 0,1 1 1 1 10 10 10 10 10 100 100 100 -0,1000 -0,2500 -0,5000 -1,0000 -1,0000 -1,0000 / / / / / / / / / / / kPa 0,01 0,01 0,01 0,01 0,01 0,01 0,001 0,001 0,001 0,01 0,01 0,01 0,01 0,01 0,1 0,1 0,1 10,00 25,00 50,00 100,0 250,0 500,0 1000 2000 5000 10000 25000 35000 50000 70000 99900 99900 99900 bar I Manuale Operativo GB Operating Manual MO.JET.544.R1 MONTAGGIO MECCANICO CONSIGLIATO RECOMMENDED MECHANICAL MOUNTING ATTENZIONE WARNING Durante il montaggio NON sforzare la scatola. Serrare con la chiave fissa (27mm). During the mounting DO NOT force the case. But tight with the wrench (27mm). Tenuta a O-RING per pressioni <1000bar O-RING tight for pressures <1000bar USIT RING 12.70X18X1.5 per pressioni <1000bar for pressures <1000bar page 12 Tenuta a CONO MORDENTE per pressioni ≥1000bar DOUBLE CONE tight for pressures ≥1000bar I Manuale Operativo MO.JET.544.R1 GB Operating Manual INSTALLAZIONE INSTALLATION L’installazione deve essere eseguita da personale istruito. Per una rapida installazione seguire la sequenza: • Verifiche preliminari. • Accensione (controllo del display). • Programmazione Parametri. Installation shall be done by authorized personnel only. For a fast installation follows the instructions listed below: • Preliminary checks. • Switch On (check the display). • Parameters Programming. VERIFICHE PRELIMINARI PRELIMINARY CHECKS Verificare che la pressione applicata non sia maggiore del fondo scala del manometro. Montare il manometro come consigliato. Se il manometro è installato in un circuito oleodinamico, eseguire lo spurgo prima di fare le misure. Be sure that pressure provided is not higher than the manometer full scale. Mount the manometer as suggested. If the manometer is installed in a oil-pressure circuit, please perform the bleeding before starting to work. ACCENSIONE SWITCH ON Lo strumento all’accensione esegue la verifica del display (TEST) , la visualizzazione della release software (3 sec.) ed infine visualizza la portata. Dopo questo test viene visualizzata la pressione misurata; nel caso compaia una serie di LLLLL (superamento fondo scala negativo) o UUUUU (superamento fondo scala positivo), riportare immediatamente la pressione all’interno del campo nominale. When switched on, instrument performs a display test, displays the software release (3 sec.) and the manometer Full Scale . After this test, measured pressure is displayed, in case of LLLLL (negative full scale overflow) or UUUUU (positive full scale overflow) message appears, bring back immediately the pressure within its nominal range. page 13 I Manuale Operativo MO.JET.544.R1 MESSAGGI DI ERRORE GB Operating Manual ERROR MESSAGES UUUUU SOVRAPRESSIONE: il manometro misura una pressione superiore UUUUU OVERPRESSURE: the manometer is measuring a higher pressure alla sua portata nominale. than its nominal rate. LLLLL SOVRAPRESSIONE in VUOTO: il manometro misura una depressione superiore -1bar. LLLLL VACUUM OVERPRESSURE: the manometer is measuring a vacuum ATTENZIONE: dopo una SOVRAPRESSIONE verificare che la calibrazione non si sia alterata. WARNING: after that a high OVERPRESSURE occurred, the calibration could have been altered. higher than –1 bar. HHHHH FUORI SCALA: cambiando unità di misura succede che la misura HHHHH supera il limite numerico del display 99999. Cambiare scala. OUT SCALE: when the unit of measurement is changed, the reading may exceed the numerical limit of the scale, 99999. Change scale. BATTERIA SCARICA: Le misure effettuate in questo stato possono essere alterate, pertanto è necessaria una ricarica immediata delle batterie. LOW BATTERY: Measurements performed during this period could be altered, it is therefore necessary to recharge the battery quickly. BATTERIA CARICA. BATTERY FULL CHARGE. page 14 I Manuale Operativo MO.JET.544.R1 GB Operating Manual PROGRAMMAZIONE dei PARAMETRI PARAMETERS PROGRAMMING Lo strumento può essere programmato tramite il MENU dei parametri: • Unità di Misura. • Filtro Digitale. • Risoluzione. • Tempo di Auto Spegnimento. • Abilitazione alla visualizzazione alternata di Pressione e Temperatura. • Parametri per Data Logger. o Intervallo di memorizzazione. o Durata del ciclo di memorizzazione. o Abilitazione alla memorizzazione anche della temperatura. • Parametri per trasmissione Wireless (opzione) o Intervallo di trasmissione. o Potenza del segnale Radio. • Tempo di accensione della retro illuminazione. • Baud rate USB (solo se non è abilitata la trasmissione radio) The instrument can be programmed through the parameters MENU: • Measurement unit. • Digital Filter. • Resolution. • Power Off Time. • Display in toggle mode of Pressure and Temperature. • Data Logger Parameters. o Storing Interval. o Max Storing Time. o Temperature Storing enabling. • Wireless transmission parameters (option). o Transmission Interval. o Radio Power Level. • Backlight On Time. • USB Baud rate (only if the radio transmission is not enabled). page 15 I Manuale Operativo MO.JET.544.R1 DESCRIZIONE dei TASTI: Accensione dello strumento. Premuto per 3 secondi accede al Menu dei parametri. Premuto per circa 5 secondi spegne lo strumento. Se abilitata, ad ogni pressione del tasto, viene attivata la retro illuminazione per il tempo programmato. Durante la misura, se premuto per 3 sec., esegue lo ZERO del display fino al 50% della portata del manometro. Lo ZERO non ha effetto sulla indicazione grafica a barra della pressione. Durante la misura, premuto per 6 sec. disabilita la funzione di ZERO mostrando l’offset del manometro. In Modo Picco resetta il valore del Picco Misurato. All’interno del menu dei parametri decrementa ( ) il valore sul display. Durante la misura, premuto per 2 sec., attiva la funzione di Picco+ (indica la pressione maggiore rilevata dopo la sua attivazione). Durante la misura, premuto per 4 sec., attiva la funzione di Picco(indica la pressione minore rilevata dopo la sua attivazione). Durante la misura, premuto per 6 sec, visualizza la temperatura, per tornare alla pressione premere nuovamente il tasto. All’interno del menu dei parametri incrementa ( ) il valore sul display. page 16 GB Operating Manual KEYS DESCRIPTION It performs the instrument switching on Pushed for 3 seconds it enters into the parameters Menu. Pushed for about 5 sec. it switch off the instrument. If enabled, for each press of the button the backlight LEDs will be active for the programmed time. During the measurement, if pushed for 3 seconds, performs the ZERO of the display up to 50% of manometer range. ZERO does not have any effect on graphic-bar indication of the pressure. During the measurement, if pushed for 6 seconds, disabled ZERO function showing the manometer offset. In Peak Mode resets the PEAK value. Inside the parameters menu it decreases ( ) the value on the display. During the measurement, if pressed for 2 second it activates the Peak+ function, (it displays the highest pressure measured after its activation). During the measurement, if pressed for 4 seconds it activates the Peak- function, (it displays the lowest pressure measured after its activation). Pressed for 6 seconds it displays the temperature, to come back to pressure press the same key again. Inside the parameters menu increases ( ) the value on the display. I Manuale Operativo GB Operating Manual MO.JET.544.R1 MENU dei PARAMETRI PARAMETERS MENU Per entrare nel menu di configurazione mantenere premuto il tasto SET per circa 3 secondi, fino alla comparsa del primo parametro (Unit per scelta unità di misura). Premere sempre SET per passare ai parametri successivi e quindi per uscire. Dopo l’ultimo parametro il tasto SET determina il salvataggio dei parametri con ritorno alla modalità di misura. I nuovi valori eventualmente impostati divengono quindi attivi all’uscita dal menu di configurazione. To enter into the setting menu keep pressed the SET key for approx. 3 seconds, until the first parameter appears on the display (Unit to choose the measurement unit). Press always SET to move to next parameter, and then to exit from the setting menu. After the last parameter the SET key saves the parameters, then comes back to the measurement mode. The new values, eventually set, becomes therefore active at the exit from setting menu. Unit UNITÀ DI MISURA In questo passo è possibile cambiare l’unità di misura agendo sui tasti e . FL XX FILTRO DIGITALE In questo passo è possibile variare l’effetto Filtro digitale. Aumentando il valore XX aumenta l’effetto di filtro, permettendo all’utente di rilevare il valore medio di pressioni instabili o pulsanti. I valori selezionabili sono da 0 a 10. Questa funzione agisce anche sulla velocità di conversione del display, pertanto se si vogliono rilevare picchi è consigliabile diminuire al minimo l’effetto del filtro. Unit MEASUREMENT UNIT In this step it is possible to change the measurement unit through the keys and . FL XX DIGITAL FILTER In this step the operator can change the Digital Filter effect. By increasing the XX value the filter effect increases enabling the operator to find out the average value of unsteady or pulsating pressures. Selectable values go from 0 up to 10. This function also acts on display conversion speed, therefore if peaks shall be detected it is recommendable to decrease the filter effect at its minimum. page 17 I r XX oFFXX LOOPX ZEroO Manuale Operativo GB Operating Manual MO.JET.544.R1 RISOLUZIONE In questo passo è possibile programmare la Risoluzione con cui il manometro visualizza la pressione. Valori selezionabili 1, 2, 5 e 10. TEMPO DI AUTO SPEGNIMENTO Definisce il numero di minuti (da 1 a 30) prima dello spegnimento automatico in caso di pressione costante. Il tempo di auto spegnimento entra in funzione se il manometro non rileva variazioni di pressione maggiori del 10% della portata. VISUALIZZAZIONE PRESSIONE e TEMPERATURA Selezionando X=1 verrà alternata la visualizzazione della pressione con quella della temperatura ad intervalli di circa 10s. Selezionando X=0 verrà ripristinata la visualizzazione della sola pressione. ABILITAZIONE FUNZIONE DI ZERO (solo versione ASSOLUTA) Questo parametro abilita o disabilita il tasto ZERO. E' particolarmente consigliato disabilitarla per non avere una lettura falsata. ZEro0= ZERO disabilitato ZEro1= ZERO abilitato r XX oFFXX LOOPX ZEroO page 18 RESOLUTION In this step it is possible to set the Resolution used by the manometer to display the pressure. Selectable values 1, 2, 5 and 10. TIME OF AUTO POWER OFF This parameter defines the time in minutes (from 1 up to 30) before the auto-power off activates in case of constant pressure. The auto-power off time starts working if the manometer doesn’t detect pressure changes higher than 10% of the rate. DISPLAY OF PRESSURE AND TEMPERATURE Selecting X=1 JET will display both temperature and pressure at regular interval of 10s. Selecting X=0 JET returns in normal mode of display (only pressure). ZERO FUNCTION ACTIVATION (only ABSOLUTE version) This parameter sets ON or OFF the ZERO key. It is warmly recommended to set ZERO OFF not to obtain a wrong reading. ZEro0= ZERO off ZEro1= ZERO on Manuale Operativo I GB Operating Manual MO.JET.544.R1 PARAMETRI PER LA TRASMISSIONE WIRELESS WIRELESS TRANSMISSION PARAMETERS (solo con opzione wireless) (only whit wireless option) Wireless TX X.X Definisce il tempo in secondi tra 2 trasmissioni di valori di pressione. X.X può essere settato tra 0.1s a 5.0 secondi. Settando 0.0 la trasmissione radio sarà disabilitata. Wireless TX X.X Questo parametro permette di impostare la potenza radio di trasmissione tra 4 livelli: X=3: +10dB X=2: +6dB X=1: -2dB X=0: -10dB PL X Aumentando il parametro X si aumenta la potenza radio e si possono raggiungere distanze di trasmissioni maggiori a scapito ovviamente del consumo della batteria. page 19 Defines the time is seconds between 2 pressure transmission. X.X can be set between 0.1 to 5.0 seconds. Setting X.X = 0.0 the radio transmission is disabled. This parameter allows to change the RF power level among 4 levels: X=3: +10dB X=2: +6dB X=1: -2dB X=0: -10dB PL X By increasing the X parameter the radio power level will increase and it is possible to reach greater distance. Any way a greater consumption of the battery will occur. I Manuale Operativo PARAMETRI DEL DATA LOGGER t1 h.mm.ss h = ore mm = minuti ss = secondi t2 hhh.mm hhh = ore mm = minuti t On t OFF GB Operating Manual MO.JET.544.R1 DATALOG PARAMETERS Definisce il tempo tra 2 intervalli di acquisizione. Il formato di inserimento del tempo t1 è: Esempio: 0.00.05 : t1 = 5s 0.01.15 : t1 = 1min e 15s Cambiando questo parametro verrà azzerato il log corrente t1 h.mm.ss h = hours mm = minutes ss = seconds t2 hhh.mm Definisce il tempo globale di durata del ciclo. Il formato di inserimento del tempo t2 è: Esempio: 001.00 : t2 = 1 ora 000.30 : t2 = 30 minuti hhh = hours mm = minutes Abilita/Disabilita l’acquisizione della temperatura. Con l’acquisizione della temperatura il numero massimo di punti memorizzabili viene limitato a 30.000. Cambiando questo parametro verrà azzerato il log corrente page 20 t On t OFF Define the time between 2 point acquisition. The format of the field t1 is the following: Example: 0.00.05 : t1 = 5s 0.01.15 : t1 = 1min e 15s Changing this parameter the current log will be cleared Define how long the cycle will last. The format of the field t1 is the following: Example: 001.00 : t2 = 1 hour 000.30 : t2 = 30 minutes Enable/Disable the temperate acquisition. With the temperature acquisition the maximum number of points that can be stored is limited to 30.000. Changing this parameter the current log will be cleared I bL XX bAUd Manuale Operativo MO.JET.544.R1 RETRO ILLUMINAZIONE Questo parametro permette di configurare il tempo di durata della retroilluminazione che viene attivata ad ogni pressione del tasto SET. XX può variare da 1 a 60 secondi. Impostando XX a 0 la retroilluminazione verrà disabilitata. Attivando la retroilluminazione si avrà un maggiore consumo di batteria per cui conviene disattivare la funzione quando non viene utilizzata. BAUD RATE USB (solo se la trasmissione radio è disabilitata) In questo passo è possibile programmare la velocità di trasmissione dell’uscita USB. 4800 , 9600, 19200. page 21 GB Operating Manual BACKLIGHT This parameter allows to set the backlight time. Backlight is attivated each time the SET key is pressed. XX can be set from 1 to 60seconds. Setting XX = 0 will disable the backlight. When the backlight is used you will have a greater battery consumption so we suggest you to disable the function when it is not necessary to use it. bL XX bAUd USB BAUD RATE (only if the Radio transmission is disabled) In this step it is possible to program the transmission speed of USB output 4800, 9600, 19200. I Manuale Operativo GB Operating Manual MO.JET.544.R1 UNITA’ DI MISURA DELLA TEMPERATURA (°C or °F) TEMPERATURE UNIT (°C or °F) La modifica della unità di misura della temperatura è protetta da password. The selection of the unit of the temperature is protected by password. Tenere premuto contemporaneamente, per alcuni secondi i tasti SET e PEAK. P0000 Unit Impostare la password 0033 ( Confermare SET. Press simultaneously and hold for a few seconds the keys SET e PEAK. P0000 ) UNITÀ DI MISURA In questo passo è possibile cambiare l’unità di misura agendo sui tasti e . page 22 Unit Select the password 0033 ( Confirm with SET. ) MEASUREMENT UNIT In this step it is possible to change the measurement unit through the keys and . I Manuale Operativo GB Operating Manual MO.JET.544.R1 FUNZIONE BLOCCO TASTI KEY BLOCK FUNCTION Questa funzione è protetta da password. This function is password protected Tenere premuto contemporaneamente, per alcuni secondi i tasti SET e PEAK. P0000 Impostare la password 0301 ( ) Confermare SET. Apparirà la scritta LOC X. Selezionando 0 la funzione è disabilitata. Selezionando 1 la funzione è abilitata e viene visualizzata l’icona: Press simultaneously and hold for a few seconds the keys SET e PEAK. P0000 LOC X LOC X Questa funzione permette di evitare che personale non abilitato possa cambiare la configurazione del manometro. I tasti SET per l’accesso al menù dei parametri, il tasto ZERO e il tasto PICCO sono disabilitati. Select the password 0301 ( Confirm with SET. ) On the display the LOC X message will appear Selected 0 la function is disabled Selecting 1 the function is enabled and the icon on the right will appear: This function allows to avoid that not authorized personnel can modify some manometer parameters. The keys SET (to access to the parameters menu), ZERO and PEAK are disabled. Any way the Data Logger functions are still enabled. La funzione di Data Logger rimane abilitata. page 23 I Manuale Operativo MO.JET.544.R1 TEST su PRESSOSTATI (opzione) GB Operating Manual PRESSURE SWITCH TEST (option) Questa funzione permette di bloccare la pressione quando il contatto di un pressostato esterno cambia stato da APERTO CHIUSO o da CHIUSO APERTO. La lettura del contatto avviene tramite l’ingresso digitale esterno (M12). Quando il contatto esterno cambia stato e la misura della pressione viene BLOCCATA e visualizzata in modo intermittente. Premendo il tasto ZERO (per poco tempo) la visualizzazione viene SBLOCCATA e la misura di pressione torna attiva. This function allows you to lock the pressure when the contact of an external pressure switch changes state from OPEN CLOSED or CLOSED OPEN. The reading of the contact takes place through the external input (M12). When the external contact changes state and the pressure measurement is LOCKED and displayed intermittently. Pressing the ZERO key (for a short time) the display is UNLOCKED and measurement of pressure back on. Sul display viene visualizzato lo stato del contatto: L’indicazione del bar-graph è attiva anche quando la visualizzazione è BLOCCATA. The display shows the status of the contact: The indication of the bar-graph is active even when the display is LOCKED. M12 CONNECTOR page 24 COLOURE OF CABLE I Manuale Operativo MO.JET.544.R1 GB Operating Manual TRASMISSIONE WIRELESS (opzione) WIRELESS TRANSMISSION (option) Il manometro JET può trasmettere la misura di pressione via radio ad intervalli regolari e con una potenza RF impostabile (vedi Menù dei Parametri). La frequenza di trasmissione, 433 MHz, rende la comunicazione sicura e affidabile anche in presenza di altri sistemi di trasmissione come cellulari, walky talky, radio microfoni, telecomandi etc che normalmente lavorano su altre frequenze. E’ possibile creare una rete di fino 32 moduli radio AEP transducers (oltre al manometro JET anche le celle di carico WIMOD e indicatori STAR) gestibili attraverso il programma WinWIMOD. In questo ambiente è possibile creare e archiviare grafici, stampare report e esportare le misure in ambiente Microsoft Excel. The JET manometer can transmit pressure measurement by radio at regular intervals and with an adjustable RF power (see Parameters Menu). The transmission frequency , 433 MHz , makes secure and reliable the communication even in the presence of other transmission systems such as cell phones , walkie talkies , radio microphones , remote controls etc that normally work on other frequencies. It is possible to create a network of up to 32 radio AEP transducers modules (in addition to JET manometer also WIMOD load cells and STAR indicators ) managed by the program WinWIMOD. In this environment you can create and store graphics , print reports and export measures on Microsoft Excel. Ulteriormente è possibile crearsi un proprio programma di ricezione richiedendo alla AEP transducers il manuale che documenta il protocollo di comunicazione wireless con il manometro JET. Additionally it is possible to create your own receiving program. For this purpose require to AEP transducers the manual that documents the protocol of wireless communication with the manometer JET . Per la comunicazione wireless è possibile utilizzare uno dei 5 possibili di sistemi di ricezione: For wireless communication , you can use up to 5 possible receiving systems: page 25 I Manuale Operativo MO.JET.544.R1 Software WINWIMOD + modulo di ricezione con interfaccia USB RXWIMOD (uno per sistema) indicato per la comunicazione con un PC e che permette di essere collegato con fino a 32 manometri JET o altri dispositivi AEP transducers wireless. GB Operating Manual Software WINWIMOD + RXWIMOD receiver module with USB interface (one per system) suitable for communication with a PC and allows to connect up to 32 JET pressure gauges or other AEP transducers wireless devices. PC + modulo di ricezione con interfaccia RXWIMOD-USB, dotato di un semplice protocollo di comunicazione e che permette una connessione point to point con un manometro JET. Soluzione adatta per chi desidera sviluppare un software dedicato. PC + RXWIMOD-USB receiver module with USB interface, with a simple communication protocol and allows a point to point connection with a JET pressure gauge. Solution for customers who want to develop a dedicated software. MP2E + RXWIMOD-RS232C modulo di ricezione con interfaccia RS232C per una comunicazione point to point con un manometro JET e un indicatore remoto MP2E da pannello. MP2E + RXWIMOD-RS232C receiver module with RS232C interface for a point to point communication with a JET pressure gauge and a remote panel indicator MP2E. page 26 I Manuale Operativo MO.JET.544.R1 GB Operating Manual RXWIMOD-RS232C: Modulo di ricezione con interfaccia RS232C per una comunicazione point to point. Soluzione adatta per chi desidera interfacciare il manometro JET con un PLC o sistemi elettronici dedicate. RXWIMOD-RS232C: RS232C receiver module for a point to point communication. Solution for those who want to interface the pressure gauge JET with a PLC or other dedicated electronic systems. Ricevitore palmare WiSTAR che permette di collegare fino a 4 manometri JET contemporaneamente. Soluzione adatta per applicazioni dove l’operatore può cambiare la propria postazione di lavoro. Wistar handheld receiver that allows you to connect up to 4 JET pressure gauges simultaneously. Solution for applications where the user can change his workplace. Nota: La frequenza di trasmissione utilizzata deve essere limitata tenendo conto della normativa ETSI EN 300-220-1 che impone un impegno della banda di 433MHz per un massimo di 6 minuti ogni ora (10% duty cycle). Ogni pacchetto di trasmissione impegna la banda per circa 3ms (3% duty cycle nel caso di frequenza di trasmissione di 10Hz). Per valutare l’impegno globale della banda è necessario tenere in considerazione anche il numero di moduli presenti nella rete. Note:The transmission rate must be limited according to ETSI EN 300-200-1 standard that limits to 6 minutes per hour (10% duty cycle) the occupation of 433MHz band. Each data packet last about 3ms (3% duty cycle for 10Hz transmission rate).To evaluate how much the RF band is occupied you must keep in count also of the number of modules in your network. page 27 I Manuale Operativo GB Operating Manual MO.JET.544.R1 Gestione del DATA LOGGER DATA LOGGER Management Il DataLogger permette la memorizzazione di fino 60.000 (30.000 se viene memorizzata anche la temperatura) punti di misura in step variabili da 1s a 10 ore in accordo al parametro t1 definito nel Menu di configurazione. La durata del ciclo è stabilita dal parametro t2 definito sempre nel Menu di configurazione. I dati memorizzati durante l’ultimo ciclo di DataLogging sono salvati in maniera permanente in memoria non volatile all’interno del manometro per cui le misure saranno sempre accessibili fino alla creazione di un nuovo ciclo di misura. Nota: La funzionalità del DataLogger è pienamente gestibile da PC utilizzando il software Quick Analyzer attraverso il quale è possibile: • Visualizzare direttamente lo stato del ciclo in corso. • Fare il download di tutte le misure effettuate. • Salvare su un file tutte le misure effettuate. • Visualizzare la curva di prova. • Stampare la curva di prova. • Esportare in Microsoft Excel la curva di prova. • Fare lo START/STOP di un ciclo. • Impostare i parametri t1 e t2 e temperatura ON/OFF. The DataLogger can store up to 60,000 measurement points (30.000 if also the temperature is stored) in steps ranging from 1s to 10 hours according to the parameter t1 defined in the Setting Menu. Cycle length is determined by the parameter t2 always defined in the Setting Menu. Data stored during the last Datalogging are permanently saved in nonvolatile memory within the gauge so that the measures will always be accessible until the creation of a new cycle of measurement. Note: The functionality of the DataLogger is fully manageable from the PC using the Quick Analyzer software through which you can: • View the status of the current cycle. • Download all the measurements. • Save all measurements on a file. • Display the test curve. • Print the test curve. • Export to Microsoft Excel the test curve. • Make the START / STOP of a cycle. • Set the parameters t1 and t2 and temperature ON/OFF. page 28 I START CICLO: STOP CICLO: VISUALIZZAZIONE DATI: Manuale Operativo MO.JET.544.R1 GB Operating Manual Tenere premuto contemporaneamente, per alcuni secondi, i tasti e . La accettazione dello START verrà segnalata sul display dalla presenza della icona REC. Ogni volta che verrà memorizzato un punto di misura lampeggerà per un secondo l’icona Il ciclo si fermerà automaticamente al tempo impostato t2. Oppure tenendo premuto contemporaneamente, per alcuni secondi, i tasti e . L’icona REC verrà spenta. CYCLE START: Tenere premuto contemporaneamente, per alcuni secondi, i tasti SET e . La accettazione della impostazione verrà visualizzata attraverso la visualizzazione delle icone REC e lampeggianti. E’ possibile visualizzare tutti i punti di misura utilizzando il tasto . Per tornare indietro di un punto utilizzare il tasto . Per uscire dalla funzione premere il tasto SET VIEW DATA: page 29 CYCLE STOP: Press simultaneously and hold for a few seconds the keys e . The acceptance of START will be shown on the display by the presence of the icon REC.. Each time a measurement point is saved, the icon SP2 will flash for a one second . The cycle will stop automatically at the set time t2. Alternatively hold down simultaneously, for a few seconds, the keys e . The icon REC. will be turned off. Press and hold simultaneously for a few seconds, the SET and keys. The acceptance of the setting will be displayed on the display by flashing REC and icons. It is possible now to see all points of measurement using the button . To go back of a measurement point use the key . To exit from the View Cycle page press the SET button. I Manuale Operativo GB Operating Manual MO.JET.544.R1 PROTOCOLLO DI COMUNICAZIONE USB USB COMMUNICATION PROTOCOL Per l’installazione del driver di JET eseguire sul PC il programma Driver USB.exe che si può scaricare dal sito: ww.aep.it. Dal punto di vista software la comunicazione USB è compatibile con una normale comunicazione RS232C. E’ necessario controllare all’interno del Pannello di Controllo di Windows la porta COM assegnata al manometro JET durante la installazione. Protocollo di comunicazione: 8 bit dato, 1 bit stop, No parity. Baud Rate : quella selezionata nel Menù dei parametri Per la lettura di pressione al manometro usare il comando: p000cr Formato del dato trasmesso: SXX.XXX UM Z PY LB To install on the PC the JET driver run the program Driver USB.exe that you can download directly from: www.aep.it. From a software point of view the USB communication is compatible with an usual serial RS232C. It is necessary to control inside the Windows Control Panel the COM port assigned to the JET manometer during its installation. S segno (carattere ASCII + o - ) XX.XXX valore misura con punto decimale unità di misura (2 digit): UM 00 = bar, 01 = mbar, 02 = psi 03 = MPa, 04 = kPa, S sign (ASCII character + or - ) XX.XXX measurement value with decimal point measurement unit (2 digits): UM 00 = bar, 01 = mbar, 02 = psi 03 = MPa, 04 = kPa, 05=kg/cm2, 06=mHg, Communication protocol: 8 bit data, 1 bit stop, No parity. Baud Rate : the baud rate selected inside the Parameter Menu. To read the manometer pressure send the following string: p000cr. Data transmitted format: SXX.XXX UM Z PY LB 07=mmHg, 08=mmH20, 09=mH2O Z PY LB 05=kg/cm2, 06=mHg, 07=mmHg, 08=mmH20, 09=mH2O se Z è presente, la misura è corretta con funzione ZERO (valore dopo l’azzeramento dell’offset). se compaiono i caratteri opzionali p+ o p- significa che la funzione di picco è attiva, e precisamente: p+ = picco positivo, p - = picco negativo . la stringa è seguita dal messaggio LB se la batteria scarica. Z PY LB page 30 if Z is present, the measurement is correct with ZERO function (value after offset reset). if the optional chars p+ or p- appear, it means that peak function is active, and precisely: p+ = positive peak, p - = negative peak. The string is followed by the message LB in case of low battery. I Manuale Operativo Formato dei comandi di programmazione parametri: pnXXcr p n XX cr inizio stringa (ASCII ‘p’) . Parametro identificativo del comando (1 carattere ASCII) . Valore decimale da assegnare al parametro. Carattere ASCII Carriage Return (13). COMANDI PROGRAMMAZIONE DEI PARAMETRI Unità di misura: Filtro digitale: Risoluzione: Auto spegnimento: Zero: Picco positivo: Picco negativo: p1xxcr p2xxcr p3xxcr p4xxcr p6xxcr p7xxcr p8xxcr GB Operating Manual MO.JET.544.R1 000 = bar 01 = mbar 02 = psi 03 = MPa 04 = kPa 005=kg/cm2 06=mHg 07=mmHg 08=mmH20 09=mH2O xx = valori 00÷ ÷10 00 = 1, 01 = 2, 02 =5, 03 =10 xx = valori 01÷ ÷30 minuti 00 = OFF, 01 = ON 00 = OFF, 01 = ON 00 = OFF, 01 = ON Parameters programming commands format: pnXXcr P n XX cr Start of command character ( ASCII ‘p’). Defines the command (1 ASCII character). Decimal value to be assigned to the parameter. Carriage Return ASCII char (13). PROGRAMMING PARAMETERS COMMANDS Measurement unit: Digital filter: Resolution: Auto power off: Zero: Positive peak: Negative peak: page 31 000 = bar 01 = mbar 02 = psi 03 = MPa p1xxcr 04 = kPa 005=kg/cm2 06=mHg 07=mmHg 08=mmH20 09=mH2O p2xxcr xx = values 00÷ ÷10 p3xxcr 00 = 1, 01 = 2, 02 =5, 03 =10 p4xxcr xx = values 01÷ ÷30 minutes p6xxcr 00 = OFF, 01 = ON p7xxcr 00 = OFF, 01 = ON p8xxcr 00 = OFF, 01 = ON I Manuale Operativo GB Operating Manual MO.JET.544.R1 MANUTENZIONE MAINTENANCE La manutenzione deve essere fatta da personale informato. Nell’uso quotidiano, lo strumento non richiede manutenzione, occasionalmente pulire il pannello anteriore con panno non abrasivo imbevuto di sostanze non corrosive. In caso di mal funzionamento contattare il fornitore. Maintenance shall be carried out by authorized personnel only. In daily use, the instrument doesn’t require maintenance, occasionally clean instrument front panel with a non-abrasive cloth soaked with non-corrosive substances. In case of faulty functioning contact the supplier. ATTENZIONE WARNING Per nessun motivo utilizzare batteria Alcalina non ricaricabili. For no reason it is possible to use ALKALINE battery . La batteria deve essere riciclata o gettata in modo appropriato. The internal battery shall be either recycled or disposed properly. In caso di non utilizzo o stoccaggio prolungato, consigliamo di TOGLIERE la batteria al fine di prevenire guasti dovuti al loro degrado. in case of long time storing or non-use, we advise to REMOVE the internal battery to prevent faults due to its characteristics degradation. page 32 I Manuale Operativo MO.JET.544.R1 GB Operating Manual RICARICA e SOSTITUZIONE DELLA BATTERIA RECHARGE and REPLACEMENT of the BATTERY Il manometro è alimentato da 1 batteria Li-Ion modello 14500 RICARICABILE da 3.6V che garantisce una lunga autonomia e un notevole numero di ricariche. Il consumo della batteria è segnalato dall’icona con una indicazione su 3 livelli. The digital manometer is supplied by 1 RECHARGEABLE 3.6V Li-Ion size 14500 battery, with a long autonomy and many recharges. Battery consumption is signalled by a 3 levels icon like the picture. BATTERIA SCARICA LOW BATTERY Le misure effettuate in questo stato possono essere alterate, quindi è necessario ricaricare la batteria il più presto possibile utilizzando una normale porta USB o con alimentatore 5V@750mA dotato di attacco USB. Durante la fase di ricarica l’icona della batteria indicherà questo stato con la usuale indicazione variabile. Il tempo di ricarica può durare fino a circa 8 ore. Quando la fase di ricarica sarà terminata verrà visualizzata l’icona della batteria stabilmente. BATTERIA CARICA Se dovesse rendersi necessario è possibile sostituire la batteria con una esattamente equivalente Li-Ion modello 14500 3.6V ricaricabile. Durante questa operazione pulire le linguette del porta batterie da eventuale ossidazione e controllare la pressione esercitata dalle linguette esterne sulla pila: aumentarla se necessario. Verificare il contatto elettrico anche in presenza di malfunzionamenti. The measurement performed during this state could be altered, so it is necessary to recharge the battery connecting the manometer to a standard USB port or using a power supply with a USB connector 5V@750mA. During the battery recharge the icon will shown this state in the usual way varying the indication. The recharge time can last up to 8 hours. When the battery will be completely recharged its icon will be stable again. BATTERY CHARGE If necessary it is possible to replace the battery with one of exactly the same tipo : Li-Ion size 14500 3.6V rechargerable During this operation clean up the clips contacts from possible oxidation and check the pressure exerted by external flaps on battery: please increase if it is necessary Verify the electrical contact also in presence of malfunctions. page 33 I Manuale Operativo MO.JET.544.R1 DIMENSIONI (mm) GB Operating Manual DIMENSIONS (mm) page 34 I Manuale Operativo MO.JET.544.R1 REGOLAZIONE DEL FONDO SCALA GB Operating Manual FULL SCALE ADJUSTABLE ATTENZIONE WARNING Questa procedura viene riportata nel presente manuale a titolo di documentazione, ma deve essere eseguita solo da centri di taratura autorizzati ed in caso di effettiva necessità. This procedure is described in the manual by way of documentation only but it shall be performed by authorised calibration centres only and in case of real need. AEP transducers declina ogni responsabilità relativamente ad errori di misura o malfunzionamenti che dovessero derivare da regolazioni non correttamente eseguite, che fanno decadere anche la certificazione ACCREDIA del manometro. AEP transducers declines any responsibility for measurement errors or bad functioning which should be caused by adjustment performed not properly. In this case the validity of manometer ACCREDIA certification would lose. NOTA: la regolazione del fondo scala deve essere eseguita con l'unità di misura programmata in bar. TARATURA PER PUNTI DEL FONDO SCALA (PRESSIONE) Portare a pressione zero il manometro aprendo il circuito idraulico. Premere contemporaneamente i tasti : ON e PEAK. P0000 Impostare la password 3124 ( ), confermare SET Il manometro indica un offset interno, azzerare con il tasto ZERO P0 e confermare con il tasto SET. NOTE: the full scale adjustment shall be performed with the measurement unit programmed in bar. FULL SCALE CALIBRATION (PRESSURE) Open the hydraulic circuit to have zero pressure Keep the ON and PEAK keys pressed for some seconds. P0000 Select the password 3124 ( ), confirm with SET The manometer displays an internal offset, reset using the ZERO P0 key and confirm with the SET key. page 35 I Manuale Operativo GB Operating Manual MO.JET.544.R1 P1 P2 P3 P4 P5 Generare la pressione al 20%(P1), 40%(P2), 60%(P3), 80%(P4) e 100%(P5) e confermare con il tasto SET. Regolare la misura con i tasti e e confermare con il tasto SET. P1 P2 P3 P4 P5 Generate the pressure at values 20%(P1), 40%(P2), 60%(P3), 80%(P4) e 100%(P5) and confirm with SET key. Adjust the measurement using the and keys and confirm with the SET key dp Selezionare il punto decimale ( ), confermare con il tasto SET. La procedura è terminata quando appare end dp Select the decimal point position ( Procedure is finished when end appears. TARATURA PER PUNTI DEL FONDO SCALA NEGATIVO (opzione VUOTO) Portare a pressione zero il manometro aprendo il circuito idraulico. Premere contemporaneamente i tasti : ON e PEAK. P0000 P 0P 1P 2P 3P 4P 5End NEGATIVE FULL SCALE ADJUSTMENT(vacuum option) Bring the manometer to zero pressure by opening the hydraulic circuit. Keep the ON and PEAK keys pressed for some seconds. Impostare la password 2124 tramite i tasti e , confermare con il tasto SET. Premere SET. Il manometro indica un offset interno, azzerare con il tasto ZERO e confermare con il tasto SET. Portare il manometro al 20%(P1), 40%(P2), 60%(P3), 80%(P4) e 100%(P5) del F.S. NEGATIVO in pressione, e confermare con il tasto SET. Regolare la misura con i tasti e e confermare con il tasto SET. La procedura è terminata ), confirm with SET. P0000 P 0P 1P 2P 3P 4P 5End page 36 Set the password 2124 using the and keys, then confirm with the SET key. Press the SET key. The manometer displays an internal offset, reset using the ZERO key and confirm with the SET key. Bring the manometer to 20%(P1), 40%(P2), 60%(P3), 80%(P4) e 100%(P5) negative F.S. of the pressure and confirm with the SET key. Adjust the measurement using the and keys and confirm with the SET key The procedure is completed I Manuale Operativo MO.JET.544.R1 SETTAGGIO VALORE PRESSIONE ATMOSFERICA (solo versione ASSOLUTA) GB Operating Manual ATMOSPHERIC PRESSURE SETTING (only ABSOLUTE version) ATTENZIONE WARNING L’alterazione di questo parametro renderà non affidabili le misure fatte in seguito. readings won’t be reliable after changing this parameter. Questa procedura viene riportata nel presente manuale a titolo di documentazione, ma deve essere eseguita solo da centri di taratura autorizzati ed in caso di effettiva necessità. This procedure is described in the manual by way of documentation only but it shall be performed by authorised calibration centres only and in case of real need. AEP transducers declina ogni responsabilità relativamente ad errori di misura o malfunzionamenti che dovessero derivare da regolazioni non correttamente eseguite, che fanno decadere anche la certificazione ACCREDIA del manometro. Premere contemporaneamente i tasti : ON e PEAK. P0000 Impostare la password 0022 ( ), confermare SET Avverte che premendo ancora SET si passerà alla regolazione At del valore della pressione atmosferica In questa fase è possibile inserire il valore della pressione atmosferica. Si raccomanda di fare riferimento ad un 1.0000 rilevamento affidabile, per non inficiare la lettura con un valore non corretto. AEP transducers declines any responsibility for measurement errors or bad functioning which should be caused by adjustment performed not properly. In this case the validity of manometer ACCREDIA certification would lose. Keep the ON and PEAK keys pressed for some seconds. P0000 Select the password 0022 ( ), confirm withSET Indicates that if you press down again SET button you'll pass to At atmosphere pressure value regulation. In this phase it is possible to select the atmospheric pressure value. It is recommended to always refer to reliable reading not 1.0000 to alter reading with an incorrect value. page 37 41126 Cognento (MODENA) Italy Via Bottego 33/A Tel:+39-(0)59-346441 Fax:+39-(0)59-346437 E-mail: [email protected] WIMOD and JET Manometer Communication protocol The communication protocol between a network, composed by WIMOD and JET Manometer (WIMODs from now on) , and a receiver sw is on 2 levels. The first level is the communication between the application sw and the receiver RF module. You need to implement this level to initialize the receiver hardware and to get RF data coming from the WIMODs network. It is based on a USB port managed by a FTDI FT232R chip. The port is seen as a virtual serial port so no special driver or library are necessary to use in your driver. You have just to use the standard API for a serial port. You must open the serial port with the followings parameters : baud: 19200 : parity : none : stop bit : 1 : N. bit : 8 The second level of the communication protocol is necessary to implement commands to WIMODs and to decode data coming from WIMODS. WIMODs /RECEIVER RF COMMUNICATION Each WIMODs network is identified by network address (4 chars) (common to all modules) and for each RF module is assigned a dedicated address (4 chars) (normally the last four digits of its serial number). These allow that can exist more than one WIMODs networks at the same time These addresses (network and module address) are AEP factory assigned. AEP will communicate for each delivered system the addresses that will be assigned to each modules From the RF communication point of view all WIMODs modules are slaves and the RF receiver is a master. Each WIMOds modules transmit its load values at regular interval (from .1s to 5s) . The time between two data can be changed by the master. The master from time to time (let me say : every 5 s) must send at least one command to each slave. In this way WIMOD recognize that the receiver is on and continue to transmit. To save battery life each WIMOD actives the radio only for a certain time. It transmit the load data packet and then for 40ms still keep the radio on waiting for a master command. The master so must send its commands inside the RX TIME slot. As soon as it receives some data from a WIMOD it must send its command to it to be sure the WIMOD radio is still on. 41126 Cognento (MODENA) Italy Via Bottego 33/A Tel:+39-(0)59-346441 Fax:+39-(0)59-346437 E-mail: [email protected] If a WIMOD does not receive at least one command from the master it goes in power down mode in order to save battery life. In power down mode WIMOD transmit a data packet every 8s. Note : this does not apply to JET Manometers RECEIVER INITIALITATION To init the RF receiver module it is necessary to send some commands to it. "C151"; "C01XXXX"; "C02YYYY"; "C0406"; "C07Z"; "C08"; "C14"; "C150"; // send * after command // XXXX = network address // YYYY = master address // the data packed length is 6 byte // Z= power Level (valid values are : ‘0’-‘1’-‘2’-‘3’ // Init Radio // Set Output *WD // don't send * after command It is not the scope of this document describe this commands. MASTER COMMANDS There are just a few commands that the master can send to each WIMOD to set parameters : The application sw must send 3 messages to the RF receiver module with the indication of the destination WIMOD address command "C03KKKK"; "C30XXXX00"; "C31"; // KKKK = destination WIMOD address slave address // XXXX00 : 6 byte of Payload data command Inside the KKKK field you have to specify the destination WIMOD and inside the XXXX00 you put the commands and its associate parameters (last 2 char always 0). The meaning of XXXX commands fields is the following : X X X X +----------------- command parameter P1 +------------- command parameter P2 +---------- command parameter P3 +------- command specifier : valid values are NOTE : The command Set Power Level Set Tx Rate Set Filter Only apply to WIMOD load cell ‘0’: do nothing : used for keep alive the WIMOD ‘1’: zero on/off: P1 = ‘0’ zero Off : ‘1’ zero On ‘2’: set power level : P1 = ‘0’ power level = -10dbm P1= ‘1’ power level = -2dbm P1= ‘2‘ power level = +6dbm P1 = ‘3’ power level = +10dbm ‘3’: Set TxRate Interval (in step of 100ms) P1= 1..50 P2=0 P3=0 ‘6’: Set Filter P1=0..31 : ASCII value : ASCII Value : binary value ; binary value ; binary value : binary value 41126 Cognento (MODENA) Italy Via Bottego 33/A Tel:+39-(0)59-346441 Fax:+39-(0)59-346437 E-mail: [email protected] DECODING RECEIVED DATA FROM WIMOD The application sw must polls data coming from WIMODs modules on the serial line Any time the RF receiver module get valid data from a WIMOD it send a data packet of 10 characters. The first 4 characters are the address of the WIMOD module. The following 6 characters are the load data sent from the WIMOD. The 6 chars received from the WIMOD are bit oriented with the following format : byte 5 byte 4 byte 3 byte 2 byte 1 byte 0 7 07 0 7 0 7 0 7 0 7 0 bit xxxxxxxx xxxxxxxx xxxxxxxx xxxxxxxx xxxxxxxx xxxxxxxx |||||||| |||||||| |||||||| ||||++++++++++++++++++++++++ 20 bit binary value with sign |||||||| |||||||| |||||||| |+++------------------------ Moltiplicative Factor |||||||| |||||||| |||||||| +--------------------------- Zero On / Zero Off |||||||| |||||||| |||||||+----------------------------- Low Battery |||||||| |||||||| |||||++------------------------------ Level Power |||||||| |||||||| ||||+-------------------------------- AEP reserved |||||||| |||||||| ++++--------------------------------- AEP reserved |||||||| ++++++++-------------------------------------- Filter Value ++++++++--------------------------------------------------- Tx Rate Moltiplicative Factor: 3 bytes: gives an exponent to the 20bit value according to the following table 000 = 0.0001 001 = 0.0010 010 = 0.0100 011 = 0.1000 100 = 1.00 101 = 10.0 110 = 100.0 111 =1000.0 So the real load value is Displayed Value ActualValue*FattoreMoltiplicativo 41126 Cognento (MODENA) Italy Via Bottego 33/A Tel:+39-(0)59-346441 Fax:+39-(0)59-346437 E-mail: [email protected] CODE EXAMPLE to decode receiving data from a WIMOD RxBuffer is the RX communication buffer. j is the index inside the buffer where it was recognized the message coming from a WIMOD address ‘E0E2’ . In this example you have RxBuffer[j+0]= ‘E’ RxBuffer[j+1]= ‘0’ RxBuffer[j+2]= ‘E’ RxBuffer[j+3]= ‘2’ char RxBuffer[10000]; int stato; //signal if the load cell is overload/underload/ in range state float value; // WIMOD Load int PowerLevel; // WIMOD actual setup : Power Level,Filter,TxRate int Filtro; int TxRate; void DecodeMessageWIMOD(int j) { union { long L; BYTE Buffer[4]; } L; L.Buffer[0]=RxBuffer[4+j]; L.Buffer[1]=RxBuffer[5+j]; L.Buffer[2]=RxBuffer[6+j] & 0xf; if (RxBuffer[6+j] & 0x8) { L.Buffer[3]=0xff; L.Buffer[2]|=0xf0; } else { L.Buffer[3]=0; L.Buffer[2]&=0x0f; } // extract the load info (20 bit) if (L.L==0x7ffff) stato=1; else if (L.L==0xfff80000) stato=2; else { stato=0; switch(RxBuffer[6+j] & 0x70) { case 0x00:FactMul=0.0001f;break; case 0x10:FactMul=0.001f;break; case 0x20:FactMul=0.01f;break; case 0x30:FactMul=0.1f;break; case 0x40:FactMul=1.0f;break; case 0x50:FactMul=10.0f;break; case 0x60:FactMul=100.0f;break; case 0x70:FactMul=1000.0f;break; } value=(float)L.L*FactMul; } //UPPER (if value = 0x7ffff then WIMOD is in overload) //LOWER (if value = 0xfff80000 then is underload) // detect the sign and extend it to the long variable 41126 Cognento (MODENA) Italy Via Bottego 33/A Tel:+39-(0)59-346441 Fax:+39-(0)59-346437 E-mail: [email protected] if (RxBuffer[6+j] & 0x80) ZeroOn=true; else ZeroOn=false; if (RxBuffer[7+j] & 0x1) LowBattery=true; else LowBattery=false; Filtro=RxBuffer[8+j]; TxRate=RxBuffer[9+j]; switch(RxBuffer[7+j] & 0x06) { case 0x00:PowerLevel=0;break; case 0x02:PowerLevel=1;break; case 0x04:PowerLevel=2;break; case 0x06:PowerLevel=3;break; } 41126 Cognento (MODENA) Italy Via Bottego 33/A Tel:+39-(0)59-346441 Fax:+39-(0)59-346437 E-mail: [email protected] DECODING RECEIVED DATA FROM JET MANOMETER The application sw must polls data coming from JET Manometer on the serial line Any time the RF receiver module get valid data from a JET Manometer it send a data packet of 10 characters. The first 4 characters are the address of the JET Manometer. The following 6 characters are the data sent from the JET Manometer. The 6 chars received from the WIMOD are bit oriented with the following format : byte 5 byte 4 byte 3 byte 2 byte 1 byte 0 7 07 0 7 0 7 0 7 0 7 0 bit xxxxxxxx xxxxxxxx xxxxxxxx xxxxxxxx xxxxxxxx xxxxxxxx |||||||| |||||||| |||||||| ||||++++++++++++++++++++++++ 20 bit binary value with sign |||||||| |||||||| |||||||| |+++------------------------ Point Position |||||||| |||||||| ||||++++------------------------------- Measurement Unit (see table below) |||||||| |||||||| |||+------------------------------------- Zero On / Zero Off |||||||| |||||||| ||+-------------------------------------- Low Battery |||||||| +++++++------------------------------------------ Filter Value ++++++++------------------------------------------------------ Tx Rate Point Position and binary value with sign The pressure value is transmitted as an integer on 20 bit The point position field gives the 000 = no decimal point 001 = 1 decimal point 010 = 2 decimal point 011 = 3 decimal point 100 = 4 decimal point 101 = 5 decimal point So the real pressure value is Displayed Value = Binary value / 10 decimal point position Measurement Unit Table The measurement Unit is a 4 bit code according to the table below 0000 0001 0010 0011 0100 0101 0110 0111 1000 1001 : : : : : : : : : : 0= bar 1=mbar 2=psi 3=MPa 4=kPa 5=kg/cm2 6=mHg 7=mmHg 8 = mmH2O 9=mH2O