1
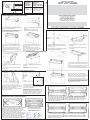
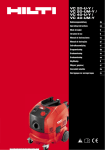
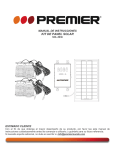
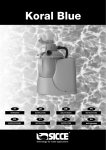
COD. 80N202
80 L - 18 UK Gal
SICCE S.p.A.
Via V. Emanuele, 115
36050 Pozzoleone - Vicenza - ITALY
www.sicce.com
WARRANTY
This product, except the rotor and the carbon cartridge, is guaranteed against defects of materials and workmanship for
a period of 2 years from the date of purchase.
The warranty certificate must be filled in by the dealer and must accompany the pump if it is returned for reparation, along
with the cash register receipt or similar document. The warranty covers the replacement of the defective parts. In case
of improper use, tampering or negligence by the buyer or user, the guarantee is void and expires immediately. The
guarantee is also void in absence of the cash register receipt or similar document. The expenses for shipping the pump
to and from the factory, or the repair station, have to be paid by the buyer.
I
Gentile cliente, grazie di aver scelto NAUTILUS, l’acquario più originale e moderno nel mercato
progettato per i gusti e le esigenze di chiunque. NAUTILUS prevede particolari tecnici molto sofisticati e può essere
implementato con prodotti aggiuntivi. Il suo design semplice e funzionale rende NAUTILUS il nuovo punto di riferimento per
gli amanti dell’acquario!
Le seguenti istruzioni di montaggio devono essere seguite scrupolosamente. Si raccomanda di eseguire le fasi di montaggio
con molta cautela, ponendo la massima attenzione agli elementi appuntiti e di maneggiare i vetri muniti di guanti di
protezione. Qualsiasi intervento di manutenzione deve essere effettuato solo dopo aver staccato l’acquario dalla rete
elettrica. Per un uso appropriato e sicuro, leggere attentamente le istruzioni e conservarle.
EN
D
INSTRUCTIONS
ANLEITUNGEN
F
I
INSTRUCTIONS
ISTRUZIONI
E
NL
INSTRUCCIONES
INSTRUCTIES
P
RU
INSTRUÇÕES
инструкции
EN
Dear client, thank you to have chosen NAUTILUS, the most original and modern aquarium in the
market, designed to accomplish everybody needs and tastes. NAUTILUS includes very sophisticated technical features
and can be implemented with additional components according to your personal tastes. Its simple and functional design
make NAUTILUS the new point of reference for the aquarium lovers! Please, read carefully and save the following
instructions to use in the best way your NAUTILUS.
IMPORTANT SAFETY INSTRUCTIONS
WARNING – To guard against injury, basic safety precautions should be observed, including the following.
READ AND FOLLOW ALL SAFETY INSTRUCTIONS BEFORE USING THE PRODUCT
DANGER: To avoid possible electric shock, special care should be taken since water is employed in the use of aquarium
equipment. For each of the following situations, do not attempt repairs by yourself. Return the appliance to an authorized
service facility for service or discard the appliance.
1) If the cover falls into the water, DON’T reach for it! First unplug it and then retrieve it. If electrical components of the
appliance get wet, unplug the appliance immediately.
2) If the appliance shows any sign of abnormal water leakage, immediately unplug it from the power source.
3) Carefully examine the appliance after installation. It should not be plugged in, if there is water on parts not intended to
be wet.
4) Do not operate any appliance if it has a damaged cord or plug, or if it is malfunctioning or has been dropped or damaged
in any manner.
5) To avoid the possibility of the appliance plug or receptacle getting wet, position aquarium stand and tank to one side of a
wall-mounted receptacle to prevent water from dripping onto the receptacle or plug. A “drip-loop” (fig. 1) should be arranged
by the user for each cord connecting an aquarium appliance to a receptacle. The “drip-loop” is the part of the cord below the
level of the receptacle or the connector if an extension cord is used, which prevents water travelling along the cord and
coming in contact with the receptacle. If the plug or socket does get wet, DON’T unplug the cord. Disconnect the fuse or
circuit breaker that supplies power to appliance. Then unplug and examine for presence of water in the receptacle.
6) Close supervision is necessary when any appliance is used by near children.
7) To avoid injury, do not contact moving parts or hot parts such as heaters, reflectors, lamp bulbs and similar.
8) Always unplug an appliance from an outlet when not in use, before putting on or taking off parts and before cleaning.
Never yank cord to pull plug from outlet. Grasp the plug and pull to disconnect.
9) Do not use an appliance for other than intended use. The use of attachments, not recommended or sold by the
manufacturer of the appliance, may cause an unsafe condition.
10) Do not install or store the appliances where it will be exposed to the weather or to temperatures below freezing.
11) Make sure an appliance mounted on a tank is securely installed before operating it.
12) If an extension cord is necessary, a cord with a proper rating should be used. A cord rated for less amperes or watts
than the appliance rating may overheat. Care should be taken to arrange the cord so that it will not be tripped over or
pulled.
13) This appliance has a polarized plug (one blade is wider than other). As a safety feature, this plug will fit in a polarized
outlet only one way. If the plug does not fit fully in the outlet, reverse the plug. If it still does not fit, contact a qualified
electrician. Never use with an extension cord unless plug can be fully inserted. Do no attempt to defeat this safety feature.
SAVE THIS INSTRUCTIONS
GENERAL SAFETY INSTRUCTIONS:
1. Do not connect the aquarium cover plug to the socket before having filled it completely with water.
2. Always disconnect the plug before carrying out any maintenance inside the aquarium, and don’t insert the plug if it or
your hands are wet.
3. Read and respect all the important notices applied on the equipment. Check that the voltage marked on the label is
the same as that of the power main. The appliance must be fed through a differential switch (life saver) with a rated current
lower than or equal to 30 mA.
4. Do not use the electrical accessories supplied if they have been damaged in any way. The power cable may not be
replaced; if it is damaged, the appliance must be scrapped.
5. It is recommended to keep the aquarium under control if it is within the reach of children or in their vicinity, checking
frequently that it is installed and operating correctly.
6. To prevent injury, do not touch mobile or hot parts such as heating units, reflectors, lamps, etc.
7. Always take out the plug if the aquarium is not in use. Take out the plug of any appliances not being used before fitting
or removing parts and before cleaning. Never pull the cable to take out the plug. To disconnect, grip the plug and pull.
8. Never touch the plug with your bare hands if it is wet. Do not touch it with wet hands either.
9. When installing the power cable, take care that it cannot be trampled or torn.
10. The aquarium and its lighting system are suitable exclusively for indoor use because:
- the top part of the lighting system has a degree of protection of IP20 (the top part of the lighting system is not protected
against humidity)
- the bottom part of the lighting system has a degree of protection of IP54 (the bottom part of the lighting system is
protected against splashes coming from the tank).
PREPARING AND INSTALLING THE AQUARIUM
ATTENTION: During installation and maintenance, the aquarium (the cover) and all the appliance in it, must be disconnected
from the power mains.
Preliminary check.
It is recommended to check that the tank is watertight because wrong manipulation could cause a fragility. It is important
to check it in the following way.
Position the aquarium on a flat and stable surface suitable to bear at least 110 kg weight and near a power socket
Check that the cables of the cover and the accessories are not damaged. Check that the light system is well fixed to the
cover.
Fill the tank with tap water up to 3-4 cm from the top edge of the glass and check that there aren’t water leakages. If there
is a water leakage, contact the seller to substitute the tank. Do not try to repair it. If everything is normal, empty the tank.
DO NOT empty it by lifting and spill the water out. Use a small tank or a flexible tube to do this operation.
Do not place the aquarium:
1) near sources of heat or current of air to avoid temperature variations.
2) near electrical appliances which can be damaged by water sprinkles (i.e. TV - stereos etc.)
3) in damp areas or where there is no protection against water.
4) near delicate furniture which could be ruined by water sprinkles
5) near windows because the direct sunlight favour the hypertrophic algae grown.
Do not use the top of the aquarium as a shelf. Clean the tank accurately with a damp cloth or a sponge. Detergents or
soap could be harmful for fishes. Do not clean the cover with alcohol or chemical substances which contains benzene,
solvents etc. because the plastic could be damaged. To clean internally the tank use a magnetic brush or other cleaning
accessories. Clean periodically the lamps using a dump cloth: in this way the light keep being bright.
MAINTAINANCE
Before doing any maintenance operation, disconnect the plug. Make sure your hands are dry and then disconnect the
aquarium and all its accessories from the power supply.
Position the cover on the tank and switch on the lamps. If the lamp switch on and off intermittence substitute it with a new
one. If the lamp doesn’t switch on, check if it is well plugged in the socket. If it keep to do not work, change the lamp with
a new one or substitute the entire light system.
This aquarium has been projected in compliance with the main international safety laws. The materials are right to be
used either with fresh and salt water, not releasing substances which could be harmful for fishes and plants. All the
materials can be separated by a specialized company and recycled. Observe the electrical and packing waste recycling
law of your country.
INSTRUCTIONS FOR THE CORRECT DISCHARGE OF THE PRODUCT ACCORDING TO EU DIRECTIVE 2002/96/EC
When used or broken, the product does not have to be discharged with the other waste. It can be delivered to the specific
electric waste collection centres or to dealers who give this service. Discharge separately an electric tool avoid negative
consequences for the environment and for the Health and allows to regenerate the materials so to have a great saving
of energy and resources.
NORME DI SICUREZZA
ATTENZIONE: per evitare possibili danni è bene osservare alcune precauzioni di sicurezza:
LEGGERE ATTENTAMENTE TUTTE LE ISTRUZIONI DI SICUREZZA PRIMA DI UTILIZZARE L’APPARECCHIO.
NAUTILUS è conforme alle norme di sicurezza nazionali e internazionali vigenti.
1) Controllare che la tensione riportata nell’etichetta tecnica corrisponda alla tensione dell’impianto elettrico;
2) L’apparecchio deve essere alimentato attraverso un interruttore differenziale (salvavita), la cui corrente nominale sia
inferiore o uguale a 30mA.
3) Prima di collegare la spina, assicurarsi che sia il cavo che la acquario siano integri;
4) La acquario ha un cavo tipo Z. Il cavo o la presa non possono essere sostituiti o riparati; in caso di danneggiamento
di uno dei due sostituire l’intera plancia;
5) ATTENZIONE: scollegare qualsiasi prodotto elettrico immerso prima di compiere lavori di manutenzione o immergere
le mani in acqua; in caso la spina o il cavo siano bagnati staccare l’interruttore generale di corrente prima di scollegare
la spina;
6) L’ acquario non può essere usata con liquidi o in ambienti con una temperatura superiore a 35°;
7) Non usare il prodotto per usi diversi da quelli per i quali è stata progettato;
8) Evitare di usare la acquario con liquidi corrosivi o abrasivi:
9) L‘ acquario non è un giocattolo e non è stato progettato per l’uso da parte di persone con ridotte capacità fisiche,
sensoriali o mentali (bambini compresi) o con mancanza di esperienza e conoscenza a meno che non siano sufficientemente
istruiti o controllati nell’uso da una persona responsabile per la loro sicurezza. I bambini dovrebbero essere sorvegliati
per accertarsi che non giochino con l’apparecchio.
10) Per evitare gocciolamenti accidentali sulla presa o la spina, formare una curva del filo sotto la presa (Fig. 1). Si deve
predisporre un “drip loop” (curva di gocciolamento), per ciascun cavo che colleghi un acquario ad una presa. Il “drip loop”
è quella parte di cavo che si trova sotto il livello della presa, o del connettore in caso di utilizzo di una prolunga, volto ad
evitare che l’acqua, scorrendo lungo il cavo stesso, venga a contatto con la presa. Qualora la spina o la presa si bagnassero,
non scollegare il cavo dalla presa. Staccare il fusibile o l’interruttore automatico che forniscono alimentazione all’apparecchio.
Quindi scollegare la spina e controllare l’eventuale presenza di acqua nella presa.
11) Evitare di sollevare la plancia per mezzo del cavo durante l’installazione o la manutenzione;
12) Il prodotto è esclusivamente per uso interno.
13) Non mettete in funzione gli accessori elettrici contenuti se questi presentano delle ammaccature, siano caduti o
abbiano subito danni di qualsiasi tipo.
14) Onde evitare lesioni non toccare pezzi mobili o caldi come riscaldatori, riflettori, lampade ecc.
15) Staccare sempre la spina se l’acquario non è in uso. Staccare la spina degli apparecchi non in funzione prima di
applicare o rimuovere dei pezzi, e di procedere ad operazioni di pulizia. Non tirare mai il cavo per scollegare la spina.
Per scollegare afferrare la spina e tirare.
16) Non toccare a mani nude la spina di alimentazione se questa è bagnata. Non toccarla neppure con mani bagnate.
17) Si raccomanda di porre attenzione nell’installare il cavo di alimentazione in modo tale che esso non possa essere
calpestato o strappato. CONSERVARE QUESTE ISTRUZIONI.
Istruzioni d’uso e manutenzione
La sicurezza e l’ecologia
Questo acquario è stato progettato seguendo rigorosamente le norme di sicurezza internazionali per questa tipologia di
prodotto. I materiali utilizzati sono di primissima scelta, adatti per essere usati sia in acqua dolce sia in acqua marina,
non rilasciando sostanze che potrebbero nuocere alla salute dei pesci e in generale all’acquario stesso. Il vostro acquario
consiste di materiali che possono venire riciclati se smontati da una ditta specializzata. Osservate le leggi del vostro
Paese in materia di smaltimento di materiali d’imballaggio e vecchi apparecchi. I componenti inseriti, in particolare quelli
elettrici, rispettano tutte le norme di sicurezza.
Caratteristiche
Questo acquario si contraddistingue, oltre che per un design innovativo che ben si integra con qualsiasi tipo di arredamento,
anche per alcune peculiarità:
• Un cavo di alimentazione per ogni apparecchio utilizzato, per facilitarne l’aggiunta o la sostituzione (gruppo illuminazione
aggiuntivo, filtro aggiuntivo, ecc.)
• Accessibilità: Per le normali operazioni quotidiane un comodissimo coperchio anteriore si apre e si chiude con semplicità.
• Robustezza: Questo acquario è costruito con materiali di prima scelta.
• Aerazione: Questo acquario è stato studiato perché sia presente un’adeguata aerazione che consenta il fondamentale
scambio gassoso con l’esterno.
• Innovazione (solo per la versione con lampade T5 da 24 W - L’accensione dell’impianto di illuminazione è controllato
elettronicamente. Pertanto permette un’accensione più rapida della lampada senza sfarfallio e l’allungamento della vita
stessa delle lampade. Non c’è più la presenza dello starter)
• Illuminazione: Vengono usate lampade fluorescenti di ottima qualità, garantendo una perfetta illuminazione per la vita
e lo sviluppo di animali e piante.
• Manutenzione semplificata: La sostituzione delle lampade viene eseguita semplicemente svitando gli attacchi stagni
posti nella parte inferiore della plancia.
• Pulizia: Con un semplice gesto il coperchio dell’acquario si solleva completamente per avere il completo accesso alla
parte interna, per le operazioni di pulizia normali e straordinarie.
• Installazione del un filtro: L’acquario dà la possibilità di installare un filtro interno e/o esterno per soddisfare le richieste
più esigenti.
Posizionamento
Anche per le successive fasi è bene attenersi alle note di seguito riportate
L’acquario va posizionato:
• su di una superficie piana, stabile e che possa sopportare un peso superiore a 100 Kg
• vicino ad una presa di corrente
L’acquario non va posizionato:
• vicino ad apparecchi elettrici delicati o che temono gli spruzzi d’acqua (ad esempio televisori, stereo ecc.)
• vicino a mobili delicati che si potrebbero rovinare al contatto con eventuali spruzzi d’acqua
• vicino a fonti di calore e correnti d’aria fredda per evitare forti sbalzi di temperatura
• vicino a finestre in quanto la luce diretta del sole favorisce la crescita ipertrofica delle alghe.
NOTA: il coperchio dell’acquario non deve essere usato come piano d’appoggio.
Controlli e operazioni preliminari
È bene controllare la tenuta della vasca, in quanto errate manipolazioni potrebbero causarne il cedimento. È importante
seguire attentamente le seguenti operazioni di controllo.
Posizionare l’acquario su di una superficie piana, stabile e che possa sopportare un peso superiore a 100 Kg. Verificare
che i cavi di alimentazione dell’acquario e degli accessori non siano danneggiati. Controllare che il gruppo illuminazione
sia vincolato al coperchio tramite gli agganci posti ai lati. Se non lo fosse, praticare una leggera pressione sul gruppo
lampade. L’avvenuto aggancio si avverte per l’intervento del dispositivo a scatto.
Rimuovere il coperchio dall’acquario, inserire la spina di alimentazione nella presa, controllando che premendo il pulsante
di accensione il gruppo illuminazione funzioni correttamente.
Riempire l’acquario con acqua di rubinetto (serve solo per il controllo) arrivando fino a 3-4 cm dal bordo superiore del
vetro. controllare accuratamente che non si verifichino perdite d’acqua da nessuno dei lati.
Nel caso in cui:
• si riscontri una perdita d’acqua, contattare il negoziante per la sostituzione della vasca. Non provate a ripararla.
• non ci sia alcuna perdita, proseguire con la fase finale delle operazioni di controllo.
Controllato che il tutto sia perfettamente funzionante, svuotare la vasca.
NOTA: non cercare mai di svuotare un contenitore in vetro quale l’acquario sollevandolo e rovesciandolo. È molto
pericoloso e si potrebbero creare dei danni alla vasca. In questi casi si
suggerisce di utilizzare un recipiente o un tubo flessibile.
Preparazione della vasca
La vasca va pulita accuratamente all’interno con un panno o una spugna imbevuti d’acqua. Non vanno assolutamente
utilizzati detergenti, saponi o altro che possa poi risultare dannoso per i pesci.
Per pulire l’acquario dalle impronte delle dita, dalla polvere e dalla sporcizia, usare un panno umido, pulito e morbido.
Non pulite la plancia dell’acquario con alcool o con agenti chimici che contengono benzene, solventi ecc. perchè la plastica
si potrebbe danneggiare ed eventuali contatti con la superficie dell’acqua sarebbero deleteri per pesci e piante.
Per pulire internamente la vasca dell’acquario e togliere così l’eventuale patina di alghe, utilizzate delle spazzole magnetiche
o altri accessori reperibili in commercio. Periodicamente si devono pulire anche le lampade, utilizzando un panno morbido
e bagnato con semplice acqua: in questo modo la luce emessa dalla lampada non sarà schermata.
Problemi e soluzioni:
1) La lampada fluorescente si accende e si spegne ad intermittenza: potrebbe essere esaurita perciò deve essere sostituita
con una nuova dello stesso tipo.
2) La lampada fluorescente non si accende: Controllare che la presa di alimentazione sia collegata alla linea elettrica
3) La temperatura dell’acqua varia spesso nell’arco della giornata: La vasca dell’acquario non è stata posizionata in un
luogo idoneo: è troppo vicina a fonti di calore o a correnti d’aria fredda. Spostare l’acquario in un luogo più adatto o
proteggerlo
GARANZIA:
Questo prodotto, escluso il rotore e la cartuccia, è garantito per un periodo di 2 anni dalla data di acquisto, da difetti di
materiale e lavorazione. Il certificato di garanzia deve essere compilato in ogni sua parte dal rivenditore, e dovrà
accompagnare l’apparecchio nel caso in cui venga restituito per la riparazione, assieme allo scontrino fiscale o equivalente.
La garanzia consiste nella sostituzione delle parti difettose. In caso di uso improprio, manomissione o negligenza da
parte dell’acquirente o utente, la garanzia è nulla e decade immediatamente. La garanzia è inoltre nulla in caso di
mancanza dello scontrino fiscale d’acquisto o equivalente. Le spese di spedizione e rinvio sono a carico dell’acquirente.
fig. 1 DRIP LOOP
• ACCESSORIES
• ZUBEHÖRTEILE
• ACCESSORI
• ACCESSOIRES
• ACCESORIOS
• SPARE PARTS
• ERSATZTEILE
• RICAMBI
• PIECES DE RECHANGE
• PIEZAS DE REPUESTOS
KIT NEON 2T8
- SKT0106
KIT CABLES-CAVI
COVER - PLANCIA
- 2 NEON T8 - SKT0101
- 1 NEON T8 - SKT0103
NEON - SKT0004
DRIP LOOP
WARRANTY - GARANTIE
GARANZIA - GARANTIA - GARANTIED
GARANTIA - GARANTI - ГАРАНТИЯ
COVER SUBSTAINED BY STAFFS
UTILIZZO IN MODALITA’ SOLLEVATA CON SUPPORTI
SEAL AND SIGNATURE OF RESALE DEALER
STEMPEL UND UNTERSCHRIFT DES VERKÄUFERS
CACHET ET SIGNATURE DU REVENDEUR
TIMBRO E FIRMA DEL RIVENDITORE
SELLO Y FIRMA DEL REVENDEDOR
STEMPEL EN HANDTEKENING VAN DE DEALER
CARIMBO E ASSINATURA DO REVENDEDOR
УПЛОТНЕНИЕ И ПОДПИСЬ МАГАЗИНА
Insert the 2 staffs and position them on the lateral sides of
the tank. Press them down to fix them.
Lay the cover on the toothed guide being sure to fix
it properly.
Inserire i 2 supporti di sostegno in dotazione e posizionarli
sui vetri laterali dell’acquario. Per fissarli è sufficiente
effettuare una pressione dall’alto verso il basso.
Appoggiare la plancia sulle guide dentate
assicurandosi che sia stabile e ben fissato.
DATE OF PURCHASE - VERKAUFSDATUM - DATE DE VENTE - DATA DI VENDITA
FECHA DE VENTA - DATUM VAN AANKOOP - DATA DE VENDA - ДАТА ПОКУПКЫ
COVER CLOSED - MODALITA’ CHIUSA
C
D
C
D
A
A
B
B
Check that the cover is in line with the tank. Otherwise
move it on the left or right pay attention to fix it on the
guide.
To make the normal tank maintenance, disconnect the
plug. Do not remove the cover. Slide the staffs on the
back as in the picture.
Controllare che la plancia sia allineata con la vasca,
eventualmente spostarla quanto basta a destra o a
sinistra, facendo attenzione che sia inserita nella guida
a” pettine”.
Per effettuare piccole manutenzioni non togliere la
plancia. E’ sufficiente spostare i supporti verso la parte
posteriore come in figura. Staccare l’alimentazione
elettrica prima di ogni manutenzione.
Then attach the B part of the staff to the A part and the
B to the D.
Use both staff to lift the cover during the maintenance
operations.
Agganciare la parte A alla parte C e successivamente
la parte B alla D.
Usare entrambe le astine per le operazioni di
manutenzione.
Detach the components at the ends of the 2 plastic
crosses and insert the A-B pieces on both sides of the 2
staffs as in the picture.
Staccare gli inserti dai 2 stampati ed inserire i pezzi A-B
nell’astina di sostegno come nelle figure.
Attach the C-D pieces in the right space on the cover
as in the picture.
Inserire i pezzi C-D negli appositi spazi nella plancia,
come in figura.
Cut, with scissors or a cutter, the pre-cutted plastic part to
make the cable or the external filter tubes exiting form the
cover.
Per fare uscire il cavo elettrico di alimentazione o eventuali
tubi dl filtro esterno, con forbici robuste o un taglierino
togliere il pezzo preformato di plastica dalle sedi pretagliate.
SUSPENDED COVER BY CABLES - PLANCIA SOSPESA CON CAVI
Screw the hooks in the two holes. Attach the lighing
system. Fix the cables to the ceiling (or to another
holder) and insert the other side in the hooks. Regulate
the height of the cover and cut the exceeding part.
Dopo aver forato, avvitare i due ganci di sostegno.
Riposizionare il gruppo lampade. Fissare un lato dei cavi
di acciaio al soffitto (o altro supporto) e dall’altro infilarli
nei ganci. Regolare l’altezza della plancia alla misura
voluta e tagliare il cavo in eccesso.
Disconnect the plug from the socket before acting on the
lighting system. Take away the light system. Use a finger
or a screwdriver to bend the hooking part.
Rimuovere il gruppo lampade con l’aiuto di un cacciavite,
flettendo il gancio di sostegno.
In the inside part of the cover there are two points,
pre-arranged to be cut, to insert the hook to hang the
cover (optional). Use scissors to cut them turning the
point until a 4 mm hole is made.
LIGHTS REPLACEMENT - SOSTITUZIONE LAMPADE
Nella parte interna del coperchio, individuare i due punti
predisposti per posizionare i ganci di sostegno
(optional). Fare un foro di 4 mm di diametro nel centro
del riferimento utilizzando le punte di un paio di forbici.
Appoggiare la punta nel centro del foro e ruotare in
senso alternato fino ad ottenere il foro desiderato.
ASSEMBLAGE OF AN ADDITIONAL LIGHTING SYSTEM
ASSEMBLAGGIO GRUPPO LAMPADE AGGIUNTIVO
Disconnect the plug from the socket before acting on the lighting system. Unscrew the cap which hold the
neon, turn 90° the neon and extract it carefully. Do the inverse operation to insert the new neon tube.
Staccare l’alimentazione elettrica prima di ogni operazione sull’impianto elettrico. Svitare i cappucci ermetici
dei portalampade, ruotare di 90° la lampada neon ed estrarla delicatamente. Inserire un nuovo neon
effettuando l’operazione all’inverso.
STARTER REPLACEMENT - SOSTITUZIONE STARTER
CLICK
CLICK
It is possible to move the lighting system according to the aquarium
lighting needs or to add another lighting system. Remove the
central lighting system. Bend to hooking part by a finger or a
screwdriver. Position the lighting system in the front or back couple
of hooking part. Be sure that it is well fixed on the cover.
È possibile spostare il gruppo lampade a seconda delle esigenze di
luminosità dell’acquario o aggiungere un secondo gruppo lampade
nella plancia. Per fare ciò rimuovere il gruppo lampade centrale
flettendo, con l’aiuto di un cacciavite, il gancio di sostegno.
Posizionare il gruppo lampade nella coppia di ganci anteriore come
in figura. Accertarsi che l’asse delle lampade sia ben agganciato.
Repeat the same operations to add
another lighting system (accessory).
Ripetere l’operazione per il secondo
gruppo lampade (accessorio).
Disconnect the plug from the socket before acting on the lighting system. With a screwdriver lift the protection
cap. Unscrew anticlockwise the starter and substitute it with a new one by doing the inverse operations.
Staccare l’alimentazione elettrica prima di ogni operazione sull’impianto elettrico. Servendosi di un cacciavite
sollevare il tappo di protezione. Con due dita svitare in senso antiorario lo starter e sostituirlo con uno nuovo
effettuando le operazioni all’inverso.