1
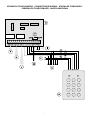
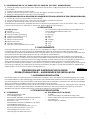
SISTEMA DI COMANDO A TASTIERA ELETTRONICA
ELECTRONIC KEYBOARD CONTROL SYSTEM
SYSTEME DE COMMANDE A CLAVIER ELECTRONIQUE
SISTEMA DE MANDO POR TECLADO ELECTRÓNICO
STEUERSYSTEM MIT ELEKTRONISCHER TASTATUR
JA108
A10801
ISTRUZIONI PER L’USO - NORME DI INSTALLAZIONE
INSTRUCTIONS FOR USE - DIRECTIONS FOR INSTALLATION
INSTRUCTIONS - REGLES D’INSTALLATION
INSTRUCCIONES PARA EL USO - NORMAS PARA LA INSTALACION
GEBRAUCHSANLEITUNG - ANWEISUNGEN ZUR INSTALLATION
AVVERTENZE PER L’INSTALLATORE
6)
OBBLIGHI GENERALI PER LA SICUREZZA
1)
2)
3)
4)
5)
6)
7)
8)
9)
10)
11)
12)
13)
14)
15)
16)
17)
18)
19)
20)
21)
22)
23)
24)
25)
ATTENZIONE! È importante per la sicurezza delle persone seguire
attentamente tutte le istruzioni. Una errata installazione o un errato uso
del prodotto può portare a gravi danni alle persone.
Leggere attentamente le istruzioni prima di iniziare l’installazione del
prodotto.
I materiali dell’imballaggio (plastica,polistirolo,ecc.) non devono
essere lasciati alla portata dei bambini in quanto potenziali fonti di
pericolo.
Conservare le istruzioni per riferimenti futuri.
Questo prodotto è stato progettato e costruito esclusivamente per
l’utilizzo indicato in questa documentazione. Qualsiasi altro utilizzo
non espressamente indicato potrebbe pregiudicare l’integrità del
prodotto e/o rappresentare fonte di pericolo.
GENIUS declina qualsiasi responsabilità derivata dall’uso improprio
o diverso da quello per cui l’automatismo è destinato.
Non installare l’apparecchio in atmosfera esplosiva: la presenza di
gas o fumi infiammabili costituisce un grave pericolo per la sicurezza.
Gli elementi costruttivi meccanici devono essere in accordo con
quanto stabilito dalle Normative UNI 8612, CEN pr EN 12604 e CEN pr
EN 12605.
Per i Paesi extra-CEE, oltre ai riferimenti normativi nazionali, per
ottenere un livello di sicurezza adeguato, devono essere seguite le
Norme sopra riportate.
GENIUS non è responsabile dell’inosservanza della Buona Tecnica
nella costruzione delle chiusure da motorizzare,nonchè delle
deformazioni che dovessero intervenire nell’utilizzo.
L’installazione deve essere effettuata nell’osservanza delle Norme
UNI8612, CEN pr EN 12453 e CEN pr EN 12635.Il livello di sicurezza
dell’automazione deve essere C+E.
Prima di effettuare qualsiasi intervento sull’impianto, togliere l’alimentazione elettrica.
Prevedere sulla rete di alimentazione dell’automazione un interruttore onnipolare con distanza d’apertura dei contatti uguale o superiore a 3mm. È consigliabile l’uso di un magnetotermico da 6A con
interruzione onnipolare.
Verificare che a monte dell’impianto vi sia un interruttore differenziale con soglia da 0,03A.
Verificare che l’impianto di terra sia realizzato a regola d’arte e
collegarvi le parti metalliche della chiusura. Collegare inoltre a terra
il filo Giallo/Verde dell’automatismo.
L’automazione
dispone
di
una
sicurezza
intrinseca
antischiacciamento costituita da un controllo di coppia che deve
comunque essere sempre accompagnato ad altri dispositivi di
sicurezza.
I dispositivi di sicurezza (Es.: fotocellule,coste sensibili,ecc...) permettono di proteggere eventuali aree di pericolo da Rischi meccanici di movimento, come ad Es. schiacciamento, convogliamento,
cesoiamento.
Per ogni impianto è indispensabile l’utilizzo di almeno una segnalazione luminosa, nonchè di un cartello di segnalazione fissato adeguatamente sulla struttura dell’infisso, oltre ai dispositivi citati al punto
“16”.
GENIUS declina ogni responsabilità ai fini della sicurezza e del buon
funzionamento dell’automazione in caso vengano utilizzati componenti dell’impianto non di produzione GENIUS
Per la manutenzione utilizzare esclusivamente parti originali GENIUS
Non eseguire alcuna modifica sui componenti facenti parte del
sistema d’automazione.
L’installatore deve fornire tutte le informazioni relative al funzionamento manuale del sistema in caso di emergenza e consegnare
all’utilizzatore dell’impianto la "Guida per l'Utente" allegata al prodotto.
Non permettere ai bambini o persone di sostare nelle vicinanze del
prodotto durante il funzionamento.
Tenere fuori dalla portata dei bambini radiocomandi o qualsiasi
altro datore di impulso, per evitare che l’automazione possa essere
azionata involontariamente.
L’utilizzatore deve astenersi da qualsiasi tentativo di riparazione o
d’intervento diretto e rivolgersi solo a personale qualificato.
Tutto quello che non è previsto espressamente in queste istruzioni non
è permesso
7)
8)
9)
10)
11)
12)
13)
14)
15)
16)
17)
18)
19)
20)
21)
22)
23)
24)
25)
CONSIGNES POUR L'INSTALLATEUR
RÈGLES DE SÉCURITÉ
1)
2)
3)
4)
5)
6)
7)
8)
9)
IMPORTANT NOTICE FOR THE INSTALLER
10)
GENERAL SAFETY REGULATIONS
1)
2)
3)
4)
5)
WARNING! GENIUS strongly recommends to follow these instructions
literally for the safety of persons. Improper installation or misuse of the
product will cause very serious damages to persons.
Packaging material (plastic, polystyrene etc.) is a potential hazard
and must be kept out of reach of children.
Read the instructions carefully before installing the product.
Keep these instructions for future reference.
This product has been designed and manufactured only for the use
stated in this manual. Any other use not expressly set forth will affect
the reliability of the product and/or could be source of hazard.
GENIUS cannot be held responsible for any damage caused by
improper use or different from the use for which the automation
system is destined to.
Do not use this device in areas subject to explosion: the presence of
flammable gas or fumes is a serious hazard.
Mechanical constructive elements must comply with UNI8612, CEN
pr EN 12604 and CEN pr EN 12605 standards.
Countries outside the EC shall follow the regulations above besides
their national normative references in order to offer the utmost
safety.
GENIUS cannot be held responsible for failure to observe technical
standards in the construction of gates and doors, or for any
deformation of the gates which may occur during use.
Installation must comply with UNI8612, CEN pr 12453 and CEN pr EN
12635. The degree of safety of the automation must be C + E.
Before carrying out any operations, turn off the system’s main switch.
An omnipower switch shall be provided for the installation with an
opening distance of the contacts of 3 mm or more. Alternatively,
use a 6A thermomagnetic breaker with multi-pole switching.
Ensure that there is a differential switch up-line of the electrical
system, with a trip threshold of 0.03A.
Check that the earthing plant is in perfect condition and connect it
to the metallic parts. Also earth the yellow/green wire of the operator.
The automation is fitted with an anti-crush safety system that is a
torque control device. In any case, further safety devices shall be
installed.
The safety devices (e.g. photocells, safety edges, etc.) protect
areas wherethere is a mechanical movement hazard, e.g. crushing,
entrapment and cutting.
Each installation must be fitted with at least one fashing light as well
as a warning plate suitably fixed to the gate, besides the safety
devices as per point 16. above.
GENIUS cannot be held responsible regarding safety and correct
functioning of the automation in the event that parts other than
GENIUS original parts are used.
Use only GENIUS original spare parts for maintenance operations.
Do not carry out any modifications to automation components.
The installer must supply all information regarding manual operation
of the system in the event of an emergency and provide the enduser with the "End-user Guide" attached to the product.
Keep out of persons when the product is in operation.
Keep out of reach of children the remote radio controls and any
control devices. The automation could be operated unintentionally.
The end-user must avoid any attempt to repair or adjust the automation
personally. These operations must be carried out exclusively by
qualified personnel.
What is not explicitly stated in these instructions is not permitted.
11)
12)
13)
14)
ATTENTION! Il est important pour la sécurité des personnes de lire
attentivement toute la notice d’instructions. Une mauvaise installation
et/ou utilisation du produit peut faire courir de graves risques aux
personnes.
Lire attentivement les instructions avant de commencer le montage
de l’automatisme
Tenir à l’écart des enfants tous les matériaux d’emballage (plastique,
polystyrène, etc...).
Toujours conserver la notice pour toute consultation future.
Cet automatisme a été conçu exclusivement pour l’utilisation
indiquée sur la présente notice. Tout autre utilisation pourrait
compromettre son efficacité et/ou représenter une source de
danger.
GENIUS décline toute responsabilité en cas d’utilisation impropre ou
autre que celle pour laquelle l’automatisme est destiné.
Ne pas installer l’automatisme en atmosphère explosive: la présence
de gaz ou de fumées inflammables représente un grave risque
pour la sécurité.
Les parties mécaniques de construction de l’automatisme doivent
satisfaire les exigences essentielles des normes UNI8612, EN pr EN
12604 et CEN pr EN 12605.
Dans les pays ne faisant par partie de la CEE, outre le respect à la
législation nationale, l’installateur doit se conformer aux normes cidessus pour garantir un niveau de sécurité adéquat.
GENIUS ne saurait être tenu pour responsable de l'inobservation des
règles de l'art dans la construction des fermetures à motoriser ni de
leurs détériorations pendant leur durée de fonctionnement.
L’installation doit être réalisée conformément aux normes UNI8612,
CEN pr EN 12453 et CEN pr EN 12635. Le niveau de sécurité de
l’automatisme doit être C+E.
Avant toute intervention sur l’installation, couper l’alimentation en
énergie électrique.
Prévoir sur le réseau d’alimentation de l’automatisme un interrupteur
omnipolaire avec distance d’ouverture des contacts égale ou
supérieure à 3 mm. En alternative, il est recommandé l’emploi d’un
interrupteur magnéto-thermique de 6 A de calibre avec coupure
omnipolaire.
Vérifier la présence en amont de l’installation électrique d’un
interrupteur différentiel avec un seuil de 0,03 A.
Vérifier l’efficacité de l’installation de terre et y raccorder les parties
SCHEMA DI COLLEGAMENTO - CONNECTION DIAGRAM - SCHEMA DE CONNEXION ESQUEMA DE CONEXIONADO - ANSCHLUßSCHEMA
1
ITALIANO
SISTEMA DI COMANDO A TASTIERA ELETTRONICA
ISTRUZIONI PER L’USO - NORME DI INSTALLAZIONE
1. CARATTERISTICHE GENERALI
È un sistema comando con tastiera elettronica in grado di pilotare due uscite relè tramite due codici personalizzabili
in modo indipendente o combinato. E’ utilizzabile per inserire e disinserire impianti d’allarme, per controllo accessi e
tutte le applicazioni che richiedono un comando affidabile, sicuro e semplice da installare ed utilizzare.
Le tastiere sono dotate di due LEDs ed un buzzer per le funzioni di programmazione, l’inserimento dei codici ed eventuali segnalazioni personalizzabili dall’installatore. La tastiera da esterno è anche dotata di tamper antistrappo.
È possibile collegare alla scheda un massimo di quattro tastiere.
2. CARATTERISTICHE TECNICHE
2.1
•
•
•
•
•
•
•
•
•
•
•
SCHEDA DI CONTROLLO
2.2 TASTIERA CORAZZATA
•
Sistema di trasmissione: DTMF
2 codici a sei cifre
Funzionamento monostabile/bistabile e combinato
Durata impulso relè monostabile: 1” ÷ 99”
Tempo di penalizzazione: 0” ÷ 99”
Distanza tra scheda e tastiera: 200mt max.
Tastiere collegabili: 4
Portata dei contatti del relè: 12V 1A
Pilotaggio LED tastiera: +12V 1mA
Tensione di alimentazione: 24V~ ±5%
Dimensioni della scheda: 90x72mm
•
•
•
•
12 Tasti
2 LEDs di segnalazione personalizzabili
Contenitore antivandalo in alluminio anodizzato
Tamper di protezione
Dimensioni:70x100x22
3. PROGRAMMAZIONE
Il sistema prevede l’utilizzo di due codici di sei cifre personalizzabili dall’utente; ogni codice può attivare il relativo
relè di uscita, o entrambe.
Per accedere alla programmazione spostare l’interruttore posto sulla scheda di controllo in posizione “ON”, oppure
cortocircuitare i morsetti “INT.PGM” (interruttore di programmazione) in morsettiera. Il LED rosso della tastiera comincia a lampeggiare.
3.1 PROGRAMMAZIONE DEI CODICI
1)
2)
3)
4)
Digitare il canale su cui bisogna programmare il codice: (1) oppure (2). Il LED rosso della tastiera si accende fisso.
Digitare il codice composto da 1 a 6 cifre. Le cifre possono anche uguali.
Digitare (#) per memorizzare il codice oppure (*) per abbandonare tale fase.
Ripetere la sequenza per modificare il codice o per programmare quello dell’altro canale.
NON UTILIZZARE DUE CODICI UGUALI.
3.2 PROGRAMMAZIONE DEL FUNZIONAMENTO
1)
2)
3)
4)
5)
6)
7)
8)
Digitare (0). Il LED rosso della tastiera si accende fisso.
Digitare il canale su cui bisogna programmare il funzionamento: (1) oppure (2).
Digitare (3) per impostare il funzionamento MONOSTABILE (ad impulso).
Digitare (4) per impostare il funzionamento BISTABILE (passo-passo).
Digitare (5) per attivare SOLO il relè relativo al canale (Canale 1 = Relè A; Canale 2 = Relè B)
Digitare (6) per attivare ANCHE il relè relativo all’altro canale.
Digitare (#) per memorizzare il codice oppure (*) per abbandonare tale fase.
Ripetere la sequenza per modificare le impostazioni o per programmare il funzionamento dell’altro canale.
3.3 PROGRAMMAZIONE DELLA DURATA IMPULSO (IN FUNZ. MONOSTABILE)
1)
2)
3)
4)
Digitare (7) per programmare la durata impulso sul relè A, oppure (8) per programmare la durata impulso sul relè B.
Il LED rosso della tastiera si accende fisso.
Digitare il tempo in secondi, composto da due cifre: da 00 a 99 secondi.
Il LED rosso della tastiera riprende a lampeggiare.
3.4 PROGRAMMAZIONE DELLA DURATA BLOCCO TASTIERA (DOPO TRE CODICI FALSI)
1) Digitare (9) . Il LED rosso della tastiera si accende fisso.
2) Digitare il tempo in secondi, composto da due cifre: da 00 a 99 secondi.
3) Il LED rosso della tastiera riprende a lampeggiare.
Per uscire dalla programmazione, spostare l’interruttore posto sulla scheda di controllo in posizione “OFF”, oppure
aprire il cortocircuito sui morsetti “INT.PGM” in morsettiera. Premere (#) il LED rosso si spegne.
2
4. INSTALLAZIONE
J) Controllo dei LEDs della tastiera per segnalazioni
personalizzate tramite positivo 12V
A = LED Verde
B = LED Rosso
K) Bianco
L) Rosso
M) Giallo
N) Nero
O) Blu
P) Blu
Legenda di pag. 1:
A) Tastiera
B) Scheda di controllo
C) Interruttore di programmazione
D) Verso altre tastiere (max 4)
E) Uscita contatti relè A
F) Uscita contatti relè B
G) Alimentazione 24V~
H) Tamper NC antistrappo
I) Interruttore di programmazione opzionale
5. FUNZIONAMENTO
Il LED rosso lampeggia una volta per confermare la digitazione del codice 1, e due volte per confermare la
digitazione del codice 2.
In funzionamento MONOSTABILE, dopo la digitazione del codice si eccita il relè relativo. Si diseccita dopo la durata
impulso programmata. Il funzionamento monostabile è particolarmente adatto per il comando di elettroserrature e
centrali di automazione.
n funzionamento BISTABILE, dopo la digitazione del codice si eccita il relè relativo e si diseccita digitando nuovamente il codice. Il funzionamento bistabile è ideale per l’inserimento ed il disinserimento delle centrali di allarme antifurto.
Dopo l’ immissione di tre codici falsi e consecutivi un sistema di protezione provoca il blocco delle tastiere per un
tempo impostato in programmazione.
E’ possibile comandare i due LED presenti sulle tastiere per altre segnalazioni. E’ sufficiente inviare un positivo 12Vcc al
morsetto (7) per accendere il LED rosso, ed al morsetto (8) per accendere il LED verde (ad es. è possibile visualizzare
l’inserimento/disinserimento dell’impianto di allarme, oppure lo stato delle zone, utilizzando le uscite N1-N4 oppure VR sui morsetti delle centrali antifurto).
ELECTRONIC KEYBOARD CONTROL SYSTEM
INSTRUCTIONS FOR USE- DIRECTIONS FOR INSTALLATION
ENGLISH
1. GENERAL FEATURES
Is a control system with electronic keyboard that can drive two relay outputs independently or in a combined mode
using two customised codes. It can be used to activate and deactivate alarm systems, for access control and for all
applications that require a safe and reliable control that is simple to install and to use.
The keyboards are equipped with two LEDs and a buzzer for programming functions, for inserting codes and for any
signals customised by the installer. The outdoor version of the keyboard is also equipped with a tear-proof tamper. A
maximum of four keyboards can be connected to the card.
2. TECHNICAL FEATURES
2.1
•
•
•
•
•
•
•
•
•
•
•
CONTROL CARD
Transmission system: DTMF
2, six-digit codes
Monostable/bistable and combined operating mode
Monostable relay impulse duration: 1” - 99”
Penalisation time: 0” - 99”
Distance between card and keyboard: 200mt max.
Connectable keyboards: 4
Relay contact rating: 12V 1A
Keyboard LED drive: +12V 1mA
Power supply: 24V~ ±5%
Card dimensions: 90x72 mm
2.2
•
•
•
•
•
ARMOURED KEYBOARD
12 keys
2 customised signal LEDs
Anodised aluminium tamper-proof container
Safety tamper
Dimensions:70x100x22
3.PROGRAMMING
The system uses two, six-digit codes that can be customised by the user. Each code can activate the relative output
relay, or both.
To access the programming mode, turn the switch located on control card to the “ON” position, or short-circuit the
“INT.PGM” terminals (programming switch) on the terminal strip. The red LED on the keyboard will begin to flash.
3.1 CODE PROGRAMMING
1) Enter the channel on which to program the code: (1) or (2). The red LED on the keyboard will turn on.
2) Enter the code consisting of 1 to 6 digits. All the digits can also be the same number.
3
3) Enter (#) to store the code or (*) to quit the phase.
4) Repeat the sequence to change the code or to program the code for the other channel.
DO NOT USE TWO IDENTICAL CODES.
3.2 OPERATING PROGRAMMING
1)
2)
3)
4)
5)
6)
7)
8)
Enter (0). The red LED on the keyboard will turn on.
Enter the channel on which to program the code: (1) or (2).
Enter (3) to set the MONOSTABLE operating mode (impulse).
Enter (4) to set the BISTABLE operating mode (step-step).
Enter (5) to activate ONLY the relay relative to the channel (Channel 1 = Relay A; Channel 2 = Relay B)
Enter (6) to activate ALSO the relay relative to the other channel.
Enter (#) to store the code or (*) to quit the phase.
Repeat the sequence to change the settings or to program the operating mode of the other channel.
3.3 IMPULSE DURATION PROGRAMMING (IN MONOSTABLE OPERATING MODE)
1)
2)
3)
4)
Enter (7) to program the impulse duration on relay A or (8) to program the impulse duration on relay B.
The red LED on the keyboard will turn on.
Enter the time in seconds, consisting of two digits: 00 t 99 seconds.
The red LED on the keyboard will start flashing.
3.4 KEYBOARD LOCKOUT DURATION PROGRAMMING (AFTER THREE FALSE CODES)
1) Enter (9). The red LED on the keyboard will turn on.
2) Enter the time in seconds, consisting of two digits: 00 t 99 seconds.
3) The red LED on the keyboard will start flashing.
To exit the programming mode, turn the switch located on control card to the “OFF” position, or open the short-circuit
on the “INT.PGM” terminals on the terminal strip. Enter (#) the red LED will turn off.
4. INSTALLATION
J) Keyboard LED control for customised signals using the
12V positive
A = Green LED
B = Red LED
K) White
L) Red
M) Yellow
N) Black
O) Blue
P) Blue
Key to pag. 1:
A) Keyboard
B) Control card
C) Programming switch
D) To other keyboards (max. 4)
E) Relay A contract output
F) Relay B contract output
G) Power supply: 24V~
H) NC tear-proof tamper
I) Optional programming switch
5. OPERATION
The red LED flashes once to confirm that code 1 was entered and twice to confirm that code 2 was entered.
In the MONOSTABLE operating mode, after entering the code, the relative relay will be excited. It is de-excited after
the programmed impulse duration. The monostable operating mode is particularly suitable to control electric locks
and automation units. In the BISTABLE operating mode, after entering the code, the relative relay will be excited and
then will be de-excited when the code is entered a second time. The bistable operating mode is ideal for turning antitheft alarm units on and off. After entering three consecutive false codes, a protection system locks out the keyboards
for a time set in the programming mode.
It is possible to control the two LEDs on the keyboards for other signals. Just send a positive 12Vdc to terminal (7) to turn
on the red LED, and to terminal (8) to turn on the green LED (e.g. it is possible to display when the alarm system turns on/
off, or the status of the various areas, using the outputs N1-N4 or V-R on the terminals of the anti-theft units).
FRANÇAIS
SYSTEME DE COMMANDE A CLAVIER ELECTRONIQUE
INSTRUCTIONS - RÈGLES D’INSTALLATION
1. CARACTÉRISTIQUES GÉNÉRALES
Est un système de commande à clavier électronique en mesure de piloter deux sorties relais au moyen de deux codes
personnalisables indépendemment ou en combinaison. Il peut être utilisé pour brancher et débrancher des systèmes
d’alarme, pour le contrôle d’accès et pour toutes applications demandant une commande fiable, sûre et simple à
installer et utiliser. Les claviers sont dotés de deux DELs et un avertisseur sonore pour les fonctions de programmation,
l’introduction des codes et d’éventuelles signalisatiosns personnalisables par l’installateur. Le clavier pour extérieur est
également doté de protection infraudable. Quatre claviers au maximum peuvent être connectés à la carte.
4
2. CARACTÉRISTIQUES TECHNIQUES
2.1
•
•
•
•
•
•
•
•
•
•
•
CARTE DE CONTRÔLE
2.2
•
•
•
•
•
Système de transmission: DTMF
2 codes à six chiffres
Fonctionnement monostable/bistable et combiné
Durée impulsion relais monostable: 1” ÷ 99”
Temps de pénalisation: 0” ÷ 99”
Distance entre carte et clavier: 200m.max.
Claviers connectables: 4
Puissance des contacts du relais: 12V 1A
Pilotage DEL clavier: +12V 1mA
Tension d’alimentation: 24V~ ±5%
Dimensions de la carte: 90x72mm
CLAVIER BLINDÉ
12 Touches
2 DELs de signalisation personnalisables
Coffre anti-vandalisme en aluminium anodisé
Tamper de protection
Dimensions:70x100x22
3. PROGRAMMATION
Ce système prévoit l’utilisation de deux codes de six chiffres personnalisés par l’usager, chaque code peut activer le
relais relatif de sortie ou bien les deux. Pour accéder à la programmation, mettre l’interrupteur placé sur la carte de
contrôle sur la position “ON”, ou bien courtcircuiter les bornes “INT.PGM” (interrupteur de programmation) sur bornier.
La DEL rouge du clavier commence à clignoter.
3.1 PROGRAMMATION DES CODES
1)
2)
3)
4)
Frapper (1) ou (2) pour le canal sur lequel programmer le code. La DEL rouge du clavier s’allume à lumière fixe.
Frapper le code composé de 1 à 6 chiffres. Les chiffres peuvent aussi être égaux.
Frapper (#) pour mémoriser le code ou (*) pour abandonner la phase.
Répéter la séquence pour modifier le code ou pour programmer le code de l’autre canal.
NE PAS UTILISER DEUX CODES ÉGAUX.
3.2 PROGRAMMATION DU FONCTIONNEMENT
1)
2)
3)
4)
5)
6)
7)
8)
Frapper (0). La DEL rouge du clavier s’allume à lumière fixe
Frapper le canal sur lequel programmer le fonctionnement (1) ou (2).
Frapper (3) pour configurer le fonctionnement MONOSTABLE (à impulsion)
Frapper (4) pour configurer le fonctionnement BISTABLE (pas à pas )
Frapper (5) pour activer SEULEMENT le relais relatif au canal (Canal 1 = Relais A; Canal 2 = Relais B)
Frapper (6) pour activer AUSSI le relais relatif à l’autre canal.
Frapper (#) pour mémoriser le code ou bien (*) pour abandonner cette phase.
Répéter la séquence pour modifier les configurations ou programmer le fonctionnement de l’autre canal.
3.3 PROGRAMMATION DE LA DURÉE IMPULSION (EN FONCTIONNNEMENT MONOSTABLE)
1) Frapper (7) pour programmer la durée impulsion sur le relais A, ou bien (8) pour programmer la durée impulsion sur
le relais B.
2) La DEL rouge du clavier s’allume à lumière fixe.
3) Frapper le temps en secondes, composé de deux chiffres de 00 a 99 secondes.
4) La DEL rouge du clavier reprend à clignoter.
3.4 PROGRAMMATION DE LA DURÉE BLOCAGE CLAVIER (APRÈS TROIS CODES ERRONÉS)
1) Frapper (9). La DEL rouge du clavier s’allume fixe.
2) Frapper le temps en secondes, composé de deux chiffes: de 00 à 99 secondes.
3) La DEL rouge du clavier reprend à clignoter.
Pour sortir de la programmation, mettre l’interrupteur placé sur la carte de contrôle sur la position “OFF”, ou bien
ouvrir le court-circuit sur les bornes “INT.PGM” en bornier. Frapper (#) la DEL rouge s’éteint.
4. INSTALLATION
Légende de pag. 1
A)
B)
C)
D)
E)
F)
G)
H)
I)
J) Contrôle des DELs du clavier pour signalisations
personnalisées par positif 12V
A = DEL Verte
B = DEL Rouge
K) Blanche
L) Rouge
M) Jaune
N) Noire
O) Bleue
P) Bleue
Clavier
Carte de contrôle
interrupteur de programmation
Pour autres claviers (max 4)
Sortie contacts relais A
Sortie contacts relais B
Alimentation 24V~
Protection NC infraudable
Interrupteur optionnel de programmation
5
5. FONCTIONNEMENT
La DEL rouge clignote une fois pour confirmer la frappe du code 1, et deux fois pour confirmer la frappe du code 2.
En fonctionnement MONOSTABLE, après la frappe du code le relais relatif s’active. Il se désactive après la durée
impulsion programmée. Le fonctionnement monostable convient particulièrement à la commande de serrures
électriques et centrales d’automatisation. En fonctionnemennt BISTABLE, une fois le code frappé, le relais relatif
s’active et se désactive en frappant le code de nouveau. Le fonctionnement bistable est idéal pour le branchement
et débranchement des centrales d’alarme anti-vol. Après introduction de trois codes erronés et consécutifs, un
système de protection provoque le blocage des claviers pour un temps établi en programmation.
Il est possible de commander les deux DELs présents sur le clavier pour d’autres signalisations. Il suffit d’envoyer un
positif 12Vcc à la borne (7) pour allumer la DEL rouge, et à la borne (8) pour allumer la DEL verte (par ex. Il est possible
de visualiser le branchement/ débranchement du système d’alarme, ou l’état des zones, en utilisant les sorties N1-N4
ou bien V-R sur les bornes des centrales anti-vol).
ESPAÑOL
SISTEMA DE MANDO POR TECLADO ELECTRÓNICO
INSTRUCCIONES PARA EL USO - NORMAS DE INSTALACION
1. CARACTERISTICAS GENERALES
Es un sistema de mando por teclado electrónico capaz de pilotar dos salidas de relé mediante dos códigos
personalizables de manera independiente o combinada. Es utilizable para activar e inactivar instalaciones de
alarma, para el control de accesos y todas las aplicaciones que requieren un mando fiable, seguro y simple de
instalar y utilizar. Los teclados llevan dos LEDs y un zumbador para las funciones de programación, la introducción de
los códigos y eventuales señalizaciones que el instalador puede personalizar. El teclado para exteriores A108 también
lleva tapa antidesgarro. Es posible conectar a la tarjeta hasta un máximo de cuatro teclados.
2. CARACTERISTICAS TECNICAS
2.1
•
•
•
•
•
•
•
•
•
•
•
TARJETA DE CONTROL
Sistema de transmisión: DTMF
2 códigos de seis dígitos
Funcionamiento monoestable/biestable y combinado
Duración impulso relé monoestable: 1” ÷ 99”
Tiempo de penalización: 0” ÷ 99”
Distancia entre tarjeta y teclado: 200mt máx.
Teclados conectables: 4
Capacidad de los contactos del relé: 12V 1A
Pilotaje LED teclado: +12V 1mA
Tensión de alimentación: 24V~ ±5%
Dimensiones de la tarjeta: 90x72mm
2.2
•
•
•
•
•
TECLADO ACORAZADO
12 Teclas
2 LEDs de señalización personalizables
Contenedor antivándalo en aluminio anodizado
Tapa de protección
Dimensiones: 70x100x22
3. PROGRAMACIÓN
El sistema prevé el uso de dos códigos de seis dígitos que el usuario puede personalizar; cada código puede activar
el relé correspondiente de salida, o ambos. Para acceder a la programación es preciso desplazar el interruptor,
situado en la tarjeta de control, en la posición “ON” o cortocircuitar los bornes “INT.PGM” (interruptor de
programación) en la bornera. El LED rojo del teclado se vuelve intermitente.
3.1 PROGRAMACIÓN DE LOS CÓDIGOS
1)
2)
3)
4)
Teclear el canal para el cual es preciso programar el código: (1) ó (2). El LED rojo del teclado se enciende fijo.
Teclear el código formado por entre 1 y 6 dígitos. Los dígitos pueden ser iguales.
Teclear (#) para memorizar el código o (*) para abandonar dicha fase.
Repetir la secuencia para modificar el código o para programar el código del otro canal.
NO UTILIZAR DOS CÓDIGOS IGUALES.
3.2 PROGRAMACIÓN DEL FUNCIONAMIENTO
1)
2)
3)
4)
5)
6)
7)
8)
Teclear (0). El LED rojo del teclado se enciende fijo.
Teclear el canal para el cual es preciso programar el funcionamiento: (1) ó (2).
Teclear (3) para determinar el funcionamiento MONOESTABLE (por impulso).
Teclear (4) para determinar el funcionamiento BIESTABLE (paso-paso).
Teclear (5) para activar SÓLO el relé correspondiente al canal (Canal 1 = Relé A; Canal 2 = Relé B)
Teclear (6) para activar TAMBIÉN el relé correspondiente al otro canal.
Teclear (#) para memorizar el código o (*) para abandonar dicha fase.
Repetir la secuencia para modificar las determinaciones o para programar el funcionamiento del otro canal.
6
3.3 PROGRAMACIÓN DE LA DURACIÓN DEL IMPULSO (EN FUNC. MONOESTABLE)
1) Teclear (7) para programar la duración del impulso sobre el relé A, o (8) para programar la duración del impulso
sobre el relé B.
2) El LED rojo del teclado se enciende fijo.
3) Teclear el tiempo en segundos, compuesto por dos dígitos: entre 00 y 99 segundos.
4) El LED rojo del teclado se vuelve de nuevo intermitente.
3.4 PROGRAMACIÓN DE LA DURACIÓN DEL BLOQUEO DEL TECLADO (DESPUÉS DE TRES CÓDIGOS ERRADOS)
1) Teclear (9) . El LED rojo del teclado se enciende fijo.
2) Teclear el tiempo en segundos, compuesto por dos dígitos: entre 00 y 99 segundos.
3) El LED rojo del teclado se vuelve de nuevo intermitente.
Para salir de la programación, desplazar el interruptor, situado en la tarjeta de control, en la posición “OFF”, o abrir el
cortocircuito en los bornes “INT.PGM” en la bornera. Teclear (#) el LED rojo se apaga.
Leyenda de pag. 1
A) Teclado
B) Tarjeta de control
C) Interruptor de programación
D) Hacia otros teclados (máx. 4)
E) Salida contactos relé A
F) Salida contactos relé B
G) Alimentación 24V~
H) Tapa NC antidesgarro
I) Interruptor de programación en opción
4. INSTALACIÓN
J) Control de los LEDs del teclado para señalizaciones
personalizadas mediante positivo 12V
A = LED Verde
B = LED Rojo
K) Blanco
L) Rojo
M) Amarillo
N) Negro
O) Azul
P) Azul
5. FUNCIONAMIENTO
El LED rojo centellea una vez para confirmar que se ha tecleado el código 1, y dos veces para confirmar que se ha
tecleado el código 2. En el funcionamiento MONOESTABLE, después de teclear el código se excita el relé
correspondiente. Se desexcita finalizado el impulso programado. El funcionamiento monoestable es particularmente
apto para el mando de cerraduras eléctricas y de centrales de automatización.
En el funcionamiento BIESTABLE, después de teclear el código se excita el relé correspondiente que se desexcita
tecleando de nuevo el código. El funcionamiento biestable es ideal para activar e inactivar las centrales de alarma
antirrobo. Tras teclear consecutivamente tres códigos errados un sistema de protección bloquea los teclados por un
tiempo determinado en la programación. Es posible mandar los dos LED presentes en los teclados para otras
señalizaciones. Basta enviar un positivo 12Vcc al borne (7) para encender el LED rojo, y al borne (8) para encender el
LED verde (por ejemplo: es posible activar/inactivar la instalación de alarma, o el estado de las zonas, utilizando las
salidas N1-N4 o V-R en los bornes de las centrales antirrobo).
STEUERSYSTEM MIT ELEKTRONISCHER TASTATUR
GEBRAUCHSANLEITUNG – ANWEISUNGEN ZUR INSTALLATION
DEUTSCH
1. ALLGEMEINE EIGENSCHAFTEN
Bei handelt es sich um ein Steuersystem mit elektronischer Tastatur, das in der Lage ist, zwei Relaisausgänge durch zwei
benutzerspezifische Codes unabhängig voneinander oder miteinander kombiniert zu steuern. Es kann benutzt werden,
um Alarmanlagen ein- und auszuschalten, für die Zugangskontrolle und sämtliche Anwendungen, die eine zuverlässige,
sichere und einfach zu installierende und zu benutzende Steuerung erfordern.
Die Tastaturen verfügen über zwei LEDs und einen Summer für die Programmierfunktionen, die Eingabe der Codes und
eventuelle vom Monteur benutzerspezifisch anpaßbare Meldungen. Die externe Tastatur verfügt auch über einen
abreißsicheren Tamper. An die Karte können maximal vier Tastaturen angeschlossen werden.
2.1 STEUERKARTE
•
•
•
•
•
•
•
•
•
•
•
2. TECHNISCHE EIGENSCHAFTEN
2.2 GUßGEKAPSELTE TASTATUR
Übertragungssystem: DTMF
2 sechsstellige Codes
Monostabiler/bistabiler und kombinierter Betrieb
Impulsdauer monostabiles Relais: 1” ÷ 99”
Sperrzeit: 0” ÷ 99”
Abstand zwischen Karte und Tastatur: max. 200 m
Anschließbare Tastaturen: 4
Stromfestigkeit der Relaiskontakte: 12 V 1 A
Steuerung LEDs auf Tastatur: +12 V 1 mA
Versorgungsspannung: 24 V~ ±5 %
Abmessungen der Karte: 90 x 72 mm
•
•
•
•
•
7
12 Tasten
2 benutzerspezifisch anpaßbare Anzeige-LEDs
Zerstörungssicheres Gehäuse aus eloxiertem Aluminium
Schutz-Tamper
Abmessungen:70 x 100 x 22
3. PROGRAMMIERUNG
Das System sieht die Benutzung von zwei sechsstelligen Codes vor, die vom Benutzer personalisiert werden können;
jeder Code kann das entsprechende Ausgangsrelais oder beide aktivieren. Um in den Programmiermodus zu
gelangen, den Schalter auf der Karte in Position “ON” schieben oder die Klemmen “INT.PGM” (Programmierschalter)
auf dem Klemmenbrett kurzschließen. Die rote LED auf der Tastatur beginnt zu blinken.
3.1 PROGRAMMIERUNG DER CODES
1) Den Kanal eingeben, auf den der Code programmiert werden soll: (1) oder (2). Die rote LED auf der Tastatur leuchtet
ständig.
2) Den 1- bis 6-stelligen Code eingeben. Die Ziffern können auch gleich sein.
3) (#) eingeben, um den Code abzuspeichern, oder (*), um diesen Schritt zu verlassen.
4) In der gleichen Reihenfolge verfahren, um den Code zu ändern oder den Code des anderen Kanals zu programmieren.
DIE BEIDEN CODES DÜRFEN NICHT GLEICH SEIN.
3.2 PROGRAMMIERUNG DES BETRIEBS
1) (0) eingeben. Die rote LED auf der Tastatur leuchtet ständig.
2) Den Kanal eingeben, auf den der Betrieb programmiert werden soll: (1) oder (2).
3) (3) eingeben, um den Betrieb MONOSTABIL (Impulsbetrieb) einzustellen.
4) (4) eingeben, um den Betrieb BISTABIL (Schrittbetrieb) einzustellen.
5) (5) eingeben, um NUR das zum Kanal gehörende Relais zu aktivieren (Kanal 1 = Relais A; Kanal 2 = Relais B)
6) (6) eingeben, um AUCH das zum anderen Kanal gehörende Relais zu aktivieren.
7) (#) eingeben, um den Code abzuspeichern, oder (*), um diesen Schritt zu verlassen.
8) In der gleichen Reihenfolge verfahren, um die Einstellungen zu ändern oder den Betrieb des anderen Kanals zu
programmieren.
3.3 PROGRAMMIERUNG DER IMPULSDAUER (BEI BETRIEB MONOSTABIL)
1) (7) eingeben, um die Impulsdauer auf Relais A zu programmieren, oder (8), um die Impulsdauer auf Relais B zu
programmieren.
2) Die rote LED auf der Tastatur leuchtet ständig.
3) Die Dauer in Sekunden eingeben; diese besteht aus zwei Ziffern: von 00 bis 99 Sekunden.
4) Die rote LED auf der Tastatur beginnt wieder zu blinken.
3.4 PROGRAMMIERUNG DER DAUER DER TASTATURSPERRE (NACH DREI FALSCH EINGEGEBENEN CODES)
1) (9) eingeben. Die rote LED auf der Tastatur leuchtet ständig.
2) Die Dauer in Sekunden eingeben; diese besteht aus zwei Ziffern: von 00 bis 99 Sekunden.
3) Die rote LED auf der Tastatur beginnt wieder zu blinken.
Um den Programmiermodus zu verlassen, den Schalter auf der Karte A10801 in Position “OFF” schieben oder den
Kurzschluß an den Klemmen “INT.PGM” auf dem Klemmenbrett öffnen. (#) eingeben die rote LED erlischt.
4. INSTALLATION
J)
Steuerung der LEDs der Tastatur für
benutzerspezifische Meldungen durch positives Signal 12 V
A = grüne LED
B = rote LED
K)
Weiß
L)
Rot
M)
Gelb
N)
Schwarz
O)
Blau
P)
Blau
Legende pag. 1
A)
Tastatur
B)
Karte
C)
Programmierschalter
D)
Zu anderen Tastaturen (max. 4)
E)
Ausgang Kontakte Relais A
F)
Ausgang Kontakte Relais B
G)
Stromversorgung 24 V~
H)
Abreißsicherer NC-Tamper
I)
Wahlweise Programmierschalter
5. BETRIEB
Die rote LED blinkt einmal auf, um die Eingabe von Code 1 zu bestätigen, und zweimal, um die Eingabe von Code 2 zu
bestätigen.
Im Betrieb MONOSTABIL wird das entsprechende Relais nach der Eingabe des Codes erregt. Nach der
programmierten Impulsdauer fällt es ab. Der monostabile Betrieb ist besonders für die Steuerung von Elektroschlössern
und Automationszentralen geeignet.
Beim Betrieb BISTABIL wird nach der Eingabe des Codes das entsprechende Relais erregt und fällt nach erneuter
Eingabe des Codes ab. Der bistabile Betrieb ist ideal für das Ein- und Abschalten von Einbruchalarmzentralen.
Nach der Eingabe von drei falschen Codes nacheinander wird durch ein Schutzsystem die Tastatursperre über eine bei
der Programmierung eingestellte Dauer ausgelöst.
Die beiden LEDs auf den Tastaturen können für andere Meldungen gesteuert werden. Es genügt, ein positives Signal 12
V Gleichstrom an Klemme (7) zu senden, damit die rote LED aufleuchtet, und an Klemme (8), damit die grüne LED
aufleuchtet (so kann z. B. durch Benutzung der Ausgänge N1-N4 oder V-R auf den Klemmen der
Einbruchalarmzentralen das Ein-/Abschalten der Alarmanlage oder der Status der Bereiche angezeigt werden).
8
métalliques de la fermeture. Mise à la terre par fil vert/jaune de
l’automatisme.
15) L’automatisme dispose d’une sécurité anti-écrasement constituée
d’un limiteur de couple qui doit être toujours associé à d’autres
dispositifs de sécurité.
16) Les dispositifs de sécurité (ex.: cellules photo-électriques, tranches
de sécurité, etc...) permettent de protéger des zones de danger
contre tous risques mécaniques de mouvement de l'automatisme
comme, par exemple, l’écrasement et le cisaillement.
17) GENIUS préconise l’utilisation d’au moins une signalisation lumineuse
pour chaque système ainsi que d’une plaque signalétique fixée
judicieusement sur la fermeture en adjonction aux dispositifs indiqués
au point 16).
18) GENIUS décline toute responsabilité quant à la sécurité et au bon
fonctionnement de l’automatisme dans le cas d’utilisation de
composants d’une origine autre que GENIUS.
19) Utiliser exclusivement des pièces (ou parties) d’origine GENIUS pour
tous les travaux d’entretien.
20) Ne pas procéder à des modifications ou réparations des
composants de l’automatisme.
21) L’installateur doit fournir toutes les informations relatives au
déverrouillage du système en cas d’urgence et les "Instructions
pour l'utilisateur" accompagnant le produit.
22) Empêcher quiconque de rester à proximité de l’automatisme
pendant son fonctionnement
23) Tenir à l’écart des enfants toutes radiocommandes ou n’importe
quel autre générateur d’impulsions, afin d’éviter toute manoeuvre
accidentelle de l’automatisme.
24) L’utilisateur doit s’abstenir de faire toute tentative de réparation pour
remédier à un défaut, et demander uniquement l’intervention d’un
personnel qualifié.
25) Toutes les interventions ou réparations qui ne sont pas prévues
expressément dans la présente notice ne sont pas autorisées.
ADVERTENCIAS PARA EL INSTALADOR
18) GENIUS declina toda responsabilidad respecto a la seguridad y al
correcto funcionamiento del equipo automático en el caso de
que se utilicen otros componentes del sistema que no hayan sido
producidos por dicha empresa.
19) Para el mantenimiento, utilizar exclusivamente recambios originales
GENIUS.
20) No efectuar ninguna modificación de los elementos que componen
el sistema de automatización.
21) El técnico instalador debe facilitar toda la información relativa al
funcionamiento manual del sistema en casos de emergencia, y
entregar al usuario del sistema las "Instrucciones para el usuario"
que se anexa al producto.
22) No permitir que los niños, ni ninguna otra persona, permanezcan en
proximidad del equipo durante el funcionamiento.
23) No dejar al alcance de los niños mandos a distancia ni otros
generadores de impulsos, para evitar que el equipo automático
sea accionado involuntariamente.
24) El usuario debe abstenerse de todo intento de reparación o de
intervención directa; es preciso consultar siempre con personal
especializado.
25) Todo aquello que no esté expresamente especificado en estas
instrucciones habrá de considerarse no permitido.
HINWEISE FÜR DEN INSTALLATIONSTECHNIKER
ALLGEMEINE SICHERHEITSVORSCHRIFTEN
1)
2)
3)
4)
5)
REGLAS GENERALES PARA LA SEGURIDAD
1)
2)
3)
4)
5)
6)
7)
8)
9)
10)
11)
12)
13)
14)
15)
16)
17)
¡ATENCIÓN! Para poder garantizar la seguridad personal, es importante seguir atentamente todas las instrucciones. La instalación
incorrecta o el uso inapropiado del producto pueden provocar
graves daños personales.
Leer detenidamente las instrucciones antes de empezar a instalar
el equipo.
No dejar los materiales de embalaje (plástico, poliestireno, etc.) al
alcance de los niños, ya que constituyen fuentes potenciales de
peligro.
Conservar las instrucciones para futuras consultas.
Este producto ha sido proyectado y construido exclusivamente
para el uso indicado en el presente manual. Cualquier aplicación
no expresamente indicada podría resultar perjudicial para el equipo
o para las personas circunstantes.
GENIUS declina toda responsabilidad ante inconvenientes derivados
del uso impropio del equipo o de aplicaciones distintas de aquella
para la cual el mismo fue creado.
No instalar el aparato en una atmósfera explosiva. La presencia de
gases o humos inflamables implica un grave peligro para la
seguridad.
Los elementos mecánicos de construcción deben ser conformes
a lo establecido en las Normativas UNI 8612, EN pr EN 12604 y CEN
pr EN 12605.
En los países no pertenecientes a la CEE, además de respetarse las
normativas nacionales, para obtener un nivel de seguridad
adecuado deben cumplirse las normas arriba mencionadas.
GENIUS no es responsable por la inobservancia de los adecuados
criterios técnicos en la construcción de los cierres que se van a
motorizar, ni por las deformaciones que puedan verificarse con el
uso.
La instalación debe efectuarse de conformidad con las Normas
UNI 8612, CEN pr EN 12453 y CEN pr EN 12635. El nivel de seguridad
del equipo automático debe ser C+E.
Antes de efectuar cualquier operación en el equipo, desconéctelo
de la alimentación eléctrica.
La red de alimentación del equipo automático debe estar dotada
de un interruptor omnipolar con una distancia de apertura de los
contactos igual o superior a 3 mm. Como alternativa, se aconseja
utilizar un interruptor magnetotérmico de 6 A con interrupción
omnipolar.
Comprobar que antes de la instalación eléctrica haya un interruptor
diferencial con umbral de 0,03 A.
Cerciorarse de que la conexión a tierra está correctamente
realizada. Conectar a ella las partes metálicas del cierre y el cable
amarillo/verde del equipo automático.
El equipo automático cuenta con un dispositivo de seguridad
antiaplastamiento, constituido por un control de par. No obstante,
también deben instalarse otros dispositivos de seguridad.
Los dispositivos de seguridad (por ej.: fotocélulas, bandas sensibles,
etc.) permiten evitar peligros derivados de acciones mecánicas de
movimiento (aplastamiento, arrastre, cercenamiento).
Para cada equipo es indispensable utilizar por lo menos una
señalización luminosa, así como también un letrero de señalización
correctamente fijado a la estructura de la cancela, además de los
dispositivos citados en el punto 16.
6)
7)
8)
9)
10)
11)
12)
13)
14)
15)
16)
17)
18)
19)
20)
21)
22)
23)
24)
25)
ACHTUNG! Zur persönlichen Sicherheit sollten die Anleitungen in allen
Teilen befolgt werden. Eine fehlerhafte Installation bzw. Verwendung
des Produkts kann zu schweren Verletzungen führen.
Vor Installation des hierin beschriebenen Produktes die Anleitungen
aufmerksam durchlesen und aufbewahren.
Verpackungsstoffe (Kunststoff, Styropor usw.) stellen eine
Gefahrenquelle für Kinder dar und sind daher außerhalb ihrer
Reichweite zu verwahren.
Die Installationsanleitungen für künftigen Bedarf aufbewahren.
Vorliegendes Produkt ist ausschließlich für den in dieser
Dokumentation angegebenen Zweck entwickelt und gefertigt
worden. Nicht ausdrücklich erwähnte Einsätze können die
Fehlerfreiheit des Produktes beeinträchtigen bzw. eine
Gefahrenquelle darstellen.
GENIUS lehnt jedwede Haftung bei unsachgemäßem und
bestimmungsfremdem Gebrauch des Antriebs ab.
Das Produkt nicht in Ex-Bereichen anwenden: Brennbare Gase oder
Rauchemissionen sind ein schwerwiegendes Sicherheitsrisiko.
Die mechanischen Bauelemente haben den Bestimmungen der
Norm UNI8612, EN pr EN 12604 und CEN pr EN 12605 zu entsprechen.
Im Hinblick auf das EG-Ausland müssen zur Gewährleistung eines
angemessenen Sicherheitsstands außer den landeseigenen
Bestimmungen ebenfalls die oben genannten Normen zur
Anwendung kommen.
GENIUS kann nicht für die Mißachtung des technischen Stands bei
der Herstellung der anzutreibenden Tore haftbar gemacht werden,
desto weniger für die während der Nutzung auftretenden
Strukturverformungen.
Bei der Installation müssen die Normen UNI8612, CEN pr EN 12453
und CEN pr EN 12635 erfüllt werden. Der Sicherheitsstand des Antriebs
soll C+E betragen.
Vor jeglichen Arbeiten an der Anlage unbedingt die Stromversorgung
unterbrechen.
Das Versorgungsnetz des Antriebs ist durch einen allpoligen Schalter
mit Kontaktöffnungsabstand von mindestens 3 mm zu schützen. Als
Alternative kann ein 6A Schutzschalter mit allpoliger Unterbrechung
verwendet werden.
Der elektrischen Anlage einen Fehlerstromschutzschalter mit 0,03A
Auslöseschwelle vorschalten.
Den Erdschluß auf Wirksamkeit überprüfen und anschließend mit
dem Tor verbinden. Grün/gelbes Antriebskabel ebenfalls erden.
Das eigensichere Einklemmschutz-System der Anlage mit
Drehmomentüberwachung
muß
stets
durch
andere
Sicherheitsvorrichtungen ergänzt werden.
Mit den Sicherheiten (z.B. Lichtschranken, pneumatische
Kontaktleisten usw.) werden Gefahrenbereiche vor mechanischen
Bewegungsrisiken wie Einklemmen, Mitreißen und Scheren geschützt.
Zu jeder Anlage gehört außerdem mindestens eine Leuchtmeldung
sowie ein entsprechendes Warnschild an der Torkonstruktion und
die unter 16) genannten Sicherheiten.
GENIUS lehnt jegliche Haftung in punkto Sicherheit und korrekte
Antriebsfunktion ab, falls die Anlage mit Fremdkomponenten
ausgerüstet ist.
Zur Wartung ausschließlich GENIUS-Originalteile verwenden.
Änderungen an Komponenten des Antriebssystems sind untersagt.
Der Installationstechniker soll sämtliche Informationen zur
Notentriegelung des Systems erteilen und dem Anwender die dem
Produkt beigestellte "Benutzerinformation" aushändigen.
Kinder oder Erwachsene sind während des Betriebs vom Produkt
fernzuhalten.
Funksteuerungen oder andere Impulsgeber dürfen nicht von Kindern
gehandhabt werden, damit keine unbeabsichtigte Bedienung des
Antriebs erfolgt.
Der Anwender darf keine eigenmächtigen Reparaturen oder Eingriffe
vornehmen, sondern damit ausschließlich Fachpersonal.
Alle weiteren, nicht ausdrücklich in dieser Anleitung vorgesehenen
Maßnahmen sind untersagt.
DICHIARAZIONE DI CONFORMITÀ
DECLARATION OF CONFORMITY
secondo le norme ISO/IEC guida 22 EN 45014
in accordance with ISO/IEC standards guide 22 EN 45014
GENIUS S.r.l.
Via Padre Elzi, 32
24050 - Grassobbio
BERGAMO - ITALY
Nome del fabbricante:
Indirizzo del fabbricante:
Dichiara, sotto la propria esclusiva responsabilità, che i
prodotti:
Address of manufacturer:
GENIUS S.r.l.
Via Padre Elzi, 32
24050 - Grassobbio
BERGAMO - ITALY
suivant ISO/IEC guide 22 EN 45014
Nom du fabricant:
GENIUS S.r.l.
Via Padre Elzi, 32
24050 - Grassobbio
BERGAMO - ITALY
Adresse du fabricant:
The above company attests, under its sole responsibility, that the Atteste sous sa propre responsabilité, que les produits:
products:
JA108 - A10801
Modelli:
Name of manufacturer:
DECLARATION DE CONFORMITE
JA108 - A10801
Model:
ai quali questa dichiarazione si riferisce, sono conformi alle
norme:
referred to in this declaration, meet the following standards:
in base a quanto previsto dalle direttive:
in accordance with the provision as specified in the directives:
EMC 89/336/CEE and changes 92/31/CEE and
EN 50081-1 (1992)
EN 50082-1 (1992)
EN 60335-1 (1994)
EN 50081-1 (1992)
EN 50082-1 (1992)
EN 60335-1 (1994)
EMC 89/336/CEE e modifiche 92/31/CEE e 93/68/CEE
BT 73/23/CEE e modifica 93/68/CEE
93/68/CEE
BT 73/23/CEE and change 93/68/CEE
Modèles:
JA108 - A10801
faisant l’objet de cette déclaration, répondent aux normes:
EN 50081-1 (1992)
EN 50082-1 (1992)
EN 60335-1 (1994)
conformément aux directives:
EMC 89/336/CEE et modifications
BT 73/23/CEE
93/68/CEE
et modification
92/31/CEE et
93/68/CEE
Note aggiuntive:
Notes:
Note supplémentaire:
questi prodotti sono stati sottoposti a test in una configurazione tipica these products have been subject to testing procedures carried out ces produits ont été soumis à des essais dans une configuration typique
omogenea (tutti i prodotti di costruzione GENIUS S.r.l.)
under standardised conditions (all products manufactured by GENIUS homogène (tous les produits sont fabriqués par GENIUS S.r.l.)
S.r.l.)
Grassobbio, 1 Marzo 2002
L’Amministratore Delegato
Grassobbio, 1 March 2002
DECLARACIÓN DE CONFORMIDAD
KONFORMITÄTSERKLÄRUNG
segùn las normas ISO/IEC guìa 22 EN 45014
Nombre del fabricante:
nacht ISO/IEC norm, richtlinie 22 EN 45014
GENIUS S.r.l.
Via Padre Elzi, 32
24050 - Grassobbio
BERGAMO - ITALY
Dirección del fabricante:
Declara, bajo su propia y exclusiva responsabilidad, que los productos:
Modelos:
JA108 - A10801
Herstellername:
Hiermit erklären wir eigenverantwortlich, daß die produkte:
93/68/CEE
y modificación
JA108 - A10801
auf welche sich diese erklärung bezieht, den normen:
EN 50081-1 (1992)
EN 50082-1 (1992)
EN 60335-1 (1994)
BT 73/23/CEE
GENIUS S.r.l.
Via Padre Elzi, 32
24050 - Grassobbio
BERGAMO - ITALY
Herstelleranschrift:
Modelle:
a los cuales esta declaración se refiere son conformes a las normas:
con arreglo a lo dispuesto por las directivas:
EMC 89/336/CEE y modificaciónes
L’Amministratore Delegato
D. Gianantoni
D. Gianantoni
EN 50081-1 (1992)
EN 50082-1 (1992)
EN 60335-1 (1994)
92/31/CEE
y
entsprechen, wie in der richtlinie vorgesehen:
EMC 89/336/CEE und abänderungen 92/31/CEE und
93/68/CEE
BT 73/23/CEE und abänderung 93/68/CEE
93/68/CEE
Nota:
Anmerkung:
los productos mencionados han sido sometidos a pruebas en una die o.g. produkte sind in einer typischen und einheitlichen weise getestet
configuración típica homogénea (todo productos fabricado por GENIUS (alle von GENIUS S.r.l. gebaute produkte).
S.r.l.)
Grassobbio, 1 de Marzo de 2002
L’Amministratore Delegato
Grassobbio, 1 März 2002
D. Gianantoni
L’Amministratore Delegato
D. Gianantoni
Grassobbio, le 1 Mars 2002
L’Amministratore Delegato
D. Gianantoni
Le descrizioni e le illustrazioni del presente manuale non sono impegnative. GENIUS si riserva il diritto, lasciando inalterate le caratteristiche essenziali dell’apparecchiatura, di apportare in qualunque momento e senza impegnarsi ad aggiornare la presente pubblicazione, le
modifiche che essa ritiene convenienti per miglioramenti tecnici o per
qualsiasi altra esigenza di carattere costruttivo o commerciale.
The descriptions and illustrations contained in the present manual are
not binding. GENIUS reserves the right, whils leaving the main features
of the equipments unaltered, to undertake any modifications to holds
necessary for either technical or commercial reasons, at any time
and without revising the present publication.
Les descriptions et les illustrations du présent manuel sont fournies à
titre indicatif. GENIUS se réserve le droit d’apporter à tout moment les
modifications qu’elle jugera utiles sur ce produit tout en conservant
les caractéristiques essentielles, sans devoir pour autant mettre à jour
cette publication .
Las descripciones y las ilustraciones de este manual no comportan
compromiso alguno. GENIUS se reserva el derecho, dejando inmutadas
las características esenciales de los aparatos, de aportar, en cualquier
momento y sin comprometerse a poner al día la presente publicación,
todas las modificaciones que considere oportunas para el
perfeccionamiento técnico o para cualquier otro tipo de exigencia de
carácter constructivo o comercial.
Die Beschreibungen und Abbildungen in vorliegendem Handbuch sind
unverbindlich. GENIUS behält sich das Recht vor, ohne die wesentlichen
Eigenschaften dieses Gerätes zu verändern und ohne
Verbindlichkeiten in Bezung auf die Neufassung der vorliegenden
Anleitungen, technisch bzw, konstruktiv / kommerziell bedingte
Verbesserungen vorzunehmen.
Timbro rivenditore: / Distributor’s stamp: / Timbre de l’agent: /
Sello del revendedor: / Fachhändlerstempel:
GENIUS s.r.l.
Via Padre Elzi, 32
24050 - Grassobbio
BERGAMO-ITALY
tel. 0039.035.4242511
fax. 0039.035.4242600
[email protected]
www.geniusg.com
I0223 REV.3