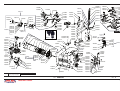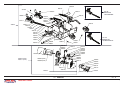
1
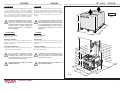
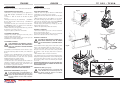
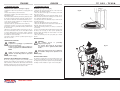
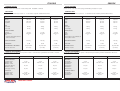
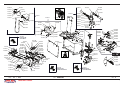
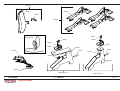
solutions creator
TC322-TC328 E’ UNO SMONTAGOMME SEMIAUTOMATICO PROGETTATO E COSTRUITO
PER ESSERE UTILIZZATO QUALE ATTREZZATURA PER LO SMONTAGGIO ED IL MONTAGGIO
DEI PNEUMATICI SU CERCHI DI RUOTE DI AUTOVEICOLI E MOTOCICLI.
TC322-TC328 IS A SEMI-AUTOMATIC TYRE CHANGING MACHINE DESIGNED AND CONSTRUCTEDTO BE USED FOR THE MOUNTING AND DEMOUNTING OF TYRES FOR CARS AND
MOTOR-CYCLES.
TC322-TC328 EST UN DEMONTE PNEUS SEMI-AUTOMATIQUE PROJETE ET CONSTRUIT
POUR ETRE EMPLOYE EN TANT QU’EQUIPEMENT POUR LE DEMONTAGE ET LE MONTAGE DES
PNEUS SUR LES JANTES DES ROUES DE VEHICULES ET MOTOCYCLETTES.
TC 322 - TC 328
SMONTAGOMME
TYRE CHANGING MACHINE - DÉMONTE PNEUS
REIFENWECHSLER - DESMONTA-NEUMATICOS
TC322-TC328 IST EIN HALB-AUTOMATISCHER REIFENWECHSLER UND WURDE FÜR
DEN EINSATZBEIM REIFENABNEHMEN UND AUFZIEHEN AUF RADFELGEN VON PERSONENKRAFTWAGENUND MOTORRÄDERN ENTWORFEN UND HERGESTELLT.
TC322-TC328 ES UN DESMONTANEUMATICOS SEMI-AUTOMATICO PROYECTADO Y CONSTRUIDO PARA SER UTILIZADO COMO HERRAMIENTA PARA EL DESMONTAJE Y EL MONTAJE DE LOS NEUMATICOS SOBRE LLANTAS DE RUEDAS DE TURISMOS Y DEMOTOCICLETAS.
solutions creator
3
ITALIANO
ENGLISH
WARNINGS
AVVERTENZE
Il presente libretto di istruzioni costituisce parte integrante del prodotto. Leggere attentamente le avvertenze e le
istruzioni in esso contenute in quanto forniscono importanti indicazioni riguardanti la sicurezza d’ uso e manutenzione. Conservare con cura questo libretto per ogni ulteriore consultazione.
The present instructions booklet is an integral part of the product. Carefully study the warnings and instructions contained in it. This information is important for safe use and maintenance. Conservethis booklet carefully for further
consultation.
LA MACCHINA E’ STATA PREVISTA PER FUNZIONARE ENTRO I LIMITI INDICATI NEL PRESENTE LIBRETTO ED IN ACCORDO
ALLE ISTRUZIONI DEL COSTRUTTORE.
La macchina dovrà essere destinata solo all’uso per il quale è stata espressamente concepita. Ogni altro uso è da considerarsi improprio e quindi irragionevole. Il costruttore non può essere considerato responsabile per eventuali
danni causati da usi impropri, erronei ed irragionevoli.
Per l’utilizzo della macchina è previsto un solo operatore che ha l’obbligo di mantenere le persone esposte lontano
dall’area di pericolo durante tutte le fasi di lavoro (3 metri intorno alla macchina).
THE MACHINE HAS BEEN DESIGNED TO OPERATE WITHIN THE LIMITS DESCRIBED IN THIS BOOKLET AND IN ACCORDANCE
WITH THE MAKER’S INSTRUCTIONS.
The machine must be used only for the purpose for which it was expressly designed. Any other use is considered wrong
and therefore unacceptable.The manufacturer cannot be held responsible for damage resulting from improper,
erroneous, or unacceptable use of the machine.
The use of the machine is foreseen for one operator who has the obligation of keeping any person exposed away from
the danger area during all the work phases (3 meters around the machine).
Questo simbolo viene utilizzato nel presente manuale quando si vuole attirare l’attenzione dell’operatore su
particolari rischi connessi con l’uso della macchina. L’operatore ne è il primo destinatario ed ha la responsabilità del rispetto delle stesse non solo da parte sua, ma anche da parte di altre persone esposte ai rischi della
macchina. Il mancato rispetto delle istruzioni può causare danni alla persona, che in alcuni casi potrebbero essere
talmente gravi da risultare mortali.
This symbol is used in the present manual to warn the operator of particular risks associated with the use of
the machine. The operator is the first consignee and is responsible for the respect of the safety regulations,
not only for himself, but also for other persons who are exposed to the risks of the machine. The non-respect
of the instructions can cause damages to the persons which in certain cases can lead to death.
La macchina non è provvista di illuminazione propria. Eseguire tutte le operazioni di lavoro, in ambienti dotati di buona
illuminazione. Per tutte le operazioni di disimballo, installazione, uso, manutenzione utilizzare idonei Dispositivi di
Protezione Individuale (guanti, scarpe, indumenti...).
The machine is not equipped with a lighting of its own. Carry out all the work operations in premises fitted with a good
lighting. For all unpacking, installation, work and maintenance operations wear suitable Individual Safety Devices
(gloves, shoes, clothes, etc).
C0NTENTS
INDICE
AVVERTENZE ............................................................................................................. 4
CARATTERISTICHE TECNICHE ........................................................................................ 6
DATI TECNICI ............................................................................................................ 6
GAMMA APPLICAZIONI ............................................................................................... 6
DATI TARGA .............................................................................................................. 6
DESCRIZIONE MACCHINA............................................................................................. 8
ACCESSORI IN DOTAZIONE .......................................................................................... 10
ACCESSORI A RICHIESTA ............................................................................................ 12
DISIMBALLO ............................................................................................................ 14
COLLOCAMENTO ........................................................................................................ 14
INSTALLAZIONE ........................................................................................................ 16
MALFUNZIONAMENTI, LORO CAUSE E POSSIBILI RIMEDI .................................................. 20
ISTRUZIONI PER L’USO............................................................................................... 22
VERSIONI SPECIALI .................................................................................................. 26
TC322 IT ................................................................................................................. 28
TC322 S .................................................................................................................. 32
TC322 PG ................................................................................................................ 32
MANUTENZIONE ORDINARIA ....................................................................................... 32
TRASPORTO E MOVIMENTAZIONE .................................................................................. 34
ACCANTONAMENTO E ROTTAMAZIONE ............................................................................ 34
ASSISTENZA TECNICA E PARTI DI RICAMBIO .................................................................. 36
DICHIARAZIONE CE DI CONFORMITA’ ............................................................................ 38
solutions creator
GENERAL WARNING .................................................................................................... 4
TECHNICAL CHARACTERISTICS ...................................................................................... 6
TECHNICAL DATA ....................................................................................................... 6
RANGE OF APPLICATIONS ............................................................................................ 6
PLATE DATA .............................................................................................................. 6
DESCIPTION OF THE MACHINE...................................................................................... 8
ACCESSORIES PROVIDED ............................................................................................ 10
ACCESSORIES ON REQUEST ......................................................................................... 12
UNPACKING ............................................................................................................. 14
LOCATION ............................................................................................................... 14
INSTALLATION.......................................................................................................... 16
MALFUNCTIONS, CAUSES AND POSSIBLE REMEDIES ......................................................... 20
INSTRUCTIONS FOR USE ............................................................................................. 22
SPECIAL VERSIONS ................................................................................................... 26
TC322 IT ................................................................................................................. 28
TC322 S .................................................................................................................. 32
TC322 PG ................................................................................................................ 32
ROUTINE MAINTENANCE ............................................................................................ 32
MOVEMENT AND TRASPORT ......................................................................................... 34
STORAGE AND SCRAPPING .......................................................................................... 34
TECHNICAL ASSISTANCE AND SPARE PARTS .................................................................... 36
DECLARATION OF CONFORMITY .................................................................................... 38
4
ITALIANO
ENGLISH
CARATTERISTICHE TECNICHE
TECHNICAL CHARACTERISTICS
DATI TECNICI
TECHNICAL DATA
DIMENSIONI
Altezza Max ............................................... 1895 mm.
Profondità ...................................................900 mm.
Larghezza ....................................................860 mm.
DIMENSIONS
Max. height................................................ 1895 mm.
Depth .........................................................900 mm.
Width ..........................................................860 mm.
PESO
Peso Netto ..................................................... 200 kg
Peso Lordo ..................................................... 220 kg
WEIGHT
Net weight ..................................................... 200 kg
Gross weight .................................................. 220 kg
MOTORE ELETTRICO (1 velocità)
Potenza ..........................................0,55 Kw - 0.75 Hp
Fasi ................................................................... 3 ~
Alimentazione .............................................230-400V
Forza Stallonatore .........................................2.500 kg
ELECTRIC MOTOR (1 speed)
Power.............................................0,55 Kw - 0.75 Hp
Phases ............................................................... 3 ~
Voltage ......................................................230-400V
Bead breaker force ........................................2.500 kg
VALORE DI PRESSIONE ACUSTICA ....................... 75 db
ACOUSTIC PRESSURE VALUES ............................. 75 db
ALIMENTAZIONE PNEUMATICA
Pressione d’es. min/max............. 800-1200kPa (8-12bar)
PNEUMATIC SUPPLY
Min/max operating pressure ....... 800-1200kPa (8-12bar)
GAMMA DI APPLICAZIONI
DATI DI TARGA
REGISTRATION PLATE DATA
2008
RANGE OF APPLICATIONS
TC322 può operare su ruote e cerchi aventi le seguentidimensioni minime e massime:
TC322 can operate on wheels having the following minimumand maximum dimensions:
RUOTE AUTOVETTURA
min/max
Larghezza ruota ...............................................3”-15”
Diametro max ruota ............................... 44” - 1120mm
Diametro cerchio (bloccaggio interno) ............... 12”-23”
Diametro cerchio (bloccaggio esterno) .............. 10”-20”
VEHICLE WHEEL
min/max
Wheel width ....................................................3”-15”
Max. wheel diameter.............................. 44” - 1120mm
Rim diameter (locked internally) ...................... 12”-23”
Rim diameter (locked externally) ...................... 10”-20”
RUOTE MOTOCICLO *
min/max
Larghezza Ruota ..............................................3”-15”
Diametro max. ruota .............................. 44” - 1160mm
Diametro cerchio...........................................15”-”25”
* Per operare su ruote motociclo è necessario installare il
dispositivo attacchi moto, disponibile su richiesta.
RUOTE MOTOCICLO *
min/max
Wheel width ....................................................3”-15”
Max. wheel diameter.............................. 44” - 1160mm
Rim diameter................................................15”-”25”
* In order to work on motorcycle wheels it is necessary to
install themotorcycle attachments, available on request.
DATI DI TARGA
TC 322 - TC328
2008
REGISTRATION PLATE DATA
I DATI DELLA MACCHINA SONO CONTENUTI IN APPOSITA
ETICHETTAINDELEBILE POSTA SUL RETRO DELLA MACCHINA
STESSA.
In essa vengono riportati i dati tecnici, la marcatura CE,
l’anno di costruzioneed il numero di matricola.
Il Numero di matricola deve essere citato nelle comunicazioni conl’assistenza tecnica.
solutions creator
THE MACHINE DATA IS ON A SPECIAL INDELIBLE LABEL ON
THEBACK OF THE MACHINE.
This contains the specifications, the CE mark, the year of
constructionand the serial number.
The Serial number must be quoted in the communications
with technical assistance.
6
ITALIANO
DESCRIZIONE DELLA MACCHINA
DESCRIPTION OF THE MACHINE
con illustrazione delle parti componenti rilevanti ai fini
dell’uso.
with illustrations of the component parts relevant for
use.
PEDALIERA (fig.1) (1)
Comprende i pedali di comando della macchina:
• Il pedale comando invertitore (1-A), per far ruotare il
piatto autocentrante nel senso desiderato.
• Il pedale comando stallonatore (1-B) per azionare il
bracciostallonatore (2-F).
• Il pedale comando apertura e chiusura (1-C) per aprire e
chiudere le griffe dell’autocentrante (4-P).
PEDAL CONTROLS (fig. 1)(1)
The machine control pedals include:
• Invertor control pedal (1-A) for rotation the chuck plate
in the direction desired.
• Bead breaking control pedal (1-B) to activate the bead
breakingarm (2-F).
• Open and close control pedal (1-C) for opening and closing the chuck jaws (4-P).
STALLONATORE (fig.1) (2)
Lo Stallonatore è il dispositivo per stallonare il pneumatico dal cerchio esi compone di:
• Braccio Stallonatore (2-F) azionato pneumaticamente da
un cilindroa doppio effetto.
• Paletta (2-E) per lo stallonamento del pneumatico.
• Appoggi antiabrasivi (2-G) per l’appoggio del cerchio
durante lafase di stallonamento.
BEAD BREAKER (fig. 1) (2)
The bead breaker is a mechanism for unbeading tyres from
rims and iscomposed of:
• Bead breaking arm (2-F) activated pneumatically by a
double actioncylinder.
• Plate (2-E) for tyre bead breaking.
• Anti-abrasion supports (2-G) for support during the
bead breakingphase.
GRUPPO PALO (Fig.1) (3)
Il Gruppo Palo è composto da un Palo fisso che supporta
i componentinecessari per smontare il pneumatico dal
cerchio (e per rimontarlo):
• Il Braccio mobile a bandiera (3-H) per il posizionamento
dellaTorretta.
• Il Volantino (3M) per la regolazione della posizione orizzontale delbraccio.
• La Leva di bloccaggio (3-L) per la regolazione della
posizioneverticale dell’asta.
• La Torretta (3-I) per togliere (e rimontare) il pneumatico dal cerchiocon l’ausilio della leva alzatalloni (vedere
accessori in dotazione).
• Il Rullino di scorrimento (3-N), inserito nella linguetta
della torretta, permette di operare sui pneumatici senza
rovinare cerchio e tallone.
COLUMN UNIT (Fig.1) (3)
The column unit is composed of a fixed column which
can be tilted backand which carries the components necessary for unmoun-ting the tyre from the rim (and for
re-mounting):
• The swinging arm (3-H) for positioning the head.
• The handwheel (3M) for the adjustment of the horizontal position of the arm.
• Locking lever (3-L) for regulating the vertical position
of the rod.
• The head (3-I) for removing (and refitting) the tyre from
the rim with the help of the bead lifting lever (see accessories provided).
• The sliding roller (3-N), inserted inside the tongue of
the head, avoids any damage to the rim or bead.
AUTOCENTRANTE (Fig.1) (4)
L’autocentrante è il dispositivo per il bloccaggio e la rotazione del cerchio; è azionato pneumaticamente da 2 cilindri “autocentranti” ed è composto da:
• 4 corsie mobili (4-P) con cunei di bloccaggio (4-O) per
il bloccaggio interno od esterno del cerchio;
• un piatto autocentrante (4-Q) per ruotare il cerchio nei
due sensisenza sbloccarlo.
solutions creator
TC 322 - TC328
ENGLISH
LEGENDA
KEY
1• PEDALIERA
A: Pedale Invertitore
B: Pedale Stallonatore
C: Ped. Apertura e Chiusura
1• PEDALS
A: Invertor pedal
B: Bead-breaker pedal
C: Open and closed pedal
2• STALLONATORE
E: Paletta Stallonatore
F: Braccio Stallonatore
G: Appoggi antiabrasivi
2• BEAD-BREAKER
E: Bead-breaking plate
F: Bead-breaking arm
G: Anti-abrasion supports
3• PALO
H: Braccio a Bandiera
I: Torretta
L: Leva di Bloccaggio vert.
M: Volantino di regolazione
N: Rullino di scorrimento
3• COLUMN
H: Swinging arm
I: Head
L: Locking lever
M: Handwheel
N: Sliding roller
4• AUTOCENTRANTE
O: Cunei di bloccaggio
P: Corsie mobili
Q: Piatto Autocentrante
M
L
3H
I
N
4• SELF-C.CHUCK
O: Locking wedges
P: Slide tracks
Q: Self-centring plates
O
4P
Q
SELF-CENTERING CHUCK (Fig.1) (4)
The chuck is the device for locking and rotating the rim. It
is driven pneumatically two “self-centring” cylinders and
is composed of:
• 4 slide tracks (4-P) with 4 locking wedges (4-O) for the
internal and external locking of the rim.
• A self-centring plate (4-Q) for rotating the rim in both
directions with-out unlocking it.
fig.1
C
1B
A
F
E 2
G
8
ITALIANO
ACCESSORI IN DOTAZIONE
LEVA ALZATALLONE (fig.2)
E’ un utensile necessario per sollevare il tallone del pneumatico e portarlo sulla torretta durante le fasi di smontaggio. Consente poi di guidare “l’incanalamento” del
tallone stesso in fase di montaggio del pneumatico. La
leva alzatalloni, una volta installata la macchina, va posizionata nell’asola dell’appoggio stallonatore, a lato della
macchina.
PISTOLA DI GONFIAGGIO (fig.3a-3b)
La macchina è dotata di una pistola con manometro per il
gonfiaggio dei pneumatici. Pressione d’utilizzo consigliata: 10 bar(1000 kPa).
La pistola di gonfiaggio va agganciata all’apposito gancio
posto sul palodella macchina (fig.3a). Viene fornito anche
il tubo di connessione completo di raccorderia (fig.3b) per
collegare la pistola di gonfiaggio al sistema di alimentazione pneumatico.
N.B. Al fine di proteggere l’operatore dai potenziali pericoli derivanti dal gonfiaggio del pneumatico sul piatto
dell’autocentrante, la macchina é stata dotata di una valvola limitatrice della pressione di esercizio tarata a 3,5
bar e di una valvola di massima pressione tarata a 4 bar.
Inoltre viene dato in dotazione anche il pennello per il
grasso.
La scatola contenente gli accessori in dotazione (fig.3c) è
inserita nell’imballo della macchina.
Prestare sempre particolare attenzione ai SEGNALI DI SICUREZZA rappresentati da appositi
adesivi applicati sulla macchina (fig.4).
Nel caso di smarrimento o deterioramento di una o più
delle etichette adesive poste sulla macchina, si prega di
richiedere l’etichetta mancante, attraverso il relativo numero di codice:
(a) - Pericolo di schiacciamento mano durante il posizionamento del palo ribaltabile (cod.n. 200449).
TC 322 - TC328
ENGLISH
ACCESSORIES PROVIDED
BEAD LIFTING LEVER (fig.2)
This is a tool required for lifting the tyre bead onto the
head during theunmounting stage. It also allows the guiding of the bead “setting” during mounting. When the
machine has been installed the bead lifting lever is kept
in the container in the bead breaking machine case on the
side of the machine.
fig.3a
fig.2
INFLATION GUN (fig.3a-3b)
The machine is fitted with an inflation gun and manometer for inflating tyres. Recommended operating pressure
is: 10 bar (1000kPa).
The inflation gun is hung on the special hook on the column of the machine (fig.3a). A supply tube is also provided
complete with connectors (fig.3b) to link the inflation
gun to the pneumatic supply.
N.B. To protect the operator from potential danger during
the inflation oftyres on the self-centring chuck plate, the
machine is fitted with a pressure limiting valve set at 3.5
bar and a maximum pressure valve setat 4 bar.
fig.3c
fig.3b
In addition, a grease brush is supplied as standard equipment.
The box containing the accessories provided (fig.3c) is
placed in the machine packing materials.
(a)
Always pay careful attention to the WARNING
SIGNS shown onadhesives applied to the machine (fig.4).
(d)
If one or more of the warning signs disappears or shows
signs of deterioration, you are requested to order a replacement, making use of the relevant code number:
(a) - Danger of crushing hands when positioning the reclining pole (code No. 200449).
(c)
(b)
(b) - Danger of being electrocuted (code No. 200446).
(b) - Pericolo di folgorazione (cod.n. 200446).
(c) - Danger of crushing a leg/foot with the bead breaker
(code No. 200448).
(c) - Pericolo di schiacciamento gamba/piede con stallonatore (cod.n. 200448).
(d) - Attention! Read carefully the operating manual before using the machine.
fig.4
(d) - Attenzione! Leggere attentamente il Manuale di uso
prima di utilizzare la macchina.
solutions creator
10
ITALIANO
ACCESSORI A RICHIESTA
GRUPPO FILTRO FR + L (fig.5)
E’ composto da un Filtro per eliminare eventuali impurità
ed eccessivaumidità presente nell’aria, un Riduttore di
pressione per regolare lacorretta pressione di utilizzo ed
un Lubrificatore per nebulizzare olio nell’impianto pneumatico.
PROTEZIONI PER CERCHI IN LEGA
Sono speciali protezioni predisposte per operare su cerchi
in lega leggera:
- Protez. Corsia per cunei (fig.6) - 4pz.
- Protez. Linguetta della torretta (fig.7a) - 1pz.
- Protez. Ala della torretta (fig.7b) - 1pz.
PISTOLA DI GONFIAGGIO (fig.8)
E’ disponibile una pistola di gonfiaggio con scala di misura da 0.7 a 12 bar. (Precisione secondo le tolleranze
imposte dalla Direttiva CEE 86/217).
N.B. Al fine di proteggere l’operatore dai potenziali pericoli derivanti dal gonfiaggio del pneumatico sul piatto
dell’autocentrante, la macchina é stata dotata di una valvola limitatrice della pressione di esercizio tarata a 3,5
bar e di una valvola di massima pressione tarata a 4 bar.
Il gonfiaggio del pneumatico è un’operazione
potenzialmente pericolosa !
DISPOSITIVO “ATTACCHI 8” (4 pz.)
Permettono lo smontaggio di pneumatici di ridotte dimensioni (es.:pneumatici di cariole, di attrezzature per giardino, di mezzi mobili per golf,etc. (fig.9).
DISPOSITIVO “ATTACCHI MOTO”
E’ un dispositivo che permette lo smontaggio ed il montaggio dei pneumaticidi ruote motociclo da 15” a 25”
(fig.9a). Un rivestimento di poliuretanoprotegge il cerchione da segnature. Gli “attacchi moto” (serie di 4 pz.)
simontano facilmente: basta inserirli sulle corsie dell’autocentrante e bloccarli con le apposite viti.
TC 322 - TC328
ENGLISH
ACCESSORIES ON REQUEST
fig.5
FILTER UNIT FR + L (fig.5)
This unit is composed of a Filter to eliminate possible
impurities andexcessive humidity in the air, a Pressure
Reducer to maintain the correctoperating pressure, and a
Lubricator to atomize oil in the pneumatic sys-tem.
ALLOY RIM PROTECTORS
These are special protectors designed for use on light alloy
rims:
- Locking wedge protectors. (fig.6) - 4p.
- Head tongue protectors (fig.7a) - 1p.
- Turret wing protection (fig.7b) - 1p.
fig.6
fig.7b
INFLATION GUN (fig.8)
A further inflation gun is available with a measuring scale
from 0.7 to 12 bar. (Precisiontolerance as required by the
EEC Directive 86/217).
N.B. To protect the operator from potential danger during
the inflation oftyres on the self-centring chuck plate, the
machine is fitted with a pressure limiting valve set at 3.5
bar and a maximum pressure valve setat 4 bar.
fig.7a
fig.8
The inflation of tyres is a potentially dangerous operation!
8” FITTINGS ATTACHMENT (4 p.)
these allow the unmounting of tyres on small wheels (e.g.
tyres fromtrolleys, garden equip., golf carts, etc.(fig.9).
MOTORCYCLE FITTINGS ATTACH-MENT
This is an attachment that allows the mounting and unmounting tyres frommotorcycle wheels from 15” to 24”
(fig.9a). A polyurethane coating pro-tects the rims from
marking. The “motorcycle attachment” parts (series of4
parts) are easily mounted: they are simply inserted in the
tracks of thechuck and locked with the bolt provided.
fig.9
fig.9a
fig.10
BEAD-BREAKING PLATE PROTECTOR (fig.10)
PROTEZIONE PALETTA STALLONATORE (fig.10)
solutions creator
12
ITALIANO
DISIMBALLO
TC 322 - TC328
ENGLISH
UNPAKING
Al ricevimento della macchina imballata togliere le reggette (facendo attenzione al distacco delle stesse), i sigilli ed
il cartone come da fig.13. Dopo avere tolto l’imballaggio
assicurarsi dell’integrità della macchina, controllando che
non vi siano parti visibilmente danneggiate. In caso di
dubbio non utilizzare la macchina e rivolgersi a personaleprofessionalmente qualificato e/o al proprio rivenditore.
On receipt of the packed machine, remove the straps
(taking care whencutting them) and packing as in fig.13.
After removing the packing check the machine for missing
or damaged parts. If in doubt do not use the machine
and refer to professionally qualified personnel and/or to
theseller.
Gli elementi dell’imballaggio (chiodi, sacchetti di plastica, pluriball, polietilene, graffette,
legni, ecc.) non devono essere lasciati alla
portata dei bambini in quanto potenziali fonti
di pericolo. Riporre i suddetti materiali negli
appositi luoghi di raccolta, se inquinanti o
non biodegradabili.
The packing materials (timber, plastic bags,
pluriball, polythene,nails, staples, etc.) must
not be left within reach of children since they
are potentially dangerous. Deposit the above
mentioned materials at the relevant collection
points if they are pollutants or are non biodegradable.
COLLOCAMENTO
± 220 Kg
fig.13
1130
1070
760
LOCATION
DIMENSIONI D’INGOMBRO
1895 x 900 x 860
OVERALL DIMENSIONS
1895 x 900 x 860
DISTANZE DI SICUREZZA
Per un utilizzo sicuro ed ergonomico della macchina è consigliabile collocarla ad una distanza minima di mm. 500
dalle pareti circostanti.
SAFE DISTANCE
For the safe and ergonomic use of the machine, it is advisable to locateit a minimum of 500 mm from the surrounding walls.
PRESCRIZIONI DI FISSAGGIO
La macchina è munita di speciali tappi in gomma per lo
smorzamento dieventuali vibrazioni.
FIXING REQUIREMENTS
The machine is fitted with special rubber feet for the muffling of possible vibrations.
Per poter gonfiare il pneumatico sul piatto
dell’autocentrante è obbligatorio provvedere
al fissaggio della macchina a terra. Per tale
operazione utilizzare gli stessi fori predisposti per fissarela macchina al pallet.
To inflate tyres on the chuck plate it is obligatory to fix the machine to the ground. For this
purpose use the same holes provided for fixing
the machineto the pallet.
LA MACCHINA NON PUO’ ESSERE COLLOCATA IN
AMBIENTE ESPLOSIVO
THE MACHINE MUST NOT BE LOCATED IN AN
EXPLOSIVE ENVIRONMENT.
1895
740
500
500
860
760
900
fig.14
solutions creator
14
ITALIANO
INSTALLAZIONE
TC 322 - TC328
ENGLISH
INSTALLATION
Operazioni di assemblaggio e posizionamento della macchina.
SMONTAGGIO DEL COPERCHIO
• Togliere le 4 viti del coperchio laterale con chiave di
10mm (fig.15) esmontare il coperchio laterale.
SOLLEVAMENTO DEL PALO
• Dotarsi di una fascia di sollevamento di mt.1 modello DR
50 -fattore disicurezza 6:1. Avvolgere la fascia attorno al
braccio a bandiera (fig.16)
• Aprire il braccio stallonatore come da fig.17 e sollevare
il palo con un paranco (2).
• Appoggiare il palo sul cassone.
FISSAGGIO DEL PALO
Fissare il palo al cassone (fig.18) con le viti contenute
nella scatola degli accessori in dotazione:
- 4 viti TEM10
- 4 dadi M10 es.- 4 rondelle bisellate diam.10
- 4 rondelle spaccate diam.10
POSIZIONAMENTO DELLA MOLLA DELL’ ASTA VERTICALE
• Sbloccare l’asta verticale, alzarla di 10 cm e tornarla a
bloccare come da fig.19 (1) .
• Svitare il cappellotto situato in cima all’asta con una
chiave a brugoladi 6mm. (Fig.19-2) Attenzione: sbloccare l’asta avendo l’accortezza di tenere una mano sotto la
stessa (fig.20) (1) e (2).
• Estrarre l’asta. Sfilare la molla e reinfilare l’asta (fig.21)
(1) nella sede originiaria bloccandola a fine corsa (fig.21)
(2)
• Inserire la molla nella parte superiore dell’asta (fig.21)
(3) e riavvitare il cappellotto con chiave a brugola di
6mm.
ATTENZIONE:
durante l’installzione della macchina accertarsi che il dado sia correttamente avvitato nello
stelo del cilindro stallonatore come indicato
in figura 22. Un non corretto montaggio pregiudica il funzionamento e costituisce pericolo per l’operatore.
Assembly operations and locating the machine
fig.16
REMOVING THE COVER
• Remove the 4 side cover screw with a 10 mm spanner
(fig.15); Remove the side cover.
RAISING THE COLUMN
• Make use of a 1 m hoisting strap model DR 50 - safety factor 6:1. Wrap the strap around the movable arm
(fig.16)
• Open the bead breaking arm as shown in fig.17 and raise
the column with a hoist (2).
• Rest the column on the machine body.
ATTACHING THE COLUMN
• Fix the column to the machine body (fig. 18) using the
screws con-tained in the accessories box:
- 4 TEM10 screws
- 4 M10 hex. nuts
- 4 chamfered washers diam.10
- 4 split washers diam.10
fig.15
18
fig.18
SETTING THE SPRING ON THE VERTICAL ROD
• Release the vertical rod, lift it up 10 cm. and lock it
again as shown infig.19 (1).
• Unscrew the cap at the top of the rod with a 6 mm
hex key (fig.19-2). Warning: when unscrewing the rod
take the precaution of keep in gone hand underneath it
(fig.20) (1) and (2).
• Remove the rod. Slide the spring off and reinsert the rod
(fig.21)(1) in its original seating, locking it at the end of
its travel (fig.21) (2).
• Insert the spring on the top of the rod (fig.21) (3) and
refit the cap with a 6 mm hex key.
WARNING:
when installing the machine make sure that
the nut is correctly fastened in the bead
breaking cylinder rod as shown in the figure
22, an incorrect mounting compromises the
functioning and represents a danger for the
operator.
fig.19
fig.20
NO!!
1
OK!!
fig.21
solutions creator
fig.17
fig.22
16
ITALIANO
INSTALLAZIONE
TC 322 - TC328
ENGLISH
INSTALLATION
Operazioni di collegamento - Verifica del funzionamento
Connection and operation checks
POSIZIONAMENTO DELLA MACCHINA
• Rimontare lo sportello laterale (fig.15) applicando le
4 viti TEM6 flangiate autofilettanti con una chiave di
10mm.
• Svitare i 2 dadi che fissano la macchina al pallet
(fig.23).
• Avvolgere la fascia (a) di sollevamento (mod.DR250
di mt.1) attornoal palo e alla fascia (b) (mod.FA650 di
mt.3) (fig.24).
• Far passare la fascia (b) in mezzo alle asole della flangia (Attenzione:operare con cautela per non schiacciare i
tubi di alimentazione dei cilindri).
• Infilare la fascia (b) nel cappio della fascia (a); sollevare
la macchina con il paranco (fig.24).
• Togliere il pallet e posizionare la macchina.
POSITIONING THE MACHINE
• Refit the side cover (fig.15) with the 4 TEM6 flanged
self-threading screws with a 10 mm spanner.
• Unscrew the two bolts that fix the machine to the pallet
(fig.23).
• Wrap the lifting strap (a) (mod. DR250 of 1 m) around
the column and strap (b) (mod. FA650 of 3 m) (fig.24).
• Pass strap (b) through the holes in the flange Warning:
take care not to crush the cylinder supply tubes !
• Thread strap (b) through the loop of strap (a); raise the
machine with ahoist (fig.24).
• Remove the pallet and position the machine.
fig.23
COLLEGAMENTO PNEUMATICO
• Collegare la pistola di gonfiaggio sul raccordo posto a
sinistra del filtro aria (ved.fig.25).
• Collegare la presa aria compressa sul raccordo posto tra
il lubrificatore ed il filtro aria (fig.25).
COLLEGAMENTO ELETTRICO
OGNI INTERVENTO SULL’IMPIANTO ELETTRICO,
ANCHE DI LIEVE ENTITÀ, DEVE ESSERE EFFETTUATO DA PERSONALE PROFESSIONALMENTE
QUALIFICATO !
• Controllare la conformità tra la tensione di linea e quella indicata sulla targa della macchina (come indicato in
fig.26).
• Collegare il cavo dell’alimentazione a una spina conforme alle norme Europee o alle norme del paese di destinazione della macchina. La spina deve essere provvista
obbligatoriamente del contatto di terra.
• Verificare l’efficacia della messa a terra.
• La macchina deve essere allacciata alla rete tramite un
sezionatore onnipolare conforme alle norme Europee, con
apertura dei contatti di almeno 3mm. Il sezionatore serve
per accendere e spegnere la macchina.
IL COSTRUTTORE DECLINA OGNI RESPONSABILITÀ PER
LA MANCATA OSSERVANZA DI DETTE PRESCRIZIONI.
VERIFICHE DI FUNZIONAMENTO (ved. fig.27):
È molto importante, per il funzionamento regolare della macchina,che alla pressione verso
il basso del pedale invertitore (A)corrisponda
un moto rotatorio in senso orario dell’autocentrante.
solutions creator
20a
fig.24
PNEUMATIC CONNECTION
• Connect the inflation gun to the connector located to
the left of the air filter (fig.25).
• Connect the compressed air to the connector positioned
between the lubricator and the air filter (fig.25).
ELECTRICAL CONNECTION
ALL WORK ON THE ELECTRICAL SYSTEM, INCLUDING MINOR OPERATIONS, MUST BE CARRIED
OUT BY PROFESSIONALLY QUALIFIED PERSONNEL !
• Check that the mains supply tension is the same as that
shown on the registration plate (as shown in fig. 26).
• Connect the supply cable to a plug that conforms with
European norms or to the norms of the country in which
the machine is used. The plug must have an earth terminal.
• Check that the earth connection is effective.
• The machine must be connected to the mains through a
multipolar isolating switch which conforms with European
norms and with contact openings of at least 3 mm. The
disconnecting switch is used for switching the machine
on and off.
THE MANUFACTURER DOES NOT ACCEPT ANY RESPONSIBILITY FOR THE FAILURE TO OBSERVE THE ABOVE MENTIONED INSTRUCTIONS.
fig.25
fig.26
fig.27
OPERATIONAL CHECK (see fig.27):
It is very important for the correct functioning
of the machine that a down ward pressure on
the invertor pedal (A) produces a clockwise
rotation of the chuck plate.
A
18
ITALIANO
MALFUNZIONAMENTI, LORO CAUSE E POSSIBILI RIMEDI
ENGLISH
MALFUNCTIONS: CAUSES AND POSSIBLE REMEDIES
Malfunzionamenti
Cause
Possibili rimedi
Malfunction
Cause
Possibile remedies
L’ autocentrante non ruota in alcun
senso
1. Spina di tensione non inserita
2. Non corretto collegamento della
spina stessa
3. Tensione non conforme
1. Verificare il corretto inserimento
della spina nella presa e il suo collegamento 2-3 (vedere 1.)
The chuck does not rotate in any direction
1. Electrical supply not plugged in
2. Incorrect plug connection
3. Electrical tension is incorrect
1. Check the correct insertion of the
plug and its connections
2/3 (see 1)
1. Invert the two phases in the plug
1. Inversione di polarità
1. Invertire le 2 fasi nella spina di
tensione
Pressing the invertor pedal (A)
downwards the chuck rotates anticlockwise
1. Polarity inverted
Azionando il pedale invertitore A
verso il basso l’autocentrante gira in
senso antiorario
The chuck rotates only weakly.
L’autocentrante gira con forza insufficiente
1. Non corretta tensione di rete
2. Cinghia lenta
1. Verificare la corrispondenza fra la
tensione di rete e quella indicata sulla targhetta del costruttore
2. Agire sul tendicinghia
1. Incorrect mains tension
2. Loose drive belt
1. Check the correspondence of the
mains tension with that shown on
the reg. plate of the machine
2. Adjust the belt tightener
The chuck does not lock the wheel
correctly
1. The pneumatic supply has not
been connected to the machine
2. Pneumatic supply pressure too
low
3. Pressure reducer closed or badly
adjusted (for the versions with this
device)
1. Connect the pneumatic system.
2. Increase the pressure.
3. Activate or correct the adjustment
of the pressure reducer
The bead-breaker does not have sufficient power to break the bead.
1. The pneumatic supply has not
been connected to the machine.
2. Pneumatic supply pressure too
low.
3. Pressure reducer closed or badly
adjusted (for the versions with this
device)
1. Connect the pneumatic system.
2. Increase the pressure.
3. Activate or correct the adjustment
of the pressure reducer
L’autocentrante non blocca correttamente la ruota
Lo stallonatore non ha la forza sufficiente per stallonare la ruota
1. Non é stata collegata la rete pneumatica alla macchina
2. Insufficiente pressione alla rete
pneumatica
3. Riduttore di pressione chiuso o
mal regolato (per le versioni con tale
dispositivo)
1. Collegare la rete pneumatica
2. Regolare in modo consono la pressione della rete
3. Aprire o regolare in modo corretto
il riduttore di pressione
solutions creator
20
ITALIANO
ISTRUZIONI PER L’USO
TC 322 - TC328
ENGLISH
INSTRUCTIONS FOR USE
fig.28
OPERAZIONI PRELIMINARI
• Sgonfiare completamente il pneumatico.
• Togliere i pesi di equilibratura della ruota per eliminare
qualsiasi rischio derivante dalla presenza dei pesi stessi.
PRELIMINARY OPERATIONS
• Completely deflate the tyre.
• Remove wheel balancing weights to eliminate any danger arising from their presence.
STALLONAMENTO (Fig.28)
• Mettere la ruota a terra, vicino allo stallonatore; avvicinare la paletta(E) al tallone e premere il pedale comando stallonatore (B). L’operazione va eseguita in vari
punti della ruota finchè il tallone non sia completamente
staccato.
• Ripetere l’operazione sul lato opposto della ruota.
BEAD-BREAKING (fig. 28)
• Place the wheel on the ground near the bead-breaker.
Move the plate (E) towards the bead and press the beadbreaking control pedal (B). This operation is conducted at
various points of the wheel until the bead is completely
detached.
• Repeat the operation on the opposite side of the
wheel.
DURANTE L’AZIONAMENTO DEL BRACCIO STALLONATORE, PRESTARE ATTENZIONE A NON COMPRIMERE GLI ARTI FRA LA GOMMA E LO STALLONATORE STESSO !
SMONTAGGIO (fig.30)
• Abbassare la leva di bloccaggio (L) per sbloccare l’asta
verticale.
• Premere il pedale comando apertura (C) per predisporre
le griffe (O) per il bloccaggio esterno del cerchio (in caso
di bloccaggio interno questa operazione non va eseguita).
• Mettere la ruota sull’autocentrante esercitando una lieve
pressione sul cerchio; premere il pedale comando chiusura
(D) per bloccarla.
• Lubrificare il tallone con grasso utilizzando l’apposito
pennello in dotazione (ved.scatola degli accessori).
• Portare la torretta (I) vicino al cerchio e far toccare il
rullino (N) e la superficie al bordo.
• Alzando la leva (L si ottiene il distanziamento verticale
della torretta ed il bloccaggio del braccio).
• Agendo sul volantino (M) si regola il distanziamento
della linguetta(misura ottimale 3mm)
• Alzare il tallone con l’apposita leva (fig.29) ed appoggiarlo sulla linguetta della torretta (I).
• Far ruotare l’autocentrante premendo il pedale (A) fino
alla completa uscita del tallone dal cerchio.
Operare con cautela, evitando di inserire le
dita tra gomma e cerchione durante le fasi di
rotazione dell’autocentrante.
• Spostare lateralmente il braccio (H) ed estrarre la camera d’aria.
• Ripetere le medesime operazioni per la fuori-uscita del
secondo tallone.
solutions creator
fig.29
WHEN USING THE BEAD-BREAKING ARM TAKE
CARE NOT TOTRAP LIMBS BETWEEN THE TYRE
AND THE BEAD-BREAKER!
DEMOUNTING (fig.30)
• Lower the locking lever (L) to unlock the vertical rod.
• Press the open control pedal (C) to prepare the chuck
jaws (O) to lock the rim externally (in the case of internal
locking, this operation is not carried out).
• Place the wheel on the self-centring chuck, pressing
lightly on the wheel. Press the close control pedal (D)
to lock it.
• Lubricate the bead with grease using the brush specially
provided (see box of accessories).
• Move the head (I) close to the rim so that the roller (N)
and the rim edge surface touch.
• Raise lever (H): in this way the vertical spacing of the
head and locking of the arm; the spacing of the tongue
is adjusted by acting on the handwheel M (3 mm ideal
distance:).
• Raise the bead with the special lever (fig.29) and hook
it onto the tongue of the head (I).
• Rotate the chuck pressing the pedal (A) until the bead
is completely out of the rim.
M
L
3H
I
N
O
4P
Q
Take care not to insert fingers between tyre
and rim while the chuck is rotating.
• Push the arm (H) aside and extract the inner tube.
• Repeat the same operation to remove the second bead.
C
1B
A
F
E 2
G
fig.30
22
ITALIANO
ISTRUZIONI PER L’USO
OPERAZIONI DI MONTAGGIO (ved.fig.30 e fig.31)
• Lubrificare i talloni del pneumatico ed appoggiarlo sul
cerchio.
• Portare la torretta in posizione di lavoro.
• Appoggiare il tallone sul bordo della torretta (I) e sotto
la linguetta(fig.31).
• Far ruotare l’autocentrante premendo il pedale (A) avendo cura di far entrare il tallone nella gola centrale del cerchio, al fine di eliminare snervamenti del tallone stesso.
• (per favorire questa operazione si consiglia di premere
con le mani sul pneumatico).
• Spostare il braccio (per liberare la zona di lavoro).
• Posizionare il cerchio, con il foro per la valvola della camera d’aria a circa 90° gradi dalla torretta; quindi inserire
la camera d’aria.
• Ripetere le operazioni iniziali (vedi sopra) per fare entrare il secondo tallone. Nel caso in cui il tallone fatichi
a scendere dalla torretta è necessario “alzare” (azionare
verso l’alto) il pedale invertitore (A) facendo ruotare l’autocentrante in senso antitorario.
• Spostare il braccio, premere il pedale apertura (C) per
sbloccare il cerchio
TC 322 - TC328
ENGLISH
INSTRUCTIONS FOR USE
MOUNTING (see fig.30 and fig.31)
• Lubricate the tyre bead and place it on the rim; move
the head to the working position.
• Place the bead on the edge of the head (I) and under
the tongue (fig.31).
• Rotate the chuck by pressing pedal (A) taking care to
make the bead move into the central groove of the rim so
as to eliminate weakening the bead.
• (to help this action it is advisable to press down on the
tyre with the hands).
• Move the adjstable arm (to free the work area).
• Place the rim with the inner tube valve at about 90° to
the head, then insert the inner tube.
• Repeat the initial operation (see above) to locate the
second bead.
• In the case that the bead has difficulty descending from
the head, itis necessary to “raise” (move upwards) the
invertor pedal (A) making the chuck rotate in an anticlockwise direction.
• Move the arm and press the open pedal (C) to unlock
the rim.
fig.31
INFLATION PROCESS
OPERAZIONI DI GONFIAGGIO
ATTENZIONE !
L’operazione di gonfiaggio è potenzialmente
pericolosa.(Ved. Fig.32).
L’operatore deve adottare tutte le misure necessarie pergarantire LE CONDIZIONI DI SICUREZZA.
Quando si usa l’aria compressa, si consiglia
l’utilizzo di idonei Dispositivi di protezione
(cuffie o tappi).
DISPOSITIVO DI SICUREZZA PER IL GONFIAGGIO
Al fine di proteggere l’operatore dai potenziali pericoli
derivanti dal gonfiaggio del pneumatico sul piatto dell’autocentrante, la macchina é stata dotata di una valvola
limitatrice della pressione di esercizio tarata a 3,5 bar e da
una valvola di massima pressione tarata a 4 bar.
solutions creator
WARNING !
The inflation process is potentially
dangerous.(see fig.32).
The operator must adopt all the measures
necessary in order to guarantee SAFE CONDITIONS.
fig.32
When using compressed air, we recommend to
wear suitable safety devices (headsets or ear
plugs).
INFLATION SAFETY DEVICE
The machine is fitted with a pressure limiting valve set at
3.5 bar and a maximum pressure valve set at 4 bar. These
are designed to protect the operator from potential danger
resulting from the inflation of tyres on the chuck plate.
24
ITALIANO
VERSIONI SPECIALI
SPECIAL VERSIONS
speciali versioni del modello base dotate di dispositivi installabili su richiesta
special versions of the basic model equipped with fittings installed on request
DATI TECNICI
TECHNICAL DATA
TC322 può essere fornito nelle versioni IT - S - PG aventi le seguenti caratteristichetecniche:
DIMENSIONI
Altezza
Profondità
Larghezza
PESI
Peso Netto
Peso Lordo
MOTORE ELETTRICO
Potenza
Alimentazione
Fasi
* macchine disponibili anche in
versione monofase
FORZA STALLONATORE
RUMOROSITA’
ALIMENTAZIONE PNEUMATICA
Pressione d’esercizio
TC322 can be supplied in the versions: IT - S - PG which have the following technicalcharacteristics:
TC322 IT
TC322 S
TC322 PG
1895 mm
1160 mm
860 mm
1895 mm
900 mm
860 mm
1895 mm
900 mm
860 mm
184 Kg
212 Kg
184 Kg
212 Kg
184 Kg
212 Kg
0.75 Hp
230-400 V
3~
0.75 Hp
230-400 V
3~
0.75 Hp
230-400 V
3~
2500 Kg
2500 Kg
2500 Kg
75 dB
75 dB
75 dB
800/1200 kPa
(8-12 bar)
800/1200 kPa
(8-12 bar)
800/1200 kPa
(8-12 bar)
GAMMA DI APPLICAZIONI
RUOTE MOTO
Larghezza ruota
Diametro ruota
Diametro cerchio
TC322 IT
TC322 S
TC322 PG
DIMENSIONS
Height
Depth
Width
1895 mm
1160 mm
860 mm
1895 mm
900 mm
860 mm
1895 mm
900 mm
860 mm
WEIGHT
Net weight
Gross weight
184 Kg
212 Kg
184 Kg
212 Kg
184 Kg
212 Kg
0.75 Hp
230-400 V
3~
0.75 Hp
230-400 V
3~
0.75 Hp
230-400 V
3~
2500 Kg
2500 Kg
2500 Kg
75 dB
75 dB
75 dB
800/1200 kPa
(8-12 bar)
800/1200 kPa
(8-12 bar)
800/1200 kPa
(8-12 bar)
ELECTRIC MOTOR
Power
Supply
Phases
* the machine is also available in
a mono-phase version
BEAD BREAKER POWER
NOISE LEVEL
PNEUMATIC SUPPLY
Operating Pressure
RANGE OF APPLICATIONS
Le speciali versioni del TC322 possono operare su ruote e cerchi aventi le seguentidimensioni minime e massime:
RUOTE AUTOVEICOLI
Larghezza ruota
Diametro ruota
Diametro cerchio
(bloccaggio interno)
Diametro cerchio
(bloccaggio esterno)
ENGLISH
TC322 IT
TC322S
TC322 PG
min/max
min/max
min/max
3”/15”
1160 mm - 44”
3”/15”
1160 mm - 44”
3”/15”
1160 mm - 44”
12”/23”
12”/23”
12”/23”
10”/20”
10”/20”
10”/20”
3”/15”
1120 mm - 44”
15”/25”
3”/15”
1120 mm - 44”
15”/25”
3”/15”
1120 mm - 44”
15”/25”
solutions creator
The special versions of TC322 can operate on wheels having the following minimum andmaximum dimensions:
CAR WHEELS
Wheel width
Wheel diameter
Rim diameter
(internal lock)
Rim diameter
(external lock)
MOTORCYCLE WHEELS
Wheel width
Wheel diameter
Rim diameter
TC322 IT
TC322S
TC322 PG
min/max
min/max
min/max
3”/15”
1160 mm - 44”
3”/15”
1160 mm - 44”
3”/15”
1160 mm - 44”
12”/23”
12”/23”
12”/23”
10”/20”
10”/20”
10”/20”
3”/15”
1120 mm - 44”
15”/25”
3”/15”
1120 mm - 44”
15”/25”
3”/15”
1120 mm - 44”
15”/25”
26
ITALIANO
TC322 IT
TC 322 - TC328
ENGLISH
TC322 IT
TC322 versione IT è uno smontagomme semiautomatico progettato per operare anche sui Pneumatici Tubeless.
Rispetto alla versione base, la macchina viene dotata dei
seguenti componenti (ved.fig.33):
• Dispositivo di gonfiaggio automatico per pneumatici
tubeless (IT): tale dispositivo è caratterizzato da un speciale circuito d’aria “a grandi passaggi” e da una valvola
ad apertura instantanea. Azionando il pedale laterale di
gonfiaggio (L) la fuoriuscita d’aria avviene attraverso un
foro per ogni corsia, in modo da intallonare perfettamente
il pneumatico tubeless.
• Bombola d’aria compressa: conforme a quanto stabilito dalla Direttiva 87/404 CEE, ha una capacità che
consente all’operatore di avere sempre disponibili 18 litri
d’aria compressa per il gonfiaggio dei pneumatici tubeless
(fig.33-B).
• Manometro di gonfiaggio: si tratta di un manometro
fissato sul lato sinistro del palo (fig.33-C) per consentire
all’operatore di sostenere il pneumatico durante le operazioni di gonfiaggio. Il manometro è conforme alla Direttiva 87/217 CEE.
ATTENZIONE!
L’operazione di gonfiaggio è potenzialmente
pericolosa! L’operatore deve adottare tutte le
misure necessarie per garantire LE CONDIZIONI DI SICUREZZA.
DISPOSITIVO DI SICUREZZA
La macchina è stata dotata di una valvola limitatrice della
pressione di esercizio, tarata a 3,5 bar, e di una valvola di
massima pressione tarata a 4 bar.
LEGENDA
A: CUNEI DI BLOCCAGGIO
C: MANOMETRO DI GONFIAGGIO
D: BOMBOLA DELL’ARIA
F: CORSIE MOBILI SPECIALI con fori per tubeless
G: PEDALE STALLONATORE
H: PEDALE APERTURA E CHIUSURA
I: PEDALE DI GONFIAGGIO PER TUBELESS.
solutions creator
TC322 version IT is a semi-automatic tyre changer designed to operate also on tubeless tyres. In addition to
the basic model the machine is fitted with the following
components (see fig.33):
• Automatic inflation device for tubeless tyres (IT):
This device has a large capacity air circuit and an instantaneous valve. Activated with the side inflation pedal (L)
the air exits from a holes in each track. These are ideally
positioned to bead in tubeless tyres.
• Compressed air cylinder conforming to EEC Directive
87/404. The cylinder capacity means that the operator
always has 18 litres of compressed air available for the
inflation of tubeless tyres (fig.33-B).
• Inflation manometer: This is a manometer (fig.33-C)
fixed to the left side of the column so as to allow the operator to support the tyre during inflation. The manometer
conforms to EEC Directive 87/217.
fig.33
C
A
F
D
WARNING!
The inflation process is potentially dangerous!
The operator must adopt all the measures necessary in order to guarantee SAFE CONDITIONS.
SAFETY DEVICE
The machine is fitted with a pressure limiting valve set at
3.5 bar and a maximum pressure valve set at 4 bar.
KEY
A: LOCKING JAWS
C: INFLATION MANOMETERD:AIR CYLINDER
F: SPECIAL SLIDE TRACKS with holes for tubeless tyres
G: BEAD BREAKING PEDAL
H: OPEN/CLOSE PEDAL
I: TUBELESS INFLATION PEDAL
I
H
G
28
ITALIANO
TC322 IT
TC 322 - TC328
ENGLISH
TC322 IT
INSTALLAZIONE
Fare riferimento alle modalità generali di installazione.
Inoltre seguire le seguenti istruzioni:
• Installare la bombola dell’aria dietro al palo applicando
le 2 viti in dotazione di M8. (Fig.34)
• Inserire il tubo di gomma nel raccordo della bombola e
stringere la fascia (fig.34a)
• Collegare il supporto manometro al palo con le 2 viti in
dotazione di M6 (fig.35)
• Collegare il tubo dell’aria di linea sul raccordo del gruppo filtro (ved. fig.36).
• Collegare il tubino dell’aria al raccordo rapido, inserendolo nell’apposito foro (fig. 37).
INSTALLATION
Refer to the general installation instructions.
In addition follow the following instructions:
• Install the air cylinder behind the column using the two
M8 bolts supplied (fig.34).
• Connect the rubber hose to the cylinder connector and
tighten the connector band (fig.34a).
• Connect the manometer holder to the column with the
two M6 bolts supplied (fig. 35).
• Connect the air line hose to the connector on the filter
unit (see fig.36).
• Connect the small air hose to the quick connector, inserting it into the relevant hole (fig.37).
ISTRUZIONI PER L’USO
Per le operazioni di Stallonatura, Smontaggio e Montaggio del pneumatico fare riferimento alle istruzioni generali
del presente libretto.Per le operazioni di intallonamento e
gonfiaggio, dopo aver montato il pneumatico sul cerchio
procedere come segue:
• inserire il tubo dell’aria nella valvola del pneumatico.
• sollevare il pneumatico verso l’alto con entrambe le
mani, permettendo all’aria (che fuori esce dai fori delle
corsie) di “entrare” fra cerchio e pneumatico (fig.38).
• spingere il pedale di gonfiaggio (I) fino a fine corsa, per
ottenere la fuoriuscita dell’aria dalle corsie e, allo stesso
tempo, rilasciare il pneumatico per consentire l’intallonamento.
INSTRUCTIONS FOR USE
For bead-breaking, demounting and mounting tyres, see
the general instructions of this manual. For beading in and
inflation, after mounting the wheel on the rim proceed
as follows:
• Raise the tyre with both hands to allow the air (which
comes out of the tracks) to get between rim and tyre (fig.
38).
• Press the inflation pedal (I) completely down to obtain
the air output frothe tracks. At the same time release the
tyre to allow the beading in.
N.B.: qualora il pneumatico non si “intalloni” ripetere scrupolosamente le operazioni suddette. Una volta
intallonato il pneumatico, continuare l’operazione di
gonfiaggio,premendo il pedale di gonfiaggio (I) nella posizione intermedia, fino a raggiungere la pressione desiderata.
N.B.: Whenever the tyre does not bead in, repeat all the
stages in the above sequence. When the tyre is beaded in,
continue inflation by pressing the pedal in the intermediate position until the desired pressure is reached.
31a
31b
fig.34
32
fig.35
fig.34a
33
34
fig.36
fig.37
fig.38
solutions creator
30
ITALIANO
TC322 S
TC 322 - TC328
ENGLISH
TC322 S
TC322 versione S è uno smontagomme progettato per poter operare anche sui pneumatici di particolare diametro
e larghezza. Rispetto alla versione base, la macchina è
dotata del seguente componente speciale:
• Dispositivo (S) a quattro posizioni (ved fig.39) che, permettendo una più ampia apertura della paletta, consente
di stallonare pneumatici di particolare larghezza (max.
438mm - 17”).
TC322 version S is a tyre changer designed for use also
with particularly wide tyres (as regards as width and diameter).
As compared with the basic version, the machine is equipped with the following special component:
• Four-position Device (S) (fig.39) which, thanks to a
wider opening of the plate, allows bead breaking on particularly wide tyres (max. width 438 mm - 17”)
ISTRUZIONI PER L’USO
La figura 39 mostra le due aperture possibili della paletta
stallonatore speciale con sfilo chiuso e aperto:
INSTRUCTIONS FOR USE
Figure 39 shows the 2 possible opening positions for the
special bead-breaker plate with open and closed stripper:
SFILO CHIUSO (ved fig.39 pos A)
Posizione (1):
largh. max. 305mm - 12” - largh. min. 65mm - 2,5”
Posizione (2):
largh. max. 392mm - 15” - largh. min. 150mm - 5”
CLOSED STRIPPER (see fig.39 pos A)
Position (1):
Max. width 305mm - 12” - Min. width 65mm - 2,5”
Position (2):
Max. width 392mm - 15” - Min. width 150mm - 5”
SFILO APERTO (ved fig.39 pos B)
Posizione (3):
largh. max. 337mm - 13” - largh.min. 65mm - 2,5”
Posizione (4):
largh. max. 438mm - 17” - largh.min. 159mm - 6”
OPEN STRIPPER (see fig.39 pos B)
Position (3):
Max. width 337mm - 13” - Min. width 65mm - 2,5”
Position (4):
Max. width 438mm - 17” - Min. width 159mm - 6”
Prima di iniziare le operazioni di stallonamento del pneumatico, impostare la posizione desiderata a seconda della
larghezza del pneumatico stesso. Per le successive operazioni di stallonamento, smontaggio e montaggio del
pneumatico, fare riferimento alle istruzioni generali e dalle avvertenze del presente libretto.
Before starting bead-breaking set the position required
according to the width of the wheel. For the successive
operations of bead-breaking, demounting and mounting
of the tyre refer to the general instructions of this manual.
fig.39
B
A
TC322 PG
TC322 PG
TC322 versione PG presenta caratteristiche tecniche uguali
alla macchina versione base, con, in aggiunta, la funzione
gonfiaggio a pedale.
solutions creator
TC322 version PG shows technical features similar to the
basic version machine with, in addition, the pedal inflation function.
32
ITALIANO
TC328
TC 322 - TC328
ENGLISH
TC328
TC328 (fig.40) è uno smontagomme semiautomatico previsto per poter operare su pneumatici di particolare diametro e/o larghezza.
La macchina viene infatti fornita dotata di:
• un autocentrante speciale per il bloccaggio del cerchio
con corsie mobili, con possibilità di bloccare:
- diametro cerchio
(bloccaggio interno) 12”÷ 31”
- diametro cerchio
(bloccaggio esterno) 10”÷ 28”
• stallonatore provvisto di uno speciale dispositivo (S) a
due posizioni che, permettendo una più ampia apertura
della paletta, consente di stallonare pneumatici di 438mm
di larghezza max.
• possibilità di gonfiaggio a pedale.
• possibilità di operare sui Pneumatici Tubeless con la
versione IT.
• rimangono inoltre invariate le misure e le funzioni
tecniche della macchina base TC322.
TC328 (fig.40) is an semi-automatic tyre changing machine capable of working on large-sized tyres.
The machine is supplied equipped with:
• special self-centering chuck jaws for locking the rim
with movable runways, with possibility of locking:
- rim diameter
(internal locking) 12”÷ 31”
- rim diameter
(external locking) 10”÷ 28”
• bead breaker fitted with a special (S) two position
device. This allows a wider plate opening for the beadbreaking of tyres of up to 438mm
• possibility of pedal inflation.
• possibility of working on Tubeless tyres with
IT version.
• Furher, the sizes and technical functions of the TC322
basic machine remain unchanged.
fig.40
ROUTINE MAINTENANCE
cleaning the machine and user maintenance
MANUTENZIONE ORDINARIA
pulizia e manutenzione della macchina a cura dell’utilizzatore
Per garantire l’efficienza della macchina e per il suo corretto funzionamento è indispensabile effettuare la pulizia
e la periodica manutenzione ordinaria.
Le operazioni di manutenzione ordinaria devono essere
effettuate dall’utilizzatore in accordo alle istruzioni del
costruttore di seguito riportate:
Prima di procedere a qualsiasi operazione di pulizia e manutenzione,spegnere la macchina tramite
l’interruttore generale e toglierela spina dalla
presa di corrente.
solutions creator
To guarantee the efficiency and correct functioning of the
machine it is essential to clean it and to conduct periodic
routine maintenance.
The operations of routine maintenance must be carried
out by the user according to the maker’s instructions given below:
Before proceeding to any cleaning or maintenance operations, switch off the machine using
the main switch and remove the plug from the
socket.
34
ITALIANO
PARTI MECCANICHE
Mantenere pulite le parti meccaniche di movimento, lavandole periodicamente con Nafta o Kerosene e lubrificandole con olio o grasso.
In particolare:
• Lubrificatore:controllare e mantenere il livello dell’olio
nel Lubrificatore, livello che non deve superare i valori
min.e max ivi indicati. Se necessario aggiungere olio fluido. Ved.Tabella Olii.
• Filtro Aria: periodicamente scaricare l’acqua di condensa
formatasi nel filtro aria.
• Rullino: controllare che il Rullino ruoti sempre liberamente. Periodicamente pulirlo con Nafta e, se necessario,
lubrificarlo con olio.
• Cinghia Motore: controllare che la cinghia del motore sia
in giusta tensione ovvero non slitti.
• Manometro di Gonfiaggio: controllare periodicamente i
valori sulla scala del manometro di gonfiaggio.
TC 322 - TC328
ENGLISH
MECHANICAL PARTS
Keep the moving parts clean, washing them periodically
with naphtha or kerosene an d lubricating them with oil
or grease.
In particular:
• Lubricator: check and maintain the level of oil in the
lubricator. The level must not go outside the min/max indicated. If necessary add liquid oil. See Oil Table.
• Air filter: periodically remove the water condensation
that forms in the air filter.
• Roller: check that the roller always turns freely. Periodically clean with naphtha and if necessary lubricate with
oil.
• Motor drive belt: check that the motor belt is at the
correct tension and that it does not slip.
• Inflation manometer: periodically check the figures on
the pump manometer scale.
fig.41
MOVEMENT AND TRANSPORT
TRASPORTO E MOVIMENTAZIONE
Qualora si renda necessario il trasporto o la
movimentazionedella macchina, adottare le
necessarie precauzioni!
Per le modalità di imbragamento e sollevamento della
macchina, vedere la figura 41 adiacente e fare riferimento
alle istruzioni del libretto.
ACCANTONAMENTO E ROTTAMAZIONE
PERIODI DI INATTIVITA’
Qualora si decida di accantonare provvisoriamente la macchina, o comunque durante i periodi in cui l’attrezzatura
non è in funzione, togliere la spina dalla presa di corrente!
ACCANTONAMENTO DEFINITIVO
Allorché si decida di non utilizzare più questa macchina,
si raccomanda di renderla inoperante asportando il cavo
dell’alimentazione elettrica dopo aver tolto la spina dalla
presa.
ROTTAMAZIONE
Essendo lo smontagomme assimilabile a rifiuto di tipo
speciale, scomporre in parti omogenee e smaltire secondo
le leggi vigenti.
solutions creator
Whenever it is necessary to move or transport
the machinetake all the necessary precautions.
For the methods of harnessing and lifting the machine,
refer to adjacent fig. 41 and the instructions of the manual.
STORAGE AND SCRAPPING
PERIODS OF INACTIVITY
Whenever it is decided to temporarily store the machine,
and during periods in which the machine is not in use,
remove the plug from the electrical supply!
PERMANENT STORAGE
If it is decided that this machine is no longer to be used,
it is advisable to make it inoperative by removing the
electrical cable after having disconnected the plug from
the supply.
SCRAPPING
Since the tyre changing machine is considered as special
refuse, it should be dismantled into homogeneous parts
and disposed of according to the laws in force.
36
ITALIANO
ASSISTENZA TECNICA E PARTI DI RICAMBIO
• QUALORA LA MACCHINA PRESENTASSE QUALCHE DISFUNZIONE, CONSULTARE LA SEZIONE “MALFUNZIONAMENTI, LORO
CAUSE E POSSIBILI RIMEDI”. ALTRE EVENTUALI DISFUNZIONI DEVONO ESSERE CONTROLLATE DA PERSONALE TECNICO
PROFESSIONALMENTE QUALIFICATO.
• IN OGNI CASO RIVOLGERSI AL SERVIZIO ASSISTENZA DEL RIVENDITORE AUTORIZZATO DELLE ATTREZZATURE M&B. PER
UN SOLLECITO INTERVENTO È IMPORTANTE, ALL’ ATTO DELLA CHIAMATA, SPECIFICARE IL MODELLO DI MACCHINA, IL N°
DI FABBRICAZIONE (RILEVABILE DALLA TARGHETTA MATRICOLA) ED IL TIPO DI DISFUNZIONE.
ATTENZIONE
QUALSIASI INTERVENTO SULL’IMPIANTO ELETTRICO, IDRAULICO E PNEUMATICO DEVE ESSERE EFFETTUATO
ESCLUSIVAMENTE DA PERSONALE PROFESSIONALMENTE QUALIFICATO.
• LE TAVOLE ESPLOSE DELLE PAGINE SEGUENTI MOSTRANO LE PARTI COMPONENTI LA MACCHINA BASE, LE VERSIONI
SPECIALI E LE PARTI ACCESSORIE.
ATTENZIONE
LE PARTI DI RICAMBIO DEVONO ESSERE RICHIESTE ESCLUSIVAMENTE AL RIVENDITORE AUTORIZZATO DELLE
ATTREZZATURE M&B.
ENGLISH
TECHNICAL ASSISTENCE AND SPARE PARTS
• WHENEVER THE MACHINE MALFUNCTIONS, CONSULT THE TROUBLE SHOOTING SECTION. ANY OTHER FAULTS MUST BE
CHECKED BY PROFESSIONALLY QUALIFIED TECHNICIANS.
• IN ALL CASES REFER TO THE ASSISTANCE SERVICE OF YOUR AUTHORISED M&B RETAILER.FOR PROMPT INTERVENTION
IT IS IMPORTANT, WHEN CALLING, TO SPECIFY THE MACHINE MODEL, THE SERIAL NUMBER (FOUND ON THE MACHINE
IDENTIFICATION PLATE)AND THE TYPE OF FAULT.
WARNING
ALL WORK ON ELECTRICAL, PNEUMATIC, AND HYDRAULIC SYSTEMS MUST BE CONDUCTED BY PROFESSIONALLY QUALIFIED PERSONNEL.
• THE EXPLODED DIAGRAMS ON THE FOLLOWING PAGES SHOW THE COMPONENT PARTS OF THE BASIC MACHINE, SPECIAL
VERSIONS, AND ACCESSORY PARTS.
WARNING
SPARE PARTS MUST BE PURCHASED EXCLUSIVELY FROM AN AUTHORISED M&B RETAILER.
THE MANUFACTURER DOES NOT ACCEPT RESPONSIBILITY FOR DAMAGE RESULTING FROM THE USE OF NON ORIGINAL
SPARE PARTS.
IL COSTRUTTORE NON RISPONDE DI EVENTUALI DANNI CAUSATI DA RISCHI EMERSI PER MALFUNZIONAMENTO DI
PARTI SOSTITUITE NON ORIGINALI.
solutions creator
38
ITALIANO
ENGLISH
INSTRUCTIONS FOR THE CORRECT MANAGMENT OF WASTE MATERIAL OF WASTE MATERIAL FROM
ELECTRIC AND ELECTRONIC DEVICES (WEEE) UNDER THE 2002/96/CE AND 2003/108/CE DIRECTIVE
• It is obligatory by law not ti dispose of WEEE as regular urban trash.
• It is also obligatory by law to collect each type of waste material separately and take it to dedicated recycling depots
according to the indications provided by the manufactures of the devices.
• The following symbol, which appears on the devices, indicates that persons in possession of any such waste material
are obliged to dispose of it or the devices themselves according to the above indications:
• Due to the dangerous substances contained within such devices or their waste material, incorrect managment or illegal dumping of them may contaminate the environment and cause damage to human health, the flora and the fauna.
• Italian regulations provide for fines against any and all persons who illegally dump or abandon waste materials from
electric and electronic devices.
solutions creator
40
+)4/2
0(
0(
+)4
'5!2.):)/.)
**
Specificare dati motore
Specify engine details
Volt
Ph
Hz
RPM
COD.
solutions creator
200894
VERS.
"
28”
"
$%44!',)/
3#!,!
REV.
1
42
25").%44/
!54/#%.42!.4%
0(
0(
0(
0(
COD.
solutions creator
25").%44/
34!,,/.!4/2%
200895
REV.
1
43
+)4
'5!2.):)/.)
VERS.
S
COD.
solutions creator
200891
REV.
0
44
25").%44/
6%23)/.))4
VERS.
!
28” IT
VERS.
!
$%44!',)/
3#!,!
25").%44/
!54/#%.42!.4%
solutions creator
IT - PG
COD.
200896
25").%44/
34!,,/.!4/2%
REV.
1
45
#%
NO#%
+)4.²
OPTIONAL
COD.
solutions creator
200893
+)4.²
REV.
0
46
AUTOCENTRANTE
STALLONATORE
(A RICHIESTA)
MONTAGGIO GRUPPO
A RICHIESTA FR+L+
VALV.TAR 3,5 bar
3.5 bar
PRESSIONE ESERCIZIO
DA 1.5 A 12 bar
PRESSIONE DA 1.5 A 12 bar
COD.
solutions creator
200686
REV.
0
47
SMONTAGOMME MONOFASE 230 Vac
230V 60Hz
230V 50Hz
110V 60Hz
L2
L1
L1
L2
PE
Q1
102 1
2
3
4
5
6
POSIZ.
Q1
ELEM.
CONT.
1
0
2
I
1
X
X
II
2
X
3
X
III
4
X
5
6
X
X
X
Bi
Bi
Ro
Ro
1 = ROTAZIONE ORARIA
2 = ROTAZIONE ANTIORARIA
COND.
AVVIAMENTO
1
MOTORE
RIDUTTORE
COD.
solutions creator
200900
REV.
0
49
ITALIANO - ENGLISH
FRANÇAIS - DEUTSCH - ESPAÑOL
DICHIARAZIONE CE DI CONFORMITA’ - DECLARATION OF CONFORMITY
La Ditta - The Company
M&B Engineering srl
VIA DELLA COSTITUZIONE 45
42015 CORREGGIO - REGGIO EMILIA (ITALY)
dichiara con la presente la conformità del Prodotto:
herewith declares conformity of the Products:
Designazione - Designation
Smontagomme - Tyre Changer
Tipo- N° di serie - Type- Serial number
TC322 - TC328 e vers. IT- S - PG
alle norme sottostanti :
with applicable regulations below :
Direttive CEE - EC Directive
98/37/CE - 2006/95/CE - 2004/108/CE
(mod. IT - S - PG)
Direttive CEE - EC Directive
Norme Armonizzate Applicate - Applied harmonized standards
EN 12100-1 ; EN 12100-2 ; EN 983 ; EN 60204-1
EN 61000-6-2 ; EN 61000-6-3
(mod. IT - S - PG)
Data
Dido Boni
15/01/2008
President
solutions creator
50