1
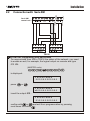
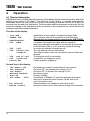
ITALIANO
security
TDX16
Combinatore telefonico GSM con
messaggi vocali pre-registrati
MANUALE PER L'UTENTE
TDX16 - Manuale dell’utente
security
Indice
Capitolo 1 - Introduzione.................................................................... 3
1.1 Caratteristiche funzionali................................................................................... 3
1.2 Caratteristiche tecniche.....................................................................................3
Capitolo 2 - Installazione.................................................................... 4
2.1 Schema di collegamenti Serie TM e Protec...................................................... 4
2.2 Schema di collegamenti con Serie XM..............................................................5
Capitolo 3 - Programmazione............................................................ 6
3.1 Rubrica.............................................................................................................. 6
3.1.1 Inserimento Numeri telefonici................................................................... 6
3.1.2 Cancellazione Numeri.............................................................................. 7
3.2 Parametri........................................................................................................... 7
3.2.1 Configurazione Relay OUT.......................................................................7
3.2.2 Configurazione Allarme Rete....................................................................8
3.2.3 Funzione abilitazione/disabilitazione inoltro SMS.....................................8
3.3 Codici MASTER e COMANDI........................................................................... 8
3.3.1 Codice MASTER...................................................................................... 8
3.3.2 Codice COMANDI.................................................................................... 9
3.3.4 Messaggio Vocale Comune personalizzabile...........................................9
3.5 Test.................................................................................................................. 10
3.6 Informazioni sul TDX16...................................................................................10
3.6 Ripristino impostazioni di fabbrica...................................................................10
3.7 Riavvio combinatore........................................................................................10
3.8 Test..................................................................................................................10
Capitolo 4 - Funzionamento............................................................. 11
4.1 Informazioni sul display................................................................................... 11
4.2 Descrizione generale del funzionamento........................................................ 12
4.3 Codice COMANDI........................................................................................... 13
4.3.1 Inserimento/disinserimento.................................................................... 13
4.3.2 Modifica codice comandi........................................................................ 14
4.4 Cicli di allarme................................................................................................. 14
4.5 Controllo Remoto............................................................................................ 15
4.6 Invio SMS........................................................................................................ 16
4.7 Interrogazione credito residuo tramite SMS e reinvio SMS ricevuti................ 16
2
Introduzione
security
1
Introduzione
1.1
!
!
!
!
!
!
!
!
!
!
!
!
!
!
1.2
Caratteristiche funzionali
Combinatore telefonico completamente pre-programmato con messaggi vocali di
allarme antifurto, assenza rete e tutti i menù guida vocali
Risponditore vocale con messaggi guida pre-registrati.
Comandi remoti per Ins/Dis e Blocco ciclo chiamate.
Codici accesso programmazione e utente.
Display alfanumerico con visualizzazione stato impianto e presenza rete.
Uscita comando centrale con funzionamento ad impulsi (SerieXM) o ON/OFF
(SerieTM).
Modulo GSM Quadriband.
Tamper di protezione antiapertura.
Messaggi vocali pre-registrati.
SMS pre-impostati per stato per stato allarme e presenza rete
Indicazione dell'intensità di segnale GSM e del gestore telefonico.
Ascolto ambientale da remoto
Timer ritardo segnalazione assenza rete (10minuti).
Lettura credito, inoltro degli SMS ricevuti ai numeri in rubrica e reset del device da
menù (senza togliere alimentazione)
Caratteristiche Tecniche
Canali
Tensione nominale di alimentazione
Assorbimento max
Rubrica
Antenna
Ingressi
Uscita
Contenitore esterno
Dimensioni (L)
Dimensioni (A)
Dimensioni (P)
2
13Vcc 10%
400mA
16 numeri
ANTGSMX (inclusa)
+INT (Stato inserimento antifurto)
K1 (Stato allarme)
K2 (Presenza rete)
Comando Inserimento/Disinserimento
ABS
107mm
140mm
26mm
3
TDX16 - Manuale dell’utente
security
2
Installazione
2.1
Schema di collegamenti Serie TM e Protec
Senza chiave elettronica
Con chiave elettronica
Centrale
antifurto
Chiave
Int. Sir
Da collegare a
un riferimento di
tensione di rete
(12Vcc max).
Chiave
12Vcc
Int. Sir
Da collegare a
un riferimento di
tensione di rete
(12Vcc max).
V R NC NA C
Uscita
LED
12Vcc
Centrale
antifurto
Chiave
elettronica
- 12V +
C NA NC
OUT1
INT IN IN
TAMPER
1 K2 K1
TDX16
- 12V +
C NA NC
OUT1
INT IN IN
TAMPER
1 K2 K1
TDX16
Il fondo della consolle può essere montato
su una comune cassetta murale tipo “503”.
Per la protezione antistrappo,
fissare anche la vite in dotazione
IMPORTANTE :
- Eliminare il codice PIN dalla
SIM con un qualsiasi cellulare.
- Inserire la SIM all’interno del
combinatore come indicato nella
figura,avendo cura di staccare
prima l’alimentazione.
4
Installazione
security
2.2
Schema di collegamenti Serie XM
Centrale
Serie XM
GND +12 +int +SA COM +SIR +OUT
009
011 012
AUX 010
- 12V +
C NA NC
OUT1
IN GND
009
INT IN IN
TAMPER
1 K2 K1
TDX16
ATTENZIONE: Programmazione da effettuare sulla consolle dell’impianto XM
Per comunicare dalla centrale XM al TDX16 lo stato della rete, bisogna
abilitare un’uscita, per esempio, l’uscita logica 012 e digitare sulla
consolle XM:
(Codice MASTER)
5 6 7 8
8 8 8 7 3
si visualizza :
3 Stato Rete
000 000 000 000
premere
o
3 Stato Rete
>0 0 0 0 0 0 0 0 0 0 0 0
inserire l’uscita 012 :
3 Stato Rete
012 000 000 000
confermare con
più volte il tasto
o
e uscire dalla programmazione premendo
.
5
TDX16 - Manuale dell’utente
3
security
5
Programmazione
6
7 8
La programmazione del combinatore è consentita soltanto dalla tastiera locale digitando il
codice MASTER ( di default è
5
7 8
6
) seguito da
oppure aprendo il
combinatore e premendo il pulsante P1 per circa 15 secondi.
Una volta entrati, si visualizza:
Indica l’intensità del
segnale (1 min 31max)
ABCD
25
(ABCD =Gestore Telefonico)
1-Rubrica
1 - Rubrica
2 - Parametri
16 Numeri telefonici.
Configurazione del modo di funzionamento del “Relè OUT1” :
A Stato(SerieTM/PROTEC) o A Impulsi(SerieXM/TM600P/XR500)
Configurazione riconoscimento Assenza Rete su IN K2
3 - Codici
Modifica del Codice MASTER e del Codice COMANDI.
4 - Messaggio Comune Possibilità di registrare un messaggio comune
5 - Ripristino
Azzera i codici (MASTER e COMANDI) e tutta la rubrica telefonica.
6 - Info
Visualizzazione del Modello; Firmware e IMEI del modulo GSM.
7 - Riavvio
Riavvia il combinatore
8 - Test
Effettua una chiamata di prova
3.1
Rubrica
3.1.1
Inserimento Numeri Telefonici
5
Una volta entrati nel menù premere
1
si visualizza :
RUBRICA
Inserisci Numeri
premere
si visualizza :
Numero
01
Non Programmato
premere
si visualizza :
Numero
_
01
>
a questo punto bisogna inserire il numero di telefono (max di 32 cifre) :
Numero
123456789
6
01
>
6
7 8
1
Programmazione
security
una volta inserito, per confermare basta premere solo il tasto
visualizza:
ed immediatamente si
Invio SMS all.?
7=SI
9=NO
per associare l’SMS al numero basta confermare premendo il tasto “7” (SI) oppure il “9”(NO).
3.1.2
Cancellazione Numeri
Per eliminare un numero telefonico l’operazione da effettuare è semplice, basta entrare in
“Rubrica” e premere uno tra i tasti
avremo :
RUBRICA
Cancella
premere
e selezionare con
(es. Numero 03) si visualizza :
il numero di telefono che si vuole eliminare
Numero 03
122668899
premere sempre il tasto
si visualizza :
Vuoi Cancellare?
7=SI
premendo il tasto
7
9=NO
si visualizza per qualche istante :
CANCELLATO
per uscire dal sottomenù “Cancella Numeri”, basta tornare indietro premendo più volte il
tasto
.
NOTA: Se durante la programmazione, la tastiera non viene utilizzata per un tempo
superiore ad 1 min, il combinatore esce da questa fase.
7
TDX16 - Manuale dell’utente
security
5
3.2
Parametri
3.2.1
Configurazione Relay OUT
6
7 8
2
Permette di scegliere il comportamento del relè di uscita per consentire l’inserimento della
centrale antifurto. Nel funzionamento A STATO (adatto per centrali tipo TM o PROTEC), il
relè di uscita inverte l’uscita OUT1 ad ogni comando, mentre nel funzionamento A
IMPULSO (adatto per le centrali SerieXM o XR), il relè chiude i contatti C/NA di OUT1 per
circa 1sec. e poi ritorna in condizioni di riposo. Una volta entrati nel menù premere il tasto
; si visualizza:
2 oppure
Conf. Relay OUT
A STATO
oppure:
Conf. Relay OUT
A IMPULSO
per cambiare la configurazione dell’uscita, basta premere
8
.
Programmazione
security
3.2.2
Premere
Configurazione Allarme Rete
per visualizzare:
Conf. All. RETE
Allarme su 0V
oppure:
Conf. All. RETE
Allarme su +12V
Per passare da una configurazione all’altra, premere i tasti
.
Con Allarme su 0V (adatto per impianti con centrali Serie TM/PROTEC), il timer comincia
il conteggio quando viene a mancare la tensione sull’ingresso IN K2 ; mentre con Allarme
su +12V (adatto per impianti con centrali Serie XM) il countdown comincia quando si
presenta una tensione sull’ingresso IN K2 .
Per terminare la configurazione, premere il tasto
.
3.2.3
Funzione abilitazione/disabilitazione inoltro SMS
Con questa funzione abilitata, il combinatore invia tutti gli SMS ricevuti, al numero inserito
alla posizione numero 1 della rubrica. .
Premere
per visualizzare:
Inoltro SMS
Abilitato
oppure:
Inoltro SMS
Disabilitato
per cambiare configurazione, usare i tasti
9
TDX16 - Manuale dell’utente
3.3
security
Codici MASTER e COMANDI
5
6
7 8
3
In questo menù è possibile cambiare i Codici MASTER e COMANDI .
Una volta entrati nel menù, premere il tasto 3 ; si visualizza:
3.3.1
Codice MASTER
Il codice MASTER,permette di accedere alle funzioni del menù,che oltre a
programmare il TDX16, consente anche di effettuare eventuali modifiche. Infatti per
cambiare i codici basta confermare con
e si visualizza :
SELEZ. CODICE
CODICE MASTER
a questo punto inserire un codice desiderato di 4 cifre, in automatico si riporta nel menù
“Selezione Codice”.
3.3.2
Codice COMANDI
Questo codice invece, permette di effettuare solo una funzione e cioè quella di INSERIRE
o DISINSERIRE l’impianto d’antifurto ad esso collegato.
Per il codice comandi utilizzare
fino a visualizzare :
CODICE MASTER
---inserire il codice desiderato di 4 cifre come visto in precedenza.Una volta digitato il nuovo
codice, il TDX16 in automatico si riporta nel menù “Selezione Codice”.
10
SELEZ. CODICE
CODICE COMANDI
CODICE COMANDI
----
Programmazione
security
3.4 Messaggio Vocale Comune personalizzabile
Utilizzare i pulsanti
5
6
7
8
4
, oppure, premendo direttamente il tasto 4 si visualizza:
ABCD
25
4-Msg. Comune
Msg. Comune
*Play
#Rec
Tenendo premuto il tasto
sarà possibile registrare un messaggio.
Rilasciandolo si interromperà la registrazione.
NOTA: la registrazione si interromperà automaticamente una volta raggiunta la durata massima
del messaggio (15 secondi).
Per riprodurre il messaggio registrato, premere il tasto
.
Durante la riproduzione o la registrazione comparirà un'animazione nella seconda riga del display, come
segue:
Msg. Comune
>>>>
Msg. Comune
>>>>>>>>
Per tornare al menu precedente, premere il tasto
ESC
Il messaggio verrà riprodotto all’inizio di ogni telefonata, prima della richiesta dell’inserimento del codice.
11
TDX16 - Manuale dell’utente
3.5
security
Ripristino impostazioni di fabbrica
5
6
7 8
5
Si cancellano tutti i numeri telefonici presenti nella rubrica e si ripristinano le impostazioni
di fabbrica del combinatore. Una volta entrati nel menù, premere il tasto 5 ; si visualizza:
25
ABCD
5-Ripristino IMP
premendo il tasto
si visualizza :
Conf. Ripristino?
7-SI
confermarmando con il tasto
7
9-NO
si visualizza per qualche istante :
Ripristino OK
invece, premendo il tasto
3.6
9
si esce dal menù senza eseguire il reset.
Informazioni sul TDX16
Per procedere basta utilizzare i tasti
5
6
7 8
6
e si visualizza :
Modello
*** TDX16 ***
3.7
Rel. Firmware
IMEI
738ESW-2.00.00
0000000000000000
5
Riavvio combinatore
6
7 8
3
Questa funzione riavvia il combinatore è può risultare utile a forzare una nuova registrazione
della scheda SIM sulla rete GSM.
Una volta entrati nel menù, premere il tasto 7 ; si visualizza:
Indica l’intensità del
segnale (1 min 31max)
12
25
ABCD
7-Reset
(ABCD =Gestore Telefonico)
Programmazione
security
3.8
5
Test
Una volta entrati nel menù, premere il tasto
8
Inserire
_
25
7 8
8
; si visualizza:
Numero
Inserire un numero telefonico qualsiasi dopodichè premere il tasto
Indica l’intensità del
segnale (da 1 a 31)
6
si visualizza :
Chiama......
1234567890
Numero telefonico
rispondendo alla chiamata si visualizza :
25
Connesso....
1234567890
Durante il test è possibile ascoltare ed inviare toni DTMF, ma non è possibile parlare con
l’utenza connessa. Questa funzione può essere utilizzata ad esempio per conoscere il credito
residuo della SIM CARD.
13
TDX16 - Manuale dell’utente
4
security
Funzionamento
4.1 Informazioni sul display
L'uso del combinatore GSM è facilitato dalla presenza del display che fornisce informazioni
sulle attività e sullo stato del combinatore. La retroilluminazione del display è gestita
automaticamente: si accende quando l'utente digita un qualsiasi tasto o si attiva un canale e si
spegne trascorsi 20 secondi circa dal termine di tutte le operazioni. Le informazioni sono
visualizzate su due righe; sulla prima appaiono quelle relative alle operazioni del combinatore
sulla linea telefonica, mentre sulla seconda le indicazioni riguardano lo stato dei canali.
Prima riga del display:
- Init GSM....
- INSERIRE SIM
- REGISTRAZIONE..
- 20¥
ABCD
-
20¥
20¥
20¥
20¥
Ric.
Chiama..
Ch. fallita
Occupato
Fine chiam.
Connesso
Chiamata
Inizializzazione del modulo di connessione telefonica
GSM.
Il combinatore attende l’inserimento di una SIM card
(staccare l’alimentazione prima di inserire la SIM).
Tentativo di registrazione sulla rete telefonica in atto.
Indica l’avvenuta connessione con il gestore telefonico
specificato e segnala in particolare l’intensità del segnale
(da 1 a 31) con il simbolo ¥ lampeggiante.
In corso un tentativo di chiamata telefonica.
Il tentativo di chiamata non ha avuto risposta.
Il num. chiamato è occupato/ha rifiutato la chiamata.
La chiamata telefonica è conclusa.
Connessione telefonica effettuata.
Ricezione chiamata telefonica.
Seconda riga del display:
-
Rubrica off
Imp Disinserito
Imp Inserito
Assenza Rete
Rete OK
TIMER RETE 0600
- Intervallo
- Gestione Remota
14
Nessun numero telefonico è inserito nella rubrica.
Sull’ingresso Input INT1 non è presente la tensione di 12V.
Sull’ingresso Input INT1 è presente la tensione di 12V.
Manca tensione di rete elettrica.
Tensione di rete elettrica presente.
Countdown di 600sec.(10min) che si attiva al mancare
della rete elettrica e si resetta al ritorno della stessa. Al
termine del conteggio, parte il ciclo di allarme.
Piccola pausa tra una telefonata e l’altra.
Attivazione controllo da remoto durante la connessione.
Funzionamento
security
4.2
Descrizione generale del funzionamento
L'attivazione del TDX16 genera un ciclo di chiamate verso i numeri telefonici inseriti nella
rubrica inviando oltre che il messaggio pre-registrato anche l’SMS pre-impostato sempre che
quest’ultimo sia stato attivato assieme al numero telefonico.
La prima operazione è quella di inserire la SIM Card come mostrato in precedenza.
Si visualizza :
Inserire
SIM
Rubrica Off
Spegnere il combinatore prima di inserire la SIM CARD, poi riaccenderlo.
Inserita la SIM, il combinatore effettua la registrazione della stessa :
Init GSM........
Rubrica Off
Una volta terminata questa operazione viene visualizzato:
25
ABCD
Rubrica Off
IMPORTANTE : Per un corretto funzionamento del combinatore, l’antenna deve
sempre essere collegata.
Il LED rosso “GSM” presente sul pannello indica l’attività del modulo GSM.
- Spento : GSM non operativo.
- Un flash ogni secondo : Rete non trovata.
- Un flash ogni 3 secondi : Rete trovata.
Il LED verde “Status”indica lo stato del TDX16 :
- Lampeggio lungo seguito da una pausa breve :
Modulo GSM in
registrazione
- Lampeggio lento :
Combinatore in attesa.
- Due lampeggi brevi + una pausa :
In connessione GSM durante
i cicli di allarme.
- Lampeggio veloce :
Controllo Remoto.
15
TDX16 - Manuale dell’utente
4.3
security
1 2 3 4
Codice COMANDI
Il Codice COMANDI (di default 1 2 3 4 ) a differenza del Codice MASTER
permette di INSERIRE o DISINSERIRE l’impianto antifurto collegato o di cambiare il
CODICE COMANDI.
4.3.1
1 2 3 4
Inserimento/Disinserimento
Una volta digitato il Codice COMANDI, premere in sequenza i tasti
e
1
1
si visualizza:
Imp:DISINSERITO
7=INS
9=DIS
premendo sul tasto
7
il combinatore comanda l’inserimento della centrale,
mentre con il tasto
9
non esegue nessuna operazione.
Se invece si visualizza :
Imp:INSERITO
7=INS
è possibile utilizzare il tasto
mentre con il tasto
7
9
9=DIS
per comandare il disinserimento dell’impianto,
non si comanda nessuna operazione.
Per uscire da questo menù, basta premere il tasto
4.3.2
.
Modifica Codice COMANDI
1 2 3 4
Una volta digitato il Codice COMANDI, premere in sequenza i tasti
e
2
2
si visualizza:
SELEZ. CODICE
CODICE COMANDI
per cambiare il Codice COMANDI premere il tasto
si visualizza :
CODICE COMANDI
---inserire il codice desiderato si visualizza di nuovo :
SELEZ. CODICE
CODICE COMANDI
NOTA : Accedendo con il Codice COMANDI non è possibile modificare il Codice MASTER.
16
Funzionamento
security
4.4
Cicli di Allarme
Quando si verifica un evento di allarme, parte il ciclo di chiamate. Sul display si visualizza :
25
Chiama.....
>>> 1234567890
In caso di evento Assenza Rete, parte il timer di 600 secondi (10min) prima che venga
effettuato il ciclo di chiamate. In caso di ripristino della rete, il ciclo di chiamate non viene
eseguito.
Effettuata la connessione si visualizza :
25
Connesso....
>>> 1234567890
si ascolterà : “Impianto in allarme e/o assenza rete (a seconda dell’evento) inserire
codice” se inserito correttamente (solo CODICE COMANDI)passa alla
fase successiva “GESTIONE REMOTA” che verrà descritta in seguito:
25
Connesso....
GESTIONE REMOTA
altrimenti se risulta incorretto dopo circa 30sec. la chiamata termina.
Il ciclo di allarme prosegue con la chiamata al numero successivo inserito nella rubrica. In
ogni ciclo, il combinatore effettua 3 tentavi per raggiungere l’utente inserito nella rubrica,
dopodichè termina il ciclo.
17
TDX16 - Manuale dell’utente
4.5
security
Controllo Remoto
Il controllo remoto permette di interrogare o comandare attraverso il TDX16 l’impianto di
allarme ad esso collegato. E’ possibile attivare questa modalità sia durante una chiamata
di allarme, come descritto in precedenza sia chiamando direttamente il combinatore da un
telefono in grado di inviare toni DTMF.
Quando la connessione si attiva,sul display comparirà :
Connesso....
25
Imp. INSERITO
si ascolta il messaggio pre-registrato: “Inserire Codice”(solo Codice COMANDI ) se
inserito correttamente si attiva la gestione remota, altrimenti se risulta errato dopo circa
30sec. la chiamata termina.
Immesso il codice, sul display comparirà :
25
Connesso....
GESTIONE REMOTA
Si ascolterà il messaggio :
“Impianto Inserito” (oppure “Impianto disinserito” a seconda dello stato di inserimento
della centrale collegata).
“Rete OK” (oppure “Assenza rete”).
“Premere 5 per ascolto ambientale”.
“Premere 7 per inserire” (oppure “Premere 9 per disinserire” se l’impianto è già
inserito).
“Premere 0 per STOP CICLI”.
NOTA : Per terminare l’ascolto ambientale è possibile digitare
.
Con il comando <0> si arresta il ciclo di chiamate e si chiude la telefonata
corrente.
Al termine della chiamata, sul display si visualizza :
Fine Chiam.
25
Imp. INSERITO
18
Funzionamento
security
4.6
Invio SMS
Quando parte un ciclo di allarme vengono inviati, per prima cosa, gli SMS verso tutti i
numeri abilitati a tale servizio nella rubrica. I messaggi sono a seconda dei casi :
1.
2.
3.
4.
“Impianto in allarme, rete OK”
“Impianto in allarme, assenza rete”
“Impianto inserito, assenza rete”
“Impianto disinserito, assenza rete”
NOTA : L’SMS viene inviato PRIMA di effettuare la telefonata e i tentativi di chiamata sono
3 per ogni numero di telefono.
4.7
Interrogazione credito residuo tramite SMS e reinvio SMS
ricevuti
Per conoscere il credito residuo sulla SIM inserita nel TDX16, seguire la procedura
descritta di seguito:
!
Inviare un SMS al combinatore dal proprio cellulare con la seguente dicitura:
SMS XXXXXX YYYYYYY
Numero di telefono del
Centro Servizi operatore SIM
Testo SMS
Esempi numeri centri servizi di alcuni operatori:
OPERATORE
TIM
VODAFONE
WIND
TESTO SMS
SMS 40916 PRE CRE SIN
SMS 404 TRAFFICO
SMS 4155 Saldo
Il combinatore invierà un SMS col testo immesso precedentemente “Y Y Y Y Y Y ”
al numero di telefono del centro servizi dell’operatore di telefonia “X X X X X X ”
Il combinatore attenderà per circa 50 secondi la risposta dal server dell’operatore (TIM,
VODAFONE, WIND ecc... ). La risposta sarà inviata al numero da cui è stato inviato l’SMS
Qualsiasi altro SMS ricevuto dal combinatore telefonico, verrà inviato al primo numero (se
presente) memorizzato nella rubrica del TDX16, (promozioni, bonus punti, ecc...).
19
TDX16 - Manuale dell’utente
security
UNI EN ISO 9001 - 08
COSTRUTTORE:
HiLTRON S.r.l.
INDIRIZZO:
Strada Provinciale di Caserta, 218 - 80144 - NAPOLI
Sulla valutazione di prove eseguite su impianti campioni rispecchianti la configurazione
funzionale prevista per l'utilizzazione, risulta che i prodotti:
CODICE DEI PRODOTTI:
TDX16
DESCRIZIONE DEI PRODOTTI:
COMBINATORE TELEFONICO CON MESSAGGI PRE REGISTRATI
MARCHIO UTILIZZATO:
security
risultano conformi alla direttive di seguito indicate
EMC/2006/95/CE
EMC/2004/108/CE
DICHIARAZIONE DI CONFORMITA’
I SUDDETTI PRODOTTI SODDISFANO LE DIRETTIVE
RIPORTATE IN TABELLA CON RIFERIMENTO ALLE NORME COMUNITARIE.
DIRETTIVE
NORME DI RIFERIMENTO
EMC/2006/95/CE
EN50081-1 ; norma generica di emissione
EN50082-1 ; norma generica di immunità
EMC/2004/108/CE
EN60065 ; norma per la sicurezza delle apparecchiature elettriche
collegate alla rete d’uso domestico e analogo uso similare
Lead free
Pb
CONFORMITA’ RoHS
RoHS
compliant
Dichiarazione di conformità alle limitazioni dell’uso di sostanza pericolose regolamentate dalla direttiva
2002/95CE (RoHS) recepita con D.lgs 25 Luglio 2005 n°151 (Articolo 5).
Il prodotto è conforme alle disposizioni della direttiva su indicata sulle
restrizioni all’uso di alcune sostanze pericolose nelle apparecchiature elettriche ed elettroniche,ovvero
non le contengono in concentrazioni superiori ai margini previsti.
CONFORMITA’ RAEE
In alcuni paesi dell’Unione l prodotto non ricade nel campo di applicazione della legge nazionale
di recepimento della direttiva WEEE, e quindi non è in essi vigente
alcun obbligo di raccolta differenziata a fine vita
DATA
L’AMMINISTRATORE DELEGATO
01 Gennaio 2008
20
ENGLISH
security
TDX16
GSM phone dialers
with prerecorder vocal messages
USER’S MANUAL
TDX16 - User’s manual
security
Index
Chapter 1 - Introduction..................................................................... 3
1.1 Functional characteristics.................................................................................. 3
1.2 Technical characteristics.................................................................................. .3
Capitolo 2 - Installation.......................................................................4
2.1 Connection Serie TM and Protec...................................................................... 4
2.2 Connection with Serie XM................................................................................. 5
Chapter 3 - Programmation............................................................... 6
3.1 Address book.................................................................................................... 6
3.1.1 Telephone numbers insered..................................................................... 6
3.1.2 Delete numbers........................................................................................ 7
3.2 Parameters........................................................................................................ 7
3.2.1 Relay OUT configuration.......................................................................... 7
3.2.2 Net Alarm configuration............................................................................ 8
3.2.3 Enable/disable SMS forwarding function..................................................8
3.3 MASTER and COMMANDS code..................................................................... 8
3.3.1 MASTER code..........................................................................................8
3.3.2 COMMANDS code................................................................................... 9
3.4 Customizable common vocal message.............................................................9
3.5 TDX16 information..........................................................................................10
3.6 Reset default settings......................................................................................10
3.7 Telephone dialer reboot...................................................................................10
Chapter 4 - Operation............................................................................. 11
4.1 Display information.......................................................................................... 11
4.2 General description of operation..................................................................... 12
4.3 COMMANDS code.......................................................................................... 13
4.3.1 Arming/Disarming................................................................................... 13
4.3.2 Commands code modify......................................................................... 14
4.4 Alarm cycles.................................................................................................... 14
4.5 Remote control................................................................................................ 15
4.6 SMS sending................................................................................................... 16
4.7 SMS residual credit and sending SMS received........................................... 16
2
Introduction
security
1
Introduction
1.1
!
!
!
!
!
!
!
!
!
!
I
!
!
!
1.2
Functional characteristics
Completely pre-programmed phone dialer with anti-theft alarm voice messages, no
network and all voice guidance menu
Pre-recorded Guide voice responder messages.
Remote controls for on/off and call loop block.
Codes and user programming access.
Alphanumeric Display with viewing system status and network presence.
Central command output with pulsed operation (SerieXM) or ON/OFF (SerieTM).
Quadriband GSM Module.
Anti opening tamper protection.
Pre-recorded voice messages.
Pre-set SMS for state by state alarm and presence network
indication GSM signal strength and service provider.
Remote listening
Delay Timer absence reporting network (10 minutes).
Credit reading, forwarding of incoming SMS to the numbers in the address book
and reset of the device from the menu (without power supply)
Technical charcteristics
Channels
Power supply voltage
Max current consumption
Address book
Antenna
Inputs
Output
External onnector
Dimensions (W)
Dimensions (H)
Dimensions (D)
2
13Vdc 10%
400mA
16 numbers
ANTGSMX (included)
+INT (Anti-theft inserting status)
K1 (Alerm status)
K2 (Net presence)
Arming/Disarming command
ABS
107mm
140mm
26mm
3
TDX16 - User’s manual
security
2
Installation
2.1
Connection Serie TM and Protec
No electronic key
With electronic key
Burglar
central unit
Chiave
Int. Sir
To connect
to voltage net
(12Vdc max).
Chiave
12Vcc
Int. Sir
To connect
to voltage net
(12Vdc max).
V R NC NA C
Uscita
LED
12Vcc
Burglar
central unit
Chiave
elettronica
- 12V +
C NA NC
OUT1
INT IN IN
TAMPER
1 K2 K1
TDX16
- 12V +
C NA NC
OUT1
INT IN IN
TAMPER
1 K2 K1
TDX16
The base of TDX16 can be mounted on a
standard wall-mounted boxtype “503”.
For the anti theft protection, fixing
with the screw in dotation
ATTENTION :
- Use any GSM phone for delete
the access code (PIN CODE) that
enables the use of the SIM CARD.
4
Installation
security
2.2
Connection with Serie XM
Serie XM
central unit
GND +12 +int +SA COM +SIR +OUT
009
011 012
AUX 010
- 12V +
C NA NC
OUT1
IN GND
009
INT IN IN
TAMPER
1 K2 K1
TDX16
ATTENTION: Programming from XM consolle
To communicate from XM to TDX16 the status of the network, you need
to enable an exit, for example, the logical output on console and type
012 XM:
(MASTER code)
5 6 7 8
8 8 8 7 3
is displayed :
3 Stato Rete
000 000 000 000
press
or
3 Stato Rete
>0 0 0 0 0 0 0 0 0 0 0 0
insert the output 012 :
3 Stato Rete
012 000 000 000
confirm with
or
and exit from programmation by pressing
most times the button
.
5
TDX16 - User’s manual
3
security
5
Programmation
6
7 8
The programmation the telephone dialer is allowed only by local keyboard typing the
master code(default is)
5
6
7 8
followed by
or by opening the dialer and
pressing the button P1 for about 15 seconds.
Once inside, is displayed:
ABCD
25
Indicates the intensity
of the signal (1 min 31max)
(ABCD = Service Provider)
1-Rubrica
1 - Address book
2 - Parameters
16 telephone number call.
Configure the operating mode of the "Relay OUT1":
In State (TM/PROTEC) or pulse (XMseries/TM600P/XR500)
Configuration recognition on Network IN K2
3 - Codes
Modify of MASTER code and COMMANDS code.
4 - Common Messages Make a test call.
5 - Restoration
Reset the codes(MASTER and command) and the entire phone book.
6 - Info
Visualization of the model; Firmware and IMEI of GSM module
7 - Restart
Restart the telephone dialer
8 - Test
Make a test call
5
3.1
Address book
3.1.1
Telephone numbers insered:
Once you enter the menu, press
1
is displayed:
RUBRICA
Inserisci Numeri
press the button
is displayed :
Numero
01
Non Programmato
press the button
is displayed :
Numero
_
01
>
at this point we must insered the phone number (maximum of 32 digits):
Numero
123456789
.
6
01
>
6
7 8
1
Programmation
security
Once inserted, to confirm by pressing only the key
and immediately is displayed:
Invio SMS all.?
7=SI
9=NO
When deciding if associed the SMS to number just confirm by pressing the button “7" () or "9" (NO)
3.1.2
Delete numbers
To delete a phone number, the step is easy, just enter in "Address book" and press one of
the buttons we have:
RUBRICA
Cancella
Press
and select the phone number you want to delete with
(example Number 03) will displayed:
Numero 03
122668899
press the button
is displayed :
Vuoi Cancellare?
7=SI
pressing the button
7
9=NO
for a few seconds will be displayed:
CANCELLATO
to exit the submenu "Delete numbers", just go back by pressing the button
times.
for more
NOTE: If during programming, the keyboard is not used for more than 1 min, the dialer exit
of this phase.
7
TDX16 - User’s manual
security
3.2
Parameters
3.2.1
Relay OUT configuration
5
7 8
6
2
Lets you choose the behavior of the output relay to allow the insertion of central alarm
system. In the run TO STATE (suitable for Central TM type or PROTEC), the output relay
reverses output OUT1 to each command, while IMPULSE OPERATION (suitable for
SerieXM or XR), the relay closes the contacts C/NA of OUT1 for about 1 sec. and then
returns to resting conditions. Once you enter the menu, press the button 2 or
; you
displayed:
Conf. Relay OUT
A STATO
or:
Conf. Relay OUT
A IMPULSO
for change the configuration of the output settings, just press
8
.
Programmation
security
3.2.2
Press
Net alarm configuration
for visualize:
Conf. All. RETE
Allarme su 0V
or:
Conf. All. RETE
Allarme su +12V
To switch from one configuration to another, press the keys
.
With alarm on 0V (suitable for installations with Central TM series/PROTEC), the timer
begins counting when it fails on input voltage IN K2; While with alarm on + 12V (suitable
for systems with XM Series plants) the countdown begins when there is a voltage on input
IN K2.
To finish the configuration, press the key
.
3.2.3
Enable/disable SMS forwarding function
With this feature enabled, the dialer sends all text messages received, the number entered
at number 1 in the address book.
Press
for visualize:
Inoltro SMS
Abilitato
or:
Inoltro SMS
Disabilitato
for change configuration, press the buttons
9
TDX16 - User’s manual
3.3
security
MASTER and COMMANDS code
In this menu you can change the MASTER Code and commands.
Once you enter the menu, press 3 ; you are viewing:
3.3.1
MASTER code
5
6
7 8
The MASTER code, allows you to access the menu functions, which in addition to
program the TDX16, also allows you to make any changes. In fact, to change the codes
just confirm with
and visualize:
SELEZ. CODICE
CODICE MASTER
now insert your desired code of 4 digits,in automatically displays in the menu "Select
Code"..
3.3.2
COMMANDS code
This code, provides only one function and that is to INSERT or REMOVE the antitheft
alarm connected to it.
For code commands use until
you displayed:
CODICE MASTER
---Enter your desired code of 4 digits. Once you have typed the new code, the TDX16
automatically returns the menu "Select Code".
10
SELEZ. CODICE
CODICE COMANDI
CODICE COMANDI
----
3
Programmation
security
3.4 Customizable common vocal message
Use the buttons
5
6
7
8
4
or directly by pressing the 4 key to display:
ABCD
25
4-Msg. Comune
Msg. Comune
*Play
#Rec
Holding down the button
will be possible to record a message.
Releasing it will stop recording.
NOTE: Recording will stop automatically once it reaches the maximum message
duration (15 seconds).
To play the recorded message, press the key
.
During playback or recording an animation will appear in the second line of the display, as follows:
Msg. Comune
>>>>
Msg. Comune
>>>>>>>>
To return to the previous menu, press
ESC
The message is played at the beginning of each call, before requesting the code is.
11
TDX16 - User’s manual
3.5
security
5
Reset default settings
6
7 8
5
Clears all the phone numbers in the address book, and you restore the factory settings of
the dialer. Once you enter the menu, press 5 ; is visualized :
25
ABCD
5-Ripristino IMP
press the button
is displayed :
Conf. Ripristino?
9-NO
7-SI
confirm with the button
7
is visualized for a few seconds :
Ripristino OK
with pressing the button
3.6
9
it exits the menu without reset.
5
TDX16 Information
To proceed, simply use the keys
6
7 8
6
and displays:
Model
*** TDX16 ***
3.7
Rel. Firmware
IMEI
738ESW-2.00.00
0000000000000000
Telephone dialer reboot
5
6
7 8
3
This function restarts the dialer you can be useful to force a new SIM card registration on the
GSM network.
Once you enter the menu, press 7 ; you displayed:
Indicates the intensity
of the signal (from 1 at 31)
12
25
ABCD
7-Reset
(ABCD =Service Provider)
Programmation
security
3.4
5
Test
Once you enter the menu, press
4
4
Numero
Insert a phone number, and after press the button
25
7 8
; you are viewing:
Inserire
_
Indicates the intensity
of the signal (from 1 at 31)
6
is visualized :
Chiama......
1234567890
Number telephone
answering the call will show:
25
Connesso....
1234567890
During the test, you can listen and send DTMF tones, but you can't talk to the users connected.
This function can be used for example to know the credit balance of the SIM CARD..
13
TDX16 - User’s manual
4
security
Operation
4.1 Display Information
GSM dialler use is facilitated by the presence of the display that provides information about the
activities and status of the dialer. The backlight of the display is handled automatically:
illuminates when the user types any button or activating a channel and turns off after 20
seconds from the end of all operations. The information shall be displayed on two lines; the first
are those relating to the operations of the mode dial on the telephone line, while the second
relates to indications of state channels.
First line of the display:
- Init GSM....
- INSERT SIM
- REGISTRATION..
- 20¥
ABCD
- 20¥
- 20¥
-
Call..
Failed call
Occupied
- 20¥
And of call
- 20¥
Connected
- Called Rec.
Initialization of the module of telephone logon GSM.
The combiner attends the insertion of one SIM card.
(disconnect the power before inserting the SIM CARD).
Attempt of recording on the telephone net in course.
It indicates the happened logon with the specified
telephone manager and marks it in particular the intensity
of marks them (from 1 to 31) with the symbol ¥ blinking.
In course an attempt of telephone call.
The call attempt has not had answer
The called number turns out occupied or the call has been
refused.
The telephone call is concluded.
Connection out telephone logon.
Called reception telephone.
Second line of the display:
-
Chn Rubric off
Chn Disabled
Chn Enable
Absence Network
Rete OK
Chn Timer
0600
- Chn Interval
- Remote Control
14
No telephone number is associated to the channel.
On Input INT1 not present the voltage of 12V.
On Input INT1 is present the voltage of 12V..
No power supply.
Present voltage.
Countdown of 600sec.(10 min) that activates the mains
fails and it resets the return thereof. At the end of the
count, the alarm cycle.
Pause between one telephone call and the next.
Activation of the control from remote during the connection.
Operation
security
4.2
General description of operation
The TDX16 generates a series of calls to the phone numbers entered in the address book by
sending as well as pre-recorded message also the pre-set SMS provided that the latter has
been activated along with the phone number.
The first step is to insert the SIM Card as shown above.
You are viewing:
Inserire
SIM
Rubrica Off
Turn OFF the dialer before inserting the SIM CARD, then turn it back on.
Insert the SIM CARD, the dialer registers the same :
Init GSM........
Rubrica Off
Once this operation is terminated, is displayed:
25
ABCD
Rubrica Off
Attention : For a good functioning of the dialer, the antenna must be connected.
The RED led “GSM” on panel, indicates the activity of the GSM module.
- OFF : GSM not operative.
- A flash every second : Network not found.
- A flash every 3 seconds : Network found.
The green LED “Status” indicates the status of the TDX16 :
- Long Flash followed by a short break :
GSM module in registration.
- Slow blinking :
Combiner waiting.
- Two short flashes + pause :
In GSM connection during alarm
cycles.
- Rapid flashing:
Remote Control.
15
TDX16 - User’s manual
4.3
security
1 2 3 4
COMMANDS code
The COMMAND Code (by default 1 2 3 4 ) at difference from the MASTER code
allows you of enable or disable of the burglar alarm system or change the COMMAND
CODE.
4.3.1
1 2 3 4
Arming / Disarming
Once you have typed the COMMAND Code, press in sequence keys
displays:
1
1
and
Imp:DISINSERITO
7=INS
press the button
with th button
9
7
the dialer, command the insertion of the burglary system.
not perform any operation.
If you visualize :
Imp:INSERITO
7=INS
Is possible utilize the button
While using the button
7
9
9=DIS
to operate the disconnection of the system,
does not command any operation.
To exit this menu, press the key
4.3.2
9=DIS
.
COMMANDS code modify
1 2 3 4
Once you have typed the COMMAND Code, press in sequence the keys
is displayed:
SELEZ. CODICE
CODICE COMANDI
for change the COMMAND code, press the button
si visualizza :
CODICE COMANDI
---Insert the code you want it displayed :
SELEZ. CODICE
CODICE COMANDI
NOTE : Accessing the COMMANDS cannot change the MASTER code.
16
and
2
2
;
Operation
security
4.4
Alarm Cycles
When an event of alarm, the cycle of calls. The display will show:
25
Chiama.....
>>> 1234567890
In case of Network Failure, event timer part 600 seconds (10 min) before it is carried out
the cycle of calls. In case of network recovery, call cycle does not run.
Once connected you show :
25
Connesso....
>>> 1234567890
You listen: "alarm system and/or absence network (depending on the event) enter code" if
correctly inserted (only CODE commands) switch to next step "REMOTE MANAGEMENT"
which will be described below:
25
Connesso....
GESTIONE REMOTA
otherwise if it is incorrect after about 30 sec. the call ends.
The alarm cycle continues with the next number in the address book. In each cycle, the
mode dial makes 3 attempts to reach the user entered in the address book, and then ends
the cycle.
17
TDX16 - User’s manual
4.5
security
Remote Control
The remote control allows you to interrogate or controlled through the TDX16 the alarm
system connected to it.
Is it possible to activate this mode both during an alarm call as described above is by
directly calling the mode dial from a mobile phone can send DTMF tones.
When the connection is active, on the display appear:
Connesso....
25
Imp. INSERITO
listening to the pre-recorded message: "Insert code" (only COMMANDS code) if entered
correctly you enable remote management, otherwise if it is broken after about 30 sec. the
call ends.
Entered the code, the display will appear:
25
Connesso....
GESTIONE REMOTA
You will hear the message:
"System enabled" (or "System disabled" depending on the state of incorporation of the
connected).
“Network OK” (or “Absence network”).
“Press 5 for ambiental listening”.
“Press 7 per enable” (or “Press 9 for disable” if the system is ON).
“Press 0 for STOP CICLI”.
NOTE : To stop listening, you can type
.
With the command <0> stops the cycle of calls and closes the current phone call.
At the end of the call, the display show :
Fine Chiam.
25
Imp. INSERITO
18
Operation
security
4.6
SMS sending
Quando parte un ciclo di allarme vengono inviati, per prima cosa, gli SMS verso tutti i
numeri abilitati a tale servizio nella rubrica. I messaggi sono a seconda dei casi :
1.
2.
3.
4.
“alarm system, network OK”
“alarm system, absence network”
“System ON, absence network””
“System OFF, absence network””
NOTE : The SMS is sent before making the call and the call are 3 attempts for each phone
number.
4.7
SMS residual credit and sending SMS received
For know the remaining credit on the SIM inserted in TDX16, follow the steps below:
!
Send an SMS to your mobile phone with controller the following wording:
SMS XXXXXX YYYYYYY
Telephone number of the
Service Center operator SIM
SMS Text
Examples of some italian numbers service centers operators :
OPERATOR
SMS TEXT
TIM
VODAFONE
WIND
SMS 40916 PRE CRE SIN
SMS 404 TRAFFICO
SMS 4155 Credit balence
The dialer will send an SMS with the text that you entered previously “Y Y Y Y Y Y ”
the Central phone number phone operator services “X X X X X X ”
The dialler will wait for about 50 seconds the response from the server of the operator (TIM,
VODAFONE, WIND, etc. ..) to the number from which the request was made.
Any SMS received from the phone dialler, will be sent to the first number (if any) stored in
the phonebook of TDX16, (promotions, bonus points, etc.).
19
TDX16 - User’s manual
security
security
UNI EN ISO 9001 - 08
CONSTRUCTOR:
HiLTRON S.r.l.
ADRESS:
Strada Provinciale di Caserta, 218 - 80144 - NAPOLI
On the appraisal of tests executed on systems rispecchianti champions the configuration works previewed
them for the use, turns out that the products:
CODE OF PRODUCTS:
TDX16
DESCRIPTION OF PRODUCTS:
2in/2out GSM phone dialer
TRADE MARK:
security
they turn out consistent to the indicated directives of continuation
EMC/2006/95/CE
EMC/2004/108/CE
DECLARATION OF CONFORMITY
THE AFORESAID PRODUCTS SATISFY THE DIRECTIVES BROUGHT BACK IN TABLE
WITH REFERENCE TO THE COMMUNITARIAN NORMS.
DIRECTIVES
REFERENCE NORMS
EMC/2006/95/CE
EN50081-1 ; generic norm of emission
EN50082-1 ; generic norm of immunity
EMC/2004/108/CE
EN60065 ; norm for the security of electrical equipments
connected to the net of domestic use and analogous similar use
Lead free
Pb
RoHS CONFORMITY
RoHS
compliant
Declaration of conformity to the restricted limitations of the use of substance dangerous
from directive 2002/95CE (RoHS) recepita with D.lgs 25 July 2005 n°151 (Article 5).
The product is in compliance with the dispositions of the directive on indicated on the restrictions
to the use of some dangerous substances in the equipment electronic electrical workers and
that is they do not contain to them in advanced concentrations to the previewed margins.
WEEE CONFORMITY
In some countries of the produced Union l it does not fall back in the field of national application
of a provision of recepimento of directive WEEE, and therefore he is not in they enforced
some obligation of collection differentiated to fine life.
DATE
DELEGATE ADMINISTRATOR
01 JANUARY 2008
20
738ADIE-4.02