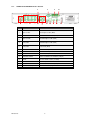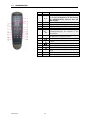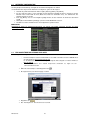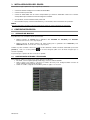
1
Mod.
1093
DS1093-100
DVR H.264 CON HDMI / H.264 WITH HDMI DVR / H.264 DVR MIT HDMI /
DVR H.264 CON HDMI
Evolution 2.0 DVR Series
4CANALI SCH. 1093/004H / 4CH Ref. 1093/004H / 4KANAL Typ 1093/004H/
4 CANALES Ref. 1093/004H
8CANALI SCH. 1093/008H / 8CH Ref. 1093/008H / 8KANAL Typ 1093/008H/
8 CANALES Ref. 1093/008H
16CANALI SCH. 1093/016H / 16CH Ref. 1093/016H / 16KANAL Typ 1093/016H
16 CANALES Ref. 1093/016H
8CANALI SCH. 1093/018H / 8CH Ref. 1093/018H / 8KANAL Typ 1093/018H/
8 CANALES Ref. 1093/018H
16CANALI SCH. 1093/019H / 16CH Ref. 1093/019H / 16KANAL Typ 1093/019H
16 CANALES Ref. 1093/019H
GUIDA RAPIDA
QUICK GUIDE
SCHNELLANLEITUNG
GUÍA RÁPIDA
ITALIANO
1
INDICE
Informazioni Generali ............................................................................................................................. 3
1.1
Descrizione Prodotto .............................................................................................................. 3
1.1.1
1.2
1.2.1
1.3
2.2
Pannello Anteriore DVR Sch. 1093/004H-008H-016H .................................................................................. 6
Pannello Anteriore DVR Sch. 1093/018H-019H ............................................................................................ 7
Pannello Posteriore ................................................................................................................ 8
2.2.1
2.2.2
2.2.3
2.2.4
5
Alimentazione ............................................................................................................................................... 4
Precauzioni per la sicurezza ......................................................................................................................... 4
Precauzioni per l’installazione ....................................................................................................................... 4
Pulizia del dispositivo .................................................................................................................................... 5
Disco rigido (hard disk) ................................................................................................................................. 5
Registrazioni immagini .................................................................................................................................. 5
Privacy e Copyright ....................................................................................................................................... 5
Descrizioni delle parti ............................................................................................................................ 6
2.1
Pannello Anteriore .................................................................................................................. 6
2.1.1
2.1.2
3
4
Contenuto della confezione .......................................................................................................................... 4
Avvertenze .............................................................................................................................. 4
1.3.1
1.3.2
1.3.3
1.3.4
1.3.5
1.3.6
1.3.7
2
Caratteristiche Generali ................................................................................................................................ 3
Apertura della confezione ....................................................................................................... 4
Pannello Posteriore DVR Sch. 1093/004H-008H-016H ................................................................................ 8
Pannello Posteriore DVR Sch. 1093/018H .................................................................................................... 9
Pannello Posteriore DVR Sch. 1093/019H .................................................................................................. 10
Funzioni delle Porte RS-485/Sensori/Allarme ............................................................................................. 10
2.3
Telecomando ........................................................................................................................ 11
2.4
Telecomando Sch. 1093/019H ............................................................................................. 12
2.5
Funzionamento con il Mouse ............................................................................................... 13
Messa in servizio base del dispositivo .............................................................................................. 14
Configurazioni di base ......................................................................................................................... 15
4.1
Selezione Monitor ................................................................................................................. 15
4.2
Impostazione della lingua e data/ora.................................................................................... 15
4.3
Controllo uscita video ........................................................................................................... 16
4.4
Parametri di registrazione .................................................................................................... 16
Configurazioni avanzate ...................................................................................................................... 17
5.1
Configurazione Hard Disk .................................................................................................... 17
5.2
Aggiornamento Firmware e Caricamento Default ................................................................ 17
5.3
Configurazione rete .............................................................................................................. 18
5.4
Accesso All’interfaccia Web del Dispositivo ......................................................................... 18
5.5
Software Mobile iUVS........................................................................................................... 21
DS1093-100
2
1
INFORMAZIONI GENERALI
Caro cliente,
La ringraziamo dell’acquisto di questo prodotto.
Il presente documento vuole essere una semplice guida rapida che le permetterà una rapida messa in funzione dei
modelli di DVR URMET S.p.A Serie Evolution 2.0. Sch.1093/004H - Sch. 1093/008H – Sch. 1093/016H - Sch.1093/018H
- Sch.1093/019H.
Prima di usare l’apparecchiatura, leggere la presente guida rapida che ne descrive l’uso corretto e sicuro.
Conservare questo documento con attenzione ed in un luogo facilmente reperibile per poterlo consultare prontamente
quando necessario.
NOTA BENE
Per maggiori approfondimenti, fare riferimento al manuale istruzioni presente sul CD a corredo del prodotto.
1.1
DESCRIZIONE PRODOTTO
Questo prodotto di URMET S.p.A. è un videoregistratore digitale in grado di registrare su un hard disk interno immagini
provenienti da più telecamere.
1.1.1
CARATTERISTICHE GENERALI
Tre modalità disponibili (registrazione, riproduzione e trasmissione via rete contemporanee)
Compressione video H. 264 con risoluzioni WD1, D1, WHD1, HD1, WCIF e CIF
Interfaccia grafica Windows, sistema operativo integrato Linux 2.6 real time
Registrazione con risoluzione WD1
Registrazione multipla o singola
Uscita Video VGA/HDMI
Menu intuitivo
Molteplici modalità di funzionamento (anteprima, registrazione, riproduzione, backup, sorveglianza via rete e
monitoraggio via cellulare)
Trasmissione in rete del Main Stream e Sub Stream
Compressione audio ADPCM
Controllo da remoto (via browser e via client software CMS)
Controllo da remoto tramite cellulare
Supporta la funzione di ingrandimento e riduzione (Zoom in/out) e la funzione ciclata
Gestione allarmi
Registrazione multipla di allarmi
Possibilità di Criptare i dati in rete
Notifica allarme tramite e-mail
Modalità di auto-manutenzione
Controlli PTZ via RS-485
Backup su USB 2.0 dal pannello frontale (unità USB o hard disk)
Sul retro, porte USB 2.0 per backup, aggiornamento e funzionamento con il mouse
Telecomando
OSD multilingue
th
th
Software per cellulare e PDA per le seguenti piattaforme : Symbian 3 e 5 Edition, Windows Mobile, Iphone,
Android, Blackberry
Watermark
Riproduzione sincrona di 4can. per Sch. 1093/004H, 8can. per Sch. 1093/08H e Sch. 1093/018H, 16 can. per
Sch. 1093/016H e Sch. 1093/019H
DS1093-100
3
1.2
APERTURA DELLA CONFEZIONE
Verificare che l’imballo ed il contenuto non presentino danni visibili. Se alcune parti non sono presenti o risultano
danneggiate, contattare immediatamente il rivenditore. In questi casi non tentare di utilizzare il dispositivo. Se il prodotto
dovesse essere rimandato al fornitore, assicurarsi di spedirlo con il suo imballo originale.
1.2.1
CONTENUTO DELLA CONFEZIONE
Videoregistratore digitale
Alimentatore
•
INPUT
⇒
100-240 Vac 50/60Hz 1.5 A max
•
OUTPUT ⇒
12Vcc 2A per Sch. 1093/004H – Sch. 1093/008H – Sch. 1093/016H
⇒
12Vcc 5A per Sch. 1093/018H - Sch. 1093/019H
Guida Rapida
MINI CD-ROM contenente software di visualizzazione e Manuali Utente
Un mouse
Un telecomando I.R. (compreso 2 pile size AAA)
Un cavo audio (Solo per Sch.1093/019H)
Cavo di rete incrociato LAN CAT.5
Una presa Shuko (Solo per Sch.1093/018H e Sch. 1093/019H)
Una presa Italiana (Solo per Sch.1093/018H e Sch. 1093/019H)
NOTA BENE:
La composizione degli accessori a corredo può essere variata senza alcun preavviso.
1.3
AVVERTENZE
1.3.1
1.3.2
1.3.3
ALIMENTAZIONE
Verificare il valore della tensione di rete alla quale l’alimentatore dovrà essere collegato.
Per scollegare il cavo di alimentazione dalla presa impugnare la spina evitando di tirare il cavo.
Per spegnere il dispositivo occorre staccare la presa di alimentazione. Questa operazione non deve essere
assolutamente eseguita quando il DVR si trova in fase di registrazione, in fase di riproduzione oppure quando ci
si trova nei menù di configurazione. Per evitare di rovinare irreparabilmente l’hard disk occorre arrestare le
registrazioni e le riproduzioni in corso prima di togliere alimentazione al dispositivo.
PRECAUZIONI PER LA SICUREZZA
Per prevenire il rischio di incendio e folgorazione evitare di esporre il dispositivo alla pioggia o all'umidità e di
introdurre al suo qualsiasi oggetto solido o liquido. Se ciò dovesse avvenire scollegare il dispositivo dalla rete di
alimentazione e farlo controllare da personale qualificato.
In nessun caso il dispositivo deve essere aperto. Per qualsiasi intervento di riparazione rivolgersi a personale
qualificato oppure contattare il centro assistenza tecnico autorizzato.
Conservare questa apparecchiatura lontano dalla portata dei bambini; in caso contrario questi potrebbero
danneggiarla, o danneggiarla accidentalmente.
Non toccare questa apparecchiatura con le mani bagnate per evitare scosse elettriche o danni meccanici.
Se l’apparecchiatura dovesse cadere o il contenitore esterno dovesse risultare danneggiato, cessarne l’utilizzo.
Se si continuasse ad utilizzarla in queste condizioni, potrebbe essere provocata una scossa elettrica. In questo
caso contattare il rivenditore, o l’installatore autorizzato.
PRECAUZIONI PER L’INSTALLAZIONE
Per prevenire il surriscaldamento del dispositivo, collocarlo in una posizione che permetta il passaggio dell'aria
attraverso i fori previsti sullo chassis. Nel caso di installazione all’interno di un rack, assicurarsi che vi siano
almeno 5 cm di spazio libero. Per lo stesso motivo non deve essere installato vicino a fonti di calore come
radiatori o condotti d'aria calda o in posizioni dove sia esposto direttamente all’irradiazione solare, così come
non deve essere installato in locali soggetti a eccessiva polvere, vibrazioni meccaniche o urti.
Non posizionare questa apparecchiatura su alcuna superficie instabile come un tavolo traballante o inclinato. In
caso contrario l’apparecchiatura potrebbe cadere con conseguenti lesioni o guasti meccanici.
Non installare questa apparecchiatura in alcun luogo dove possa essere esposta a umidità o acqua. Non
bagnarla con un getto d’acqua diretto per evitare la possibilità di incendio, scosse elettriche o guasto
meccanico.
Se all’interno dell’apparecchiatura dovesse penetrare acqua o qualche altro materiale estraneo cessarne
l’utilizzo al fine di evitare la possibilità di incendio e scosse elettriche. In questo caso contattare il rivenditore, o
l’installatore autorizzato.
Non posare sul dispositivo oggetti pesanti o che generino calore, dato che ciò può danneggiare il mobile o far
aumentare la temperatura interna, causando anomalie di funzionamento.
Non coprire l’apparecchiatura con un panno quando sta funzionando per evitare deformazioni del contenitore
esterno e surriscaldamento delle parti interne con conseguente possibilità di incendio, scosse elettriche o
guasto meccanico.
Non avvicinare magneti od oggetti magnetizzati al dispositivo in quanto ciò potrebbe causare anomalie di
funzionamento.
Non usare questa apparecchiatura in ambienti con presenza di fumo, vapore, umidità, polvere, o vibrazioni
intense.
DS1093-100
4
1.3.4
1.3.5
1.3.6
1.3.7
Non mettere in funzione il dispositivo immediatamente dopo il trasporto da un luogo freddo ad un luogo caldo e
viceversa. Attendere mediamente tre ore: questo intervallo di tempo è necessario al dispositivo per adattarsi al
nuovo ambiente (temperatura, umidità, ecc... ).
PULIZIA DEL DISPOSITIVO
Usare un panno asciutto e strofinare leggermente per eliminare polvere e sporcizia.
Nel caso in cui la sporcizia non fosse eliminabile con un panno asciutto, compiere l’operazione con un panno
inumidito con detergente neutro.
Non usare liquidi volatili come benzina, alcool, solventi ecc. o panni trattati chimicamente per pulire il dispositivo
al fine di evitare deformazioni, deterioramenti o graffi della finitura della vernice.
DISCO RIGIDO (HARD DISK)
Il disco rigido installato su questo dispositivo è sensibile agli urti, agli sbalzi di temperatura ed alle vibrazioni.
L’inosservanza di tali avvertenze oltre a compromettere il corretto funzionamento del dispositivo potrebbe
causare la perdita dei dati contenuti sul disco rigido.
In caso di riparazione, prima di portare l’apparecchio al centro assistenza è consigliabile effettuare il salvataggio
dei dati considerati importanti. La società URMET S.p.A. non assume nessuna responsabilità per l’eventuale
perdita di dati memorizzati.
L’eventuale aggiunta di hard disk deve essere eseguita solo da personale tecnico qualificato, oppure
contattando l’assistenza tecnica.
REGISTRAZIONI IMMAGINI
Questa apparecchiatura non è progettata come antifurto ma per registrare immagini. Perciò, qualora
l’utilizzatore subisca un furto, la società URMET S.p.A. non può essere considerata responsabile di alcuna
perdita o danno conseguente.
Effettuare una registrazione di prova prima di utilizzare l’apparecchiatura per verificare che l’operazione
avvenga correttamente. Tenere in considerazione che se l’utente subisce qualche perdita o danno a causa di
errata impostazione di osservazione, utilizzo, funzionamento improprio o malfunzionamento
dell’apparecchiatura, la società URMET S.p.A. non può essere considerata responsabile per l’eventuale perdita
di dati memorizzati.
Questa apparecchiatura contiene componenti elettronici di precisione. Per garantire la registrazione corretta
delle immagini, non sottoporla ad urti o colpi durante tale operazione.
PRIVACY E COPYRIGHT
Il videoregistratore digitale Evolution 2.0 serie Sch. 1093/004H – Sch. 1093/008H – Sch. 1093/016H – Sch.
1093/018H – Sch. 1093/019H è un dispositivo per sistemi TVCC. La registrazione delle immagini è subordinata
alle leggi vigenti nel paese di utilizzo. È inoltre vietata la registrazione di immagini protette da Copyright.
Gli utenti del prodotto sono responsabili per il controllo ed il rispetto di tutte le norme e gli statuti locali relativi al
monitoraggio e alla registrazione di segnali video. Il produttore NON potrà essere ritenuto responsabile per un
utilizzo di questo prodotto che non sia in conformità con le norme in vigore. Per maggiori informazioni
consultare l’indirizzo web http://www.garanteprivacy.it
DS1093-100
5
2
2.1
DESCRIZIONI DELLE PARTI
PANNELLO ANTERIORE
Si ricorda che DVR è l’acronimo di Digital Video Recorder Equipment (Dispositivo di video registrazione
digitale)
2.1.1
PANNELLO ANTERIORE DVR SCH. 1093/004H-008H-016H
4
9
8
20
N.
5
Funzione
6
10
7
13
2
Ricevitore IR
3
Indicatore HDD
4
Ricerca
video
5
Disabilita l’audio
MUTE
Disabilita l’audio
Selezione canali:
CH- CH+
CH CH +
Selettore tasto CH
7
Tutti
ALL
Monitor in QUAD/nove noni/ sedici noni
8
PLAY
9
PAUSA
10
Riproduzione
frame
11
STOP
Ferma la riproduzione o la registrazione manule.
12
REC
●
Premendo il tasto inizia la registrazione manule.
13
PTZ
PTZ
14
MENU
15
Sinistra
Riavvolgi
16
Sopra
DS1093-100
2
18
1
3
Descrizione
Indicatore
accensione
6
16 17
19
1
PWR
15
12
11
Tasto
di
14
Se l’indicatore è “verde” il sistema è regolarmente alimentato.
Riceve il segnale IR dal telecomando
HDD
files
SEARCH
Quando l'indicatore "rosso" lampeggia significa che è in corso la lettura o la
scrittura sul disco rigido.
Ricerca files video
Entra nel menu di scelta rapida; Riproduci file di registrazione.
Pausa / riproduzione frame by frame manuale
Riproduzione frame by frame
MENU/ESC
/
Premendo il tasto si attiva la modalità PTZ
Premendo il tasto si attiva il menu principale , si esce dalla riproduzione
Entrare nel menu principale, uscire o interrompere la riproduzione / Sposta a
sinistra, funzione Rewind, diminuzione della velocità di rotazione PTZ e il valore
del parametro / Selezione Monitor VGA/HDMI e BNC
Sposta verso l’alto
6
2.1.2
17
Destra / Avanti
veloce
Selezionare [Invio] / [Modifica] in funzione / tasto destro, F. tasto Avanti;
aumento della velocità di rotazione PTZ e il valore del parametro.
18
Basso
Sposta verso il basso.
19
ENTER
Selezione [Enter] / [Edit] operazione
20
Porta USB
Connettore porta USB2.0
PANNELLO ANTERIORE DVR SCH. 1093/018H-019H
11
12
17
N.
Tipo
1
13
14
9 10 6
15
Funzione
Tasto
Indicatore HDD
HDD
Indicatore
Power
PWR
Indicatori
2
3
4
5
Ricevitore
IR
Tasti
multipli
Menu
MENU/ESC
7
DESTRA
/
BASSO
9
SINISTRA
/
10
ENTER
11
12
13
14
15
Tasti
controllo
Selezione canali
e tasti numerici
Play
Play/Pausa
Stop
Registrazione
manuale
16
Multi Display
17
Porta USB
DS1093-100
7
3
Descrizione
Quando l'indicatore "rosso" lampeggia
significa che è in corso la lettura o la
scrittura sul disco rigido.
Se l’indicatore è “verde” il sistema è
regolarmente alimentato.
Entra nel menu principale / Uscita
Sposta verso l’alto
Sposta verso destra / avanzamento veloce
Sposta verso il basso.
Sposta verso sinistra. / riavvolgi veloce
Modalità
PTZ
Tasti numerici
0,1-9 e tasti
selezione
canali CH1~9
●
7
PTZ, Selezione [Enter] / [Edit]
operazione
1.
Selezione
canali e
ingresso
numerico
8
Disabilita l’audio
Mute
ALTO
Tasti
direzione
4
Riceve il segnale IR dal telecomando
6
8
5
16
2
2.
3.
Numerazione 1~9 per tasti numerici e
selezione canali per CH 1~9.
Seleziona
canale
CH11-CH16:
premere prima il tasto numerico 1 e
poi gli altri tasti numerici. Per esempio
CH16 seleziona prima 1 e poi tasto 6.
Tenere premuto il tasto 0 per 3
secondi converte l’uscita video del
dispositivo.
Play
play/ pausa
Ferma la registrazione manuale.
Premere il pulsante per iniziare la
registrazione manuale.
Schermo intero Schermo diviso in 4,
schermo diviso in 9 –schermo diviso in 16
Connettore porta USB2.0
1
2.2
2.2.1
PANNELLO POSTERIORE
PANNELLO POSTERIORE DVR SCH. 1093/004H-008H-016H
2
1
7
4
3
6
2
1
8
11
3
6
4
DS1093-100
10
11
9
5
10
7
3
12
8
2
1
5
7
4
9
6
12
8
11
5
9
10
12
N.
Porta fisica
Descrizione
1
Ingresso video
Connettori CH1-4 per DVR Sch. 1093/004H, CH1-8 per
DVR Sch. 1093/008H, CH 1-16 per DVR Sch. 1093/016H
ingressi video (BNC)
2
Uscita video
Connettore uscita monitor (BNC)
3
Ingresso audio
Ingresso audio (RCA)
4
Uscita audio
Uscita audio (RCA)
5
Porta USB
Connettore USB per mouse
6
Porta HDMI
Connettore HDMI per monitor
7
Porta VGA
Connettore VGA per monitor e PC monitor
8
PIN RS485/ Allarmi
Interfaccia RS485/Sensori/Allarmi (vedi pin)
9
IR-EXT
Per telecomando esterno (usi futuri)
10
Alimentazione
Connettore presa di alimentazione - 12Vcc 2A
11
Porta Ethernet
Connettore LAN, Ethernet (RJ45)
12
Accensione / Spegnimento
Tasto accensione / spegnimento
8
2.2.2
PANNELLO POSTERIORE DVR SCH. 1093/018H
2
4
DS1093-100
1
5
8
7
3
9
12
6
10
11
13
N.
Porta fisica
Descrizione
1
Ingresso video
CH1-8 ingresso video (BNC)
2
Uscita video
Connettore uscita monitor (BNC)
3
Ingresso audio
CH1-CH4 Ingressi audio (RCA)
4
Uscita audio
CH5-CH8 Ingressi audio (RCA)
5
Uscita audio
Uscita audio (RCA)
6
Porta USB
Connettore USB per mouse
7
Porta HDMI
Connettore HDMI per monitor
8
Porta VGA
Connettore VGA per monitor e PC monitor
9
PIN RS485/ Allarmi
Interfaccia RS485/Sensori/Allarmi (vedi pin)
10
IR-EXT
Per telecomando esterno (usi futuri)
11
Alimentazione
Connettore presa di alimentazione - 12Vcc 5A
12
Porta Ethernet
Connettore LAN, Ethernet (RJ45)
13
Accensione / Spegnimento
Tasto accensione / spegnimento
9
2.2.3
2.2.4
PANNELLO POSTERIORE DVR SCH. 1093/019H
N.
Porta fisica
Descrizione
1
Ingressi video
Connettori CH1-16 ingresso video (BNC)
2
Uscita video
(SOPRA) Uscita video principale; (SOTTO) Uscita spot (BNC)
3
Ingressi audio CH1-4
Connettori CH1-4 ingresso segnale audio (BNC)
4
Uscita audio
5
Ingressi Audio CH5-16
Connettori uscita segnale audio, (SOPRA) uscita audio (BNC),
(SOTTO) uscita spot principale (BNC)
Connettori (CH5~CH16) ingressi audio (BNC)
6
Porta Ethernet
Connettore LAN, Ethernet (RJ45)
7
Accensione / Spegnimento
Tasto accensione / spegnimento
8
Porta HDMI
Uscita HDMI
9
Porta VGA
Connettore VGA per monitor e PC monitor
10
Porta USB
Connettore USB per mouse
11
PIN RS485/ Allarmi
Interfaccia RS485/Sensori/Allarmi (vedi pin)
12
Alimentazione
Connettore presa di alimentazione - 12Vcc 5A
FUNZIONI DELLE PORTE RS-485/SENSORI/ALLARME
Ingresso allarme: collegare il segnale [-] del sensore al pin G (GND) e il segnale [+] all’ingresso del canale,
come da dispositivo di allarme.
Uscita allarme: collegare i due segnali contrassegnati da “out”.
Porta PTZ: collegare la linea seriale RS-485 della telecamera rispettivamente a RS-485A e RS485B.
DS1093-100
10
2.3
TELECOMANDO
Num
1
2
3
4
5
6
7
8
Nome
tasto
1-8
9、
、0
ALL
Menu
▲
▼
◄/
SEL
9
10
DS1093-100
11
12
13
14
■
15
16
Audio
Mute
●
11
Funzione del tasto
Selezione canali 1-8; tasto numerico
Tasto numerico; premendo 0 si passa alla funzione
GUI (Graphical user Interface)
Modalità di visualizzazione multipla
Entrata/uscita dal menu principale
Freccia verso l’alto, regolazione volume
Freccia verso il basso, regolazione volume
Freccia sinistra/destra, diminuisce/aumenta il
valore del parametro della barra di controllo
Tasto
Select/Edit;
conferma
l’operazione
selezionata
Tasto Rewind
Entra nel menu di ricerca record; tasto di
riproduzione
Tasto Forward
Tasto di registrazione
Tasto di pausa/sequenza
Interrompe la registrazione manuale; interrompe la
riproduzione
Test audio
Modalità mute attivata/disattivata
2.4
TELECOMANDO SCH. 1093/019H
Nome tasto
REC
SEARCH
2×
×2
Per accedere alla modalità di visualizzazione Quad
3×
×3
Per accedere alla modalità di visualizzazione in 9
riquadri
Per accedere alla modalità di visualizzazione in 16
riquadri
Visualizzazione temporizzata
Selezione canale; tasto numerico
Visualizzazione
multipla canale (Quad, 9, 16
4×
×4
AUTO
0~9
DISPLAY
MODE
riquadri e pieno schermo)
▲
Tasto freccia verso l’alto
▼
Tasto freccia verso il basso
Tasto freccia sinistra/destra; diminuisce/aumenta il
il valore del parametro della barra di controllo
Selezione operazioni [Enter] / [Edit]
Entra nel / Esce dal menu principale
Modalità visualizzazione PIP
Tasto Mute
◄/
ENTER
Menu/ESC
PIP
MUTE
FWD
Forward(x2、x4、x8)
REW
Rewind(x2、x4、x8)
PLAY
STOP
PAUSE/
FRAME
SLOW
Z+
ZF+
FI+
IPTZ
LOCK
DS1093-100
Funzione tasto
Premere il tasto per avviare la registrazione
manuale
Premere il tasto per accedere al menu di ricerca
record
12
Entra nel menu di ricerca record; riproduce l’evento
registrato
Ferma la riproduzione / riproduzione manuale
Pausa / riproduzione di un frame per volta
(1/2、1/4、1/8)Riproduzione lenta
Zoom out (ingrandimento) area video
Zoom in (riduzione) area video
Aumento messa a fuoco
Riduzione messa a fuoco
Aumento luminosità via PTZ
Riduzione luminosità via PTZ
Permette di impostare il preset bit e controllo PTZ
Blocco Sistema
2.5
FUNZIONAMENTO CON IL MOUSE
Oltre ai tasti del pannello anteriore e del telecomando, per operare sul sistema è possible utilizzare il mouse.
TIPO
Cliccare con il tasto
sinistro del mouse
Cliccare con il tasto
destro del mouse
Cliccare due volte
con il tasto sinistro
del mouse
Muovere il mouse
Far
scorrere
il
mouse
DS1093-100
Funzione
In modalità menu bloccato, entrare nel menu pop-up e cliccare su qualsiasi sottomenu
per far apparire la finestra di login; in modalità menu sbloccato, entrare nel menu popup e cliccare con il tasto sinistro del mouse per entrare direttamente in qualsiasi
sottomenu.
Dopo essere entrati nel menu principale, cliccare con il tasto sinistro per entrare in
qualsiasi sottomenu; in modalità [Detailed file] , cliccare con il tasto sinistro per
riprodurre un file di registrazione.
Cambiare lo stato della casella di spunta e dell’area di rilevazione movimento.
Cliccare sulla casella combo per accedere al menu a tendina; cliccare con il tasto
sinistro per fermare la visualizzazione temporizzata quando è attiva.
Cliccando con il tasto sinistro è possibile regolare la barra di controllo del colore e la
barra di controllo del volume.
Cliccare sulla casella combo per accedere al menu a tendina.
Cliccando con il tasto sinistro è possibile selezionare i valori nella caselle apposite.
Attivando il menu a tendina, si avrà il supporto per l’inserimento di parole in caratteri
cinesi, simboli speciali, numeri e lettere, da usare al posto di [Enter] o [Backspace
]
In modalità visualizzazione live, cliccare con il tasto destro per visualizzare il menu
pop-up.
In modalità menu principale o sottomenu, cliccare con il tasto destro per uscire dal
menu corrente.
In modalità visualizzazione live o riproduzione, il doppio clic con il tasto sinistro
mostrerà l’immagine a pieno schermo.
Selezionare la voce del menu
In modalità rilevazione movimento, far scorrere il mouse per selezionare l’area di
rilevazione movimento; in modalità [Color set], far scorrere il mouse per regolare la
barra colore e volume.
13
3
MESSA IN SERVIZIO BASE DEL DISPOSITIVO
Per una rapida messa in servizio del dispositivo seguire le seguenti indicazioni base.
Connettere ai BNC dei canali di ingresso le relative telecamere analogiche desiderate.
Connettere il mouse alla porta USB.
Connettere l’uscita “VGA” e/o “HDMI” al relativo monitor VGA/HDMI e/o connettere l’uscita BNC “Video Out” al
relativo monitor per la visualizzazione delle telecamere analogiche precedentemente connesse.
Connettere il cavo di rete alla porta LAN, se necessario.
Accendere il dispositivo inserendo il connettore dell’alimentazione nell’apposito plug di alimentazione e posizionare
l’interruttore sulla posizione 1 (ove previsto).
NOTA BENE
Per maggiori approfondimenti, fare riferimento al manuale istruzioni presente sul CD a corredo del prodotto.
DS1093-100
14
4
CONFIGURAZIONI DI BASE
4.1
SELEZIONE MONITOR
Tale funzione permette di controllare il menù OSD sul monitor con uscita tipo HDMI/VGA o monitor con uscita di tipo
BNC.
E’ possibile commutare il controllo menu OSD sull’uscita video tramite pannello frontale del DVR:
Tenendo premuto il tasto “” REWIND (a destra del pannello sui tasti di selezione) per i DVRs Sch.
1093/004H, Sch. 1093/008H e Sch. 1093/016H e rilasciando il tasto dopo il segnale acustico.
Tenendo premuto il tasto numerico 0 posto sul pannello frontale per i DVRs Sch. 1093/018H e Sch.
1093/019H e rilasciando il tasto dopo il segnale acustico.
E’ possibile anche commutare il controllo menu OSD sull’uscita video tramite telecomando (selezionando il tasto 0) e
mouse (selezionando la relativa icona
dell’uscita video dal menu in pop-up).
Attendere che il puntatore del Mouse sia visualizzato sullo schermo.
4.2
IMPOSTAZIONE DELLA LINGUA E DATA/ORA
E’ possibile impostare la lingua e la Data/Ora secondo le istruzioni seguenti:
Selezionare sul DVR [Menù PrincipaleSistema] e selezionare la lingua che si intende utilizzare sul DVR.
Procedere anche alla Modifica della data, l’ora e il formato, impostando la Data/Ora corrente. E’ anche possibile
impostare l’ora legale selezionando il tasto [Imposta DST].
A questo punto salvare le impostazioni cambiate e uscire dal Menu del DVR, procedere al riavvio del
Dispositivo se richiesto.
DS1093-100
15
4.3
CONTROLLO USCITA VIDEO
Selezionare sul DVR [Menù PrincipaleSistemaUscita] per impostare in maniera definitiva il Controllo del Menu
selezionando l’uscita Video desiderata.
L’opzione [Controllo Uscita video] include le seguenti opzioni:
•
HDMI con la quale è possibile caricare le impostazioni di controllo menu all’avvio del DVR sull’uscita video
HDMI/VGA.
•
VOUT: con la quale è possibile caricare le impostazioni di controllo menu all’avvio del DVR sull’uscita video
MAIN BNC.
•
AUTO: con la quale è possibile caricare automaticamente le impostazioni di controllo menu all’avvio del DVR
sull’uscita video HDMI/VGA o MAIN BNC in base all’uscita video collegata e al tipo di monitor utilizzato.
NOTA BENE:
Si consiglia di selezionare l’uscita Video [HDMI/ VGA] o [VOUT] in funzione del tipo di Monitor utilizzato.
L’opzione [AUTO] è consigliata quando si collegano entrambi i monitor HDMI/ VGA e BNC e l’utente vuole poter
cambiare il controllo Menu su Uscita Video.
Salvare le modifiche effettuate selezionando il tasto [APPLICA], uscire dal menu e riavviare il dispositivo
affinché le modifiche abbiano effetto.
4.4
PARAMETRI DI REGISTRAZIONE
Selezionare [Menu Principale] [Registra] per entrare nel menu [Registrazione]. Si elencano le seguenti funzioni:
1.
2.
3.
Il menu [Programmazione] permette l’impostazione delle registrazioni: 24 ore o Normale, su Motion/Allarme e si
possono personalizzare per fasce orarie stabilite. E’ anche possibile programmare entrambe le registrazioni
Normale/Allarmata sulle stesse fasce orarie.
La voce [Dimensione File] nel Menu [Registra Parametri] indica la durata massima dei file registrati (15min,
30min, 45min, 60 min).
Dopo aver effettuato le impostazioni del Menù di Registrazione, salvare le modifiche e assicurarsi che usciti dal
Menu del Dispositivo sia visualizzata a schermo per ciascun canale in modalità LIVE, l’icona “R” che indica che
il Dispositivo è in registrazione secondo i parametri impostati.
DS1093-100
16
5
CONFIGURAZIONI AVANZATE
5.1
CONFIGURAZIONE HARD DISK
Selezionare [Menu Principale] [Dispositivo] e procedere con la configurazione dell’Hard Disk in funzione dell’utilizzo
del Cliente, controllando le seguenti opzioni:
5.2
SOVRASCRITTURA: Selezionando “AUTO”, nel momento in cui l’Hard Disk è pieno il sistema sovrascriverà
automaticamente le registrazioni più vecchie ed è quindi possibile determinare la permanenza, in giorni, delle
registrazioni sull’Hard Disk. Selezionando “OFF”, nel momento in cui l’Hard Disk è pieno, la registrazione si
fermerà.
E’ anche possibile definire il tempo (in giorni) di permanenza delle registrazioni effettuate su tutti i canali del
dispositivo. Scegliere un valore tra le varie opzioni suggerite.
FORMATTA HD: Questa opzione serve per formattare l’Hard Disk; non è infatti possibile registrare i file nell’HD
se questo non è stato formattato. Selezionare il tasto [Formatta HD] per iniziare la formattazione; il sistema
chiederà: “La formattazione dell’HD causerà la perdita di tutti i dati, confermi?”; premendo “OK”, il sistema
informerà: “Formattazione in corso …” e “Formattazione completata”; successivamente il sistema si riavvierà
automaticamente. Per anomalie in caso di mancata registrazione del Dispositivo al momento dell’installazione
potrebbe essere utili procedere alla formattazione dell’Hard Disk.
SPAZIO LIBERO: Indica lo spazio inutilizzato disponibile sull’ HD.
SPAZIO TOTALE: Indica lo spazio totale disponibile sull’HD
TEMPO LIBERO: Basandosi su i livelli di qualità e frame rate del video corrente, il sistema mostrerà una stima
del tempo disponibile rimanente.
AGGIORNAMENTO FIRMWARE E CARICAMENTO DEFAULT
Dopo aver controllato la versione Firmware del DVR in [Menù Principale Sistema Info], se quest’ultima non è
recente, è possibile aggiornare il software di sistema (firmware) del Dispositivo, seguendo le istruzioni:
Inserire sul PC una chiavetta USB e copiare sulla chiavetta stessa la cartella “dvrupgrade” utile
all’aggiornamento.
Inserire la Chiavetta USB nella porta USB (frontale o posteriore) del DVR.
Selezionare sul DVR [Menù Principale Avanzate] e poi selezionare [Aggiorna].
Attendere che l’aggiornamento Firmware e il conseguente riavvio del dispositivo siano completati.
Selezionare sul DVR [Menù Principale Avanzate] e poi selezionare [Carica Default]. Si aprirà una nuova
schermata dove è necessario selezionare tutte le voci e cliccare su [Applica], il dispositivo sarà riportato ai
valori originari di fabbrica.
Uscire dal Menù OSD e attendere il Riavvio del Dispositivo se necessario.
NOTE IMPORTANTI:
Si consiglia di effettuare sempre un Backup di tutte i files di registrazione ritenuti importanti e presenti
sull’Hard Disk, prima di procedere con l’aggiornamento della versione Firmware. Dopo aver effettuato il
Backup, i files dovranno essere riprodotti utilizzando il Software Player in dotazione relativo alla
corrente versione Firmware.
Dopo aver caricato i parametri di Default, configurare nuovamente le configurazioni di base (Lingua,
Data/Ora, Parametri di Registrazione, Impostazioni Controllo uscita video locale,ecc.)
DS1093-100
17
5.3
CONFIGURAZIONE RETE
Entrare nel [Menu PrincipaleRete] per accedere alla programmazione della rete. Seguono le istruzioni se si vuole
configurare il Dispositivo in Rete locale LAN.
Selezionare il Tipo di Rete che si vuole utilizzare [Statico], [DHCP] e [PPPoE].
Per il Tipo [Statico] assegnare un Indirizzo IP sul Dispositivo in rete e assicurarsi che siano assegnati i valori
delle porte come mostrato in figura: Porta Mobile (ad esempio 18600), Porta Client (ad esempio 9000) e Porta
http (ad esempio 80).
Per il Tipo [DHCP] è necessario impostare solamente i valori delle Porte, di cui al punto precedente, e la Rete
assegnerà automaticamente un indirizzo IP Dinamico che potrà cambiare in maniera casuale.
Salvare le modifiche cliccando sul Tasto [Applica] e Uscire dal Menu OSD del DVR.
Riavviare il Dispositivo come notificato e attendere il completo riavvio.
NOTA BENE:
Per maggiori approfondimenti sul Menu di Rete e il Menù di Configurazione del Telefono Cellulare Mobile ed
Internet fare riferimento alle relative sezioni sul manuale utente disponibile sul CD a corredo del prodotto.
5.4
ACCESSO ALL’INTERFACCIA WEB DEL DISPOSITIVO
Seguono le istruzioni per la configurazione e l’accesso alla Pagine Web del Dispositivo configurato in Rete locale LAN su
Internet Explorer:
o Lanciare Internet Explorer e digitare nella barra degli indirizzi l’indirizzo IP associato al DVR e la
Porta HTTP del DVR, come segue http://IP Address:HTTP Port. Se la porta HTTP del DVR è 80 è
necessario solamente inserire l’indirizzo IP del DVR come segue http://IP Address.
o
Se viene richiesta l’installazione di un componente ActiveX, verificare che ciò avvenga nelle
seguenti modalità:
DS1093-100
Aprire il browser Internet Explorer facendo doppio click sull’icona
Apparirà la seguente videata (o comunque la pagina iniziale predefinita).
Selezionare dal Menu della finestra di Internet Explorer “Strumenti → Opzioni Internet”
18
.
Selezionare l’area “Siti attendibili”.
Cliccare su “Livello Personlizzato” e assicurarsi che il livello di protezione sia impostato su
“Bassa”. Se non è impostato selezionare il livello di protezione basso e poi cliccare su
“Reimposta” come mostrato in figura. Selezionare OK per confermare.
DS1093-100
Apparirà la schermata di “Proprietà”. Selezionare “Protezione”.
Cliccare sulla voce “Siti”.
19
Apparirà la seguente videata. A questo punto sarà necessario aggiungere l’indirizzo IP del
dispositivo (ad esempio http://192.168.36.40) nel campo “Aggiungi il sito web all’area”.
Cliccare sul pulsante “Aggiungi”.
NOTA BENE
Non selezionare la voce “Richiedi verifica server (https:) per tutti i siti dell’area”.
o
o
o
DS1093-100
Dopodiché chiudere la finestra cliccando su “Chiudi”
Confermare cliccando su “Applica” e “OK”
Chiudere Internet Explorer.
Lanciare Internet Explorer e digitare nella barra degli indirizzi l’indirizzo IP e la Porta HTTP del
DVR, come ad esempio http://IP Address:Web Port/
A questo punto, dopo aver installato l’Active X apparirà la schermata di cui sotto e procedere con
l’inserimento del Nome Utente, Password e Porta Client, nonché selezionare la Lingua e il Tipo di
Stream.
Si ricorda che al primo accesso è necessario inserire come Nome Utente admin e lasciare il
campo Password vuoto. Il primo accesso è valido se si sono mantenuti i parametri di Default e la
Password risulta disabilitata nel Menù Utenti del DVR. In caso contrario, se la Password è stata
abilitata, sarà necessario inserire la Password per amministratore e/o utente.
Dopo aver impostato i parametri di cui sopra (Nome Utente, Password, Porta Client, Lingua, Tipo
Stream) selezionare il Tasto [Accesso] per accedere all’interfaccia Web del Dispositivo.
20
5.5
SOFTWARE MOBILE IUVS
URMET iUVS è un’applicazione TVCC per cellulare sviluppata per le piattaforme iOS e Android. È compatibile con i
modelli di DVR URMET H.264 della Serie New Dynamic & Video Smart o Evolution 2.0 che utilizzano versioni Firmware
V3.1 o superiore.
Caratteristiche
• Audio/video live streaming fino a 4 canali
• Ricerca e riproduzione da remoto
• Riproduzione locale
• Funzione PTZ
• Funzione di cattura immagini e funzione di cattura video
• Supporta più dispositivi
Avvio
•
•
•
Scaricare l’App iUVS da Apple Store o Android Market e procedere con l’installazione.
Connettere il dispositivo a Internet tramite rete 3G o WiFi.
Lanciare l’applicazione per accedere al menu principale iUVS.
Aggiunta e cancellazione di un dispositivo
La finestra “Device manager” permette di aggiungere o cancellare un dispositivo e di modificare le sue proprietà.
Selezionare "Device Manager” nel menu principale per aprire l’interfaccia mostrata di seguito:
Per aggiungere un nuovo dispositivo selezionare il tasto “Add” in alto a destra, poi inserire il nome del dispositivo,
l’indirizzo (IP o nome di dominio), la porta, il nome utente, la password, etc. Le proprietà dei canali possono essere
ricavate dal dispositivo.
NOTA BENE: E’ necessario impostare la Porta Dati (ad esempio 9000) per il corretto funzionamento del Software
Mobile iUVS. Se l’utente imposta la Porta Mobile, il Software iUVS non funzionerà correttamente.
Per cancellare un dispositivo dalla lista selezionare il nome del dispositivo da eliminare e cliccare sul tasto di
cancellazione posto accanto al nome del dispositivo.
DS1093-100
21
Schermo live
Nel menu principale selezionare “Live Monitor”; comparirà l’interfaccia Live completa delle funzioni di flusso video,
registrazione, istantanea e PTZ, etc.
1. Apertura di un dispositivo
Selezionare
per aprire la lista dei dispositivi, come mostrato sotto; selezionando uno dei dispositivi si apriranno
automaticamente tutti i suoi canali.
2. Apertura di un canale
In una delle finestre di visualizzazione comparirà la finestra con la lista dei canali. Selezionare un canale per aprirlo nella
finestra precedente. A questo punto il LIVE del canale selezionato sarà visualizzato.
NOTA BENE:
Per l’installazione e le istruzioni del Software Mobile compatibile sulle piattaforme Symbian, Windows e BlackBerry
fare riferimento al manuale utente disponibile sul CD a corredo del prodotto.
Per maggiori approfondimenti sul Software Mobile iUVS fare riferimento alle relative sezioni sul manuale utente
disponibile sul CD a corredo del prodotto.
DS1093-100
22
ENGLISH
TABLE OF CONTENTS
1
General Information ............................................................................................................................. 24
1.1
Product description ............................................................................................................... 24
1.1.1
1.2
1.2.1
1.3
2.2
Ref. 1093/004H-008H-016H DVR Front Panel............................................................................................ 27
Ref. 1093/018H-019H DVR Front Panel ..................................................................................................... 28
Rear Panel ............................................................................................................................ 29
2.2.1
2.2.2
2.2.3
2.2.4
5
Power ......................................................................................................................................................... 26
Safety precautions ...................................................................................................................................... 26
Installation precautions ............................................................................................................................... 26
Cleaning the device .................................................................................................................................... 26
Hard disk .................................................................................................................................................... 26
Image recording .......................................................................................................................................... 26
Privacy and copyright.................................................................................................................................. 26
Descriptions of the Parts ..................................................................................................................... 27
2.1
Front Panel ........................................................................................................................... 27
2.1.1
2.1.2
3
4
Contents of the box ..................................................................................................................................... 25
Warnings .............................................................................................................................. 26
1.3.1
1.3.2
1.3.3
1.3.4
1.3.5
1.3.6
1.3.7
2
General features ......................................................................................................................................... 24
Opening the box ................................................................................................................... 25
Ref. 1093/004H-008H-016H DVR Back Panel ............................................................................................ 29
Ref. 1093/018H DVR Back Panel ............................................................................................................... 30
Ref. 1093/019H DVR Back Panel ............................................................................................................... 31
RS485/Sensor/Alarm port functions ............................................................................................................ 31
2.3
Remote Controller ................................................................................................................ 32
2.4
Remote Controller Ref. 1093/019H ...................................................................................... 33
2.5
Mouse Operation .................................................................................................................. 34
Device Basic Startup ............................................................................................................................ 35
Basic Configuration ............................................................................................................................. 35
4.1
Monitor Selection .................................................................................................................. 35
4.2
Language and Date/Time Settings ....................................................................................... 35
4.3
Video Output Control ............................................................................................................ 36
4.4
Recording Parameters.......................................................................................................... 36
Advanced Configurations .................................................................................................................... 37
5.1
Hard Disk Configuration ....................................................................................................... 37
5.2
Firmware Upgrade and Default Settings .............................................................................. 37
5.3
Network Configuration .......................................................................................................... 38
5.4
Login Device in Web Interface ............................................................................................. 38
5.5
iUVS Software Mobile........................................................................................................... 41
DS1093-100
23
1
GENERAL INFORMATION
Dear Customer,
Thank you for having purchased this Urmet product.
This document describes how to install and use the URMET Evolution 2.0 DVR Series ref. 1093/004H – ref. 1093/008H –
ref. 1093/016H - ref. 1093/018H - ref. 1093/019H
Read this quick guide which contains information for correct, safe use carefully.
Keep this quick guide at hand so that you can refer to it when needed.
NOTE
For more detailed information about the devices, refer to the full instruction manual inside the CD provided with the
product.
1.1
PRODUCT DESCRIPTION
The URMET S.p.A. product is a digital video recorder capable of recording from several cameras to internal hard disk.
1.1.1
GENERAL FEATURES
Triplex mode (recording, play and network transmission at the same time)
H. 264 video compression, with WD1, WHD1 e WCIF resolutions
Windows Graphical interface; embedded real-time Linux 2.6 Operation System
Recording in 960H Resolution
Multiple or single recording
HDMI/ VGA Output
User friendly Menu
Multiple operation modes (Preview, record, playback, backup, network surveillance and mobile phone
monitoring)
Main Stream and Sub Stream network transmission
ADPCM audio compression
Remote control (via browser and via client Software CMS)
Remote control through mobile
Supports Zoom in/out and sequence function
Alarm management
Multiple alarm recording
Web Data Encryption
Alarm notification through email
Auto-maintenance mode
PTZ controls via RS-485
Backup on USB 2.0 in front Panel (flash drive or hard disk)
Rear USB 2.0 ports for back-up, upgrade and mouse operation
Remote Control
Multilanguage OSD
PDA software Mobile for the following Platforms: Symbian 3th and 5th Edition, Windows Mobile, iOS, Android,
Blackberry
Watermark
Syncronous Playback 4ch. for DVR 4 ch. Models, 8ch. for DVR 8 ch. Models, and16 ch. For DVR 16 ch. Models
IMPORTANT NOTE
Contact an authorised Service Centre for increasing the recording capacity of devices.
DS1093-100
24
1.2
OPENING THE BOX
Check that the packing and the contents are not visibly damaged. Contact the retailer immediately if parts are either
missing or damaged. Do not attempt to use the device in this case. Send the product back in its original packing if it is
damaged.
1.2.1
CONTENTS OF THE BOX
DVR
Power unit
•
INPUT
⇒
100-240 Vac 50/60Hz 1.5 A max.
•
OUTPUT ⇒
12Vdc 2A for Ref. 1093/004H – Ref. 1093/008H – Ref. 1093/0016H
⇒
12Vdc 5A for Ref. 1093/018H and Ref. 1093/019H
Quick Guide
CD-ROM containing software and user manuals
Mouse
IR remote control, (included 2 batteries size AAA)
Audio cable (Only for Ref.1093/019H)
Shuko plug (Only for Ref.1093/018H and Ref. 1093/019H)
Italian plug (Only for Ref.1093/018H and Ref. 1093/019H)
Cross LAN cable cat. 5
IMPORTANT NOTE
Accessories may be changed without prior notice.
DS1093-100
25
1.3
WARNINGS
1.3.1
1.3.2
1.3.3
1.3.4
1.3.5
1.3.6
1.3.7
POWER
Only use the power unit provided to power the device. Check mains rating before plugging the power unit in.
Do not pull the cable to unplug the device.
Switch the device off before unplugging power unit. This operation must not be performed when the DVR is
recording, playing or from the configuration menu. Stop recordings and playback in progress before
disconnecting power from the device to prevent damaging the hard disk beyond repair.
SAFETY PRECAUTIONS
Keep the device away from rain and humidity to prevent risk of fire and electrocution. Do not introduce material
(solid or liquid) inside. If this should accidentally occur, disconnect the device from the mains and have it
inspected by qualified personnel.
Never open the device. In all cases, contact a qualified personnel or authorised service centre for repairs.
Keep the device away from children, to prevent accidental damage.
Do not touch the device with wet hands to prevent electrical shock or mechanical damage.
Do not use the device if it should fall or the external casing is damaged. Risk of electrocution if the device is
used in such conditions. Contact the retailer or authorised installer.
INSTALLATION PRECAUTIONS
To prevent overheating the device, arrange it in a position allowing the flow of air through the slots in the casing.
Ensure at least 5 cm of free space when installing inside a rack. For the same reason, do not install sources of
heat, such as radiators or hot air ducts. Keep away from direct sunlight. Do not install in areas subject to
excessive dust, mechanical vibrations or shocks.
Do not arrange this device on an unstable surface, such as a tottering or slanted table. The device could fall
causing injury or mechanical failures.
Do not install the device in a place where it could be exposed to humidity or water. Do not direct a jet of water
onto the device: risk of fire, electrocution or mechanical failure.
Stop using the device if water or other material should penetrate inside: risk of fire and electrocution. Contact
the retailer or authorised installer.
Do not place heavy or heat generating objects on top of the device: this could damage the casing and/or
increase internal temperature causing faults.
Do not cover the device with a cloth while it is running to prevent deforming the external casing and overheating
the internal parts: risk of fire, electrocution and mechanical failure.
Keep magnets and magnetised objects away from the device to prevent faults.
Do not use the device in presence of smoke, vapour, humidity, dust or intense vibrations.
Wait for a while before operating a device immediately after transporting it from a cold place to a warm place
and vice versa. Wait on average for three hours: this will allow the device to adapt to the new ambient
(temperature, humidity, etc.).
CLEANING THE DEVICE
Rub delicately with a dry cloth to remove dust and dirt.
Dip the cloth in neutral detergent if dirt cannot be eliminated with a dry cloth alone.
Do not use volatile liquids (such a petrol, alcohol, solvents, etc.) or chemically treated clothes to clean the
device to prevent deformation, deterioration or scratches to the paint finish.
HARD DISK
The hard disk installed in this device is sensitive to shocks, differences in temperature and vibrations.
Disrespect of these precautions can compromise correct operation of the device and loss of data stored on the
hard disk.
If repairs are required, it is advisable to backup all important data before taking the device to the service centre.
URMET S.p.A. is not liable for loss of stored data.
IMAGE RECORDING
This device was designed to record images, not as a burglar alarm. URMET S.p.A. cannot be held liable for loss
or damage following theft sustained by the user.
Make a test recording before using the device to make sure that is working correctly. Please note that URMET
S.p.A. is not liable for loss of stored data consequent to loss or damage caused by incorrect observation
installation, use, improper use or malfunctioning of the device.
This device contains precision electronic components. Protect the device from shocks to ensure correct
recording of images.
PRIVACY AND COPYRIGHT
The 1093/004H – 1093/008H – 1093/016H – 1093/018H – 1093/019H digital video recorder is a device for
CCTV systems. Recording of images is subject to the laws in force in your country. Recording of images
protected by copyright is forbidden.
Product users shall be responsible for checking and respecting all local rules and regulations concerning
monitoring and recording video signals. The manufacturing SHALL NOT BE LIABLE for use of this product not
in compliance with the laws in force.
DS1093-100
26
2
2.1
2.1.1
DESCRIPTIONS OF THE PARTS
FRONT PANEL
REF. 1093/004H-008H-016H DVR FRONT PANEL
4
8
20
Item
5
6
10
9
Key title
or
Indicator
7
13
15 16 17
19
12
11
Remark
18
2
1
3
Function & Description
If the “Green” indicator is on the system is getting power
normally.
1
Power Indicator
2
IR Receiver
3
HDD Indicator
4
Search Video File
5
Disable Audio
MUTE
Disable Audio
Channel select:
CH- CH+
CH CH +
CH select key
7
ALL
ALL
Monitor in QUAD/nineth/ sixteenth Mode
8
PLAY
9
PAUSE
10
By frame
11
STOP
Stop playing or stop manual record
12
REC
●
Press the button to start manual record.
13
PTZ
PTZ
14
MENU
15
Left Key / Rew
Enter into Main menu, exit or stop playing / Move to left; Rewind
function; decrease PTZ rotation speed and parameter value /
Selection Monitor BNC and HDMI or VGA.
16
Up key
Move up
17
Right Key / Fast
Forward
select [Enter] / [Edit] operation / Right key, F. Forward key;
18
Down key
Move down
19
ENTER
Select [Enter] / [Edit] operation
20
USB Port
Connect to USB2.0 port
6
DS1093-100
PWR
14
Receives IR signal from Remote Controller
HDD
SEARCH
When the “Red” indicator flashes it means the hard drive is
being read or written to.
Search Video File
Enter into Pop-up Menu; Play record file.
Pause / play frame by frame manually
Play frame by frame
MENU/ESC
Enter into PTZ Mode
Enter into Main menu, exit or stop playing
increase PTZ rotation speed and Parameter value.
27
2.1.2
REF. 1093/018H-019H DVR FRONT PANEL
11
12
17
Item
Type
1
13
14
9 10 6
15
Key title
/Indicator
Marks
HDD indicator
HDD
Power indicator
PWR
Indicator
2
3
4
5
IR
Receiver
Complex
Key
5
16
4
8
7
2
3
Function
When the “Red” indicator flashes it means
the hard drive is being read or written to.
If the “Green” indicator is on the system is
getting power normally.
Receives IR signal from Remote Control
Menu
MENU/ESC
Enter into main menu / Exit
Open or close audio input
Mute
Move up
6
UP
7
RIGHT
/
DOWN
9
LEFT
/
Move left / RWD
10
ENTER
PTZ
Enter into PTZ control, select [Enter] /
[Edit] operation
8
Direction
Key
Move right / FWD
Move down
1.
11
12
13
14
15
Channel
Select &
numeric
input
Play
Control
Single Channel
and numeric key
Play
Play/Pause
Stop
Manual record
16
Multi Display
17
USB Port
DS1093-100
Numeric key
0,1-9 and CH
key CH1~9
●
28
Number 1~9 stand for numeric 1~9
and CH 1~9.
2. CH11-CH16 select method: press
firstly numeric key 1 and then other
numeric key. For example CH16
select firstly press 1, and then press
6.
3. Holding press key 0 for three seconds
may convert current output device
Convert to play status
Convert to play/ pause status
Stop playing and stop manual record
Press the button to start manual record.
Live display Quad mode, 9-split and 16split mode
Connect to USB2.0 port
1
2.2
2.2.1
REAR PANEL
REF. 1093/004H-008H-016H DVR BACK PANEL
2
1
7
4
3
6
2
1
8
11
3
6
4
Item
DS1093-100
10
11
5
9
10
7
3
12
8
2
1
5
7
4
9
6
12
8
11
5
9
10
12
Physical port
Connection method
1
Video input
Connect CH1-4 for DVR Ref. 1093/004H, CH1-8 for DVR
Re. 1093/008H, CH 1-16 for DVR Ref. 1093/016H (Virtual)
video input device (BNC interface)
2
Video output
Connect monitor output (BNC interface)
3
Audio Input
4CH audio input (RCA interface);
4
Audio Output
Audio output (RCA interface);
5
USB Port
Connect USB mouse
6
HDMI Port
Connect to HDMI monitor
7
VGA Port
Connect to VGA monitor, such as PC monitor
8
PIN RS485/ Sensor Alarms
RS485/Sensor/Alarm interface (see pin outs below)
9
IR-EXT
For IR ext Remote Control (for future use)
10
Power Port
Connect power supply - DC12V 2A
11
Ethernet Port
Connect LAN, Ethernet (RJ45 interface)
12
Power Switch
Turn Power on and off
29
2.2.2
REF. 1093/018H DVR BACK PANEL
2
4
Item
DS1093-100
1
5
8
7
3
9
12
6
10
11
13
Physical port
Connection method
1
Video input
CH1-8 video input device (BNC interface)
2
Video output
Connect monitor output(BNC interface)
3
Audio Input
CH1-CH4 audio input (RCA interface);
4
Audio Input
CH5-CH8 audio input (RCA interface);
5
Audio Output
Audio output (RCA interface);
6
USB Port
Connect USB mouse
7
HDMI Port
Connect to HDMI monitor
8
VGA Port
Connect to VGA monitor, such as PC monitor
9
PIN RS485/ Sensor Alarms
RS485/Sensor/Alarm interface (see pin outs below)
10
IR-EXT
For IR ext Remote Control (for future use)
11
Power Port
Connect power supply - DC12V 5A
12
Ethernet Port
Connect LAN, Ethernet (RJ45 interface)
13
Power Switch
Turn Power on and off
30
2.2.3
REF. 1093/019H DVR BACK PANEL
Item
2.2.4
Physical port
Connection method
1
Video input
Connect CH1-16 video input (BNC interface)
2
Video output
(UP) Main video output; (Down) Spot output (BNC interface)
3
Audio input
Connect CH1-4 audio signal input (BNC interface)
4
Audio output
5
Audio input
Connect audio signal output, including spot main audio output and sequence
audio output (BNC interface)
Connect (CH5~CH16) Audio input
6
Ethernet Port
Connect LAN, Ethernet (RJ45 interface)
7
Power Switch
Turn Power on and off
8
HDMI
HDMI Output
9
VGA Port
Connect to VGA monitor, such as PC monitor
10
USB Port
Connect USB mouse
11
RS-485/Sensor/Alarm
RS485/Sensor/Alarm interface (see pin outs below)
12
Power Port
Connect power supply - DC12V 5A
RS485/SENSOR/ALARM PORT FUNCTIONS
Alarm input: Connect [-] port of your sensor to G (GND) pin, and [+] port to channel input according to the alarm device
you purchased.
Alarm output: Connect to the two ports marked with “out”
PTZ Port: Connect your camera to RS-485A and RS485B accordingly.
DS1093-100
31
2.3
REMOTE CONTROLLER
Item
1
2
3
4
5
6
7
8
Key title
1-8
9、
、0
ALL
Menu
▲
▼
◄/
SEL
9
10
11
12
13
14
15
16
DS1093-100
●
■
Audio
Mute
32
Key function
Channel select 1-8; Numeric key
Numeric key; Clicking numeric “0” allow you switch
to GUI (Graphical user Interface) function
Multiple display mode
Enter into Main menu/Exit
Up arrow key, Volume adjust
Down arrow key, Volume adjust
Left/Down key,
Decrease/increase parameter value of control bar
Select key/Edit key;
Confirm the selected operation.
Rewind key
Enter into record search menu;
Play key
Forward key
Record key
Pause/Sequence key
Stop manual record; stop playing
Testing
Mute on/off
2.4
REMOTE CONTROLLER REF. 1093/019H
Key Title
REC
SEARCH
2×
×2
Enter into Quad display
3×
×3
Enter into 9-split display
4×
×4
Enter into 16-split display
AUTO
0~9
DISPLAY
MODE
Enter into dwell time display
Channel select; numeric key
Multiple CH display (Quad, 9-split, 16-split and full
screen display)
▲
Up direction key
▼
Down direction key
Left/right direction key; also decrease/increase
parameter value of control bar.
select [Enter] / [Edit] operation
Enter into/exit Main menu
PIP display mode
Mute key
◄/
ENTER
Menu/ESC
PIP
MUTE
FWD
Forward(x2、x4、x8)
REW
Rewind(x2、x4、x8)
PLAY
STOP
PAUSE/
FRAME
SLOW
Z+
ZF+
FI+
IPTZ
LOCK
DS1093-100
Key Function
Press the button to enter into manual record.
Press the button to enter into record search menu
33
Enter into record search, play record event
Stop play / manual play
Pause / play frame by frame
(1/2、1/4、1/8)Slow play
Zoom out video area
Zoom in video area
Extend focus
Extend focus
Increase PTZ brightness
Decrease PTZ brightness
Allow you set preset bit and control PTZ.
Lock system
2.5
MOUSE OPERATION
Except using buttons of front panel or remote controller, you also can use mouse to perform system operation.
TYPE
Click left key of
Mouse
Click right key of
Mouse
Double-click
Left
key of Mouse
Moving Mouse
Sliding Mouse
DS1093-100
Function
In menu lock mode, Enter into pop-up menu and clicking any sub menu to pop up Login window; on menu unlock mode, enter into pop-up menu, and then clicking left key to
enter into any sub menu directly.
After entering into main menu, clicking left key could enter into any sub menu; On
[Detailed file] menu mode, clicking left key could playback one recording file.
Change the status of check box and motion detection area.
Clicking combo box to access pull-down menu; Click left key to stop dwell time display
when dwell time display is activated.
By clicking left key you can adjust Color control bar and volume control bar.
Clicking combo box to access pull-down menu
By clicking left key you can select values in edit boxes or pull-down menu and supports
Chinese word input, special symbol, numeric and character input, use instead of
[Enter] or [Backspace
]
In live display mode, clicking right key will display pop-up menu.
In Main menu or sub menu mode, clicking right key will exit current menu.
In live display or playback mode, double-clicking left key will maximize the screen.
Select menu item
On motion mode, sliding mouse will select motion area; On [Color set] menu mode,
sliding mouse will adjust color control bar and volume control bar.
34
3
DEVICE BASIC STARTUP
For a quick startup of the device, follow the procedure below:
Connect the desired analog cameras to BNC input channels.
Connect the mouse to the USB port.
Connect the HDMI/ VGA output to the respective HDMI/ VGA monitor and/or connect the BNC “Video Out” output
to the respective monitor in order to display the analog cameras previously connected.
Connect the network cable to LAN port, if needed.
Power the device on, inserting the power supply connector into the plug and set the switch to position 1 (if
requested).
NOTE
For further details, see the instructions manual in the CD provided with the product.
4
BASIC CONFIGURATION
4.1
MONITOR SELECTION
This Function allows to control the OSD Menu, switching BNC video Output and HDMI/VGA Video Output.
It is possible to switch the OSD Menu on video Output by DVR Front Panel:
Press and Hold “” REWIND Button (i.e. the Selection Button in right position of DVR Front Panel) for DVR
Models Ref. 1093/004H, Ref. 1093/008H and Ref. 1093/016H. Release the button after audible warning.
Press and Hold ”0” Button (Numeric Button on DVR Front Panel) for DVR Models Ref. 1093/018H and Ref.
1093/019H. Release the button after audible warning.
It is also possible to switch the OSD Menu on video Output by Remote Control (i.e. Selecting 0 Button), or select by
mouse the icon
from pop-up Menu (i.e. last icon on the right bottom of pop-up Menu displayed in the screen).
Wait till that the mouse pointer is displayed on Monitor.
4.2
LANGUAGE AND DATE/TIME SETTINGS
To set language and date/time, follow the procedure below:
On the DVR, select [Main MenuSystem] and choose the language for the DVR.
Change date, time and format, setting the current date/time. It is also possible to set the daylight-saving time, by
selecting the button [Set DST].
Save the configurations, exit from the DVR menu and reboot the device, if required.
DS1093-100
35
4.3
VIDEO OUTPUT CONTROL
On the DVR, select [Main Menu Monitor Output] to definitively set the menu control, by selecting the desired video
output.
The option [Video Out Control] includes the following items:
•
•
•
HDMI: used to load the menu control configurations at DVR startup on HDMI/ VGA video output.
VOUT: used to load the menu control configurations at DVR startup on MAIN BNC video output.
AUTO: used to automatically load the menu control configurations at DVR startup on HDMI/ VGA or MAIN BNC
video output, according to the video output connected and to the monitor used.
NOTE:
It is suggested to select the output [HDMI/ VGA] or [VOUT] according to the monitor.
The option [AUTO] is suggested when both HDMI/ VGA and BNC monitors are connected and the user wants
to be able to switch the menu control on the video output.
To save the changes, select the button [APPLICA], exit from the menu and reboot the device in order to make
changes active.
4.4
RECORDING PARAMETERS
Select [Main Menu Record] to access the menu [Record]. The following functions are available:
4.
5.
6.
The menu [Schedule] allows to set recording options: 24 hours or Normal, on Motion/Alarm; recording time
tables can be customized. It is also possible to program both recording options, Normal/Alarm within the same
time tables.
The item [File Size] in the menu [Rec Parameters] defines the maximum length of the recorded files (15min,
30min, 45min, 60 min).
After configurations in the Recording menu have been completed, save these changes and check that, after
exiting from the device menu, the icon “R” is displayed for each channel in LIVE mode; this icon indicates that
the device is recording according to configurations.
DS1093-100
36
5
ADVANCED CONFIGURATIONS
5.1
HARD DISK CONFIGURATION
Select [Main Menu Device] and start with the Hard Disk configuration, according to the user’s needings, checking the
following options:
5.2
OVERWRITE: If selecting “AUTO”, when the Hard Disk is full, the system will automatically overwrite the oldest
records, so it is possible to define how many days the records will remain in the hard disk. If selecting “OFF”,
when the Hard Disk is full, the recording will stop.
It is also possible to define how many days to keep the records of all the device channels. Select a value among
the available options.
FORMAT HD: This option is used to format the Hard Disk; files can’t be stored in the HD if this has not been
formatted. Select the Hard Diskthe button [Format HD] to start formatting; the system will ask: “All HD data will
be deleted, do you confirm?”; after pressing “OK”, the system will display: “Format in progress…” and “Format
complete”, then the system will automatically reboot. In case of fault, if the device doesn’t work at the first
installation, it could be useful to format the Hard Disk.
UNUSED FREE SPACE: it is the space available on the Hard Disk.
TOTAL SPACE: it is the total Hard Disk space.
REMAINING TIME: According to current video quality levels and frame rate, the system will show an evaluation
of the remaining recording time.
FIRMWARE UPGRADE AND DEFAULT SETTINGS
Select [Main Menu System Info ] for checking the DVR Firmware Version. If the Firmware Version is old, it is
possible to upgrade the device system software (firmware). Follow the procedure below:
Insert a USB flash drive into the PC and copy on the key the folder “dvrupgrade”, used to upgrade.
Insert the USB flash drive into the USB port (front or back) of the DVR.
On the DVR, select [Main Menu Advanced] and then [Update].
Wait until firmware upgrade and device reboot have been completed.
On the DVR, select [Main Menu Advanced] and then [Load Default]. A new screen will be displayed: select all
the items and click on [Apply], the device will be reset to factory defaults.
Exit from the OSD menu and wait for the device reboot, if needed.
IMPORTANT NOTES:
It is strongly recommended to Backup the record files stored in the Hard Disk before Upgrade Firmware
Version. After Backup Process, the files shall be played using the Player Software present in the current
Firmware Release
After Uploading Default Settings please set again the Basic Configurations (i.e. Video Out Control,
Language, Date/Time and Record Parameters, etc.)
DS1093-100
37
5.3
NETWORK CONFIGURATION
Select [Main MenuNetwork] to access network configuration. To configure the device for the local network, follow the
procedure below.
Select the desired network [Static], [DHCP] and [PPPoE].
For [Static] type, assign an IP address to the device, and check that [Client Port], such as 9000, and [Http Port],
such as 80 and [Mobile Port] as 18600 have been assigned. Please refer to picture below.
For [DHCP] type it is possible to set the Mobile Port, Client Port and HTTP Port as above and the network will
automatically assign a dynamic IP address, that can randomly change.
Save the changes by clicking on the button [Apply] and exit from the DVR OSD menu.
Reboot the device, as required, and wait until this operation has been completed.
NOTE:
For further details about the Network configuration Menu and Mobile and Internet Configuration Menu, see the
respective sections on the user manual, available in the CD provided with the product.
5.4
LOGIN DEVICE IN WEB INTERFACE
The instructions below describe how to access and configure the device web pages via LAN and Internet Explorer:
o
o
DS1093-100
Launch Internet Explorer and enter in the address bar the DVR IP address and the DVR HTTP
port, as http://IP Address:HTTP Port. If the DVR HTTP port is 80, enter only the DVR IP address,
as http://IP Address
If the installation of an ActiveX component is required, check that this operation is performed
as follows:
Double click on the icon
to open the browser Internet Explorer.
The following screen will appear (or the default first page):
Select from the menu of the Internet Explorer window the item “Tools → Internet options”
38
The window “Properties” will appear. Select “Security”.
Select “Trusted sites”.
Click on “Custom Level” and make sure that the protection level is set to “Low”. If the
protection level is not set, set it to Low and click on “Re-set” as shown in the figure. Select OK
to confirm.
DS1093-100
Click on the item “Sites”.
39
The following screen will appear. Add the device IP address (for example:
http://192.168.36.40) in the field “Add Web Site to the Zone”.
Click on the button “Add”.
NOTE
Don’t select the item “Require server (https:) verification for all sites in this zone”.
o
o
o
DS1093-100
Select “Exit” to close the window
Confirm by clicking on “Apply” and “OK”.
Close Internet Explorer.
Launch Internet Explorer and enter in the address bar the IP address and HTTP port of the DVR,
for example http://IP Address:Web Port/
After installing Active X, the following screen will appear; enter user name, password and Client
port, select the language and the Stream type. At the first access, enter admin as user name and
leave the password field empty. The first access is valid if default parameters have been kept and
the password is disabled in the DVR user menu. Otherwise, if the password has been enabled,
enter the password for administrator and/or user.
After setting the previous parameters (user name, password, client port, language, stream type),
select the button [Login] to access the device web interface.
40
5.5
IUVS SOFTWARE MOBILE
URMET iUVS is a mobile phone CCTV application developed for iOS and Android Platform. It's compatible with the URMET
H.264 New Dynamic & Video Smart and Evolution 2.0 DVR Series for Firmware V3.1 or upper version.
Features
Here follow the main features of the application:
•
•
•
•
•
•
Live audio/video streaming of up to 4 channels
Remote Search and Playback
Local Playback
PTZ function
Snapshot and Video capture
Multiple devices supported
Getting Start
•
•
•
Download and install the iUVS App from Apple Store or Android Market.
Connect your device to the internet using 3G or WiFi.
Launch application you will brought to iUVS main menu
Add and delete device
Device manager allow you add or delete device, and also modify device properties. Tab "Device Manager" on Main Menu to
open this interface as below
To add a new device, click "Add" button at the top right, then you can input the device name, address(IP or domain name), port,
user name and password etc. The Channels property can be retrieved form device.
NOTE: It is needed to set the Data Port (i.e. 9000) for iUVS Software Mobile correct working. If the user sets the Mobile
Port, iUVS Software Mobile cannot work for any reason.
To delete a device from list, swipe the device name you want to delete, then tap the delete button next to the device name.
DS1093-100
41
Live video monitor
Tab Live Monitor on Main Menu will bring up Live interface, which provides stream video, record, snapshot and PTZ, etc.
1. Open a device
Tab
to open device list as below, then select one of devices in the list, will open all channels of it automatically.
2. Open a channel
Tab Cross button on one of the view window will enter channel list window, then select one channel to open on the previous
window. Live preview about selected channel will be played.
NOTE:
About Software Mobile installation details for Symbian, Windows and BlackBerry Platforms, see the respective
sections on the user manual, available in the CD provided with the product.
For further details about the iUVS Software Mobile, see the respective sections on the user manual, available in the
CD provided with the product.
DS1093-100
42
1
DEUTSCH
INHALTSVERZEICHNIS
Allgemeine Hinweise ............................................................................................................................ 44
1.1
Produktbeschreibung............................................................................................................ 44
1.1.1
1.2
1.2.1
1.3
2.2
Typ 1093/004H-008H-016H DVR Geräte Vorerseite................................................................................... 47
Typ 1093/018H-019H DVR Geräte Vorderseite .......................................................................................... 48
Geräte Rückseite .................................................................................................................. 49
2.2.1
2.2.2
2.2.3
2.2.4
5
Stromversorgung ........................................................................................................................................ 45
Sicherheitshinweise .................................................................................................................................... 45
Vorsichtsmassnahmen bei der Aufstellung ................................................................................................. 45
Reinigung des Geräts ................................................................................................................................. 46
Festplatte .................................................................................................................................................... 46
Bildaufzeichnung ........................................................................................................................................ 46
Vertraulichkeit und Copyright ...................................................................................................................... 46
Beschreibung der Teile ........................................................................................................................ 47
2.1
Geräte Vorerseite ................................................................................................................. 47
2.1.1
2.1.2
3
4
Verpackungsinhalt ...................................................................................................................................... 45
Warnungen ........................................................................................................................... 45
1.3.1
1.3.2
1.3.3
1.3.4
1.3.5
1.3.6
1.3.7
2
Generelle Merkmale.................................................................................................................................... 44
Öffnen der Verpackung ........................................................................................................ 45
Typ 1093/004H-008H-016H DVR Geräte Rückseite ................................................................................... 49
Typ 1093/018H DVR Geräte Rückseite ...................................................................................................... 50
Typ 1093/019H DVR Geräte Rückseite ...................................................................................................... 51
Anschlussbeschreibung RS485/Sensor/Alarm ............................................................................................ 51
2.3
Fernbedienung ..................................................................................................................... 52
2.4
Fernbedienung Typ 1093/019H ............................................................................................ 53
2.5
Mausfunktionen .................................................................................................................... 54
Einfache Startprozedur ........................................................................................................................ 54
Basis Konfiguration ............................................................................................................................. 55
4.1
Monitor Auswahl ................................................................................................................... 55
4.2
Einstellungen Sprache und Datum/Zeit ................................................................................ 55
4.3
Kontrolle Videoausgang ....................................................................................................... 55
4.4
Aufnahmeparameter ............................................................................................................. 56
Erweiterte Konfigurationen ................................................................................................................. 57
5.1
Festplattenkonfiguration ....................................................................................................... 57
5.2
Firmware Upgrade und Werkseinstellungen ........................................................................ 57
5.3
Netzwerk Konfiguration ........................................................................................................ 58
5.4
Einloggen über den Internet Explorer................................................................................... 58
5.5
iUVS Software Mobile........................................................................................................... 61
DS1093-100
43
1
ALLGEMEINE HINWEISE
Lieber Kunde,
wir danken Ihnen für den Kauf dieses Produkts.
In dieser Schnellanleitung finden Sie Beschreibungen über die Aufstellung und den Gebrauch der digitalen
Videorekorder Evolution 2.0 Serie URMET 1093/004H – 1093/008H - 1093/016H – 1093/018H – 1093/019H.
Lesen Sie diese Unterlagen sorgfältig durch, damit Sie das Gerät richtig und sicher einsetzen können.
Halten Sie die Schnellanleitung griffbereit, so dass Sie im Zweifelsfall immer nachschauen können.
HINWEIS
Detailiertere Informationen zu dem Produkt entnehmen Sie bitte der Bedienungsanleitung die dem Gerät beiliegt.
1.1
PRODUKTBESCHREIBUNG
Das Produkt URMET S.p.A. ist ein digitaler Videorekorder, der Aufnahmen von mehreren Kameras auf internen
Festplatten aufzeichnen kann.
1.1.1
GENERELLE MERKMALE
Triplexmodus (gleichzeitige Aufnahme, Wiedergabe und Netzwerkübertragung)
H. 264 Videokompression mit WD1, WHD1 und WCIF Auflösungen
Grafische Bedieneroberfläche mit eingebundenem LINUX 2.6 Betriebssystem
Aufnahme in 960H Auflösung
Mehrfach oder Einzelaufzeichnung
Nutzerfreundliche Menüführung
Vielfaltige Betriebsarten (Liveansicht, Aufnahme, Wiedergabe, Backup, Netzwerküberwachung und Mobile
Überwachung)
Main Stream und Sub Stream Netzwerkübertragung
ADPCM Audiokompression
Fernbedienung (über Browser und über Client Software CMS)
Fernbedienung über Mobiltelefon
Unterstützt Zoom in/out und Sequenzfunktionen
Alarm-Verwaltung
Mehrfach-Alarm-Aufzeichnung
Web Daten Verschlüsselung
Alarmbenachrichtigung per E-Mail
Auto-Wartungsmodus
PTZ-Kamera-Steuerung über RS-485
Datensicherung auf USB 2.0 Port (Flash drive oder Festplatte)
Rückseitiger USB 2.0 Port für Backup, Update und Mausbedienung
Fernbedienung
Mehrsprachiges OSD Menü
PDA Software für Mobiltelefon für folgende Plattformen: Symbian 3. und 5. Edition, Windows Mobiltelefon, iOS,
Android, Blackberry
Watermark
Mehrsprachige Web / Client Software
Synchrone Wiedergabe 4 Ch. für 1093/004H, 8 Ch. für 1093/008H und 1093/018H, 16 Ch. für 1093/016H und
1093/019H
WICHTIGER HINWEIS
Kontaktieren Sie den Grothe Customer Service für die Erhöhung der Aufnahmekapazität des DVRs..
DS1093-100
44
1.2
ÖFFNEN DER VERPACKUNG
Überprüfen Sie die Verpackung und den Verpackungsinhalt auf erkennbare Schäden. Fehlen Teile oder weisen diese
Beschädigungen auf, wenden Sie sich bitte umgehend an Ihren Fachhändler. In diesen Fällen nicht versuchen, das Gerät in
Betrieb zu nehmen. Sollte das Gerät an den Lieferanten zurückgeschickt werden müssen, vergewissern Sie sich bitte, dass dies
in der Originalverpackung erfolgt.
1.2.1
VERPACKUNGSINHALT
DVR
Netzteil
•
Eingang
•
Ausgang
⇒
⇒
⇒
100/240 VAC 50/60Hz max. 1.5A
12VDC 2A Nur für Typ 1093/004H, Typ 1093/008H, Typ 1093/016H
12VDC 5A Nur für Typ 1093/018H und Typ 1093/019H
Schellanleitung
CD-ROM mit software und Bedienungsanleitungen
Maus
IR Fernbedienung, (inklusiv 2 Batterien Größe AAA)
Audiokabel (Nur für Typ 1093/019H)
Shukostecker (Nur für Typ 1093/018H und Typ 1093/019H)
Italienischer Stecker (Nur für Typ 1093/018H und Typ 1093/019H)
Cross LAN Kabel Cat. 5
WICHTIGER HINWEIS
Die Zusammensetzung der in der Lieferung enthaltenen Zubehörteile kann ohne Vorankündigung geändert werden.
1.3
WARNUNGEN
1.3.1
1.3.2
1.3.3
STROMVERSORGUNG
Verwenden Sie nur das Netzteil, das für die Stromversorgung des Gerätes mitgeliefert wurde. Prüfen Sie die
Netzspannung, bevor Sie das Netzteil anschließen.
Nicht am Kabel ziehen, wenn Sie das Gerät vom Netz trennen wollen.
Schalten Sie das Gerät aus, bevor Sie den Netzstecker ziehen. Das darf nicht geschehen, während der DVR
aufnimmt, wiedergibt oder wenn das Konfigurationsmenü angezeigt wird. Stoppen Sie die laufende Aufnahme
oder Wiedergabe, bevor Sie das Gerät vom Netz trennen, um eine Beschädigung der Festplatte zu vermeiden,
die eventuell irreparabel ist.
SICHERHEITSHINWEISE
Halten Sie das Gerät von Regen und Feuchtigkeit fern, um einen Brand oder einen elektrischen Schlag zu
verhindern. Lassen Sie kein Material (fest oder flüssig) in das Geräteinnere gelangen. Wenn das versehentlich
passiert, trennen Sie das Gerät vom Netz und lassen Sie es durch einen Fachmann überprüfen.
Öffnen Sie niemals das Gerät. Nehmen Sie in jedem Fall Kontakt mit einer Fachfirma auf, um das Gerät
reparieren zu lassen.
Halten Sie das Gerät von Kindern fern, um eine versehentliche Beschädigung zu vermeiden.
Berühren Sie das Gerät nicht mit nassen Händen, damit Sie keinen elektrischen Schlag bekommen oder
mechanische Schäden verursachen.
Benutzen Sie das Gerät nicht, wenn es heruntergefallen oder das Gehäuse beschädigt ist. Es besteht die
Gefahr eines Stromschlags, wenn Sie das Gerät in einem solchen Zustand benutzen. Nehmen Sie Kontakt mit
dem Händler oder einer Fachfirma auf.
VORSICHTSMASSNAHMEN BEI DER AUFSTELLUNG
Um ein Überhitzen des Geräts zu vermeiden, stellen Sie es so auf, dass immer Luft durch die
Belüftungsschlitze im Gehäuse zirkulieren kann. Lassen Sie mindestens 5 cm Platz frei, wenn Sie das Gerät in
einem Regal aufstellen. Aus dem gleichen Grund keine Heizquellen, wie z.B. Heizkörper oder Heizstrahler in
der Nähe aufstellen. Von direkter Sonneneinstrahlung fernhalten. Nicht an Plätzen mit extremem Staubanfall,
mechanischen Vibrationen oder Erschütterungen aufstellen.
Stellen Sie das Gerät nicht auf einer instabilen Unterlage auf, wie z.B. wackelnden oder schrägen Tischen. Das
Gerät könnte herabfallen und Verletzungen verursachen oder mechanisch beschädigt werden.
Stellen Sie das Gerät nicht an einem Platz auf, wo es Feuchtigkeit oder Wasser ausgesetzt sein könnte.
Richten Sie keinen Wasserstrahl auf das Gerät: Es besteht Brandgefahr, Gefahr eines elektrischen Schlags
oder mechanischer Fehlfunktion.
Benutzen Sie das Gerät nicht weiter, wenn Wasser oder andere Substanzen in das Geräteinnere gelangt sind.
Es besteht Brandgefahr und die Gefahr eines elektrischen Schlags. Nehmen Sie Kontakt mit dem Händler oder
einer Fachfirma auf.
Stellen Sie keine schweren oder wärmeerzeugenden Geräte oben auf das Gerät: Das könnte zu
Beschädigungen des Gehäuses führen und/oder die Temperatur im Geräteinneren erhöhen und zu Fehlfunktion
führen.
Decken Sie das Gerät nicht mit einem Tuch ab während es läuft, um eine Deformation des Gehäuses und ein
Überhitzen des Geräts zu vermeiden: Es besteht Brandgefahr, Gefahr eines elektrischen Schlags oder
mechanischer Fehlfunktion.
Halten Sie Magnete und magnetisierte Objekte vom Gerät fern, um Fehlfunktionen zu vermeiden.
Benutzen Sie das Gerät nicht bei Rauch, Dampf, Feuchtigkeit, Staub oder intensiven Vibrationen.
DS1093-100
45
1.3.4
1.3.5
1.3.6
1.3.7
Warten Sie mit dem Einschalten des Gerätes nach einem Transport von einem kalten zu einem warmen Platz
und umgekehrt. Warten Sie ungefähr drei Stunden, um das Gerät an die neue Umgebung (Temperatur,
Feuchtigkeit usw.) anzupassen.
REINIGUNG DES GERÄTS
Reiben Sie das Gehäuse vorsichtig mit einem trockenen Tuch ab, um Staub und Schmutz zu entfernen.
Feuchten Sie das Tuch mit einem neutralen Reinigungsmittel an, wenn sich der Schmutz nicht mit einem
trockenen Tuch entfernen lässt.
Verwenden Sie keine leicht verdunstenden Flüssigkeiten (wie z.B. Benzin, Alkohol, Reinigungslösungen usw.)
oder chemisch präparierte Tücher zur Reinigung des Gerätes, um Deformationen, Beschädigungen oder
Kratzer auf dem Lack zu vermeiden.
FESTPLATTE
Die in dem Gerät eingebaute Festplatte ist gegen Stoß, Temperaturunterschiede und Vibrationen geschützt.
Missachtung dieser Vorsichtsmaßnahmen kann den ordnungsgemäßen Betrieb beeinträchtigen oder zum
Verlust gespeicherter Daten auf der Festplatte führen.
Falls Reparaturen erforderlich werden ist es ratsam, alle gespeicherten Daten zu sichern, bevor das Gerät zum
Servicezentrum gebracht wird. URMET S.p.A. ist nicht für den Verlust gespeicherter Daten haftbar.
BILDAUFZEICHNUNG
Das Gerät wurde zur Aufzeichnung von Bildern entwickelt, nicht als Einbruchmelder. URMET S.p.A. kann nicht
für den Verlust oder die Beschädigungen haftbar gemacht werden, die durch Diebstahl entstehen.
Machen Sie eine Testaufnahme bevor Sie das Gerät einsetzen, um sicher zu sein, dass es ordnungsgemäß
funktioniert. Beachten Sie bitte, dass URMET S.p.A. nicht für den Verlust oder die Beschädigung gespeicherter
Daten haftbar ist, die durch unsachgemäße Aufstellung des Gerätes, falschen Gebrauch oder Fehlfunktionen
verursacht werden.
Dieses Gerät enthält elektronische Präzisionskomponenten. Schützen Sie es deshalb vor Stoß, um eine
einwandfreie Aufzeichnung der Bilder zu gewährleisten.
VERTRAULICHKEIT UND COPYRIGHT
Die digitalen Videorekorder 1093/004H - 1093/008H - 1093/016H – 1093/018H – 1093/019H sind Geräte für
CCTV-Systeme. Bildaufnahmen unterliegen den geltenden gesetzlichen Bestimmungen in Ihrem Land.
Bildaufnahmen von durch Copyright geschützten Objekten sind verboten.
Die Benutzer der Geräte sind für die Überprüfung und Einhaltung aller örtlichen Bestimmungen in Bezug auf
Überwachung und Aufzeichnungen von Videosignalen verantwortlich. Der Hersteller ist NICHT HAFTBAR für
den Einsatz dieses Gerätes, bei dem die gültigen Gesetze nicht beachtet werden.
DS1093-100
46
2
2.1
2.1.1
BESCHREIBUNG DER TEILE
GERÄTE VORERSEITE
TYP 1093/004H-008H-016H DVR GERÄTE VORERSEITE
4
6
Taste/Anzeige/Anschluss
13
7
14
15
16 17
19
12
11
10
9
8
20
Nr.
5
2
18
Symbol
Funktion & Beschreibung
PWR
Leuchtet die Anzeige “Grün” ist das Gerät im
Normalzustand eingeschaltet.
1
Spannungsanzeige
2
IR Empfänger
3
HDD Anzeige
4
Search
SEARCH
Suche Videodatei
5
Ton aus
MUTE
Ton ausschalten
6
Kanalauswahl:
CH- CH+
CH CH +
Kanal-Auswahltaste
7
ALL
ALL
Umschaltung des Anzeigemodus Vier-/Neun und
Sechzehn-Fach
8
PLAY
9
PAUSE
10
By frame
11
STOP
Stopptaste der
Funktionen.
12
REC
●
Taste zum Starten der manuellen Aufnahme.
13
PTZ
PTZ
14
MENU
Receives IR signal from Remote Controller
HDD
When the “Red” indicator flashes it means the hard
drive is being read or written to.
Öffnen
des
Aufzeichnung.
Menüoberfläche;
Wiedergabe
Pause / Manuelle Einzelbildwiedergabe
Wiedergabe Bild für Bild
Wiedergabe-
und
Aufnahme-
Zugang zur PTZ Steuerung
MENU/ESC
Zugang und Verlassen des Konfigurationsmenüs
oder Stopp der Wiedergabe
Taste links, Rücklwärts-Funktion; Verringert die
Geschwindigkeit der PTZ Rotation und Paramerwerte
/ zur Umschaltung der OSD-Menü Anzeige zwischen
HDMI/ VGA- und BNC Ausgang.
15
Taste links / Rew
16
Taste oben
Bewegt den Cursor im Menü nach oben.
17
Taste
rechts
Forward
Taste links, Taste Schneller Vorlauf, Erhöht die
Geschwindigkeit
der
PTZ
Rotation
und
Paramerwerte.
18
Taste unten
Bewegt den Cursor im Menü nach unten.
19
ENTER
Auswahl Befehle [Enter] / [Edit]
20
USB Port
USB2.0 Anschluss
DS1093-100
/
Fast
47
1
3
2.1.2
TYP 1093/018H-019H DVR GERÄTE VORDERSEITE
11
12
17
Nr.
Typ
1
13
14
9 10 6
15
5
16
Tastenname/Bezeichnung
Symbol
HDD Anzeige
HDD
Spannungsanzeige
PWR
Menü
MENU/ESC
Anzeigen
2
3
IR Empfänger
4
MehrfachTasten
5
HOCH
7
RECHTS
/
RUNTER
9
LINKS
/
10
ENTER
11
Richtungstasten
Kanalauswahl &
numerische
Eingabe
13
14
15
Numerische
Taste 0,1-9
und CH
Taste
CH1~9
Einzelkanal und
nummerische Taste
Wiedergabe
Steuerung
Stopp
Manuelle Aufzeichnung
●
16
Multi Display
17
USB Port
DS1093-100
PTZ
Wiedergabe
Wiedergabe/Pause
12
8
7
3
Funktion
Blinkt die Anzeige “Rot”, ist
die
Festplatte
aktiv
(lesen/schreiben).
Leuchtet die Anzeige “Grün”
ist
das
Gerät
im
Normalzustand eingeschaltet.
Empfängt das IR Signal von
der Fernbedienung.
Enter into main menu / Exit
Bewegung hoch
Mute
6
8
4
2
48
Bewegung rechts / FWD
Bewegung runter
Bewegung links / RWD
Bewegung hoch
Zugang zur PTZ-Steuerung
Auswahl Befehle[Enter] /
[Edit]
1. Nummer 1~9 stehen für
Zahlen 1~9 und Kanal
1~9.
2. Auswahl Kanal11-16:
Zuerst die Taste 1
betätigen und dann eine
andere numerische
Taste, z. B. für Kanal 16
zuerst die Taste „1“ und
danch die Taste „6“.
3. Halten der Taste “0“ zur
Umschaltung der OSDMenü Anzeige zwischen
HDMI/ VGA- und BNC
Ausgang.
Wiedergabetaste
Pausentaste
Stoppen der Wiedergabe und
manuellen Aufzeichnung.
Taste zum Starten der
manuellen Aufzeichnung.
Liveansicht: Quad-, 9-fach
oder 16-fach Modus.
Anschluss für ein USB2.0
Gerät.
1
2.2
2.2.1
GERÄTE RÜCKSEITE
TYP 1093/004H-008H-016H DVR GERÄTE RÜCKSEITE
2
1
7
4
3
6
2
1
8
11
3
6
4
Nr.
DS1093-100
10
11
5
9
10
7
3
12
8
2
1
5
7
4
9
6
12
8
11
5
9
10
12
Physikalischer Anschluss
Beschreibung
1
Video Eingang
Anschluss CH1-4 für DVR Typ 1093/004H, CH1-8 für DVR
Typ 1093/008H, CH 1-16 für DVR Typ 1093/016H
Videoeingänge (BNC Schnittstelle)
2
Video Ausgang
Anschluss Monitor Ausgang (BNC Schnittstelle)
3
Audio Eingang
4CH Audio Eingang (RCA Schnittstelle)
4
Audio Ausgang
Audio Ausgang (RCA Schnittstelle)
5
USB Port
Verbindung USB Maus
6
HDMI Port
Verbindung mit HDMI Monitor
7
VGA Port
Verbindung mit VGA Monitor, wie PC Monitor
8
PIN RS485/ Sensor Alarme
RS485/Sensor/Alarm Schnittstelle (siehe Pin Out unten)
9
IR-EXT
Anschluss einer externen IR Fernbedienung ( für zukünftige
Nutzungen)
10
Spannung
Verbindung Spannungsversorgung - DC12V 2A
11
Ethernet Port
Verbindung LAN, Netzwerk (RJ45 Schnittstelle)
12
Ein/Aus-Schalter
Ein/Ausschalten der Spannungsversorgung am Gerät
49
2.2.2
TYP 1093/018H DVR GERÄTE RÜCKSEITE
2
4
Nr.
1
5
8
7
3
9
12
6
10
11
13
Physikalischer Anschluss
Beschreibung
1
Video Eingang
CH 1-8 Videoeingänge (BNC Schnittstelle)
2
Video Ausgang
Anschluss Monitor Ausgang (BNC Schnittstelle)
3
Audio Eingang
CH1 – CH4 Audio Eingang (RCA Schnittstelle)
4
Audio Eingang
CH5 – CH8 Audio Eingang (RCA Schnittstelle)
5
Audio Ausgang
Audio Ausgang (RCA Schnittstelle)
6
USB Port
Verbindung USB Maus
7
HDMI Port
Verbindung mit HDMI Monitor
8
VGA Port
Verbindung mit VGA Monitor, wie PC Monitor
9
PIN RS485/ Sensor Alarme
RS485/Sensor/Alarm Schnittstelle (siehe Pin Belegung nachfolgend)
10
IR-EXT
Anschluss einer externen IR Fernbedienung ( für zukünftige Nutzungen)
11
Spannung
Verbindung Spannungsversorgung - DC12V 5A
12
Ethernet Port
Verbindung LAN, Netzwerk (RJ45 Schnittstelle)
13
Ein/Aus Schalter
Ein/Ausschalten der Spannungsversorgung am Gerät
DS1093-100
50
2.2.3
TYP 1093/019H DVR GERÄTE RÜCKSEITE
Nr.
2.2.4
Physikalischer Anschluss
Beschreibung
1
Video Eingang
CH 1-16 Videoeingänge (BNC Schnittstelle)
2
Video Ausgang
(OBEN) Haupt-Videoausgang; (Unten) Spot Ausgang (BNC Schnittstelle)
3
Audio Eingang
CH1 – CH4 Audio Eingang (BNC Schnittstelle)
4
Audio Ausgang
5
Audio Eingang
Audio Ausgang, inclusive Spot/Haupt und Sequenz-Signalausgang (BNC
Schnittstelle)
CH5 – CH8 Audio Eingang (BNC Schnittstelle)
6
Ethernet Port
Verbindung LAN, Netzwerk (RJ45 Schnittstelle)
7
Ein/Aus Schalter
Ein/Ausschalten der Spannungsversorgung am Gerät
8
HDMI Port
Verbindung mit HDMI Monitor
9
VGA Port
Verbindung mit VGA Monitor, wie PC Monitor
10
USB Port
Verbindung USB Maus
11
RS-485/Sensor Alarme
RS485/Sensor/Alarm Schnittstelle (siehe Pin Belegung nachfolgend)
12
Spannung
Verbindung Spannungsversorgung - DC12V 5A
ANSCHLUSSBESCHREIBUNG RS485/SENSOR/ALARM
Alarm Eingang: Anschluss [-] des Sensors an die Klemme G (GND) des DVR und [+] des Sensors an die gewünschte
Eingangsklemme des DVR.
Alarm Ausgang: Anschluss an die zwei Klemmen die mit “OUT” oder “ALARM” bezeichnet sind.
PTZ Port: Anschluss der RS485 Steuerleitung der PTZ-Kamera an die Klemmen RS-485 +/- (T oder TX).
DS1093-100
51
2.3
FERNBEDIENUNG
Nr.
1
2
Taste
1-8
9、
、0
3
4
5
6
7
ALL
Menu
▲
▼
◄/
8
SEL
9
10
DS1093-100
11
12
13
14
■
15
16
Audio
Mute
●
52
Beschreibung
Kanalwahl 1-8 ; Numerische Tasten
Numerische Tasten; Durch Betätigen der Taste
“0” besteht die Möglichkeit zur Umschaltung,
der OSD-Menü-Anzeige zwischen VGA- und
BNC Ausgang.
Vorschau aller Kanäle
Zugang/Verlassen des Hauptmenüs
Hoch-Taste, Lautstärke erhöhen
Runter-Taste , Lautstärke verringern
Links/Rechts-Taste,
Erhöhung/Verringerung der Parameter in den
Steuerfeldern
Auswahl-Taste/ Editier-Taste ;
Bestätigung des ausgeführten Befehls
Rücklauftaste
Wiedergabe-Taste, Zugang zum Menü „Aufnahme
suchen“
Vorlauftaste
Manuelle Aufnahme
Pause / Einzelbild- Wiedergabe
Stopp der manuellen Aufnahme; WiedergabeStopp
Test
Stummschaltung
2.4
FERNBEDIENUNG TYP 1093/019H
Key Title
REC
SEARCH
2×
×2
Quad-Anzeige
3×
×3
9 Kanal-Anzeige
4×
×4
16 Kanal-Anzeige
AUTO
0~9
DISPLAY
MODE
Sequenz-Anzeige
Kanalauswahl; numerische Tasten
Auswahl Mehrfachbetrachtung (Quad, 9-fach, 16fach und Vollbild)
▲
Hoch-Taste
▼
Runter-Taste
Links/Rechts-Taste,
Erhöhung/Verringerung der Parameter in den
Steuerfeldern
Bestätigungstaste [Enter] / [Edit]
Zugang/Verlassen des Hauptmenüs
Bild in Bild Funktion
Stummschaltung
Vorlauftaste (x2 ; x4 ; x8)
Rücklauftaste (x2 ; x4 ; x8)
Wiedergabe-Taste, Zugang zum Menü „Aufnahme
suchen“
Stopp der manuellen Aufnahme; Wiedergabe-Stopp
◄/
ENTER
Menu/ESC
PIP
MUTE
FWD
REW
PLAY
STOP
PAUSE/
FRAME
SLOW
Z+
ZF+
FI+
IPTZ
LOCK
DS1093-100
Key Function
Starten der manuellen Aufnahme.
Zugang zum Aufnahme-Suchmenü
53
Pause / Einzelbildwiedergabe
Langsam vorwärts (x1/2 ; x1/4 ; x1/8)
Heranzoomen
Wegzoomen
Fokus
Fokus
PTZ-Kamera-Helligkeit größer
PTZ-Kamera-Helligkeit geringer
PTZ-Kamera-Steuerung
Systemverriegelung
2.5
MAUSFUNKTIONEN
Abgesehen von der Nutzung der Tasten an der Gerätevorderseite und der Fernbedienung, kann der DVR auch über die
mitgelieferte USB-Maus gesteuert werden.
TYPE
Klicken auf die
linke Maustaste
Klicken auf die
rechte Maustaste
Doppelklick auf die
linke Maustaste
Bewegen der Maus
Verschieben
der
Maus
3
Function
Gehen Sie im Menü Verriegelungsmodus in das Dialogmenü und klicken auf irgendein
Untermenü, um das Anmeldefenster anzuzeigen. Gehen Sie im Menü
Entriegelungsmodus in das Dialogmenü und klicken dann die linke Taste, um direkt in
irgendein Untermenü zu gelangen.
Nachdem Sie im Hauptmenü sind, kommen Sie durch Klicken der linken Taste in jedes
Untermenü. Im Menümodus [detaillierten Datei] können Sie durch Klicken der linken
Taste eine aufgenommene Datei wiedergeben.
Ändern Sie den Status der Dialogbox und den Bereich der Bewegungsmeldung.
Klicken Sie auf die Combobox, um in das Aktionsmenü zu gelangen.
Durch Klicken der linken Taste können Sie die Farbskala und die Lautstärke einstellen.
Klicken Sie auf die Combobox, um in das Aktionsmenü zu gelangen.
Durch Klicken der linken Taste können Sie Werte in den Editierboxen oder im
Aktionsmenü auswählen, Eingabe von Sondersymbolen, numerischen Zeichen,
anstelle der Tasten [Enter] oder [Rücksprung
]
Im laufenden Wiedergabemodus können Sie durch Klicken der rechten Taste das
Dialogmenü anzeigen.
Sie können im Hauptmenü- oder Untermenümodus durch Klicken der rechten Taste
das aktuelle Menü verlassen.
Durch Doppelklick auf die linke Taste wird bei laufender Anzeige oder im
Wiedergabemodus das Bild auf Bildschirmgröße maximiert.
Auswahl des Menüpunktes
Durch Verschieben der Maus im Bewegungsmodus wählen Sie den
Bewegungsbereich aus. Im Menümodus [Farbeinstellungen] stellen Sie durch
Verschieben der Maus die Farbskala und die Lautstärke ein.
EINFACHE STARTPROZEDUR
Für einen Schnellstart des DVR folgen Sie untenstehender Prozedur:
Anschluss der gewünschten Analog-Kameras an die BNC Eingangskanäle.
Anschluss der Maus an den ausgewiesenen USB-Port.
Anschluss des Monitors an den HDMI/ VGA- bzw. BNC-Videoausgangsanschluss, auf welchem die analogen
Kameras dargestellt werden sollen.
Wenn nötig, das LAN-Kabel anschliessen.
Spannungsversorgung zum DVR herstellen und je nach DVR den Netzschalter auf Position 1 stellen.
HINWEIS
Weitergehende Details zur Inbetriebnahme entnehmen Sie bitte der Haupt-Bedienungsanleitung.
DS1093-100
54
4
BASIS KONFIGURATION
4.1
MONITOR AUSWAHL
Diese Funktion erlaubt die Verwaltung des OSD Menüs auf dem jeweiligen HDMI-, VGA- oder BNC-Monitors.
Es besteht die Möglichkeit den Videoausgang durch die Maus (Auswahl des Videoausgangs über die Bedienfront des
DVR (Beschreibung siehe unten) zu verwalten.
Betätigen und Halten der Taste “” REWIND (bei den Auswahltasten auf der rechten Seiten des Bedienpanels)
für die DVR Modelle Typ 1093/004H, Typ 1093/008H und Typ 1093/016H. Loslassen der Taste nach dem
Ertönen der akustischen Warnung.
Betätigen und Halten der Taste ”0” (bei den nummerischen Tasten auf dem Bedienpanel) für die DVR Modelle
Typ 1093/018H und Typ 1093/019H. Loslassen der Taste nach dem Ertönen der akustischen Warnung.
Ebenfalls besteht die Möglichkeit der Umschaltung des OSD Menüs über die FGernebedienung (z. B. über die “0”
Taste), oder über die USB-Maus durch Auswahl des Symbols
Menüleiste in der rechten unteren Seite des Bildschirms).
im Pop-Up Menü ( letztes Sysmbol in der
Warten bis der Mauszeiger auf dem Bildschirm angezeigt wird.
4.2
EINSTELLUNGEN SPRACHE UND DATUM/ZEIT
Um die Sprache und auch das Datum/Zeit einzustellen führen Sie untenstehenden Schritte aus:
Am DVR, Auswahl [HauptmenüSystem] und ändern der Sprache für das OSD-Menü des DVR.
Ändern des Datums, Zeit und Zeitformat. Ebenfalls besteht die Möglichkeit Einstellungen für die Sommer/Winterzeit [Sommerzeit] einzustellen.
Speichern der Konfigurationen, Verlassen des OSD-Menüs und wenn nötig den DVR neu starten.
4.3
KONTROLLE VIDEOAUSGANG
Am DVR, Auswahl [Hauptmenü Anzeige Ausgabe] um die endgültige Einstellung des gewünschten Videausgangs
vorzunehmen.
Die Option [Video Ausgangssteuerung] enthält folgende Auswahlmöglichkeiten:
•
•
•
HDMI: Wird genutzt um das OSD-Menü beim Starten des DVR auf einem HDMI/ VGA-Monitor anzuzeigen.
VOUT: Wird genutzt um das OSD-Menü beim Starten des DVR auf einem BNC-Monitor anzuzeigen.
AUTO: Wird genutzt um das OSD-Menü beim Starten des DVR automatisch dem angeschlossenen Monitors
(BNC oder HDMI/ VGA) zu zuordnen.
BEACHTEN:
Es wird empfohlen, den Videoausgang [HDMI/ VGA] oder [BNC] dem angeschlossenen Monitor zu zuordnen.
Die Option [AUTO] sollte bei Einsatz von zwei angeschlossenen Monitoren BNC und HDMI/ VGA gewählt
werden, um die Umschaltung der Menüsteuerung für zwei Monitore zu gestatten.
Um die Konfiguration zu speichern, die Schaltfläche [Bestätige] anklicken, Verlassen des OSD-Menüs und den
DVR neu starten um die Änderungen wirksam zu machen.
DS1093-100
55
4.4
AUFNAHMEPARAMETER
Auswahl [Hauptmenü Aufnahme] um in das Aufnahmemenü zu gelangen. Folgende Funktionen stehen zur Verfügung:
1.
2.
3.
Der Menüpunkt [Dateigröße] im Menü [Aufz. Parameter] definiert die maximale Länge der Aufzeichnungsdatei
(15min, 30min, 45min, 60 min).
Das Menü [Zeitplan] erlaubt die Aufnahmeoptionen: 24 Stunden im Normalmodus, bei Bewegung, Alarm; der
Zeitplan kann dabei benutzerdefiniert angelegt werden. Ebenfalls ist es möglich Aufnahmeoptionen zu mischen,
das heißt in der selben Zeitleiste eine normale Aufnahmezeit mit zum Beispiel einer Alarmaufnahme.
Nach der Konfiguration des Aufnahmemenüs die Änderungen speichern, Verlassen des OSD-Menüs und
prüfen ob bei einer normalen Aufzeichnung das Symbol “R” im jeweiligen Kamerafenster erscheint.
DS1093-100
56
5
ERWEITERTE KONFIGURATIONEN
5.1
FESTPLATTENKONFIGURATION
Auswahl [Hauptmenü Gerät] um die Konfiguration der Festplatte auszuführen, überprüfen Sie dabei folgende
Optionen:
5.2
ÜBERSCHREIBEN: Bei Auswahl “AUTO”, werden wenn die Festplatte voll ist, die ältesten Aufnahmen
automatisch überschrieben. Ebenfalls besteht die Möglichkeit Tage (1, 2, 3 7, 30 oder nur am Wochendende)
vorzugeben, nach welchen die Festplatte wieder überschrieben werden soll. Bei Auswahl “Schliessen”, werden
wenn die Festplatte voll ist, alle Aufnahmen gestoppt.
HDD formatieren: Mit dieser Option wird die Festplatte formatiert, da eine nicht formatierte Festplatte keine
Daten (Aufnahmen) speichern kann. Nach Betätigen der Schaltfläche [HDD formatieren] startet die
Formatierung; es öffnet sich ein Warnfenster “Formatierung löscht alle Daten auf HDD“, diese muss man mit
[OK] bestätige um mit der Formatierung fortzufahren. Während der Formatierung erscheint ein Fenster
“Formatierung. Bitte warten” und nach Abschluss das Fenster “Formatieren beendet”. Dieses dann mit [OK]
bestätigen. Im Falle dass der DVR bei der Erstinstallation nicht korrekt arbeitet, ist es sinnvoll die Festplatte
einmal zu formatieren.
Verfügbarer Speicher: Ist der momentan verfügbare Speicher auf der Festplatte.
Gesamter Speicher: Ist der Gesamtspeicherplatz auf der Festplatte.
Verfügbare Zeit: In Zusammenhang der eingestellten Videoqualität und der Bildrate in der Aufnahme zeigt das
System hier die ungefähre verbleibende Aufnahmezeit an.
FIRMWARE UPGRADE UND WERKSEINSTELLUNGEN
Auswahl [Hauptmenü System Version ] zum Überprüfen der aktuellen Firmwareversion. Sollte eine alte Version auf
dem DVR vorhanden sein, besteht die Möglichkeit zum Update des Systems. Gehen Sie bitte wie folgt vor:
Den USB-Stick in den PC einstecken und den Ordner “dvrupgrade” für das Firmware-Update auf den USBStick kopieren. Insert the USB flash drive into the USB port (front or back) of the DVR.
Den USB-Stick danach am DVR einstecken und im OSD-Menü [Hauptmenü Erweitert Update] das
Firmware-Update starten.
Warten bis das Update ausgeführt und der DVR neu gestartet wurde.
Am DVR, Auswahl [Hauptmenü Erweitert Lade Werkeinstellungen]. Ein neues Fenster öffnet sich, alle
Menüpunkte auswählen und die Schaltfläche [Bestätige] betätigen, der DVR lädt nun die Werkseinstellungen.
Verlassen des OSD-Menüs und warten bis der DVR, wenn nötig, einen Neustart ausgeführt hat.
BEACHTEN:
Es wird dringend empfohlen, die auf der Festplatte gespeicherten Dateien zu sichern (Backup) bevor ein
Firmware-Upgrade durchgeführt wird. Nach Abschluss des Upgrades sollten die Dateien mit der PlayerSoftware aus der alten Firmware Version abgespielt werden können.
Nach Rücksetzung auf die Werkseinstellungen bitte die Basis-Konfigurationen (Sprache, Datum, Zeit,
Videoausgang und Aufnahmeparameter) neu ausführen!
DS1093-100
57
5.3
NETZWERK KONFIGURATION
Auswahl [HauptmenüNetzwerk] um Zugriff auf die Netzwerk-Konfiguration zu erhalten.
Um den DVR für das entsprechende Netzwerk zu konfigurieren, gehen Sie wie folgt vor:
Auswahl der gewünschten Netzwerk-Adressvergabe [Statisch], [DHCP] oder [PPPoE].
Bei einer statischen Adresse, muss dem DVR eine dem Netzwerk kompatible IP-Adresse zugewiesen werden.
Ebenfalls müssen beim DVR die Ports (Mobile Port, Web Port und Medien Port) , die Sub-Netmask, das
Gateway zugewiesen werden.
Beim Typ [DHCP], müssen keine Eingaben getätigt werden, da das Netzwerk die Parameter automatisch
vergibt.
Die Eingaben mit Schaltfläche [Bestätige] speichern und das OSD-Menü verlassen.
Den DVR neu starten und abwarten bis alle Konfigurationen geladen wurden.
BEACHTEN:
Weitergehende Details für Netzwerk-Konfigurationen, wie Internet oder Mobile entnehmen Sie bitte der HauptBedienungsanleitung.
5.4
EINLOGGEN ÜBER DEN INTERNET EXPLORER
Die nachfolgende Anleitung beschreibt den Zugriff und die Konfiguration des DVR über LAN mit dem Internet Explorer.
o
o
DS1093-100
Den Internet Explorer starten und die IP-Adresse des DVR in der Adressleiste des WEB-Browsers
wie folgt eingeben: http://IP Adresse:HTTP Port
Ist der HTTP-Port des DVR mit 80 vergeben erfolgt die Adresseingabe nur mit der IP-Adresse:
http://IP Adresse
Wenn die Installation einer ActiveX Komponente erforderlich ist, folgen Sie der
untenstehenden Prozedur:
Öffnen Sie Internet Explorer durch Doppelklick auf
Die folgende Seite (oder die Homepage) erscheint.
Doppelklick auf
Das “Internetoptionen - Sicherheit” Fenster erscheint.
.
58
.
Wählen Sie “Vertrauenswürdige Seiten”; „Stufe anpassen…“ und wählen Sie die Stufe ‚Sehr Niedrig’.
Klicken Sie auf “Seiten (Sites)…”
Das folgende Fenster erscheint.
Fügen Sie die IP Adresse des Gerätes (um die Adresse anzuzeigen drücken Sie “F2” auf der
Vorderseite des Gerätes) in dem Feld “Diese Webseite zur Zone hinzufügen” hinzu.
DS1093-100
59
Klicken Sie auf “Hinzufügen”.
Das folgende Bestätigungsfenster erscheint.
WICHTIGER HINWEIS
Wählen Sie nicht “Für Seiten dieser Zone ist eine Serverüberprüfung (https:) erforderlich“.
Klicken Sie mehrmals auf “OK” um diese Eingabe zu beenden.
Fahren Sie mit der Installation von “ActiveX” fort.
Schliessen Sie nach erfolgreicher Installation den Internet Explorer und öffnen Sie diesen wieder.
WICHTIGER HINWEIS
Sie können nach der Installation von “ActiveX “ die erforderliche Sicherheitszone wieder zurücksetzen.
o
o
o
Eingabe der IP-Adresse in der Adressleiste des WEB-Browsers, wie am Anfang des Kapitels
beschrieben.
Nach erfolgreicher Installation des ActiveX Elements und richtiger Eingabe der IP-Adresse
erscheint folgendes Fenster. In dem Login-Fenster können der Nutzername, das Passwort, der
Client Port, der Stream-Typ eingegeben und die Sprache für die Menüführung ausgewählt werden.
Beim ersten Zugriff nur den Nutzernamen eingeben, dass Passwortfeld freilassen. Sollte im OSDMenü des DVRs die Passwortabfrage schon aktiviert sein muss der Nutzername und das
Passwort eingegeben werden.
Nach Eingabe der Parameter (Nutzername, Passwort, Client Port, Sprache, Streamtyp), die
Schaltfläche [Login] anklicken um Zugriff auf das WEB-Browser Menü des DVR zu erhalten.
BEACHTEN:
Weitergehende Details für die WEB-Browser Oberfläche, entnehmen Sie bitte der Haupt-Bedienungsanleitung
DS1093-100
60
5.5
IUVS SOFTWARE MOBILE
URMET iUVS ist eine Mobiltelefon CCTV Applikation entwickelt für das iOS und Android Betriebssystem. Diese App ist
kompatibel zu URMET H.264 DVRs New Dynamic & Video Smart und Evolution 2.0 Serie mit der Firmware 3.1 oder höher.
Hauptmerkmale
Nachfolgend die Hauptmerkmale der App iUVS:
•
•
•
•
•
•
Live Audio/Video Darstellung von bis zu 4 Kanälen
Fernsuche und Wiedergabe
Lokale Wiedergabe
PTZ Funktion
Einzelbild- und Videoerfassung
Unterstützung von mehreren Geräten
Starten
•
•
•
Download und Installation der “iUVS” App vom Apple Store oder Android Market.
Verbinden des Gerät mit dem 3G Netzwerk oder einer WIFI Verbindung.
Aufruf der App um das Hauptmenü der iUVS zu öffnen.
Hinzufügen und Löschen von Geräten
Der Gerätemanager (Device Manager) gestattet das Hinzufügen oder Löschen von Geräten und das Verwalten der
Gerätedaten. Anklicken des Gerätemanagers und es öffnet sich unten dargestelltes Menü.
Um eine neues Gerät hinzu zufügen, anklicken der Fläche "Add" oben rechts in der Menüoberfläche. Es erscheint eine neues
Fenster in welchem Gerätename, Geräte-IP (IP-Adresse oder Domain), Port, Nutzername und Password eingegeben werden
können. Die Anzahl der Kanäle empfängt die App beim Einlogen in das Gerät.
HINWEIS: Es muss der Datenport (z.B 9000) eingetragen werden, damit die App ordnungsgemäß arbeitet. Wird in der
App der Mobile Port eingegeben, kann die App keine Verbidnung zum DVR aufbauen.
Um ein Gerät zu löschen, das Gerät auswählen und mit Löschen (Delete) bestätigen.
DS1093-100
61
Live Videoanzeige
Anklicken der Schaltfläche Live Monitor im Hauptmenü und nachfolgendes Fenster öffnet sich. In diesem Übersichtsfenster
befinden sich die Optionen der Liveansicht, der Aufzeichnung, der Einzelbilderfassung, die PTZ-Steuerung usw.
1. Öffnen eines DVRs
Anklicken der Schaltfläche
um die Geräteliste zu öffnen, dann Auswahl eines Geräts aus der Liste und es öffnen sich
automatisch die Videokanäle des Gerätes.
2. Öffnen eines Einzelkanals
Anklicken der Schaltfläche “+” in der Kanalansicht, es öffnet sich eine Geräteauswahl, dann den gewünschten Kanal auswählen
und diesel erscheint danni m gewählten Liveansichsfenster.
HINWEIS:
DS1093-100
Weitere Details zur Softwareinstallation der Betriebssysteme Symbian, Windows und Blackberry entnehmen Sie
bitte der Bedienungsanleitung auf der CD, die dem Gerät als Beipack beigefügt ist.
Weitere Details über die Software “iUVS Mobile” entnehmen Sie bitte der Bedienungsanleitung auf der CD, die
dem Gerät als Beipack beigefügt ist.
62
ESPAÑOL
ÍNDICE
1
Información general ............................................................................................................................. 64
1.1
Descripción del producto ...................................................................................................... 64
1.1.1
1.2
1.2.1
1.3
2.2
Panel frontal de los DVR 1093/004H-008H-016H ....................................................................................... 67
Panel frontal de los DVR 1093/018H-019H ................................................................................................. 68
Panel posterior ..................................................................................................................... 69
2.2.1
2.2.2
2.2.3
2.2.4
5
Alimentación ............................................................................................................................................... 65
Precauciones de seguridad ........................................................................................................................ 65
Precauciones de instalación ....................................................................................................................... 65
Limpieza del dispositivo .............................................................................................................................. 65
Disco duro .................................................................................................................................................. 66
Grabación de imágenes .............................................................................................................................. 66
Privacidad y Copyright ................................................................................................................................ 66
Descripción de los componente ......................................................................................................... 67
2.1
Panel Frontal ........................................................................................................................ 67
2.1.1
2.1.2
3
4
Contenido del paquete ................................................................................................................................ 65
Advertencias ......................................................................................................................... 65
1.3.1
1.3.2
1.3.3
1.3.4
1.3.5
1.3.6
1.3.7
2
Características generales ........................................................................................................................... 64
Comprobación del paquete .................................................................................................. 65
Panel posterior de los DVR 1093/004H-008H-016H ................................................................................... 69
Panel posterior del DVR 1093/018H ........................................................................................................... 70
Panel posterior del DVR 1093/019H ........................................................................................................... 71
Puerto RS-485/Sensor/Alarma.................................................................................................................... 71
2.3
Mando a distancia ................................................................................................................ 72
2.4
Mando a distancia del DVR 1093/019H ............................................................................... 73
2.5
Funcionamiento con el ratón ................................................................................................ 74
Instalación básica del equipo ............................................................................................................. 75
Configuración básica ........................................................................................................................... 75
4.1
Selección del monitor ........................................................................................................... 75
4.2
Configuración de idioma y Fecha/Hora ................................................................................ 75
4.3
Control de la salida de vídeo ................................................................................................ 76
4.4
Parámetros de grabación ..................................................................................................... 76
Configuración avanzada ...................................................................................................................... 77
5.1
Configuración del disco duro (HDD)..................................................................................... 77
5.2
Versión de firmware y Carga por defecto ............................................................................. 77
5.3
Configuración de red ............................................................................................................ 78
5.4
Inicio de sesión del equipo en la interfaz web ...................................................................... 78
5.5
iUVS Software Mobile........................................................................................................... 81
DS1093-100
63
1
INFORMACIÓN GENERAL
Estimado cliente:
Le agradecemos que haya comprado este producto.
En este documento se describe cómo instalar y utilizar los grabadores de vídeo digital Ref. 1093/004H, 1093/008H,
1093/016H, 1093/018H y 1093/019H de URMET.
Lea con atención esta guía rápida, ya que contiene información sobre el uso correcto y seguro de los dispositivos.
Guarde esta guía rápida en un lugar fácilmente accesible para poder consultarlo cuando sea necesario.
NOTA
Para obtener información detallada sobre estos equipos, consulte el manual de instrucciones completo incluido en el CD
suministrado con el producto.
1.1
DESCRIPCIÓN DEL PRODUCTO
El producto de URMET S.p.A. es un grabador de vídeo digital que permite almacenar en un disco duro interno las
imágenes de varias cámaras.
1.1.1
CARACTERÍSTICAS GENERALES
Modo tríplex (grabar, reproducir y transmitir por red simultáneamente)
Compresión de vídeo H.264, con resolución WD1, WHD1 o WCIF
Interfaz gráfico Windows; sistema operativo Linux 2.6 embebido en tiempo real
Grabación con resolución WD1
Grabación de uno o varios canales
Sencillo menú de usuarios
Varios modos operativos (directo, grabación, reproducción, copia de seguridad, vigilancia en red y
monitorización a través del teléfono móvil)
Transmisión por la red Main-stream y Sub-stream
Compresión de audio ADPCM
Control remoto (por navegador web o software cliente CMS)
Control remoto a través de teléfono móvil
Zoom y secuencias
Gestión de alarmas
Grabación de varias alarmas
Encriptación de datos web
Notificación de alarmas por correo electrónico
Mantenimiento automático
Control PTZ a través de RS-485
Copia de seguridad en puerto USB 2.0 del panel frontal (pendrive o disco duro)
Puertos USB 2.0 en el panel posterior para copias de seguridad, actualizaciones y conexión de un ratón
Mando a distancia
Menú OSD multilingüe
Software para las siguientes plataformas PDA: Symbian (versiones 3 y 5), Windows Mobile, iOS, Android,
BlackBerry
Función de marca de agua
Reproducción síncrona de 4 canales para 1093/004H, 8 canales para 1093/008H y 1093/018H, 16 canales
para 1093/016H y 1093/019H
NOTA
Para aumentar la capacidad de grabación de los equipos, póngase en contacto exclusivamente con un centro de
servicios autorizado.
DS1093-100
64
1.2
COMPROBACIÓN DEL PAQUETE
Compruebe visualmente que el paquete y su contenido no presentan ningún daño. Si falta algún componente o está
dañado, póngase en contacto con su distribuidor. En este caso, no intente utilizar el dispositivo. Si el producto presenta
daños, devuélvalo en su embalaje original.
1.2.1
CONTENIDO DEL PAQUETE
DVR
Alimentador
• ENTRADA ⇒ 100 a 240 VAC, 50/60 Hz, max. 1.5 A
• SALIDA
⇒ 12 VDC, 2 A (sólo para Ref. 1093/004H y 1093/008H y 1093/016H)
⇒ 12 VDC, 5 A (sólo para Ref. 1093/018H y 1093/019H)
Guía rápida
CD-ROM que incluye software y manuales de usuario
Ratón
Mando a distancia de infrarrojos, (se suministra con 2 pilas de tipo AAA)
Cable de audio (sólo para Ref. 1093/0019H)
Un enchufe Schucko (sólo para Ref. 1093/0018H y 1093/019H)
Enchufe italiano (sólo para Ref. 1093/0018H y 1093/019H)
Cable LAN cruzado de Cat. 5
NOTA
Los accesorios están sujetos a modificaciones sin previo aviso.
1.3
ADVERTENCIAS
1.3.1
1.3.2
1.3.3
1.3.4
ALIMENTACIÓN
Utilice únicamente el alimentador suministrado con el equipo. Compruebe la tensión eléctrica AC antes de
conectar el alimentador.
Para desconectar el cable de alimentación del dispositivo, no tire del cable sino del conector.
Apague el dispositivo antes de desconectar el alimentador. Esta operación no debe realizarse cuando el
grabador esté grabando, reproduciendo o en el menú de configuración. Para evitar dañar el disco duro
irreparablemente, conviene detener la grabación y reproducción en curso antes de desconectar la alimentación
del dispositivo.
PRECAUCIONES DE SEGURIDAD
Para evitar cualquier riesgo de incendio y descargas eléctricas, no exponga el dispositivo a la lluvia o a la
humedad. No introduzca dentro ningún material sólido o líquido. Si esto se produjera de manera accidental,
desconecte el equipo de la red eléctrica y haga que lo inspeccione personal cualificado.
No intente en ningún caso abrir el dispositivo o repararlo por su cuenta. En caso de avería, póngase en
contacto con personal cualificado o con el servicio de asistencia técnica.
Mantenga el equipo alejado de los niños, para evitar daños accidentales.
No opere el equipo con las manos húmedas, para evitar descargas eléctricas o daños mecánicos.
No utilice el equipo si se ha caído o si la carcasa externa está dañada, ya que podría producirse una descarga
eléctrica. En este caso, contacte con el distribuidor o instalador autorizado.
PRECAUCIONES DE INSTALACIÓN
Para que el equipo no se sobrecaliente, colóquelo de tal forma que no se obstruya el paso de aire a través de
las ranuras de la carcasa. Si el equipo se instala en un rack, asegúrese de dejar un espacio libre de al menos
5 cm. Asimismo, no lo instale junto a fuentes de calor, como radiadores o conductos de aire caliente, ni lo
exponga a la luz solar directa. No instale el dispositivo en zonas con mucho polvo, o sometidas a vibraciones
mecánicas o choques.
No coloque el dispositivo sobre una superficie inestable, como una mesa tambaleante o inclinada, ya que
podría caerse y causar lesiones o fallos mecánicos.
No instale el dispositivo en un lugar expuesto a la humedad o al agua. No dirija un chorro de agua directamente
sobre el dispositivo ya que podría producirse un incendio, una descarga eléctrica o un fallo mecánico.
Si entra agua o cualquier otro material extraño dentro del dispositivo, desconéctelo inmediatamente a fin de
evitar cualquier riesgo de incendio o descarga eléctrica. En este caso, contacte con el distribuidor o instalador
autorizado.
No coloque objetos pesados o que generen calor sobre el equipo, ya que podrían dañar la carcasa o aumentar
la temperatura interna, causando un mal funcionamiento.
No cubra el equipo con una tela mientras esté funcionando para evitar deformar la carcasa y sobrecalentar las
piezas internas, con el consiguiente riesgo de incendio, descarga eléctrica o fallo mecánico.
No deje imanes u objetos magnéticos cerca del equipo ya que podrían causar fallos.
No utilice este equipo en presencia de humo, vapor, humedad, polvo o vibraciones intensas.
No ponga en funcionamiento el dispositivo inmediatamente después de transportarlo de un lugar frío a otro
caliente o viceversa. Espere unas tres horas para que el dispositivo se adapte al nuevo ambiente (temperatura,
humedad, etc.).
LIMPIEZA DEL DISPOSITIVO
Frote delicadamente el dispositivo con un paño seco para quitar el polvo y la suciedad.
DS1093-100
65
Si la suciedad no desaparece con el paño seco, utilice un paño humedecido en detergente neutro.
No utilice líquidos volátiles (como gasolina, alcohol, disolventes, etc.) ni paños tratados químicamente en la
limpieza del equipo para evitar la deformación, deterioro o arañazos en su superficie.
1.3.5
DISCO DURO
El disco duro instalado en este dispositivo es sensible a los choques, diferencias de temperatura y vibraciones.
El hacer caso omiso de estas precauciones puede tener como consecuencia un funcionamiento incorrecto y la
pérdida de los datos almacenados en el disco duro.
Antes de llevar el equipo al centro de reparaciones, se recomienda realizar una copia de seguridad de todos los
datos importantes. URMET S.p.A. no se responsabiliza de la pérdida de los datos almacenados.
1.3.6
1.3.7
GRABACIÓN DE IMÁGENES
Este equipo está diseñado como grabador de imágenes, no como alarma de robo. URMET S.p.A. no se
responsabiliza de las pérdidas o daños como consecuencia de robo sufrido por el usuario.
Haga una prueba de grabación antes de usar el equipo para asegurarse de que funciona correctamente.
Tenga en cuenta que URMET S.p.A. no se responsabiliza de la pérdida de los datos almacenados como
consecuencia de una instalación o uso incorrectos, o debido al uso inadecuado o negligente del equipo.
Como el equipo integra componentes electrónicos de precisión, proteja el equipo contra los golpes para
garantizar una grabación correcta de las imágenes.
PRIVACIDAD Y COPYRIGHT
Los grabadores de vídeo digital 1093/004H, 1093/008H, 1093/016H, 1093/018H y 1093/019H son equipos para
sistemas CCTV. La grabación de imágenes está sujeta a la legislación vigente en cada país. No se permite
grabar imágenes que estén protegidas por derechos de autor.
Los usuarios del producto son responsables de conocer y cumplir todas las normas y reglamentos locales
relativos a la vigilancia y grabación de señales de vídeo. El fabricante no se hace responsable del uso de este
producto no conforme con la legislación vigente.
DS1093-100
66
2
2.1
2.1.1
DESCRIPCIÓN DE LOS COMPONENTE
PANEL FRONTAL
PANEL FRONTAL DE LOS DVR 1093/004H-008H-016H
4
20
N.º
5
6
9
8
1
Indicador
encendido
de
2
Receptor
infrarrojos
de
3
Indicador de disco
duro
4
Buscar
vídeo
5
Desactivar el audio
archivo
11
10
Rótulo o indicador
de
7
13
14
15 16 17
19
12
2
18
1
3
Símbolo
Función y descripción
PWR
Si el indicador se ilumina en color verde, el sistema se ha
encendido correctamente
Recibe la señal de IR del mando a distancia
HDD
SEARCH
MUTE
Cuando parpadea en color rojo, indica que se está leyendo o
grabando en el disco duro
Buscar archivo de vídeo
Desactivar el audio
CH- CH+
CH CH+
Botón de selección de canal
7
TODOS
ALL
Monitorar con la pantalla dividida en 4, 9 o 16
8
REPRODUCIR
9
PAUSA
10
Cuadro a cuadro
11
DETENER
Detener la reproducción o detener manualmente la grabación
12
GRABAR
●
Pulsar el botón para iniciar manualmente la grabación
13
PTZ
14
MENÚ
15
Botones izquierdo y
rebobinado rápido
Entrar en el menú principal, salir o detener la reproducción,
desplazarse a la izquierda, rebobinado rápido, disminuir la velocidad
de giro PTZ y los valores de la configuración / Seleccionar Monitor
BNC y HDMI o VGA.
16
Botón Arriba
Desplazarse hacia arriba
17
Botones derecho y
avance rápido
Seleccionar o editar, botón derecho, botón de avance rápido,
18
Botón Abajo
Desplazarse hacia abajo
19
ENTER
Seleccionar o editar
20
Puerto USB
Conectar al puerto USB 2.0
6
DS1093-100
Selector de canales:
Entrar en el menú emergente; reproducir una grabación
Pausa y reproducción manual cuadro a cuadro
Reproducción cuadro a cuadro
PTZ
MENU/ESC
Permite entrar en modo PTZ
Entrar en el menú principal, salir o detener la reproducción
aumentar la velocidad de giro PTZ y los valores de la configuración
67
2.1.2
PANEL FRONTAL DE LOS DVR 1093/018H-019H
11
12
17
N.º
Tipo
1
13
14
9 10 6
15
Rótulo o
indicador
Símbolo
Indicador de
disco duro
HDD
Indicador de
encendido
PWR
Menú
MENU/ESC
Indicador
2
3
4
5
Receptor de
infrarrojos
Botón
especial
ARRIBA
7
DERECHA
/
ABAJO
9
IZQUIERDA
/
10
ENTER
Botón de
dirección
5
4
11
Reproducir
Reproducir/Pausa
12
13
14
15
16
17
DS1093-100
Canal individual
y botones
numéricos
Control de la
reproducción
Detener
Grabación
manual
Visualización
múltiple
Puerto USB
7
3
Función
Cuando parpadea en color rojo, indica
que se está leyendo o grabando en el
disco duro
Si el indicador se ilumina en color verde,
el
sistema
se
ha
encendido
correctamente
Recibe la señal de IR del mando a
distancia
Entrar o salir del menú principal
PTZ
Desplazarse hacia arriba
Desplazarse hacia la derecha/Avance
rápido
Desplazarse hacia abajo
Desplazarse
hacia
la
izquierda/Rebobinado rápido
Entrar en el control PTZ, seleccionar o
editar
4.
Selección de
canales y
entrada
numérica
8
Activa o desactiva la entrada de audio
Silenciar
6
8
16
2
Botones
numéricos 0 a
9 y botones
CH1 a CH9
●
Los números 1 a 9 son los números
1 a 9 así como los canales 1 a 9.
5. Selección de los canales CH11 a
CH16: pulsar el botón 1 y después
otro botón numérico. Por ejemplo,
para el canal CH16 seleccione
primero el 1 y liego pulse el 6.
6. Mantener pulsado el botón 0 durante
3 segundos
para
cambiar
el
dispositivo de salida actual.
Pasa a reproducción
Pasa a reproducción/pausa
Detener la reproducción y detener
manualmente la grabación
Pulsar el botón para iniciar manualmente
la grabación
Visualización de 4, 9 o 16 imágenes
Conectar al puerto USB 2.0
68
1
2.2
2.2.1
PANEL POSTERIOR
PANEL POSTERIOR DE LOS DVR 1093/004H-008H-016H
2
1
7
4
3
6
2
1
8
11
3
6
4
N.º
10
11
5
9
10
7
3
12
8
2
1
5
7
4
9
6
12
8
11
5
9
10
12
Conector
Método de conexión
1
Entrada de vídeo
Conexión de entrada desde el equipo de vídeo: canales 1
a 4 (DVR 1093/004H), o canales 1 a 8 (DVR 1093/008H),
o canales 1 a 16 (DVR 1093/016H) (conectores BNC)
2
Salida de vídeo
Conexión de la salida de monitor (conector BNC)
3
Entrada de audio
Entrada de audio de 4 canales (conector RCA)
4
Salida de audio
Salida de audio (conector RCA)
5
Puerto USB
Conexión de un ratón USB
6
Puerto HDMI
Conexión de un monitor HDMI
7
Puerto VGA
Conexión de un monitor VGA, como un monitor de PC
8
Regleta de terminales
RS-485/Alarmas de sensores
Conector para RS-485/Sensor/Alarma (ver pineado más
adelante)
9
IR-EXT
Para mando a distancia de infrarrojos (uso futuro)
10
Toma de alimentación eléctrica
Conexión de la alimentación eléctrica 12 VDC, 2 A
11
Puerto Ethernet
Conexión LAN, Ethernet (conector RJ45)
12
Interruptor de encendido
Encendido y apagado del equipo
DS1093-100
69
2.2.2
PANEL POSTERIOR DEL DVR 1093/018H
2
4
N.º
1
5
8
7
3
9
12
6
10
11
13
Conector
Método de conexión
1
Entrada de vídeo
Conexión de la entrada de vídeo, canales 1 a 8 (conector BNC)
2
Salida de vídeo
Conexión de la salida de monitor (conector BNC)
3
Entrada de audio
Conexión de la entrada de audio, canales 1 a 4 (conector RCA)
4
Entrada de audio
Conexión de la entrada de audio, canales 5 a 8 (conector RCA)
5
Salida de audio
Salida de audio (conector RCA)
6
Puerto USB
Conexión de un ratón USB
7
Puerto HDMI
Conexión de un monitor HDMI
8
Puerto VGA
Conexión de un monitor VGA, como un monitor de PC
9
Regleta de terminales
RS-485/Alarmas de sensores
Conector para RS-485/Sensor/Alarma (ver pineado más adelante)
10
IR-EXT
Para mando a distancia de infrarrojos (uso futuro)
11
12
Toma de alimentación eléctrica
Puerto Ethernet
Conexión de la alimentación eléctrica 12 VDC, 5A
Conexión LAN, Ethernet (conector RJ45)
13
Interruptor de encendido
Encendido y apagado del equipo
DS1093-100
70
2.2.3
PANEL POSTERIOR DEL DVR 1093/019H
N.º
2.2.4
Conector
Método de conexión
1
Entrada de vídeo
Conexión de la entrada de vídeo, canales 1 a 16 (conector BNC)
2
Salida de vídeo
3
Entrada de audio
(arriba) Salida principal de vídeo; (abajo) Salida Spot
(conector BNC)
Conexión de la entrada de audio, canales 1 a 4 (conector BNC)
4
Salida de audio
5
Entrada de audio
Conexión de la salida de audio: salida spot y principal de audio
(conector BNC)
Conexión de la entrada de audio (canales 5 a 16)
6
Puerto Ethernet
Conexión LAN, Ethernet (conector RJ45)
7
Interruptor de encendido
Encendido y apagado del equipo
8
HDMI
Salida HDMI
9
Puerto VGA
Conexión de un monitor VGA, como un monitor de PC
10
Puerto USB
Conexión de un ratón USB
11
Puerto RS-485/Sensor/Alarma
Conector para RS-485/Sensor/Alarma (ver pineado más adelante)
12
Toma de alimentación eléctrica
Conexión de la alimentación eléctrica 12 VDC, 5 A
PUERTO RS-485/SENSOR/ALARMA
Entrada de alarma: Conecte la señal [-] del sensor al terminal G (GND), y la señal [+] a la entrada apropiada del
dispositivo de alarma.
Salida de alarma: Conecte los dos terminales marcados con “OUT”
Puerto PTZ: Conecte la cámara a RS-485A o RS485B.
DS1093-100
71
2.3
MANDO A DISTANCIA
N.º
1
2
Botón
1-8
3
4
5
6
7
ALL
Menu
▲
▼
9/0
◄/
8
SEL
9
10
11
12
13
14
15
16
DS1093-100
●
■
Audio
Mute
72
Función del botón
Seleccionar canales 1 a 8; botones numéricos
Botones numéricos. Pulsar “0” para cambiar el
menú de salida de monitor
Modo de visualización múltiple
Entrar o salir del menú principal
Botón ARRIBA, ajuste de volumen
Botón ABAJO, ajuste de volumen
Botones Izquierdo/Derecho.
Incrementar/disminuir un valor de la barra de
control
Botón Seleccionar/Editar.
Permite confirmar la operación seleccionada.
Botón Rebobinado rápido
Entrar en el menú de búsqueda de grabaciones.
Botón de reproducción
Botón Avance rápido
Botón de grabación
Botón de pausa/secuencia
Detener la grabación manual o la reproducción
Test de sonido
Activar o desactivar el silencio de sonido
2.4
MANDO A DISTANCIA DEL DVR 1093/019H
Botón
REC
SEARCH
2×2
3×3
4×4
AUTO
0-9
DISPLAY
MODE
▲
▼
◄/
ENTER
MENU/ESC
PIP
MUTE
FWD
REW
PLAY
STOP
PAUSE/
FRAME
SLOW
Z+
ZF+
FI+
IPTZ
LOCK
DS1093-100
73
Función del botón
Pulsar el botón para iniciar manualmente la
grabación.
Pulsar el botón para entrar en el menú de
búsqueda de grabaciones.
Visualización de 4 imágenes en pantalla
Visualización de 9 imágenes en pantalla
Visualización de 16 imágenes en pantalla
Visualización temporizada en pantalla
Selección de canales y entrada numérica
Visualización de varios canales (4, 9, 16 imágenes
y pantalla completa)
Botón ARRIBA
Botón ABAJO
Botones izquierdo/derecho. También incrementan o
disminuyen un valor de la barra de control.
Seleccionar o editar
Entrar/Salir del menú principal
Modo de visualización PIP
Botón para desactivar el sonido
Avance rápido (x2, x4, x8)
Rebobinado rápido (x2, x4, x8)
Entra en el modo de búsqueda de grabaciones,
reproduce eventos grabados
Detiene la reproducción, reproducción manual
Pausa y reproducción manual cuadro a cuadro
Reproducción lenta (1/2, 1/4, 1/8)
Aumenta el zoom de la imagen
Disminuye el zoom de la imagen
Ajusta el enfoque
Ajusta el enfoque
Abre el iris vía PTZ
Cierra el iris vía PTZ
Permite establecer el bit de preset y el control PTZ.
Permite bloquear el sistema
2.5
FUNCIONAMIENTO CON EL RATÓN
Además de los botones del panel frontal o del mando a distancia, también puede emplear el ratón para realizar
operaciones del sistema.
TIPO
Clic con el botón
izquierdo del ratón
Función
En el modo bloqueado, permite acceder al menú emergente y seleccionar cualquiera
de los submenús para abrir el menú de Inicio de sesión. En el modo desbloqueado,
permite acceder al menú emergente y pulsar el botón izquierdo para entrar
directamente en cualquiera de los submenús.
Tras acceder al menú principal, permite acceder a cualquier submenú; permite
reproducir una grabación y mostrar la información correspondiente en el menú
Búsqueda de vídeo, función [Lista de archivos].
Permite cambiar el estado de las casillas de verificación o de las áreas de detección
de movimiento.
Haga clic en los cuadros combinados para que se abra la lista correspondiente. Haga
clic con el botón izquierdo del ratón para cerrar la visualización temporizada en
pantalla si está activa.
Permite ajustar los controles de color y de volumen.
Haga clic en los cuadros combinados para que se abra la lista correspondiente.
Permite seleccionar los valores programados e insertar palabras, símbolos especiales,
números y caracteres. También puede reemplazar el uso de [INTRO
] o [RETROCESO
].
Clic con el botón
derecho del ratón
Doble clic con el
botón izquierdo del
ratón
Movimiento
del
ratón
Arrastre del ratón
DS1093-100
Permite visualizar el menú emergente en el modo de reproducción en tiempo real.
Permite salir del menú principal o del submenú.
Permite maximizar la pantalla en modo de reproducción en tiempo real.
Permite seleccionar una opción de menú.
En el modo movimiento permite seleccionar el área de movimiento. En el menú
[Configuración de color] permite ajustar los controles de color y de volumen.
74
3
INSTALACIÓN BÁSICA DEL EQUIPO
Para instalar el equipo rápidamente, siga el siguiente procedimiento:
Conecte las cámaras analógicas a los canales de entrada BNC.
Conecte el ratón al puerto USB.
Conecte la salida HDMI/ VGA al monitor correspondiente y/o conecte la salida BNC “Video Out” al monitor
correspondiente para visualizar las cámaras analógicas conectadas.
Si es necesario, conecte el cable de red al puerto LAN.
Para encender el equipo, conecte la toma eléctrica y, si es necesario, sitúe el conmutador en la posición 1.
NOTA
Para más información, consulte el manual de instrucciones incluido en el CD suministrado con el producto.
4
CONFIGURACIÓN BÁSICA
4.1
SELECCIÓN DEL MONITOR
Esta función permite controlar el menú OSD, cambiando entre la salida de vídeo BNC y la HDMI/VGA.
Es posible hacer esa conmutación desde el panel frontal:
Mantener pulsada “” REWIND para los grabadores Ref. 1093/004H, Ref. 1093/008H y Ref. 1093/016H.
Cuando suene un aviso sonoro deje de pulsar.
Mantener pulsado “0” (Botón numérico del panel frontal) para los grabadores Ref. 1093/018H y Ref.
1093/019H. Cuando suene un aviso sonoro deje de pulsar.
También es posible conmutar el menú en la salida de vídeo utilizando el mando a distancia suministrado (Seleccionar
pulsado 0), o bien con el ratón pulsando
muestra en pantalla).
en el menú emergente (último icono del menú emergente que se
Espere hasta que el puntero del ratón se muestre en pantalla.
4.2
CONFIGURACIÓN DE IDIOMA Y FECHA/HORA
Para configurar el idioma y la fecha y hora, siga el siguiente procedimiento:
En el DVR, seleccione [Menú principal Sistema] y seleccione el idioma del DVR.
Ajuste la fecha y hora actuales y seleccione los formatos de fecha y hora. Configure también el horario de
verano mediante el botón [Horario de verano].
Guarde los cambios, salga del menú del DVR y reinicie el equipo si es necesario.
DS1093-100
75
4.3
CONTROL DE LA SALIDA DE VÍDEO
En el DVR, seleccione [Menú principal Monitor Salida] para configurar la salida de vídeo.
La opción [Inicio en] incluye las siguientes posibilidades:
•
•
•
HDMI: para abrir el menú de control desde el inicio del DVR en la salida de vídeo HDMI/ VGA.
VOUT: para abrir el menú de control desde el inicio del DVR en la salida de vídeo BNC principal.
AUTO: para abrir automáticamente el menú de control desde el inicio del DVR en la salida de vídeo HDMI/
VGA o BNC, en función de la salida de vídeo conectada y del monitor usado.
NOTA:
Se recomienda seleccionar la salida [HDMI/ VGA] o [VOUT] en función del monitor empleado.
Se recomienda la opción [AUTO] si hay conectados un monitor HDMI/ VGA y otro con BNC y el usuario desea
poder cambiar el menú de control a una salida de vídeo.
Para guardar los cambios, seleccione el botón [APLICAR], salga del menú y reinicie el equipo para que los
cambios surtan efecto.
4.4
PARÁMETROS DE GRABACIÓN
Seleccione [Menú principal Grabar] para entrar en el menú [Grabar]. Las posibles funciones son las siguientes:
7.
8.
9.
El menú [Horario] permite seleccionar las opciones de grabación: 24 horas o Normal, grabación por detección
de movimiento, o disparo de alarma. Se pueden personalizar los horarios. También es posible programar las
opciones de grabación Normal y Alarma con el mismo horario.
El parámetro [Tiempo de empaquear] del menú [Parámetros de grabación] define la máxima longitud de las
grabaciones (15 min., 30 min., 45 min., 60 min.).
Cuando haya terminado de configurar valores en el menú Grabar, guarde los cambios realizados y compruebe
que, después de salir del menú del equipo, se muestra el icono “R” en cada canal en modo En directo. Este
icono indica que el equipo está grabando de acuerdo a la configuración actual.
DS1093-100
76
5
CONFIGURACIÓN AVANZADA
5.1
CONFIGURACIÓN DEL DISCO DURO (HDD)
Seleccione [Menú principal Equipo], configure el disco duro de acuerdo con sus necesidades y compruebe las
siguientes opciones:
SOBRESCRIBIR: Si selecciona la opción “AUTO”, el sistema sobrescribirá automáticamente las grabaciones
más antiguas cuando se llena el disco duro; de esta manera, podrá establecerse el número de días que las
grabaciones se guardarán en el disco duro. Si selecciona “OFF”, se dejará de grabar en cuanto se llene el
disco duro.
También se puede establecer el número de días que se guardarán las grabaciones en el disco duro.
Seleccione un valor entre los posibles que se le presentan.
FORMAT HDD: Con este botón podrá formatear el disco duro: tenga en cuenta que las grabaciones no podrán
guardarse en el disco duro a menos que esté formateado. Seleccione el botón [Format HDD] para iniciar el
formateo; el sistema le mostrará el siguiente mensaje: “Todos los datos serán eliminados. ¿Continuar?”.
Cuando pulse “CONFIRMAR” verá los mensajes: “Formateando…” y, finalmente, “Formateo completo”, antes
de que el sistema se reinicie automáticamente. Si el equipo no funciona la primera vez que se instala, pruebe
con formatear el disco duro.
ESPACIO DISPONIBLE: Es el espacio disponible en el disco duro.
ESPACIO TOTAL: Es el espacio total del disco duro.
TIEMPO: En función de la calidad de vídeo y del frame rate, el sistema da una estimación del tiempo de
grabación restante.
5.2
VERSIÓN DE FIRMWARE Y CARGA POR DEFECTO
Seleccione [Menú principal Sistema Info] para consultar la versión de firmware del DVR. Si la versión de firmware
es antigua, puede actualizar el software del sistema del equipo (firmware). Siga el siguiente procedimiento:
Conecte una llave USB al PC y copie la carpeta “dvrupgrade” en la llave.
Conecte la llave USB al puerto USB (del frontal o de la trasera) del DVR.
En el DVR, seleccione [Menú principal Avanzado] y luego [Actualizar].
Espere a que termine la actualización de firmware y a que se reinicie el equipo.
En el DVR, seleccione [Menú principal Avanzado] y luego [Carga por defecto]. En la pantalla que aparece
ahora, seleccione todas las opciones y haga clic en [Aplicar] para que el equipo vuelva a la configuración de
fábrica.
Salga del menú OSD y, si es necesario, espere a que el equipo se reinicie.
NOTA:
Es altamente recomendable hacer una copia de las imágenes del disco antes de proceder a actualizar el
firmware del mismo. Después de la actualización, los ficheros se reproducirán utilizando el Player
correspondiente a la versión de firmware anterior.
Una vez cargada la configuración de fábrica vuelva a realizar la configuración básica (como la salida de
vídeo, idioma, fecha y hora y los parámetros de grabación).
DS1093-100
77
5.3
CONFIGURACIÓN DE RED
Seleccione [Menú principalRed] para configurar los parámetros de red. Para configurar el equipo dentro de una red
local, siga el siguiente procedimiento:
Seleccione el tipo de red [Manual], [DHCP] o [PPPoE].
Para el tipo [Manual], asigne una dirección al equipo y compruebe que ha asignado un [Puerto Mobile] como el
18600, [Puerto cliente], como el 9000, y un [Puerto Http], como el 80. Consulte la figura siguiente.
Para el tipo [DHCP], puede configurar el [Puerto cliente] y el [Puerto Http] igual que antes y la red asignará
automáticamente una dirección IP dinámica que puede cambiar aleatoriamente.
Haga clic en el botón [Aplicar] para guardar los cambios y salir del menú OSD del DVR.
Reinicie el equipo, si así se le solicita, y espere a que termine esta operación.
NOTA:
Para más información sobre el menú de configuración de red, y el menú de configuración de móvil e internet,
consulte los apartados correspondientes del manual de usuario en el CD suministrado con el producto.
5.4
INICIO DE SESIÓN DEL EQUIPO EN LA INTERFAZ WEB
Las siguientes instrucciones describen cómo acceder y configurar la web del equipo a través de la red LAN mediante
Internet Explorer:
o
o
DS1093-100
Inicie Internet Explorer y escriba en la barra de direcciones la dirección IP del DVR y el puerto del
DVR, por ejemplo: http://DirecciónIP:PuertoHTTP. Si el puerto HTTP del DVR es 80, escriba
únicamente la dirección IP del DVR: http://DirecciónIP
Si es necesario instalar un componente ActiveX, siga el siguiente procedimiento:
Haga doble clic en el icono
para abrir el navegador Internet Explorer.
Se mostrará la siguiente pantalla (o la página por defecto):
En la barra de menús de Internet Explorer seleccione “Herramientas→
→ Opciones de
Internet”
78
Se mostrará la pantalla “Propiedades de Seguridad Internet”. Seleccione “Seguridad”.
DS1093-100
Seleccione “Sitios de confianza”.
Haga clic en “Nivel personalizado” y compruebe que el nivel de protección sea “Bajo”. Si el
nivel de protección no está definido, seleccione Bajo y haga clic en “Restablecer”.
Seleccione “Aceptar” para confirmar.
Haga clic en “Sitios”.
Aparecerá la siguiente pantalla. Añada la dirección IP del equipo (por ejemplo:
http://192.168.36.40) en el cuadro de texto “Agregar este sitio web a la zona”.
Haga clic en el botón “Agregar”.
79
NOTA
No active la casilla “Requerir comprobación del servidor (https:) para todos los sitios de esta
zona”.
o
o
o
DS1093-100
Pulse el botón “Cerrar” para cerrar la ventana
Para confirmar los cambios realizados, haga clic en “Aplicar” y luego en “Aceptar”.
Cierre la aplicación de Internet Explorer.
Inicie Internet Explorer y escriba en la barra de direcciones la dirección IP y el puerto HTTP del
DVR, por ejemplo: http://DirecciónIP:PuertoWeb/.
Después de instalar el control ActiveX, se mostrará la siguiente pantalla; escriba el nombre de
usuario, la contraseña, el puerto cliente, seleccione el idioma y el tipo de stream. Cuando acceda
por primera vez, escriba admin como nombre de usuario y deje la contraseña vacía. Este primer
acceso será válido siempre que se hayan mantenido los parámetros por defecto y que la
contraseña esté desactivada en el menú Usuarios del DVR. En caso contrario, si la contraseña
está activada, escriba la contraseña de administrador y/o usuario.
Cuando haya configurado estos parámetros (nombre de usuario, contraseña, puerto cliente,
idioma, tipo de stream), pulse el botón [Login] para entrar en la interfaz web del equipo.
80
5.5
IUVS SOFTWARE MOBILE
URMET iUVS es una aplicación CCTV para móviles desarrollada para el sistema operativo iPhone y Android. Es compatible
con los DVR URMET H.264 Evolution 2.0 Series y New Dynamic & Video Smart Series con la versión de firmware V3.1 o
superior.
Características
Principales características de la aplicación:
•
•
•
•
•
•
Audio y vídeo en streaming de hasta 4 canales
Reproducción y búsquedas remotas
Reproducción local
Funciones PTZ
Capturas de imágenes fijas y de vídeo
Admite varios dispositivos
Inicio
•
•
•
Descargue e instale la app iUVS desde el Apple Store o Play Store de Android.
Conecte su dispositivo a internet por 3G o Wi-Fi.
Lance la aplicación y aparecerá el menú principal de iUVS.
Añadir o quitar dispositivos
El administrador de dispositivos (Device manager) le permite añadir, quitar dispositivos, y también modificar las propiedades de
un dispositivo. Seleccione "Device Manager" del menú principal para abrir esta ventana:
Para añadir un nuevo dispositivo, pulse el botón "Add" de la esquina superior derecha. Ahora podrá introducir el nombre del
dispositivo, la dirección (IP o nombre de dominio), el puerto, el nombre de usuario y la contraseña, etc. Desde el dispositivo
puede recuperarse la propiedad Channels.
NOTA: Es necesario establecer el puerto de datos (p.e., 9000) para que el software iUVS funcione correctamente. Si el
usuario establece el puerto móvil, es posible que el software iUVS no funcione.
DS1093-100
81
Para quitar un dispositivo de la lista, seleccione el nombre del dispositivo que desea quitar y pulse el botón correspondiente
para eliminarlo.
Monitor de vídeo en directo (Live monitor)
Pulse "Live Monitor" en el menú principal para ir a la pantalla de vídeo en directo, en la que podrá ver el vídeo, grabar, hacer
capturas, mover la cámara, etc.
1. Abrir un dispositivo
Pulse
para abrir la lista de dispositivos, como se muestra en la figura siguiente. Al seleccionar un dispositivo, se abrirán
todos sus canales automáticamente.
2. Abrir un canal
Pulse el botón de aspa en la ventana para entrar en la ventana de lista de canales; a continuación, seleccione un canal para
abrirlo en la ventana anterior.
NOTAS:
Con respecto a los detalles de instalación en dispositivos móviles basados en plataformas Windows o Blackberry, siga
las instrucciones correspondientes que se encuentran en las secciones respectivas disponibles en el CD que se
suministra con el equipo.
Para más detalles sobre el software Mobile iUVS, consulte las secciones correspondientes en el manual del usuario,
disponibles en el CD que se suministra con el equipo.
DS1093-100
82
DS1093-100
83
DS1093-100
URMET S.p.A.
10154 TORINO (ITALY)
VIA BOLOGNA 188/C
Telef.
DS1093-100+39 011.24.00.000 (RIC.AUT.)
Fax
+39 011.24.00.300 - 323
84
Area tecnica
servizio clienti +39 011.23.39.810
http://www.urmet.com
e-mail: [email protected]
MADE IN CINA