1
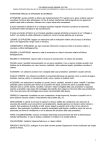
GSM-SERIES LOUDSPEAKERS
GSM-1260 • GSM-1585 • GSM-3250
GSM-1260
12” Loudspeaker, 100W RMS, 400W peak power
Serial Number
1
2
3
Note: 1260, 1585, and 3250 have similiar back panels.
Nota: 1260, 1585 y 3250 tienen paneles traseros similares.
Note: 1260, 1585 et 3250 disposent d’une face arrière identique.
Wichtig: 1260, 1585 und 3250 haben identische Rückseiten.
DESIGNED AND ENGINEERED IN USA BY GEMINI,
A DIVISION OF GCI TECHNOLOGIES, MANUFACTURED IN CHINA
Specifications
GSM-1260
GSM-1585
GSM-3250
Frequency Response
Respuesta Frecuencia | Bande passante | Frequenzgang
50Hz ~ 20kHz
40Hz ~ 20kHz
35Hz ~ 20kHz
16.02 x 11.93 x 23.35 in
18.86x 13.90x 28.46 in
18.86x 13.9x 43.43 in
(407x 303x 593 mm)
(479x 353x 723 mm)
(479x 353x 1103 mm)
Net Weight
Peso Neto | Poids net | Gewicht
24 lbs. (10.9 kg)
38.7 lbs. (17.6 kg)
56.1 lbs. (25.5 kg)
Piezo Horn
Trompeta Piezo | Moteur à pavillon | Piezohorn
10” x 4” horn, (3) 3” Piezo
15” x 5” horn, (4) 3” Piezo
15” x 5” horn, (4) 3” Piezo
Low Frequency Driver
Altavoz de graves | Haut-parleur Basses | Bass-Chassis
12“
15”
(2)15”
Input
Entrada | Entrée | Eingang
Terminal Cup & (2) 1/4”
Terminal Cup & (2) 1/4”
Terminal Cup & (2) 1/4”
Impedance
Impedancia | Impedance | Impedanz
8Ω
8Ω
4Ω
Peak Power
Potencia de pico | Peak | Peak
400W
700W
1200W
RMS
RMS | RMS | RMS
100W
175W
300W
Dimensions
Dimensiones | Dimensions | Abmessungen
INTRODUCTION:
Congratulations on your purchase of a GSM-SERIES speaker, engineered & manufactured by
Gemini Sound Products. This state of the art speaker is backed up by a one-year warranty.
CAUTIONS:
1. Read all operating instructions before using this equipment.
2. To reduce the risk of electrical shock, do not open the unit. There are NO USER REPLACEABLE
PARTS INSIDE. Please refer servicing to a qualified Gemini Sound Products service technician.
3. Do not expose this unit to direct sunlight or to a heat source such as a radiator or stove.
4. This unit should be cleaned only with a damp cloth. Avoid solvents or other cleaning detergents.
5. When moving this equipment, it should be placed in its original carton and packaging. This will
reduce the risk of damage during transit.
6. DO NOT EXPOSE THIS UNIT TO RAIN OR MOISTURE.
7. DO NOT USE ANY SPRAY CLEANER OR LUBRICANT ON ANY CONTROLS OR SWITCHES.
CONNECTIONS:
PLEASE NOTE IT IS VERY IMPORTANT THAT YOUR AMPLIFIER HAS MATCHED POWER RATINGS!
Make sure your equipment is completely OFF. Lower ALL VOLUME, LEVEL, & GAIN controls before
connecting the speaker.
1. Use a 1/4” SPEAKER CABLE from your AMPLIFIER LINE OUTPUT to connect to your speaker’s
1/4” INPUT JACK (1).
2. Another way to connect your AMPLIFIER to your speaker is through the TERMINAL CUP (3).
Use the PUSH-BUTTON CONNECTORS to connect the POSITIVE (+) and NEGATIVE (-) ends of a
standard SPEAKER WIRE with a 12-GAUGE minimum thickness from your AMPLIFIER LINE OUTPUT to your speaker’s TERMINAL CUP (3).
3. You can also use the 1/4” AUXILIARY OUTPUT JACK (2) to CHAINLINK an additional speaker
using a 1/4” SPEAKER CABLE.
OPERATION:
The speakers can be used in pairs for a NORMAL setup, or in groups of four when CHAIN-LINKED
together.
NORMAL SETUP:
1. Now turn on your MIXER or other signal source.
2. Then turn on your AMPLIFIER and increase the VOLUME or GAIN control as recommended by
the AMPLIFIER’s manual.
3. Start playing from your TURNTABLE, CD PLAYER, MIC, etc. and adjust the volume controls from
your mixer to a reasonable level.
CHAIN-LINK:
Only 1 additional speaker can be added to each speaker in a CHAINLINK setup. Connect your
speakers first then follow the steps for a NORMAL setup, your AMPLIFIER should compensate for
the extra speakers.
INTRODUCCIÓN:
Felicitaciones en su compra de un sistema del altavoz de la GSM-SERIE, dirigido y fabricado por
los Productos de Gemini Sound. Este altavoz avanzado es sostenido por una garantía de tres
años.
PRECAUIONES:
1. Deberán leerse todas las instrucciones de operación antes de usar el equipo.
2. Para reducir el riesgo de shock eléctrico, no abra esta unidad. No contiene PIEZAS REEMPLAZABLES POR EL USUARIO. Por favor, refiera el servicio a un técnico de servicio calificado.
No devuelva el aparato a la tienda donde lo compró.
3. No exponga la unidad a la luz solar directa ni a una fuente de calor, por ejemplo, un radiador o
estufa.
4. Esta unidad sólo deberá limpiarse con un paño húmedo. Evite el uso de disolventes u otros
detergentes de limpieza.
5. Para mover este equipo, colóquelo en la caja y empaque original, a fin de reducir el riesgo de
daños durante el transporte.
6. NO DEJE ESTA UNIDAD EXPUESTA A LLUVIA O HUMEDAD.
7. NO USE LIMPIADORES DE ROCÍO O LUBRICANTES EN CUALESQUIER CONTROLES O
INTERRUPTORES.
CONEXIONES:
¡NOTA ES POR FAVOR MUY IMPORTANTE QUE SU AMPLIFICADOR HA EMPAREJADO GRADOS
DE ENERGÍA!
Se cerciora de su equipo está totalmente APAGADO y también más bajo TODO el VOLUMEN,
NIVEL, y CONTROLES del AUMENTO y antes de conectar el altavoz.
1. Utilice un 1/4” SPEAKER CABLE de su línea del AMPLIFIER LINE OUTPUT para conectar con
su 1/4” INPUT JACK (1) de los altavoces .
2. Otra manera de conectar su AMPLIFICADOR con su altavoz es la TERMINAL CUP. Utilice los
PUSH-BUTTON CONNECTORS para conectar el POSITIVO (+) y los extremos NEGATIVOS (-) de
un SPEAKER WIRE con un grueso mínimo 12-GAUGE de su línea del AMPLIFIER LINE OUTPUT a
su TERMINAL CUP (3) de los altavoces.
3. Usted puede también utilizar el CADENA-ACOPLAMIENTO adicional del 1/4” AUXILIARY OUTPUT JACK (2) un altavoz adicional usando un 1/4” SPEAKER CABLE.
INSTRUCCIONES DE FUNCIONAMIENTO:
Los altavoces se pueden utilizar en los pares para una disposición NORMAL, o en grupos de cuatro cuando CADENA-ESTA’N ligados juntos.
DISPOSICIÓN NORMAL:
1. Ahora dé vuelta encendido al su MEZCLADOR o a la otra fuente de la señal.
2. Entonces gire su AMPLIFICADOR y aumente el VOLUMEN o GANE el control según lo recomendado por el manual del dueño de los AMPLIFICADORES.
3. Comience a jugar de su PLACA GIRATORIA, LECTOR DE CD, MIC, ETC. y ajuste los controles
de volumen de su mezclador a un nivel razonable.
CADENA-ACOPLAMIENTO:
Solamente 1 altavoz adicional se puede agregar a cada altavoz en una disposición del ACOPLAMIENTO de CADENA. Conecte sus altavoces primero entonces siguen los pasos para una
disposición NORMAL, su AMPLIFICADOR debe compensar para los altavoces adicionales.
2 English & Español
INTRODUCTION:
Félicitations sur votre achat d’un du haut-parleur GSM-SÉRIE, machiné et construit par des
Produits de Gemini Sound. Ce haut-parleur du dernier cri est soutenu par une garantie de trois
ans.
EINFÜHRUNG:
Glückwünsche auf Ihrem Erwerb eines GSM-REIHE Lautsprechers, ausgeführt u. durch Gemini
Sound Produkte hergestellt. Dieser Zustand des kunstlautsprechers wurde durch eine einjährige
Garantie unterstützt.
AVERTISSEMENTS:
1. On devrait lire toutes les consignes d’exploitation avant d’utiliser ce matériel.
2. Afin de réduire le risque de choc électrique, n’ouvrez pas l’appareil. Il n’y a pas de PIÈCES REMPLAÇABLES À L’INTÉRIEUR. Veuillez soumettre l’entretien/la réparation à un technicien qualifié.
Ne renvoyez pas l’appareil au détaillant.
3. Ne pas exposer cet appareil aux rayons du soleil direct ou à une source de chaleur telle qu’un
radiateur ou un poêle.
4. Cet appareil devrait être nettoyé seulement avec un chiffon humide. Evitez les solvants et autres
détergents de nettoyage.
5. Quand on déplace ce matériel, il devrait être mis dans son carton et son emballage d’origine.
Ceci réduira le risque de dégâts pendant le transport.
6. NE PAS EXPOSER CET APPAREIL À LA PLUIE OU À L’HUMIDITÉ.
7. N’UTILISEZ PAS DE PRODUIT DE NETTOYAGE AVEC VAPORISATEUR OU LUBRIFIANT SUR
AUCUN DES BOUTONS OU DES INTERRUPTEURS.
VORSICHTSMAßNAHMEN:
1. Vor Anwendung dieses Geräts bitte alle Anweisungen sorgfältig durchlesen.
2. Das Gerät nicht öffnen, um das Risiko elektrischen Schocks zu vermeiden. Es enthält KEINE
VOM ANWENDER ERSETZBAREN TEILE. Die Wartung darf nur von befähigten Wartungstechnikern durchgeführt werden. Das Gerät bitte nicht an Ihren Händler zurückschicken.
3. Das Gerät von direktem Sonnenlicht oder einer Wärmequelle wie Heizkörper oder Ofen
aussetzen.
4. Dieses Gerät darf nur mit einem feuchten Tuch gesäubert werden. Keine Lösungs-oder Reinigungsmittel benutzen.
5. Bei Umzügen sollte das Gerät in seinem ursprünglichen Versandkarton und Verpackungsmaterial verpackt werden. Dadurch verhindert man, daß das Gerät während des Transportes beschädigt
wird.
6. DIESES GERÄT NICHT REGEN ODER FEUCHTIGKEIT AUSSETZEN.
7. AN DEN REGLERN ODER SCHALTERN KEIN SPRAYREINIGUNGSMITTEL ODER SCHMIERMITTEL BENUTZEN.
CONNEXIONS:
NOTE IL VEUILLEZ ÊTRE TRÈS IMPORTANT QUE VOTRE AMPLIFICATEUR AIT ASSORTI DES
ESTIMATIONS DE PUISSANCE!
S’assurent votre équipement est complètement au LOIN et également inférieur TOUS les VOLUME,
NIVEAU, et COMMANDES de GAIN et avant de relier le haut-parleur.
1. Employez un 1/4” SPEAKER CABLE de votre AMPLIFIER LINE OUTPUT pour se relier à votre
1/4” INPUT JACK (1) de haut-parleurs.
2. Une autre manière de relier votre AMPLIFICATEUR à votre haut-parleur est la TERMINAL CUP
(3). Utilisez les PUSH-BUTTON CONNECTORS pour relier le POSITIVE (+) et les extrémités NEGATIVE (-) d’un SPEAKER WIRE avec une épaisseur 12-GAUGE minimum de votre AMPLIFIER LINE
OUTPUT dans votre TERMINAL CUP (3) de haut-parleurs.
3. Vous pouvez également employer le CHAÎNE-LIEN additionnel du 1/4” AUXILIARY OUTPUT
JACK (2) un haut-parleur additionnel en utilisant un 1/4” SPEAKER CABLE additionnel.
INSTRUCTIONS D’EXPLOITATION:
Les haut-parleurs peuvent être employés dans les paires pour une installation NORMALE, ou dans
les groupes de quatre une fois CHAÎNE-LIÉS ensemble.
INSTALLATION NORMALE:
1. Tournez maintenant dessus votre MÉLANGEUR ou toute autre source de signal.
2. Mettez alors en marche votre AMPLIFICATEUR et augmentez le VOLUME ou GAGNEZ la commande comme recommandé par le manuel de propriétaire d’AMPLIFICATEURS.
3. Commencez à jouer à partir de votre PLATEAU TOURNE-DISQUES, JOUEUR CD, MIC, ETC. et
ajustez les commandes de volume à partir de votre mélangeur sur un niveau raisonnable.
CHAÎNE-LIEN:
Seulement 1 haut-parleur additionnel peut être ajouté à chaque hautparleur dans une installation
de MAILLON de CHAÎNE. Reliez vos hautparleurs suivent d’abord alors les étapes pour une installation NORMALE, votre AMPLIFICATEUR devrait compenser les haut-parleurs supplémentaires.
ANSCHLÜSSE:
BITTE ANMERKUNG IST ES SEHR WICHTIG, DASS IHR VERSTÄRKER ANSCHLUSSWERTE
ZUSAMMENGEBRACHT HAT!
UÅNberprüfen Ihre Ausrüstung ist vollständig AUS und auch niedriger ALLE VOLUME, LEVEL, &
GAIN und bevor sie den Lautsprecher anschließt.
1. Benutzen Sie einen 1/4” SPEAKER CABLE von Ihrer AMPLIFIER LINE OUTPUT ausgab, um an
Ihre Lautsprecher 1/4” AMPLIFIER INPUT JACK (1) anzuschließen.
2. Eine andere Weise, Ihren VERSTÄRKER an Ihren Lautsprecher anzuschließen ist die TERMINAL
CUP (3). Benutzen Sie die PUSHBUTTON CONNECTORS, um das POSITIVE anzuschließen (+)
und NEGATIVE (-), Enden einer Standard-SPEAKER WIRE mit einer minimalen Stärke 12-GAUGE
von Ihrer AMPLIFIER LINE OUTPUT zu Ihrer Lautsprecher TERMINAL CUP (3) aus.
3. Sie können zusätzliche 1/4” AUXILIARY OUTPUT JACK (2) zur KETTENVERBINDUNG ein zusätzlicher Lautsprecher mit einem zusätzlichen 1/4” SPEAKER CABLE.
BETRIEBSANWEISUNGEN:
Die Lautsprecher können in den Paaren für eine NORMALE Einstellung benutzt werden oder in den
Gruppen von vier, wenn sie zusammen KETTE-VERBUNDEN werden.
NORMALE EINSTELLUNG:
1. Drehen Sie jetzt an Ihren MISCHER oder andere Signalquelle.
2. Schalten Sie dann Ihren VERSTÄRKER ein und erhöhen Sie die AUSGABE oder GEWINNEN Sie
Steuerung, wie durch das VERSTÄRKER-Inhaberhandbuch empfohlen.
3. Fangen Sie an, von Ihrer DREHSCHEIBE, von DIGITALSCHALLPLATTE SPIELER, von MIC, von
ETC. zu spielen und justieren Sie die Lautstärkeregler von Ihrem Mischer auf ein angemessenes
Niveau.
KETTE-VERBINDUNG:
Nur 1 zusätzlicher Lautsprecher kann jedem Lautsprecher in einer KETTENVERBINDUNG Einstellung hinzugefügt werden. Schließen Sie Ihre Lautsprecher zuerst folgen dann den Schritten für eine
NORMALE Einstellung, Ihr VERSTÄRKER sollte die Extralautsprecher entschädigen an.
Français & Deutsch
3
Register your product online at
www.geminidj.com/onlinereg.html
to be eligible for great prize giveaways!
IN THE UNITED KINGDOM
In the event that you need service on your Gemini product under warranty, simply write a letter describing the
problem, along with your contact information. Make sure to enclose a copy of your receipt for proof of warranty information. A return number is not required. You will be responsible for shipping charges to Gemini UK,
and Gemini UK will pay to return the unit to you if it is considered under warranty.
Warranty and Repair:
All Gemini products are designed and manufactured to the highest standards in the industry. With proper care
and maintenance, your product will provide years of reliable service.
Gemini Sound Products
Unit 44
Brambles Enterprise Centre
Waterlooville P07 7TH, UK
Tel: 087 087 00880
Fax: 087 087 00990
EN ESPAÑA
En caso de mal funcionamiento de esta unidad, por favor contacte con el Servicio de Atención al Cliente en
el teléfono 93 436 37 00 que le asesorará sobre el procedimiento correcto para solucionarlo. En caso de ser
necesario enviar la unidad para su reparación, el Servicio de Atención al Cliente le proveerá de un número de
incidencia, así como de la dirección del Servicio de Asistencia Técnica más cercano a su residencia.
LIMITED WARRANTY
A. Gemini guarantees its products to be free from defects in materials and workmanship for One (1) year from
the original purchase date. Exceptions: Laser assemblies on CD Players, cartridges, and crossfaders are covered
for 90 days.
B. This limited warranty does not cover damage or failure caused by abuse, misuse, abnormal use, faulty installation, improper maintenance or any repairs other than those provided by an authorized Gemini Service Center.
C. There are no obligations of liability on the part of Gemini for consequential damages arising out of or in connection with the use or performance of the product or other indirect damages with respect to loss of property,
revenues, of profit, or costs of removal, installation, or reinstallation. All implied warranties for Gemini, including
implied warranties for fitness, are limited in duration to One (1) year from the original date of purchase, unless
otherwise mandated by local statutes.
RETURN/REPAIR
A. In the U.S.A., please call our helpful customer service representatives at (732)346-0061, and they will be
happy to give you a Return Authorization Number (RA#) and the address of an authorized service center closest to you.
B. After receiving an RA#, include a copy of the original sales receipt, with defective product and a description
of the defect. Send by insured freight to: Gemini Sound Products Corp, and use the address provided by your
customer service representative. Your RA# must be written on the outside of the package, or processing will be
delayed indefinitely!
C. Service covered under warranty will be paid for by Gemini and returned to you. For non-warrantied products, Gemini will repair your unit after payment is received. Repair charges do not include return freight. Freight
charges will be added to the repair charges.
D. On warranty service, you pay for shipping to Gemini, we pay for return shipping within the continental United
States. Alaska, Hawaii, Puerto Rico, Canada, Bahamas, and the Virgin Islands will be charged for freight.
E. Please allow 2-4 weeks for return of your product. Under normal circumstances your product will spend no
more than 10 working days at Gemini. We are not responsible for shipping times.
Gemini Sound Products
Worldwide Headquarters
1 Mayfield Ave
Edison, NJ 08837 USA
Tel: (732) 346-0061
Fax: (732) 346-0065
Gemini Sound Products S.A.
Caspe, 172 - 1º A
08013 Barcelona, Spain
Tel: 34 93 436 37 00
Fax: 34 93 347 69 61
EN FRANCE
En cas de panne, merci de contacter votre revendeur. Tout appareil en panne doit y être retourné, accompagné
de sa facture d’achat, de son emballage d’origine et d’un descriptif de panne. L’appareil sera expédié au SAV de
GCI Technologies France. Tout produit reçu sans facture sera réparé hors garantie. L’appareil sera ensuite réexpédié au revendeur.
GCI Technologies s.a.r.L
2bis, rue Léon Blum
91120 Palaiseau, France
Tél: + 33 1 69 79 97 70
Fax: + 33 1 69 79 97 80
IN DEUTSCHLAND
Die allgemeinen gesetzlichen Gewährleistungen bleiben von den Herstellergarantien unberührt. Der Garantieanspruch erlischt bei Eingriffen durch den Käufer oder durch Dritte sowie bei unsachgemässer Behandlung.
Gewährleistungsansprüche sind ausschließlich gegenüber Ihrem Fachhändler geltend zu machen.
GCI Technologies
Lerchenstraße 14
80995 München, Germany
Tel: 089 - 319 019 8 - 0
Fax: 08131 – 39171 – 8
LATIN AMERICA, MEXICO, AND CARIBBEAN
GCI Technologies
8320 NW 68 Street
Miami, FL 33166, USA
Tel: (305) 592-4746 • Fax: (305) 592-4746
© GCI Technologies Corp. 2009 All Rights Reserved.
Registration
4 Product
Registro de Producto • Enregistrement du produit • Produktregistrierung