1
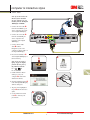
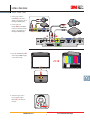
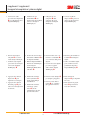
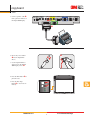
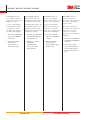
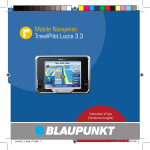
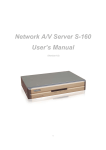
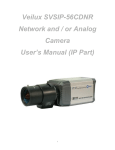
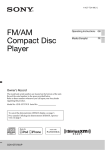
3
Digital Wall Display
Getting Started
quick reference guide
rapide guide
anleitung für den schnellen einstieg
rapido manuale
inicio rápido
computer & remote mouse
souris d’ordinateur et de commande à distance / computer und entfernte maus / computer e mouse remoto / ordenador y ratón remoto
computer & interactive stylus
ordinateur et stylet interactif / computer und interaktiver griffel / computer e stilo interattivo / ordenador y estilo interactivo
video devices
appareils vidéo / videogeräte / dispositivi video / dispositivos de vídeo
copyboard
copyboard / copyboard / lavagna fotocopiatrice / pizarra digital
cd-rom
cd-rom • cd-rom • cd-rom • cd-rom
Please read, understand and
follow all safety information
contained in either the 9000PD
or 9200IC/IW Operator’s Guide
prior to installation and use.
Avant l’installation et l’utilisation, s’il vous plait, veuillez
lire, comprendre et suivre
toutes les informations de sécurité contenues dans le Guide de
l’Utilisateur du 9000PD ou du
9200IC/IW.
Lesen, verstehen und befolgen
Sie bitte alle Sicherheitsinfo
rmationen, die entweder im
Bedienerhandbuch des 9000PD
oder des 9200IC/IW gegeben
werden, bevor Sie das 9000PD
Digital WallDisplay installieren
und anwenden.
Leggere, comprendere e
seguire tutte le informazioni
sulla sicurezza contenute nella
Guida per l’operatore del
9000PD o del 9200IC/IW prima
dell’installazione e dell’utilizzo.
3M™ Digital Wall Display
quick reference guide
Por favor, lea atentamente y siga
toda la información de seguridad
incluida en la Guía del usuario
del 9000PD ó el 9200IC/IW
antes de su instalación y uso.
souris d’ordinateur et de commande à distance / computer und entfernte maus /
computer e mouse remoto / ordenador y ratón remoto
1. Connectez le câble
vidéographique ➊ entre le
port du moniteur VGA de
l’ordinateur et le VGA sur
le Digital WallDisplay.
2. Connectez le câble
USB ➋ du port USB
de l’ordinateur avec la
souris USB sur le Digital
WallDisplay.
3. Connectez le câble PC
audio ➌ de la prise casque
sur l’ordinateur avec le
PC audio sur le Digital
WallDisplay.
4. Appuyez sur le bouton
Marche/Arrêt ➍ sur le
Digital WallDisplay pour
allumer la lampe.
Remarque: Si vous
utilisez un ordinateur
portable, basculez la
fonction d’affichage en
utilisant une des méthodes
suivantes:
Fn +
ou
Fn + LCD/CRT.
5. Sélectionnez la source
d’entrée en appuyant sur
le bouton entrée ➎ dans le
contrôle à distance.
6. Utilisez le contrôle à
distance Diskpad ➏ pour
contrôler le pointeur
de l’ordinateur. Bouton
déclencheur ➐ = cliquer
sur le bouton gauche de
la souris et Souris D ➑ =
cliquer droit
1. Schließen Sie das VGAKabel ➊ am VGA/
Monitor-Anschlusses
des Computers und am
Anschluss „VGA“ des
Digital WallDisplay an.
2. Schließen Sie das USBKabel ➋ am USBAnschluss des Computers
und am Anschluss „USB
Mouse“ des Digital
WallDisplay an.
1. Conecte el cable VGA ➊
del puerto VGA/Monitor
del ordenador al puerto
VGA del dispositivo
Digital WallDisplay.
2. Collegare il cavo USB ➋
dalla porta USB del
computer al mouse USB
del Digital WallDisplay.
2. Conecte el cable USB ➋
del puerto USB del
ordenador al puerto de
ratón USB del dispositivo
Digital WallDisplay.
3. Collegare il cavo PC Audio
➌ dal jack della cuffia
del computer all’uscita
PC Audio del Digital
WallDisplay.
3. Schließen Sie das PCAudio-Kabel ➌ an der
Kopfhörerbuchse des
Computers und am
Anschluss „PC Audio“ des
Digital WallDisplay an.
4. Premere il tasto On/Off ➍
del Digital WallDisplay
per accendere la lampada.
4. Drücken Sie am Digital
WallDisplay auf die
Taste ON/OFF (EIN/
AUS) ➍, um die Lampe
einzuschalten.
Nota: se si usa un
laptop, modificare il
funzionamento del display
con uno dei metodi
seguenti:
Fn +
oppure
Fn + LCD/CRT.
Hinweis: Falls Sie ein
Laptop verwenden,
schalten Sie die
Bildschirmfunktion wie
folgt um:
Fn +
oder
Fn + LCD/CRT.
5. Wählen Sie die
Eingangsquelle, indem Sie
auf der Fernbedienung die
Taste „Input“ (Eingang) ➎
drücken.
6. Verwenden Sie das
FernbedienungsDiskpad ➏, um den
Mauszeiger zu steuern.
Taste “Trigger” ➐ =
Klicken mit der linken
Maustaste; R Mouse ➑ =
Klicken mit der rechten
Maustaste.
1-800-328-1371
1. Collegare il cavo VGA ➊
dalla porta VGA/monitor
del computer all’uscita
VGA del Digital
WallDisplay.
2
3. Conecte el cable PC
Audio ➌ de la clavija para
auriculares del ordenador
a la toma PC Audio
del dispositivo Digital
WallDisplay.
4. Pulse el botón de
encendido/apagado ➍
del dispositivo Digital
WallDisplay para encender
la lámpara.
Nota: si está trabajando
con un ordenador portátil,
active y desactive la
función de la pantalla
utilizando los métodos
siguientes:
Fn +
o
Fn + LCD/CRT.
5. Selezionare il tipo di
input di origine premendo
il tasto Input ➎ del
telecomando.
5. Seleccione la fuente de
entrada pulsando el botón
de entrada ➎ del mando a
distancia.
6. Per controllare il puntatore
del mouse del computer,
usare il Remote Control
Diskpad ➏. Tasto Trigger
➐ = clic con il tasto
sinistro del mouse, R
Mouse ➑ = clic con il
tasto destro del mouse.
6. Utilice la rueda de control
del mando a distancia ➏
para mover el puntero del
ratón del ordenador. Botón
de activación ➐ = botón
izquierdo del ratón y botón
ratón R ➑ = botón derecho
del ratón.
www.3M.com/meetings
computer & remote mouse
9000PD • 9200IW • 9200IC
1. Connect the VGA cable ➊
from the VGA/Monitor
port on the computer to
the VGA on the Digital
WallDisplay.
2. Connect the USB cable ➋
from the USB port on
the computer to the USB
Mouse on the Digital
WallDisplay.
3. Connect the PC Audio
cable ➌ from the
Headphones jack on the
computer to the PC Audio
on the Digital WallDisplay.
➌
���
��
����� �����
➋
➊
�����
� ��� �
�����
� �� �
������� ���
�������
�����
���
������
�����
������
������������
��������
4. Press the On/Off button ➍
on the Digital WallDisplay
to turn on the lamp.
Note: If you are using a
laptop, toggle the display
function by using one of
the following methods:
Fn +
or
Fn + LCD/CRT.
�
5. Select the input source
by pressing the Input
button ➎ on the Remote
Control.
6. Use the Remote Control
Diskpad ➏ to control the
computer mouse pointer.
Trigger button ➐ = left
mouse click, and
R Mouse button ➑ = right
mouse click.
1-800-328-1371
�
�
�
3
�
www.3M.com/meetings
ordinateur et stylet interactif / computer und interaktiver griffel /
computer e stilo interattivo / ordenador y estilo interactivo
Remarque : Si vous
n’avez pas de eBeam sur
votre ordinateur, vous
pouvez l’installer à l’aide
du CD-ROM Digital
WallDisplay 3M.
Hinweis: Wenn eBeam
nicht auf Ihrem Computer
installiert ist, können Sie
es von der 3M Digital
WallDisplay CD-ROM
installieren.
1. Connectez le câble
vidéographique entre le port
du moniteur VGA ➊ de
l’ordinateur et le VGA sur le
Digital WallDisplay.
1. Schließen Sie das VGAKabel ➊ am VGA/MonitorAnschlusses des Computers
und am Anschluss „VGA“ des
Digital WallDisplay an.
2. Connectez le câble séquentiel
➋ entre le port séquentiel/
COM de l’ordinateur et
l’ordinateur sur le Digital
WallDisplay.
2. Schließen Sie das serielle
Kabel ➋ am seriellen/COMAnschluss des Computers und
am Anschluss „Computer“ des
Digital WallDisplay an.
3. Connectez le câble PC audio
➌ de la prise casque sur
l’ordinateur avec le PC audio
sur le Digital WallDisplay.
3. Schließen Sie das PC-AudioKabel ➌ an der Kopfhörerbuchse des Computers und am
Anschluss „PC Audio“ des
Digital WallDisplay an.
4. Appuyez sur le bouton
Marche/Arrêt ➍ sur le
Digital WallDisplay pour
allumer la lampe.
4. Drücken Sie am Digital
WallDisplay auf die Taste
ON/OFF (EIN/AUS) ➍ , um
die Lampe einzuschalten.
Remarque: Si vous utilisez
un ordinateur portable,
basculez la fonction
d’affichage en utilisant une
des méthodes suivantes:
Fn +
ou
Fn + LCD/CRT.
5. Double-cliquez sur l’icône de
Bureau eBeam ➎ pour lancer
le logiciel Tableau blanc.
6. Pour calibrer la boîte de
dialogue ➏, cliquez sur le
bouton Calibrer dans Digital
WallDisplay.
7. Captez chacune des cibles
surlignées ➐ à l’aide du
stylet interactif.
8. Utilisez l’outil d’annotation
eBeam ➑ pour annoter votre
présentation.
Nota: se il computer non
è provvisto di eBeam,
è possible installarlo
dal CD-ROM Digital
WallDisplay 3M.
1. Collegare il cavo VGA ➊
dalla porta VGA/monitor del
computer all’uscita VGA del
Digital WallDisplay.
1. Conecte el cable VGA ➊
del puerto VGA/Monitor
del ordenador al puerto
VGA del dispositivo Digital
WallDisplay.
2. Collegare il cavo seriale ➋
dalla porta seriale/COM del
computer al Computer del
Digital WallDisplay.
2. Conecte el cable serie ➋
del puerto serie/COM del
ordenador al puerto para el
ordenador del dispositivo
Digital WallDisplay.
3. Collegare il cavo PC Audio
➌ dal jack della cuffia
del computer all’uscita
PC Audio del Digital
WallDisplay.
3. Conecte el cable PC Audio ➌
de la clavija para auriculares
del ordenador a la toma PC
Audio del dispositivo Digital
WallDisplay.
4. Premere il tasto On/Off ➍
del Digital WallDisplay per
accendere la lampada.
4. Pulse el botón de encendido/
apagado ➍ del dispositivo
Digital WallDisplay para
encender la lámpara.
Nota: se si usa un
laptop, modificare il
funzionamento del display
con uno dei metodi
seguenti:
Fn +
oppure
Fn + LCD/CRT.
Hinweis: Falls Sie ein Laptop
verwenden, schalten Sie die
Bildschirmfunktion wie folgt
oder
um: Fn +
Fn + LCD/CRT.
Nota: Si su ordenador no
dispone de eBeam, puede
instalarlo desde el CD-ROM
3M Digital WallDisplay.
Nota: si está trabajando
con un ordenador portátil,
active y desactive la función
de la pantalla utilizando los
métodos siguientes:
Fn +
o
Fn + LCD/CRT.
5. Fare doppio clic sull’icona
eBeam ➎ sul desktop
per lanciare il software
Whiteboard.
5. Haga doble clic en el icono
de eBeam ➎ en el escritorio
para iniciar el software de la
pizarra electrónica.
6. Facendo clic sul tasto
Regola del Digital
WallDisplay 3M, si regola la
casella di dialogo ➏ .
6. Haga clic en el botón de
calibración ➏ del cuadro de
diálogo de calibración de 3M
Digital WallDisplay.
7. Tippen Sie jedes der hervorgehobenen Ziele ➐ mit dem
interaktiven Griffel an.
7. Picchiettare ciascuno dei
bersagli evidenziati ➐ con
lo stilo interattivo.
7. Pulse cada uno de los
objetivos ➐ con el estilo
interactivo.
8. Mit dem eBeam-Kommentierungswerkzeug ➑ können Sie
Ihrer Präsentation Kommentare hinzufügen.
8. Usare lo strumento di
annotazione eBeam ➑ per
inserire appunti nella propria
presentazione.
8. Utilice la herramienta de
anotación de eBeam ➑ para
introducir anotaciones en la
presentación.
5. Doppelklicken Sie auf dem
Desktop auf das Symbol
„eBeam“ ➎, um die Whiteboard-Software zu starten.
6. Klicken Sie in Dialogfeld
„3M Digital WallDisplay kalibrieren“ auf die Schaltfläche
„Kalibrieren“ ➏.
1-800-328-1371
4
www.3M.com/meetings
computer & interactive stylus
9200IW • 9200IC
Note: If you do not have the
eBeam software installed
on your computer, you can
install it from the 3M Digital
WallDisplay CD-ROM.
1. Connect the VGA cable ➊
from the VGA/Monitor port
on the computer to the VGA
on the Digital WallDisplay.
2. Connect the serial cable ➋
from the serial/COM port
on the computer to the
Computer on the Digital
WallDisplay.
➌
���
��
����� �����
➊
�����
� ��� �
�
�����
�� �
������� ���
�������
�����
���
������
�����
������
������������
��������
➋
3. Connect the PC Audio
cable ➌ from the
Headphones jack on the
computer to the PC Audio on
the Digital WallDisplay.
4. Press the On/Off button ➍
on the Digital WallDisplay to
turn on the lamp.
�
�
Note: If you are using a
laptop, toggle the display
function by using one of
the following methods:
Fn +
or
Fn + LCD/CRT.
5. Double-Click the eBeam
desktop icon on your
computer ➎ to launch the
whiteboard software.
6. Click the Calibrate button ➏
in the 3M Digital WallDisplay
calibrate dialog box.
7. Tap each of the highlighted
targets ➐ with the interactive
stylus.
8. Use the eBeam annotation
tools ➑ to annotate your
presentation.
�
�
�
�
1-800-328-1371
5
www.3M.com/meetings
appareils vidéo / videogeräte /
dispositivi video / dispositivos de vídeo
1. Connectez le câble
vidéo S ➊ de la sortie
vidéo à l’entrée vidéo S
sur le Digital WallDisplay.
2. Connectez les connecteurs
blanc et rouge du câble
A/V ➋ de la sortie audio
avec l’entrée audio sur le
Digital WallDisplay.
1. Schließen Sie das
S-Video-Kabel ➊ am
Video-Ausgang und am
Anschluss „S-Video In“
am Digital WallDisplay an.
1. Collegare il cavo SVideo ➊ dall’uscita video
all’entrata S-Video del
Digital WallDisplay.
2. Collegare i connettori
rosso e bianco del cavo
A/V ➋ dall’uscita Audio
all’entrata Audio del
Digital WallDisplay.
2. Schließen Sie den roten
und den weißen Stecker
des A/V-Kabels ➋ am
Audio-Ausgang und am
Anschluss „Audio In“ am
Digital WallDisplay an.
1. Conecte el cable
S-Vídeo ➊ de la toma de
salida de vídeo a la toma
de entrada de S-Vídeo
del dispositivo Digital
WallDisplay.
2. Enchufe los conectores
rojo y blanco del cable
A/V ➋ de la salida de
audio a la entrada de audio
del dispositivo Digital
WallDisplay.
3. Appuyez sur le bouton
Marche/Arrêt ➌ sur le
Digital WallDisplay pour
allumer la lampe.
3. Drücken Sie am Digital
WallDisplay auf die
Taste ON/OFF (EIN/
AUS) ➌, um die Lampe
einzuschalten.
3. Premere il tasto On/Off ➌
del Digital WallDisplay
per accendere la lampada.
3. Pulse el botón de
encendido/apagado ➌
del dispositivo Digital
WallDisplay para encender
la lámpara.
4. Sélectionnez la source
d’entrée en appuyant sur
le bouton entrée ➍ dans le
contrôle à distance.
4. Wählen Sie die
Eingangsquelle, indem Sie
auf der Fernbedienung die
Taste „Input“ (Eingang) ➍
drücken.
4. Selezionare il tipo di
input di origine premendo
il tasto Input ➍ del
telecomando.
4. Seleccione la fuente de
entrada pulsando el botón
de entrada ➍ del mando a
distancia.
1-800-328-1371
6
www.3M.com/meetings
video devices
9000PD • 9200IW • 9200IC
1. Connect the S-Video
Cable ➊ from the video
output to the S-Video In on
the Digital WallDisplay.
2. Connect the A/V
Cable’s ➋ Red and White
connectors from the Audio
output to the Audio In on
the Digital WallDisplay.
�
�����
�� �
�����
������� ���
�������
������
�����
���
��������
➋
���
��
����� �����
➊
�����
� �� �
�����
� ��� �
�������
������� ���
�����
���
������
�����
��������
3. Press the On/Off button ➌
on the Digital Wall Display
to turn on the lamp.
�
4. Select the input source
by pressing the Input
button ➍ on the Remote
Control.
�
1-800-328-1371
7
www.3M.com/meetings
������
������������
copyboard / copyboard /
lavagna fotocopiatrice / pizarra digital
1. Connectez le câble
provenant de l’imprimante
➊ avec Imprimante sur le
Digital WallDisplay.
1. Schließen Sie ein
Druckerkabel ➊ am
Drucker und am Anschluss
„Printer“ am Digital
WallDisplay an.
1. Collegare un cavo
stampante ➊ dalla
stampante all’uscita
Stampante del Digital
WallDisplay.
1. Conecte el cable de
impresora ➊ al puerto de
impresora del dispositivo
Digital WallDisplay.
2. Insérez un marqueur
effaçable ➋ à sec dans
l’étui du stylo numérique.
2. Stecken Sie einen trocken
abwischbaren Marker ➋ in
die digitale Stifthülse.
2. Introduzca un rotulador en
la funda ➋ del bolígrafo
digital.
3. Utilisez le stylo digital
pour écrire des remarques
sur l’écran du Digital
WallDisplay. ➌
3. Mit dem digitalen Marker
können Sie Anmerkungen
auf den Digital
WallDisplay-Bildschirm
schreiben. ➌
2. Inserire un marcatore con
inchiostro cancellabile ➋ a
secco nel fusto della penna
digitale.
4. Appuyez sur le bouton
Impression ➍ pour
imprimer les remarques.
4. Drücken Sie die Taste
“Print” (Drucken) ➍,
um die Anmerkungen
auszudrucken.
5. Appuyez sur le bouton
Nouvelle page ➎ pour
effacer les remarques dans
la mémoire.
3. Usare il marcatore digitale
per scrivere appunti
sullo schermo Digital
WallDisplay. ➌
4. Premere il tasto Stampa ➍
per stampare gli appunti.
5. Premere il tasto Nuova
pagina ➎ per cancellare
gli appunti in memoria.
5. Drücken Sie die Taste
“New Page” (Neue
Seite) ➎, um die
Anmerkungen aus dem
Speicher zu löschen.
1-800-328-1371
8
3. Utilice el rotulador digital
para escribir notas en la
pantalla del dispositivo
Digital WallDisplay. ➌
4. Pulse el botón de
impresión ➍ para imprimir
las notas.
5. Pulse el botón de página
nueva ➎ para borrar las
notas de la memoria.
www.3M.com/meetings
copyboard
9200IC
1. Connect a printer cable ➊
from a printer to Printer on
the Digital WallDisplay.
���
��
����� �����
�����
� ��� �
�
�����
�� �
�������
������� ���
�����
���
������
�����
��������
➊
2. Insert a dry-erase marker
➋ into the Digital Pen
Sleeve.
�
�
3. Use the digital marker to
write notes on the Digital
WallDisplay screen. ➌
4. Press the Print button ➍ to
print the notes.
5. Press the New Page
button ➎ to clear notes in
memory.
1-800-328-1371
�
�
9
www.3M.com/meetings
������
������������
cd-rom / cd-rom / cd-rom / cd-rom
Le CD-ROM contient le
logiciel Tableau blanc, la
documentation produit et un
didacticiel en ligne.
Die CD-ROM enthält die
Whiteboard-Software, die
Produktdokumentation und
ein Online-Lernprogramm.
Il CD-ROM contiene il
software per la lavagna
bianca, la documentazione sul
prodotto e il tutorial online.
Le logiciel tableau blanc,
la documentation produit
et le didacticiel en ligne
sont disponibles à l’adresse
www.3M.com/walldisplay.
Die Whiteboard-Software, die
Produktdokumentation und
das Online-Lernprogramm
sind auch unter www.3M.com/
walldisplay verfügbar.
Il software della lavagna
bianca, la documentazione
sul prodotto e il tutorial
online sono reperibili dal sito
www.3M.com/walldisplay.
1. Insérez le CD-ROM dans
le lecteur CD-ROM de
l’ordinateur.
1. Legen Sie die CD-ROM in
das CD-ROM-Laufwerk
des Computers ein.
1. Inserire il CD-ROM
nell’unità CD-ROM del
computer.
2. Choisissez Installer
logiciel, Lire
documentation ou
Didacticiel en ligne.
2. Wählen Sie “Software
installieren”,
„Dokumentation
lesen“ oder „OnlineLernprogramm“.
2. Selezionare Installa
software, Leggi
documentazione oppure
Tutorial online.
1-800-328-1371
10
El CD-ROM contiene el
software de la pizarra
electrónica, la documentación
del producto, además de un
tutorial en línea.
El software de la pizarra
electrónica, la documentación
del producto y el tutorial
en línea se encuentran
disponibles en www.3M.com/
walldisplay.
1. Introduzca el CD-ROM en
la unidad de CD-ROM del
ordenador.
2. Seleccione el archivo
para instalar el software,
leer la documentación o
el archivo del tutorial en
línea.
www.3M.com/meetings
cd-rom
The CD-ROM contains the whiteboard software, product documentation, and an online tutorial.
The whiteboard software, product documentation and the online tutorial are also available at www.3M.com/walldisplay.
1. Insert the CD-ROM into the CD-ROM drive of the computer.
2. Choose Install Software, Read Documentation, or On-Line Tutorial.
If the CD-ROM is missing,
please contact your local 3M distributor
and order a CD-ROM part number 78-6970-9409-8.
Si vous ne pouvez pas obtenir de CD-ROM à cette adresse,
veuillez contacter votre revendeur local 3M
et commander un CD-ROM avec le n° de réf. 78-6970-9409-8.
Falls keine CD-ROM enthalten ist,
wenden Sie sich bitte an Ihre örtliche 3M-Niederlassung
und bestellen eine CD-ROM mit der Bestell-Nr. 78-6970-9409-8.
Se qui non fosse disponibile un CD-ROM,
contattare il distributore locale 3M
e ordinare un CD-ROM con codice articolo 78-6970-9409-8.
Si no encuentra el CD-ROM,
póngase en contacto con su distribuidor local de 3M
y solicite un CD-ROM con el número de referencia 78-6970-9409-8.
1-800-328-1371
11
www.3M.com/meetings
technical support
assistance technique / technische unterstützung / supporto tecnico / asistencia técnica
Europe
Korea
Malaysia
+49 (0)2131/14-2853
82 (0)31 230-7337
60 (0)3 5637-7888 Ext 123
Singapore
China
Japan
65-6849-3451
86 21 6485-5220 Ext. 241
81 42 779-2182
Hong Kong
Thailand
Australia
852-2806-6403
66 (0)2 260-85-77 Ext. 221
61 (0)2 9498-9754
Taiwan
Philippines
United States
886 (0)2 2704-9011 Ext 563
63 2 887-1091
1-800-328-1371
www.3M.com/walldisplay
[email protected]
The 3M logo and 3M are trademarks of 3M Company.
eBeam, e-Beam, eBeam Mouse and eBeam Software are registered trademarks of Luidia, Inc.
Important Notice
All statements, technical information, and recommendations related to 3M’s products are based on information believed to be reliable, but
the accuracy or completeness is not guaranteed. Before using this product or implementation, you must evaluate them and determine if
they are suitable for your intended application or situation. You assume all risks and liability associated with such use or implementation.
Any statements related to the product which are not contained in 3M’s current publications, or any contrary statements contained on your
purchase order shall have no force or effect unless expressly agreed upon, in writing, by an authorized officer of 3M.
Warranties
3M’s product warranty is stated in its Product Literature, a copy of which is available upon request. 3M MAKES NO OTHER WARRANTIES
INCLUDING, BUT NOT LIMITED TO, ANY IMPLIED WARRANTY OF MERCHANTABILITY OR FITNESS FOR A PARTICULAR PURPOSE.
If this product is defective within the warranty period stated in the Product Literature, your exclusive remedy shall be, at 3M’s option, to replace
or repair the 3M product or refund the purchase price of the 3M product. Except where prohibited by law, 3M will not be liable for any loss or
damage arising from this 3M product, whether direct, indirect, special, incidental or consequential regardless of the legal theory asserted.
© 2005 3M 78-6970-9410-6 Rev. A
1-800-328-1371
www.3M.com/meetings
3M™ Digital WallDisplay
quick reference guide