1
44314R 14,000 Pound
44305R Class IV, 10,000 Pound
Performance Products
Coupler Owner’s Manual
FULTON
MAINTENANCE
Maintain a film of automotive grease in the ball pocket, ball clamp, and where shaft enters housing. Maintain a
film of oil on the pivot points and spring ends, using SAE 30 WT. motor oil.
Keep the ball pocket and mechanism clean because dirt, paint, etc. can hinder proper operation. When parking
or storing your trailer, keep the coupler off the ground so dirt and/or other foreign material will not build up in
the coupler ball pocket.
HOW TO ORDER PARTS
Always replace broken, worn or bent parts before using this product. Use only Fulton Performance Products’
parts or parts of equal quality for repair. Replacement parts are available through Fulton Performance Products’
Customer Service Department, 715-693-1700. Please specify product model number, name of parts, and part
number.
LIMITED THREE YEAR WARRANTY
Warranty. Fulton Performance Products, Inc. ("We") warrants to the original consumer purchaser ("You") that the product will be free from defects in material and workmanship for a
period of three years under normal use and service, ordinary wear and tear excepted. If the product does not comply with this warranty, We will replace the product without charge to You
and within a reasonable time or, at Fulton's option, refund the purchase price. This warranty is not transferable.
Limitations on the Warranty. The warranty does not cover the following: (a) normal wear and tear; (b) damage through abuse, neglect, misuse, or as a result of any accident or in any
other manner; (c) damage from misapplication, overloading, or improperly installed; (d) improper maintenance; (e) a product altered in any manner by anyone other than us.
Obligations of Purchaser. To make a claim, contact us at 50 Indianhead Drive, Mosinee, WI, (715) 693-1700, identify the product, and follow the instructions that will be provided. Any
returned product that is replaced or refunded becomes the property of Fulton. You will be responsible for shipping costs to us. Please retain your purchase receipt to verify date of
purchase. This must be produced to honor warranty claim.
Remedy Limits. Repair or replacement is the purchaser's sole remedy under this or any other warranty on the product, whether express or implied. We shall not be liable for service or
labor charges incurred in removing or replacing a product or any incidental or consequential damages of any kind. We expressly disclaim any implied warranty of merchantability or
fitness for particular purpose after the three-year warranty period. Some states do not allow the exclusion of incidental or consequential damages or limitation of an implied warranty so
the above exclusion and limitation may not apply to you.
Legal Rights. This warranty gives you specific legal rights, and You also may have other rights which vary from state to state. ANY IMPLIED WARRANTY OF
MERCHANTABILITY OR FITNESS FOR A PARTICULAR PURPOSE ON ANY PRODUCT SHALL BE LIMITED TO THREE YEARS FROM THE DATE OF RETAIL
PURCHASE BY YOU. Some states do not allow limitations on how long an implied warranty lasts, so the above limitation may not apply to You.
This warranty is governed by the laws of the United States of America and is void where prohibited.
1050 Indianhead Dr., P.O. Box 8 Mosinee, WI 54455-0008
800/604-9466 715/693-1700 Fax 715/693-1799
www.fultonperformance.com
[email protected]
F3190 (RE-8791) 6/03
READ, UNDERSTAND, FOLLOW AND SAVE THESE INSTRUCTIONS
WARNING
! Read, understand and follow all instructions before installing and/or using this product. NEVER allow anyone unfamiliar
with the operating instructions to use this product.
! Read, understand, and follow all instructions provided by the manufacturer of the product(s) that this coupler will be
installed on and used with.
! Fulton is not responsible for accidents, occurrences, injuries and losses to or of any person or property wherever which
arises as a result of Purchaser’s alteration, modification, assembly, reassembly or installation of this product.
! Installation, use, and maintenance of these Fulton couplers must conform to the following mounting instructions only.
Fulton cannot be held liable for improper installation, use, or maintenance of this product.
! Never position any part of your body under any portion of the coupler or the load being supported. Never allow anyone or
any bodily parts to be positioned on or under the load being supported. Disregard could cause property damage and/or
serious bodily injury.
! Use only a 2 5/16" diameter ball rated for minimum coupler weight rating. Use of any other ball will create an extremely
dangerous condition which can result in separation of the coupler and ball, or ball failure.
! Before towing, ensure that hitch ball is fully seated in the coupler ball pocket AND that the lever is rotated back in the
closed position (See Figures 3 & 4).
! DO NOT TOW IF BALL IS NOT FULLY SEATED AND/OR HANDLE IS OPEN AND/OR LATCH NOT
ENGAGED. (See Operating Instructions)
! Before towing, check vehicle, hitch, hitch ball and coupler for signs of wear or damage and that the coupler handle opens
and closes freely. Replace any worn or damaged components before towing. If coupler is deformed or damaged, replace
complete coupler.
! Weigh your trailer plus added load. Do not exceed lesser of coupler, hitch, vehicle, ball or trailer weight ratings.
! Before latching/unlatching coupler, make sure vehicle, trailer and load will not shift, roll, etc.
! Ensure that the trailer safety chains are properly connected to the towing vehicle and trailer.
! After installing this coupler to a trailer, if coupler operation has been impaired in any way, DO NOT USE.
! Before towing, ensure that all trailer lighting is hooked up and working correctly before each use.
! When parking or storing your trailer, keep the coupler off the ground so dirt and/or other foreign material will not build up
in the coupler ball pocket.
! All welds must be performed by an American Welding Society (AWS) certified welder.
! Failure to follow these warnings and instructions may result in property damage and/or serious bodily injury, resulting in
death.
MOUNTING INSTRUCTIONS
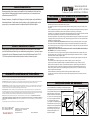
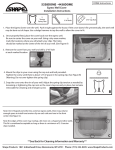
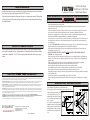
Weld-On Mounting Instructions
1) All welding must be performed by an AWS certified welder.
2) This coupler can only be used with 50 degree trailer tongues. Place the
coupler on trailer tongue members. Weld Fig. A
on both sides and the top using a 3/16"
minimum fillet weld as shown in Figures A
& B. A minimum coupler/tongue overlap
of 6.5” is required.
3) If coupler is to be primed/painted after
installation, make sure excess paint/primer
buildup is removed from ball pocket and
latching mechanism. Make sure coupler
operation has not been impaired in any
way.
Fig. B
PARTS BREAKDOWN
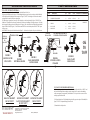
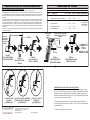
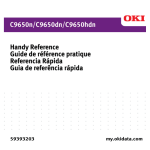
OPERATING INSTRUCTIONS
TO LATCH COUPLER TO HITCH BALL:
COUPLERS
1) Before latching coupler, make sure vehicle, trailer and load will not shift, roll, etc.
2) Open coupler locking lever (See Figure 1). While holding locking lever open, lower the coupler over the hitch ball until
ball is fully seated into the ball pocket of the coupler (See Figure 2). NOTE: The locking lever will close due to internal
spring and therefore must be held open or pinned open.
3) If locking lever is pinned open, remove pin. Close locking lever to the closed position (See Figure 3). DO NOT force
handle down. If handle does not close easily, trailer and tow vehicle may be misaligned. Re-align as necessary. Check that
latch is engaged by lifting up on back of locking lever (See Figure 4). Also, check that the hitch ball is fully seated and ball
clamp is below the ball (See Figure 5). If the ball is not seated WITH lever in the closed position, DO NOT TOW. Repeat
the above steps.
4) OPTIONAL: Place a pin or lock in hole shown (See Figure 5). A lock can be used in place of the pin as a theft deterrent.
OPTIONAL
HOLD OPEN
PIN
LOCATION
ITEM
DESCRIPTION
LATCH
02 251 06
02 251 37
PART #
1
COUPLER WELDMENT
2
LOCKING LEVER ASSEMBLY
(1)
02 702 08
02 702 08
N/A
3
SPRING - COMPRESSION
(1)
02 410 12
02 410 12
64 0801
4
LINK PIN
(1)
02 380 02
02 380 02
5
BALL CLAMP
(1)
02 700 18
02 700 18
6
GROOVE PIN
(1)
02 270 57
02 270 57
FIGURE 3
BALL SEATED WITH
LEVER CLOSED
44305R BALL CLAMP
REPAIR KIT
OK
TO
TOW
ENGAGED
FIGURE 2
HITCHBALL SEATED
N/A
LIFT HERE WITH FINGER TO
ENSURE LATCH IS ENGAGED
LATCH
FIGURE 1
LOCKING LEVER
FULLY OPEN
REPAIR KIT KIT DESCRIPTION
(1)
OPTIONAL
PIN LOCATION
LOCKING LEVER
44305R
PART #
44314R
QTY.
FIGURE 4
ENSURE LATCH IS
ENGAGED
FIGURE 5
BALL CLAMP
BELOW BALL
TO UNLATCH COUPLER FROM HITCH BALL:
1) Before unlatching coupler, make sure vehicle, trailer and load will not shift, roll, etc. NOTE: Load
may have shifted during transit, resulting in a negative tongue load. Use caution when unlatching
coupler, as tongue may rise unexpectedly when unlatched. If lock or pin is in lever, remove it before
removing coupler from hitch ball.
BALL NOT SEATED!!!
DO NOT TOW!!!
LEVER NOT CLOSED!!! LEVER NOT CLOSED!!!
LATCH NOT ENGAGED!!!
DO NOT TOW!!!
DO NOT TOW!!!
2) Fully open locking lever. While holding locking lever fully open, raise coupler off of hitchball (See
figure 1). NOTE: An optional hold open pin can be used.
3) Return handle to closed position.
1050 Indianhead Dr., P.O. Box 8 Mosinee, WI 54455-0008
800/604-9466 715/693-1700 Fax 715/693-1799
www.fultonperformance.com
[email protected]
F3190 (RE-8791) 6/03
Manual del propietario del
acoplador 44314R 14,000 libras
Performance Products 44305R Clase IV, 10,000 libras
FULTON
MANTENIMIENTO
Mantenga una película de grasa automotriz en el casquillo de la bola, la abrazadera de la bola y donde el eje
ingresa al bastidor. Mantenga una película de aceite en los puntos de pivote y en los extremos del resorte
utilizando aceite para motor SAE 30 WT.
Mantenga el mecanismo y el casquillo de la bola limpios pues la suciedad, la pintura, etc. pueden dificultar el
funcionamiento adecuado. Cuando estacione o guarde su remolque, no deje el acoplador apoyado en el piso
para que el polvo y/u otros materiales extraños no se adhieran al casquillo de la bola del acoplador.
LEA, COMPRENDA, SIGA Y GUARDE ESTAS INSTRUCCIONES
ADVERTENCIA
! Lea, comprenda y siga todas las instrucciones antes de instalar y/o utilizar este producto. NUNCA permita que una persona que no esté
familiarizada con las instrucciones de funcionamiento utilice este producto.
! Lea, comprenda y siga todas las instrucciones proporcionadas por el fabricante del/de los producto(s) en el/los que se instalará y se usará
este producto.
! Fulton no se responsabiliza por accidentes, ocurrencias, lesiones y pérdidas de cualquier persona o propiedad sea cual fuere que surja como
resultado de una alteración, modificación, armado, rearmado o instalación de este producto por parte del Comprador.
! La instalación, el uso y el mantenimiento de estos acopladores Fulton deben cumplir únicamente con las siguientes instrucciones de montaje.
Fulton no puede ser responsabilizado por la instalación, el uso o el mantenimiento inadecuado de este producto.
! Nunca coloque ninguna parte de su cuerpo debajo de ninguna porción del acoplador ni de la carga que está apoyada. Nunca deje que nadie
!
COMO ORDENAR PIEZAS
Siempre reemplace las piezas rotas, desgastadas o dobladas antes de usar este producto. Utilice solamente
piezas de Fulton Performance Products o piezas de calidad similar para las reparaciones. Las piezas de repuesto
están disponibles a través del Departamento de atención al cliente de Fulton Performance Products, 715-6931700. Sírvase especificar el número de modelo del producto, el nombre y el número de las piezas.
!
!
!
!
!
!
!
!
!
GARANTÍA LIMITADA DE TRES AÑOS
!
!
ni ninguna parte del cuerpo de una persona se coloque sobre o debajo de la carga apoyada. El no tomar esto en cuenta puede causar daño a
la propiedad y/o graves lesiones corporales.
Utilice únicamente una bola de 2 5/16” (6 cm) de diámetro clasificada para el valor de peso mínimo del acoplador. El uso de cualquier
otra bola creará una situación extremadamente peligrosa que puede provocar la separación del acoplador y la bola o un fallo de la bola.
Antes de remolcar, asegúrese de que la bola de enganche esté totalmente apoyada en el casquillo de la bola Y que la palanca esté hacia atrás
en la posición de cerrado (vea las figuras 3 y 4).
NO REMOLQUE SI LA BOLA NO ESTÁ TOTALMENTE APOYADA Y/O EL MANGO ESTÁ ABIERTO Y/O EL SEGURO NO
ESTÁ TRABADO. (Vea las instrucciones de funcionamiento)
Antes de remolcar, revise el vehículo, el enganche, la bola de enganche y el acoplador para detectar señales de desgaste o daños y que el
mango del acoplador se abra y cierre libremente. Cambie cualquier componente desgastado o dañado antes de remolcar. Si el acoplador
está deformado o dañado, reemplace el acoplador completo.
Pese su remolque más la carga agregada. No exceda las clasificaciones de peso menores del acoplador, del enganche, del vehículo, de la
bola o del remolque.
Antes de trabar/destrabar el acoplador, asegúrese de que el vehículo, el remolque y la carga no se muevan, giren, etc.
Asegúrese de que las cadenas de seguridad del remolque estén conectadas adecuadamente al remolque y al vehículo que lo lleva.
Después de instalar este acoplador a un remolque, si el funcionamiento del acoplador se ve impedido de alguna forma, NO LO USE.
Antes de remolcar, asegúrese de que todas las luces del remolque estén conectadas y funcionando adecuadamente antes de cada uso.
Cuando estacione o guarde su remolque, no deje el acoplador apoyado en el piso para que el polvo y/u otros materiales extraños no se
adhieran al casquillo de la bola del acoplador.
Todas las soldaduras deben ser realizadas por un soldador certificado por la American Welding Society (AWS).
Si no cumple con estas advertencias e instrucciones puede ocasionar daño a la propiedad y/o graves lesiones corporales, que den como
resultado la muerte.
Garantía. Fulton Performance Products, Inc. (“Nosotros”) garantiza al comprador original (“Usted”) que el producto estará libre de defectos en el material y la mano de obra durante un período de tres
años bajo un uso y servicio normal, exceptuando el uso y desgaste normal. Si el producto no cumple con esta garantía, nosotros reemplazaremos el producto sin cargo para usted y dentro de un período de
tiempo razonable, o según la decisión de Fulton, se reembolsará el precio de compra. Esta garantía no es transferible.
Limitaciones de la Garantía. Esta garantía no cubre lo siguiente: (a) uso y desgaste normal; (b) daños por abuso, negligencia, uso inadecuado o como resultado de cualquier accidente o cualquier otra
forma; (c) daño por aplicación indebida, sobrecarga o instalación inadecuada; (d) mantenimiento inadecuado; (e) un producto alterado de alguna forma por cualquier otra persona.
Obligaciones del Comprador. Para presentar un reclamo, póngase en contacto con nosotros en 50 Indianhead Drive, Mosinee, WI, (715) 693-1700, identifique el producto, y siga las instrucciones que se
le proporcionarán. Cualquier producto devuelto que sea reemplazado o reembolsado pasa a ser propiedad de Fulton. Usted es el responsable de los costos de envío a nosotros. Conserve el recibo de
compra para verificar la fecha de compra. Éste debe ser presentado, para posibilitar el pago de un reclamo sobre la garantía.
Límites de compensaciones. La reparación o el reemplazo es la única compensación del comprador bajo esta o cualquier otra garantía sobre este producto, ya sea expresa o implícita. Nosotros no
seremos responsables por los cargos de servicio o mano de obra incurridos para remover o reemplazar un producto o por cualquier daño incidental o consecuente de cualquier índole. Nosotros negamos
expresamente la responsabilidad de cualquier garantía implícita de comerciabilidad o idoneidad para un propósito en particular después del período de garantía de tres años. Algunos estados no permiten
esta exclusión de daños incidentales o consecuentes o la limitación de una garantía implícita por lo que la exclusión y limitación anterior puede no aplicarse a usted.
Derechos legales. Esta garantía le proporciona derechos legales específicos, y usted además tiene otros derechos que varían de un estado a otro. CUALQUIER GARANTÍA IMPLÍCITA DE
COMERCIABILIDAD O IDONEIDAD PARA UN PROPÓSITO EN PARTICULAR DE CUALQUIER PRODUCTO ESTARÁ LIMITADA A UN PLAZO DE TRES AÑOS A PARTIR DE LA
FECHA DE COMPRA AL POR MENOR POR PARTE DE USTED. Algunos estados no permiten limitaciones sobre la duración de una garantía implícita, por lo que la limitación anterior puede no
aplicarse a usted.
Esta garantía está regida por las leyes de los Estados Unidos de América y queda anulada donde esté prohibida.
1050 Indianhead Dr., P.O. Box 8 Mosinee, WI 54455-0008
800/604-9466 715/693-1700 Fax 715/693-1799
www.fultonperformance.com
[email protected]
F3190 (RE-8791) 6/03
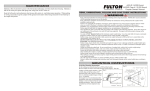
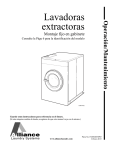
INSTRUCCIONES DE ARMADO
Instrucciones de armado con soldadura
1) Todas las soldaduras deben ser realizadas por un soldador certificado por AWS.
2) Este acoplador se puede usar únicamente con barras de remolques de 50 grados.
Coloque el acoplador sobre las piezas de la barra. Fig. A
Suelde en ambos lados y en la parte superior
utilizando una soldadura con filete mínimo de
SOLDADURA CON FILETE, MÍN. 3/16” (0,5 CM)
3/16” (0,5cm) como se muestra en las figuras A y
B. Se requiere una superposición mínima de
6,5” (16,5cm) del acoplador y la barra.
3) Si el acoplador va a ser imprimado/pintado
después de la instalación, asegúrese de que la
acumulación de exceso de pintura/imprimador
sea eliminada del casquillo de la bola y del
mecanismo de seguro. Asegúrese de que el
funcionamiento del acoplador no se vea
BARRA DEL REMOLQUE
impedido de forma alguna.
Fig. B
SOLDADURA CON FILETE, MÍN. 3/16” (0,5 CM)
ACOPLADOR/BARRA
SUPERPOSICIÓN MÍN. 6,5” (16,5 CM)
SUPERPOSICIÓN MÁX. 7,5” (19 CM)
SÓLO BARRAS
A 50º
BARRA DEL REMOLQUE
DESGLOSE DE PIEZAS
INSTRUCCIONES DE FUNCIONAMIENTO
PARA ASEGURAR EL ACOPLADOR A LA BOLA DE ENGANCHE:
1) Antes de asegurar el acoplador, asegúrese de que el vehículo, el remolque y la carga no se muevan, giren, etc.
2) Abra la palanca de trabado del acoplador (vea la figura 1). Mientras mantiene abierta la palanca de trabado, baje el acoplador sobre la
bola de enganche hasta que la bola esté totalmente apoyada en el casquillo de la bola del acoplador (vea la figura 2). NOTA: La palanca de
trabado se cerrará debido al resorte interno y por lo tanto debe ser sostenida en la posición de abierto o debe ser fijada con un pasador en
dicha posición.
3) Si la palanca de trabado está fijada en la posición de abierto con un pasador, retire el pasador. Cierre la palanca de trabado en la posición
de cerrado (vea la figura 3). NO fuerce el mango hacia abajo. Si el mango no se cierra fácilmente, es posible que el remolque y el vehículo
que lo lleva estén mal alineados. Vuelva a alinearlos si fuera necesario. Verifique que el seguro esté trabado levantando la parte trasera de
la palanca de trabado (vea la figura 4). Además, verifique que la bola de enganche esté totalmente apoyada y que la abrazadera de la bola
esté debajo de la bola (vea la figura 5). Si la bola no está apoyada CON la palanca en la posición de cerrado, NO REMOLQUE. Repita los
pasos anteriores.
4) OPCIONAL: Coloque un pasador o seguro en el orificio que se muestra (vea la figura 5). Se puede usar un seguro en lugar del pasador
como un elemento antirrobo.
UBICACIÓN
OPCIONAL DEL
PASADOR PARA
MANTENER
ABIERTO
ACOPLADORES
ART.
DESCRIPCIÓN
SEGURO
44305R
PIEZA Nº
PIEZA Nº
44314R
02 251 06
02 251 37
KIT REPAR. DESCRIPCIÓN KIT
1
PIEZAS SOLDADAS DEL ACOPLADOR
(1)
2
ENSAMBLAJE DE PALANCA DE TRABADO
(1)
02 702 08
02 702 08
N/A
3
RESORTE COMPRESIÓN
(1)
02 410 12
02 410 12
64 0801
4
PASADOR DE UNIÓN
(1)
02 380 02
02 380 02
5
ABRAZADERA DE LA BOLA
(1)
02 700 18
02 700 18
6
PASADOR DE RANURA
(1)
02 270 57
02 270 57
UBICACIÓN DEL
PASADOR
OPCIONAL
PALANCA DE TRABADO
CANT.
CORRECTO
PARA
REMOLCAR
TRABADO
FIGURA 2
BOLA DE ENGANCHE
APOYADA
FIGURA 3
BOLA APOYADA CON
PALANCA CERRADA
¡¡¡LA BOLA NO ESTÁ ¡¡¡LA PALANCA NO ESTÁ CERRADA!!! ¡¡¡LA PALANCA NO ESTÁ
¡¡¡EL SEGURO NO ESTÁ TRABADO!!!
CERRADA!!!
APOYADA!!!
¡¡¡NO REMOLQUE!!!
¡¡¡NO REMOLQUE!!!
¡¡¡NO REMOLQUE!!!
1050 Indianhead Dr., P.O. Box 8 Mosinee, WI 54455-0008
800/604-9466 715/693-1700 Fax 715/693-1799
www.fultonperformance.com
[email protected]
FIGURA 4
ASEGÚRESE DE QUE EL
SEGURO ESTÉ TRABADO
FIGURA 5
ABRAZADERA DE LA BOLA
DEBAJO DE LA BOLA
PARA DESTRABAR EL ACOPLADOR A LA BOLA DE ENGANCHE:
1) Antes de destrabar el acoplador, asegúrese de que el vehículo, el remolque y la carga no se muevan,
giren, etc. NOTA: Es posible que la carga se haya movido durante el trayecto, dando como resultado una
carga negativa sobre la barra. Tenga cuidado cuando desenganche el acoplador, ya que la barra puede
levantarse inesperadamente cuando se la desenganche. Si el seguro o pasador está en la palanca, retírelo
antes de quitar el acoplador de la bola de enganche.
2) Abra totalmente la palanca de trabado. Mientras sostiene la palanca de trabado totalmente abierta,
levante el acoplador de la bola de enganche (vea la figura 1). NOTA: Se puede usar un pasador opcional
para mantenerla abierta.
3) Vuelva a colocar el mango a la posición de cerrado.
F3190 (RE-8791) 6/03
JUEGO DE
REPARACIÓN DE
ABRAZADERA DE LA
BOLA 44305R
LEVANTE AQUÍ CON EL DEDO PARA
VERIFICAR QUE EL SEGURO ESTÁ
TRABADO
SEGURO
FIGURA 1
PALANCA DE TRABADO
TOTALMENTE ABIERTA
N/A