1
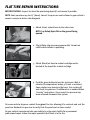
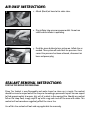
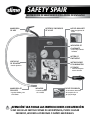
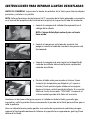
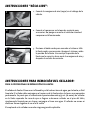
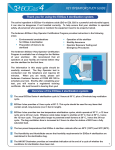
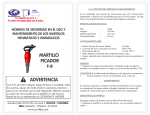
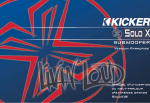
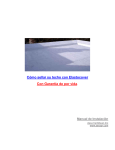
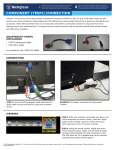
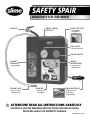
SAFETY SPAIR
EMERGENCY FLAT TIRE REPAIR
AIR HOSE
ON/OFF SWITCH
FOR LIGHT
BRIGHT LED LIGHT
•For nighttime
emergencies
DIAL GAUGE
•Check tire pressure
ON/OFF SWITCH
SEALANT
CARTRIDGE
BACKLIT
INSTRUCTIONS
•Refill available
SEALANT HOSE
•Injects sealant
and air into tire
•Convenient for
nighttime use
INFLATOR
•Powerful 12
volt inflator
POWER RECEPTACLE
•Plugs into 12 volt
power outlet
•10' (3m) length
! ATTENTION! READ ALL INSTRUCTIONS CAREFULLY
FAILURE TO FOLLOW WARNING INSTRUCTIONS CAN RESULT IN FIRE,
PERSONAL INJURY OR PROPERTY DAMAGE.
PART# 70005 | 05.10.13
FLAT TIRE REPAIR INSTRUCTIONS:
BEFORE STARTING: Inspect tire tread for puncturing object(s) and remove if possible.
NOTE: Seals punctures up to 1/4" (6mm). Correct tire pressure can be found in your vehicle’s
owner’s manual or driver side doorjamb.
1
1. Attach (clear) sealant hose to tire valve stem.
2
2. Plug inflator into accessory power outlet. Do not run
vehicle while inflator is operating.
3
3. Attach (black) air hose to sealant cartridge nozzle,
located at the top of the sealant cartridge.
4
4. Push the green button to turn the system on. Wait 6
minutes (in temperatures below 32˚F wait 12 minutes).
Some sealant may remain in the hose. Turn system off
and check tire pressure. If additional air is needed follow
“air only” instructions. Once correct tire pressure has
been achieved disconnect the system.
NOTE: Lay Safety Spair flat on the ground facing
upward.
Drive one mile to dispense sealant throughout the tire, allowing it to seek out and seal the
puncture. Recheck tire pressure to verify that the puncture has been sealed.
At your earliest convenience take your vehicle to a tire repair facility for a permanent
professional repair. Inform tire repair specialist that Slime is in the tire.
AIR ONLY INSTRUCTIONS:
1
1. Attach (black) air hose to tire valve stem.
2
2. Plug inflator into accessory power outlet. Do not run
vehicle while inflator is operating.
3
3. Push the green button to turn system on. Inflate tire as
needed. Turn system off and check tire pressure. Once
correct tire pressure has been achieved, disconnect air
hose and power plug.
SEALANT REMOVAL INSTRUCTIONS:
FOR THE TIRE REPAIR PROFESSIONAL
Slime Tire Sealant is non-flammable and water based so clean up is simple. The sealant
should be rinsed or wiped out of the tire prior to making a permanent repair. You can expect
to find approximately 16 ounces (473 mL) of sealant in the repaired tire. Should any sealant
fall on the shop floor, simply wipe it up with a rag and rinse off the area with water. This
sealant will not corrode or negatively affect the rim or tire.
Use of this tire sealant will not void any applicable tire warranty.
WARNING! TIRE SEALANT CONTAINS LATEX. Harmful if swallowed. Do not inhale or
swallow. May cause eye and skin irritation. Avoid skin and eye contact. Keep out of
reach of children.
FIRST AID
Ingestion/Inhalation: Contact physician immediately. Do not induce vomiting.
Skin: Wash thoroughly with soap and water.
Eye: Flush with water for at least 15 minutes.
Call Chemtel: +1-800-255-3924
Reference product name: SLX
Sealant cartridge refills available • PART# 10100
Limited Warranty: Manufacturer’s liability is limited to product replacement or cash refund with proof of purchase.
QUESTIONS OR COMMENTS: Call +1-805-489-0490 or visit www.slime.com
Slime and Safety Spair are trademarks of Illinois Tool Works, Inc, registered in the U.S. and other countries.
Accessories Marketing, Inc, a division of Illinois Tool Works, Inc. 125 Venture Drive, Suite 210, San Luis Obispo, CA 93401 USA
SAFETY SPAIR
REPARACIÓN DE EMERGENCIA DE LLANTAS DESINFLADAS
MANGUERA
DE AIRE
BOTÓN DE ENCENDIDO
DE LA LUZ
LUZ LED BRILLANTE
•Para emergencias de
noche
INDICADOR DE
CUADRANTE
•Revise la presión de
la llanta
BOTÓN DE
ENCENDIDO
CARTUCHO
DE SELLADOR
INSTRUCCIONES
DE ILUMINACIÓN
DE FONDO
•Puede reponerse
• Conveniente para
usarse de noche
MANGUERA DE
SELLADOR
•Inyecta sellador y aire
en la llanta
INFLADOR
•Potente inflador
de 12 voltios
FUENTE DE ENERGÍA
•Se conecta en una toma
de corriente de 12 V
•3m (10') de largo
! ¡ATENCIÓN! LEA TODAS LAS INSTRUCCIONES CON ATENCIÓN
SI NO SIGUE LAS INSTRUCCIONES DE ADVERTENCIA, PUEDE CAUSAR
INCENDIO, LESIONES A PERSONAS O DAÑOS MATERIALES.
INSTRUCCIONES PARA REPARAR LLANTAS DESINFLADAS:
ANTES DE COMENZAR: Inspeccione la banda de rodadura de la llanta para detectar objetos
punzantes y retírelos si es posible.
NOTA: Sella perforaciones de hasta 6mm (1/4"). La presión de la llanta adecuada se encuentra
en el manual del propietario del vehículo o en el panel de la puerta del lado del conductor.
1
1. Conecte la manguera de sellador (transparente) en el
vástago de la válvula.
NOTA: Coloque Safety Spair sobre el piso vol teado
hacia arriba.
2
2. Conecte el compresor en la toma de corriente. No
ponga en marcha el vehículo cuando el com presor esté
funcionando.
3
3. Conecte la manguera de aire (negra) en la boquilla del
cartucho de sellador ubicada en la parte superior del
cartucho de sellador.
4
4. Presione el botón verde para encender el sistema. Espere
6 minutos (en temperaturas por debajo de 32˚F espere 12
minutos). Puede que dar algo de sellador en la manguera.
Apague el sistema y mida la presión de la llanta. Si se necesita
inflar más, lea las instrucciones “SÓLO AIRE”. Desconecte el
sistema cuando la presión de la llanta sea la correcta.
Conduzca 1.6 km (una milla) para esparcir el sellador en toda la llanta y permitir que
encuentre y selle la punción. Revise nuevamente la presión de la llanta para verificar que se
selló la punción.
Lleve su vehículo lo más pronto posible a un centro de reparación de vehículos para que
reparen la llanta profesionalmente. Informe al especialista en reparaciones que hay Slime
dentro de la llanta.
INSTRUCCIONES “SÓLO AIRE”:
1
1. Conecte la manguera de aire (negra) en el vástago de la
válvula.
2
2. Conecte el compresor en la toma de corriente para
accesorios. No ponga en marcha el vehículo cuando el
compresor esté funcionando.
3
3. Presione el botón verde para encender el sistema. Infle
la llanta según sea necesario. Apague el sistema y mida
la presión de la llanta. Una vez que la presión de la
llanta sea la correcta, desco necte la manguera de aire y
después el enchufe de corriente.
INSTRUCCIONES PARA REMOCIÓN DEL SELLADOR:
PARA EL PROFESIONAL EN REPARACIÓN DE LLANTAS
El sellador de llantas Slime no es inflamable y está hecho a base de agua; por lo tanto, es fácil
limpiarlo. El sellador debe enjuagarse o limpiarse de la llanta antes de hacer una reparación
permanente. Se prevé que se encontrarán aproximadamente 473 mL (16 onzas) de sellador
en la llanta reparada. En caso de que se llegara a derramar sellador en el piso del taller,
simplemente límpielo con un trapo y enjuague el área con agua. El sellador no corroe ni
afecta en forma negativa al aro ni a la rueda.
El empleo de este sellador no anula ninguna garantía aplicable.
¡ADVERTENCIA! EL SELLADOR DE LLANTAS CONTIENE LÁTEX. Es nocivo si se ingiere. No
lo inhale ni lo ingiera. Puede causar irritación de los ojos y piel. Evite el contacto con
la piel y ojos. Manténgase lejos del alcance de los niños.
PRIMEROS AUXILIOS
Ingestión o inhalación: Pida ayuda médica de inmediato. No induzca el vómito.
Piel: Lave profusamente con agua y jabón.
Ojos: Lave profusamente con agua durante al menos 15 minutos.
Llame a Chemtel: +1-800-255-3924
Nombre de referencia del producto: SLX
Hay repuestos de cartucho de sellador disponibles • PARTE NO. 10100
Garantía limitada: La responsabilidad del fabricante se limita a reemplazar el producto o a reembolsar el dinero presentando
el comprobante de compra.
PREGUNTAS O COMENTARIOS: Llame al +1-805-489-0490 o visite www.slime.com
Slime y Safety Spair son marcas registradas de Illinois Tool Works, Inc., registradas en los Estados Unidos y en otros países.
Accessories Marketing, Inc., una división de Illinois Tool Works, Inc. ,
125 Venture Drive, Suite 210, San Luis Obispo, CA 93401 EE.UU.