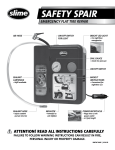
1
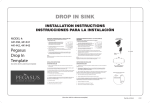
117 Jac k s on Road . Berl i n, NJ 08009
800. 625. 9525 . F A X 856. 753. 7202
P DF *
C OL OR P R OOF
JO B NU MBER: 38046
CL I ENT: Bl anc o
BRA ND : Bl anc o Pegas us
I TEM: 440997 Rvsd.,Undermount Temp.
U PC NO : NA
D I MENSI O NS: 26” x 23”
BL EED : NA
G L U E F L A P: NA
D A TE: 2/ 18/ 11
STA TU S ( Pl eas e Chec k On e )
o O K ( No Changes )
PRO O F VERSI O N: 4
PRO O F CREA TO R: MT
Co lo rs:
C
M
Y
K
280
280
280
280
Sig n a tu re
o MA KE CH A NG ES (Submit Revised Proof)
*PDF proofs are for content
verification only. Images have
been aggressively downsampled to allow for transmission
via email. This may cause
images to appear jagged, or
blurry in the PDF proof. PDF
proofs are not to be considered as color-accurate, even
on color-managed screens.
DROP IN SINK
INSTALLATION INSTRUCTIONS
INSTRUCCIONES PARA LA INSTALACIÓN
IMPORTANT INFORMATION PRIOR TO INSTALLING SINK
INFORMACIÓN IMPORTANTE PREVIA A LA INSTALACIÓN DEL
FREGADERO
Please make sure to make any additional holes in the sink
~ BEFORE INSTALLING ~ .
MODEL #: 440002/440965
1.
Pegasus
Drop In
Template
Asegúrese de hacer cualquier orificio adicional en el fregadero
~ ANTES DE LA INSTALACIÓN ~ .
Additional holes available are pre-punched from
underneath the sink and are marked on top by
stickers at each location. Check position of the
stickers before you knock out the hole.
1.
2.
Put packing materials back into the box and place
the sink on top of the box.
3.
While holding your hand under the sink you will feel
the pre-punched hole. Tap the center of the sticker lightly with a 6 or 8 oz
ball peen hammer.
4.
Trim the hole with the ball peen hammer lightly or use a fine file to clean
up the rough edges. Please make sure you do not make the hole larger
than the pre-punched hole underneath.
NOTE:
Please do not use a drill or any flat type of hammer as this could crack the sink
and void the warranty.
(See other side for undermount template)
Los orificios adicionales disponibles han sido
perforados previamente desde la parte de abajo del
marcados en la parte superior con etiquetas que
indican cada ubicación. Verifique la posición de las
etiquetas antes de empezar a perforar.
fregadero y están
2.
Coloque los materiales del embalaje dentro de la
caja y ubique el fregadero sobre la misma.
3.
Coloque la mano debajo del fregadero y sentirá el orificio perforado con
anterioridad. Golpee con suavidad en el centro de la etiqueta con un martillo
de bola de 6 u 8 oz. (170 ó 227 g)
4.
Recorte el agujero suavemente con el martillo de bola o bien utilice una lima
fina para emparejar los bordes ásperos. Asegúrese de no hacer un orificio
más grande del que fuera perforado previamente en la parte de abajo.
NOTA:
No utilice perforadora ni ningún martillo de tipo plano, ya que se podría rajar el
fregadero y, en consecuencia, se anularía la validez de la garantía.
INSTALLATION INSTRUCTIONS
INSTRUCCIONES DE INSTALACIÓN
ATTENTION INSTALLER
ATENCIÓN INSTALADOR
1.
Make sure that the template model number matches the model number of the
sink in the box.
1.
Asegúrese de que el número de modelo de a plantilla coincida con el número de modelo del
fregadero en la caja.
2.
Unpack sink and check for damage. If sink is damaged, "DO NOT INSTALL SINK".
Contact your dealer immediately. If installed warranty is not valid.
2.
3.
Remove template and leave sink in box until ready to be installed. Position template
to desired location, pay attention to overall size of sink and bowls, relative to position
of cabinet walls, and pull out drawers.
Desempaquete el fregadero y verifique que no esté dañado. Si el fregadero está dañado,
"NO INSTALE EL FREGADERO". Comuniquese con su representante inmediatamente.
Si se lo instala, la garantia no tendrá validez.
3.
Retire la plantilla y deje el fregadero en la caja hasta que esté listo para instalarlo. Coloque la
plantilla en la ubicación deseada, preste atención al tamaño total del fregadero y de las tazas,
en relación con la posición de las paredes de los gabinetes y abra los cajones.
4.
Utilice cinta adhesiva para pegar la plantilla en Ia mesada.
5.
Perfore el agujero piloto para la sierra de vaivén y corte por la lines.
6.
Invierta el fregadero y asegúrese de que el área se encuentre limpia. Agregue una linea de
sellador en el borde interior alrededor del fregadero. El fabricante no asume ninguna
responsabilidad por hinchazón de la mesada si no se selló correctamente.
7.
Coloque el fregadero en la mesada.
8.
Ajuste los sujetadores en secuencia. Ver Figura 1.
9.
Quite el exceso de sellador alrededor del fregadero.
4.
Use masking tape to tape template to countertop.
5.
Drill pilot hole for jig saw and cut on the line.
6.
Flip sink over, making sure area is clean. Add a bead of sealant to the inside edge
around sink. The manufacturer does not assume any responsibility of swelling to
the countertop if not sealed correctly.
7.
Put sink into counter.
8.
Tighten down clips in sequence. See Figure 1.
9.
Remove excess sealant from around sink.
Mounting Clip
Sujetador de Montaje
DROP-IN (TOP MOUNT) INSTALLATION
Rear
2
4
1
3
Sink Rim
Countertop
Sink Bowl
Front
Screw
Tornillo
Fig. 1 Clamping Sequence
Secuencia de Sujeción
PART NO. 440997
(See other side for undermount template)
117 Jac k s on Road . Berl i n, NJ 08009
800. 625. 9525 . F A X 856. 753. 7202
P DF *
C OL OR P R OOF
JO B NU MBER: 38046
CL I ENT: Bl anc o
BRA ND : Bl anc o Pegas us
I TEM: 440997 Rvsd., Drop In Temp.
U PC NO : NA
D I MENSI O NS: 26” x 23”
BL EED : NA
G L U E F L A P: NA
D A TE: 2/ 18/ 11
STA TU S ( Pl eas e Chec k On e )
o O K ( No Changes )
PRO O F VERSI O N: 4
PRO O F CREA TO R: MT
Co lo rs:
C
M
Y
K
280
280
280
280
Sig n a tu re
o MA KE CH A NG ES (Submit Revised Proof)
*PDF proofs are for content
verification only. Images have
been aggressively downsampled to allow for transmission
via email. This may cause
images to appear jagged, or
blurry in the PDF proof. PDF
proofs are not to be considered as color-accurate, even
on color-managed screens.
2/11