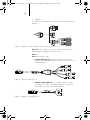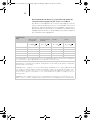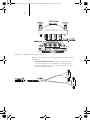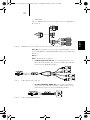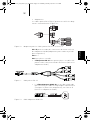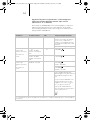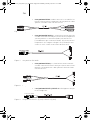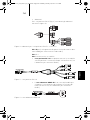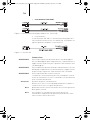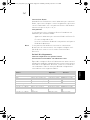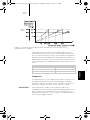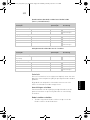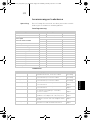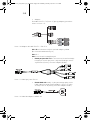
1
Reocor D
Cardiac Rhythm Management
External pacemaker
Technical manual
en
Externí kardiostimulátor
Technická příručka
cs
Externer Herzschrittmacher
Gebrauchsanweisung
de
Marcapasos externo
Manual técnico
es
Stimulateur cardiaque externe
Manuel technique
fr
Külső pacemaker
Használati utasítás
hu
Pacemaker esterno
Manuale tecnico
it
Externe pacemaker
Technische handleiding
nl
Zewnętrzny stymulator serca
Instrukcja obsługi
pl
Marcapasso externo
Manual técnico
pt
394271--J_GA_Reocor_D_mul_Cover.indd 1
External Devices
19.08.2014 12:54:14
394271--J
Português
Polski
Nederlands
Italiano
Magyar
Français
Español
Deutsch
Česky
English
394271--J_GA_Reocor_D_mul.book Page -1 Monday, January 26, 2015 3:35 PM
394271--J_GA_Reocor_D_mul.book Page 0 Monday, January 26, 2015 3:35 PM
English
394271--J_GA_Reocor_D_mul.book Page 1 Monday, January 26, 2015 3:35 PM
1
Handling, Care and Maintenance ............................................................26
Reocor D ................................................................... 26
Reusable Patient Cables .......................................... 27
Maintenance, Service, Inspections .......................... 27
Disposal .................................................................... 28
Deutsch
Español
Français
Magyar
Italiano
Pacing Modes and Parameters ...............................................................22
Pacing Modes ........................................................... 22
Refractory Periods ................................................... 22
Rate .......................................................................... 23
AV Delay .................................................................... 24
Pulse Amplitude – Atrium/Ventricle ........................ 24
Sensitivity – Atrium .................................................. 24
Sensitivity – Ventricle ............................................... 24
Cross Channel Blanking .......................................... 24
Interference interval ................................................ 24
Burst ......................................................................... 25
Nederlands
Operating Notes .....................................................................................10
General Remarks ..................................................... 10
Operating Devices and LEDs .................................... 11
Protective Cover ....................................................... 13
Lead Connection ...................................................... 14
Start Up .................................................................... 19
Attachment ............................................................... 20
Battery Exchange ..................................................... 20
Polski
General Description .................................................................................3
Product Description ...................................................3
Indications ..................................................................3
Contraindications .......................................................4
Potential Side Effects .................................................4
Handling Instructions .................................................4
Visual and Acoustic Signals .......................................9
Česky
Contents
Technical Data ........................................................................................30
Português
Technical Safety .....................................................................................29
394271--J_GA_Reocor_D_mul.book Page 2 Monday, January 26, 2015 3:35 PM
2
Conformity According to IEC 60601-1-2 .................................................33
Scope of Delivery and Accessories .........................................................37
Legend for the Label ..............................................................................39
English
394271--J_GA_Reocor_D_mul.book Page 3 Monday, January 26, 2015 3:35 PM
3
The safety features of Reocor D include:
•
Visual display of sensed and paced events
•
Microprocessor-controlled pacing parameters
•
Lead impedance monitoring
•
Visual warning when the battery is almost depleted
•
A movable, transparent cover of the controls to prevent
accidental changes of the programmed parameters
Temporary catheters, heart wires and leads with 2-mm plugs
can be connected directly to Reocor D. Additional patient
cables and adapters are available, too. This system offers a
secure connection of transvenous catheters and myocardial
leads, which are applied either as unipolar or bipolar.
Indications
Temporary pacing with Reocor D is suitable for the following
applications for patients of any age:
•
Treatment of arrhythmias and heart block
•
Symptomatic sinus bradycardia
Deutsch
Español
Français
A defect of the device (failed self-test after the device was
switched on) is indicated by continuously lit LEDs and an
intermittent acoustic signal. If the self-test does not find any
errors, the acoustic and visual signals will turn off after a few
seconds.
Magyar
LEDs display the sense (Sense), pace (Pace) and battery
status (Low battery). An acoustic signal sounds when a very
high frequency or very low sensitivity value is set and when
the lead impedance is not optimal.
Italiano
The pacing mode, rate, sensitivity and pulse amplitude,
AV delay and burst rate are adjustable.
Nederlands
There are six pacing modes available: DDD, D00, VDD, VVI,
V00 and VVT, as well as an atrial burst function.
Polski
Reocor D is a battery-powered, external dual-chamber pacemaker, which can be used in conjunction with temporary
pacemaker leads (including endocardial leads and transvenous implantable catheters) for temporary atrial, ventricular and AV sequential pacing in clinical settings.
The connection is made directly or via a separate patient
cable and adapter, if necessary.
Português
Product Description
Česky
General Description
394271--J_GA_Reocor_D_mul.book Page 4 Monday, January 26, 2015 3:35 PM
4
•
Sick sinus syndrome
•
Pre-, intra- and postoperative pacing of patients with
heart surgery
•
Termination of supraventricular tachyarrhythmias
•
Prophylactic pacing for prevention of arrhythmias
•
Emergency pacing
•
Checking the pacing thresholds
Contraindications
•
Reocor D cannot be sterilized and is therefore not suitable for use within the sterile field.
•
The atrially triggered pacing modes (DDD and VDD) are
contraindicated for atrial fibrillation, atrial flutter and
other fast atrial rhythms.
•
When high ventricular rates are not well tolerated by the
patient (e.g., in the presence of angina pectoris), atriumcontrolled modes can be contraindicated.
•
If retrograde conduction is encountered after ventricular
pacing, extending the atrial refractory period and/or
shortening the AV delay may be necessary programming
options to prevent pacemaker-mediated tachycardia. It
may be necessary in such cases to program a VVI mode.
•
Atrial single-chamber pacing is contraindicated for
patients with existing AV conduction disturbances.
•
The use of an external pacemaker is contraindicated in
the presence of an active, implanted pacemaker.
Potential Side Effects
Potential complications associated with the application of
temporary external pacing include asystole after abrupt cessation of pacing (e.g., if the patient cable is inadvertently
disconnected, the leads are loosened or the settings are
incorrect) or pacemaker dependency.
Complications when inserting transvenous leads include:
Wound infection, arterial puncture, pericardial friction,
cardiac perforation and dysrhythmia after lead insertion.
Handling Instructions
Depending on the pacing settings and the patient's underlying illness, pacing can induce arrhythmias. To ensure the
patient's safety, certain procedures should be observed and
Intended use
•
Reocor D and the cables and accessories approved along
with the device may only be used in accordance with this
technical manual.
•
Reocor D must not be connected to other electromedical
devices.
•
Reocor D must not be used in areas in which there is a
danger of explosion.
Changes not
permitted
•
Only the manufacturer or a party expressly authorized by
BIOTRONIK may perform corrective maintenance,
enhancements or modifications to the device.
Replacement parts
and accessories
•
To ensure safety compliance, use only original replacement parts and accessories authorized by BIOTRONIK.
Using any other parts voids the manufacturer's liability
for any consequences, guarantee and warranty.
Devices
on hand
•
In case of pacemaker dependency of the patient, an
emergency pacemaker should be kept on hand.
•
Keep an external defibrillator, oxygen, intubation equipment and emergency drugs on hand.
•
Before use, Reocor D should be visually inspected for
damages and dirt.
•
Never use a device that is damaged or shows abnormal
behavior. Replace any cable that shows even slight
damage.
•
Before using Reocor D, the patient cable or leads, the
user should touch the patient to equalize electrical
potentials.
•
It is strongly recommended that users examine all set
parameters before the leads are connected to Reocor D.
•
Even though Reocor D is protected from dripping water,
the device and all plugs should be kept clean and dry.
•
Reocor D cannot be sterilized.
Behavior
before use
Deutsch
Reocor D interacts with the human heart. There is also
an interaction with the patient's skin and blood vessels.
Español
•
Français
Mode of action
Magyar
Reocor D may only be used by persons with knowledge of
cardiology who were trained in the handling of the device.
Potential users are technical and medical hospital staff
and physicians.
Italiano
•
Nederlands
Users
Polski
the precautionary measures listed below taken. Please read
about additional procedures and precautionary measures in
appropriate medical publications.
Português
5
Česky
English
394271--J_GA_Reocor_D_mul.book Page 5 Monday, January 26, 2015 3:35 PM
394271--J_GA_Reocor_D_mul.book Page 6 Monday, January 26, 2015 3:35 PM
6
Lead connection
Behavior
during use
Pacing with
high rates
•
The connections of Reocor D and the temporary pacing
leads must be secured and checked regularly.
•
The patient cable must first be connected to Reocor D
and then to the leads.
•
The temporary leads, to which the Reocor D is connected,
represent a low-impedance conductor to the myocardium for electric current. Therefore line-powered devices
that are operated in the patient's vicinity must be
grounded in accordance with established guidelines.
•
When handling already implanted leads, their connector
pins and metal contact surfaces must not touch or come
into contact with electrically conductive or wet surfaces.
•
If the cable has become disconnected from the Reocor D,
it must be reconnected immediately and the security of
the connection inspected.
•
When using unipolar leads, two unipolar leads must be
used for each chamber for effective pacing.
•
During use of Reocor D, the protective cover must be
completely closed to prevent inadvertent resetting of the
programmed parameters.
•
Secure Reocor D either horizontally on a non-slip surface
or on the patient with an armband, or operate it from a
hanging position on the infusion stand using the hanger
on the back of the device.
•
Reocor D must not be worn directly on the skin.
•
During use of Reocor D, the heart rate of the patient is to
be monitored with an ECG monitor with alarm function.
•
For disturbances caused by electromagnetic interference
(EMI), Reocor D will trigger asynchronous pacing when
certain limits are exceeded. Depending on whether the
interference was sensed in the atrium or in the ventricle,
the following operating modes will result for the duration
of the interference:
•
Undisturbed operating mode
Interference by EMI
SSI, SST
S00
VDD
VAT, VVI, V00
DDD
DAD, DVI, D00
Pacing the heart with rates higher than 180 ppm over a
long period of time can cause severe hemodynamic complications. Pacing with high rates should only be performed when continuous monitoring is ensured.
•
Inspection and maintenance work should be performed
according to page 26.
•
Do not use rechargeable batteries. The service time of
these batteries is difficult to estimate, making it possible
to inadvertently exceed the ERI1 time, resulting in sudden
cessation of pacing.
Only 9-volt batteries with the international code
IEC 6LR61 may be used. When using the battery type
MN 1604 Duracell® Procell®, external pacing is possible
for at least 500 hours before the battery must be
replaced.
It is possible to exchange a battery while Reocor D is in
use. The device remains ready for use for at least 30 s at
the ambient temperature (20 ± 2°C) when the battery is
removed.
For safety reasons, the patient should be paced by
another source during the battery replacement.
Electrocautery
•
Electrocautery should definitely not be performed at a
distance less than 15 cm from the leads, as it is possible
that ventricular fibrillation will be induced or the pacemaker could be damaged.
The pacemaker should be set to asynchronous pacing to
avoid pacemaker inhibition due to interference signals.
During treatment, the peripheral pulse of the patient
should be continuously monitored. After treatment, the
pacemaker function must be inspected.
Defibrillation
1
•
The circuitry of Reocor D is protected from the shock
energy that can be induced by a defibrillation. Nonetheless, the following precautionary measures should be
taken, if possible:
Reocor D reminds you to replace the battery with the ERI signal (Low battery LED flashes).
Deutsch
A damp cloth and mild soap can be used for cleaning.
Strong cleaning agents or organic solvents should be
avoided, as these can corrode the plastic housing.
Español
•
Français
If the device will be stored for a long period of time, the
battery should be removed to prevent damage due to
leakage.
Magyar
•
Italiano
After a defibrillation or cauterization, the device should
be subjected to a function test.
Nederlands
Battery operation
•
Polski
Behavior after use
Português
7
Česky
English
394271--J_GA_Reocor_D_mul.book Page 7 Monday, January 26, 2015 3:35 PM
394271--J_GA_Reocor_D_mul.book Page 8 Monday, January 26, 2015 3:35 PM
8
— The set energy should not be higher than necessary
for defibrillation.
— The distance between the leads of the cardiac defibrillator and the leads of Reocor D should be at least
10 cm.
— After a defibrillation, Reocor D must be switched off
and then on again so that the device can perform a
complete self-test.
Additionally, after defibrillation the pacemaker function
and pacing threshold must be checked and monitored for
a sufficient period of time.
Interference
resistance
•
Reocor D is protected against interference due to electromagnetic radiation, electrostatic discharge and
against transferred interference. The radiation emitted by
Reocor D has also been minimized. Thus, the device
meets the requirements of IEC 60601-1-2. However, it
still is possible that strong electromagnetic fields which
can occur (e.g., in the direct vicinity of electric motors,
transformers, power lines, and other electric devices)
may impair the function of Reocor D.
Electromagnetic interference can lead to the following
errors:
— Unexpected reset (self-test is executed).
— Cardiac events are sensed but do not appear on the
ECG monitor.
— Reocor D exhibits unexpected behavior.
Measures to restore proper function of Reocor D:
— Check the connection between device and temporary
pacing leads and adjust, if necessary.
— Correctly adjust the sensitivity of the Reocor D: Often,
the sensitivity safety margin is half the average
intrinsic signal amplitude.
— Turn off all electric devices in the vicinity of Reocor D
if they can cause electromagnetic interference and
their operation is not absolutely necessary.
— Move the interference source to a location where the
interference cannot have an affect on the Reocor D.
— If safe to do: Switch Reocor D off and then on again to
reset the pacemaker to interference-free operation.
— If the technical failure persists, please contact
BIOTRONIK.
•
If the atrial sensitivity is set to a value less than 1 mV,
interference from electromagnetic fields could result.
Thus, if possible sensitivity values higher than 1 mV
should be programmed. Programming sensitivity values
to less than 1 mV requires explicit medical necessity.
Values like this can only be set and retained with physician supervision.
English
394271--J_GA_Reocor_D_mul.book Page 9 Monday, January 26, 2015 3:35 PM
9
•
The Sense (green) LEDs signal sensing of a P wave or
R wave.
•
The Pace (yellow) LEDs signal pulse delivery.
•
The LEDs and acoustic signals also provide the following
warnings during operation:
Warning
Meaning
Acoustic signal for 2 s
A pulse amplitude of < 1 V or a rate Check whether the set values
of > 180 ppm is programmed.
are suitable for the patient.
Error correction
Fast sequence of sounds
Impedance outside of the permissible range
Check whether all connectors
are securely plugged in.
Check whether the leads have
the desired position.
Acoustic signal and flashing High rate protection has been
of the Pace and Sense LEDs triggered; self-test failed.
Turn the device off and return
it to BIOTRONIK.
Low battery LED flashes.
Replace the battery; about 36
hoursa) of service time remain.
a)
ERI has been reached.
When using the battery type MN 1604 Duracell®, Procell®
Deutsch
A required battery replacement is indicated by the flashing red Low battery LED.
Español
•
Français
When the self-test finds a defect, all LEDs flash continuously and warning signals sound.
Magyar
•
Italiano
If the self-test does not find any errors, the LEDs and
warning signals turn off.
Nederlands
•
Polski
During the self-test after switching on Reocor D, all LEDs
light up and brief acoustic signals can be heard. The selftest is completed after a few seconds.
Português
•
Česky
Visual and Acoustic Signals
394271--J_GA_Reocor_D_mul.book Page 10 Monday, January 26, 2015 3:35 PM
10
Operating Notes
General Remarks
Caution!
The connections of Reocor D and the temporary pacing leads
must be secured and checked regularly.
Self-test
After the device is switched on, Reocor D executes a self-test
for a few seconds. This includes:
•
Check of the program code and the microprocessor
•
Memory test
•
Function test of the LEDs and the acoustic signals
•
Test of the pacing and sensing capability
•
Test of the efficacy of high rate protection
When the self-test finds a defect, all LEDs flash continuously
and acoustic warning signals sound. In this case, the pacemaker must be turned off and sent to BIOTRONIK.
If the self-test did not find any errors, Reocor D begins
delivering pacing pulses in accordance with the programmed
parameters. The negative electrode (cathode) should therefore only be connected when it has been ensured that the
pacing mode, pacing rate, pulse amplitude and sensitivity
have been programmed correctly.
Setting the rotary switch for the operating mode to OFF
prevents pacing pulses from being delivered to the patient
immediately after connecting the leads.
Warning messages
The following warnings can appear during use:
•
A required battery replacement is indicated by the flashing Low battery LED.
•
If the lead impedance is not within a permissible range
(e.g. due to a fractured lead or a loose contact), a rapid
sequence of sounds can be heard no earlier than
5 seconds after activation.
•
If the pulse amplitude is set to values <1 V or the rate to
values >180 ppm, an acoustic signal sounds for about
2 seconds.
•
If the rate is too high (see page 31 “High rate protection”)
or if the self-test has not passed, an acoustic signal
sounds and the Pace and Sense LEDs flash.
English
394271--J_GA_Reocor_D_mul.book Page 11 Monday, January 26, 2015 3:35 PM
11
17
D
0
30
0
10
80
60
10
7
0,1
3
0,5
3
1
2
5
3
4
12
17
10
5
5
10
7
8
2
7
0,1
14
11
1
3
Magyar
2
1
5
20
17
0 ,5
Français
2
0, 3
0, 2
Español
0
40
20
0
0, 5
300
0
25
20 0
18
0
1
12
0, 7
0
17
4 00
35
0
10
0
0
10
75
50
0
60 0
60
50
V0 0
80
0
1000
70
VV I
T
25
15
12
0
VV
40
Deutsch
14 0
DD
20
0
250
D
VD
D0 0
Česky
Operating Devices and LEDs
Nederlands
Italiano
b
DIFF.-
Polski
INDIFF.+
Português
Figure 1: Reocor D operating panel
394271--J_GA_Reocor_D_mul.book Page 12 Monday, January 26, 2015 3:35 PM
12
Designation
1a
Function
Atrial channel connection
1b
For cables and leads with 2-mm plugs or for Redel adapters
Ventricular channel connec- (red = plus; blue = minus)
tion
2
Battery compartment
For 9-V block battery
3
Low battery LED
Provides a warning when the battery voltage is too low
4
Ventricle Pace LED
Yellow display for ventricular stimulated event
5
Ventricle Sense LED
Green display for sensed R wave
6
Ventricle Ampl. control dial
Setting the ventricular pulse amplitude
7
Ventricle Sens. control dial
Setting the ventricular sensitivity
(cannot be used in D00 and V00 operating modes)
8
Atrium Pace LED
Yellow display for atrial stimulated event
9
Atrium Sense LED
Green display for sensed P wave
10
Atrium Ampl. control dial
Setting the atrial pulse amplitude
(cannot be used in VDD operating mode)
11
Atrium Sens. control dial
Setting the atrial sensitivity
(cannot be used in D00 operating mode)
12
Start burst
Starts the atrial burst function
13
Velcro harness and hanger
(on back)
Securing Reocor D to patient, bed or infusion stand
14
Burst rate atrium control dial Setting the atrial burst rate
15
AV delay control dial
Setting the AV delay
16
Select burst
Selection of the atrial burst function
17
Mode dial
Selection of the pacing operating mode and off switch
18
Rate control dial
Setting the pacing rate
Table 1: Description of elements in Figure 1
Bold labels of the operating devices indicate safe values for
the intended use of the device.
English
394271--J_GA_Reocor_D_mul.book Page 13 Monday, January 26, 2015 3:35 PM
13
Figure 2: Correct positioning of the protective cover
Español
Deutsch
The protective cover is locked when the cover has been
pushed to the stop, passing two snap-in points and when the
lever is resting on the rail (see Figure 2).
Correct:
False:
Česky
Protective Cover
Push the release lever up with one hand.
The protective cover can be removed completely for cleaning.
Push the cover all the way down to the stop and then remove
it.
Caution!
During use of Reocor D, the protective cover must be locked
to prevent inadvertent resetting of the rotary switch and control dial, and thus of the programmed parameters.
Nederlands
Slide the protective cover upwards along the rail until it
locks into place (see Figure 2).
Polski
To lock the protective cover:
Português
Figure 3: Unlocking the protective cover
Italiano
Magyar
At the same time, use your other hand to slide down the
protective cover.
Français
To release the protective cover (see Figure 3):
394271--J_GA_Reocor_D_mul.book Page 14 Monday, January 26, 2015 3:35 PM
14
Lead Connection
Reocor D has four connector ports for direct connection of
leads with touch-proof 2-mm plugs.
To connect cables with Redel plugs, the Redel adapter must
be fitted on the correct side and screwed in (Figure 4). The
Redel adapter is attached to the correct side if it can be
screwed on to the Reocor D.
Note:
The function of the Redel adapter is only guaranteed if it is
attached to the correct side!
Figure 4: Redel adapter for Reocor D
Reocor D can be used with the following patient cables and
adapters:
•
Patient cable PK-175 with four screw terminals for temporary leads on the patient side and Redel plug on the
Reocor D side (use the Redel adapter)
Figure 5: Patient cable PK-175
Patient cable PK-82 with two insulated alligator clips for
temporary leads on the patient side and two touch-proof
2-mm plugs on the Reocor D side.
Figure 6: Patient cable PK-82
•
Patient cable PK-83-B for single-chamber pacing with
two screw terminals for temporary leads on the patient
side and a Redel plug on the Reocor D side (use the Redel
adapter). Temporary leads that are connected with the
PK-83-B are connected to the ventricular channel of
Reocor D.
Deutsch
•
Español
15
Česky
English
394271--J_GA_Reocor_D_mul.book Page 15 Monday, January 26, 2015 3:35 PM
Français
Redel plug
Patient cable PK-83 for single-chamber pacing with two
insulated screw terminals for temporary leads on the
patient side and two touch-proof 2-mm plugs on the
Reocor D side.
Patient cable PK-67-L, PK-67-S differ only in length.
Figure 9: Patient cable PK-67-L (2.6 m) and PK-67-S (0.8 m)
Polski
•
Português
Figure 8: Patient cable PK-83
Nederlands
Italiano
•
Magyar
Figure 7: Patient cable PK-83-B
394271--J_GA_Reocor_D_mul.book Page 16 Monday, January 26, 2015 3:35 PM
16
•
Adapters
The adapters from Figure 10 fit the patient cables PK-67 L/S
(Figure 9):
Figure 10: Adapters for the patient cables PK-67-L and PK-67-S
PA-1-B for the connection of touch-proof 2-mm plugs or
MHW adapters (adapters for heart wires)
PA-2 IS-1
PA-4 with alligator clips
•
Patient cable PK-141 with four alligator clips on the
patient side and Redel plug on the Reocor D side (use the
Redel adapter).
Figure 11: Patient cable PK-141
•
Adapter cable ADAP-2R is a reusable cable to connect
the single-use cables according to Figure 13 (for USA
only) to Reocor D (use the Redel adapter).
Figure 12: Adapter cable ADAP-2R
English
394271--J_GA_Reocor_D_mul.book Page 17 Monday, January 26, 2015 3:35 PM
17
Cable for single use (USA only)
Danger to patient by damaged cables.
Damaged cables are limited in functionality and pose a danger to patients. Do not use damaged cables.
WARNING!
Danger from loss of function.
Damp cables have limited functionality and pose a danger to
patients. Do not use damp cables.
WARNING!
Danger from electrical currents.
Unused cable contacts can conduct electrical currents to
patients. Adhere unused cable contacts close to the patient.
Caution!
Allergic reactions and inflammations.
Prevent the cable from coming into contact with the patient's
wounds or skin.
Note:
Ensure correct fitting of the insulators prior to using the
cables.
Note:
Do not connect the patient cable to the temporary pacing lead
of the patient before the connection has been established to
the Reocor D.
Direct connection
If Reocor D is used without the Redel adapter, temporary
catheters and heart wires can be connected to the patient
cables PK-82 and PK-83 directly at the connector ports A+, Aand V+, V-.
Español
Français
Connection
WARNING!
Magyar
Figure 14: Cable PK-155
Italiano
The single-use cables PK-155 and Remington 301-CG
(USA only) with alligator clips (Figure 14) are connected to the
patient through the cable PK-67-S.
Nederlands
Cable for single use
Polski
•
Português
Figure 13: Single-use cable by Remington Medical Inc. (USA only)
Deutsch
Česky
•
394271--J_GA_Reocor_D_mul.book Page 18 Monday, January 26, 2015 3:35 PM
18
Patient cable
The patient cable is connected via a Redel adapter to the
Reocor D.
Fit the Redel adapter to Reocor D.
Screw the adapter in tight.
Insert the Redel plug of the patient cable into the Redel
port of the adapter.
Note:
No dual-chamber pacing is possible with the patient cable
PK-83-B. Leads that are connected with the PK-83-B are
connected to the ventricular channel of Reocor D.
Connection Variants
Temporary catheters with 2-mm plugs or
heart wire with 2-mm adapter
You have the option to connect Reocor D directly to a temporary catheter with touch-proof 2-mm plug or to a heart wire
with 2-mm adapter, without any other cables or adapters. All
other options are listed in the following table.
Connection:
patient-side
BIOTRONIK cable
Connection
device-side
Reocor D
connection
Recommended connections
Direct connection (without BIOTRONIK cables)
2-mm connector port
2 mm
PK-67-S/L with PA-1-B
Redel plug
Redel adapter
Screw terminals
PK-175 with TC Adapt
Redel plug
Redel adapter
Screw terminals
PK-83 with TC Adapt (2x)
2-mm plug
2-mm connector port
Possible connections
Alligator clips
PK-141
Redel plug
Redel adapter
Alligator clips
PK-67-S/L with PA-4
Redel plug
Redel adapter
Alligator clips
PK-67-S/L with PK-155 (2x)
Redel plug
Redel adapter
Alligator clips
PK-82 (2x)
2-mm plug
2-mm connector port
Heart wire with break-off needle or with
flexible end (max. 2.3 mm in diameter)
Connection:
patient-side
BIOTRONIK cable
Connection
device-side
Reocor D
connection
Recommended connections
Screw terminals
PK-175
Redel plug
Redel adapter
Screw terminals
PK-83 (2x)
2-mm plug
2-mm connector port
Possible connections
Alligator clips
PK-141
Redel plug
Redel adapter
Alligator clips
PK-67-S/L with PA-4
Redel plug
Redel adapter
Alligator clips
PK-67-S/L with PK-155 (2x)
Redel plug
Redel adapter
Alligator clips
PK-82 (2x)
2-mm plug
2-mm connector port
English
394271--J_GA_Reocor_D_mul.book Page 19 Monday, January 26, 2015 3:35 PM
19
Redel plug
Redel adapter
Recommended connections
IS-1 connector
port
PK-67-S/L with PA-2
Possible connections
Alligator clips
PK-141
Redel plug
Redel adapter
Alligator clips
PK-67-S/L with PA-4
Redel plug
Redel adapter
Alligator clips
PK-67-S/L with PK-155 (2x)
Redel plug
Redel adapter
Alligator clips
PK-82 (2x)
2-mm plug
2-mm connector port
Polarity
Reocor D principally paces in bipolar mode, but it can be used
with bipolar or unipolar temporary pacing leads.
If unipolar leads are used, two leads must be connected for
each chamber.
Separating connections
Disconnect patient cables from the temporary pacing leads of
the patient or disengage the direct connection.
Separating Redel plug
•
Retract the retaining ring at the Redel plug and pull the
Redel plug off the Redel port.
Deutsch
Reocor D
connection
Español
Connection
device-side
Français
BIOTRONIK cable
Magyar
Connection:
patient-side
Česky
Implanted lead with IS-1 connector
•
Insert battery.
•
Push protective cover down.
•
Prepare patient: Place the leads but do not connect them
to the pacemaker yet.
•
Prepare Reocor D:
Nederlands
The operation of Reocor D is identical for all operating
modes. The operating steps should be carried out in the following order (the numbers in parentheses refer to Figure 1 on
page 11).
Italiano
Start Up
Set the pacing amplitudes for atrium1 and ventricle with
the Atrium Ampl. (10)1 and Ventricle Ampl. (6) control
dials.
1
Only for 2-chamber pacing
Português
Set the AV delay with the AV delay control dial (15)1.
Polski
Set the pacing rate with the Rate control dial (18).
394271--J_GA_Reocor_D_mul.book Page 20 Monday, January 26, 2015 3:35 PM
20
•
Select the pacing mode with the dial Mode (17). The
device will be activated at the same time.
•
After the internal self-test has been completed successfully, all 5 LEDs on the operating panel will simultaneously flash twice.
•
If the Low battery LED (3) flashes, the battery needs to be
exchanged (for battery exchange, see page 20).
•
Connect leads, the yellow Atrium Pace (8)1 and Ventricle
Pace (4) LEDs will flash in synchrony with the atrial and
ventricular pacing pulses.
•
Set the sensitivity for atrium and ventricle with the Atrium
Sens. (11)1 and Ventricle Sens. control dials (7) such that
the green Atrium Sense (9)1 and Ventricle Sense (5) LEDs
flash in synchrony with each sensed atrial or ventricular
event.
A sufficient safety margin should be considered to ensure
reliable sensing.
•
Caution!
Monitor the ECG of the patient and adjust amplitude
and/or sensitivity, if necessary.
During use of Reocor D, the heart rate of the patient must be
monitored with an ECG monitor with an alarm function.
Attachment
Reocor D must be operated either horizontally on a non-slip
surface or affixed to the patient with an armband, or from a
hanging position on the infusion stand using the hanger on
the back of the device.
To attach Reocor D to an infusion stand, unscrew the hanger
from the back of the device. This ensures safe operation and
unburdens the patient cables.
Battery Exchange
When the Low battery LED (3) starts flashing, it indicates that
the battery is almost depleted. When using the battery type
MN 1604 Duracell® Procell® approximately 36 hours of service time remain. However, the battery should be replaced as
soon as possible.
Reocor D must be operated with a 9-V battery, international
code IEC 6LR61. Only alkaline manganese batteries should
be used. When using the battery type MN 1604 Duracell®
Procell®, external pacing is possible for at least 500 hours at
20 ± 2°C before the battery must be replaced.
Do not use rechargeable batteries. The service time of these
batteries is difficult to estimate, making it possible to inadvertently exceed the ERI, resulting in a sudden loss of pacing.
The battery compartment (2) is located on the right side of the
device, and can be opened by pushing the blue slider upwards
and pulling out the drawer towards the right. Remove the
battery carefully.
To protect the battery poles, a rubber plug can be put on the
new battery. Remove it before you insert the new battery.
Caution!
The preferred pole orientation is marked in the battery compartment. When inserting the new battery you only need to
ensure that the battery poles point to the middle of the housing. The position of the plus and minus pole can be selected
freely.
Note:
If the pacemaker is stored or will not be used for a long period
of time, it is recommended to remove the battery to prevent
damage due to leakage.
Polski
Close the drawer and press the blue slider down until it snaps
in place with an audible click.
Português
Figure 15: Inserting the battery
Nederlands
Italiano
Magyar
Insert the new battery with the bottom (Figure 15) down first
into the battery compartment.
Deutsch
For safety reasons, the patient should be paced by another
source during the battery replacement.
Español
It is possible to exchange a battery while Reocor D is in use.
The device remains ready for use for at least 30 s at the ambient temperature (20 ± 2°C) when the battery is removed.
Français
21
Česky
English
394271--J_GA_Reocor_D_mul.book Page 21 Monday, January 26, 2015 3:35 PM
394271--J_GA_Reocor_D_mul.book Page 22 Monday, January 26, 2015 3:35 PM
22
Pacing Modes and Parameters
Pacing Modes
Reocor D operates in one of the following six pacing modes:
DDD
Synchronous A-V pacing with sensing and pacing in the atrium as well as in the ventricle.
VDD
Synchronous, ventricular pacing with atrial tracking.
D00
Asynchronous A-V pacing, no sensing in both chambers.
VVI
Sensing and pacing in the ventricle
V00
Asynchronous pacing in the ventricle
VVT
Like VVI, but immediate pulse delivery upon sensing of a ventricular event outside the
refractory period
In case of disturbances caused by electromagnetic interference (EMI), Reocor D will select asynchronous pacing
when certain limits are exceeded. Depending on whether the
interference is sensed in the atrium or in the ventricle, the
following operating modes will result for the duration of
the interference:
Undisturbed operating mode
Interference by EMI
SSI, SST
S00
VDD
VAT, VVI, V00
DDD
DAD, DVI, D00
Refractory Periods
The rate up to which the ventricles are paced synchronous to
atrially sensed events (upper rate) is determined by the atrial
refractory period (ARP). The temporal sequence is started by
atrially sensed and paced events, as well as by premature
ventricular contractions, which reset the timing cycle. If the
upper rate is exceeded, every second atrial pulse will fall into
the ARP, will not be sensed, and will not trigger a ventricular
pulse. The ventricular pacing rate will continue at a ratio of
2:1. (Figure16).
English
394271--J_GA_Reocor_D_mul.book Page 23 Monday, January 26, 2015 3:35 PM
200 ms
Over 200 ppm
175 ms
Rate
The rate can be continuously adjusted from 30 ppm to
250 ppm with the Rate control dial (18). If a value greater than
180 ppm is set, the device will sound a warning signal for
two seconds.
WARNING!
Pacing the heart with rates higher than 180 ppm over a long
time period can cause severe hemodynamic complications.
Pacing with high rates should only be performed when continuous monitoring is ensured.
Français
Magyar
225 ms
150 ppm to 200 ppm
Italiano
Refractory period VRP
Under 150 ppm
Nederlands
Pacing rate
Polski
The total atrial refractory period (TARP) of Reocor D is calculated by the sum of 175 ms and the programmed AV delay;
however, its minimum value is 400 ms below a pacing rate of
120 ppm. Above this rate, the minimum TARP is reduced to
240 ms.
The ventricular refractory period VRP of Reocor D depends
on the pacing rate:
Português
Figure 16: Reaction of the upper tracking rate during atrial tachycardia
(basic rate 72 ppm).
Español
Deutsch
Česky
23
394271--J_GA_Reocor_D_mul.book Page 24 Monday, January 26, 2015 3:35 PM
24
AV Delay
The AV delay can be continuously adjusted from 15 ms to
400 ms with the AV delay control dial (15). Short AV delays
may be selected for special indications, e.g., in case of recurring tachycardia.
Reocor D limits the AV delay upwards to half the basic rate
interval.
Pulse Amplitude – Atrium/Ventricle
The pulse amplitudes for the atrium and ventricle can be
adjusted with the Ampl. control dials (10), (6) within a range
from 0.1 V to 17 V. If a value less than 1 V is set, the device will
sound a warning signal for two seconds.
The pulse width is 1 ms.
Pacing should be checked regularly to ensure that pacing
takes place and that a sufficient safety margin has been set.
Sensitivity – Atrium
The sensitivity can be adjusted with the Atrium Sens. control
dial (11) between 0.2 mV and 10 mV. It should be checked
regularly to ensure that correct sensing takes place and that
a sufficient safety margin has been set.
Sensitivity – Ventricle
The sensitivity can be adjusted with the Ventricle Sens.
control dial (7) between 1 mV and 20 mV. The sensitivity
should be checked regularly to ensure that correct sensing
takes place and that a sufficient safety margin has been set.
Cross Channel Blanking
After a stimulus has been delivered, sensing is suppressed
for 19 ms ± 3 ms in the opposite channel to prevent far-field
sensing.
Interference interval
The interference interval is started by both atrial and ventricular paced and sensed events.
The interval is reset by noise sensed in any channel during
the interval length of 80 ms, leading to asynchronous pacing
at the programmed rate while the interference lasts.
25
For instance, in the operation mode DDD, an atrial interference that does not affect the ventricular channel leads to DVI
pacing. Sensing of noise in the ventricular channel leads to
DAD pacing.
Česky
English
394271--J_GA_Reocor_D_mul.book Page 25 Monday, January 26, 2015 3:35 PM
Pacing the heart with rates higher than 180 ppm over a long
time period can cause severe hemodynamic complications.
Pacing at high rates should only be performed when continuous monitoring is ensured.
The mode for high-frequency pacing is used to terminate
certain supraventricular tachycardias (SVT) and should only
be considered for atrial applications. The application of asynchronous high-frequency stimuli can interrupt an SVT by
depolarizing portions of a reentry path. When an ectopic atrial
focus is responsible for an SVT, the application of highfrequency stimuli in the atrium can also lead to increased
suppression of the ectopic center.
Various risks have to be considered in association with highfrequency atrial pacing. The risks include possible ventricular
pacing and ventricular tachycardia or fibrillation. This can be
caused by poor placement of the leads or the presence of
anomalous stimulus conduction paths that circumvent the
normal atrioventricular stimulus conduction (e.g. WolffParkinson-White Syndrome). Patient discomfort and asystole
after high-frequency pacing are other possible problems.
Español
Français
Magyar
After a burst stimulation in the atrium, the ventricular blanking interval can prevent sensing of intrinsic signals and lead
to asynchronous pacing in the ventricle.
Italiano
WARNING!
Nederlands
This function is activated with two key buttons: First the
Select burst key button (16) must be pressed and then, within
two seconds, the Start burst key button (12). The pulse
delivery then lasts as long as the Start burst key button is
pressed. During this activation, the ventricular channel will
continue to pace at the programmed rate, (which can be
adjusted during this process). If an inhibiting operating mode
has been programmed, pacing will be inhibited in the ventricle.
Polski
The rate of the Burst rate atrium function can be selected
with the control dial (14) between 60 ppm and 1000 ppm.
Português
Burst
Deutsch
Interference in both channels results in D00 pacing.
394271--J_GA_Reocor_D_mul.book Page 26 Monday, January 26, 2015 3:35 PM
26
Handling, Care and Maintenance
Reocor D
Reocor D is a highly developed precision device that must be
treated with care. Mechanical impact, e.g. by dropping the
device, can impair its function.
Please return the device to BIOTRONIK in case of damage or
impaired function.
Prior to use, the pacemaker should be stored at least two
hours under the ambient conditions specified for operation
(see page 31).
Housing, operating devices, connections, and patient cables
must be visually inspected for mechanical damage, deformation, loose parts, cracks, and dirt before each use.
WARNING!
Never use a damaged device or a device that exhibits abnormal behavior; especially if it has been dropped or could have
been damaged by high-frequency or defibrillation voltage.
Secure Reocor D either horizontally on a non-slip surface or
on the patient with an armband, or operate it from a hanging
position on the infusion stand using the hanger on the back of
the device.
Caution!
If an armband is used, Reocor D must not be worn directly on
the skin.
Cleaning
A moist cloth and, if necessary, mild soap can be used to
clean Reocor D. Strong cleaning agents or organic solvents
(such as ether or gasoline) should be avoided, as these can
corrode the plastic housing.
Disinfection
For disinfection, wipe the device with a cloth soaked with a
disinfectant solution (e.g. Aerodesin 2000 or Lysoform D).
When mixing the solution, follow the dilution measure stated
by the manufacturer.
Note:
After cleaning or disinfection, Reocor D must not be used for
one hour.
Sterilization
Reocor D cannot be sterilized. If the device needs to be used
in a sterile environment, it can be packed into a sterile cover.
Annual checks of the device by manufacturer-authorized
technicians are recommended.
Caution!
Even though Reocor D is protected from dripping water, the
device should be kept clean and dry.
English
394271--J_GA_Reocor_D_mul.book Page 27 Monday, January 26, 2015 3:35 PM
27
After disinfection, the cable must be cleaned from residues of
the disinfectant by rinsing it in electrolyte-free water.
Sterilization
All patient cables can be sterilized as follows unless otherwise stated in the patient cables' documents:
•
Steam sterilization at 121 °C and 1.1 bar for 20 min.
PK-175 and PK-83-B patient cables can also be sterilized as
follows:
•
Steam sterilization at 134 °C and 3.0 bar for 18 min.
Maintenance, Service, Inspections
The only required maintenance action is the replacement of
the battery (see page 20).
No other maintenance work is required.
Test before use
A short test should be performed prior to each use of the
device. It consists of a visual inspection and a simple function
test.
Deutsch
Español
Français
For disinfection in a disinfectant bath, an aldehyde-based
(e.g. Lysoformin 3000) or alcohol-based (e. g. Aerodesin 2000)
disinfectant agent must be used in accordance with the
manufacturer information and in accordance to the respective hospital guidelines.
Visual inspection:
•
Inspect the housing for mechanical damage, deformation, loose parts, cracks, etc.
•
Inspect the cable connection area for mechanical
damage.
•
Inspect the labeling for legibility.
Polski
Disinfection
Magyar
The use of a wiping cloth with regular, alcohol-free hand soap
or the cleaning agent Stabimed by Braun is the recommended cleaning method for the cables. Subsequently, the
cables must be cleaned from cleaning agent residue with
electrolyte-free water and then wiped with a clean, dry cloth.
Italiano
The reusable patient cables can be cleaned and disinfected
with hospital cleaning agents following many different
methods. However, aggressive chemicals (such as acetone)
may never be used.
Português
Cleaning
Nederlands
Prior to opening, the package of a sterile cable must be
inspected for damage to determine whether sterility has
been compromised.
Česky
Reusable Patient Cables
394271--J_GA_Reocor_D_mul.book Page 28 Monday, January 26, 2015 3:35 PM
28
Function test:
The result of the self-test that runs automatically after
activation must be heeded.
Inspection
Inspections should be performed:
•
after an application together with high-frequency surgical instruments or defibrillators,
•
when malfunctions are suspected,
•
once a year.
The inspection should follow the manufacturer specifications. These are made available upon request.
The specification lists all required test steps and the necessary equipment.
Disposal
Reocor D is marked with the symbol of a crossed-out garbage can on its type plate. The symbol indicates that the
European guideline 2002/96/EC on waste electrical and electronic equipment (WEEE directive) applies to the disposal
method of the device.
Old devices and accessories that are no longer needed,
such as patient cables and adapters, should be returned to
BIOTRONIK. This ensures that proper disposal will be carried
out in accordance with the national implementations of the
WEEE directive.
Note:
Cables to be disposed of due to contact with blood must be
disposed of as medical waste, in accordance with environmental regulations. Non-contaminated cables must be
disposed of in accordance with the European Directive 2002/
96/EC regarding waste electrical and electronic equipment
(WEEE).
Depleted batteries must be treated as hazardous waste and
disposed of by the user.
If you have any questions, please contact BIOTRONIK.
English
394271--J_GA_Reocor_D_mul.book Page 29 Monday, January 26, 2015 3:35 PM
29
The temporary leads that are connected to Reocor D represent a low-impedance conductor to the myocardium for
electric current. Therefore line-powered devices that are
operated in the patient's vicinity must be grounded in accordance with established guidelines.
The pacemaker must not be used in areas at risk for explosion.
All additional maintenance work and repairs should only be
performed by BIOTRONIK.
Deutsch
The closed protective cover protects the pacemaker
against dripping water.
Español
•
Français
The design meets the standard for the device class CF
(cardiac floating) and is approved for direct treatment of
the heart. The pacemaker complies with the requirements for defibrillation protection stipulated in the international standards.
Magyar
•
Italiano
No metal parts that can be touched, according to the
definition of the IEC.
Nederlands
WARNING!
•
Polski
The following special features offer safety for the patient:
Português
The external pacemaker Reocor D meets the international
standards for the safety of electro-medical devices according
to IEC 60601-1 and IEC 60601-1-2, as well as the international standard IEC 60601-2-31 for temporary, external
pacemakers.
Česky
Technical Safety
394271--J_GA_Reocor_D_mul.book Page 30 Monday, January 26, 2015 3:35 PM
30
Technical Data
Symbols
Follow the instructions for use in the technical manual.
Indication of the placement of the battery in the compartment
Disposal according to the WEEE directive
Classification: CF (cardiac floating) applied part, defibrillation
protected
IP31
Water-repellent, protection degree IP31
OFF
Off (on the Mode dial)
Adjustable parameters
Pacing modes
DDD, D00, VDD, VVI, V00, VVT
Basic rate
(30 … 250 ppm) ± 1 ppm
At a rate of > 180 ppm a warning
tone is emitted
Pulse amplitude (A, V)
0.1 … 17 V ± max.
(50 mV, 10%)
At a pulse amplitude of < 1 V a
warning tone is emitted
Sensitivity (A)
0.2 … 10 mV ± 15%
With respect to 15 ms sin2 pulse
Sensitivity (V)
1 … 20 mV ± 15%
With respect to 40 ms sin2 pulse
AV delay
(15 … 400 ms) ± 4 ms
Burst rate (A)
(60 … 1000 ppm) ± 20 ppm
Fixed parameters
Pulse width
1 ms ± 5%
Auto short after pace
< 20 ms ± 10%
Interference interval
80 ms ± 5 ms
In channel blanking
110 ms ± 3 ms
Cross channel blanking
19 ms ± 3 ms
Total atrial refractory
period (TARP)
AVD + 175 ms ± 5 ms
TARP minimum
for (30 … 120) ppm
for (121 … 250) ppm
400 ms ± 5 ms
240 ms ± 5 ms
English
394271--J_GA_Reocor_D_mul.book Page 31 Monday, January 26, 2015 3:35 PM
31
214 ms ± 10%
Pulse waveform
Asymmetric, biphasic
Lead impedance monitoring
Acoustic warning
Above 2000 W ± 15%, at 5 V amplitude
Lead connection
Touch-proof 2-mm connector ports;
Redel port, 6-pin via Redel adapter
Electrical data/battery
Battery
•
•
•
Alkaline-manganese type: IEC 6LR61 / ANSI 1604A
9 V leak-proof
E.g. MN1604 Duracell® Procell®a)
Polarity
Cathodic
Inverse-polarity protection
None: Polarity is irrelevant
Power consumption
Typically 1 mA (70 ppm, 5.0 V, 500 Ω)
Service time with
new batteryb)
•
•
•
500 h (-10%) at 20°C (±2°C)
At: 70 ppm, 5 V, mode DDD, 500 ohm
Until: ERI signal (EOS warning)
End of service (EOS)
Flashing “Low battery” LED
Remaining service time
after ERI signalb)
•
•
36 hours
At: 70 ppm, 5 V, mode DDD, 500 ohm
Behavior during battery
exchange
•
Device remains ready for use for at least 30 s when the battery
is removed.
The set Mode is retained.
•
a)
b)
Registered trademark of Duracell Inc., Bethel, CT 06801
When using the battery type MN 1604 Duracell® , Procell®
Deutsch
181 … 250 ppm
286 ms = 210 ppm, does not apply
for Burst
214 ms = 280 ppm, does not apply
for Burst
Español
286 ms ± 10%
Français
260 ppm ± 10%
High rate protection
1 … 180 ppm
Magyar
Upper rate
Italiano
225 ms ± 5 ms
200 ms ± 5 ms
175 ms ± 5 ms
Nederlands
Refractory period (V)
(30 … 150) ppm
(151 … 200) ppm
(201 … 250) ppm
Česky
Fixed parameters
+10°C … +40°C
Temperature range for storage
0°C … +50°C
Relative humidity
30% … 75%, non-condensing
Atmospheric pressure
700 hPa … 1060 hPa
Noise level
50 dB
Português
Temperature range for operation
Polski
Ambient conditions
394271--J_GA_Reocor_D_mul.book Page 32 Monday, January 26, 2015 3:35 PM
32
Dimensions, weight, material
Reocor D dimensions
160 mm x 75 mm x 35 mm (without Redel adapter)
Reocor D weight
With battery, with Redel adapter: 325 g ± 10%
Without battery, with Redel adapter: 280 g ± 10%
Without battery, without Redel adapter: 240 g ± 10%
Dimensions of the Redel adapter 76 mm x 35.5 mm x 29.4 mm
for Reocor D
Weight of Redel adapter for
Reocor D
40 g ± 10%
Housing material
Babyblend FR 3000 (PC-ABS)
Classification
Applied part classification
CF (cardiac floating), defibrillation protected
Safety class
II b
Protection degree
IP31 (water-repellent)
Defibrillation-proof level
5 kV
Operating mode
Continuous operation
Estimated service lifea)
(according to EN 60601-1:2007, 4.4)
12 years
a)
The service life describes the expected maximum operating life time of the device after
distribution. The expected maximum operating life time is not supported by any test data.
English
394271--J_GA_Reocor_D_mul.book Page 33 Monday, January 26, 2015 3:35 PM
33
Compliance level Guidelines for the electromagnetic environment
Group 1
The device uses HF energy exclusively for its own
function. Therefore, the high-frequency interference is very low and not likely to cause any
interference in nearby electronic equipment.
HF emission
according to CISPR 11
Class B
Emission of harmonic
oscillations according to
IEC 61000-3-2
Not applicable
The device is suitable for use in all areas,
excluding residential areas and buildings that are
connected directly to the public power supply.
Voltage fluctuations
according to
IEC 61000-3-3
Not applicable
Checking the resistance to interference
Test level
according to
IEC 60601
Compliance
level
Guidelines for the electromagnetic
environment
Electrostatic
discharge (ESD)
according to
IEC 61000-4-2
±6 kV contact
discharge
±8 kV air
discharge
±6 kV contact
discharge
±15 kV air
discharge
Floors should be made of wood,
cement or ceramic tiles. When the
floor consists of a synthetic material, the relative humidity must be at
least 30%.
Fast transient electric Not applicable
interference/bursts
according to
IEC 61000-4-4
Polski
Not applicable
Português
Surges voltages
(surges) according to
IEC 61000-4-5
Italiano
The device is intended for use in an electromagnetic environment as described below. The user of the device should make
sure that it is used in such an environment.
Nederlands
Manufacturer guidelines and declaration –
resistance to electromagnetic interference
(IEC 60601-1-2: Table 2)
Magyar
Français
Emissions test
HF emission
according to CISPR 11
Deutsch
The device is intended for use in an electromagnetic environment as described below. The user should make sure that the
device is used in such an environment.
Español
Manufacturer guidelines and declaration –
electromagnetic radiation (IEC 60601-1-2: Table 1)
Česky
Conformity According to IEC 60601-1-2
394271--J_GA_Reocor_D_mul.book Page 34 Monday, January 26, 2015 3:35 PM
34
Checking the resistance to interference
Test level
according to
IEC 60601
Compliance
level
Guidelines for the electromagnetic
environment
30 A/m
The magnetic field strength should
correspond to the typical value in
business and hospital environments.
Voltage drops, brief
Not applicable
interruptions and fluctuations in the supply
voltage according to
IEC 61000-4-11
Magnetic field at the
3 A/m
supply frequencies
(50/60 Hz) according to
IEC 61000-4-8
Manufacturer guidelines and declaration – resistance to
electromagnetic interference for all external pacemaker
models (IEC 60601-1-2: Table 3)
The device is intended for use in an electromagnetic environment as described below. The user of the device should make
sure that it is used in such an environment.
Checking the resis- Test level according to Compliance
tance to interIEC 60601
level
ference
Guidelines for the electromagnetic
environment
Portable and mobile radio devices
are not used closer to any part of
the device, including cables, than
the recommended safe distance.
Recommended safe distance:
Conducted HF
interferences
according to
IEC 61000-4-6
10 Vrms
10 kHz to 80 MHz
outside of the ISM
bandsa
10 Vrms
10 Vrms
10 kHz to 80 MHz
inside of the ISM
bandsa)
10 Vrms
Radiated HF inter- 10 V/m
ference according to 800 MHz to 2.5 GHz
IEC 61000-4-3
d = 0.35
P
d = 1.2
P
d = 1.2
P
10 V/m
for 80 MHz to 800 MHz
d = 2.3
P
for 800 MHz to 2.5 GHz
COMMENT: These guidelines do not necessarily apply in all situations. The spread of electromagnetic waves is influenced by absorption and reflection from buildings, objects, and humans.
a)
b)
c)
d)
The ISM bands (for industrial, scientific and medical applications) between 150 kHz and 80
MHz are 6.765 MHz to 6.795 MHz; 13.553 MHz to 13.567 MHz; 26.957 MHz to 27.283 MHz and
40.66 MHz to 40.70 MHz.
The compliance level in the ISM frequency bands between 150 kHz and 80 MHz and in the frequency range 80 MHz to 2.5 GHz is designed to reduce the likelihood that mobile communication devices cause interference if they are unintentionally brought into the patient area. For
this reason a greater safety distance is recommended in these frequency ranges (factor 1.2
instead of 0.35).
The field strengths of stationary transmitters, such as base stations for cellular phones and
land mobile radios, amateur radio stations and radio and TV broadcasts cannot be predicted
with accuracy. To assess the electromagnetic environment by fixed HF transmitters, a study of
the location should be considered. If the measured field strength exceeds the HF compliance
level at the location where the device is used, the device must be observed to ensure correct
functioning. Additional measures may be necessary, such as re-orienting or relocating the
external pacemaker.
In the frequency range of 150 kHz to 80 MHz the field strengths should be less than 10 V/m.
Deutsch
Español
Français
Interference can occur in devices
that have the following warning
sign.
Magyar
The field strength of stationary
transmitting devices must be measured on sitec) and must be lower
than the compliance level at all
frequenciesd).
Italiano
P is the maximum rated power of
the transmitter in watts [W] according to the information from the
transmitter manufacturer and d is
the recommended safe distance in
meters [m]b).
Nederlands
Guidelines for the electromagnetic
environment
Polski
Checking the resis- Test level according to Compliance
tance to interIEC 60601
level
ference
Português
35
Česky
English
394271--J_GA_Reocor_D_mul.book Page 35 Monday, January 26, 2015 3:35 PM
394271--J_GA_Reocor_D_mul.book Page 36 Monday, January 26, 2015 3:35 PM
36
Recommended safe distances to portable and mobile RF
communications equipment (IEC 60601-1-2: Table 5)
The device is intended for use in an electromagnetic environment, in which the RF interference is controllable. The user of
the device can help to prevent electromagnetic interference
by maintaining the safe distance to mobile RF communication
equipment (transmitters) – depending on the power output of
the communication equipment.
Rated power of
the transmitter
P [W]
Safe distance d [m] corresponding to transmission frequency
150 kHz to
80 MHz outside
the ISM bands
d = 0.35
P
150 kHz to
80 MHz to
80 MHz inside the 800 MHz
ISM bands
d = 1.2
P
d = 1.2
800 MHz to
2.5 GHz
P
d = 2.3
0.01
0.04
0.12
0.12
0.23
0.10
0.11
0.38
0.38
0.73
1.00
0.35
1.20
1.20
2.30
10.00
1.11
3.79
3.79
7.27
100.00
3.50
12.00
12.00
23.00
P
For transmitters whose rated power is not specified in the table above, the safe distance can be
calculated using the specified formula for the corresponding frequency. Here P is the rated power
of the transmitter in watts [W] and d is the safe distance in meters [m].
COMMENT 1: The ISM bands (for industrial, scientific and medical applications) between 150 kHz
and 80 MHz are 6.765 MHz to 6.795 MHz; 13.553 MHz to 13.567 MHz; 26.957 MHz to 27.283 MHz
and 40.66 MHz to 40.70 MHz.
COMMENT 2: The compliance level in the ISM frequency bands between 150 kHz and 80 MHz and
in the frequency range 80 MHz to 2.5 GHz is designed to reduce the likelihood that mobile communication devices cause interference if they are unintentionally brought into the patient area.
For this reason a greater safety distance is recommended in these frequency ranges (factor 1.2
instead of 0.35).
COMMENT 3: These guidelines do not necessarily apply in all situations. The spread of electromagnetic waves is influenced by absorption and reflection from buildings, objects, and humans.
English
394271--J_GA_Reocor_D_mul.book Page 37 Monday, January 26, 2015 3:35 PM
37
Note:
Reocor D may only be used with the accessories developed
and tested for this pacemaker.
Česky
Scope of Delivery and Accessories
Number of
Reocor D
1
Battery
1
Armband
– For Japan
– For all other countries
Comments
Order no.
Duracell Plus, 6LR61
–
365529
1
Short
391843
1
Standard
103704
Redel adapter
1
371262
Protective cover
1
378007
Technical manual
1
394271
370123
Quick Reference Guide EN
1
371300
Quick Reference Guide ES
371301
Quick Reference Guide FR
371302
Quick Reference Guide IT
371303
Quick Reference Guide PT
372230
Quick Reference Guide ZH
371304
Case
1
379384
Français
368702
Quick Reference Guide DE
Magyar
Technical manual ZH
Español
Item description
Deutsch
Scope of delivery
Accessories
PK-83 (2.5 m)
128563
Patient cable with two insulated screw
terminals, can be resterilized
Direct connection
PK-83 (1.5 m)
128562
Patient cable with two insulated screw
terminals, can be resterilized
Direct connection
PK-83-B (2.5 m)
347485
Patient cable with two insulated 2.3 mm
screw terminals
Redel adapter
PK-83-B (1.5 m)
347606
Patient cable with two insulated 2.3 mm
screw terminals
Redel adapter
PK-175
333959
Patient cable, with four screw terminals
for connection of temporary leads, can be Redel adapter
resterilized
PK-67-L
123672
Patient cable, can be resterilized, for
combination with adapter PA-1-B, PA-2,
PA-4
Redel adapter
Patient cable, can be resterilized, for
combination with PK-155 and
Remington model 301-CG
Redel adapter
Patient cable, can be resterilized, with
four touch-proof alligator clips
Redel adapter
PK-67-S
PK-141 (2.8 m)
128085
353181
Connection
Italiano
Patient cable with two insulated alligator Direct connection
clips, can be resterilized
Nederlands
Description
128564
Polski
Order no.
PK-82
Português
Item
394271--J_GA_Reocor_D_mul.book Page 38 Monday, January 26, 2015 3:35 PM
38
Item
Order no.
Description
Connection
Reocor armband,
standard
103704
Standard armband
–
Reocor armband,
short
391843
Smaller-sized armband.
Suitable for small arms.
–
Only for the USA
Item
Manufacturer
Description
Connection
ADAP-2R
(0.24 m)
Remington
Medical Inc.
Reusable adapter for cable model S-101-97 and
model FL-601-97
Redel
adapter
Adapters for PK-67-S and PK-67-L
Item
Order no.
Description
PA-1-B
123751
For connection to 2-mm adapter or MHW adapter
(adapter for heart wires), can be resterilized
PA-1-C
349723
For connection to 2-mm adapter or MHW adapter
(adapter for heart wires), can be resterilized
PA-2
123157
For connection to IS-1 connector, can be resterilized
PA-4
123090
With alligator clips, can be resterilized
PK-155
337358
(set with two cables)
Sterile patient cable, 2-wire with alligator clips for single use
Adapters for PK-67-S and PK-67-L (USA only)
Item
Manufacturer
Description
Model 301-CG
Remington
Medical Inc.
Sterile patient cable, 2-wire with alligator clips for
single use
Adapters for ADAP-2R (USA only)
Item
Manufacturer
Description
Model 301-CG
Remington
Medical Inc.
Sterile patient cable, 2-wire with alligator clips for
single use
Model S-101-97
(2.5 m)
Remington
Medical Inc.
Patient cable, 2-wire with alligator clips for
single use
Model FL-601-97
(2.0 m)
Remington
Medical Inc.
Patient cable, 2-wire with screw terminals for
single use
English
394271--J_GA_Reocor_D_mul.book Page 39 Monday, January 26, 2015 3:35 PM
39
The label icons symbolize the following:
Meaning
BIOTRONIK order number
Serial number of the device
Español
Redel adapter
Deutsch
Reocor D
Acceptable temperature range for storage
Français
Date of manufacture of the device
Acceptable relative humidity range for storage
Magyar
Acceptable atmospheric pressure range for storage
Contents
Italiano
Patient with implanted lead
Follow the instructions for use!
Nederlands
Disposal sign
CE mark
Polski
Caution: Federal (U.S.A.) law restricts this product to sale by, or on
the order of, a physician.
Português
Symbol
Česky
Legend for the Label
394271--J_GA_Reocor_D_mul.book Page 40 Monday, January 26, 2015 3:35 PM
40
English
394271--J_GA_Reocor_D_mul.book Page 41 Monday, January 26, 2015 3:35 PM
41
Všeobecný popis .................................................................................... 43
Popis výrobku .......................................................... 43
Česky
Obsah
Kontraindikace ........................................................ 44
Možné vedlejší účinky .............................................. 44
Pokyny k manipulaci ............................................... 45
Deutsch
Indikace ................................................................... 44
Návod k obsluze .................................................................................... 50
Všeobecné poznámky .............................................. 50
Ovládací prvky a LED ............................................... 51
Español
Optická a akustická signalizace .............................. 49
Připojení elektrod .................................................... 53
Uvedení do provozu ................................................. 59
Připevnění ............................................................... 61
Français
Kryt ovládacího pole ................................................ 52
Režimy a parametry .............................................................................. 63
Režimy ..................................................................... 63
Magyar
Výměna baterie ........................................................ 61
Refrakterní periody ................................................. 63
AV zpoždění ............................................................. 65
Amplituda impulzu – síň/komora ........................... 65
Italiano
Frekvence ................................................................ 64
Citlivost – komora ................................................... 65
Cross Channel Blanking ......................................... 65
Interferenční interval .............................................. 65
Burst ........................................................................ 66
Nederlands
Citlivost – síň ........................................................... 65
Reocor D .................................................................. 67
Opakovaně použitelné pacientské kabely ............... 68
Polski
Manipulace, údržba a péče .................................................................... 67
Likvidace .................................................................. 69
Technická bezpečnost ........................................................................... 70
Português
Údržba, servis, bezpečnostně-technické prohlídky 68
394271--J_GA_Reocor_D_mul.book Page 42 Monday, January 26, 2015 3:35 PM
42
Technické parametry ............................................................................
Shoda podle IEC 60601-1-2 ...................................................................
Obsah dodávky a příslušenství ..............................................................
Vysvětlivky ke štítku .............................................................................
71
74
77
79
English
394271--J_GA_Reocor_D_mul.book Page 43 Monday, January 26, 2015 3:35 PM
43
K dispozici je šest režimů: DDD, D00, VDD, VVI, V00 a VVT
a také síňová funkce burst.
Nastavit lze stimulační režim, frekvenci, citlivost
a amplitudu impulzu, AV zpoždění a frekvenci BURST.
Světelné diody (LED) indikují vlastní akci (Sense), stimulovanou akci (Pace) a stav baterie (Low battery).
Akustický signál upozorňuje na nastavené velmi vysoké
frekvence nebo příliš nízké hodnoty citlivosti i na nepříliš
optimální impedanci elektrod.
Závada přístroje (neúspěšný samočinný test po zapnutí
přístroje) je signalizována nepřerušovaně svítícími LED
a přerušovaným zvukovým signálem. Když samočinný test po
zapnutí přístroje neodhalí žádnou chybu, je akustická a optická signalizace po několika sekundách vypnuta.
Deutsch
Español
Připojení se provádí přímo nebo přes samostatný pacientský
kabel a příp. adaptér.
Français
Reocor D je externí dvoudutinový kardiostimulátor na baterie,
který se používá ve spojení s dočasnými elektrodami pro
stimulaci (včetně endokardiálních elektrod a transvenózně
implantovatelných katetrů) k přechodné síňové, komorové
a AV sekvenční stimulaci v klinickém prostředí.
Magyar
Popis výrobku
Česky
Všeobecný popis
K bezpečnostním znakům kardiostimulátoru Reocor D patří:
•
optická výstraha při nadcházejícím vybití baterie,
•
posouvatelný, průhledný kryt ovládacích prvků jako
ochrana před neúmyslnými změnami parametrů.
Dočasné katetry, srdeční dráty, elektrody s 2 mm konektory
mohou být připojeny přímo ke kardiostimulátoru Reocor D.
Dále jsou k dispozici různé pacientské kabely a adaptéry.
Tento systém nabízí bezpečné připojení transvenózních katetrů a myokardiálních elektrod, které lze použít buď unipolárně nebo bipolárně.
Nederlands
kontrola impedance elektrod,
Polski
parametry stimulace řízené mikroprocesorem,
•
Italiano
optická indikace sensovaných a stimulovaných událostí,
•
Português
•
394271--J_GA_Reocor_D_mul.book Page 44 Monday, January 26, 2015 3:35 PM
44
Indikace
Přechodná stimulace kardiostimulátorem Reocor D je vhodná pro následující aplikace u pacientů jakéhokoli věku:
•
léčba arytmií a srdečního bloku,
•
symptomatická sinusová bradykardie,
•
syndrom sinusového uzlu,
•
předoperační, operační a pooperační stimulace pacientů
s operací srdce,
•
ukončení suprakomorových tachyarytmií,
•
profylaktická stimulace jako prevence arytmií,
•
nouzová stimulace,
•
kontrola stimulačních prahů.
Kontraindikace
•
Reocor D nelze sterilizovat a není proto vhodný pro použití uvnitř sterilního prostředí pacientů.
•
Síněmi spouštěné režimy (DDD a VDD) jsou kontraindikovány při fibrilaci síňí, síňovém flutteru a jiných rychlých
síňových rytmech.
•
Když pacient špatně snáší vysoké komorové frekvence
(např. při angině pectoris), mohou být kontraindikovány
režimy řízené síněmi.
•
Pokud se zjistí retrográdní převod po komorové stimulaci,
musí se za jistých okolností naprogramovat delší síňová
refrakterní perioda nebo kratší AV zpoždění, aby se předešlo tachykardiím indukovaným kardiostimulátorem.
Za určitých okolností je v těchto případech nutné naprogramování režimu VVI.
•
Jednodutinová síňová stimulace je kontraindikována u
pacientů s existujícími poruchami AV-převodu.
•
Použití externího kardiostimulátoru je kontraindikováno
v přítomnosti aktivního, implantovaného kardiostimulátoru.
Možné vedlejší účinky
K možným komplikacím při použití dočasné externí stimulace
patří mimo jiné asystoly po neplánovaném přerušení stimulace (např. v důsledku neúmyslného uvolnění pacientského
kabelu, uvolnění elektrody, nesprávného nastavení) nebo
závislost na kardiostimulátoru.
Ke komplikacím při zavádění transvenózních elektrod patří
mj.: infekce rány, arteriální punkce, perikardiální tření, perforace srdeční stěny a dysrytmie po zavedení elektrod.
English
394271--J_GA_Reocor_D_mul.book Page 45 Monday, January 26, 2015 3:35 PM
45
•
Reocor D se schváleným kabelem přístroje a příslušenstvím se smí používat pouze v souladu s pokyny této technické příručky.
•
Reocor D se nesmí připojovat k jiným elektrolékařským
přístrojům.
•
Reocor D se nesmí používat v oblastech s nebezpečím
výbuchu.
Zákaz změn
•
Uvedení do provozu, rozšíření nebo modifikace přístroje
smí provádět pouze výrobce BIOTRONIK nebo provoz,
který je výrobcem výslovně autorizován.
Náhradní díly
a příslušenství
•
Originální náhradní díly a příslušenství autorizované firmou BIOTRONIK zajistí Vaši bezpečnost. Použití součástí
jiných výrobců ruší odpovědnost za vzniklé následky,
záruka propadá.
Příprava
přístrojů
•
U pacientů se závislostí na kardiostimulátoru je nutné
připravit nouzový stimulátor.
•
Připravit se musí externí defibrilátor, kyslík, intubační
vybavení a nouzové léky.
•
Před použitím je nutné Reocor D prohlédnout z hlediska
poškození a znečištění.
•
Nikdy nepoužívejte poškozený přístroj nebo přístroj, který
vykazuje abnormální chování. Vyměňte kabely všech druhů již při nepatrně rozpoznatelných poškozeních.
•
Před použitím kardiostimulátoru Reocor D, pacientských
kabelů nebo elektrod by se měl uživatel dotknout
pacienta, aby se vyrovnaly elektrické potenciály.
•
Důrazně doporučujeme, aby uživatel před připojením
elektrod ke kardiostimulátoru Reocor D zkontroloval
každý nastavený parametr.
Postup před
použitím
Deutsch
Použití v souladu
s ustanovením
Español
Reocor D vzájemně působí s lidským srdcem.
Dále ovlivňuje pokožku a cévy pacienta.
Français
•
Magyar
Princip činnosti
Italiano
Reocor D smí používat pouze osoby se znalostmi kardiologie, které absolvovaly zaškolení v oblasti manipulace
s přístrojem. Potenciální uživatelé jsou technickolékařské odborné osoby nemocnic a lékaři.
Nederlands
•
Polski
Okruh uživatelů
Português
Podle nastavení stimulace a základního onemocnění pacienta
může stimulace indukovat arytmie. Aby byla zajištěna bezpečnost pacienta, měli by se dodržovat určité postupy
a přijímat bezpečnostní opatření, která jsou uvedena v následujícím textu. Další postupy a bezpečnostní opatření by měly
být zjištěny z příslušných lékařských publikací.
Česky
Pokyny k manipulaci
394271--J_GA_Reocor_D_mul.book Page 46 Monday, January 26, 2015 3:35 PM
46
Připojení elektrod
Způsob používání
Stimulace
s vysokými
frekvencemi
•
Ačkoli je Reocor D chráněn proti kapající vodě, měly byste
udržovat všechny zásuvky a přístroj v čistotě a v suchu.
•
Reocor D nelze sterilizovat.
•
Přípojky kardiostimulátoru Reocor D a dočasných stimulačních elektrod musí být zabezpečeny a pravidelně
kontrolovány.
•
Pacientský kabel musíte připojit nejprve ke kardiostimulátoru Reocor D, potom k elektrodám.
•
Dočasné elektrody, ke kterým se připojuje Reocor D,
představují pro elektrický proud nízkoodporový vodič
k myokardu. Proto musí být přístroje napájené ze sítě,
které jsou v provozu v blízkosti pacienta, uzemněny podle
předpisů.
•
Při manipulaci s již implantovanými elektrodami se jejich
vodivé kontakty nesmí vzájemně dotýkat ani nesmí přijít
do kontaktu s elektricky vodivými nebo vlhkými povrchy.
•
Pokud se kabel kardiostimulátoru Reocor D uvolnil, musí
být okamžitě znovu připojen a musí být ověřena bezpečnost připojení.
•
Při použití unipolárních elektrod musíte pro účinnou
stimulaci každé dutiny použít dvě unipolární elektrody.
•
Při používání kardiostimulátoru Reocor D musí být kryt
ovládacího pole zcela zavřený, aby nedošlo k neúmyslné
změně parametrů programu.
•
Reocor D používejte buď v leže na vodorovné, protiskluzové podložce nebo připevněný manžetou na ruku pacienta
nebo pomocí závěsného oka na zadní straně přístroje
zavěšený na stojanu s infuzí.
•
Reocor D se nesmí nosit přímo na pokožce.
•
Během používání kardiostimulátoru Reocor D musí být
sledována srdeční frekvence pacienta monitorem EKG
s funkcí alarmu.
•
Při poruchách v důsledku elektromagnetické interference (EMI) přejde Reocor D při překročení určitých
hraničních hodnot do asynchronní stimulace. Podle toho,
zda poruchy byly detekovány v síni nebo v komoře, vyplývají po dobu trvání poruch následující provozní režimy:
•
Stimulační režim
Při rušení elektromagnetickou interferencí
SSI, SST
S00
VDD
VAT, VVI, V00
DDD
DAD, DVI, D00
Stimulace srdce s frekvencemi vyššími než 180 ppm po
delší dobu může způsobit vážné hemodynamické komplikace. Stimulace s vysokými frekvencemi by se měly provádět, pouze pokud je zajištěna neustálá kontrola.
•
Kontroly a údržbu provádějte podle strany 67.
•
Nepoužívejte dobíjecí baterie (akumulátory). Servisní
dobu těchto baterií lze těžko odhadnout, takže může dojít
k nepředvídatelnému překročení1časového bodu ERI
s náhlým vynecháním stimulace.
Používat se smí pouze 9V baterie s mezinárodním kódem
IEC 6LR61. Při použití typu baterie MN 1604 Duracell®
Procell® je možná stimulace po dobu minimálně
500 hodin, než bude nutná výměna baterií.
Výměna baterie je možná za provozu. Při vyjmutí baterie
zůstává kardiostimulátor Reocor D při okolní teplotě
20 ±2°C ještě cca 30 s připraven k provozu.
Z bezpečnostních důvodů by však měl být pacient zabezpečen jinak.
Elektrokauterizace
•
Elektrokauterizace by se neměla v žádném případě provádět v okruhu menším než 15 cm okolo elektrod, protože existuje nebezpečí, že bude indukována komorová
fibrilace nebo dojde k poškození kardiostimulátoru.
Kardiostimulátor by měl být nastaven na asynchronní
stimulaci, aby se zamezilo inhibici kardiostimulátoru
interferenčními signály. Během vyšetření musíte průběžně kontrolovat periferní puls pacienta. Po vyšetření musíte zkontrolovat funkčnost kardiostimulátoru.
Defibrilace
1
•
Spínací okruhy kardiostimulátoru Reocor D jsou chráněny proti energii defibrilačního výboje. Přesto byste měli
přijmout pokud možno následující bezpečnostní opatření:
— Nastavená energie by neměla být vyšší než je nutné
pro defibrilaci.
— Vzdálenosti elektrod defibrilátoru od elektrod kardiostimulátoru Reocor D by měly být minimálně 10 cm.
— Po defibrilaci se musí Reocor D vypnout a znovu
zapnout, aby mohl přístroj provést úplný samočinný
test.
Signálem ERI (přerušovaně svítí LED Low battery) upozorňuje Reocor D na výměnu baterie.
Deutsch
Pro čištění lze použít vlhkou tkaninu a jemné mýdlo.
Nepoužívejte agresivní čisticí prostředky nebo organická
rozpouštědla, abyste nepoškodili umělohmotné pouzdro.
Español
•
Français
Pokud bude přístroj po delší dobu skladován a nebude
používán, je nutné vyjmout baterii, aby nedošlo
k poškození v důsledku vytečení.
Magyar
•
Italiano
Po defibrilaci nebo kauterizaci musí být proveden funkční
test přístroje.
Nederlands
Provoz na baterie
•
Polski
Po použití
Português
47
Česky
English
394271--J_GA_Reocor_D_mul.book Page 47 Monday, January 26, 2015 3:35 PM
394271--J_GA_Reocor_D_mul.book Page 48 Monday, January 26, 2015 3:35 PM
48
Kromě toho musí být po defibrilaci zkontrolována funkce
kardiostimulátoru a stimulační práh a musí být sledována po dostatečně dlouhou dobu.
Odolnost
proti rušení
•
Reocor D je chráněn proti poruchám v důsledku elektromagnetického záření, elektrostatického výboje a proti
přeneseným interferencím. Také vyzařování kardiostimulátorem Reocor D bylo minimalizováno. Přístroj tak splňuje požadavky podle IEC 60601-1-2. Přesto je možné, že
silná elektromagnetická pole, která se mohou vyskytovat
např. v bezprostřední blízkosti elektromotorů, transformátorů, elektrických vedení a jiných elektrických přístrojů, budou ovlivňovat funkci kardiostimulátoru Reocor D.
Elektromagnetické interference mohou způsobit následující chyby:
— Neočekávané resetování (provede se samočinný
test).
— Budou snímány kardiální události, nebudou zobrazovány ale na monitoru EKG.
— Reocor D se bude nevysvětlitelně chovat.
Opatření k obnovení správné funkce kardiostimulátoru
Reocor D:
— Zkontrolujte spojení mezi přístrojem a dočasnými
stimulačními elektrodami a příp. opravte.
— Správně nastavte citlivost na kardiostimulátoru
Reocor D: Často vede poloviční hodnota průměrné
amplitudy vlastního signálu ke správnému nastavení
citlivosti.
— Všechny elektrické přístroje v blízkosti kardiostimulátoru Reocor D vypněte, pokud mohou tyto přístroje
způsobovat elektromagnetickou interferenci a jejich
provoz není bezpodmínečně nutný.
— Zdroj rušení přesuňte na místo, ze kterého nebude
rušení účinné.
— Pokud je to bezpečné: Vypněte a znovu zapněte
Reocor D, aby se kardiostimulátor resetoval do normálního provozu.
— Při setrvávající technické závadě se obrat'te na firmu
BIOTRONIK.
•
Pokud je předsíňová citlivost přístroje nastavena na hodnotu < 1,0 mV, může docházet k rušení elektromagnetickým polem. Pokud je to klinicky možné, měl by se nastavit parametr citlivosti větší než 1,0 mV. Nastavení parametrů citlivosti < 1,0 mV vyžaduje explicitní lékařskou
indikaci. Takové hodnoty lze nastavovat nebo udržovat
pouze pod lékařským dohledem.
English
394271--J_GA_Reocor_D_mul.book Page 49 Monday, January 26, 2015 3:35 PM
49
Pokud samočinný test zjistí závadu, budou všechny LED
přerušovaně svítit a budou aktivovány výstražné signály.
•
Červeně přerušovaně svítící LED Low battery indikuje
nutnou výměnu baterie.
•
Zelené LED Sense signalizují snímání vlny P nebo vlny R.
•
Žluté LED Pace signalizují stimulační impulz.
•
Kromě toho poskytují LED a akustické signály při provozu
následující upozornění:
Varování
Význam
Odstranění poruchy
Akustický signál po
dobu 2 s
Je nastavena amplituda
impulzu < 1 V nebo
frekvence > 180 ppm.
Zkontrolujte, zda jsou nastavené
hodnoty vhodné pro pacienta.
Rychlý sled tónů
Impedance mimo
přípustný rozsah
Zkontrolujte, zda jsou všechny
zásuvky elektrody pevně připojené.
Zkontrolujte, zda jsou elektrody
v požadované poloze.
Akustický signál
Byla vyvolána High Rate Vypněte přístroj a pošlete ho firmě
BIOTRONIK.
a přerušovaná činnost Protection; samočinný
test nebyl úspěšný.
LED diod Pace
a Sense
Přerušovaně svítí LED Dosaženo ERI
Low battery
Polski
Nederlands
Při použití typu baterie MN 1604 Duracell®, Procell®
Português
a)
Vyměňte baterii. Zbývá ještě přibližně 36 hodina) servisní doby.
Deutsch
•
Español
Když samočinný test nezjistí žádnou závadu, LED zhasnou a výstražné signály pominou.
Français
•
Magyar
Během samočinného testu po zapnutí kardiostimulátoru
Reocor D svítí všechny LED a ozvou se krátké akustické
signály. Po několika sekundách je samočinný test skončený.
Italiano
•
Česky
Optická a akustická signalizace
394271--J_GA_Reocor_D_mul.book Page 50 Monday, January 26, 2015 3:35 PM
50
Návod k obsluze
Všeobecné poznámky
Pozor!
Samočinný test
Přípojky kardiostimulátoru Reocor D a dočasné stimulační
elektrody musí být zabezpečeny a pravidelně kontrolovány.
Po zapnutí provádí Reocor D po dobu několika málo sekund
samočinný test. K tomu patří:
•
kontrola kódu programu a mikroprocesoru,
•
test paměti,
•
funkční test LED a akustických signálů,
•
kontrola schopnosti stimulace a snímání,
•
kontrola účinnosti High Rate Protection.
Pokud samočinný test zjistí závadu, budou všechny LED
přerušovaně svítit a budou slyšet akustické výstražné signály.
V tomto případě musíte kardiostimulátor vypnout a poslat
firmě BIOTRONIK.
Pokud samočinný test nezjistil žádnou závadu, Reocor D
začne podle nastavených parametrů vysílat stimulační
impulzy. Záporná elektroda (katoda) by se proto měla připojovat teprve, když je zajištěno, že je správně nastaven režim,
stimulační frekvence, amplituda impulzu a citlivost.
Pokud přestavíte otočný spínač provozního režimu do polohy
OFF (VYP), zabrání se tomu, aby ihned s připojením elektrod
byly předávány stimulační impulzy pacientovi.
Výstražná hlášení
Během provozu se mohou vyskytnout následující výstražná
hlášení:
•
Nutná výměna baterie je indikována přerušovanou činností LED Low battery.
•
Pokud se impedance elektrod nachází mimo přípustný
rozsah (např. v důsledku poškozené elektrody, uvolněného kontaktu), zazní rychlý sled tónů nejdříve 5 s po zapnutí.
•
Pokud je amplituda impulzu nastavena na hodnoty < 1 V
nebo stimulační frekvence na hodnoty > 180 ppm, zazní
na dobu přibližně 2 s akustický signál.
•
Při příliš vysoké frekvenci (viz str. 72 „High Rate Protection“) i při neúspěšném samočinném testu zazní
akustický signál a přerušovaně svítí LED Pace a Sense.
English
394271--J_GA_Reocor_D_mul.book Page 51 Monday, January 26, 2015 3:35 PM
51
17
D
0
30
0
10
80
60
10
7
0,1
3
0,5
3
1
2
5
3
4
12
17
10
5
5
10
7
8
2
7
0,1
14
11
1
3
Magyar
2
1
5
20
17
0 ,5
Français
2
0, 3
0, 2
Español
0
40
20
0
0, 5
300
0
25
20 0
18
0
1
12
0, 7
0
17
4 00
35
0
10
0
0
10
75
50
0
60 0
60
50
V0 0
80
0
1000
70
VV I
T
25
15
12
0
VV
40
Deutsch
14 0
DD
20
0
250
D
VD
D0 0
Česky
Ovládací prvky a LED
Nederlands
Italiano
b
DIFF.-
Polski
INDIFF.+
Português
Obrázek 1: Ovládací pole Reocor D
394271--J_GA_Reocor_D_mul.book Page 52 Monday, January 26, 2015 3:35 PM
52
1a
1b
2
3
4
5
6
7
8
9
10
11
12
13
14
15
16
17
18
Označení
Přípojka síňového kanálu
Přípojka komor. kanálu
Přihrádka na baterii
LED Low battery
LED Ventricle Pace
LED Ventricle Sense
Otočný regulátor
Ventricle Ampl.
Otočný regulátor
Ventricle Sens.
LED Atrium Pace
LED Atrium Sense
Otočný regulátor
Atrium Ampl.
Otočný regulátor
Atrium Sens.
Start burst
Držák na pásek a závěsné oko
(na zadní straně)
Otočný regulátor
Burst rate atrium
Otočný regulátor
AV delay
Select burst
Otočný spínač Mode
Otočný regulátor Rate
Tabulka 1:
Funkce
Pro kabely a elektrody s 2 mm konektory nebo pro adaptér
Redel (červená = plus; modrá = minus)
Pro baterii 9 V
Upozorňuje na příliš nízké napětí baterie
Žlutá indikace pro komorovou stimulovanou událost
Zelená indikace pro snímanou vlnu R
Nastavení komorové amplitudy impulzu
Nastavení komorové citlivosti
(nelze použít v provozních režimech D00 a V00)
Žlutá indikace pro síňovou stimulovanou událost
Zelená indikace pro snímanou vlnu P
Nastavení síňové amplitudy impulzu
(nelze použít v provozním režimu VDD)
Nastavení síňové citlivosti
(nelze použít v provozním režimu D00)
Spuštění síňové funkce BURST
Připevnění kardiostimulátoru Reocor D k pacientovi,
posteli nebo stojanu s infuzí
Nastavení síňové BURST stimulace
Nastavení AV zpoždění
Volba síňové funkce BURST
Volba provozního režimu stimulace a vypínač
Nastavení stimulační frekvence
Popis prvků na obrázku 1
Tučný popis ovládacích prvků označuje bezpečné hodnoty pro
zamýšlené lékařské použití přístroje.
Kryt ovládacího pole
Kryt ovládacího panelu je zajištìný, pokud byl nasunut až na
doraz pøes dva zaskakovací body a pokud zámek sedí za
zarážkou (viz Obrázek 2).
Správně:
Obrázek 2: Správné umístění krytu ovládacího panelu
Chybně:
English
394271--J_GA_Reocor_D_mul.book Page 53 Monday, January 26, 2015 3:35 PM
53
Jednou rukou tlačte zajišťovací páčku směrem nahoru.
Español
Deutsch
Druhou rukou současně posuňte kryt ovládacího panelu
směrem dolů.
Česky
Odblokování krytu ovládacího panelu (viz Obrázek 3):
Připojení elektrod
Kardiostimulátor Reocor D je vybaven 4 zdířkami pro přímé
připojení elektrod s 2 mm konektory s ochranou proti dotyku.
Pro připojení kabelů se zásuvkami Redel musí být adaptér
Redel připojený stranově správně a musí být přišroubovaný
(obr. 4). Adaptér Redel je stranově správně připojený, pokud
ho můžete přišroubovat ke kardiostimulátoru Reocor D.
Upozornění:
Pouze pokud je adaptér Redel stranově správně připojený, je
zajištěna jeho funkce!
Magyar
Při používání kardiostimulátoru Reocor D musí být kryt ovládacího pole zajištený, aby nedošlo k neúmyslnému přestavení
otočných spínačů a regulátorů a tím ke změně parametrů
programu.
Italiano
Pozor!
Nederlands
K čištění můžete kryt ovládacího pole zcela sejmout.
K tomu posuňte kryt dolů až k dorazu. Potom kryt přetáhněte
až za doraz.
Polski
Nasuňte kryt ovládacího panelu nahoru přes zarážku až
na doraz (viz Obrázek 2).
Português
Zajištění krytu ovládacího panelu:
Français
Obrázek 3: Odblokování krytu ovládacího panelu
394271--J_GA_Reocor_D_mul.book Page 54 Monday, January 26, 2015 3:35 PM
54
INDIFF.+
DIFF.-
Obrázek 4: Adaptér Redel pro Reocor D
Reocor D lze používat s následujícími pacientskými kabely
a adaptéry:
•
Pacientský kabel PK-175 se čtyřmi šroubovanými
svorkami pro dočasné elektrody na straně pacienta
a zásuvkou Redel na straně kardiostimulátoru Reocor
(použijte adaptér Redel)
English
394271--J_GA_Reocor_D_mul.book Page 55 Monday, January 26, 2015 3:35 PM
55
Obrázek 6: Pacientský kabel PK-82
Pacientský kabel PK-83-B pro jednokomorovou stimulaci se dvěma šroubovanými svorkami pro dočasné elektrody na straně pacienta a zásuvkou Redel na straně kardiostimulátoru Reocor (použijte adaptér Redel). Dočasné
elektrody, které se připojují pomocí PK-83-B, jsou spojeny s komorovým kanálem kardiostimulátoru Reocor D.
Pacientský kabel PK-83 pro jednokomorovou stimulaci
se dvěma izolovanými šroubovanými svorkami pro dočasné elektrody na straně pacienta a dvěma 2 mm konektory
s ochranou proti dotyku na straně kardiostimulátoru
Reocor.
Português
Obrázek 8: Pacientský kabel PK-83
Polski
Nederlands
•
Italiano
Obrázek 7: Pacientský kabel PK-83-B
Magyar
Français
•
Deutsch
Pacientský kabel PK-82 se 2 izolovanými krokosvorkami
pro dočasné elektrody na straně pacienta a dvěma 2 mm
konektory s ochranou proti dotyku na straně kardiostimulátoru Reocor.
Español
•
Česky
Obrázek 5: Pacientský kabel PK-175
394271--J_GA_Reocor_D_mul.book Page 56 Monday, January 26, 2015 3:35 PM
56
•
Pacientské kabely PK-67-L, PK-67-S se liší pouze svou
délkou.
Obrázek 9: Pacientský kabel PK-67-L (2,6 m) a PK-67-S (0,8 m)
•
Adaptéry
K pacientským kabelům PK-67-L/-S (obr. 9) jsou vhodné
adaptéry podle obr. 10:
Obrázek 10:
Adaptéry pro pacientské kabely PK-67-L a PK-67-S
PA-1-B pro připojení 2 mm konektorů nebo adaptérů MHW
s ochranou proti dotyku (adaptéry pro srdeční dráty)
PA-2 IS-1
PA-4 s krokosvorkami
•
Obrázek 11:
Pacientský kabel PK-141 se čtyřmi krokosvorkami na
straně pacienta a zásuvkou Redel na straně kardiostimulátoru Reocor (použijte adaptér Redel)
Pacientský kabel PK-141
•
Obrázek 12:
Adaptační kabel ADAP-2R je opakovaně použitelný kabel
pro spojení jednorázového kabelu podle obr. 13 (pouze
pro USA) s Reocor D (použijte adaptér Redel).
Adaptační kabel ADAP-2R
Kabel pro jednorázové použití (pouze USA)
•
Kabel pro jednorázové použití
Jednorázové kabely PK-155 a Remington 301-CG (pouze
USA) s krokosvorkami (obr. 14) se spojují s pacientem pomocí
PK-67-S.
Obrázek 14:
Kabel PK-155
Ohrožení pacienta v důsledku poškozených kabelů. Poškozené kabely ovlivňují jejich funkci a vytvářejí pro pacienty nebezpečí. Nepoužívejte poškozené kabely.
VAROVÁNÍ!
Ohrožení ztrátou funkcí.
Vlhké kabely mohou omezit jejich funkci a ohrozit pacienty.
Nepoužívejte vlhké kabely.
Nederlands
VAROVÁNÍ!
Ohrožení elektrickým proudem.
Nepoužité kontakty kabelů mohou zavést do těla pacienta
elektrický proud. Upevněte nevyužité kontakty kabelů v blízkosti pacienta.
Pozor!
Alergické reakce a záněty.
Zabraňte, aby kabely přišly do kontaktů s poraněními
a pokožkou pacienta.
Português
VAROVÁNÍ!
Polski
Připojení
Magyar
Jednorázový kabel od firmy Remington Medical Inc. (pouze USA)
Italiano
Obrázek 13:
Français
Español
•
Deutsch
57
Česky
English
394271--J_GA_Reocor_D_mul.book Page 57 Monday, January 26, 2015 3:35 PM
394271--J_GA_Reocor_D_mul.book Page 58 Monday, January 26, 2015 3:35 PM
58
Upozornění:
Před použitím kabelů dbejte na správné usazení izolačních
trubiček.
Upozornění:
Pacientský kabel nepřipojujte k dočasné stimulační elektrodě
pacienta dříve, než ho připojíte ke kardiostimulátoru
Reocor D.
Přímé připojení
Pokud je Reocor D v provozu bez adaptéru Redel, mohou být
přechodné katetry a srdeční dráty připojeny k pacientským
kabelům PK-82 a PK-83 přímo ke zdířkám A+, A- a V+, V-.
Pacientský kabel
Adaptérem Redel u kardiostimulátoru Reocor D se připojí
pacientský kabel.
Nasaďte adaptér Redel na kardiostimulátor Reocor D.
Pevně ho přišroubujte.
Zastrčte zásuvku Redel pacientského kabelu do zdířky
Redel adaptéru.
Upozornění:
S pacientským kabelem PK-83-B není možná dvoudutinová
stimulace. Elektrody, které se připojují k PK-83-B, jsou spojeny s komorovým kanálem kardiostimulátoru Reocor D.
Varianty připojení
Dočasné katetry s 2 mm konektory nebo srdeční drát
s adaptérem 2 mm
Je možné připojit Reocor D bez dalších kabelů nebo adaptérů
přímo k přechodnému katetru pomocí 2 mm konektoru
s ochranou proti dotyku nebo srdečního drátu s adaptérem
2 mm. Všechny další možnosti najdete v následující tabulce.
Připojení na straně
pacienta
Kabel BIOTRONIK
Připojení na straně
přístroje
Připojení Reocor D
Doporučené přípojky
Přímá přípojka (bez kabelu BIOTRONIK)
Zdířky 2 mm
2 mm
PK-67-S/L s PA-1-B
Zásuvka Redel
Adaptér Redel
Šroubované svorky
PK-175 s adapt. TC
Zásuvka Redel
Adaptér Redel
Šroubované svorky
PK-83 s adapt. TC (2x)
Zásuvka 2 mm
Zdířky 2 mm
Krokosvorky
PK-141
Zásuvka Redel
Adaptér Redel
Krokosvorky
PK-67-S/L s PA-4
Zásuvka Redel
Adaptér Redel
Krokosvorky
PK-67-S/L s PK-155 (2x)
Zásuvka Redel
Adaptér Redel
Krokosvorky
PK-82 (2x)
Zásuvka 2 mm
Zdířky 2 mm
Možné přípojky
59
Srdeční drát s jehlou Breakoff nebo
s flexibilním koncem (průměr max. 2,3 mm)
Připojení na straně
pacienta
Kabel BIOTRONIK
Připojení na straně
přístroje
Připojení Reocor D
Česky
English
394271--J_GA_Reocor_D_mul.book Page 59 Monday, January 26, 2015 3:35 PM
Adaptér Redel
Zásuvka 2 mm
Zdířky 2 mm
Možné přípojky
Krokosvorky
PK-141
Zásuvka Redel
Adaptér Redel
Krokosvorky
PK-67-S/L s PA-4
Zásuvka Redel
Adaptér Redel
Krokosvorky
PK-67-S/L s PK-155 (2x)
Zásuvka Redel
Adaptér Redel
Krokosvorky
PK-82 (2x)
Zásuvka 2 mm
Zdířky 2 mm
Připojení na straně
pacienta
Kabel BIOTRONIK
Připojení na straně
přístroje
Připojení Reocor D
PK-67-S/L s PA-2
Zásuvka Redel
Adaptér Redel
Implantované elektrody se zásuvkou IS-1
Doporučené přípojky
Možné přípojky
Krokosvorky
PK-141
Zásuvka Redel
Adaptér Redel
Krokosvorky
PK-67-S/L s PA-4
Zásuvka Redel
Adaptér Redel
Krokosvorky
PK-67-S/L s PK-155 (2x)
Zásuvka Redel
Adaptér Redel
Krokosvorky
PK-82 (2x)
Zásuvka 2 mm
Zdířky 2 mm
Při použití unipolárních elektrod musí být pro každou dutinu
připojeny 2 elektrody.
Odpojení přípojek
Pacientský kabel odsvorkujte od dočasných stimulačních
elektrod pacienta příp. uvolněte přímou přípojku.
Odpojení zásuvky Redel
Stáhněte převlečný kroužek na zásuvce Redel zpět
a vytáhněte zásuvku Redel ze zdířky Redel.
Uvedení do provozu
Obsluha kardiostimulátoru Reocor D je identická pro všechny
provozní režimy. Kroky při obsluze byste měli provádět
v následujícím pořadí (čísla v závorkách se vztahují k obr. 1 na
straně 51 této technické příručky).
Polski
•
Nederlands
Reocor D stimuluje zásadně bipolárně, může se ale použít
s bipolární nebo unipolární dočasnou stimulační elektrodou.
Italiano
Polarita
Português
Pouzdro IS-1
Español
Zásuvka Redel
PK-83 (2x)
Français
PK-175
Šroubované svorky
Magyar
Šroubované svorky
Deutsch
Doporučené přípojky
394271--J_GA_Reocor_D_mul.book Page 60 Monday, January 26, 2015 3:35 PM
60
•
Vložení baterie.
•
Kryt ovládacího pole posuňte dolů.
•
Příprava pacienta: položte elektrody, ale zatím je nepřipojujte ke kardiostimulátoru.
•
Příprava kardiostimulátoru Reocor:
Nastavte stimulační frekvenci otočným regulátorem Rate
(18).
Nastavte AV zpoždění otočným regulátorem AV delay
(15)1.
Nastavte amplitudu stimulace pro síň1 a komoru otočnými regulátory Atrium Ampl. (10)1 a Ventricle Ampl. (6).
•
Zvolte režim otočným spínačem Mode (17).
Tím se současně přístroj zapne.
•
Po úspěšném skončení vnitřního samočinného testu se
současně dvakrát přerušovaně rozsvítí všech 5 LED na
ovládacím panelu.
•
Pokud přerušovaně svítí LED Low battery (3), je nutné
vyměnit baterii (výměna baterie, viz strana 61).
•
Připojte elektrody, žluté LED Atrium Pace (8)1
a Ventricle Pace (4) svítící přerušovaně synchronně
s síňovými resp. komorovými stimulačními impulzy.
•
Citlivost pro síň a komoru nastavte otočnými regulátory
Atrium Sens. (11)1 a Ventricle Sens. (7) tak, aby zelené
LED Atrium Sense (9)1 a Ventricle Sense (5) přerušovaně
svítily synchronně s každou snímanou síňovou resp.
komorovou událostí.
Měli byste zohlednit dostatečné bezpečnostní rozpětí, aby
bylo zajištěno spolehlivé snímání.
•
Pozor!
1
Monitorujte prostřednictvím EKG pacienta a v případě
potřeby amplitudu a citlivost přizpůsobte.
Během používání kardiostimulátoru Reocor D se musí sledovat srdeční frekvence pacienta monitorem EKG s funkcí
alarmu.
Pouze u dvoudutinové stimulace.
English
394271--J_GA_Reocor_D_mul.book Page 61 Monday, January 26, 2015 3:35 PM
61
Aby bylo možné připevnit Reocor D ke stojanu s infuzí, vytočte
závěsné oko na zadní straně přístroje. Tím zajistíte bezpečné
používání a odlehčíte pacientský kabel.
Deutsch
Reocor D používejte buď v leže na vodorovné, protiskluzové
podložce nebo připevněný manžetou na ruku pacienta nebo
pomocí závěsného oka na zadní straně přístroje pověšený ke
stojanu s infuzí.
Česky
Připevnění
Prostor pro baterii (2) se nachází vpravo na straně přístroje
a otvírá se tak, že přestavíte modrý posuvný prvek nahoru
a přihrádku vysunete doprava. Baterii opatrně vyjměte.
Pro ochranu pólů baterie může být na nové baterii nasazena
pryžová zátka. Před vložením nové baterie tuto zátku stáhněte.
Pozor!
V přihrádce na baterii je označena upřednostňovaná polarita.
Při vkládání nové baterie však musíte pouze dbát, aby póly
baterie směřovaly do středu pouzdra. Poloha plusového
a minusového pólu je libovolná.
Français
Magyar
Italiano
Nepoužívejte dobíjecí baterie (akumulátory). Servisní dobu
těchto baterií lze těžko odhadnout, takže může dojít
k nepředvídatelnému překročení ERI s náhlým vynecháním
stimulace.
Nederlands
Z bezpečnostních důvodů by však měl být pacient zabezpečen
jinak.
Polski
Reocor D musí být provozován s jednou 9 V baterií, mezinárodní kód IEC 6LR61. Používejte pouze alkalické manganové
baterie s ochranou proti vytečení. Při použití typu baterie
MN 1604 Duracell® Procell® je při teplotě 20 ±2 °C možná
stimulace po dobu minimálně 500 hodin, než bude nutná
výměna baterií.
Výměna baterie je možná za provozu. Při vyjmutí baterie
zůstává kardiostimulátor Reocor D při okolní teplotě 20 ±2°C
ještě cca 30 s připraven k provozu.
Português
Když začne LED Low battery (3) přerušovaně svítit, je baterie
téměř vybitá. Při použití typu baterie MN 1604 Duracell® Procell® zbývá ještě přibližně 36 hodin servisní doby. Přesto
byste měli baterii co nejrychleji vyměnit.
Español
Výměna baterie
394271--J_GA_Reocor_D_mul.book Page 62 Monday, January 26, 2015 3:35 PM
62
Nejprve vložte novou baterii dnem (obr. 15) dolů do přihrádky
na baterii.
Obrázek 15:
Vložení baterie
Zavřete přihrádku a přestavte modrý posuvný prvek dolů, až
slyšitelně zacvakne.
Upozornění:
Pokud bude kardiostimulátor po delší dobu skladován
a nebude používán, doporučujeme vyjmout baterii, aby nedošlo k poškození v důsledku vytečení.
English
394271--J_GA_Reocor_D_mul.book Page 63 Monday, January 26, 2015 3:35 PM
63
Česky
Režimy a parametry
Režimy
Při poruchách v důsledku elektromagnetické interference
(EMI) zvolí Reocor D při překročení určitých hraničních hodnot asynchronní stimulaci. Podle toho, zda poruchy byly detekovány v síni nebo v komoře, vyplývají po dobu trvání poruch
následující provozní režimy:
Stimulační režim
Při rušení elektromagnetickou interferencí
SSI, SST
S00
VDD
VAT, VVI, V00
DDD
DAD, DVI, D00
Refrakterní periody
Frekvence, do které jsou komory stimulovány synchronně
se síňově snímanými událostmi (horní hraniční frekvence),
je určena síňovou refrakterní periodou (atrial refractory
period, ARP). Časový průběh se spouští síňově snímanými
a stimulovanými událostmi, stejně jako snímanými komorovými extrasystolami, které časový cyklus vynulují. Při překročení horní hraniční frekvence spadne každý druhý síňový pulz
do ARP, není snímán a nevyvolá komorový impulz. Komorová
stimulační frekvence pokračuje v poměru 2:1. (obr. 16).
Español
Jako VVI, ale při snímání komorové události mimo refrakterní periodu okamžitá
stimulace.
Français
Asynchronní stimulace v komoře.
VVT
Magyar
Snímání a stimulace v komoře.
V00
Italiano
Asynchronní stimulace A-V, bez snímání v obou dutinách.
VVI
Nederlands
Synchronní, komorová stimulace s síňovým paralelním chodem.
D00
Polski
Synchronní stimulace A-V se snímáním a stimulací v síni i v komoře.
VDD
Português
DDD
Deutsch
Reocor D pracuje v jednom z následujících šesti režimů:
394271--J_GA_Reocor_D_mul.book Page 64 Monday, January 26, 2015 3:35 PM
64
Obrázek 16: Reakce horní hraniční frekvence během síňových tachykardií
(základní frekvence 72 ppm).
Totální síňová refrakterní perioda (TARP) kardiostimulátoru
Reocor D se tvoří ze součtu 175 ms a nastaveného AV zpoždění, minimální hodnota je však 400 ms pod stimulační frekvencí 120 ppm. Nad touto frekvencí se minimální TARP sníží na
240 ms.
Komorová refrakterní perioda VRP kardiostimulátoru
Reocor D závisí na stimulační frekvenci:
Stimulační frekvence
Komorová refrakterní perioda
Menší než 150 ppm
225 ms
150 ppm až 200 ppm
200 ms
Větší než 200 ppm
175 ms
Frekvence
Frekvenci lze plynule nastavit otočným regulátorem Rate (18)
od 30 ppm do 250 ppm. Při nastavení hodnoty vyšší než
180 ppm vydá přístroj výstražný tón v délce 2 s.
VAROVÁNÍ!
Stimulace srdce s frekvencemi vyššími než 180 ppm po delší
dobu může způsobit vážné hemodynamické komplikace.
Stimulace s vysokými frekvencemi by se měly provádět, pouze
pokud je zajištěna neustálá kontrola.
English
394271--J_GA_Reocor_D_mul.book Page 65 Monday, January 26, 2015 3:35 PM
65
Citlivost – síň
Citlivost lze nastavit otočným regulátorem Atrium sens. (11)
od 0,2 mV do 10 mV. Je nutné ji v pravidelných intervalech
kontrolovat, aby bylo zajištěno, že je k dispozici správné snímání a je nastaveno dostatečné bezpečnostní rozpětí.
Citlivost – komora
Citlivost lze nastavit otočným regulátorem Ventricle sens. (7)
od 1 mV do 20 mV. Citlivost je nutné v pravidelných intervalech kontrolovat, aby bylo zajištěno, že je k dispozici správné
snímání a je nastaveno dostatečné bezpečnostní rozpětí.
Cross Channel Blanking
Po stimulu se na 19 ms ± 3 ms potlačí snímání vždy ve
druhém kanálu, aby nedošlo k far-field sensingu.
Interferenční interval
Interferenční interval se spouští síňově i komorově stimulovanými i snímanými událostmi.
Interval (doba intervalu je 80 ms) se vynuluje snímaným
šumem v libovolném kanálu, což vede k asynchronní stimulaci s programovanou frekvencí, po dobu trvání interference.
Deutsch
Español
Français
Stimulaci je nutné v pravidelných intervalech kontrolovat, aby
bylo zajištěno, že je stimulace účinná a je nastaveno dostatečné bezpečnostní rozpětí.
Magyar
Šířka impulzu je 1 ms.
Italiano
Amplitudy impulzu pro síň a komoru lze nastavit otočnými
regulátory Ampl. (10), (6) v rozsahu 0,1 V až 17 V. Při nastavení
hodnoty nižší než 1 V vydá přístroj výstražný tón v délce 2 s.
Nederlands
Amplituda impulzu – síň/komora
Polski
Reocor D omezuje AV zpoždění nahoru na polovinu základního intervalu.
Português
AV zpoždění lze plynule nastavit otočným regulátorem
AV delay (15) od 15 ms do 400 ms. Krátká AV zpoždění
lze zvolit pro speciální indikace, např. při opakovaně nastupujících tachykardiích.
Česky
AV zpoždění
394271--J_GA_Reocor_D_mul.book Page 66 Monday, January 26, 2015 3:35 PM
66
To např. znamená, že v provozním režimu DDD síňové interference bez vlivu na komorový kanál vedou ke stimulaci DVI.
Snímání šumu v komorovém kanálu vede ke stimulaci DAD.
Interference v obou kanálech vede ke stimulaci D00.
Burst
Frekvenci síňové funkce Burst rate atrium lze zvolit otočným
regulátorem (14) od 60 ppm do 1000 ppm.
Aktivace této funkce se provádí 2 tlačítky: Nejprve stiskněte
tlačítko (16) Select burst a potom do 2 s tlačítko (12)
Start burst. Stimulace BURST probíhá potom po dobu stisknutí tohoto tlačítka. Komorový kanál stimuluje přitom dále
nastavenou frekvencí, která může být změněna i v průběhu.
Komorově se inhibuje, pokud je nastaven inhibující provozní
režim.
VAROVÁNÍ!
Po BURST stimulaci v síni může komorový interval nulování
zabránit snímání vlastních událostí a způsobit asynchronní
stimulaci v komoře.
Stimulace srdce s frekvencemi vyššími než 180 ppm po delší
dobu může způsobit vážné hemodynamické komplikace.
Stimulace s vysokými frekvencemi by se měly provádět, pouze
pokud je zajištěna neustálá kontrola.
Režim k vysokofrekvenční stimulaci vede k ukončení určitých
suprakomorových tachykardií (SVT) a měl by se brát v úvahu
pouze pro síňové aplikace. Aplikace asynchronních vysokofrekvenčních stimulů může přerušit SVT v důsledku depolarizace částí uzavřené dráhy arytmie. I když je ektopické síňové
ložisko zodpovědné za SVT, může aplikace vysokofrekvenčních stimulů v síni vést k zesílenému potlačení ektopického
centra.
Ve spojení s vysokofrekvenční síňovou stimulací je nutné
zohlednit různá rizika. K nim patří možná komorová stimulace a komorová tachykardie nebo fibrilace. To může být způsobeno nesprávným umístěním elektrod nebo přítomností
anomálních drah vedení vzruchu, které běžné síňovo-komorové vedení podráždění obchází (např. Wolff-Parkinson-White
syndrom). Další možné problémy mohou být nepohodlí
pacienta a asystoly po vysokofrekvenční stimulaci.
English
394271--J_GA_Reocor_D_mul.book Page 67 Monday, January 26, 2015 3:35 PM
67
Nikdy nepoužívejte poškozený přístroj nebo přístroj, který
vykazuje anomálie, zejména pokud spadl nebo byl poškozen
vysokofrekvenčním nebo defibrilačním napětím.
Reocor D používejte buď v leže na vodorovné, protiskluzové
podložce nebo připevněný manžetou na ruku pacienta nebo
pomocí závěsného oka na zadní straně přístroje zavěšený na
stojanu s infuzí.
Pozor!
Při použití manžety na ruku se nesmí Reocor D nosit přímo
na pokožce.
Čištění
Pro čištění kardiostimulátoru Reocor D lze použít vlhkou
tkaninu a příp. jemné mýdlo. Nepoužívejte agresivní čisticí
prostředky nebo organická rozpouštědla, jako je např. éter
nebo benzín, abyste nepoškodili umělohmotné pouzdro.
Dezinfekce
Pro dezinfekci otřete přístroj tkaninou napuštěnou dezinfekčním roztokem (např. Aerodesin 2000 nebo Lysoform D). Při
použití roztoku dodržujte výrobcem uvedené ředění.
Upozornění:
Po očištění nebo dezinfekci se nesmí Reocor D po dobu jedné
hodiny používat.
Sterilizace
Reocor D nelze sterilizovat. Pokud přístroj musíte použít ve
sterilním prostředí, může být zabalen do sterilního krytu.
Doporučujeme provádět roční kontroly přístroje autorizovaným technikem stanoveným výrobcem.
Pozor!
Ačkoli je Reocor D chráněn před kapající vodou, udržujte jej
v čistotě a v suchu.
Deutsch
Español
Français
VAROVÁNÍ!
Magyar
Pouzdro, ovládací prvky, přípojky a pacientský kabel je nutné
před každým použitím vizuálně zkontrolovat z hlediska
mechanického poškození, deformace, uvolněných dílů,
prasklin a znečištění.
Italiano
Před použitím musí být kardiostimulátor uložen minimálně
2 hodiny v okolních podmínkách uvedených pro provoz (viz
str. 72).
Nederlands
V takovém případě pošlete přístroj firmě BIOTRONIK.
Polski
Reocor D je vysoce vyvinutý přesný přístroj, který vyžaduje
opatrnou manipulaci. Mechanické poškození, např. v důsledku pádu, může ovlivnit jeho funkci.
Português
Reocor D
Česky
Manipulace, údržba a péče
394271--J_GA_Reocor_D_mul.book Page 68 Monday, January 26, 2015 3:35 PM
68
Opakovaně použitelné pacientské kabely
Obal sterilního kabelu je nutné před otevřením zkontrolovat
z hlediska poškození, aby bylo možné stanovit, zda je zajištěna sterilita.
Čištění
Opakovaně použitelné pacientské kabely lze čistit
a dezinfikovat nemocničními čisticími prostředky různými
metodami. Přitom se nesmí používat v žádném případě intenzivní chemikálie, jako je např. aceton.
Jako způsob čištění kabelů doporučujeme použít utěrku
s běžným mýdlem na ruce bez obsahu alkoholu nebo čisticím
prostředkem Stabimed od firmy Braun. Následně musíte
kabely očistit od zbytků čisticího prostředku ve vodě bez
obsahu elektrolytu a otřít čistou, suchou tkaninou.
Dezinfekce
Pro dezinfekci v dezinfekční lázni použijte dezinfekční prostředek na nástroje na bázi aldehydu (např. Lysoformin 3000)
nebo na bázi alkoholu (např. Aerodesin 2000) podle údajů
výrobce a dodržujte příslušné směrnice nemocnice.
Po dezinfekci musí být kabel zbaven zbytků dezinfekčního
prostředku opláchnutím ve vodě bez obsahu elektrolytu.
Sterilizace
Není-li v dokumentaci k pacientským kabelům uvedeno jinak,
mohou být všechny pacientské kabely sterilizovány následujícím způsobem:
•
sterilizace parou při teplotě 121 °C a tlaku 1,1 baru po
dobu 20 min.
Pacientské kabely PK-175 a PK-83-B mohou být kromě toho
sterilizovány takto:
•
sterilizace parou při teplotě 134 °C a tlaku 3,0 baru po
dobu 18 min.
Údržba, servis, bezpečnostně-technické
prohlídky
Jediná nutná údržba je výměna baterie (viz str. 61).
Další údržbové práce nejsou požadovány.
Kontrola před
použitím
Před každým použitím přístroje proveďte krátkou kontrolu.
Jedná se o vizuální kontrolu a jednoduchou funkční kontrolu.
Vizuální kontrola:
•
kontrola pouzdra z hlediska mechanického poškození,
deformace, uvolněných dílů, vrypů atd.;
•
kontrola oblasti přípojek kabelů z hlediska mechanického poškození;
•
kontrola čitelnosti nápisů.
English
394271--J_GA_Reocor_D_mul.book Page 69 Monday, January 26, 2015 3:35 PM
69
Inspekce se musí provádět podle údajů výrobce. Ty jsou k dispozici na vyžádání. Jsou v nich uvedeny všechny požadované
kontrolní kroky i potřebné přístroje.
Likvidace
Reocor D je označen symbolem přeškrtnuté nádoby na odpad
na typovém štítku. Tento symbol indikuje, že pro zpětný odběr
a likvidaci přístroje platí evropská směrnice 2002/96/ES
o likvidaci elektrického a elektronického odpadu (směrnice
WEEE).
Použité přístroje a nepotřebné příslušenství, jako jsou např.
pacientské kabely a adaptéry, by se měly posílat firmě
BIOTRONIK. Tím je zajištěno, že likvidace bude provedena
v souladu s transpozicemi směrnice WEEE do národních
předpisů.
Upozornění:
Kabely, jež je třeba odstranit a které jsou v kontaktu s krví,
musí být odstraněny s ohledem na životní prostředí jako kontaminovaný lékařský odpad. Kabely, které nejsou kontaminovány, musí být odstraněny podle směrnice 2002/96/ES o likvidaci elektrického a elektronického odpadu (směrnice WEEE).
Se spotřebovanými bateriemi zacházejte jako se zvláštním
odpadem a likviduje je uživatel.
V případě dotazů se obrat'te prosím na firmu BIOTRONIK.
Deutsch
jednou ročně.
Español
při podezření na poruchy funkce,
•
Français
•
Magyar
po společném použití s VF chirurgickými přístroji nebo
defibrilátory,
Italiano
•
Nederlands
Inspekce by měla být provedena:
Polski
Bezpečnostnětechnická kotrola
Português
Je nutné sledovat výsledek samočinného testu, který probíhá
automaticky po zapnutí.
Česky
Funkční kontrola
394271--J_GA_Reocor_D_mul.book Page 70 Monday, January 26, 2015 3:35 PM
70
Technická bezpečnost
Externí kardiostimulátor Reocor D splňuje mezinárodní
standardy na bezpečnost elektrolékařských přístrojů podle
IEC 60601-1 a IEC 60601-1-2, i mezinárodní standard
IEC 60601-2-31 pro přechodné externí kardiostimulátory.
Bezpečnost pacienta je zajištěna následujícími speciálními
charakteristikami:
VAROVÁNÍ!
•
Žádné kovové části podle definice IEC, kterých by bylo
možné se dotknout.
•
Konstrukce odpovídá standardu pro třídu přístrojů CF
(cardiac floating) a je povolena pro přímé ošetření srdce.
Kardiostimulátor splňuje požadavky předepsané mezinárodními standardy pro ochranu před defibrilací.
•
Zavřený kryt ovládacího pole chrání kardiostimulátor
před kapající vodou.
Dočasné elektrody, které se připojují ke kardiostimulátoru
Reocor D, představují pro elektrický proud nízkoodporový
vodič k myokardu. Proto musí být přístroje napájené ze sítě,
které jsou v provozu v blízkosti pacienta, uzemněny podle
předpisů.
Kardiostimulátor se nesmí používat v oblastech
s nebezpečím výbuchu.
Všechny další údržbové práce a opravy by měla provádět
výhradně firma BIOTRONIK.
English
394271--J_GA_Reocor_D_mul.book Page 71 Monday, January 26, 2015 3:35 PM
71
Označení polohy baterie v přihrádce na baterie
Likvidace podle smrnice WEEE
Klasifikace aplikačního dílu CF (cardiac floating), chráněno proti
defibrilaci
Ochrana proti vodě, stupeň krytí IP31
OFF
VYP (na otočném spínači Mode)
Français
IP31
Deutsch
Dodržujte pokyny v technické příručce
Español
Symboly
Česky
Technické parametry
Amplituda impulzu (A, V)
0,1 … 17 V ± max
(50 mV, 10 %)
Při amplitudě impulzu < 1 V zazní
výstražný signál
Citlivost (A)
0,2 … 10 mV ±15 %
Vzhledem k impulzu 15 ms sin2
Citlivost (V)
1 … 20 mV ±15 %
Vzhledem k impulzu 40 ms sin2
AV zpoždění
(15 … 400 ms) ±4 ms
Impulzní šumfrekvence (A)
(60 … 1000 ppm) ±20 ppm
Pevné parametry
Šířka impulzu
1 ms ±5 %
Auto short po stimulu
< 20 ms ±10 %
Interferenční interval
80 ms ±5 ms
In channel blanking
110 ms ± 3 ms
Cross Channel
Blanking
19 ms ±3 ms
Totální síňová refrakterní
perioda (TARP)
AVD +175 ms ±5 ms
TARP minimálně pro
(30 … 120) ppm pro
(121 … 250) ppm
400 ms ±5 ms
240 ms ±5 ms
Italiano
Při frekvenci > 180 ppm zazní
výstražný signál
Nederlands
(30 … 250 ppm) ±1 ppm
Polski
DDD, D00, VDD, VVI, V00, VVT
Základní frekvence
Português
Režim
Magyar
Naprogramované parametry
394271--J_GA_Reocor_D_mul.book Page 72 Monday, January 26, 2015 3:35 PM
72
Pevné parametry
Refrakterní perioda (V)
(30 … 150) ppm
(151 … 200) ppm
(201 … 250) ppm
Horní hraniční frekvence
(upper rate)
225 ms ±5 ms
200 ms ±5 ms
175 ms ±5 ms
260 ppm ±10 %
High Rate Protection
1 … 180 ppm
286 ms ±10 %
181 … 250 ppm
214 ms ±10 %
Forma impulzu
Asymetrická, bifázová
286 ms = 210 ppm, neplatí pro
burst
214 ms = 280 ppm, neplatí pro
burst
Sledování impedance elektrod
Akustické varování
Od 2000 Ω ± 15 %, při amplitudě 5 V
Elektrodová přípojka
Zdířky 2 mm s ochranou proti dotyku; pouzdro Redel, 6pólové
prostřednictvím adaptéru Redel
Elektrická data/baterie
Baterie
•
•
•
Polarita
Katodová
Ochrana proti záměně pólů
Žádná: polarita není podstatná
Spotřeba proudu
Běžně 1 mA (70 ppm, 5,0 V, 500 Ω )
Servisní doba s novou
bateriíb)
•
•
•
Konec servisní doby (EOS)
Přerušovaně svítící LED „Low battery“
Zbývající servisní doba po
signálu ERIb)
•
•
36 hodin
Při: 70 ppm, 5 V, režim DDD, 500 ohm
Chování během výměny
baterie
•
Přístroj zůstane s vyjmutou baterií ještě minimálně 30 s
připraven k provozu.
Nastavený režim zůstane aktivní.
•
a)
b)
Typ alkalická-manganová: IEC 6LR61 / ANSI 1604A
9 V s ochranou proti vytečení
Např. MN1604 Duracell® Procell®a)
500 h (−10 %) při 20°C (±2°C)
Při: 70 ppm, 5 V, režim DDD, 500 ohm
Do: signálu ERI (výstraha EOS)
Zapsaná obchodní značka firmy Duracell Inc., Bethel, CT 06801
Při použití typu baterie MN 1604 Duracell®, Procell®
Podmínky pro okolní prostředí
Rozsah provozních teplot
+10°C … +40°C
Rozsah teplot pro skladování
0°C … +50°C
Relativní vlhkost vzduchu
30 % … 75 %, nekondenzující
Tlak vzduchu
700 hPa … 1060 hPa
Hladina hluku
50 dB
73
Mechanické parametry
Rozměry kardiostimulátoru Reocor D
160 mm x 75 mm x 35 mm (bez adaptéru Redel)
Hmotnost kardiostimulátoru Reocor D
S baterií, s adaptérem Redel: 325 g ± 10%
Česky
English
394271--J_GA_Reocor_D_mul.book Page 73 Monday, January 26, 2015 3:35 PM
Bez baterie, s adaptérem Redel: 280 g ± 10%
CF (cardiac floating), chráněno proti defibrilaci
Třída ochrany
II b
Stupeň krytí
IP31 (ochrana proti vodě)
Odolnost proti defibrilaci
5 kV
Provozní režim
Trvalý provoz
Očekávaná životnosta)
(podle EN 60601-1:2007, 4.4)
12 let
a)
Životnost je očekávaná maximální životnost provozu přístroje po uvedení do provozu. Očekávaná maximální životnost provozu není podepřena testovacími daty.
Español
Klasifikace aplikačního dílu
Français
Klasifikace
Magyar
Babyblend FR 3000 (PC-ABS)
Italiano
Materiál pouzdra
Nederlands
40 g ±10 %
Polski
Hmotnost adaptéru Redel pro
kardiostimulátor Reocor D
Português
76 mm x 35,5 mm x 29,4 mm
Deutsch
Bez baterie, bez adaptéru Redel: 240 g ± 10%
Rozměry adaptéru Redel pro
kardiostimulátor Reocor D
394271--J_GA_Reocor_D_mul.book Page 74 Monday, January 26, 2015 3:35 PM
74
Shoda podle IEC 60601-1-2
Pokyny a prohlášení výrobce – elektromagnetické
vyzařování (IEC 60601-1-2: Tabulka 1)
Přístroj je určen pro provoz v níže popsaném elektromagnetickém prostředí. Uživatel musí zajistit, že bude přístroj
používán v takovém prostředí.
Test emisí
Hladina souladu
Pokyny pro elektromagnetické prostředí
Vysokofrekvenční vyzařování podle CISPR 11
Skupina 1
Přístroj využívá vysokofrekvenční energii výhradně pro svou vlastní funkci. Proto je vyzařování
vysokofrekvenčních rušivých veličin velmi nízké
a není pravděpodobné, že by způsobovaly rušení
okolních elektronických zařízení.
Vysokofrekvenční vyzařování podle CISPR 11
Třída B
Vyzařování harmonických
oscilací podle IEC 610003-2
Nelze použít
Přístroj je vhodný pro použití ve všech zařízeních
mimo domácí prostředí a takových budov, které
jsou přímo napojeny na veřejnou napájecí sít'.
Výkyvy napětí podle
IEC 61000-3-3
Nelze použít
Pokyny a prohlášení výrobce – elektromagnetická
rezistence na interferenci (IEC 60601-1-2: Tabulka 2)
Přístroj je určen pro provoz v níže popsaném elektromagnetickém prostředí. Uživatel musí zajistit, že bude přístroj
používán v takovém prostředí.
Kontrola rezistence na Zkušební
interferenci
hladina podle
IEC 60601
Hladina souladu Pokyny pro elektromagnetické
prostředí
Vybití statické elektřiny ±6 kV výboj
(ESD) podle IEC 61000- kontakt
4-2
±8 kV výboj
vzduch
±6 kV výboj
kontakt
±15 kV výboj
vzduch
Podlahy by měly být ze dřeva,
betonu nebo dlažby. Pokud je podlaha ze syntetického materiálu,
musí být v místnosti relativní
vlhkost nejméně 30 %.
30 A/m
Magnetická intenzita pole by měla
odpovídat typické hodnotě
v komerčním a nemocničním
prostředí.
Rychlé přechodné elek- Nelze použít
trické rušení/bursty
podle IEC 61000-4-4
Rázová napětí (surges)
podle IEC 61000-4-5
Nelze použít
Poklesy napětí, krátká
přerušení a pomalé
změny napájecího
napětí podle
IEC 61000-4-11
Nelze použít
Magnetické pole při
napájecích kmitočtech
(50/60 Hz) podle
IEC 61000-4-8
3 A/m
Kontrola rezistence Zkušební hladina
na interferenci
podle IEC 60601
Hladina
souladu
Pokyny pro elektromagnetické
prostředí
Přenosné a mobilní rádiové přístroje se nepoužívají blíže k libovolné
části přístroje, včetně kabelů, než je
doporučený ochranný odstup.
Doporučený ochranný odstup:
Vedené VF rušivé
veličiny podle
IEC 61000-4-6
10 Vrms
10 kHz až 80 MHz
mimo pásma ISMa
10 Vrms
10 Vrms
10 kHz až 80 MHz
uvnitř pásem ISMa)
10 Vrms
Vyzařované VF ruši- 10 V/m
vé veličiny podle
800 MHz až 2,5 GHz
IEC 61000-4-3
d = 0,35
P
d = 1,2
P
d = 1,2
P
10 V/m
Deutsch
Přístroj je určen pro provoz v níže popsaném elektromagnetickém prostředí. Uživatel musí zajistit, že bude přístroj
používán v takovém prostředí.
Español
Pokyny a prohlášení výrobce – elektromagnetická
rezistence na interferenci pro všechny externí modely
kardiostimulátorů (IEC 60601-1-2: Tabulka 3)
Français
75
Česky
English
394271--J_GA_Reocor_D_mul.book Page 75 Monday, January 26, 2015 3:35 PM
Intenzita pole od pevných rádiových
vysílačů, stanovená měřením elektromagnetických parametrů pracovištěc) musí být menší než hladina
souladud).
K rušení může dojít v blízkosti
zařízení označených následujícím
symbolem.
POZNÁMKA: Tyto pokyny nemusí platit ve všech případech. Elektromagnetický přenos je ovlivňován absorpcí a odrazem od budov, objektů a osob.
a)
Pásma ISM (pro průmyslové, vědecké a lékařské aplikace) mezi 150 kHz a 80 MHz jsou
6,765 MHz až 6,795 MHz; 13,553 MHz až 13,567 MHz; 26,957 MHz až 27,283 MHz a 40,66 MHz
až 40,70 MHz.
Italiano
Kde P je maximální jmenovitý výkon
vysílače ve wattech [W] podle údajů
výrobce vysílače a d je doporučený
ochranný odstup v metrech [m]b).
Nederlands
pro 800 MHz až 2,5 GHz
Polski
P
Português
d = 2,3
Magyar
pro 80 MHz až 800 MHz
394271--J_GA_Reocor_D_mul.book Page 76 Monday, January 26, 2015 3:35 PM
76
b)
c)
d)
Hladiny souladu ve frekvenčních pásmech ISM mezi 150 kHz a 80 MHz a ve frekvenčním rozsahu 80 MHz až 2,5 GHz mají zmenšit pravděpodobnost, že budou mobilní komunikační přístroje způsobovat poruchy, pokud budou neúmyslně doneseny do oblasti pacienta. Proto se
v těchto frekvenčních rozsazích doporučuje vyšší ochranný odstup (faktor 1,2 místo 0,35).
Intenzity pole stacionárních vysílačů, jako jsou např. základní stanice pro mobilní telefony
a mobilní radiopřijímače, amatérské radiostanice, rádiové a televizní vysílače nelze předem
stanovit. K posouzení elektromagnetického prostředí pevnými VF vysílači by se měla provést
studie na místě. Pokud naměřená intenzita pole na místě, kde se přístroj používá, překračuje
výše uvedené VF hladiny souladu, je nutné pozorovat přístroj, aby byla zajištěna správná
funkce. Popřípadě je nutné přijmout další opatření, jako je např. jiná orientace nebo jiné
stanoviště externího kardiostimulátoru.
Ve frekvenčním rozsahu 150 kHz až 80 MHz by měly být intenzity pole menší než 10 V/m.
Doporučené vzdálenosti od přenosných a mobilních VF
telekomunikačních zařízeních (IEC 60601-1-2: Tabulka 5)
Přístroj je určen pro provoz v elektromagnetickém prostředí,
ve kterém jsou kontrolovány VF rušivé veličiny. Uživatel přístroje může pomoci vyhnout se elektromagnetické interferenci tím, že bude dodržovat ochranný odstup od mobilních
VF komunikačních přístrojů (vysílačů) – v závislosti na výstupním výkonu komunikačního přístroje, jak je uvedeno dole.
Jmenovitý výkon
vysílače P [W]
Ochranný odstup d [m] podle frekvence vysílání
150 kHz až
80 MHz mimo
pásma ISM
150 kHz až
80 MHz uvnitř
pásem ISM
d = 0,35
d = 1,2
P
P
80 MHz až
800 MHz
d = 1,2
800 MHz až
2,5 GHz
P
d = 2,3
0,01
0,04
0,12
0,12
0,23
0,10
0,11
0,38
0,38
0,73
1,00
0,35
1,20
1,20
2,30
10,00
1,11
3,79
3,79
7,27
100,00
3,50
12,00
12,00
23,00
P
Pro vysílače, jejichž jmenovitý výkon není uveden ve výše uvedené tabulce, může být ochranný
odstup vypočítán na základě vzorce uvedeného pro příslušnou frekvenci vysílače. Přitom je P jmenovitý výkon vysílače ve wattech [W] a d ochranný odstup v metrech [m].
POZNÁMKA 1: Pásma ISM (pro průmyslové, vědecké a lékařské aplikace) mezi 150 kHz a 80 MHz
jsou 6,765 MHz až 6,795 MHz; 13,553 MHz až 13,567 MHz; 26,957 MHz až 27,283 MHz a 40,66 MHz
až 40,70 MHz.
POZNÁMKA 2: Hladiny souladu ve frekvenčních pásmech ISM mezi 150 kHz a 80 MHz a ve frekvenčním rozsahu 80 MHz až 2,5 GHz jsou určeny k tomu, aby zmenšily pravděpodobnost, že
budou mobilní komunikační přístroje způsobovat poruchy, pokud budou neúmyslně doneseny do
oblasti pacienta. Proto se v těchto frekvenčních rozsazích doporučuje vyšší ochranný odstup
(faktor 1,2 místo 0,35).
POZNÁMKA 3: Tyto pokyny nemusí platit ve všech případech. Elektromagnetický přenos je ovlivňován absorpcí a odrazem od budov, objektů a osob.
English
394271--J_GA_Reocor_D_mul.book Page 77 Monday, January 26, 2015 3:35 PM
77
Upozornění:
Reocor D je možné používat pouze s příslušenstvím, které
bylo vyvinuto a otestováno pro tento kardiostimulátor.
Česky
Obsah dodávky a příslušenství
Poznámka
Obj. č.
Baterie
1
Duracell Plus, 6LR61
–
Manžeta na ruku
– Pro Japonsko
– Pro všechny ostatní země
1
Krátká
391843
1
Standardní
103704
Adaptér Redel
1
371262
Kryt ovládacího pole
1
378007
Technická příručka
1
394271
365529
Technická příručka ZH
368702
Krátký návod DE
370123
Krátký návod EN
371300
Krátký návod ES
371301
Krátký návod FR
371302
Krátký návod IT
371303
Krátký návod PT
372230
376006
376005
371304
Kapsa pro implantát
1
379384
Příslušenství
Druh zboží
Obj. č.
Popis
Připojení
PK-82
128564
Pacientský kabel se dvěma izolovanými
krokosvorkami, opakovaně sterilizovatelný
Přímé připojení
PK-83
(2,5 m)
128563
Pacientský kabel se dvěma izolovanými šroubovanými Přímé připojení
svorkami, opakovaně sterilizovatelný
PK-83
(1,5 m)
128562
Pacientský kabel se dvěma izolovanými šroubovanými Přímé připojení
svorkami, opakovaně sterilizovatelný
PK-83-B
(2,5 m)
347485
Pacientský kabel se dvěma izolovanými šroubovanými
Adaptér Redel
svorkami 2,3 mm
PK-83-B
(1,5 m)
347606
Pacientský kabel se dvěma izolovanými šroubovanými Adaptér Redel
svorkami 2,3 mm
PK-175
333959
Pacientský kabel, se čtyřmi šroubovanými svorkami
pro připojení dočasných elektrod, opakovaně
sterilizovatelný
Adaptér Redel
PK-67-L
123672
Pacientský kabel, opakovaně sterilizovatelný, pro
kombinaci s adaptérem PA-1-B, PA-2, PA-4
Adaptér Redel
PK-67-S
128085
Pacientský kabel, opakovaně sterilizovatelný, pro
kombinaci s PK-155 a modelem Remington 301-CG
Adaptér Redel
Italiano
Krátký návod ZH
Nederlands
1
Polski
Krátký návod CS
Português
Krátký návod PL
Español
1
Français
Počet
Reocor D
Magyar
Označení druhu zboží
Deutsch
Obsah dodávky
394271--J_GA_Reocor_D_mul.book Page 78 Monday, January 26, 2015 3:35 PM
78
Druh zboží
Obj. č.
Popis
Připojení
PK-141
(2,8 m)
353181
Pacientský kabel, opakovaně sterilizovatelný se
čtyřmi krokosvorkami s ochranou proti dotyku
Adaptér Redel
Reocor
manžeta
standardní
103704
Reocor
manžeta
krátká
391843
–
Standardní manžeta na ruku
Manžeta na ruku s malým obvodem.
Vhodná pro úzké paže.
–
Pouze pro USA
Druh zboží
Výrobce
Popis
Připojení
ADAP-2R
(0,24 m)
Remington
Medical Inc.
Opakovaně použitelný adaptér pro kabely, model
S-101-97 a model FL-601-97
Adaptér
Redel
Adaptér pro PK-67-S a PK-67-L
Druh zboží
Obj. č.
Popis
PA-1-B
123751
Pro připojení k adaptéru 2 mm nebo adaptéru MHW (adaptér
pro srdeční dráty), opakovaně sterilizovatelný
PA-1-C
349723
Pro připojení k adaptéru 2 mm nebo adaptéru MHW (adaptér
pro srdeční dráty), opakovaně sterilizovatelný
PA-2
123157
Pro připojení zásuvky IS-1, opakovaně sterilizovatelný
PA-4
123090
S krokosvorkami, opakovaně sterilizovatelný
PK-155
(sada se 2 kabely)
337358
Sterilní pacientský kabel, 2žilový s krokosvorkami pro jednorázové použití
Adaptér pro PK-67-S a PK-67-L
(pouze pro USA)
Druh zboží
Výrobce
Popis
Model 301-CG
Remington
Medical Inc.
Sterilní pacientský kabel, 2žilový s krokosvorkami pro
jednorázové použití
Adaptér pro ADAP-2R (pouze pro USA)
Druh zboží
Výrobce
Popis
Model 301-CG
Remington
Medical Inc.
Sterilní pacientský kabel, 2žilový s krokosvorkami pro
jednorázové použití
Model S-101-97
(2,5 m)
Remington
Medical Inc.
Pacientský kabel, 2žilový s krokosvorkami pro jednorázové použití
Model FL-601-97
(2,0 m)
Remington
Medical Inc.
Pacientský kabel, 2žilový se šroubovanými přípojkami pro
jednorázové použití
English
394271--J_GA_Reocor_D_mul.book Page 79 Monday, January 26, 2015 3:35 PM
79
Symboly na štítku mají následující význam:
Význam
Objednací číslo BIOTRONIK
Sériové číslo přístroje
Español
Adaptér Redel
Deutsch
Reocor D
Povolený rozsah teplot pro skladování
Français
Výrobní datum přístroje
Povolený rozsah vlhkosti vzduchu pro skladování
Magyar
Povolený rozsah tlaku vzduchu pro skladování
Obsah
Italiano
Pacient s implantovanou elektrodou
Dodržujte instrukce pro použití!
Nederlands
Značka likvidace
CE značka
Polski
Pozor: Podle zákonů USA je prodej tohoto přístroje omezen pouze na
lékaře nebo na zakázku lékaře.
Português
Symbol
Česky
Vysvětlivky ke štítku
394271--J_GA_Reocor_D_mul.book Page 80 Monday, January 26, 2015 3:35 PM
80
English
394271--J_GA_Reocor_D_mul.book Page 81 Monday, January 26, 2015 3:35 PM
81
Handhabung, Wartung und Pflege ........................................................109
Reocor D.................................................................. 109
Wiederverwendbare Patientenkabel ...................... 110
Wartung, Service, Inspektionen .............................. 110
Entsorgung .............................................................. 111
Deutsch
Español
Français
Magyar
Italiano
Stimulationsarten und Parameter ........................................................104
Stimulationsarten ................................................... 104
Refraktärperioden................................................... 104
Frequenz.................................................................. 105
AV-Zeit ..................................................................... 106
Impulsamplitude – Atrium/Ventrikel ...................... 106
Empfindlichkeit – Atrium ........................................ 106
Empfindlichkeit – Ventrikel..................................... 106
Cross Channel Blanking ......................................... 106
Interferenzintervall ................................................. 107
Burst........................................................................ 107
Nederlands
Bedienungshinweise...............................................................................91
Allgemeine Anmerkungen ........................................ 91
Bedienelemente und LEDs ....................................... 92
Bedienfeldabdeckung ............................................... 93
Elektrodenanschluss ................................................ 94
Inbetriebnahme....................................................... 101
Befestigung ............................................................. 102
Batteriewechsel ...................................................... 102
Polski
Allgemeine Beschreibung.......................................................................83
Produktbeschreibung................................................ 83
Indikationen............................................................... 84
Kontraindikationen.................................................... 84
Mögliche Nebenwirkungen ....................................... 85
Hinweise zur Handhabung........................................ 85
Optische und akustische Signale.............................. 89
Česky
Inhalt
Technische Daten..................................................................................113
Português
Technische Sicherheit...........................................................................112
394271--J_GA_Reocor_D_mul.book Page 82 Monday, January 26, 2015 3:35 PM
82
Konformität gemäß IEC 60601-1-2 .......................................................116
Lieferumfang und Zubehör ...................................................................120
Legende zum Etikett .............................................................................122
Allgemeine Beschreibung
Einstellbar sind Stimulationsart, Frequenz, Empfindlichkeit
und Impulsamplitude, AV-Zeit und die Burst-Frequenz.
Leuchtdioden (LEDs) zeigen die Wahrnehmung (Sense),
Stimulation (Pace) und Batteriezustand (Low battery) an.
Ein akustisches Signal warnt, wenn sehr hohe Frequenzen
oder sehr niedrige Empfindlichkeitswerte eingestellt sind
sowie bei nicht optimaler Elektrodenimpedanz.
Ein Defekt des Geräts (Selbsttest nach Einschalten des
Geräts nicht bestanden) wird durch dauerhaft leuchtende
LEDs und ein getaktetes Tonsignal angezeigt. Wenn der
Selbsttest nach dem Einschalten des Geräts keinen Fehler
entdeckt hat, gehen die akustischen und optischen Signale
nach ein paar Sekunden aus.
Deutsch
Español
Es stehen sechs Stimulationsarten zur Verfügung: DDD, D00,
VDD, VVI, V00 und VVT sowie eine atriale Burst-Funktion.
Français
Reocor D ist ein batteriebetriebener, externer ZweikammerHerzschrittmacher, welcher in Verbindung mit temporären
Schrittmacherelektroden (einschließlich endokardialer Elektroden und transvenös implantierbare Katheter) zur temporären atrialen, ventrikulären und AV-sequentiellen Stimulation im klinischen Umfeld eingesetzt wird. Der Anschluss
erfolgt direkt oder über ein separates Patientenkabel und
ggf. Adapter.
Magyar
Produktbeschreibung
Česky
Allgemeine Beschreibung
•
Mikroprozessorgesteuerte Stimulationsparameter
•
Überwachung der Elektrodenimpedanz
•
Optische Warnung bei bevorstehender Erschöpfung der
Batterie
•
Eine verschiebbare, transparente Abdeckung der
Bedienelemente, um unbeabsichtigte Änderungen der
Parameter zu vermeiden.
Temporäre Katheter, Herzdrähte, Elektroden mit 2-mmSteckern können direkt an Reocor D angeschlossen werden.
Ferner stehen verschiedene Patientenkabel und Adapter zur
Verfügung. Dieses System bietet einen sicheren Anschluss
von transvenösen Kathetern und myokardialen Elektroden,
die entweder unipolar oder bipolar angewendet werden.
Nederlands
Optische Anzeige von wahrgenommenen und
stimulierten Ereignissen
Polski
•
Italiano
Zu den Sicherheitsmerkmalen von Reocor D gehören:
Português
83
English
394271--J_GA_Reocor_D_mul.book Page 83 Monday, January 26, 2015 3:35 PM
394271--J_GA_Reocor_D_mul.book Page 84 Monday, January 26, 2015 3:35 PM
84
Allgemeine Beschreibung
Indikationen
Die temporäre Stimulation mit Reocor D eignet sich für
folgende Anwendungen an Patienten jeden Alters:
•
Behandlung von Arrhythmien und Herzblock
•
symptomatische Sinusbradykardie
•
Sinusknotensyndrom
•
prä-, intra- und postoperative Stimulation von Patienten
mit einer Herzoperation
•
Terminierung supraventrikulärer Tachyarrhythmien
•
prophylaktische Stimulation zur Prävention von Arrhythmien
•
Notfallstimulation
•
Prüfung der Reizschwellen
Kontraindikationen
•
Reocor D kann nicht sterilisiert werden und ist daher
nicht für die Verwendung innerhalb der sterilen Patientenumgebung geeignet.
•
Die atrial getriggerten Stimulationsarten (DDD und VDD)
sind kontraindiziert bei atrialem Kammerflimmern,
Kammerflattern und anderen schnellen atrialen Rhythmen.
•
Wenn vom Patienten hohe ventrikuläre Frequenzen
schlecht toleriert werden (z. B. bei Angina Pectoris)
können vorhofgesteuerte Modi kontraindiziert sein.
•
Wenn eine retrograde Überleitung nach ventrikulärer
Stimulation beobachtet wird, muss unter Umständen
eine längere atriale Refraktärperiode oder kürzere AVZeit programmiert werden, um schrittmacherinduzierten
Tachykardien vorzubeugen. Unter Umständen ist in
diesen Fällen die Programmierung eines VVI-Modus
notwendig
•
Die atriale Einkammerstimulation ist kontraindiziert bei
Patienten mit bereits bestehenden AV-Leitungsstörungen.
•
Die Verwendung eines externen Schrittmachers ist kontraindiziert in Gegenwart eines aktiven, implantierten
Herzschrittmachers.
85
Allgemeine Beschreibung
English
394271--J_GA_Reocor_D_mul.book Page 85 Monday, January 26, 2015 3:35 PM
•
Reocor D darf nur eingesetzt werden von Personen mit
Kenntnissen der Kardiologie, die in die Handhabung des
Geräts eingewiesen wurden. Potentielle Anwender sind
technisch-medizinisches Fachpersonal eines Krankenhauses und Ärzte.
Wirkungsweise
•
Reocor D interagiert mit dem menschlichen Herzen.
Ferner findet eine Wechselwirkung mit der Haut und den
Blutgefäßen des Patienten statt.
Bestimmungsgemäßer Gebrauch
•
Reocor D und die mit dem Gerät zugelassenen Kabel und
Zubehör dürfen nur nach Maßgabe dieser Gebrauchsanweisung verwendet werden.
•
Reocor D darf nicht an andere elektromedizinische
Geräte angeschlossen werden.
•
Reocor D darf nicht in Bereichen verwendet werden, in
denen Explosionsgefahr besteht.
Veränderungsverbot
•
Die Instandsetzung, Erweiterung oder Modifizierung des
Geräts dürfen nur durch den Hersteller BIOTRONIK oder
durch einen vom Hersteller ausdrücklich dazu autorisierten Betrieb erfolgen.
Ersatzteile und
Zubehör
•
Originalersatzteile und von BIOTRONIK autorisiertes
Zubehör dienen Ihrer Sicherheit. Die Verwendung anderer Komponenten hebt die Haftung für die daraus entstehenden Folgen auf, Garantie und Gewährleistung
erlöschen.
Deutsch
Español
Français
Magyar
Anwenderkreis
Italiano
Je nach Stimulationseinstellungen und der zu Grunde liegenden Erkrankung des Patienten kann die Stimulation
Arrhythmien induzieren. Um die Sicherheit des Patienten zu
gewährleisten, sollten bestimmte Verfahrensweisen beachtet
und Vorsichtsmaßnahmen ergriffen werden, die im Folgenden aufgelistet sind. Weitergehende Verfahren und Vorsichtsmaßnahmen sollten in entsprechenden medizinischen
Publikationen nachgelesen werden.
Nederlands
Hinweise zur Handhabung
Polski
Zu den Komplikationen beim Einführen transvenöser Elektroden gehören u. a.: Wundinfektion, arterielle Punktion,
perikardiale Reibungen, kardiale Perforation und Dysrhythmie nach Elektrodeninsertion.
Português
Zu den möglichen Komplikationen bei der Anwendung der
temporären externen Stimulation gehören unter anderem
Asystolen nach abrupter Beendigung der Stimulation (z. B.
durch unbeabsichtigtes Lösen des Patientenkabels, Lösen
der Elektrode, fehlerhafte Einstellungen) oder eine Abhängigkeit vom Herzschrittmacher.
Česky
Mögliche Nebenwirkungen
394271--J_GA_Reocor_D_mul.book Page 86 Monday, January 26, 2015 3:35 PM
86
Geräte
bereithalten
Verhalten vor
dem Einsatz
Elektrodenanschluss
Verhalten während
des Einsatzes
Allgemeine Beschreibung
•
Bei Schrittmacherabhängigkeit des Patienten ist ein Notfallstimulator bereitzuhalten.
•
Bereitzuhalten sind externer Defibrillator, Sauerstoff,
Intubationsausrüstung und Notfallmedikamente.
•
Vor der Anwendung ist Reocor D durch Augenschein hinsichtlich Beschädigungen und Verschmutzungen zu
untersuchen.
•
Niemals ein beschädigtes Gerät oder ein Gerät, das Anomalien aufweist, verwenden. Tauschen Sie Kabel aller Art
bereits bei geringfügigen erkennbaren Beschädigungen
aus.
•
Vor dem Einsatz von Reocor D, der Patientenkabel oder
Elektroden sollte der Anwender den Patienten berühren,
um elektrische Potenzialdifferenzen auszugleichen.
•
Es wird dringend empfohlen, dass der Anwender jeden
eingestellten Parameter prüft, bevor die Elektroden an
Reocor D angeschlossen werden.
•
Obwohl Reocor D gegen Tropfwasser geschützt ist, sollten alle Stecker und das Gerät sauber und trocken gehalten werden.
•
Reocor D kann nicht sterilisiert werden.
•
Die Anschlüsse von Reocor D und der temporären Stimulationselektroden müssen gesichert und regelmäßig
überprüft werden.
•
Das Patientenkabel muss zuerst an Reocor D, dann an
die Elektroden angeschlossen werden.
•
Die temporären Elektroden, an die Reocor D angeschlossen ist, stellen für elektrischen Strom eine niederohmige
Zuleitung zum Myokard dar. Deshalb müssen netzbetriebene Geräte, die in der Nähe des Patienten betrieben
werden, vorschriftsmäßig geerdet sein.
•
Bei der Handhabung von bereits implantierten Elektroden dürfen deren Kontaktstifte und metallischen Kontaktflächen nicht berührt werden oder in Kontakt mit
elektrisch leitenden oder feuchten Oberflächen kommen.
•
Falls sich das Kabel vom Reocor D gelöst hat, muss es
sofort wieder angeschlossen und die Sicherheit der Verbindung kontrolliert werden.
•
Bei der Verwendung unipolarer Elektroden müssen für
eine wirksame Stimulation für jede Kammer zwei unipolare Elektroden verwendet werden.
•
Während des Gebrauchs von Reocor D muss die Bedienfeldabdeckung vollständig geschlossen sein, um ein
versehentliches Verändern der Programmparameter zu
verhindern.
Ungestörte Betriebsart
SSI, SST
VDD
DDD
Bei Störung durch EMI
S00
VAT, VVI, V00
DAD, DVI, D00
Stimulation mit
hohen Frequenzen
•
Eine Stimulation des Herzens mit Frequenzen von mehr
als 180 ppm über einen längeren Zeitraum kann schwere
hämodynamische Komplikationen verursachen. Eine
Stimulation mit hohen Frequenzen sollte nur durchgeführt werden, wenn eine kontinuierliche Überwachung
gewährleistet ist.
Verhalten nach
dem Einsatz
•
Nach einer Defibrillation oder Kauterisation ist das Gerät
einem Funktionstest zu unterziehen.
•
Wird das Gerät längere Zeit gelagert und nicht benutzt,
ist die Batterie herauszunehmen, um Schäden durch
Auslaufen zu verhindern.
•
Zur Reinigung kann ein feuchtes Tuch und eine milde
Seife verwendet werden. Starke Reinigungsmittel oder
organische Lösungsmittel sind zu vermeiden, da sie das
Kunststoffgehäuse angreifen können.
•
Inspektionen und Wartungsarbeiten sind entsprechend
Seite 109 duchzuführen.
•
Benutzen Sie keine wiederaufladbaren Batterien (Akkus).
Die Betriebszeit dieser Batterien ist schwer abzuschätzen, so dass es zu einem unvorhersehbaren Überschreiten des ERI1-Zeitpunktes mit plötzlichem Ausbleiben der
Stimulation kommen kann.
Batteriebetrieb
Es dürfen nur 9-Volt-Batterien mit dem internationalen
Code IEC 6LR61 verwendet werden. Bei der Verwendung
der Batterie Typ MN 1604 Duracell® Procell® ist eine
externe Stimulation von mindestens 500 Stunden möglich, bevor ein Batteriewechsel erforderlich wird.
1
Mit dem Signal ERI (LED Low battery blinkt) erinnert Reocor D an den Batterieaustausch
Česky
Bei Störungen infolge elektromagnetischer Interferenz
(EMI) geht Reocor D bei Überschreitung bestimmter
Grenzwerte in eine asynchrone Stimulation über. Je
nachdem ob die Störungen im Atrium oder im Ventrikel
wahrgenommen werden, ergeben sich für die Dauer der
Störungen folgende Betriebsarten:
Deutsch
•
Español
Während der Verwendung von Reocor D ist die Herzfrequenz des Patienten mit einem EKG-Monitor mit
Alarmfunktion zu überwachen.
Français
Reocor D darf nicht direkt auf der Haut getragen werden.
•
Magyar
•
Italiano
Reocor D entweder liegend auf einer horizontalen, rutschfesten Unterlage oder mit der Armmanschette am Patienten fixiert oder mit Hilfe der Aufhängeöse auf der Geräterückseite an einem Infusionsständer hängend betreiben.
Nederlands
•
Polski
Allgemeine Beschreibung
Português
87
English
394271--J_GA_Reocor_D_mul.book Page 87 Monday, January 26, 2015 3:35 PM
394271--J_GA_Reocor_D_mul.book Page 88 Monday, January 26, 2015 3:35 PM
88
Allgemeine Beschreibung
Ein Batteriewechsel im laufenden Betrieb ist möglich.
Bei herausgenommener Batterie bleibt Reocor D bei
einer Umgebungstemperatur von 20 ± 2 °C noch für ca.
30 s betriebsbereit.
Aus Sicherheitsgründen sollte jedoch der Patient anderweitig versorgt werden.
Elektrokauterisation
•
Eine Elektrokauterisation sollte auf keinen Fall im
Umkreis von weniger als 15 cm um die Elektroden
durchgeführt werden, da die Gefahr besteht, dass ein
Kammerflimmern induziert oder der Schrittmacher
beschädigt wird.
Der Schrittmacher sollte auf asynchrone Stimulation
eingestellt werden, um eine Schrittmacherinhibierung
durch Interferenzsignale zu vermeiden. Während der
Behandlung sollte der periphere Puls des Patienten fortlaufend kontrolliert werden. Nach der Behandlung muss
die Schrittmacherfunktion überprüft werden.
Defibrillation
•
Die Schaltkreise von Reocor D sind gegen die Schockenergie, die durch eine Defibrillation induziert werden
kann, geschützt. Dennoch sollten, wenn möglich, folgende Vorsichtsmaßnahmen getroffen werden:
— Die eingestellte Energie sollte nicht höher sein als
für die Defibrillation erforderlich.
— Die Abstände der Elektroden des Defibrillators zu
den Elektroden von Reocor D sollten mindestens
10 cm betragen.
— Nach einer Defibrillation muss Reocor D aus- und
wieder eingeschaltet werden, damit das Gerät einen
vollständigen Selbsttest durchführen kann.
Außerdem müssen nach der Defibrillation Schrittmacherfunktion und Reizschwelle überprüft und über
einen ausreichend langen Zeitraum überwacht werden.
Störsicherheit
•
Reocor D ist gegen Störungen infolge elektromagnetischer Strahlung, elektrostatischer Entladung und
gegen übergeleitete Störungen geschützt. Auch die von
Reocor D emittierte Strahlung wurde minimiert. Damit
erfüllt das Gerät die Anforderungen nach IEC 60601-1-2.
Dennoch ist es möglich, dass starke elektromagnetische
Felder, wie sie z. B. in der unmittelbaren Nähe von
Elektromotoren, Transformatoren, Stromleitungen und
anderen elektrischen Geräten auftreten können, die
Funktion von Reocor D beeinträchtigen.
Ist die atriale Empfindlichkeit des Geräts auf einen Wert
<1,0 mV eingestellt, kann es zu Störungen durch elektromagnetische Felder kommen.
Wenn es klinisch möglich ist, soll ein Empfindlichkeitsparameter von größer 1,0 mV eingestellt werden.
Die Einstellung von Empfindlichkeitsparametern <1,0 mV
erfordert eine explizite medizinische Indikation. Solche
Werte dürfen nur unter ärztlicher Aufsicht eingestellt
und beibehalten werden.
Optische und akustische Signale
•
Während des Selbsttests nach dem Einschalten von
Reocor D leuchten alle LEDs auf und kurze akustische
Signale sind zu hören. Nach wenigen Sekunden ist der
Selbstest beendet.
•
Wenn der Selbsttest keinen Fehler findet, erlöschen die
LEDs und die Warnsignale.
•
Wenn der Selbsttest einen Defekt findet, blinken alle
LEDs dauerhaft und Warnsignale ertönen.
•
Ein erforderlicher Batteriewechsel wird durch die rot
blinkende LED Low battery angezeigt.
Česky
Deutsch
Español
Français
Magyar
•
Italiano
Maßnahmen zur Wiederherstellung der korrekten Funktion von Reocor D:
— Verbindung zwischen Gerät und temporären Stimulationselektroden überprüfen und ggf. korrigieren.
— Empfindlichkeit am Reocor D richtig justieren: Oft
führt der halbe Wert der durchschnittlichen Amplitude des intrinsischen Signals zu einer korrekten
Empfindlichkeitseinstellung.
— Alle elektrischen Geräte in der Nähe von Reocor D
ausschalten, wenn diese elektromagnetische Störungen verursachen können und ihr Betrieb nicht
unbedingt nötig ist.
— Die Störquelle an einen Ort verbringen, von dem aus
keine Störungen wirksam werden.
— Wenn gefahrlos möglich: Reocor D aus- und wieder
einschalten, um so den Schrittmacher in den ungestörten Betrieb zurückzusetzen.
— Bei weiter bestehender Fehlfunktion wenden Sie sich
an BIOTRONIK.
Nederlands
Elektromagnetische Störungen können zu folgenden
Fehlern führen:
— Unerwartetes Zurücksetzen (Selbsttest wird durchgeführt).
— Kardiale Ereignisse werden wahrgenommen,
erscheinen aber nicht auf dem EKG-Monitor.
— Reocor D zeigt ein unerklärliches Verhalten.
Polski
Allgemeine Beschreibung
Português
89
English
394271--J_GA_Reocor_D_mul.book Page 89 Monday, January 26, 2015 3:35 PM
394271--J_GA_Reocor_D_mul.book Page 90 Monday, January 26, 2015 3:35 PM
90
Allgemeine Beschreibung
•
Die grünen LEDs Sense signalisieren die Wahrnehmung
einer P-Welle oder R-Zacke.
•
Die gelben LEDs Pace signalisieren die Impulsabgabe.
•
Die LEDs und die akustischen Signale liefern außerdem
folgende Warnhinweise im Betrieb:
Warnhinweis
Bedeutung
Störbeseitigung
Akustisches Signal
für 2 s
Es ist eine Impulsamplitude
< 1 V oder eine Frequenz
> 180 ppm eingestellt
Prüfen Sie, ob die eingestellten Werte für den
Patienten geeignet sind.
Schnelle Tonfolge
Impedanz außerhalb des
zulässigen Bereiches
Prüfen Sie, ob alle Stecker
fest aufgesteckt sind.
Prüfen Sie, ob die Elektroden die gewünschte Lage
haben.
Akustisches Signal und
Blinken der LEDs Pace
und Sense
High Rate Protection wurde
ausgelöst;
Selbsttest nicht bestanden
Schalten Sie das Gerät
aus und schicken Sie es
an BIOTRONIK.
LED Low battery blinkt
ERI erreicht
Wechseln Sie die Batterie.
Es verbleiben noch etwa
36 Stundena) Betriebszeit.
a)
Bei der Verwendung der Batterie Typ MN 1604 Duracell® , Procell®
91
Bedienungshinweise
English
394271--J_GA_Reocor_D_mul.book Page 91 Monday, January 26, 2015 3:35 PM
Funktionstest der LEDs und der akustischen Signale
•
Prüfung der Stimulations- und Sensing-Fähigkeit
•
Prüfung der Wirksamkeit der High Rate Protection
Wenn der Selbsttest einen Defekt findet, blinken alle LEDs
dauerhaft und akustische Warnsignale ertönen. In diesem
Fall muss der Schrittmacher ausgeschaltet und an
BIOTRONIK geschickt werden.
Wenn der Selbsttest keinen Fehler entdeckt hat, erlöschen
die LEDs und die Warnsignale und Reocor D beginnt entsprechend der eingestellten Parameter Stimulationsimpulse
abzugeben. Die negative Elektrode (Kathode) sollte deshalb
erst angeschlossen werden, wenn sichergestellt ist, dass
Stimulationsart, Stimulationsfrequenz, Impulsamplitude und
Empfindlichkeit korrekt eingestellt sind.
Wenn der Drehschalter für die Betriebsart auf OFF gestellt
ist, wird verhindert, dass sofort mit Anschließen der Elektroden Stimulationsimpulse an den Patienten abgegeben werden.
Warnmeldungen
Während des Betriebs können folgende Warnmeldungen auftreten:
•
Ein erforderlicher Batteriewechsel wird durch die blinkende LED Low battery angezeigt.
•
Wenn die Elektrodenimpedanz nicht innerhalb eines
zulässigen Bereiches liegt (z. B. infolge einer gebrochenen Elektrode, eines losen Kontakts), ertönt eine
schnelle Tonfolge frühestens 5 s nach dem Einschalten.
•
Wenn die Impulsamplitude auf Werte < 1 V oder die
Frequenz auf Werte > 180 ppm eingestellt wird, ertönt für
etwa 2 s ein akustisches Signal.
•
Bei einer zu hohen Frequenz (siehe S. 114 “High Rate
Protection”) sowie bei nicht bestandenem Selbsttest
ertönt ein akustisches Signal und die LEDs Pace und
Sense blinken.
Deutsch
Speichertest
•
Español
•
Français
Überprüfung des Programm-Codes und des Mikroprozessors
Magyar
•
Italiano
Nach dem Einschalten führt Reocor D für wenige Sekunden
einen Selbsttest durch. Dazu gehören:
Nederlands
Selbsttest
Die Anschlüsse von Reocor D und der temporären
Stimulationselektroden müssen gesichert und regelmäßig
überprüft werden.
Polski
Achtung!
Português
Allgemeine Anmerkungen
Česky
Bedienungshinweise
394271--J_GA_Reocor_D_mul.book Page 92 Monday, January 26, 2015 3:35 PM
92
Bedienungshinweise
0
30
0
10
80
60
0
40
0
20
0, 5
300
0
25
200
18
0
10
2
0,3
0,2
7
1
12
0, 7
0
0
17
10
50
0
10
75
50
0
60
400
35
0
0,1
3
0,5
3
1
2
5
3
4
12
17
10
5
5
10
7
8
2
7
0,1
14
11
1
0 ,5
3
2
1
5
20
17
INDIFF.+
DIFF.-
Bedienfeld Reocor D
70
60 0
VV I
V0 0
80
0
1000
25
15
12
0
VV
T
40
b
Bild 1:
17
D
14 0
DD
20
0
250
D
VD
D00
Bedienelemente und LEDs
Anschluss ventrik. Kanal
Für Kabel und Elektroden mit 2-mm-Steckern oder für
Redel-Adapter (rot = plus; blau = minus)
2
Batteriefach
Für Blockbatterie 9 V
3
LED Low battery
Warnt vor zu niedriger Batteriespannung
4
LED Ventricle Pace
Gelbe Anzeige für ventrikuläres stimuliertes Ereignis
5
LED Ventricle Sense
Grüne Anzeige für wahrgenommene R-Welle
6
Drehregler
Ventricle Ampl.
Einstellung der ventrikulären Impulsamplitude
7
Drehregler
Ventricle Sens.
Einstellung der ventrikulären Empfindlichkeit
(nicht anwendbar in den Betriebarten D00 und V00)
8
LED Atrium Pace
Gelbe Anzeige für atriales stimuliertes Ereignis
9
LED Atrium Sense
Grüne Anzeige für wahrgenommene P-Welle
10
Drehregler
Atrium Ampl.
Einstellung der atrialen Impulsamplitude
(nicht anwendbar in der Betriebsart VDD)
11
Drehregler
Atrium Sens.
Einstellung der atrialen Empfindlichkeit
(nicht anwendbar in der Betriebsart D00)
12
Start burst
Start der atrialen Burst-Funktion
13
Gurthalterung und Aufhänge- Befestigung Reocor D an Patient, Bett oder Infusionsöse (rückseitig)
ständer
14
Drehregler Burst rate atrium
Einstellung der atrialen Burst-Frequenz
15
Drehregler AV delay
Einstellung der AV-Zeit
16
Select burst
Wahl der atrialen Burst-Funktion
17
Drehschalter Mode
Wahl der Stimulationsbetriebsart und Ausschalter
18
Drehregler Rate
Einstellung der Stimulationsfrequenz
Tabelle 1: Beschreibung der Elemente im Bild 1
Česky
1b
Deutsch
Funktion
Anschluss atrialer Kanal
Español
Bezeichnung
1a
Français
Bedienungshinweise
Magyar
93
English
394271--J_GA_Reocor_D_mul.book Page 93 Monday, January 26, 2015 3:35 PM
Bedienfeldabdeckung
Die Bedienfeldabdeckung ist verriegelt, wenn die Bedienfeldabdeckung über zwei Rastpunkte bis zum Anschlag
geschoben wurde und die Verriegelung über dem Steg sitzt
(siehe Bild 2).
Falsch:
Bild 2:
Korrekter Sitz der Bedienfeldabdeckung
Português
Polski
Richtig:
Nederlands
Italiano
Fette Beschriftung von Bedienelementen kennzeichnet für
die Zweckbestimmung des Geräts sichere Werte.
394271--J_GA_Reocor_D_mul.book Page 94 Monday, January 26, 2015 3:35 PM
94
Bedienungshinweise
Um die Bedienfeldabdeckung zu entriegeln (siehe Bild 3):
Drücken Sie mit einer Hand den Verriegelungshebel
nach oben.
Schieben Sie gleichzeitig mit der anderen Hand die
Bedienfeldabdeckung nach unten.
Bild 3:
Entriegeln der Bedienfeldabdeckung
Um die Bedienfeldabdeckung zu verriegeln:
Schieben Sie die Bedienfeldabdeckung über den Steg
nach oben bis zum Anschlag (siehe Bild 2).
Zur Reinigung können Sie die Bedienfeldabdeckung vollständig abnehmen. Schieben Sie dazu die Abdeckung nach
unten bis zum Anschlag. Schieben Sie anschliessend die
Abdeckung über den Anschlag hinaus.
Achtung!
Während des Gebrauchs von Reocor D muss die Bedienfeldabdeckung verriegelt sein, um ein versehentliches
Verstellen der Drehschalter und -regler und damit der
Programmparameter zu verhindern.
Elektrodenanschluss
Reocor D verfügt über 4 Buchsen für den direkten Anschluss
von Elektroden mit berührungsgeschützten 2-mm-Steckern.
Für den Anschluss von Kabeln mit Redel-Stecker muss der
Redel-Adapter seitenrichtig aufgesteckt und verschraubt
werden (Bild 4). Der Redel-Adapter ist seitenrichtig aufgesteckt, wenn Sie ihn am Reocor D verschrauben können.
Hinweis:
Ausschließlich wenn der Redel-Adapter seitenrichtig aufgesteckt ist, ist seine Funktion gewährleistet!
95
English
394271--J_GA_Reocor_D_mul.book Page 95 Monday, January 26, 2015 3:35 PM
Bedienungshinweise
Español
Deutsch
Česky
.
Reocor D kann mit folgenden Patientenkabeln und Adaptern
verwendet werden:
Patientenkabel PK-175 mit vier Schraubklemmen für
temporäre Elektroden auf der Patientenseite und RedelStecker auf der Reocor-Seite (Redel-Adapter benutzen)
Nederlands
Italiano
•
Magyar
DIFF.-
Redel-Adapter für Reocor D
Français
INDIFF.+
Bild 4:
•
Bild 6:
Patientenkabel PK-82 mit 2 isolierten Krokodilklemmen
für temporäre Elektroden auf der Patientenseite und
2 berührungsgeschützten 2-mm-Steckern auf der
Reocor-Seite.
Patientenkabel PK-82
Polski
Patientenkabel PK-175
Português
Bild 5:
394271--J_GA_Reocor_D_mul.book Page 96 Monday, January 26, 2015 3:35 PM
96
Bedienungshinweise
•
Bild 7:
Patientenkabel PK-83-B
•
Bild 8:
Patientenkabel PK-83 für Einkammerstimulation mit
zwei isolierten Schraubklemmen für temporäre Elektroden auf der Patientenseite und zwei berührungsgeschützten 2-mm-Steckern auf der Reocor-Seite.
Patientenkabel PK-83
•
Bild 9:
Patientenkabel PK-83-B für Einkammerstimulation mit
zwei Schraubklemmen für temporäre Elektroden auf der
Patientenseite und Redel-Stecker auf der Reocor-Seite
(Redel-Adapter benutzen). Temporäre Elektroden, die
über das PK-83-B angeschlossen werden, sind mit dem
ventrikulären Kanal von Reocor D verbunden.
Patientenkabel PK-67-L, PK-67-S unterscheiden sich
nur in ihrer Länge.
Patientenkabel PK-67-L (2,6 m) und PK-67-S (0,8 m)
Bedienungshinweise
Bild 10: Adapter für die Patientenkabel PK-67-L und PK-67-S
PA-1-B zum Anschluss von berührungsgeschützten
2-mm-Steckern oder MHW-Adaptern (Adapter für Herzdrähte)
PA-2 IS-1
Deutsch
PK-67-L/-S
Česky
Adapter
An die Patientenkabel PK-67-L/-S (Bild 9) passen die Adapter
nach Bild 10:
Español
•
Français
97
English
394271--J_GA_Reocor_D_mul.book Page 97 Monday, January 26, 2015 3:35 PM
Patientenkabel PK-141 mit vier Krokodilklemmen auf
der Patientenseite und Redel-Stecker auf der ReocorSeite (Redel-Adapter benutzen)
Adapterkabel ADAP-2R ist ein wiederverwendbares
Kabel zur Verbindung der Einmalkabel nach Bild 13
(nur für USA) mit Reocor D (Redel-Adapter benutzen).
Bild 12: Adapterkabel ADAP-2R
Polski
•
Português
Bild 11: Patientenkabel PK-141
Nederlands
Italiano
•
Magyar
PA-4 mit Krokodilklemmen
394271--J_GA_Reocor_D_mul.book Page 98 Monday, January 26, 2015 3:35 PM
98
Bedienungshinweise
•
Kabel zum einmaligen Gebrauch (nur USA)
Bild 13: Einmalkabel von Remington Medical Inc. (nur USA)
•
Kabel zum einmaligen Gebrauch
Die Einmalkabel PK-155 und Remington 301-CG (nur USA)
mit Krokodilklemmen (Bild 14) werden über das Kabel
PK-67-S mit dem Patienten verbunden.
Bild 14: Kabel PK-155
Anschließen
WARNUNG!
Gefährdung des Patienten durch beschädigte Kabel. Beschädigte Kabel beeinträchtigen deren Funktion und bringen den
Patienten in Gefahr. Benutzen Sie keine beschädigten Kabel.
WARNUNG!
Gefährdung durch Funktionsverlust.
Feuchte Kabel können deren Funktion beeinträchtigen und
den Patienten in Gefahr bringen. Benutzen Sie keine feuchten
Kabel.
WARNUNG!
Gefährdung durch elektrische Ströme.
Ungenutzte Kabelkontakte können elektrische Ströme in den
Patienten leiten. Befestigen Sie ungenutzte Kabelkontakte in
der Nähe des Patienten.
Achtung!
Allergische Reaktionen und Entzündungen.
Vermeiden Sie, dass Kabel mit Wunden und der Haut des
Patienten in Berührung kommen.
Hinweis:
Achten Sie vor Benutzung der Kabel auf den richtigen Sitz der
Isoliertüllen.
Hinweis:
Das Patientenkabel nicht an die temporäre Stimulationselektrode des Patienten anschließen, bevor der Anschluss
am Reocor D hergestellt ist.
99
Bedienungshinweise
English
394271--J_GA_Reocor_D_mul.book Page 99 Monday, January 26, 2015 3:35 PM
Wenn Reocor D ohne den Redel-Adapter betrieben wird, können temporäre Katheter und Herzdrähte mit dem Patientenkabel PK-82 und PK-83 direkt an die Buchsen A+, A- und
V+, V- angeschlossen werden.
Česky
Direktanschluss
Über ein Redel-Adapter am Reocor D wird das Patientenkabel angeschlossen.
Stecken Sie den Redel-Adapter auf Reocor D.
Deutsch
Patientenkabel
Français
Magyar
Italiano
Nederlands
Mit dem Patientenkabel PK-83-B ist keine Zweikammerstimulation möglich. Elektroden, die an das PK-83-B angeschlossen werden, sind mit dem ventrikulären Kanal von
Reocor D verbunden.
Polski
Hinweis:
Português
Stecken Sie den Redel-Stecker des Patientenkabels in
die Redel-Buchse des Adapters.
Español
Schrauben Sie diesen fest.
394271--J_GA_Reocor_D_mul.book Page 100 Monday, January 26, 2015 3:35 PM
100
Bedienungshinweise
Anschlussvarianten
Temporäre Katheter mit 2-mm-Steckern oder
Herzdraht mit 2-mm-Adapter
Sie haben die Möglichkeit, Reocor D direkt, ohne weitere
Kabel oder Adapter, an einen temporären Katheder mit
berührungsgeschützten 2-mm-Stecker oder einen Herzdraht mit 2-mm-Adapter anzuschließen. Alle weiteren Möglichkeiten entnehmen Sie der folgenden Tabelle.
Anschluss
patientenseitig
BIOTRONIK Kabel
Anschluss
geräteseitig
Reocor D
Anschluss
Empfohlene Anschlüsse
Direkter Anschluss (ohne BIOTRONIK Kabel)
2-mm-Buchsen
2 mm
PK-67-S/L mit PA-1-B
Redel-Stecker
Redel-Adapter
Schraubklemmen
PK-175 mit TC Adapt
Redel-Stecker
Redel-Adapter
Schraubklemmen
PK-83 mit TC Adapt (2x)
2-mm-Stecker
2-mm-Buchsen
Krokodilklemmen
PK-141
Redel-Stecker
Redel-Adapter
Krokodilklemmen
PK-67-S/L mit PA-4
Redel-Stecker
Redel-Adapter
Krokodilklemmen
PK-67-S/L mit PK-155 (2x)
Redel-Stecker
Redel-Adapter
Krokodilklemmen
PK-82 (2x)
2-mm-Stecker
2-mm-Buchsen
Mögliche Anschlüsse
Herzdraht mit Breakoff-Nadel oder mit
flexiblem Ende (max. 2,3 mm Durchmesser)
Anschluss
patientenseitig
BIOTRONIK Kabel
Anschluss
geräteseitig
Reocor D
Anschluss
Empfohlene Anschlüsse
Schraubklemmen
PK-175
Redel-Stecker
Redel-Adapter
Schraubklemmen
PK-83 (2x)
2-mm-Stecker
2-mm-Buchsen
Krokodilklemmen
PK-141
Redel-Stecker
Redel-Adapter
Krokodilklemmen
PK-67-S/L mit PA-4
Redel-Stecker
Redel-Adapter
Krokodilklemmen
PK-67-S/L mit PK-155 (2x)
Redel-Stecker
Redel-Adapter
Krokodilklemmen
PK-82 (2x)
2-mm-Stecker
2-mm-Buchsen
Anschluss
patientenseitig
BIOTRONIK Kabel
Mögliche Anschlüsse
Implantierte Elektrode mit IS-1 Stecker
Anschluss
geräteseitig
Reocor D
Anschluss
PK-67-S/L mit PA-2
Redel-Stecker
Redel-Adapter
Krokodilklemmen
PK-141
Redel-Stecker
Redel-Adapter
Krokodilklemmen
PK-67-S/L mit PA-4
Redel-Stecker
Redel-Adapter
Krokodilklemmen
PK-67-S/L mit PK-155 (2x)
Redel-Stecker
Redel-Adapter
Krokodilklemmen
PK-82 (2x)
2-mm-Stecker
2-mm-Buchsen
Empfohlene Anschlüsse
IS-1 Buchse
Mögliche Anschlüsse
101
Bedienungshinweise
English
394271--J_GA_Reocor_D_mul.book Page 101 Monday, January 26, 2015 3:35 PM
Reocor D stimuliert grundsätzlich bipolar, kann aber mit
bipolaren oder mit unipolaren temporären Stimulationselektroden verwendet werden.
Česky
Polarität
Die Bedienung von Reocor D ist für alle Betriebsarten identisch. Die Bedienschritte sollten in der folgenden Reihenfolge
durchgeführt werden (die Zahlen in Klammern beziehen sich
auf Bild 1 auf Seite 92 dieser Gebrauchsanweisung).
•
Batterie einlegen
•
Bedienfeldabdeckung nach unten schieben
•
Patienten vorbereiten: Elektroden legen, jedoch noch
nicht an den Schrittmacher anschließen.
•
Reocor vorbereiten:
Die Stimulationsfrequenz mit dem Drehregler Rate (18)
einstellen.
Die AV-Zeit mit dem Drehregler AV delay (15) einstellen1.
Die Stimulationsamplituden für Atrium1 und Ventrikel
mit den Drehreglern Atrium Ampl. (10)1 und Ventricle
Ampl. (6) einstellen.
1
•
Mit dem Drehschalter Mode (17) die Stimulationsart
wählen. Gleichzeitig wird das Gerät damit eingeschaltet.
•
Nach erfolgreichem Abschluss des internen Selbsttests
blinken alle 5 LEDs auf dem Bedienfeld gleichzeitig zweimal auf.
•
Wenn die LED Low battery (3) blinkt, muss die Batterie
gewechselt werden (Batteriewechsel siehe Seite 102).
•
Elektroden anschließen, die gelben LEDs Atrium Pace
(8)1 und Ventricle Pace (4) blinken synchron mit den
atrialen bzw. ventrikulären Stimulationsimpulsen.
Nur bei 2-Kammer-Stimulation
Español
Français
Inbetriebnahme
Magyar
Ziehen Sie den Überwurfring am Redel-Stecker zurück
und ziehen Sie den Redel-Stecker aus der Redel-Buchse
ab.
Italiano
•
Nederlands
Redelstecker trennen
Polski
Patientenkabel von den temporären Stimulationselektroden
des Patienten abklemmen bzw. den direkten Anschluss
lösen.
Português
Anschlüsse trennen
Deutsch
Bei Verwendung von unipolaren Elektroden müssen für jede
Kammer 2 Elektroden angeschlossen werden.
394271--J_GA_Reocor_D_mul.book Page 102 Monday, January 26, 2015 3:35 PM
102
Bedienungshinweise
•
Empfindlichkeit für Atrium und Ventrikel mit den Drehreglern Atrium Sens. (11)1 und Ventricle Sens. (7) so
einstellen, dass die grünen LEDs Atrium Sense (9)1 und
Ventricle Sense (5) synchron mit jedem wahrgenommenen atrialen bzw. ventrikulären Ereignis blinken.
Es sollte eine ausreichende Sicherheitsmarge berücksichtigt werden, um eine zuverlässige Wahrnehmung zu
gewährleisten.
•
Achtung!
Das EKG des Patienten überwachen und ggf. Amplitude
und Empfindlichkeit anpassen.
Während der Verwendung von Reocor D muss die Herzfrequenz des Patienten mit einem EKG-Monitor mit Alarmfunktion überwacht werden.
Befestigung
Reocor D muss entweder liegend auf einer horizontalen,
rutschfesten Unterlage oder mit der Armmanschette am
Patienten fixiert oder mit Hilfe der Aufhängeöse auf der
Geräterückseite an einem Infusionsständer hängend betrieben werden.
Um Reocor D an einem Infusionsständer befestigen zu können, drehen Sie die Aufhängeöse auf der Geräterückseite
heraus. Damit gewährleisten Sie einen sicheren Gebrauch
und entlasten die Patientenkabel.
Batteriewechsel
Wenn die LED Low battery (3) anfängt zu blinken, ist die Batterie nahezu erschöpft. Bei der Verwendung der Batterie Typ
MN 1604 Duracell® Procell® verbleiben noch etwa 36 Stunden Betriebszeit. Dennoch sollte die Batterie so schnell wie
möglich ausgewechselt werden.
Reocor D muss mit einer 9-Volt-Batterie, internationaler
Code IEC 6LR61, betrieben werden. Es sollten nur auslaufsichere Alkali-Mangan-Batterien verwendet werden. Bei der
Verwendung der Batterie Typ MN 1604 Duracell® Procell®
ist bei 20 ± 2 °C eine externe Stimulation für mindestens
500 Stunden möglich, bevor ein Batteriewechsel erforderlich
wird.
Ein Batteriewechsel im laufenden Betrieb ist möglich. Bei
herausgenommener Batterie bleibt Reocor D bei einer
Umgebungstemperatur von 20 ± 2 °C noch für ca. 30 s
betriebsbereit.
Das Batteriefach (2) befindet sich rechts an der Seite des
Geräts und wird geöffnet, indem der blaue Schieber nach
oben gedrückt und die Lade nach rechts herausgezogen wird.
Batterie vorsichtig herausnehmen.
Zum Schutz der Batteriepole kann auf der neuen Batterie ein
Gummistopfen gesteckt sein. Ziehen Sie diesen ab, bevor Sie
die neue Batterie einsetzen.
Achtung!
Im Batteriefach ist eine Markierung mit der bevorzugten
Polung. Jedoch müssen Sie beim Einsetzen der neuen Batterie lediglich beachten, dass die Batteriepole zur Gehäusemitte zeigen. Die Position des Plus- bzw. Minuspols ist frei
wählbar.
Italiano
Magyar
Legen Sie die neue Batterie mit dem Boden (Bild 15) nach
unten zuerst in das Batteriefach.
Česky
Benutzen Sie keine wiederaufladbaren Batterien (Akkus).
Die Betriebszeit dieser Batterien ist schwer abzuschätzen, so
dass es zu einem unvorhersehbaren Überschreiten von ERI
mit plötzlichem Ausbleiben der Stimulation kommen kann.
Deutsch
Aus Sicherheitsgründen sollte jedoch der Patient anderweitig
versorgt werden.
Español
Bedienungshinweise
Français
103
English
394271--J_GA_Reocor_D_mul.book Page 103 Monday, January 26, 2015 3:35 PM
Wird der Schrittmacher längere Zeit gelagert oder nicht
benutzt, wird empfohlen, die Batterie herauszunehmen, um
Schäden durch Auslaufen zu verhindern.
Polski
Hinweis:
Português
Schließen Sie die Lade und drücken Sie den blauen Schieber
nach unten, bis er hörbar einrastet.
Nederlands
Bild 15: Einsetzen der Batterie
394271--J_GA_Reocor_D_mul.book Page 104 Monday, January 26, 2015 3:35 PM
104
Stimulationsarten und Parameter
Stimulationsarten und Parameter
Stimulationsarten
Reocor D arbeitet in einer der folgenden sechs Stimulationsarten:
DDD
Synchrone A-V-Stimulation mit Wahrnehmung und Stimulation sowohl im Atrium
als auch im Ventrikel
VDD
Synchrone, ventrikuläre Stimulation mit atrialem Tracking
D00
Asynchrone A-V-Stimulation, keine Wahrnehmung in beiden Kammern
VVI
Wahrnehmung und Stimulation im Ventrikel
V00
Asynchrone Stimulation im Ventrikel
VVT
Wie VVI, aber bei Wahrnehmung eines ventrikulären Ereignisses außerhalb der
Refraktärperiode sofortige Impulsabgabe
Bei Störungen infolge elektromagnetischer Interferenz (EMI)
wechselt Reocor D bei Überschreitung bestimmter Grenzwerte eine asynchrone Stimulation. Je nachdem, ob die Störungen im Atrium oder im Ventrikel wahrgenommen werden,
ergeben sich für die Dauer der Störungen folgende Betriebsarten
Ungestörte Betriebsart
Bei Störung durch EMI
SSI, SST
S00
VDD
VAT, VVI, V00
DDD
DAD, DVI, D00
Refraktärperioden
Die Frequenz, bis zu der die Ventrikel synchron mit atrial
wahrgenommenen Ereignissen stimuliert werden (obere
Grenzfrequenz), wird von der atrialen Refraktärperiode (atrial
refractory period, ARP) bestimmt. Der zeitliche Ablauf wird
durch atrial wahrgenommene und stimulierte Ereignisse
gestartet, ebenso wie durch wahrgenommene ventrikuläre
Extrasystolen, die den Zeitzyklus zurücksetzen.
Bei Überschreiten der oberen Grenzfrequenz fällt jeder
zweite atriale Puls in die ARP, wird nicht wahrgenommen und
löst keinen ventrikulären Impuls aus. Die ventrikuläre Stimulationsfrequenz wird mit einem Verhältnis von 2:1 fortgesetzt
(Bild 16).
Stimulationsarten und Parameter
Česky
105
English
394271--J_GA_Reocor_D_mul.book Page 105 Monday, January 26, 2015 3:35 PM
Español
Deutsch
t
175 ms
Frequenz
Die Frequenz kann mit dem Drehregler Rate (18) kontinuierlich von 30 ppm bis 250 ppm verstellt werden. Wenn ein Wert
von mehr als 180 ppm eingestellt wird, gibt das Gerät
2 Sekunden lang einen Warnton ab.
WARNUNG!
Eine Stimulation des Herzens mit Frequenzen von mehr als
180 ppm über einen längeren Zeitraum kann schwere hämodynamische Komplikationen verursachen. Eine Stimulation
mit hohen Frequenzen sollte nur durchgeführt werden, wenn
eine kontinuierliche Überwachung gewährleistet ist.
Magyar
200 ms
Über 200 ppm
Italiano
225 ms
150 ppm bis 200 ppm
Nederlands
Refraktärperiode VRP
Unter 150 ppm
Polski
Stimulationsfrequenz
Português
Die totale atriale Refraktärperiode (TARP) von Reocor D wird
aus der Summe von 175 ms und der eingestellten AV-Zeit
gebildet, jedoch beträgt ihr minimaler Wert 400 ms unterhalb
einer Stimulationsfrequenz von 120 ppm. Oberhalb dieser
Frequenz reduziert sich die minimale TARP auf 240 ms.
Die ventrikuläre Refraktärperiode VRP von Reocor D ist
abhänig von der Stimulationsfrequenz:
Français
Bild 16: Reaktion der oberen Grenzfrequenz während atrialer Tachykardien (Grundfrequenz 72 ppm)
394271--J_GA_Reocor_D_mul.book Page 106 Monday, January 26, 2015 3:35 PM
106
Stimulationsarten und Parameter
AV-Zeit
Die AV-Zeit kann mit dem Drehregler AV delay (15) kontinuierlich von 15 ms bis 400 ms verstellt werden. Kurze AV-Zeit
können für spezielle Indikationen, z. B. bei wieder eintretenden Tachykardien, gewählt werden.
Reocor D begrenzt die AV-Zeit nach oben hin auf die Hälfte
des Basisintervalls.
Impulsamplitude – Atrium/Ventrikel
Die Impulsamplituden für Atrium und Ventrikel können mit
den Drehreglern Ampl. (10), (6) im Bereich von 0,1 V bis 17 V
verstellt werden. Wenn ein Wert von unter 1 V eingestellt
wird, gibt das Gerät 2 Sekunden lang einen Warnton ab.
Die Impulsdauer beträgt 1 ms.
Die Stimulation sollte in regelmäßigen Abständen überprüft
werden, um zu gewährleisten, dass eine Stimulation vorhanden und eine ausreichende Sicherheitsmarge eingestellt ist.
Empfindlichkeit – Atrium
Die Empfindlichkeit kann mit dem Drehregler Atrium sens.
(11) zwischen 0,2 mV und 10 mV eingestellt werden. Sie sollte
in regelmäßigen Abständen überprüft werden, um zu
gewährleisten, dass eine korrekte Wahrnehmung vorhanden
und eine ausreichende Sicherheitsmarge eingestellt ist.
Empfindlichkeit – Ventrikel
Die Empfindlichkeit kann mit dem Drehregler Ventricle sens.
(7) zwischen 1 mV und 20 mV eingestellt werden. Die Empfindlichkeit sollte in regelmäßigen Abständen überprüft werden, um zu gewährleisten, dass eine korrekte Wahrnehmung
vorhanden und eine ausreichende Sicherheitsmarge eingestellt ist.
Cross Channel Blanking
Nach Abgabe eines Stimulus wird für 19 ms ± 3 ms die Wahrnehmung im jeweils anderen Kanal unterdrückt, um eine
Far-Field-Wahrnehmung zu vermeiden.
107
Stimulationsarten und Parameter
English
394271--J_GA_Reocor_D_mul.book Page 107 Monday, January 26, 2015 3:35 PM
So führt beispielsweise in der Betriebsart DDD eine atriale
Interferenz ohne Beeinträchtigung des ventrikulären Kanals
zu einer DVI Stimulation. Wahrnehmung eines Rauschens im
ventrikulären Kanal führt zu einer DAD Stimulation.
Interferenz in beiden Kanälen führt zu einer D00 Stimulation.
Deutsch
Das Intervall wird zurückgesetzt durch wahrgenommenes
Rauschen in einem beliebigen Kanal während der Intervalldauer von 80 ms, was zu einer asynchronen Stimulation mit
der programmierten Frequenz führt, solange die Interferenz
besteht.
Español
Das Interferenzintervall wird sowohl von atrial und ventrikulär stimulierten als auch wahrgenommenen Ereignissen
gestartet.
Česky
Interferenzintervall
Eine Stimulation des Herzens mit Frequenzen von mehr als
180 ppm über einen längeren Zeitraum kann schwere hämodynamische Komplikationen verursachen. Eine Stimulation
mit hohen Frequenzen sollte nur durchgeführt werden, wenn
eine kontinuierliche Überwachung gewährleistet ist.
Der Modus zur hochfrequenten Stimulation dient zur Terminierung bestimmter supraventrikulärer Tachykardien (SVT)
und sollte nur für atriale Anwendungen in Betracht gezogen
werden. Die Anwendung asynchroner hochfrequenter Stimuli
kann eine SVT durch Depolarisierung von Teilen eines
Reentry-Pfades unterbrechen. Auch wenn ein ektopischer
atrialer Fokus für eine SVT verantwortlich ist, kann die Applikation hochfrequenter Stimuli am Atrium zu einer verstärkten Unterdrückung des ektopen Zentrums führen.
Magyar
Italiano
Nach einer Burst-Stimulation im Atrium kann das ventrikuläre Blanking-Intervall die Wahrnehmung intrinsischer
Ereignisse verhindern und zu einer asynchronen Stimulation
im Ventrikel führen.
Nederlands
WARNUNG!
Polski
Die Aktivierung dieser Funktion erfolgt mit 2 Tastern: Zuerst
ist der Taster (16) Select burst zu drücken und danach innerhalb von 2 Sekunden der Taster (12) Start burst. Die Impulsabgabe erfolgt dann, solange dieser Taster gedrückt wird.
Der ventrikuläre Kanal stimuliert hierbei weiter mit der eingestellten Frequenz, die auch währenddessen verstellt werden kann. Es wird ventrikulär inhibiert, sofern eine inhibierende Betriebsart eingestellt ist.
Português
Die Frequenz der atrialen Burst rate atrium-Funktion kann
mit dem Drehregler (14) zwischen 60 ppm und 1000 ppm
gewählt werden.
Français
Burst
394271--J_GA_Reocor_D_mul.book Page 108 Monday, January 26, 2015 3:35 PM
108
Stimulationsarten und Parameter
In Verbindung mit der hochfrequenten atrialen Stimulation
sind verschiedene Risiken zu berücksichtigen. Dazu gehören
mögliche ventrikuläre Stimulation und ventrikuläre Tachykardie oder Fibrillation. Dies kann durch eine schlechte Platzierung der Elektroden oder das Vorhandensein anomaler
Erregungsleitungswege verursacht werden, die die normale
atrioventrikuläre Erregungsleitung umgehen (z. B. WolffParkinson-White-Syndrom). Weitere mögliche Probleme
können Unbehagen des Patienten und Asystolen nach einer
hochfrequenten Stimulation sein.
109
Handhabung, Wartung und Pflege
English
394271--J_GA_Reocor_D_mul.book Page 109 Monday, January 26, 2015 3:35 PM
WARNUNG!
Niemals ein beschädigtes Gerät oder ein Gerät, das Anomalien aufweist, verwenden, insbesondere wenn es fallengelassen wurde oder durch Hochfrequenz- oder Defibrillationsspannung beschädigt sein könnte.
Reocor D entweder liegend auf einer horizontalen, rutschfesten Unterlage oder mit der Armmanschette am Patienten
fixiert oder mit Hilfe der Aufhängeöse auf der Geräterückseite an einem Infusionsständer hängend betreiben.
Achtung!
Bei Verwendung einer Armmanschette darf Reocor D nicht
direkt auf der Haut getragen werden.
Reinigung
Zur Reinigung von Reocor D kann ein feuchtes Tuch und ggf.
eine milde Seife verwendet werden. Starke Reinigungsmittel
oder organische Lösungsmittel wie z. B. Äther oder Benzin
sind zu vermeiden, da sie das Kunststoffgehäuse angreifen
können.
Desinfektion
Zur Desinfektion wischen Sie das Gerät mit einem Tuch ab,
das mit einer Desinfektionslösung getränkt ist (z. B. Aerodesin 2000 oder Lysoform D). Beachten Sie beim Ansetzen
der Lösung das vom Hersteller angegebene Maß der Verdünnung.
Hinweis:
Sterilisation
Nach einer Reinigung oder Desinfektion darf Reocor D eine
Stunde lang nicht benutzt werden.
Reocor D kann nicht sterilisiert werden. Falls das Gerät in
einer sterilen Umgebung verwendet werden muss, kann es in
einen sterilen Überzug gepackt werden.
Deutsch
Español
Français
Gehäuse, Bedienelemente, Anschlüsse und Patientenkabel
müssen vor jeder Anwendung visuell auf mechanische
Beschädigung, Deformierung, lose Teile, Sprünge und
Verschmutzung visuell geprüft werden.
Magyar
Vor dem Gebrauch muss der Schrittmacher mindestens
2 Stunden unter den für den Betrieb angegebenen Umgebungsbedingungen (s. S. 114) gelagert werden.
Italiano
Senden Sie das Gerät in diesem Fall an BIOTRONIK.
Nederlands
Reocor D ist ein hochentwickeltes Präzisionsgerät, das mit
Sorgfalt behandelt werden sollte. Durch mechanische Einwirkung, z. B. durch Herunterfallen, kann seine Funktion
beeinträchtigt werden.
Polski
Reocor D
Česky
Handhabung, Wartung und Pflege
Achtung!
Obwohl Reocor D gegen Tropfwasser geschützt ist, sollte das
Gerät sauber und trocken gehalten werden.
Português
Jährliche Überprüfungen des Geräts durch vom Hersteller
autorisierte Techniker werden empfohlen.
394271--J_GA_Reocor_D_mul.book Page 110 Monday, January 26, 2015 3:35 PM
110
Handhabung, Wartung und Pflege
Wiederverwendbare Patientenkabel
Die Verpackung eines sterilen Kabels ist vor dem Öffnen auf
Beschädigungen zu untersuchen, um feststellen zu können,
ob die Sterilität gewährleistet ist.
Reinigung
Die wiederverwendbaren Patientenkabel lassen sich nach
vielen verschiedenen Methoden mit Krankenhaus-Reinigungsmitteln reinigen und desinfizieren. Dabei dürfen jedoch
keinesfalls scharfe Chemikalien wie etwa Aceton verwendet
werden.
Als Reinigungsmethode für die Kabel wird die Verwendung
eines Wischtuchs mit gewöhnlicher, alkoholfreier Handseife
oder dem Reinigungsmittel Stabimed der Fa. Braun empfohlen. Anschließend sind die Kabel mit elektrolytfreiem Wasser
von Rückständen des Reinigungsmittels zu befreien und
danach mit einem sauberen, trockenen Tuch abzuwischen.
Desinfektion
Für eine Desinfektion in einem Desinfektionsmittelbad ist ein
Instrumentendesinfektionsmittel auf Aldehydbasis (z. B.
Lysoformin 3000) oder Alkoholbasis (z. B. Aerodesin 2000)
nach den Angaben des Herstellers und unter Beachtung der
entsprechenden Krankenhausrichtlinien zu verwenden.
Nach der Desinfektion muss das Kabel durch Spülen in elektrolytfreiem Wasser von Resten des Desinfektionsmittels
befreit werden.
Sterilisation
Wenn in den Dokumenten zu den Patientenkabeln nicht
anders angegeben, können alle Patientenkabel wie folgt sterilisert werden:
•
Dampfsterilisation bei 121 °C und 1,1 bar für 20 min
Darüber hinaus können die Patientenkabel PK-175 und
PK-83-B wie folgt sterilisiert werden:
•
Dampfsterilisation bei 134 °C und 3,0 bar für 18 min
Wartung, Service, Inspektionen
Die einzige erforderliche Wartungsmaßnahme ist der Batteriewechsel (siehe Seite 102).
Weitere Wartungsarbeiten sind nicht notwendig.
Prüfung vor
Gebrauch
Vor jedem Gebrauch des Geräts soll eine kurze Prüfung
durchgeführt werden. Sie umfasst eine visuelle Prüfung und
eine einfache Funktionsprüfung.
Visuelle Prüfung:
•
Prüfung des Gehäuses auf mechanische Beschädigungen, Verformung, lose Teile, Risse etc.
Handhabung, Wartung und Pflege
•
Prüfung des Kabelanschlussbereichs auf mechanische
Beschädigungen
•
Prüfung der Beschriftung auf Lesbarkeit
Funktionsprüfung:
Česky
111
English
394271--J_GA_Reocor_D_mul.book Page 111 Monday, January 26, 2015 3:35 PM
Diese Inspektion muss gemäß den Herstellerangaben erfolgen. Diese werden auf Nachfrage zur Verfügung gestellt.
Darin aufgeführt sind alle erforderlichen Prüfschritte sowie
die dazu benötigten Geräte.
Entsorgung
Reocor D ist mit dem Symbol einer durchkreuzten Abfalltonne auf dem Typenschild gekennzeichnet. Dieses Symbol
zeigt an, dass für Rücknahme und Entsorgung des Geräts die
Europäische Richtlinie 2002/96/EG über Elektro- und Elektronik-Altgeräte (WEEE-Richtlinie) gilt.
Alte Geräte und nicht mehr benötigtes Zubehör, wie z. B.
Patientenkabel und Adapter, sollten an BIOTRONIK geschickt
werden. Dadurch wird sichergestellt, dass die Entsorgung in
Übereinstimmung mit den nationalen Ausführungen der
WEEE-Richtlinie geschieht.
Hinweis:
Zu entsorgende Kabel, die in Kontakt mit Blut gekommen
sind, müssen umweltgerecht als kontaminierter medizinischer Abfall entsorgt werden. Nicht kontaminierte Kabel
müssen im Sinne der Richtlinie 2002/96/EG über Elektro-und
Elektronik-Altgeräte (WEEE) entsorgt werden.
Verbrauchte Batterien müssen als Sondermüll behandelt
werden und sind durch den Anwender zu entsorgen.
Bei Fragen wenden Sie sich bitte an BIOTRONIK.
Español
einmal im Jahr.
Français
bei Verdacht auf Funktionsstörungen,
•
Magyar
•
Italiano
nach gemeinsamer Anwendung mit HF-Chirurgiegeräten oder Defibrillatoren,
Nederlands
•
Polski
Die Inspektion sollte durchgeführt werden
Português
Inspektion
Deutsch
Das Ergebnis des Selbsttests, der automatisch nach dem
Einschalten abläuft, ist zu beachten.
394271--J_GA_Reocor_D_mul.book Page 112 Monday, January 26, 2015 3:35 PM
112
Technische Sicherheit
Technische Sicherheit
Der externe Schrittmacher Reocor D entspricht den internationalen Standards für die Sicherheit von elektromedizinischen Geräten nach IEC 60601-1 und IEC 60601-1-2,
ebenso wie dem internationalen Standard IEC 60601-2-31 für
temporäre, externe Schrittmacher.
Die folgenden speziellen Merkmale bieten Sicherheit für den
Patienten:
WARNUNG!
•
Keine Metallteile gemäß Definition nach IEC, die berührt
werden können.
•
Die Konstruktion entspricht den Standards für Geräteklasse CF (cardiac floating) und ist für die direkte
Behandlung des Herzens zugelassen. Der Schrittmacher
erfüllt die von den internationalen Standards vorgeschriebenen Anforderungen für den Defibrillationsschutz.
•
Die geschlossene Bedienfeldabdeckung schützt den
Schrittmacher vor Tropfwasser.
Die temporären Elektroden, die an Reocor D angeschlossen
sind, stellen für elektrischen Strom eine niederohmige Zuleitung zum Myokard dar. Deshalb müssen netzbetriebene
Geräte, die in der Nähe des Patienten betrieben werden,
vorschriftsmäßig geerdet sein.
Der Schrittmacher darf nicht in Bereichen verwendet werden, in denen Explosionsgefahr besteht.
Alle weiterführenden Wartungsarbeiten und Reparaturen
sollten nur von BIOTRONIK ausgeführt werden.
113
English
394271--J_GA_Reocor_D_mul.book Page 113 Monday, January 26, 2015 3:35 PM
Technische Daten
Hinweise in der Gebrauchsanweisung beachten
Markierung der Batterieposition im Batteriefach
Deutsch
Symbole
Česky
Technische Daten
IP31
Wasserabweisend, Schutzart IP31
OFF
Aus (auf dem Drehschalter Mode)
Français
Klassifikation Anwendungsteil CF (Cardiac Floating),
defibrillationsgeschützt
Español
Entsorgung nach WEEE-Richtlinie
Impulsamplitude (A, V)
0,1 ... 17 V ± max (50 mV, 10 %)
Bei einer Impulsamplitude < 1 V
ertönt ein Warnsignal
Empfindlichkeit (A)
0,2 ... 10 mV ± 15 %
Bzgl. 15 ms sin2-Impuls
Empfindlichkeit (V)
1 ... 20 mV ± 15 %
Bzgl. 40 ms sin2-Impuls
AV-Zeit
(15 ... 400 ms) ± 4 ms
Burst-Frequenz (A)
(60 ... 1000 ppm) ± 20 ppm
Feste Parameter
Impulsdauer
1 ms ± 5 %
Auto short nach Pace
< 20 ms ± 10%
Interferenzintervall
80 ms ± 5 ms
In channel blanking
110 ms ± 3 ms
Cross Channel
Blanking
19 ms ± 3 ms
Totale Atriale Refraktärperiode (TARP)
AVD +175 ms ± 5 ms
TARP minimal
für (30 ... 120) ppm
für (121 ... 250)ppm
400 ms ± 5 ms
240 ms ± 5 ms
Italiano
Bei einer Frequenz > 180 ppm
ertönt ein Warnsignal
Nederlands
(30 ... 250 ppm) ± 1 ppm
Polski
DDD, D00, VDD, VVI, V00, VVT
Grundfrequenz
Português
Stimulationsarten
Magyar
Einstellbare Parameter
394271--J_GA_Reocor_D_mul.book Page 114 Monday, January 26, 2015 3:35 PM
114
Technische Daten
Feste Parameter
Refraktärperiode (V)
(30 ... 150) ppm
(151 ... 200) ppm
(201 ... 250) ppm
225 ms ± 5 ms
200 ms ± 5 ms
175 ms ± 5 ms
Obere Grenzfrequenz
260 ppm ± 10 %
High Rate Protection
1 ... 180 ppm
286 ms ± 10 %
181 ... 250 ppm
214 ms ± 10 %
Impulsform
Asymmetrisch, biphasisch
286 ms = 210 ppm, gilt nicht bei
Burst
214 ms = 280 ppm, gilt nicht bei
Burst
Überwachung Elektrodenimpedanz
Akustische Warnung
Ab 2000 Ω ± 15 %, bei 5 V Amplitude
Elektrodenanschluss
Berührungsgeschützte 2-mm-Buchsen;
Redel-Buchse, 6-polig mittels Redel-Adapter
Elektrische Daten/Batterie
Batterie
•
•
•
Alkali-Mangan-Typ: IEC 6LR61 / ANSI 1604A
9 V, auslaufsicher
Z. B. MN1604 Duracell® Procell®a)
Polarität
Kathodisch
Verpolschutz
Keiner: Polarität ist unerheblich
Stromverbrauch
Typisch 1 mA (70 ppm, 5,0 V, 500 Ω )
Betriebszeit mit
neuer Batterieb)
•
•
•
500 h (−10 %) bei 20 °C (± 2°C)
Bei: 70 ppm, 5 V, Mode DDD, 500 Ohm
Bis: ERI-Signal (EOS-Warnung)
Ende der Betriebszeit (EOS) Blinkende LED “Low battery”
Verbleibende Betriebszeit
nach ERI-Signalb)
•
•
36 Stunden
Bei: 70 ppm, 5 V, Mode DDD, 500 Ohm
Verhalten während des
Batteriewechsels
•
Gerät bleibt bei herausgenommener Batterie noch mindestens 30 s betriebsbereit.
Der eingestellte Mode bleibt erhalten.
•
a)
b)
Eingetragenes Warenzeichen von Duracell Inc., Bethel, CT 06801
Bei der Verwendung der Batterie Typ MN 1604 Duracell® , Procell®
Umgebungsbedingungen
Temperaturbereich für Betrieb
+10 °C ... +40 °C
Temperaturbereich für Lagerung
0 °C ... +50 °C
Relative Luftfeuchtigkeit
30% ... 75%, nicht kondensierend
Luftdruck
700 hPa ... 1060 hPa
Geräuschpegel
50dB
Technische Daten
Abmessungen, Gewicht, Material
Abmessungen Reocor D
160 mm x 75 mm x 35 mm (ohne Redel-Adapter)
Gewicht Reocor D
Mit Batterie, mit Redel-Adapter: 325 g ± 10 %
Česky
115
English
394271--J_GA_Reocor_D_mul.book Page 115 Monday, January 26, 2015 3:35 PM
Ohne Batterie, mit Redel-Adapter: 280 g ± 10 %
Schutzklasse
II b
Schutzart
IP31 (wasserabweisend)
Defibrillationsfestigkeit
5 kV
Betriebsart
Dauerbetrieb
Erwartete Lebensdauera)
(gemäß EN 60601-1:2007,
4.4)
12 Jahre
a)
Die Lebensdauer ist die erwartete maximale Betriebs-Lebensdauer des Geräts nach
Inverkehrbringen. Die erwartete maximale Betriebs-Lebensdauer ist nicht von Testdaten
gestützt.
Español
Français
Klassifikation Anwendungs- CF (cardiac floating), defibrillationsgeschützt
teil
Magyar
Klassifikation
Italiano
Babyblend FR 3000 (PC-ABS)
Nederlands
Gehäusematerial
Polski
40 g ± 10 %
Português
Gewicht Redeladapter für
Reocor D
Deutsch
Ohne Batterie, ohne Redel-Adapter: 240 g ± 10 %
Abmessungen Redeladapter 76 mm x 35,5 mm x 29,4 mm
für Reocor D
394271--J_GA_Reocor_D_mul.book Page 116 Monday, January 26, 2015 3:35 PM
116
Konformität gemäß IEC 60601-1-2
Konformität gemäß IEC 60601-1-2
Leitlinien und Erklärung des Herstellers Elektromagnetische Aussendungen
(IEC 60601-1-2: Tabelle 1)
Das Gerät ist für den Betrieb in der unten beschriebenen
elektromagnetischen Umgebung vorgesehen. Der Anwender
sollte gewährleisten, dass das Gerät in einer solchen Umgebung verwendet wird.
Emissionstest
Übereinstimmungspegel
Leitlinien zur elektromagnetischen Umgebung
HF-Aussendung
nach CISPR 11
Gruppe 1
Das Gerät benutzt HF-Energie ausschließlich für
seine eigene Funktion. Deshalb ist die Aussendung hochfrequenter Störgrößen sehr gering
ebenso wie die Wahrscheinlichkeit, andere in der
Nähe betriebene elektronische Geräte zu stören.
HF- Aussendung
nach CISPR 11
Klasse B
Aussendung von
Oberschwingungen
nach IEC 61000-3-2
Nicht
anwendbar
Das Gerät ist für die Anwendung in allen Einrichtungen außer der häuslichen Umgebung und
solchen Gebäuden geeignet, die direkt an das
öffentliche Versorgungsnetz angeschlossen sind.
Spannungsschwankungen Nicht
nach IEC 61000-3-3
anwendbar
Leitlinien und Erklärung des Herstellers Elektromagnetische Störfestigkeit
(IEC 60601-1-2: Tabelle 2)
Das Gerät ist für den Betrieb in der unten beschriebenen
elektromagnetischen Umgebung vorgesehen. Der Anwender
des Geräts sollte gewährleisten, dass es in einer solchen
Umgebung verwendet wird.
Prüfung der
Störfestigkeit
Prüfpegel nach
IEC 60601
Entladung statischer ± 6 kV KontaktElektrizität (ESD) nach entladung
IEC 61000-4-2
± 8 kV Luftentladung
Schnelle transiente
elektrische Störgrößen/Bursts nach
IEC 61000-4-4
nicht
anwendbar
Stoßspannungen
(Surges) nach
IEC 61000-4-5
nicht
anwendbar
Übereinstimmungspegel
Leitlinien zur elektromagnetischen Umgebung
± 6 kV Kontaktentladung
± 15 kV Luftentladung
Fußböden sollten aus Holz, Beton
oder Keramikfliesen bestehen.
Wenn der Fußboden aus synthetischem Material besteht, muss die
relative Luftfeuchtigkeit mindestens 30% betragen.
30 A/m
Die magnetische Feldstärke sollte
dem in der Geschäfts- und
Krankenhausumgebung vorzufindenden typischen Wert
entsprechen.
Spannungseinbrüche, nicht
Kurzzeitunterbreanwendbar
chungen und Schwankungen der Versorgungsspannung nach
IEC 61000-4-11
3 A/m
Magnetfeld bei den
Versorgungsfrequenzen (50/60 Hz)
nach IEC 61000-4-8
Leitlinien und Erklärung des Herstellers –
Elektromagnetische Störfestigkeit für alle externen
Herzschrittmachermodelle (IEC 60601-1-2: Tabelle 3)
Das Gerät ist für den Betrieb in der unten beschriebenen
elektromagnetischen Umgebung vorgesehen. Der Anwender
des Geräts sollte gewährleisten, dass es in einer solchen
Umgebung verwendet wird.
Prüfung der
Störfestigkeit
Prüfpegel nach
IEC 60601
Übereinstimmungspegel
Česky
Leitlinien zur elektromagnetischen Umgebung
Deutsch
Übereinstimmungspegel
Español
Prüfpegel nach
IEC 60601
Français
Prüfung der
Störfestigkeit
Konformität gemäß IEC 60601-1-2
Leitlinien zur elektromagnetischen Umgebung
Tragbare und mobile Funkgeräte
werden nicht näher an einem
beliebigen Teil des Geräts, einschließlich Kabeln, verwendet, als
der empfohlene Schutzabstand.
Magyar
117
English
394271--J_GA_Reocor_D_mul.book Page 117 Monday, January 26, 2015 3:35 PM
10 Vrms
Gestrahlte HF-Stör- 10 V/m
größen nach
800 MHz bis 2,5 GHz
IEC 61000-4-3
P
d = 1,2
P
d = 1,2
P
10 V/m
für 80 MHz bis 800 MHz
d = 2,3
Nederlands
10 Vrms
10 kHz bis 80 MHz
innerhalb von ISMBänderna)
d = 0,35
P
für 800 MHz bis 2,5 GHz
Polski
10 Vrms
Português
10 Vrms
10 kHz bis 80 MHz
außerhalb von ISMBänderna
Italiano
Empfohlener Schutzabstand:
Geleitete HF-Störgrößen nach
IEC 61000-4-6
394271--J_GA_Reocor_D_mul.book Page 118 Monday, January 26, 2015 3:35 PM
118
Prüfung der
Störfestigkeit
Konformität gemäß IEC 60601-1-2
Prüfpegel nach
IEC 60601
Übereinstimmungspegel
Leitlinien zur elektromagnetischen Umgebung
Darin ist P die maximale Nennleistung des Senders in Watt [W]
gemäß Angaben des Senderherstellers und d der empfohlene
Schutzabstand in Meter [m]b).
Die Feldstärke stationärer
Funksender muss bei allen
Frequenzen gemäß einer Untersuchung vor Ortc) geringer sein als
der Übereinstimmungspegeld).
In der Umgebung von Geräten, die
das folgende Bildzeichen tragen,
sind Störungen möglich.
ANMERKUNG: Diese Leitlinien gelten möglicherweise nicht in allen Fällen. Die Ausbreitung elektromagnetischer Wellen wird durch Absorption und Reflexion durch Gebäude, Gegenstände und
Menschen beeinflusst.
a)
b)
c)
d)
Die ISM-Bänder (für industrielle, wissenschaftliche und medizinische Anwendungen)
zwischen 150 kHz und 80 MHz sind 6,765 MHz bis 6,795 MHz; 13,553 MHz bis 13,567 MHz;
26,957 MHz bis 27,283 MHz und 40,66 MHz bis 40,70 MHz.
Die Übereinstimmungspegel in den ISM-Frequenzbändern zwischen 150 kHz und 80 MHz und
im Frequenzbereich 80 MHz bis 2,5 GHz sollen die Wahrscheinlichkeit verringern, dass mobile
Kommunikationsgeräte Störungen verursachen, wenn sie unbeabsichtigt in Patientenbereiche gebracht werden. Deshalb wird in diesen Frequenzbereichen ein höherer Schutzabstand empfohlen (Faktor 1,2 statt 0,35).
Die Feldstärken stationärer Sender, wie z. B. Basisstationen für Mobiltelefone und mobile
Landfunkgeräte, Amateurfunkstationen, Rundfunk- und Fernsehsender können nicht genau
vorherbestimmt werden. Zur Beurteilung der elektromagnetischen Umgebung durch feste
HF-Sender sollte eine Studie des Standorts erwogen werden. Wenn die gemessene Feldstärke an dem Ort, an dem das Gerät verwendet wird, den obigen HF-Übereinstimmungspegel
überschreitet, muss das Gerät beobachtet werden, um die ordnungsgemäße Funktion zu
gewährleisten. Gegebenenfalls müssen zusätzliche Maßnahmen getroffen werden, wie z. B.
eine andere Ausrichtung oder ein anderer Standort des externen Schrittmachers.
Im Frequenzbereich von 150 kHz bis 80 MHz sollten die Feldstärken weniger als 10 V/m
betragen.
d = 1,2
P
d = 1,2
P
d = 2,3
0,01
0,04
0,12
0,12
0,23
0,10
0,11
0,38
0,38
0,73
1,00
0,35
1,20
1,20
2,30
10,00
1,11
3,79
3,79
7,27
100,00
3,50
12,00
12,00
23,00
P
Für Sender, deren Nennleistung nicht in obiger Tabelle angegeben ist, kann der Schutzabstand
anhand der für die jeweilige Senderfrequenz angegebenen Formel berechnet werden. Dabei ist P
die Nennleistung des Senders in Watt [W] und d der Schutzabstand in Meter [m].
ANMERKUNG 1: Die ISM-Bänder (für industrielle, wissenschaftliche und medizinische Anwendungen) zwischen 150 kHz und 80 MHz sind 6,765 MHz bis 6,795 MHz; 13,553 MHz bis 13,567
MHz; 26,957 MHz bis 27,283 MHz und 40,66 MHz bis 40,70 MHz.
ANMERKUNG 2: Die Übereinstimmungspegel in den ISM-Frequenzbändern zwischen 150 kHz
und 80 MHz und im Frequenzbereich 80 MHz bis 2,5 GHz sind dazu bestimmt, die Wahrscheinlichkeit zu verringern, dass mobile Kommunikationsgeräte Störungen verursachen, wenn sie
unbeabsichtigt in den Patientenbereich gebracht werden. Deshalb wird in diesen Frequenzbereichen ein höherer Schutzabstand empfohlen (Faktor 1,2 statt 0,35).
ANMERKUNG 3: Diese Leitlinien gelten möglicherweise nicht in allen Fällen.
Die Ausbreitung elektromagnetischer Wellen wird durch Absorption und Reflexion durch Gebäude, Gegenstände und Menschen beeinflusst.
Česky
Deutsch
Español
P
Français
d = 0,35
800 MHz bis
2,5 GHz
Magyar
Nennleistung des Schutzabstand d [m] entsprechend Sendefrequenz
Senders P [W]
150 kHz bis
150 kHz bis
80 MHz bis
80 MHz außerhalb 80 MHz innerhalb 800 MHz
von ISM-Bändern von ISM-Bändern
Italiano
Das Gerät ist für den Betrieb in einer elektromagnetischen
Umgebung vorgesehen, in der die HF-Störgrößen kontrolliert
sind. Der Anwender des Geräts kann helfen, elektromagnetische Störungen zu vermeiden, indem er den Schutzabstand
zu mobilen HF-Kommunikationsgeräten (Sendern) - abhängig von der Ausgangsleistung des Kommunikationsgeräts,
wie unten angegeben - einhält.
Nederlands
Empfohlene Schutzabstände zu tragbaren und mobilen HFTelekommunikationsgeräten (IEC 60601-1-2: Tabelle 5)
Polski
Konformität gemäß IEC 60601-1-2
Português
119
English
394271--J_GA_Reocor_D_mul.book Page 119 Monday, January 26, 2015 3:35 PM
394271--J_GA_Reocor_D_mul.book Page 120 Monday, January 26, 2015 3:35 PM
120
Lieferumfang und Zubehör
Lieferumfang und Zubehör
Hinweis:
Reocor D darf nur mit dem für diesen Schrittmacher entwickelten und getesteten Zubehör verwendet werden.
Auslieferungsumfang
Artikelbezeichnung
Anzahl
Reocor D
1
Bemerkung
Bestell-Nr.
Batterie
1
Duracell Plus, 6LR61
–
Armmanschette
– für Japan
– für alle anderen Länder
1
Kurz
391843
1
Standard
103704
Redel-Adapter
1
371262
Bedienfeldabdeckung
1
378007
Gebrauchsanweisung
1
394271
365529
Gebrauchsanweisung ZH
368702
Kurzanleitung DE
1
370123
Kurzanleitung EN
371300
Kurzanleitung ES
371301
Kurzanleitung FR
371302
Kurzanleitung IT
371303
Kurzanleitung PT
372230
Kurzanleitung ZH
371304
Tasche
1
379384
Zubehör
Artikel
BestellNr.
Beschreibung
Anschluss
PK-82
128564
Patientenkabel mit zwei isolierten
Krokodilklemmen, resterilisierbar
Direktanschluss
PK-83 (2,5 m)
128563
Patientenkabel mit zwei isolierten
Schraubklemmen, resterilisierbar
Direktanschluss
PK-83 (1,5 m)
128562
Patientenkabel mit zwei isolierten
Schraubklemmen, resterilisierbar
Direktanschluss
PK-83-B (2,5 m)
347485
Patientenkabel mit zwei isolierten 2,3 mm
Schraubklemmen
RedelAdapter
PK-83-B (1,5 m)
347606
Patientenkabel mit zwei isolierten 2,3 mm
Schraubklemmen
RedelAdapter
PK-175
333959
Patientenkabel, mit vier Schraubklemmen
zum Anschließen temporärer Elektroden,
resterilisierbar
RedelAdapter
PK-67-L
123672
RedelPatientenkabel, resterilisierbar, für
Kombination mit Adapter PA-1-B, PA-2, PA-4 Adapter
PK-67-S
128085
Patientenkabel, resterilisierbar, für
Kombination mit PK-155 und Remington
Model 301-CG
RedelAdapter
Anschluss
PK-141 (2,8 m)
353181
Patientenkabel, resterilisierbar, mit vier
berührungsgeschützten Krokodilklemmen
RedelAdapter
Reocor Manschette
standard
103704
Standard Armmanschette
–
Reocor Manschette
kurz
391843
Armmanschette mit geringerem Umfang.
Für schmale Arme geeignet.
–
Nur für die USA
Artikel
Hersteller
Beschreibung
Anschluss
ADAP-2R
(0,24 m)
Remington
Medical Inc.
Wiederverwendbarer Adapter für Kabel Model
S-101-97 und Model FL-601-97
RedelAdapter
Adapter für PK-67-S und PK-67-L
Artikel
Bestell-Nr. Beschreibung
PA-1-B
123751
Zum Anschluss an 2-mm-Adapter oder MHW-Adapter
(Adapter für Herzdrähte), resterilisierbar
PA-1-C
349723
Zum Anschluss an 2-mm-Adapter oder MHW-Adapter
(Adapter für Herzdrähte), resterilisierbar
PA-2
123157
Zum Anschluss an IS-1-Stecker, resterilisierbar
PA-4
123090
Mit Krokodilklemmen, resterilisierbar
PK-155
(Set mit 2 Kabeln)
337358
Steriles Patientenkabel, 2-adrig, mit Krokodilklemmen für
einmaligen Gebrauch
Česky
Beschreibung
Deutsch
BestellNr.
Español
Artikel
Français
Lieferumfang und Zubehör
Magyar
121
English
394271--J_GA_Reocor_D_mul.book Page 121 Monday, January 26, 2015 3:35 PM
Artikel
Hersteller
Beschreibung
Model 301-CG
Remington
Medical Inc.
Steriles Patientenkabel, 2-adrig, mit Krokodilklemmen
für einmaligen Gebrauch
Italiano
Adapter für PK-67-S und PK-67-L (nur für USA)
Beschreibung
Remington
Medical Inc.
Steriles Patientenkabel, 2-adrig, mit Krokodilklemmen
für einmaligen Gebrauch
Model S-101-97
(2,5 m)
Remington
Medical Inc.
Patientenkabel, 2-adrig, mit Krokodilklemmen für einmaligen Gebrauch
Model FL-601-97
(2,0 m)
Remington
Medical Inc.
Patientenkabel, 2-adrig, mit Schraubanschlüssen für
einmaligen Gebrauch
Polski
Hersteller
Model 301-CG
Português
Artikel
Nederlands
Adapter für ADAP-2R (nur für USA)
394271--J_GA_Reocor_D_mul.book Page 122 Monday, January 26, 2015 3:35 PM
122
Legende zum Etikett
Legende zum Etikett
Die Symbole auf dem Etikett haben folgende Bedeutung:
Symbol
Bedeutung
Reocor D
Redel-Adapter
BIOTRONIK-Bestellnummer
Seriennummer des Geräts
Herstellerdatum des Geräts
Erlaubter Temperaturbereich für die Lagerung
Erlaubter Luftdruckbereich für die Lagerung
Erlaubter Luftfeuchtigkeitsbereich für die Lagerung
Patient mit implantierter Elektrode
Inhalt
Entsorgungszeichen
Gebrauchsanweisung beachten!
Achtung: Laut Bundesgesetz (USA) darf das Produkt nur von einem
Arzt oder auf Anweisung eines Arztes verkauft werden.
CE-Zeichen
English
394271--J_GA_Reocor_D_mul.book Page 123 Monday, January 26, 2015 3:35 PM
123
Manejo, mantenimiento y cuidado ........................................................151
Reocor D ................................................................. 151
Cables del paciente reutilizables ........................... 152
Mantenimiento, reacondicionamiento, inspecciones ..
152
Desecho .................................................................. 153
Seguridad técnica ................................................................................154
Deutsch
Español
Français
Magyar
Italiano
Nederlands
Modos de estimulación y parámetros ..................................................146
Modos de estimulación .......................................... 146
Períodos refractarios ............................................. 146
Frecuencia .............................................................. 147
Retardo AV .............................................................. 148
Amplitud de impulso auricular/ventricular ........... 148
Sensibilidad auricular ............................................ 148
Sensibilidad ventricular ......................................... 148
Blanking cruzado ................................................... 148
Intervalo de interferencia ....................................... 149
Ráfaga ..................................................................... 149
Polski
Instrucciones de uso ............................................................................133
Observaciones generales ....................................... 133
Elementos de mando y LEDs ................................. 134
Tapa del panel de mando ....................................... 135
Conexión de los electrodos .................................... 136
Puesta en servicio .................................................. 143
Fijación ................................................................... 144
Cambio de pila ........................................................ 144
Português
Descripción general .............................................................................125
Descripción del producto ....................................... 125
Indicaciones ............................................................ 126
Contraindicaciones ................................................. 126
Posibles efectos secundarios ................................ 126
Instrucciones de uso .............................................. 127
Señales acústicas y ópticas ................................... 131
Česky
Contenido
394271--J_GA_Reocor_D_mul.book Page 124 Monday, January 26, 2015 3:35 PM
124
Datos técnicos ......................................................................................155
Conformidad según IEC 60601-1-2 ......................................................158
Volumen de suministro y accesorios ....................................................162
Leyenda de la etiqueta .........................................................................164
English
394271--J_GA_Reocor_D_mul.book Page 125 Monday, January 26, 2015 3:35 PM
125
Pueden configurarse el modo de estimulación, la frecuencia,
la sensibilidad, la amplitud de impulso, el retardo AV y la
frecuencia de ráfagas.
Los LEDs indican la detección (“Sense”), la estimulación
(“Pace”) y el estado de carga de la pila (“Low battery”).
Se escuchará una señal acústica en caso de elegir
frecuencias muy altas o sensibilidades muy bajas, así como
cuando la impedancia de los electrodos no sea óptima.
Si se descubre alguna disfunción en la autocomprobación
que sigue al encendido del dispositivo, ello se indicará
mediante LEDs y una señal acústica intermitente. Si en la
autocomprobación que sigue al encendido no se descubre
ningún error, las señales ópticas y acústicas se desactivarán
tras unos pocos segundos.
Deutsch
Español
Dispone de seis modos de estimulación: DDD, D00, VDD, VVI,
V00 y VVT, así como una función auricular de ráfagas.
Français
Reocor D es un marcapasos externo bicameral que funciona
a pila y que va destinado al uso en centros clínicos conectado
a electrodos temporales (incl. electrodos intracardíacos y
catéteres transvenosos implantables) para la estimulación
temporal auricular, ventricular y AV secuencial. Se conecta
directamente o mediante un cable del paciente adicional y, de
ser necesario, un adaptador.
Magyar
Descripción del producto
Česky
Descripción general
•
Monitorización de impedancia de electrodos
•
Advertencia óptica cuando la pila está próxima a agotarse
•
Una tapa corrediza transparente sobre los elementos de
mando evita que puedan modificarse los parámetros
accidentalmente.
Al Reocor D podrán conectarse directamente catéteres temporales, electrodos temporales y electrodos con conectores
de 2 mm. Se ofrecen asimismo cables del paciente y adaptadores. Este sistema permite conectar de forma segura catéteres transvenosos y electrodos miocárdicos que podrán aplicarse unipolar o bipolarmente.
Nederlands
Parámetros de estimulación controlados por microprocesador
Polski
Indicación óptica de la detección y la estimulación
•
Português
•
Italiano
Algunas de las funciones de seguridad del Reocor D:
394271--J_GA_Reocor_D_mul.book Page 126 Monday, January 26, 2015 3:35 PM
126
Indicaciones
La estimulación temporal con Reocor D es apta para las
siguientes aplicaciones en pacientes de cualquier edad:
•
Tratamiento de arritmias y bloqueos cardíacos
•
Bradicardia sinusal sintomática
•
Síndrome del nodo sinusal
•
Estimulación pre, intra y postoperativa de pacientes con
operación del corazón
•
Terminación de taquiarritmias supraventriculares
•
Estimulación profiláctica para prevenir arritmias
•
Estimulación de urgencia
•
Comprobación de umbrales de estimulación
Contraindicaciones
•
Reocor D no puede esterilizarse y no es, por tanto, idóneo
para usar dentro del entorno esterilizado del paciente.
•
Los modos de estimulación mediante desencadenante
(DDD y VDD) están contraindicados en caso de fibrilación
auricular, flúter y otros ritmos auriculares acelerados.
•
Si los pacientes toleran mal las frecuencias ventriculares
altas, (p.ej. en el caso de la angina de pecho), los modos
por control auricular pueden ser contraindicados.
•
Cuando se observen conducciones retrógradas tras las
estimulaciones ventriculares, en determinadas circunstancias será necesario programar un período refractario
auricular más prolongado o un retardo AV más breve al
objeto de prevenir taquicardias mediadas por el marcapasos. Circunstancialmente, en tales casos habrá a
veces que programar un modo VVI.
•
La estimulación auricular unicameral estará contraindicada en los pacientes que presenten ya trastornos de
conducción AV.
•
El uso de un marcapasos externo estará contraindicado
si el paciente tiene un marcapasos activo implantado.
Posibles efectos secundarios
Entre las complicaciones resultantes de la estimulación
externa temporal se incluyen, entre otras, posibles asistolias
tras una interrupción repentina de la estimulación (p.ej.
debido a soltarse accidentalmente el electrodo o el cable del
paciente, o bien a causa de ajustes incorrectos) y dependencia del marcapasos.
127
Entre las complicaciones que pueden presentarse al introducir electrodos por vía transvenosa se incluyen, entre otras:
infección de la herida, punción arterial, roces pericárdicos,
perforación cardíaca y disritmias tras introducir el electrodo.
Česky
English
394271--J_GA_Reocor_D_mul.book Page 127 Monday, January 26, 2015 3:35 PM
Uso conforme a lo
previsto
•
Reocor D y los cables y accesorios del dispositivo admitidos únicamente podrán usarse tal y como se especifica
en este manual técnico.
•
No se permite conectar el Reocor D a otros dispositivos
electro-médicos.
•
No se permite hacer uso del Reocor D en lugares
expuestos a riesgo de explosión.
Prohibición de
modificaciones
•
Las operaciones de reparación y ampliación o modificación del dispositivo solo pueden ser realizadas por el
fabricante BIOTRONIK o por una empresa expresamente
autorizada por este fabricante para ello.
Recambios y
accesorios
•
El uso de recambios originales y de accesorios autorizados por BIOTRONIK es fundamental para garantizar su
seguridad. La utilización de otros componentes exime al
fabricante de toda responsabilidad por daños resultantes
y anula la garantía.
Dispositivos
a tener a mano
•
Deberá tenerse un estimulador de urgencia para el
supuesto de que el paciente sufra dependencia del marcapasos.
•
Deberán tenerse a mano un desfibrilador externo,
oxígeno, intubación y medicación de emergencia.
Español
El Reocor D interactúa con el corazón humano. Tiene
lugar también una interacción con la piel y los vasos
sanguíneos del paciente.
Français
•
Magyar
Principio de
actuación
Italiano
El Reocor D únicamente habrá de ser utilizado por personas con conocimientos de cardiología y que hayan sido
instruidas en el uso del dispositivo. Los usuarios potenciales son los médicos y el personal sanitario especializado de un hospital.
Nederlands
•
Polski
Grupo de usuarios
Português
Según la estimulación configurada y la enfermedad subyacente del paciente, es posible que la estimulación induzca
arritmias. Para salvaguardar la seguridad del paciente, deberían seguirse determinados procedimientos y tomar ciertas
medidas de precaución, tal y como se describe a continuación. Las medidas de precaución y los procedimientos especiales deberían consultarse en las correspondientes publicaciones médicas.
Deutsch
Instrucciones de uso
394271--J_GA_Reocor_D_mul.book Page 128 Monday, January 26, 2015 3:35 PM
128
Preliminares
antes de usar
Conexión de los
electrodos
Comportamiento
durante la
utilización
•
Antes de usarlo, deberá examinarse visualmente el
Reocor D y comprobar que esté limpio y libre de daños.
•
Nunca use un dispositivo dañado ni un dispositivo que
presente anomalías. Cambie cualquier tipo de cable,
incluso con mínimos daños reconocibles.
•
Antes de aplicar el Reocor D, el cable del paciente o electrodos, el usuario debería tocar primero al paciente para
compensar posibles diferencias de potencial eléctrico.
•
Recomendamos encarecidamente al usuario que compruebe todos los parámetros antes de conectar los electrodos al Reocor D.
•
Aunque Reocor D está protegido frente a posibles gotas
de agua, conserve limpios y secos todos los conectores y
el dispositivo.
•
El Reocor D no puede esterilizarse.
•
Las conexiones del Reocor D y de los electrodos temporales de estimulación deberán asegurarse y comprobarse periódicamente.
•
El cable del paciente deberá conectarse primeramente al
Reocor D y luego a los electrodos.
•
Los electrodos temporales a los que se conecta el
Reocor D, constituyen una conducción eléctrica de baja
impedancia al miocardio. Por tanto, los aparatos eléctricos conectados a la red eléctrica que se usen en las
inmediaciones del paciente deberán tener una puesta a
tierra conforme a la normativa vigente.
•
Al intervenir en electrodos ya implantados, habrá que
tener sumo cuidado de no tocar sus pins de contacto ni
sus superficies metálicas e impedir todo contacto de
estos con superficies húmedas o conductoras.
•
Si el cable se ha soltado del Reocor D, habrá que volver a
conectarlo inmediatamente y comprobar la seguridad de
la conexión.
•
En caso de usar electrodos unipolares, deberán usarse
dos electrodos unipolares por cámara para garantizar
una estimulación efectiva.
•
Mientras se esté haciendo uso del Reocor D, deberá
tenerse completamente cerrada la tapa del panel de
mando para evitar así toda modificación accidental de los
parámetros del programa.
•
El Reocor D se usará colocado horizontalmente sobre
una superficie no deslizante o fijado al brazo del paciente
con su manguito o suspendido por la anilla de la cara trasera del dispositivo a una barra de sueros.
•
No se permite tener el Reocor D directamente sobre la
piel.
S00
VDD
VAT, VVI, V00
DDD
DAD, DVI, D00
Estimulación con
altas frecuencias
•
Una estimulación del corazón con frecuencias superiores
a 180 ppm de forma prolongada puede causar serias
complicaciones hemodinámicas. Use la estimulación a
altas frecuencias sólo en el supuesto de estar garantizada una monitorización ininterrumpida.
Comportamiento
tras la utilización
•
Tras una desfibrilación o cauterización, deberá realizarse
una prueba de funcionamiento del dispositivo.
•
Si el dispositivo se va a tener guardado y sin usar durante
un tiempo, deberá sacársele la pila para evitar daños por
derrame.
•
Para la limpieza puede usarse un paño húmedo y jabón
suave. Evite usar agentes limpiadores fuertes o disolventes orgánicos, ya que estos podrían deteriorar la carcasa
de plástico.
•
Las inspecciones y el mantenimiento deberán realizarse
conforme a lo indicado en la página 151.
•
No use pilas recargables (baterías). No es fácil valorar
cuánto durarán tales baterías, por lo que podría superarse el momento de aviso de recambio ERI1 con una
posible desaparición de la estimulación como consecuencia.
Funcionamiento
a pila
Se permiten únicamente pilas de 9 V con el código internacional IEC 6LR61. La batería tipo MN 1604 Duracell®
Procell® permite efectuar una estimulación externa de
un mínimo de 500 horas antes de que se requiera cambiarla.
1
Con la señal ERI (LED “Low battery” parpadeante) el Reocor D avisa de que debe cambiarse
la pila
Deutsch
Español
Con interferencias
Français
Modo sin interferencias
SSI, SST
Magyar
En caso de perturbaciones por causa de interferencias
electromagnéticas (IEM), el Reocor D adoptará un estado
de estimulación asíncrona si se llegan a exceder ciertos
valores límite. Según si las perturbaciones se han detectado en la aurícula o en el ventrículo, se aplicarán los
siguientes modos operativos mientras duren las perturbaciones:
Italiano
•
Nederlands
Mientras se tenga aplicado el Reocor D, deberá controlarse la frecuencia cardíaca del paciente mediante un
monitor de ECG con función de alarma.
Polski
•
Português
129
Česky
English
394271--J_GA_Reocor_D_mul.book Page 129 Monday, January 26, 2015 3:35 PM
394271--J_GA_Reocor_D_mul.book Page 130 Monday, January 26, 2015 3:35 PM
130
Mientras se cambia de pila con el Reocor D en uso, éste
seguirá aún operativo como mínimo 30 s a una temperatura ambiente de 20 ± 2 °C.
Sin embargo, por razones de seguridad el paciente debería ser estimulado con otros medios durante ese tiempo.
Electrocauterización
•
En ningún caso practique una electrocauterización a
menos de 15 cm de los electrodos, ya que ello conllevaría
el riesgo de inducir una fibrilación ventricular o de
causar daños al marcapasos.
Para evitar la inhibición del marcapasos debido a interferencias, el mismo debería ponerse en modo de estimulación asíncrona. Durante el tratamiento debería tenerse
controlado en todo momento el pulso periférico del
paciente. Tras el tratamiento deberá comprobarse el funcionamiento del marcapasos.
Desfibrilación
•
Los circuitos del Reocor D están protegidos contra la
energía de choque que puede ser inducida por una desfibrilación. Deberían, no obstante, tomarse las siguientes
precauciones, de ser posible.
— La energía elegida no debería ser mayor que lo necesario para la desfibrilación.
— Entre los electrodos del desfibrilador y los electrodos
del Reocor D debería haber al menos 10 cm de distancia.
— Tras una desfibrilación, deberá Ud. apagar y volver a
encender el Reocor D , para que el dispositivo realice
una autocomprobación completa.
Tras una desfibrilación deberá comprobarse además el
funcionamiento del marcapasos y el umbral de estimulación, monitorizándolos durante un período suficiente.
Inmunidad a
interferencias
•
El Reocor D está protegido frente a perturbaciones por
emisión electromagnética, descarga electrostática y perturbaciones transmitidas. Las interferencias emitidas
por el Reocor D han sido asimismo minimizadas. Así, el
dispositivo cumple las exigencias de la norma IEC 606011-2. Sin embargo, es posible que los fuertes campos
electromagnéticos, como p.ej. los que se producen cerca
de motores eléctricos, transformadores, cables de
corriente y otros equipos eléctricos, menoscaben el
funcionamiento del Reocor D.
Las interferencias electromagnéticas pueden dar lugar a
los siguientes errores:
— Reinicialización inesperada (se ejecuta la autocomprobación).
— Se detectan eventos cardíacos, pero no se muestran
en el monitor de ECG.
— El Reocor D reacciona de forma inexplicable.
Señales acústicas y ópticas
•
Durante la autocomprobación seguido a encender el
Reocor D se encenderán todos los LEDs y se escucharán
breves señales acústicas. La autocomprobación finaliza
en unos pocos segundos.
•
Si no se descubre ningún fallo en la autocomprobación,
se apagarán los LEDs y dejarán de escucharse las señales.
•
Si se descubre algún fallo en la autocomprobación,
parpadearán todos los LEDs permanentemente y se
escucharán señales acústicas de advertencia.
•
La necesidad de cambiar de pila se indica con el parpadeo del LED rojo “Low battery”.
•
Los LEDs verdes “Sense” señalizan la detección de una
onda P u onda R.
•
Los LEDs amarillos “Pace” señalizan los impulsos de
estimulación.
Deutsch
Español
Français
Magyar
Italiano
Si para la sensibilidad auricular del dispositivo se ha configurado un valor <1,0 mV, es posible que se produzcan
interferencias debido a campos electromagnéticos. Si
desde un punto de vista clínico es factible, el parámetro
de sensibilidad debe configurarse a más de 1,0 mV. La
configuración de parámetros de sensibilidad <1,0 mV
requiere una indicación médica explícita. Solo se permite
configurar y mantener tales valores bajo la supervisión
de un médico.
Nederlands
•
Polski
Medidas para restaurar el correcto funcionamiento del
Reocor D:
— Compruebe la conexión entre el dispositivo y los
electrodos de estimulación temporales y, de ser
necesario, corríjala.
— Ajuste correcto de la sensibilidad del Reocor D: a
menudo, con la mitad del valor de amplitud promedio
de la señal intrínseca se obtiene un ajuste correcto
de sensibilidad.
— Apague todos los dispositivos eléctricos próximos al
Reocor D, en caso de que causen interferencias electromagnéticas y no sea imprescindible tenerlos
encendidos.
— Coloque la fuente de interferencias en un lugar
desde el que no pueda causar interferencias.
— De ser posible sin ningún riesgo: apague el Reocor D
y vuelva a encenderlo para reinicializar así el marcapasos en el modo operativo sin interferencias.
— Si no desaparece la disfunción, póngase en contacto
con BIOTRONIK.
Português
131
Česky
English
394271--J_GA_Reocor_D_mul.book Page 131 Monday, January 26, 2015 3:35 PM
394271--J_GA_Reocor_D_mul.book Page 132 Monday, January 26, 2015 3:35 PM
132
•
Los LEDs y las señales acústicas indican asimismo las
siguientes advertencias durante el funcionamiento:
Advertencia
Significado
Solución
Señal acústica durante
2s
Se ha ajustado una amplitud
de impulso < 1 V o una frecuencia > 180 ppm
Compruebe si los valores
ajustados son idóneos
para el paciente.
Señales acústicas en
secuencia rápida
Impedancia fuera del ámbito
admisible
Compruebe si todos los
conectores están firmemente conectados.
Compruebe si los electrodos están en la posición
deseada.
Señal acústica y parpa- Ha disparado la protección de Apague el dispositivo
y devuélvalo a BIOTRONIK.
deo de los LEDs “Pace” y alta frecuencia.
Autocomprobación fallida.
“Sense”
El LED “Low battery”
parpadea
a)
Aviso ERI alcanzado
Cambie la pila. El dispositivo tendrá aún reserva
para unas 36 horasa).
Si se emplea una batería de tipo MN 1604 Duracell®, Procell®
English
394271--J_GA_Reocor_D_mul.book Page 133 Monday, January 26, 2015 3:35 PM
133
Prueba de funcionamiento de LEDs y señales acústicas
•
Comprobación de la capacidad de detección y
estimulación
•
Comprobación de la operatividad de la protección de alta
frecuencia
Si se descubre algún fallo en la autocomprobación, parpadearán todos los LEDs permanentemente y se escucharán
señales acústicas de advertencia. En tal caso, apague el
marcapasos y envíelo a BIOTRONIK.
Si no se descubre ningún fallo en la autocomprobación, se
apagarán los LEDs, dejarán de escucharse las señales y el
Reocor D comenzará a generar impulsos de estimulación
conforme a los parámetros configurados. El electrodo negativo (cátodo) no debería, por tanto, conectarse hasta verificar
que se han ajustado correctamente el modo y la frecuencia
de estimulación, la amplitud de impulso y la sensibilidad.
Con el selector de modo operativo en posición OFF se evitará
que se emitan impulsos de estimulación al paciente seguido
a conectar los electrodos.
Mensajes de
advertencia
Durante el funcionamiento pueden presentarse los siguientes mensajes de advertencia:
•
La necesidad de cambiar de pila se indica con el parpadeo del LED “Low battery”.
•
Si la impedancia de los electrodos se encuentra fuera del
ámbito admisible (p. ej., porque se ha roto el electrodo o
hay un contacto flojo), suena una secuencia rápida de
tonos como máximo 5 seg. antes de la conexión..
•
Si se han elegido para la amplitud de impulso valores
< 1 V o para la frecuencia valores > 180 ppm, sonará una
señal acústica durante 2 s.
•
En caso de una frecuencia excesiva (ver pág. 156 “Protección de alta frecuencia”) o si la autocomprobación descubre errores, sonará una señal acústica y parpadearán los
LEDs “Pace” y “Sense”.
Deutsch
Prueba de memoria
•
Español
•
Français
Comprobación del código del programa y del microprocesador
Magyar
•
Italiano
Tras encenderlo, el Reocor D ejecutará una autocomprobación que dura unos pocos segundos. Incluye:
Nederlands
Autocomprobación
Las conexiones del Reocor D y de los electrodos temporales
de estimulación deberán asegurarse y comprobarse periódicamente.
Polski
¡Atención!
Português
Observaciones generales
Česky
Instrucciones de uso
394271--J_GA_Reocor_D_mul.book Page 134 Monday, January 26, 2015 3:35 PM
134
0
30
0
10
80
60
0
40
20
0
0, 5
300
0
25
20 0
18
0
10
2
0, 3
0, 2
7
1
12
0, 7
0
0
10
75
50
0
60 0
0
17
10
50
V0 0
80
0
1000
60
4 00
35
0
0,1
3
0,5
3
1
2
5
3
4
12
17
10
5
5
10
7
8
2
7
0,1
14
11
1
0 ,5
3
2
1
5
20
17
INDIFF.+
DIFF.-
Panel de mando del Reocor D
70
VV I
T
25
15
12
0
VV
40
b
Fig. 1:
17
D
14 0
DD
20
0
250
D
VD
D0 0
Elementos de mando y LEDs
2
Compartimento de la pila
Para pila rectangular de 9 V
3
LED “Low battery”
Avisa de voltaje insuficiente de la pila
4
LED “Ventricle Pace”
Luz amarilla de evento de estimulación ventricular
5
LED “Ventricle Sense”
Luz verde de onda R detectada
6
Ruedecilla “Ventricle Ampl.”
Ajuste de la amplitud de impulso ventricular
7
Ruedecilla ”Ventricle Sens.”
Ajuste de la sensibilidad ventricular
(no aplicable en los modos operativos D00 y V00)
8
LED “Atrium Pace”
Luz amarilla de evento de estimulación auricular
9
LED “Atrium Sense”
Luz verde de onda P detectada
10
Ruedecilla ”Atrium Ampl.”
Ajuste de la amplitud de impulso auricular
(no aplicable en el modo operativo VDD)
11
Ruedecilla ”Atrium Sens.”
Ajuste de la sensibilidad auricular
(no aplicable en el modo operativo D00)
12
”Start burst”
Inicia la función de ráfagas auriculares
13
Soporte de correa y anilla de
suspensión (cara trasera)
Fijación del Reocor D al paciente, la cama o al soporte de
sueros
14
Ruedecilla “Burst rate atrium”
Ajuste de la frecuencia de ráfagas auriculares
15
Ruedecilla “AV delay”
Ajuste del retardo AV
16
”Select burst”
Selección de la función de ráfagas auriculares
17
Selector “Mode”
Selección del modo operativo de estimulación
y encendido/apagado
18
Ruedecilla “Rate”
Ajuste de la frecuencia de estimulación
Tabella 1: Descripción de los elementos ilustrados en la figura 1
Los valores de los elementos de mando rotulados en negrita
indican valores seguros para el uso previsto del dispositivo.
Tapa del panel de mando
La tapa estará bloqueada, si se ha deslizado por encima de
dos retenes hasta el tope y el bloqueo se encuentra justo
sobre la trabilla (véase la Fig. 2).
Incorrecto:
Fig. 2:
Posición correcta de la tapa del panel de mando
Português
Polski
Correcto:
Deutsch
Para cables y electrodos con conectores de 2 mm
o para adaptadores Redel (rojo = positivo; azul = negativo)
Español
Conexión del canal ventricular
Français
1b
Magyar
Función
Conexión del canal auricular
Italiano
Designación
1a
Nederlands
135
Česky
English
394271--J_GA_Reocor_D_mul.book Page 135 Monday, January 26, 2015 3:35 PM
394271--J_GA_Reocor_D_mul.book Page 136 Monday, January 26, 2015 3:35 PM
136
Para desbloquear la tapa del panel de mando (véase la
Fig. 3):
Con una mano, empuje hacia arriba la palanca de
bloqueo.
Con la otra mano, desplace simultáneamente hacia
abajo la tapa del panel de mando.
Fig. 3:
Desbloqueo de la tapa del panel de mando
Para bloquear la tapa del panel de mando:
Deslice la tapa del panel de mando por encima de la trabilla hacia arriba hasta el tope (véase la Fig. 2).
Para la limpieza es posible retirar por completo la tapa del
panel de mando, deslizándola hacia abajo de modo que traspase el tope.
¡Atención!
Durante el empleo del Reocor D, la tapa del panel de mando
debe estar bloqueada para evitar un reajuste accidental de
selectores y ruedecillas y, con ello, de los parámetros del
programa.
Conexión de los electrodos
El Reocor D dispone de cuatro conectores hembra para
enchufar directamente electrodos con conectores de 2 mm
protegidos contra roces.
Para conectar cables con conector Redel deberá enchufarse
el adaptador Redel por el lado correcto y fijarlo a rosca
(fig. 4). El adaptador Redel estará enchufado por el lado
correcto cuando pueda enroscarse al Reocor D.
Nota:
¡El adaptador Redel funcionará correctamente sólo si se ha
conectado por el lado correcto!
English
394271--J_GA_Reocor_D_mul.book Page 137 Monday, January 26, 2015 3:35 PM
137
Español
Deutsch
Česky
.
El Reocor D podrá Ud. usarlo con los siguientes adaptadores
y cables del paciente:
Cable del paciente PK-175 con cuatro bornes de rosca
para electrodos temporales del lado del paciente y
conector Redel del lado del Reocor (usar adaptador
Redel)
Cable del paciente PK-175
Português
Fig. 5:
Polski
Nederlands
Italiano
•
Magyar
DIFF.-
Adaptador Redel para Reocor D
Français
INDIFF.+
Fig. 4:
394271--J_GA_Reocor_D_mul.book Page 138 Monday, January 26, 2015 3:35 PM
138
•
Fig. 6:
Cable del paciente PK-82
•
Fig. 7:
Cable del paciente PK-83 para estimulación unicameral
con dos bornes de rosca aislados para electrodos temporales del lado del paciente y dos conectores de 2 mm protegidos contra roces por el lado del Reocor.
Cable del paciente PK-83
•
Fig. 9:
Cable del paciente PK-83-B para estimulación unicameral con dos bornes de rosca para electrodos temporales
del lado del paciente y conector Redel del lado del
Reocor (usar adaptador Redel). Los electrodos temporales que se conectan mediante el cable PK-83-B están
conectados al canal ventricular del Reocor D.
Cable del paciente PK-83-B
•
Fig. 8:
Cable del paciente PK-82 con dos pinzas de cocodrilo
aisladas para electrodos temporales del lado del
paciente y dos conectores de 2 mm protegidos contra
roces por el lado del Reocor.
Los cables del paciente PK-67-L y PK-67-S se diferencian sólo en su longitud.
Cables del paciente PK-67-L (2,6 m) y PK-67-S (0,8 m)
English
394271--J_GA_Reocor_D_mul.book Page 139 Monday, January 26, 2015 3:35 PM
139
Adaptador
PA-1-B para enchufar conectores de 2 mm protegidos contra
roces o adaptadores MHW (adaptadores para electrodos temporales)
PA-2 IS-1
Français
Fig. 10: Adaptadores para cables del paciente PK-67-L y PK-67-S
Español
Deutsch
Para el cable del paciente PK-67 (fig. 9) valen los adaptadores
de la fig. 10:
Česky
•
Cable del paciente PK-141 con cuatro pinzas de cocodrilo del lado del paciente y conector Redel del lado del
Reocor (usar adaptador Redel)
El cable adaptador ADAP-2R es un cable reutilizable
para conectar cables desechables según la fig. 13 (sólo
para EEUU) al Reocor D (usar adaptador Redel).
Fig. 12: Cable adaptador ADAP-2R
Polski
•
Português
Fig. 11: Cable del paciente PK-141
Nederlands
Italiano
•
Magyar
PA-4 con pinzas de cocodrilo
394271--J_GA_Reocor_D_mul.book Page 140 Monday, January 26, 2015 3:35 PM
140
•
Cable desechable (sólo EEUU)
Fig. 13: Cable desechable de Remington Medical Inc. (sólo EEUU)
•
Cable desechable
Los cables desechables PK-155 y Remington 301-CG (sólo
EEUU) con pinzas de cocodrilo (fig. 14) se conectan al
paciente mediante el cable PK-67-S.
Fig. 14: Cable PK-155
Conectar
¡ADVERTENCIA!
Peligro para el paciente a causa de cables dañados.
Los cables dañados afectan al funcionamiento y suponen un
peligro para los pacientes. No emplee bajo ningún concepto
cables dañados.
¡ADVERTENCIA!
Peligro a causa de un funcionamiento anómalo. Los cables
húmedos pueden afectar al funcionamiento y suponen un
peligro para los pacientes. No emplee bajo ningún concepto
cables húmedos.
¡ADVERTENCIA!
Peligro a causa de corrientes eléctricas. Los contactos de
cables sin utilizar pueden derivar corrientes eléctricas al
paciente. Fije los contactos de cables sin utilizar en las inmediaciones del paciente.
¡Atención!
Reacciones alérgicas, inflamaciones. Evite que el cable entre
en contacto con heridas o con la piel del paciente.
Nota:
Verifique antes de la utilización de los cables se las fundas
protectoras esten correctamente posicionadas.
Nota:
No conecte el cable del paciente al electrodo de estimulación
temporal del paciente antes de conectarlo al Reocor D.
English
394271--J_GA_Reocor_D_mul.book Page 141 Monday, January 26, 2015 3:35 PM
141
Si el Reocor D se va a usar sin adaptador Redel, podrán
conectarse electrodos temporales y catéteres temporales al
cable del paciente PK-82 o PK-83 directamente en los conectores hembra A+, A- y V+, V-.
Česky
Conexión directa
El cable del paciente se conecta al Reocor D mediante un
adaptador Redel.
Conecte el adaptador Redel al Reocor D.
Deutsch
Cable del paciente
Variantes de conexión
Catéter temporal con conectores de 2 mm o
electrodo temporal con adaptador de 2 mm
Usted podrá conectar el Reocor D sin más cables ni adaptadores directamente a un catéter temporal con conector de
2 mm protegido contra roces o a un electrodo temporal con
adaptador de 2 mm. Todas las demás posibilidades figuran
en la siguiente tabla.
Conexiones recomendadas
Conexión directa (sin cable BIOTRONIK)
Conexión del
Reocor D
2 mm
Bornes de rosca
Bornes de rosca
PK-67-S/L con PA-1-B
PK-175 con TC Adapt
PK-83 con TC Adapt (2x)
Conector Redel
Conector Redel
Conectores de
2 mm
Conectores hembra de 2 mm
Adaptador Redel
Adaptador Redel
Conectores hembra de 2 mm
Conexiones posibles
Pinzas de cocodrilo
Pinzas de cocodrilo
Pinzas de cocodrilo
Pinzas de cocodrilo
PK-141
PK-67-S/L con PA-4
PK-67-S/L con PK-155 (2x)
PK-82 (2x)
Conector Redel
Conector Redel
Conector Redel
Conectores de
2 mm
Adaptador Redel
Adaptador Redel
Adaptador Redel
Conectores hembra de 2 mm
Italiano
Conexión por
el lado del
dispositivo
Nederlands
Cable BIOTRONIK
Polski
Conexión por el lado
del paciente
Français
El cable del paciente PK-83-B no permite la estimulación
bicameral. Los electrodos que se conectan al cable PK-83-B
están conectados al canal ventricular del Reocor D.
Português
Nota:
Magyar
Enchufe el conector Redel del cable del paciente al
conector Redel hembra del adaptador.
Español
Enrósquelo para que quede firme.
394271--J_GA_Reocor_D_mul.book Page 142 Monday, January 26, 2015 3:35 PM
142
Electrodo temporal con aguja separable o con
extremo flexible (máx. 2,3 mm de diámetro)
Conexión por el lado
del paciente
Cable BIOTRONIK
Conexiones recomendadas
Bornes de rosca
PK-175
Bornes de rosca
PK-83 (2x)
Conexiones posibles
Pinzas de cocodrilo
Pinzas de cocodrilo
Pinzas de cocodrilo
Pinzas de cocodrilo
PK-141
PK-67-S/L con PA-4
PK-67-S/L con PK-155 (2x)
PK-82 (2x)
Conexión por
el lado del
dispositivo
Conexión del
Reocor D
Conector Redel
Conectores de
2 mm
Adaptador Redel
Conectores hembra de 2 mm
Conector Redel
Conector Redel
Conector Redel
Conectores de
2 mm
Adaptador Redel
Adaptador Redel
Adaptador Redel
Conectores hembra de 2 mm
Electrodo implantado con conector IS-1
Conexión por el lado
del paciente
Cable BIOTRONIK
Conexiones recomendadas
Conector hembra
PK-67-S/L con PA-2
IS-1
Conexiones posibles
Pinzas de cocodrilo
PK-141
Pinzas de cocodrilo
PK-67-S/L con PA-4
Pinzas de cocodrilo
PK-67-S/L con PK-155 (2x)
Pinzas de cocodrilo
PK-82 (2x)
Conexión por
el lado del
dispositivo
Conexión del
Reocor D
Conector Redel
Adaptador Redel
Conector Redel
Conector Redel
Conector Redel
Conectores de
2 mm
Adaptador Redel
Adaptador Redel
Adaptador Redel
Conectores hembra de 2 mm
Polaridad
De forma básica, el Reocor D estimula bipolarmente. Sin
embargo, podrá usarse tanto con electrodos de estimulación
temporales bipolares como unipolares.
Si se usa con electrodos unipolares, deberán conectarse dos
electrodos para cada cámara.
Separación de las conexiones
Desemborne el cable del paciente del electrodo de estimulación temporal del paciente o suelte la conexión directa.
Separación del conector Redel
•
Tire hacia atrás del anillo de unión del conector Redel y
desenchufe el conector Redel del conector hembra
Redel.
English
394271--J_GA_Reocor_D_mul.book Page 143 Monday, January 26, 2015 3:35 PM
143
Ajustar la frecuencia de estimulación con la ruedecilla
“Rate” (18).
Ajustar el retardo AV con la ruedecilla “AV delay” (15)1.
Ajustar las amplitudes de estimulación para aurícula1 y
ventrículo con las ruedecillas “Atrium Ampl.” (10)1 y
“Ventricle Ampl.” (6).
•
Elegir el modo de estimulación con el selector “Mode”
(17). Éste sirve además como botón de encendido del
dispositivo.
•
Si la autocomprobación es correcta, parpadearán simultáneamente dos veces los 5 LEDs del panel de mando.
•
Si el LED “Low battery” (3) parpadea, deberá cambiarse
la pila (para cambiar la pila, ver página 144).
•
Conectar los electrodos. Los LEDs amarillos “Atrium
Pace” (8)1 y “Ventricle Pace” (4) parpadearán al unísono
con cada impulso de estimulación auricular o ventricular.
•
Ajuste la sensibilidad auricular y ventricular con las ruedecillas “Atrium Sens.” (11)1 y “Ventricle Sens.” (7) de
forma tal que los LEDs verdes “Atrium Sense” (9)1 y “Ventricle Sense” (5) parpadeen con cada evento de detección
auricular o ventricular.
Debería configurarse un margen de seguridad suficiente
que garantice una detección fiable.
•
¡Atención!
1
Controlar el ECG del paciente y, de ser necesario, reajustar la amplitud y la sensibilidad.
Mientras se tenga aplicado el Reocor D, deberá controlarse
la frecuencia cardíaca del paciente mediante un monitor de
ECG con función de alarma.
Sólo para estimulación bicameral
Deutsch
Español
Preparación del Reocor:
Français
•
Magyar
Preparación del paciente: colocar los electrodos, pero sin
conectarlos aún al marcapasos.
Italiano
Deslizar hacia abajo la tapa del panel de mando
•
Nederlands
Colocación de la pila
•
Polski
•
Português
El uso del Reocor D es idéntico en todos los modos operativos. A la hora de usar el dispositivo, siga este orden
(los números entre paréntesis se refieren a la figura 1 de la
página 134 de este manual técnico).
Česky
Puesta en servicio
394271--J_GA_Reocor_D_mul.book Page 144 Monday, January 26, 2015 3:35 PM
144
Fijación
El Reocor D se usará colocado horizontalmente sobre una
superficie no deslizante o fijado al brazo del paciente con su
manguito o suspendido por la anilla de la cara trasera del
dispositivo a una barra de sueros.
Para fijar el Reocor D a un soporte de sueros, gire hacia
afuera la anilla de su cara trasera. Así se podrá usar de forma
segura y el cable del paciente no estará sometido a fuerzas
de tracción.
Cambio de pila
Si el LED “Low battery” (3) empieza a parpadear, ello indica
que la pila está próxima a agotarse. Si se emplea una batería
del tipo MN 1604 Duracell® Procell®, el tiempo de servicio
restante es aproximadamente de 36 horas. No obstante,
debería cambiarse la batería sin la menor dilación.
El Reocor D deberá usarse con una pila de 9 V con código
internacional IEC 6LR61. Emplee exclusivamente pilas alcalinas de manganeso a prueba de interrupciones. La batería
tipo MN 1604 Duracell® Procell® permite efectuar a una
temperatura de 20 ± 2 °C una estimulación externa de un
mínimo de 500 horas antes de que se requiera cambiarla.
Mientras se cambia de pila con el Reocor D en uso, éste
seguirá aún operativo unos 30 s a una temperatura ambiente
de 20 ± 2 °C.
Sin embargo, por razones de seguridad el paciente debería
ser estimulado con otros medios durante ese tiempo.
No use pilas recargables (baterías). No es fácil valorar cuánto
durarán tales baterías, por lo que podría superarse el
momento de aviso de recambio ERI, con una posible desaparición de la estimulación como consecuencia.
El compartimento de la pila (2) se halla en el lateral derecho
del dispositivo. Para abrirlo, oprima la pestaña azul hacia
arriba al tiempo que extrae el compartimento hacia la derecha. Saque la pila con cuidado.
Es posible que la nueva pila tenga un capuchón de goma que
protege sus polos. Retire éste antes de colocar la nueva pila.
¡Atención!
Una marca en el compartimento de la pila indica la polaridad
recomendada. Sin embargo, lo único que deberá observarse
necesariamente es que los polos de la pila miren hacia el
centro de la carcasa. La posición de los polos negativo y positivo es de libre elección.
145
Français
Magyar
Italiano
Si el marcapasos se va a tener guardado y sin usar durante
un tiempo, es aconsejable sacarle la pila para evitar daños
por derrame.
Nederlands
Nota:
Polski
Introduzca el compartimento y oprima la pestaña azul hacia
abajo hasta escuchar cómo encastra.
Português
Fig. 15: Colocación de la pila
Español
Deutsch
Introduzca la nueva pila colocando primeramente su parte
inferior (la contraria a los polos) en el compartimento (fig 15).
Česky
English
394271--J_GA_Reocor_D_mul.book Page 145 Monday, January 26, 2015 3:35 PM
394271--J_GA_Reocor_D_mul.book Page 146 Monday, January 26, 2015 3:35 PM
146
Modos de estimulación y parámetros
Modos de estimulación
El Reocor D funcionará en uno de los siguientes modos:
DDD
Estimulación A-V síncrona con detección y estimulación tanto en la aurícula como
en el ventrículo
VDD
Estimulación ventricular síncrona con seguimiento auricular
D00
Estimulación A-V asíncrona, sin detección en ambas cámaras
VVI
Detección y estimulación en el ventrículo
V00
Estimulación asíncrona en el ventrículo
VVT
Como VVI pero con emisión inmediata de impulso en caso de detectar un evento
ventricular fuera del período refractario
En caso de perturbaciones por causa de interferencias electromagnéticas (IEM), el Reocor D adoptará un estado de
estimulación asíncrona si se llegan a exceder ciertos valores
límite. Según si las perturbaciones se han detectado en la
aurícula o en el ventrículo, se aplicarán los siguientes modos
operativos mientras duren las perturbaciones.
Modo sin interferencias
Con interferencias
SSI, SST
S00
VDD
VAT, VVI, V00
DDD
DAD, DVI, D00
Períodos refractarios
La frecuencia hasta la cual el ventrículo se estimula de forma
síncrona con los eventos auriculares detectados (frecuencia
límite superior) viene determinada por el período refractario
auricular (PRA). La secuencia la desencadenarán los eventos
de detección y estimulación auricular, así como las extrasístoles ventriculares detectadas, las cuales harán que se reinicialice el ciclo. En caso de excederse la frecuencia límite
superior, uno de cada dos pulsos auriculares quedará dentro
del período refractario auricular, por lo que no se detectará y
no generará ningún impulso ventricular. La frecuencia de
estimulación ventricular proseguirá en una relación de 2 a 1
(fig. 16).
English
394271--J_GA_Reocor_D_mul.book Page 147 Monday, January 26, 2015 3:35 PM
Español
Deutsch
Česky
147
175 ms
Frecuencia
La frecuencia podrá Ud. regularla con la ruedecilla “Rate”
(18) desde 30 ppm hasta 250 ppm. Si elige Ud. un valor de
más de 180 ppm, el dispositivo emitirá una señal acústica de
advertencia durante 2 s.
¡ADVERTENCIA!
Una estimulación del corazón con frecuencias superiores a
180 ppm de forma prolongada puede causar serias complicaciones hemodinámicas. Use la estimulación a altas frecuencias sólo en el supuesto de estar garantizada una monitorización ininterrumpida.
Magyar
200 ms
Más de 200 ppm
Italiano
225 ms
150 ppm – 200 ppm
Nederlands
Período refractario PRV
Polski
Frecuencia de estimulación
Menos de 150 ppm
Português
Aunque el período refractario auricular total (PRAT) del
Reocor D es el resultado de sumar 175 ms y el retardo AV
elegido, su valor mínimo será de 400 ms por debajo de una
frecuencia de estimulación de 120 ppm. Por encima de esta
frecuencia, el PRAT mínimo se reducirá a 240 ms.
El período refractario ventricular PRV del Reocor D dependerá de la frecuencia de estimulación:
Français
Fig. 16: Respuesta de la frecuencia límite superior durante taquicardias auriculares
(frecuencia básica 72 ppm).
394271--J_GA_Reocor_D_mul.book Page 148 Monday, January 26, 2015 3:35 PM
148
Retardo AV
El retardo AV podrá Ud. regularlo con la ruedecilla “AV delay”
(15) desde 15 ms hasta 400 ms. Podrán elegirse cortos retardos AV para indicaciones médicas especiales, como p.ej.
taquicardias recurrentes.
El Reocor D limita el valor superior del retardo AV a la mitad
del intervalo básico.
Amplitud de impulso auricular/ventricular
Las amplitudes de impulso auricular y ventricular podrá Ud.
regularlas con las ruedecillas “Ampl.” (10), (6) en un rango
entre 0,1 V y 17 V. Si elige Ud. un valor de menos de 1 V, el dispositivo emitirá una señal acústica de advertencia durante
2 s.
La duración del impulso es de 1 ms.
La estimulación debería comprobarse a intervalos regulares,
para asegurarse de que hay estimulación y que se ha elegido
un margen de seguridad adecuado.
Sensibilidad auricular
La sensibilidad podrá Ud. regularla con la ruedecilla “Atrium
Sens.” (11) en un rango entre 0,2 mV y 10 mV. Debería comprobarla a intervalos regulares, para asegurarse de que hay
una correcta detección y que se ha elegido un margen de
seguridad adecuado.
Sensibilidad ventricular
La sensibilidad podrá Ud. regularla con la ruedecilla “Ventricle Sens.” (7) en un rango entre 1 mV y 20 mV. La sensibilidad
debería comprobarse a intervalos regulares, para asegurarse
de que hay una correcta detección y que se ha elegido un
margen de seguridad adecuado.
Blanking cruzado
Tras generarse un estímulo se anulará la función de detección durante 19 ms ± 3 ms en el otro canal, a fin de evitar
detecciones de campo lejano.
English
394271--J_GA_Reocor_D_mul.book Page 149 Monday, January 26, 2015 3:35 PM
149
Así, por ejemplo una interferencia auricular en el modo operativo DDD sin menoscabo del canal ventricular dará lugar a
una estimulación DVI. La detección de ruido en el canal ventricular dará lugar a una estimulación DAD.
La interferencia en ambos canales dará lugar a una estimulación D00.
Deutsch
El intervalo se reinicializará en caso de detectar ruido en
alguno de los canales durante 80 ms, lo que dará lugar a una
estimulación asíncrona con la frecuencia programada mientras dure la interferencia.
Español
El intervalo de interferencia es iniciado tanto por la estimulación auricular y ventricular como por los eventos de detección.
Česky
Intervalo de interferencia
Una estimulación del corazón con frecuencias superiores a
180 ppm de forma prolongada puede causar serias complicaciones hemodinámicas. Use la estimulación a altas frecuencias sólo en el supuesto de estar garantizada una monitorización ininterrumpida.
El modo con estimulación de alta frecuencia sirve para terminar determinadas taquicardias supraventriculares (TSV) y
debería tomarse en consideración únicamente para aplicaciones auriculares. La aplicación de estímulos asíncronos de
alta frecuencia puede interrumpir una TSV mediante la despolarización de partes de una vía de reentrada. Aun cuando
un foco ectópico auricular sea el causante de una TSV, la
aplicación de estímulos de alta frecuencia a la aurícula puede
dar lugar a una mayor supresión del centro ectópico.
Magyar
Italiano
Tras una estimulación por ráfagas de la aurícula, es posible
que el intervalo de blanking ventricular impida la detección
de eventos intrínsecos y que origine una estimulación asíncrona del ventrículo.
Nederlands
¡ADVERTENCIA!
Polski
Para activar esta función se deben pulsar dos botones: primero se pulsará el botón “Select burst” (16) y luego, antes de
que pasen dos segundos, el botón “Start burst” (12). Se emitirá el impulso mientras se tenga pulsado este botón. En el
canal ventricular se seguirá estimulando con la frecuencia
configurada, que podrá modificarse entre tanto. Si se tiene
configurado un modo operativo inhibidor, ello hará que se
inhiba la función ventricular.
Português
La frecuencia de la función auricular “Burst rate atrium”
podrá Ud. regularla con la ruedecilla (14) en un rango entre
60 ppm y 1000 ppm.
Français
Ráfaga
394271--J_GA_Reocor_D_mul.book Page 150 Monday, January 26, 2015 3:35 PM
150
En conjunción con la estimulación auricular de alta frecuencia habrá que tener en cuenta diversos riesgos. Entre ellos
tenemos posibles estimulaciones ventriculares y fibrilación o
taquicardia ventricular. Esto puede ser causado por una mala
colocación de los electrodos o por la existencia de vías anormales de conducción de excitación que dejan a un lado la
conducción normal de excitación AV (p.ej. en el síndrome de
Wolff-Parkinson-White). Pueden surgir otros problemas,
tales como malestar del paciente o asistolias tras una estimulación de alta frecuencia.
English
394271--J_GA_Reocor_D_mul.book Page 151 Monday, January 26, 2015 3:35 PM
151
Nunca use un dispositivo dañado ni un dispositivo que presente anomalías, particularmente si se le ha caído al suelo o
si ha sufrido daños por voltaje de desfibrilación o de altas
frecuencias.
El Reocor D se usará colocado horizontalmente sobre una
superficie no deslizante o fijado al brazo del paciente con su
manguito o suspendido por la anilla de la cara trasera del
dispositivo a una barra de sueros.
¡Atención!
En caso de usar un manguito de brazo, no se permite tener el
Reocor D directamente sobre la piel.
Limpieza
Para limpiar el Reocor D puede usarse un paño húmedo y, de
ser necesario, jabón suave. Evite usar agentes limpiadores
fuertes o disolventes orgánicos, como p.ej. éter o bencina, ya
que estos podrían deteriorar la carcasa de plástico.
Desinfección
Para desinfectar el dispositivo, pásele un paño previamente
humedecido con una solución desinfectante (p.ej. Aerodesin
2000 o Lysoform D). Al preparar la solución, observe las proporciones de dilución especificadas por el fabricante.
Nota:
Tras limpiarlo o desinfectarlo, no se permite hacer uso del
Reocor D hasta que transcurra una hora.
Esterilización
El Reocor D no puede esterilizarse. Si el dispositivo debe
usarse en un entorno estéril, podrá Ud. introducirlo en una
funda esterilizada.
Se recomienda encargar la revisión anual del dispositivo a
técnicos autorizados por el fabricante.
¡Atención!
Aunque Reocor D está protegido frente a posibles gotas de
agua, procure conservar el dispositivo limpio y seco.
Deutsch
Español
Français
¡ADVERTENCIA!
Magyar
Cada vez que se vaya a usar, deberá comprobarse primeramente que la carcasa, los elementos de mando, las conexiones y el cable del paciente no presenten daños mecánicos ni
deformaciones, que no haya partes sueltas, dislocadas ni
sucias.
Italiano
Antes de usarlo, el marcapasos deberá haber estado al
menos dos horas a las condiciones ambientales especificadas para su uso (véase página 156).
Nederlands
En tales casos devuelva el dispositivo a BIOTRONIK.
Polski
El Reocor D es un dispositivo de precisión altamente desarrollado que debería ser tratado con el debido cuidado. Sus
funciones pueden verse menoscabadas por efecto de fuerzas
mecánicas (p.ej. si llega a caerse al suelo).
Português
Reocor D
Česky
Manejo, mantenimiento y cuidado
394271--J_GA_Reocor_D_mul.book Page 152 Monday, January 26, 2015 3:35 PM
152
Cables del paciente reutilizables
Antes de abrir el envase de un cable estéril, deberá examinarse que el envase esté intacto, para constatar si de hecho
la esterilidad está garantizada.
Limpieza
Los cables del paciente reutilizables podrán limpiarse y
desinfectarse de diversas formas con agentes de limpieza
hospitalarios. No se permite, sin embargo, usar sustancias
agresivas como p.ej. la acetona.
Como método de limpieza de los cables se recomienda usar
un paño humedecido con jabón de manos libre de alcohol o
con el agente limpiador Stabimed de la marca Braun. A continuación deberán enjuagarse con agua libre de electrolitos
para eliminar todo resto del agente limpiador y luego secarse
con un paño seco y limpio.
Desinfección
Para desinfectarlos sumergiéndolos en un baño se usará un
agente desinfectante de instrumental médico de base aldehídica (p.ej. Lysoformin 3000) o de base alcohólica (p.ej. Aerodesin 2000), tal y como indique el fabricante del producto y
cumpliendo las correspondientes directivas hospitalarias.
Tras desinfectarlos, los cables deberán enjuagarse con agua
libre de electrolitos para eliminar así todo resto del agente
desinfectante.
Esterilización
Todos los cables de paciente pueden esterilizarse del modo
siguiente a menos que se afirme lo contrario en su respectiva
documentación:
•
Esterilización al vapor a 121 °C y 1,1 bar de presión
durante 20 minutos
Además, es posible esterilizar los cables de paciente PK-175
y PK-83-B del modo siguiente:
•
Esterilización al vapor a 134 °C y 3,0 bar de presión
durante 20 minutos
Mantenimiento, reacondicionamiento,
inspecciones
La única operación de mantenimiento necesaria es el cambio
de pila (ver página 144).
No es necesario realizar otros trabajos de mantenimiento.
Comprobación
previa al uso
Cada vez que vaya a usar el dispositivo, debería Ud. examinarlo brevemente. Se trata de una comprobación visual y una
sencilla prueba de funcionamiento.
English
394271--J_GA_Reocor_D_mul.book Page 153 Monday, January 26, 2015 3:35 PM
153
Ver si en la carcasa hay daños mecánicos, deformaciones, piezas sueltas, agrietamientos, etc.
•
Ver si en la zona de conexión de cables hay daños mecánicos
•
Comprobar la legibilidad de las rotulaciones
Prueba de funcionamiento:
Observe el resultado de la rutina de autocomprobación que el
dispositivo realiza automáticamente tras encenderlo.
Dicha inspección deberá realizarse conforme a las instrucciones del fabricante. Estas instrucciones podrá Ud. pedirlas
en caso de necesitarlas. En ellas se relacionan todos los
pasos de comprobación necesarios y el equipamiento requerido a tal efecto.
Desecho
El Reocor D lleva grabado en la placa de características el
símbolo de un contenedor de basura tachado. Este símbolo
indica que para la recepción y el desecho del dispositivo rige
la directiva europea 2002/96/CEE de residuos de aparatos
eléctricos y electrónicos (directiva de RAEE).
Los dispositivos usados y los accesorios descartados, como
p.ej. cables del paciente y adaptadores, debería Ud. devolverlos a BIOTRONIK. Así se garantizará que tales residuos se
desechen en consonancia con la aplicación nacional de la
directiva de RAEE.
Nota:
Los cables que se vayan a eliminar y hayan estado en contacto con sangre deben desecharse conforme a la normativa
medioambiental vigente para residuos médicos contaminados. Los cables que no estén contaminados deben eliminarse
conforme a la Directiva europea 2002/96/CE sobre residuos
de aparatos eléctricos y electrónicos (RAEE).
Las pilas usadas deberán tratarse como basura especial y
será responsabilidad del usuario desecharlas correctamente.
En caso de tener alguna duda, consulte a BIOTRONIK.
Français
Una vez al año
Magyar
Si se sospecha de anomalías en el dispositivo
•
Italiano
•
Nederlands
Tras haber usado el dispositivo junto con instrumental
quirúrgico de AF o desfibriladores
Polski
•
Español
Debería realizarse una inspección
Português
Inspección
Deutsch
•
Česky
Comprobación visual:
394271--J_GA_Reocor_D_mul.book Page 154 Monday, January 26, 2015 3:35 PM
154
Seguridad técnica
El marcapasos externo Reocor D cumple las normativas
internacionales de seguridad de dispositivos electromédicos
conforme a IEC 60601-1 y IEC 60601-1-2, así como la normativa internacional IEC 60601-2-31 relativa a marcapasos
externos temporales.
Las siguientes características especiales proporcionan
mayor seguridad al paciente:
¡ADVERTENCIA!
•
Sin elementos metálicos (según indica la normativa IEC)
que puedan tocarse.
•
Su diseño cumple las normativas para la clase de dispositivos CF (cardiac floating) y está homologado para el
tratamiento directo del corazón. El marcapasos cumple
las exigencias de las normas internacionales en materia
de protección de desfibrilación.
•
La tapa cerrada de la unidad de mando protege al marcapasos frente a salpicaduras de agua.
Los electrodos temporales que están conectados al Reocor D
constituyen una conducción eléctrica de baja impedancia al
miocardio. Por tanto, los aparatos eléctricos conectados a la
red eléctrica que se usen en las inmediaciones del paciente
deberán tener una puesta a tierra conforme a la normativa
vigente.
No se permite hacer uso del marcapasos en lugares expuestos a riesgo de explosión.
Todos los demás trabajos de mantenimiento y reparación
deberían ser realizados únicamente por BIOTRONIK.
English
394271--J_GA_Reocor_D_mul.book Page 155 Monday, January 26, 2015 3:35 PM
155
Marca de la posición de la pila en su compartimento
A desechar como ordena la directiva de residuos de aparatos eléctricos y electrónicos
DDD, D00, VDD, VVI, V00, VVT
Frecuencia básica
(30 … 250 ppm) ± 1 ppm
A frecuencias > 180 ppm sonará
una señal de advertencia
Amplitud del impulso
(A, V)
0,1 … 17 V ± máx (50 mV, 10 %)
A una amplitud de impulso < 1 V
sonará una señal de advertencia
Sensibilidad (A)
0,2 … 10 mV ± 15 %
Para impulso de 15 ms sen2
Sensibilidad (V)
1 … 20 mV ± 15 %
Para impulso de 40 ms sen2
Retardo AV
(15 … 400 ms) ± 4 ms
Frecuencia de ráfaga (A)
(60 … 1000 ppm) ± 20 ppm
Parámetros fijos
Duración del impulso
1 ms ± 5 %
Auto Short tras estimulación
< 20 ms ± 10 %
Intervalo de interferencia
80 ms ± 5 ms
Blanking en canal activo
110 ms ± 3 ms
Blanking cruzado
19 ms ± 3 ms
Período refractario auricular total
(PRAT)
AVD +175 ms ± 5 ms
PRAT mínimo
para (30 … 120) ppm
para (121 … 250) ppm
400 ms ± 5 ms
240 ms ± 5 ms
Magyar
Modos de estimulación
Italiano
Parámetros configurables
Nederlands
Apagado (con el selector “Mode”)
Polski
Hidrófugo, grado de protección IP31
OFF
Português
IP31
Français
Clasificación de componente de aplicación CF (Cardiac Floating),
a prueba de desfibrilación
Deutsch
Observar las instrucciones del manual técnico
Español
Símbolos
Česky
Datos técnicos
394271--J_GA_Reocor_D_mul.book Page 156 Monday, January 26, 2015 3:35 PM
156
Parámetros fijos
Período refractario (V)
(30 … 150) ppm
(151 … 200) ppm
(201 … 250) ppm
225 ms ± 5 ms
200 ms ± 5 ms
175 ms ± 5 ms
Frecuencia límite superior
260 ppm ± 10 %
Protección de alta frecuencia
1 … 180 ppm
286 ms ± 10 %
181 … 250 ppm
214 ms ± 10 %
Forma del impulso
Asimétrico, bifásico
286 ms = 210 ppm, no válido en
caso de “Burst”
214 ms = 280 ppm, no válido en
caso de “Burst”
Monitorización de impedancia de electrodos
Aviso acústico
A partir de 2000 Ω ± 15%, con 5 V de amplitud
Conexión de los electro- Conectores hembra de 2 mm protegidos contra roces;
dos
conector hembra Redel de seis polos mediante adaptador Redel
Datos eléctricos/pila
Pila
•
•
•
Tipo alcalino manganeso: IEC 6LR61/ANSI 1604A
9 V a prueba de interrupciones
P.ej. MN1604 Duracell® Procell®a)
Polaridad
Catódica
Protección contra polaridad
inversa
No: la polaridad es irrelevante
Consumo de energía
Típicamente 1 mA (70 ppm, 5,0 V, 500 Ω )
Tiempo de servicio con
pila nuevab)
•
•
•
Fin del tiempo de uso (EOS)
LED parpadeante “Low battery”
Tiempo de servicio restante
tras señal de ERIb)
•
•
36 horas
A 70 ppm, 5 V, modo DDD, 500 ohmios
Comportamiento durante el
cambio de pila
•
Al sacar la pila, el dispositivo permanecerá operativo aún
30 s más como mínimo.
El modo activo en ese momento permanecerá habilitado.
•
a)
b)
500 h (-10 %) a 20 °C (± 2 °C)
A 70 ppm, 5 V, modo DDD, 500 ohmios
Hasta señal ERI (advertencia EOS)
Marca registrada de Duracell Inc., Bethel, CT 06801
Si se emplea una batería de tipo MN 1604 Duracell®, Procell®
Condiciones del entorno
Temperaturas de uso
+10 °C … +40 °C
Temperaturas de almacenamiento
0 °C … +50 °C
Humedad relativa del aire
30 % … 75 %, sin condensación
Presión atmosférica
700 hPa … 1060 hPa
Nivel de ruido
50 dB
157
Dimensiones, peso, material
Dimensiones del Reocor D
160 mm x 75 mm x 35 mm (sin adaptador Redel)
Peso del Reocor D
Con pila, con adaptador Redel: 325 g ± 10%
Česky
English
394271--J_GA_Reocor_D_mul.book Page 157 Monday, January 26, 2015 3:35 PM
Sin pila, con adaptador Redel: 280 g ± 10%
Clase de protección
II b
Grado de protección
IP31 (hidrófugo)
Resistencia a la desfibrilación
5 kV
Modo operativo
Régimen de uso continuo
Vida útil estimadaa)
(según EN 60601-1:2007, 4.4)
12 años
a)
La vida útil se entiende como la vida máxima esperada de servicio del dispositivo tras la primera puesta en funcionamiento. La vida máxima esperada de servicio no es comprobada por
datos de prueba.
Español
CF (cardiac floating), a prueba de desfibrilación
Français
Clasificación del componente
de aplicación
Magyar
Clasificación
Italiano
Babyblend FR 3000 (PC-ABS)
Nederlands
Material de la carcasa
Polski
Peso del adaptador Redel para Reocor D 40 g ±10 %
Português
76 mm x 35,5 mm x 29,4 mm
Deutsch
Sin pila, sin adaptador Redel: 240 g ± 10%
Dimensiones del adaptador Redel
para Reocor D
394271--J_GA_Reocor_D_mul.book Page 158 Monday, January 26, 2015 3:35 PM
158
Conformidad según IEC 60601-1-2
Directrices y declaración del fabricante –
Emisiones electromagnéticas (IEC 60601-1-2: Tabla 1)
El dispositivo va destinado a su uso en un entorno electromagnético como el que se describe a continuación. El usuario debería asegurarse de que el dispositivo se usará siempre
en un entorno tal.
Prueba de emisión
Nivel de
conformidad
Directrices sobre el entorno electromagnético
Emisión de AF según
CISPR 11
Grupo 1
El dispositivo usa energía de AF exclusivamente
para su propio funcionamiento. Por tal razón, la
generación de interferencias de alta frecuencia
así como la probabilidad de interferir con otros
dispositivos electrónicos próximos son mínimas.
Emisión de AF según
CISPR 11
Clase B
Emisión de armónicos
según la norma
IEC 61000-3-2
No aplicable
El dispositivo es apto para ser utilizado en todo
tipo de instalaciones que no sean de tipo residencial y edificios que estén directamente conectados a la red pública de abastecimiento.
Fluctuaciones de tensión
según la norma
IEC 61000-3-3
No aplicable
Directrices y declaración del fabricante –
Inmunidad a interferencias electromagnéticas
(IEC 60601-1-2: Tabla 2)
El dispositivo va destinado a su uso en un entorno electromagnético como el que se describe a continuación. El usuario del dispositivo debería garantizar que éste se usará en un
entorno tal.
Comprobación de la
inmunidad a interferencias
Nivel de compro- Nivel de
bación según
conformidad
IEC 60601
Descarga de electrici- ±6 kV de
dad estática (ESD)
descarga de
según IEC 61000-4-2 contacto
±8 kV de descarga aérea
Perturbaciones transi- No aplicable
torias rápidas y
ráfagas según
IEC 61000-4-4
Sobretensiones
(picos) según
IEC 61000-4-5
No aplicable
±6 kV de
descarga de
contacto
±15 kV de descarga aérea
Directrices sobre el entorno
electromagnético
Los suelos deberían ser de
madera, hormigón o losas cerámicas. Si el suelo es de material sintético, la humedad relativa del aire
deberá ser como mínimo del 30 %.
La intensidad de campo magnético
debería estar dentro de los valores
típicos de centros comerciales y
hospitalarios.
Directrices y declaración del fabricante – Inmunidad a
interferencias de todos los modelos de marcapasos
externos (IEC 60601-1-2: Tabla 3)
El dispositivo va destinado a su uso en un entorno electromagnético como el que se describe a continuación. El usuario del dispositivo debería garantizar que éste se usará en un
entorno tal.
Comprobación de
inmunidad a interferencias
Nivel de comprobación según
IEC 60601
Nivel de
Directrices sobre el entorno
conformidad electromagnético
No se usarán teléfonos u otros
equipos móviles o inalámbricos a
una distancia menor a la de seguridad respecto a cualquier parte del
dispositivo, cables incluidos.
Distancia de seguridad recomendada:
Interferencias de AF 10 Vrms
10 kHz – 80 MHz
inducidas según
IEC 61000-4-6
fuera de bandas ISMa
10 Vrms
10 Vrms
10 Vrms
10 kHz – 80 MHz
a)
dentro de bandas ISM
Interferencias de AF 10 V/m
emitidas según
800 MHz – 2,5 GHz
IEC 61000-4-3
d = 0,35
P
d = 1,2
P
d = 1,2
P
10 V/m
Deutsch
30 A/m
Español
3 A/m
Français
Campo magnético
para las frecuencias
de alimentación
(50/60 Hz) según
IEC 61000-4-8
Magyar
No aplicable
Italiano
Caídas de tensión,
interrupciones breves
y fluctuaciones
de la tensión de
alimentación según
IEC 61000-4-11
Directrices sobre el entorno
electromagnético
para 80 MHz –
800 MHz
d = 2,3
P
para 800 MHz –
2,5 GHz
Polski
Nivel de compro- Nivel de
bación según
conformidad
IEC 60601
Português
Comprobación de la
inmunidad a interferencias
Nederlands
159
Česky
English
394271--J_GA_Reocor_D_mul.book Page 159 Monday, January 26, 2015 3:35 PM
394271--J_GA_Reocor_D_mul.book Page 160 Monday, January 26, 2015 3:35 PM
160
Comprobación de
inmunidad a interferencias
Nivel de comprobación según
IEC 60601
Nivel de
Directrices sobre el entorno
conformidad electromagnético
”P” es la potencia nominal máxima
del emisor, en vatios [W], especificada por su fabricante y “d” es la
distancia de seguridad, en metros
[m]b).
La intensidad de campo de los emisores inalámbricos estacionarios
debería ser (según una evaluación
in situ)c) menor que el nivel de conformidadd).
Es posible que se produzcan interferencias cerca de dispositivos que
tengan grabado el siguiente símbolo gráfico:
OBSERVACIÓN: es posible que no para todos los casos sean válidas estas directrices. La propagación de ondas electromagnéticas se ve influida por la absorción y reflexión de edificios, objetos
y personas.
a)
b)
c)
d)
Las bandas ISM (de uso industrial, científico y médico) entre 150 kHz y 80 MHz son 6,765 MHz
hasta 6,795 MHz; 13,553 MHz hasta 13,567 MHz; 26,957 MHz hasta 27,283 MHz y 40,66 MHz
hasta 40,70 MHz.
Los niveles de conformidad en las bandas de frecuencias ISM entre 150 kHz y 80 MHz y en el
rango de frecuencias desde 80 MHz hasta 2,5 GHz tienen como objetivo reducir la posibilidad
de que se produzcan interferencias debido a la presencia inesperada de dispositivos de comunicación móviles en el entorno del paciente. Por tanto, en dichos rangos de frecuencias es
recomendable una mayor distancia de seguridad (factor de seguridad 1,2 en lugar de 0,35).
Es imposible predecir las intensidades de campo de emisores estacionarios, como p.ej. bases
de teléfonos inalámbricos, cargadores de radios terrestres, estaciones de radioaficionados,
emisoras de AM/FM y de TV. Para evaluar el entorno electromagnético generado por emisores
fijos de AF, sería conveniente realizar un estudio del lugar. Si la intensidad de campo medida
en el lugar donde se hace uso del dispositivo sobrepasa el nivel de conformidad de AF arriba
especificado, deberá observarse el dispositivo para garantizar su correcto funcionamiento. De
ser necesario, deberán tomarse otras medidas correctoras, como p.ej. colocarlo en otra orientación o elegir otro lugar de uso para el marcapasos externo.
En el rango de frecuencias desde 150 kHz hasta 80 MHz, las intensidades de campo deberían
ser menores a 10 V/m.
Distancias de seguridad recomendadas a aparatos de
telecomunicación inalámbricos/celulares de AF
(IEC 60601-1-2: Tabla 5)
El dispositivo ha sido diseñado para ser utilizado en entornos
electromagnéticos con interferencias de AF controladas. El
usuario contribuirá a evitar interferencias electromagnéticas
en la medida que respete la distancia de seguridad a equipos
de comunicación de AF (emisores) en función de la potencia
de salida del respectivo equipo de comunicación, como se
especifica a continuación.
d = 2,3
0,01
0,04
0,12
0,12
0,23
0,10
0,11
0,38
0,38
0,73
1,00
0,35
1,20
1,20
2,30
10,00
1,11
3,79
3,79
7,27
100,00
3,50
12,00
12,00
23,00
P
Para los emisores cuya potencia nominal no figure en la tabla de arriba, la distancia de seguridad
podrá calcularse con ayuda de la fórmula especificada en base a la frecuencia concreta del emisor. “P” es la potencia nominal del emisor, en vatios [W], mientras que “d” es la distancia de seguridad, en metros [m].
OBSERVACIÓN 1: las bandas ISM (de uso industrial, científico y médico) entre 150 kHz y 80 MHz
son 6,765 MHz hasta 6,795 MHz; 13,553 MHz hasta 13,567 MHz; 26,957 MHz hasta 27,283 MHz y
40,66 MHz hasta 40,70 MHz.
OBSERVACIÓN 2: los niveles de conformidad en las bandas de frecuencias ISM entre 150 kHz y
80 MHz y en el rango de frecuencias desde 80 MHz hasta 2,5 GHz tienen como objetivo reducir la
posibilidad de que se produzcan interferencias debido a la presencia inesperada de dispositivos
de comunicación móviles en el entorno del paciente. Por tanto, en dichos rangos de frecuencias
es recomendable una mayor distancia de seguridad (factor de seguridad 1,2 en lugar de 0,35).
OBSERVACIÓN 3: es posible que no para todos los casos sean válidas estas directrices. La propagación de ondas electromagnéticas se ve influida por la absorción y reflexión de edificios, objetos y personas.
Français
P
Magyar
d = 1,2
Italiano
P
Nederlands
d = 1,2
Polski
P
Português
d = 0,35
Español
Potencia nominal Distancia de seguridad d [m] según frecuencia de emisión
del emisor P [W] 150 kHz hasta
150 kHz hasta
80 MHz hasta
800 MHz –
80 MHz fuera de 80 MHz dentro de 800 MHz
2,5 GHz
bandas ISM
bandas ISM
Deutsch
161
Česky
English
394271--J_GA_Reocor_D_mul.book Page 161 Monday, January 26, 2015 3:35 PM
394271--J_GA_Reocor_D_mul.book Page 162 Monday, January 26, 2015 3:35 PM
162
Volumen de suministro y accesorios
Nota:
El Reocor D deberá utilizarse únicamente con los accesorios
fabricados y probados para este marcapasos.
Volumen de suministro
Denominación del artículo
Cantidad
Reocor D
1
Comentario
Nº de referencia
Pila
1
Duracell Plus, 6LR61
–
Manguito de brazo
– Para Japón
– Para los demás países
1
Corto
391843
1
Estándar
103704
Adaptador Redel
1
371262
Tapa del panel de mando
1
378007
Manual técnico
1
394271
365529
Manual técnico ZH
368702
Guía rápida DE
370123
Guía rápida EN
371300
Guía rápida ES
1
371301
Guía rápida FR
371302
Guía rápida IT
371303
Guía rápida PT
372230
Guía rápida ZH
371304
Bolsa
1
379354
Accesorios
Artículo
Nº de
referencia
Descripción
Conexión
PK-82
128564
Cable del paciente con dos pinzas de
cocodrilo aisladas, reesterilizable
Conexión
directa
PK-83 (2,5 m)
128563
Cable del paciente con dos bornes de rosca
aislados, reesterilizable
Conexión
directa
PK-83 (1,5 m)
128562
Cable del paciente con dos bornes de rosca
aislados, reesterilizable
Conexión
directa
PK-83-B (2,5 m)
347485
Cable del paciente con dos bornes de rosca
aislados de 2,3 mm
Adaptador
Redel
PK-83-B (1,5 m)
347606
Cable del paciente con dos bornes de rosca
aislados de 2,3 mm
Adaptador
Redel
PK-175
333959
Cable del paciente con cuatro bornes de
rosca para conectar electrodos temporales,
reesterilizable
Adaptador
Redel
PK-67-L
123672
Adaptador
Cable del paciente reesterilizable para
combinar con adaptador PA-1-B, PA-2, PA-4 Redel
PK-67-S
128085
Cable del paciente reesterilizable para
combinar con PK-155 y modelo Remington
301-CG
Adaptador
Redel
English
394271--J_GA_Reocor_D_mul.book Page 163 Monday, January 26, 2015 3:35 PM
163
Descripción
Conexión
PK-141 (2,8 m)
353181
Cable del paciente reesterilizable con cuatro Adaptador
pinzas de cocodrilo protegidas contra roces Redel
Manguito estándar
Reocor
103704
Manguito de brazo estándar
–
Manguito corto
Reocor
391843
Manguito de brazo de tamaño reducido.
Indicado para brazos estrechos.
–
Česky
Nº de
referencia
Deutsch
Artículo
Sólo para EEUU
Nº de referencia
Descripción
PA-1-B
123751
Para conectar a adaptador de 2 mm o adaptador MHW
(para electrodos temporales), reesterilizable
PA-1-C
349723
Para conectar a adaptador de 2 mm o adaptador MHW
(para electrodos temporales), reesterilizable
PA-2
123157
Para conectar a conector IS-1, reesterilizable
PA-4
123090
Con pinzas de cocodrilo, reesterilizable
PK-155
(set con dos cables)
337358
Cable estéril de dos hilos del paciente con pinzas de cocodrilo, desechable
Adaptadores para cables PK-67-S y PK-67-L (sólo
para EEUU)
Artículo
Fabricante
Descripción
Modelo 301-CG
Remington
Medical Inc.
Cable estéril de dos hilos del paciente con pinzas de
cocodrilo, desechable
Adaptador para ADAP-2R (sólo para EEUU)
Artículo
Fabricante
Descripción
Modelo 301-CG
Remington
Medical Inc.
Cable estéril de dos hilos del paciente con pinzas de cocodrilo, desechable
Modelo S-101-97
(2,5 m)
Remington
Medical Inc.
Cable de dos hilos del paciente con pinzas de cocodrilo,
desechable
Modelo FL-601-97
(2,0 m)
Remington
Medical Inc.
Cable de dos hilos del paciente con bornes de rosca,
desechable
Français
Artículo
Magyar
Adaptadores para cables PK-67-S y PK-67-L
Español
Conexión
Italiano
Adaptador reutilizable para cables de los modelos Adaptador
S-101-97 y FL-601-97
Redel
Nederlands
Descripción
Polski
Fabricante
Remington
Medical Inc.
Português
Artículo
ADAP-2R
(0,24 m)
394271--J_GA_Reocor_D_mul.book Page 164 Monday, January 26, 2015 3:35 PM
164
Leyenda de la etiqueta
Los símbolos de la etiqueta significan lo siguiente:
Símbolo
Significado
Reocor D
Adaptador Redel
Nº de referencia de BIOTRONIK
Número de serie del dispositivo
Fecha de fabricación del dispositivo
Temperaturas de almacenamiento admisibles
Presiones atmosféricas de almacenamiento admisibles
Humedades de almacenamiento admisibles
Paciente con electrodo implantado
Contenido
Símbolo de desecho
Observe las instrucciones del manual técnico
Atención: La ley federal de EEUU restringe la venta de este producto
mediante, o a través de la petición de, un médico.
Marcado CE
English
394271--J_GA_Reocor_D_mul.book Page 165 Monday, January 26, 2015 3:35 PM
165
Manipulation, maintenance et entretien ..............................................193
Reocor D ................................................................. 193
Câbles patient réutilisables ................................... 194
Maintenance, service, inspections ......................... 194
Élimination ............................................................. 195
Deutsch
Español
Français
Magyar
Italiano
Modes de stimulation et paramètres ...................................................188
Modes de stimulation ............................................. 188
Périodes réfractaires ............................................. 188
Fréquence ............................................................... 189
Délai AV .................................................................. 190
Amplitude d'impulsion – oreillette/ventricule ....... 190
Sensibilité – oreillette ............................................ 190
Sensibilité – ventricule ........................................... 190
Période de Blanking ............................................... 190
Intervalle d'interférence ......................................... 191
Rafale ...................................................................... 191
Nederlands
Instructions de commande ...................................................................175
Remarques générales ............................................ 175
Éléments de commande et DEL ............................ 176
Couvercle du panneau de commande .................... 177
Connexion des sondes ........................................... 178
Mise en service ....................................................... 185
Fixation ................................................................... 186
Remplacement de la pile ....................................... 186
Polski
Description générale ............................................................................167
Description de l'appareil ........................................ 167
Indications .............................................................. 168
Contre-indications .................................................. 168
Effets secondaires potentiels ................................. 169
Instructions de manipulation ................................. 169
Signaux optiques et acoustiques ........................... 174
Česky
Contenu
Spécifications techniques ....................................................................197
Conformité à CEI 60601-1-2 .................................................................200
Português
Sécurité technique ...............................................................................196
394271--J_GA_Reocor_D_mul.book Page 166 Monday, January 26, 2015 3:35 PM
166
Équipement fourni et accessoires ........................................................204
Légende de l'étiquette .........................................................................206
English
394271--J_GA_Reocor_D_mul.book Page 167 Monday, January 26, 2015 3:35 PM
167
Un défaut de l'appareil (échec de l'auto-test suivant la mise
sous tension de l'appareil) est indiqué par un allumage prolongé des DEL et un signal acoustique intermittent. Si l'autotest n'a détecté aucune erreur après la mise sous tension de
l'appareil, les signaux acoustiques et sonores s'interrompent
après quelques secondes.
Les caractéristiques de sécurité du Reocor D sont entre
autres :
•
Affichage optique des événements détectés et stimulés
•
Paramètres de stimulation contrôlés par microprocesseur
•
Surveillance de l'impédance de sonde
•
Avertissement optique en cas d'épuisement proche de la
pile
•
Couvercle transparent coulissant sur les éléments de
commande pour éviter toute modification accidentelle
des paramètres.
Il est possible de raccorder directement des cathéters temporaires, des sondes myocardiques temporaires, des sondes
avec des connecteurs de 2 mm sur le Reocor D. Différents
câbles patients et adaptateurs sont également disponibles.
Deutsch
Español
Français
Magyar
Des diodes électroluminescentes (DEL) indiquent la détection (Sense), la stimulation (Pace) et l'état de la pile (Low battery). Un signal sonore avertit si des fréquences très élevées
ou des valeurs de sensibilité très basses ont été réglées, ou si
l'impédance de la sonde n'est pas parfaite.
Italiano
Le mode de stimulation, la fréquence, la sensibilité et
l'amplitude d'impulsion, le retard AV et la fréquence de
rafales sont les paramètres réglables.
Nederlands
Il permet six types de stimulation : DDD, D00, VDD, VVI, V00 et
VVT, il présente également une fonction de rafales auriculaires.
Polski
Le stimulateur cardiaque externe Reocor D est un
stimulateur double chambre qui fonctionne sur pile et avec
des sondes temporaires (y compris des sondes endocavitaires et des cathéters intraveineux) ; il est destiné à des stimulations temporaires auriculaires, ventriculaires et séquentielles A-V dans un environnement clinique. Il est raccordé
directement ou avec un câble patient et un adaptateur correspondant si nécessaire.
Português
Description de l'appareil
Česky
Description générale
394271--J_GA_Reocor_D_mul.book Page 168 Monday, January 26, 2015 3:35 PM
168
Ce système assure une connexion solide des cathéters intraveineux et des sondes myocardiques, qu'il s'agisse de modèles unipolaires ou bipolaires.
Indications
La stimulation temporaire délivrée par le Reocor D répond
aux indications suivantes sur des patients de tous âges :
•
Traitement d'arythmies et de bloc cardiaque
•
Bradycardie sinusale symptomatique
•
Maladie du sinus
•
Stimulation temporaire avant, pendant et après une opération cardiaque
•
Arrêt de tachyarythmies supraventriculaires
•
Stimulation prophylactique de prévention des arythmies
•
Stimulation d'urgence
•
Contrôle des seuils de stimulation
Contre-indications
•
Reocor D ne peut être stérilisé, il est par conséquent
inadapté à une utilisation dans un entourage stérile du
patient.
•
Les modes déclenchés auriculaires (DDD et VDD) sont
contre-indiqués si une fibrillation auriculaire, un flutter
auriculaire ou d'autres rythmes auriculaires rapides
existent.
•
Si le patient supporte mal des fréquences ventriculaires
élevées (par ex. s'il souffre d'une angine de poitrine), les
modes contrôlés par l'oreillette peuvent être contre-indiqués.
•
Lorsqu'une conduction rétrograde est observée suite à
une stimulation ventriculaire, il convient de programmer
une période réfractaire auriculaire prolongé ou un délai
AV écourté afin d'éviter une tachycardie induite par le stimulateur. Dans certaines conditions, la programmation
d'un mode VVI peut alors être nécessaire.
•
La stimulation simple chambre auriculaire est contreindiquée chez les patients présentant déjà des troubles
de conduction AV.
•
L'utilisation d'un stimulateur externe est contre-indiquée
lorsque le patient est équipé d'un stimulateur cardiaque
implanté fonctionnel.
English
394271--J_GA_Reocor_D_mul.book Page 169 Monday, January 26, 2015 3:35 PM
169
•
Seules des personnes disposant de connaissances en
cardiologie et formées au maniement de l'appareil sont
autorisées à utiliser le Reocor D.
Le personnel technico-médical d'un hôpital et les médecins sont des utilisateurs potentiels de l'appareil.
Fonctionnement
•
Reocor D agit en interaction avec le cœur du patient. Une
interaction a également lieu avec la peau et les vaisseaux
sanguins du patient.
Utilisation
conforme
•
Le Reocor D ainsi que les câbles et les accessoires qui y
sont rattachés ne doivent être utilisés que conformément
aux dispositions de ce manuel technique.
•
Il est interdit de raccorder le Reocor D à d'autres appareils électriques médicaux.
•
Il est interdit d'utiliser le Reocor D dans des zones présentant un risque d'explosion.
Interdiction de
modifier
•
La réparation, la mise à jour ainsi que l'ajout de module
supplémentaire sur l'appareil sont effectués uniquement
par BIOTRONIK ou par un tiers autorisé expressément
par BIOTRONIK.
Pièces de rechange
et accessoires
•
Les pièces de rechange d'origine et accessoires autorisés par BIOTRONIK servent à votre sécurité. L'utilisation
de tout autre composant entraîne la suppression de la
responsabilité pour les conséquences qui en résultent et
l'annulation de tout droit à la garantie.
Deutsch
Español
Français
Magyar
Groupe
d'utilisateurs
Italiano
La stimulation peut induire des arythmies, en fonction des
paramètres de stimulation et de la maladie dont souffre le
patient. Afin de garantir la sécurité du patient, il convient de
respecter certaines procédures et mesures de précaution
énumérées ci-dessous. Des informations plus détaillées
concernant ces méthodes et mesures de précaution se trouvent dans les publications médicales correspondantes.
Nederlands
Instructions de manipulation
Polski
L'introduction de sondes intraveineuses, pour sa part, peut
provoquer entre autres une infection de la plaie, des frottements péricardiques, une perforation cardiaque ou une
dysrythmie suivant l'implantation de la sonde.
Português
Des asystoles suivant un arrêt abrupt de la stimulation
(par ex. une déconnexion accidentelle du câble patient, une
déconnexion de la sonde, des réglages erronés) ou une
dépendance vis à vis du stimulateur cardiaque font partie des
complications possibles inhérentes à l'utilisation d'un stimulateur externe.
Česky
Effets secondaires potentiels
394271--J_GA_Reocor_D_mul.book Page 170 Monday, January 26, 2015 3:35 PM
170
Appareils
à portée de main
Comportement
avant
l'utilisation
Connexion des
sondes
•
Si un patient est dépendant d'un stimulateur cardiaque, il
doit toujours disposer d'un stimulateur de secours à portée de la main.
•
Il convient de toujours avoir à portée de main un défibrillateur externe, de l'oxygène, un équipement d'intubation et des médicaments d'urgence.
•
Avant d'utiliser le Reocor D, procéder à un contrôle visuel
de l'appareil pour s'assurer de l'absence de dommages
ou de souillures.
•
Ne jamais utiliser un appareil endommagé ni un appareil
présentant des anomalies. Remplacez tout câble dès que
des traces d'usure ou d'endommagement sont détectées.
•
Avant d'utiliser le Reocor D, le câble patient ou les sondes, l'utilisateur doit toucher le patient afin d'éliminer les
différences de potentiel électriques existantes.
•
Nous recommandons instamment à l'utilisateur de
contrôler soigneusement tous les paramètres configurés
avant de raccorder les sondes au Reocor D.
•
Bien que le Reocor D soit protégé contre les gouttelettes
d'eau, veiller à toujours maintenir l'appareil et les
connecteurs de sonde propres et secs.
•
Le Reocor D n'est pas stérilisable.
•
Il convient de protéger et de contrôler à intervalles réguliers les connexions du Reocor D et des sondes temporaires de stimulation.
•
Le câble patient doit d'abord être connecté au Reocor D
avant de brancher les sondes.
•
Les sondes temporaires auxquelles le Reocor D est raccordé font office de conducteur de basse impédance vers
le myocarde pour le courant électrique. Les appareils
reliés au secteur et situés à proximité du patient doivent
donc impérativement être équipés d'une mise à la terre
réglementaire.
•
Lors de la manipulation de sondes déjà implantées ne
pas toucher leurs broches ni leurs contacts métalliques
et les tenir à l'écart de surfaces conductrices ou humides.
•
Si le câble se sépare du Reocor D, il convient de le reconnecter immédiatement puis de vérifier que la connexion
est sécurisée.
•
Si des sondes unipolaires sont utilisées, deux sondes
sont nécessaires par cavité afin d'obtenir une stimulation
efficace.
•
Pendant l'utilisation du Reocor D, la fréquence cardiaque
du patient doit être surveillée sur un moniteur ECG avec
fonction d'alarme.
•
En présence de perturbations provoquées par des interférences électromagnétiques (EMI), le Reocor D déclenche une stimulation asynchrone en cas de dépassement
de certaines valeurs limites. En fonction de la détection
ou non des perturbations dans l'oreillette ou le ventricule, les modes de fonctionnement suivants sont activés
pendant la durée des perturbations :
Mode de fonct. non perturbé
Perturbation via IEM
SSI, SST
S00
VDD
VAT, VVI, V00
DDD
DAD, DVI, D00
Stimulation à
fréquences élevées
•
Une stimulation cardiaque à des fréquences supérieures
à 180 cpm pendant une période prolongée peut provoquer de graves complications hémodynamiques. Il est
recommandé de ne procéder à une stimulation à fréquence élevée que si une surveillance permanente est
garantie.
Comportement
après l'utilisation
•
Après une défibrillation ou une cautérisation, le dispositif
doit être soumis à un test de fonctionnement.
•
Si le dispositif est stocké, et donc non utilisé, pendant
une période prolongée, il convient d'en extraire la pile
afin d'éviter tout dommage provoqué par des coulures
éventuelles.
•
Utiliser un détergent doux et un chiffon humide pour nettoyer le dispositif. Éviter d'utiliser des détergents agressifs ou des solvants organiques, car ils risquent d'attaquer le boîtier en plastique de l'appareil.
•
Les opérations d'inspection et de maintenance doivent
être effectuées conformément aux instructions de la
page 193.
Deutsch
Il est interdit de porter le Reocor D directement sur la
peau.
Español
•
Français
Le Reocor D doit être utilisé soit posé à plat sur une surface horizontale non glissante, soit fixé au bras du patient
à l'aide du brassard, soit accroché à un pied à perfusion
par l'œillet de suspension situé au dos.
Magyar
•
Italiano
Pendant le fonctionnement du Reocor D, le couvercle du
panneau de commande doit être parfaitement fermé afin
d'éviter toute modification inopinée des paramètres du
programme.
Nederlands
•
Polski
Comportement
au cours de
l'utilisation
Português
171
Česky
English
394271--J_GA_Reocor_D_mul.book Page 171 Monday, January 26, 2015 3:35 PM
394271--J_GA_Reocor_D_mul.book Page 172 Monday, January 26, 2015 3:35 PM
172
Fonctionnement
de la pile
•
Ne jamais utiliser de piles rechargeables (accus). Il est
difficile d'évaluer la durée de vie de ces piles, il peut donc
arriver que le moment de l'ERI1soit dépassé de manière
accidentelle, interrompant alors brutalement la stimulation.
Utiliser uniquement des piles 9 V correspondant au code
international CEI 6LR61. L'utilisation d'une pile de type
MN 1604 Duracell® Procell® permet au moins 500 heures de stimulation externe avant de devoir remplacer la
pile.
Si le changement de pile est effectué alors que Reocor D
est en service, à température ambiante de 20 °C ± 2 °C,
le dispositif demeure opérationnel pendant encore au
moins 30 secondes.
Pour des raisons de sécurité, il est recommandé de prendre en charge le patient autrement lors du changement
de la pile.
Électrocautérisation
•
Il est interdit d'entreprendre une électrocautérisation
dans un rayon de moins de 15 cm autour des sondes, car
elle peut induire une fibrillation ventriculaire ou une
détérioration du stimulateur.
Afin d'éviter une inhibition du stimulateur par des
signaux d'interférence, il convient de régler le stimulateur sur une stimulation asynchrone. Pendant le traitement, contrôler le pouls périphérique du patient en permanence. Contrôler le fonctionnement du stimulateur
une fois le traitement terminé.
Défibrillation
•
Les circuits du Reocor D sont protégés contre l'énergie
du choc susceptible d'être induite par une défibrillation.
Cependant, dans la mesure du possible, les mesure de
précaution suivantes doivent être prises :
— L'énergie réglée ne doit pas dépasser celle requise
pour la défibrillation.
— La distance entre les sondes du défibrillateur et
celles du Reocor D doit être supérieure à 10 cm.
— Après une défibrillation, le Reocor D doit être arrêté
et remis en marche afin qu'il puisse procéder à un
auto-test complet.
D'autre part, il convient de contrôler le fonctionnement
du stimulateur et le seuil de stimulation après la
défibrillation ; la surveillance doit s'étendre sur une
période suffisamment longue.
1
Le signal ERI (la DEL Low battery clignote) rappelle que le remplacement de la pile du
Reocor D est nécessaire
•
Si la sensibilité auriculaire de l'appareil est réglée sur
une valeur <1,0 mV, des dysfonctionnements dus à des
champs électromagnétiques peuvent apparaître. Si la
situation clinique le permet, il convient de régler un paramètre de sensibilité supérieur à 1,0 mV. Le réglage de
paramètres de sensibilité <1,0 mV requiert une indication
médicale explicite. De telles valeurs ne doivent être
réglées et conservées que sous surveillance médicale.
Deutsch
Español
Français
Mesures pour rétablir le fonctionnement normal du
Reocor D :
— Vérifier la connexion entre le dispositif et les sondes
temporaires de stimulation, la corriger si nécessaire.
— Réajuster la sensibilité du Reocor D : la demi-valeur
de l'amplitude moyenne du signal intrinsèque
conduit souvent à un réglage correct de la sensibilité.
— Mette hors tension tous les appareils électriques
situés à proximité du Reocor D s'ils sont en mesure
de provoquer des interférences électromagnétiques
et si leur fonctionnement n'est pas indispensable.
— Déplacer la source parasite dans un endroit où les
interférences n'auront pas d'effet sur l'appareil.
— Si cette opération ne présente pas le moindre risque,
arrêter et remettre en marche le Reocor D afin de
réinitialiser le stimulateur en mode non perturbé.
— Si le dysfonctionnement persiste, contacter
BIOTRONIK.
Magyar
Des interférences électromagnétiques peuvent engendrer les erreurs suivantes :
— Remise à zéro inopinée (un auto-test est exécuté).
— Détection d'événements cardiaques, sans qu'ils
apparaissent sur le moniteur ECG.
— Comportement incompréhensible du Reocor D.
Italiano
Le Reocor D est protégé contre les perturbations provoquées par des radiations électromagnétiques et des
décharges électrostatiques, ainsi que contre les perturbations transmises. Les radiations émises par le
Reocor D ont-elles aussi été réduites. Le dispositif
répond ainsi aux exigences de la norme CEI 60601-1-2.
Cependant il est possible que des champs électromagnétiques de forte intensité, similaires à ceux pouvant être
générés à proximité immédiate de moteurs électriques,
de transformateurs, de lignes électriques ou d'autres
appareils électriques, puissent perturber le fonctionnement du Reocor D.
Nederlands
•
Polski
Résistance aux
perturbations
Português
173
Česky
English
394271--J_GA_Reocor_D_mul.book Page 173 Monday, January 26, 2015 3:35 PM
394271--J_GA_Reocor_D_mul.book Page 174 Monday, January 26, 2015 3:35 PM
174
Signaux optiques et acoustiques
•
Lors de l'auto-test suivant la mise sous tension du
Reocor D, toutes les DEL s'allument et de courts signaux
acoustiques sont audibles. L'auto-test ne dure que quelques secondes.
•
Si l'auto-test ne détecte pas d'erreur, les DEL s'éteignent
et les signaux acoustiques disparaissent.
•
Si l'auto-test détecte un défaut, toutes les DEL clignotent
de manière persistante et des signaux sonores retentissent.
•
La DEL rouge clignotante Low battery indique qu'un
remplacement de la pile est nécessaire.
•
Les DEL vertes Sense signalent la détection d'une onde P
ou d'une onde R.
•
Les DEL jaunes Pace signalent l'émission d'impulsions.
•
Les DEL et les signaux acoustiques fournissent également les mises en garde suivantes au cours du
fonctionnement :
Mise en garde
Signification
Remède
Signal acoustique pendant 2 s
Une amplitude d'impulsion
< 1 V ou une fréquence
> 180 cpm est réglée
Vérifier si les valeurs
réglées conviennent
au patient.
Signaux acoustiques
rapprochés
Impédance hors de la plage
admise
Vérifier si tous les connecteurs sont solidement
enfichés.
Vérifier si les sondes sont
en position souhaitée.
Protection haute fréquence
Signal acoustique
et clignotement des DEL déclenchée ;
l'auto-test a échoué
Pace et Sense
Désactiver l'appareil
et l'expédier à
BIOTRONIK.
DEL Low battery
clignote
Remplacer la pile.
Il reste alors environ
36 heuresa) de service
à l'appareil.
a)
ERI atteint
Lors de l'utilisation d'une pile de type MN 1604 Duracell®, Procell®
English
394271--J_GA_Reocor_D_mul.book Page 175 Monday, January 26, 2015 3:35 PM
175
Test de la mémoire
•
Test de fonctionnement des DEL et des signaux acoustiques
•
Contrôle de la capacité de stimulation et de détection
•
Contrôle de l'efficacité de la protection haute fréquence
Si l'auto-test détecte un défaut, toutes les DEL clignotent de
manière persistante et des signaux acoustiques retentissent.
Dans ce cas le stimulateur cardiaque doit être arrêté et expédié à la société BIOTRONIK.
Si l'auto-test ne détecte pas d'erreur, les DEL s'éteignent et
les signaux acoustiques disparaissent, le Reocor D commence à émettre des impulsions de stimulation conformément aux paramètres réglés. Il convient donc de raccorder
l'électrode négative (cathode) uniquement après avoir vérifié
que le mode de stimulation, la fréquence de stimulation,
l'amplitude d'impulsion et la sensibilité sont correctement
réglés.
Si le commutateur rotatif de mode de fonctionnement est
positionné sur OFF, cela empêche que des impulsions de
stimulation soient délivrées au patient dès que les sondes
sont connectées.
Messages
d'avertissement
Les alarmes suivantes peuvent se déclencher au cours du
fonctionnement :
•
La DEL clignotante Low battery indique qu'un remplacement de la pile est nécessaire.
•
Si l'impédance électrique n'est pas comprise dans une
plage admise (par ex. à la suite d'une rupture de sonde
ou d'un mauvais contact), une succession rapide de
signaux sonores retentit dans un délai de 5 s après la
mise sous tension.
•
Si l'amplitude d'impulsion est réglée sur des valeurs
< 1 V ou la fréquence sur des valeurs > 180 cpm, un signal
sonore retentit pendant environ 2 s.
Deutsch
Español
Contrôle du code de programme et du microprocesseur
•
Français
•
Magyar
Dès que le Reocor D est sous tension, il procède à un autotest de quelques secondes. Ce test comprend les étapes
suivantes :
Italiano
Auto-test
Nederlands
Il convient de protéger et de contrôler à intervalles réguliers
les connexions du Reocor D et des sondes temporaires de
stimulation.
Polski
Attention !
Português
Remarques générales
Česky
Instructions de commande
394271--J_GA_Reocor_D_mul.book Page 176 Monday, January 26, 2015 3:35 PM
176
•
Si la fréquence est trop élevée (voir page 198 « Protection
haute fréquence ») ou en cas d'échec de l'auto-test, un
signal acoustique retentit et les DEL Pace et Sense
clignotent.
17
D
0
14 0
30
0
80
60
0
40
20
0
300
0
25
20 0
18
0
0, 5
12
10
2
0, 3
0, 2
7
1
0
17
10
0
0
10
75
50
0
60 0
60
4 00
35
0
0, 7
10
V0 0
80
0
1000
70
VV I
T
25
15
12
0
VV
40
50
DD
20
0
250
D
VD
D0 0
Éléments de commande et DEL
0,1
3
0,5
3
1
2
5
3
4
12
17
10
5
5
10
7
8
2
7
0,1
14
11
1
3
2
1
5
20
17
0 ,5
b
INDIFF.+
DIFF.-
Figure 1: zone de commande du Reocor D
8
9
10
11
12
13
14
15
16
17
18
Réglage de la sensibilité ventriculaire (non utilisable dans les
modes de fonctionnement D00 et V00)
Affichage jaune d'événement auriculaire stimulé
Voyant vert d'onde P détectée
Réglage de l'amplitude d'impulsion auriculaire
(non utilisable dans le mode de fonctionnement VDD)
Réglage de la sensibilité auriculaire
(non utilisable dans le mode de fonctionnement D00)
Démarrage de la fonction de rafales auriculaires
Fixation du Reocor D au patient, au lit ou
au pied à perfusion
Réglage de la fréquence des rafales auriculaires
Réglage du retard AV
Sélection de la fonction de rafales auriculaires
Sélection du mode stimulation et arrêt
Réglage de la fréquence de stimulation
Table 1: description des éléments de la figure 1
Les valeurs en gras sur les éléments de commande représentent les paramètres sûrs pour l'objectif médical de
l'appareil.
Couvercle du panneau de commande
Le couvercle du panneau de commande est verrouillé lorsque
vous l'aurez glissé sur les deux points de blocage jusqu'à la
butée et que le verrouillage est placé au-dessus de la saillie
(voir Fig. 2).
Faux :
Figure 2: Position correcte du couvercle du panneau de commande
Deutsch
Português
Polski
Correct :
Español
7
Pour pile 9 V
Avertit lorsque la tension de la pile est faible
Affichage jaune d'événement ventriculaire stimulé
Voyant vert d'onde R détectée
Réglage de l'amplitude d'impulsion ventriculaire
Français
2
3
4
5
6
Fonction
Pour câbles et sondes à connecteurs de 2 mm ou
adaptateur Redel(rouge = plus ; bleu = moins)
Magyar
1b
Désignation
Connecteur canal
auriculaire
Connecteur canal
ventriculaire
Compartiment de pile
DEL Low battery
DEL Ventricle Pace
DEL Ventricle Sense
Molette de réglage
Ventricle Ampl.
Molette de réglage
Ventricle Sens.
DEL Atrium Pace
DEL Atrium Sense
Molette de réglage
Atrium Ampl.
Molette de réglage
Atrium Sens.
Start burst
Étui pour ceinture et œillet de
fixation (au dos)
Molette de réglage Burst rate
atrium
Molette de réglage AV delay
Select burst
Commutateur rotatif Mode
Molette de réglage Rate
Italiano
1a
Nederlands
177
Česky
English
394271--J_GA_Reocor_D_mul.book Page 177 Monday, January 26, 2015 3:35 PM
394271--J_GA_Reocor_D_mul.book Page 178 Monday, January 26, 2015 3:35 PM
178
Pour déverrouiller le couvercle du panneau de commande
(voir Fig. 3):
Tirez le levier de déverrouillage d'une main vers le haut.
Faites simulanément glisser le couvercle du panneau de
commande de l'autre main vers le bas.
Figure 3: Déverrouillage du couvercle du panneau de commande
Pour verrouiller le couvercle du panneau de commande:
Glissez le couvercle du panneau de commande par-dessus la saillie et poussez-le vers le haut jusqu'à la butée
(voir Fig. 2).
Il est possible de retirer complètement le couvercle pour
pouvoir le nettoyer. Pour ce faire, glissez le couvercle vers le
bas jusqu'à la butée. Après le nettoyage, glissez le couvercle
au-delà de la butée.
Attention !
Pendant le fonctionnement du Reocor D, le couvercle du panneau de commande doit être fermé afin d'empêcher toute
manipulation involontaire des commutateurs rotatifs et
molettes de réglage, et par conséquent des paramètres du
programme.
Connexion des sondes
Reocor D est équipé de quatre bornes destinées au raccordement direct de sondes avec des connecteurs de 2 mm isolés.
Le raccordement des câbles avec des connecteurs Redel
requiert d'enficher et de visser l'adaptateur Redel du côté
approprié (fig. 4). L'adaptateur Redel est enfiché par le bon
côté lorsqu'il est possible de le visser sur le Reocor D.
Remarque :
l'adaptateur Redel peut fonctionner uniquement s'il est enfiché correctement sur l'appareil.
English
394271--J_GA_Reocor_D_mul.book Page 179 Monday, January 26, 2015 3:35 PM
Il est possible d'utiliser Reocor D avec les câbles patients et
les adaptateurs suivants :
Câble patient PK-175 avec quatre bornes à vis pour sondes temporaires, côté patient, et connecteur Redel côté
Reocor (utiliser l'adaptateur Redel).
Câble patient PK-82 avec deux pinces crocodile isolées
pour sondes temporaires côté patient et deux connecteurs de 2 mm isolés côté Reocor.
Figure 6: câble patient PK-82
Polski
•
Português
Figure 5: câble patient PK-175
Nederlands
Italiano
•
Magyar
Figure 4: adaptateur Redel pour Reocor D
Français
Español
Deutsch
Česky
179
394271--J_GA_Reocor_D_mul.book Page 180 Monday, January 26, 2015 3:35 PM
180
•
Câble patient PK-83-B pour stimulation simple chambre, avec deux bornes à vis pour sondes temporaires,
côté patient, et connecteur Redel côté Reocor (utiliser
l'adaptateur Redel). Les sondes temporaires raccordées
via le PK-83-B sont reliées au canal ventriculaire du
Reocor D.
PK-83-B
Figure 7: câble patient PK-83-B
•
Câble patient PK-83 pour stimulation simple chambre,
avec deux bornes à vis isolées pour sondes temporaires
côté patient et deux connecteurs de 2 mm isolés côté
Reocor.
Figure 8: câble patient PK-83
•
Les câbles patient PK-67-L, PK-67-S diffèrent uniquement dans la longueur.
Figure 9: câbles patient PK-67-L (2,6 m) et PK-67-S (0,8 m)
English
394271--J_GA_Reocor_D_mul.book Page 181 Monday, January 26, 2015 3:35 PM
181
Adaptateurs
adaptateur pour les câbles patient PK-67-L et PK-67-S
PA-1-B pour raccorder des connecteurs de 2 mm isolés ou
des adaptateurs MHW (adaptateurs pour sondes myocardiques temporaires)
PA-2 IS-1
Français
Figure 10:
Español
Deutsch
Les câbles patient PK-67 (fig. 9) peuvent accueillir les adaptateurs conformément à la figure 10 :
Česky
•
Câble patient PK-141 avec quatre pinces crocodile côté
patient et des connecteurs Redel côté Reocor (utiliser les
adaptateurs Redel)
Figure 11:
câble patient PK-141
Le câble adaptateur ADAP-2R est un câble réutilisable
qui sert à relier les câbles à usage unique conformément
à la figure 13 (États-Unis uniquement), avec Reocor D
(utiliser les adaptateurs Redel).
Polski
•
Nederlands
Italiano
•
Magyar
PA-4 avec pinces crocodile
câble adaptateur ADAP-2R
Português
Figure 12:
394271--J_GA_Reocor_D_mul.book Page 182 Monday, January 26, 2015 3:35 PM
182
•
Figure 13:
ment)
Câbles à usage unique (États-Unis uniquement)
câbles à usage unique de Remington Medical Inc. (États-Unis unique•
Câbles à usage unique
Les câbles à usage unique PK-155 et Remington 301-CG
(États-Unis uniquement) avec pinces crocodile (fig. 14) sont
reliés au patient à l'aide du câble PK-67-S.
Pinces crocodile
sur PK-67-S
301-CG (États-Unis uniquement)
Figure 14:
câble PK-155
Connexion
AVERTISSEMENT !
Les câbles défectueux mettent le patient en danger. Les
câbles défectueux altèrent leur fonctionnement et mettent le
patient en danger. N'utilisez pas de câbles défectueux.
AVERTISSEMENT !
Mise en danger liée à une perte de fonction.
Les câbles humides peuvent altérer leur fonctionnement et
mettre le patient en danger. N'utilisez pas de câbles humides.
AVERTISSEMENT !
Mise en danger liée aux courants électriques.
Les contacts de câbles non utilisés peuvent induire des
courants électriques dans le corps du patient. Attachez les
contacts de câbles non utilisés à proximité du patient.
Attention !
Réactions allergiques, inflammations.
Évitez que les câbles n'entrent en contact avec des plaies ou
la peau du patient.Ne pas raccorder le câble patient à la
sonde temporaire de stimulation avant d'avoir établi la
connexion sur le Reocor D.
Remarque :
avant d'utiliser les câbles , veillez à la position correcte des
gaines isolantes.
Remarque :
ne pas raccorder le câble patient à la sonde temporaire de
stimulation avant d'avoir établi la connexion sur le Reocor D.
English
394271--J_GA_Reocor_D_mul.book Page 183 Monday, January 26, 2015 3:35 PM
183
Si Reocor D est utilisé sans adaptateur Redel, il est possible
de raccorder directement des cathéters et des sondes myocardiques temporaires aux bornes A+, A- et V+, V- à l'aide des
câbles patient PK-82 et PK-83.
Česky
Connexion directe
Le câble patient est raccordé au Reocor D via un adaptateur
Redel.
Enficher l'adaptateur Redel sur le Reocor D.
Deutsch
Câble patient
Il est possible, sans utiliser de câble ni d'adaptateur supplémentaire, de raccorder directement le Reocor D à un cathéter temporaire avec un connecteur de 2 mm ou à une sonde
myocardique temporaire avec un adaptateur de 2 mm. Le
tableau ci-dessous présente tous les autres cas de figure
possibles.
Raccordement côté Câble BIOTRONIK
patient
Connexion côté
appareil
Connexion
Reocor D
Connexions recommandées
Raccordement direct (sans câble BIOTRONIK)
Bornes de 2 mm
2 mm
PK-67-S/L avec PA-1-B
Connecteur
Redel
Adaptateur Redel
Bornes à vis
PK-175 avec TC Adapt
Connecteur
Redel
Adaptateur Redel
Bornes à vis
PK-83 avec TC Adapt (2x)
Connecteur
de 2 mm
Bornes de 2 mm
Pinces crocodile
PK-141
Connecteur
Redel
Adaptateur Redel
Pinces crocodile
PK-67-S/L avec PA-4
Connecteur
Redel
Adaptateur Redel
Pinces crocodile
PK-67-S/L avec PK-155 (2x)
Connecteur
Redel
Adaptateur Redel
Pinces crocodile
PK-82 (2x)
Connecteur
de 2 mm
Bornes de 2 mm
Raccords possibles
Français
Magyar
Cathéter temporaire avec connecteurs de 2 mm ou
sonde myocardique temporaire avec adaptateur de 2 mm
Italiano
Raccordements possibles
Nederlands
le câble patient PK-83-B permet de procéder à une stimulation double chambre. Les sondes raccordées au PK-83-B
sont reliées au canal ventriculaire du Reocor D.
Polski
Remarque :
Português
Enficher le connecteur Redel du câble patient dans la
borne Redel de l'adaptateur.
Español
Visser à fond.
394271--J_GA_Reocor_D_mul.book Page 184 Monday, January 26, 2015 3:35 PM
184
Sonde myocardique temporaire avec aiguille sectionnable
ou avec extrémité flexible (diamètre max. 2,3 mm)
Connecteur
côté patient
Câble BIOTRONIK
Connecteur
côté appareil
Reocor D
connecteur
Connexions recommandées
Bornes à vis
PK-175
Connecteur Redel
Adaptateur Redel
Bornes à vis
PK-83 (2x)
Connecteur
de 2 mm
Bornes de 2 mm
Raccords possibles
Pinces crocodile
PK-141
Connecteur Redel
Adaptateur Redel
Pinces crocodile
PK-67-S/L avec PA-4
Connecteur Redel
Adaptateur Redel
Pinces crocodile
PK-67-S/L avec PK-155 (2x)
Connecteur Redel
Adaptateur Redel
Pinces crocodile
PK-82 (2x)
Connecteur
de 2 mm
Bornes de 2 mm
Connecteur
côté patient
Câble BIOTRONIK
Sonde implantée avec connecteur IS-1
Connecteur
côté appareil
Reocor D
connecteur
Connecteur Redel
Adaptateur Redel
Connexions recommandées
Borne IS-1
PK-67-S/L avec PA-2
Raccords possibles
Pinces crocodile
PK-141
Connecteur Redel
Adaptateur Redel
Pinces crocodile
PK-67-S/L avec PA-4
Connecteur Redel
Adaptateur Redel
Pinces crocodile
PK-67-S/L avec PK-155 (2x)
Connecteur Redel
Adaptateur Redel
Pinces crocodile
PK-82 (2x)
Connecteur
de 2 mm
Bornes de 2 mm
Polarité
En règle générale, Reocor D stimule en mode bipolaire, mais
il peut être utilisé au choix avec des sondes de stimulation
temporaire bipolaires ou unipolaires.
Lorsque des sondes unipolaires sont utilisées, deux sondes
doivent être connectées.
Déconnexion
Débrancher le câble patient des sondes temporaires de
stimulation du patient ou de la connexion directe.
Déconnexion du connecteur Redel
•
Tirer la bague d'accouplement du connecteur Redel puis
débrancher le connecteur de la borne Redel.
English
394271--J_GA_Reocor_D_mul.book Page 185 Monday, January 26, 2015 3:35 PM
185
Mettre la pile en place.
•
Repousser le couvercle du panneau de commande vers le
bas.
•
Préparer le patient : mettre les sondes en place, mais
sans les raccorder au stimulateur.
•
Préparer le Reocor :
Régler la fréquence de stimulation avec la molette de
réglage Rate (18).
Deutsch
•
Español
La commande du Reocor D est identique dans tous les
modes de fonctionnement. Les différentes étapes de commande doivent se dérouler dans l'ordre suivant (les chiffres
entre parenthèses renvoient à la figure 1, page 176 de ce
Manuel technique).
Česky
Mise en service
•
Une fois l'auto-test interne terminé avec succès, les
5 DEL du panneau de commande clignotent simultanément deux fois.
•
Si la DEL Low battery (3) clignote, il est nécessaire de
remplacer la pile (le changement de pile est décrit à la
page 186).
•
Raccorder les sondes, les DEL jaunes Atrium Pace (8)1 et
Ventricle Pace (4) clignotent de manière synchrone avec
les impulsions de stimulation auriculaire et ventriculaire.
•
Régler la sensibilité requise pour l'oreillette et le ventricule avec les molettes de réglage Atrium Sens2 et
Ventricle Sens. (7) de sorte que les DEL vertes Atrium
Sense (9)1 et Ventricle Sense (5) clignotent de manière
synchronisée avec chaque événement auriculaire ou
ventriculaire détecté.
Nederlands
Prévoir une marge de sécurité suffisante afin de garantir
la fiabilité de la détection.
Uniquement avec stimulation des deux chambres
Uniquement avec stimulation des deux chambres
Italiano
Magyar
Sélectionner le mode de stimulation avec le commutateur rotatif Mode (17). Cette manipulation active également l'appareil.
Português
1
2
•
Polski
Régler les amplitudes de stimulation de l'oreillette1 et du
ventricule avec les molettes de réglage Atrium Ampl.
(10)1 et Ventricle Ampl. (6).
Français
Régler le délai AV avec la molette de réglage AV delay
(15)1.
394271--J_GA_Reocor_D_mul.book Page 186 Monday, January 26, 2015 3:35 PM
186
•
Attention !
Surveiller l'ECG du patient et adapter, le cas échéant, les
valeurs de l'amplitude et de la sensibilité.
Pendant l'utilisation du Reocor D, la fréquence cardiaque du
patient doit être surveillée sur un moniteur ECG avec fonction
d'alarme.
Fixation
Le Reocor D doit être utilisé soit posé à plat sur une surface
horizontale non glissante, soit fixé au bras du patient à l'aide
du brassard, soit accroché à un pied à perfusion par l'œillet
de suspension situé au dos.
Pour pouvoir accrocher le Reocor D à un pied de perfusion,
tourner l'œillet de suspension situé au dos de l'appareil. Vous
garantissez ainsi une utilisation sure de l'appareil tout en
délestant le câble patient.
Remplacement de la pile
Lorsque la pile est presque vide la DEL Low battery (3) commence à clignoter. Lorsqu'une pile de type MN 1604 Duracell® Procell® est utilisée, la durée de service restante est
d'environ 36 heures. Il convient cependant de remplacer la
pile dans les meilleurs délais.
Le Reocor D doit être alimenté par une pile 9 V, de code international CEI 6LR61. Veiller à utiliser uniquement des piles
alcalines au manganèse étanches. L'utilisation d'une pile de
type MN 1604 Duracell® Procell® permet au moins 500 heures de stimulation externe à une température de 20 ± 2 °C
avant de devoir remplacer la pile.
Si le changement de pile est effectué alors que Reocor D est
en service, à température ambiante de 20 ± 2 °C, l'appareil
demeure opérationnel pendant encore 30 s environ.
Pour des raisons de sécurité, il est recommandé de prendre
en charge le patient autrement lors du changement de la pile.
Ne jamais utiliser de piles rechargeables (accus). Il est difficile d'évaluer la durée de vie de ces piles, il peut donc arriver
que le moment de l'ERI soit dépassé accidentellement, ce qui
interrompt alors soudainement la stimulation.
Le compartiment de pile (2) se trouve sur le côté droit de
l'appareil ; pour l'ouvrir, pousser le verrou bleu vers le haut
puis extraire le capot vers la droite. Extraire prudemment les
piles.
Il est possible que les pôles de la pile neuve soient protégés
par un capuchon en caoutchouc. Retirer ce capuchon avant
de mettre la pile neuve en place.
Attention !
Un marquage indiquant la polarisation recommandée se
trouve dans le compartiment de pile. Lors de la mise en place
de la nouvelle pile, veiller simplement à ce que les pôles
soient orientés vers le centre du boîtier. La position des pôles
positif et négatif n'a pas d'importance.
Magyar
si l'appareil est stocké, et donc non utilisé, pendant une
période prolongée, il convient d'en extraire la pile afin d'éviter
tout dommage provoqué par des coulures éventuelles.
Italiano
Remarque :
Nederlands
Refermer le capot puis repousser le verrou bleu vers le bas
jusqu'à ce qu'il s'encliquète de manière audible.
Polski
mise en place de la pile
Português
Figure 15:
Français
Español
Mettre la nouvelle pile en place en insérant sa partie inférieure en premier dans le compartiment (fig. 15).
Deutsch
187
Česky
English
394271--J_GA_Reocor_D_mul.book Page 187 Monday, January 26, 2015 3:35 PM
394271--J_GA_Reocor_D_mul.book Page 188 Monday, January 26, 2015 3:35 PM
188
Modes de stimulation et paramètres
Modes de stimulation
Le Reocor D fonctionne dans l'un des six modes de stimulation suivants :
DDD
Stimulation A-V synchrone avec détection et stimulation tant dans l'oreillette que
dans le ventricule
VDD
Stimulation ventriculaire synchrone avec déclenchement auriculaire
D00
Stimulation A-V asynchrone, aucune détection dans les deux chambres
VVI
Détection et stimulation dans le ventricule
V00
Stimulation asynchrone dans le ventricule
VVT
Comme VVI, mais avec émission immédiate d'impulsions en cas de détection d'un
événement ventriculaire hors de la période réfractaire
En cas de perturbations provoquées par des interférences
électromagnétiques (EMI), le Reocor D opte pour une stimulation asynchrone si certaines valeurs limites sont dépassées. En fonction de la détection ou non des perturbations
dans l'oreillette ou le ventricule, les modes de fonctionnement suivants sont activés pendant la durée des
perturbations :
Mode de fonct. non perturbé
Perturbation via IEM
SSI, SST
S00
VDD
VAT, VVI, V00
DDD
DAD, DVI, D00
Périodes réfractaires
La fréquence limite, jusqu'à laquelle le ventricule est stimulé
de manière synchrone avec des événements auriculaires
détectés (fréquence limite supérieure), est déterminée par la
période réfractaire auriculaire (atrial refractory period, ARP).
La séquence est déclenchée par des événements auriculaires détectés et stimulés, de la même manière, des extrasystoles ventriculaires détectées réinitialisent cette séquence.
Lorsque la fréquence limite supérieure est dépassée, une
impulsion sur deux tombe pendant la période réfractaire
auriculaire, n'est pas détectée et ne déclenche aucune
impulsion ventriculaire. La fréquence de stimulation ventriculaire est poursuivie selon un rapport de 2:1 (fig. 16).
English
394271--J_GA_Reocor_D_mul.book Page 189 Monday, January 26, 2015 3:35 PM
Español
Deutsch
Česky
189
175 ms
Fréquence
Il est possible de modifier progressivement la valeur de la
fréquence avec la molette de réglage Rate (18), de 30 cpm à
250 cpm. Lorsque la valeur réglée est supérieure à 180 cpm,
l'appareil émet un signal acoustique pendant 2 secondes.
AVERTISSEMENT !
Une stimulation cardiaque à des fréquences supérieures à
180 cpm pendant une période prolongée peut provoquer de
graves complications hémodynamiques. Il est recommandé
de ne procéder à une stimulation à fréquence élevée que si
une surveillance permanente est garantie.
Magyar
200 ms
Supérieure à 200 cpm
Italiano
225 ms
150 cpm à 200 cpm
Nederlands
Période réfractaire VRP
Polski
Fréquence de stimulation
Inférieure à 150 cpm
Português
La période réfractaire auriculaire totale (TARP) du Reocor D
est la somme de 175 ms et de la durée AV réglée ; sa valeur
minimum est cependant inférieure de 400 ms à la fréquence
de stimulation de 120 cpm. Si cette fréquence est dépassée,
la TARP minimum est réduite à 240 ms.
La période réfractaire ventriculaire VRP du Reocor D dépend
de la fréquence de stimulation :
Français
Figure 16: réaction de la fréquence limite supérieure pendant une tachycardie auriculaire (fréquence de base 72 cpm).
394271--J_GA_Reocor_D_mul.book Page 190 Monday, January 26, 2015 3:35 PM
190
Délai AV
Le délai AV est modifié progressivement via la molette de
réglage AV delay (15), de 15 ms à 400 ms. Un délai AV court
peut être sélectionné pour des indications spécifiques, par
exemple en cas de tachycardies à répétition.
Reocor D limite le délai AV vers le haut à la moitié de l'intervalle de base.
Amplitude d'impulsion – oreillette/ventricule
Les amplitudes d'impulsion destinées à l'oreillette et au ventricule peuvent être modifiées avec les molettes de réglage
Ampl. (10) et (6) dans une plage comprise entre 0,1 V et 17 V.
Lorsque la valeur réglée est inférieure à 1 V, l'appareil émet
un signal sonore pendant 2 secondes.
L'impulsion dure 1 ms.
Il convient de contrôler la stimulation à intervalles réguliers
afin de garantir qu'une stimulation a lieu et que la marge de
sécurité réglée est suffisante.
Sensibilité – oreillette
La sensibilité se règle avec la molette de réglage Atrium
Sens. (11) à une valeur comprise entre 0,2 mV et 10 mV. Il est
nécessaire de la contrôler à intervalles réguliers afin de
garantir qu'une détection correcte a lieu et que la marge de
sécurité réglée est suffisante.
Sensibilité – ventricule
La sensibilité se règle avec la molette de réglage Ventricle
Sens. (7) à une valeur comprise entre 1 mV et 20 mV. Il
convient de contrôler la sensibilité à intervalles réguliers afin
de garantir qu'une détection correcte a lieu et que la marge
de sécurité réglée est correcte.
Période de Blanking
Lorsqu'une stimulation a été émise, la détection est inhibée
pendant 19 ms ± 3 ms dans l'autre canal, afin d'éviter une
détection far-field.
English
394271--J_GA_Reocor_D_mul.book Page 191 Monday, January 26, 2015 3:35 PM
191
Ainsi, une interférence auriculaire n'affectant pas le canal
ventriculaire conduit, en mode DDD, à une stimulation DVI.
La détection de bruits dans le canal ventriculaire conduit à
une stimulation DAD.
Des interférences dans les deux canaux conduisent à une
stimulation D00.
Deutsch
L'intervalle est remis à zéro par des bruits détectés dans l'un
des canaux au cours d'un intervalle de 80 ms, ce qui provoque
une stimulation asynchrone à la fréquence programmée tant
que l'interférence persiste.
Español
L'intervalle d'interférence est déclenché aussi bien par des
événements de stimulation auriculaire et ventriculaire que
par des événements détectés.
Česky
Intervalle d'interférence
Une stimulation cardiaque à des fréquences supérieures à
180 cpm pendant une période prolongée peut provoquer de
graves complications hémodynamiques. Il est recommandé
de ne procéder à une stimulation à fréquence élevée que si
une surveillance permanente est garantie.
Le mode de stimulation à hautes fréquences est destiné à
stopper certaines tachycardies supraventriculaires (SVT) et
doit être envisagé uniquement pour des indications auriculaires. L'utilisation de stimulations asynchrones à hautes fréquences peut interrompre une tachycardie supraventriculaire
en dépolarisant des sections d'un vecteur de réentrée. Même
si un foyer ectopique auriculaire est responsable d'une tachy-
Magyar
Italiano
Après une stimulation par rafales dans l'oreillette, l'intervalle
de blanking ventriculaire peut empêcher la détection d'événements intrinsèques et provoquer une stimulation asynchrone du ventricule.
Nederlands
AVERTISSEMENT !
Polski
Cette fonction s'active avec deux touches : appuyer tout
d'abord sur la touche (16) Select burst puis, dans les 2 secondes suivantes, sur la touche (12) Start burst. L'émission
d'impulsions a lieu tant que la deuxième touche est enfoncée.
Le canal ventriculaire poursuit alors la stimulation à la fréquence réglée, qui peut être aussi modifiée conjointement.
Une inhibition ventriculaire a lieu dans la mesure où un mode
de fonctionnement inhibant a été réglé.
Português
La fréquence de la fonction auriculaire Burst rate atrium peut
être sélectionnée entre 60 cpm et 1000 cpm à l'aide de la
molette de réglage (14).
Français
Rafale
394271--J_GA_Reocor_D_mul.book Page 192 Monday, January 26, 2015 3:35 PM
192
cardie supraventriculaire, l'application d'une stimulation
auriculaire à hautes fréquences peut provoquer une inhibition massive du foyer ectopique.
L'application d'une stimulation auriculaire à haute fréquence
présente certains risques qui doivent être pris en considération. Ce sont par exemple une stimulation ventriculaire, une
tachycardie ou fibrillation ventriculaires. Elles peuvent résulter d'un positionnement incorrect des sondes ou de parcours
de conduction anormaux de l'excitation, qui n'empruntent
pas les conductions d'excitation AV normales (par ex. dans le
cas du syndrome de Wolff-Parkinson-White). Une stimulation
à haute fréquence peut également provoquer des malaises
des patients ainsi que des asystoles.
English
394271--J_GA_Reocor_D_mul.book Page 193 Monday, January 26, 2015 3:35 PM
193
Ne jamais utiliser un appareil endommagé ni un appareil
présentant des anomalies, particulièrement s'il a chuté ou
s'il peut avoir été endommagé par une tension haute fréquence ou de défibrillation.
Le Reocor D doit être utilisé soit posé à plat sur une surface
horizontale non glissante, soit fixé au bras du patient à l'aide
du brassard, soit accroché à un pied à perfusion par l'œillet
de suspension situé au dos.
Attention !
Si un brassard est utilisé, Reocor D ne doit pas être posé
directement sur la peau.
Nettoyage
Utiliser un détergent doux et un chiffon humide pour nettoyer
le Reocor D. Éviter d'utiliser des détergents agressifs ou des
solvants organiques tels qu'essence ou éther, car ils risquent
d'attaquer le boîtier en plastique de l'appareil.
Désinfection
Pour le désinfecter, essuyer l'appareil avec un chiffon imbibé
d'une solution désinfectante (par ex. Aerodesin 2000 ou Lysoform D). Tenir compte des indications du fabricant concernant les proportions de mélange de la solution.
Remarque :
lorsque le Reocor D a été nettoyé ou désinfecté, il est interdit
de l'utiliser pendant une heure.
Stérilisation
Le Reocor D n'est pas stérilisable. Si l'appareil doit être utilisé dans un environnement stérile, il convient de l'emballer
dans une couverture de protection stérile.
Il est recommandé de faire contrôler l'appareil chaque année
par un technicien agréé par le constructeur.
Deutsch
Español
Français
AVERTISSEMENT !
Magyar
Le boîtier, les éléments de commande, les connexions et
câbles patient doivent être contrôlés visuellement avant chaque utilisation, afin de déceler les dommages mécaniques,
déformations, pièces desserrés, fêlures ou souillures éventuelles.
Italiano
Avant utilisation le stimulateur cardiaque doit être entreposé
pendant au moins deux heures dans les conditions ambiantes indiquées (voir page 199).
Nederlands
En pareil cas l'appareil doit être renvoyé à la société
BIOTRONIK.
Polski
Le Reocor D est un appareil de haute précision qui doit être
manipulé avec précaution. Une sollicitation mécanique
(provoquée par une chute par ex.), peut entraver son
fonctionnement.
Português
Reocor D
Česky
Manipulation, maintenance et entretien
394271--J_GA_Reocor_D_mul.book Page 194 Monday, January 26, 2015 3:35 PM
194
Attention !
Bien que le Reocor D soit protégé contre les gouttelettes
d'eau, veiller à toujours le maintenir propre et sec.
Câbles patient réutilisables
Avant de l'ouvrir, vérifier que l'emballage d'un câble stérile
est intact afin de garantir la stérilité du matériel.
Nettoyage
Les câbles patient réutilisables peuvent être nettoyés et
désinfectés avec des détergents hospitaliers selon différentes méthodes. Pour ce nettoyage il est interdit d'utiliser des
produits chimiques agressifs, comme l'acétone par exemple.
La méthode de nettoyage recommandée consiste à utiliser
un chiffon humide et un savon normal, sans alcool, ou le
détergent Stabimed de la société Braun. Les câbles doivent
ensuite être rincés avec de l'eau sans électrolyte pour éliminer les restes de détergent, puis essuyés avec un chiffon
propre et sec.
Désinfection
La désinfection dans un bain s'effectue avec un produit
désinfectant pour instruments médicaux à base d'aldéhydes
(par ex. Lysoformin 3000) ou d'alcool (par ex. Aerodesin
2000), conformément aux indications du fabricant et aux
prescriptions des directives hospitalières correspondantes.
Après la désinfection, il convient de rincer le câble avec de
l'eau sans électrolyte pour le débarrasser des restes de
désinfectant.
Stérilisation
Sauf mention contraire dans les documents associés, tout
câble patient peut être stérilisé de la façon suivante :
•
Stérilisation à la vapeur à 121 °C et 1,1 bar, pendant
20 min
Les câbles patient PK-175 et PK-83-B peuvent être stérilisés
de la façon suivante :
•
Stérilisation à la vapeur à 134 °C et 3,0 bar, pendant
18 min
Maintenance, service, inspections
La maintenance nécessaire se limite au changement de la
pile (voir page 186).
D'autres travaux de maintenance ne sont pas nécessaires.
Contrôle avant
utilisation
Procéder à un rapide contrôle de l'appareil avant chaque
utilisation. Ceci doit inclure un contrôle visuel et un simple
contrôle du fonctionnement de l'appareil.
English
394271--J_GA_Reocor_D_mul.book Page 195 Monday, January 26, 2015 3:35 PM
195
Contrôler l'absence de dommages mécaniques, déformations, pièces mobiles, fissures, etc.
•
Contrôler l'absence de dommages mécaniques sur la
zone de connexion des câbles.
•
Vérifier que les inscriptions sont parfaitement lisibles.
Contrôle de fonctionnement :
Tenir compte du résultat de l'auto-test effectué automatiquement à la mise sous tension de l'appareil.
Élimination
La plaque signalétique du Reocor D présente le symbole
représentant une poubelle barrée d'une croix.
Ce symbole indique que la reprise et l'élimination de l'appareil sont régies par la directive européenne 2002/96/CE relative aux déchets des équipements électriques et électroniques (directive DEEE).
Les appareils anciens ainsi que les accessoires obsolètes,
comme par ex. les câbles patient, doivent être renvoyés à la
société BIOTRONIK. Il est ainsi garanti que l'élimination est
effectuée en conformité avec les exécutions nationales de la
directive DEEE.
Remarque :
s’ils ont été en contact avec du sang, les câbles doivent être
mis au rebut avec les déchets médicaux contaminés dans le
respect de l'environnement. Mettez au rebut les câbles non
contaminés conformément à la Directive européenne 2002/
96/CE relative aux déchets d’équipements électriques et
électroniques (DEEE).
Les piles usagées doivent être traitées comme des déchets
spéciaux et doivent être éliminées par l'utilisateur.
Pour toute question, contacter BIOTRONIK.
Français
Une fois par an.
Cette inspection doit se dérouler conformément aux indications du constructeur. Ces informations sont disponibles sur
demande. Elles contiennent également une description des
différentes étapes de contrôle et une liste des appareils
requis.
Magyar
En cas de soupçon de dysfonctionnement,
•
Italiano
•
Nederlands
Après une utilisation commune avec des instruments
chirurgicaux haute fréquence ou des défibrillateurs,
Polski
•
Español
Procéder à une inspection
Português
Inspection
Deutsch
•
Česky
Contrôle visuel :
394271--J_GA_Reocor_D_mul.book Page 196 Monday, January 26, 2015 3:35 PM
196
Sécurité technique
Le stimulateur cardiaque externe Reocor D répond aux exigences des normes internationales en vigueur en matière de
sécurité des appareils électro-médicaux CEI 60601-1 et
CEI 60601-1-2, ainsi que de la norme internationale
CEI 60601-2-31 concernant les stimulateurs cardiaques
temporaires externes.
Les caractéristiques spéciales suivantes assurent la sécurité
du patient :
AVERTISSEMENT !
•
Aucun contact possible avec des pièces métalliques
telles qu'elles sont définies par la CEI.
•
La construction répond aux spécifications de la catégorie
de matériel CF (cardiac floating) et est homologuée pour
le traitement cardiaque. Le stimulateur cardiaque est
conforme aux exigences des normes internationales
relatives à la protection contre les défibrillations.
•
Le couvercle du panneau de commande fermé protège le
stimulateur cardiaque des gouttes d'eau.
Les sondes temporaires auxquelles le Reocor D est raccordé
font office de conducteur de basse impédance vers le myocarde pour le courant électrique. Les appareils reliés au secteur et situés à proximité du patient doivent donc impérativement être équipés d'une mise à la terre réglementaire.
Il est interdit d'utiliser le stimulateur cardiaque dans des
zones présentant un risque d'explosion.
Seuls des techniciens de BIOTRONIK sont autorisés à effectuer tous les autres travaux de maintenance et de réparation.
English
394271--J_GA_Reocor_D_mul.book Page 197 Monday, January 26, 2015 3:35 PM
197
Élimination conformément à la Directive 2002/96/CE du Parlement
européen et du Conseil du 27 janvier 2003 relative aux déchets
d'équipements électriques et électroniques
Classification de la partie appliquée CF (Cardiac Floating), protégée
contre les chocs de défibrillation
IP31
Hydrofuge, degré de protection IP31
OFF
Arrêt (commutateur rotatif Mode)
Deutsch
Repérage de la position de la pile dans son compartiment
Español
Respecter les indications du manuel technique
Français
Symboles
Česky
Spécifications techniques
Amplitude d'impulsion
(A, V)
0,1 … 17 V ± max (50 mV, 10 %) Lorsque l'amplitude d'impulsion est
< 1 V, un avertissement sonore retentit
Sensibilité (A)
0,2 … 10 mV ± 15 %
Pour une impulsion 15 ms sin2
Sensibilité (V)
1 … 20 mV ± 15 %
Pour une impulsion 40 ms sin2
Délai AV
(15 … 400 ms) ± 4 ms
Fréquence rafale (A)
(60 … 1000 cpm) ± 20 cpm
Paramètres invariables
Durée impulsion
1 ms ± 5 %
Auto short après Pace
< 20 ms ± 10 %
Intervalle d'interférence
80 ms ± 5 ms
In channel blanking
110 ms ± 3 ms
Cross Channel Blanking
19 ms ± 3 ms
Période réfractaire auriculaire totale (TARP)
AVD +175 ms ± 5 ms
TARP minimale
pour (30 … 120) cpm
pour (121 … 250) cpm
400 ms ± 5 ms
240 ms ± 5 ms
Lorsque la fréquence est > 180 cpm,
un avertissement sonore retentit
Italiano
(30 … 250 cpm) ± 1 cpm
Nederlands
Fréquence de base
Polski
DDD, D00, VDD, VVI, V00, VVT
Português
Modes de
stimulation
Magyar
Paramètres réglables
394271--J_GA_Reocor_D_mul.book Page 198 Monday, January 26, 2015 3:35 PM
198
Paramètres invariables
Période réfractaire (V)
(30 … 150) cpm
(151 … 200) cpm
(201 … 250) cpm
225 ms ± 5 ms
200 ms ± 5 ms
175 ms ± 5 ms
Fréquence maximale
260 cpm ± 10 %
Protection haute
fréquence
1 … 180 cpm
286 ms ± 10 %
181 … 250 cpm
214 ms ± 10 %
Forme de l'impulsion
Asymétrique, biphasique
286 ms = 210 cpm, sauf en
cas de rafales (Burst)
214 ms = 280 cpm, sauf en
cas de rafales (Burst)
Surveillance impédance de sonde
Avertissement sonore
À partir de 2000 Ω ± 15 %, pour 5 V d'amplitude
Connexion des sondes
Bornes isolées de 2 mm ;
plot Redel, 6 pôles, via adaptateur Redel
Caractéristiques électriques/pile
Pile
•
•
•
Type alcaline au manganèse : CEI 6LR61/ANSI 1604A
9 V étanche
Par ex. MN1604 Duracell® Procell® a)
Polarité
Cathodique
Protection contre
inversions de polarité
Aucune : polarité sans importance
Consommation d'énergie
Caractéristique 1 mA (70 cpm, 5,0 V, 500 Ω )
Durée de service avec pile
neuveb)
•
•
•
Fin de la durée
de service (EOS)
DEL clignotante « Low battery »
Durée de service restante
après signal ERIb)
•
•
36 heures
Avec : 70 cpm, 5 V, mode DDD, 500 Ohm
Comportement durant le
changement de pile
•
L'appareil demeure opérationnel pendant au moins 30 s après
extraction de la pile
Le mode réglé est conservé
•
a)
b)
500 h (−10 %) à 20 °C (± 2 °C)
Avec : 70 cpm, 5 V, mode DDD, 500 Ohm
Jusqu'à : signal ERI (avertissement EOS)
Marque commerciale déposée de Duracell Inc., Bethel, CT 06801
Lors de l'utilisation d'une pile de type MN 1604 Duracell®, Procell®
+10 °C … +40 °C
Gamme de température de stockage
0 °C … +50 °C
Humidité relative
30 % … 75 %, sans condensation
Pression atmosphérique
700 hPa … 1060 hPa
Niveau de bruit
50 dB
Dimensions, poids, matériau
Dimensions Reocor D
160 mm x 75 mm x 35 mm (sans adaptateur Redel)
Poids Reocor D
Avec pile, avec adaptateur Redel : 325 g ± 10 %
Sans pile, avec adaptateur Redel : 280 g ± 10 %
Sans pile, sans adaptateur Redel : 240 g ± 10 %
Dimensions adaptateur
Redel pour Reocor D
76 mm x 35,5 mm x 29,4 mm
Poids adaptateur Redel pour 40 g ± 10 %
Reocor D
Matériau du boîtier
Babyblend FR 3000 (PC-ABS)
Deutsch
Gamme de température d'utilisation
Español
Conditions ambiantes
Français
199
Česky
English
394271--J_GA_Reocor_D_mul.book Page 199 Monday, January 26, 2015 3:35 PM
IP31 (hydrofuge)
Résistance aux chocs
de défibrillation
5 kV
Mode de fonctionnement
Utilisation permanente
12 ans
Durée de vie estiméea)
(selon EN 60601-1:2007, 4.4)
a)
La durée de vie correspond à la durée de vie de service maximale estimée de l'appareil après
sa mise sur le marché. La durée de vie de service maximale estimée ne s'appuie pas sur des
données de test.
Italiano
II b
Degré de protection
Nederlands
Classe de protection
Polski
CF (cardiac floating), protection contre les chocs de défibrillation
Português
Classification partie
appliquée
Magyar
Classification
394271--J_GA_Reocor_D_mul.book Page 200 Monday, January 26, 2015 3:35 PM
200
Conformité à CEI 60601-1-2
Directives et déclaration du fabricant –
Émissions électromagnétiques (CEI 60601-1-2 : Tableau 1)
Le dispositif a été conçu pour être utilisé dans un environnement électromagnétique similaire à celui décrit ci-dessous.
L'utilisateur doit faire en sorte que l'appareil soit utilisé dans
un tel environnement.
Essai d'émission
Niveau de
conformité
Directives concernant l'environnement électromagnétique
Émissions HF selon
CISPR 11
Groupe 1
Le dispositif utilise de l'énergie HF uniquement
pour son propre fonctionnement. L'émission de
hautes fréquences est par conséquent très faible
et ne présente pratiquement aucun risque de provoquer des interférences avec des appareils électroniques fonctionnant à proximité de l'appareil.
Émissions HF selon
CISPR 11
Classe B
Émission d'harmoniques
selon CEI 61000-3-2
Sans objet
Le dispositif peut être utilisé dans tous les environnements autres que dans les lieux d'habitation et
les lieux directement raccordés à un réseau
d'alimentation public.
Variations de tensions
selon CEI 61000-3-3
Sans objet
Directives et déclaration du fabricant Immunité aux interférences électromagnétiques
(CEI 60601-1-2 : Tableau 2)
Le dispositif a été conçu pour être utilisé dans un environnement électromagnétique similaire à celui décrit ci-dessous.
L'utilisateur doit faire en sorte que l'appareil soit utilisé dans
un tel environnement.
Test d'immunité aux
interférences
Niveau de
test selon
CEI 60601
Niveau de
conformité
Directives concernant
l'environnement
électromagnétique
Décharge d'électricité
statique selon
CEI 61000-4-2
±6 kV décharge de
contact
±8 kV décharge
dans l'air
±6 kV décharge de contact
±15 kV
décharge
dans l'air
Le sol doit être en bois, en béton ou
en carrelage céramique. Si le sol
est revêtu d'un matériau synthétique, l'humidité atmosphérique
relative doit être d'au moins 30 %.
Perturbations électriques transitoires
rapides/rafales selon
CEI 61000-4-4
Sans objet
Tensions transitoires
(surtensions) selon
CEI 61000-4-5
Sans objet
Directives et déclaration du fabricant – Immunité aux
interférences électromagnétiques de tous les modèles de
stimulateurs cardiaques externes (CEI 60601-1-2 : Tableau 3)
Le dispositif a été conçu pour être utilisé dans un environnement électromagnétique similaire à celui décrit ci-dessous.
L'utilisateur doit faire en sorte que l'appareil soit utilisé dans
un tel environnement.
Contrôle de
l'immunité aux
interférences
Niveau de test
selon CEI 60601
Niveau de
conformité
Directives concernant
l'environnement
électromagnétique
Les dispositifs radio portables et
mobiles doivent par conséquent
être utilisés à une distance de
l'appareil en aucun cas inférieure à
la distance de sécurité recommandée.
Distance de sécurité
recommandée :
Interférences RF
dirigées selon
CEI 61000-4-6
Interférences RF
émises selon
CEI 61000-4-3
10 Vrms
10 kHz à 80 MHz
hors des bandes ISMa
10 Vrms
10 Vrms
10 kHz à 80 MHz
dans les bandes ISMa)
10 Vrms
10 V/m
800 MHz à 2,5 GHz
10 V/m
d = 0,35
P
d = 1,2
P
d = 1,2
P
pour 80 MHz à 800 MHz
d = 2,3
Deutsch
L'intensité du champ magnétique
doit être équivalente à celle d'un
environnement commercial et
hospitalier habituel.
Español
Champ magnétique aux 3 A/m
fréquences d'alimentation (50/60 Hz) selon
CEI 61000-4-8
Français
30 A/m
Chutes de tension,
Sans objet
interruptions de courte
durée et variations de la
tension d'alimentation
selon CEI 61000-4-11
Magyar
Directives concernant
l'environnement
électromagnétique
Italiano
Niveau de
conformité
P
pour 800 MHz à 2,5 GHz
Polski
Niveau de
test selon
CEI 60601
Português
Test d'immunité aux
interférences
Nederlands
201
Česky
English
394271--J_GA_Reocor_D_mul.book Page 201 Monday, January 26, 2015 3:35 PM
394271--J_GA_Reocor_D_mul.book Page 202 Monday, January 26, 2015 3:35 PM
202
Contrôle de
l'immunité aux
interférences
Niveau de test
selon CEI 60601
Niveau de
conformité
Directives concernant
l'environnement
électromagnétique
P étant la puissance nominale
maximum de l'émetteur en watts
[W] selon les indications du fabricant de l'émetteur, et d étant la distance de sécurité recommandée en
mètres [m]b).
L'intensité du champ magnétique
d'émetteurs radio stationnaires
doit, conformément aux examens
sur le terrain, et quelle que soit la
fréquence,c) être inférieure au
niveau de conformitéd).
Des interférences sont possibles à
proximité d'appareils portant le
symbole ci-dessous.
REMARQUE : il se peut que ces directives ne soient pas applicables dans tous les cas de figure.
La propagation des ondes électromagnétiques est affectée par l'absorption et la réflexion dues
aux bâtiments, aux objets et aux personnes.
a)
b)
c)
d)
Les bandes ISM (destinées aux applications industrielles, scientifiques et médicales) comprises entre 150 kHz et 80 MHz sont de 6,765 MHz à 6,795 MHz ; 13,553 MHz à 13,567 MHz ;
26,957 MHz à 27,283 MHz et 40,66 MHz à 40,70 MHz.
Les niveaux de conformité existant dans les bandes de fréquence ISM comprises entre
150 kHz et 80 MHz et dans la gamme de fréquence de 80 MHz à 2,5 GHz sont destinés à réduire la probabilité que des appareils mobiles de communication créent des perturbations s'ils
parviennent accidentellement dans la zone de traitement des patients. Il est par conséquent
recommandé de respecter une distance de sécurité plus importante dans ces gammes de fréquence (facteur 1,2 au lieu de 0,35).
Il est impossible de prévoir avec précision l'intensité du champ des émetteurs stationnaires
tels que des stations de base pour téléphones portables, appareils radio terrestres mobiles,
appareils de radio amateur, radio et télévision AM et FM. Il est recommandé de mener une étude du site afin de déterminer quel environnement électromagnétique est produit par des
émetteurs HF fixes. Si l'intensité du champ mesurée sur le lieu d'utilisation de l'appareil
dépasse le niveau de conformité RF ci-dessus, il convient de surveiller l'appareil afin de garantir qu'il fonctionne correctement. Si cela est nécessaire, prendre des mesures supplémentaires, par ex. pour modifier l'orientation ou l'emplacement du stimulateur cardiaque externe.
Dans la gamme de fréquence de 150 kHz à 80 MHz, les intensités de champ doivent être inférieures à 10 V/m.
Distances de sécurité recommandées par rapport aux
appareils de télécommunication HF portables
et mobiles (CEI 60601-1-2 : Tableau 5)
Le dispositif a été conçu pour être utilisé dans un environnement électromagnétique dans lequel les interférences HF
sont contrôlées. L'utilisateur du dispositif peut aider à éviter
l'apparition d'interférences électromagnétiques en respectant la distance de sécurité requise pour les appareils de
communication HF mobiles (émetteurs), en fonction de la
puissance de sortie de l'appareil de communication.
d = 1,2
P
d = 2,3
0,01
0,04
0,12
0,12
0,23
0,10
0,11
0,38
0,38
0,73
1,00
0,35
1,20
1,20
2,30
10,00
1,11
3,79
3,79
7,27
100,00
3,50
12,00
12,00
23,00
P
Pour les émetteurs dont la puissance nominale n'est pas répertoriée ci-dessus,
la distance de sécurité peut être calculée à l'aide de la formule indiquée avec la fréquence de
transmission. P représente la puissance nominale de l'émetteur en watts [W] et d la distance de
sécurité en mètres [m].
REMARQUE 1 : les bandes ISM (destinées aux applications industrielles, scientifiques et médicales) comprises entre 150 kHz et 80 MHz sont de 6,765 MHz à 6,795 MHz ; 13,553 MHz à
13,567 MHz ; 26,957 MHz à 27,283 MHz et 40,66 MHz à 40,70 MHz.
REMARQUE 2 : les niveaux de conformité existant dans les bandes de fréquence ISM comprises
entre 150 kHz et 80 MHz et dans la gamme de fréquence de 80 MHz à 2,5 GHz sont destinés à
réduire la probabilité que des appareils mobiles de communication créent des perturbations s'ils
parviennent accidentellement dans la zone de traitement des patients. Il est par conséquent
recommandé de respecter une
distance de sécurité plus importante dans ces gammes de fréquence (facteur 1,2 au lieu de 0,35).
REMARQUE 3 : il se peut que ces directives ne soient pas applicables dans tous les cas de figure.
La propagation des ondes électromagnétiques est affectée par l'absorption et la réflexion dues
aux bâtiments, aux objets et aux personnes.
Français
P
Magyar
d = 1,2
Italiano
P
Nederlands
d = 0,35
800 MHz à
2,5 GHz
Polski
150 kHz à 80 MHz 150 kHz à 80 MHz 80 MHz à
hors des bandes dans les bandes 800 MHz
ISM
ISM
Español
Distance de sécurité d [m] correspondant à la fréquence
de transmission
Português
Puissance
nominale de
l'émetteur P [W]
Deutsch
203
Česky
English
394271--J_GA_Reocor_D_mul.book Page 203 Monday, January 26, 2015 3:35 PM
394271--J_GA_Reocor_D_mul.book Page 204 Monday, January 26, 2015 3:35 PM
204
Équipement fourni et accessoires
Remarque :
Reocor D doit être utilisé uniquement avec les accessoires
développés et testés pour ce dispositif précis.
Équipement fourni
Désignation article
Nombre
Reocor D
1
Remarque
Référence
365529
Pile
1
Duracell Plus, 6LR61
–
Brassard
– Pour le Japon
– Pour tous les autres pays
1
Court
391843
1
Standard
Adaptateur Redel
1
371262
Couvercle du panneau
de commande
1
378007
Manuel technique
1
394271
103704
Manuel technique ZH
368702
Guide rapide DE
370123
Guide rapide EN
371300
Guide rapide ES
371301
Guide rapide FR
1
371302
Guide rapide IT
371303
Guide rapide PT
372230
Guide rapide ZH
371304
Sacoche
1
379384
Accessoires
Article
Référen- Description
ce
Connecteur
PK-82
128564
Câble patient avec deux pinces crocodile isolées,
restérilisable
Connexion
directe
PK-83 (2,5 m)
128563
Câble patient avec 2 bornes à vis isolées,
restérilisable
Connexion
directe
PK-83 (1,5 m)
128562
Câble patient avec deux bornes à vis isolées,
restérilisable
Connexion
directe
PK-83-B (2,5 m)
347485
Câble patient avec deux bornes à vis isolées de
2,3 mm
Adaptateur
Redel
PK-83-B (1,5 m)
347606
Câble patient avec deux bornes à vis isolées de
2,3 mm
Adaptateur
Redel
PK-175
333959
Câble patient avec quatre bornes à vis pour
sondes temporaires, restérilisable
Adaptateur
Redel
PK-67-L
123672
Câble patient restérilisable, pour combinaison
avec adaptateurs PA-1-B, PA-2, PA-4
Adaptateur
Redel
PK-67-S
128085
Câble patient, restérilisable, pour combinaison
avec PK-155 et Remington, type 301-CG
Adaptateur
Redel
PK-141 (2,8 m)
353181
Câble patient, restérilisable, avec quatre pinces
crocodile isolées
Adaptateur
Redel
Brassard
court Reocor
391843
Brassard petit diamètre.
Convient aux bras minces.
–
Uniquement pour les États-Unis
Article
Fabricant
Description
Connecteur
ADAP-2R
(0,24 m)
Remington
Medical Inc.
Adaptateur réutilisable pour câbles de type
S-101-97 et de type FL-601-97
Adaptateur
Redel
Adaptateur pour PK-67-S et PK-67-L
Article
Référence Description
PA-1-B
123751
Pour raccordement à l'adaptateur de 2 mm ou à
l'adaptateur MHW (adaptateur pour sondes myocardiques
temporaires), restérilisable
PA-1-C
349723
Pour raccordement à l'adaptateur de 2 mm ou à
l'adaptateur MHW (adaptateur pour sondes myocardiques
temporaires), restérilisable
PA-2
123157
Pour raccordement au connecteur IS-1, restérilisable
PA-4
123090
Avec pinces crocodile, restérilisable
PK-155
(jeu de deux câbles)
337358
Câble patient stérile, à deux brins, avec pinces crocodile, à
usage unique
Adaptateur pour PK-67-S et PK-67-L
(États-Unis uniquement)
Article
Fabricant
Description
Type 301-CG
Remington
Medical Inc.
Câble patient stérile, à deux brins, avec pinces crocodile,
à usage unique
Adaptateur pour ADAP-2R
(États-Unis uniquement)
Article
Fabricant
Description
Type 301-CG
Remington
Medical Inc.
Câble patient stérile, à deux brins, avec pinces crocodile,
à usage unique
Type S-101-97
(2,5 m)
Remington
Medical Inc.
Câble patient, à deux brins, avec pinces crocodile, à usage
unique
Type FL-601-97
(2,0 m)
Remington
Medical Inc.
Câble patient, à deux brins, avec bornes à vis, à usage unique
Deutsch
–
Español
Brassard standard
Français
103704
Magyar
Brassard
standard Reocor
Italiano
Connecteur
Nederlands
Référen- Description
ce
Polski
Article
Português
205
Česky
English
394271--J_GA_Reocor_D_mul.book Page 205 Monday, January 26, 2015 3:35 PM
394271--J_GA_Reocor_D_mul.book Page 206 Monday, January 26, 2015 3:35 PM
206
Légende de l'étiquette
Les symboles de l'étiquette ont la signification
suivante :
Symbole
Signification
Reocor D
Adaptateur Redel
Numéro de référence BIOTRONIK
Numéro de série de l'appareil
Date de fabrication de l'appareil
Gamme de température de stockage autorisée
Plage de pression atmosphérique de stockage autorisée
Plage d'humidité atmosphérique de stockage autorisée
Patient avec sonde implantée
Contenu
Symbole d'élimination
Respecter le manuel technique !
Attention : la loi fédérale (des États-Unis) limite la vente de ce
produit aux médecins ou sur ordonnance médicale.
Marquage CE
English
394271--J_GA_Reocor_D_mul.book Page 207 Monday, January 26, 2015 3:35 PM
207
Kezelés, karbantartás és ápolás ..........................................................233
Reocor D ................................................................. 233
Újra felhasználható páciens kábelek ..................... 234
Karbantartás, szerviz, átvizsgálások ..................... 234
Ártalmatlanítás ...................................................... 235
Műszaki biztonság ................................................................................236
Deutsch
Español
Français
Magyar
Italiano
Nederlands
Ingerlési módok és paraméterek .........................................................229
Stimulációs formákIngerlési módok ..................... 229
Refrakter periódusokidők ...................................... 229
Frekvencia .............................................................. 230
AV-idő ..................................................................... 230
Impulzus amplitúdó – pitvar/kamra ...................... 231
Érzékenység – pitvar .............................................. 231
Érzékenység – kamra ............................................. 231
Cross Channel Blanking ........................................ 231
Interferencia intervallum ....................................... 231
Burst ....................................................................... 232
Polski
Kezelési tudnivalók ..............................................................................216
Általános megjegyzések ........................................ 216
Kezelőelemek és LED-ek ....................................... 217
A kezelőpanel burkolata ........................................ 219
Elektróda csatlakoztatás ........................................ 220
Elektróda-aljzat ...................................................... 220
Üzembehelyezés .................................................... 226
Rögzítés .................................................................. 227
Elemcsere .............................................................. 227
Português
Általános leírás ....................................................................................209
Termékleírás .......................................................... 209
Indikációk ............................................................... 210
Ellenjavallatok ........................................................ 210
Lehetséges mellékhatások .................................... 210
Tudnivalók a kezelésről .......................................... 211
Optikai és akusztikus jelek .................................... 215
Česky
Tartalom
208
English
394271--J_GA_Reocor_D_mul.book Page 208 Monday, January 26, 2015 3:35 PM
Az IEC 60601-1-2 szerinti megfelelőség ..............................................240
A csomag tartalma és tartozékok ........................................................245
Česky
Műszaki adatok ....................................................................................237
Português
Polski
Nederlands
Italiano
Magyar
Français
Español
Deutsch
Jelmagyarázat a címkéhez ...................................................................247
English
394271--J_GA_Reocor_D_mul.book Page 209 Monday, January 26, 2015 3:35 PM
209
Beállítható az ingerlési mód, a frekvencia, az érzékenység
és az impulzus impulzus-amplitúdó, az AV-idő és a burstfrekvencia.
Világító diódák (LED-ek) mutatják az érzékelést (Sense),
az ingerlést (Pace) és az elemállapotot (Low battery).
Akusztikus jel figyelmezteti a felhasználót, ha nagyon magas
frekvenciákat vagy nagyon alacsony érzékenységi értékeket
állít be, valamint ha az elektródaimpedancia nem optimális.
A készülék meghibásodása (az önteszt sikertelensége)
esetén tartósan világító LED és hangjelzés hívja fel a
figyelmet a problémára. Amennyiben az önteszt a készülék
bekapcsolása után nem talál hibát, akkor az akusztikus és
optikai jelzések pár másodperc után eltűnnek.
Deutsch
Español
Hatféle ingerlési mód áll rendelkezésre: DDD, D00, VDD, VVI,
V00 és VVT, valamint pitvari Burstburst-funkció.
Français
A Reocor D elemmel működtetett, külső, kétkamrás
pacemaker, amely ideiglenes pacemaker elektródákkal
együtt (beleértve az endokardiális elektródákat és a transzvenózusan implantálható katétereket) klinikai környezetben
ideiglenes pitvari, kamrai és AV-szekvenciális ingerléshez
használatos. A csatlakoztatás közvetlenül vagy egy külön
páciens kábellel, adott esetben adapterrel történik.
Magyar
Termékleírás
Česky
Általános leírás
•
Az elektródaimpedancia felügyelete
•
az elektródaimpedancia felügyelete;
•
Optikai optikai figyelmeztetés az elem lemerülése előtt
előtt;
•
Egy egy eltolható, átlátszó burkolat védi a kezelőpanelt,
így kiküszöbölve a paraméterek nem szándékolt módosítását.
Az ideiglenes katéterek, szívvezetékekelektródák, szív-drót,
2-mm-es csatlakozóval rendelkező elektródák közvetlenül
csatlakoztathatók a Reocor D-hez. Ezen felül különböző
páciens kábelek és adapterek állnak rendelkezésre. A rendszer lehetővé teszi a transzvenózus katéterek és miokardiális
elektródák biztonságos csatlakoztatását, melyek akár unipolárisan, akár bipolárisan használhatók.
Nederlands
Mikroprocesszorral mikroprocesszorral vezérelt
ingerlési paraméterek;
Polski
Az az érzékelési és ingerlési események optikai kijelzése;
•
Português
•
Italiano
A Reocor D biztonsági jellemzői közé tartozik:
394271--J_GA_Reocor_D_mul.book Page 210 Monday, January 26, 2015 3:35 PM
210
Indikációk
A Reocor D-vel történő ideiglenes ingerlés a következő
célokra használható bármilyen korú pácienseknél:
• Arritmiák arritmiák és szívblokkolások blokkok kezelése;
• Visszatérő visszatérő szinuszbradikardia;
• Szinuszcsomószinuszcsomó-szindróma;
• Szívműtéten szívműtéten átesett páciensek műtét előtti,
alatti és utáni ingerlése;
• Szupraventrikuláris szupraventrikuláris tachiarritmiák
megszüntetése;
• Megelőző megelőző célú ingerlés, arritmiák prevenciója
érdekében;
• Vészhelyzeti vészhelyzeti ingerlés;
• Ingerküszöbök ingerküszöbök ellenőrzése.
Ellenjavallatok
•
A Reocor D nem sterilizálható, ezért nem használható
steril pácienskörnyezetben.
•
A pitvar által kiváltott vezérelt ingerlési módok (DDD és
VVV) ellenjavallottak pitvari szívüreg fibrillációnálpitvar
kamrafibrilláció, remegésnél és egyéb, gyors, pitvari
ritmusoknál.
•
Ha a páciens rosszul tolerálja a ventrikuláris frekvenciákat (pl. angina pectoris esetén), akkor a pitvar-vezérelt
üzemmódok ellenjavalltak lehetnek.
•
Ha retrográd átvezetés észlelhető a ventrikuláris stimulációt ingerlés követően, bizonyos körülmények között
hosszabb atriális refrakter periódust vagy rövidebb AVidőt kell beprogramozni a pacemaker keltette
tachycardia tachicardia megelőzése érdekében. Adott
esetben ilyenkor VVI-módot kell programozni
•
A pitvari, együreges ingerlés ellenjavallott olyan
pácienseknél, akik már meglévő AV-vezetési zavarokban
szenvednek.
•
A külső pacemaker használata ellenjavallott más aktív,
beültetett pacemaker esetén.
Lehetséges mellékhatások
Az ideiglenes, külső ingerlés lehetséges mellékhatásai közé
tartozik többek között az aszisztólia az ingerlés hirtelen
megszakadásakor (pl. a páciens kábel nem szándékolt kihúzásakor, az elektróda leválásakor, hibás beállításoknál) vagy a
pacemakerre visszavezethető okok miatt.
A transzvenózus elektródák bevezetésekor felmerülő szövődmények lehetnek többek között: sebfertőződés, az artéria
Működési módHatásmechanizmus
•
A Reocor D interakcióba lép az emberi szívvel. Ezen felül
kölcsönhatásba lép a páciens bőrével és ereivel is.
Rendeltetésszerű
használat
•
A Reocor D és a készülékhez jóváhagyott kábelek és
tartozékok csak a használati útmutató előírásainak
megfelelően használhatók.
•
A Reocor D nem csatlakoztatható más elektromos orvosi
berendezésekhez.
•
A Reocor D nem használható olyan területenhelyen, ahol
robbanásveszély áll fenn.
Átalakítási tilalom
•
A készülék karbantartása, kiegészítése és módosítása
csak a BIOTRONIK, mint gyártó vagy a gyártó által erre
kifejezetten felhatalmazott vállalkozás által történhetvégezhető.
Alkatrészek és
tartozékok
•
A BIOTRONIK-tól származó eredeti alkatrészek, ill. jóváhagyott eszközök a biztonságot szolgálják. Más egységek
használata esetén a gyártó mentesül az az ebből eredő
következmények alól, és érvényét veszíti a jótállás és a
szavatosság.
Készülékek
készenlétben
tartása
•
A páciens pacemaker-függősége esetén vészhelyzeti
ingerkeltőt kell készenlétben tartani.
•
Készenlétben kell tartani külső defibrillátort, oxigént,
intubációs felszerelést és vészhelyzeti gyógyszereket.
Teendők a
használat előtt
•
A Reocor D használata előtt szemrevételezéssel meg kell
vizsgálni azt sérülésekre a sérüléseket és szennyeződésekreszennyeződéseket.
•
Soha ne használjon sérült vagy rendellenesen kinéző
működő készüléket. Cserélje ki a kábeleket, ha a legkisebb sérülések látszanak rajta.
Deutsch
Español
A Reocor D csak olyan személyek által használható, akik
rendelkeznek kardiológiai ismeretekkel, illetve kioktatták
őket a készülék használatáról. A potenciális felhasználók
közé tartozik a műszaki-egészségügyi kórházi szakszemélyzet és az orvosok,.
Français
•
Magyar
Felhasználói kör
Italiano
Az ingerlési beállításoktól és a páciens betegségétől függően
az ingerlés arritmiákhoz vezethet. A páciens biztonsága
érdekében követni kell bizonyos eljárásmódokat és biztonsági intézkedéseket kell alkalmazni, amelyeket az alábbiakban sorolunk fel. A további eljárások és óvintézkedések a
megfelelő orvosi kiadványokból közleményekből ismerhetők
meg.
Nederlands
Tudnivalók a kezelésről
Polski
átszúrása, perikardiális dörzsölődésperikarditisz, kardiális
perforáció és diszritmia az elektróda behelyezése után.
Português
211
Česky
English
394271--J_GA_Reocor_D_mul.book Page 211 Monday, January 26, 2015 3:35 PM
394271--J_GA_Reocor_D_mul.book Page 212 Monday, January 26, 2015 3:35 PM
212
ElektródacsatlakoztatásElekt
róda-aljzat
Magatartás használat közben
•
A Reocor D, a páciens kábelek vagy elektródák használata előtt a felhasználó érintse meg a pácienst az elektromos potenciál-kiegyenlítés érdekében.
•
Feltétlenül javasoljuk, hogy a felhasználó ellenőrizze az
összes beállított paramétert, mielőtt az elektródákat a
Reocor D-hez csatlakoztatná.
•
Bár a Reocor D védett a vízcseppekkel szemben, mégis
törekedni kell a csatlakozók és az eszköz tisztán és
szárazon tartására.
•
A Reocor D nem sterilizálható.
•
A Reocor D és az ideiglenes ingerlési elektródák csatlakozásait biztosítani és rendszeresen ellenőrizni kell.
•
A páciens kábelt először a Reocor D-hez, majd ezt követően az elektródákhoz kell csatlakoztatni.
•
A Reocor D-hez csatlakoztatott ideiglenes elektródák
impedanciája alacsony ellenállású vezetéket biztosítanak
az elektromos áram számára a miokardium felé. Emiatt a
páciens közelében lévő, hálózatról üzemeltetett eszközöket előírásszerűen földelni kell.
•
A már beültetett elektródák esetében nem szabad
megérinteni az érintkező stifteket és a fémes érintkező
felületeket, illetve azok nem kerülhetnek érintkezésbe
elektromosan vezető vagy nedves felületekkel.
•
Amennyiben a kábel leválik a Reocor D-ről, akkor
azonnal csatlakoztatni kell azt, és ellenőrizni kell a csatlakozás biztonságosságát.
•
Unipoláris elektródák használata esetén az egyes szívüregek hatásos stimulálása érdekében minden a szívüreghez két unipoláris elektródát kell használni.
•
A Reocor D használata közben a kezelőpanel burkolatát
teljesen le kell zárni, mivel így megelőzhető a programparaméterek nem szándékolt módosítása.
•
A Reocor D-t D vagy egy vízszintes, csúszásmentes
felületen vízszintesen vagy egy karmandzsettával a pácienshez rögzítve vagy a készülék hátoldalán található
rögzítőszemmel egy infúziós állványhoz rögzítve működtethető.
•
A Reocor D nem viselhető közvetlenül a bőrön.
•
A Reocor D használata közben a páciens szívfrekvenciáját riasztási funkcióval rendelkező EKG-monitorral kell
felügyelni.
•
Az elektromágneses interferencia (EMI) következtében
fellépő zavarok esetén a Reocor D bizonyos határértékek
átlépése esetén aszinkron ingerlésre vált át. Attól függően, hogy a zavarok a pitvarban vagy a kamrában merül-
•
A szív 180 ppm feletti frekvenciával történő, hosszabb
ideig tartó ingerlése súlyos hemodinamikai szövődményekhez vezethet. A nagy frekvenciával történő
ingerlést csak akkor szabad alkalmazni, ha biztosított a
folyamatos felügyelet.
Magatartás
a használat után
•
Defibrilláció vagy kauterizáció után az eszközön működési tesztet kell végezni.
•
Amennyiben a készüléket hosszabb ideig tárolják, akkor
az elemet ki kell venni a kifolyásból eredő károk megelőzése érdekében.
•
A tisztításhoz nedves kendő vagy enyhe szappan használható. Az erős tisztítószereket vagy szerves oldószereket
kerülni kell, mivel ezek károsíthatják a műanyag házat.
•
Az ellenőrzéseket és karbantartási munkálatokat a
233. oldalon leírtaknak megfelelően kell végrehajtani.
•
Ne használjanak újratölthető elemeket (akkumulátorokat). Ezeknek az üzemideje nehezen becsülhető, így előre
nem látható ERI-1időpont túllépés miatt az ingerlés
kimaradhat.
Elemről történő
működtetés
Csak az IEC 6LR61 nemzetközi kódnak megfelelő 9 voltos
elemet lehet használni. MN 1604 típusú Duracell®
Procell® használata esetén legalább 500 órás külső
stimuláció lehetséges, mielőtt szükségessé válna az
elemcsere.
Lehetőség van a működés közbeni elemcserére is. Az
elem eltávolítása esetén a Reocor D 20 ± 2 °C környezeti
hőmérséklet esetén kb. 30 másodpercig üzemképes
marad.
Biztonsági okok miatt azonban a pácienst másképp kell
ellátni.
Elektrokauterizáció
1
•
Elektrokauterizációt semmi esetre sem szabad az
elektródákhoz 15 cm-nél közelebb végezni, mivel fennáll
a veszély, hogy fibrillációt kamrafibrillációt indukál vagy
károsítja a pacemakert.
Az ERI jellel (a Low battery LED villog) a Reocor D arra hívja fel a figyelmet, hogy elemet kell
cserélni.
Deutsch
Nagy frekvenciával
történő ingerlés
Español
DAD, DVI, D00
Français
VAT, VVI, V00
DDD
Magyar
S00
VDD
Italiano
EMI általi zavar esetén
Nederlands
Zavartalan üzemmód
SSI, SST
Polski
nek fel, a következő üzemmódok használhatók a zavar
időtartama alatt:
Português
213
Česky
English
394271--J_GA_Reocor_D_mul.book Page 213 Monday, January 26, 2015 3:35 PM
394271--J_GA_Reocor_D_mul.book Page 214 Monday, January 26, 2015 3:35 PM
214
A pacemakert érdemes aszinkron stimulációra
ingerlésre beállítani, hogy elejét vegyük a pacemaker
interferenciajel okozta inhibiciójának. A kezelés során a
beteg perifériás pulzusát folyamatosan ellenőrizni kell. A
kezelést követően ellenőrizni kell a pacemaker működését.
Defibrilláció
•
A Reocor D áramkörei védettek a sokkenergiával
szemben, amelyeket egy defibrilláció ki tud váltani.
Ennek ellenére célszerű bizonyos óvintézkedéseket
foganatosítani:
— A beállított energia ne legyen magasabb, mint
amennyi a defibrillációhoz szükséges.
— Az A defibrillátor elektródái és a Reocor D elektródái
közötti távolságnak legalább 10 cm-nek kell lennie.
— A defibrillációt követően a Reocor D-t ki és be kell
kapcsolni annak érdekében, hogy a készülék teljes
körű öntesztet hajtson végre.
Ezen felül a defibrillációt követően kellően hosszú időn
keresztül ellenőrizni kell a pacemaker funkciót és az
ingerküszöböt.
Zavartűrés
•
A Reocor D ist védett az elektromágneses sugárzás
miatti zavarokkal, az elektrosztatikus kisülésekkel és az
átvezetett áramokkal interferenciával szemben. A
Reocor D által kibocsátott sugárzás szintje is minimális.
Ezzel a készülék megfelel az IEC 60601-1-2 előírásainak.
Ennek ellenére erős elektromágneses mezők
alakulhatnak ki, pl. villanymotoroktranszformátorokvillanymotorok, transzformátorok,
elektromos vezetékek és más elektromos berendezések
közvetlen közelében, amelyek megzavarhatják a
Reocor D működését.
Az elektromágneses zavarok a következő hibákhoz vezethetnek:
— Váratlan újraindulás (az önteszt végrehajtásra kerül).
— Érzékeli ugyan a kardiális eseményeket, de azok nem
jelennek meg az EKG-monitoron.
— A Reocor D megmagyarázhatatlanul viselkedik.
Intézkedések a Reocor D megfelelő működésének helyreállításához:
— Az eszköz és az ideiglenes ingerlő elektródák közötti
kapcsolat ellenőrzése, szükség esetén korrigálása.
— A Reocor D érzékenységének megfelelő beállítása:
Az az intrinsic jel átlagos amplitúdójának fele általában megfelelő érzékenységi beállítást eredményez.
— Kapcsolja ki a Reocor D közelében található összes
elektromos készüléket, ha ezek elektromágneses
zavarokat okozhatnak, és azok működtetése nem
elengedhetetlenül szükséges.
A Reocor D bekapcsolása utáni önteszt során az összes
LED világít, és rövid, akusztikus jelek hallhatók. Az
önteszt néhány másodperc után lezárul.
•
Amennyiben az önteszt nem talál hibát, kialszanak a
LED-ek és a figyelmeztető jelzések.
•
Amennyiben az önteszt hibát talál, akkor az összes LED
folyamatosan villog és figyelmeztető jelzések hallhatóak.
•
Amennyiben elemcsere szükséges, a Low battery LED
pirosan villog.
•
A zöld Sense LED-ek P hullám vagy R csúcs érzékelésére
utalnak.
•
A sárga Pace LED-ek az impulzus leadását jelzik.
•
A LED-ek és akusztikus jelek ezen felül a következő
figyelmeztető jelzéseket adhatják működés közben:
Figyelmeztető jelzés
Jelentés
Elhárítás
2 másodperces
akusztikus jel
< 1 V impulzus-amplitúdó
vagy > 180 ppm frekvencia
Ellenőrizze, hogy a beállított
értékek megfelelnek-e a
páciensnek.
Gyors hangsorozat
Az impedancia a megenge- Ellenőrizze, hogy az összes
dett tartományon kívül esik csatlakozó a helyén van-e.
Ellenőrizze, hogy az
elektródák a kívánt helyen
vannak-e.
lett beállítva
Akusztikus jel és a Pace A high rate protection
és Sense LED-ek villo- aktiválódott;
gása
Az az önteszt sikertelen.
Kapcsolja ki a készüléket, és
küldje el a BIOTRONIK-hoz.
A Low battery LED villog ERI elérve
Cserélje ki az elemet. Még
mintegy 36 óraa) üzemidő
maradt.
a)
MN 1604 Duracell®, Procell® típusú elem használata esetén
Deutsch
Español
Français
•
Magyar
Optikai és akusztikus jelek
Italiano
Amennyiben a készülék pitvari érzékenységének beállítása <1,0 mV, akkor az elektromágneses mezők zavart
okozhatnak a rendszerben. Amennyiben klinikailag
lehetséges, akkor az érzékenységi paramétert 1,0 mVnál nagyobb értékre kell beállítani. Az érzékenységi
paraméterek <1,0 mV beállításához kifejezett orvosi
javallat szükséges. Ezek az értékek csak orvosi felügyelet
alatt állíthatók be és tarthatók meg.
Nederlands
•
Polski
— Vigye a zavarforrást olyan helyre, ahonnan már nem
tud zavart okozni.
— Amennyiben veszélytelenül megoldható: Kapcsolja
be és ki a Reocor D-t, így a pacemaker visszaáll a
zavartalan üzemmódba.
— A hiba további fennállása esetén vegye fel a kapcsolatot a BIOTRONIK-kal.
Português
215
Česky
English
394271--J_GA_Reocor_D_mul.book Page 215 Monday, January 26, 2015 3:35 PM
394271--J_GA_Reocor_D_mul.book Page 216 Monday, January 26, 2015 3:35 PM
216
Kezelési tudnivalók
Általános megjegyzések
Figyelem!
Önellenőrzés
A Reocor D és az ideiglenes ingerlési elektródák csatlakozásait biztosítani és rendszeresen ellenőrizni kell.
A bekapcsolást követően a Reocor D néhány másodpercen
keresztül öntesztet végez. Ennek részei:
•
A a programkód és a mikroprocesszor ellenőrzése;
•
Memóriateszt
•
memóriateszt;
•
A a LED-ek és az akusztikus jelzések működési tesztje;
•
Az az ingerlési és érzékelési képesség ellenőrzése;
•
A a high rate protection működésének ellenőrzése.
Amennyiben az önteszt hibát talál, akkor az összes LED folyamatosan villog és akusztikus figyelmeztető jelzések hallhatóak. Ebben az esetben a pacemakert ki kell kapcsolni és el
kell küldeni a BIOTRONIK-nak.
Amennyiben az önteszt nem talál hibát, akkor az összes LED
kialszik és figyelmeztető jelzés megszűnik, majd a Reocor D
a beállított paramétereknek megfelelően megkezdi az
ingerlő impulzusok leadását. Ezért a negatív elektródát
(katód) kell először csatlakoztatni, ha meggyőződtek arról,
hogy az ingerlési mód, az ingerlési frekvencia, az impulzus
amplitúdó és az érzékenység beállítása megfelelő.
Amennyiben az üzemmód szabályozó tárcsa OFF állásban
van, akkor az elektródák csatlakoztatását követően a készülék nem kerülnek azonnal leadásra az impulzusok ad le
impulzusokat a páciens részérebetegnek.
Figyelmeztetések
Működés közben a következő figyelmeztető üzenetek léphetnek fel:
•
Elemcsere szükségessége esetén a Low battery LED
villog.
•
Amennyiben az elektróda impedancia a megengedett
tartományon kívül van, (pl. elektródatörés, kilazult csatlakozás miatt), akkor gyors hangsorozat hangzik el
legkorábban 5 másodperccel a bekapcsolás után.
•
Amennyiben az impulzus amplitúdó < 1 V vagy a frekvencia > 180 ppm, akkor 2 másodperces hangjelzés
hallható.
•
Túl magas frekvencia (lásd 238. o "High Rate Protection"), valamint sikertelen önteszt esetén hangjelzés
hallható és a Pace és Sense LED-ek villognak.
English
394271--J_GA_Reocor_D_mul.book Page 217 Monday, January 26, 2015 3:35 PM
217
17
D
0
30
0
10
80
60
10
7
0,1
3
0,5
3
1
2
5
3
4
12
17
10
5
5
10
7
8
2
7
0,1
14
11
1
3
Magyar
2
1
5
20
17
0 ,5
Français
2
0, 3
0, 2
Español
0
40
20
0
0, 5
300
0
25
20 0
18
0
1
12
0, 7
0
17
4 00
35
0
10
0
0
10
75
50
0
60 0
60
50
V0 0
80
0
1000
70
VV I
T
25
15
12
0
VV
40
Deutsch
14 0
DD
20
0
250
D
VD
D0 0
Česky
Kezelőelemek és LED-ek
Nederlands
Italiano
b
DIFF.-
Polski
INDIFF.+
Português
1. ábra: Reocor D kezelőpanel
394271--J_GA_Reocor_D_mul.book Page 218 Monday, January 26, 2015 3:35 PM
218
Megnevezés
Funkció
1a Pitvari csatorna csatlakozó
1b Kamrai csatorna csatlakozó
2 mm-es csatlakozóval rendelkező kábelekhez és elektródákhoz vagy Redel-adapterhez
(piros = plusz; kék = minusz)
2
Elemrekesz
9 V telephez
3
Low battery LED
Figyelmeztet az alacsony akkumulátor feszültségre
4
Ventricle Pace LED
Sárga kijelző kamrai ingerlésű ingerlés eseményhez
5
Ventricle Sense LED
Zöld jelzés az érzékelt R-hullámhoz
6
Szabályozó tárcsa
Ventricle Ampl.
A kamrai impulzus amplitúdó beállítása
7
Szabályozó tárcsa
Ventricle Sens.
A kamrai érzékenység beállítása
(D00 és V00 üzemmódok esetén nem alkalmazható)
8
Atrium Pace LED
Sárga kijelző pitvari ingerlésű ingerlés eseményekhez
9
Atrium Sense LED
Zöld jelzés az érzékelt P-hullámhoz
10 Szabályozó tárcsa
Atrium Ampl.
A pitvari impulzus amplitúdó beállítása
(VDD üzemmód esetén nem alkalmazható)
11 Szabályozó tárcsa
Atrium Sens.
A pitvari érzékenység beállítása
(D00 üzemmód esetén nem alkalmazható)
12 Start burst
A pitvari burst-funkció indítása
13 Övrögzítés és függesztőszem
(hátoldali)
A Reocor D pácienshez, ágyhogy vagy
infúziós állványhoz történő rögzítésére szolgál
14 Burst rate atrium szabályozó
tárcsa
A pitvari burst-frekvencia beállítása
15 AV delay szabályozó tárcsa
Az AV-idő beállítása
16 Select burst
A pitvari burst-funkció kiválasztása
17 Mode szabályozó tárcsa
Az ingerlési üzemmód kiválasztása és kikapcsolás
18 Rate szabályozó tárcsa
Az ingerlési frekvencia beállítása
1. táblázat:
Az 1. ábrán látható elemek leírása
A kezelőelemek vastagon szedett leírása a készülék rendeltetése szempontjából biztonságos értékeket jelöli.
English
394271--J_GA_Reocor_D_mul.book Page 219 Monday, January 26, 2015 3:35 PM
219
A kezelőpanel burkolata bereteszelt állapotban van, ha két
rögzítési ponton ütközésig áttolták azt, és a rögzítés a stégen
sínen helyezkedik el (lásd 2. ábra).
Helytelen:
2. ábra: A kezelőpanel burkolat megfelelő elhelyezkedése
Español
Deutsch
Helyes:
Česky
A kezelőpanel burkolata
Egyik kézzel nyomja felfelé a reteszt.
Tolja a kezelőpanel burkolatát a stégen sínen teljesen fel
(lásd 2. ábra).
A tisztításhoz a kezelőpanel burkolata teljesen eltávolítható.
Ehhez teljesen tolja le a burkolatot. Ezt követően tolja a
végponton túl a burkolatot.
Figyelem!
A Reocor D használata közben a kezelőpanel burkolatának
lezárt állapotban kell lennie a szabályozó tárcsák, és ezáltal a
program paraméterek nem kívánt módosításának megelőzése érdekében.
Polski
A kezelőpanel burkolatának rögzítéséhez:
Português
3. ábra: A kezelőpanel burkolatának kireteszelése
Nederlands
Italiano
Magyar
Egyidejűleg a másik kezével tolja lefelé a kezelőpanel
burkolatát.
Français
A kezelőpanel burkolatának kireteszelése (lásd 3. ábra):
394271--J_GA_Reocor_D_mul.book Page 220 Monday, January 26, 2015 3:35 PM
220
Elektróda csatlakoztatás
Elektróda-aljzat
A Reocor D 4 elektróda-aljzattal rendelkezik, melyek 2-mm-es
-csatlakozóval rendelkező, érintésvédett elektródák csatlakoztatására szolgálnak.
Redel-csatlakozós kábelek esetén a Redel-adaptert
megfelelő irányban kell felhelyezni és becsavarni (4. ábra).
A Redel-adapter akkor került megfelelően felhelyezésre, ha
becsavarható a Reocor D-be.
Fontos:
A Redel-adapter működése csak akkor biztosított, ha azt a
megfelelő irányban dugják be..
Redel-aljzat
Csavarozás
Csavarozás
érintésvédett 2 mm-es
érintkező stiftek
2 mm-es aljzatok
INDIFF.+
DIFF.-
4. ábra: Redel-adapter a Reocor D-hez
221
A Reocor D a következő páciens kábelekkel és adapterekkel
használható:
A négy csavarrögzítéssel rendelkező PK-175 páciens
kábelt a páciens oldalon ideiglenes elektródákkal, a
Reocor-oldalon Redel-csatlakozóval kell használni
(Redel-adapter szükséges).
Pitvar
Deutsch
•
Česky
English
394271--J_GA_Reocor_D_mul.book Page 221 Monday, January 26, 2015 3:35 PM
•
A két csavarrögzítéssel rendelkező, egykamrás egy üregű
ingerléshez használt PK-83-B páciens kábelt a páciens
oldalon ideiglenes elektródákkal, a Reocor-oldalon
Redel-csatlakozóval kell használni (Redel-adapter szükséges).
A PK-83-B-n keresztül csatlakoztatott ideiglenes kábelek a Reocor D kamrai csatornájához kapcsolódnak.
Français
Magyar
6. ábra: PK-82 páciens kábel
Italiano
2 mm-es dugó
Nederlands
PK-82 páciens kábel 2 szigetelt krokodilcsipesszel a
páciens oldalon és 2 érintésvédett 2 mm-es csatlakozóval a Reocor-oldalon.
Polski
•
Português
Kamra
5. ábra: PK-175 páciens kábel
Español
Redel-csatlakozó
394271--J_GA_Reocor_D_mul.book Page 222 Monday, January 26, 2015 3:35 PM
222
7. ábra: PK-83-B páciens kábel
•
A két csavarrögzítéssel rendelkező, egykamrás egy üregű
ingerléshez használt PK-83 páciens kábelt a páciens
oldalon ideiglenes elektródákkal, a Reocor-oldalon két
érintésvédett 2 mm-es csatlakozóval rendelkezik.
2 mm-es dugó
8. ábra: PK-83 páciens kábel
•
A PK-67-L, PK-67-S páciens kábelek esetében csak a
hosszúság eltérő.
Redel-csatlakozó
9. ábra: PK-67-L (2,6 m) és PK-67-S páciens kábel (0,8 m)
• Adapter
A PK-67-L/-S ( 9. ábra) pácienskábelhez páciens kábelhez
a 10. ábra szerinti adapterek illeszthetők:
PK-67-L/-S
10. ábra: PK-67-L és PK-67-S pácienskábelekhez páciens kábelekhez tartozó adapterek
PA-1-B érintésvédett, 2-mm--es csatlakozókhoz vagy
MHW-adapterekhez (adapter szívvezetékekhez)
PA-2 IS-1
PA-4 krokodilcsipeszekkel
223
•
A PK-141 páciens kábelt a páciens oldalon négy krokodilcsipesszel, a Reocor-oldalon Redel-csatlakozóval kell
használni (Redel-adapter szükséges).
Česky
English
394271--J_GA_Reocor_D_mul.book Page 223 Monday, January 26, 2015 3:35 PM
Deutsch
Redel-csatlakozó
Français
Az ADAP-2R adapterkábel egy újrahasználható kábel az
egyszerhasználatos kábel 13. ábra (csak USA) és a
Reocor D összekapcsolásához (Redel-adapter szükséges).
•
Español
11. ábra: PK-141 páciens kábel
Redel-csatlakozó
Krokodilcsipeszek
ADAP-2R-en
Csavaros csatlakozók
13. ábra: Egyszerhasználatos kábelek a Remington Medical Inc.-től
(csak USA)
• Egyszerhasználatos kábelek
A PK-155 és a Remington 301-CG (csak USA) egyszerhasználatos, krokodilcsipeszes kábelek ( 14. ábra) a PK-67-S kábelen keresztül kapcsolódnak a pácienshez.
301-CG (csak USA)
Polski
Krokodilcsipeszek
PK-67-S-en
14. ábra: PK-155 kábel
Italiano
ADAP-2R-en
Nederlands
Egyszerhasználatos kábelek (csak USA)
Português
•
Magyar
12. ábra: ADAP-2R adapterkábel
394271--J_GA_Reocor_D_mul.book Page 224 Monday, January 26, 2015 3:35 PM
224
Csatlakoztatás
FIGYELMEZTETÉS!
A sérült kábel veszélyezteti a pácienst. A sérült kábelek
működése nem biztosítható, és veszélybe sodorják
a pácienst. Ne használjon sérült kábeleket.
FIGYELMEZTETÉS!
A működés elvesztése veszélyeskiesés miatti veszély.
A nedves kábelek működése nem biztosíthatókorlátozzák
az eszköz működését, és veszélybe sodorják a pácienst.
Ne használjon nedves kábeleket.
FIGYELMEZTETÉS!
Elektromos áramok miatti veszély.
A használaton kívüli érintkezések elektromos áramokat
vezethetnek a páciensbe. A Ügyeljen arra, hogy a használaton
kívüli érintkezéseket csatlakozók ne kerüljenek a páciens
közelében rögzíteni kellbeteg közelébe.
Figyelem!
Allergiás reakciók és gyulladások gyulladások.
Kerülni kell, hogy a kábelek a páciens bőrén lévő bőréhez
vagy a sebekhez érjenek.
Fontos:
A kábelek használata során különösen ügyelni kell a szigetelő mandzsetták megfelelő elhelyezkedésére.
Fontos:
A páciens kábelt nem szabad a páciens ideiglenes stimulációs elektródájához csatlakoztatni mindaddig, amíg létre nem
jön megfelelő a kapcsolat a Reocor D-vel.
Közvetlen csatlakoztatás
Ha a Reocor D-t Redel-adapter nélkül működtetik, akkor az
ideiglenes katéterek és szívvezetékek szív-drótok a PK-82 és
PK-83 kábelekkel közvetlenül az A+, A- és V+, V- aljzatokhoz
csatlakoztathatók.
Páciens kábel
A páciens kábelt egy Redel-adapter segítségével csatlakoztatják a Reocor D-hez.
Csatlakoztassa a Redel-adaptert a Reocor D-hez.
Csavarja be azt.
Csatlakoztassa a páciens kábel Redel-csatlakozóját az
adapter Redel-aljzatához.
Fontos:
A PK-83-B páciens kábellel kétkamrás ingerlés nem lehetséges. A PK-83-B-n keresztül csatlakoztatott ideiglenes kábelek a Reocor D kamrai csatornájához kapcsolódnak.
English
394271--J_GA_Reocor_D_mul.book Page 225 Monday, January 26, 2015 3:35 PM
225
2 mm-es aljzatok
Redel-csatlakozó
Redel-adapter
Csavarcsipeszekcsa- PK-175 TC adapterrel
varos csatlakozó
Redel-csatlakozó
Redel-adapter
Csavarcsipeszekcsa- PK-83 TC adapterrel (2x)
varos csatlakozó
2 mm-es csatlakozók
2 mm-es aljzatok
2 mm
PK-67-S/L PA-1-B-vel
Lehetséges csatlakozások
Krokodilcsipeszek
PK-141
Redel-csatlakozó
Redel-adapter
Krokodilcsipeszek
PK-67-S/L PA-4-gyel
Redel-csatlakozó
Redel-adapter
Krokodilcsipeszek
PK-67-S/L PK-155-tel (2x)
Redel-csatlakozó
Redel-adapter
Krokodilcsipeszek
PK-82 (2x)
2 mm-es csatlakozók
2 mm-es aljzatok
Szívvezeték breakoff-tűvel vagy
rugalmas véggel (max. 2,3 mm-es átmérő)
Csatlakozás
páciens oldali
BIOTRONIK kábel
Csatlakozás
eszköz oldali
Reocor D
csatlakozás
Javasolt csatlakozások
Csavarcsipeszekcsa- PK-175
varos csatlakozó
Redel-csatlakozó
Redel-adapter
Csavarcsipeszekcsa- PK-83 (2x)
varos csatlakozó
2 mm-es csatlakozók
2 mm-es aljzatok
Lehetséges csatlakozások
Krokodilcsipeszek
PK-141
Redel-csatlakozó
Redel-adapter
Krokodilcsipeszek
PK-67-S/L PA-4-gyel
Redel-csatlakozó
Redel-adapter
Krokodilcsipeszek
PK-67-S/L PK-155-tel (2x)
Redel-csatlakozó
Redel-adapter
Krokodilcsipeszek
PK-82 (2x)
2 mm-es csatlakozók
2 mm-es aljzatok
Deutsch
Español
Javasolt csatlakozások
Közvetlen csatlakozás (BIOTRONIK kábel nélkül)
Français
Reocor D
Csatlakozáscsatlakozás
Magyar
Csatlakozás
eszköz oldali
Italiano
BIOTRONIK kábel
Nederlands
Csatlakozás
páciens oldali
Polski
Lehetőség van a Reocor D és az érintésvédett, 2 mm-es
csatlakozóval rendelkező ideiglenes katéter vagy a 2 mm-es
adapterrel rendelkező szívvezeték szív-drót közvetlen, más
kábel nélküli vagy adapteres összekapcsolására. Minden
egyéb lehetőséget az alábbi táblázat tartalmaz.
Português
Ideiglenes katéterek 2 mm-es csatlakozókkal vagy
szívvezeték szív-drót 2 mm-es adapterrel
Česky
Csatlakoztatási változatok
394271--J_GA_Reocor_D_mul.book Page 226 Monday, January 26, 2015 3:35 PM
226
Beültetett elektróda IS-1 csatlakozóval
Csatlakozás
páciens oldali
BIOTRONIK kábel
IS-1 aljzat
PK-67-S/L PA-2-vel
Csatlakozás
eszköz oldali
Reocor D
csatlakozás
Javasolt csatlakozások
Redel-csatlakozó
Redel-adapter
Lehetséges csatlakozások
Krokodilcsipeszek
PK-141
Redel-csatlakozó
Redel-adapter
Krokodilcsipeszek
PK-67-S/L PA-4-gyel
Redel-csatlakozó
Redel-adapter
Krokodilcsipeszek
PK-67-S/L PK-155-tel (2x)
Redel-csatlakozó
Redel-adapter
Krokodilcsipeszek
PK-82 (2x)
2 mm-es csatlakozók
2 mm-es aljzatok
Polaritás
A Reocor D alapvetően bipoláris ingerlést végez, azonban
használható bipoláris vagy unipoláris ideiglenes ingerlő
elektródákkalelektródákkal is.
Unipoláris elektródák használata esetén minden kamrához
üreghez
2 elektróda csatlakoztatható.
A kapcsolat bontása
Válassza le a páciens kábelt az ideiglenes ingerlő elektródáiról, ill. bontsa a közvetlen kapcsolatot.
A Redel-csatlakozó leválasztása
•
Húzza vissza az átdobó biztosító gyűrűt a Redel-adapteren, és húzza ki a Redel-adaptert a Redel-aljzatból.
Üzembehelyezés
A Reocor D működtetése minen üzemmódban ugyanúgy
történik. A kezelési műveleteket a következő sorrendben kell
elvégezni (a zárójeles számok az 1. ábrára vonatkoznak a
Használati utasítás 217. oldalán).
•
Elem behelyezése.
•
A kezelőpanel burkolatát tolja lefelé.
•
A páciens előkészítése: Az elektródák elhelyezése a
pacemaker csatlakoztatása nélkül.
•
A Reocor előkészítése:
Állítsa be az ingerlési frekvenciát a Rate szabályozó
tárcsával (18).
Állítsa be az AV-időt az AV delay szabályozó tárcsával
(15)1.
1
Csak 2-kamrás ingerlés esetén
•
A belső önteszt sikeres lezárása után mind az 5 LED
kétszer felvillan a kezelőpanelen.
•
Ha a Low battery (3) LED villog, akkor az elemet ki kell
cserélni (az elemcserét ld. 227. oldal).
•
Csatlakoztassa az elektródákat; az Atrium Pace (8)1 és a
Ventricle Pace (4) LED-ek a pitvari ill. kamrai ingerlő
impulzusokkal szinkronban villognak.
•
A pitvari és kamrai érzékenységet az Atrium Sens. (11)1
és a Ventricle Sens. (7) szabályozó tárcsával úgy kell
beállítani, hogy a zöld Atrium Sense (9)1 és Ventricle
Sense (5) LED-ek az érzékelt pitvari ill. kamrai
eseményekkel szinkronban villogjanak.
Kellő biztonsági tartalékot kell hagyni a megbízható
érzékelés szavatolása érdekében.
•
A Reocor D használata közben a páciens szívfrekvenciáját
riasztási funkcióval rendelkező EKG-monitorral kell
felügyelni.
Elemcsere
Ha a Low battery LED (3) villogni kezd, akkor az elem
majdnem teljesen kimerült. MN 1604 típusú Duracell®
Procell® használata esetén a fennmaradó üzemidő még
mintegy 36 óra. Ennek ellenére az elemet a lehető leghamarabb ki kell cserélni.
A Reocor D-t 9 V-os elemmel (nemzetközi kód: IEC 6LR61)
kell üzemeltetni. Csak kifolyásbiztos alkáli-mangán
elemeket szabad használni. Amennyiben az MN 1604 típusú
Duracell® Procell® 20 ± 2 °C hőmérsékleten használják,
Nederlands
A Reocor D infúziós állványhoz történő rögzítéséhez forgassa
kifelé a készülék hátoldalán található függesztő szemet.
Ezzel szavatolható a biztonságos használat és tehermentesíthető a páciens kábel.
Polski
A Reocor D fektetve, vízszintes felületen vagy karmandzsettával a pácienshez rögzítve vagy a készülék hátoldalán található
rögzítőszemmel egy infúziós állványhoz rögzítve kell működtetni.
Italiano
Rögzítés
Português
Figyelem!
Felügyelje a páciens EKG-ját, és szükség esetén állítsa
be az amplitúdót és az érzékenységet.
Deutsch
A Mode (17) szabályozó tárcsával válassza ki az ingerlési
módot. Ezzel egyidejűleg a készülék bekapcsol.
Español
•
Français
A kamra1 és a pitvar ingerlési amplitúdóját az Atrium
Ampl. (10)1 és Ventricle Ampl. (6) szabályozó tárcsákkal
kell beállítani.
Magyar
227
Česky
English
394271--J_GA_Reocor_D_mul.book Page 227 Monday, January 26, 2015 3:35 PM
394271--J_GA_Reocor_D_mul.book Page 228 Monday, January 26, 2015 3:35 PM
228
akkor az legalább 500 óra ingerlést tesz lehetővé, mielőtt az
elemcsere szükségessé válna.
Lehetőség van a működés közbeni elemcserére is. Az elem
eltávolítása esetén a Reocor D 20 ± 2 °C környezeti hőmérséklet esetén kb. 30 másodpercig üzemképes marad.
Biztonsági okok miatt azonban a pácienst másképp kell
ellátni.
Ne használjanak újratölthető elemeket (akkumulátorokat).
Ezeknek az üzemideje nehezen becsülhető, így előre nem
látható ERI túllépés miatt az ingerlés kimaradhat.
Az elemrekesz (2) a készülék jobb oldalán található, és a
kinyitásához a kék reteszt felfelé kell tolni, majd a zárófedelet
jobbra le kell húzni. Óvatosan vegye ki az elemet.
Az elempólusok védelme érdekében az új elembe gumidugókat helyezhetnek. Az elem behelyezése előtt távolítsa el
ezeket.
Figyelem!
Az elemrekeszben látható a megkívánt polaritás jelölése. Az
elem behelyezése során azonban nem szabad megfeledkezni
arról, hogy az elempólusok a készülékház közepe felé mutassanak. A plusz- és a minusz-pólus helye szabadon választható.
Helyezze be az új elemet a (pólus nélküli) alsó részével
(15. ábra) kezdve az elemrekeszbe.
15. ábra: Az elem behelyezése
Zárja le a rekeszt, és tolja lefelé a kék reteszt addig, amíg az
hallhatóan a helyére reteszelődik.
Fontos:
Amennyiben a pacemakert hosszabb ideig tárolják vagy nem
használják, akkor az elemet ki kell venni a kifolyásból eredő
károk megelőzése érdekében.
English
394271--J_GA_Reocor_D_mul.book Page 229 Monday, January 26, 2015 3:35 PM
229
Stimulációs formákIngerlési módok
Česky
Ingerlési módok és paraméterek
Aszinkron A-V ingerlés, nincs érzékelés a két szívüregben
VVI
Érzékelés és ingerlés a kamrában
V00
Aszinkron kamrai ingerlés
VVT
Mint a VVI, azonban a refrakter perióduson kívüli kamrai esemény érzékelése
esetén azonnal impulzusleadás impulzus leadás történik.
Az elektromágneses interferencia (EMI) következtében fellépő zavarok esetén a Reocor D bizonyos határértékek átlépése
esetén aszinkron ingerlésre vált át. Attól függően, hogy a
zavarok a pitvarban vagy a kamrában merülnek feljelentkeznek, a következő üzemmódok használhatók a zavar
időtartama alatt:
Zavartalan üzemmód
EMI általi zavar esetén
SSI, SST
S00
VDD
VAT, VVI, V00
DDD
DAD, DVI, D00
Español
Szinkron kamrai ingerlés pitvari nyomon követéssel
D00
Français
Szinkron A-V ingerlés, pitvari és kamrai érzékeléssel és ingerléssel
VDD
Magyar
DDD
Deutsch
A Reocor D a következő hat ingerlési módban képes működni:
Nederlands
Polski
Português
Az Azt a frekvenciafrekvenciát, amely amellyel így a kamra a
pitvarban érzékelt eseményekkel szinkronban ingerelhető
(felső határfrekvencia) a kamrai refrakter periódustól függ
periódust határozza meg (atrial refractory period, ARP). Az
időbeni lefutást a pitvarban érzékelt és ingerelt események
indítják, akár csak az érzékelt kamrai extraszisztolék, melyek
újraindítják az időciklust.
A felső határfrekvencia túllépése esetén minden második
pitvari pulzus esik az ARP-be, így azok nem érzékelődnek
és nem váltanak ki kamrai impulzust. A kamrai ingerlési
frekvencia 2:1 arányban folytatódik (16. ábra).
Italiano
Refrakter periódusokidők
394271--J_GA_Reocor_D_mul.book Page 230 Monday, January 26, 2015 3:35 PM
230
Kamrai
ingerlési
frekvencia
[min-1]
t
Spontán pitvari frekvencia [min-1]
16. ábra: A felső határfrekvencia reakciója pitvari tachikardiák alatt (alapfrekvencia
72 ppm)
A teljes pitvari refrakter időszak (TARP) a Reocor D esetében
175 ms és a beállított AV-idő összegéből képződik, azonban
minimális értéke 400 ms, amennyiben az ingerlési frekvencia
120 ppm alatti. Ezen frekvencia felett a minimális TARP
240 ms-ra csökken. A kamrai refrakter periódus VRP a
Reocor D esetében az ingerlési frekvenciától függ:
Ingerlési frekvencia
150 ppm alatt
VRP refrakter periódus
225 ms
150 ppm és 200 ppm között
200 ppm felett
200 ms
175 ms
Frekvencia
A frekvencia a Rate szabályozó tárcsával (18) fokozatmentesen állítható 30 ppm-től 250 ppm-ig. Amennyiben 180 ppm
feletti értéket állítanak be, akkor a készülék 2 másodperces
figyelmeztető jelzést ad le.
FIGYELMEZTETÉS!
A szív 180 ppm feletti frekvenciával történő, hosszabb ideig
tartó ingerlése súlyos hemodinamikai szövődményekhez
vezethet. A nagy frekvenciával történő ingerlést csak akkor
szabad alkalmazni, ha biztosított a folyamatos felügyelet.
AV-idő
Az AV-idő az AV delay szabályozó tárcsával (15) fokozatmentesen állítható 15 ppm-től 400 ppm-ig. Rövid AV-idő alkalmazása speciális esetekben javallott, pl. visszatérő tachikardia
esetében.
A Reocor D az AV-időt felülről a bázisintervallum felénél
korlátozza.
English
394271--J_GA_Reocor_D_mul.book Page 231 Monday, January 26, 2015 3:35 PM
231
A pitvar és a kamra impulzus amplitúdója az Ampl. (10), (6)
szabályozó tárcsával 0,1 V és 17 V között állíthatók be.
Amennyiben 1 V alatti értéket állítanak be, akkor a készülék
2 másodperces figyelmeztető jelzést ad le.
Česky
Impulzus amplitúdó – pitvar/kamra
Érzékenység – kamra
Az érzékenység a Ventricle sens. (7) szabályozó tárcsával
1 mV és 20 mV között állítható be. Az érzékenységet
rendszeres időközönként ellenőrizni kell annak érdekében,
hogy megfelelő érzékelés és kellő biztonsági tartalék álljon
rendelkezésre.
Español
Az érzékenység az Atrium sens. (11) szabályozó tárcsával
0,2 mV és 10 mV között állítható be. Az ingerlést rendszeres
időközönként ellenőrizni kell annak érdekében, hogy
megfelelő érzékelés és kellő biztonsági tartalék álljon
rendelkezésre.
Français
Érzékenység – pitvar
Magyar
Az ingerlést rendszeres időközönként ellenőrizni kell annak
érdekében, hogy az ingerlés és kellő biztonsági tartalék álljon
rendelkezésre.
Deutsch
Az impulzusidő 1 ms.
Az ingerlés leadása után az érzékelés 19 ms(± 3 ms)-on
keresztül elnyomásra kerül a másik csatornában a far field
érzékelés hatókörön kívüli észlelés elkerülése érdekében.
Italiano
Cross Channel Blanking
Így például DDD üzemmódban a pitvari interferencia a
kamrai csatorna zavarása nélkül DVI ingerléshez vezet.
A kamrai csatornában érzékelt zaj DAD ingerléshez vezet.
Mindkét csatornában fellépő interferencia esetén
D00ingerlés alakul ki.
Polski
Bármely csatornában a 80 ms-os intervallum idő alatt fellépő
zaj esetén az intervallum visszaállításra kerül, ami a programozott frekvenciával történő aszinkron ingerléshez vezet az
interferencia fennállása alatt.
Português
Az interferencia intervallumot a pitvari és kmrai kamrai
ingerlés, illetve az érzékelt jelek is aktiválják.
Nederlands
Interferencia intervallum
394271--J_GA_Reocor_D_mul.book Page 232 Monday, January 26, 2015 3:35 PM
232
Burst
A pitvari burst rate pitvari funkció a szabályozó tárcsával (14)
60 ppm és 1000 ppm között állítható be.
A funkció aktiválás 2 gombbal lehetséges: Először nyomja
meg a Select burst gombot (16) , majd ezt követően 2 másodpercen belül a Start burst gombot (12). Ekkor megtörténik az
impulzus leadása, amennyiben a gombot nyomva tartják.
A kamrai csatorna eközben a beállított frekvenciával végzi az
ingerlést, amely közben át is állítható. Gátló üzemmód esetén
kamrai gátlás történikingerlés gátolt lesz.
FIGYELMEZTETÉS!
Pitvari burst-ingerlés után a kamrai blanking intervallum
megakadályozhatja az intrinsic események érzékelését és
aszinkron ingerléshez vezethet a kamrában.
A szív 180 ppm feletti frekvenciával történő, hosszabb ideig
tartó ingerlése súlyos hemodinamikai szövődményekhez
vezethet. A nagy frekvenciával történő ingerlést csak akkor
szabad alkalmazni, ha biztosított a folyamatos felügyelet.
A magas frekvenciájú ingerlési mód bizonyos szupraventrikuláris tachikardiák (SVT) leállítására szolgál, és csak pitvari
alkalmazásokhoz használható. Az aszinkron, nagy frekvenciájú ingerek használata az SVT-t a reentry-útvonal részeinek
depolarizálásával tudja megállítani. Akkor is, ha ektópiás
fókusz felelős az SVT-ért, akkor a nagyfrekvenciájú ingerek
pitvatban történő alkalmazása az ektópiás központ elnyomásához vezet.
A nagyfrekvenciájú pitvari ingerlés esetében különböző
kockázatokra kell ügyelni. Ilyenek a lehetséges kamrai ingerlés és a kamrai tachikardia vagy fibrilláció. Ezt okozhatja az
elektródák nem megfelelő elhelyezkedése vagy a normáltól
eltérő ingerületvezetés, amely megkerüli a normál atrioventrikuláris ingerület vezetést (pl. Wolff-Parkinson-Whiteszindróma). További problémát jelenthet nagyfrekvenciás
ingerlés után a páciens tehetetlensége beteg diszkomfortja
és az a nagyfrekvenciás ingerlés utáni aszisztólia.
English
394271--J_GA_Reocor_D_mul.book Page 233 Monday, January 26, 2015 3:35 PM
233
Soha nem szabad olyan készüléket használni, amely sérült
vagy amelyen rendellenességek figyelhetők meg, különösen,
ha azt leejtették vagy magas frekvencia vagy defibrillációs
feszültség miatt megsérülhetett.
A Reocor D fektetve, vízszintes felületen vagy karmandzsettával a pácienshez rögzítve vagy a készülék hátoldalán található
rögzítőszemmel egy infúziós állványhoz rögzítve kell működtetni.
Figyelem!
Karmandzsetta használata esetén a Reocor D nem viselhető
közvetlenül a bőrön.
Tisztítás
A Reocor D tisztításához nedves kendő vagy enyhe szappan
használható. Az erős tisztítószereket vagy szerves oldószereket, pl. éter vagy benzin kerülni kell, mivel ezek károsíthatják
a műanyag házat.
Fertőtlenítés
A fertőtlenítéshez törölje le a készüléket egy kendővel,
amelyet fertőtlenítőszerbe mártottak (pl. Aerodesin 2000
vagy Lysoform D). Az oldat használata során a gyártó által
megadott hígítással kell használni az oldatot.
Fontos:
A tisztítás vagy fertőtlenítés után a Reocor D egy órán keresztül nem használható.
Sterilizálás
A Reocor D nem sterilizálható. Amennyiben a készüléket
steril környezetben kell használni, akkor steril csomagolásba
lehet helyezni azt.
A készüléket évente ellenőriztetni kell egy, a gyártó által
felhatalmazott technikussal.
Figyelem!
Bár a Reocor D védett a vízcseppekkel szemben, mégis törekedni kell az eszköz tisztán és szárazon tartására.
Deutsch
Español
Français
FIGYELMEZTETÉS!
Magyar
A készülékházat, a kezelőelemeket, a csatlakozásokat és a
páciens kábeleket minden használat előtt meg kell vizsgálni
mechanikai sérülésekre, deformációkra, laza alkatrészekre,
leválásokra és szennyeződésekre.
Italiano
A használat előtt a pacemakert legalább 2 órán keresztül a
működtetésre vonatkozó környezeti feltételek között (lásd
238. o.) kell tárolni.
Nederlands
Ebben az esetben jutassa el a készüléket a BIOTRONIK-hoz.
Polski
A Reocor D magasan fejlett precíziós eszköz, melyet
gondosan kell kezelni. A mechanikus behatások, pl. leesés,
kihatással lehetnek a készülék működésére.
Português
Reocor D
Česky
Kezelés, karbantartás és ápolás
394271--J_GA_Reocor_D_mul.book Page 234 Monday, January 26, 2015 3:35 PM
234
Újra felhasználható páciens kábelek
A steril kábel csomagolását a felbontás előtt át kell vizsgálni
sérülésekre, mivel így megállapítható, hogy a sterilitás még
fennáll-e,
Tisztítás
Az újra felhasználható páciens kábelek több különböző
módszerrel megtisztíthatók és fertőtleníthetők kórházi tisztítószerekkel. Ehhez azonban semmiképpen sem használhatók maró vegyszerek, például aceton.
A kábelek tisztításához célszerű egy tisztító kendőt használni
szokásos, alkoholmentes szappannal vagy a Braun által
gyártott Stabimeddel. Ezt követően a kábeleket elektrolitmentes vízzel meg kell tisztítani a tisztítószer maradványaitól, majd ezt követően tiszta, száraz kendővel megtörölni.
Fertőtlenítés
Fertőtlenítő fürdőben történő fertőtlenítéshez aldehidbázisú
(pl. Lysoformin 3000) vagy alkoholbázisú (pl. Aerodesin 2000)
műszer fertőtlenítőt kell használni a gyártó előírásai szerint,
és követni kell a kapcsolódó kórházi irányelveket.
A fertőtlenítés után a kábelt elektrolitmentes vízzel meg kell
tisztítani a fertőtlenítőszer maradványaitól.
Sterilizálás
Amennyiben a pácienskábelekhez mellékelt dokumentáció
másként nem rendelkezik, akkor a pácienskábelek az alábbiak szerint sterilizálhatók:
•
gőzsterilizáció 121 °C-on és 1,1 bar nyomáson, 20 percen
keresztül
Ezen felül a PK-175 és PK-83-B páciens kábelek az alábbiak
szerint sterilizálhatók:
•
gőzsterilizáció 134 °C-on és 3,0 bar nyomáson, 18 percen
keresztül
Karbantartás, szerviz, átvizsgálások
Az egyetlen szükséges karbantartási művelet az elemcsere
(ld. 227. oldal).
Egyéb karbantartást nem igényel.
Használat előtti
ellenőrzés
A készülék minden használata előtt rövid ellenőrzést kell
végezni. Ez egy szemrevételezésből és egy egyszerű működési tesztből áll.
Szemrevételezés:
•
A a ház átvizsgálása mechanikus sérülésekre, deformációkra, meglazult alkatrészekre, törésekre, stb.;
•
A a kábelcsatlakozó terület ellenőrzése mechanikus
sérülésekre;
•
A a feliratok olvashatóságának ellenőrzése.
English
394271--J_GA_Reocor_D_mul.book Page 235 Monday, January 26, 2015 3:35 PM
235
A felülvizsgálatot a gyártó előírásai szerint kell elvégezni.
Ezeket igény esetén rendelkezésére bocsátjuk. Ez tartalmazza az összes ellenőrzési lépést, illetve az ezekhez szükséges eszközöket.
Ártalmatlanítás
A Reocor D-n egy áthúzott szemetes látható a típustáblán. Ez
a jelzés arra utal, hogy a készülék visszavételére és ártalmatlanítására a az elektromos és elektronikus készülékekről
szóló 2002/96/EK irányelv (WEEE-irányelv) vonatkozik.
A régi készülékeket és a szükségtelenné vált tartozékokat,
pl. páciens kábeleket és adaptereket vissza kell küldeni a
BIOTRONIK-nak. Ezáltal biztosítható, hogy az ártalmatlanítás
a WEEE-irányelv végrehajtásáról szóló nemzeti előírásokkal
összhangban történik.
Fontos:
Vérrel kapcsolatba került, ártalmatlanítandó kábeleket
környezetkímélő módon, szennyezett egészségügyi hulladékként kell ártalmatlanítani. A nem szennyezett kábeleket
az elektromos és elektronikus készülékekről szóló 2002/96/
EK-irányelvnek (WEEE) megfelelően kell ártalmatlanítani.
Az elhasznált elemeket veszélyes hulladékként kell kezelni,
és azok ártalmatlanításáról a felhasználónak kell gondoskodnia.
Kérdéseivel, kérjük, forduljon a BIOTRONIK-hoz.
Deutsch
évente egyszer.
Español
üzemzavarok gyanúja esetén,
•
Français
•
Magyar
ha együtt használják magas frekvenciájú sebészeti
eszközökkel vagy defibrillátorokkal,
Italiano
•
Nederlands
A felülvizsgálatra akkor van szükség,
Polski
Felülvizsgálat
Português
Az automatikusan lefutó önteszt eredményét figyelembe kell
venni.
Česky
Működési teszt:
394271--J_GA_Reocor_D_mul.book Page 236 Monday, January 26, 2015 3:35 PM
236
Műszaki biztonság
A Reocor D külső pacemaker megfelel az elektromos orvosi
eszközök biztonságáról szóló IEC 60601-1 és IEC 60601-1-2
szabványoknak, illetve az ideiglenes, külső pacemakerekről
szóló IEC 60601-2-31 nemzetközi szabványnak.
A következő speciális intézkedések gondoskodnak a páciens
védelméről:
FIGYELMEZTETÉS!
•
Nincsenek az IEC definíció szerinti megérinthető fém
alkatrészek.
•
A felépítés megfelel a CF (cardiac floating) készülékosztályra vonatkozó szabványoknak, és így használható a
szív közvetlen kezelésére. A pacemaker teljesíti a
nemzetközi szabványok által előírt követelményeket a
defibrilláció-védelem vonatkozásában.
•
A lezárt kezelőpanel burkolat biztosítja a pacemaker
vízcseppekkel szembeni védelmét.
A Reocor D-hez csatlakoztatott ideiglenes elektródák
alacsony ellenállású vezetéket biztosítanak az elektromos
áram számára a miokardium felé. Emiatt a páciens közelében lévő, hálózatról üzemeltetett eszközöket előírásszerűen
földelni kell.
A pacemaker nem használható olyan területen, ahol robbanásveszély áll fenn.
Minden további karbantartási és javítási munkálatot
a BIOTRONIK-nak kell elvégeznie.
English
394271--J_GA_Reocor_D_mul.book Page 237 Monday, January 26, 2015 3:35 PM
237
Česky
Műszaki adatok
Szimbólumok
Ártalmatlanítás a WEEE-irányelv szerint
IP31
Víztaszító, IP31 védelmi típus
OFF
Ki (a Mode szabályozó tárcsán)
Français
CF (Cardiac Floating) készülék rész osztályozás, defibrilláció-védett
Español
Az elempozíció jelölése az elemrekeszben
Deutsch
Vegye figyelembe a használati utasításban található tudnivalókat
< 1 V impulzus-amplitúdó
esetén figyelmeztető hangjelzés
hallható
Érzékenység (A)
0,2 ... 10 mV ± 15 15%
ill. 15 ms sin2-impulzus
Érzékenység (V)
1 ... 20 mV ± 15 15%
ill. 40 ms sin2-impulzus
AV-idő
(15 ... 400 ms) ± 4 ms
Burst-frekvencia (A)
(60 ... 1000 ppm) ± 20 ppm
Rögzített paraméterek
Impulzusidő
1 ms ± 5 5%
Pace után auto short
< 20 ms ± 10%
Interferencia intervallum 80 ms ± 5 ms
In channel blanking
110 ms ± 3 ms
Cross Channel
Blanking
19 ms ± 3 ms
Teljes pitvari refrakteridő AVD +175 ms ± 5 ms
(TARP)
TARP minimum
(30 ... 120) ppm
(121 ... 250)ppm
400 ms ± 5 ms
240 ms ± 5 ms
Italiano
Impulzus-amplitúdó (A, V) 0,1 ... 17 V ± max (50 mV, 10 10%)
> 180 ppm frekvencia esetén
figyelmeztető hangjelzés hallható
Nederlands
(30 ... 250 ppm) ± 1 ppm
Polski
DDD, D00, VDD, VVI, V00, VVT
Alapfrekvencia
Português
Ingerlési módok
Magyar
Beállítható paraméterek
394271--J_GA_Reocor_D_mul.book Page 238 Monday, January 26, 2015 3:35 PM
238
Rögzített paraméterek
Refrakter periódus (V)
(30 ... 150) ppm
(151 ... 200) ppm
(201 ... 250) ppm
225 ms ± 5 ms
200 ms ± 5 ms
175 ms ± 5 ms
Felső határfrekvencia
260 ppm ± 10 %
High Rate Protection
1 ... 180 ppm
286 ms ± 10 %
181 ... 250 ppm
214 ms ± 10 %
Impulzusforma
Aszimmetrikus, kétfázisú
286 ms = 210 ppm, burst esetén
nem érvényes
214 ms = 280 ppm, burst esetén
nem érvényes
Az elektródaimpedancia felügyelete
Akusztikus figyelmeztetés
2000 Ω ± 15 %-tól, 5 V amplitúdó esetén
Elektróda csatlaktatáscsatlakozás
Érintésvédett 2 mm-es aljzatok;
Redel-aljzat, 6-pólusú, Redel-adapterrel
Elektromos adatok/elem
Elem
•
•
•
Alkáli-mangán-típus: IEC 6LR61 / ANSI 1604A
9 V, kifolyásmentes
Pl. MN1604 Duracell® Procell®a)
Polaritás
Katódikus
Téves polarizálás ellen
védett
Nincs: A a polaritás jelentéktelen
Áramfogyasztás
Jellemzően 1 mA (70 ppm, 5,0 V, 500 Ω )
Az új elem üzemidejeb)
•
•
•
Üzemidő vége (EOS)
Villogó "Low battery" LED
Fennmaradó üzemidő az
ERI-jel utánb)
•
•
36 óra
Ha: 70 ppm, 5 V, Mode DDD, 500 Ohm
Magatartás az elemcsere
közben
•
A készülék az elem kivétele után minimum 30 másodpercig
üzemképes marad.
A beállított üzemmód fennmarad.
•
a)
b)
500 h (−10 %) 20 °C (± 2°C)-on
Ha: 70 ppm, 5 V, Mode DDD, 500 Ohm
Eddig: ERI-jel (EOS-figyelmeztetés)
A Duracell Inc., Bethel, CT 06801 bejegyzett védjegye
MN 1604 Duracell® , Procell® típusú elem használata esetén
Környezeti feltételek
Üzemeltetési hőmérséklet-tartomány
+10 °C ... +40 °C
Tárolási hőmérséklet-tartomány
0 °C ... +50 °C
Relatív légnedvességpáratartalom
30% ... 75%, nem lecsapódó
Légnyomás
700 hPa ... 1060 hPa
Zajszint
50dB
English
394271--J_GA_Reocor_D_mul.book Page 239 Monday, January 26, 2015 3:35 PM
239
Reocor D méretek
Reocor D tömeg
160 mm x 75 mm x 35 mm (Redel-adapter nélkül)
Elemmel, Redel-adapterrel 325 g ± 10 %
Elem nélkül, Redel-adapterrel 280 g ± 10 %
Česky
Méretek, tömeg, anyag
CF (cardiac floating), defibrillációval szemben védett
Érintésvédelmi osztály
II b
Érintésvédelem
IP31 (víztaszító)
Defibrillációtűrés
5 kV
Üzemmód
Tartós üzem
Várt élettartama)
(az EN 60601-1:2007,
4.4 szerint)
12 év
a)
Az élettartam a készülék várható maximális üzemi élettartama a forgalomba hozataltól
számítva. A várható maximális üzemi élettartamot tesztadatok nem támasztják alá.
Español
Alkalmazási Alkalmazott
rész osztályozás
Français
Osztályozás
Magyar
Babyblend FR 3000 (PC-ABS)
Italiano
A ház anyaga
Nederlands
40 g ± 10 %
Polski
Tömeg Redel-adapter a
Reocor D-hez
Português
76 mm x 35,5 mm x 29,4 mm
Deutsch
Elem nélkül, Redel-adapter nélkül 240 g ± 10 %
Méretek Redeladapter a
Reocor D-hez
394271--J_GA_Reocor_D_mul.book Page 240 Monday, January 26, 2015 3:35 PM
240
Az IEC 60601-1-2 szerinti megfelelőség
Irányelvek és a gyártó nyilatkozata – Elektromágneses
sugárzás (IEC 60601-1-2: 1. táblázat)
A készülék az alábbiakban leírt elektromágneses környezetben történő üzemeltetésre lett kialakítva. A felhasználónak
biztosítania kell, hogy a készüléket ilyen környezetben
működtetik.
Kibocsátási teszt
Egyezőségi szint
Az elektromágneses környezettel kapcsolatos
irányelvek
HF-kibocsátás
a CISPR 11 szerint
1. csoport
A készülék kizárólag saját működéséhez használ
magas frekvenciájú energiát. Ezért a nagyfrekvenciás zavarkibocsátás nagyon alacsony,
ahogyan annak a valószínűsége is, hogy ezzel a
közelében működtetett elektronikus készülékeket zavarja.
HF- kibocsátás
a CISPR 11 szerint
B osztály
Felső rezgések
kibocsátása
IEC 61000-3-2 szerint
Nem
értelmezhető
A készülék mindenfajta alkalmazásra alkalmas,
kivéve az otthoni környezetet és olyan épületeket,
melyek közvetlenül kapcsolódnak a nyilvános
elektromos ellátó hálózathoz.
Feszültségingadozások
IEC 61000-3-3 szerint
Nem
értelmezhető
A készülék az alábbiakban leírt elektromágneses környezetben történő üzemeltetésre lett kialakítva. A készülék
felhasználójának biztosítania kell, hogy a készüléket ilyen
környezetben működtetik.
A zavartűrés Az inter- Ellenőrzési
Egyezőségi
ferencia ellenálló
szint az
szint
IEC 60601 szerint
képesség
ellenőrzése
Irányelvek az elektromágneses
környezettel kapcsolatosan
Statikus elektromosság kisülése (ESD) az
IEC 61000-4-2 szerint
± 6 kV kontaktkisülés
± 15 kV levegőkisülés
A padlónak fából, betonból vagy
kerámiacsempéből kell lennie.
Amennyiben a padlózat szintetikus
anyagból van, akkor a relatív páratartalomnak legalább 30%-osnak
kell lennie.
30 A/m
A mágneses térerősségnek meg
kell felelnie az üzleti és kórházi
környezetben jellemzően előforduló értéknek.
nem
értelmezhető
Italiano
3 A/m
Nederlands
Mágneses mező
tápfrekvencia esetén
(50/60 Hz) az
IEC 61000-4-8 szerint
Magyar
nem
Feszültségesések,
rövid idejű megszaka- értelmezhető
dások és a tápfeszültség ingadozásai az
IEC 61000-4-11 szerint
Polski
Feszültséglökések
(surges) az
IEC 61000-4-5 szerint
Français
Gyors tranziens
nem
elektromos zavarmér- értelmezhető
tékekzavar/
burst-ök az
IEC 61000-4-4 szerint
Português
± 6 kV kontaktkisülés
± 8 kV levegőkisülés
Deutsch
Irányelvek és a gyártó nyilatkozata – Elektromágneses
zavartűrés (IEC 60601-1-2: 2. táblázat)
Español
241
Česky
English
394271--J_GA_Reocor_D_mul.book Page 241 Monday, January 26, 2015 3:35 PM
394271--J_GA_Reocor_D_mul.book Page 242 Monday, January 26, 2015 3:35 PM
242
A gyártó irányelvei és nyilatkozata – elektromágneses
zavartűrés minden külső pacemaker típus esetén
(IEC 60601-1-2: 3. táblázat)
A készülék az alábbiakban leírt elektromágneses környezetben történő üzemeltetésre lett kialakítva. A készülék
felhasználójának biztosítania kell, hogy a készüléket ilyen
környezetben működtetik.
A zavartűrés
ellenőrzése
Ellenőrzési szint az
IEC 60601 szerint
Egyezőségi
szint
Irányelvek az elektromágneses
környezettel kapcsolatosan
Hordozható és mobil rádiótávbeszélőket a készülék egy alkatrésze, beleértve a kábeleket is,
esetében sem szabad a javasolt
biztonsági távolságnál közelebb
használni.
Javasolt biztonságitávolság:
Vezetett magas
frekvenciájú
zavarmérték zavar
az
IEC 61000-4-6
szerint
10 Vrms
10 kHz – 80 MHz
az ISM-csatornákon
kívül
10 Vrms
10 Vrms
10 kHz – 80 MHz
az ISM-csatornákon
belüla)
10 Vrms
Kisugárzott magas
frekvenciájú
zavarmérték zavar
az
IEC 61000-4-3
szerint
10 V/m
800 MHz – 2,5 GHz
10 V/m
d = 0,35
P
d = 1,2
P
d = 1,2
P
80 MHz – 800 MHz
d = 2,3
P
800 MHz – 2,5 GHz
Ahol P az adó névleges teljesítménye wattban (W) a gyártó
adatai alapján, illetve d az ajánlott
biztonsági távolság méterben
(m)b).
A helyhez kötött rádióadók erősségének minden frekvencián
kisebbnek kell lennie a helyszínenc) az egyezési szintnéld).
A következő szimbólummal
jelzett készülékek környzetében
zavarok léphetnek fel.
MEGJEGYZÉS: Ezek az irányelvek esetlegesen nem minden esetben érvényesek. Az elektromágneses hullámok terjedését az épületek, készülékek és emberek abszorpciója és visszaverődése
befolyásolja.
Česky
Deutsch
Español
Français
Magyar
d)
Italiano
c)
Nederlands
b)
A 150 kHz – 80 MHz közötti ISM-csatornák (ipari, tudományos és orvosi alkalmazásokhoz
használatos) 6,765 MHz – 6,795 MHz; 13,553 MHz – 13,567 MHz; 26,957 MHz – 27,283 MHz és
40,66 MHz – 40,70 MHz.
Az egyezési szint az ISM-frekvenciasávokban 150 kHz és 80 MHz, valamint 80 MHz és 2,5 GHz
között azt a célt szolgálja, hogy csökkentse a mobil kommunikációs berendezések által
okozott zavarok valószínűségét, ha ezek nem szándékoltan a páciens közelébe kerülnek.
Éppen ezért ezekben a frekvencia tartományokban nagyobb biztonsági távolságot kell tartani
(0,35-ös együttható helyett 1,2).
Helyhez kötött adókészülékek, pl. mobil készülékek bázisállomása és mobil szárazföldi
adókészülékek, amatőr rádióállomások, AM- és FM rádióadók és televízióadók
térerősségének pontos előzetes elméleti meghatározása nem lehetséges. A helyhez kötött,
nagyfrekvenciájú-adók értékeléséhez célszerű mérlegelni egy helyszíni tanulmány
elkészítését. Amennyiben a készülék használatának helyszínén mért térerősség meghaladja
a fenti- egyezőségi szintet, akkor a készüléket meg kell figyelni a megfelelő működés biztosítása érdekében. Adott esetben külön intézkedéseket kell hozni, pl. más elrendezést vagy más
helyet kell választani a külső pacemaker számára.
A 150 kHz – 80 Mhz frekvencia tartományban a térerősségnek 10 V/m alatt kell lennie.
Polski
a)
Português
243
English
394271--J_GA_Reocor_D_mul.book Page 243 Monday, January 26, 2015 3:35 PM
394271--J_GA_Reocor_D_mul.book Page 244 Monday, January 26, 2015 3:35 PM
244
Javasolt biztonsági távolságok hordozható és mobil
nagy frekvenciájú telekommunikációs eszközöktől
(IEC 60601-1-2: 5. táblázat)
A készülék olyan elektromágneses környezetben működtethető, ahol a magas frekvenciájú zavar nagysága ellenőrizhető. A készülék felhasználója segíthet az elektromágneses
zavarok elkerülésében, ha betartja a mobil nagyfrekvenciájú
készülékekhez (adók) képest a biztonsági távolságot - a kommunikációs eszköz kimeneti teljesítményétől függően.
Az adó névleges
teljesítménye
P [W]
Az adó frekvenciájának megfelelő biztonsági távolság d [m]
150 kHz – 80 MHz 150 kHz – 80 MHz 80 MHz –
az ISM-csatorná- az ISM-csatorná- 800 MHz
kon kívül
kon belül
d = 0,35
P
d = 1,2
P
d = 1,2
800 MHz –
2,5 GHz
P
d = 2,3
0,01
0,04
0,12
0,12
0,23
0,10
0,11
0,38
0,38
0,73
1,00
0,35
1,20
1,20
2,30
10,00
1,11
3,79
3,79
7,27
100,00
3,50
12,00
12,00
23,00
P
Olyan adók esetében, melyek névleges teljesítménye nem szerepel a fenti táblázatban, a biztonsági távolság az adófrekvenciához tartozó képlettel meghatározható. Ahol P az adó névleges
teljesítménye wattban (W) a gyártó adatai alapján, illetve d az ajánlott biztonsági távolság méterben (m).
1. MEGJEGYZÉS: A 150 kHz – 80 MHz közötti ISM-csatornák (ipari, tudományos és orvosi
alkalmazásokhoz használatos) 6,765 MHz – 6,795 MHz; 13,553 MHz – 13,567 MHz;
26,957 MHz – 27,283 MHz és 40,66 MHz – 40,70 MHz.
2. MEGJEGYZÉS: Az egyezési szint az ISM-frekvenciasávokban 150 kHz és 80 MHz, valamint
80 MHz és 2,5 GHz között azt a célt szolgálja, hogy csökkentse a mobil/hordozható kommunikációs berendezések általokozott zavarok valószínűségét, ha ezek nem szándékoltan a páciens
közelébe kerülnek. Éppen ezért ezekben a frekvencia tartományokban nagyobb biztonsági
távolságot kell tartani (0,35-ös együttható helyett 1,2).
3. MEGJEGYZÉS: Ezek az irányelvek esetlegesen nem minden esetben érvényesek.
Az elektromágneses hullámok terjedését az épületek, készülékek és emberek abszorpciója és
visszaverődése befolyásolja.
English
394271--J_GA_Reocor_D_mul.book Page 245 Monday, January 26, 2015 3:35 PM
245
Fontos:
A Reocor D csak az ezen pacemakerhez kifejlesztett és tesztelt kiegészítőkkel használható.
Česky
A csomag tartalma és tartozékok
Darabszám Megjegyzés
Rendelési szám:
Reocor D
1
Elem
1
Duracell Plus, 6LR61
365529
–
– Japán
1
Rövid
391843
– minden egyéb ország
1
Szabványos
103704
Redel-adapter
1
371262
Kezelőpanelburkolat
1
378007
Használati utasítás
1
394271
Karmandzsetta
1
370123
Rövid útmutató EN
371300
Rövid útmutató ES
371301
Rövid útmutató FR
371302
Rövid útmutató IT
371303
Rövid útmutató PT
372230
Rövid útmutató ZH
371304
Táska
1
379384
Français
368702
Rövid útmutató DE
Magyar
Használati utasítás ZH
Español
Cikk megnevezése
Deutsch
A kiszállítási csomag tartalma
PK-82
128564
Páciens kábel két szigetelt
krokodilcsipesszel, újrasterilizálható
Közvetlencsatlakozás
PK-83 (2,5 m)
128563
Páciens kábel két szigetelt csavarcsipesszel- Közvetlencsatlakozás
csavaros csatlakozóval, újrasterilizálható
PK-83 (1,5 m)
128562
Páciens kábel két szigetelt csavarcsipesszel- Közvetlencsatlakozás
csavaros csatlakozóval, újrasterilizálható
PK-83-B (2,5 m)
347485
Páciens kábel két szigetelt 2,3 mm-es
csavarcsipesszelcsavaros csatlakozóval
Redeladapter
PK-83-B (1,5 m)
347606
Páciens kábel két szigetelt 2,3 mm-es
csavarcsipesszelcsavaros csatlakozóval
Redeladapter
PK-175
333959
Páciens kábel, négy csavarcsipesszel
Redelcsavaros csatlakozóval az ideiglenes elektró- adapter
dák csatlakoztatásához, újrasterilizálható
PK-67-L
123672
RedelPáciens kábel, újrasterilizálható, a PA-1-B,
PA-2, PA-4 adapterrel történő kombinációhoz adapter
PK-67-S pácienskábelekhez tartozó
adapterekS
128085
Páciens kábel, újrasterilizálható, a PK-155Redeltel és a Remington Model 301-CG-vel történő adapter
kombinációhoz
Nederlands
Csatlakozás
Polski
Rendelési Leírás
szám:
Português
Termék
Italiano
Tartozékok
394271--J_GA_Reocor_D_mul.book Page 246 Monday, January 26, 2015 3:35 PM
246
Termék
Rendelési Leírás
szám:
Csatlakozás
PK-141 (2,8 m)
353181
Páciens kábel, újrasterilizálható, négy érintésvédett krokodilcsipesszel
Redeladapter
Reocor mandzsetta
szabványos
103704
Szabványos karmandzsetta
–
Reocor mandzsetta
rövid
391843
Kisebb átmérőjű karmandzsetta. Vékonyabb
karhoz.
–
Csak USA
Termék
Gyártó
Leírás
Csatlakozás
ADAP-2R
(0,24 m)
Remington
Medical Inc.
Újra felhasználható adapter Model S-101-97 és
Model FL-601-97 kábelekhez
Redel-adapter
Adapter PK-67-S-hez és PK-67-L-hez
Termék
Rendelési
szám:
Leírás
PA-1-B
123751
A 2 mm-es adapterhez vagy MHW-adapterhez (adapter szívvezetékekhez) történő csatlakoztatáshoz, újrasterilizálható
PA-1-C
349723
A 2 mm-es adapterhez vagy MHW-adapterhez (adapter szívvezetékekhez) történő csatlakoztatáshoz, újrasterilizálható
PA-2
123157
Az IS-1 csatlakozóhoz történő csatlakoztatáshoz, újrasterilizálható
PA-4
123090
PK-155 (2 kábelből 337358
álló készlet)
Krokodilcsipeszekkel, újrasterilizálható
Steril páciens kábel, 2-eres, krokodilcsipeszekkel, egyszeri
használatra
Adapter PK-67-S-hez és PK-67-L-hez (csak USA)
Termék
Gyártó
Leírás
Model 301-CG
Remington
Medical Inc.
Steril páciens kábel, 2-eres, krokodilcsipeszekkel,
egyszeri használatra
Adapter ADAP-2R-hez (csak USA)
Termék
Gyártó
Leírás
Model 301-CG
Remington
Medical Inc.
Steril páciens kábel, 2-eres, krokodilcsipeszekkel,
egyszeri használatra
Model S-101-97
(2,5 m)
Remington
Medical Inc.
Páciens kábel, 2-eres, krokodilcsipeszekkel, egyszeri
használatra
Model FL-601-97
(2,0 m)
Remington
Medical Inc.
Páciens kábel, 2-eres, csavarcsipeszekkelcsavaros csatlakozókkal, egyszeri használatra
English
394271--J_GA_Reocor_D_mul.book Page 247 Monday, January 26, 2015 3:35 PM
247
A címkén lévő jelek jelentése a következő:
Jelentés
BIOTRONIK rendelési szám
A készülék sorozatszáma
Español
Redel-adapter
Deutsch
Reocor D
Beültetett elektródával rendelkező páciens
Tartalom
Ártalmatlanítási jelölés
Kövesse a használati útmutatót!
Figyelem: A szövetségi törvények (USA) a terméket csak orvos vagy
orvosi rendelvény alapján szabad értékesíteni.
Magyar
Megengedett tárolási páratartalom
Italiano
Megengedett tárolási légnyomás
Nederlands
Megengedett tárolási hőmérséklet
Français
A készülék gyártási dátuma
Polski
CE-jelölés
Português
Szimbólum
Česky
Jelmagyarázat a címkéhez
394271--J_GA_Reocor_D_mul.book Page 248 Monday, January 26, 2015 3:35 PM
248
English
394271--J_GA_Reocor_D_mul.book Page 249 Monday, January 26, 2015 3:35 PM
249
Utilizzo, manutenzione e cura ..............................................................276
Reocor D ................................................................. 276
Cavi paziente riutilizzabili ...................................... 277
Manutenzione, assistenza, ispezione ..................... 277
Smaltimento ........................................................... 278
Deutsch
Español
Français
Magyar
Italiano
Modi di stimolazione e parametri .........................................................272
Modi di stimolazione .............................................. 272
Periodi refrattari .................................................... 272
Frequenza ............................................................... 273
Ritardo AV ............................................................... 274
Ampiezza dell'impulso – atrio/ventricolo .............. 274
Sensibilità – atrio ................................................... 274
Sensibilità – ventricolo ........................................... 274
Cross Channel Blanking ........................................ 274
Intervallo di rumore ............................................... 274
Burst ....................................................................... 275
Nederlands
Note per il funzionamento ...................................................................259
Note generali .......................................................... 259
Elementi di comando e LED ................................... 260
Copertura del quadro comandi .............................. 262
Connessione degli elettrocateteri .......................... 263
Messa in esercizio .................................................. 269
Fissaggio ................................................................ 270
Sostituzione della batteria ..................................... 270
Polski
Descrizione generale ...........................................................................251
Descrizione del prodotto ........................................ 251
Indicazioni ............................................................... 252
Controindicazioni .................................................... 252
Possibili effetti collaterali ...................................... 252
Istruzioni per l'uso ................................................. 253
Segnali ottici e acustici .......................................... 257
Česky
Contenuto
Dati Tecnici ...........................................................................................280
Português
Sicurezza tecnica .................................................................................279
394271--J_GA_Reocor_D_mul.book Page 250 Monday, January 26, 2015 3:35 PM
250
Conformità alla norma IEC 60601-1-2 ..................................................283
Contenuto della confezione e accessori ...............................................287
Legenda dell'etichetta .........................................................................289
English
394271--J_GA_Reocor_D_mul.book Page 251 Monday, January 26, 2015 3:35 PM
251
È possibile impostare il modo di stimolazione, la frequenza,
la sensibilità e l'ampiezza dell'impulso, il ritardo AV e la frequenza burst.
I LED segnalano il sensing (Sense), la stimolazione (Pace) e lo
stato della batteria (Low battery). Un segnale acustico avverte
l'operatore quando sono impostate frequenze molto elevate o
valori di sensibilità molto bassi e quando l'impedenza
dell'elettrocatetere non è ottimale.
Un difetto del dispositivo (autotest, dopo l'accensione del
dispositivo, non superato) viene indicato dall'accensione dei
LED e da un segnale acustico cadenzato. Se l'autotest dopo
l'accensione del dispositivo non ha individuato errori i segnali
acustici e ottici cessano dopo qualche secondo.
Deutsch
Español
Sono disponibili sei modi di stimolazione: DDD, D00, VDD,
VVI, V00 e VVT e la funzione burst atriale.
Français
Reocor D è un pacemaker bicamerale esterno, funzionante a
batteria, che viene collegato a elettrocateteri temporanei
(compresi elettrocateteri endocardiaci e cateteri transvenosi
impiantabili) e con essi impiegato per la stimolazione temporanea atriale, ventricolare e sequenziale AV in ambiente
clinico. Il collegamento è diretto o mediante un cavo paziente
separato od eventualmente un adattatore.
Magyar
Descrizione del prodotto
Česky
Descrizione generale
•
Controllo dell'impedenza degli elettrocateteri
•
Avvertimento ottico dell'imminente esaurimento di
carica della batteria
•
Una copertura trasparente scorrevole degli elementi di
comando per evitare modifiche accidentali dei parametri.
Al Reocor D è possibile collegare direttamente elettrocateteri
con connettori da 2 mm, elettrocateteri endocardici e cateteri
temporanei. Sono inoltre disponibili diversi cavi paziente e
adattatori. Questo sistema permette una connessione sicura
di cateteri transvenosi ed elettrocateteri endocardici, per
applicazioni unipolari o bipolari.
Nederlands
Parametri di stimolazione comandati da microprocessore
Polski
Indicazione ottica di eventi rilevati e stimolati
•
Português
•
Italiano
Reocor D presenta le seguenti caratteristiche di sicurezza:
394271--J_GA_Reocor_D_mul.book Page 252 Monday, January 26, 2015 3:35 PM
252
Indicazioni
La stimolazione temporanea con Reocor D si presta per le
seguenti applicazioni su pazienti di ogni età:
•
Trattamento di aritmie e blocco cardiaco
•
Bradicardia sinusale sintomatica
•
Sindrome del nodo del seno
•
Stimolazione pre, intra e post operatoria di pazienti soggetti ad intervento al cuore
•
Conclusione di tachiaritmie sopraventricolari
•
Stimolazione profilattica per la prevenzione di aritmie
•
Stimolazione di emergenza
•
Controllo delle soglie di stimolazione
Controindicazioni
•
Reocor D non può essere sterilizzato e non è quindi
adatto per l'impiego nell'ambiente sterile del paziente.
•
I modi di stimolazione atriale triggerata (DDD e VDD)
sono controindicati in caso di fibrillazione atriale, flutter
atriale e altri ritmi atriali accelerati.
•
In caso di cattiva tolleranza delle frequenze ventricolari
elevate del paziente (ad es. nel caso di angina pectoris) i
modi atrioguidati possono essere controindicati.
•
Nel caso si osservi una conduzione retrograda dopo la
stimolazione ventricolare, occorre eventualmente programmare un periodo refrattario atriale più lungo o un
ritardo AV più breve per prevenire tachicardie indotte dal
pacemaker. In questi casi, è necessaria la programmazione del modo VVI.
•
La stimolazione monocamerale atriale è controindicata
nei pazienti che presentano già disturbi di conduzione AV.
•
L'utilizzo di un pacemaker esterno è controindicato se è
già attivo un pacemaker impiantato.
Possibili effetti collaterali
La stimolazione esterna temporanea può dar luogo a complicazioni, tra cui asistolie dopo l'improvvisa interruzione della
stimolazione (ad es. quella causata da un distacco inavvertito
del cavo paziente, dell'elettrocatetere o da impostazioni
errate) oppure una dipendenza dal pacemaker.
Tra le complicazioni derivanti dall'introduzione di elettrocateteri transvenosi si contano anche: infezione della ferita, pun-
Principio di
funzionamento
•
Reocor D interagisce con il cuore umano. Ha inoltre
luogo un'interazione con la pelle e i vasi sanguigni del
paziente.
Uso conforme alla
destinazione
•
Reocor D e i cavi ed accessori autorizzati per il dispositivo
vanno utilizzati solo secondo le istruzioni del presente
manuale tecnico.
•
Reocor D non va collegato ad altri apparecchi elettromedicali.
•
Reocor D non può essere utilizzato in aree soggette al
rischio di esplosione.
Divieto di modifiche
•
Le riparazioni, gli aggiornamenti e le modifiche al dispositivo devono essere eseguite esclusivamente dal produttore BIOTRONIK o da un rivenditore espressamente autorizzato da BIOTRONIK.
Parti di ricambio
eaccessori
•
Le parti di ricambio originali e gli accessori autorizzati da
BIOTRONIK garantiscono la sicurezza. L'uso di altri componenti comporta l'annullamento di qualsiasi responsabilità del produttore per eventuali conseguenze e l'annullamento della garanzia e delle prestazioni di garanzia.
Dispositivi
a portata di mano
•
In caso di dipendenza del paziente dal pacemaker si deve
tenere a portata di mano uno stimolatore di emergenza.
•
Sono da tenere a portata di mano il defibrillatore esterno,
ossigeno, l'attrezzatura per intubazione e farmaci di
emergenza.
•
Prima dell'uso si deve controllare se il Reocor D presenta
danni e tracce di sporco sottoponendolo ad un esame
visivo.
Comportamento
prima dell'uso
Deutsch
Español
Reocor D può essere impiegato solo da persone con
conoscenze di cardiologia che sono state informate sul
modo di utilizzo del dispositivo. Gli utilizzatori potenziali
sono il personale medico-tecnico di un ospedale e i
medici.
Français
•
Magyar
Gruppo di
utilizzatori
Italiano
A seconda delle impostazioni per la stimolazione e della
malattia di partenza del paziente la stimolazione può indurre
aritmie. Per garantire la sicurezza del paziente si devono
adottare determinate procedure e misure preventive elencate
di seguito. Ulteriori procedure e misure preventive sono indicate nelle rispettive pubblicazioni di medicina.
Nederlands
Istruzioni per l'uso
Polski
tura arteriosa, sfregamenti pericardici, perforazione cardiaca
e aritmia dopo l'inserimento dell'elettrocatetere.
Português
253
Česky
English
394271--J_GA_Reocor_D_mul.book Page 253 Monday, January 26, 2015 3:35 PM
394271--J_GA_Reocor_D_mul.book Page 254 Monday, January 26, 2015 3:35 PM
254
Connessione degli
elettrocateteri
Comportamento
durante l'uso
•
Non utilizzare mai un dispositivo danneggiato o che presenti anomalie. Sostituire i cavi di qualsiasi tipo, anche in
caso di minimi danneggiamenti visibili.
•
Prima dell'uso di Reocor D, dei cavi paziente o degli elettrocateteri l'utilizzatore dovrebbe toccare il paziente per
compensare differenze di potenziale elettriche.
•
Si consiglia caldamente all'utilizzatore di controllare ogni
parametro impostato prima di collegare gli elettrocateteri al Reocor D.
•
Sebbene Reocor D sia protetto contro le gocce d'acqua si
devono mantenere tutti i connettori e il dispositivo stesso
puliti e asciutti.
•
Reocor D non può essere sterilizzato.
•
Le connessioni di Reocor D e degli elettrocateteri di stimolazione temporanei devono essere protette e controllate periodicamente.
•
Il cavo paziente deve essere collegato prima al Reocor D
e poi agli elettrocateteri.
•
Gli elettrocateteri temporanei ai quali è collegato il
Reocor D costituiscono una linea di alimentazione a
bassa impedenza verso il miocardio per la corrente elettrica. I dispositivi alimentati dalla rete utilizzati in prossimità del paziente devono pertanto essere messi a terra in
conformità alle norme vigenti.
•
Quando si opera con elettrocateteri già impiantati, non si
devono toccare gli spinotti del connettore e le superfici di
contatto metalliche, né metterli a contatto con superfici
umide o conduttrici.
•
Se il cavo del Reocor D si è disconnesso occorre ricollegarlo immediatamente e verificare la sicurezza del collegamento.
•
Quando si utilizzano elettrocateteri unipolari si devono
usare due elettrocateteri unipolari per ogni camera affinché la stimolazione sia efficace.
•
Mentre si usa il Reocor D la copertura del quadro
comandi deve rimanere completamente chiusa per
evitare di cambiare inavvertitamente i parametri del
programma.
•
Utilizzare Reocor D adagiandolo su una superficie orizzontale antiscivolo oppure fissandolo al paziente con il
bracciale o agganciandone l'occhiello situato sul lato
posteriore ad un'asta portaflebo.
•
Reocor D non deve essere fissato a diretto contatto con la
pelle.
SSI, SST
S00
VDD
VAT, VVI, V00
DDD
DAD, DVI, D00
Stimolazione con
frequenze elevate
•
Una stimolazione del cuore con frequenze superiori a
180 bpm per un intervallo di tempo prolungato può provocare gravi complicazioni emodinamiche. Una stimolazione con frequenze elevate deve essere eseguita solo
quando è garantito un monitoraggio continuo.
Comportamento
dopo l'uso
•
Dopo una defibrillazione o una cauterizzazione si deve
sottoporre il dispositivo a un test di funzionamento.
•
Quando il pacemaker viene riposto e non viene utilizzato
per un periodo di tempo prolungato si deve estrarre la
batteria per evitare perdite che lo danneggino.
•
Per la pulizia si può usare un panno umido e un sapone
delicato. Va evitato l'impiego di detergenti aggressivi o
solventi organici perché possono intaccare la cassa di
plastica.
•
Eseguire ispezioni e lavori di manutenzione come indicato a pagina 276.
•
Non utilizzare batterie ricaricabili (accumulatori). La
durata di servizio di queste batterie non è prevedibile e
può accadere che si superi inaspettatamente il momento
ERI1con improvvisa interruzione della stimolazione.
Alimentazione
a batteria
Si possono usare solo batterie da 9 V con il codice internazionale IEC 6LR61. Con batterie di tipo MN 1604 Duracell® Procell® la stimolazione esterna viene garantita
per circa 500 ore prima che si renda necessaria la sostituzione della batteria.
1
Con il segnale ERI (il LED Low battery lampeggia) Reocor D ricorda che occorre sostituire la
batteria
Deutsch
Español
A seguito di interferenze
elettromagnetiche
Français
Modo senza interferenze
Magyar
In caso di rumore dovuto a interferenza elettromagnetica
Reocor D passa ad una stimolazione asincrona, quando
vengono superati determinati valori limite. A seconda che
le interferenze vengano percepite nell'atrio o nel ventricolo si hanno i seguenti modi di funzionamento per la
durata dei disturbi:
Italiano
•
Nederlands
Durante l'utilizzo del Reocor D è necessario tenere sotto
controllo la frequenza cardiaca del paziente con un monitor ECG provvisto di funzione di allarme.
Polski
•
Português
255
Česky
English
394271--J_GA_Reocor_D_mul.book Page 255 Monday, January 26, 2015 3:35 PM
394271--J_GA_Reocor_D_mul.book Page 256 Monday, January 26, 2015 3:35 PM
256
Se il cambio di batteria avviene durante il funzionamento
il Reocor D rimane operativo ancora per ca. 30 secondi se
la temperatura ambiente è di 20 °C ± 2 °C.
Per ragioni di sicurezza si dovrebbe tuttavia provvedere a
garantire l'alimentazione in altro modo per tutelare il
paziente.
Elettrocauterizzazione
•
Un'elettrocauterizzazione non va eseguita mai ad una
distanza inferiore a 15 cm dagli elettrocateteri, poiché
sussiste il pericolo che venga indotta una fibrillazione o
che il pacemaker subisca dei danni.
Si consiglia di impostare il pacemaker sulla stimolazione
asincrona per evitare un'inibizione del dispositivo a causa
di segnali d'interferenza. Durante il trattamento si deve
controllare costantemente il battito periferico del
paziente. Dopo il trattamento si deve controllare la
funzionalità del pacemaker.
Defibrillazione
•
I circuiti di Reocor D sono protetti dall'energia di shock
che può essere indotta da una defibrillazione. Tuttavia è
opportuno adottare, se possibile, le seguenti misure
preventive:
— L'energia impostata non deve essere superiore a
quella necessaria per la defibrillazione.
— Le distanze tra gli elettrocateteri del defibrillatore e
gli elettrocateteri di Reocor D devono essere di
almeno 10 cm.
— Dopo una defibrillazione si deve spegnere e riaccendere il Reocor D, affinché esso possa eseguire un
autotest completo.
Dopo la defibrillazione si devono inoltre controllare la
funzionalità del pacemaker e la soglia di stimolazione e
tenerle sotto controllo per un periodo sufficientemente
lungo.
Immunità dalle
interferenze
•
Reocor D è protetto contro interferenze causate da radiazioni elettromagnetiche, scariche elettrostatiche e contro
le interferenze trasmesse. Anche la radiazione emessa
dal Reocor D è stata ridotta al minimo. Il dispositivo soddisfa quindi i requisiti previsti dalla IEC 60601-1-2. Tuttavia è possibile che forti campi elettromagnetici, come
quelli che possono crearsi ad es. nelle immediate vicinanze di motori elettrici, trasformatori, linee elettriche e
altri apparecchi elettrici, pregiudichino il funzionamento
del Reocor D.
Interferenze elettromagnetiche possono provocare i
seguenti errori:
— Reset inaspettato (viene eseguito l'autotest).
— Vengono rilevati eventi cardiaci, che però non
appaiono sul monitor ECG.
— Il Reocor D ha un comportamento inspiegabile.
Segnali ottici e acustici
•
Durante l'autotest dopo l'accensione del Reocor D si illuminano tutti i LED e si odono brevi segnali acustici. Dopo
pochi secondi l'autotest è concluso.
•
Quando l'autotest non rileva errori i LED si spengono e i
segnali cessano.
•
Quando l'autotest riscontra un'anomalia lampeggiano a
lungo tutti i LED e vengono emessi segnali di avvertimento.
•
La necessità di sostituire la batteria viene segnalata dal
lampeggio del LED rosso Low battery.
•
I LED verdi Sense segnalano il sensing di un'onda P o di
un'onda R.
•
I LED gialli Pace segnalano l'emissione dell'impulso.
•
I LED e i segnali acustici forniscono inoltre le seguenti
segnalazioni durante il funzionamento:
Deutsch
Español
Français
Magyar
Italiano
Se la sensibilità atriale del dispositivo è stata impostata
su un valore di <1,0 mV, possono verificarsi delle interferenze provocate da campi elettromagnetici. Se clinicamente possibile, si consiglia di impostare un parametro
di sensibilità superiore a 1,0 mV. L'impostazione dei
parametri di sensibilità a <1,0 mV richiede un'indicazione
medica esplicita. Tali valori possono essere impostati e
mantenuti solo con la supervisione di un medico.
Nederlands
•
Polski
Misure per ripristinare il corretto funzionamento del
Reocor D:
— Controllare ed eventualmente correggere il collegamento tra dispositivo e elettrocateteri di stimolazione
temporanei.
— Impostare un'adeguata sensibilità sul Reocor D:
spesso metà del valore dell'ampiezza media del
segnale intrinseco permette di ottenere un'impostazione corretta della sensibilità.
— Spegnere tutti gli apparecchi elettrici in prossimità
del Reocor D, se questi possono provocare interferenze elettromagnetiche e il loro funzionamento
non è assolutamente necessario.
— Portare la fonte delle interferenze in un luogo dal
quale non agiscono.
— Se è possibile senza correre pericoli: spegnere e
riaccendere il Reocor D, per riportare il pacemaker
ad un funzionamento regolare.
— Se il problema tecnico sussiste rivolgersi a
BIOTRONIK.
Português
257
Česky
English
394271--J_GA_Reocor_D_mul.book Page 257 Monday, January 26, 2015 3:35 PM
394271--J_GA_Reocor_D_mul.book Page 258 Monday, January 26, 2015 3:35 PM
258
Segnalazione
Significato
Tipo di intervento
Segnale acustico per 2 s È impostata un'ampiezza
dell'impulso < 1 V o una
frequenza > 180 bpm
Controllare se i valori impostati sono appropriati per il
paziente.
Sequenza di toni veloce
Controllare se tutti i
connettori sono inseriti
correttamente.
Verificare se gli elettrocateteri si trovano nella posizione desiderata.
Impedenza al di fuori dei
margini ammessi
Segnale acustico e lam- È intervenuta la protezione
peggio dei LED Pace e
alta frequenza; non è stato
superato l'autotest
Sense
Spegnere il dispositivo e
spedirlo a BIOTRONIK.
LED Low battery
lampeggiante
Sostituire la batteria.
Il dispositivo ha ancora
circa 36 orea) di autonomia.
a)
È stato raggiunto l'ERI
Con batterie di tipo MN 1604 Duracell®, Procell®
English
394271--J_GA_Reocor_D_mul.book Page 259 Monday, January 26, 2015 3:35 PM
259
Test della memoria
•
Test di funzionamento dei LED e dei segnali acustici
•
Controllo della capacità di stimolazione e di sensing
•
Controllo dell'efficacia della protezione alta frequenza
Quando l'autotest riscontra un'anomalia lampeggiano a
lungo tutti i LED e vengono emessi segnali acustici di avvertimento. In questo caso si deve spegnere il pacemaker e spedirlo a BIOTRONIK.
Quando l'autotest non ha rilevato alcun errore i LED si spengono, i segnali cessano e il Reocor D inizia ad emettere
impulsi di stimolazione rispondenti ai parametri impostati.
L'elettrodo negativo (catodo) deve pertanto essere collegato
solo quando è garantita un'impostazione corretta del modo di
stimolazione, della frequenza di stimolazione, dell'ampiezza
dell'impulso e della sensibilità.
Quando la manopola di regolazione del il modo di
funzionamento è regolata su OFF si impedisce che vengano
emessi impulsi di stimolazione al paziente immediatamente
dopo il collegamento degli elettrocateteri.
Avvisi
Durante il funzionamento possono essere emessi i seguenti
avvisi:
•
La necessità di sostituire la batteria viene segnalata dal
lampeggio del LED Low battery.
•
Quando l'impedenza dell'elettrocatetere non è compresa
tra i margini di tolleranza ammessi (ad es. in seguito alla
rottura di un elettrodo, un contatto allentato) viene
emessa una sequenza di toni veloce dopo almeno 5 s
dall'accensione.
•
Quando si imposta l'ampiezza dell'impulso su valori < 1 V
o la frequenza su valori > 180 bpm viene emesso un
segnale acustico per circa 2 s.
•
Nel caso di una frequenza troppo elevata (vedere pag. 281
“Protezione alta frequenza”) e di un mancato superamento dell'autotest viene emesso un segnale acustico e
lampeggiano i LED Pace e Sense.
Deutsch
Español
Verifica del codice di programma e del microprocessore
•
Français
•
Magyar
Dopo l'accensione il Reocor D esegue un autotest per alcuni
secondi. Questo include:
Italiano
Autotest
Nederlands
Le connessioni di Reocor D e degli elettrocateteri di stimolazione temporanei devono essere protette e controllate periodicamente.
Polski
Attenzione!
Português
Note generali
Česky
Note per il funzionamento
394271--J_GA_Reocor_D_mul.book Page 260 Monday, January 26, 2015 3:35 PM
260
0
30
0
10
80
60
0
40
20
0
0, 5
300
0
25
20 0
18
0
10
2
0, 3
0, 2
7
1
12
0, 7
0
17
4 00
35
0
10
0
0
10
75
50
0
60 0
60
50
V0 0
80
0
1000
70
VV I
T
25
15
12
0
VV
40
0,1
3
0,5
3
1
2
5
3
4
12
17
10
5
5
10
7
8
2
7
0,1
14
11
1
3
2
1
5
20
17
0 ,5
b
INDIFF.+
DIFF.-
Figure 1: quadro comandi Reocor D
17
D
14 0
DD
20
0
250
D
VD
D0 0
Elementi di comando e LED
Per batteria 9 V
LED Low battery
Voltaggio della batteria troppo basso
4
LED Ventricle Pace
Indicatore giallo di un evento ventricolare
stimolato
5
LED Ventricle Sense
Indicatore verde del rilevamento di un'onda R
6
Manopola di regolazione
Ventricle Ampl.
Impostazione dell'ampiezza dell'impulso ventricolare
7
Manopola di regolazione
Ventricle Sens.
Impostazione della sensibilità ventricolare
(non utilizzabile nei modi di funzionamento D00 e V00)
8
LED Atrium Pace
Indicatore giallo di un evento atriale stimolato
9
LED Atrium Sense
Indicatore verde del rilevamento di un'onda P
10
Manopola di regolazione
Atrium Ampl.
Impostazione dell'ampiezza dell'impulso atriale
(non utilizzabile nel modo di funzionamento VDD)
11
Manopola di regolazione
Atrium Sens.
Impostazione della sensibilità atriale
(non utilizzabile nel modo di funzionamento D00)
12
Start burst
Avvio della funzione burst atriale
13
Astuccio per cintura e
occhiello di aggancio
(sul retro)
Fissaggio del Reocor D al paziente, al letto o all'asta portaflebo
14
Manopola di regolazione
Burst rate atrium
Impostazione della frequenza burst atriale
15
Manopola di regolazione AV
delay
Impostazione del ritardo AV
16
Select burst
Selezione della funzione burst atriale
17
Manopola di regolazione
Mode
Selezione del modo di stimolazione e disinserimento
18
Manopola di regolazione
Rate
Impostazione della frequenza di stimolazione
Table 1: descrizione degli elementi della figura 1
Le scritte in grassetto sugli elementi di comando
contraddistinguono valori sicuri per l'uso medico del dispositivo.
Deutsch
Contenitore delle batterie
3
Español
2
Français
Per cavi e elettrocateteri con spinotti da 2 mm
o per adattatori per connettori Redel
(rosso = più; blu = meno)
Magyar
Conn. canale ventricolare
Italiano
1b
Nederlands
Funzione
Conn. canale atriale
Polski
Denominazione
1a
Português
261
Česky
English
394271--J_GA_Reocor_D_mul.book Page 261 Monday, January 26, 2015 3:35 PM
394271--J_GA_Reocor_D_mul.book Page 262 Monday, January 26, 2015 3:35 PM
262
Copertura del quadro comandi
La copertura del quadro comandi è chiusa quando viene
spinta sui due punti di arresto fino al punto di bloccaggio e la
chiusura si trova oltre la staffa (vedere Fig. 2).
Corretto:
Errato:
Figure 2: Posizione corretta della copertura del quadro comandi
Per aprire la copertura del quadro comandi (vedere Fig. 3):
Sollevare con una mano la levetta di bloccaggio verso
l'alto.
Contemporaneamente far scorrere con l'altra mano la
copertura del quadro comandi verso il basso.
Figure 3: Apertura della copertura del quadro comandi
Per chiudere la copertura del quadro comandi:
Spingere la copertura del quadro comandi verso l'alto
oltre la staffa fino a bloccarla (vedere Fig. 2).
È possibile smontare completamente la copertura del quadro
comandi per eseguire la pulizia. Far scivolare la copertura
verso il basso fino all'arresto. Spostare quindi la copertura
energica oltre il fermo.
Attenzione!
Mentre si usa il Reocor D la copertura del quadro comandi
deve rimanere chiusa per evitare di girare inavvertitamente
commutatori rotanti e manopole di regolazione, modificando
i parametri del programma.
English
394271--J_GA_Reocor_D_mul.book Page 263 Monday, January 26, 2015 3:35 PM
263
Per la connessione di cavi con connettore Redel si deve applicare sul lato appropriato l'adattatore per connettori Redel e
avvitarlo (fig. 4). L'adattatore per connettori Redel è applicato
sul lato giusto se si riesce ad avvitare sul Reocor D.
La funzione dell'adattatore per connettori Redel è garantita
esclusivamente se applicato sul lato giusto!
Reocor D può essere utilizzato con i seguenti cavi paziente e
adattatori:
Cavo paziente PK-175 con quattro connettori filettati per
elettrocateteri temporanei sul lato paziente e connettore
Redel sul lato Reocor (con l'adattatore per connettori
Redel)
Figure 5: cavo paziente PK-175
Português
Polski
•
Nederlands
Figure 4: adattatore per connettori Redel per Reocor D
Italiano
Magyar
Français
Español
Nota:
Deutsch
Reocor D dispone di quattro prese per la connessione diretta
di elettrocateteri con spinotti isolati di 2 mm.
Česky
Connessione degli elettrocateteri
394271--J_GA_Reocor_D_mul.book Page 264 Monday, January 26, 2015 3:35 PM
264
•
Cavo paziente PK-82 con due morsetti a coccodrillo isolati per elettrocateteri temporanei sul lato paziente e due
spinotti isolati da 2 mm sul lato Reocor.
Figure 6: cavo paziente PK-82
•
Cavo paziente PK-83-B per stimolazione monocamerale
con due connettori filettati per elettrocateteri temporanei
sul lato paziente e connettore Redel sul lato Reocor
(con adattatore per connettori Redel). Gli elettrocateteri
temporanei che vengono collegati con il PK-83-B sono
connessi con il canale ventricolare del Reocor D.
Figure 7: cavo paziente PK-83-B
•
Cavo paziente PK-83 per stimolazione monocamerale
con due connettori filettati isolati per elettrocateteri temporanei sul lato paziente e due spinotti isolati da 2 mm
sul lato Reocor.
Figure 8: cavo paziente PK-83
•
I cavi paziente PK-67-L, PK-67-S si distinguono solo per
la loro lunghezza.
Connettore Redel
Figure 9: cavi paziente PK-67-L (2,6 m) e PK-67-S (0,8 m)
English
394271--J_GA_Reocor_D_mul.book Page 265 Monday, January 26, 2015 3:35 PM
265
Adattatori
PA-2 IS-1
PA-4 con morsetti a coccodrillo
Cavo paziente PK-141 con quattro morsetti a coccodrillo
sul lato paziente e connettore Redel sul lato Reocor (con
l'adattatore per connettori Redel).
Italiano
•
Français
PA-1-B per il collegamento di spinotti isolati da 2 mm o adattatori MHW (per elettrocateteri endocardici)
Magyar
Figure 10: adattatori per i cavi paziente PK-67-L e PK-67-S
Español
Deutsch
Per i cavi paziente PK-67 (fig. 9) sono idonei gli adattatori
mostrati in figura 10:
Česky
•
Figure 12: cavo adattatore ADAP-2R
Polski
Il cavo adattatore ADAP-2R è un cavo riutilizzabile per
collegare il cavo monouso della figura 13 (solo per gli
USA) con Reocor D (con l'adattatore per connettori
Redel).
Português
•
Nederlands
Figure 11: cavo paziente PK-141
394271--J_GA_Reocor_D_mul.book Page 266 Monday, January 26, 2015 3:35 PM
266
•
Cavo monouso (solo USA)
Figure 13: cavo monouso Remington Medical Inc. (solo USA)
•
Cavo monouso
Il cavo monouso PK-155 e il cavo monouso Remington 301CG (solo USA) con morsetti a coccodrillo (fig. 14) vengono collegati al paziente mediante il cavo PK-67-S.
Figure 14: cavo PK-155
Connessione
AVVERTENZA!
Pericolo per il paziente derivante da un cavo danneggiato.
Un cavo danneggiato può compromettere il funzionamento e
rappresentare un pericolo per il paziente. Non utilizzare mai
cavi danneggiati.
AVVERTENZA!
Pericolo derivante da alterazione del funzionamento. Un cavo
umido può compromettere il funzionamento e rappresentare
un pericolo per il paziente. Non utilizzare mai cavi umidi.
AVVERTENZA!
Pericolo derivante da correnti elettriche.
I contatti dei cavi non utilizzati possono convogliare correnti
elettriche nel paziente. Fissare i contatti dei cavi non utilizzati
nelle vicinanze del paziente.
Attenzione!
Reazioni allergiche, infiammazioni.
Evitare che il cavo e la testa di programmazione vengano a
contatto con le ferite e la pelle del paziente.
Nota:
prima dell'uso del cavo far attenzione alla corretta posizione
delle guaine isolanti.
Nota:
non collegare il cavo paziente all'elettrocatetere di
stimolazione temporaneo del paziente prima di aver realizzato la connessione al Reocor D.
English
394271--J_GA_Reocor_D_mul.book Page 267 Monday, January 26, 2015 3:35 PM
267
Quando Reocor D funziona senza l'adattatore per connettori
Redel, si possono collegare i cateteri temporanei e gli elettrocateteri endocardici con i cavi paziente PK-82 e PK-83 direttamente alle prese A+, A- e V+, V-.
Česky
Connessione diretta
Il cavo paziente viene collegato al Reocor D mediante un
adattatore per connettori Redel.
Applicare l'adattatore per connettori Redel sul Reocor D.
Deutsch
Cavo paziente
È possibile collegare il Reocor D direttamente ad un catetere
temporaneo mediante spinotti da 2 mm o a un elettrocatetere
miocardico con adattatore da 2 mm, senza necessità di altri
cavi o adattatori. Tutte le altre possibilità di collegamento
sono indicate nella seguente tabella.
Connessione lato
Cavo BIOTRONIK
paziente
Connessioni raccomandate
Connessione diretta (senza cavo BIOTRONIK)
2 mm
PK-67-S/L con PA-1-B
Connettori filettati
PK-175 con TC Adapt
Connettori filettati
PK-83 con TC Adapt (2x)
Connessioni possibili
Morsetti a coccodrillo
PK-141
Morsetti a coccodrillo
PK-67-S/L con PA-4
Morsetti a coccodrillo
PK-67-S/L con PK-155
(2x)
Morsetti a coccodrillo
PK-82 (2x)
Connessione lato
dispositivo
Connessione
Reocor D
Connettore Redel
Connettore Redel
Spinotti 2 mm
Prese 2 mm
Adattatore Redel
Adattatore Redel
Prese 2 mm
Connettore Redel
Connettore Redel
Connettore Redel
Adattatore Redel
Adattatore Redel
Adattatore Redel
Spinotti 2 mm
Prese 2 mm
Français
Magyar
Catetere temporaneo con spinotti 2 mm o
elettrocatetere miocardico con adattatore 2 mm
Italiano
Varianti di collegamento
Nederlands
il cavo paziente PK-83-B non consente la stimolazione
bicamerale. Gli elettrocateteri che vengono collegati con il
PK-83-B sono connessi con il canale ventricolare del
Reocor D.
Polski
Nota:
Português
Inserire il connettore Redel del cavo paziente nella presa
Redel dell'adattatore.
Español
Fissarlo stringendo le viti.
394271--J_GA_Reocor_D_mul.book Page 268 Monday, January 26, 2015 3:35 PM
268
Elettrocatetere con punta sezionabile o
con estremità flessibile (diametro max. 2,3 mm)
Connessione
Cavo BIOTRONIK
lato paziente
Connessioni raccomandate
Connettori filettati
PK-175
Connettori filettati
PK-83 (2x)
Connessioni possibili
Morsetti a coccodrillo
PK-141
Morsetti a coccodrillo
PK-67-S/L con PA-4
Morsetti a coccodrillo
PK-67-S/L con PK-155
(2x)
Morsetti a coccodrillo
PK-82 (2x)
Connessione
lato dispositivo
Connessione
Reocor D
Connettore Redel
Spinotti 2 mm
Adattatore Redel
Prese 2 mm
Connettore Redel
Connettore Redel
Connettore Redel
Adattatore Redel
Adattatore Redel
Adattatore Redel
Spinotti 2 mm
Prese 2 mm
Elettrocatetere impiantato con connettore IS-1
Connessione
lato paziente
Cavo BIOTRONIK
Connessione
lato dispositivo
Connessione
Reocor D
Connettore Redel
Adattatore Redel
Connessioni raccomandate
Presa IS-1
PK-67-S/L con PA-2
Connessioni possibili
Morsetti a coccodrillo
PK-141
Connettore Redel
Adattatore Redel
Morsetti a coccodrillo
PK-67-S/L con PA-4
Connettore Redel
Adattatore Redel
Morsetti a coccodrillo
PK-67-S/L con PK-155
(2x)
Connettore Redel
Adattatore Redel
Morsetti a coccodrillo
PK-82 (2x)
Spinotti 2 mm
Prese 2 mm
Polarità
Reocor D produce sostanzialmente una stimolazione bipolare, ma può essere utilizzato sia con elettrocateteri di stimolazione temporanei bipolari che con quelli unipolari.
Quando si utilizzano elettrocateteri unipolari si devono collegare due elettrocateteri per ogni camera.
Scollegamento dei connettori
Staccare i morsetti del cavo paziente dagli elettrocateteri di
stimolazione temporanei del paziente o staccare la connessione diretta.
Scollegamento del connettore Redel
•
Tirare all'indietro l'anello del connettore Redel e
staccarlo dalla presa Redel.
English
394271--J_GA_Reocor_D_mul.book Page 269 Monday, January 26, 2015 3:35 PM
269
Regolare la frequenza di stimolazione con la manopola di
regolazione Rate (18).
Impostare il ritardo AV con la manopola di regolazione AV
delay (15)1.
Regolare l'ampiezza di stimolazione per l'atrio1 e il ventricolo con le manopole di regolazione Atrium Ampl. (10)1
e Ventricle Ampl. (6).
•
Selezionare il modo di stimolazione con la manopola di
regolazione Mode (17). Con queste regolazioni si attiva il
dispositivo.
•
Una volta concluso senza errori l'autotest interno lampeggiano contemporaneamente i cinque LED del quadro
comandi per due volte.
•
Quando il LED Low battery (3) lampeggia, si deve cambiare la batteria (per la sostituzione della batteria vedere
pag. 270).
•
Collegare gli elettrocateteri, i LED gialli Atrium Pace (8)1
e Ventricle Pace (4) lampeggiano in sincronia con gli
impulsi di stimolazione atriali o ventricolari.
•
Impostare la sensibilità per atrio e ventricolo con le
manopole di regolazione Atrium Sens (11)1 e Ventricle
Sens. (7) in modo tale che i LED verdi Atrium Sense (9)1 e
Ventricle Sense (5) lampeggino in sincronia con ogni
evento atriale o ventricolare rilevato.
È opportuno prevedere un margine di sicurezza sufficiente per garantire un sensing affidabile.
•
1
Tenere sotto controllo l'elettrocardiogramma del
paziente ed eventualmente adattare l'ampiezza e la sensibilità.
Solo per stimolazione bicamerale
Deutsch
Preparare il Reocor
Español
•
Français
Preparare il paziente: applicare gli elettrocateteri, aspettando però a collegare il pacemaker.
Magyar
•
Italiano
Far scivolare la copertura del quadro comandi verso il
basso
Nederlands
Inserire la batteria
•
Polski
•
Português
Il comando del Reocor D è uguale in tutti i modi di funzionamento. Si consiglia di effettuare i passi operativi nel seguente
ordine (i numeri tra parentesi si riferiscono alla figura 1 a
pagina 260 del presente manuale tecnico di istruzione).
Česky
Messa in esercizio
394271--J_GA_Reocor_D_mul.book Page 270 Monday, January 26, 2015 3:35 PM
270
Attenzione!
Durante l'utilizzo del Reocor D è necessario tenere sotto controllo la frequenza cardiaca del paziente con un monitor ECG
provvisto di funzione di allarme.
Fissaggio
Utilizzare Reocor D adagiandolo su una superficie orizzontale
antiscivolo oppure fissandolo al paziente con il bracciale o
agganciandone l'occhiello situato sul lato posteriore ad
un'asta portaflebo.
Per poter fissare il Reocor D ad un'asta portaflebo ruotare in
fuori l'occhiello di aggancio situato sul lato posteriore del
dispositivo. In questo modo si garantisce un impiego sicuro
evitando la trazione dei cavi paziente.
Sostituzione della batteria
Quando il LED Low battery (3) inizia a lampeggiare la batteria
è quasi esaurita. Con batterie di tipo MN 1604 Duracell®
Procell® restano circa 36 ore di vita di servizio. Tuttavia, si
deve sostituire la batteria il prima possibile.
Reocor D deve funzionare con una batteria da 9 V, con codice
internazionale IEC 6LR61. Vanno utilizzate solo batterie di
tipo alcalino-manganese a prova di perdite. Con batterie di
tipo MN 1604 Duracell® Procell® la stimolazione esterna
viene garantita a 20 ± 2 °C per circa 500 ore prima che si
renda necessaria la sostituzione della batteria.
Se il cambio di batteria avviene durante il funzionamento il
Reocor D rimane operativo ancora per ca. 30 s se la temperatura ambiente è di 20 ± 2 °C.
Per ragioni di sicurezza si dovrebbe tuttavia provvedere a
garantire l'alimentazione in altro modo per tutelare il
paziente.
Non utilizzare batterie ricaricabili (accumulatori). La durata
di servizio di queste batterie non è prevedibile e può accadere
che si superi inaspettatamente il momento ERI con interruzione improvvisa della stimolazione.
Il contenitore delle batterie (2) si trova sul bordo laterale
destro del dispositivo e si apre spingendo la copertura blu
verso l'alto e tirando il cassetto verso destra. Estrarre la
batteria con delicatezza.
È possibile che sulla nuova batteria sia applicato un tappo di
gomma per proteggerne i poli. Toglierlo prima di inserire la
nuova batteria.
Attenzione!
Nel contenitore delle batterie è indicata la polarità preferibile.
Quando si inserisce la batteria nuova si deve tuttavia solo fare
in modo che i poli siano rivolti verso il centro del contenitore.
La posizione del polo positivo e del polo negativo può essere
scelta a piacere.
Figure 15: inserimento della batteria
Français
Español
Inserire la batteria nuova introducendo per primo il fondo
(fig. 15) in modo che sia rivolto verso la base del contenitore
delle batterie.
Deutsch
271
Česky
English
394271--J_GA_Reocor_D_mul.book Page 271 Monday, January 26, 2015 3:35 PM
Italiano
Nederlands
Polski
quando il pacemaker viene riposto e non viene utilizzato per
un periodo di tempo prolungato si deve estrarre la batteria
per evitare perdite che lo danneggino.
Português
Nota:
Magyar
Chiudere il cassetto e spostare la copertura blu verso il basso
finché non scatta in modo udibile.
394271--J_GA_Reocor_D_mul.book Page 272 Monday, January 26, 2015 3:35 PM
272
Modi di stimolazione e parametri
Modi di stimolazione
Reocor D opera in uno dei seguenti sei modi di stimolazione:
DDD
Stimolazione sincrona A/V con sensing e stimolazione sia nell'atrio che nel ventricolo.
VDD
Stimolazione ventricolare sincrona con trascinamento atriale.
D00
Stimolazione asincrona A/V, senza sensing nelle due camere.
VVI
Sensing e stimolazione nel ventricolo
V00
Stimolazione asincrona nel ventricolo
VVT
Come VVI, ma con emissione immediata dell'impulso in caso di sensing di un evento
ventricolare al di fuori del periodo refrattario
In caso di rumore dovuto a interferenza elettromagnetica
Reocor D seleziona una stimolazione asincrona, quando
vengono superati determinati valori limite. A seconda che il
rumore venga rilevato nell'atrio o nel ventricolo si hanno i
seguenti modi di funzionamento per la durata dei disturbi
Modo senza interferenze
A seguito di interferenze
elettromagnetiche
SSI, SST
S00
VDD
VAT, VVI, V00
DDD
DAD, DVI, D00
Periodi refrattari
La frequenza fino alla quale vengono stimolati i ventricoli in
sincronia con gli eventi rilevati a livello atriale (frequenza
massima) viene determinata dal periodo refrattario atriale
(atrial refractory period, ARP). La sequenza temporale è
avviata da eventi rilevati e stimolati a livello atriale e da extrasistoli ventricolari percepite che resettano l'intervallo base.
Quando viene superata la frequenza massima un impulso
atriale su due passa in periodo refrattario atriale, non viene
rilevato e non provoca nessun impulso ventricolare. La
frequenza di stimolazione ventricolare prosegue con un
rapporto di 2:1 (fig. 16).
English
394271--J_GA_Reocor_D_mul.book Page 273 Monday, January 26, 2015 3:35 PM
200 ms
Superiore a 200 bpm
175 ms
Frequenza
La frequenza può essere modificata in modo continuo con la
manopola di regolazione Rate (18) da 30 bpm a 250 bpm.
Quando si imposta un valore di oltre 180 bpm, il dispositivo
emette un segnale d'allarme acustico per 2 secondi.
AVVERTENZA!
Una stimolazione cardiaca con frequenze superiori a
180 bpm per un intervallo di tempo prolungato può provocare
gravi complicazioni emodinamiche. Una stimolazione con
frequenze elevate deve essere eseguita solo quando è garantito un monitoraggio continuo.
Français
Magyar
225 ms
Da 150 bpm a 200 bpm
Italiano
Periodo refrattario VRP
Nederlands
Frequenza di stimolazione
Inferiore a 150 bpm
Polski
Il periodo refrattario atriale totale (TARP) di Reocor D è il
risultato della somma di 175 ms e del ritardo AV impostato,
ma il suo valore minimo è 400 ms al di sotto di una frequenza
di stimolazione di 120 bpm. Al di sopra di questa frequenza il
TARP minimo si riduce a 240 ms. Il periodo refrattario ventricolare (VRP) di Reocor D dipende dalla frequenza di stimolazione:
Português
Figure 16: reazione della frequenza massima durante le tachicardie atriali
(frequenza base 72 bpm).
Español
Deutsch
Česky
273
394271--J_GA_Reocor_D_mul.book Page 274 Monday, January 26, 2015 3:35 PM
274
Ritardo AV
Il ritardo AV può essere regolato in modo continuo con la
manopola di regolazione ritardo AV (15) da 15 ms a 400 ms.
Si possono selezionare ritardi AV brevi per indicazioni speciali, ad es. in caso di tachicardie che si ripetono.
Reocor D prevede un limite superiore per il ritardo AV corrispondente alla metà dell'intervallo base.
Ampiezza dell'impulso – atrio/ventricolo
Le ampiezze dell'impulso per atrio e ventricolo possono
essere regolate con le manopole di regolazione Ampl. (10) e
(6) nel campo compreso tra 0,1 V e 17 V. Quando si imposta un
valore inferiore a 1 V, il dispositivo emette un segnale
d'allarme acustico per 2 secondi.
La durata dell'impulso è di 1 ms.
È opportuno controllare la stimolazione a intervalli regolari
per garantire che essa abbia luogo e sia impostato un margine di sicurezza sufficiente.
Sensibilità – atrio
La sensibilità può essere impostata con la manopola di regolazione Atrium Sens. (11) tra 0,2 mV e 10 mV. È opportuno
controllarla a intervalli regolari per garantire che abbia luogo
un sensing corretto e sia impostato un margine di sicurezza
sufficiente.
Sensibilità – ventricolo
La sensibilità può essere impostata con la manopola di regolazione Ventricle Sens. (7) tra 1 mV e 20 mV. È opportuno controllare la sensibilità a intervalli regolari per garantire che
abbia luogo un sensing corretto e sia impostato un margine di
sicurezza sufficiente.
Cross Channel Blanking
Dopo l'emissione di uno stimolo viene soppresso per 19 ms
± 3 ms il sensing nell'altro canale per evitare un sensing
far-field.
Intervallo di rumore
L'intervallo di rumore viene avviato sia da eventi atriali e
ventricolari stimolati che da quelli rilevati.
L'intervallo viene azzerato dalla percezione di rumore in uno
qualsiasi dei canali durante l'intervallo di 80 ms, con conseguente stimolazione asincrona alla frequenza programmata,
della stessa durata dell'interferenza.
275
Ad esempio, un'interferenza atriale nel modo DDD provoca
così una stimolazione DVI senza pregiudicare l'attività del
canale ventricolare. Il sensing di un rumore nel canale ventricolare provoca una stimolazione DAD.
Česky
English
394271--J_GA_Reocor_D_mul.book Page 275 Monday, January 26, 2015 3:35 PM
Una stimolazione del cuore con frequenze superiori a
180 bpm per un intervallo di tempo prolungato può provocare
gravi complicazioni emodinamiche. Una stimolazione con
frequenze elevate deve essere eseguita solo quando è garantito un monitoraggio continuo.
Il modo per la stimolazione ad alta frequenza serve per concludere determinate tachicardie sopraventricolari (SVT) e
dovrebbe essere preso in considerazione solo per applicazioni atriali. L'applicazione di stimoli asincroni ad alta frequenza può interrompere una SVT mediante depolarizzazione
di tratti di un percorso da rientro. Anche quando un focolaio
atriale ectopico è responsabile di una SVT l'applicazione di
stimoli a frequenze elevate all'atrio può tradursi in una soppressione maggiore del centro ectopico.
Per quanto riguarda la stimolazione atriale a frequenze elevate si devono considerare diversi rischi. Tra questi ci sono la
possibile stimolazione ventricolare e la tachicardia ventricolare o fibrillazione. Ciò può essere causato da un posizionamento sbagliato degli elettrocateteri o dalla presenza di percorsi di eccitazione anomali, che aggirano il normale sistema
di conduzione dell'eccitazione atrioventricolare (ad es. nella
sindrome di Wolff-Parkinson-White). Altri possibili problemi
possono essere disagio del paziente e asistolie dopo una
stimolazione ad alta frequenza.
Español
Français
Magyar
Dopo una stimolazione burst nell'atrio l'intervallo di blanking
ventricolare può impedire il sensing di eventi intrinseci provocando una stimolazione asincrona nel ventricolo.
Italiano
AVVERTENZA!
Nederlands
L'attivazione di questa funzione avviene con 2 pulsanti: prima
si deve premere il pulsante (16) Select burst e poi, entro
2 secondi, il pulsante (12) Start burst. L'emissione
dell'impulso avviene finché questo pulsante viene premuto.
Il canale ventricolare continua a stimolare con la frequenza
impostata che nel frattempo può anche essere corretta. Se è
impostato un modo di funzionamento inibente avviene un'inibizione ventricolare.
Polski
La frequenza della funzione atriale Burst rate atrium può
essere selezionata con la manopola di regolazione (14) tra
60 bpm e 1000 bpm.
Português
Burst
Deutsch
L'interferenza in entrambi i canali provoca una stimolazione
D00.
394271--J_GA_Reocor_D_mul.book Page 276 Monday, January 26, 2015 3:35 PM
276
Utilizzo, manutenzione e cura
Reocor D
Reocor D è un dispositivo di precisione altamente tecnologico
che deve essere usato con cautela. Se sottoposto a sollecitazioni meccaniche, ad es. in caso di caduta, la sua funzione
può essere pregiudicata.
In questo caso spedire il dispositivo a BIOTRONIK.
Prima dell'uso si deve far riposare il pacemaker per almeno
2 ore alle condizioni ambientali previste per il funzionamento
(v. pag. 282).
Prima di ogni impiego esaminare con un controllo visivo se la
cassa, gli elementi di comando, i punti di connessione e i cavi
paziente hanno subito danneggiamenti meccanici, deformazioni e se presentano pezzi staccati, incrinature e tracce di
sporco.
AVVERTENZA!
Non utilizzare mai un dispositivo danneggiato o che presenti
anomalie, in particolare se è caduto o potrebbe aver subito
danni a causa della tensione o della defibrillazione ad alta
frequenza.
Utilizzare Reocor D adagiandolo su una superficie orizzontale
antiscivolo oppure fissandolo al paziente con il bracciale o
agganciandone l'occhiello situato sul lato posteriore ad
un'asta portaflebo.
Attenzione!
Quando si utilizza un bracciale non si deve applicare
Reocor D a contatto diretto con la pelle.
Pulizia
Per la pulizia di Reocor D si può usare un panno umido ed
eventualmente del sapone delicato. Va evitato l'impiego di
detergenti aggressivi o solventi organici, come ad es. etere o
benzina, perché possono intaccare la cassa di plastica.
Disinfezione
Per la disinfezione passare sul dispositivo un panno imbevuto
con una soluzione disinfettante (ad es. Aerodesin 2000 o
Lysoform D). Quando si applica la soluzione attenersi alle
quantità indicate dal produttore riguardanti la diluizione.
Nota:
Dopo una pulizia o disinfezione Reocor D non va utilizzato per
un'ora.
Sterilizzazione
Reocor D non può essere sterilizzato. Se il dispositivo deve
essere utilizzato in un ambiente sterile può essere imballato
in un involucro sterile.
Si raccomanda di consegnare il dispositivo a tecnici autorizzati per l'esecuzione di controlli annuali.
Attenzione!
Sebbene Reocor D sia protetto contro le gocce d'acqua va
mantenuto pulito e asciutto.
English
394271--J_GA_Reocor_D_mul.book Page 277 Monday, January 26, 2015 3:35 PM
277
Dopo la disinfezione il cavo deve essere pulito dai residui di
disinfettante con acqua priva di elettroliti.
Sterilizzazione
Se non indicato diversamente nei manuali dei cavi paziente,
tutti i cavi paziente possono essere sterilizzati nel modo
seguente:
•
Sterilizzazione a vapore a 121 °C e 1,1 bar per 20 min
Inoltre, i cavi paziente PK-175 e PK-83-B possono essere sterilizzati come indicato di seguito:
•
Sterilizzazione a vapore a 134 °C e 3,0 bar per 18 min
Manutenzione, assistenza, ispezione
L'unico provvedimento di manutenzione necessario è la
sostituzione della batteria (vedere pag. 270).
Altri lavori di manutenzione non sono necessari.
Controllo prima
dell'uso
Prima di ogni uso del dispositivo si deve eseguire un breve
controllo. Esso comprende un controllo visivo e un semplice
controllo del funzionamento.
Deutsch
Español
Français
Per un bagno di disinfettante utilizzare un prodotto per strumenti a base aldeidica (ad es. Lysoformin 3000) o a base di
alcool (ad es. Aerodesin 2000) secondo le indicazioni del produttore e tenendo conto delle rispettive direttive ospedaliere.
Controllo visivo:
•
Controllo della cassa al fine di individuare danni meccanici, deformazioni, elementi allentati, incrinature, ecc.
•
Controllo della zona di connessione dei cavi per individuare danni meccanici
•
Controllo della leggibilità delle scritte
Controllo del funzionamento:
Tenere conto del risultato dell'autotest che viene eseguito
automaticamente dopo l'accensione.
Polski
Disinfezione
Magyar
Il metodo di pulizia da noi consigliato per i cavi è l'utilizzo di
un panno e di un comune sapone per le mani privo di alcool o
del detergente Stabimed della Braun. Successivamente
vanno eliminati i residui di detergente dai cavi con acqua
senza elettroliti e i cavi devono essere poi asciugati con un
panno pulito e asciutto.
Italiano
I cavi paziente riutilizzabili possono essere puliti e disinfettati
con molti metodi differenti mediante detergenti per uso ospedaliero. Non vanno tuttavia mai usati prodotti chimici aggressivi, come l'acetone.
Português
Pulizia
Nederlands
Controllare se la confezione di un cavo sterile è danneggiata,
prima di aprirla, per verificarne la sterilità.
Česky
Cavi paziente riutilizzabili
394271--J_GA_Reocor_D_mul.book Page 278 Monday, January 26, 2015 3:35 PM
278
Ispezione
L'ispezione deve essere eseguita
•
dopo l'utilizzo del dispositivo con strumenti chirurgici ad
alta frequenza o defibrillatori,
•
in caso di sospetto di disfunzioni,
•
una volta l'anno.
Questa ispezione deve avvenire in modo conforme alle indicazioni del produttore. Esse vengono messe a disposizione su
richiesta. Tali indicazioni comprendono tutte le operazioni di
controllo necessarie e gli apparecchi richiesti a tale scopo.
Smaltimento
Reocor D porta sulla targhetta il simbolo di un bidone dei
rifiuti barrato. Questo simbolo significa che per la ripresa in
consegna e lo smaltimento del dispositivo vale la direttiva
europea 2002/96/CE sui rifiuti delle apparecchiature elettriche ed elettroniche ( Direttiva 2002/96/CE del Parlamento
europeo e del Consiglio del 27 gennaio 2003).
I dispositivi vecchi e gli accessori non più utilizzati, come
ad es. cavi paziente e adattatori, devono essere spediti a
BIOTRONIK. In questo modo ci si assicura che lo smaltimento
dei rifiuti avvenga in conformità con l'applicazione nazionale
della direttiva RAEE.
Nota:
i cavi che sono venuti a contatto con il sangue devono essere
smaltiti correttamente secondo le disposizioni ambientali per
i rifiuti medici contaminati. I cavi non contaminati devono
essere smaltiti secondo la direttiva europea 2002/96/CE sui
rifiuti di apparecchiature elettriche ed elettroniche (RAEE).
Le batterie esaurite devono essere trattate come rifiuti
speciali e smaltite dall'utilizzatore.
Per eventuali domande, rivolgersi a BIOTRONIK.
English
394271--J_GA_Reocor_D_mul.book Page 279 Monday, January 26, 2015 3:35 PM
279
La costruzione è conforme agli standard per la classe di
apparecchi CF (cardiac floating) ed è omologata per il
trattamento diretto del cuore. Il pacemaker soddisfa i
requisiti prescritti dagli standard internazionali per la
protezione dal rischio di defibrillazione.
•
La copertura del quadro comandi chiusa protegge il
pacemaker dalle gocce d'acqua.
Gli elettrocateteri temporanei collegati al Reocor D costituiscono una linea di alimentazione a bassa impedenza verso il
miocardio per la corrente elettrica. I dispositivi alimentati
dalla rete utilizzati in prossimità del paziente devono pertanto
essere messi a terra in conformità alle norme vigenti.
Il pacemaker non può essere utilizzato in aree soggette al
rischio di esplosione.
Deutsch
•
Español
Nessuna parte metallica può essere toccata come previsto dalla definizione secondo IEC.
Polski
Nederlands
Italiano
Tutti i lavori di manutenzione e le riparazioni ulteriori devono
essere eseguiti da BIOTRONIK.
Português
AVVERTENZA!
•
Français
Le seguenti caratteristiche speciali offrono sicurezza per il
paziente:
Magyar
Il pacemaker esterno Reocor D è conforme agli standard
internazionali per la sicurezza degli apparecchi elettromedicali previsti da IEC 60601-1 e IEC 60601-1-2 e allo standard
internazionale IEC 60601-2-31 per pacemaker esterni temporanei.
Česky
Sicurezza tecnica
394271--J_GA_Reocor_D_mul.book Page 280 Monday, January 26, 2015 3:35 PM
280
Dati Tecnici
Simboli
Osservare le note contenute nel manuale tecnico di istruzione
Marcatura della posizione della batteria nel contenitore delle
batterie
Smaltimento conforme alla Direttiva 2002/96/CE del Parlamento
europeo e del Consiglio del 27 gennaio 2003 sui rifiuti di apparecchiature elettriche ed elettroniche
Classificazione componente CF (cardiac floating), protetto contro gli
shock di defibrillazione
IP31
Idrorepellente, grado di protezione IP31
OFF
Disinserito (sulla manopola di regolazione Mode)
Parametri impostabili
Modi di stimolazione
DDD, D00, VDD, VVI, V00, VVT
Frequenza base
(30 … 250 bpm) ± 1 bpm
Ad una frequenza > 180 bpm
viene emesso un segnale di
avvertimento
Ampiezza dell'impulso
(A, V)
0,1 … 17 V ± max (50 mV, 10%)
Ad un'ampiezza dell'impulso
< 1 V viene emesso un segnale di
avvertimento
Sensibilità (A)
0,2 … 10 mV ± 15%
O impulso 15 ms sin2
Sensibilità (V)
1 … 20 mV ± 15%
O impulso 40 ms sin2
Ritardo AV
(15 … 400 ms) ± 4 ms
Frequenza Burst (A)
(60 … 1000 bpm) ± 20 bpm
Parametri predefiniti
Durata impulso
1 ms ± 5%
Auto short dopo Pace
< 20 ms ± 10%
Intervallo di rumore
80 ms ± 5 ms
In channel blanking
110 ms ± 3 ms
Cross Channel Blanking
19 ms ± 3 ms
Periodo refrattario atriale
totale (TARP)
Ritardo AV +175 ms ± 5 ms
English
394271--J_GA_Reocor_D_mul.book Page 281 Monday, January 26, 2015 3:35 PM
281
Periodo refrattario: (V)
(30 … 150) bpm
(151 … 200) bpm
(201 … 250) bpm
225 ms ± 5 ms
200 ms ± 5 ms
175 ms ± 5 ms
Frequenza massima
260 bpm ± 10%
Protezione alta
frequenza
1 … 180 bpm
286 ms ± 10%
214 ms ± 10%
181 … 250 bpm
Forma dell'impulso
286 ms = 210 bpm, non vale per il
Burst
214 ms = 280 bpm, non vale per il
Burst
Asimmetrica, bifasica
Deutsch
400 ms ± 5 ms
240 ms ± 5 ms
Español
TARP minimo
per (30 … 120) bpm
per (121 … 250) bpm
Česky
Parametri predefiniti
Avvertimento acustico
Da 2000 Ω ± 15%, con 5 V di ampiezza
Connessione degli elettrocateteri
Prese da 2 mm isolate; connettore Redel, a 6 poli mediante
adattatore per connettori Redel
Français
Controllo dell'impedenza degli elettrocateteri
•
•
•
Polarità
Catodica
Protezione da inversione di
polarità
Nessuna: La polarità è irrilevante
Consumo di corrente
Normalm. 1 mA (70 bpm, 5,0 V, 500 Ω )
Durata di servizio con la batteria •
•
nuovab)
•
500 h (-10%) a 20 °C (± 2°C)
Con: 70 bpm, 5 V, modo DDD, 500 ohm
Fino a: segnale ERI (avvertimento EOS)
36 ore
Con: 70 bpm, 5 V, modo DDD, 500 ohm
Comportamento durante
il cambio della batteria
Il dispositivo rimane operativo per almeno 30 s dopo
l'estrazione della batteria.
L'impostazione del modo non viene perduta.
•
•
a)
b)
Marchio registrato di Duracell Inc., Bethel, CT 06801
Con batterie di tipo MN 1604 Duracell®, Procell®
Polski
Durata di servizio residua dopo il •
•
segnale ERIb)
Nederlands
Lampeggio del LED "Low battery"
Português
Fine della durata di servizio
(EOS)
Tipo alcalino-manganese: IEC 6LR61 / ANSI 1604A
9 V a prova di perdite
Ad es. MN1604 Duracell® Procell® a)
Italiano
Batteria
Magyar
Dati elettrici/Batteria
394271--J_GA_Reocor_D_mul.book Page 282 Monday, January 26, 2015 3:35 PM
282
Condizioni ambientali
Campo di temperatura per il
funzionamento
+10 °C … +40 °C
Campo di temperatura per
l'immagazzinamento
0 °C … +50 °C
Umidità relativa dell'aria
30% … 75%, senza condensa
Pressione atmosferica
700 hPa … 1060 hPa
Livello di rumore
50 dB
Dimensioni, peso, materiale
Dimensioni Reocor D
160 mm x 75 mm x 35 mm (senza adattatore Redel)
Peso Reocor D
Con batteria, con adattatore Redel: 325 g ± 10 %
Senza batteria, con adattatore Redel: 280 g ± 10 %
Senza batteria, senza adattatore Redel: 240 g ± 10 %
Dimensioni adattatore Redel
per Reocor D
76 mm x 35,5 mm x 29,4 mm
Peso adattatore Redel per
Reocor D
40 g ± 10%
Materiale cassa
Babyblend FR 3000 (PC e ABS)
Classificazione
Classificazione componente
CF (cardiac floating), protetto contro gli shock di
defibrillazione
Classe di protezione
II b
Grado di protezione
IP31 (idrorepellente)
Resistenza agli shock di
defibrillazione
5 kV
Modo di funzionamento
Funzionamento continuo
Durata di servizio previstaa)
(secondo la norma
EN 60601-1:2007, 4.4)
12 anni
a)
La vita di servizio è la durata di servizio prevista per il dispositivo dopo la messa in funzione.
La durata di servizio prevista non è sostenuta da dati di test.
English
394271--J_GA_Reocor_D_mul.book Page 283 Monday, January 26, 2015 3:35 PM
283
Emissione ad alta
frequenza conforme a
CISPR 11
Classe B
Il dispositivo è idoneo per l'uso in tutte le strutture, tranne l'ambiente abitativo ed edifici che
sono collegati direttamente alla rete di alimentazione pubblica.
Emissione di armoniche a Non applicabile
norma IEC 61000-3-2
Variazioni di tensione a
norma IEC 61000-3-3
Non applicabile
Linee guida e spiegazione del produttore Immunità alle interferenze elettromagnetiche
(IEC 60601-1-2: tabella 2)
Il dispositivo è previsto per il funzionamento nell'ambiente
elettromagnetico descritto sotto. L'utilizzatore del dispositivo
deve garantire che esso venga utilizzato in questo tipo di
ambiente.
Verifica di immunità
alle interferenze
Livello di test a
Livello di
norma IEC 60601 conformità
Scarica di elettricità
statica (ESD) a norma
IEC 61000-4-2
±6 kV scarica dei
contatti
±8 kV scarica
dell'aria
Non applicabile
Disturbi transitori
elettrici veloci / burst a
norma IEC 61000-4-4
Tensioni impulsive
(surge) a norma
IEC 61000-4-5
Non applicabile
±6 kV scarica dei
contatti
±15 kV scarica
dell'aria
Linee guida per l'ambiente
elettromagnetico
I pavimenti dovrebbero essere di
legno, cemento o mattonelle in
ceramica. Se il pavimento è di
materiale sintetico, l'umidità relativa deve essere minimo del 30%.
Deutsch
Il dispositivo fa uso di energia ad alta frequenza
esclusivamente per il suo funzionamento. Per
questo l'emissione di interferenze ad alta frequenza è estremamente bassa e la probabilità di
disturbare altri apparecchi elettronici nelle vicinanze è scarsa.
Español
Gruppo 1
Français
Emissione ad alta
frequenza conforme a
CISPR 11
Magyar
Linee guida per l'ambiente elettromagnetico
Italiano
Livello di
conformità
Nederlands
Test interferenze
Polski
Il dispositivo è previsto per il funzionamento nell'ambiente
elettromagnetico descritto sotto. L'utilizzatore deve garantire
che il dispositivo venga utilizzato in questo tipo di ambiente.
Português
Linee guida e spiegazione del produttore –
Emissioni elettromagnetiche (IEC 60601-1-2: tabella 1)
Česky
Conformità alla norma IEC 60601-1-2
394271--J_GA_Reocor_D_mul.book Page 284 Monday, January 26, 2015 3:35 PM
284
Verifica di immunità
alle interferenze
Livello di test a
Livello di
norma IEC 60601 conformità
Linee guida per l'ambiente
elettromagnetico
Vuoti di tensione, brevi Non applicabile
interruzioni e variazioni della tensione di
alimentazione a
norma IEC 61000-4-11
Campo magnetico
con le frequenze di
alimentazione
(50/60Hz) a norma
IEC 61000-4-8
3 A/m
30 A/m
L'intensità del campo magnetico
dovrebbe corrispondere al valore
standard di un ambiente commerciale e ospedaliero.
Linee guida e spiegazione del produttore – immunità alle
interferenze elettromagnetiche per tutti i modelli di
pacemaker esterni (IEC 60601-1-2: tabella 3)
Il dispositivo è previsto per il funzionamento nell'ambiente
elettromagnetico descritto sotto. L'utilizzatore del dispositivo
deve garantire che esso venga utilizzato in questo tipo di
ambiente.
Verifica di
immunità alle
interferenze
Livello di test a norma Livello di
IEC 60601
conformità
Linee guida per l'ambiente
elettromagnetico
Gli apparecchi radio portatili
e mobili, compresi i cavi, non
devono essere utilizzati ad una
distanza da qualsiasi parte del
dispositivo che sia inferiore alla
distanza di sicurezza
raccomandata.
Distanza di sicurezza
raccomandata:
Grandezze perturbatrici condotte a
norma
IEC 61000-4-6
Grandezze perturbatrici irradiate a
norma
IEC 61000-4-3
10 Vrms
da 10 kHz a 80 MHz
al di fuori delle bande
ISMa
10 Vrms
10 Vrms
da 10 kHz a 80 MHz
nelle bande ISMa)
10 Vrms
10 V/m
da 800 MHz a 2,5 GHz
10 V/m
d = 0,35
P
d = 1,2
P
d = 1,2
P
per 80 MHz – 800 MHz
d = 2,3
P
per 800 MHz – 2,5 GHz
NOTA: è possibile che queste linee guida non valgano in tutti i casi. La diffusione delle onde elettromagnetiche è influenzata dall'assorbimento e dalla riflessione di palazzi, oggetti e persone.
a)
b)
c)
d)
Le bande ISM (per applicazioni industriali, scientifiche e medicali) tra 150 kHz e 80 MHz sono
6,765 MHz – 6,795 MHz; 13,553 MHz – 13,567 MHz; 26,957 MHz – 27,283 MHz e 40,66 MHz –
40,70 MHz.
Il livello di conformità delle bande di frequenza ISM tra 150 kHz e 80 MHz e nella gamma di
frequenze 80 MHz – 2,5 GHz devono ridurre la probabilità, che i dispositivi di comunicazione
mobili provochino disturbi, quando vengono inavvertitamente avvicinati alla zona in cui si trova
il paziente. In queste gamme di frequenze si consiglia pertanto una maggiore distanza di sicurezza (fattore 1,2 invece di 0,35).
Le intensità del campo di trasmettitori fissi, come ad es. delle stazioni base per telefoni cellulari, apparecchi cellulari, radio amatoriali, radio e televisione non possono in teoria essere
previste con esattezza. Per la valutazione dell'ambiente elettromagnetico con trasmettitori
HF fissi si dovrebbe prevedere uno studio del luogo. Se l'intensità del campo misurata sul
luogo in cui si impiega il dispositivo supera il suddetto livello di conformità per l'alta frequenza, è necessario osservare il dispositivo per verificare che funzioni in modo conforme.
Eventualmente si devono prendere ulteriori provvedimenti, come ad es. un altro orientamento
o un altro luogo di installazione del pacemaker esterno.
Nella gamma di frequenze compresa tra 150 kHz e 80 MHz le intensità del campo non devono
essere inferiori a 10 V/m.
Deutsch
Español
Nelle vicinanze di apparecchi con
questo simbolo è possibile che si
verifichino delle interferenze.
Français
L'intensità del campo di trasmettitori radio fissi deve risultare,
mediante opportune ispezioni in
lococ) , inferiore al livello di conformità in tutte le frequenzed).
Magyar
Con P come potenza nominale
massima del trasmettitore in Watt
[W] in base alle indicazioni del
fabbricante del trasmettitore e
d come distanza di sicurezza
raccomandata in metri [m]b).
Italiano
Linee guida per l'ambiente
elettromagnetico
Nederlands
Livello di test a norma Livello di
IEC 60601
conformità
Polski
Verifica di
immunità alle
interferenze
Português
285
Česky
English
394271--J_GA_Reocor_D_mul.book Page 285 Monday, January 26, 2015 3:35 PM
394271--J_GA_Reocor_D_mul.book Page 286 Monday, January 26, 2015 3:35 PM
286
Distanze di sicurezza raccomandate dagli apparecchi di
telecomunicazione HF portatili e mobili (IEC 60601-1-2:
tabella 5)
Il dispositivo è previsto per il funzionamento in un ambiente
elettromagnetico, in cui le grandezze perturbatrici sono controllate. L'utilizzatore del dispositivo può contribuire ad evitare interferenze elettromagnetiche attenendosi alla distanza
di sicurezza – dipendente dalla potenza in uscita dell'apparecchio di comunicazione, come indicato in basso – dagli
apparecchi di telecomunicazioni HF mobili (trasmettitori).
Potenza nomiDistanza di sicurezza d [m] in base alla frequenza di trasmissione
nale del trasmet- Da 150 kHz a
Da 150 kHz a
Da 80 MHz a
Da 800 MHz a
titore P [W]
80 MHz al di fuori 80 MHz nelle
800 MHz
2,5 GHz
delle bande ISM
bande ISM
d = 0,35
P
d = 1,2
P
d = 1,2
P
d = 2,3
0,01
0,04
0,12
0,12
0,23
0,10
0,11
0,38
0,38
0,73
1,00
0,35
1,20
1,20
2,30
10,00
1,11
3,79
3,79
7,27
100,00
3,50
12,00
12,00
23,00
P
Per trasmettitori, la cui potenza nominale non è riportata nella tabella in alto, si può calcolare la
distanza di sicurezza utilizzando la formula fornita per la rispettiva frequenza del trasmettitore.
In questo caso P è la potenza nominale del trasmettitore espressa in Watt [W], d la distanza di
sicurezza espressa in metri [m].
NOTA 1: le bande ISM (per applicazioni industriali, scientifiche e medicali) tra 150 kHz e 80 MHz
sono 6,765 MHz – 6,795 MHz; 13,553 MHz – 13,567 MHz; 26,957 MHz – 27,283 MHz e 40,66 MHz –
40,70 MHz.
NOTA 2: il livello di conformità delle bande di frequenza ISM tra 150 kHz e 80 MHz e nella gamma
di frequenze 80 MHz – 2,5 GHz devono ridurre la probabilità, che i dispositivi di comunicazione
mobili provochino disturbi, quando vengono inavvertitamente avvicinati alla zona in cui si trova il
paziente. In queste gamme di frequenze si consiglia pertanto una maggiore distanza di sicurezza
(fattore 1,2 invece di 0,35).
NOTA 3: è possibile che queste linee guida non valgano in tutti i casi. La diffusione delle onde elettromagnetiche è influenzata dall'assorbimento e dalla riflessione di palazzi, oggetti e persone.
English
394271--J_GA_Reocor_D_mul.book Page 287 Monday, January 26, 2015 3:35 PM
287
Nota:
Reocor D può essere utilizzato solo con gli accessori sviluppati e testati per questo pacemaker.
Česky
Contenuto della confezione e accessori
1
Nota
N° d'ordine
Batteria
1
Duracell Plus, 6LR61
–
Bracciale
– Per il Giappone
– Per tutti gli altri paesi
1
Corto
391843
1
Standard
Adattatore Redel
1
365529
103704
371262
Copertura del quadro comandi
1
378007
Manuale tecnico di istruzione
1
394271
Manuale tecnico ZH
368702
Guida rapida DE
370123
Guida rapida EN
371300
Guida rapida ES
371301
Guida rapida FR
371302
Guida rapida IT
1
371303
372230
Guida rapida ZH
371304
Custodia
1
379384
Magyar
Guida rapida PT
Español
Quant.
Reocor D
Français
Denominazione articolo
Deutsch
Contenuto della confezione
Connessione
Connessione
diretta
PK-83 (2,5 m)
128563
Cavo paziente con due connettori
filettati isolati, risterilizzabile
Connessione
diretta
PK-83 (1,5 m)
128562
Cavo paziente con due connettori
filettati isolati, risterilizzabile
Connessione
diretta
PK-83-B (2,5 m)
347485
Cavo paziente con due connettori
filettati isolati da 2,3 mm
Adattatore
Redel
PK-83-B (1,5 m)
347606
Cavo paziente con due connettori
filettati isolati da 2,3 mm
Adattatore
Redel
PK-175
333959
Cavo paziente, con quattro connettori
filettati per il collegamento di
elettrocateteri temporanei,
risterilizzabile
Adattatore
Redel
PK-67-L
123672
Cavo paziente, risterilizzabile, per la
combinazione con adattatori PA-1-B,
PA-2, PA-4
Adattatore
Redel
PK-67-S
128085
Cavo paziente, risterilizzabile, per la
combinazione con PK-155 e
Remington modello 301-CG
Adattatore
Redel
PK-141 (2,8 m)
353181
Cavo paziente, risterilizzabile con
quattro morsetti a coccodrillo isolati
Adattatore
Redel
Nederlands
Descrizione
Cavo paziente con due morsetti a
coccodrillo isolati, risterilizzabile
Polski
N° d'ordine
128564
Português
Articolo
PK-82
Italiano
Accessori
394271--J_GA_Reocor_D_mul.book Page 288 Monday, January 26, 2015 3:35 PM
288
Articolo
N° d'ordine
Descrizione
Connessione
Bracciale Reocor
standard
103704
Bracciale standard
–
Bracciale con diametro ridotto.
Indicato per braccia sottili.
–
Bracciale Reocor corto 391843
Solo per gli USA
Articolo
Produttore
Descrizione
Connessione
ADAP-2R
(0,24 m)
Remington
Medical Inc.
Adattatore riutilizzabile per cavi modello
S-101-97 e modello FL-601-97
Adattatore
Redel
Adattatore per PK-67-S e PK-67-L
Articolo
N° d'ordine
Descrizione
PA-1-B
123751
Per la connessione con l'adattatore da 2 mm o l'adattatore
MHW (adattatore per elettrocateteri endocardici),
risterilizzabile
PA-1-C
349723
Per la connessione con l'adattatore da 2 mm o l'adattatore
MHW (adattatore per elettrocateteri endocardici),
risterilizzabile
PA-2
123157
Per la connessione al connettore IS-1, risterilizzabile
PA-4
123090
Con morsetti a coccodrillo, risterilizzabile
PK-155
(set di due cavi)
337358
Cavo paziente sterile, a 2 conduttori con morsetti
a coccodrillo, monouso
Adattatore per PK-67-S e PK-67-L
(solo per gli USA)
Articolo
Produttore
Descrizione
Modello 301-CG
Remington
Medical Inc.
Cavo paziente sterile, a 2 conduttori con morsetti a coccodrillo, monouso
Adattatore per ADAP-2R (solo per gli USA)
Articolo
Produttore
Descrizione
Modello 301-CG
Remington
Medical Inc.
Cavo paziente sterile, a 2 conduttori con morsetti a
coccodrillo, monouso
Modello S-101-97
(2,5 m)
Remington
Medical Inc.
Cavo paziente, a 2 conduttori con morsetti a coccodrillo,
monouso
Modello FL-601-97
(2,0 m)
Remington
Medical Inc.
Cavo paziente, a 2 conduttori con connettori filettati,
monouso
English
394271--J_GA_Reocor_D_mul.book Page 289 Monday, January 26, 2015 3:35 PM
289
I simboli sull'etichetta hanno il seguente significato:
Significato
Numero d'ordine BIOTRONIK
Numero di serie del dispositivo
Español
Adattatore Redel
Deutsch
Reocor D
Range di temperatura consentito per l'immagazzinamento
Français
Data di fabbricazione del dispositivo
Range di umidità consentito per l'immagazzinamento
Magyar
Range di pressione atmosferica consentito per l'immagazzinamento
Contenuto
Italiano
Paziente con elettrocatetere impiantato
Rispettare le istruzioni per l'uso!
Nederlands
Simbolo dello smaltimento
Marchio CE
Polski
Attenzione: le leggi Federali degli U.S.A. restringono la vendita o
l'ordine di questo prodotto ai soli medici.
Português
Simbolo
Česky
Legenda dell'etichetta
394271--J_GA_Reocor_D_mul.book Page 290 Monday, January 26, 2015 3:35 PM
290
English
394271--J_GA_Reocor_D_mul.book Page 291 Monday, January 26, 2015 3:35 PM
291
Hantering, onderhoud en verzorging ...................................................318
Reocor D ................................................................. 318
Hergebruikbare patiëntenkabel ............................. 319
Onderhoud, service, inspecties .............................. 319
Afvalverwijdering .................................................... 320
Deutsch
Español
Français
Magyar
Italiano
Stimulatiemodi en parameters ............................................................313
Stimulatiemodi ....................................................... 313
Refractaire perioden .............................................. 313
Frequentie .............................................................. 314
AV-interval .............................................................. 315
Impulsamplitude – Atrium/ventrikel ..................... 315
Gevoeligheid – Atrium ............................................ 315
Gevoeligheid – Ventrikel ......................................... 315
Cross Channel Blanking ........................................ 315
Interferentie-interval ............................................. 316
Burst ....................................................................... 316
Nederlands
Bedieningsaanwijzingen ......................................................................300
Algemene opmerkingen ......................................... 300
Bedieningselementen en LED's ............................. 301
Bedienveldafdekking .............................................. 302
Elektrodeaansluiting .............................................. 303
Ingebruikname ....................................................... 310
Bevestiging ............................................................. 311
Batterijvervanging .................................................. 311
Polski
Algemene beschrijving ........................................................................293
Productbeschrijving ............................................... 293
Indicaties ................................................................ 294
Contra-indicaties .................................................... 294
Mogelijke bijwerkingen .......................................... 294
Opmerkingen over de hantering ............................ 295
Optische en akoestische signalen .......................... 299
Česky
Inhoud
Technische gegevens ...........................................................................322
Português
Technische veiligheid ...........................................................................321
394271--J_GA_Reocor_D_mul.book Page 292 Monday, January 26, 2015 3:35 PM
292
Conformiteit volgens IEC 60601-1-2 ....................................................325
Leveromvang en toebehoren ................................................................329
Legenda bij het etiket ..........................................................................331
English
394271--J_GA_Reocor_D_mul.book Page 293 Monday, January 26, 2015 3:35 PM
293
Instelbaar zijn stimulatiemodus, frequentie, gevoeligheid en
impulsamplitude, AV-interval en de burstfrequentie.
Lichtdiodes (LED's) tonen de waarneming (Sense), stimulatie
(Pace) en batterijconditie (Low battery) . Een akoestisch
signaal waarschuwt als zeer hoge frequenties of zeer lage
gevoeligheidswaarden zijn ingesteld alsmede bij niet-optimale elektrodeimpedantie.
Een defect van het apparaat (als de zelftest na inschakelen
van het apparaat mislukt) wordt weergegeven door continu
brandende LED's en een impuls-geluidssignaal. Als de zelftest na het inschakelen van het apparaat geen fout heeft ontdekt, gaan de akoestische en optische signalen na een paar
seconden uit.
Deutsch
Español
Er bestaan zes stimulatiemodi ter beschikking:
DDD, D00, VDD, VVI, V00 en VVT alsmede een atriale burstfunctie.
Français
Reocor D is een door een batterij gevoede, externe tweekamer-pacemaker die in combinatie met tijdelijke pacemakerelektroden (inclusief endocardiale elektroden en transveneus
implanteerbare katheters) voor tijdelijke atriale, ventriculaire
en AV-sequentiële pacing in de klinische omgeving wordt
gebruikt. De aansluiting wordt direct of via een aparte patiëntenkabel en eventueel adapter uitgevoerd.
Magyar
Productbeschrijving
Česky
Algemene beschrijving
Microprocessorgestuurde pacingparameters
•
Bewaking van de elektrodeimpedantie
•
Optische waarschuwing bij vroegtijdige uitputting van de
batterij
•
Een verschuifbare, transparante afdekking van de bedieningselementen om onbedoelde wijzigingen van de parameters te voorkomen.
Tijdelijke katheters, hartdraden, elektroden met 2-mmstekkers kunnen direct op Reocor D worden aangesloten.
Bovendien zijn verschillende patiëntenkabels en adapters
beschikbaar. Dit systeem biedt een veilige aansluiting van
transveneuze katheters en myocardiale elektroden die unipolaire of bipolair worden gebruikt.
Nederlands
•
Polski
Optische weergave van waargenomen en gestimuleerde
events
Português
•
Italiano
Tot de veiligheidskenmerken van Reocor D behoren:
394271--J_GA_Reocor_D_mul.book Page 294 Monday, January 26, 2015 3:35 PM
294
Indicaties
De tijdelijke pacing met Reocor D is geschikt voor volgende
toepassingen bij patiënten ongeacht de leeftijd:
• Behandeling van aritmie en hartblok
• Symptomatische sinusbradycardia
• Sinusknoopdysfunctie
• Pre-, intra- en postoperatieve pacing van patiënten met
een hartoperatie
• Beëindiging van supraventriculaire tachyaritmieën
• Profylactische pacing ter preventie van hartritmestoornissen
• Noodgevalpacing
• Controle van de stimulatiedrempels
Contra-indicaties
•
•
•
•
•
•
Reocor D kan niet worden gesteriliseerd en is daarom
niet geschikt voor gebruik binnen een steriele patiëntomgeving.
De atriaal getriggerde stimulatiemodi (DDD en VDD) zijn
contrageïndiceerd bij atriale fibrillatie, atriale flutter en
andere snelle atriale ritmen.
Als door de patiënt hoge ventriculaire frequenties slecht
worden getolereerd (bijvoorbeeld bij angina pectoris),
kunnen boezemgestuurde modi contrageïndiceerd zijn.
Als een retrograde geleiding na ventriculaire pacing
wordt waargenomen, moet eventueel een langere atriale
refractaire periode of korter AV-interval worden geprogrammeerd om door de pacemaker geïnduceerde tachycardie te vermijden. Eventueel is in deze gevallen de programmering van een VVI-modus vereist
De atriale eenkamersimulatie is contrageïndiceerd bij
patiënten met reeds bestaande AV-geleidingsstoringen.
Gebruik van een externe pacemaker is contrageïndiceerd
bij aanwezigheid van een actieve, geïmplanteerde pacemaker.
Mogelijke bijwerkingen
Tot de mogelijke complicaties bij toepassing van tijdelijke,
externe pacing behoren onder andere extrasystolen na plotselinge beëindiging van de pacing (bijvoorbeeld door onbedoeld losmaken van de patiëntenkabel, losmaken van de
elektrode, onjuiste instellingen) of afhankelijkheid van de
pacemaker.
Tot de complicaties bij het inbrengen van transveneuze
elektroden behoren onder andere: wondinfectie, arteriële
punctie, pericardiale wrijvingen, cardiale perforatie en
dysrhythmie na elektrodeninsertie.
English
394271--J_GA_Reocor_D_mul.book Page 295 Monday, January 26, 2015 3:35 PM
295
Reglementair
gebruik
•
Reocor D en de met het apparaat toegelaten kabels en
toebehoren mogen alleen volgens de norm van deze
gebruikersaanwijzing worden gebruikt.
•
Reocor D mag niet op andere elektromedische apparaten
worden aangesloten.
•
Reocor D mag niet worden gebruikt in bereiken waar
explosiegevaar bestaat.
Wijzigingsverbod
•
Reparatie, uitbreiding of modificatie van het apparaat
mag alleen door de fabrikant BIOTRONIK of door een
bedrijf dat hiervoor van de fabrikant uitdrukkelijk toestemming heeft gekregen worden uitgevoerd.
Reservedelen en
toebehoren
•
Originele reservedelen en door BIOTRONIK geautoriseerd toebehoren zijn bedoeld voor uw veiligheid.
Gebruik van andere componenten doet de aansprakelijkheid voor de gevolgen hiervan en de garantie vervallen.
Apparaten
gereed houden
•
Bij pacemakerafhankelijkheid van de patiënt moet een
noodgevalstimulator gereed worden gehouden.
•
Externe defibrillator, zuurstof, intubatie-uitrusting en
noodmedicamenten moeten gereed worden gehouden.
•
Voor gebruik moet Reocor D visueel op beschadiging en
verontreiniging worden onderzocht.
•
Nooit een beschadigd apparaat of een apparaat met
afwijkingen gebruiken. Vervang alle kabels met ook maar
de kleinst herkenbare schade.
•
Voor gebruik van de Reocor D, de patiëntenkabel of
elektroden moet de gebruiker de patiënt aanraken om
elektrische potentiaalverschillen te compenseren.
Gedrag voor
gebruik
Deutsch
Español
Reocor D interageert met het menselijke hart. Bovendien
vindt een wisselwerking plaats met de huid en de bloedvaten van de patiënt.
Français
•
Magyar
Werking
Italiano
Reocor D mag alleen worden gebruikt door personen
met kennis van de cardiologie die over het gebruik van
het apparaat zijn geïnformeerd. Potentiële gebruikers
zijn technisch-medisch vakpersoneel van een ziekenhuis
en artsen.
Nederlands
•
Polski
Doelgroep
Português
Afhankelijk van de pacinginstellingen en het ziektebeeld van
de patiënt kan de pacing hartritmestoornissen induceren.
Om de veiligheid van de patiënt te garanderen moeten
bepaalde procedures in acht worden genomen en voorzorgsmaatregelen worden genomen die hieronder zijn opgesomd.
Verdergaande procedures en voorzorgsmaatregelen moeten
in de desbetreffende medische publicaties worden nagelezen.
Česky
Opmerkingen over de hantering
394271--J_GA_Reocor_D_mul.book Page 296 Monday, January 26, 2015 3:35 PM
296
Elektrodeaansluiting
Gedrag tijdens
gebruik
•
Het wordt dringend aanbevolen om de gebruiker elke
ingestelde parameter te laten controleren, alvorens de
elektroden op de Reocor D aan te sluiten.
•
Hoewel Reocor D tegen waterdruppels is beschermd,
moeten alle stekkers en het apparaat schoon en droog
worden gehouden.
•
Reocor D kan niet worden gesteriliseerd.
•
De aansluitingen van Reocor D en de tijdelijke pacingelektroden moeten zijn beveiligd en regelmatig worden
gecontroleerd.
•
De patiëntenkabel moet eerst op Reocor D, en dan pas op
de elektroden worden aangesloten.
•
De tijdelijke elektroden waarop de Reocor D is aangesloten, zijn voor elektrische stroom een laagohmige lead
naar het myocard. Daarom moeten apparaten met netvoeding die in de nabijheid van de patiënt worden
gebruikt, volgens de voorschriften worden geaard.
•
Bij de hantering van reeds geïmplanteerde elektroden
mogen hun contactstiften en metalen contactoppervlakken niet worden aangeraakt en niet in contact komen met
elektrisch geleidende of vochtige oppervlakken.
•
Indien de kabel van Reocor D is losgeraakt, moet deze
onmiddellijk weer worden aangesloten en de veiligheid
van de verbinding worden gecontroleerd.
•
Bij gebruik van unipolaire elektroden moeten voor een
functionerende stimulatie voor elke kamer twee unipolaire elektroden worden gebruikt.
•
Tijdens gebruik van Reocor D moet de doorzichtige cover
volledig zijn gesloten om onbedoeld wijzigen van de programmaparameters te voorkomen.
•
Reocor D ofwel liggend op een horizontale, slipbestendige ondergrond of met de armmanchet aan de patiënt
gefixeerd of met het ophangoog aan de apparaatachterzijde aan een infusiestandaard gebruiken.
•
Reocor D mag niet direct op de huid worden gedragen.
•
Tijdens gebruik van Reocor D moet de hartfrequentie van
de patiënt met een ECG-monitor met alarmfunctie worden bewaakt.
•
Bij storingen door elektromagnetische interferentie (EMI)
schakelt Reocor D bij overschrijding van bepaalde grenswaarden naar een synchrone pacing. Afhankelijk van het
feit of de storingen in het atrium of in het ventrikel werden waargenomen, gelden gedurende de storingen volgende bedrijfsmodi:
Pacing met hoge
frequenties
•
Een pacing van het hart met frequenties van meer dan
180 ppm gedurende een langere periode kan ernstige
hemodynamische complicaties veroorzaken. Een pacing
met hoge frequenties moet alleen worden uitgevoerd, als
een continue bewaking is gegarandeerd.
Gedrag na gebruik
•
Na defibrillatie of cauterisering moet het apparaat
opnieuw op functioneren worden onderzocht.
•
Als het apparaat langdurig wordt opgeslagen of niet
gebruikt, moet de batterij worden verwijderd om schade
door uitlopen te voorkomen.
•
Voor de reiniging kan een vochtige doek en een milde
zeep worden gebruikt. Sterke reinigingsmiddelen of
organische oplosmiddelen moeten worden vermeden
omdat ze de kunststof behuizing kunnen aantasten.
•
Inspecties en onderhoudswerkzaamheden moeten volgens pagina 318 worden uitgevoerd.
•
Gebruik geen oplaadbare batterijen (accu's).
De bedrijfstijd van deze batterijen kan moeilijk worden
geschat hetgeen kan leiden tot een onverwacht overschrijden van het ERI1-tijdstip met plotseling ontbreken
van de pacing.
Batterijbedrijf
Er mogen alleen 9-V-batterijen met de internationale
code IEC 6LR61 worden gebruikt. Bij gebruik van het
batterijtype MN 1604 Duracell® Procell ® is een externe
pacing van minstens 500 uur mogelijk voordat een batterijvervanging is vereist.
Een batterijvervanging tijdens bedrijf is mogelijk. Met
verwijderde batterij blijft Reocor D bij een omgevingstemperatuur van 20 ±2 °C nog ca. 30 s gebruiksklaar.
Uit veiligheidsredenen echter moet de patiënt op andere
wijze worden verzorgd.
Elektrocauterisatie
•
Een elektrocauterisatie mag in geen geval binnen een
bereik van minder dan 15 cm rond de elektroden worden
uitgevoerd omdat gevaar bestaat dat een ventriculaire
fibrillatie geïndiceerd of de pacemaker beschadigd wordt.
De pacemaker moet op asynchrone pacing worden ingesteld om een pacemakerinhibitie door interferentiesignalen te vermijden. Tijdens de behandeling moet de perifere
1
Met het signaal ERI (LED Low battery knippert) herinnert Reocor D aan de batterijvervanging
Deutsch
DAD, DVI, D00
Español
DDD
Français
VAT, VVI, V00
Magyar
S00
VDD
Italiano
SSI, SST
Nederlands
Bij storing door elektromagnetisch
interferentie
Polski
Ongestoorde
bedrijfsmodus
Português
297
Česky
English
394271--J_GA_Reocor_D_mul.book Page 297 Monday, January 26, 2015 3:35 PM
394271--J_GA_Reocor_D_mul.book Page 298 Monday, January 26, 2015 3:35 PM
298
pols van de patiënt ononderbroken worden gecontroleerd. Na de behandeling moet de pacemakerfunctie
worden gecontroleerd.
Defibrillatie
•
De schakelingen van Reocor D zijn beveiligd tegen
schokenergie die door een defibrillatie kan worden geïnduceerd. Toch moeten, indien nodig, volgende voorzorgsmaatregelen worden genomen:
— De ingestelde energie moet niet hoger zijn dan voor
defibrillatie vereist.
— De afstanden van de elektroden van de defibrillators
tot de elektroden van Reocor D moeten minstens
10 cm bedragen.
— Na een defibrillatie moet Reocor D uit- en ingeschakeld worden zodat het apparaat een volledige zelftest
kan uitvoeren.
Bovendien moeten na de defibrillatie pacemakerfunctie
en sensor threshold gecontroleerd en gedurende een voldoende lange periode worden bewaakt.
Storingsveiligheid
•
Reocor D is tegen storingen door elektromagnetische
straling, elektrostatische ontlading en tegen overgeleide
storingen beveiligd. Ook de door Reocor D uitgezonden
straling is geminimaliseerd. Daarmee voldoet het apparaat aan de eisen conform IEC 60601-1-2. Het is echter
mogelijk dat sterke elektromagnetische velden, zoals die
bijvoorbeeld in de buurt van elektromotoren, transformatoren, stroomleidingen en andere elektrische apparaten
optreden, de functie van Reocor D kunnen beïnvloeden.
Elektromagnetisch interferentie kan leiden tot volgende
storingen:
— Onverwacht terugzetten (zelftest wordt uitgevoerd).
— Cardiale events worden waargenomen, maar verschijnen niet op de ECG-monitor.
— Reocor D heeft onverklaarbare eigenschappen.
Maatregelen voor het herstellen van de correcte functie
van Reocor D:
— Verbinding tussen apparaat en tijdelijke stimulatieelektroden controleren en eventueel corrigeren.
— Gevoeligheid van Reocor D aanpassen:
Vaak leidt de halve waarde van de gemiddelde amplitude van het intrinsieke signaal tot een correcte
gevoeligheidsinstelling.
— Alle elektrische apparaten in de buurt van Reocor D
uitschakelen, als deze elektromagnetisch interferentie kunnen veroorzaken en bedrijf ervan niet werkelijk nodig is.
•
Als voor de atriale gevoeligheid van het apparaat een
waarde <1,0 mV is ingesteld, kan dit leiden tot storingen
door elektromagnetische velden. Als het klinisch mogelijk is, moet een gevoeligheidsparameter van de grootte
1,0 mV worden gebruikt. De instelling van gevoeligheidsparameters <1,0 mV vereist een expliciete medische indicatie. Dergelijke waarden mogen alleen worden ingesteld
onder supervisie van een arts.
Deutsch
— De storingsbron zodanig verplaatsen dat geen storingen meer optreden.
— Indien zonder gevaar mogelijk: Reocor D uit- en
inschakelen om zo de pacemaker in ongestoord
bedrijf terug te zetten.
— Raadpleeg bij verder bestaande technische storing
BIOTRONIK.
Español
299
Česky
English
394271--J_GA_Reocor_D_mul.book Page 299 Monday, January 26, 2015 3:35 PM
Als de zelftest een defect vindt, knipperen alle LED's continu en klinken waarschuwingssignalen.
•
Een vereiste batterijvervanging wordt aangegeven door
de rood knipperende LED Low battery.
•
De groene LED's Sense signaliseren de sensing van een
P-golf of R-golf.
•
De gele LED's Pace signaliseren de impulsafgave.
•
De LED's en de akoestische signalen tonen bovendien
volgende aandachtspunten tijdens bedrijf:
Aandachtspunt
Betekenis
Storing verhelpen
Akoestisch signaal
gedurende 2 s
Er is een impulsamplitude
< 1 V of een frequentie
> 180 ppm ingesteld
Impedantie buiten
het toegestane bereik
Controleer of de ingestelde waarden voor de
patiënt geschikt zijn.
Controleer of alle stekkers
vast zijn opgestoken.
Controleer of de elektroden de gewenste positie
hebben.
Schakel het apparaat uit
en stuur het naar
BIOTRONIK.
Vervang de batterij.
Er resten nog ongeveer
36 uura) bedrijfstijd.
Snelle opvolging van
tonen
Akoestisch signaal
en knipperen van de
LED's Pace en Sense
LED Low battery
knippert
a)
High Rate Protection werd
geactiveerd; Zelftest mislukt
ERI bereikt
Bij gebruik van het batterijtype MN 1604 Duracell® , Procell®
Magyar
•
Italiano
Als de zelftest geen fout vindt, gaan alle LED's en waarschuwingssignalen uit.
Nederlands
•
Polski
Tijdens de zelftests na het inschakelen van Reocor D
branden alle LED's kort en klinken korte akoestische
signalen. Na enkele seconden is de zelftest beëindigd.
Português
•
Français
Optische en akoestische signalen
394271--J_GA_Reocor_D_mul.book Page 300 Monday, January 26, 2015 3:35 PM
300
Bedieningsaanwijzingen
Algemene opmerkingen
Attentie!
Zelftest
De aansluitingen van Reocor D en de tijdelijke pacingelektroden moeten zijn beveiligd en regelmatig worden
gecontroleerd.
Na inschakelen voert Reocor D gedurende enkele seconden
een zelftest uit. Hiertoe behoren:
•
Controle van de programmacode en de microprocessor
•
Geheugentest
•
Functietest van de LED's en de akoestische signalen
•
Controle van het pacing- en sensingvermogen
•
Controle van de werking van de High Rate Protection
Als de zelftest een defect vindt, knipperen alle LED's continu
en klinken akoestische waarschuwingssignalen. In dit
geval moet de pacemaker worden uitgeschakeld en naar
BIOTRONIK worden gestuurd.
Als de zelftest geen fout heeft ontdekt, gaan de LED's en de
waarschuwingssignalen uit en begint Reocor D volgens de
ingestelde parameters met het geven van stimulatie-impulsen. De negatieve elektrode (kathode) moet daarom pas worden aangesloten, als zeker is dat stimulatiemodus, stimulatiefrequentie, impulsamplitude en gevoeligheid correct zijn
ingesteld.
Als de draaischakelaar voor de bedrijfsmodus op UIT is gezet,
wordt voorkomen dat onmiddellijk na aansluiten van de elektroden stimulatie-impulsen aan de patiënt worden gegeven.
Waarschuwingsmeldingen
Tijdens bedrijf kunnen volgende waarschuwingsmeldingen
verschijnen:
•
Een vereiste batterijvervanging wordt aangegeven door
de knipperende LED Low battery.
•
Als de elektrodeimpedantie niet binnen een toegestaan
tolerantiebereik ligt (bijvoorbeeld door een gebroken
elektrode of een los contact), klinken snelle, opeenvolgende tonen minstens 5 s na inschakelen.
•
Als de impulsamplitude op waarden < 1 V of de frequentie
op waarden > 180 ppm wordt ingesteld, klinkt ongeveer
2 s een akoestisch signaal.
•
Bij een te hoge frequentie (zie pagina 323 „High Rate
Protection”) alsook bij mislukte zelftest klinkt een akoestisch signaal en knipperen de LED's Pace en Sense.
English
394271--J_GA_Reocor_D_mul.book Page 301 Monday, January 26, 2015 3:35 PM
301
0
0
0
40
10
0,1
3
3
2
5
1
5
10
3
4
12
17
10
7
8
2
7
0,1
14
11
1
3
2
1
5
20
17
0 ,5
Nederlands
Italiano
b
Magyar
2
0,5
Français
7
0, 3
0, 2
5
Español
80
60
20
0
300
0
25
20 0
18
0
0, 5
12
1
0
17
10
50
0
0
10
75
50
0
60 0
60
4 00
35
0
0, 7
10
V0 0
80
0
1000
70
VV I
T
25
15
20
VV
40
1
30
Deutsch
17
D
14 0
DD
20
0
250
D
VD
D0 0
Česky
Bedieningselementen en LED's
DIFF.-
Polski
INDIFF.+
Português
Beeld 1: Bedienveld Reocor D
394271--J_GA_Reocor_D_mul.book Page 302 Monday, January 26, 2015 3:35 PM
302
Aanduiding
Functie
1a
Aansluiting van atriaal kanaal
1b
Aansluiting ventrik. Kanaal
Voor kabels en elektroden met 2-mm-stekkers
of voor Redel-adapters (rood = plus; blauw = minus)
2
Batterijvak
Voor blokbatterij 9 V
3
LED Low battery
Waarschuwt voor te laag batterijvoltage
4
LED Ventricle Pace
Gele weergave voor ventriculair gestimuleerde event
5
LED Ventricle Sense
Groene weergave voor waargenomen R-golf
6
Draairegelaar Ventricle Ampl.
Instelling van de ventriculaire impulsamplitude
7
Draairegelaar Ventricle Sens.
Instelling van de ventriculaire gevoeligheid
(niet toepasbaar in bedrijfsmodi D00 en V00)
8
LED Atrium Pace
Gele weergave voor atriaal gestimuleerde event
9
LED Atrium Sense
Groene weergave voor waargenomen P-golf
10
Draairegelaar Atrium Ampl.
Instelling van de atriale impulsamplitude
(niet toepasbaar in bedrijfsmodus VDD)
11
Draairegelaar Atrium Sens.
Instelling van de atriale gevoeligheid
(niet toepasbaar in de bedrijfsmodus D00)
12
Start burst
Start van de atriale burstfunctie
13
Riemhouder en ophangoog
(achterzijde)
Bevestiging Reocor D aan patiënt, bed of infuusstandaard
14
Draairegelaar Burst rate atrium
Instelling van de atriale burstfrequentie
15
Draairegelaar AV delay
Instelling van het AV-interval
16
Select burst
Selectie van de atriale burstfunctie
17
Draaischakelaar Mode
Selectie van pacingbedrijfsmodus en uitschakelaar
18
Draairegelaar Rate
Instelling van de stimulatiefrequentie
Tabel 1: Beschrijving van de elementen in beeld 1
Vet opschrift van bedieningselementen kenmerkt voor het
gebruiksdoel van het apparaat veilige waarden.
Bedienveldafdekking
De bedienveldafdekking is vergrendeld, als de bedienveldafdekking over twee grendelpunten tot het einde wordt verschoven en de vergrendeling over de rand zit (zie Fig. 2).
Juist:
Beeld 2: Juiste bevestiging van de bedienveldafdekking
Onjuist:
English
394271--J_GA_Reocor_D_mul.book Page 303 Monday, January 26, 2015 3:35 PM
303
Druk met een hand de vergrendelingshendel omhoog.
Español
Deutsch
Schuif gelijktijdig met de andere hand de bedienveldafdekking omlaag.
Česky
Om de bedienveldafdekking te ontgrendelen (zie Fig. 3):
Elektrodeaansluiting
Reocor D beschikt over 4 elektrodeaansluitingen voor de
directe aansluiting van elektroden met contactbeschermde
2-mm-stekkers.
Voor de aansluiting van kabels met Redel-stekkers moet de
Redel-adapter aan de juiste zijde worden opgestoken en
vastgeschroefd (beeld 4). De Redel-adapter is aan de juiste
zijde opgestoken als hij op de Reocor D kan worden vastgeschroefd.
Opmerking:
Alleen als de Redel-adapter in de juiste richting is opgestoken, is de functie ervan gegarandeerd!
Magyar
Tijdens gebruik van Reocor D moet de bedienveldafdekking
vergrendeld zijn, om onbedoeld verstellen van de draaischakelaar- en regelaar en daarmee de programmaparameters
te voorkomen.
Italiano
Attentie!
Nederlands
Voor reiniging kunt u de bedienveldafdekking volledig verwijderen. Schuif hiervoor de afdekking helemaal omlaag. Schuif
vervolgens de afdekking met een lichte ruk over de aanslag
heen.
Polski
Schuif de bedienveldafdekking over de rand helemaal
omhoog (zie Fig. 2).
Português
Om de bedienveldafdekking te vergrendelen:
Français
Beeld 3: Bedienveldafdekking ontgrendelen
394271--J_GA_Reocor_D_mul.book Page 304 Monday, January 26, 2015 3:35 PM
304
Beeld 4: Redel-adapter voor Reocor D
Reocor D kan met volgende patiëntenkabels en adapters
worden gebruikt:
•
Patiëntenkabel PK-175 met vier schroefklemmen voor
tijdelijke elektroden aan de patiëntzijde n Redel-stekker
aan de Reocor-zijde (Redel-adapter gebruiken)
Beeld 5: Patiëntenkabel PK-175
•
Patiëntenkabel PK-82 met 2 geïsoleerde krokodillenklemmen voor tijdelijke elektroden aan de patiëntzijde en
2 contactbeschermde 2-mm-stekkers aan de Reocorzijde.
Beeld 6: Patiëntenkabel PK-82
305
Patiëntenkabel PK-83-B voor eenkamerstimulatie met
twee schroefklemmen voor tijdelijke elektroden aan de
patiëntzijde en Redel-stekker aan de Reocor-zijde
(Redel-adapter gebruiken). Tijdelijke elektroden die via
de PK-83-B worden aangesloten, zijn met het ventriculaire kanaal van Reocor D verbonden.
Patiëntenkabel PK-83 voor eenkamerstimulatie met
twee geïsoleerde schroefklemmen voor tijdelijke elektroden aan de patiëntzijde en twee contactbeschermde
2-mm-stekkers aan de Reocor-zijde.
Magyar
•
Français
Beeld 7: Patiëntenkabel PK-83-B
Español
Deutsch
•
Česky
English
394271--J_GA_Reocor_D_mul.book Page 305 Monday, January 26, 2015 3:35 PM
Nederlands
Beeld 9: Patiëntenkabel PK-67-L (2,6 m) en PK-67-S (0,8 m)
Polski
Patiëntenkabel PK-67-L, PK-67-S verschillen alleen in
lengte.
Português
•
Italiano
Beeld 8: Patiëntenkabel PK-83
394271--J_GA_Reocor_D_mul.book Page 306 Monday, January 26, 2015 3:35 PM
306
•
Adapter
Op de patiëntenkabel PK-67-L/-S (beeld 9) passen de adapters volgens beeld 10:
PK-67-L/-S
Beeld 10: Adapter voor de patiëntenkabels PK-67-L en PK-67-S
PA-1-B voor de aansluiting van contactbeschermde 2-mmstekkers of MHW-adapters (adapter voor hartdraden)
PA-2 IS-1
PA-4 met krokodillenklemmen
•
Patiëntenkabel PK-141 met vier krokodillenklemmen
aan de patiëntzijde en Redel-stekker aan de Reocor-zijde
(Redel-adapter gebruiken)
Beeld 11: Patiëntenkabel PK-141
•
Adapterkabel ADAP-2R is een hergebruikbare kabel
voor de verbinding van de disposable kabel volgens
beeld 13 (alleen voor de USA) met Reocor D (Redel-adapter gebruiken).
Beeld 12: Adapterkabel ADAP-2R
English
394271--J_GA_Reocor_D_mul.book Page 307 Monday, January 26, 2015 3:35 PM
307
Kabel voor eenmalig gebruik (alleen USA)
WAARSCHUWING!
Gevaar door functieverlies.
Vochtige kabels kunnen niet optimaal functioneren en een
gevaar vormen voor de patiënt. Gebruik geen vochtige kabels.
WAARSCHUWING!
Gevaar door elektrische stroom.
Ongebruikte kabelcontacten kunnen elektrische stroom in de
patiënt leiden. Bevestig ongebruikte kabelcontacten in de
buurt van de patiënt.
Attentie!
Allergische reacties en ontstekingen.
Voorkom dat kabels met wonden en de huid van de patiënt in
contact komen.
Opmerking:
Controleer voor gebruik van de kabel de juiste bevestiging van
de isolaties.
Opmerking:
De patiëntenkabel pas op de tijdelijke pacingelektrode van de
patiënt aansluiten, nadat de aansluiting op de Reocor D is
uitgevoerd.
Directe aansluiting
Als Reocor D zonder de Redel-adapter wordt gebruikt, kunnen tijdelijke katheters en hartdraden met de patiëntenkabel
PK-82 en PK-83 direct op de elektrodeaansluitingen A+, Aen V+, V- worden aangesloten.
Español
Français
Gevaar voor de patiënt door beschadigde kabel. Beschadigde
kabels kunnen niet optimaal functioneren en een gevaar vormen voor de patiënt. Gebruik geen beschadigde kabels.
Magyar
Aansluiten
WAARSCHUWING!
Italiano
Beeld 14: Kabel PK-155
Nederlands
Kabel voor eenmalig gebruik
De disposable kabel PK155 en Remington 301-CG (alleen
USA) met krokodillenklemmen (beeld 14) worden via de kabel
PK-67-S met de patiënt verbonden.
Polski
•
Português
Beeld 13: Disposable kabel van Remington Medical Inc. (alleen USA)
Deutsch
Česky
•
394271--J_GA_Reocor_D_mul.book Page 308 Monday, January 26, 2015 3:35 PM
308
Patiëntenkabel
Via een Redel-adapter op de Reocor D wordt de patiëntenkabel aangesloten.
Steek de Redel-adapter op Reocor D.
Schroef deze vast.
Steek de Redel-stekker van de patiëntenkabel in de
Redel-bus van de adapter.
Opmerking:
Met de patiëntenkabel PK-83-B is geen tweekamerstimulatie
mogelijk. Elektroden die via de PK-83-B worden aangesloten,
zijn met het ventriculaire kanaal van Reocor D verbonden.
Aansluitvarianten
Tijdelijke katheter met 2-mm-stekkers of hartdraad met
2-mm-adapter
U kunt zonder verdere kabels of adapters Reocor D direct op
een tijdelijke katheter met contactbeschermde 2-mm-stekker of een hartdraad met 2-mm-adapter aansluiten. Alle verdere mogelijkheden staan in volgende tabel.
Aansluiting
patiëntzijde
BIOTRONIK kabel
Aansluiting
apparaatzijde
Reocor D
Aansluiting
Aanbevolen aansluitingen
Directe aansluiting (zonder BIOTRONIK kabel)
2-mm-elektrodeaansluitingen
2 mm
PK-67-S/L met PA-1-B
Redel-stekker
Redel-adapter
Schroefklemmen
PK-175 met TC adapt
Redel-stekker
Redel-adapter
Schroefklemmen
PK-83 met TC adapt (2x)
2-mm-stekker
2-mm-elektrodeaansluitingen
Krokodillenklemmen
PK-141
Redel-stekker
Redel-adapter
Krokodillenklemmen
PK-67-S/L met PA-4
Redel-stekker
Redel-adapter
Krokodillenklemmen
PK-67-S/L met PK-155 (2x)
Redel-stekker
Redel-adapter
Krokodillenklemmen
PK-82 (2x)
2-mm-stekker
2-mm-elektrodeaansluitingen
Mogelijke aansluitingen
309
Hartdraad met breakoff-naald of met flexibel einde
(max. 2,3 mm diameter)
Aansluiting
patiëntzijde
BIOTRONIK kabel
Aansluiting
apparaatzijde
Reocor D
Aansluiting
Česky
English
394271--J_GA_Reocor_D_mul.book Page 309 Monday, January 26, 2015 3:35 PM
PK-175
Redel-stekker
Redel-adapter
Schroefklemmen
PK-83 (2x)
2-mm-stekker
2-mm-elektrodeaansluitingen
Krokodillenklemmen
PK-141
Redel-stekker
Redel-adapter
Krokodillenklemmen
PK-67-S/L met PA-4
Redel-stekker
Redel-adapter
Krokodillenklemmen
PK-67-S/L met PK-155 (2x)
Redel-stekker
Redel-adapter
Krokodillenklemmen
PK-82 (2x)
2-mm-stekker
2-mm-elektrodeaansluitingen
Aansluiting
patiëntzijde
BIOTRONIK kabel
Mogelijke aansluitingen
Español
Schroefklemmen
Deutsch
Aanbevolen aansluitingen
Aansluiting
apparaatzijde
Reocor D
Aansluiting
PK-67-S/L met PA-2
Redel-stekker
Redel-adapter
Krokodillenklemmen
PK-141
Redel-stekker
Redel-adapter
Krokodillenklemmen
PK-67-S/L met PA-4
Redel-stekker
Redel-adapter
Krokodillenklemmen
PK-67-S/L met PK-155 (2x)
Redel-stekker
Redel-adapter
Krokodillenklemmen
PK-82 (2x)
2-mm-stekker
2-mm-elektrodeaansluitingen
Aanbevolen aansluitingen
IS-1 elektrodeaansluiting
Français
Geïmplanteerde elektrode met IS-1 stekker
Aansluitingen scheiden
Patiëntenkabel van de tijdelijke pacingelektroden van de
patiënt losmaken respectievelijk de directe aansluiting
losmaken.
Redel-stekker scheiden
•
Trek de ring van de Redel-stekker terug en trek de
Redel-stekker uit de Redel-bus.
Italiano
Nederlands
Bij gebruik van unipolaire elektroden moeten voor elke
kamer 2 elektroden worden aangesloten.
Polski
Reocor D stimuleert in het algemeen bipolair, maar kan met
bipolaire of met unipolaire tijdelijke pacingelektroden worden
gebruikt.
Português
Polariteit
Magyar
Mogelijke aansluitingen
394271--J_GA_Reocor_D_mul.book Page 310 Monday, January 26, 2015 3:35 PM
310
Ingebruikname
De bediening van Reocor D is voor alle bedrijfsmodi gelijk.
De bedienstappen moeten in volgende volgorde worden uitgevoerd (getallen tussen haakjes hebben betrekking op
beeld 1 op pagina 301 van deze Gebruikersaanwijzing).
•
Batterij plaatsen
•
Bedienveldafdekking omlaag schuiven
•
Patiënt voorbereiden: Elektroden neerleggen, echter nog
niet op de pacemaker aansluiten.
•
Reocor voorbereiden:
De stimulatiefrequentie met de draairegelaar Rate (18)
instellen.
Het AV-interval met de draairegelaar AV delay (15) instellen1.
De stimulatieamplituden voor atrium1 en ventrikel met
de draairegelaars Atrium Ampl. (10)1 en Ventricle Ampl.
(6) instellen.
•
Met de draaischakelaar Mode (17) de stimulatiemodus
selecteren. Gelijktijdig wordt het apparaat hiermee ingeschakeld.
•
Na succesvol voltooien van de interne zelftests knipperen
alle 5 LED's op het bedienveld gelijktijdig twee keer.
•
Als de LED Low battery (3) knippert, moet de batterij worden vervangen (batterijvervanging zie pagina 311).
•
Elektroden aansluiten, de gele LED's Atrium Pace (8)1 en
Ventricle Pace (4) knipperen synchroon met de atriale
resp. ventriculaire stimulatie-impulsen.
•
Gevoeligheid voor atrium en ventrikel met de draairegelaars Atrium Sens. (11)1 en Ventricle Sens. (7) zodanig
instellen dat de groene LED's Atrium Sense (9)1 en
Ventricle Sense (5) synchroon met elke waargenomen
atriale respectievelijk ventriculaire event knipperen.
Er moet voor voldoende veiligheidsmarge worden
gezorgd om een betrouwbare sensing te garanderen.
•
Attentie!
1
Het ECG van de patiënt bewaken en eventueel amplitude
en gevoeligheid aanpassen.
Tijdens gebruik van Reocor D moet de hartfrequentie van de
patiënt met een ECG-monitor met alarmfunctie worden
bewaakt.
Alleen bij 2-kamerstimulatie
English
394271--J_GA_Reocor_D_mul.book Page 311 Monday, January 26, 2015 3:35 PM
311
Om Reocor D aan een infusiestandaard te kunnen bevestigen, draait u de ophangoog aan de apparaatachterzijde eruit.
Zo garandeert u veilig gebruik en ontlast u de patiëntenkabel.
Deutsch
Reocor D ofwel liggend op een horizontale, slipbestendige
ondergrond of met de armmanchet aan de patiënt gefixeerd
of met het ophangoog aan de apparaatachterzijde aan een
infusiestandaard gebruiken.
Česky
Bevestiging
Het batterijvak (2) bevindt zich aan de rechterzijde van het
apparaat en wordt geopend door de blauwe schuif omhoog te
drukken en de lade er naar rechts uit te trekken. Batterij
voorzichtig verwijderen.
Ter bescherming van de batterijpool kan op de nieuwe batterij
een rubberstop zijn geplaatst. Trek deze eraf alvorens de
nieuwe batterij te plaatsen.
Attentie!
In het batterijvak staat een markering met de aanbevolen
pool. Zorg er bij het plaatsen van de nieuwe batterij echter
vooral voor dat de batterijpolen naar het midden van de
behuizing zijn gericht. De positie van de plus- resp. minpool
is uitwisselbaar.
Français
Magyar
Italiano
Gebruik geen oplaadbare batterijen (accu's). De bedrijfstijd
van deze batterijen kan moeilijk worden geschat hetgeen kan
leiden tot een onverwacht overschrijden van het ERI met plotseling ontbreken van de pacing.
Nederlands
Uit veiligheidsredenen echter moet de patiënt op andere
wijze worden verzorgd.
Polski
Reocor D moet met een 9-V-batterij, internationale code
IEC 6LR61, worden gebruikt. Er mogen alleen lekdichte alkalinebatterijen worden gebruikt. Bij gebruik van het batterijtype MN 1604 Duracell® Procell® is bij 20 ±2 °C een extreme
stimulatie gedurende minstens 500 uur mogelijk, voordat een
batterijvervanging is vereist.
Een batterijvervanging tijdens bedrijf is mogelijk. Met verwijderde batterij blijft Reocor D bij een omgevingstemperatuur
van 20 ±2 °C nog ca. 30 s gebruiksklaar.
Português
Als de LED Low battery (3) begint te knipperen, is de batterij
bijna leeg. Bij gebruik van het batterijtype MN 1604 Duracell®
Procell® verblijven nog ongeveer 36 uur bedrijfstijd. Toch
moet de batterij zo snel mogelijk worden vervangen.
Español
Batterijvervanging
394271--J_GA_Reocor_D_mul.book Page 312 Monday, January 26, 2015 3:35 PM
312
Plaats de nieuwe batterij met de onderzijde (beeld 15)
omlaag in het batterijvak.
Beeld 15: Plaatsen van de batterij
Sluit de lade, en druk de blauwe schuif omlaag tot deze hoorbaar vergrendeld.
Opmerking:
Als de pacemaker langdurig wordt opgeslagen of niet
gebruikt, is het raadzaam de batterij te verwijderen om
schade door uitlopen te voorkomen.
English
394271--J_GA_Reocor_D_mul.book Page 313 Monday, January 26, 2015 3:35 PM
313
Synchrone, ventriculaire pacing met atriale tracking.
D00
Asynchrone A-V-pacing, geen sensing in beide kamers.
VVI
Sensing en pacing in ventrikel
V00
Asynchrone pacing in ventrikel
VVT
Zoals VVI, maar bij sensing van een ventriculair event buiten de refractaire periode
onmiddellijke impulsafgave
Bij storingen door elektromagnetische interferentie (EMI)
selecteert Reocor D bij overschrijding van bepaalde grenswaarden naar een synchrone pacing. Afhankelijk van het feit
of de storingen in het atrium of in het ventrikel werden waargenomen, gelden gedurende de storingen volgende bedrijfsmodi
Ongestoorde
bedrijfsmodus
Bij storing door elektromagnetisch
interferentie
SSI, SST
S00
VDD
VAT, VVI, V00
DDD
DAD, DVI, D00
Deutsch
Synchrone A-V-pacing met sensing en pacing in zowel atrium als ventrikel.
VDD
Español
DDD
Français
Reocor D werkt in een van volgende zes stimulatiemodi:
Magyar
Stimulatiemodi
Česky
Stimulatiemodi en parameters
Nederlands
Polski
Português
De frequentie tot waartoe de ventrikels synchroon met atriaal
waargenomen events worden gestimuleerd (bovengrensfrequentie), wordt door de atriale refractaire periode (atrial
refractory period, ARP) bepaald. Het tijdelijke verloop wordt
door atriaal waargenomen en gestimuleerde events gestart,
eveneens door waargenomen ventriculaire extrasystolen die
de tijdcyclus terugzetten. Bij overschrijden van de bovengrensfrequentie valt elke tweede atriale impuls in de ARP,
wordt niet waargenomen en activeert geen ventriculaire
impuls. De ventriculaire stimulatiefrequentie wordt met een
conditie van 2:1 voortgezet (beeld 16).
Italiano
Refractaire perioden
394271--J_GA_Reocor_D_mul.book Page 314 Monday, January 26, 2015 3:35 PM
314
Beeld 16: Reactie van de bovengrensfrequentie tijdens atriale tachycardieën
(basisfrequentie 72 ppm).
De totale atriale refractaire periode (TARP) van Reocor D
wordt uit de som van 175 ms en het ingestelde AV-interval
gevormd, de minimale waarde bedraagt echter minstens
400 ms onder een stimulatiefrequentie van 120 ppm. Boven
deze frequentie wordt de minimale TARP gereduceerd tot
240 ms. De ventriculaire refractaire periode VRP van
Reocor D is afhankelijk van de stimulatiefrequentie:
Stimulatiefrequentie
Ventriculaire refractaire periode VRP
Onder 150 ppm
225 ms
150 ppm tot 200 ppm
200 ms
Boven 200 ppm
175 ms
Frequentie
De frequentie kan met de draairegelaar Rate (18) continu van
30 ppm tot 250 ppm worden versteld. Als een waarde van
meer dan 180 ppm wordt ingesteld, klinkt gedurende
2 seconden een waarschuwingstoon uit het apparaat.
WAARSCHUWING!
Een pacing van het hart met frequenties van meer dan
180 ppm gedurende een langere periode kan ernstige hemodynamische complicaties veroorzaken. Een pacing met hoge
frequenties moet alleen worden uitgevoerd, als een continue
bewaking is gegarandeerd.
English
394271--J_GA_Reocor_D_mul.book Page 315 Monday, January 26, 2015 3:35 PM
315
Impulsamplitude – Atrium/ventrikel
De impulsamplituden voor atrium en ventrikel kunnen met
de draairegelaars Ampl. (10), (6) in het bereik van 0,1 V tot
17 V worden versteld. Als een waarde onder 1 V wordt ingesteld, klinkt 2 seconden een lange waarschuwingstoon uit
het apparaat.
Deutsch
Reocor D begrenst het AV-interval omhoog tot de helft van
het basisinterval.
Español
Het AV-interval kan met de draairegelaar AV delay (15) continu van 15 ms tot 400 ms worden versteld. Korte AV-intervallen kunnen voor speciale indicaties, bijvoorbeeld bij opnieuw
optredende tachycardie, worden geselecteerd.
Česky
AV-interval
De pacing moet regelmatig worden gecontroleerd om te
garanderen dat de pacing voorhanden is en voldoende veiligheidsmarge is ingesteld.
Français
De impulsduur bedraagt 1 ms.
Cross Channel Blanking
Na afgave van een stimulus wordt gedurende 19 ms ± 3 ms
de waarneming in steeds het andere kanaal onderdrukt om
een Far-Field-sensing te vermijden.
Italiano
Nederlands
De gevoeligheid kan met de draairegelaar Ventricle sens. (7)
tussen 1 mV en 20 mV worden ingesteld. De gevoeligheid
moet regelmatig worden gecontroleerd om te garanderen dat
correcte sensing voorhanden is en voldoende veiligheidsmarge is ingesteld.
Polski
Gevoeligheid – Ventrikel
Português
De gevoeligheid kan met de draairegelaar Atrium sens. (11)
tussen 0,2 mV en 10 mV worden ingesteld. Deze moet regelmatig worden gecontroleerd om te garanderen dat de sensing voorhanden is en voldoende veiligheidsmarge is ingesteld.
Magyar
Gevoeligheid – Atrium
394271--J_GA_Reocor_D_mul.book Page 316 Monday, January 26, 2015 3:35 PM
316
Interferentie-interval
Het interferentie-interval wordt zowel atriaal als ventriculair
gestimuleerde alsook door waargenomen events gestart.
Het interval wordt teruggezet door waargenomen ruis in
een willekeurig kanaal tijdens de intervalduur van 80 ms,
hetgeen tot een asynchrone pacing met de geprogrammeerde frequentie leidt zolang de interferentie bestaat.
Zo leidt bijvoorbeeld in de bedrijfsmodus DDD een atriale
interferentie zonder beïnvloeding van het ventriculaire kanaal
tot een DVI pacing. Sensing van ruis in het ventriculaire
kanaal leidt tot een DAD pacing.
Interferentie in beide kanalen leidt tot een D00 pacing.
Burst
De frequentie van de atriale burst rate atrium-functie kan
met de draairegelaar (14) tussen 60 ppm en 1000 ppm worden geselecteerd.
De activering van deze functie wordt uitgevoerd met
2 toetsen: Eerst moet op de toets (16) Select burst worden
gedrukt, en daarna binnen 2 seconden op de toets (12)
Start burst. De impulsafgave wordt uitgevoerd zolang deze
toets wordt ingedrukt. Het ventriculaire kanaal stimuleert
hierbij verder met de ingestelde frequentie die ondertussen
kan worden versteld. Er wordt ventriculair geïnhibeerd voorzover een inhiberende bedrijfsmodus is ingesteld.
WAARSCHUWING!
Na een burststimulatie in het atrium kan het ventriculaire
blanking-interval de sensing van intrinsieke events verhinderen en tot een asynchrone pacing in het ventrikel leiden.
Een pacing van het hart met frequenties van meer dan
180 ppm gedurende een langere periode kan ernstige hemodynamische complicaties veroorzaken. Een pacing met hoge
frequenties moet alleen worden uitgevoerd, als een continue
bewaking is gegarandeerd.
De modus voor hoogfrequente pacing is bedoeld voor de
beëindiging van bepaalde supraventriculaire tachycardieën
(SVT) en moet alleen voor atriale toepassingen worden
gebruikt. Gebruik van asynchrone stimuli kan een SVT door
depolarisatie van delen van een Reentry-pad onderbreken.
Ook als een ectopische atriale focus voor een SVT verantwoordelijk is, kan de toepassing van hoogfrequente stimuli
aan het atrium tot een versterkte onderdrukking van het
ectope centrum leiden.
Deutsch
Español
Français
Magyar
Italiano
Nederlands
Polski
Bij hoogfrequente atriale pacing bestaan bepaalde gevaren.
Hiertoe behoren mogelijke ventriculaire pacing en ventriculaire tachycardie of fibrillatie. Dit kan door een slechte positionering van de elektroden of het voorhanden zijn van anomale samentrekking-geleidewegen worden veroorzaakt die
de normale atrioventriculaire samentrekkingsleiding overbruggen (bijvoorbeeld Wolff-Parkinson-White-syndroom).
Verdere mogelijke problemen kunnen onbehagen van de
patiënt en asystolen na een hoge pacing zijn.
Português
317
Česky
English
394271--J_GA_Reocor_D_mul.book Page 317 Monday, January 26, 2015 3:35 PM
394271--J_GA_Reocor_D_mul.book Page 318 Monday, January 26, 2015 3:35 PM
318
Hantering, onderhoud en verzorging
Reocor D
Reocor D is een hoogontwikkeld precisieapparaat dat zorgvuldig moet worden behandeld. Door mechanische invloeden,
bijvoorbeeld vallen, kan de functie ervan nadelig worden
beïnvloed.
Stuur het apparaat in dit geval naar BIOTRONIK.
Voor gebruik moet de pacemaker minstens 2 uur onder de
voor bedrijf aangegeven omgevingscondities (zie pagina 323)
worden bewaard.
Behuizing, bedieningselementen, aansluitingen en patiëntenkabel moeten voor elke toepassing visueel op mechanische beschadiging, vervorming, losse delen, scheuren en
verontreiniging worden gecontroleerd.
WAARSCHUWING!
Nooit een beschadigd apparaat of een apparaat met anomalieën gebruiken, vooral niet als het is gevallen of door hoogfrequentie- of defibrillatiespanning kan zijn beschadigd.
Reocor D ofwel liggend op een horizontale, slipbestendige
ondergrond of met de armmanchet aan de patiënt gefixeerd
of met het ophangoog aan de apparaatachterzijde aan een
infusiestandaard gebruiken.
Attentie!
Bij gebruik van een armmanchet mag Reocor D niet direct op
de huid worden gedragen.
Reiniging
Voor de reiniging van Reocor D kan een vochtige doek en een
milde zeep worden gebruikt. Sterke reinigingsmiddelen of
organische oplosmiddelen, zoals bijvoorbeeld ether of benzine, moeten worden vermeden omdat ze de kunststof behuizing kunnen aantasten.
Desinfectie
Voor desinfectie wist u het apparaat af met een doek die in
een desinfectie-oplossing is gedompeld (bijvoorbeeld Aerodesin 2000 of Lysoform D). Neem bij het maken van de oplossing de door de fabrikant aangegeven mate van verdunning in
acht.
Opmerking:
Na reiniging of desinfectie mag Reocor D een uur lang niet
worden gebruikt.
Sterilisatie
Reocor D kan niet worden gesteriliseerd. Indien het apparaat
in een steriele omgeving moet worden gebruikt, kan het steriel worden verpakt.
Jaarlijkse controles van het apparaat door technici die door
de fabrikant zijn geautoriseerd wordt aanbevolen.
De hergebruikbare patiëntenkabels kunnen volgens verschillende methodes met ziekenhuis-reinigingsmiddelen worden
gereinigd en gedesinfecteerd. Hierbij mogen echter in geen
geval scherpe chemicaliën zoals aceton worden gebruikt.
Als reinigingsmethode voor de kabels wordt gebruik van een
doek met gewone, alcoholvrije handzeep of het reinigingsmiddel Stabimed van Braun aanbevolen. Vervolgens moeten
de kabels met elektrolytvrij water van resten worden ontdaan
en daarna met een schone, droge doek worden schoongeveegd.
Desinfectie
Voor desinfectie in een desinfectiemiddelbad moet een intrumentendesinfectiemiddel op aldehydebasis (bijvoorbeeld
Lysoformin 3000) of alcoholbasis (bijvoorbeeld Aerodesin
2000) volgens fabrikantgegevens en onder inachtneming van
desbetreffende ziekenhuisrichtlijnen worden gebruikt.
Na de desinfectie moet de kabel door spoelen in elektrolytvrij
water van desinfectiemiddelresten worden ontdaan.
Sterilisatie
Tenzij in de documenten over de patiëntenkabels anders is
vermeld, kunnen alle patiëntenkabels als volgt gesteriliseerd
worden:
•
stoomsterilisatie bij 121 °C en 1,1 bar gedurende 20 min
Bovendien kunnen de patiëntenkabels PK-175 en PK-83-B
als volgt gesteriliseerd worden:
•
stoomsterilisatie bij 134 °C en 3,0 bar gedurende 18 min
Onderhoud, service, inspecties
De enige vereiste onderhoudsmaatregel is de batterijvervanging (zie pagina 311).
Deutsch
Reiniging
Español
De verpakking van een steriele kabel moet voor het openen
op beschadigingen worden gecontroleerd, om te kunnen
vaststellen of de steriliteit is gegarandeerd.
Français
Hergebruikbare patiëntenkabel
Magyar
Hoewel Reocor D tegen waterdruppels is beschermd, moet
het apparaat schoon en droog worden gehouden.
Italiano
Attentie!
Nederlands
319
Česky
English
394271--J_GA_Reocor_D_mul.book Page 319 Monday, January 26, 2015 3:35 PM
Voor elk gebruik van het apparaat moet een korte controle
worden uitgevoerd. Deze omvat een visuele controle en een
eenvoudige functiecontrole.
Português
Controle voor
gebruik
Polski
Verdere onderhoudswerkzaamheden zijn niet nodig.
394271--J_GA_Reocor_D_mul.book Page 320 Monday, January 26, 2015 3:35 PM
320
Visuele controle:
•
Controle van de behuizing op mechanische beschadiging,
vervorming, losse delen, scheuren etc.
•
Controle van het kabelaansluitingbereik op mechanische
beschadigingen
•
Controle van opschriften op leesbaarheid
Functiecontrole:
Het resultaat van de zelftest, die automatisch na het inschakelen afloopt, moet in acht worden genomen.
Inspectie
De inspectie moet worden uitgevoerd
•
na gebruik samen met HF-chirurgieapparaten of defibrillators,
•
bij vermoedelijke functiestoringen,
•
jaarlijks.
Deze inspectie moet worden uitgevoerd volgens fabrikantgegevens. Deze worden op aanvraag ter beschikking gesteld.
Hierin zijn alle vereiste controlestappen alsook de hiervoor
benodigde apparaten vermeld.
Afvalverwijdering
Op het merk- en typeaanduidingsplaatje op de Reocor D staat
een symbool met een doorgestreepte vuilnisbak. Dit symbool
geeft aan dat terugname en verwijdering van het apparaat
volgens de Europese richtlijn 2002/96/EC betreffende elektronische en elektrotechnische componenten (AEEA) moeten
plaatsvinden.
Oude apparaten en niet meer benodigd toebehoren, zoals
bijvoorbeeld patiëntenkabel en adapter moeten naar
BIOTRONIK worden gestuurd. Hierdoor kan worden gegarandeerd dat de verwijdering plaatsvindt in overeenstemming
met de nationale uitvoering van AEEA-richtlijn.
Opmerking:
Kabels die in contact met bloed zijn geweest en die moeten
worden afgevoerd, moeten milieuvriendelijk als gecontamineerd medisch afval worden behandeld. Niet-gecontamineerde kabels moeten conform richtlijn 2002/96/EC betreffende elektronische en elektrotechnische componenten
(AEEA) worden afgevoerd.
Opgebruikte batterijen moeten als gevaarlijk afval worden
behandeld, en door de gebruiker worden afgevoerd.
Raadpleeg bij vragen BIOTRONIK.
English
394271--J_GA_Reocor_D_mul.book Page 321 Monday, January 26, 2015 3:35 PM
321
De constructie voldoet aan de standaard voor apparaatklasse CF (cardiac floating) en is voor de directe behandeling van het hart toegelaten. De pacemaker voldoet
aan de door de internationale standaards voorgeschreven
eisen voor defibrillatiebescherming.
•
De gesloten bedienveldafdekking beschermt de pacemaker tegen waterdruppels.
De tijdelijke elektroden die op de Reocor D zijn aangesloten,
zijn voor elektrische stroom een laagohmige lead naar het
myocard. Daarom moeten apparaten met netvoeding die in
de nabijheid van de patiënt worden gebruikt, volgens de voorschriften worden geaard.
De pacemaker mag niet worden gebruikt in bereiken waar
explosiegevaar bestaat.
Deutsch
•
Español
Geen metalen delen volgens definitie conform IEC die
kunnen worden aangeraakt.
Polski
Nederlands
Italiano
Alle verdergaande onderhoudswerkzaamheden en reparaties
moeten door BIOTRONIK worden uitgevoerd.
Português
WAARSCHUWING!
•
Français
Volgende speciale kenmerken bieden veiligheid voor de
patiënt:
Magyar
De externe pacemaker Reocor D voldoet aan de internationale standaards voor de veiligheid van elektromedische
apparaten conform IEC 60601-1 en IEC 60601-1-2, en aan de
internationale standaard IEC 60601-2-31 voor tijdelijke,
externe pacemakers.
Česky
Technische veiligheid
394271--J_GA_Reocor_D_mul.book Page 322 Monday, January 26, 2015 3:35 PM
322
Technische gegevens
Symbolen
Opmerkingen in de gebruikshandleiding in acht nemen
Markering van de batterijpositie in het batterijvak
Afvoer volgens AEEA-richtlijn
Classificatie gebruiksdeel CF (Cardiac Floating), defibrillatiebeveiligd
IP31
Waterkerend, beschermingswijze IP31
OFF
Uit (op de draaischakelaar Mode)
Instelbare parameter
Stimulatiemodi
DDD, D00, VDD, VVI, V00, VVT
Basisfrequentie
(30 … 250 ppm) ±1 ppm
Bij een frequentie > 180 ppm
klinkt een waarschuwingssignaal
Impulsamplitude (A, V)
0,1 … 17 V ±max (50 mV, 10 %)
Bij een impulsamplitude < 1 V
klinkt een waarschuwingssignaal
Gevoeligheid (A)
0,2 … 10 mV ±15 %
Betr. 15 ms sin2-impuls
Gevoeligheid (V)
1 … 20 mV ±15 %
Betr. 40 ms sin2-impuls
AV-interval
(15 … 400 ms) ±4 ms
Burstfrequentie (A)
(60 … 1000 ppm) ±20 ppm
Vaste parameter
Impulsduur
1 ms ±5 %
Auto short na Pace
< 20 ms ±10 %
Interferentie-interval
80 ms ±5 ms
In channel blanking
110 ms ± 3 ms
Cross Channel Blanking
19 ms ±3 ms
Totale atriale refractaire
periode (TARP)
AVD +175 ms ±5 ms
TARP minimal
voor (30 … 120) ppm
voor (121 … 250)ppm
400 ms ±5 ms
240 ms ±5 ms
English
394271--J_GA_Reocor_D_mul.book Page 323 Monday, January 26, 2015 3:35 PM
323
Asymmetrisch, bifasisch
Bewaking elektrodeimpedantie
Akoestische
waarschuwing
Vanaf 2000 Ω ± 15 %, bij 5 V amplitude
Elektrodeaansluiting
Contactbeschermde 2-mm-elektrodeaansluitingen;
Redel-elektrodeaansluiting, 6-polig middels
Redel-adapter
Elektrische gegevens/batterij
Batterij
•
•
•
Alkalinebatterij: IEC 6LR61 / ANSI 1604A
9 V lekdicht
Bijvoorbeeld MN1604 Duracell® Procell®a)
Polariteit
Kathodisch
Polariteitsinversiebeveiliging
Geen: Polariteit is onbelangrijk
Stroomverbruik
Typisch 1 mA (70 ppm, 5,0 V, 500 Ω )
Bedrijfstijd met nieuwe
batterijb)
•
•
•
End of Service (EOS)
Knipperende LED „Low battery”
Resterende bedrijfstijd na
ERI-signaalb)
•
•
36 uur
Bij: 70 ppm, 5 V, stimulatiemodus DDD, 500 ohm
Gedrag tijdens
batterijvervanging
•
Apparaat blijft bij verwijderde batterij nog minstens 30 s klaar
voor gebruik.
De ingestelde modus blijft gelijk.
•
a)
b)
500 h (−10 %) bij 20 °C (±2°C)
Bij: 70 ppm, 5 V, stimulatiemodus DDD, 500 ohm
Tot: ERI-signaal (EOS-waarschuwing)
Gedeponeerd handelsmerk van Duracell Inc., Bethel, CT 06801
Bij gebruik van het batterijtype MN 1604 Duracell® , Procell®
Omgevingscondities
Temperatuurbereik voor bedrijf
+10 °C … +40 °C
Temperatuurbereik voor opslag
0 °C … +50 °C
Relatieve luchtvochtigheid
30 % … 75 %, niet-condenserend
Luchtdruk
700 hPa … 1060 hPa
Geluidsniveau
50dB
Deutsch
Impulsvorm
Español
214 ms ±10 %
Français
181 … 250 ppm
286 ms = 210 ppm, geldt niet bij
burst
214 ms = 280 ppm, geldt niet bij
burst
Magyar
286 ms ±10 %
Italiano
260 ppm ±10 %
High Rate Protection
1 … 180 ppm
Nederlands
Bovengrensfrequentie
Polski
225 ms ±5 ms
200 ms ±5 ms
175 ms ±5 ms
Português
Refractaire periode (V)
(30 … 150) ppm
(151 … 200) ppm
(201 … 250) ppm
Česky
Vaste parameter
394271--J_GA_Reocor_D_mul.book Page 324 Monday, January 26, 2015 3:35 PM
324
Afmetingen, gewicht, materiaal
Afmetingen Reocor D
160 mm x 75 mm x 35 mm (zonder Redel-adapter)
Gewicht Reocor D
Met batterij, met Redel-adapter: 325 g ±10 %
Zonder batterij, met Redel-adapter: 280 g ±10 %
Zonder batterij, zonder Redel-adapter: 240 g ±10 %
Afmetingen Redel-adapter voor 76 mm x 35,5 mm x 29,4 mm
Reocor D
Gewicht Redel-adapter voor
Reocor D
40 g ±10 %
Behuizingsmateriaal
Babyblend FR 3000 (PC-ABS)
Classificatie
Classificatie gebruiksdeel
CF (cardiac floating), defibrillatiebeveiligd
Beschermingsklasse
II b
Beschermingswijze
IP31 (waterkerend)
Defibrillatiebestendigheid
5 kV
Bedrijfsmodus
Continugebruik
12 jaar
Verwachte levensduura)
(conform EN 60601-1:2007, 4.4)
a)
De levensduur is de verwachte maximale bedrijfslevensduur van het apparaat na ingebruikname. De verwachte maximale bedrijfslevensduur is niet onderboud door enige test data.
English
394271--J_GA_Reocor_D_mul.book Page 325 Monday, January 26, 2015 3:35 PM
325
HF-interferentie
volgens CISPR 11
Klasse B
Interferentie van boventonen conform
IEC 61000-3-2
Niet-toepasbaar
Het apparaat is bedoeld voor gebruik in alle
inrichtingen behalve de huiselijke omgeving en
gebouwen die direct zijn aangesloten op het
openbare net.
Spanningsschommelingen conform
IEC 61000-3-3
Niet-toepasbaar
Richtlijnen en verklaring van de fabrikant –
Elektromagnetische storingsgevoeligheid
(IEC 60601-1-2: tabel 2)
Het apparaat is bedoeld voor bedrijf in de hieronder beschreven elektromagnetische omgeving. De gebruiker van het
apparaat moet garanderen dat het in een dergelijke omgeving wordt gebruikt.
Testen van de storingsgevoeligheid
Testniveau conform IEC 60601
Ontlading statische
±6 kV contactelektriciteit (ESD) con- ontlading
form IEC 61000–4-2
±8 kV luchtontlading
Snelle transiënte elek- Niet-toepasbaar
trische signalen/
bursts conform
IEC 61000-4-4
Stootspanningen
(Surges) conform
IEC 61000-4-5
Niet-toepasbaar
Conformiteitsniveau
Richtlijn voor
elektromagnetische omgeving
±6 kV contactontlading
±15 kV luchtontlading
Vloeren moeten van hout, beton of
keramische tegels zijn. Als de vloer
bekleed is met synthetisch materiaal, moet de relatieve luchtvochtigheid minstens 30 % bedragen.
Deutsch
Het apparaat gebruikt hoogfrequente energie
uitsluitend voor zijn eigen werking. Hierdoor is
de interferentie van hoogfrequente stoorsignalen zijn gering, evenals de waarschijnlijkheid
dat elektronische apparaten in de omgeving
worden gestoord.
Español
Groep 1
Français
HF-interferentie
volgens CISPR 11
Magyar
Richtlijn voor elektromagnetische omgeving
Italiano
Conformiteitsniveau
Nederlands
Emissietest
Polski
Het apparaat is bedoeld voor bedrijf in de hieronder beschreven elektromagnetische omgeving. De gebruiker moet
garanderen dat het apparaat in een dergelijke omgeving
wordt gebruikt.
Português
Richtlijnen en verklaring van de fabrikant –
Elektromagnetische interferentie (IEC 60601-1-2: tabel 1)
Česky
Conformiteit volgens IEC 60601-1-2
394271--J_GA_Reocor_D_mul.book Page 326 Monday, January 26, 2015 3:35 PM
326
Testen van de storingsgevoeligheid
Testniveau conform IEC 60601
Conformiteitsniveau
Richtlijn voor
elektromagnetische omgeving
30 A/m
De magnetische veldsterkte moet
overeenkomen de typische waarde
van bedrijfs- en ziekenhuisomgevingen.
Spanningsdalingen,
Niet-toepasbaar
korte onderbrekingen
en schommelingen
van de netspanning
conform IEC 61000–411
3 A/m
Magneetveld bij de
netspanningsfrequentie (50/60 Hz) conform
IEC 61000-4-8
Richtlijnen en verklaring van de fabrikant –
Elektromagnetische storingsgevoeligheid voor alle externe
pacemakermodellen (IEC 60601-1-2: tabel 3)
Het apparaat is bedoeld voor bedrijf in de hieronder beschreven elektromagnetische omgeving. De gebruiker van het
apparaat moet garanderen dat het in een dergelijke omgeving wordt gebruikt.
Testen van
de Storingsgevoeligheid
Testniveau volgens
IEC 60601
Conformiteitsniveau
Richtlijn voor
elektromagnetische omgeving
Draagbare en mobiele
zendapparaten worden niet dichter bij een deel van het apparaat,
inclusief kabels, gebruikt dan de
aanbevolen veilige afstand.
Aanbevolen veilige afstand:
Geleide
HF-signalen
conform
IEC 61000-4-6
Gestraalde
HF-signalen
conform
IEC 61000-4-3
10 Vrms
10 kHz tot 80 MHz
buiten ISM-bandena
10 Vrms
10 Vrms
10 kHz tot 80 MHz
binnen ISM-bandena)
10 Vrms
10 V/m
800 MHz tot 2,5 GHz
10 V/m
d = 0,35
P
d = 1,2
P
d = 1,2
P
voor 80 MHz tot 800 MHz
d = 2,3
P
voor 800 MHz tot 2,5 GHz
Storingen zijn mogelijk in de
omgeving van apparaten met het
volgende beeldmerk.
OPMERKING: Deze richtlijnen gelden eventueel niet in alle gevallen. De spreiding van elektromagnetische golven wordt beïnvloed door absorptie en reflectie van gebouwen, voorwerpen en
personen.
a)
b)
c)
d)
De ISM-banden (voor industriële, wetenschappelijke en medische toepassingen) tussen
150 kHz en 80 MHz zijn 6,765 MHz tot 6,795 MHz; 13,553 MHz tot 13,567 MHz; 26,957 MHz tot
27,283 MHz en 40,66 MHz tot 40,70 MHz.
De conformiteitsniveaus in de ISM-frequentiebanden tussen 150 kHz en 80 MHz en in het
frequentiebereik 80 MHz tot 2,5 GHz zijn bedoeld om de waarschijnlijkheid te reduceren dat
mobiele communicatieapparaten storingen veroorzaken als deze zich onbedoeld in het
patiëntbereik bevinden. Daarom wordt in deze frequentiebereiken een hogere veilige afstand
aanbevolen (factor 1,2 in plaats van 0,35).
De veldsterktes van stationaire zenders, zoals bijvoorbeeld basisstations voor mobiele telefoons en mobiele landzenders, amateurzendstations, radio- en televisiezenders kunnen niet
exact worden geschat. Voor de beoordeling van de elektromagnetische omgeving door vaste
HF-zenders moet een onderzoek van de plaats van opstelling worden uitgevoerd. Als de
gemeten veldsterkte op de plaats waar het apparaat wordt gebruikt bovenstaand conformiteitsniveaus overschrijdt, moet het apparaat worden bewaakt om de correcte functie te garanderen. Eventueel moeten aanvullende maatregelen worden getroffen zoals bijvoorbeeld een
richtingswijziging of een andere positionering van de externe pacemaker.
In het frequentiebereik van 150 kHz tot 80 MHz moeten de veldsterktes minder dan 10 V/m
bedragen.
Deutsch
Español
De veldsterkte van stationaire
radiozenders moet op alle frequenties volgens een onderzoek
ter plekkec) geringer zijn dan het
conformiteitsniveaud).
Français
Hierbij is P de maximale nominale capaciteit van de zender in
watt [W] volgens de gegevens van
de zenderfabrikant en d de aanbevolen veilige afstand in meters
[m]b).
Magyar
Richtlijn voor
elektromagnetische omgeving
Italiano
Conformiteitsniveau
Nederlands
Testniveau volgens
IEC 60601
Polski
Testen van
de Storingsgevoeligheid
Português
327
Česky
English
394271--J_GA_Reocor_D_mul.book Page 327 Monday, January 26, 2015 3:35 PM
394271--J_GA_Reocor_D_mul.book Page 328 Monday, January 26, 2015 3:35 PM
328
Aanbevolen veilige afstanden tussen draagbare en mobiele
HF-telecommunicatie-apparatuur (IEC 60601-1-2: tabel 5)
Het apparaat is bedoeld voor bedrijf in een elektromagnetische omgeving waarin de HF-storingen zijn gecontroleerd.
De gebruiker van het apparaat kan helpen om de elektromagnetisch interferenties te voorkomen door de veilige
afstand tot mobiele HF-communicatieapparaten (zenders) –
afhankelijk van het uitgangsvermogen van het communicatieapparaat, zoals onder aangegeven – aan te houden.
Nominale capaci- Veilige afstand d [m] overeenkomstig zendfrequentie
teit van de zender 150 kHz tot
150 kHz tot
80 MHz tot
P [W]
80 MHz buiten
80 MHz binnen
800 MHz
ISM-banden
ISM-banden
d = 0,35
P
d = 1,2
P
d = 1,2
P
800 MHz tot
2,5 GHz
d = 2,3
0,01
0,04
0,12
0,12
0,23
0,10
0,11
0,38
0,38
0,73
1,00
0,35
1,20
1,20
2,30
10,00
1,11
3,79
3,79
7,27
100,00
3,50
12,00
12,00
23,00
P
Voor zenders waarvan de nominale capaciteit niet in bovenstaande tabel is vermeld, kan de veilige afstand aan de hand van de voor de desbetreffende zenderfrequentie aangegeven formule
worden berekend. Hierbij is P de nominale capaciteit van de zender in watt [W] en d de veilige
afstand in meter [m].
OPMERKING 1: De ISM-banden (voor industriële, wetenschappelijke en medische toepassingen)
tussen 150 kHz en 80 MHz zijn 6,765 MHz tot 6,795 MHz; 13,553 MHz tot 13,567 MHz; 26,957 MHz
tot 27,283 MHz en 40,66 MHz tot 40,70 MHz.
OPMERKING 2: De conformiteitsniveaus in de ISM-frequentiebanden tussen 150 kHz en 80 MHz
en in het frequentiebereik 80 MHz tot 2,5 GHz zijn bedoeld om de waarschijnlijkheid te reduceren
dat mobiele communicatieapparaten storingen veroorzaken als deze zich onbedoeld in het
patiëntbereik bevinden. Daarom wordt in deze frequentiebereiken een hogere veilige afstand
aanbevolen (factor 1,2 in plaats van 0,35).
OPMERKING 3: Deze richtlijnen gelden eventueel niet in alle gevallen. De spreiding van elektromagnetische golven wordt beïnvloed door absorptie en reflectie van gebouwen, voorwerpen en
personen.
English
394271--J_GA_Reocor_D_mul.book Page 329 Monday, January 26, 2015 3:35 PM
329
Opmerking:
Reocor D mag alleen met de voor deze pacemaker ontwikkeld en getest toebehoren worden gebruikt.
Česky
Leveromvang en toebehoren
Aantal
Reocor D
1
Opmerking
Bestel-nr.
365529
Batterij
1
Duracell Plus, 6LR61
–
Armmanchet
– voor Japan
– voor alle andere landen
1
Kort
391843
1
Standaard
Redel-adapter
1
103704
371262
Bedienveldafdekking
1
378007
Gebruikershandleiding
1
394271
1
370123
Korte handleiding EN
371300
Korte handleiding ES
371301
Korte handleiding FR
371302
Korte handleiding IT
371303
Korte handleiding PT
372230
Korte handleiding ZH
371304
Pacemaker pocket
1
379384
Français
368702
Korte handleiding DE
Magyar
Gebruikershandleiding ZH
Español
Artikelaanduiding
Deutsch
Leveringsomvang
Aansluiting
Patiëntenkabel met twee geïsoleerde
krokodillenklemmen, hersteriliseerbaar
Directe
aansluiting
PK-83 (2,5 m)
128563
Patiëntenkabel met twee geïsoleerde
schroefklemmen, hersteriliseerbaar
Directe
aansluiting
PK-83 (1,5 m)
128562
Patiëntenkabel met twee geïsoleerde
schroefklemmen, hersteriliseerbaar
Directe
aansluiting
PK-83-B (2,5 m)
347485
Patiëntenkabel met twee geïsoleerde 2,3 mm
schroefklemmen
Redeladapter
PK-83-B (1,5 m)
347606
Patiëntenkabel met twee geïsoleerde 2,3 mm
schroefklemmen
Redeladapter
PK-175
333959
Patiëntenkabel, met vier schroefklemmen voor Redelhet aansluiten van tijdelijke elektroden,
adapter
hersteriliseerbaar
PK-67-L
123672
Patiëntenkabel, hersteriliseerbaar, voor
combinatie met adapter PA-1-B, PA-2, PA-4
Redeladapter
PK-67-S
128085
Patiëntenkabel, hersteriliseerbaar, voor
combinatie met PK-155 en Remington model
301-CG
Redeladapter
PK-141 (2,8 m)
353181
Patiëntenkabel, hersteriliseerbaar met vier
contactbeschermde krokodillenklemmen
Redeladapter
Nederlands
Beschrijving
128564
Polski
Bestel-nr.
PK-82
Português
Artikel
Italiano
Toebehoren
394271--J_GA_Reocor_D_mul.book Page 330 Monday, January 26, 2015 3:35 PM
330
Artikel
Bestel-nr.
Reocor manchet
standaard
103704
Reocor manchet
kort
391843
Beschrijving
Aansluiting
Standaard armmanchet
–
Armmanchet met geringe omvang.
Voor smalle armen geschikt.
–
Alleen voor de USA
Artikel
Fabrikant
Beschrijving
Aansluiting
ADAP-2R
(0,24 m)
Remington
Medical Inc.
Hergebruikbare adapter voor kabel model
S-101-97 en model FL-601-97
Redeladapter
Adapter voor PK-67-S en PK-67-L
Artikel
Bestel-nr.
Beschrijving
PA-1-B
123751
Voor de aansluiting op een 2-mm-adapter of MHW-adapter
(adapter voor hartdraden), hersteriliseerbaar
PA-1-C
349723
Voor de aansluiting op een 2-mm-adapter of MHW-adapter
(adapter voor hartdraden), hersteriliseerbaar
PA-2
123157
Voor de aansluiting op IS-1-stekker, hersteriliseerbaar
PA-4
123090
Met krokodillenklemmen, hersteriliseerbaar
PK-155
(set met 2 kabels)
337358
Steriele patiëntenkabel 2-aderig met krokodillenklemmen
voor eenmalig gebruik
Adapter voor PK-67-S en PK-67-L
(alleen voor de USA)
Artikel
Fabrikant
Beschrijving
Model 301-CG
Remington
Medical Inc.
Steriele patiëntenkabel 2-aderig met krokodillenklemmen voor eenmalig gebruik
Adapter voor ADAP-2R (alleen voor de USA)
Artikel
Fabrikant
Beschrijving
Model 301-CG
Remington
Medical Inc.
Steriele patiëntenkabel 2-aderig met krokodillenklemmen voor eenmalig gebruik
Model S-101-97
(2,5 m)
Remington
Medical Inc.
Patiëntenkabel, 2-aderig met krokodillenklemmen voor
eenmalig gebruik
Model FL-601-97
(2,0 m)
Remington
Medical Inc.
Patiëntenkabel, 2-aderig met schroefaansluitingen voor
eenmalig gebruik
English
394271--J_GA_Reocor_D_mul.book Page 331 Monday, January 26, 2015 3:35 PM
331
De symbolen op het etiket hebben volgende betekenis:
Betekenis
BIOTRONIK-bestelnummer
Serienummer van het apparaat
Español
Redel-adapter
Deutsch
Reocor D
Inhoud
Afvoerteken
Gebruikersaanwijzing raadplegen!
Attentie: Volgens de landelijke wetgeving (USA) mag het product
alleen door een arts of in opdracht van een arts worden verkocht.
EG-merkteken
Magyar
Patiënt met geïmplanteerde elektrode
Italiano
Toegestane luchtvochtigheidsbereik voor opslag
Nederlands
Toegestane luchtdrukbereik voor opslag
Polski
Toegestaan temperatuurbereik voor de opslag
Français
Productiedatum van het apparaat
Português
Symbool
Česky
Legenda bij het etiket
394271--J_GA_Reocor_D_mul.book Page 332 Monday, January 26, 2015 3:35 PM
332
English
394271--J_GA_Reocor_D_mul.book Page 333 Monday, January 26, 2015 3:35 PM
333
359
359
360
360
361
Deutsch
Obsługa, konserwacja i pielęgnacja ....................................................
Reocor D ................................................................
Kable pacjenta wielokrotnego użytku ...................
Konserwacja, serwis, przegląd .............................
Utylizacja ...............................................................
Español
354
354
354
355
356
356
356
356
356
357
357
Français
Tryby stymulacji i parametry ..............................................................
Tryby stymulacji .....................................................
Okresy refrakcji .....................................................
Częstotliwość ........................................................
Opóźnienie AV ........................................................
Amplituda impulsu – przedsionek i komora .........
Czułość – przedsionek ..........................................
Czułość – komora ..................................................
Cross Channel Blanking .......................................
Interwał zakłóceniowy ...........................................
Stymulacja typu burst ...........................................
Magyar
342
342
343
344
345
351
352
352
Italiano
Wskazówki dotyczące obsługi .............................................................
Uwagi ogólne .........................................................
Elementy obsługi i diody LED ...............................
Osłona panelu .......................................................
Podłączanie elektrod .............................................
Uruchomienie ........................................................
Mocowanie .............................................................
Wymiana baterii ....................................................
Nederlands
335
335
336
336
336
337
341
Polski
Opis ogólny .........................................................................................
Opis wyrobu ...........................................................
Wskazania ..............................................................
Przeciwwskazania .................................................
Możliwe skutki uboczne ........................................
Wskazówki dotyczące użytkowania .......................
Sygnały optyczne i akustyczne ..............................
Česky
Spis treści
Dane techniczne .................................................................................. 363
Português
Bezpieczeństwo techniczne ................................................................ 362
394271--J_GA_Reocor_D_mul.book Page 334 Monday, January 26, 2015 3:35 PM
334
Zgodność z normą IEC 60601-1-2 ........................................................ 366
Zakres dostawy i akcesoria ................................................................. 370
Objaśnienie symboli ............................................................................ 372
English
394271--J_GA_Reocor_D_mul.book Page 335 Monday, January 26, 2015 3:35 PM
335
Pod nazwą Reocor D kryje się zewnętrzny, dwujamowy stymulator serca zasilany z baterii. Stymulator ten wraz z elektrodami (włącznie z elektrodami endokawitarnymi oraz cewnikami wszczepianymi drogą przezżylną) tworzy układ do czasowej stymulacji przedsionków i komór, jak i sekwencyjnej
stymulacji A-V w warunkach klinicznych.
Deutsch
Opis wyrobu
Česky
Opis ogólny
Bezpieczną stymulację zapewniają wymienione poniżej właściwości stymulatora Reocor D:
•
optyczny wskaźnik wyczuwanych i stymulowanych zdarzeń,
•
mikroprocesor sterujący parametrami stymulacji,
•
kontrola impedancji elektrod,
•
optyczny wskaźnik rozładowania baterii,
•
przesuwalna, przezroczysta osłona zabezpieczająca
przed niepożądaną zmianą parametrów.
Bezpośrednio do stymulatora można podłączyć zakładane
tymczasowo cewniki, elektrody endokawitarne oraz elektrody
wyposażone w złącze 2 mm. W ofercie dostępne są także różnego rodzaju kable dla pacjentów i adaptery. Stymulator
umożliwia także bezpieczne podłączenie cewników wprowadzanych drogą przezżylną oraz jedno- lub dwubiegunowych
elektrod endokawitarnych.
Français
Magyar
O wystąpieniu uszkodzenia informuje zapalona na stymulatorze dioda LED oraz przerywany sygnał dźwiękowy. W tym
przypadku rozpoczęty po włączeniu stymulatora autotest nie
został zakończony pomyślnie. Jeśli autotest nie wykaże
błędu, wówczas sygnał dźwiękowy ustanie po upływie kilku
sekund, a diody LED zgasną.
Italiano
W przypadku ustawienia bardzo wysokiej częstotliwości lub
bardzo niskiej czułości stymulator wydaje sygnał dźwiękowy.
To samo nastąpi przy nieoptymalnej impedancji elektrod.
Nederlands
Znajdujące się na stymulatorze diody LED sygnalizują wyczuwanie (Sense), stymulację (Pace) oraz poziom naładowania
baterii (Low battery).
Polski
W stymulatorze można ustawić tryb stymulacji, częstotliwość, czułość, amplitudę impulsu, opóźnienie AV oraz
częstotliwość stymulacji typu burst.
Português
Stymulator pracuje w sześciu trybach: DDD, D00, VDD, VVI,
V00 i VVT oraz umożliwia stymulację przedsionkową typu
burst.
Español
Elektrody można podłączyć do stymulatora bezpośrednio lub
przy użyciu kabla pacjenta i adaptera.
394271--J_GA_Reocor_D_mul.book Page 336 Monday, January 26, 2015 3:35 PM
336
Wskazania
Reocor D nadaje się do zastosowania u pacjentów w każdym
wieku:
• do leczenia arytmii i bloku serca,
• do leczenia objawowej bradykardii zatokowej,
• do leczenia zaburzeń węzła zatokowo-przedsionkowego,
• do elektrostymulacji serca u pacjentów przed, w trakcie
lub po operacji mięśnia sercowego,
• do przerwania częstoskurczu nadkomorowego,
• do stymulacji profilaktycznej w celu uniknięcia arytmii,
• do stymulacji doraźnej,
• do kontroli progu stymulacji.
Przeciwwskazania
•
Reocor D nie może być poddawany sterylizacji
i w związku z tym nie nadaje się do zastosowania
w warunkach sterylnych.
•
Tryb wyzwalanej stymulacji przedsionkowej (DDD i VDD)
jest przeciwwskazany u pacjentów z migotaniem lub
trzepotaniem przedsionków lub innym rodzajem częstoskurczu przedsionkowego.
•
Tryb wyzwalanej stymulacji przedsionkowej może być
również przeciwwskazany, jeśli organizm pacjenta negatywnie reaguje na wysoką częstotliwość stymulacji
komorowej (np. w przypadku dławicy piersiowej).
•
Jeśli po stymulacji komorowej zaobserwuje się wsteczne
pobudzenie przedsionków, należy wówczas zaprogramować dłuższy okres refrakcji przedsionkowej lub mniejsze
opóźnienie AV, aby zapobiec wywołaniu tachykardii przez
stymulator. W takich przypadkach może być konieczne
zaprogramowanie trybu VVI.
•
Jednojamowa stymulacja przedsionkowa jest przeciwwskazana u pacjentów z zaburzeniami przewodzenia AV.
•
Przeciwwskazania do stosowania zewnętrznego stymulatora serca istnieją także u pacjentów ze wszczepionym
stymulatorem serca.
Możliwe skutki uboczne
Do możliwych powikłań związanych z zastosowaniem
zewnętrznego stymulatora serca należy m.in. ryzyko wystąpienia asystolii po nagłym przerwaniu stymulacji (np. na skutek mimowolnego oderwania się kabla czy elektrody lub
dokonania błędnych ustawień), a także fizjologiczna potrzeba
stałej stymulacji.
337
Podczas wprowadzania elektrod drogą przezżylną mogą
wystąpić takie powikłania, jak: infekcja rany, nakłucie przedsionka, ocieranie o osierdzie, perforacja mięśnia sercowego,
czy też dysrytmia serca po wprowadzeniu elektrody.
Česky
English
394271--J_GA_Reocor_D_mul.book Page 337 Monday, January 26, 2015 3:35 PM
Zastosowanie
zgodnie
z przeznaczeniem
•
Reocor D oraz przeznaczone dla niego kable i akcesoria
należy stosować zgodnie ze wskazówkami zawartymi
w instrukcji obsługi.
•
Zabrania się podłączania Reocor D do innych elektrycznych urządzeń medycznych.
•
Zabrania się stosowania Reocor D w obszarach zagrożonych wybuchem.
Zakaz modyfikacji
•
Naprawa, rozbudowa lub modyfikacja urządzenia może
zostać przeprowadzona wyłącznie przez firmę BIOTRONIK
lub przez inną firmę za wyraźną zgodą producenta.
Części zamienne
i akcesoria
•
Bezpieczeństwo użytkowania mogą zapewnić wyłącznie
oryginalne części zamienne i akcesoria dopuszczone do
użytku przez firmę BIOTRONIK. Producent nie ponosi
odpowiedzialności z tytułu gwarancji i rękojmi za następstwa wynikające z zastosowania innych komponentów.
Urządzenia
w pogotowiu
•
W przypadku uzależnienia pacjenta od stymulatora należy trzymać w pogotowiu dodatkowy stymulator.
•
Ponadto należy mieć przygotowany zewnętrzny defibrylator, butle z tlenem, zestaw do intubacji oraz leki do stosowania doraźnego.
Español
Reocor D współdziała z sercem pacjenta. Wzajemne
oddziaływanie występuje również ze skórą i naczyniami
krwionośnymi.
Français
•
Magyar
Sposób działania
Italiano
Do stosowania Reocor D upoważnione są wyłącznie
osoby posiadające wiedzę z dziedziny kardiologii oraz
znajomość obsługi stymulatora. Do grona potencjalnych
użytkowników należą technicy medyczni pracujący
w szpitalu oraz lekarze.
Nederlands
•
Polski
Grono użytkowników
Português
Przyczyną wystąpienia arytmii może być niewłaściwa konfiguracja parametrów ustawionych na podstawie występującego u pacjenta schorzenia. Aby zapewnić pacjentowi bezpieczeństwo, należy przestrzegać wymienionych poniżej zasad
postępowania i środków ostrożności. Szczegółowe informacje
na temat postępowania i środków ostrożności zamieszczone
są w odpowiednich publikacjach medycznych.
Deutsch
Wskazówki dotyczące użytkowania
394271--J_GA_Reocor_D_mul.book Page 338 Monday, January 26, 2015 3:35 PM
338
Przed użyciem
Podłączanie
elektrod
Podczas użycia
•
Przed użyciem należy sprawdzić wzrokowo Reocor D pod
kątem uszkodzeń i zanieczyszczeń.
•
Nigdy nie używać stymulatora wykazującego ślady uszkodzeń lub anomalie. Wszelkiego rodzaju kable należy
wymienić nawet w przypadku niewielkich uszkodzeń.
•
Przed użyciem stymulatora, kabla pacjenta lub elektrody
należy dotknąć pacjenta w celu wyrównania różnicy
potencjałów.
•
Przed podłączeniem elektrod do Reocor D usilnie zaleca
się sprawdzenie wszystkich parametrów.
•
Reocor D jest zabezpieczony przed wnikaniem wilgoci.
Mimo to, złącza i stymulator należy utrzymywać w stanie
czystym i suchym.
•
Reocor D nie może być poddawany sterylizacji.
•
Złącza w Reocor D oraz w elektrodach do czasowej stymulacji muszą być zabezpieczone i poddawane regularnej kontroli.
•
Kabel pacjenta należy podłączyć najpierw do Reocor D,
a następnie do elektrod.
•
Elektrody do czasowej stymulacji, podłączane do
Reocor D, cechują się niską impedancją przewodzonych
impulsów elektrycznych. W związku z tym urządzenia
zasilane z sieci, znajdujące się w pobliżu pacjenta, muszą
posiadać odpowiednie uziemienie.
•
W przypadku użycia wszczepionych już elektrod nie
należy dotykać ich złączy elektrycznych ani powierzchni
metalicznych. Elementy te nie mogą mieć także styczności z przedmiotami wilgotnymi lub przewodzącymi prąd.
•
Oderwany od Reocor D kabel należy natychmiast ponownie podłączyć i sprawdzić prawidłowość połączenia.
•
W wypadku zastosowania elektrod jednobiegunowych,
dla zapewnienia skutecznej stymulacji w obu jamach
serca należy użyć dwóch elektrod jednobiegunowych.
•
Aby w trakcie używania Reocor D zapobiec przypadkowej
zmianie parametrów, osłona panelu powinna być całkowicie zamknięta.
•
Reocor D należy położyć na płaskiej podkładce przeciwpoślizgowej lub zamocować na ramieniu pacjenta przy
użyciu opaski albo zawiesić na stojaku do kroplówek za
pomocą uchwytu znajdującego się z tyłu stymulatora.
•
Reocor D nie może mieć bezpośredniego kontaktu ze
skórą pacjenta.
•
Podczas stosowania należy kontrolować częstotliwość
rytmu serca na monitorze EKG z funkcją alarmu.
S00
VDD
VAT, VVI, V00
DDD
DAD, DVI, D00
Elektrostymulacja serca z częstotliwością powyżej
180 ppm przez dłuższy okres może wywołać groźne
powikłania hemodynamiczne, dlatego powinna odbywać
się jedynie pod stałym nadzorem lekarza.
Po użyciu
•
Po defibrylacji lub kauteryzacji należy sprawdzić działanie stymulatora.
•
W przypadku przechowywania lub nieużywania stymulatora przez dłuższy okres należy wyjąć baterię, aby nie
spowodowała uszkodzeń na skutek jej rozlania.
•
Do czyszczenia można używać zwilżonej szmatki
i łagodnego mydła. Nie stosować środków czyszczących
o silnym działaniu ani organicznych rozpuszczalników,
gdyż mogą uszkodzić obudowę z tworzywa sztucznego.
•
Przegląd i konserwację należy wykonać zgodnie ze wskazówkami zamieszczonymi na stronie 359.
•
Nie używać baterii przeznaczonych do wielokrotnego
ładowania (baterii akumulatorowych). Ze względu na to,
że nie sposób jest określić żywotności tych baterii, może
nagle i nieoczekiwanie dojść do pojawienia się wskaźnika
ERI1 i przerwania stymulacji.
Baterie
Należy używać wyłącznie baterii 9 V oznaczonych międzynarodowym kodem IEC 6LR61. Użycie baterii Duracel®
Procell® typu MN 1604 umożliwia zewnętrzną stymulację
przez co najmniej 500 godzin, zanim konieczna będzie ich
wymiana.
Nederlands
•
Baterie można wymienić w trakcie użytkowania stymulatora. Po wyjęciu baterii Reocor D pozostaje jeszcze przez
ok. 30 s w stanie gotowości do działania w temperaturze
otoczenia 20 ±2°C.
Polski
Stymulacja
z wysoką
częstotliwością
Deutsch
Przy zakłóceniach EMI
SSI, SST
Español
Tryb pracy bez zakłóceń
Français
W przypadku wystąpienia zakłóceń powstałych na skutek
interferencji elektromagnetycznych (EMI) Reocor D po
przekroczeniu określonych wartości granicznych przechodzi w tryb stymulacji asynchronicznej. Tryby stymulacji, w jakich pracuje Reocor D podczas trwania zakłóceń,
zależą od miejsca ich występowania (w przedsionku/
komorze) i przedstawiają się następująco:
Magyar
•
Italiano
339
Česky
English
394271--J_GA_Reocor_D_mul.book Page 339 Monday, January 26, 2015 3:35 PM
1
Wskaźnik ERI (migająca dioda LED Low battery) sygnalizuje konieczność wymiany baterii.
Português
Ze względów bezpieczeństwa należy jednak zapewnić
możliwość stymulacji z innego źródła.
394271--J_GA_Reocor_D_mul.book Page 340 Monday, January 26, 2015 3:35 PM
340
Elektrokauteryzacja
•
Zabiegu elektrokauteryzacji nie należy w żadnym
wypadku wykonywać w odległości mniejszej niż 15 cm od
elektrod. W przeciwnym razie zachodzi ryzyko wywołania
migotania komór lub uszkodzenia stymulatora.
W stymulatorze należy ustawić stymulację asynchroniczną, aby zapobiec hamowaniu wyzwalania impulsów przez zakłócenia. Podczas zabiegu należy stale kontrolować tętno obwodowe pacjenta. Po zakończeniu
zabiegu należy sprawdzić działanie stymulatora.
Defibrylacja
•
Układy scalone w Reocor D są zabezpieczone przed
działaniem impulsów defibrylacyjnych. Mimo to, w miarę
możliwości należy zachować następujące środki ostrożności:
— Nie ustawiać energii większej niż wymagana do defibrylacji.
— Odstęp pomiędzy elektrodami defibrylatora
i elektrodami Reocor D powinien wynosić co najmniej
10 cm,
— Po zakończeniu defibrylacji należy wyłączyć
i ponownie włączyć Reocor D, aby mógł on przeprowadzić autotest.
Poza tym należy sprawdzić i nadzorować przez odpowiednio długi czas działanie stymulatora i próg stymulacji.
Ochrona przed
zakłóceniami
•
Reocor D jest zabezpieczony przed zakłóceniami elektromagnetycznymi, wyładowaniami elektrostatycznymi oraz
interferencjami przewodzonymi. W stymulatorze zmniejszono także emisję promieniowania. Dzięki temu urządzenie to spełnia wymagania dyrektywy IEC 60601-1-2.
Mimo to, nie można wykluczyć występowania silnych
pól elektromagnetycznych zakłócających działanie
stymulatora, np. w bezpośredniej bliskości silników
elektrycznych, transformatorów, przewodów elektrycznych i innych urządzeń elektrycznych.
Zakłócenia elektromagnetyczne mogą wywołać następujące usterki:
— raptowne zresetowanie (stymulator przeprowadza
autotest),
— wyczuwanie zdarzeń w sercu nie pojawiających się na
monitorze EKG,
— Reocor D działa w sposób niewytłumaczalny.
Sposób przywrócenia prawidłowego działania:
— Sprawdzić i ewentualnie skorygować połączenie między stymulatorem a elektrodami do czasowej stymulacji.
— Nastawić odpowiednią czułość w Reocor D: prawidłowe ustawienie można uzyskać zmniejszając o połowę wartość przeciętnej amplitudy sygnału wewnątrzsercowego.
Po włączeniu stymulatora przeprowadza on autotest,
w trakcie którego zapalają się wszystkie diody LED oraz
generowane są krótkie sygnały akustyczne. Autotest
zostaje zakończony po kilku sekundach.
•
Sygnały akustyczne ustaną, a diody LED zgasną, jeśli
autotest nie wykaże błędów.
•
W przypadku wykrycia uszkodzenia zaczną migać wszystkie diody LED oraz rozlegną się sygnały akustyczne.
•
Czerwona, migająca dioda LED (Low battery) sygnalizuje
konieczność wymiany baterii.
•
Zielone diody LED (Sense) sygnalizują wyczuwanie
załamka P lub załamka R.
•
Żółte diody LED (Pace) sygnalizują wyzwolenie impulsu.
•
Sygnały akustyczne i diody LED ostrzegają ponadto o
następujących zdarzeniach:
Ostrzeżenie
Znaczenie
Sygnał dźwiękowy trwający 2 s Amplituda impulsu ustawiona
<1 V, a częstotliwość >180 ppm
Usuwanie usterek
Sprawdzić poprawność ustawionych wartości dla pacjenta.
Sekwencja krótkich sygnałów
dźwiękowych
Impedancja poza dopuszczalnym Sprawdzić prawidłowe połązakresem
czenie wszystkich złączy
i położenie elektrod.
Sygnał dźwiękowy i miganie
diod LED Pace i Sense
Nastąpiło wyzwolenie funkcji
Wyłączyć urządzenie i odesłać
High Rate Protection; autotest
do firmy BIOTRONIK.
nie został zakończony pomyślnie
Miganie diody LED Low battery Wskaźnik ERI
a)
W wypadku użycia baterii Duracell® , Procell® typu MN1604.
Wymienić baterię. Stymulator
będzie działał jeszcze przez
ok. 36 godzina).
Deutsch
Español
Français
•
Magyar
Sygnały optyczne i akustyczne
Italiano
Jeżeli w urządzeniu czułość dla przedsionka ustawiona
jest na wartość <1,0 mV, to mogą wystąpić zakłócenia
elektromagnetyczne. W związku z tym należy w miarę
możliwości ustawić wartość powyżej 1,0 mV. Ustawienie
czułości na wartość <1,0 mV dozwolone jest tylko na
wyraźne zalecenie lekarza. Wartości te mogą zostać
ustawione i zachowane wyłącznie pod nadzorem lekarza.
Nederlands
•
Polski
— Wyłączyć wszystkie urządzenia elektryczne znajdujące się w pobliżu Reocor D, które mogą powodować
zakłócenia elektromagnetyczne i których użytkowanie nie jest konieczne.
— Urządzenia będące źródłem zakłóceń należy umieścić w takim miejscu, aby nie powodowały zakłóceń.
— Jeśli jest to bezpieczne: wyłączyć i ponownie włączyć
Reocor D, aby przywrócić prawidłowe działanie.
— Jeśli stymulator nadal nie działa prawidłowo, należy
skontaktować się z firmą BIOTRONIK.
Português
341
Česky
English
394271--J_GA_Reocor_D_mul.book Page 341 Monday, January 26, 2015 3:35 PM
394271--J_GA_Reocor_D_mul.book Page 342 Monday, January 26, 2015 3:35 PM
342
Wskazówki dotyczące obsługi
Uwagi ogólne
Uwaga!
Autotest
Złącza w Reocor D oraz w elektrodach do czasowej stymulacji
muszą być zabezpieczone i poddawane regularnej kontroli.
Po włączeniu stymulatora przeprowadza on autotest, który
trwa kilka sekund i obejmuje:
•
kontrolę kodu programu i mikroprocesora,
•
kontrolę pamięci,
•
kontrolę działania diod LED i sygnałów akustycznych,
•
kontrolę funkcji stymulacji i wyczuwania,
•
kontrolę skuteczności zabezpieczenia przed wysoką
częstotliwością (High Rate Protection).
W przypadku wykrycia uszkodzenia zaczną migać wszystkie
diody LED oraz rozlegną się sygnały akustyczne. W takim
przypadku należy wyłączyć stymulator i odesłać go do firmy
BIOTRONIK.
Jeśli autotest nie wykaże błędów, wówczas po upływie
kilku sekund ustanie sygnał akustyczny, diody LED zgasną,
a Reocor D rozpocznie wyzwalanie impulsów zgodnie z ustawionymi parametrami. Elektrodę ujemną (katodę) należy
podłączyć dopiero po upewnieniu się, że prawidłowo zostały
ustawione parametry, takie jak rodzaj i częstotliwość stymulacji oraz amplituda impulsu i czułość.
Aby zapobiec natychmiastowemu wyzwalaniu impulsów po
podłączeniu elektrod, należy ustawić regulator Mode w pozycji OFF.
Ostrzeżenia
W trakcie użytkowania stymulatora mogą pojawić się następujące ostrzeżenia:
•
Migająca dioda LED (Low battery) sygnalizuje konieczność wymiany baterii.
•
Jeśli wartość impedancji elektrody nie leży w dopuszczalnym zakresie (np. z powodu złamania elektrody lub
poluzowania się styku), to po upływie 5 s od włączenia
stymulatora rozlegnie się kilka krótkich sygnałów dźwiękowych.
•
Jeśli amplituda impulsu ustawiona jest <1 V, a częstotliwość >180 ppm, wówczas rozlegnie się sygnał akustyczny
trwający ok. 2 s.
•
W przypadku ustawienia zbyt wysokiej częstotliwości
(patrz str. 364 „Zabezpieczenie przed wysoką częstotliwością“) lub niepomyślnego zakończenia autotestu rozlegnie się sygnał akustyczny, a diody LED Pace i Sense
zaczną migać.
English
394271--J_GA_Reocor_D_mul.book Page 343 Monday, January 26, 2015 3:35 PM
343
17
D
0
30
0
10
80
60
10
7
0,1
3
0,5
3
1
2
5
3
4
12
17
10
5
5
10
7
8
2
7
0,1
14
11
1
3
Magyar
2
1
5
20
17
0 ,5
Français
2
0, 3
0, 2
Español
0
40
20
0
0, 5
300
0
25
20 0
18
0
1
12
0, 7
0
17
4 00
35
0
10
0
0
10
75
50
0
60 0
60
50
V0 0
80
0
1000
70
VV I
T
25
15
12
0
VV
40
Deutsch
14 0
DD
20
0
250
D
VD
D0 0
Česky
Elementy obsługi i diody LED
Nederlands
Italiano
b
DIFF.-
Polski
INDIFF.+
Português
Ilustr. 1: Panel Reocor D
394271--J_GA_Reocor_D_mul.book Page 344 Monday, January 26, 2015 3:35 PM
344
1a
1b
2
3
4
5
6
7
8
9
10
11
12
13
14
15
16
17
18
Oznaczenie
Złącze kanału przedsionkowego
Złącze kanału komorowego
Schowek na baterie
LED Low battery
LED Ventricle Pace
LED Ventricle Sense
Regulator obrotowy
Ventricle Ampl.
Regulator obrotowy
Ventricle Sens.
LED Atrium Pace
LED Atrium Sense
Regulator obrotowy
Atrium Ampl.
Regulator obrotowy
Atrium Sens.
Start burst
Uchwyt z paskiem (z tyłu)
Regulator obrotowy
Burst rate atrium
Regulator obrotowy
AV delay
Select burst
Regulator obrotowy Mode
Regulator obrotowy Rate
Funkcja
Na kabel i elektrody z wtykiem 2 mm lub adapter Redel
(czerwony = plus; niebieski = minus)
Na baterie blokowe 9 V
Sygnalizuje za niskie napięcie baterii
Żółta dioda sygnalizująca stymulację komory
Zielona dioda sygnalizująca wyczuwanie załamka R
Do regulacji amplitudy impulsu przewodzonego do komory
Do regulacji czułości wyczuwania w komorze
(nie ma zastosowania w trybie D00 i V00)
Żółta dioda sygnalizująca stymulację przedsionka
Zielona dioda sygnalizująca wyczuwanie załamka P
Do regulacji amplitudy impulsu przewodzonego do przedsionka (nie ma zastosowania w trybie VDD)
Do regulacji czułości wyczuwania w przedsionku (nie ma
zastosowania w trybie D00)
Rozpoczyna stymulację przedsionkową typu burst
Do zamocowania Reocor D na ramieniu pacjenta, łóżku lub
stojaku do kroplówek
Do regulacji częstotliwości stymulacji przedsionkowej typu
burst
Do regulacji opóźnienia AV
Umożliwia wybór stymulacji przedsionkowej typu burst
Umożliwia wybór trybu stymulacji i wyłączenie
Do regulacji częstotliwości stymulacji
Tabela 1: Opis elementów przedstawionych na ilustr. 1
Podane na regulatorach wartości oznaczone pogrubioną
czcionką zapewniają bezpieczne działanie wyrobu medycznego.
Osłona panelu
Pokrywa panelu obsługi jest zamknięta, gdy została przesunięta przez dwa punkty zatrzaśnięcia, aż do oporu, a blokada
znajduje się nad mostkiem (patrz Ilustr. 2).
Tak:
Ilustr. 2: Prawidłowe położenie pokrywy panelu
Nie:
English
394271--J_GA_Reocor_D_mul.book Page 345 Monday, January 26, 2015 3:35 PM
345
Jedną ręką unieść dźwignię blokady do góry.
Español
Deutsch
Równocześnie drugą ręką przesunąć pokrywę panelu
obsługi w dół.
Česky
Aby otworzyć pokrywę panelu obsługi należy (patrz Ilustr. 3):
Podłączanie elektrod
Reocor D posiada 4 gniazda. Umożliwiają one bezpośrednie
podłączenie elektrod do izolowanych wtyków 2 mm.
W celu podłączenia kabli do wtyku Redel należy nasadzić i
przykręcić z odpowiedniej strony adapter Redel (ilustr. 4).
Jeśli adapter ten nie jest nasadzony z prawidłowej strony,
wówczas nie można go przykręcić do stymulatora.
Wskazówka:
Prawidłowe działanie adaptera Redel można zapewnić
wyłącznie po nasadzeniu go z odpowiedniej strony!
Magyar
Aby w trakcie używania Reocor D zapobiec przypadkowemu
przestawieniu pokręteł i regulatorów, a co za tym idzie zmianie parametrów, osłona panelu powinna być zablokowana.
Italiano
Uwaga!
Nederlands
Do czyszczenia osłona panelu może zostąć zdjęta.
W tym celu należy przesunąć osłonę panelu w dół do oporu.
Następnie przesunąć ją dalej, pokonując wyczuwalny opór.
Polski
Przesunąć pokrywę panelu obsługi przez mostek do góry
do oporu (patrz Ilustr.2).
Português
Aby zamknąć pokrywę panelu obsługi należy:
Français
Ilustr. 3: Odblokowanie pokrywy panelu
394271--J_GA_Reocor_D_mul.book Page 346 Monday, January 26, 2015 3:35 PM
346
Ilustr. 4: Adapter Redel do stymulatora Reocor D
Do stymulatora Reocor D można użyć następujących kabli i
adapterów:
•
Kabel pacjenta PK-175 z czterema zaciskami śrubowymi
na elektrody do czasowej stymulacji po stronie pacjenta i
wtykami Redel po stronie stymulatora (należy stosować
adapter Redel).
Wtyk Redel
Ilustr. 5: Kabel pacjenta PK-175
Kabel pacjenta PK-82 z 2 izolowanymi zaciskami krokodylkowymi na elektrody do czasowej stymulacji po stronie
pacjenta i 2 izolowanymi wtykami 2 mm po stronie
stymulatora.
Ilustr. 6: Kabel pacjenta PK-82
Kabel pacjenta PK-83-B do stymulacji jednojamowej
z dwoma zaciskami śrubowymi na elektrody do czasowej
stymulacji po stronie pacjenta i wtykami Redel po stronie
stymulatora (należy stosować adapter Redel); elektrody
do czasowej stymulacji, podłączane z użyciem kabla
PK-83-B, połączone są z kanałem komorowym Reocor D.
Ilustr. 7: Kabel pacjenta PK-83-B
Kabel pacjenta PK-83 do stymulacji jednojamowej
z dwoma izolowanymi zaciskami śrubowymi na elektrody
do czasowej stymulacji po stronie pacjenta i dwoma izolowanymi wtykami 2 mm po stronie stymulatora.
Ilustr. 8: Kabel pacjenta PK-83
Kable pacjenta PK-67-L i PK-67-S różnią się jedynie długością.
Polski
•
Nederlands
Italiano
•
Magyar
Français
•
Deutsch
•
Español
347
Česky
English
394271--J_GA_Reocor_D_mul.book Page 347 Monday, January 26, 2015 3:35 PM
Português
Ilustr. 9: Kabel pacjenta PK-67-L (2,6 m) i PK-67-S (0,8 m)
394271--J_GA_Reocor_D_mul.book Page 348 Monday, January 26, 2015 3:35 PM
348
•
Adapter
Do kabla PK-67-L/-S (ilustr. 9) pasują adaptery przedstawione na ilustr. 10:
PA-1-B
PK-67-L/-S
PA-2
PA-4
Ilustr. 10: Adapter do kabli PK-67-L i PK-67-S
PA-1-B na izolowane wtyki 2 mm lub adaptery MHW
(do elektrod endokawitarnych)
PA-2 IS-1
PA-4 z zaciskami krokodylkowymi
•
Kabel pacjenta PK-141 z czterema zaciskami krokodylkowymi po stronie pacjenta i wtykami Redel po stronie
stymulatora (należy stosować adapter Redel).
Ilustr. 11: Kabel pacjenta PK-141
•
Kabel ADAP-2R nadaje się do ponownego połączenia
kabli jednorazowego użytku zgodnie z ilustr. 13 (tylko
w USA) z Reocor D (należy stosować adapter Redel).
Ilustr. 12: Kabel do adaptera ADAP-2R
English
394271--J_GA_Reocor_D_mul.book Page 349 Monday, January 26, 2015 3:35 PM
349
Kabel jednorazowego użytku (tylko w USA)
•
Kable jednorazowego użytku
Français
Kable jednorazowego użytku PK-155 oraz kabel firmy
Remington 301-CG (tylko w USA) z zaciskami krokodylkowymi (ilustr. 14) podłączane są do pacjenta za pomocą kabla
PK-67-S.
Español
Ilustr. 13: Kabel jednorazowego użytku firmy Remington Medical Inc. (tylko USA)
Deutsch
Česky
•
Ilustr. 14: Kabel PK-155
Ryzyko porażenia prądem elektrycznym!
Nieużywane końcówki kabli mogą przewodzić prąd elektryczny oddziałujący na organizm pacjenta. Nieużywane
końcówki kabli należy przymocować w pobliżu pacjenta.
Uwaga!
Reakcje alergiczne i stany zapalne!
Kable nie powinny mieć kontaktu z ranami ani skórą
pacjenta.
Wskazówka:
Przed użyciem kabli należy zwrócić uwagę na prawidłowe
zamocowanie izolowanych końcówek.
Wskazówka:
Kabel pacjenta należy podłączyć do elektrody dopiero po
podłączeniu go do urządzenia Reocor D.
Podłączanie bezpośrednie
Jeśli Reocor D używany jest bez adaptera Redel, to zakładane
tymczasowo cewniki i elektrody endokawitarne z kablami
PK-82 i PK-83 można podłączyć bezpośrednio do gniazd
A+, A- i V+, V-.
Italiano
OSTRZEŻENIE!
Nederlands
Zagrożenie spowodowane przerwą w działaniu!
Mokre kable nie działają prawidłowo i stwarzają zagrożenie
dla pacjenta. Nie używać mokrych kabli.
Polski
OSTRZEŻENIE!
Português
Zagrożenie dla pacjenta spowodowane uszkodzeniem kabli!
Uszkodzone kable działają nieprawidłowo i stwarzają zagrożenie dla pacjenta. Nie należy używać uszkodzonych kabli.
Magyar
Podłączanie
OSTRZEŻENIE!
394271--J_GA_Reocor_D_mul.book Page 350 Monday, January 26, 2015 3:35 PM
350
Kabel pacjenta
Kabel pacjenta podłączany jest do Reocor D za pomocą adaptera Redel.
Nasadzić adapter Redel na Reocor D.
Przykręcić adapter.
Włożyć wtyk Redel znajdujący się na kablu pacjenta do
gniazda Redel w adapterze.
Wskazówka:
Przy użyciu kabla pacjenta PK-83-B nie jest możliwa stymulacja dwujamowa. Elektrody podłączane do kabla PK-83-B są
połączone z kanałem komorowym Reocor D.
Możliwości podłączania
Zakładane tymczasowo cewniki z wtykami 2 mm lub
elektroda endokawitarna z adapterem 2 mm
Reocor D można podłączyć bezpośrednio do zakładanego
tymczasowo cewnika z izolowanym wtykiem 2 mm lub do
elektrody endokawitarnej z adapterem 2 mm bez potrzeby
użycia dodatkowych kabli czy adapterów. Pozostałe możliwości podłączania przedstawiono w poniższej tabeli.
Po stronie pacjenta
Kabel firmy BIOTRONIK
Zalecane złącza
Bezpośrednie podłączenie (bez kabla firmy BIOTRONIK)
2 mm
PK-67-S/L z PA-1-B
Zaciski śrubowe
PK-175 z TC Adapt
Zaciski śrubowe
PK-83 z TC Adapt (2x)
Możliwe złącza
Zaciski krokodylkowe
PK-141
Zaciski krokodylkowe
PK-67-S/L z PA-4
Zaciski krokodylkowe
PK-67-S/L z PK-155 (2x)
Zaciski krokodylkowe
PK-82 (2x)
Po stronie
urządzenia
Do Reocor D
Wtyk Redel
Wtyk Redel
Wtyk 2 mm
Gniazda 2 mm
Adapter Redel
Adapter Redel
Gniazda 2 mm
Wtyk Redel
Wtyk Redel
Wtyk Redel
Wtyk 2 mm
Adapter Redel
Adapter Redel
Adapter Redel
Gniazda 2 mm
Elektroda endokawitarna z igłą do punkcji lub
z elastyczną końcówką (o maks. przekroju 2,3 mm)
Po stronie pacjenta
Zalecane złącza
Zaciski śrubowe
Zaciski śrubowe
Możliwe złącza
Zaciski krokodylkowe
Zaciski krokodylkowe
Zaciski krokodylkowe
Zaciski krokodylkowe
Kabel firmy BIOTRONIK
Po stronie
urządzenia
Do Reocor D
PK-175
PK-83 (2x)
Wtyk Redel
Wtyk 2 mm
Adapter Redel
Gniazda 2 mm
PK-141
PK-67-S/L z PA-4
PK-67-S/L z PK-155 (2x)
PK-82 (2x)
Wtyk Redel
Wtyk Redel
Wtyk Redel
Wtyk 2 mm
Adapter Redel
Adapter Redel
Adapter Redel
Gniazda 2 mm
English
394271--J_GA_Reocor_D_mul.book Page 351 Monday, January 26, 2015 3:35 PM
351
Po stronie pacjenta
Kabel firmy BIOTRONIK
Po stronie
urządzenia
Do Reocor D
PK-67-S/L z PA-2
Wtyk Redel
Adapter Redel
Zaciski krokodylkowe
PK-141
Wtyk Redel
Adapter Redel
Zaciski krokodylkowe
PK-67-S/L z PA-4
Wtyk Redel
Adapter Redel
Zaciski krokodylkowe
PK-67-S/L z PK-155 (2x)
Wtyk Redel
Adapter Redel
Zaciski krokodylkowe
PK-82 (2x)
Wtyk 2 mm
Gniazda 2 mm
Zalecane złącza
Gniazdo IS-1
Česky
Implantowana elektroda ze złączem IS-1
W przypadku użycia elektrod jednobiegunowych należy podłączyć po 2 elektrody do każdej komory.
Odłączanie złączy
Español
Reocor D przeprowadza stymulację z reguły w konfiguracji
dwubiegunowej, niemniej jednak nadaje się również do zastosowania z dwu- lub jednobiegunowymi elektrodami do czasowej stymulacji.
Français
Biegunowość
Deutsch
Możliwe złącza
Obsługa Reocor D jest identyczna we wszystkich trybach
pracy. Poszczególne kroki należy wykonać w przedstawionej
poniżej kolejności (liczby podane w nawiasach odnoszą się do
ilustr. 1 na stronie 343 w niniejszej instrukcji obsługi).
•
Włożyć baterię.
•
Odsunąć w dół osłonę panelu.
•
Założyć pacjentowi elektrody bez podłączania ich do
stymulatora.
•
W stymulatorze Reocor:
Ustawić częstotliwość stymulacji regulatorem Rate (18).
Ustawić opóźnienie AV regulatorem AV delay (15)1.
Ustawić amplitudę stymulacji dla przedsionka1 i komory
regulatorem Atrium Ampl. (10)1 i Ventricle Ampl. (6).
1
Dotyczy tylko stymulacji dwujamowej.
Italiano
Uruchomienie
Nederlands
Zdjąć pierścień nasadowy z wtyku Redel, po czym wyjąć
tenże wtyk z gniazda Redel.
Polski
•
Português
Odłączanie wtyku Redel
Magyar
Wyjąć kabel pacjenta z zacisków elektrod do czasowej stymulacji lub odłączyć bezpośrednie połączenie.
394271--J_GA_Reocor_D_mul.book Page 352 Monday, January 26, 2015 3:35 PM
352
•
Wybrać tryb stymulacji regulatorem Mode (17). W tym
samym czasie włączy się stymulator.
•
Po pomyślnym zakończeniu autotestu na panelu zaświecą się dwukrotnie wszystkie diody LED (5 diod).
•
W przypadku migania diody LED Low battery (3) należy
wymienić baterię (odnośnie wymiany baterii patrz stronie
352).
•
Po podłączeniu elektrod zaczną migać żółte diody LED
Atrium Pace (8)1 i Ventricle Pace (4). W tym samym czasie
nastąpi wyzwolenie impulsu do stymulacji przedsionka
lub komory.
•
Ustawić czułość dla przedsionka i komory regulatorem
Atrium Sens. (11)1 i Ventricle Sens. (7) w taki sposób, aby
zielone diody LED Atrium Sense (9)1 i Ventricle Sense (5)
migały jednocześnie z każdym wyczuwanym zdarzeniem
w przedsionku lub komorze.
Aby zapewnić niezawodne wyczuwanie, należy uwzględnić również dostateczny margines bezpieczeństwa.
•
Uwaga!
Monitorować zapis EKG i w razie potrzeby dostosować
amplitudę oraz czułość.
W trakcie używania Reocor D należy kontrolować częstotliwość rytmu serca na monitorze EKG z funkcją alarmu.
Mocowanie
Reocor D należy położyć na płaskiej podkładce przeciwpoślizgowej lub zamocować na ramieniu pacjenta przy użyciu
opaski albo zawiesić na stojaku do kroplówek za pomocą
uchwytu znajdującego się z tyłu stymulatora.
Aby zawiesić Reocor D na stojaku do kroplówek, należy
wykręcić znajdujący się na tylnej stronie uchwyt. Zapewnia on
bezpieczne użytkowanie stymulatora oraz odciąża kabel
pacjenta.
Wymiana baterii
Migająca dioda LED Low battery (3) sygnalizuje wyczerpywanie się baterii. W wypadku użycia baterii Duracell® Procell®
typ MN1604 urządzenie pracuje jeszcze 36 godzin. Mimo to,
należy możliwie jak najszybciej wymienić baterię.
Stymulator Reocor D może być zasilany wyłącznie z baterii
9 V oznaczonych międzynarodowym kodem IEC 6LR61. Należy używać wyłącznie baterii alkaliczno-manganowych zabezpieczonych przed wylaniem. Użycie baterii Duracel® Procell®
Schowek na baterie (2) znajduje się z prawej strony stymulatora. Aby go otworzyć, należy przesunąć do góry niebieski
suwak i odsunąć w prawo szufladkę. Baterie należy wyjmować ostrożnie.
Dla zabezpieczenia biegunów w nowej baterii można nałożyć
na nie gumową zatyczkę. Zatyczkę tę należy jednak zdjąć
przed włożeniem baterii do stymulatora.
Uwaga!
W schowku na baterie zaznaczona została prawidłowa biegunowość. Przy wkładaniu nowej baterii należy zwrócić uwagę
na to, aby jej bieguny skierowane były do środka obudowy.
Położenie bieguna dodatniego i ujemnego nie odgrywa roli.
Deutsch
Nie używać baterii przeznaczonych do wielokrotnego ładowania (baterii akumulatorowych). Ze względu na to, że nie sposób jest określić żywotności tych baterii, może nagle i nieoczekiwanie dojść do pojawienia się wskaźnika ERI i przerwania stymulacji.
Español
Ze względów bezpieczeństwa należy jednak zapewnić możliwość stymulacji z innego źródła.
Français
typu MN 1604 umożliwia zewnętrzną stymulację w temperaturze 20 ± 2°C przez co najmniej 500 godzin, zanim konieczna
będzie ich wymiana.
Baterie można wymienić w trakcie użytkowania stymulatora.
Po wyjęciu baterii Reocor D pozostaje jeszcze przez ok. 30 s
w stanie gotowości do działania w temperaturze otoczenia
20 ±2°C.
Magyar
353
Česky
English
394271--J_GA_Reocor_D_mul.book Page 353 Monday, January 26, 2015 3:35 PM
Nederlands
Italiano
Do schowka należy włożyć nową baterię skierowaną spodem
w dół (ilustr. 15).
Wskazówka:
W przypadku przechowywania lub nieużywania stymulatora
przez dłuższy okres należy wyjąć baterię, aby nie spowodowała uszkodzeń na skutek jej rozlania.
Português
Zamknąć szufladkę i przesunąć niebieski suwak w dół do
usłyszenia odgłosu zatrzaśnięcia.
Polski
Ilustr. 15: Wkładanie baterii
394271--J_GA_Reocor_D_mul.book Page 354 Monday, January 26, 2015 3:35 PM
354
Tryby stymulacji i parametry
Tryby stymulacji
Reocor D pracuje w jednym z sześciu trybów zestawionych
w poniższej tabeli.
DDD
Synchroniczna stymulacja przedsionkowo-komorowa A-V z wyczuwaniem
VDD
Synchroniczna stymulacja komorowa ze śledzeniem czynności skurczowej
przedsionków
D00
Asynchroniczna stymulacja A-V bez wyczuwania
VVI
Stymulacja komorowa z wyczuwaniem
V00
Asynchroniczna stymulacja komorowa
VVT
Jak VVI, jednak w chwili wyczucia zdarzenia w komorze poza okresem refrakcji następuje natychmiastowe wyzwolenie impulsu
W przypadku wystąpienia zakłóceń powstałych na skutek
interferencji elektromagnetycznych (EMI) Reocor D po przekroczeniu określonych wartości granicznych przechodzi
w tryb stymulacji asynchronicznej. Tryby stymulacji, w jakich
pracuje Reocor D podczas trwania zakłóceń, zależą od
miejsca ich występowania (w przedsionku/komorze)
i przedstawiają się następująco:
Tryb pracy bez zakłóceń
Przy zakłóceniach EMI
SSI, SST
S00
VDD
VAT, VVI, V00
DDD
DAD, DVI, D00
Okresy refrakcji
Górna granica częstotliwości stymulacji komór z jednoczesnym wyczuwaniem zdarzeń w przedsionku zależy od
okresu refrakcji przedsionka (ang. atrial refractory period,
ARP). Stymulator rozpoczyna cykl stymulacji w chwili wyczucia zdarzeń zachodzących w przedsionku, a w przypadku
wyczucia dodatkowych skurczy komór powtarza cały cykl od
początku. W przypadku przekroczenia górnej granicy częstotliwości, co drugi impuls wysyłany do przedsionka przechodzi
w okres refrakcji przedsionkowej, nie jest wyczuwany i nie
powoduje wyzwolenia impulsu do komory. Częstotliwość
stymulacji komorowej utrzymywana jest w stosunku 2:1
(ilustr. 16).
English
394271--J_GA_Reocor_D_mul.book Page 355 Monday, January 26, 2015 3:35 PM
Częstotliwość stymulacji
Okres refrakcji komory VRP
Poniżej 150 ppm
225 m/s
Od 150 ppm do 200 ppm
200 m/s
Powyżej 200 ppm
175 m/s
Français
Nederlands
Elektrostymulacja serca z częstotliwością powyżej 180 ppm
przez dłuższy okres może wywołać groźne powikłania hemodynamiczne, dlatego powinna odbywać się jedynie pod stałym
nadzorem lekarza.
Português
OSTRZEŻENIE!
Do ciągłej regulacji częstotliwości w zakresie od 30 ppm do
250 ppm służy regulator Rate (18). W przypadku ustawienia
wartości powyżej 180 ppm, stymulator generuje sygnał
dźwiękowy trwający przez ok. 2 sekundy.
Polski
Częstotliwość
Magyar
Całkowity okres refrakcji przedsionka (ang. total atrial refractory period, TARP) zapisany w stymulatorze Reocor D wynika
z sumy otrzymanej po dodaniu 175 m/s do ustawionego czasu
opóźnienia AV. Jego minimalna wartość wynosi jednak
400 m/s i leży poniżej częstotliwości stymulacji równej
120 ppm. Powyżej tej częstotliwości całkowity okres refrakcji
przedsionka zmniejsza się do 240 m/s. Okres refrakcji
komory (ang. ventricular refractory period, VRP) w stymulatorze Reocor D zależy od częstotliwości stymulacji:
Italiano
Ilustr. 16: Charakterystyka górnej granicy częstotliwości podczas częstoskurczu
przedsionkowego (częstotliwość podstawowa 72 ppm).
Español
Deutsch
Česky
355
394271--J_GA_Reocor_D_mul.book Page 356 Monday, January 26, 2015 3:35 PM
356
Opóźnienie AV
Do ciągłej regulacji opóźnienia AV w zakresie od 15 m/s do
400 m/s służy regulator AV delay (15). U pacjentów ze szczególnymi wskazaniami, np. w przypadku ponownego wystąpienia tachykardii, może zostać ustawione krótkie opóźnienie AV.
Reocor D wyznacza górną granicę opóźnienia AV odpowiadającą połowie częstotliwości podstawowej.
Amplituda impulsu – przedsionek i komora
Amplitudy impulsów dochodzących do przedsionka i komory
mogą być regulowane za pomocą regulatorów Ampl. (10) i (6)
w zakresie od 0,1 V do 17 V. W przypadku ustawienia wartości
poniżej 1 V, stymulator generuje sygnał dźwiękowy trwający
przez ok. 2 sekundy.
Czas trwania impulsu wynosi 1 m/s.
Aby zapewnić optymalne ustawienie marginesu bezpieczeństwa oraz ciągłość stymulacji, należy kontrolować przebieg
tejże w regularnych odstępach czasu.
Czułość – przedsionek
Czułość można ustawić przy użyciu regulatora Atrium Sens.
(11) w zakresie od 0,2 mV do 10 mV. Aby zapewnić optymalne
ustawienie marginesu bezpieczeństwa oraz prawidłowe
wyczuwanie, należy kontrolować jego przebieg w regularnych
odstępach czasu.
Czułość – komora
Czułość można ustawić przy użyciu regulatora Ventricle Sens.
(7) w zakresie od 1 mV do 20 mV. Aby zapewnić optymalne
ustawienie marginesu bezpieczeństwa oraz prawidłowe
wyczuwanie, należy kontrolować czułość w regularnych
odstępach czasu.
Cross Channel Blanking
Po wyzwoleniu impulsu stymulującego, wyczuwanie
w odpowiednim kanale zostaje wstrzymane na czas 19 ms
± 3 ms, aby zapobiec wyczuwaniu odległych potencjałów.
English
394271--J_GA_Reocor_D_mul.book Page 357 Monday, January 26, 2015 3:35 PM
357
Do aktywacji tej funkcji służą 2 przyciski. Najpierw należy
nacisnąć przycisk (16) Select burst, a następnie w ciągu
2 sekund przycisk (12) Start burst. Impulsy wyzwalane są do
momentu zwolnienia tego przycisku. Stymulacja komory trwa
nadal przy ustawionej częstotliwości, którą w tym czasie
można zmienić. Wyzwalanie impulsów do komory zostaje
wstrzymane, o ile ustawiony został taki tryb.
OSTRZEŻENIE!
Po zakończeniu stymulacji przedsionkowej typu burst, blanking komorowy może uniemożliwić wyczuwanie zdarzeń
sercowych i spowodować przejście stymulatora w tryb
asynchronicznej stymulacji komorowej.
Elektrostymulacja serca z częstotliwością powyżej 180 ppm
przez dłuższy okres może wywołać groźne powikłania hemodynamiczne, dlatego powinna odbywać się jedynie pod stałym
nadzorem lekarza.
Tryb stymulacji z wysoką częstotliwością pozwala zatrzymać
określone formy częstoskurczu nadkomorowego (ang. supraventricular tachycardia, SVT) i powinien być brany pod uwagę
tylko przy wskazaniach do stymulacji przedsionkowej. Asynchroniczne impulsy stymulujące o wysokiej częstotliwości
mogą przerwać częstoskurcz nadkomorowy w wyniku częściowej depolaryzacji w obwodzie reentry. Zastosowanie
impulsów o wysokiej częstotliwości do stymulacji przedsion-
Deutsch
Español
Français
Do regulacji częstotliwości stymulacji przedsionkowej typu
burst w zakresie od 60 ppm do 1000 ppm służy regulator
Burst rate (14).
Magyar
Stymulacja typu burst
Italiano
Interferencje występujące w obu kanałach powodują przejście stymulatora w tryb D00.
Nederlands
Na przykład występujące w przedsionku zakłócenia podczas
stymulacji w trybie DDD, nie mające wpływu na kanał komorowy, powodują zmianę trybu stymulacji na DVI. Szumy
wyczuwane w kanale komorowym powodują przejście stymulatora w tryb DAD.
Polski
W przypadku wyczuwania szumów w dowolnym kanale przez
80 m/s stymulator przerywa pracę w ustawionym trybie i
przechodzi w tryb stymulacji asynchronicznej o zaprogramowanej częstotliwości na czas występowania zakłóceń.
Português
Zmianę trybu pracy mogą spowodować zdarzenia występujące zarówno w przedsionku, jak i komorze podczas stymulacji
i wyczuwania.
Česky
Interwał zakłóceniowy
394271--J_GA_Reocor_D_mul.book Page 358 Monday, January 26, 2015 3:35 PM
358
kowej może silniej zahamować przedwczesne pobudzenia
w ognisku ektopowym, nawet jeśli ognisko to jest przyczyną
występowania częstoskurczu nadkomorowego.
Należy pamiętać, iż tego typu stymulacja niesie ze sobą różnego rodzaju ryzyko. Między innymi może dojść do stymulacji
i częstoskurczu komorowego oraz do fibrylacji. Ich przyczyną
może być niewłaściwe umiejscowienie elektrod lub obecność
dodatkowych dróg przewodzenia przedsionkowo-komorowego (np. przy zespole Wolffa-Parkinsona-White'a). Ponadto
u pacjenta może wystąpić nieprzyjemne uczucie, a także
asystolie.
English
394271--J_GA_Reocor_D_mul.book Page 359 Monday, January 26, 2015 3:35 PM
359
W żadnym wypadku nie należy używać stymulatora, jeśli
wykazuje on ślady uszkodzeń lub anomalie, szczególnie jeśli
spadł na ziemię lub uległ uszkodzeniu pod wpływem oddziaływania napięcia o wysokiej częstotliwości lub napięcia
impulsów defibrylacyjnych.
Reocor D należy położyć na płaskiej podkładce przeciwpoślizgowej lub zamocować na ramieniu pacjenta przy użyciu
opaski albo zawiesić na stojaku do kroplówek za pomocą
uchwytu znajdującego się z tyłu stymulatora.
Uwaga!
W przypadku użycia opaski Reocor D nie może mieć bezpośredniego kontaktu ze skórą pacjenta.
Czyszczenie
Do czyszczenia stymulatora Reocor D można użyć zwilżonej
szmatki i ewentualnie łagodnego mydła. Nie stosować środków czyszczących o silnym działaniu ani organicznych rozpuszczalników, np. eteru lub benzyny, gdyż mogą uszkodzić
obudowę z tworzywa sztucznego.
Dezynfekcja
W celu dezynfekcji należy przetrzeć stymulator szmatką
nasączoną roztworem dezynfekcyjnym (np. marki Aerodesin
2000 lub Lysoform D). Przed przygotowaniem roztworu należy
zwrócić uwagę na podany przez producenta stopień rozcieńczenia.
Wskazówka:
Po czyszczeniu i dezynfekcji stymulator Reocor D może
zostać ponownie użyty nie wcześniej niż po upływie jednej
godziny.
Sterylizacja
Reocor D nie może być poddawany sterylizacji. Jeśli ma
być używany w sterylnym otoczeniu, można go zapakować
w sterylny pokrowiec.
Deutsch
Español
Français
OSTRZEŻENIE!
Magyar
Przed każdym użyciem należy sprawdzić wzrokowo obudowę,
panel, złącza i kabel pacjenta pod kątem uszkodzeń mechanicznych, zniekształcenia, poluzowania się części, porysowania i zanieczyszczenia.
Italiano
Stymulator przed użyciem musi być przechowywany przez co
najmniej 2 godziny w określonych warunkach użytkowania
(patrz stronie 365).
Nederlands
W takim przypadku należy odesłać stymulator do firmy
BIOTRONIK.
Polski
Reocor D jest urządzeniem wysoce precyzyjnym, zatem należy obchodzić się z nim z należytą dbałością. Czynniki mechaniczne, jak np. uderzenie, mogą ujemnie wpłynąć na działanie
stymulatora.
Português
Reocor D
Česky
Obsługa, konserwacja i pielęgnacja
394271--J_GA_Reocor_D_mul.book Page 360 Monday, January 26, 2015 3:35 PM
360
Zaleca się przeprowadzanie corocznych kontroli stymulatora
przez upoważnionego technika.
Uwaga!
Reocor D jest zabezpieczony przed wnikaniem wilgoci. Mimo
to, należy go utrzymywać w stanie czystym i suchym.
Kable pacjenta wielokrotnego użytku
Przed otwarciem opakowania, w którym znajduje się sterylny
kabel, należy sprawdzić je pod kątem uszkodzeń i stwierdzić,
czy zachowana została pełna sterylność.
Czyszczenie
Do czyszczenia i dezynfekcji kabli wielokrotnego użytku można zastosować różnego rodzaju środki czyszczące używane
w szpitalach. W żadnym wypadku nie należy używać środków
chemicznych o silnym działaniu, np. acetonu.
Do czyszczenia kabli zaleca się użycie ściereczki i zwykłego
mydła do rąk bez zawartości alkoholu lub środka czyszczącego Stabimed firmy Braun. Po czyszczeniu należy usunąć
z kabla pozostałości środka czyszczącego przy użyciu wody
pozbawionej elektrolitów, a następnie wytrzeć kabel czystą i
suchą szmatką.
Dezynfekcja
Do dezynfekcji metodą zanurzenia należy użyć środka do
dezynfekcji narzędzi na bazie aldehydów (np. Lysoformin 3000)
lub alkoholu (np. Aerodesin 2000) zgodnie z zaleceniami producenta i z uwzględnieniem odpowiednich wytycznych obowiązujących w szpitalach.
Po dezynfekcji należy usunąć z kabla pozostałości środka
dezynfekcyjnego przy użyciu pozbawionej elektrolitów wody.
Sterylizacja
Jeśli w dokumentacji kabli pacjenta nie podano inaczej,
wszystkie kable pacjenta można sterylizować w następujący
sposób:
•
sterylizacja parowa w temperaturze 121 °C i ciśnieniu
1,1 bara przez 20 minut.
Kable pacjenta PK-175 oraz PK-83-B można sterylizować
również następująco:
•
sterylizacja parowa w temperaturze 134 °C i ciśnieniu
3,0 barów przez 18 minut.
Konserwacja, serwis, przegląd
Stymulator poza wymianą baterii (patrz stronie 352) nie
wymaga konserwacji.
Dodatkowe czynności konserwacyjne nie są konieczne.
Kontrola przed
użyciem
Przed każdym użyciem należy poddać stymulator krótkiej
kontroli wzrokowej oraz kontroli działania.
Kontrola wzrokowa:
•
kontrola obudowy pod kątem uszkodzeń mechanicznych,
deformacji, poluzowania się części, porysowania, itd.;
•
kontrola połączeń kabli pod kątem uszkodzeń mechanicznych;
•
kontrola czytelności napisów.
Kontrola działania
Deutsch
361
Česky
English
394271--J_GA_Reocor_D_mul.book Page 361 Monday, January 26, 2015 3:35 PM
raz do roku.
Przegląd należy wykonać zgodnie z zaleceniami producenta.
Lista zaleceń dostępna jest na żądanie. Wyszczególnione są
w niej wszystkie niezbędne czynności kontrolne oraz wymagane urządzenia.
Utylizacja
Na tabliczce znamionowej stymulatora Reocor D widnieje
przekreślony symbol pojemnika na śmieci. Symbol ten informuje o tym, że przy zwrocie i utylizacji urządzenia obowiązuje
dyrektywa UE 2002/96/WE w sprawie zużytego sprzętu elektrycznego i elektronicznego (WEEE).
Zużyte lub niepotrzebne urządzenia, np. kabel pacjenta i
adapter, należy odesłać do firmy BIOTRONIK, aby zapewnić
utylizację urządzeń zgodną z krajowymi przepisami wdrażającymi dyrektywę WEEE.
Wskazówka:
Kable, które miały kontakt z krwią, należy usuwać jak skażone wyroby medyczne zgodnie z przepisami o ochronie środowiska. Nieskażone kable należy usuwać zgodnie z wymaganiami dyrektywy 2002/96/WE dotyczącej zużytego sprzętu
elektrycznego i elektronicznego (WEEE).
Zużyte baterie należą do odpadów specjalnych i nie mogą być
utylizowane przez użytkownika.
Français
w przypadku podejrzewania zakłóceń w działaniu,
•
Magyar
•
Italiano
po użyciu stymulatora wraz z urządzeniami chirurgicznymi wysokiej częstotliwości lub defibrylatorami,
Nederlands
•
Polski
Przeglądu należy dokonać:
Pytania prosimy kierować do firmy BIOTRONIK.
Português
Przegląd
Español
Zwrócić uwagę na wynik autotestu przeprowadzanego po
włączeniu stymulatora.
394271--J_GA_Reocor_D_mul.book Page 362 Monday, January 26, 2015 3:35 PM
362
Bezpieczeństwo techniczne
Zewnętrzny stymulator serca Reocor D spełnia wymagania
międzynarodowych norm IEC 60601-1 i IEC 60601-1-2 dotyczących bezpieczeństwa elektrycznych urządzeń medycznych
oraz wymagania międzynarodowej normy IEC 60601-2-31
dotyczącej zewnętrznych stymulatorów serca.
Bezpieczną stymulację zapewniają wymienione poniżej właściwości stymulatora:
OSTRZEŻENIE!
•
Brak nieosłoniętych części metalowych zgodnie
z definicją ujętą w normie IEC.
•
Konstrukcja zgodna ze standardem obowiązującym dla
urządzeń klasy CF (cardiac floating), dopuszczona do
bezpośredniej elektrostymulacji serca. Stymulator spełnia wymagania międzynarodowych norm dotyczących
ochrony przed ryzykiem związanym z defibrylacją.
•
Zamknięta osłona panelu chroni stymulator przed wnikaniem wilgoci.
Elektrody do czasowej stymulacji, podłączane do Reocor D,
cechują się niską impedancją przewodzonych impulsów elektrycznych. W związku z tym urządzenia zasilane z sieci, znajdujące się w pobliżu pacjenta, muszą posiadać odpowiednie
uziemienie.
Zabrania się stosowania stymulatora w obszarach zagrożonych wybuchem.
Wszelkie dodatkowe czynności konserwacyjne i naprawy
mogą być przeprowadzane wyłącznie przez firmę BIOTRONIK.
English
394271--J_GA_Reocor_D_mul.book Page 363 Monday, January 26, 2015 3:35 PM
363
Česky
Dane techniczne
Symbole
Utylizacja zgodnie z dyrektywą WEEE
IP31
Wodoodporny, stopień ochrony IP31
OFF
Wyłączanie (regulator Mode)
Français
Urządzenie klasy CF (cardiac floating), ochrona przed ryzykiem związanym z defibrylacją
Español
Oznaczenie położenia baterii w schowku
Deutsch
Przestrzegać wskazówek zawartych w instrukcji obsługi
0,1 … 17 V ± maks.
(50 mV, 10%)
Czułość (A)
0,2 … 10 mV ±15%
Czułość (V)
Opóźnienie AV
Częstotliwość burst (A)
1 … 20 mV ±15%
(15 … 400 m/s) ±4 m/s
(60 … 1000 ppm) ±20 ppm
Parametry stałe
Czas trwania impulsu
Auto short po Pace
1 m/s ±5%
<20 m/s ±10%
Interwał zakłóceniowy
80 m/s ±5 m/s
In channel blanking
110 m/s ± 3 m/s
Cross Channel Blanking
Całkowity okres refrakcji
przedsionka (TARP)
TARP minimalny dla
(30 … 120) ppm dla
(121 … 250) ppm
19 m/s ±3 m/s
AVD +175 m/s ±5 m/s
400 m/s ±5 m/s
240 m/s ±5 m/s
Przy amplitudzie
impulsu <1 V zostaje wygenerowany sygnał dźwiękowy
Dot. impulsu 15 m/s sin2
Dot. impulsu 40 m/s sin2
Italiano
Amplituda impulsu (A, V)
Przy częstotliwości
>180 ppm zostaje wygenerowany sygnał dźwiękowy
Nederlands
(30 … 250 ppm) ±1 ppm
Polski
DDD, D00, VDD, VVI, V00, VVT
Częstotliwość podstawowa
Português
Tryby stymulacji
Magyar
Parametry ustawiane
394271--J_GA_Reocor_D_mul.book Page 364 Monday, January 26, 2015 3:35 PM
364
Parametry stałe
Okres refrakcji (V)
(30 … 150) ppm
(151 … 200) ppm
(201 … 250) ppm
225 m/s ±5 m/s
200 m/s ±5 m/s
175 m/s ±5 m/s
Górna granica częstotliwości
260 ppm ±10%
Zabezpieczenie przed wysoką
częstotliwością (High Rate
Protection)
1 … 180 ppm
286 m/s ±10%
181 … 250 ppm
214 m/s ±10%
Kształt impulsu
Asymetryczny, dwufazowy
286 m/s = 210 ppm, nie dotyczy funkcji burst
214 m/s = 280 ppm, nie dotyczy funkcji burst
Kontrola impedancji elektrod
Sygnał dźwiękowy
Od 2000 Ω ± 15%, przy amplitudzie 5 V
Złącze elektrody
Izolowane gniazda 2 mm; gniazdo Redel,
6-biegunowe, z użyciem adaptera Redel
Parametry elektryczne/bateria
Bateria
•
•
•
Biegunowość
Katodowa
Ochrona przed odwróceniem
biegunowości
Brak: biegunowość nie ma znaczenia
Typu Al-Mn: IEC 6LR61/ANSI 1604A
9 V zabezpieczona przed wylaniem
Np. MN1604 Duracell® Procell®a)
Pobór energii
Normalnie 1 mA (70 ppm, 5,0 V, 500 Ω )
Czas pracy nowej bateriib)
•
•
•
500 h (−10%) w temp. 20°C (±2°C)
Przy 70 ppm, 5 V, tryb DDD, 500 omów
Do pojawienia się sygnału ERI
(ostrzeżenie EOS)
Koniec czasu użytkowania (EOS)
Migająca dioda LED Low battery
Pozostały czas użytkowania po
sygnale ERIb)
•
•
36 godzin
Przy 70 ppm, 5 V, tryb DDD, 500 omów
Przy wymianie baterii
•
Po wyjęciu baterii stymulator pozostaje
w stanie gotowości do działania jeszcze
przez co najmniej 30 s
Ustawiony tryb zostaje zachowany
•
a)
b)
Zastrzeżony znak towarowy firmy Duracell Inc., Bethel, CT 06801.
W wypadku użycia baterii Duracell® , Procell® typu MN1604.
365
Warunki otoczenia
+10°C … +40°C
Zakres temperatury przechowywania 0°C … +50°C
Wymiary, masa, materiał
Wymiary Reocor D
160 mm x 75 mm x 35 mm (bez adaptera Redel)
Masa Reocor D
Z baterią i adapterem Redel: 325 g ± 10%
Bez baterii, z adapterem Redel: 280 g ±10%
Bez baterii i adaptera Redel: 240 g ± 10%
Wymiary adaptera Redel do Reocor D 76 mm x 35,5 mm x 29,4 mm
Masa adaptera Redel do Reocor D
40 g ±10%
Materiał obudowy
Babyblend FR 3000 (PC-ABS)
Klasyfikacja
II b
IP31 (wodoodporny)
Odporność na elektrowstrząsy
5 kV
Tryb pracy
Tryb ciągły
Szacowana żywotnośća) (zgodnie
z norma EN 60601-1:2007, 4.4)
12 lat
a)
Żywotność urządzenia, to oczekiwany maksymalny okres pracy od momentu wprowadzenia go
do obrotu. Oczekiwany maksymalny okres pracy nie jest oparty na wynikach testów.
Italiano
Klasa ochrony
Stopień ochrony
Magyar
CF (cardiac floating), ochrona przed ryzykiem związanym
z defibrylacją
Nederlands
Urządzenie klasy
Español
50 dB
Français
700 hPa … 1060 hPa
Poziom szumów
Deutsch
30% … 75%, bez kondensacji
Ciśnienie powietrza
Polski
Względna wilgotność powietrza
Português
Zakres temperatury użytkowania
Česky
English
394271--J_GA_Reocor_D_mul.book Page 365 Monday, January 26, 2015 3:35 PM
394271--J_GA_Reocor_D_mul.book Page 366 Monday, January 26, 2015 3:35 PM
366
Zgodność z normą IEC 60601-1-2
Deklaracja producenta i wytyczne dotyczące emisji
elektromagnetycznej (IEC 60601-1-2: tabela 1)
Urządzenie przeznaczone jest do użytku w opisanym poniżej
otoczeniu elektromagnetycznym. Użytkownik powinien
zapewnić użytkowanie urządzenia w takich warunkach.
Kontrola emisji
Poziom
zgodności
Wytyczne dotyczące otoczenia elektromagnetycznego
Emisja pola elektromagnetycznego wysokiej
częstotliwości wg
CISPR 11
Grupa 1
Urządzenie pobiera energię wysokiej częstotliwości wyłącznie do działania. Poziom emisji zakłóceń wysokiej częstotliwości, jak i prawdopodobieństwo wystąpienia zakłóceń w innych urządzeniach elektrycznych znajdujących się w pobliżu,
są bardzo małe.
Emisja pola elektromagnetycznego wysokiej
częstotliwości wg
CISPR 11
Klasa B
Urządzenie nadaje się do zastosowania we
wszystkich budynkach z wyjątkiem budynków
mieszkalnych oraz budynków podłączonych
bezpośrednio do publicznej sieci energetycznej.
Emisja wyższych drgań
harmonicznych wg
IEC 61000-3-2
Nie ma zastosowania
Wahania napięcia wg
IEC 61000-3-3
Nie ma zastosowania
Deklaracja producenta i wytyczne dotyczące odporności na
zakłócenia elektromagnetyczne (IEC 60601-1-2: tabela 2)
Urządzenie przeznaczone jest do użytku w opisanym poniżej
otoczeniu elektromagnetycznym. Użytkownik powinien
zapewnić użytkowanie urządzenia w takich warunkach.
Test odporności na
zakłócenia
Poziom testu wg Poziom
IEC 60601
zgodności
Wytyczne dotyczące otoczenia
elektromagnetycznego
Wyładowania elektrostatyczne (ESD) wg
IEC 61000-4-2
Wyładowanie
stykowe ±6 kV
Wyładowanie
powietrzne ±8 kV
Podłogi powinny być wykonane
z drewna, betonu lub płytek ceramicznych. Jeżeli podłogi pokryte
są materiałem syntetycznym,
względna wilgotność powietrza
w pomieszczeniu powinna wynosić
co najmniej 30%.
Szybkie, przejściowe
zakłócenia elektryczne/bursts wg
IEC 61000-4-4
Nie ma zastosowania
Napięcia udarowe
(surges) wg
IEC 61000-4-5
Nie ma zastosowania
Wyładowanie
stykowe ±6 kV
Wyładowanie
powietrzne
±15 kV
Deklaracja producenta i wytyczne dotyczące odporności na
zakłócenia elektromagnetyczne wszystkich modeli
zewnętrznych stymulatorów serca (IEC 60601-1-2: tabela 3)
Urządzenie przeznaczone jest do użytku w opisanym poniżej
otoczeniu elektromagnetycznym. Użytkownik powinien
zapewnić użytkowanie urządzenia w takich warunkach.
Test odporności na
zakłócenia
Poziom testu wg
IEC 60601
Poziom
zgodności
Wytyczne dotyczące otoczenia
elektromagnetycznego
Przenośnych odbiorników
i nadajników radiowych wolno używać w pobliżu dowolnej części urządzenia, z kablami włącznie, jedynie
pod warunkiem zachowania zalecanej odległości bezpieczeństwa.
Zalecana odległość bezpieczeństwa:
Przewodzone zakłócenia wysokiej
częstotliwości wg
IEC 61000-4-6
10 Vrms
10 kHz do 80 MHz
poza pasmem ISMa
10 Vrms
10 Vrms
10 kHz do 80 MHz
w zakresie pasma
ISMa)
10 Vrms
Promieniowane
10 V/m
zakłócenia wysokiej 800 MHz do 2,5 GHz
częstotliwości wg
IEC 61000-4-3
d = 0,35
P
d = 1,2
P
d = 1,2
P
10 V/m
dla 80 MHz do 800 MHz
d = 2,3
P
dla 800 MHz do 2,5 GHz
Deutsch
Natężenie pola magnetycznego
powinno odpowiadać wartości
typowej dla otoczenia szpitala lub
miejsca prowadzenia działalności.
Español
30 A/m
Français
3 A/m
Pole magnetyczne
przy częstotliwości
zasilania (50/60 Hz) wg
IEC 61000-4-8
Magyar
Nie ma zastosowania
Italiano
Spadki napięcia,
krótkie przerwy
w dostawie prądu
i zmiany napięcia na
liniach zasilających
IEC 61000-4-11
Wytyczne dotyczące otoczenia
elektromagnetycznego
Nederlands
Poziom testu wg Poziom
IEC 60601
zgodności
Polski
Test odporności na
zakłócenia
Português
367
Česky
English
394271--J_GA_Reocor_D_mul.book Page 367 Monday, January 26, 2015 3:35 PM
394271--J_GA_Reocor_D_mul.book Page 368 Monday, January 26, 2015 3:35 PM
368
Test odporności na
zakłócenia
Poziom testu wg
IEC 60601
Poziom
zgodności
Wytyczne dotyczące otoczenia
elektromagnetycznego
Wartość P oznacza maksymalną
moc znamionową nadajnika
w watach [W] zgodnie ze wskazówkami producenta, a wartość d zalecaną odległość bezpieczeństwa
w metrach [m]b).
Według wyników badań przeprowadzonych na miejscu, natężenie pola
nadajników stacjonarnych przy
jakiejkolwiek częstotliwości
powinnoc) być mniejsze od poziomu
zgodnościd).
W otoczeniu urządzeń oznakowanych poniższym piktogramem mogą
występować zakłócenia.
Ad.: Niniejsze wytyczne niekoniecznie obowiązują we wszystkich przypadkach. Na promieniowanie
elektromagnetyczne wpływa także współczynnik odbicia i absorpcji przypisywany budynkom,
przedmiotom i ludziom.
a)
b)
c)
d)
Pasmo ISM (do zastosowań przemysłowych, naukowych i medycznych) od 150 kHz do 80 MHz:
6,765 MHz do 6,795 MHz; 13,553 MHz do 13,567 MHz; 26,957 MHz do 27,283 MHz oraz
40,66 MHz do 40,70 MHz.
Poziomy zgodności w zakresie częstotliwości ISM od 150 kHz do 80 MHz oraz od 80 MHz do
2,5 GHz mają na celu zmniejszyć prawdopodobieństwo wystąpienia zakłóceń wywołanych
przez przenośne urządzenia komunikacyjne, które nieoczekiwanie znajdą się w pobliżu
pacjenta. W związku z tym w niniejszych zakresach częstotliwości zaleca się zwiększenie odległości bezpieczeństwa (współczynnik 1,2 zamiast 0,35).
Nie sposób jest dokładnie określić natężenie pola dla nadajników stacjonarnych, np. stacji
bazowej telefonii komórkowej, przenośnych odbiorników radiowych, radiostacji amatorskich,
nadawczych stacji radiowych i telewizyjnych. W celu dokonania oceny otoczenia elektromagnetycznego stacjonarnych nadajników wysokiej częstotliwości należy wziąć pod uwagę wyniki
przeprowadzonych na miejscu badań. Jeżeli natężenie pola zmierzone w miejscu użytkowania
urządzenia przekracza podany wyżej poziom zgodności wysokiej częstotliwości, należy kontrolować urządzenie dla zapewnienia prawidłowego działania. W razie potrzeby należy przedsięwziąć dodatkowe środki, np. ustawić zewnętrzny stymulator w innym kierunku lub zmienić
miejsce jego użytkowania.
W zakresie częstotliwości od 150 kHz do 80 MHz natężenie pola powinno wynosić poniżej
10 V/m.
Zalecane odległości bezpieczeństwa dla przenośnych
urządzeń telekomunikacyjnych wysokiej częstotliwości
(IEC 60601-1-2: tabela 5)
Urządzenie przeznaczone jest do użytku w otoczeniu elektromagnetycznym, w którym kontrolowane są zakłócenia wysokiej częstotliwości. Użytkownik urządzenia może zapobiec
występowaniu w nim zakłóceń elektromagnetycznych zachowując odległość bezpieczeństwa od przenośnych urządzeń
telekomunikacyjnych wysokiej częstotliwości (nadajników),
w zależności od mocy wyjściowej tychże urządzeń.
d = 2,3
0,01
0,04
0,12
0,12
0,23
0,10
0,11
0,38
0,38
0,73
1,00
0,35
1,20
1,20
2,30
10,00
1,11
3,79
3,79
7,27
100,00
3,50
12,00
12,00
23,00
P
Odległość bezpieczeństwa dla nadajników, których moc znamionowa nie została wyszczególniona w powyższej tabeli, może zostać obliczona na podstawie wzoru podanego dla danej częstotliwości nadawania. Wartość P oznacza moc znamionową nadajnika w watach [W], a wartość d
odległość bezpieczeństwa w metrach [m].
Ad. 1: Pasmo ISM (do zastosowań przemysłowych, naukowych i medycznych) od 150 kHz do
80 MHz: 6,765 MHz do 6,795 MHz; 13,553 MHz do 13,567 MHz; 26,957 MHz do 27,283 MHz oraz
40,66 MHz do 40,70 MHz.
Ad. 2: Poziomy zgodności w zakresie częstotliwości ISM od 150 kHz do 80 MHz oraz od 80 MHz do
2,5 GHz mają na celu zmniejszyć prawdopodobieństwo wystąpienia zakłóceń wywołanych przez
przenośne urządzenia komunikacyjne, które nieoczekiwanie znajdą się w pobliżu pacjenta.
W związku z tym w niniejszych zakresach częstotliwości zaleca się zwiększenie odległości bezpieczeństwa (współczynnik 1,2 zamiast 0,35).
Ad. 3: Niniejsze wytyczne niekoniecznie obowiązują we wszystkich przypadkach. Na promieniowanie elektromagnetyczne wpływa także współczynnik odbicia i absorpcji przypisywany budynkom, przedmiotom i ludziom.
Français
P
Magyar
d = 1,2
Italiano
P
Nederlands
d = 1,2
Polski
P
Português
d = 0,35
Español
Moc znamionowa Odległość bezpieczeństwa d [m] wg częstotliwości nadawania
nadajnika P [W] 150 kHz do
150 kHz do
80 MHz do
800 MHz do
80 MHz poza
80 MHz w zakre- 800 MHz
2,5 GHz
pasmem ISM
sie pasma ISM
Deutsch
369
Česky
English
394271--J_GA_Reocor_D_mul.book Page 369 Monday, January 26, 2015 3:35 PM
394271--J_GA_Reocor_D_mul.book Page 370 Monday, January 26, 2015 3:35 PM
370
Zakres dostawy i akcesoria
Wskazówka:
Reocor D może być używany tylko ze specjalnie zaprojektowanymi i przetestowanymi akcesoriami.
Zakres dostawy
Nazwa artykułu
Ilość
Reocor D
1
Bateria
1
Opaska na ramię
– Dla Japonii
– Dla wszystkich pozostałych krajów
Uwagi
Nr katalogowy
365529
Duracell Plus, 6LR61
–
1
Krótka
391843
1
Standardowa
103704
Adapter Redel
1
371262
Osłona panelu
1
378007
Instrukcja obsługi
1
394271
Instrukcja obsługi ZH
368702
Skrócona instrukcja obsługi DE
370123
Skrócona instrukcja obsługi EN
371300
Skrócona instrukcja obsługi ES
371301
Skrócona instrukcja obsługi FR
371302
Skrócona instrukcja obsługi IT
371303
Skrócona instrukcja obsługi PT
372230
Skrócona instrukcja obsługi ZH
371304
Skrócona instrukcja obsługi PL
1
Skrócona instrukcja obsługi CS
376006
376005
Torba
1
379384
Akcesoria
Art.
Nr katalogowy
Opis
Podłączenie
PK-82
128564
Kabel pacjenta z dwoma izolowanymi
zaciskami krokodylkowymi, do ponownej
sterylizacji
Podłączanie
bezpośrednie
PK-83
(2,5 m)
128563
Podłączanie
Kabel pacjenta z dwoma izolowanymi
zaciskami śrubowymi, do ponownej sterylizacji bezpośrednie
PK-83
(1,5 m)
128562
Podłączanie
Kabel pacjenta z dwoma izolowanymi
zaciskami śrubowymi, do ponownej sterylizacji bezpośrednie
PK-83-B
(2,5 m)
347485
Kabel pacjenta z dwoma izolowanymi
zaciskami śrubowymi 2,3 mm
Adapter Redel
PK-83-B
(1,5 m)
347606
Kabel pacjenta z dwoma izolowanymi
zaciskami śrubowymi 2,3 mm
Adapter Redel
PK-175
333959
Kabel pacjenta z czterema zaciskami
śrubowymi na elektrody do czasowej
stymulacji, do ponownej sterylizacji
Adapter Redel
Kabel pacjenta, do ponownej sterylizacji,
stosowany w połączeniu z adapterem
PA-1-B, PA-2, PA-4
Adapter Redel
Kabel pacjenta, do ponownej sterylizacji,
stosowany w połączeniu z kablami PK-155 i
Remington 301-CG
Adapter Redel
PK-67-L
PK-67-S
123672
128085
Nr katalogowy
Opis
Podłączenie
PK-141
(2,8 m)
353181
Kabel pacjenta, do ponownej sterylizacji,
z czterema izolowanymi zaciskami
krokodylkowymi
Adapter Redel
Opaska Reocor 103704
standardowa
Opaska na ramię standardowa
–
Opaska Reocor 391843
krótka
Opaska na ramię wąska.
Odpowiednia do szczupłych ramion.
–
Tylko w USA
Art.
Producent
Opis
Podłączenie
ADAP-2R
(0,24 m)
Remington
Medical Inc.
Adapter wielokrotnego użytku na kable typu
S-101-97 i FL-601-97
Adapter Redel
Deutsch
Art.
Español
371
Česky
English
394271--J_GA_Reocor_D_mul.book Page 371 Monday, January 26, 2015 3:35 PM
Nr katalogowy
Opis
PA-1-B
123751
Podłączany do adaptera 2 mm lub MHW (dla elektrod
śródsercowych), ponownej sterylizacji
PA-1-C
349723
Podłączany do adaptera 2 mm lub MHW (dla elektrod
śródsercowych), ponownej sterylizacji
PA-2
123157
Podłączany do złącza IS-1, do ponownej sterylizacji
PA-4
123090
Z zaciskami krokodylkowymi, do ponownej sterylizacji
PK-155
(zestaw 2 kabli)
337358
Sterylny kabel pacjenta, 2-żyłowy z zaciskami krokodylkowymi, do jednorazowego użytku
Magyar
Art.
Français
Adapter do PK-67-S i PK-67-L
Sterylny kabel pacjenta, 2-żyłowy z zaciskami krokodylkowymi, do jednorazowego użytku
Adapter do ADAP-2R (tylko w USA)
Art.
Producent
Opis
Model 301-CG
Remington
Medical Inc.
Sterylny kabel pacjenta, 2-żyłowy z zaciskami krokodylkowymi, do jednorazowego użytku
Model S-101-97
(2,5 m)
Remington
Medical Inc.
Kabel pacjenta, 2-żyłowy z zaciskami krokodylkowymi, do
jednorazowego użytku
Model FL-601-97
(2,0 m)
Remington
Medical Inc.
Kabel pacjenta, 2-żyłowy z zaciskami śrubowymi, do jednorazowego użytku
Nederlands
Opis
Remington
Medical Inc.
Polski
Producent
Model 301-CG
Português
Art.
Italiano
Adapter do PK-67-S i PK-67-L (tylko w USA)
394271--J_GA_Reocor_D_mul.book Page 372 Monday, January 26, 2015 3:35 PM
372
Objaśnienie symboli
Zamieszczone na etykiecie symbole mają następujące
znaczenie:
Symbol
Znaczenie
Reocor D
Adapter Redel
Nr katalogowy BIOTRONIK
Numer seryjny urządzenia
Data produkcji urządzenia
Dopuszczalny zakres temperatury przechowywania
Dopuszczalny zakres ciśnienia powietrza podczas przechowywania
Dopuszczalny zakres wilgotności powietrza podczas przechowywania
Pacjent z wszczepioną elektrodą
Zawartość opakowania
Znak recyclingu
Przestrzegać instrukcji obsługi!
Ostrzeżenie! Zgodnie z prawem federalnym USA urządzenie może
być sprzedawane wyłącznie przez lekarza lub z jego upoważnienia.
Znak CE
English
394271--J_GA_Reocor_D_mul.book Page 373 Monday, January 26, 2015 3:35 PM
373
Manuseio, cuidados e manutenção .......................................................400
Reocor D ................................................................. 400
Cabos do paciente reutilizáveis ............................. 401
Manutenção, serviço e inspeções .......................... 401
Descarte ................................................................. 402
Deutsch
Español
Français
Magyar
Italiano
Modos de estimulação e parâmetros ...................................................396
Modos de estimulação ........................................... 396
Períodos refratários ............................................... 396
Frequência .............................................................. 397
Intervalo AV ............................................................ 398
Amplitude de pulso – Átrio/ventrículo ................... 398
Sensibilidade – Átrio .............................................. 398
Sensibilidade – Ventrículo ...................................... 398
Cross Channel Blanking ........................................ 398
Intervalo de interferência ....................................... 398
Burst ....................................................................... 399
Nederlands
Instruções para a operação ..................................................................383
Observações gerais ................................................ 383
Controles de operação e LEDs ............................... 384
Tampa de proteção ................................................. 385
Conexão de eletrodos ............................................. 386
Colocação em funcionamento ................................ 393
Fixação ................................................................... 394
Troca da bateria ...................................................... 394
Polski
Descrição geral ....................................................................................375
Descrição do produto ............................................. 375
Indicações ............................................................... 376
Contra-indicações .................................................. 376
Possíveis efeitos colaterais .................................... 376
Precauções para o manuseio ................................. 377
Sinais visuais e acústicos ....................................... 381
Česky
Conteúdo
Dados técnicos .....................................................................................404
Português
Segurança técnica ................................................................................403
394271--J_GA_Reocor_D_mul.book Page 374 Monday, January 26, 2015 3:35 PM
374
Conformidade com IEC 60601-1-2 ........................................................407
Escopo de fornecimento e acessórios ..................................................411
Legenda da etiqueta .............................................................................413
English
394271--J_GA_Reocor_D_mul.book Page 375 Monday, January 26, 2015 3:35 PM
375
Podem ser ajustados o modo de estimulação, a frequência,
a sensibilidade, a amplitude de pulso, o intervalo AV e a
frequência de burst.
Diodos luminosos (LEDs) indicam a detecção (Sense), estimulação (Pace) e o estado da bateria (Low battery). Um sinal
acústico alerta quando frequências muito elevadas ou valores
de sensibilidade muito baixos estão ajustados e no caso de
impedância não ideal do eletrodo.
Um defeito no aparelho (não passou pelo auto-teste depois
de ligar o aparelho) é indicado mediante LEDs permanentemente acesos e por um sinal acústico sequenciado. Se o
auto-teste depois de ligar o aparelho não detectou nenhuma
falha, os sinais visuais e acústicos se desligam depois de
alguns segundos.
Deutsch
Español
Seis modos de estimulação estão à disposição: DDD, D00,
VDD, VVI, V00 e VVT, bem como uma função de burst atrial.
Français
Reocor D é um marcapasso bicameral externo operado a
bateria que é utilizado no âmbito clínico em combinação com
eletrodos temporários de marcapasso (inclusive eletrodos
endocardíacos e cateteres de implante transvenoso) para a
estimulação temporária atrial, ventricular e AV sequencial.
A conexão ocorre diretamente ou mediante um cabo do
paciente separado via adaptadores, se necessário.
Magyar
Descrição do produto
Česky
Descrição geral
•
Supervisão da impedância do eletrodo
•
Advertência visual no caso da proximidade do esgotamento da bateria
•
Tampa de proteção transparente deslizante dos elementos de comando, para evitar a alteração não intencional
dos parâmetros
Eletrodos temporários, fios cardíacos e eletrodos com
conectores de 2 mm podem ser conectados diretamente ao
Reocor D. Além disso, há diversos cabos do paciente e adaptadores à disposição. Este sistema oferece a conexão segura
de eletrodos transvenosos e eletrodos miocárdicos que
podem ser aplicados de forma unipolar ou bipolar.
Nederlands
Parâmetros de estimulação controlados por microprocessador
Polski
Indicação visual de eventos detectados e estimulados
•
Português
•
Italiano
Pertencem às características de segurança do Reocor D:
394271--J_GA_Reocor_D_mul.book Page 376 Monday, January 26, 2015 3:35 PM
376
Indicações
A estimulação temporária com Reocor D é adequada para as
seguintes aplicações com pacientes de qualquer idade:
•
Terapia de arritmias e bloqueio cardíaco
•
Bradicardia sinusal sintomática
•
Doença do nó sinusal
•
Estimulação pré-, intra- e pós-operatória de pacientes
com uma cirurgia cardíaca
•
Terminação de taquiarritmias supraventriculares
•
Estimulação profilática para a prevenção de arritmias
•
Estimulação de emergência
•
Verificação dos limiares de estimulação
Contra-indicações
•
O Reocor D não pode ser esterilizado e, portanto, não é
adequado para a utilização em ambiente estéril.
•
Os modos de estimulação deflagrados de forma atrial
(DDD e VDD) são contra-indicados no caso de fibrilação
atrial, flutter atrial e outros ritmos atriais acelerados.
•
Se o paciente não tolerar bem elevadas frequências
ventriculares (por exemplo, no caso de angina pectoris)
os modos de controle pelo átrio podem ser contra-indicados.
•
Se for observada uma condução retrógrada após estimulação ventricular, pode ser necessárioprogramar um
período refratário atrial mais longo ou um intervalo AV
mais curto para prevenir taquicardia induzidas pelo
marcapasso. Nestes casos, a programação de um modo
de estimulação VVI pode ser necessária.
•
A estimulação unicameral atrial é contra-indicada em
pacientes com distúrbios da condução AV pré-existentes.
•
A utilização de um marcapasso externo é contra-indicada
na presença de um marcapasso implantado ativo.
Possíveis efeitos colaterais
Pertencem às possíveis complicações relacionadas à aplicação de estimulação externa temporária, entre outras, assistolias após finalização abrupta da estimulação (por exemplo,
causada por desconexão não intencional do cabo do paciente,
se o eletrodo se soltar, ou por ajustes incorretos) ou uma
dependência do marcapasso.
377
Pertencem às complicações durante a introdução de eletrodos transvenosos, entre outras: infecção do corte, punção
arterial, atritos pericárdicos, perfuração cardíaca e arritmia
após a inserção do eletrodo.
Česky
English
394271--J_GA_Reocor_D_mul.book Page 377 Monday, January 26, 2015 3:35 PM
Utilização prevista
•
Reocor D e os seus cabos e acessórios permitidos apenas podem ser utilizados de acordo com o especificado
neste manual técnico.
•
O Reocor D não pode ser conectado a outros aparelhos
eletromedicinais.
•
Reocor D não pode ser utilizado em áreas com perigo de
explosão.
Proibido alterações
•
A manutenção, ampliação ou alteração do aparelho
somente podem ser efetuadas pelo fabricante BIOTRONIK
ou por uma empresa explicitamente autorizada pelo
fabricante.
Peça de reserva e
acessórios
•
Peças de reserva originais e acessórios autorizados pela
BIOTRONIK garantem sua segurança. A utilização de
outros componentes invalidam a responsabilidade pelas
consequências bem como a garantia e a segurança da
integridade.
Aparelhos
à disposição
•
No caso da dependência do paciente do marcapasso,
deve ser mantido em prontidão um estimulador de emergência.
•
Devem ser mantidos em prontidão um desfibrilador
externo, oxigênio, equipamento de entubação e medicamentos de emergência.
Español
O Reocor D interage com o coração humano.
Além disso, há uma interação com a pele e os vasos sanguíneos do paciente.
Français
•
Magyar
Princípio de
operação
Italiano
O Reocor D apenas pode ser utilizado por pessoas com
conhecimentos em cardiologia que foram instruídas para
o manuseio do aparelho. Potenciais usuários são o pessoal técnico-médico qualificado de uma clínica e médicos.
Nederlands
•
Polski
Grupo de
usuários
Português
De acordo com os ajustes de estimulação e com a doença
pré-existente do paciente, a estimulação pode induzir arritmias. Para garantir a segurança do paciente, determinados
procedimentos devem ser respeitados e as medidas de precaução listadas a seguir devem ser tomadas. Outros procedimentos e medidas de precaução devem ser consultados nas
respectivas publicações médicas.
Deutsch
Precauções para o manuseio
394271--J_GA_Reocor_D_mul.book Page 378 Monday, January 26, 2015 3:35 PM
378
Comportamento
antes da utilização
Conexão de
eletrodos
Comportamento
durante a aplicação
•
Antes da utilização, o Reocor D deve ser submetido a um
exame visual para detectar danos e contaminações.
•
Nunca utilizar um aparelho danificado ou um aparelho
que mostra anomalias. Substitua cabos de qualquer tipo
em caso de danos mesmo minimamente visíveis.
•
Antes da utilização do Reocor D, dos cabos de paciente
ou de eletrodos, o usuário deve tocar o paciente para
compensar diferenças de potencial elétrico.
•
Recomenda-se veementemente que o usuário verifique
cada parâmetro ajustado antes de conectar os eletrodos
ao Reocor D.
•
Apesar do Reocor D ser protegido contra gotejamento de
água, todos os conectores e o aparelho devem ser mantidos limpos e secos.
•
O Reocor D não pode ser esterilizado.
•
As conexões do Reocor D e dos eletrodos temporários de
estimulação deve ser protegidas e regularmente verificadas.
•
O cabo do paciente deve ser conectado primeiramente ao
Reocor D e depois aos eletrodos.
•
Os eletrodos temporários, aos quais o Reocor D está
conectado, representam uma via de condução elétrica de
baixa resistência ao miocárdio. Por isso, aparelhos ligados à rede elétrica utilizados perto do paciente devem ser
aterrados conforme os regulamentos.
•
Ao manusear eletrodos já implantados, os pinos de contato dos mesmos e superfícies metálicas de contato não
podem ser tocadas nem podem entrar em contato com
superfícies condutoras de eletricidade ou superfícies
úmidas.
•
Se um cabo se soltar do Reocor D, reconecte imediatamente e a segurança da conexão deve ser controlada.
•
Ao utilizar eletrodos unipolares, devem ser utilizados
dois eletrodos unipolares para cada câmara para uma
estimulação eficaz.
•
Durante a aplicação do Reocor D, a tampa de proteção
dos elementos de comando deve estar completamente
fechada para evitar a alteração não intencional dos parâmetros de funcionamento.
•
Operar o Reocor D apoiado num suporte horizontal antiderrapante ou fixado no paciente com a braçadeira ou
suspenso num suporte de infusão com ajuda da alça de
suspensão do lado traseiro do aparelho.
•
O Reocor D não pode ser usado diretamente na pele.
•
Durante a utilização do Reocor D, a frequência cardíaca
do paciente deve ser monitorada com um monitor de
ECG com função de alarme.
S00
VDD
VAT, VVI, V00
DDD
DAD, DVI, D00
Estimulação com
altas frequências
•
A estimulação do coração com frequências acima de
180 ppm durante um longo período de tempo pode causar graves complicações hemodinâmicas. Uma estimulação com altas frequências deve ser efetuada somente
com supervisão contínua assegurada.
Comportamento
depois da aplicação
•
Após uma desfibrilação ou cauterização, o aparelho deve
ser submetido a um teste de função.
•
Se o aparelho for armazenado sem utilização por um
longo período de tempo, a bateria deve ser retirada para
evitar danos devidos a um vazamento.
•
Para a limpeza podem ser usados um pano úmido e
sabão suave. Produtos de limpeza fortes ou solventes
orgânicos devem ser evitados, pois podem agredir a carcaça de plástico.
•
Trabalhos de inspeção e manutenção devem ser efetuados de acordo com a página 400.
•
Não utilizar baterias recarregáveis. O tempo de serviço
destas baterias é difícil de se estimar, desta forma o
ponto de ERI1pode ser ultrapassado de forma imprevista
o que pode ocasionar uma falha repentina na estimulação.
Operação a bateria
Polski
1
É possível realizar a troca da bateria com o Reocor D em
uso. Após a retirada da bateria, o dispositivo permanece
operacional por no mínimo 30 s, a uma temperatura de
ambiente de 20 ± 2 °C.
Porém, por motivos de segurança, durante a troca da
bateria, o paciente pode ser estimulado por outra fonte.
Português
Apenas podem ser utilizadas baterias de 9 V com o código internacional IEC 6LR61. Utilizando a bateria do tipo
MN 1604 Duracell® Procell®, é possível uma estimulação externa de, no mínimo, 500 horas antes que uma
troca da bateria seja necessária.
Deutsch
SSI, SST
Español
Com interferência eletromagnética
Français
Modo de funcionamento sem
interferência
Magyar
Em caso de distúrbios ocasionados por interferência
eletromagnética (EMI), o Reocor D muda para um modo
assíncrono quando determinados limites forem ultrapassados. Dependendo da detecção das interferências no
átrio ou no ventrículo, resultam para a duração das interferências os seguintes modos de operação:
Italiano
•
Nederlands
379
Česky
English
394271--J_GA_Reocor_D_mul.book Page 379 Monday, January 26, 2015 3:35 PM
Mediante o sinal ERI (LED Low battery piscando), o Reocor D alerta para a necessidade
de trocar a bateria
394271--J_GA_Reocor_D_mul.book Page 380 Monday, January 26, 2015 3:35 PM
380
Eletrocauterização
•
Sob nenhuma hipótese pode ser efetuada uma eletrocauterização num raio de menos de 15 cm ao redor dos
eletrodos, pois existe o perigo de induzir fibrilação ventricular ou de danificar o marcapasso.
O marcapasso deve ser ajustado para estimulação assíncrona para evitar sua inibição devido a detecção de interferências. Durante o tratamento, o pulso periférico do
paciente deve ser controlado continuamente. Depois do
tratamento, o funcionamento do marcapasso deve ser
verificado.
Desfibrilação
•
Os circuitos do Reocor D estão protegidos contra a energia de choque proveniente de uma desfibrilação. Mesmo
assim, se possível devem ser tomadas as seguintes
medidas de precaução:
— A energia ajustada não deve ser mais alta do que é
necessário para a desfibrilação
— A distância entre os eletrodos do desfibrilador e os
eletrodos do Reocor D deve ser de no mínimo 10 cm
— Depois de uma desfibrilação, o Reocor D deve ser
desligado e ligado de novo, para o aparelho poder
executar um auto-teste completo
Além disso, depois da desfibrilação devem ser verificados e monitorados por um período maior o funcionamento do marcapasso e o limiar de estimulação.
Proteção contra
interferências
•
O Reocor D é protegido contra interferências devido a
radiação eletromagnética, descarga eletrostática e contra interferências conduzidas. Também a radiação emitida pelo Reocor D foi minimizada. Com isso, o aparelho
satisfaz as exigências conforme IEC 60601-1-2. Porém,
mesmo assim é possível que fortes campos eletromagnéticos, tais como os que podem incidir, por exemplo, na
proximidade imediata de motores elétricos, transformadores, linhas elétricas e outros aparelhos elétricos,
prejudiquem o funcionamento do Reocor D.
Interferências eletromagnéticas podem causar as
seguintes falhas:
— Reinicialização inesperada (auto-teste é efetuado)
— Eventos cardíacos são detectados, porém, não aparecem no monitor do ECG
— O Reocor D mostra comportamento inexplicável
Medidas para a restauração do funcionamento correto do
Reocor D:
— Verificar a conexão entre o aparelho e os eletrodos
temporários de estimulação e corrigir se necessário
— Ajustar corretamente a sensibilidade no Reocor D:
muitas vezes a metade do valor da amplitude média
do sinal intrínseco leva a um ajuste correto da sensibilidade
•
Durante o auto-teste depois de ligar o Reocor D, todos os
LEDs acendem e breves sinais acústicos soam. Após
poucos segundos, o auto-teste encerra.
•
Se o auto-teste não encontrar erros, os LEDs apagam e
os sinais de alerta param.
•
Se o auto-teste encontrar um defeito, todos os LEDs
piscam continuamente e os sinais de alerta soam.
•
A necessidade da troca de bateria é indicada pelo LED
Low battery piscando em vermelho.
•
Os LEDs verdes Sense sinalizam a detecção de uma onda
P ou de uma onda R.
•
Os LEDs amarelos Pace sinalizam a liberação de pulsos.
•
Durante a operação, os LEDs e os sinais acústicos fornecem além disso os seguintes avisos de alerta:
Deutsch
Español
Français
Magyar
Sinais visuais e acústicos
Italiano
Se a sensibilidade atrial do aparelho estiver ajustada
num valor de <1,0 mV, podem ocorrer interferências por
campos eletromagnéticos. Quando for clinicamente possível, um parâmetro de sensibilidade superior a 1,0 mV
deve ser ajustado. O ajuste de parâmetros de sensibilidade de <1,0 mV exige uma indicação médica explícita.
Estes valores só podem ser ajustados e mantidos sob
supervisão médica.
Nederlands
•
Polski
— Desligar todos os aparelhos elétricos na proximidade
do Reocor D se os mesmos podem causar interferências eletromagnéticas e se sua operação não for
imprescindível
— Deslocar a fonte de interferência para um local onde
ela não possa incidir sobre o Reocor D
— Caso for seguro: desligar o Reocor D e ligar novamente para reiniciar o marcapasso para uma operação sem interferência
— Se uma disfunção persistir, entrar em contato com a
BIOTRONIK
Português
381
Česky
English
394271--J_GA_Reocor_D_mul.book Page 381 Monday, January 26, 2015 3:35 PM
394271--J_GA_Reocor_D_mul.book Page 382 Monday, January 26, 2015 3:35 PM
382
Avisos
Significado
Sinal acústico por 2 s
Foi ajustada uma amplitude de Verificar se os valores
pulso < 1 V ou uma frequência ajustados são adequados
> 180 ppm
para o paciente.
Sequência rápida
de sons
Impedância fora da faixa
admissível
Verificar se todos os
conectores estão firmemente conectados.
Verificar se os eletrodos
estão na posição desejada.
Sinal acústico
e LEDs Pace e Sense
piscando
Proteção contra frequências
elevadas foi acionada;
não passou pelo auto-teste
Desligar o aparelho e
enviar à BIOTRONIK.
LED Low battery
piscando
ERI alcançado
Trocar a bateria.
Ainda restam cerca de
36 horasa) de operação.
a)
Utilizando a bateria do tipo MN 1604 Duracell®, Procell®
Eliminação do erro
English
394271--J_GA_Reocor_D_mul.book Page 383 Monday, January 26, 2015 3:35 PM
383
Teste de função dos LEDs e dos sinais acústicos
•
Verificação da capacidade de estimulação e sensibilidade
•
Verificação da eficácia da proteção contra frequências
elevadas
Se o auto-teste encontrar um defeito, todos os LEDs piscam
continuamente e os sinais acústicos de alerta soam.
Neste caso, o marcapasso deve ser desligado e enviado à
BIOTRONIK.
Se o auto-teste não encontrar erros, os LEDs apagam
e os sinais de alerta param e o Reocor D começa a liberar
pulsos de estimulação de acordo com os parâmetros ajustados. Por isso, o eletrodo negativo (catodo) apenas deve ser
conectado depois de garantir que o modo de estimulação, a
frequência de estimulação, a amplitude de pulso e a sensibilidade estão ajustados corretamente.
Se o seletor para o modo de estimulação estiver colocado na
posição OFF, evita-se que imediatamente ao conectar os
eletrodos são liberados pulsos de estimulação ao paciente.
Mensagens
de aviso
Durante a operação, as seguintes mensagens de aviso
podem ocorrer:
•
A necessidade da troca de bateria é indicada pelo LED
Low battery piscando.
•
Se a impedância do eletrodo não estiver dentro da faixa
admissível (p. ex., devido a um eletrodo quebrado, um
contato solto), é emitida uma sequência rápida de sons,
no mínimo 5 segundos depois de ligar.
•
Se a amplitude de pulso é ajustada para valores < 1 V, ou
a frequência para valores > 180 ppm, soa um sinal acústico por cerca de 2 segundos.
•
Com a frequência muito alta (v. página 405 Proteção contra frequências elevadas) e se falhar no auto-teste, soará
um sinal acústico e os LEDs Pace e Sense piscarão.
Deutsch
Teste de memória
•
Español
•
Français
Verificação do código do programa e do microprocessador
Magyar
•
Italiano
Depois de ligar, o Reocor D executa um auto-teste durante
alguns segundos. Isso inclui:
Nederlands
Auto-teste
As conexões do Reocor D e dos eletrodos temporários de
estimulação deve ser protegidas e regularmente verificadas.
Polski
Atenção!
Português
Observações gerais
Česky
Instruções para a operação
394271--J_GA_Reocor_D_mul.book Page 384 Monday, January 26, 2015 3:35 PM
384
17
D
0
14 0
30
0
80
60
0
40
20
0
300
0
25
20 0
18
0
0, 5
12
10
2
0, 3
0, 2
7
1
0
17
10
0
0
10
75
50
0
60 0
60
4 00
35
0
0, 7
10
V0 0
80
0
1000
70
VV I
T
25
15
12
0
VV
40
50
DD
20
0
250
D
VD
D0 0
Controles de operação e LEDs
0,1
3
0,5
3
1
2
5
3
4
10
7
0,1
8
14
11
1
3
2
1
5
20
17
0 ,5
b
INDIFF.+
DIFF.-
Figura 1: Campo de operação Reocor D
12
17
5
5
10
7
2
2
Compartimento da bateria
Para bateria bloco 9 V
3
LED Low battery
Alerta para voltagem insuficiente da bateria
4
LED Ventricle Pace
Indicador amarelo para evento de estimulação ventricular
5
LED Ventricle Sense
Indicador verde para onda R detectada
6
Seletor Ventricle Ampl.
Ajuste da amplitude de pulso ventricular
7
Seletor Ventricle Sens.
Ajuste da sensibilidade ventricular
(não se aplica nos modos de operação D00 e V00)
8
LED Atrium Pace
Indicador amarelo para evento de estimulação atrial
9
LED Atrium Sense
Indicador verde para onda P detectada
10
Seletor Atrium Ampl.
Ajuste da amplitude de pulso atrial
(não se aplica no modo de operação VDD)
11
Seletor Atrium Sens.
Ajuste da sensibilidade atrial
(não se aplica no modo de operação D00)
12
Start burst
Iniciar a função de burst atrial
13
Alça de suspensão
(lado traseiro)
Fixação do Reocor D no paciente, na cama ou no suporte de
infusão
14
Seletor Burst rate atrium
Ajuste da frequência de burst atrial
15
Seletor AV delay
Ajuste do intervalo AV
16
Select burst
Seleção da função de burst atrial
17
Seletor Mode
Selecionar o modo de estimulação e desligar
18
Seletor Rate
Ajuste da frequência de estimulação
Tabela 1: Descrição dos elementos na Figura 1
Inscrição em negrito nos elementos de comando marca valores seguros para a finalidade do aparelho.
Tampa de proteção
A tampa de proteção está travada quando a mesma for deslizada sobre os dois pontos de limitação e a trava estiver sobre
o trilho (veja Fig. 2).
Errado:
Figura 2: Posição correta da tampa de proteção do campo de operação
Português
Polski
Certo:
Deutsch
Para cabos e eletrodos com conectores de 2 mm ou para
adaptadores Redel (vermelho = positivo; azul = negativo)
Español
Conexão canal ventricular
Français
1b
Magyar
Função
Conexão do canal atrial
Italiano
Designação
1a
Nederlands
385
Česky
English
394271--J_GA_Reocor_D_mul.book Page 385 Monday, January 26, 2015 3:35 PM
394271--J_GA_Reocor_D_mul.book Page 386 Monday, January 26, 2015 3:35 PM
386
Para destravar a tampa de proteção (veja Fig. 3):
Pressione com uma mão a alavanca de travagem para
cima.
Deslize, simultaneamente, com a outra mão, a tampa de
proteção para baixo.
Figura 3: Destravar a tampa de proteção do campo de operação
Para travar a tampa de proteção:
Deslize a tampa de proteção ao longo do trilho para cima,
até o limite (veja Fig. 2).
Para a limpeza, é possível remover a tampa de proteção
totalmente. Para isso, deslizar a tampa para baixo até o
limite. Em seguida deslizar a tampa de proteção por cima do
limite.
Atenção!
Durante a aplicação do ReocorD, a tampa de proteção deve
estar travada para evitar a alteração acidental dos botões e
seletores rotativos e assim, dos parâmetros do programa.
Conexão de eletrodos
O Reocor D dispõe de quatro tomadas para a conexão direta
de eletrodos com conectores de 2 mm protegidos contra contato.
Para a conexão de cabos com conectores Redel, o adaptador
Redel deve ser conectado pelo lado correto e aparafusado
(figura 4). O adaptador Redel está conectado pelo lado correto se é possível parafusá-lo no Reocor D.
Informação:
Somente se o adaptador Redel estiver conectado pelo lado
correto sua função está garantida!
English
394271--J_GA_Reocor_D_mul.book Page 387 Monday, January 26, 2015 3:35 PM
O Reocor D pode ser utilizado com os seguintes cabos do
paciente e adaptadores:
Cabo do paciente PK-175 com quatro terminais rosqueáveis para eletrodos temporários no lado do paciente e
conector Redel do lado do Reocor (utilizar adaptador
Redel).
Cabo do paciente PK-82 com dois clipes jacaré isolados
para eletrodos temporários no lado do paciente e dois
conectores de 2 mm protegidos contra contato do lado do
Reocor.
Figura 6: Cabo do paciente PK-82
Polski
•
Português
Figura 5: Cabo do paciente PK-175
Nederlands
Italiano
•
Magyar
Figura 4: Adaptador Redel para Reocor D
Français
Español
Deutsch
Česky
387
394271--J_GA_Reocor_D_mul.book Page 388 Monday, January 26, 2015 3:35 PM
388
•
Cabo do paciente PK-83-B para estimulação unicameral
com dois terminais rosqueáveis para eletrodos temporários no lado do paciente e conector Redel do lado do
Reocor (utilizar adaptador Redel). Eletrodos temporários
conectados através do PK-83-B são ligados ao canal
ventricular do Reocor D.
Figura 7: Cabo do paciente PK-83-B
•
Cabo do paciente PK-83 para estimulação unicameral
com dois terminais rosqueáveis isoladas para eletrodos
temporários no lado do paciente e dois conectores de
2 mm protegidos contra contato do lado do Reocor.
Figura 8: Cabo do paciente PK-83
•
Os cabos do paciente PK-67-L, PK-67-S apenas divergem no seu comprimento.
Figura 9: Cabo do paciente PK-67-L (2,6 m) e PK-67-S (0,8 m)
English
394271--J_GA_Reocor_D_mul.book Page 389 Monday, January 26, 2015 3:35 PM
389
Adaptador
PA-1-B para a conexão de conectores de 2 mm protegidos
contra contato ou adaptadores MHW (adaptadores para fios
cardíacos)
PA-2 IS-1
Français
Figura 10: Adaptador para os cabos de paciente PK-67-L e PK-67-S
Español
Deutsch
Aos cabos do paciente PK-67 (figura 9) podem ser conectados os adaptadores de acordo com a figura 10:
Česky
•
Cabo do paciente PK-141 com quatro clipes jacaré no
lado do paciente e conector Redel do lado do Reocor
(utilizar adaptador Redel).
O cabo adaptador ADAP-2R é um cabo reutilizável para a
conexão dos cabos de uso único conforme figura 13 (apenas para EUA) com o Reocor D (usar adaptador Redel).
Figura 12: Cabo adaptador ADAP-2R
Polski
•
Português
Figura 11: Cabo do paciente PK-141
Nederlands
Italiano
•
Magyar
PA-4 com clipes jacaré
394271--J_GA_Reocor_D_mul.book Page 390 Monday, January 26, 2015 3:35 PM
390
•
Cabo para uso único (apenas EUA)
Terminais rosqueáveis
Figura 13: Cabo de uso único da Remington Medical Inc. (apenas EUA)
•
Cabos para uso único
Os cabos de uso único PK-155 e Remington 301-CG (apenas
EUA) com clipes jacaré (figura 14) são conectados ao
paciente mediante o cabo PK-67-S.
Figura 14: Cabo PK-155
Conexão
AVISO!
Cabos danificados causam perigo para o paciente. Cabos
danificados prejudicam a sua função e causam perigo para o
paciente. Não utilize cabos danificados.
AVISO!
Perigo através da perda de função.
Cabos úmidos podem prejudicar a sua função e causam
perigo para o paciente. Não utilize cabos úmidos.
AVISO!
Perigo devido à condução de correntes elétricas.
O contato com cabos não utilizados podem conduzir correntes elétricas ao paciente. Fixe os contatos dos cabos não
utilizados na proximidade do paciente.
Atenção!
Reações alérgicas e inflamações.
Evite o contato de cabos com feridas ou com a pele do
paciente.
Informação:
Antes da utilização dos cabos, certifique-se da posição correta da capa de proteção.
Informação:
Não conectar o cabo do paciente ao eletrodo temporário de
estimulação do paciente antes de ter estabelecido a conexão
no Reocor D.
English
394271--J_GA_Reocor_D_mul.book Page 391 Monday, January 26, 2015 3:35 PM
391
Se o Reocor D for operado sem o adaptador Redel, eletrodos
temporários e fios cardíacos podem ser diretamente conectados às tomadas A+, A- e V+, V-, mediante os cabos do
paciente PK-82 e PK-83.
Česky
Conexão direta
O cabo do paciente é conectado mediante um adaptador
Redel no Reocor D.
Colocar adaptador Redel no Reocor D.
Deutsch
Cabo do paciente
Variantes de conexão
Eletrodos temporários com conectores de 2 mm ou fio
cardíaco com adaptador de 2 mm
Existe a possibilidade de conectar o Reocor D diretamente a
um eletrodo temporário com conector de 2 mm protegido contra contato ou a um fio cardíaco com adaptador de 2 mm, sem
outros cabos ou adaptadores. Todas as demais possibilidades
podem ser consultadas na tabela a seguir.
Conexão
Reocor D
Conexões recomendadas
Conexão direta (sem cabo BIOTRONIK)
Tomadas 2 mm
2 mm
PK-67-S/L com
PA-1-B
Conector Redel
Adaptador Redel
Terminais rosqueáveis
PK-175 com TC Adapt
Conector Redel
Adaptador Redel
Terminais rosqueáveis
PK-83 com TC Adapt (2x) Conector 2 mm
Tomadas 2 mm
Conexões possíveis
Clipes jacaré
PK-141
Conector Redel
Adaptador Redel
Clipes jacaré
PK-67-S/L com PA-4
Conector Redel
Adaptador Redel
Clipes jacaré
PK-67-S/L com
PK-155 (2x)
Conector Redel
Adaptador Redel
Clipes jacaré
PK-82 (2x)
Conector 2 mm
Tomadas 2 mm
Italiano
Conexão do lado
do aparelho
Nederlands
Cabo BIOTRONIK
Polski
Conexão do lado
do paciente
Français
Com o cabo do paciente PK-83-B, a estimulação bicameral
não é possível. Eletrodos conectados ao PK-83-B são ligados
ao canal ventricular do Reocor D.
Português
Informação:
Magyar
Inserir o conector Redel do cabo do paciente na tomada
Redel do adaptador.
Español
Aparafusar o mesmo.
394271--J_GA_Reocor_D_mul.book Page 392 Monday, January 26, 2015 3:35 PM
392
Fio cardíaco com agulha Breakoff ou com
ponta flexível (diâmetro máx. 2,3 mm)
Conexão do lado
do paciente
Cabo BIOTRONIK
Conexão do lado
do aparelho
Reocor D
Conexão
Terminais rosqueáveis
PK-175
Conector Redel
Adaptador Redel
Terminais rosqueáveis
PK-83 (2x)
Conector 2 mm
Tomadas 2 mm
Clipes jacaré
PK-141
Conector Redel
Adaptador Redel
Clipes jacaré
PK-67-S/L com PA-4
Conector Redel
Adaptador Redel
Clipes jacaré
PK-67-S/L com
PK-155 (2x)
Conector Redel
Adaptador Redel
Clipes jacaré
PK-82 (2x)
Conector 2 mm
Tomadas 2 mm
Conexões recomendadas
Conexões possíveis
Eletrodo implantado com conector IS-1
Conexãodo lado
do paciente
Cabo BIOTRONIK
Conexão do lado
do aparelho
Reocor D
Conexão
PK-67-S/L com PA-2
Conector Redel
Adaptador Redel
Clipes jacaré
PK-141
Conector Redel
Adaptador Redel
Clipes jacaré
PK-67-S/L com PA-4
Conector Redel
Adaptador Redel
Clipes jacaré
PK-67-S/L com
PK-155 (2x)
Conector Redel
Adaptador Redel
Clipes jacaré
PK-82 (2x)
Conector 2 mm
Tomadas 2 mm
Conexões recomendadas
Tomada IS-1
Conexões possíveis
Polaridade
O Reocor D, por via de regra, estimula de forma bipolar,
porém, pode ser utilizado também com eletrodos temporários de estimulação bipolares ou unipolares.
Ao utilizar eletrodos unipolares, devem ser conectados
2 eletrodos para cada câmara.
Soltar as conexões
Desconectar o cabo do paciente dos eletrodos temporários
de estimulação do paciente ou soltar a conexão direta.
Soltar o conector Redel
•
Puxar o anel de segurança no conector Redel para trás e
puxar o conector Redel para fora da tomada Redel.
English
394271--J_GA_Reocor_D_mul.book Page 393 Monday, January 26, 2015 3:35 PM
393
Ajustar a frequência de estimulação com o seletor Rate
(18).
Ajustar o intervalo AV com o seletor AV delay (15)1.
Ajustar a amplitude de estimulação para o átrio1 e ventrículo com os seletores Atrium Ampl. (10)1 e Ventricle
Ampl. (6).
•
Selecionar o modo de estimulação com o seletor Mode
(17). Com isso, ao mesmo tempo se liga o aparelho.
•
Depois que o auto-teste interno encerrou com êxito,
todos os 5 LEDs no campo de operação piscam simultaneamente duas vezes.
•
Quando o LED Low battery (3) piscar, a bateria deve ser
trocada (para a troca da bateria, ver página 394).
•
Conectar os eletrodos, os LEDs amarelos Atrium Pace
(8)1 e Ventricle Pace (4) piscam sincronizados com os pulsos de estimulação atriais e ventriculares.
•
Ajustar a sensibilidade para o átrio e ventrículo com os
seletores Atrium Sens.1 e Ventricle Sens. (7) de forma
que os LEDs verdes Atrium Sense (9)1 e Ventricle Sense
(5) pisquem sincronizados com cada evento atrial ou ventricular detectado.
Deve ser considerada uma margem de segurança suficiente para garantir uma sensibilidade confiável.
•
Atenção!
1
Monitorar o ECG do paciente e adaptar a amplitude e
sensibilidade, caso necessário.
Durante a utilização do Reocor D, a frequência cardíaca do
paciente deve ser monitorada com um monitor de ECG com
função de alarme.
Apenas com estimulação de duas câmaras
Deutsch
Español
Preparar o Reocor:
Français
•
Magyar
Preparar o paciente: posicionar os eletrodos, porém,
ainda não conectar ao marcapasso.
Italiano
Deslizar a tampa de proteção para baixo
•
Nederlands
Inserir a bateria
•
Polski
•
Português
A operação do Reocor D é idêntica para todos os modos de
operação. Os passos de operação devem ser executados na
seguinte ordem (os números entre parênteses referem-se à
figura 1, na página 384 deste manual técnico).
Česky
Colocação em funcionamento
394271--J_GA_Reocor_D_mul.book Page 394 Monday, January 26, 2015 3:35 PM
394
Fixação
O Reocor D deve ser operado apoiado num suporte horizontal
antiderrapante ou fixado no paciente com a braçadeira ou
suspenso num suporte de infusão com ajuda da alça de suspensão do lado traseiro do aparelho.
Para fixar o Reocor D num suporte de infusão, girar a alça de
suspensão para fora do lado traseiro do aparelho. Com isso,
a utilização segura é garantida e os cabos do paciente são
aliviados.
Troca da bateria
Quando o LED Low battery (3) começar a piscar, a bateria está
quase vazia. Utilizando a bateria do tipo MN 1604 Duracell®
Procell®, restam ainda aproximadamente 36 horas de tempo
de operação. Mesmo assim, a bateria deve ser trocada o mais
rápido possível.
O Reocor D deve ser operado com uma bateria de 9 V, código
internacional IEC 6LR61. Apenas devem ser utilizadas baterias alcalinas-manganês à prova de vazamento. Utilizando a
bateria do tipo MN 1604 Duracell® Procell®, é possível uma
estimulação externa de, no mínimo, 500 horas em temperatura ambiente (20 ± 2 °C ) antes que uma troca da bateria seja
necessária.
Durante uma troca da bateria com o Reocor D em funcionamento, o mesmo continua operacional por cerca de 30 s,
a uma temperatura de ambiente de 20 ± 2 °C.
Porém, por motivos de segurança, durante a troca da bateria,
o paciente pode ser estimulado por outra fonte.
Não utilizar baterias recarregáveis. O tempo de serviço destas baterias é difícil de se estimar, desta forma o ponto de ERI
pode ser ultrapassado de forma imprevista o que pode ocasionar uma falha repentina na estimulação.
O compartimento da bateria (2) encontra-se ao lado direito do
aparelho e se abre pressionando o fecho azul para cima e
puxando a gaveta para fora do lado direito. Retirar a bateria
cuidadosamente.
É possível que haja um tampão de borracha na nova bateria,
para a proteção dos seus pólos. Remover o mesmo antes de
inserir a nova bateria.
Atenção!
No compartimento da bateria está marcada a polaridade
sugerida. Porém, ao inserir a nova bateria é necessário
somente observar que os pólos da bateria apontem para o
centro da carcaça. A posição do pólo positivo e negativo pode
ser escolhida livremente.
Magyar
Italiano
Se o aparelho for armazenado ou não utilizado por um longo
período de tempo, recomenda-se retirar a bateria para evitar
danos devidos a um vazamento.
Nederlands
Informação:
Polski
Fechar a gaveta e empurrar o fecho azul para baixo até engatar audivelmente.
Português
Figura 15: Inserir a bateria
Français
Español
Inserir a nova bateria com o fundo (figura 15) para baixo no
compartimento da bateria.
Deutsch
395
Česky
English
394271--J_GA_Reocor_D_mul.book Page 395 Monday, January 26, 2015 3:35 PM
394271--J_GA_Reocor_D_mul.book Page 396 Monday, January 26, 2015 3:35 PM
396
Modos de estimulação e parâmetros
Modos de estimulação
O Reocor D trabalha em um dos seis modos de estimulação
a seguir:
DDD
Estimulação AV síncrona com detecção e estimulação tanto no átrio quanto no ventrículo.
VDD
Estimulação ventricular síncrona com acompanhamento atrial.
D00
Estimulação AV assíncrona, sem sensibilidade nas duas câmaras.
VVI
Sensibilidade e estimulação no ventrículo
V00
Estimulação assíncrona no ventrículo
VVT
Como VVI, porém, no caso da detecção de um evento ventricular fora do período refratário,
ocorre liberação imediata de pulso
Em caso de distúrbios ocasionados por interferência eletromagnética (EMI), o Reocor D muda para um modo assíncrono
quando determinados limites forem ultrapassados. Dependendo da detecção das interferências no átrio ou no ventrículo,
os seguintes modos de operação serão aplicados enquanto
persistir a interferência.
Modo de funcionamento sem
interferência
Com interferência
eletromagnética
SSI, SST
S00
VDD
VAT, VVI, V00
DDD
DAD, DVI, D00
Períodos refratários
A frequência máxima de estimulação ventricular de forma
síncrona com eventos detectados pelo canal atrial (limite
superior de frequência) é determinada pelo período refratário
atrial (atrial refractory period, ARP). A sequência temporal é
iniciada por eventos detectados e estimulados no canal atrial,
bem como por extra-sístoles detectadas no canal ventricular
(EV) que reiniciam o ciclo. Ao ultrapassar o limite superior de
frequência, um a cada dois pulsos atriais cai no período refratário atrial, e não deflagra um pulso ventricular. A frequência
de estimulação ventricular é continuada com uma proporção
de 2:1 (Figura 16).
English
394271--J_GA_Reocor_D_mul.book Page 397 Monday, January 26, 2015 3:35 PM
200 ms
Acima de 200 ppm
175 ms
Frequência
A frequência pode ser regulada continuamente de 30 ppm a
250 ppm com o seletor Rate (18). Se um valor acima de
180 ppm é ajustado, o aparelho emite um tom de alerta
durante 2 segundos.
AVISO!
A estimulação do coração com frequências acima de 180 ppm
durante um longo período de tempo pode causar graves
complicações hemodinâmicas. Uma estimulação com altas
frequências deve ser efetuada somente com supervisão contínua assegurada.
Français
Magyar
225 ms
150 ppm a 200 ppm
Italiano
Período refratário VRP
Abaixo de 150 ppm
Nederlands
Frequência de estimulação
Polski
O período refratário atrial total (TARP) do Reocor D é formado
pelo intervalo AV ajustado mais 175 ms, porém, seu valor
mínimo é de 400 ms abaixo de uma frequência de estimulação de 120 ppm. Acima desta frequência, o TARP mínimo se
reduz a 240 ms. O período refratário ventricular VRP do
Reocor D depende da frequência de estimulação:
Português
Figura 16: Reação do limite superior de frequência durante taquicardias atriais
(frequência básica 72 ppm).
Español
Deutsch
Česky
397
394271--J_GA_Reocor_D_mul.book Page 398 Monday, January 26, 2015 3:35 PM
398
Intervalo AV
O intervalo AV pode ser regulado continuamente de 15 ms a
400 ms com o seletor AV delay (15). Intervalos AV curtos
podem ser selecionados para indicações específicas, p.ex.,
com taquicardias recorrentes.
O Reocor D limita o intervalo AV para cima a um valor que
corresponde à metade do intervalo básico.
Amplitude de pulso – Átrio/ventrículo
As amplitudes de pulso para átrio e ventrículo podem ser
ajustados com os seletores Atrium Ampl. (10), (6) na gama de
0,1 V a 17 V. Se um valor abaixo de 1 V é ajustado, o aparelho
emite um tom de alerta durante 2 segundos.
A largura de pulso é de 1 ms.
A estimulação deve ser verificada em intervalos regulares
para garantir que haja uma estimulação e que uma margem
de segurança suficiente tenha sido ajustada.
Sensibilidade – Átrio
A sensibilidade pode ser ajustada com o seletor Atrium sens.
(11) entre 0,2 mV e 10 mV. A mesma deve ser verificada em
intervalos regulares para garantir que haja uma detecção
correta e que uma margem de segurança suficiente tenha
sido ajustada.
Sensibilidade – Ventrículo
A sensibilidade pode ser ajustada com o seletor Ventricle
Sens. (7) entre 1 mV e 20 mV. A sensibilidade deve ser verificada em intervalos regulares para garantir que haja uma
detecção correta e que uma margem de segurança suficiente
tenha sido ajustada.
Cross Channel Blanking
Depois de liberar um estímulo, a sensibilidade do respectivo
outro canal é suprimida por 19 ms ± 3 ms, para evitar uma
detecção Far-Field.
Intervalo de interferência
O intervalo de interferência é iniciado tanto por eventos estimulados quanto detectados no canal atrial e ventricular.
O intervalo é reiniciado por ruído detectado em qualquer
canal durante a duração do intervalo de 80 ms, o que leva a
uma estimulação assíncrona com a frequência programada
enquanto a interferência persistir.
399
Assim por exemplo, no modo de estimulação DDD, uma
interferência atrial induz uma estimulação DVI, sem prejuízo
para o canal ventricular. A detecção de ruído no canal ventricular induz uma estimulação DAD.
Česky
English
394271--J_GA_Reocor_D_mul.book Page 399 Monday, January 26, 2015 3:35 PM
A estimulação do coração com frequências acima de 180 ppm
durante um longo período de tempo pode causar graves
complicações hemodinâmicas. Uma estimulação com altas
frequências deve ser efetuada somente com supervisão contínua assegurada.
O modo de estimulação para a estimulação de alta frequência serve para a terminação de determinadas taquicardias
supraventriculares (TSV) e apenas deve ser considerado para
aplicações atriais. A aplicação de estímulos assíncronos de
alta frequência pode interromper uma TSV através da despolarização de partes de um caminho de reentrada. Mesmo se
um foco atrial ectópico for responsável por uma TSV, a aplicação de estímulos de alta frequência no átrio pode levar à
supressão do foco ectópico.
A respeito da estimulação atrial de alta frequência, diversos
riscos devem ser considerados. Entre eles a possível estimulação ventricular e taquicardia ventricular ou fibrilação. Isso
pode ser causado por um mau posicionamento dos eletrodos
ou pela presença de vias de condução anormais que desviam
da via de condução atrioventricular normal, (p.ex., síndrome
Wolff-Parkinson-White). Outros possíveis problemas depois
de uma estimulação de alta frequência podem ser desconforto do paciente e assístolia.
Español
Français
Magyar
Depois de uma estimulação burst no átrio, o intervalo de
blanking ventricular pode impedir a sensibilidade de eventos
intrínsecos e levar a uma estimulação assíncrona no ventrículo.
Italiano
AVISO!
Nederlands
A ativação desta função ocorre com duas teclas: primeiramente, a tecla (16) Select burst deve ser acionada, e depois,
dentro de 2 segundos, a tecla (12) Start burst. A liberação de
pulsos ocorre enquanto esta tecla estiver pressionada.
O canal ventricular continua estimulando com a frequência
ajustada que também pode ser reajustado simultaneamente.
Ocorre inibição ventricular se um modo de estimulação de
inibição estiver ajustado.
Polski
A frequência de burst atrial Burst rate atrium pode ser selecionada mediante o seletor (14) entre 60 ppm e 1000 ppm.
Português
Burst
Deutsch
Interferência nos dois canais induz a estimulação D00.
394271--J_GA_Reocor_D_mul.book Page 400 Monday, January 26, 2015 3:35 PM
400
Manuseio, cuidados e manutenção
Reocor D
O Reocor D é um aparelho de precisão altamente sofisticado
que deve ser tratado com cuidado. Impacto mecânico, por
exemplo, causado por quedas, pode prejudicar seu funcionamento.
Neste caso, enviar o aparelho à BIOTRONIK.
Antes da utilização, o marcapasso deve ser armazenado no
mínimo por 2 horas nas condições de ambiente especificadas
para a operação (v. página 406).
A carcaça, os elementos de comando, as conexões e os cabos
do paciente devem ser inspecionados visualmente antes de
cada aplicação para detectar danos mecânicos, deformação,
peças soltas, rachaduras e contaminação.
AVISO!
Nunca utilizar um aparelho danificado ou um aparelho que
mostra anomalias, especialmente, se o mesmo sofreu uma
queda ou pode estar danificado por tensão de alta frequência
ou de desfibrilação.
Operar o Reocor D apoiado num suporte horizontal antiderrapante ou fixado no paciente com a braçadeira ou suspenso
num suporte de infusão com ajuda da alça de suspensão do
lado traseiro do aparelho.
Atenção!
No caso de utilizar a braçadeira, o Reocor D não pode ser
usado diretamente na pele.
Limpeza
Para a limpeza do Reocor D podem ser usados um pano úmido e sabão suave, se necessário. Produtos de limpeza fortes
ou solventes orgânicos, tais como benzina ou éter, devem ser
evitados, pois podem
agredir a carcaça de plástico.
Desinfecção
Para a desinfecção, limpar o aparelho com um pano molhado
com solução de desinfecção (p. ex., Aerodesin 2000 ou Lysoform D). Observar a medida de diluição indicada pelo fabricante ao misturar a solução.
Informação:
Depois de uma limpeza ou desinfecção, o Reocor D não pode
ser utilizado durante uma hora.
Esterilização
O Reocor D não pode ser esterilizado. Se o aparelho precisa
ser utilizado num ambiente esterilizado, o mesmo pode ser
embalado numa capa esterilizada.
Recomenda-se a verificação anual do aparelho por técnicos
autorizados pelo fabricante.
Recomenda-se como método de limpeza para os cabos a utilização de um pano com sabonete de mãos comum sem álcool
ou com o produto de limpeza Stabimed da empresa Braun.
A seguir, os resíduos do produto de limpeza devem ser removidos dos cabos com água livre de eletrólitos e depois os cabos
devem ser enxugados com um pano limpo e seco.
Desinfecção
Para a desinfecção em um banho de agente de desinfecção,
deve ser utilizado um produto de desinfecção de instrumentos à base de aldeídos (p.ex., Lysoformin 3000) ou à base de
álcool (p. ex., Aerodesin 2000) de acordo com as indicações do
fabricante e em observância às respectivas diretivas do hospital.
Depois da desinfecção, o cabo deve ser enxaguado com água
livre de eletrólitos para remover os restos do produto de
desinfecção.
Esterilização
Se não existir nenhuma informação em contrário na documentação dos cabos do paciente, todos os cabos do paciente
podem ser esterilizados da seguinte forma:
•
Esterilização a vapor a 121 °C e 1,1 bar por 20 min
Além disso, os cabos do paciente PK-175 e PK-83-B podem
ser esterilizados da seguinte forma:
•
Esterilização a vapor a 134 °C e 3,0 bar por 18 min
Manutenção, serviço e inspeções
A única medida de manutenção necessária é a troca da bateria (v. página 394).
Outros trabalhos de manutenção não são necessários.
Verificação antes da
utilização
Antes de cada utilização do aparelho deve ser efetuada uma
breve verificação. Ela inclui uma verificação visual e uma
simples verificação do funcionamento.
Deutsch
Español
Os cabos do paciente reutilizáveis podem ser limpos
e desinfetados por vários diferentes métodos com produtos
hospitalares de limpeza. Porém, não podem ser utilizados
produtos químicos agressivos tais como acetona.
Français
Limpeza
Magyar
A embalagem do cabo esterilizado deve ser verificada para
detectar danos antes de abrir, para determinar se a esterilidade está garantida.
Italiano
Cabos do paciente reutilizáveis
Nederlands
Apesar do Reocor D ser protegido contra gotejamento de
água, o aparelho deve ser mantido limpo e seco.
Polski
Atenção!
Português
401
Česky
English
394271--J_GA_Reocor_D_mul.book Page 401 Monday, January 26, 2015 3:35 PM
394271--J_GA_Reocor_D_mul.book Page 402 Monday, January 26, 2015 3:35 PM
402
Verificação visual:
•
Verificação da carcaça para detectar danificações mecânicas, deformação, peças soltas, rachaduras, etc.
•
Verificação da área de conexão dos cabos para detectar
danificações mecânicas
•
Verificação das inscrições para garantir legibilidade
Verificação do funcionamento:
Deve ser observado o resultado do auto-teste que é executado automaticamente depois de ligar.
Inspeção
A inspeção deve ser efetuada
•
depois da utilização conjunta com aparelhos cirúrgicos
de AF ou desfibriladores,
•
no caso de suspeitas de disfunções,
•
uma vez por ano.
Esta inspeção deve ser efetuada de acordo com as indicações
do fabricante. As mesmas podem ser solicitadas . Listam-se
nelas todos os passos de verificação necessários e os aparelhos necessários para a verificação.
Descarte
O Reocor D exibe o símbolo de uma lata de lixo riscada na
placa de identificação. Este símbolo indica que para a recolha
e reciclagem, a Diretiva Europeia 2002/96/CE sobre os
Resíduos de Equipamentos Elétricos e Eletrônicos (REEE)
aplica-se a este aparelho.
Aparelhos velhos e acessórios não mais utilizados, tais como,
p. ex., cabos do paciente ou adaptadores devem ser enviados
à BIOTRONIK. Assim, é garantido que a eliminação ocorra de
acordo com as versões nacionais da Diretiva REEE.
Informação:
Cabos que tiveram contato com sangue devem ser descartados corretamente como resíduo hospitalar contaminado em
conformidade com as normas ambientais. Cabos não contaminados devem ser descartados conforme a Diretiva Europeia 2002/96/EC sobre os Resíduos de Equipamentos Elétricos e Eletrônicos (REEE).
Baterias usadas devem ser tratadas como lixo especial e
devem ser eliminadas pelo usuário.
Favor entrar em contato com a BIOTRONIK se houver dúvidas.
English
394271--J_GA_Reocor_D_mul.book Page 403 Monday, January 26, 2015 3:35 PM
403
A construção corresponde às normas para a classe de
aparelhos CF (cardiac floating) e é certificada para o tratamento direto do coração. O marcapasso satisfaz as exigências estabelecidas por normas internacionais para a
proteção contra desfibrilação.
•
A tampa de proteção fechada protege o marcapasso contra gotas de água.
Os eletrodos temporários, aos quais o Reocor D está conectado, representam um via de condução elétrica de baixa
resistência ao miocárdio. Por isso, aparelhos ligados à rede
elétrica utilizados perto do paciente devem ser aterrados
conforme os regulamentos.
O marcapasso não pode ser utilizado em áreas com perigo de
explosão.
Deutsch
•
Español
Não há peças metálicas conforme definição IEC que possam ser tocadas.
Polski
Nederlands
Italiano
Quaisquer outros trabalhos de manutenção ou reparos apenas devem ser efetuados pela BIOTRONIK.
Português
AVISO!
•
Français
As seguintes características especiais oferecem segurança
ao paciente:
Magyar
O marcapasso externo Reocor D satisfaz as normas internacionais para a segurança de aparelhos eletromedicinais
conforme IEC 60601-1 e IEC 60601-1-2, bem como a norma
internacional IEC 60601-2-31 para marcapassos externos
temporários.
Česky
Segurança técnica
394271--J_GA_Reocor_D_mul.book Page 404 Monday, January 26, 2015 3:35 PM
404
Dados técnicos
Símbolos
Observar avisos no manual técnico
Marcação da posição da bateria no compartimento
Descarte de acordo com a diretiva REEE
Classificação como componente de aplicação CF (cardiac floating),
proteção contra desfibrilação
IP31
Repele a água, classe de proteção IP31
OFF
Desliga (no interruptor giratório Mode)
Parâmetros ajustáveis
Modos de estimulação
DDD, D00, VDD, VVI, V00, VVT
Frequência básica
(30…250 ppm) ± 1 ppm
Com uma frequência > 180 ppm
soa um sinal de aviso
Amplitude de pulso
(A, V)
0,1…17 V ± máx
(50 mV, 10 %)
Com uma amplitude de pulso
< 1 V soa um sinal de aviso
Sensibilidade (A)
0,2…10 mV ± 15 %
Rel. a um pulso de 15 ms sin2
Sensibilidade (V)
1…20 mV ± 15 %
Rel. a um pulso de 40 ms sin2
Intervalo AV
(15…400 ms) ± 4 ms
Frequência
de burst (A)
(60…1000 ppm) ± 20 ppm
Parâmetros fixos
Largura de pulso
1 ms ± 5 %
Auto short após Pace
< 20 ms ± 10 %
Intervalo de
interferência
80 ms ± 5 ms
In channel blanking
110 ms ± 3 ms
Cross Channel Blanking
19 ms ± 3 ms
Período refratário atrial
total (TARP)
AVD +175 ms ± 5 ms
TARP mínimo
para (30…120) ppm
para (121…250)ppm
400 ms ± 5 ms
240 ms ± 5 ms
English
394271--J_GA_Reocor_D_mul.book Page 405 Monday, January 26, 2015 3:35 PM
405
Proteção contra
frequências elevadas
1…180 ppm
286 ms ± 10 %
181…250 ppm
214 ms ± 10 %
Forma do pulso
Assimétrica, bifásica
286 ms = 210 ppm,
não válido para Burst
214 ms = 280 ppm,
não válido para Burst
Monitoração da impedância do eletrodo
Aviso acústico
A partir de 2000 Ω ± 15 %, com amplitude de 5 V
Conexão do eletrodo
Tomadas de 2 mm com proteção contra contato;
Tomada Redel, 6 pinos, mediante adaptador Redel
Deutsch
260 ppm ± 10 %
Español
Limite superior
de frequência
225 ms ± 5 ms
200 ms ± 5 ms
175 ms ± 5 ms
Français
Período refratário (V)
(30…150) ppm
(151…200) ppm
(201…250) ppm
Česky
Parâmetros fixos
Nenhuma: polaridade é irrelevante
Consumo de potência
Tipicamente 1 mA (70 ppm, 5,0 V, 500 Ω )
Tempo de operação
com bateria novab)
•
•
•
Fim do tempo
de operação (EOS)
LED Low battery piscando
Tempo de operação após
sinal de ERIb)
•
•
36 horas
Com: 70 ppm, 5 V, Mode DDD, 500 Ohm
Comportamento durante a
troca da bateria
•
Com a bateria retirada, o aparelho continua operacional por
no mínimo 30 seg.
O Mode ajustado é preservado
•
a)
b)
500 h (−10 %) a 20 °C (± 2 °C)
Com: 70 ppm, 5 V, Mode DDD, 500 Ohm
Até: sinal ERI (aviso EOS)
Marca comercial registrada da Duracell Inc., Bethel, CT 06801
Utilizando a bateria do tipo MN 1604 Duracell®, Procell®
Italiano
Catódica
Proteção contra
inversão da polaridade
Nederlands
Polaridade
Tipo alcalina-manganês: IEC 6LR61 / ANSI 1604A
9 V a prova de vazamento
P. ex., MN1604 Duracell® Procell®a)
Polski
•
•
•
Português
Bateria
Magyar
Dados elétricos/bateria
394271--J_GA_Reocor_D_mul.book Page 406 Monday, January 26, 2015 3:35 PM
406
Condições ambientais
Variação de temperatura
para a operação
+10 °C…+40 °C
Variação de temperatura
para o armazenamento
0 °C…+50 °C
Umidade relativa
30 %…75 %, sem condensação
Pressão atmosférica
700 hPa…1060 hPa
Nível de ruído
50 dB
Dimensões, peso, material
Dimensões Reocor D
160 mm x 75 mm x 35 mm (sem adaptador Redel)
Peso Reocor D
Com bateria, com adaptador Redel: 325 g ± 10 %
Sem bateria, com adaptador Redel: 280 g ± 10 %
Sem bateria, sem adaptador Redel: 240 g ± 10 %
Dimensões adaptador Redel
para Reocor D
76 mm x 35,5 mm x 29,4 mm
Peso adaptador Redel
para Reocor D
40 g ± 10 %
Material da carcaça
Babyblend FR 3000 (PC-ABS)
Classificação
Classificação do componente de CF (cardiac floating), proteção contra desfibrilação
aplicação
Categoria de proteção
II b
Classe de proteção
IP31 (repele a água)
Resistência à
desfibrilação
5 kV
Modo de operação
Operação contínua
Vida útil esperadaa)
(conforme EN 60601-1:2007,
4.4)
a)
12 anos
A vida útil esperada é o tempo operacional máximo esperado do aparelho após comercialização. O tempo operacional máximo esperado do aparelho não é comprovado por datos de
testes.
English
394271--J_GA_Reocor_D_mul.book Page 407 Monday, January 26, 2015 3:35 PM
407
Emissão de AF
conforme CISPR 11
Classe B
Emissão de frequências
harmônicas conforme
IEC 61000-3-2
Não aplicável
O aparelho é adequado para o uso em todas as
instituições que não são do âmbito residencial, e
em edificações que são diretamente ligadas à
rede pública de alimentação elétrica.
Alterações de tensão con- Não aplicável
forme IEC 61000-3-3
Diretivas e declarações do fabricante Resistência a interferência eletromagnética
(IEC 60601-1-2: Tabela 2)
O aparelho é previsto para a operação no ambiente eletromagnético abaixo descrito. O usuário do aparelho deve
garantir que o mesmo é utilizado num ambiente conforme
esta descrição.
Verificação
da resistência
a interferências
Nível de teste
conforme
IEC 60601
Nível de
conformidade
Diretrizes para o ambiente
eletromagnético
Descarga de eletricidade estática (DES)
conforme IEC 610004-2
±6 kV descarga
por contato
±8 kV descarga
pelo ar
±6 kV descarga por
contato
±15 kV descarga
pelo ar
Pisos deveriam ser de madeira
ou concreto ou ter revestimento
cerâmico. Se o piso for de material sintético, a umidade relativa
deve ser de no mínimo 30 %.
Confundidores
elétricos transientes
rápidos/bursts conforme IEC 61000-4-4
Não aplicável
Sobretensão (Surges)
conforme IEC 610004-5
Não aplicável
Deutsch
O aparelho usa energia de alta frequência exclusivamente para seu próprio funcionamento. Por
isso, a emissão de grandezas de interferência de
alta frequência é muito reduzida, bem como
a probabilidade de causar interferência com
outros aparelhos eletrônicos operados na proximidade.
Español
Grupo 1
Français
Emissão de AF
conforme CISPR 11
Magyar
Diretrizes para o ambiente
eletromagnético
Italiano
Nível de
conformidade
Nederlands
Teste de emissões
Polski
O aparelho é previsto para a operação no ambiente eletromagnético abaixo descrito. O usuário deve garantir que o
aparelho é utilizado num ambiente conforme esta descrição.
Português
Diretivas e declarações do fabricante Emissões eletromagnéticas (IEC 60601-1-2: Tabela 1)
Česky
Conformidade com IEC 60601-1-2
394271--J_GA_Reocor_D_mul.book Page 408 Monday, January 26, 2015 3:35 PM
408
Verificação
da resistência
a interferências
Nível de teste
conforme
IEC 60601
Quedas de tensão,
interrupções de curta
duração e oscilações
na tensão de alimentação conforme
IEC 61000-4-11
Não aplicável
Campo magnético
3 A/m
com a frequência de
alimentação (50/60 Hz)
conforme IEC 610004-8
Nível de
conformidade
Diretrizes para o ambiente
eletromagnético
30 A/m
A força do campo magnético
deveria corresponder ao valor
tipicamente encontrado em
ambientes comerciais ou hospitalares.
Diretivas e declarações do fabricante –
Resistência a interferência eletromagnética
para todos os modelos de marcapassos externos
(IEC 60601-1-2: Tabela 3)
O aparelho é previsto para a operação no ambiente eletromagnético abaixo descrito. O usuário do aparelho deve
garantir que o mesmo é utilizado num ambiente conforme
esta descrição.
Verificação da
resistência a
interferências
Nível de teste
conforme
IEC 60601
Nível de
conformidade
Diretrizes para o ambiente
eletromagnético
Aparelhos de comunicação por
rádio móveis e portáteis não são
utilizados mais próximos a
qualquer parte do aparelho,
inclusos os cabos, do que a distância de segurança recomendada.
Distância de segurança
recomendada:
Interferências
induzidas de AF
conforme
IEC 61000-4-6
Interferências
de AF emitidas
conforme
IEC 61000-4-3
10 Vrms
10 kHz a 80 MHz
fora de bandas ISMa
10 Vrms
d = 0,35
P
10 Vrms
10 Vrms
10 kHz a 80 MHz
a)
dentro de bandas ISM
d = 1,2
P
10 V/m
800 MHz a 2,5 GHz
d = 1,2
P
10 V/m
para 80 MHz a 800 MHz
d = 2,3
P
para 800 MHz a 2,5 GHz
É possível que ocorram interferências na proximidade de
dispositivos que exibem o
seguinte símbolo gráfico.
OBSERVAÇÃO: Estas diretrizes talvez não sejam válidas em todos os casos. A propagação de
ondas eletromagnéticas é influenciada pela absorção e reflexão por edifícios, objetos e pessoas.
a)
b)
c)
d)
As bandas ISM (para aplicações industriais, científicas e medicinais) entre 150 kHz e 80 MHz
são 6,765 MHz a 6,795 MHz; 13,553 MHz a 13,567 MHz; 26,957 MHz a 27,283 MHz e 40,66 MHz
a 40,70 MHz.
Os níveis de conformidade nas bandas de frequência ISM entre 150 kHz e 80 MHz e na banda
de frequências de 80 MHz a 2,5 GHz são destinadas a reduzir a probabilidade de aparelhos
móveis de comunicação causarem interferências caso forem trazidos para dentro da área de
pacientes de forma não-intencional.
Por isso, recomenda-se uma distância de segurança maior nestas bandas de frequência (fator
1,2 ao invés de 0,35).
É impossível prever com precisão a intensidade de campos de transmissores estacionários,
como p.ex. bases de telefones sem fio ou carregadores de equipamentos de radiocomunicação, emissores de radioamador, emissoras de AM e FM e canais de TV. Para avaliar o ambiente
eletromagnético criado por emissores estacionários de AF deveria ser considerado a elaboração de um estudo do local. Se a intensidade de campo medida no local de utilização do aparelho ultrapassar o nível de conformidade de AF acima indicado, será conveniente observar o
aparelho para garantir que funcione de modo previsto. Pode ser necessário adotar medidas
adicionais, como, p.ex., uma alteração do alinhamento ou um outro lugar de instalação do
marcapasso externo.
Na gama de frequências de 150 kHz a 80 MHz, a intensidade de campo deveria ser menor que
10 V/m.
Deutsch
Español
A intensidade do campo dos
transmissores de ondas de
rádio estacionários de acordo
com um estudo no localc) deve
ser menor que o nível de conformidaded).
Français
Nisso, “P” é a potência máxima
do transmissor, em Watt [W],
conforme especificada pelo
fabricante do transmissor, e “d”,
a distância de segurança recomendada, em metros [m]b).
Magyar
Diretrizes para o ambiente
eletromagnético
Italiano
Nível de
conformidade
Nederlands
Nível de teste
conforme
IEC 60601
Polski
Verificação da
resistência a
interferências
Português
409
Česky
English
394271--J_GA_Reocor_D_mul.book Page 409 Monday, January 26, 2015 3:35 PM
394271--J_GA_Reocor_D_mul.book Page 410 Monday, January 26, 2015 3:35 PM
410
Distâncias de segurança recomendadas de aparelhos de
comunicação de AF portáteis e móveis (IEC 60601-1-2:
Tabela 5)
O aparelho foi desenhado para ser utilizado em ambientes
eletromagnéticos com interferências de AF controladas.
O usuário do aparelho pode ajudar a evitar interferências
eletromagnéticas, mantendo a distância de segurança para
aparelhos móveis de comunicação de AF (transmissores), de
acordo com a potência de saída do aparelho de comunicação,
conforma abaixo indicado.
Potência
Distância de segurança d [m] conforme frequência de transmissão
nominal do trans- 150 kHz a 80 MHz 150 kHz a 80 MHz 80 MHz a
800 MHz a
missor P [W]
fora
dentro de bandas 800 MHz
2,5 GHz
de bandas ISM
ISM
d = 0,35
P
d = 1,2
P
d = 1,2
P
d = 2,3
0,01
0,04
0,12
0,12
0,23
0,10
0,11
0,38
0,38
0,73
1,00
0,35
1,20
1,20
2,30
10,00
1,11
3,79
3,79
7,27
100,00
3,50
12,00
12,00
23,00
P
Para transmissores cuja potência nominal não está indicada na tabela acima, a distância de
segurança pode ser calculada com ajuda da fórmula indicada para a respectiva frequência de
transmissão. Nisso “P” representa a potência nominal de emissão em Watt [W] e “d” a distância
de segurança em metros [m].
OBSERVAÇÃO 1: as bandas ISM (para aplicações industriais, científicas e medicinais) entre
150 kHz e 80 MHz são 6,765 MHz a 6,795 MHz; 13,553 MHz a 13,567 MHz; 26,957 MHz a
27,283 MHz e 40,66 MHz a 40,70 MHz.
OBSERVAÇÃO 2: os níveis de conformidade nas bandas de frequência ISM entre 150 kHz e
80 MHz e na banda de frequências de 80 MHz a 2,5 GHz são destinadas a reduzir a probabilidade
de aparelhos móveis de comunicação causarem interferências caso forem trazidos para dentro
da área de pacientes de forma não-intencional. Por isso, recomenda-se uma distância de segurança maior nestas bandas de
frequência (fator 1,2 ao invés de 0,35).
OBSERVAÇÃO 3: estas diretrizes talvez não sejam válidas em todos os casos. A propagação de
ondas eletromagnéticas é influenciada pela absorção e reflexão por edifícios, objetos e pessoas.
English
394271--J_GA_Reocor_D_mul.book Page 411 Monday, January 26, 2015 3:35 PM
411
Informação:
O Reocor D apenas pode ser utilizado com acessórios desenvolvidos e testados para este marcapasso.
Česky
Escopo de fornecimento e acessórios
Denominação do artigo
Quantidade
Observação
Nº para pedido
Reocor D
1
Bateria
1
Duracell Plus, 6LR61
–
Braçadeira
– Para o Japão
– Para todos os demais países
1
Curta
391843
1
Padrão
103704
Adaptador Redel
1
371262
Proteção do campo de operação
1
378007
Manual técnico
1
394271
368702
Guia rápido DE
370123
Guia rápido EN
371300
Guia rápido ES
371301
Guia rápido FR
371302
371303
Guia rápido PT
1
Guia rápido ZH
Magyar
Guia rápido IT
Français
Manual técnico ZH
Español
365529
Deutsch
Escopo de fornecimento
372230
371304
Estojo
1
379384
Conexão
PK-82
128564
Cabo do paciente com dois clipes jacaré,
reesterilizável
Conexão
direta
PK-83 (2,5 m)
128563
Cabo do paciente com dois terminais
rosqueáveis isolados, reesterilizável
Conexão
direta
PK-83 (1,5 m)
128562
Cabo do paciente com dois terminais
rosqueáveis isolados, reesterilizável
Conexão
direta
PK-83-B (2,5 m)
347485
Cabo do paciente com dois terminais
rosqueáveis isolados de 2,3 mm
Adaptador
Redel
PK-83-B (1,5 m)
347606
Cabo do paciente com dois terminais
rosqueáveis isolados de 2,3 mm
Adaptador
Redel
PK-175
333959
Cabo do paciente com quatro terminais
rosqueáveis para conectar eletrodos
temporários, reesterilizável
Adaptador
Redel
PK-67-L
123672
Cabo do paciente, reesterilizável, para
Adaptador
combinação com adaptadores PA-1-B, PA-2, Redel
PA-4
PK-67-S
128085
Cabo do paciente, reesterilizável, para
combinação com PK-155 e Remington
Model 301-CG
Adaptador
Redel
Nederlands
Descrição
Polski
Nº para
pedido
Português
Artigo
Italiano
Acessórios
394271--J_GA_Reocor_D_mul.book Page 412 Monday, January 26, 2015 3:35 PM
412
Artigo
Nº para
pedido
Descrição
Conexão
PK-141 (2,8 m)
353181
Cabo do paciente, reesterilizável, com quatro Adaptador
clipes jacaré com proteção contra contato
Redel
Braçadeira Reocor
padrão
103704
Braçadeira Reocor
curta
391843
Braçadeira padrão
–
Braçadeira com circunferência reduzida.
Apropriada para braços mais finos.
–
Apenas para os EUA
Artigo
Fabricante
Descrição
Conexão
ADAP-2R
(0,24 m)
Remington
Medical Inc.
Adaptador reutilizável para cabo modelo
S-101-97 e modelo FL-601-97
Adaptador
Redel
Adaptador para PK-67 e PK-67-L
Artigo
Nº para
pedido
Descrição
PA-1-B
123751
Para conexão ao adaptador de 2 mm ou adaptador MHW
(adaptador para fios cardíacos), reesterilizável
PA-1-C
349723
Para conexão ao adaptador de 2 mm ou adaptador MHW
(adaptador para fios cardíacos), reesterilizável
PA-2
123157
Para conexão ao conector IS-1, reesterilizável
PA-4
123090
Com clipes jacaré, reesterilizável
PK-155
(conj. de dois cabos)
337358
Cabo do paciente esterilizado, dois fios, com clipes jacaré
para uso único
Adaptador para PK-67-S e PK-67-L
(apenas para EUA)
Artigo
Fabricante
Descrição
Modelo 301-CG
Remington
Medical Inc.
Cabo do paciente esterilizado, dois fios, com clipes jacaré
para uso único
Adaptador para ADAP-2R (apenas para EUA)
Artigo
Fabricante
Descrição
Modelo 301-CG
Remington
Medical Inc.
Cabo do paciente esterilizado, dois fios, com clipes jacaré
para uso único
Modelo S-101-97
(2,5 m)
Remington
Medical Inc.
Cabo do paciente, dois fios, com clipes jacaré para uso
único
Modelo FL-601-97
(2,0 m)
Remington
Medical Inc.
Cabo do paciente, dois fios, com terminais rosqueáveis
para uso único
English
394271--J_GA_Reocor_D_mul.book Page 413 Monday, January 26, 2015 3:35 PM
413
Os símbolos na etiqueta têm o seguinte significado:
Significado
Adaptator Redel
Deutsch
Reocor D
Número de série do aparelho
Español
Número para pedido BIOTRONIK
Variação de temperatura de armazenamento permitida
Français
Data de fabricação do aparelho
Variação de umidade do ar de armazenamento permitida
Magyar
Variação de pressão atmosférica de armazenamento permitida
Símbolo de descarte
Observar o manual técnico!
Nederlands
Conteúdo
Italiano
Paciente com eletrodo implantado
Marca CE
Polski
Atenção: Conforme a lei dos Estados Unidos, a venda deste produto
é restrita para ou autorizado por um médico.
Português
Símbolo
Česky
Legenda da etiqueta
394271--J_GA_Reocor_D_mul.book Page 414 Monday, January 26, 2015 3:35 PM
414
Técnico Responsável:
Eng. Zolmo de Oliveira Jr. - CREA/SP nº: 060 1869029
Eng. Rogério Quiarim Zarza - CREA/SP nº: 060 1812032
Marcapasso Externo Reocor D - Reg. ANVISA nº: 80224390179
Fabricante / Distribuidor:
BIOTRONIK SE & Co. KG
Woermannkehre, 1
D-12359 Berlim · Alemanha
Tel.: (+49 30) 689 05-600
Fax: (+49 30) 689 2804
[email protected]
www.biotronik.com
Fornecedor:
BIOTRONIK Comercial Médica Ltda.
Rua dos Inocentes, 506
04764-050 São Paulo, SP
Tel.: (+55 11) 5694 7755
Fax: (+55 11) 5694 7770
CNPJ: 50.595.271/0001-05
© BIOTRONIK SE & Co. KG
All rights reserved. Specifications are subject
to modification, revision and improvement.
0123 2009
15-D-xx
Revision: J (2015-01-26)
394271--J_GA_Reocor_D_mul_Cover.indd 2
BIOTRONIK SE & Co. KG
Woermannkehre 1
12359 Berlin · Germany
Tel +49 (0) 30 68905-0
Fax +49 (0) 30 6852804
[email protected]
www.biotronik.com
19.08.2014 12:54:15