1
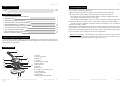
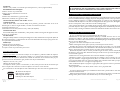
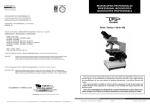
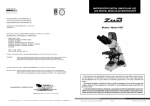
MICROSCOPIOS DE EDUCACIÓN EDUCATION MICROSCOPES Serie / Series 119 Este manual es parte inseparable del aparato por lo que debe estar disponible a todos los usuarios del equipo. Le recomendamos leer atentamente el presente manual y seguir rigurosamente los procedimientos de uso para obtener las máximas prestaciones y una mayor duración del mismo. This manual should be available for all users of these equipments. To get the best results and a higher duration of this equipment it is advisable to read carefully this manual and follow the processes of use. Revisión 6 de Marzo - 05 Manual de instrucciones 50119XXX Pág. 1 ENGLISH ANNEX I: CE CERTIFICATE AUXILAB S.L. CE DECLARATION OF CONFORMITY ZUZI EDUCATION MICROSCOPES SERIES 119 of AUXILAB, S.L. for the Directive of Machines (89/392/CEE modified) and the regulations adopted for their transposition LEA DETALLADAMENTE ESTE MANUAL DE INSTRUCCIONES ANTES DE OPERAR CON ESTE EQUIPO CON EL FIN DE OBTENER LAS MÁXIMAS PRESTACIONES Y UNA MAYOR DURACION DEL MISMO. NAME OF THE MANUFACTURER/IMPORTER: AUXILAB, S.L. ADDRESS: Polígono Morea Norte, 8 31191 Beriáin (Navarra) Tenga especialmente presente lo siguiente: Este manual es parte inseparable del microscopio de educación Zuzi serie 119, por lo que WE STATE THAT: ZUZI EDUCATION MICROSCOPES SERIES 119 CODES 50119005, 50119008, 50119028, 50119228, 50119009 AND 50119029 Are designed and manufactured according to: Directive 89/392/CEE, including the modifications and the national regulations that transpose them. Directive 73/23/CEE modified over the electric security. Directive 89/336/CEE modified over the electromagnetic compatibility. And that the following harmonized rules have been applied (or part of them): UNE 292-1, UNE 292-2, UNE 292-2/A1, UNE 614-1, UNE 1050, UNE 294, UNE 894-1, UNE 894-2, UNE 60204, UNE 61010-1. BERIAIN 13th October 2004 Signed by: ALFONSO AINCIBURU SANZ DIRECTOR/MANAGER Polígono Morea Norte, 8 31191 Beriain (Navarra) - Spain. Tel. 948 310 513 Fax 948 312 071 Internet: www.auxilab.es · Email: [email protected] Page 30 Instruction manual 50119XXX CASTELLANO Gracias por haber adquirido este equipo. Deseamos sinceramente que disfrute del microscopio de educación Zuzi serie 119. Le recomendamos que cuide el equipo conforme a lo expuesto en este manual. Zuzi desarrolla sus productos según las directrices del marcado CE y haciendo hincapié en la ergonomía y seguridad del usuario. La calidad de los materiales empleados en la fabricación y el correcto proceder le permitirán disfrutar del equipo por muchos años. El uso incorrecto o indebido del equipo puede dar lugar a accidentes, descargas eléctricas, cortocircuitos, fuegos, lesiones, etc. Lea el punto de Mantenimiento, donde se recogen aspectos de seguridad. Version 6 March - 05 debe estar disponible para todos los usuarios del equipo. Debe manipularse siempre con cuidado evitando los movimientos bruscos, golpes, caídas de objetos pesados o punzantes; evitar el derrame de líquidos en su interior Nunca desmonte el equipo para repararlo usted mismo, además de perder la garantía podría producir un funcionamiento deficiente de todo el equipo, así como daños a las personas que lo manipulan. Para prevenir fuego o descargas eléctricas, evite los ambientes secos y polvorientos. Si esto ocurre, desenchufar inmediatamente el equipo de la toma de corriente. Cualquier duda puede ser aclarada por su distribuidor (instalación, puesta en marcha, funcionamiento). Usted puede también mandarnos sus dudas o sugerencias a la siguiente dirección de correo del Servicio Técnico Zuzi ([email protected]) o bien llamando al Tel: 807117040 (0,30Euros/min). Este equipo está amparado por la Ley de garantías y bienes de consumo (10/2003). No se consideran en garantía las revisiones del equipo. La manipulación del equipo por personal no autorizado provocará la pérdida total de la garantía. Los fusibles (0,5A) o accesorios, así como la pérdida de los mismos, no están cubiertos por dicha garantía. Tampoco estarán cubiertos por el periodo de garantía las piezas en su desgaste por uso natural. Asegúrese de guardar la factura de compra para tener derecho de reclamación o prestación de la garantía. En caso de enviar el equipo al Servicio Técnico adjuntar factura o copia de la misma como documento de garantía. Rellene y envíe la garantía antes de los 15 días después de la compra. El fabricante se reserva los derechos a posibles modificaciones y mejoras sobre este manual y equipo. ¡ATENCION! NO SE ADMITIRA NINGUN APARATO PARA REPARAR QUE NO ESTE DEBIDAMENTE LIMPIO Y DESINFECTADO. Revisión 6 de Marzo - 05 Manual de instrucciones 50119XXX Pág. 3 CASTELLANO INDICE DE IDIOMAS ENGLISH 9. RECOMMENDATIONS Castellano Inglés 1-16 17-30 INDICE DE CONTENIDOS 1. APLICACIONES DEL INSTRUMENTO 2. DESCRIPCIÓN 3. ESPECIFICACIONES TÉCNICAS 4. INSTALACIÓN / PUESTA EN MARCHA 5. MANTENIMIENTO Y LIMPIEZA 6. ELECCION DE OBJETIVOS Y OCULARES 7. CAUSAS DE UNA MALA IMAGEN 8. LOCALIZACION DE AVERIAS 9. RECOMENDACIONES PRÁCTICAS ANEXO I: CERTIFICADO CE 4 4 5 8 12 13 13 14 15 16 As the head is rotary you should rather observe by the stage's frontal part, as it facilitates access to the mechanical control knobs. When using the oil immersion objective you should notice the following: In order to use all the numerical aperture of the oil immerson objective: - Pre-focusing: Focus the sample with the objective with less magnification (4x). - Put a drop of oil immersion on the cover glass. - You should avoid air bubbles in the oil so as not to spoil the resulting image. To do so you should move the pre-focusing control up and down to make the oil layer uniform. - Turn the nosepiece and then locate the oil immersion objective; you can adjust focusing with the micrometric control. We highly recommend drying the frontal lens after each use. You should never use a duster. Instead of it you should use specific optics cloth and liquids that are sold to this purpose (as the ones for cleaning sunglasses or binocular lenses). You should not submerge the objective in any liquid, as this could provoke the lens' detachment. Handling the stage: First, you should move the sample in consecutive steps, from the front to the back; each fraction is observed to detail by means of a lateral movement. Thus, you can move the sample in a uniform way and so explore all its area. 1. APLICACIONES DEL INSTRUMENTO Su avanzado y moderno diseño, así como la configuración modular, hacen de estos microscopios una herramienta imprescindible y de fácil manejo para laboratorios de educación en cualquier tipo de enseñanza. 2. DESCRIPCIÓN 1 2 3 4 5 9 10 8 11 12 7 13 Pág. 4 14 6 1.-Ocular 2.-Cabezal giratorio 3.-Objetivos 4.- Estativo 5. Tornillo tope enfoque 6.-Macrométrico 7.-Micrométrico 8.-Platina 9.-Pinza/carro 10.- Mandos movimiento carro 11.-Condensador 12.-Precondensador 13.-Interruptor 14.-Regulador de intensidad Manual de instrucciones 50119XXX Revisión 6 de Marzo - 05 Version 6 March - 05 Instruction manual 50119XXX Page 29 ENGLISH 119/29 3. ESPECIFICACIONES TÉCNICAS Instruction manual 50119XXX Version 6 March - 05 119/238 119/228 119/218 119/208 119/28 119/26 119/8 119/6 Revisión 6 de Marzo - 05 Manual de instrucciones 50119XXX Fijo sin regulación Fijo con regulación Abbe, regulac. por piñón y cremallera Condensador Petrográfica Pinzas Carro Platina Macro y micro coaxial Macro Macro y micro independiente Enfoque Acromáticos 4x, 10x, 40x(R) Acromáticos 4x, 10x, 40x(R) , 100x(R)(I) Objetivos Cuádruple P16 Triple Revólver WF 10x WF 15x Oculares Triocular Cabezal Binocular 119/5 Before sending the microscope back to Zuzi Technical Assistance Department you should check the following: If the lamp does not switch on: Check it is properly connected to the right current intake. Check both fuse and lamp are in good conditions. If not you should replace the fuse. If the field of vision is cut: Check the nosepiece is properly fit. To do that, turn it slightly back and forth until it fits. Check it is well centred and if not you should send it to Zuzi Technical Assistance Department through your distributor. If there is dust or dirt in the field of vision: Check there is dust on the precondenser's lens, upper lens of the condenser or the eyepiece, as well as the cleanliness of the sample. Once you find out where the dirt is you should clean it as explained before. If an area in the field of vision s out of focus: Check the objective is properly located on the luminous beam's path. If not you should turn it until it is appropriate position. Check the sample is properly located on the stage, making sure it is held by the stage clips. Then, if it does not focus you should revise the pre-focusing control. If the frontal lens of the objective touches the prepared slide when focusing: Check the prepared slide is not the other way round (being the cover glass over the slide) and placing it properly in case it is appropriate to do so. If the frontal lens of the more powerful objective touches the prepared slide when passing from a lowmagnification objective to a superior one: Check the prepared slide is not the other way round and check also the slide's thickness, which has to have a standard thickness of 0,17 mm. If the slide slips under the mechanical stage: Adjust the distance between the mechanical section and the stage with the screws located on the rear part of the mechanical stage (the screws have a standard size), making sure there is enough space to avoid the slide passing through and obtain a smooth movement without scratching the stage. Once it is properly adjusted notice you should not hold the microscope by the mechanical stage, as its weight could loosen the equipment. In case the problem persists you should send the equipment to Zuzi Technical Assistance Department through your distributor. Monocular 8. TROUBLESHOOTING Page 28 CASTELLANO 119/9 In case the lamp blows you should replace it for another one, making sure it is a 6V 15W Zuzi original one. Please take care and do not touch the lamp with bare hands. IMPORTANT: Before replacing the lamp make sure you have disconnected the microscope from the electric intake. Check you are using the proper lamps, as other types can provoke malfunction. Pág. 5 CASTELLANO ESTATIVO: Metálico, muy estable, con mandos para enfoque macro y micro (según modelo). RECORRIDO DEL ENFOQUE: Macro: 30 mm con parada final. Micro: 30 mm, 0-200 micras en 2 micras. CABEZAL: Monocular, inclinado 45º y giratorio 360º. Binocular, inclinado 30º y giratorio 360º. LONGITUD MECÁNICA DEL TUBO: 160 mm. CONDENSADOR: Abbe de doble lente, está situado debajo de la platina y permite concentrar la luz en la muestra que se observa. Según modelo, ver tabla características técnicas. Apertura numérica: 1.25. Portafiltros móvil. Incluye filtros azul y verde (32 mm/día). DIAFRAGMA IRIS: Está situado debajo del condensador y de la platina, siendo el encargado de regular la entrada de luz al condensador. ILUMINADOR: Halógeno de baja tensión con lámpara halógena 6V 15W, alimentador incorporado (220V 50 Hz ±10%), interruptor y potenciómetro de control de intensidad. Se incluye espejo plano-cóncavo para iluminación natural. EMBALAJE: Funda protectora de plástico. Molde de poliestireno expandido. Caja de cartón con protecciones para envío. Especificaciones ópticas Objetivos acromáticos: A la hora de trabajar con los objetivos, podemos hablar de objetivos secos, que son aquellos en los que entre el objetivo y la preparación sólo hay aire y también podemos hablar de objetivos de inmersión, cuando es necesario colocar entre la lente y la preparación un aceite de inmersión, que permite una mayor luminosidad. Objetivos secos: 4x, 10x, y 40x. Objetivo de inmersión: 100x. Los objetivos de 40x y 100x son retráctiles, es decir, están provistos de un mecanismo que evita la ruptura de la muestra al entrar el objetivo en contacto con la muestra. Las características de cada objetivo están codificadas por unas marcas de la siguiente manera: 40: Aumento del objetivo. 0.65: Apertura numérica. 160: Longitud del tubo. 40/0,65 0.17: Espesor del cubreobjetos. 160/0 Pág. 6 Manual de instrucciones 50119XXX Revisión 6 de Marzo - 05 ENGLISH ATTENTION!! IF EQUIPMENTS ARE NOT PROPERLY CLEAN AND DISINFECTED THEY WOULD NOT BE ALLOWED TO REPAIR BY OUR TECHNICAL SERVICE. 6. CHOOSING OBJECTIVES AND EYEPIECES The observed image loses surface and sharpness as magnification increases. The mentioned increase should be done by changing objectives and putting each time a more powerful one and not by changing eyepieces to a higher magnification, as eyepieces only magnify the image obtained with the objective. Thus, the more magnification the eyepiece has, the higher will be the loss of sharpness, clarity and surface of the resulting image. For routine observations you should use the eyepiece with lesser magnification with more powerful objectives. The eyepiece with the higher magnification should be kept back for particular occasions, bearing in mind that it decreases definition and does not increase resolution. 7. CAUSES OF A DEFECTIVE IMAGE In case of a defective image you should check the following: Illumination is well done and luminous intensity is neither excessive nor too weak. You should never adjust it with the condenser's diaphragm. Both the condenser and the lamp should be well centred. Check that between the field diaphragm and the aperture diaphragm there is not any diffuser filter. Eyepieces are well fit and objectives well screwed. When cleaning the entire optical system you should proceed as follows: a) Make the eyepieces turn checking the little specks are moving; if so you should clean them. Make the head turn. You should never disassemble the head, but you can clean it with delicacy by blowing the accessible surfaces of prisms with a plastic bulb. b) Turn the objective and, in case the parasite images also turn, clean it with the help of a dry brush to remove the dust. Watch the front part of the microscope with a magnifying glass or an inverted eyepiece. Immersion oil is enough and does not contain air bubbles or impurities. Thickness of slides, cover glasses and means of assembly is not too much as to avoid focusing with medium or high magnification (there are standard sizes for both the slides and cover glasses). Slides and cover glasses should be clean. Check that the slide is properly located and there are not two cover glasses superimposed. The combination objective-eyepiece is appropriate; the eyepiece can be too powerful for the selected objective. The prepared slide is well done; check it with a "test" prepared slide. To remove dust from lenses you should blow them with a plastic bulb or clean them with a natural horsehair brush. When cleaning mechanical or plastic parts you should not use abrasive solvents that could damage either paint or finish. You should always use neutral detergent. Version 6 March - 05 Instruction manual 50119XXX Page 27 ENGLISH It is essential to have the equipment switched off and unplugged from the net before cleaning, checking components or replacing any piece (e.g. replacement of a fuse). Never try to repair the microscope by yourself, since you will lose the warranty and may provoke damages to the general operating system or the electrical installation, as well as injuries to the people that usually handle the equipment (burns, hurts…). Made under the European regulations for electrical security, electromagnetic compatibility and security on machines. To get the best results and a higher duration of this microscope it is essential to follow the processes of use. Note: All the processes of use mentioned below will not have any value unless you keep a continued and careful maintenance. Please follow the processes of use of this manual. This manual should be available for all users of this equipment. Always use original components and supplies. Other devices can be similar but they can damage the equipment. The microscope is supplied with a Schuko standard wire. It has to be plugged to an earth connection and the socket should be handy and ready to unplug the equipment in case of emergency. Never try to repair the microscope by yourself, since you will lose the warranty and may provoke damages to the general operating system or the electrical installation, as well as injuries to the people that usually handle the equipment (burns, hurts…) or damages in nearby equipments. In the event of breakdown please contact your distributor to overhaul through Zuzi Technical Assistance Department. In case the lamp blows you should replace it for another one, making sure it is a 6V 15W Zuzi original one. Please take care and do not touch the lamp with bare hands. You must not use lamps with a higher power, as they could provoke over heating or any malfunction. Please use the plastic cover provided to keep the microscope away from dust lying on the optical parts when it is not used for a long period of time. Please keep the original packaging either to transport the equipment, when it is not being used for a long time or when you send it for an overhaul. Cleaning Never use scourers or substances that can grate for cleaning metallic parts such as stainless steel, aluminium, coatings, etc. as they damage the microscope and produce an early ageing of the equipment. Use a fluff-free cloth dampened with soaped water that does not contain abrasives. Lenses must not be disassembled by the user. Were there any dust or dirt to be cleaned, you should clean it with a natural horse hair brush or a smooth piece of cloth, fluff-free, dampened with a bit of xilol or toluene. You should use non-corrosive lubricants in metallic parts, being careful of not touching optical parts. Instruction manual 50119XXX Aumento Distancia de trabajo Distancia focal Resolución Apertura numérica 4X 37.50 mm 31.04 mm 360 0.10 10X 7.32 mm 17.13 mm 900 0.25 40X (R) 0.63 mm 4.65 mm 2340 0.65 100X (R)(I) 0.19 mm 2.90 mm 4500 1.25 (R) Retráctil, (I) Inmersión Oculares: Están formados por dos lentes que se encuentran separados por un diafragma. Su misión es llevar la imagen desde el objetivo hasta el ojo. 5. MAINTENANCE AND CLEANING Page 26 CASTELLANO Version 6 March - 05 Tipo / Aumento Distancia focal Diámetro de campo W.F. / 10X 24.99 mm 18 P /16x 15.58 mm 11 Aumentos totales: Es el resultado de multiplicar el aumento del ocular por el aumento del objetivo. Oculares WF10X P16X Objetivos Aumento total Campo de visión(mm) Aumento total Campo de visión (mm) 4X 40 4,50 64 2,75 10X 100 1,80 160 1,10 40X (R) 400 0,45 640 0,27 100X(R)(I) 1000 0,18 1600 0,11 (R): Retráctil (I): Objetivo de inmersión. - A.N: Determina las propiedades del objetivo. La apertura numérica más grande hace la imagen más brillante y la resuelve mejor. - Distancia de trabajo: distancia, en mm., entre la preparación y la lente frontal del objetivo cuando el microscopio se encuentra enfocado. - Distancia focal: distancia desde el plano principal imagen del sistema hasta su foco imagen, expresada en mm. - Resolución: es el valor reciproco del poder separador, el cual representa la mínima distancia en la cual dos pequeñas partículas bajo la lente pueden verse separadas. - Campo de visión: tamaño, en mm., del campo real que estamos observando. Los objetivos secos son 4x, 10x, y 40x. El objetivo de inmersión es 100x. Los objetivos de 40x y 100x son retráctiles, es decir, están provistos de un mecanismo que evita la ruptura de la muestra al entrar el objetivo en contacto con la muestra. Revisión 6 de Marzo - 05 Manual de instrucciones 50119XXX Pág. 7 CASTELLANO 4. INSTALACIÓN Y PUESTA EN MARCHA Inspección preliminar Desembale el microscopio, retire el plástico que lo envuelve y quite la protección de poliespán en que viene encajada. Retire todas las protecciones y, sin conectar el equipo a la red eléctrica, asegúrese de que no presenta ningún daño debido al transporte. De ser así, comuníquelo inmediatamente a su transportista o suministrador para que pueda hacer las debidas reclamaciones en el plazo establecido. Guarde el embalaje, ya que siempre se deben realizar las devoluciones en su embalaje original con todos los accesorios suministrados. Compruebe los accesorios que usted debe recibir junto al equipo: - 1 Lámpara halógena de recambio 6V 15W - Estativo - Aceite de inmersión (excepto 119/5) - Cabezal (según modelo,) - 2 Fusibles 0,5 A - Objetivos (según modelo,) - Funda de plástico - Oculares (según modelo,) - Manual de instrucciones - Cable Schuko estándar - Certificado de garantía (10A, 250V, UNE 20356, EN 60 320). - Juego de filtros (verde y azul) - Soporte y espejo para iluminación natural. No aceptaremos ningún equipo en periodo de devolución sin que venga en su embalaje original. Instalación Antes de comenzar a utilizar el instrumento, es conveniente familiarizarse con sus componentes y fundamentos básicos, así como con las funciones de sus controles. LEA DETALLADAMENTE ESTE MANUAL DE INSTRUCCIONES ANTES DE OPERAR CON ESTE EQUIPO CON EL FIN DE OBTENER LAS MÁXIMAS PRESTACIONES Y UNA MAYOR DURACION DEL MISMO. Coloque el microscopio sobre una mesa horizontal, plana y estable, creando un espacio libre al menos de 30 cm por cada lado. No coloque el equipo en zonas próximas a fuentes de calor (mecheros, sopletes...), ni lo exponga directamente a la luz del sol, etc. Evite en el lugar de trabajo productos inflamables o tóxicos. El observador debe adoptar una postura cómoda, bien sentado y con la espalda recta. Es conveniente trabajar sobre una mesa oscura a fin de eliminar toda luz parásita que deslumbra y disminuye la buena definición de las imágenes, evitándose así una fatiga absurda. El microscopio se suministra con un cable Schuko estándar. Inserte el cable de alimentación de corriente alterna (CA) a la base de corriente 220V 50Hz ±10% provista de toma de tierra y por el otro extremo al conector del microscopio. Ni el fabricante ni el distribuidor asumirán responsabilidad alguna por los daños ocasionados al equipo, instalaciones o lesiones sufridas a personas debido a la inobservancia del correcto procedimiento de conexión eléctrica. La tensión debe ser de 220V 50Hz ±10%. Pág. 8 Manual de instrucciones 50119XXX Revisión 6 de Marzo - 05 ENGLISH To make a birefringence study you should proceed as follows: Set up the polarizer as described in Installation/Setting up section (see pic. 3), making the "0" in the knob coincide with the stage mark so as to read the rotating angle. Then, put the analyzer on the eyepiece and, without placing any sample on the stage, turn the analyzer until you observe a completely dark image (crossed polarizers). Please be careful and make sure you do not move the analyzer while observing, as the reading done would be entirely wrong. Place the sample into the stage. Focus the object. This microscope can only be used with the stage properly centred; otherwise, when turning the stage the sample's object would be out of the field of vision. To centre a prepared slide it is necessary to start with few magnifications and engrave, either with ink or a diamond, a cross or a circle with 1mm diameter. Then you have to place the sample in the middle of the stage, fix it with the holding clips and then turn the stage. It is inevitable that the object gets out of the field of vision. As it must remain centred, you should move it with your hand. After sizing up it previously, you have to turn the stage a complete turn without the object being out of the field of vision. In this moment you have to turn the nosepiece to a higher magnification making sure you follow the same steps; doing it as explained you will keep the sample centred with any optical arrangement. Once you have centred the stage and placed the turning sample between the crossed polarizers, two cases can come up while observing: a) If the sample disappears 4 times and appears another four times in positions that separate 45 º one from each other (which can be done and verified with the stage's graduated circle), we can state we have a birefringent material. You should not forget that with overly thin materials or slightly anisotropic ones, lighting must be extremely weak. b) If the field of vision remains dark during all the time we are turning the sample, we can consider three different possibilities: - The structure is birefringent, but it is badly positioned. If its axis coincides with the microscope's, it would be acting as if an isotropic object. In this case, you should relocate the object or replace the prepared slide. - The material is slightly birefringent, not enough to produce a luminous signal. - Finally, we can consider we have an isotropic object. Security The microscope must be used by previously qualified staff that knows how the equipment works thanks to the user manual. You should put the microscope in a horizontal plane stable table, having a safety area of at least 30 cm per side. Do not place the microscope near any warm supply (burners, blowlamps, etc), nor expose it directly to the sun. Avoid vibrations, dust and dry environments. During its functioning dangerous materials such as flammable or pathological substances must be out of the safety area. When you are not using the microscope for a long period of time please make sure it is unplugged in order to avoid possible accidents. Version 6 March - 05 Instruction manual 50119XXX Page 25 ENGLISH CASTELLANO By turning the nosepiece you will pass to an objective with higher magnification. As they are Cuando no vaya a hacer uso del microscopio durante largos períodos de tiempo, asegúrese de que esté desconectado de la red y protéjalo del polvo (evitando así posibles accidentes y prolongando la vida útil del equipo). paracentric you will only have to adjust focusing with the micrometric control. Adjust both the diaphragm and condenser until you get the lighting intensity desired. Normally, when you are operating with an intense lighting the condenser's numerical aperture should be lesser than the objective's, in order to avoid glares on the field of vision that may distort the image contrast. You should lower the condenser to cover a wide field and avoid too much lighting intensity, raising it in a progressive way with higher magnification objectives in order to gather the light beam and gain contrast and illumination. With the oil immersion objective you should play with the condenser's height to focus properly. Iris diaphragm enables decreasing the numerical aperture to a value similar to objective's. Thus you avoid marginal illumination that decreases contrast and therefore it will be more closed when you use a lesser magnification objective and with a small numerical aperture. You will only use its total aperture when you use the oil immersion objective. The closing of the diaphragm by reducing the optical system's numerical aperture increases the focusing depth. You must not surpass the diffraction limit as an excuse to increase the focusing depth. Diaphragm must not be used to reduce luminous diffraction. In spite of going straight on light's simple harmonic motion disperses when passing through a very closed diaphragm, provoking fuzzy vision and limiting the magnifying capacity of the microscope. Petrographic stage (depending on the model supplied) Petrographic stages are used when we want to find out optical characteristics of different structures according to birefringence. We know as birefringence a characteristic of certain substances that partially restore light when placed between two crossed polarizers (that is, they have double refraction). Double refraction is known as the monochromatic light beam that makes differ two refracted beams when simultaneously entering through certain materials. Uses of polarized light microscopes cover different fields such as the study of vitamins, starch or biological anisotropies, but studies of worn stones (crystal structures) until they constitute thin preparations are one of the most appealing applications. In these preparations you can easily identify constituent minerals by its crystals' shape, as well as thanks to the bright colours acquired when seen through crossed polarizers. There are some precautions to be taken: - As a consequence of absorption phenomena produced in both polarizers a loss of light is caused, so it is convenient to avoid any odd light when using polarized light. Thus, it is recommended to use a large sheet of black paperboard (large enough to hide the observer's head) as a protective screen. - In the case of tasks that require quite an accurate and meticulous work with slightly birefringent structures we should make sure neither slides nor cover glasses present traces of birefringence; for this reason, we will previously observe the samples with the stage and the analyzer. - For the study of dried up crystalline precipitates it is important to examine it in two parts: a part being dry and the other prepared with Canadian balsam, as it stands out better the interference colours. In this case it is advisable to have a little amount of balsam for some peripheral crystals to be in the air. Page 24 Instruction manual 50119XXX Version 6 March - 05 Puesta en funcionamiento Haga bajar la platina mediante los mandos de enfoque macro. Los objetivos en el revólver porta-objetivos deben seguir un orden ascendente (4x-10x-40x-100x) en el sentido de las agujas de un reloj (Figura 2). Inserte el ocular. El tubo monocular se coloca normalmente en dirección del frente del microscopio, pero si fuese necesario puede colocarlo en cualquier otra dirección. MUY IMPORTANTE: Nunca coja el microscopio por la platina ni por el tubo, ya que de esta manera todo el peso del aparato descansa sobre el tornillo micrométrico y las partes mecánica y de precisión son lentamente erosionadas. Figura 2 Para realizar la observación en el modelo petrográfico es imprescindible colocar el analizador sobre el ocular, que no es más que otro filtro de polarización (fig. 3). El modelo petrográfico 119/218 puede emplearlo directamente como microscopio biológico. No obstante, si desea utilizarlo sin platina petrográfica, tiene que sustituir el tornillo-tope largo por el corto (fig. 4) para ello suelte los dos tornillos (fig.5) y sustituya la pieza correspondiente. Quitar la platina petrográfica, colocando las pinzas que vienen incluidas. Figura 3 Estos microscopios se suministran con cable Schuko. Inserte el cable de alimentación de corriente alterna (CA) a la base de corriente provista de toma a tierra y por el otro extremo al conector del microscopio. La unidad acepta una tensión de 220V 50 Hz ±10%. Utilice la funda de plástico del microscopio siempre que este no esté en uso para evitar que el polvo se pose sobre las partes ópticas. Antes de colocar la preparación sobre la platina esta debe bajarse a una distancia superior a la distancia de trabajo del objetivo de menor aumento. Figura 4 Hecho esto, se centrará la preparación mirando por fuera del ocular y se colocará la muestra en el centro de la apertura de la platina. Mirando con el ocular y el objetivo de menos aumentos suba la platina con el mando macro (6) que aparezca la imagen. En este momento se empieza a accionar el mando micro (7) hasta conseguir un correcto enfoque. IMPORTANTE: Empiece siempre la observación con el objetivo de menos aumentos, ya que facilita el enfoque e imposibilita que se estropeen las preparaciones o se ensucien los objetivos. Además, es Figura 5 indispensable para regular la iluminación previa a la observación de mayor aumento y obtiene una imagen de conjunto de la topografía de la estructura para centrarse en los puntos de mayor interés para su observación a mayores aumentos. Revisión 6 de Marzo - 05 Manual de instrucciones 50119XXX Pág. 9 CASTELLANO ENGLISH Accionando el revólver se pasa a otro objetivo de mayor aumento; por ser estos parafocales If you are not using the microscope for a long period of time please make sure it is discon- bastará con retocar el enfoque con el mando micrométrico. nected from the net and protected from dust (this way you will avoid accidents and will extend its working-life). Regule el diafragma y el condensador hasta conseguir la intensidad de luz deseada. En general, cuando se esté observando con iluminación muy intensa, la apertura numérica del condensador deberá ser ligeramente menor que la del objetivo para evitar brillos en el campo visual que pudieran influenciar en el contraste de la imagen. Se bajará el condensador para cubrir un amplio campo y evitar una iluminación demasiado intensa, debiendo elevarlo progresivamente con los objetivos mayores para concentrar el haz de luz y ganar en iluminación y contraste. Con el objetivo de inmersión deberemos de jugar con la altura del condensador para realizar un enfoque correcto. El diafragma iris permite disminuir la apertura hasta un valor similar al del objetivo; de este modo se evita una iluminación marginal que disminuya el contraste y, por lo tanto, estará más cerrado cuando se utilice un objetivo de poco aumento y de escasa apertura numérica. En realidad solamente se usará su apertura total con el objetivo de inmersión. El cierre del diafragma reduciendo la apertura numérica del sistema óptico aumenta la profundidad de enfoque o poder de penetración. No se debe sobrepasar el límite de difracción bajo el pretexto de aumentar la profundidad de enfoque. El diafragma no debe usarse para reducir la difracción luminosa. El movimiento ondulatorio de la luz, al pasar por el diafragma muy cerrado se dispersa en vez de seguir en línea recta produciendo borrosidad y de esta manera se limita la capacidad del aumento útil del microscopio. Platina petrográfica (según modelo) La platina petrográfica se utiliza cuando se quieren conocer las propiedades ópticas de las estructuras atendiendo a su birrefringencia. Entendemos como birrefringencia la característica de determinadas sustancias que, al colocarlas entre dos polarizadores cruzados, restablecen parcialmente la luz, es decir, que poseen doble refracción. Conocemos como doble refracción al haz de luz monocromática que al penetrar en ciertos materiales simultáneamente hace a dos haces refractados distintos. Las aplicaciones del microscopio de luz polarizada abarcan varios campos como el estudio de las vitaminas, almidón o de las anisotropías biológicas, pero tiene como una de sus más interesantes aplicaciones el estudio de las rocas desgastadas (estructuras cristalinas) hasta constituir preparaciones delgadas. En estos cortes se puede reconocer fácilmente la naturaleza de los minerales constituyentes por la forma de los cristales y por los brillantes colores que adquieren entre nícoles cruzados. Las precauciones que hay que tomar en la utilización de este microscopio son las siguientes: - Como consecuencia de los fenómenos de absorción que se producen en los dos polarizadores hay una gran pérdida de luz, por lo que conviene evitar cualquier luz extraña al observar con luz polarizada. Por ello, se utilizarán unas pantallas formadas por una gran hoja de cartón negro lo bastante alta como para esconder la cabeza del observador. - En casos de trabajos muy meticulosos y precisos de estructuras escasamente birrefringentes, debemos asegurarnos que ni los portaobjetos ni los cubreobjetos presenten trazas de birrefringencia; para ello, se observarán previamente con la platina y el analizador. - Para el estudio de los precipitados cristalinos desecados es importante examinar una parte de ellos en seco y la otra parte montada en bálsamo del Canadá, dado que éste hace destacar mejor los colores de interferencia. En este caso es conveniente contar con una pequeña cantidad de bálsamo, de manera que algunos cristales periféricos queden en el aire. Pág. 10 Manual de instrucciones 50119XXX Revisión 6 de Marzo - 05 Setting up Lower the stage with the help of the macrometric control. Notice objectives in the nosepiece must be placed clockwise in an ascendant way (4x-10x-40x- 100x) as shown in picture 2. Insert the eyepiece. Monocular tube is normally facing the front of microscope, but you can place it in any other direction if necessary. VERY IMPORTANT: Never hold the microscope by the stage nor the tube, as all the equipment's weight would fall on the micrometric screw and mechanical and precision parts would be slowly eroded. If you are using the petrographic model you should place the Picture 2 analyzer on the eyepiece before operating with the equipment, which is just another polarization filter (pic. 3). Petrographic model 119/218 can be used as a biological microscope. Nevertheless, if you want to use it without its petrographic stage you should replace the long limit screw by the short one (pic. 4). To do this you should loose both screws (pic. 5) and replace the corresponding piece. Then remove the petrographic stage and place the holding clips included. These microscopes are supplied with a Schuko standard wire. Picture 3 Please plug this wire to an alternating current (AC) power source provided with an earth connection and plug the other socket to the microscope. The tension supported is 220V 50 Hz ±10%. Please use the plastic cover provided whenever the microscope is not used so as to avoid dust laying on the optics. You should lower the stage according to the appropriate working distance for the objective with lesser magnification before placing the sample on it. Picture 4 Once you have done this, you should place the slide by looking directly at it (not by the eyepiece) and placing the sample centred on the stage opening. Looking through the eyepiece using the objective with lesser magnification you should now raise the stage by using the macrometric control (6) until the sample appears. Then, you should move the micrometric control (7) until the image is focused. IMPORTANT: You should always start operating by using the objective with lesser magnification, as it facilitates focusing and Picture 5 makes impossible to ruin the slides or get the objectives dirty. Furthermore, it is essential to adjust the previous lighting to using the higher magnification, and it helps you to see the whole topographic structure of the sample so as you can concentrate on the more appealing parts to observe them at higher magnifications. Version 6 March - 05 Instruction manual 50119XXX Page 23 ENGLISH 4. INSTALLATION / SETTING UP Preliminary inspection Unwrap the microscope, take off the involving plastic and take off the polispan protection in which it comes fitted. Take off all the protective items and, without connecting the equipment to the net, make sure that it does not present any damage because of the shipment. In case the microscope presents any damage tell it immediately to your transport agent or dealer so that they can make the claims in the correct time limit. Please keep the original wrapping; you will always need it for returns enclosed with all the accessories supplied. Please check that all the accessories are enclosed with the equipment: - Estative - 1 spare halogen lamp of 6V 15W - Head (depending on the model supplied) - Immersion oil (except model 119/5) - Objectives (depending on the model supplied) - 2 Fuses 0,5 A - Eyepieces (depending on the model supplied) - Plastic cover - Standard Schuko cable - Instruction manual (10A, 250V, UNE 20356, EN 60 320). - Warranty certificate - Set of filters (green and blue) - Stand and mirror for life lighting. We will not accept any equipment in return period unless it comes in its original wrapping. Installation Before using this instrument, it is convenient for you to familiarize with its components and basic essentials. PLEASE READ THOROUGHLY THE INSTRUCTIONS BEFORE CONNECTING AND OPERATING WITH THIS EQUIPMENT. Please put the microscope on top of a horizontal, plane and stable table making a free space at least at 30 cm per side. Do not put the microscope near any warm supply (burners, blowlamps…), nor expose it directly to the sun, etc. Avoid inflammable or toxic substances in the working area. The operator has to assume a comfortable, upright position with the back straight. It is convenient to work in a dark table in order to avoid an awkward fatigue and parasite light, as it may dazzle the operator or decrease the image sharpness. The microscope is supplied with a Schuko standard wire. Please insert the wire that feeds the AC electric current in the base of current 220V 50Hz ±10% provided with earth wire and to the other end to the microscope connector. Neither the manufacturer nor the distributor will assume any responsibility for the damages produced to the equipment during its installation or damages to persons suffered by the improper use of the electric connection. The tension should be 220V 50Hz ±10%. Page 22 Instruction manual 50119XXX Version 6 March - 05 CASTELLANO Para realizar un estudio de birrefringencia se procede de la siguiente manera: Se instala el polarizador de la forma descrita en el apartado de Instalación (ver fig. 3), haciendo coincidir el "0" de la rueda con la marca de la platina para poder realizar una medición del ángulo de giro. Asimismo, se coloca el analizador en el ocular y, sin colocar ninguna muestra en la platina, se gira el analizador hasta conseguir observar una imagen totalmente oscura (nícoles cruzados). Tenga mucho cuidado de no mover el analizador mientras realice la observación, ya que la medición del ángulo sería totalmente incorrecta. Coloque la preparación sobre la platina. Enfoque el objeto. Únicamente con la platina correctamente centrada podrá ser utilizado este microscopio; de lo contrario, al girar la platina el material saldrá del campo óptico. Para realizar el centrado de una preparación es necesario comenzar con muy pocos aumentos y grabar con tinta o con un diamante una cruz o un círculo de un milímetro de diámetro. Situar esta preparación en el centro del campo, fijarla con las pinzas y seguidamente girar lentamente la platina. Inevitablemente el objeto sale del campo; debe mantenerse en el centro, desplazándolo con la mano. Tras un previo tanteo, hacemos girar la platina una vuelta entera sin que el objeto se desplace del campo. Es en ese momento cuando se pasa a un mayor aumento, haciendo exactamente las mismas maniobras, y de esta forma se consigue mantener el centrado para todas las combinaciones ópticas. Una vez centrada la platina y la muestra giratoria situada entre los dos nícoles cruzados, pueden presentarse dos casos al efectuar la observación: a) Si la muestra desaparece cuatro veces y aparece otras cuatro en posiciones distantes 45º una de la otra (lo cual puede hacerse y verificarse con el círculo graduado de la platina), evidentemente se trata de un material birrefringente. No debe olvidarse que con materiales excesivamente delgados o escasamente anisótropos la iluminación debe ser sumamente débil. b) Si el campo permanece oscuro durante todo el proceso giratorio, podemos considerar tres hipótesis: - La estructura puede ser birrefringente pero está mal orientada. Efectivamente, si su eje coincide con el del microscopio, se comporta como si se tratara de un cuerpo isótropo. En este caso deberá desplazarse el objeto o hacer otra preparación. - El material es birrefringente, pero muy poco, insuficiente para dar una señal luminosa. - Finalmente podemos considerar que el material es isótropo. Seguridad El microscopio debe ser utilizado por personal cualificado previamente, que conozca el equipo y su manejo mediante el manual de uso. Coloque el microscopio sobre una mesa horizontal, plana y estable, creando un espacio libre al menos de 30 cm por cada lado. No coloque el microscopio en zonas próximas a fuentes de calor (mecheros, sopletes...), ni exponga el equipo directamente a la luz del sol. Evite las vibraciones, el polvo y ambientes muy secos. Durante su funcionamiento el material peligroso como líquidos inflamables o material patológico, deben estar fuera de esta área. Revisión 6 de Marzo - 05 Manual de instrucciones 50119XXX Pág. 11 CASTELLANO ENGLISH Cuando no vaya a hacer uso del equipo por largos períodos de tiempo, asegúrese de que está desconectado de la red para evitar posibles accidentes. Para cualquier manipulación de limpieza, verificación de los componentes o sustitución de cualquier componente (ej: sustitución de fusible) es imprescindible apagar el equipo y desconectarlo de la toma de corriente. No intente repararlo usted mismo; además de perder la garantía puede causar daños en el funcionamiento general del equipo, así como lesiones a la persona (quemaduras, heridas...) y daños a la instalación eléctrica. Fabricado según las directivas europeas de seguridad eléctrica, compatibilidad electromagnética y seguridad en máquinas. Linear magnification Working distance Focal distance Resolution Numerical aperture Limpieza Para la limpieza de las partes metálicas, acero inoxidable, aluminio, pinturas, etc nunca utilice estropajos o productos que puedan rallar, ya que deterioran el microscopio, limitando la vida útil del equipo. Para la limpieza del equipo recomendamos se utilice un trapo libre de pelusa humedecido con agua jabonosa que no contenga productos abrasivos. Pág. 12 Manual de instrucciones 50119XXX Revisión 6 de Marzo - 05 10X 7.32 mm 17.13 mm 900 0.25 40X (R) 0.63 mm 4.65 mm 2340 0.65 100X (R)(I) 0.19 mm 2.90 mm 4500 1.25 (R) Retractile, (I) Immersion Eyepieces: They are composed by two lenses separated by a diaphragm. Eyepieces work in combination with microscope objectives to further magnify the intermediate image so that sample details can be observed. 5. MANTENIMIENTO Y LIMPIEZA Para un adecuado funcionamiento del microscopio es necesario seguir algunas recomendaciones. Nota: Todas las normas de utilización citadas anteriormente carecerán de valor si no se realiza una continua labor de mantenimiento. Siga las instrucciones y advertencias relativas a este manual. Tenga este manual siempre a mano para que cualquier persona pueda consultarlo. Utilice siempre componentes y repuestos originales. Puede ser que otros dispositivos sean parecidos, pero su empleo puede dañar el equipo. El microscopio dispone de un cable de red Schuko; este debe conectarse a una toma de corriente que esté conectada a tierra, debiendo quedar a mano para poder desconectarlo en caso de emergencia. No intente repararlo usted mismo; además de perder la garantía puede causar daños en el funcionamiento general del microscopio, así como lesiones a la persona (quemaduras, heridas...) y daños a la instalación eléctrica, o equipos eléctricos cercanos. En caso de avería diríjase a su proveedor para la reparación través del Servicio Técnico de Zuzi. Si se funden las lámparas reemplácelas por otras de 6V 15W originales Zuzi, teniendo cuidado de no tocar la ampolla con las manos desnudas. No utilice lámparas de mayor potencia ya que podrían producir un sobrecalentamiento u otra mala función. Utilice la funda de plástico siempre que el microscopio no esté en uso para evitar que el polvo se pose sobre las partes ópticas. Guarde el embalaje original para transportarlo, así como cuando no vaya a utilizarse durante mucho tiempo o cuando haya que enviarlo a revisar. 4X 37.50 mm 31.04 mm 360 0.10 Type / Magnification Focal distance Field’s diameter W.F. / 10X 24.99 mm 18 P /16x 15.58 mm 11 Total magnifications: This is the result of multiplying the eyepiece's magnifications by the objective's magnifications. Eyepieces WF10X P16X Objectives Total magnification Field of vision(mm) Total magnification Field of vision (mm) 4X 40 4,50 64 2,75 10X 100 1,80 160 1,10 40X (R) 400 0,45 640 0,27 100X(R)(I) 1000 0,18 1600 0,11 (R): Retractile. (I): Immerion objective(oil). - A.N: Numerical aperture, it determines the objective's properties. The numerical aperture of a microscope objective is a measure of its ability to gather light and resolve fine sample detail at a fixed object distance. Thus, the bigger it is, the brighter and better resolved the image will be. - Working distance: It is the distance in millimetres between the microscope slide and the objective's front lens when the image is focused. - Focal distance: It is the distance, expressed in millimetres, from the main image plane to its image focus. - Resolution: It is the reciprocal value of the separating power, that is to say, the smallest distance between two points on a sample that can still be distinguished as two separate entities. - Field of view: Dimensions of the real field we are observing, expressed in millimetres. Dry objectives: 4x, 10x, and 40x. Immersion objective: 100x. Objectives 40x and 100x are retractile, that is, they have a built-in mechanism to avoid the breakage of the slide when the objective contacts the sample. Version 6 March - 05 Instruction manual 50119XXX Page 21 ENGLISH CASTELLANO ESTATIVE: Metallic, very stable, with macrometric and micrometric knobs (depending on the model supplied). FOCUSING TRAVELLING: Macro: 30 mm with stop limit. Micro: 30 mm, 0-200 microns in 2 microns. HEAD: Monocular, inclined 45º and rotary 360º. Binocular, inclined 30º and rotary 360º. MECHANICAL LENGTH OF THE TUBE: 160 mm. CONDENSER: Abbe double lens, located under the stage and it enables the light to be focused on the observed simple. See technical specifications chart for further details. Numerical aperture: 1.25. Movable filter holder. It includes blue and green filters (32 mm/day). IRIS DIAPHRAGM: Located under the condenser and the stage, it controls the amount of light that enters the condenser. ILLUMINATOR: Halogen, low tension with halogen lamp 6V 15W, built-in feeder (220V 50Hz ±10%), switch and intensity adjust potentiometer. Concave mirror included for life lighting. PACKAGING: Plastic protective cover. Expanded polystyrene mould. Cardboard box with protective items to send the equipment. Las lentes no deben ser desmontadas por el usuario. Si hubiese cualquier suciedad en las superficies externas de las lentes, límpielas con un paño suave que no desprenda pelusa humedecido con un poco de xilol o tolueno. Para quitar el polvo que se haya posado sobre las lentes, sople con una pera o límpielo con un cepillo o pincel suave de pelo natural, o mediante alguna gasa especial para lentes. En las partes mecánicas utilice lubricantes no corrosivos, teniendo especial cuidado de no tocar las partes ópticas. Optical specifications Achromatic objectives: We can talk about two types of objectives. Dry objectives are the ones where there is only air between the objective and the microscope slide, whereas immersion objectives are those that need immersion oil to be placed between the lens and the slide so as to obtain a higher luminosity. - Dry objectives: 4x, 10x and 40x - Immersion objective: 100x. 100x and 40x objectives are also retractile, which means that they have a built-in mechanism to avoid the breakage of the slide when the objective contacts the sample. There is a wealth of information inscribed on the barrel of each objective which can be broken down into several categories. We stand out four: 40: Linear magnification 0.65: Numerical aperture 160: Mechanical tube length 40/0,65 0.17: Cover glass thickness 160/0 Page 20 Instruction manual 50119XXX ¡ATENCION! NO SE ADMITIRA NINGUN APARATO PARA REPARAR QUE NO ESTE DEBIDAMENTE LIMPIO Y DESINFECTADO. 6. ELECCIÓN DE OBJETIVOS Y OCULARES La imagen observada pierde superficie y nitidez a medida que los aumentos son superiores. Este incremento de aumentos debe obtenerse mediante objetivos cada vez más potentes y no a partir de oculares de más aumento, ya que el ocular solo aumenta la imagen dada por el objetivo. Así, cuantos más aumentos tenga el ocular mayor es la pérdida de nitidez, claridad y superficie que presenta la imagen. Para las observaciones rutinarias utilice el ocular de menos aumentos con objetivos más potentes. El ocular de gran aumento se reservará para casos particulares, teniendo presente el hecho de que disminuye la definición y que no incrementa la resolución. 7. CAUSAS DE UNA MALA IMAGEN En caso de una imagen deficiente comprobar: Que la iluminación esté bien realizada, que la intensidad lumínica no sea excesiva ni demasiado débil. No regularla nunca con el diafragma del condensador. El condensador y la lámpara deben estar bien centrados. Comprobar que entre el diafragma de campo y el de apertura no hay ningún filtro difusor. Que los oculares están bien encajados y los objetivos bien enroscados. En la limpieza de todo el sistema óptico el procedimiento será de la siguiente manera: a) Hacer girar los oculares contemplando si las motitas se mueven; si es así limpiarlos. Hacer girar el cabezal en su conjunto. Nunca debe desmontarse el cabezal, pero sí pueden limpiarse delicadamente, soplando con una pera, aquellas superficies accesibles de los prismas. b) Girar el objetivo y, si las imágenes parásitas giran, limpiarlo con la ayuda de un pincel seco intentando eliminar el polvo. Observar la superficie frontal con una lupa o con un ocular invertido. Que el aceite de inmersión sea suficiente y no contenga burbujas ni impurezas. Que el grosor del portaobjetos, cubreobjetos y medio de montaje no sea demasiado grueso e impida el enfoque a medios y grandes aumentos (existen unas dimensiones estándar tanto para el portaobjetos como para el cubreobjetos). Los portaobjetos y el cubreobjetos deben estar limpios. Comprobar que el primero esté bien colocado y que no haya dos cubreobjetos superpuestos. Revisión 6 de Marzo - 05 Manual de instrucciones 50119XXX Pág. 13 CASTELLANO Manual de instrucciones 50119XXX Revisión 6 de Marzo - 05 119/29 119/9 119/238 119/208 119/28 119/26 119/8 119/6 Version 6 March - 05 Fixed without adjustment Fixed with adjustment Abbe, adjustment by pinion and rack Condenser Petrographic Mechanical Clips Instruction manual 50119XXX Stage Macro and micro coaxial Macro Macro and micro independent Focusing Achromatic 4x, 10x, 40x(R) Achromatic 4x, 10x, 40x(R) , 100x(R)(I) Objectives Quadruple P16 Triple Nosepiece WF 10x Trinocular WF 15x Eyepieces Head Binocular 119/5 Consulte los siguientes puntos antes de remitir el microscopio al servicio técnico: Si la lámpara no enciende: Compruebe que exista una buena conexión a una toma de corriente apropiada. Compruebe que el fusible y la lámpara están en buen estado. Si no fuera así reemplace el fusible. Si el campo de visión aparece recortado: Compruebe que el revólver se encuentra perfectamente encajado en su posición. Para ello gire el revólver ligeramente a ambos lados hasta que éste encaje correctamente. Compruebe que quede centrado, si no fuera así mande el microscopio al Servicio Técnico de Zuzi a través de su distribuidor. Si existe polvo o suciedad visible en el campo de visión: Compruebe la existencia de polvo en la lente del precondensador, lente superior del condensador y ocular, así como la limpieza de la muestra. Una vez localizada la zona causante del problema proceder a su limpieza según lo citado anteriormente. Si un sector del campo de visión está fuera de foco: Comprobar si el objetivo está correctamente situado en la trayectoria del haz luminoso, si no es así girarlo hasta que se inserte correctamente en su posición. Comprobar si la muestra se encuentra situada correctamente en la platina y asegúrese de que queda el porta sujeto por la pinza. Si no enfoca revise el mando pre-enfoque. Si durante la operación de enfoque la lente frontal del objetivo toca la preparación: Comprobar si la preparación está colocada al revés (el portaobjetos encima del cubreobjetos), y proceder a su correcta colocación si fuese necesario. Si al pasar de un objetivo de menor aumento a otro objetivo superior, la lente frontal del objetivo más potente toca la preparación: Comprobar si la preparación está colocada al revés, así como el espesor del cubreobjetos, el cual deberá tener un espesor estándar (0.17mm). Monocular 8. LOCALIZACIÓN DE AVERIAS Pág. 14 3. TECHNICAL SPECIFICATIONS 119/218 Para eliminar el polvo posado sobre las lentes sople con una pera o límpielo con un cepillo o pincel suave de pelo natural. En la limpieza de las partes mecánicas o plásticas no utilice disolventes abrasivos que podrían dañar la pintura o acabados, use siempre un detergente neutro. Si se funde la lámpara reemplácela por una lámpara halógena de 6v 15w Zuzi original, teniendo cuidado de no tocar la ampolla con las manos desnudas. IMPORTANTE: Antes de reemplazar la lámpara asegúrese de desconectar el microscopio de la red eléctrica. Asegúrese de utilizar las lámparas adecuadas; el uso de otro tipo de lámparas provocaría un mal funcionamiento del microscopio. ENGLISH 119/228 Que se utiliza la combinación correcta entre el ocular y el objetivo, pues puede ocurrir que el ocular sea demasiado potente. Que la preparación esté bien hecha, comparándola con una preparación test. Page 19 ENGLISH INDEX OF LANGUAGES Spanish English 1-15 16-29 INDEX OF CONTENTS 1. USES OF THE INSTRUMENT 2. DESCRIPTION 3. TECHNICAL SPECIFICATIONS 4. INSTALLATION / SETTING UP 5. MAINTENANCE AND CLEANING 6. CHOOSING OBJECTIVES AND EYEPIECES 7. CAUSES OF A DEFECTIVE IMAGE 8. TROUBLESHOOTING 9. RECOMMENDATIONS ANNEX I: CE CERTIFICATE 18 18 19 22 26 27 27 28 29 30 1. USES OF THE INSTRUMENT Thanks to their modern and developed design and to the modular configuration Zuzi microscopes series 119 become essential and ease-to-use equipments for laboratories in any education field. 2. DESCRIPTION 1 2 3 4 5 9 10 8 11 12 7 13 Page 18 14 6 1.- Eyepiece 2.-Rotary head 3.-Objectives 4.- Estative 5. Focus limit screw 6.-Macrometric control 7.-Micrometric control 8.-Stage 9.-Slide clip / Mechanical stage 10.- Translational control knobs 11.-Condenser 12.-Precondenser 13.-Switch 14.-Intensity adjustment knob Instruction manual 50119XXX Version 6 March - 05 CASTELLANO Si el portaobjetos se desliza por debajo del carro: Ajustar la distancia entre el campo móvil y la platina mediante dos tornillos situados en la parte posterior del carro, (estos tienen medidas estándar) asegurándose que la separación es la suficiente para impedir el paso del portaobjetos y conseguir un movimiento suave sin rayar la platina. Una vez bien ajustado preste atención de no agarrar el microscopio por el carro, ya que el peso podría desajustarlo. Si el problema persiste mande el microscopio al Servicio Técnico de Zuzi a través de su distribuidor. 9. RECOMENDACIONES PRÁCTICAS Como el cabezal es giratorio, es preferible la observación por la parte frontal de la platina, ya que facilita el acceso a los mandos mecánicos. Cuando utilicemos el objetivo de inmersión deberemos tener en cuenta las siguientes consideraciones: Para utilizar toda la apertura numérica del objetivo de inmersión, procederemos de la siguiente manera: - Pre-enfoque: enfoque la preparación con un objetivo de pocos aumentos (4x). - Ponga una gota de aceite de inmersión en el cubre. - Debemos evitar la formación de burbujas en la película de aceite, ya que se deteriora en gran medida la imagen resultante. Para solventar este problema con el mando de pre-enfoque con movimientos de arriba hacia abajo formaremos una película uniforme. - Gire el revólver y situaremos el objetivo de inmersión, con el mando micrométrico retocaremos el enfoque. Se recomienda secar la lente frontal después de cada observación, ¡Nunca debe utilizarse gamuza!, límpielas con unos paños ópticos y líquidos que para dicho propósito se comercializan (tipo limpieza de gafas, lentes prismáticos). No debe sumergirse nunca el extremo del objetivo en ningún tipo de líquido, dado que puede provocar el desprendimiento de la lente. Manejo de la platina: Inicialmente se desplaza la preparación por etapas sucesivas, de delante hacia atrás; cada fracción es estudiada por toda su extensión mediante un desplazamiento lateral. De esta forma puede hacerse deslizar la preparación de forma uniforme y así poder explorar toda su extensión. Revisión 6 de Marzo - 05 Manual de instrucciones 50119XXX Pág. 15 CASTELLANO ANEXO I: CERTIFICADO CE AUXILAB S.L. DECLARACIÓN CE DE CONFORMIDAD MICROSCOPIO ZUZI SERIE 119 de Auxilab, S.L a la Directiva de Máquinas (89/392/CEE modificada) y a las reglamentaciones adoptadas para su transposición TO GET THE BEST RESULTS AND A HIGHER DURATION OF THE EQUIPMENT IT IS ADVISABLE TO READ THOROUGHLY THIS MANUAL BEFORE OPERATING WITH THE EQUIPMENT. NOMBRE DEL FABRICANTE / IMPORTADOR: AUXILAB, S.L. DIRECCIÓN: Polígono Morea Norte, 8 31191 Beriáin (Navarra) Please bear in mind the following: This manual is inseparable from the Zuzi education microscope series 119, so it should be DECLARAMOS QUE: MICROSCOPIO ZUZI SERIE 119 REFERENCIAS 50119005, 50119008, 50119028, 50119228, 50119009 y 50119029 Esta diseñado y fabricado de acuerdo a: Directiva 89/392/CEE, incluidas las modificaciones de la misma, y las reglamentaciones nacionales que la transponen. Directiva 73/23/CEE modificada sobre seguridad eléctrica. Directiva 89/336/CEE modificada sobre compatibilidad electromagnética. Y que se han aplicado las siguientes normas armonizadas (o parte de ellas): UNE 292-1, UNE 292-2, UNE 292-2/A1, UNE 614-1, UNE 1050, UNE 294, UNE 894-1, UNE 894-2, UNE 60204, UNE 61010-1. BERIAIN a 13 de Octubre de 2004 Fdo: ALFONSO AINCIBURU SANZ DIRECTOR/GERENTE Polígono Morea Norte, 8 31191 Beriain (Navarra) - Spain. Tel. 948 310 513 Fax 948 312 071 Internet: www.auxilab.es · Email: [email protected] Pág. 16 Manual de instrucciones 50119XXX ENGLISH Thank you for choosing this equipment. We sincerely wish that you enjoy your Zuzi education microscope series 119. We highly recommend looking after this equipment according to what is stated in this manual. Zuzi develops its products according to the CE marking regulations as well as emphasizing the ergonomics and security for its user. The correct using of the equipment and its good quality will permit you to enjoy this equipment for years. The improper use of the equipment can cause accidents and electric discharges, circuit breakers, fires, damages, etc. Please read the point of Maintenance, where we expose the security notes. Revisión 6 de Marzo - 05 available for all the users of this equipment. You should carefully handle the microscope avoiding sudden movements, knocks, free fall of heavy / sharp objects on it. Avoid spilling liquids inside the equipment. Never dismantle the different pieces of the microscope to repair it yourself, since it could produce a defective use of the whole equipment and a loss of the product warranty, as well as injuries on people that handle the microscope. To prevent fire or electric discharges avoid dry or dusty environments. In case it may happen unplug the equipment immediately. If you have any doubt about setting up, installation or functioning do not hesitate in contacting your wholesaler. You can also tell us any doubts or suggestions you have by contacting Zuzi Technical Assistance Department by email to [email protected] or by telephone: +34 807 117 040 (0,30 Euros/min). This equipment is protected under the Warranties and consumer goods regulation (10/2003). Overhaul is not covered by the microscope warranty. Operations made by non-qualified staff will automatically produce a loss of the microscope warranty. Neither fuses (0,5A) nor accessories (including their loss), are covered by the product's warranty. The warranty neither covers piece's deterioration due to the course of time. Please make sure you keep the invoice, either for having the right to claim or asking for warranty coverage. In case you have to send the equipment to Zuzi Technical Assistance Department you should enclose the original invoice or a copy as guarantee. Please do not forget filling the warranty certificate and send it before 15 days after the date of purchase. Manufacturer reserves the right to modify or improve the manual or equipment. ATTENTION!! IF EQUIPMENTS ARE NOT PROPERLY CLEAN AND DISINFECTED THEY WOULD NOT BE ALLOWED TO REPAIR BY OUR TECHNICAL SERVICE. Version 6 March - 05 Instruction manual 50119XXX Page 17