1
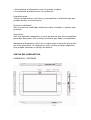
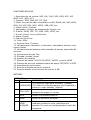
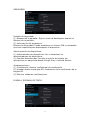
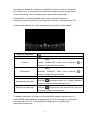
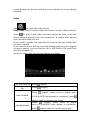
BTPC-4-B-N-A-R
Manual de Instrucciones
CONTENIDO
Instrucciones de seguridad
Vistas del dispositivo
Apariencia y botónes
Funciones básicas
Botones
Iconos de estado
Preparación
Uso de la tarjeta Micro SD
Carga de batería
ON/OFF/REPOSO
Funciones básicas
Ajustes
Aplicaciones de Software
Explorador de archivos
Música
Vídeo
Internet
Online
Fotos
E-book
E-mail
Calendario
Reloj
Google Play
1
INSTRUCCIONES DE SEGURIDAD
Lea estas instrucciones de seguridad antes de usar el dispositivo y
guárdelas para futuras referencias. Siga siempre estas precauciones
básicas de seguridad al usar su dispositivo móvil. Esto reduce el
riesgo de incendio, problemas eléctricos y lesiones.
● No exponga este producto a la lluvia o la humedad.
● Mantenga el dispositivo fuera de la luz solar directa y fuentes de
calor.
● Proteja el cable de alimentación. Coloque los cables de alimentación
de forma que no sea probable que sean pisados o aplastados por
elementos colocados encima o contra ellos. Preste especial atención al
punto donde el cable se conecta al dispositivo.
● Sólo utilice el adaptador de corriente que se incluye con el
dispositivo.
● No abra nunca la cubierta. No hay piezas que el usuario pueda
reparar.
● Si el cable del cargador está dañado, debe ser reparado por el
fabricante, su servicio técnicopara evitar cualquier peligro.
● Las personas que no han leído el manual, a menos que hayan
recibido explicaciones por una persona responsable de su seguridad y
la supervisión, no debe utilizar esta unidad.
● Los niños deben ser supervisados para asegurarse de que no
jueguen con el cargador.
● El aparato no debe ser expuesto a goteos o salpicaduras de agua.
● No coloque objetos que contengan líquidos, como cerca del
dispositivo.
● Siempre deje una distancia mínima de 10 cm alrededor de la unidad
para garantizar una ventilación suficiente.
● Las fuentes de llamas vivas, como velas, no se deben colocar cerca
del dispositivo.
● PRECAUCIÓN: Peligro de explosión si la batería se sustituye de
forma incorrecta o por una no del mismo tipo o equivalente.
Apague el dispositivo en áreas restringidas
Apague la unidad cuando el uso del dispositivo móvil no esté
autorizado o cuando pueda causar interferencia o peligro, por ejemplo,
a bordo de una aeronave o cerca de equipos médicos, combustibles,
productos químicos, etc.
Seguridad del tráfico
Revise las leyes y reglamentos vigentes en la zona en que conduce, en
relación con el uso de dispositivos móviles, como este dispositivo
móvil.
2
• No sostenga el dispositivo móvil mientras conduce
• Concéntrese plenamente en la conducción
Intereferencias
Todos los dispositivos móviles son susceptibles a interferencias que
pueden afectar su rendimiento.
Personal cualificado
Sólo el personal cualificado está autorizado a instalar o reparar este
producto
Accesorios
Sólo use baterías, cargadores y otros accesorios que son compatibles
para este dispositivo. No conecte productos que sean incompatibles.
Mantenga el dispositivo móvil en un lugar seguro fuera del alcance de
los niños pequeños. Su dispositivo móvil contiene piezas pequeñas
que puedan entrañar un peligro de asfixia.
VISTAS DEL DISPOSITIVO
APARIENCIA Y BOTONES
3
FUNCIONES BÁSICAS
1. Reproducción de música: MP3, RM, FLAC, APE, OGG, MPC, AIF,
WMA, AAC, WAV, AC3.
2. Imagen: JPEG, BMP, GIF, TIF, PNG.
3. Vídeo: formato de vídeo compatible con RM, RMVB, AVI, MKV, WMV,
MOV, FLV, ASF, MP4, MPG, MPEG, VOB, DAT, etc.
4. Video online: Youtube.
5. Navegador: Google, de búsqueda de Google, etc.
6. E-book: EPUB, PDF, TXT, CHM, UMD, HTML, etc.
7. E-mail: Gmail, correo electrónico.
8. Mapa: Google
9. Función de oficina
10. Chat: MSN.
11. Soporta Java, G-sensor.
12. Herramientas: calendario, cronómetro, calculadora, alarma, reloj,
tiempo global.
13. Herramientas del sistema: administrador de tareas, explorador de
archivos.
14. Aplicaciones Google Play
15. Entrada: teclado virtual.
16. Ajustes de pantalla.
17. Soporte de salida TV OUT, PAL/NTSC, AVOUT y puerto HDMI
18. Sistema de archivos predeterminado de apoyo FAT/FAT32 y NTFS
19. Actualización de firmware
20. Soporta múltiples tareas en marcha
21. Soporta acceso a los archivos de más de 4 GB.
BOTONES
BOTONES
No. FUNCIÓN
1
2
DEFINICIÓN
(1) Pulsación larga para encender y apagar
ENCENDIDO (2) Pulsación corta para apagar sólo la pantalla y
entrar en modo standby (espera)
Aumenta y disminuye el volumen con
VOL+/VOLpulsaciones largas y/o cortas
3
BACK
Volver a la pantalla anterior
4
HOME
Volver al escritorio principal
MENÚ
BLOQUEO
En el modo encendido o standby (espera),
mediante pulsación corta, desbloquea la
pantalla. En modo normal despliega el menú del
programa.
5
4
No.
2
FUNCIÓN
Pulsación
corta
Puls. larga
3
Arrastre
4
Escritura
Para introducir caracteres y símbolos.
5
Teclado
virtual
It belongs to virtual keyboard.
1
DEFINICIÓN
Menor a 1,2 segundos, para confirmar
selecciones.
Más de 1,2 segundos.
Para pasar menús, imágenes, etc. Arrastre el
dedo por la pantalla.
ICONOS DE ESTADO
En la parte inferior de la barra de la pantalla de estado, hay tres iconos
de funcionamiento en el lado izquierdo:
Iconos de estado
Volver
Home
Modo abreviado
Función
Para volver a la función anterior. Uso similar al
botón BACK.
Vuelta al menú principal. Uso similar al botón
HOME.
Enumera las aplicaciones abiertas en miniatura.
En la parte derecha se encuentran los iconos que muestran la
información del estado actual del dispositivo:
5
Iconos de estado
Estado de USB
Depuración USB
Estado de SD
Hora
Wi-Fi
Batería
Función
Muestra el estado de la conexión USB
Muestra si se conecta el depurador de USB
Información sobre la tarjeta SD
Muestra la hora actual
Muestra el estado de la conexión WI-FI
Muestra el estado de la batería
PREPARACIÓN
USO DE LA TARJETA MICRO SD
El dispositivo soporta tarjetas micro SD de hasta 32GB.
Plug-in: Introducir la tarjeta según la información en la carcasa hasta
oir un clic. De esta forma podrá reproducir los archivos de la tarjeta.
Plug-out: Presione en la tarjeta hasta oir un clic para extraerla.
CARGA DE LA BATERÍA
La batería se debe cargar completamente antes de empezar a utilizar
el aparato. Puede cargar la unidad por USB a través del PC o mediante
el adaptador suministrado.
Cuando el icono de la batería muestre que necesita cargar de nuevo
conecte el dispositivo para su carga.
ON/OFF/REPOSO
ENCENDIDO: Pulsar la tecla de encendido para encender la unidad.
APAGADO: Durante la visualización de la página de interfaz principal,
presionar el botón de encendido durante 5 segundos para apagar la
unidad, a continuación, haga clic en "Sí", la unidad se apagará.
AHORRO DE ENERGÍA EN ESPERA: Durante el encendido, pulsar la
tecla de encendido para entrar en modo ahorro de energía en espera,
pulse la tecla de encendido de nuevo volver al modo normal.
FUNCIONES BÁSICAS
PANTALLA PRINCIPAL
Tras el encendido, la unidad está bloqueada, toque la tecla Menú y
6
siga las instrucciones para desbloquear.
A través de esta pantalla principal podrá cambiar a otras pantallas
principales: deslice la pantalla hacia la izquierda/derecha y podrá
acceder a cinco pantallas principales.
Para volver a la pantalla principal pulse sobre el icono en la barra de
estado o en el botón de Inicio.
MENÚ PRINCIPAL
Haga clic en el icono en la parte superior derecha de la pantalla
principal, y aparecerá el menú principal. Todas las aplicaciones que
aparecen en el menú principal pueden ser consultadas arrastrando el
dedo hacia la izquierda o derecha.
ABRIR APLICACIONES
Seleccione un programa, pulse el icono para iniciar la aplicación.
Toque en el icono Inicio o la tecla HOME para volver a la pantalla
principal.
GESTIÓN DE PANTALLA PRINCIPAL
Mediante una presión larga en un icono puede colocar un acceso
directo al mismo en la pantalla principal.
7
ZOOM
Al ver las imágenes, página web, correo electrónico o mapas, puede
acercar o alejar la imagen cuando esta función sea compatible.
Deslice con dos dedos hacia dentro o hacia fuera para aumentar o
reducir la visión.
VISTA HORIZONTAL O VERTICAL
Este dispositivo es compatible con la función de giro de la pantalla
para ver la pantalla horizontal o verticalmente. Sólo tiene que tener
activada esta función en las opciones y girar el dispositivo para
cambiar la orientación.
ENTRADA DE TEXTO
Cuando usted necesite introducir texto teclado se mostrará en la
pantalla. En la parte inferior derecha de la pantalla aparecerá un icono
que le permite mostrar el teclado.
AJUSTES
Esta función le permite configurar las aplicaciones, fijar la fecha y la
hora, la configuración y conexión de red, etc.
RED WI-FI
Determina las redes disponibles y permite configurar opciones de
8
conexión.
Seleccione ON en WIFI, y el dispositivo buscará redes disponibles
dentro del rango de comunicación por un tiempo, a continuación, elija
una red, si es necesario, introduzca la contraseña.
Una vez se conecte, en el lado derecho de la barra de la pantalla de
estado mostrará la intensidad de la señal.
Una vez que añadida la red por primera vez, el dispositivo se unirá a
esta red automáticamente cuando la detecte. Si hay varias redes
utilizadas que se encuentren dentro del rango el dispositivo se unirá a
la red utilizada por última vez. Cuando desea desconectar la función
WI-FI haga clic en "OFF".
Otros ajustes de RED: Puede configurar estos modos: Modo Avión,
VPN, Red Móvil.
PANTALLA
9
Brillo: ajusta el brillo de la pantalla.
Fondos de Escritorio: podemos elegir el salvapantallas deseado.
Auto-rotación de la pantalla: cuando se hace girar es dispositivo
permite que gire la pantalla al mismo tiempo.
NOTA: En algunas aplicaciones puede que la rotación no esté
permitida, para un correcto funcionamiento de esa función.
Sleep: Si no se realiza ninguna pulsación el dispositivo puede ir a
modo de espera y puede seleccionar el tiempo para que ocurra esto:
15s/30s/1min/2min/5min/10min/30min. De esta forma el dispositivo
permite ahorrar batería.
Tamaño de fuente: permite configurar el tamaño de la fuente
(pequeña/normal/ grande/muy grande).
CUENTAS Y SINCRONIZACIÓN
Toque en "Añadir cuenta" en la parte superior derecha de la pantalla,
usted puede agregar la cuenta de Google o cualquier otra cuenta.
Servicio de ubicación de Google: Que aplicaciones utilizan datos
provenientes de fuentes tales como Wi-Fi y redes de telefonía móvil
para determinar su ubicación.
Localización y búsqueda de Google: Deja que Google use su posición
para mejorar los resultados de búsqueda y otros servicios.
10
SEGURIDAD
Pantalla de seguridad:
(1) Bloqueo de la pantalla: Elija el modo de desbloqueo usando al
bloqueo de la pantalla.
(2) Información del propietario.
Bloqueo de Seguridad: Puede establecer un número PIN o contraseña
que será requerida para desbloquear el dispositivo.
Administración de dispositivos:
(1) Administrador de dispositivos: Ver o desactivar los
administradores de dispositivos.
(2) Fuentes desconocidas: Permite la opción de instalar las
aplicaciones no adquiridas desde Google Play o Android Market.
Almacenamiento:
(1) Confidencial: Mostrar confidencial de certificación.
(2) Instalar desde una tarjeta SD: Instalación de la certificación de la
tarjeta SD.
(3) Eliminar todas las certificaciones.
IDIOMA Y ENTRADA DE TEXTO
11
Idioma: seleccione el idioma que se visualiza la pantalla.
Corrección ortográfica: active o desactive la corrección.
Diccionario personal: Haga clic en el botón "ADD" en la parte superior
derecha de la pantalla, se pueden añadir palabras para crear su propio
diccionario.
Teclado y entrada: Se puede seleccionar el tipo de entrada y teclado:
(1) Por defecto
(2) Teclado de Android
ACCESIBILIDAD
APLICACIONES DE SOFTWARE
EXPLORADOR DE ARCHIVOS
Toque el icono de explorador de archivos para navegar por los
diferentes archivos de la memoria interna o tarjeta micro SD.
Pulse
o
para cambiar de dispositivo MID y tarjeta SD.
Seleccione múltiples archivos (carpetas): toque ligeramente
,a
continuación, seleccione el archivo.
Buscar un determinado archivo (carpeta): toque ligeramente
,
Puede buscar por ruta o por archivo (carpeta).
Toque ligeramente
, para cambiar la forma a mostrar.
También se pueden organizar por lista / icono.
Edición de archivos y carpetas: puede cortar, copiar, renombrar, borrar,
seleccionar todo, etc.
12
También puede crear nuevos archivos y carpetas.
También puede cambiar al administrador de tareas
<setting-manage>, gerente de aplicación.
Puede realizar una copia de seguridad de aplicaciones, desinstalar,
crear accesos directos y otras opciones a través de administrador de
aplicaciones. Pulse la tecla menú para ver las opciones.
MÚSICA
Pulse el icono de Música para entrar en la biblioteca de música, todos
los archivos de música aparecerán por separado según artistas,
Álbumes, Canciones, Género.
Buscar música: Pulse brevemente la tecla Menú para seleccionar
función de búsqueda de música.
la
Shuffle: Pulse la tecla Menú para seleccionar la función de
reproducción aleatoria.
Puede crear listas de reproducción de la misma forma.
Nota: Si elimina la música de la lista de reproducción, este archivo no
se eliminará del disco.
Reproducción de música: haga clic en la canción deseada.
Usted puede escuchar música cuando use otras aplicaciones. Cuando
se está reproduciendo música, la parte superior izquierda de la barra
de estado mostrará esta información.
VIDEO
Pulse el icono de Vídeo para entrar en el modo de reproducción de
vídeo.
Reproducción de vídeo: seleccione el vídeo a reproducir. Puede
13
reproducirlo desde el comienzo o desde el punto en que se visualizó
por última vez. Si es necesario actualizar la lista de archivos de vídeo,
pulse la tecla de menú brevemente y seleccione actualizar.
Para buscar el vídeo deseado pulse menú brevemente para
seleccionar buscar archivo en la memoria interna o tarjeta micro SD.
Cuando reproduzca un vídeo aparecerá la siguiente información:
Reproducir siguiente
Reproducir anterior
Presione
Avanzar
brevemente y ajuste la velocidad de
avance 1/2/4/8/16/32. Para volver presione
y
volverá a la reproducción anterior
Presione
brevemente y ajuste la velocidad de
Retroceder
Avanzar vídeo a un punto
Visualización de vídeo
retroceso 1/2/4/8/16/. Para volver presione
y
volverá a la reproducción anterior
Deslice el dedo por la barra de progreso
Presione
brevemente para ver el vídeo a pantalla
completa, tamaño original, pequeño, etc.
Modo de reproducción
Presione
brevemente para seleccionar entre los
diversos modos de reproducción.
Si desea reproducir el vídeo en una pantalla externa puede usar la
salida HDMI para conectar el dispositivo al TV. Al conectarlo el vídeo se
reproducirá en el TV y la pantalla del dispositivo mostrará los
controles operativos.
14
INTERNET
Antes de navegar por Internet, asegúrese de que su unidad se ha
conectado a una red Wi-Fi. Usted puede navegar por Internet por el
navegador de Android incluido.
Haga clic en "explorador" del menú principal, entre en la página
principal, el valor predeterminado es la página principal de Google.
Abrir una página web: introducir una URL en la barra de direcciones,
haga clic en botón “Entrar” en la parte inferior derecha del teclado
para entrar en sitio web.
Puede desplazarse por la pantalla de la página web arrastrando hacia
arriba, hacia abajo, hacia la izquierda o hacia la derecha. La barra de
zoom aparecerá al tocar la pantalla ligeramente. Puede acercar y
alejar el zoom para ver página web actual.
ONLINE
El dispositivo es compatible con reproducción de vídeo en línea como
You Tube. Para ello es necesario que esté conectado a una red WI-FI.
Seleccione un soporte de vídeo en red desde el menú principal, haga
clic y entre en su página web directamente.
Pulse la tecla de menú para usar las opciones posibles. Puede añadir
la dirección URL como favorito, entre otras funciones.
Toque la pantalla ligeramente durante la reproducción de vídeo para
ajustar el zoom y ajustar el tamaño del vídeo.
FOTOS
Haga clic en el icono de Fotos para comenzar a reproducir las
imágenes.
E-BOOK
Haga clic en el icono del buscador de archivos para seleccionar los
archivos de libros electrónicos guardados.
E-MAIL
Usted puede enviar o recibir correos electrónicos en el dispositivo.
Configure su cuenta en las opciones de correo electrónico.
15
CALENDARIO/RELOJ
Haga clic en el icono del calendario:
GOOGLE PLAY/ANDROID MARKET
Configure esta función con su cuenta gmail para acceder a las
aplicaciones Android.
“Las especificaciones pueden cambiar sin previo aviso”
IMPORTADO
I.R.P., S.L.
AVDA. SANTA CLARA DE CUBA 5
SEVILLA, SPAIN
DECLARACIÓN DE CONFORMIDAD
I.R.P., S.L. declara bajo su responsabilidad que el aparato indicado cumple
los requisitos de las siguientes directivas:
DIRECTIVAS EMC
EN60950-1:2006/A11:2009/A1:2010
EN 62311: 2088
EN 301 489-1 V1.9.2:2011-09
EN 301 489-17 V2.1.1:2009-05
EN 300 328 V1.7.1: 2006-10
ETSI EN 301 489-1 V1.9.2(2011-09)
ETSI EN 301 489-17 V2.1.1(2009-05)
Descripción del aparato:
16
Modelo BRIGMTON BTPC-4-B-N-A-R
Dispositivo de conexión a internet
Importador: I.R.P., S.L.
Dirección: Avda. Santa Clara de Cuba 5, 41007, Sevilla.
17
BTPC-4-B-N-A-R
Instruction Manual
18
CONTENT
SAFETY INSTRUCTIONS
VIEWS OF THE DEVICE
APPEARANCE AND BUTTONS
FUNCTIONS
BUTTONS
STATUS ICONS
PREPARATION
USING MICRO SD CARD
BATTERY CHARGE
ON / OFF / REST
FUNCTIONS
ADJUSTMENTS
SOFTWARE APPLICATIONS
FILE EXPLORER
MUSIC
VIDEO
INTERNET
ONLINE
PHOTOS
E-BOOK
E-MAIL
CALENDAR
WATCH
PLAY GOOGLE
19
Safety instructions
Read these safety instructions before using your device and store
them for possible future reference. Always follow these basic
safety precautions when using your Mobile device. This reduces
the risk of fire, electric shock, and injury.
● Do not expose this product to rain or moisture.
● Keep the device out of direct sunlight and heat sources.
● Protect the power cord. Route power cords so that they are
not likely to be walked on or pinched by items placed on or
against them. Pay particular attention to the point where
the cord attaches to the device.
● Only use the AC adapter included with the device. Using any
other power adapter voids your warranty.
● Do not remove the cover. There are no user-serviceable
parts inside.
● If the charger cord is damaged, have it repaired by the
manufacturer, its service or a similarly qualified person in
order to avoid any hazard.
● The charger is not intended for use by persons (including
children) with reduced physical, sensory or mental capacity.
Persons who have not read the manual, unless they have
received explanations by a person responsible for their
safety and supervision should not use this unit.
● Children should be monitored to ensure that they do not
play with the charger.
● The charger should always be readily accessible.
● The device should not be exposed to dripping or splashing
water.
● No objects filled with liquids such as vases shall be placed
on the device.
● Always leave a minimum distance of 10 cm around the unit
to ensure sufficient ventilation.
● Naked flame sources, such as candles, should not be placed
on top of the device.
● The device is intended for use only in a temperate climate.
● CAUTION: Danger of explosion if battery is incorrectly
replaced or not replaced by the same type or equivalent.
● The battery should not be exposed to excessive heat such
as sunshine, fire or similar.
20
●
●
●
●
Different types of batteries, new and used batteries should
not be mixed.
The battery must be installed according to the polarity.
If the battery is worn, it must be removed from the product.
The battery must be disposed of safely. Always use the
collection bins provided (check with your dealer) to protect
the environment.
Clean your Device
Treat the screen gently. To clean fingerprints or dust from the
screen, we recommend using a soft, non-abrasive cloth such
as a camera lens cloth.
If the charger cord is damaged, have it repaired by the manufacturer,
its service or a similarly qualified person in order to avoid any hazard.
The charger is not intended for use by persons (including children)
with reduced physical, sensory or mental capacity. Persons who have
not read the manual, unless they have received explanations by a
person responsible for their safety and supervision should not use this
unit.
Children should be monitored to ensure that they do not play with the
charger.
The charger should always be readily accessible.
The device should not be exposed to dripping or splashing water.
No objects filled with liquids such as vases shall be placed on the
device.
Always leave a minimum distance of 10 cm around the unit to ensure
sufficient ventilation.
Naked flame sources, such as candles, should not be placed on top of
the device.
The device is intended for use only in a temperate climate.
CAUTION: Danger of explosion if battery is incorrectly replaced or not
replaced by the same type or equivalent.
The battery should not be exposed to excessive heat such as sunshine,
fire or similar.
Different types of batteries, new and used batteries should not be
mixed.
The battery must be installed according to the polarity.
If the battery is worn, it must be removed from the product.
The battery must be disposed of safely. Always use the collection bins
provided (check with your dealer) to protect the environment.
SWITCH OFF IN RESTRICTED AREAS
21
Turn off the power when the use of the mobile device is not authorized
or when it may cause interference or danger, for example; on board
an aircraft, near medical equipment, fuel, chemicals or blasting sites.
ROAD SAFETY COMES FIRST
Check the current laws and regulations in the area where you drive,
regarding the use of mobile devices such as this mobile device.
• Do not hold this mobile device while driving
• Concentrate fully on the driving
• Radio Frequency (RF) can affect certain electronic systems in
your car, such as the audio-stereo system or security equipment.
• An airbag inflates with great force. Do not store the mobile device
or any of its accessories in the area above the bag or in its
deployment area.
INTERFERENCE
All wireless devices are susceptible to interference which can affect
their performance.
AUTHORISED PERSONNEL
Only qualified personnel are authorized to install or repair this product
ACCESSORIES
Only use batteries, chargers and other accessories which are
compatible for this device. Do not connect incompatible products.
KEEP YOUR DEVICE DRY
Your device is not water proof. Keep it dry.
CHILDREN
Keep the mobile device in a safe place out of the reach of young
children. Your mobile device contains small pieces which can present
a choking hazard.
22
Overview
2.1
Appearance and button:
2.2
Basic Functions
1. Music play: support MP3, RM, FLAC, APE, OGG, MPC,
AIF, WMA, AAC, WAV, AC3 these local file.
2. Picture browse: support JPEG, BMP, GIF, TIF, PNG
formats.
3. Video play: full format video supports
RM,RMVB,AVI,MKV, WMV,MOV,FLV,ASF,
MP4,MPG,MPEG,VOB,DAT and etc.
4. Online Video: support Tudou, Youku, Youtube.
5. Browser: Google browser, Google search etc.
6. E-book: support PDF, TXT, CHM, UMD, HTML and etc.
7. E-mail: Gmail, Email-client
8. Map: Google map
9. Office Function: quick office to go
10. Internet chat tool: support、MSN.
11. Game support: JAVA game,G-sensor game.
23
12. Tool support: support calendar、stopwatch、calculator、
alarm clock function、weather forecast、Global time、
Google Play.
13. System Tool: ES task manager、ES file browser
14. Market store: support the third party Android market
store
15. Input: soft keyboard, Google PinYin(simplified and
traditional Chinese),hand input: YiLu input method.
16. Setting function: support display and setting of each
function’s property.
17. Support TV OUT output,PAL/NTSC system, AVOUT and
HDMI port
18. File system default support FAT/FAT32, furthermore
NTFS file system;
19. Firmware upgrade: support ADFU recover and USB
upgrade.
20. Support multitask running;
21. Support more than 4GB file access, and multistage
catalogue.
2.3 Key
1.Key
No. Name
Function Definition
(1) long press to turn on/turn off the player
(entering power off interface prompt)
(2) short press to turn on/turn off the screen,
entering lock screen standby mode.
Increase/decrease volume short-cut key, short
press to increase/decrease one frame volume;
long press to increase/decrease volume
continuously.
1
Power
2
Vol+/ Vol-
3
Back key
Turn back to previous menu interface
4
Home key
Turn back to main interface
Menu/Hold
key
In the state of power on and standby, short
press this key to unlock the screen(Hold key)
In normal standby mode or software running
state, short press the key popup to the
corresponding menu(Menu key)
5
24
2. Touch operation
No.
Name
1
Short press
2
Long press
3
Slide/Drag
operation
4
5
2.4
Function Definition
It indicates the press time shorter than 1.2s, it
mainly used in selecting menu, confirm and etc.
It indicates the press time longer than 1.2s.
It belongs to identify the touch trace direction.
Mainly used in picture/page turning/drag and
etc.
Handwriting
It mainly used in inputting characters/symbol.
identification
Virtual key
It belongs to virtual keyboard.
Status Icons
On the bottom of screen status bar, there are three operation icons on
the left side:
Status icons
Implication
Back up soft key Turn back to previous interface, its function is
similar to BACK key
Home soft key
Back to main interface, its function is the same as
HOME key.
List the common applications and its thumbnail,
Shortcut key
then click to enter directly.
The icons on the right side display the current state information of
MID:
Status icons
Implication
USB connecting
Display the USB connecting status
state
USB debugging
Display whether it connected the USB debugger.
state
SD card
connecting state
It prompts when SD card was pulled out.
25
Time
Wi-Fi
Battery
Display current time
MID has join up the internet via Wi-Fi. the more
the signal, the stronger the signal is
Showing the volume of battery or charging state.
Preparation
2.5 Use Micro SD card
This unit support Micro SD Card up to 32GBB.
Plug-in: face the front side (the side with prints) Micro SD card
upwards (the direction in which the machine’s display screen faces)
and connect it with the machine by plugging it with slight force into
the card slot of the machine. Now the machine can play the files in the
card.
Plug-out: push Micro SD card inwards slightly, it will spring back for
certain length, and then take it out.
2.6 Charge the battery
The battery must fully charge up before you start to use it. You can
charge the unit by connect it to a USB port of PC or the attached
adapter.
When unit used for a certain period, the battery is going to low
electricity, the battery icon show low battery, it is the time to charge
up the battery again. If you don’t charge up the battery, then the unit
will turn of automatically, After the unit charge up again, unit will
working perfectly.
2.7
Power ON/OFF/Standby
POWER ON: Pressing Power key to turn on the unit.
POWER OFF: During display the main interface page, Pressing Power
button for 5s to turn off the unit, then click “YES”, the unit will power
off.
POWER SAVING STANDBY: During power on, pressing Power key to
enter power saving standby mode, press Power key again back to
normal mode.
26
Basic Function
Main screen
After power on, the unit is locked, tap Menu key to unlock.
Switch to other main screens: slide the screen leftward/rightward,
it supports totally five main screens.
Switch to the first main screen: Tap the HOME icon on the status
bar or HOME key on the player.
Main menu
Click the icon
on the upper right side of main screen, and the
main menu popped up. All the applications listed on the main menu,
you can drag the screen leftward or rightward to check.
Open or switch the applications
Select a program; tap its icon to start the application. Tap the
HOME icon or HOME key to return to the main screen.
User defined screen(
(main screen manage)
)
Long pressing a certain application icon on the main screen, it can
realize the main screen function of adding shortcut to it.
27
Zoom in or zoom out
When you view the pictures、webpage、emails or maps, zoom in or
zoom out the frame by the gesture is supported. When you slide
openly on screen by your two fingers, the frame will be zoomed in
one stage; when you slide closely, the frame will be zoomed out one
stage.
Watch the MID horizontal or vertical
This DEVICE supports to watch the screen horizontal or vertical
when you turn it. And the contents will be changed while turning to
adapt the display screen.
Input TXT
When you need to input, the keyboard will be appeared. And in
this time, on the lower right side of screen, soft keyboard icon
will appeared. When you click it, the selecting menu of input will
appear. As following figure:
Setting
Setting allows you to set applications, setting date and time,
configuration network connection and etc.
28
Wireless and Network
It determines whether you connect internet by Wi-Fi.
Wi-Fi:
Join Wi-Fi network: click “open”, MID detects the network within
communication range for a while, then choosing a network, if it needs,
inputting password.
After MID connects to some Wi-Fi network, the right side of screen
status bar
will display signal intensity, the more the cell is, the
stronger the signal is.
Once joining a Wi-Fi network manually, when the network is within
communication range, MID will join this network automatically. If
there are multiple networks used before are within communication
range, then MID will join the last used network. click “OFF” to turn off
the Wi-Fi.
(2)More:
:
Set “Airplane mode”、”VPN”、”mobile network” and so forth.
29
Display
Brightness: set the brightness of screen.
Wallpaper: we can choose wallpaper from the live wallpaper、
picture library and normal wallpaper.
Auto-rotate screen: when MID is rotated, whether the image will
be rotated at the same time to adapt watching.
【Notice】:In order to display well, the rotation will be forbidden
when some applications or games is running.
Sleep: Setting that if there is no operation in a span
(15s/30s/1min/2min/5min/10min/30min),
MID
will
sleep
automatically, and the display backlight will be auto off to save
battery.
Font size: setting displayed font size(small/normal/big/oversize ).
Accounts and synchronization
Manage accounts and synchronize information. Tap “ADD
ACCOUNT” on the upper right side of screen, you can add Google
account、company account、or email account.
30
Google’s location service: Let apps use data from sources such
as Wi-Fi and mobile networks to determine your approximate.
Location and Google search:
: Let Google use your location to
improve search results and other services.
Security
Screen security:
:
(1)
)screen lock:
:Choose the unlock mode using when screen
lock.
( 2 ) owner information: Set the owner information which
displayed when the screen lock.
Encryption:
:
Set the number PIN or password which you need input to decode the
tablet each time.
SIM card lock:
:Set SIM lock.
31
Password:
:Whether display characters when you input password.
Device administration:
:
( 1 ) Device
administrator:
View
or
deactivate
device
administrators.
( 2 ) Unknown sources: Whether this option setting permits
installing the applications which don’t purchase from Android
market.
Evidence storage:
(1)
)Confidential evidence: Display confidential CA certification.
(2)
)Install from SD card: Install certification from SD card.
(3)
)Clear evidence: Delete all certifications.
Language and input
Language:
:Choose the language which screen displayed.
Spelling correction:
:Input characters whether open correction.
Personal dictionary:
:Click the “ADD” button on the upper right
side of screen; you can add vocabularies to create your own
dictionary.
Keyboard and input: this option list the input installed in MID, you
can do some related setting to each input.
(1)
)Default:
:Setting when a character input box appeared, it is
default input.
(2)
)Android keyboard:
:Offer the setting of android English input.
32
(3)
)Japanese IME:
:Offer the setting of android Japanese input.
(4)
)Google PinYin input:
:Offer the setting of Google PinYin input.
Accessibility
Set whether use oversize font、autorotation screen、password display、
touch and press delay、install webpage script.
Application Software
2.8
ES file browser
,you can browse file on MID and SD card by ES file browser.
Tap
Tap
or
to switch from MID device and SD card.
Select multiple files(folders):
:tap
Search a certain file(folder):
: tap
slightly, then choose file.
slightly, screen display as
follows. You can search by path or by file (folder).
Tap
slightly; it can change file’s arrangement. It also can arrange
by list/icon.
Edit files/folders:
:press setting slightly, select operation from popup
menu, you can cut、copy、rename、delete、select all and etc of selecting
file.
You
can
also
create
new
files/folders
33
by<setting-new
construction>.
If it needs to set file browser, please press setting key to select
setting.
You can also switch to task manager by <setting-manage>, app
manager and etc. The related operations of task manager view in next
chapter. The app manager interface as follows:
You can backup apps、uninstall them、create shortcut of them and etc
via app manager. You can press menu key slightly, and popup setting
menu.
Also you can long press a certain app, popup operation menu.
2.9
:
Music
Tap
to enter the music library, all the music file listed
separately on the folder of “Artists”, “Albums”, “Songs”, “Genre”.
Search music: Press Menu key slightly, enter into setting—search,
input the music that you need and search in the library.
Shuffle: Press Menu key slightly, enter into setting—shuffle, and
choose the music from library to play.
Default state will play on the basis of play list. You can create or edit
the play list by your own love.
Note: If you delete the music from the play list, this file will
not be deleted from disc.
Click any category to enter the list.
Play music: click the music name slightly.
You can play the music when you use the other applications.
Such as: while browse pictures/read txt/surf the internet, while listen
to music. When it is playing music background, upper left side of
status bar displays
, pressing
34
and dragging downward, the
screen displays as follows, click the music and back to music playing
interface.
Video
Tap
to enter the video library.
Play video: Tap the select video and wait a minute, after analysis,
press
to play. If the video has been played last time, it will ask
about whether playing from the breakpoint. It means that playing
from the point that you exit.
If you need to update the video file list, press menu key slightly and
choose to update.
If you want to search the file you need, please press menu key slightly,
choose to search, you can find the file in MID RAM or SD card(if the
card has plugged in).
When the video play, the screen display as follows:
Play the next file
Play the previous
file
Fast Forward
Fast Backward
press
slightly
Press
slightly
Press
slightly, press once to adjust once,
1/2/4/8/16/32 time speed,in circulation, press
slightly back to normal play mode.
Press
slightly, press once to adjust
once,1/2/4/8/16/32 time speed, in circulation,
press
slightly back to normal play mode.
35
Drag the video to
Drag the progress bar
any time point
Video display
Press
slightly, full screen, scale, original size
mode
Play mode
Press
slightly, sequence play, repeat current
video, all loop play
If you want to output the video in MID to TV side, you can use
the HDMI cable to connect MID to the TV’s HDMI input side
when the video is playing. At this time, the video frame auto
switches to TV , MID screen only display the operating control
interface.
Internet
Before you surfing the internet, ensure your unit has been connected
to Wi-Fi. You can surf the internet by android attached browser.
Click “browser” below main menu, entering homepage, the default is
Google homepage.
Open the webpage: input the URL on address bar, click “forward’
button on the lower right side of soft keyboard to enter website. You
can check it horizontally or vertically, the webpage will be auto adjust
to adapt the screen.
You can scroll the webpage by drag screen upward, downward,
leftward or rightward. The zoom bar will be activated if you touch the
screen slightly. And zooming in or zooming out current webpage to
check.
Online
It supports online video play, Youku, Tudou, You tube.
If you need to use online playing, unit must connects with Wi-Fi.
Select a network video media from the main menu, click and enter its
homepage directly, and you can watch the video you like.
Press Menu key, menu options popup, it can turn back to main menu,
or add the current URL as bookmark, or set the screen scaling size.
36
Touch screen slightly when the video play, it also can activate the
zoom bar, and adjust the video size.
Picture
Click the picture library
, starting to browse picture. All pictures
list on the basis of their deposit route.
E-books
, find your storage e-books in MID or SD card by ES file
Click
browser:
Click a certain e-book file among those, program will prompt selecting
one way to open:
Email
You can send or receive email by MID.
Click Email
,then start to send email.
Calendar
Click calendar
, entering Calendar.
37
“Features can change without notice”
Imported: I.R.P., S.L.
Avda. Santa Clara de Cuba 5
41007 Sevilla
Spain
DECLARATION OF CONFORMITY
I.R.P., SL declare under our responsibility that the equipment meets
the requirements indicated in the following directives:
EMC DIRECTIVES
EN60950-1:2006/A11:2009/A1:2010
EN 62311: 2088
EN 301 489-1 V1.9.2:2011-09
EN 301 489-17 V2.1.1:2009-05
EN 300 328 V1.7.1: 2006-10
ETSI EN 301 489-1 V1.9.2(2011-09)
ETSI EN 301 489-17 V2.1.1(2009-05)
Description of apparatus:
BRIGMTON Model BTPC-4-B-N-A-R
Movile Internet Device
Importer: I.R.P., SL
Address: Avenida Santa Clara de Cuba 5, 41007, Sevilla.
38