1
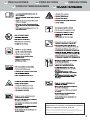
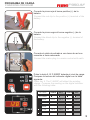
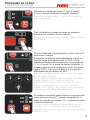
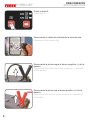
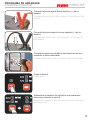
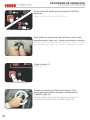
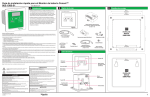
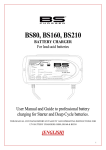
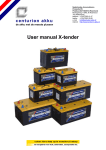
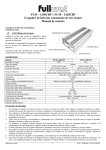
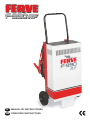
E
MANUAL DE INSTRUCCIONES
GB OPERATING INSTRUCTIONS
F-990RF
230 V ~ 50/60 Hz
RF
12 V
24 V
100 A arith.
150 A eff.
70 A arith.
105 A eff.
BOOSTER 600 A
42,550 kg
ESPECIFICACIONES TÉCNICAS
TECHNICAL SPECIFICATIONS
automatic
Estas especificaciones están sujetas
a cambios sin previo aviso.
These specifications may be subject
to changes without previous notice.
! Cargador-comprobador de baterías RF (Ripple Free): permite cargar la batería sin
desconectarla del vehículo, eliminando la componente alterna y los picos de tensión, a la
vez que protege las memorias y los dispositivos electrónicos.
! Mantenimiento automático de la carga de la batería.
! Protección contra temperatura excesiva, inversión de polaridad, conexión incorrecta y
excesos de carga.
! Controlado en todo momento por microprocesador.
! Battery RF (Ripple Free) charger-tester: Enables the battery to be charged without
disconnecting it from the vehicle, eliminating any voltage alternation and peaks, while at the
same time protecting the memories and electronic devices.
! Automatic battery charge maintenance.
! Protecting against excessive temperature, inverted polarity, incorrect connection and
excessive charging.
! Controlled at all times by a microprocessor.
GARANTÍA
WARRANTY
FERVE garantiza este aparato contra todo defecto de fabricación o de las piezas durante un
período de 24 meses a partir de la fecha de compra.
Quedan excluidos los daños provocados por errores de manejo, suciedad, conexión o energía
inadecuada, accidentes y en general aquellos que provengan de causas externas al aparato.
Cualquier otra prestación comprometida por el distribuidor será de la exclusiva responsabilidad
del mismo. El presente documento tampoco cubre los deterioros ocasionados a otros bienes
como consecuencia de un defecto del aparato garantizado. Esta garantía solamente tendrá
validez acompañada de la factura de compra original o el recibo del establecimiento. Esta
garantía perderá su vigencia cuando el aparato sea manipulado por personal o talleres ajenos a
nuestros servicios técnicos.
FERVE warrants this device against all-defective or faulty manufacturing or parts for a period of
24 months as of the purchase date.
This warranty excludes damages caused by mishandling, dirt and filth, improper connection or
power, accidents and, in general, any damages arising from causes that are external to the
device. Any other warranty performance agreed to by the distributor shall be the exclusive liability
of this party. Furthermore, this document does not cover wear or damage caused to other goods
or assets as a result of a fault in the device under warranty. This warranty is only valid when
accompanied by the original invoice or sales receipt. This warranty shall lose validity if the device
is handled by personnel or shops not related to our technical service.
2
E
PRECAUCIONES
D
GB
PRECAUTIONS
VORSICHTSMASSNAHMEN
F
PRÉCAUTIONS
NL
Cuando el F-990RF desarrolla su máxima
potencia en el arranque, la instalación eléctrica
debe ser capaz de soportar 32 A AC.
When the F-990RF develops its maximum
power during starting, the electrical installation
should be able to support 32 A AC.
3
PANEL DE CONTROL
CONTROL PANEL
F-990RF
1 INDICADOR DIGITAL: Amperímetro - voltímetro.
DIGITAL INDICATOR: Ammeter - voltmeter.
2 TEST A / V: El indicador digital muestra amperios (A) o voltios (V), según el led iluminado.
3
4
5
6
7
8
9
10
11
12
13
TEST A / V: The indicator displays amps "A" or volts "V" depending on the LED that is on.
LED DE ALARMA: Indica que la temperatura interna es excesiva.
ALARM LED: Indicates that the internal temperature is excessive.
LED INDICADOR DE ENCENDIDO
LED POWER INDICATOR
ON/OFF: Pone en marcha y detiene el cargador.
ON/OFF: Switches the charger on and off.
TENSIÓN DE LA BATERÍA: Selecciona 12 o 24 voltios.
BATTERY VOLTAGE: Selects 12 or 24 volts.
TIPO DE BATERÍA: Selecciona baterías líquidas o de gel.
TYPE OF BATTERY: Selects liquid or gel battery.
CORRIENTE DE CARGA: Selecciona la potencia de carga y la ayuda al arranque.
CHARGING CURRENT: Selects the charging current and the start help.
TIEMPO DE CARGA: Determina el tiempo de carga inicial: 1, 2, 4 horas o tiempo
indefinido.
CHARGING TIME: Determines the initial charging time: 1, 2, 4 hours or indefinite.
POWER: Pone en marcha el programa de carga o arranque.
POWER: Starts the charging or starting program.
STOP: Detiene el programa de carga o arranque.
STOP: Stops the charging or starting program.
LED DE CONEXIÓN INCORRECTA: Indica polaridad invertida o anomalía en la conexión.
INCORRECT CONNECTION LED: Indicates inverted polarity or an anomaly in the
connection.
DISPOSITIVO DE SEGURIDAD.
SAFETY DEVICE.
1
2
3
13
4
4
5
6
7
8
9
10 11
12
PROGRAMA DE CARGA
CHARGING PROGRAM
F-990RF
Conecte la pinza roja al borne positivo (+) de la
batería.
Connect the red clip to the positive (+) terminal of the
battery.
Conecte la pinza negra al borne negativo (-) de la
batería.
Connect the black clip to the negative (-) terminal of
the battery.
Conecte el cable de entrada a una toma de red con
conexión a tierra adecuada.
Connect the mains plug to a mains socket with earth.
Pulse la tecla 5. El F-990RF detecta el nivel de carga.
Compare la lectura del indicador digital con la tabla
siguiente:
Press key 5. The F-990RF will detect the existing
charge. Compare the reading on the digital indicator
with the following table:
ESTADO
DE CARGA
STATE
OF CHARGE
LIQUID
12 V
GEL
12 V
LIQUID
24 V
GEL
24 V
<20%
< 11.9
< 12.1
< 23.8
< 24.2
25%
12.1
12.3
24.3
24.5
50%
12.3
12.5
24.6
25
75%
12.5
12.8
25
25.5
100%
12.7
13
25.4
26
5
PROGRAMA DE CARGA
CHARGING PROGRAM
F-990RF
Si el nivel de carga es inferior al 100%, debe cargar
la batería. Para ello, seleccione la tensión (12 o 24 V)
pulsando la tecla 6.
If the charge is below 100%, the battery should be
charged. To do this, select the voltage (12 or 24 V) by
pressing key 6.
Seleccione el tipo de batería (liquída o gel) pulsando
la tecla 7.
Select the type of battery (liquid or gel), by pressing
key 7.
Compruebe la capacidad (Ah) indicada en la batería y
seleccione la potencia de carga con la tecla 8, según
la tabla siguiente:
Check the capacity (Ah) indicated on the battery and
select the charging power with key 8, using the
following table:
POTENCIA
DE CARGA
CHARGING
POWER
MAX.
MIN.
12 V
MIN.
MAX.
24 V
MIN.
MAX.
600Ah 1000Ah 450Ah
700Ah
300Ah
550Ah
250Ah
400Ah
180Ah
250Ah
120Ah
200Ah
45Ah
150Ah
45Ah
100Ah
NOTA: No debe seleccionar esta posición, ya que
pertenece exclusivamente a la función "PROGRAMA
DE ARRANQUE".
NOTE: You should not select this position, as it is
exclusively for the "STARTING PROGRAM" function.
6
PROGRAMA DE CARGA
CHARGING PROGRAM
F-990RF
Seleccione el tiempo de carga (1 hora, 2 horas,
4 horas o tiempo indefinido) pulsando la tecla 9.
Select the charging time (1, 2, 4 hours or indefinite)
by pressing key 9.
Para visualizar el proceso de carga en amperios,
seleccione el indicador A con la tecla 2.
To view the charging process in amps, select indicator
A with key 2.
12
12
3
9
3
9
6
12
6
6
12
3
9
6
3
9
Una vez finalizada la programación, pulse la tecla 10
para iniciar la carga.
El cargador se detiene automáticamente cuando el
nivel de carga de la batería está al 100%, o bien
cuando ha transcurrido el tiempo de carga asignado
(1, 2 o 4 horas). En el modo de tiempo indefinido, el
cargador pasa al modo de espera cuando la batería
llega al 100%, y se vuelve a activar si la carga de
ésta desciende por debajo del 90%.
Once the programming has been carried out, press
key 10 to start charging.
The charger will automatically stop when the battery
charge reaches 100% charge or when the
predetermined charging time is reached (1, 2 or 4
hours). In indefinite time mode, once the battery
reaches 100% charge, the charger goes into standby
and restarts if the charge falls below 90%.
En cualquier momento puede detener el programa de
carga pulsando la tecla 11 (pausa momentánea; la
carga se reanuda con la tecla 10), o pulsando la tecla
5 (parada definitiva).
You can stop the charging program at any time by
pressing key 11 (momentary pause, the charging
resumes when you press key 10) or by pressing key 5
(definitive stop).
7
DESCONEXIÓN
DISCONNECTION
F-990RF
Pulse la tecla 5.
Press key 5.
Desconecte el cable de entrada de la toma de red.
Disconnect the mains plug.
Desconecte la pinza negra al borne negativo (-) de la
batería.
Disconnect the black clip to the negative (-) terminal
of the battery.
Desconecte la pinza roja al borne positivo (+) de la
batería.
Disconnect the red clip to the positive (+) terminal of
the battery.
8
PROGRAMA DE ARRANQUE
STARTING PROGRAM
F-990RF
Conecte la pinza roja al borne positivo (+) de la
batería.
Connect the red clip to the positive (+) terminal of the
battery.
Conecte la pinza negra al borne negativo (-) de la
batería.
Connect the black clip to the negative (-) terminal of
the battery.
Conecte el cable de entrada a una toma de red con
conexión a tierra adecuada.
Connect the mains plug to a mains socket with earth.
Pulse la tecla 5.
Press key 5.
Seleccione la tensión del vehículo que queremos
arrancar pulsando la tecla 6.
Select the voltage of the vehicle you want to start by
pressing key 6.
9
PROGRAMA DE ARRANQUE
STARTING PROGRAM
F-990RF
Pulse la tecla 8 hasta que se ilumine el LED de
arranque.
Press key 8 until the start LED is on.
Pare todos los accesorios del vehículo, luces, aire
acondicionado, radio, etc., antes de arrancar el motor.
Switch off all the vehicle's accessories, such as lights,
air conditioning, radio, etc. before starting the engine.
Pulse la tecla 10.
Press key 10.
Ponga en marcha el motor de arranque. Una
vez el vehículo está en marcha, desconecte el
F-990RF (pág. 8).
Switch on the starter motor. Once the engine is
running, disconnect the F-990RF (page 8).
10
SOLUCIÓN DE PROBLEMAS
TROUBLESHOOTING
- El LED de conexión (4)
no se enciende.
- The connection LED (4)
does not come on.
F-990RF
El cargador no está conectado a la red o
no hay corriente eléctrica.
The charger is not connected to the mains
or there is no current.
El dispositivo de seguridad está
desconectado.
The safety device is disconnected.
Conecte el cargador a una toma de corriente
válida.
Connect the charger to a working mains socket.
Las pinzas están conectadas a la batería
con la polaridad invertida o bien no están
conectadas correctamente a los bornes de
la batería.
The clips are connected to the battery with
the wrong polarity or are not properly
connected to the battery terminals.
La tensión de la batería es inferior a 3
voltios.
The voltage of the battery is below 3 volts.
Conecte las pinzas a la batería asegurándose
que la polaridad es la correcta: pinza roja en el
borne positivo (+) y pinza negra (-) en el borne
negativo.
Connect the clips to the battery making sure the
polarity is correct.
- El LED 3 (ALARM) está
encendido.
El cargador ha superado la temperatura
límite de seguridad para su correcto
funcionamiento.
- LED 3 (ALARM) is on.
The charger has exceeded the maximum
temperature safety limit for correct
functioning.
Desconecte el cargador de la red eléctrica.
Espere unos minutos y vuelva a conectarlo.
Compruebe que el LED 3 se ha apagado, y en
caso contrario repita el proceso.
Disconnect the charger from the mains. Wait for
a few minutes and reconnect. Check that LED 3
is off, if not, repeat the process.
- El cargador se para
cuando lo pongo en
marcha.
- The charger stops when
switched on.
La batería es de una tensión inferior a la
seleccionada.
- El LED de conexión
erronea (12) está
encendido.
- The incorrect connection
LED (12) is on.
The battery has a lower voltage than the
one selected.
Se ha superado el límite de corriente
máxima.
The maximum current limit has been
exceeded.
La batería es inferior a 45 Ah.
The battery is of less than 45 Ah capacity.
Conecte el dispositivo de seguridad
desplazando la palanca hacia arriba.
Connect the safety device by moving the lever
upwards.
Verifique la tensión de la batería.
Check the battery voltage.
Compruebe la tensión de la batería a cargar
(12 o 24 V) y seleccione la tensión
correspondiente.
Check the voltage of the battery to be charged
(12 or 24 V) and select the appropriate voltage.
La corriente de carga seleccionada es superior
a los Ah de la batería a cargar. Seleccione una
intensidad más baja, de acuerdo con los Ah de
la batería.
The charging current selected is over the Ah
capacity of the battery to be charged. Select a
lower intensity, in accordance with the battery's
Ah.
Recuerde que el rango admitido para este
cargador es de 45 a 1000 Ah.
Remember that this charger accepts a range
from 45 to 1000 Ah.
- He seleccionado una
corriente de carga
superior a la mínima y
ahora está en la posición
de carga mínima.
- You have selected a
charging current greater
than the minimum and it
is now in the minimum
charge position.
Ha elegido una posición de carga
excesiva para la capacidad de la batería.
El cargador verificó durante cinco minutos que
la carga era realmente del 100%. Al no serlo,
se ha vuelto ha conectar a la corriente de carga
mínima.
You have selected an excessive charge
position for the capacity of the battery.
The charger checked that the charge was
actually 100% for five minutes. If this is not the
case, the minimum charge current is
connected.
- El cargador no responde
o realiza operaciones
anómalas.
El programa interno del cargador se ha
bloqueado.
- The charger does not
obey or carries out
anomalous operations.
The internal program of the charger is
blocked.
Desconecte el cargador de la red eléctrica.
Espere unos momentos y vuelva a conectarlo.
En caso que la avería persista, póngase en
contacto con el servicio técnico FERVE más
cercano.
Disconnect the charger from the mains. Wait for
a few moments and reconnect. If the fault
persists, contact the closest FERVE technical
service.
11
EU/UE
DECLARACIÓN DE CONFORMIDAD
DECLARATION OF CONFORMITY
Nosotros, We
FERVE, S.A.
declaramos, bajo nuestra única responsabilidad, que el producto
declare, under our sole responsability, that the product
Cargador de baterías / Battery charger
F-990RF
al cual esta declaración se refiere, es conforme a la siguiente norma:
to which this declaration relates, is in conformity with the following standard:
EN 60335-1:2012
EN 60335-2-29:2006
según las disposiciones de la Directiva:
following the provisions of Directive:
2006/95/CE
El Vendrell, 2013
© FERVE, S.A. - Design Ferret - 2013
FERVE, S.A
Ctra. de Calafell, 15-25 - Apartado (P.O. Box) 7 - 43700 El Vendrell (España)
Tel. 34 977 660 500 - Fax 34 977 661 160
http://www.ferve.com - e-mail: [email protected]
2099001-0113