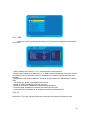
1
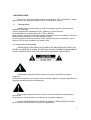
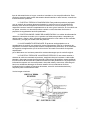
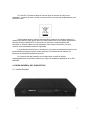
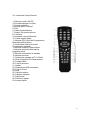
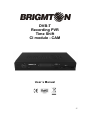
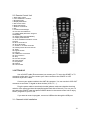
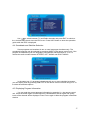
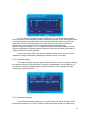
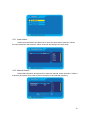
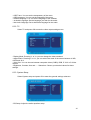
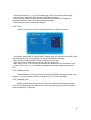
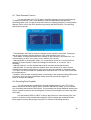
ESPAÑOL
Receptor TDT
Grabador
Time Shift
Modulo CI para CAM
Manual de Instrucciones
1
ÍNDICE
1. INTRODUCCIÓN
1.1. Características
1.2. Información de Seguridad
2. VISIÓN GENERAL DEL DISPOSITIVO
2.1. Unidad Principal
2.2. Unidad de Control Remoto
3. PUESTA EN MARCHA
3.1.Instalación de Canales
4. OPERACIONES BÁSICAS TDT
4.1. Lista de Canales
4.2. Lista de Favoritos
4.3. Guía de Programación Electrónica (EPG)
4.4. Selección de Pista de Audio y Subtítulos
4.5. Consultar Información de Programa
4.6. Teletexto
4.7. Grabación de TDT
5. MENÚ PRINCIPAL
6. CONFIGURACIÓN DE TV DIGITAL
6.1. Gestor de Canales
6.1.1. Organizador de Canales
6.1.2. Ordenar Canales
6.1.3. Agrupar Canales
6.1.4. Editar Canales
6.1.5. Borrar Todo
6.2. Instalación
6.2.1. Búsqueda de Área
6.2.2. Búsqueda Manual
6.2.3. Auto Búsqueda
6.3. Configuración
6.3.1. OSD
6.3.2. TV
6.3.3. Ajustes de Sistema
6.3.4. Ajuste de Hora
6.3.5. Temporizador
6.3.6. Restricción de Edad
6.4. Actualización
6.5. Ajustes Iniciales
6.6. Formatear disco
6.7. Versión
7. VÍDEOS, MÚSICA Y FOTOS
8. PROGRAMADOR
8.1. Grabación Temporizada
8.2. Reproducción de Archivos Grabados
8.3. Función Timeshift
9. MÓDULO CAM
10. SOLUCIÓN DE PROBLEMAS
11. ESPECIFICACIONES
ESPAÑOL
2
1. INTRODUCCIÓN
Sintonice la Televisión Digital Terrestre conectando su TDT a su televisor y realice
grabaciones de sus programas favoritos de un modo sencillo y rápido.
1.1.
Características
Interfaz para el usuario prática e intuitiva con soporte para la visualización de
caracteres multilingüe.
Guía de programación electrónica (EPG), Teletexto y Control Paternal.
Compatibilidad con los estándares PAL, NTSC y SECAM.
Modo completo de edición de canales (añadir, memorizar favoritos, reordenar y cancelar).
Grabación de programas de TV sobre dispositivo USB.
La ranura Common Interface le permite recibir señales de acceso condicional, como la
señal de TDT de pago (mediante una tarjeta CAM).
1.2. Información de Seguridad
PRECAUCIÓN: PARA REDUCIR EL RIESGO DE DESCARGA ELÉCTRICA, NO
RETIRE LA CUBIERTA (O PANEL POSTERIOR). NO HAY ELEMENTOS MANEJABLES
POR EL USUARIO EN EL INTERIOR. DIRÍJASE A PERSONAL CUALIFICADO.
Este símbolo pretende alertar al usuario acerca de la presencia de voltajes
peligrosos
carentes de aislamiento, que pueden ser de suficiente magnitud como para representar un
riesgo de descarga eléctrica a las personas.
Este símbolo pretende alertar al usuario acerca de la existencia de importante
información
de operación y mantenimiento en el manual que acompaña al aparato.
AVISO: PARA REDUCIR EL RIESGO DE FUEGO O DESCARGA ELÉCTRICA,
NO EXPONGA ESTE APARATO A LLUVIA O HUMEDAD.
3
PRECAUCIÓN: Usar controles o ajustes o emplear procesos diferentes de los
especificados aquí puede resultar en exposición a radiación dañina.
Por favor, estudie detenidamente este manual y manténgalo siempre al alcance. De todos
modos, hay algunas precauciones de instalación y operación que debe tener presentes:
LEA LAS INSTRUCCIONES:
1. Todas las instrucciones de seguridad y operación deben ser leídas antes de
operar con el producto.
2. CONSERVE LAS INSTRUCCIONES: Las instrucciones de seguridad y
operación deben ser conservadas para futuras consultas.
3. ATIENDA A LAS INSTRUCCIONES: Todos los avisos en el producto y en las
instrucciones de operación deben ser atendidas.
4. SIGA LAS INSTRUCCIONES: Todas las instrucciones de uso y operación
deben ser seguidas.
5. LIMPIEZA: Desenchufe el producto de la toma de corriente antes de limpiarlo.
No use limpiadores líquidos o en aerosol. Use un trapo húmedo para la limpieza.
6. ACOPLAMIENTOS: No use acoplamientos no recomendados por el fabricante
ya que pueden causar daños.
7. AGUA Y HUMEDAD: No use este producto cerca del agua – por ejemplo, cerca
de una bañera, pila, fregadero o desagüe – en un sótano húmedo o cerca de una piscina
o similares.
8. ACCESORIOS: No coloque este producto en un carro, estante, trípode, soporte
o mesa inestable.
El producto puede caer, causando serias lesiones a niños y adultos y serios daños
al equipo. Use solo con un carro, estante, trípode, soporte o mesa recomendado por el
fabricante o vendido con el producto. Cualquier montaje del producto debe seguir las
instrucciones del fabricante y debe usar un accesorio de montaje recomendado por el
fabricante. La combinación de producto y carrito debe ser movida cuidado. Pasos rápidos,
fuerza excesiva y superficies desiguales pueden causar el vuelco de la combinación de
producto y carrito.
9. VENTILACIÓN: Las ranuras y aberturas de la cubierta son dispuestas para
ventilación y para asegurar un funcionamiento fiable del producto y para protegerlo de
sobrecalentamiento, y estas aberturas no deben ser bloqueadas o tapadas. Las aberturas
no deben nunca ser bloqueadas por colocar el producto sobre una cama, sofá, alfombra o
superficies similares. Este producto no debe ser integrado en estructuras como
estanterías o cajoneras a no ser que se le proporcione la correcta ventilación o que las
instrucciones del fabricante lo permitan.
10. FUENTE DE ALIMENTACIÓN: Este producto debe ser conectado solo a una
fuente de alimentación del tipo que se indica en el panel posterior. Si no está seguro del
4
tipo de alimentación de su hogar, consulte al vendedor o a la compañía eléctrica. Para
productos previstos para operar alimentados desde baterías u otras fuentes, consulte las
instrucciones de operación.
11. PUESTA A TIERRA O POLARIZACIÓN: Este producto puede ser equipado
con un enchufe de corriente alterna polarizado (un enchufe con un polo de diferente
tamaño). Este enchufe encajará en la toma de corriente en un solo sentido. Si no es
capaz de insertar el enchufe completamente en la toma, gire el enchufe. Si el enchufe aun
no ajusta, consulte a un electricista sobre sustituir su toma obsoleta. No frustre el
propósito de seguridad del enchufe polarizado.
12. PROTECCIÓN DEL CABLE DE ALIMENTACIÓN: Los cables de alimentación
deben ser colocados de modo que no puedan ser fácilmente pisados o atrapados por
objetos sobre o frente a ellos, prestando especial atención a los cables en los enchufes,
conectores y el lugar por donde salen del producto.
13. ACOPLAMIENTO DE ENCHUFE: El producto está equipado con un
acoplamiento de enchufe con protección contra sobrecargas. Este es un elemento de
seguridad. Consulte el manual para sustituir el dispositivo de protección. Si la sustitución
es requerida, asegúrese de que el servicio técnico ha usado un enchufe de repuesto
especificado
por el fabricante con la misma protección contra sobrecargas que el enchufe original.
14. PUESTA A TIERRA DE LA ANTENA EXTERIOR: Si una antena exterior o
sistema de cable es conectado al producto, asegúrese de que la antena o cable estén
puestos a tierra para proporcionar protección contra picos de tensión o cargas estáticas.
El Artículo 810 de la norma NEC (National Electrical Code) ANSI/NFPA 70, proporciona
información respecto a la correcta puesta a tierra del mástil y estructura, cable de guía
hacia una unidad de descarga de antena, tamaño de los conductores de tierra,
localización de la unidad de descarga de antena, conexión a electrodos de tierra y
requisitos para el electrodo de tierra.
Vea la imagen siguiente:
5
15. RAYOS: Para una mayor protección del producto durante una tormenta de
rayos o cuando no vaya a ser utilizado por un largo periodo de tiempo, desenchufe el
producto de la toma de corriente y desconecte la antena o sistema de cable. Esto
prevendrá daños en el producto debidos a rayos y picos de tensión.
16. LÍNEAS DE TENSIÓN: Un sistema de antena externo no debe ser colocado
cerca de líneas de tensión u otras luces eléctricas o circuitos de corriente o donde puedan
caer sobre este tipo de líneas o circuitos. Cuando instale un sistema de antena externa,
extreme el cuidado sobre evitar el contacto con este tipo de líneas o circuitos ya que el
contacto con ellos puede ser fatal.
17. SOBRECARGA: No sobrecargue las tomas, extensores o conectores ya que
esto puede albergar riesgo de fuego o descarga eléctrica.
18. ENTRADA DE OBJETOS O LÍQUIDOS: Nunca introduzca objetos de ningún
tipo en el producto a través de las aberturas ya que pueden tocar puntos de voltajes
peligrosos o cortocircuitar partes que pudieran provocar fuego o descarga eléctrica.
Nunca derrame líquidos sobre el producto.
19. REPARACIÓN: No intente reparar el producto por usted mismo ya que abrir o
quitar la cubierta puede exponerle a voltajes peligrosos u otros daños. Deje toda
reparación a personal técnico cualificado.
20. DAÑOS QUE REQUIEREN REPARACIÓN: Desenchufe el producto de la toma
de corriente y remita a personal cualificado en los siguientes casos:
- Cuando el cable de alimentación o enchufe estén dañados.
- Si se ha derramado líquido o se han introducido objetos en el producto.
- Si el producto ha sido expuesto a lluvia o agua.
- Si el producto no funciona normalmente siguiendo las instrucciones de operación. Ajuste
solo los controles cubiertos por las instrucciones de operación ya que un ajuste incorrecto
de otros controles puede resultar en daños y suele requerir gran trabajo a un técnico
cualificado restituir el producto a su funcionamiento normal.
- Si el producto ha sido golpeado o dañado de algún modo.
- Cuando el producto manifieste un cambio en su funcionamiento.
Esto indica la necesidad de reparación.
21. REPUESTOS: Cuando necesite repuestos, asegúrese de que el servicio
técnico use repuestos especificados por el fabricante o con las mismas características
que los originales. Sustituciones no autorizadas pueden provocar fuego u otros daños.
22. REVISIÓN DE SEGURIDAD: Para completar cualquier reparación del
producto, pida
al servicio técnico que haga comprobaciones de seguridad para asegurar que el producto
funciona correctamente.
ESPAÑOL
23. MONTAJE DE PARED O TECHO: El producto solo debe ser montado sobre
pared o techo del modo recomendado por el fabricante.
6
24. CALOR: El producto debe ser situado lejos de fuentes de calor como
radiadores, registros de calor, estufas u otros productos (incluyendo amplificadores) que
producen calor.
Este producto porta el símbolo de tratamiento selectivo de residuos eléctricos y
electrónicos (WEEE). Esto quiere decir que este producto ha de ser tratado siguiendo la
Directiva Europea 2002/96/ EC a la hora de ser reciclado o desmantelado para
minimizar su impacto sobre el medio ambiente. Para mayor información, por favor
consulte a las autoridades locales o regionales.
Los productos electrónicos no incluidos en el proceso de tratamiento selectivo son
potencialmente peligrosos para el medio ambiente y la salud humana, debido a la
presencia de sustancias peligrosas en ellos.
En el precio final del producto se ha repercutido el coste de gestión
medioambiental de los residuos electrónicos, según se establece legalmente en el R.D.
208/2005.
2. VISIÓN GENERAL DEL DISPOSITIVO
2.1. Unidad Principal
7
2.2. Unidad de Control Remoto
1. Silenciar sonido (MUTE)
2. Encender/Apagar el equipo
3. Teclado numérico
4. Mostrar Menú Principal
5. Salir
6. Canal siguiente/Arriba
7. Reducir volumen/Izquierda
8. Confirmar
9. Aumentar volumen/Derecha
10. Canal anterior/abajo
11. Mostrar EPG (Guía de Programación
Electrónica)/Modo diario
12. Seleccionar idioma de audio/
Programación semanal
13. Mostrar teletexto/Temporizador
14. Mostrar subtítulos/Información
programa actual
15. Mostrar información de canales
16. Mostrar favoritos
17. Seleccionar canales de TV o Radio
18. Girar fotografías 90º/Canal anterior
19. Temporizador
20. Función mosaico
21. Grabar
22. Dispositivos USB conectados
23. Función Zoom
24. Stop
25. Capítulo anterior
26. Capítulo siguiente
27. Play/Pausa
28. Retroceso rápido
29. Avance rápido
8
3. PUESTA EN MARCHA
Utilice un cable SCART (Euroconector) para conectar su aparato de TV al conector
SCART-TV del equipo. Puede conectar su grabador de vídeo al conector SCART-VCR a
través de un cable SCART.
Conecte su cable de antena al conector ANT IN. Puede usar también el conector
ANT OUT para enviar la señal de antena a otro dispositivo (VCR, TV,…).
Conecte el cable de alimentación del receptor de TDT a una toma de corriente
doméstica (compruebe que su toma de corriente concuerda con lo especificado en la
parte posterior del equipo). Encienda su aparato de TV, seleccione la entrada de SCART
y pulse el botón de encendido del receptor de TDT para disfrutar de la Televisión Digital
Terrestre en su televisor.
Si desea realizar grabaciones, conecte un dispositivo USB a través del puerto
USB.
3.1. Instalación de Canales
Si es la primera vez que usa el receptor TDT, después de pulsar el botón de
encendido, en pantalla aparecerá el menú de Instalación Inicial.
En el apartado IDIOMA OSD, seleccione el idioma en que desee que aparezcan
los menús de su TDT. En la opción ÁREA, introduzca la zona para la búsqueda de
canales. Seleccione el desfase de zona horaria y active -si lo desea- el modo Horario de
Verano para el cambio automático de hora.
Una vez establecidas las distintas configuraciones pulse OK y seleccione SÍ en la
ventana emergente para comenzar la instalación.
Espere un momento mientras el equipo completa el proceso de búsqueda de
canales. Los canales encontrados se almacenarán automáticamente.
9
4. OPERACIONES BÁSICAS TDT
Pulse CH+ o CH- en su mando a distancia para elegir un canal o numérico.
Pulse el botón
para conmutar entre listas de canales de TV y Radio.
Utilice los botones V- o V+ para disminuir o aumentar el volumen del receptor TDT.
Puede silenciar el sonido pulsando el botón MUTE en el mando a distancia.
4.1. Lista de Canales
Puede seleccionar el canal a través de las listas de canales que puede crear
(consulte el capítulo 6.1. Gestor de Canales). Una vez creada (si ha realizado la
sintonización automática, esto ya está resuelto), pulse OK para mostrar la lista de canales
y utilice los botones CH+ o CH para seleccionar el que desee. Pulse OK para visualizarlo.
Pulse V- o V+ para cambiar al anterior o siguiente género de lista o pulse
para conmutar entre las listas de canales de TV y Radio. Para cerrar la lista de canales
pulse el botón EXIT.
SELECTOR
ESPAÑOL
Pulse
canales.
para acceder a la guía de operación mientras consulta la lista de
4.2 Lista de Favoritos
Puede establecer también su propia lista de canales favoritos (consulte el capítulo 6.1.
Gestor de Canales). Pulse FAV para mostrar la lista de canales favoritos, pulse CH+ o
CH- para seleccionar un canal y pulse OK para visualizarlo. Use
para conmutar
entre canales de TV y radio. Pulse EXIT para cerrar la lista de favoritos.
Pulse
favoritos.
para acceder a la guía de operación mientras consulta la lista de
10
4.3. Guía de Programación Electrónica (EPG)
También puede seleccionar el canal deseado desde la Guía de Programación
Electrónica (EPG). Como en la lista de canales, la interfaz de la EPG muestra una lista de
los canales almacenados junto con información de los programas que están siendo
emitidos.
Pulse EPG para acceder al menú de EPG, pulse CH+ o CH- para seleccionar un
canal y se mostrará la información de la programación. Pulse el botón ROJO para mostrar
la programación diaria, el botón VERDE para mostrar la programación semanal, el botón
AMARILLO para mostrar información del programa que seleccione y el botón AZUL para
acceder al temporizador y programar una grabación.
Use
para conmutar entre canales de TV y radio y pulse EXIT para visualizar el
canal seleccionado y cerrar el menú de EPG. Pulse INFO para acceder a la guía de
operación mientras consulta la EPG.
4.4. Selección de Pista de Audio y Subtítulos
Algunos programas son emitidos en dos o más idiomas a la vez.
El idioma de audio puede ser escogido pulsando el botón AUDIO en el mando a distancia.
Use CH+/- para seleccionar el idioma. Si el programa se emite en un solo idioma, pulse
los botones V- o V+ para escoger entre los modos de audio ESTÉREO, MONO
IZQUIERDA y MONO DERECHA.
Modo Diario
11
Del mismo modo, si un programa es emitido con uno o más idiomas de subtítulos,
puede mostrarlos en pantalla pulsando SUBTITLE en el mando a distancia y utilizando Vo V+ para ver las opciones disponibles.
4.5. Consultar Información de Programa
Puede leer información acerca del programa que esté viendo pulsando
en el
mando a distancia. Pulse este botón de nuevo y se mostrará también la frecuencia, el
ancho de banda y los niveles de señal y calidad. Pulse una vez más para ocultar la
ventana de información.
Puede leer la información de la programación diaria o semanal usando la EPG
(consulte el capítulo 4.3. Guía de Programación Electrónica).
4.6. Teletexto
Pulse TTX y a continuación OK para acceder a la ventana de Teletexto. Puede
usar CH+, CH-, V- o V+ para avanzar o retroceder páginas o introducir directamente el
número de página usando el teclado numérico. Use las teclas de color como atajos a las
páginas señaladas en la parte inferior de la pantalla.
12
Pulse EXIT para cerrar la ventana de Teletexto.
4.7. Grabación de TDT
Este TDT le permite realizar grabaciones de programas de TDT que serán
almacenadas en el dispositivo USB que haya conectado a su sintonizador TDT. Consulte
el correspondiente.
ESPAÑOL
5. MENÚ PRINCIPAL
Desde el Menú Principal pueden activar distintas funciones o efectuar las
regulaciones deseadas para configurar su TDT. Pulse el botón MENU de su mando a
distancia (o de su dispositivo) y se mostrará el Menú Principal de su TDT. Pulse CH+ o
CH- para seleccionar la opción que desee y a continuación OK para acceder. Pulse EXIT
para salir del menú.
Menú principal
6. CONFIGURACIÓN DE TV DIGITAL
6.1. Gestor de Canales
Dentro del menú de TV Digital, seleccione Gestor de Canales y pulse OK para
confirmar. Dentro de este submenú podrá acceder a los siguientes ajustes:
13
6.1.1. Organizador de Canales
El Organizador de Canales le permitirá manejar los canales de TDT encontrados.
Use los botones CH+ o CH- para seleccionar los canales.
Después de seleccionar un canal, pulse el botón ROJO para establecer el canal
como Favorito. Pulse el botón AZUL para eliminar el canal. Pulse el botón VERDE para
mover el canal a otra posición dentro de la lista (seleccione la nueva posición que desea y
pulse OK).Pulse el botón AMARILLO para bloquear el canal; si más tarde desea volver a
ver este canal.
Seleccione un canal y pulse V- o V+ para abrir la interfaz de renombrar canales.
Utilice el teclado numérico y las teclas de color para establecer el nuevo nombre y pulse
OK para confirmar y cerrar la interfaz.
Pulse repetidamente EXIT hasta cerrar el Menú Principal y los ajustes se
guardarán automáticamente (borrando los canales marcados como “Borrar”).
6.1.2. Ordenar Canales
14
En el submenú de Ordenar Canales se muestra información de los canales
almacenados, incluyendo el Número de Canal, Nombre de Canal, Frecuencia y Ancho de
Banda. En este submenú podrá ordenar la lista de canales en función de varios
parámetros (área, orden alfabético, LCN –Logical Channel Number-,…).
Organizar Canales
6.1.3. Agrupar Canales
En el submenú de Agrupar Canales podrá clasificar los canales almacenados.
Pulse las teclas de dirección CH+ o CH- para elegir el canal y a continuación pulse un
número del 1 al 8 para clasificar el canal en el grupo Nada, Noticias, Ciencia, Deportes,
Películas, Infantil, Música o Moda. Una vez terminado el ajuste, pulse repetidamente EXIT
hasta salir del menú de TV Digital y el equipo guardará automáticamente los cambios
realizados.
6.1.4. Editar Canales
En el submenú de Editar Canales, pulse el botón ROJO en el mando a distancia
para añadir canales de TV o pulse el botón AMARILLO para editar los canales.
15
6.1.5. Borrar Todo
En el submenú de Borrar Todo podrá borrar toda la lista de canales. Introduzca
correctamente la contraseña de restricción de edad y a continuación seleccione borrar
canales de TV o Radio.
6.2. Instalación
Dentro del menú de TV Digital, seleccione Instalación y pulse OK para confirmar.
Dentro de este submenú podrá acceder a los siguientes ajustes.
6.2.1. Búsqueda de Área
Seleccione Búsqueda de Área y pulse OK para entrar en el submenú de búsqueda
de canales por área. Seleccione un área de búsqueda y pulse OK para comenzar a
buscar canales dentro del área establecida.
16
6.2.2. Búsqueda Manual
Seleccione Búsqueda Manual y pulse OK para entrar en el submenú de búsqueda
manual. Seleccione una frecuencia y pulse OK para empezar la búsqueda de canales
dentro de esa frecuencia.
6.2.3. Auto Búsqueda
Seleccione Auto Búsqueda y pulse OK para llevar a cabo una búsqueda
automática de canales.
6.3. Configuración
Dentro del menú de TV Digital, seleccione Configuración y pulse OK para
confirmar. Dentro de este submenú podrá acceder a los siguientes ajustes.
17
6.3.1. OSD
Seleccione OSD y pulse OK para entrar en el submenú de ajustes de información
en pantalla.
- OSD: Pulsando los botones V- o V+ podrá ajustar el color del menú.
- Mostrar reloj: Pulsando los botones V- o V+ podrá activar o desactivar la función de reloj
en pantalla (una vez activada, la hora se mostrará en la esquina superior derecha de la
pantalla).
- Duración de OSD: Podrá establecer el tiempo de permanencia en pantalla de los textos
OSD.
- Transparencia: Ajuste la transparencia del menú.
- Idioma de OSD: Establezca el idioma del menú.
- Idioma de subtítulos: Establezca el idioma de los subtítulos.
- Audio Principal: Establezca el idioma que desee para el audio.
- Audio Secundario: Establezca un segundo idioma de audio alternativo.
6.3.2. TV
Seleccione TV y pulse OK para entrar en el submenú de ajustes de salida de vídeo.
18
- Modo de TV: Empleando los botones V- o V+ podrá cambiar el estándar de la salida de
vídeo.
- Aspecto: Empleando los botones V- o V+ podrá seleccionar la relación de pantalla entre
4:3LB, 4:3PS y 16:9.
- Salida de Vídeo: Puede escoger entre vídeo compuesto (CVBS) , RGB, P-YUV o SVídeo.TVPAÑOL
- Brillo, Contraste, Tono y
Saturación: Ajuste estos parámetros a los valores que
desee.
6.3.3. Ajustes de Sistema
Seleccione Ajustes de Sistema y pulse OK para entrar en el submenú de ajustes
generales.
- Ecualización: Ajuste la ecualización de audio en función del programa sintonizado.
- Surround: Empleando los botones V- o V+ podrá activar el modo de sonido envolvente.
- Antena Activa: Seleccione la opción Apagar para este parámetro por defecto.
- LCN: Active la función LCN para ordenar los canales, una vez terminada la búsqueda,
en función de su número LCN (Logical Channel Number).
- Área: Seleccione la zona de búsqueda de canales.
Ajustes de Sistema
19
6.3.4 Ajuste de Hora
Seleccione Ajuste de Hora y pulse OK para entrar en el submenú de ajuste de la
hora del sistema.
- Modo de Hora: Seleccione Auto para tomar la hora de la emisión TDT (puede ajustar el
desfase GMT y el horario de verano). Seleccione Manual para ajustar la hora y la fecha
manualmente.
- Fecha: Emplee el teclado numérico para introducir la fecha actual.
- Hora: Emplee el teclado numérico para introducir la hora actual.
- Desfase GMT: Use los botones V- o V+ para ajustar la hora en relación con la diferencia
con la hora de Greenwich.
- Horario de Verano: Use los botones V- o V+ para activar o desactivar el ajuste
automático al horario de verano.
6.3.5. Temporizador
Seleccione Temporizador y pulse OK para entrar en el submenú de ajuste del
temporizador. Consulte el capítulo 9.1 Grabación Temporizada para programar su TDT
para realizar grabaciones.
6.3.6. Restricción de Edad
Seleccione Restricción de Edad y pulse OK para entrar en el submenú de control
paternal de canales. Su TDT está equipado con una función de Restricción de Edad que
le permitirá bloquear el acceso canales a través de un código PIN.
20
Para ajustar su código PIN, entre en el submenú Restricción de Edad bajo el menú
Configuración y cambie la contraseña actual por su nueva contraseña. El código PIN por
defecto es 0000.
Para bloquear un canal, entre en el submenú Organizar Canales bajo el menú
Gestor de Canales, seleccione un canal y pulse el botón azul en el mando a distancia.
Un
aparecerá junto al canal.
Abandone el menú OSD para confirmar y bloquear el canal. La próxima vez que intente
acceder al canal, el código PIN será requerido.
6.4. Actualización
Seleccione Actualización de SW y pulse OK para entrar en el submenú de
actualización de software del sistema.
Su TDT dispone de la función OTA (Over The Air), que le permite descargar
actualizaciones desde la emisión de TDT, a través de la entrada de antena del equipo.
IMPORTANTE:
No apague ni desconecte el equipo mientras dure el proceso de actualización o de
lo contrario podrían producirse daños irreversibles en el sistema.
6.5. Ajustes Iniciales
Dentro del menú de TV Digital, seleccione Ajustes Iniciales y pulse OK para
recuperar la configuración que el equipo tenía por defecto al abandonar la fábrica.
Después de introducir la contraseña correcta, seleccione SÍ y pulse OK. En ese momento
todos los ajustes del menú de TDT volverán a sus valores iniciales.
L
6.6 Formatear disco
Dentro del menú de TV Digital, seleccione Formatear disco y pulse OK para
formatear un dispositivo de almacenamiento externo USB. Se formatea el disco entero en
FAT32.
21
Se recomienda llevar esta operación a cabo antes de realizar grabaciones de TV
sobre su dispositivo de almacenamiento externo USB, pues para que el equipo reconozca
el dispositivo éste ha de estar formateado en FAT32.
De hecho, si su TDT le muestra algún mensaje de error relacionado con el
dispositivo USB (ejemplo: “La partición tiene errores”), la operación de formateo lo
solucionará. Considere la posible pérdida de datos.
6.7. Versión
Dentro del menú de TV Digital, seleccione Versión y pulse OK para acceder a la
información sobre la versión de software y hardware de su receptor TDT.
7. VÍDEOS, MÚSICA Y FOTOS.
Su TDT está equipado con un reproductor multimedia simplificado que le permitirá
reproducir ciertos tipos de archivos. Puede conectar un dispositivo USB a su TDT y
reproducir música en formato MP3, imágenes y ciertos tipos de archivos de vídeo (como
los grabados por su TDT). Para explorar y reproducir los archivos multimedia
almacenados en la memoria externa deberá acceder al Menú Principal pulsando el
botón MENU. Acceder a la opción MULTIMEDIA. Seleccionar Vídeo, Música o Fotos
según el tipo de archivo que desee reproducir y pulse OK para confirmar.
Seleccione el dispositivo y la carpeta donde se encuentran almacenados los
archivos que desea reproducir y pulse OK para reproducir. Pulse EXIT si desea volver al
explorador de archivos.
Utilice los botones PREV o NEXT para saltar al anterior o al siguiente archivo, y
pulse
o
para retroceder o avanzar en el archivo actual de vídeo o música.
Pulse
para pausar un vídeo o un archivo de audio y pulse
reproducción.
para reanudar la
NOTA: El reproductor multimedia USB es una característica adicional de este
receptor TDT, por lo que solo las funciones de reproducción esenciales estarán
disponibles (Play, Pausa, Stop,...). Reproduciendo algunos archivos de vídeo MPEG-4
(AVI) podría encontrar cierto retardo AV debido a la gran cantidad de recursos que la
decodificación de vídeo consume del sistema. El rango de formatos de video compatibles
es limitado, por favor use un reproductor de vídeo para reproducir archivos de vídeo
específicos.
8. PROGRAMADOR
Puede realizar grabaciones de los programas de TDT que desee que serán
almacenadas en el dispositivo USB que haya conectado a su TDT a través del puerto
USB.
22
Cuando comience la emisión del programa TDT, pulse REC en el mando a
distancia para comenzar la grabación. Se le pedirá introducir una duración en tiempo.
Pulse STOP cuando desee detener la grabación y seleccione SÍ para confirmar la
finalización. Los archivos se almacenarán en su dispositivo externo (carpeta PVR) y serán
accesibles mediante la opción GRABACIONES descrita en el capítulo anterior.
8.1. Grabación Temporizada
Puede programar su TDT para que comience una grabación el día y hora que
usted indique. Para configurar el temporizador, pulse MENU para acceder al Menú
Principal de su TDT y seleccione la opción Programador (también puede acceder a esta
opción seleccionando desde la interfaz de EPG pulsando el botón AZUL). Se mostrarán
las siguientes opciones:
Temporizador
SPAÑOL
- Número de Temporizador: Es el número de grabación de programa con tiempo
asignado. Puede establecer 8 grabaciones con tiempo asignado, para lo que dispondrá de
los número del 1 al 8.
- Frecuencia: Con la que ha de realizarse la grabación. Puede escoger sólo una vez, una
vez al día, una vez a la semana o una vez al año.
- Modo: Es el tipo de temporizador. Puede escoger entre encender o apagar el equipo,
conmutar a cierto canal, lanzar un mensaje o, por supuesto, realizar una grabación.
- Canal: Es el canal a grabar en la hora indicada.
- Fecha: Es el día en el que tiene que activarse el temporizador. Pulsando las teclas de
dirección izquierda o derecha podrá abrir el calendario para escoger un día.
- Hora de Inicio: Es la hora a la que se activará el temporizador. Puede establecerla
directamente usando el teclado numérico.
- Duración: Es la duración de la grabación (00:05 significa 5 minutos).
- Dispositivo: Selección del dispositivo de almacenamiento.
Una vez terminados los ajustes, pulse OK y abandone el Menú Principal para
confirmar la programación.
8.2. Reproducción de Archivos Grabados
Puede acceder a los archivos grabados con su TDT a través del menú principal.
Pulse MENU para entrar en el Menú Principal y seleccione la opción Vídeo. A
continuación seleccione el dispositivo USB donde haya almacenado sus grabaciones y
23
acceda a la carpeta PVR. Se mostrará la lista de archivos grabados indicando el canal de
procedencia así como la fecha de grabación Seleccione el archivo de grabación que
desee y pulse OK para reproducir.
Utilice los botones PREV o NEXT para saltar al anterior o al siguiente archivo
grabado, y pulse para retroceder o avanzar en el archivo actual. Pulse play/pause para
pausar el archivo de grabación y pulse nuevamente play/pause para reanudar la
reproducción. Pulse EXIT para salir del explorador de grabaciones.
8.3. Función Timeshift
Su TDT le permite detener la emisión en directo y reanudarla en cualquier
momento desde el punto en que se interrumpió, mientras el equipo sigue grabando
gracias a la función Timeshift. Por supuesto, también puede adelantar o rebobinar la
emisión gracias a esta función.
Para ello conecte un dispositivo USB al puerto USB del frontal de su equipo y
pulse play/pause para pausar el programa que esté viendo. En ese momento se activará
la función Timeshift y comenzará la grabación de la emisión en directo. Pulse de nuevo
para retomar el programa desde el punto en que fue interrumpido. En pantalla se mostrará
una barra de tiempo que indicará el tiempo actual y el tiempo de inicio de la grabación.
Pulse EXIT para detener la función Timeshift y almacenar o eliminar la grabación. Su TDT
recuperará la emisión en directo.
Timeshift en Grabación
La función Timeshift también está disponible mientras realiza una grabación, de
modo que le permite rebobinar la propia grabación en directo sin interrumpirla. Una vez
que ha pulsado REC para iniciar una grabación del programa que desee, pulse
en el
momento que desee pausar el programa sin interrumpir la grabación. De este modo se
activará la función Timeshift que aparecerá indicada en la pantalla.
Pulse
para detener esta función y púlselo de nuevo para retomar el programa desde
el punto en que fue interrumpido. Pulse EXIT para detener la función Timeshift y volver al
modo de grabación en el punto actual de la emisión en directo.
9. MÓDULO CAM
Su TDT dispone de una ranura Common Interface en el panel frontal que le
permitirá conectar un módulo CAM al equipo para recibir señales de acceso condicional
(como la señal de TDT de pago). Inserte el módulo CAM en la ranura correspondiente con
el logo del proveedor el servicio de TV mirando hacia arriba (asegúrese de introducir el
módulo CAM en la posición correcta para no dañar la ranura o el módulo).
Seleccione en el Menú Principal de su TDT la opción Módulo CAM para poder
acceder a las distintas opciones que su tarjeta de pago le proporciona. Pulse OK sobre la
opción que desee.
AÑOL
10. SOLUCIÓN DE PROBLEMAS
No se enciende el dispositivo:
- Compruebe que el cable de alimentación esté conectado.
24
No se encuentra señal:
- Quizás la antena esté desconectada o dañada. Compruebe el estado de la antena.
- Es posible que se encuentre en una zona con un bajo nivel de señal. Por favor, consulte
al suministrador.
Mensaje de canal codificado:
- El canal está codificado. Escoja otro canal.
El mando a distancia no responde:
- Quizás el receptor IR se encuentre obstruido. Apunte directamente con el mando al
receptor IR.
- Sustituya las baterías del mando cuando se estén agotadas.
Olvidó el código de bloqueo de canal:
- Reinstalando los canales cancelará el bloqueo de canal.
El dispositivo USB no es detectado:
- Compruebe que el cable USB esté correctamente conectado.
- Asegúrese de que el disco tiene formato de archivos FAT32.
Importante:
Debido a la gran cantidad de discos USB en el mercado, no podemos asegurar la
compatibilidad entre el equipo y cualquier dispositivo USB. Por favor, use únicamente
discos de última tecnología y marcas contrastadas para obtener el mejor rendimiento.
Si su disco USB dispone de fuente de alimentación externa, por favor, conéctela cuando
use el disco para reproducir o grabar programas de TV con su TDT.
ESPAÑOL
25
11. ESPECIFICACIONES
SALIDA A/V
Decodificación MPEG2 MP@ML
Salida de video en formato 4:3 y 16:9
Frecuencia de recepción: VHF/UHF
SINTONIZADOR
Ancho de banda: 7MHz & 8MHz
Salida de antena RF
Tipo de onda: COFDM (Coded Orthogonal
Frequency Division Multiplexing)
Demodulación: QPSK, 16QAM, 64QAM
DEMODULACIÓN
Modo: 2K, 8K
Int. de guarda: 1/4, 1/8, 1/16, 1/32
BÚSQUEDA DE CANALES
Instalación inicial automática de canales
Soporta modos de búsqueda de área y búsqueda
manual
Múltiples idiomas OSD, incluyendo español e inglés
INTERFAZ DE USUARIO
EPG (Guía de Programación Electrónica)
Información de programa
Teletexto
COMPATIBILIDAD
ARCHIVOS MULTIMEDIA
Vídeo: MPEG2 MP@MPL, MPEG-4.2+MP3 (AVI,
Xvid, ...)
Audio: MP3
Imágenes: JPEG
FORMATO DISCO DURO
DISPOSITIVO USB
FAT32
ALIMENTACIÓN
TEMPERATURA DE
FUNCIONAMIENTO
DIMESIONES/PESO
90-240V~50/60Hz AC
Soporta dispositivos de hasta 1,5 TB
-20ºC a 65ºC
260x160x38mm, 0,9 Kg
“Las especificaciones pueden variar sin previo aviso”
KVFESA S. COOP.
MIGUEL SERVET 7
46015 VALENCIA
ESPAÑA
26
ESPAÑOL
DVB-T
Recording PVR
Time Shift
CI module - CAM
User´s Manual
27
Index
1. INTRODUCTION
1.1..Features
1.2..Safety Information
2. DEVICE OVERVIEW
2.1..Main unit
2.2..Remote Control Unit
3. SETTING UP
3.1..Channels Initial Installation
4. DVB-T BASIC OPERATION
4.1..Channel List
4.2..Favourite List
4.3..Electronic Program Guide (EPG)
4.4..Soundtrack and Subtitles Selection
4.5..Displaying Program Information
4.6..Teletext
4.7..DVB-T recording
5. MAIN MENU
6. DIGITAL TV CONFIGURATION
6.1..Channel Manager
6.1.1..Channel Organizer
6.1.2..Channel sorting
6.1.3..Channel Grouping
6.1.4..Edit Channels
6.1.5..Delete All
6.2..Installation
6.2.1..Area Search
6.2.2..Manual Search
6.2.3..Automatic Search
6.3..Configuration
6.3.1..OSD
6.3.2..TV
6.3.3..System Setup
6.3.4..Time
6.3.5..Wakeup Timer
6.3.6..Parental Lock
6.4..Software Upgrade
6.5..Factory Default
6.6..Format Disk
6.7..Version
7. MOVIE, MUSIC AND PHOTO
8. RECORDER
8.1..Timer Recorder Function
8.2..Recording Files Playback
8.3..Timeshift Function
9. COMMON INTERFACE MODULE
10. TROUBLE SHOOTING
11. SPECIFICATIONS
28
1. INTRODUCTION
Tune in the Digital Terrestrial Television connecting your TDT to your TV and
record your favourite programs in a easy and fast way.
1.1. Features
Handy and intuitive user interface that supports the display of multilingual characters.
Electronic Program Guide (EPG), Teletext and Parental Lock.
Compatible with PAL, NTSC and SECAM TV systems.
Channel manager mode to add, memorize favourites, sort and delete channels.
TV programs recording function on USB device.
The Common Interface card solt allows you to receive and decode pay-per-view TDT
signals (by using a CAM card).
1.2. Safety Information
To ensure reliable and safe operation of this equipment, please read carefully all
the instructions in this user guide, especially the safety information below.
CAUTION: TO REDUCE THE RISK OF ELECTRIC SHOCK, DO NOT REMOVE COVER
(OR BACK). NO USER-SERVICEABLE PARTS INSIDE. REFER SERVICING TO
QUALIFIED SERVICE PERSONNEL.
The lightening flash with arrowhead symbol, within an equilateral triangle is
intended to alert the user to the presence of un-insulated “dangerous voltage” within the
products enclosure that may be of sufficient magnitude to constitute a risk of electric shock
to the persons.
The exclamation point within an equilateral triangle is intended to alert the user to
the
presence of important operating and maintenance (servicing) instructions in the literature
accompanying the appliance.
29
WARNING: TO REDUCE THE RISK OF FIRE OR ELECTRIC SHOCK, DO NOT EXPOSE
THIS APPLIANCE TO RAIN OR MOISTURE.
CAUTION: Use of controls or adjustments or performance of procedures other than those
specified herein may result in hazardous radiation exposure.
Please, carefully study this manual and always keep it available. There are, however,
some installation and operation precautions which you should be aware of:
READ INSTRUCTIONS
1. ating instructions should be read before the product is operated.
2. RETAIN INSTRUCTIONS: The safety and operating instructions should be retained for
future reference.
3. HEED WARNINGS: All warnings on the product and in the operating instructions should
be adhered to.
4. FOLLOW INSTRUCTIONS: All operating and use instructions should be followed.
5. CLEANING: Unplug this product from the wall outlet before cleaning. Do not use liquid
cleaners or aerosol cleaners. Use a damp cloth for cleaning.
6. ATTACHMENTS: Do not use attachments not recommended by the product
manufacturer as they may cause hazards.
7. WATER AND MOISTURE: Do not use this product near water – for example, near a
bath tub, wash bowl, kitchen sink, or laundry tub - in a wet basement or near a swimming
pool and the like.
8. ACCESSORIES: Do not place this product on an unstable cart, stand, tripod, bracket or
table.
The product may fall, causing serious injury to a child or adult and serious damage
to the product. Use only with a cart, stand, tripod, bracket or table recommended by the
manufacturer or sold with the product. Any mounting of the product should follow the
manufacturer’s instructions and should use a mounting accessory recommended by the
manufacturer. A product and cart combination should be moved with care: Quick steps,
excessive force and uneven surfaces may cause the product and cart combination to
overturn.
9. VENTILATION: Slots and openings in the cabinet are provided for ventilation and to
ensure reliable operation of the product and to protect it from overheating, and these
openings must not be blocked or covered. The openings should never be blocked by
placing the product on a bed, sofa, rug, or other similar surface. This product should not be
placed in a built-in installation such as a bookcase or rack unless proper ventilation is
provided or the manufacturer’s instructions have been adhered to.
30
10. POWER SOURCES: This product should be operated only from the type of power
source indicated on the marking label. If you are not sure of the type of power supply to
your home, consult your product dealer or local power company. For products intended to
operate from battery power, or other sources, refer to the operating instructions.
11. GROUNDING OR POLARIZATION: This product may be equipped with a polarized
alternating-current line plug (a plug having one blade wider than the other).This plug will fit
into the power outlet only one way. This is a safety feature .If you are unable to insert the
plug fully into the outlet, try reversing the plug .If the plug should still fail to fit,
contact your electrician to replace your obsolete outlet. Do not defeat the safety purpose of
the polarized plug.
12. POWER-CORD PROTECTION: Power-supply cords should be routed so that they are
not likely to be walked on or pinched by items placed upon or against them, paying
particular attention to cords at plugs, convenience receptacles, and the point where they
exit from the product.
13. PERCEPTIVE ATTACHMENT PLUG: The product is equipped with an attachment
plug having overload protection. This is a safety feature. See instruction manual for
replacement or resetting of protective device. If replacement of the plug is required, be
sure the technician service has used a replacement plug specified by the manufacturer
that has the same overload protection as the original plug.
14. OUTDOOR ANTENNA GROUNDING: If an outside antenna or cable system is
connected to the product, be sure the antenna or cable system is grounded so as to
provide some protection against voltage surges and built-up static charges. Article 810 of
the National Electrical Code, ANSI/NFPA 70, provides information with regard to proper
grounding of the mast and supporting structure, grounding of the leadin wire to an antenna
discharge unit, size of grounding conductors, location of antenna-discharge unit,
connection to grounding electrodes, and requirements for the grounding electrode:
15. LIGHTNING: For added protection for this product during a lightning storm, or when it
is left unattended and unused for long periods of time, unplug it from the wall outlet and
31
disconnect the antenna or cable system. This will prevent damage to the product due to
lightning and power-line surges.
16. POWER LINES: An outside antenna system should not be located in the vicinity of
overhead power lines or other electric light or power circuits, or where it can fall into such
power lines or circuits. When installing an outside antenna system, extreme care should
be taken to keep from touching such power lines or circuits as contact with them might be
fatal.
17. OVERLOADING: Do not overload wall outlets, extension cords, or integral
convenience receptacles as this can result in a risk of fire or electric shock.
18. OBJECT AND LIQUID ENTRY: Never push objects of any kind into this product
through openings as they may touch dangerous voltage points or short-out parts that could
result in a fire or electric shock. Never spill liquid of any kind on the product.
19. SERVICING: Do not attempt to service this product yourself as opening or removing
covers may expose you to dangerous voltage or other hazards. Refer all servicing to
qualified service personnel.
20. DAMAGE REQUIRING SERVICE: Unplug this product from the wall outlet and refer
servicing to qualified service personnel under the following conditions:
- When the power-supply cord or plug is damaged.
- If liquid has been spilled, or objects have fallen into the product.
- If the product has been exposed to rain or water.
- If the product does not operate normally by following the operating instructions. Adjust
only those controls that are covered by the operating instructions as an improper
adjustment of other controls may result in damage and will often require extensive work by
a qualified technician to restore the product to its normal operation.
- If the product has been dropped or damaged in any way.
- When the product exhibits a distinct change in performance – this indicates a need for
service.
21. REPLACEMENT PARTS: When replacement parts are required, be sure the service
technician has used replacement parts specified by the manufacturer or have the same
characteristics as the original part. Unauthorized substitutions may result in fire, electric
shock, or other hazards.
22. SAFETY CHECK: Upon completion of any service or repairs to this product, ask the
service technician to perform safety checks to determine that theproduct is in proper
operating condition.
23. WALL OR CEILING MOUNTING: The product should be mounted to a wall or ceiling
only as recommended by the manufacturer.
ENGLISH
24. HEAT: The product should be situated away from heat sources such as radiators, heat
registers, stoves, or other products (including amplifiers) that produce heat.
32
This product bears the selective sorting symbol for waste electrical and electronic
equipment (WEEE). This means that this product must be handled pursuant to European
Directive 2002/96/EC in order to be recycled or dismantled to minimize its impact on the
environment. For further information, please contact your local or regional authorities.
Electronic products not included in the selective sorting process are potentially
dangerous for the environment and human heath due to the presence of hazardous
substances.
In the final product’s price is included the environmental management cost of the
electronic residues, as it is established legally in the R.D. 208/2005.
2. DEVICE OVERVIEW
2.1. Main unit
33
2.2. Remote Control Unit
1. Mute audio output
2. Turn ON/OFF the receiver
3. Numerical pad
4. Display Main Menu
5. Exit current menu
6. Next Channel/Up
7. Reduce volume/Left
8. OK
9. Increase volume/Right
10. Previous channel/Down
11. Display EPG (Electronic Program
Guide)/Daily
12. Select audio language/Weekly
13. Display teletext/Timer
14. Show subtitles/Information current
program
15. Show channel info
16. Show favourites
17. Switch TV or Radio channels
18. Rotate photos 90º/Last channel
19. Timer
20. Digest function
21. Record
22. USB device connected
23. Zoom function
24. Stop
25. Previous chapter
26. Next chapter
27. Play/Pause
28. Rewind
29. Fast forward
3. SETTING UP
Use a SCART cable (Euroconnector) to connect your TV set to the SCART to TV
connector on the unit. You can connect your video recorder to the SCART to VCR
connector by SCART cable.
Connect your antenna cable to the ANT IN connector. You can use the LOOP OUT
connector to send the TV signal to other devices (VCR, TV,…).
Plug the power cable to an electrical outlet (please, make sure that the electrical
outlet is of the same type than the specified at the back side of the unit). Turn on your TV
set, select the SCART input and press POWER button in the remote control unit to enjoy
DVB-T programs in your TV set.
If you want to record a program, connect a USB device through the USB port.
3.1. Channels Initial Installation
34
If this is the first time for you to use the DVB-T receiver, after pressing POWER
button at the screen will appear the Init Install menu.Install
ENGLISH
In the OSD Language item, you could set up the language of the on screen menus.
At the Area item you can choose your current area, where you are going to search
channels. Select the GMT Offset and turn on -if you wish to- the Summer Time mode
(automatic time update).
Once the OSD language and area are selected, press OK button and select YES
on the popup window to start channels installation. Wait a moment while the unit
completes the channels searching process. The channels founded will be stored
automatically.
4. DVB-T BASIC OPERATION
Press CH+ or CH- in your remote control unit to select a channel or just enter the
channel number with the numerical pad.
Press the button
to switch between TV and Radio channels. Use the buttons
V- or V+ to decrease or increase the volume of the DVB-T receiver. You can silence the
ound from the receiver by pressing MUTE button on the remote control unit.
4.1. Channel List
You can select the channel by using the lists you have created (see chapter 6.1.
Channel Manager). Once the list has been created, press OK to show the channels list
and press CH+ or CH- to select the one you wish. Press OK to display it.
Use V- or V+ to display the previous or next genre or press button to switch
between TV and radio channels lists. Press EXIT to close the channels list.
35
Press to enter the operation guide while the channels list is displayed.CK SELECT
4.2 Favourite List
You can set your own favourite channels lists too (see chapter 6.1. Channel
Manager). Press FAV to display the favourite list, press CH+ or CH- to select a channel
to switch between TV and radio channels. Press
and press OK to display it. Use
EXIT to close the favourite list.
Press
to enter the operation guide while the favourite list is displayed.
4.3. Electronic Program Guide (EPG)
You can also select the channel you wish form the Electronic Program Guide
(EPG). As in the channels list, the EPG interface displays a list of the stored channels
along with information on what programmes are being broadcast.
Press EPG to enter the EPG menu, press CH+ or CH- to highlight a channel and
the program information will be shown. Press the RED button to display the programs
daily, the GREEN one to display the programs weekly, the YELLOW one to display info
about the program you have selected and the BLUE button to access the timer and
schedule a recording.
36
to switch between TV and Radio channels and press EXIT to switch to
Use
the elected channel and close the EPG menu. Press INFO button to enter the operation
guide while the EPG is displayed.
4.4. Soundtrack and Subtitles Selection
Some programs are broadcast in two or more languages simultaneously. The
soundtrack language can be selected by pressing AUDIO in the remote control unit. If the
program is broadcast in just one language, press AUDIO and the buttons V- or V+ to
choose the audio modes between STEREO, LEFT MONO and RIGHT MONO.
In the same way, if a program is broadcast with one or more subtitles languages,
you can display them by pressing SUBTITLE in the remote control unit and using V- or V+
to show the available options.
4.5. Displaying Program Information
You can read the current program information by pressing I in the remote control
unit. Press the button again and the frequency, bandwidth as well as signal and quality
levels of the channel will be displayed. Press I once again to hide the program information
window.
37
You can read too the program information daily and weekly by using the EPG (see
chapter 4.3. Electronic Program Guide).
4.6. Teletext
Press TTX and then OK to access the Teletext window. You can use CH+, CH-, Vor V+ to display the previous or next pages, or input directly the page number using the
numerical pad. Use the colour buttons to short cut to the pointed pages.
Press EXIT to close the Teletext window.
4.7. DVB-T recording
Your TDT allows you to record your favourite programs and store them in a USB
device you must connect to the receiver. Recording to make a recording of the program
you wish.
ENGLISH
38
5. MAIN MENU
From the Main Menu you can activate several functions and adjust many settings
as you wish. Press MENU button in your remote control unit (or in the main unit) and your
TDT Main Menu will be dispayed. Press CH+ or CH- to selct the option you wish and after
OK to enter. Press EXIT to close the menu.
Main Menu
6. DIGITAL TV CONFIGURATION
6.1. Channel Manager
In the Digital TV Menu, select Channel Manager and press OK to enter. In this
submenu you will find the following settings:
6.1.1. Channel Organizer
The Channel Organizer submenu could manage the searched DVB-T channels.
Press CH+ or CH- to select the channels.
39
Digital TV
Once a channel is selected, press the RED button to set up the channel as the
Favourite channel. Press the BLUE button to delete the channel. Press the GREEN button
to move the channel to another place in the list (select the new position you wish and
press OK). Press the YELLOW button to lock the channel; if you want to watch this
channel later, you will need input the correct password of the parental lock.
Select a channel and press V- or V+ to display the rename channels interface. Use the
numerical pad and the coloured buttons to enter the new name and press OK button to
confirm and exit the rename interface.
Press continuously EXIT until close the system settings menu, and the unit will
update the settings automatically (deleting the channels set up as “Delete”).
6.1.2. Channel sorting
The Channel Sorting submenu shows information of the channel storage, including
the channel’s Number, Channel Name, Frequency and Bandwidth. In this submenu you
may sort the channels list depending on several parameters (area, alphabetical order,
LCN-Logical Channel Number-,…).
6.1.3. Channel Grouping
In the Channel Grouping submenu you could classify the stored channels. Press
the direction buttons CH+ or CH- to choose a channel and then press a number button
40
from 1 to 8 to classify the channels as None, News, Science, Sports, Movies, Kids, Music
or Fashion. Once the setting has been finished, press continuously EXIT until lose the TV
Digital Menu and the device will save the settings automatically.
6.1.4. Edit Channels
In the Edit Channel submenu, pressing the RED button in the remote control unit to
add channels or press the YELLOW button to edit the channels.
6.1.5. Delete All
In Delete All submenu you could delete the whole channels list. Enter the correct
password of the parental lock and then choose to delete TV or Radio channels.
6.2. Installation
In the Digital TV menu, select Installation and press OK to confirm. In this submenu
you will find the following settings.
41
6.2.1. Area Search
Select the Area Search and press OK to enter the area search submenu. Select
the zone and press OK to start to search channels according to the area setup.
6.2.2. Manual Search
Select Manual Search and press OK to enter the manual search submenu. Select a
frequency and press OK to start to search channels in the selected frequency.
42
6.2.3. Automatic Search
Select Automatic Search and press OK to enter the automatic search submenu.
Select a start frequency, an end frequency and a bandwidth and press OK to start to
search channels in the selected range.
6.3. Configuration
In the Digital TV Menu, select Configuration OK to enter. In this submenu you will
find the following settings.
6.3.1. OSD
Select OSD and press OK to enter the information settings submenu.
- OSD: Pressing V- or V+ you can set up the colour of the menu.
- Time on OSD: Pressing V- or V+ you can activate or deactivate the
- Time Display function (if it is active, the time will be displayed on the upper right corner of
the screen).
- OSD Timeout: You can set the staying time of the OSD texts on the screen.
43
- OSD Trans: You can set the transparency of the menu.
- OSD Language: You can set the language of the menu.
- Subtitle Language: You can set the language of the subtitles.
- 1st Audio Language: Set the language you wish for the audio.
- 2nd Audio Language: Set a alternative language for the audio.
6.3.2. TV
Select TV and press OK to enter the video output settings menu.
- Display Mode: Pressing V- or V+ you can change the video standard.
- Aspect Ratio: Pressing V- or V+ you can switch the scale of the screen between 4:3LB,
4:3PS and 16:9.
- Video Out: You can choose between composite video (CVBS), RGB, P-YUV or S-Vídeo
outputs.
- Brightness, Contrast, Hue and
Saturation: Choose your desired values for these
settings.
6.3.3. System Setup
Select System setup and press OK to enter the general settings submenu.
- EQ Setup: Adjust the audio equalizer setup.
44
- Surround: Pressing V- or V+ you can change the sound’s surrounding effect setup.
- Active Antenna: Select the OFF option to this setting by default.
- LCN: Once the search has been finished, active the LCN function to arrange the
channels according to the LCN (Logical Channel Number).
- Area: Select the zone to search the channels.
6.3.4. Time
Select Time and press OK to enter the system’s time settings submenu.
- Timer Mode: Select Auto to use the DVB-T program time (you can set up the GMT Offset
and the summer time). Choose Manual to set up manually time and date.
- Date: Use the numerical pad to enter manually the current date.
- Time: Use the numerical pad to enter manually the current time.
- GMT Offset: Use V- or V+ to set up the relative time difference to the Greenwich Time.
- Summer Time: Use V- or V+ to enable or disable the automatic switch to the summer
time.
6.3.5. Wakeup Timer
Select Wakeup Timer and press OK to enter the scheduler settings submenu. See
chapter 9.1 Timer Recorder Function to schedule your TDT to do recordings.
ENGLISH
6.3.6. Parental Lock
Select parantal Lock and press OK to enter the channels lock settings submenu.
Your TDT is equipped with a Parental Lock function that allows you to lock the access to
certain channels by a PIN code.
45
To set up your PIN code, enter Parental Lock submenu under System Setup menu
and change the current password by your new one. The PIN code by default is 0000.
To lock a channel, enter the Channel Organizer submenu under Channel Manager
will be
menu, select a channel and press the blue button at the remote control unit. A
displayed besides the channel.
Exit the OSD menu to confirm and lock the channel. The next time you try to
access the channel, the PIN code will be asked.
6.4. Software Upgrade
Select Software Upgrade and press OK button to access the system’s software
upgrading submenu.
Your TDT supports the OTA function (Over The Air), which allows you to download
updates from the DTT broadcasting, through the RF antenna input connector. You can
also install updates directly from the USB Host port of the apparatus.
IMPORTANT:
Do not turn off or disconnect the unit during the upgrading process, it may cause
irreversible damage to the system.
6.5. Factory Default
In the Digital TV menu, select Factory Default and press OK to recover the default
settings of the device when it left the factory. Enter the correct password of the parental
lock, select YES and press OK to reset all the DVB-T settings to their defaulted status.
6.6. Format Disk
In the Digital TV menu, select Format Disk and press OK to format and setup an
external USB storage device. The entire disk will formatted in FAT32 file system.
We recommend to perform this operation before start recording any TV program to
your external USB device. The device must be formatted in FAT32 file system to be
correctly detected by your TDT.
46
In fact, if your TDT shows any error message related to the USB device, the format
operation will solve the problem. Take care, your data stored into the USB device will be
lost.
6.7. Version
In the Digital TV menu, select Version and press OK to find information about the
software and hardware versions of the DVB-T receiver
7. MOVIE, MUSIC AND PHOTO
Your TDT is equipped with a simplified function multimedia player that allows you
to play certain kind of files. You can connect a USB device to your TDT and play music in
MP3 format, images and some kind of video files (as the files recorded by your TDT). You
must access the Main Menu by pressing MENU button to browse and play the multimedia
files stored in the external memory. Select the MULTIMEDIA option.
Select Movie, Music or Photos according to the type of file you want to play and press OK
to confirm.
Select the device and the folder where the files are stored and press OK to start to
play. Press EXIT if you want to return to the file browser.
Use the buttons REV or NEXT to skip to the previous or next file,and press
or
to rewind or fast forward the current video or audio file. Press
to pause a video or
audio file and press
again to resume the playing.
NOTE: The USB multimedia player is an additional feature of this DVB-T receiver,
therefore only the essential playback functions will be availe (Play, Pause, Stop,...). When
playing some MPEG-4 video files (AVI) you may find some AV delay due the high quantity
of resources that video decompression consumes from the system. The range of
compatible video formats is limited, please use a video player to play specific video files.
8. RECORDER
You can perform recordings of the DVB-T programs you wish. The recordings will
be stored in the USB device you have connected to your TDT trough the USB port
previously.
When the DVB-T program starts to be broadcast, press REC in the remote control
to start the recording. Insert a time duration. Press STOP when you want to stop the
recording and select YES to confirm the end of the recording. The recorded programs will
be stored in the PVR folder of your external USB device (if there is no this folder in the
device, the player will create one automatically). They will be accessible via the Disk
Manager option described previously.
47
8.1. Timer Recorder Function
You can schedule your TDT to start a recording anytime you must set previously.
To adjust the Wakeup Timer, press MENU to enter the Main Menu and select the
Recording option (you can also access this function by selecting DIigital TV-ConfigurationWakeup Timer or from the EPG interface by pressing the BLUE button). The following
options will be shown:
- Timer Number: Is the serial number of waking up the mission in fixed time. The player
can set up 8 missions with the fixed time, with serial numbers from 1 to 8.
- Timer Mode: Is the period enactment of waking up the missions in the fixed time. You
could choose just once, once a day, once a week or once a year.
- Wakeup Mode: Is the program mode. You could choose to turn on or turn off the unit,
switch to a certain channel, display a message on the screen, or, of course, set a
recording.
- Wakeup Channel: It is the channel that must be recorded at the selected time.
- Wakeup Date: It is the day when the wakeup timer must be active to start to record.
Pressing the direction buttons left or right you can open the calendar to choose the date.
- On Time: It is the hour when the wakeup timer must be active. You can set this time with
the numerical pad.
- Duration: Is the duration of being waken up according to the channel mode (00:05 means
5 minutes). Once you have finished the setup, press OK and exit the Digital TV
menu to confirm the changes.
8.2. Recording Files Playback
You can access the recording files through the Main Menu of your TDT. Press
MENU and select the Movie option. After, select the USB device where you have stored
your recordings and enter the PVR folder. The recordings list will be displayed showing the
source channel as well as the recording date. Select the recording file you wish and press
OK to play.
Use the buttons PREV or NEXT to skip to the previous or next recording file, and
press or to rewind or fast forward the current file. Press to pause the recorded file and
press again to resume the playing. Press EXIT to leave the recordings browser.
48
8.3. Timeshift Function
Your TDT allows you to stop the live broadcasting and resume it from the point it
has been stopped whenever you wish, while the device is still recording thanks to the
Timeshift function. Of course you may perform fast forward and fast rewind operations too.
Connect an USB device to your TDT through the USB port and press to pause the
program you are watching. At this moment the Timeshift function will be activated and the
recording of the live broadcasting will start. Press again to resume the program from the
point you have paused it. A time bar will be displayed on the screen with the current time
and the initial recording time. Press EXIT to stop the Timeshift function and save or delete
the recording. Your TDT will recover the live broadcasting.
Timeshift during a Recording
The Timeshift function is also available while you are doing a recording, so it allows
you to rewind the recording without stopping it. Once you have pressed REC to start a
recording of the program you wish, press
when you want to pause the program
without stopping the recording. At this moment the Timeshift function will be activated and
it will be indicated on the screen.
Press
to stop this function and press it again to resume the program from the
point you have paused it. Press EXIT to stop the Timeshift function and return to the
recording mode.
9. COMMON INTERFACE MODULE
Your TDT is provided with a Common Interface slot at the front panel which allows
you to connect a CAM module to the unit to receive conditional access signals (as pay
DTT channel signal). Insert the CAM module into the corresponding slot with the TV
broadcaster logofacing up, as you can see in the following picture (please be sure the
CAM module is correctly inserted to avoid damaging the slot or the moldule).
Select the Common Interface option at the Main Menu of your TDT to access
several options that your CAM card supply. Press OK button over the option you wish and
select YES to confirm the opperation.
10. TROUBLE SHOOTING
The device does not turn on:
- Check the main lead is connected correctly.
No signal found:
- Maybe the antenna is disconnected or damaged. Check the antenna status.
- It is possible that you are out of digital signal area. Please, contact with the dealer.
Scrambled channel message:
- The channel is scrambled. Select an alternative channel.
49
The remote control unit does not work:
- Maybe the IR receiver is obstructed. Aim the remote control unit directly to IR receiver.
- Replace remote controller batteries if they exhausted.
You have forgotten the channel lock code:
- Reinstall the channels to cancel the channel lock.
The USB device is not detected:
- Check the USB cable is connected correctly.
- Be sure the disck has FAT32 files system format.
ENGLISH
Important:
Due the high amount of USB disk in the market, we cannot assure the compatibility
between the unit and any USB device. Please use just contrasted brand and latest
technology disks to obtain the best performance. If your USB disk is provided of an
external power adaper unit, please connect it when using the disc to play or record TV
programs with your TDT.
50
11. SPECIFICATIONS
A/V OUTPUT
Decodificación MPEG2 MP@ML
Salida de video en formato 4:3 y 16:9
Frecuencia de recepción: VHF/UHF
TUNER
Ancho de banda: 7MHz & 8MHz
Salida de antena RF
Tipo de onda: COFDM (Coded Orthogonal
Frequency Division Multiplexing)
Demodulación: QPSK, 16QAM, 64QAM
DEMODULATION
Modo: 2K, 8K
Int. de guarda: 1/4, 1/8, 1/16, 1/32
CHANNELS SEARCH
Instalación inicial automática de canales
Soporta modos de búsqueda de área y búsqueda
manual
Múltiples idiomas OSD, incluyendo español e inglés
USER´S INTERFACE
EPG (Guía de Programación Electrónica)
Información de programa
Teletexto
MULTIMEDIA FILES
COMPATIBILITY
Vídeo: MPEG2 MP@MPL, MPEG-4.2+MP3 (AVI,
Xvid, ...)
Audio: MP3
Imágenes: JPEG
HD FORMAT
USB
FAT32
POWER SUPPLY
WORKING TEMPERATURE
90-240V~50/60Hz AC
DIMENSIONS
260x160x38mm, 0,9 Kg
Soporta dispositivos de hasta 1,5 TB
-20ºC a 65ºC
KVFESA S. COOP.
MIGUEL SERVET 7
46015 VALENCIA
ESPAÑA
51