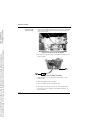
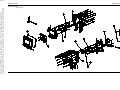
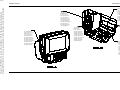
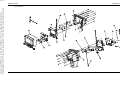
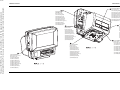
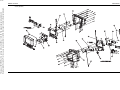
1
This copy of 3010798 Rev 0 is valid as of Nov-04-2005 at 12:12:00. The signed original is maintained in
Documentation Systems. Prior to use, you are responsible to confirm this copy's revision is the latest released.
VIEWED/PRINTED:
11/09/2005 at 03:09:15.
Veris 8600
Patient Monitoring System
TM
Service Manual
p/n 3010798 Revision 0
Date 09/05
Page i
VIEWED/PRINTED:
11/09/2005 at 03:09:15.
Serial Numbers and date of installation must be supplied when ordering
replacement parts or inquiring about service. For convenience, record the following
information below:
OWNER:
DATE INSTALLED:
SYSTEM SERIAL NUMBER:
MONITOR SERIAL NUMBER:
BASE SERIAL NUMBER:
POWER SUPPLY SERIAL NUMBER:
This copy of 3010798 Rev 0 is valid as of Nov-04-2005 at 12:12:00. The signed original is maintained in
Documentation Systems. Prior to use, you are responsible to confirm this copy's revision is the latest released.
ECG MODULE SERIAL NUMBER:
REMOTE DISPLAY SERIAL NUMBER:
The information and specifications included in this publication were in effect at the
time of approval for printing. MEDRAD, Inc., reserves the right, however, to
discontinue or otherwise change specifications or design at anytime without notice
and without incurring any obligation whatsoever.
Page ii
This copy of 3010798 Rev 0 is valid as of Nov-04-2005 at 12:12:00. The signed original is maintained in
Documentation Systems. Prior to use, you are responsible to confirm this copy's revision is the latest released.
VIEWED/PRINTED:
11/09/2005 at 03:09:15.
Contents
Contents................................................................................................................ iii
Section 1
Introduction
Copyright Notice................................................................................................. 1-1
Trademarks ........................................................................................................ 1-1
Restricted Sale................................................................................................... 1-1
In Case of Emergency Contact .......................................................................... 1-1
CE Contact ................................................................................................... 1-1
MEDRAD Subsidiaries.................................................................................. 1-1
International Offices...................................................................................... 1-2
Applicability ........................................................................................................ 1-3
Purpose.............................................................................................................. 1-3
Important Safety Notice...................................................................................... 1-3
Intended Use...................................................................................................... 1-3
Certifications ...................................................................................................... 1-3
Medrad Service - Additional Information Regarding Compliance to IEC 60601-1-2
/ 2001 2nd Edition ......................................................................................................... 1-4
Symbols and Descriptions.................................................................................. 1-7
Regulatory Symbols...................................................................................... 1-7
Safety Symbols............................................................................................. 1-7
System Symbols ........................................................................................... 1-8
Port Symbols ................................................................................................ 1-8
Miscellaneous Symbols ................................................................................ 1-9
Definition of Warnings and Cautions................................................................ 1-10
Warnings .......................................................................................................... 1-10
Cautions ........................................................................................................... 1-12
Leakage Current ......................................................................................... 1-13
Voltage Fluctuations ................................................................................... 1-13
Equipotential Ground .................................................................................. 1-13
Software Version ........................................................................................ 1-14
Software Error Related Hazard Mediation .................................................. 1-14
Potential Interference.................................................................................. 1-14
Biocompatibility........................................................................................... 1-15
Probes Fall in Fluids ................................................................................... 1-15
FCC and Industry Canada Compliance ...................................................... 1-15
Audible Pulse Tone..................................................................................... 1-15
Accessory Disposal .................................................................................... 1-15
Latex Content ............................................................................................. 1-15
Section 2
Main Monitor Maintenance and Checkout
Incoming Inspection ........................................................................................... 2-1
Maintenance Schedule....................................................................................... 2-1
Monitor Safety Testing ....................................................................................... 2-2
Equipment and Tools.................................................................................... 2-2
Accessory Testing ........................................................................................ 2-2
Cleaning and Disinfecting .................................................................................. 2-3
Accidental Wetting ............................................................................................. 2-3
Battery Safety..................................................................................................... 2-4
Long-Term Monitor and Battery Storage............................................................ 2-4
Monitor and Accessories Disposal ..................................................................... 2-4
Fuse Replacement ............................................................................................. 2-4
Electrical Safety Testing (Main Monitor) ............................................................ 2-5
Leakage Test Equipment and Setup ............................................................ 2-5
Leakage Test Procedure .............................................................................. 2-5
Functional Testing.............................................................................................. 2-6
iii
Medrad Veris 8600
This copy of 3010798 Rev 0 is valid as of Nov-04-2005 at 12:12:00. The signed original is maintained in
Documentation Systems. Prior to use, you are responsible to confirm this copy's revision is the latest released.
VIEWED/PRINTED:
11/09/2005 at 03:09:15.
Interface Inspection....................................................................................... 2-6
Manual Controls Check................................................................................. 2-6
Fiber Optic Communication........................................................................... 2-7
Alarms Verification ........................................................................................ 2-8
Module Verification ............................................................................................. 2-9
NIBP Verification ........................................................................................... 2-9
SpO2 Verification ........................................................................................ 2-10
Smart Sat Procedure................................................................................... 2-11
SpO2 Gating Verification .............................................................................2-11
ECG Verification.......................................................................................... 2-12
ECG Gating Verification .............................................................................. 2-14
IBP Verification............................................................................................ 2-14
Temperature Verification.............................................................................2-15
Anesthesia/CO2/O2 Verification .................................................................. 2-15
Electrical Safety Testing (Power Supply) ......................................................... 2-16
Verification of Fuses and Assembly ............................................................ 2-16
Leakage Test Equipment and Setup........................................................... 2-16
Leakage Test Procedure.............................................................................2-16
Output Verification....................................................................................... 2-17
ECG Module Verification .................................................................................. 2-18
Equipment Needed ..................................................................................... 2-18
Verification of ECG Module Charger........................................................... 2-18
Risk Current Testing ................................................................................... 2-18
ECG Display Testing................................................................................... 2-18
ECG Lead-Off Testing................................................................................. 2-19
Section 3
Main Monitor Troubleshooting
Troubleshooting and Repair ............................................................................... 3-3
Main Board ......................................................................................................... 3-3
Power Supply ..................................................................................................... 3-4
Fuse Replacement ............................................................................................. 3-4
Section 4
Main Monitor Theory of Operation
Power Module..................................................................................................... 4-1
Main CPU and System ....................................................................................... 4-1
Vital Signs Module ........................................................................................ 4-1
Speaker Driver .............................................................................................. 4-1
ECG Module ....................................................................................................... 4-2
Pulse Oximeter Module (SpO2) .......................................................................... 4-2
Capnometer Module (CO2)................................................................................. 4-2
Galvanic Oxygen Sub-Module (O2) .................................................................... 4-3
Temperature ....................................................................................................... 4-4
Communications................................................................................................. 4-5
Gating ................................................................................................................. 4-5
Printer ................................................................................................................. 4-5
Block Diagram .................................................................................................... 4-6
Section 5
Main Monitor Disassembly
Before You Begin ............................................................................................... 5-1
Tools Needed................................................................................................ 5-1
Supplies Needed........................................................................................... 5-1
Precautions ................................................................................................... 5-1
Service Safety ............................................................................................... 5-2
Electrostatic Discharge Protection ................................................................ 5-2
Front Housing Removal...................................................................................... 5-3
iv
This copy of 3010798 Rev 0 is valid as of Nov-04-2005 at 12:12:00. The signed original is maintained in
Documentation Systems. Prior to use, you are responsible to confirm this copy's revision is the latest released.
VIEWED/PRINTED:
11/09/2005 at 03:09:15.
Contents
Front Housing Disassembly ............................................................................... 5-7
Rotary Encoder Knob Removal and Replacement ....................................... 5-7
Membrane Keypad Removal and Replacement ........................................... 5-8
Water Trap Manifold Removal/Replacement................................................ 5-9
Inverter Board Removal and Replacement................................................. 5-10
Display Screen Removal and Replacement ............................................... 5-11
Replacing Printed Circuit Boards (PCBs)......................................................... 5-14
IBP Board ................................................................................................... 5-14
Temperature Module/Board........................................................................ 5-15
ECG Gating Board...................................................................................... 5-16
Vital Signs Module (VSM) Board ................................................................ 5-17
Replacing the Post ........................................................................................... 5-18
Base Disassembly............................................................................................ 5-20
Replacing the Batteries............................................................................... 5-21
Replacing the NIBP Chassis Assembly: ..................................................... 5-22
Replacing the Charger PCB ....................................................................... 5-23
Replacing the O2 Sensor (on Anesthetic Units).......................................... 5-24
Replacing the CO2 Absorber (on Anesthetic Units).................................... 5-25
Replacing the Agent Bench (on Anesthetic Units)...................................... 5-25
Safety Tests ..................................................................................................... 5-25
Servicing the ECG Module............................................................................... 5-26
Servicing the Power Supply ............................................................................. 5-26
Section 6
Main Monitor BOMs and Drawings
List of Drawings.................................................................................................. 6-1
Assembly BOMs and Drawings .................................................................... 6-1
Monitor Final Assemblies ................................................................................... 6-2
Base Monitor................................................................................................. 6-2
BasePlus Monitor.......................................................................................... 6-2
Cardiac Monitor ............................................................................................ 6-2
Cardiac with Temperature Monitor ............................................................... 6-2
Anesthetic Monitor ........................................................................................ 6-3
Anesthetic with Temperature Monitor ........................................................... 6-3
Base Assemblies................................................................................................ 6-4
Base Assembly without Gas ......................................................................... 6-4
Base Assembly with Gas .............................................................................. 6-4
Main Top Assemblies......................................................................................... 6-5
Base.............................................................................................................. 6-5
BasePlus....................................................................................................... 6-5
Cardiac ......................................................................................................... 6-6
Cardiac with Temperature ............................................................................ 6-6
Anesthesia .................................................................................................... 6-7
Anesthesia with Temperature ....................................................................... 6-7
Monitor Final Assembly (3010947) .................................................................... 6-9
Base Assemblies.............................................................................................. 6-10
Base Assembly--No Gas (3010982) ........................................................... 6-10
Base Assembly--With Gas (3010672) ........................................................ 6-11
Main Top Assembly.......................................................................................... 6-12
Base (3010977) .......................................................................................... 6-12
BasePlus (3010978) ................................................................................... 6-14
Cardiac (3010979) ...................................................................................... 6-16
Cardiac With Temperature (3010980) ........................................................ 6-18
Anesthesia (3010981)................................................................................. 6-20
Anesthesia with Temperature (3010946).................................................... 6-22
v
Medrad Veris 8600
This copy of 3010798 Rev 0 is valid as of Nov-04-2005 at 12:12:00. The signed original is maintained in
Documentation Systems. Prior to use, you are responsible to confirm this copy's revision is the latest released.
VIEWED/PRINTED:
11/09/2005 at 03:09:15.
Section 7
Remote Display Maintenance and Checkout
Incoming Inspection............................................................................................ 7-1
Maintenance Schedule ....................................................................................... 7-1
Every 3 Months ............................................................................................. 7-1
Every Year .................................................................................................... 7-1
Monitor Safety Testing........................................................................................ 7-1
Equipment and Tools .................................................................................... 7-2
Accessory Testing......................................................................................... 7-2
Cleaning and Disinfecting................................................................................... 7-3
Accidental Wetting.............................................................................................. 7-3
Fuse Removal and Replacement ....................................................................... 7-4
Long-Term Monitor Storage ............................................................................... 7-5
Monitor and Accessories Disposal ..................................................................... 7-5
Electrical Safety Testing ..................................................................................... 7-6
Leakage Test Equipment and Setup............................................................. 7-6
Leakage Test Procedure............................................................................... 7-6
Functional Testing .............................................................................................. 7-7
Encoder Verification ...................................................................................... 7-7
Fiber Optic Communication........................................................................... 7-7
Display Performance..................................................................................... 7-7
Interface Performance................................................................................... 7-8
Remote Printer Function ............................................................................... 7-8
External Display Function ............................................................................. 7-8
Visual Inspection ........................................................................................... 7-8
Field Service Testing Safety............................................................................... 7-9
Remote Display Fault Testing .......................................................................... 7-10
Power Supply PCB Test.............................................................................. 7-10
Main Board Testing ..................................................................................... 7-11
Communication Board Testing.................................................................... 7-12
Section 8
Remote Display Troubleshooting
Troubleshooting and Repair ............................................................................... 8-3
Main Board ......................................................................................................... 8-3
Communication................................................................................................... 8-3
DPAC Communications Board...................................................................... 8-3
Fuse Replacement ............................................................................................. 8-4
AC Power Components ...................................................................................... 8-4
Section 9
Remote Display Theory of Operation
Overview............................................................................................................. 9-1
Communication ............................................................................................. 9-1
Printer Interface............................................................................................. 9-1
Main CPU and System ....................................................................................... 9-2
Speaker Driver .............................................................................................. 9-2
Communications................................................................................................. 9-2
Printer ................................................................................................................. 9-2
Block Diagram .................................................................................................... 9-3
vi
This copy of 3010798 Rev 0 is valid as of Nov-04-2005 at 12:12:00. The signed original is maintained in
Documentation Systems. Prior to use, you are responsible to confirm this copy's revision is the latest released.
VIEWED/PRINTED:
11/09/2005 at 03:09:15.
Contents
Section 10
Remote Display Disassembly
Before You Begin ............................................................................................. 10-1
Tools Needed ............................................................................................. 10-1
Supplies Needed ........................................................................................ 10-1
Precautions................................................................................................. 10-1
Service Safety............................................................................................. 10-2
Electrostatic Discharge Protection.............................................................. 10-2
Front Housing Removal ................................................................................... 10-3
Front Housing Disassembly ............................................................................. 10-7
Rotary Encoder Knob Removal and Replacement ..................................... 10-7
Membrane Keypad Removal and Replacement ......................................... 10-8
Display Assembly Removal and Replacement ........................................... 10-9
Inverter PCB Removal and Replacement................................................. 10-10
Display Screen Removal and Replacement ............................................. 10-11
Printer Removal and Replacement ................................................................ 10-13
Rear Housing Disassembly............................................................................ 10-14
Main PCB Removal and Replacement ..................................................... 10-14
Front Chassis Removal ............................................................................ 10-16
Power Supply PCB Removal and Replacement....................................... 10-17
Speaker.......................................................................................................... 10-18
Section 11
Remote Display BOMs and Drawings
List of Drawings................................................................................................ 11-1
Assembly BOMs and Drawings 1
Remote Monitor Final Assembly ...................................................................... 11-2
Front Housing Assembly .................................................................................. 11-3
Remote Front Display Assembly ................................................................ 11-3
Rear Housing Assembly................................................................................... 11-4
Chassis Assembly ...................................................................................... 11-4
Printer Module ............................................................................................ 11-4
Remote Final Assembly (3010482).................................................................. 11-5
Remote Front Housing Assembly (3010644) ................................................... 11-6
Remote Front Display Assembly (3010655) .................................................... 11-7
Remote Rear Housing Assembly (3010643).................................................... 11-8
Remote Chassis Assembly (3010645)............................................................. 11-9
vii
This copy of 3010798 Rev 0 is valid as of Nov-04-2005 at 12:12:00. The signed original is maintained in
Documentation Systems. Prior to use, you are responsible to confirm this copy's revision is the latest released.
VIEWED/PRINTED:
11/09/2005 at 03:09:15.
VIEWED/PRINTED:
11/09/2005 at 03:09:15.
This copy of 3010798 Rev 0 is valid as of Nov-04-2005 at 12:12:00. The signed original is maintained in
Documentation Systems. Prior to use, you are responsible to confirm this copy's revision is the latest released.
1 Introduction
Copyright Notice
Copyright 2005, MEDRAD, Inc. All rights reserved.
Reproduction of this manual is strictly prohibited without express
written consent of MEDRAD, Inc.
For more information about MEDRAD products and services, please
visit www.medrad.com
Trademarks
MEDRAD VerisTM is a trademark of MEDRAD, Inc.
Restricted Sale
U.S. Federal law restricts the sale of this device on or by the order of
a physician.
In Case of Emergency
Contact
CE Contact
EC REP
MEDRAD Subsidiaries
MEDRAD, Inc. Corporate Office
One Medrad Drive
Indianola, PA 15051-0780 USA
Telephone: 1 (412) 767-2400
FAX: 1 (412) 767-4128
OTHER: 1 (800) 633-7231
MEDRAD, Inc. Service Repair
One Medrad Drive
Indianola, PA 15051-0780 USA
Telephone: 1 (412) 767-2400
FAX: 1 (412) 767-4126
OTHER: 1 (800) 633-7237
Medrad Europe B.V.
Postbus 205
6190 AE Beek
The Netherlands
Imaxeon Pty. Ltd.
Rydalmere Metro Centre
Unit 2, 38-46 South Street
Rydalmere NSW 2116
Australia
Telephone: +61 2 8845 4999
FAX: +61 2 8845 4998
MEDRAD Europe B.V.
P.O. Box 205
6190 AE Beek
The Netherlands
Telephone: +31 (0) 43-3585600
FAX: +31 (0) 43-3656598
(Visiting MEBV address:)
Horsterweg 24
6199 AC Maastricht Airport
The Netherlands
(Alternate address:)
P.O. Box 150
Rydalmere BC
NSW 1701
Sydney, Australia
Nihon MEDRAD K.K.
9F Central Shin-Osaka Bldg.
4-5-36, Miyahara
Yodogawa-ku
Osaka 532-0003, Japan
Telephone: +81 (0) 6-6350-0680
FAX: +81 (0) 6-6398-0670
1-1
MEDRAD Veris 8600
This copy of 3010798 Rev 0 is valid as of Nov-04-2005 at 12:12:00. The signed original is maintained in
Documentation Systems. Prior to use, you are responsible to confirm this copy's revision is the latest released.
VIEWED/PRINTED:
11/09/2005 at 03:09:15.
International Offices
MEDRAD do Brasil Ltda.
Av. Fagundes Filho, 191 conjuntos 51 a 54, 57 e 58
Ed. Houston Office Center
Vila Monte Alegre
04304-010 - São Paulo - SP Brazil
Telephone: + 55 (11) 5079-6500
FAX: + 55 (11) 5584-8951
Mediwest Denmark ApS
Naverland 2
2600 Glostrup
Denmark
Telephone: +45 38-16 16 16
FAX: +45 38-16 16 46
MEDRAD Middle East & Africa
92 Al Lasilky Street
New Maadi Cairo
Egypt
E-mail: Medrad_ME&[email protected]
(If contacting Andre directly, please
phone or fax)
+00.20.2.754.88.29
1-2
MEDRAD France S.a.r.l.
MEDRAD, Inc. (Asia)
8, rue des Pyrénées — Silic 514
Wissous
F-94623 Rungis
France
Telephone: +33 (0) 1.46.86.98.84
FAX: +33 (0) 1.46.86.98.83
200 Jalan Sultan #09-01
Textile Centre
Singapore 199018
Telephone: +(65) 6 292 5357
FAX: +(65) 6 292 7276
MEDRAD Italia S.r.l.
Via Togliatti, 111
27051 Cava Manara (PV)
Italy
Telephone: +39 (0) 382 552882
FAX: +39 (0) 382 552876
MEDRAD Medizinische Systeme
GmbH
Industriestraße 2b
97332 Volkach
Germany
Telephone: +49 (0) 9381/80 36 80
FAX: +49 (0) 9381/80 36 85
MEDRAD Mexicana S. de
R.L. de C.V.
Leibnitz, 204
Col. Anzures Del. Miguel Hidalgo
CP. 11590 Mexico City
Mexico D.F. 16018
Telephone: +52 (555) 250-6575
FAX: +52 (555) 250-9762
Mediwest Norway AS
Aslakveien 14A
NO-075
3
Oslo, Norway
Telephone: +47 (0) 22-06 57 10
FAX: +47 (0) 22-06 57 15
Mediwest Scandinavia AB
Lona Knapes gata 5, plan 2
S-421 32 Västra Frölunda
Sweden
Telephone: +46 (0) 31-74 82 88 0
FAX: +46 (0) 31-74 82 99 9
MEDRAD UK Ltd.
25 Lancaster Way Business Park
Witchford, Ely
Cambridgeshire
CB6 3NW
Telephone: +44 (0) 1353-645024
FAX: +44 (0) 1353-645037
This copy of 3010798 Rev 0 is valid as of Nov-04-2005 at 12:12:00. The signed original is maintained in
Documentation Systems. Prior to use, you are responsible to confirm this copy's revision is the latest released.
VIEWED/PRINTED:
11/09/2005 at 03:09:15.
Introduction
Applicability
This manual applies to the MEDRAD Veris 8600 patient monitor and
to the power supply and ECG module used with the MEDRAD Veris
8600 patient monitor. This manual also applies to the optional
MEDRAD Veris 8600 remote display.
Purpose
The purpose of this manual is intended to provide instructions for
servicing the MEDRAD Veris 8600 patient monitor and optional
remote display safely and accurately. It is intended for those qualified
to service the patient monitor, whether they be MEDRAD Service
Personnel, Certified Laboratory Service Technicians, or MEDRAD
authorized international dealers.
Important Safety Notice
The information in this manual is intended for people with adequate
backgrounds and experience in electronics and electromechanical
devices. Any attempt to repair a sophisticated medical device such as
the patient monitor may result in personal injury, property damage, or
patient injury.
Intended Use
Refer to the MEDRAD Veris 8600 Patient Monitor Operation Manual.
Certifications
MEDRAD Veris patient monitors and remote displays are equipped
to operate at 100-240VAC, 50/60 Hz, and designed to be in
compliance with EN 60601-1 (Safety), and EN 60601-1-2 (EMC/
Emissions).
MEDRAD, Inc. is EN-ISO 9001/EN 13485 certified.
MEDRAD Europe B.V. is EN-ISO 9002/EN 13488 certified.
(European Medical Device Directive 93/42/EEC).
Nihon MEDRAD KK is ISO 9001/ISO 13485 certified.
1-3
This copy of 3010798 Rev 0 is valid as of Nov-04-2005 at 12:12:00. The signed original is maintained in
Documentation Systems. Prior to use, you are responsible to confirm this copy's revision is the latest released.
VIEWED/PRINTED:
11/09/2005 at 03:09:15.
MEDRAD Veris 8600
Medrad Service - Additional
Information Regarding
Compliance to IEC 60601-1-2 /
2001 2nd Edition
The information contained herein is intended to reflect conformance
to IEC-60601-1-2 / 2001 2nd edition Standards.
The following statements are cautions. Cautions advise of
circumstances that could result in damage to the device. Read and
understand these cautions before operating the system.
!
CAUTION !
• System may disarm or fail to operate when exposed to high
magnetic fields. Portable and mobile RF communications
equipment can affect the system.
• FOR PROPER OPERATION, use only accessories and options
provided by MEDRAD that are designed specifically for the
system. Other non-MEDRAD approved accessories or options
may cause equipment damage or may result in increased
emissions or decreased immunity of the system. System
accessories listed in the operation manual comply with the
requirements of electromagnetic emissions and immunity
standards IEC-60601-1-2 / 2001 2nd edition.
• DO NOT USE SYSTEM ADJACENT TO OR STACKED WITH
OTHER EQUIPMENT. If adjacent or stacked use is necessary,
the system should be observed to verify normal operation in the
configuration in which it will be used.
Recommended separation distances between portable and mobile RF communications
equipment and the system
The system is intended for use in an electromagnetic environment in which radiated RF disturbances are
controlled. The customer or the user of the system can help prevent electromagnetic interference by maintaining a
minimum distance between portable and mobile RF communications equipment (transmitters) and the system as
recommended below, according to the maximum output power of the communications equipment.
Rated maximum output
power of transmitter W
Separation distance according to frequency of transmitter m
150 KHz to 80 MHz
d = [3.5/V1]
p
80 MHz to 800 MHz
d = [3.5/E1] p
800 MHz to 2.5 GHz
d = [7/E1]
p
0.01
0.12
0.12
0.23
0.1
0.37
0.37
0.74
1
1.17
1.17
2.33
10
3.69
3.69
7.38
100
11.67
11.67
23.33
For transmitters rated at a maximum output power not listed above, the recommended separation distance d in
meters (m) can be estimated using the equation applicable to the frequency of the transmitter, where p is the
maximum output power rating of the transmitter in watts (W) according to the transmitter manufacturer.
NOTE 1 At 80 MHz and 800 MHz, the separation distance for the higher frequency applies.
NOTE 2 These guidelines may not apply in all situations. Electromagnetic propagation is affected by absorption
and reflection from structures, objects and people.
SYSTEM REQUIRES SPECIAL PRECAUTIONS REGARDING EMC.
1-4
VIEWED/PRINTED:
11/09/2005 at 03:09:15.
Introduction
Install and put into service according to the EMC information provided
below:
Guidance and manufacturer's declaration - electromagnetic emissions
The system is intended for use in the electromagnetic environment specified below. The customer or user of the
system should assure that it is used in such an environment.
Emissions test
Compliance
RF emissions
CISPR 11
Group 1
The system uses RF energy only for its internal function.
Therefore, its RF emissions are very low and are not likely to
cause any interference in nearby electronic equipment.
RF emissions
CISPR 11
Class B: Veris 8600
Harmonic emissions
IEC 61000-3-2
Class B: Veris 8600
The system is suitable for use in all establishments, including
domestic establishments and those directly connected to the
public low-voltage power supply network that supplies
buildings used for domestic purposes.
Voltage fluctuations/flicker
emissions
IEC 61000-3-3
This copy of 3010798 Rev 0 is valid as of Nov-04-2005 at 12:12:00. The signed original is maintained in
Documentation Systems. Prior to use, you are responsible to confirm this copy's revision is the latest released.
Electromagnetic environment - guidance
Complies
Guidance and manufacturer's declaration - electromagnetic immunity
The system is intended for use in the electromagnetic environment specified below. The customer or user of the
system should assure that it is used in such an environment.
Immunity test
IEC 60601 test level
Compliance level
Electromagnetic environment guidance
Electrostatic
discharge (ESD)
IEC 61000-4-2
+6 kV contact +8 kV air
+6 kV contact +8 kV air
Floors should be wood, concrete or ceramic
tile. If floors are covered with a synthetic
material, the relative humidity should be at
least 30%.
Electrical/fast
transient/burst
IEC 61000-4-4
+2 kV for power supply lines
+1 kV for input/output lines
+2 kV for power supply lines
+1 kV for input/output lines
Mains power quality should be that of a typical
commercial or hospital environment.
Surge
IEC 61000-4-5
+1 kV differential mode
+2 kV common mode
+1 kV differential mode
+2 kV common mode
Mains power quality should be that of a typical
commercial or hospital environment.
Voltage dips,
short
interruptions and
voltage variations
on power supply
input lines IEC
61000-4-11
<5% UT
(>95% dip in UT)
for 0.5 cycle
<5% UT
(>95% dip in UT)
for 0.5 cycle
40% UT
(60% dip in UT)
for 5 cycles
40% UT
(60% dip in UT)
for 5 cycles
Mains power quality should be that of a typical
commercial or hospital environment. If the
user of the system requires continuous
operation during power mains interruptions, it
is recommended the system be powered from
an uninterruptible power supply or battery.
70% UT
(30% dip in UT)
for 25 cycles
70% UT
(30% dip in UT)
for 25 cycles
<5% UT
(>95% dip in UT)
for 5 sec
<5% UT
(>95% dip in UT)
for 5 sec
3 A/m
3 A/m
Power frequency
(50/60 Hz)
magnetic field
IEC 61000-4-8
Power frequency magnetic fields should be at
levels characteristic of a typical location in a
typical commercial or hospital environment.
NOTE UT is the A.C. mains voltage prior to application of the test level.
1-5
VIEWED/PRINTED:
11/09/2005 at 03:09:15.
MEDRAD Veris 8600
Guidance and manufacturer's declaration - electromagnetic immunity
The system is intended for use in the electromagnetic environment specified below. The customer or user of the
system should assure that it is used in such an environment.
Immunity test
IEC 60601 test level
Compliance level
Electromagnetic environment guidance
Portable and mobile RF communications
equipment should be used no closer to any
part of the system, including cables, than the
recommended separation distance calculated
from the equation applicable to the frequency
of the transmitter.
Recommended separation distance:
Conducted RF
IEC-61000-4-6
3 V rms
150 kHz to 80 MHz
3 V rms
Radiated RF
IEC 61000-4-3
3 V/m
80 MHz to 2.5 GHz
3 V/m
d = 1.17
This copy of 3010798 Rev 0 is valid as of Nov-04-2005 at 12:12:00. The signed original is maintained in
Documentation Systems. Prior to use, you are responsible to confirm this copy's revision is the latest released.
d = 1.17
d = 2.33
p
p
p
80 MHz to 800 MHz
800 MHz to 2.5 GHz
Where p is the maximum output power rating
of the transmitter in watts (W) according to
the transmitter manufacturer and d is the
recommended separation distance in meters
(m).
Field strengths from fixed RF transmitters, as
determined by an electromagnetic site
survey,a should be less than the compliance
level in each frequency range.b
Interference may occur in the
vicinity of equipment marked with
the following symbol:
NOTE 1 At 80 MHz and 800 MHz, the higher frequency range applies.
NOTE 2 These guidelines may not apply in all situations. Electromagnetic propagation is affected by absorption and reflection
from structures, objects and people.
a
Field strengths from fixed transmitters, such as base stations for radio (cellular/cordless) telephones and land mobile radios,
amateur radio, AM and FM radio broadcast cannot be predicted theoretically with accuracy. To assess the electromagnetic
environment due to fixed RF transmitters, an electromagnetic site survey should be considered. If the measured field
strength in the location in which the system is used exceeds the applicable RF compliance level above, the system should
be observed to verify normal operation. If abnormal performance is observed, additional measures may be necessary, such
as reorienting or relocating the system.
b
Over the frequency range 150 kHz to 80 MHz, field strengths should be less than 3 V/m.
1-6
VIEWED/PRINTED:
11/09/2005 at 03:09:15.
Introduction
Symbols and Descriptions
Symbol
Regulatory Symbols
Definition
European Community Mark
ETL Mark
FCC (US Federal Communications Commission)
Mark
Safety Symbols
ATTENTION! Refer to Operation Manual for
Information
This copy of 3010798 Rev 0 is valid as of Nov-04-2005 at 12:12:00. The signed original is maintained in
Documentation Systems. Prior to use, you are responsible to confirm this copy's revision is the latest released.
Shock Hazard
Type CF Equipment, defib proof
IPX0
Indicates no protection against ingress of water
(remote display)
IPX1
Identifies the degree of protection against fluid as
drip-proof (main monitor)
IPX2
Identifies the degree of protection against fluid as
drip-proof (power supply)
Equipotential Terminal
Ground Symbol
Indicates the MR magnet and power
Indicates distance between MR magnet and monitor
Indicates the presence of a battery
Recycle batteries following hospital protocols and
local environmental regulations.
Do not incinerate! Keep away from fire or other
sources of extreme heat.
1-7
MEDRAD Veris 8600
VIEWED/PRINTED:
11/09/2005 at 03:09:15.
Symbol
Definition
Do not dispose of in municipal waste. Wheeled bin
symbol indicates separate collection for electrical and
electronic equipment.
(WEEE Directive 2002/96/EEC)
Risk of electrical shock! Do not remove cover.
Refer servicing to qualified personnel.
System Symbols
Fuse
Alternating Current (AC)
This copy of 3010798 Rev 0 is valid as of Nov-04-2005 at 12:12:00. The signed original is maintained in
Documentation Systems. Prior to use, you are responsible to confirm this copy's revision is the latest released.
Direct Current (DC)
Wireless Product
Port Symbols
Signal Input
Signal Output
IOIOI
Digital Output
Air Intake
Scavenging Port
Communication Port
Video Out
1-8
VIEWED/PRINTED:
11/09/2005 at 03:09:15.
Introduction
Symbol
Miscellaneous Symbols
Definition
Technical Support Phone Number
Manufacturing Contact
SN
REF
Serial Number
Part Reference Number
Place this side against the skin (Blood Pressure Cuff)
This copy of 3010798 Rev 0 is valid as of Nov-04-2005 at 12:12:00. The signed original is maintained in
Documentation Systems. Prior to use, you are responsible to confirm this copy's revision is the latest released.
Placement of the cuff over the brachial artery.
2
Single use device only. Do not reuse.
1-9
VIEWED/PRINTED:
11/09/2005 at 03:09:15.
MEDRAD Veris 8600
Definition of Warnings and
Cautions
Definitions for Warning, Caution, and Note symbols:
Designates an imminent danger.
Non-observance is likely to lead to death or the
most severe injuries.
!
DANGER !
!
WARNING !
Designates a possible dangerous situation.
Non-observance may lead to death or the most
severe injuries.
!
CAUTION !
Designates a possible dangerous situation.
Non-observance may lead to minor injuries or
damage to the product.
This copy of 3010798 Rev 0 is valid as of Nov-04-2005 at 12:12:00. The signed original is maintained in
Documentation Systems. Prior to use, you are responsible to confirm this copy's revision is the latest released.
NOTE: Indicates that important information follows, a tip that can help
you recover from an error, or point you to related details in the
manual.
Warnings
!
WARNING !
• Read this manual entirely before using the monitor.
• Inspect For Damage! User should inspect the system for signs
of damage. Do not use the system if failure is evident or
suspected.
• Possible burn hazard! Do not coil cables inside the MR scanner.
• Possible explosion hazard! Do not use the monitor in the
presence of flammable anesthetics. The equipment is not
suitable for use in the presence of a flammable anesthetic
mixture with air or with oxygen or Nitrous Oxide.
• Possible explosion hazard! Do not use the monitor in the
presence of gas mixtures which may be flammable.
• Do not use this device in conjunction with flammable
anesthetics such as cyclopropane and ether. The monitor can
sample from pure oxygen environments, but the monitor itself
should never be placed inside an oxygen tent or gas
containment apparatus. Proper anesthetic gas waste recovery
should be used. When not in operation, this device is not
intended to be connected to any pressurized source containing
an enriched oxygen environment.
• Cables, tubing, and lead wires may present a risk of
entanglement or strangulation! Verify safe and proper
positioning of these items at all times.
• Unapproved modifications to the monitor may cause unexpected
results and present a hazard to the patient.
• Risk of electrical shock! Do not remove cover. Refer servicing to
qualified personnel.
1-10
VIEWED/PRINTED:
11/09/2005 at 03:09:15.
Introduction
!
WARNING !
• All cords must have hospital grade plugs and be plugged into
hospital grade outlets. (The electrical installation of the relevant
room must comply with NFPA 70: National Electric Code or
NFPA 99: Standard for Health Care Facilities. Outside the
United States, the relevant room must comply with all electrical
installation regulations mandated by the local and regional
bodies of government).
• Do not bring tools containing ferrous material into the magnet
room. Risk of serious injury and/or damage to equipment can
occur.
• Do not route gating cables near or within the scanning volume.
This copy of 3010798 Rev 0 is valid as of Nov-04-2005 at 12:12:00. The signed original is maintained in
Documentation Systems. Prior to use, you are responsible to confirm this copy's revision is the latest released.
• Apply brakes to prevent movement.
• Improper disposal of batteries may result in explosion, leakage,
or personal injury. Do not open batteries. Do not dispose of
batteries in a fire. Follow all local regulations concerning the
disposal of spent Lead-acid and Lithium-Ion batteries or contact
MEDRAD for assistance.
• Connect only MEDRAD approved three-lead or five-lead ECG
cables from the patient to the ECG module. Do not connect any
other signal source to the ECG module.
• There is no defibrillator synchronization output on the Veris
monitor. Make no connections between the Veris and a
defibrillator.
• Leakage currents may increase if other equipment is
interconnected to the patient. The increased leakage currents
may present a hazard to the patient.
• PACEMAKER PATIENTS: This device does not include
pacemaker spike rejection capability. Heart rate readouts
derived from the ECG patient connections are likely to display
erroneous high or erratic rates when a pacemaker is in use.
Keep pacemaker patients under close surveillance. For
pacemaker patients it may be advisable to select the SpO2
function as the primary heart rate source.
• High Frequency (HF) surgical equipment may affect ECG
operation. The system is not designed to operate in the
presence of ESU interference. The patient may be burned.
Patient burns can also result from a defective HF surgical
equipment neutral electrode connection.
• The heart rate calculated by the monitor may be affected by
cardiac arrhythmia.
• Do not stand on power supply enclosure. Injury from tripping or
falling can occur.
1-11
VIEWED/PRINTED:
11/09/2005 at 03:09:15.
MEDRAD Veris 8600
!
WARNING !
• Do not stand on the base. Possible injury can result from falling.
• Do not take the remote display or the ECG module battery
charger into the MR scanner room. These contain ferromagnetic
material and can be strongly attracted to the magnet causing a
safety hazard.
• Do not use with an open MRI. Use of the monitor in an open
MRI may result in erratic or unavailable monitoring.
• Do not stand or sit on monitor accessories tray. Possible injury
can result from falling.
• Do not stand or sit on monitor accessories tray. Possible injury
can result from falling.
This copy of 3010798 Rev 0 is valid as of Nov-04-2005 at 12:12:00. The signed original is maintained in
Documentation Systems. Prior to use, you are responsible to confirm this copy's revision is the latest released.
• U.S. Federal law restricts this device to sale by or on the order
of a physician.
Cautions
!
CAUTION !
• Use only accessories designated for use with this monitor. Use
of accessories not designated for use with the Veris monitor can
cause inaccurate measurements and/or a safety hazard for the
patient.
• This device has been tested to 60601-1-2 specified levels for
emissions of and immunity to electrical interference. External
disturbances which exceed these levels may cause operational
issues with this device. Other devices which are sensitive to a
lower level of emissions than those allowed by IEC 60601-1-2
may experience operational issues when used in proximity to
this device.
• Equipment accuracy may be affected at extreme temperatures.
• Do not store equipment at extreme temperature. Temperatures
exceeding specified storage temperatures could damage the
system.
• Avoid routing the DC cable through the magnet room door.
Possible damage can occur to the DC cable and/or the scanner
room door.
• Do not press on the keys with sharp or hard objects. This could
damage the keys. Use only your fingertips to press on the keys.
• Changes or modifications not expressly approved by MEDRAD,
Inc., may void the user's authority to operate the equipment and
may also void the warranty.
• Do not use the monitor in the path of a Linear Accelerator or
Positron Emission Tomography (PET) scanner beam. This could
result in inaccurate physiologic parameters or waveforms.
1-12
VIEWED/PRINTED:
11/09/2005 at 03:09:15.
Introduction
!
CAUTION !
• Transporting the monitor in a mobile scanner trailer can lead to
damage from shock, vibration, or extreme temperatures.
• Do not allow the conductive parts of the patient electrodes to
contact other conductive parts, including ground (earth).
• High Frequency (HF) surgical equipment may affect ECG
operation.
• Do not tip the monitor. Possible injury can result from falling.
• Do not pinch cables between the table and the bore. This can
damage the cables.
• Do not roll the monitor over or step on cables. This can damage
the cables.
This copy of 3010798 Rev 0 is valid as of Nov-04-2005 at 12:12:00. The signed original is maintained in
Documentation Systems. Prior to use, you are responsible to confirm this copy's revision is the latest released.
• Do not bend fiber optic cables too tightly. Refer to the
specifications in Appendix C of the Operation Manual.
• If a probe falls on the floor or into liquid, clean the probe
following proper cleaning methods. If the probe is not properly
cleaned, inaccurate physiologic parameters or waveforms may
result.
• Do not place more than 40 pounds (18 kg) on the tray.
Leakage Current
The monitor complies with leakage current limits required by medical
safety standards for patient-connected devices. The Veris monitor
conforms to EN 60601-1 standards. A hazard caused by the
summation of leakage currents is possible, when several pieces of
equipment are interconnected.
Voltage Fluctuations
When operated in the line voltage range specified in this manual any
minor fluctuations will have a negligible effect. Very low line voltage
will cause the monitor to revert to battery power. Very high line
voltage may cause damage to the charger circuits. The monitor is
designed with circuitry that will turn the unit off before spurious
readings can be caused by a low battery condition.
Equipotential Ground
Health care providers and patients are subject to dangerous,
uncontrollable compensating currents for electrical equipment.
These currents are due to the potential differences between
connected equipment and touchable conducting parts as found in
medical rooms.
1-13
MEDRAD Veris 8600
This copy of 3010798 Rev 0 is valid as of Nov-04-2005 at 12:12:00. The signed original is maintained in
Documentation Systems. Prior to use, you are responsible to confirm this copy's revision is the latest released.
VIEWED/PRINTED:
11/09/2005 at 03:09:15.
The safety solution to the problem is accomplished with consistent
equipotential bonding. The remote display and the main monitor
power supply are fitted with connecting leads made up with angled
sockets to the equipotential bonding network in medical rooms.
Equipotential
Terminal
Connection Lead
(Socket)
Equipotential
Connector
Main
Body
Earth Ground
Software Version
The initial release of this monitoring system was at a software
revision of 1.0 on the main monitor and 1.0 on the remote display on
4 January 2005. This revision could be advanced for many reasons
following the initial release. To identify the presently installed revision
on either the main monitor or remote display, power-up the monitor
while observing the initial power-on screen. The current software
revision will be displayed prior to display of the normal monitoring
screen.
Software Error Related
Hazard Mediation
MEDRAD, Inc., has quality control practices and procedures in place
to review potential hazards as they relate to software. The monitor
utilizes a four-digit year for all date, time, and leap year calculations.
Potential Interference
MAGNETIC FIELDS
Always position the Veris Base, Base Plus, and Cardiac monitors at
or outside the 2000 Gauss line. Always position the Veris Anesthesia
monitor at or outside of the 500 Gauss line. This monitor is designed
specifically for MR compatibility and is 0.5 to 3T compatible. It will not
cause interference with MRI image quality, nor will its performance be
affected by the magnet field.
The "T" wave may become excessively large or inverted with the
patient in the magnetic field. This effect is due to hemodynamic flow
induced voltage and may interfere with QRS detection. Try other
leads and/or electrode placements for best results.
CONDUCTED TRANSIENTS
The monitor conforms with IEC 61000-4-4, and IEC 61000-4-5 for
conducted transients, and will operate with negligible adverse effects.
X-RAY, CT, ULTRASOUND, AND/OR NUCLEAR MEDICINE
The monitor will operate with negligible adverse effects in these
environments. However, the monitor should not be placed directly in
the radiated beam, which could damage the internal electronics of the
monitor.
1-14
VIEWED/PRINTED:
11/09/2005 at 03:09:15.
Introduction
OTHER INTERFERENCE
There is a negligible adverse effect to the monitor from electrocautery
and electrosurgery, infrared energy, and defibrillation.
CABLING INTERFERENCE
Route all Veris system cabling away from other manufacturer cables
in the magnet room.
Biocompatibility
This copy of 3010798 Rev 0 is valid as of Nov-04-2005 at 12:12:00. The signed original is maintained in
Documentation Systems. Prior to use, you are responsible to confirm this copy's revision is the latest released.
Probes Fall in Fluids
FCC and Industry Canada
Compliance
All patient-contact or user-contact materials in this monitor and it's
accessories have passed ISO 10993-5, -10, & -11 biocompatibility
tests or have been in use in clinical environments in large numbers
over an extended period of time predating these standards.
Whenever probes fall and land in fluids, clean the probes according to
the cleaning instructions in “Cleaning and Disinfecting” in Appendix A
of the Operation Manual.
This device complies with Part 15 of the FCC Rules.
Operation is subject to the following two conditions:
1. This device may not cause harmful interference, and
2. This device must accept any interference received, including
intereference that may cause undesired operation.
!
WARNING !
• Changes or modifications not expressly approved by the party
responsible for compliance could void the user’s authority to
operate the equipment.
The term “IC” before the certification/registration number only
signifies that the Industry Canada technical specifications were met.
IC: 5338A-CSI8600
Audible Pulse Tone
The amplitude of the audible pulse tone remains constant regardless
of changes in patient parameter measurements.
Accessory Disposal
Discard disposable medical waste according to your institution's
policies and procedures to prevent biological contamination. See
“Disposal” in Appendix A of the Operation Manual.
Latex Content
This MEDRAD product (patient monitors and approved accessories)
are free from latex in any location that may result in patient contact.
1-15
This copy of 3010798 Rev 0 is valid as of Nov-04-2005 at 12:12:00. The signed original is maintained in
Documentation Systems. Prior to use, you are responsible to confirm this copy's revision is the latest released.
VIEWED/PRINTED:
11/09/2005 at 03:09:15.
VIEWED/PRINTED:
11/09/2005 at 03:09:15.
This copy of 3010798 Rev 0 is valid as of Nov-04-2005 at 12:12:00. The signed original is maintained in
Documentation Systems. Prior to use, you are responsible to confirm this copy's revision is the latest released.
2 Main Monitor Maintenance and
Checkout
This section contains recommended procedures for maintenance,
and an operational checkout of the MEDRAD Veris patient monitor.
Routine maintenance and inspection will:
• Ensure continued performance of the patient monitor system.
• Reduce the possibility of equipment malfunction.
Incoming Inspection
You must inspect patient monitors coming back from service for
shipping damage before you place them into operation just like newly
purchased patient monitors. The patient monitor should be free from
dents, cracks, or other physical damage.
If further incoming inspection or testing is required, the manufacturer
recommends that you use the Alarms Verification (located in this
section) as an incoming inspection test. You can perform additional
electrical safety testing in this section as part of an incoming
inspection in accordance with the policies of the health care provider.
Maintenance Schedule
Every Patient
•
•
•
•
•
Clean and disinfect the sensor cables and sensor.
Inspect the accessories and cables for damage.
Change the gas sampling device and sampling line.
Check the NIBP function.
Change the water trap
Every Day
• Charge the batteries as necessary. If not using the
monitor on a patient, keep it plugged into the power
supply for continuous charging.
• Test the NIBP function.
Every Week
• Charge the ECG module battery.
Every 3
Months
• Clean the exterior of the unit (or clean as needed).
• Fully charge the batteries.
• Perform the annual safety tests.
• NIBP calibration and safety tests.
• Verify the CO2 and agent gas calibration.
MEDRAD also recommends that a complete system calibration and performance checkout be performed annually. Contact MEDRAD Factory Service or
your local MEDRAD office for complete details.
Every Year
In the United States, Canada, Japan, and Europe, the MEDRAD Service
Department offers Preventive Maintenance Programs. These annual programs greatly assist in maintaining accuracy and reliability, and can also
extend the life of the system. COntact MEDRAD for details. In Europe, contact
your local MEDRAD office or your local authorized dealer for further information. Refer to “MEDRAD Subsidiaries” on page 1-1 and “International Offices”
on page 1-2 for address, telephone, and FAX information.
NOTE: Failures which occur due to a lack of proper maintenance will not be
covered under warranty.
2-1
VIEWED/PRINTED:
11/09/2005 at 03:09:15.
MEDRAD Veris 8600
Monitor Safety Testing
You can perform the following tests as part of a periodic safety check.
If the monitor fails any portion of these tests, contact MEDRAD.
The contents of this section include the following verifications and
safety tests:
• Electrical Leakage
• Interface Inspection
• Manual Controls Check
• Alarm Verification
• Vital Sign Modules Verification
• ECG
• SpO2
• NIBP
• IBP
This copy of 3010798 Rev 0 is valid as of Nov-04-2005 at 12:12:00. The signed original is maintained in
Documentation Systems. Prior to use, you are responsible to confirm this copy's revision is the latest released.
• Temperature
• Gas Flow/CO2/O2
• Communications
Repaired modules could require more extensive testing than what is
shown in this list.
Always follow ESD precautions when performing a procedure
discussed in this section.
!
WARNING !
• Because test procedures require working with exposed
electrical circuits, only experienced electrical or biomedical
technicians should perform the procedures.
• After a monitor is altered through repair or hardware
adjustment, you must fully test it before use.
Equipment and Tools
Accessory Testing
2-2
The following procedures assume that the technician has an ESD
safe workbench, a set of electronic hand tools, and a digital
multimeter with a 10 amp setting. At the beginning of each test,
special equipment can be listed. A variety of customized cables, clips,
and test fixtures are also needed to complete the tests. For more
information, contact MEDRAD.
Check the electrical safety of the power cord as part of the patient
monitor safety testing.
This copy of 3010798 Rev 0 is valid as of Nov-04-2005 at 12:12:00. The signed original is maintained in
Documentation Systems. Prior to use, you are responsible to confirm this copy's revision is the latest released.
VIEWED/PRINTED:
11/09/2005 at 03:09:15.
Main Monitor Maintenance and Checkout
Cleaning and Disinfecting
!
WARNING !
• Shock Hazard! Before cleaning the patient monitor, turn the
power off and disconnect the AC power cable.
• Shock Hazard! Never immerse the patient monitor because the
patient monitor has an internal power source that is active even
when the unit is unplugged.
Do not use abrasive cleaners on the patient monitor or on any
sensors or probes. Abrasive cleaners damage the patient monitor.
With the exception of the display screen, wipe clean the exterior
surface of the patient monitor with alcohol. Dry it with a soft, dry cloth.
Because paper towels or tissues can scratch the surface of the
display, use a cotton cloth to clean the patient monitor.
Do not use full-strength alcohol on the display screen. Repeated use
of strong cleaners damages the screen. Clean the display window by
wiping it clean with a soft, lint-free cloth sprayed with common glass
cleaner, however, do not spray glass cleaner directly on the display.
Accidental Wetting
!
WARNING !
• Shock Hazard! Because a patient monitor is an AC-powered
device, an immersed patient monitor presents a danger to
anyone who attempts to handle the device.
Immediately perform the following steps following an accidental
wetting of equipment:
1. Turn the power off. Disconnect AC power from the patient
monitor.
2. If the monitor is monitoring a patient, transfer the patient to
another monitor as quickly as possible.
3. Use a clean, dry towel or cloth to remove the liquid from the
patient monitor housing.
4. A service technician should inspect the patient monitor as soon
as possible.
5. If the internal mechanism is saturated, allow the liquid to drain
out for 24 hours before shipping.
6. If liquid has entered the patient monitor, it must be dried and
cleaned internally. Full testing is required before you can use
the monitor. Contact MEDRAD as soon as possible.
Time is critical. The longer any liquid remains in the patient monitor,
the more damage it can do. It is important to service the patient
monitor immediately after any liquid is spilled into it.
2-3
This copy of 3010798 Rev 0 is valid as of Nov-04-2005 at 12:12:00. The signed original is maintained in
Documentation Systems. Prior to use, you are responsible to confirm this copy's revision is the latest released.
VIEWED/PRINTED:
11/09/2005 at 03:09:15.
MEDRAD Veris 8600
Battery Safety
The batteries require no maintenance. For more information, refer to
the MEDRAD Veris 8600 Patient Monitor Operator’s Manual.
!
CAUTION !
• Do not short circuit the battery terminals! The resulting highcurrent discharge can cause burns.
• Charge the battery completely after extended battery use to
ensure a fully-charged battery is available for the next use.
• Explosion hazard! Keep lighted cigarettes, sparks, and flames
away from the battery.
• The battery contains sulfuric acid electrolyte that can cause
severe burns and eye damage, as well as illness from sulfur
oxide fumes.
• Do not crack, cut, burn, or dissolve (with solvents) the battery
case. Damaging the battery case can cause the release of
sulfuric acid. If sulfuric acid is released from the battery, wear
eye protection and rubber gloves to handle the battery, and use
a solution of baking soda in water to neutralize the sulfuric acid.
• Do not incinerate the batttery. The used battery is a potential
environmental hazard and must be disposed of properly.
Dispose of the old battery in accordance with local and federal
laws.
Long-Term Monitor
and Battery Storage
No special preparation is necessary for long term storage of the
monitor. Although you do not have to remove the battery from the
monitor for long term storage, the battery drains to an unrecoverable
state after 3 months without periodic charging.
Monitor and Accessories
Disposal
At the end of its useful life, you can dispose of the monitor and its
accessories according to your institution’s policies and procedures for
disposal of patient-contact medical waste.
Alternately, you can return the monitor and its accessories to
MEDRAD, Inc., for safe disposal. The shipping address is:
MEDRAD, Inc.
One Medrad Drive
Indianola, PA 15051-0780 USA
Fuse Replacement
There are two AC power fuses located at the AC input side of the
power supply directly above the AC power entry socket. See the fuse
specifications for the proper fuse.
1. Pry the cover from the fuse well above the AC cord.
2. Gently remove the fuse assembly and remove the spent fuse(s).
3. Replace fuses and reassemble in reverse order.
2-4
VIEWED/PRINTED:
11/09/2005 at 03:09:15.
Main Monitor Maintenance and Checkout
Electrical Safety Testing
(Main Monitor)
Perform this test each time you open the patient monitor housing and
before you use the monitor on patients.
!
WARNING !
• Shock Hazard! Because dangerous and lethal voltages are
present during the withstanding voltage, leakage, and ground
continuity test, all leakage and voltage testing must be done
with the monitor housing in place. For complete information
about the proper operating and safety procedures, refer to the
Veris 8600 Patient Monitor Operator’s Manual.
Leakage Test
Equipment and Setup
Perform all testing with the cover on. The following test requires a
Dynatech 232D leakage tester or equivalent.
This copy of 3010798 Rev 0 is valid as of Nov-04-2005 at 12:12:00. The signed original is maintained in
Documentation Systems. Prior to use, you are responsible to confirm this copy's revision is the latest released.
1. Perform a self-test, if applicable, on the DYNATECH 232D by
plugging it into 110 VAC outlet. Turn on the leakage tester. Set
the mode switch to self test. Display should read 1000 ±20 and
the CURRENT SOURCE ACTIVE lamp should be on.
!
CAUTION !
• If these conditions are not met, do not continue with this test.
2. Set the mode switch on the Dynatech 232 to L1-L2 (line
voltage). The display should read the line voltage ±10%. Set the
mode switch to L1-GND. The display should read no more than
5% of L1-L2 on a grounded power system. Set the mode switch
to L2-GND.
NOTE: This should read about the same as the L1-L2 reading
for a grounded system.
Leakage Test Procedure
The monitor must be powered up during all of the isolation tests.
1. Turn the mode switch to EARTH CURRENT LEAKAGE.
Connect the AC cord from the Dynatech 232D to the monitor,
and turn on the unit. With the POLARITY switch in the NORMAL
position, press OPEN GROUND and monitor the readout for
less than 0.25 mA at 120VAC.
2. Change the polarity switch to the REVERSE position, press
OPEN GROUND and monitor the meter for less than 0.25 mA at
120VAC.
3. With the POLARITY switch in the NORMAL position, press
OPEN NEUTRAL and OPEN GROUND switches and monitor
the meter for less 0.25 mA at 120VAC.
4. Change the POLARITY switch to the REVERSE position and
press the OPEN NEUTRAL and OPEN GROUND switches and
monitor the meter for less than 0.25 mA at 120VAC.
5. Cardiac and Anesthetic models only: Connect an IBP ground
leakage cable to a brown lead of the leakage tester. Turn the
LEADS selector switch to the ISO position. Turn the POLARITY
switch to NORMAL, press the ISO TEST button, and monitor the
meter for less than 20 microamps. Verify IBP current leakage is
less than 0.020mA.
2-5
MEDRAD Veris 8600
VIEWED/PRINTED:
11/09/2005 at 03:09:15.
Functional Testing
Interface Inspection
1. Verify that a readable screen displays. For a guide to proper
screen layout, refer to the Veris 8600 Patient Monitor Operator’s
Manual for sample screens.
2. Verify that the screen display is clear and bright when you
directly face the patient monitor.
3. Verify the image quality. There should be no intermittence or
jittering of pixels. The maximum amount of pixels missing from
any display are as follows:
• Maximum number of bad dots allowed per screen is 7.
• Maximum number of bad dots within any 20mm radius circle
is 1.
Manual Controls Check
This copy of 3010798 Rev 0 is valid as of Nov-04-2005 at 12:12:00. The signed original is maintained in
Documentation Systems. Prior to use, you are responsible to confirm this copy's revision is the latest released.
This procedure is for the monitor’s TFT active display.
1. Verify that rotating the menu knob moves the cursor through the
menu items. Verify that when you press the menu knob on a
highlighted menu item the monitor displays a sub-menu.
2. Use the menu knob to enter the CONFIG window and set the
date and time for the real time clock.
3. Press the FREEZE key. Verify that you get an audible response
from the speaker. Press the FREEZE key again to unlock the
waveforms.
4. Press the TREND key. Verify that you get an audible response
from the speaker. A Trend window appears on the display. Press
the TREND key again to close the Trend window. (Or optionally,
press and hold the TREND key to open the TYPE/INTERVAL/
SCREEN menu that you close by selecting EXIT.)
5. Press the STAND BY key. Verify that you get an audible
response from the speaker. A standby confirmation menu or
ALARM STANDBY MODE message should appear. Press the
STAND BY key again to return to the screen.
6. Press the DEFAULT key. Verify that you get an audible response
from the speaker. The Custom Default menu appears. Select
NO and then select EXIT to return to the Main window.
7. Press the NIBP CYCLE/STAT key. Verify an audible response
from the speaker. The NIBP STAT/Cycle Time menu appears.
Choose EXIT to return to the Main window.
8. Press the NIBP key. Verify an audible response from the
speaker and that the NIBP pump runs. Press the NIBP key
again to cancel the reading.
9. Press the PRINT key. Verify an audible response from the
speaker.
NOTE: Since no printer is present, nothing should happen. The
audible response verifies that the key is functional.
10.Press the SILENCE Key. Verify an audible response from the
speaker and that a silence symbol appears in the top, right hand
corner of Waveform 1.
2-6
This copy of 3010798 Rev 0 is valid as of Nov-04-2005 at 12:12:00. The signed original is maintained in
Documentation Systems. Prior to use, you are responsible to confirm this copy's revision is the latest released.
VIEWED/PRINTED:
11/09/2005 at 03:09:15.
Main Monitor Maintenance and Checkout
Fiber Optic Communication
This test is for units with a remote display. If the Veris patient monitor
does not have a remote display, skip this test.
To verify fiber optic communication:
1. Enter the CONFIG menu and select ENTER NETWORK
CONFIG.
2. Enter the password (MEDRAD) to enter, then click on Yes.
3. Set to the following:
• Sync Type:
Fiber Optic
• IP Address:
192.168.000.xxx
• Net Mask:
255.255.255.000
• Port:
02571
• Channel Type:
Peer-to-Peer
• Channel:
X
• SSID:
Any
4. Select Exit to effect changes.
5. Re-cycle the power to save the setting.
6. Turn on a test Veris remote display set to Fiber Optic. Verify
communication.
7. Use the encoder to verify that the screen on the remote display
replicates what is present on the main monitor.
8. Press the PRINT key on the main monitor and verify that the
remote display prints data.
2-7
MEDRAD Veris 8600
VIEWED/PRINTED:
11/09/2005 at 03:09:15.
Alarms Verification
To verify the alarm circuitry for SpO2, perform the following
procedure.
1. In the PARAMS window turn off all monitoring modules except
for SpO2. Set the display to show a plethysmograph waveform.
2. In the PARAMS window set the SpO2 Low Limit Alarm setting to
HIGH. This sets the alarm priority for only this alarm parameter.
3. Use an SpO2 simulator to set the monitor to display the
plethysmograph waveform. Confirm the heart rate reading
appears in the HR parameter box and the saturation reading
appears in the SpO2 parameter box.
4. In the ALARMS window adjust the SpO2 low alarm level above
the saturation reading to cause an alarm condition.
This copy of 3010798 Rev 0 is valid as of Nov-04-2005 at 12:12:00. The signed original is maintained in
Documentation Systems. Prior to use, you are responsible to confirm this copy's revision is the latest released.
5. Verify that the message LOW SPO2 appears at the top of the
waveform channel in red letters.
6. Verify that you get an audible response. The alarm should be a
high priority alarm tone consisting of 3 beeps followed shortly by
two beeps.
7. In the PARAMS softkey window, change the SpO2 Low Limit
Alarm setting to MEDIUM.
8. Verify that the message LOW SPO2 appears at the top of the
waveform channel in yellow letters.
9. Verify that you get an audible response. The alarm should be a
medium priority alarm tone consisting of 3 beeps.
ALARM VOLUME TEST
1. From the ALARMS window, vary the Alarm Volume through the
ranges, from 1 to 10. Verify that the speaker volume changes
according to the setting of the Alarm Volume.
2. Press the alarm SILENCE key once. Verify that the low heart
rate alarm stops for 2 minutes and that the 2-minute Alarm
Silence symbol appears in the top, right hand corner of
Waveform 1.
3. Press and hold the alarm SILENCE key for at least 2 seconds.
Verify that the low heart rate alarm stops and the infinity Alarm
Silence symbol appears in the top, right hand corner of
Waveform 1.
2-8
VIEWED/PRINTED:
11/09/2005 at 03:09:15.
Main Monitor Maintenance and Checkout
Module Verification
NIBP Verification
The NIBP verification requires Dynatech Nevada NIBP Analyzer.
Connect the 8600 monitor to a Dynatech Nevada NIBP Analyzer set
for the following operation.
NIBP Analyzer Settings
Adult 120/80 (90); Heart Rate 80 bpm
Neonate 80/50 (62); Heart Rate 80 bpm
Pressure Adjustments: Gain 100%; Shift 4
1. Use the T-connection with a small adult or adult cuff for these
tests. Wrap the cuff around the monitor’s pole. Connect the cuffs
to the 0-300 mmHg port of the NIBP analyzer.
2. Connect the monitor to an AC (mains) power source and turn on
the monitor.
This copy of 3010798 Rev 0 is valid as of Nov-04-2005 at 12:12:00. The signed original is maintained in
Documentation Systems. Prior to use, you are responsible to confirm this copy's revision is the latest released.
3. Press and hold down the monitor’s NIBP CYCLE/STAT key. The
monitor’s cycle time window appears.
4. Select the NIBP Cycle Time to two minutes.
120/80 OPERATION SETTING
1. In the monitor’s ADM/DIS window set the Patient Size to Adult
mode.
2. Connect the NIBP hose to the fitting on the monitor.
3. Press the NIBP key.
4. Allow the monitor to take at least four (4) readings. Calculate the
average of the four (4) readings and verify that each reading
does not vary by more than ±4% or ±4mmHg (whichever is
greater) from the calculated average. Each reading shall not
vary more than 8 mmHg from the simulator setting.
5. Recalibrate the monitor if necessary.
80/50 OPERATION SETTING
1. Set the monitor to the Neonate mode. Use a Neonate cuff
wrapped around a post on the tray.
2. To verify STAT mode operation, press and hold the NIBP
CYCLE/STAT key.
3. Allow the monitor to take at least four (4) readings. Calculate the
average of the 4 readings and verify that each reading does not
vary by more than ±4% or ±4mmHg (whichever is greater) from
the calculated average. Each reading shall not vary more than 8
mmHg from the simulator setting.
2-9
MEDRAD Veris 8600
This copy of 3010798 Rev 0 is valid as of Nov-04-2005 at 12:12:00. The signed original is maintained in
Documentation Systems. Prior to use, you are responsible to confirm this copy's revision is the latest released.
VIEWED/PRINTED:
11/09/2005 at 03:09:15.
SpO2 Verification
The following test requires a SmartSat SpO2 analyzer and an 8-pin
serial test connector with a BNC connection at one end.
1. Verify that the message SPO2: NO SENSOR appears when
there is nothing connected to the SPO2 connector.
2. Verify that the message SPO2: SENSOR appears when you
plug the finger sensor in, but without a finger actually inserted
into the sensor.
3. Verify that the message SPO2: HIGH AMBIENT appears by
introducing a higher than normal amount of ambient light on the
SpO2 sensor detector. Verify the message disappears within 10
seconds after you remove the ambient light.
4. Place the SpO2 finger sensor on an index finger and verify that
the heart rate and plethysmograph operation display on the
LEDs within 15 seconds. Verify that SpO2 error messages do
not appear (alarm violations can occur depending on individual
readings and monitor set-up).
5. Select Pleth in a waveform setting in the DISPLAY menu. Verify
the LCD displays a plethysmograph waveform. Connect the 8pin serial test cable to the monitor: the 8-pin connector to COM2
on the monitor and the BNC connector into an oscilloscope
channel. In the CONFIG window, scroll to ANALOG OUT
SELECT, then select PLETH. Use the SpO2 finger sensor to
verify that the SpO2 waveforms appear on the scope. The
waveform should be centered on 0 volts and register 1 volt
peak-to-peak. Remove the SpO2 cable.
6. Verify that the pulse tone increases as you change the tone from
1 to 10 in the Alarm Setting window.
7. Use an optical load to simulate a small signal and verify that the
message SPO2: SEARCH or LOST appears after search delay
time ± 5 seconds. (An optical load that can be used for this test
is a foam peanut used for packing.)
8. Enter the DISPLAY screen and change the SpO2 waveform size
to x2 and x4 and verify the scale change on the display for each
setting. Return size setting to x1.
9. Connect a Smart Sat SpO2 simulator and verify the readings are
within the acceptable tolerance found in the “Smart Sat
Procedure” on page 2-11.
2-10
VIEWED/PRINTED:
11/09/2005 at 03:09:15.
Main Monitor Maintenance and Checkout
Smart Sat Procedure
Equipment needed:
• SmartSat SS-100A or equivalent pulse oximetry analyzer
1. Turn on the pulse oximetry analyzer. Press F1 (Sp02 Sim) and
then F2 (AutoSeq) to access the Programmable AutoSequence
Directory.
2. Press F1 (Select ) or F2 (Select ) to select the file “CSI 1”.
When the file has been selected press F5 (Run) to begin the
program.
3. Insert the SpO2 cable from the pulse oximetry analyzer in to the
unit to be tested.
4. Turn on the monitor to be tested. Press F1 (Start) on the pulse
oximetry analyzer to begin the simulation.
This copy of 3010798 Rev 0 is valid as of Nov-04-2005 at 12:12:00. The signed original is maintained in
Documentation Systems. Prior to use, you are responsible to confirm this copy's revision is the latest released.
5. Verify the monitor stabilizes within the limits given for each level.
Use Smart Sat Auto Sequence “CSI 1”.
Level
1
2
3
4
5
6
7
SpO2
99%
96
90
78
61
52
40
Limits
97 - 99%
94 – 98
88 – 92
76 – 80
58 – 64
49 – 55
37 – 43
Heart rate
40 bpm
60
80
100
120
180
300
Limits
39-41 bpm
59-61
79-81
99-101
119-121
179-181
297-303
6. If the Veris monitor fails only 1 level, rerun that level using the
manual mode of the pulse oximetry analyzer.
a. Press PREV (2) times and then F1 (Manual).
b. Press F4 (Change+), and F5 (Change-) to manually set the
SPO2 %.
c. Press F3 (-->Select) to select pulse rate. Press F4
(Change+), and F5 (Change-) to manually set the PULSE
RATE (BPM).
d. Allow 30 seconds for the readings to settle. If the readings
settle within the given limits, pass the monitor.
SpO2 Gating Verification
1. Connect a gating test cable to the GATING connector on the
monitor.
2. Enter the PARAMS menu and set Gating to SpO2 Pulse.
3. Verify that the gating output matches the heart rate frequency.
2-11
MEDRAD Veris 8600
This copy of 3010798 Rev 0 is valid as of Nov-04-2005 at 12:12:00. The signed original is maintained in
Documentation Systems. Prior to use, you are responsible to confirm this copy's revision is the latest released.
VIEWED/PRINTED:
11/09/2005 at 03:09:15.
ECG Verification
This test requires a Dynatech Nevada Model 300 simulator.
NOTE: For Base and BasePlus models, begin with step 5.
1. Select the PARAMS menu to set up for ECG PARAMS to 5Lead, ECG ON, Filters: MONITOR, SENSITIVITY to HIGH.
2. Insert a shorted ECG cable into the ECG connector. Use the
menu knob to enter the DISPLAY window. Set the following and
use the current defaults for the size. They are 25MM except
waveform 1:
• Waveform 1 ECG I x 4.0 25.0
• Waveform 2 ECG II x 4.0 25.0
• Waveform 3 ECG V x 4.0 25.0
3. Exit the DISPLAY window. Verify that the baselines are
centered. Verify that the base line signal is no greater than 3
pixels in height. Select the most solid line as the reference line
and verify that this reference is less than ±3 pixels from the ECG
y-axis center line. Remove the shorted cable.
4. Verify that the message LEADS OFF appears at the top of the
window when a cable is not connected.
5. Connect the 3-lead ECG patient cable to the ECG cable
assembly, and use a Dynatech Nevada Model 300 simulator to
turn on (ECG) normal sinus, 60BPM, amp 1.0mV, axis int.
Respiration rate 20, and the impedance set for 0.5 ohms, and
base impedance for 2K. Set the “Lead select” on the simulator
to Lead II.
6. Rotate the menu knob to select PARAMS and press to enable
the menu. Select for ECG Cable: 3 lead). Set the monitor for
LEAD II waveforms. Check the following lead configurations for
the following items:
• Heart rate 60 ±3 BPM,
• RESPIRATION RATE of 20 ±2 breaths per minute and
• Correct waveform.
2-12
This copy of 3010798 Rev 0 is valid as of Nov-04-2005 at 12:12:00. The signed original is maintained in
Documentation Systems. Prior to use, you are responsible to confirm this copy's revision is the latest released.
VIEWED/PRINTED:
11/09/2005 at 03:09:15.
Main Monitor Maintenance and Checkout
7. Use the Electrode status error messages on the monitor display
to perform a lead off check in LEAD II.
(LL) Red
(LA) Black
(RA) White
LEAD OFF
LA LEADS OFF
RA LEAD OFF
NOTE: This completes the ECG Verification for Base and
BasePlus models. Continue with the Electrical Safety tests.
8. Connect all the leads back on the simulator and select ECG
Cable to 5-lead. Set the monitor for LEAD I waveforms. Verify
that the following messages appear and lead switching occurs
as each lead is disconnected one at a time (reconnect the cable
to eliminate the message and return the waveform):
(V1) Brown
(LL) Red
(LA) Black
(RA) White
V LEADS OFF
LEADS OFF
LA LEAD OFF
RA LEAD OFF
LEADSWITCH TO LEAD II
LEADSWITCH TO LEAD III
NOTE: The Green lead (RL) does not display a lead off
message. Verification is not required.
9. Check the following lead configurations for following items:
• Heart rate 60 ±3 BPM,
• Correct waveforms.
10.Set the Dynatech MED SIM300 to a heart rate of 300BPM.
Verify that the ECG HR reads 300BPM ±1BPM.
11.Turn off the simulator and verify that the message ECG LOST
appears at the top of the window.
12.Turn the simulator back on and set the simulator for 60BPM,
LEAD II and verify that the gain settings are effective at x.5, x2,
and x4 for 1mv ECG input.
13.Select ECG on the simulator, select base, then BPM, and 60.
This gives a normal sinus rhythm at this time. Select ECG, then
ARRH, then VNT2, and then VFIB. The unit should detect an
erratic baseline and display the message ECG LOST.
2-13
MEDRAD Veris 8600
This copy of 3010798 Rev 0 is valid as of Nov-04-2005 at 12:12:00. The signed original is maintained in
Documentation Systems. Prior to use, you are responsible to confirm this copy's revision is the latest released.
VIEWED/PRINTED:
11/09/2005 at 03:09:15.
ECG Gating Verification
1. Enter the PARAMS menu and set Gating to ECG Pulse.
2. Set the ECG simulator to normal sinus and heart rate to 60bpm.
Connect a modified gating cable from the GATING connector on
the monitor to an oscilloscope and verify that the frequency of
the output matches the input BPM.
IBP Verification
The main focus of the following steps is the MED SIM 300 (or its
equivalent). This is only for monitors with IBP (Cardiac and
Anesthetic models).
1. Attach the IBP cable from BP1 on the simulator to IBP 1 on the
monitor’s connector panel.
2. Select BP on the simulator. Select Channel 1. Select STAT.
Select ZERO by using the up and down arrows on the MED SIM
300, scroll through the menu until STAT appears and press to
select.
3. Rotate the rotary encoder knob to highlight PARAMS and move
down to IBP1. Press the menu knob once. Set the SITE for ART.
4. Press the rotary encoder knob again. Adjust the RANGE. This
should be set for 0-200. Press the rotary knob until you reach
IBP1 again.
5. Exit out of PARAMS. Use the rotary encoder knob to scroll to
select the IBP1 ZERO selection on the display. Observe that a
0 (zero) appears on the screen next to the line that contains
ART (---/---( 0 ) MMHG.
6. Return to the Medsim and select WAVE and execute. Select
ART for ARTERIAL and press EXE to execute the function.
Observe the waveform on the screen. Verify that the pressure
reads 120/80 ±2MMHG.
7. Attach the IBP cable from BP2 on the simulator to IBP 2 on the
monitor’s connector panel.
8. Select BP on the simulator. Select Channel 1. Select STAT.
Select ZERO by using the up and down arrows on the MED SIM
300, scroll through the menu until STAT appears and press to
select.
9. Rotate the rotary encoder knob to highlight PARAMS and move
down to IBP2. Press the menu knob once. Set the SITE for CVP.
Press the rotary encoder knob again. Adjust the RANGE. This
should be set for 0-20. Press the rotary knob until you reach
IBP2 again.
10.Exit out of PARAMS. Use the rotary encoder knob to scroll to
select the IBP2 ZERO selection on the display. Observe that a
0 (zero) appears on the screen next to the line that contains
CVP ( 0 ) MMHG.
11.Return to the Medsim and select WAVE and execute. Select
CVP and press EXE to execute the function. Observe the
waveform on the screen. Verify that the pressure reads
12 ±1MMHG.
2-14
Main Monitor Maintenance and Checkout
VIEWED/PRINTED:
11/09/2005 at 03:09:15.
Temperature Verification
1. Measure room air temperature using each probe (1 and 2) and
compare the output with a calibrated thermocouple. Verify each
reading is within 0.5°F of each other and the thermocouple.
2. Place each probe and the thermocouple probe between an
index finger and a thumb. Verify each reading is within 0.5°F of
each other and the thermocouple.
Anesthesia/CO2/O2 Verification
Turn on the monitor and then rotate the menu knob to select the
PARAMS window. Go to Other Params Menus and select Gas Menu.
Select the unit of measure for PERCENT under CO2.
PNEUMATIC LEAKAGE TEST
1. Power cycle the monitor. After the monitor has completed the
auto-cal, connect a vacuum gauge to the sample line of the
water trap. Verify that the vacuum at the sample line is greater
than 10 inches of mercury within 30 seconds.
This copy of 3010798 Rev 0 is valid as of Nov-04-2005 at 12:12:00. The signed original is maintained in
Documentation Systems. Prior to use, you are responsible to confirm this copy's revision is the latest released.
OCCLUSION TEST
1. With the vacuum gauge still attached, verify the OCCLUSION
message appears on the screen and that the pump runs at a
higher speed to clear the occlusion.
EXHAUST FLOW VERIFICATION
1. Verify that the exhaust flow is fluctuating approximately
100 mL/min – 200mL /Min.
2. Obstruct the exhaust port (pinch tubing or cover the port with a
finger) and verify the AGT: NO EXHAUST message appears.
VERIFY EXPIRED O2
1. Run 5% CO2, 95%N2 mixture connected via a breathing
simulator to the sample line. Verify the expired O2 is less than
1%.
NOTE: If any verification fails, contact MEDRAD service.
2-15
VIEWED/PRINTED:
11/09/2005 at 03:09:15.
MEDRAD Veris 8600
Electrical Safety Testing
(Power Supply)
!
WARNING !
• Shock Hazard! Because dangerous and lethal voltages are
present during the withstanding voltage, leakage, and ground
continuity test, all leakage and voltage testing must be done
with the monitor housing in place. For complete information
about the proper operating and safety procedures, refer to the
Veris 8600 Patient Monitor Operator’s Manual.
Verification of Fuses
and Assembly
Leakage Test
Equipment and Setup
This copy of 3010798 Rev 0 is valid as of Nov-04-2005 at 12:12:00. The signed original is maintained in
Documentation Systems. Prior to use, you are responsible to confirm this copy's revision is the latest released.
Perform this test each time you open the power supply housing.
1. Using a small flat head screw driver, remove fuse drawer with a
prying motion. Inspect the fuse rating on each fuse of the AC
inlet. Replace if not specified rating (3.15A @ 250V).
Perform all testing with the cover on. The following test requires a
Dynatech 232D leakage tester or equivalent.
1. Perform a self-test, if applicable, on the DYNATECH 232D by
plugging it into 110 VAC outlet. Turn on the leakage tester. Set
the mode switch to self test. Display should read 1000 ±20 and
the CURRENT SOURCE ACTIVE lamp should be on.
!
CAUTION !
• If these conditions are not met, do not continue with this test.
2. Set the mode switch on the Dynatech 232 to L1-L2 (line
voltage). The display should read the line voltage ±10%. Set the
mode switch to L1-GND. The display should read no more than
5% of L1-L2 on a grounded power system. Set the mode switch
to L2-GND.
NOTE: This should read about the same as the L1-L2 reading
for a grounded system.
Leakage Test Procedure
The monitor must be powered up during all of the isolation tests.
1. Verify Normal Earth Leakage is <0.25 mA at 120VAC line
voltage.
2. Verify Earth Leakage with Reverse Polarity is <0.5mA at
120VAC line voltage.
3. Verify Earth Leakage with Open Neutral is <0.5mA at 120VAC
line voltage.
4. .Verify Earth Leakage with Reversed Polarity and Open Neutral
is <0.5mA at 120 line voltage.
5. Verify Normal Enclosure Leakage is <0.05mA at 120VAC line
voltage.
6. Verify Enclosure Leakage with Reversed Polarity is <0.25mA at
120VAC line voltage.
7. Verify Enclosure Leakage with Open Neutral is <0.25mA at
120VAC line voltage.
2-16
VIEWED/PRINTED:
11/09/2005 at 03:09:15.
Main Monitor Maintenance and Checkout
8. Verify Enclosure Leakage with Reversed Polarity and Open
Neutral is <0.25mA at 120VAC line voltage.
9. Verify Enclosure Leakage with Open Earth Ground is <0.25mA
at 120VAC line voltage.
10.Verify Enclosure Leakage with Reversed Polarity and Open
Earth Ground is <0.25mA at 120VAC line voltage.
Output Verification
1. Apply 120VAC to the AC inlet using a standard AC power cord.
2. Measure at the DB-15 connector.
a. Measure between pins 1 and 8. Verify that the voltage is
16.5VDC (±0.2VDC).
b. Measure between pins 2 and 9. Verify that the voltage is
16.5VDC (±0.2VDC).
This copy of 3010798 Rev 0 is valid as of Nov-04-2005 at 12:12:00. The signed original is maintained in
Documentation Systems. Prior to use, you are responsible to confirm this copy's revision is the latest released.
c. Measure between pins 3 and 10. Verify that the voltage is
16.5VDC (±0.2VDC).
NOTE: If 0V is the measured output, this would indicate an
open wire or miswired connection.
2-17
VIEWED/PRINTED:
11/09/2005 at 03:09:15.
MEDRAD Veris 8600
ECG Module Verification
Equipment Needed
• 1 ECG patient simulator (Fluke 217A or equivalent)
• 1 5-Lead ECG Leadset (3010473)
• 1 ECG fiber optic cable (3005290)
• 1 Hi-Pot Tester
• 1 100K-Ohm resistor with 2 8x32 screws and nuts.
Verification of ECG
Module Charger
1. Connect the ECG moldule to an ECG Module Charger and
verify that the green LED flashes slowly with an approximately
50% duty cycle.
2. Turn on the ECG moldule and verify that the fiber optic
transmitter lights for approximately 1 second.
3. Turn off the ECG module and disconnect it from the charger.
This copy of 3010798 Rev 0 is valid as of Nov-04-2005 at 12:12:00. The signed original is maintained in
Documentation Systems. Prior to use, you are responsible to confirm this copy's revision is the latest released.
Risk Current Testing
1. Turn on the ECG module and record and verify the following
voltages.
NOTE: Verify that all switches not specified as positive are
negative.
Positive
RA
LA
LL
V
RL
ECG Display Testing
Tied to
LA, LL, V, RL
RA, LL, V, RL
RA, LA, V, RL
RA, LA, LL, RL
RA, LA, LL, V
Range
1.75 to 2.75mV
1.75 to 2.75mV
-5.50 to –7.50mV
1.75 to 2.75mV
-0.1 to 0.1mV
1. Remove the ECG module safety tester and connect an ECG
patient simulator by using the 5-Lead ECG Leadset.
2. Set the ECG patient simulator to the following settings: Normal
rhythm, 60bpm, 1mV amplitude
3. Set the Veris monitor to display ECG Leads II, III, and V.
4. Confirm that all three leads display as described.
NOTE: The ECG module needs to be on for this test.
Verify that Lead II displays a waveform with normal rhythm at
60bpm.
Verify that Lead III displays a waveform about 1/3 of the size of
Lead II with a normal rhythm at 60bpm.
Verify that Lead V displays a waveform with the opposite polarity
of Lead II and a normal rhythm at 60bpm.
2-18
VIEWED/PRINTED:
11/09/2005 at 03:09:15.
Main Monitor Maintenance and Checkout
ECG Lead-Off Testing
1. Remove the LA connection from the ECG module.
a. Verify that the message ECG: LA LEAD OFF appears.
b. Verify that the Lead III and Lead V traces becomes flat.
c. Verify that the Lead II trace is unaffected.
d. Replace the LA connection.
2. Remove the RA connection from the ECG module.
a. Verify that the message ECG: RA LEAD OFF appears.
b. Verify that the Lead II and Lead V traces becomes flat.
c. Verify that the Lead III trace is unaffected.
d. Replace the RA connection.
3. Remove the V connection from the ECG module.
This copy of 3010798 Rev 0 is valid as of Nov-04-2005 at 12:12:00. The signed original is maintained in
Documentation Systems. Prior to use, you are responsible to confirm this copy's revision is the latest released.
a. Verify that the message ECG: V LEAD OFF appears.
b. Verify that the Lead V trace becomes flat.
c. Verify that the Lead II and Lead III traces are unaffected.
d. Replace the V connection.
4. Remove the LL connection from the ECG module.
a. Verify that the message ECG: LEADS OFF appears.
b. Verify that all lead traces become flat.
c. Replace the LL connection.
5. Remove all test connections from the ECG module.
2-19
This copy of 3010798 Rev 0 is valid as of Nov-04-2005 at 12:12:00. The signed original is maintained in
Documentation Systems. Prior to use, you are responsible to confirm this copy's revision is the latest released.
VIEWED/PRINTED:
11/09/2005 at 03:09:15.
VIEWED/PRINTED:
11/09/2005 at 03:09:15.
This copy of 3010798 Rev 0 is valid as of Nov-04-2005 at 12:12:00. The signed original is maintained in
Documentation Systems. Prior to use, you are responsible to confirm this copy's revision is the latest released.
3 Main Monitor Troubleshooting
This section lists the possible causes of monitor problems. Use this
table and the drawings in Section 6 to identify and locate components
that malfunction.
Symptom
Problem
Solution
• Main Board fuse blown
• Bad membrane
Recharge the battery
Reconnect DC power cable at PS2 on
Main Board
Replace F3 on Main Board
Replace the keypad membrane
Cannot activate hardkey
function or turn on monitor
with AC power (On/Off
LED is green)
• Membrane panel is
disconnected or loose
• Keypad membrane is bad
Reconnect ribbon cable to J7 on
Main Board
Replace keypad membrane panel
Display is blank or not
readable
• Video screen cables to Main
Board are disconnected or
loose
• Inverter not plugged in
Reconnect data and inverter cables to
connectors on Main Board
(J2, J3, J4, and/or J5)
Make sure all Inverter connections
are secure.
Replace the inverter
Unit won’t power up (On/
Off LED is dark)
• Battery is dead
• Main Board is disconnected
• Bad inverter
No sound from speaker
• Volume turned down
• Main Board connection is
disconnected or loose
• Speaker wire broken at
speaker terminals
Set volume higher in Configuration
window.
Reconnect J20 on Main Board
Check speaker wires for breaks or
bad crimp pins
Speaker scratchy or
unclear
• Metal debris on speaker
• Bad speaker
Remove debris from speaker drum
Replace speaker
COM 1 serial interface
doesn’t work
•
•
•
•
Reset monitor to external printer
Replace with correct serial cable
Reset baud rate and other settings
Replace the Main Board
No ECG trace displays
• ECG module battery may not
be charged.
• ECG Cable may be bad.
• The connection between
Main Board J17 and VSM
Board P1 is loose or
disconnected.
• Fiber optic cable from ECG
Gating Board may be loose or
disconnected.
• Fiber optic cable from ECG
Gating Board may be bad.
• Main Board or VSM Board
may be bad.
Set to internal printer
Incorrect or bad cable
Setting mismatch
Connector is bad
Charge ECG module battery.
Replace with known good cable.
Reseat the connection.
Reseat the connection.
Replace cable.
Replace Board(s)
3-1
This copy of 3010798 Rev 0 is valid as of Nov-04-2005 at 12:12:00. The signed original is maintained in
Documentation Systems. Prior to use, you are responsible to confirm this copy's revision is the latest released.
VIEWED/PRINTED:
11/09/2005 at 03:09:15.
MEDRAD Veris 8600
Symptom
No NIBP reading displays
Unit does not communicate with the remote display
Problem
Solution
• Check for leaks in cuff or cuff
hose.
• Tubing at NIBP module at
base of unit may be pinched
or loose.
• Tubing at the pressure
transducer on the Main Board
or at receptacle at top of unit
may be pinched or loose.
• NIBP module may be bad.
Replace with known good cuff or
hose.
Reseat or replace loose or pinched
tubing.
• Fiber optic cable to remote
display may be loose or
disconnected.
• Fiber optic cables not
connected properly
Reseat or reconnect fiber optic cable.
• Fiber optic cable may be bad.
• Remote display may be
malfunctioning
• Network settings in the
CONFIG. menu may be
incorrect.
• Communication Board may
not be seated tightly to the
Main Board.
• Communication Board may
be bad.
SpO2 is “noisy”
Temperature not working
properly (readings are out
of spec.)
3-2
• Sensor may be bad.
• Receptacle may be damaged.
• The connection between
Main Board J17 and VSM
Board P1 is loose or
disconnected.
• Main Board or VSM Board
may be bad.
• The connections on the
Temperature Board are loose
or disconnected.
• Temperature cables or Board
may be bad.
Reseat or replace loose or pinched
tubing.
Replace NIBP module.
Make sure that the fiber optic cables
go from “TX” to “RX”. They should
NOT go “TX” to “TX”/”RX” to “RX”
Replace fiber optic cable.
Try another remote display with the
system.
Reset network settings to correct
settings.
Verify Communication Board is
seated to the Main Board.
Replace Communication Board
Replace the sensor.
Replace receptacle.
Reseat the connection.
Replace Board(s)
Reseat the connections.
Replace Board and cables.
This copy of 3010798 Rev 0 is valid as of Nov-04-2005 at 12:12:00. The signed original is maintained in
Documentation Systems. Prior to use, you are responsible to confirm this copy's revision is the latest released.
VIEWED/PRINTED:
11/09/2005 at 03:09:15.
Main Monitor Troubleshooting
Troubleshooting and Repair
Before attempting to repair a damaged monitor the technician must
fully understand the functions of the monitor. The service technician
should have read and understood all the previous sections of this
manual.
You must fully repair, calibrate, and test all damaged monitors before
you use them on patients. The monitor must meet the original
operating specifications before you use it on a patient.
Always follow ESD precautions when performing any of the
procedures discussed in this section.
Main Board
The Main Board contains the primary processors, storage memory,
NIBP circuitry, communication interfaces, audio driver, vital signs
module connections, low voltage power regulation, and video
generation and keypad inputs (User I/O).
The Main Board has an adjustable pot R84 that you set during NIBP
calibration. There are two CPUs on the Main Board that you must
program from a Service Download Station. The programmable
settings remain in non-volatile memory. Repair or improper handling
of the Main Board can corrupt this software.
There are two replacable 3-amp time-delay fuses (F1 and F3) for the
battery input at PS1. There is one replaceable 4-amp time-delay fuse
for the power supply module at PS2 (F2 protects the supply output).
If you replace the Main Board you are required to cal-check the NIBP
module. NIBP pneumatics assemblies and Main Boards may not be
changed unless re-calibrated.
The Main Board is not a field-repairable component. Replacement
Main Boards are pre-tested, programmed, and calibrated.
!
DANGER !
• High Voltage! Remove the battery connections before servicing
the Main Board.
3-3
VIEWED/PRINTED:
11/09/2005 at 03:09:15.
MEDRAD Veris 8600
Power Supply
!
DANGER !
• High Voltage! Repairing and testing the power supply requires
working with dangerous voltages. The power supply module
should only be serviced by experienced electrical repair
technicians.
The external power supply is not field servicable. Return the power
supply to MEDRAD for service.
Fuse Replacement
The main fuses for the power supply is located in an external
compartment above the AC power cord connection. Replace only
with T 4A L 250V fuses.
This copy of 3010798 Rev 0 is valid as of Nov-04-2005 at 12:12:00. The signed original is maintained in
Documentation Systems. Prior to use, you are responsible to confirm this copy's revision is the latest released.
You do not have to open the power supply case to change the main
power fuses. See “Fuse Replacement” on page 2-4.
!
WARNING !
• Shock hazard. Substitution of fuses or jumping the fuse
contacts can endanger the patient and damage the monitor.
3-4
VIEWED/PRINTED:
11/09/2005 at 03:09:15.
This copy of 3010798 Rev 0 is valid as of Nov-04-2005 at 12:12:00. The signed original is maintained in
Documentation Systems. Prior to use, you are responsible to confirm this copy's revision is the latest released.
4 Main Monitor Theory of Operation
Power Module
The patient monitor employs a universal switching power supply for
international use.
In order to monitor the status of the line power and the condition of
the battery pack, the internal power supply circuitry drives several
status lines available to the main module. The power management/
watchdog circuit provides a low battery level detection mechanism
and a hardware-based check on software operation (watchdog timer).
Main CPU and System
The microprocessor circuitry handles the Main Board computational
functions and provides integrated I/O functions, including timers, I/O
pins, serial interfaces, and analog I/O.
The CONM module contains a microprocessor and associated
circuitry for NIBP and the ability to control the optional Capnometer
Module. No electrical connection is made with the patient from the
monitor for NIBP. The vital signs parameters are passed to the main
module using a serial channel.
Vital Signs Module
The vital signs module is a single printed circuit board with
connectors to the Main Board, the ECG input leads, the SpO2
connector, and the temperature sensor. The vital signs module
contains a microprocessor and associated circuitry for pulse oximetry,
temperature, ECG signals, and TTI respiration. ECG signals can be
either 3-lead single channel or 5-lead triple channel. Patient isolation
for galvanic contact is required for the temperature and ECG
functions. Patient isolation for non-galvanic contact is required for the
pulse oximetry sensor. A CAN Bus passes the vital signs parameters
to the main module.
The main module sends the vital signs module control information
and the vital signs module sends the main module waveforms and
hardware status. The communication cycle is 20 Hz for the vital signs
information from the vital signs module, twice a second for the status
of the vital signs module, and as needed for the control information
from the main module.
Speaker Driver
The speaker drive circuit is a DAC controlling speaker volume and an
output pin to control frequency. A software-controlled timer generates
a square-wave signal that drives the speaker. Hence any drive
frequency has harmonic components and generates no “pure tones.”
Applicable standards recommend against the use of pure tones in
alarm situations to reduce the risk of an individual with a “notch”
hearing deficit missing an alarm.
4-1
This copy of 3010798 Rev 0 is valid as of Nov-04-2005 at 12:12:00. The signed original is maintained in
Documentation Systems. Prior to use, you are responsible to confirm this copy's revision is the latest released.
VIEWED/PRINTED:
11/09/2005 at 03:09:15.
MEDRAD Veris 8600
ECG Module
The patient module receives the physiological ECG data from the
patient as either a 5- or 3-lead format (user selectable; a 5-lead
placement can be viewed as either 3-lead or 5-lead). The module
receives the ECG data along with the gradient and RF noise
generated by the scanner. This information is converted to a pulse
width modulated light signal which is sent over a fiber optic cable to
the main monitor. The monitor converts the light signal to an
electronic signal. At that point the information is processed to remove
the noise from the ECG signal. The ECG signal is forwarded to the
monitor in a format that is capable of being received for processing
for display on the monitor screen. Also at this point the ECG signal is
made available as a gating signal to the scanner in both a waveform
and a pulse.
Pulse Oximeter Module (SpO2)
The method of measuring the oxygen saturation is
spectrophotometry and plethysmography. The sensor is made up of a
dual emitter and a detector. The emitter and detector are remote from
the patient by a length of optical fibers which remove the electronic
components from the patient area. The sensor emits two wavelengths
of light: red and infrared. The photodetector measures the intensity of
the two wavelengths that pass through the measuring site
unabsorbed. The resultant signal is converted to an electrical signal
and returned to the monitor where the information is processed and
displayed for the user to view.
Capnometer Module (CO2)
The optional capnometer (Anesthetic models only) contains the
circuitry for monitoring the sidestream CO2 level by actively sampling
from the patient’s airway. It contains provisions for interfacing with
galvanic oxygen monitoring option sub-modules. No electrical
connection is made with the patient from the monitor for capnometry.
The CONM module controls the capnometer.
The CO2 Board contains an assembly known as a “bench.” This
bench contains the optics, IR source, detector, sample cell, and
optical filters. The purpose of this bench is to convert CO2 levels in a
gas sample to electrical signals.
The bench assembly utilizes the principle of infrared absorption
spectrometry to measure the amount of CO2 in patients breath.
Infrared absorption spectrometry is widely used in gas analysis.
Using a phenomenon explained in “Beers Law,” CO2 gas absorbs
certain wavelengths of infrared energy with the amount depending on
the amount of CO2 gas. A detector, outfitted with an infrared
bandpass filter, only allows a certain wavelength of infrared energy
that the CO2 gas absorbs. As the CO2 concentrations in the sampled
air passes through the sample cell, the detector senses the infrared
energy changes and converts them to an electrical signal. This
electrical signal is then amplified and conditioned and sent to a
microprocessor for processing and then sent to a display.
4-2
Main Monitor Theory of Operation
This copy of 3010798 Rev 0 is valid as of Nov-04-2005 at 12:12:00. The signed original is maintained in
Documentation Systems. Prior to use, you are responsible to confirm this copy's revision is the latest released.
VIEWED/PRINTED:
11/09/2005 at 03:09:15.
Infrared analysis of the gas samples is done using Beer’s Law. The
formula for Beer’s Law is as follows:
I
I0
e
ε( λ )
I = I0 e – ε ( λ )cd
Infrared value of measured sample.
Infrared value of light source.
Exponential function.
Extinction coefficient.
c
Concentration of the gas sample
d
Distance measured through the sample
The CO2 Board also uses a reference channel. The purpose of this
reference channel is to “cancel” the effects of IR source changes,
sample cell contamination, temperature, etc. The only difference from
the CO2 channel is that the detector is outfitted with an optical filter
that is tuned to a band in the infrared spectrum that is transparent to
CO2 and other gases typically found in the medical industry. The
signal from the reference channel is processed similarly to that of
CO2 measurement channel.
The CO2 and reference detectors work by an effect known as
“pyroelectric.” Pyroelectric effect works by changing energy levels,
either increasing or decreasing, that are imposed on a sensing
element. The detector is outfitted with an optical bandpass filter that
passes only a narrow band of a determined wavelength of infrared
energy. The infrared source is modulated at 15 hertz (Hz) to provide
varying energy for the detector and amplifier circuits.
Correction for temperature and pressure effects on the CO2 sample is
implemented to maintain accuracy over a wide temperature and
atmospheric pressure range.
Galvanic Oxygen
Sub-Module (O2)
The galvanic oxygen-monitoring sub-module contains the control and
signal acquisition circuitry for monitoring the O2 level in the airflow
drawn by the capnometer module. It is an optional daughter board on
the capnometer module. No electrical connection is made with the
patient from the monitor for oxygen monitoring.
The relationship between gas concentration and pressure is
calculated by the microprocessor. The numerical value displayed by
the monitor (O2 Calculated) is generated using the following formula.
PC
20.9
O2 Calculated = O 2 Measured × ------------------------------ × -----O 2Ambient P 0
The measured O2 predictive value is multiplied by a fixed value
derived from room pressure divided by room ambient oxygen levels.
The measurement is further adjusted by multiplying the ratio of the
pressure determined at calibration (PC) with the current pressure (P0).
4-3
VIEWED/PRINTED:
11/09/2005 at 03:09:15.
MEDRAD Veris 8600
Temperature
The Veris monitor uses a fiber-optic thermometer to measure
temperature. This provides accurate and reliable measurements in
the MRI environment.
This sensor probe features an environmentally inert, non-conductive,
non-metallic, miniature probe, making it ideal for harsh operating
conditions like the MRI environment, which includes conditions where
high levels of electromagnetic interference (EMI) such as RF field or
high voltages exist. The probe itself is inert to chemical and biological
agents and is ideally suited to applications where a completely nonreactive sensor is required or where other types of sensors would
malfunction or become damaged.
Temperature-sensitive
Phosphor
This copy of 3010798 Rev 0 is valid as of Nov-04-2005 at 12:12:00. The signed original is maintained in
Documentation Systems. Prior to use, you are responsible to confirm this copy's revision is the latest released.
Optical Fiber
Incident pulse of LED Time-decaying phosphor
emission pulse returns to
energizes phosphor;
spontaneous emission detection circuitry
occurs
Figure 4-1: Temperature Probe Signals
The temperature system is comprised of a probe, a fiber optic cable,
detection optics, and signal processing, and interfaces contained
within the main monitor. The probe itself contains a patented, highly
temperature-sensitive phosphor as its sensing element, and both the
probe and phosphor are protected by a fluoropolymer sheath. The
standard cable length is 3 meters.
The temperature system uses a fluorodecay sensing technique.
Pulsed light from an LED is sent down the optical fiber to energize the
phosphor. The time decaying glow of the phosphor changes with
temperature and is transmitted back to the sensor head where it is
converted to a temperature reading. The temperature system uses a
unique ratio measurement system to minimize inaccuracies due to
signal loss from the fiber and connector.
The temperature system is fully calibrated at the factory. Each probe
contains its own calibration data within an embedded memory
module.
4-4
Main Monitor Theory of Operation
This copy of 3010798 Rev 0 is valid as of Nov-04-2005 at 12:12:00. The signed original is maintained in
Documentation Systems. Prior to use, you are responsible to confirm this copy's revision is the latest released.
VIEWED/PRINTED:
11/09/2005 at 03:09:15.
Communications
The monitor provides two patient-isolated external RS-232 serial data
ports (TX, RX, and ground):
• The DB-9 COM1 port is configured for compatibility with ASCII
printer applications.
• The DIN-8 COM2 port is custom-configured with one pin
reserved for analog output.
The main module drives a patient-isolated external analog output. It
provides a 0 to 1 v output capable of driving a high-level input, such
as a defibrillator or chart recorder.
Gating
The gating function provides an analog signal output to the scanner.
When this signal is detected by the scanner, the scanner initiates the
image acquisition based on the signal received. The function
provides two types of signals to the scanner: waveform and pulse.
These signals are derived from two sources: ECG and SpO2. The
waveform signal is the signal as extracted from the patient, processed
by the monitor, and sent to the scanner input. The pulse signal
consists of a pulse coincident with the R-wave or the peak of the
SpO2 wave with a pulse width such that the scanner can detect the
signal, and amplitudes equivalent to the peaks of the waveform.
The system provides appropriate gating signals at least 97% of the
time keeping false positives and false negatives to less than 3%.
The user selects which type of signal and the source of the signal
from the parameter menu. The interface cabling from the system to
the scanner is scanner specific for the major scanners. For other
scanners, a universal gating cable interface is available.
Printer
The printer only comes with an optional remote display.
4-5
MEDRAD Veris 8600
The following block diagram aids in tracing communication and data
routes within the system. The diagram is keyed to the theory of
operations found on the previous pages.
P1
P2
J19 J10 J4
J7
J2
P 1 P 3
P4
U5
J2
J1
J1
U7
P6
P3
J20
J6
J3
J17
P 4
J18 PS1 J5
P 7
P 8
P 5
P1
P1
J4
P1
This copy of 3010798 Rev 0 is valid as of Nov-04-2005 at 12:12:00. The signed original is maintained in
Documentation Systems. Prior to use, you are responsible to confirm this copy's revision is the latest released.
VIEWED/PRINTED:
11/09/2005 at 03:09:15.
Block Diagram
J1
P3
P7
J16
4-6
P5
U15 U17
P6
P 6
P 2
VIEWED/PRINTED:
11/09/2005 at 03:09:15.
5 Main Monitor Disassembly
Before You Begin
Tools Needed
• Proper ESD mat and antistatic grounding straps
• #1 Philips screwdriver
• #2 Philips screwdriver
• Small flat scredriver
• 1/2-inch socket, deep well
• 5/16-inch socket, deep well
• 3/16-inch socket, deep well
This copy of 3010798 Rev 0 is valid as of Nov-04-2005 at 12:12:00. The signed original is maintained in
Documentation Systems. Prior to use, you are responsible to confirm this copy's revision is the latest released.
• 1/2-inch wrench
• 3/8-inch wrench
• 1/2-inch nut driver
• 5/16-inch nut driver
• 1/4-inch nut driver
• 3/32-inch Hex key
• Grounded soldering iron
Supplies Needed
• Kapton tape
• Labeling material
• Cotton cloth
• Rubbing alcohol
Precautions
1. Turn the monitor off.
2. Disconnect the A.C. (Mains) power cord and remove the
batteries.
!
WARNING !
• The procedures presented in this section are intended to be
implemented by qualified biomedical engineering or field service
personnel for PCB assembly replacement.
• The procedures presented in this section are not intended to be
used for component-level trouble shooting and repair of the PCB
assemblies. Only MEDRAD service personnel are authorized to
perform component-level repair.
• Possible safety hazard. Read the battery safety information
provided in “Replacing the Batteries” on page 5-21
5-1
MEDRAD Veris 8600
VIEWED/PRINTED:
11/09/2005 at 03:09:15.
The repair procedures for the monitor are included here for the
determination of damaged or unusable assemblies. MEDRAD does
not recommend attempting the field repair of the circuit boards.
Service Safety
!
DANGER !
• The patient monitor uses an external AC power supply that
contains potentially lethal voltages.
Electrostatic Discharge
Protection
The procedures in this section require handling of electrostatic
sensitive components. Microprocessors and other electronic
components can be permanently damaged by attempting repairs at
an unprotected workbench.
This copy of 3010798 Rev 0 is valid as of Nov-04-2005 at 12:12:00. The signed original is maintained in
Documentation Systems. Prior to use, you are responsible to confirm this copy's revision is the latest released.
Use all electrostatic discharge (ESD) protection as described!
• Perform the disassembly procedure on an antistatic mat that is
grounded. Check the ground cable to insure that it is connected
to a good earth ground.
• Use a grounded soldering iron.
• Wear a wrist-grounding strap.
• Connect the wrist strap and mat through a resistor (1 megohm
typical) to the same ground source.
• Test the wrist-ground straps on a daily basis.
• Temporarily store components in metal or antistatic containers.
Do not store components in plastic dishes. Store circuit boards
in sealed antistatic bags or cover them in antistatic boxes. Do
not store electronic boards directly in cardboard boxes.
5-2
VIEWED/PRINTED:
11/09/2005 at 03:09:15.
Main Monitor Disassembly
Front Housing Removal
Follow the ESD cautions discussed in “Electrostatic Discharge
Protection” on page 5-2.
!
CAUTION !
• Keep the base cover in place to prevent hardware from dropping
onto components in the base of the system.
1. Remove the covers from the communication ports.
This copy of 3010798 Rev 0 is valid as of Nov-04-2005 at 12:12:00. The signed original is maintained in
Documentation Systems. Prior to use, you are responsible to confirm this copy's revision is the latest released.
Remove covers from
Communication Ports
Figure 5-1: Communication Port Covers
2. Remove the nine (9) screws from the bottom of the display.
Remove screws
Remove
screws
Remove three screws along this side.
Figure 5-2: Screws on Bottom of Display
5-3
MEDRAD Veris 8600
VIEWED/PRINTED:
11/09/2005 at 03:09:15.
3. Remove the 12 screws holding the front and rear assemblies
together and the two (2) screws by the handle. When the screws
are removed, the rear housing slides off toward the back.
NOTE: The screws have lock washers.
This copy of 3010798 Rev 0 is valid as of Nov-04-2005 at 12:12:00. The signed original is maintained in
Documentation Systems. Prior to use, you are responsible to confirm this copy's revision is the latest released.
Two (2) Screws
by Handle
Figure 5-3: Screws on the Back of the Monitor
4. Remove the three (3) screws holding the front bezel in place.
NOTE: When you remove the screws, carefully lower the front
bezel to avoid damaging the ribbon cable.
Remove Three (3) Bezel Screws
Figure 5-4: Remove Bezel Screws
5-4
VIEWED/PRINTED:
11/09/2005 at 03:09:15.
Main Monitor Disassembly
5. Label and remove the ribbon cable from J7 on the Main Board.
6. Label and remove the water trap tubes.
NOTE: Trim the tubes back in reassembly to create a good seal.
Ribbon Cable at J7
NOTE: Remove this
cable before
opening the unit all
the way.
This copy of 3010798 Rev 0 is valid as of Nov-04-2005 at 12:12:00. The signed original is maintained in
Documentation Systems. Prior to use, you are responsible to confirm this copy's revision is the latest released.
DRY SIDE
WET SIDE
Water Trap Tubes
Figure 5-5: Remove Ribbon Cable at J7
7. Label and disconnect from the Main Board:
• the backlight cable from J2,
• the rotary encoder cable from J3, and
• the membrane switch cable from J6.
J2
J7
J6
J3
Figure 5-6: Main Board Connections
5-5
MEDRAD Veris 8600
This copy of 3010798 Rev 0 is valid as of Nov-04-2005 at 12:12:00. The signed original is maintained in
Documentation Systems. Prior to use, you are responsible to confirm this copy's revision is the latest released.
VIEWED/PRINTED:
11/09/2005 at 03:09:15.
8. If the patient monitor has a fiber optic connection to the main
monitor, label and disconnect the fiber optic cables from U5 and
U7 on the DPAC Communication Board.
U5 & U7
Figure 5-7: DPAC Assembly
9. If the DPAC Communication Board needs to be replaced,
remove the DPAC Communication Board from the Main Board.
If only the Main Board needs to be replaced, remove the DPAC
Communication Board from the Main Board as an assembly to
attach to the new Main Board.
NOTE: The DPAC Communication Module is not provided with a
replacement Main Board. Retain the DPAC Communication
Module from your existing system and attach to the new Main
Board.
10.Remove the Main/Communication assembly from the chassis.
This assembly is held with six (6) #6 screws.
Figure 5-8: Remove the Six Screws
5-6
VIEWED/PRINTED:
11/09/2005 at 03:09:15.
Main Monitor Disassembly
Front Housing Disassembly
1. Remove the two (2) hex-head screws.
Remove Hexhead screws
Figure 5-9: Remove Hex-head screws.
This copy of 3010798 Rev 0 is valid as of Nov-04-2005 at 12:12:00. The signed original is maintained in
Documentation Systems. Prior to use, you are responsible to confirm this copy's revision is the latest released.
2. Remove the front display assembly from the chassis.
Rotary Encoder Knob
Removal and Replacement
1. With a flat screwdriver pry the rotary encoder knob from the
unit.
Rotary
Encoder
Knob
Figure 5-10: Remove the Rotary Encoder Knob
2. Remove the retaining nut and lock washer from the front of the
housing.
3. If you need to replace the rotary encoder knob assembly,
Insulate the new rotary encoder knob assembly with Kapton
tape.
4. Install the rotary encoder knob assembly and tighten the nut and
lock washer.
5. Install the rotary encoder knob.
5-7
MEDRAD Veris 8600
VIEWED/PRINTED:
11/09/2005 at 03:09:15.
Membrane Keypad
Removal and Replacement
Use this procedure only if you need to replace the membrane keypad
on the monitor.
NOTE: Once you remove a membrane from the front panel you
cannot reattach it to the front panel.
1. With a flat screwdriver pry the rotary encoder knob from the
unit.
Rotary
Encoder
Knob
This copy of 3010798 Rev 0 is valid as of Nov-04-2005 at 12:12:00. The signed original is maintained in
Documentation Systems. Prior to use, you are responsible to confirm this copy's revision is the latest released.
Figure 5-11: Remove the Rotary Encoder Knob
2. Push a flat screwdriver through the ribbon cable slot to begin
peeling the membrane off the front of the unit. Do not attempt to
use tools to peel the membrane from the front as you may mar
the case and be unable to properly attach the new membrane.
Use a screwdriver to push
membrane away from housing
through the ribbon cable slot
Figure 5-12: Removing Membrane
3. Peel the membrane away from the front housing.
4. Remove any excess glue from the front housing. Use a cotton
cloth dampened with alcohol. If any glue remains on the
housing, the new membrane cannot adhere properly.
5. Remove the protective backing from the adhesive on the new
membrane.
6. Install the new membrane. Line up the membrane along a
straight edge and lay the membrane into place. Press down
firmly on the membrane when it is in position.
7. Reattach the rotary encoder knob to the front housing.
5-8
This copy of 3010798 Rev 0 is valid as of Nov-04-2005 at 12:12:00. The signed original is maintained in
Documentation Systems. Prior to use, you are responsible to confirm this copy's revision is the latest released.
VIEWED/PRINTED:
11/09/2005 at 03:09:15.
Main Monitor Disassembly
Water Trap Manifold Removal/
Replacement
1. Remove the two (2) Phillips screws from the back of the
housing.
Screws
Figure 5-13: Remove the Water Trap Manifold
2. Unplug the manifold from the wire. The wire disconnects at a
junction between the chassis and the manifold.
Disconnect
manifold wire
Figure 5-14: Wire to CO2 Manifold
3. When you install the new manifold, be sure to insert the lower
tab into the recess first.
4. Replace the two (2) Phillips screws.
5-9
MEDRAD Veris 8600
This copy of 3010798 Rev 0 is valid as of Nov-04-2005 at 12:12:00. The signed original is maintained in
Documentation Systems. Prior to use, you are responsible to confirm this copy's revision is the latest released.
VIEWED/PRINTED:
11/09/2005 at 03:09:15.
Inverter Board
Removal and Replacement
!
CAUTION !
• High Voltage! The Inverter Board will contain high voltage. Use
caution when servicing the Inverter Board and/or the front
display assembly.
1. Label and disconnect the cables (Item 1 on the photo) on the
Inverter Board.
2. Remove the four (4) nuts and lock washers.
Inverter
1
2
Figure 5-15: Remove the Inverter Board
3. Remove and replace the Inverter Board.
4. Fasten the new Inverter Board with the four (4) nuts and nylon
washers you removed earlier. (See #2 in "Figure 5-15:Remove
the Inverter Board".)
NOTE: When you install the new Inverter Board, be sure the
nylon standoffs are in place.
5. Reattach the cables. (See #1 in "Figure 5-15:Remove the
Inverter Board".)
5-10
VIEWED/PRINTED:
11/09/2005 at 03:09:15.
Main Monitor Disassembly
Display Screen
Removal and Replacement
!
CAUTION !
• High Voltage! The Inverter Board will contain high voltage. Use
caution when servicing the Inverter Board and/or the front
display assembly.
1. Remove the 10 Phillips screws: three (3) at the top, three (3) at
the bottom, two (2) at each side.
Screws
This copy of 3010798 Rev 0 is valid as of Nov-04-2005 at 12:12:00. The signed original is maintained in
Documentation Systems. Prior to use, you are responsible to confirm this copy's revision is the latest released.
Inverter
Board
Screws
Figure 5-16: Remove the Display Housing Screws
5-11
This copy of 3010798 Rev 0 is valid as of Nov-04-2005 at 12:12:00. The signed original is maintained in
Documentation Systems. Prior to use, you are responsible to confirm this copy's revision is the latest released.
VIEWED/PRINTED:
11/09/2005 at 03:09:15.
MEDRAD Veris 8600
2. Label and disconnect the cable at Label 2 from the Inverter
Board.
2
Inverter
Figure 5-17: Remove the Inverter Board Connection
3. Disconnect the ribbon cable from the display.
3
Figure 5-18: Remove the Ribbon Cable, Display Screws
5-12
This copy of 3010798 Rev 0 is valid as of Nov-04-2005 at 12:12:00. The signed original is maintained in
Documentation Systems. Prior to use, you are responsible to confirm this copy's revision is the latest released.
VIEWED/PRINTED:
11/09/2005 at 03:09:15.
Main Monitor Disassembly
4. Turn the display over and remove the four Phillips screws.
Screws
Figure 5-19: Remove the Display Screws
5. Remove and replace the display screen.
NOTE: Be sure the display and the inside of the clear cover are
clean before you re-assemble the assembly. See “Cleaning and
Disinfecting” on page 2-3.
6. Reassemble in reverse order.
NOTE: Make sure the EMI window is centered and installed with
the painted border towards the gasket on the front of the unit.
5-13
Replacing Printed Circuit
Boards (PCBs)
The Vital Signs Module (VSM) Board, the Temperature Board, and
the IBP Board are found behind the Main Board.
ECG Gating
Board
Vital Signs
Module
(VSM) Board
Temperature
Board
IBP Board
Figure 5-20: Printed Circuit Boards
IBP Board
NOTE: This PCB is only on Cardiac and Anesthetic models.
1. Label and remove the cable from P1 and P3 on the IBP Board.
P1
5 Screws
This copy of 3010798 Rev 0 is valid as of Nov-04-2005 at 12:12:00. The signed original is maintained in
Documentation Systems. Prior to use, you are responsible to confirm this copy's revision is the latest released.
VIEWED/PRINTED:
11/09/2005 at 03:09:15.
MEDRAD Veris 8600
P3
Figure 5-21: IBP Board
2. Remove the five (5) Phillips screws holding the board to the
chassis.
3. Remove the old board.
4. Install the new IBP Board.
5. Attach the cable from Main Board J18 to P1 on the IBP Board.
Attach the patient connector cable to P3 on the IBP Board.
6. Reassemble in reverse order.
5-14
This copy of 3010798 Rev 0 is valid as of Nov-04-2005 at 12:12:00. The signed original is maintained in
Documentation Systems. Prior to use, you are responsible to confirm this copy's revision is the latest released.
VIEWED/PRINTED:
11/09/2005 at 03:09:15.
Main Monitor Disassembly
Temperature Module/Board
NOTE: This PCB is only on Cardiac with Temperature and Anesthetic
with Temperature models.
1. Remove the four (4) screws from the Temperature Board.
Remove
Screws
Figure 5-22: Temperature Assembly
2. Remove the cables from J4 and near J16 from the Temperature
Board.
NOTE: The cables are matched with the Temperature Board.
The new Temperature Board should come with new cables. If
the new board does not have cables, contact MEDRAD Service.
3. Remove the four (4) Philips screws at the patient connector.
4. Reassemble in reverse order. Make sure that Cable 1 attaches
to T1 at the patient connector and Cable 2 attaches to T2 at the
patient connector.
5-15
MEDRAD Veris 8600
This copy of 3010798 Rev 0 is valid as of Nov-04-2005 at 12:12:00. The signed original is maintained in
Documentation Systems. Prior to use, you are responsible to confirm this copy's revision is the latest released.
VIEWED/PRINTED:
11/09/2005 at 03:09:15.
ECG Gating Board
!
CAUTION !
• The ECG Gating Board is attached to the Vital Signs Module
(VSM) Board at J1 on the VSM Board. Be careful when
removing the ECG Gating Board from the VSM Board.
1. Label and remove the temperature cable at P5 (if unit has
temperature) and the ECG cables at U15 and U17 on the ECG
Gating Board.
P5
U15
U17
Figure 5-23: ECG Gating Board
2. Remove the four (4) Phillips screws holding the ECG Board to
the VSM Board.
Screws
ECG Gating
Board
Temperature
Board
Vital Signs Module
(VSM) Board
Figure 5-24: Removing ECG Gating Board
3. Attach new ECG Gating Board to the VSM Board with the four
(4) Phillips screws removed earlier.
4. Reattach the emperature cable at P5 and the ECG cables at
U15 and U17 on the ECG Gating Board.
5-16
VIEWED/PRINTED:
11/09/2005 at 03:09:15.
Main Monitor Disassembly
Vital Signs Module (VSM) Board
!
CAUTION !
• The Vital Signs Module (VSM) Board is attached to the Main
Board between P1 on the VSM Board and J17 on the Main
Board. Be careful when removing the VSM Board from the Main
Board that you do not bend the pins when removing the VSM
Board.
1. Remove the ECG Gating Board (see “ECG Gating Board” on
page 5-16).
2. Label and remove the cables from P6 and P7.
This copy of 3010798 Rev 0 is valid as of Nov-04-2005 at 12:12:00. The signed original is maintained in
Documentation Systems. Prior to use, you are responsible to confirm this copy's revision is the latest released.
NOTE: P7 has no cable on Base and BasePlus models.
P6
P7
Figure 5-25: VSM Board
3. Remove the two (2) Phillips screws holding the board to the
standoffs. Remove the standoffs.
4. Being careful not to bend the pins connecting the VSM Board
(P1) to the Main Board (J17), remove the board from the
assembly.
5. Being careful not to bend the pins connecting the VSM Board
(P1) to the Main Board (J17), install the new board into the
assembly with the two screws removed earlier.
6. Reattach the cables at P6 and P7.
7. Reassemble in reverse order.
5-17
This copy of 3010798 Rev 0 is valid as of Nov-04-2005 at 12:12:00. The signed original is maintained in
Documentation Systems. Prior to use, you are responsible to confirm this copy's revision is the latest released.
VIEWED/PRINTED:
11/09/2005 at 03:09:15.
MEDRAD Veris 8600
Replacing the Post
1. Remove the three (3) panhead screws holding the monitor to
the top of the post. Lift the monitor up by the handle and set in a
safe place.
2. Loosen the three (3) Allen head screws from the collar. Remove
the collar from the top of the post
1
2
Loosen Allen head screws
Remove panhead screws
holding monitor to the post holding collar to the post
(three total)
(three total)
Figure 5-26: Removing top assembly from post
3. Remove the three screws from the tray collar. Remove the tray
from the post.
Screws
Tray Collar
Tray
Figure 5-27: Removing Tray from Post
5-18
VIEWED/PRINTED:
11/09/2005 at 03:09:15.
Main Monitor Disassembly
4. Remove the eight (8) screws from the cosmetic base cover.
This copy of 3010798 Rev 0 is valid as of Nov-04-2005 at 12:12:00. The signed original is maintained in
Documentation Systems. Prior to use, you are responsible to confirm this copy's revision is the latest released.
Figure 5-28: Remove Cosmetic Cover
5. Remove the four (4) Nylock nuts holding the post to the base.
6. Remove the old post from the base.
Figure 5-29: Remove Post from Base
7. Attach the new post to the base using the four (4) Nylock nuts.
8. Reattach the cosmetic base cover, tray, and tray collar.
9. Attach the monitor to the top of the post with the three (3)
panhead screws.
10.Send the old post back to MEDRAD.
5-19
This copy of 3010798 Rev 0 is valid as of Nov-04-2005 at 12:12:00. The signed original is maintained in
Documentation Systems. Prior to use, you are responsible to confirm this copy's revision is the latest released.
VIEWED/PRINTED:
11/09/2005 at 03:09:15.
MEDRAD Veris 8600
Base Disassembly
1. Remove the four (4) screws holding the fascia to the base.
Remove the cosmetic flap above the DC inlet.
Four screws
REAR
FRONT
Cosmetic flap
Figure 5-30: Remove the Four Fascia Screws
2. Remove the 30 screws holding the base cover onto the base
assembly.
Figure 5-31: Remove 30 Screws Holding Cover to Base
5-20
VIEWED/PRINTED:
11/09/2005 at 03:09:15.
Main Monitor Disassembly
Replacing the Batteries
!
CAUTION !
• Do not short circuit the battery terminals! The resulting highcurrent discharge can cause burns.
• Charge the battery completely after extended battery use to
ensure a fully-charged battery is available for the next use.
• Explosion hazard! Keep lighted cigarettes, sparks, and flames
away from the battery.
• The battery contains sulfuric acid electrolyte that can cause
severe burns and eye damage, as well as illness from sulfur
oxide fumes.
This copy of 3010798 Rev 0 is valid as of Nov-04-2005 at 12:12:00. The signed original is maintained in
Documentation Systems. Prior to use, you are responsible to confirm this copy's revision is the latest released.
• Do not crack, cut, burn, or dissolve (with solvents) the battery
case. Damaging the battery case can cause the release of
sulfuric acid. If sulfuric acid is released from the battery, wear
eye protection and rubber gloves to handle the battery, and use
a solution of baking soda in water to neutralize the sulfuric acid.
• Do not incinerate the batttery. The used battery is a potential
environmental hazard and must be disposed of properly.
Dispose of the old battery in accordance with local and federal
laws.
1. Label and disconnect the battery cables from P5 and P8 on the
Charger PCB Assembly.
P8
P5
Figure 5-32: Battery Connections on the
Charger Board
2. Remove the batteries from the base.
3. Replace with new battery assemblies.
4. Connect the batteries to P5 and P8 on the Charger PCB
Assembly.
5-21
MEDRAD Veris 8600
This copy of 3010798 Rev 0 is valid as of Nov-04-2005 at 12:12:00. The signed original is maintained in
Documentation Systems. Prior to use, you are responsible to confirm this copy's revision is the latest released.
VIEWED/PRINTED:
11/09/2005 at 03:09:15.
Replacing the NIBP
Chassis Assembly:
1. If the unit has and O2 assembly, remove the four (4) screws that
hold the O2 assembly in place. Remove the O2 assembly and
set in a safe location.
Figure 5-33: Remove O2 Assembly
2. Disconnect the 1/8-inch tubing on the NIBP Assembly from the
base assembly.
2
3
Figure 5-34: NIBP Assembly
3. Label and disconnect the pneumatic cable from P2 on the
Charger PCB.
4. Remove the NIBP chassis assembly.
5. Place new NIBP chassis assembly into unit.
6. Reconnect the pneumatic cable to P2 on the Charger PCB.
7. Reconnect the 1/8-inch tubing on the NIBP Assembly to the
base assembly.
5-22
VIEWED/PRINTED:
11/09/2005 at 03:09:15.
Main Monitor Disassembly
Replacing the Charger PCB
1. Label and remove the eight (8) cables from P1, P2, P3, P4, P5,
P6, P7, and P8 on the Charger PCB.
NOTE: Some connectors are for anesthetic modules that may
not be in the unit and thus have no connections to the Charger
Board.
This copy of 3010798 Rev 0 is valid as of Nov-04-2005 at 12:12:00. The signed original is maintained in
Documentation Systems. Prior to use, you are responsible to confirm this copy's revision is the latest released.
P8
P5
P2
P7 P4 P6
P3
P1
Figure 5-35: Connections on the Charger Board
2. Remove the Charger PCB.
3. Place the new Charger PCB into the unit.
4. Reattach the cables to P1, P2, P3, P4, P5, P6, P7, and P8 on
the Charger PCB (each has a unique connection).
5-23
MEDRAD Veris 8600
This copy of 3010798 Rev 0 is valid as of Nov-04-2005 at 12:12:00. The signed original is maintained in
Documentation Systems. Prior to use, you are responsible to confirm this copy's revision is the latest released.
VIEWED/PRINTED:
11/09/2005 at 03:09:15.
Replacing the O2 Sensor
(on Anesthetic Units)
1. Label and remove the cable from the O2 sensor.
1
2
Figure 5-36: O2 Assembly
2. Unscrew the O2 sensor module from the O2 PCB.
3. Place a new O2 sensor (pn 3010970) into socket.
4. Reattach the cable to the O2 sensor.
5-24
VIEWED/PRINTED:
11/09/2005 at 03:09:15.
Main Monitor Disassembly
Replacing the CO2 Absorber
(on Anesthetic Units)
1. Label and disconnect the tube marked “Absorber” from the CO2
absorber.
2. Remove the absorber from the wire clip located on the front
wall.
NIBP
Module
This copy of 3010798 Rev 0 is valid as of Nov-04-2005 at 12:12:00. The signed original is maintained in
Documentation Systems. Prior to use, you are responsible to confirm this copy's revision is the latest released.
IBench
CO2 Absorber
FRONT
Figure 5-37: CO2 Absorber
3. Place a new CO2 absorber (pn 3010971) into the wire clip on
the front wall.
4. Attach the tube marked “Absorber” to the new CO2 absorber.
Replacing the Agent Bench
(on Anesthetic Units)
1. Label and disconnect the tubes marked “Wet Side (B1),” “Dry
Side (B4),” “Exhaust (B6),” “O2 In (B2),” and “O2 Out (B5)” from
the Agent Bench assembly.
2. Label and disconnect the tube marked “Absorber” from the CO2
absorber and remove the absorber from the wire clip located on
the front wall.
3. Remove the Agent Bench assembly from the unit.
4. Place new Agent Bench assembly into unit.
5. Attach the tube marked “Absorber” to the new CO2 absorber.
6. Attach the tubes marked “Wet Side (B1),” “Dry Side (B4),”
“Exhaust (B6),” “O2 In (B2),” and “O2 Out (B5)” to the new Agent
Bench assembly.
Safety Tests
Replacement or repair of the boards or modules requires Hi-Pot and
Leakage testing. See “Main Monitor Maintenance and Checkout” in
Section 2 for full test procedures.
5-25
This copy of 3010798 Rev 0 is valid as of Nov-04-2005 at 12:12:00. The signed original is maintained in
Documentation Systems. Prior to use, you are responsible to confirm this copy's revision is the latest released.
VIEWED/PRINTED:
11/09/2005 at 03:09:15.
MEDRAD Veris 8600
Servicing the ECG Module
The ECG Module is not field servicable. Return the ECG Module to
MEDRAD for service or replacement.
Servicing the Power Supply
!
DANGER !
• High Voltage! Repairing and testing the power supply requires
working with dangerous voltages. The power supply module
should only be serviced by experienced electrical repair
technicians.
The external power supply is not field servicable. Return the power
supply to MEDRAD for service or replacement.
5-26
VIEWED/PRINTED:
11/09/2005 at 03:09:15.
This copy of 3010798 Rev 0 is valid as of Nov-04-2005 at 12:12:00. The signed original is maintained in
Documentation Systems. Prior to use, you are responsible to confirm this copy's revision is the latest released.
6
Main Monitor BOMs and Drawings
List of Drawings
Assembly BOMs and Drawings
Title
Drawing Number
Monitor Final Assembly Drawing
3010947
Monitor Final Assemblies
Base
BasePlus
Cardiac
Cardiac With Temperature
Anesthesia
Anesthesia with Temperature
3010455
3010723
3010457
3010843
3010458
3010841
Base Assembly
With Gas
Without Gas
3010672
3010982
Post Assembly
3010764
Main Top Assembly
Base
BasePlus
Cardiac
Cardiac With Temperature
Anesthesia
Anesthesia with Temperature
3010977
3010978
3010979
3010980
3010981
3010946
Enclosure Rear Top Unit Assembly
3010772
Charger Board Assembly
3010668
NIBP Chassis Assembly
3011486
Battery Assembly
3011506
6-1
VIEWED/PRINTED:
11/09/2005 at 03:09:15.
MEDRAD Veris 8600
Monitor Final Assemblies
Base Monitor
This copy of 3010798 Rev 0 is valid as of Nov-04-2005 at 12:12:00. The signed original is maintained in
Documentation Systems. Prior to use, you are responsible to confirm this copy's revision is the latest released.
BasePlus Monitor
Cardiac Monitor
Cardiac with
Temperature Monitor
6-2
3010620
MR COMP MON BASIC SYSTEM
Item #
01
02
03
04
06
07
08
09
Part Number
3010982
3010764
3010977
3010770
3010744
3010745
3010948
3010967
3010723
MR COMP MON BASIC+SYSTEM
Item #
01
02
03
04
06
07
08
09
Part Number
3010982
3010764
3010978
3010770
3010744
3010745
3010948
3010967
3010621
MR COMP MONITOR CARDIAC
Item #
01
02
03
04
06
07
08
09
Part Number
3010982
3010764
3010979
3010770
3010744
3010745
3010948
3010967
3010844
MR COMP MONITOR CARDIAC
Item #
01
02
03
04
06
07
08
09
Part Number
3010982
3010764
3010980
3010770
3010744
3010745
3010948
3010967
Description
BASE AY MAIN NO GAS
POST ASSEMBLY
TOP AY MAIN BASE
FLANGE TOP MAIN UNIT
COVER COSMETIC
COVER SMALL COSMETIC
TRAY OBSERVER
COLLAR TOP TRAY
Description
BASE AY MAIN NO GAS
POST ASSEMBLY
TOP AY MAIN BASE COMM
FLANGE TOP MAIN UNIT
COVER COSMETIC
COVER SMALL COSMETIC
TRAY OBSERVER
COLLAR TOP TRAY
Description
BASE AY MAIN NO GAS
POST ASSEMBLY
TOP AY MAIN C-NO TEMP
FLANGE TOP MAIN UNIT
COVER COSMETIC
COVER SMALL COSMETIC
TRAY OBSERVER
COLLAR TOP TRAY
Description
BASE AY MAIN NO GAS
POST ASSEMBLY
TOP AY MAIN C-W/TEMP
FLANGE TOP MAIN UNIT
COVER COSMETIC
COVER SMALL COSMETIC
TRAY OBSERVER
COLLAR TOP TRAY
This copy of 3010798 Rev 0 is valid as of Nov-04-2005 at 12:12:00. The signed original is maintained in
Documentation Systems. Prior to use, you are responsible to confirm this copy's revision is the latest released.
VIEWED/PRINTED:
11/09/2005 at 03:09:15.
Main Monitor BOMs and Drawings
Anesthetic Monitor
Anesthetic with
Temperature Monitor
3010622
MR COMP MON ANESTHESIA
Item #
01
02
03
04
06
07
08
09
Part Number
3010672
3010764
3010981
3010770
3010744
3010745
3010948
3010967
3010842
MR COMP MON ANESTHESIA
Item #
01
02
03
04
06
07
08
09
Part Number
3010672
3010764
3010946
3010770
3010744
3010745
3010948
3010967
Description
BASE AY MAIN W/ GAS
POST ASSEMBLY
TOP AY MAIN A-NO TEMP
FLANGE TOP MAIN UNIT
COVER COSMETIC
COVER SMALL COSMETIC
TRAY OBSERVER
COLLAR TOP TRAY
Description
BASE AY MAIN W/ GAS
POST ASSEMBLY
TOP AY MAIN A-W/TEMP
FLANGE TOP MAIN UNIT
COVER COSMETIC
COVER SMALL COSMETIC
TRAY OBSERVER
COLLAR TOP TRAY
6-3
This copy of 3010798 Rev 0 is valid as of Nov-04-2005 at 12:12:00. The signed original is maintained in
Documentation Systems. Prior to use, you are responsible to confirm this copy's revision is the latest released.
VIEWED/PRINTED:
11/09/2005 at 03:09:15.
MEDRAD Veris 8600
Base Assemblies
Base Assembly without Gas
Base Assembly with Gas
3010982
BASE AY MAIN NO GAS
Item #
01
02
03
04
06
07
12
13
14
19
37
Part Number
3010673
3010674
3011506
3010668
3010676
3010682
3011486
3006523
3006524
3011485
3010975
3012459
3012460
3012471
3012472
3012473
3012474
3012475
3012476
3010672
BASE AY MAIN W/ GAS
Item #
01
02
03
04
05
06
07
12
13
14
19
37
Part Number
3010673
3010674
3011506
3010668
3010691
3010676
3010682
3011486
3006523
3006524
3011485
3010975
3012459
3012460
3012471
3012472
3012473
3012474
3012475
3012476
3010730
40
6-4
Description
HOUSING BASE
COVER BASE MAIN
BATTERY AY W/ CABLE
PCB CHARGER ASSEMBLY
PLATE CONNECTORS BASE AY
PLATE POWER INPUT AY
CHASSIS NIBP AY
CASTER ROLL RESISTANT
CASTER WITH BRAKE
GASKET ROUND MESH
LBL SET BASE AY, ENGLISH
LBL SET BASE AY, FRENCH
LBL SET BASE AY, GERMAN
LBL SET BASE AY, JAPANESE
LBL SET BASE AY, SPANISH
LBL SET BASE AY, PORTUGUESE
LBL SET BASE AY, ITALIAN
LBL SET BASE AY, SWEDISH
LBL SET BASE AY, DUTCH
Description
HOUSING BASE
COVER BASE MAIN
BATTERY AY W/ CABLE
PCB CHARGER ASSEMBLY
IBENCH WITH MOUNTING AY
PLATE CONNECTORS BASE AY
PLATE POWER INPUT AY
CHASSIS NIBP AY
CASTER ROLL RESISTANT
CASTER WITH BRAKE
GASKET ROUND MESH
LBL SET BASE AY, ENGLISH
LBL SET BASE AY, FRENCH
LBL SET BASE AY, GERMAN
LBL SET BASE AY, JAPANESE
LBL SET BASE AY, SPANISH
LBL SET BASE AY, PORTUGUESE
LBL SET BASE AY, ITALIAN
LBL SET BASE AY, SWEDISH
LBL SET BASE AY, DUTCH
CHASSIS O2 AY
This copy of 3010798 Rev 0 is valid as of Nov-04-2005 at 12:12:00. The signed original is maintained in
Documentation Systems. Prior to use, you are responsible to confirm this copy's revision is the latest released.
VIEWED/PRINTED:
11/09/2005 at 03:09:15.
Main Monitor BOMs and Drawings
Main Top Assemblies
Base
BasePlus
3010977
TOP AY MAIN BASE
Item #
04
05
06
16
34
35
Part Number
3010641
3010652
3010662
3011485
3011567
3010963
3012477
3012478
3012479
3012480
3012481
3012482
3012483
3012484
3010978
TOP AY MAIN BASE COMM
Item #
04
05
06
13
16
34
35
Part Number
3010641
3010652
3010662
3010973
3011485
3011567
3010963
3012477
3012478
3012479
3012480
3012481
3012482
3012483
3012484
3011476
3011499
47
48
Description
VERIS MAIN UNIT MAIN BRD
AY PCB VSM BOARD
AY PCB ECG-DSP BOARD
GASKET ROUND MESH .125 FT
CABLE F-O DUPLEX STR-THRU
LBL SET TOP UNIT, ENGLISH
LBL SET TOP UNIT, FRENCH
LBL SET TOP UNIT, GERMAN
LBL SET TOP UNIT, JAPANESE
LBL SET TOP UNIT, SPANISH
LBL SET TOP UNIT, PORTUGUESE
LBL SET TOP UNIT, ITALIAN
LBL SET TOP UNIT, SWEDISH
LBL SET TOP UNIT, DUTCH
Description
VERIS MAIN UNIT MAIN BRD
AY PCB VSM BOARD
AY PCB ECG-DSP BOARD
DPAC COMMUNICATIONS BRD
GASKET ROUND MESH .125 FT
CABLE F-O DUPLEX STR-THRU
LBL SET TOP UNIT, ENGLISH
LBL SET TOP UNIT, FRENCH
LBL SET TOP UNIT, GERMAN
LBL SET TOP UNIT, JAPANESE
LBL SET TOP UNIT, SPANISH
LBL SET TOP UNIT, PORTUGUESE
LBL SET TOP UNIT, ITALIAN
LBL SET TOP UNIT, SWEDISH
LBL SET TOP UNIT, DUTCH
FO INT COMM DUPLX CBL
ST SPLICE BUSHING
6-5
MEDRAD Veris 8600
This copy of 3010798 Rev 0 is valid as of Nov-04-2005 at 12:12:00. The signed original is maintained in
Documentation Systems. Prior to use, you are responsible to confirm this copy's revision is the latest released.
VIEWED/PRINTED:
11/09/2005 at 03:09:15.
Cardiac
3010979
TOP AY MAIN C-NO TEMP
Item #
04
05
06
07
13
16
34
35
Part Number
3010641
3010652
3010662
3011533
3010973
3011485
3011567
3010963
3012477
3012478
3012479
3012480
3012481
3012482
3012483
3012484
3011476
3011499
47
48
Cardiac with Temperature
3010980
TOP AY MAIN C-W/TEMP
Item #
04
05
06
07
08
13
16
34
35
Part Number
3010641
3010652
3010662
3011533
3010986
3010973
3011485
3011567
3010963
3012477
3012478
3012479
3012480
3012481
3012482
3012483
3012484
3011476
3011499
47
48
6-6
Description
VERIS MAIN UNIT MAIN BRD
AY PCB VSM BOARD
AY PCB ECG-DSP BOARD
VERIS IBP PCB ASSY
DPAC COMMUNICATIONS BRD
GASKET ROUND MESH .125 FT
CABLE F-O DUPLEX STR-THRU
LBL SET TOP UNIT, ENGLISH
LBL SET TOP UNIT, FRENCH
LBL SET TOP UNIT, GERMAN
LBL SET TOP UNIT, JAPANESE
LBL SET TOP UNIT, SPANISH
LBL SET TOP UNIT, PORTUGUESE
LBL SET TOP UNIT, ITALIAN
LBL SET TOP UNIT, SWEDISH
LBL SET TOP UNIT, DUTCH
FO INT COMM DUPLX CBL
ST SPLICE BUSHING
Description
VERIS MAIN UNIT MAIN BRD
AY PCB VSM BOARD
AY PCB ECG-DSP BOARD
VERIS IBP PCB ASSY
TEMP MODULE W/MOUNT
DPAC COMMUNICATIONS BRD
GASKET ROUND MESH .125 FT
CABLE F-O DUPLEX STR-THRU
LBL SET TOP UNIT, ENGLISH
LBL SET TOP UNIT, FRENCH
LBL SET TOP UNIT, GERMAN
LBL SET TOP UNIT, JAPANESE
LBL SET TOP UNIT, SPANISH
LBL SET TOP UNIT, PORTUGUESE
LBL SET TOP UNIT, ITALIAN
LBL SET TOP UNIT, SWEDISH
LBL SET TOP UNIT, DUTCH
FO INT COMM DUPLX CBL
ST SPLICE BUSHING
This copy of 3010798 Rev 0 is valid as of Nov-04-2005 at 12:12:00. The signed original is maintained in
Documentation Systems. Prior to use, you are responsible to confirm this copy's revision is the latest released.
VIEWED/PRINTED:
11/09/2005 at 03:09:15.
Main Monitor BOMs and Drawings
Anesthesia
3010981
TOP AY MAIN A-NO TEMP
Item #
04
05
06
07
13
16
34
35
Part Number
3010641
3010652
3010662
3011533
3010973
3011485
3011567
3010963
3012477
3012478
3012479
3012480
3012481
3012482
3012483
3012484
3011476
3011499
47
48
Anesthesia with Temperature
Description
VERIS MAIN UNIT MAIN BRD
AY PCB VSM BOARD
AY PCB ECG-DSP BOARD
VERIS IBP PCB ASSY
DPAC COMMUNICATIONS BRD
GASKET ROUND MESH .125 FT
CABLE F-O DUPLEX STR-THRU
LBL SET TOP UNIT, ENGLISH
LBL SET TOP UNIT, FRENCH
LBL SET TOP UNIT, GERMAN
LBL SET TOP UNIT, JAPANESE
LBL SET TOP UNIT, SPANISH
LBL SET TOP UNIT, PORTUGUESE
LBL SET TOP UNIT, ITALIAN
LBL SET TOP UNIT, SWEDISH
LBL SET TOP UNIT, DUTCH
FO INT COMM DUPLX CBL
ST SPLICE BUSHING
3010946
TOP AY MAIN A-W/TEMP
Item #
04
05
06
07
08
13
16
34
35
Part Number
3010641
3010652
3010662
3011533
3010986
3010973
3011485
3011567
3010963
3012477
3012478
3012479
3012480
3012481
3012482
3012483
3012484
3011476
3011499
47
48
Description
VERIS MAIN UNIT MAIN BRD
AY PCB VSM BOARD
AY PCB ECG-DSP BOARD
VERIS IBP PCB ASSY
TEMP MODULE W/MOUNT
DPAC COMMUNICATIONS BRD
GASKET ROUND MESH .125 FT
CABLE F-O DUPLEX STR-THRU
LBL SET TOP UNIT, ENGLISH
LBL SET TOP UNIT, FRENCH
LBL SET TOP UNIT, GERMAN
LBL SET TOP UNIT, JAPANESE
LBL SET TOP UNIT, SPANISH
LBL SET TOP UNIT, PORTUGUESE
LBL SET TOP UNIT, ITALIAN
LBL SET TOP UNIT, SWEDISH
LBL SET TOP UNIT, DUTCH
FO INT COMM DUPLX CBL
ST SPLICE BUSHING
6-7
This copy of 3010798 Rev 0 is valid as of Nov-04-2005 at 12:12:00. The signed original is maintained in
Documentation Systems. Prior to use, you are responsible to confirm this copy's revision is the latest released.
VIEWED/PRINTED:
11/09/2005 at 03:09:15.
This copy of 3010798 Rev 0 is valid as of Nov-04-2005 at 12:12:00. The signed original is maintained in
Documentation Systems. Prior to use, you are responsible to confirm this copy's revision is the latest released.
6
MEDRAD Veris 8600
VI
11/
Main Monitor BOMs and Drawings
Main Monitor BOMs and Drawings
Monitor Final Assembly
(3010947)
6-9
VI
11/
Main Monitor BOMs and Drawings
This copy of 3010798 Rev 0 is valid as of Nov-04-2005 at 12:12:00. The signed original is maintained in
Documentation Systems. Prior to use, you are responsible to confirm this copy's revision is the latest released.
MEDRAD Veris 8600
Base Assemblies
Base Assembly--No Gas
(3010982)
Label 46446Bxxx
(Battery Disposal)
from Label Set:
3010975 (English)
30122459 (French)
3012460 (German)
3012471 (Japanese)
3012472 (Spanish)
3012473 (Portuguese)
3012474 (Italian)
3010475 (Swedish)
3010476 (Dutch)
Label 46490Bxxx
(Serial Number)
from Label Set:
3010975 (English)
30122459 (French)
3012460 (German)
3012471 (Japanese)
3012472 (Spanish)
3012473 (Portuguese)
3012474 (Italian)
3010475 (Swedish)
3010476 (Dutch)
Label 46446Bxxx
(Serial Number)
from Label Set:
3010975 (English)
30122459 (French)
3012460 (German)
3012471 (Japanese)
3012472 (Spanish)
3012473 (Portuguese)
3012474 (Italian)
3010475 (Swedish)
3010476 (Dutch)
Label 46429Bxxx
(DC Rating)
from Label Set:
3010975 (English)
30122459 (French)
3012460 (German)
3012471 (Japanese)
3012472 (Spanish)
3012473 (Portuguese)
3012474 (Italian)
3010475 (Swedish)
3010476 (Dutch)
6-10
VI
11/
This copy of 3010798 Rev 0 is valid as of Nov-04-2005 at 12:12:00. The signed original is maintained in
Documentation Systems. Prior to use, you are responsible to confirm this copy's revision is the latest released.
MEDRAD Veris 8600
Main Monitor BOMs and Drawings
Base Assembly--With Gas
(3010672)
Label 46446Bxxx
(Battery Disposal)
from Label Set:
3010975 (English)
30122459 (French)
3012460 (German)
3012471 (Japanese)
3012472 (Spanish)
3012473 (Portuguese)
3012474 (Italian)
3010475 (Swedish)
3010476 (Dutch)
Label 46490Bxxx
(Serial Number)
from Label Set:
3010975 (English)
30122459 (French)
3012460 (German)
3012471 (Japanese)
3012472 (Spanish)
3012473 (Portuguese)
3012474 (Italian)
3010475 (Swedish)
3010476 (Dutch)
Label 46446Bxxx
(Serial Number)
from Label Set:
3010975 (English)
30122459 (French)
3012460 (German)
3012471 (Japanese)
3012472 (Spanish)
3012473 (Portuguese)
3012474 (Italian)
3010475 (Swedish)
3010476 (Dutch)
Label 46429Bxxx
(DC Rating)
from Label Set:
3010975 (English)
30122459 (French)
3012460 (German)
3012471 (Japanese)
3012472 (Spanish)
3012473 (Portuguese)
3012474 (Italian)
3010475 (Swedish)
3010476 (Dutch)
6-11
This copy of 3010798 Rev 0 is valid as of Nov-04-2005 at 12:12:00. The signed original is maintained in
Documentation Systems. Prior to use, you are responsible to confirm this copy's revision is the latest released.
MEDRAD Veris 8600
Main Monitor BOMs and Drawings
Main Top Assembly
Base (3010977)
6-12
VI
11/
VI
11/
This copy of 3010798 Rev 0 is valid as of Nov-04-2005 at 12:12:00. The signed original is maintained in
Documentation Systems. Prior to use, you are responsible to confirm this copy's revision is the latest released.
MEDRAD Veris 8600
Main Monitor BOMs and Drawings
Label 46434Bxxx (Warnings)
from Label Set:
3010963 (English)
3012477 (French)
3012478 (German)
3012479 (Japanese)
3012480 (Spanish)
3012481 (Portuguese)
3012482 (Italian)
3012483 (Swedish)
3012484 (Dutch)
Label 46497Bxxx
(COMM Ports)
from Label Set:
3010963 (English)
3012477 (French)
3012478 (German)
3012479 (Japanese)
3012480 (Spanish)
3012481 (Portuguese)
3012482 (Italian)
3012483 (Swedish)
3012484 (Dutch)
Label 46436Bxxx
(Patient Connectors)
from Label Set:
3010963 (English)
3012477 (French)
3012478 (German)
3012479 (Japanese)
3012480 (Spanish)
3012481 (Portuguese)
3012482 (Italian)
3012483 (Swedish)
3012484 (Dutch)
Label 46498Bxxx
(Video Out)
from Label Set:
3010963 (English)
3012477 (French)
3012478 (German)
3012479 (Japanese)
3012480 (Spanish)
3012481 (Portuguese)
3012482 (Italian)
3012483 (Swedish)
3012484 (Dutch)
Label 46443Bxxx
(Serial Number)
from Label Set:
3010963 (English)
3012477 (French)
3012478 (German)
3012479 (Japanese)
3012480 (Spanish)
3012481 (Portuguese)
3012482 (Italian)
3012483 (Swedish)
3012484 (Dutch)
Label 46445Bxxx
(FCC Label)
from Label Set:
3010963 (English)
3012477 (French)
3012478 (German)
3012479 (Japanese)
3012480 (Spanish)
3012481 (Portuguese)
3012482 (Italian)
3012483 (Swedish)
3012484 (Dutch)
6-13
This copy of 3010798 Rev 0 is valid as of Nov-04-2005 at 12:12:00. The signed original is maintained in
Documentation Systems. Prior to use, you are responsible to confirm this copy's revision is the latest released.
MEDRAD Veris 8600
Main Monitor BOMs and Drawings
BasePlus (3010978)
6-14
VI
11/
VI
11/
This copy of 3010798 Rev 0 is valid as of Nov-04-2005 at 12:12:00. The signed original is maintained in
Documentation Systems. Prior to use, you are responsible to confirm this copy's revision is the latest released.
MEDRAD Veris 8600
Main Monitor BOMs and Drawings
Label 46434Bxxx (Warnings)
from Label Set:
3010963 (English)
3012477 (French)
3012478 (German)
3012479 (Japanese)
3012480 (Spanish)
3012481 (Portuguese)
3012482 (Italian)
3012483 (Swedish)
3012484 (Dutch)
Label 46497Bxxx
(COMM Ports)
from Label Set:
3010963 (English)
3012477 (French)
3012478 (German)
3012479 (Japanese)
3012480 (Spanish)
3012481 (Portuguese)
3012482 (Italian)
3012483 (Swedish)
3012484 (Dutch)
Label 46498Bxxx
(Video Out)
from Label Set:
3010963 (English)
3012477 (French)
3012478 (German)
3012479 (Japanese)
3012480 (Spanish)
3012481 (Portuguese)
3012482 (Italian)
3012483 (Swedish)
3012484 (Dutch)
Label 46436Bxxx
(Patient Connectors)
from Label Set:
3010963 (English)
3012477 (French)
3012478 (German)
3012479 (Japanese)
3012480 (Spanish)
3012481 (Portuguese)
3012482 (Italian)
3012483 (Swedish)
3012484 (Dutch)
Label 46499Bxxx
(Video Out)
from Label Set:
3010963 (English)
3012477 (French)
3012478 (German)
3012479 (Japanese)
3012480 (Spanish)
3012481 (Portuguese)
3012482 (Italian)
3012483 (Swedish)
3012484 (Dutch)
Label 46443Bxxx
(Serial Number)
from Label Set:
3010963 (English)
3012477 (French)
3012478 (German)
3012479 (Japanese)
3012480 (Spanish)
3012481 (Portuguese)
3012482 (Italian)
3012483 (Swedish)
3012484 (Dutch)
Label 46445Bxxx
(FCC Label)
from Label Set:
3010963 (English)
3012477 (French)
3012478 (German)
3012479 (Japanese)
3012480 (Spanish)
3012481 (Portuguese)
3012482 (Italian)
3012483 (Swedish)
3012484 (Dutch)
6-15
This copy of 3010798 Rev 0 is valid as of Nov-04-2005 at 12:12:00. The signed original is maintained in
Documentation Systems. Prior to use, you are responsible to confirm this copy's revision is the latest released.
MEDRAD Veris 8600
Main Monitor BOMs and Drawings
Cardiac (3010979)
6-16
VI
11/
VI
11/
This copy of 3010798 Rev 0 is valid as of Nov-04-2005 at 12:12:00. The signed original is maintained in
Documentation Systems. Prior to use, you are responsible to confirm this copy's revision is the latest released.
MEDRAD Veris 8600
Main Monitor BOMs and Drawings
Label 46434Bxxx (Warnings)
from Label Set:
3010963 (English)
3012477 (French)
3012478 (German)
3012479 (Japanese)
3012480 (Spanish)
3012481 (Portuguese)
3012482 (Italian)
3012483 (Swedish)
3012484 (Dutch)
Label 46497Bxxx
(COMM Ports)
from Label Set:
3010963 (English)
3012477 (French)
3012478 (German)
3012479 (Japanese)
3012480 (Spanish)
3012481 (Portuguese)
3012482 (Italian)
3012483 (Swedish)
3012484 (Dutch)
Label 46498Bxxx
(Video Out)
from Label Set:
3010963 (English)
3012477 (French)
3012478 (German)
3012479 (Japanese)
3012480 (Spanish)
3012481 (Portuguese)
3012482 (Italian)
3012483 (Swedish)
3012484 (Dutch)
Label 46437Bxxx
(Patient Connectors)
from Label Set:
3010963 (English)
3012477 (French)
3012478 (German)
3012479 (Japanese)
3012480 (Spanish)
3012481 (Portuguese)
3012482 (Italian)
3012483 (Swedish)
3012484 (Dutch)
Label 46499Bxxx
(Video Out)
from Label Set:
3010963 (English)
3012477 (French)
3012478 (German)
3012479 (Japanese)
3012480 (Spanish)
3012481 (Portuguese)
3012482 (Italian)
3012483 (Swedish)
3012484 (Dutch)
Label 46443Bxxx
(Serial Number)
from Label Set:
3010963 (English)
3012477 (French)
3012478 (German)
3012479 (Japanese)
3012480 (Spanish)
3012481 (Portuguese)
3012482 (Italian)
3012483 (Swedish)
3012484 (Dutch)
Label 46445Bxxx
(FCC Label)
from Label Set:
3010963 (English)
3012477 (French)
3012478 (German)
3012479 (Japanese)
3012480 (Spanish)
3012481 (Portuguese)
3012482 (Italian)
3012483 (Swedish)
3012484 (Dutch)
6-17
This copy of 3010798 Rev 0 is valid as of Nov-04-2005 at 12:12:00. The signed original is maintained in
Documentation Systems. Prior to use, you are responsible to confirm this copy's revision is the latest released.
MEDRAD Veris 8600
Main Monitor BOMs and Drawings
Cardiac With Temperature
(3010980)
6-18
VI
11/
VI
11/
This copy of 3010798 Rev 0 is valid as of Nov-04-2005 at 12:12:00. The signed original is maintained in
Documentation Systems. Prior to use, you are responsible to confirm this copy's revision is the latest released.
MEDRAD Veris 8600
Main Monitor BOMs and Drawings
Label 46434Bxxx (Warnings)
from Label Set:
3010963 (English)
3012477 (French)
3012478 (German)
3012479 (Japanese)
3012480 (Spanish)
3012481 (Portuguese)
3012482 (Italian)
3012483 (Swedish)
3012484 (Dutch)
Label 46497Bxxx
(COMM Ports)
from Label Set:
3010963 (English)
3012477 (French)
3012478 (German)
3012479 (Japanese)
3012480 (Spanish)
3012481 (Portuguese)
3012482 (Italian)
3012483 (Swedish)
3012484 (Dutch)
Label 46498Bxxx
(Video Out)
from Label Set:
3010963 (English)
3012477 (French)
3012478 (German)
3012479 (Japanese)
3012480 (Spanish)
3012481 (Portuguese)
3012482 (Italian)
3012483 (Swedish)
3012484 (Dutch)
Label 46438Bxxx
(Patient Connectors)
from Label Set:
3010963 (English)
3012477 (French)
3012478 (German)
3012479 (Japanese)
3012480 (Spanish)
3012481 (Portuguese)
3012482 (Italian)
3012483 (Swedish)
3012484 (Dutch)
Label 46499Bxxx
(Video Out)
from Label Set:
3010963 (English)
3012477 (French)
3012478 (German)
3012479 (Japanese)
3012480 (Spanish)
3012481 (Portuguese)
3012482 (Italian)
3012483 (Swedish)
3012484 (Dutch)
Label 46443Bxxx
(Serial Number)
from Label Set:
3010963 (English)
3012477 (French)
3012478 (German)
3012479 (Japanese)
3012480 (Spanish)
3012481 (Portuguese)
3012482 (Italian)
3012483 (Swedish)
3012484 (Dutch)
Label 46445Bxxx
(FCC Label)
from Label Set:
3010963 (English)
3012477 (French)
3012478 (German)
3012479 (Japanese)
3012480 (Spanish)
3012481 (Portuguese)
3012482 (Italian)
3012483 (Swedish)
3012484 (Dutch)
6-19
This copy of 3010798 Rev 0 is valid as of Nov-04-2005 at 12:12:00. The signed original is maintained in
Documentation Systems. Prior to use, you are responsible to confirm this copy's revision is the latest released.
MEDRAD Veris 8600
Main Monitor BOMs and Drawings
Anesthesia (3010981)
6-20
VI
11/
VI
11/
This copy of 3010798 Rev 0 is valid as of Nov-04-2005 at 12:12:00. The signed original is maintained in
Documentation Systems. Prior to use, you are responsible to confirm this copy's revision is the latest released.
MEDRAD Veris 8600
Main Monitor BOMs and Drawings
Label 46434Bxxx (Warnings)
from Label Set:
3010963 (English)
3012477 (French)
3012478 (German)
3012479 (Japanese)
3012480 (Spanish)
3012481 (Portuguese)
3012482 (Italian)
3012483 (Swedish)
3012484 (Dutch)
Label 46497Bxxx
(COMM Ports)
from Label Set:
3010963 (English)
3012477 (French)
3012478 (German)
3012479 (Japanese)
3012480 (Spanish)
3012481 (Portuguese)
3012482 (Italian)
3012483 (Swedish)
3012484 (Dutch)
Label 46498Bxxx
(Video Out)
from Label Set:
3010963 (English)
3012477 (French)
3012478 (German)
3012479 (Japanese)
3012480 (Spanish)
3012481 (Portuguese)
3012482 (Italian)
3012483 (Swedish)
3012484 (Dutch)
Label 46437Bxxx
(Patient Connectors)
from Label Set:
3010963 (English)
3012477 (French)
3012478 (German)
3012479 (Japanese)
3012480 (Spanish)
3012481 (Portuguese)
3012482 (Italian)
3012483 (Swedish)
3012484 (Dutch)
Label 46499Bxxx
(Video Out)
from Label Set:
3010963 (English)
3012477 (French)
3012478 (German)
3012479 (Japanese)
3012480 (Spanish)
3012481 (Portuguese)
3012482 (Italian)
3012483 (Swedish)
3012484 (Dutch)
Label 46443Bxxx
(Serial Number)
from Label Set:
3010963 (English)
3012477 (French)
3012478 (German)
3012479 (Japanese)
3012480 (Spanish)
3012481 (Portuguese)
3012482 (Italian)
3012483 (Swedish)
3012484 (Dutch)
Label 46445Bxxx
(FCC Label)
from Label Set:
3010963 (English)
3012477 (French)
3012478 (German)
3012479 (Japanese)
3012480 (Spanish)
3012481 (Portuguese)
3012482 (Italian)
3012483 (Swedish)
3012484 (Dutch)
6-21
This copy of 3010798 Rev 0 is valid as of Nov-04-2005 at 12:12:00. The signed original is maintained in
Documentation Systems. Prior to use, you are responsible to confirm this copy's revision is the latest released.
MEDRAD Veris 8600
Main Monitor BOMs and Drawings
Anesthesia with Temperature
(3010946)
6-22
VI
11/
VI
11/
This copy of 3010798 Rev 0 is valid as of Nov-04-2005 at 12:12:00. The signed original is maintained in
Documentation Systems. Prior to use, you are responsible to confirm this copy's revision is the latest released.
MEDRAD Veris 8600
Main Monitor BOMs and Drawings
Label 46434Bxxx (Warnings)
from Label Set:
3010963 (English)
3012477 (French)
3012478 (German)
3012479 (Japanese)
3012480 (Spanish)
3012481 (Portuguese)
3012482 (Italian)
3012483 (Swedish)
3012484 (Dutch)
Label 46497Bxxx
(COMM Ports)
from Label Set:
3010963 (English)
3012477 (French)
3012478 (German)
3012479 (Japanese)
3012480 (Spanish)
3012481 (Portuguese)
3012482 (Italian)
3012483 (Swedish)
3012484 (Dutch)
Label 46498Bxxx
(Video Out)
from Label Set:
3010963 (English)
3012477 (French)
3012478 (German)
3012479 (Japanese)
3012480 (Spanish)
3012481 (Portuguese)
3012482 (Italian)
3012483 (Swedish)
3012484 (Dutch)
Label 46438Bxxx
(Patient Connectors)
from Label Set:
3010963 (English)
3012477 (French)
3012478 (German)
3012479 (Japanese)
3012480 (Spanish)
3012481 (Portuguese)
3012482 (Italian)
3012483 (Swedish)
3012484 (Dutch)
Label 46499Bxxx
(Video Out)
from Label Set:
3010963 (English)
3012477 (French)
3012478 (German)
3012479 (Japanese)
3012480 (Spanish)
3012481 (Portuguese)
3012482 (Italian)
3012483 (Swedish)
3012484 (Dutch)
Label 46443Bxxx
(Serial Number)
from Label Set:
3010963 (English)
3012477 (French)
3012478 (German)
3012479 (Japanese)
3012480 (Spanish)
3012481 (Portuguese)
3012482 (Italian)
3012483 (Swedish)
3012484 (Dutch)
Label 46445Bxxx
(FCC Label)
from Label Set:
3010963 (English)
3012477 (French)
3012478 (German)
3012479 (Japanese)
3012480 (Spanish)
3012481 (Portuguese)
3012482 (Italian)
3012483 (Swedish)
3012484 (Dutch)
6-23
This copy of 3010798 Rev 0 is valid as of Nov-04-2005 at 12:12:00. The signed original is maintained in
Documentation Systems. Prior to use, you are responsible to confirm this copy's revision is the latest released.
VI
11/
VIEWED/PRINTED:
11/09/2005 at 03:09:15.
7 Remote Display Maintenance and
Checkout
This section contains recommended procedures for maintenance,
and an operational checkout of the MEDRAD Veris remote display.
Routine maintenance and inspection will:
• Ensure continued performance of the remote display.
• Reduce the possibility of equipment malfunction.
This copy of 3010798 Rev 0 is valid as of Nov-04-2005 at 12:12:00. The signed original is maintained in
Documentation Systems. Prior to use, you are responsible to confirm this copy's revision is the latest released.
Incoming Inspection
You must inspect remote displays coming back from service for
shipping damage before you place them into operation just like newly
purchased remote displays. The remote display should be free from
dents, cracks, or other physical damage. The quality inspection seal
of the remote display should be unbroken, indicating that the remote
display has been tested according to manufacturer’s specifications.
If further incoming inspection or testing is required, the manufacturer
recommends that you use the Alarms Verification (located in this
section) as an incoming inspection test. You can perform additional
electrical safety testing in this section as part of an incoming
inspection in accordance with the policies of the health care provider.
Maintenance Schedule
Every 3 Months
Every Year
Monitor Safety Testing
• Clean the exterior of the unit (or clean as needed).
• Perform the annual safety tests provided in this section.
You can perform the following tests as part of a periodic safety check.
The following safety tests are designed so that the monitor’s warranty
seal does not have to be broken. If the monitor fails any portion of
these tests, contact MEDRAD.
The contents of this section include the following verifications and
safety tests:
• Electrical Leakage
• Interface Inspection
• Manual Controls Check
• Alarm Verification
• Internal Printer
• Communications
MEDRAD recommends that you run a serviced remote display for 24
hours before you perform the tests listed above and place the remote
display back into service.
7-1
MEDRAD Veris 8600
VIEWED/PRINTED:
11/09/2005 at 03:09:15.
Repaired modules could require more extensive testing than what is
shown in this list.
Always follow ESD precautions when performing a procedure
discussed in this section.
!
WARNING !
• Because test procedures require working with exposed
electrical circuits, only experienced electrical or biomedical
technicians should perform the procedures.
• After a remote display is altered through repair or hardware
adjustment, you must fully test it before use.
This copy of 3010798 Rev 0 is valid as of Nov-04-2005 at 12:12:00. The signed original is maintained in
Documentation Systems. Prior to use, you are responsible to confirm this copy's revision is the latest released.
Equipment and Tools
Accessory Testing
7-2
The following procedures assume that the technician has an ESD
safe workbench, a set of electronic hand tools, and a digital
multimeter with a 10 amp setting. At the beginning of each test,
special equipment can be listed. A variety of customized cables, clips,
and test fixtures are also needed to complete the tests. For more
information, contact MEDRAD.
Check the electrical safety of the power cord as part of the remote
display safety testing.
This copy of 3010798 Rev 0 is valid as of Nov-04-2005 at 12:12:00. The signed original is maintained in
Documentation Systems. Prior to use, you are responsible to confirm this copy's revision is the latest released.
VIEWED/PRINTED:
11/09/2005 at 03:09:15.
Remote Display Maintenance and Checkout
Cleaning and Disinfecting
!
WARNING !
• Shock Hazard! Before cleaning the remote display, turn the
power off and disconnect the AC power cable.
• Shock Hazard! Never immerse the remote display because the
remote display has an internal power source that is active even
when the unit is unplugged.
Do not use abrasive cleaners on the remote display or on any
sensors or probes. Abrasive cleaners damage the remote display.
With the exception of the display screen, wipe clean the exterior
surface of the remote display with alcohol. Dry it with a soft, dry cloth.
Because paper towels or tissues can scratch the surface of the
display, use a cotton cloth to clean the remote display.
Do not use full-strength alcohol on the display screen. Repeated use
of strong cleaners damages the screen. Clean the display window by
wiping it clean with a soft, lint-free cloth sprayed with common glass
cleaner, hwoever, do not spray glass cleaner directly on the display.
Accidental Wetting
!
WARNING !
• Shock Hazard! Because a remote display is an AC-powered
device, an immersed remote display presents a danger to
anyone who attempts to handle the device.
Immediately perform the following steps following an accidental
wetting of equipment:
1. Turn the power off. Disconnect the AC power cord from the
remote display.
2. Use a clean, dry towel or cloth to remove the liquid from the
remote display housing.
3. A service technician should inspect the remote display as soon
as possible.
4. If the internal mechanism is saturated, allow the liquid to drain
out for 24 hours before shipping.
5. If liquid has entered the remote display, it must be dried and
cleaned internally. Full testing is required before you can use
the monitor. Contact MEDRAD as soon as possible.
Time is critical. The longer any liquid remains in the remote display,
the more damage it can do. It is important to service the remote
display immediately after any liquid is spilled into it.
7-3
VIEWED/PRINTED:
11/09/2005 at 03:09:15.
MEDRAD Veris 8600
Fuse Removal and
Replacement
There are two AC power fuses located at the rear of the remote
display directly above the AC power entry socket. The remote display
uses T 1A L 250V fuses (pn 3012943).
1. Press in the side clips (at the same time) with a tool and lift out
the small, black access cover. The two fuse sockets are visible.
This copy of 3010798 Rev 0 is valid as of Nov-04-2005 at 12:12:00. The signed original is maintained in
Documentation Systems. Prior to use, you are responsible to confirm this copy's revision is the latest released.
Clips
Figure 7-1: Remove the Fuse Cover
Figure 7-2: Fuses Exposed
2. Gently pull the fuses out of the fuse cover assembly.
3. Insert the new fuse(s) into the fuse cavity.
4. Place the cover back over the fuses.
For more information about troubleshooting power problems, refer to
“Remote Display Troubleshooting” in Section 8 in this manual.
7-4
This copy of 3010798 Rev 0 is valid as of Nov-04-2005 at 12:12:00. The signed original is maintained in
Documentation Systems. Prior to use, you are responsible to confirm this copy's revision is the latest released.
VIEWED/PRINTED:
11/09/2005 at 03:09:15.
Remote Display Maintenance and Checkout
Long-Term Monitor Storage
No special preparation is necessary for long term storage of the
remote display.
Monitor and Accessories
Disposal
At the end of its useful life, you can dispose of the monitor and its
accessories according to your institution’s policies and procedures for
disposal of patient-contact medical waste.
Alternately, you can return the monitor and its accessories to
MEDRAD, Inc., for safe disposal. The shipping address is:
MEDRAD, Inc.
One Medrad Drive
Indianola, PA 15051-0780 USA
7-5
VIEWED/PRINTED:
11/09/2005 at 03:09:15.
MEDRAD Veris 8600
Electrical Safety Testing
!
WARNING !
• Shock Hazard! Because dangerous and lethal voltages are
present during the withstanding voltage, leakage, and ground
continuity test, all leakage and voltage testing must be done
with the monitor housing in place. For complete information
about the proper operating and safety procedures, refer to the
Veris 8600 Patient Monitor Operator’s Manual.
Leakage Test
Equipment and Setup
This copy of 3010798 Rev 0 is valid as of Nov-04-2005 at 12:12:00. The signed original is maintained in
Documentation Systems. Prior to use, you are responsible to confirm this copy's revision is the latest released.
Perform this test each time you open the remote display housing and
before you use the remote display on patients.
Perform all testing with the cover on. The following test requires a
Dynatech 232D leakage tester or equivalent.
1. Perform a self-test, if applicable, on the DYNATECH 232D by
plugging it into 110 VAC outlet. Turn on the leakage tester. Set
the mode switch to self test. Display should read 1000 ±20 and
the CURRENT SOURCE ACTIVE lamp should be on.
!
CAUTION !
• If these conditions are not met, do not continue with this test.
2. Set the mode switch on the Dynatech 232 to L1-L2 (line
voltage). The display should read the line voltage ±10%. Set the
mode switch to L1-GND. The display should read no more than
5% of L1-L2 on a grounded power system. Set the mode switch
to L2-GND.
NOTE: This should read about the same as the L1-L2 reading
for a grounded system.
Leakage Test Procedure
The remote display must be powered up during all of the isolation
tests.
1. Verify Earth Leakage with Open Ground is <0.25mA @ 120VAC
line Voltage.
2. Verify Earth Leakage with Reverse Polarity and Open Ground is
<0.25mA @ 120VAC line Voltage.
3. Verify Earth Leakage with Open Neutral and Open Ground is
<0.25mA @ 120VAC line Voltage.
4. Verify Earth Leakage with Reversed Polarity, Open Neutral and
Open Ground is <0.25mA @ 120 line Voltage.
7-6
This copy of 3010798 Rev 0 is valid as of Nov-04-2005 at 12:12:00. The signed original is maintained in
Documentation Systems. Prior to use, you are responsible to confirm this copy's revision is the latest released.
VIEWED/PRINTED:
11/09/2005 at 03:09:15.
Remote Display Maintenance and Checkout
Functional Testing
Encoder Verification
Fiber Optic Communication
Verify that the encoder functions properly.
To verify fiber optic communication:
1. Enter the CONFIG screen, then select Enter Network Config.
Enter Network Config is password protected.
2. Set the following parameters:
•
Sync Type
Fiber Optic
•
IP Adress
192.168.000.XXX
•
Net Mask
255.255.255.000
•
Port
•
Channel Type
•
Channel
•
SSID
02571
Peer-to-Peer
X
Any
3. Select Exit to save the settings.
4. Connect the remote display to a main monitor test set-up with
fiber optic cables.
5. Select Connect Fiber Optic.
6. Use the encoder to verify that the screen on the remote display
replicates what is present on the main monitor.
Display Performance
1. Verify that the display is showing a readable screen. The patient
parameters should display along the right hand of the screen
and waveform names along the left side (no ECG waveforms
are present).
2. There should be no intermittence or jittering of pixels. The
maximum amount of pixels missing from any display are as
follows:
• Seven dots are the maximum allowed per screen
• Only 1 dot within a 20mm radius circle
7-7
MEDRAD Veris 8600
This copy of 3010798 Rev 0 is valid as of Nov-04-2005 at 12:12:00. The signed original is maintained in
Documentation Systems. Prior to use, you are responsible to confirm this copy's revision is the latest released.
VIEWED/PRINTED:
11/09/2005 at 03:09:15.
Interface Performance
1. Install Paper into the printer and Press the PRINT key. Verify
that the printout is clear. If the printer does not function, verify
that the printer is set to Internal Printer in the CONFIG menu.
2. Press the NIBP key on the remote. Verify that the NIBP pump is
running on the Main Test unit.
3. Press the NIBP CYCLE/STAT key. Verify that the Cycle/Stat
menu appears on the remote screen.
4. Press the FREEZE key. Verify an audible response from the
speaker. Press the FREEZE key a second time to unlock
waveforms.
5. Press the TREND key. Verify an audible response from the
speaker. Verify that a trend screen appears on the display.
Press the TREND key again to close the trend screen.
6. Press the DEFAULT key. Verify an audible response from the
speaker. A Restore Unit Defaults window appears. Choose
CANCEL in the response and press the encoder twice to exit
back to the main screen.
7. Press the STAND BY key. Verify an audible response from the
speaker. A standby confirmation menu should appear. Press the
encoder button to close menu.
8. Attach an ECG simulator to the Main Test Unit and set the heart
rate to 300BPM. Verify that the remote is alarming. This is also
a speaker verification for the remote.
9. Press the SILENCE key to silence the alarm. Verify the
message 2 Min next to a bell with an X through it appear in the
upper right hand corner of the main window.
10.Press and hold the SILENCE key for 2 seconds to turn off the
alarm. Verify that the infinity symbol and a bell with an X through
it appear in the upper right hand corner of the main window.
Remote Printer Function
External Display Function
1. Press the PRINT key on the Main Test unit. Verify a remote print
out matching step 1 in “Interface Performance” on page 7-8 is
printed from the remote unit under test.
To verify the External Display function:
1. Enter the DISPLAY menu and update External Display to ON.
2. Connect a Standard video cable to the video port and verify the
screen of a standard VGA monitor matches the display.
Visual Inspection
7-8
Visually inspect the unit for all cosmetic faults and assure that all
hardware is in place and tight.
VIEWED/PRINTED:
11/09/2005 at 03:09:15.
Remote Display Maintenance and Checkout
Field Service Testing Safety
!
WARNING !
• Service testing procedures require working with exposed
electrical circuits and should only be attempted by experienced
electrical or biomedical technicians.
• When a remote display is altered through repair or hardware
adjustment, it should be fully tested before use.
!
CAUTION !
• Always follow ESD precautions when performing any procedure
discussed in this section.
This copy of 3010798 Rev 0 is valid as of Nov-04-2005 at 12:12:00. The signed original is maintained in
Documentation Systems. Prior to use, you are responsible to confirm this copy's revision is the latest released.
• Modules and PCBs that have been repaired may require more
extensive testing than what is described in this manual.
The pre-assembly testing of printed circuit boards (PCBs) is not
covered in this manual. Disassembly of surface mounted components
on PCBs is not recommended. Tests provided here are only for the
identification of damaged or degraded PCBs.
7-9
This copy of 3010798 Rev 0 is valid as of Nov-04-2005 at 12:12:00. The signed original is maintained in
Documentation Systems. Prior to use, you are responsible to confirm this copy's revision is the latest released.
VIEWED/PRINTED:
11/09/2005 at 03:09:15.
MEDRAD Veris 8600
Remote Display Fault Testing
The following procedures are used to determine whether boards and
assemblies are damaged. New boards and mechanical assemblies
should be tested as part of any replacement repair.
Board level tests require opening the remote display housing which
can void your product warranty.
Always follow ESD precautions when performing these procedures.
!
DANGER !
• High Voltage! Board testing requires working with dangerous
voltages. The rear assembly, that contains the power supply
module, should only be serviced by experience electrical
technicians.
Power Supply PCB Test
1. Remove the remote display from AC power.
2. Open the case.
3. Follow the disassembly procedures (refer to “Remote Display
Disassembly” in Section 10 in this manual) to expose the power
module PCB. Do not remove the power module PCB.
4. Disconnect the DC power cable at PS2 of the Main Board.
Leave the other end attached to the Power Supply Board.
5. Using a controlled AC source, apply 115 VAC at 60 Hz to the AC
receptacle. The source should be able to supply a minimum of 3
amps. (Use a power cable that has suitable connections to the
AC source.)
6. Measure the DC power cable end. The power module should
supply 15.6 VDC (±0.1V).
7. Proceed to the next step if the voltage is within specification. If it
is a new board under test, it might not be calibrated. The trim
potentiometer on calibrated boards should be varnished or
otherwise sealed.
8. Remove the power module. Verify that the trim potentiometer
measures 15.6 VDC.
9. Reassemble the remote display.
7-10
VIEWED/PRINTED:
11/09/2005 at 03:09:15.
Remote Display Maintenance and Checkout
Main Board Testing
1. Verify that the shunts at JP5 and JP6 are set to +PRWSW and
REMOTE, respectively
2. Connect a speaker to J21 on the Main Board.
3. Connect a membrane switch to J6 on the Main Board.
4. Attach a rotary menu knob to J3 on the Main Board.
5. Connect a 16VDC 3A power supply to connector PS2 on the
Main Board.
6. Insert an ammeter inline with the positive lead from the power
supply.
7. Press the ON/OFF key and verify that the “on” current to the
board is less than 300mA.
8. While using TP27 as ground, verify the following voltages:
This copy of 3010798 Rev 0 is valid as of Nov-04-2005 at 12:12:00. The signed original is maintained in
Documentation Systems. Prior to use, you are responsible to confirm this copy's revision is the latest released.
• +16.00 (±0.5) VDC @ TP25 (+PWRUNSW)
• +5.00 (±0.1) VDC @ TP21 (+5D)
• +5.00 (±0.1) VDC @ TP28 (+5P)
• +3.3 (±0.05) VDC @ TP23 (+3.3D)
• +8.00 (±0.25) VDC @ TP29 (+8V)
• -5.00 (±0.1) VDC @ TP20 (-5A)
• +5.00 (±0.025) VDC @ TP18 (+5VREF)
• +3.30 (±0.1) VDC @ TP22 (+3.3B)
7-11
VIEWED/PRINTED:
11/09/2005 at 03:09:15.
MEDRAD Veris 8600
Communication Board Testing
1. Complete a visual inspection of the PCB followed by an “in
circuit” test.
2. Setup up the remote display for fiber optic communication.
a. Attach one of the fiber optic duplex cables to the
Communication PCBA.
• The black lead of the duplex cable connects to U7 on the
Communication PCBA.
• The blue lead of the duplex cable connects to U5 on the
Communication PCBA.
b. Attach the unconnected ends of the duplex cable to two of the
bushings.
c. Attach the terminated fiber optic cable.
This copy of 3010798 Rev 0 is valid as of Nov-04-2005 at 12:12:00. The signed original is maintained in
Documentation Systems. Prior to use, you are responsible to confirm this copy's revision is the latest released.
d. The fiber optic cable marked “Rx” connects to the duplex
cable labeled BLACK.
e. The fiber optic cable marked “Tx” connects to the remaining
duplex cable.
f. Connect the remote display to the remaining Main PCBA.
NOTE: The remote display will be connected to the
unconnected ends of the terminated fiber optic cable.
3. Connect each Main PCBA to one display assembly, one rotary
encoder, and one membrane switch.
4. Turn off both units.
5. Sync the two (2) units through fiber optic communication.
a. Set the network settings on the main PCBA with main code.
• Turn on the unit.
• Go to the CONFIG menu and select Enter Network Config.
• Enter the password MEDRAD and select YES.
• Select Sync Type and select Fiber Optic.
• Select EXIT.
b. Set the network settings on the main PCBA with remote
code.
• Turn on the unit.
• Select Configure.
• Select Sync Type and then select Fiber Optic.
c. Restart the unit with main code and select “Exit” on the unit
with remote code.
d. Select Connect Fiber Optic on the unit with remote code.
e. Verify that the two units sync through fiber optic
communication.
7-12
VIEWED/PRINTED:
11/09/2005 at 03:09:15.
This copy of 3010798 Rev 0 is valid as of Nov-04-2005 at 12:12:00. The signed original is maintained in
Documentation Systems. Prior to use, you are responsible to confirm this copy's revision is the latest released.
8 Remote Display Troubleshooting
This section lists the possible causes of remote display problems.
Use this table and the schematics in “Remote Display BOMs and
Drawings” in Section 11 to identify and locate components that
malfunction.
Symptom
Unit won’t power up (On/
Off LED is dark)
Problem
• AC power cord is not securely
connected to the remote
display
• AC outlet off or unpowered
• Fuses are blown (Located
above AC connection
• Main PCB is disconnected
Solution
Connect AC power cord to the remote
display
Connect power cord to a live outlet
Replace AC fuses
• Bad membrane
• Main PCB fuse blown
• Main PCB failed
Reconnect power cable at PS2 on
Main PCB
Replace the keypad membrane
Replace F3 on Main PCB
Replace Main PCB
Cannot activate hardkey
function or turn on monitor
with AC power (On/Off
LED is green)
• Membrane panel is
disconnected or loose
• Keypad membrane is bad
Reconnect ribbon cable to J6 on
Main PCB
Replace keypad membrane panel
Cannot activate softkeys
with rotary knob
• Rotary knob is disconnected
or loose
• Bad rotary knob
Reconnect cable to J3 on Main PCB
• Video screen cables to Main
PCB are disconnected or
loose
• Inverter not plugged in
Reconnect data and inverter cables to
connectors on the Main PCB
(J2 and/or J7)
Make sure all Inverter connections
are secure.
Replace the inverter
Replace display
Display is blank or not
readable
• Bad inverter
• Bad display
No sound from speaker
Speaker scratchy or
unclear
• Volume turned down
Replace rotary knob
Set volume higher in Configuration
(CONFIG) window.
Reconnect J21 on Main PCB
• Main PCB connection is
disconnected or loose
• Speaker wire broken at
speaker terminals
Check speaker wires for breaks or
bad crimp pins
• Metal debris on speaker
• Bad speaker
Remove debris from speaker drum
Replace speaker
8-1
This copy of 3010798 Rev 0 is valid as of Nov-04-2005 at 12:12:00. The signed original is maintained in
Documentation Systems. Prior to use, you are responsible to confirm this copy's revision is the latest released.
VIEWED/PRINTED:
11/09/2005 at 03:09:15.
MEDRAD Veris 8600
Symptom
Remote cannot
communicate with the
main monitor (hard wire)
Problem
• Fiber optic cable to remote
display may be loose or
disconnected.
• Fiber optic cables not
connected properly
• Fiber optic cable may be bad.
• Remote display may be
malfunctioning
• Network settings in the
CONFIG. menu may be
incorrect.
• Communication Board may
not be seated tightly to the
Main Board.
• Communication Board may
be bad.
COM 1 serial interface
doesn’t work
•
•
•
•
Printer doesn’t print
• Not set to internal printer
Set to internal printer
Incorrect or bad cable
Setting mismatch
Connector is bad
• Printer connection is
disconnected or loose
• Bad printer
• Bad Printer PCB
8-2
Solution
Reseat or reconnect fiber optic cable.
Make sure that the fiber optic cables
go from “TX” to “RX”. They should
NOT go “TX” to “TX”/”RX” to “RX”
Replace fiber optic cable.
Try another remote display with the
system.
Reset network settings to correct
settings.
Verify Communication Board is
seated to the Main Board.
Replace Communication Board
Reset monitor to external printer
Replace with correct serial cable
Reset baud rate and other settings
Replace the Main PCB
Set the Print Device to Internal Printer
in the CONFIG menu
Reconnect J9 on the Main PCB and/
or CN2 and CN3 on the Printer PCB
Replace printer
Replace Printer PCB
VIEWED/PRINTED:
11/09/2005 at 03:09:15.
Remote Display Troubleshooting
Troubleshooting and Repair
You must fully repair, calibrate, and test all damaged remote displays
before you use them on patients. The remote display must meet the
original operating specifications before you use it on a patient.
Always follow ESD precautions when performing any of the
procedures discussed in this section.
Main Board
This copy of 3010798 Rev 0 is valid as of Nov-04-2005 at 12:12:00. The signed original is maintained in
Documentation Systems. Prior to use, you are responsible to confirm this copy's revision is the latest released.
Before attempting to repair a damaged remote display the technician
must fully understand the functions of the remote display. The service
technician should have read and understood all the previous sections
of this manual.
The Main PCB contains the primary processors, storage memory,
communication interfaces, audio driver, power regulation, and video
generation and keypad inputs (User I/O).
The main ground cable and the display ground cable are part of the
Main PCB assembly.
There is one replaceable fuse (3A PICO 125V SLO-BLO) for the
power supply module at PS2 (F4 protects the supply output).
The Main PCB is not a field-repairable component. Replacement
Main PCBs are pre-tested, programmed, and calibrated.
!
DANGER !
• High Voltage! Repairing and testing the power supply requires
working with dangerous voltages. The power supply module
should only be serviced by experienced electrical repair
technicians.
Communication
DPAC Communications Board
The DPAC Communications PCB facilitates communications with the
main monitor through the fiber optic ports. The DPAC
Communications PCB connects to J1 of the Main PCB. The fiber
optic cables connect at U5 and U7 on the DPAC Communications
PCB.
8-3
VIEWED/PRINTED:
11/09/2005 at 03:09:15.
MEDRAD Veris 8600
Fuse Replacement
You do not have to open the remote display case to change the main
power fuses. See “Fuse Removal and Replacement” on page 7-4.
!
WARNING !
• Shock hazard. Substitution of fuses or jumping the fuse
contacts can endanger the patient and damage the remote
display.
AC Power Components
This copy of 3010798 Rev 0 is valid as of Nov-04-2005 at 12:12:00. The signed original is maintained in
Documentation Systems. Prior to use, you are responsible to confirm this copy's revision is the latest released.
The main fuses (pn 3012943) for the remote display is located in an
external compartment above the AC power cord connection. Replace
only with T 1A L 250V fuses.
The power entry assembly is composed of two AC chokes, a ferrite,
and power cable connections. The source connections attach directly
to the AC receptacle fuse assembly.
Replace broken, cracked, or loose AC receptacles. Replace the
receptacle if the external pins are bent or broken. Do not attempt to
remove or modify the ground pin!
Check the cables and chokes for heat damage before power module
replacement. Remove the assembly from the housing and inspect the
back side of the board for scorching or damaged solder connections.
Replace the entire assembly if there are any signs of high current
damage.
8-4
VIEWED/PRINTED:
11/09/2005 at 03:09:15.
This copy of 3010798 Rev 0 is valid as of Nov-04-2005 at 12:12:00. The signed original is maintained in
Documentation Systems. Prior to use, you are responsible to confirm this copy's revision is the latest released.
9 Remote Display Theory of Operation
Overview
The Veris color remote display is an option with the Veris MR patient
monitoring system. This remote display duplicates the features and
functionality of the main monitor interface. The remote display has no
patient sensor interface capability.
The remote display is wall powered with no battery. The remote
display is not MR compatible.
The remote display employs a universal switching power supply for
international use.
In order to monitor the status of the line power, and condition of the
battery pack, the internal power supply circuitry drives several status
lines available to the main module. The power management/
watchdog circuit provides a low battery level detection mechanism
and a hardware-based check on software operation (watchdog timer).
Communication
The remote display communicates to the patient monitor via a direct
fiber optic cable interface. The remote display has a hardwire output
port providing CUSP communication to the main monitor. The
communication interface is operational up to 200 feet from the patient
monitor in the scan room to the remote display in the control room.
The remote display has 1 analog output representing user selectable
waveforms. The remote display has a serial output representing the
corresponding numeric data associated with each parameter.
Printer Interface
The remote display has a standard printer interface for an internal
thermal line printer.
9-1
VIEWED/PRINTED:
11/09/2005 at 03:09:15.
MEDRAD Veris 8600
Main CPU and System
Speaker Driver
Communications
The microprocessor circuitry handles the Main Board computational
functions and provides integrated I/O functions, including timers, I/O
pins, serial interfaces, and analog I/O.
The speaker drive circuit is a DAC controlling speaker volume and an
output pin to control frequency. A software-controlled timer generates
a square-wave signal that drives the speaker. Hence, any drive
frequency has harmonic components, and generates no “pure tones.”
Applicable standards recommend against the use of pure tones in
alarm situations to reduce the risk of an individual with a “notch”
hearing deficit missing an alarm.
The monitor provides two patient-isolated external RS-232 serial data
ports (TX, RX, and ground):
This copy of 3010798 Rev 0 is valid as of Nov-04-2005 at 12:12:00. The signed original is maintained in
Documentation Systems. Prior to use, you are responsible to confirm this copy's revision is the latest released.
• The DB-9 COM1 port is configured for compatibility with ASCII
printer applications.
• The DIN-8 COM2 port is custom-configured with one pin
reserved for analog output.
The main module drives a patient-isolated external analog output. It
provides a 0 to 1 v output capable of driving a high-level input, such
as a defibrillator or chart recorder.
Printer
9-2
The Main Board powers and controls the printer module. The Main
Board processes error messages from the Printer Board and displays
them on the screen. The internal printer module is a Sieko
LTP1245-type mechanism.
J4
PS2
(DIN 8)
J10
(BNC)
J11
PS1
J16
J17
P3
Component Side
CN3
Motor
CN2
CN1
Printer
Board
J9
J7
Active
LED
J8
J6
Keypad
J5
J3
Rotary
Encoder
J1
P1
JP1
J21
P5
Main Board
P2
J20
P4
J19
P6
J18
Solder Side
J1
J2
Backlight
Inverter
J1
Print
Head
J2
KEY
Backlight
J2
U5
Fiber Optic
DPAC
Communication
Board
U7
Jumper
AC In
JP1
Speaker
Power
Board
CN1
External
Module
Connection
This copy of 3010798 Rev 0 is valid as of Nov-04-2005 at 12:12:00. The signed original is maintained in
Documentation Systems. Prior to use, you are responsible to confirm this copy's revision is the latest released.
J12
J15
J13
The following block diagram aids in tracing communication and data
routes within the remote display system. Connection numbers are
given to show the relationship between the boards. The diagram is
keyed to the theory of operations found on the previous pages.
J14
Block Diagram
J5
VIEWED/PRINTED:
11/09/2005 at 03:09:15.
Remote Display Theory of Operation
Connection stuffed
Connection not stuffed
Figure 9-1: PCB Interconnect Diagram
9-3
This copy of 3010798 Rev 0 is valid as of Nov-04-2005 at 12:12:00. The signed original is maintained in
Documentation Systems. Prior to use, you are responsible to confirm this copy's revision is the latest released.
VIEWED/PRINTED:
11/09/2005 at 03:09:15.
VIEWED/PRINTED:
11/09/2005 at 03:09:15.
10Remote Display Disassembly
Before You Begin
Tools Needed
• Proper ESD mat and antistatic grounding straps
• #1 Philips screwdriver
• #2 Philips screwdriver
• Small flat scredriver
• 10mm socket, deep well
• 1/4 inch socket, deep well
• 7/16 inch socket, deep well
This copy of 3010798 Rev 0 is valid as of Nov-04-2005 at 12:12:00. The signed original is maintained in
Documentation Systems. Prior to use, you are responsible to confirm this copy's revision is the latest released.
• 3/8 inch socket, deep well
• Grounded soldering iron
Supplies Needed
• Kapton tape
• Labeling material
• Cotton cloth
• Rubbing alcohol
Precautions
1. Turn the monitor off.
2. Disconnect the AC (Mains) power cord.
!
WARNING !
• The procedures presented in this section are intended to be
implemented by qualified biomedical engineering or field service
personnel for PCB assembly replacement.
• The procedures presented in this section are not intended to be
used for component-level trouble shooting and repair of the PCB
assemblies. Only MEDRAD service personnel are authorized to
perform component-level repair.
• Possible safety hazard. Read the battery safety information
provided in “Important Safety Notice” on page 1-3
The repair procedures for the remote display are included here for the
determination of damaged or unusable assemblies. MEDRAD does
not recommend attempting the field repair of the printed circuit
boards (PCBs).
10-1
MEDRAD Veris 8600
This copy of 3010798 Rev 0 is valid as of Nov-04-2005 at 12:12:00. The signed original is maintained in
Documentation Systems. Prior to use, you are responsible to confirm this copy's revision is the latest released.
VIEWED/PRINTED:
11/09/2005 at 03:09:15.
Service Safety
!
DANGER !
• The remote display contains an internal AC power supply that
contains potentially lethal voltages.
• High Voltage! The internal Power Supply PCB has a protective
shield that should not be removed during service. If the power
supply is defective, replace the entire Power Supply assembly.
Electrostatic Discharge
Protection
The procedures in this section require handling of electrostatic
sensitive components. Microprocessors and other electronic
components can be permanently damaged by attempting repairs at
an unprotected workbench.
Use all electrostatic discharge (ESD) protection as described!
• Perform the disassembly procedure on an antistatic mat that is
grounded. Check the ground cable to insure that it is connected
to a good earth ground.
• Use a grounded soldering iron.
• Wear a wrist-grounding strap.
• Connect the wrist strap and mat through a resistor (1 megohm
typical) to the same ground source.
• Test the wrist-ground straps on a daily basis.
• Temporarily store components in metal or antistatic containers.
Do not store components in plastic dishes. Store circuit boards
in sealed antistatic bags or cover them in antistatic boxes. Do
not store electronic boards directly in cardboard boxes.
10-2
This copy of 3010798 Rev 0 is valid as of Nov-04-2005 at 12:12:00. The signed original is maintained in
Documentation Systems. Prior to use, you are responsible to confirm this copy's revision is the latest released.
VIEWED/PRINTED:
11/09/2005 at 03:09:15.
Remote Display Disassembly
Front Housing Removal
Follow the ESD cautions discussed in “Electrostatic Discharge
Protection” on page 10-2.
1. Remove the eight (8) Philips screws holding the front and rear
assemblies together.
Figure 10-2: Philips Screws on the Back of the Monitor
2. Carefully pull off the front housing in order to avoid pulling any
wires.
NOTE: The unit may be hard to open due to the curing of the
adhesive on the water ingress shield. Carefully separate the
housing taking care that you don’t crack the housing.
Main PCB
Front
Housing
Figure 10-3: Remove the Front Housing
10-3
MEDRAD Veris 8600
This copy of 3010798 Rev 0 is valid as of Nov-04-2005 at 12:12:00. The signed original is maintained in
Documentation Systems. Prior to use, you are responsible to confirm this copy's revision is the latest released.
VIEWED/PRINTED:
11/09/2005 at 03:09:15.
3. The printer cable has a ZIF connector. Unlock the connector
before remove the cable. Label and disconnect the printer cable
from J9 of the Main PCB.
J9
J2
J7
J6
J3
Figure 10-4: Main PCB Connector Side Connections
4. Label and disconnect the fiber optic cables from U5 and U7 on
the DPAC Communication PCB.
U5 & U7
Figure 10-5: DPAC Communication PCB
10-4
This copy of 3010798 Rev 0 is valid as of Nov-04-2005 at 12:12:00. The signed original is maintained in
Documentation Systems. Prior to use, you are responsible to confirm this copy's revision is the latest released.
VIEWED/PRINTED:
11/09/2005 at 03:09:15.
Remote Display Disassembly
5. Remove the Main/Communication assembly from the chassis.
This assembly is held with six (6) #6 screws.
Figure 10-6: Remove the Six Screws
6. If the DPAC Communication PCB needs to be replaced, remove
the DPAC Communication PCB from the Main PCB.
If only the Main PCB needs to be replaced, remove the DPAC
Communication PCB from the Main PCB to attach to the new
Main PCB.
7. Label and disconnect the two (2) display cables from J2 and J7
of the Main PCB. See "Figure 10-4: Main PCB Connector Side
Connections".
8. Note the orientation of the membrane cable in the ZIF
connector. Unlock the ZIF connector. Label and remove the
membrane cable from J6 of the Main PCB. See "Figure 10-4:
Main PCB Connector Side Connections".
9. Label and remove the rotary encoder knob cable from J3 of the
Main PCB. See "Figure 10-4: Main PCB Connector Side
Connections".
10.Lay the display front housing flat on the table.
10-5
This copy of 3010798 Rev 0 is valid as of Nov-04-2005 at 12:12:00. The signed original is maintained in
Documentation Systems. Prior to use, you are responsible to confirm this copy's revision is the latest released.
VIEWED/PRINTED:
11/09/2005 at 03:09:15.
MEDRAD Veris 8600
11.Remove the ground cables held in place with a Philips screw.
Ground
Cable
Attached
Figure 10-7: Remove the Ground Cable
12.Remove the front housing assembly.
10-6
VIEWED/PRINTED:
11/09/2005 at 03:09:15.
Remote Display Disassembly
Front Housing Disassembly
Rotary Encoder Knob
Removal and Replacement
1. With a flat screwdriver pry the rotary encoder knob from the
remote display.
Rotary
Encoder
Knob
Figure 10-8: Remove the Rotary Encoder Knob
This copy of 3010798 Rev 0 is valid as of Nov-04-2005 at 12:12:00. The signed original is maintained in
Documentation Systems. Prior to use, you are responsible to confirm this copy's revision is the latest released.
2. Remove the retaining nut and lock washer from the front of the
housing. Remove the assembly from the front housing.
3. Install the rotary encoder onto the front enclosure and secure
using the supplied lock washer and nut. Ensure that the encoder
is oriented so that the cable is towards the far edge (right).
4. Cover the backside of the encoder with kapton tape. Ensure that
all exposed metal is covered.
5. Install the encoder knob onto the encoder. Press the knob onto
the shaft of the encoder completely.
NOTE: The encoder knob and the shaft are keyed.
10-7
MEDRAD Veris 8600
VIEWED/PRINTED:
11/09/2005 at 03:09:15.
Membrane Keypad
Removal and Replacement
Use this procedure only if you need to replace the membrane keypad
on the remote display.
NOTE: Once you remove a membrane from the front panel you
cannot reattach it to the front panel.
1. With a flat screwdriver pry the rotary encoder knob from the
unit.
Rotary
Encoder
Knob
This copy of 3010798 Rev 0 is valid as of Nov-04-2005 at 12:12:00. The signed original is maintained in
Documentation Systems. Prior to use, you are responsible to confirm this copy's revision is the latest released.
Figure 10-9: Remove the Rotary Encoder Knob
2. Push a flat screwdriver through the ribbon cable slot to begin
peeling the membrane off the front of the unit. Do not attempt to
use tools to peel the membrane from the front as you may mar
the case and be unable to properly attach the new membrane.
Use a screwdriver to push the
membrane away from housing
through the ribbon cable slot
Figure 10-10: Removing Membrane
3. Peel the membrane away from the front housing.
4. Remove any excess glue from the front housing. Use a cotton
cloth dampened with alcohol.
NOTE: If any glue remains on the housing, the new membrane
cannot adhere properly.
5. Remove the protective backing from the adhesive on the new
membrane.
6. Install the new membrane. Line up the membrane along a
straight edge and lay the membrane into place. Press down
firmly on the membrane when it is in position.
NOTE: Make sure that all of the air is removed from under the
membrane switch.
7. Reattach the encoder knob onto the encoder. Press the knob
onto the shaft of the encoder completely.
NOTE: The encoder knob and the shaft are keyed.
10-8
This copy of 3010798 Rev 0 is valid as of Nov-04-2005 at 12:12:00. The signed original is maintained in
Documentation Systems. Prior to use, you are responsible to confirm this copy's revision is the latest released.
VIEWED/PRINTED:
11/09/2005 at 03:09:15.
Remote Display Disassembly
Display Assembly
Removal and Replacement
1. Remove the four (4) nuts from the interior frame of the front
housing assembly. The front housing comes apart from the
display.
1
Nuts
Figure 10-11: Remove the Display Nuts
2. Lift the front up. Allow the cables to slide through the access
hole.
3. Remove the four (4) screws that hold the display housing
together.
3
Figure 10-12: Remove the Display Housing Screws
4. Remove the back half of the display housing.
10-9
MEDRAD Veris 8600
This copy of 3010798 Rev 0 is valid as of Nov-04-2005 at 12:12:00. The signed original is maintained in
Documentation Systems. Prior to use, you are responsible to confirm this copy's revision is the latest released.
VIEWED/PRINTED:
11/09/2005 at 03:09:15.
Inverter PCB
Removal and Replacement
1. Label and disconnect the cables (Item 1 on the photo) on the
Inverter PCB.
2. Remove the two (2) small Philips screws and plastic washers.
Inverter
1
2
Figure 10-13: Remove the Inverter PCB
3. Remove and replace the Inverter PCB.
4. Fasten the Inverter PCB with the two (2) screws and nylon
washers you removed earlier. (See #2 in "Figure 10-13: Remove
the Inverter PCB".)
NOTE: When you install the new Inverter PCB, be sure the
nylon standoffs are in place.
5. Reattach the cables. (See #1 in "Figure 10-13: Remove the
Inverter PCB".)
10-10
This copy of 3010798 Rev 0 is valid as of Nov-04-2005 at 12:12:00. The signed original is maintained in
Documentation Systems. Prior to use, you are responsible to confirm this copy's revision is the latest released.
VIEWED/PRINTED:
11/09/2005 at 03:09:15.
Remote Display Disassembly
Display Screen
Removal and Replacement
1. Remove the four (4) Philips screws.
Inverter
PCB
1 Screws
Figure 10-14: Remove the Display Housing Screws
2. Label and disconnect the cable at Label 2 from the Inverter
PCB.
2
Inverter
Figure 10-15: Remove the Inverter PCB Connection
10-11
MEDRAD Veris 8600
This copy of 3010798 Rev 0 is valid as of Nov-04-2005 at 12:12:00. The signed original is maintained in
Documentation Systems. Prior to use, you are responsible to confirm this copy's revision is the latest released.
VIEWED/PRINTED:
11/09/2005 at 03:09:15.
3. Disconnect the ribbon cable from the display.
3
Figure 10-16: Remove the Ribbon Cable, Display
Screws
4. Turn the display over and remove the four (4) Philips screws.
5
Screws
Figure 10-17: Remove the Display Screws
5. Remove and replace the display screen.
NOTE: Be sure the display and the inside of the clear cover are
clean before you re-assemble the assembly.
10-12
Remote Display Disassembly
VIEWED/PRINTED:
11/09/2005 at 03:09:15.
6. Reassemble in reverse order.
Printer Removal and
Replacement
1. Remove the paper roll from the unit.
2. Remove the two (2) Philips screws that hold the printer
assembly.
Screws
This copy of 3010798 Rev 0 is valid as of Nov-04-2005 at 12:12:00. The signed original is maintained in
Documentation Systems. Prior to use, you are responsible to confirm this copy's revision is the latest released.
Figure 10-18: Remove the Printer Housing Screws
3. Disconnect the ribbon cable from CN1 on the the Printer PCB.
4. Remove the printer assembly.
5. If the Printer PCB needs to be replaced, remove the four (4)
Philips screws from the Printer PCB.
Screws
CN1
Figure 10-19: Printer PCB Screws
6. Lift the Printer PCB away from the unit.
7. Label and disconnect the cables from CN3 and CN2 on the back
of the Printer PCB.
8. Remove the metal plate and shielding.
9. Remove the printer from the housing.
10-13
VIEWED/PRINTED:
11/09/2005 at 03:09:15.
MEDRAD Veris 8600
10.Replace the printer and/or Printer PCB and reassemble the
remote display.
Rear Housing Disassembly
Follow the ESD cautions discussed in “Electrostatic Discharge
Protection” on page 10-2.
Because the interior of the rear assembly contains exposed AC
contacts, you must disconnect the AC power before you begin the
disassembly procedure. See “Before You Begin” on page 10-1.
Main PCB Removal
and Replacement
1. Remove the front housing, as described in “Front Housing
Removal” on page 10-3.
2. Remove the six (6) Philips screws shown in the picture below.
This copy of 3010798 Rev 0 is valid as of Nov-04-2005 at 12:12:00. The signed original is maintained in
Documentation Systems. Prior to use, you are responsible to confirm this copy's revision is the latest released.
J9
J2
J7
J6
J21
J3
Figure 10-20: Main PCB Screws
3. Disconnect the printer cable from J9 on the Main PCB.
4. Label and disconnect the speaker cable at J21 on the Main
Board.
10-14
This copy of 3010798 Rev 0 is valid as of Nov-04-2005 at 12:12:00. The signed original is maintained in
Documentation Systems. Prior to use, you are responsible to confirm this copy's revision is the latest released.
VIEWED/PRINTED:
11/09/2005 at 03:09:15.
Remote Display Disassembly
5. Carefully pull the Main PCB away from the front chassis. The
board only pulls forward slightly.
NOTE: PS2 is on the solder (back) side of the Main Board.
PS2
Figure 10-21: Main Board Solder Side Connections
6. Label and disconnect the Power Supply PCB cable at PS2 on
the Main Board.
7. Replace in reverse order.
10-15
MEDRAD Veris 8600
This copy of 3010798 Rev 0 is valid as of Nov-04-2005 at 12:12:00. The signed original is maintained in
Documentation Systems. Prior to use, you are responsible to confirm this copy's revision is the latest released.
VIEWED/PRINTED:
11/09/2005 at 03:09:15.
Front Chassis Removal
The Main PCB is attached to a metal chassis. You can remove this
PCB as an assembly.
NOTE: MEDRAD advises that you remove the Main PCB prior to
removing the Front Chassis. See “Main PCB Removal
and Replacement” on page 10-14.
1. Remove the printer from the remote display. See “Printer
Removal and Replacement” on page 10-13.
2. Remove the two (2) Philips screws hidden beneath the printer
module.
Screws
Figure 10-22: Remove the Chassis Screws
3. Turn the remote display over and remove the two (2) bottom
screws and the two (2) feet.
4. Gently pull the front chassis from the rear housing.
Figure 10-23: Remove the Front Chassis
5. Label and remove all cables from the front.
10-16
Remote Display Disassembly
This copy of 3010798 Rev 0 is valid as of Nov-04-2005 at 12:12:00. The signed original is maintained in
Documentation Systems. Prior to use, you are responsible to confirm this copy's revision is the latest released.
VIEWED/PRINTED:
11/09/2005 at 03:09:15.
6. With a 1/4-inch deep well socket, remove the two (2) Power
Supply PCB ground cables.
Screws in Cup Washers
Ground Cables
Figure 10-24: Power Supply PCB Assembly
Power Supply PCB
Removal and Replacement
1. Remove the four (4) screws and cup washers.
2. Remove the AC cable from J5, the AC In cable from CN1, and
the Ground cable from JP1 on the Power Supply PCB.
Figure 10-25: Power Supply PCB Connections
3. Reassemble in reverse order.
4. Reassemble the remote display.
10-17
This copy of 3010798 Rev 0 is valid as of Nov-04-2005 at 12:12:00. The signed original is maintained in
Documentation Systems. Prior to use, you are responsible to confirm this copy's revision is the latest released.
VIEWED/PRINTED:
11/09/2005 at 03:09:15.
MEDRAD Veris 8600
Speaker
10-18
1. Remove the two (2) screws at the back of the chassis.
Remove
screws
2. Slide the old speaker out.
3. Reassemble in reverse order.
VIEWED/PRINTED:
11/09/2005 at 03:09:15.
This copy of 3010798 Rev 0 is valid as of Nov-04-2005 at 12:12:00. The signed original is maintained in
Documentation Systems. Prior to use, you are responsible to confirm this copy's revision is the latest released.
11 Remote Display BOMs and
Drawings
List of Drawings
Title
Assembly BOMs Remote Monitor Final Assembly
and Drawings Rear Housing Assembly
Drawing Number
3010482
3010643
Front Housing Assembly
3010644
Remote Front Display Assembly
3010655
Chassis Assembly
3010645
Printer Module
3012890
Veris Remote Main Board Assembly
3011535
11-1
This copy of 3010798 Rev 0 is valid as of Nov-04-2005 at 12:12:00. The signed original is maintained in
Documentation Systems. Prior to use, you are responsible to confirm this copy's revision is the latest released.
VIEWED/PRINTED:
11/09/2005 at 03:09:15.
MEDRAD Veris 8600
Remote Monitor Final
Assembly
11-2
3010482
REMOTE MONITOR ASSEMBLY
Item #
01
03
05
09
17
18
61
Part Number
3010643
3010644
3010645
3011535
3012890
3010973
3010950
3012493
3012494
3012495
3012496
3012497
3012498
3012499
3012500
Description
HOUSING REAR REMOTE ASSY
HOUSING FRONT MONITOR ASY
CHASSIS REMOTE ASSEMBLY
MAIN PCB REMOTE
PRINTER MODULE 8100/9100
DPAC COMMUNICATIONS BRD
ENGLISH REMOTE LABEL SET
FRENCH REMOTE LABEL SET
GERMAN REMOTE LABEL SET
JAPANESE REMOTE LABEL SET
SPANISH REMOTE LABEL SET
PORTUGESE REMOTE LABEL SET
ITALIAN REMOTE LABEL SET
SWEDISH REMOTE LABEL SET
DUTCH REMOTE LABEL SET
This copy of 3010798 Rev 0 is valid as of Nov-04-2005 at 12:12:00. The signed original is maintained in
Documentation Systems. Prior to use, you are responsible to confirm this copy's revision is the latest released.
VIEWED/PRINTED:
11/09/2005 at 03:09:15.
Remote Display BOMs and Drawings
Front Housing Assembly
MR3010644 HOUSING FRONT MONITOR ASY
Item #
01
02
10
Remote Front Display Assembly
Part Number
3010650
3010655
3010657
Description
HOUSING FRONT REMOTE
DISPLAY FRONT MONITOR AY
MEMBRANE SWITCH MONITOR
MR3010655 DISPLAY FRONT MONITOR AY
Item #
01
Part Number
3010654
Description
DISPLAY BEZEL FRONT
11-3
VIEWED/PRINTED:
11/09/2005 at 03:09:15.
MEDRAD Veris 8600
Rear Housing Assembly
Chassis Assembly
This copy of 3010798 Rev 0 is valid as of Nov-04-2005 at 12:12:00. The signed original is maintained in
Documentation Systems. Prior to use, you are responsible to confirm this copy's revision is the latest released.
Printer Module
11-4
3010643
HOUSING REAR REMOTE ASSY
Item #
01
06
09
22
23
59
Part Number
3010651
3010663
3010648
3011499
3011476
3012493
3010645
CHASIS REMOTE ASSEMBLY
Item #
01
02
Part Number
3010646
3010647
3012890
PRINTER MODULE 8100/9100
Description
HOUSING REAR REMOTE
CABLE POWER ENT 2 PWR SUP
COVER BATT OPENING REMOTE
ST SPLICE BUSHING
FO INT COMM DUPLX CBL
FUSE 3A PICO 125V SLO-BLO
Description
CHASSIS BOTTOM REMOTE
CHASSIS VERTICAL REMOTE
This copy of 3010798 Rev 0 is valid as of Nov-04-2005 at 12:12:00. The signed original is maintained in
Documentation Systems. Prior to use, you are responsible to confirm this copy's revision is the latest released.
1
VI
11/
6Remote Display BOMs and Drawings
Remote Display BOMs and Drawings
Remote Final Assembly
(3010482)
6-5
VI
11/
This copy of 3010798 Rev 0 is valid as of Nov-04-2005 at 12:12:00. The signed original is maintained in
Documentation Systems. Prior to use, you are responsible to confirm this copy's revision is the latest released.
MEDRAD Veris 8600
Remote Front Housing
Assembly (3010644)
Label 46424Bxxx from Label Set:
3010950 (English)
3012493 (French)
3012494 (German)
3012495 (Japanese)
3012496 (Spanish)
3012497 (Portugese)
3012498 (Italian)
3012499 (Swedish)
3012500 (Dutch)
6-6
This copy of 3010798 Rev 0 is valid as of Nov-04-2005 at 12:12:00. The signed original is maintained in
Documentation Systems. Prior to use, you are responsible to confirm this copy's revision is the latest released.
Remote Display BOMs and Drawings
Remote Front Display
Assembly (3010655)
6-7
VI
11/
This copy of 3010798 Rev 0 is valid as of Nov-04-2005 at 12:12:00. The signed original is maintained in
Documentation Systems. Prior to use, you are responsible to confirm this copy's revision is the latest released.
MEDRAD Veris 8600
Remote Rear Housing
Assembly (3010643)
6-8
VI
11/
This copy of 3010798 Rev 0 is valid as of Nov-04-2005 at 12:12:00. The signed original is maintained in
Documentation Systems. Prior to use, you are responsible to confirm this copy's revision is the latest released.
Remote Display BOMs and Drawings
Remote Chassis Assembly
(3010645)
6-9
VI
11/
This copy of 3010798 Rev 0 is valid as of Nov-04-2005 at 12:12:00. The signed original is maintained in
Documentation Systems. Prior to use, you are responsible to confirm this copy's revision is the latest released.
VI
11/