1
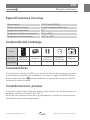
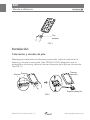
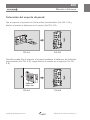
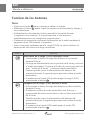
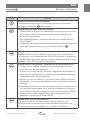
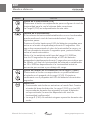
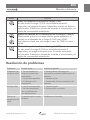
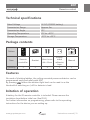
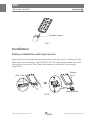
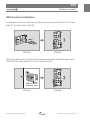
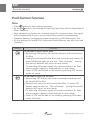
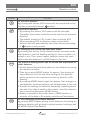
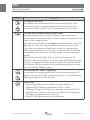
www.grupotemper.com
KDP
Mando a distancia
Remote control
KDP
Mando a distancia
Índice
Especificaciones técnicas
3
Contenido del embalaje
3
Características
3
Consideraciones previas
3
Instalación
4
Función de los botones
6
Resolución de problemas
9
Contents
Technical specifications
11
Package contents
11
Features
11
Initation of operation
11
Installation
12
Push button function
14
Troubleshooting
17
Manual de instrucciones | 2
www.grupotemper.com
KDP
Mando a distancia
Especificaciones técnicas
Alimentación
3V DC (pila CR2032)
Alcance de transmisión
3 metros aproximadamente
Ángulo de transmisión
35º
Temperatura de funcionamiento
0ºC a +45ºC
Temperatura de almacenaje
-25°C a +55°C
Contenido del embalaje
Icono
Artículo
Mando a
distancia
Soporte
Tornillos
Φ4x25mm
Adhesivo
doble faz
Manual
Cantidad
1
1
2
1
1
Características
Con el mando a distancia KDP ya no necesitará de escaleras para programar
los detectores de presencia instalados en techos o lugares de difícil acceso.
Presionando el botón
podrá establecer el umbral de luz para el cual la
iluminación debe activarse.
Consideraciones previas
El mando a distancia incluye pila. Retire la tira aislante de la misma antes de
empezar a utilizar el mando. (Ver FIG. 1).
Para más información acerca de la programación consulte las instrucciones
del detector que esté configurando.
www.grupotemper.com
Manual de instrucciones | 3
KDP
Mando a distancia
Tira
aislante
FIG.1
Instalación
Colocación y cambio de pila
Mantenga el mecanismo de bloqueo presionado, retire el soporte de la
batería y coloque la nueva pila (tipo CR2032 3V DC). Asegúrese que la
polaridad es correcta y vuleva a colocar el soporte de la pila en su posición.
(Ver FIG. 2).
Ranura
1
Ranura
para pila
Ranura
2
Soporte para pila
FIG.2
Manual de instrucciones | 4
www.grupotemper.com
KDP
Mando a distancia
Colocación del soporte de pared
Fije el soporte a la pared con los tornillos suministrados (Ver FIG. 3-A) y
deslice el mando a distancia en el mismo (Ver FIG. 3-B).
16~2
FIG.3-A
0mm
FIG.3-B
También puede fijar el soporte a la pared mediante el adhesivo de doble faz
suministrado (Ver FIG. 4-A), luego deslice el mando en el soporte (Ver FIG.
4-B).
Adhesivo
doble faz
FIG.4-A
www.grupotemper.com
FIG.4-B
Manual de instrucciones | 5
KDP
Mando a distancia
Funcíon de los botones
Nota
• Presione el botón
para comenzar a utilizar el mando.
• Mediante el botón
podra copiar los ajustes de luminosidad y tiempo a
otros detectores.
• Cada pulsación de cualquier botón transmitirá una señal durante
1 segundo como máximo. Si se presionan dos o más botones
simultáneamente no se transmitirá ninguna señal.
• El detector de presencia confirmará la recepción de la señal mediante el
parpadeo de su LED durante 2 segundos.
• Todos los ajustes realizados para la carga II (CH2) no serán válidos si el
detector tan sólo tiene una carga conectada.
Botón
Función
Encendido de la carga I (CH1) durante 8 horas
• Presionando el botón la carga del detector se conectará
durante 8 horas.
• La carga se desconectará tras un periodo de 8 horas y volverá
al modo automático. Presione el botón de nuevo para salir de
este “modo de 8 horas” y volver al modo automático.
También puede cortar la alimentación del detector de
presencia durante 5 segundos para que este vuelva al modo
automático.
• Si estamos en el modo ON puede apagar la carga I (CH1)
presionando el botón
.
Apagado de la carga I (CH1) durante 8 horas
• Presionando el botón la carga del detector se desconectará
durante 8 horas.
• El detector volverá al modo automático tras 8 horas, o
presionando de nuevo este botón si aún no han transcurrido
las 8 horas.
También puede cortar la alimentación del detector de
presencia durante 5 segundos para que este vuelva al modo
automático.
• Si estamos en el modo OFF puede pasar al modo ON
presionando el botón
.
Manual de instrucciones | 6
www.grupotemper.com
KDP
Mando a distancia
Botón
Función
Bloqueo de funciones del mando
Presionando este botón se bloquerán el resto de botones
excepto el botón de
desbloqueo.
Desbloqueo de funciones del mando
• Presionando este botón se desbloquerán el resto de botones
del mando y podrá comenzar a usarlo para configurar el
detector de presencia.
• Tras el desbloqueo el canal por defecto del mando será el
CH1 (Carga I).
• El detector se bloqueará automáticamente 5 minutos después
de la última operación si no se presiona el botón
.
Modo auto/manual
Mediante este botón el detector pasará a modo automático,
indicándolo con el parpadeo de la luz LED durante 2 segundos.
Presionándolo de nuevo pasará a modo semiautomático con el
parpadeo del LED durante dos segundos.
Memorización de ajustes y duplicación a otros detectores
1.Configure los valores deseados de luminosidad y tiempo
mediante el mando a distancia.
2.Presione el botón MEMO durante 3 segundos apuntando al
detector, los valores de Lux y tiempo se guardarán mediante
el parpadeo del LED del detector.
3.Apunte hacia otro detector y pulse el botón MEMO durante
1 segundo, los valores guardados serán transferidos al nuevo
detector.
4.Repita estos pasos con cuantos detectores sena necesarios. Si
no hay datos guardados en el mando a distancia el detector
no mostrará ninguna indicación al presionar el botón MEMO.
5.Para borrar los datos guardados retire la pila durante 5
segundos o presione el botón RESET.
Restablecer ajustes del detector
Si presiona este botón apuntando hacia el detector, se
restablecerán los ajustes del potenciómetro del mismo y se
borrarán los datos guardados en el mando a distancia.
www.grupotemper.com
Manual de instrucciones | 7
KDP
Mando a distancia
Botón
Función
Ajuste de la luminosidad (LUX)
Presionane el botón correspondiente para configurar el nivel de
luminosidad para la cual el sistema debe conectarse.
La Carga II (CH2) es independiente de este valor.
Lectura de la luz ambiente
Si los valores de luminosidad establecidos no son los deseados
puede medirse el nivel de luminosidad actual. Siga los
siguientes pasos:
Presione el botón hasta que el LED del detector parpadee para
entrar en el modo de aprendizaje durante 10 segundos. Una
vez se haya memorizado el valor de luminosidad la carga y su
LED se encenderán durante 5 segundos para, posteriormente,
volver al modo automático.
Nota: si la luz ambiente está fuera del rango 10-2000Lux,
tras los 10 segundos de aprendizaje, el LED del detector
parepadeará rápidamente durante 5 segundos para indicar que
ha fallado y el nivel de luiminosidad del sistema se establecerá
en 10 ó 2000Lux dependiendo si la luminosidad actual se
encuentra por encima o por debajo del rango.
Ajuste del retardo de la iluminación de la carga I (TIME1)
Presionando el botón correspondiente se podrá establecer
el retardo en el apagado de la carga I (CH1). El ajuste se
confirmará con el parpadeo del LED del detector durante dos
segundos.
Modo Test
• Presionando este botón se entrará en el modo Test. Camine
a través del área de detección, la carga I (CH1) y su luz LED
se encenderán durante dos segundos una vez el detector
se haya activado (la reacción dependerá del nivel de
luminosidad configurado).
• La carga II (CH2) no realizará ninguna operación durante este
modo.
Manual de instrucciones | 8
www.grupotemper.com
KDP
Mando a distancia
Botón
Función
Modo de impulso corto para la carga I (CH1)
En este modo la carga I (CH1) se encenderá durante 1
segundo y se apagará durante 9 segundos cuando se detecte
movimiento. El detector actuará de acuerdo al movimiento y el
ajuste de luminosidad establecido.
Ajuste del retardo de la iluminación de la carga II (TIME2)
Presionando el botón correspondiente podrá establecer el
retardo en el apagado de la Carga II (CH2) para HVAC.
Si el detector tiene una sola carga el valor de TIME2 no será
válido.
Modo de impulso corto para la carga I (CH1)
En este modo la carga II (CH2) se encenderá durante 5
segundos y se apagará durante otros 5 cuando se detecte
movimiento. El detector actuará de acuerdo al movimiento y el
ajuste de luminosidad establecido.
Resolución de problemas
Problema
Posible causa
Solución sugerida
El detector no
recibe la señal
1. Se ha excedido la
distancia máxima de
transmisión.
2. La pila está agotada.
3. El detector está
estropeado.
1. Sitúese dentro del rango de
transmisión y apunte directamente al
detector.
2. Cambie la pila.
3. Compruebe el funcionamiento del
detector.
No hay señal
1. La pila está agotada.
2. Se han presionado
dos o más botones
simultáneamente.
1. Cambie la pila.
2. Presione sólo un botón.
Fallo en la
transmisión de
señal
El mando está en modo
bloqueo.
Desbloquee el mando.
www.grupotemper.com
Manual de instrucciones | 9
KDP
Remote control
Instructions manual | 10
www.grupotemper.com
KDP
Remote control
Technical specifications
Rated Voltage
3V DC (CR2032 battery)
Transmission Range
Approx. 3m
Transmission Angle
35º
Operating Temperature
0ºC to +45ºC
Storage Temperature
-25°C to +55°C
Package contents
Pattern
Item
Remote
controller
Quantity
1
Bracket
Wood screw
Φ4 x 25mm
Doublesided
adhesive
tape
Manual
1
2
1
1
Features
No need of climbing ladders, the ceiling mounted presence detector can be
programmed easily and safely with KDP.
By pressing
button the ambient light level can be read-in as the
threshold of switching on / off for detector’s load.
Initation of operation
A battery for the IR remote controller is included. Please remove the
insulation sheet before initial use (See FIG.1).
For further information on programming, please refer to the operating
instructions for the device you are setting up.
www.grupotemper.com
Instructions manual | 11
KDP
Remote control
Insulation sheet
FIG.1
Installation
Battery installation and replacement
Keep the locking mechanism pressed down and pull out the battery holder,
then put in a new battery (type CR2032 3V DC). And please make sure that
the polarity is correct, then insert the battery holder into the housing
(See FIG.2).
Battery
slot 3
Slot 1 Slot 2
Battery holder
FIG.2
Instructions manual | 12
www.grupotemper.com
KDP
Remote control
Wall bracket installation
Fix the wall bracket on the wall by attached wood screw (See FIG.3-A), then
slide IR-11 into it (See FIG.3-B).
16~2
0mm
FIG.3-A
FIG.3-B
Stick the wall bracket on the wall by attached double-sided adhesive tape
(See FIG.4-A), then slide IR-11 into it (See FIG.4-B).
Double-sided
adhesive tape
FIG.4-A
www.grupotemper.com
FIG.4-B
Instructions manual | 13
KDP
Remote control
Push button function
Note
• Press
button to start setting operation.
• By using
button, the settings of light level and time can be duplicated to
other detectors.
• Each operation on button can transmit signal for maximum 1sec. No signal
will be transmitted if two or more buttons are pressed simultaneously.
• Presence detector confirms the signal reception by LED flashing for 2sec.
• All the settings for loadⅡ(CH2) are invalid while detector has only one load
(channel).
Button
Function
To set load I (CH1) on for 8hrs
• By pressing ON button, the load of detector will be turned on
for 8hrs.
• Load will be turned off after 8hrs and return to auto mode. Or
press ON button again to exit this “8hrs on mode” during
this period, detector will return to auto mode.
Or switching off power supply of presence detector for 5sec
and re-supply it again to lead detector to auto mode.
• Load I (CH1) can be lead to off mode by pressing OFF button
under on mode.
To set load I (CH1) off for 8hrs
• By pressing OFF button, the load connected to detector will
be turned off for 8hrs.
• Detector will return to auto mode after 8hrs. Or press OFF
button again to exit this “8hrs off mode” during this period,
detector will return to auto mode.
Or switching off power supply of presence detector for 5sec
and re-supply it again to lead detector to auto mode.
• Load I (CH1) can be lead to on mode by pressing ON button
• under off mode.
Instructions manual | 14
www.grupotemper.com
KDP
Remote control
Button
Function
To lock KDP buttons
By pressing this button, KDP buttons will be locked and no key
function is workable (Except
button).
Unlock KDP buttons
• By pressing this button, KDP buttons will be unlocked.
Thereafter, the remote controller can be used to set presence
detector.
• The default channel is CH1 (Load I) after unlocking KDP.
• When operating KDP to detector under unlock mode,
detector will lock automatically 5min after the last operating
if
button is not pressed.
Ex-changing auto mode and semi auto mode
By pressing this button, firstly, detector enters into auto mode
with detector’s red LED flashing quickly for 2sec no matter it is
locked or not. Then, press it again, detector enters into semiauto mode with detector’s red LED keeps on for 2sec.
The previous setting values can be stored and duplicated to
other detector
1.Set the desired Lux and time values on one detector by using
the remote controller.
2.Then by pressing MEMO button for approx. 3sec aiming to
above detector, the Lux and time settings of this detector
will be saved into this remote controller by detector’s LED
flashing.
3.By pressing MEMO button again for approx. 1sec aiming to a
new detector, the saved settings can be duplicated to the one.
4.Transfer the settings to detectors desired by repeating above
last step. If no data is saved in the remote controller, detector
has no reaction after press MEMO button.
5.Battery removed for more than 5sec or MEMO button is
pressed, all the data in IR remote controller will be deleted.
To reset settings on presence detector
By pressing RESET button aiming to the detector, all settings on
presence detector will go back to potentiometers’ settings, and
all MEMO data will be deleted.
www.grupotemper.com
Instructions manual | 15
KDP
Remote control
Button
Function
To adjust Lux value
By pressing corresponding button, the selected light level
threshold is set to presence detector for switching on the
connected load. Load II (CH2) is independent of Lux value.
To read-in the actual ambient light level
Actual ambient light level can be read-in as threshold for
switching the connected load, if the provided Lux values do not
match user’s requirement.
The steps are as below: Press
button till detector’s red LED
flashing to enter into learning mode, learning time is 10sec.
Then the actual ambient light level is read-in confirmed by
both load and LED turn on for 5sec to indicate IR-11 learning
successfully and then turn off. Afterwards, it returns to Auto
mode.
Note: If the ambient light level is out of the range of 10 2000Lux, detector will learn for 10sec, then LED flashes quickly
for 5sec to indicate KDP learning is failed, and the alternative
of 10Lux or 2000Lux value will be stored depending on under
10Lux or above 2000Lux value.
To set delay off TIME1 (Lighting)
By pressing corresponding button, the desired switching off
delay time of load I(CH1) can be exactly set, it is confirmed by
flashing of detector’s LED for 2sec.
Test mode
• By pressing this button to enter into Test mode, it is
confirmed by flashing of detector’s LED for 2sec.
Walking through the detection coverage, both load I(CH1)
and detector’s LED turn on 2sec once detector is triggered
(Reaction is regardless of Lux value).
• Load II(CH2) has no reaction in test mode.
Instructions manual | 16
www.grupotemper.com
KDP
Remote control
Button
Function
Short impulse mode for load I (CH1)
In this mode Load I(CH1) will on 1sec and off 9sec when
detector detects movement. Detector acts depending on
movement and the pre-set Lux value under short impulse
mode.
To set delay off TIME2 (HVAC)
By pressing corresponding button, the desired swithing off
delay time of load II (CH2) for HVAC can be exactly set, it is
confirmed by flashing of detector’s LED for 2sec.
If detector has only one load, TIME2 is invalid.
Short impulse mode for load II (CH2)
In this mode LoadⅡ(CH2) will on 5sec and off 5sec when
detector detects movement. Detector acts depending on
movement regardless of Lux value setting under short impulse
mode.
Troubleshooting
Problem
Possible cause
Suggested solution
Detector fails
to receive
signal
1. Exceed the
transmission range.
2. Low battery power.
3. Detector works
abnormally.
1. Operate within transmission range,
and ensure KDP aims directly to the
detector.
2. Replace a new battery.
3. Check the trouble of detector, then
refer the TROUBLE SHOOTING of
detector manual for reparing.
No signal
1. Low battery power.
2. Press two or more
buttons once.
1. Replace battery.
2. Press one button once.
Fail to transmit
signal
In locked mode.
Unlock the controller.
www.grupotemper.com
Instructions manual | 17
KDP
Remote control
Instructions manual | 18
www.grupotemper.com
GARANTÍA • WARRANTY
GARANTIE • GARANTIA
2
años
years
années
anos
TEMPER ENERGY INTERNATIONAL S.L.
garantiza este aparato por 2 años ante
todo defecto de fabricación. Para hacer
válida esta garantía, es imprescindible
presentar con este resguardo el ticket o
factura de compra.
TEMPER ENERGY INTERNATIONAL
S.L. garantit cet apareil pour le durée
de 2 annèes contre tout défault de
fabrication. Pour le service de garantie,
vous devez présenter ce reçu avec du
ticket de caisse ou la facture.
TEMPER ENERGY INTERNATIONAL S.L.
guarantees this device during 2 years
against any manufacturing defect. For
warranty service, you must present this
receipt with the purchase receipt or
invoice.
TEMPER ENERGY INTERNATIONAL S.L.
garantía este aparelho contra defeitos
de fábrica ate 2 anos. Para o serviço
de garantia, você deve apresentar este
recibo com o recibo de compra ou
fatura.
Ref. Art.
Nº serie / Serial number
Nombre / Name / Nom / Nombre
Fecha de venta / Date of purchase
Date de vente / Data de venda
Sello establecimiento vendedor / Dealer stamp
Cachet du commercant / Cambo da firma
TEMPER ENERGY INTERNATIONAL S.L.
Polígono industrial de Granda, nave 18
33199 • Granda - Siero • Asturias
Teléfono: +34 902 201 292
Fax:
+34 902 201 303
Email:
[email protected]
Una empresa
del grupo