1
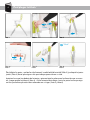
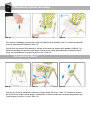
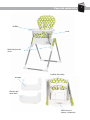
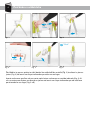
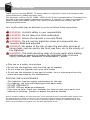
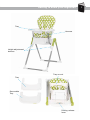
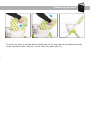
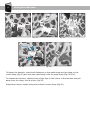
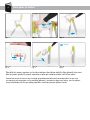
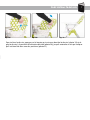
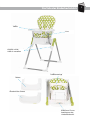
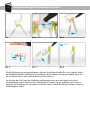
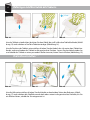
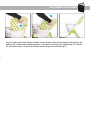
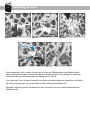
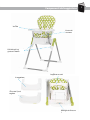
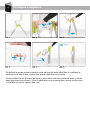
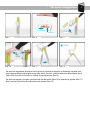
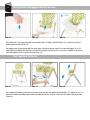
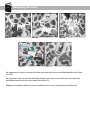
Trona
Manual de Instrucciones
IMPORTANTE
GUARDE LAS INSTRUCCIONES PARA
FUTURAS CONSULTAS
POR FAVOR, LEA LAS INSTRUCCIONES
ATENTAMENTE ANTES DE UTILIZAR EL PRODUCTO
2
Safety Warnings
Precauciones
de seguridad
Gracias
INNOVACIONES
Parathat
asegurarse
de que laistrona
utiliza
según laswith
instrucThank por
youelegir
for choosing
OBABY.M.S.
To S.L.
ensure
your highchair
usedsein
accordance
these instructions,
please
them fully.
ciones,
por favor lea todas
lasread
instrucciones.
Thistrona
highchair
conforms
to BS 14988:2006+A1:2012
is guaranteed
months
from
Esta
cumple
con la normativa
BS 14988:2006+A1:2012and
y tiene
una garantíafor
de 24
24 meses
des
de
date
purchase
against
defects.
If, however
have problema,
any problems,
lathe
fecha
deofcompra
siempre
que manufacturing
sea un defecto de
fabricación.
Si tiene you
cualquier
contacte
please
contact your
retailer
from whom
you
who
will
con
el distribuidor
o elOBABY
punto de
venta donde
adquirió
el purchased
producto, elyour
cual product,
hará lo que
corresponda
take
appropriate
action.
en
cada
caso.
child’s
safety
may be
affected
do not del
follow
SiYour
no sigue
estas
instrucciones
puede
afectarifayou
la seguridad
niño.these instructions.
¡! PRECAUCIONES:
la seguridad
niño es
su responsabilidad.
WARNING:
A child’s
safety del
is your
responsibility
¡!
PRECAUCIONES:
no
deje
al
niño
sólo
WARNING: Do not leave the child unattended
¡! PRECAUCIONES:
asegúrese
de que is
el arnés
esté bien
colocado
WARNING:
Ensure
the harness
correctly
fitted
¡! PRECAUCIONES:
no utilice
la trona
a no serunless
que todos
componentes
de la
WARNING:
Do not
use the
highchair
all los
components
are
misma estén
bien colocados
y ajustados.
correctly
fitted
and adjusted
¡! PRECAUCIONES:
tengaof
enthe
cuenta
el of
riesgo
quefisupone
chimenea
o cualquier
WARNING:
Be aware
risk
open
re and laother
sources
of
otra fuente
de calor
comobar
estufas
eléctricas,
estufas
etcvicinity
que puestrong
heat,
suchextremo,
as electric
fires,
gas fires,
etcdeingas,
the
of
dan estar
cerca de la trona.
the
highchair
¡! PRECAUCIONES:
debe should
mantener
niño fuera
del alcance
de las
partes
móviles
WARNING:
The child
beal clear
of moving
parts
while
making
adjustments
ortrona.
opening
or folding
the graves
highchair.
Risk
of serious
al abrir o cerrar la
Hay riesgo
de heridas
( el niño
se puede
quedar
injury
(entrapment,
laceration
or una
amputation
) exists
atrapado,
sufrir una laceración
o incluso
amputación).
· •Sólo
puede
tronalevel
en zonas
sin desnivel, estables.
Only
useutilizar
on a esta
stable,
surface
· •NoDo
utilice
trona
hasta
que el niño
pueda
sentado
sin ayuda.
not lause
this
highchair
until
thequedarse
child can
sit unaided
not move
with your child inside
· •NoDo
mueva
la tronathe
con highchair
el niño dentro.
not lause
the
highchair
is any
part
is broken,
tornpieza,
or missing
and
use only
· •NoDo
utilice
trona
si hay
alguna parte
rota,
rajada
o falta alguna
sólo puede
utilizar
las partes
spare parts
aprobadas
por el approved
fabricante. by the manufacturer
ROUTINE
CARE & MAINTENANCE
CUIDADO
Y MANTENIMIENTO
RUTINARIO
This
highchair
regular regular
maintenance
by the user
--Esta
trona
necesita requires
un mantenimiento
por el usuario.
Forlimpiarla,
cleaning,
usesólo
only
a mild
warm
--Para
utilice
jabón
para detergent
ropa delicadaand
y agua
tibiawater
DO
NOT USE
--NO
UTILICE
LEJIA BLEACH
DO
NOT USE
any abrasivas.
abrasive substances
--NO
UTILICE
sustancias
From
time
to
time,
checkque
your
highchair
for
loosetornillo
screws,
worn
parts,
- De vez en cuando, compruebe
la trona
no tenga
ningún
suelto,
partes
rotas,torn
o material
material or stitching. Replace or adjust the parts as needed.
que no esté bien colocado o descosido. Cambie o ajuste las partes de la trona que lo necesiten.
Due to constant
updatingmejoras
and improvements,
some components
may occasionally
differ
from diDebido
a las constantes
y actualizaciones,
algunos componentes
pueden
serslightly
ligeramente
the images
in these
instructions.
We en
reserve
the rights to change
the specifiel
cations
of any
ferentes
de shown
los de las
imágenes
que salen
las instrucciones.
Nos reservamos
derecho
de cambiar
prior notice. If you need any assistance please contact your OBABY retailer from
elproducts
detalle without
de cualquier
producto sin previo aviso. Si tiene cualquier duda, por favor contacte con el
whom you purchased your product, who will take appropriate action.
distribuidor
INNOVACIONES M.S. S.L. o con el punto de venta donde adquirió el producto , que harán
las gestiones correspondientes.
Getting to knowPartes
your Highchair
de la trona
Tray
Bandeja
Harness
Arnés
Botón
para
ajustar
Height
adjustment
la
altura
buttons
Traydemount
Soporte
la bandeja
Bandeja
Tray
La
bandeja se puede
Removable
quitar
Tray
Palanca para
plegar
Folding
release
la trona
lever
3
4
Para
plegar
la trona
Folding
your
Highchair
Press
fig. 1
Foto
fig.22
Foto
fig. 3
Foto
“Click”
1. Slide
fig. 4
Foto
Lower
2. Lift
fig.55
Foto
fig. 6
Foto
Para
plegar
patas,
apriete
los dos
botones
a cada
del asiento
fotoand
2) y coloque
laslegs
patas
To fold
the las
legs,
press
the two
buttons
either
sidelado
of the
seat (fi(g.2)
swing the
juntas
( foto
3) hasta
que
oigaclick
un clic
indique que están en su sitio.
together
(fig.3)
until
they
intoque
place.
Apriete
asa quebeneath
hay debajo
asiento,
primero
palanca
endirection
la dirección
se muesGrip theelhandle
thedel
seat,
and yfirst
slide baje
the la
lever
in the
as que
shown,
then
tra
, luego
palanca
foto 4)the
. Gire
el asiento
hacia
, haciaitlas
patas
hasta
que(fi
oiga
press
the apriete
lever inla(fi
g.4). (Rotate
seat
towards
theabajo
legs until
clicks
into
place
g.5
un
que indica que están bien colocadas en su lugar ( foto 5 y foto 6)
& ficlic
g.6).
Para desplegar
la trona
Unfolding
your Highchair
1.1.Deslice
Slide
Foto
7
fig. 7
Foto
fig. 88
2.Levante
Lift
2.
5
2. Levante
Lift
Foto
9
fig. 9
“Click”
Press
Foto
fig. 10
Foto
fig. 11
11
Foto
fig. 12
Para desplegar la trona, apriete el asa primero y deslice la palanca en la dirección que se muesTo unfold the highchair, grip the handle and first slide the lever in the direction as shown,
tra,
luego apriete la palanca como en ( foto 8 ) . Gire el asiento y súbalo des de las patas hacia
then press the lever in (fig.8). Rotate the seat away from the legs and lift the seat up
arriba
un (fi
clic
que indique que está bien colocado en su sitio ( foto 9 )
until it, hasta
clicksque
intooiga
place
g.9).
Para
desplegar
las patas,
apriete
los dos
botones
a ambos
lados
asiento
( foto
10)swing
y separe
To unfold
the legs,
press
the two
buttons
either
side of
the del
seat
(fig.10)
and
thelas
patas
( foto (fi
11)g.11)
hastauntil
que oiga
clicinto
que place
indica(fi
que
están colocadas en su sitio ( foto 12)
legs apart
theyun
click
g.12).
6
Para
colocar
ajustar lathe
bandeja
Fitting
and y
Adjusting
Tray
“Click”
Foto
fig. 13
Foto
fig. 14
14
Foto
fig. 15
To fitcolocar
the tray
squeeze,apriete
the handle
the de
tray
(fig.13) (and
traylaonto
the
Para
la bandeja
el asaunderneath
que hay debajo
la bandeja
fotoslide
13) y the
deslice
bandetray
(fig.14).
ja
pormount
el soporte
de la bandeja ( foto 14) .
To adjust
positionde
of la
the
tray, squeeze
the
underneath
the
tray (fi( g.13)
Para
ajustarthe
la posición
bandeja
, apriete el
asahandle
que hay
debajo de la
bandeja
dibujoand
13) y
slide the
tray to the
position.
and
thesetray
to click
deslice
la bandeja
a la required
posición que
desee. Release
Suelte el the
asa yhandle
deje que
la allow
bandeja
coloque
en elinto
place (fig.15).
lugar
correspondiente, cuando esté oirá un clic. ( foto 15 )
Para
ajustarthe
la altura
Adjusting
Height
Press
Foto
fig. 16
Foto
fig. 17
17
Foto
fig. 18
Para
ajustarthe
la altura,
apriete
lados
delofchasis
( foto 17)
y deslice
asiento
To
adjust
height,
presslos
thebotones
buttonsa ambos
on either
side
the frame
(fig.17)
andelslide
the
de la silla
hacia
arriba
haciatoabajo
y colóquelo
a la altura
que
desee,
hasta
que
un clic que
chair
up or
down
theolegs
the desired
height,
until it
clicks
into
place
(fioiga
g.18).
significa que ya está en su sitio ( foto 18 )
ParaReclining
reclinar elthe
respaldo
Seat
7
Press
Foto
fig. 19
Foto
fig. 20
20
Foto
fig. 21
Para reclinar el respaldo, apriete el botón de la parte trasera del respaldo del asiento ( foto 19)
recline
the seat,a la
press
the button
at theque
back
of the
seat
g.19)que
andoiga
adjust
theque
seat
yToajuste
el respaldo
posición
de reclinado
desee
( foto
20)(fi
, hasta
un clic
to the que
required
position
(fig.20),
it clicks
into place
(fig.21).
indica
está bien
colocada
en unauntil
de las
posiciones
( foto 21
)
8
Para
utilizar
el arnés
Using
the Harness
fig. 22
22
Foto
fig. 23
23
Foto
fig. 24
24
Foto
Press
fig. 25
Foto
25
fig. 26
Foto
To fasten
the el
harness,
insert both
on the
waist
thedentro
clasp de
on la
the
Para
abrochar
arnés, introduzca
las fasteners
dos lengüetas
de las
tirasstrap
de la into
cintura
hebilla
crotch que
strap
(fig.22)
clipde
each
chest strap
onto22the
waist strap
(fig.23
& los
24).
central
está
sujeta and
a la tira
la entrepierna
( foto
) y enganche
cada
tira de
hombros
a la tira de la cintura ( foto 23 y 24)
To release the harness, squeeze each of the clips in the centre of the harness and pull
awaysoltar
fromelthe
clasp,
one los
at a
time
(fig.25).que hay dentro del centro del arnés y sáquelos de
Para
arnés
, apriete
dos
enganches
la hebilla central , primero uno y después el otro ( foto 25)
Adjust the harness length using the buckles on each strap (fig.26).
Ajuste la longitud del arnés con las hebillas que hay en cada una de las tiras ( foto 26 )
GARANTÍA FORMAL
Los contenidos de este documento como se muestra a continuación tendrán efecto desde el momento que se compra el producto.
Innovaciones M.S. S.L. el distribuidor oficial situado en Pol. Ind.
La Cava. Avda. Generalitat Valenciana s/n. Sector Industrial 5. 46892
MONTAVERNER. Valencia.(Spain) garantiza al consumidor que este
es un producto nuevo y no tiene ningún fallo en cuanto a los materiales, diseño y fabricación y que tiene las características que ha declarado el fabricante.
Esta garantía formal, es válida para todos los países miembros de
la Comunidad Europea sin quedar en ninguno excluido el derecho del
consumidor según medidas legales que obligan a la tienda que vende
el producto a ofrecer esta garantía.
Para beneficiarse de esta garantía formal, el Consumidor debe devolver el producto defectuoso a la tienda donde lo adquirió presentando al comerciante la prueba de compra del producto que debe
mostrar detalladamente la dirección de la tienda, la fecha de compra
del producto con el sello de la tienda y una firma indicando de que
producto se trata, o , en su defecto, el recibo que no debe ser alterado y que claramente debe mostrar la misma información que hemos
dicho antes.
La garantía formal es válida durante veinticuatro (24) meses des de
que se compra el producto.
Durante este periodo INNOVACIONES M.S. S.L. arreglará o cambiará cualquier producto defectuoso bajo su criterio.
La garantía formal es para el comprador final del producto (Consumidor) y no excluye ni limita los derechos del Consumidor según
marca la ley y/o los derechos que el Consumidor tiene respecto a la
tienda que vende el producto.
LA GARANTÍA NO SERÁ VÁLIDA EN LOS SIGUIENTES CASOS.
La garantía formal queda excluida en el caso de daño causado al
producto por las siguientes razones: si el producto se utiliza de una
forma que no cumple con la información de las instrucciones para su
uso y montaje, si le han dado un golpe al producto o se ha caído, si
el producto está expuesto a la humedad, o al calor extremo o a con-
diciones ambientales adversas, o a cambios repentinos de tiempo,
cuando el producto se corroe , se oxida o se repara o se altera el
producto sin autorización previa, si lo repara utilizando piezas de repuesto no autorizadas , si el uso o mantenimiento del producto no es
el correcto, o no hace ningún tipo de mantenimiento sin hacer lo que
se dice en el manual de instrucciones, se monta mal, tiene algún accidente , se estropea a causa de la comida o la bebida, por cualquier
producto químico o causas de fuerza mayor.
En cualquier caso, INNOVACIONES M.S. S.L. ,rechaza toda responsabilidad por daños causada a las personas o a la propiedad ,
otra que no sea el producto ,si el daño lo causa por no seguir las
instrucciones, consejos o precauciones que hay en el manual de instrucciones por parte del propietario o persona que esté utilizando el
producto. (Sólo como ejemplo, no deje nunca al niño solo o el niño
debe de tener siempre el arnés puesto…)
Es más, INNOVACIONES M.S. S.L. , rechaza toda responsabilidad de daño a personas y a la propiedad cuando la rotura del producto se debe a un deterioro de los componentes del producto normal
por el uso que se hace de éste. Todos los componentes de este producto hechos de plástico, se desgastan con el uso.
Importado por INNOVACIONES M.S. S.L.
Pol. Ind. La Cava
C/. Beniganim, 9
46892 MONTAVERNER (Valencia) Spain
Tel. 96 229 76 70 - Fax 96 229 76 76
Sello del establecimiento vendedor para garantía
Importado por:
INNOVACIONES M.S. S.L.
Pol. Ind. La Cava.
C/ Benigànim, 9
46892 MONTAVERNER (Valencia) Spain
Tel. 96229 76 70 Fax 96 229 76 76
Trona
Manual de Instruções
IMPORTANTE
GUARDAR AS INSTRUÇÕES PARA FUTURAS CONSULTAS
POR FAVOR, LEIA CUIDADOSAMENTE AS INSTRUÇÕES ANTES DE USAR O PRODUTO
2
Safety Warnings
Precauções
de segurança
Obrigado
porfor
escolher
INNOVACIONES
M.S.S.L. that
Para garantir
que a cadeirinha
de acordo
Thank you
choosing
OBABY. To ensure
your highchair
is used iné usada
accordance
withcom
these
instructions,
please
readas
them
fully.
as
instruções,
por favor
leia todas
instruções.
This highchair conforms to BS 14988:2006+A1:2012 and is guaranteed for 24 months from
Esta
esta em against
conformidade
com os regulamentos
BS14988:2006+A1:2012
tem uma
the cadeirinha
date of purchase
manufacturing
defects. If, however
you have anyeproblems,
garantia
de 24 meses
partir da
data dafrom
compra,
desde
seja um defeito
de fabricação.
Se tiver
please contact
youraOBABY
retailer
whom
youque
purchased
your product,
who will
qualquer
problemaaction.
entre em contato com o revendedor ou loja onde adquiriu o produto, que irá
take appropriate
fazer o adequado a cada caso.
Your
safety
may be
affected
if youado
not follow
these instructions.
Se
vocêchild’s
não seguir
instruções
pode
comprometer
segurança
da criança.
PRECAUÇÕES!AAchild’s
segurança
da criança
é sua
responsabilidade
WARNING:
safety
is your
responsibility
PRECAUÇÕES!
Não
deixe
a
criança
sozinha
WARNING: Do not leave the child unattended
PRECAUÇÕES!Ensure
Certifique-se
de que ois
cinto
está bem
colocado
WARNING:
the harness
correctly
fitted
PRECAUÇÕES!Do
Não
useuse
a cadeirinha
a menosunless
que todos
seus componentes
WARNING:
not
the highchair
all os
components
are
estejam no filugar
apertados
correctly
ttedeand
adjusted
PRECAUÇÕES!BeTeraware
em mente
o risco
porand
umaother
lareira,sources
ou qualquer
WARNING:
of the
riskrepresentado
of open fire
of
outra fonte
de calor
tais como
fogões
elétricos,
gás,
etc.,
ficar
strong
heat,
suchextremo,
as electric
bar fi
res, gas
fires,
etc
in que
thepodem
vicinity
of
pertohighchair
da cadeirinha.
the
PRECAUÇÕES!The
Devem
a criança
longe
peças móveis
quandomaking
abrir ou
WARNING:
childmanter
should
be clear
ofdas
moving
parts while
adjustments
or opening
orlesões
folding
thea criança
highchair.
of serious
fechar a cadeirinha.
Há risco de
grave,
podeRisk
ficar presa,
sofrendo
injury
(entrapment,
laceration
or amputation ) exists
uma laceração
ou até mesmo
uma amputação.
Esta
cadeirinha
pode
apenas ser
utilizada
em áreas sem desníveis, estáveis.
• Only
use on
a stable,
level
surface
.Não
utilize
a
cadeirinha
até
que
a
criança
pode
ficar can
sentada
sozinha, sem ajuda.
• Do not use this highchair until the
child
sit unaided
.Não mova a cadeirinha com a criança dentro
• Do not move the highchair with your child inside
.Não use a cadeirinha se houver alguma peça quebrada, rachada, ou falta de peças. Só podem ser
• Do not
the
highchair
any part is broken, torn or missing and use only
utilizadas
as use
partes
aprovadas
peloisfabricante.
spare parts approved by the manufacturer
CUIDADOS E MANUTENÇÃO DE ROTINA
ROUTINE CARE & MAINTENANCE
- Esta cadeirinha requer de uma manutenção regular por parte do usuário
This
highchair
requires
regular
maintenance by the user
- -Para
limpar
use apenas
água morna
e sabão
ForUSE
cleaning,
use only a mild detergent and warm water
- -NÃO
ÁGUA SANITÁRIA
DOUSE
NOT
USE BLEACH
- -NÃO
SUBSTÂNCIAS
ABRASIVAS
- DO NOT USE any abrasive substances
- Verifique periodicamente que a cadeirinha não tenha parafusos soltos, peças soltas ou material que
- From time to time, check your highchair for loose screws, worn parts, torn
nãomaterial
está bem or
colocado
ou descosturado.
Mudar
ou ajustar
as partes
da cadeira que necessitam.
stitching.
Replace or
adjust
the parts
as needed.
Devido
a constantes atualizações e melhorias, alguns componentes podem ser ligeiramente difeDue to constant updating and improvements, some components may occasionally differ slightly from
rentes
das imagens
aparecem
nas instruções.
o the
direito
decations
alterar of
o detalhe
the images
shown inque
these
instructions.
We reserveOs
thereservamo-nos
rights to change
specifi
any
de
qualquer
produto
avisoIfprévio.
Se any
tiverassistance
alguma dúvida
emyour
contato
com
o revendedor
products
without
priorsem
notice.
you need
please entre
contact
OBABY
retailer
from
whom you purchased
your
who
will take
appropriate
INNOVACIONES
M.S.S.L.
ou product,
loja onde
adquiriu
o produto,
queaction.
irá fazer as gestões correspondentes.
Getting to know
your
Peças
da Highchair
cadeirinha
Tray
Bandeja
Harness
Cinto
Botão
deadjustment
ajuste da
Height
altura
buttons
Traydamount
Suporte
bandeja
Bandeja
Tray
Bandeja
que
Removable
deve
Tray retirar
Alavanca release
para Folding
dobrar a cadeirinha
lever
3
4
Para
dobrar
a cadeirinha
Folding
your
Highchair
Press
fig.11
Fig.
fig.22
Fig.
fig. 33
Fig.
“Click”
1. Slide
fig. 44
Fig.
Lower
2. Lift
fig.55
Fig.
fig. 66
Fig.
Para
dobrar
pernas
apertar
os dois
botões
em cada
do seat
assento
(Fig.and
2) e colocar
as pernas
To fold
the as
legs,
press
the two
buttons
either
side lado
of the
(fig.2)
swing the
legs
juntas
(Fig.(fi3)g.3)
até ouvir
que estão no seu lugar.
together
until um
theyclique
click indicando
into place.
Aperte
a alavanca
que fica sob
assento,
a alavanca
sentido
indicado
(Fig. 4).then
ViGrip the
handle beneath
the oseat,
andapós
first baixar
slide the
lever inno
the
direction
as shown,
rar
o assento
parainabaixo,
emRotate
direçãothe
as pernas
até ouvirthe
umlegs
clique
indicando
está(fi
bem
press
the lever
(fig.4).
seat towards
until
it clicksque
intoele
place
g.5
posicionado
no seu lugar (Fig. 5 e 6).
& fig.6).
Para
desdobrar
cadeirinha
Unfolding
youra Highchair
1.1.Deslice
Slide
Fig.
fig.77
Fig.
fig.88
2.Levante
Lift
2.
5
2. Levante
Lift
Fig.
fig. 99
“Click”
Press
Fig.
fig. 10
10
Fig.
fig.11
11
Fig.
fig. 12
12
Para desdobrar a cadeira, primeiro aperte a alça e deslize a alavanca na direção indicada, em seTo unfold the highchair, grip the handle and first slide the lever in the direction as shown,
guida,
aperte a alavanca como na (Fig. 8). Girar a cadeira e levante-a dos pés para cima até ouvir
then press the lever in (fig.8). Rotate the seat away from the legs and lift the seat up
um
clique
indicando
que está
no seu lugar (Fig. 9).
until it clicks
into place
(fig.9).
Para
desdobrar
as pernas,
osbuttons
dois botões
emside
cadaof
lado
assento
(Fig.and
10) eswing
separethe
as
To unfold
the legs,
pressapertar
the two
either
thedo
seat
(fig.10)
pernas
(Fig. (fi
11)
até ouvir
clique
que
está no seu lugar (Fig. 12).
legs apart
g.11)
untilum
they
clickindicando
into place
(fig.12).
6
Para
colocar
ajustar lathe
bandeja
Fitting
and y
Adjusting
Tray
“Click”
Fig.
fig.13
13
Fig.
fig.1414
Fig.
fig.15
15
To fitcolocar
the tray
squeezeaperte
the handle
underneath
the trayabaixo
(fig.13)
and slide(Fig.
the13)
tray
onto the
Para
a bandeja,
a alavanca
que se encontra
da bandeja
e deslize
a
tray mount
g.14). da bandeja (Fig. 14)
bandeja
pelo(fi
suporte
To adjust
position
the tray,
squeeze
the handle
the tray
(fig.13)(Fig.
and
Para
ajustarthe
a posição
daofbandeja,
aperte
a alavanca
que seunderneath
encontra abaixo
da bandeja
13)
theatray
to the
required
position.
Release
handle
and allow
tray to
into
eslide
deslize
bandeja
para
a posição
desejada.
Soltar athe
alavanca
e deixar
que athe
bandeja
seclick
encaixe,
place (fig.15).
quando
esteja colocada vai ouvir um clique (Fig. 15).
Para
ajustarthe
a altura
Adjusting
Height
Press
Fig.
fig.16
16
Fig.
fig.17
17
Fig.
fig.18
18
Para
ajustarthe
a altura,
aperte
osthe
botões
nos laterais
do chassi
e deslizar
o assento
da caTo
adjust
height,
press
buttons
on either
side of(Fig.
the17)
frame
(fig.17)
and slide
the
deira para
cima
e para
colocando-o
altura desejada
até ouvir
clique
indicando que
chair
up or
down
the baixo,
legs to
the desirednaheight,
until it clicks
intoum
place
(fig.18).
está no seu lugar (Fig. 18).
ParaReclining
reclinar elthe
respaldo
Seat
7
Press
Fig.
fig.19
19
Fig.
fig.20
20
Fig.
fig. 21
21
Para reclinar o encosto, pressione o botão na parte traseira do encosto (Fig. 19) e ajustar o encosTo reclinando
recline thepara
seat,
press the
button(Fig.
at the
of the
(fiindicando
g.19) andque
adjust
seat
to
a posição
desejada
20), back
até ouvir
um seat
clique
está the
colocado
to thedas
required
position
(fig.20), until it clicks into place (fig.21).
numa
posições
(Fig. 21).
8
Para
utilizar
el arnés
Using
the Harness
fig.22
22
Fig.
fig.23
23
Fig.
fig. 24
24
Fig.
Press
fig. 25
Fig.
fig. 26
26
Fig.
To fasten
theo harness,
insert
bothsobre
fasteners
waist
strapda
into
thecentral
clasp on
Para
prender
arnês, insira
as guias
as tirasondathe
cintura
dentro
fivela
quethe
é fixada
strap
(fiperna
g.22) (Fig.
and 22)
clipe each
chest
strap
the waist
strap da
(fig.23
& (Fig.
24).23 e 24).
àcrotch
faixa da
entre
envolver
cada
tira onto
dos ombros
à correia
cintura
To release
harness,
each of the
clips
in no
thecentro
centre
the harness
andfirmeza
pull
Para
soltar othe
arnês,
aperte squeeze
as duas fechaduras
que
estão
doofarnês
e puxe com
from
thedo
clasp,
one
at a time
g.25). u outro (Fig. 25).
eaway
tirar da
fivela
centro,
primeiro
um (fi
e depois
Adjust o
the
harness length
using
theasbuckles
on ficam
each strap
(fig.26).
Ajustar
comprimento
do arnês
com
fivelas que
em cada
uma das tiras (Fig. 26).
Importado por:
INNOVACIONES M.S. S.L.
Pol. Ind. La Cava.
C/ Benigànim, 9
46892 MONTAVERNER (Valencia) Spain
Tel. 96229 76 70 Fax 96 229 76 76
Nanofold Highchair
Instruction Manual
IMPORTANT
KEEP FOR FUTURE REFERENCE
PLEASE READ THESE INSTRUCTIONS
CAREFULLY BEFORE USING THIS PRODUCT
2
Safety Warnings
Thank you for choosing OBABY. To ensure that your highchair is used in accordance with
these instructions, please read them fully.
This highchair conforms to BS 14988:2006+A1:2012 and is guaranteed for 24 months from
the date of purchase against manufacturing defects. If, however you have any problems,
please contact your OBABY retailer from whom you purchased your product, who will
take appropriate action.
Your child’s safety may be affected if you do not follow these instructions.
WARNING: A child’s safety is your responsibility
WARNING: Do not leave the child unattended
WARNING: Ensure the harness is correctly fitted
WARNING: Do not use the highchair unless all components are
correctly fitted and adjusted
WARNING: Be aware of the risk of open fire and other sources of
strong heat, such as electric bar fires, gas fires, etc in the vicinity of
the highchair
WARNING: The child should be clear of moving parts while making
adjustments or opening or folding the highchair. Risk of serious
injury (entrapment, laceration or amputation ) exists
•
•
•
•
Only use on a stable, level surface
Do not use this highchair until the child can sit unaided
Do not move the highchair with your child inside
Do not use the highchair is any part is broken, torn or missing and use only
spare parts approved by the manufacturer
ROUTINE CARE & MAINTENANCE
-
This highchair requires regular maintenance by the user
For cleaning, use only a mild detergent and warm water
DO NOT USE BLEACH
DO NOT USE any abrasive substances
From time to time, check your highchair for loose screws, worn parts, torn
material or stitching. Replace or adjust the parts as needed.
Due to constant updating and improvements, some components may occasionally differ slightly from
the images shown in these instructions. We reserve the rights to change the specifications of any
products without prior notice. If you need any assistance please contact your OBABY retailer from
whom you purchased your product, who will take appropriate action.
Getting to know your Highchair
Tray
Harness
Height adjustment
buttons
Tray mount
Tray
Removable
Tray
Folding release
lever
3
4
Folding your Highchair
Press
fig. 1
fig. 2
fig. 3
“Click”
1. Slide
fig. 4
Lower
2. Lift
fig. 5
fig. 6
To fold the legs, press the two buttons either side of the seat (fig.2) and swing the legs
together (fig.3) until they click into place.
Grip the handle beneath the seat, and first slide the lever in the direction as shown, then
press the lever in (fig.4). Rotate the seat towards the legs until it clicks into place (fig.5
& fig.6).
Unfolding your Highchair
1. Slide
fig. 7
fig. 8
5
Lift
2. Lift
fig. 9
“Click”
Press
fig. 10
fig. 11
fig. 12
To unfold the highchair, grip the handle and first slide the lever in the direction as shown,
then press the lever in (fig.8). Rotate the seat away from the legs and lift the seat up
until it clicks into place (fig.9).
To unfold the legs, press the two buttons either side of the seat (fig.10) and swing the
legs apart (fig.11) until they click into place (fig.12).
6
Fitting and Adjusting the Tray
“Click”
fig. 13
fig. 14
fig. 15
To fit the tray squeeze the handle underneath the tray (fig.13) and slide the tray onto the
tray mount (fig.14).
To adjust the position of the tray, squeeze the handle underneath the tray (fig.13) and
slide the tray to the required position. Release the handle and allow the tray to click into
place (fig.15).
Adjusting the Height
Press
fig. 16
fig. 17
fig. 18
To adjust the height, press the buttons on either side of the frame (fig.17) and slide the
chair up or down the legs to the desired height, until it clicks into place (fig.18).
Reclining the Seat
7
Press
fig. 19
fig. 20
fig. 21
To recline the seat, press the button at the back of the seat (fig.19) and adjust the seat
to the required position (fig.20), until it clicks into place (fig.21).
8
Using the Harness
fig. 22
fig. 23
fig. 24
Press
fig. 25
fig. 26
To fasten the harness, insert both fasteners on the waist strap into the clasp on the
crotch strap (fig.22) and clip each chest strap onto the waist strap (fig.23 & 24).
To release the harness, squeeze each of the clips in the centre of the harness and pull
away from the clasp, one at a time (fig.25).
Adjust the harness length using the buckles on each strap (fig.26).
Imported by:
INNOVACIONES M.S. S.L.
Pol. Ind. La Cava.
C/ Benigànim, 9
46892 MONTAVERNER (Valencia) Spain
Tel. 96229 76 70 Fax 96 229 76 76
CHAISE HAUTE
Manuel d’Utilisation
IMPORTANT
CONSERVEZ LES INSTRUCTIONS POUR CONSULTATION ULTÉRIEURE.
S’IL VOUS PLAÎT, LISEZ ATTENTIVEMENT LES INSTRUCTIONS AVANT D’UTILISER LE PRODUIT
2
Safety Warnings
Précautions
de sécurité
Merci
pour
INNOVACIONES
Pourthat
vousyour
assurer
que la chaise
haute
est utilisée selon
Thank
youchoisir
for choosing
OBABY. M.S.S.L.
To ensure
highchair
is used
in accordance
with les
these instructions,
please
read lire
them
instructions,
s’il vous plaît
veuillez
les fully.
instructions.
This highchair conforms to BS 14988:2006+A1:2012 and is guaranteed for 24 months from
Cette
chaise
est conforme
à la norme BS 14988:2006+A1:2012
a une
garantie
de 24 mois à
the date
of haute
purchase
against manufacturing
defects. If, howeveretyou
have
any problems,
partir
decontact
la date d’achat
seulement
si défaut
fabrication.
Si vous avez
unproduct,
problème,
veuillez
please
your OBABY
retailer
from de
whom
you purchased
your
who
will contactez
le distributeur
votre point de vente, lequel fera ce qu’il faut dans chacun des cas.
take
appropriateou
action.
Si vous ne suivez ces instructions cela pourrait nuire la sécurité de l’enfant.
Your child’s safety may be affected if you do not follow these instructions.
PRÉCAUTION!ALachild’s
sécurité
de l’enfant
est votre
responsabilité
WARNING:
safety
is your
responsibility
PRÉCAUTION
!
Ne
pas
laissez
l’enfant
sans
surveillance
WARNING: Do not leave the child unattended
PRÉCAUTIONEnsure
! S’assurer
que
le système
d’harnais est
correctement fixé
WARNING:
the
harness
is correctly
fitted
PRÉCAUTIONDo
! N’utilisez
la chaise
haute que unless
si tous les
sont bien
fixés et
WARNING:
not use
the highchair
alléléments
components
are
réglés
correctly
fitted and adjusted
PRÉCAUTIONBe
! Tenez
compte
du risk
risqueofque
suppose
la cheminée
ou n’importe
WARNING:
aware
of the
open
fire and
other sources
of
quelle autre
source
deas
chaleur,
tel que
électrique,
chauffage
gaz, etc.,of
strong
heat,
such
electric
barchauffage
fires, gas
fires, etc
in the àvicinity
qui pourrait
être à côté de la chaise.
the
highchair
PRÉCAUTION
! Maintenir
l’enfant àbe
l’écart
desofparties
mobiles
enwhile
ouvrant
ou ferWARNING: The
child should
clear
moving
parts
making
adjustments
or opening
or folding
the
highchair.
ofcoincé,
serious
mant la chaise. Risques
de blessures
graves,
l’enfant
pourraitRisk
rester
souffrir
injury
(entrapment,
or amputation ) exists
une lacération
ou même laceration
une amputation.
.Utilisez
sursurface
zones stables, sans dénivellation
• Onlycette
usechaise
on a uniquement
stable, level
. Ne
pas
utiliser
la
chaise
jusqu’à
ce
que
puisse
rester
sans aide
• Do not use this highchair untill’enfant
the child
can
sit assis
unaided
. Ne pas bouger la chaise avec l’enfant à l’intérieur
• Do not move the highchair with your child inside
. Ne pas utiliser la chaise s’il y a une partie cassée, fissurée ou il manque une pièce, vous pouvez utili• Do
not use
highchair
is any
is broken, torn or missing and use only
ser
seulement
les the
parties
approuvées
par lepart
fabriquant.
spare parts approved by the manufacturer
ENTRETIEN ROUTINIER
ROUTINE CARE & MAINTENANCE
. Cette chaise a besoin d’un entretien régulier de l’utilisateur
-. Pour
Thislahighchair
requires
regular
by the
user
nettoyer, utilisez
du savon
pourmaintenance
linge délicat et eau
chaude
-. NE
ForPAS
cleaning,
useJAVEL
only a mild detergent and warm water
UTILISER DE
-.NE
DO
NOT
USE des
BLEACH
PAS
UTILISER
substances abrasives
- DO NOT USE any abrasive substances
. De temps en temps, vérifiez que la chaise n’a aucune vis desserrée, partie cassée ou matériel qui ne
- From time to time, check your highchair for loose screws, worn parts, torn
soitmaterial
pas bien fixé
décousu. Changez
les the
parties
de laas
chaise
qui en ont besoin
or ou
stitching.
Replaceou
orréglez
adjust
parts
needed.
Dû
aux constantes améliorations et actualisations, certains des éléments peuvent être légèrement
Due to constant updating and improvements, some components may occasionally differ slightly from
différents
deshown
ceux qui
apparaissent
sur les
Sous
réserve
de changer
le détail
the images
in these
instructions.
Weimages
reserve des
the instructions.
rights to change
the
specifications
of any
de
n’importe
quelprior
produit
sansIfpréavis.
Si vous
avez des questions,
s’il vous
contactez
le distribuproducts
without
notice.
you need
any assistance
please contact
your plaît,
OBABY
retailer from
whom
you purchasedM.S.S.L
your product,
who
willde
take
appropriate
action.
teur
INNOVACIONES
ou votre
point
vente
qui feront
les démarches nécessaires
Getting to know
your de
Highchair
Parties
la chaise
Tray
Tablette
Harness
Harnais
Bouton
ajusHeightpour
adjustment
ter
la hauteur
buttons
Traydemount
Support
la tablette
Tablette
Tray
Tablette
qui peut
Removable
s’enlever
Tray
Manette pour
plier
Folding
release
la chaise
lever
3
4
Pour
plieryour
la chaise
Folding
Highchair
Press
fig.11
Fig.
fig.22
Fig.
fig. 33
Fig.
“Click”
1. Slide
fig. 44
Fig.
Lower
2. Lift
fig.55
Fig.
fig. 66
Fig.
Pour
plier
leslegs,
pattes,
appuyez
sur les
deux boutons
de chaque
côté (fi
dug.2)
siègeand
(photo2)
assemTo fold
the
press
the two
buttons
either side
of the seat
swinget
the
legs
blez
les pattes
(photo
jusqu’à
entendre
un plier qui indique qu’elles sont à leur place.
together
(fig.3)
until3)they
click
into place.
Serrez
l’anse
qui sebeneath
trouve sous
le siège,
premièrement
baissez
dans leassens
qui then
Grip the
handle
the seat,
and
first slide the
lever la
inmanette
the direction
shown,
est
montré,
puis appuyez
surRotate
la manette
4). tournez
siège
versit le
bas, vers
pattes
press
the lever
in (fig.4).
the (photo
seat towards
the le
legs
until
clicks
into les
place
(fig.5
jusqu’à
entendre un clic qui indique qu’elles sont bien placées.(photo 5 et 6).
& fig.6).
Para
desdobrar
cadeirinha
Unfolding
youra Highchair
1.1.Glissez
Slide
Fig.
fig.77
Fig.
fig.88
2.Levez
Lift
2.
5
2. Appuyez
Lift
Fig.
fig. 99
“Click”
Press
Fig.
fig. 10
10
Fig.
fig.11
11
Fig.
fig. 12
12
Pour déplier la chaise, serrez premièrement l’anse, et glissez la manette dans le sens qui est indiTo unfold the highchair, grip the handle and first slide the lever in the direction as shown,
qué,
puis appuyez sur la manette comme dans (photo8). Tournez le siège et montez-le depuis les
then press the lever in (fig.8). Rotate the seat away from the legs and lift the seat up
pattes
le haut,
jusqu’á(fientendre
un clic qui indique qu’il est bien à sa place (photo 9)
until itvers
clicks
into place
g.9).
Pour
déplier
leslegs,
pattes,
appuyez
sur les
deux boutons
sur of
lesthe
deux
côtés
du siège
(photo
10)
et
To unfold
the
press
the two
buttons
either side
seat
(fig.10)
and
swing
the
séparez
les pattes
(photo
jusqu’à
qui indique qu’elles sont bien à leur place
legs apart
(fig.11)
until 11)
they
click entendre
into placeun
(ficlic
g.12).
(photo 12)
.
6
Pour
fixer
et régler
la chaise
Fitting
and
Adjusting
the Tray
“Click”
Fig.
fig.13
13
Fig.
fig.1414
Fig.
fig.15
15
To fitfixer
the la
tray
squeeze
the handle
underneath
thesous
trayla(fitablette
g.13) and
slide
tray onto
Pour
tablette,
appuyez
sur l’anse
qui se trouve
(photo
13)the
et glissez
la the
tray mount
g.14).
tablette
dans(fi
son
support (photo 14)
To adjust
positiondeoflathe
tray, squeeze
thel’anse
handle
thelatray
(fig.13)
and
Pour
réglerthe
la position
tablette,
appuyez sur
quiunderneath
se trouve sous
tablette
(dessin
slide
traylato
the required
position.
ReleaseLâchez
the handle
allowque
the la
tray
to click
into
13)
et the
glissez
tablette
jusqu’à la
position désirée.
l’anseand
et laissez
tablette
se fixe
place (fig.15).
dans
l’endroit correspondant, jusqu’â entendre un clic (photo 15)
Para
ajustarthe
a altura
Adjusting
Height
Press
Fig.
fig.16
16
Fig.
fig.17
17
Fig.
fig.18
18
Pour
réglerthe
la chaise,
appuyez
sur les
boutons
se trouve
lesframe
deux côtés
du châssis
(photo
To
adjust
height,
press the
buttons
on qui
either
side ofsur
the
(fig.17)
and slide
the
17) et up
glissez
le siège
la chaise
le hautheight,
ou versuntil
le bas
fixez-le
la hauteur
désirée,
chair
or down
thedelegs
to thevers
desired
it et
clicks
intoà place
(fig.18).
jusqu’à entendre un clic qui indique qu’il est à sa place (photo 18).
Pour
incliner the
le dossier
Reclining
Seat
7
Press
Fig.
fig.19
19
Fig.
fig.20
20
Fig.
fig. 21
21
Pour incliner le dossier, appuyez sur le bouton qui se trouve derrière le dossier (photo 19) et réTo recline
theàseat,
press d’inclination
the button at
the back
of 20),
the jusqu’à
seat (fientendre
g.19) and
seat
glez
le dossier
la position
désirée
(photo
unadjust
clic quithe
indique
to the
g.20),
until (photo
it clicks
into place (fig.21).
qu’il
estrequired
bien fixé position
dans une(fi
des
positions
21).
8
Pour
utiliser
le harnais
Using
the Harness
fig.22
22
Fig.
fig.23
23
Fig.
fig. 24
24
Fig.
Press
fig. 25
Fig.
fig. 26
26
Fig.
To fasten
theleharness,
insert bothles
fasteners
on the waist
strap into
claspdans
on the
Pour
attacher
harnais, introduisez
deux languettes
des sangles
de lathe
ceinture
la
crotch centrale
strap (fiqui
g.22)
chest
strap onto(photo
the waist
(fig.23
& 24).
boucle
estand
fixéeclip
à laeach
sangle
d’entrejambes
22) etstrap
attachez
chaque
sangle des
épaules à la sangle de la ceinture (photo 23 et 24)
To release the harness, squeeze each of the clips in the centre of the harness and pull
awaydétacher
from the
one
at a time
(fig.25).
Pour
le clasp,
harnais,
appuyez
sur les
deux crochets qu’il y a au centre de l’harnais, et sortezle de la boucle centrale, d’abord un et après le deuxième (photo 25)
Adjust the harness length using the buckles on each strap (fig.26).
Réglez la longueur de l’harnais avec les boucles qu’il y a sur chacune des sangles (photo 26).
Importé par:
INNOVACIONES M.S. S.L.
Pol. Ind. La Cava.
C/ Benigànim, 9
46892 MONTAVERNER (Valencia) Spain
Tel. 96229 76 70 Fax 96 229 76 76
Kinderhochstuhl
Bedienungsanleitung
WICHTIG
Bewahren Sie die Anleitung als
zukünftige Referenz auf.
BITTE LESEN SIE DIE ANLEITUNG AUFMERKSAM,
BEVOR SIE DAS PRODUKT BENUTZEN.
2
Safety Warnings
Sicherheitsvorkehrungen
Vielen
Sie sich fürOBABY.
INNOVACIONES
M.S.S.L.
entschieden
haben.isUm
sicherzustellen,
dasswith
der KinThankDank,
you dass
for choosing
To ensure
that
your highchair
used
in accordance
these instructions,
please
read them fully.benutzt wird, bitten wie Sie diese vollständig durchzulesen.
derhochstuhl
gemäß der
Bedienungsanleitung
This highchair conforms to BS 14988:2006+A1:2012 and is guaranteed for 24 months from
Dieser
Kinderhochstuhl
die manufacturing
Norm BS 14988:2006+A1:2012
und hat abyou
dem
Kaufdatum
im Falle eines
the date
of purchaseerfüllt
against
defects. If, however
have
any problems,
Fabrikationsfehler
24 Monate
Garantie.
Sollten
irgendein
Problem haben,
Sie who
sich an
den Verplease contact your
OBABY
retailer
from Sie
whom
you purchased
yourwenden
product,
will
triebgesellschaft
oder
den Händler, bei dem Sie das Produkt erworben haben. Diese werden sich entspretake appropriate
action.
chend darum kümmern.
Your
child’s safety
may bekann
affected
if youdes
doKindes
not follow
these instructions.
Das
Missachten
dieser Anleitung
die Sicherheit
gefährden.
ACHTUNG! Die
des Kindes
liegtresponsibility
in Ihrer Verantwortung.
WARNING:
A Sicherheit
child’s safety
is your
ACHTUNG!
Lassen
Sie
das
Kind
nicht
alleine.
WARNING: Do not leave the child unattended
ACHTUNG! Vergewissern
sich, dassisder
Gurt gut fiangelegt
WARNING:
Ensure theSie
harness
correctly
tted ist
ACHTUNG! Benutzen
den
Kinderhochstuhl
nicht, all
wenn
nicht alle dessen
WARNING:
Do notSie
use
the
highchair unless
components
are Einzelteile am richtigen
gut eingestellt sind.
correctly
fitted Platz
and und
adjusted
ACHTUNG! Beachten
Sie dass
Risiko,
entsteht,
wenn
sich der
KinderhoWARNING:
Be aware
of the
riskwelches
of open
fire and
other
sources
of
chstuhl in
der Nähe
Kaminen,
strong
heat,
suchvon
asÖfen,
electric
bar fielektrischen
res, gas fiHeizungen,
res, etc inGasheizungen
the vicinity of
oderhighchair
anderen Hitzequellen befindet.
the
ACHTUNG!
sollten
darauf
achten,
Teile while
zum Öffnen
und
WARNING:Sie
The
child
should
be dass
cleardie
ofbeweglichen
moving parts
making
adjustments
or opening or außerhalb
folding the
Risk
of serious
Schliessen des Kinderhochstuhl
der highchair.
Reichweite des
Kindes
liegen. Es
injury
laceration
or amputation
exists
besteht(entrapment,
das Risiko von schweren
Verletzungen
(das Kind) kann
sich verfangen und
eine Verletzung oder sogar eine Amputation erleiden).
• Der
Kinderhochstuhl
darf nurlevel
auf ebenen
und stabilen Flächen benutzt werden.
• Only
use on a stable,
surface
• Benutzen
Sie
den
Kinderhochstuhl
erst,
wenn
das Kind
fremde Hilfe darin sitzen bleiben kann.
• Do not use this highchair until the child
canohne
sit unaided
• Bewegen Sie den Kinderhochstuhl nicht, wenn ein Kind darin sitzt.
• Do not move the highchair with your child inside
• Benutzen Sie den Kinderhochstuhl nicht, wenn Teile kaputt oder zerrissen sind oder wenn irgendein
• Do
not
the highchair
is any partTeile
is broken,
torn or missing
Teil
fehlt.
Nuruse
die vom
Hersteller genehmigten
dürfen verwendet
werden. and use only
spare parts approved by the manufacturer
ROUTINE CARE & MAINTENANCE
REGELMÄßIGE PFLEGE UND WARTUNG
ThisKinderhochstuhl
highchair requires
regular
maintenance
by the
- -Dieser
benötigt
regelmäßige
Wartung durch
denuser
Benutzer.
ForReinigen
cleaning,
only a mild
detergent
warm
water
- -Zum
nur use
Feinwaschmittel
und
lauwarmesand
Wasser
benutzen.
DO BLEICHMITTEL
NOT USE BLEACH
- -KEINE
BENUTZEN.
- DO NOT USE any abrasive substances
- KEINE SCHEUERMITTEL VERWENDEN.
- From time to time, check your highchair for loose screws, worn parts, torn
- Vergewissern
Siestitching.
sich ab und Replace
zu, dass sich
Schrauben
undas
Nähte
gelöst haben, es keine kamaterial or
or keine
adjust
the parts
needed.
putten Teile gibt und alles gut angebracht ist. Falls nötig, stellen Sie die fraglichen Teile neu ein oder
tauschen
Sie diese aus.
Due to constant updating and improvements, some components may occasionally differ slightly from
the images shown in these instructions. We reserve the rights to change the specifications of any
Wegen
ständiger
und
Aktualisierungen,
können
einigeyour
Elemente
von
den
products
without Verbesserungen
prior notice. If you
need
any assistance please
contact
OBABYleicht
retailer
from
whom you purchased
your product,
who willWir
take
appropriate
Abbildungen
in der Anleitung
abweichen.
behalten
uns action.
das Recht vor, Detailveränderungen
jeglicher Produkte ohne vorherige Ankündigung vorzunehmen. Bei sämtlichen Unschlüssigkeiten,
kontaktieren Sie bitte den Lieferanten INNOVACIONES M.S.S.L. oder den Händler, bei dem Sie das
Produkt erworben haben. Diese werden dann die entsprechenden Schritte unternehmen.
Getting
to know
your Highchair
Die Teile
des Kinderhochstuhls
Tray
Tablett
Harness
Gurt
Knöpfe,
die
Heightum
adjustment
Höhe
zu verstellen
buttons
Tray mount
Tablettunterlage
Tablett
Tray
Abnehmbares
Removable Tablett
Tray
Hebel zum
ZusamFolding
release
menklappen des
lever
Kinderhochstuhls
3
4
Zusammenklappen
des Kinderhochstuhls
Folding your Highchair
Press
fig. 1
Abb.
fig. 2
Abb.
fig. 33
Abb.
“Click”
1. Slide
fig. 44
Abb.
Lower
2. Lift
fig. 5
Abb.
fig. 66
Abb.
Um
die Stuhlbeine
zusammenzuklappen,
Sie die
zweiseat
Knöpfe,
die and
sich an
beiden
To fold
the legs, press
the two buttonsdrücken
either side
of the
(fig.2)
swing
the Seiten
legs
der
Sitzfläche
befinden
(Abbildung
2) und
klappen die Stuhlbeine zusammen (Abbildung 3), bis
together
(fig.3)
until they
click into
place.
Sie ein Klicken hören, wenn die korrekte Position erreicht ist.
Grip the handle beneath the seat, and first slide the lever in the direction as shown, then
Sie
drücken
den Griff
Sitzfläche
und bewegen
nunlegs
zuerst
denitHebel
press
the lever
in (fiunter
g.4). der
Rotate
the seat
towards the
until
clicksnach
into unten,
place (fig.5
wie
abgebildet, und drücken ihn dann (Abbildung 4). Klappen Sie die Sitzfläche nach unten in
& fig.6).
Richtung der Stuhlbeine, bis Sie wieder ein Klicken hören, sobald die richtige Position erreicht ist
(Abbildungen 5 und 6).
Auseinanderklappen
des Kinderhochstuhls
Unfolding
your Highchair
1.1.Deslice
Slide
Abb.
7
fig. 7
Abb.
8
fig. 8
2.Levante
Lift
2.
5
2. Levante
Lift
Abb.
fig. 99
“Click”
Press
Abb.
10
fig. 10
Abb.
fig. 11
Abb.
12
fig. 12
Um den Kinderhochstuhl auseinanderzuklappen, drücken Sie zuerst den Griff und schieben den
To unfold the highchair, grip the handle and first slide the lever in the direction as shown,
Hebel
in die abgebildete Richtung. Dann drücken Sie den Hebel wie in Abbildung 8 gezeigt.
then press the lever in (fig.8). Rotate the seat away from the legs and lift the seat up
Klappen
Sie dieinto
Sitzfläche
von
den Stuhlbeinen aus nach oben, bis Sie ein Klicken hören, sobald
until it clicks
place (fi
g.9).
die richtige Position erreicht ist (Abbildung 9).
To unfold the legs, press the two buttons either side of the seat (fig.10) and swing the
Zum
deruntil
Stuhlbeine,
drücken
Sie die(fi
zwei
Knöpfe auf den beiden Seiten der Sitzflälegs Ausklappen
apart (fig.11)
they click
into place
g.12).
che (Abbildung 10) und klappen Sie die Beine auseinander (Abbildung 11), bis Sie ein Klicken
hören, sobald die richtige Position erreicht ist (Abbildung 12).
6
Befestigen
Einstellen
Tabletts
Fitting andund
Adjusting
thedes
Tray
“Click”
Abb.
fig. 13
Abb.
fig. 14
14
Abb.
fig. 15
To fidas
t the
tray zu
squeeze
the handle
theder
tray
(fig.13)
and Tablett
slide the
tray onto
the
Um
Tablett
befestigen,
drückenunderneath
Sie den Hebel,
sich
unter dem
befindet
(Abbiltray mount
g.14). es auf die Tablettunterlage (Abbildung 14).
dung
13) und(fischieben
To adjust
the position
of the
tray, squeeze
the handle
underneath
the
traydem
(fig.13)
and
Um
die Position
des Tabletts
einzustellen,
drücken
Sie den Hebel,
der sich
unter
Tablett
beslide the
to the required
position.
Release thePosition.
handle Lassen
and allow
the Hebel
tray towieder
click into
findet,
undtray
verschieben
das Tablett
in die gewünschte
Sie den
los
place (fig.15).
und
sobald das Tablett an einer passenden Stelle einrastet, hören Sie ein Klicken (Abbildung 15).
Die
Höhe einstellen
Adjusting
the Height
Press
Abb.
16
fig. 16
Abb.
fig. 17
17
Abb.
18
fig. 18
Umadjust
die Höhe
drücken
Sie die Knöpfe
an side
den beiden
Seiten des
Rahmens
(AbbilTo
theeinzustellen,
height, press
the buttons
on either
of the frame
(fig.17)
and slide
the
dung 17)
unddown
schieben
die Sitzfläche
nach oben
oderuntil
unten
in die gewünschte
chair
up or
the legs
to the desired
height,
it clicks
into place (fiSitzhöhe,
g.18). bis Sie
ein Klicken hören, sobald der Sitz eingerastet ist
ParaReclining
reclinar elthe
respaldo
Seat
7
Press
Abb.
fig. 19
Abb.
fig. 20
Abb.
21
fig. 21
Zum Einstellen der Rückenlehne, drücken Sie den Knopf auf der Rückseite der Rückenlehne (AbTo recline
pressdie
the
button at the
back
of the seat
(fig.19)
and adjust
seat
bildung
19)the
undseat,
bewegen
Rückenlehne
in die
gewünschte
Position
(Abbildung
20).the
Sobald
to the
required
position
(fiRückenlehne
g.20), until itwieder
clickseingerastet
into place (Abbildung
(fig.21). 21).
Sie
ein Klicken
hören,
ist die
8
Benutzung
des Gurts
Using the Harness
fig. 22
Abb.
fig. 23
23
Abb.
fig. 24
Abb.
24
Press
fig. 25
Abb.
25
fig. 26
Abb.
26
To fasten
thedes
harness,
insert both
fasteners
on the
strap intointhe
on the
Zum
Anlegen
Gurts stecken
Sie die
zwei Laschen
derwaist
Taillenbänder
die clasp
Mittelschnalle,
crotch strap
(fig.22)
clip eachden
chest
strapverläuft,
onto the
waist strap
(fig.23 &
welche
von dem
Band and
das zwischen
Beinen
gehalten
wird. Hängen
Sie24).
jedes der
Schulterbänder an die Taillenbänder ein (Abbildung 23 und 24).
To release the harness, squeeze each of the clips in the centre of the harness and pull
awayLösen
fromdes
theGurts,
clasp,drücken
one at Sie
a time
(fig.25).
Zum
jeweils
von oben und unten die beiden Schnallen in der Mitte
des Gurtes und nehmen sie nacheinander aus der Halterung (Abbildung 25).
Adjust the harness length using the buckles on each strap (fig.26).
Verändern Sie die Länge der Gurtbänder an den Schnallen, die sich an jedem Band befinden
(Abbildung 26).
Importiert von:
INNOVACIONES M.S. S.L.
Pol. Ind. La Cava.
C/ Benigànim, 9
46892 MONTAVERNER (Valencia) Spain
Tel. 96229 76 70 Fax 96 229 76 76
Seggiolone
Manuale d’uso
Importante
Conservare per riferimenti futuri
PER FAVORE, LEGGERE ATTENTAMENTE LE
ISTRUZIONI PRIMA DELL’USO DEL PRODOTTO
2
Safety Warnings
AVVERTENZE
DI SICUREZZA
Grazie
aver
INNOVACIONES
M.S.S.L.
Per assicurarsi
il seggiolone
si usa
le istruzioni
Thankper
you
forscelto
choosing
OBABY. To
ensure
that your che
highchair
is used
in secondo
accordance
with
theseleggere
instructions,
please read them fully.
d’uso,
queste istruzioni.
This highchair conforms to BS 14988:2006+A1:2012 and is guaranteed for 24 months from
Questo
seggiolone
è conforme
allamanufacturing
norma Europea BS
14988:2006+A1:2012
e la have
durataany
dellaproblems,
garanzia è prethe date
of purchase
against
defects.
If, however you
vista
per contact
24 mesi dalla
di acquisto
qualora
di fabbricazione.
Per qualche
problema,
please
yourdata
OBABY
retailer
from presentasse
whom you difetto
purchased
your product,
who will
contattare
con il Rivenditore
take appropriate
action. presso il quale è stato effettuato l’acquisto, il quale farà quello che corrisponda
in ogni caso.
Your
child’s
may be
affected
if you do not
follow
these
La
sicurezza
del safety
vostro bambino
può
venire compromessa
se non
seguite
questeinstructions.
istruzioni.
Avvertenza! la
del bambino
è vostra
responsabilità.
WARNING:
A sicurezza
child’s safety
is your
responsibility
Avvertenza!
mai
lasciare
il
bambino
incustodito.
WARNING: Do not leave the child unattended
Precauzioni! Ensure
assicurarsi
cheharness
il sistemaisdicorrectly
ritenuta siaficorrettamente
montato.
WARNING:
the
tted
Precauzioni! non
utilizzare
prodotto
se tutti
i suoi compenenti
non sono
coWARNING:
Do not
use ilthe
highchair
unless
all components
are
rrettamentefifissati
e regolati.
correctly
tted and
adjusted
Precauzioni! Be
Siete
consapevoli
pericoli
derivanti
di fiamme
WARNING:
aware
of thedei
risk
of open
fire della
and presenza
other sources
of
libere o altre
fonti
di calore
quali radiatori,
caminetti,
e avicinity
gas, non of
strong
heat,
such
as electric
bar fires,
gas fistufe
res, elettriche
etc in the
lasciare
il seggiolone vicino.
the
highchair
Precauzioni!
tenere
lontano
il bambino
durante
le operazioni
apertura
e chiuWARNING: The
child
should
be clear
of moving
partsdi while
making
adjustments
or C’è
opening
orferite
folding
the highchair.
Riskincastrato,
of serious
sura del prodotto.
rischio di
(il bambino
può rimanere
risultare
injury
(entrapment,
laceration or amputation ) exists
ferito o soffrire
un’amputazione).
• Usare
sempre
su una
superficie
piana
e stabile.
• Only
use on
a stable,
level
surface
• Non
usare
fino
a
quando
il
bambino
non
sa stare
da solo.
• Do not use this highchair until the
childseduto
can sit
unaided
• Non spostare il seggiolone con il bambino seduto.
• Do not move the highchair with your child inside
• Non utilizzare il seggiolone se tutti i suoi componenti non sono correttamente fissati e regolati.
• Do not use the highchair is any part is broken, torn or missing and use only
spare parts approved by the manufacturer
La manutenzione e la pulizia del prodotto
ROUTINE CARE & MAINTENANCE
- Questo seggiolone richiede una manutenzione regolare da parte dell’utilizzatore.
This
highchair
requires
regular
maintenance
by the
user
- -Per
pulire,
usare soltanto
sappone
per vestiti
delicati ed acqua
tiepida.
ForCANDEGGIARE
cleaning, use only a mild detergent and warm water
- -NON
DOUSARE
NOT USE
BLEACH
- -NON
prodotti
solventi.
- DO NOT USE any abrasive substances
- Ispezionare regolarmente i dispositivi di sicurezza per accertarsi della perfetta funzionalità del pro- From time to time, check your highchair for loose screws, worn parts, torn
dotto.
Rilevareor
eventuali
segniReplace
di danneggiamento
scuciture
e lacerazioni.
material
stitching.
or adjuste/o
theusura,
parts
as needed.
Per
motivi di aggiornamento e migliore, alcuni componenti potranno essere diversi di quelli descritti
Due to constant updating and improvements, some components may occasionally differ slightly from
inthe
questo
libretto
Ci teniamo
il diritto
a fare qualunque
sul specifi
prodotto
senza
previo avviimages
shownd’uso.
in these
instructions.
We reserve
the rights tomodifica
change the
cations
of any
so.
Se ha qualche
contattare
per favore
al distribuitore
M.S.S.L.
o rivolgersi
al
products
without dubbio,
prior notice.
If you need
any assistance
please INNOVACIONES
contact your OBABY
retailer
from
whomd’acquisto,
you purchased
product,
who will necessarie.
take appropriate action.
punto
doveyour
faranno
le gestione
Getting
to know your
Highchair
Componenti
del seggiolone
Tray
Vassoio
Cinture di
Harness
sicurezza
Pulsante
per agHeight adjustment
giustare
buttonsl’altezza
Tray vassoio
mount
Sopporto
Il seggiolone
Tray
IlRemovable
Vassoio si può
togliere
Tray
Maniglia di
chiusura
Folding
release
lever
3
4
Per
piegare
il seggiolone
Folding
your
Highchair
Press
fig. 11
Foto.
fig. 2
Foto.
2
fig. 33
Foto.
“Click”
1. Slide
fig. 44
Foto.
2. Lift
Lower
fig. 5
Foto.
5
fig. 66
Foto.
Per
piegare
gambe,
premere
i pulsanti
adside
ognioflato
(foto
2) swing
e collocare
le
To fold
the le
legs,
press
the two
buttonssituati
either
thedella
seatsedile
(fig.2)
and
the legs
gambe
insieme
3)they
fino aclick
sentire
questo vuole dire che è a posto.
together
(fig.3)(foto
until
intoclick,
place.
Premere
leva che
c’è all’interno
del sedile,
e prima
si mostra,
Grip thelahandle
beneath
the seat,
and first
slide abbassare
the lever la
inleva
the direzione
direction come
as shown,
then
dopo
(foto Rotate
4). Girare
il sedile
sotto, verso
gambe
a sentire
click,(fi
quespressaggiustare
the lever la
in leva
(fig.4).
the
seat towards
thelelegs
untilfino
it clicks
intounplace
g.5
to
vuol
dire che tutto è a posto. (foto 5 e 6)
&fi
g.6).
Per aprire
il seggiolone
Unfolding
your
Highchair
1.1.Scivolare
Slide
Foto.
fig. 77
Foto.
fig. 88
2.Sollevare
Lift
2.
5
2. Sollevare
Lift
Foto.
fig. 99
“Click”
Press
Foto.
10
fig. 10
Foto.
11
fig. 11
Foto.
12
fig. 12
Per aprire il seggiolone, premere la leva prima e scivolare la maniglia in direzione a quella spieTo unfold the highchair, grip the handle and first slide the lever in the direction as shown,
gata,
dopo premere la maniglia come nella foto 8. Girare il sedile e sollevarlo dalle gambe verso
then press the lever in (fig.8). Rotate the seat away from the legs and lift the seat up
sopra,
a sentire
il click(fi
che
ne indicia che ora è pronto. (foto 9)
until itfino
clicks
into place
g.9).
Per
aprire lethe
gambe,
dai lati
del sedile
(foto
e separare
gambe
(foto
To unfold
legs, stringere
press thei pulsante
two buttons
either
side of
the10)
seat
(fig.10)leand
swing
the11)
fino
sentire
click che
nethey
indica
cheinto
ora èplace
pronto
(foto 12).
legsaapart
(fiilg.11)
until
click
(fig.12).
6
Per
collocare
ed aggiustare
vassoio
Fitting
and Adjusting
the il
Tray
“Click”
Foto.
13
fig. 13
Foto.
fig. 14
14
Foto.
15
fig. 15
To ficollocare
t the tray
squeezepremere
the handle
underneath
tray
(fig.13)
and13),
slide
the tray
onto the
Per
il vassoio,
la maniglia
che c’èthe
sotto
il vassoio
(foto
inserire
il vassoio
tray mount
(fisedi
g.14).
delle
apposite
(foto 14).
To adjust
the la
position
of the
tray, squeeze
the leva
handle
underneath
the tray
(fig.13)
Per
aggiustare
posizione
del vassoio,
agire sulla
posta
sotto il vassoio
(disegno
13) eand
sfislidenella
the tray
to thedesiderata.
required position.
handle
and
allow the
tray tonel
click
into
larlo
posizione
Lasciare la Release
maniglia the
e lasciare
che
il vassoio
si collochi
posto
place (fig.15).
corrispondente,
fino a sentire il click (foto 15).
Per
regolarethe
l’altezza
Adjusting
Height
Press
Foto.
16
fig. 16
Foto.
fig. 17
Foto.
18
fig. 18
Peradjust
regolare
l’altezza,
entrambi
i pulsanti
daiside
lati della
struttura(foto
17), abbassare
soTo
the
height,premere
press the
buttons
on either
of the
frame (fig.17)
and slide o
the
llevareup
il sedile
secondo
la posizione
desiderata,
finountil
a sentire
il click
cheplace
ne indica
che è pronto.
chair
or down
the legs
to the desired
height,
it clicks
into
(fig.18).
(foto 18)
Inclinazione
seggiola
Reclining the
Seat
7
Press
Foto.
19
fig. 19
Foto.
20
fig. 20
Foto.
21
fig. 21
Per inclinare la seggiola, premere il pulsante dietro la seggiola (foto 19), aggiustare nella posizioTo desiderata
recline the(foto
seat,
press
button
at the
of the
(fig.19)
and
ne
20),
fino the
a sentiré
il click
cheback
ne indica
cheseat
è pronto
(foto
21).adjust the seat
to the required position (fig.20), until it clicks into place (fig.21).
8
Benutzung
des Gurts
Using the Harness
fig. 22
Foto.
22
fig. 23
Foto.
23
fig. 24
Foto.
24
Press
fig. 25
Foto.
25
fig. 26
Foto.
26
To fasten
the harness,
bothlefasteners
on the
waist
strap
intofibbia
the clasp
on the (foto
Per
agganciare
la cintura,insert
introdurre
due estremità
della
cintura
nella
della cintura
crotch
23
e 24).strap (fig.22) and clip each chest strap onto the waist strap (fig.23 & 24).
To release
harness,
squeeze
each of
the clips
theincentre
harness
and pull
Per
slanciarethe
le cinture,
premere
entrambi
cinture
che in
sono
centro of
allathe
cintura
ed spostarle
awayfibbia
fromcentrale,
the clasp,
oneuno
at ae time
g.25).
della
prima
dopo(fi
l’altro
(foto 25).
Adjust the
harness length
using the
on each
strap
(fig.26). cinture (foto 26)
Regolare
la lunghezza
della cintura
con buckles
le fibbie che
ci sono
in entrambe
Importato da:
INNOVACIONES M.S. S.L.
Pol. Ind. La Cava.
C/ Benigànim, 9
46892 MONTAVERNER (Valencia) Spain
Tel. 96229 76 70 Fax 96 229 76 76