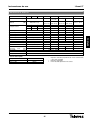
1
“Avant 5”
Ref. 5325
© Copyright Televés S.A.
“Avant 5”
IMPORTANTES INSTRUCCIONES DE SEGURIDAD
IMPORTANT SAFETY INSTRUCTIONS:
• Antes de manipular o conectar el equipo leer éste manual.
• Para reducir el riesgo de fuego o choque eléctrico, no
exponer el equipo a la lluvia o a la humedad.
• No quitar la tapa del equipo sin desconectarlo de la red.
• No obstruir las ranuras de ventilación del equipo.
• Deje un espacio libre alrededor del aparato para proporcionar una ventilación adecuada.
• El aparato no debe ser expuesto a caídas o salpicaduras
de agua. No situar objetos o recipientes llenos de agua
sobre o cerca del aparato si no se tiene la suficiente protección.
• No situar el equipo cerca de fuentes de calor o en
ambientes de humedad elevada.
• No situar el equipo donde pueda estar sometido a fuertes
vibraciones o sacudidas.
• Before handling or connecting the equipment, please read
this manual.
• In order to reduce the risk of fire or electric shock, do not
expose the equipment to rain or moisture.
• Do not take the cover off the equipment without disconnecting it from the mains.
• Do not obstruct the equipment's ventilation system.
• Please allow air circulation around the equipment.
• The equipment must not come into contact with water or
even be splashed by liquids. Do not place containers with
water on or near the equipment if it is not adequately protected.
• Do not place the equipment near sources of heat or in
excessively moisture conditions.
• Do not place the equipment where it may be affected by
strong vibrations or knocks.
HOW TO USE THE EQUIPMENT SAFELY
OPERACIÓN SEGURA DEL EQUIPO
• La tensión de alimentación de éste producto es de: 230V~
±15% 50/60Hz.
• The powering supply of this product is: 230V~ ±15%
50/60Hz.
• Si algún líquido u objeto se cayera dentro del equipo, por
favor recurra al servicio técnico especializado.
• If any liquid or object falls inside the equipment, please
contact a specialized technician.
• Para desconectar el equipo de la red, tire del conector,
nunca del cable de red.
• To disconnect the equipment from the mains, pull from the
connector, and never pull from the cable.
• No conectar el equipo a la red eléctrica hasta que todas
las demás conexiones del equipo hayan sido efectuadas.
• Do not connect the equipment to the mains until all the
other connections have been made.
• La base de enchufe al que se conecte el equipo debe
estar situada cerca de éste y será fácilmente accesible.
• The mains socket that is going to be used to connect the
equipment should be located nearby and should be easily
accessible.
DESCRIPCIÓN DE SIMBOLOGÍA DE SEGURIDAD
ELÉCTRICA
DESCRIPTION
SYMBOL
OF
THE
ELECTRICAL
SAFETY
• Para evitar el riesgo de choque eléctrico no
abrir el equipo.
• To avoid the risk of electric shock, do not open
the equipment.
• Este símbolo indica que el equipo cumple los
requerimientos de seguridad para equipos de
clase II.
• This symbol indicates that the equipment
complies with the safety requirements for class
II equipment.
• Este símbolo indica que el equipo cumple los
requerimientos del marcado CE.
• This symbol indicates that the equipment
complies with the requirements of CE mark.
2
“Avant 5”
IN D IC E
. . . . . . . . . . . . . . . . . . . . . . . . . . . . . . . . . . . . . . . . . . . . . . Pag .
DESCRIPCIÓN
. . . . . . . . . . . . . . . . . . . . . . . . . . . . . . . . . . . . . . . . . . . . . . .
5
MANEJO DE LA UNIDAD. Programador PCT 4.0 . . . . . . . . . . . . . . . . . . . . . . . . . . . . . . . . .
7
Utilización del programador
. . . . . . . . . . . . . . . . . . . . . . . . . . . . . . . . . . . . . . . . .
7
Estructura de menús . . . . . . . . . . . . . . . . . . . . . . . . . . . . . . . . . . . . . . . . . . . . . .
8
Funcionamiento de los menús. Menú Principal . . . . . . . . . . . . . . . . . . . . . . . . . . . . .
9
Configuración entradas
. . . . . . . . . . . . . . . . . . . . . . . . . . . . . . . . . . . . . . . .
9
Configuración de filtros . . . . . . . . . . . . . . . . . . . . . . . . . . . . . . . . . . . . . . . .
10
Configuración nivel de salida . . . . . . . . . . . . . . . . . . . . . . . . . . . . . . . . . . . . .
12
Configuración de FI . . . . . . . . . . . . . . . . . . . . . . . . . . . . . . . . . . . . . . . . . . .
13
Configuración de VHF . . . . . . . . . . . . . . . . . . . . . . . . . . . . . . . . . . . . . . . . . .
14
Configuración de FM . . . . . . . . . . . . . . . . . . . . . . . . . . . . . . . . . . . . . . . . . .
15
Funcionamiento de los menús. Menú Extendido . . . . . . . . . . . . . . . . . . . . . . . . . . . . .
16
Estado
. . . . . . . . . . . . . . . . . . . . . . . . . . . . . . . . . . . . . . . . . . . . . . .
16
Selección Idioma . . . . . . . . . . . . . . . . . . . . . . . . . . . . . . . . . . . . . . . . . . . .
17
Dirección CDC . . . . . . . . . . . . . . . . . . . . . . . . . . . . . . . . . . . . . . . . . . . . . .
18
Configuración por defecto . . . . . . . . . . . . . . . . . . . . . . . . . . . . . . . . . . . . . . .
18
PIN bloqueo unidad . . . . . . . . . . . . . . . . . . . . . . . . . . . . . . . . . . . . . . . . . . .
19
Proceso de Grabación y Ajuste
. . . . . . . . . . . . . . . . . . . . . . . . . . . . . . . . . . . . . .
20
. . . . . . . . . . . . . . . . . . . . . . . . . . . . . . . . . . . . . . . . .
21
UTILIZACIÓN DEL PULSADOR “RESET” . . . . . . . . . . . . . . . . . . . . . . . . . . . . . . . . . . . . . . .
26
SOLUCIONES A LOS PROBLEMAS MAS FRECUENTES . . . . . . . . . . . . . . . . . . . . . . . . . . . . .
26
CARACTERISTICAS TÉCNICAS . . . . . . . . . . . . . . . . . . . . . . . . . . . . . . . . . . . . . . . . . . . .
27
APLICACION
. . . . . . . . . . . . . . . . . . . . . . . . . . . . . . . . . . . . . . . . . . . . . . .
28
GARANTIA
. . . . . . . . . . . . . . . . . . . . . . . . . . . . . . . . . . . . . . . . . . . . . . .
55
Clonado de configuraciones
3
ESPAÑOL
Instrucciones de uso
Instrucciones de uso
“Avant 5”
Descripción
1
2
3
4
5
6
7
234710
ESPAÑOL
(1)
234710
8
Programador
Ref. 7234
(1)
Mod. PCT 4.0
9
1.2.3.4.5.6.7.-
10 11
Entrada
Entrada
Entrada
Entrada
Entrada
Entrada
Entrada
12 13
UHF1 + Vdc
UHF2 + Vdc
UHF3 + Vdc
FM
BI / BIII / DAB + Vdc
47-430 / 470-862 MHz
FI / SAT +13/17Vdc 0/22 KHz
8.9.10.11.12.13.-
LED de encendido
Alimentación 230 V~
Pulsador Reset
Conector Programador (1)
Salida MATV
Salida MATV + FI
Cabecera de amplificación analógica/digital programable para su aplicación tanto en viviendas unifamiliares como
colectivas caracterizada por: facilidad de instalación, programación sencilla, elevada ganancia, programador externo,
alimentación de bajo consumo.
5
Instrucciones de uso
“Avant 5”
Dispone de 3 entradas programables de UHF repartidas entre 10 filtros. Se puede seleccionar el número de filtros por
entrada (9-0-1, 7-2-1 y 6-3-1), lo cual se hará en función de los canales que se reciban por cada una de las antenas.
La entrada UHF3 está siempre dirigida al filtro 10.
U1: 9
U2: 0
U3: 1
U1: 7
U2: 2
U3: 1
U1: 6
U2: 3
U3: 1
UHF1
UHF3
FILTER FILTER FILTER FILTER FILTER FILTER FILTER FILTER FILTER
1
2
3
4
5
6
7
8
UHF1
FILTER FILTER FILTER FILTER FILTER FILTER FILTER
1
2
3
4
5
6
7
2
3
4
5
6
FILTER FILTER
FILTER
9
8
10
UHF3
FILTER FILTER FILTER
7
10
UHF3
UHF2
FILTER FILTER FILTER FILTER FILTER FILTER
FILTER
UHF2
8
UHF1
1
9
9
FILTER
10
Estas entradas son preamplificadas, disponiendo de un sistema automático de alimentación, siendo en cualquiera
de los filtros seleccionable cualquier canal del 21 al 69 con un ancho de banda desde 1 hasta 5 canales.
UHF
FILTER FILTER FILTER FILTER FILTER FILTER
Cn ... Cn+5
Los niveles de salida de los filtros se equilibran automáticamente, pudiendo darle una cierta pendiente de compensación en banda.
La entrada BI/BIII/DAB también dispone de un sistema automático de alimentación capaz de soportar cortocircuitos.
Tanto en la entrada de FM como la de BI/BIII/DAB la ganancia se regula por medio de un atenuador automático.
La central dispone de una entrada toda banda, previa a la amplificación destinada a su uso en posibles expansiones
del sistema, como pueda ser la inclusión de un equipo de U.I. de satélite o un equipo de TDT's.
La inclusión en la central de una amplificación de la banda de 950 a 2.150 MHz, de ganancia compensada en banda,
da respuesta a las más recientes necesidades de la instalación, como lo es la incorporación de la televisión digital a la
colectiva, refuerza su uso en las distribuciones ICT.
La mezcla de la banda de MATV y FI se realiza con un sistema de filtrado que garantiza la ausencia de interferencia
entre los canales de ambas bandas.
6
Instrucciones de uso
“Avant 5”
Man ejo de la u n idad. Programador Un iversal PCT 4.0
Utilización del programador
Con esta unidad, el significado que toman las teclas y LEDs del programador es el siguiente:
LEDs
A
B
C
: Indica el modo “Menú Normal”.
: Indica el modo “Menú Extendido”.
: Indica el modo “Grabación”.
Teclas
/
+ +
+ +
:
:
:
:
:
:
:
Opciones menú o submenú.
(pulsación corta) - Cambiar de opciones en submenú (posicionamiento del cursor).
(pulsación larga) - Paso a modo extendido y viceversa.
(pulsación corta) - Cambio de menú.
(pulsación larga) - Grabar y ajustar.
Aumenta el contraste de la pantalla.
Disminuye el contraste de la pantalla.
Al conectar el mando a la unidad, ésta le envía los parámetros con los que está configurada (canal memorizado en
cada monocanal, configuración de entradas, nivel de salida...).
Versión de
firmware
unidad
V:2.02b
PCT firmware
version
-----------V:4.05
El programador se inicializa posicionándose en el menú “CONFIG UHF” de forma que pulsando la tecla de selección de menú
podemos recorrer todos los menús de forma cíclica, seleccionando las diferentes opciones a modificar
con la tecla
y cambiando las opciones disponibles con las teclas
.
Una vez configuradas todas las opciones del sistema, realizamos una pulsación larga en la tecla de ajuste
(lo que
enciende el LED verde de ajuste en la “Avant”) y la unidad se encarga de forma automática de establecer todos los
parámetros introducidos con el mando.
NOTA: Para realizar el proceso de ajuste de niveles, cargar las dos salidas de la unidad con una impedancia de
75 ohm (ref. 4061), no siendo preciso cargar las entradas no utilizadas, ver fig. 1.b (pág. 28).
La tecla de ajuste
puede ser pulsada (pulsación larga) en cualquier momento independientemente de la opción de
menú en la que nos encontremos.
7
ESPAÑOL
El sistema se programa con el Programador Universal PCT 4.0. Como mando de la “Avant”, el programador presenta
un menú con opciones que se recorren pulsando la tecla
y que permiten realizar las siguientes acciones:
- Configurar las entradas de UHF del sistema (número de filtros por entrada).
- Apagado de las entradas VHF y/o FM.
- Seleccionar los canales para cada filtro (5 canales consecutivos por filtro máximo).
- Establecer el nivel de salida de UHF (que determina los niveles de VHF y FM).
- Introducir la pendiente de ecualización de UHF.
- Configuración de FI.
Instrucciones de uso
“Avant 5”
Estructura de Menús
A partir del encendido de la unidad, efectuando pulsaciones cortas sobre
siguiente manera:
se recorren los menús principales, de la
CONFIG
U1: 9 U2: 0 U3: 1 -
Menú PRINCIPAL
1. Configuración de entradas
UHF
OFF
Auto
OFF
FILTRO 1
-- -- --- -Ajuste: --
CONFIG FM
2. Filtro 1
FM: ON
Ajuste: +3dB
3. Filtro 2
4. Filtro 3
5. Filtro 4
6. Filtro 5
7. Filtro 6
FILTRO 2
-- -- --- -Ajuste: --
CONFIG VHF
VHF: OFF
Ajuste: --
8. Filtro 7
9. Filtro 8
FILTRO 10
-- -- --- -Ajuste: --
CONFIG FI
Aten:
0dB
EQ:
0dB
LNB: 0V/--
10. Filtro 9
11. Filtro 10
12. Configuración de Nivel de salida
NIV.SALIDA
13. Configuración de FI
Vsal:111dBµV
UHF EQ: 0dB
14. Configuración de VHF
15. Configuración de FM
Para acceder a los menús extendidos habrá que pulsar
durante más de tres segundos en cualquier posición de
menú. Una vez en modo extendido los menús se recorren efectuando pulsaciones cortas sobre , siguiendo la secuencia:
Menú EXTENDIDO
F1F4ø
F7ø
F0ø
1. Estado de los filtros
2. Selección de idioma
F2ø F3F5ø F6F8ø F9ø
VHFø FMø
3. Dirección CDC
IDIOMA
PASSWORD
4. Config. por defecto
Español
0 0 0 0
5. PIN bloqueo unidad (Password)
: Ajuste OK
: Nivel bajo
¿Cargar
config. por
defecto?
NO
: Nivel alto
ø : Filtro vacío
DIRECC CDC
001
Nota: Si desea modificar el idioma de los menús antes de comenzar con la configuración del dispositivo, deberá acceder
al menú “Idioma”. Para ello deberá pulsar la tecla
(pulsación larga) para acceder al menú Extendido, pulsar la
tecla
una vez y luego mediante las teclas
ó
seleccionar el idioma. Finalmente pulsar la tecla
(pulsación
larga) para grabar los cambios. Para mas información, ver apartado “Menú Extendido => Selección de idioma”.
8
Instrucciones de uso
“Avant 5”
Funcionamiento de los Menús - Menú Principal
1.- Menú CONFIGURACIÓN DE ENTRADAS
El primer menú que se muestra es el menú “CONFIG UHF”. La correspondencia de las teclas en este menú es la
siguiente:
Recorren las opciones de los parámetros del menú.
(pulsación corta) - Posiciona el cursor sobre cada parámetro modificable
(pulsación larga) - Pasa al menú extendido.
(pulsación corta) - Cambio al próximo menú: Configuración de filtros
(pulsación larga) - Grabación y ajuste
Procedimiento
En primer lugar pulse la tecla
para activar (parpadea) la primera opción -Distribución de entradas-. Con las teclas
seleccione la configuración deseada para las entradas UHF1-UHF2-UHF3: 9-0-1, 7-2-1, 6-3-1.
CONFIG
U1: 9 U2: 0 U3: 1 -
UHF
OFF
OFF
OFF
CONFIG
U1: 9 U2: 0 U3: 1 -
CONFIG
U1: 7 U2: 2 U3: 1 -
UHF
OFF
OFF
OFF
UHF
OFF
OFF
OFF
CONFIG
U1: 6 U2: 3 U3: 1 -
UHF
OFF
OFF
OFF
Pulse a continuación la tecla
para acceder a la siguiente opción del menú -Alimentación de entradas-. Aquí podrá
seleccionar el modo de funcionamiento de la alimentación de cada entrada: Auto, OFF, ON.
ON: Alimentación siempre activada en la entrada correspondiente.
OFF: Alimentación desactivada en la entrada correspondiente.
Auto: Si dispone de un amplificador, la Avant lo alimentará si considera que el nivel de señal recibido es insuficiente.
CONFIG
U1: 9 U2: 0 U3: 1 -
UHF
OFF
OFF
OFF
Pulse la tecla
Pulse la tecla
CONFIG
U1: 9 U2: 0 U3: 1 -
CONFIG
U1: 9 U2: 0 U3: 1 -
UHF
OFF
OFF
OFF
UHF
Auto
OFF
OFF
CONFIG
U1: 9 U2: 0 U3: 1 -
UHF
ON
OFF
OFF
para activar y modificar la alimentación de las otras dos entradas.
para pasar al siguiente menú.
Nota:
- En la alimentación de entradas, si tiene seleccionada la opción 9-0-1 no se permite modificar el valor por
defecto (OFF) para la entrada U2.
9
ESPAÑOL
-
Instrucciones de uso
“Avant 5”
2.- Menú CONFIGURACION DE FILTROS
El siguiente menú que se muestra es el de Configuración de Filtros. La correspondencia de las teclas en este menú
es la siguiente:
- Permiten programar un canal en la posición apuntada. En Ajuste manual (Ajuste) permiten subir o bajar un dB
por pulsación el nivel del filtro.
- (pulsación corta) - Pasa el cursor a la siguiente posición de canal en este filtro (5 en total) o bien a la posición
de ajuste manual (Ajuste).
- (pulsación larga) - Pasa al menú extendido
- (pulsación corta) - Pasa al siguiente filtro (siguiente menú principal)
- (pulsación larga) - Grabación y ajuste
Procedimiento
Si no hay canales asignados a los filtros, el menú se muestra vacío.
Para asignar un canal a uno de los filtros, pulse la tecla
para activar el primer canal. A continuación con las
teclas
seleccione un canal entre el C21 y el C69. El canal seleccionado puede ser analógico “A” o digital “D”.
FILTRO 1
-- -- --- -Ajuste: --
FILTRO 1
40D -- --- -Ajuste: --
FILTRO 1
21A -- --- -Ajuste: --
FILTRO 1
40D 41A --- -Ajuste: --
Puede incluir hasta un máximo de 5 canales por filtro. En este caso estos canales deberán ser consecutivos.
Una vez configurados todos los filtros, seleccionada la tensión de salida, ... y realizado el ajuste automático de la
Avant, se activa la opción de Ajuste.
Esta opción le permite subir o bajar un dB por pulsación el nivel del filtro en cuestión (una vez ajustado en el proceso
de ajuste automático). El display parpadeará durante el proceso de reajuste (un dB por pulsación). Una vez terminado el
reajuste mostrará el valor alcanzado, lo que informa de si ha sido posible o no inc/dec el nivel de salida. No habrá podido reajustar si vuelve al valor original.
FILTRO 1
40D 41A --- -Ajuste: +0dB
FILTRO 1
40D 41A --- -Ajuste: -2dB
Una vez programados los canales del primer filtro, pulse la tecla
para pasar al siguiente filtro.
Si desea programar canales en este filtro, proceda como en el primero y así sucesivamente.
Si no desea programar mas canales en los filtros restantes, pulse la tecla
sucesivamente hasta llegar al siguiente
menú “Configuración Nivel de Salida”.
Notas:
- El display mostrará el mensaje ERROR! si se está intentando programar algo ilegal (solape de filtros o ancho de
banda mayor de 5 canales en algún filtro y no se podrá salir del menú mientras no corrijamos el error).
- El ajuste manual (Ajuste) solamente será accesible si la unidad ha sido ya ajustada. Tras el ajuste automático el
offset será inicializado a 0dB en filtros no vacíos.
10
Instrucciones de uso
“Avant 5”
FILTRO 7
-- -- --- -Ajuste: --
No hay canales programados en el filtro 7.
Ajuste manual no accesible (filtro vacío).
FILTRO 10
40A 42D 44A
-- -Ajuste: --
Tres canales programados en el filtro 10.
La unidad no ha sido ajustada, por tanto el ajuste manual no es accesible.
FILTRO 3
21A 22A 23A
25A -Ajuste: --
Cuatro canales programados en el filtro 3.
Unidad no ajustada.
FILTRO 3
21A 22A 23A
24A 25D
Ajuste: +0dB
Cinco canales programados en el filtro 3.
Unidad ajustada, ajuste manual inicializado a 0dB
FILTRO 4
32A 35D --- -Ajuste: +1dB
Dos canales programados en el filtro 4 (uno analógico y otro digital).
Corrección manual (posterior al ajuste automático) de +1dB.
FILTRO 7
21A -- --- -Ajuste: -2dB
Canal 21 programado en el filtro 7.
Corrección manual (posterior al ajuste automático) de -2dB.
Nota:
- La indicación
en la esquina superior derecha de la pantalla indica que la unidad todavía no ha sido ajustada
con la configuración actual (esto también se puede comprobar en el menú Estado).
11
ESPAÑOL
Ejemplos:
Instrucciones de uso
“Avant 5”
3.- Menú CONFIGURACION NIVEL DE SALIDA
El siguiente menú que se muestra es el de Configuración Nivel de Salida. La correspondencia de las teclas en este
menú es la siguiente:
- Permiten seleccionar el nivel de salida entre: 96 dBµV, …, 111 dBµV. En la Pendiente de Ecualización selecciona
el valor de la pendiente entre: 0 dB, …, 9 dB.
- (pulsación corta) - Posiciona el cursor sobre el nivel de salida o sobre la Pendiente de Ecualización.
- (pulsación larga) - Pasa al menú extendido.
- (pulsación corta) - Cambia al menú Configuración de FI
- (pulsación larga) - Grabación y ajuste
Procedimiento
Pulse la tecla
para activar (parpadea) la opción -Vsal-. Con las teclas
nivel de salida entre un valor mínimo de 96 dBµV y un máximo de 111 dBµV.
NIV.SALIDA
NIV.SALIDA
NIV.SALIDA
Vsal: 96dBµV
UHF EQ: 0dB
Vsal: 96dBµV
UHF EQ: 0dB
Vsal:111dBµV
UHF EQ: 0dB
seleccione el valor deseado para el
Pulse a continuación la tecla
para acceder a la siguiente opción del menú -Pendiente de Ecualización-. Aquí
podrá seleccionar un valor para la pendiente de ecualización en UHF entre los valores 0dB (mínimo) y 9dB (máximo).
NIV.SALIDA
NIV.SALIDA
Vsal:102dBµV
UHF EQ: 0dB
Vsal:102dBµV
UHF EQ: 6dB
Ejemplo:
NIV.SALIDA
Vsal:105dBµV
UHF EQ: 2dB
105 dBµV de nivel de salida y 2 dB de pendiente de ecualización
12
Instrucciones de uso
“Avant 5”
4.- Menú CONFIGURACION DE FI
El siguiente menú que se muestra es el de Configuración de FI. La correspondencia de las teclas en este menú es
la siguiente:
- Permiten seleccionar los valores editables del menú como son la Atenuación, la Ecualización o la Configuración
del LNB.
- (pulsación corta) - Posiciona el cursor en atenuación, ecualización o configuración LNB.
- (pulsación larga) - Pasa al menú extendido.
- (pulsación corta) - Cambia al menú de Configuración VHF.
- (pulsación larga) - Grabación y ajuste.
Pulse la tecla
para activar (parpadea) la opción -Atenuación FI-. Con las teclas
para esta opción entre los valores -- (apagado), 0dB, ...., 24dB.
CONFIG FI
Aten:
0dB
EQ:
0dB
LNB: 0V/--
seleccione el valor deseado
CONFIG FI
9dB
Aten:
EQ:
0dB
LNB: 0V/--
CONFIG FI
0dB
Aten:
EQ:
0dB
LNB: 0V/--
Pulse a continuación la tecla
para acceder a la siguiente opción del menú -Ecualización de FI-. Aquí podrá seleccionar un valor para la ecualización de FI entre los valores 0dB (mínimo) y 12dB (máximo).
CONFIG FI
Aten:
9dB
0dB
EQ:
LNB: 0V/--
CONFIG FI
Aten:
9dB
10dB
EQ:
LNB: 0V/--
Pulse a continuación la tecla
para acceder a la siguiente opción del menú -Configuración LNB-. Aquí podrá indicar
si alimenta el LNB con 13V (polaridad vertical), con 17V (polaridad horizontal) o bien si no lo alimenta 0V (apagado).
Finalmente pulse la tecla
para acceder a la última parte del menú, donde podrá indicar si el tono de 22KHz está activo ON (banda alta) o bien si está apagado OFF (banda baja).
Las opciones son OV/-- (apagado), 13V/OFF, 13V/ON, 17V/OFF y 17V/ON.
CONFIG FI
Aten:
9dB
EQ:
10dB
LNB: 0V/--
CONFIG FI
Aten:
9dB
EQ:
10dB
LNB: 13V/OFF
CONFIG FI
Aten:
9dB
EQ:
10dB
LNB: 13V/--
Ejemplo:
CONFIG FI
Aten:
7dB
EQ:
3dB
LNB: 13V/ON
Atenuación en FI de 7 dB y ecualización de 3 dB.
LNB configurado a 13V con tono.
13
CONFIG FI
Aten:
9dB
EQ:
10dB
LNB: 13V/ON
ESPAÑOL
Procedimiento
Instrucciones de uso
“Avant 5”
5.- Menú CONFIGURACION DE VHF
El siguiente menú que se muestra es el de Configuración de VHF. La correspondencia de las teclas en este menú
es la siguiente:
- Permiten activar/desactivar la entrada de VHF. En Ajuste Manual (Ajuste) permiten subir o bajar un dB por pulsación el nivel del filtro (una vez ajustado en el proceso de ajuste automático).
- (pulsación corta) - Posiciona el cursor sobre la posición de filtro VHF o el ajuste manual del filtro de VHF (Ajuste).
- (pulsación larga) - Pasa al menú extendido.
- (pulsación corta) - Cambia al menú de Configuración FM.
- (pulsación larga) - Grabación y ajuste.
Procedimiento
Pulse la tecla
da de VHF.
para activar (parpadea) la opción -VHF-. Con las teclas
CONFIG VHF
VHF: OFF
Ajuste: --
active (ON) o desactive (OFF) la entra-
CONFIG VHF
CONFIG VHF
VHF: ON
Ajuste: --
VHF: OFF
Ajuste: --
Después de realizar un ajuste automático de la unidad, queda activa la opción Ajuste.
Esta opción le permite subir o bajar un dB por pulsación el nivel del filtro de VHF ajustado.
El display parpadeará durante el proceso de reajuste (un dB por pulsación). Una vez terminado mostrará el valor
alcanzado, lo que informa de si ha sido posible o no inc/dec el nivel de salida. No habrá podido reajustar si vuelve al
valor original.
CONFIG VHF
CONFIG VHF
VHF: OFF
Ajuste: +0dB
VHF: ON
Ajuste: +2dB
Nota:
- El ajuste manual (Ajuste) solamente será accesible si la unidad ha sido ya ajustada y la entrada de VHF está activada (VHF: ON). Tras el ajuste automático el offset será inicializado a 0dB.
Ejemplo:
CONFIG VHF
VHF: OFF
Ajuste: --
Entrada de VHF desactivada (ajuste manual no accesible).
14
Instrucciones de uso
“Avant 5”
6.- Menú CONFIGURACION DE FM
El siguiente menú que se muestra es el de Configuración de FM. La correspondencia de las teclas en este menú es
la siguiente:
- Permiten activar/desactivar la entrada de FM. En Ajuste Manual (Ajuste) permiten subir o bajar un dB por pulsación el nivel del filtro (una vez ajustado en el proceso de ajuste automático).
- (pulsación corta) - Posiciona el cursor sobre la posición de filtro FM o el ajuste manual del filtro de FM (Ajuste).
- (pulsación larga) - Pasa al menú extendido.
- (pulsación corta) - Cambia al menú de Configuración Entradas.
- (pulsación larga) - Grabación y ajuste.
Pulse la tecla
de FM.
para activar (parpadea) la opción -FM-. Con las teclas
CONFIG FM
---------FM: OFF
Ajuste: --
CONFIG FM
---------FM: OFF
Ajuste: --
active (ON) o desactive (OFF) la entrada
CONFIG FM
---------FM: ON
Ajuste: --
Después de realizar un ajuste automático de la unidad, queda activa la opción Ajuste.
Esta opción le permite subir o bajar un dB por pulsación el nivel del filtro de FM ajustado.
El display parpadeará durante el proceso de reajuste (un dB por pulsación). Una vez terminado mostrará el valor
alcanzado, lo que informa de si ha sido posible o no inc/dec el nivel de salida. No habrá podido reajustar si vuelve al
valor original.
CONFIG FM
---------FM: OFF
Ajuste: +0dB
CONFIG FM
---------FM: ON
Ajuste: +2dB
Nota:
- El ajuste manual (Ajuste) solamente será accesible si la unidad ha sido ya ajustada y la entrada de FM está activada (FM: ON). Tras el ajuste automático el offset será inicializado a 0dB.
Ejemplo:
CONFIG FM
---------FM: ON
Ajuste: +3dB
Entrada de FM activada. Ajuste manual de +3dB.
15
ESPAÑOL
Procedimiento
Instrucciones de uso
“Avant 5”
Funcionamiento de los Menús - Menú Extendido
Para acceder al Menú Extendido habrá que pulsar la tecla
Menú Principal.
durante más de tres segundos en cualquier posición del
1.- Submenú ESTADO
El primer submenú que se muestra es el Estado de la Avant. La correspondencia de las teclas en este menú es la
siguiente:
-
Nada.
(pulsación
(pulsación
(pulsación
(pulsación
corta) - Nada.
larga) - Regresa al menú principal.
corta) - Cambia al menú Selección de Idioma.
larga) - Nada.
Este menú presenta tres posibilidades:
A.- Unidad no ajustada
INFO ESTADO
Unidad
no ajustada
B.- Resultado de ajuste de nivel de los filtros programados
F1F4ø
F7ø
F0ø
F2 F3F5ø F6F8ø F9ø
VHFø FMø
Estado de todos los filtros en este momento
: Ajuste OK
: Nivel bajo
: Nivel alto
ø : Filtro vacío
C.- Unidad protegida por contraseña
INFO ESTADO
Unidad
con password
16
Instrucciones de uso
“Avant 5”
2.- Submenú SELECCION DE IDIOMA
El segundo submenú que se muestra es Selección de Idioma. La correspondencia de las teclas en este menú es la
siguiente:
-
Permiten seleccionar el idioma en que se muestran los menús en el display.
(pulsación corta) - Posiciona el cursor sobre las opciones a seleccionar.
(pulsación larga) - Pasa al menú principal.
(pulsación corta) - Cambia al menú de Dirección CDC.
(pulsación larga) - Grabación y ajuste.
Pulse la tecla
para activar (parpadea) la opción -Selección de Idioma.-. Con las teclas
en que se muestran los menús en el display.
IDIOMA
Español
LANGUAGE
English
Ejemplo:
IDIOMA
Español
Seleccionados los menús en Español
17
seleccione el idioma
ESPAÑOL
Procedimiento
Instrucciones de uso
“Avant 5”
3.- Submenú DIRECCION CDC
El siguiente submenú que se muestra es Dirección CDC. La correspondencia de las teclas en este menú es la
siguiente:
- Permiten incrementar o decrementar cada uno de los tres dígitos de la dirección entre 0 .. 9. El valor para la
dirección estará entre 001 y 254.
- (pulsación corta) - Posiciona el cursor sobre los dígitos a modificar.
- (pulsación larga) - Pasa al menú principal.
- (pulsación corta) - Cambia al menú de Paso a config. por defecto.
- (pulsación larga) - Grabación y ajuste.
Procedimiento
Pulse la tecla
para activar el primer dígito que conforma la dirección. Con las teclas
seleccione un número
entre 0 y 2. Pulse una segunda vez la tecla
para pasar al segundo de los dígitos y repita el proceso anterior seleccionando un número entre 0 y 9. Así hasta completar la dirección.
DIRECC CDC
001
DIRECC CDC
DIRECC CDC
101
001
DIRECC CDC
101
Ejemplo:
DIRECC CDC
Dirección 31 en el bus CDC
031
4.- Submenú CONFIGURACION POR DEFECTO
El siguiente submenú que se muestra es Configuración por defecto. La correspondencia de las teclas en este menú
es la siguiente:
-
Modifica el parámetro (SI/NO)
(pulsación corta) - Activa el cursor.
(pulsación larga) - Ejecuta la opción seleccionada y vuelve al menú principal.
(pulsación corta) - Cambia al menú de PIN bloqueo unidad e ignora el cambio realizado.
(pulsación larga) - Grabación y Ajuste (ignorando CONFIGURACION POR DEFECTO).
Procedimiento
Pulse la tecla
para activar el parámetro. Mediante las teclas
seleccione SI/NO, y confirme la acción con la
tecla . Esto carga la configuración por defecto y vuelve al menú principal.
¿Cargar
config. por
defecto?
NO
¿Cargar
config. por
defecto?
NO
¿Cargar
config. por
defecto?
SI
18
Instrucciones de uso
“Avant 5”
5.- Submenú PIN BLOQUEO UNIDAD
El siguiente submenú que se muestra es el PIN Bloqueo Unidad. La correspondencia de las teclas en este menú es
la siguiente:
- Permiten incrementar o decrementar cada uno de los cuatro dígitos de la clave, el primero entre 0 .. 7 y los
demás entre 0 .. 9 (0000 .. 7999).
- (pulsación corta) - Posiciona el cursor sobre los dígitos a modificar.
- (pulsación larga) - Pasa al menú principal y activa el Bloqueo
- (pulsación corta) - Cambia al menú Estado filtros.
- (pulsación larga) - Grabación y Ajuste.
La unidad sale de fábrica desbloqueada, para bloquearla hay que introducir un PIN de cuatro dígitos mediante este
menú.
Para ello pulse la tecla
para seleccionar el primero de los dígitos que conforman el código PIN. Mediante las
teclas
seleccione un número entre 0 y 7. Pulse una segunda vez la tecla
para pasar al segundo de los dígitos y
repita el proceso anterior seleccionando un número entre 0 y 9. Así hasta completar el código.
PASSWORD
0 0 0 0
PASSWORD
PASSWORD
0 0 0 0
6 0 0 0
PASSWORD
6 0 0 0
Una vez se ha introducido una clave hay que confirmarla con
(pulsación larga). A partir de entonces se podrán
visualizar todos los menús pero no se podrá variar la configuración de la unidad ni grabar/ajustar (tampoco mediante el
pulsador de rearme externo).
Mientras esté bloqueada los menús del mando muestran
como indicación de este estado. Para desbloquear la
unidad hay que introducir de nuevo el PIN con el que se bloqueó la unidad en este mismo menú extendido siguiendo el
mismo proceso (meter código y confirmar con pulsación larga de ) y quedará desbloqueada.
Ejemplo:
CONFIG FI
Aten:
7dB
EQ:
3dB
LNB: 13V/ON
Menú de configuración de FI en una unidad bloqueada mediante password
INFO ESTADO
Unidad
con password
(el menú Estado también informa de este estado)
19
ESPAÑOL
Procedimiento
Instrucciones de uso
“Avant 5”
Proceso de Grabación y Ajuste. (Programador PCT 4.0)
Pulsar
durante más de tres segundos desde cualquier posición de menú/submenú inicia el proceso de grabación
y ajuste. El display mostrará información relacionada con los siguientes procesos:
-
Grabación de la configuración en EEPROM
Inicio del ajuste
Configuración de las entradas
Barrido previo (encendido de alimentaciones y ajuste automático de atenuadores de entrada)
Ajuste de UHF
Ajuste de cada filtro (con bucle de interacción con el usuario en caso de error)
Ajuste de VHF (en caso de que no esté cortada)
Ajuste de FM (en caso de que no esté cortada)
Ajuste del atenuador de salida
Ajuste del canal más alto programado al nivel de salida especificado
Los errores de nivel alto y nivel bajo se indicarán con mensajes en el display.
Se puede reintentar el ajuste con
corto o descartar con
corto.
Ejemplos:
Programando
y guardando
parámetros
...
Inicio de la secuencia de grabación y ajuste
Pulsación larga de la tecla
Ajustando
filtro: 1
...
Ajustando filtros de UHF.
Ajustando filtro 1
Filtro: 1
Señal entrad
NIVEL BAJO
Ajustando filtros de UHF.
Encontrada señal de entrada con nivel bajo
Descartando
filtro: 1
...
Ajustando filtros de UHF.
Descartado ajuste del filtro 1 con la pulsación corta de
F1F4ø
F7ø
F0ø
F2 F3F5ø F6F8ø F9ø
VHFø FMø
Resultado final del ajuste
20
.
Instrucciones de uso
“Avant 5”
Clonado de Configuraciones
Descripción de los parámetros que se muestran en el display y a los que se hace referencia en el manual.
Modo de Operación
Descripción de la Configuración
<2> MODO
- Avant3 Hotel Plaza
(salida)
Indicador de dispositivo
Comando
Nota: Las opciones de clonado de configuración estarán disponibles en unidades Ref. 5325 con un firmware V2.02 ó
superior. Así mismo, será necesario disponer de un programador universal PCT 4.0 Ref. 7234 con versión de
firmware 4.05 ó superior.
Guía Rápida
Copiar con figu racion es
(Un idad => Man do)
ENTRAR MODO COPIA
+
SELECCIONAR POSICION
- Activa cursor
- Selecciona posición
INTRODUCIR DESCRIPC.
- Posiciona cursor
- Selecciona carácter
EJECUTAR COMANDO
- Posiciona cursor
- Selecciona comando
- Ejecutar comando
SALIR MODO COPIA
- Selecciona comando
- Ejecutar comando
Cargar con figu racion es
(Man do => Un idad)
-----------Entrando
modo copia
------------
ENTRAR MODO CARGA
<11> MODO
............
(salida)
BUSCAR CONFIGURACION
<11> MODO
Hotel
(salida)
EJECUTAR COMANDO
<11> MODO
Hotel Plaza
(copiar)
SALIR MODO CARGA
+
- Activa cursor
- Selec. configuración
- Posiciona cursor
- Selecciona "cargar"
- Ejecutar comando
- Selecciona "salida"
- Ejecutar comando
<11> MODO
- Avant3 Hotel Plaza
(salida)
-----------Saliendo
modo copia
------------
21
Borrar con figu racion es
-----------Entrando
modo carga
------------
ENTRAR MODO
COPIA O CARGA
<22> MODO
- AVANT 5 C/ Sol, 34
(salida)
BUSCAR CONFIGURACION
A BORRAR
<22> MODO
- AVANT 5 C/ Sol, 34
(cargar)
EJECUTAR COMANDO
+
+
- Activa cursor
- Selec. configuración
- Posiciona cursor
- Selecciona "borrar"
- Ejecutar comando
<07> MODO
- AVANT 5 Domaio - #3
(salida)
<22> MODO
- AVANT 5 Domaio - #3
(borrar)
<22> MODO
- AVANT 5 C/ Sol, 34
(salida)
-----------Borrando
config
------------
-----------Saliendo
modo carga
------------
<22> MODO
............
(salida)
ESPAÑOL
Indice de Configuración
Instrucciones de uso
“Avant 5”
1.- Copiar configuraciones: Unidad => Mando
Este menú le permite copiar configuraciones de dispositivos (1) al Programador Universal, siempre que se disponga
del PCT 4.0 con versión de software v4.05 o posterior. La correspondencia de las teclas en este menú es la siguiente:
-
Permiten incrementar o decrementar el valor cada uno de los dígitos. Seleccionan valores en cada opción.
(pulsación corta) - Posiciona el cursor sobre los dígitos a modificar. Activa la opción para modificar.
(pulsación larga) - Mueve el cursor directamente al parámetro “Comando”.
(pulsación corta) - Nada.
(pulsación larga) - Ejecuta la acción indicada en el parámetro “Comando”.
Procedimiento
Pulse simultáneamente las teclas
y
para activar a esta opción. Se muestra unos momentos la pantalla de inicio y a continuación se accede al menú de copia.
-----------Entrando
modo copia
-----------Pulse la tecla
para activar el “Indice de Configuración”. Con las teclas
seleccione una de las 30 posiciones
que le permite el programador y que será donde se guarde la configuración de la unidad conectada. Con cada configuración aparece en una linea de texto (no modificable) que indica el dispositivo conectado una vez guardada la configuración. Pulsando una vez mas la tecla
pasamos a la opción “Modo” donde se indica si se copia o carga una configuración.
<1> MODO
- Avant3 Vigo sec. B1
(salida)
<2> MODO
............
(salida)
La siguiente pulsación de la tecla
nos lleva a la “Descripción de la configuración”. Linea de texto de 12 caracteres
editable por el usuario para identificar una configuración determinada. Cuando la posición está vacía, aparece una linea
de puntos y el texto lo debe introducir el usuario en el momento de copiar una configuración al mando. Mediante la tecla
desplazamos el cursor por las 12 posiciones de la cadena y con las teclas
se selecciona el caracter deseado.
<2> MODO
- Avant3 Hotel
(salida)
<2> MODO
- Avant3 Hotel Plaza
(salida)
La siguiente pulsación de la tecla
nos lleva a la opción “Comando”. Con las teclas
Copiar (copia la configuración de la unidad a la posición indicada por el índice de configuración).
A continuación copie la configuración seleccionada pulsando la tecla
más de tres segundos.
<2> MODO
- Avant3 Hotel Plaza
(salida)
seleccione la opción
<2> MODO
- Avant3 Hotel Plaza
(copiar)
Finalmente salga del menú de copia seleccionando la opción Salida y pulsando la tecla
más de tres segundos.
Nota: - El idioma en que se muestran los mensajes y menús será el mismo de la unidad conectada. Si ésta no soportase idiomas, se mostrarán por defecto en inglés.
(1) La unidad a clonar también deberá disponer de esta facilidad. Consulte el manual de instrucciones de la unidad para
confirmar esta característica.
22
Instrucciones de uso
“Avant 5”
2.- Cargar configuraciones: Mando => Unidad
Este menú le permite cargar configuraciones guardadas en el Programador Universal a un dispositivo conectado. La
correspondencia de las teclas en este menú es la siguiente:
-
Permiten incrementar o decrementar el valor cada uno de los dígitos. Seleccionan valores en cada opción.
(pulsación corta) - Posiciona el cursor sobre los dígitos a modificar. Activa la opción para modificar.
(pulsación larga) - Nada.
(pulsación corta) - Nada.
(pulsación larga) - Ejecuta la acción indicada en la opción “Comando”.
Pulse simultáneamente las teclas
y
para activar a esta opción. Se muestra unos momentos la pantalla de inicio y a continuación se accede al menú de carga de configuraciones.
-----------Entrando
modo carga
-----------Pulse la tecla
para activar el “Indice de Configuración”. Con las teclas
seleccione una de las 30 configuraciones distintas. Este índice sirve para desplazarse entre ellas y seleccionar la configuración que nos interese cargar.
Con cada configuración aparece en una linea de texto (no modificable) que indica a que dispositivo corresponde la configuración almacenada. Si intenta cargar una configuración incompatible con el dispositivo, mostrará un mensaje de error.
Pulsando una vez mas la tecla
pasamos a la opción “Modo” donde se indica si se copia o carga una configuración.
<1> MODO
- Avant5 v3.12 Madrid
(salida)
<22> MODO
- Avant5 C/ Sol 34
(salida)
La siguiente pulsación de la tecla
nos lleva a la opción “Comando”. Con las teclas
Cargar (carga la configuración seleccionada en la unidad conectada).
A continuación carge la configuración seleccionada pulsando la tecla
más de tres segundos.
<22> MODO
- Avant5 C/ Sol 34
(salida)
seleccione la opción
<22> MODO
- Avant5 C/ Sol 34
(cargar)
Finalmente salga del menú de copia seleccionando la opción Salida y pulsando la tecla
más de tres segundos.
<22> MODO
- Avant5 C/ Sol 34
(salida)
Al salir del menú de copia, se habrá cargado la configuración deseada en la unidad pero no se realiza el proceso de
ajuste de la misma.
Nota: - Durante el proceso de carga de configuración es donde resulta útil poder modificar el “Modo” de funcionamiento (carga
o copia ) para salvar en el mando la configuración que tenga la unidad antes de proceder
a la carga de la nueva configuración.
- El idioma en que se muestran los mensajes y menús será el mismo de la unidad conectada. Si ésta no soportase idiomas, se mostrarán por defecto en inglés.
23
ESPAÑOL
Procedimiento
Instrucciones de uso
“Avant 5”
3.- Borrado de configuraciones
Este menú le permite borrar configuraciones guardadas en el Programador Universal. La correspondencia de las
teclas en este menú es la siguiente:
-
Permiten seleccionar los valores en cada opción.
(pulsación corta) - Activa la opción para modificar.
(pulsación larga) - Nada.
(pulsación corta) - Nada.
(pulsación larga) - Ejecuta la acción indicada en la opción “Comando”.
Procedimiento
Pulse simultáneamente las teclas
y
para activar la opción de clonado. Se muestra unos momentos la pantalla
de inicio y a continuación se accede al menú de copia.
-----------Entrando
modo copia
------------
Pulse la tecla
para activar el “Indice de Configuración”. Con las teclas
seleccione la configuración a borrar
entre las disponibles. Este índice sirve para desplazarse entre ellas y seleccionar la configuración que nos interese
borrar. Con cada configuración aparece en una linea de texto (no modificable) que indica a que dispositivo corresponde
la configuración almacenada.
La “Descripción de la configuración” nos sirve para identificar una configuración determinada cuando hay varias
guardadas para el mismo dispositivo.
<1> MODO
- Avant3 Stgo DC - #2
(salida)
<7> MODO
- Avant5 Domaio - #3
(salida)
La siguiente pulsación de la tecla
nos lleva a la opción “Comando”. Con las teclas
Borrar (borra la configuración indicada por el índice de configuración).
Finalmente borre la configuración seleccionada pulsando la tecla
más de tres segundos.
<7> MODO
- Avant5 Domaio - #3
(salida)
<7> MODO
- Avant5 Domaio - #3
(borrar)
seleccione la opción
-----------Borrando
config
------------
Nota:
- El idioma en que se muestran los mensajes y menús será el mismo de la unidad conectada. Si ésta no soportase idiomas, se mostrarán por defecto en inglés.
24
Instrucciones de uso
“Avant 5”
4.- Mensajes de Error
-----------NO
DISPONIBLE
------------
La unidad a la que se intenta copiar/cargar una configuración no soporta el clonado de configuraciones.
-----------ERROR
AL COPIAR
------------
Hubo algún problema durante el proceso de copia. La configuración no se pudo copiar correctamente al mando.
-----------ERROR
AL CARGAR
------------
Hubo algún problema durante el proceso de carga. La configuración no se pudo cargar correctamente en la unidad.
-----------REFERENCIA
NO VALIDA
------------
La configuración que se está intentando cargar no se corresponde al dispositivo conectado al
mando. La operación de carga ha sido abortada.
-----------VERS FIRMW
INVALIDA
------------
La configuración que se está intentando cargar en la unidad no es compatible porque la versión
de firmware de la configuración guardada no se corresponde al dispositivo conectado al mando.
La operación de carga no se ha llevado a cabo.
-----------ERROR LECT
IDIOMA UD.
------------
No se puede recuperar el idioma de funcionamiento de la unidad. La operación de copia/carga
ha sido abortada.
-----------ERROR LECT
NOMBRE UD.
------------
No se puede recuperar el nombre de la unidad. La operación de copia no se ha completado
correctamente.
25
ESPAÑOL
Durante el proceso de clonado pueden darse alguno de los siguientes mensajes de error:
Instrucciones de uso
“Avant 5”
Utilización del pu lsador “Reset”
La unidad "Avant" puede ser programada previamente fuera de la instalación y sin señal de entrada, permitiendo el
posterior ajuste de niveles en la instalación y sin necesidad de utilizar el programador, mediante el pulsador “Reset”
situado a la izquierda del conector del programador.
El proceso a seguir es el siguiente:
Seleccionaremos mediante el programador los parámetros adecuados para la instalación (canales, nivel de salida,
pendiente de ecualización ...) y pulsaremos la tecla de ajuste
(pulsación larga). Al realizarse la programación sin señal
de entrada, el ajuste se detendrá al no detectar señal en UHF, pudiéndose entonces retirar el mando ya que aunque el
proceso de ajuste se haya interrumpido, los datos seleccionados han sido memorizados por la unidad.
Posteriormente, en la instalación, y tras conectar las entradas utilizadas y cargar con 75ohm la salida, únicamente
tendremos que accionar el pulsador “Reset” para que la unidad realice el proceso de ajuste. El ajuste de la unidad
“Avant” mediante el pulsador “Reset” se realiza de igual forma que con el programador, aunque en este caso el proceso
no se detendrá si la unidad detecta error en los niveles de entrada y el LED rojo de error se encenderá sólo cuando se
produce error de nivel en alguno de los monocanales.
En efecto, si la unidad ya ha sido programada con los parámetros deseados para la instalación (canales, nivel de
salida, pendiente de ecualización ...), al pulsar el rearme la unidad “Avant” realizará el ajuste automático de niveles de
forma análoga a como lo haría al hacer una pulsación larga en la tecla de ajuste
del programador, encendiendose el
LED verde indicando que están ajustándose los niveles de todos los canales de UHF (que la unidad tiene en memoria),
de los amplificadores de FM, VHF y F.I., manteniendo la configuración de entradas, la pendiente de ecualización y los
niveles de salida con los que había sido configurada.
Solu cion es a los problemas más frecu en tes.
Al pulsar la tecla de ajuste aparece el mensaje de error: La unidad no permite que dos monocanales se programen en el
mismo canal de RF de salida, si apareciese este mensaje la unidad no comienza el ajuste, debiendo pulsar la tecla
para
salir de este estado e indicándose en el display del mando el primer canal incorrecto para que sea modificado.
Los canales no se ajustan al nivel de salida programado: Comprobar que el monocanal programado en el canal de salida
más alto tiene señal y un nivel adecuado ya que éste se toma como referencia para el ajuste del nivel de salida seleccionado.
Los canales aplicados por BI/BIII son regulados incorrectamente: La entrada de BI/BIII está destinada para la amplificación de un canal terrestre radiado, si precisamos amplificar señales en esta banda procedentes de unidades interiores
deberemos utilizar la entrada de "Toda Banda". Si aplicamos un único canal por esta entrada su nivel quedaría ajustado
5dB por debajo del nivel de los canales de UHF, pero si con el mismo nivel aplicamos un conjunto de canales equilibrados
procedentes de unidades interiores, la unidad los tratará como si fuese un solo canal de mayor nivel, reduciendo el nivel
ajustado del conjunto respecto al que tendríamos con un canal.
Los canales aplicados por la entrada toda banda quedan desequilibrados respecto a los monocanales: La entrada "Toda
Banda" está preparada para amplificar señales procedentes de unidades interiores, el nivel recomendado por esta entrada
debe estar comprendido entre 70 y 74 dBµV (para canales de UHF) para que estos canales queden equilibrados con el resto
de los canales ajustados. Si el nivel aplicado estuviera por debajo del margen indicado estos canales quedarían con un
nivel menor que el resto, y si el nivel fuera superior pueden aparecer perturbaciones debido a la intermodulación de los
canales.
Nivel detectado bajo/alto en alguna entrada o monocanal: El proceso de ajuste comienza con la comprobación de los niveles de las señales introducidas por la entrada de FM, BI/BIII y finalmente con la verificación de los monocanales programados, la indicación de que el nivel en FM ó en BI/BIII es bajo cuando no aplicamos señal por estas entradas no afectará al
correcto ajuste del resto de los canales seleccionados.
Debemos recordar que las indicaciones del nivel en las entradas de FM, BI/BIII y monocanales aparecidas en el mando son
una orientación para el ajuste, siendo la unidad capaz de equilibrar canales en los que se ha indicado error de nivel siempre
que los niveles de entrada no presenten grandes variaciones respecto a los márgenes óptimos especificados.
26
Instrucciones de uso
“Avant 5”
Características técn icas
Banda
UHF1
(MHz)
Ganancia
(dB)
Configuración filtros
FM
BI/BIII/DAB
470 - 862
87 - 108
47 - 68/
174 - 230
Auto (máx. 51 ± 3)
Auto
(máx. 41 ± 2)
(dB)
47-430/470-862 MHz
47 - 430
470 - 862
Auto
Auto
(máx. 44 ± 2) (máx. 35 ± 2)
Auto
(máx. 39 ± 2)
FI SAT
950 - 2150
42 ± 2 - 45 ± 2
9
0
1
---
---
---
---
---
2
1
---
---
---
---
---
3
1
0 - 5 **
Regulación pendiente
Margen entrada óptimo
UHF3
7
6
Nº canales por filtro
UHF2
---
---
---
---
---
---
---
---
---
--0 - 12 **
0-9
---
---
---
---
(dBµV)
60 - 105
60 - 85
62 - 87
69 - 73
70 - 74
---
(dB)
0 - 20 *
0 - 25-OFF*
0 - 25-OFF*
---
---
0 - 24 - Off **
(dB)
Regulación ganancia
Reg. manual ganancia
± 9 (por filtro)
±9
±9
---
---
---
Nivel de salida ***
(dBµV)
117
111
111
111
117
123
Regulación nivel salida
(dBµV)
91 - 106
96 - 111
---
96 - 111
86 - 101
91 - 106
Figura de ruido
(dB)
9 tip.
10
10
Rechazo
(dB)
20 (±16MHz)
20 (±16MHz)
20 (±16MHz)
Alimentación entradas (1)
(automático) I. max.
(V=)
24
---
24
---
---
(mA)
60
---
60
---
---
Tensión RED
(V~)
Consumo
(W)
9
---
40 (a 862MHz)
13 / 17 (22KHz)
300
230 ± 15% 50/60 Hz
30
Indice protección
(1)
---
IP 20
Corriente total disponible
Sólo previos
Sólo LNB
Previos + LNB
*
150 mA
300 mA
300 mA
**
***
27
Regulación automática (Dependiendo del nivel de salida deseado
y de la señal de entrada).
Regulación programable
El nivel de salida depende del nº de canales
ESPAÑOL
Entradas
Instrucciones de uso
“Avant 5”
A plicación
TDT
Ref. 5023
QPSK-PAL
Ref. 5079
UHF3
UHF2
FM
UHF1
BI/BIII/DAB
Ref. 5436
SAT RF
Ref. 7310
FI1
70...75dBµV
(UHF)
234756
234756
234756
234756
23475
234756
234756
234756
234756
Ref. 5325
234710
FI2
230V~
50/60 Hz
234710
Ref. 5316
Ref. 4061
MATV + FI1
MATV + FI2
Fig. 1.b
Ref. 7234
Fig. 1.a
NOTA: Los niveles aplicados por la entrada toda-banda deben de estar entre 69 - 73 dBµV para canales de VHF y 70 74 dBµV para canales de UHF, para obtener dichos canales ajustados al mismo nivel que los monocanales
seleccionados.
28
“Avant 5”
IN D E X
. . . . . . . . . . . . . . . . . . . . . . . . . . . . . . . . . . . . . . . . . . . . . . Pag e
DESCRIPTION
. . . . . . . . . . . . . . . . . . . . . . . . . . . . . . . . . . . . . . . . . . . . . . .
31
USING THE UNIT. Universal Programming Unit PCT 4.0 . . . . . . . . . . . . . . . . . . . . . . . . . . . .
33
Using the programming unit
. . . . . . . . . . . . . . . . . . . . . . . . . . . . . . . . . . . . . . . . .
33
. . . . . . . . . . . . . . . . . . . . . . . . . . . . . . . . . . . . . . . . . . . . . .
34
Using the menus. Main menu . . . . . . . . . . . . . . . . . . . . . . . . . . . . . . . . . . . . . . . .
35
Input configuration . . . . . . . . . . . . . . . . . . . . . . . . . . . . . . . . . . . . . . . . . . .
35
Filter configuration . . . . . . . . . . . . . . . . . . . . . . . . . . . . . . . . . . . . . . . . . . .
36
Output level configuration
. . . . . . . . . . . . . . . . . . . . . . . . . . . . . . . . . . . . . .
38
IF configuration . . . . . . . . . . . . . . . . . . . . . . . . . . . . . . . . . . . . . . . . . . . . .
39
VHF configuration . . . . . . . . . . . . . . . . . . . . . . . . . . . . . . . . . . . . . . . . . . . .
40
FM configuration
41
Menu structure
. . . . . . . . . . . . . . . . . . . . . . . . . . . . . . . . . . . . . . . . . . . .
Using the menus. Extended menu
. . . . . . . . . . . . . . . . . . . . . . . . . . . . . . . . . . . . .
42
. . . . . . . . . . . . . . . . . . . . . . . . . . . . . . . . . . . . . . . . . . . . . . .
42
Language selection . . . . . . . . . . . . . . . . . . . . . . . . . . . . . . . . . . . . . . . . . . .
43
CDC address . . . . . . . . . . . . . . . . . . . . . . . . . . . . . . . . . . . . . . . . . . . . . . .
44
Default configuration . . . . . . . . . . . . . . . . . . . . . . . . . . . . . . . . . . . . . . . . . .
44
Unit locking PIN . . . . . . . . . . . . . . . . . . . . . . . . . . . . . . . . . . . . . . . . . . . . .
45
Saving and Adjustment process . . . . . . . . . . . . . . . . . . . . . . . . . . . . . . . . . . . . . . .
46
Configuration Cloning . . . . . . . . . . . . . . . . . . . . . . . . . . . . . . . . . . . . . . . . . . . . . .
47
USING “RESET” BUTTON . . . . . . . . . . . . . . . . . . . . . . . . . . . . . . . . . . . . . . . . . . . . . . .
52
TROUBLESHOOTING
. . . . . . . . . . . . . . . . . . . . . . . . . . . . . . . . . . . . . . . . . . . . . . .
52
TECHNICAL SPECIFICATIONS . . . . . . . . . . . . . . . . . . . . . . . . . . . . . . . . . . . . . . . . . . . . .
53
TYPICAL APPLICATION
. . . . . . . . . . . . . . . . . . . . . . . . . . . . . . . . . . . . . . . . . . . . . . .
54
GUARANTEE
. . . . . . . . . . . . . . . . . . . . . . . . . . . . . . . . . . . . . . . . . . . . . . .
55
Status
29
ENGLISH
User instructions
User instructions
“Avant 5”
Description
1
2
3
4
5
6
7
234710
(1)
234710
8
Programming unit
Ref. 7234
(1)
9
1.2.3.4.5.6.7.8.-
10 11
12 13
UHF1 + Vdc input
UHF2 + Vdc input
UHF3 + Vdc input
FM input
BI / BIII / DAB + Vdc input
47-430 / 470-862 MHz input
FI / SAT +13/17Vdc 0/22 KHz input
Switching on LED
9.10.11.12.13.-
230 V~ powering supply
Reset Button
Programming unit connector (1)
MATV output
MATV + FI output
Programmable digital / analogue headend amplifier for use in both single family buildings or in communal buildings,
characterised by: ease of installation, simple programming, high gain, external programmer, low consumption powering.
31
ENGLISH
Mod. PCT 4.0
User instructions
“Avant 5”
It disposes of 3 programmable UHF inputs split into 10 filters. The number of filters per input can be selected among
three possible configurations (9-0-1, 7-2-1 and 6-3-1), which will be carried out according to the channels that are received by each antenna. Input IHF3 is always associated to filter 10.
U1: 9
U2: 0
U3: 1
U1: 7
U2: 2
U3: 1
U1: 6
U2: 3
U3: 1
UHF1
UHF3
FILTER FILTER FILTER FILTER FILTER FILTER FILTER FILTER FILTER
1
2
3
4
5
6
7
8
UHF1
FILTER FILTER FILTER FILTER FILTER FILTER FILTER
1
2
3
4
5
6
7
2
3
4
5
6
FILTER FILTER
FILTER
9
8
10
UHF3
FILTER FILTER FILTER
7
10
UHF3
UHF2
FILTER FILTER FILTER FILTER FILTER FILTER
FILTER
UHF2
8
UHF1
1
9
9
FILTER
10
These inputs are pre-amplified, as it has an automatic powering system. Any of the filters can select any channel
from 21 to 69 with a bandwidth up to 5 channels.
UHF
FILTER FILTER FILTER FILTER FILTER FILTER
Cn ... Cn+5
The output levels of the filters are automatically balanced with a certain band compensation slope.
The BI/BIII/DAB input also disposes of an automatic powering system that is able to withstand short circuits.
The gain is regulated by an automatic attenuation system in both the FM input as well as in the BI/BIII/DAB input.
The amplifier disposes of a broadband input, intended for possible expansions in the system, such as the inclusion
of a satellite headend or TDT’s.
The amplification of the band between 950 to 2,150 MHz, of sloped band gain, is a response to the most recent installation needs, as is the incorporation of digital television in communal TV installations, and it reinforces its use in ICT
distributions.
The mixing of the MATV band and the IF band is carried out by a filtering system that guarantees the absence of
interferences between channels from both bands.
32
User instructions
“Avant 5”
Usin g th e u n it. Un iversal Programmin g Un it PCT 4.0
Using the programming unit
This system is programmed by the Universal Programmer PCT 4.0. The programming unit has a menu with various
options which the user can scroll through by pressing the
button and which allow the following functions:
- Configuration of the system's UHF inputs (number of filters per input).
- Switching off of the VHF and/or FM inputs.
- Select the channels for each filter (maximum 5 consecutive channels per filter).
- Set the UHF output level (it determines the VHF and FM levels).
- Set the UHF equalisation slope.
- Set the IF configuration.
The buttons and LEDs indicate the following:
LEDs
A
B
C
: Indicates “Main Menu” mode.
: Indicates “Extended Menu” mode.
: Indicates “Saving” mode.
Buttons
+ +
+ +
:
:
:
:
:
:
:
Menu or submenu options.
(short press) - To change the submenu options.
(long press) - To change from the main menu to the extended menu.
(short press) - To scroll through the main menus.
(long press) - To save and adjust (from any menu or submenu).
Increases the contrast of the screen.
Decreases the contrast of the screen.
Unit
firmware
version:
V:2.02b
PCT firmware
version
-----------V:4.05
The programming unit begins by accessing the "UHF CONFIG" menu so that by pressing the menu selection button
, we can scroll through the different options and with the
buttons we can select the desired parameters.
Once all of the system's options have been selected, press the adjustment button
for a long time (this switches
the Avant’s green adjustment LED on) and the unit automatically records and sets up all the parameters selected with
the programming unit.
NOTE: To carry out the level adjustment process, it is necessary to terminate the two outputs of the unit with a
75 ohms impedance (ref. 4061), without needing to load the unused inputs, see fig. 1.b (page 54).
The adjustment button
can be pressed (long press) at any time independently of the option of the menu the Avant
is.
33
ENGLISH
Once connected, the programmer receives the previously set parameters from the Avant unit (memorised channel in
each cluster, input configuration, output level . . .).
User instructions
“Avant 5”
Menu
structure
zcczxvcvzcv
When the unit is switched on, by pressing the
button for a short time, the user can scroll through the main menus:
MAIN Menu
UHF CONFIG
U1: 9 - OFF
U2: 0 - Auto
U3: 1 - OFF
1. Input configuration
2. Filter 1
3. Filter 2
FM CONFIG
4. Filter 3
FM: ON
Offset: +3dB
5. Filter 4
FILTER 1
-- -- --- -Offset: --
6. Filter 5
7. Filter 6
8. Filter 7
9. Filter 8
FILTER 2
-- -- --- -Offset: --
VHF CONFIG
VHF: OFF
Offset: --
10. Filter 9
11. Filter 10
12. Output level configuration
13. IF configuration
FILTER 10
-- -- --- -Offset: --
FI CONFIG
Att:
0dB
EQ:
0dB
LNB: 0V/--
14. VHF configuration
LEVEL OUT
15. FM configuration
OL: 111dBµV
UHF EQ: 0dB
There is also an extended menu option which can be accessed from any submenu of the main menu by pressing
the
button for more than three seconds. Once in the extended menu, the following secuence of options will appear
when pressing the
button:
EXTENDED Menu
F1F4ø
F7ø
F0ø
1. Status of the filters.
F2ø F3F5ø F6F8ø F9ø
VHFø FMø
2. Language selection
LANGUAGE
PASSWORD
3. CDC address
English
0 0 0 0
4. Default configuration
5. PIN (Password) to lock the unit
: Adjustment OK
Load
default
settings?
NO
: Level low
: Level high
CDC ADDRESS
001
ø : Empty filter
Note: If you wish to modify the language of the menus before starting to configure the device, you must enter the
“Language” menu. Proceed by pressing the
buton for three seconds to enter the Extended Menu, then press
the
button once and then by means of
or
select the language. Finally press the
button (long press) to
save the changes. For further information, see “Extended Menu => Language Selection” section.
34
User instructions
“Avant 5”
Using the menus - Main Menu
1.- INPUT CONFIGURATION menu
The first menu that appears is “UHF CONFIG” menu:
-
Scrolls through the options of the menu.
(short press) -Places the cursor on each modifiable parameter.
(long press) - Enters the extended menu.
(short press) - Changes to the next menu: Filters configuration.
(long press) - Saving and adjustment.
Procedure
First of all, press the
button to activate (blinks) the first option -Distribution of inputs-. Use
the desired configuration for the UHF1-UHF2-UHF3 inputs: 9-0-1, 7-2-1, 6-3-1.
UHF CONFIG
U1: 9 - OFF
U2: 0 - OFF
U3: 1 - OFF
UHF CONFIG
U1: 7 - OFF
U2: 2 - OFF
U3: 1 - OFF
UHF CONFIG
U1: 9 - OFF
U2: 0 - OFF
U3: 1 - OFF
buttons to select
UHF CONFIG
U1: 6 - OFF
U2: 3 - OFF
U3: 1 - OFF
Then press the
button to enter the following option of the menu -Inputs powering-. You will be able to select the
input powering mode for each input: Auto, OFF, ON.
ON: Input powering activated.
OFF: Input powering deactivated.
Auto: If there is an amplifier connected and the input signal level is not enough, the Avant will power the amplifier
automatically.
Press
Press
UHF CONFIG
U1: 9 - Auto
U2: 0 - OFF
U3: 1 - OFF
UHF CONFIG
U1: 9 - OFF
U2: 0 - OFF
U3: 1 - OFF
UHF CONFIG
U1: 9 - ON
U2: 0 - OFF
U3: 1 - OFF
to activate and modify the powering through the other two inputs.
to enter the next menu.
Note:
- In this menu, if the current configuration of the inputs is 9-0-1, the user will not be allowed to modify the default
value (OFF) for the input powering through U2.
35
ENGLISH
UHF CONFIG
U1: 9 - OFF
U2: 0 - OFF
U3: 1 - OFF
User instructions
“Avant 5”
2.- FILTER CONFIGURATION menu
The next menu is Filter configuration:
- Allow to program a channel in the selected position. During the manual adjustment (Offset) these buttons allow
to increase or decrease the level of the filter one dB per press.
- (short press) - Moves the cursor to the next position within the filter (5 in total) or to the manual adjustment
position (Offset).
- (long press) - Enters the extended menu.
- (short press) - Changes to the next filter (next main menu)
- (long press) - Saving and adjustment
Procedure
If there are no channels assigned to the filters, the menu will be shown empty.
To assign a channel to one filter, press
to activate the first channel. Then by means of
channel between C21 and C69. The selected channel can be either analogue “A” or digital “D”.
FILTER 1
-- -- --- -Offset: --
FILTER 1
40D -- --- -Offset: --
FILTER 1
21A -- --- -Offset: --
buttons select a
FILTER 1
40D 41A --- -Offset: --
You can include up to 5 channels per filter. In this case the channels must be consecutive.
Once all the filters have been configured, select the output level, ... and performing the automatic adjustment of the
Avant, the Offset option will be activated.
This option allows to increase or decrease the level of the selected filter one dB per press (once the automatic
adjusment has been made). The display will blink during the readjusment process (one dB per press). Once the readjustment has finished the reached valued will be shown, informing whether it was possible or not to increase/decrease the
output level. It will not be able to readjust if it goes back to the previous value.
FILTER 1
40D 41A --- -Offset: +0dB
FILTER 1
40D 41A --- -Offset: -2dB
Once the channels of the first filter have been programmed, press the
button to enter the next filter.
If you wish to program channels in this filter, proceed as we have just seen for the first filter. Repeat this step to
program all the filters in the Avant.
If you do not wish to program more channels in the filters you have left to program, press the
button repetitively
until you get to the next menu “Output Level Configuration”.
Notes:
- The display will show the message ERROR! if you intend to program something illegal (overlapping of filters or
bandwidth of any filter wider than 5 channels). You will not be allowed to leave this menu before solving this
error.
- The manual adjustment (Offset) will be only accessible if the unit has already been adjusted. After the automatic
adjustment the offset will be initialized to 0dB in the filters that are not empty.
36
User instructions
“Avant 5”
Examples
There are no programmed channels in filter 7 .
Manual adjustment not accessible (empty filter).
FILTER 10
40A 42D 44A
-- -Offset: --
Three channels programmed in filter 10.
The unit has not been adjusted, so the manual adjustment is not accessible.
FILTER 3
21A 22A 23A
25A -Offset: --
Four channels programmed in filter 3.
Unit Not adjusted.
FILTER 3
21A 22A 23A
24A 25D
Offset: +0dB
Five channels programmed in filter 3.
Unit adjusted, manual adjusted initialized at 0dB
FILTER 4
32A 35D --- -Offset: +1dB
Two channels programmed in filter 4 (one analogue and one digital).
Manual correction (after the automatic adjustment) of +1dB.
FILTER 7
21A -- --- -Offset: -2dB
Channel 21 programmed in filter 7.
Manual Correction (after the automatic adjustment) of -2dB.
ENGLISH
FILTER 7
-- -- --- -Offset: --
Note:
- The indication
in the top right corner of the display indicates that the unit has not been adjusted with the
current configuration (this could be also checked in the Status menu).
37
User instructions
“Avant 5”
3.- OUTPUT LEVEL CONFIGURATION menu
The next menu is Output Level Configuration:
- Allow to select the output level between: 96 dBµV, …, 111 dBµV. In Equalization Slope, select the value
between: 0 dB, …, 9 dB.
- (short press) - Place the cursor on the output level or on the Equalization Slope.
- (long press) - Enters the extended menu.
- (short press) - Changes to the IF Configuration menu
- (long press) - Saving and adjustment
Procedure
Press the
button to activate (blinks) the option -Output Level-. Use
buttons to select the desired value for
the output level between a minimum value of 96 dBµV and a maximum of 111 dBµV.
LEVEL OUT
LEVEL OUT
LEVEL OUT
OL:
96dBµV
UHF EQ: 0dB
OL:
96dBµV
UHF EQ: 0dB
OL: 111dBµV
UHF EQ: 0dB
Then press the
button to enter the following option of the menu -Equalization Slope-. You will be able to select a
slope of equalization in the UHF band between the values: 0dB (minimum) and 9dB (maximum).
LEVEL OUT
LEVEL OUT
OL: 102dBµV
UHF EQ: 0dB
OL: 102dBµV
UHF EQ: 6dB
Example:
LEVEL OUT
OL: 105dBµV
UHF EQ: 2dB
Output level of 105 dBµV and Equalization slope of 2 dB
38
User instructions
“Avant 5”
4.- IF CONFIGURATION menu
The next menu is IF Configuration:
-
Allow to select the editable values of the menu such as Attenuation, Equalization or LNB configuration.
(short press) - Places the cursor on attenuation, equalization or LNB configuration.
(long press) - Enters the extended menu.
(short press) - Changes to the VHF Configuration menu
(long press) - Saving and adjustment
Procedure
Press the
button to activate (blinks) the option -IF Attenuation-. Use
between the possible values -- (OFF), 0dB, ...., 24dB.
FI CONFIG
Att:
0dB
EQ:
0dB
LNB: 0V/--
buttons to select the desired value
FI CONFIG
9dB
Att:
EQ:
0dB
LNB: 0V/--
FI CONFIG
0dB
Att:
EQ:
0dB
LNB: 0V/--
Then press the
button to access to the following option of the menu -IF Equalization-. You will be able to select a
value of equalization in the IF band between the values: 0dB (minimum) and 12dB (maximum).
FI CONFIG
Att:
9dB
0dB
EQ:
LNB: 0V/--
FI CONFIG
Att:
9dB
10dB
EQ:
LNB: 0V/--
FI CONFIG
Att:
9dB
EQ:
10dB
LNB: 0V/--
FI CONFIG
Att:
9dB
EQ:
10dB
LNB: 13V/--
FI CONFIG
Att:
9dB
EQ:
10dB
LNB: 13V/OFF
Example:
FI CONFIG
Att:
7dB
EQ:
3dB
LNB: 13V/ON
IF Attenuation of 7 dB and equalization of 3 dB.
LNB configured at 13V with tone.
39
FI CONFIG
Att:
9dB
EQ:
10dB
LNB: 13V/ON
ENGLISH
Then press the
button to enter the following option of the menu -LNB Configuration-. You will be able to configure
the powering of the LNB: 13V (vertical polarization), 17V (horizontal polarization) or 0V (no powering). Finally press the
to access to the last option of the menu, where you will be allowed to indicate if the 22KHz tone is ON (high band) or
OFF (low band).
The possible options are: OV/-- (switch OFF), 13V/OFF, 13V/ON, 17V/OFF and 17V/ON.
User instructions
“Avant 5”
5.- VHF CONFIGURATION menu
The next menu is VHF Configuration:
- Allow to activate/deactivate the VHF input. In Manual Adjustment (Offset) allows to increase or decrease the
level of the filter one dB per press (once the filter has already been adjusted automatically).
- (short press) - Places the cursor on the position of the VHF filter or on the manual adjustment of the VHF filter
(Offset).
- (long press) - Enters the extended menu.
- (short press) - Changes to the FM Configuration menu
- (long press) - Saving and adjustment
Procedure
Press the
VHF input.
button to activate (blinks) the option -VHF-. Use
VHF CONFIG
VHF: OFF
Offset: --
buttons to activate (ON) or deactivate (OFF) the
VHF CONFIG
VHF CONFIG
VHF: ON
Offset: --
VHF: OFF
Offset: --
After performing an automatic adjustment of the unit, the Offset function is activated.
This option allows to increase or decrease the level of the selected filter one dB per press (once the automatic adjusment has been made). The display will blink during the readjusment process (one dB per press). Once the readjustment
has finished the reached valued will be shown, informing whether it was possible or not to increase/decrease the output
level. It will not be able to readjust if it goes back to the previous value.
VHF CONFIG
VHF CONFIG
VHF: OFF
Offset: +0dB
VHF: ON
Offset: +2dB
Note:
- The manual adjustment (Offset) will only be accessible if the unit has already been adjusted and the VHF input is
active (VHF: ON). After the automatic adjustment the offset will be initialized at 0dB.
Example:
VHF CONFIG
VHF: OFF
Offset: --
VHF input deactivated (manual adjustment not available).
40
User instructions
“Avant 5”
6.- FM CONFIGURATION menu
The next menu is FM Configuration:
- Allows to activate/deactivate the FM input. In Manual Adjustment allows to increase or decrease the level of
the filter one dB per press (once the filter has already been adjusted automatically).
- (short press) - Places the cursor on the position of the FM filter or on the manual adjustment of the FM filter
(Offset).
- (long press) - Enters the extended menu.
- (short press) - Changes to the Input Configuration menu
- (long press) - Saving and adjustment
Procedure
Press the
input.
button to activate (blinks) the option -FM-. Use
buttons to activate (ON) or deactivate (OFF) the FM
FM CONFIG
FM CONFIG
FM CONFIG
FM: OFF
Offset: --
FM: OFF
Offset: --
FM: ON
Offset: --
After performing an automatic adjustment of the unit, the Offset function is activated.
This option allows to increase or decrease the level of the selected filter one dB per press (once the automatic adjusment has been made). The display will blink during the readjusment process (one dB per press). Once the readjustment
has finished the reached valued will be shown, informing whether it was possible or not to increase/decrease the output
level. It will not be able to readjust if it goes back to the previous value.
FM CONFIG
FM CONFIG
FM: OFF
Offset: +0dB
FM: ON
Offset: +2dB
- The manual adjustment (Offset) will only be accessible if the unit has already been adjusted and the FM input is
active (VHF: ON). After the automatic adjustment the offset will be initialized at 0dB.
Example:
FM CONFIG
FM: ON
Offset: +3dB
FM input activated. Manual adjustment at +3dB.
41
ENGLISH
Note:
User instructions
“Avant 5”
Using the menus - Extended Menu
To enter the Extended Menu press the
for at least three seconds in any position of the Main Menu.
1.- STATUS menu
In this first menu it is shown the Status of the Avant:
-
Nothing.
(short press) - Nothing.
(long press) - Back to the Main Menu.
(short press) - Changes to the Language Selection menu
(long press) - Nothing.
This menu could have three possibilities:
A.- Unit not adjusted
STATUS INFO
Unit is
not adjusted
B.- Result of the adjustment of the programmed filters level
F1F4ø
F7ø
F0ø
F2 F3F5ø F6F8ø F9ø
VHFø FMø
Status of the filters at the moment
:Adjustment OK
: Level low
: Level high
ø : Empty filter
C.- Unit protected with password
STATUS INFO
The unit
has password
42
User instructions
“Avant 5”
2.- LANGUAGE SELECTION menu
The second menu is Language Selection:
-
Allow to select the language of the menus of the display.
(short press) - Places the cursor on the options to select.
(long press) - Enters the main menu.
(short press) - Changes to the CDC Address menu.
(long press) - Saving and adjustment.
Procedure
Press the
button to activate (blinks) the option -Language Selection-. Use
guage of the menus of the display.
IDIOMA
Español
buttons to select the desired lan-
LANGUAGE
English
Example:
LANGUAGE
Menus selected in English
ENGLISH
English
43
User instructions
“Avant 5”
3.- CDC Address menu
The next menu is CDC Address:
- Allow to increase or decrease each of the three digits of the address between 0 .. 9. The value of the address
must be between 001 and 254.
- (short press) - Places the cursor on the digits to be modified.
- (long press) - Enters the main menu.
- (short press) - Changes to Set to Default Configuration menu.
- (long press) - Saving and adjustment.
Procedure
Press the
button to activate the first digit that composes the address. Use
buttons to select a number
between 0 y 2. Press again the
to activate the second digit and repeat the previous process to select a number
between 0 and 9. Repeat for the third digit.
CDC ADDRESS
CDC ADDRESS
CDC ADDRESS
001
101
001
CDC ADDRESS
101
Example:
CDC ADDRESS
031
Address 31 in the CDC bus
4.- Default Configuration menu
The next menu is Default Configuration:
-
Modifies the parameter (YES/NO)
(short press) - Activates the cursor.
(long press) - Executes the selected option and returns to the main menu.
(short press) - Changes to the PIN menu ignoring the changes.
(long press) - Saving and adjustment (ignoring DEFAULT CONFIGURATION).
Procedure
Press the
button to activate the parameter. Use
to select YES/NO, and confirm the action with the
button. This will load the default configuration and returns to the main menu.
Load
default
settings?
NO
Load
default
settings?
NO
Load
default
settings?
YES
44
User instructions
“Avant 5”
5.- UNIT LOCKING PIN menu
The following menu is Unit locking PIN.
- Allows to increase or decrease each of the four digits of the password, the first between 0 ..7 and the rest
between 0 .. 9 (0000 .. 7999).
- (short press) - Places the cursor on the digits to be modified.
- (long press) - Enters the main menu and activates the locking.
- (short press) - Changes to Filter Status menu.
- (long press) - Saving and adjustment.
Procedure
The unit leaves the factory unlocked, to lock it you need to enter a four digit PIN using this menu.
Press the
button to activate the first digit that composes the PIN. Use
buttons to select a number between
0 y 7. Press again the
to activate the second digit and repeat the previous process to select a number between 0
and 9. Repeat untill you complete the code.
PASSWORD
0 0 0 0
PASSWORD
PASSWORD
0 0 0 0
6 0 0 0
PASSWORD
6 0 0 0
Once this code has been entered you must confirm it with a long press on the
button. From now on, you can see
all the menus but you cannot change the configuration of the unit and you cannot save / adjust it (not even with the external reset button).
While it is locked, all the menus of the programming unit show
indicating this state. To unlock the unit, you need to
enter the PIN again in this menu following the same procedure (enter code and then confirm with a long press of the
button) and the unit will be unlocked.
CONFIG FI
Aten:
7dB
EQ:
3dB
LNB: 13V/ON
IF configuration menu in a password locked unit
STATUS INFO
The unit
has password
(the status menu also informs of this locking)
45
ENGLISH
Example:
User instructions
“Avant 5”
Saving and Adjustment process. (Programming unit PCT 4.0)
Press
for more than three seconds from any of the menus/submenus and the saving and adjustment process will
begin. The display will indicate the following information:
-
Saving the configuration in EEPROM
Starting the adjustment
Configuration of the inputs
Previous scan (switch on of the powerings and automatic adjustment of the input attenuators)
UHF adjustment
Adjustment of each filter (with interaction of the user in the case of error)
VHF adjustment (in the case it is not cut-off)
FM adjustment (in the case it is not cut-off)
Output attenuator adjustment
Adjustment of the highest channel programmed to a specific output level
The errors regarding a high or low level are indicated by messages on the display.
The adjustment can be attempted again by pressing the
button quickly or ignored by pressing the
quickly.
Examples:
Programming
and saving
parameters
...
Adjusting
filter: 1
...
Filter: 1
Input signal
LOW LEVEL
Skipping
filter: 1
...
F1F4ø
F7ø
F0ø
F2 F3F5ø F6F8ø F9ø
VHFø FMø
Begining of the saving and adjusting secuence
Long press of the
button
Adjusting UHF filters.
Adjusting filter 1.
Adjusting UHF filters.
Low level input signal.
Adjusting UHF filters.
Ignoring adjustment of filter 1 by short pressing on the
Final result of the adjustment
46
button.
button
User instructions
“Avant 5”
Configuration Cloning
Description of the parameters referred to in the manual and shown on display.
Operating Mode
Configuration index
Configuration Description
<2> MODE
- Avant3 Hotel Plaza
(exit)
Device indicator
Command
Note: The Configuration cloning options will be available in units Ref. 5325 with a firmware of V2.02 or better. Likewise it
will be necessary to have a universal programmer PCT 4.0 Ref. 7234 with a 4.05 or better firmware version.
Quick Guide
L oad settin gs
(Programmer => Un it)
ENTER SAVE MODE
+
SELECT POSITION
- Cursor activation
- Select position
INPUT DESCRIPTION
- Cursor position
- Select character
RUN COMMAND
- Cursor position
- Select command
- Run command
EXIT SAVE MODE
- Select command
- Run command
-----------Save
Mode
------------
ENTER LOAD MODE
<11> MODE
............
(exit)
SEARCH SETTING
<11> MODE
Hotel
(exit)
RUN COMMAND
-
<11> MODE
Hotel Plaza
(save)
+
- Cursor activation
- Select configuration
- Cursor position
- Select "load"
- Run command
EXIT LOAD MODE
- Select "exit"
- Run command
<11> MODE
- Avant3 Hotel Plaza
(exit)
-----------Leaving
save mode
------------
47
Delete settin gs
-----------Load
Mode
------------
ENTER SAVE
OR LOAD MODE
<22> MODE
- AVANT 5 C/ Sol, 34
(exit)
FIND SETTINGS
TO DELETE
<22> MODE
- AVANT 5 C/ Sol, 34
(load)
RUN COMMAND
+
+
- Cursor activation
- Select configuration
- Cursor position
- Select "delete"
- Run command
<07> MODE
- AVANT 5 Domaio - #3
(exit)
<22> MODE
- AVANT 5 Domaio - #3
(delete)
<22> MODE
- AVANT 5 C/ Sol, 34
(exit)
-----------Deleting
config
------------
-----------Leaving
load mode
------------
<22> MODE
............
(exit)
ENGLISH
Copy settin gs
(Un it => Programmer)
User instructions
“Avant 5”
1.- Copy settings: Unit => Programmer
This menu will allow you to copy device settings (1) to a universal programmer, as long as you have the PCT 4.0 with
a v4.05 or newer software version. The keyboard correspondence in this menu is as follows:
-
To increase or decrease the value of each digit. Select values for each option.
(short press) - Put the cursor on the digits you wish to modify. Enable the modifying option.
(long press) - Move the cursor directly to “Command” parameter.
(short press) - Nothing.
(long press) - Run the action indicated by the “Command” parameter.
Procedure
Simultaneously press keys
the copy menu will appear.
and
to activate this option. The startup menu will show for a few seconds and then
-----------Save
Mode
-----------Press the
key to enable the “Settings index”. Using keys
select one of the 30 programmer positions available for the setting of the connected unit to be saved. In each setting a non modifiable line of text appears that indicates
the connected device once the setting has been saved. If you press
once again you enter the “Mode” option, where
setting copy or load should be indicated.
<1> MODE
- Avant3 Vigo sec. B1
(exit)
<2> MODE
............
(exit)
The next press of the
key will take us to “Settings Description”. It is a 12 character user-editable line of text, to
identify a certain setting. When the position appears to be empty it is replaced by a dotted line and user should fill in the
text to copy settings to control. Using the
key we move the cursor through the twelve positions in the chain and using
the
keys we select the desired character.
<2> MODE
- Avant3 Hotel
(exit)
<2> MODE
- Avant3 Hotel Plaza
(exit)
The next press of the
key takes us to the “Command” option. Using the
the unit setting to the position indicated by the settings index).
Next, copy the selected setting by pressing the
key for over three seconds.
<2> MODE
- Avant3 Hotel Plaza
(exit)
keys select the Save option (copies
<2> MODE
- Avant3 Hotel Plaza
(save)
Finally exit the copy menu by selecting the Exit option and pressing the
key for over three seconds.
Note: - The language in which the messages and menu are displayed will be the same as that of the connected
device. If said device does not accept languages, they will appear by default in English.
(1) The unit one wishes to clone must also have this availability. Consult the instructions manual to be sure it does.
48
User instructions
“Avant 5”
2.- Loading settings: Programmer => Unit
This menu allows you to load the settings saved in the Universal Programmer to a connected device. The keyboard
correspondence in this menu is as follows:
-
To increase or decrease the value of each digit. Select values for each option.
(short press) - Put the cursor on the digits you wish to modify. Enable the modifying option.
(long press) - Nothing.
(short press) - Nothing.
(long press) - Runs the action indicated in the “Command” option.
Procedure
Simultaneously press keys
and
the settings load menu will appear.
to enable this option. The startup menu will show for a few seconds and then
-----------Load
Mode
-----------Press
key to enable the “Settings Index”. Using
keys, select one of the 30 different settings. This index
allows us to browse through them and select the setting we’re interested in loading. With each setting a non modifiable
line of text appears indicating what device each loaded setting corresponds to. If you try to load a setting which is
incompatible with the device an error message will appear. By pressing the
key once again we get to the “Mode”
option where setting copy or load is indicated.
<22> MODE
- Avant5 C/ Sol 34
(exit)
The next time you press the
key, it will take you to the “Command” option. Using the
option (it loads the selected setting to the connected device).
Then load the selected setting by pressing the
key for over three seconds.
<22> MODE
- Avant5 C/ Sol 34
(exit)
keys, select the Load
<22> MODE
- Avant5 C/ Sol 34
(load)
Finally exit the copy menu by selecting the Exit option and pressing the
key for over three seconds.
<22> MODE
- Avant5 C/ Sol 34
(exit)
Once you exit the copy menu, the setting will have been saved in the device but the adjusting process will not have
been done.
Note: - During the settings loading process it is useful to be able to modify the operating “Mode” (load
or save )
to save the previous setting of the device before loading the new settings.
- The language in which the messages and menu are displayed will be the same as that of the connected
device. If the latter does not accept languages, they will appear by default in English.
49
ENGLISH
<1> MODE
- Avant5 v3.12 Madrid
(exit)
User instructions
“Avant 5”
3.- Deleting of settings
This menu allows you to delete settings that are saved in the Universal programmer. The keyboard correspondence
in this menu is as follows:
-
This enables the selecting of values for each option.
(short press) - Enables the modifying option.
(long press) - Nothing.
(short press) - Nothing.
(long press) - Runs the action indicated in “Command” option.
Procedure
Simultaneously press keys
and
and then the save menu will appear.
to enable the cloning option. The startup menu will show for a few seconds
-----------Save
Mode
------------
Press the
key to activate the “Settings Index”. Using the
keys, select the setting you wish to delete from
those displayed. This index allows you to browse through them and select the setting you wish to delete. With each
setting a non modifiable line of text appears indicating what device each loaded setting corresponds to.
The “Setting description” allows us to identify a certain setting when there are a number of different ones saved for
the same device.
<1> MODE
- Avant3 Stgo DC - #2
(exit)
<7> MODE
- Avant5 Domaio - #3
(exit)
The next press of the
key takes us to the “Command” option. Using the
keys select the Delete option (it
deletes the setting indicated by the setting index).
Finally delete the selected setting by pressing the
key for more than three seconds.
<7> MODE
- Avant5 Domaio - #3
(exit)
<7> MODE
- Avant5 Domaio - #3
(delete)
-----------Deleting
config
------------
Note:
- The language in which the messages and menu are displayed will be the same as that of the connected
device. If the latter does not accept languages, they will appear by default in English.
50
User instructions
“Avant 5”
4.- Error message
-----------NOT
AVAILABLE
------------
The unit you are trying to copy/load does not allow settings cloning.
-----------COPY
FAILED
------------
There was a problem during the copy process. The setting could not be copied successfully to
control.
-----------LOAD
FAILED
------------
There was some problem during the loading process. The setting could not be successfully
loaded to the device.
-----------REFERENCE
NOT VALID
------------
The setting you are trying to load does not correspond to the device connected to control.
The loading operation has been aborted.
-----------INVALID
FIRMW VERS
------------
The setting you are trying to load on the unit is not compatible because the firmware version of
the loaded setting does not correspond to the device connected to control.
The loading operation could not take place.
-----------LANGUAGE
READ ERROR
------------
The working language of the unit can not be recovered. The copy/load operation has been
aborted.
-----------UNIT NAME
READ ERROR
------------
The name of the unit can not be recovered. The copy operation has not been completed
successfully.
51
ENGLISH
During the cloning process some of the following error messages can appear:
User instructions
“Avant 5”
Usin g “Reset” bu tton
The "Avant" unit can be programmed before the installation is carried out and without an input signal, and the levels
can be adjusted later without the use of the programmer, using the “reset” button located to the left of the programmer’s connector.
To do so, take the following steps:
Select the adequate parameters for the installation using the programmer (channels, output level, equalisation
slope ...) and press the
adjustment button (pressed for longer). As the programming is carried out without the input
signal, the adjustment will stop when it does not detect a UHF signal. The remote control can then be put away, as
although the adjustment process has been interrupted, the data selected has been memorised by the unit.
Afterwards, in the installation, and after connecting the inputs that are being used and loading the output with 75
ohms, the user simply has to press the “Reset” button and the unit will carry out the adjustment process. The adjustment of the “Avant” unit via the “Reset” button is carried out in the same way as with the programmer, although in this
case, the process will not stop if the units detect an error in the input levels and the red error LED will only light up when
there is an error in the level of any of the single channels.
Therefore, if the unit has been programmed with the desired parameters for the installation (channels, output level,
equalisation slope ...), when the reset button is pressed, the “Avant” unit will carry out an automatic adjustment of the
levels in the same way as when the programmer’s
adjustment button is pressed for a longer period of time. The
green LED will light up indicating that the levels of all the UHF channels are being adjusted (that the unit has in its
memory) of the FM, VHF and IF amplifiers, while maintaing the input configurations, the equalisation slope and the output levels that it had already configured.
Trou blesh ootin g.
When I press the adjustment button, an error message appears: The unit does not allow two single-channels to be
programmed in the same RF output channel, if this message appears, the unit will not begin the adjustment, so press
the
button to exit. The first incorrect channel that can be modified will appear on the remote control’s display.
The channels are not adjusted to the programmed output level: Check that the programmed single-channel in the highest output channel has an adequate signal and level as this is taken as a reference for the adjustment of the selected
output level.
The channels selected by BI/BIII are not regulated correctly: The BI/BIII input is used for the amplification of a terrestrial
channel, if you need to amplify the signals in this band coming from satellite receivers you need to use the “Broadband”
input port. If you apply a sole channel in this input, its level will be adjusted to 5dB below the UHF channels level.
However, if with the same level, you apply a collection of equalised channels from satellite receivers, the unit will treat
them as though it is dealing with one channel with a greater level, reducing the adjusted level of the collection as
regards the level that we would have with one channel.
The channels in the broadband input are not equalised as regards the single-channels: The "broadband" input amplifies
signals coming from satellite receivers, the recommended level for this input is between 70 and 74 dBµV (for UHF channels) for these channels to be equalised with the rest of the adjusted channels. If the level applied is below the indicated
range these channels will have a lower level than the rest, and if the level is higher there will be disturbances due to the
intermodulation of the channels.
A high/low level detected in an input or a single-channel: The adjustment process begins with the verification of the signal levels introduced in the FM, BI/III input and finally with the verification of the programmed single-channels. The indication that the FM or BI/III level is low when we do not apply the signal in these inputs will not affect the rest of the
selected channels.
We must remember that the level indications in the FM, BI/III inputs and single-channels that have appeared on the
remote control are a reference for the adjustment process, as this is the unit capable of balancing the channels where a
level error has been found so long as the input levels do not present large variations as regards the maximum specified
range.
52
User instructions
“Avant 5”
Tech n ical specification s
Inputs
UHF1
Band
(MHz)
Gain
(dB)
Filters configuration
Nº channels per filter
Slope adjustment
Optimum input margin
Gain regulation
Manual reg. gain
(dB)
UHF2
UHF3
470 - 862
FM
BI/BIII/DAB
87 - 108
47 - 68/
174 - 230
47 - 430
Auto
Auto
Auto
Auto (Máx 51 ± 3)
(Máx. 41 ± 2)
47-430/470-862 MHz
470 - 862
Auto
(Máx. 44 ± 2) (Máx. 35 ± 2)
(Máx. 39 ± 2)
IF SAT
950 - 2150
42 ± 2 - 45 ± 2
9
0
1
---
---
---
---
---
7
2
1
---
---
---
---
---
6
3
1
---
---
---
---
---
0 - 5 **
---
---
---
---
---
0-9
---
---
---
---
0 - 12 **
(dBµV)
60 - 105
60 - 85
62 - 87
69 - 73
70 - 74
---
(dB)
0 - 20 *
0 - 25-OFF*
0 - 25-OFF*
---
---
0 - 24 - Off **
(dB)
± 9 (per filter)
±9
±9
---
---
---
Output level ***
(dBµV)
117
111
111
111
117
123
Output level regulation
(dBµV)
91 - 106
96 - 111
---
96 - 111
86 - 101
91 - 106
Noise figure
(dB)
9 typ.
10
10
---
9
Rejection
(dB)
20 (±16MHz)
20 (±16MHz)
20 (±16MHz)
---
40 (at 862MHz)
Input powering (1)
(automatic)
I max.
(V=)
24
---
24
---
---
(mA)
60
---
60
---
---
Mains
(V~)
Consumption
(W)
300
230 ± 15% 50/60 Hz
30
Protection index
IP 20
Total current available
Preamp. only
Only LNB
Preamp. + LNB
*
150 mA
300 mA
300 mA
**
***
Automatic adjustment (Depending on the wished level of
exit and the signal of entrance).
Programmable adjustment.
The output level depends of the nº channels.
ENGLISH
(1)
13 / 17 (22KHz)
53
User instructions
“Avant 5”
Typical application
TDT
Ref. 5023
QPSK-PAL
Ref. 5079
UHF3
UHF2
FM
UHF1
BI/BIII/DAB
Ref. 5436
SAT RF
Ref. 7310
IF1
70...75dBµV
(UHF)
234756
234756
234756
234756
23475
234756
234756
234756
234756
Ref. 5325
234710
IF2
230V~
50/60 Hz
234710
Ref. 5316
Ref. 4061
MATV + IF1
MATV + IF2
Fig. 1.b
Ref. 7234
Fig. 1.a
NOTE: All the levels applied by the broadband input should be between 69 - 73 dBµV for the VHF channels and
70 - 74 dBµV for the UHF channels, so that these channels are adjusted to the same level as the selected single channels.
54
“Avant 5”
Garan tia / Gu aren tee
Televés S.A. ofrece una garantía de dos años calculados a partir de la fecha de compra para los países de la UE. En
los países no miembros de la UE se aplica la garantía legal que está en vigor en el momento de la venta. Conserve la
factura de compra para determinar esta fecha.
Durante el período de garantía, Televés S.A. se hace cargo de los fallos producidos por defecto del material o de
fabricación. Televés S.A. cumple la garantía reparando o sustituyendo el equipo defectuoso.
No están incluidos en la garantía los daños provocados por uso indebido, desgaste, manipulación por terceros,
catástrofes o cualquier causa ajena al control de Televés S.A.
Televés S.A. offers a two year guarantee, beginning from the date of purchase for countries in the EU. For countries
that are not part of the EU, the legal guarantee that is in force at the time of purchase is applied. Keep the purchase
invoice to determine this date.
During the guarantee period, Televés S.A. complies with the guarantee by repairing or substituting the faulty equipment.
The harm produced by improper usage, wear and tear, manipulation by a third party, catastrophes or any other cause
beyond the control of Televés S.A. is not included in the guarantee.
55
Red Comercial Nacional
BURGOS C.P. 09188
C/Ca mpa ne ro, 3, S . A driá n de
J ua rros
Tfno.:
947 56 04 58
Móv il:
670 73 75 86
e milia nov a rga @a me na .c om
A CORUÑA C.P. 15011
Gre gorio He rná nde z 8.
Tfnos .: 981 27 47 31 /981 27 22 10
Fa x : 981 27 16 11
c oruna @te le v e s .c om
ALMERÍA C.P. 04008
Ca mpogrís 9.
Tfno.: 950 23 14 43
Fa x : 950 23 14 43
a lme ria @te le v e s .c om
MÁLAGA C.P. 29006
C/ La B ohe me 55
P ol. Ind. A la me da 2
ma la ga @te le v e s .c om
MURCIA C.P. 30010
P olígono Conv e r - C/ R io P lie go
22
Tfnos .: 968 26 31 44 /968 26 31 77
Fa x : 968 25 25 76
murc ia @te le v e s .c om
GIJÓN C.P. 33210
C/J a pón, 14
Tfnos .: 985 15 25 50 /985 15 29
67
Fa x :
985 14 63 89
gijon@te le v e s .c om
BADAJOZ C.P. 06010
C/J a c obo R odrígue z,
P e re ira , nº11-Ofic ina
Tfno.: 924 20 74 83
Móv il: 670 70 21 93
Fa x : 924 20 01 15
s a he rc o@te rra .e s
LAS PALMAS C.P. 35006
Gra l. Ma s de Ga minde 26
Tfnos .: 928 23 11 22 /928 23 12
42
Fa x : 928 23 13 66
la s pa lma s @te le v e s .c om
BARCELONA C.P. 08940
C/ S a nt Fe rrá n, 27
Corne llá - B a rc e lona
Tfnos .: 93 377 08 62 /93 474 29 50
Fa x :
93 474 50 06
ba rc e lona @te le v e s .c om
SEVILLA C.P. 41008
P ol. Ind. S tore - C/ A -6. Na v e 5
Tfnos .: 95 443 64 50 /95 443 58 00
Fa x : 95 443 96 93
s e v illa @te le v e s .c om
MADRID C.P. 28005
P a s e o de los P ontone s 11
Tfnos .: 91 474 52 21 /91 474 52
22
Fa x : 91 474 54 21
ma drid@te le v e s .c om
A CORUÑA
GIJÓN
LUGO
OURENSE
ZAMORA N
GUIPÚZCOA
ÁLAVA
ASTURIAS
BURGOS
NAVARRA
PAMPLONA
PALENCIA LA RIOJA
ZAMORA
SORIA
ZARAGOZA
SEGOVIA
SALAMANCA
GUADALAJARA
ÁVILA
OPORTO
LISBOA
CUENCA
CIUDAD REAL
VALENCIA
BARCELONA
TARRAGONA
ALICANTE
MURCIA
JAÉN
BALEARES
GRANADA
HUELVA
SEVILLA
ALMERÍA
MÁLAGA
CÁDIZ
CANARIAS
SUCURSALES
TENERIFE
DELEGACIONES
CEUTA
LAS PALMAS
ZARAGOZA C.P. 50002
C/ Mona s te rio de A la hón 1-3
Tfno.: 976 41 12 73
Fa x : 976 59 86 86
za ra goza @te le v e s .c om
TELEVES ELECTRONICA PORTUGUESA
MAIA - OPORTO
Via . Dr Francisco Sa Carneiro. Lote 17.
ZONA Ind. MAIA 1. Sector-X MAIA. C.P. 4470 BARCA
Tel/Fax.: 00 351 22 9478900
GSM: 00 351 968581614
[email protected]
LISBOA
C.P. 1000 Rua Augusto Gil 21-A.
Tel.: 351 21 7932537 Fax: 351 21 7932418
[email protected]
PALMA DE
MALLORCA
ALBACETE
BADAJOZ
CÓRDOBA
GIRONA
CASTELLÓN
TOLEDO
VIGO C.P. 36204
Es c ultor Gre gorio Fe rná nde z, 5
Tfnos .: 986 42 33 87 /986 42 40
44
Fa x : 986 42 37 94
v igo@te le v e s .c om
TERUEL
MADRID
CÁCERES
HUESCA
LLEIDA
LOGROÑO
VALLADOLID
VALENCIA C.P. 46022
P la za J ordi S a n J ordi s /n
Tfnos .: 96 337 12 01 /96 337 12
72
Fa x : 96 337 06 98
v a le nc ia @te le v e s .c om
Red Comercial Internacional
BILBAO
CANTABRIA
LEÓN
VIGO
PAMPLONA C.P. 31007
A v da . S a nc ho e l Fue rte 5
Tfno.: 948 27 35 10
Fa x : 948 17 41 49
ja zpe itia @c in.e s
LOGROÑO C.P. 26004
S a n P rude nc io 19. ba jo
Tfno.: 941 23 35 24
Fa x : 941 25 50 78
r.grija lba @c ga c .e s
BILBAO C.P. 48150
Ibe rre k a le a , módulo 16, pa be llón
15-B
S a ngroniz-S ondik a
Tfnos .: 94 471 12 02 /94 471 24 78
Fa x : 94 471 14 93
bilba o@te le v e s .c om
SANTIAGO
PALMA DE MALLORCA C.P.
07007
Fe rre r de P a lla re s 45. ba jo D.
Tfno.: 971 24 70 02
Fa x : 971 24 53 42
ma llorc a @te le v e s .c om
TENERIFE C.P. 38108
A v da . El P a s o, 25 Los Ma jue los - La La guna
Tfnos .: 922 31 13 14 /922 31 13
16
Fa x : 922 31 13 33
te ne rife @te le v e s .c om
MELILLA
FÁBRICAS
TELEVES FRANCE S.A.R.L.
1 Rue Louis de Broglie
Parc d'Activités de l'Esplanade
77400 St Thibault des Vignes FRANCE
Tél.: +33 (0)1 60 35 92 10
Fax: +33 (0)1 60 35 90 40
[email protected]
TELEVES ITALIA S.r.l.
Viale Liguria 24
20068 Peschiera Borromeo (MI) Italia
Tel.: (+39)-0251650604 (RA)
Fax: (+39)-0255307363
[email protected]
TELEVES MIDDLE EAST FZE
P.O. Box 17199
JEBEL ALI FREE ZONE DUBAI,
UNITED ARAB EMIRATES
Tel.: 9714 88 343 44 Fax: 9714 88 346 44
[email protected]
Rúa B. de Conxo, 17
15706 SANTIAGO DE COMPOSTELA
Tel. 981 52 22 00 Fax 981 52 22 62
[email protected] www.televes.com
Miembro de número del
Empresa
Registrada
ER 224/1/94
TELEVES UNITED KINGDOM LTD
Unit 11 Hill Street, Industrial State
CWMBRAN, GWENT NP44 7PG.
(United Kingdom)
Tel.: 44 01 633 87 58 21
Fax: 44 01 633 86 63 11
[email protected]