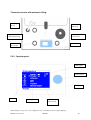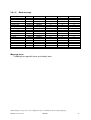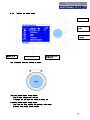
1
Operator's Manual Massage bath tub Type: Aroma Model: 1.5-23 (The drawings correspond to any configuration, they could differ from the original display!) Manual Aroma 1.5-23 20.04.09 1 Index 1. Scope of delivery 4 2. Equipment treatment area 4 3. Apparatus description 3.1 System components 3.2 Optional equipment 5 5 6 4. Danger indications 7 5. Operation 5.1 General operation steps 5.2 Operation elements 5.2.1 Fittings arrangement 5.2.2 Operator panel 5.3 Operation of the control 5.3.1 Start menu 5.3.2 Overview menu paths 5.4 Treatment path 5.4.1 Menu „bath preparation“ 5.4.2 Menu „programmes“ 5.4.3 Menu „massage course“ 5.4.4 Menu „end of bath“ 5.5 Hygiene path 5.5.1 Menu „Hygiene“ 5.6 Setup – path 5.6.1 Menu „setup – language“ 5.6.2 Menu „setup – display“ 5.6.3 Menu „setup – bath preparation“ 5.6.4 Menu „setup – massage course“ 5.6.5 Menu „setup – end of bath“ 5.6.6 Menu „setup – hygiene“ 5.7 Optional equipment 5.7.1 Manual underwater massage equipment 5.7.2 Rotational abdomen massage 5.7.3 Further options 5.8 Table of massage programmes 8 8 9 9 10 11 13 13 14 15 16 19 21 23 23 27 27 27 28 28 28 28 30 30 30 30 31 6. Cleaning and disinfection 36 7. Maintenance 7.1 Maintenance table 7.2 Air turbine (option) 7.3 Exchange - projector lamp 37 37 37 38 (The drawings correspond to any configuration, they could differ from the original display!) Manual Aroma 1.5-23 20.04.09 2 8. Installation 8.1 Setting up of the unit 8.2 Installation of the cladding 39 39 40 9. Controls 9.1 Manufacturer's recommendation 43 43 10. Technical data 10.1 Operation conditions 10.2 Storing and transport conditions 10.3 Ecological indications 43 44 44 44 11. Guarantee 11.1 Declaration of conformity 44 45 (The drawings correspond to any configuration, they could differ from the original display!) Manual Aroma 1.5-23 20.04.09 3 1. - - 2. Scope of delivery foot rest / tub shortening device, 5 times adjustable 1 nozzle pin for cleaning purposes 1 bottle of UBELIN tub cleanser Installation accessories: 2 connection nipples 2 high-pressure connection tubes (already preassambled) tub cladding: 2 calottes to clad the front sides 2 side plates to clad the long sides of the tub Equipment treatment area The tub is made for the following treatments and persons: Automatically controlled underwater massage Manual underwater massage Air bubble baths Chromotherapy baths Attention: The tub is not suited for children and adolescents as well as weak persons. - The operation, application and use of the equipment by children and adolescents have to be strictly avoided. - The tub may only be operated by qualified personnel after being instructed. (The drawings correspond to any configuration, they could differ from the original display!) Manual Aroma 1.5-23 20.04.09 4 3. Apparatus description Wellness and Thalasso bath Model: „Aroma“ (type 1.5-23) Low-noise experience bath tub with fully automatic, individual programmable health massage for Spa treatments and thalasso therapy. The health massage of the tub offers: Massage of 14 body zones produced of 148 nozzles in 5 massage sequences; Individual regulation of the massage pressure; Smooth overlapping of the single massage sequences to guarantee a harmonic health massage; Massage individually adjustable concerning massage pressure, massage zones, massage sequences and treatment process; System suitable for all current water-soluble and foam-free bath additives; Noise development of approx. 73 dB(A) during the massage. 3.1 System components Fully electronic control unit: Operation by means of an LCD display and integrated sensors for an easy handling; In total 10 programs directly recallable, 5 massage courses are individually programmable; Further possibility of an individual programming of treatment courses (selection of massage zones, sequences and duration). Hygiene systems: Rinsing system to eliminate used water from the complete tube system of the underwater massage and air bubble system; Automatic discharge of the complete pump circuit; Semi-automatic rinsing disinfection according to ÖNORM M 6222-1; Semi-automatic cleaning and disinfection courses. - Tub body and storage: Tub in ergonomic body shape with moulded seat, leg wedge and arm rests; Tub body of seamlessly deep-drawn Acrylic glass; Rear reinforced by special laminate; Base made from chrome-nickel steel, height adjustable in order to balance unevenness of the floor; Tub equipment: Massage system Electro-galvanically seperated plastic pump aggregate; Integrated dry operation protection; Special massage nozzles including channel system and sequential distribution unit; (The drawings correspond to any configuration, they could differ from the original display!) Manual Aroma 1.5-23 20.04.09 5 - Fully electronic control unit: LCD display to indicate the different treatment menus; Action and error indications; Sensors to input or select treatment and hygiene courses; Indication of treatment type, treatment time, residual treatment time, residual disinfection time, filling and bathing temperature, automatic rinsing active. - Standard fittings equipment: Tub filling battery DN 20; Tub inlet DN 25; Shower battery DN 15; Emerging shower; Automatically controlled discharge valve DN 50; - Specially designed handles: Hand grips to help entering and leaving the tub, installed on the tub rim - Pneumatic foot rest: Foot rest / tub-shortening device, 5 times adjustable. 3.2 Optional equipment - Automatic filling equipment via thermostat, two filling levels preselectable; - Hand shower operation can be turned on and off via control; - Air bubble bath; - Starlight effect; - Highlight effect; - Rotational abdomen massage equipment; - Manual underwater massage equipment; - Fittings for aggressive water - Hygiene automatic - Drying of the piping (The drawings correspond to any configuration, they could differ from the original display!) Manual Aroma 1.5-23 20.04.09 6 4. Danger indications - The tub is not suited for children and adolescents as well as weak persons. The operation, application and use of the equipment by children and adolescents have to be strictly avoided. - Mains operated, electrical devices, which can fall into the bath, mustn’t neither be used, nor stored next to the bath. There is the risk of a lethal electric shock. - Because of humid-slippery surfaces, there is the risk of sliding for the client in case of inattentiveness. Point out this risk to the client and assist handicaped people when they enter or leave the bath. - The addition of bath additives must be harmonised with the client's tolerance. Consider that the use of such additives can cause allergic reactions. The addition of oily bath additives can soil the pump circuit. Therefore, bath additives shoul generally dispose of hydrophilic characteristics. The use of flower baths must not effect together with whirl operation of the unit, as otherwise the pump circuit can be dammaged. - Too high selected bath temperatures over a long bath time can cause fever. The temperature of the bath should not exceed 37 °C. - The omission of the regular cleaning and disinfection actions can cause a contamination of the tub surfaces or of the pump circuit. - When using disinfectants take care that the room is well-aerated and wear protective clothes as well as protective glasses etc. Adher to the producer indications when using the appropriate disinfectants. - In case of defect of the unit, directly contact the technical customer service and stop the unit until it is completely repaired - The opening of the unit can only effect by technical trained workers. - The unit may not be operated without the main switch next to the tub installed by customer. (The drawings correspond to any configuration, they could differ from the original display!) Manual Aroma 1.5-23 20.04.09 7 5. Operation 5.1. General operation steps 5.1.1. Main switch - The unit can be turned on or off with the main switch installed by customer next to the unit. After switching-on, the unit is in standby operation. 5.1.2. Switch on and off – control - Switch on: With putting the control button, the control is switched on. The „start window“ is opened. - Standby: If there is no input at the control panel, the control switches to standyby automatically after 20 minutes, when there is no tub fontion acitvated. Or: Mark „off field“in the function bar of the start window with the cursor and confirm with enter. The control switches into standby mode. 5.1.3. Filling of the tub - - Position the start panel on the menu point „bath preparation“ and open the filling valves (warm/cold). The inlet thermometer indicates the current filling temperature. The filling level is achieved when the above liying nozzles are at least 5 cm under water. In case of units with the option „automatic filling via thermostate valve“, the filling effects via the operation table. There are two different filling levels to choose. Open menu „bath preparation“. Mark the correspondent filling level with the cursor and confirm with enter. The tub is filled up to the selected filling level. With the thermostat, the temperature can be adjusted. The inlet thermometer of the menu indicates the current filling temperature. - After having reached the filling level, further operation steps can be effected at the operation panel. (The drawings correspond to any configuration, they could differ from the original display!) Manual Aroma 1.5-23 20.04.09 8 5.1.4. Positioning of the client - The tub can be shortened by the supplied pneumatic foot rest so that smaller clients have a better halt in the tub. Compress the foot rest and put it into the provided opening on both interior tub sides. Assist the client when positioning into the tub. Humid-slippery surfaces risk injuries by overturns. 5.2. Operation elements 5.2.1. Fittings arrangement - The fittings equipment depends on the customer's configuration and is therefore always different. An illustration of all possible variants would be too complicated. The two general fitting equipments are shown here. Standard equipment: Option: manual underwater Emerging shower Hand shower warm-cold Filling warm-cold Control panel Massage pressure control valve (The drawings correspond to any configuration, they could differ from the original display!) Manual Aroma 1.5-23 20.04.09 9 Thermostat version with automatic filling: Emerging shower Thermostat with scale Option: manual underwatermassage Massage pressure control valve Hand shower mixed water Control panel 5.2.2. Operator panel LCD display Control button Glass pad toolbar Menu and function field Navigation bar (The drawings correspond to any configuration, they could differ from the original display!) Manual Aroma 1.5-23 20.04.09 10 Functions of the control button Turn the control button: cursor control on the display setting up of parameters, as time etc. Press the control button: confirmation of a push button marked by the cursor switch on of the control 5.3. Operation of the control 5.3.1.1. - Turn the control button slowly. The cursor moves on the display according to the turning direction. In case of adjustment of parameters, the parameters also modify according to the turning direction. 5.3.1.2. - Turning function Enter function A function field marked by the cursor can be activated by pressing the button. Is the control panel on standby, the control is switched on by pressing the button. 5.3.1.2. back = next off = = = Navigation functions back to the last menu window (home) directly back to „start menu“ following the programme switch off the unit (The drawings correspond to any configuration, they could differ from the original display!) Manual Aroma 1.5-23 20.04.09 11 5.3.1.3. Toolbar The toolbar offers different function symbols appropriate to the equipment of the unit.. Optional equipment: light on/off Optional equipment: alternating colour on/off Optional equipment: hand shower on/off Optional equipment: cervical massage on/off Serial equipment: leg massage on/off Optional equipment: air bubble bath on/off Triangular marking in frot of a symbol marks the current operation (On) (The drawings correspond to any configuration, they could differ from the original display!) Manual Aroma 1.5-23 20.04.09 12 5.3.2 Start menu - After having switched on the control the „start menu“ opens with the selection of menu paths, function symbols and navigation functions. Menu field: Treatment Hygiene „Setup“ Toolbar: function symbols (compare chapter 5.3.1.4) Navigation bar: off Treatment - By cursor marking and pressing the enter button, the respective marked fields are executed. Triangular markings signalise the operating condition (On). 5.3.3. Overview menu paths 5.3.3.1 - Setup path Menu „setup“ for individual presetting of the user: Language Display Bath preparation Massage course Bath – end Hygiene (The drawings correspond to any configuration, they could differ from the original display!) Manual Aroma 1.5-23 20.04.09 13 5.3.3.2. Treatment path - Menu „bath preparation“ for the basic preliminary works: Filling + temperature measurement Discharge - Menu „programmes“ for selection of preselected massage programmes or setup of individual programmes: Programmes New programme - Menu “massage course” to show the essential programme parameters which can be influenced interactively before and during the programme. - Menu „bath-end“ for the basic hygiene actions between the bathes, as: Rinsing disinfection Discharge Rinsing 5.3.3.3. - Hygiene path Menu „hygiene“ for daily hygiene actions: Discharge Rinsing programme Cleaning programme Optional: Automatic hygiene Drying (The drawings correspond to any configuration, they could differ from the original display!) Manual Aroma 1.5-23 20.04.09 14 5.4. Treatment path 5.4.1. Menu bath preparation - - Starting point „start menu“ Mark the menu path „treatment“ with the cursor and press enter. The menu „bath preparation“ is opened. In case of standard fittings (filling via valve warm/cold), please fill the unit at least 5 cm above the nozzle level. The filling temperature is indicated. Only afterwards, the massage programmes can be recalled. Bath preparation Discharge Programmes New programme back - In case of units with „automatic filling“, the filling level is selected by marking with the cursor and pressing enter. With the thermostat, the filling temperature can be adjusted, which is indicated on the display. The cursor is on „stop“if you want to interrupt the filling and empty the tub again. Bath preparation Filling 1 Filling 2 Discharge Programmes New programme back (The drawings correspond to any configuration, they could differ from the original display!) Manual Aroma 1.5-23 20.04.09 15 5.4.2 Menu „programmes“ - Select the menu „programmes“ in the menu „bath preparation“ with the cursor and press enter. The menu „programmes“ is opened. Classical massage Energy massage Jet-lag massage Anti-cellulitis massage Back massage Free Occupied Free Free Free Last programme back - The programme overview shows 5 factory-made programmes and 5 free programmable programmes. The point „last programme“ shows the massage programme which has been practised at last. - The data of the programmes 1-5 programmed by factory can be seen under the category „table of the massage programmes“, chapter 4.8. - The individual programmable programmes no. 6-10 can be freely figured over the path start menu / treatment preparations / new programme and filed under the memory spaces 6-10. The saved individual programme is thus available at any time over the menu „programme“. - „Last programme“ shows the massage programme which has been practised at last in the unit. It can be selected and recalled. - Select the desired massage programme with the cursor and press enter. The menu „massage course“ is opened. (The drawings correspond to any configuration, they could differ from the original display!) Manual Aroma 1.5-23 20.04.09 16 5.4.2.1. - Menu „new programme“ The menu „new programme“ combines the possibility to create individual programmes and to save it on 5 memory positions (6-10) or to directly start it. Select menu „new programme“ with the cursor and press enter. The menu „new programme“ is opened. New programme Complete treatment time Massage step 1 Complete body massage 45 min Zone groups Only Only back save start Indications: „Complete treatment time“ is calculated from the time of the input massage steps and the therefore needed times. That means, the control adds the times which are between the massage zones to your personal time entries. A massage step is registered when the complete body massage or massage-zone groups are temporally programmed. Selected function symbols of the toolbar are marked with the „triangular symbol“. Complete body massage: In case of complete body massage, all massage zones run ascendingly and repeat cyclically. Time selection: Select „complete body massage“ with the cursor and press enter. By „turning the control button“ time can be prolongated resp. minimised. The time is confirmed by pressing enter. Massage pressure selection: Select the pressure symbol and press enter. By “turning the control butten” the pressure can be modified. The chosen massage pressure is confirmed by pressing enter. Information: Toolbar functions can be combined with the complete massage. (The drawings correspond to any configuration, they could differ from the original display!) Manual Aroma 1.5-23 20.04.09 17 Zone groups: The unit disposes of 5 zone groups: Feet, legs, hips, arms, back Mark „zone groups“ with the cursor and press enter. Zone groups Complete treatment time thights back next Time selection: Select „zone groups“ with the cursor and press enter. By turning the control button, time can be prolonged or minimised. Confirm time by pressing enter. Massage pressure selection: Select the pressure symbol and press enter. By “turning the control butten” the pressure can be modified. The chosen massage pressure is confirmed by pressing enter. Info: Several zone groups can be programmed in succession. The zone groups proceed according to entry order. Functions of the toolbar can be combined with the massage of the zone groups. With „next“, massage steps are adapted and the menu „new programme“ is reopened, in which further programme steps can be programmed. Only „air bubble bath“ (option) Symbol: Select „only air bubble bath“ and press enter. By turning the control button, time can be prolonged or minimised. Confirm time by pressing enter. (The drawings correspond to any configuration, they could differ from the original display!) Manual Aroma 1.5-23 20.04.09 18 Only „light bath“ (option) Symbol: Select „ only light bath“ and press enter. By turning the control botton, time can be prolonged or minimised. Confirm time by pressing enter. Save or start programmes On the navigation bar, the following programmes are offered: - Back: = quit the programme section without saving - Save = saving of the programme; selection of the programme space and saving; follow the display instructions - Start = open the menu massage course to start the programme; the programme ist not saved. 5.4.3. Menu „massage course“ - By selecting a massage programme in the programme overview of the menu „programmes“, the menu „massage course“ is opened. Massage course Programme 07 Treatment time 25 min Back - End The menu „massage course“ serves as indication of the basic programme parameters of a selected programme. The parameters can be interactively modified before and during the programme. (The drawings correspond to any configuration, they could differ from the original display!) Manual Aroma 1.5-23 20.04.09 19 5.4.3.1 - The selected programme (in the picture programme 07) has a complete treatment time of 25 min. The following instructions (compare toolbar) are marked and operated during the programme (07): light – alternating coulours – legs The water temperature of the bath is 30 °C. 5.4.3.2. - Interactive intervention in the programme The parameters of the programme can be modified interactively. If required, mark offered function symbols on the toolbar with the cursor and press enter. If required, mark treatment time with the cursor and press enter. By turning the control button, time can be prolonged or minimised. Confirm with enter. 5.4.3.3. - Indication of the programme parameters Start massage programme Mark „start“ with the cursor and press enter. The preselected and possibly interactively modified massage programme is started.The interactive intervention is also possible during the massage. (The drawings correspond to any configuration, they could differ from the original display!) Manual Aroma 1.5-23 20.04.09 20 5.4.4. Menu „end of bath“ - After having finished a massage programme, the menu „end of bath“ opens automatically with the selection of the following menu points: - Rinsing disinfection Discharge Rinsing programme - The cursor goes automatically to the menu point „rinsing disinfection“. - End of bath Rinsing disinfection Discharge Rinsing programme back 5.4.4.1 Rinsing disinfection The rinsing disinfection is conceived for the necessary hygiene between the baths. It is conform to Ö-Norm M 6222-1. First, let the client off of the tub! Completely open the pressure control valve of the unit. Select „rinsing disinfection“ and press enter. The control now calls your attention to add disinfectant to the bath. Please use for this a measuring cup. When handling with dangerous material, respect manufacturer instructions! (The drawings correspond to any configuration, they could differ from the original display!) Manual Aroma 1.5-23 20.04.09 21 Disinfectant substance: Quantity per tub filling: 12,5 % sodium hypochlorite, liquid 30 ml Please add cleanser or disinfectant back Confirm the disinfectant addition with „Ok“. The rinsing disinfection is started. Programme course of the rinsing disinfection after activation: 1 min. mixing of the disinfection substance 3 min. residence time 3 min. discharge time 2 min. rinsing of the piping - Information The programme times of the rinsing disinfection can be modified within certain time limits via „setup“ on the initial page. The indicated times are the factory setting. 5.4.4.2. - Discharge If no rinsing disinfection should be executed, discharge of the tub can be activated manually. Select the function field „discharge“ with the cursor and press enter. The tub is emptied and afterwards rinsed with clear water. (The drawings correspond to any configuration, they could differ from the original display!) Manual Aroma 1.5-23 20.04.09 22 5.4.4.3. Rinsing programme If another rinsing is wished after discharge, select the function field „rinsing programme“ and press enter. The rinsing is executed for 2 minutes. During the rinsing course pay attention that the pressure control valve is completely opened. Information The rinsing time of the rinsing programme can be modified via „setup“ within the time limits 2 – 4 – 6 minutes. 5.5. Hygiene path 5.5.1. Menu „hygiene“ - Starting point: „start menu“ Select the menu path „hygiene“ and press enter. The menu „hygiene“ is opened and offers the following menu points for daily hygiene works: Discharge Rinsing programme Rinsing disinfection Cleaning programme Optional: Automatic hygiene Drying Discharge Rinsing programme Rinsing disinfection Cleaning programme back (The drawings correspond to any configuration, they could differ from the original display!) Manual Aroma 1.5-23 20.04.09 23 5.5.1.1. - Select the function field „discharge“ with the cursor and press enter. The tub is discharged and afterwards automatically rinsed with clear water. 5.5.1.2. - Discharge Rinsing programme Should an additional rinsing be desired, select the function field „rinsing programme“ and press enter. The rinsing is executed for 2 minutes. During rinsing pay attention that the pressure control valve is completely opened. Information The rinsing times of the rinsing programme can be modified via „setup“ within the time limits 2 – 4 – 6 minutes. 5.5.1.3. - Rinsing disinfection The rinsing disinfection is conceived for the necessary hygiene between the baths. Furthermore, it is helping to quickly make the tub hygienically servicable in case of shorter or middle-term stop phases. During rinsing pay attention that the pressure control valve is completely opened. Select „rinsing disinfection“ and press enter. The control now calls your attention to the filling of the tub. Is the unit equipped with an automatic filling, it is automatically filled. Afterwards, you are instructed to add disinfectant. For this, use a measuring cup. When handling dangerous material, respect the manufactuerer instructions! Disinfectant substance: Quantity par tub filling: 12,5 % sodium hypochlorite, liquid 30 ml (The drawings correspond to any configuration, they could differ from the original display!) Manual Aroma 1.5-23 20.04.09 24 Please add cleanser or disinfectand back Confirm the disinfectant addition with „Ok“. The rinsing disinfection is started. Programme course of the rinsing disinfection after start: 1 min. mixing of the disinfectant substance 3 min. residence time 3 min. discharge time 2 min. rinsing of the piping Information The programme times of the rinsing disinfection can be modified via „setup“ within certain time limits. 5.5.1.4. - Cleaning programme The cleaning programme is a hygiene programme which should be executed 1-2 times per day. The cleaning programme is similar to the rinsing disinfection concerning handling and programme course. However, here are considerably longer residence times for the cleaning with cleanser or disinfectant possible. During rinsing, pay attention that the pressure control valve is completely openend. Select „cleaning programme“ and press enter. The control now calls your attention to the filling of the tub. Is the unit equipped with an automatic filling, it is automatically filled. Afterwards, you are instructed to add disinfectant. For this, use a measuring cup. When handling dangerous material, respect the manufactuerer instructions! Mixing of cleanser and sodium hypochlorite (chlorine) can cause dangerous chemical reactions and is therefore forbidden. (The drawings correspond to any configuration, they could differ from the original display!) Manual Aroma 1.5-23 20.04.09 25 Recommendation Cleanser substance Alternative cleanser Disinfection substance Alternative disinfectants - Ubelin, liquid (Unbescheiden GmbH) About 50 ml per tub filling Sanitary cleanser, liquid, customary in trade, but equipped with foam free additives About 50 ml per tub filling 12,5 % sodium hypochlorite, liquid 10 ml on one tub filling fresh water The free chlorine content should be between 2-4 mg/l. DGHM listed of authorised surface disinfectants or cleanser The dosage depends on the approriate manufacturer instruction complied with the wished residence time Confirm the disinfection or cleanser addition with „Ok“. The cleaning programme is started. Programme course of the cleaning programme after start: 1 min. mixing of the substance 3 min. residence time 3 min. discharge time 2 min. rinsing of the piping Information The programme times can be modified within certain time limits via „setup“on the initial page. (The drawings correspond to any configuration, they could differ from the original display!) Manual Aroma 1.5-23 20.04.09 26 5.6. Setup path Mark the path „setup“ in the start menu with the cursor and press enter. The menu „setup“ opens with the correspondent programme selection. Language Display Bath preparation Massage course End of bath Hygiene Factory-made settings Back 5.6.1. Menu „setup language“ - Select the menu „language“ with the cursor and press enter. The language selection opens. - Selcect the requested language with the cursor and press enter. The requested language is adjusted and used on the complete user interface. 5.6.2. Menu „setup display“ - Select menu „display“ and press enter. The display functions are offered which can be individually adjusted. These are: Contrast 20 * (0 = low, 20 = high) Select click 1* - 10 (1 = quiet, 10 = loud) Select enter 1* - 10 (1 = quiet, 10 = loud) - Select requested function, press enter and adjust wished value by turning the control button and pressing enter again. (The drawings correspond to any configuration, they could differ from the original display!) Manual Aroma 1.5-23 20.04.09 27 5.6.3. Menu „setup bath preparation“ - Select menu „bath preparation“ and press enter. The functions which concern the bath are offered. These are: Level 1 (Selection of the filling level in case of optional equipment „automatic filling“) Level 2* (Selection of indication in °C or °F) - Select requested function with the cursor and press enter. 5.6.4. Menu „setup massage course“ - Select menu „massage course“ and press enter. The function with which all treatment times can generally be limited is offered. Treatment time 60* min (max. treatment time limit) - Select required function, confirm with enter and adjust the required value by turning the control button and pressing enter. 5.6.5. Menu „setup end of bath“ - Select menu „end of bath“ and press enter. The menu is opened and functions can be selected. Here, the performance of the unit in case of end of bath can be influenced. Following functions: Discharge after end of bath (on/off*) Rinsing after end of bath (on/off) Acoustic signal after end of bath (on/off*) Call signal after end of bath (on/off*) - Select required function and press enter. 5.6.6. Menu „setup hygiene“ - Select menu „hygiene“ and press enter. The menu selection of the hygiene area is offered: Rinsing programme Rinsing disinfection Cleaning programme Factory-made settings (The drawings correspond to any configuration, they could differ from the original display!) Manual Aroma 1.5-23 20.04.09 28 5.6.6.1. Setup rinsing programme - Select menu „setup rinsing programme“ and press enter. The function of rinsing time determination is offered. Rinsing time 2* min (2, 4, 6 min. can be adjusted) - Select the required function, confirm with enter and select the required value by turning the control button and pressing enter again. 5.6.6.2. Rinsing disinfection - Select menu „setup rinsing disinfection“ and press enter. The functions residence time and rinsing time are offered. Residence time 3* min. (3, 6 min. can be adjusted) Rinsing time 2* min. (2, 4 minutes can be adjusted) - Select required function, press enter and select the required value by turning the control button and pressing enter again. 5.6.6.3. Cleaning programme - Select menu „setup cleaning programme“ and press enter. Following functions are offered: Automatic filling (on/off when calling up the programme, option) Residence time 30* min (3-120 min. can be adjusted) Rinsing time 4* min (2, 4, 6, 8, 10 min. can be adjusted) - Select requested function, press enter and select the requested value by turning the control button and pressing enter again. 5.6.6.4. Factory-made settings - In case of too much interference, overview can be lost. Then, the parameters of the setup areas can be readjusted to the starting point. - Select function factory-made settings and press enter. Then, you see the control request, if the control should really adapt the factory-made settings. When you answer with „Yes“, the current setup values are replaced by the factory-made settings. The factory-made settings are marked by * in the chapters 5.6. (The drawings correspond to any configuration, they could differ from the original display!) Manual Aroma 1.5-23 20.04.09 29 5.7. Optional equipment The units can, differing from the standard, be equipped with different options according to clients' configuration. 5.7.1. Manual underwater massage equipment The unit with manual underwater massage equipment disposes additionally of a pressure control valve and a plug-in coupling compare chapter 5.2. Scope of delivery The scope of delivery consists of a massage hose with unscrewable nozzles of different dimensions. Handling Close pressure control valve and connect massage hose with the plug-in coupling. Start complete body massage via control and close the pressure control valve of the complete body massage. Put the massage nozzle firmly under water and slowly open the related pressure control valve. Pay attention that the massage hose is always disconnected again and the related pressure control valve is reclosed. An uncontrolled massage hose can cause blow injuries or injuries through the hard water jet becuase of the high pressure of the unit. 5.7.2. Rotational abdomen massage - With the rotational abdomen massage the client can be massaged at the abdomen coevally to the standard massage programme. Therefore, the unit disposes of a plug-in coupling in the leg channel. Handling Connect the form hose with the plug-in coupling of the tub and start any massage programme. The rotational nozzles run coevally to the applicated underwater massage. - Indicate to your client that the form hose of the abdomen massage is no backup or exit assistance. In case of non-intended charge, dammages can be caused. 5.7.3. Further options - Further options, as the „light unit“, air bubble unit etc. are offered directly in the toolbar of the menus. (The drawings correspond to any configuration, they could differ from the original display!) Manual Aroma 1.5-23 20.04.09 30 5.8. Table of massage programmes 5.8.1.1. Classical massage Massage step Time Pressure 1. complete body 5:00 min high 2. feet 0:40 min High 3. lower legs 0:40 min High 4. feet 0:40 min High 5. lower legs 0:40 min High 6. thighs/hips 0:40 min High 7. lower legs 0:40 min High 8. thighs/hips 0:40 min High 9. arms 0:40 min High 10. thighs/hips 0:40 min High 11. arms 0:40 min High 12. back 0:40 min High 13. arms 0:40 min High 14. back 0:40 min High 15. feet 0:40 min High 16. back 0:40 min High 17. complete body 5:00 min High Programme time 20:00 min X = switched on when function equipment existent Air bubble X X X X X X X X X X X X X X X X X Leg zones X X X X X X X X X X X X X X X X X Light X X X X X X X X X X X X X X X X X Massage focus Complete body, intensity: high (The drawings correspond to any configuration, they could differ from the original display!) Manual Aroma 1.5-23 20.04.09 31 5.8.1.2. Energy massage Massage step Time Pressure 1. complete body 5:00 min Medium 2. feet 0:40 min Medium 3. lower legs 0:20 min Medium 4. feet 1:00 min Medium 5. lower legs 0:40 min Medium 6. thighs/hips 0:20 min Medium 7. lower legs 1:00 min Medium 8. thighs/hips 0:40 min Medium 9. arms 0:20 min Medium 10. thighs/hips 1:00 min Medium 11. arms 0:40 min Medium 12. back 0:20 min Medium 13. arms 1:00 min Medium 14. back 0:40 min Medium 15. feet 0:20 min Medium 16. back 1:00 min Medium 17. complete body 5:00 min Medium Programme time 20:00 min X = switched on when function equipment existent Air bubble X X X X X X X X X X X X X X X X X Leg zones X X X X X X X X X X X X X X X X X Light X X X X X X X X X X X X X X X X X Massage focus Strongly tumbling massage by linear increase of the massage times of the recuring zones. (The drawings correspond to any configuration, they could differ from the original display!) Manual Aroma 1.5-23 20.04.09 32 5.8.1.3. Jet lag massage Massage step Time Pressure 1. complete body 4:00 min Medium 2. feet 1:00 min Medium 3. lower legs 0:40 min Medium 4. feet 1:00 min Medium 5. lower legs 1:00 min Medium 6. thighs/hips 0:40 min Medium 7. lower legs 1:00 min Medium 8. thighs/hips 0:40 min Medium 9. arms 0:40 min Medium 10. thighs/hips 0:40 min Medium 11. arms 0:40 min Medium 12. back 0:40 min Medium 13. arms 0:40 min Medium 14. back 1:00 min Medium 15. feet 0:40 min Medium 16. back 1:00 min Medium 17. complete body 4:00 min Medium Programme time 20:00 min X = switched on when function equipment existent Air bubble X X X X X X X X X X X X X X X X X Leg zones X X X X X X X X X X X X X X X X X Light X X X X X X X X X X X X X X X X X Massage focus Tumbling massage with focus on the feet, lower legs and back zones. (The drawings correspond to any configuration, they could differ from the original display!) Manual Aroma 1.5-23 20.04.09 33 5.8.1.4 Anti cellulitis massage Massage step Time Pressure 1. complete body 4:00 min high 2. feet 0:30 min High 3. lower legs 0:30 min High 4. feet 0:30 min High 5. lower legs 0:30 min High 6. thighs/hips 1:00 min High 7. lower legs 0:30 min High 8. thighs/hips 1:30 min High 9. arms 0:40 min High 10. thighs/hips 2:00 min High 11. arms 0:40 min High 12. back 0:30 min High 13. arms 0:40 min High 14. back 0:30 min High 15. feet 0:30 min High 16. back 0:30 min High 17. complete body 5:00 min High Programme time 20:00 min X = switched on when function equipment existent Air bubble X X X X X X X X X X X X X X X X X Leg zones X X X X X X X X X X X X X X X X X Light X X X X X X X X X X X X X X X X X Massage focus Tumbling massage with strong focus on thighs and hips. Gentle focus on caudal arms. (The drawings correspond to any configuration, they could differ from the original display!) Manual Aroma 1.5-23 20.04.09 34 5.8.1.5. Back massage Massage step Time Pressure 1. complete body 5:00 min Medium 2. feet 0:30 min Medium 3. lower legs 0:30 min Medium 4. feet 0:30 min Medium 5. lower legs 0:30 min Medium 6. thighs/hips 0:30 min Medium 7. lower legs 0:30 min Medium 8. thighs/hips 0:30 min Medium 9. arms 0:30 min Medium 10. thighs/hips 0:30 min Medium 11. arms 0:30 min Medium 12. back 1:00 min Medium 13. arms 0:30 min Medium 14. back 1:30 min Medium 15. feet 0:30 min Medium 16. back 1:30 min Medium 17. complete body 5:00 min Medium Programme time 20:00 min X = switched on when function equipment existent Air bubble X X X X X X X X X X X X X X X X X Leg zones X X X X X X X X X X X X X X X X X Light X X X X X X X X X X X X X X X X X Massage focus Tumbling massage with focus on the back zone. (The drawings correspond to any configuration, they could differ from the original display!) Manual Aroma 1.5-23 20.04.09 35 6 Cleaning and disinfection Information: Operation, type and size of the cleaning measures are described in chapter 5 “Operation”. The necessary hygiene measures are made programme supported in order to keep the operation easy. In order to secure the hygiene measures we recommend to keep records of the hygiene operations indicating the hygiene operations and the responsible person. The neglect of these cleaning and hygiene measures recommended in the manual and regularly executed can lead to bacterial contamination of the tub surface or of the pump circuit. Cleaning agents and disinfectants are dangerous substances. Please see when handling dangerous substances the indications of the manufacturer concerning the protection requirements. 6.1. Cleaning and disinfection intervals 6.2. Hygiene plan Art Interval surface cleaning after each customer surface disinfection after each customer “rinsing disinfection” see chapter 6.4 “rinsing disinfection” See chapter 6.5 “cleaning programme” see chapter 6.5 after “end bath” or after each customer after shutdowns Daily 1 cleaning interval Daily 1 disinfection interval Medium Quantity/Residence time mild liquid sanitary cleaning agent DGHM tested surface disinfectants Natriumhypochloride 12.5 % liquid Natriumhypochloride 12.5%, liquid Sanitary cleaning agent liquid as necessary as necessary or following instructions 30 ml / tub filling Residence time 3 minutes 30 ml / tub filling Residence time 3 minutes 50 ml / tub filling residence time 30 minutes Natriumhypochloride 12.5 % liquid 10 ml / tub filling Residence time 30 minutes Alternative: Allowed surface disinfectant or disinfectant cleaning agent Dosing and residence time according to manufacturer’s instructions (The drawings correspond to any configuration, they could differ from the original display!) Manual Aroma 1.5-23 20.04.09 36 7. Maintenance The unit is to a large extent maintenance-free and therefore, a special maintenance is not necessary. However, this does not exclude a service intervention in case of abrasion of abrasion typical parts. Correspondent works are explained in this chapter. These works should be executed by accordingly qualified specialists! 7.1. Maintenance table Equipment Air turbine Air turbine Halogen lamp/projector Projector 7.2. - Action Filter cleaning Filter exchange Exchange Free from dust Interval Biennial Biennial As necessary When exchanging the lamp Air turbine (option) The air turbine is, as all kineto-mechanical units, subject to abrasion. To assure a long life expectancy of the unit, the air filter should be regularly cleaned and replaced. 7.2.1.1 Proceeding First assure that the complete unit is currentless to exclude sources of danger of an electrical shock. - Detach front cladding at the top of the tub, compare chapter „install cladding“. - Detach the screw of the filter box and take out the filter insert. - Is the filter insert not too dirty, tap it and put it again in the correspondent gap. Can the filter insert no more be cleaned, it must be replaced. - Correctly put the filter box and fix it with the screw. (The drawings correspond to any configuration, they could differ from the original display!) Manual Aroma 1.5-23 20.04.09 37 7.3. Exchange of the projector lamp Type of lamp: 100 W / 12 V / KSL GX 5,3 7.3.1.1. Exchange of the lamp Concerning all service works, strictly pay attention that the sensitive optical fibres are not dammaged. In case of break of the fibres, no more light is transported resp. the tub can become leaky! In general, only the indicated type of lamp may be used. Stronger lamps or lamps of another type may not be used for safety reasons. 7.3.1.2. - Proceeding The light projector is installed under the tub back rest. First assure that the tub is completely currentless! - Detach the tub cladding, compare chapter „install cladding“. - The two cover screws of the light projector are unscrewed and the cover diplaced in direction of the optical fibres until the halogen lamp can be seen in the reflector. - Is the cover hindered in its deplacement because of an unfavourable lying of the optical fibres, the fibre bundle can be removed from the projector. The attachment screw of the fibre bundle is removed by the delivered socket wrench and the fibre bundle can completely be extracted. The box can now be completely opened. - Remove connector of the lamp and extract the lamp of the holder. - Take the new lamp with a clean tissu out of its packing and carefully insert it in its holder. - Please take care that you do not touch the reflector and the bordered lamp with your hands, as grease can make the reflector resp. the lamp blunt or blind during operation with great heat. - The connector is related with the connection pins of the lamp by pressing it. - Push the cover flatly and fix it with the screws. - If you detached the fibre bundle, put it as far as it will go into the projector guidance by the coupling and fix it with the socket screw. - Before you attach the cladding, first check the functionality of the lamp and the ventilator of the projector. On this occasion, remove the projector of dust deposits near the fan guard. - Should the lamp abrade extremely often, a defect fan can be the reason. Please contact our client service. (The drawings correspond to any configuration, they could differ from the original display!) Manual Aroma 1.5-23 20.04.09 38 8. Installation 8.3. Setting up of the unit In general, the delivered installation drawing is the basis to fulfill the structural conditions. Nevertheless, some points must be respected when setting up the unit. All installation works (sanitary and electric) may exclusively effect by qualified specialists. The room must correspond to the connection conditions indicated in the installation drawing. The transport of the unit may only effect at the frame. 1. The tub must stand horizontally on an even, firm subsoil. Small unevenesses of the floor can be evened by the adjustable tub feet. 2. If the delivered sanitary connection hoses must be elongated because of structural reasons, generally use metal cloth reinforced high pressure hoses. 3. The tub drain needs a DN 50 connection. The canalisation must not be smaller. Discharge times would be negatively influenced. 4. To assure a reasonable functionality of the unit, the constructional water flow pressure should be 3 - 3,5 bar. Filling times are influenced by the flow pressure. 5. For the electrical installation generally provide an all-pole, illuminated main switch near the unit. A voltage equalising cable is to be provided. Furthermore, the power line in the sub-distribution must be carried via a ground fault circuit interrupter with a tripping characteristic of 30 mA and a line safety switch. 6. The installation must be followed by a documented safety-related control according to DIN VDE 0701 T1. (The drawings correspond to any configuration, they could differ from the original display!) Manual Aroma 1.5-23 20.04.09 39 8.2. Installation of the cladding 8.2.1.1. Dismantling and installation of the side cladding Dismantling of the side cladding by loosing the socket screws (socket wrench 4mm) The position of the socket screws are shown in the picture 8 (arrow) Picture 8 Picture 9 (The drawings correspond to any configuration, they could differ from the original display!) Manual Aroma 1.5-23 20.04.09 40 8.2.1.2. - Attachment side parts The side cladding elements are dismantled by loosing the socket screws (socket wrench 4mm) from the frame (see picture 10) Picture 10 - After having loosen the cladding on both sides with 2 screws, they have to be lifted so that the cladding of the foot can be taken out (see picture 11) Picture 11 (The drawings correspond to any configuration, they could differ from the original display!) Manual Aroma 1.5-23 20.04.09 41 8.2.1.3. - Fixing of the calotte cladding Push the front cladding under the tub and pusht it unter the bulge of the tub to the top. When the foot cladding is correctly positioned, fix the front cladding with 4 socket screws (socket wrench 4 mm). See pictures 12-14. Picture 12 Picture 14 Picture 13 Picture 15 (The drawings correspond to any configuration, they could differ from the original display!) Manual Aroma 1.5-23 20.04.09 42 9. Controls - The unit described in this manual is subject to the regulations of the european low voltage directive 73/23/EWG and the out of it resulting national apparatus safety law. The unit is subject to a regular, safety-related control according to the national user accident prevention regulations. 9.1. Manufacturer recommendations To assure a safe handling of the unit, it should only put into operation when: - The responsible concerning the operation of the unit has been instructed how to operate the unit on the basis of the manual. - The unit has run a safety-related control according to DIN VDE 0701 part 1 after repairs or technical interventions concerning the electronic. - The unit is controlled safety-related all two years according to the accident prevention regulations according to DIN VDE 0701 part 1. The safety-related controls should consist of the following checks: - General sight check concerning sources of danger Check of the protective conductor R < 0,2 Ω Leakage current check IEA < 3,5 mA Isolation firmness check RISO > 1MΩ Apparatus connection as well as the functionality of the fuse by customer General control concerning sources of danger 10. Technical data Charakteristic Power supply Frequency Max. power input Protection class Protection category Sanitary connection Effluent connection (firm) Apparatus dimensions L x B x H Useable volume of the tub Total weight 230 50 2 I X4 20 50 2,35 x 0,9 x 0,7 250 400 Value V~, N, PE Hz kW IP DN (3/4“) DN m litres kg (The drawings correspond to any configuration, they could differ from the original display!) Manual Aroma 1.5-23 20.04.09 43 10.1. Operating conditions Characteristic Ambient temperature Relative humidity - not condensing Water supply (warm/cold): Temperature Static pression Sort of water Water qualitiy Network water separation via pipe network separator (drinking water protection) Electric mains supply via all-pole main switch network fuse fuse min. wire width 10 to 40 Up to 90 Value °C % Up to 70 °C 3-max. 4,5 bar fresh water drinking water Type EA2 according to DIN 1988/DVGW Near the unit 16 30 1,5 A, nimble mA mm² 10.2. Conditions of storage and transport Characteristic Ambient temperature - water core emptied Relative humidity Weather protected Transport position -20 – 60 Up to 90 Value °C % Evenly standing 10.3. Ecological indications The apparatus consists of recycable material and has to be given to a recycle unit after end of use. 11. Guarantee As manufacturer and expeller of our products, we can only take over guarantee for safety and functionality of the unit within the legal guarantee concerning installation, expansion, resetting and modification or repair of the unit, if: - These works have been executed by ourselves or by authorised persons. The sanitary and electrical installation of the unit and the concerned room correspond to the appropriate determinations. The unit is used of qualified specialists in compliance with the manual. (The drawings correspond to any configuration, they could differ from the original display!) Manual Aroma 1.5-23 20.04.09 44 12. CE – Declaration of conformity Manufacturer: Unbescheiden GmbH Ruhrstraße 6 76532 Baden-Baden Tel.: +49-(0)-7221-95340 Fax: +49-(0)-7221-67186 Email: [email protected] Sort of product: Product description: Product identification: Low voltage product Massage tub Model 1.5.17 „Aroma“ The mentioned product is conditioned with the appointments of the following directions: Low voltage direction 2006/95 EG Electromagenetic compatibility 89/336/EG Applied standards: EN 60335-1 EN 60335-2-60 EN 60601-1-2/A1+A2 EN 55014-1 EN 55014-2 EN 61000-3-2 EN 61000-3-3 EN 12764 ÖN M 6222-1 limit class B limit class HH The unit has the CE marking. Baden-Baden, August 2008 The declaration of conformity is valid without signature (The drawings correspond to any configuration, they could differ from the original display!) Manual Aroma 1.5-23 20.04.09 45 Manual del usuario Bañera de masaje Tipo: Aroma Índice 1. 2. 3. 4. 5. 6. 7. 8. 9. Elementos entregados …………………………………………………………………………………….3 Descripción del aparato ………………………………………………………………………………….4 2.1 Componentes del sistema……………………………………………………………………4 2.2 Equipamiento opcional………………………………………………………….…………….5 Indicaciones de peligro…………………………………………………………………………………….6 Funcionamiento ………………………………………………………………………………………………… 7 4.1 Pasos de funcionamiento general………………………………………………………………7 4.2 Elementos de funcionamiento …………………………………………………………………8 4.2.1 Colocación de los accesorios……………………………………………………8 4.2.2 Panel del usuario ………………………………………………………………………9 4.3 Funcionamiento del control ……………………………………………………………………10 4.3.1 Menú inicio ………………………………………………………………….……….11 4.3.2 Visualización de los recorridos del menú ………………………………12 4.4 Recorrido del tratamiento …………………………………………………………………13 4.4.1 Menú “preparación del baño” ……………………………………………… 13 4.4.2 Menú “programas” ……………………………………………………………….14 4.4.3 Menú “recorrido de masaje” …………………………………………………17 4.4.4 Menú “fin del baño”…………………………………………………………………18 4.5 Recorrido de higiene …………………………………………………………………………20 4.5.1 Menú “higiene" ………………………………………………………………………20 4.6 Configurar recorrido……………………………………………………………………………23 4.6.1 Menú “configurar idioma”…………………………………………………………23 4.6.2 Menú “configurar visualización”………………………………………………23 4.6.3 Menú “configurar preparación baño”……………………………………23 4.6.4 Menú “configuración recorrido de masaje” ……………………………24 4.6.5 Menú “configurar fin del baño” ………………………………………………24 4.6.6 Menú “configurar higiene” ……………………………………………………24 4.7 Equipamiento opcional ………………………………………………………………………26 4.7.1 Equipo de hidromasaje manual………………………………………………26 4.7.2 Masaje abdominal rotativo…………………………………………………….26 4.7.3 Otras opciones……………………………………………………………………….26 4.8 Tabla de programas de masaje ………………………………………………………27 Mantenimiento ………………………………………………………………………………………………28 5.1 Tabla de mantenimiento ………………………………………………………………….28 5.2 Turbina de aire (opción)……………………………………………………………………28 5.3 Cambio de la lámpara del proyector…………………………………………………29 Instalación………………………………………………………………………………………………………30 6.1 Instalación de la unidad……………………………………………………………………30 6.2 Funcionamiento del revestimiento……………………………………………………31 Controles ………………………………………………………………………………………………………35 7.1 Recomendaciones del fabricante………………………………………………………35 Datos técnicos ………………………………………………………………………………………………35 8.1 Condiciones de funcionamiento…………………………………………………………36 8.2 Condiciones de almacenamiento y transporte…………………………………36 8.3 Instrucciones ecológicas……………………………………………………………………36 Garantía………………………………………………………………………………………………………36 9.1 Declaración CE de conformidad…………………………………………………………37 1. - - Elementos entregados instrumento para el descanso podal / reducción de la bañera, ajustable en 5 posiciones clavija de boquilla para limpieza 1 botella de limpiador de bañeras UBELIN Accesorios de instalación: 2 latiguillos de conexión 2 tubos de conexión de alta presión (ya preinstalados) revestimiento de la bañera: 2 protecciones para revestir los frontales 2 placas laterales para revestir ambos lados de la bañera 2. Descripción del aparato Bañera de wellness y talasoterapia Modelo: “Aroma” (tipo 1.5.23) Bañera silenciosa con masaje terapéutico completo, totalmente automático y programable individualmente para tratamiento de spa y talasoterapia. El masaje de la bañera ofrece: Masaje en 14 zonas diferentes del cuerpo, generado por 148 boquillas en 5 secuencias de masaje; Regulación electrónica individual de la presión del masaje, gracias a sus programas de presión aplicable; Cambio paulatino de las diversas secuencias de masaje para garantizar un masaje terapéutico harmónico; Masajes adaptables individualmente respecto a la presión, las zonas y las secuencias de masaje, así como en el proceso de tratamiento; Sistema apto para todos los aditivos de baño actuales solubles en agua y sin espuma; El ruido durante el masaje es de aproximadamente de 73 dB (A). 2.1 Componentes del sistema Unidad controlada totalmente de forma electrónica: Manipulación mediante pantalla LCD y sensores integrados para un manejo fácil; Un total de 10 programas directamente elegibles, 5 recorridos de masaje individualmente programables; Posibilidad de programar de forma individual programas de tratamiento (selección de las zonas de masaje, las secuencias y la duración). Sistemas de higiene: Sistema de aclarado para eliminar el agua usada de todo el sistema de la bañera de hidromasaje y del sistema de burbujas de aire; Descarga automática de todo el circuito de bombeo; Desinfección con aclarado semiautomático según ÖNORM M 6222-1; Recorridos de limpieza semiautomática y desinfección. Estructura de la bañera y almacenamiento: Bañera con forma ergonómica, asiento modulable, moldura para las piernas y reposabrazos; Estructura de la bañera de cristal acrílico termomoldeado sin juntas; Parte posterior reforzada con un laminado especial; Base realizada en acero al cromo-níquel, de altura ajustable para equilibrar los desniveles del suelo; Equipamiento de la bañera: Sistema de masaje Conjunto de bomba de plástico separada electro-galvánicamente; Protección integrada para manipulación en seco; Boquillas de masaje especiales que incluyen el sistema de canales y una unidad de distribución secuencial; - Unidad controlada totalmente de forma electrónica; Pantalla LCD para indicar los diferentes menús de tratamiento; Indicaciones de funcionamiento y error; Sensores para introducir o seleccionar el tratamiento y los recorridos de higiene; Indicación del tipo de tratamiento, tiempo del tratamiento y tiempo restante de tratamiento, tiempo de desinfección residual, temperatura de llenado y del baño, y aclarado activo automático. - Equipamiento con accesorios estándar; Batería de llenado de la bañera DN 20; Entrada de la bañera DN 25; Batería de ducha DN 15; Ducha retráctil; Válvula de descarga controlada automáticamente DN 40; Agarraderas especialmente diseñadas; Asideros para ayudar a la entrada y salida de la bañera situados en el borde la de bañera - Reposapiés de goma; Instrumento para el descanso podal / reductor de la bañera, ajustable en 5 posiciones 2.2 Equipamiento opcional - Equipo de llenado automático a través del termostato, dos niveles de llenado preseleccionables; El funcionamiento de la ducha manual puede ser activado y detenido con el control; Baño de burbujas; Efecto luz de estrellas; Efecto reflejos; - Equipo de masaje abdominal rotativo; - Equipo de hidromasaje manual; - Otras opciones 3. - - - - - - Indicaciones de peligro No deben utilizarse ni almacenarse cerca de la bañera aquellos aparatos que requieran de suministro eléctrico y que puedan precipitarse dentro de la bañera. Podría producirse una descarga eléctrica mortal. Debido a que se trata de superficies húmedas y resbaladizas, existe el riesgo de que el cliente en caso de despiste pueda resbalar. Advierta del riesgo al cliente y ayude a las personas con alguna minusvalía a entrar o salir de la bañera. Para añadir aditivos de baño ha de tenerse en cuenta la tolerancia del cliente. Tenga en cuenta que el uso de dichos aditivos puede causar reacciones alérgicas. Añadir aceites de baño puede ensuciar el circuito de la bomba. Por lo tanto, los aditivos deberán tener características hidrófilas. La utilización de flores de baño no podrá realizarse simultáneamente la función de chorros y burbujas de la unidad, pues podría dañarse el circuito de bombeo. Las temperaturas altas durante un baño prolongado pueden provocar fiebre. La temperatura del baño no debería sobrepasar los 37 °C. La falta de limpieza periódica y de acciones de desinfección pueden provocar la contaminación de las superficies de la bañera y del circuito de bombeo. Si se utilizan desinfectantes, hay que tener precaución de que la habitación esté bien aireada y se realice con indumentaria protectora adecuada, gafas de protección, etc. Se han de seguir siempre las instrucciones del fabricante y utilizar los desinfectantes apropiados. En caso de defecto de la unidad, contacte con el servicio de atención técnica y no utilice la unidad hasta que esté totalmente reparada. La unidad sólo puede ser desmontada por personal técnico cualificado. La unidad no puede ponerse en funcionamiento si el interruptor principal no está situado cerca de la bañera. 4. Funcionamiento 4.1 Pasos de funcionamiento general 4.1.1 Interruptor principal La unidad puede encenderse y apagarse con el interruptor principal que el cliente instalará cerca de la bañera. Una vez conectada, la unidad permanecerá en estado de reposo. 4.1.2 Encendido y apagado - control - Encendido: apretando el botón de control, el control se encenderá. Se abrirá la ventana “ventana de inicio”. - Modo reposo: Si no se realiza ninguna entrada en el panel de control, el control cambiará automáticamente a modo reposo tras 20 minutos y si no hay activada ninguna función de la bañera. - O: Pulse “fuera de campo” en la barra de función de la ventana de inicio con el cursor y confirme pulsando ENTER. El control cambiará a modo reposo. 4.1.3 Llenado de la bañera Sitúe el panel de inicio en el punto del menú “preparación baño” y abra las válvulas de llenado (caliente/frío). El termómetro de entrada indica la temperatura actual de llenado. Se alcanzará el nivel de llenado cuando las boquillas estén como mínimo 5 cm bajo el nivel del agua. En unidades con la opción “llenado automático a través del termostato”, el llenado se realiza siguiendo la tabla de operaciones. Se puede elegir entre dos niveles de llenado diferentes. Abrir menú “preparación baño”. Indique con el cursor el nivel de llenado correspondiente y confírmelo pulsando ENTER. La bañera se llenará hasta el nivel seleccionado. La temperatura puede ajustarse con el termostato. El termómetro de entrada del menú indica la temperatura actual de llenado. - Después de alcanzar el nivel de llenado, podrán realizarse los siguientes pasos desde el panel de funcionamiento. 4.1.4 Colocación del cliente La bañera puede reducirse con el reposapiés de goma suministrado, de forma que los clientes de menor estatura se sientan más cómodos en la bañera. Presione el reposapiés y sitúelo en las aberturas situadas en el interior de los laterales de la bañera. Ayude al cliente a situarse dentro de la bañera. Las superficies húmedas y resbaladizas pueden provocar resbalones y por lo tanto lesiones. 4.2 Elementos de funcionamiento 4.2.1 Colocación de los accesorios - La colocación de los accesorios depende de la configuración que desee cada cliente y por lo tanto puede variar. Ofrecer una ilustración de todas las posibles variantes resultaría demasiado complicado. Aquí se muestran los dos equipos de accesorios generales. Equipamiento estándar: Llenado de agua caliente-fría Versión de termostato con llenado automático: 4.2.2 Panel del usuario Funciones del botón de control Girar el botón de control: el cursor de control aparecerá en la pantalla seleccionar los parámetros, como el tiempo, etc. Presionar el botón de control: confirmar presionando el botón indicado por el cursor encender el control 4.3 Funcionamiento del control 4.3.1.1 Activar la función Girar el botón de control lentamente. El cursor se desplazará en la pantalla según la dirección de giro. En el supuesto de que se tengan que seleccionar los parámetros, éstos se modificarán según la dirección de giro. 4.3.1.1 Introducir la función Un campo de función marcado por el cursor podrá activarse presionando el botón. Si el panel de control está en reposo, éste se encenderá presionando el botón de control. 4.3.1.1 Funciones de navegación atrás = retroceder hasta la última ventana de menú = siguiente = apagar = (inicio) retroceder directamente hasta el “menú inicio”. seguir el programa apagar la unidad 4.3.1.4 Barra de herramientas La barra de herramientas muestra diferentes símbolos de función adecuados para el equipo de la unidad. Equipamiento opcional: luces encendidas/apagadas Equipamiento opcional: alternancia de color - encendido/apagado Equipamiento opcional: ducha manual - encendida/apagada Equipamiento opcional: masaje cervical - encendido/apagado Equipamiento estándar: masaje de piernas - encendido/apagado Equipamiento opcional: baño de burbujas - encendido/apagado La señal triangular frente a un símbolo indica cuál es la función actual (Encendida) 4.3.2 - Menú inicio Una vez encendido el control se abrirá el "menú inicio" con la selección de los recorridos del menú, símbolos de función y funciones de navegación. Campo del menú: Tratamiento Higiene “Configuración” Barra de herramientas: símbolos de función (ver capítulo 4.3.1.4) Barra de navegación: apagar - Un campo de función indicado por el cursor podrá activarse presionando el botón ENTER. Las marcas triangulares indican la función activa en ese momento (en funcionamiento). 4.3.3 Visualización de los recorridos del menú 4.3.3.1 Configurar recorrido - Menú “configuración” para la preselección individual del usuario: Idioma Visualización Preparación baño Recorrido masaje Baño - fin Higiene 4.3.3.2 Recorrido del tratamiento Menú “Preparación baño” para las funciones preliminares básicas: Llenado + medición de la temperatura Descarga “Programas” del menú para elegir los programas de masaje preseleccionados o configurar programas individuales: Programas Nuevo programa Menú “Baño-fin” para las funciones de higiene básicas entre los baños: Aclarado desinfectante Descarga Aclarado 4.3.3.2 - Recorrido de higiene Menú “higiene” para las acciones de higiene diarias: Descarga Programa de aclarado Programa de limpieza Opcional: Higiene automática Secado 4.4 Recorrido del tratamiento 4.4.1 Menú preparación del baño - - - Abrir el "menú inicio" Indique el recorrido del menú de “tratamiento” con el cursor y presione ENTER. Se abrirá el menú “preparación baño”. En el caso de accesorios estándar (llenar mediante la válvula caliente/frío). Llenar la unidad como mínimo 5 cm por encima del nivel de las boquillas. Se mostrará la temperatura de llenado. Sólo después de esto podrán seleccionarse los programas de masaje. En las unidades con “llenado automático”, el nivel de llenado se selecciona mediante el cursor, presionando ENTER. Con el termostato puede seleccionarse la temperatura de llenado, que se indicará en la pantalla. El cursor se situará sobre el “stop” por si se quiere interrumpir el llenado y vaciar la bañera. - - - - 4.4.2 Menú “programas” Seleccione el menú de “programas” del menú “preparación baño” con el cursor y presione ENTER. El menú “programas” se abrirá. La visualización del programa muestra 5 programas preconfigurados de fábrica y 5 programas configurables. El punto “último programa” muestra el último programa de masaje que se ha llevado a cabo. La información de los programas 1 a 5 preconfigurados de fábrica puede verse en la categoría “tabla de programas de masajes” del capítulo 4.8. Los programas individuales configurables nº 6-10 pueden ser ajustados libremente en el recorrido menú de inicio / preparativos de tratamiento / nuevo programa y completados en los espacios de memoria del nº 6-10. Los programas individuales guardados estarán disponibles en cualquier momento en el menú “programa”. El punto “último programa” muestra el último programa de masaje que se ha llevado a cabo en la unidad. Puede ser seleccionado y activado. Seleccione el programa de masaje deseado con el cursor y presione ENTER. El menú “recorrido de masaje” se abrirá. 4.4.2.1 Menú "programa nuevo" El menú “programa nuevo” combina la posibilidad de crear programas individuales y guardarlos en las 5 posiciones de la memoria (6-10) o ponerlos directamente en funcionamiento. Seleccione el menú “programa nuevo” con el cursor y presione ENTER. El menú “programa nuevos” se abrirá. Instrucciones: El “tiempo de tratamiento completo” se calcula a partir de los pasos de masaje introducidos. El paso de masaje se registra cuando el masaje corporal completo o el de grupos de zona de masaje están temporalmente programados. Los símbolos de función seleccionados de la barra de herramientas se marcarán con un “símbolo triangular”. Masaje corporal completo: En el caso de masaje corporal completo, todas las zonas de masaje se pondrán en funcionamiento de forma ascendente y se repetirán cíclicamente. Seleccione “masaje corporal completo” con el cursor y presione ENTER. Girando el botón de control el tiempo puede prolongarse o reducirse. El tiempo se confirmará presionando ENTER. Las funciones de la barra de herramientas pueden combinarse con el masaje completo. Grupos de zona: La unidad dispone de 5 grupos de zona: Pies, pantorrillas, pantorrillas II, muslos, caderas, nalgas, antebrazos, brazo superior, tórax-lumbares y hombros. Seleccione los “grupos de zona” con el cursor y presione ENTER. Seleccione los “grupos de zona” con el cursor y presione ENTER. Girando el botón de control se puede prolongar o reducir el tiempo. Confirmar el tiempo presionando ENTER. Pueden programarse sucesivamente diversas zonas del cuerpo. Los grupos de zona se irán sucediendo según el orden de entrada. Las funciones de la barra de herramientas pueden combinarse con el masaje de los grupos de zona. Pulsando “siguiente” los pasos de masaje se adaptarán y el menú “nuevo programa” se abrirá y se podrán seleccionar los siguientes pasos del programa. Sólo “baño de burbujas” (opcional) Símbolo: Seleccionar “sólo baño de burbujas” y presionar ENTER. Accionando el botón de control se puede prolongar o reducir el tiempo. Confirmar el tiempo presionando ENTER. Sólo “baño de luz” (opcional) Símbolo: Seleccionar “sólo baño de luz” y presionar ENTER. Girando el botón de control se puede prolongar o reducir el tiempo. Confirmar el tiempo presionando ENTER. Guardar o iniciar programas En la barra de navegación se ofrecen los siguientes programas: Atrás: = salir de la sección de programa sin guardar Guardar = guardar el programa; seleccionar el espacio de programa y guardar; seguir las instrucciones mostradas Inicio = abrir el menú recorrido de masaje para iniciar el programa; el programa no está guardado. 4.4.3 - Menú “recorrido de masaje” Al seleccionar un programa de masaje de la visualización de programas del menú “programas”, se abrirá el menú "recorrido de masaje". - El menú “recorrido de masaje” sirve como muestra de los parámetros del programa básico de un programa seleccionado. Los parámetros pueden ser modificados interactivamente antes y durante el programa. 4.4.3.1 Indicación de los parámetros del programa El programa seleccionado (en el dibujo del programa 07) tiene un tiempo de tratamiento completo de 25 min. Las siguientes instrucciones (comparar barra de herramientas) se muestran y accionan durante el programa (07): luz – alternancia de color piernas La temperatura del baño es de 30 °C. 4.4.3.2 Actuación interactiva en el programa Los parámetros del programa pueden ser modificados interactivamente. Si fuese necesario, seleccione los símbolos de función indicados en la barra de herramientas con el cursor y presione ENTER. Si así lo desea, indique el tiempo de tratamiento con el cursor y presione ENTER. Girando el botón de control se puede prolongar o reducir el tiempo. 4.4.3.3 Iniciar el programa de masaje Seleccione “inicio” con el cursor y presione ENTER. El programa de masaje preseleccionado o modificado interactivamente se pondrá en marcha. La intervención interactiva también es posible durante el masaje. 4.4.4 - - Menú “fin del baño” Una vez finalizado el programa de masaje, aparecerá el menú “fin del baño” automáticamente con los siguientes puntos del menú indicados: Aclarado desinfectante Descarga Programa de aclarado El cursor se situará automáticamente en el punto de menú “aclarado desinfectante". 4.4.4.1 Aclarado desinfectante El aclarado desinfectante se considera necesario para la higiene entre baño y baño. Se establece en atención a la normativa ÖNORM M 6222-1. Compruebe que el cliente haya salido de la bañera. Abra completamente la válvula de control de presión de la unidad. Seleccione “aclarado desinfectante” y presione ENTER. En ese momento el control le pedirá que añada desinfectante a la bañera. Utilice un cazito para añadir la cantidad correcta. Cuando manipule material peligroso siga siempre las instrucciones del fabricante. Sustancia desinfectante: 12,5 % de hipoclorito sódico, líquido Cantidad por tubo de llenado: 30 ml Confirme que ha añadido desinfectante presionando “Ok”. Se iniciará el aclarado desinfectante. Recorrido del programa de aclarado desinfectante tras su activación: 1 minuto mezclando la sustancia desinfectante 3 minutos de tiempo de permanencia 3 minutos de tiempo de descarga 2 minutos para aclarar las tuberías Información Los tiempos del programa del aclarado desinfectante pueden modificarse con ciertos límites de tiempo mediante la “configuración” de la página inicial. 4.4.4.2 Descarga Si no va a realizar el aclarado desinfectante puede activar manualmente la descarga de la bañera. Seleccione la función “descarga” con el cursor y presione ENTER. La bañera se vaciará y luego se aclarará con agua limpia. 4.4.4.3 Programa de aclarado Si se desea realizar otro aclarado tras la descarga, seleccione la función “programa de aclarado” y presione ENTER. El aclarado se llevará a cabo durante 2 minutos. Durante el recorrido de aclarado tenga cuidado de que la válvula de control de presión esté completamente abierta. Información El tiempo de aclarado del programa de aclarado puede modificarse “configurando” los límites de tiempo a 2-4-6 minutos. 4.5 Recorrido de higiene 4.5.1 Menú “higiene" - Punto de inicio: “menú inicio” Seleccionar el recorrido del menú “higiene” y presionar ENTER. El menú “higiene” se abrirá y ofrecerá los siguientes puntos de menú para las acciones de higiene diaria: Descarga Programa de aclarado Aclarado desinfectante Programa de limpieza Opcional: Higiene automática Secado 4.5.1.1 Descarga Seleccione la función “descarga” con el cursor y presione ENTER. La bañera se vaciará y automáticamente se aclarará con agua limpia. 4.5.1.2 Programa de aclarado Si se desea realizar otro aclarado, seleccione la función “programa de aclarado” y presione ENTER. El aclarado se llevará a cabo durante 2 minutos. Durante el aclarado tenga cuidado de que la válvula de control de presión esté completamente abierta. Información El tiempo de aclarado del programa de aclarado puede modificarse “configurando” los límites de tiempo a 2-4-6 minutos. 4.5.1.3 Aclarado desinfectante El aclarado desinfectante se considera necesario para la higiene entre baño y baño. Además, ayuda a que la bañera esté higienizada de forma rápida para su uso tras periodos cortos o medios en los que no ha sido utilizada. Durante el aclarado tenga cuidado de que la válvula de control de presión esté completamente abierta. Seleccione “aclarado desinfectante” y presione ENTER. El control le pedirá que añada desinfectante a la bañera. Si la unidad tiene llenado automático, ésta se llenará automáticamente. Después, le pedirá que añada desinfectante. Para ello utilice un cazito para añadir la cantidad correcta. Cuando manipule material peligroso siga siempre las instrucciones del fabricante. Sustancia desinfectante: Cantidad por tubo de llenado: 12,5 % de hipoclorito sódico, líquido 30 ml Confirme que ha añadido desinfectante presionando “Ok”. Se iniciará el aclarado desinfectante. Recorrido del programa de aclarado desinfectante tras su activación: 1 minuto mezclando la sustancia desinfectante 3 minutos de tiempo de permanencia 3 minutos de tiempo de descarga 2 minutos para aclarar las tuberías Información Los tiempos de programa del aclarado desinfectante pueden modificarse, con ciertos límites de tiempo, mediante la “configuración”. 4.5.1.4 - - Programa de limpieza El programa de limpieza es un programa de higiene que debe ejecutarse una o dos veces al día. El programa de limpieza es similar al aclarado desinfectante en cuanto al manejo y recorrido del programa. En este caso los tiempos de permanencia son considerablemente superiores para que sea posible la limpieza con limpiadores o desinfectantes. Durante el aclarado tenga cuidado de que la válvula de control de presión esté completamente abierta. Seleccione “programa de limpieza” y presione ENTER. El control le pedirá que añada desinfectante a la bañera. Si la unidad tiene llenado automático, ésta se llenará automáticamente. Después, le pedirá que añada desinfectante. Para ello utilice un cazito para añadir la cantidad correcta. Cuando manipule material peligroso siga siempre las instrucciones del fabricante. Mezclar limpiador con hipoclorito sódico (cloro) está prohibido, pues puede provocar reacciones químicas. Recomendaciones Sustancia limpiadora Limpiadores alternativos Sustancia desinfectante Desinfectantes alternativos - Ubelin, líquido (Unbescheiden GmbH) Unos 50 ml por tubo de llenado Limpiador sanitario, líquido, habitual en el mercado pero equipado con aditivos libres de espuma. Unos 50 ml por tubo de llenado. 12,5% de hipoclorito sódico, líquido El contenido libre de cloro debe estar entre los 2-4 mg/l. DGHM listado en los desinfectantes y limpiadores de superficie autorizados. La dosificación depende de las instrucciones del fabricante y del tiempo de permanencia deseado. Confirme que ha añadido desinfectante o limpiador presionando “Ok”. Se iniciará el programa de limpieza. Recorrido del programa de limpieza tras su activación: 1 minuto mezclando la sustancia 3 minutos de tiempo de permanencia 3 minutos de tiempo de descarga 2 minutos para aclarar las tuberías Información Los tiempos de programa pueden modificarse con ciertos límites de tiempo mediante la “configuración” de la página inicial. 4.6 Configurar recorrido Seleccione la “configuración” del recorrido en el menú de inicio con el cursor y presione ENTER. El menú “configuración” se abrirá con su correspondiente selección de programa. 4.6.1 - Menú “configurar idioma” Seleccione el menú “idioma” con el cursor y presione ENTER. Se abrirá la sección de idiomas. Seleccione el idioma deseado con el cursor y presione ENTER. El idioma solicitado se configurará y se utilizará en toda la interfaz con el usuario. 4.6.2 Menú “configurar visualización” Seleccione menú “visualización” y presione ENTER. Las funciones de visualización que se ofrecen pueden configurarse de forma individual. Éstas son: Contraste 20 % (0 = bajo, 20 = alta) Seleccionar clic 1 * -10 (1 = silencioso, 10 = alto) Seleccionar ENTER 1 * -10 (1 = silencioso, 10 = alto) Seleccione la función requerida, presione ENTER y ajuste el valor deseado con el botón de control y presione de nuevo ENTER. 4.6.3 Menú “configurar preparación baño” Seleccione menú “preparación baño” y presione ENTER. Se muestran las funciones relativas al baño. Éstas son: Nivel 1 (Selección del nivel de llenado en caso de equipamiento opcional “llenado automático”) Nivel 2* (Selección de mostrar temperatura en °C o °F) Seleccione la función deseada con el cursor y presione ENTER. 4.6.4 Menú “configuración recorrido de masaje” - Seleccione menú “recorrido masaje” y presione ENTER. La función de todos los tiempos de tratamiento puede limitarse. Tiempo de tratamiento 60* mín. (Límite máx. de tiempo de tratamiento) Seleccione la función requerida, confirme presionando ENTER y ajuste el valor deseado con el botón de control y presione de nuevo ENTER. - 4.6.5 - - Menú “configurar fin del baño” Seleccione menú “fin del baño” y presione ENTER. El menú se abrirá para poder seleccionar las funciones. De esta forma puede modificarse el funcionamiento de la unidad al final del baño. Instrucciones a seguir: Descargar tras finalizar el baño (encendido/apagado*) Aclarar tras finalizar el baño (encendido/apagado) Señal acústica al finalizar el baño (encendido/apagado*) Señal de alarma al finalizar el baño (encendido/apagado*) Seleccione la función deseada y presione ENTER. 4.6.2 Menú “configurar higiene” - 4.6.6.1 - - 4.6.6.2 - - Seleccione menú “higiene” y presione ENTER. Aparecerá el menú de selección de higiene: Programa de aclarado Aclarado desinfectante Programa de limpieza Configuraciones de fábrica Configuración del programa de aclarado Seleccione menú “configuración del programa de aclarado” y presione ENTER. Aparecerá la función de aclarado por un tiempo determinado. El tiempo será de 2 minutos (podrá ajustarse a 2, 4 o 6 minutos) Seleccione la función requerida, confirme presionando ENTER y elija el valor deseado con el botón de control y presione de nuevo ENTER. Aclarado desinfectante Seleccione menú “configuración aclarado desinfectante” y presione ENTER. Se mostrarán las funciones de tiempo de permanencia y tiempo de aclarado. Tiempo de permanencia 3* minutos (podrá ajustarse a 3 y 6 minutos) Tiempo de aclarado 2 minutos (podrá ajustarse a 2 y 4 minutos) Seleccione la función requerida, presione ENTER y ajuste el valor deseado con el botón de control y presione de nuevo ENTER. 4.6.6.3 - - 4.6.6.4 - - Programa de limpieza Seleccione menú “configuración del programa de limpieza” y presione ENTER. Se mostrarán las siguientes instrucciones: Llenado automático (encendido/apagado al elegir el programa/opción) Tiempo de permanencia 30* minutos (podrá ajustarse de 3 a 120 minutos) Tiempo de aclarado 4* minutos (podrá ajustarse a 2, 4, 6, 8 o 10 minutos) Seleccione la función requerida, presione ENTER y ajuste el valor deseado con el botón de control y presione de nuevo ENTER. Configuraciones preestablecidas de fábrica En caso de que existan muchas interferencias, es posible perder la visión general. Por lo que los parámetros de las áreas de configuración pueden regresarse al punto de inicio. Seleccione la función configuraciones preestablecidas de fábrica y presione ENTER. Entonces el control le solicitará si realmente quiere volver a la configuración preestablecida de fábrica. Si su respuesta es “Sí” las configuraciones actuales se sustituirán por las preestablecidas de fábrica. Las configuraciones preestablecidas de fábrica se indican un con * en los capítulos 4.6. 4.7 Equipamiento opcional Las unidades pueden mejorarse con más equipamiento, respecto al modelo estándar, en atención a los deseos del cliente. 4.7.1 Equipo de hidromasaje manual La unidad con equipo de hidromasaje manual dispone de una válvula de control y un acoplamiento por encaje adicional. Véase capítulo 4.2. Elementos entregados Los elementos entregados consisten en una manguera de masaje con boquillas no desenroscables de diferente tamaño. Manipulación Cierre la válvula de control de presión y conecte la manguera de masaje con el acoplamiento por encaje. Comience con el masaje corporal completo a través del control y cierre la válvula de control de presión del masaje corporal completo. Coloque la boquilla de masaje firmemente bajo el agua y abra lentamente la válvula de control de presión. Tenga precaución de que la manguera de masaje esté de nuevo desconectada y que la válvula de control de presión vuelva a estar cerrada. Una manguera de masaje sin control puede causar golpes y lesiones debido a que la presión del chorro de agua de la unidad que ser muy fuerte. 4.7.2 - Masaje abdominal rotativo Con el masaje abdominal rotativo el cliente puede recibir un masaje en la zona abdominal además del programa de masaje estándar. Por lo tanto, la unidad dispone de un acoplamiento por encaje en el canal de la pierna. Manipulación - 4.7.3 Conecte la manguera con el acoplamiento por encaje de la bañera e inicie el programa de masaje. Las boquillas rotativas se activarán para aplicar el hidromasaje. Indique a su cliente que la manguera del masaje abdominal no es para apoyarse ni para ayudarle a salir de la bañera. En caso de carga no intencionada, es posible que se produzcan daños. Otras opciones Las otras opciones, como la “unidad de luz", burbujas, etc. se ofrecen directamente en los menús de la barra de herramientas. 4.8 Tabla de programas de masaje Programas de masaje corporal completo Enfoque principal Intensidad Duración Temperatura Masaje intensivo Corporal completo Muy alta 20 min. 35-38<ºC Masaje clásico Corporal completo Alto 20 min. 35-38<ºC Masaje relajación Corporal completo Medio 20 min. 35-38<ºC Masaje energético suave Corporal completo Bajo-medio 20 min. 33-35<ºC Masaje deportivo / mantenimiento Corporal completo Alto 20 min. 35-38<ºC Masaje jet-lag Corporal completo Bajo-medio 20 min. 35-38<ºC Baño de burbujas Corporal completo Bajo 20 min. 35-38<ºC Programas de masajes parciales Enfoque principal Intensidad Duración Temperatura Masaje de piernas Pies, pantorrillas y muslos Alto 20 min. 35-38<ºC Masaje anticelulítico Pantorrillas, caderas y nalgas Alto 20 min. 35-38<ºC Masaje de brazos / hombros Antebrazo, brazo superior, hombros y cuello Alto 20 min. 35-38<ºC Masaje de espalda Espina lumbar, tórax, hombros y cuello Alto 20 min. 35-38<ºC 5. Mantenimiento - No es necesario realizar un amplio mantenimiento de la unidad, por lo que no será necesario ningún mantenimiento especial. Aunque esto no excluye que tenga que intervenir el servicio técnico en caso de que se estropeen por el calor las partes habituales. En este capítulo se explican los trabajos correspondientes. Estas tareas deberán ser llevadas a cabo por especialistas cualificados. 5.1 Tabla de mantenimiento Equipamiento Turbina de aire Turbina de aire Lámpara/proyector halógenos Proyector 5.2 Acción Limpieza del filtro Cambio de filtro Cambio Intervalo de tiempo Bienal Bienal Cuando sea necesario Limpiar de polvo Cuando se cambie la lámpara Turbina de aire (opción) - La turbina de aire, al igual que todas las unidades cinético-mecánicas, puede quemarse. Para garantizar una larga vida a la unidad, los filtros de aire han de ser limpiados y cambiados con regularidad. 5.2.1.1 Procedimiento En primer lugar, asegúrese de que toda la unidad está desconectada de la corriente, para eliminar posibles riesgos de descarga eléctrica. - - Extraer el revestimiento superior de la bañera. Véase el apartado “instalar revestimiento”. Extraer el tornillo de la caja de filtrado y extraer la inserción del filtro. Si el filtro no está muy sucio, presiónelo y colóquelo de nuevo en su espacio correspondiente. Si ya no es posible limpiar el filtro, éste debe sustituirse. Sitúe correctamente la caja del filtro y fíjela con el tornillo. 5.3 Cambio de la lámpara del proyector Tipo de lámpara: 5.3.1.1 100 W /12 V / KSL GX 5,3 Cambio de la lámpara Al realizar el cambio, preste mucha atención para que no se dañen las sensibles fibras ópticas. Si las fibras se rompiesen, no se produciría más luz en la bañera y podrían producirse filtraciones. Sólo puede emplearse el tipo de lámpara recomendada. Por razones de seguridad no es posible utilizar lámparas con más potencia o de otro tipo. 5.3.1.2 - - - - - Procedimiento El proyector de luz está instalado debajo del respaldo de la bañera. En primer lugar, asegúrese de que la bañera no está conectada a la corriente eléctrica. Extraiga el revestimiento de la bañera. Véase el capítulo “instalar el revestimiento”. Destornillar los dos tornillos de la cubierta del proyector y desplazarla en dirección de las fibras ópticas, hasta que pueda verse la lámpara halógena. En caso de que la cubierta esté desplazada debido a una mala colocación de las fibras ópticas, el haz de fibras puede extraerse del proyector. El tornillo de fijación del haz de fibras se eliminará con la llave de tubo proporcionada y el haz de fibras podrá extraerse completamente. Ahora la caja podrá abrirse totalmente. Extraiga el conector de la lámpara y retire la lámpara del soporte. Sujete la nueva lámpara con un pañuelo limpio al sacarla de su embalaje e insértela en su soporte. Tenga cuidado de no tocar el reflector y la lámpara con las manos, pues la grasa de las manos puede hacer que la lámpara y el reflector se quemen o deformen durante su funcionamiento debido a las elevadas temperaturas. El conector se fija mediante presión con las clavijas de conexión de la lámpara. Presione la cubierta plana y fíjela con los tornillos. Al colocar el haz de fibras, introdúzcalo lo más adentro que pueda en la guía del proyector y luego fíjelo con el tornillo de cabeza. Antes de fijar el revestimiento, compruebe que la lámpara y el ventilador del proyector funcionan. Si así fuera, elimine los restos de polvo del proyector cercanos a la cubierta del ventilador. Si la lámpara se quema demasiado a menudo, es porque existe un defecto. En ese caso, contacte con atención al cliente. 6. Instalación 6.1 Instalación de la unidad En general, el dibujo de instalación proporcionado es el básico para cumplir con las condiciones estructurales. Hay algunos puntos que siempre deben respetarse al instalar la unidad. Todos los trabajos de instalación (sanitarios y eléctricos) deben realizarse exclusivamente por especialistas cualificados. La habitación donde va a instalarse debe contar con las condiciones de conexión indicadas en el esquema de instalación. El transporte de la unidad puede afectar a la estructura. 1. La bañera debe permanecer horizontal y sobre un suelo nivelado y firme. Los pequeños desniveles del suelo deben nivelarse mediante los pies ajustables de la bañera. 2. Si es necesario alargar las mangueras de conexión proporcionadas por motivos estructurales, deberá utilizarse una malla metálica como apoyo a las altas presiones de las mangueras. 3. El desagüe de la bañera necesita una conexión DN 50. La canalización no debe ser inferior o los tiempos de descarga se verán influenciados negativamente. 4. Para garantizar una funcionalidad razonable de la unidad, la presión del flujo de agua de construcción debe ser de 3 – 3,5 bar. El flujo de presión influye en los tiempos de llenado. 5. En la instalación eléctrica generalmente se coloca un interruptor principal iluminado y que accione todos polos, cerca de la unidad. También se proporciona un cabe ecualizador de voltaje. Además, la corriente eléctrica en la subdistribución debe transportarse mediante un interruptor de circuito a tierra por defect,o con características de desconexión de 30 mA y un interruptor de seguridad. 6. La instalación debe completarse documentalmente con un control de seguridad, en atención a la norma DIN VDE 0701 T1. 6.2 Funcionamiento del revestimiento 6.2.1.1 Instalación del soporte de barra en U - En ambos lados de la unidad las barras de aluminio deben fijarse y ajustarse en sus correspondientes soportes. Colóquese la arandela y atornille la tuerca. Todavía no la fije, pues el nivel de la barra debe adaptarse a la posición del revestimiento lateral. Dibujo 8 Dibujo 9 6.2.1.2 - Fijar las partes laterales En primer lugar, coloque la placa lateral frente a la barra de soporte en el suelo. A continuación indúzcalo debajo del nervio de la corona de la unidad (dibujo 11) y colóquelo en la barra en U. Dibujo 10 Revestimiento colocado en la barra en U. Dibujo 11 Aprox. 1,5 cm Nervio de la corona Revestimiento lateral - Ajuste el revestimiento lateral mediante el ajuste de altura de la barra en U situado paralelamente al nervio de la corona de la unidad. Anchura de unión: Aprox. 1 - 1,5 cm. A continuación afloje las tuercas de la barra en U. 6.2.1.3 Fijación del revestimiento de protección En primer lugar, coloque la protección lateral frente a la unidad, en el suelo (dibujo 12). A continuación, la protección se coloca sobre el nervio de la corona y se sitúa en la doble ruedecilla y en la barra en U de los laterales. Dibujo 12 Doble redecilla Soporte de protección Soporte del zócalo Dibujo 13 - Comprobar la dimensión de la junta entre el lateral y la protección. Comprobar el paralelismo, posición y empalmes del revestimiento entre los laterales y la protección. Si fuese necesario, las correcciones pueden llevarse a cabo modificando la altura de la doble ruedecilla (dibujo 13). Dibujo 14 6.2.1.4 - Colocación del zócalo Los zócalos semicirculares se colocan con los extremos planos de la barra en U (dibujo 15) y se enganchan en las ruedecillas (dibujo 13). Dibujo 15 7. Controles - 7.1 La unidad descrita en este manual está sujeta a las disposiciones de la directiva europea de bajo voltaje 73/23/EWG y a la aplicación de las leyes de seguridad nacionales propias del aparato. Asimismo, la unidad está sujeta a controles periódicos de seguridad en atención a la normativa nacional de prevención de accidentes para el usuario. Recomendaciones del fabricante Para garantizar una manipulación segura de la unidad, sólo se pondrá en funcionamiento si: El responsable del funcionamiento de la unidad ha sido formado para manipular la unidad siguiendo lo descrito en este manual. La unidad ha pasado los controles de seguridad propios de DIN VDE 0701 parte 1, tras las reparaciones o intervenciones técnicas que hayan afectado a la parte electrónica. La unidad se somete a controles cada dos años, en atención a la normativa de prevención de accidentes del DIN VDE 0701 parte 1. Los controles relacionados con la seguridad deberán conllevar las siguientes comprobaciones: Repaso general de todas las fuentes de peligro Comprobación del conductor de protección R < 0,2 Ω Comprobación de fugas de energía IEA < 3,5 mA Comprobación de la resistencia de aislamiento RISO > 1M Ω Conexión del aparato así como la funcionalidad de los fusibles del cliente Control general de todas las fuentes de peligro 8. Datos técnicos Características Valor Suministro energético 230 V~, N, PE Frecuencia 50 Hz Corriente de entrada máxima 2 kW Clase de protección I Categoría de protección Conexión sanitaria X4 20 IP DN (3/4") Conexión efluente (firmeza) 50 DN Dimensiones del aparato (L x B x A): 2,35 x 0,9 x 0,7 m Volumen útil de la bañera 250 litros Peso total 400 kg 8.1 Condiciones de funcionamiento Características Valor Temperatura ambiente 10 a 40 Humedad relativa – sin condensación- Hasta el 90 % °C Ducha (caliente-fría): Hasta 70 °C Temperatura Presión estática 3-máx. 4,5 bar Tipo de agua Agua corriente Agua apta para beber Calidad del agua Separación de red de agua gracias a un Tipo EA2 según DIN 1988/DVGW separador de red de tuberías (protección del agua apta para el consumo) Suministro eléctrico principal - interruptor principal que accione todos los polos Próximo a la unidad - red de fusibles 16 A, listo - fusible 30 mA - anchura min. cableado 1,5 mm2 8.2 Condiciones de almacenamiento y transporte Características Valor Temperatura ambiente – vaciado núcleo de -20 - 60 agua Humedad relativa – protección condiciones Hasta 90 meteorológicas Posición de transporte 8.3 °C % Posición estable Instrucciones ecológicas El aparato está fabricado en material reciclable y cuando finalice su uso ha de entregarse para su reciclaje. 9. Garantía Como fabricantes y distribuidores de nuestros productos, sólo podemos asumir la garantía por la seguridad y la funcionalidad de la unidad acorde a la garantía legal, que afecta a la instalación, ampliación, reajuste, modificación o reparación de la unidad si: - Dichos trabajos los realizamos nosotros mismos o personal cualificado. La instalación sanitaria o eléctrica de la unidad, así como la habitación donde se instale cumplen con los requisitos adecuados. La unidad es utilizada por especialistas cualificados siguiendo las instrucciones del manual. Tipo de producto: Descripción del producto: Identificación del producto: El producto indicaciones: mencionado Producto de bajo voltaje Ajustes de masaje Modelo 1.5.17 “Aroma” está Instrucciones de bajo voltaje Compatibilidad electromagnética La unidad tiene la marca CE. condicionado a cumplir 73/23/EWG 89/336/EWG con las siguientes 5 5 5 5 5 5 5 5 6278575983 25 4218578534485 012345 5 5 5 5 5 5 5 5 5 0 2 345678 8 9 2 222 2 2 2 2 2 2 2 222 2 2 2 2 2 2 2 2222 2 2 2 2 92 !22 2 2 2 2 2 2 #2 2 2 2 2 2 2 2 2 %22&2 2 2 2 2 2 2 2 #(2 2 2 2 2 2 2 2 92 *2(2+((,22 2 2 2 2 -(2(2 2 2 2 2 92/+22202 2 2 210222 2 2 2 2 #(2222 2 2 2 922222 2 2 2 2 2/322 2 2 2 2 2 122 2 2 2 2 2 9222422052 2 2 2224+52 2 2 2 222422+52 2 2 22246220522 2 2 2 2 78+92 2 2 2 2 2 2 92224:8+952 2 2 2 2 "2 !6+2 2 2 2 2 2 " 922246+2;2+52 2 2 " 22246+2;2(52 2 2 " 22246+2;2(22052 " 22246+2;222+52 " 22246+2;2622052 2 " "22246+2;2:8+9522 2 $2 #2 2 2 2 2 2 2 $ 92-&22+2222 $ 22+22 2 2 2 2 $ 2/22 2 2 2 2 '2 1022+22+22 2 2 2 2 2 2 2 2 2 2 2 2 2 2 2 2 2 2 2 2 2 2 2 2 2 2 2 2 2 2 2 2 2 2 2 2 2 2 2 2 2 2 2 2 2 2 2 2 2 2 2 2 2 2 2 2 2 2 2 2 2 2 2 2 2 2 2 2 2 2 2 2 "2 $2 '2 )2 )2 9.2 9.2 992 92 92 92 92 92 9"2 .2 92 2 2 "2 "2 "2 "2 $2 $2 $2 )2 )2 )2 )2 .2 10 0 2 2 2 342 567789 6267267822 2 2 2 2 342 76 626267789 62672626782 2 342 2962 2 2 2 2 2 42 76 62 2 2 2 2 2 42 ! "6 #262$ 76 622 2 2 42 !#"62%2 2&8'78(2 2 2 2 42 ) 62*2 $'62#2'8+676#22 2 2 ,42 7 7822 2 2 2 2 2 ,42 7 78262#72 2 2 2 ,42 7 782#26-76$6722 2 2 2 .42 /87062 2 2 2 2 2 2 .42 782#2 " 72 2 2 2 2 242 3862764#62 2 2 2 2 242/87828' 7822 2 2 2 242/8782676'8 62672627 '872 242 782884#62 2 2 2 2 42 5 762 2 2 2 2 2 2 2 42 3 7826288$722 2 2 2 2 2 2 2 2 2 2 2 2 2 2 2 2 2 2 2 2 2 2 2 2 2 2 2 2 2 2 2 2 2 2 2 2 2 2 2 2 2 2 2 2 2 2 2 2 2 2 2 2 2 2 2 2 2 2 2 2 2 2 2 2 2 2 2 2 2 2 2 2 2 2 2 2 32 32 32 2 ,2 ,2 .2 12 12 12 2 112 112 112 12 10 0 2 2 2 345 6789 55875 5 2 222!"#2 2 $2 % ##22" 2 2 $2 " !##2&'()*+2, !22-!!.%2 ,2"%-,2 2 /00 ,221-!%22 32,00,22%,%2 32!. 4220--4-25 !2,-26782,71-!792 2 , :;!1-!22 320#!!2 ,2#2,-!2 32<02#!7,#2 ,2#20=!72#-%!- 42 2 2 >455 ?7 5@ A875 5 )B-!722"-2!20-0:2 ,2#2!,!1-!2!2,--2:-!222 C21%2 2 2 !1!D 2 C21%2 2 21- #2 C2"-2" ##---!2 C2"-2#1- 42 C2"-2,1!D 2 C2,--2 #!2 2 5 5 EFFF75 C2G5HI75@F5A5AA7AJ5A7955KFL5578MF55 N955A75A7I45 C2G@7AJF75F58@9F8F7558@9FJ5A55KF5F578MF57F5OF5 PM8945 C2G@AA8557F5N9@OF57AJJ595A785N98KJ5875F9MF75 AA7AJ45 2 2 2 2 2 2 10 0 2 2 2 345 6789 575 75 5 222!"2"22#$%%"$&2 '()2*2+,-./2 2 2%0%2(1&2&3"22023%%2(2%"&2")3"2"3"42"2 20233"2(2(22(%2""3"%2(252"2(22#$%%"$&,2 2 '%%2%"&2(22*2 623%%2(278597859 7782(:2%32(2+;<2%%22=5 8>?@7978575A88B7 628>?@7978575A88B750%2"233%5C795 788575 A88B75A72 62D(20$E&2(F2(%2%&40%2(23%%2(2(%2D2(2"2 23%%2(2%"&2$342 62%%2(23%%G2H%2(23%%G2%&40%2(23%%2"2(&2(2 ""3"2%"2C@77A75I@8J7822 62%K%")32&22%20"%2%&3"%2(2G2%%2(%212"2 3%%"%2 62>A885785J @857C 5L35MNOP2("223%%,2 10 0 2 3452 67897 2 2 672 7 2! 2" 2#2$ %&2$'%$( )*+,-.. ../)00-1)*0234 -,0 *56297788 2($ 82($ 97$8 9*:-3)-* --;-*1*00.;,0-4 .0-.--,03*.;*1*000--3)-* <)=>*-?-*--;9*--3)-*--;9*0*3*0 .--*--;@A BC D82(EFC7$D C D82 (2$G7/*H31)0H-3*-I-*,,00 .0*--;--4 (" $ J $72(2$G7227J782#2KLMNO2O2PQQQR54 "'% 2 (27C722(2(" $J $72%78$'% 4 679 2(28$77$22 % 9 $7 , ;/;1)-;039)0*S,-.-,-4 ).- *0,;T)I0;0-=/3---*-<)0,0)@ 1)/)*/*.03-.3)04 )=U-- -))V0)=1)S-;=.0H*.> 3;03-*.0)=4 1W *0,;<)0,0)@4 X'%$982(28$77$ YI- *--; 3.0-1)-3.30);014 .))0)=+-)3;34 ,--*--;-.3)0-9-I-*)>)0-3**-, -3004 Z 3*)[0 )*.3)+)->0*-.*)**//3--* -9-;-*2)-;0--*2-4 ---..)=-0--3)-**2=I;4 .--**3-/)9.3*,*.0--;9\; )13-A ] .*0, ,*.0--;^_`a4 3*H^_`:4 ,**)=^_5:4 *)=-),04 3)0)[03^_ba4 c --=3-*-; -**-.---)*H3**-)**,9-003- -0,**0,;<)0,0)@ d0 .*-. )0.*-e)))--*,;9)/-S-,0A 10 0 2 3456 789 6 6 2 22222!"2#2!$%2 2 &' 22'!(%2 2 ) !2$!!!%2 2 *+ +2,%2 2 *+ +2-%2 2 * !222"!%2 2 * !222!%2 2 $ !2.'2222"%2 2 -/ !2%2 2 & ''!22/022!%2 2 2 2 2 2 2 2 2 2 2 2 2 2 2 2 2 2 2 2 2 2 2 2 2 2 2 2 2 2 2 2 2 2 2 2 2 2 2 10 0 2 345 6789 9758595 5 22222 !2"2#2$22#2#%&22 '"2#22#(2 !22%"%2#2%"!22#2 $22#2#%&2#2)2*&%"(2 2+2"!2!%&'"2'"2"2,2#2%222#-22"%.2 2,2/2#"2(20%2122%2'"2#"2&2&2!%&'"(2 20%2122%2'"2#2&2"232&"2#2"$&22",#2#2%2(2 0#'"42&2'"232%"%"2242"*22#2"2 2#& !2#2%!22%2(2 2##2#2" %!,2#22#2)22,!2-&2%2%!&2#"2 &%(2, %2#2&2" %!,2"2&"2#2!&2%%'"(22 2 +2" %!,2%!"*2"-2%%"2%2&&"2#2%2, (25"2&2 .2%2" %!,2#22#-2)221# 2%(2 2 "%2#22#2$%"22#22$$&"2,%2-&2%22 "%%.2&2&%2"2#,,2%2&&"2#2%2, (2 2 2+2, !"2#"22 2!%-!2"-2&"2"2!2#2$/-2&242 %2&%(262"'"2%2, !"2#"222#-22#! 27896(2 2,2#2,"2#2122#2#!$&2!"%/2 &,,#!2#2&2,#2#, %2"-2&"2"2%$!2#2 ,2"2%2"$&22#2%2&&"2#2%2, (2 2:222"%2#2#!$&(2;%%4232&2'"2%2%&%22 2!!2242#"2-),2&"22'"2#2%"2&&2 &(22"&2#"2$&2#"2#!$&2"%!2#-2)2 ! &!(2 2<2&2#2#!$"2#2% %.2&&42#&,2%2-&2&%/%2 &2'"22,42%"!222-&2="'"32%2! 2&, %/(2 2 %22#2'")2"-22"2* 2'"%$!(2 2"!22#22)2 !!22" "2!!%2%%!22%2,((2 /2#2%2(2 2 2 2 2 2 2 2 2 2 2 2 2 2 2 2 2 2 10 0 2 342 56789 2 342 926789 277892 3442 886 8277892 2 !"#$%#&'##&(%)*#+*+%'&(%)*#"(%,#%%"#%-!!%(, '(,,!"%.'/#,!0 1"%.',(&'##&(%)*#2,!#'#3#,,#0 3444256 782 2796 7829268892 2 9 '##&(%)*#: ;"%#''(,#<++/#)+&&(/#2,()+&&(/##'()3!#0(=#$%# >9(%)*#?#'+3#%#0 @(/<A: @,A("('/#%!#'%,#(<,#(/#)+&&(/##"('/#=+)+/#,( <(-+%##'()3#2,()+&&(/#"(''#(+&(B#&##3#,,#("%.'CD &#'0 E: 9(%B#F,#)*(&">1%%$?/(',(<(%%#/#(3-(+/#,(=#$%# >9(%)*#?(3#),#)%'#%#)+=%&#F(3#),(+)*#;%!#0()+&&(/# "(''##3#,,#0 344G2H8692292I982 2 J+' +#F,#(<,#(/#)+&&(/#'%,#"+>J%!"(%(+/<(?# +3%#F,#'3(#'/#%#&",''(-#K)*(/L=%+/M0#*#%&+&.%#&+%#,( #&"!%(%#/#%#&",''(-#()#,,#0#3#(/#%#&",''(-##'()*#3!',#' <'#''"!%#%#''+(&+'N)&'+'#(0 ; )('/!'(3#),+"+>O#&",''(-#(+&(B#"(%3(# *#%&+'(B#?2,#%#&",''(-#'#==#)#"(%,#(<,#(/#)+&&(/#0P,A( /#Q3#(Q/==!%#'0 E3%%,#&#>J%!"(%(+/<(?0 J(%,#)%'#%23+'&(%B#F,#3#(/#%#&",''(-#)+%%#'"+/(#3+' )+=%&#F(3#),(+)*#;%!#0(<(-+%##'%#&",#R'B(3#( '+*(!0 J(%,#*#%&+'(2,(#&"!%(%#"#$%#(R'!#0/)(+/#,(#&"!%(%# &+%#,(#&"!%(%#/#%#&",''(-#()#,,#0 @#, #&#("%.'(3+%()*#3!,#3#(/#%#&",''(-#2/(%#'"(' /+"!%(+S,!)%("#3#$%##Q!)!'0 344T2 8 226 2 2 U+' "+3#F%())+%)%,(<(-+%#"(%,#%#"+'#"#/"#&(B#,3%!2# '+%#B#/#'),#'",'"#'+(""0 V+&"%#''#F,#%#"+'#"#/#&# #F,#/(',#'+3#%%#'/(',#')W!' ,+-/(Q0 1'''#F(),##"+'+(/(',(<(-+%#0 X#''%=()#'*&/#'#-,''(#'"%!'##,#%'B#/#'<,#''%#'"(% )*#'0 10 0 3 4567 89 7 7 4565777977 7 3 !"#$#%&3'#3()3*+,!%#&&#*!#3'"#%'3'#3()3-+%.!/ *)&!+%3' 3-(!#%&3#&3"# &3)!%0!3 1)*!#*3.+*&#$#%&23)3*#"*0#%&)&!+%3'#3&+ (#03"+00!,!(!&030#*)!&3&*303 #$,*+ !((#23#03'# 43 !"#$#%&03"*!%-!") 430+%&3.!/ *03')%03-#3 !30!&23 3 856777 7 <=>?@ABBCD=0 EFCGH0I0JKLAH0 SLGEF=PP=0 =BEC>LPCT@=0 MCNN=0H=0KODG@CPALN0 H=0@C0?K=BBALN0H=0 >CBBCD=0 U?PALNV0 >CBBCD=0 BLGB0=CG0 >CNG=@0 SLGEF=PP=0 3E3F33C3G3H3303I03J3K3L33A3H303333 7 7 879567:;79765677 7 7 QEKCN0 HRL?OKCPALN0 SLGEF=PP=0 =BEC>LPCT@=0 WF=K>LBPCP0 CX=E0OEF=@@=0 U?PALNV0>CBBCD=0 BLGB0=CG0>CNG=@0 SLGEF=PP=0 =CG0>O@CNDO=0 77777777777777777777 7 7 7 7 7 7 7 MCNN=0H=0KODG@CPALN0H=0 @C0?K=BBALN0H=0>CBBCD=0 QEKCN0HRL?OKCPALN0 120 0 2 3454526789 72 27 2 789:;8<0=;>>?0 @A>8B0C0A>DEF8<G0 :DH<DI;0 JK<FKB0I;0 AKBF>L:;0 MN8OP0I;0O;B<0;F0 J8>>;02 J8>>;0I;0B8=DR8FDKB0 2ISK<FD:E0 I;0QKBAFDKB00 2 2 2282 27 2 2 2 2 222222222222222222222222 !""# $ % & '!(()*!# % +, (#-(.##"/(!""".(!0 1((!""# $ % &2 3"#3)"#4*.#!( % 53 ((63!#!""# 110 0 3 3 4567 89 7777 456557 777 7 3 3 !3"#3$3%&&'$3!#&#(3 )3%*3"+3*3!,-%'3*!3!'3$.%#.3$3#*(3)*3/'!*3$*3 0''&1#*3/'.#3*!3!'3$.%#.3$3#*323'*%$'#*33$*%$'#*(3 3 4565537 47576 777 7 3 83 %9'&03$3:%#.3&';-30'3!3%*30#3<#3'%#./-330**'#3!3 "#(3 3 =. 3!,-%'3*#33/.!!>3!'3%&&'$3*#3&.*33&'%9330**'#3!3"#(3 3 4565567 77?@7 7 #33 A3 #3B3!'3$.13:<#3$3&3 33 A3 C9&D3$.%##3'3&3E3=#'#3F3 0%9'.3 A3 %#.3!30+'&&3 '<#33 A3 &.*39*3&'%93$3!,.#-3 3 45655G7 H7I47 7 )'3"'3$,#.!*3::3$3$.::-#*3*J&"!*3$3:%#.3'3:3#3B3&*3$*3 /'.'#*3$,-;.0&#(3 3 KLMNOPQ0RSTNUVW0TXVYZW0[0XVV\M0 KLMNOPQ0YOSRWSV]0XRMWVP^W]0TXVYZW0[0XVV\M0 KLMNOPQ0_OSYZWMMW0TXVYZW0[0XVV\M0 KLMNOPQ0TX]]X`W0YWVaNYXR0TXVYZW0[0XVV\M0 bMXP_XV_Q0TX]]X`W0_W]0cXTdW]0TXVYZW0[0 XVV\M0 KLMNOPQ0dXNP0dOSNRROPPXPM0TXVYZW0[0XVV\M0 7 3 eXVfSX`W0MVNXP`SRXNVWQ0]ǸPXRW0Rg^MXM0_W0hOPYMNOPPWTWPM0iTXVYZWj0 120 0 3 3 45657389 333 3 !"#"" $%&'($""")*!" " $#+,"!"- "- !". / 0)!"" $1 2"" 3+. " 40 -.$ 5 6"!($1 &+,"!"-$ 7"8)"9/:/;/<= 6"!". 1 > BC9D9 3 ?" - " ! " "*$"@$."" "" ,$ !" !"/ ?" @$." .$". " (!"- "" 7A)"=/ 120 0 3 3 4565789 88 4565758 8 8 3 3 !"#$%&'#!(3)!%3)%*%*$+&$3#,#-#,+.3 /&$3 01%&3 2%*)&%&'#!3,33 !%43,35&44&$3 6#3,33 78$#93 3 3 45657578 :8 8 3 3 2%*)&%&'#!3,33&#(3)!%3+43'%&-&;3)%*+#5#&#%43)%#1#)&;.3 <5)+#44&$3=354%3,3+&3'5)*%&'%3 >#,&$3 3 3 3 2%!$%&554(3)!%3+&34*+*1'#!3,43)%!$%&5543,35&44&$3)%!$%&55*43 !3+?&@4'&$3,43)%!$%&5543#,#-#,+4.3 2%!$%&5543 A!-&3)%!$%&553 B33 !%43,35&44&$(3)!%3+?#,#1&'#!3,43)&%&59'%4344'#+43C#3 )-'3D'%35!,#"#*43&-&'3'3),&'3+?!)*%&'#!3,3)%!$%&55E3 3 3 3 6#3,33&#(3)!%3+43'%&-&;3,?F8$#93)%#1#)&;3'%3+433G31!55.3 H*4#"1'#!3,3%#I&$3 >#,&$3 <#I&$3 3 3 45657568 JKL88 8 3 3 78$#9(3)!%3+43'%&-&;3,?F8$#93C!'#,#4.3 >#,&$3 2%!$%&553,3%#I&$3 2%!$%&553,3''!8&$3 M)'#!.3 78$#93&'!5&'#C3 3 3 H44#11&'#!3 3 3 3 3 3 3 3 3 3 3 120 0 3 4567 89 7 4565779 9 77 7 7 3 3 3!"#$3% &3'(#$)3 *#$+& 3,3% &3-3.$#% 3/3"#$3,30&$1 &$3302$% 33"#$3,#3&04 35$! 63 3 53 0#13 3$7 $31##$38$%",11#9 3"#$3:# 1304#&3;32$<=3 $%",1133,>&!3#&3%3?30%3#& 11&13&3:#&3 137&1 163@#3%"!$#&$3 3$%",11#9 313+&! 63A"$B13,3$%",11#9 30%",=3,13"$9$#%% 13 3 %#11#9 3" &: 3C$3#"" ,!16333 9 9 77 7 H I7 9I9 J7 7 KL 79I9 7 $&$3 3333333530#13>&!13#:03-3D %",11#9 3#&%#+& 3/=3,3: #&3 3$%" 3,11#9 313 0413"#$3,30&$1 &$3302$% 33"#$3,#3&04 35$! 63A:03,34 $%1#=3,#3 %"!$#&$3 3$%",11#9 3" &3C$3$!9,! 63@#3%"!$#&$3 3$%",11#9 313 +&! 31&$3,>!0$#63@ 30&$1 &$313!EF31&$3-3A$$C3/3"&$3,30#13G3:&13:&,33 #$$C$3,3$%",11#9 63 $!"#$#3&37#3 D %",63M3 D %",63N3 O#9 3 $9$#%% 13 3 P&:#&3"$9$#%% 3 3333333 $&$3 3 120 0 3 45657389 3393 !"#$%&%'!!()*'(!"#$%+'%'*",')+'% "%("%+%(('"-.%/0!"#$%&%'!!()("1%/ A'(('&'((6" A'(('&*2%& A'(('&B'& A'(('&'" A'(('&*"*( 0,% C"+ 0,% 0,% 0,% @%%+%&%'!! %"% 02'+%3"*+%&%'!!(!%4+%&%'!!(*"5',%'4+%&%'!! (6" +"17%+%&%'!!(*1*"!/0+8*%%+%&%'!!9( +%&%'!!6"'+%*%%"/ 0( *(*(+%&%'!!(:4+%&%'!!(+'%5',%'+"17% 1"(("('%",%6"8;','"*(+%&%'!!(*!'(('&9/ 0( +%&%'!!(*1*"(/<:=+"17%!*(+'%!"8'%9 8$%+'%'*"%'!98>"1'"+%&%'!!9!!%((("(( '((!!%(!(/0+%&%'!!*1*"!!%(('(?" !!*(+,*'(!"8$%&%'!!(9/ #@% %+%&%'!!)(+%&%'!!*!'(('&6"'+%*%% "/ +%&%'!!*!'(('&("-'+'%"%("%+%((' "-.%/ 3 3 3 3 3 3 3 3 3 3 3 3 3 120 0 3 45657583 9 3 3 3 !"#$#!%&'()!"**('()(+,-&#,#-*"#$#!* (-((-)*+)*,#(*#*#)*.&!**,(#*)*!&+(#-(#&++/ 0!#12 ) !"#$#!%!&)&#*#+"#**23+#,/ !"#$#! ;#, P!*-!**!$Q 0!**!$-&#"*&")<+R.( S#"*-*2* C)/ C)/ #+# ,#(*#!#&F 3 4567869:3 !;#,-+#!(++&")<+%*+&!)&),-*-#,*-*"!*-!**!$ "#$#!,*+)*+"*-=!+++/>=*+?-(#@)!&!-!A+)*+"* -=!++++#)*2*-!**!$!+!+(1+/ B"!*-!**!$*+&"+,*(!**!$-&#"*&")+2- !**!$*+"#$#!,+"#))+/ C(-**D')*-E&+(-)!'!##-=+()**+&F(*(*@&G&(*+!#1,* "!#)*D')+#(!$)!(#/ 999 3537937H 8:3 3&!*-!**!$-&#"*&")+@++*)*2*-!**!$*+!**,* )=!"#<*)=!+#!*&-!+++-*&-!+++#,",+,*&D&)(1+/ I,$)!$-)!-#,J 0!#12K0!**!$-&#"*&")+L"!#)&#*#+"#**2)!+&F3+#,/ 3+#!+)'+-&!-@)!-#,"+M+#!A*+,/!-#,*+ &E(#,"!#)!+&F3+#,/ NA*+!$-)!"#**(-!**!$J 0!#12)*D')-)!"#**(+"#**2)!+&F3+#,/3+#!+) '+-&!-@)!"#**("+M+#!A*+,$#!-))+/!"#**( !A*+,*+&E(#,"!#)!+&F3+#,/ OEJ *E&+(*-)!'!##-=+()*"+M+#&'(,*!&)!**!$-&#"* &")+/ 120 0 3 3 456789 6 7899 3333333 3!"#3$!%$3#&!33 '!&3(3)3*3!&3+3%&&33%,&"3!&3+!3%$3-&.3 3 9&333 :&33&!"3 33333333%3 33333333333333333333 &&3 3 3 33333&%$!3 3 /0+!033+!3&33 '!&3(3)33*3!&3+3%&&33&3+!3%$3-&.3-3&!3 +3#33%""!3+!3&331&3!.3!3&33%,&"3!&3+!3 %$3-&.3 3 2!033+!3&33"!!033 '!&3+33"#+33+!3&33&3+!3%$3-&.3-3&!3+3 #33%""!3+!3&331&3!30&!++".3!3&3 !33%,&"3!&3+!3%$3-&.3 3 4,33 +&333531&3&0&!""3+3!&63+!&.3 7+3+!3%33+&3+33&+3%""3!33"!!0.3 3,%33+!3#!&&3+3531&3%"#3!5%3+3"!!033 0&33.3 25%3(3&%$!3*3+3!33"!!033!33+3"3(385!3 &0&!""3*335&3&3!&3!33&0&!"".3 3 3 3 3 3 3 3 3 3 3 3 120 0 3 3 45675859 9677999 9 3 30 3 3 !3"#$ 3%3$ % &33'(##!3%3$)3* (+,3* 3$(% 3 3$ 3-3% -.3%3-$(+3'$3/(3'( 0+3$3(%$(,31 2(!3 3 '(##% 3%3$)3* (+,3 3 45675859 97689563 9 3 30 3 3 !3"#$ 3%3$$4&33'(##!3%3$)3* (+,3* 3$(% 33 $ 3-3% -.3%3-$(+3'$3/(3'( 0+3$3(%$(,31 2(!3 3 '(##% 3%3$)3* (+,3 3 5687857696877579587:78858 $(3%3%((3-3%;0% .3#3'(0(%#3#$;% #3# 3-#' #3 <3 ( $(3 3 =3 >$(33'(0(%3#% #3+(#(3 <3 +( #(3 =3 +(#(33'(0(%?3 #+ 3-3%3%#3+(33+(#(?3 #$+-!3#3#($ #3#$(3@+(% 3 <3 %()33 =3 $;(3 3 $3$(#3-3%##%03'$(3-+%(((333 '(0(%?3 3'(0(%3@#3'%#3+(#+3 3 3 3 3 3 3 3 3 3 3 3 3 3 3 3 3 3 3 3 3 120 0 3 3 4565789 88 8 8 8 3 3 !"3#3$%!&%"''3(3'""&3("3)"$%*#3(3$%!&%"''+33 '#3,3!#%3(3'""&3-33!#.%/3 L!#%3(3'""&3 T%!&%"''3?@3 3 U#%33BC3'3 0 !#%3 3 3 3 3 33333373 3333333033333'#31!% #%3(3'""&23%333)("!3(3$"%"'4%3(3$%!3&%"''3 $%$"#5/303$"%"'4%3$#.36%3'!(73%".'3"."33 $("3)!$%"!3(#3$%!&%"''/3 3 45657588 9:;:8 8<=; 8 8< 88 8 3 03 $%!&%"''3!3>#%3)'"&3$%!&%"''3?@A3"3#3(#%3(3%"'3 !'$43(3BC3' #/3 3 0"3 $%!3(3'""&33"D#3"#3'"5'#'333"$$E#3$("33 !#%3(#3$%!&%"''/3 3 03 %#!3#."3>!'$"%F3G"%%3()!#A3!3'"%E#33!3 !$%3$("33!#%3(#3$%!&%"''3>?@AH3 3 #' 4%3I3!##%3"%3I3D"'G3 3 0"3 '$%"#%3(3)"#3(#3G"33J?3KL/3 3 456575M8 9; N ;:8:; ;:N 88O 8< 8 8 3 03 $"%"'4%3(#3$%!&%"''3$#.36%3'!(73%".'/33 3 P"%E#F3 3Q'G!3(37!!3#%3"3G"%%3()!#3".33#%#%33$%F3 "3!#R3%/33 3 P"%E#F3 "3(#%3(3%"'3".33#%#%33$%F3"3!#R3%/33 !#%"33G!#!3(3!''"(+3"3(#%3$#36%3$%!!&3!#3%"!#%/3 3 45657578 S;:N 8O 8< 8 8 88 8 3 P"%E#F3 1"%23$"%33#%#%33$%F3"3!#R3%/303R!3$%!&%"''3 (3'""&3E#33$#6%3'!(73%".'3('"%%/30)%.!3 %".33&"'3$!G3$("33'""&/3 120 0 3 3 45656789 7 77 7 7 3 3 333 !!"3#"3! "$3%"3!"3&33#3'3(3)"3 *!*+"!"*3",3%3-%",*3#"3!"3*.3 /-",*3#"30 "3 1# "3 2 !!"3#"30 "3 3"3,"3"3%,"3*!*+"!"*33!"34#-",*3#"3 0 "563 Q3#3'3 33333333333 3333333333/-",*3#"30 "3 3 33333333331# "3 3 33333333332 !!"3#"30 "3 0 000 "*3 33333333333 3 3 45656577 89: 9;<= 797> ?@97 7 33#-",*3#"30 "3"*3,,""33%)AB"3-,""3"*"3%"3'63 C%%"3"*3,!"3D3EF!3G3HIIIJ63 3 R*3#)'#$3%"S3%"3,%"*3+**"3%3'"T3 3 3 G+"S3&3#-",*3#"30 "3"*3,!"S33%3*,A"3C*-"63 3 3 3 G*"*$3%3,!!#"33%"3#)U*"3#"3#-",**3#3 3 %)"3#"3'6323,"%$3*%"S3%"3'"%"*3#-3VPJPP3!%W63 3 3 3 3 X"",*"S3%"3*,*3#3',*3"3,3#)*%*3#"3 !*"3# -""T3 3 3 K'*,"3#"3#-",*.3 JI$L3M3#!3AB,A%*"$3%+#"3 N**-33'.33 3 OP3!%3 120 2 2 0 KL4 28472 25 4& 2422 2 756 52 8 482 234 22225226272829 22222222222222774522756 52 222756 7452 22875 2 2 499 5 2 2 3482284899 2 22756 7452 2875 28277452 !2 "2 975295 2 22#5 2 2756 7452 !2 $2 9752 92782 !2 $2 9752 92 275 2 !2 %2 9752875 22&9 2 275 2 2 '()*+,-./*(0 28 2 22756 7452 2875 2 218 294767 252 875 2797 2 2 9282456787452822 27577 2 2 23434350 6/7-(890 0 !2 :7 22756 7452 2875 25 2472218 2 ; <22#75478 2 218 2 7 295 9 52: 7455 2 2=92 265745275 282 28 82 28 224= 2>58 22#75478 2 27 2 282875 282 278 2 2 '()*+,-./*(0 ?424287452 245 82 2=78 2@2A&75 2B2 2@2C577452 287D 2B2 52 294 2 9472 2 234343E0 F+*8+-,,90790+/(G-890 0 :72528 2875 2 24=7282 275 <2 7455 2 2=92 26457452 84899 2 2875 2 28 224= 2>58 2 2875 2 2 ;2482%2 975 2 2 M 552 2875 <267 2 57452D 2255 2 287452 2 8 7452 249 9 524 8 2 2 22 2 '()*+,-./*(0 28 22875 2 218 294767 28245678745252 2797 2 2 92 2%2H2I2H2J2975 2 110 0 3 4546 789 6 45456689 6 6 3 333!"#3$%3 &'()3'3"#3!*+,-%33$$)3'3#(*3./303"#3!*+,-%3 $1#233333'$3"#$3$#2$3#3'$32#431*+,-35#$3 3 3 6,3 3 3 ,""337,3 3 3 8$3(337,3 3 3 ,""33+,3 3 3 93 :+,-3#"5#3 3 3 3 3 8$$((3 3 6,3 ,""337,3 8$3(337,3 3 ,""33+,3 #3 333333333333 3 3 454556 ; <=96 6 3 &' ()3'3(*"333(3!2,%33'3(#$#33$$)3'3#(*3 ./303>,3$3233-$3(3#"5#"31#3('/3 3 3 45455?6 @AB9A=CC6<6A D=96 6 3 & 32#$3$#*)3#3#37,E3$'()3'3(*"333(3 !,""337,%33$$)3'3#(*3./3037,3$34(#3#3 F3"#$/3 3 3'37,E33$335#3'3233,#'33$$3$3 ("'-"3#2/3 3 GHBAC=I B6 03#3#37,3#3J3"333!(3,#%3$3'$3'"$33"$3 3F3K3L3K3M3"#$/3 120 0 3 45456578 9 888 8 3 3 !"#$3!3%&'!3!#3"$"!()!3*$)%3+!3#%(),3-./'0!3"!%!3 !#%!3+!312333$)#%!43"-!#3!"$)%1+!3!3(#!3%!%!3+31'$%!3)#+1+!3 *%03!3*%$!3-%%5#331%!3$)336$/!3#!%6!23 3 7!# 3+!3%&'!43#!3##!#$38)!3+3(!3!3"$#%9+!3!3+3*%!$3!#3 "$6*+0#!6!#3$)(!%#!23 3 :!+!"#$!;3<!"#$3!3%&'!=3!#3*%!!;3+3#$)".!33#%!23 3 3"$66!3($)3'+!36#!#3!3%!6*+%3+31'$%!23:3+-)#3*$!3-)3 %!6*+'!3)#$6#8)!43+!3%!6*+'!3- !"#)!3)#$6#8)!6!#23 3)#!43($)3!(!;3>$)#!%3!3!"##237$)%3"!+43)#+!;3)3'$1!+!#3'%)23 3 L!*!"#!;3+!3#%)"#$3)31%"#3!3"3-)#+#$3!3 6 #0%!3'%!)!M3 3 0 3 :)1#"!3!3!"#$?3 @A4B3C3$)63./*$".+$%#!43+8)!3 D)##3*%31?33 3 EF36+3 3 N>$)#!;3*%$)#3!3!##$/'!3$)33 3 0!"##3 333%!#$)%3 3333333333333333 3 G$%6!;3+-#$3!3!"##3(!"3<HI=233!"#$3!3%&'!36%%!23 3 G$)%3!3*%$'%66!3!3+3!"#$3!3%&'!3*%03+!3#%#?3 3 @3 6236+'!3!3+3)1#"!3!3!"#$3 3 E3 623#!6*3-'%3 3 E3 623#!6*3!3('!3 3 A3 623%&'!3)3/#06!3!3+'!3 3 JK8 3)%!3)3%&'!3*!)#35#%!36$!3*%3<"$')%#$=33"!%#!3+6#!3!3 #!6*23 3 3 120 0 3 45456578 9 888 8 3 3 333!3"33#$%&3'"%3%3(3)*+"*3,3 -3)33."!/33333!!0132313*!%3+%33%43 3+3'"%3++313%3313+"!33/35*%!631!3 !3#(3"31337+3"3"%333"3*!%3+3 "73!!%013(31"!31!/3 3 81+%93:33;33!!9313"+$3<*/3 3 3+37"!3!%13%331%3130%%/38%31#"%*3%!!3#"3 1%!!3"%'"63131%!!3!#*33+"3"%'"/3 <!"%637"!3793."33*!%3+/3="3+163"%1%!93"3013"*/3 8 U!+931!3%!"+%!3"330%+33+!3#"%1%!%3!3%&!3 *"!!V3 3 3*133"%3333!%"3$+$1%3C+$1F3"3 3 + "!33"!!3*+%!3+$%%'"!33!3%%3"3+3 3 %!/3 8 8 >?@A8 8 8"0!+33 3 ="%33 31%33 8"0!+33*!%3+%3 L*!%3+31%33 8 B01%631%'"%3CB0!+$%3D0EF3 <7%3GH31330%3 ="%3%+"3!%%631%'"%63"!"163%!3*'"%*3 7+3!3!"1*!3"!!!3 <7%3GH31330%3 ,-6G3I3!%"3$+$1%631%'"%3 3"31%033+$137%3(33-J3 K1/3 L*!%3+!3"3"%3%+"!3"%!*!3"31%!*!3 3LDEM/33 3!3*3!3%!"+%!3"330%+3 3++37+313!3#%3!"$%*/3 N3%931#%%33*!%3+3"3"%3%+"33:OP;/3333 3*/3 3 N"!3 33&!3!Q3 ,3%/3*13313!"0!+3 R3%/3!3#%3 R3%/3!337%3 -3%/3%43"3!!&331%3 3 ST A8 3"*33!3"3(3%3%*33:+3%"%;3!3+%!31%%!3 3!/3 3 3 3 3 3 3 120 0 3 4567 89 9 7 7 3!3"#3$3%3#3&3$3#33&##3$3'3 ()*3+3%3!3#,-3-3$3#)$3"3&%%#3 #&"*3 +3 (3 Q)&3"3C3 <#3"3%##33 P3"3C3 RS83 3 <#3"3C3 3 3 3333333333333333 4565.7/0 7129 9 73 047 7 53 6$ 3$3%3$!3&3$3#33&##3$3'3()*3+3 #)$3"#3$#3#,-*3 53 6$ 3$3$3#')3&3$3#33&##3$3'3()*3+3 $3#')3#37#)33$#)3&3$,3%&$8*3 3 456597/0 7129 9 7:2 47 7 53 6$ 3$3%3)!33&##3$3'3()*3+#3#3"3 $,)3#3#33&-3;3%")#3"-"$$%*3<$$#53#3=3 <#3 >?3@3A?3B3C#D3>?3B3'E3 6$3$F3GH353G?3AG3B3"ID3G?3B3'E3 (3$F3 GH353G?3AG3B3"I3D3G?3B3'E3 53 6$ 3$33#')D3&##3$3'3()337#3$3-$3 #')333$3C3"3%%"33&##3$3'3()33 3#*3 3 4565J7/0 7129 9 7K:K9 7L7M 47 7 53 6$ 3$3%3&)&3"3C!33&##3$3'3()*3+#3 #333$3C3#3#*3<$$#53#=3 N-3G3 A6)$3"3-3"3%&$##33#3",&3 %&$##3%!E3 N-3>H3 A6)$3"3$,"33O<33OPE3 53 6$ 3$33"%")3&3$3#33&##3$3'3()*3 120 0 3 4565789 888 8 8 8 3 !""#33$"%3&!%'(3)3$*((*+,33-'((#3*3!%.3/"'0132*3 3!"!"3*435%3(3)%'0(3)3'*$"3-%4"36'3$ 0(3+0"0'*$"3(3 !33'13 7%'03)3'*$"33 89:3$ "3;$ *!"3$*<13)3*3)%'03)3'*$"=3 3 !""#3*33!"!"3(!%.*0>3!"3'$#3-*'3*3!%.3/"'033*?%(#33 4*%'3(!%.*03"3!%'"*"33@!%!"3)3!$$*")33-'((*"3*3!%.3/"'013 3 3 4565489 8888A8 8 3 !""#33$"%3&3"3)%3@*",33-'((#3*3!%.3/"'0132(3(%4*"(3 3!"!"(3(!"3!33'(B3 3 C)*"+3*-'D(3*33"3)%3@*"3 3 ;$*'.E*''6:=3 3 F"G*+3*-'D(3*33"3)%3@*"3 3 ;$*'.E*''6=3 3 +"*3(!"!'3*-'D(3*33"3)%3@*"3 ;$*'.E*''6:=3 3 +"*3)H*--3*-'D(3*33"3)%3@*"3 ;$*'.E*''6:=3 3 !""#3*33!"!"3(!%.*033-'((#3*3!%.3/"'013 3 3 4565689 88IJK 8 8 3 !""#33$"%3&.L+D",33-'((#3*3!%.3/"'01323$"%3(0!"3 )(3#!"(3)H.L+D"3(3!33'B3 M'!+'*$$3)3'"G*+3 70("3!"3)3'"G*+3 M'!+'*$$3)3"!L*+3 N!"3+%'*!"(3-*'333*@'*"3 3 3 456565O8 P8Q 8 8R 8 8 3 !""#33$"%3&!"3+%'*!"3-'!+'*$$3)3'"G*+,33-'((#3*3!%.3 /"'0132*33!"!"3S3)%'03)3'"G*+3T3(3!33'13 7%'03)3'"G*+3U:3$ "3;U>3V>383$ "13-%4"36'3*?%(0(=3 3 !""#3*33!"!"3(!%.*0>3!"3'$#3-*'3*3!%.3/"'033(!""#3 *34*%'3(!%.*03"3!%'"*"33@!%!"3)3!$$*")33-'((*"3*3!%.3 /"'03"!'3%"33!(13 3 3 456565W8 XY 8 8R 8 8 3 !""#33$"%3&!"3+%'*!"3)0("3!"3)3'"G*+,33-'((#3*3!%.3 /"'0132(33!"!"(3$-(3)H*+'33$-(3)3'"G*+3(!"3!33'(18 Z$-(3)H*+'3 [:3$ "13;[>383$ "13-%4"36'3*?%(0(=3 Z$-(3)3'"G*+3U:3$ "13;U>3V3$ "%(3-%4"36'3*?%(0(=3 3 !""#3*33!"!"3(!%.*0>3-'((#3*3!%.3/"'033(!""#3*3 4*%'3(!%.*03"3!%'"*"33@!%!"3)3!$$*")33-'((*"3*3!%.3 /"'03"!'3%"33!(18 120 0 3 45656578 9 888 8 3 333!"#$3%#"#$3&3'$"(33%#))3$3 *3+#,-3.)3!)3)/$)3)3!!#)03 1%))$"3$$233$#*4$##533$%%$33%#"#$63%73 8%)3&9$"#3:;<333 3:=>;3-3%/35#3$?),)73 8%)3&3#@$"33 A<333>63A63B63C63=;3-3%/35#3$?),)73 3 3$3!3)*$,63%#))3$3*3+#,33)3$3 /$#3)*$,33#$33D3&3$&33%#))$3$3*3 +#,3#33!)-3 3 3 456565E8 FGHI HJ8I8GK HL8 8 3 +3 $)3&3#%3&9#/)63$3/3&9)D3%35#3%#&-3+33$)63)3 %$#$M#)3&3$3!"#$3%/35#3#,$D)3$3%3&3&,%$#-3 3 3$3!3!"#$)3&3!$D#$33%#))3$3*3+#,-3 +)63/)35)3&$&,)3)3$3$&3&3/#$35#3#,$D3$3%3 &3&,%$#-33/)3#,%&3$/3N3O3P63)3/$#)3&3!"#$3$)3 )3#,%$,)3%$#3)3&,)3&3!$D#$-3.)3!"#$)3&3!$D#$3)3 $#2,)3%$#3<3&$)3)3*$%#)3A-B---3 3 3 3 3 3 3 3 3 3 3 3 3 3 3 3 3 3 3 3 3 3 3 3 3 3 3 3 3 3 120 0 3 4567 89 7 7 3333333333!!3 ""3#"3#3"!$"33#%3 3 3 4565&7'()9*+* 7,*7+--.*7)7*-)7+-)*/7 7 0331331$3"331#3"30333 $#"33#3"3"##3303 "33"123334%5%3 3 6/)+*7,*7/78-7 93 3 "#133#"33"1"303:331$3333 #331"3!!%7 7 ;-*+* 7 93 <123 #333$#"33#3"33"23#3:331$3 3#3 "3%3 93 =123 #31$33"3"1#33#3"1133!123#333 $#"33#3"331$33"3"1#%3 93 > 23#3331$3!113"333"23#13#333 $#"33#3"3""%3 3 <3"33#3:331$3"3"C"3"#3A3 33#"33#333$#"33#3"33!133 3 "%3G3:331$3"H#3333#3I3 3 3 3 4565?7;--.*77* 8-/7 7 93 @ 3 #31$3#3#3#3331333##A#133 "$11331$3%3B"3#3#03"303 "33 3#3#33C1%3 3 ;-*+* 7 93 D" 23#3:33#3 "333#3$"331233 "$11331$%333"3"3##A#1331$3"3 3#%3 3 J233#33#3:331$3#303303"3 033"%3K3333$13$#3#0333 3 "11$%3 3 3 4565E7F) 8*79 7 7 93 @ 3""3"113#033#1A33#33"##"3%3"3"!!3 133#330"#331%3 3 120 0 3 4567 89 77977997 4565799797 7 977997 7 97 7 7 7 7 7 97 "77 $7%7 ! #9 7 7 97 &'3()*+,3()-+./03 132333-453 67803 93 93 93 :'3+4/;,3 332<33-453 67803 93 93 93 ='3+4.)5,3 332<33-453 67803 93 93 93 <'3+4/;,3 332<33-453 67803 93 93 93 1'3+4.)5,3 332<33-453 67803 93 93 93 >'3(84,,/,?675(6/3 332<33-453 67803 93 93 93 @'3+4.)5,3 332<33-453 67803 93 93 93 A'3(84,,/,?675(6/3 332<33-453 67803 93 93 93 B'3C*7,3 332<33-453 67803 93 93 93 &3'3(84,,/,?675(6/3 332<33-453 67803 93 93 93 &&'3C*7,3 332<33-453 67803 93 93 93 &:'3;),3 332<33-453 67803 93 93 93 &='3C*7,3 332<33-453 67803 93 93 93 &<'3;),3 332<33-453 67803 93 93 93 &1'3+4/;,3 332<33-453 67803 93 93 93 &>'3;),3 332<33-453 67803 93 93 93 &@'3()*+,3()-+./03 132333-453 67803 93 93 93 3 D8*E/3;83 :332333-453 3 3 3 +*)F*7--/3 93G3-4,3/53-7*(6/3,43)+04)53;4,+)54C./3 7 HI977997J7 K3L7,,7F/3-7*(67503M;/8N3O)5/,3P3.Q7R750S385/3O)5/3P3.Q7**4T*/U3 3 3 3 3 3 3 3 3 3 3 3 3 3 3 3 3 3 3 3 3 3 3 3 120 0 3 4565789 88 8 88 8 8 8 %&3'()*+3'(,*-./3 031223,343 7&3*3.8+3 231923,343 :&3*3-(4+3 231723,343 9&3*3.8+3 %31223,343 0&3*3-(4+3 231923,343 ;&3'<3++.+=>?4'>.3 231723,343 @&3*3-(4+3 %31223,343 A&3'<3++.+=>?4'>.3 231923,343 B&3C)?+3 231723,343 %2&3'<3++.+=>?4'>.3 %31223,343 %%&3C)?+3 231923,343 %7&38(+3 231723,343 %:&3C)?+3 %31223,343 %9&38(+3 231923,343 %0&3*3.8+3 231723,343 %;&38(+3 %31223,343 %@&3'()*+3'(,*-./3 031223,343 D<)E.38<3 7231223,343 *)(F)?,,.3 63G3,3+3.43,?)'>.3+33(*/3(4383+*(43C-.3 8 8 ,(5.43 ,(5.43 ,(5.43 ,(5.43 ,(5.43 ,(5.43 ,(5.43 ,(5.43 ,(5.43 ,(5.43 ,(5.43 ,(5.43 ,(5.43 ,(5.43 ,(5.43 ,(5.43 ,(5.43 3 8 8 8 8 88 "8#8 ! 8 $8 8 63 63 63 63 63 63 63 63 63 63 63 63 63 63 63 63 63 63 63 63 63 63 63 63 63 63 63 63 63 63 63 63 63 63 63 63 63 63 63 63 63 63 63 63 63 63 63 63 63 63 63 3 3 3 8 H $$88 8I8 J3K?++?F.3,?)'>?4/3?L.'3/.,*+38.3,?++?F.3?+'.48?4/3-34E?3).,.4/3./3M(4.+3 )E*E/3/3L.+&3 3 8 8 8 8 8 8 8 8 8 8 8 8 8 8 8 8 8 8 8 8 8 8 120 3 45657389 9393 3 9 339 93 0 3 3 #$%&'()*%&'+),-.% /%011%+23% 6$%)2-7*% #%011%+23% 8$%)2,'3*% 1%0/1%+23% /$%)2-7*% #%011%+23% 9$%)2,'3*% #%011%+23% :$%&;2**-*<=>3&=-% 1%0/1%+23% ?$%)2,'3*% #%011%+23% @$%&;2**-*<=>3&=-% 1%0/1%+23% A$%B(>*% 1%0/1%+23% #1$%&;2**-*<=>3&=-% 1%0/1%+23% ##$%B(>*% 1%0/1%+23% #6$%7'*% 1%0/1%+23% #8$%B(>*% 1%0/1%+23% #/$%7'*% #%011%+23% #9$%)2-7*% 1%0/1%+23% #:$%7'*% #%011%+23% #?$%&'()*%&'+),-.% /%011%+23% C;(D-%7;% 61%011%+23% )('E(>++-% 5%F%+2*%-3%+>(&=-%*2%').2'3%72*)'32B,-% 3 3 +'4-3% +'4-3% +'4-3% +'4-3% +'4-3% +'4-3% +'4-3% +'4-3% +'4-3% +'4-3% +'4-3% +'4-3% +'4-3% +'4-3% +'4-3% +'4-3% +'4-3% % 3 3 3 93 33 3!3 9 3 "3 93 5% 5% 5% 5% 5% 5% 5% 5% 5% 5% 5% 5% 5% 5% 5% 5% 5% 5% 5% 5% 5% 5% 5% 5% 5% 5% 5% 5% 5% 5% 5% 5% 5% 5% 5% 5% 5% 5% 5% 5% 5% 5% 5% 5% 5% 5% 5% 5% 5% 5% 5% % % % 3 GH9""339 93I3 J%K>**>E-%+>(&=>3.%>L-&%>&&-3.;>.2'3*%7D,2&>.-*%7>3*%,-*%M'3-*%)2-7*N%)2,'3*% -.%7'*% % % % % % % % % 3 3 3 3 3 3 3 3 3 3 3 3 3 3 3 120 0 2 34546278998 282 2 89228998 2 2 2 !"#$%&'(#$%)'*+,# -#.//#)01# 6"#'0+7(# /#.8/#)01# 8"#'0*%1(# /#.8/#)01# -"#'0+7(# /#.8/#)01# 9"#'0*%1(# /#.8/#)01# :"#$40((+(;231$2+# !#.//#)01# <"#'0*%1(# /#.8/#)01# ="#$40((+(;231$2+# !#.8/#)01# >"#?&3(# /#.-/#)01# !/"#$40((+(;231$2+# 6#.//#)01# !!"#?&3(# /#.-/#)01# !6"#7%(# /#.8/#)01# !8"#?&3(# /#.-/#)01# !-"#7%(# /#.8/#)01# !9"#'0+7(# /#.8/#)01# !:"#7%(# /#.8/#)01# !<"#$%&'(#$%)'*+,# 9#.//#)01# @4&A+#74# 6/#.//#)01# '&%B&3))+# 5#C#)0(#+1#)3&$2+#(0#%',0%1#70('%10?*+# 2 992 234,# 234,# 234,# 234,# 234,# 234,# 234,# 234,# 234,# 234,# 234,# 234,# 234,# 234,# 234,# 234,# 234,# # 2 2 2 82 9292 22 892 2 82 5# 5# 5# 5# 5# 5# 5# 5# 5# 5# 5# 5# 5# 5# 5# 5# 5# 5# 5# 5# 5# 5# 5# 5# 5# 5# 5# 5# 5# 5# 5# 5# 5# 5# 5# 5# 5# 5# 5# 5# 5# 5# 5# 5# 5# 5# 5# 5# 5# 5# 5# # # # 2 DE8228998 2F2 G#H3((3B+#)3&$231,#3I+$#3$$+1,43,0%1#$*30&+#7+#*3#J%1+#$40((+(;231$2+"# K$$+1,43,0%1#7%4$+#7+(#?&3(#$3473*("2 # # # # # # # # # # # # # # # # # # # # # # # 110 0 3 4565433 78998 3393 3 89338998 3 3 3 !"#$%&'(#$%)'*+,# -#.//#)01# 4"#$%&'(#$%)'*+,# /#.5/#)01# 5"#$%&'(#$%)'*+,# /#.5/#)01# 6"#$%&'(#$%)'*+,# /#.5/#)01# -"#$%&'(#$%)'*+,# /#.5/#)01# 7"#'0+8(# /#.5/#)01# 9"#)%**+,#8%&(:*# /#.5/#)01# ;"#'0*%1#*:,<&:*# /#.5/#)01# ="#$>0((+# /#.5/#)01# !/"#?:1$?+# /#.5/#)01# !!"#(<:1,# /#.5/#)01# !4"#:@:1,AB&:(# !#.//#)01# !5"#$>0((+# /#.5/#)01# !6"#8%(#B:(# !#.//#)01# !-"#8%(#?:>,# /#.5/#)01# !7"#8%(#B:(# !#.//#)01# !9"#8%(#?:>,# -#.//#)01# C>&<+#8># 4/#.//#)01# '&%D&:))+# 3#E#)0(#+1#):&$?+#(0#%',0%1#80('%10B*+# 3 993 )%2+1# )%2+1# )%2+1# )%2+1# )%2+1# )%2+1# )%2+1# )%2+1# )%2+1# )%2+1# )%2+1# )%2+1# )%2+1# )%2+1# )%2+1# )%2+1# )%2+1# # 3 3 3 83 9393 33 893 3 83 3# 3# 3# 3# 3# 3# 3# 3# 3# 3# 3# 3# 3# 3# 3# 3# 3# 3# 3# 3# 3# 3# 3# 3# 3# 3# 3# 3# 3# 3# 3# 3# 3# 3# 3# 3# 3# 3# 3# 3# 3# 3# 3# 3# 3# 3# 3# 3# 3# 3# 3# # # # 3 FG8 338998 3H3 I#J:((:D+#):&$?:1,#:@+$#:$$+1,>:,0%1#$*:0&+#8+#*:#K%1+#8>#8%(# # # # # # # # # # # # # # # # # # # # # # # # # 120 0 3 4567899 8689689 6 6 6 333!"3#3##33$%3#3&#3"3 '()*3+3,33-.3/#3##30($%*13&'##*#3#32#3#3"#3 )%#33#333'""#4'*3#35'*"#3637&'&#.3 3 83##3"3#&'*&3)3"#3##30($%*13#3!#3'#3 3*33"*!339#*5*'*3#3"3"3'(33#30($%*13#3'#*%&3 )3"3)#"3#)#*2".3 3 `@ H 686H8C;86;C=B;8686899 868968689 6 aC86686H 86@8HI= 6I8C<896C8;6C86I; =;9 686 3 8;H86C;6=86C;8686=6E ;868966=86;C9686I HI856 3 6 3 b86IC;98C;68968996 9686H9B;868;8C856 3 c8I898d6=869;C9 6C6E;96 8;96=86H8C;86 3 I; 989;86e6I;8;86I896=@C856 3 3 3 45:6 98;<==8686899 868968689 6 45>6 ?=6@AB86 6 79C;86 J$%3#3 #5'#3 L&#*5'*3#3 #5'#3 L&#*5'*33 *Q%3R'()*3S.ST3 L&#*5'*33 *Q%3R'()*3S.+T3 8%33 $%3R'()*3 S.+T3 3 3 3 3 3 3 3 3 3 3 98;<==86 DCE986 K)1#3'(33 L73)*5*'3 *3 #**3"*3*3 K)1#3'(33 L&#*5'3)3#3 *3 #5'#3"*#&3)3 LNOP3 K)1#35*332*3#).3 M*3($)'("*3 )1#3'(33 UV+W3"*3*3 *3 K)1#3#3)&*#3 M*3($)'("*3 0 \3]3U33 UV+W3"*3*3 ^**3 8*5*'3#**3 U373)'###33 "*3*3 $%3 ^**3 M*3($)'("*3 U373)'###33 UV+W3"*3*3 &#*5'*3 K"*!3_3 L&#*5'#33 )*5*'#3*# FC99G98HI6@;6 M"3"#32#*#3 M"3"#32#*#3#).3 *#'*3 XY3"3Z3)"*##%3 [)#30%*3X3*.3 XY3"3Z3)"*##%3 [)#30%*3X3*.3 +Y3"3Z3)"*##%3 [)#30%*3XY3*.3 UY3"3Z3)"*##%3 [)#30%*3XY3*.3 L#%33)#30%*3 #"3*#'*33 52*'3 120 0 3 456 789 8 6 6 3 3 33333333333333 !3!"#3$3!!3%!"3333!33!3 &33'!3()#3*3%3!33 33!3 !+#6 3 JT698:84W63496018 0 6/R74:949606/R4 9K6079: 6X96WK4KT6 589604659T7 /6348/9Y9KZ6 3 3 3 45,6 -8./606189 8 63 6 234951 6 ;3<33 ;3<33 3+"'@A!3 CA!3 697 6 =(33"3 ?!+33"3 ?!+3 ?"3"3'3 8 9:8//6 ;3"3>33 ;3"3>33 B"3"33 C3"&!+33"3" 3 6 3 45D6 -49.9 6E68996F7597 G6 6 3 3 3<3H3! 33"33!) !)H33" C333333"33"&"H3"3"3<333I3 (3"' 33 "!#3 3 3 45D5,6JK189L6 6 JR8.790S68TT49U6346/R4 9K6T6715/V1 619T6L79T6189L6 57496W/496/699T3460R4 6L76K/993456 3 3 3 * !+M3"3I 3"3<3"3I33"3H3! M3!+3 N""3I O#3 3 * !+M3"333P33"33"M3"&33"#3 3 B 3"&33"3&333""H3M"33 M"33"3!+3 !#3 B3"&33"333"3I3(H3!!33I3 "!#3 3 Q M3"3P33"3!! 33%M"33#3 3 3 3 3 3 3 3 3 3 3 120 0 3 4567 89 7777797 333 !""3#3$3!%3&3$3'()3*+3,-.3 3 3 4565/789 7777 7 T5=74==83859<3<384E9J33<4E:7-3L:8<388=8:5=3M93<3 L:?4<358:M9<3<=<:8:E<3=3<5=83<3=5@><A3U=37<33 3 7<<3<3L:?4<-39<339:;43=N<8384=<548>34<A33 3 ?:@=5:43983E=:434>?Q3 3 U= 3@>=>4-3<9=8338333:=:M9>35:83F84398::<>35943 3 <34:<5=<33<>794:8>A3 3 3 456507129 7 7 33 )3 4567894339:;43<83:=<8>393<<59<3935<<:4333?:@=5:4A3 1VWX7YYZ7[77W\\7Y79]7YY7 9^7 3 3 33 B>8 7CD334EF8=8333?:@=5:4-3754D37C:843G:=<88:5=3 4EF8=8HA3 33 I93 4567894339:;4-3<39J3E:<393?5K8:43<5=83>E:<<><3833?5K8:43<83 >7>3=3:478:5=3<3L:?4<358:M9<369<M9NO373M93E59<3E5D333 C5@;=3=<33:45:4A3 33 (: 33>7=8393759E4733?5K8:43<83=84E>3O379<3N9=35<:8:5=3 >LE54?3<3L:?4<358:M9<-33M983<3L:?4<358:M9<3983F843>87C>3 934567894A3IE7337>3I=3:E4>-33E:<33L:J8:5=393M983<3L:?4<3 58:M9<3<83>L:83833M983<3L:?4<358:M9<3<83>@@>375;8=8A3 )3?5K8:43983:=8==83=3859837<3F84359E48375;8=8A33 33 B>8 7CD3375==78943333838:4D3333:45:4393<9548A3 33 P4=D3 3=59E33E739=38:<<9345433N?@38388D33 49=83=<33<9548A3 33 &: D3O373M93E59<3=38597CD3<33:45:438333?54>3433:=-3 75-3O379<3337C943==833<4E:7-3<3::<393754<39E=83 4=433:45:43833384=-373M9:3=84K=439=34833748>3Q3 33 )3 75==78943<83759>3E73<3?457C<3375==J:5=333A33 33 R ?4:M9D33759E47393?5K8:4383L:JD3343<3E:<A3 33 (: 3E59<3E:D3>87C>33M983<3L:?4<358:M9<-359<<D33M983<3L:?4<3 58:M9<343347754375=8433?98>3=<33@9:@3934567894383L:JD33 433E:<3I=A3 33 IE=8 3N:M94334EF8=833=59E9-375=84SD3N?5433L5=78:5===83 3338393E=8:8943934567894A3I37883577<:5=-3=ED33 59<<:;4333@4:393E=8:894A3 33 (: 3339<3:=C?:89=83<59E=8-334:<5=35944:83F8439=3E=8:8943 >L7899JA3T5=878D3=5843<4E:737:=8;A3 3 3 3 120 0 3 456 789 86 456 789 8668 6 6 3333!"#$%3&3!33'3()%3*"")+(+!33 ")!)3!%"!%,3-+)3$%$%3()!3)&!3.!3("!3(!3 *!!)33*%!,3 3 I)%33!&%93*!!)3J!3!3"!$%K33)&!3 $%*.!39"%!3(3%3()3$%2,33 03)"3)!3")()3%93")!)33")9)3$%33 3 3 33!"#$%,3 3 03!()!33*%!33)!3$%3*22"!%3%3"#L,3 3 /,3 03')3)!3.!3()!)3#)1)!+!3%3%3(3!32+3)%3 ),343(!!32)+!)3%3)3(%&!3.!3")+(3(33(3 5%!'333'),3 6,3 733!%8%33")9)3&3)!3.!3)3()%33)3!%"!%3 %!13+!33!%8%93#%!3()32)"3(3!%3 +!$%,3 :,3 0*")%+!333')33')3*%3")9)334-3;<,3033 "!)33)!3(3.!3(%3(!!,303%33&3!32%"3 !&+!,3 =,3 >)%3%3%32)"!)!3)'33*%!33()3%3")%!3 3*%3%33!3&!3.!3:3?3:;3',303%33+(3!3 2%"3(33()3%3")%!,3 ;,3 >)%3*!!)3"!$%3(&)813+!3%3!%(!%3("(3 %3!)%33(@3!3%+ 3(A33*%!,3 B333")+(!)33()!!3)!3.!3(&%,3 3)%!333*+!!)333!'%!)3")3)!3.!3 %3&3%35)"!%322!33&"3%3""!!$%33 ""#+!33:<3+C3!3%35)"!%33()!"!)33""%!,3 D,3 7%!3E3*!!)3%3")!@3&!3E33"%!3)"%+!3)34F-3 G43<H</3I/3!33%%,3 3 3 3 3 3 3 3 3 3 3 3 3 3 3 3 3 3 120 0 3 4567 7 89 97797 456557 9779 77977 7 3 !"3 #!3$!%&!!3#'$'#3!3(%)**'3#!*3%)*3(+3*,#!3-,#3*).3/'*303123 3 3'3 /*))3(!*3%)*3(+3*,#!3!*3)()4+!3*+$3#5)'6!373-8#9,:!*123 3 3 ;'6!373 3 3 ;'6!3<3 3 3 7 3 3 120 0 3 3 456563789 8393 93 3 !!"#$"$#$%!%#&"'('$%) *!+,#&'!#(%!-./,0 1!-./ 2*3!"%$&#&)'4!'5%6"&7#" 8&#&*%#*&%$(%!-.., 1!-.. 120 0 3 45657589 99999 9 3 3 !3"#$%&'%3(#('%!3()3)3!(3*(+,'+"3%3-" !3( )3)3.&*"(,3)3!(3*(+,'+"/30+3!3"#$%&'%3)3-+)3%3.""..%&'%3 -+%+''1233+43!3"#$%&'%3(#('%3-("353#+3)3.!36.!13+43-('353&&723 +&(,38985/3 3 :&(,3893 3 3 3 3 3 :&(,38;3 3 3 3 :&(,3853 3 3 3 3 :&(,38<3 3 3 3 120 0 3 453 6789 3 3 !"#!!$ !%&'()'(*+,!!-.!! !!/0%#! 1!23!#! $/ 4543 5677788989:7839;3<8= :68893 3 >!0%!-!3?$-@3 %!! !! !.! !/3 1!2!ABCDA*E&EFF 2 $G3/3 1!2!"!! #!$!ABCDA*E&EFF/3 1!!$!$ $@ H 1!$!#3 H 1! I J E-)K3 H 1!0 B*L J '-ML3 H 1!! IBNOP FQK3 H" ! !30!R00!! //3 H 1!#!#3 4S53 T788U396V8:W;3 3 6V8 8X9U :9:W;3 Y8; 3 L! )'EDZ-C->* [3 ME\] >%%"/ )^+ H! B H#_ `aB> H" )EACb'(acd *!b0d MEAC A!""\ )-'M"E-e"E-& D!!!%# )ME! >! aEE^# 120 0 3 4564789 9 799 7 7 87 7 !"#3$3%&'"(#!)3 *+3,3-+333333333333333./3 8#24#&,39+333333333333:3 0#1$1"3!"(2314#3%!"153 63'('37('$'2!'"363 3 ;%1'"!"1('3$&!#3<73!#$=>(1$?@3 8#24#&,3D+33333333333./3 !"#3 E6-FG3!HI33333333333J!3 A221('32"!"14#3 !#3$(#73 B("3$&!#3 C#!%1"3$&!#3 !#3("!J%3 B!!"1('3!#3K32!#3!32!!"#3,3 L3M;N32%('3OPQ3*9RR=OSTU3 2!#3$3"#L!#"13<("7"1('3$&!#3("!J%?3 ;%1'"!"1('3$#32!#3%7"14#3 3 63 A!3 1'" #"#31'71!%32#3"(#23%23V%23AX23$3%&#'1"3 63 W#21 J%3$32!#3 *Y3 ;3 63 O1 28('7"#3$1>>'"1%3 E+3 ;3 63 /(#3 "!'252!%3$#3>1%3%7"14#31'I3 *FG333333333333333333333333Z3 7 7 456[789 9 7 9\777 97 7 87 7 !"#3$3%&'"(#!)33 6N+3K3Y+33333333333333333333./3 63'(L!#3$&!#351$3633 0#1$1"3!"(2314#3%!"1533 ]#24#&,39+33333333333333333:3 A(")37('"3%3"23 A(21"1('3$3"!'2("3 $J(#"3 7 7 456^7_ 9 799\7 7 `&#'1"3237((23$23!"1X237#!J%23"3$(1"3a"3$(''3,3#'32"!"1('3$3 7L7%!)3!(13!X23%!3>1'3$3%&#"1%12!"1('I3 3 3 4467 b 7 7 /(3>!J17!'"3"3$12"1J#"#3$3'(23($#1"2F3'(#23'3(#5('234#&!22#3%!3 )!!'"13(#3%!327#1"3"3%!3>('7"1(''!%1"3'$!'"3%&1'2"!%%!"1('F3%&H"'21('F3%!3 '(#5%%3J!#73F3%!3($1>17!"1('3(#3%!3!!"1('3$3%&#'1"3'37!$3$3%!3)!!'"13 %)!%F3213@3 3 63 /23 "!5!#H3('"3"3H7#"23!3'(#26a23(#3$#32(''%3!#"(12I3 63 `23 1'2"!%%!"1('232!'1"!123"3%7"14#23$3%&#'1"3"3$#3%(7!%37('7'3 7( 2('$'"3!#H3)#%!"1('237( 2('$!'"2I3 63 `& #'1"32"3#"1%123!3$#32(''%34#!%1>13'327"!'"3%3($3$&%(1I3 3 3 3 120 0 2 3452 672829 22 2 2 !"#$"%"&'( )*$#+", -,./01%"21%" 3456 7892:;<2-00=29./8; > 7892:;<2-00=2,-=?, @2'5 ABC*"#$"%"6B' DB"%"EB%* FB%*%"##""#B G"#EB%*EB%* 1HB"%"'##H" GI%"AB%*EB%*JB%K5"=6.20/ L"EB%*'"B4"'E55"#%"B#%"5%"M" G"B%"##""#B -/N0/N@O& 3B54"45B'H4P*" ?9N//,N@O& LI*45"'P*H"Q@6 1%"21%"R5"/;S*0;;, L%"5B%"BAB'4"#M5%"###H*" 110