1
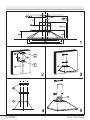
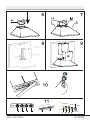
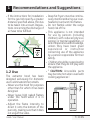
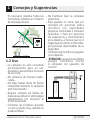
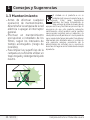
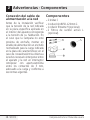
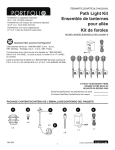
Hood
User Manual
EN ES
CWB 7441 X
ENGLISH
1 Recommendations and Suggestions . . . . . . . 6
2 Warnings - Components . . . . . . . . . . . . . . . . . . . . 9
3Installation . . . . . . . . . . . . . . . . . . . . . . . . . . . . . . . . 11
4 Use - Maintenance . . . . . . . . . . . . . . . . . . . . . . . .12
ESPAÑOL
1 Consejos y Sugerencias . . . . . . . . . . . . . . . . . . .14
2 Consejos y Sugerencias . . . . . . . . . . . . . . . . . . .16
3Instalación. . . . . . . . . . . . . . . . . . . . . . . . . . . . . . . . .19
4 Uso - Mantenimiento . . . . . . . . . . . . . . . . . . . . . 20
01M-8848813200-0615-01
2 / 20 EN
Hood / User Manual
Please read this user manual first!
Dear Customer,
Thank you for preferring a Beko product. We hope that you get the best results from
your product which has been manufactured with high quality and state-of-the-art
technology. Therefore, please read this entire user manual and all other accompanying
documents carefully before using the product and keep it as a reference for future
use. If you handover the product to someone else, give the user manual as well. Follow
all warnings and information in the user manual.
Remember that this user manual is also applicable for several other models. Differences
between models will be identified in the manual.
Explanation of symbols
Throughout this user manual the following symbols are used:
C
A
B
Important information or useful
hints about usage.
Warning for hazardous situations
with regard to life and property.
Warning for electric shock.
Packaging materials of the product
are manufactured from recyclable
materials in accordance with our
National Environment Regulations.
Do not dispose of the packaging materials together with the domestic or other
wastes. Take them to the packaging material collection points designated by the local
authorities.
This product was manufactured using the latest technology in environmentally friendly conditions.
4 / 20 EN
Hood / User Manual
Hood / User Manual
5 / 20 EN
1 Recommendations and Suggestions
A
The Instructions for Use
apply to several versions of this appliance.
Accordingly, you may find
descriptions of individual
features that do not apply
to your specific appliance.
1.1 Installation
•• The manufacturer will not be held
liable for any damages resulting
from incorrect or improper
installation.
•• The minimum safety distance
between the cooker top and
the extractor hood is 650 mm
(some models can be installed
at a lower height, please refer
to the paragraphs on working
dimensions and installation).
•• Check that the mains voltage
corresponds to that indicated on
the rating plate fixed to the inside
of the hood.
•• For Class I appliances, check
that the domestic power supply
guarantees adequate earthing.
•• Connect the extractor to the
exhaust flue through a pipe of
minimum diameter 120 mm. The
route of the flue must be as short
as possible.
6 / 20 EN
•• Do
not connect the extractor
hood to exhaust ducts carrying
combustion fumes (boilers,
fireplaces, etc.).
•• If the extractor is used in
conjunction with non-electrical
appliances (e.g. gas burning
appliances), a sufficient degree
of aeration must be guaranteed
in the room in order to prevent
the backflow of exhaust gas. The
kitchen must have an opening
communicating directly with the
open air in order to guarantee
the entry of clean air. When the
cooker hood is used in conjunction
with appliances supplied with
energy other than electric, the
negative pressure in the room
must not exceed 0,04 mbar to
prevent fumes being drawn back
into the room by the cooker hood.
•• In the event of damage to the
power cable, it must be replaced
by the manufacturer or by the
technical service department, in
order to prevent any risks.
Hood / User Manual
1 Recommendations and Suggestions
•• If the instructions for installation
for the gas hob specify a greater
distance specified above, this has
to be taken into account. Regulations concerning the discharge of
air have to be fulfilled.
•• Deep fat fryers must be continu-
ously monitored during use: overheated oil can burst into flames.
•• Do not flambè under the range
hood; risk of fire
•• This appliance is not intended
for use by persons (including
children) with reduced physical,
sensory or mental capabilities, or
lack of experience and knowledge,
unless they have been given
supervision or instruction
concerning use of the appliance
by a person responsible for their
safety.
•• Children should be supervised to
ensure that they do not play with
the appliance.
•• “ CAUTION: Accessible parts
1.2 Use
may become hot when used with
The extractor hood has been cooking appliances.”.
designed exclusively for domestic
use to eliminate kitchen smells.
•• Never use the hood for purposes
other than for which it has been
designed.
•• Never leave high naked flames
under the hood when it is in
operation.
•• Adjust the flame intensity to
direct it onto the bottom of the
pan only, making sure that it does
not engulf the sides.
Hood / User Manual
7 / 20 EN
1 Recommendations and Suggestions
1.3 Maintenance
•• Switch off or unplug the appliance
from the mains supply before
carrying out any maintenance
work.
•• Clean and/or replace the Filters
after the specified time period
(Fire hazard).
•• Clean the hood using a damp cloth
and a neutral liquid detergent.
The symbol onthe productoronitspackaging indicatesthat thisproductmay not
betreatedas householdwaste. Insteadit
shalbe handed overtotheapplicablecolectionpointfortherecyclingofelectrical andelectronic equipment. By ensuringthis
product isdisposedof correctly, you wilhelpprevent potential negative consequences fortheenvironmentandhumanhealth, whichcouldotherwisebe caused by inappropriate wastehandling of
this product. For more detailedinformation about
recycling of this product, pleasecontact your local
city office, yourhouseholdwaste disposal serviceor the shop where youpurchased the product.
8 / 20 EN
Hood / User Manual
2 Warnings - Components
Warnings
This appliance has been designed
for use as either an EXTRACTION
(ducting to the outside) or
RECIRCULATION (filtering) hood.
The measurements contained on
the drawings in this booklet refer to two models of cooker hood.
Therefore, it is essential that you refer to the correct drawing when taking measurements for installation.
•• The minimum distance between
the cooking surface and the metal
grease filters on the underside of
the hood must be 650mm.
•• This cooker hood must be installed
in accordance with the installation
instructions and all requirements
must be adhered to.
•• If the room where the cooker
hood is to be used contains a fuel
burning appliance such as a central
heating boiler then its flue must
be of the room sealed or balance
flue type.
•• If other types of flue or appliances
are fitted ensure that there is an
adequate supply of air to the room.
Hood / User Manual
•• When
the range hood and
appliance supplied with energy
other than electricity are
simultaneously in operation, the
negative pressure in the room
must not exceed 4 Pa (4x10⁻⁵
bar).
•• The ducting system for this
appliance must not be connected
to any ventilation system which is
being used for any other purpose.
•• The ducting system for this
appliance must not be connected
to any existing ventilation system
which is being used for any other
purpose.
•• Do not leave naked flames or carry
out flambè cooking under this
cooker hood.
•• This appliance is not intended
for use by persons (including
children) with reduced physical,
sensory or mental capabilities, or
lack of experience and knowledge,
unless they have been given
supervision or instruction
concerning use of the appliance
by a person responsible for their
safety.
•• Children should be supervised to
ensure that they do not play with
the appliance
9 / 20 EN
2 Warnings - Components
Connecting the power
cable to the mains
power supply
Before installation, check that the
mains voltage indicated on the rating plate inside the appliance corresponds to the voltage available in
your home. If the Hood is not fitted
with a plug have a licensed electrician, fit the power cable with a plug
of a type approved for the load indicated on the rating plate; when
connecting directly to the mains,
insert an omni polar circuit breaker
with a minimum contact aperture of
3mm and a size suitable for the load
in question between the appliance
and the mains supply, making sure
it is of a type that complies with
current regulations.
10 / 20 EN
Components
•• 2 No Wall Brackets C
•• 1 No 150-120mm Ducting Spigot G
•• 1
No Air Outlet Connection H
(Optional)
•• 2 No Charcoal Filters L (Optional)
Hood / User Manual
3 Installation
The cooker hood must be installed centrally
over a cooking appliance. The minimum distance
between the cooking surface and the metal
grease filters on the underside of the hood must
be at least 650mm.
To install the hood proceed as follows:
1. Drill six 8mm diameter holes at X1-X2-J and
insert the plastic rawl plugs supplied as
illustrated in fig. 2 ensuring the brackets are
fitted as shown in the blow up.
2.Secure the two brackets C to the wall inserting
two of the screws supplied through the two
holes on line X1-X2 as illustrated in fig. 2.
3.Slide the canopy down the wall to locate the key
hole over the washer then secure the canopy to
the wall by inserting two of the screws supplied
through the two outer holes in the rim of the
canopy J1 and J2 as illustrated in fig. 3.
4.EXTRACTION OR RECIRCULATION
INSTALLATION:
WARNING: It is a possible fire hazard if the metal
grease filters are not cleaned and the charcoal
filters replaced regularly.
Fitting The Chimney
5.Fitting the Chimney upper
To fit the upper chimney A, place the top edge
of the chimney over the bracket C as illustrated
in fig. 8 and secure the chimney using two of
the 2.9mm self tapping screws provided. The
distance H in the height between the fixing
holes X1 and X2 is determined by the height of
the upper chimney A.
6.FITTING THE CHIMNEY LOWER
To fit the lower chimney B, apply slight force to
the two rear edges to increase the width of the
apperture, then sleeve the chimney B over the
chimney A as illustrated in fig. 9.
EXTRACTION (DUCTED)
When installing the ducted version, connect the
hood to the chimney using either a flexible or rigid
pipe ø 150 or 120 mm, the choice of which is left
to the installer.
•• To install a ø 120 mm air exhaust connection,
insert the reducer flange 9 on the hood body
outlet.
•• Fix the pipe in position using sufficient pipe
clamps (not supplied).
•• Remove any activated charcoal filters.
RECIRCULATION (FILTERED)
•• When the hood is fitted in the recirculation
mode the Air Outlet Connection H should be fitted as illustrated in fig. 6.
•• Fit the (optional) charcoal filters by repeating
the following operation on each side of the
motor housing. Place the two key hole slots in
the filter L and turn the filter clockwise to lock
the filter in position as illustrated in fig. 7.
Hood / User Manual
11 / 20 EN
4 Use - Maintenance
Use
the cooker hood functions are controlled by a
series of slider or push button switches mounted
on the front of the hood and control the worktop
lighting and fan motor speeds. This cooker hood
will not remove steam.
1) Slider switches
•• A switch controls the worktop lighting - ON/OFF.
•• A switch controls the fan speeds - OFF/ON-1-2-3.
•• The red neon lamp illuminates when the motor
is switched ON .
2) Push button switches
•• A switch controls the worktop lighting ON/OFF.
•• A button switches the motor OFF/ON at the low
speed setting.
•• A button switches the motor to the medium
speed setting.
•• A button switches the motor to the high speed
setting.
•• The red neon lamp illuminates when the motor
is switched ON.
3) Speed settings
•• 1 / Low should be selected when simmering or
when using only one pan.
•• 2 / Medium should be selected for cooking when
using up to four pans.
•• 3 / High should be selected when frying or cooking food with a strong odour.
Maintenance
N.B. Before carring out any kind of maintenance,
cleaning or replacing lamps, disconnect the hood
from the mains supply.
12 / 20 EN
1. Lighting
Comprises two (28W - 40W) bulbs. To replace the
bulbs, proceed as follows (fig.10): Remove one of
the pins at the sides of the lamp cover. Slide the
glass towards the side from which the pin has
been removed until the opposite edge has been
freed, then pull gently downwards. Replace the
bults and fit the glass again by repeating the
above operations in reverse order.
2. Filters
•• The metal grease filter should be cleaned every
two months or more frequently if the hood is
used consistently and can be cleaned in a dishwasher or by hand using a mild detergent or
liquid soap. When replacing, ensure that they
are dry.
•• The charcoal filter cannot be washed and
should be replaced at least every 2 months or
more frequently if the hood is used consistently.
3. Cleaning
When cleaning the hood, it is recommended to use
a damp cloth and mild liquid household cleaner.
Never use abrasive cleaning materials.
IMPORTANT: When using a gas hob in connection
with the cooker hood never leave the burners
of the hob uncovered while the hood is in use
or when the pans have been removed. It is very
important to follow all instructions for cleaning
the hood and filters. There could be a possible fire
hazard if the filters are not replaced according to
these instructions.
ATTENTION: The manufacturer declines all
responsibility for any damage or injury caused
as a result of not following the instructions for
installation, for maintenance and replacement
times of filters indicated (in order to avoid a
possible risk of fire when the filters are saturated
with grease).
Hood / User Manual
Lea el manual de usuario antes de utilizar el aparato
Estimado cliente:
Gracias por elegir los productos Beko. Esperamos que obtenga los mejores resultados
de nuestro producto ya que ha sido fabricado con gran calidad y con tecnología de
última generación. Por tanto, le aconsejamos que lea con atención este manual de
usuario y todos los demás documentos adjuntos antes de utilizar el producto; guárdelo
para futuras consultas. Si va a entregar este producto a otra persona, proporciónele el
manual de usuario también. Siga todas las advertencias e instrucciones incluidas en
este manual.
Recuerde que este manual de usuario también es válido para otros modelos. Las
diferencias entre los modelos se señalan dentro del manual.
Explicación de los símbolos
En este manual se utilizan los siguientes símbolos:
C
A
B
Información importante o consejos
útiles sobre el uso.
Advertencia para situaciones de
riesgo con respecto a la vida y la
propiedad.
Advertencia para descarga eléctrica
El embalaje del producto está
fabricado a partir de material
reciclable de acuerdo con la
Normativa nacional sobre medio
ambiente.
No se deshaga del material de embalaje ni de los desechos domésticos o de otro
tipo. Llévelos a los puntos de recogida de material de embalaje designados por las
autoridades locales.
Este producto ha sido fabricado utilizando la última tecnología para garantizar unas condiciones de
fabricación respetuosas con el medio ambiente.
1 Consejos y Sugerencias
A
Las presentes instrucciones de servicio son válidas para diferentes modelos de aparato; por ello
puede ser posible que se
describan detalles y características de equipamiento que no concuerden íntegramente con las
de su aparato concreto.
1.1 Instalación
•• El
fabricante declina cualquier
responsabilidad debida a los daños
provocados por una instalación
incorrecta o no conforme con las
reglas.
•• La distancia mínima de seguridad
entre la encimera y la campana
debe ser de 650mm (algunos
modelos pueden ser instalados a
una altura por debajo, se refieren
al párrafo huella y la instalación).
•• Comprobar que la tensión de red
corresponda a la indicada en la
placa situada en el interior de la
campana.
•• Para los aparatos Clase I
asegurarse de que la instalación
eléctrica doméstica posea una
toma de tierra eficaz.
14 / 20 ES
•• Conectar
la campana a la salida
del aire de aspiración mediante un
tubo de 120mm de diámetro como
mínimo. El recorrido del tubo debe
ser lo más corto posible.
•• No conectar la campana a tubos
de descarga de humos producidos
por combustión (calderas,
chimeneas, etc.).
•• En el caso que en la cocina se
utilice de manera silmultánea
la campana y otros aparatos no
eléctricos (por ejemplo aparatos
de gas), debe existir un sistema de
ventilación suficiente para todo el
ambiente. Si la cocina no posee
un orificio que comunique con el
exterior, hay que realizarlo para
garantizar el recambio del aire. Un
uso propio y sin riesgos se obtiene
cuando la depresión máxima del
local no supera los 0,04 mBar.
•• En el caso se dañe el cable de
alimentación, éste debe ser
sustituido por el constructor o por
el servicio de asistencia técnica,
para prevenir cualquier riesgo.
•• Si las instrucciones de instalación
del dispositivo de cocción de gas
sugieren la necesidad de una
distancia mayor que la indicada
anteriormente, es necesario
tenerlas en cuenta.
Campana extractora / Manual de usuario
1 Consejos y Sugerencias
Es necesario respetar todas las
normativas relativas al conducto
de descarga del aire.
flambear bajo la campana
extractora.
•• Este aparato no tiene que ser
utilizado por personas (niños
incluídos) con capacidades
psíquicas, sensoriales o mentales
reducidas, o bien por personas
sin experiencia y conocimientos
en la materia, a menos que no lo
hagan bajo el control, o instruídos,
por personas responsables de su
seguridad.
•• Controlar que los niños no jueguen
con el aparato.
•• “ATENCIÓN: Las partes accesibles
1.2 Uso
pueden calentarse mucho
si utilizadas con aparatos de
•• La campana ha sido concebida
exclusivamente para un uso cocción.”
doméstico, para eliminar los olores
de la cocina.
•• No utilizarla de manera inadecuada.
•• No dejar llamas libres de fuerte
intensidad mientras la campana
esté funcionando.
•• Regular siempre las llamas de
manera que éstas no sobresalgan
lateralmente con respecto al
fondo de las ollas.
•• Controlar las freídoras durante
su uso: el aceite muy caliente se
puede inflamar.
Campana extractora / Manual de usuario
•• No
15 / 20 ES
1 Consejos y Sugerencias
1.3 Mantenimiento
•• Antes
de efectuar cualquier
operación de mantenimiento,
desenchufar la campana de la red
eléctrica o apagar el interruptor
general.
•• Efectuar un mantenimiento
escrupuloso e inmediato de los
filtros, según los intervalos de
tiempo aconsejados (riesgo de
incendio).
•• Para limpiar las superficies de la
campana es suficiente utilizar un
trapo mojado y detergente líquido
neutro.
16 / 20 ES
El símbolo en el producto o en su
embalaje indica que este producto no se
puede tratar como desperdicios
normales del hogar. Esteproducto se
debe entregar al punto de recolección de
equipos eléctricos y electrónicos para reciclaje. Al
asegurarse de que este producto sedeseche
correctamente, usted ayudará a evitar posibles
consecuencias negativas para el ambiente y la
salud pública, lo cual podría ocurrir sieste producto
no se manipula de forma adecuada. Para obtener
información más detallada sobre el reciclaje de
este producto, póngase encontacto con la
administración de suciudad, con su servicio de
desechos del hogar o con la tienda donde compró
elproducto.
Campana extractora / Manual de usuario
2 Advertencias - Componentes
Advertencıas
Este aparato ha sido proyectado
para usarlo como campana
ASPIRANTE (evacuación del aire
hacia el exterior) o FILTRANTE
(reactivación del aire en el interior).
•• La distancia mínima entre el plano
de cocción y la parte inferior de la
campana debe ser de 650mm por
lo menos.
•• Observar las siguientes instrucciones referentes al funcionamiento
de la campana cuando el aire es
encauzado hacia el exterior. (uso
aspirante)
•• Debe preverse una ventilación
adecuada del local cuando
la campana o los aparatos
alimentados con energía diferente
de la energía eléctrica se usan
simultáneamente; la presión
negativa de la habitación no debe
superar 4 Pa (4x10⁻⁵ bar).
•• El aire recolectado no debe
encauzarse hacia un conducto
usado para la descarga de los
humos de aparatos alimentados
con energía diferente de la energía
eléctrica.
Campana extractora / Manual de usuario
•• Respetar
las prescripciones de
las Autoridades competentes
relativas a la descarga del aire que
hay que evacuar.
•• Evitar la presencia de llamas
libres en el espacio debajo de la
campana.
•• La campana ha sido construida
con aislamiento de Clase II por lo
tanto no necesita conexiones de
tierra.
•• Antes de efectuar todas las
operaciones de mantenimiento
desconectar el aparato de la
alimentación eléctrica.
•• Este aparato no tiene que ser
utilizado por personas (niños
incluídos) con capacidades
psíquicas, sensoriales o mentales
reducidas, o bien por personas
sin experiencia y conocimientos
en la materia, a menos que no lo
hagan bajo el control, o instruídos,
por personas responsables de su
seguridad.
•• Controlar que los niños no jueguen
con el aparato.
17 / 20 ES
2 Advertencias - Componentes
Conexıón del cable de
alımentacıón a la red
Antes de la instalación verificar
que la tensión de la red indicada
en la placa específica aplicada en
el interior del aparato,corresponda
a la tensión de su habitación. En
el caso que la Campana no esté
provista de enchufe, montar en
elcable de alimentación un enchufe
normalizado para la carga indicada
en la placa de características; en el
caso de conexióneléctrica directa a
la red es necesario interponer entre
el aparato y la red un interruptor
omnipolar con aperturamínima
entre los contactos de 3 mm,
adecuado a la carga y conforme a
las normas vigentes.
18 / 20 ES
Componentes
•• 2 bridas C
•• 1 reducción Ø150-120mm G
•• 1 collarin filtrante H (opcional)
•• 2
filtros de carbón activo L
(opcional)
Campana extractora / Manual de usuario
3 Instalación
La campana debe montarse al centro del plano
de cocción. La distancia mínima entre el plano de
cocción y la superficie inferior de la campana debe
ser de 650mm.
Para el montaje de la campana proceder de la
manera siguiente:
1. Hacer n°6 orificios (X1-X2-J) Ø 8mm respetando
las cotas indicadas en la fig. 1.
2.Para los diferentes montajes usar los tornillos
y los tornillos de expansión suministrados en
dotación.
3.Bloquear los bridas C (fig. 2) a la pared en los
orificios X.
4.Fijar la campana a la pared en los orificios
externos J1 e J2 (fig. 3).
5.Fijar la brida de empalme E con los
correspondientes tornillos autorroscantes Ø
2,9mm en la boca de salida del aire del motor
en los orificios Z predispuestos (fig. 4).
6.Montaje ASPIRANTE o FILTRANTE:
7.Fijar la chimenea superior A (fig. 8) en los
bridas C (fig. 2/fig. 8) usando n°4 tornillos
autorroscantes Ø2,9mm suministrados en
dotación. La distancia entre los orificios de
fijación X1 y X2, queda determinada por la
altura de la chimenea superior H.
8.Aplicar frontalmente la chimenea inferior B (fig.
9) ensanchando ligeramente las dos partes
laterales y luego insertarla en la campana
(fig. 9).
ASPIRANTE
Para la instalación de la versión aspirante,
conectar la campana al tubo de salida mediante
un tubo rígido o flexible de ø150 o 120 mm, a
discreción del instalador.
•• Para la conexión con el tubo de ø120 mm, introducir la brida de reducción 9 en la salida del
cuerpo de la campana.
•• Fijar el tubo con abrazaderas adecuadas. Este
material no se proporciona en dotación.
•• Quitar los filtros antiolor al carbón activo.
FILTRANTE (OPCIÓN)
•• Introducir el collarin filtrante H (fig. 6).
•• Montar los filtros de carbón activo L (fig. 7) y
bloquearlos girando en sentido horario (aproximadamente 10°) hasta que se acciona el tope
de parada. Para desmontar efectuar las operaciones en orden inverso.
Campana extractora / Manual de usuario
19 / 20 ES
4 Uso - Mantenimiento
Uso
Les recomendamos hacer funcionar el aparato un
poco antes de proceder a la cocción de cualquier
alimento y dejarlo funcionar hasta 15 minutos
después de la cocción, en todo caso hasta que
haya desaparecido todo el olor.
1) Tablero de mandos con
interruptores
•• Un interruptor que manda el encendido de la
instalación de iluminación.
•• Un interruptor para conmutar las tres velocidades de ejercicio.
•• Una luz indicadora general que señala que el
motor está en función.
2) Tablero de mandos con
pulsadores
•• Un pulsador que manda el encendido del motor
en primera velocidad, adecuada para un recambio de aire continuo particularmente silencioso,
cuando hay pocos vapores de cocción.
•• Un pulsador que manda el motor en segunda
velocidad, adecuada a la mayor parte de las condiciones de uso, dada la óptima relación entre
caudal de aire tratado y nivel de ruidosidad.
•• Un pulsador que manda el motor en tercera velocidad, adecuada para enfrentar las máximas
emisiones de vapores de cocción, incluso por
tiempos largos.
•• Un pulsador que manda el encendido de la instalación de iluminación.
Mantenimiento
NOTA. Antes de cualquier intervención de
mantenimiento, reparación y eventual sustitución
de las lámparas, desconectar el aparato de la red
eléctrica.
20 / 20 ES
1. Iluminación
Está formada por dos bombillas de (28W - 40W).
Para cambiarlas seguir las siguientes instrucciones
(fig. 10): Quitar uno de los pernos situados a los
lados del plafón. Deslizar el cristal hacia el lado
donde hemos quitado el perno hasta que quede
suelta la punta opuesta y tirar suavemente hacia
abajo. Cambiar las bombillas y volver a colocar el
cristal siguiendo la secuencia opuesta.
2. Filtros
Con intervalos más o menos frecuentes, según el
uso de la campana, en todo caso una vez cada 2
meses, los filtros metálicos deben desmontarse
y lavarse con agua caliente jabonosa, o ser
directamente lavados en lavavajillas y deben
montarse nuevamente cuando están secos (los
filtros de carbón activo no deben lavarse en
absoluto y deben ser sustituidos cada 2 meses).
3. Limpieza
Para la limpieza externa de la campana usar
un paño húmedo con alcohol o con productos
adecuados que se encuentran en el comercio.
Evite usar elementos abrasivos.
IMPORTANTE: El empleo de llamas libres es
dañoso para los filtros, por lo tanto se aconseja no
dejar encendido un quemador de gas sin olla. Es
obligatorio limpiar la campana y los filtros, además
de sustituirlos periódicamente según nuestras
instrucciones para evitar peligros de incendio.
ATENCIÓN: La casa productora no responde
por eventuales daños causados por la falta de
mantenimiento del filtro anti-grasa (lavado cada
dos meses), sustitución del filtro carbón y por no
respetar las instrucciones de montaje y conexión
eléctrica antes descritas.
Campana extractora / Manual de usuario
www beko com