1
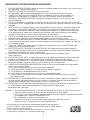
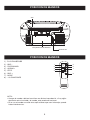
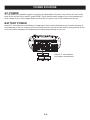
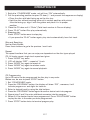
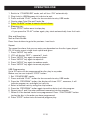
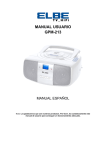
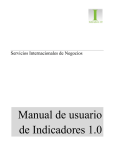
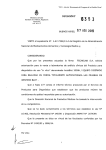
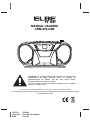
MANUAL USUARIO
CDM-250-USB
ATENCIÓN: La conexión USB únicamente funciona con aquellos
reproductores de MP3, memory sticks o sistemas de
almacenamiento de música que NO sean discos duros.
Únicamente MP3 con memoria fresca.
Por favor, antes de conectar su MP3 o memory stick , verifique
que no es un disco duro.
“La unidad de lectura del aparato USB/SD sólo funcionará con archivos apropiados de MP3”
Nota: Le agradecemos que use nuestros productos. Por favor, lea cuidadosamente este manual de usuario para conseguir
un funcionamiento adecuado.
F070702
19/09-2007
ELBE
UC638A
Revised User Manual
Size: A5
ADVERTENCIA: PARA EVITAR QUE SE PRODUZCAN FUEGOS O DESCARGAS ELECTRICAS, NP EXPONGA ESTA
UNIDAD A LA LLUVIA O A LA HUMEDAD.
WARNING : SHOCK HAZARD-DO NOT OPEN
Esta marca se encuentra en la parte trasera del aparato.
El símbolo del rayo con punta de flecha dentro de un triángulo equilátero avisa al
usuario de la presencia de “voltaje peligroso” sin aislar en el interior de la carcasa
de producto que puede constituir un riesgo de descarga eléctrica para la persona.
El signo de admiración dentro del triángulo equilátero avisa al usuario de la existencia
de instrucciones importantes acerca del funcionamiento y el mantenimiento
(reparaciones) en la documentación que se incluye con el aparato.
La siguiente etiqueta se adjunta a la unidad, especificando la presencia de rayos láser.
1.ESTA ETIQUETA SE ADJUNTA PARA INFORMARLE DE QUE EL APARATO CONTIENE UN
COMPONENTE LASER.
2.ESTA ETIQUETA INFORMA DE LA RADIACIÓN QUE CONTIENE LA UNIDAD COMO SE
MUESTRA EN LA ILUSTRACIÓN. ADVIERTE DEL PELIGRO DE POSIBLES MANIPULACIONES
DE LA UNIDAD YA QUE ESTE EQUIPO CONTIENE RAYOS LASER QUE EXCEDEN EL
LÍMITE DE LOS PRODUCTOS DE LASER DE CLASE 1.
2
1
CLASS 1 LASER PRODUCT
DANGER : INVISIBLE LASER
RADIATION WHEN OPEN AND
INTERLOCKS DEFEATED, AVOID
EXPOSURE TO BEAM
1
IMPORTANTE: INSTRUCCIONES DE SEGURIDAD
1. LEA LAS INSTRUCCIONES: antes de utilizar la unidad, deberá leer todas las instrucciones
de seguridad y de funcionamiento.
2. GUARDE LAS INSTRUCCIONES: las instrucciones
de seguridad y de funcionamiento deberán conservarse para futuras consultas.
3. TENGA EN CUENTA LAS ADVERTENCIAS: se deberán tener en cuenta todas las
advertencias indicadas en el aparato y en las instrucciones de funcionamiento.
4. RESPETE LAS INSTRUCCIONES: se deberán respetar todas las instrucciones de
funcionamiento.
5. AGUA Y HUMEDAD: la unidad no se debe utilizar cerca del agua, por ejemplo, cerca de
una bañera, de un fregadero de cocina, de una pila de lavar, de una piscina o en un sótano
húmedo.
6. VENTILACIÓN: el aparato deberá estar colocado de manera que su ubicación o posición
no impida la ventilación adecuada. Por ejemplo, la unidad no se debe situar sobre una
cama, sofá, alfombra o superficie similar que pueda bloquear la apertura de ventilación,
ni se debe colocar sobre una superficie encastrada, como una estantería, que pueda
impedir el flujo de aire a través de las aperturas de ventilación.
7. CALOR: la unidad deberá colocarse lejos de fuentes de calor como radiadores,
estufas u otros aparatos (incluyendo amplificadores) que produzcan calor.
8. FUENTE DE ALIMENTACIÓN: la unidad se debe conectar a la alimentación eléctrica
únicamente del tipo descrito en las instrucciones de funcionamiento, o según lo indicado
en la propia unidad.
9. TOMA DE TIERRA: se deben tomar medidas para garantizar que la toma de tierra del
aparato está en perfecto estado.
10. PROTECCIÓN DEL CABLE DE ALIMENTACION: los cables de alimentación deberán
estar situados de forma que no se pueda tropezar con ellos o que no queden aplastados
por objetos colocados encima o contra ellos.
11. LINEAS ELÉCTRICAS: las antenas de exterior deberán estar alejadas de las
líneas eléctricas.
12. PERIODOS DE NO USO: se deberá desenchufar el cable de alimentación de la toma de
pared si la unidad no se va a utilizar durante un periodo prolongado de tiempo.
13. ENTRADA DE OBJETOS Y LÍQUIDOS: tenga cuidado para que no caigan objetos ni se
derramen líquidos sobre la carcasa y se introduzcan por las aberturas.
14. DAÑOS QUE REQUIEREN REPARACIÓN: sólo un técnico cualificado está autorizado a
reparar la unidad cuando:
A. El cable de alimentación o la conexión estén dañados.
B. Se ha derramado líquido o han caído objetos sobre el aparato.
C. La unidad haya quedado expuesta a la lluvia.
D. La unidad se haya caído o la carcasa haya resultado dañada.
E. Parezca que la unidad no funcione con normalidad o el rendimiento de la misma
haya disminuido.
15. REPARACIÓN Y MANTENIMIENTO: el usuario no deberá intentar reparar la unidad de
otra forma que no aparezca en las instrucciones. Cualquier otro tipo de reparación o
mantenimiento deberá ser realizado por un técnico cualificado.
16. ATENCIÓN: si esta unidad está preparada para la función de grabación, el fabricante no
se responsabiliza del material grabado sin consentimiento previo del
propietario del copyright.
NOTAS: 1. Es aconsejable mantener un CD dentro del aparato incluso si éste no está en uso.
De esta manera evitará la acumulación de polvo en la lente óptica.
2. CD sucios o arañados pueden reproducirse de manera irregular, sufriendo saltos en
la reproducción. Limpie o reemplace el CD.
3. Si se produce un error en la pantalla o el
aparato no funciona correctamente, desconecte el cable AC y quite
todas las pilas. A continuación, conéctelo de nuevo.
NOTAS ACERCA DE LOS DISCOS COMPACTOS ANTES DE SU REPRODUCCION Ya que discos sucios, dañados o rayados pueden dañar la unidad, debe de
tener en cuenta los siguientes puntos:
a. Utilice sólo los discos compactos que contengan su marca de disco.
b. Utilice discos compactos con señales de audio digital.
2
POSICION DE MANDOS
LOCA
Antena telescópica FM
Control de volume
Puerta del CD
Interruptor de Funciones
Selector de banda
Abrir / Cerrar
Escala del Dial
Ranura para tarjeta
Puerto USB
Botón Grabar
Botón Play
Botón Pause
Botón Stop / Eject
Botón Rebobinar
Botón Avance rápido
Pantalla LCD
Indicator de encendido
Indicaador FM estéreo
Prog
Álbum
Botón Stop
Botón +
Botón Botón Play / Pause
Mode
Sensor Remoto
Puerta del Cassette
3
POSICION DE MANDOS
Asa
Compartimento de baterías
Enchufe AC
POSICION DE MANDOS
1.)
2.)
3.)
4.)
5.)
6.)
7.)
8.)
PLAY/PAUSE/USB
SKIP PROGRAMAR
ALBUM +
STOP
SKIP +
MODE
+10 CANCIONES
1
5
2
3
4
6
7
8
NOTA :
• Aunque el mando a distancia esté en una distancia prudencial, si hay algún
obstáculo entre la unidad y el mando, este puede no funcionar.
• Si se usa el mando cerca de otras aplicaciones que usen infrarrojos, puede
haber interferencias.
4
PRECAUCIONES ACERCA DE LAS PILAS
Instalación de las pilas del mando
1. Abra el compartimiento
2. Ponga dos pilas AAA
a. Asegúrese que las pilas están correctamente puestas con la polarizad
“+” o “-“.
3. Cierre la tapa hasta oír clic.
a. Si necesita acercarse mucho a la unidad para hacer funcionar el mando,
por favor cambie las pilas.
FUNCIONAMIENTO A PILAS
Introduzca 6 pilas tamaño "C" en el compartimiento de las pilas.
Asegúrese que las pilas están bien colocadas para evitar daños en el aparato.
Retire las pilas del aparato siempre que no lo vaya a utilizar durante un largo
período de tiempo ya que de lo contrario, pueden producirse filtraciones y,
consecuentemente, dañar la unidad.
NOTA
Asegúrese que las pilas están correctamente puestas con la polarizad “+” o “-“.
Use pilas del mismo tipo. No mezcle pilas diferentes.
Si no usa el aparato o el mando durante cierto tiempo (más de un mes), quite las
pilas para evitar derrames. Si hubiera alguna pérdida de líquido de la pila , por
favor contacte con nuestros Servicios Técnicos para que le asesoren.
FUENTE DE ALIMENTACIÓN
TOMA DE TIERRA
Puede conectar esta unidad portátil a una toma de tierra con un cable AC.
Compruebe que el voltaje del aparato coincida con el del lugar.
Asegúrese de que el cable AC esté completamente conectado a la unidad.
PRECAUCION
Para evitar una descarga eléctrica, compruebe que el enchufe está totalmente
insertado en la toma.
5
REPRODUCCION CD / CD MP3
1 Encienda el aparato con el botón de modo “CD/MP3/USB”, la unidad se encenderáautomáticamente.
2 Pulse el botón “OPEN” para abrir el compartimiento del CD.
• Ponga el disco con la etiqueta hacia arriba.
• Coja el disco sin tocar ninguna de sus superficies con la parte impresa hacia arriba, inserte el CD en
las guías y sitúelo en la posición adecuada.
3 Cierre el compartimiento del CD, éste hará un “click” cuando esté completamente cerrado.
(A continuación, el número total de pistas aparecerá en pantalla tras unos segundos).
4 Pulse el botón “PLAY” y el disco se reproducirá automáticamente.
Saltar y buscar
Botón siguiente o anterior: Pulse estos botones para reproducir la pista siguiente o anterior.
Repeat
Las funciones de repetición que puede disfrutar dependen del tipo de CD que reproduzca.
CD: repetir todas las pistas, una sola pista y de manera aleatoria.
1 Pulse el botón “MODE” una vez.
2 La pantalla LCD visualizará “REP” = repetir 1 pista.
3 Pulse el botón “MODE” de nuevo para repetir todas las pistas.
4 Pulse el botón de nuevo “MODE” para reproducir de manera aleatoria.
5 Pulse el botón “MODE” de nuevo para reproducir normalmente.
Memoria del CD
Puede programar hasta 20 pistas en cualquier orden.
Antes de programar, asegúrese de que pulsa el botón “STOP”.
1 Ponga el modo “CD/MP3/USB”.
2 Pulse el botón “PROGRAM”, aparecerá “P01”en la pantalla, además, indicará el número de programa y los
dígitos de los números de las pistas.
3 Seleccione la pista deseada utilizando los botones para saltar de pista.
4 Pulse el botón “PROGRAM” de nuevo para confirmar la pista seleccionada en el programa.
5 Repita los pasos 2 y 3 para introducir más pistas en el programa.
6 Cuando todas las pistas deseadas hayan sido programadas, pulse el botón “PLAY/PAUSE” para reproducir el
disco en el orden programado.
7 Pulse el botón “STOP” dos veces para borrar la programación.
6
RADIO
1 Ponga el selector de función en la posición “RADIO”.
2 Seleccione la banda deseada (el dígito de frecuencia de radio aparecerá en el dial).
3 Ajuste la frecuencia de radio en la emisora que desee utilizando el sintonizador.
4 Ajuste el control del Volumen a su gusto.
Recepción FM / FM-Estéreo
• Sitúe el selector en la posición de recepción “MONO”.
• Sitúe el selector en la posición “FM-ST” para la recepción “FM-Estéreo”. El
indicador estéreo se encenderá indicando el modo “FM Estéreo”,
cuando se sintonice una emisora estéreo.
CASSETTE
OPERACIÓN GENERAL
Botón STOP / EJECT:
Apriete una vez para parar el funcionamiento del cassette. Apriete de
nuevo para abrir la tapa.
BOTONES ADELANTE / ATRÁS: Apriete el botón para ir rápidamente adelante o atrás en función de lo
que desee. Apriete el botón stop para parar la acción.
Botón PLAY:
Apriete este botón para reproducir el cassette.
Botón PAUSA:
Apriete este botón para parar temporalmente el cassette.
Apriete de nuevo para continuar con la reproducción.
Botón GRABAR:
Apriete el botón junto con el botón Play para empezar a grabar
PARA REPRODUCIR UN CASSETTE
- Ponga el selector de función el el modo “TAPE”.
- Introduzca un cassette.
- Apriete el botón Play para empezar a reproducir el cassette.
- Ajuste el volumen al nivel deseado.
- Use el botón Pausa si quiere parar el cassette temporalmente.
- Apriete Stop/Ejec. cuando quiera finalizar la reproducción del cassette.
GRABACIÓN DE RADIO
- Ponga el selector de función el el modo “TUNER”.
- Sintonice la emisora deseada e introduzca un cassette.
- Apriete el botón junto con el botón Play para empezar a grabar.
- Apriete Stop/Eject cuando quiera finalizar la grabación.
GRABACIÓN DE CD
- Ponga el selector de función el el modo “CD”.
- Seleccione la/las pistas del CD a grabar.
- Apriete el botón junto con el botón Play para empezar a grabar
- Apriete Stop/Eject cuando quiera finalizar la grabación
7
REPRODUCCION USB
ATENCIÓN: La conexión USB únicamente funciona con aquellos
reproductores de MP3, memory sticks o sistemas de
almacenamiento de música que NO sean discos duros.
Únicamente MP3 con memoria fresca.
Por favor, antes de conectar su MP3 o memory stick , verifique
que no es un disco duro.
1 Encienda el aparato con el botón de modo ‘CD/MP3/USB’, la unidad se encenderá automáticamente.
2 Conecte en el puerto USB el dispositivo de memoria.
3 Pulse y mantenga presionado unos segundos el botón ‘PLAY’ para entrar en el modo USB.
4 La pantalla mostrará el total de archivos y número de pistas.
5 Pulse el botón ‘PLAY’ y el disco se reproducirá automáticamente.
6 Pulse el boton “ALBUM” para ir al album deseado.
7 Parando la reproduccion: Pulse el boton ‘Stop’ una vez para parar la reproduccion. Si pulsa el ‘PLAY’
de nuevo, la reproduccion comenzara desde la primera pista.
Saltar y buscar
Botón Siguiente o Anterior: pulse estos botones para reproducir a la siguiente o anterior pista.
Repetir
Las funciones repetir que puede disfrutar dependen del tipo de disco reproducido.
CD: repetición de todas las pistas, de una pista y modo aleatorio.
1 Pulse la tecla ‘MODE’ una vez.
2 La pantalla LCD mostrará ‘REP’ = repetir 1 pista.
3 Pulse la tecla ‘MODE’ otra vez para repetir un álbum.
4 Pulse la tecla ‘MODE’ otra vez para repetir todo.
5 Pulse la tecla ‘MODE’ otra vez para repetir de manera aleatoria.
6 Pulse la tecla ‘MODE’ otra vez para repetir normalmente.
Memoria USB.
Puede programar hasta 20 pistas para reproducir en cualquier orden.
Antes de empezare, asegúrese de pulsar el botón ‘STOP’.
1 Ponga el modo ‘CD/MP3/USB’.
2 Pulse y mantenga presionado unos segundos el botón ‘PLAY’ para entrar en el modo USB.
3 Pulse el botón ‘PROGRAM’, la pantalla mostrará ‘P01’, y además, indicará el número de
programa y de pistas.
4 Seleccione la pista deseada usando los botones saltar.
5 Pulse el botón ‘PROGRAM’ otra vez para confirmar la programación de la pista deseada.
6 Repita los pasos 2 y 3 para introducir más pistas en la programación.
7 Cuando TODAS las pistas deseadas estén programadas, pulse el botón ‘PLAY/PAUSE’
para reproducir el disco en el orden programado.
8 Pulse el botón ‘STOP’ dos veces para finalizar la programación.
NOTAS: Para salir del modo USB, desconecte el aparato y vuelva al modo CD/MP3 o
mantenga pulsado el botón “PLAY” unos segundos.
8
WARNING : TO PREVENT FIRE OR SHOCK HAZARD DO NOT EXPOSE THIS APPLIANCE TO RAIN OR MOISTURE
WARNING : SHOCK HAZARD-DO NOT OPEN
This marking is located on the rear of the unit
The lighting flash with arrowhead symbol, within an equilateral triangle, is
intended to alert the user to the presence of uninsulated dangerous voltage
within the products enclosure that may be of sufficient magnitude to
constitute a risk of electric shock to persons.
The exclamation point within an equilateral triangle, is intended to alert
the user to the presence of important operating and maintenance (servicing)
instructions in the literature accompanying the appliance.
The following label has been affixed to the unit, listing the proper procedure
for working with the laser beam.
1.
2.
THIS LABEL IS ATTACHED TO THE PLACE AS ILLUSTRATED TO INFORM THAT
THE APPARATUS CONTAINS A LASER COMPONENT.
THE WARNING LABEL INFORMING OF RADIATION IS PLACED INSIDE THE
UNIT. AS SHOWN IN THE ILLUSTRATION. TO WARN AGAINST FURTHER
MEASURES ON THE UNIT. THE EQUIPMENT CONTAINS A LASER RADIATING
LASER RAYS ACCORDING THE LIMIT OF LASER PRODUCT OF CLASS 1.
1
2
CLASS 1 LASER PRODUCT
DANGER : INVISIBLE LASER
RADIATION WHEN OPEN AND
INTERLOCKS DEFEATED, AVOID
EXPOSURE TO BEAM
E-1
SAFETY INSTRUCTIONS
1. READ INSTRUCTIONS-All the safety and
operating instructions should be read before
the appliance is operated.
2. RETAIN INSTRUCTIONS-The safety and
operating instruction should be retained for future
reference.
3. HEED WARNINGS-All warnings on the appliance
and in the operating instructions should be
adhered to.
4. FOLLOW INSTRUCTIONS-All operating
instructions should be followed.
5. WATER AND MOISTURE-The appliance should
not be used near water, for example, near a
bathtub, washbowl, kitchen sink, laundrytub,
swimming pool or in a wet basement
6. VENTILATION-The appliance should be situated
so that its location or position does not interfere
with its proper ventilation. For example, the
appliance should not be situated on a bed, sofa,
rug or similar surface that may block the
ventilation openings, placed in a built-in
installation, such as a bookcase or cabinet that
may impede the flow of air through the ventilation
openings.
7. HEAT-The appliance should be situated away
from heat sources such as radiators, stoves, or
other appliances (including amplifiers) that
produce heat.
8. POWER SOURCE-The appliance should be
connected to a power supply only of the type
described in the operating instructions or as
marked on the appliance.
9. GROUNDING-Precautions should be taken to
ensure that the grounding means of an appliance
is not defeated.
10. POWER CORD PROTECTION-Power supply
cords should be routed so that they are not likely
to be walked on or pinched by items placed
upon or against them.
11. POWER LINES-An out door antenna should be
located away from power lines.
12. NON-USE PERIODS-The power cord of the
appliance should be unplugged from the outlet
when the appliance is to be left un-used for a
long period of time.
13. OBJECT and LIQUID ENTRY-Care should be
taken so that objects do not fall and liquids are
not spilled into the enclosure through openings.
14. DAMAGE REQUIRING SERVICE-The appliance
should be serviced by qualified service personnel
when :
A. The power-supply cord or plug has been
damaged.
B. Objects have fallen into, or liquid has been
spilled into the appliance enclosure.
C. The appliance has been exposed to rain.
D. The appliance has been dropped, or the
enclosure damaged.
E. The appliance does not appear to operate
normally or exhibits a marked change in
performance.
15. SERVICING-The user should not attempt to
service the appliance beyond that described in
the user operating instructions. All other servicing
should be referred to qualified service personnel.
16. ATTENTION-While this cassette deck offers a
recording facility, the manufacturer wishes to
point out that recording copyright material
requires prior consent from the copyright owners.
NOTES:
1) It is preferred to retain CD inside the unit even
when it is not in use .This prevents dust
accumulation on optical lens.
2) Dirty or scratched CD may cause a skipping
problem. Clean or replace the CD.
3) If an error display or malfunction occurs,
disconnect the AC cord and remove all the
batteries. Then turn the power back on.
BEFORE OPERATION
NOTES-CONCERNING COMPACT DISCS.
Since dirty, damaged or warped discs may damage
the unit, care should be taken of the followings items:
1. a. Usable compact discs
Use compact disc only with the mark shown
on the disc.
b. CD compact disc only with digital audio
signals.
E-2
LOCATION OF CONTROLS
FM Antenna
Volume Control Knob
CD Door
Function Selector
Band Selector
Open / Close
Dial Pointer
SD Card Slot
USB Jack
Cassette Record Key
Cassette Play Key
Cassette Pause Key
Cassette Stop / Eject Key
Cassette Reverse Key
Cassette Forward Key
LCD Display
FM Stereo Indicator
Power Indicator
Program Button
Album Button
Stop Button
Skip+ Button
Skip- Button
Play / Pause Button
MODE
Remote Sensor
Cassette Door
E-3
LOCATION OF CONTROLS
Handle
DC Compartment
AC Jack
LOCATION OF REMOTE CONTROL
1.)
2.)
3.)
4.)
5.)
6.)
7.)
8.)
PLAY/PAUSE/USB
SKIP PROGRAM
ALBUM +
STOP
SKIP +
MODE
+10 TRACK
1
5
2
3
4
6
7
8
E-4
SENSOR WINDOW OF THE RECEIVER
Note:
• Even if the remote control unit is operated within the effective range, remote
control operation may be impossible if there are any obstacles between the
unit and the remote control.
• If the remote control unit is operated near other appliances which generate
infrared rays, or if other remote control devices using infrared rays are used
near the unit, it may operate incorrectly.
PRECAUTIONS CONCERNING BATTERIES
• Be sure to insert the batteries with correct positive “+” and negative “-“
polarities.
• Use batteries of the same type. Never use different types of batteries
together.
• When the remote control unit is not to be used for a long time (more than a
month), remove the batteries from the remote control unit to prevent them
from leaking. If they leak, wipe away the liquid inside the battery compartment
and replace the batteries and never dispose of old batteries by throwing
them in a fire.
Battery Installation
1. Remove the battery compartment cover.
2. Insert two “AAA” dry batteries
• Make sure that the batteries are inserted with their positive “+” and negative
“-“ poles positioned correctly.
3. Close the cover until it clicks.
If the distance required between the remote control unit and main unit
decreases, the batteries are exhausted. In this case replace the batteries
with new ones.
E-5
POWER SOURCES
AC POWER
You can power your portable system by plugging the detachable AC power cord into the AC inlet on the
back of the unit and into a wall AC power outlet. Check that the rated voltage of your unit matches your
local voltage of your local voltage. Make sure that the AC power cord is fully inserted into the unit.
BATTERY POWER
Insert 6“C” size batteries in the Battery Compartment. Be sure that the batteries are inserted correctly to
avoid damage to the unit. Always remove the batteries when unit will not be used for a long period of time,
as this will cause leakage to the batteries and subsequently damage to your set.
Insert 6”C” size batteries
into battery compartment
E-6
OPERATING CD
1 Switch to “CD/MP3/USB” mode, unit will turn “ON” automatically.
2 Pull the protruding position to open CD door (“-“ and present time appears on display)
• Place the disc with label facing up on the disc tray.
• Hold the disc without touching either of its surface position with printed
title side facing up, align it with the guides and place it in its proper
position.
3 Close the CD door unit it “Clicks” (Total track number in Disc on display).
4 Press “PLAY” button Disc play automatically
5 Stopping play
Press “STOP” button once to stop play
• If you press the “PLAY” button again, play starts automatically from first track.
Skip and Searching
Next or Back Button:
Press these buttons to go to the previous / next track
Repeat
The repeat functions that you can enjoy are dependent on the disc types played
CD: All tracks repeat, single track repeat and given
1 Press “MODE” key once.
2 LCD will display “REP” = repeat of 1 track.
3 Press “MODE” key again to repeat all.
4 Press “MODE” key again to random mode.
5 Press “MODE” key again to normal playback.
CD Programming
Up to 20 tracks can be programmed for disc play in any order.
Before use, be sure to press “STOP” button
1 Set “CD/MP3/USB” mode.
2 Press the “PROGRAM” button, the display will show “P01”, moreover, it will
indicate program no. and digits for track no.
3 Select a desired track by using the skip buttons.
4 Press the “PROGRAM” button again to confirm desire track into program.
5 Repeat step 2 and 3 to enter additional memories into the program.
6 When ALL the desired tracks have programmed. Press “PLAY/PAUSE” button
to play the disc in the order you have programmed.
7 Press “STOP” button twice to terminal program play.
E-7
RADIO OPERATION
1
2
3
4
Set the function selector to “RADIO” position
Select desire BAND (FM ST. / FM / AM) by using the band selector.
Adjust radio frequent to your desire station by using the tuner control
Adjust Volume Control for volume level
FM / FM-Stereo Reception
• Set to FM mode position for “MONO” reception
• Set to “FM-ST” position for “FM-Stereo” reception. The Stereo indicator
light up to show “FM Stereo” mode.
TAPE OPERATION
GENERAL OPERATION
STOP / EJECT KEY
FAST FORWARD KEY &
FAST REWIND KEY
PRESS TO STOP ALL DECK OPERATIONS. PRESS AGAIN TO OPEN THE
CASSETTE DOORS.
PRESS TO START RAPID TAPE WINDING IN EITHER FORWARD OR REVERSE
DIRECTION. PRESS STOP / EJECT KEYS WHEN THE CASSETTE SPOOLS
STOP TURNING.
PLAY KEY
PRESS TO START PLAYING TAPE.
PAUSE KEY
PRESS TO STOP TAPE OPERATION TEMPORARILY. PRESS AGAIN TO
RESUME TAPE OPERATION.
RECORD KEY
PRESS RECORD KEY TOGETHER WITH PL AY KEY TO START RECORDING.
PLAYBACK
- SET THE FUNCTION SELECTOR TO TAPE POSITION.
- PUT IN YOUR CASSETTE TAPE.
- PRESS PLAY KEY TO ACTIVATE PLAYBACK.
- ADJUST THE VOLUME CONTROL TO THE DESIRED LEVEL.
- USE PAUSE KEY WHEN YOU WANT TO STOP PLAYBACK TEMPORARILY.
- PRESS STOP / EJECT KEY WHEN FINISHED.
RECORDING
RECORDING FROM RADIO
•
•
•
SET IN TUNER MODE.
TUNE IN YOUR STATION AND PUT IN YOUR CASSETTE TAPE.
PRESS RECORD KEY AND THE PLAY KEY OF DECK AT THE SAME TIME TO START RECORDING.
PRESS STOP / EJECT KEY WHEN FINISHED.
RECORDING FROM CD
•
•
•
SET IN CD MODE.
SELECT THE REQUIRED TRACKS TO BE RECORDED.
INSERT A CASSETTE INTO THE CASSETTE DECK AND PRESS RECORD KEY.
PRESS STOP / EJECT KEY WHEN FINISHED.
E-8
OPERATING MP3
1 Switch to “CD/MP3/USB” mode, unit will turn “ON” automatically.
2 Press “OPEN” button to open CD door (“-“ and present time appears on display)
• Place the disc with label facing up on the disc tray.
• Hold the disc without touching either of its surface position with printed
title side facing up, align it with the guides and place it in its proper
position.
3 Close the CD door unit it “Clicks” (Total track number in Disc on display).
4 Press “PLAY” button Disc play automatically
5 Press “ALBUM” button to search desired album.
6 Stopping play
Press “STOP” button once to stop play
• If you press the “PLAY” button again, play starts automatically from first track.
Skip and Searching
Next or Back Button:
Press these buttons to go to the previous / next track
Repeat
The repeat functions that you can enjoy are dependent on the disc types played
CD: All tracks repeat, single track repeat and given
1 Press “MODE” key once.
2 LCD will display “REP” = repeat of 1 track.
3 Press “MODE” key again to repeat album.
4 Press “MODE” key again to repeat all.
5 Press “MODE” key again to random mode.
6 Press “MODE” key again to normal playback.
MP3 Programming
Up to 20 tracks can be programmed for disc play in any order.
Before use, be sure to press “STOP” button
1 Set “CD/MP3/USB” mode.
2 Press the “PROGRAM” button, the display will show “P01”, moreover, it will
indicate program no. and digits for track no.
3 Select a desired track by using the skip buttons.
4 Press the “PROGRAM” button again to confirm desire track into program.
5 Repeat step 2 and 3 to enter additional memories into the program.
6 When ALL the desired tracks have programmed. Press “PLAY/PAUSE” button
to play the disc in the order you have programmed.
7 Press “STOP” button twice to terminal program play.
E-9
OPERATING USB
1
2
3
4
Switch to “CD/MP3/USB” mode, unit will turn “ON” automatically.
Plug & slot in USB/Memony stick device to port.
Press and hold “PLAY” button for few seconds to entry USB mode.
Display show Total File and Tracks No.
5 Press “ALBUM” button to search desired album.
6 Stopping play
Press “STOP” button once to stop play
• If you press the “PLAY” button again, play starts automatically from first track.
Skip and Searching
Next or Back Button:
Press these buttons to go to the previous / next track
Repeat
The repeat functions that you can enjoy are dependent on the disc types played
CD: All tracks repeat, single track repeat and given
1 Press “MODE” key once.
2 LCD will display “REP” = repeat of 1 track.
3 Press “MODE” key again to repeat album.
4 Press “MODE” key again to repeat all.
5 Press “MODE” key again to random mode.
6 Press “MODE” key again to normal playback.
USB Programming
Up to 20 tracks can be programmed for disc play in any order.
Before use, be sure to press “STOP” button
1 Set “CD/MP3/USB” mode.
2 Press and hold “PLAY” button for few seconds to entry USB mode.
3 Press the “PROGRAM” button, the display will show “P01”, moreover, it will
indicate program no. and digits for track no.
4 Select a desired track by using the skip buttons.
5 Press the “PROGRAM” button again to confirm desire track into program.
6 Repeat step 2 and 3 to enter additional memories into the program.
7 When ALL the desired tracks have programmed. Press “PLAY/PAUSE” button
to play the disc in the order you have programmed.
8 Press “STOP” button twice to terminal program play.
E-10