1
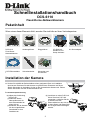
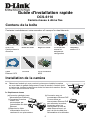
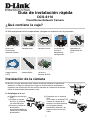
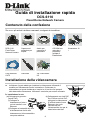
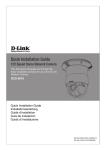
FIXED DOME NETWORK CAMERA
DCS-6110
Quick Installation Guide+
Installations-Anleitung+
Guide d’installation+
Guía de instalación+
Guida di Installazione+
Quick Installation Guide
DCS-6110
Fixed Dome Network Camera
Package Contents
If any of the items are missing, please contact your reseller.
DCS-6110
Fixed Dome
Network Camera
Dome Enclosure
Ring Enclosure
CAT5 Ethernet
Cable
Screwdriver
Screws and I/O
Connector
CD-ROM with
Manual and
Setup Wizard
Camera Installation
a. Find a suitable place to install the camera using the alignment paper.
Place the camera at the desired operating location and insert the screws
through the two holes located at the base of the camera. Use the screwdriver
to tighten and secure.
b. Network Deployment
(a)General Connection
(without PoE)
(i)Connect the network
camera to a hub via
Ethernet cable.
(ii)Connect the supplied
power cable from the
camera to a power
outlet.
(b)Connection with a PoE Hub
If using a PoE hub, connect
the IP camera to the hub via
Ethernet cable, which will
provide transmission of both
power and data over a single
cable.
1
12V Power
Adapter
c. Install the software
Turn on the computer and insert the D-Link DCS-6110 Autorun CD into the CD-ROM drive. Click on
the Installation Wizard to begin software installation.
d. Configuring Your Camera with the Installation Wizard
Run the Installation Wizard to search and setup your network camera. If you have a DHCP server on
your network, there will be a valid IP address displayed in the Installation Wizard page.
Double click the IP address and it will connect you to the network camera. Enter ‘admin’ as the
default username and leave the password blank. Click OK to continue. The live video page of the
network camera will then be displayed. For more information on using the web configuration, please
refer to the user manual.
e. Adjusting the Lens
Adjust the viewing angle by the 3-axis mechanisms. Adjust the zoom
and focus of the lens module until a clear image is achieved.
f. Attaching the Enclosures
(a)Once the lens is properly adjusted, rearrange the light shield so that it
does not obstruct the lens during surveillance.
(b)Place the dome enclosure over the IP camera so that the LED sticker
on the dome enclosure is properly aligned with the camera’s LED.
Insert the supplied screws into the two holes located at the base of
the dome enclosure, tighten until secure.
(c)Place the ring enclosure over the dome enclosure. Once placed,
gently turn the ring enclosure clockwise until it locks and is securely
attached to the dome enclosure.
Frequently Asked Questions
(1). Can the network camera be used outdoors?
The DCS-6110 Fixed Dome Network Camera is not weatherproof. It needs to be equipped with a
weatherproof case for outdoor use, however, it is not recommended.
(2). Can the network camera be connected to the network if it consists of only private IP
addresses?
The DCS-6110 Fixed Dome Network Camera can be connected to a LAN with private IP addresses.
(3). Can the network camera be installed if a firewall exists on the network?
If a firewall exists on the network, port 80 is open for ordinary data communication. The DCS-6110
uses port 554 for RTSP streaming. These ports – or the ports that you specified in the Setup Tab in
the Configuration screen – need to be opened on the firewall.
(4). Why am I unable to access the network camera from a web browser?
If a router or firewall is used on the network, the correct ports for the DCS-6110 may not be configured
on the router or firewall. To correct the problem, you need to determine if the DCS-6110 is behind a
router or firewall, and if the router or firewall is properly configured for the ports the DCS-6110 is using.
Other possible problems may be due to the network cable. Try replacing your network cable. Test the
network interface of the product by connecting a local computer to the unit, utilizing an Ethernet
crossover cable. If the problem is not resolved, there may be a malfunction with the network camera.
Technical Support
D-Link UK Technical Support over the Telephone:
0871 873 3000 (United Kingdom)
BT 10ppm (UK Pence per minute), other carriers may vary.
Times Mon-Fri 9.00am - 6.00pm Sat 10.00am - 2.00pm
+1890 886 899 (Ireland)
€0.05ppm peak, €0.045ppm off peak Times Mon-Fri 9.00am - 6.00pm Sat 10.00am - 2.00pm
D-Link UK & Ireland Technical Support over the Internet:
http://www.dlink.co.uk
ftp://ftp.dlink.co.uk
2
Schnellinstallationshandbuch
DCS-6110
Fixed-Dome-Netzwerkkamera
Paketinhalt
Wenn eines dieser Elemente fehlt, wenden Sie sich bitte an Ihren Vertriebspartner.
DCS-6110
Fixed-DomeNetzwerkkamera
Haubengehäuse
Ringgehäuse
CAT5-Ethernetkabe
l
Schraubenzieher
Schrauben und
E/A-Stecker
CD-ROM mit
Handbuch und
Setup-Assistent
12V-Stromadapter
Installation der Kamera
a. Suchen Sie mithilfe der Bohrschablone einen geeigneten Platz zur Installation
der Kamera. Platzieren Sie die Kamera am gewünschten Einsatzort und führen
Sie die Schrauben in die beiden Löcher an der Unterseite der Kamera ein. Ziehen
Sie die Schrauben mit dem Schraubenzieher fest.
b. Netzwerkimplementierung
(a) Allgemeine Verbindung
(ohne PoE)
(i) Schließen Sie die
Netzwerkkamera mit
dem Ethernetkabel an
einen Hub an.
(ii)Schließen Sie die Kamera
mit dem mitgelieferten
Stromkabel an eine
Steckdose an.
(b) Anschluss an einen PoE-Hub
Wenn Sie einen PoE-Hub
verwenden, schließen Sie die
IP-Kamera mit dem
Ethernetkabel an den Hub an,
so dass Strom und Daten über
ein einziges Kabel übertragen
werden.
3
c. Installation der Software
Schalten Sie den Computer ein und legen Sie die CD "D-Link DCS-6110 Autorun" in das CD-ROM-Laufwerk
ein. Klicken Sie auf den Installationsassistenten, um mit der Software-Installation zu beginnen.
d. Konfiguration der Kamera mit dem Installationsassistenten
Führen Sie den Installationsassistenten aus, um Ihre Netzwerkkamera zu suchen und zu konfigurieren. Wenn
in Ihrem Netzwerk ein DHCP-Server vorhanden ist, wird auf der Seite „Installationsassistent" eine gültige
IP-Adresse angezeigt.
Doppelklicken Sie auf die IP-Adresse, um sich über diese mit der Netzwerkkamera verbinden zu lassen.
Geben Sie als Standard-Benutzernamen „Admin“ ein und lassen Sie das Kennwortfeld leer. Klicken Sie zum
Fortfahren auf OK. Anschließend wird die Live-Videoseite der Netzwerkkamera angezeigt. Weitere
Informationen zur Verwendung der Webkonfiguration finden Sie im Benutzerhandbuch.
e. Einstellung der Linse
Stellen Sie den Sichtwinkel über die 3-Achsen-Mechanismen ein. Stellen Sie den
Zoom und den Fokus des Linsenmoduls ein, bis Sie ein klares Bild sehen.
f. Anbringung der Gehäuse
(a) Wenn Sie die Linse eingestellt haben, verstellen Sie den Lichtschirm so,
dass er die Sicht durch die Linse nicht versperrt.
(b) Platzieren Sie das Haubengehäuse so über der IP-Kamera, dass das
LED-Etikett auf dem Haubengehäuse bündig mit der LED der Kamera ist.
Führen Sie die mitgelieferten Schrauben in die beiden Löcher an der
Unterseite des Kuppelgehäuses
ein und ziehen Sie sie fest.
(c) Platzieren Sie das Ringgehäuse über dem Haubengehäuse. Drehen Sie das
Ringgehäuse anschließend im Uhrzeigersinn, bis es einrastet und fest mit
dem Haubengehäuse verbunden ist.
Häufig gestellte Fragen
(1). Kann die Netzwerkkamera auch im Freien verwendet werden?
Die Fixed-Dome-Netzwerkkamera DCS-6110 ist nicht wetterfest. Für eine Verwendung im Freien muss sie
mit einer wetterfesten Abdeckung ausgestattet sein. Dies wird allerdings nicht empfohlen.
(2). Kann die Netzwerkkamera mit dem Netzwerk verbunden werden, wenn dieses nur aus privaten
IP-Adressen besteht?
Die Fixed-Dome-Netzwerkkamera DCS-6110 kann an ein LAN mit privaten IP-Adressen angeschlossen
werden.
(3). Kann die Netzwerkkamera auch installiert werden, wenn das Netzwerk eine Firewall aufweist?
Wenn im Netzwerk eine Firewall vorhanden ist, ist Port 80 für normale Datenkommunikation offen. Für
RTSP-Streaming verwendet die DCS-6110 Port 554. Diese Ports – oder die Ports, die Sie auf der
Registerkarte „Setup" in der Maske "Konfiguration" angegeben haben – müssen in der Firewall geöffnet sein.
(4). Warum kann ich die Netzwerkkamera nicht von einem Webbrowser aus aufrufen?
Wenn im Netzwerk ein Router oder eine Firewall verwendet wird, können auf dem Router oder in der
Firewall die korrekten Ports für die DCS-6110 nicht konfiguriert werden. Um dieses Problem zu beheben,
müssen Sie herausfinden, ob die DCS-6110 sich hinter einem Router oder hinter einer Firewall befindet und
ob der Router oder die Firewall ordnungsgemäß für die Ports konfiguriert ist, die von der DCS-6110
verwendet werden.
Wenn sonstige Probleme auftreten, kann der Grund dafür das Netzwerkkabel sein. Tauschen Sie ggf. das
Netzwerkkabel aus. Testen Sie die Netzwerkschnittstelle des Produkts, indem Sie mit einem
Ethernet-Crossover-Kabel einen lokalen Computer an die Einheit anschließen. Wenn das Problem nicht
behoben ist, kann eine Störung der Netzwerkkamera vorliegen.
Technische Unterstützung
Web: http://www.dlink.de
E-Mail: [email protected]
Telefon: +49 (1805)2787
4
0,14€ pro Minute
Guide d'installation rapide
DCS-6110
Caméra réseau à dôme fixe
Contenu de la boîte
Contactez immédiatement votre revendeur s'il manque l'un des éléments.
DCS-6110
Caméra réseau à
dôme fixe
Boîtier du dôme
Bague du boîtier
Câble
Ethernet CAT5
Tournevis
Vis et connecteur
d'E/S
CD-ROM avec
manuel et
assistant de
configuration
Installation de la caméra
a.
Déterminez l'endroit qui vous convient le mieux pour installer la caméra
en vous aidant du gabarit d'alignement. Posez la caméra à l'endroit choisi
et insérez les vis dans les deux trous situés à la base de la caméra. Serrez
les vis à l'aide du tournevis fourni.
b. Déploiement réseau
(a)Connexion générale (sans
alimentation par Ethernet)
(i)Connectez la caméra
réseau à un
concentrateur par
l'intermédiaire du câble
Ethernet.
(ii)Branchez le câble
d'alimentation fourni à la
caméra et à une prise secteur.
(b) Connexion avec un
concentrateur Ethernet PoE
Si vous utilisez un
concentrateur Ethernet PoE
pour alimenter la caméra,
connectez celle-ci au
concentrateur à l'aide du
câble Ethernet fourni, qui
sert à la fois de câble pour
l'alimentation et les données.
5
Adaptateur
secteur 12 V
c. Installation du logiciel
Allumez l'ordinateur et insérez le CD D-Link DCS-6110 à exécution automatique dans le lecteur de
CD-ROM. Cliquez sur l'assistant d'installation pour lancer l'installation du logiciel.
d. Configuration de la caméra à l'aide de l'assistant d'installation
Exécutez l'assistant d'installation pour détecter et configurer votre caméra réseau. Si un serveur
DHCP se trouve sur votre réseau, l'assistant d'installation indique une adresse IP valide.
Double-cliquez sur l'adresse IP pour vous connecter à la caméra réseau. Tapez admin comme nom
d'utilisateur par défaut et laissez le mot de passe vide. Cliquez sur OK pour continuer. L'image vidéo
en direct de la caméra réseau s'affiche. Pour en savoir plus sur la configuration Web, consultez le
manuel de l'utilisateur.
e. Réglage de l'objectif
Réglez l'angle de vision en jouant sur le mécanisme sur 3 axes. Réglez le
zoom et la mise au point de l'objectif jusqu'à obtenir une image nette.
f. Fixation du boîtier
(a) Après avoir réglé l'objectif, ajustez l'écran protecteur de lampe de façon
à ce qu'il ne gêne pas l'objectif durant la surveillance.
(b)Placez le boîtier du dôme sur la caméra réseau de façon à aligner
l'autocollant LED du dôme avec la LED de la caméra. Insérez les vis
fournies dans les deux trous situés à la base du boîtier du dôme, puis
serrez-les.
(c)Installez la bague sur le boîtier du dôme. Ensuite, tournez délicatement
la bague dans le sens des aiguilles d'une montre pour la bloquer et
ainsi la fixer au boîtier du dôme.
Questions fréquentes
(1). Puis-je utiliser la caméra réseau en extérieur ?
La caméra réseau à dôme fixe DCS-6110 n'est pas étanche. Vous pouvez l'équiper d'un boîtier
étanche pour un usage en extérieur, même si cela reste déconseillé.
(2). Puis-je connecter la caméra au réseau si celui-ci consiste uniquement en des adresses IP
privées ?
La caméra réseau à dôme fixe DCS-6110 peut être connectée à un réseau local utilisant des
adresses IP privées.
(3). Puis-je installer la caméra réseau si le réseau est protégé par un pare-feu ?
Si un pare-feu protège le réseau, le port 80 est normalement ouvert pour permettre la transmission
de données. La caméra DCS-6110 utilise le port 554 pour la diffusion multimédia en temps réel
(RTSP). Ces ports, ou les ports que vous avez spécifiés sous l'onglet Configuration de l'écran de
configuration, doivent être ouverts dans le pare-feu.
(4). Pourquoi m'est-il impossible d'accéder à la caméra réseau depuis un navigateur Web ?
Si vous utilisez un routeur ou un pare-feu sur le réseau, il est possible que les ports utilisés par la
caméra DCS-6110 ne soient pas configurés. Pour résoudre le problème, vous devez déterminer si la
caméra DCS-6110 se trouve derrière un routeur ou un pare-feu, puis si ce dernier est bien configuré
pour les ports utilisés par la caméra.
D'autres problèmes peuvent éventuellement être dus au câble réseau. Essayez de remplacer votre
câble réseau. Testez l'interface réseau de la caméra en la reliant à un ordinateur local à l'aide d'un
câble Ethernet croisé. Si le problème persiste, il est possible que la caméra réseau fonctionne mal.
Assistance technique
Assistance technique D-Link par téléphone : 0 820 0803 03
0,12 €/min Hours : Monday - Friday 9h to 13h and 14h to 19h Saturday 9h to
13h and from 14h to 16h
Assistance technique D-Link sur internet :
http://www.dlink.fr
e-mail : [email protected]
6
Guía de instalación rápida
DCS-6110
Fixed Dome Network Camera
¿Qué contiene la caja?
Si falta cualquiera de los componentes, póngase en contacto con el proveedor.
DCS-6110
Fixed Dome
Network Camera
Carcasa domo
Carcasa circular
Cable Ethernet
CAT5
Destornillador
Tornillos y
conector de E/S
CD-ROM con
manual y
asistente de
configuración
Instalación de la cámara
a. Busque un lugar adecuado para instalar la cámara utilizando la plantilla de
alineación. Coloque la cámara en el lugar de funcionamiento que desee e
introduzca los tornillos por los dos orificios situados en la base de la cámara.
Utilice el destornillador para apretar y fijar.
b. Despliegue de la red
(a) Conexión general (sin
PoE)
(i)Conecte la cámara
de red a un terminal
vía cable Ethernet.
(ii)Conecte el cable de
alimentación
suministrado desde la
cámara a una toma de
alimentación.
(b) Conexión con un terminal
PoE
Si se utiliza un terminal PoE,
conecte la cámara IP al
terminal vía cable Ethernet,
el cuál proporcionará
transmisión eléctrica y de
datos a través de un solo
cable.
7
Adaptador de
alimentación de
12 V
c. Instalación del software
Encienda el ordenador e introduzca el CD de ejecución automática de D-Link DCS-6110 en la unidad
de CD-ROM. Haga clic en el asistente para la instalación para comenzar la instalación del software.
d. Configuración de la cámara con el asistente para la instalación
Ejecute el asistente de instalación para buscar y configurar la cámara de red. Si tiene un servidor
DHCP en la red, aparecerá una dirección IP válida en la página del asistente para la instalación.
Haga doble clic en la dirección IP y se conectará a la cámara de red. Escriba "admin" como nombre
de usuario predeterminado y deje la contraseña en blanco. Haga clic en Aceptar para continuar. Se
mostrará a continuación la página de vídeo en directo de la cámara de red. Para obtener más
información sobre cómo utilizar la configuración Web, consulte el manual del usuario.
e. Ajuste de la lente
Ajuste el ángulo de visualizacion mediante los mecanismos de los 3 ejes.
Ajuste el zoom y el enfoque del módulo de la lente hasta conseguir una
imagen nítida.
f. Colocación de las carcasas
(a) Una vez ajustada correctamente la lente, cambie la colocación de la
pantalla para que no bloquee la lente durante la vigilancia.
(b) Coloque la carcasa domo sobre la cámara IP, de modo que la
pegatina del LED en la carcasa domo esté alineada correctamente
con el LED de la cámara. Introduzca los tornillos suministrados en los
dos orificios situados en la base de la carcasa domo, apriételos hasta
que estén fijados.
(c)Coloque la carcasa circular sobre la carcasa domo. Una vez colocada,
gire suavemente la carcasa circular hacia la derecha hasta que se
bloquee y esté acoplada firmemente a la carcasa domo.
Preguntas más frecuentes
(1). ¿Puede utilizarse la cámara de red en exteriores?
La Fixed Dome Network Camera DCS-6110 no es estanca. Es necesario equiparla con una caja
impermeable para utilizarla en exteriores; sin embargo, no se recomienda.
(2). ¿Puede conectarse la cámara de red si ésta sólo incluye direcciones IP privadas?
La Fixed Dome Network Camera DCS-6110 se puede conectar a una LAN con direcciones IP privadas.
(3). ¿Puede instalarse la cámara de red si existe un cortafuegos en la red?
Si existe un cortafuegos en la red, el puerto 80 está abierto para la comunicación de datos ordinaria.
La DCS-6110 utiliza el puerto 554 para streaming de RTSP. Estos puertos, o los puertos que haya
especificado en la ficha Configuración de la pantalla, deben estar abiertos en el cortafuegos.
(4). ¿Porqué no puedo acceder a la cámara de red desde el explorador de Web?
Si se utiliza un router o un cortafuegos en la red, es posible que no estén configurados los puertos
correctos para la cámara DCS-6110 en el router o el cortafuegos. Para corregir el problema, deberá
determinar si la DCS-6110 está detrás de un router o un cortafuegos y si éstos están configurados
correctamente para los puertos que está utilizando la DCS-6110.
El resto de los problemas posibles pueden ser debidos al cable de red. Intente sustituir el cable de
red. Compruebe la interfaz de red del producto conectando un ordenador local a la unidad mediante
un cable de cruce Ethernet. Si el problema no se soluciona, puede existir un funcionamiento
defectuoso en la cámara de red.
Asistencia Técnica
Asistencia Técnica de D-Link por teléfono: +34 902 30 45 45
0,067 €/min
Lunes a Viernes de 9:00 a 14:00 y de 15:00 a 18:00
http://www.dlink.es
email: [email protected]
8
Guida di installazione rapida
DCS-6110
Fixed Dome Network Camera
Contenuto della confezione
Se uno o più articoli risultano mancanti, rivolgersi al rivenditore.
DCS-6110
Fixed Dome
Network Camera
Copertura di
protezione per
cupola
Anello per
copertura di
protezione
Cavo Ethernet
CAT5
Cacciavite
Viti e connettore
I/O
CD-ROM con
manuale e
procedura
guidata di
installazione
Alimentatore 12
V
Installazione della videocamera
a.
Individuare il punto adatto per installare la videocamera utilizzando il
modello per l'allineamento fornito in dotazione. Posizionare la
videocamera nel punto desiderato e inserire le viti nei due fori presenti
sulla base della videocamera. Utilizzare il cacciavite per serrarle e fissarle.
b. Installazione in rete
(a)Collegamento generico
(senza PoE)
(i)Collegare la
videocamera di rete a
un hub tramite il cavo
Ethernet.
(ii)Collegare un'estremità del cavo
di alimentazione fornito alla
videocamera e l'altra estremità a
una presa elettrica.
(b)Collegamento con hub PoE
Se si utilizza un hub PoE,
collegare la videocamera
IP all'hub tramite il cavo
Ethernet, che verrà
utilizzato sia per
l'alimentazione che per la
trasmissione dei dati.
9
c. Installazione del software
Accendere il computer e inserire il CD ad esecuzione automatica di D-Link DCS-6110 nell'unità CD-ROM.
Fare clic sull'Installazione guidata per avviare l'installazione del software.
d. Configurazione della videocamera con l'Installazione guidata
Eseguire l'Installazione guidata per cercare e configurare la videocamera di rete. Se in rete è disponibile un
server DHCP, nella pagina dell'Installazione guida verrà visualizzato un indirizzo IP valido.
Fare doppio clic sull'indirizzo IP per attivare il collegamento alla videocamera di rete. Immettere ‘Admin’
come nome utente predefinito e lasciare vuoto il campo relativo alla password. Fare clic su OK per
continuare. Verrà quindi visualizzata la pagina del video in diretta della videocamera di rete. Per ulteriori
informazioni sull'utilizzo della configurazione Web, fare riferimento al manuale dell'utente.
e. Regolazione della lente
Regolare l'angolo di visualizzazione agendo sui meccanismi dei tre assi.
Regolare lo zoom e la messa a fuoco del modulo lente fino a ottenere
immagini nitide.
f. Fissaggio delle coperture di protezione
(a)Una volta regolata correttamente la lente, risistemare la schermatura
luminosa in modo che non ostruisca la lente durante la sorveglianza.
(b)Posizionare la copertura di protezione della cupola sopra la videocamera IP
in modo che l'adesivo LED presente sulla copertura sia correttamente
allineato al LED della videocamera. Inserire le viti fornite nei due fori
presenti
alla base della copertura di protezione della cupola, quindi serrarle fino a
bloccarle.
(c)Posizionare l'anello della copertura di protezione sulla copertura stessa.
Una volta posizionato, ruotarlo delicatamente in senso orario finché non si
blocca e risulta fissato alla copertura di protezione della cupola.
Domande frequenti
(1). È possibile utilizzare la videocamera di rete all'esterno?
La videocamera DCS-6110 Fixed Dome Network Camera non è impermeabile. Per poterla utilizzare
all'esterno, è necessario installare un'apposita custodia impermeabile. L'utilizzo all'esterno non è tuttavia
consigliato.
(2). È possibile collegare la videocamera di rete a una rete costituita solo da indirizzi IP privati?
La videocamera DCS-6110 Fixed Dome Network Camera può essere collegata a una rete LAN costituita da
indirizzi IP privati.
(3). È possibile installare la videocamera di rete se nella rete è presente un firewall?
Se nella rete è presente un firewall, la porta 80 è aperta per le normali trasmissioni di dati. La videocamera
DCS-6110 utilizza la porta 554 per lo streaming RTSP. È pertanto necessario aprire tali porte o quelle
specificate nella scheda Configurazione della schermata relativa nel firewall.
(4). Perché non è possibile accedere alla videocamera di rete da un browser Web?
Se nella rete viene utilizzato un router o un firewall, è possibile che nel router o nel firewall non siano configurate
le porte corrette per DCS-6110. Per risolvere il problema, è necessario stabilire se DCS-6110 sia mascherato da
un router o da un firewall, nonché se il router o il firewall sia correttamente configurato per le porte utilizzate da
DCS-6110.
Altri possibili problemi possono dipendere dal cavo di rete. Provare a sostituire il cavo di rete. Eseguire il test
dell'interfaccia di rete del prodotto collegando un computer locale all'unità tramite un cavo crossover Ethernet.
Se il problema persiste, è possibile che la videocamera di rete non funzioni correttamente.
Supporto tecnico
Supporto Tecnico dal lunedì al venerdì dalle ore 9.00 alle ore 19.00 con
orario continuato
Telefono: 199400057
http://www.dlink.it/support
10
Ver.1.10 (E)
2008/08/20
625005701G
11