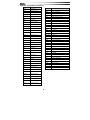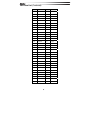
1
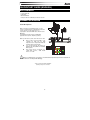
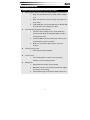
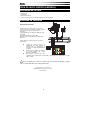
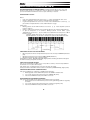
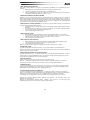
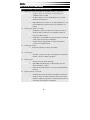
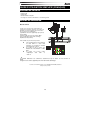
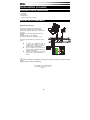
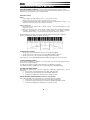
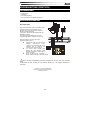
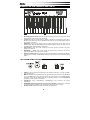
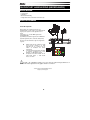
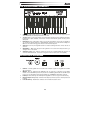
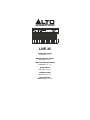
5 LIVE 25 QUICKSTART GUIDE ENGLISH ( 3 – 7 ) MANUAL DE INICIO RÁPIDO ESPAÑOL ( 8 – 12 ) GUIDE D’UTILISATION RAPIDE FRANÇAIS ( 13 – 17 ) GUIDA RAPIDA ITALIANO ( 18 – 22 ) KURZANLEITUNG DEUTSCH ( 23 – 27 ) SNELSTARTGIDS NEDERLANDS ( 28 – 32 ) QUICKSTART GUIDE (ENGLISH) BOX CONTENTS y y y y Live 25 keyboard USB cable Quickstart Guide Safety Instructions & Warranty Information booklet CONNECTION DIAGRAM Power-On Sequence When connecting your LIVE keyboard to a sound system, set all the volumes to minimum then follow the correct sequence to turn all the devices on: (1) Computer or/and other MIDI device which receives MIDI data (2) LIVE keyboard, which sends out MIDI data (3) Audio devices (mixer, amplifier, speakers) When you turn off the system, follow the reverse order. After you have connected LIVE to your computer via USB, turn the LIVE keyboard on; the computer will find it and install the drivers automatically. You can plug and play this product on Windows XP / Vista, Windows 7 and Mac OSX systems. This product will be recognized as a ”USB Audio Device”, ”USB Sound Device” or ”LIVE”. Before you make these connections, ensure that the keyboard is powered off and turn off all other devices to avoid possible damage. * Items not mentioned in BOX CONTENTS (including cables) are not included 3 TOP PANEL FEATURES 3 2 55 4 6 1 1. 2. 3. 4. 5. 6. Velocity Sensitive keys- When you play the keys on the keyboard, they will respond based on the force you produce when striking the keys. Joystick- When you release the joystick, it will automatically return to the center position. The joystick allows you to control the pitch, modulation, and aftertouch. The modulation section of the Joystick is assignable. LED indicator- This will light up when the unit is powered on. It is also used as an operational indicator. When you enter valid MIDI CC data, it will flash three times. When you enter unsupported data, it will flash twice. Shift button- This button is used along with other controls to activate more functions. OCT/TRANS + - buttons- These buttons are used to transpose or shift the octave of the keyboard up or down. Assignable slider- This slider can be assigned to send different MIDI CC data. By default, this function is assigned to send volume control (CC#7). REAR PANEL FEATURES 3 2 1 4 5 1. 2. 3. 4. 5. USB Port – This is used to USB bus power the keyboard and allows you to transfer MIDI data. MIDI Out- Connect a standard 5 pin MIDI cable to send data to a MIDI module or another keyboard’s MIDI input. If you are only using the MIDI output port, you will need to use an AC adapter (not included) to the POWER IN jack in order for this to be activated. Pedal jack- This switch type 1/8” TRS input is used to add sustain. DC IN (AC adapter power in port) - Connect an AC adapter (not included) to externally power the keyboard. Power On-Off switch - Use this switch to turn the instrument on/off. 4 ADVANCED FEATURES FACTORY RESET- If you press and hold both【-】and【+】 buttons while turning on this product, this will reset the keyboard to factory default settings. The initialization operation will also erase all user settings. TRANSPOSE AND OCTAVE z Octave: By default, you can use the【- , +】button for octave shift. When the octave is shifted, the related button indicator will be on. The octave shift range is 3 octaves. Press the【- , +】buttons simultaneously will set the octave shift to 00, and the indicator will be off. z Transpose: Press and hold down the SHIFT button while use the 【- , +】buttons. You can shift the keyboard pitch in semitones. When the transpose value is changed, the related button indicator will flash slowly. The transpose range is 12 semitones. Hold the SHIFT button and press both 【- , +】buttons simultaneously will set the transpose shift to 00, and the indicator will be off. When both octave and transpose values are changed, the related buttons will flash quickly. The default keyboard ranges of keyboard are shown below: WORKING WITH THE JOYSTICK z Move the joystick to the left/right to send the PITCHBEND message. z Move the joystick upward to send the MODULATION message. z Move the joystick downward to send the assigned message. You can use the【ASSIGN JOYSTICK】command to define the downward joystick message. USING THE PEDAL INPUT: By default, PEDAL is used with a sustain pedal and sends a CC#64 message. The data value is either 0 or 127(switch data). To change pedal type or polarity, please use the system settings function You can customize the MIDI data to be sent using the【ASSIGN PEDAL】feature SENDING BANK LSB/MSB MESSAGES: Sends the LSB (Least Significant Bit) and MSB (Most Significant Bit): 1. Hold the Shift button while pressing the keyboard's MSB or LSB key. 2. Use the keyboard's numeric keys to enter the MSB or LSB (0-127). 3. Press the keyboard's ENTER key to confirm your choice. SENDING PROGRAM CHANGE MESSAGES: Sends a MIDI message to change to a certain program number: 1. Hold the Shift button while pressing the keyboard's Program Change key. 2. Use the keyboard's numeric keys to enter the Program Change (0-127). 3. Press the keyboard's ENTER key to confirm your choice. 5 CHANGING TO ANOTHER MIDI CHANNEL: Sends a MIDI message to change to a certain MIDI Channel (default is Ch 1): 1. Hold the Shift button while pressing the keyboard's Channel key. 2. Use the keyboard's numeric keys to enter the MIDI Channel (1-16). 3. Press the keyboard's ENTER key to confirm your choice. The keyboard channel also affects the MIDI channel of the joystick, pedals and slider. SENDING A MIDI RESET MESSAGE: There are two reset keys for resetting an external MIDI device by sending a MIDI reset message. Hold the Shift button while pressing the [Reset all Controls] (sends CC#121) or [All Notes Off] (sends CC#123) key. The SHIFT indicator will then turn off and the keyboard will go to normal play mode. Make sure your MIDI device support the related MIDI reset message before using this function. ASSIGNING THE JOYSTICK: This feature is for defining the downward joystick message. 1. Hold the Shift button while pressing the [Assign Joystick] key 2. Use the numeric keys to enter the controller value (0-127). The center position of the joystick will send data 0, and the lowest position will send data 127. 3. Press the [Enter] button to send the data. ASSIGNING THE SLIDER 1. 2. 3. Hold the Shift button while pressing [Assign Slider] key. Use the numeric keys to enter the controller value (0-127) Value. The most left position of the slider will send data 0, and the most right position will send data 127. Press the [Enter] button to send the data. ASSIGNING THE PEDAL PORT 1. Hold the Shift button while pressing [Assign Pedal] key. 2. Use the numeric keys to enter the controller value (0-127) Value. 3. Press the [Enter] button to send the data. Note: Only a switch type pedal (momentary on/off footswitch) can be used for this function. PEDAL POLARITY: You can set the polarity of the switch type pedal. The default setting is “normally open”. To set this, hold the [Shift] button while pressing the【Pedal Polarity] key and the change will occur. ASSIGNING OCT/TRANS BUTTON You can assign the【- , +】buttons to default to Octave or Transpose. The default setting for the button is Octave. To set this, hold the Shift button while pressing [Oct/Trans] key. You do not need to press Enter. VELOCITY CURVE There are 10 velocity curves that can be selected ranging from 0 – 9. Operation:【SHIFT】ÖF2【Velocity Curve】Ö【Set value】and use the numeric key to select the curve value. The default velocity curve number is 1. GM/GS SWITCH With the default setting, when you first use this feature, the GS (General Synthesis) On message will be sent. When you trigger this feature again, the GM (General MIDI) On message will be sent out. Hold the [Shift] button and press the [GM/GS] button to use this. RECALL SETTINGS: The LIVE keyboard’s settings are non-volatile- its settings will be stored even if you turn the keyboard off or unplug it from its power source. You may save your settings in 10 preset banks numbered 0 – 9. You can recall one of them any time. The contents of the preset memory include: Oct/Trans setting, velocity curve, all assignments for slider, pedal etc. Recall Operation: Hold【SHIFT】press【Preset】Öset value and simply press a number key. Store Operation: Hold【SHIFT】press【Preset】+ set value simultaniously to select a register bank to store. 6 TROUBLESHOOTING Common symptoms with possible causes and solutions z After turning on the power switch, the LIVE keyboard is not powered on: 1. Make sure the USB connection is made and the computer is on. 2. Make sure the power connector is firmly connected to the 3. Faulty USB cable. Try another USB cable or different USB power outlet. port (rear port on the computer if possible) z No sound when playing the LIVE keyboard: 1. Check the volume settings of your sound module and speaker system. Move the Assignable Slider on LIVE to the right most postion. 2. Check the MIDI connection and the audio cables on your sound module/ computer soundcard. 3. Make sure you have the right settings in your music software. z Continuous long sound: 1. z Check Sustain Pedal and polarity. Incorrect voice: 1. Your sound module or software is not set properly. Initialize or restart recording software. z Wrong pitch: 1. Adjust the Octave function of the keyboard. 2. MIDI pitch is tuned in your software/sound module. Adjust fine tuning or coarse tuning. 3. Pitch bend message not returned to default, please reset. 7 GUÍA DE INICIO RÁPIDO (ESPAÑOL) CONTENIDO DE LA CAJA y y y y Teclado Live Cable USB Guía de inicio rápido Folleto de instrucciones de seguridad e información sobre la garantía DIAGRAMA DE CONEXIÓN Secuencia de encendido Cuando conecte su teclado LIVE a un sistema de sonido, ajuste todos los volúmenes al mínimo y siga la secuencia correcta para encender todos los dispositivos: (1) Computadora y/u otro dispositivo MIDI que recibe datos MIDI (2) Teclado LIVE que envía datos MIDI (3) Dispositivos de audio (mezclador, amplificador y altavoces) Cuando apague el sistema, realice la secuencia en orden inverso. Después de colectar el LIVE a su computadora por USB, encienda el teclado LIVE; la computadora lo encontrará e instalará automáticamente los drivers. Puede enchufar y utilizar este producto en sistemas Windows XP / Vista, Windows 7 y Mac OSX. Este producto será reconocido como ”USB Audio Device” (Dispositivo de audio USB), ”USB Sound Device” (Dispositivo de sonido USB) o ”LIVE”. Antes de realizar estas conexiones, asegúrese de que el teclado esté apagado y apague todos los demás dispositivos para evitar posibles daños. * Los elementos que no se mencionan en CONTENIDO DE LA CAJA (incluso los cables) no están incluidos 8 CARACTERÍSTICAS DEL PANEL SUPERIOR DE LIVE 25 3 2 55 4 6 1 1. Teclas sensibles a la velocidad- Cuando usted toca las teclas del teclado, las mismas responden en función de la fuerza que aplica al tocarlas. Palanca de mando- Cuando la suelta, la palanca de mando (joystick) vuelve automáticamente a la posición central. La palanca de mando le permite controlar el pitch, la modulación y la post-pulsación. La sección de modulación de la palanca de mando es asignable. LED indicador- Se ilumina cuando se enciende la unidad. También se usa como indicador de funcionamiento. Cuando usted ingresa datos CC MIDI válidos, destella tres veces. Cuando ingresa datos no compatibles, destella dos veces. Botón de funciones adicionales- Este botón se usa junto con otros controles para activar más funciones. Botones OCT/TRANS + - - Estos botones se usan para transponder o desplazar la octava del teclado hacia arriba o abajo. Cursor asignable- Este cursor deslizante se puede asignar para enviar distintos datos CC MIDI. Como opción predeterminada, esta función se asigna para enviar el control de volumen (CC#7). 2. 3. 4. 5. 6. CARACTERÍSTICAS DEL PANEL TRASERO 3 2 1 4 5 1. 2. 3. 4. 5. Puerto USB – Se usa para alimentar el teclado por el bus USB y le permite transferir datos MIDI. Salida MIDI- Conecte aquí un cable MIDI estándar de 5 pines para enviar datos a un módulo MIDI o a la entrada MIDI de otro teclado. Si va a utilizar sólo el puerto de salida MIDI, debe usar un adaptador de CA (no incluido) en el conector POWER IN (Entrada de alimentación) a fin de activarlo. Conector para pedal- Esta entrada TRS de 1/8” tipo interruptor se utiliza para agregar sostenido. Entrada de CC (puerto de entrada de alimentación del adaptador de CA) - Conecte aquí un adaptador de CA (no incluido) para alimentar externamente el teclado. Interruptor de encendido - Use este interruptor para encender y apagar el instrumento. 9 CARACTERÍSTICAS AVANZADAS DE LIVE 25 RESTABLECIMIENTO DE VALORES DE FÁBRICA- Si mantiene pulsado ambos botones 【-】y【+】 mientras enciende el producto, se restablecen los valores de fábrica de los parámetros del teclado. La operación de inicialización también borra todos los ajustes realizados por el usuario. TRANSPOSICIÓN Y OCTAVA Octava: • Como opción predeterminada, puede usar el botón 【- , +】para el desplazamiento de la octava. • Cuando se desplaza la octava, se enciende el indicador del botón relacionado. • La gama de desplazamiento de octava es de 3 octavas. Pulse simultáneamente los botones【- , +】 para establecer el desplazamiento de octava en 00. El indicador se apaga. Transposición: • Mantenga pulsado el botón SHIFT mientras usa los botones 【- , +】. Puede desplazar el pitch del teclado en semitonos. • Cuando se cambia el valor de transposición, el indicador del botón seleccionado destella lentamente. • La gama de transposición es 12 semitonos. Mantenga pulsado el botón SHIFT y pulse simultáneamente los botones【- , +】para establecer el desplazamiento de transposición en 00. El indicador se apaga. Cuando se cambian ambos valores, de octava y transposición, los botones relacionados destellan rápidamente. Se muestran a continuación las gamas predeterminadas del teclado: CÓMO TRABAJAR CON LA PALANCA DE MANDO • Mueva la palanca de mando a la izquierda/derecha para enviar el mensaje PITCHBEND (Inflexión de pitch). • Muévala hacia arriba para enviar el mensaje MODULATION (Modulación). • Muévala hacia abajo para enviar el mensaje asignado . Puede utilizar el comando 【ASSIGN JOYSTICK】(Asignar palanca de mando) para definir el mensaje del movimiento hacia abajo de la palanca de mando. CÓMO USAR LA ENTRADA DE PEDAL: Como opción predeterminada, el PEDAL se usa con un pedal de sostenido y envía un mensaje CC#64. El valor del dato es 0 o 127 (datos del interruptor). Para cambiar el tipo o polaridad de pedal, use la función de ajustes del sistema. Puede personalizar los datos MIDI a enviarse usando la característica【ASSIGN PEDAL】(Asignar pedal). CÓMO ENVIAR MENSAJES DE LSB/MSB DEL BANCO: Para enviar el LSB (bit menos significativo) y el MSB (bit más significativo): 1. Mantenga pulsado el botón Shift mientras pulsa la tecla de MSB o LSB del teclado. 2. Use las teclas numéricas del teclado para ingresar el MSB O LSB (0-127). 3. Pulse la tecla ENTER del teclado para confirmar su selección. ENVÍO DE MENSAJES DE CAMBIO DE PROGRAMA: Para enviar un mensaje MIDI a fin de cambiar a un determinado número de programa: 1. Mantenga pulsado el botón Shift mientras pulsa la tecla Program Change (Cambio de programa) del teclado. 2. Use las teclas numéricas del teclado para ingresar el cambio de programa (0-127). 3. Pulse la tecla ENTER del teclado para confirmar su selección. 10 CÓMO CAMBIAR A OTRO CANAL MIDI: Para enviar un mensaje MIDI a fin de cambiar a un determinado canal MIDI (la opción predeterminada es Ch 1 (Canal 1)): 1. Mantenga pulsado el botón Shift mientras pulsa la tecla Channel (Canal) del teclado. 2. Use las teclas numéricas del teclado para ingresar el canal MIDI (1-16). 3. Pulse la tecla ENTER del teclado para confirmar su selección. El canal del teclado afecta también al canal MIDI de la palanca de mando, los pedales y el cursor. CÓMO ENVIAR UN MENSAJE DE REINICIACIÓN MIDI: Existen dos teclas de reiniciación para reiniciar un dispositivo MIDI externo enviando un mensaje de reiniciación MIDI. Mantenga pulsado el botón Shift mientras pulsa la tecla [Reset all Controls] (Reiniciar todos los controles) (se envía CC#121) o [All Notes Off] (Todas las notas desactivadas) (se envía CC#123). El indicador SHIFT se apaga y el teclado vuelve al modo de reproducción normal. Antes de usar esta función, asegúrese de que su dispositivo MIDI sea compatible con el mensaje de reiniciación MIDI relacionado. CÓMO ASIGNAR LA PALANCA DE MANDO: Esta característica se usa para definir el mensaje correspondiente al movimiento descendente de la palanca de mando. 1. Mantenga pulsado el botón Shift mientras pulsa la tecla [Assign Joystick] (Asignar palanca de mando) del teclado. 2. Use las teclas numéricas para ingresar el valor del controlador (0-127). La posición central de la palanca de mando envía el dato 0 y la posición más baja el dato 127. 3. Pulse el botón [Enter] para enviar los datos. CÓMO ASIGNAR EL CURSOR 1. Mantenga pulsado el botón Shift mientras pulsa la tecla [Assign Slider] (Asignar cursor) del teclado. 2. Use las teclas numéricas para ingresar el valor del controlador (0-127). La posición del extremo izquierdo del cursor envía el dato 0 y la posición del extremo derecho el dato 127. 3. Pulse el botón [Enter] para enviar los datos. CÓMO ASIGNAR EL PUERTO DE PEDAL 1. Mantenga pulsado el botón Shift mientras pulsa la tecla [Assign Pedal] (Asignar pedal) del teclado. 2. Use las teclas numéricas para ingresar el valor del controlador (0-127). 3. Pulse el botón [Enter] para enviar los datos. Nota: Para esta función sólo se puede usar un pedal de tipo interruptor (interruptor sí/no de pedal). POLARIDAD DEL PEDAL: Es posible fijar la polaridad del pedal tipo interruptor. La opción predeterminada es “normalmente abierto”. Para fijar este parámetro, mantenga pulsado el botón [Shift] mientras pulsa la tecla 【Pedal Polarity] (Polaridad del pedal) a fin de que se produzca el cambio. CÓMO ASIGNAR EL BOTÓN DE OCTAVA/TRANSPOSICIÓN Es posible asignar los botones 【- , +】para que adopten como opción predeterminada Octave (Octava) o Transpose (Transposición). La opción predeterminada de este botón es Octava. Para fijarla, mantenga pulsado el botón Shift mientras pulsa la tecla [Oct/Trans]. No es necesario pulsar Enter. CURVA DE VELOCIDAD Existen 10 curvas de velocidad que se pueden seleccionar y que varían de 0 a 9. Operación:【SHIFT】ÖF2【Velocity Curve】(Curva de velocidad)Ö【Set value】(Fijar valor) y use la tecla numérica para seleccionar el valor de la curva. El número de curva de velocidad predeterminado es 1. CONMUTADOR GM/GS Con la opción predeterminada, cuando usa esta función por primera vez, se envía el mensaje de activación de GS (Síntesis general). Cuando dispara esta función otra vez, se envía el mensaje de activación de GM (MIDI general). Mantenga pulsado el botón [Shift] y pulse el botón [GM/GS] para usarla. RECUPERACIÓN DE VALORES DE PARÁMETROS: Los valores de parámetros del teclado LIVE son ajustes no volátiles que se almacenan incluso si usted apaga el teclado o lo desenchufa de su fuente de alimentación. Es posible guardar sus ajustes en 10 bancos predeterminados numerados de 0 a 9. Puede recuperar uno de ellos en cualquier momento. El contenido de la memoria predeterminada incluye: Ajuste Oct/Trans, curva de velocidad, todas las asignaciones del cursor, pedal, etc. Operación de recuperación: Mantenga pulsado 【SHIFT】, pulse【Preset】Ö Set value (Fijar valor) y pulse simplemente una tecla numérica. Operación de almacenamiento: Mantenga pulsado 【 SHIFT 】 , pulse 【 Preset 】 + Set value (Fijar valor) simultáneamente para seleccionar un banco de registro para almacenamiento. 11 SOLUCIÓN DE PROBLEMAS Síntomas comunes con causas posibles y soluciones z Después de conectar el interruptor de encendido, el LIVE no se enciende: 1. Asegúrese de que esté realizada la conexión USB y que la computadora esté encendida. 2. Asegúrese de que el conector de alimentación esté conectado firmemente al tomacorriente. 3. Cable USB defectuoso. Pruebe con otro cable USB defectuoso o un puerto USB diferente (el puerto trasero de la computadora, si es posible). z No hay sonido cuando se toca LIVE: 1. Compruebe los ajustes de volumen de su módulo de sonido y su sistema de altavoces. Mueva el cursor asignable de LIVE a la posición del extremo derecho. 2. Compruebe la conexión MIDI y los cables de audio de su módulo de sonido / tarjeta de sonido de la computadora. 3. Asegúrese de que tenga ajustados los valores de parámetros correctos en su software musical. z Sonido largo continuo: 1. z Compruebe el pedal de sostenido y la polaridad. Voz incorrecta: 1. Su módulo o software de sonido no están ajustados correctamente. Inicialice o reinicie el software de grabación. z Pitch incorrecto: 1. 2. Ajuste la función de octavas del teclado. El pitch MIDI está afinado para su software/módulo de sonido. Ajuste el afinado fino o grueso. 3. El mensaje de inflexión de pitch no vuelve al valor predeterminado. Reinícielo. z Algunas funciones no funcionan: 1. 2. Compruebe que el punto de división esté asignado correctamente. Asegúrese de que su software le permita tocar por varios canales. Asimismo, asegúrese de que tanto los canales del teclado como los del software estén asignados correctamente. 12 GUIDE D’UTILISATION SIMPLIFIÉ (FRANÇAIS) CONTENU DE LA BOÎTE y y y y Clavier LIVE Câble USB Guide d’utilisation simplifié Consignes de sécurité et informations concernant la garantie SCHÉMA DE CONNEXION Mise en marche Lorsque vous connectez votre clavier LIVE à un système de sonorisation, réglez tous les volumes au minimum, puis suivez l’ordre de mise en marche cidessous de tous les périphériques : (1) Ordinateur et/ou autre périphérique qui reçoit des données MIDI (2) Clavier LIVE, qui envoie des données MIDI (3) Les périphériques audio (table de mixage, amplificateur, haut-parleurs) Pour éteindre, toujours inversez l'opération. Une fois LIVE branché à votre ordinateur via USB, allumez le clavier LIVE; l'ordinateur le reconnaîtra et installera automatiquement les pilotes. Ce produit est prêt à utiliser sous Windows XP / Vista, Windows 7 et Mac OSX. Ce produit sera reconnu comme « Périphérique audio USB » ou « LIVE ». » Avant d'effectuer ces connexions, assurez-vous que le clavier est hors tension et éteignez tous les autres appareils pour éviter d'éventuels dommages. * Les items non mentionnés dans la section CONTENU DE LA BOÎTE (incluant les câbles) ne sont pas inclus. 13 CARACTÉRISTIQUES DU PANNEAU ARRIÈRE DU LIVE 25 3 2 55 4 6 1 1. 2. 3. 4. 5. 6. Touches sensibles à la dynamique - Lorsque vous jouez sur les touches du clavier, ils vont répondre en fonction de la force de la frappe. Molette – Lorsque vous relâchez le levier, il reviendra automatiquement à la position centrale. La molette vous permet de contrôler la hauteur, la modulation et l'aftertouch. La section de modulation de la molette est assignable. Indicateur DEL – La DEL s’allume lorsque l’appareil est mis sous tension. Il est également utilisé comme un indicateur opérationnel. Lorsque vous entrez des données CC MIDI valides, il clignote trois fois.Cependant, lorsque vous entrez des données CC MIDI non supportées, il clignote deux fois. Touche Shift – Ce bouton est utilisé avec d'autres commandes pour activer plus de fonctions. Touches OCT/TRANS + - - Ces touches sont utilisées pour transposer ou décaler l'octave du clavier vers le haut ou vers le bas. Curseur programmable – Ce curseur peut être assigné à envoyer des données MIDI CC différentes. Par défaut, cette fonction est assignée à envoyer un message de commande du volume (CC#7). CARACTÉRISTIQUES DU PANNEAU ARRIÈRE 3 2 1 4 5 1. 2. 3. 4. 5. Port USB – Ce port est utilisé pour l'alimentation du bus USB du clavier et vous permet de transférer des données MIDI. Sortie MIDI - Branchez un câble MIDI standard à 5 broches pour envoyer des données à un module MIDI ou une autre entrée MIDI du clavier. Si vous utilisez uniquement le port de sortie MIDI, vous devrez brancher un adaptateur secteur (non inclus) à l’entrée d’alimentation pour que ce soit activée. Entrée pédale de maintien – Cette entrée TRS 1/8 po de type commutateur permet d’ajouter une pédale de maintien (sustain). Entrée d’alimentation CC (adaptateur CA dans le port) – Connectez un adaptateur CA (non inclus) afin d’alimenter le clavier. Interrupteur Marche/Arrêt – Cet interrupteur permet de mettre l’appareil sous et hors tension. 14 FONCTIONS ÉVOLUÉES DU LIVE25 RÉINITIALISATION DES PARAMÈTRES D’USINE – Lorsque vous appuyez simultanément sur les touches 【-】et【+】 lors de la mise en marche du clavier, les paramètres d’usine sont réinitialisés. La réinitialisation supprime également tous les paramètres utilisateur. TRANSPOSITION ET OCTAVE Octave : • Par défaut, vous pouvez utiliser la touche 【-, +】 pour le changement d'octave. • Lorsque l'octave est décalée, l'indicateur de la touche correspondante sera allumé. • La plage d’octave est de 3 octaves. Lorsque vous appuyez sur les touches 【-, +】 simultanément, la plage d'octave revient à 00 et l'indicateur est éteint. Transpose : • Enfoncez et maintenez la touche SHIFT tout en utilisant les touches 【- , +】. Vous pouvez décaler la hauteur tonale du clavier par demi-tons. • Lorsque la valeur de transposition est modifiée, l'indicateur correspondant clignote lentement. • La gamme de transposition est 12 demi-tons. Lorsque la touche SHIFT est enfoncée tout en appuyant sur les deux touches【-, +】, le réglage du décalage de transposition sera à 00 et l'indicateur sera éteint. Lorsque la valeur de l’octave et de la transposition est modifiée, les indicateurs correspondants clignotent rapidement. Les gammes du clavier par défaut sont indiquées ci-dessous : UTILISATION DE LA MOLETTE (JOYSTICK) • Déplacez la molette vers la gauche/droite pour envoyer le message PITCHBEND (variation tonale). • Déplacez la molette vers le haut pour envoyer le message de MODULATION. • Déplacez la molette vers le bas pour envoyer le message assigné. Vous pouvez utiliser la commande【ASSIGN JOYSTICK】pour définir le message de la position du bas de la molette. UTILISATION DE L’ENTRÉE POUR PÉDALE : Par défaut, cette entrée est utilisée avec une pédale de maintien et envoie un message CC#64. La valeur des données est soit 0 ou 127 (commutateur de données). Pour changer de type de pédale ou la polarité, veuillez utiliser la fonction des paramètres du système. Vous pouvez personnaliser les données MIDI à envoyer en utilisant la fonction【ASSIGN PEDAL】. ENVOI DES MESSAGES BANK LSB/MSB : Cette fonction permet d’envoyer le bit le moins significatif (LSB - Least Significant Bit) et le bit le plus significatif (MSB - Most Significant Bit) : 1. Maintenez la touche Shift enfoncée tout en appuyant sur la touche MSB ou LSB du clavier. 2. Utilisez les touches numériques du clavier afin d'entrer le numéro MSB ou LSB (0 à 127). 3. Appuyez sur le bouton ENTER du clavier pour confirmer votre sélection. ACHEMINEMENT DES COMMANDES DE MODIFICATION DES PROGRAMMES : Envoie un message MIDI afin de changer de numéro de programme : 1. Maintenez la touche Shift enfoncée tout en appuyant sur la touche Program Change du clavier. 2. Utilisez les touches numériques du clavier afin d'entrer le numéro de changement de programme (0 à 127). 3. Appuyez sur le bouton ENTER du clavier pour confirmer votre sélection. 15 CHANGEMENT DE CANAL MIDI : Envoie un message MIDI afin de changer de canal MIDI (le canal par défaut est Ch 1) : 1. Maintenez la touche Shift enfoncée tout en appuyant sur la touche Channel du clavier. 2. Utilisez les touches numériques du clavier afin d'entrer le numéro de canal MIDI désiré(1-16). 3. Appuyez sur le bouton ENTER du clavier pour confirmer votre sélection. Le canal du clavier affecte également le canal MIDI de la molette, les pédales et le curseur. ACHEMINER LA COMMANDE DE RÉINITIALISATION MIDI : Il ya deux touches de réinitialisation pour réinitialiser un périphérique MIDI externe en envoyant un message de réinitialisation MIDI. Maintenez la touche Shift enfoncée tout en appuyant sur [Reset all Controls] (envoie CC#121) ou [All Notes Off] (envoie CC#123). L'indicateur SHIFT s’éteint ensuite et le clavier passe en mode de lecture normale. Assurez-vous que votre périphérique MIDI prend en charge le message de réinitialisation MIDI correspondant avant d'utiliser cette fonction. AFFECTATION DE LA MOLETTE (JOYSTICK) : Cette fonction permet de définir le message lorsque la molette est mise à la position du bas. 1. Maintenez la touche Shift enfoncée tout en appuyant sur la touche [Assign Joystick] du clavier. 2. Utilisez les touches numériques du clavier afin d'entrer la valeur du contrôleur (0 à 127). La position du centre de la molette permet d’envoyer des données 0, et la position la plus basse d’envoyer des données 127. 3. Appuyez sur la touche [Enter] pour envoyer les données. L'AFFECTATION DU CURSEUR 1. Maintenez la touche Shift enfoncée tout en appuyant sur la touche [Assign Slider]. 2. Utilisez les touches numériques du clavier afin d'entrer la valeur du contrôleur (0 à 127). La position du centre du curseur permet d’envoyer des données 0, et la position la plus à d’envoyer des données 127. 3. Appuyez sur la touche [Enter] pour envoyer les données. AFFECTATION DE L’ENTRÉE POUR PÉDALE 1. Maintenez la touche Shift enfoncée tout en appuyant sur la touche [Assign Pedal]. 2. Utilisez les touches numériques du clavier afin d'entrer la valeur du contrôleur (0 à 127). 3. Appuyez sur la touche [Enter] pour envoyer les données. Remarque : Seule une pédale de type commutateur (momentanée) peut être utilisée pour cette fonction. POLARITÉ DE LA PÉDALE : Vous pouvez régler la polarité de la pédale de type commutateur. La valeur par défaut est « normalement ouvert ». Pour le modifier, maintenez la touche [Shift] enfoncée tout en appuyant sur la touche 【Pedal Polarity] et le changement s’effectuera. AFFECTATION DE LA TOUCHE OCT/TRANS Vous pouvez affecter les touches【-, +】afin quelle soit réglées par défaut sur Octave ou sur Transpose. La valeur par défaut est Octave. Pour la modifier, maintenez la touche Shift enfoncée tout en appuyant sur la touche [Oct/Trans]. Vous n'avez pas besoin d'appuyer sur la touche Enter. RÉPONSE À LA DYNAMIQUE Il ya 10 courbes de dynamique qui peuvent être sélectionnés allant de 0 à 9. Fonctionnement : 【 SHIFT 】 ÖF2 【 Velocity Curve 】 Ö 【 Set value 】 et utiliser les touches numériques pour sélectionner la valeur de la réponse. La réponse par défaut est 1. TOUCHE GM/GS Avec le réglage par défaut, lorsque vous utilisez cette fonction, le message d’activation GS (General Synthesis On) sera envoyé. Lorsque vous déclenchez cette fonction de nouveau, le message d’activation GM (General MIDI On) sera envoyé. Maintenez la touche [Shift] enfoncée et appuyez sur le bouton [GM/GS] pour utiliser cette fonction. PARAMÈTRES DE RAPPEL Les paramètres du clavier LIVE sont non volatile, ses réglages seront stockés même si vous mettez le clavier hors tension ou le débranchez de sa source d'alimentation. Vous pouvez enregistrer vos réglages dans 10 banques de mémoire numérotées de 0 à 9. Vous pouvez rappeler l'un d'eux à tout moment. Le contenu de la mémoire des préréglages inclus : Réglages Oct/Trans, la réponse à la dynamique, toutes les affectations de curseur, de la pédale, etc. Procédure de rappel : maintenez la touche【SHIFT】enfoncée tout en appuyant sur【PresetÖ réglez la valeur et appuyer sur une touche numérique. Procédure de sauvegarde : maintenez la touche【SHIFT】enfoncée tout en appuyant sur【PresetÖ + réglez la valeur afin de sélectionner une banque de mémoire pour la sauvegarde. 16 GUIDE DE DÉPANNAGE Les symptômes communs avec les causes et solutions possibles z Après avoir l'avoir mis sous tension, le LIVE ne fonctionne pas : 1. Veuillez vous assurer que la connexion USB est correctement effectuée et que l’ordinateur est en marche. 2. Veuillez vous assurer que le câble d’alimentation est correctement branché à une prise secteur. 3. Câble USB défectueux. Essayez un autre câble USB ou un autre port USB (port arrière sur l'ordinateur, si possible) z Le LIVE ne produit pas de son : 1. Vérifiez les paramètres du volume de votre module audio et de système de sonorisation. Déplacez le curseur programmable sur le LIVE à l'extrême droite. 2. Vérifiez la connexion MIDI et les câbles audio sur votre module audio ou la carte son de votre ordinateur. 3. z Son long en continu : 1. z Assurez-vous d'avoir les bons réglages dans votre logiciel de musique. Vérifiez la pédale de maintien et la polarité. Voix incorrecte : 1. Votre module audio ou logiciel n'est pas configuré correctement. Initialisez ou redémarrez le logiciel d'enregistrement. z Mauvaise tonalité : 1. Régler la fonction Octave du clavier. 2. La tonalité MIDI doit être configurée dans votre logiciel/module audio. Procédez au réglage d'accord fin ou au réglage d'accord approximatif. 3. Message de variation tonale (pitch bend) n’est pas retourné au paramètre par défaut, s'il vous plaît réinitialiser. z Certaines fonctions ne fonctionnent pas : 1. 2. Assurez-vous que votre point de division est affecté correctement. Assurez-vous que votre logiciel vous permet de jouer sur plusieurs canaux. Assurez-vous également que les canaux du clavier et du logiciel sont correctement affectés. 17 GUIDA RAPIDA (ITALIANO) CONTENUTI DELLA CONFEZIONE y y y y Tastiera live Cavo USB Guida rapida Istruzioni di sicurezza e garanzia SCHEMA DEI COLLEGAMENTI Sequenza di accensione Al momento di collegare la tastiera LIVE ad un sistema audio, impostare tutti i volumi al minimo, quindi seguire la giusta sequenza per accendere tutti i dispositivi: (1) Computer e/o altri dispositivi MIDI che ricevono dati MIDI (2) Tastiera LIVE, che invia dati MIDI (3) Dispositivi audio (mixer, amplifcatori, casse) Al momento dello spegnimento, procedere in ordine inverso. In seguito al collegamento LIVE al computer tramite USB, accendere la tastiera LIVE; il computer la troverà e installerà i driver automaticamente. Si può effettuare il plug and play di questo prodotto su Windows XP / Vista, Windows 7 e Mac OSX. Il prodotto verrà riconosciuto come "USB Audio Device", "USB Sound Device" o "LIVE". Prima di effettuare i collegamenti, assicurarsi che la tastiera sia spenta e spegnere tutti gli altri dispositivi per evitare possibili danni. * Le voci non indicate nel CONTENUTO DELLA CONFEZIONE (inclusi i cavi) non sono in dotazione 18 CARATTERISTICHE PANNELLO SUPERIORE LIVE 25 3 2 55 4 6 1 1. 2. 3. 4. 5. 6. Tasti sensibili alla velocità - Quando si premono i tasti sulla tastiera, questi rispondono in base alla forza con la quale vengono battuti i tasti stessi. Joystick - Quando si rilascia il joystick, questo torna automaticamente in posizione centrale. Il joystick consente di regolare il pitch, la modulazione e l'aftertouch. La sezione di modulazione del Joystick è assegnabile. Indicatore a LED - Si accende all'accensione dell'apparecchio. Viene anche utilizzato come indicatore operativo. Quando si inseriscono dati MIDI CC validi, lampeggia tre volte. Quando si inseriscono dati non supportati, lampeggia due volte. Tasto Shift - Viene utilizzato insieme ad altri comandi per attivare ulteriori funzioni. Tasti OCT/TRANS + - - Questi tasti vengono utilizzati per trasporre o spostare l'ottava della tastiera verso l'alto o verso il basso. Cursore assegnabile - Questo cursore può essere assegnato per inviare dati MIDI CC diversi. In via predefinita, questa funzione è assegnata all'invio del comando di regolazione del volume (CC#7). CARATTERISTICHE PANNELLO POSTERIORE 3 2 1 4 5 1. 2. 3. 4. 5. Porta USB – Questa viene utilizzata per alimentare tramite USB la tastiera e consente di trasferire dati MIDI. Uscita MIDI - Collegare un cavo standard MIDi a 5 poli per inviare dati a un modulo MIDI o all'ingresso MIDI di un'altra tastiera. Se si utilizza unicamente la porta di uscita MIDI occorrerà utilizzare un adattatore CA (non in dotazione) collegato al jack di alimentazione POWER IN affinché questa venga attivata. Jack a pedale - Questo ingresso TRS da 1/8” a interruttore viene utilizzato per aggiungere sustain. DC IN (porta di alimentazione adattatore CA) - Collegare a questo livello un adattatore CA (non in dotazione) per alimentare esternamente la tastiera. Interruttore di accensione-spegnimento (on/off) - Servirsi di questo interruttore per accendere/spegnere l'apparecchio 19 CARATTERISTICHE AVANZATE DEL LIVE 25 RESET IMPOSTAZIONI DI FABBRICA - Tenendo premuti contemporaneamente i tasti【-】e【+】al momento di accendere il prodotto, la tastiera tornerà alle impostazioni predefinite di fabbrica. L'operazione di inizializzazione cancellerà anche tutte le configurazioni utente. TRASPONI e OTTAVA Ottava: • In via predefinita, è possibile utilizzare il tasto【- , +】per spostare le ottave. • Quando l'ottava viene spostata, il relativo indicatore del tasto sarà acceso. • La gamma di spostamento delle ottave è di 3 ottave. Premendo contemporaneamente i tasti【- , +】lo spostamento delle ottave passerà a 00, e l'indicatore sarà spento. Transpose (trasponi): • Tenere premuto il tasto SHIFT mentre si utilizzano i tasti【- , +】. Il pitch della tastiera può essere modificato in semitoni. • Quando il valore di trasposizione viene modificato, il relativo indicatore del tasto lampeggia lentamente. • La gamma di trasposizione è di 12 semitoni. Tenendo premuto il tasto SHIFT e premendo contemporaneamente i tasti【- , +】la trasposizione passerà a 00, e l'indicatore sarà spento. Quando entrambi i valori di ottave e trasposizione cambiano, i relativi tasti lampeggiano rapidamente. Le gamme predefinite della tastiera sono illustrate qui di seguito: LAVORARE CON IL JOYSTICK • Spostare il joystick verso sinistra/destra per inviare il messaggio PITCHBEND. • Spostare il joystick verso l'alto per inviare il messaggio MODULATION (modulazione). • Spostare il joystick verso il basso per inviare il messaggio assigned (assegnato).. Si può utilizzare il comando【ASSIGN JOYSTICK】per definire il messaggio verso il basso del joystick. USO DELL'INGRESSO A PEDALE: In via predefinita, il PEDALE viene utilizzato con un pedale sustain e invia un messaggio CC#64. Il valore dei dati è pari a 0 o 127 (dati interruttore). Per cambiare tipo di pedale o polarità, servirsi della funzione di configurazione di sistema È possibile personalizzare i dati MIDI da inviare servendosi della funzione【ASSIGN PEDAL】 INVIO MESSAGGI BANK LSB/MSB: Invia LSB (Least Significant Byte - byte meno significativo) ed MSB (Most Significant Byte - byte più significativo): 1. Tenere premuto il tasto Shift premendo il tasto MSB o LSB della tastiera. 2. Servirsi dei tasti numerici della tastiera per inserire MSB o LSB (0-127). 3. Premere il tasto ENTER (Invio) della tastiera per confermare la scelta. INVIO DI MESSAGGI PROGRAM CHANGE (cambiamento di programma): Invia un messaggio MIDI rivolto al cambiamento di un determinato numero di programma: 1. Tenere premuto il tasto Shift premendo il tasto Program Change della tastiera. 2. Servirsi dei tasti numerici della tastiera per entrare in modalitä Program Change (0-127). 3. Premere il tasto ENTER (Invio) della tastiera per confermare la scelta. 20 PASSARE AD UN ALTRO CANALE MIDI: Invia un messaggio MIDI per passare ad un determinato canale MIDI (quello predefinito è il Ch 1): 1. Tenere premuto il tasto Shift premendo il tasto Channel della tastiera. 2. Servirsi dei tasti numerici della tastiera per inserire il canale MIDI desiderato (1-16). 3. Premere il tasto ENTER (Invio) della tastiera per confermare la scelta. Il canale della tastiera influenza anche il canale MIDI del joystick, dei pedali e del cursore. INVIO DI UN MESSAGGIO MIDI RESET: Sono presenti due tasti reset per l'azzeramento di un dispositivo MIDI esterno inviando un messaggio di reset MIDI. Tenere premuto il tasto Shift premendo il tasto [Reset all Controls] (invia CC#121) o [All Notes Off] (invia CC#123). L'indicatore SHIFT si spegne e la tastiera torna alla modalità di riproduzione normale. Assicurarsi che il dispositivo MIDI supporti il relativo messaggio MIDI reset prima di utilizzare questa funzione. ASSEGNAZIONE DEL JOYSTICK: questa funzione serve a definire il messaggio del joystick verso il basso. 1. Tenere premuto il tasto Shift premendo il tasto [Assign Joystick]. 2. Servirsi dei tasti numerici per inserire il valore del controller (0-127). La posizione centrale del joystick invierà dati 0, e la posizione più bassa invierà dati 127. 3. Premere il tasto [Enter] per inviare i dati. ASSEGNAZIONE DEL CURSORE 1. Tenere premuto il tasto Shift premendo il tasto [Assign Slider]. 2. Servirsi dei tasti numerici per inserire il valore del controller (0-127). La posizione all'estrema sinistra del joystick invierà dati 0, e la posizione all'estrema destra invierà dati 127. 3. Premere il tasto [Enter] per inviare i dati. ASSEGNAZIONE DELLA PORTA DEL PEDALE 1. Tenere premuto il tasto Shift premendo il tasto [Assign Pedal]. 2. Servirsi dei tasti numerici per inserire il valore del controller (0-127). 3. Premere il tasto [Enter] per inviare i dati. Nota bene: per questa funzione è unicamente possibile servirsi di un interruttore a pedale (interruttore a pedale di accensione/spegnimento temporaneo). POLARITÀ DEL PEDALE: È possibile impostare la polarità dell'interruttore a pedale. La configurazione predefinita è "normalmente aperto". Per impostare questa configurazione, tenere premuto il tasto [Shift] premendo contemporaneamente il tasto [Pedal Polarity] e il cambiamento avrà luogo. ASSEGNAZIONE DEL TASTO OCT/TRANS È possibile assegnare i tasti【- , +】in via predefinita ad Octave (ottava) o Transpose (trasponi). La configurazione predefinita del tasto è Octave. Per impostarlo, tenere premuto Shift premendo il tasto [Oct/Trans]. Non occorre premere Enter (Invio). CURVA DI VELOCITÀ Possono essere selezionate 10 curve di velocità, da 0 – 9. Uso:【SHIFT】ÖF2【Velocity Curve】Ö【Set value】e servirsi dei tasti numerici per selezionare il valore della curva. Il numero predefinito della curva di velocità è 1. INTERRUTTORE GM/GS Con la configurazione predefinita, la prima volta in cui si utilizza questa funzione, verrà inviato il messaggio GS (General Synthesis) On. Quando si attiva nuovamente questa funzione, verrà inviato il messaggio GM (General MIDI) On. Tenere premuto il tasto [Shift] e premere il tasto [GM/GS] per utilizzarla. RICHIAMARE LE IMPOSTAZIONI: Le impostazioni della tastiera del LIVE sono non volatili: le sue configurazioni saranno memorizzate anche se si spegne la tastiera o se la si scollega dall'alimentazione. Le impostazioni possono essere salvate in banchi da 10 preset numerati da 0 a 9. Questi possono essere richiamati in qualsiasi momento. I contenuti della memoria dei preset include: impostazione Oct/Trans, curva di velocità, tutte le assegnazioni per cursore, pedale, ecc. Richiamare le operazioni: tenere premuto【SHIFT】premere il valore【Preset】Öimpostato e premere un tasto numerico. Memorizzare le operazioni: tenere premuto 【 SHIFT 】 premere 【 Preset 】 + valore predefinito simultaneamente per selezionare un banco registrato da memorizzare. 21 RISOLUZIONE DI PROBLEMI Sintomi comuni con possibili cause e soluzioni z Dopo aver acceso l'interruttore di alimentazione, il LIVE non si accende: 4. Assicurarsi di aver effettuato il collegamento USB e che il computer sia acceso. 5. Assicurarsi che il connettore di alimentazione sia ben inserito nella presa. 6. Cavo USB guasto. Provare un altro cavo USB o una porta USB diversa (se possibile, porta posteriore del computer) z Nessun suono quando si suona il LIVE: 4. Verificare le impostazioni del volume del modulo audio e del sistema di altoparlanti/casse. Spostare il cursore assegnabile del LIVE all'estrema destra. 5. Verificare il collegamento MIDI e i cavi audio del modulo audio / la scheda audio del computer. 6. Assicurarsi che il software musicale presenti le giuste configurazioni. z Suono lungo continuo: 2. z Verificare il pedale Sustain e la polarità. Voce errata: 2. Il modulo audio o il software non sono configurati adeguatamente. Inizializzare o riavviare il software di registrazione. z Pitch errato: 4. Regolare la funzione Ottava sulla tastiera. 5. Il pitch MIDI è sintonizzato nel software/modulo audio. Sistemare la regolazione fine o quella grossolana. 6. Il messaggio di bend del pitch non è tornato al valore predefinito, resettare. z Alcune funzioni non funzionano: 1. Assicurarsi che il punto di divisione (split) sia stato assegnato correttamente. 2. Assicurarsi che il software consenta di suonare su più canali. Inoltre, assicurarsi che sia i canali della tastiera che quelli del software siano assegnati correttamente. 22 KURZANLEITUNG (DEUTSCH) LIEFERUMFANG y y y y Live-Keyboard USB-Kabel Schnellstart-Anleitung Sicherheitshinweise und Garantieinformationen ANSCHLUSSÜBERSICHT Einschaltsequenz Wenn Sie Ihr LIVE-Keyboard mit einem Audio-System verbinden, stellen Sie alle Lautstärken auf das Minimum und befolgen dann beim Einschalten der Geräte die richtige Reihenfolge: (1) Computer oder/und ein anderes MIDI-Gerät, das MIDI-Daten empfängt (2) LIVE-Keyboard, das MIDI-Daten aussendet (3) Audio-Geräte (Mixer, Verstärker, Lautsprecher) Beim Ausschalten des Systems gehen Sie in umgekehrter Reihenfolge vor. Nachdem Sie LIVE über USB an Ihren Computer angeschlossen haben, schalten Sie das LIVE-Keyboard ein; der Computer wird es erkennen und automatisch die Treiber installieren. Sie können dieses Produkt unter Windows XP / Vista, Windows 7 und Mac OS X-Systemen im Plug-and-PlayBetrieb verwenden. Dieses Produkt wird als "USB-AudioGerät", "USB-Sound-Gerät" oder "LIVE" erkannt. Bevor Sie diese Verbindungen herstellen: Vergewissern Sie sich, dass das Keyboard ausgeschaltet ist und schalten Sie alle anderen Geräte aus, um mögliche Schäden zu vermeiden. * Produkte, die nicht im LIEFERUMGANG erwähnt werden (inklusive Kabel), sind nicht im Lieferumfang enthalten 23 ELEMENTE AN DER OBERSEITE DES LIVE 25 3 2 55 4 6 1 1. 2. 3. 4. 5. 6. Anschlagdynamische Tasten- Wenn Sie die Tasten am Keyboard spielen, reagieren diese auf die Anschlagstärke, mit der Sie die Tasten anschlagen. Joystick- Wenn Sie den Joystick loslassen, springt er automatisch in die mittlere Position zurück. Mit dem Joystick können Sie Tonhöhe, Modulation und Aftertouch steuern. Der Modulations-Bereich des Joysticks ist zuweisbar. LED-Anzeige- Diese Anzeige leuchtet, wenn das Gerät eingeschaltet ist. Sie dient auch als Betriebsanzeige. Wenn Sie gültige MIDI CC-Daten eingeben, blinkt sie dreimal auf. Wenn Sie nicht unterstützte Daten eingeben, blinkt sie zweimal auf. Umschalt-Taste- Diese Taste wird zusammen mit anderen Controls verwendet, um weitere Funktionen zu aktivieren. OKT/TRANS + - Tasten- Diese Tasten werden zur Transponierung verwendet, oder um das Keyboard eine Oktave höher oder tiefer einzustellen. Belegbarer Schieberegler- Diesem Schieberegler kann das Senden von verschiedenen MIDI CCDaten zugewiesen werden. Standardmäßig sendet diese Funktion Daten für die Lautstärkeregelung (CC#7). ELEMENTE DER RÜCKSEITE 3 2 1 4 5 1. 2. 3. 4. 5. USB-Port - Dies ermöglicht das Keyboard über den USB-Bus mit Strom zu versorgen oder MIDIDaten zu übertragen. MIDI Out- Schließen Sie ein handelsübliches 5-poliges MIDI-Kabel an, um Daten an ein MIDI-Modul oder an den MIDI-Eingang eines anderen Keyboards zu senden. Wenn Sie nur den MIDI-Ausgang verwenden, müssen Sie ein Netzteil (nicht im Lieferumfang enthalten) an den NETZEINGANG anschließen, um diese Funktion zu aktivieren. Pedal-Buchse- Dieser schalterähnliche 1/8"-TRS-Eingang wird verwendet, um Sustain hinzuzufügen. DC-EINGANG (Stromversorgung über angeschlossenes Netzteil) - Schließen Sie ein Netzteil (nicht im Lieferumfang enthalten) an, um das Keyboard extern mit Strom zu versorgen. Ein-/Aus-Schalter - Mit diesem Schalter schalten Sie das Gerät ein/aus. 24 ERWEITERTE FUNKTIONEN DES LIVE-25 WERKSEINSTELLUNG- Wenn Sie die Tasten 【-】 und 【+】 gleichzeitig drücken, während Sie das Gerät einschalten, wird das Keyboard auf die Werkseinstellung zurückgesetzt. Beim Initialisierungsablauf werden auch alle Benutzer-Einstellungen gelöscht. TRANSPOSITION und OKTAVE Oktave: • • • Standardmäßig können Sie die Tasten 【-, +】 verwenden, um die Oktave zu wechseln. Wenn die Oktave verschoben wird, wird dies von der entsprechenden Tastenanzeige indiziert. Der gesamte Oktavenbereich umfasst 3 Oktaven. Wenn Sie die Tasten 【-, +】 gleichzeitig drücken, so wird die Oktavenverschiebung auf 00 gesetzt und die Anzeige ausgeschaltet. Transposition: • Halten Sie die UMSCHALT-Taste gedrückt während Sie die Tasten 【-, +】verwenden. Sie können die Tonhöhe des Keyboards in Halbtonschritten anheben oder absenken. • Wird der Transpositionswert geändert, blinkt die entsprechende Tastenanzeige langsam auf. • Der Transpositionsbereich umfasst 12 Halbtöne. Wenn Sie die UMSCHALT-Taste halten und dabei gleichzeitig die Tasten 【-, +】 drücken, wird die Transposition auf 00 gesetzt und die Anzeige ausgeschaltet. Wenn sowohl der Oktaven- als auch der Transpositionswert geändert wird, blinken die entsprechenden Tastenanzeigen schnell auf. Die Standard-Bereiche des Keyboards sind unten dargestellt: ARBEITEN MIT DEM JOYSTICK • Bewegen Sie den Joystick nach links/rechts, um einen PITCHBEND-Befehl zu senden. • Bewegen Sie den Joystick nach oben, um einen MODULATIONS-Befehl zu senden. • Bewegen Sie den Joystick nach unten, um den zugeordneten Befehl zu senden. Sie können den Befehl 【JOYSTICK ZUWEISEN】 verwenden, um die Nachricht zu definieren, die gesendet wird, wenn der Joystick nach unten bewegt wird. VERWENDUNG DES PEDALEINGANGS: Standardmäßig wird PEDAL mit einem Sustain-Pedal benutzt und sendet einen CC#64-Befehl. Der Datenwert beträgt entweder 0 oder 127 (Switch-Daten). Um den Pedal-Typ oder die Polarität zu ändern, benutzen Sie bitte die Systemeinstellungsfunktion Sie können die zu sendenden MIDI-Daten mit der Funktion 【PEDAL ZUWEISEN】 individuell anpassen SENDEN VON BANK LSB-/MSB-BEFEHLEN: Sendet das LSB (Least Significant Bit - niedrigstwertiges Bit) und das MSB (Most Significant Bit höchstwertiges Byte): 1. Halten Sie die Umschalt-Taste gedrückt während Sie am Keyboard die Taste MSB oder LSB drücken. 2. Benutzen Sie die numerischen Tasten des Keyboards, um den MSB oder LSB (0-127) einzugeben. 3. Drücken Sie die ENTER-Taste des Keyboards, um Ihre Wahl zu bestätigen. SENDEN VON PROGRAMMWECHSEL-BEFEHLEN: Sendet einen MIDI-Befehl, um eine bestimmte Programm-Nummer zu ändern: 1. Halten Sie die Umschalt-Taste gedrückt während Sie die Taste Programmwechsel am Keyboard drücken. 2. Benutzen Sie die numerischen Tasten des Keyboards, um den Programmwechsel (0-127) einzugeben. 3. Drücken Sie die ENTER-Taste des Keyboards, um Ihre Wahl zu bestätigen. 25 WECHSEL AUF EINEN ANDEREN MIDI-KANAL: Sendet einen MIDI-Befehl, um einen bestimmten MIDI-Kanal (Standard: Ch 1) zu ändern: 1. Halten Sie die Umschalt-Taste gedrückt während Sie die Taste Kanal am Keyboard drücken. 2. Benutzen Sie die numerischen Tasten des Keyboards, um den gewünschten MIDI-Kanal (1-16) einzugeben. 3. Drücken Sie die ENTER-Taste des Keyboards, um Ihre Wahl zu bestätigen. Der Keyboard-Kanal wirkt sich auch auf den MIDI-Kanal des Joysticks, der Pedale und des Schiebereglers aus. SENDEN DES BEFEHLS MIDI-ZURÜCKSETZEN: Es gibt zwei Zurücksetzen-Tasten, um ein externes MIDI-Gerät durch das Senden des Befehls MIDI-Zurücksetzen zurückzusetzen. Halten Sie die Umschalt-Taste gedrückt während Sie die Taste [Alle Controls Zurücksetzen] (sendet CC#121) oder [Alle Noten Aus] (sendet CC#123) drücken. Der UMSCHALT-Indikator wird dann ausgeschaltet und das Keyboard springt in den normalen Abspielmodus zurück. Achten Sie darauf, dass Ihr MIDI-Gerät den damit verbundenen Befehl MIDI-Zurücksetzen unterstützt, bevor Sie diese Funktion anwenden. ZUWEISEN DES JOYSTICKS: Diese Funktion dient der Konfiguration des Befehls, wenn der Joystick nach unten bewegt wird. 1. Halten Sie die Umschalt-Taste gedrückt, während Sie die Taste [Joystick Zuweisen] drücken 2. Verwenden Sie die numerischen Tasten, um den Controller-Wert (0-127) einzugeben. Die Mittelstellung des Joysticks sendet den Wert 0, und die niedrigste Position sendet den Wert 127. 3. Drücken Sie die [Enter]-Taste, um die Daten zu senden. ZUWEISEN DES SCHIEBEREGLERS 1. Halten Sie die Umschalt-Taste gedrückt, während Sie die Taste [Schieberegler Zuweisen] drücken. 2. Verwenden Sie die numerischen Tasten, um den Controller-Wert (0-127) einzugeben. Die SchiebereglerPosition ganz links sendet den Wert 0, die Position ganz rechts sendet den Wert 127. 3. Drücken Sie die [Enter]-Taste, um die Daten zu senden. ZUWEISEN DES PEDAL-PORTS 1. Halten Sie die Umschalt-Taste gedrückt, während Sie die Taste [Pedal Zuweisen] drücken 2. Verwenden Sie die numerischen Tasten, um den Controller-Wert (0-127) einzugeben. 3. Drücken Sie die [Enter]-Taste, um die Daten zu senden. Hinweis: Für diese Funktion kann nur ein schalterähnliches Pedal (vorübergehendes Ein-/Ausschalten über Fußschalter) verwendet werden. PEDALPOLARITÄT: Sie können die Polarität des schalterähnlichen Pedals einstellen. Die Standardeinstellung steht auf "offen". Um dies einzustellen, halten Sie die [Umschalt]-Taste gedrückt, während Sie die Taste 【Pedalpolarität] drücken und die Einstellung wird entsprechend geändert. ZUWEISEN DER TASTE OKT/TRANS Die können die Tasten 【-, +】zuweisen, um standardmäßig die Funktionen Oktave oder Transposition auszuführen. Die Standardeinstellung für diese Taste ist Oktave. Um dies einzustellen, halten Sie die Umschalt-Taste gedrückt, während Sie die Taste [Okt/Trans] drücken. Die Enter-Taste muss nicht gedrückt werden. ANSCHLAGDYNAMIK-KURVE Es gibt 10 wählbare Anschlagdynamik-Kurven von 0 – 9. Vorgang: 【 UMSCHALTEN 】 ÖF2 【 Anschlagdynamik-Kurve 】 Ö 【 Wert Einstellen 】 . Verwenden Sie die numerischen Tasten, um den Kurvenwert auszuwählen. Der standardmäßige Wert der Anschlagdynamik-Kurve ist 1. GM/GS-SCHALTER Wenn Sie diese Funktion zum ersten Mal nutzen, wird standardmäßig der GS-Befehl Ein gesendet. (General Synthesis) Wenn Sie diese Funktion erneut aufrufen, wird der GM-Befehl Ein gesendet (General MIDI). Halten Sie die [Umschalt]-Taste gedrückt und drücken Sie die Taste [GM/GS], um dies zu verwenden. AUFRUFEN DER EINSTELLUNGEN: Die Einstellungen des LIVE Keyboards sind permanent - die Einstellungen werden gespeichert, auch wenn Sie das Keyboard ausschalten oder von der Stromquelle trennen. Sie können Ihre Einstellungen in 10 Preset-Banken mit den Nummern 0 – 9 speichern. Sie können jederzeit eine dieser Einstellungen aufrufen. Die Paramenter des PresetSpeichers umfassen: Okt-/Trans-Einstellung, Anschlagdynamik-Kurve, alle Zuweisungen für den Schieberegler, das Pedal etc. Aufruffunktion: Halten Sie 【Umschalten】 gedrückt, drücken Sie 【PRESET】Ö, wählen Sie den Wert und drücken einfach eine numerische Taste. Speicherfunktion: Halten Sie 【UMSCHALTEN】gedrückt, drücken Sie 【Preset】 + stellen Sie gleichzeitig den Wert ein, um eine Bank zum Speichern auszuwählen. 26 FEHLERBEHEBUNG Häufige Fehlersymptome mit möglichen Ursachen und Lösungen z Nach dem Einschalten des Netzschalters schaltet sich LIVE nicht ein: 1. Vergewissern Sie sich, dass die USB-Verbindung hergestellt wurde und Ihr Computer eingeschaltet ist. 2. Achten Sie darauf, dass das Netzteil ordnungsgemäß mit der Steckdose verbunden ist. 3. Fehlerhaftes USB-Kabel. Versuchen Sie ein anderes USB-Kabel oder einen anderen USB-Anschluss zu verwenden (idealerweise an der Rückseite des Computers) z Kein Ton beim Spielen am LIVE: 1. Überprüfen Sie die Lautstärke-Einstellungen Ihres Sound-Moduls und am Lautsprecher-System. Bewegen Sie den zuweisbaren Schieberegler am LIVE auf die Position ganz rechts. 2. Überprüfen Sie die MIDI-Verbindung und die Audio-Kabel an Ihrem SoundModul / Ihrer Computer-Soundkarte. 3. Stellen Sie sicher, dass Sie die richtigen Einstellungen in Ihrer Musiksoftware vorgenommen haben. z Anhaltender, langer Ton: 1. z Überprüfen Sie das Sustain-Pedal und die Polarität. Falsche Stimme: 1. Ihr Sound-Modul oder Ihre Software ist nicht richtig eingestellt. Initialisieren oder starten Sie Ihre Aufnahme-Software neu. z Falsche Tonhöhe: 1. 2. Passen Sie die Oktaven-Funktion des Keyboards an. MIDI-Tonhöhe ist in Ihrer Software / Ihrem Sound-Modul verstimmt. Passen Sie die Feinabstimmung oder Grobabstimmung an. 3. Der Pitch-Bend-Befehl ist nicht auf die Ausgangsposition zurückgesprungen, bitte setzen Sie das Gerät zurück. z Einige Funktionen funktionieren nicht: 1. 2. Überprüfen Sie, ob Ihr Spalt-Punkt korrekt zugeordnet ist. Achten Sie darauf, dass Sie in Ihrer Software auf mehreren Kanälen spielen können. Stellen Sie außerdem sicher, dass sowohl die Tastatur- als auch die Software-Kanäle richtig zugeordnet sind. 27 QUICKSTART HANDLEIDING (NEDERLANDS) DOOS INHOUD y y y y Live keyboard USB kabel Quickstart Handleiding Veiligheidsinstructies & Garantie Informatie boekje AANSLUITSCHEMA Power-On Sequentie Bij het sluiten van uw LIVE keyboard aan een geluidsinstallatie, zet alle volumes op het minimum dan volg de juiste sequentie om alle apparaten aan te zetten: (1) Computer en / of andere MIDI-apparaat dat ontvangt MIDI data (2) LIVE keyboard, dat het volgende uit zet: MIDI data (3) Audio-apparaten (mixer, versterker, luidsprekers) Als u het systeem uitschakelt, volgt u de omgekeerde volgorde. Nadat u LIVE aan uw computer via USB heeft gesloten, schakelt u de LIVE keyboard aan; de computer zal het vinden en installeert het drivers automatisch. U kunt dit product automatisch aansluiten en afspelen op Windows XP / Vista, Windows 7 en Mac OSX systemen. Dit product zal worden herkend als een 'USB Audio Device "," USB Sound Device "of" LIVE ". Voordat u de verbindingen maakt, zorg ervoor dat het keyboard uitgeschakeld is en schakel alle andere apparaten om mogelijke schade te voorkomen. * Stukken die niet in DOOS INHOUD (inclusief kabels) zijn niet inbegrepen 28 LIVE 25 BOVENPANEEL KENMERKEN 3 2 55 4 6 1 1. 2. 3. 4. 5. 6. Aanslaggevoelige toetsen- Wanneer u de toetsen op het keyboard speelt, zal ze reageren op basis van de kracht dat u uit oefent bij het raken van het toetsen. Joystick- Wanneer u de joystick loslaat, zal het automatisch terugkeren naar de middenpositie. Met de joystick kunt u de pitch, modulatie, en after-touch controleren. De modulatie gedeelte van de joystick is aanwijsbaar. LED indicator- Deze gaat branden wanneer het toestel ingeschakeld is. Het wordt ook gebruikt als een operationele indicator. Wanneer u geldige MIDI CC gegevens invoert, zal het drie keer knipperen. Wanneer u niet ondersteund gegevens invoert, zal het twee keer knipperen. Shift knop- Deze knop wordt gebruikt samen met andere besturingselementen om meer functies te activeren. OCT/TRANS + - knop- Deze knoppen worden gebruikt om het octaaf van het keyboard omhoog of omlaag te zetten of verschuiven. Aanwijsbare slider- Deze slider kan aangewezen worden om verschillende MIDI CC gegevens te verzenden. Standaardwaarde - deze functie is toegewezen om het volume aan te sturen (CC#7). ACHTERPANEEL KENMERKEN 3 2 1 4 5 1. 2. 3. 4. 5. USB Port – Dit wordt gebruikt om het toetsenbord aan te drijven en geeft u de mogelijkheid in om MIDI data te verzenden. MIDI Out- Sluit een standaard 5 pins MIDI-kabel aan om gegevens te verzenden naar een MIDImodule of een andereMIDI input van het keyboard. Als u uitsluitend gebruik maakt van de MIDI output poort, moet u een AC-adapter (niet inclusief) gebruiken om de POWER IN aansluiting te activeren. Pedaal jack- Deze switch type 1/8" TRS-input wordt gebruikt voor het toevoegen van ondersteuning. DC IN (AC adapter in de poort) - Verbind een AC-adapter (niet inclusief) om het extern keyboard aan te drijven. Power On-Off knop - Gebruik deze schakelaar om het instrument aan/uit te zetten. 29 LIVE 25 GEAVANCEERDE KENMERKEN FACTORY RESET- Als u op beide knoppen 【-】and【+】 tegelijkertijd in drukt, zal dit het toetsenbord naar de fabrieksinstellingen terug zetten. De initialisatie operatie wordt tevens alle gebruikersinstellingen wissen. TRANSPOSE EN OCTAAF Octaaf: • Standaard kunt u de 【- , +】knop gebruiken voor octaaf shift. • Wanneer het octaaf wordt verschoven, zal de betreffende knopindicator aangaan. • De octaafverschuiving bereik is drie octaven. Drukken op de 【-, +】 toetsen tegelijkertijd, doet het octaaf verschuiven naar 00, en de indicator zal dan uitgaan. Transpose: • Houd de SHIFT knop terwijl u gebruik maakt van de 【-, +】 toetsen. U kunt het keyboard toonhoogte in halve tonen verschuiven. • Wanneer de transpose waarde is gewijzigd, zal de betreffende knop indicator langzaam knipperen. • De transpose bereik is 12 halve tonen. Houd de SHIFT knop in en druk tegelijkertijd op de 【-, + 】 toetsen, dan zal de transpose verschuiven naar 00, en de indicator zal dan uitgaan. Wanneer zowel octaaf en omzetten waarden zijn gewijzigd, zal de betreffende knoppen snel knipperen. De standaard keyboard bereik van het keyboard, wordt hieronder weergegeven: WERKEN MET DE JOYSTICK • Beweeg de joystick naar links / rechts om de PITCHBEND bericht te verzenden. • Beweeg de joystick opwaarts om de MODULATIE bericht te verzenden. • Beweeg de joystick neerwaarts om het aangewezen bericht te zenden. U kunt gebruik maken van de 【ASSIGN JOYSTICK】commando om de neerwaartse joystick bericht te definiëren. GEBRUIKMAKING VAN DE PEDAAL INPUT: Standaard wordt PEDAAL gebruikt met een ondersteunend pedaal en stuurt een CC # 64 bericht. De gegevens waarde is 0 of 127 (switch data). Voor het wijzigen pedaal type of polariteit, gebruik dan de systeeminstellingen functie U kunt de MIDI data die verzonden moet worden via de【ASSIGN PEDAL】functie aanpassen VERZENDEN VAN BANK LSB/MSB BERICHTEN: Stuurt de LSB (Least Significant Bit) en MSB (Most Significant Bit): 1. Houd de Shift knop ingedrukt, terwijl u op de MSB of LSB knop van het keyboard indrukt. 2. Gebruik de numerieke toetsen van het keyboard om de MSB of LSB (0-127) in te voeren. 3. Druk op de ENTER knop van het keyboard om uw keuze te bevestigen. VERZENDEN PROGRAM CHANGE BERICHTEN: Stuurt een MIDI bericht om over te schakelen naar een bepaald programmanummer: 1. Houd de Shift toets ingedrukt, terwijl u op het keyboard Program Change toets indrukt. 2. Gebruik de numerieke toetsen van het keyboard om de Program Change (0-127) in te voeren. 3. Druk op het keyboard ENTER toets om uw keuze te bevestigen. OVERGANG VAN EEN MIDI KANAAL NAAR DE ANDERE: Stuurt een MIDI bericht om over te schakelen naar een bepaald MIDI Kanaal (standaard is Ch 1): 1. Houd de Shift toets ingedrukt, terwijl u op het keyboard Channel toets indrukt. 2. Gebruik de numerieke toetsen van het keyboard om de MIDI Channel (1-16) in te voeren. 3. Druk op het keyboard ENTER toets om uw keuze te bevestigen. Het keyboard kanaal beïnvloedt ook de MIDI kanaal van de joystick, pedalen en slider. 30 VERZENDEN VAN EEN MIDI RESET BERICHT: Er zijn twee reset toetsen voor het resetten van een extern MIDI-apparaat voor het sturen van een MIDI reset bericht. Houd de Shift toets ingedrukt, terwijl u op het keyboard [Reset all Controls] (stuurt CC#121) of [All Notes Off] (stuurt CC#123) toets indrukt. De SHIFT indicator zal dan uitgeschakeld worden en het keyboard zal naar de normale afspeel stand gaan. Zorg ervoor dat uw MIDI-apparaat de daarmee verband houdende MIDI reset bericht ondersteunt, voordat u deze functie gaat gebruiken. JOYSTICK AANWIJZEN: Deze functie is voor het definiëren van de neerwaartse joystick bericht. 1. Houdt de Shift knop ingedrukt, terwijl u op de [ASSIGN Joystick] toets indrukt 2. Gebruik de numerieke toetsen op de controller-waarde (0-127) in te voeren. De middenstand van de joystick zal data 0 en de laagste stand data 127 sturen. 3. Druk op de [Enter] knop om de data te verzenden. SLIDER AANWIJZEN 1. Houdt de Shift knop ingedrukt, terwijl u op de [Assign Slider] toets indrukt. 2. Gebruik de numerieke toetsen om de controller-waarde (0-127) in te voeren. De meest linkse positie van de slider zal data 0 en de meest rechtse positie zal data 127 sturen. 3. Druk op de [Enter] knop om data te verzenden. AANWIJZEN VAN DE PEDAAL POORT 1. Houdt de Shift knop ingedrukt, terwijl u op [Assign Pedal] toets indrukt. 2. Gebruik de numerieke toetsen om de controller-waarde (0-127) in te voeren. 3. Druk op de [Enter] knop om de data te verzenden. Opmerking: Slechts een type pedaal schakelaar (kortstondige aan/uit voetschakelaar) kan worden gebruikt voor deze functie. PEDAAL POLARITEIT: U kunt de polariteit van de schakelaar het type pedaal instellen. De standaardinstelling is "normaal open". Om deze te stelle, houdt u de [Shift] knop terwijl u op de 【Pedal Polariteit] toets en de wijziging wordt dan doorgevoerd. OCT/TRANS AANWIJZEN U kunt de 【-, +】 knoppen op de standaardwaarde Octaaf of Transpose aanwijzen. De standaardinstelling voor de knop is Octaaf. Om dit in te stellen, houdt u de Shift knop ingedrukt, terwijl u op [Oct / Trans] toets indrukt. U hoeft niet op Enter te drukken. SNELHEIDS CURVE Er zijn 10 snelheid curves die geselecteerd kunnen worden, variërend van 0 - 9. Operatie:【SHIFT】ÖF2【Velocity Curve】Ö【Set value】en het numerieke key gebruiken om de curve waarde te selecteren. Het standaard snelheidscurve nummer is 1. GM/GS SWITCH Met de standaardinstelling, wanneer u voor het eerst deze functie gebruikt, zal de GS (General Synthese) Op bericht verzonden worden. Als u deze functie weer activeert, zal de GM (General MIDI) Opbericht worden verzonden. Houdt de [Shift] knop ingedrukt en druk de [GM/GS] om dit te gebruiken. TERUGROEPING VAN INSTELLINGEN: De LIVE-toetsenbord instellingen zijn niet-vluchtig. De instellingen worden opgeslagen zelfs als u het toetsenbord uitschakelt of uittrekt van het stopcontact. U kunt uw instellingen opslaan in de 10 vooraf ingestelde banken genummerd van 0 - 9. U kunt een van deze op elk gewenst moment terugroepen. De inhoud van het vooraf ingestelde geheugen zijn onder meer: Oct / Trans instelling, snelheidcurve, alle opdrachten voor de slider, pedaal etc. Terugroeping Werking: Houdt【SHIFT】druk【Preset】Övoer dan een waarde in en druk gewoon op een toets. Store Operation: Houdt【SHIFT】druk【Preset】+ voer dan een waarde tegelijkertijd in en selecteer een register bank om later op te slaan. 31 PROBLEEMOPLOSSING Veel voorkomende symptomen met mogelijke oorzaken en oplossingen z Na het inschakelen van de schakelaar, staat de LIVE niet aan: 1. Zorg ervoor dat de USB-aansluiting gemaakt is en dat de computer aan staat. 2. 3. Zorg ervoor dat de stekker goed aangesloten is in het stopcontact. Defecte USB-kabel. Probeer een andere USB-kabel of andere USB-poort (poort aan de achterzijde van de computer indien mogelijk) z Geen geluid bij het afspelen van LIVE: 1. Controleer de volume-instellingen van je geluid module en luidsprekersysteem. Verplaats de Aanwijsbare Slider op Live tot de meest rechtse positie. 2. Controleer de MIDI aansluiting en de audio kabels op uw klankmodule / computer geluidskaart. 3. z 1. z Zorg ervoor dat u de juiste instellingen in uw muziek software heeft. Continu lang geluid: Controleer Sustain Pedaal en polariteit. Onjuiste stem: 1. Uw geluidsmodule of software is niet goed ingesteld. Initialiseren of herstart de opname software. z Verkeerde toonhoogte: 1. 2. Pas de Octaaf functie van het keyboard. MIDI toonhoogte is afgestemd op uw software / geluidsmodule. Stel het fijn draaien of grof tuning. 3. Pitch bend bericht niet naar standaard teruggekeerd, dan kunt u het resetten. z Sommige functies werken niet: 1. 2. Controleer of uw splitpunt correct aangewezen is. Zorg ervoor dat uw software op meerdere kanalen kunt spelen. Zorg er ook voor zowel het toetsenbord en de softwarezenders correct aangewezen is. 32 TECHNICAL SPECIFICATIONS z Keyboard: 25 keys (C2 – C4), (velocity sensitive). z Functions: Basic functions: USB MIDI, Octave shift, Transpose, Joystick, Pedals, MIDI OUT, Slider, Function buttons; MIDI Data: Bank select, Program change, GM System On, GS System on, Control change, All Notes Off, etc; Parameters: Transose, Octave, MIDI out channels, Velocity curve, Pitch bend, Moulation, Brightness, etc. z Panel Controls and Indicators: Function buttons with light × 2; Slider × 1, SHIFT button with light × 1; Joystick × 1. z Display: LED indicator for power/signal. z Input/Output Terminals: POWER ON/OFF switch × 1 POWER IN connector × 1 USB port ×1 PEDAL jack × 1 MIDI OUT port × 1 z Power: USB bus power or AC Power Adapter (Optional) Power Adapter requirement: 9V DC 500mA , center positive, tip negative Dimensions (W x D x H) and Weight: 726.5mm × 210mm × 58.3 mm, 2.6 kg 28.6” x 8.3” x 2.3”, 5.7 lbs z ★ Specifications and appearance are subject to change without notice. 33 Appendix - Assignable Controller List C o n t # Name 000 Bank Select 001 Cont# Modulation wheel 002 Breath control 003 Undefined 004 Name 067 Soft pedal on/off 068 Legato Footswitch 069 Hold 2 070 Sound Variation Foot controller 071 Timbre/Harmonic Intens. 005 Portamento time 072 Release Time 006 Data Entry 073 Attack Time 007 Channel Volume 074 Brightness 075 Decay Time 076 Vibrato Rate) 008 Balance 009 Undefined 077 Vibrato Depth 010 Pan 078 Vibrato Delay 011 Expression 079 Sound Cont. 080-083 General Purpose 012 Effect control 1 084 Portamento Control 013 Effect control 2 085-090 Undefined 014-015 Undefined 091 Reverb Send Level 016-019 General Purpose 092 Tremolo Depth 020-031 Undefined 093 Chorus Send Level 032 Bank Select 033 Modulation wheel 034 Breath control 097 Data entry -1 035 Undefined 098 NRPN LSB 036 Foot controller 094 Celeste/Detune Depth 095 Phaser Depth 096 Data entry +1 099 NRPN MSB 100 RPN LSB 037 Portamento time 101 RPN MSB 038 Data entry 102-119 Undefined 039 Channel Volume 040 Balance 041 Undefined 042 Pan 043 Expression 044 Effect control 1 045 Effect control 2 046-047 Undefined 048-051 General Purpose 052-063 Undefined 064 Damper pedal 065 Portamento on/off 066 Sustenuto on/off 34 120 All Sound Off 121 Reset All Controllers 122 Local control on/off 123 All notes off 124 Omni mode off 125 Omni mode on 126 Poly mode off 127 Poly mode on GM Voice List Voice# Name Voice# Name 001 GrandPno 033 Aco.Bass 002 BritePno 034 FngrBass 003 El.Grand 035 PickBass 004 HnkyTonk 036 Fretless 005 E.Piano1 037 SlapBas1 006 E.Piano2 038 SlapBas2 007 Harpsi. 039 SynBass1 008 Clavi 040 SynBass2 009 Celesta 041 Violin 010 Glocken 042 Viola 011 MusicBox 043 Cello 012 Vibes 044 Contrabs 013 Marimba 045 Trem.Str 014 Xylophon 046 Pizz.Str 015 TubulBel 047 Harp 016 Dulcimer 048 Timpani 017 DrawOrgn 049 Strings1 018 PercOrgn 050 Strings2 019 RockOrgn 051 Syn Str1 020 ChrchOrg 052 Syn Str2 021 ReedOrgn 053 ChiorAah 022 Acordion 054 VoiceOoh 023 Harmnica 055 SynVoice 024 TangoAcd 056 Orch.Hit 025 NylonGtr 057 Trumpet 026 SteelGtr 058 Trombone 027 Jazz Gtr 059 Tuba 028 CleanGtr 060 Mute Trp 029 Mute.Gtr 061 Fr. Horn 030 Ovrdrive 062 BrasSect 031 Dist.Gtr 063 SynBrss1 032 GtrHarmo 064 SynBrss2 35 GM Voice List (Continued) Voice# Name Voice# Name 065 SprnoSax 097 Rain 066 Alto Sax 098 SoundTrk 067 TenorSax 099 Crystal 068 Bari.Sax 100 Atmosphr 069 Oboe 101 Bright 070 Eng.Horn 102 Goblins 071 Bassoon 103 Echoes 072 Clarinet 104 Sci-Fi 073 Piccolo 105 Sitar 074 Flute 106 Banjo 075 Recorder 107 Shamisen 076 PanFlute 108 Koto 077 Bottle 109 Kalimba 078 Shakhchi 110 Bagpipe 079 Whistle 111 Fiddle 080 Ocarina 112 Shanai 081 SquareLd 113 TnklBell 082 Saw Lead 114 Agogo 083 CaliopLd 115 SteelDrm 084 Chiff Ld 116 WoodBlok 085 CharanLd 117 TaikoDrm 086 Voice Ld 118 MelodTom 087 Fifth Ld 119 Syn Drum 088 Bass&Ld 120 RevCymbl 089 NewAgePad 121 FretNoiz 090 Warm Pad 122 BrthNoiz 091 PolySyPd 123 Seashore 092 ChoirPad 124 Tweet 093 BowedPad 125 Telphone 094 MetalPad 126 Helicptr 095 Halo Pad 127 Applause 096 SweepPad 128 Gunshot 36 MIDI IMPLEMENTATION CHART Function Basic Default Channel Changed Default Mode Messages Altered Note Number: True voice Velocity Note ON Note OFF Aftertouch Key’s Ch’s Pitch Bend Control Change Prog Change: True # System Exclusive System Clock Real Time Commands System command Aux Messages ○: Yes Song position Active Sense Transmitted Recognized 1 × 1~16 × × *********** 0~127 × *********** ○ v=0~127 × ○ v=0~127 × × × × × ○ × 0~127 ○ *********** ○ × ○ × × × × × ×: No 37 ○ × × × www.altoprofessional.com MANUAL VERSION 1.3