1
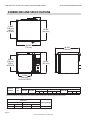
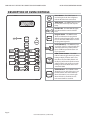
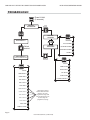
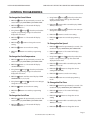
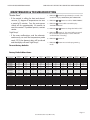
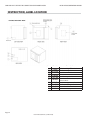
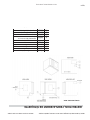
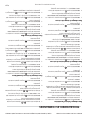
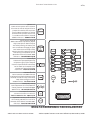
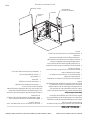
INSTALLATION, OPERATING
INSTRUCTIONS
HALF-SIZE, ELECTRIC CONVECTION
OVEN, MODEL: MCOE5L
WARNING:
IMPROPER INSTALLATION, ADJUSTMENT, ALTERATION, SERVICE OR MAINTENANCE CAN CAUSE
PROPERTY DAMAGE, INJURY OR DEATH. READ THE INSTALLATION, OPERATING AND MAINTENANCE
INSTRUCTIONS THOROUGHLY BEFORE INSTALLING OR SERVICING THIS EQUIPMENT.
NOTE:
OVEN WILL PRODUCE A QUANTITY OF SMOKE UPON INITIAL FIRE UP. THIS “BURN OFF” MAY LAST
IN EXCESS OF 10-20 MINUTES.
PLEASE READ ALL SECTIONS OF THIS MANUAL AND RETAIN FOR FUTURE REFERENCE.
THIS EQUIPMENT MUST BE INSTALLED AND COMMISSIONED BY A PROFESSIONAL,
FACTORY-TRAINED TECHNICIAN.
NOTE: This manual pertains to all oven models listed above. The reader/operator must interpret its
contents to applicable needs. If you have questions about any instructional materials pertaining to Garland
convection ovens, please contact our Customer Service Department at one of the phone numbers below.
MANUFACTURED EXCLUSIVELY FOR McDonald's BY
CLEVELAND RANGE
1333 EAST 179 St., CLEVELAND, OH 44110
MCD HOTLINE TOLL FREE: (800) 446-8367 PHONE: (800) 424-2411 FAX: (888) 606-0460
E-mail: [email protected]
http://www.garland-group.com
Part # 4516833 Rev C (19 Mar 2014)
GARLAND HALF SIZE ELECTRIC CONVECTION OVEN MODEL:MCOE5
INSTALLATION/OPERATION MANUAL
WARRANTY
Applicable only to ovens with a serial number production date on or after January 1, 2013
This warranty covers defects in material and workmanship under normal use providing that:
a.
the equipment has not been accidentally or intentionally damaged, altered or misused.
b.
the equipment is properly installed, adjusted, operated and maintained in accordance with national and local
codes and in accordance with the installation instructions provided with this product.
c.
the warranty serial number affixed to the appliance by us has not been defaced, obliterated or removed.
d.
an acceptable report for any claim under this warranty is supplied to us.
The equipment warranty coverage remains in force for two (2) years limited, (parts and labor), (USA & Canada Only)
The equipment warranty coverage of five (5) years limited, (Door Hinge), (USA & Canada Only).
The Garland Group agrees to repair or replace, at its option, any part that proves to be defective in material or
workmanship at no charge for the part or normal labor.
We assume no responsibility for installation, adjustments, diagnosis, or normal maintenance such as: lubrication of
springs or valves.
We assume no responsibility for travel costs beyond two (2) hours and 100 miles/150Kms round trip, travel other than
overland, and overtime costs of repair.
We exclude broken glass, paint and porcelain finish, surface rust, gasket material, ceramic material, light bulbs and
fuses from normal coverage.
We exclude damage or dysfunction caused by fire, flood, and like “Acts of God” that are beyond the control of The
Garland Group.
We exclude failures caused by erratic voltage or gas supplies.
The Garland Group will only cover the cost of the parts replacement and/or service.
This warranty is limited and is in lieu of all other warranties, expressed or implied. The Garland Group, our employees,
or our agents shall not be held liable for any claims of personal injury or consequential damage or loss.
This warranty gives you specific legal rights, and you may have other rights which vary from state to state.
Page 2
Part # 4516833 Rev C (19 Mar 2014)
GARLAND HALF SIZE ELECTRIC CONVECTION OVEN MODEL:MCOE5
INSTALLATION/OPERATION MANUAL
TABLE OF CONTENTS
WARRANTY . . . . . . . . . . . . . . . . . . . . . . . . . . . . . . . . . . . . . . . . . . . . . . . . . . . . . . . . . . . . . . . . . . . . . . . . . . . . . . . . . . . 2
Applicable only to ovens with a serial number production date on or after January 1, 2013 . . . . . . . . . . . . . . . . . . . . . . . . . . . 2
DIMENSIONS AND SPECIFICATIONS . . . . . . . . . . . . . . . . . . . . . . . . . . . . . . . . . . . . . . . . . . . . . . . . . . . . . . . . . . . . 4
INSTALLATION . . . . . . . . . . . . . . . . . . . . . . . . . . . . . . . . . . . . . . . . . . . . . . . . . . . . . . . . . . . . . . . . . . . . . . . . . . . . . . . . 5
Electrical Connection . . . . . . . . . . . . . . . . . . . . . . . . . . . . . . . . . . . . . . . . . . . . . . . . . . . . . . . . . . . . . . . . . . . . . . . . . . . . . . . . . . . . . . . . . . . . . . . 5
DESCRIPTION OF OVEN CONTROLS . . . . . . . . . . . . . . . . . . . . . . . . . . . . . . . . . . . . . . . . . . . . . . . . . . . . . . . . . . . . . 6
OPERATING INSTRUCTIONS . . . . . . . . . . . . . . . . . . . . . . . . . . . . . . . . . . . . . . . . . . . . . . . . . . . . . . . . . . . . . . . . . . . . 7
To turn oven ON . . . . . . . . . . . . . . . . . . . . . . . . . . . . . . . . . . . . . . . . . . . . . . . . . . . . . . . . . . . . . . . . . . . . . . . . . . . . . . . . . . . . . . . . . . . . . . . . . . . . 7
Preheat. . . . . . . . . . . . . . . . . . . . . . . . . . . . . . . . . . . . . . . . . . . . . . . . . . . . . . . . . . . . . . . . . . . . . . . . . . . . . . . . . . . . . . . . . . . . . . . . . . . . . . . . . . . . . 7
To Select a menu item . . . . . . . . . . . . . . . . . . . . . . . . . . . . . . . . . . . . . . . . . . . . . . . . . . . . . . . . . . . . . . . . . . . . . . . . . . . . . . . . . . . . . . . . . . . . . . 7
To begin a cook cycle or start a bake cycle . . . . . . . . . . . . . . . . . . . . . . . . . . . . . . . . . . . . . . . . . . . . . . . . . . . . . . . . . . . . . . . . . . . . . . . . . . . 7
To cancel a cook cycle or cancel a bake . . . . . . . . . . . . . . . . . . . . . . . . . . . . . . . . . . . . . . . . . . . . . . . . . . . . . . . . . . . . . . . . . . . . . . . . . . . . . . 7
Profile Baking. . . . . . . . . . . . . . . . . . . . . . . . . . . . . . . . . . . . . . . . . . . . . . . . . . . . . . . . . . . . . . . . . . . . . . . . . . . . . . . . . . . . . . . . . . . . . . . . . . . . . . . 7
Hold Timer . . . . . . . . . . . . . . . . . . . . . . . . . . . . . . . . . . . . . . . . . . . . . . . . . . . . . . . . . . . . . . . . . . . . . . . . . . . . . . . . . . . . . . . . . . . . . . . . . . . . . . . . . 7
Recovery Timer . . . . . . . . . . . . . . . . . . . . . . . . . . . . . . . . . . . . . . . . . . . . . . . . . . . . . . . . . . . . . . . . . . . . . . . . . . . . . . . . . . . . . . . . . . . . . . . . . . . . . 7
Fast Cool . . . . . . . . . . . . . . . . . . . . . . . . . . . . . . . . . . . . . . . . . . . . . . . . . . . . . . . . . . . . . . . . . . . . . . . . . . . . . . . . . . . . . . . . . . . . . . . . . . . . . . . . . . . 7
PROGRAM LOGIC. . . . . . . . . . . . . . . . . . . . . . . . . . . . . . . . . . . . . . . . . . . . . . . . . . . . . . . . . . . . . . . . . . . . . . . . . . . . . . 8
CONTROL PROGRAMMING . . . . . . . . . . . . . . . . . . . . . . . . . . . . . . . . . . . . . . . . . . . . . . . . . . . . . . . . . . . . . . . . . . . . . 9
To change the Cancel Alarm . . . . . . . . . . . . . . . . . . . . . . . . . . . . . . . . . . . . . . . . . . . . . . . . . . . . . . . . . . . . . . . . . . . . . . . . . . . . . . 9
To change the Cook Temperature . . . . . . . . . . . . . . . . . . . . . . . . . . . . . . . . . . . . . . . . . . . . . . . . . . . . . . . . . . . . . . . . . . . . . . . . . . . . . . . . . . . 9
To change the Cook Time . . . . . . . . . . . . . . . . . . . . . . . . . . . . . . . . . . . . . . . . . . . . . . . . . . . . . . . . . . . . . . . . . . . . . . . . . . . . . . . . . . . . . . . . . . . 9
To Change the Fan Speed . . . . . . . . . . . . . . . . . . . . . . . . . . . . . . . . . . . . . . . . . . . . . . . . . . . . . . . . . . . . . . . . . . . . . . . . . . . . . . . . . . . . . . . . . . . 9
To Change the Flex Time . . . . . . . . . . . . . . . . . . . . . . . . . . . . . . . . . . . . . . . . . . . . . . . . . . . . . . . . . . . . . . . . . . . . . . . . . . . . . . . . . . . . . . . . . . . . 9
To Change the Fan Cycle . . . . . . . . . . . . . . . . . . . . . . . . . . . . . . . . . . . . . . . . . . . . . . . . . . . . . . . . . . . . . . . . . . . . . . . . . . . . . . . . . . . . . . . . . . .10
To change the Hold Time. . . . . . . . . . . . . . . . . . . . . . . . . . . . . . . . . . . . . . . . . . . . . . . . . . . . . . . . . . . . . . . . . . . . . . . . . . . . . . . . . . . . . . . . . . .10
To change the Product Name . . . . . . . . . . . . . . . . . . . . . . . . . . . . . . . . . . . . . . . . . . . . . . . . . . . . . . . . . . . . . . . . . . . . . . . . . . . . . . . . . . . . . .10
To View Recovery Information. . . . . . . . . . . . . . . . . . . . . . . . . . . . . . . . . . . . . . . . . . . . . . . . . . . . . . . . . . . . . . . . . . . . . . . . . . . . . . . . . . . . . .10
Control Safety Features . . . . . . . . . . . . . . . . . . . . . . . . . . . . . . . . . . . . . . . . . . . . . . . . . . . . . . . . . . . . . . . . . . . . . . . . . . . . . . . . . . . . . . . . . . . .10
To reset factory defaults. . . . . . . . . . . . . . . . . . . . . . . . . . . . . . . . . . . . . . . . . . . . . . . . . . . . . . . . . . . . . . . . . . . . . . . . . . . . . . . . . . . . . . . . . . . .11
MAINTENANCE & TROUBLESHOOTING . . . . . . . . . . . . . . . . . . . . . . . . . . . . . . . . . . . . . . . . . . . . . . . . . . . . . . . . . 11
Factory Default Menu Items. . . . . . . . . . . . . . . . . . . . . . . . . . . . . . . . . . . . . . . . . . . . . . . . . . . . . . . . . . . . . . . . . . . . . . . . . . . . . . . . . . . . . . . .11
Check Calibration. . . . . . . . . . . . . . . . . . . . . . . . . . . . . . . . . . . . . . . . . . . . . . . . . . . . . . . . . . . . . . . . . . . . . . . . . . . . . . . . . . . . . . . . . . . . . . . . . .12
Break-In Period . . . . . . . . . . . . . . . . . . . . . . . . . . . . . . . . . . . . . . . . . . . . . . . . . . . . . . . . . . . . . . . . . . . . . . . . . . . . . . . . . . . . . . . . . . . . . . . . . . . .12
Exterior Cleaning . . . . . . . . . . . . . . . . . . . . . . . . . . . . . . . . . . . . . . . . . . . . . . . . . . . . . . . . . . . . . . . . . . . . . . . . . . . . . . . . . . . . . . . . . . . . . . . . . .12
Blower Wheel & Temperature Probe . . . . . . . . . . . . . . . . . . . . . . . . . . . . . . . . . . . . . . . . . . . . . . . . . . . . . . . . . . . . . . . . . . . . . . . . . . . . . . . .13
Motor Care . . . . . . . . . . . . . . . . . . . . . . . . . . . . . . . . . . . . . . . . . . . . . . . . . . . . . . . . . . . . . . . . . . . . . . . . . . . . . . . . . . . . . . . . . . . . . . . . . . . . . . . .13
INSTRUCTION, LABEL LOCATION . . . . . . . . . . . . . . . . . . . . . . . . . . . . . . . . . . . . . . . . . . . . . . . . . . . . . . . . . . . . . . 14
Page 3
Part # 4516833 Rev C (19 Mar 2014)
GARLAND HALF SIZE ELECTRIC CONVECTION OVEN MODEL:MCOE5
INSTALLATION/OPERATION MANUAL
DIMENSIONS AND SPECIFICATIONS
21.000"
[535 mm]
OVEN
INTERIOR
25.250"
[645 mm]
30.500"
[775 mm]
30.250"
[766 mm]
20.000
[510 mm]
OVEN
INTERIOR
25.750"
[657 mm]
15.500"
[393 mm]
OVEN INTERIOR
Element
Package
Total
kW
Standard
8.0
208V/1Ph 240V/1Ph
38.5
33.3
Nominal Amperes Per Line
208V/3Ph
240V/3Ph
X
Y
Z
X
Y
Z
20.8 23.0 23.0 18.0 20.0 20.0
240V/1Ph
34.8
Electrical specifications include motor requirements. Double-deck models require 2 separate power supplies.
Clearances
Combustible Wall
Entry
Shipping Weight
Sides
Rear
Crated
Uncrated
1” (25mm)
1” (25mm)
36” (914mm)
31” (787mm)
350lbs. (159Kg)
Page 4
Part # 4516833 Rev C (19 Mar 2014)
230V /3Ph N 400V
X
Y
Z
13.1
10.9
10.9
GARLAND HALF SIZE ELECTRIC CONVECTION OVEN MODEL:MCOE5
INSTALLATION/OPERATION MANUAL
INSTALLATION
Proper placement of the oven will ensure operator
convenience and satisfactory performance.
enough length to reach the terminal block.
6. Strip just enough wire to insert into the terminal block.
Adequate clearance must be provided for cleaning,
servicing, and proper operation. (Refer to chart on page 4
for minimum clearances.)
7. Tighten terminal block screws and the screws in the BX
to clamp the cord.
Electrical Connection
8. Verify all electrical connections are correct. Re-attach
the body side and control panel assembly.
Before attempting the electrical connection, the rating
plate should be checked to confirm that the oven’s
electrical characteristics and the electrical supply are
compatible. The plate is located on the inside surface of
the control panel/body side.
1. Open the oven door to reveal the control panel
mounting screws.
Visually inspect all electrical connections. A wiring diagram
is affixed to the inside surface of the control panel/body
side section.
Installation of the wiring must be made in accordance with
UL 197, Commercial Electric Cooking Appliance Standards,
local codes, and the National Electrical Code, ASNI/NFPA 701990, in regard to:
2. Remove all screws attaching the control panel
assembly to the oven.
a. Switch panel size
3. Next remove the screws mounting the body side to the
oven in the front and back.
c. Wire type
4. Remove the knockout plate at the rear of the oven and
mount the appropriate Size BX connector to fasten the
cord. Re-attach the knockout to the oven.
e. Temperature limitations of wires
b. Overload protection
d. Wire size
f. Method of connection, (conduit, cable, etc.)
5. Pass the cord through the bx connector leaving
KNOCKOUT
PLATE
CONTROL PANEL
ASSEMBLY
TERMINAL
BLOCK
BODY SIDE
Page 5
Part # 4516833 Rev C (19 Mar 2014)
GARLAND HALF SIZE ELECTRIC CONVECTION OVEN MODEL:MCOE5
INSTALLATION/OPERATION MANUAL
DESCRIPTION OF OVEN CONTROLS
Power Button – The START button is
used to begin a bake. The led lights to
indicate the bake has been started.
TEMP Button – The TEMP button is used
to verify the actual temp and setpoint
temp.
Heat On LED – The HEAT ON LED lights
to indicate that the control called for
heat.
Program Button – The PROG button
allows each button to be programed
with the various functions of the control.
Press and hold the PROG button to enter
the programming mode.
Product Button(s) – The PRODUCT keys
are used to select pre-programmed time
and temperature for specific products.
Up to 10 different product buttons can
be programmed.
VIEW / UTILITY Button – The VIEW/
UTILITY button toggles the display when
baking multiple products at the same
time. Press the view/utility button and
the display will show the product names
and time left for each product currently
baking in the oven. Allows the user to
enter FAST COOL
CANCEL Button – The CANCEL button
allows the user to end a bake. Press and
hold the button, the control will beep
when the button is pressed and again
when the bake is cancelled. The last
bake entered will be cancelled.
Page 6
Part # 4516833 Rev C (19 Mar 2014)
GARLAND HALF SIZE ELECTRIC CONVECTION OVEN MODEL:MCOE5
INSTALLATION/OPERATION MANUAL
OPERATING INSTRUCTIONS
To turn oven ON
The Main Power Switch – Controls power to the oven
and must be turned ON to start operation. The controller
display will be active and default to product “BISCUITS”
(Product Key 1).
“beep” sounds. Another “beep” sounds when the timer is
cancelled. The CANCEL button works in the order of the
last product entered, i.e. Biscuits are timing and bagels
are started accidentally. Bagels will be cancelled first, then
biscuits.
Preheat
Once a timer has completed counting down, the display
will default back to the menu item programmed in
PRODUCT KEY 1 (Most often Biscuits).
The oven will preheat to the set temperature of Product
Key 1 (Note: Factory default for Product Key 1 is BISCUITS Oven set temperature 375°F).
Profile Baking
During this preheat mode, the controller will display “TOO
COOL”. “TOO COOL” will appear in the display while the
temperature is greater than 25°F below set temperature
AND for 10 minutes upon reaching set temperature from
initial power up. “TOO HOT” will be displayed when the
control is 250 F above the set temperature.
To Select a menu item
To select a menu item, simply press the desired menu item
number button.
To begin a cook cycle or start a bake cycle
To start a bake for a selected menu item, press the
Profile Baking is only available in software & flash
numbers 240-91018-05-XX. With profile baking,
menu items can be programmed with up to 4 stages of
functional changes. The following menu item functions
are available with up to 4 stages:
• FAN CYCLE
• COOK TEMP
• COOK TIME
• FAN SPEED
• FLEX TIME
FAN CYCLE – The Fan Cycle function has 2 options:
FULL - The convection fan is constant on
HEAT – The convection fan is only on during the heat
cycle.
button. The product name and the remove time
programmed will be displayed. The countdown of the
programmed time for that product will start and a number
“1” will be displayed in the lower right hand corner of the
screen to indicate that there 1 product baking at that time.
The number will update as subsequent cook cycles are
started.
Hold Timer
Flex Time – Included in this oven is a feature called “FLEX
TIME”. Flex time is a feature which when a product bake
timer is counting down, the operator may notice the time
either slowing down or speeding up. The “flex time” is
based on the temperature drop in the oven over a period
of time. Larger bake sizes (i.e. full tray of Muffins) will have
a slower time where as smaller bake sizes will have a faster
time.
Recovery Timer
During baking, press the
button to display the product
name and the time remaining before removal.
NOTE: The oven is designed to bake batches of different
sizes using the same time settings.
To cancel a cook cycle or cancel a bake
The hold timer is a separate timer that counts down within
the control and is HIDDEN from the display. The hold timer
alerts the operator when product is available to be served
after cooling down. This timer is most often used for
cooling pies.
Built into this control is a recovery timer. This timer is a
stored value from when the oven last rise in temperature
from 150°F to 250°F. The value of this number should
generally be “1:00” to “1:30” indicating that it took
between 1 minute and 1 minute and 30 seconds to rise
in temperature between 150°F to 250°F. A value outside
this parameter may indicate a potential or future heating
problem.
Fast Cool
The fast cool feature when activated cools the oven down
in a rapid manner while the door is open. Press the VIEW/
UTILITY button and then press the START button.
To cancel a bake, the user presses and holds the
button. Immediately upon pressing the button, an audible
Page 7
Part # 4516833 Rev C (19 Mar 2014)
GARLAND HALF SIZE ELECTRIC CONVECTION OVEN MODEL:MCOE5
INSTALLATION/OPERATION MANUAL
PROGRAM LOGIC
Press & Hold
(3 seconds)
MAIN MENU
EDIT MENU ITEM
Scroll
Forward
MAIN MENU
SYSTEM INFO
RECOVERY
SELECT PRODUCT ->
FLASH NUMBER
Select
product
MAIN MENU
SERVICE MENU
SOFTWARE NUMBER
DOWNLOAD NUMBER
ADDRESS
SELECT PRODUCT ->
PRODUCT NAME SELECTED
Scroll
Backward
SHELF ID
DOOR ALARM
TEMP DISPLAY
CANCEL
CAL OFFSET
COOK TEMP T1
SETBACK TIME
COOK TIME T1
FACTORY DEFAULTS
FAN SPEED T1
FAN CYCLE T1
FLEX TIME T1
COOK TEMP T2
COOK TIME T2
FAN SPEED T2
FAN CYCLE T2
Shown Only in FLASH
Number 240-91018-05-1
NOTE: T2, T3, T4 are
programmed stages and
will only appear when the
previous stage has
programmed settings
FLEX TIME T2
HOLD TIME
PRODUCT NAME
Page 8
Part # 4516833 Rev C (19 Mar 2014)
GARLAND HALF SIZE ELECTRIC CONVECTION OVEN MODEL:MCOE5
INSTALLATION/OPERATION MANUAL
CONTROL PROGRAMMING
To change the Cancel Alarm
1. PRESS the button for approximately 3 seconds. The
control will display “MAIN MENU | EDIT MENU ITEM”.
2. PRESS the button 1x. The control will display
“SELECT PRODUCT->”.
3. Using buttons through , select the product that
requires a programming change. The control will
display that menu item.
4. PRESS the
“CANCEL”.
button 1x. The control will display
5. PRESS the
setting.
or
6. PRESS the
button to save the new setting.
7. PRESS the
mode.
button to change the current
button 2x to exit the programming
To change the Cook Temperature
1. PRESS the button for approximately 3 seconds. The
control will display “MAIN MENU | EDIT MENU ITEM”.
2. PRESS the button 1x. The control will display
“SELECT PRODUCT->”.
3. Using buttons through , select the product that
requires a programming change. The control will
display that menu item.
3. Using buttons through , select the product that
requires a programming change. The control will
display that menu item.
4. PRESS the button until the control displays “COOK
TIME (T1, T2, T3, T4)” .
5. Using buttons through , enter the new setting to
change the current setting.
6. PRESS the
7. PRESS the
mode..
button to save the new setting.
button 2x to exit the programming
To Change the Fan Speed
1. PRESS the button for approximately 3 seconds. The
control will display “MAIN MENU | EDIT MENU ITEM”.
2. PRESS the button 1x. The control will display
“SELECT PRODUCT->”.
3. Using buttons through , select the product that
requires a programming change. The control will
display that menu item.
4. PRESS the button until the control displays “FAN
SPEED (T1, T2, T3, T4)”.
5. PRESS the or button to change the current
setting (HIGH OR LOW).
6. PRESS the
button to save the new setting.
4. PRESS the button until the control displays “COOK
TEMPERATURE (T1, T2, T3, T4)”.
7. PRESS the
mode..
5. Using buttons through , enter the new setting to
change the current setting.
To Change the Flex Time
6. PRESS the
1. PRESS the button for approximately 3 seconds. The
control will display “MAIN MENU | EDIT MENU ITEM”.
7. PRESS the
mode..
button to save the new setting.
button 2x to exit the programming
To change the Cook Time
1. PRESS the button for approximately 3 seconds. The
control will display “MAIN MENU | EDIT MENU ITEM”.
2. PRESS the button 1x. The control will display
“SELECT PRODUCT->”.
button 2x to exit the programming
2. PRESS the button 1x. The control will display
“SELECT PRODUCT->”.
3. PRESS the
setting.
or
button to change the current
4. PRESS the button until the control displays “FLEX
TIME (T1, T2, T3, T4)”.
5. PRESS the
or
button to change the current
Page 9
Part # 4516833 Rev C (19 Mar 2014)
GARLAND HALF SIZE ELECTRIC CONVECTION OVEN MODEL:MCOE5
INSTALLATION/OPERATION MANUAL
CONTROL PROGRAMMING
setting (YES or NO).
6. PRESS the
7. PRESS the
mode..
button to save the new setting.
button 2x to exit the programming
2. PRESS the button 1x. The control will display
“SELECT PRODUCT->”.
3. PRESS the or button to scroll through the list of
available menu item names.
To Change the Fan Cycle
1. PRESS the button for approximately 3 seconds. The
control will display “MAIN MENU | EDIT MENU ITEM”.
2. PRESS the button 1x. The control will display
“SELECT PRODUCT->”.
3. Using buttons through , select the product that
requires a programming change. The control will
display that menu item.
4. PRESS the button until the control displays “FAN
CYCLE (T1, T2, T3, T4)”.
5. PRESS the
setting.
or
6. PRESS the
button to save the new setting.
7. PRESS the
mode..
1. PRESS the button for approximately 3 seconds. The
control will display “MAIN MENU | EDIT MENU ITEM”.
button to change the current
Available Menu items names
Bacon
Bagels
BB Muffin
Buscuits
Bread
Casserole
Chicken
Chicken II
Cookies
Eggs
McGriddle
Meatloaf
Muffin
New Item 0
New Item 1
New Item 2
New Item 3
New Item 4
New Item 5
New Item 6
New Item 7
New Item 8
New Item 9
Pancake
Pasta
Pastry
Pies
Potato Bake
Pretzels
Sausage
Scratch Biscuit
Stuffing
4. PRESS the button until the control displays
“PRODUCT NAME”
button 2x to exit the programming
5. Using buttons through , enter the new setting to
change the current setting.
To change the Hold Time
6. PRESS the
1. PRESS the button for approximately 3 seconds. The
control will display “MAIN MENU | EDIT MENU ITEM”.
2. PRESS the button 1x. The control will display
“SELECT PRODUCT->”.
3. Using buttons through , select the product that
requires a programming change. The control will
display that menu item.
7. PRESS the
mode.
1. PRESS the button for approximately 3 seconds. The
control will display “MAIN MENU | EDIT MENU ITEM”.
7. PRESS the
mode..
or
button to scroll to “SYSTEM INFO”.
button until the control displays “HOLD
3. PRESS the button until the control displays
“RECOVERY”
5. Using buttons through , enter the new setting to
change the current setting (Note: a number of 00:00
turns the hold timer OFF”).
6. PRESS the
button 2x to exit the programming
To View Recovery Information
2. PRESS the
4. PRESS the
TIME”
button to save the new setting.
button to save the new setting.
4. PRESS the
mode..
button 2x to exit the programming
Control Safety Features
button 2x to exit the programming
To change the Product Name
Page 10
Part # 4516833 Rev C (19 Mar 2014)
GARLAND HALF SIZE ELECTRIC CONVECTION OVEN MODEL:MCOE5
INSTALLATION/OPERATION MANUAL
MAINTENANCE & TROUBLESHOOTING
“Heater Error”
• If the control is calling for heat and doesn’t
see one, (1), degree of temperature rise over
a period of 5 minutes. Turn the main power
switch off for approximately 10 seconds to
reset the control. If problem persists, contact
service.
“High Temp”
• If the oven malfunctions, and the elements
continuously run until the temperature probe
reads 575°F, the element relay will be closed
and the display will read “High Temp”:
To reset factory defaults
1. PRESS the button for approximately 3 seconds. The
control will display “MAIN MENU | EDIT MENU ITEM”.
2. PRESS the
or
button to scroll to “SERVICE MENU”.
3. PRESS the button until the control displays
“FACTORY DEFAULTS”
4. PRESS the
or
button to change the “NO” to “YES”
5. PRESS the button 1X. The control will not respond
for a period of approximately 5 seconds while the
control defaults are loading.
6. PRESS the
7. PRESS the
mode..
button 1X.
button 2x to exit the programming
Factory Default Menu Items
Select Product ->
CANCEL
Product 1
BISCUITS
“MANUAL”
Product 2
BAGELS
“MANUAL”
Product 3
PIES
“MANUAL”
Product 4
COOKIES
MANUAL
Product 5
MCGRIDDLE
MANUAL
Product 6
MUFFINS
MANUAL
Product 7
PASTRY BITES
MANUAL
Product 8
NEW ITEM 8
MANUAL
Product 9
NEW ITEM 9
MANUAL
Product 10
NEW ITEM 0.1
MANUAL
COOK TEMP T 1
COOK TIME T 1
FAN SPEED T 1
FAN CYCLE T 1
FLEX TIMING T 1
375F
4:45
HIGH
FULL
YES
375F
3:00
HIGH
FULL
YES
375F
11:00
HIGH
FULL
YES
375F
2:00
HIGH
FULL
YES
375F
6:00
HIGH
FULL
YES
360F
:30
LOW
FULL
NO
350F
3:00
LOW
FULL
NO
375F
0:00
HIGH
FULL
YES
375F
0:00
HIGH
FULL
YES
375F
0:00
HIGH
FULL
YES
COOK TEMP T 2
COOK TIME T 2
FAN SPEED T 2
FAN CYCLE T 2
FLEX TIMING T2
375F
0
HIGH
FULL
YES
375F
0
HIGH
FULL
YES
375F
0
HIGH
FULL
YES
375F
0
HIGH
FULL
YES
375F
0
HIGH
FULL
FLEX
305F
27:30
LOW
HEAT
NO
350F
11:00
LOW
HEAT
NO
COOK TEMP T 3
COOK TIME T 3
FAN SPEED T 3
FAN CYCLE T 3
FLEX TIMING T3
375F
0:00
HIGH
FULL
YES
375F
0:00
HIGH
FULL
FLEX
375F
0:00
HIGH
FULL
FLEX
375F
0:00
HIGH
FULL
FLEX
375F
0:00
HIGH
FULL
FLEX
310F
19:00
LOW
FULL
NO
350F
6:00
LOW
FULL
NO
COOK TEMP T 4
COOK TIME T 4
FAN SPEED T 4
FAN CYCLE T 4
FLEX TIMING T4
375F
0:00
HIGH
FULL
YES
375F
0:00
HIGH
FULL
FLEX
375F
0:00
HIGH
FULL
FLEX
375F
0:00
HIGH
FULL
FLEX
375F
0:00
HIGH
FULL
FLEX
375F
0:00
LOW
FULL
NO
375F
0:00
LOW
FULL
NO
HOLD TIME
0:00
0:00
0:00
0:00
0:00
0:00
0:00
0:00
0:00
0:00
Page 11
Part # 4516833 Rev C (19 Mar 2014)
GARLAND HALF SIZE ELECTRIC CONVECTION OVEN MODEL:MCOE5
INSTALLATION/OPERATION MANUAL
MAINTENANCE & TROUBLESHOOTING
9. Press the VIEW/UTILITY button, then START to put the
unit into the FAST COOL mode.
Check Calibration
Tools: digital thermometer with probe, oven mitt.
1. Clamp the probe in the center of the middle rack. Pass
the probe wire out of the oven between the door and
the door seal and close the oven door. Plug the probe
wire into the thermometer.
2. Press the oven on/off switch.
3. Allow the oven to preheat to 375°F for approx. 30
minutes before calibrating.
4. Record the values displayed on the thermometer when
the HEAT ON LED goes off, and again when it goes back
on. The average of these 2 numbers is the temperature
at which the oven is cycling. This is the value used to
calibrate the oven.
5. To begin programming, press and hold the PROG
button until the display changes to main menu/edit
menu item.
6. Press the 2 or 8 button to toggle through main menu to
service menu.
7. Pressing the PROG button again will advance to
CAL/OFFSET. The 2 or 8 buttons can be used to
increment the offset by 1 degree per button push.
The offset can be + or -. The factory default will be 0,
(no offset). If there is already offset programmed, add
or subtract the number found in Step 4 to/from the
existing offset. Press the PROG button and then the
start button to exit the service menu program mode
and finish the calibration.
Example: Recorded temp: 380°F, (step 4), set temp: 375°f—
the offset would be +5 to calibrate. Subtract the set temp
from the recorded value and that will give the +/- value to
use (380-375=+5).
Maximum offset of +/- 50°f can be entered in calibration
mode
8. After entering a calibration offset, if necessary, allow
the unit to cycle and verify calibration by repeating
Step 4. The value found in Step 4 should match the set
temperature.
10. Wait 3 minutes with oven in FAST COOL, then
using an oven mitt, remove the oven probe.
Break-In Period
When oven is new, operate it for one hour at 375°F before
you begin your normal cooking operation. After cooling,
wipe the interior, including the racks, with a clean damp
cloth.
NOTE: Disconnect the oven from its from power supply
before cleaning or servicing.
Exterior Cleaning
Establish a regular schedule. Any spills should be wiped off
immediately.
1. The oven should always be allowed to cool
sufficiently,using FAST COOL, before any cleaning is
attempted. See “VIEW/UTILITY Button” on Page 12.
2. Wipe exposed, cleanable surface when cool with a mild
detergent and hot water. Stubborn residue spots may
be removed with a lightweight non-metallic scouring
pad. Dry thoroughly with a clean cloth.
3. Stainless Steel surfaces can often be cleaned
adequately with the same method. Stubborn stains
may be removed by using a non-metallic abrasive
pad, rubbing in the direction of the metal’s grain. If
necessary, for particularly heavy deposits, you may mix
a thin paste of water and scouring powder, and apply
it with a sponge. Be careful to apply light pressure and
remember to rub only in the direction of the grain in
the metal.
4. The control panel surface is easily cleaned with hot
water, soap and a soft cloth. Do not use hard abrasives,
solvent type materials or metallic scouring pads since
these will scratch or cloud the surface.
5. Never spray the perforated areas or control panel
with steam or water, as this will allow moisture into
the control cavity, which could damage electrical
components.
Page 12
Part # 4516833 Rev C (19 Mar 2014)
GARLAND HALF SIZE ELECTRIC CONVECTION OVEN MODEL:MCOE5
INSTALLATION/OPERATION MANUAL
MAINTENANCE & TROUBLESHOOTING
Blower Wheel & Temperature Probe
Motor Care
Tools: brush, cloth.
The motor on your convection oven is maintenance free
since it is constructed with self-lubricating sealed ball
bearings. It is designed to provide durable service when
treated with ordinary care.
1. Unplug the unit from the receptacle.
2. Remove the racks, right rack guide and the baffle.
3. Brush the wheel as needed to remove any grease and/
or particles.
4. Carefully wipe the blower wheel and temp probe clean
with a damp cloth.
5. Replace the baffle, rack guide and racks.
INS
IDE
RA
CK
SU
PP
OR
T
Procedure is complete.
OV
We have a few suggestions to follow on the care of
your motor. When the motor is operating, it cools itself
internally by air entering at the rear of the motor case,
provided proper clearance has been allowed. Since
the blower wheel is in the oven cavity it is at the same
temperature as the oven. If the motor is stopped while the
oven is hot, the heat from the blower wheel is conducted
down the shaft and into the armature of the motor. This
action could shorten the life of the motor.
EN
We recommend, at the end of the bake or roasting period,
when the oven will be idle for any period of time, or before
shutting down completely, that the doors be left open
slightly, and press the VIEW/UTILITY button on the control
panel. The fan will continue to run until the oven cools
down to 150°F (66°C). When the oven temperature drops
below 150ºF (66ºC) turn the oven off using the ON/OFF
switch. This feature protects the oven motor from premature failure. Optimal cool-down will be achieved with
the door open slightly.
Page 13
Part # 4516833 Rev C (19 Mar 2014)
GARLAND HALF SIZE ELECTRIC CONVECTION OVEN MODEL:MCOE5
INSTALLATION/OPERATION MANUAL
INSTRUCTION, LABEL LOCATION
Item
Part #
Description
113062 Mylar, Serial Tag Cover 4”x6”
4519760 Instruction Magnet
1
2
3
4
5
1104408
1167700
6
1807863
7
8
9
10
113393
1288000
1104200
250539
Page 14
Part # 4516833 Rev C (19 Mar 2014)
Serial Number Label
NSF Label
Fuse Warning Label
WD-MCOE5 MCD Cntrl 8.5x11,
Adhesive Back
Label, Warning, Casters, Electic Only
Label Use Only Leg or Casters
Phase Information Sticker
1.5”x2.5” Label, Sequential
INSTALLATION/OPERATION MANUAL
GARLAND HALF SIZE ELECTRIC CONVECTION OVEN MODEL:MCOE5
Page 15
Part # 4516833 Rev C (19 Mar 2014)
GARLAND HALF SIZE ELECTRIC CONVECTION OVEN MODEL:MCOE5
INSTALLATION/OPERATION MANUAL
MANUFACTURED EXCLUSIVELY FOR McDonald's BY
CLEVELAND RANGE
1333 EAST 179 St., CLEVELAND, OH 44110
MCD HOTLINE TOLL FREE: (800) 446-8367 PHONE: (800) 424-2411 FAX: (888) 606-0460
E-mail: [email protected]
http://www.garland-group.com
Installation & Operation Manual
HALF-SIZE CONVECTION OVENS MODEL MCOE5L
Part # 4516833 Rev C (19 Mar 2014)
FOURS À CONVECTION ÉLECTRIQUES DEMI-TAILLE GARLAND, MODÈLE MCOE5L
MANUEL D’INSTALLATION ET D’UTILISATION
FABRIQUÉ EN EXCLUSIVITÉ POUR McDonald’s PAR
CLEVELAND RANGE
1333 EAST 179 St., CLEVELAND, OH 44110 (É.-U.)
MCD HOTLINE TOLL FREE: (800) 446-8367 PHONE: (800) 424-2411 FAX: (888) 606-0460
Courriel: [email protected]
http://www.garland-group.com
Manuel d’installation et d’utilisation
FOURS À CONVECTION DEMI-TAILLE, MODÈLE MCOE5L
Pièce nº4516833 Rev C (19 Mar 2014)
MANUEL D’INSTALLATION ET D’UTILISATION
FOURS À CONVECTION ÉLECTRIQUES DEMI-TAILLE GARLAND, MODÈLE MCOE5L
Pièce nº4516833 Rev C (19 Mar 2014)
Page15
FOURS À CONVECTION ÉLECTRIQUES DEMI-TAILLE GARLAND, MODÈLE MCOE5L
MANUEL D’INSTALLATION ET D’UTILISATION
INSTRUCTION, l’EMPLACEMENT DE l’ÈTIQUETTE
Page14
113393
1288000
1104200
250539
7
8
9
10
1807863
6
1104408
1167700
113062
4519760
1
2
3
4
5
Part #
Item
Description
Mylar, Serial Tag Cover 4”x6”
Instruction Magnet
Serial Number Label
NSF Label
Fuse Warning Label
WD-MCOE5 MCD Cntrl 8.5x11,
Adhesive Back
Label, Warning, Casters, Electic Only
Label Use Only Leg or Casters
Phase Information Sticker
1.5”x2.5” Label, Sequential
Pièce nº4516833 Rev C (19 Mar 2014)
MANUEL D’INSTALLATION ET D’UTILISATION
FOURS À CONVECTION ÉLECTRIQUES DEMI-TAILLE GARLAND, MODÈLE MCOE5L
ENTRETIEN ET DÉPANNAGE
Roue du ventilateur et sonde de température
Outils : brosse, chiff on.
1. Débranchez l’appareil de la prise.
2. Retirez les grilles, le guide de la grille de droite et la
chicane.
3. Brossez la roue jusqu’à ce que toute la graisse et/ou
toutes les particules aient été éliminées.
4. Essuyez avec précaution la roue du ventilateur et la
sonde de température avec un chiff on humide.
5. Remettez en place la chicane, le guide de la grille de
droite et les grilles.
Soins du moteur
Le moteur de votre four à convection ne requiert aucun
entretien puisqu’il est fabriqué de roulements à billes
autolubrifi ants. Il est conçu de manière à fonctionner
longtemps avec des soins de base
Voici quelques suggestions pour les soins à apporter à
votre moteur. Lorsque le moteur fonctionne, il se refroidit à
l’intérieur par l’air entrant par l’arrière du boîtier du moteur,
dans la mesure où le dégagement approprié a été prévu.
Puisque la roue du ventilateur est dans la cavité du four,
elle est à la même température que le four. Si le moteur
est arrêté alors que le moteur est chaud, la chaleur de la
roue du ventilateur est acheminée vers le bas par l’arbre
et jusque dans l’armature du moteur. Cette action pourrait
réduire la durée de vie du moteur
INS
IDE
OV
Nous recommandons, à la fi n de la période de cuisson
or de rôtissage, lorsque le four est à l’arrêt depuis un
certain temps, ou avant l’arrêt complet, que les portes
soient laissées entrouvertes et d’enfoncer le bouton VIEW/
UTILITY (Service) du tableau de commande. Le ventilateur
continuera de fonctionner jusqu’à ce que la température
du four baisse à 66 °C (150 °F). Lorsque la température
du four baisse sous les 66 °C (150 °F), arrêtez le four en
utilisant l’interrupteur ON/OFF (Marche/Arrêt). Cette
fonction protège le moteur du four contre les défaillances
prématurées. Le refroidissement optimal sera atteint alors
que la porte est entrouverte.
EN
RA
CK
SU
PP
OR
T
Procedure is complete.
Pièce nº4516833 Rev C (19 Mar 2014)
Page13
FOURS À CONVECTION ÉLECTRIQUES DEMI-TAILLE GARLAND, MODÈLE MCOE5L
MANUEL D’INSTALLATION ET D’UTILISATION
ENTRETIEN ET DÉPANNAGE
Vérifi er la calibration
Outils : thermomètre numérique avec sonde, gant de
cuisinier.
9. Enfoncez le bouton VIEW/UTILITY (Service), puis enfoncez
le bouton START (Marche) afi n de mettre l’appareil en
mode FAST COOL (Refroidissement rapide)
10. Attendez 3 minutes alors que le four est à FAST COOL
(Refroidissement rapide), puis à l’aide d’un gant de
cuisson,
Période de rodage
2. Enfoncez l’interrupteur Marche/Arrêt du four.
11. retirez la sonde du four.
1. Pincez la sonde sur la grille du centre. Faites sortir les
fi ls de la sonde du four entre la porte et le joint de la
porte et fermez la porte du four. Branchez le fi l de la
sonde dans le thermomètre
3. Laissez le four préchauff er jusqu’à 196 °C (375 °F)
pendant environ 30 minutes avant la calibration..
4. Affi chez les valeurs affi chées sur le thermomètre
lorsque le voyant DEL HEAT ON (Chaleur en marche)
s’éteint, et de nouveau lorsqu’il se rallume. La moyenne
de ces deux chiff res est la température de cycle du
four. C’est la valeur utilisée pour calibrer le four.
5. Pour commencer à programmer, enfoncez et
maintenez le bouton PROG jusqu’à ce que l’affi chage
change pour « MAIN MENU | EDIT MENU ITEM » (Menu
principal | Modifi er l’élément de menu).
6. Enfoncez le bouton 2 ou 8 afi n de basculer entre le
menu principal et le menu d’entretien.
7. Enfoncez le bouton PROG encore une fois permettra
d’avancer jusqu’à CAL/OFFSET (Calibration/
Compensation). Les boutons 2 ou 8 peuvent être
utilisés pour augmenter la compensation de 1
degré à chaque fois que le bouton est enfoncé.
La Compensation peut être + ou -. Le paramètre
défi ni en usine est de 0 (aucune compensation). Si
une compensation est déjà programmée, ajoutez/
soustrayez le nombre que vous trouvez à l’étape 4 à/de
la compensation existante. Enfoncez le bouton PROG,
puis le bouton START (Marche) pour quitter le mode
de programmation du menu d’entretien et terminer la
calibration.
Example: Température enregistrée : 193 °C (380 °F),
(étape 4), Température prédéterminée : 191 °C (375 °F)
— La compensation devrait être de +2 °C (+5 °F) pour
calibrer. Soustrayez la température prédéterminée de la
valeur enregistrée et cela vous donnera la valeur +/- que
vous devez utiliser (193 - 191 = +2). Une compensation
maximale de +/- 28 °C (50 °F) peut être entrée en mode de
calibration
8.
Après avoir entré la compensation de calibration, au
besoin, laissez l’appareil eff ectuer un cycle et vérifi ez
la calibration en répétant l’Étape 4. La valeur indiquée
à l’Étape 4 devrait correspondre à la température
prédéterminée.
Page12
Lorsque le four est neuf, faites-le fonctionner pendant une
heure à 191 °C (375 °F) avant de commencer votre cuisson
normale. Après avoir laissé le four refroidir, essuyez l’intérieur,
incluant les grilles, à l’aide d’un chiff on propre et humide.
NOTE: Débranchez le four de sa source d’alimentation avant
de le nettoyer ou de le réparer.
Nettoyage de l’extérieur
Établir un horaire régulier. Tout déversement doit être essuyé
immédiatement.
1. Vous devez toujours laisser le four refroidir suffi samment,
à l’aide de FAST COOL (Refroidissement rapide), avant
de tenter tout nettoyage. Voir le bouton VIEW/UTILITY
(Service) à la Page 12.
2. Une fois que le four est froid, essuyez la surface exposée
et nettoyable à l’aide d’eau chaude et d’un détergent
doux. Les taches de résidu tenaces peuvent être enlevées
à l’aide d’un tampon à récurer non métallique léger.
Séchez les surfaces nettoyées complètement à l’aide d’un
chiff on propre
3. Les surfaces en acier inoxydable peuvent souvent être
nettoyées à l’aide de la même méthode. Les taches
tenaces peuvent être enlevées à l’aide d’un tampon
abrasif non métallique, en frottant dans le sens du grain
du métal. Au besoin, pour les dépôts particulièrement
importants, vous pouvez appliquer à l’aide d’une éponge
une pâte mince faite en mélangeant de la poudre à
récurer et de l’eau. Prenez garde de n’appliquer qu’une
faible pression et souvenez-vous de frotter uniquement
dans le sens du grain du métal.
4. La surface du tableau de commande se nettoie
facilement avec de l’eau chaude, du savon et un chiff
on doux. N’utilisez pas d’abrasifs trop puissants, de
substances telles que les solvants ou de tampons à
récurer de métal, car ceux-ci peuvent égratigner ou
embrouiller la surface
5. Ne vaporisez jamais de vapeur ou d’eau sur les surfaces
perforées ou le tableau de commande, car cela
permettrait une infi ltration de l’eau dans le logement
des commandes, ce qui pourrait endommager les
composants électriques.
Pièce nº4516833 Rev C (19 Mar 2014)
MANUEL D’INSTALLATION ET D’UTILISATION
FOURS À CONVECTION ÉLECTRIQUES DEMI-TAILLE GARLAND, MODÈLE MCOE5L
ENTRETIEN ET DÉPANNAGE
Caractéristiques de sécurité des commandes
« Heater Error » (Erreur de chauff age)
• Lorsque le contrôleur demande de la chaleur et
qu’il ne détecte pas un (1) degré d’augmentation
de température sur une période de 5 minutes.
Mettez l’interrupteur à l’arrêt pendant environ
10 secondes afi n de réinitialiser le contrôleur.
Si le problème persiste, communiquez avec le
service d’entretien.
Pour réinitialiser aux paramètres installés
en usine
1. ENFONCEZ le bouton pendant environ 3 secondes.
Le contrôleur affi chera « MAIN MENU | EDIT MENU
ITEM » (Menu principal | Modifi er l’élément de menu).
2. ENFONCEZ le bouton ou le bouton pour défi ler
jusqu’à « SERVICE MENU » (Menu d’entretien)..
3. ENFONCEZ le bouton jusqu’à ce que le contrôleur
affi che « FACTORY DEFAULTS » (Réglages en usine).
4. ENFONCEZ le bouton ou le bouton pour changer
le paramètre actuel « NO » à « YES » (Non à Oui).
“High Temp” (Température élevée)
• Lorsqu’il y a un dysfonctionnement du four et
que les éléments chauff ent continuellement
jusqu’à ce que la sonde indique 302 °C (575
°F), le relais d’élément sera fermé et l’affi cheur
indiquera « High Temp » (Température élevée):
5. ENFONCEZ le bouton 1x. Le contrôleur ne répondra
pas pour une période d’environ 5 secondes alors que
les paramètres par défaut du contrôleur sont chargés.
6. ENFONCEZ le bouton
7. ENFONCEZ le bouton
programmation.
1x.
2x pour quitter le mode de
Éléments du menu créés en usine
0:00
HOLD TIME
375F
0:00
HIGH
FULL
YES
COOK TEMP T 4
COOK TIME T 4
FAN SPEED T 4
FAN CYCLE T 4
FLEX TIMING T4
375F
0:00
HIGH
FULL
YES
COOK TEMP T 3
COOK TIME T 3
FAN SPEED T 3
FAN CYCLE T 3
FLEX TIMING T3
375F
0
HIGH
FULL
YES
COOK TEMP T 2
COOK TIME T 2
FAN SPEED T 2
FAN CYCLE T 2
FLEX TIMING T2
375F
4:45
HIGH
FULL
YES
COOK TEMP T 1
COOK TIME T 1
FAN SPEED T 1
FAN CYCLE T 1
FLEX TIMING T 1
Product 1
BISCUITS
“MANUAL”
Select Product ->
CANCEL
Product 2
BAGELS
“MANUAL”
Product 3
PIES
“MANUAL”
375F
3:00
HIGH
FULL
YES
375F
11:00
HIGH
FULL
YES
375F
0
HIGH
FULL
YES
375F
0
HIGH
FULL
YES
375F
0:00
HIGH
FULL
FLEX
375F
0:00
HIGH
FULL
FLEX
375F
0:00
HIGH
FULL
FLEX
375F
0:00
HIGH
FULL
FLEX
0:00
0:00
Product 4
COOKIES
MANUAL
375F
2:00
HIGH
FULL
YES
375F
0
HIGH
FULL
YES
375F
0:00
HIGH
FULL
FLEX
375F
0:00
HIGH
FULL
FLEX
0:00
Product 5
MCGRIDDLE
MANUAL
375F
6:00
HIGH
FULL
YES
375F
0
HIGH
FULL
FLEX
375F
0:00
HIGH
FULL
FLEX
375F
0:00
HIGH
FULL
FLEX
0:00
Product 6
MUFFINS
MANUAL
360F
:30
LOW
FULL
NO
305F
27:30
LOW
HEAT
NO
310F
19:00
LOW
FULL
NO
375F
0:00
LOW
FULL
NO
0:00
Product 7
PASTRY BITES
MANUAL
350F
3:00
LOW
FULL
NO
Product 8
NEW ITEM 8
MANUAL
375F
0:00
HIGH
FULL
YES
Product 9
NEW ITEM 9
MANUAL
Product 10
NEW ITEM 0.1
MANUAL
375F
0:00
HIGH
FULL
YES
375F
0:00
HIGH
FULL
YES
350F
11:00
LOW
HEAT
NO
350F
6:00
LOW
FULL
NO
375F
0:00
LOW
FULL
NO
0:00
0:00
0:00
0:00
Page11
Pièce nº4516833 Rev C (19 Mar 2014)
FOURS À CONVECTION ÉLECTRIQUES DEMI-TAILLE GARLAND, MODÈLE MCOE5L
MANUEL D’INSTALLATION ET D’UTILISATION
PROGRAMMER LES COMMANDES
2x pour quitter le mode de
7. ENFONCEZ le bouton
programmation..
pour enregistrer le nouveau
6. ENFONCEZ le bouton
paramètre.
Pour changer le nom du produit
1. ENFONCEZ le bouton pendant environ 3 secondes.
Le contrôleur affi chera « MAIN MENU | EDIT MENU
ITEM » (Menu principal | Modifi er l’élément de menu).
3. Enfoncez le bouton ou le bouton pour faire défi
ler la liste des éléments de menu disponibles.
1. ENFONCEZ le bouton pendant environ 3 secondes.
Le contrôleur affi chera « MAIN MENU | EDIT MENU
ITEM » (Menu principal | Modifi er l’élément de menu)
2. ENFONCEZ le bouton 1x. Le contrôleur affi chera «
SELECT PRODUCT-> » (Sélectionnez un produit).
Pour changer le cycle du ventilateur
Les noms d’éléments de menu disponibles
2. ENFONCEZ le bouton 1x. Le contrôleur affi chera «
SELECT PRODUCT-> » (Sélectionnez un produit).
3. En utilisant les boutons à , sélectionnez le
produit dont la programmation doit être changée. Le
contrôleur affi chera cet élément du menu.
4. ENFONCEZ le bouton jusqu’à ce que le contrôleur
affi che « FAN CYCLE (T1, T2, T3, T4) » (Cycle de
ventilateur).
2x pour quitter le mode de
7. ENFONCEZ le bouton
programmation.
pour enregistrer le nouveau
6. ENFONCEZ le bouton
paramètre.
ou le bouton
5. ENFONCEZ le bouton
le paramètre actuel.
pour changer
Bacon
Bagels
BB Muffin
Pastry (Pâtisserie)
Pasta (Pâtes)
New Item 9
(Nouvel élément 9)
New Item 8
(Nouvel élément 8)
New Item 6
(Nouvel élément 6)
New Item 5
(Nouvel élément 5)
New Item 4
(Nouvel élément 4)
New Item 3
(Nouvel élément 3)
New Item 2
(Nouvel élément 2)
New Item 1
(Nouvel élément 1)
New Item 0
(Nouvel élément 0)
Muffin
McGriddle
Eggs (OEufs)
Chicken II (Poulet II)
Chicken (Poulet)
Bread (Pain)
Buscuits (Petits pains
au lait)
Stuffing (Farce)
Scratch Biscuit (Petit
pain au lait maison)
Pretzels
Potato Bake (Cuire
pomme de terre)
Casserole
Cookies
Meatloaf (Pain de
viande)
New Item 7
(Nouvel élément 7)
Pancake (Crêpe)
Pies (Chaussons)
Sausage (Saucisse)
5. À l’aide des boutons à , entrez le nouveau
paramètre pour changer le paramètre actuel.
1. ENFONCEZ le bouton pendant environ 3 secondes.
Le contrôleur affi chera « MAIN MENU | EDIT MENU
ITEM » (Menu principal | Modifi er l’élément de menu”).
4. ENFONCEZ le bouton jusqu’à ce que le contrôleur
affi che « PRODUCT NAME » (Nom du produit).
Pour changer le temps de maintien
2. ENFONCEZ le bouton 1x. Le contrôleur affi chera «
SELECT PRODUCT-> » (Sélectionnez un produit).
6. ENFONCEZ le bouton
paramètre.
7. ENFONCEZ le bouton
programmation.
pour enregistrer le nouveau
2x pour quitter le mode de
2. ENFONCEZ le bouton ou le bouton pour défi ler
jusqu’à « SYSTEM INFO » (Infos sur le système).
5. À l’aide des boutons à , entrez le nouveau
paramètre pour changer le paramètre actuel (Note : un
nombre de 00:00 mettra la minuterie de maintien à «
OFF » (Arrêt).
1. ENFONCEZ le bouton pendant environ 3 secondes.
Le contrôleur affi chera « MAIN MENU | EDIT MENU
ITEM » (Menu principal | Modifi er l’élément de menu).
4. ENFONCEZ le bouton jusqu’à ce que le contrôleur
affi che « HOLD TIME (T1, T2, T3, T4) » (Temps de
maintien).
Pour affi cher l’information de recouvrement
3. En utilisant les boutons à , sélectionnez le
produit dont la programmation doit être changée. Le
contrôleur affi chera cet élément du menu.
2x pour quitter le mode de
7. ENFONCEZ le bouton
programmation..
pour enregistrer le nouveau
6. ENFONCEZ le bouton
paramètre.
3. ENFONCEZ le bouton jusqu’à ce que le contrôleur
affi che « RECOVERY » (Recouvrement).
4. ENFONCEZ le bouton
programmation..
Page10
2x pour quitter le mode de
Pièce nº4516833 Rev C (19 Mar 2014)
MANUEL D’INSTALLATION ET D’UTILISATION
FOURS À CONVECTION ÉLECTRIQUES DEMI-TAILLE GARLAND, MODÈLE MCOE5L
PROGRAMMER LES COMMANDES
Pour changer l’alerte d’annulation
1. ENFONCEZ le bouton pendant environ 3 secondes. Le
contrôleur affi chera « MAIN MENU | EDIT MENU ITEM »
(Menu principal | Modifi er l’élément de menu).
2. ENFONCEZ le bouton 1x. Le contrôleur affi chera «
SELECT PRODUCT-> » (Sélectionnez un produit).
3. En utilisant les boutons à , sélectionnez le produit
dont la programmation doit être changée. Le contrôleur
affi chera cet élément du menu.
2x pour quitter le mode de
7. ENFONCEZ le bouton
programmation.
pour enregistrer le nouveau
6. ENFONCEZ le bouton
paramètre.
ou le bouton
5. ENFONCEZ le bouton
paramètre actuel.
1x. Le contrôleur affi chera «
4. ENFONCEZ le bouton
CANCEL » (Annuler).
pour changer le
Pour changer la température de cuisson
1. ENFONCEZ le bouton pendant environ 3 secondes. Le
contrôleur affi chera « MAIN MENU | EDIT MENU ITEM »
(Menu principal | Modifi er l’élément de menu)..
2. ENFONCEZ le bouton 1x. Le contrôleur affi chera «
SELECT PRODUCT-> » (Sélectionnez un produit).
3. En utilisant les boutons à , sélectionnez le produit
dont la programmation doit être changée. Le contrôleur
affi chera cet élément du menu.
4. ENFONCEZ le bouton jusqu’à ce que le contrôleur
affi che « COOK TEMPERATURE (T1, T2, T3, T4) »
(Températures de cuisson).
5. À l’aide des boutons à , entrez le nouveau paramètre
pour changer le paramètre actuel.
2x pour quitter le mode de
7. ENFONCEZ le bouton
programmation.
pour enregistrer le nouveau
6. ENFONCEZ le bouton
paramètre.
3. En utilisant les boutons à , sélectionnez le produit
dont la programmation doit être changée. Le contrôleur
affi chera cet élément du menu.
4. ENFONCEZ le bouton jusqu’à ce que le contrôleur affi
che « COOK TIME (T1, T2, T3, T4) » (Temps de cuisson).
5. À l’aide des boutons à , entrez le nouveau paramètre
pour changer le paramètre actuel
2x pour quitter le mode de
7. ENFONCEZ le bouton
programmation.
pour enregistrer le nouveau
6. ENFONCEZ le bouton
paramètre.
Pour changer la vitesse du ventilateur
1. ENFONCEZ le bouton pendant environ 3 secondes. Le
contrôleur affi chera « MAIN MENU | EDIT MENU ITEM »
(Menu principal | Modifi er l’élément de menu
2. ENFONCEZ le bouton 1x. Le contrôleur affi chera «
SELECT PRODUCT-> » (Sélectionnez un produit).
3. En utilisant les boutons à , sélectionnez le produit
dont la programmation doit être changée. Le contrôleur
affi chera cet élément du menu.
4. ENFONCEZ le bouton jusqu’à ce que le contrôleur affi
che « FAN SPEED (T1, T2, T3, T4) » (Vitesse de ventilateur).
5. ENFONCEZ le bouton ou le bouton pour changer le
paramètre actuel (HIGH ou LOW) (Plus vite ou Moins vite).
2x pour quitter le mode de
7. ENFONCEZ le bouton
programmation.
pour enregistrer le nouveau
6. ENFONCEZ le bouton
paramètre.
Pour changer le temps flex
1. ENFONCEZ le bouton pendant environ 3 secondes. Le
contrôleur affi chera « MAIN MENU | EDIT MENU ITEM »
(Menu principal | Modifi er l’élément de menu).
2. ENFONCEZ le bouton 1x. Le contrôleur affi chera «
SELECT PRODUCT-> » (Sélectionnez un produit).
ou le bouton
pour changer le
4. ENFONCEZ le bouton jusqu’à ce que le contrôleur affi
che « FLEX TIME (T1, T2, T3, T4) » (Temps de cuisson).
1. ENFONCEZ le bouton pendant environ 3 secondes. Le
contrôleur affi chera « MAIN MENU | EDIT MENU ITEM »
(Menu principal | Modifi er l’élément de menu).
3. ENFONCEZ le bouton
paramètre actuel.
Pour changer le temps de cuisson
2. ENFONCEZ le bouton 1x. Le contrôleur affi chera «
SELECT PRODUCT-> » (Sélectionnez un produit).
5. ENFONCEZ le bouton ou le bouton pour changer le
paramètre actuel (YES ou NO) (OUI ou NON).
Page9
Pièce nº4516833 Rev C (19 Mar 2014)
FOURS À CONVECTION ÉLECTRIQUES DEMI-TAILLE GARLAND, MODÈLE MCOE5L
MANUEL D’INSTALLATION ET D’UTILISATION
LOGIQUE DU PROGRAMME
Appuyez et maintenez
(3 secondes)
Menu principal
Modifier l’élément de menu
Défiler vers
l’avant
MENU PRINCIPAL INFOS
SUR LE SYSTÈME
SÉLECTIONNEZ
UN PRODUIT->
RECOVERY
(Recouvrement)
FLASH NUMBER
(Numéro de flash)
MENU PRINCIPAL
SOFTWARE NUMBER
MENU D’ENTRETIEN
(Numéro de logiciel)
DOWNLOAD NUMBER
(Numéro de téléchargement)
ADDRESS
(Adresse)
Sélectionnez
un produit
SÉLECTIONNEZ UN PRODUIT ->
Nom du produit sélectionné
Défiler vers
l’arrière
SHELF ID
(Nº de tablette)
DOOR ALARM
(Alerte de porte)
TEMP DISPLAY
CANCEL
(Affichage Tem)
(Annuler)
CAL OFFSET
COOK TEMP T1
(Calibration/Compensation)
(Temp. de cuisson T1)
SETBACK TIME
COOK TIME T1
(Temps de compensation)
(Temps de cuisson T1)
FACTORY DEFAULTS
FAN SPEED T1
(Paramètres définis en usine)
(Vitesse de ventilateur T1)
FAN CYCLE T1
(Cycle de ventilateur T1)
FLEX TIME T1
(Temps flex T1)
COOK TEMP T2
(Temp. de cuisson T2)
COOK TIME T2
(Temps de cuisson T2)
FAN SPEED T2
(Vitesse de ventilateur T2)
FAN CYCLE T2
(Cycle de ventilateur T2)
FLEX TIME T2
(Temps flex T2)
Affiché seulement en FLASH
Numéro : 240-9108-05-1
NOTE : T2, T3, T4 sont des
stades programmés et
apparaîtront uniquement
lorsque le stade précédent
comporte des paramètres
programmés
HOLD TIME
(Minuterie de maintien)
PRODUCT NAME
(Nom du produit)
Page8
Pièce nº4516833 Rev C (19 Mar 2014)
MANUEL D’INSTALLATION ET D’UTILISATION
FOURS À CONVECTION ÉLECTRIQUES DEMI-TAILLE GARLAND, MODÈLE MCOE5L
MODE D’EMPLOI
Pour mettre le four à ON (Marche)
Interrupteur principal – Contrôle l’apport d’électricité au
four et doit être allumé (ON) pour utiliser le four. L’affi chage du
contrôleur sera actif et se mettra en mode « BISCUITS » par défaut
(touche de produit 1).
Préchauff er
Le four préchauff era à la température prédéterminée de la
touche de produit 1 (Note : La touche de produit 1 est BISCUITS –
La température prédéterminée du four est de 191 °C (375 °F).
Pendant ce mode de préchauff age, le contrôleur affi chera «
TOO COOL » (Trop froid). « TOO COOL » apparaîtra sur l’affi chage
lorsque la température est inférieure d’au moins 13 °C (25 °F) à la
température prédéterminée ET pendant 10 minutes après avoir
atteint la température prédéterminée depuis l’allumage initial. «
TOO HOT » apparaîtra sur l’affi chage lorsque la commande est à
25 °F au-dessus de la température prédéterminée..
Pour choisir un élément du menu
Pour choisir un élément du menu, enfoncez simplement le
bouton du numéro de l’élément du menu désiré.
Pour démarrer un cycle de cuisson
Pour démarrer la cuisson pour un élément du menu désiré,
enfoncez le bouton
Le nom du produit et le temps de
retrait prédéterminé seront affi chés. Le décompte du temps
prédéterminé pour ce produit commencera et un numéro « 1 »
sera affi ché dans le coin inférieur droit de l’écran pour indiquer
qu’il y a 1 produit qui cuit à ce moment-là. Le numéro changera
lorsque d’autres cycles de cuisson sont démarrés.
Flex Time – Ce four comporte une fonction nommée « FLEX
TIME » (Temps fl exible). Flex time est une fonction qui, lors du
décompte du temps de cuisson, permet de ralentir ou d’accélérer
le temps affi ché. Le « fl ex time » est en fonction des baisses ou
des hausses de température dans le four sur une période de
temps. Le temps des fournées plus grosses (p. ex., un plateau
plein de muffi ns) sera plus lent et le temps des fournées moins
grosses sera plus rapide.
Pendant la cuisson, enfoncez le bouton
pour affi cher le nom
du produit et le temps restant avant de le retirer.
NOTE: Le four est conçu pour cuire des fournées de produits de
tailles diff érentes en utilisant les mêmes aramètres de temps.
Pour annuler un cycle de cuisson
Pour annuler un cycle de cuisson, l’utilisateur enfonce et
maintient le bouton
Dès que le bouton est enfoncé, un
bip se fait entendre. Un autre bip se fait entendre lorsque
la minuterie est annulée. Le bouton CANCEL (Annuler)
fonctionne dans l’ordre du dernier produit entré, p. ex., la
minuterie est en marche pour les Biscuits et les bagels sont
démarrés par erreur. Les bagels sont annulés d’abord, et les
biscuits ensuite.
Une fois que la minuterie a terminé le décompte, l’affi
cheur se réinitialisera à l’élément du menu programmé
dans la touche de produit 1 (Biscuits la plupart du temps)..
Profi le Baking (Cuisson par profi l)
Profi le Baking (Cuisson par profi l) est seulement
disponible dans les numéros de logiciel et de fl ash
240-91018-05-XX. Avec profi le baking, les éléments de
menu peuvent être programmés de manière à comporter
jusqu’à 4 étapes de changements fonctionnels. Les
éléments de menu suivants peuvent comporter jusqu’à 4
stades :
• FAN CYCLE (Cycle de ventilateur)
• COOK TEMP (Temp. de cuisson)
• COOK TIME (Temps de cuisson)
• FAN SPEED (Vitesse de ventilateur)
• FLEX TIME (Temps fl exible)
FAN CYCLE – La fonction Fan Cycle (Cycle de ventilateur)
comporte 2 options:
FULL (Complet) – Le ventilateur de convection est
toujours en
marche
HEAT (Chaleur) – Le ventilateur de convection est en
marche seulement lors du cycle de chaleur
Minuterie de maintien
La minuterie de maintien est une minuterie distincte qui
compte à rebours à l’intérieur de la commande et qui
N’APPARAÎT PAS sur l’affi cheur. La minuterie de maintien
alerte l’opérateur lorsque le produit est prêt à être servi
après avoir refroidi. Cette minuterie est le plus souvent
utilisée pour refroidir les chaussons
Minuterie de recouvrement
Cette commande comporte une minuterie de
recouvrement. La minuterie est une valeur stockée depuis
la dernière fois que la température du four est passée de
66 °C à 121 °C (150 °F à 250 °F). La valeur de ce nombre
devrait généralement être de « 1:00 » à « 1:30 », indiquant
qu’il a fallu entre 1 minute et 1 minute 30 secondes pour
faire passer la température de 66 °C à 121 °C (150 °F à 250
°F). Une valeur en dehors de ces paramètres peut indiquer
un problème de chauff age éventuel ou futur
Refroidissement rapide
Lorsqu’elle est activée, la fonction fast cool
(refroidissement rapide) permet de refroidir le four de
manière rapide alors que la porte est ouverte. Enfoncez le
bouton VIEW/UTILITY, puis enfoncez le bouton START
Pièce nº4516833 Rev C (19 Mar 2014)
Page7
FOURS À CONVECTION ÉLECTRIQUES DEMI-TAILLE GARLAND, MODÈLE MCOE5L
MANUEL D’INSTALLATION ET D’UTILISATION
DESCRIPTION DES COMMANDES DU FOUR
Bouton Marche/Arrêt – Le bouton
START (Marche) est utilisé pour démarrer
la cuisson. Le voyant DEL s’allume pour
indiquer que la cuisson a commencé.
Bouton TEMP – Le bouton TEMP est utilisé
pour vérifi er la température réelle et la
température prédéterminée.
Voyants DEL Heat On – Le voyant DEL
HEAT ON (Chaleur en marche) s’allume
pourindiquer que la commande pour la
chaleur a été activée.
Bouton Program – Le bouton PROG
permet à chaque bouton d’être
programmé grâce aux diverses fonctions
de la commande. Enfoncez et maintenez
le bouton PROG afi n d’entrer le mode
de programmation
Bouton(s) Product – Les touches
PRODUCT (Produit) sont utilisées
pour sélectionner un temps et une
température préprogrammés pour des
produits précis. Jusqu’à 10 boutons
de produits diff érents peuvent être
programmés
Bouton VIEW/UTILITY – Le bouton
VIEW/ UTILITY (Service) permet d’affi
cher les produits tour à tour lorsque
plusieurs produits sont cuits en même
temps. Appuyez sur le bouton view/
utility et l’affi chage indiquera le nom
des produits et le temps restant pour
chaque produit qui cuit dans le four.
Permet à l’utilisateur d’entrer FAST COOL
(Refroidissement rapide)
Bouton CANCEL – Le bouton CANCEL
(Annuler) est utilisé pour mettre fi n à
une cuisson. Enfoncez et maintenez le
bouton, la commande émettra un bip
sonore lorsque le bouton est enfoncé
et encore une fois lorsque la cuisson est
annulée. La plus récente cuisson entrée
sera annulée
Page6
Pièce nº4516833 Rev C (19 Mar 2014)
MANUEL D’INSTALLATION ET D’UTILISATION
FOURS À CONVECTION ÉLECTRIQUES DEMI-TAILLE GARLAND, MODÈLE MCOE5L
INSTALLATION
8. Vérifi ez que toutes les connexions électriques sont
bonnes. Réinstallez l’ensemble côté du corps et tableau
de commande.
Il doit y avoir un dégagement suffi sant pour le nettoyage,
la réparation et le bon fonctionnement. (Reportez-vous au
tableau à la page 4 pour les dégagements minimum.)
7. Serrez les vis du bornier et les vis dans le BX pour serrer
le cordon en place.
Bien situer le four garantira qu’il sera plus facile à utiliser et
qu’il fonctionne comme il se doit.
Connexion électrique
Avant de tenter de faire les connexions électriques, il faut
vérifi er la plaque signalétique afi n de confi rmer que
les caractéristiques techniques du four et l’alimentation
électrique sont compatibles. La plaque signalétique se
trouve sur la face intérieure du tableau de commande/côté
du four.
1. Ouvrez la porte du four pour révéler les vis de fi xation
du tableau de commande.
2. Retirez toutes les vis servant à fi xer l’ensemble du
tableau de commande au four.
Le câblage doit être installé conformément aux normes UL
197, Commercial Electric Cooking Appliance Standards,
aux codes locaux et au code national de l’électricité, ASNI/
NFPA 70-1990, en ce qui a trait au :
a. Dimensions du tableau de commande
b. Protection contre les surcharges
c. Type de fi l
d. Calibre de fi l
e. Limites de température des fi ls
f. Méthode de connexion (conduit, câble, etc.)
3. Retirez ensuite les vis servant à fi xer le côté sur le four à
l’avant et à l’arrière.
4. Retirez la plaque d’éjection à l’arrière du four et installez
les connecteurs BX de la taille appropriée pour fi xer le
cordon. Réinstallez la plaque d’éjection sur le four.
5. Passez le cordon par le connecteur bx en laissant suffi
samment de longueur pour atteindre le bornier de
connexion.
6. Dénudez tout juste assez de fi l pour l’insérer dans le
bornier
PLAQUE
D’ÉJECTION
BORNIER
ENSEMBLE DE TABLEAU
DE COMMANDES
CÔTÉ DU CORPS
Pièce nº4516833 Rev C (19 Mar 2014)
Page5
FOURS À CONVECTION ÉLECTRIQUES DEMI-TAILLE GARLAND, MODÈLE MCOE5L
MANUEL D’INSTALLATION ET D’UTILISATION
DIMENSIONS ET CARACTÉRISTIQUES TECHNIQUES
21.000"
[535 mm]
INTÉRIEUR
DU FOUR
25.250"
[645 mm]
30.500"
[775 mm]
20.000
[510 mm]
30.250"
[766 mm]
25.750"
[657 mm]
INTÉRIEUR
DU FOUR
15.500"
[393 mm]
INTÉRIEUR DU FOUR
8.0
Standard
Total
kW
Ensemble
élément
208V/1Ph 240V/1Ph
38.5
33.3
X
20.8
Ampères nominaux par câble
208V/3Ph
240V/3Ph
Y
Z
X
Y
Z
23.0 23.0 18.0 20.0 20.0
240V/1Ph
34.8
230V /3Ph N 400V
X
Y
Z
13.1
10.9
10.9
Electrical specifications include motor requirements. Double-deck models require 2 separate power supplies.
Dégagements
Paroi combustible
1” (25mm)
1” (25mm)
Arrière
Côtés
Poids à
l’expédition
Entrée
Emballé
Déballé
36” (914mm)
31” (787mm)
Page4
350lbs. (159Kg)
Pièce nº4516833 Rev C (19 Mar 2014)
MANUEL D’INSTALLATION ET D’UTILISATION
FOURS À CONVECTION ÉLECTRIQUES DEMI-TAILLE GARLAND, MODÈLE MCOE5L
TABLE OF CONTENTS
GARANTIE . . . . . . . . . . . . . . . . . . . . . . . . . . . . . . . . . . . . . . . . . . . . . . . . . . . . . . . . . . . . . . . . . . . . . . . . . . . . 2
DIMENSIONS ET CARACTÉRISTIQUES TECHNIQUES . . . . . . . . . . . . . . . . . . . . . . . . . . . . . . . . . . . . . . 4
INSTALLATION . . . . . . . . . . . . . . . . . . . . . . . . . . . . . . . . . . . . . . . . . . . . . . . . . . . . . . . . . . . . . . . . . . . . . . . . 5
Connexion électrique . . . . . . . . . . . . . . . . . . . . . . . . . . . . . . . . . . . . . . . . . . . . . . . . . . . . . . . . . . . . . . . . . . . . . . . . . . . . . . . . . . . . . . . . . . . . . . . 5
DESCRIPTION DES COMMANDES DU FOUR . . . . . . . . . . . . . . . . . . . . . . . . . . . . . . . . . . . . . . . . . . . . . . 6
MODE D’EMPLOI . . . . . . . . . . . . . . . . . . . . . . . . . . . . . . . . . . . . . . . . . . . . . . . . . . . . . . . . . . . . . . . . . . . . . . 7
Pour mettre le four à ON (Marche) . . . . . . . . . . . . . . . . . . . . . . . . . . . . . . . . . . . . . . . . . . . . . . . . . . . . . . . . . . . . . . . . . . . . . . . . . . . . . . . . . . . 7
Préchauff er . . . . . . . . . . . . . . . . . . . . . . . . . . . . . . . . . . . . . . . . . . . . . . . . . . . . . . . . . . . . . . . . . . . . . . . . . . . . . . . . . . . . . . . . . . . . . . . . . . . . . . . . 7
Pour choisir un élément du menu . . . . . . . . . . . . . . . . . . . . . . . . . . . . . . . . . . . . . . . . . . . . . . . . . . . . . . . . . . . . . . . . . . . . . . . . . . . . . . . . . . . 7
Pour démarrer un cycle de cuisson . . . . . . . . . . . . . . . . . . . . . . . . . . . . . . . . . . . . . . . . . . . . . . . . . . . . . . . . . . . . . . . . . . . . . . . . . . . . . . . . . . 7
Pour annuler un cycle de cuisson. . . . . . . . . . . . . . . . . . . . . . . . . . . . . . . . . . . . . . . . . . . . . . . . . . . . . . . . . . . . . . . . . . . . . . . . . . . . . . . . . . . . 7
Profi le Baking (Cuisson par profi l) . . . . . . . . . . . . . . . . . . . . . . . . . . . . . . . . . . . . . . . . . . . . . . . . . . . . . . . . . . . . . . . . . . . . . . . . . . . . . . . . . . 7
Minuterie de maintien . . . . . . . . . . . . . . . . . . . . . . . . . . . . . . . . . . . . . . . . . . . . . . . . . . . . . . . . . . . . . . . . . . . . . . . . . . . . . . . . . . . . . . . . . . . . . . 7
Minuterie de recouvrement . . . . . . . . . . . . . . . . . . . . . . . . . . . . . . . . . . . . . . . . . . . . . . . . . . . . . . . . . . . . . . . . . . . . . . . . . . . . . . . . . . . . . . . . . 7
Refroidissement rapide . . . . . . . . . . . . . . . . . . . . . . . . . . . . . . . . . . . . . . . . . . . . . . . . . . . . . . . . . . . . . . . . . . . . . . . . . . . . . . . . . . . . . . . . . . . . . 7
LOGIQUE DU PROGRAMME . . . . . . . . . . . . . . . . . . . . . . . . . . . . . . . . . . . . . . . . . . . . . . . . . . . . . . . . . . . . 8
PROGRAMMER LES COMMANDES . . . . . . . . . . . . . . . . . . . . . . . . . . . . . . . . . . . . . . . . . . . . . . . . . . . . . . 9
Pour changer l’alerte d’annulation. . . . . . . . . . . . . . . . . . . . . . . . . . . . . . . . . . . . . . . . . . . . . . . . . . . . . . . . . . . . . . . . . . . . . . . . 9
Pour changer la température de cuisson. . . . . . . . . . . . . . . . . . . . . . . . . . . . . . . . . . . . . . . . . . . . . . . . . . . . . . . . . . . . . . . . . . . . . . . . . . . . . 9
Pour changer le temps de cuisson . . . . . . . . . . . . . . . . . . . . . . . . . . . . . . . . . . . . . . . . . . . . . . . . . . . . . . . . . . . . . . . . . . . . . . . . . . . . . . . . . . . 9
Pour changer la vitesse du ventilateur . . . . . . . . . . . . . . . . . . . . . . . . . . . . . . . . . . . . . . . . . . . . . . . . . . . . . . . . . . . . . . . . . . . . . . . . . . . . . . . 9
Pour changer le temps flex . . . . . . . . . . . . . . . . . . . . . . . . . . . . . . . . . . . . . . . . . . . . . . . . . . . . . . . . . . . . . . . . . . . . . . . . . . . . . . . . . . . . . . . . . . 9
Pour changer le cycle du ventilateur. . . . . . . . . . . . . . . . . . . . . . . . . . . . . . . . . . . . . . . . . . . . . . . . . . . . . . . . . . . . . . . . . . . . . . . . . . . . . . . .10
Pour changer le temps de maintien . . . . . . . . . . . . . . . . . . . . . . . . . . . . . . . . . . . . . . . . . . . . . . . . . . . . . . . . . . . . . . . . . . . . . . . . . . . . . . . .10
Pour changer le nom du produit . . . . . . . . . . . . . . . . . . . . . . . . . . . . . . . . . . . . . . . . . . . . . . . . . . . . . . . . . . . . . . . . . . . . . . . . . . . . . . . . . . .10
Pour affi cher l’information de recouvrement . . . . . . . . . . . . . . . . . . . . . . . . . . . . . . . . . . . . . . . . . . . . . . . . . . . . . . . . . . . . . . . . . . . . . . .10
Éléments du menu créés en usine . . . . . . . . . . . . . . . . . . . . . . . . . . . . . . . . . . . . . . . . . . . . . . . . . . . . . . . . . . . . . . . . . . . . . . . . . . . . . . . . . .11
Caractéristiques de sécurité des commandes . . . . . . . . . . . . . . . . . . . . . . . . . . . . . . . . . . . . . . . . . . . . . . . . . . . . . . . . . . . . . . . . . . . . . . .11
Pour réinitialiser aux paramètres installés en usine . . . . . . . . . . . . . . . . . . . . . . . . . . . . . . . . . . . . . . . . . . . . . . . . . . . . . . . . . . . . . . . . . .11
ENTRETIEN ET DÉPANNAGE . . . . . . . . . . . . . . . . . . . . . . . . . . . . . . . . . . . . . . . . . . . . . . . . . . . . . . . . . . . 11
Vérifi er la calibration . . . . . . . . . . . . . . . . . . . . . . . . . . . . . . . . . . . . . . . . . . . . . . . . . . . . . . . . . . . . . . . . . . . . . . . . . . . . . . . . . . . . . . . . . . . . . .12
Période de rodage . . . . . . . . . . . . . . . . . . . . . . . . . . . . . . . . . . . . . . . . . . . . . . . . . . . . . . . . . . . . . . . . . . . . . . . . . . . . . . . . . . . . . . . . . . . . . . . . .12
Nettoyage de l’extérieur . . . . . . . . . . . . . . . . . . . . . . . . . . . . . . . . . . . . . . . . . . . . . . . . . . . . . . . . . . . . . . . . . . . . . . . . . . . . . . . . . . . . . . . . . . .12
Roue du ventilateur et sonde de température . . . . . . . . . . . . . . . . . . . . . . . . . . . . . . . . . . . . . . . . . . . . . . . . . . . . . . . . . . . . . . . . . . . . . .13
Soins du moteur . . . . . . . . . . . . . . . . . . . . . . . . . . . . . . . . . . . . . . . . . . . . . . . . . . . . . . . . . . . . . . . . . . . . . . . . . . . . . . . . . . . . . . . . . . . . . . . . . . .13
INSTRUCTION, l’EMPLACEMENT DE l’ÈTIQUETTE . . . . . . . . . . . . . . . . . . . . . . . . . . . . . . . . . . . . . . . 14
Pièce nº4516833 Rev C (19 Mar 2014)
Page3
FOURS À CONVECTION ÉLECTRIQUES DEMI-TAILLE GARLAND, MODÈLE MCOE5L
MANUEL D’INSTALLATION ET D’UTILISATION
GARANTIE
Applicable seulement aux fours avec une date de production de numéro de série dessus ou
après le 1er janvier 2013
Cette garantie couvre les défauts de matériau et de main-d'oeuvre en vertu d'une utilisation normale à condition que :
a) l'équipement n'a pas été accidentellement ou intentionnellement endommagé, modifié ou utilisé de manière
abusive ou inadéquate.
b) l'équipement est correctement installé, ajusté, utilisé et entretenu en respectant les codes nationaux et locaux et
selon les instructions d'installation fournies avec ce produit.
c) le numéro de série servant à la garantie apposé sur l'appareil par notre compagnie n'a pas été endommagé, effacé
ou enlevé.
d)
un rapport acceptable de réclamation en vertu de cette garantie nous est fourni.
La garantie de cet équipement demeure en vigueur pendant deux (2) années (pièces et main-d'oeuvre), (en Etats-Unis et
Canada seulement).
La garantie de cet équipement est limitée à cinq (5) ans (Gond de Porte), (en Etats-Unis et Canada seulement).
Le Groupe Garland convient d'effectuer la réparation ou de remplacer, à sa discrétion, n'importe quelle pièce qui s'avère
défectueuse en raison d'un vice de matériau ou de fabrication, et ce, sans frais, pièces et main-d'oeuvre.
Nous n'assumons aucune responsabilité d'installation, d'ajustements, de diagnostic, ou d'entretien normal tels : la lubrification des ressorts ou des valves.
Nous n'assumons aucune responsabilité des coûts de déplacement au-delà de deux (2) heures et 100 milles / 150Kms,
déplacement outremer, et des heures supplémentaires en raison d'une réparation.
Nous excluons le verre brisé, la peinture et la finition en porcelaine endommagées, la rouille extérieure, les joints, les pièces
de céramique, les ampoules et les fusibles de la couverture normale.
Nous excluons les dommages ou le dysfonctionnement causés par le feu, les inondations, et les cas de « force majeure »
qui sont au-delà du contrôle du Groupe Garland.
Nous excluons les bris provoqués par une tension ou un approvisionnement en gaz irréguliers
La responsabilité du Groupe Garland sur une réclamation de garantie n'excédera pas le prix du matériel et/ou du service,
qui ont mené à la réclamation.
Cette garantie est limitée et remplace toutes autres garanties, expresses ou implicites. Le Groupe Garland, nos employés
ou nos agents ne seront tenus responsables d'aucune réclamation relative à des blessures ou des pertes ou dommages
consécutifs.
Cette garantie vous octroie des droits légaux spécifiques et vous pouvez avoir d'autres droits qui varient d'un pays à l'autre
et d'une province à l'autre.
Page2
Pièce nº4516833 Rev C (19 Mar 2014)
INSTRUCTIONS
D’INSTALLATION ET
D’UTILISATION POUR LE
FOUR À CONVECTION
ÉLECTRIQUE DEMI-TAILLE,
MODÈLE : MCOE5L
AVERTISSEMENT :
L’INSTALLATION, AJUSTEMENT, MODIFICATION, RÉPARATION OU ENTRETIEN INADÉQUAT PEUT
CAUSER DES DOMMAGES À LA PROPRIÉTÉ, DES BLESSURES OU LA MORT. BIEN LIRE LES INSTRUCTIONS
D’INSTALLATION, D’UTILISATION ET D’ENTRETIEN AVANT D’INSTALLER OU DE RÉPARER CETTE PIÈCE
D’ÉQUIPEMENT.
NOTE:
LE FOUR PRODUIRA UNE CERTAINE QUANTITÉ DE FUMÉE LORS DU PREMIER ALLUMAGE. CE
« BRÛLAGE » PEUT DURER 10 À 20 MINUTES OU PLUS.
VEUILLEZ LIRE TOUTES LES SECTIONS DE CE MANUEL ET LE CONSERVER POUR VOUS Y RÉFÉRER ULTÉRIEUREMENT.
CETTE PIÈCE D’ÉQUIPEMENT DOIT ÊTRE INSTALLÉE ET MISE EN SERVICE PAR UN TECHNICIAN
PROFESSIONNEL FORMÉ EN USINE.
NOTE : Ce manuel s’applique à tous les modèles de four énumérés ci-dessus. Le lecteur/opérateur doit
interpréter son contenu en fonction de ses propres besoins. Si vous avez des questions à propos des
manuels des fours à convection de Garland, veuillez contacter notre Département de service à la clientèle
en composant l’un des numéros de téléphone ci-dessous.
FABRIQUÉ EN EXCLUSIVITÉ POUR McDonald’s PAR
CLEVELAND RANGE
1333 EAST 179 St., CLEVELAND, OH 44110 (É.-U.)
MCD HOTLINE TOLL FREE: (800) 446-8367 PHONE: (800) 424-2411 FAX: (888) 606-0460
Courriel: [email protected]
http://www.garland-group.com
Pièce nº4516833 Rev C (10 Mar 2014)