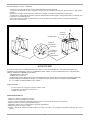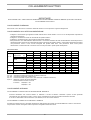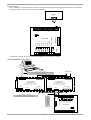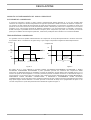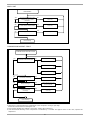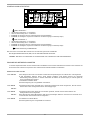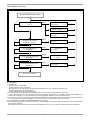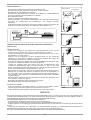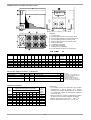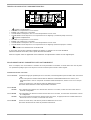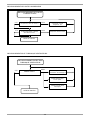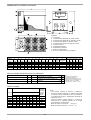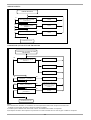
1
MSAT 102-122-142-162-182-202-242 UNITA’ MOTOCONDENSANTI RAFFREDDATI AD ARIA (con ventilatori elicoidali) AIR-COOLED CONDENSING UNITS (with helical fans) LUFTGEKÜHLTE VERFLÜSSIGERSÄTZE (mit Axialventilatoren) GROUPES DE CONDENSATION REFROIDIS PAR AIR (avec ventilateurs hélicoïdes) UNIDADES MOTOCONDENSADORAS ENFRIADAS POR AIRE (con ventilador helicoidal) MANUALE DI INSTALLAZIONE USO E MANUTENZIONE INSTALLATION AND MAINTENANCE MANUAL ANLEITUNG ZUR INSTALLATION, BEDIENUNG UND WARTUNG MANUEL D’INSTALLATION ET D’ENTRETIEN MANUAL DE INSTALACION USO Y MANTENIMIENTO M69A60C3 SOMMARIO GENERALE......................................................................................................................................... 4 AVVERTENZE GENERALI ..................................................................................................................................................4 PRINCIPI DI INTEGRAZIONE DELLA SICUREZZA............................................................................................................4 ACCESSORI ........................................................................................................................................................................4 DATI TECNICI GENERALI...................................................................................................................................................5 POSIZIONAMENTO.............................................................................................................................................................6 SPAZI FUNZIONALI.............................................................................................................................................................6 DIMENSIONE E DISTRIBUZIONE PESI .............................................................................................................................7 TARATURE PROTEZIONI E CONTROLLI ..........................................................................................................................7 LIVELLI SONORI .................................................................................................................................................................7 RICEVIMENTO .................................................................................................................................... 8 CONTROLLO AL RICEVIMENTO........................................................................................................................................8 MOVIMENTAZIONE.............................................................................................................................................................8 STOCCAGGIO .....................................................................................................................................................................9 RIMOZIONE IMBALLO ........................................................................................................................................................9 COLLEGAMENTI ELETTRICI ........................................................................................................... 10 COLLEGAMENTI FUNZIONALI .........................................................................................................................................10 COLLEGAMENTO ALLA RETE DI ALIMENTAZIONE.......................................................................................................10 COLLEGAMENTI OPZIONALI ...........................................................................................................................................10 COLLEGAMENTO A P.C.O B.M.S.....................................................................................................................................11 MESSA IN FUNZIONE ...................................................................................................................... 12 CONTROLLI PRELIMINARI ...............................................................................................................................................12 MESSA IN FUNZIONE.......................................................................................................................................................13 REGOLAZIONE................................................................................................................................. 14 MODALITA' DI FUNZIONAMENTO DEL MODULO PRINCIPALE.....................................................................................14 ROTAZIONE DEI COMPRESSORI....................................................................................................................................14 TEMPORIZZAZIONI COMPRESSORI...............................................................................................................................14 REGOLATORE VENTILATORI BATTERIA .......................................................................................................................15 PANNELLO DEL MODULO DI CONTROLLO PRINCIPALE .............................................................................................16 IMPOSTAZIONE DEI PARAMETRI DI FUNZIONAMENTO...............................................................................................16 ALLARMI ............................................................................................................................................................................18 RICERCA GUASTI ............................................................................................................................ 19 BLOCCO ALTA PRESSIONE ............................................................................................................................................20 BLOCCO BASSA PRESSIONE .........................................................................................................................................21 INTERVENTO SICUREZZA COMPRESSORE..................................................................................................................22 INTERVENTO TERMICA VENTILATORI...........................................................................................................................22 UNITA’ RUMOROSA..........................................................................................................................................................23 COMPRESSORE NON PARTE .........................................................................................................................................23 MANUTENZIONE ORDINARIA ......................................................................................................... 24 UNITA'................................................................................................................................................................................24 PARTE ELETTRICA...........................................................................................................................................................24 TUBAZIONI REFRIGERANTI............................................................................................................ 25 TUBAZIONE DI ASPIRAZIONE .........................................................................................................................................25 TUBAZIONE LIQUIDO .......................................................................................................................................................25 CONTROLLO PERDITE ....................................................................................................................................................26 MODALITA’ - INDICAZIONI PER UN CORRETTO COLLEGAMENTO .............................................................................26 RISCHI RESIDUI ............................................................................................................................... 27 DEFINIZIONE ZONA PERICOLOSA .................................................................................................................................27 RISCHI GENERICI.............................................................................................................................................................28 SCHEDE SICUREZZA REFRIGERANTE ..........................................................................................................................28 I dati contenuti nel presente manuale non sono impegnativi e possono essere cambiati dal costruttore senza obbligo di preavviso. Riproduzione anche parziale vietata. 3 GENERALE AVVERTENZE GENERALI Il presente manuale è stato realizzato per permettere una corretta installazione, messa a punto e manutenzione dell’unità; è quindi di fondamentale importanza che: ─ le seguenti istruzioni siano lette con la dovuta attenzione; ─ l’unità sia installata, collaudata e assistita da personale qualificato (legge n.46 del 5/3/1990) in possesso dei requisiti di legge. • Viene declinata ogni responsabilità del produttore con decadimento della garanzia in caso di modifiche elettriche e/o meccaniche. Manomissioni in genere non espressamente autorizzate e che non rispettino quanto riportato nel presente manuale, fanno decadere la garanzia. • Osservare le norme di sicurezza locali vigenti al momento dell’installazione. • Verificare che le caratteristiche della rete elettrica siano conformi ai dati riportati sulla targhetta matricolare della unità che si trova all’interno presso il quadro elettrico. • Il presente manuale e lo schema elettrico dell’unità vanno conservati con cura e messi a disposizione dell’operatore per ogni ulteriore consultazione. • Il materiale di imballaggio (sacchetti in plastica, polistirolo espanso, chiodi, ecc.) in quanto potenziale fonte di pericolo deve essere tenuto fuori dalla portato dei bambini e correttamente riciclato secondo le norme locali in vigore. • L’unità motocondensante è destinata al condizionamento in abbinamento ad unità interna ad espansione del refrigerante. • Disattivare l’apparecchiatura in caso guasto o di cattivo funzionamento. • Per l’eventuale riparazione rivolgersi esclusivamente ad un centro di assistenza tecnica autorizzato dal costruttore e richiedere l’utilizzo di ricambi originali. Il mancato rispetto di quanto sopra può compromettere la sicurezza dell’apparecchiatura. La casa costruttrice declina ogni responsabilità per eventuali danni che possono direttamente o indirettamente derivare a persone o cose in conseguenza alla mancata osservanza delle presenti istruzioni. PRINCIPI DI INTEGRAZIONE DELLA SICUREZZA L’unità è progettata e costruita in modo tale da non esporre a rischio la salute e la sicurezza delle persone. A tale scopo sono state adottate soluzioni di progetto atte a eliminare le possibili cause di rischio ove possibile o a ridurre sensibilmente la probabilità dell’evento rischio. Qualora non fosse stato possibile intervenire in fase di progetto per prevenire e/o eliminare il rischio, si faccia riferimento alle prescrizioni comportamentali riportate nella sezione rischi residui. ACCESSORI Le unità posso essere dotate dei seguenti accessori (a richiesta): ─ tensioni diverse dallo standard ─ griglia protezione condensatore ─ antivibranti ─ contaore funzionamento compressori ─ valvola solenoide ─ Set di collegamento che comprende: valvola termostatica, valvola solenoide, linea liquido, filtro deidratore, indicatore passaggio liquido. ─ unità con comando compressori separati ─ collegamento a modulo di controllo remoto ─ collegamento a PC o BMS 4 DATI TECNICI GENERALI Modello MSAT Tensione standard Modello MSAT R-22 Potenzialità frigorifera Potenza ass. compres. Modello MSAT R-407C Potenzialità frigorifera Potenza ass. compres. Compressore tipo n° giri al minuto Carica olio 102 122 142 162 182 400 / 3 / 50 202 n° e diametro N° giri al minuto Portata aria Potenza nominale Dati riferiti a: kW kW 31.3 8.5 36.4 10.3 41.3 11.3 48.7 13.5 53.8 15.8 63.9 17.5 77.9 22.3 kW kW 29.8 9.4 34.1 11.2 39.2 12.6 44.1 14.7 50.3 17.8 62.8 20.3 72.8 25.2 rpm 2x 1,55 L 2x 1,65 Gradini capacità Protezione motore Materiale Quantità Sup.Front. Tot. Spaziatura alette n° ranghi ∅ tubo Pressione prova 242 2 m mm mm kPa SCROLL 2900 2x 2,5 2 NTC Temperatura aria esterna+35°C Temperatura di aspirazione satura (SST) 7.5°C R-22, (SST) 9.5°C (dew point) R-407C Tipo olio SUNISO 3GS OIL Nota: se unità con R-407C tipo olio - MOBIL EAL ARTIC 22 CC - 32 MMMA POE 2x 4 Condensatore Tubi di rame/alette in alluminio 2 3 3,6 4,9 1,6 2,1 1,6 1,6 2 9,52 3000 Elettroventilatore assiale 2x560 4x450 n° x ∅ rpm 680 840 L/s 3056 4125 kW 2x0,22 4x0,16 6x450 6120 6x0,16 Rubinetto liquido Rubinetto aspirazione Connessioni Freon 16 ∅ 14 28 ∅ 22 Carica R-22 Carica R-407C kg kg Refrigerante 8.2 8,2 9 9.2 9,2 10 9 10 9.6 10.6 12 13 Peso trasp. appross. Volume imballo appr. kg 3 m Pesi e Volumi 275 280 380 1,50 420 3,20 485 580 590 4,30 47,5 45 49 46 44,5 -4 43,5 -8 46 -4 43 -8 -5 -9 -5 -9 Limiti di funzionamento Max. temp. aria R-22 49 47,5 47,5 ingresso condensatore 45 45 SST = +5 °C R-407C 47 Min. temp. aria R-22 -4 -4 -4 ingresso condensatore R-407C -5 -5 -5 SST = +5 °C Max. Temp. R-22 aspirazione gas R-407C Saturo °C Dati riferiti a: ─ Motore a rotore esterno ─ Griglia antinfortunistica 18 28 Note: Attacchi a saldare 22 35 Nota: 12,5 12,5 5 12 13 Carica da completare in fase di messa in funzione Note: SST Temperatura di aspirazione satura. Surriscaldamento gas aspirato + 5°K POSIZIONAMENTO Le unità sono progettate per l’installazione all’esterno. • Verificare che il piano d’appoggio sia adatto a sopportare il peso dell’unità (vedere peso e distribuzione pesi a pag. 7) e che sia in piano. Interporre uno strato di gomma tra base appoggio unità e supporto (per evitare rumori e vibrazioni). • Rispettare gli spazi funzionali. • Se l’unità è installata su terrazzo o tetto ne è consigliabile il montaggio su appositi antivibranti, in questo caso le tubazioni di collegamento dovranno essere provviste di giunti elastici. • Posizionare l’unità in modo che non sia investita su lati lunghi da eventuali venti predominanti. • Ancorare l’unità al suolo. SPAZI FUNZIONALI La scelta della dislocazione delle unità è di fondamentale importanza per il suo buon funzionamento. Ostacoli al flusso dell’aria, sorgenti di calore (come scarichi, aria calda), difficoltà di ricambi d’aria nella zona d’installazione, foglie o atri corpi che possono ostruire le batterie di scambio, venti che contrastano o favoriscono eccessivamente il flusso d’aria sono causa di anomalie di funzionamento o blocchi. Le unità necessitano di spazi minimi per il funzionamento e per la manutenzione. Gli schizzi di seguito riportati riguardano alcune tipologie d’installazione, verificare caso per caso tenendo presente quanto riportato nel presente manuale. Nota: Le misure sono espresse in mm UNITA’ CIRCUITI INDIPENDENTI ANTIVIBRANTI DI BASE UNITA’ CON COMANDO COMPRESSORI SEPARATI (accessorio) (accessorio) A richiesta, è possibile fornire l’unità con comando compressori separati, predisposta per il collegamento con 2 distinte unità terminali. In comune rimane l’alimentazone elettrica. 6 DIMENSIONE E DISTRIBUZIONE PESI Legenda: 1 - Compressore 2 - Attacco linea liquido Ø G1 primo circuito 2’ - Attacco linea liquido Ø G1 secondo circuito 3 - Attacco linea gas Ø G2 primo circuito 3’ - Attacco linea gas Ø G2 secondo circuito 4 - Quadro elettrico 5 - Ventilatori elicoidali 6 - Ingresso linea elettrica 7 - Batterie condensante 8 - Accesso quadro elettrico e compressore Grand. 102 122 142 162/182 202/242 A B C 1530 678 1400 1530 678 1400 1563 1107 1570 1563 1107 1570 2098 1107 1570 DIMENSIONI G H D E F 128 128 128 128 128 73 73 130 130 130 75 75 75 75 75 628 628 1058 1058 1058 42 42 42 42 42 I L O 1255 1255 1077 1077 1612 800 800 900 900 900 153 153 153 Ø G1 14 16 16 18 22 Ø G2 22 28 28 28 35 n° ventilatori 2 2 4 4 6 PESI W1 W2 W3 W4 Tot. 88 89 121 155 191 275 280 380 485 590 42 42 58 74 95 95 98 132 168 200 50 51 69 88 104 Nota: Le dimensioni sono espresse in mm, i pesi in kg. TARATURE PROTEZIONI E CONTROLLI Nota: Le sicurezze “pressostato alta pressione” e “termostato sicurezza Apre Chiude Pressostato alta pressione (kPa) 2750 2000 Tappo fusibile sicurezza Pressostato bassa pressione(kPa) 230 360 Max avviamenti ora compressore ( °C ) 120 scarico” sono resettabili ( n° ) 10 manualmente dall’unità di controllo, Termostato sicurezza scarico ( °C ) 120 pressione” è a ripristino automatico. LIVELLI SONORI Nota: Livello di pressione sonora Bande d’ottava (Hz) globale 125 250 500 1000 2000 4000 8000 dB(A) Livello di potenza sonora (dB) Grand. 102 122 142 162 182 202 242 63 80 80 87 87 84 86 86 84 76 80 81 78 79 82 75 73 74 76 78 78 81 73 73 73 73 74 77 75 69 71 71 70 69 72 70 63 65 69 69 70 67 73 60 62 66 65 62 62 63 42 43 63 62 55 54 65 La sicurezza “pressostato bassa - I livelli sonori si riferiscono ad unità funzionali a pieno carico con massima velocità di rotazione dei ventilatori, aria entrante al condensatore a 35°C, temperatura aspirazione satura +5°C. - Livello di pressione sonora riferito a 1 metro di distanza dalla superficie esterna dell’unità. -12 - Livelli di potenza sonora rif. : 1x10 w -5 - Livelli di pressione sonora rif. : 2 x 10 Pa 59 59 60 60 60 61 62 7 RICEVIMENTO CONTROLLO AL RICEVIMENTO Le unità sono spedite in appositi imballi di protezione. Controllare all’arrivo che l’unità non abbia subito danneggiamenti durante il trasporto e che la stessa sia completa nelle sue parti come da ordine. Nel caso di danni visibili annotare immediatamente sul documento relativo al trasporto il danno riscontrato riportando la dicitura: “RITIRO CON RISERVA PER EVIDENTI DANNI A IMBALLO” in quanto la resa franco stabilimento comporta il risarcimento dei danni a carico dell’assicurazione secondo quanto previsto dalla legge N° 450 del 22.08.85 “limite di risarcibilità“. IMPORTANTE TUTTE LE OPERAZIONI DI SEGUITO CITATE DEBBONO ESSERE ESEGUITE IN CONFORMITA’ ALLE NORME DI SICUREZZA VIGENTI, SIA PER QUANTO RELATIVO ALLA ATTREZZATURA USATA SIA PER QUANTO RELATIVO ALLE MODALITA’ OPERATIVE. ATTENZIONE PRIMA DI DAR CORSO A OPERAZIONI DI MOVIMENTAZIONE ASSICURARSI CHE LA CAPACITA’ DI SOLLEVAMENTO SIA ADEGUATA AL PESO DELL’ UNITA’ IN QUESTIONE. Grandezza Peso Kg 102 275 122 280 142 380 162 480 182 485 202 580 242 590 MOVIMENTAZIONE MOVIMENTAZIONE con CARRELLO ELEVATORE o SIMILARE - Inserire le forche sul lato lungo della pedana in legno a corredo dell’unità. - Dar corso al sollevamento assicurandosi che l’unità sia in equilibrio stabile. Tenere in considerazione che la parte più pesante è quella ove installato il compressore. 8 SOLLEVAMENTO con GRU o SIMILARE - Posizionare i tubi di sollevamento nei fori predisposti sul basamento dell’unità. - Portare le parti terminali dei tubi a sporgere in misura tale da permettere l’inserimento delle sicurezze e delle relative coppiglie. - Posizionare le cinghie di sollevamento sui tubi tra le coppiglie ed il basamento dell’unità (vedi disegno). - Posizionare in corrispondenza dei bordi superiori dell’unità delle strutture rigide a salvaguardia della sua integrità (solo se previsto un solo punto di forza). - Portare in tensione le cinghie di sollevamento in modo graduale assicurandosi del loro corretto posizionamento. - Dar corso al sollevamento. Tavole di protezione Struttura rigida Cinghia di sollevamento Sicurezza Coppiglia di sicurezza Tubo di sollevamento AVVERTENZE IL RISPETTO DELLE RACCOMANDAZIONI RIPORTATE SUL LATO ESTERNO DEL CARTONE DELL’IMBALLO E’ GARANTE DI UNA INTEGRITA’ FISICA E FUNZIONALE DELL’ UNITA’ A TUTTO VANTAGGIO DELL’ UTILIZZATORE FINALE. VIENE RACCOMANDATO QUINDI DI : - MOVIMENTARE CON CURA - TENERE ALL’ ASCIUTTO - EVITARE NEL MODO PIÙ ASSOLUTO DI SOVRAPPORRE ALL’ UNITA’ ALTRI OGGETTI SE NON NEI LIMITI DEI PIANI DI SOVRAPPOSIZIONE RIPORTATI ( IL NUMERO RIPORTATO SPECIFICA I PIANI SOVRAPPONIBILI. Es. 1 = 1 PIANO SOVRAPPONIBILE SULL’ UNITA’ ). STOCCAGGIO − − − Tenere al riparo da: raggi solari, pioggia, sabbia e vento Temperature: massime 60°C minime -10°C Umidità massima: 90% RIMOZIONE IMBALLO - Tagliare con forbice le reggette di chiusura. - Sollevare il cartone di imballo (se presente). - Togliere le staffe che fissano l’unità alla pedana in legno con l’ausilio di una chiave fissa da 10mm. - Sollevare l’unità in modo da separarla dalla pedana. - Appoggiare l’unità a terra in corrispondenza del punto predestinato. - Verificare la presenza di danni visibili. - Smaltire i prodotti di imballo facendoli confluire ai centri di raccolta o di riciclaggio specializzati (attenersi alle norme vigenti). 9 COLLEGAMENTI ELETTRICI IMPORTANTE ASSICURARSI CHE L’ UNITÀ NON SIA ALIMENTATA ELETTRICAMENTE PRIMA DI INIZIARE QUALSIASI LAVORO DI COLLEGAMENTO ELETTRICO COLLEGAMENTI FUNZIONALI Prima di dar corso alla messa in funzione dell’unità dovranno essere previsti i seguenti collegamenti: COLLEGAMENTO ALLA RETE DI ALIMENTAZIONE - Collegare la linea trifase agli appositi morsetti indicati sullo schema elettrico con L1 L2 L3 del dispositivo di protezione generale (sezionatore). - Collegare il conduttore di neutro al morsetto N del quadro elettrico. - Collegare il conduttore di terra al morsetto Pe del quadro elettrico. - Sarà particolare cura dell’installatore dimensionare i cavi di allacciamento alla rete di alimentazione tenendo presente i dati riportati sulla scheda tecnica dell’unità adesivata sulla porta del quadro elettrico. Sarà inoltre importante prevedere una protezione contro il corto circuito adeguata alla portata della linea. Tale protezione dovrà avere potere d’interruzione commisurato alla corrente di corto circuito presunta in quella parte dell’impianto. DATI ELETTRICI Grandezza Singolo compressore Ventilatori (A) (A) Totale (A) L.R.A. Compressore (A) F.L.I. Compressore (kW) Ventilatore (kW) Totale (kW) M.IC. Totale F.L.A. 1) F.L.A. 2) L.R.A. 3) F.L.I. 4) M.I.C. (A) 230/3/50 400/3/50 230/1/50 230/3/50 400/3/50 230/3/50 400/3/50 230/3/50 400/3/50 102 122 19.7 9.8 1.15x2 41.6 21.8 132.5 66 11.3 0.22x2 11.8 154.5 78.1 22.9 11.3 1.15x2 48.1 25.0 164 74 13.2 0.22x2 13.6 189.2 87.6 142 162 25.3 24.1 13.6 14.7 0.65 x 4 0.65 x 4 53.9 51.4 30.3 32.5 171 166 102 94 15.2 16.8 0.17 x 4 0.17 x 4 15.9 17.5 199.5 193.3 118.8 111.9 182 202 242 31.2 17.5 0.65 x 4 65.6 38.1 211 117 20.7 0.17 x 4 21.4 244.9 137.2 35.8 20.0 0.65 x 6 76.4 44.9 224 128 23.8 0.17 x 6 24.8 264.6 152.3 45.2 25.2 0.65 x 6 85.8 55.2 280 159 29.2 0.17 x 6 30.2 329.5 189.0 Corrente assorbita alle massime condizioni ammesse. Corrente di spunto del compressore. Potenza assorbita a pieno carico (alle massime condizioni ammesse). Massima corrente di spunto dell’unità. Sbilanciamento tensione: max 2% Tensione: 400/3/50 ± 6% 230/3/50 ± 6% COLLEGAMENTI OPZIONALI COLLEGAMENTO A DISPOSITIVO DI SEGNALAZIONE ANOMALIA Facendo riferimento allo schema elettrico si individui il circuito di allarme cumulativo. Questo circuito permette l’inserimento di un dispositivo acustico o visivo per la segnalazione remota di anomalia intervenuta sull’unità. Il circuito va alimentato in bassa tensione (24V 300mA) come da schema elettrico. COLLEGAMENTO A MODULO DI CONTROLLO REMOTO Il modulo di controllo remoto è la fedele riproduzione della tastiera del modulo di controllo ENERGY LIGHT e consente da una posizione remota di eseguire tutte le operazioni eseguibili a bordo macchina. 10 INSTALLAZIONE Prima di effettuare il collegamento del modulo di controllo remoto togliere tensione all’unità disarmando il sezionatore. Collegare la tastiera remota come rappresentato nella figura. Posteriore terminale remoto C5121423 25 24 26 S + - ESPANSION E SERIAL E COMUNE RELE' 7 RELE' 6 RELE' 5 RELE' 4 RELE' 3 RELE' 2 C5121420 RELE' 1 - S+ CONN B RELE' ALLARME CONN A La lunghezza massima del cavo di collegamento ENERGY LIGHT tastiera è di 80m. COLLEGAMENTO A P.C.O B.M.S. 230 Vac A C U R A D E L C L IE N T E C a vo d i c o ll e g a m e n to R S 2 3 2 9 p o l i m a s c h io - fe m m i n a L u n g h e zza M a x 1 0 m t 10 12 A l im e n ta z i o n e C 5121425 22 - - + 11 9 8 7 - 6 5 4 RELE' 4 Lunghezza Max =2mt Cavo seriale 5vie 2molex C5121248 10 24 + RELE' 5 + A C U R A D E L C L IE N T E C a vo s e r ia le R S 4 8 5 C a vo ; 2 fi li tw is ta ti L u n g h e z z a m a x d e ll a l in e a = 1 0 0 0 m t 23 3 2 1 RELE' 1 ON RELE' 2 21 RELE' 3 DTR R S 485 TTL RELE' 6 + O FF S RELE' 7 - 1 2 3 4 24 COMUNE + 23 RELE' ALLARME ON 22 SERIALE 21 ECHO R S 485 TTL NU NU DTR NU NU ECHO O FF S e r ia l o p to c o u p le d a d a p te r R S 2 3 2 /T T L R S 2 3 2 /R S 4 8 5 - R S 4 8 5 /T T L M i c r o n e t a n d M o d B u s P r o to c o l ESPANSIONE PE1P0005 C5121425 S e r ia l o p to c o u p le d a d a p te r R S 2 3 2 /T T L R S 2 3 2 /R S 4 8 5 - R S 4 8 5 /T T L M i c r o n e t a n d M o d B u s P r o to c o l 1 2 3 4 10 12 A l im e n ta z i o n e R S 232 - R S 232 C 5121420 CONN B CONN A MESSA IN FUNZIONE TUTTE LE APPARECCHIATURE DEBBONO ESSERE AVVIATE DAI CENTRI DI ASSISTENZA AUTORIZZATI. SOLO COSI' VIENE RESA EFFETTIVA LA GARANZIA CONTRATTUALE. L'ASSISTENZA SI LIMITA ALLA SOLA MESSA IN FUNZIONE E NON ESEGUE COLLEGAMENTI O LAVORI PROPRI DELL'IMPIANTO. CONTROLLI PRELIMINARI - Controllare che l'unità sia posizionata in modo corretto e che gli allacciamenti con l'unità terminale interna siano perfettamente eseguiti sia dal lato frigorifero che elettrico. - Controllare il valore della tensione e della frequenza di rete: DEVONO RIENTRARE NEI VALORI RIPORTATI: 230 ± 6% 400 ± 6% - Controllare il corretto serraggio delle viti che fissano i conduttori ai componenti elettrici presenti nel quadro (durante la movimentazione ed il trasporto le vibrazioni potrebbero aver prodotto degli allentamenti). OPERAZIONE DI VUOTO Dopo avere accertato, con l'impianto in pressione, che non vi siano perdite (vedi manuale delle tubazioni refrigeranti) sia nelle tubazioni di collegamento che nell'unità terminale procedere come sotto indicato. - Scaricare l'impianto con rubinetti MSAT sempre chiusi. - Con l’ausilio di un gruppo manometrico allacciare la pompa del vuoto su entrambi gli attacchi dei rubinetti, avendo cura che eventuali organi di intercettazione (valvola solenoide o rubinetti intermedi) siano aperti e procedere al vuoto. - Per far si che la valvola solenoide rimanga aperta, scollegarla dai morsetti del quadro elettrico (vedi schema) dell’unità esterna e allacciarla ad una comune presa di corrente 220v. - Fermare la pompa alla pressione di circa 100Pa e lasciare per alcune ore in vuoto, una piccola risalita iniziale della pressione è normale per poi stabilizzarsi definitamente. Se la pressione continua a risalire è sintomo o di piccole perdite o di presenza di umidità. Nel primo caso ripetere le operazioni descritte nel paragrafo CONTROLLO PERDITE del manuale delle tubazioni refrigeranti. Nel secondo caso ricaricare l'impianto con refrigerante sino a 100KPa e rifare il vuoto come sopra descritto. Stabilizzata definitivamente la pressione passare alla fase successiva di carica. CARICA REFRIGERANTE Le grandezze in oggetto sono spedite con una carica da completare in fase di messa in funzione a seconda della tipologia dell’unità terminale interna e dello sviluppo delle tubazioni. - Con l'impianto in vuoto chiudere i rubinetti del gruppo manometrico e scollegare la pompa del vuoto. - Allacciare la bombola del gas refrigerante, facendo sfiatare l’aria nella gomma di collegamento con il gruppo manometrico. - Aprire i rubinetti del gruppo monometrico e lasciare entrare refrigerante allo stato gassoso sino all’equilibrio della pressione impianto / bombola, e comunque ad una pressione superiore alla pressione atmosferica. - Aprire i rubinetti dell’unità motocondensante (prima quello del liquido) per far si che l'unità sia pronta ad essere avviata. Si raccomanda di utilizzare una chiave adeguata, con sezione quadra, corrispondente alla dimensione dello stelo del rubinetto e con braccio-leva di lunghezza sufficiente per esercitare una forza elevata. ( * VEDI FIGURA ) Peso di refrigerante nelle linee frigorifere durante il funzionamento ( KG / 10 m ) Ø Esterno Tubazione Liquido a 38° 10 12 14 16 18 22 28 35 42 0,60 1,06 1,41 1,71 2,36 3,62 6,61 9,47 -- Aspirazione SST+4,5°C --0,025 0,030 0,043 0,070 0,120 0,195 0,290 UNITA’ ESTERNA UNITA’ INTERNA Rubinetto gas Rubinetto Liquido IMPORTANTE: alla prima messa in funzione dell'unità e dopo ogni periodo di sosta prolungata è IMPORTANTE alimentare le resistenze (se presenti) di riscaldamento dell'olio del carter del compressore per almeno 8 ore prima della partenza del compressore. L'operazione di attivazione si esegue secondo le fasi riportate: - agire sul sezionatorere QS1 del motocondensante facendo molta attenzione che il LED verde sia spento. 12 MESSA IN FUNZIONE - Accertare il corretto funzionamento dell’unità interna. - Controllare il collegamento delle eventuali valvole solenoidi. - Localizzare sullo schema elettrico il comando SA2. Esso rappresenta il segnale proveniente dall’unità interna per la scelta del gradino di potenza e corrisponde all’attivazione del primo gradino, mentre il comando per l’attivazione del secondo gradino è rappresentato dal simbolo SA3 nello schema elettrico. - Il compressore che si avvia per primo è definito dal sistema di regolazione (vedi manuale regolazione). Contemporaneamente al compressore parte la ventilazione riguardante il solo circuito in funzione. - Accertare che ci sia richiesta dall'ambiente. - Per aggiungere gas refrigerante, utilizzare la presa di servizio dei rubinetti di intercettazione delle linee di aspirazione, e fare aspirare freon allo stato gassoso. Fare particolare attenzione in questa fase in quanto all'avviamento il pressostato di minima viene bypassato per 70 secondi. Se si vuol fare la carica prima su un circuito e successivamente sull'altro agire sui rispettivi portafusibili per fermare il compressore non interessato in quanto il modulo principale a una sua logica di ciclicità di funzionamento. ATTENZIONE: dopo una qualsiasi fermata, il sistema conteggia 6 minuti dalla partenza precedente, (se questo tempo è già trascorso saranno conteggiati solamente i 30 secondi di ritardo) prima di un successivo avviamento. - La carica si può considerare completa quando: - La spia del liquido (se presente) non segnala bolle. - Il surriscaldamento del gas aspirato è di 4-8°K. - Il sottoraffeddamento del liquido è di 3-5°K. AGGIUNTA D' OLIO E' necessario sapere con esattezza la quantità di refrigerante aggiunto, alla carica di fabbrica, nell'impianto per potere definire la quantità di olio da aggiungere. La quantità deve essere pari a circa il 10% del peso del refrigerante aggiunto (il tipo di olio è specificato nel manuale generale). L’aggiunta di olio è indispensabile per rabbocchi di refrigerante superiori a 3Kg. Verificare comunque sulla presa schrader di livello olio del compressore, ove presente. VERIFICHE DI PRIMA MESSA IN FUNZIONE DOPO AVER AVVIATO L’ UNITA’ VERIFICARE: PARTE ELETTRICA Sbilanciamento delle fasi. Deve essere inferiore ad un valore massimo pari al 2% (vedi esempio di calcolo). Esempio di calcolo: L1 - L2 = 388V L2 - L3 = 379V L3 - L1 = 377V La media dei valori misurati è data da: 388 + 379 + 377 = 381 3 La massima deviazione dalla media è data da: 388-381=7V Lo sbilanciamento è dato da: 7 x 100 = 1,83% (accettabile) 381 Assorbimento compressore. Deve essere inferiore al valore riportato alla tabella allegata alla voce F.L.A. PARTE CIRCUITO FRIGORIFERO - Fare un ultima verifica delle perdite sugli attacchi rubinetti e prese di pressione presenti sull'impianto. Attenzione tutti i cappucci delle prese manometriche e dei rubinetti devono essere rimontati al loro posto. - Controllare spia del liquido (se presente). - Verificare con manometri collegati le pressioni di lavoro (bassa pressione da 400KPa a 560KPa corrispondenti a 0°C+8°C SST) e temperatura di condensazione di circa 15-20°C superiore alla temperatura aria esterna (valori indicativi). - Controllare surriscaldamento facendo la differenza tra la temperatura letta sul manometro di bassa pressione, e la temperatura misurata, con termometro a contatto, direttamente sulla tubazione di aspirazione a monte del compressore. Se i valori sono da 4 a 8 gradi è sinonimo di corretto funzionamento, se decisamente al di fuori da queste tolleranze ricercare la causa con l'ausilio della sezione RICERCA GUASTI. - Controllo del sottoraffreddamento facendo la differenza tra la temperatura letta sul manometro di alta pressione, e la temperatura misurata, con termometro, direttamente sulla linea di liquido a valle del condensatore. Se i valori sono assestati su 3/5 gradi tutto va bene altrimenti come sopra ricercare la causa. - Per una corretta analisi dell'impianto controllare anche la temperatura di scarico del compressore che con i dati di surriscaldamento e sottoraffreddamento indicati deve essere di circa 30/40 gradi superiore alla temperatura di condensazione. • Facciamo presente inoltre che essendo l'unità dotata di regolazione velocità dei ventilatori. E‘ opportuno effettuare tutte queste verifiche di funzionamento con condizioni aria esterna - aria ambiente, molto vicine alle condizioni standard di progetto. • Ricordiamo inoltre che tutti i dati sopra riportati sono validi per unità con campo di lavoro per condizionamento e muniti di valvola termostatica. Per condizioni di progetto con temperature di evaporazione (SST) inferiori allo 0°C verificare di volta in volta sia i parametri di funzionamento che il dimensionamento delle tubazioni refrigeranti. Quanto sopra descritto presenta alcune delle problematiche con relative soluzioni che si possono verificare nella messa in funzione di una macchina motocondensante, resta comunque indispensabile, la serietà e qualifica del personale addetto. 13 REGOLAZIONE MODALITA' DI FUNZIONAMENTO DEL MODULO PRINCIPALE ROTAZIONE DEI COMPRESSORI Il processore provvede a gestire in modo corretto il funzionamento globale dell’unità. E’ il caso per esempio della rotazione dei compressori. Tramite l’impostazione di opportuni parametri si abilita la funzione di rotazione compressori. Ciò significa che alla richiesta di funzionamento da parte del termoregolatore il compressore che partirà per primo sarà quello che avrà il minor numero di ore di funzionamento mentre a fermarsi per primo sarà il compressore con il numero maggiore di ore. Tale funzione permette di distribuire equamente le ore di funzionamento su entrambi i compressori. Esiste comunque la possibilità di fare funzionare sempre il primo compressore per primo ed il secondo per secondo questo per soddisfare alcune esigenze particolari, l’unità viene predisposta dal costruttore con la rotazione abilitata. TEMPORIZZAZIONI COMPRESSORI Per garantire una buona qualità di funzionamento dei compressori alcuni tipi di temporizzazioni si rendono necessarie. Può risultare utile la consultazione dei grafici di fig. 3-4 per meglio comprendere il significato delle temporizzazioni. Comp. 1 Compressore ON ON OFF Secondi Comp. 2 ON OFF OFF Secondi Intervallo intervento primo secondo compressore C06 Intervallo spegnimento primo secondo compressore C07 Tempo sicurezza accensione spegnimento C01 Secondi*10 Tempo sicurezza accensione..accensione C02 Figura 3 Figura 4 Nel grafico di fig. 4 sono raffigurati 2 parametri. TEMPO SICUREZZA SPEGNIMENTO ACCENSIONE e TEMPO SICUREZZA ACCENSIONE ACCENSIONE. Il primo parametro prevede che all’arresto del compressore debba trascorrere un determinato tempo per permettere il riavvio del medesimo. Questo tempo viene rispettato anche se vi è richiesta da parte del termoregolatore. Il secondo parametro prevede che debba trascorrere un determinato tempo tra un’accensione e la successiva. Nel caso di unità a due compressori vengono utilizzati altri due parametri INTERVALLO INTERVENTO PRIMO SECONDO COMPRESSORE e INTERVALLO SPEGNIMENTO PRIMO SECONDO COMPRESSORE. Il primo parametro evita la partenza simultanea dei due compressori questo principalmente per evitare degli spunti troppo elevati dell’unità. Il secondo prevede un intervallo di tempo tra lo spegnimento del primo e del secondo compressore. Questi due parametri fanno riferimento al grafico di figura 3. 14 REGOLATORE VENTILATORI BATTERIA Nelle unità MSAT la regolazione della velocità dei ventilatori è di tipo termostatico di serie, può essere di tipo pressostatico su richiesta, quest’ ultima configurazione viene fornita con un kit. Il principio di funzionamento che andremo a descrivere rimane identico per le due regolazioni. - CONTROLLO VENTILATORI IN COOLING Di seguito proponiamo un grafico esplicativo per il modo di funzionamento cooling fig. 6. VENTILATORE ESTERNO IN MODALITA' COOL Figura 6 Quando il compressore viene attivato si ha una ventilazione forzata cioè le ventole non seguono la regolazione dettata dal controllo ma girano per un tempo definito da un parametro alla massima velocità a meno che la temperatura non sia inferiore al valore di CUT-OFF nel qual caso le ventole girano alla minima velocità per il periodo sopra citato. Fatta questa premessa vediamo il funzionamento del regolatore. Il primo parametro da definire è il CUT-OFF che corrisponde ad un particolare valore di temperatura di condensazione sotto il quale le ventole sono ferme. L’ISTERESI CUT-OFF è un parametro che definisce il campo entro il quale avviene la commutazione tra lo stato di funzionamento delle ventole alla minima velocità e lo stato di quiete delle medesime. Riassumendo le ventole inizieranno a funzionare alla minima velocità ad un valore di temperatura pari al valore di CUTOFF + ISTERESI CUT-OFF mentre la fermata viene determinata dalla differenza tra il valore di SET COOLING e DELTA CUT-OFF. Quando la temperatura di condensazione supera il valore SET FAN COOLING il regolatore inizia a regolare la velocità delle ventole proporzionalmente alla temperatura di condensazione. Nel caso delle unità Clivet contrariamente a quanto descritto sul grafico la regolazione viene mantenuta fino al raggiungimento del valore SET MAX FAN COOLING. Merita per completezza soffermarsi sulla descrizione dei parametri MAX SPEED SILENT e BANDA PROPORZIONALE COOLING. Il primo definisce una soglia massima di velocità dei ventilatori corrispondente ad un determinata temperatura di condensazione entro la quale avviene la regolazione della velocità mentre per BANDA PROPORZIONALE definisce l’inclinazione della retta entro la quale avviene la regolazione della velocità. Le unità CLIVET sono costruite per regolare la rotazione dei ventilatori fino alla massima velocità. 15 PANNELLO DEL MODULO DI CONTROLLO PRINCIPALE • • • • LED 1 compressore 1 ON se il compressore 1é attivo OFF se il compressore 1é spento BLINK alla frequenza di 1 Hz se sono in corso temporizzazioni di sicurezza BLINK a bassa frequenza se compressore in sbrinamento (solo pompa di calore) • • • • LED 3 compressore 2 ON se il compressore 1é attivo OFF se il compressore 1é spento BLINK alla frequenza di 1 Hz se sono in corso temporizzazioni di sicurezza BLINK a bassa frequenza se compressore in sbrinamento. (solo pompa di calore) ON se controllore in modalità Cooling Se non é acceso il LED COOL il controllore è in modalità STAND-BY. Quando la macchina è in OFF rimane acceso solo il punto decimale. N.B. I LED 2 e 4 sono riferiti ad unità con 4 compressori e due circuiti frigoriferi. IMPOSTAZIONE DEI PARAMETRI DI FUNZIONAMENTO In questo paragrafo ci limitiamo ad elencare i soli parametri accessibili in modo diretto senza password. I parametri protetti da password sono pertinenza del personale dei centri autorizzati. SIGNIFICATO DEI TASTI Tasto ON-OFF Tasto MODE ON-OFF a) Se tenuto premuto per più di 2sec. il termoregolatore passa dallo stato ON a OFF e viceversa. b) Una pressione singola su questo tasto resetta tutti gli allarmi a riarmo manuale non attivi. Vengono resettati anche i contattori del numero interventi ora, anche se questi non sono attivi. c) Nella modalità menu diventa il tasto di scorrimento verso il basso. d) Permette di decrementare il valore del parametro selezionato. a) Premendo e rilasciando entrambi i tasti entro 2sec. si scende di un livello nel menu di configurazione. Tasto MODE ON-OFF a) Tenendo premuto entrambi i tasti per più di 2 secondi si sale di 1 livello nel menu di configurazione. b) Se si sta visualizzando l’ultimo livello di un menu, la pressione simultanea e il rilascio entro due sec., permette di risalire di un livello. Tasto MODE a) In modalità menù tasto scorrimento verso l’alto. b) Permette di incrementare il valore del parametro selezionato. 16 Tabella 1 Codice H46 ELENCO DEI PARAMETRI ACCESSIBILI Descrizione Unità di misura unità Password Livello 0 Sonda regolazione Allarme attivo Livello 1 Set Point : SEt Livello 2 Set di fabbrica 0 Livello 3 Livello 4 Label Set Cooling: Coo Valore Set Cooling Label Set Heating: HEA Valore Set Heating Ing. Analogici: tP Codice ingressi: t01- t06 Valore ingresso analogico Allarmi: Err Codice all.attivi: E00-E46 Ing.Digitali: Id Codice ingressi: I01-I11 Stato ingresso digitale Parametri: PAr Par. configurazione: CnF Indice par. H01-H69 Valore parametro Par. compressore: CP Indice par. C01-C08 Valore parametro Par. ventilazione: FAn Indice par. F01-F25 Valore parametro Par. allarmi: ALL Indice par. A01-A26 Valore parametro Par. pompa: PUP Indice par. P01-P03 Valore parametro Par. antigelo: Fro Indice par. r01-r17 Valore parametro Par. sbrinamento: dFr Indice par. d01-d11 Valore parametro Par. espansione: ESP Indice par: N01-N07 Valore parametro Password: PSS Valore password Ore funzionamento: OHr Ore comp: OH1-OH4 Numero ore Ore pompa: OHP Numero ore Per muoversi all’interno dei livelli si utilizza la pressione simultanea dei tasti “Mode” e “on off” 1 - Premendo e rilasciando entrambi i tasti entro 2 secondi, si scende di un livello nel menu di configurazione. 2 - Tenendo premuto entrambi i tasti per più di 2 secondi si sale di un livello nel menu di configurazione. 3 - Se si sta visualizzando l’ultimo livello di un menu, la pressione simultanea e il rilascio entro 2 secondi, permette di risalire di livello. 17 ALLARMI I codici di allarme compaiono sul display del terminale interfaccia utente quando un errore si verifica. Gli allarmi vengono visualizzati sul display quelli a ripristino automatico scompaiono non appena si risolve l’anomalia quelli a ripristino manuale devono essere ripristinati tramite l’intervento di un tecnico. Gli allarmi compaiono sul terminale di interfaccia utente seguendo la sequenza con cui sono stati inseriti nella tabella. E’ da precisare inoltre che se sono contemporaneamente presenti più allarmi verrà visualizzato soltanto il primo, quando questo sarà ripristinato appare il secondo e cosi via fino ad esaurimento. Attenzione: in fase di standby, oppure di OFF, non sono segnalati gli allarmi e non è attivato il relè di blocco cumulativo. Gli allarmi, se presenti, sono segnalati ed è attivato il relè di blocco cumulativo, al momento della selezione del modo di funzionamento. Tabella 2 Codice E01 E02* E03 E04 E07 E21 E22* E24 E27 E45 Tipo di guasto Massima Pressione circ. 1 Minima Pressione circ. 1 Termica Compressore 1 Termica Ventole circ. 1 Guasto Sonda BT3/BP3 Massima Pressione circ. 2 Minima pressione circ. 2 Termica ventole circ. 2 Guasto sonda BT5/BP5 Configurazione Blocchi Compressore Compressore ventilatore Compressore ventilatore Compressore ventilatore Compressore ventilatore Compressore ventilatore Compressore ventilatore Compressore ventilatore Compressore ventilatore Compressore Ripristino MANUALE AUTOMATICO MANUALE MANUALE AUTOMATICO MANUALE AUTOMATICO MANUALE AUTOMATICO MANUALE * Dopo 5 segnalazioni diventa a ripristino manuale. Ogni allarme segnalato viene contato solo se fra una segnalazione e l'altra passano più di 225 secondi. 18 RICERCA GUASTI Ciò che segue vuole essere indicativo di alcune possibili anomalie e loro soluzione. Le operazioni derivanti sono e restano a responsabilità totale di chi le esegue. E’ obbligatorio rivolgersi ad un tecnico autorizzato in possesso dei requisiti di legge per ogni operazione intervento necessario a ripristinare il funzionamento. L’ intervento di un dispositivo di sicurezza indica anomalia di funzionamento: prima di ripristinare verificare ed eliminare la causa dell’anomalia. Di seguito sono elencati possibili problemi con relative cause e rimedi. ATTENZIONE LE OPERAZIONI RIPORTATE SONO A TOTALE RESPONSABILITÀ DI CHI LE ESEGUE, È OBBLIGATORIO RIVOLGERSI AD UN CENTRO DI ASSISTENZA AUTORIZZATO IN POSSESSO DEI REQUISITI NECESSARI PER LE OPERAZIONI FINALIZZATE AL RIPRISTINO DELLA FUNZIONALITÀ. Ogni guasto o condizione anomala di funzionamento viene gestito dal modulo di controllo principale. Ad ogni condizione anomala o guasto, il modulo, oltre a porre in sicurezza l’unità, può visualizzare l’evento a distanza. 19 BLOCCO ALTA PRESSIONE BLOCCO ALTA PRESSIONE SI Ventilazione efficiente ? NO Verifica batteria (1) Verifica ventilatore (2) Verifica modulo ventilatore (3) Verifica sonda (4) SI Temperatura aria esterna inferiore ai limiti di funzionamento ? SI NO Verificare i dati di progetto (5) NO Verificare sottoraffreddamento liquido (6) Carica refrigerante corretta ? SI NO Rifare vuoto e carica (7) Assenza di incondensabili ? SI Temperatura e/o pressione aspirazione regolare ? NO Verificare funzionamento unità interna (8) Verificare funzionabilità degli organi di intercettazione della linea liquido (9) Unità in funzione Note: 1) Importantissimo che offra il massimo scambio termico, di conseguenza deve essere libera da sporco incrostazioni o da ostacoli al flusso d’aria. 2) Verificare l’integrità del ventilatore se danneggiato sostituirlo. 3) Verificare che la tensione in uscita dalla scheda, moduli in modo proporzionale la velocità dei ventilatori. Nel caso contrario sostituire il modulo. 4) Verificare il posizionamento: deve essere in intimo contatto con il tubo sagomato della batteria di scambio. Deve avere un dato di resistenza perfettamente in linea con la temperatura, verificare con apposito Ohmmetro tale valore di resistenza. 5) Verificare: - Limiti di funzionamento. (vedi sezione generale) - Che la batteria non sia esposta a raggi solari diretti o vicino a superfici riflettenti. - Che nelle immediate vicinanze non ci siano flussi di aria calda di qualsiasi genere. - Che non ci sia un ricircolo della stessa aria. 6) Per modalità di controllo consultare la sezione di MESSA IN FUNZIONE. NB un eventuale allagamento dei circuiti della batteria di scambio sino al punto di alloggiamento della sonda, causa un funzionamento anomalo, del sistema di regolazione della velocità dei ventilatori. 7) Una condizione che si può verificare è che la temperatura di condensazione sia molto alta (25/30 gradi al di sopra della temperatura dell’aria esterna) abbinata ad una resa frigorifera scadente. Può portare gli stessi sintomi di una carica refrigerante abbondate. Constatato che la carica è corretta valutare questa ipotesi e rifare tutte le operazioni di vuoto e carica. 8) Verificare che la portata aria non sia esuberante, e che la temperatura dell’aria ambiente non sia troppo elevata. Condizioni queste che potrebbero inalzare la resa della macchina e conseguentemente il calore da smaltire al condensatore. 9) Verificare che tutti gli organi di intercettazione sulla linea del liquido siano completamente aperti. 20 BLOCCO BASSA PRESSIONE BLOCCO BASSA PRESSIONE SI Funzionamento regolare unità interna ? NO Verificare funzionamento unità interna (1) Verificare condizioni di lavoro unità interna ( 2 ) Verificare tubazioni di collegamento (3) SI SI SI SI Filtro deidratore efficiente ? Carica refrigerante regolare ? Rubinetto aspirazione completamente aperto ? Temperatura e/o pressione aspirazione regolare ? NO Controllare ∆ t tra monte e valle (4) NO Controllare surriscaldamento NO (5) Verificare eventualmente aprire NO Verificare funzionamento (6) unità esterna Unità in funzione Note: 1) Verificare: - Che ci sia sufficiente portata d’aria. - Che il senso di rotazione dei ventilatori sia corretto. - Che lo scambiatore non sia sporco o incrostato in quanto deve offrire il massimo dello scambio termico. - Che la valvola solenoide sia funzionante. - Che la valvola termostatica sia funzionante. 2) Verificare che le condizioni di temperatura/umidità dell’aria trattata rientrino nelle condizioni di progetto. 3) Verificare che lo sviluppo e il diametro delle tubazioni siano dimensionate correttamente (vedere la sezione delle TUBAZIONI REFRIGERANTI). In caso contrario potrebbero causare delle perdite di carico inaccettabili per il buon funzionamento dell’unità. 4) Controllare con termometro a contatto la temperatura a monte e successivamente a valle del filtro deidratore. Se la differenza di temperatura è superiore a un 1°C è sintomo o di filtro non efficiente oppure di filtro sottodimensionato, in entrambi i casi sostituirlo. 5) Per modalità di controllo consultare la sezione di MESSA IN FUNZIONE. 6) Se la pressione di condensazione è al di sotto di 1200Kpa manometrici si può verificare una anomala alimentazione dell’organo di laminazione e di conseguenza una pressione di aspirazione troppo bassa. Verificare che la ventilazione dell’unità esterna sia perfettamente funzionante (cioè moduli o fermi i ventilatori). 21 INTERVENTO SICUREZZA COMPRESSORE INTERVENTO SICUREZZA COMPRESSORE SI Temperatura scarico compressore nei limiti ? NO SI Termostato a contatto funzionale ? NO Verificare parametri tipo : surriscaldamento, carica refrigerante, ecc. Sostituire termostato Unità in funzione INTERVENTO TERMICA VENTILATORI INT ERVENTO TERM ICA VENTILATORE SI Motore integro ? NO Verificare possibili ostruzioni dello scam biatore Verificare ostruzioni sulle pale Verificare avvolgim enti elettrici Unità in funzione 22 UNITA’ RUMOROSA UNITA’ RUMOROSA SI NO Gli ammortizzatori del compressore sono in buone condizioni ? NO NO Le viti di fissaggio del compressore sono allentate ? SI SI Le tubazioni vibrano ? Verificare ed eventualmente sostituire Verificare ed eventualmente serrare Verificare i punti di serraggio Unità in funzione COMPRESSORE NON PARTE COMPRESSORE NON PARTE NO Mancanza di tensione ai morsetti ? SI Intervento Klixon (1) Motore bruciato (2) Compressore bloccato (3) SI SI SI Magnetotermico inserito ? Relè funzionante ? Modulo di controllo funzionante ? NO NO NO Inserire Controllare che la bobina non sia bruciata e che i contatti non siano ossidati Verificare ed eventualmente sostituire Unità in funzione Note: 1) L’intervento del Klixson si manifesta con una temperatura della carcassa del compressore piuttosto alta. Verificare la causa prima di riavviare l’unità. 2) Verificare se gli avvolgimenti sono a massa. Eventualmente sostituire il compressore. 3) Il blocco meccanico del compressore è manifestato da un sostenuto e tipico rumore. Nel caso sostituire il compressore. 23 MANUTENZIONE ORDINARIA IMPORTANTE PRIMA DI DAR CORSO A QUALSIASI OPERAZIONE DI MANUTENZIONE O DI PULIZIA DELL'UNITA' ACCERTARSI CHE LA STESSA NON SIA IN TENSIONE. Questa sezione è dedicata all'utilizzatore finale ed è estremamente importante per il regolare funzionamento nel tempo dell'unità. Poche operazioni eseguite con scrupolo e periodicamente possono evitare di dover ricorrere a interventi di personale specializzato. Le operazioni da effettuare non richiedono conoscenze tecniche particolari e si riassumono in semplici controlli ai componenti dell'unità: - batteria di condensazione - elettroventilatori - struttura UNITA' BATTERIA DI CONDENSAZIONE ATTENZIONE: il contatto accidentale con le alette dello scambiatore può provocare delle piccole ferite da taglio. Per effettuare le operazioni sotto descritte utilizzare appositi guanti. E' importante che la batteria condensante sia in grado di offrire il massimo scambio termico. E' importante quindi che la sua superficie sia sempre libera da sporco o polveri che possono essersi depositate per effetto dell'azione degli elettroventilatori. - Rimuovere con l'ausilio di una spazzola tutte le impurità tipo carta, foglie, ecc. che possono essersi depositate sulla superficie della batteria. - Con l’ausilio di un getto di aria in pressione pulire la superficie in alluminio della batteria avendo cura di orientare il getto in senso parallelo all'andamento delle alette per non produrre danneggiamenti. - Verificare che la elette in alluminio non abbiano subito danneggiamenti o piegature, nel caso si riscontrino situazioni del genere "pettinare" con apposito attrezzo la batteria fino a ripristinare la situazione iniziale per un ottimale flusso d'aria. ELETTROVENTILATORI Al primo avviamento stagionale verificare la rumorosità. Se sostenuta e con presenza di vibrazioni può essere sintomo: o di sbilanciamento delle pale oppure di un allentamento delle viti di fissaggio. Nel caso di accertata anomalia chiamare il centro di assistenza autorizzato in quanto i ventilatori sono posizionati all'interno della macchina tra le batterie condensanti. - Verificare lo stato del fissaggio dell’elettro-ventilatore alla griglia di supporto. - Verificare lo stato del fissaggio della griglia di supporto dell’elettroventilatore alla struttura dell'unità. - Verificare, per quanto possibile, eventuali sbilanciamenti dell’elettroventilatore evidenziati da condizioni di rumore e vibrazioni anomale. STRUTTURA - Verificare lo stato delle parti costituenti la struttura. Particolare attenzione va posta alle parti in acciaio. - Trattare con vernici atte ad eliminare o ridurre il fenomeno di ossidazione quei punti dell'unità che dovessero manifestare il problema. - Verificare il fissaggio della pannellatura esterna dell’unità. Cattivi fissaggi sono origine di rumori e vibrazioni anomale. PARTE ELETTRICA Verificare che il cavo di alimentazione che collega l'unità al quadro di distribuzione non presenti lacerazioni, screpolature o alterazioni tali da comprometterne l’isolamento. Contattare un centro di assistenza autorizzato nel caso si renda necessaria della manutenzione. IMPORTANTE E' CONSIGLIABILE LA PRESENZA DI PERSONALE AUTORIZZATO AD OGNI AVVIAMENTO STAGIONALE DELL' UNITA' IN MODO DA DAR CORSO OLTRE CHE ALLE VERIFICHE DI CUI SOPRA ANCHE A VERIFICHE AL CIRCUITO FRIGORIFERO 24 TUBAZIONI REFRIGERANTI Il dimensionamento delle linee refrigeranti di collegamento tra unità motocondensanti esterne e unità evaporanti interne è di primaria importanza. Per collegamenti con nostre unità, vedere la tabella sotto riportata dove per lunghezze specificate il diametro degli attacchi corrisponde al diametro da utilizzare per le tubazioni di collegamento. Per distanze superiori il diametro dovrà essere calcolato (vedere apposite bibliografie o nostro bollettino DIMENSIONAMENTO LINEE FRIGORIFERE NEGLI IMPIANTI A DUE SEZIONI). La tabella sotto indicata riporta inoltre il dislivello massimo consigliato sia nel caso che l'unità motocondensante sia più in basso rispetto alla unità terminale sia nel caso opposto. Usare solo tubo di rame per refrigerazione. Grand. 102 122 142 162 182 202 242 ∅ Aspir. 22 22 28 28 28 35 35 ∅ Liquido 14 14 16 18 18 22 22 Max. Max. lunghezza m N° curve 10 6 10 6 16 8 16 6 12 6 23 10 20 10 Dislivello massimo Fig. 4 Fig. 6 9 9 9 9 12 12 10 10 10 10 18 18 14 14 TUBAZIONE DI ASPIRAZIONE Per tutte le grandezze gli attacchi sono a saldare con l'unità viene fornito di serie l'apposito attacco ROTALOK. - Collegare la linea preparata al rubinetto di intercettazione con l'ausilio di due chiavi come indicato (in figura 1 per quanto riguarda il primo circuito, figura 2 per il secondo). Figura 1 Figura 2 TUBAZIONE LIQUIDO Figura 3 Per tutte le grandezze gli attacchi sono a saldare con l'unità viene fornito di serie l'apposito attacco ROTALOK. - Collegare la linea preparata al rubinetto di intercettazione con l'ausilio di due chiavi come indicato (in figura 3 per quanto riguarda il primo circuito, figura 4 per il secondo). Figura 4 NOTA: Tutte le tubazioni devono essere perfettamente pulite (eseguire una pulizia con azoto o aria secca prima di allacciare le tubazioni alle due unità) e prive di umidità' per permettere una operazione di vuoto ottimale. 25 CONTROLLO PERDITE - Controllare accuratamente che i rubinetti dell’unità motocondensante siano chiusi. - Collegare il gruppo manometrico con gli attacchi di servizio dei rubinetti. - Eseguire la pressatura con refrigerante sino a 250KPa. - Chiudere i rubinetti del gruppo manometrico per effettuare lo scollegamento della bombola del refrigerante e successivamente collegare la bombola di azoto. - Aprire i rubinetti del gruppo manometrico. - Mettere in pressione l’impianto con azoto fino a 1200KPa. - Controllare accuratamente con lampada cerca fughe o altro strumento elettronico tutta la tubazione con particolare attenzione sulle saldature e giunzioni in genere. Se non in possesso della attrezzatura necessaria lasciare ispezionabili tutte quelle parti che potrebbero dar luogo a fughe di refrigerante (saldature, giunzioni ecc.). U N ITA ’ ES TE R N A Bulbo termostatica Bulbo termostatica U N ITA ’ IN T ER N A Figura 5 R ubinetto gas R ubinetto liquido MODALITA’ - INDICAZIONI PER UN CORRETTO COLLEGAMENTO TUBAZIONE ASPIRAZIONE - Pendenza verso il compressore nei tratti orizzontali (0.5%) per assicurare il ritorno dell'olio al compressore anche alle condizioni di carico mimino. - Isolare accuratamente la tubazione con polietilene anticondensa a celle chiuse spessore minimo 9mm. - Se l'unità motocondensante è posizionata più bassa rispetto all'unità evaporante (figura 5), prevedere un sifone di altezza pari al pacco della batteria per prevenire, durante il fermo macchina un ritorno di liquido al compressore. - Per evitare il sifone montare sulla linea del liquido una valvola solenoide (vedi Figura 6) comunque sempre consigliata. - Se l'unità terminale è dotata di valvola termostatica oltre al sifone prevedere un pozzetto (vedi Figura 5) il più vicino possibile all'unità. Quanto detto per evitare che il bulbo della valvola termostatica, a macchina ferma, rimanga in contatto con del liquido (vedi figura 5). Nel caso di collegamento con nostra unità terminale CED-V il sifone è già predisposto all’intenso dell'unità. - Se l'unità motocondensante è posizionata più alta rispetto all'unità evaporante, prevedere un solo pozzetto (vedi Fig. 7) attenzione però se la distanza totale supera i 7-10 metri si rende necessario l'utilizzo della valvola solenoide sulla linea del liquido. - Per risalite verticali prevedere oltre al pozzetto alla base un sifone raccolta olio ogni 6 metri (vedi Figura 8). - Utilizzare curve ad ampio raggio (non gomiti). - Evitare accuratamente schiacciamenti sulla tubazione. TUBAZIONE LIQUIDO - Se esposta al sole o attraversa zone a temperature superiore a quella esterna deve essere isolata altrimenti può essere libera. - Evitare diametri eccessivi per non causare eccesso di carica di refrigerante. Figura 6 Figura 7 Figura 8 IMPORTANTE Con l'unità terminale interna dotata di valvola termostatica, se le tubazioni di collegamento sono di lunghezza superiore a circa 15/20 metri oppure se l'impianto è previsto per funzionare con condizioni climatiche variabili (ad esempio aria esterna molto diversa giorno/notte) è consigliabile 'installazione di un ricevitore di liquido di adeguata capacità vicino all’unità interna. Il ricevitore di liquido può assolvere le funzioni sotto descritte: - Evita che all'organo di laminazione arrivi freon allo stato gassoso. - Sopperisce alle variazioni di carica che si verificano nello impianto al variare delle condizioni di funzionamento. - Sopperisce in parte e per un certo tempo ad eventuali microperdite non rilevabili che nel tempo tendono a scaricare l'impianto. - Evita un eccessivo allagamento del condensatore con relativo innalzamento della temperatura/pressione di condensazione se l'impianto è stato caricato con una quantità maggiore di refrigerante, o se la carica fatta in condizioni climatiche anomale. Detto questo l'installazione del ricevitore di liquido è sempre consigliato quando le distanze di collegamento sono elevate. 26 RISCHI RESIDUI ATTENZIONE VIENE SEGNALATA NEL PRESENTE FASCICOLO OGNI OPERAZIONE ATTA A GENERARE SITUAZIONE DI RISCHIO OLTRE ALLE MISURE CAUTELATIVE DA OSSERVARSI CASO PER CASO DEFINIZIONE ZONA PERICOLOSA La figura sottostante evidenzia l’area nella quale può agire solo un operatore autorizzato. - Zona pericolosa esterna è individuata da una precisa superficie attorno alla macchina ed alla proiezione a terra della stessa sulla verticale in caso di macchina sospesa. - Zona pericolosa interna è l’area accessibile soltanto mediante rimozione deliberata delle carenature o parti di esse. 27 RISCHI GENERICI Zona considerata Batterie di scambio Rischio residuo Lesioni di lieve entità Valvole di sicurezza Lesioni Intossicazioni Area circostante l’unità Lesioni Intossicazioni Ustioni gravi Morte Morte per: Ustioni gravi Intossicazioni Area circostante l’unità Modalità Avvertenze Evitare contatti accidentali Usare guanti protettivi Applicare griglie di protezione scambiatori (optional) Espulsione gas Evitare di entrare nella zona pericolosa refrigerante per intervento Convogliare opportunamente gli scarichi della protezione in oggetto della valvola di sicurezza Usare abbigliamento ed occhiali appropriati Esplosione dovuta ad Non lasciare mai chiusi eventuali aumento della temperatura rubinetti di mandata e aspirazione ambiente (incendio) compressori a macchina ferma Contatto Incendio dovuto a corto circuito o surriscaldamento dei cavi di alimentazione elettrica a monte dei sezionatori di macchina. Contatto con compressori e tubazioni di mandata. Corretto dimensionamento dei cavi e dei dispositivi di protezione della linea di allacciamento alla rete elettrica. Utilizzare guanti di protezione Accedere all’interno della unità solo dopo che è stato aperto il sezionatore posto sulla linea di allacciamento elettrico alla unità. ( a cura del cliente ) Curare in maniera particolarmente attenta l’esecuzione del collegamento all’impianto di terra delle masse metalliche della macchina. Provvedere ad aprire e luchettare il sezionatore generale prima di togliere i ripari. Interno unità Ustioni Interno unità Interno unità Lesioni Morte per: Folgorazione gravi Zona pericolosa interna Morte per: Folgorazione Contatto con spigoli vivi Difetto di isolamento sui cavi di alimentazione elettrica a monte dei sezionatori di macchina. Masse metalliche sotto tensione Zona pericolosa interna Morte per: Folgorazione Ustioni gravi Contatto con parti in tensione accessibili dopo rimozione dei ripari Evitare contatti accidentali Usare guanti protettivi. SCHEDE SICUREZZA REFRIGERANTE 01 Elementi identificatori della sostanza Nome del prodotto: forane 407C Nome del prodotto: forane 22 N°SDS 01965/1 Fornitore: ELF ATOCHEM ITALIA Via G.Murat 17, 20159 Milano tel. 02/668111 02 Composizione informazione sui componenti Natura chimica del preparato Miscela a base di: • Forane 32(difluorometano) (N° CAS: 75-10-5) • Forane 125 (pentafluoroetano) (N° CAS: 354-33-6) • Forane 134a (1.1.1.2 tetrafluoroetano) (N° CAS: 811-97-2) Maggiori pericoli fisici e chimici: Decomposizione termica in prodotti tossici e corrosivi N°SDS 0005/7 Fornitore: ELF ATOCHEM ITALIA 4 Cours Michelet Cedex 42 92091 Paris France tel. 0033149008080 Natura chimica del preparato Miscela a base di: Clorodifluorometano idrocarburo alogenato N° CAS 75-45-6 EINECS 200-871-9 03 Identificazione del rischio 04 Misure di pronto soccorso Informazioni generali: Inalazione: Trasportare la vittima all’aria aperta. Ricorrere all’ossigeno o alla respirazione artificiale se necessario. Contatto con la pelle: I congelamenti devono essere curati come ustioni termiche. Contatto con gli occhi: Lavaggio immediato, abbondante con acqua. Qualora persista l’irritazione consultare un oftalmologo. Istruzioni per il medico: Non somministrare catecolammine (a causa della sensibilizzazione cardiaca provocata dal prodotto) 28 Effetti per la salute: Praticamente non nocivo Maggiori pericoli fisici e chimici: Decomposizione termica in prodotti tossici e corrosivi Pericoli specifici /CEE: Pericoloso per lo strato d’ozono Informazioni generali: Inalazione: Trasportare la vittima all’aria aperta. Ricorrere all’ossigeno o alla respirazione artificiale se necessario. Contatto con la pelle: I congelamenti devono essere curati come ustioni termiche. Contatto con gli occhi: Lavaggio immediato, abbondante con acqua. Qualora persista l’irritazione consultare un oftalmologo. 05 Misure antincendio Pericoli Specifici: Decomposizione termica in prodotti tossici e corrosivi. Acido fluoridrico. Ossidi di carbonio Metodi specifici d’intervento: Raffreddare i contenitori/cisterne con getti d’acqua. Proibire ogni fonte di scintille e di ignizione Non FUMARE. Sistemi di protezione speciali per le squadre di soccorso: Portare un autorespiratore e indumenti di protezione 06 Misure in caso di fuoriuscita accidentale Precauzioni individuali: Evitare il contatto con la pelle, gli occhi e l’inalazione dei vapori. Usare mezzi di protezione personali. In un locale chiuso: ventilare o usare un autorespiratore (rischio di anossia).DIVIETO DI FUMARE Precauzioni per la protezione dell’ambiente: Limitare al massimo i rifiuti nell’ambiente. Misure /precauzioni tecniche Disposizioni di stoccaggio e di manipolazione applicabili ai prodotti: GAS SOTTO PRESSIONE Prevedere una ventilazione ed una evacuazione appropriata al livello delle apparecchiature. Consigli per l’utilizzo: Evitare le fonti d’ignizione e il contatto con le superfici calde. NON FUMARE Misure tecniche/Modalità di stoccaggio: Immagazzinare a temperatura ambiente nel contenitore originale. Tenere lontano da fiamme libere, superfici calde e sorgenti di ignizione. Conservare in un luogo fresco e ben ventilato. Proteggere i contenitori pieni dalle sorgenti di calore per evitare sovrapressioni. Raccomandati: Acciaio ordinario Da evitare: Lega contenente più di 2% di magnesio Materie plastiche 07 Manipolazione e stoccaggio 08 Controllo dell’esposizione/ protezione individuale 09 Proprietà fisiche e chimiche 10 Stabilità e reattività Pericoli Specifici: Decomposizione termica in prodotti tossici e corrosivi. Acido fluoridrico. Acido Cloridrico gas. Fosgene Ossidi di carbonio CO Metodi specifici d’intervento: Raffreddare i contenitori/cisterne con getti d’acqua. Proibire ogni fonte di scintille e di ignizione Non FUMARE. Sistemi di protezione speciali per le squadre di soccorso: Portare un autorespiratore e indumenti di protezione Precauzioni individuali: Evitare il contatto con la pelle, gli occhi e l’inalazione dei vapori. In un locale chiuso: ventilare o usare un autorespiratore (rischio di asfissia).DIVIETO DI FUMARE Allontanare tutte le fonti di ignizione Misure /precauzioni tecniche Disposizioni di stoccaggio e di manipolazione applicabili ai prodotti: GAS PRESSURIZZATI Prevedere una ventilazione ed una evacuazione appropriata al livello delle apparecchiature. Consigli per l’utilizzo: Proibire i punti d’ignizione e il contatto con le superfici calde. NON FUMARE Misure tecniche/Modalità di stoccaggio: Immagazzinare a temperatura ambiente nel contenitore originale. Tenere lontano da fiamme libere, superfici calde e sorgenti di ignizione. Conservare in un luogo fresco e ben ventilato. Proteggere i contenitori pieni dalle sorgenti di calore per evitare sovrapressioni. Raccomandati: Acciaio ordinario Da evitare: Lega contenente più di 2% di magnesio Materie plastiche Misure precauzionali da adottare: Assicurare un Misure precauzionali da adottare: Assicurare un sufficiente ricambio d’aria e/o un’aspirazione negli sufficiente ricambio d’aria e/o un’aspirazione negli ambienti di lavoro. ambienti di lavoro. Parametri di controllo Parametri di controllo Valori limite di esposizione: Non esiste valore limite FValori limite di esposizione: USA Francia 1989: VME = 1000 ppm Forane 134a valore limite raccomandato da Elf : USA 1992: TWA = 1000 ppm = 3500 mg/m3 Equipaggiamento di protezione individuale: VME=1000ppm Forane 32 valore limite raccomandato da Elf : Protezione Respiratoria: In caso di ventilazione VME=1000ppm Forane 125 valore limite raccomandato insufficiente, portare una attrezzatura respiratoria da Elf : VME=1000ppm adatta. Equipaggiamento di protezione individuale: Protezione delle mani: Guanti Protezione degli occhi: Occhiali di protezione Protezione Respiratoria: In caso di ventilazione insufficiente, portare una attrezzatura respiratoria adatta. Misure d’igiene specifiche: Evitare il contatto con la pelle, gli occhi e l’inalazione dei vapori. Protezione delle mani: Guanti Protezione degli occhi: Occhiali di protezione Stato fisico (20°C): Gas liquefatto Stato fisico (20°C): Gas liquefatto Colore: Incolore Colore: Incolore Odore: Leggermente simile all’etere. pH: Non Odore: Leggermente simile all’etere. pH: Non applicabile applicabile Punto /intervallo d’ebollizione: -42,4 °C Punto /intervallo d’ebollizione: -40,8 °C Punto di infiammabilità: Non si infiamma nelle Temperature/intervallo di fusione: - 160 °C Temperatura di decomposizione: 480 °C condizioni di prova Tensione di vapore: (25°C): 1.13 Mpa (11,3 bar) a Pressione di vapore: (20°C): 0,91 Mpa (9,1 bar) a (50°C): 2.11 Mpa (21,1 bar) a (70°C): 3.26 Mpa (32,6 (50°C): 1,91 Mpa (19,4 bar) Densità di vapore: ( 20 °C) 3,57 kg/m3 bar) Densità di vapore: Al punto di ebollizione 4,54 kg/m3 Densità: (20°C) 1213 kg/m3 a (50°C) 1085 kg/m3 Densità: (25°C) 1133 kg/m3 a (50°C) 1004 kg/m3 a Solubilità: acqua (25°C) 3g/l - Solvente solubile (70°C) 861 kg/m3 negli idrocarburi e solventi clorurati, Alcoli, Chetoni, Esteri Solubilità dell’acqua nel prodotto a 30°C : 0,15 % in peso. Condizioni da evitare: Evitare il contatto con fiamme e Condizioni da evitare: Evitare il contatto con le superfici metalliche arroventate fiamme e le superfici metalliche arroventate Prodotti di decomposizione pericolosi: Prodotti di decomposizione pericolosi: Decomposizione termica in prodotti fluorurati tossici Decomposizione termica in prodotti tossici e Fluoruro di idrogeno (acido fluoridrico) corrosivi: acido fluoridrico, acido cloridrico gas, Altre Informazioni: Prodotto stabile nelle normali fosgene, ossido di carbonio (CO) condizioni di stoccaggio e manipolazione 29 11 Informazioni tossicologiche 12 Informazioni ecologiche Inalazione: Sperimentale per l’animale Forane 134a, 32, 125 praticamente non nocivo per inalazione. Nessuna mortalità riscontrata nel ratto a 500000 ppm/4h. Come per gli altri componenti alogenati alifatici volatili, il prodotto può causare con l’accumulazione di vapori e/o con l’inalazione di quantità importanti: perdita di conoscenza e disturbi cardiaci aggravati dallo stress e dalla mancanza di ossigeno: rischio mortale. Contatto con la pelle: Congelamenti possibili per schizzi di gas liquefatto Tossicità cronica: Degli studi per inalazione prolungata sull’animale non hanno messo in evidenza alcun effetto tossico sub-cronico (ratto/3 mese(i)/ Inalazione:50000ppm) Effetti specifici: Genotossicità, secondo i dati sperimentali disponibili Forane 134a, 32, 125 NON Genotossico Cancerogenesi: Forane 134a la sperimentazione animale non ha messo in evidenza un effetto cancerogeno chiaramente dimostrato (ratto /Inalazione - via orale) Tossicità per la riproduzione: Sviluppo fetale Forane 134a, 32, 125 secondo i dati disponibili assenza di effetti tossici per lo sviluppo del feto. Fertilità, secondo i dati limitati disponibili sull’animale: Forane 134a assenza di effetti sulla fertilità (topi/inalazione) Forane 32 Persistenza /degradabilità: Nell’acqua non facilmente biodegradabile 5% dopo 28d Inalazione: Sperimentale per l’animale praticamente non nocivo per inalazione. Nessun effetto sotto i 50000 ppm. Come per gli altri componenti alogenati alifatici volatili, il prodotto può causare con l’accumulazione di vapori e/o con l’inalazione di quantità importanti: perdita di conoscenza e disturbi cardiaci aggravati dallo stress e dalla mancanza di ossigeno: rischio mortale. Contatto con la pelle: Congelamenti possibili per schizzi di gas liquefatto Contatto con gli occhi: Irritazioni passeggere Bioaccumolabile: Praticamente non bioaccumolabile log pow 1,48 tossicità, 24 h> 400mg/l Mobilità: Evaporazione veloce t ½ vita 2,7 h Persistenza /degradabilità: Nell’acqua non facilmente biodegradabile 0% dopo 28d . Nell’aria Bioaccumolabile: Praticamente non bioaccumolabile log pow 0,21 degradazione nella atmosfera ½ vita 14 anni. Forane 125 Potenziale di distruzione dell’ozono ODP (R-11 = Mobilità: Evaporazione veloce t ½ vita 3,2 h (stimato) 1)=0,055. Effetto serra potenziale (HGWP) = 0,36. Persistenza /degradabilità: Nell’acqua non facilmente Nel suolo e nei sedimenti basso adsorbimento log biodegradabile 5% dopo 28d. Nell’aria degradazione nella Koc= 1,8 troposfera t ½ vita 28,3 y (stimato). Potenziale di distruzione Bioaccumolabile: Praticamente non dell’ozono ODP (R-11 = 1)=0. Effetto serra potenziale (GWP): bioaccumolabile log pow 1,08 Tossicità acquatica: Tossicità acuta, pesci soglia di (HGWP) = 0,58. Nel suolo e nei sedimenti basso tossicità, 24/h = 180mg/l, Batteri anaerobi: soglia di adsorbimento log Koc= 1,3-1,7 Forane 134a Mobilità: Evaporazione veloce t ½ vita 3 h (stimato) Persistenza /degradabilità: Nell’acqua non facilmente biodegradabile 3% dopo 28d. Nell’aria degradabile nella atmosfera 3% dopo 28d . Potenziale di distruzione dell’ozono ODP (R-11 = 1)=0. Effetto serra potenziale (GWP) 0,26. Bioaccumolabile: Praticamente non bioaccumolabile log pow 1,06 13 Considerazioni sullo smaltimento 14 Informazioni sul trasporto Eliminazione del prodotto: Riciclare o incenerire Consultare i servizi sicurezza della ELF ATOCHEM per informazioni complementari ed aggiornamenti Numero ONU 3163. RID\ADR classe 2 cifra (e lettera) 4°a Prescrizioni: Etichette 2 N°pericolo /N°materia 20/3163 IMDG classe 2.2 N°ONU (IMDG) 3163 Prescrizioni: Etichette 2.2 IATA classe 2.2 N°ONU (IATA) o N°ID3163 Prescrizioni: Etichette 2.2 Direttiva CEE 15 Informazione Schede di sicurezza: D.91/155/CEE modificata dalla D. sulla regolamentazione 93/112/CEE: Sostanze pericolose Classificazione/etichettatura CEE Preparati pericolosi: Non classificato come pericoloso Inventari: EINECS conforme 16 Altre informazioni Utilizzi raccomandati: Refrigerante Referenze bibliografiche: Encyclopedie des gas (Air Liquide-ed.1976- ELSEVIER AMSTERDAM) Eliminazione del prodotto: Riciclare o incenerire Numero ONU 1018. RID\ADR classe 2 cifra (e lettera) 3°a Prescrizioni: Etichette 2 N°pericolo /N°materia 20/1018 IMDG classe 2.2 N°ONU (IMDG) 1018 Prescrizioni: Etichette NON INFIAMMABILE GAS/2 IATA classe 2.2 N°ONU (IATA) o N°ID1018 Prescrizioni: Etichette NON INFIAMMABILE GAS/2 Codice prodotto: 00055/7 Direttiva CEE Schede di sicurezza: D.91/155/CEE modificata dalla D. 93/112/CEE: Sostanze e preparati pericolosi Preparati pericolosi: D. 67/548/CEE modificata dalla D. 93/21/CEE: Guida all’etichettatura (18a APT) R59 Dannoso per lo strato d’ozono S59 Consultare il produttore /fornitore per informazioni relative al recupero riciclaggio S 61 Evitare di disperdere nell’ambiente. Consultare le istruzioni speciali/la scheda dei dati di sicurezza Utilizzi raccomandati: Refrigerante a bassa temperatura, Agente congelante, Condizionamento dell’aria Referenze bibliografiche: Encyclopedie des gas (Air Liquide-ed.1976- ELSEVIER AMSTERDAM). Scheda tossicologica INRS: N° 142 CLORODIFLUOROMETANO Questo documento si riferisce al prodotto tale e quale, conforme alle specifiche fornite dalla ELF ATOCHEM. In caso di combinazioni o miscele, assicurarsi che non sopravvengano nuovi pericoli. Le informazioni riportate in questa scheda sono date in buona fede e sono basate sulle nostre ultime conoscenze relative al prodotto in questione, alla data di edizione della stessa. Si attira l’attenzione degli utilizzatori sugli eventuali rischi in cui si può incorrere qualora il prodotto venga impiegato in usi diversi da quelli ai quali è destinato. Questa scheda deve essere utilizzata e riprodotta solo per fini di prevenzione e sicurezza. L’elenco dei testi legislativi, regolamentari o amministrativi non deve essere considerato esauriente. E’ compito dell’utilizzatore del prodotto riferirsi all’insieme dei testi ufficiali riguardanti l’utilizzo, la conservazione e la manipolazione del prodotto per i quali egli è il solo responsabile. L’utilizzatore del prodotto deve inoltre portare a conoscenza le persone che possono venire a contatto con il prodotto di tutte le informazioni necessarie alla sicurezza del lavoro e alla protezione della salute e dell’ambiente, trasmettendo loro questa scheda di dati di sicurezza. 30 CONTENTS GENERAL ............................................................................................................................................. 32 GENERAL WARNINGS ..........................................................................................................................................................32 ADDITIONAL SAFETY PRECAUTIONS .................................................................................................................................32 ACCESSORIES ......................................................................................................................................................................32 GENERAL TECHNICAL SPECIFICATIONS ...........................................................................................................................33 POSITIONING.........................................................................................................................................................................34 FUNCTIONAL CLEARANCES ................................................................................................................................................34 DIMENSIONS AND WEIGHT DISTRIBUTION........................................................................................................................35 PROTECTION AND CONTROL DEVICE SETTINGS.............................................................................................................35 SOUND LEVELS.....................................................................................................................................................................35 RECEPTION.......................................................................................................................................... 36 INSPECTION UPON RECEIPT...............................................................................................................................................36 HANDLING..............................................................................................................................................................................36 STORAGE...............................................................................................................................................................................37 REMOVING THE PACKAGING ..............................................................................................................................................37 ELECTRICAL CONNECTIONS ............................................................................................................. 38 FUNCTIONAL CONNECTIONS ..............................................................................................................................................38 CONNECTION TO THE MAINS POWER ...............................................................................................................................38 OPTIONAL CONNECTIONS...................................................................................................................................................38 CONNECTION TO A P.C. OR BMS........................................................................................................................................39 START-UP............................................................................................................................................. 40 PRELIMINARY CHECKS ........................................................................................................................................................40 START-UP ..............................................................................................................................................................................41 CONTROL ............................................................................................................................................. 42 OPERATION OF THE MAIN MODULE...................................................................................................................................42 COMPRESSOR ROTATION ...................................................................................................................................................42 COMPRESSOR TIMERS ........................................................................................................................................................42 COIL FAN CONTROLLER ......................................................................................................................................................43 MAIN CONTROL MODULE PANEL........................................................................................................................................44 SETTING THE OPERATING PARAMETERS .........................................................................................................................44 ALARMS .................................................................................................................................................................................46 TROUBLESHOOTING........................................................................................................................... 47 HIGH PRESSURE SHUTDOWN.............................................................................................................................................48 LOW PRESSURE SHUTDOWN .............................................................................................................................................49 COMPRESSOR CUT-OUT .....................................................................................................................................................50 FAN OVERLOAD ....................................................................................................................................................................50 NOISY UNIT............................................................................................................................................................................51 COMPRESSOR DOESN’T START .........................................................................................................................................51 ROUTINE MAINTENANCE ................................................................................................................... 52 UNIT........................................................................................................................................................................................52 ELECTRICAL PARTS .............................................................................................................................................................52 REFRIGERANT PIPES.......................................................................................................................... 53 INTAKE PIPE ..........................................................................................................................................................................53 LIQUID PIPES.........................................................................................................................................................................53 CHECKING FOR LEAKS ........................................................................................................................................................54 INSTRUCTIONS FOR CORRECT CONNECTION .................................................................................................................54 RESIDUAL RISKS................................................................................................................................. 55 definition of dangerous area....................................................................................................................................................55 GENERAL RISKS ...................................................................................................................................................................56 COOLANT SAFETY DIAGRAMS ............................................................................................................................................56 All technical specifications presented in this manual are not binding and subject to change without notice. Copyright - CLIVET S.p.A.- Feltre (BL) - Italy. All rights reserved. 31 GENERAL GENERAL WARNINGS The contents of this manual are designed to assure the correct installation, adjustment and maintenance of the unit; therefore: − read the instructions with due care and attention; − the unit must be installed, tested and serviced by properly qualified personnel (law no. 45, 5/3/1990) licensed in accordance with established legislation. • The manufacturer declines all liability, and warranty cover is automatically waived, if electrical and/or mechanical modifications are made to the unit. Tampering and unauthorised repairs or modifications to the unit will automatically void the warranty. • Observe the safety regulations in force at the time of installation. • Make sure that the characteristics of the mains network conform to the data on the serial number plate inside the electrical panel. • Keep this manual and the wiring diagram with care. Make sure that they are available for reference by the operator whenever necessary. • Packing materials (plastic bags, polystyrene foam, nails, etc.) are potentially hazardous and must be kept out of the reach of children. Recycle packing materials in accordance with local standards. • The condensing unit is designed for air-conditioning in combination with the indoor refrigerant expansion unit. • Disconnect the unit in the case of breakdowns or malfunctions. • If repairs are necessary, only use service centres that are authorised by the manufacturer and always insist on original spare parts. The use of non-original parts and/or unauthorised service centres may result in unsafe operation of the unit. The manufacturer declines all liability for direct or indirect damage to property or injury to persons resulting from failure to adhere to the instructions in this manual. ADDITIONAL SAFETY PRECAUTIONS This unit has been especially designed and manufactured so to prevent any risk to persons and health hazard. For this reason, solutions designed to eliminate (where possible) any cause of risk and significantly reduce the probability of danger have been adopted. Please refer to the residual risks section of this manual and strictly observe the behaviour prescriptions listed there in order to prevent any possible risks that have not been possible to avoid in the design stage. ACCESSORIES The unit can be fitted with the following accessories (on request): ─ voltages other than standard ─ coil protection grid ─ antivibration mounts ─ compressor operation counter ─ solenoid valve ─ connection kit, which includes: thermostat, solenoid valve, liquid line, dewatering filter, liquid flow indicator. ─ separate compressor control unit ─ connection to remote control module ─ connection to PC or BMS 32 GENERAL TECHNICAL SPECIFICATIONS Model MSAT Standard voltage Model MSAT R-22 Cooling capacity Compressor power input Model MSAT R-407C Cooling capacity Compressor power input kW kW Compressor type RPM rpm Oil content 102 kW kW L 122 142 162 182 400 / 3 / 50 202 No. and diameter RPM Air flow-rate Rated power 2 m mm mm kPa no. x dia. rpm L/s kW The data refers to: 31.3 8.5 36.4 10.3 41.3 11.3 48.7 13.5 53.8 15.8 63.9 17.5 77.9 22.3 29.8 9.4 34.1 11.2 39.2 12.6 44.1 14.7 50.3 17.8 62.8 20.3 72.8 25.2 2x 1,55 SCROLL 2900 2x 2,5 2 NTC 2x 1,65 Capacity steps Motor protection Material Quantity Tot. front surf. Fin spacing No. of rows Pipe dia. Test pressure 242 Outside air temperature +35°C Saturated suction temperature (SST) 7.5°C R-22, (SST) 9.5°C (dew point) R-407C Type of oil SUNISO 3GS OIL Note: for units with R407C, type of oil - MOBIL EAL ARTIC 22 CC - 32 MMMA POE 2x 4 Condenser Copper pipes/aluminium fins 2 3 3,6 4,9 1,6 2,1 1,6 1,6 2 9,52 3000 Axial-flow fans 2x560 680 3056 2x0,22 4x450 840 4125 4x0,16 Liquid valve Intake valve Freon connections 16 ∅ 14 28 ∅ 22 R-22 charge R-407C charge kg kg Refrigerant 8.2 8,2 9.2 9,2 6x450 9 10 Weights and Volumes Approx. shipping weight kg 275 280 380 3 1,50 Approx. packaging volume m Operating limits Max. condenser air R-22 49 47,5 47,5 intake temp. 45 45 SST = +5 °C R-407C 47 Min. condenser air R-22 -4 -4 -4 intake temp. R-407C -5 -5 -5 SST = +5 °C Max. saturated gas R-22 suction temperature °C R-407C The data refers to: - Motor with external rotor - Safety grid 6120 6x0,16 18 28 Note: Welded fittings 22 35 9 10 9.6 10.6 12 13 420 3,20 485 580 590 4,30 47,5 45 49 46 44,5 -4 43,5 -8 46 -4 43 -8 -5 -9 -5 -9 12,5 12,5 33 12 13 Note: Charge to be completed during start-up Note: SST Saturated suction temperature Suction gas superheating + 5°K POSITIONING The units are designed for outdoor installation. • Check that the support surface can bear the weight of the unit (see weights and weight distribution on page 35) and that both are level. Place a layer of rubber between the base of the unit and the support (to prevent noise and vibrations). • Respect the functional clearances. • If the unit is installed on a balcony or on the roof, it should be placed on special antivibration mounts; in this case, the connection tubing must be fitted with elastic joints. • Position the unit so that the long sides are not facing prevailing wind. • Anchor the unit to the ground. FUNCTIONAL CLEARANCES The choice of the location of the unit is of fundamental importance for correct operation. Obstacles that block the flow of air (such as drains, hot air), difficulty in air circulation, leaves or other objects that may block the exchanger coils, winds that contrast or excessively assist the air flow, can cause operating anomalies or shut-down the machine. The unit requires minimum spaces for operation and maintenance. The following drawings show some types of installation; check on a case-by-case basis, keeping in mind the information provided in this manual. Note: The measurements are in mm Free side UNITS WITH INDEPENDENT CIRCUITS BASE ANTIVIBRATION MOUNTS UNITS WITH SEPARATE COMPRESSOR CONTROL (accessory) (accessory) The units can be supplied upon request with separate compressor control, fitted for connection to two distinct terminal units. The power supply is still shared in common. 34 DIMENSIONS AND WEIGHT DISTRIBUTION Key: 1 - Compressor 2 - Liquid line fitting dia. G1 first circuit 2’ - Liquid line fitting dia. G1 second circuit 3 - Gas line fitting dia. G2 first circuit 3’ - Gas line fitting dia. G2 second circuit 4 - Electrical panel 5 - Helical fans 6 - Electrical inlet 7 - Condenser coil 8 - Access to electrical panel and compressor Size 102 122 142 162/182 202/242 A B C 1530 678 1400 1530 678 1400 1563 1107 1570 1563 1107 1570 2098 1107 1570 D E 128 128 128 128 128 73 73 130 130 130 DIMENSIONS F G H 75 75 75 75 75 628 628 1058 1058 1058 42 42 42 42 42 I L O 1255 1255 1077 1077 1612 800 800 900 900 900 153 153 153 dia. G1 14 16 16 18 22 dia. G2 22 28 28 28 35 no. of fans 2 2 4 4 6 WEIGHTS W1 W2 W3 W4 Tot. 88 89 121 155 191 275 280 380 485 590 42 42 58 74 95 95 98 132 168 200 50 51 69 88 104 Note: The dimensions are expressed in mm, the weights in kg. PROTECTION AND CONTROL DEVICE SETTINGS High pressure switch Open (kPa) 2750 Low pressure switch (kPa) Close 2000 230 360 Safety fuse plug ( °C ) 120 Max. compressor starts per hour ( n° ) 10 Safety discharge thermostat ( °C ) 120 SOUND LEVELS Sound power level (dB) Size 102 122 142 162 182 202 242 Octave band (Hz) 63 80 80 87 87 84 86 86 125 84 76 80 81 78 79 82 250 75 73 74 76 78 78 81 500 73 73 73 73 74 77 75 1000 2000 4000 8000 69 63 60 42 71 65 62 43 71 69 66 63 70 69 65 62 69 70 62 55 72 67 62 54 70 73 63 65 Note: The “high pressure switch” and “safety discharge thermostat” safety devices can be manually reset by the control unit. The “low pressure switch” is automatically reset. Note: Total sound press. level dB(A) - The sound levels refer to units operating at full load with maximum fan speed, condenser air intake 35°C, saturated suction temperature + 5°C. - Sound pressure level at 1 metre from the external surface of the unit. -12 - Sound power level ref.: 1x10 w -5 - Sound pressure level ref.: 2 x 10 Pa 59 59 60 60 60 61 62 35 RECEPTION INSPECTION UPON RECEIPT The units are shipped in special protective packaging. When it arrives, check the unit has not been damaged during transport and that it has been supplied complete with all the parts specified in the order. If there is any visible damage make a note of it on the transport document, accompanied by the words: “ACCEPTED WITH RESERVATIONS DUE TO OBVIOUS DAMAGE TO PACKING” since delivery free to factory includes cover for damage to be borne by the insurers, in compliance with Italian law no. 450 dated 22/08/85 “limite di risarcibilità”. IMPORTANT EVERY OPERATION DESCRIBED BELOW MUST BE CARRIED OUT IN COMPLIANCE WITH THE SAFETY REGULATIONS IN FORCE CONCERNING BOTH THE EQUIPMENT USED AND THE OPERATING PROCEDURES ADOPTED. WARNING ALWAYS MAKE SURE THE LIFTING CAPACITY OF THE EQUIPMENT USED IS SUITABLE FOR THE WEIGHT OF THE UNIT IN QUESTION BEFORE CARRYING OUT ANY HANDLING OPERATIONS. Size Weight Kg 102 275 122 280 142 380 162 480 182 485 202 580 242 590 HANDLING HANDLING using a FORKLIFT or SIMILAR - Insert the forks in the long side of the wooden pallet supplied with the unit. - Start lifting the unit, making sure that it is balanced and stable. Keep in mind that the heaviest part is the part where the compressor is installed. 36 HOISTING using a CRANE or SIMILAR - Position the lifting pipes in the holes on the base of the unit. - Make sure the ends of the pipes protrude enough to allow the safety pins and split pins to be fitted. - Position the hoisting straps on the pipes, between the split pins and the base of the unit (see the drawing). - Place rigid structures on the top edges of the unit to protect it (if one only lifting point is used). - Gradually tension the lifting straps, checking that they remain in position. - Start lifting. Protective boards Rigid structure Hoisting straps Safety pin Split pin Lifting pipes WARNING FOLLOWING THE ADVICE ON THE OUTSIDE OF THE CARDBOARD PACKING WILL ENSURE THE UNIT REMAINS IN PERFECT CONDITION AND OPERATES CORRECTLY, TO THE BENEFIT OF THE END USER. THIS ADVICE IS AS FOLLOWS: - HANDLE WITH CARE - KEEP DRY - UNDER NO CIRCUMSTANCES EVER PLACE OTHER OBJECTS ON TOP OF THE UNIT UNLESS WITHIN THE STACKING LIMIT SHOWN (THE NUMBER SPECIFIES THE NUMBER OF STACKING LAYERS. E.G. 1 = 1 STACKING LAYER PERMITTED ON THE UNIT). STORAGE − − − Store away from: direct sunlight, rain, sand and wind Temperature: maximum 60°C minimum -10°C Maximum humidity: 90% REMOVING THE PACKAGING - Cut the fastening straps with scissors. - Lift the carton (if present). - Remove the brackets that fasten the unit to the pallet, using a 10mm spanner. - Lift the unit so that is detached from the pallet. - Rest the unit on the ground in the chosen position. - Check for any visible damage. - Dispose of the packaging so that it is taken to specialist collection or recycling centres (observe the standards in force). 37 ELECTRICAL CONNECTIONS IMPORTANT MAKE SURE THE UNIT IS NOT CONNECTED TO THE POWER SUPPLY BEFORE STARTING WORK ON ANY ELECTRICAL CONNECTIONS FUNCTIONAL CONNECTIONS The following devices will have to be connected up before the unit can be started: CONNECTION TO THE MAINS POWER - Connect the trhee-phase line to the terminals indicated on the electrical panel with L1 L2 L3 of the general cut-out switch. Connect the NEUTRAL conductor to terminal N of the electrical panel. Connect the EARTH conductor to the Pe terminal of the electrical panel. The installer must take particular care in sizing the wires for connection to the mains power supply, taking into consideration the data on the unit’s technical datasheet sticker on the electrical panel door. It is also important to fit a short circuit protection device rated suitably for the power capacity of the line. The protection device must present appropriate breaking power in relation to the calculated short circuit current in that section of the system. ELECTRICAL DATA SIZE F.L.A. L.R.A. F.L.I. M.IC. 1) F.L.A. 2) L.R.A. 3) F.L.I. 4) M.I.C. Single compressor 230/3/50 (A) 400/3/50 Fans (A) 230/1/50 230/3/50 Total (A) 400/3/50 230/3/50 Compressor (A) 400/3/50 Compressor (kW) Fan (kW) Total (kW) 230/3/50 Total (A) 400/3/50 102 122 142 162 182 202 242 19.7 9.8 1.15x2 41.6 21.8 132.5 66 11.3 0.22x2 11.8 154.5 78.1 22.9 11.3 1.15x2 48.1 25.0 164 74 13.2 0.22x2 13.6 189.2 87.6 25.3 13.6 0.65 x 4 53.9 30.3 171 102 15.2 0.17 x 4 15.9 199.5 118.8 24.1 14.7 0.65 x 4 51.4 32.5 166 94 16.8 0.17 x 4 17.5 193.3 111.9 31.2 17.5 0.65 x 4 65.6 38.1 211 117 20.7 0.17 x 4 21.4 244.9 137.2 35.8 20.0 0.65 x 6 76.4 44.9 224 128 23.8 0.17 x 6 24.8 264.6 152.3 45.2 25.2 0.65 x 6 85.8 55.2 280 159 29.2 0.17 x 6 30.2 329.5 189.0 Full Load Amperes. Compressor Locked Rotor Amperes. Full Load Input of compressor (at maximum rated operating conditions). Maximum Inrush Current of unit. Voltage unbalance: max 2% Voltage: 400/3/50 ± 6% 230/3/50 ± 6% OPTIONAL CONNECTIONS CONNECTING AN ANOMALY SIGNAL DEVICE Referring to the electrical diagram, the summation shut-down signalling line can be equipped with an audible or visual alarm device to signal anomalies detected on the unit. The signalling device should be powered at low voltage (24V, 300mA) as per the wiring diagram. CONNECTION TO REMOTE CONTROL PANEL The remote control module is a faithful reproduction of the keypad on the ENERGY LIGHT control module and allows all the operations on the machine to be performed from a remote location. 38 INSTALLATION Before connecting the remote control module, disconnect power from the unit by releasing main switch. Connect the remote keypad as shown in the figure. Posteriorekeypad terminale remoto Remote - Rear C5121423 25 24 26 S + - ESPANSION E SERIAL E RELE' 7 COMUNE RELE' 6 RELE' 5 RELE' 4 RELE' 3 RELE' 2 C5121420 RELE' 1 - S+ CONN B RELE' ALLARME CONN A The maximum length of the connection cable between the ENERGY LIGHT and the keypad is 80m. CONNECTION TO A P.C. OR BMS 230 Vac TO BE PERFORMED BY THE CUSTOMER RS232 connection cable, 9 pin male-femaleMax length 10m 10 12 power supply C5121425 RS 485 OFF RS 485 TTL 22 21 23 24 ON - + + 39 8 7 6 5 4 3 2 1 RELAY 1 9 RELAY 2 C5121248 5 way 2 Molex serial cableMax length 2m 10 RELAY 4 TO BE PERFORMED BY THE CUSTOMER RS485 serial cableTwisted pair Maximum length of the line=1000m - RELAY 6 + RELAY 3 - RELAY 5 - + 1 2 3 4 24 S RELAY 7 + 23 COMMON ON 22 ALARM RELAY 21 SERIAL TTL EXPANSION OFF Serial optocoupled adapter RS232/TTL RS 232/RS485 - RS485/TTL Micronet and ModBus Protocol NU NU ECHO DTR NU NU ECHO DTR PE1P0005 C5121425 Serial optocoupled adapter RS232/TTL RS 232/RS485 - RS485/TTL Micronet and ModBus Protocol 1 2 3 4 10 12 power supply RS 232 - RS 232 C5121420 CONN B CONN A START-UP ALL THE EQUIPMENT MUST BE STARTED BY AUTHORISED SERVICE CENTRES, IN ORDER TO VALIDATE THE CONTRACTUAL WARRANTY. THIS SERVICE ONLY INVOLVES THE START-UP OF THE SYSTEM AND NOT THE CONNECTIONS OR ANY OTHER WORK ON THE SYSTEM. PRELIMINARY CHECKS - Check that the unit is correctly positioned and that the connections to the indoor terminal unit have been performed correctly on the refrigerating side and the electrical side. - Check the mains voltage and frequency values: THESE MUST FALL WITHIN THE FOLLOWING VALUES 230 ± 6% 400 ± 6% - Check that the screws fastening the wires to the electrical components in the panel are tight (vibrations during handling and transport may have caused these to loosen). EMPTYING After having checked, with the system under pressure, that there are no leaks (see the section on the refrigerant pipes), both in the connection pipes and the terminal unit, proceed as follows. - Empty the system with the MSAT valves always closed. - With the help of a pressure gauge, connect the vacuum pump to both fittings on the valves, making sure that any on-off devices (solenoid valves or cocks) are open, and then empty the system. - To ensure that the solenoid valve remains open, disconnect it from the terminals on the outdoor unit electrical panel (see the wiring diagram) and connect to a normal 220V outlet. - Stop the pump at a pressure of around 100Pa and leave the system in this condition for a few hours; a small initial rise in pressure is normal, after which it will stabilise. If the pressure continues to rise it means there are small leaks or moisture in the system. In the former case, repeat the operations described in the paragraph CHECKING FOR LEAKS in the refrigerant pipe manual. In the latter case, recharge the system with refrigerant to 100KPa and then repeat the emptying procedure, as described above. Once the pressure has stabilised, proceed to the subsequent charging phase. REFRIGERANT CHARGE The sizes in question are delivered with a refrigerant charge to be completed during start-up, according to the type of the indoor terminal unit and the layout of the pipes. - With the system empty, close the valves on the pressure gauge assembly and disconnect the vacuum pump. - Connect the bottle of refrigerant gas, venting the air in the pressure gauge assembly connection hose. - Open the valves on the pressure gauge assembly, introducing refrigerant in the gaseous state until there is equilibrium in the system / bottle pressure, and in any case at a pressure above atmospheric pressure. - Open the valves on the condensing units (the liquid valve first) to prepare the unit for operation. We recommend to use a square-section wrench of the same size as the valve stem and with a lever arm long enough to exert the necessary force. ( * SEE FIGURE ) Weight of refrigerant in the lines during operation (KG / 10m) Pipe OD Liquid at 38°C 10 12 14 16 18 22 28 35 42 0,60 1,06 1,41 1,71 2,36 3,62 6,61 9,47 -- Intake SST+4.5°C --0,025 0,030 0,043 0,070 0,120 0,195 0,290 OUTDOOR UNIT INDOOR UNIT Gas valve Liquid valve IMPORTANT: When starting the unit for the first time and after each period of extended shutdown, the compressor crankcase oil heating elements (if present) MUST be powered for at least 8 hours before starting the compressor. The start-up operations are performed in the following order: - Switch the isolating switch QS1 on the condensing unit, making sure that the green LED is off. 40 START-UP - Make sure the indoor unit is working correctly. - Check the connections of any solenoid valves. - Locate the command SA2 on the wiring diagram. This represents the signal from the indoor unit for the selection of the capacity-control step, and corresponds to the activation of the first step, while the command for the activation of the second step is represented by the symbol SA3 on the wiring diagram . - The first compressor to start is defined by the control system (see control manual). The fans in the circuit in operation only start at the same time as the compressor. - Make sure that there is demand from the system. - To add refrigerant gas, use the service test point on on-off valve in the suction line, and introduce freon in the gaseous state. Pay careful attention in this phase, as during start-up the minimum pressure switch is bypassed for 70 seconds. To charge one circuit first and then the other, use the corresponding fuse holders to stop the compressor on the circuit not being charged, as the control module features an operating cycle logic. IMPORTANT: after stopping, the system counts a period of 6 minutes from the previous start, (if this time has already elapsed only the 30 second delay will be counted) before starting again. - The charge is considered complete when: - No bubbles can be seen in the liquid inspection opening (if present). - The superheating of the suction gas is 4-8°K. - The subcooling of the liquid is 3-5°K. ADDING OIL The exact quantity of refrigerant added to the system, in addition to the factory charge, must be known in order to define the quantity of oil required. The quantity must be equal to around 10% of the weight of the refrigerant added (the type of oil is specified in the general manual). Oil must be added for refrigerant top-ups of over 3kg. In any case, check the compressor oil level using the Schrader fitting, where present. CHECKS ON FIRST START-UP AFTER HAVING STARTED THE UNIT, CHECK: ELECTRICAL PARTS The unbalance of the phases. This must be lower than a maximum value of 2% (see calculation example). Calculation example: L1 - L2 = 388V L2 - L3 = 379V L3 - L1 = 377V The average of the values measured is: 388 + 379 + 377 = 381 3 The maximum deviation from the average is: 388-381=7 V The unbalance is therefore: 7 x 100 = 1,83% (acceptable) 381 Compressor power input. Must be less than the value shown in the table enclosed, under the item F.L.A. REFRIGERANT CIRCUIT - Carry out a final check for leaks from the valves and pressure test points on the system. Make sure that all the caps are replaced on the test points and valves. - Check liquid inspection opening (if present). - Check the operating pressure using the pressure gauges connected (low pressure from 400KPa to 560Kpa, corresponding to 0°C -+8°C SST), and condensing temperature of around 15-20°C greater than the outside air temperature (typical values). - Check the superheating, by calculating the difference between the temperature read on the low pressure gauge, and the temperature measured using a thermometer in direct contact with the inlet tubing upstream of the compressor. Values between 4 and 8 degrees reflect correct operation, while in the event of values that differ greatly from these tolerances, refer to the TROUBLESHOOTING section. - Check the subcooling, by calculating the difference between the temperature read on the high pressure gauge, and the temperature measured using a thermometer directly on the fluid line downstream of the condenser. Values of around 3/5 degrees mean correct operation, otherwise refer to the troubleshooting section as before. - For correct analysis of the system, also check the compressor discharge temperature, which with the superheating and subcooling data indicated must be around 30/40 degrees higher than the condensing temperature. • It should be noted that the units feature fan speed control, and that it is useful to perform all these operating checks with outside air - ambient air conditions similar to the standard design conditions. • It should also be noted that all the data indicated above is valid for units with a cooling field of operation and fitted with thermostats. For design conditions with an evaporation temperature (SST) lower than 0°C, check the operating parameters and the sizing of the refrigerant pipes on a case-by-case basis. - The indications provided above are some of the problems and corresponding solutions that may arise when the condensing unit is started; the professionalism and qualification of the personnel responsible are in any case essential. 41 CONTROL OPERATION OF THE MAIN MODULE COMPRESSOR ROTATION The processor also features other functions for the overall management of the unit. One example of this is compressor rotation. The compressor rotation function is enabled by setting the corresponding parameters. This means than when compressor operation is requested by the thermoregulator, the compressor that will start first is the one with the lowest number of operating hours, while the one that will stop first is the compressor with the highest number of hours. This function allows the number of operating hours to be divided evenly between both compressors. In any case, the first compressor can always be started first and the second compressor second, in the case of specific needs; the unit is delivered by the manufacturer with rotation enabled. COMPRESSOR TIMERS To maximise the quality of compressor operation, a number timers are required. Refer to the graph in Fig. 3-4 to better understand the meaning of the timers. Figure 3 Figure 4 Compressor Comp. 1 ON ON OFF Seconds Comp. 2 OFF ON Seconds*10 ON-OFF safety time C01 OFF Seconds ON-ON safety timeC02 First-second compressor on interval First-second compressor off interval C07 C06 The graph in Fig. 4 shows two parameters. OFF-ON SAFETY TIME and ON-ON SAFETY TIME. The first parameter means that when a compressor stops a certain time must elapse before it can start again. This time is respected even when there is a request from the thermoregulator. The second parameter means that a certain time must elapse between two successive starts. In the case of units with two compressors, a further two parameters are used, that is, FIRSTSECOND COMPRESSOR ON INTERVAL and FIRST-SECOND COMPRESSOR OFF INTERVAL. The first parameter avoids simultaneous starts of the two compressors, mainly to avoid excessive current peaks. The second represents an interval between the shut-down of the first and the second compressor. The function of these two parameters are shown in the graph in Figure 3. 42 COIL FAN CONTROLLER In the MSAT units, as standard the fan speed is controlled according to the temperature, with pressure-based control available upon request; the latter configuration is supplied in a kit. The operating principle described below is the same for both type of control. - FAN CONTROL IN COOLING The following graph shows operation in cooling mode, Fig. 6. EXTERNAL FAN IN COOL OPERATION Speed Prop. Cooling band F09 Temperature Pressure Figure 6 When the compressor is started, the fans are forced on, that is, the fans are not managed directly by the controller but rather are switched on for a set time at maximum speed, according to the value of a parameter, unless the temperature is below the CUT-OFF value; in this case, the fans are started at minimum speed for the same period. That being stated, we will now describe the operation of the controller. The first parameter to be defined is the CUT-OFF, which corresponds to a special condensing temperature value below which the fans are off. The CUT-OFF HYSTERESIS is a parameter that defines the field within which the fans switch from operation at minimum speed to off, and vice-versa. In summary, the fans start operating at minimum speed when the temperature is equal to the CUT-OFF + CUT-OFF HYSTERESIS, while they stop based on the difference between the COOLING set point and the CUT-OFF DELTA. When the condensing temperature exceeds the COOLING FAN SET POINT, the controller starts to control the speed of the fans proportionally to the condensing temperature. In the case of Clivet units, contrary to the operation described in the graph, the control functions are maintained until the MAX COOLING FAN SET POINT is reached. For completion, the description of the parameters MAX SILENT SPEED and COOLING PROPORTIONAL BAND are also described. The first defines a maximum fan speed threshold corresponding to a certain condensing temperature, below which the speed is controlled, while the PROPORTIONAL BAND defines the gradient of the straight line corresponding to the speed control function. The CLIVET units are designed to control the fans up to the maximum speed. 43 MAIN CONTROL MODULE PANEL • • • • LED 1 compressor 1 ON if compressor 1 is on OFF if compressor 1 is off BLINKING at a frequency of 1 Hz, is safety timers are in progress BLINKING at low frequency if the compressor is defrosting (only heat pump) • • • • LED 3 compressor 2 ON if compressor 1 is on OFF if compressor 1 is off BLINKING at a frequency of 1 Hz, is safety timers are in progress BLINKING at low frequency if the compressor is defrosting (only heat pump) ON if control in Cooling mode If neither the HEAT LED nor the COOL LED are on, the control is in STAND-BY mode. When the machine is OFF, only the decimal point remains on. N.B. LEDs 2 and 4 refer to units with 4 compressors and two refrigerant circuits. SETTING THE OPERATING PARAMETERS In this chapter we will simply list the parameters that can be accessed in direct mode, without password. The passwordprotected parameters are managed by personnel from the authorised service centres. MEANING OF THE KEYS ON-OFF button a) If pressed for more than 2 seconds, the thermoregulator switches from ON to OFF or vice-versa. b) Pressing this button once resets all the manual-reset alarms that are not active. The intervention counters are also reset, even if these are not active. c) In menu mode becomes the scroll down button. d) Decreases the value of the selected parameter. MODE button ON-OFF a) Pressing and releasing both buttons within 2 seconds goes up one level in the configuration menu. MODE button ON-OFF a) Keeping both buttons pressed for more than 2 seconds goes up 1 level in the configuration menu. b) If the last level of a menu is displayed, pressing together and releasing within two seconds moves back up one level. MODE button a) In menu mode becomes the scroll up button. b) Increases the value of the selected parameter. 44 Table 1 Code H46 Description PARAMETERS WHICH CAN BE ACCESSED Unit of measurement Password unità Level 0 Control probe Alarm active Factory setting Level 1 Set Point : SEt Level 2 0 Level 3 Level 4 Label Set Cooling: Coo Cooling Set Value Label Set Heating: HEA Heating Set Value Analogical input: tP Input codes: t01- t06 Analogical input values Alarms: Err Active alarm codes: E00E46 Digital inputs: Id Input codes: I01-I11 Digital input status Parameters: PAr Configuration par.: CnF Par. index . H01-H69 Parameter value Compressor Par.: CP Par. index C01-C08 Parameter value Fan par.: FAn Par. index F01-F25 Parameter value Alarm par.: ALL Par. index A01-A26 Parameter value Pump par.: PUP Par. index P01-P03 Parameter value Antifreeze par: Fro Par. index r01-r17 Parameter value Defrost par.: dFr Par. index d01-d011 Parameter value Expansion par.: ESP Par. index N01-N07 Parameter value Password: PSS Password value Operating hours: OHr Comp. hours: OH1-OH4 Number of hours Pump hours: OHP Number of hours To move around the levels press the “Mode” and “on off” buttons together 1 - Pressing and releasing both buttons within 2 seconds goes down one level in the configuration menu. 2 - Holding both buttons for more than 2 seconds goes up one level in the configuration menu. 3 - If the last level of a menu is displayed, pressing and releasing the buttons within 2 seconds goes back up a level. 45 ALARMS The alarm codes appear on the display of the use interface terminal when errors occur. If the alarms displayed feature automatic reset, they will disappear as soon as the problem has been resolved, while those with manual reset must be reset by a service engineer. The alarms appear on the user interface terminal following the sequence shown in Table. It should also be highlighted that if more than one alarm is active, only the first will be displayed, and when this is reset the second will appear, and so on until no more alarms are active. Note: in standby mode, or alternatively when the unit is OFF, the alarms are not signalled and the cumulative fault relay is not activated. The alarms, if present, are signalled and the cumulative fault relay is activated when the operating mode is selected. Table 2 Codice E01 E02 E03 E04 E07 E21 E22* E24 E27 E45 Tipo di guasto Max pressure circ. 1 Min pressure circ. 1 Compressor 1 thermal Fan thermal cut-out circ. 1 Probe fault BT3/BP3 Max pressure circ. 2 Min pressure circ. 2 Fan thermal cut-out circ. 2 Probe fault BT5/BP5 Configuration Blocchi Compressor Compressor fan Compressor fan Compressor fan Compressor fan Compressor fan Compressor fan Compressor fan Compressor fan Compressor 46 Ripristino MANUAL AUTOMATIC (After 5 manual reset signals) MANUAL MANUAL AUTOMATIC MANUAL AUTOMATIC (After 5 manual reset signals) MANUAL AUTOMATIC MANUAL TROUBLESHOOTING The following provides indications on some possible anomalies and their corresponding solutions. The resulting operations are the full responsibility of the person performing them. An authorised technician possessing the legal requisites for each operation must be contacted to reset the operation of the unit. The activation of a safety device indicates an operating anomaly: before resetting the device, check and eliminate the causes of the anomaly. The following are possible problems and their corresponding causes and solutions. WARNING THE OPERATIONS SHOWN HERE ARE THE FULL RESPONSIBILITY OF THE PERSON PERFORMING THEM; AN AUTHORISED TECHNICIAN POSSESSING THE LEGAL REQUISITES FOR EACH OPERATION MUST BE CONTACTED TO RESET THE CORRESPONDING FUNCTION. All faults and anomalous operating conditions are handled by the main control module. When an anomalous condition or fault arises, the module, as well as placing the unit in safety mode, can display the event remotely. 47 HIGH PRESSURE SHUTDOWN HIGH PRESSURE SHUT-DOWN YES Ventilation working efficiently? NO Check the coil (1) Check the fan (2) Check the fan module (3) Check the probe (4) YES YES YES YES Outside air temperature lower than the operating limits? NO Check the design data (5) NO Check liquid subcooling (6) Refrigerant charge correct? NO Empty and recharge (7) Absence of incondensables? Intake temperature and/or pressure correct? NO Check operation of the indoor unit ( 8 ) Check operation of the liquid line on-off valve (9) Unit working Notes The condenser must provide the maximum heat exchange, and as a consequence must be free of dirt, deposits or obstacles to the flow of air. 2) Check the condition of the fan and replace it if damaged. 3) Check that the voltage output from the board proportionally modulates the fan speed. If not, replace the module. 4) Check the positioning: it must be in close contact with the shaped exchanger coil pipe. The resistance values must be perfectly in line with the temperature; check the resistance values using a special ohmmeter. 5) Check: - Operating limits. (see the general section) - That the coil not is exposed to direct sunlight or placed near reflecting surfaces. - That there are no hot air streams of any type in the immediate vicinity. - That the same air is not recirculated. 6) For information on how to perform the checks, please refer to section on START-UP. NB the flooding of the exchanger coil circuits to the point of the probe socket will cause the anomalous operation of the fan speed controller. 7) One condition that may arise is a very high condensing temperature (25/30 degrees above the air temperature) combined with low refrigerant efficiency. This may cause the same symptoms as an excessive refrigerant charge. Check the charge and, if correct, evaluate this possibility and perform all the emptying and charging operations again. 8) Check that the air flow-rate not is too high and that the ambient air temperature is not too high. These conditions may increase the output of the machine and consequently the heat to be dispersed by the condenser. 9) Check that all the on-off devices on the liquid line are completely open. 48 LOW PRESSURE SHUTDOWN LOW PRESSURE SHUT-DOWN YES Indoor unit working correctly? NO Check operation of the indoor unit ( 1 ) Check operating conditions of the indoor unit ( 2 ) Check connection pipes (3) YES YES YES YES Dewatering filter working efficiently? Refrigerant charge correct? Intake valve completely open? Intake temperature and/or pressure correct? NO NO NO NO Check ∆t from upstream to downstream (4) Check superheating (5) Check and open if necessary Check operation of outdoor unit (6) Unit working Notes 1) Check: - That there is sufficient air flow. - That the direction of rotation of the fans is correct. - That the exchanger is not dirty or blocked, and can provide maximum heat exchange. - That the solenoid valve is working. - That the thermostat is working. 2) Check that the temperature/humidity conditions of the air being treated falls within the design conditions. 3) Check that the layout and the diameter of the pipes are correctly sized (see the section on REFRIGERANT PIPES). If not, unacceptable pressure drops may occur for the correct operation of the unit. 4) Check, using a thermometer in direct contact, the temperature upstream and downstream of the dewatering filter. If the difference in temperature is higher than 1°C, the filter is not working efficiently or is under-rated; in both cases, replace the filter. 5) For information on how to perform the checks, please refer to section on START-UP. 6) If the condensing pressure is below 1200kPa there may be irregular supply to the expansion device and as a consequence too low inlet pressure. Check that the ventilation system for the outdoor unit is working perfectly (that is, modulates or stops the fans). 49 COMPRESSOR CUT-OUT COMPRESSOR CUT-OUT YES Compressor discharge temperature within limits? NO YES Contact thermostat working? NO Check parameters, e.g.: superheating, refrigerant charge, etc. Replace the thermostat Unit working FAN OVERLOAD FAN OVERLOAD YES NO Check for possible blockages on exchanger Motor intact? Check the blades are not obstructed Check electric windings Unit working 50 NOISY UNIT UNIT NOISY YES The shock absorbers on the compressor are in good condition ? NO Check and replace if necessary NO The compressor fastening screws have come loose? YES Check and tighten if necessary NO YES The pipes vibrate? Check tightness Unit working COMPRESSOR DOESN’T START COMPRESSOR DOESN’T START NO No power at the terminals? YES Klixon activation (1) Motor burnt out (2) Compressor blocked (3) YES Overload switched? YES Relay working? YES Control module working? NO NO NO Switch Check that the coil is not burnt out and the contacts are not oxidised Check and replace if necessary Unit working Notes 1) The Klixon is activated when the temperature of the compressor casing is quite high. Check the causes before re-starting the unit. 2) Check if the windings are earthed. If necessary, replace the compressor. 3) The mechanical blocking of the compressor is indicated by a constant and typical noise. In this case, replace the compressor. 51 ROUTINE MAINTENANCE IMPORTANT MAKE SURE THE UNIT IS NOT CONNECTED TO THE POWER SUPPLY BEFORE STARTING ANY MAINTENANCE OR CLEANING OPERATIONS This section is intended for the end user and contains information that is extremely important to ensure the unit has a long, trouble free service life. Scrupulously carrying out the few simple operations described below at regular intervals can avoid the need for servicing by specialist personnel. The operations which need to be carried out do not require any special technical knowledge, involving the following simple checks on the components of the unit: - condenser coil - electrical fans - structure UNIT CONDENSER COIL IMPORTANT: accidentally touching the exchanger fins could cause minor cuts. This operation should be carried out using special gloves. The condenser coils must be able to provide the maximum heat exchange. It is therefore important for their surfaces to be free of dirt and dust that may be deposited due to the effect of the electrical fans. - Use a brush to remove any impurities, such as paper, leaves, etc. that may have deposited on the surface of the coil. - Use a jet of pressurised air to clean the aluminium surface of the coil, making sure to point the jet parallel to the direction of the fins, so as not to damage them. - Check that the aluminium fins are not damaged or bent. If there is any damage of this kind, “comb” them using the special tool for this purpose to return them to their initial positions, ensuring the coil operates with optimal air flow. FANS Before every seasonal start-up check the noise of the fans. Persistent noise and vibrations may be the symptom of either the unbalancing of the blades or the loosening of the fastening screws. In the event of anomalies, call the authorised service centre, as the fans are located inside the machine, between the condenser coils. - Check the fastening of the fans to the support grill. - Check the fastening of the fan support grill to the structure of the unit. - Check, where possible, for any unbalancing of the fans, highlighted by abnormal noises and vibrations. STRUCTURE - Check the condition of the parts forming the structure, paying special attention to its steel components. - Treat any rusted points of the unit with paints designed to eliminate or reduce this problem. - Make sure that the unit’s casing panels are mounted firmly in place. Poor mounting can cause abnormal vibrations and noise. ELECTRICAL PARTS Check that the power cable connecting the unit to the electrical panel is not cut, cracked or damaged in any way that may affect its insulation. Contact an authorised service centre should maintenance be required. IMPORTANT AUTHORISED PERSONNEL SHOULD BE CALLED OUT EVERY TIME THE UNIT IS STARTED UP AT THE BEGINNING OF THE SEASON, SO THAT THEY CAN NOT ONLY CARRY OUT THE ABOVE INSPECTIONS BUT ALSO CARRY OUT A THOROUGH CHECK ON THE REFRIGERANT CIRCUIT. 52 REFRIGERANT PIPES The sizing of the refrigerant lines connecting the outdoor condensing unit and the indoor evaporating unit is of primary importance. For connections to our units, see the table below, where for the lengths specified, the diameter of the fittings corresponds to the diameter to be used for the connection pipes. For greater distances, the diameter must be calculated (see corresponding bibliographies or our bulletin SIZING THE REFRIGERANT LINES IN SPLIT SYSTEMS). The table below also describes the recommended maximum difference in height for standard pipes, in both the case where the condensing unit is lower than the terminal unit, and vice-versa. Only use copper pipes for refrigeration. Size 102 122 142 162 182 202 242 Intake dia. Liquid dia. 22 22 28 28 28 35 35 14 14 16 18 18 22 22 Max. Max. length m 10 10 16 16 12 23 20 no. curves 6 6 8 6 6 10 10 Max difference in height Fig. 4 Fig. 6 9 9 9 9 12 12 10 10 10 10 18 18 14 14 INTAKE PIPE For all sizes, the fittings are welded; the unit is supplied as standard with special ROTALOCK connections. - Connect the specific line to the on-off valve using two spanners as shown (Figure 1 for the first circuit, Figure 2 for the second). Figure 1 Figure 2 LIQUID PIPES Figure 3 For all sizes, the fittings are welded; the unit is supplied as standard with special ROTALOK connections. - Connect the line to the on-off valve using two spanners, as shown (Figure 3 for the first circuit, Figure 4 for the second). Figure 4 NOTE: All the pipes must be perfectly clean (clean using nitrogen or dry air before connecting the pipes to the two units) and free of moisture for optimal emptying. 53 CHECKING FOR LEAKS O UT DO O R U NIT IN DO O R U NIT G as v alv e Thermostat bulb Thermostat bulb Max. height difference - Carefully check that the valves on the condensing units are closed. - Connect the pressure gauge assembly to the service test points on the valves. - Pressurise with refrigerant to 250KPa. - Close the valves on the pressure gauge assembly, then disconnect the refrigerant bottle and subsequently connect the nitrogen bottle. - Open the valves on the pressure gauge. - Pressurise the system with nitrogen to 1200KPa. - Carefully check all the pipes using a leak detector or other electronic instrument, with special attention to the welds and joints in general. If the necessary equipment is not available, make sure any parts that may give rise to refrigerant leaks (welds, joints etc.) are accessible. Figure Figura 5 5 Liquid v alv e INSTRUCTIONS FOR CORRECT CONNECTION Figure Figura 6 6 Max. height difference Figure Figura 77 8 metres INTAKE PIPE - Slope this towards the compressor in the horizontal sections (0.5 %) to ensure the return of oil to the compressor even under minimum load conditions. - Carefully insulate the pipe with anti-condensate, closed cell polyethylene, minimum thickness 9mm. - If the condensing unit is lower than the evaporating unit (figure 5), install a drain trap of equal height to the exchanger coil, so as to prevent the return of liquid to the compressor when the unit is off. - To avoid fitting a drain trap, install a solenoid valve on the liquid line (see Figure 6); this is always recommended in any case. - If the terminal unit is fitted with a thermostat as well as a drain trap, install a socket (see Figure 5) as near as possible to the unit. This will prevent the bulb of the thermostat from remaining in contact with the liquid when the unit is off (see Figure 5). In the case of connection to our CED-V terminal units, the drain trap is already fitted inside the unit. - If the condensing unit is higher than the evaporating unit, only install the socket (see Fig 7). Note that if the total distance exceeds 7-10 metres, the solenoid valve must be installed on the liquid line. - For vertical rises, as well as well the socket also fit an oil collection trap every 6 metres (see Figure 8). - Use wide-radius curves (no elbows). - Carefully avoid choking the pipes. LIQUID PIPES - If exposed to the sun or passing through areas where the temperature is higher than the outside temperature, they must insulated, otherwise they can be free. - Avoid excessive diameters so as to prevent an excess refrigerant charge. Figura 88 Figure IMPORTANT When the indoor terminal unit is fitted with a thermostat, if the connection pipes are longer than around 15/20 metres or alternatively if the system is expected to operate in variable climatic conditions (for example, very different Day/Night outside air temperature) a liquid receiver of suitable capacity should be installed near the indoor unit. The liquid receiver performs the following functions: - It prevents gaseous freon form reaching the expansion device. - It compensates for the variations in charge that occur in the system due to the change in operating conditions. - For a certain time it partly compensates for any immeasurable microscopic leaks that occur in the system over time. - It prevents the excessive flooding of the condenser with the corresponding raising of the condensing temperature/pressure if the system has been charged with a higher quantity of refrigerant, or if the system was charged in abnormal climatic conditions. Having said this, the liquid receiver should always be installed when the connections are very long. 54 RESIDUAL RISKS WARNING THIS SPECIFIC SECTION OF THE MANUAL POINTS OUT EACH OPERATION WHICH BRINGS WITH IT A POSSIBLE RISKY SITUATION AS WELL AS ALL THE PARTICULAR PRECAUTIONS TO OBSERVE. DEFINITION OF DANGEROUS AREA The figure below points out the area which is accessible to authorised personnel only. The external dangerous zone is a precise area all around the unit and its vertical projection on the ground in the case of hanging unit. The internal dangerous zone is the area which one can enter only with previous and intentional removal of the protecting panels. 55 GENERAL RISKS Particular area Heat exchanger coils Danger Superficial wounds LP Safety Valves Wounds Intoxication Refrigerant gas exhaust due to the intervention of the safety cut-out. Area surrounding the unit Wounds Intoxication Serious burns Death Death by: Serious burns Intoxication Explosion due to a rise in ambient temperature (fire). Area surrounding the unit Unit internal part Burns Unit internal part Wounds Inner dangerous area Death by: Electrocution Death by: Electrocution Serious burns Inner dangerous area Modality Contact Fire due to short-circuit or overheating of the power supply cables before the unit mains switch. Contact with compressors and discharge pipes Contact with sharp corners Metal parts under tension. Contact with parts under tension which one can reach only after having removed the protective panels. Instructions Avoid incidental contacts. Wear protective gloves. Install coil protective grills (optional). Avoid to enter the dangerous zone. Pipe in an appropriate way the safety exhaust valves. Wear appropriate clothes and gloves. Never shut the compressors inlet/outlet valves when the unit is off. Exact measurement of cables and safety cut-outs of the connections to the power supply line. Avoid incidental contacts Wear protective gloves Wear protective gloves Put scrupulously to earth the metal parts of the unit. Open the unit mains switch and lock it with a padlock before removing the panels. COOLANT SAFETY DIAGRAMS 01 Identifying elements for the substance Product name: forane 407C N°SDS 01965/1 Supplier: ELF ATOCHEM ITALIA Via G.Murat 17, 20159 Milano tel. 02/668111 Product name: forane 22 N°SDS 0005/7 Supplier: ELF ATOCHEM ITALIA 4 cours Michelet Cedex 42, 92091 Paris, France. Tel: 00331 49.00.80.80 02 Information concerning composition of components Chemical nature of the compound Chemical nature of the compound 03 04 05 06 Mixture based on: * Forane 32(difluoromethane) (N° CAS: 75-10-5) * Forane 125 (pentafluoroethan) (N° CAS: 354-33-6) * Forane 134a (1.1.1.2 tetrafluoroethan) (N° CAS: 811-97-2) Greatest physical and chemical dangers: Thermal decomposition in toxic and corrosive products Mixture based on: Chlorodifluoromethane halogenated hydrocarbon N° CAS 75-45-6 EINECS 200-871-9 Identification of risk Effects on health: practically non-toxic Greatest physical and chemical dangers: Thermal decomposition in toxic and corrosive products Specific dangers/EEC: Dangerous for the ozone layer. First-aid measures General information: General information: Inhalation: Carry the victim into the open air. Resort to oxygen or Inhalation: Carry the victim into the open air. Resort to oxygen or artificial respiration if necessary. artificial respiration if necessary. Contact with skin: Frostbite must be treated in the same way as Contact with skin: Frostbite must be treated in the same way as burns. burns. Contact with the eyes: Immediate rinsing in abundant water. If Contact with the eyes: Immediate rinsing in abundant water. If irritation should continue, consult an ophthalmologist. irritation should continue, consult an ophthalmologist. Instructions for the physician: Do not administer catecolammine (due to the cardiac sensitisation provoked by the product) Fire prevention measures Specific dangers: Thermal decomposition into toxic and Specific dangers: Thermal decomposition into toxic and corrosive products. Hydrofluoric acid. Carbon oxides. corrosive products. Hydrofluoric acid. Hydrochloric acid in Specific means of intervention: Cool containers/cisterns with gaseous form. Phosgene Carbon monoxides (CO). jets of water. Prevent any sparks or flames. Specific means of intervention: Cool containers/cisterns with Do NOT smoke. jets of water. Prevent any sparks or flames. Special protection systems for fire-fighting squads: Carry Do NOT smoke. breathing apparatus and wear protective clothing Special protection systems for fire-fighting squads: Carry breathing apparatus and wear protective clothing. Measures to take in case Individual precautions: Avoid contact with the skin, eyes and Individual precautions: Avoid contact with the skin, eyes and of accidental spillage inhalation of vapours. Use personal protection means. inhalation of vapours. In an enclosed space: ventilate or use breathing apparatus (risk In an enclosed space: ventilate or use breathing apparatus (risk of anoxia). NO SMOKING ALLOWED of suffocation). NO SMOKING ALLOWED. Environment protection precautions: limit waste into Remove all risk of sparks or flames. environment with the greatest care. 56 07 Manipulation and storage 08 Control of individual exposure/protection 09 Physical and chemical properties 10 Stability and reactivity 11 Toxicological information Technical measures/precautions. Form of storage and manipulation applicable to the products: PRESSURIZED GAS. Ensure adequate ventilation and evacuation for the level of equipment. Advice for use: Prevent sparks and contact with hot surfaces. DO NOT SMOKE. Technical measures/Storage procedures: Store at room temperature in the original container. Keep away from flames, hot surfaces and sparks. Store in a cool, well-ventilated place. Protect full containers from sources of heat to avoid excessive pressures. Recommended: Ordinary steel. Avoid: Alloy containing more than 2% magnesium. Plastics. Precautionary measures to be taken: Ensure a sufficient exchange of air and/or suction in workplaces. Control parameters. Exposure limits: No limit value F-USA Forane 134a recommended limit value by Elf : VME=1000ppm Forane 32 recommended limit value by Elf : VME=1000ppm Forane 125 recommended limit value by Elf : VME=1000ppm Individual protective equipment: Respiratory protection: In case of insufficient ventilation, carry suitable breathing apparatus. Protection for the hands: Gloves Protection for the eyes: Protective eyewear Technical measures/precautions. Form of storage and manipulation applicable to the products: PRESSURIZED GAS. Ensure adequate ventilation and evacuation for the level of equipment. Advice for use: Prevent sparks and contact with hot surfaces. DO NOT SMOKE. Technical measures/Storage procedures: Store at room temperature in the original container. Keep away from flames, hot surfaces and sparks. Store in a cool, well-ventilated place. Protect full containers from sources of heat to avoid excessive pressures. Recommended: Ordinary steel. Avoid: Alloy containing more than 2% magnesium. Plastics. Precautionary measures to be taken: Ensure a sufficient exchange of air and/or suction in workplaces. Control parameters. Exposure limits: France 1989: VME = 1000 USA 1992: TWA = 1000 p.p.m. = 3500 mg/m3 Individual protective equipment: Respiratory protection: In case of insufficient ventilation, carry suitable breathing apparatus. Protection for the hands: Gloves Protection for the eyes: Protective eyewear. Specific hygiene measures: avoid contact with the skin, eyes and inhalation of the vapours. Physical state (20°C): liquid gas Physical state (20°C): liquid gas Colour: colourless Colour: colourless Smell: Slightly similar to ether; pH: not applicable. Smell: Slightly similar to ether; pH: not applicable. Boiling point/interval: -42,4 °C Boiling point/interval: -40.8 °C Flash point: No flare up at test conditions Melting point/interval: -160 °C Vapour pressure: (25°C): 1.13 Mpa (11,3 bar) a (50°C): 2.11 Decomposition temperature: 480 °C Mpa (21,1 bar) a (70°C): 3.26 Mpa (32,6 bar) Vapour pressure: (20 °C) 0.91 Mpa (9.1 bar); at 50 °C: 1.91 Vapour density: At boiling point 4,54 kg/m3 Mpa (19.4 bar) Density: (25°C) 1133 kg/m3 a (50°C) 1004 kg/m3 a (70°C) 861 Vapour density: (20° C) 3.57 kg/m3 kg/m3 Solubility: water (25 °C) 3g/l - solvent soluble in hydrocarbons and chlorinated solvents, alcohols, ketones, esters. Solubility of water in the product at 30° C: 0.15% in weight. Conditions to avoid: Avoid contact with flames and red-hot Conditions to avoid: Avoid contact with flames and red-hot metal surfaces. metal surfaces. Dangerous decomposition products: Thermal decomposition Dangerous decomposition products: Thermal decomposition into toxic and corrosive products: hydrofluoric acid, hydrochloric into toxic and corrosive products: (hydrofluoric acid) acid in gaseous form, phosgene, carbon monoxide (CO) Other Information: Stable product at normal storage and handling conditions Inhalation: In experiments on animals Forane 134a, 32, 125 Inhalation: Practically non-toxic in experiments conducted on practically non-toxic. No mortality noticed on rats at 500000 animals. No effect below 50,000 p.p.m. ppm/4h. As with other volatile aliphatic halogenated compounds, As with other volatile aliphatic halogenated compounds, with the with the accumulation of vapours and/or the inhalation of large accumulation of vapours and/or the inhalation of large quantities, quantities, the product can cause: loss of consciousness and the product can cause: loss of consciousness and heart problems heart problems aggravated by stress and lack of oxygen; risk of aggravated by stress and lack of oxygen; risk of death. death. Contact with skin: Frostbite possible from splashes of liquefied Contact with skin: Frostbite possible from splashes of liquefied gas. gas. Contact with the eyes: Temporary irritation. Chronic toxicity: Studies on animal protracted inhalation do not highlight any sub-chronic toxic effect (rat/3 month(s)/ Inhalation: 50000ppm) Specifical effects: Genotoxicity according experimental available data Forane 134a, 32, 125 NOT Genotoxic Cancerogenesis: Forane 134a: experiments on animals do not highlight carcinogen effect clearly demonstrated (rat /Inhalation – for oral administration) Toxicity for reproduction: Foetal growth Forane 134a, 32, 125 according to available data no toxic effect for foetal development. Fertility, according the limited data on animal: Forane 134a no effects on fertility (rats/inhalation) 57 12 Ecological information 13 14 Notes concerning disposal Information on shipping 15 Information on regulation Forane 32 , Durability/degradability: Not easily biodegradable in water 5% after 28d Bioaccumulation: Practically non-absorbable by biological organisms log pow 0,21 Forane 125 Mobility: Rapid evaporation t ½ life 3,2 h (estimate) Durability/degradability: Not easily biodegradable in water 5% after 28d. In the troposphere degradation at rate t ½ life 28,3 y (estimate). Potential for destruction of ozone ODP (R-11 = 1)=0. Potential greenhouse effect (GWP): (HGWP) = 0,58. Low absorption in ground and sediments log Koc= 1,3-1,7 Bioaccumulation: Practically non-absorbable by biological organisms log pow 1,48 Forane 134a Mobility: Rapid evaporation t ½ vita 3 h (estimate) Durability/degradability: Not easily biodegradable in water 3% after 28d. 28d. In the atmosphere degradation at rate 3% after 28d . Potential for destruction of ozone ODP (R-11 = 1)=0. Potential greenhouse effect (GWP) 0,26. Bioaccumulation: Practically non-absorbable by biological organisms log pow 1,06 Disposal of product: recycle or incinerate. Mobility: Rapid evaporation: 1/2 life 2.7 h. Durability/degradability: Not easily biodegradable in water: 0% after 28 days. In the atmosphere degradation at rate of 1/2 life in 14 years. Potential for destruction of ozone ODP (R-11 = 1) = 0.055. Potential greenhouse effect (HGWP) - 0.36. Low absorption in ground and sediments log Koc = 1.8. Bioaccumulation: Practically non-absorbable by biological organisms: log pow 1.08. Aquatic toxicity: Acute toxicity, level of toxicity for fish over 24 hours = 180 mg/l; for anaerobic bacteria, level of toxicity over 24 hours > 400 mg/l. Call ELF ATOCHEM safety services for updating and more information. ONU Number 3163. RID\ADR class 2 figure (and letter) 4°a Prescriptions: Labels 2 N° danger /N° material 20/3163 IMDG class 2.2 N°ONU (IMDG) 3163 Prescriptions: Labels 2.2 IATA class 2.2 N°ONU (IATA) or N°ID3163 Prescriptions: Labels 2.2 ONU number 1018. RID/ADR class 2 figure (and letter) 3° a Regulations: No. danger/No. material 20/1018 label 2 IMDG class 2.2 ONU (IMDG) 1018 Regulations: NON INFLAMMABLE GAS/2 label IATA class 2.2 ONU (IATA) or No.ID1018 Regulations: NON INFLAMMABLE GAS/2 label Product code: 00055/7 EEC directives EEC directives Security reports: D.91/155/EEC modified by D.93/112/EEC: Dangerous substances EEC classification and labelling Dangerous preparation: Not classified as dangerous Inventory: in accordance with EINECS 16 Other information Recommended uses: Refrigerant fluid Bibliographical references: Encyclopedie des gas (Air Liquideed.1976- ELSEVIER AMSTERDAM) Disposal of product: recycle. Security reports: D.91/155/EEC modified by D.93/112/EEC: Dangerous substances and manufactured compounds Dangerous manufactured compounds: D.67/548/CEE modified by D.93/21/CEE: Guide to labelling (18th APT). R59 Dangerous for the ozone layer S59 Consult producer/supplier for information concerning recovery and recycling. S61 Do not dump. Consult specific instructions and safety information. Recommended uses: low-temperature coolant, Freezing agent, Air conditioning. Bibliographical references: Encyclopédie des gas (Air liquideed. 1976 - ELSEVIER AMSTERDAM). INRS toxicological report: No. 142 CHLOROFLUOROMETHANE This document refers to the product as is and which conforms to the specifications supplied by ELF ATOCHEM. If combinations or mixtures are made, check that there are no new dangers resulting from this action. The information provided in this report has been provided in good faith and is based on our latest knowledge of the product in question as of the date of publication of the same. The attention of users is drawn to the potential risks of employing the product for any use other than that for which it is intended. This report must be used and reproduced solely for purposes of prevention and safety. The list of legislative, regulatory or administrative texts must not be considered exhaustive. The product user is under obligation to refer to all the official texts concerning the use, conservation and manipulation of the product for which he is sole responsible. The product user must also provide all those who might come into contact with the product with the information necessary for their safety at work and the protection of their health and that of the environment, giving them a copy of this safety information report. 58 ZUSAMMENFASSUNG ALLGEMEINES................................................................................................................................... 60 ALLGEMEINE HINWEISE.....................................................................................................................................................60 ERGÄNZENDE SICHERHEITSPRINZIPIEN ........................................................................................................................60 ZUBEHÖR.............................................................................................................................................................................60 ALLGEMEINE TECHNISCHE DATEN ..................................................................................................................................61 GERÄTEAUFSTELLUNG .....................................................................................................................................................62 PLATZBEDARF.....................................................................................................................................................................62 ABMESSUNGEN UND GEWICHTSVERTEILUNG...............................................................................................................63 EINSTELLWERTE FÜR REGEL- UND SICHERHEITSEINRICHTUNGEN ..........................................................................63 GERÄUSCHPEGEL ..............................................................................................................................................................63 ÜBERNAHME ..................................................................................................................................... 64 EINGANGSKONTROLLE......................................................................................................................................................64 FLURTRANSPORT...............................................................................................................................................................64 LAGERUNG ..........................................................................................................................................................................65 AUSPACKEN ........................................................................................................................................................................65 ELEKTRISCHE ANSCHLÜSSE .......................................................................................................... 66 FUNKTIONSANSCHLÜSSE .................................................................................................................................................66 NETZANSCHLUSS ...............................................................................................................................................................66 MONTAGE VON OPTIONEN................................................................................................................................................66 ANSCHLUSS AN PC ODER BMS ........................................................................................................................................67 INBETRIEBNAHME ............................................................................................................................ 68 VORAB-PRÜFUNGEN..........................................................................................................................................................68 INBETRIEBNAHME ..............................................................................................................................................................69 REGULIERUNG .................................................................................................................................. 70 BETRIEBSEIGENSCHAFTEN DES HAUPTMODULS .........................................................................................................70 SCHALTFOLGE DER verdichter...........................................................................................................................................70 ZEITSCHALTUNGeN DER verdichter...................................................................................................................................70 REGLER WÄRMETAUSCHER VENTILATOREN.................................................................................................................71 KONTROLLMODULTASTATUR ...........................................................................................................................................72 EINGABE DER BETRIEBSPARAMETER.............................................................................................................................72 ALARME ...............................................................................................................................................................................74 STÖRUNGSSUCHE ............................................................................................................................ 75 HD-STÖRABSCHALTUNG ...................................................................................................................................................76 ND-STÖRABSCHALTUNG ...................................................................................................................................................77 AUSLÖSUNG VERDICHTERSICHERHEIT ..........................................................................................................................78 AUSLÖSUNG VENTILATORSCHUTZ..................................................................................................................................78 LAUTER GERÄTEBETRIEB .................................................................................................................................................79 KEIN VERDICHTERSTART ..................................................................................................................................................79 REGELMÄSSIGE WARTUNG............................................................................................................. 80 EINHEIT ................................................................................................................................................................................80 ELEKTRIK .............................................................................................................................................................................80 KÄLTELEITUNGEN ............................................................................................................................ 81 ANSAUGLEITUNG................................................................................................................................................................81 KÄLTEMITTELLEITUNG.......................................................................................................................................................81 LECKKONTROLLE ...............................................................................................................................................................82 HINWEISE/ANLEITUNGEN FÜR EINEN ORDNUNGSGEMÄSSEN ANSCHLUSS .............................................................82 RESTGEFAHREN ............................................................................................................................... 83 DEFINITION GEFAHRENBEREICH .....................................................................................................................................83 ALLGEMEINE GEFAHREN ..................................................................................................................................................84 DATENBLÄTTER FÜR DIE SICHERHEIT BEI DER VERWENDUNG VON KÜHLMITTELN ...............................................84 Die in dem vorliegenden Handbuch aufgeführten Daten sind nicht bindend und können vom Hersteller ohne Vorankündigung geändert werden. Vervielfältigung (auch teilweise) nicht gestattet. 59 ALLGEMEINES ALLGEMEINE HINWEISE Das vorliegende Handbuch dient zur korrekten Installation, Einstellung und Wartung des Geräts; es ist demnach unerläßlich, daß: ─ die folgenden Hinweise mit der entsprechenden Aufmerksamkeit gelesen werden; ─ das Gerät von Fachpersonal mit entsprechender Ausbildung installiert, abgenommen und gewartet wird. • Elektrische bzw. mechanische Änderungen entbinden den Hersteller jeglicher Haftpflicht und haben außerdem den Verfall der Garantieleistung zur Folge. Bei nicht ausdrücklich genehmigten Eingriffen, die unter Mißachtung der vorliegenden Anleitung ausgeführt werden, erlischt die Garantie. • Bei der Installation sind die jeweils gültigen Sicherheitsnormen zu beachten. • Nachprüfen, ob die Eigenschaften des Stromnetzes mit den Daten auf dem Typenschild des Geräts im Schaltschrank übereinstimmen. • Die vorliegende Anleitung und der Schaltplan des Geräts sind mit entsprechender Sorgfalt aufzubewahren und dem Bedienungspersonal ggf. zur Verfügung zu stellen. • Das Verpackungsmaterial (Kunststoff, Styropor, Stifte usw.) ist als potentielle Gefahrenquelle außerhalb der Reichweite von Kindern aufzubewahren und gemäß den gültigen Normen einem entsprechenden Recyclingverfahren zuzuführen. • Der Verflüssiger ist in Verbindung mit einer Inneneinheit zur Expansion des Kältemittels für die Klimatisierung bestimmt. • Das Gerät bei Defekten oder Störungen abschalten. • Für eventuelle Reparaturen ausschließlich einen vom Hersteller autorisierten technischen Kundendienst beauftragen und Original-Ersatzteile anfordern. Die Nichtbeachtung der o.a. Hinweise kann die Sicherheit des Geräts beeinträchtigen. Der Hersteller übernimmt keinerlei Haftung für Personen- oder Sachschäden, die direkt bzw. indirekt aus der Nichtbeachtung der vorliegenden Anleitungen resultieren. ERGÄNZENDE SICHERHEITSPRINZIPIEN Die Maschine wurde im Hinblick auf die Bedienersicherheit entworfen und gebaut. Zu diesem Zweck wurden Planlösungen angewandt, welche die möglichen Gefahrenursachen so weit wie möglich beseitigen oder die Möglichkeit des Auftretens der Gefahr spürbar reduzieren. Sollte es in der Entwurfsphase nicht möglich gewesen sein, der Gefahr vorzubeugen oder sie zu beseitigen, wird auf die Verhaltensvorschriften im Abschnitt Restgefahren verwiesen. ZUBEHÖR Die Einheiten können mit folgendem Zubehör ausgestattet werden (auf Wunsch): sonderspannung verflüssigerschutzgitter magnetventil betriebsstundenzähler Verdichter schwingungsdämpfer anschlußsatz mit: Entfeuchtungsfilter, thermostatventil magnetventil Kaltwasserleitung durchflußanzeiger ─ Einheit mit Steuerung separater Verdichter ─ anschluß an ferngeschaltetes Kontrollmodul ─ anschluß an PC oder BMS ─ ─ ─ ─ ─ ─ 60 ALLGEMEINE TECHNISCHE DATEN Modell MSAT Nennspannung Modell MSAT R-22 Kaelteleistung Leistungsaufnahme der Verdichter Modell MSAT R-407C Kaelteleistung Leistungsaufnahme der Verdichter 102 kW kW kW kW Verdichtertyp Drehzahl 122 142 162 182 400 / 3 / 50 202 L Daten beziehen sich auf: Außenlufttemperatur +35°C 31.3 36.4 41.3 48.7 53.8 63.9 77.9 Saugtemperatur des Sattgases 8.5 10.3 11.3 13.5 15.8 17.5 22.3 (SST) 9.5°C (dew point) R-407C 29.8 34.1 39.2 44.1 50.3 62.8 72.8 9.4 11.2 12.6 14.7 17.8 20.3 25.2 SCROLL 2900 2x 2,5 2 NTC rpm Ölfüllung 242 2x 1,55 2x 1,65 Leistungsabstufung Motorschutz (SST) 7.5°C R-22, Oeltyp SUNISO 3GS OIL Nota: Ölsorte bei Einheiten mit R-407C - MOBIL EAL ARTIC 22 CC - 32 MMMA POE 2x 4 Verflüssiger Kupferrohr mit aufgepreßten Aluminiumlamellen Material Anzahl Wärmetauschfläche Lamellenabstand Anzahl Rohrreihen ∅ Leitung Prüfdruck mm kPa Anzahl u. Durchm Drehzahl Luftmenge Installierte Leistung Anz x ∅ rpm L/s kW 2 m mm Ventil Kältemittel Ansaugventil Füllmenge R-22 Füllmenge R-407C Transportgewicht ca. Verpackungsvolumen ca. 3 1,6 2 3,6 2,1 2 9,52 3000 Axialventilator 2x560 680 3056 2x0,22 4x450 Kältemittel 8.2 8,2 9.2 9,2 6x450 840 4125 4x0,16 Anschlüsse Kältemittel 16 ∅ 14 28 ∅ 22 kg kg 4,9 1,6 1,6 9 10 Gewicht und Volumen kg 275 280 380 3 1,50 m Einsatzgrenzen Max. R-22 49 47,5 47,5 Verflüssigerlufteintritts45 45 temperatur SST = +5°C R-407C 47 Min. R-22 -4 -4 -4 VerflüssigerlufteintrittsR-407C -5 -5 -5 temperatur SST = +5°C Max. R-22 Ansaugtemperatur R-407C gesättigtes Gas °C Merke: ─ Motor mit Außenrotor ─ Schutzgitter 6120 6x0,16 18 28 Merke: Schweißanschlüsse 22 35 9 10 9.6 10.6 12 13 420 3,20 485 580 590 4,30 47,5 45 49 46 44,5 -4 43,5 -8 46 -4 43 -8 -5 -9 -5 -9 12,5 12,5 61 12 13 Merke: Füllung bei Inbetriebnahme vervollständigen Merke: SST Gesättigte Ansaugtemperatur Überhitzung Ansauggas + 5°K GERÄTEAUFSTELLUNG Die Geräte sind zur Außeninstallation vorgesehen. • Nachprüfen, ob die Stellfläche das Gewicht des Geräts (s. Gewicht und Gewichtsverteilung auf S. 63) trägt und eben ist. Zur Vermeidung von Lärm und Vibrationen Gummistreifen zwischen Geräteboden und Stellfläche einfügen. • Platzbedarf für einwandfreien Betrieb beachten. • Bei Installation auf Terrassen oder Dächern wird die Montage auf Schwingungsdämpfern empfohlen; fener sind die Leitungen mit elastischen Verbindungselementen auszurüsten. • Gerät so positionieren, daß auf den Längsseiten keine Windlasten einwirken können. • Gerät am Boden verankern. PLATZBEDARF Zum einwandfreien Betrieb der Einheit ist ein geeigneter Stellplatz unerläßlich. Folgende Faktoren können den Betrieb beeinträchtigen oder eine Störabschaltung der Einheit verursachen: Behinderungen für Luftströmung, Wärmequellen (z.B. Ab-, Heißluft), unzureichender Luftaustausch im Stellbereich, den Wärmetauscher behindernde Blätter oder sonstige Fremdkörper, den Luftstrom hemmende oder begünstigende Winde. Ein Mindestplatzbedarf zum/r einwandfreien Betrieb/ Wartung der Einheiten muß gewährleistet sein. In folgenden Schizzen sind einige Einstellungsmodalitäten gezeigt; jede Installation ist gemäß der vorliegenden Anleitung zu überprüfen. Merke: Alle Maße in mm Freie Seite EINHEIT MIT SEPARATEN STEUERKREISEN SCHWINGUNGSDÄMPER EINHEIT MIT STEUERUNG SEPARATER VERDICHTER (Zubehör) (Zubehör) Auf Wunsch kann die Einheit mit Steuerung separater Verdichter und Vorrüstung für 2 getrennte Inneneinheiten geliefert werden. Es besteht weiterhin eine gemeinsame Stromversorgung. 62 ABMESSUNGEN UND GEWICHTSVERTEILUNG Zeichenerklärung: 1 - Verdichter 2 - Anschluss Flüssigkeitsleitung Ø G1 1. Kreis 2’ - Anschluss Flüssigkeitsleitung Ø G1 2. Kreis 3 - Anschluss Gasleitung Ø G2 1. Kreis 3’ - Anschluss Gasleitung Ø G2 2. Kreis 4 - Schaltschrank 5 - Axialventilatoren 6 - Stromeinspeisung 7 - Verflüssiger 8 - Wartungspaneel (Zugang Schaltschrank und Verdichter) ABMESSUNGEN Größe 102 122 142 162/182 202/242 A B C 1530 678 1400 1530 678 1400 1563 1107 1570 1563 1107 1570 2098 1107 1570 GEWICHTE D E F G H I L O 128 128 128 128 128 73 73 130 130 130 75 75 75 75 75 628 628 1058 1058 1058 42 42 42 42 42 1255 1255 1077 1077 1612 800 800 900 900 900 153 153 153 Ø G1 14 16 16 18 22 Ø G2 22 28 28 28 35 Luefteranzahl 2 2 4 4 6 W1 W2 W3 W4 Tot. 88 89 121 155 191 275 280 380 485 590 42 42 58 74 95 95 98 132 168 200 50 51 69 88 104 Merke: Abmessungen in mm, Gewichte in kg. EINSTELLWERTE FÜR REGEL- UND SICHERHEITSEINRICHTUNGEN Offen Geschl Merke: Die Sicherheiten “HDSchalter” und “Heißgassicher- HD-Schalter (kPa) 2750 2000 Systemüberdrucksicherung ND-Schalter (kPa) 230 360 Max. Verdichterstarts/Stunde ( °C ) 120 heitsthermostat” können manuell ( n° ) 10 rückgestellt werden, der ND- Heißgassicherheitsthermostat ( °C ) 120 automatische Rückstellung. GERÄUSCHPEGEL Schalleistungspegel (dB) Größe 102 122 142 162 182 202 242 Oktav-Frequenzbandbereich (Hz) 63 80 80 87 87 84 86 86 125 84 76 80 81 78 79 82 250 75 73 74 76 78 78 81 500 73 73 73 73 74 77 75 1000 2000 4000 8000 69 63 60 42 71 65 62 43 71 69 66 63 70 69 65 62 69 70 62 55 72 67 62 54 70 73 63 65 Schalldruck -pegel dB(A) 59 59 60 60 60 61 62 63 Schalter verfügt dagegen über eine Merke: - Die Geräuschpegel beziehen sich auf Einheiten bei Vollast, maximaler Ventilatorendrehzahl, 35°C Außenlufttemperatur und +5°C gesättigter Ansaugtemperatur. - Schalldruckpegel in 1 m Abstand zur Gerätoberfläche, im Freifeld gemessen. -12 - Schalleistungspegel bez. auf: 1x10 w. -5 - Schalldruckpegel bez. auf : 2 x 10 Pa ÜBERNAHME EINGANGSKONTROLLE Die Geräte werden mit einer entsprechenden Schutzverpackung geliefert. Bei Eingang der Lieferung das Gerät auf Transportschäden und Vollständigkeit überprüfen. Sind Schäden erkennbar, ist auf dem Transportdokument umgehend der entsprechende Schaden mit folgender Anmerkung zu verzeichnen: “ÜBERNAHME MIT VORBEHALT WEGEN OFFENSICHTLICHER VERPACKUNGSSCHÄDEN”, da die Preisstellung ab Werk eine Schadenvergütung durch die Versicherung gemäß dem Gesetz Nr. 450 vom 22.08.85 “Begrenzung der Schadenerstattung“ einschließt. WICHTIG DIE HIERIN BESCHRIEBENEN ARBEITEN SIND ALLESAMT NACH DEN GÜLTIGEN SICHERHEITSNORMEN AUSZUFÜHREN, SOWOHL HINSICHTLICH DER AUSRÜSTUNG WIE DER VORGEHENSWEISE. ACHTUNG VOR JEDEM TRANSPORT SICHERSTELLEN, DASS DIE ANGEWANDTEN MITTEL EINE DEM JEWEILIGEN GERÄTEGEWICHT ENTSPRECHENDE HUBLEISTUNG AUFWEISEN. Größe Gewicht Kg 102 275 122 280 142 380 162 480 182 485 202 580 242 590 FLURTRANSPORT TRANSPORT mit GABELSTAPLER oder ÄHNLICHEM MITTEL - Gabeln längs unter die Holzpalette des Gerätes einführen. - Beim Anheben auf die gleichmäßige Verteilung des Gerätegewichts achten, das auf Verdichterseite am größten ist. 64 HEBEN mit KRAN oder ÄHNLICHEM HUBMITTEL - Hubrohre in die vorgesehenen Bohrungen am Geräteständer einführen. - Der beidseitige Überstand der Rohre muß die Anbringung der Sicherheitsbolzen mit Splinten gewährleisten. - Hubriemen zwischen Splinten und Geräteständer anlegen (siehe Zeichnung). - Zum Schutz des Gerätegehäuses die oberen Kanten mit einem Holzverschlag abdecken (bei nur 1 Hubpunkt). - Hubriemen langsam anspannen und dabei die korrekte Ausrichtung derselben überprüfen. - Anschließend das Gerät heben. Kantenschutz Holzverschlag Hubriemen Bolzen Sicherheitssplint Hubrohr ACHTUNG ZUR GEWÄHRLEISTUNG DER GERÄTESTRUKTUR UND -FUNKTION MUSS DER ANWENDER DIE ANLEITUNGEN AUF DER VERPACKUNG SORGFÄLTIG BEACHTEN. EMPFEHLUNGEN: - VORSICHTIG TRANSPORTIEREN. - KEINER FEUCHTIGKEIT ODER NÄSSE AUSSETZEN. - IN KEINEM FALL GEGENSTÄNDE AUF DEM GERÄT STAPELN, ES SEI DENN INNERHALB DER ZULÄSSIGEN GRENZEN (DIE ANGEGEBENE ZIFFER DEFINIERT DIE ANZAHL DER STAPELBAREN LAGEN. Z.B. 1 = 1 STAPELLAGE AUF DER EINHEIT). LAGERUNG − − − vor Sonneneinstrahlung, Regen, Sand und Wind schützen Temperaturbereich: max. 60°C, min. -10°C max. Feuchtigkeit: 90% AUSPACKEN - Mit einer Schere die Bandeisen durchtrennen. - Verpackungskarton abnehmen (dabei auch die Eckenschützer herausziehen). - Mit einem festen Schraubschlüssel SW 10 mm die Befestigungsbügel des Geräts mit der Holzpalette abnehmen. - Gerät anheben und Holzpalette entfernen. - Gerät am vorgesehenen Stellplatz auf den Boden absetzen. - Nachprüfen, ob sichtbare Schäden zu verzeichnen sind. - Verpackungsmaterial fach- und umweltgerecht entsorgen und dem Recycling zuführen (gemäß den gültigen Umweltbestimmungen). 65 ELEKTRISCHE ANSCHLÜSSE ACHTUNG ALLE ANSCHLÜSSE ELEKTRISCHER GERÄTE MÜSSEN BEI AUSGESCHALTETER STROMVERSORGUNG DURCHGEFÜHRT WERDEN. FUNKTIONSANSCHLÜSSE Diese Anschlüsse müssen Sie vor Inbetriebnahme der Einheit herstellen. NETZANSCHLUSS - Die Drehstromlinie an die im Stromplan mit L1 L2 L3 bezeichneten Klemmen des Haupttrennschalters anschließen. - Den Nullleiter an Klemme N der Schalttafel anschließen. - Den Erdleiter an Klemme Pe der Schalttafel anschließen. - Der Installateur muss die Anschlusskabel an die Stromversorgung gemäß den Angaben des in der Schaltschranktür aufgekletben Datenblatts bemessen. Es ist außerdem für einen auf die Stromstärke der Leitung abgestimmten Schutz gegen Kurzschlüsse zu sorgen. Das Trennvermögen dieser Schutzeinrichtung muss dem in diesem Anlageteil angenommenen Kurzschlussstrom entsprechen. DATI ELETTRICI GRÖSSE F.L.A. L.R.A. F.L.I. M.IC. 1) F.L.A. 2) L.R.A. 3) F.L.I. 4) M.I.C. Einzel Verdichter 230/3/50 (A) 400/3/50 Ventilatoren (A) 230/1/50 230/3/50 Insgesamt (A) 400/3/50 230/3/50 Verdichter (A) 400/3/50 Verdichter (kW) Ventilatoren (kW) Insgesamt (kW) 230/3/50 Insgesamt (A) 400/3/50 102 122 19.7 9.8 1.15x2 41.6 21.8 132.5 66 11.3 0.22x2 11.8 154.5 78.1 22.9 11.3 1.15x2 48.1 25.0 164 74 13.2 0.22x2 13.6 189.2 87.6 142 162 25.3 24.1 13.6 14.7 0.65 x 4 0.65 x 4 53.9 51.4 30.3 32.5 171 166 102 94 15.2 16.8 0.17 x 4 0.17 x 4 15.9 17.5 199.5 193.3 118.8 111.9 182 202 242 31.2 17.5 0.65 x 4 65.6 38.1 211 117 20.7 0.17 x 4 21.4 244.9 137.2 35.8 20.0 0.65 x 6 76.4 44.9 224 128 23.8 0.17 x 6 24.8 264.6 152.3 45.2 25.2 0.65 x 6 85.8 55.2 280 159 29.2 0.17 x 6 30.2 329.5 189.0 Stromaufnahme bei max. zulässigen Bedingungen. Anlaufstrom des Verdichters. Leistungsaufnahme bei Volllast (bei max. zulässigen Bedingungen). Anlaufstrom der Einheit. Spannungsabweichung: max 2% Spannung: 400/3/50 ± 6% 230/3/50 ± 6% MONTAGE VON OPTIONEN ANSCHLUSS AN ALARMANZEIGE Im gleichen Bereich des Schaltplans finden Sie ebenfalls den gemeinsamen Alarmkreis. Sie können eine akustische bzw. visuelle Alarmanzeige für Störungsmeldungen der Einheit in diesen Kreis schalten. Die Versorgung der Alarmanzeige hat gemäß Schaltplan mit Niederspannung (12V 300mA) zu erfolgen. ANSCHLUSS AN FERNSTEUERMODUL Das Fernsteuermodul ist die genaue Kopie der Tastatur am Steuermodul ENERGY LIGHT und gestattet Ihnen, sämtliche am Gerät möglichen Bedienungen von fernliegender Position auszuführen. 66 INSTALLAZIONE Bevor Sie das Fernsteuermodul anschließen, müssen Sie durch Auslösen des Schutzschalters den Haupttrennschalter unterbrechen. Die Ferntastatur gemäß Abbildung anschließen. Rückseite PosterioreFernsteuerung terminale remoto C5121423 25 24 26 S + - SERIAL E COMUNE RELE' 7 RELE' 6 RELE' 5 RELE' 4 RELE' 3 RELE' 2 RELE' 1 C5121420 ESPANSION E - S+ CONN B RELE' ALLARME CONN A Die maximale Länge des Anschlusskabels ENERGY LIGHT – Tastatur beträgt 80 m. ANSCHLUSS AN PC ODER BMS K U N D E N S E IT IG A n s c h lu s s k a b e l R S 2 3 2 9 -p o lig S te c k e r - B u c h s e H ö c h s tlä n g e 1 0 m 10 12 V e rs o r g u n g C 5121425 22 21 23 DTR ECHO RS 485 TTL 1 2 3 4 24 OFF 21 22 23 24 ON - + 67 7 6 5 4 3 2 1 RELAIS 1 8 RELAIS 4 9 RELAIS 6 2molex Höchstlänge = 2 m Serielles Kabel 5-Wege 10 RELAIS 5 K U N D E N S E IT IG S e r ie lle s K a b e l 5 S 4 8 5 K a b e l, 2 g e tw is te t e D r ä h te H ö c h s tlä n g e d e r L e itu n g = 1 0 0 0 m - + MASSE + RELAIS 2 - RELAIS 7 + RELAIS ALARMSIGNAL - SERIELL + RELAIS 3 ON RS 485 TTL AUSDEHNUNG OFF S e ria l o p to c o u p le d a d a p t e r R S 2 3 2 /T T L R S 2 3 2 /R S 4 8 5 - R S 4 8 5 /T T L M ic ro n e t a n d M o d B u s P r o to c o l NU NU DTR NU NU ECHO S e r ia l o p to c o u p le d a d a p t e r R S 2 3 2 /T T L R S 2 3 2 /R S 4 8 5 - R S 4 8 5 /T T L M ic ro n e t a n d M o d B u s P r o to c o l 1 2 3 4 10 12 V e rs o rg u n g RS 232 C 5121425 S - PE1P0005 RS 232 230 Vac C 5121420 VERB. B VERB. A INBETRIEBNAHME SÄMTLICHE GERÄTE SIND VON EINEM AUTORISIERTEN KUNDENDIENST IN BETRIEB ZU NEHMEN. ANDERENFALLS ERLISCHT DIE VERTRAGLICH FESTGELEGTE GARANTIE. DER KUNDENDIENST BESCHRÄNKT SICH AUF DIE INBETRIEBNAHME UND UMFASST WEDER ANSCHLÜSSE NOCH ARBEITEN AM GERÄT VORAB-PRÜFUNGEN - Vor jeder Prüfung sicherstellen, daß das Gerät einwandfrei waagrecht aufgestellt ist und die elektrischen wie kühltechnischen Anschlüsse an die Inneneinheit ordnungsgemäß ausgeführt sind. - Netzspannung und -Frequenz überprüfen: FOLGENDE RICHTWERTE SIND EINZUHALTEN 230 ± 6% 400 ± 6% - Die vorgeschriebene Spannung der Fixierschrauben Leiter-Elektrokomponenten auf der Schalttafel überprüfen (transportbedingte Erschütterungen könnten zur Lockerung dieser Schrauben geführt haben). VAKKUMERZEUGUNG Nach Überprüfung etwaiger Leckstellen in den Anschlußleitungen und der Inneneinheit (s. Handbuch der Kälteleitungen) bei beaufschlagter Anlage ist wie folgt zu verfahren. - Die Anlage bei geschlossenen MCAT Ventilen entleeren. - Vakuumpumpe mithilfe eines Manometers an beide Ventilstutzen anschließen und hierbei darauf achten, daß etwaige Absperrelemente (Magnetventil oder Zwischenventile) geöffnet sind. Daraufhin Vakuum erzeugen. - Damit das Magnetventil geöffnet bleibt, muss es von den Klemmen im Schaltschrank (s. Stromplan) getrennt und eine gewöhnliche 220V Steckdose angeschlossen werden. - Die Pumpe bei einem Druck von ca. 100 Pa anhalten und einige Stunden auf Vakuum belassen. Der dann normalerweise eintretende Druckaufbau wird nach einiger Zeit wieder ausgeglichen. Sollte der Druck jedoch weiterhin ansteigen, so liegen geringfügige Leckagen bzw. Feuchtigkeitseinschlüsse vor. Im ersten Fall die Eingriffe unter Abschnitt LECKKONTROLLE im Handbuch Kälteleitungen wiederholen, im zweiten Fall die Anlage bis 100 Kpa mit Kältemittel R22 füllen und gemäß obigen Hinweisen erneut auf Vakuum fahren. Nach erreichter Druckstabilisierung zur Anlagenfüllung übergehen. KÄLTEMITTELFÜLLUNG Die Füllung der betreffenden Größen ist bei Inbetriebnahme je nach Ausführung der Inneneinheit und Leitungslänge zu vervollständigen. - Bei Anlagenvakuum die Manometerhähne schließen und die Vakuumpumpe abtrennen. - Die Kältegasflasche anschließen und die Entlüftung an der Gummiverbindung mit dem Manometer vornehmen. - Die Manometerhähne öffnen und gasförmiges bis zum Druckausgleich Anlage/Flasche bzw. zu einem höheren Druckwert als der Luftdruck einströmen lassen. - Die Hähne der Verdampfereinheit (zuerst den Flüssigkeitshahn) öffnen und die Einheit somit in Startbereitschaft setzen. Benuetzen Sie einen gemaessentsprechenden Schluessel, mit viereckigem Schaft. Der Schaft soll die gleiche Laenge des Hahn sowie eine angemessene Hebelkraft haben. ( * Siehe Zeichnung ) Betriebsgewicht Kältemittel in den Kühlleitungen ( KG / 10 m ) Außen ∅ Leitung 10 12 14 16 18 22 28 35 42 Kältemittel Ansaugung a 38°C SST+4,5°C 0,60 1,06 1,41 1,71 2,36 3,62 6,61 9,47 -- --0,025 0,030 0,043 0,070 0,120 0,195 0,290 Außeneinheit UNITA’ ESTERNA Inneneinheit UNITA’ INTERNA Rubinetto Gasventil gas Kältemittel Rubinetto ventil Liquido WICHTIGER HINWEIS: Bei erstmaliger Inbetriebnahme der Einheit bzw. nach längerem Stillstand UNBEDINGT die Heizwiderstände (sofern vorhanden) des Öls im Verdichtergehäuse mindestens 8 Stunden vor dem Verdichterstart mit Strom versorgen. Zum Einschalten folgende Schritte ausführen: - Bei Betätigen des Trennschalters QS1 der Verflüssigereinheit muss die grüne LED erloschen sein. 68 INBETRIEBNAHME - Einwandfreien Betrieb der Inneneinheit nachweisen. - Anschluß des etwaigen Magnetventils überprüfen. - Im Stromplan die Steuerung SA2 lokalisieren. Sie stellt das von der Raumeinheit stammende Signal zur Auswahl der Leistungsstufe dar und entspricht der Aktivierung der ersten Stufe. Die Steuerung zum Aktivieren der zweiten Stufe ist durch das Symbol SA3 im Stromplan gekennzeichnet. - Das Regelsystem bestimmt die Einschaltfolge der Verdichter (s. Handbuch Regulierung). Gleichzeitig zum Verdichterstart läuft auch die Ventilation im betreffenden Kreis an. - Raumseitigen Betriebsbedarf überprüfen (LED 1 erleuchtet bzw. blinkend). - Zur Nachfüllung von Kältemittel den Serviceanschluß des ansaugseitigen Sperrventils verwenden, hierbei Freon in gasförmigem Zustand ansaugen lassen. Dieser Vorgang bedarf größter Umsicht, da der ND-Schalter 70 s lang gebypasst wird. Soll erst ein Kreis und dann der andere gefüllt werden, den nicht betroffenen Verdichter durch Betätigung des Sicherungshalters stoppen, am Hauptmodul kann infolge der Betriebslogik die Abschaltung nicht vorgenommen werden. ACHTUNG: nach einem Stopp zählt das System 6 Minuten vom vorhergehenden Start (nach Verstreichen dieser Zeit werden nur die 30 s Verzögerung berechnet) vor der nächsten Wiedereinschaltung. - Der Füllvorgang ist beendet, wenn: - Die Kältemittellampe (soweit vorhanden) keine Luftbaslen anzeigt. - Die Heißgastemperatur 4-8 °K beträgt. - Die Unterkühlung des Kältemittels 3-5 °K beträgt. ÖLNACHFÜLLUNG Zur Ermittlung der erforderlichen Ölnachfüllmenge ist die Kenntnis der zur werkseitigen Füllung zusätzlich aufgefüllten Kältemittelmenge erforderlich. Die Menge soll ca. 10% des zugesetzten Kältemittelgewichts betragen (Ölsorten im Handbuch Abschnitt Allgmeines nachschlagen). Die Ölnachfüllung ist nur bei zusätzlicher Kältemittelfüllung über 3 kg notwendig. Am Schraderstutzen in jedem Fall den Ölstand des Verdichters überprüfen. PRÜFUNGEN BEI ERSTER INBETRIEBNAHME NACH EINSCHALTUNG DES GERÄTS FOLGENDE KONTROLLEN VORNEHMEN: ELEKTRIK Phasenasymmetrie. Sie muß stets unter dem Höchstwert von 2% liegen (siehe Rechenbeispiel). Rechenbeispiel: L1 - L2 = 388V L2 - L3 = 379V L3 - L1 = 377V Das Mittel der Meßwerte ergibt sich aus: 388 + 379 + 377 = 381 3 Die maximale Abweichung vom Mittel: 388-381=7 V Die Phasenasymmetrie ergibt sich aus: 7 (zulässig) x 100 = 1,83% (accettabi le) 381 Stromaufnahme Verdichter. Sie muß unter dem in Tabelle mit F.L.A. angegebenen Wert liegen. KÜHLKREIS - Etwaige Leckstellen an den Ventilanschlüssen und Druckmeßstutzen feststellen. Achtung: Sämtliche Schraubkappen der Manometerstutzen und Ventile wieder einbauen. - Kontrollampe Kältemittel überprüfen (sofern vorhanden). - Über angeschlossene Manometer die Betriebs-drücke nachprüfen ( ND zwischen 400 und 560 KPa bei 0 °C -+8 °C SST und einer Verflüssigungstemperatur von ca. 15-20 °C über der Außenlufttemperatur (Richtwerte). - Durch Differenz zwischen der am ND-Manometer und der ansaugseitig vor dem Verdichter auf dem Kontaktthermometer abgelesenen Temperatur den Wert der Überhitzung überprüfen. Bei Werten im Bereich 4-8 Grad liegt ein störungsfreier Betrieb vor, anderenfalls die Ursachen der Störung anhand des Abschnitt STÖRUNGSSUCHE ermitteln. - Durch Differenz zwischen der am HD-Manometer und der auf der Kaltwasserleitung nach dem Verdichter auf dem Thermometer abgelesenen Temepratur den Wert der Unterkühlung ermitteln. Alles i.O. bei Werten im Bereich 3/5 Grad, anderenfalls Störungsursache gemäß obigen Hinweisen feststellen. - Bei einer vollständigen Ermittlung der Anlagenfunktion ist auch die Austrittstemperatur des Verdichters zu überprüfen, wobei diese unter Berücksichtigung der angeführten Überhitz- und Unterkühlwerte ca. 30/40 Grad über der Verflüssigungstemperatur liegen soll. • Angesichts der Drehzahlregelung der Ventilatoren sollten die genannten Betriebsprüfungen unter möglichst vorgabeähnlichen Außen- und Raumluftbedingungen durchgeführt werden. • Es wird darauf hingewiesen, daß die o.e. Daten für Einheiten mit Klimabetrieb und Thermostatventil gelten. Bei Projektbedingungen mit Verdampfungstemperaturen (SST) unter 0 °C sind die Funktionsparameter je nach Auslegung der Kälteleitungen zu überprüfen. Dies sind einige der bei Inbetriebnahme der Verflüssiger nicht auszuschließende Probleme, wobei jedoch in jedem Fall die Erfahrung und Qualifizierung des zuständigen Fachpersonals maßgeblich sind. 69 REGULIERUNG BETRIEBSEIGENSCHAFTEN DES HAUPTMODULS SCHALTFOLGE DER VERDICHTER Zusätzlich zur Einstellung der Flüssigkeitstemperatur unterstützt der Mikroprozessor weitere Funktionen für die Betriebsoptimierung der gesamten Einheit. Es handelt sich beispielsweise um die Schaltfolge der Verdichter, die durch Eingabe entsprechender Parameter aktiviert wird. Mit anderen Worten startet auf Befehl des Temperaturreglers zuerst der Verdichter mit der geringsten Anzahl von Betriebsstunden, während der am längsten in Betrieb befindliche Verdichter als erster stoppt. Mit dieser Funktion werden die Betriebsstunden gleichmäßig zwischen beiden Verdichtern verteilt. Für besondere Anwendungen besteht immerhin die Möglichkeit, stets den ersten Verdichter zuerst und den zweiten Verdichter danach in Betrieb zu nehmen. Die Einheiten werden vom Hersteller mit aktivierter Schaltfolge eingerichtet. ZEITSCHALTUNGEN DER VERDICHTER Zum einwandfreien Betrieb der Verdichter sind bestimmte Zeitschaltungen erforderlich. Zum besseren Verständnis dieser Zeitschaltungen wird auf das Diagramm in Abb. 3 verwiesen. Verdichter Verd. 1 EIN EIN AUS Sekunden Verd. 2 AUS EIN Sicherheitszeit Einschaltung Abschaltung C01 AUS Sekunden Einschaltspanne 1. 2. Verdichter C06 Sekunden*10 Sicherheitszeit Einschaltung Einschaltung C02 Ausschaltspanne 1. 2. Verdichter C07 Abbildung 3 Abbildung 4 Im Diagramm von Abb. 4 sind 2 Parameter dargestellt. SICHERHEITSZEIT EINSCHALTUNG ABSCHALTUNG und SICHERHEITSZEIT EINSCHALTUNG EINSCHALTUNG. Durch den ersten Parameter wird festgelegt, dass nach dem Stopp des Verdichters eine bestimmte Zeit vor dessen erneuter Einschaltung verstreicht. Diese Zeit wird selbst bei Betriebsaufforderung durch den Temperaturregler berücksichtigt. Durch den zweiten Parameter wird festgelegt, dass zwischen zwei aufeinanderfolgenden Einschaltungen eine bestimmte Zeit vergehen muss. Bei Einheiten mit zwei Verdichtern werden zusätzlich zwei weitere Parameter verwendet, u.z. EINSCHALTSPANNE ERSTER ZWEITER VERDICHTER und ABSCHALTSPANNE ERSTER ZWEITER VERDICHTER. Mit dem ersten Parameter wird der gleichzeitige Start beider Verdichter verhindert, in erster Linie um übermäßige Anlaufströme der Einheit zu vermeiden. Der zweite Parameter legt eine Zeitspanne zwischen der Abschaltung des ersten und zweiten Verdichters fest. Diese zwei Parameter beziehen sich auf das Diagramm in Abbildung 3. 70 REGLER WÄRMETAUSCHER VENTILATOREN Standardmäßig werden die Einheiten MSAT mit thermostatischem Regler gestellt, auf Anfrage mit Regelung über Druckschalter in einem entsprechenden Bausatz. Das nachstehend beschriebene Funktionsprinzip ist allerdings bei beiden Regelarten identisch. - LÜFTUNGSSTEUERUNG IM KÜHLBETRIEB Der Kühlbetrieb wird im nachstehenden Diagramm in Abb. 6 beschrieben. Abbildung 6 Beim Start des Verdichters findet eine Zwangslüftung statt, d.h. die Ventilatoren drehen unabhängig von der gesteuerten Regelung für eine über Parameter festgelegte Zeit bei maximaler Drehzahl, sofern die Temperatur nicht unter dem ABSCHALTWERT liegt. In diesem Fall laufen die Ventilatoren hingegen die gleiche Zeit lang auf Mindestdrehzahl. Es soll nun die Funktion des Reglers näher betrachtet werden. Als ersten Parameter muss die ABSCHALTUNG festgelegt werden, also diejenige Verflüssigungstemperatur, unter der die Ventilatoren im Stillstand sind. Die ABSCHALTHYSTERESE definiert den Schaltbereich zwischen Mindestdrehzahl der Ventilatoren und ihrem Stillstand. Die Ventilatoren starten demnach mit Mindestdrehzahl bei einem Temperaturwert von ABSCHALTUNG + ABSCHALTHYSTERESE, während der Stopp durch die Differenz zwischen SOLLWERT KÜHLEN und ABSCHALTDIFFERENZ gegeben ist. Sobald die Verflüssigungstemperatur den SOLLWERT VENTILATOREN KÜHLEN übersteigt, stimmt der Regler die Ventilatordrehzahl mit proportionaler Regelung auf die Verflüssigungstemperatur ab. Bei Clivet Einheiten wird diese Regelung entgegen der vom Diagramm gezeigten Darstellung bis Erreichen des SOLLWERTS VENTILATOREN MAX KÜHLEN aufrecht gehalten. Der Vollständigkeit halber sollen auch die Parameter MAX DREHZAHL SCHALLGEDÄMPFT und PROPORTIONALBAND KÜHLEN erläutert werden. Mit dem ersten Parameter wird eine Höchstschwelle der Ventilatordrehzahl festgelegt, die einer der Drehzahlregelung unterliegenden Verflüssigungstemperatur entspricht. Das PROPORTIONALBAND KÜHLEN definiert hingegen den Steigungswinkel der Geraden, in welchem die Regelung der Drehzahl stattfindet. Die CLIVET Einheiten sind mit Regelung der Ventilatoren bis zur maximalen Drehzahl ausgerüstet. 71 KONTROLLMODULTASTATUR • • • • LED 1 Verdichter 1 ON bei Einschaltung des 1. Verdichters OFF bei Abschaltung des 1. Verdichters BLINKEN mit Frequenz 1Hz bei zeitgesteuerten Sicherheitstakten BLINKEN mit niedriger Frequenz bei Verdichter im Abtauvorgang (nur Wärmepumpe ) • • • • LED 3 Verdichter 2 ON bei Einschaltung des 1. Verdichters OFF bei Abschaltung des 1. Verdichters BLINKEN mit Frequenz 1Hz bei zeitgesteuerten Sicherheitstakten BLINKEN mit niedriger Frequenz bei Verdichter im Abtauvorgang (nur Wärmepumpe) ON bei Steuerung im Kühlbetrieb Bei erloschener Led KÜHLUNG befindet sich die Steuerung im Modus STAND-BY Bei abgeschalteter Maschine (OFF) ist nur die Dezimalstelle erleuchtet. HINWEIS: Die LED 2 und 4 beziehen sich auf Einheiten mit 4 Verdichtern und zwei Kältekreisen. EINGABE DER BETRIEBSPARAMETER In diesem Kapitel behandeln wir ausschließlich die unmittelbar ohne Kennwort aufrufbaren Parameter. Die Parameter mit Kennwortschutz sind dem Fachpersonal der autorisierten Kundendienststellen vorbehalten. BEDEUTUNG DER TASTEN Taste ON-OFF a) Bei längerem Druck als 2 Sekunden schaltet der Temperaturregler von ON auf OFF und umgekehrt. b) Mit einmaligem Drücken dieser Taste werden sämtliche nicht aktiven Alarme mit manueller Rückstellung zurückgesetzt. Es werden außerdem die Zähler der Auslösungen pro Stunde gelöscht, auch im deaktivierten Zustand. c) Abrolltaste im Modus Menü. d) Wertverringerung des ausgewählten Parameters. Taste MODE a) Werden beiden Tasten innerhalb von 2 Sekunden gedrückt und wieder losgelassen, wird die nächst höhere Ebene des Konfigurationsmenüs hinuntergegangen. ON-OFF Taste MODE ON-OFF Taste MODE a) Werden beiden Tasten länger als 2 Sekunden gedrückt, wird die nächst höhere Ebene des Konfigurationsmenüs aufgerufen. b) Bei Anzeige der letzten Menüebene wird durch gleichzeitiges Drücken und Loslassen innerhalb von 2 Sekunden die nächst höhere Ebene aufgerufen. a) Aufrolltaste im Modus Menü. b) Wertvergrößerung des ausgewählten Parameters. 72 Tabelle 1 Code H46 Kennwort Beschreibung Ebene 0 Regelfühler aktiver Alarm LISTE DER AUFRUFBAREN PARAMETER Maßeinheit Einheit Ebene 1 Sollwert : SEt Ebene 2 Ebene 3 Werkvorgabe 0 Ebene 4 Etk. Sollwert Kühlen: Coo Sollwert Kühlen Etk. Sollwert Heizen: HEA Sollwert Heizen Analogeingänge: tP Code Eingänge: t01- t06 Wert Analogeingang Alarme: Err Cod akt.Alarme: E00-E46 Digitaleingänge: Id Code Eingänge: 01-I11 Zustand Digitaleingang Parameter: PAr Konfig.Parameter: CnF Par.Index H01-H69 Parameterwert Verdichterparameter: CP Par.Index C01-C08 Parameterwert Lüftungsparameter: FAn Par.Index F01-F25 Parameterwert Alarmparameter: ALL Par.Index A01-A26 Parameterwert Pumpenparameter: PUP Indice par. P01-P03 Parameterwert Frostschutzpar: Fro Par.Index r01-r17 Parameterwert Abtauparameter: dFr Par.Index d01-d11 Parameterwert Expansionsparameter: ESP Par.Index N01-N07 Parameterwert Kennwort: PSS Wert Kennwort Betriebsstunden: OHr Verd.Stunden: OH1-OH4 Stunden Pumpenstd.: OHP Stunden Zur Bewegung innerhalb der einzelnen Ebenen drücken Sie gleichzeitig die Tasten “Mode” und “on off” 1 - Indem Sie beide Tasten weniger als 2 Sekunden drücken, steigen Sie um eine Ebene im Konfigurationsmenü abwärts 2 - Indem Sie beide Tasten mehr als 2 Sekunden drücken, steigen Sie um eine Ebene im Konfigurationsmenü aufwärts 3 - Auf der letzten Ebene eines Menüs verursacht das gleichzeitige Drücken und Loslassen der Tasten innerhalb von 2 Sekunden das Aufsteigen um eine Ebene. 73 ALARME Auf dem Display des Bedienerterminals werden die Alarmschlüssel bei Eintreten eines Fehlers eingeblendet. Die Anzeige der Alarme mit automatischer Rückstellung erlischt bei Behebung der Störung, die Alarme mit manueller Rückstellung müssen dagegen durch technisches Fachpersonal zurückgesetzt werden. Bei der Alarmanzeige auf dem Bedienerterminal wird die Eingabefolge in Tabelle 4 berücksichtigt. Sollten mehrere Alarme gleichzeitig auftreten, wird auf jeden Fall nur der erste angezeigt, nach dem Löschen dann der zweite usw. bis sämtliche Alarme gelöscht sind. Achtung: Im Standby- bzw. ausgeschalteten Zustand erfolgt keine Alarmanzeige und das Alarmrelais ist deaktiviert. Erst bei Aufrufen des Betriebsmodus werden etwaige Alarme angezeigt und das Alarmrelais aktiviert. Tabelle 2 Schlüssel E01 E02* Störung Höchstdruck Kreis 1 Mindestdruck Kreis 1 Blocke Verdichter Verdichter ventilator E03 E04 E07 E21 E22* Schutzschalter Verdichter 1 Schutzschalter Lüfter Kreis 1 Defekt Fühler BT3/BP3 Höchstdruck Kreis 2 Mindestdruck Kreis 2 Verdichter ventilator Verdichter ventilator Verdichter ventilator Verdichter ventilator Verdichter ventilator E24 E27 E45 Schutzschalter Lüfter Kreis 2 Defekt Fühler BT5/BP5 Konfiguration Verdichter ventilator Verdichter ventilator Verdichter Reset MANUELL AUTOMATISCH (Nach 5 Meldungen manuelles Löschen) MANUELL MANUELL AUTOMATISCH MANUELL AUTOMATISCH (Nach 5 Meldungen manuelles Löschen) MANUELL AUTOMATISCH MANUELL * Geht nach 5 Meldungen auf manuelle Rückstellung über. Die Alarmmeldungen werden nur dann gezählt, wenn zwischen zwei aufeinander folgenden Meldungen mehr als 225 Sekunden verstreichen. 74 STÖRUNGSSUCHE Auf folgenden Seiten wird in übersichtlicher Form die Erkennung und Abhilfe einige Gerätestörungen beschrieben. Die Ausführung der hierin geschilderten Arbeiten unterliegt der vollen Eigenhaftung. Eingriffe zur Wiederherstellung der Gerätefunktion müssen daher unbedingt einem autorisierten Techniker mit den erforderlichen Sachkenntnis anvertraut werden. Die Auslösung einer Sicherheit deutet stets auf eine Betriebsstörung hin, deren Ursache vor Rücksetzen der angesprochenen Sicherheit identifiziert und behoben werden soll. Es folgt nun eine Auflistung der Störungen, Ursachen und entsprechenden Abhilfen. ACHTUNG DIE AUSFÜHRUNG DER BESCHRIEBENEN ARBEITEN UNTERLIEGT DER VOLLEN EIGENHAFTUNG. EINGRIFFE ZUR WIEDERHERSTELLUNG DER GERÄTEFUNKTION MÜSSEN DAHER UNBEDINGT EINER AUTORISIERTEN SERVICESTELLE MIT DEN ERFORDERLICHEN KENNTNISSEN ANVERTRAUT WERDEN. Fehler oder Betriebsstörungen werden ausnahmslos vom Hauptmodul verwaltet. Bei jedem Fehler bzw. Störzustand kann das Modul zusätzlich zur Sicherheitsabschaltung der Einheit den Vorfall ebenfalls auf Ferndisplay anzeigen. 75 HD-STÖRABSCHALTUNG HD- STÖRABSCHALTUNG JA Belüftung wirksam ? NEIN Nachweis Verflüssiger (1) Nachweis Ventilator (2) Nachweis Ventilatormodul (3) Nachweis Fühler (4) JA Außenlufttemperatur unter Betriebsgrenzen ? JA Kältemittelfüllung i.O. ? JA NEIN NEIN NEIN Ansaugtemperatur bzw. Druck i.O. ? Nachweis Unterkühlung Kältemittel (6) Neues Vakuum und Füllen (7) Keine Nichtkondensate ? JA Nachweis Projektdaten (5) NEIN Betriebsnachweis Inneneinheit (8) Funktionsnachweis der Absperrelemente auf der Kältemittelleitung (9) Einheit in Betrieb Anmerkungen: 1) Soll max. Luftaustausch sichern, es dürfen daher keine Schmutzreste, Ablagerungen oder den Luftstrom behindernde Elemente vorhanden sein. 2) Ggf. beschädigten Ventilator ersetzen. 3) Ausgangsspannung der Platine soll die Drehzahl der Ventilatoren proportional regeln; sonst Modul ersetzen. 4) Einbauposition nachweisen: Muß mit dem Profilrohr des Austauschers stets in Berührung stehen. Der Widerstand soll einwandfrei auf die Temperatur abgestimmt sein, den Wert mit Ohmmeter nachmessen. 5) Nachweisen: - Betriebsgrenzen (s. Handbuch Allgemeines). - Austauscher darf keiner direkten Sonne ausgesetzt sein bzw. in der Nähe abstrahlender Oberflächen stehen. - In unmittelbarer Nähe darf keine Warmluftströmung auftreten. - Es darf nicht die gleiche Luft umgewälzt werden. 6) Prüfmodalitäten im Handbuch INBETRIEBNAHME nachschlagen. MERKE: Eine Überflutung bis zur Einbauposition des Fühlers verursacht eine Betriebs-störung des Regelsystems für die Drehzahl der Ventilatoren. 7) Es kann eine extrem hohe Verflüssigungstemperatur (25/30 Grad über der Außenlufttemperatur) bei schwacher Kühlleistung eintreten. Die Merkmale sind die einer übermäßigen Kältemittelfüllung, sodaß nach Überprüfung dieser Möglichkeit die Anlage ggf. erneut auf Vakuum zu fahren und zu befüllen ist. 8) Luftdurchfluß und Raumlufttemperatur dürfen nicht allzu hoch sein. Dies könnte die Ausbringung der Maschine steigern und somit den Verflüssiger durch Ableitung der Mehrwärme belasten. 9) Sämtliche Absperrelemente auf der Kältemittelleitung müssen komplett geöffnet sein. 76 ND-STÖRABSCHALTUNG ND-STÖ RABSCHALTUNG JA Betrieb der Inneneinheit i.O . ? NEIN Betriebsnachweis Inneneinheit (1) Betriebsbedingungen Inneneinheit prüfen ( 2 ) Anschlußleitungen überprüfen (3 ) JA Entfeuchtungsfilter funktionstüchtig ? JA Kältem ittelfüllung korrekt ? JA JA Ansaugventil komplett geöffnet ? Ansaugtemperatur bzw . Druck i.O . ? NEIN NEIN NEIN NEIN ∆ t vor und nach Filter überprüfen (4) Überhitzung nachweisen (5 ) Nachweisen und ggf. öffnen Betriebsnachweis Inneneinheit (6) Einheit in Betrieb Anmerkungen: 1) Nachweisen: - Ausreichenden Luftdurchfluß. - Richtigen Drehsinn der Ventilatoren. - Wärmetauscher auf Schmutzablagerungen oder Rückstände, da max. Austausch gefordert wird. - Funktionsbereitschaft des Magnetventils. - Funktionsbereitschaft des Thermostatventils. 2) Die Temperatur-/Feuchtigkeitswerte der behandelten Luft sollen den Projektvorgaben entsprechen. 3) Länge und Durchmesser der Leitungen sollen den Vorgaben entsprechen (s. Handbuch KÄLTE-LEITUNGEN). Die anderenfalls möglichen Leckagen könnten den ordnungsgemäßen Betrieb der einheit beeinträchtigen. 4) Temperatur vor und nach dem Entfeuchtungsfilter mit Kontaktthermometer überprüfen. Übersteigt die Temperaturdifferenz 1°C, ist der Filter nicht funktions-tüchtig bzw. zu klein bemessen. In beiden Fällen den Filter ersetzen. 5) Prüfmodalitäten im Handbuch INBETRIEBNAHME nachschlagen. 6) Bei Verflüssigungsdruck unter 1200kPa kann eine unregelmäßige Versorgung eintreten und hierdurch ein unzureichender Ansaugdruck vorliegen. Die Belüftung der Außeneinheit muß einwandfrei gewärhleistet sein (d.h. Regelung oder Abschaltung der Ventilatoren). 77 AUSLÖSUNG VERDICHTERSICHERHEIT AUSLÖSUNG VERDICHTERSICHERHEIT JA Austrittstemperatur innerhalb Grenzwerten ? NEIN JA Kontaktthermostat funktionstüchtig ? NEIN Parameternachweis, wie: Überhitzung, Kältemittelfüllung usw. Thermostat ersetzen Einheit in Betrieb AUSLÖSUNG VENTILATORSCHUTZ AUS L Ö SU NG V E NT ILAT O RSC HUT Z JA M o to r i.O . ? NE IN Behinderungen des Austauschers nachweisen Behinderungen der Schaufeln nachweisen Elektrische W icklungen überprüfen Ein h eit in B etrieb 78 LAUTER GERÄTEBETRIEB L A U T E R G E R Ä T E B E T R IE B JA S c h w in g u n g s d ä m p fe r d e s V e r d ic h te r s in g u t e m Z u s ta n d ? N E IN Ü b e r p rü fe n u n d g g f. e rs e tz e n N E IN B e fe s tig u n g s s c h ra u b e n d e s V e rd ic h te rs g e lo c k e rt ? JA Ü b e rp rü fe n u n d g g f. a n z ie h e n JA D ie F ix ie rs te lle n n a c h w e is e n N E IN L e itu n g e n in S c h w in g u n g ? E in h e it in B e trie b KEIN VERDICHTERSTART K E IN V E R D IC H T E R S T A R T N E IN L ie g t S p a n n u n g a n d e n K le m m e n a n ? JA K li x o n A u s lö s u n g ( 1 ) M o to r d u r c h g e b ra n n t ( 2 ) V e r d ic h te rs tö ra b s c h a ltu n g ( 3 ) JA JA JA S c h u tz s c h a lte r e in g e r ü c k t ? S c h ü t z f u n k t io n s t ü c h t ig ? K o n t r o llm o d u l f u n k t io n s t ü c h t ig ? N E IN E in r ü c k e n S p u le a u f D u r c h b re n n e n u n d K o n ta k to x id a tio n ü b e rp rü fe n N E IN N E IN Ü b e rp rü fe n u n d g g f. e r s e tz e n E in h e it in B e t r ie b Anmerkungen 1) Die Klixon Auslösung wird von einer relativ hohen Gehäusetemperatur begleitet. Vor Neustart die Ursache ermitteln. 2) Wicklungen auf Masseschluß überprüfen. Ggf. Verdichter ersetzen. 3) Die mechanische Störabschaltung macht sich durch ein anhaltendes und typisches Geräusch erkennbar. Ggf. den Verdichter ersetzen. 79 REGELMÄSSIGE WARTUNG WICHTIG VOR SÄMTLICHEN WARTUNGS- BZW. REINIGUNGSARBEITEN DIE EINHEIT SPANNUNGSLOS SETZEN. Dieser Abschnitt ist dem Benutzer gewidmet und folglich für die ordnungsgemäße Langzeitfunktion der Einheit von entscheidender Bedeutung. Die gründliche und regelmäßige Ausführung einiger weniger Arbeiten kann den Eingriff von Fachpersonal ohne weiteres ersparen. Die beschriebenen Arbeiten erfordern keine besonderen technischen Kenntnisse und sind als einfache Überprüfungen an den Komponenten der Einheit zu verstehen, d.h.: - Verdampfer - Elektroventilatoren - Struktur EINHEIT VERDAMPFER Es ist vor allen Dingen wichtig, daß der Verdampfer einen optimalen Wärmeaustausch gewährleistet. Aus diesem Grund darf seine Oberfläche weder Verschmutzungen noch Staubablagerungen ausweisen, die durch den Ventilatorbetrieb zugeführt werden können. - Die sich ggf. auf die Verdampferfläche abgesetzten Verunreinigungen, wie zum Beispiel Papier, Blätter usw., sind mit einer Bürste zu entfernen. - Die Alu-Fläche des Verdampfers sollte mit Druckluft abgeblasen werden, wobei der Luftstrahl zum Schutz vor Beschädigungen stets parallel zu den Lamellen zu richten ist. - Die Alu-Lamellen auf Schäden bzw. Verbiegung überprüfen. In einem derartigen Fall müssen die Lamellen mit geeignetem Werkzeug “gekämmt” werden, um den strömungsgünstigen Anfangszustand des Verdampfers wiederherzustellen. ELEKTROVENTILATOREN Bei saisonbedingtem Ersteinschalten das Betriebsgeräusch nachweisen. Ursachen für ein erhöhtes Betriebsgeräusch und Schwingungen: Unwucht der Flügel bzw. Lockern der Befestigungsschrauben. Bei einer erwiesenen Störung die autorisierte Kundendienststelle mit der Behebung beuaftragen, da die Ventilatoren im Verflüssigerbereich der Maschine angeordnet sind. - Die Befestigung des Elektroventilators am Stützgitter überprüfen. - Die Befestigung des Stützgitters an der Tragstruktur der Einheit überprüfen. - Soweit möglich, die durch lautes Betriebsgeräusch und übermäßige Schwingungen gekennzeichte Unwuchten des Elektroventilators nachweisen. STRUKTUR - Den Zustand der Strukturteile überprüfen. Hierbei besonders auf die Stahlkomponenten achtgeben. - Die rostbefallen Teile der Einheit mit geeignetem Schutzlack behandeln. - Die Befestigung der äußeren Verkleidung überprüfen. Lockere Teile verursachen störende Geräusche und Schwingungen. ELEKTRIK Das Netzkabel der Einheit zum Schaltschrank darf weder gerissen noch abgeschabt sein oder sonstige Beschädigungen aufweisen, wodurch die Isolation beeinträchtigt werden könnte. Für Wartungsarbeiten in diesem Sinne ist eine autorisierte Servicestelle zuständig. WICHTIG DAS SAISONBEDINGTE EINSCHALTEN DER EINHEIT SOLLTE STETS IM BEISEIN VON FACHPERSONAL ERFOLGEN, UM NACH ABSCHLUSS DER BESCHRIEBENEN ARBEITEN AUCH DIE ÜBERPRÜFUNG DES KÜHLKREISES VORNEHMEN ZU KÖNNEN. 80 KÄLTELEITUNGEN Die Auslegung der Kälteleitungen zur Verbindung von externen Verflüssigereinheiten und internen Verdampfern ist von entscheidender Bedeutung. Für den Anschluß an unsere Einheiten die untenstehende Tabelle einsehen, in der zu den jeweiligen Längen die Zuordnung von Anschluß- und Außendurchmesser der Verbindungsleitungen angegeben ist. Bei größeren Leitungslängen ist der Durchmesser rechnerisch zu ermitteln (s. hierzu Fachliteratur bzw. unsere Broschüre AUSLEGUNG DER KÄLTELEITUNGEN IN DOPPELTEN ANLAGEN). Die Tabelle gibt außerdem Aufschluß über den empfohlenen Höhenunterschied bei Standardleitungen für den Fall einer tiefer gelegenen Verflüssigereinheit i.V. zum Endgerät und umgekehrt. Es dürfen ausschließlich Kälteleitungen aus Kupfer verwendet werden. Größe. 102 122 142 162 182 202 242 ∅ Ansaug. ∅ Kältem 22 22 28 28 28 35 35 14 14 16 18 18 22 22 Max. Länge m 10 10 16 16 12 23 20 Max. Bogenanz 6 6 8 6 6 10 10 Max. Höhenunter Abb. 4 Abb. 6 9 9 9 9 12 12 10 10 10 10 18 18 14 14 ANSAUGLEITUNG Bei sämtlichen Größen sind Schweißanschlüsse vorgesehen, wozu die Einheit serienmäßig mit speziellem ROTALOCK Anschluß beigestellt wird. - Die vorgerüstete Leitung anhand von zwei Schlüsseln an das Absperrventil anschließen (gem. Abb. 1 für 1. Steuerkreis, gem. Abb. 2 für 2. Steuerkreis). Abbildung 1 Abbildung 2 KÄLTEMITTELLEITUNG Abbildung 3 Bei sämtlichen Größen sind Schweißanschlüsse vorgesehen, wozu die Einheit serienmäßig mit speziellem ROTALOCK Anschluß beigestellt wird. - Die vorgerüstete Leitung anhand von zwei Schlüsseln an das Absperrventil anschließen (gem. Abb. 3 für 1. Steuerkreis, gem. Abb. 4 für 2. Steuerkreis). Abbildung 4 HINWEIS: Sämtliche Leitungen müssen einwandfrei sauber (vor dem Anschluß sind sie mit Stickstoff oder Trockenluft zu reinigen) und feuchtigkeitsfrei sein, damit eine optimale Vakuumerzeugung gesichert wird. 81 LECKKONTROLLE - Die Ventile der Verflüssigereinheit müssen geschlossen sein. - Das Manometer mit den Serviceanschlüssen der Ventile verbinden. - Mit Kältemittel bis auf 250Kpa beaufschlagen. - Die Hähne des Manometersatzes schließen, die Verbindung zur Kältemittelflasche trennen und daraufhin die Stickstoffflasche verbinden. - Manometerhähne öffnen. - Anlage bis 1200kPa mit Stickstoff beaufschlagen. - Mit Lecksuchlampe oder anderem Elektronikgerät den gesamten Leitungsverlauf, besonders die Schweißungen und Verbindungen, nach etwaigen Verlusten abchecken. Sollte man nicht über die geeignete Ausrüstung verfügen, sämtliche Leckstellen des Kältemittels inspektionieren lassen (Schweißungen, Verbindungen usw.). Außeneinheit Inneneinheit Thermostatkugel Thermostatkugel Abbildung 5 Figura 5 Gasventil Kältem ittelventil HINWEISE/ANLEITUNGEN FÜR EINEN ORDNUNGSGEMÄSSEN ANSCHLUSS ANSAUGLEITUNG - Gefälle zum Verdichter in den waagrechten Leitungsabschnitten (0,5%), um den Ölrücklauf zum Verdichter auch unter min. Lastbedingungen zu sichern. - Leitung einwandfrei mit kondensatsperrendem PÄ geschlossener Poren in einer Mindeststärke von 9 mm isolieren. - Befindet sich der Verflüssiger auf einer geringeren Höhe als der Verdampfer (Abbildung 5), einen Siphon einbauen und somit bei Stillstand der Anlage den Rücklauf des Kältemittels zum Verdichter verhindern. - Als Ersatz des Siphons ein Magnetventil auf die Kältemittelleitung einbauen (s. Abb. 6), wobei der Ventileinbau übrigens in jedem Fall ratsam ist. - Verfügt das Endgerät außer dem Siphon auch über Thermostatventil, einen Verschluß in größtmöglicher Nähe zur Einheit vorsehen (s. Abb. 5). Auf diese Weise soll verhindert werden, daß die Kugel des Thermostatventils bei stehender Anlage mit dem Kältemittel in Berührung bleibt (s. Abb. 5). Bei Anschluß an unser CED-V Gerät ist der Siphon bereits in die Einheit integriert. - Befindet sich der Verflüssiger dagegen auf größerer Höhe als der Verdampfer, nur den Verschluß (s. Abb. 7) vorsehen; sollte die Entfernung jedoch insgesamt über 710 m betragen, muß außerdem ein Magnetventil auf die Leitung des Kältemittels eingebaut werden. - Bei senkrechtem Gefälle außer dem bodenseitigen Verschluß ebenfalls alle 6 Meter einen Ölsiphon vorsehen (s. Abb. 8). - Weitläufige Leitungsbögen (keine Kniestücke) verwenden. - Die Leitung darf keine Quetschstellen aufweisen. KÄLTEMITTELLEITUNG - Kann normalerweise ungeschützt verlaufen, ist jedoch im Fall direkter Sonneneinstrahlung oder höherer Temperaturen entsprechend zu isolieren. - Gegen Überfüllung sollten größere Leitungsdurchmesser vermieden werden. Figura 6 Abbildung 6 Figura 7 Abbildung 7 Abbildung 8 Figura 8 WICHTIG Bei internem Endgerät mit Thermostatventil und Anschlußleitungen über ca. 15/20 m Länge bzw. bei Anlagenbetrieb unter schwankenden Klimabedingungen (z.B. starke Veränderungen der Außenluft bei Tag/Nacht und Sommer/Winter) sollte ein Kältemittelbehälter geeigneter Größe in Nähe der Inneneinheit installiert werden. Dem Kältemittelbehälter kommen untenstehende Funktionen zu: - Er verhindert den Eintritt gasförmigen Freons in den Lamellenbereich. - Er gleicht die Füllschwankungen der Anlage bei Änderung der Betriebsbedingungen aus. - Er gleicht teilweise und kurzzeitig nicht wahrnehmbare Kleinverluste aus, die auf Dauer zur Entleerung der Anlage führen können. - Verhindert das Überfluten des Verflüssigers mit darauffolgendem Anstieg von Verflüssigungsdruck/-Temperatur bei übermäßiger Kältemittelfüllung der Anlage bzw. Füllvorgängen unter ungünstiger Witterung. Bei großer Anschlußlänge sollte der Kältemittelbehälter jedoch auf jeden Fall eingebaut werden. 82 RESTGEFAHREN ACHTUNG IM VORLIEGENDEN ABSCHNITT WERDEN MÖGLICHE, GEFAHRSITUATIONEN SOWIE DIE ZU BEACHTENDEN SICHERHEITSMASSNAHMEN AUFGEZEIGT. DEFINITION GEFAHRENBEREICH Die unten gezeigte Abbildung gibt den Bereich an, in welchem sich nur autorisiertes Fachpersonal aufhalten darf. Der äußere Gefahrenbereich wird durch eine klar abgegrenzte Fläche um die Maschine herum und durch die vertikale Bodenprojektion bei schwebender Maschine bestimmt. Der innere Gefahrenbereich ist der Bereich, der nur durch absichtliches Entfernen der Verkleidung oder von Verkleidungsteilen zugänglich ist. 83 ALLGEMEINE GEFAHREN Betrachteter Bereich Wärmetauscher Gefahren Leichte Verletzungen Hochdrucksicherheitsventil Verletzungen Vergiftungen Bereich um das Gerät Verletzungen Vergiftungen Schwere Verbrennungen Gefahr durch: Schwere Verbrennungen Vergiftungen Verbrennungen Bereich um das Gerät Inneres der Einheit Inneres der Einheit Inneres der Einheit Innere Gefahrenbereich Innere Gefahrenbereich Verletzungen Gefahr durch: Stromschlag Schwere Verbrennungen Gefahr durch: Stromschlag Gefahr durch: Stromschlag Schwere Verbrennungen Ursache Sicherheitshinweise Unbeabsichtigte Kontakte vermeiden. Schutzhandschuhe tragen. Verflüssigerschutzgitter (Zubehör) anbringen. Ausstoß von Kältemittel durch Eintreten in den Gefahrenbereich vermeiden. Ansprechen der betreffenden Schutzgitter am Verdichtergehäuse anbringen (optional). Sicherheitsvorrichtung Den Ablaß des Sicherheitsventils in geeigneter Weise herausführen. Geeignete Kleidung und Schutzbrille tragen. Explosion aufgrund Erhöhung Die Druck- und Ansaugventile der Verdichter bei der Umgebungstemperatur stehender Maschine nie geschlossen lassen. (Brand) Brand infolge Kurzschluß oder Korrekte Bemessung der Kabel und der Überhitzung Einspeisekabel vor Schutzvorrichtungen der Anschlußleitung an das dem Hauptschalter Stromnetz. Kontakt mit Druckleitungen und Unbeabsichtigte Kontakte vermeiden Verdichtern. Schutzhandschuhe tragen. Kontakt mit Scharfenkanten Schutzhandschuhe tragen Beschädigung der Isolation auf den Von Betreten Haupttrennschalter ausschalten, Einspeisekabeln vor den gegen Wiedereinschalten sichern. Haupttrennschalter Unter Spannung stehende Anschluß der Maschine an den Metallteile. Potentialausgleichsleiter sicherstellen Kontakt mit Spannungsteilen, die Vor der Entfernung der Schutzvorrichtungen den nach Entfernung der Haupttrennschalter gegen Wiedereinschalten Sicherheitsvorrichtungen sichern. zugänglich sind. Kontakt DATENBLÄTTER FÜR DIE SICHERHEIT BEI DER VERWENDUNG VON KÜHLMITTELN 01 Indentifizierungsele mente der Substanz Bezeichnung des Produkts: Forane 407C N°SDS 01965/1 Lieferant: ELF ATOCHEM ITALIA Via G.Murat 17, 20159 Milano tel. 02/668111 Bezeichnung des Produkts: Forane 22 Nr. SDS 005/7 Lieferant: ELF ATOCHEM ITALIA 4 Cours Michelet Cedex 42 92091 Paris Frankreich Tel. 0033149008080 02 Zusammensetzung Information bez. des Produkts chemische Zusammensetzung des Produkts chemische Zusammensetzung des Produkts 03 Bestimmung des Risikos 04 Erste-Hilfe Maßnahmen 05 Feuerlöschmaßnah men Mischung auf der Grundlage von: • Forane 32 (Difluormethan) (N° CAS: 75-10-5) • Forane 125 (Pentafluoräthan) (N° CAS: 354-33-6) • Forane 134a (1.1.1.2 Tetrafluoräthan) (N° CAS: 811-97-2) Größere physikalische und chemische Risiken: Thermische Zerlegung in toxische und ätzende Produkte. Allgemeine Hinweise: Bei Inhalation: Betroffene Person sofort an die frische Luft bringen. Sauerstoff bzw. künstliche Beatmung einsetzen, falls erforderlich. Hautkontakt: Erfrierungserscheinungen müssen wie Brandverletzungen behandelt werden. Kontakt mit den Augen: sofort mit reichlich Wasser waschen. Bei Andauern der Reizung einen Augenarzt aufsuchen. Anweisungen fuer den Arzt: Kein Katecolammine verschreiben (wegen der Herzreizungsgefahr durch den Produkt verursacht) Spezifische Gefahren: thermische Zerlegung in toxische und ätzende Produkte. Fluorwasserstoffsäure, Salzsäure, gasförmig, Phosgen Kohlenstoffoxyde CO. Spezifische Eingriffsmaßnahmen: Die Behälter/Tanks durch Wasserberieselung kühlen. Jegliche Funken- und Zündquelle muß ausgeschaltet werden. RAUCHEN VERBOTEN. Besondere Schutzsysteme für die Einsatzmannschaften: Atemgerät und Schutzkleidung Spezifische Gefahren: thermische Zerlegung in toxische und ätzende Produkte. Fluorwasserstoffsäure. Kohlenoxyde. Spezifische Eingriffsmaßnahmen: Die Behälter/Tanks durch Wasserberieselung kühlen. Jegliche Funken- und Zündquelle muß ausgeschaltet werden. RAUCHEN VERBOTEN. Besondere Schutzsysteme für die Einsatzmannschaften: Atemgerät und Schutzkleidung. 84 Mischung auf der Grundlage von: Chlordifluormethan, Halogenierter Kohlenwasserstoff Nr. CAS 75-45-6 EINECS 200-871-9 Risiko für die Gesundheit: praktisch unschädlich Größere physikalische und chemische Risiken: Thermische Zerlegung in toxische und ätzende Produkte. Spezifische Gefahren/EG: schädlich für die Ozonschicht Allgemeine Hinweise: Bei Inhalation: Betroffene Person sofort an die frische Luft bringen. Sauerstoff bzw. künstliche Beatmung einsetzen, falls erforderlich. Hautkontakt: Erfrierungserscheinungen müssen wie Brandverletzungen behandelt werden. Kontakt mit den Augen: sofort mit reichlich Wasser waschen. Bei Andauern der Reizung einen Augenarzt aufsuchen. Spezifische Gefahren: thermische Zerlegung in toxische und ätzende Produkte. Fluorwasserstoffsäure, Salzsäure, gasförmig, Phosgen Kohlenstoffoxyde CO. Spezifische Eingriffsmaßnahmen: Die Behälter/Tanks durch Wasserberieselung kühlen. Jegliche Funken- und Zündquelle muß ausgeschaltet werden. RAUCHEN VERBOTEN. Besondere Schutzsysteme für die Einsatzmannschaften: Atemgerät und Schutzkleidung. 06 07 08 Maßnahmen bei Persönliche Schutzmaßnahmen: Haut- und Augenkontakt sowie unvorhergesehenem Einatmen der Dämpfe vermeiden. Persoenliche Schutzmittel Ausströmen verwenden. In geschlossenen Räumen: lüften oder ein Atemgerät benutzen (Magersuchtgefahr). RAUCHEN VERBOTEN Massnahmen fuer den Umweltschutz: Die Abfaelle moglichts einschraenken. Handhabung und technische Vorsichtsmaßnahmen Lagerung Vorschriften zur Lagerung und Handhabung der Produkte: DRUCKGASE Der Geräteart entsprechende Lüftung und Evakuierung vorsehen. Hinweise zur Benutzung: Zündquellen und Kontakt mit heißen Oberflächen vermeiden. RAUCHEN VERBOTEN. Technische Maßnahmen/Lagerung: Bei Raumtemperatur im Originalbehälter lagern. Fern von freien Flammen, heißen Oberflächen und Zündquellen lagern. An kühlem, gut gelüfteten Ort aufbewahren. Volle Behälter vor Hitze schützen, um Überdruck zu vermeiden. Empfohlen: Normalstahl Zu vermeiden: Legierung mit mehr als 2% Magnesiumgehalt, Kunststoff Kontrolle der Exposition/Persö nliche Schutzmaßnahm en 09 Physikalisch/che mische Eigenschaften 10 Stabilität und Reaktivität 11 Toxikologische Hinweise Persönliche Schutzmaßnahmen: Haut- und Augenkontakt sowie Einatmen der Dämpfe vermeiden. In geschlossenen Räumen: lüften oder ein Atemgerät benutzen (Erstickungsgefahr). RAUCHEN VERBOTEN. Jegliche Zündquelle vermeiden. technische Vorsichtsmaßnahmen Sicherheitsmaßnahmen: Für ausreichende Lüftung und/oder Luftabsaugung am Arbeitsplatz sorgen. Vorschriften zur Lagerung und Handhabung der Produkte: DRUCKGASE Der Geräteart entsprechende Lüftung und Evakuierung vorsehen. Hinweise zur Benutzung: Zündquellen und Kontakt mit heißen Oberflächen vermeiden. RAUCHEN VERBOTEN. Technische Maßnahmen/Lagerung: Bei Raumtemperatur im Originalbehälter lagern. Fern von freien Flammen, heißen Oberflächen und Zündquellen lagern. An kühlem, gut gelüfteten Ort aufbewahren. Volle Behälter vor Hitze schützen, um Überdruck zu vermeiden. Empfohlen: Normalstahl Zu vermeiden: Legierung mit mehr als 2% Magnesiumgehalt, Kunststoff Sicherheitsmaßnahmen: Für ausreichende Lüftung und/oder Luftabsaugung am Arbeitsplatz sorgen. Kontrollparameter Kontrollparameter Expositions-Grenzwerte: Kein Grenzwert vorhanden F-USA Forane 134a Grenzwert empfohlen von Elf : VME=1000ppm Forane 32 Grenzwert empfohlen von Elf : VME=1000ppm Forane 125 Grenzwert empfohlen von Elf : VME=1000ppm Persönliche Schutzausrüstung: Atemschutz: Bei unzureichender Lüftung angemessenes Atemgerät benutzen. Händeschutz: Handschuhe Augenschutz: Schutzbrille Expositions-Grenzwerte: Frankreich 1989: VME=1000 ppm USA 1992: TWA=1000 ppm=3500 mg/m3 Persönliche Schutzausrüstung: Atemschutz: Bei unzureichender Lüftung angemessenes Atemgerät benutzen. Händeschutz: Handschuhe Augenschutz: Schutzbrille Spezifische Hygienemaßnahmen: Kontakt mit der Haut, den Augen und Inhalation vermeiden. Physikalischer Zustand (20° C): flüssiges Gas Physikalischer Zustand (20° C): flüssiges Gas Farbe: farblos Farbe: farblos Geruch: erinnert an Äther. PH: trifft nicht zu Geruch: erinnert an Äther. PH: trifft nicht zu Siedepunkt/-intervall: -40,8° C Siedepunkt/-intervall: -40,8° C Entflammungspunkt: Bei Porbebedingungen nicht endzuendlich Schmelztemperatur/-intervall: -160° C Dampfdruck: (25°C): 1.13 Mpa (11,3 bar) bei (50°C): 2.11 Mpa (21,1 Zersetzungstemperatur: 480° C bar) bei (70°C): 3.26 Mpa (32,6 bar) Dampfdruck: (20° C): 0,91 Mpa (9,1 bar) bei (50° C): 1,91 Mpa Dampfdichte: bei Dampfpunkt 4,54 kg/m3 (19,4 bar) Dichte: (25°C) 1133 kg/m3 bei (50°C) 1004 kg/m3 bei (70°C) 861 Dampfdichte: (20 ° C) 3,57 kg/m3 Dichte: (20° C) 1213 kg/m3 bei (50° C) 1085 kg/m3 kg/m3 Löslichkeit: Wasser (25° C) 3 g/l - In chlorierten Kohlenwasserstoffen und Lösemitteln, Alkohol, Chetonen, Estern lösliches Lösemittel Löslichkeit von Wasser in dem Produkt bei 30° C: 0,15% Gewicht Condizioni da evitare: Evitare il contatto con fiamme e le superfici Zu vermeidende Umstände: Kontakt mit Flammen und metalliche arroventate glühenden Metallflächen vermeiden. Gefährliche Zersetzungsprodukte: Thermische Zersetzung in Gefährliche Zersetzungsprodukte: Thermische Zersetzung in Fluorwasserstoffe toxische und ätzende Stoffe: Fluorwasserstoffsäure, Salzsäure, Andere Informationen: Stabiles Produkt bei normalen Lager- und gasförmig, Phosgen Kohlenstoffoxyd (CO) Handhabungsbedingungen Inhalation: Im Tierversuch praktisch ungefährlich Forane 134a, 32, Inhalation: Im Tierversuch praktisch ungefährlich. Keinerlei 125. Keine Todfaelle bei Ratten festgestellt bei 500000 ppm/4h. Wie Wirkung unter 50 000 ppm. andere halogenierte haliphatische flüchtige Stoffe kann dieses Produkt Wie andere halogenierte haliphatische flüchtige Stoffe kann durch Akkumulation von Dämpfen und/oder Inhalation von größeren dieses Produkt durch Akkumulation von Dämpfen und/oder Mengen: Bewußtseinsverlust und Herzstörungen verursachen, die Inhalation von größeren Mengen: Bewußtseinsverlust und durch Streß und Sauerstoffmangel erschwert werden: Lebensgefahr. Herzstörungen verursachen, die durch Streß und Hautkontakt: Erfrierungserscheinungen durch flüssige Gasspritzer Sauerstoffmangel erschwert werden: Lebensgefahr. möglich. Hautkontakt: Erfrierungserscheinungen durch flüssige Chronische Toxizitaet: Studien durch Tierversuche fuer verlaengerte Gasspritzer möglich. Inhalation haben kein subchronischer toxischer Effekt ergeben Augenkontakt: vorübergehende Reizung (Ratte/3 Monate)/ Inhalation:50000ppm) Spezifische Auswirkungen: Genotoxizitaet, aufgrund der vorhandenen experimentellen Daten Forane 134a, 32, 125 NON Genotoxisch Krebsgenesis: Forane 134a Tierversuche haben keinen klar beisbaren krebserregenden Effekt ergeben (Ratte /Inhalation muendlich) Toxizitaet fuer die Reproduktion: kein Toxizitaet fuer die Entwicklung des Fetus Forane 134a, 32, 125 aufgrund der vorhandenen Daten sind keine toxischen Effekte fuer die Entwicklung des Fetus vorhanden. Fruchtbarkeit, aufgrund der vorhandenen Daten durch Tierversuche: Forane 134a Keine Effekte auf die Fruchtbarkeit (Ratten/ Inhalation) 85 12 13 14 15 16 Umweltbezüglich Forane 32 Persistenz/Abbaufähigkeit: In Wasser nicht leicht biologisch e Hinweise abbaubar 5% nach 28 Tagen Bioakkumulation: praktisch keine Bioakkumulation log pow 0,21 Forane 125 Mobilität: verdampft schnell; Halbwertzeit 3,2 Std. (geschaetzt) Persistenz/Abbaufähigkeit: In Wasser nicht leicht biologisch abbaubar 5% nach 28 Tagen. In der Luft beträgt die Abbaufähigkeit in der Troposphäre: Halbwertzeit 28,3 Jahre (geschaetzt). Potentielles Ozon-Zerstörungsvermögen ODP (R-11 = 1) = 0. Potentieller Treibhauseffekt (GWP): (HGWP) = 0,58. Geringe Adsorption in Boden und Sedimentationen log Koc = 1,3-1,7 Bioakkumulation: praktisch keine Bioakkumulation log pow 1,48 Forane 134a Mobilität: verdampft schnell; Halbwertzeit 3 Std. (geschaetzt) Persistenz/Abbaufähigkeit: In Wasser nicht leicht biologisch abbaubar 3% nach 28 Tagen. In der Luft beträgt die Abbaufähigkeit in der Atmosphäre: Halbwertzeit 3% nach 28 Tagen. Potentielles OzonZerstörungsvermögen ODP (R-11 = 1)=0. Potentieller Treibhauseffekt (GWP) 0,26. Bioakkumulation: praktisch keine Bioakkumulation log pow 1,06 Betrachtung zur Entsorgung des Produkts: recyclieren oder verbrennen Entsorgung Fuer weitere Auskuenfte und Abaenderungen wenden Sie sich bitte an Hinweise zum den Sicherheitsdienst der ELF ATOCHEM UNO-Nr. 3163. RID\ADR Transport Klasse 2, Ziffer (und Buchstabe) 4°a Vorscriften: 2 Etiketten Nr. Gefahr /Nr. Stoff 20/3163 IMDG Klasse 2.2 Nr. UNO (IMDG) 3163 Vorscriften: Etiketten 2.2 IATA Klasse 2.2 Nr. UNO (IATA) oder Nr. ID3163 Vorscriften: Etiketten 2.2 Hinweise zur EG-richtlinien Reglementierung Sicherheitsblätter: D.91/155/EG, abgeändert von D. 93/112/EG: Gefährliche Substanzen. Classificazione/etichettatura CEE Gefährliche Präparate: nicht als gefährlich eingestuft Inventare: gemäß EINECS Andere Hinweise Empfohlene Einsatzbereiche: Kühlmittel Literatur: Encyclopedie des gas (Air Liquide-ed.1976- ELSEVIER AMSTERDAM) Mobilität: verdampft schnell; Halbwertzeit: 2,7 Std. Persistenz/Abbaufähigkeit: In Wasser nicht leicht biologisch abbaubar 0% nach 28 Tagen. In der Luft beträgt die Abbaufähigkeit in der Atmosphäre: Halbwertzeit 14 Jahre. Potentielles Ozon-Zerstörungsvermögen ODP (R-11 = 1) = 0,055. Potentieller Treibhauseffekt (HGWP) = 0,36. Geringe Adsorption in Boden und Sedimentationen log Koc = 1,8. Bioakkumulation: praktisch keine Bioakkumulation log pow 1,08 Toxizität in Wasser: akute Toxizität, Fische Toxizitätsschwelle, 24 Std. = 180 mg/l, anaerobe Bakterien: Toxizitätsschwelle, 24 h > 400 mg/l Entsorgung des Produkts: recyclieren oder verbrennen UNO-Nr. 1018. RID/ADR Klasse 2, Ziffer (und Buchstabe) 3°a Vorschriften: 2 Etiketten Nr. Gefahr/Nr. Stoff 20/1018 IMDG Klasse 2.2 Nr. UNO (IMDG) 1018 Vorschriften: Etiketten NICHT BRENNBAR GAS/2 IATA Klasse 2.2 Nr. UNO (IATA) oder Nr. ID1018 Produktion: Etiketten NICHT BRENNBAR GAS/2 Produktcode: 00055/7 EG-richtlinien Sicherheitsblätter: D.91/155/EG, abgeändert von D. 93/112/EG: Gefährliche Substanzen und Präparate Gefährliche Präparate: D. 67/548/EG, abgeändert von D. 93/21/EG: Hinweise zur Etikettierung (18a APT) R59 Schädlich für die Ozonschicht S59 Hersteller/Lieferanten für Informationen über Recycling ansprechen. S 61 Nicht in der Umwelt freilassen. Sonderhinweise/Datenblätter zur Sicherheit lesen. Empfohlene Einsatzbereiche: Niedertemperatur-Kühlmittel, Gefriermittel, Luftklimatisierung Literatur: Encyclopédie des gaz (Air Liquide-ed. 1976ELSEVIER AMSTERDAM). Toxikologisches Kennblatt: INRS: Nr. 142 CHLORDIFLUORMETHAN Dieses Dokument bezieht sich auf das unveränderte Produkt, gemäß den von ELF ATOCHEM mitgeteilten Spezifikationen. Im Falle von Kombination oder Vermischung von Produkten vergewissere man sich, daß keine weiteren Gefahren entstehen. Die in diesem Blatt angegebenen Informationen erfolgen in gutem Glauben gemäß dem neuesten uns bekannten Wissensstand über das betreffende Produkt zum Zeitpunkt der Herausgabe. Wir machen die Anwender auf eventuelle Risiken aufmerksam, die bei unsachgemäßer Verwendung des Produkts entstehen können. Dieses Blatt darf ausschließlich zur Verhütung und Sicherheit verwendet und vervielfältigt werden. Die Liste der gesetzlichen, reglementarischen oder administrativen Schriften erhebt keinen Anspruch auf Vollständigkeit. Der Anwender des Produkts hat die Aufgabe, auf die Gesamtheit der offiziellen Texte zur Verwendung, Aufbewahrung und Handhabung des Produkts zu verweisen, für die er ausschließlich verantwortlich ist. Der Anwender des Produkts muß außerdem allen Personen, die mit dem Produkt in Berührung kommen können, alle für die Unfallverhütung und die Sicherheit am Arbeitsplatz und der Umwelt erforderlichen Informationen mit diesem Datenblatt zur Verfügung stellen. 86 SOMMAIRE GÉNÉRAL ........................................................................................................................................... 88 AVERTISSEMENTS GÉNÉRAUX.........................................................................................................................................88 PRINCIPES D'INTÉGRATION DE LA SÉCURITÉ ................................................................................................................88 ACCESSOIRES ....................................................................................................................................................................88 CARACTÉRISTIQUES TECHNIQUES GÉNÉRALES...........................................................................................................89 POSITIONNEMENT ..............................................................................................................................................................90 ESPACES FONCTIONNELS ................................................................................................................................................90 DIMENSION ET DISTRIBUTION DES POIDS......................................................................................................................91 RÉGLAGES PROTECTION ET CONTRÔLES .....................................................................................................................91 NIVEAUX SONORES............................................................................................................................................................91 RÉCEPTION........................................................................................................................................ 92 CONTRÔLE À LA RÉCEPTION............................................................................................................................................92 MANUTENTION ....................................................................................................................................................................92 STOCKAGE ..........................................................................................................................................................................93 ENLÈVEMENT DE L'EMBALLAGE.......................................................................................................................................93 RACCORDEMENTS ÉLECTRIQUES.................................................................................................. 94 RACCORDEMENTS FONCTIONNELS ................................................................................................................................94 RACCORDEMENT AU RÉSEAU D’ ALIMENTATION ..........................................................................................................94 RACCORDEMENTS EN OPTION.........................................................................................................................................94 RACCORDEMENT À UN PC OU À UNE GTC. ....................................................................................................................95 MISE EN SERVICE ............................................................................................................................. 96 CONTRÔLES PRÉLIMINAIRES ...........................................................................................................................................96 MISE EN MARCHE ...............................................................................................................................................................97 RÉGLAGE ........................................................................................................................................... 98 MODE DE FONCTIONNEMENT DU MODULE PRINCIPAL ................................................................................................98 ROTATION DES COMPRESSEURS ....................................................................................................................................98 TEMPORISATIONS DU COMPRESSEUR ...........................................................................................................................98 REGULATEUR DES VENTILATEURS DE LA BATTERIE....................................................................................................99 TABLEAU DU MODULE DE COMMANDE PRINCIPAL .....................................................................................................100 PROGRAMMATION DES PARAMETRES DE FONCTIONNEMENT .................................................................................100 ALARMES ...........................................................................................................................................................................102 DÉPANNAGE.....................................................................................................................................103 BLOCAGE HAUTE PRESSION ..........................................................................................................................................104 BLOCAGE BASSE PRESSION...........................................................................................................................................105 DÉCLENCHEMENT SÉCURITÉ COMPRESSEUR ............................................................................................................106 DÉCLENCHEMENT PROT. THERMIQUE VENTILATEURS..............................................................................................106 GROUPE BRUYANT...........................................................................................................................................................107 COMPRESSEUR NE DÉMARRANT PAS ..........................................................................................................................107 ENTRETIEN ORDINAIRE...................................................................................................................108 GROUPE.............................................................................................................................................................................108 PARTIE ÉLECTRIQUE .......................................................................................................................................................108 TUYAUTERIES FRIGORIFIQUES......................................................................................................109 TUYAUTERIE D'ASPIRATION............................................................................................................................................109 TUYAUTERIE LIQUIDE ......................................................................................................................................................109 CONTRÔLE DES FUITES ..................................................................................................................................................110 MODALITÉS - INDICATIONS POUR UN RACCORDEMENT CORRECT..........................................................................110 RISQUES RESIDUELS ......................................................................................................................111 DEFINITION ZONE DANGEREUSE ...................................................................................................................................111 RISQUES GENERAUX .......................................................................................................................................................112 FICHES DE SECURITE REFRIGERANT ...........................................................................................................................112 Les données contenues dans ce manuel ne sont pas contractuelles, elles peuvent être modifiées par le constructeur sans obligation de préavis. Toute reproduction, même partielle, est interdite. 87 GÉNÉRAL AVERTISSEMENTS GÉNÉRAUX Ce manuel a été réalisé afin de permettre une installation, une mise au point et un entretien corrects; il est par conséquent fondamental que: - les instructions qui suivent soient lues le plus attentivement possible; - le groupe soit installé, testé et assisté par du personnel qualifié (loi n° 46 du 5/3/1990) satisfaisant aux exigences de la loi. • Le producteur décline toute responsabilité et le bénéfice de la garantie cesse d'être accordé en cas de modifications électriques et/ou mécaniques. Toute modification en général non expressément autorisée et non conforme aux indications du présent manuel entraîne la perte du bénéfice de la garantie. • Respecter les normes de sécurité locales en vigueur au moment de l'installation. • Vérifier que les caractéristiques du réseau électrique sont conformes aux données figurant sur la plaquette de matricule du groupe se trouvant à l'intérieur, près du tableau électrique. • Le présent manuel et le schéma électrique du groupe doivent être conservés avec soin et mis à la disposition de l'opérateur pour toute consultation future. • Le matériel d'emballage (sachets en plastique, polystyrène expansé, clous, etc.) constitue une source potentielle de danger. Il doit par conséquent être conservé hors de portée des enfants et correctement recyclé, conformément aux normes locales en vigueur. • Le groupe de condensation est destiné au conditionnement en combinaison avec une unité intérieure à détente du réfrigérant. • Désactiver l'appareillage en cas de défaut ou de mauvais fonctionnement. • Pour une éventuelle réparation, s'adresser exclusivement à un centre d'assistance technique agréé par le constructeur et demander l'utilisation de pièces de rechange originales. Le non-respect des consignes susmentionnées peut compromettre la sécurité de l'appareillage. Le constructeur décline toute responsabilité en cas d'éventuels dommages causés, directement ou indirectement, à des personnes ou des biens suite au non-respect des présentes instructions. PRINCIPES D'INTÉGRATION DE LA SÉCURITÉ Le groupe est conçu et construit de manière à ne pas exposer la santé et la sécurité des personnes à des risques. Dans ce but, on a adopté des solutions de projet visant à éliminer les possibles causes de risque, lorsque cela était possible, ou à réduire sensiblement la probabilité d'un événement risque. Dans le cas où il n'aurait pas été possible d'intervenir au moment de la conception pour prévenir et/ou éliminer le risque, se référer aux prescriptions de comportement indiquées dans la section risques résiduels. ACCESSOIRES Les groupes peuvent être équipés des accessoires suivants (sur demande): tensions différentes de la tension standard grille de protection condenseur antivibratiles compteur horaire de fonctionnement compresseur vanne solénoïde set de raccordement comprenant: détendeur thermostatique, vanne solénoïde, ligne liquide, filtre déshydrateur, indicateur passage liquide. ─ groupe avec commande compresseurs séparés ─ raccordement à un module de contrôle déporté ─ raccordement à un PC ou à un BMS ─ ─ ─ ─ ─ ─ 88 CARACTÉRISTIQUES TECHNIQUES GÉNÉRALES 102 Modèle MSAT 122 Tension standard 142 162 182 400 / 3 / 50 202 242 Données se rapportant à: Modèle MSAT R-22 Puissance frigorifique kW Puissance abs. Compresseurs kW 31.3 36.4 41.3 48.7 53.8 63.9 77.9 8.5 10.3 11.3 13.5 15.8 17.5 22.3 29.8 34.1 39.2 44.1 50.3 62.8 72.8 9.4 11.2 12.6 14.7 17.8 20.3 25.2 Température air extérieur +35°C Temperature d'aspiration du gaz saturé (SST) 7.5°C R-22, (SST) 9.5°C (dew point) R-407C Modèle MSAT R-407C Puissance frigorifique kW Puissance abs. compresseurs kW SCROLL 2900 2x 2,5 2 NTC Compresseur type Nbre de tours par minute tr/mn Charge huile 2x l 1,55 2x 1,65 Étages capacité Protection moteur Type huile SUNISO 3GS OIL Remarque: si groupe avec R407C type huile - MOBIL EAL ARTIC 22 CC - 32 MMMA POE 2x 4 Condenseur Matériau Quantité Surf. front. tot. Espacement ailettes Nbre rangées ∅ tube Pression essai Tubes en cuivre/ailettes en aluminium 2 3 3,6 4,9 1,6 2,1 1,6 1,6 2 9,52 3000 2 m mm mm kPa Électroventilateur axial Nbre et diamètre nbre x ∅ Nbre de tours par minute tr/mn Débit air l/s Puissance nominale kW 2x560 680 3056 2x0,22 4x450 6x450 840 4125 4x0,16 6120 6x0,16 Connessioni Freon Remarques: Raccords à souder Robinet liquide Robinet aspiration ∅ ∅ 14 22 Charge R-22 kg 8.2 8,2 9 9 9.6 12 12 Charge R-407C kg 9.2 9,2 10 10 10.6 13 13 Poids transp. approx. Volume emballage appr. kg 3 m 420 3,20 485 580 590 4,30 16 28 Données se rapportant à: ─ Moteur à rotor extérieur ─ Grille de sécurité 18 28 22 35 Réfrigérant Remarque: Charge à compléter en phase de mise en service Poids et Volumes 275 280 1,50 380 Limites de fonctionnement Temp. maxi air entrée condenseur SST = +5 °C Temp. mini. air entrée condenseur SST = +5 °C Temp. maxi aspiration gaz saturé °C R-22 49 47,5 47,5 47,5 45 49 46 R-407C R-22 47 -4 45 -4 45 -4 44,5 -4 43,5 -8 46 -4 43 -8 R-407C -5 -5 -5 -5 -9 -5 -9 R-22 R-407C 12,5 12,5 89 Remarques: SST Température d'aspiration saturée Surchauffe gaz aspiré + 5°K POSITIONNEMENT Les groupes sont conçus pour être installés à l'extérieur. • Vérifier que le plan d'appui est en mesure de supporter le poids du groupe (cf. poids et distribution des poids p. 91) et qu'il est bien horizontal. Interposer une épaisseur en caoutchouc entre la base d'appui du groupe et le support (afin d'éviter les bruits et les vibrations). • Respecter les espaces fonctionnels. • Si le groupe est installé sur une terrasse ou sur un toit, il est conseillé de le monter sur des antivibratiles appropriés; dans ce cas les tuyauteries de raccordement devront être munies de joints élastiques. • Placer le groupe de manière à ce qu'il ne soit pas frappé sur les côtés longs par d'éventuels vents prédominants. • Fixer le groupe au sol. ESPACES FONCTIONNELS Le choix de l'emplacement des groupes est d'une importance fondamentale pour leur bon fonctionnement. Des obstacles au passage de l'air, des sources de chaleur (telles que refoulements, air chaud), des difficultés de renouvellement de l'air dans la zone d'installation, des feuilles ou autres corps pouvant obstruer les batteries d'échange, des vents s'opposant au passage de l'air ou le favorisant excessivement sont à l'origine d'anomalies de fonctionnement ou d'arrêts. Les groupes n'ont besoin que d'espaces minimaux pour le fonctionnement et l'entretien. Les croquis ci-après concernent certaines typologies d'installation; vérifier au cas par cas en tenant compte de ce qui est indiqué dans le présent manuel. Remarque: Les mesures sont exprimées en mm GROUPE CIRCUITS INDÉPENDANTS ANTIVIBRATILES DE BASE GROUPE AVEC COMMANDE COMPRESSEURS SÉPARÉS (accessoire) (accessoire) Sur demande, on peut fournir le groupe avec une commande compresseurs séparés, prévue pour le raccordement à 2 unités terminales distinctes. L'alimentation électrique reste en commun. 90 DIMENSION ET DISTRIBUTION DES POIDS Legenda: 1 - Compresseur 2 - Raccord ligne liquide Ø G1 premier circuit 2’ - Raccord ligne liquide Ø G1 deuxième circuit 3 - Raccord ligne gaz Ø G2 premier circuit 3’ - Raccord ligne gaz Ø G2 deuxième circuit 4 - Tableau électrique 5 - Ventilateurs hélicoïdes 6 - Entrée ligne électrique 7 - Batteries de condensation 8 - Accès tableau électrique et compresseur Taille 102 122 142 162/182 202/242 A B C 1530 678 1400 1530 678 1400 1563 1107 1570 1563 1107 1570 2098 1107 1570 DIMENSIONS F G H D E 128 128 128 128 128 73 73 130 130 130 75 75 75 75 75 628 628 1058 1058 1058 42 42 42 42 42 I L O Ø G1 Ø G2 1255 1255 1077 1077 1612 800 800 900 900 900 153 153 153 14 16 16 18 22 22 28 28 28 35 nbre ventilateurs 2 2 4 4 6 POIDS W1 W2 W3 W4 Tot. 88 89 121 155 191 275 280 380 485 590 42 42 58 74 95 95 98 132 168 200 50 51 69 88 104 Remarque: les dimensions sont exprimées en mm, les poids en kg. RÉGLAGES PROTECTION ET CONTRÔLES Pressostat HP (kPa) Apre 2750 Pressostat BP (kPa) 230 Chiude 2000 360 Fusible sécurité (°C) 120 Démarrages maxi/heure compresseur (nbre) 10 Thermostat sécurité refoulement NIVEAUX SONORES Remarques: Niveau de sonore Bandes d'octaves (Hz) global 125 250 500 1000 2000 4000 8000 dB(A) - Les niveaux sonores se rapportent à des groupes fonctionnant à pleine charge avec vitesse maximale de rotation des ventilateurs, air entrant au condenseur à 35°C et température aspiration saturée de +5°C. - Niveau de pression sonore se rapportant à 1 mètre de distance de la surface extérieure du groupe. -12 - Niveaux de puissance sonore réf. : 1x10 W. -5 - Niveaux de pression sonore réf. : 2 x 10 Pa. Niveau de puissance sonore (dB) Taille 102 122 142 162 182 202 242 63 80 80 87 87 84 86 86 84 76 80 81 78 79 82 75 73 74 76 78 78 81 73 73 73 73 74 77 75 69 71 71 70 69 72 70 63 65 69 69 70 67 73 60 62 66 65 62 62 63 42 43 63 62 55 54 65 (°C) 120 Remarque: Les sécurités « pressostat HP » et « thermostat sécurité refoulement » peuvent être réarmées manuellement depuis l'unité de contrôle La sécurité « pressostat BP » est à réarmement automatique 59 59 60 60 60 61 62 91 RÉCEPTION CONTRÔLE À LA RÉCEPTION Les groupes sont expédiés dans des emballages de protection appropriés. À l'arrivée, contrôler que le groupe n'a pas subi de dommages pendant le transport et qu'il contient bien toutes les parties indiquées dans la commande. En cas de dommages visibles, noter immédiatement le dommage constaté sur le document relatif au transport, en indiquant la mention: « RETRAIT AVEC RÉSERVE POUR DOMMAGES ÉVIDENTS À L'EMBALLAGE » car la livraison franco établissement comporte le dédommagement des dégâts par l'assurance selon ce qui est prévu par la loi n° 450 du 22.08.85 « limite de dédommagement ». IMPORTANT TOUTES LES OPÉRATIONS INDIQUÉES CI-APRÈS DOIVENT ÊTRE EFFECTUÉES CONFORMÉMENT AUX NORMES DE SÉCURITÉ EN VIGUEUR, AUSSI BIEN POUR CE QUI CONCERNE L'ÉQUIPEMENT UTILISÉ QUE POUR LES MODALITÉS OPÉRATIONNELLES. ATTENTION AVANT DE COMMENCER DES OPÉRATIONS DE MANUTENTION, S'ASSURER QUE LA CAPACITÉ DE LEVAGE EST APPROPRIÉE AU POIDS DU GROUPE EN QUESTION. Taille Poids kg 102 275 122 280 142 380 162 480 182 485 202 580 242 590 MANUTENTION MANUTENTION avec un CHARIOT ÉLÉVATEUR ou AUTRE - Introduire les fourches dans le côté le plus long de la palette en bois fournie avec le groupe. - Commencer le levage en s'assurant que l'équilibre du groupe est stable. Ne pas oublier que la partie la plus lourde est celle où le compresseur est installé. 92 LEVAGE avec une GRUE ou AUTRE - Positionner les tubes de levage dans les trous prévus sur la base du groupe. - Faire dépasser les parties terminales des tubes d'une mesure permettant d'introduire les sécurités et les goupilles correspondantes. - Positionner les élingues de levage sur les tubes entre les goupilles et la base du groupe (cf. dessin). - Positionner des structures rigides de protection au niveau des bords supérieurs du groupe (uniquement si un seul point de force est prévu). - Tendre les élingues de levage de manière graduelle, en vérifiant que leur positionnement est correct. - Commencer le levage. Planches de protection Structure rigide Élingue de levage Sécurité Goupilles de sécurité Tube de levage AVERTISSEMENTS LE RESPECT DES RECOMMANDATIONS FIGURANT SUR LE CÔTÉ EXTERNE DU CARTON DE L'EMBALLAGE EST UNE GARANTIE D'INTÉGRITÉ PHYSIQUE ET FONCTIONNELLE DU GROUPE, CE QUI EST TOUT À L'AVANTAGE DE L'UTILISATEUR FINAL. IL EST DONC RECOMMANDÉ DE: - MANUTENTIONNER AVEC SOIN - CONSERVER À L'ABRI DE L'HUMIDITÉ - ÉVITER DE LA MANIÈRE LA PLUS ABSOLUE DE POSER SUR LE GROUPE D'AUTRES OBJETS SI CE N'EST DANS LES LIMITES DES ÉTAGES DE SUPERPOSITION INDIQUÉES (LE CHIFFRE INDIQUÉ SPÉCIFIE LES ÉTAGES SUPERPOSABLES. Par ex. 1 = 1 ÉTAGE SUPERPOSABLE SUR LE GROUPE). STOCKAGE − − − Conserver à l'abri de: rayons solaires, pluie, sable et vent. Températures: maxi 60°C, mini -10°C. Humidité maxi: 90% ENLÈVEMENT DE L'EMBALLAGE - Couper les feuillards de fermeture avec des ciseaux. - Soulever le carton d'emballage (s'il est présent). - Retirer les pattes fixant le groupe à la palette en bois à l'aide d'une clé fixe de 10 mm. - Lever le groupe pour le séparer de la palette. - Poser le groupe au sol au niveau du point choisi. - Vérifier la présence de dommages visibles. - Éliminer les produits d'emballage en les envoyant aux centres de récupération ou de recyclage spécialisés (se conformer aux normes en vigueur). 93 RACCORDEMENTS ÉLECTRIQUES IMPORTANT S’ASSURER QUE L’UNITÉ N’EST PAS ALIMENTÉE ÉLECTRIQUEMENT AVANT DE COMMENCER TOUTE OPÉRATION DE RACCORDEMENT ÉLECTRIQUE RACCORDEMENTS FONCTIONNELS Avant de mettre en marche l’unité, prévoir les raccordements suivants: RACCORDEMENT AU RÉSEAU D’ ALIMENTATION - Raccorder la ligne triphasée aux bornes prévues à cet effet, indiquées sur le schéma électrique par L1 L2 L3 du dispositif de protection général. - Raccorder le neutre à la borne N sur le tableau électrique. - Connecter la TERRE à la borne PE sur le tableau électrique. - L'installateur attachera une attention particulière au dimensionnement des câbles de raccordement au réseau d'alimentation, en tenant compte des données figurant sur la fiche technique de l'unité, collée sur la porte du tableau électrique. Il est très important d’installer en début de ligne une protection contre les effets de court-circuit. Cette protection doit avoir un pouvoir de coupure proportionnel au courant de court-circuit présumé sur cette partie de l’installation. CARACTÉRISTIQUES ÉLECTRIQUES Taille F.L.A. L.R.A. F.L.I. M.IC. 1) F.L.A. 2) L.R.A. 3) F.L.I. 4) M.I.C. Compresseur singulier Ventilateurs 230/3/50 (A) 400/3/50 (A) 230/1/50 230/3/50 Total (A) 400/3/50 230/3/50 Compresseur (A) 400/3/50 Compresseur (kW) Ventilateurs (kW) Total (kW) 230/3/50 Total (A) 400/3/50 102 122 142 19.7 9.8 1.15x2 41.6 21.8 132.5 66 11.3 0.22x2 11.8 154.5 78.1 22.9 11.3 1.15x2 48.1 25.0 164 74 13.2 0.22x2 13.6 189.2 87.6 162 25.3 24.1 13.6 14.7 0.65 x 4 0.65 x 4 53.9 51.4 30.3 32.5 171 166 102 94 15.2 16.8 0.17 x 4 0.17 x 4 15.9 17.5 199.5 193.3 118.8 111.9 182 202 242 31.2 17.5 0.65 x 4 65.6 38.1 211 117 20.7 0.17 x 4 21.4 244.9 137.2 35.8 20.0 0.65 x 6 76.4 44.9 224 128 23.8 0.17 x 6 24.8 264.6 152.3 45.2 25.2 0.65 x 6 85.8 55.2 280 159 29.2 0.17 x 6 30.2 329.5 189.0 Courant consommé dans les conditions maximums admises. Courant de démarrage du compresseur. Consommation à pleine charge (dans les conditions maximums admises). Courant de démarrage maximum de l’unité. Déséquilibre de tension: 2% maxi Tension: 400/3/50 ± 6% 230/3/50 ± 6% RACCORDEMENTS EN OPTION RACCORDEMENT AU DISPOSITIF DE SIGNALISATION ANOMALIE En se référant au schéma électrique, identifier le circuit d'alarme. Ce circuit permet l'installation d'un dispositif sonore ou visuel pour la signalisation à distance d'une anomalie survenue dans l'unité. Le circuit doit être alimenté en basse tension (24 V 300 mA) conformément au schéma électrique. RACCORDEMENT AU MODULE DE COMMANDE À DISTANCE Le module de contrôle à distance est la reproduction fidèle du clavier du module de contrôle ENERGY LIGHT et permet, depuis une position déportée, d'effectuer toutes les opérations réalisables sur la machine. 94 INSTALLATION Avant d'effectuer le raccordement du module de contrôle à distance, couper la tension de l'unité. Raccorder le clavier à distance comme illustré sur la figure. Arrière terminal à distance C5121423 25 24 26 S + - -S+ SÉRIE COMMUN RELAIS 6 RELAIS 7 RELAIS 4 RELAIS 5 RELAIS 3 RELAIS 2 RELAIS 1 C5121420 EXTENSION RELAIS ALARME CONN B CONN A La longueur maxi du câble de raccordement ENERGY LIGHT clavier est de 80 m. RACCORDEMENT À UN PC OU À UNE GTC. 230 Vac À L A C H A R G E D U C L IE N T C â b le d e r a c c o rd e m e n t R S 2 3 2 9 p ô le s m â le - fe m e lle . Longueur 10 m m axi 10 12 A l im e n t a t i o n C5121425 22 RS 485 TTL 21 22 23 24 ON - + 95 7 6 5 4 3 2 1 RELAIS 1 8 RELAIS 2 9 RELAIS 4 C5121248 10 RELAIS 5 À L A C H A R G E D U C L IE N T C â b le s é r ie R S 4 8 5 C â b le ; 2 fils to rs a d é s . L o n g u e u r m a x i d e la lig n e = 1 0 0 0 m - + RELAIS 6 + RELAIS 3 - RELAIS 7 + S COMMUN - O FF RELAIS ALARME + 1 2 3 4 24 SÉRIE ON 23 EXTENSION 21 DTR NU NU ECHO RS 485 TTL Longueur maxi = 2 m OFF S e ri a l o p t o c o u p le d a d a p t e r R S 2 3 2 /T T L R S 2 3 2 /R S 4 8 5 - R S 4 8 5 /T T L M ic r o n e t a n d M o d B u s P r o t o c o l Câble série 5 voies 2 molex. DTR NU NU ECHO PE1P0005 C 5121425 S e r ia l o p t o c o u p le d a d a p t e r R S 2 3 2 /T T L R S 2 3 2 / R S 4 8 5 - R S 4 8 5 /T T L M i c ro n e t a n d M o d B u s P ro t o c o l 1 2 3 4 10 12 A li m e n t a t i o n RS 232 - RS 232 C 5121420 CONN B CONN A MISE EN SERVICE TOUS LES APPAREILLAGES DOIVENT ÊTRE MIS EN MARCHE PAR LES CENTRES D'ASSISTANCE AGRÉÉS. C'EST LA SEULE MANIÈRE DE RENDRE EFFECTIVE LA GARANTIE CONTRACTUELLE. L'ASSISTANCE SE LIMITE À LA SEULE MISE EN MARCHE ET N'EFFECTUE AUCUN RACCORDEMENT OU TRAVAIL SPÉCIFIQUE SUR L'INSTALLATION. CONTRÔLES PRÉLIMINAIRES - Contrôler que le groupe est correctement positionné et que les raccordements à l'unité terminale intérieure sont parfaitement réalisés, aussi bien du côté frigorifique que du côté électrique. - Contrôler la valeur de la tension et de la fréquence de réseau: 400 ± 6% ELLES DOIVENT RENTRER DANS LES VALEURS INDIQUÉES: 230 ± 6% - Contrôler le serrage correct des vis fixant les conducteurs aux composants électriques présents dans le tableau (pendant la manutention et le transport, les vibrations pourraient les avoir desserrées). OPÉRATION DE VIDE Après avoir vérifié, avec l'installation sous pression, qu'il n'y a pas de fuites (cf. section des tuyauteries frigorifiques) aussi bien dans les tuyauteries de raccordement que dans l'unité terminale, procéder comme suit. - Vidanger l'installation avec les robinets MSAT toujours fermés. - Au moyen d'un groupe manométrique, brancher la pompe à vide sur les deux raccords des robinets, en veillant à ce que les éventuels organes d'arrêt (vanne solénoïde ou robinets intermédiaires) soient ouverts et procéder au vide. - Pour faire en sorte que la vanne solénoïde reste ouverte, la débrancher des bornes du tableau électrique (cf. schéma électrique) de l'unité extérieure et la brancher sur une prise de courant normale 220 V. - Arrêter la pompe à la pression de 100 Pa environ et laisser sous vide pendant quelques heures; une petite remontée initiale de la pression est normale pour qu'elle se stabilise ensuite définitivement. Si la pression continue à remonter, cela veut dire qu'il y a de petites fuites ou une présence d'humidité. Dans le premier cas, répéter les opérations décrites au paragraphe CONTRÔLE DES FUITES du manuel des tuyauteries frigorifiques. Dans le deuxième cas, remplir de nouveau l'installation avec du réfrigérant jusqu'à 100 kPa et refaire le vide comme indiqué ci-dessus. Lorsque la pression est définitivement stabilisée, passer à la phase suivante de charge. CHARGE RÉFRIGÉRANT Les tailles en question sont expédiées avec une charge à compléter lors de la mise en service selon la typologie de l'unité terminale intérieure et de la disposition des tuyauteries. - Avec l'installation sous vide, fermer les robinets du groupe manométrique et débrancher la pompe à vide. - Brancher la bouteille du gaz réfrigérant, en éventant l'air dans le tuyau de raccordement au groupe manométrique. - Ouvrir les robinets du groupe manométrique et laisser entrer du réfrigérant à l'état gazeux jusqu'à l'équilibre de la pression installation / bouteille, et dans tous les cas à une pression supérieure à la pression atmosphérique. - Ouvrir les robinets du groupe de condensation (d'abord celui du liquide) pour faire en sorte que le groupe soit prêt à être démarré. Utiliser une clé appropriée, de section carrée, correspondante à la dimension du tige du robinet et avec un bras de levier de longueur suffisante pour exercer une force elevée. ( * VOIR DESSIN ) Poids de réfrigérant dans les lignes frigorifiques pendant le fonctionnement (kg/10 m) Ø Extérieur Tuyauterie 10 12 14 16 18 22 28 35 42 Liquide à 38°C 0,60 1,06 1,41 1,71 2,36 3,62 6,61 9,47 -- Aspiration SST +4,5°C --0,025 0,030 0,043 0,070 0,120 0,195 0,290 UNITÉ EXTÉRIEURE UNITÉ INTÉRIEURE Robinet gaz Robinet liquide IMPORTANT: À la première mise en marche du groupe et après chaque période d'arrêt prolongé, il est IMPORTANT d'alimenter les résistances (si elles sont présentes) de chauffage de l'huile du carter du compresseur pendant 8 heures au moins avant la mise en marche du compresseur. L'opération d'activation s'effectue selon les phases indiquées: - Agir sur le sectionneur QS1 du groupe de condensation en faisant très attention que la LED verte soit éteinte. 96 MISE EN MARCHE - Vérifier le fonctionnement correct de l'unité intérieure. - Contrôler le raccordement de l'éventuelle vanne solénoïde. - Localiser sur le schéma électrique la commande SA2. Elle représente le signal provenant de l'unité intérieure pour le choix de l’étage de puissance et corresponde à l'activation du premier étage, alors que la commande pour l'activation du deuxième étage est représentée par le symbole SA3 sur le schéma électrique. - Le compresseur qui démarre en premier est défini par le système de réglage (cf. manuel réglage). En même temps que le compresseur se met en route la ventilation concernant le seul circuit en marche. - Vérifier qu'il y a bien demande de l'ambiance. - Pour ajouter du gaz réfrigérant, utiliser la prise de service du robinet d'arrêt de la ligne d'aspiration, et faire aspirer du fréon à l'état gazeux. Faire particulièrement attention pendant cette phase, car au démarrage le pressostat BP est bypassé pendant 70 secondes. Si on veut faire la charge d'abord sur un circuit puis sur l'autre, agir sur les tableau des fusibles respectifs pour arrêter le compresseur n'étant pas concerné car le module principal a sa propre logique de fonctionnement à caractère cyclique. ATTENTION: après tout arrêt, le système calcule 6 minutes à partir du démarrage précédent (si ce temps s'est déjà écoulé, seules les 30 secondes de retard seront comptées) avant un autre démarrage. - La charge peut être considérée comme complète quand: - Le voyant du liquide (s'il est présent) ne signale pas de bulles. - La surchauffe du gaz aspiré est de 4-8°K. - Le sous-refroidissement du liquide est de 3-5°K. AJOUT D'HUILE Il est nécessaire de connaître exactement la quantité de réfrigérant ajoutée dans l'installation par rapport à la charge d'usine pour pouvoir définir la quantité d'huile à ajouter. La quantité doit être égale à 10% environ du poids du réfrigérant ajouté (le type d'huile est spécifié dans le manuel général). L'ajout d'huile est indispensable pour des appoints de réfrigérant supérieurs à 3 kg. Vérifier de toute façon sur la prise schrader de niveau de l'huile du compresseur, lorsqu'elle est présente. VÉRIFICATIONS DE PREMIÈRE MISE EN MARCHE APRÈS AVOIR FAIT DÉMARRER LE GROUPE, VÉRIFIER: PARTIE ÉLECTRIQUE Déséquilibre des phases. Il doit être inférieur à une valeur maximale de 2% (cf. exemple de calcul). Exemple de calcul: L1 - L2 = 388 V L2 - L3 = 379 V L3 - L1 = 377 V La moyenne des valeurs mesurées est donnée par: 388 + 379 + 377 3 = 381 L'écart maximum par rapport à la moyenne est alors: Le déséquilibre qui en résulte est de: 388-381=7 V 7 x 100 = 1,83% (acceptable) 381 Absorption compresseur. Doit être inférieure à la valeur indiquée dans le tableau joint à la rubrique F.L.A. PARTIE CIRCUIT FRIGORIFIQUE - Faire une dernière vérification des fuites sur les raccords des robinets et des prises de pression présents dans l'installation. Attention, tous les capuchons des prises manométriques et des robinets doivent être remis en place. - Contrôler le voyant du liquide (s'il est présent). - Vérifier, avec les manomètres raccordés, les pressions de travail (basse pression de 400 kPa à 560 kPa correspondant à 0°C -+8°C SST) et température de condensation d'environ 15-20°C supérieure à la température de l'air extérieur (valeurs indicatives). - Contrôler la surchauffe en faisant la différence entre la température lue sur le manomètre de basse pression et la température mesurée, avec un thermomètre à contact, directement sur la tuyauterie d'aspiration en amont du compresseur. Si les valeurs sont de 5 à 8 degrés, le fonctionnement peut être considéré comme correct; si elles se situent nettement hors de ces tolérances, en chercher la cause en s'aidant de la section DÉPANNAGE. - Contrôle du sous-refroidissement en faisant la différence entre la température lue sur le manomètre de haute pression et la température mesurée, avec un thermomètre, directement sur la ligne de liquide en aval du condenseur. Si les valeurs sont de 3/5 degrés, tout va bien, sinon rechercher la cause comme ci-dessus. - Pour une analyse correcte de l'installation, contrôler aussi la température à la sortie du compresseur qui, avec les données de surchauffe et de sous-refroidissement indiquées, doit être d'environ 30/40 degrés supérieure à la température de condensation. • Ne pas oublier en outre que si le groupe est équipée d'une régulation de la vitesse des ventilateurs, il convient d'effectuer toutes ces vérifications de fonctionnement avec des conditions d'air extérieur - air ambiant très proches des conditions standard de projet. • Nous rappelons également que toutes les données indiquées ci-dessus sont valables pour des groupes avec plage de travail pour conditionnement et équipées d'un détendeur thermostatique. Pour des conditions de projet avec des températures d'évaporation (SST) inférieures à 0°C, vérifier à chaque fois aussi bien les paramètres de fonctionnement que le dimensionnement des tuyauteries du réfrigérant. • Ce qui est dit ci-dessus présente certaines des problématiques (avec les solutions correspondantes) pouvant se produire à la mise en marche d'une machine; le sérieux et la qualification du personnel sont dans tous les cas toujours indispensables. 97 RÉGLAGE MODE DE FONCTIONNEMENT DU MODULE PRINCIPAL ROTATION DES COMPRESSEURS Le processeur, non seulement régule de manière optimale la température du fluide, mais il remplit aussi d'autres fonctions pour gérer de manière correcte le fonctionnement global de l'unité. C'est le cas par exemple de la rotation des compresseurs. En programmant certains paramètres, on valide la fonction de rotation des compresseurs. Cela veut dire qu'à la demande de fonctionnement de la part du thermorégulateur, le compresseur qui démarrera en premier sera celui qui aura le moins grand nombre d'heures de fonctionnement et celui qui s'arrêtera en premier sera celui ayant le plus grand nombre d'heures de fonctionnement. Cette fonction permet de distribuer d'égale manière les heures de fonctionnement sur les deux compresseurs. L’unité est prévue par le constructeur avec la rotation validée. TEMPORISATIONS DU COMPRESSEUR Afin de garantir une bonne qualité de fonctionnement des compresseurs, certains types de temporisations sont nécessaires. Il peut être utile à ce propos de consulter le graphique de la fig. 3-4 pour mieux comprendre la signification des temporisations. Compresseur Comp. 1 ON ON OFF Secondes Comp. 2 OFF ON Secondes*10 Temps sécurité mise en marche-arrêt C01 OFF Secondes Intervalle intervention premier deuxième compresseur C06 Temps sécurité mise en marche..mise en marche C02 Intervalle arrêt premier deuxième compresseeur C07 Figure 3 Figure 4 Le graphique de la fig. 4 représente 2 paramètres. TEMPS SECURITE ARRET-MISE EN MARCHE et TEMPS SECURITE MISE EN MARCHE-MISE EN MARCHE. Le premier paramètre prévoit qu'après l'arrêt du compresseur, un temps donné doit s'écouler avant que son redémarrage soit autorisé. Ce temps est respecté même s'il y a une demande de la part du thermorégulateur. Le deuxième paramètre prévoit qu'un temps donné doit s'écouler entre une mise en marche et la suivante. En cas d'unités à deux compresseurs, deux autres paramètres sont utilisés: INTERVALLE INTERVENTION PREMIER DEUXIEME COMPRESSEUR et INTERVALLE ARRET PREMIER DEUXIEME COMPRESSEUR. Le premier paramètre permet d'éviter le démarrage simultané des deux compresseurs, cela principalement afin d'éviter des courants de démarrage trop élevés de l'unité. Le deuxième prévoit un intervalle de temps entre les arrêts du premier et du deuxième compresseur. Ces deux paramètres font référence au graphique de la figure 3. 98 REGULATEUR DES VENTILATEURS DE LA BATTERIE De série, dans les unités MSAT, la régulation de la vitesse des ventilateurs est du type thermostatique; elle peut être du type pressostatique sur demande, cette dernière configuration étant fournie avec un kit. Le principe de fonctionnement que nous allons décrire est le même pour les deux régulations. - CONTRÔLE DES VENTILATEURS EN FROID On trouvera ci-après un graphique expliquant le mode de fonctionnement en froid (fig. 6). VENTILATORE ESTERNO IN MODALITA' COOL Vitesse vitesse vitesse e e Figure 6 Quand le compresseur est activé, on a une ventilation forcée, c'est-à-dire que les ventilateurs ne suivent pas la régulation dictée par le contrôleur mais tournent, pendant un temps défini par un paramètre, à la vitesse maximale à moins que la température ne soit inférieure à la valeur de COUPURE, auquel cas les ventilateurs tournent à la vitesse minimale pendant la période précitée. Ceci étant dit, voyons le fonctionnement du régulateur. Le premier paramètre à définir est la COUPURE qui correspond à une valeur particulière de température de condensation au-dessous de laquelle les ventilateurs sont à l'arrêt. L’HYSTÉRÉSIS COUPURE est un paramètre définissant la plage à l'intérieur de laquelle on a la commutation entre l'état de fonctionnement des ventilateurs à la vitesse minimale et l'état de repos de ces mêmes ventilateurs. Pour résumer, les ventilateurs commenceront à fonctionner à la vitesse minimale à une valeur de température égale à la valeur de COUPURE + HYSTÉRÉSIS COUPURE alors que l'arrêt est déterminé par la différence entre les valeurs de CONSIGNE FROID et de DELTA COUPURE. Quand la température de condensation dépasse la valeur CONSIGNE VENTILATEURS EN FROID, le régulateur commence à réguler la vitesse des ventilateurs proportionnellement à la température de condensation. Dans le cas des unités CLIVET, contrairement à ce qui est décrit sur le graphique, la régulation est maintenue jusqu'à l'obtention de la valeur CONSIGNE MAXI VENTILATEUR EN FROID. Par souci d'exhaustivité, il convient de s'arrêter sur la description des paramètres VITESSE MAXI SILENCIEUSE et BANDE PROPORTIONNELLE EN FROID. Le premier définit un seuil maximum de vitesse des ventilateurs correspondant à une température donnée de condensation pour laquelle on a la régulation de la vitesse tandis que la BANDE PROPORTIONNELLE définit la pente de la droite à l'intérieur de laquelle on a la régulation de la vitesse. Les unités CLIVET sont construites pour réguler le régime des ventilateurs jusqu'à la vitesse maximale. 99 TABLEAU DU MODULE DE COMMANDE PRINCIPAL • • • • Voyant 1 compresseur 1 ALLUME si le compresseur 1 est en marche ETEINT si le compresseur 1 est arrêté CLIGNOTANT à la fréquence de 1 Hz si des temporisations sont en cours CLIGNOTANT à basse fréquence si le compresseur est en dégivrage (seulement pompe à chaleur) • • • • Voyant 3 compresseur 2 ALLUME si le compresseur 1 est en marche ETEINT si le compresseur 1 est éteint CLIGNOTANT à la fréquence de 1 Hz si des temporisations sont en cours CLIGNOTANT à basse fréquence si le compresseur est en dégivrage (seulement pompe à chaleur) • ALLUME si le contrôleur est en mode Froid Si aucun des deux voyants CHAUD ou FROID n'est allumé, le contrôleur est en mode ATTENTE. Quand la machine est en OFF, seul le point décimal reste allumé. N.B. Les voyants 2 et 4 se rapportent à une unité avec 4 compresseurs et deux circuits frigorifiques. PROGRAMMATION DES PARAMETRES DE FONCTIONNEMENT Dans ce chapitre, nous nous limitons à énumérer les seuls paramètres accessibles en mode direct sans mot de passe. Les paramètres protégés par un mot de passe sont du ressort du personnel des centres agréés. SIGNIFICATION DES TOUCHES Touche ON-OFF Touche MODE ON-OFF Touche MODE ON-OFF Touche MODE a) Maintenue appuyée pendant plus de 2 secondes, le thermorégulateur passe de ON à OFF et de OFF à ON. b) Une seule pression remet à zéro toutes les alarmes à réarmement manuel non actives; sont également remis à zéro les compteurs du nombre d'interventions/heure, même si ceux-ci ne sont pas actifs. c) Dans le mode menu, cette touche permet le défilement vers le bas. d) Permet de decrémenter la valeur du paramètre sélectionné. a) En appuyant et en lâchant ces deux touches dans les 2 secondes, on descend d'un niveau dans le menu de configuration. a) En appuyant et en lâchant ces deux touches dans les 2 secondes, on monte d'un niveau dans le menu de configuration. b) Si on est en train de visualiser le dernier niveau d'un menu, en appuyant dessus simultanément et en lâchant dans les 2 secondes, on remonte d'un niveau. a) Dans le mode menu, cette touche permet le défilement vers le haut. b) Permet d'incrémenter la valeur du paramètre sélectionné. 100 Tableau 1 Code H46 Mot de passe Niveau 0 Sonde réglage Alarme active Description Niveau 1 Consigne : SEt LISTE DES PARAMETRES ACCESSIBLES Unité de mesure Consigne d'usine unité 0 Niveau 2 Niveau 3 Niveau 4 Label Cons. Froid: Coo Valeur Consigne Froid Label Cons. Chaud: HEA Valeur Consigne Chaud Ent. Analogiques: tP Code Entrées: t01- t06 Valeur Ent. Analogiques Alarmes: Err Code al. actives: E00-E46 Ent. Numériques: Id Code entrées: I01-I11 Etat éntrée numériques Paramètres: PAr Par. configuration: CnF Paramètres H01-H69 Valeur paramètre Par. compresseur: CP Paramètres C01-C08 Valeur paramètre Par. ventilation: FAn Paramètres F01-F25 Valeur paramètre Par. alarmes: ALL Paramètres A01-A26 Valeur paramètre Par. pompe: PUP Paramètres P01-P03 Valeur paramètre Par. antigel: Fro Paramètres r01-r17 Valeur paramètre Par. dégivrage: dFr Paramètres d01-d11 Valeur paramètre Par. extension: ESP Paramètres N01-N07 Valeur paramètre Mot de passe: PSS Valeur mot de passe Heures fonct.: OHr Heures comp: OH1-OH4 Nombre heures Heures pompe: OHP Nombre heures Pour se déplacer à l'intérieur des niveaux, appuyer en même temps sur les touches «Mode» et «on off». 1 - En appuyant et en lâchant les deux touches dans les 2 secondes, on descend d'un niveau dans le menu de configuration. 2 - En gardant les deux touches appuyées pendant plus de 2 secondes, on monte d'un niveau dans le menu de configuration. 3 - Si on est en train de visualiser le dernier niveau d'un menu, en appuyant dessus simultanément et en les lâchant dans les 2 secondes, on remonte d'un niveau. 101 ALARMES Les codes d'alarme apparaissent sur l'afficheur du terminal interface utilisateur quand une erreur se produit. Les alarmes sont visualisées sur l'afficheur, celles à réarmement automatique disparaissent dès que l'anomalie a été résolue, celles à réarmement manuel doivent être réarmées par un technicien. Les alarmes apparaissent sur le terminal d'interface utilisateur selon la séquence avec laquelle elles ont été introduites dans le tableau 4. A préciser en outre que, si plusieurs alarmes sont présentes simultanément, seule la première sera visualisée; une fois celle-ci réarmée, on verra apparaître la deuxième et ainsi de suite jusqu'à la fin des alarmes. Attention: en phase de standby, ou de OFF, les alarmes ne sont pas signalées et le relais de blocage cumulatif n'est pas activé. Si elles sont présentes, les alarmes sont signalées et le relais de blocage cumulatif est activé au moment de la sélection du mode de fonctionnement. Tableau 2 CODE E01 E02* E03 E04 E07 E21 E22* E24 E27 E45 TYPE DE DEFAUT Pression maxi circ. 1 Pression mini circ. 1 ARRÊTS Compresseur Compresseur ventilateur Therm. compresseur 1 Prot. therm. ventilateurs circ. 1 Défaut sonde BT3/BP3 Pression maxi circ. 2 Pression mini circ. 2 Compresseur ventilateur Compresseur ventilateur Prot. therm. ventilateurs circ. 2 Défaut sonde BT5/BP5 Configuration Compresseur ventilateur Compresseur ventilateur Compresseur ventilateur REARMEMENT MANUEL AUTOMATIQUE (Après 5 signalisations, devient à réarmement manuel) MANUEL MANUEL Compresseur ventilateur AUTOMATIQUE MANUEL AUTOMATIQUE (Après 5 signalisations, devient à réarmement manuel) MANUEL Compresseur ventilateur Compresseur AUTOMATIQUE MANUEL * Après 5 signalisations, elle devient à réarmement manuel. Chaque alarme signalée n'est comptée que si plus de 225 s s'écoulent entre une signalisation et la suivante. 102 DÉPANNAGE Ce qui suit entend indiquer quelques possibles anomalies et leur solution. La responsabilité des opérations qui en découlent revient toujours et entièrement à celui qui les effectue. Il est obligatoire de s'adresser à un technicien agréé satisfaisant aux conditions requises par la loi pour chaque opération nécessaire au rétablissement du fonctionnement. Le déclenchement d'un dispositif de sécurité indique une anomalie de fonctionnement: avant de réarmer, vérifier et éliminer la cause de l'anomalie. On trouvera ci-après une liste de possibles problèmes avec leur cause et leurs solutions. ATTENTION LES OPÉRATIONS INDIQUÉES SONT ENTIÈREMENT SOUS LA RESPONSABILITÉ DE CELUI QUI LES EFFECTUE. IL EST OBLIGATOIRE DE S'ADRESSER À UN CENTRE D'ASSISTANCE AGRÉÉ SATISFAISANT AUX CONDITIONS NÉCESSAIRES POUR LES OPÉRATIONS DESTINÉES À RÉTABLIR LA FONCTIONNALITÉ. Tous les défauts et toutes les conditions anormales de fonctionnement sont gérés par le module de contrôle principal. Pour chaque condition anormale ou de défaut, le module, non seulement met le groupe en sécurité, mais il peut aussi visualiser l'événement à distance. 103 BLOCAGE HAUTE PRESSION B L O C AG E H AU TE P R E S S IO N OUI V en tilatio n efficace ? NON V érifier batterie (1 ) V érifier ventilateur (2 ) V érifier m odule ventilateur (3 ) V érifier sonde (4 ) OUI OUI OUI OUI T em p ératu re air extérieu r in férieu re aux lim ites d e fo n ctio n nem en t ? NON V érifier les données de projet (5 ) NON C h arg e réfrig éran t co rrecte ? A b sen ce d 'in con d en sab les? T em p ératu re et/o u p ressio n d 'asp iratio n rég u lières ? NON NON V érifier sousrefroidissem ent liquide (6 ) R efaire le vide et rem plir (7 ) V érifier fonctionnem ent (8 ) unité intérieure V érifier la fonctionnalité des organes d'arrêt de la ligne du liquide (9 ) U n ité en m arch e Remarques: 1) Il est très important qu'il offre un échange thermique maximal, ce qui implique qu'il doit être libre de toute saleté, d'entartrages ou d'obstacles au passage de l'air. 2) Vérifier l'intégrité du ventilateur; s'il est endommagé, le remplacer. 3) Vérifier que la tension à la sortie de la carte module en mode proportionnel la vitesse des ventilateurs. Dans le cas contraire, remplacer le module. 4) Vérifier le positionnement: il doit être en contact étroit avec le tube profilé de la batterie d'échange. Il doit avoir une donnée de résistance parfaitement en accord avec la température, vérifier avec un ohmmètre cette valeur de résistance. 5) Vérifier : - Limites de fonctionnement. (cf. section générale). - Que la batterie n'est pas exposée à des rayons solaires directs et qu'elle ne se trouve pas près de surfaces réfléchissantes. - Qu'il n'y a aucun flux d'air chaud, d'aucun type, à proximité immédiate. - Qu'il n'y a pas de recyclage du même air. 6) Pour les modalités de contrôle, consulter le manuel de MISE EN MARCHE. N.B.: une éventuelle inondation des circuits de la batterie d'échange jusqu'au point de logement de la sonde provoque un fonctionnement anormal du système de régulation de la vitesse des ventilateurs. 7) Une condition pouvant se produire est que la température de condensation soit très élevée (25/30 degrés au-dessus de la température de l'air extérieur) associée à un mauvais rendement frigorifique. Cela peut provoquer les mêmes symptômes qu'une charge de réfrigérant abondante. Après avoir constaté que la charge est correcte, évaluer cette hypothèse et refaire toutes les opérations de vidange et de remplissage. 8) Contrôler que le débit d'air n'est pas excessif, et que la température de l'air ambiant n'est pas trop élevée. Ces conditions pourraient augmenter le rendement de la machine et par conséquent la chaleur à éliminer au condenseur. 9) Vérifier que tous les organes d'arrêt sur la ligne du liquide sont complètement ouverts. 104 BLOCAGE BASSE PRESSION BLOCAGE BASSE PRESSION OUI Fonctionnement unité intérieure régulier ? NON Vérifier fonctionnement unité intérieure ( 1 ) Vérifier conditions de travail unité int. ( 2 ) Vérifier tuyauteries de raccordement (3) OUI OUI OUI OUI Filtre déshydrateur efficace ? Charge réfrigérant correcte? Robinet aspiration complètement ouvert ? Température et/ou pression d'aspiration régulières ? NON NON Contrôler ∆ t entre amont et aval (4) Contrôler surchauffe (5) NON Vérifier, éventuellement ouvrir NON Vérifier fonctionnement unité extérieure (6) Unité en marche Remarques: 1) Vérifier : - que le débit d'air est suffisant; - que le sens de rotation des ventilateurs est correct; - que l'échangeur n'est pas sale ou entartré afin qu'il puisse offrir un échange thermique maximal; - que la vanne solénoïde fonctionne. - que le détendeur thermostatique fonctionne. 2) Vérifier que les conditions de température/humidité de l'air traité se situent dans les conditions de projet. 3) Vérifier que la disposition et le diamètre des tuyauteries sont corrects (cf. section TUYAUTERIES FRIGORIFIQUES). Dans le cas contraire, on pourrait avoir des pertes de charge inacceptables pour le bon fonctionnement du groupe. 4) Contrôler avec un thermomètre à contact la température en amont, puis en aval du filtre déshydrateur. Si la différence de température est supérieure à un 1°C, cela veut dire que le filtre n'est pas en bon état de marche ou qu'il est sousdimensionné; dans les deux cas, le remplacer. 5) Pour les modes de contrôle, consulter la section MISE EN MARCHE. 6) Si la pression de condensation est inférieure à 1200kPa manométriques, on peut avoir une alimentation anormale du détendeur et par conséquent une pression d'aspiration trop basse. Vérifier que la ventilation de l'unité extérieure fonctionne parfaitement (c'est-à-dire module ou arrête les ventilateurs). 105 DÉCLENCHEMENT SÉCURITÉ COMPRESSEUR DÉCLENCHEMENT SÉCURITÉ COMPRESSEUR OUI OUI Température refoulement compresseur dans les limites ? Le thermostat à contact fonctionne-t-il ? NON NON Vérifier paramètres type : surchauffe, charge réfrigérant, etc Remplacer le thermostat Unité en marche DÉCLENCHEMENT PROT. THERMIQUE VENTILATEURS DÉCLENCHEMENT PROTECTION THERMIQUE VENTILATEUR OUI NON Moteur intact ? Vérifier possibles obstructions de l'échangeur Vérifier obstructions sur les pales Vérifier enroulements électriques Unité en marche 106 GROUPE BRUYANT UNITÉ BRUYANTE OUI NON NON Les amortisseurs du compresseur sont-ils en bon état ? NON Vérifier et éventuellement remplacer Les vis de fixation du compresseur sont-elles desserrées? OUI Vérifier et éventuellement serrer Les tuyauteries vibrent-elles ? OUI Vérifier les points de serrage Unité en marche COMPRESSEUR NE DÉMARRANT PAS COM PRESSEUR NE D É M AR R AN T P AS NON A b s en ce d e te n sio n au x b o rn es ? OUI In te rve n tion K lixo n (1 ) M o te u r b rû lé (2 ) C om p res se u r b lo q ué (3 ) OUI D is j. m ag n é to th e rm iq u e b ra n ch é ? OUI NON NON C o n trô le r qu e la b o b in e n 'es t p a s b rû lée e t q u e le s c on ta c ts n e so n t p a s o xy d é s NON V é rifie r e t év e n tu elle m e n t re m p la c e r L e relais fo n ctio n n e -t-il ? OUI L e m o d u le d e co n trô le fo n c tio n n e-t-il ? B ra n ch e r U n ité en m arc h e Remarques: 1) L'intervention du Klixon se produit en cas de température plutôt élevée de la carcasse du compresseur. Vérifier la cause avant de faire redémarrer le groupe. 2) Vérifier si les enroulements sont à la masse. Éventuellement remplacer le compresseur. 3) Le blocage mécanique du compresseur se manifeste par un bruit soutenu et typique. Si nécessaire, remplacer le compresseur. 107 ENTRETIEN ORDINAIRE IMPORTANT AVANT DE COMMENCER TOUTE OPÉRATION D'ENTRETIEN OU DE NETTOYAGE DU GROUPE, S'ASSURER QUE CELUI-CI N'EST PAS SOUS TENSION. Cette section est consacrée à l'utilisateur final et elle est extrêmement importante pour le fonctionnement régulier dans le temps du groupe. Quelques opérations effectuées scrupuleusement et périodiquement permettent d'éviter de devoir recourir à des interventions de personnel spécialisé. Les opérations à effectuer ne nécessitent pas de connaissances techniques particulières et se résument à de simples contrôles des composants du groupe. - batterie de condensation - électroventilateurs - structure GROUPE BATTERIE DE CONDENSATION ATTENTION: un contact accidentel avec les ailettes de l'échangeur peut provoquer de petites blessures par coupure. Pour effectuer les opérations décrites ci-dessous, utiliser des gants appropriés. Il est important que l'échangeur soit en mesure d'offrir l'échange thermique maximal. Il est donc important que sa surface soit toujours exempte de saletés ou de poussières qui pourraient s'être déposées sous l'effet de l'action des électroventilateurs. - Éliminer, à l'aide d'une brosse, toute les impuretés qui pourraient s'être déposées sur la surface de la batterie. - À l'aide d'un jet d'air sous pression, nettoyer la surface en aluminium de la batterie en ayant soin d'orienter le jet parallèlement aux ailettes pour ne pas les endommager. - Vérifier que les ailettes en aluminium n'ont pas été endommagées ou pliées; si on constate des situations de ce genre, « peigner » la batterie avec un outil approprié jusqu'à ce qu'on ait rétabli la situation initiale pour un passage optimal de l'air. ÉLECTROVENTILATEURS Au premier démarrage saisonnier, vérifier le niveau sonore. S'il est élevé et qu'on a des vibrations, cela peut être le signe: soit d'un déséquilibre des pales soit d'un desserrement des vis de fixation. En cas d'anomalie effective, appeler le centre d'assistance agréé car les ventilateurs sont positionnés à l'intérieur de la machine entre les batteries de condensation. - Vérifier l'état de fixation de l'électroventilateur à la grille de support. - Vérifier l'état de fixation de la grille de support de l'électroventilateur à la structure du groupe. - Vérifier, pour autant que faire se peut, les éventuels déséquilibres de l'électroventilateur, qui se manifestent par des conditions de bruit et de vibrations anormales. STRUCTURE - Vérifier l'état des parties constituant la structure. Attacher une attention particulière aux parties en acier. - Traiter avec des peintures en mesure d'éliminer ou de réduire le phénomène d'oxydation les points du groupe qui présenteraient ce problème. - Vérifier la fixation du panneautage externe du groupe. De mauvaises fixations sont à l'origine de vibrations et de bruits anormaux. PARTIE ÉLECTRIQUE Vérifier que le câble d'alimentation qui raccorde le groupe au tableau de distribution ne présente pas de lacérations, de craquelures ou d'altérations de nature à compromettre l'isolement. Contacter un centre d'assistance agréé dans le cas où une intervention serait nécessaire. IMPORTANT LA PRÉSENCE DE PERSONNEL AUTORISÉ EST CONSEILLÉE À CHAQUE DÉMARRAGE SAISONNIER DU GROUPE DE MANIÈRE À COMMENCER, NON SEULEMENT LES VÉRIFICATIONS PRÉCITÉES, MAIS AUSSI LES VÉRIFICATIONS DU CIRCUIT FRIGORIFIQUE. 108 TUYAUTERIES FRIGORIFIQUES Le dimensionnement des lignes frigorifiques de raccordement entre groupes de condensation et unités d'évaporation intérieures est d'une importance fondamentale. Pour les raccordements à nos groupes, consulter le tableau ci-dessous où, pour des longueurs spécifiées, le diamètre des raccords correspond au diamètre à utiliser pour les tuyauteries de raccordement. Pour des distances supérieures, le diamètre devra être calculé (cf. bibliographies appropriées ou notre Catalogue DIMENSIONNEMENT DES LIGNES FRIGORIFIQUES DANS LES INSTALLATIONS À DEUX SECTIONS). Le tableau cidessous indique en outre la dénivellation maximum conseillée, avec des tuyauteries standard aussi bien dans le cas où le groupe de condensation est plus bas que l'unité terminale que dans le cas contraire. Utiliser uniquement du tube de cuivre pour réfrigération. Taille 102 122 142 162 182 202 242 ∅ Aspir. ∅ Liquide 22 22 28 28 28 35 35 14 14 16 18 18 22 22 Longueur Maxi m 10 10 16 16 12 23 20 Nbre courbes maxi 6 6 8 6 6 10 10 Dénivellation maxi Fig. 4 9 9 12 10 10 18 14 Fig. 6 9 9 12 10 10 18 14 TUYAUTERIE D'ASPIRATION Pour toutes les tailles, les raccords sont à souder; le raccord spécial ROTALOCK est fourni de série avec le groupe. - Raccorder la ligne préparée au robinet d'arrêt à l'aide de deux clés comme indiqué (figure 1 pour ce qui concerne le premier circuit, figure 2 pour le deuxième). Figure 1 Figure 2 TUYAUTERIE LIQUIDE Figure 3 Pour toutes les tailles, les raccords sont à souder; le raccord spécial ROTALOCK est fourni de série avec l'unité. - Raccorder la ligne préparée au robinet d'arrêt à l'aide de deux clés comme indiqué (figure 3 pour ce qui concerne le premier circuit, figure 4 pour le deuxième). Figure 4 REMARQUE: Toutes les tuyauteries doivent être parfaitement propres (effectuer un nettoyage avec de l'azote ou de l'air sec avant de brancher les tuyauteries sur les deux unités) et exemptes d'humidité afin de permettre une opération de vide optimale. 109 CONTRÔLE DES FUITES - Contrôler soigneusement que les robinets du groupe de condensation sont fermés. - Brancher le groupe manométrique sur les raccords de service des robinets. - Effectuer la mise sous pression avec le réfrigérant jusqu'à 250 kPa. - Fermer les robinets du groupe manométrique pour débrancher la bouteille du réfrigérant puis brancher la bouteille d'azote. - Ouvrir les robinets du groupe manométrique. - Mettre l'installation sous pression avec de l'azote jusqu'à 1200 kPa. - Contrôler soigneusement toute la tuyauterie avec une lampe de détection des fuites ou un autre instrument électronique, en faisant particulièrement attention aux soudures et aux jonctions en général. Si on ne dispose pas de l'équipement nécessaire, laisser toutes les parties qui pourraient donner lieu à des fuites de réfrigérant (soudures, jonctions, etc.) en mesure d'être inspectées. U N IT É EXTÉ R IEU R E BULBE DÉT. THERMOSTAT. BULBE DÉT. THERMOSTAT. U N ITÉ IN T ÉR IEU R E Figure Figura 5 5 Robinet gaz R obinet liquide MODALITÉS - INDICATIONS POUR UN RACCORDEMENT CORRECT TUYAUTERIE ASPIRATION - Pente vers le compresseur dans les portions horizontales (0,5%) pour assurer le retour de l'huile au compresseur même dans des conditions de charge minimale. - Isoler soigneusement la tuyauterie avec du polyéthylène anti-condensation à cellules fermées d'une épaisseur minimale de 9 mm. - Si le groupe de condensation est placé plus bas que l'unité d'évaporation (cf. figure 5), prévoir un siphon d'une hauteur égale à la batterie afin de prévenir, pendant l'arrêt machine, tout retour de liquide au compresseur. - Pour éviter le siphon, monter sur la ligne du liquide une vanne solénoïde (cf. Figure 6) qui, de toute façon, est toujours conseillée. - Si l'unité terminale est équipé d'un détendeur thermostatique, en plus du siphon, prévoir un siphon (cf. Figure 5) le plus près possible du groupe. Cela afin d'éviter que, lorsque la machine est à l'arrêt, le bulbe du détendeur thermostatique ne reste en contact avec du liquide (cf. figure 5). En cas de raccordement à notre unité terminale CED-V, le siphon est déjà prévu à l'intérieur du groupe. - Si le groupe de condensation est positionné plus haut que l'unité d'évaporation, prévoir un seul siphon vers le bas (cf. Fig. 7) Faire toutefois attention: si la distance totale dépasse 7-10 mètres, il est nécessaire d'utiliser la vanne solénoïde sur la ligne du liquide. Pour les remontées verticales, prévoir outre le siphon vers le bas à la base un siphon de récupération de l'huile tous les 6 mètres (cf. Figure 8). - Faire des courbes à rayon ample (et non pas des coudes). - Éviter soigneusement tout écrasement de la tuyauterie. TUYAUTERIE LIQUIDE - Si elle est exposée au soleil ou qu'elle traverse des zones à des températures supérieures à la température extérieure, elle doit être isolée, sinon elle peut être libre. - Éviter les diamètres excessifs pour ne pas provoquer un excès de charge de réfrigérant. Figura 6 6 Figure Figura 77 Figure Figura 8 8 Figure IMPORTANT Avec l'unité terminale intérieure munie d'un détendeur thermostatique, si les tuyauteries de raccordement sont d'une longueur supérieure à environ 15/20 mètres ou si l'installation est prévue pour fonctionner dans des conditions climatiques variables (par exemple air extérieur très différent entre le jour et la nuit), il est conseillé d'installer un réservoir de liquide d'une capacité appropriée près de l'unité intérieure. Le réservoir de liquide peut remplir les fonctions suivantes: - Éviter que du fréon à l'état gazeux arrive au détendeur thermostatique. - Remédier aux variations de charge qui se produisent dans l'installation lorsque les conditions de fonctionnement varient. - Remédier en partie et pour un certain temps à d'éventuelles micro-fuites non détectables, qui dans le temps tendent à décharger l'installation. - Éviter une inondation excessive du condenseur et l'élévation de la température/pression de condensation qui en résulterait si l'installation a été chargée avec une quantité supérieure de réfrigérant, ou si la charge est faite dans des conditions climatiques anormales. Ceci dit, l'installation du réservoir de liquide est toujours conseillée quand les distances de raccordement sont élevées. 110 RISQUES RESIDUELS ATTENTION ON INDIQUE DANS CE FASCICULE TOUTES LES OPERATIONS POUVANT ETRE A L’ORIGINE DE SITUATIONS DE RISQUE, AINSI QUE LES MESURES DE PRECAUTION A PRENDRE AU CAS PAR CAS DEFINITION ZONE DANGEREUSE La figure ci-dessous met en évidence la zone dans laquelle ne peut agir qu’un seul opérateur autorisé. - Par zone dangereuse extérieure, on entend une surface précise autour du groupe et la projection à la verticale sur le sol de cette même surface en cas de groupe suspendu. - Par zone dangereuse intérieure, on entend la zone à laquelle on ne peut accéder qu’en enlevant délibérément les carrosseries ou des parties de celles-ci. 111 RISQUES GENERAUX Zone considérée Batteries d’échange Risque résiduel Blessures légères Soupapes de sûreté Intoxications Blessures Zone autour de l’unité Intoxications Blessures Brûlures graves Mort Mort par: Brûlures graves Foudroiement Zone autour de l’unité Intérieur unité Brûlures Intérieur unité Intérieur unité Blessures Mort due à une électrocution grave Zone dangereuse intérieure Mort par: Foudroiement Zone dangereuse intérieure Mort par: Brûlures graves Foudroiement Modalités Contact Expulsion du gaz réfrigérant par intervention de la protection en question. Explosion due à une augmentation de la température ambiante (incendie). Incendie dû à un court-circuit ou une surchauffe des câbles d’alimentation électrique en amont des sectionneurs du groupe. Contact avec les compresseurs et tuyauterie de refoulement Contact avec arête vive Défaut d'isolation sur les câbles d'alimentation électrique en amont des sectionneurs de machine Masses métalliques sous tension. Contact avec des parties sous tension accessibles après enlèvement des protections. Avertissements Eviter tout contact accidentel Utiliser des gants de protection Appliquer des grilles de protection batteries d’échange (en option) Eviter d’entrer dans la zone dangereuse Collecter correctement les décharges de la soupape de sûreté Utiliser des vêtements et des lunettes appropriés Ne jamais laisser les robinets de refoulement et d’aspiration des compresseurs fermés lorsque le groupe est à l’arrêt Dimensionnement correct des câbles et des dispositifs de protection de la ligne de raccordement au réseau électrique Eviter tout contact accidentel Utiliser des gants de protection Utiliser des gants de protection Ne glisser les mains à l'intérieur de l'unité qu'après avoir ouvert le sectionneur situé sur la ligne de raccordement électrique de l'unité (à la charge du client) Soigner de façon particulièrement attentive la réalisation du raccordement à l’installation de terre des masses métalliques du groupe. Ouvrir et cadenasser le sectionneur général avant de retirer les protections FICHES DE SECURITE REFRIGERANT 01 Eléments identificateurs de la substance Nom du produit: forane 407C N°SDS 01965/1 Fournisseur: ELF ATOCHEM ITALIA Via G.Murat 17, 20159 Milano tel. 02/668111 Nom du produit: forane 22 N° SDS 0005/7 Fournisseur: ELF ATOCHEM ITALIA 4 Cours Michelet Cedex 42 92091 Paris France Tél. 00331 49008080 02 Composition information sur les composants Nature chimique de la préparation Nature chimique de la préparation 03 Identification du risque Risques physiques et chimiques principaux: Décomposition thermique en produits toxiques et corrosifs 04 Premiers soins 05 Mesures antiincendie Informations générales: Inhalation: transporter la victime à l'air frais. Si nécessaire, donner de l'oxygène ou appliquer la respiration artificielle. Contact avec la peau: les engelures doivent être soignées comme des brûlures thermiques. Contact avec les yeux: lavage immédiat et abondant à l'eau. Si l'irritation persiste, contacter un ophtalmologue. Instructions pour le médecin: ne pas administrer catecolammine (vu la sensibilisation cardiaque provoqué par le produit) Risques spécifiques: décomposition thermique en produits toxiques et corrosifs. Acide fluorhydrique. Oxydes de carbone. Méthodes spécifiques d'intervention: refroidir les contenants/citernes avec des jets d'eau. Interdire toute source d'étincelles et d'ignition. NE PAS FUMER. Systèmes spéciaux de protection pour les équipes de secours: porter un appareil respiratoire autonome et des vêtements de protection. 06 Mesures en cas de fuite accidentelle Mélange à base de: Forane 32(difluoromethane) (N° CAS: 75-10-5) Forane 125 (pentafluoroethane) (N° CAS: 354-33-6) Forane 134a (1.1.1.2 tetrafluoroethane) (N° CAS: 811-97-2) Précautions individuelles: éviter tout contact avec la peau, les yeux et l'inhalation des vapeurs. Utiliser moyens de protection personnels. Dans une pièce close: aérer ou utiliser un appareil respiratoire autonome (risque d’anoxie). INTERDICTION DE FUMER. Précautions pour la protection de l’ambiance : Limiter au maximum les déchets dans l’ambiance. 112 Mélange à base de: Chlorodifluoromethane hydrocarbure halogéné N° CAS 75-45-6 EINECS 200-871-9 Effets sur la santé: pratiquement non nocif Risques physiques et chimiques principaux: Décomposition thermique en produits toxiques et corrosifs Risques spécifiques / CEE: dangereux pour la couche d'ozone Informations générales: Inhalation: transporter la victime à l'air frais. Si nécessaire, donner de l'oxygène ou appliquer la respiration artificielle. Contact avec la peau: les engelures doivent être soignées comme des brûlures thermiques. Contact avec les yeux: lavage immédiat et abondant à l'eau. Si l'irritation persiste, contacter un ophtalmologue. Risques spécifiques: décomposition thermique en produits toxiques et corrosifs. Acide fluorhydrique. Acide Chlorhydrique gaz. Phosgène, Oxydes de carbone CO. Méthodes spécifiques d'intervention: refroidir les contenants/citernes avec des jets d'eau. Interdire toute source d'étincelles et d'ignition. NE PAS FUMER. Systèmes spéciaux de protection pour les équipes de secours: porter un appareil respiratoire autonome et des vêtements de protection. Précautions individuelles: éviter tout contact avec la peau, les yeux et l'inhalation des vapeurs. Dans une pièce close: aérer ou utiliser un appareil respiratoire autonome (risque d'asphyxie). INTERDICTION DE FUMER. Eloigner toutes les sources d'ignition. 07 08 Manipulation et stockage Contrôle de l’exposition/prote ction individuelle Mesures/précautions techniques Mesures/précautions techniques Paramètres de contrôle Paramètres de contrôle Dispositions de stockage et de manipulation applicables aux produits: GAZ PRESSURISES. Prévoir une aération et une évacuation appropriées au niveau des appareils. Conseils pour l’utilisation: interdire les points d’ignition et le contact avec les surfaces chaudes. NE PAS FUMER. Mesures techniques/Modalités de stockage: emmagasiner à température ambiante dans le contenant d’origine. Tenir loin de flammes libres, surfaces chaudes et sources d’ignition. Conserver dans un endroit frais et bien aéré. Protéger les contenants pleins contre les sources de chaleur pour éviter toute surpression. Recommandés: acier ordinaire A éviter: alliage contenant plus de 2% de magnésium, matières plastiques Mesures de précaution à prendre: assurer un renouvellement d’air et/ou une aspiration suffisants dans les ambiances de travail. Valeurs limite d’exposition: valeur limite non existante F-USA Forane 134a valeur limite recommandée par Elf: VME = 1000ppm Forane 32 valeur limite recommandée par Elf: VME = 1000ppm Forane 125 valeur limite recommandée par Elf: VME = 1000ppm Equipement de protection individuelle: Protection Respiratoire: en cas d’aération insuffisante, porter un équipement respiratoire approprié. Protection des mains: gants. Protection des yeux: lunettes de protection. 09 Propriétés physiques et chimiques 10 Stabilité et réactivité 11 Informations toxicologiques Dispositions de stockage et de manipulation applicables aux produits: GAZ PRESSURISES. Prévoir une aération et une évacuation appropriées au niveau des appareils. Conseils pour l’utilisation: interdire les points d’ignition et le contact avec les surfaces chaudes. NE PAS FUMER. Mesures techniques/Modalités de stockage: emmagasiner à température ambiante dans le contenant d’origine. Tenir loin de flammes libres, surfaces chaudes et sources d’ignition. Conserver dans un endroit frais et bien aéré. Protéger les contenants pleins contre les sources de chaleur pour éviter toute surpression. Recommandés: acier ordinaire A éviter: alliage contenant plus de 2% de magnésium Matières plastiques Mesures de précaution à prendre: assurer un renouvellement d’air et/ou une aspiration suffisants dans les ambiances de travail. Valeurs limite d’exposition: France 1989: VME = 1000 ppm USA 1992: TWA = 1000 ppm = 3500 mg/m3 Equipement de protection individuelle: Protection Respiratoire: en cas d’aération insuffisante, porter un équipement respiratoire approprié. Protection des mains: gants. Protection des yeux: lunettes de protection. Mesures d’hygiène spécifiques: éviter tout contact avec la peau, les yeux et l’inhalation des vapeurs. Etat physique (20°C): gaz liquéfié Etat physique (20°C): gaz liquéfié Couleur: Incolore. Couleur: Incolore. Odeur: légèrement semblable à l’éther. PH: non applicable Odeur: légèrement semblable à l’éther. PH: non applicable Point/intervalle d’ébullition: -40,8°C Point/intervalle d’ébullition: -42,4 °C Point de inflammabilité: Ne s’enflamme pas aux conditions de test Température/intervalle de fusion: -160°C Pression de vapeur: (25°C): 1.13 Mpa (11,3 bar) a (50°C): 2.11 Température de décomposition: 480°C Pression de vapeur: (20°C): 0,91 Mpa (9,1 bars) à (50°C): 1,91 Mpa Mpa (21,1 bar) a (70°C): 3.26 Mpa (32,6 bar) (19,4 bars) Densité de vapeur: Au point d’ébullition 4,54 kg/m3 Densité de vapeur: (20°C) 3,57 kg/m3 Densité: (25°C) 1133 kg/m3 à (50°C) 1004 kg/m3 à (70°C) 861 kg/m3 Densité: (20°C) 1213 kg/m3 à (50°C) 1085 kg/m3 Solubilité: eau (25°C) 3 g/l – Solvant soluble dans les hydrocarbures et solvants chlorurés, Alcools, Cétones, Esters Solubilité de l’eau dans le produit à 30°C: 0,15% en poids. Conditions à éviter: éviter tout contact avec des flammes et des Conditions à éviter: éviter tout contact avec des flammes et des surfaces métalliques brûlantes. surfaces métalliques brûlantes. Produits de décomposition dangereux: décomposition thermique Produits de décomposition dangereux: décomposition thermique en en produits fluorés toxiques (acide fluorhydrique) produits toxiques et corrosifs: acide fluorhydrique, acide chlorhydrique Autres informations : Produit stable aux conditions normales de gaz, phosgènes, oxyde de carbone (CO). stockage et manipulation Inhalation: expérimentale pour l’animal Forane 134a, 32, 125 Inhalation: expérimentale pour l’animal pratiquement non nocif par pratiquement non nocif par inhalation. Aucune mortalité relevé sur le inhalation. Aucun effet sous 50000 ppm. rat à a 500000 ppm/4h. Comme pour les autres composants Comme pour les autres composants halogénés aliphatiques volatils, halogénés aliphatiques volatils, par accumulation de vapeurs et/ou par accumulation de vapeurs et/ou par inhalation de quantités par inhalation de quantités importantes, ce produit peut causer: importantes, ce produit peut causer: perte de connaissances et perte de connaissances et troubles cardiaques aggravés par le troubles cardiaques aggravés par le stress et le manque d’oxygène: stress et le manque d’oxygène: risque mortel. risque mortel. Contact avec la peau: engelures possibles par projection de gaz Contact avec la peau: engelures possibles par projection de gaz liquéfié. liquéfié. Toxicité chronique : Etudes sur l’inhalation prolongé sur l’animal Contact avec les yeux: irritations passagères n’ont pas mis en évidence aucun éffet toxique sub-chronique (rat / 3 mois / inhalation: 50000ppm). Effects spécifiques : Génotoxicité selon les données expérimentales disponibles : Forane 134a, 32, 125 PAS Génotoxique Cancérogenèse :: Forane 134a les expériments n’ont pas mis en évidence aucun effet cancérogène demonstré clairement (rat / inhalation – via orale) Toxicité pour la réproduction : Développement fœtal Forane 134a, 32, 125 : selon les données disponibles, absence d’effets toxiques pour le développement du foetus. Fertilité : selon les données limitées disponibles sur l’animal : Forane 134a absence d’effets sur la fertilité (rats / inhalation) 113 12 Informations écologiques 13 Considérations sur l'élimination Informations sur le transport 14 15 16 Forane 32 Persistance/dégradabilité: dans l'eau, non facilement biodégradable 5% après 28j Bio-accumulable: pratiquement non bio-accumulable log pow 0,21 Forane 125 Mobilité: évaporation rapide t ½ vie 3,2 h (estimation) Persistance/dégradabilité: dans l'eau, non facilement biodégradable 5% dopo 28d. Dans l'air, dégradation dans la troposphère t ½ vie 28,3 y (estimation). Potentiel de destruction de l'ozone ODP (R-11 = 1)=0. Effet de serre potentiel (GWP): (HGWP) = 0,58. Dans le sol et dans les sédiments basse absorption log Koc= 1,3-1,7 Bio-accumulable: pratiquement non bio-accumulable log pow 1,48 Forane 134a Mobilité: évaporation rapide t ½ vie 3 h (estimation) Persistance/dégradabilité: dans l'eau, non facilement biodégradable 3% dopo 28j. Dans l'air, dégradation dans l’atmosphètre 3% après 28j . Potentiel de destruction de l'ozone ODP (R-11 = 1)=0. Effet de serre potentiel (GWP) 0,26. Bio-accumulable: pratiquement non bio-accumulable log pow 1,06 Elimination du produit: recycler ou incinérer Consulter les services de sécurité de ELF ATOCHEM pour informations complémentaires et mises à jour Numéro ONU 3163. RID\ADR classe 2 chiffre (et lettre) 4°a Prescriptions: Etiquettes 2 N° risque /N° matière 20/3163 IMDG classe 2.2 N°ONU (IMDG) 3163 Prescriptions: Etiquettes 2.2 IATA classe 2.2 N°ONU (IATA) o N°ID3163 Prescriptions: Etiquettes 2.2 Information sur la Directive CEE réglementation Fiches de sécurité: D. 91/155/CEE modifié par la D. 93/112/CEE: Substances dangereuses Classification / étiquette CEE Préparations dangereuses: Pas classifiés comme dangereux Inventaire: EINECS conforme Autres informations Utilisations recommandées: Réfrigérant Références bibliographiques: Encyclopedie des gas (Air Liquideed.1976- ELSEVIER AMSTERDAM) Mobilité: évaporation rapide t ½ vie 2,7 h Persistance/dégradabilité: dans l'eau, non facilement biodégradable 0% après 28d. Dans l'air, dégradation dans l'atmosphère ½ vie 14 ans. Potentiel de destruction de l'ozone ODP (R-11 = 1) = 0,055. Effet de serre potentiel (HGWP) = 0,36. Dans le sol et dans les sédiments basse absorption log Koc = 1,8. Bio-accumulable: pratiquement non bio-accumulable log pow 1,08. Toxicité aquatique: toxicité aiguë, poissons seuil de toxicité, 24/h = 180 mg/l, Bactéries anaérobies seuil de toxicité 24h > 400 mg/l. Elimination du produit: recycler ou incinérer Numéro ONU 1018. RID\ADR classe 2 chiffre (et lettre) 3°a Prescriptions: Etiquettes 2 N° risque /N° matière 20/1018 IMDG classe 2.2 N° ONU (IMDG) 1018 Prescriptions: Etiquettes NON INFLAMMABLE GAZ/2 IATA classe 2.2 N° ONU (IATA) ou N° ID1018 Prescriptions: Etiquettes NON INFLAMMABLE GAZ/2 Code produit: 00055/7 Directive CEE Fiches de sécurité: D. 91/155/CEE modifié par la D. 93/112/CEE: Substances et préparations dangereuses. Préparations dangereuses: D. 67/548/CEE modifiée par la D. 93/21/CEE: Guide à l'étiquetage (18a APT) R59 Nuisible pour la couche d'ozone S59. Consulter le producteur /fournisseur pour informations relatives à la récupération et au recyclage S 61 Eviter de jeter dans la nature. Consulter les instructions spéciales/la fiche des données de sécurité Utilisations recommandées: Réfrigérant à basse température, Agent congelant, Climatisation de l'air Références bibliographiques: Encyclopédie des gaz (Air Liquide ed. 1976 - ELSEVIER AMSTERDAM). Fiche toxicologique INRS: N° 142 CHLORODIFLUOROMETHANE Ce document se réfère au produit tel quel, conforme aux spécifications fournies par ELF ATOCHEM. En cas de combinaisons ou de mélanges, s'assurer qu'aucun risque nouveau ne puisse survenir. Les informations contenues dans cette fiche sont fournies de bonne foi et se basent sur nos dernières connaissances relatives au produit en question, à la date d'édition de ladite fiche. On attire l'attention des utilisateurs sur les éventuels risques qu'ils peuvent courir si ce produit est employé pour des utilisations différentes de celles auxquelles il est destiné. Cette fiche ne doit être utilisée et reproduite qu'à des fins de prévention et de sécurité. La liste des textes de loi, réglementaires ou administratifs ne doit pas être considérée comme exhaustive. L'utilisateur du produit a le devoir de se référer à l'ensemble des textes officiels concernant l'utilisation, la conservation et la manipulation du produit, pour lesquels il est le seul responsable. L'utilisateur du produit doit en outre fournir aux personnes pouvant entrer en contact avec ledit produit toutes les informations nécessaires à la sécurité du travail et à la protection de la santé et de l'environnement, en leur transmettant cette fiche de données de sécurité. 114 SUMARIO GENERAL ......................................................................................................................................... 116 ADVERTENCIAS GENERALES.......................................................................................................................................116 PRINCIPIOS DE SEGURIDAD PARA LA INTEGRIDAD .................................................................................................116 ACCESORIOS .................................................................................................................................................................116 DATOS TECNICOS GENERALES...................................................................................................................................117 UBICACION .....................................................................................................................................................................118 ESPACIOS FUNCIONALES ............................................................................................................................................118 DIMENSIONES Y DISTRIBUCION PESOS .....................................................................................................................119 REGULACIONES DE PROTECCION Y CONTROLES ...................................................................................................119 LIVELLI SONORI .............................................................................................................................................................119 RECEPCION ..................................................................................................................................... 120 CONTROL EN LA RECEPCION ......................................................................................................................................120 TRASLADO ......................................................................................................................................................................120 ALMACENAJE .................................................................................................................................................................121 DESEMBALAJE ...............................................................................................................................................................121 CONEXIONES ELECTRICAS .............................................................................................................. 122 CONEXIONES FUNCIONALES .......................................................................................................................................122 CONEXIÓN A LA RED DE ALIMENTACIÓN ...................................................................................................................122 CONEXIONES OPCIONALES .........................................................................................................................................122 CONEXIÓN CON P.C. O B.M.S.......................................................................................................................................123 PUESTA EN MARCHA ....................................................................................................................... 124 CONTROLES PRELIMINARES .......................................................................................................................................124 PUESTA EN MARCHA ....................................................................................................................................................125 REGULACION ................................................................................................................................... 126 MODALIDAD DE FUNCIONAMIENTO DEL MÓDULO PRINCIPAL ................................................................................126 ROTACIÓN DE LOS COMPRESORES ...........................................................................................................................126 TEMPORIZACIONES DE LOS COMPRESORES ..........................................................................................................126 REGULADOR VENTILADORES DE LA BATERIA ..........................................................................................................127 PANEL DEL MÓDULO DE CONTROL PRINCIPAL.........................................................................................................128 PROGRAMACIÓN DE LOS PARÁMETROS DE FUNCIONAMIENTO............................................................................128 ALARMAS ........................................................................................................................................................................130 BUSQUEDA DE AVERIAS.................................................................................................................. 131 BLOQUEO ALTA PRESION ............................................................................................................................................132 BLOQUEO BAJA PRESION ...........................................................................................................................................133 INTERVENCIÓN SEGURIDAD COMPRESOR................................................................................................................134 INTERVENCION TERMICA VENTILADORES.................................................................................................................134 UNIDAD RUIDOSA ..........................................................................................................................................................135 COMPRESOR QUE NO SE PONE EN MARCHA ...........................................................................................................135 MANTENIMIENTO ORDINARIO .......................................................................................................... 136 UNIDAD ...........................................................................................................................................................................136 PARTE ELECTRICA ........................................................................................................................................................136 CIRCUITOS FRIGORÍFICOS ............................................................................................................... 137 CIRCUITO DE ASPIRACION ...........................................................................................................................................137 CIRCUITO LIQUIDO ........................................................................................................................................................137 PRUEBA DE FUGAS .......................................................................................................................................................138 MODALIDAD - INDICACIONES PARA UNA CORRECTA CONEXION...........................................................................138 RIESGOS RESIDUALES .................................................................................................................... 139 DEFINICION DE ZONA PELIGROSA ..............................................................................................................................139 RIESGOS GENERICOS ..................................................................................................................................................140 FICHA DE SEGURIDAD DEL REFRIGERANTE .............................................................................................................140 Todos los datos contenidos en este manual no son vinculantes y pueden ser cambiados por el fabricante sin preaviso. Cualquier reproducción total o parcial queda terminantemente prohibida. 115 GENERAL ADVERTENCIAS GENERALES Este manual ha sido concebido para ayudar a realizar una correcta instalación, puesta a punto y mantenimiento de la unidad; por lo que es de fundamental importancia: ─ leer atentamente estas instrucciones; ─ la instalación, puesta en servicio y asistencia de la unidad sea realizada por personal competente (ley n.46 del 5/3/1990) bajo requisitos legales. • Será rechazada cualquier responsabilidad con vencimiento de la garantía en caso de modificaciones eléctricas y/o eléctricas. En general intervenciones que no sean expresamente autorizadas y no respetan el manual, invalidan la garantía. • al instalar la unidad hay que tener presente las normas vigentes de seguridad locales. • Verificar que las características de la red eléctrica sean conforme a los datos recogidos en la placa de la unidad, que aparece en el interior del cuadro eléctrico. • Este manual y el esquema eléctrico deben ser bien conservados y puestos a disposición del operador para futuras consultas. • Todo el material de embalaje (bolsas de plástico, poliestireno, clavos, etc.) al ser potenciales fuentes de peligro deben mantenerse fuera del alcance de los niños y reciclarlo según la normativa local en vigor. • La unidad motocondensante esta destinada al acondicionamiento combinada a una unidad interna por expansión del refrigerante. • En caso de avería o mal funcionamiento hay que desactivar el aparato. • En caso de posibles reparaciones hay que dirigirse única y exclusivamente a un centro técnico de asistencia autorizado por el fabricante, y solicitar piezas de recambio originales. El no respetar las anteriores advertencias puede poner en riesgo la seguridad del aparato. La empresa constructora declina cualquier responsabilidad en caso de eventuales daños que directa o indirectamente puedan derivar a personas o cosas como consecuencia de la falta de atención de estas instrucciones. PRINCIPIOS DE SEGURIDAD PARA LA INTEGRIDAD La unidad esta protegida y construida para no poner en riesgo la salud y seguridad de las personas. Por ese motivo se han adoptado soluciones aptas para eliminar, dentro de lo posible, las posibles causas de riesgo o reducir sensiblemente la probabilidad del mismo. En caso de que no se hubiese podido prever o eliminar tal riesgo en fase de proyecto, véase la sección riesgos residuales. ACCESORIOS Las unidades pueden ir dotadas de los siguientes accesorios (bajo pedido): ─ tensiones diferentes del estándar ─ reja de protección batería ─ Amortiguadores ─ contador funcionamiento compresor ─ válvula solenoide ─ set de conexión compuesto de: válvula termostática, filtro deshidratador, válvula solenoide línea liquido, visor de liquido ─ conexión a modulo de control a distancia ─ conexión con PC o BMS 116 DATOS TECNICOS GENERALES 102 Modello MSAT 122 Tension estandar 142 162 182 400 / 3 / 50 202 242 Datos referidos a: Modelo MSAT R-22 Potencia frigorífica Potencia abs. compres. kW kW 31.3 8.5 36.4 10.3 41.3 11.3 48.7 13.5 53.8 15.8 63.9 17.5 77.9 22.3 kW kW 29.8 9.4 34.1 11.2 39.2 12.6 44.1 14.7 50.3 17.8 62.8 20.3 72.8 25.2 Modelo MSAT R-407C Potencia frigorifica Potencia abs. compres. SCROLL 2900 2x 2,5 2 NTC Compresor tipo n° vueltas por minuto Carga aceite rpm 2x 1,55 L 2x 1,65 Etapas de capacidad Protecion motor Material Cantidad Sup.Front. Tot. Separacion entre aletas n° rangos ∅ tubo Presion prueba n° e diametro N° vueltas por minuto Caudal de aire Potencia nominal 2 m mm mm kPa Temperatura aire externo +35°C Temperatura aspiración de gas saturado (SST) 7.5°C R-22, (SST) 9.5°C (dew point) R-407C Tipo aceite SUNISO 3GS OIL Nota: si la unidad es con R407C tipo aceite - MOBIL EAL ARTIC 22 CC - 32 MMMA POE 2x 4 Condensador Tubo de cobre/aletas en aluminio 2 3 3,6 4,9 1,6 2,1 1,6 1,6 2 9,52 3000 Electroventilador axial 2x560 4x450 n° x ∅ rpm 680 840 L/s 3056 4125 kW 2x0,22 4x0,16 Toma de líquido Toma de aspiración Conexiones Freon 16 ∅ 14 28 ∅ 22 Carga R-22 Carga R-407C kg kg Peso transp. aproxim. Volumen embal. aprox. kg 3 m 6x450 6120 6x0,16 18 28 Note: Conexiones para soldar 22 35 Refrigerante 8.2 9.2 8,2 9,2 Datos referidos a: ─ Motore con rotor externo ─ Griglia antinfortunistica Nota: 9 10 9 10 9.6 10.6 12 13 12 13 420 3,20 485 580 590 4,30 Carga a completar en fase de puesta en marcha Pesos y Volúmenes 275 280 1,50 380 Limites de funcionamiento Max. temp. aire R-22 entrada condensador SST = +5 °C R-407C Min. temp. aire R-22 entrada Condensador R-407C SST = +5 °C Max. temp. aspiración R-22 gas saturado °C R-407C 49 47,5 47,5 47,5 45 49 46 47 -4 45 -4 45 -4 44,5 -4 43,5 -8 46 -4 43 -8 -5 -5 -5 -5 -9 -5 -9 12,5 12,5 117 Note: SST Temperatura de aspiración de saturación. Sobrecalentamiento del gas aspirado + 5°K UBICACION Las unidades están proyectadas para ser instaladas al exterior. • Verificar que el plano de apoyo sea plano e idóneo para soportar el peso de la unidad (véase peso y distribución pesos en la pag. 119). Poner un estrato de goma entre la base de apoyo de la unidad y el plano (para evitar ruidos y vibraciones). • Respetar los espacios funcionales. • Si la unidad es instalada en una terraza o sobre tejado es aconsejable que se monte sobre soporte antivibraciones, en este caso las tuberías de conexión tendrán que ir dotadas de juntas elásticas. • Colocar la unidad de modo que quede protegida en sus lados principales de posibles vientos. • Fijar la unidad al suelo. ESPACIOS FUNCIONALES La elección de la localización de la unidad es de fundamental importancia para su buen funcionamiento. Obstáculos en el flujo de aire, fuentes de calor (como descargas, aire caliente), dificultad del cambio de aire en la zona de instalación, hojas u otros cuerpos extraños que pueden obstruir la batería, vientos que favorecen excesivamente o se oponen al flujo de aire causan anomalías de funcionamiento o bloqueos. Las unidades necesitan de espacios mínimos de funcionamiento y de mantenimiento. Los siguientes esquemas muestran algunas formas de instalación, verificar caso por caso observando todo el contenido de este manual. Lado libre Nota: Las medidas son en mm UNIDAD CON CIRCUITOS INDEPENDIENTES UNIDAD CON MANDO DE COMPRESORES SEPARADOS AMORTIGUADORES DE BASE (accesorio) (accesorio) Bajo pedido, es posible suministrar la unidad con mando de compresores separados, preparada para la conexión con 2 unidades terminales distintas La alimentación eléctrica será común. 118 DIMENSIONES Y DISTRIBUCION PESOS Leyenda: 1 - Compresor 2 - Conexión linea liquido Ø G1 primer circuito 2’ - Conexion linea liquido Ø G1 segundo circuito 3 - Conexión linea gas Ø G2 primer circuito 3’ - Conexión linea gas Ø G2 segundo circuito 4 - Cuadro electrico 5 - Ventilador helicoidal 6 - Entrada linea eléctrica 7 - Bateria condensadora 8 - Acceso cuadro electrico y compresor Tamañ. 102 122 142 162/182 202/242 A B C 1530 678 1400 1530 678 1400 1563 1107 1570 1563 1107 1570 2098 1107 1570 DIMENSIONES F G H D E 128 128 128 128 128 73 73 130 130 130 75 75 75 75 75 628 628 1058 1058 1058 42 42 42 42 42 I L O 1255 1255 1077 1077 1612 800 800 900 900 900 153 153 153 Ø G1 14 16 16 18 22 Ø G2 22 28 28 28 35 n° W1 ventilador. 2 88 2 89 4 121 4 155 6 191 PESOS W2 W3 W4 Tot. 42 42 58 74 95 275 280 380 485 590 95 98 132 168 200 50 51 69 88 104 Nota: Las dimensiones están expresadas en mm, el peso en kg. REGULACIONES DE PROTECCION Y CONTROLES Apre Chiude Presostato alta presion (kPa) 2750 2000 Presostato baja presion (kPa) 230 360 Tapón fusible de seguridad Nº máximo de arranques horarios del compresor Termostato seguridad descarga Nota: Los ajustes de seguridad de (°C) 120 “presostato alta presión” y 10 “termostato seguridad descarga” se pueden rearmar manualmente en la (n°) unidad de control. La seguridad (°C) 120 “presostato baja presión” es por de LIVELLI SONORI Nivel de presión Sooraivell Sonora Bandas de octava (Hz) Global 125 250 500 1000 2000 4000 8000 dB(A) Nivel de potencia sonora (dB) Tamañ. 102 122 142 162 182 202 242 63 80 80 87 87 84 86 86 84 76 80 81 78 79 82 75 73 74 76 78 78 81 73 73 73 73 74 77 75 69 71 71 70 69 72 70 63 65 69 69 70 67 73 60 62 66 65 62 62 63 42 43 63 62 55 54 65 59 59 60 60 60 61 62 119 Nota: - Los niveles sonoros se refieren a unidad en función a máxima potencia con máxima velocidad de rotación de los ventiladores, aire de entrada en el condensador de 35°C, temperatura saturada de aspiración + 5°C. - Nivel de presión sonora referido a 1 metro de distancia de la superficie externa de la unidad funcionando a campo abierto. -12 - Nivel de potencia sonora ref. : 1x10 w. -5 - Nivel de presión sonora ref. : 2 x 10 Pa. RECEPCION CONTROL EN LA RECEPCION Las unidades se envían en embalajes de protección. Controlar que la unidad a su llegada no haya sufrido ningún daño durante el transporte y que la misma llegue completa como en el pedido. En el caso de visibles daños anote inmediatamente en el documento de transporte el tipo de daño que se ha encontrado, con la indicación: “RETIRO CON RESERVA POR EVIDENTES DAÑOS EN EL EMBALAJE" en cuanto a la entrega directa en fabrica conlleva un resarcimiento por daños a cargo de la compañía aseguradora según ley N° 450 del 22.08.85 “limite de resarcimiento“. IMPORTANTE TODAS LAS OPERACIONES CITADAS HAN DE EFECTUARSE SEGUN LAS NORMAS DE SEGURIDAD VIGENTES, SEA EN LO RELATIVO AL MATERIAL UTILIZADO COMO AL MODO DE OPERAR. ATENCION ANTES DE EMPEZAR LA OPERACION DE MOVIMIENTO DE LA UNIDAD ASEGURARSE QUE LA CAPACIDAD DE ELEVACION SEA ADECUADA AL PESO DE LA UNIDAD EN CUESTION. Tamaño Peso Kg 102 275 122 280 142 380 162 480 182 485 202 580 242 590 TRASLADO TRANSPORTE con CARRETILLA ELEVADORA o SIMILAR - Introducir las pinzas por la parte más larga del pallet que forma parte del embalaje. - Asegurarse antes de empezar la elevación que la unidad este en equilibrio estable. Hay que tener en cuenta que la parte mas pesada es donde va instalado el compresor. 120 ELEVAR con GRUA o SIMILAR - Poner los tubos de elevación en los huecos situados en la base de la unidad. - Los extremos de los tubos deben sobresalir en modo tal que permitan introducir las seguridades y sus respectivos enganches. - Situar las cintas de elevación en los tubos entre las seguridades y la base de la unidad (véase el diseño). - Situar en los bordes superiores de la unidad estructuras rígidas para proteger la unidad (solo si se ha previsto un único punto de elevación). - Poner gradualmente en tensión la cintas de elevación y asegurarse de su correcto montaje. - Iniciar la elevación. Tablas de protección Estructura rigida Cinta de elevación Seguridad Enganches de seguridad Tubo de elevación ADVERTENCIAS EL RESPETO DE LAS INSTRUCCIONES SITUADAS AL LADO EXTERNO DEL CARTON DE EMBALAJE ES PARA EL USUARIO FINAL GARANTIA DE INTEGRIDAD FISICA Y FUNCIONAL DE LA UNIDAD. SE ACONSEJA: - TRASLADAR CON PRECAUCION - MANTENER EN LUGAR SECO - SE ACONSEJA NUNCA APOYAR OBJETOS SOBRE LA UNIDAD, SOLO DENTRO DE LOS LIMITES DE LOS PLANOS DE CARGA INDICADOS (EL NUMERO INDICADO ESPECIFICA LA CANTIDAD DE PLANOS QUE PUEDEN SOBREPONERSE. Es. 1 = 1 PLANO SOBREPUESTO EN LA UNIDAD). ALMACENAJE − − − Mantener la unidad reparada de: rayos solares, lluvia, arena y viento Temperatura: máxima 60°C mínima -10°C Máxima humedad: 90% DESEMBALAJE - Cortar con tijeras las cintas de embalaje. - Elevar el cartón de embalaje (si existiera). - Quitar las abrazaderas que fijan la unidad al pallet con la ayuda de llave de 10mm. - Elevar la unidad para que quede separada del pallet. - Apoyar la unidad en el punto donde ira destinada. - Verificar la presencia de daños visibles. - Deshacerse del material de embalaje en centros de reciclaje especializados (respetar la normativa vigente). 121 CONEXIONES ELECTRICAS IMPORTANTE COMPROBAR QUE LA UNIDAD NO ESTÉ CONECTADA ELÉCTRICAMENTE ANTES DE EMPEZAR OPERACIONES EN LA PARTE ELÉCTRICA CONEXIONES FUNCIONALES Antes de poner en marcha la unidad deben realizarse las siguientes conexiones: CONEXIÓN A LA RED DE ALIMENTACIÓN - Conectar la línea trifasica a los bornes del dispositivo de protección general (seccionador) indicados en el esquema eléctrico como L1 L2 L3. - Conectar el conductor de neutro al borne N del cuadro eléctrico. - Conectar el conductor de toma de tierra al borne Pe del cuadro eléctrico. - El personal que realizará la instalación prestará especial atención al seleccionar los cables de conexión con la red de alimentación, siguiendo los datos contenidos en la ficha técnica de la unidad; adhesivo situado en la puerta del cuadro eléctrico. También tiene importancia prever una protección contra posibles cortocircuitos que sea adecuada a la línea de alimentación. Dicha protección debe poder cortar la posible corriente de cortocircuito en la zona de la instalación donde se localice. DATOS ELECTRICOS TAMAÑO F.L.A. L.R.A. F.L.I. M.IC. 1) F.L.A. 2) L.R.A. 3) F.L.I. 4) M.I.C. Unico compresor 230/3/50 (A) 400/3/50 Ventiladores (A) 230/1/50 230/3/50 Total (A) 400/3/50 230/3/50 Compresor (A) 400/3/50 Compresor (kW) Ventilador (kW) Total (kW) 230/3/50 Total (A) 400/3/50 102 122 142 162 182 202 242 19.7 9.8 1.15x2 41.6 21.8 132.5 66 11.3 0.22x2 11.8 154.5 78.1 22.9 11.3 1.15x2 48.1 25.0 164 74 13.2 0.22x2 13.6 189.2 87.6 25.3 13.6 0.65 x 4 53.9 30.3 171 102 15.2 0.17 x 4 15.9 199.5 118.8 24.1 14.7 0.65 x 4 51.4 32.5 166 94 16.8 0.17 x 4 17.5 193.3 111.9 31.2 17.5 0.65 x 4 65.6 38.1 211 117 20.7 0.17 x 4 21.4 244.9 137.2 35.8 20.0 0.65 x 6 76.4 44.9 224 128 23.8 0.17 x 6 24.8 264.6 152.3 45.2 25.2 0.65 x 6 85.8 55.2 280 159 29.2 0.17 x 6 30.2 329.5 189.0 Corriente absorbida en condiciones máximas permitidas. Corriente en la puesta en marcha del compresor. Potencia absorbida a plena carga (en condiciones máximas permitidas). Máxima corriente en la puesta en marcha de la unidad. Desequilibrio tensión: máx 2% Tensión: 400/3/50 ± 6% 230/3/50 ± 6% CONEXIONES OPCIONALES CONEXIÓN AL DISPOSITIVO DE SEÑALIZACIONES DE ANOMALÍAS Siempre en la misma sección del esquema eléctrico se puede observar el circuito de alarma acumulativa. Con este circuito se puede introducir un dispositivo acústico o visual de señalización de anomalías en la unidad. El dispositivo de señalización tiene una alimentación de 12V 300mA en baja tensión según esquema eléctrico. CONEXIÓN AL MÓDULO DE CONTROL A DISTANCIA El módulo de control a distancia es un duplicado perfecto del teclado del módulo de control ENERGY LIGHT que permite efectuar a distancia todas las operaciones que se realizan desde la unidad. 122 INSTALACIÓN Antes de realizar la conexión del módulo de control a distancia hay que abrir el seleccionador para eliminar la tensión de la unidad. Conectar el teclado a distancia como se indica a continuación. Lado posterior del terminal a distancia C5121423 25 24 26 S + - ESPANSION E SERIAL E RELE' 7 COMUNE RELE' 6 RELE' 4 RELE' 5 RELE' 3 RELE' 2 C5121420 RELE' 1 - S+ CONN B RELE' ALLARME CONN A La longitud máxima del cable de conexión ENERGY LIGHT para teclado es de 80m. CONEXIÓN CON P.C. O B.M.S. 230 Vac A C A R G O D E L C L IE N T E C a b le d e c o n e x ió n R S 2 3 2 9 p o lo s m a c h o - h e m b ra L o n g itu d m á x 1 0 m t 10 12 A lim e n ta c ió n C5121425 C 5121425 21 22 23 DTR R S 485 TTL 1 2 3 4 24 OFF 22 21 23 24 ON - + 123 7 6 5 4 3 2 1 RELE' 1 8 RELE' 2 9 S RELE' 7 C5121248 Cable serial 5 vias 2molex Longitud máx: 2 mt 10 RELE' 6 A C A R G O D E L C L IE N T E C a b le s e r ia l R S 4 8 5 C a b le 2 h ilo s tw is t L o n g itu d m á x d e la lín e a :1 0 0 0 m t - + RELE' 3 + RELE' 5 - COMUNE + RELE' ALLARME - SERIALE + RELE' 4 ON R S 485 TTL ESPANSIONE OFF S e r ia l o p to c o u p le d a d a p te r R S 2 3 2 /T T L R S 2 3 2 /R S 4 8 5 - R S 4 8 5 /T T L M ic r o n e t a n d M o d B u s P r o to c o l NU NU ECHO DTR NU NU ECHO S e r ia l o p to c o u p le d a d a p te r R S 2 3 2 /T T L R S 2 3 2 /R S 4 8 5 - R S 4 8 5 /T T L M i c r o n e t a n d M o d B u s P r o to c o l 1 2 3 4 10 12 A lim e n ta c ió n R S 232 - PE1P0005 R S 232 C 5121420 CONN B CONN A PUESTA EN MARCHA TODAS LAS UNIDADES HAN DE SER PUESTAS EN MARCHA POR CENTROS DE ASISTENCIA AUTORIZADOS. SOLO DE ESTE MODO SE HACE EFECTIVA LA GARANTIA. LA ASISTENCIA SE LIMITA UNICAMENTE A LA PUESTA EN MARCHA Y NO INCLUYE CONEXIONES U TAREAS PROPIAS DE INSTALACION. CONTROLES PRELIMINARES - Controlar que la unidad este ubicada correctamente y que las conexiones con la unidad terminal estén perfectamente efectuadas sea en el lado frigorífico como en el eléctrico. - Controlar el valor de la tensión y de la frecuencia de alimentación: DEBEN CORRESPONDER A LOS VALORES 230 ± 6% 400 ± 6% - Controlar que los tornillos que fijan los cables a los componentes eléctricos presentes en el cuadro estén bien ancorados (durante el traslado y transporte las vibraciones podrían haberlos aflojado). OPERACION DE VACIO Una vez comprobado, con la instalación en presión, que no haya perdidas (véase sección "circuitos refrigerantes") tanto en los circuitos de conexión como en la unidad terminal, hay que proceder como se indica a continuación. - Descargar la instalación con llaves MSAT cerradas. - Ayudándose de un grupo manométrico, conectar la bomba de vacío en las dos conexiones auxiliares de las llaves, comprobar que eventuales elementos de interceptación, como válvula solenoide o llaves intermedias, estén abiertas y realizar el vacío. - Para que la válvula solenoide permanezca abierta, desconectarla de las bornas del panel eléctrico de la unidad externa (véase esquema eléctrico) y conectarla a una presa de corriente de 220V. - Parar la bomba de vacío cuando la presión es de cerca de 100Pa y dejar la instalación durante algunas horas en vacío; una pequeña subida inicial de la presión es normal para luego estabilizarse definitivamente. Si la presión continua a subir es porque hay pequeñas fugas o humedad. En el primer caso hay que repetir la operación descrita en la sección PRUEBA DE FUGAS del manual "circuitos refrigerantes". En el segundo caso recargar la instalación con refrigerante hasta 100KPa y volver a efectuar el vacío como anteriormente descrito. Una vez que la presión se estabiliza definitivamente pasar a la fase sucesiva de carga. CARGA REFRIGERANTE Estas unidades son entregadas con una carga a completar en la fase de puesta en marcha, en base al tipo de unidad terminal interna y a las dimensiones de los circuitos. - Con la instalación en vacío cerrar las llaves del grupo manométrico y desconectar la bomba de vacío. - Conectar la bombona de gas refrigerante, haciendo salir el aire del tubo de conexión con el grupo manométrico. - Abrir las llaves del grupo manométrico y dejar entrar refrigerante en estado gaseoso hasta que la presión de la instalación y bombona estén equilibradas, y en cualquier modo con una presión superior a la atmosférica. - Abrir las llaves de la unidad motocondensadora (antes la del líquido) para que la unidad este preparada para ser puesta en marcha. Se recomienda utilizar una llave adecuada, con sección cuadrada, correspondiente a la dimensión del vastago de la valvula y con un brazon elevador del longitud suficiente para ejercitar una fuerza de elevación. ( * VER FIGURA ) Cantidad de refrigerante en las líneas frigoríficas durante el funcionamiento (KG / 10 m) Ø Exterior Líquido Aspiración tubería a 38°C SST+4,5°C 10 0,60 -UNIDAD EXTERNA 12 1,06 -14 1,41 0,025 llave gas 16 1,71 0,030 18 2,36 0,043 llave Liquido 22 3,62 0,070 28 6,61 0,120 35 9,47 0,195 42 -0,290 UNIDAD INTERNA IMPORTANTE: En la primera puesta en marcha de la unidad y después de cada periodo de prolongada parada es IMPORTANTE alimentar las resistencias (si las hay) de calentamiento de aceite del cárter del compresor mínimo 8 horas antes de la puesta en funcionamiento del compresor. Las operaciones de activación se efectúan siguiendo las siguientes fases: - Accionar el interruptor QS1 de la motocondensadora prestando atención que el LED verde este apagado. 124 PUESTA EN MARCHA - Comprobar que el funcionamiento de la unidad interna sea correcto. - Controlar la conexión de la eventual válvula solenoide. - Localizar el comando SA2 en el esquema eléctrico. Éste representa la señal procedente de la unidad interna para la elección del grado de potencia y corresponde a la activación del primer grado, mientras que el comando para la activación del segundo grado aparece representado por el símbolo SA3 en el esquema eléctrico. - El compresor que se pone en funcionamietno primero está definido por el sistema de regulación (ver manual regulación). Al mismo tiempo que el compresor se pone en marcha el ventilador relativo al funcionamiento con un solo circuito. - Verificar que la señal de puesta en marcha llegue de la unidad interna. - Para añadir gas refrigerante, hay que utilizar la conexión auxiliar en la llave de interceptación de la línea de aspiración, y hacer aspirar freon en estado gaseoso. Prestar mucha atención en esta fase porque durante la puesta en marcha el presostato de mínima es inactivo por 70 segundos. Si se quiere hacer la carga sobre un circuito primero y así sucesivamente sobre los otros actuar sobre los correspondientes portafusibles para parar el compresor que no interesa en cuanto al módulo principal de uno según su lógica de ciclo de funcionamiento. ATENCION: Después de producirse una parada, el sistema calcula 6 minutos desde la anterior puesta en marcha antes de la sucesiva puesta en marcha (si este lapso de tiempo ha transcurrido solo se contaran 30 segundos de retraso). - La carga es completa cuando: - No aparecen burbujas en el visor de líquido (si es presente). - El recalentamiento del gas aspirado es de 4-8°K. - El subenfriamiento del líquido es de 3-5°K. AÑADIDO DE ACEITE Es necesario saber con exactitud la cantidad de refrigerante añadido en la instalación a la carga de fabrica, para poder definir la cantidad de aceite a añadir. La cantidad ha de ser mas o menos igual al 10% del peso del refrigerante añadido (el tipo de aceite se especifica en el manual general). El añadido de aceite es indispensable para añadidos de refrigerante superiores a 3Kg. En cualquier caso verificar el nivel de aceite del compresor con la conexión schrader, donde este presente. CONTROL DE PRIMERA PUESTA EN MARCHA UNA VEZ PUESTA EN MARCHA LA UNIDAD VERIFICAR: SECCION ELECTRICA Desequilibrio de las fases. Debe ser inferior al 2% (véase ejemplo de calculo). Ejemplo de calculo: L1 - L2 = 388V L2 - L3 = 379V L3 - L1 = 377V La media de los valores medidos se obtiene de: 388 + 379 + 377 3 = 381 La máxima desviación de la media se obtiene de: 388-381=7 V El desequilibrio se obtiene de: 7 x 100 = 1,83% (aceptable) 381 Corriente absorbida del compresor. Debe ser inferior al valor recogido en la tabla adenda en F.L.A. SECCION CIRCUITO FRIGORIFICO - Verificar una vez mas que no haya fugas en las junturas de las llaves y conexión de presión de la instalación. Atención: todas las capuchas de las conexiones manométricas y de las llaves deben volverse a montar. - Controlar el visor de líquido (si es presente). - Verificar con los manómetros las presiones de funcionamiento (baja presión de 400KPa a 560KPa corresponden a 0°C+8°C SST) y que la temperatura de condensación sea de 15-20°C superior a la temperatura del aire externa (valores indicativos). - Controlar el recalentamiento, diferenciando la temperatura del manómetro de baja presión y la temperatura medida, con termómetro a contacto, directamente en el circuito de aspiración antes del compresor. Hay un correcto funcionamiento si los valores son entre 4 y 8 grados; si el recalentamiento esta fuera de estos valores hay que buscar la causa con la ayuda de la sección BUSQUEDA DE AVERIAS. - Controlar el subenfriamiento, diferenciando la temperatura del manómetro de alta presión y la temperatura medida, con termómetro, directamente en la línea de líquido después del condensador. Hay un correcto funcionamiento si los valores son de 3/5 grados sino hay que buscar la causa. - Para un correcto análisis de la instalación hay que controlar también la temperatura de descarga del compresor, que con los valores de recalentamiento y de subenfriamiento indicados debe ser de 30/40 grados superior a la temperatura de condensación. • Se hace presente que, estando dotada la unidad de regulación de velocidad de los ventiladores, es oportuno efectuar todas estas verificaciones de funcionamiento con temperaturas de aire externa y aire ambiente muy cercanas a las condiciones estándar de proyecto. • Se recuerda que todos los datos aquí recogidos son validos para unidades de acondicionamiento y con válvula termoestática. Para condiciones de proyecto con temperaturas de evaporación (SST) inferiores a 0°C hay que verificar tanto los parámetros de funcionamiento como la dimensión de los circuitos refrigerantes. Estas informaciones presentan algunos problemas y sus soluciones que se pueden verificar en la puesta en marcha de la unidad motocondensadora. Es siempre indispensable la seriedad y la especialización de los operadores. 125 REGULACION MODALIDAD DE FUNCIONAMIENTO DEL MÓDULO PRINCIPAL ROTACIÓN DE LOS COMPRESORES El microprocesador controla correctamente el funcionamiento global de la unidad. Por ejemplo, la rotación de los compresores. A través de la programación de los parámetros dedicados, se habilita la función de rotación de los compresores. Lo que significa que con una orden de funcionamiento por parte del control, el compresor que funcionará en primer lugar, será el que tenga el menor número de horas de funcionamiento, mientras que el compresor que es el primero en pararse es el que tenga el mayor número de horas. Esta función permite distribuir equitativamente las horas de funcionamiento entre los dos compresores. También se puede hacer funcionar el primer compresor siempre en primer lugar y el segundo en segundo lugar para que se sigan ciertas particulares exigencias; la unidad es preparada con rotación habilitada por el constructor. TEMPORIZACIONES DE LOS COMPRESORES Para garantizar una buena calidad de funcionamiento de los compresores, se necesitan ciertos tipos de temporizaciones. Puede resultar útil consultar los gráficos de la fig. 3-4 para comprender mejor el significado de las temporizaciones. Figura 3 Figura 4 Compresor Comp. 1 ON ON OFF Segundos Comp. 2 OFF ON Segundos*10 Tiempo de seguridad entre parada y arranques C01 OFF Segundos Temporización entre arranque primero y segundo compresor C06 Tiempo de seguridad entre arranques sucesivos C02 Temporización entre parada primero y segundo compresor C07 En el gráfico de la fig. 4 se representan 2 parámetros. TIEMPO DE SEGURIDAD PARADA - ARRANQUE Y TIEMPO DE SEGURIDAD ARRANQUE - ARRANQUE. El primer parámetro prevé que cuando se para un compresor tiene que transcurrir un determinado tiempo para que éste pueda volver a encenderse. Este tiempo es respetado incluso cuando el termorregulador demanda más potencia. El segundo parámetro prevé que tenga que transcurrir un determinado tiempo entre un encendido y el sucesivo. En el caso de unidad con dos compresores, se hace uso de otros dos parámetros INTERVALO INTERVENCIÓN PRIMERO SEGUNDO COMPRESOR e INTERVALO PARADA PRIMERO SEGUNDO COMPRESOR. El primer parámetro es para evitar el arranque simultáneo de los dos compresores, que sirve principalmente para evitar corrientes demasiado altas durante el arranque de la unidad. El segundo prevé un intervalo de tiempo entre el apagado del primero y del segundo compresor. Estos dos parámetros se representan en el gráfico de la figura 3. 126 REGULADOR VENTILADORES DE LA BATERIA En las unidades MSAT la regulación de la velocidad de los ventiladores es de serie de tipo termostático, puede ser bajo pedido de tipo presostático, esta última configuración va suministrada con kit. El principio de funcionamiento que describimos a continuación permanece igual para las dos regulaciones. - CONTROL VENTILADORES EN ENFRIAMIENTO A continuación proponemos un gráfico que explica el modo de funcionamiento en enfriamiento fig. 6. VENTILADOR EXTERNO EN MODALIDAD ENFRIAMIENTO Speed Pressure e Figura 6 Cuando el compresor es activado hay ventilación forzada, es decir los ventiladores no siguen la regulación indicada por el control sino que funcionan durante un tiempo definido por el parámetro a máxima velocidad, excepto cuando la temperatura es inferior al valor de CUT-OFF. En tal caso los ventiladores funcionan a velocidad mínima durante el tiempo antes mencionado. Tras este paréntesis, veamos como funciona el regulador. El primer parámetro a definir es el CUT-OFF que corresponde a un especial valor de temperatura de condensación bajo el cual los ventiladores están parados. La HISTÉRESIS CUT-OFF es un parámetro que define el campo dentro del que se produce la conmutación entre el estado de funcionamiento de los ventiladores a velocidad mínima y el no funcionamiento de los mismos. Resumiendo, los ventiladores empiezan a funcionar a velocidad mínima con valor de temperatura igual al valor de CUT-OFF + HISTÉRESIS CUT-OFF mientras que la parada se determina por la diferencia entre el valor de SET EN ENFRIAMIENTO y DELTA CUT-OFF. Cuando la temperatura de condensación supera el valor SET VENTILADOR EN ENFRIAMIENTO el regulador comienza a regular la velocidad de los ventiladores proporcionalmente a la temperatura de condensación. Para las unidades Clivet en contraposición a aquello descrito en el gráfico se mantiene la regulación hasta que se alcanza el valor SET MÁX VENTILACIÓN EN ENFRIAMIENTO. Además existen los parámetros MÁX VELOCIDAD SILENCIADA y BANDA PROPORCIONAL EN ENFRIAMIENTO. El primero define el nivel máximo de velocidad de los ventiladores que corresponde a una determinada temperatura de condensación dentro de la que se efectúa la regulación de la velocidad, mientras que la BANDA PROPORCIONAL define la inclinación de la línea recta donde se realiza la regulación de la velocidad. Las unidades CLIVET son realizadas para regular la rotación de los ventiladores hasta alcanzar la máxima velocidad. 127 PANEL DEL MÓDULO DE CONTROL PRINCIPAL • • • • LED 1 compresor 1 ON sí el compresor 1 es activo OFF sí el compresor 1 está apagado BLINK a frecuencia de 1 Hz si están activas las temporizaciones de seguridad BLINK a baja frecuencia si el compresor está en desescarchado (sólo bomba de calor) • • • • LED 3 compresor 2 ON sí el compresor 1 es activo OFF sí el compresor 1 está apagado BLINK a frecuencia de 1 Hz si están activas las temporizaciones de seguridad BLINK a baja frecuencia si el compresor está en desescarchado (sólo bomba de calor) ON si el control está en Enfriamiento Si el LED COOL no está encendido el control está en STAND-BY Cuando la unidad está en OFF solo permanece encendido el punto decimal. NOTA: Los LED 2 y 4 sirven para unidades compuestas de 4 compresores y de dos circuitos frigoríficos. PROGRAMACIÓN DE LOS PARÁMETROS DE FUNCIONAMIENTO En este capítulo solo nos limitamos a indicar los parámetros con acceso directo sin password. Los parámetros protegidos con password solo pueden ser utilizados por personal de servicio técnico autorizado. SIGNIFICADO DE LAS TECLAS Tecla ON-OFF a) Si se pulsa por más de 2seg. el termorregulador pasa de ON a OFF y viceversa. b) Pulsando esta tecla solo una vez se obtiene el reset de todas las alarmas con rearme manual que no están activas. También se ponen a cero los contadores del número de intervenciones por hora, aunque no estén activos. c) En modalidad menú, la tecla funciona como flecha hacia abajo. d) Permite disminuir el valor del parámetro seleccionado. Tecla MODE ON-OFF a) Pulsando y soltando ambas teclas antes de 2 seg. se baja en el menú de configuración de un nivel. Tecla MODE ON-OFF a) Teniendo pulsadas ambas teclas por más de 2 seg. se sube en el menú de configuración de 1 nivel. b) Si se está visualizando el último nivel de un menú, pulsando simultáneamente y soltando antes de dos seg., se puede subir un nivel. Tecla MODE a) En modalidad menú, la tecla funciona como flecha hacia arriba. b) Permite aumentar el valor del parámetro seleccionado. 128 Tabla 1 Código H46 Description Password Nivel 0 Sonda regulación Alarma activa LISTADO DE LOS PARÁMETROS ACCESIBLES Unidad de medida Set de fabricacion unidad 0 Nivel 1 Set Point : Set Nivel 2 Nivel 3 Nivel 4 Label Set Cooling: Coo Valor Set Cooling Label Set Heating: HEA Valor Set Heating Entradas Analógicas: tP Código entradas: t01- t06 Valor entrada analógica Alarmas: Err Código alar. activas: E00-E46 Entradas Analógicas: Id Código entradas: I01-I11 Estado entrada digital Parámetros: PAr Par. configuración : CnF Indice par. H01-H69 Valor parámetro Par. compresor: CP Indice par. C01-C08 Valor parámetro Par. ventilación: FAn Indice par. F01-F25 Valor parámetro Par. alarmas: ALL Indice par. A01-A26 Valor parámetro Par. bomba: PUP Indice par. P01-P03 Valor parámetro Par. antihielo: Fro Indice par. r01-r17 Valor parámetro Par. desescarchado: dFr Indice par. d01-d11 Valor parámetro Par. expansión: ESP Indice par. N01-N07 Valor parámetro Password: PSS Valor password Horas de funcionamiento: Hr Horas compr: OH1-OH4 Número horas Horas bomba: OHP Número horas Hay que pulsar simultáneamente las teclas “Mode” y “on off” para ir de un nivel a otro 1 – Pulsando y soltando ambas teclas antes de 2 segundos, en el menú de configuración se desciende de un nivel 2 – Pulsando ambas teclas por más de dos segundos, en el menú de configuración se sube de un nivel 3 – Si se está visualizando el último nivel de un menú, se puede subir de un nivel pulsando simultáneamente y soltando antes de 2 segundos. 129 ALARMAS Los códigos de alarma aparecen en la pantalla del terminal interfase usuario cuando se verifica un error. Las alarmas se visualiza en la pantalla, aquellas por rearme automático desaparecen cuando es resuelta la anomalía, aquellas por rearme manual necesitan para su reset la intervención del servicio técnico. Las alarmas aparecen en el terminal de interfase usuario siguiendo el orden con que han sido incluidas en la tabla 4. Además si hay más de una alarma al mismo tiempo, se visualizará sólo la primera, cuando está sea rearmada, aparecerá la segunda y así hasta que no que se termine la sucesión. Atención: en fase de standby, o de OFF, no se señalan las alarmas y no se activa el relé de bloqueo acumulativo. Si hay alarma se señalan y el relé de bloqueo es activado, cuando se selecciona el modo de funcionamiento. Tabla 2 Código E01 E02 Tipo de avería Máxima Presión circ. 1 Mínima Presión circ. 1 Bloqueos Compresor Compresor ventilador E03 E04 E07 E21 E22 Térmica Compresor 1 Térmica Ventilador circ. 1 Avería Sonda BT3/BP3 Máxima Presión circ. 2 Mínima presión circ. 2 Compresor ventilador Compresor ventilador Compresor ventilador Compresor ventilador Compresor ventilador E24 E27 E45 Térmica Ventilador circ. 2 Avería sonda BT5/BP5 Configuración Compresor ventilador Compresor ventilador Compresor 130 Rearme MANUAL AUTOMÁTICO (Tras 5 señalizaciones necesita de rearme manual) MANUAL MANUAL AUTOMÁTICO MANUAL AUTOMÁTICO (Tras 5 señalizaciones necesita rearme manual) MANUAL AUTOMÁTICO MANUAL BUSQUEDA DE AVERIAS A continuación se hacen presentes algunas posibles anomalías con sus respectivas soluciones. Las operaciones que se deriven quedan bajo la responsabilidad de quien las efectúa. Es obligatorio dirigirse a personal técnico especializado que cumpla los requisitos legales para cualquier operación necesaria para volver a establecer el funcionamiento. La intervención de un dispositivo de seguridad indica cualquier anomalía de funcionamiento: antes de volver a establecer el funcionamiento hay que verificar y eliminar la causa de la anomalía. A continuación se enumeran los posibles problemas con sus respectivas causas y soluciones. ATENCION LAS OPERACIONES INDICADAS SON RESPONSABILIDAD DE QUIEN LAS EFECTUA, ES OBLIGATORIO DIRIGIRSE A CENTRO DE ASISTENCIA AUTORIZADO QUE CUMPLA REQUISITOS NECESARIOS PARA EFECTUAR OPERACIONES CON EL FIN DE REACTIVAR EL FUNCIONAMIENTO. Cualquier avería o condición anómala de funcionamiento es controlada por el módulo principal de control. Por cada condición anómala o de avería, el módulo, además de poner en seguridad la unidad, puede visualizarla a distancia. 131 BLOQUEO ALTA PRESION BLOQUEO ALTA PRESION SI ¿ Ventilación eficiente ? NO Verificar batería (1) Verificar ventilador (2) Verificar módulo ventilador (3) Verificar sonda (4) SI ¿ Temperatura aire externa inferior a los límites de funcionamiento ? SI NO Controlar datos de proyecto (5) NO Verificar subenfriamiento líquido (6) ¿ Carga refrigerante correcta ? SI SI ¿ Ausencia de no condensables ? ¿ Temperatura y/o presión de aspiración regular ? Unidad en función NO Repetir vacío y carga (7) Verificar el funcionamiento de la unidad interna (8) NO Verificar el funcionamiento de los elementos que interceptan la línea líquido (9) Notas: 1) Muy importante es que ofrezca el máximo intercambio térmico, por tanto tiene que estar libre de suciedad, incrustaciones u obstáculos que impidan el flujo de aire. 2) Verificar la integridad del ventilador, si estuviese dañado hay que sustituirlo. Controlar que la protección térmica del ventilador (si la tuviese) no haya actuado. 3) Verificar que la tensión de salida del módulo de control regule proporcionalmente la velocidad de los ventiladores. En caso contrario hay que sustituir el módulo. 4) Verificar la ubicación: debe estar en estrecho contacto con el tubo de la batería de condensación. Tiene que haber un dato de resistencia perfectamente en línea con la temperatura, controlar con el ohmímetro tal valor de resistencia. 5) Verificar: - Los limites de funcionamiento (véase sección general). - Que la batería no este expuesta directamente a los rayos solares o cerca de superficies que reflejen. - Que en las cercanías no haya ningún flujo de aire caliente. - Que no hayan corrientes de retorno del aire. 6) Para modalidad de control consultar el manual de PUESTA EN MARCHA. Nota: posibles inundaciones de los circuitos de la batería de condensación hasta donde esta ubicada la sonda pueden provocar un anómalo funcionamiento del sistema de regulación de la velocidad de los ventiladores. 7) Una condición que puede producirse es que la temperatura de condensación sea muy alta (25/30 grados por encima de la temperatura del aire externo) combinada con un rendimiento frigorífico insuficiente. Puede aportar los mismos resultados de una carga refrigerante abundante. Constatar que la carga es correcta, valorar esta hipótesis y volver a efectuar todas las operaciones de vaciado y carga. 8) Controlar que el aporte de aire no sea excesivo, y que la temperatura del aire ambiente no sea demasiado elevada. Estas condiciones podrían aumentar el rendimiento de la maquina y consecuentemente el calor a eliminar en el condensador. 9) Controlar que todos los órganos de interceptación de la línea de liquido estén completamente abiertos. 132 BLOQUEO BAJA PRESION BLOQUEO BAJA PRESION SI ¿ Funcionamiento regular de la unidad interna ? NO Verificar el funcionamiento de la unidad interna (1) Verificar condiciones de funcionamiento de la unidad interna (2) Verificar conexiones de tubos (3) SI SI SI SI ¿ Filtro deshidratador eficiente ? ¿ Carga refrigerante regular ? ¿ Llave aspiración completamente abierta ? ¿ Temperatura y/o presión de aspiración regular ? NO NO NO NO Control ∆t antes y después del filtro (4) Controlar el re-calentamiento (5) Verificar y eventualmente abrir Verificar el funcionamiento de la unidad externa ( 6 ) Unidad en función Notas: 1) Verificar: - Que haya suficiente aporte de aire. - Que el sentido de rotación de los ventiladores sea correcto. - Que la batería no este sucia o con incrustaciones ya que debe ofrecer el máximo intercambio térmico. - Que la válvula solenoide este funcionando. - Que la válvula termoestatica este funcionando. 2) Verificar que las condiciones de temperatura y humedad del aire tratado estén dentro de las condiciones de proyecto. 3) Verificar que la instalación y diámetro de las tuberías estén correctamente dimensionadas (véase la sección "TUBERIAS REFRIGERANTES"). En caso contrario podrían causar pérdidas de carga inadmisibles para un correcto funcionamiento de la unidad. 4) Controlar con un termómetro a contacto la temperatura antes y después del filtro deshidratador. Si la diferencia de temperatura es superior a un 1°C es signo de filtro no eficiente o de filtro bajo dimensionado, en ambos casos hay que sustituirlo. 5) Para modalidad de control consultar la sección de PUESTA EN FUNCION. 6) Si la presión de condensación esta por debajo de 1200Kpa manométricos se puede verificar una anomalía de funcionamiento del órgano de la termoestatica y como consecuencia presión de aspiración demasiado baja. Verificar que la ventilación de la unidad externa funcione perfectamente (es decir controla o para los ventiladores). 133 INTERVENCIÓN SEGURIDAD COMPRESOR INTERVENCION SEGURIDAD COMPRESOR SI Temperatura de salida del compresor, ¿ dentro de los limites previstos ? NO Verificar parámetros tipo : re-calentamiento, carga refrigerante, etc. Unidad en función INTERVENCION TERMICA VENTILADORES INTERVENCION TERMICA VENTILADOR SI NO Verificar posibles obstrucciones del condensador ¿ Motor integro ? Verificar obstrucciones en las aletas Verificar bobinas eléctricas Unidad en función 134 UNIDAD RUIDOSA UNIDAD RUIDOSA SI ¿ Los amortiguadores del compresor est á n en buenas condiciones ? NO Verificar y eventualmente sustituir NO ¿ Los tornillos de fijación del compresor se han aflojado ? SI Verificar y eventualmente apretar NO SI ¿ Las tuberías vibran ? Verificar los puntos de fijación Unidad en función COMPRESOR QUE NO SE PONE EN MARCHA COM PRESOR QUE NO SE PONE EN MARCHA NO ¿ Falta de tensión en las bornas ? SI Intervención Klixon (1) Motor quemado (2) Compresor bloqueado (3) SI SI SI Interruptor, ¿ cerrado ? Relee, ¿ funciona ? Modulo de controlo, ¿ funciona ? NO NO NO Rearmar Controlar que la bovina no este quemada y que los contactos no estén oxidados Verificar y eventualmente sustituir Unidad en función Notas: 1) La intervención del Klixon se manifiesta con una temperatura externa del compresor más bien alta. Verificar la causa antes de volver a poner en marcha la unidad. 2) Verificar que los bobinas del motor están a tierra. Eventualmente sustituir el compresor. 3) EI bloqueo mecánico del compresor se presenta con ruido constante. En tal caso hay que sustituir el compresor. 135 MANTENIMIENTO ORDINARIO IMPORTANTE ANTES DE INICIAR CUALQUIER OPERACION DE MANTENIMIENTO O DE LIMPIEZA DE LA UNIDAD HAY QUE ASEGURARSE QUE LA MISMA NO ESTE BAJO TENSION Esta sección esta dedicada al usuario final y es de extrema importancia para un regular funcionamiento de la unidad a lo largo del tiempo. Pocas operaciones realizadas con atención y periódicamente pueden evitar recurrir a la intervención de personal especializado. Las operaciones a ejecutar no requieren conocimientos técnicos especiales y se resumen en sencillos controles de los componentes de la unidad: - batería de condensación - electroventiladores - estructura UNIDAD BATERIA DE CONDENSACION ATENCION: Un contacto accidental con las aletas del condensador puede provocar pequeñas heridas por corte. Para efectuar las operaciones descritas mas abajo se aconseja utilizar guantes. Es importante que la batería condensante ofrezca el máximo intercambio térmico. Es importante que la superficie no tenga ni suciedad ni polvo que pueden depositarse por efecto de la acción de los electroventiladores. - Retirar con la ayuda de un cepillo todas las impurezas como papeles, hojas etc. que puedan depositarse en la superficie de la batería. - Limpiar la superficie de aluminio de la batería con la ayuda de un chorro de aire a presión teniendo cuidado en orientar el chorro paralelamente a la dirección de las aletas evitando provocar daños. - Verificar que las aletas de aluminio no hayan sufrido daños ni se hayan plegado, en el caso se produjeran situaciones de ese tipo, "enderezar" con el instrumento necesario la batería hasta volver a la situación inicial y obtener un perfecto flujo de aire. ELECTROVENTILADORES Con el primer encendido de la temporada hay que verificar la rumorosidad. Si es elevada y con vibraciones puede ser causada por: desequilibrio de las aletas o sino los tornillos de fijación se han aflojado. Si hay anomalías hay que llamar al centro de asistencia autorizado ya que los ventiladores están situados en el interior de la maquina entre las baterías de condensación. - Verificar que el electroventilador este perfectamente fijado a la reja de soporte. - Verificar que la reja de soporte del electroventilador este perfectamente fijada a la estructura de la unidad. - Verificar dentro de lo posible, desequilibrios del electroventilador que se evidencian al crearse condiciones de ruido y vibraciones anómalas. ESTRUCTURA - Verificar el perfecto estado de las partes que componen la estructura. Prestar especial atención a las partes en acero. - Tratar con barnices adaptas a eliminar o reducir el oxido aquellas zonas de la unidad donde se produjera. - Verificar que el panel externo de la unidad este perfectamente fijado. Erróneas fijaciones pueden originar rumores y vibraciones anómalas. PARTE ELECTRICA Verificar que el cable de alimentación que conecta la unidad al cuadro de distribución no presente laceraciones, grietas o alteraciones que puedan reducir el aislamiento. En caso de necesidad de mantenimiento, contactar un centro de asistencia autorizado. IMPORTANTE SE ACONSEJA LA PRESENCIA DE PERSONAL CUALIFICADO AUTORIZADO PARA CUALQUIER ENCENDIDO DE TEMPORADA DE LA UNIDAD, DE ESE MODO SE VERIFICA EL CIRCUITO FRIGORIFICO Y TODOS LOS PUNTOS ARRIBA MENCIONADOS 136 CIRCUITOS FRIGORÍFICOS La dimensión de las líneas refrigerantes de conexión entre la unidad motocondensadora externa y las unidades de evaporación internas es de gran importancia. Para realizar conexiones con nuestra unidad, véase el esquema de debajo donde por longitudes especificadas el diámetro de las conexiones corresponde al diámetro a utilizar para los circuitos de conexión. Para distancias superiores el diámetro tendrá que ser calculado (véase bibliografías o nuestro boletín DIMENSION LINEAS FRIGORIFICAS EN INSTALACIONES A DOS SECCIONES). Además, el esquema de debajo indica el desnivel máximo aconsejado con circuitos estándar, sea cuando la unidad motocondensadora es mas baja respecto a la unidad terminal como a la inversa. Usar solo tuberías de cobre para la refrigeración. Modelo 102 122 142 162 182 202 242 ∅ Aspir. ∅ Líquido 22 22 28 28 28 35 35 14 14 16 18 18 22 22 Max. longitud m 10 10 16 16 12 23 20 Max. N° curvas 6 6 8 6 6 10 10 Desnivel Max Fig. 4 Fig. 6 9 9 9 9 12 12 10 10 10 10 18 18 14 14 CIRCUITO DE ASPIRACION Para todos los modelos las conexiones son para soldar, con la unidad es suministrada de serie la conexión ROTALOCK. Conectar la reducción de salida de la unidad a la toma con la ayuda de dos llaves como se indica a continuación (en la figura 1 por cuanto se refiere al primer circuito, figura 2 para el segundo). Figura 1 Figura 2 CIRCUITO LIQUIDO Figura 3 Para toda la serie todas las conexiones son para soldar y de serie es suministrada la conexión ROTALOCK. Conectar la reducción de salida de la unidad a la toma con la ayuda de dos llaves como se indica a continuación (en la figura 3 por cuanto se refiere al primer circuito, figura 4 para el segundo). Figura 4 NOTA: Todos los circuitos deben estar perfectamente limpios y sin humedad para permitir una operación de vacío perfecto (la limpieza se realiza con nitrógeno o aire seca antes de conectar los circuitos a las dos unidades). 137 PRUEBA DE FUGAS U N D A D E XT E R N A U N ID A D IN T E R N A BULBO BULBO TERMOESTATICA TERMOESTATICA Max. Desnivel - Controlar atentamente que las válvulas de servicio de la unidad motocondensadora estén cerradas. - Conectar el grupo manométrico a las conexiones auxiliares de las válvulas. - Poner el sistema en presión con refrigerante hasta 250KPa. - Cerrar las llaves del grupo manométrico para efectuar la desconexión de la bombona de refrigerante y acto seguido conectar la bombona de nitrógeno. - Abrir las llaves del grupo manométrico. - Poner en presión la instalación con nitrógeno hasta 1200KPa. - Controlar atentamente con aparato detector de fugas u otro instrumento electrónico todo el circuito con especial atención a las soldaduras y junturas en general. Si no se posee el equipo necesario, dejar accesibles todas aquellas partes que pudiesen causar fugas de refrigerante (soldaduras, juntas etc.). Figura 5 L la v e ga s Lla v e liquido MODALIDAD - INDICACIONES PARA UNA CORRECTA CONEXION Figura 6 Max. Desnivel CIRCUITO DE ASPIRACION - Inclinación hacia el compresor en los trechos horizontales (0.5%) parar asegurar que vuelva el aceite al compresor incluso en condiciones de carga mínima. - Aislar con cuidado el circuito con polietileno anticondensación de células cerradas espesor mínimo 9mm. - Si la unidad motocondensadora esta situada mas baja respecto a la unidad de evaporación (véase figura 5), prever un sifón con la misma altura de la batería para prevenir, durante la parada de la unidad, el retorno de líquido al compresor. - Para evitar el sifón, montar en la línea del líquido una válvula solenoide (véase Figura 6), siempre aconsejada. - Si la unidad terminal esta dotada de válvula termoestatica, además del sifón prever una curva a U (véase Figura 5) lo mas cerca de la unidad. Todo esto para evitar que el bulbo de la válvula termoestatica, con la unidad parada, permanezca en contacto con el líquido. (véase figura 5). En el caso de conexiones con nuestra unidad terminal CED-V el sifón viene ya instalado al interno de la unidad. - Si la unidad motocondensadora esta situada mas alta respecto a la unidad de evaporación, prever solo una curva a U (véase Fig. 7). Hay que prestar atención si la distancia total supera los 7-10 metros entonces es necesario utilizar la válvula solenoide en la línea del líquido. - Para subidas en vertical prever además de la curva a U en la base, un sifón de recogida de aceite cada 6 metros (véase Figura 8). - Utilizar curvas de amplio radio (sin codos). - Evitar deformaciones en las tuberías de los circuitos. CIRCUITO LIQUIDO - Si esta expuesto al sol o cruza zonas con temperatura superior a la externa debe ser aislado, en caso contrario puede ir sin aislamiento. - Evitar diámetros demasiado grandes para no causar un exceso de carga de refrigerante. Figura 7 Figura 8 IMPORTANTE Con la unidad terminal interna dotada de válvula termoestatica, si los circuitos de conexión tienen una longitud superior a 15/20 metros o si la instalación esta prevista para funcionar en condiciones climáticas variables (por ejemplo el aire externo es muy diferente del día a la noche) se aconseja instalar cerca de la unidad interna un recipiente del líquido con capacidad adecuada. El recipiente del líquido puede realizar estas funciones: - Evita que llegue freon en estado gaseoso a la válvula termoestatica. - Compensa las variaciones de carga que se verifican en la instalación al variar las condiciones de funcionamiento. - Compensa en parte y por un cierto tiempo eventuales microperdidas que no se detectan y que en el tiempo tienden a descargar la instalación. - Evita la excesiva inundación del condensador con relativa subida de la temperatura/presión de condensación si la instalación esta cargada con mayor cantidad de refrigerante, o si la carga se ha efectuado en condiciones climatológicas anómalas. Siempre se aconseja la instalación del recipiente del líquido cuando las distancias de conexión son elevadas. 138 RIESGOS RESIDUALES ATENCION EN ESTE FASCICULO SE SEÑALA TODA OPERACION QUE PUEDA GENERAR SITUACIONES DE RIESGO Y MEDIDAS DE CAUTELA QUE HAN DE OBSERVARSE CASO POR CASO DEFINICION DE ZONA PELIGROSA La figura de debajo evidencia el área donde solo puede operar el operador autorizado. - La zona peligrosa externa es determinada por una superficie en torno a la maquina y a la proyección en el suelo de la misma en la vertical si la maquina esta suspendida. - La zona peligrosa interna es el área donde solo se accede mediante abertura deliberada de todos los paneles o partes del los mismo. 139 RIESGOS GENERICOS Zona considerada Riesgo residual Baterías de condensación Lesiones leves Válvulas de seguridad Lesiones Intoxicación Area circundante a la unidad Lesiones Intoxicación Quemaduras graves Muerte Muerte por: Quemaduras graves Intoxicación Area circundante a la unidad Modalidad Advertencias Por contacto Evitar contactos accidentales Usar guantes de protección Aplicar rejas de protección para condensadores (opcional) Expulsión gas refrigerante Evitar entrar en la zona peligrosa por funcionamiento de la Provocar oportunamente las descargas protección de las válvulas de seguridad Usar indumentos y gafas apropiados Explosión originada por el Nunca dejar cerradas las llaves de aumento de la temperatura descarga ni de aspiración compresores ambiente (incendio) con la unidad parada Incendio originado por cortocircuito o calentamiento de cables eléctricos antes de los interruptores de la unidad Contacto con compresores y tuberías de descarga Correcta dimensión de los cables y sus dispositivos de protección de la línea de conexión con la red eléctrica. Contacto con ángulos puntiagudos Defecto de aislamiento en los cables eléctricos antes de los interruptores de la unidad Utilizar guantes de protección Zona interna unidad Quemaduras Zona interna unidad Lesiones Zona interna unidad Muerte por: Electrocución Grave Zona interna unidad Muerte por: Electrocución Elementos metálicos bajo tensión Zona interna unidad Muerte por: Electrocución Quemaduras graves Contacto con partes bajo tensión de fácil alcance al levantar los paneles Evitar contactos accidentales Usar guantes de protección Acceder al interior de la unidad solo después de que se haya abierto el interruptor situado en la línea de conexión eléctrica con la unidad (a cargo del cliente) Realizar cuidadosamente la conexión a tierra de los elementos metálicos de la unidad Proceder a abrir y bloquear el interruptor general antes de quitar los paneles FICHA DE SEGURIDAD DEL REFRIGERANTE 01 Elementos de identificación de la sustancia 02 Composición e información de los componentes 03 Identificación del riesgo 04 Medidas de primeros auxilios Nombre del producto: forane 407C N°SDS 01965/1 Proveedor: ELF ATOCHEM ITALIA Via G.Murat 17, 20159 Milano Italia tel. 02/668111 Composición química del preparado Mezcla a base de: • Forane 32 (difluorometano) (N° CAS: 75-10-5) • Forane 125 (pentafluoroetano) (N° CAS: 354-33-6) • Forane 134a (1.1.1.2 tetrafluoroetano) (N° CAS: 811-972) Principales peligros físicos y químicos: Descomposición térmica en productos tóxicos y corrosivos Informaciones generales: Inhalación: Transportar la víctima al aire libre. Recurrir al oxigeno o a la respiración artificial en caso fuese necesario. Contacto con la piel: EI congelamiento ha de ser curado como las quemaduras térmicas. Contacto con los ojos: Lavar inmediatamente con abundante agua. En el caso persistiera la irritación hay que consultar un oftalmólogo. 140 Nombre del producto: forane 22 N°SDS 0005/7 Proveedor: ELF ATOCHEM ITALIA 4 Cours Michelet Cedex 42 92091 París Francia tel. 0033149008080 Composición química del preparado Mezcla a base de: HC halogenado Clorodifluorometano N° CAS 75-45-6 EINECS 200-871-9 Efectos para la salud: Prácticamente no es nocivo Principales peligros físicos y químicos: Descomposición térmica en productos tóxicos y corrosivos Peligros específicos /CEE: Nocivo para la capa de ozono Informaciones generales: Inhalación: Transportar la víctima al aire libre. Recurrir al oxigeno o a la respiración artificial en caso fuese necesario. Contacto con la piel: EI congelamiento ha de ser curado como las quemaduras térmicas. Contacto con los ojos: Lavar inmediatamente con abundante agua. En el caso persistiera la irritación hay que consultar un oftalmólogo. Peligros específicos: Descomposición térmica en productos tóxicos y corrosivos. Acido fluorhidrico. Acido Clorhídrico gas. Fosgeno. Monóxido de carbono (CO) Enfriar los contenedores/cisternas con chorros de agua. Prohibir cualquier fuente de chispas e ignición No FUMAR. Sistemas de protección especiales para las escuadras de socorro: Llevar un respirador e indumentos de protección Precauciones individuales: Evitar el contacto con la Precauciones individuales: Evitar el contacto con Medidas en caso piel, los ojos e inhalaciones de vapores. Usar indumentos la piel, los ojos e inhalaciones de vapores. de fuga accidental de protección personal. En un local cerrado: ventilar o usar un respirador En un local cerrado: ventilar o usar respirador (riesgo de (riesgo de asfixia). PROHIBIDO FUMAR axfisia). PROHIBIDO FUMAR Alejar toda fuente de ignición Precauciones para la protección del medio ambiente: Limitar al máximo los residuos en el ambiente. Medidas /precauciones técnica Medidas /precauciones técnica Manipulación y almacenamiento Disposiciones para almacenamiento y manipulaciones Disposiciones de almacenamiento y aplicables a los productos: GAS EN PRESION manipulaciones aplicables a los productos: GASES Prever una apropiada ventilación y evacuación al nivel de PRESURIZADOS los aparatos. Prever una apropiada ventilación y evacuación al Consejos para el uso: Evitar fuentes de ignición y el nivel de los aparatos. Consejos para el uso: Evitar fuentes de ignición y contacto con superficies calientes. NO FUMAR Medidas técnicas/ Modalidad de almacenamiento: el contacto con superficies calientes. NO FUMAR Medidas técnicas/ Modalidad de Almacenar a temperatura ambiente en el contenedor almacenamiento: Almacenar a temperatura original. Mantener lejos de las llamas, superficies calientes y fuentes inflamables. Conservar en lugar fresco ambiente en el contenedor original. Mantener lejos y bien ventilado. Proteger los contenedores llenos de de las llamas, superficies calientes y fuentes fuentes de calor para evitar sobrepresiones. inflamables. Conservar en lugar fresco y bien Recomendaciones: Acero normal ventilado. Proteger los contenedores llenos de A evitar: Aleación que contenga mas del 2% de fuentes de calor para evitar sobrepresiones. Recomendaciones: Acero normal magnesio A evitar: Aleación que contenga mas del 2% de Materias plásticas magnesio Materias plásticas Medidas de precaución a ejecutar: Asegurar suficiente Medidas de precaución a ejecutar: Asegurar Control de la exposición/ renovación de aire y/o aspiración en ambientes de suficiente renovación de aire y/o aspiración en protección trabajo. ambientes de trabajo. Parámetros de control Parámetros de control individual Valores limites de exposición: No hay valor limite F-USA Valores limites de exposición: Forane 134a valor limite aconsejado por Elf : Francia 1989: VME = 1000 ppm VME=1000ppm USA 1992: TWA = 1000 ppm = 3500 mg/m3 Equipo de protección individual: Forane 32 valor limite aconsejado por Elf : VME=1000ppm Forane 125 valor limite aconsejado por Protección Respiratoria: En caso de insuficiente ventilación, llevar aparatos respiración artificial. Elf : VME=1000ppm Equipo de protección individual: Protección para las manos: Guantes Protección Respiratoria: En caso de insuficiente Protección para los ojos: Gafas de protección ventilación, llevar aparatos respiración artificial. Medidas especificas de higiene: Evitar el contacto Protección para las manos: Guantes con piel, ojos e inhalación de vapores. Protección para los ojos: Gafas de protección Estado físico (20°C): Gas licuado Propiedades físicas Estado físico (20°C): Gas licuado Color: Incoloro Color: Incoloro y químicas Olor: Ligeramente parecido al éter. pH: No aplicable Olor: Ligeramente parecido al éter. pH: No Punto /intervalo de ebullición: -42,4 °C aplicable Punto de inflamabilidad: No se inflama en condiciones Punto /intervalo de ebullición: -40,8 °C Temperaturas/intervalo de fusión: - 160 °C de prueba Presión de vapor: (25°C): 1.13 Mpa (11,3 bar) a Temperatura de descomposición: 480 °C Presión de vapor: (20°C): 0,91 Mpa (9,1 bar) a (50°C): 2.11 Mpa (21,1 bar) a (70°C): 3.26 Mpa (32,6 (50°C): 1,91 Mpa (19,4 bar) bar) Densidad de vapor: En el punto de ebullición 4,54 kg/m3 Densidad de vapor: ( 20 °C) 3,57 kg/m3 Densidad: (25°C) 1133 kg/m3 a (50°C) 1004 kg/m3 a Densidad: (20°C) 1213 kg/m3 a (50°C) 1085 (70°C) 861 kg/m3 kg/m3 Solubilidad: agua (25°C) 3g/l - Solvente soluble en hidrocarburos y disolventes clorados, Alcohol, Quetonas, Eteres Solubilidad del agua en el producto a 30°C : 0,15 % de peso. Estabilidad y Condiciones a evitar: Evitar el contacto con llamas y Condiciones a evitar: Evitar el contacto con reactividad con superficies metálicas incandescentes llamas y con superficies metálicas incandescentes Productos de descomposición peligrosa: Descomposición térmica en productos fluorados Productos de descomposición peligrosa: tóxicos ácido fluorhidrico Descomposición térmica en productos tóxicos y Otras Informaciones: Producto estable en normales corrosivos: ácido fluorhidrico, ácido clorhídrico gas, fosgeno, monóxido de carbono (CO) condiciones de almacenamiento y manipulación 05 Medidas antincendios 06 07 08 09 10 Peligros específicos: Descomposición térmica en productos tóxicos y corrosivos. Acido fluorhidrico. Oxidos de carbono Métodos específicos de intervención: Enfriar los contenedores/cisternas con chorros de agua. Prohibir cualquier fuente de chispas e ignición No FUMAR. Sistemas de protección especiales para las escuadras de socorro: Llevar un respirador e indumentos de protección 141 11 Informaciones sobre la toxicidad 12 Informaciones ecológicas Inhalación: Experimental en animales Forane 134a, 32, 125 no es casi nocivo por inhalación. No hay señal de mortalidad encontrada en ratas de 500000 ppm/4h. Como para otros componentes volátiles alifáticos halogenados, el producto puede causar por acumulación de vapores y/o por inhalación de cantidades considerables: perdida de consciencia y trastornos cardiacos agravados por estrés y falta de oxigeno: riesgo mortal. Contacto con la piel: Posible congelamiento por salpicadura de gas licuado Toxicidad crónica: De estudios realizados por inhalación prolongada en animales no se ha puesto en evidencia algún efecto tóxico subcronico (rata/3 mes(es)/ Inhalación:50000ppm) Efectos específicos: Genotoxicidad, según datos experimentales disponibles Forane 134a, 32, 125 NO Genotoxico Cancerígenos: Forane 134a la experimentación animal no ha puesto en evidencia un efecto canceroso claramente demostrado (rata /Inhalación - vía oral) Toxicidad por reproducción: Desarrollo fetal Forane 134a, 32, 125 según datos disponibles ausencia de efectos tóxicos en el desarrollo del feto. Fertilidad, según datos limitados disponibles en animales: Forane 134a ausencia de efectos en la fertilidad (ratas/inhalación) Forane 32 Persistencia /degradabilidad: En el agua no de fácil biodegradabilidad 5% después de 28d Bioacumulable: No es prácticamente bioacumulable log pow 0,21 13 14 Consideración para eliminación Información sobre el transporte Forane 125 Movilidad: Evaporación veloz t ½ vida 3,2 h (estimada) Persistencia /degradabilidad: En el agua no es fácilmente biodegradable 5% después de 28d. En el aire se degrada en la troposfera t ½ vida 28,3 y (estimado). Potencial de destrucción del ozono ODP (R-11 = 1)=0. Efecto invernadero potencial (GWP): (HGWP) = 0,58. Baja absorción en el suelo y en los sedimentos log Koc= 1,3-1,7 Bioacumulable: Practicamente no bioacumulable log pow 1,48 Forane 134a Movilidad: Evaporación veloz t ½ vida 3 h (estimado) Persistencia /degradabilidad: En el agua no es de fácilmente biodegradable 3% después de28d. En el aire se degrada en la atmósfera 3% después de 28d . Potencial de destrucción del ozono ODP (R-11 = 1)=0. Efecto invernadero potencial (GWP) 0,26. Bioacumulable: Prácticamente no bioacumulable log pow 1,06 Eliminación del producto: Reciclar o incinerar Para mas información complementaria y actualización consultar los servicios de seguridad de ELF ATOCHEM Numero ONU 3163. RID\ADR clase 2 cifra (y letra) 4°a Prescripciones: Placa 2 N°peligro /N°materia 20/3163 IMDG clase 2.2 N°ONU (IMDG) 3163 Prescripciones: Placas 2.2 IATA clase 2.2 N°ONU (IATA) o N°ID3163 Prescripciones: Placas 2.2 15 Información sobre la legislación Directiva CEE Ficha de seguridad: D.91/155/CEE modificada por D. 93/112/CEE: Sustancias peligrosas Clasificación/ ficha CEE Preparados peligrosos: No es clasificado como peligroso Inventarios: EINECS conformes 16 Otras informaciones Usos aconsejados: Refrigerante Referencias bibliográficas: Encyclopedie des gas (Air Liquide-ed.1976- ELSEVIER AMSTERDAM) Inhalaciones: Experimental en animales no es prácticamente nocivo por inhalación. Ningún efecto por debajo de 50000 ppm. Como para otros componentes volátiles alifáticos halogenados, el producto puede causar por acumulación de vapores y/o por inhalación de cantidades considerables: perdida de consciencia y trastornos cardiacos agravados por estrés y falta de oxigeno: riesgo mortal. Contacto con la piel: Posible congelamiento por salpicadura de gas licuado Contacto con los ojos: Irritaciones pasajeras Movilidad: Evaporación veloz t ½ vida 2,7 h Persistencia /degradabilidad: En el agua no es de fácilmente biodegradable 0% después de 28d. En el aire se degrada en la troposfera ½ vida 14 años. Potencial de destrucción del ozono ODP (R11 = 1)=0,055. Efecto invernadero potencial (HGWP) = 0,36. Baja absorción en el suelo y en los sedimentos log Koc= 1,8 Bioacumulable: Prácticamente no bioacumulable log pow 1,08 Toxicidad acuática: Toxicidad aguda, peces nivel de toxicidad 24/h = 180mg/l, Bacterias anaerobias: nivel de toxicidad, 24 h> 400mg/l Eliminación del producto: Reciclar o incinerar Numero ONU 1018. RID\ADR clase 2 cifra (y letra) 3°a Prescripciones: Placa 2 N°peligro /N°materia 20/1018 IMDG clase 2.2 N°ONU (IMDG) 1018 Prescripciones: Placa NO INFLAMABLE GAS/2 IATA clase 2.2 N°ONU (IATA) o N°ID1018 Prescripciones: Placa NO INFLAMABLE GAS/2 Código producto: 00055/7 Directiva CEE Ficha de seguridad: D.91/155/CEE modificada por D. 93/112/CEE: Sustancias y preparados peligrosos Preparados peligrosos: D. 67/548/CEE modificada por D. 93/21/CEE: Guía de las placas (18a APT) R59 Dañino para la capa de ozono S59 Consultar el productor /proveedor para mas información relativa al reciclado S 61 No diseminar en el ambiente. Consultar las instrucciones especiales y la ficha de seguridad. Usos aconsejados: Refrigerante a baja temperatura, Agente congelante, Acondicionamiento del aire Referencia bibliográfica: Encyclopedie des gas (Air Liquide-ed.1976- ELSEVIER AMSTERDAM). Ficha toxicología INRS: N° 142 CLORODIFLUOROMETANO Este documento se refiere al producto conforme a las especificas suministradas por ELF ATOCHEM. En caso de mezclas, hay que asegurarse que no acontezcan nuevos peligros. Las informaciones de esta ficha se consideran correctas basándose en nuestros últimos conocimientos relativos al producto en cuestión, en la fecha de edición de la misma. Es importante para el usuario conocer los posibles riesgos en los que se pudiese incurrir si el producto fuese utilizado para usos distintos de aquellos a los que es destinado. Esta ficha solo debe ser utilizada y reproducida a fines de prevención y seguridad. La lista de textos legislativos, regulaciones o administrativos no debe considerarse completa. Es responsabilidad del usuario del producto remitirse a textos oficiales para la utilización, conservación y manipulación del producto de lo que es único responsable. Además el usuario del producto debe informar a las personas que puedan estar involucradas en el manejo del producto de todas las informaciones necesarias sobre la seguridad en el trabajo, protección de la salud y del medio ambiente, dándoles esta ficha de datos de seguridad. 142 CLIVET S.P.A. Via Camp Lonc, 25 Z.I. Villapaiera 32030 FELTRE (BL) Tel. 0439 3131 Fax. 0439 313300 www.clivet.com [email protected]