1
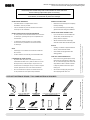
Manuel d’installation pour douche ronde en coin à portes coulissantes Corner round shower with sliding doors installation guide Pour modèle de douche / For shower model : • 045-3187 (NTK6002-3636) 045-3187 (NTK6002-3636) INSTALLATION SUR LES TUILES EN CÉRAMIQUE INSTALLATION OVER CERAMIC TILES INSTALLATION • Si votre porte de douche doit être installée sur une bordure SUR LES TUILES EN CÉRAMIQUE • If your shower door is to be installed over • Si votre ceramic tiles, the tiles should lay comen céramique, le jambage doit reposer complètement sur porte de douche doit être installée sur une bordure ceramic tiles, the tiles should lay comen céramique, le jambage doit reposer complètement sur pletely under the wall jamb. cette dernière. pletely under the wall jamb. cette dernière. TOOLS MATERIAL / OUTILS ET MATÉRIAUX REQUIS • AND Silicone shouldREQUIRED be used to seal the gap • Le calfeutrage doit être appliqué sur le côté extérieur • Silicone should be used to seal the gap Le calfeutrage doit être appliqué sur le côté extérieur where the ceramic tiles meet the fixed panel. de la douche où le panneau fixe rencontre la •bordure where the ceramic tiles meet the fixed panel. de la douche où le panneau fixe rencontre la bordure en céramique. * NOTICE en céramique. • Caulking: no sealant is required inside the NOTICE • Caulking: no sealant isNOTE required inside the shower, unless otherwise stated. • stated. Calfeutrage: aucun scellant n’est nécessaire NOTE à l’intérieur shower, unless otherwise • Some models are equipped with clear • Calfeutrage: aucun scellant n’est nécessaire à l’intérieur de la douche. • Some models are equipped with clear sealing gaskets. de la douche. Certains modèles sont dotés de joints d’étanchéité clairs. sealing(X2) gaskets.LEVEL• SCREWDRIVER LONG NOSE LOCKING PLIERS 1/4" & 1/8" DRILL BITS • Certains modèles sont dotés de joints d’étanchéité clairs. SHOWER DOORPINCE SERRE ÉTAU (X2) NIVEAU TOURNEVIS MÈCHE 1/4" CARE & 1/8" FOR YOUR DOOR L’ENTRETIEN DE VOTRE DOUCHE • Never use scouring powder pads or sharp CARE FOR YOUR SHOWER L’ENTRETIEN DE VOTRE DOUCHE • Never use scouring powder pads or sharp • Ne jamais utiliser de poudre ou de tampon à récurer, ni instruments on metal pieces or glass pan• Ne jamais utiliser de poudre ou de tampon à récurer, ni instruments on metal pieces or glass pand’instrument tranchant sur les parties en métal ou en verre. els. An occasional wiping down with a mild tranchant sur les parties en métal ou en verre. els. An occasional wiping down with aà mild De temps autre, il suffit de nettoyer la porte avecd’instrument une soap diluted in water is all that is needed De temps à autre, il suffit de nettoyer la porte avec une soap diluted in water is all that is needed solution d’eau et un détergent doux pour conserver l’aspect to keep the panels and aluminum parts solution d’eau et un détergent doux pour conserver l’aspect to keep the panels and aluminum parts neuf des panneaux de verre et du cadre en aluminium. looking new. neuf des panneaux de verre et du cadre en aluminium. looking new. • Nous recommandons de passer une raclette de douche • We recommend wiping the glass panels PE MEASURE CUTTING PLIERS SILICONE MALLET BLOCK • WRENCH • Nous recommandons de passer une raclette de douche We recommend wiping the glass sur lespanels panneaux de verre après chaque utilisation. with a squeegee after each use. AN À MESURER PINCE COUPANTE SCELLANT MAILLET BLOC CLÉ À FOURCHE sur les panneaux de verre après chaque utilisation. with a squeegee after each use. INSTRUCTIONS GÉNÉRALES GENERAL INSTRUCTIONS • Lire attentivement et complètement le manuelINSTRUCTIONS GÉNÉRALES • Read this manual carefully and completely • Lire attentivement et complètement le manuel d’installation avant de procéder. before proceeding. d’installation avant de procéder. • Il est recommandé de porter des lunettes de sécurité en • It is recommended that you wear safety • Il est recommandé de porter des lunettes de sécurité en tout temps lors de l’installation. glasses at all times during the installation. tout temps lors de l’installation. Fr Manuel d’installation pour douche ronde en coin à portes coulissantes Corner round shower with sliding doors installation guide ual and product code number for future Please keep this manual and product co Pleasereference keep this manual and product code number for future reference dering replacement parts if necessary. and for ordering replacement and for ordering replacement parts if necessary. befored’installation proceeding. avant de procéder. • beforeavant proceeding. d’installation de procéder. It •is recommended that you Il est recommandé dewear portersafety des lunettes de sécurité en glasses at temps all times during the installation. tout lors de l’installation. Fr INSTALLATION OVERSUR CERAMIC TILES EN CÉRAMIQUE INSTALLATION LES TUILES • If •yourSi shower door is to be installed overinstallée sur une bordure votre porte de douche doit être ceramic the tilesleshould lay doit com-reposer complètement sur entiles, céramique, jambage pletelycette under the wall jamb. dernière. • Silicone be used toêtre sealappliqué the gap sur le côté extérieur • Leshould calfeutrage doit where de thelaceramic tiles meet the fixed panel. douche où le panneau fixe rencontre la bordure NOTICE • • en céramique. • sealing gaskets. • Certains modèles sont dotés de joints d’étanchéité clairs. • Ne jamais utiliser de poudre ou de tampon à récurer, ni instruments on metal pieces or glass pand’instrument tranchant sur les parties els. An occasional wiping down with a mild en métal ou en verre. INSTALLATION OVER CERAMIC TILES INSTALLATION SUR LES TUILES EN CÉRAMIQUE • If your shower door is to be installed over • Si votre porte de douche doit être installée sur une bordure ceramic tiles, the tiles should lay comen céramique, le jambage doit reposer complètement sur pletely under the wall jamb. cette dernière. • Silicone should be used to seal the gap • Le calfeutrage doit être appliqué sur le côté extérieur where the ceramic tiles meet the fixed panel. de la douche où le panneau fixe rencontre la bordure NOTE • • Caulking: no sealant is required inside the shower, unless otherwise stated. Calfeutrage: aucun scellant n’est nécessaire à l’intérieur • Some models are equipped with clear de la douche. sealing gaskets. Certains modèles sont dotés de joints d’étanchéité clairs. CARE FOR YOUR SHOWER DOOR els. An occasional wiping down a mild d’instrument tranchant sur les parties enwith métal ou en verre. soap diluted in water is all thatlaisporte needed De temps à autre, il suffit de nettoyer avec une keep panels anddoux aluminum parts solution to d’eau etthe un détergent pour conserver l’aspect looking new. neuf des panneaux de verre et du cadre en aluminium. des panneaux de verre et du cadre en aluminium. lookingneuf new. • recommend Nous recommandons de passer une raclette de douche We wiping the glass panels sur les panneaux de verre après chaque utilisation. with a squeegee after each use. • • Never use scouring powder pads or sharp L’ENTRETIEN DE VOTRE DOUCHE instruments metaloupieces or glass pan- ni • Ne jamais utiliser de on poudre de tampon à récurer, De temps à autre, il suffit deneeded nettoyer la porte avec une soap diluted in water is all that is solution d’eau et un détergent doux pour conserver l’aspect to keep the panels and aluminum parts • • recommandé It is recommended wear safety Il est de porterthat desyou lunettes de sécurité en glasses at all times during the installation. tout temps lors de l’installation. en céramique. NOTICE Caulking: no sealant is required inside the NOTE shower, unless otherwise stated. • Calfeutrage: aucun scellant n’est nécessaire à l’intérieur Some de models are equipped with clear la douche. CARE FOR YOUR SHOWER DOOR L’ENTRETIEN DE powder VOTREpads DOUCHE • Never use scouring or sharp FrEn • • recommandons We recommend panels Nous dewiping passerthe uneglass raclette de douche with a squeegee after each use. sur les panneaux de verre après chaque utilisation. AND MATERIAL / OUTILS ETREQUIRED MATÉRIAUX REQUIS OUTILS ET MATÉRIQUXTOOLS REQUIS / TOOLS REQUIRED AND MATERIALS * Use a ¼" drillProduct bit when drilling into ceramic specifications are subject to tiles change without notice * Utiliser une mèche de ¼" pour percer des tuiles en céramique. • GENERAL INSTRUCTIONS INSTRUCTIONS GÉNÉRALES • Read this carefully and completely • Lire attentivement manual et complètement le manuel • Des changements peuvent être apportés au produit sans préavis. Product specifications are subject to change without notice • Des changements peuvent être apportés au produit sans préavis. En Fr Read this carefully and completelyle manuel • Lire manual attentivement et complètement GENERAL INSTRUCTIONS INSTRUCTIONS GÉNÉRALES En En Please keep this manual and product code number for future reference Please this manual and product code number for future reference and for ordering replacement parts keep if necessary. and for ordering replacement parts if necessary. Veuillez conserver ce manuel et le code de produit pour des références futures, Veuillez conserver ce manuel et le code de produit pour des références futures, et au besoin, la commande de pièces de rechange. et au besoin, la commande de pièces de rechange. nuel et le code de produit pourVeuillez des références futures, Veuillez conserver ce manuel et le code de p conserver ce manuel et le code de produit pour des références futures, n, la commande de pièces de rechange. et au besoin, la commande de et au besoin, la commande de pièces de rechange. MÈCHE 1/4" & 1/8" RUBAN À MESURER LONG NOSE LOCKING PLIERS (X2) LEVEL TOURNEVIS SCREWDRIVER ÉTAU (X2) (X2) LONGPINCE NOSESERRE LOCKING PLIERS NIVEAU LEVEL TOURNEVIS PINCE SERRE ÉTAU (X2) NIVEAU CUTTING PLIERS MALLET BLOCK WRENCH SILICONE MAILLET MALLET BLOC BLOCK CLÉWRENCH À FOURCHE SCELLANT SILICONE MAILLET BLOC CLÉ À FOURCHE SCELLANT • CRAYON SCREWDRIVER PINCE COUPANTE CUTTING PLIERS • TAPE MEASURE RUBAN MESURER TAPE À MEASURE • PENCIL CRAYON PENCIL If your shower door is to be installed over PERCEUSE INSTALLATION OVER CERAMIC TILES MÈCHE & 1/8" 1/4" & 1/8"1/4" DRILL BITS before proceeding. 1/4" & 1/8" DRILL BITS GENERAL INSTRUCTIONS DRILL PERCEUSE DRILL glasses at all times during the installation. It is recommended that you wear safety Read this manual carefully and completely * * En TOOLS AND MATERIAL REQUIRED / OUTILS ET MATÉRIAUX REQUIS PINCE COUPANTE * Use a ¼" drill bit when drilling 2into ceramic tiles * Utiliser unea mèche pourdrilling percer des en céramique. * Use ¼" drillde bit¼" when intotuiles ceramic tiles * Utiliser une mèche de ¼" pour percer des tuiles en céramique. POSSIBLE CONFIGURATIONS / CONFIGURATIONS POSSIBLES POSSIBLE CONFIGURATIONS / CONFIGURATIONS POSSIBLES ge without notice • Des changements peuventProduct être apportés au produit préavis. Productsans specifications specifications aresans subject to change without notice • Des changements peuvent être apportés au produit préavis. are subject to change without notice • Des chan Manuel d’installation pour douche ronde en coin à portes coulissantes Corner round shower with sliding doors installation guide LISTE DES PIÈCES / PARTS LIST J B A C G D V N E L L F Q R K K S I U H M M A B C D E F G H I J K L M N O P Q R S T U V Rail du haut des portes (x 1) Vis ST4 x 25 mm (x 8) Vis à tête plate ST4 x 25 mm (x 2) Vis à tête plate ST4 x 40 mm (x 2) Cheville (x 10) Support / récepteur de verre (x 2) Roulette de haut de porte (x 4) Roulette de bas de porte (x 4) Assemblage de poignée (x 2) Jambage muraux (x 4) Panneau de verre fixe (plat) (x 2) Porte coulissante (courbée) (x 2) Joint étanche de panneau (x 4) Joint étanche magnétique (x 2) Base de douche Rail du bas des portes (x 1) Capuchon couvre-vis (x 2) Clé allen 3 mm Clé allen 4 mm Forêt de perçeuse 3 mm Vis ST4 x 10 mm Stoppeur de porte (x 2) O P F 3 A B C D E F G H I J K L M N O P Q R S T U V Top rail for the 2 doors (x 1) Screws ST4 x 25 mm (x 8) ST4 x 25 mm Flathead screws (x 2) ST4 x 40 mm Flathead screws (x 2) Wall plug (x 10) Glass clip (x 2) Top door roller (x 4) Bottom door roller (x 4) Handle assembly (x 2) Wall profile (x 4) Fixed Glass (x 2) Sliding Door (x 2) Rubber gasket (x 4) Magnetic Seal (x 2) Shower tray (available separately) Bottom Rail ((x 1) Screw cover cap (x 2) 3 mm Allen Key 4 mm Allen Key 3 mm Drill bit Screws ST4 x 10 mm Door Stopper (x 2) Manuel d’installation pour douche ronde en coin à portes coulissantes Corner round shower with sliding doors installation guide 1. INSTALLATION DE LA BASE / SHOWER TRAY ASSEMBLY - Installez votre base de douche selon les instructions du manuel fourni dans la boite de la base de douche. - Assurez-vous que le renvoi de la douche est bien connecté au tuyau d’évacuation dans le plancher. - Assurez-vous que la base de douche soit parfaitement au niveau et que l’évacuation de l’eau se fait correctement avant de poursuivre les autres étapes d’installation. - Si la cabine de douche n’est pas installé sur une base de douche, veuillez choisir un type de revêtement de sol adapté afin que l’évacuation de l’eau se fasse correctement. Installation Procedure - Install your shower tray according to the instruction guide provided in the shower tray carton. - Make sure that the shower drain is properly connected to the drain pipe in the floor. - Make sure the shower tray is perfectly leveled and that water drains properly before proceeding to further installation steps. - If the shower enclosure is not installed on a shower tray, select a type of flooring material that will ensure water will drain correctly. STEP1: Tray assembling Connect the waste pipe of shower tray to the waste pipe in the floor. -Fit the shower tray(available separately) in the required position. -If the shower enclosure is not being installed on a 4 shower tray, please choose a suitable flooring type to fit the enclosure to. na ype Manuel d’installation pour douche ronde en coin à portes coulissantes Corner round shower with sliding doors installation guide 2. ASSEMBLAGE DES JAMBAGES / WALL JAMB INSTALLATION - Mesurer la distance correcte du coin à la position exigée de l’extérieur des jambages muraux et marquer cette position sur le mur avec un crayon. - Positionner les jambages muraux (J) contre ces marques et utiliser un niveau à bulle pour s’assurer qu’ils sont à la verticale. - Utilisation des jambages muraux (J) comme modèle, marquez les positions des trous pré-percés sur le mur. - Percer les positions marquées avec un forêt de 5.5 mm. - Utiliser un maillet de caoutchouc pour insérer les chevilles (F) dans les trous. - Fixer les jambages de mur avec des vis 4 x 25mm. (B) - Measure the correct distance from the corner to the required positions of the outside of the wall profiles and mark this position on the wall with a pencil. - Position the wall profiles (J) against these marks and use a spirit level to ensure they are vertical. - Using the wall profiles (J) as a template, mark the positions of the pre-drilled holes on the wall. - Drill the positions marked using a 5.5 mm drill bit. - Use a rubber mallet to insert the wall plugs (F) into the holes. - Fix the wall profiles with screws 4 x 25 mm. (B) STEP2: Wall profiles assembling B:SIZE:90×90×195cm 885mm 885mm 20 J 27 J φ5.5mm F ST4X25 B 5 4 er to wall with a Manuel d’installation pour douche ronde en coin à portes coulissantes Corner round shower with sliding doors installation guide 3. ASSEMBLAGE DES PANNEAUX DE VERRE FIXES / FIXED GLASS PANELS ASSEMBLY - Insérer les panneaux de verre fixes (K) dans les jambages muraux (J). (Remarque: Assurez-vous que les deux panneaux de verre sont parfaitement verticaux et égaux l’un par rapport à l’autre.) - Insert the fixed glass panels (K) into the wall profiles (J). (Note: Make sure the two glass panels are perfectly vertical and equal with each other.) STEP3: Fixed glass panels Assembling ks tical. the l. l bit. into B」. J K -Insert the fixed glass panels into the wall profiles. (Note: please make sure the two glass panels are vertical with each other.) 6 6 Manuel d’installation pour douche ronde en coin à portes coulissantes Corner round shower with sliding doors installation guide 4. ASSEMBLAGE DU RAIL DES PORTES COULISSANTES (HAUT) / SLIDING DOOR RAIL ASSEMBLY (TOP) STEP4: - Désserrer la vis pré-fixée M5 x 25 mm et désassembler les connecteurs en plastique pré-fixés sur le rail du haut. - Loose the pre-installed screw M5 x 25 mm and dis-assemble the pre-installed plastic connectors on the top rail. Fixed glass panels Assembling M5X25 R 3mm Allen Key M5X25 R 3mm Allen Key -Loose the pre-fixed screw M5x25mm and 7 dis-assembled the pre-fixed plastic connectors on the top rails. Manuel d’installation pour douche ronde en coin à portes coulissantes Corner round shower with sliding doors installation guide 5. SOLIDIFICATION DES PANNEAUX DE VERRE FIXES / SECURING THE FIXED GLASS PANELS - Placer le rail supérieur dans sa position correcte à l’intérieur des panneaux de verre fixes, et assurez-vous que les trous dans les panneaux de verre fixes s’alignent avec les trous sur les connecteurs en plastique du rail du haut. - Utiliser les vis M5 x 25 mm pour fixer solidement le rail du haut aux 2 panneaux de verre fixes. - Place the top rail in it’s correct position from the inside of fixed glass panels, and make sure the panel’s holes aligns with the holes on the plastic connectors of top rail. - Using the M5 x 25 mm screws, secure the top rail to the 2 fixed glass panels. STEP5: Fixed glass panels Assembling M5X25 3mm Allen Key 3mm Allen Key R R M5X25 -Place the top rails in correct positions from the inside of glass panels, and make sure the holes on 8 the fixed glass panels be overlapped with the holes on the plastic connectors of top rails. STEP6: Manuel d’installation pour douche ronde en coin à portes coulissantes Corner round Assembling shower with sliding doors installation guide Bottom Rails Rails Assembling STEP6: STEP6: Option 2:The shower is n 1:The shower is Bottom Railsenclosure Assembling Bottom Railsenclosure Assembling 6. ASSEMBLAGE RAIL DEStray. PORTES COULISSANTES (BAS) / SLIDING DOOR RAIL ASSEMBLY (BOTTOM) installed on theshower floor. installed theDU shower Option 2:The enclosur Option on 1:The shower enclosure is installed on the floor installed on the shower tray. Option 1: STEP6: La cabine de douche est installéé sur la base de douche. Bottom Rails Rails Assembling 90° Assembling The shower enclosure is installed on the shower tray. Option 1:The shower n 1:The shower enclosure isenclosure is 90° on tray. the shower tray. installed on installed the shower 90° Option 2: STEP6: La cabine de STEP6: douche est installée directement sur le sol. Bottom Rails Assembling Bottom Rails Assembling The shower enclosure is installed on the floor. Option 2:The shower is enclosur Option 2:The shower enclosure installed90° oninstalled the floor.on the floor 90° 90° 90° 90° F F F F C 25 rews er cap C 25 9 rews F C ST4X25 Flathead screws S 9 Drill bit 5.5mm F C ST4X25 S er cap Drill bit 3mm S Screw cover cap FFlathead screws R E Drill bit 3mm Screw cover cap Flathead screws ST4X40 F Drill bit 5.5mm Screw cover cap ST4X40 Flathead screws Drill bit 3mm Drill bit 3mm E S Scre ST4X40 Flathead screws S R E R ST4X40 Flathead screws 10 ES - Insérer le support/récepteur de verre (F) sur les panneaux de verre fixes et insérer le rail inférieur dans les supports/récepteurs (F). Drill bit 5.5mm Screw cover cap bit 5.5mm - S’assurer que les supports/récepteurs de verre (F) et le rail inférieur soient à niveau avec leDrill bord de la base de douche. - Utiliser un crayon pour marquer les positions des trous pré-percés sur la base de douche. - Retirer les supports/récepteurs de verre de verre et le rail inférieur, percer les positions marquées avec un foret de 3 mm. (Remarque: Si la cabine de douche n’est pas installée sur une base de douche, mais plutôt sur le sol, un foret 5.5 mm doit être utilisé.) - Replacer les supports/récepteurs de verre, rail inférieur à leur position et aligner les trous avec ceux percés. Les fixer avec des vis à tête plate 4 x 25 mm (C) et mettre les capuchons de vis. (Note: Si la cabine de douche n’est pas installée sur une base de douche, mais plutôt sur le sol, des chevilles doivent être utilisés avant de fixer les vis à tête plate 4 x 40 mm (D)). - Insert the glass clips (F) onto the fixed glass panels and insert the bottom rail into the glass clips (F). - Make sure the glass clips and the bottom rails be in level with the edge of shower tray. - Use a pencil to mark the positions of the pre-drilled holes on the shower tray. - Remove the glass clips, bottom rails, and drill the marked positions with a 3 mm drill bit. (Note: If the shower enclosure is not installed on the shower tray, but on the floor, a 5.5 mm drill bit should be used.) - Put the glass clips, bottom rails back to the position, and line up the holes with the holes drilled. Fix them with flathead screw 4 x 25 mm (C) Put the screw cover caps on. (Note: If the shower enclosure is not installed on the shower tray, but on the floor, the wall plugs should be used before fixing the flathead screws 4 x 40 mm (D)) 9 Scre R 10 Manuel d’installation pour douche ronde en coin à portes coulissantes Corner round shower with sliding doors installation guide 7. ASSEMBLAGE DE LA PORTE COULISSANTE / SLIDING DOOR PANEL ASSEMBLY - Utiliser la clé allen 3 mm pour fixer le boulon, puis la vis de fixation avec la clé à molette (ATTENTION ne pas serrer trop fort, les rouleaux doivent être ajustés plus tard) - Utiliser un tournevis pour fixer la petite vis du stoppeur de porte (V) sous l’une des 2 roulettes. - Using 3 mm allen key to install the bolt, then fasten screw with wrench (ATTENTION do not overtight, the roller have to be adjusted later) STEP7: - Use a screwdriver to fasten the small door stopper screw (V) underneath one of the rollers. Sliding Doors Assembling G R 3mm Allen Key V V H L R 3mm Allen Key - Using 3MM alley ken to fixate the bolt, then 10 fastening screw with wrench (pay attention, do not very tight, the roller have Manuel d’installation pour douche ronde en coin à portes coulissantes Corner round shower with sliding doors installation guide 8. INSTALLATION DES PORTES COULISSANTES / SLIDING DOOR PANELS INSTALLATION - Installer les roulettes du haut sur les portes, accrocher les portes au rail supérieur, puis installer les roulettes du bas, même procédure décrite à l’étape 7 (ATTENTION ne pas serrer trop fort, les rouleaux doivent être ajustés plus tard) - Install the top rollers on the doors, hang the doors to the top rail, then install the bottom rollers, same as step 7 (ATTENTION do not overtight, the roller have to be adjusted later) STEP8: Sliding Doors Assembling 3mm Allen Key R - Install the up roller to the rail, then install the bottom roller, same as step 7, also do not be very 11 tight, the roller have to be adjust later. Manuel d’installation pour douche ronde en coin à portes coulissantes Corner round shower with sliding doors installation guide 9. INSTALLATION DES BANDES ÉTANCHES MAGNÉTIQUES / MAGNETIC GASKETS INSTALLATION - Pousser les bandes étanches magnétiques (N) sur les portes coulissantes. Couper à la longueur voulue. STEP9: - Push the magnetic seals (N) onto the sliding doors. Cut to required length. Magnetic Seals Assembling N -Push the magnetic seals「N」onto the sliding doors. Cut into required length. 12 14 Manuel d’installation pour douche ronde en coin à portes coulissantes Corner round shower with sliding doors installation guide 10. AJUSTEMENT DES PORTES COULISSANTES / SLIDING DOOR PANELS ADJUSTMENT - Utiliser clé allen de 3 mm pour installer le boulon, puis ajuster la vis avec la clé à molette jusqu’à ce que les joints magnétiques soient alignés et qu’ils ferment bien l’un contre l’autre lors de la fermeture des portes. - Quand tout est OK, serrez les vis dans cette position finale. (ATTENTION ne pas serrer de manière excessive afin de ne pas briser le verre) - Using 3 mm allen key install the bolt, then adjust the screw with wrench till the magnetic gaskets are flush and closes well together when closing the doors. STEP10: - When everything is fine, secure the screws in this final position. (ATTENTION do not overtight, this could cause the glass to break) Sliding Doors Adjustment R 3mm Allen Key - Using 3mm alley ken to fixate the bolt, then adjust 13 the screw with wrench till the magnetic seal fixed well. ust ed Manuel d’installation pour douche ronde en coin à portes coulissantes Corner round shower with sliding doors installation guide 11. INSTALLATION DES BANDES ÉTANCHES DE CAOUTCHOUC / RUBBER GASKETS INSTALLATION - Pousser les bandes étanches de caoutchouc (M) sur les panneaux de verre fixes et les portes coulissantes. Couper à la longueur voulue. - Utilisez le tournevis cruciforme pour assembler les poignées. - Push the rubber gaskets (M) onto the fixed glass panels and sliding doors. Cut to required length. STEP11: - Use the cross screw driver to assemble the handles. Rubber Seals and Handles Assembling M I M5X20 -Push the rubber seals「M」onto the fixed glass panels and sliding doors. 14 Cut into required length. -Use the cross screw driver to assemble the handles. Manuel d’installation pour douche ronde en coin à portes coulissantes Corner round shower with sliding doors installation guide 12. INSTALLATION DES PIÈCES DE FINITION / FINISHING PARTS INSTALLATION - Mettre les capuchons sur les attaches des rails et sur les roulettes. - Put the cover caps on the rails fasteners and on the rollers. STEP12: Cover Caps Assembling -Put the cover caps for the rails and rollers on. 15 17 - Manuel d’installation pour douche ronde en coin à portes coulissantes Corner round shower with sliding doors installation guide 1. ASSEMBLAGE DE LA PORTE COULISSANTE / SLIDING DOOR PANEL ASSEMBLY - Percer des trous avec la perceuse et un foret de 3 mm dans les jambages muraux (J) (de l’intérieur de la cabine de douche). (Remarque: Ne pas percer à travers les profils, sinon, il va endommager la surface du profil.) - Solidifier l’ensemble de la structure avec les rondelle et vis 4 x 10 mm (U). - Finalement, mettre les cache-vis. - Drill holes with 3 mm drill bit on the wall profiles (from the inside of the enclosure). (Note: Do not drill through the profiles, otherwise, it will damage the profile’s surface.) STEP13: - Secure the whole enclosure with screw washer and screw 4 x 10 mm (U). Fixing Wall Profiles - Put the screw covers on. J J 3mm Drill bit T ST4X10 U -Drill holes with 3mm bit on wall profile.(Note: Do not drill through the profiles, otherwise, it will 16 damage the profile's surface.) -Fix it with screw washer and screw 4x10mm「U」. Manuel d’installation pour douche ronde en coin à portes coulissantes Corner round shower with sliding doors installation guide 14. APPLICATION DU SILICONE / SILICONE APPLICATION - Appliquer du scellant de silicone sur tous les joints extérieurs comme les jambages muraux et la base de douche. - Ne pas utiliser la cabine de douche pour 24 heures afin de permettre au silicone de sécher complètement. - Apply silicone sealant to all exterior joints between wall profiles and tray. - Do not use the enclosure for 24hours, to allow the silicone to dry completely. HEURES HOURS 17