1
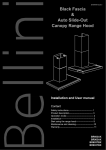
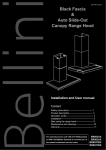
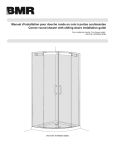
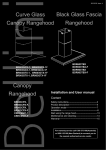
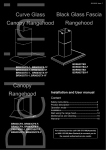
20110311 Issue 3
Curve Glass Canopy
Range Hood
Installation and User manual
Content
Safety instructions----------------------------------------1
Product description---------------------------------------3
Operation mode-------------------------------------------4
Installation---------------------------------------------------5
Start using the range hood------------------------------10
Maintenance and cleaning------------------------------11
Warranty-----------------------------------------------------12
For warranty service call 1300 373 199 to
connect you to the nearest authorised
service centre
BR603GCX
BR903GCX
Safety instructions
1
This manual explains the proper installation and use of your range hood, please read it
carefully before using even if you are familiar with the product. The manual should be kept
in a safe place for future reference.
Never to do:
Always to do:
z
z
This appliance is not intended for use by persons
(including children) with reduced physical, sensory
plastic items) must be kept out of reach of
and mental capabilities, or lack of experience and
babies or young children at all times due to
knowledge, unless they have been given
risk of suffocation.
supervision or instruction concerning use of the
z
appliance by a person responsible for their safety.
z
Young children should be supervised to
ensure that they do not play with the
Never carry out flamable cooking under the
appliance
z
Packaging materials (eg; polystyrene and
appliance.
z
Ensure the range hood is switched off before
The exhaust from the range hood must not be
carrying out maintenance, to avoid any
discharged into any heating flue, which may carry
possibility of electric shock.
combustion products from other sources.
z
Grease filters must be removed every four
weeks (maximum) for cleaning to reduce the
risk of fire.
z
There must be adequate ventilation of the
room when the range hood is used at the
same time as appliances burning gas or other
fuels.
z
Always cover lit gas burners with pots or pans
when range hood is in use.
z
z
Do not leave lit gas burners exposed due to the risk
of fire.
Always switch off gas burners before you
remove pots or pans.
z
If the supply cord is damaged, the cord must
be replaced by the manufacturer, its service
agent or similarly qualified persons in order to
avoid a hazard
z
z
This range hood is not recommended for
barbecues.
Plug must be accessible after installation.
Safety instructions
2
Never to do:
Always to do:
z
This range hood cannot be installed for outdoor use.
z
z
It is prohibited to fit the range hood over a solid fuel
applicable regulations concerning discharge
stove
of exhaust air are fulfilled.
z
z
z
z
This appliance must not be connected to a chimney
z
Attention should be given to ensure that any
This appliance should be installed and
or vent flue which is in use.
maintained by a suitably qualified and
This appliance is not to be vented into the roof
competent person in accordance with the
cavity, must exit into open air.
relevant safety regulations.
Exhaust air must not be discharged into a wall
z
Before connecting the appliance to the mains
cavity, unless the cavity is designed for the purpose.
supply, ensure that the voltage and frequency
This appliance should not be connected to ducting
details on the rating plate are consistent with
which ventilates rooms with fire places.
the source of supply.
Product description
3
Accessories bag
Description
Picture
User Manual
1
1:1 installation guide template
1
Upper decorative chimney bracket
1
Lower decorative chimney bracket
1
Hood mount bracket
1
Outlet( diameter 150mm)
1
Dry wall anchors plugs
9
Screw(ST4x8mm)
8
Screw(ST4x40mm)
7
Screw(ST4x30mm)
2
Screw(4x22mm)
4
Decorative ring*
4
Rubber insert*
4
*BR903GCS only
Component list:
Technical data:
1. Upper decorative chimney bracket
2. Upper decorative chimney(Inner)
Power supply: 220 – 240v, 50Hz
3. Lower decorative chimney bracket
Lights: 2x20W Halogen lamp
4. Flexible exhaust pipe
Motor: 190W
5. Lower decorative chimney(outer)
Length of power cord: 2m
6. Hood mount bracket
Air outlet diameter: 150mm
7. Outlet(diameter 150mm)
8. Main body
9. Grease mesh filter
QTY
Operation Mode
4
Your range hood can be operated in two optional modes, choose the mode suitable for your kitchen before
installation.
Air Exaction
To outside
For air exaction mode, a ducting kit is required, the air is
drawn in and cleaned by the grease filters and directed
outside.
Ducting must be vented to outside atmosphere.
Air Recirculation
To inside
For air recirculation mode, charcoal filter is a must to
eliminate cooking smells.
The air is drawn in and cleaned first by the grease filters
and then charcoal filter. The cleaned air is then
re-circulated back into kitchen through grilles on the
upper decorative chimney.
Installation
5
Dimensions:
BR603GCX
BR903GCX
Installation:
Warning:
Check that the installation complies with the standards of local building, gas and electrical authorities. Before
connecting to the mains supply ensure the mains voltage corresponds to the voltage on the appliance rating
plate inside the range hood.
When installing the range hood, make sure you adhere to the minimum and maximum distances from the range
hood base to the cooktop hob surface.
Hints for exhaust duct installation
The following rules must be strictly followed to obtain optimal air extraction
•
Keep exhaust duct short and straight
•
Do not reduce the size or restrict exhaust duct
•
When using flexible duct always install the duct pulled taut to minimize pressure loss
•
Failure to observe these basic instructions will reduce the performance and increase noise levels of the
range hood
Ensure the exhaust ducting selected for installation complies with relevant standards and is fire retardant.
6
1. Using a spirit level mark a vertical centre line on the wall where the hood is to be positioned, and a horizontal
line where the hood base will be.
NOTE: The distance from the horizontal line to an electrical cooktop underneath must be minimum of
600mm & 650mm to a gas cook top and a maximum height of 800mm (refer to table below).
Vertical centre line
Horizontal line
Hood base
Minimum:
Electric 600mm
Gas 650mm
Maximum:
800mm
Top of hob
*If the instructions of the hob specify a greater distance than the minimum above, then that shall be the minimum height for installation
2. Use the installation guide template to determine where screw mount holes should be at. Make sure vertical
and horizontal line on the installation guide template superpose with the line just drew on the wall.
3. According to the position just marked by installation guide template, drill holes on the wall and hammer dry
wall anchor plugs into holes.
4. Fit the outlet on the top of range hood body with 4pcs ST4x8mm screws.
7
5. Fit the flexible exhaust pipe onto outlet.
* If choose air extraction mode, please install the flexible exhaust pipe; if choose air recirculation mode, no
need to install the flexible exhaust pipe, please skip this step and go to step 6 directly
6. Use 2pcs ST4x8mm screws to attach lower and upper chimney together, do not fasten screws too much,
make sure upper decorative chimney can be telescopically adjusted after assembled.
Upper decorative chimney(Inner)
Lower Chimney bracket
Lower decorative chimney(Outer)
7. Remove grease mesh filter and install active charcoal filter onto motor chamber according to below drawing.
* If choose air recirculation mode, we strongly recommend you have charcoal filter installed; if choose air
extraction mode, please skip this step and go to step 8 directly.
8. Secure the hood mount bracket onto wall with 3pcs screw ST4x40, make sure the screws are fastened
completely and the hood mount bracket is securely fastened to wall.
8
9. Hang on the hood onto the hook of the hood mount bracket, make sure the mount slot on cooker hood
completely slide into hooks.
*Above photo is for BR903GCX. For BR603GCX, glass already installed on main body
10. Fasten the 2pcs anti-tilt ST4x30mm screws onto wall to ensure horizontality of cooker hood. You can find out
screw holes inside hood near the motor chamber.
11. Use 3pcs ST4x40mm screws to secure the lower decorative chimney bracket onto wall.
12. Plug in the main power supply.
13. Determine position where upper decorative chimney maximum extent to, use 2pcs ST4x40mm screws to
secure the upper decorative chimney bracket onto wall.
* Total maximum extension height is 980mm; each chimney height is 500mm.
14. Carefully put the glass according to the arrow direction onto the cooker hood, and then fasten the screws+
decorative ring + rubber washer to fix the glass.
* for BR603GCX, glass already installed on main body so skip this step but go to next step directly.
9
15. Extend the upper decorative chimney to desired height and fix it with the upper decorative chimney bracket
by 2pcs ST4x8mm screws.
16. Remove all blue protective film on chimney and cooker hood, the installation is now finished.
Start using your range hood
10
Lamp – Turn on/off light
Speed –select speed to suit cooking conditions
Low – light frying/boiling. Depress this button to enter into low speed and again to turn off motor.
Medium – frying/wok cooking/heavy boiling. Depress this button to enter into medium speed and
again to turn off motor
High – grilling, intensive frying and wok cooking. Depress this button to enter into high speed and
again to turn off motor
Maintenance and cleaning
11
Caution:
GREASE MESH FILTERS
• Before maintenance or cleaning is carried out, the
The mesh filters can be cleaned either by hand or in
range hood should be disconnected from the main
the dishwasher. After cleaning ensure that the filters
power supply. Ensure that the range hood is switched
are completely dry before refitting.
off at the wall socket and the plug removed.
- By hand: Soak in warm water and a neutral
• External surfaces are susceptible to scratches and
washing up liquid. For stubborn grease stains use a
abrasions, so please follow the cleaning instructions
soft nylon brush or sponge to help remove these
to ensure the best possible result is achieved without
stains. (Leave to dry naturally out of direct sun light)
damage.
- In a dishwasher: Ensure that placement of the
filters is made so as to not impede the function of the
GENERAL
spray arm. Washing the filters in a dishwasher may
Cleaning and maintenance should be carried out with
cause discoloration of the aluminum inner mesh over
the appliance cold especially when cleaning
time although it will not affect their performance.
Avoid leaving alkaline or acid substances (lemon
Filters should be washed separately to crockery and
juice, vinegar etc.) on the surfaces
kitchen utensils. It is advisable not to use rinse aid.
STAINLESS STEEL
Replace Lamps
The stainless steel must be cleaned regularly (e.g.
weekly) to ensure long life expectancy.
Dry with a clean soft cloth. A specialized stainless
steel cleaning fluid may be used.
NOTE: Ensure that wiping is done along with the
grain of the stainless steel to prevent any
unsightly crisscross scratching patterns from
appearing.
Switch the range hood off and disconnect supply cord
from Power outlet.
CONTROL PANEL SURFACE
Unscrew the Chrome rims in an anti clockwise
The inlay control panel can be cleaned using warm
direction to gain access to the halogen globe.
soapy water. Ensure the cloth is clean and well wrung
Remove Halogen globe whilst cool and replace with
before cleaning. Use a dry soft cloth to remove any
new globe. Screw chrome rims back into place in
excess moisture left after cleaning.
clockwise direction until secure.
Important
The range hood takes 2 x 20 W – 12 Volts Halogen
Avoid using harsh cleaning chemicals, strong
Globes.
household detergents or products containing
abrasives as this will affect the appliance
Important
appearance and potentially remove any printing
When handling globes hold with a cloth or gloves to
of artwork on the control panel and will void
ensure perspiration does not come in contact with the
manufactures warrantee
globe as this can reduce the life of the globe.
Warranty
12
The benefits conferred by this warranty are in
expense to this appliance caused directly or
addition to all implied warranties, other rights and
indirectly
remedies in respect of the product which the
damage or connected to incorrect power supply.
consumer has under the Trade Practices Act and
6. The Company (and any company related to the
by
power
surges,
electrical
storm
Company) will not be liable for any special,
similar State and Territory Laws.
incidental or consequential damages or for loss,
The original purchaser of this Bellini product is
damage or expense or for personal injury or loss or
provided with the following warranty, subject to the
destruction of property arising directly or indirectly
following warranty conditions.
from the use or inability to use this appliance or
any of its parts.
This product is covered by a 2 Year In Home Warranty
from the date of purchase.
The warranty covers
rectification free of charge of any fault arising from
defective
materials
workmanship.
or
components,
or
faulty
The product will be repaired or
7. Warranty will only be given where proof of
purchase is provided, e.g. original invoice.
8. Not designed or warranted for industrial or
commercial use (Commercial use applies to shops,
offices, schools, factories & workshops etc.).
replaced at the option of GSM Sales Pty Ltd.
DO NOT SEND IN THIS WARRANTY
WARRANTY CONDITIONS
Fill out the following details and file with your
1. This warranty is only valid for appliances installed
purchase invoice.
and
used
according
to
the
manufacturer’s
instructions.
2. This warranty does not apply to damage caused if
RETAIN & FILE WITH YOUR RECEIPT
Your Purchase Receipt/Invoice is proof of date of
your appliance has been dismantled, repaired or
purchase.
serviced by any person other than someone
purchase, or if the fault is not covered by this
authorised by the Company.
warranty, or if the product is found to be in working
3. If you live outside the service area of the Company
or one of its service agents, this warranty does not
If you are unable to establish the date of
order, you will be required to bear all service call
charges.
cover the cost of transport of the appliance for
service nor the service agent’s traveling costs to
GSM Sales Pty Ltd reserves the right to discontinue
and from your home.
items, modify designs and change specifications
4. If you are required to transport the appliance to
without incurring obligation.
the Company or its service agent, you must ensure
it is securely packed and insured. The Company
Whilst
does not accept any responsibility for loss or
descriptions, specifications and other information in
damage of the appliance prior to it being received
this publication is correct, no warranty is given in
by the Company or its service agent.
respect thereof and the company shall not be liable
5. This warranty does not cover loss, damage or
every
effort
is
made
to
ensure
that
for any errors therein.
You may not make claim under this warranty unless the defect claimed is due to faulty or defective parts or
workmanship. GSM Sales is not liable in the following situations (which are not exhaustive): 1. accident, 2.
misuse or abuse including failure to maintain, 3. normal wear and tear, 4. power surges, electrical storm
damage or incorrect power supply, 5. incorrect or incomplete installation, 6. incorrect operation and use, 7. any
modification to appliance without consent, 8. the appliance is serviced by anyone other than a GSM Sales
authorised service agent.
13
FOR WARRANTY SERVICE CALL 1300 373 199 TO
CONNECT YOU TO THE NEAREST AUTHORISED SERVICE
CENTRE
NOTES:
Serial Number