1
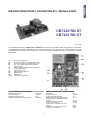
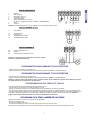
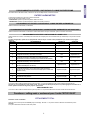
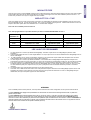
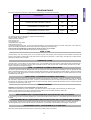
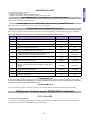
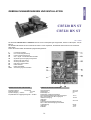
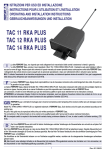
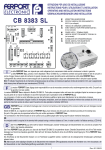
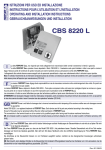
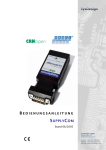
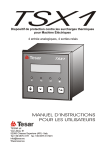
ISTRUZIONI PER USO ED INSTALLAZIONE
CB 7220 RN ST
CB 7221 RN ST
Rev 06/2007
La centrale CB7220 RN ST e CB7221 RN ST è dotata di ricevitore radio con frequenza 433.92 Mhz omologata PP.TT. La CB7220 RN ST
è compatibile con i trasmettitori serie K e KA, mentre la CB7221 RN ST con i trasmettitori serie TR04. I trasmettitori servono anche per la
programmazione della centrale
P
LA
LB
LC
LD
F1
F2
R2
R1
R3
12Vcc
Pulsante programmazione
Led di programmazione rosso
Led di programmazione verde
Led verde di segnalazione tasto APRE
Led rosso di segnalazione ingresso configurabile
Fusibile logica 500 mA
Fusibile motore 3,15 A
Relè LUCE CORTESIA.
Relè APRE
Relè CHIUDE
Alimentazione fotocellule.
CARATTERISTICHE SEZIONE RADIO
Freq. di ricezione
Freq. Intermedia
Impedenza di ingresso antenna
Sensibilità per segnale a buon fine
CARATTERISTICHE SCHEDA LOGICA
433.92 MHz.
10.7 Mhz
50 Ω
>-100 dBm
Alimentazione
Frequenza di rete
Logica di funzionamento
Uscita alimentazione dispositivi ausiliari
Massimo assorbimento applicabile all'uscita
alimentazione ausiliaria
Tensione uscita luce di cortesia
Tensione uscita lampeggiante
Massima potenza commutabile sull'uscita motori
Massima potenza commutabile Luce Cortesia
Massima potenza Lampada lampeggiante
1
A
230 Vac
50-60 Hz
µC
12 Vcc
100 mA
230 Vac
230 Vac
600 W
100 W
25 W
MORSETTERA J5
1
2
3
4
5
6
7
8
Antenna
Massa antenna
Alimentazione 12Vcc. (+)
Alimentazione 12Vcc. (-)
Tasto dinamico
Ingresso configurabile (N.C.) o (N.A.)
es. (STOP) – (FOTOCELLULE) – (CHIUDE) – (ANEMOMETRO)
STOP
Comune
Attenzione: L’ingresso PX deve essere N.C. se è configurato come ingresso fotocellula o STOP.
MORSETTERA J2 E J3
9
10
11
12
13
Apre motore 230 Vac 50-60Hz
Comune motore
Chiude motore 230 Vac 50-60 Hz
Alimentazione 230Vac. Neutro
Alimentazione 230Vac. Fase
14
15
16
Fase lampeggiante 230 Vac.
Neutro.
Fase Luce di cortesia 230 Vac.
MORSETTERA J4
Attenzione: l’uscita lampeggiante non necessita di scheda lampeggio.
Installare un lampeggiante a luce fissa
PROGRAMMAZIONE RADIOCOMANDO TASTO
APERTURA
- premere una volta il pulsante P (accensione LA).
- premere il tasto del radiocomando che vogliamo far apprendere (es. TASTO SX).
PROGRAMMAZIONE RADIOCOMANDO TASTO CHIUSURA
- premere due volte il pulsante P (accensione LB).
- premere il tasto del radiocomando che vogliamo far apprendere (es:TASTO DX).
Attenzione: questo secondo tasto funziona come il primo tranne che in modalità uomo presente.
In modalità uomo presente, il primo tasto apre, mentre il secondo chiude.
PROGRAMMAZIONE DEI TEMPI DI LAVORO
La programmazione dei tempi di lavoro viene fatta come segue:
- premere il pulsante P della centralina tre volte (accensione LA e LB)
- premere il radiocomando o il tasto dinamico per far partire in apertura il motore
- finito il tempo di apertura che vogliamo memorizzare premere nuovamente il radiocomando o il tasto dinamico - far
passare il tempo di pausa che vogliamo memorizzare e premere di nuovo il radiocomando o il tasto dinamico - trascorso il
tempo di chiusura che vogliamo memorizzare premere il radiocomando o il tasto dinamico.
Attenzione: il tempo di pausa deve essere memorizzato anche se e` disattivata la chiusura automatica.
PROGRAMMAZIONE TEMPO LUCE DI CORTESIA
- Premere quattro volte il pulsante P sulla centralina (LED LA e LED LB lampeggianti).
- premere il tasto apre.
- inizia il tempo di conteggio.
- finito il tempo che vogliamo memorizzare ripremere il tasto apre.
Adesso tutte le volte che il motore verrà azionato la luce di cortesia sarà accesa per il tempo precedentemente memorizzato.
2
TABELLA DI PROGRAMMAZIONE
Per numero di impulso si intende quante volte viene premuto il pulsante P sulla centrale.
IMPULSO
PROGRAMMAZIONE
LED LA
LED LB
1
APPRENDIMENTO RADIOCOMANDO TASTO APERTURA
ON
OFF
2
APPRENDIMENTO RADIOCOMANDO TASTO CHIUSURA
OFF
ON
3
APPRENDIMENTO TEMPI DI LAVORO
ON
ON
4
APPRENDIMENTO TEMPO LUCE DI CORTESIA
Lampeggiante
Lampeggiante
PROGRAMMAZIONE MODALITÀ DI FUNZIONAMENTO
Dalla fabbrica la centralina esce di default nella seguente maniera:
Funzionamento: APRE-STOP-CHIUDE Senza richiusura automatica
Tempo di apertura: 30 secondi
Tempo di chiusura: 30 secondi.
Ingresso configurabile: pulsante di stop.
Tempo luce di cortesia:30 secondi
Per entrare nel modo di programmazione bisogna tenere premuto per circa 5 secondi il pulsante P sulla centralina. A questo punto
inizierà a lampeggiare alternativamente il led LA e il led LB e saremo entrati nella modalità di configurazione(vedi tabella) Una volta
scelto il tipo di programmazione premere il tasto apre per confermare.
Al termine la centralina esce automaticamente dalla programmazione.
APRE-CHIUDE
Un colpo apre, un colpo chiude (ciclico). Se in apertura non viene dato nessun comando, la centralina finito il tempo di apertura rimane
in stop. Un altra pressione sul radiocomando o sul tasto apre fa chiudere la centralina. Se in chiusura viene premuto il tasto di apre o il
radiocomando, si inverte la marcia.
APRE-STOP-CHIUDE
Un colpo apre, un colpo stoppa, un colpo chiude (ciclico). Se in apertura non viene dato nessun comando, la centralina finito il tempo di
apertura rimane in stop. Un altra pressione sul radiocomando o sul tasto apre fa chiudere la centralina. Se in chiusura viene premuto il
tasto di apre o il radiocomando, la centralina si stoppa.
APRE-CHIUDE CON RICHIUSURA AUTOMATICA
Uguale all`apre- chiude con la differenza che quando la centralina ha finito il tempo di apertura, invece di rimanere in stop conta un
tempo (quello programmato) quindi si chiude. Se durante la pausa premi il tasto, resetti il tempo di pausa (riparte da zero). Se durante
l’apertura il tasto di apre viene tenuto premuto fino alla pausa, abbiamo il funzionamento tipo orologio. (per lasciare aperta
l’automazione per un certo periodo dato appunto dall’orologio collegato sul tasto di apre).
APRE-STOP-CHIUDE CON RICHIUSURA AUTOMATICA
Uguale all`apre-stop- chiude con la differenza che quando la centralina ha finito il tempo di apertura invece di rimanere in stop conta un
tempo (quello programmato) quindi chiude. Se durante la pausa, premi il tasto, resetti il tempo di pausa (riparte da zero). Se durante
l’apertura il tasto di apre viene tenuto premuto fino alla pausa abbiamo il funzionamento tipo orologio. (per lasciare aperta
l’automazione per un certo periodo dato appunto dall’orologio collegato sul tasto di apre).
UOMO PRESENTE
È importante programmare “ingresso configurabile” come ingresso chiude.
Il motore viene azionato tenendo premuto il tasto dinamico. Premendo questo tasto il motore viene azionato in apertura, mentre
premendo il tasto configurabile il motore viene azionato in chiusura.
Con il radiocomando il motore viene azionato in apertura fino al raggiungimento del tempo max. di apertura precedentemente
memorizzato.
Una volta raggiunto questo tempo una nuova pressione del radiocomando fa chiudere l’automazione
PROGRAMMAZIONE INGRESSO CONFIGURABILE COME FOTOCELLULA IN CHIUSURA
Se in chiusura questo ingresso viene aperto (logica negativa) la centralina blocca la marcia per 1 secondo quindi si inverte la marcia aprendo.
PROGRAMMAZIONE INGRESSO CONFIGURABILE COME FOTOCELLULA IN APERTURA E CHIUSURA
Se in apertura l`’ingresso di stop viene aperto, la centralina blocca la marcia fino a quando l’ingresso non viene richiuso. Se in chiusura
questo ingresso viene aperto (logica negativa) la centralina blocca la marcia per 1 secondo dopo di che inverte la marcia aprendo.
3
PROGRAMMAZIONE INGRESSO CONFIGURABILE COME INGRESSO CHIUDE
Quando viene azionato questo ingresso la centralina chiude. Se è già chiusa è inattivo.
INGRESSO ANEMOMETRO
L’ingresso anemometro è in definitiva un tasto di chiude.
Per chiarezza dobbiamo definire come:
- APERTURA l’operazione in cui la tenda viene aperta
- CHIUSURA l’operazione in cui la tenda viene avvolta e quindi chiusa
PROGRAMMAZIONE INGRESSO CONFIGURABILE COME INGRESSO ANEMOMETRO
Quando viene azionato questo ingresso la centralina chiude.
PROGRAMMAZIONE INGRESSO CONFIGURABILE COME INGRESSO ANEMOMETRO AUTOMATICO
Quando viene azionato questo ingresso la centralina chiude. Dopo che questo ingresso non è più azionato, passato 10 minuti, la centralina apre.
PROGRAMMAZIONE INGRESSO CONFIGURABILE COME STOP
Quando viene aperto l’ingresso, la centralina blocca il moto e non accetta più comandi fino a quando l’ingresso stop non viene nuovamente chiuso.
L’ingresso configurabile quando è programmato come stop oppure come fotocellula deve essere N.C.. (logica
negativa).
IMPULSO
PROGRAMMAZIONE
LED LA
LED LB
ON
OFF
Lampeggio lento
OFF
Lampeggio veloce
OFF
Apre-Stop-Chiude con richiusura automatica
OFF
ON
5
Configurazione ingresso Stop: fotocellula in chiusura
OFF
Lampeggio lento
6
Configurazione ingresso stop: fotocellula in apertura e chiusura (in
apertura il moto si blocca fino alla rimozione dell’ostacolo).
OFF
Lampeggio veloce
7
Configurazione ingresso stop: come ingresso chiude
ON
ON
Lampeggio lento
Lampeggio lento
Lampeggio veloce
Lampeggio veloce
Lampeggio lento
Lampeggio veloce
1
Apre-Chiude senza richiusura automatica
2
Apre-Stop-Chiude senza richiusura automatica
3
Apre-Chiude con richiusa automatica
4
8
9
Configurazione ingresso stop: come ingresso anemometro
(chiusura automatica in caso di vento)
Configurazione ingresso stop: come ingresso anemometro
automatico (chiusura in caso di vento e riapertura automatica dopo
che sono passati X minuti dal cessare del vento)
10
Configurazione ingresso stop:come ingresso stop
11
Uomo presente
12
Esce dalla programmazione
Lampeggio veloce
ON
OFF
OFF
IMPULSI DAL 1 AL 4
Se viene scelto uno dei modi di funzionamento (dall’impulso 1 al 4) la scelta esclude chiaramente i restanti modi di funzionamento.
Una volta programmato uno dei quattro punti per scegliere i restanti punti (dal 5 al 10) bisogna tenere di nuovo premuto il
pulsante per 5 secondi e scorrere fino al punto desiderato.
IMPULSI DAL 5 AL 10
Se viene scelto uno dei modi di funzionamento (dall’impulso 5 al 10) la scelta esclude chiaramente i restanti modi di funzionamento.
FUNZIONI ROLLING CODE SOLO PER CB7221 RN ST
CANCELLAZIONE TOTALE
Da effettuare prima dell'installazione
Tenere premuto il pulsante P per 12 secondi fino a quando i led non inizieranno ad accendersi. A questo punto rimarranno accesi
simultaneamente per circa 4 secondi per poi spegnersi .
A questo punto la cancellazione totale dei codici é avvenuta.
4
MODALITA' FREE
Tenere premuto il pulsante P per 6 secondi , dopo che tutti i led inizieranno a lampeggiare lentamente lasciare il pulsante. In
questa modalità è possibile memorizzare più radiocomandi con lo stesso codice utente. Per uscire da questa modalità premere il
pulsante P. La funzione easy è attiva. Per cancellare un utente uscire dalla modalità.
MODALITA' FULL TIME
Dopo aver fatto la cancellazione totale dei codici fare apprendere alla ricevente un radiocomando inerente a quell’impianto: tenere poi
premuto il pulsante P per 9 secondi verificare che tutti i led lampeggino e, a questo punto, la ricevente resterà in programmazione.
Questa funzione è utile nel caso di sostituzione di una ricevente in un impianto con un numero elevato di utenti.
Per ucire dalla modalità premere il pulsante P
N.B.: Questa programmazione avviene nella sola modalità MONOSTABILE del relè 1.
Durata
pressione
Modalità
Led LA
Led LB
3 sec.
Modalità di funzionamento
Alternato a LB
Alternato a LA
6 sec.
Modalità FREE
Lampeggio lento
Lampeggio lento
9 sec.
Modalità FULL TIME
Lampeggio veloce
Lampeggio veloce
12 sec.
Cancellazione totale
Lampeggio velocissimo
Lampeggio velocissimo
LEGGERE PRIMA DELLA PROGRAMMAZIONE
1. Il codice utente è un numero che identifica il radiocomando. Deve essere unico anche se il radiocomando ha più codici impianto.
2. Ogni radiocomando deve avere un codice utente diverso, non possono esistere sullo stesso impianto due radiocomandi con lo
stesso codice utente.
3. Il codice impianto è un numero che identifica la ricevente. È importante non installare due riceventi con lo stesso codice impianto
nella stessa zona (raggio di azione delle riceventi).
4. Il codice installatore è un numero che identifica l’installatore. Viene immesso nel radiocomando automaticamente ogni volta che
avviene la programmazione tramite infrarosso. Questo numero risiede nel programmatore/visualizzatore PC042 e non può essere
modificato.
5. Se vogliamo programmare un radiocomando TR04 che aziona i 4 (quattro) relè di una ricevente quadricanale bisogna procedere
come segue: programmare i quattro tasti del radiocomando con un codice utente (sempre lo stesso vedi punto 1) e con un codice
impianto uguale per ogni tasto (vedi punto 3).Ogni tasto del trasmettitore dovrà essere abbinato ad un relè della ricevente.
6. La programmazione easy può essere fatta solamente sui primi due relè.
7. La funzione FULL-TIME una volta attivata rimane attiva. In questo arco di tempo la ricevente abiliterà tutti i radiocomandi avente il codice impianto
uguale alla ricevente. Prima di attivare la funzione Full-Time è importante memorizzare almeno un radiocomando nella maniera tradizionale, questo
per fare apprendere alla ricevente il codice impianto.
ATTENZIONE
Nella CB7220 RN ST e CB7221 RN ST, nella modalità uomo presente, è importante memorizzare il tasto di configurabile
come tasto chiude.
La ditta FERPORT S.a.s. non risponde per errati collegamenti e/o manomissioni delle centrali e tantomeno le riterrà in
garanzia.
La ditta FERPORT S.a.s. precisa di aver depositato il Mod. CB7220 RN ST e CB7221 RN ST. Il medesimo sarà quindi
tutelato in tutte le sue parti a norma di legge. Nessuna parte del contenuto di questo manuale può essere riprodotta
senza autorizzazione scritta della FERPORT S.a.s. I collegamenti alla centrale devono essere eseguiti solo da personale
specializzato e dopo aver attentamente letto le istruzioni sopra riportate. N.B.: E’ richiesto l’inserimento di un interruttore
onnipolare presso la centrale, con distanza d’apertura minima dei contatti di 3 mm, per lo spegnimento della stessa
prima dell’apertura per manutenzione (CEI 64-8).
PERICOLO ALTA TENSIONE
5
INSTRUCTIONS POUR L’UTILISATION ET L’INSTALLATION
CB7220 RN ST
CB7221 RN ST
Rev. 11/2006
Les appareils électroniques CB7220 RN et CB7221N sont pourvues de récepteur radio avec fréquence 433,92 Mhz.
L’unité CB7220 RN ST est compatible avec les émetteurs de la série K et KA, alors que l’unité CB7221 RN ST est
compatible avec les émetteurs de la série TR 04. Par les émetteurs il est possible aussi bien de programmer l’appareil
électronique.
P
LA
LB
LC
LD
F1
F2
R2
R1
R3
12Vcc
Bouton de programmation
Voyant lumineux témoin de programmation rouge
Voyant lumineux témoin de programmation vert
Vert - Voyant lumineux témoin de signalisation
touche OUVRE
Rouge - Led de signalisation entrée configurable
Fusible logique 500 mA
Fusible moteur 3,15A
Relais lumière de courtoisie.
Relais OUVRE
Relais Ferme
Alimentation photocellules
CARACTERISTIQUES DE RADIO
Fréquence de reception
Fréq. Intermédiaire
Impédance d'entrée antenne
Sensibilité de signal d'accusé de réception
CARACTERISTIQUES CARTE LOGIQUE
433.92 MHz
10,7 MHz
50 Ω
>-100 dBm
Alimentation
Fréquence de réseau
Logique de fonctionnement par
Sortie d'alimentation dispositifs auxiliaires
Absorption max. à la sortie d'alimentation
Auxiliaire
Tension sortie lumière courtoisie
Tension sortie clignotant
Puissance max. commutable à la sortie
moteurs
Puissance maxi. lumière de courtoisie
Puissance maxi. Clignotant
6
230 V
50-60 Hz
µC
12 Vcc
100 mA
230 Vac
230 Vac
600 W
100 W
25 W
BOITE A BORNES J5
1
2
3
4
5
6
Antenne
Masse antenne
Alimentation 12Vcc (+)
Alimentation 12Vcc (-)
Touche dynamique
Entrée configurable (N.C.) ou (N.A.)
ex. (STOP) – (PHOTOCELLULES) – (FERME) – (ANÉMOMÈTRE)
7
STOP
8
Commun
Attentinon: l’entrée PX doit étre N.C. s’ il est configuré comme entrée photocellule ou STOP.
BOITE A BORNES J2 et J3
9
Ouvre moteur.
10
11
12
13
Commune moteur
Ferme moeur.
Alimentation 230Vac. Neutral
Alimentation 230Vac. Phasè
BOITE A BORNES J4
14
15
16
Phasè clignotant 230 Vac.
Neutral.
Phasè lumière de courtoisie 230 Vac.
Attention: la sortie clignotant ne nécessite pas de fiche clignote.
Installer un clignotant à lumiére fixe.
PROGRAMMATION RADIOCOMMANDE TOUCHE OUVERTURE
- appuyer une fois sur le bouton P (accension LA)
- appuyer sur la touche de la radiocommande qu’on désire faire apprendre (EXEMPLE: TOUCHE GAUCHE)
PROGRAMMATION RADIOCOMMANDE TOUCHE FERMETURE
- appuyer deux fois sur le bouton P (accension LB)
- appuyer sur la touche de la radiocommande qu’on désire faire apprendre (EXEMPLE: TOUCHE DROITE)
Attentinon: cette seconde touche fonctione comme le premier à moins qu’en modalié uomo présent. En modalità uomo présent,
la premiére touche ouvre, pendant que la seconde ferme.
PROGRAMMATION DES TEMPS DE TRAVAIL
La programmation des temps de travail doit être effectuée comme suit:
- appuyer trois fois sur le bouton P de l’unité (accension LA et LB)
- appuyer sur la radiocommande ou sur la touche dinamique pour faire démarrer le moteur en ouverture
- une fois écoulé le temps d’ouverture qu’on veut mémoriser, appuyer de nouveau sur la radiocommande ou sur la touche dinamique
- faire passer le temps de pause qu’on veut mémoriser et appuyer de nouveau sur la radiocommande ou sur la touche dinamique - une
fois écoulé le temps de fermeture qu’on veut mémoriser, appuyer sur la radiocommande ou sur la touche dinamique. Attention: le
temps de pause doit être mémorisé même si la fermeture automatique est désactivée.
PROGRAMMATION TEMPS LUMIÈRE DE POLITESSE
- appuyer qatre fois sur le bouton P de l’unité (LA et LB clignotants).
- appuyer sur le bouton ouvre
- le temps de comptage commence
- une fois écoulé le temps qu’on veut mémoriser, appuyer de nouveau sur la touche ouvre.
Maintenant lors du démarrage du moteur, la lumière de politesse sera allumée pendant le temps précédemment émorisé.
7
TABLEAU DE PROGRAMMATION
Par nombre d’impulsions on entend le nombre de fois qu’on appuie sur le bouton P de l’unité
IMPULSION
PROGRAMMATION
VOYANT LA
VOYANT LB
1
APPRENTISSAGE RADIOCOMMANDE TOUCE OUVERTURE
ON
OFF
2
APPRENTISSAGE RADIOCOMMANDE TOUCE FERMETURE
OFF
ON
3
PROGRAMMATIOIN TEMPS DE TRAVAIL
ON
ON
4
APPRENTISSAGE TEMPS LUMIÈRE DE COURTOISIE
clignotant
clignotant
PROGRAMMATION DU MODE DE FONCTIONNEMENT
L’unité sort de la fabrique par défaut comme suit:
Fonctionnement: OUVRE –STOP-FERME sans refermeture automatique.
Temps ouverture:30 secondes.
Temps fermeture: 30 secondes.
Temps lumiére de courtoisie: 30 secondes.
L’entrée configurable: bouton stop.
Pour entrer dans le mode de programmation on doit exercer une pression d’environ 5 secondes sur le bouton P de l’unité. A ce point
les voyants lumineux L1 et L2 se mettent à clignoter alternativement et on est entrés dans la modalité de configuration (voir tableau)
Une fois qu’on a choisi le type de programmation, appuyer sur la touche ouvre pour confirmer. A la fin, l’unité sort
automatiquement de la programmation.
OUVRE-FERME
Un coup ouvre, un coup ferme (cyclique). Si à l’ouverture aucune commande n’est donnée, une fois le temps d’ouverture écoulé, l’unité reste en stop.
Une autre pression sur la radiocommande ou sur la touche ouvre entraîne la fermeture. Si au moment de la fermeture on appuie sur la touche ouvre ou
sur la radiocommande, la marche s’inverse.
OUVRE - STOP – FERME
Un coup ouvre, un coup ferme (cyclique). Si à l’ouverture aucune commande n’est donnée, une fois le temps d’ouverture écoulé, l’unité reste en stop.
Une autre pression sur la radiocommande ou sur la touche ouvre entraîne la fermeture. Si au moment de la fermeture on appuie sur la touche ouvre ou
sur la radiocommande, l’unité s’arrêt.
OUVRE-FERME AVEC REFERMETURE AUTOMATIQUE
Idem ouvre-ferme avec la différence que quand l’unité a dépassé le temps d’ouverture, au lieu de rester en stop, elle compte un temps (celui
programmé), après quoi elle ferme. Si pendant la pause on appuie sur la touche start, le temps de pause recommence depuis le début. Si pendant
l’ouverture on appuie sur la touche ouvre jusqu’à la pause, on a le fonctionnement type horloge (pour laisser l’automation ouverte pendant un certain
temps donné précisément par l’horloge connectée sur la touche ouvre).
OUVRE-STOP-FERME AVEC REFERMETURE AUTOMATIQUE
Idem ouvre-stop-ferme avec la différence que quand l’unité a dépassé le temps d’ouverture, au lieu de rester en stop, elle compte un temps (celui
programmé), après quoi elle ferme. Si pendant la pause on appuie sur la touche start, le temps de pause recommence depuis le début. Si pendant
l’ouverture on appuie sur la touche ouvre jusqu’à la pause, on a le fonctionnement type horloge (pour laisser l’automation ouverte pendant un certain
temps donné précisément par l’horloge connectée sur la touche ouvre).
À LA PRÉSENCE D’UNE PERSONNE
Il est important de configurer “entrée configuration” en tant que entrée fermeture.
Le moteur est actionné en appuyant sur la touche dynamique. Lorsque l’on appuie sur cette touche, le moteur est actionné en ouverture, tandis que si
l’on appuie sur la touche de configuration, le moteur est actionné en fermeture. À travers la radiocommande, le moteur est actionné en ouverture, dans
le plein respect du temps maximal d’ouverture, précédemment mémorisé.
Lorsque ce temps s’est écoulé, il suffit d’appuyer à nouveau sur la radio-commande pour l’automation se referme.
PROGRAMMATION ENTRÉE CONFIGURABLE COMME PHOTOCELLULE EN FERMETURE
Si cette entrée est ouverte lors de la fermeture (logique négative), l’unité bloque la marche pendant 1 seconde, après quoi elle inverse
la marche en ouvrant.
PROGRAMMATION ENTRÉE CONFIGURABLE COMME PHOTOCELLULE EN OUVERTURE ET
FERMETURE
Si lors de l’ouverture l’entrée de stop est ouverte, l’unité bloque la marche jusqu’à la refermeture de l’entrée. Si cette entrée est ouverte
lors de la fermeture (logique négative), l’unité bloque la marche pendant 1 seconde, après quoi elle inverse la marche en ouvrant.
8
PROGRAMMATION ENTRÉE CONFIGURABLE COMME ENTRÉE FERME
Par l’actionnement de cette entrée, l’unité ferme. Si elle est déjà fermée, l’entrée est inactive.
ENTRÉE ANÉMOMÈTRE
L’entrée anémomètre est en fait une touche de fermeture.
Pour plus de clarté il faut définir comme:
- OUVERTURE l’opération pendant laquelle le rideau est ouvert
- FERMETURE l’opération pendant laquelle le rideau est enroulé puis fermé.
PROGRAMMATION ENTRÉE CONFIGURABLE COMME ENTRÉE ANÉMOMÈTRE
Quand on actionne cette entrée, l’unité ferme.
PROGRAMMATION ENTRÉE CONFIGURABLE COMME ENTRÉE ANÉMOMÈTRE AUTOMATIQUE
Quand on actionne cette entrée, l’unité ferme. Quand cette entrée n’est plus actionnée, après 10 minutes l’unité ouvre
PROGRAMMATION ENTRÉE CONFIGURABLE COMME STOP
Quand l’entrée est ouverte, l’unité bloque le mouvement et n’accepte plus de commandes tant que l’entrée stop n’est pas de nouveau
fermée.
L'entrée configurable, quand elle est programmée comme stop ou comme cellule photoélectrique, doit être N.C. (logique
négative).
IMPULSION
PROGRAMMATION
VOYANT LA
VOYANT LB
1
Ouvre-Ferme sans refermeture automatique
ON
OFF
2
Ouvre-Stop-Ferme sans refermeture automatique
Clignotement lent
OFF
3
Ouvre-Ferme avec refermeture automatique
Clignotement rapide
OFF
4
Ouvre-Stop-Ferme avec refermeture automatique
OFF
ON
5
Configuration Entrée Stop: photocellule en fermeture
OFF
Clignotement lent
6
Configuration Entrée Stop: photocellule en ouverture et fermeture
(En ouverture le mouvement se bloque jusqu’au enlèvement de l’obstacle)
OFF
Clignotement rapide
7
Configuration Entrée Stop: comme entrée ferme
ON
ON
8
Configuration Entrée Stop: comme entrée anémomètre
(fermeture automatique en cas de vent)
Clignotement lent
Clignotement lent
9
Configuration Entrée Stop: comme entrée anémomètre automatique
(fermeture en cas de vent et réouverture automatique après x minutes de la
cessation du vent)
Clignotement rapide
Clignotement rapide
10
Configuration Entrée Stop: comme entrée de stop
Clignotement lent
Clignotement rapide
11
À la présence d’une personne
Clignotement rapide
ON
12
Sort de la programmation
OFF
OFF
IMPULSIONS DE 1 A 4
Le choix d’un des modes de fonctionnement (de l’impulsion 1 à 4) exclut évidemment les autres modes de fonctionnement.
Une fois qu’on a programmé un des quatre points, pour choisir les autres points (de 5 à 10) il faut appuyer de nouveau sur le
bouton pendant 5 secondes et glisser jusqu’au point désiré.
IMPULSIONS DE 5 A 10
Le choix d’un des modes de fonctionnement (de l’impulsion 5 à 10) exclut évidemment les autres modes de fonctionnement.
Fonctions « rolling-code » seulement pour l’unité CB7221 RN ST
EFFACEMENT TOTAL
À effectuer avant l'installation
Appuyer sur le bouton P pour 12 seconds jusqu’à l’allumage des leds. À ce point ils resteront allumés simultanément pour 4
seconds .
Å ce point l’effacement total des codes s’est passé.
9
MODALITÉ FREE
Appuyer sur le bouton P pour 6 seconds ,après que tous le led entameront à clignoter lentement laisser le bouton. Dans cette modalité
il est possible mémoriser plus de radiocommandes avec le même code usager. Pour sortir cette modalité à presser le bouton P. La
fonction easy est active. Pour rayer un usager sortir de la modalité.
MODALITÉ FULL TIME
Après avoir effacé tous les codes communiquer au récepteur un radioguidage se rapportant à cette installation: appuyer sur le bouton
P pour 9 seconds, tous les voyants doivent clignoter, et à ce point, le récepteur sera programmé . Cette fonction est utile au cas où le
récepteur doive être replacé dans une installation avec un numéro élevé d’usagers.
Pour sortir de la modalité presser le bouton P
N.B.: Cette programmation ne peut être effectuée que dans la modalité MONOSTABLE du relais 1.
Pression sur
le bouton P
Modalitè
Led LA
Led LB
3 sec.
MODE DE FONCTIONNEMENT
Alterné à LB
Alterné à LA
6 sec.
Modalitè FREE
Clignotement lent
Clignotement lent
9 sec.
Modalitè FULL TIME
Clignotement rapide
Clignotement rapide
12 sec.
Effacement total
Clignotement très rapide
Clignotement très rapide
LIRE AVANT DE PROGRAMMER
1. Le code usager est un numéro qui identifie le radioguidage. Il doit être unique même si le radioguidage a plusieurs codes
installation.
2. Chaque radioguidage doit avoir un code usager différent. On ne peut pas avoir sur la même installation deux radioguidages avec le
même code usager.
3. Le code installation est un numéro qui identifie le récepteur. Il est important de ne pas installer deux récepteurs avec le même
code installation dans la même zone (rayon d’action des récepteurs).
4. Le code usager est un numéro qui identifie l’installateur. Il est introduit dans le radioguidage automatiquement chaque fois la
programmation est faite par rayons infrarouges. Ce numéro se trouve dans le programmateur PC042 et in ne peut pas être modifié.
5. Si on veut programmer un radioguidage TR04 qui actionne les 4 (quatre) relais d’un récepteur à quatre canaux il faut suivre la
procédure suivante: programmer les quatre touches du radioguidage avec un code usager (toujours le même voir point 1) et avec
un code installation pareil pour chaque touche (voir point 3) chaque touche du transmetteur devra être jumelée à un relais du
récepteur.
6. La programmation easy peut être faite seulement sur les deux premiers relais.
7. La fonction FULL-TIME activée reste active. Dans cette période le récepteur activera tous les radioguidages ayant le même code
installation du récepteur. Avant d’activer la fonction FullTime il est important de mémoriser au moins un radioguidage de façon
traditionnelle, afin que le récepteur apprenne le code installation.
ATTENTION
Pour la modalité présence d’une personne, il est important de mémoriser la touche configuration en tant que touche de fermeture
La maison FERPORT S.a.s. dégage toute responsabilité en cas de mauvaises connexions et/ou endommagement des unités. En pareil cas la
garantie n’est pas valable.
La maison FERPORT S.a.s.a déposé le Modèle CB7220 RN ST et CB7221 RN ST. Toute pièce composant cette unité sera donc protégée
d'après les normes en vigueur. Aucune partie de ce manuel d’utilisation ne peut être reproduite sans l’autorisation écrite de FERPORT S.a.s. Les
connexions à l’unité ne seront effectuées que par des techniciens qualifiés et après avoir attentivement lu les instructions ci-dessus. ATTENTION! Il est
nécessaire d’équiper l’unité d’un interrupteur omnipolaire, avent une distance d’ouverture minimum des contacts de 3 mm. ce qui permet la mise hors
service de celle-ci avant l’ouverture lors des opérations l’entretien (CEI 64-8).
DANGER HAUTE TENSION
10
OPERATING AND INSTALLATION INSTRUCTIONS
CB7220 RN ST
CB7221 RN ST
Rev 11/2006
CB7220 RN ST and CB7221 RN ST control-boxes are provided with integrated radio-receiver 433,92 Mhz
frequency. CB7220 RN ST control-box is compatible with the transmitters of K and KA series, while CB7221 RN ST controlbox is compatible with the transmitters of TR 04 serie. The transmitters help also for the programme mode of the control-box.
P
LA
LB
LC
LD
F1
F2
R2
R1
R3
12Vcc
Program button
Program Led
Program Led
OPEN Led (green)
Configurable input LED
500 mA logic fuse
3,15A motor fuse
Light courtesy relay
OPEN relay
CLOSE relay
Power supply to photoelectric cell
RADIO SECTION
Receiving frequency
Intermediate frequency
Antenna input impedance
Sensitivity for a sent signal
LOGIC BOARD
433.92 MHz.
10.7 MHz
50 Ω
>-100 dBm
Power
Power frequency
logic operation
Auxiliary devices output
Max consumption applicable to the auxiliary
power output
Power Light courtesy
Power Blinking
Max switchable motori output
Max switchable light courtesy output
Max switchable light blinking output
11
230 Vac
50-60 Hz
µC
12 Vcc
100 mA
230 Vac
230 Vac
600 W
100 W
25 W
TERMINAL BLOCK J5
1
2
3
4
5
6
Antenna
Antenna ground
Power supply 12Vcc. (+)
Power supply 12Vcc. (-)
Dynamic key
Input configuration (N.C.) or (N.O).
e.g. (STOP)- PHOTOELECTRIC CELL)-(CLOSE)-(ANEMOMETER)
7
STOP
8
Common
When programmed as a stop or photocell, the configurable input must be NC (negative logic).
TERMINAL BLOCK J2 E J3
9
10
11
12
13
Motor open
Motor common
Motor close
Power input 230Vac. Neutre
Power input 230Vac. Phase
14
15
16
Blinking light 230 Vac phase.
Neutre.
Light courtesy 230 Vac phase
TERMINAL BLOCK J4
Attention: the escape blinking does not need of card flashes
To install a blinking fixed light
RADIO CONTROL PROGRAMMING KEY OPEN
- press the button P once (lighting LA)
- press the button P on the radio control which we wish to start. (es. SX KEY).
RADIO CONTROL PROGRAMMING KEY CLOSE
–
–
press the button P two times (lighting LB)
press the button P on the radio control which we wish to start. (es. DX KEY).
Attention: this according to key it works like the first unless in modality present man.
In modality present man, the first key opens, while the second closes.
PROGRAMMING OF WORKING TIMES
The working times can be programmed as follows:
- press the button P three times on the terminal (lighting LA)
- press the radio control or the ‘dynamic’ key to start the opening motor
- once the opening time that we wish to store has elapsed, press the radio control or ‘dynamic’ key again - wait for
the pause time that we wish to store and then press the radio control or ‘dynamic’ key again - once the closing time
that we wish to store has elapsed, press the radio control ‘dynamic’ key
Attention: the pause time must be stored even if the automatic closing is not activated.
PROGRAMMING COURTESY LIGHT
.
- press the button P four times on the terminal (LED LA e LED LB blinking).
- press the radio control or the ‘dynamic’ key to start the opening motor
- it begins the time of conteggio
- ended the time to press the dynamic’ key to start the opening motor
when the motor is set in action the courtesy light will be ignited for the set up time
12
PROGRAM TABLE
By number of pulses, we mean the number of times that the key P on the terminal is pressed.
PULSE
PROGRAMMING
LED LA
LED LB
1
STORAGE OF RADIO CONTROLS OPEN KEY
ON
OFF
2
STORAGE OF RADIO CONTROLS CLOSE KEY
OFF
ON
3
PROGRAMMING OF WORKING TIMES
ON
ON
4
PROGRAMMING COURTESY LIGHT
Blinking
Blinking
PROGRAMMING THE OPERATING MODE
The terminal comes from the factory by default in the following way:
Function: OPEN –STOP - CLOSE
Without automatic reclosing
Time opening: 30 s
Time clossing: 30 s
Configurable input: stop button
Light courtesy time: 30 s
To enter into programming mode, you must hold down the button P on the terminal for about 5 seconds. At this point, Led LA and Led
LB will start flashing alternatively and we have entered the configuration mode (see table)
Once the type of programming has been chosen, press the ‘open’ key to confirm.
At the end, the terminal will automatically escape from the programming.
OPEN-CLOSE
One click opens, one click closes (cyclic). If no command is given when opening, when opening time has elapsed, the terminal will
remain in stop position. Another click on the radio control or the ‘open’ key will close. If, when closing, the ‘open’ key or radio control is
pressed, the direction will be inverted.
OPEN-STOP- CLOSE
One click opens, one click stops, one click closes (cyclic). If no command is given when opening, when opening time has elapsed, the
terminal will remain in stop position. Another click on the radio control or ‘open’ key will close. If, when closing, the ‘open’ key or radio
control is pressed, the movement will stop.
OPEN – CLOSE WITH AUTOMATIC RECLOSING
The same as open-close with the difference that when the opening time has elapsed, instead of remaining in stop, the terminal will close
after a (programmed) period of time. If the key is pressed during the pause, it resets the pause time (starts again). If, during the opening,
the ‘open’ key is held until the pause, we have a clock-type function (to leave the automation open for a certain period set by the timer
connected to the ‘open’ key).
OPEN –STOP -- CLOSE WITH AUTOMATIC RECLOSING
The same as open-stop-close with the difference that when the opening time has elapsed , instead of remaining in stop, the terminal
will close after a (programmed) period of time. If the key is pressed during the pause, it resets the pause time (starts again). If, during
the opening, the ‘open’ key is held until the pause, we have a clock-type function (to leave the automation open for a certain period set
by the timer connected to the ‘open’ key).
PERSON PRESENT
Remember to program the "input configurable" as the Close input.
Hold down the movement key to start the motor. This starts the motor to open the gate. Press the Soft key to close the gate.
With the remote control the motor opens until reaching the maximum time memorised previously. When this
time is reached, press the remote control key again to close.
PROGRAMMING INPUT CONFIGURABLE AS PHOTOELECTRIC CELL IN CLOSING
If, while closing, this input is opened (negative logic), the terminal will block the movement for 1 second after which the direction will be
inverted.
PROGRAMMING INPUT CONFIGURABLE AS PHOTOELECTRIC CELL IN OPENING AND CLOSING
If, while opening, this stop input is opened, the terminal will block the movement until the input is closed. If, in closing, this input is
opened (negative logic), the terminal will block the movement for 1 second after which the direction will change, so opening it.
PROGRAMMING INPUT CONFIGURABLE AS CLOSE INPUT
When this input is opened, the terminal closes. If this input is already closed, it is inactive.
13
ANEMOMETER INPUT
The anemometer input is a closure key.
For simplicity we can define it as:
- OPENING - the operation in which the awning is opened
- CLOSING - the operation in which the awning is rewound and therefore closed
PROGRAMMING INPUT CONFIGURABLE AS ANEMOMETER INPUT
When this input is in action, the terminal will close
PROGRAMMING INPUT CONFIGURABLE AS AUTOMATIC ANEMOMETER INPUT
When this input is no longer in action, after 10 minutes the terminal will open.
PROGRAMMING INPUT CONFIGURABLE AS STOP
When the input is opened, the terminal will block the motor and will not accept further commands until the stop input is closed again.
When programmed as a stop or photocell, the configurable input must be NC (negative logic).
PULSE
PROGRAMMING
LED LA
LED LB
ON
OFF
1
Open-Close without automatic reclosing
2
Open-Stop-Close without automatic reclosing
Slow blinking
OFF
3
Open-Close with automatic reclosing
Fast blinking
OFF
4
Open-Stop-Close with automatic reclosing
OFF
ON
5
Configuration Stop Input: photoelectric cell in closing
OFF
Slow blinking
6
Configuration Stop Input: photoelectric cell in opening and closing
(In opening the motion stops until the obstacle is removed)
OFF
Fast blinking
7
Configuration Stop Input: as close input
ON
ON
8
Configuration Stop Input: as anemometer input
(automatic closure in the event of ind)
Slow blinking
Slow blinking
Fast blinking
Fast blinking
9
Configuration Stop Input: as automatic anemometer input
(closure in the event of wind and automatic reopening x minutes after the
wind has
ceased)
10
Configuration Stop Input: as stop input
Slow blinking
Fast blinking
11
Person present
Fast blinking
ON
12
Escape from programming
OFF
OFF
PULSES FROM 1 TO 4
If one of the functioning modes is chosen (from pulse 1 to 4) the choice obviously excludes the remaining functioning modes. Once
one of the four points has been programmed, to select the remaining points (from 5 to 10) you must again press and hold the
button for 5 seconds until you reach the desired point.
PULSES FROM 5 TO 10
If one of the functioning modes is chosen (from pulse 5 to 10) the choice obviously excludes the remaining functioning modes.
“Rolling-code” functions only for CB7221 RN ST control-box.
TOTAL ERASURE
To carry out before the installation
Press the key P for 12 seconds until the leds start turning on. At this point they will be on simultaneously for about 4 seconds, then
they will turn off . At this point the total codes erasure has been fulfiled.
14
FREE PROCEDURE
Press the key P for 6 seconds after that all the led will begin to slowly flash to leave the push-button. In this modality it is possible
memorizzare more remote control with the same code customer. In order to exit this modality to press the key P. The function easy is
active. In order to cancel a customer to exit from themodality.
FULL TIME PROCEDURE
After erasing all the codes make the receiving unit learn a radio control concerning that unit: keep the key P pressed for 9 seconds,
check all leds are flashing and, at this point, the receiving unit will be programmed
This function is useful in case a receiver in a unit with a great number of consumers needs substituting.
In order to exit the modality to press the P push-button
N.B.: This programming takes place only in the SINGLESTABLE function of the relay n. 1.
Pressure on
the P pushbutton
Modality
Led LA
Led LB
3 sec.
Operating mode
Alternated to LB
Alternated to LA
6 sec.
Modality FREE
Flash slow
Flash slow
9 sec.
Modality FULL TIME
Flash fast
Flash fast
12 sec.
Total erasure
Flash fastest
Flash fastest
TO READ BEFORE PROGRAMMING
1. The consumer’s code is a number indetifying the radio control. It must be unique event if the radio control has more unit codes.
2. Each radio control must have a different consumer’s code. No system can have two radio controls with the same consumer’s code.
3. The unit code is a number identifying the receiving unit. It is important not to install two receiving units with the same unit code in
the same area (action range of the receiving units).
4. The installer’s code is a number identifying the installer. It is inserted in the radio control automatically each time programming
takes place through infra-red rays. This number is present in the programmer/visualiser PC042 and can not be changed
5. If we want to program a radio control TR04, which makes the 4 (four) relays of a four. Channel receiving unit work, the procedure is
the following: the four keys of the radio control are to be progremmed with a consumer’s code (always the same as to point 1) and
unit code which is the same for each key (as to point 3). Each key or the transmitter is to be combined with a relay of the receiving
unit.
6. The easy programming can be done only on the first two relays.
7. When the FULL-TIME function is on, it is active. During this period of time the receiving unit will make all the radio controls having
the same unit code as the receiving unit work. Before starting the Full-Time function it is important to store at least a radio control in
the traditional way, so that the receiving unit can learn the unit code.
WARNING
In "person present" mode, always remember to memorise the "Soft" key as the "Close" key.
FERPORT S.a.s. is not liable for damages due to incorrect connections and/or tampering of the receivers neither are such damages covered by
guarantee.
Model CB7220 RN ST and CB7221 RN ST is a registered trademark of FERPORT S.a.s. Such devices and all its parts are protected
according to the existing laws. No part of this guide may be reproduced without the prior written permission of FERPORT S.a.s.
The connections to the terminal board are to be carried out by qualified people after having read the above mentioned instructions.
NB: An omnipolar switch is required in the terminal with contacts having a minimum distance of 3 mm, in order to switch it off before servicing (CEI 648).
DANGER 230 VAC
15
GEBRAUCHSANWEISUNGEN UND INSTALLATION
CB7220 RN ST
CB7221 RN ST
Rev 11/2006
Die Zentralen CB7220 RN und CB7221N sind mit einem Funkempfaenger ausgestattet, dessen Funkfrequenz 433,92
Mhz ist.
Die Zentrale CB7220 RN ST ist mit Sender der Serie K e KA anpassend, die Zentrale CB7221 RN ST mit Sender der
Serie TR04.
Durch die Sender werden die Zentralen programmiert/gesteuert.
P
LA
LB
LC
LD
F1
F2
R2
R1
R3
12Vcc
Programmierungstaste
Rot - Led der Programmierung
Led der Programmierung Grün
Grün – Signal - Led der Steuertaste ÖFFNEN
Signalisierungs-LED Eingang konfigurierbar
Sicherung der Logik 500mA
Sicherung des Motors 3,15A
Relè HELLE HÖFLICHKEIT.
Relais ÖFFNEN
Relais SCHLIEßEN
Stromversorgung der Photozellen
EIGENSCHAFTEN DES FUNKSYSTEMS
EIGENSCHAFTEN DER LOGIKKARTE
Empfangs frequenz
433.92 MHz.
Zwischen frequenz
10.7 MHz
Impedanz Eingang – Antenne
50 Ω
Empfindlichkeit für eingegangene Signale >-100 dBm
Stromversorgung
Netzfrequenz
Betriebslogik mit
Betriebslogik mit Mikrokontrolleinheit
Stromversorgungsausgang der Hilfsvorrichtungen
Max. Stromaufnahme für den Ausgang der
Hilfsstromversorgung
Hilfslichtes
BLINKER
Spannung der Klemmleistesteuerungen.
Max. zu dem Motorenausgang umschaltbare
Antriebsleistung
Hilfslichtes
BLINKER
16
230 V Ws
50-60 Hz
µC
12 Vcc
100 mA
230 V Ws
600 W
100 W
25 W
KLEMMLEISTE J5
1
2
3
4
5
6
7
8
Antenne
Erde der antenne
Stromversorgung 12V Gs (+)
Stromversorgung 12V Gs (-)
Dynamische Steuertaste
Konfigurierbare eingangs (N.G. – normalerweise geschlossen) oder
(N.O. - normalerweise offen) z.b. (STOP) - (PHOTOZELLEN) (SCHLIEßEN)-(ANEMOMETER))
STOP
Gemeinsame Erdungseinheit
Der konfigurierbare Eingang muss N.C. (negative Logik) sein, wenn er als Stop oder Fotozelle programmiert wird.
KLEMMLEISTEJ2 E J3
9
10
11
12
13
Öffnung des Motors 230 V Ws 50-60Hz
Gemeinsame Erdungseinheit des Motors
tromversorgung 230 V Ws 50-60 Hz
Stromversorgung 230V Ws Neutral
Stromversorgung 230V Ws Phase
14
15
16
Phase BLINKER 230 V Ws.
Neutral.
Phase Hilfslichtes 230 V Ws.
KLEMMLEISTE J4
Aufmerksamkeit: das blinkende Entweichen nicht Notwendigkeit der Karte
Blitze.
Ein Blinken zu örtlich festgelegtem Licht anbringen
PROGRAMMIERENDE FERNBEDIENUNG-SCHLÜSSEL-ÖFFNUNG
- die Taste P einmal drücken (Anzünden LA)
- die Taste des Funksenders drücken, die man lernen lassen will.(es. SCHLÜSSEL SX).
PROGRAMMIERENDES FERNBEDIENUNG-SCHLÜSSELSCHLIESSEN
- die Taste P zweimal drücken (Anzünden LB)
- die Taste des Funksenders drücken, die man lernen lassen will.(es. SCHLÜSSEL DX).
Aufmerksamkeit: dieses entsprechend Schlüssel, den, es wie das erste
es sei denn im Modalitätgeschenkmann funktioniert.
Im Modalitätgeschenkmann öffnet sich der erste Schlüssel, während
die Sekunde schließt.
PROGRAMMIERUNG DER ARBEITSZEITEN
Die Programmierung der Arbeitszeiten wird durchgeführt, wie folgt:
- die Taste P der Steuereinheit dreimal drücken (Anzünden LA,LB)
- den Funksender oder die Steuertaste “dynamisch” drücken, um den Motor in dem Mode “dynamisch” in Betrieb zu setzen
- den Funksender oder die Steuertaste “dynamisch” erneut drücken, als die für die Speicherung gewünschte Öffnungszeit zu Ende ist
- die für die Speicherung gewünschte Pausezeit abwarten und den Funksender oder die Steuertaste “dynamisch” erneut drücken. - den
Funksender oder die Steuertaste “dynamisch” erneut drücken, als die für die Speicherung gewünschte Schließungszeit zu Ende ist
Achtung!: die Pausezeit speichern, auch wenn die automatische Schließung nicht aktiv ist.
PROGRAMMIERUNG DER ZEITEN DES HILFSLICHTS
- die Taste P der Steuereinheit viermal drücken (Ich blitzeLA,LB)
- den Funksender oder die Steuertaste “dynamisch” drücken, um den Motor in dem Mode “dynamisch” in Betrieb zu setzen
- die Zählung der Zeit Startet.als die für die Speicherung gewünschte Zeit zu Ende ist,die Öffnungstaste emeut drücken.
Von jetzt an wird das Hilfslicht die oben genannte Zeit hindurch leuchten, als der Motor in Gang gesetzt wird
17
TABELLE FÜR DIE PROGRAMMIERUNG
Unter “Anzahl der Impulse” versteht man wie viele Male die Steuertaste der Steuereinheit gedrückt wird.
IMPULS
PROGRAMMIER
LED LA
LED LB
1
PROGRAMMIERENDE FERNBEDIENUNG-SCHLÜSSEL-ÖFFNUNG
ON
OFF
2
PROGRAMMIERENDES FERNBEDIENUNG-SCHLÜSSELSCHLIESSEN
OFF
ON
3
PROGRAMMIERUNG DER ARBEITSZEITEN
ON
ON
4
ZEITEN DES HILFSLICHTES
Lampeggiante
Lampeggiante
PROGRAMMIERUNG BETRIEBSWEISEN
Die Steuereinheit wird defaultkonstruiert und – hergestellt, wie folgt:
Betriebsweise: ÖFFNEN-SCHLIEßEN
Ohne Automatischer Schließung
öffnen Sie Zeit : 30 s
geschlossene Zeit:30 s
Eingang Konfigurierbare: Stoptaste
Hilfslichtes Zeit: 30 s
Um in den Programmierungsmode einzuspringen, muss man die Taste der Steuereinheit etwa 5 Sekunden lang gedrückt halten. Zu
diesem Punkt beginnen die LED LA und LB, abwechselnd zu blinken: wir sind jetzt in dem Konfigurationsmode. (s. Tabelle) Nachdem
man den Programmierungstyp ausgewählt hat, die Steuertaste “öffnen” drücken, damit man eine Bestätigung gibt.
Am Ende dieses Vorgangs springt die Steuereinheit automatische aus der Programmierung aus.
ÖFFNEN - SCHLIEßEN
Ein Stoß öffnet, ein Stoß schließt. (zyklisch) Wird kein Befehl während der Öffnung erteilt, so bleibt die Steuereinheit am Ende der
Öffnungszeit in dem Mode Stop. Bei erneuter Betätigung des Funksenders oder der Steuertaste “Öffnen” schließt man die
Steuereinheit. Hält man die Steuertaste “Öffnen” oder den Funksender beim Schließung gedrückt, so kehrt die Bewegung um.
ÖFFNEN - STOP - SCHLIEßEN
Ein Stoß öffnet, ein Stoß stoppt, ein Stoß schließt. (zyklisch) Gibt man keinen Befehl bei der Öffnung, so bleibt die Steuereinheit am
Ende der Öffnungszeit in dem Mode Stop. Bei erneuter Betätigung des Funksenders oder der Steuertaste “Öffnen”, schließt man die
Steuereinheit. Wenn man die Steuertaste “Öffnen” oder den Funksender bei der Schließung drückt, stoppt sich die Steuereinheit.
ÖFFNEN- SCHLIEßEN MIT AUTOMATISCHER WIEDERSCHLIEßUNG
Das gleich wie beim “öffnen – schließen“. In diesem Fall, bleibt aber die Steuereinheit in dem Mode Stop nicht, sondern sie wartet eine
(vorher programmierte) Pausezeit ab, nachdem die Öffnungszeit zu Ende ist, und schließt. Drückt man die Taste während der
Pausezeit, so setzt man diese Zeit zurück. (Sie wird nullgestellt) Wenn man die Steuertaste “Öffnen” während der Öffnung bis zur
Pausezeit gedrückt hält, schaltet man den Taktgeber-Betrieb ein (dadurch die Automation offen bleibt, solange der an die Steuertaste
“Öffnen“ angeschlossene Taktgeber es bestimmt).
ÖFFNEN – STOP – SCHLIEßEN MIT AUTOMATISCHER WIEDERSCHLIEßUNG
Gleich wie beim “öffnen - Stop – schließen“. In diesem Fall bleibt aber die Steuereinheit in dem Mode Stop nicht, sondern sie wartet
eine (vorher programmierte) Pausezeit ab, nachdem die Öffnungszeit zu Ende ist, und schließt. Drückt man die Taste während der
Pausezeit, so setzt man diese Zeit zurück (sie wird nullgestellt) Wenn man die Steuertaste “Öffnen” während der Öffnung bis zur
Pausezeit gedrückt hält, schaltet man den Taktgeber-Betrieb ein (dadurch die Automation geöffnet bleibt, solange der an die
Steuertaste “Öffnen“ angeschlossene Taktgeber es bestimmt)
MANN ANWESEND
Es ist wichtig, die “gestaltbare Eingang” als Eingang “Schliessen“ zu programmieren.
Der Motor wird durch das anhaltende Drücken auf die dynamische Taste in Betrieb gesetzt. Mit Druck auf diese Taste wird der Motor
zur Öffnung betrieben, indem die gestaltbare Taste gedrückt wird, stellt sich der Motor auf Schließen. Mit der Funksteuerung wird der
Motor in Öffnung bis zum Erreichen der Öffnungs-Maximalzeit betrieben, die vorher eingestellt wurde. Ist diese Maximalzeit erreicht,
schließt ein erneutes Drücken der Funksteuerung die Automation.
PROGRAMMIERUNG DES EINGANG KONFIGURIERBARE ALS PHOTOZELLE BEI DER SCHLIEßUNG
Wenn man diesen Eingang während der Schließung öffnet, (negative Logik), stoppt die Steuereinheit die Bewegung 1 Sekunde lang
und dann kehrt sie in die Öffnungsbewegung um.
PROGRAMMIERUNG DES EINGANG KONFIGURIERBARE ALS PHOTOZELLE
BEI DER SCHLIEßUNG UND BEI DER ÖFFNUNG
Wenn der Stopeingang während der Öffnung wieder geöffnet wird, stoppt die Steuereinheit die Bewegung bis zur Wiederschließung des
Eingangs. Öffnet man diesen Eingang bei der Schließung, (negative Logik), so stoppt die Steuereinheit die Bewegung 1 Sekunde lang und dann
kehrt sie in die Öffnungsbewegung um.
PROGRAMMIERUNG DES EINGANG KONFIGURIERBARE ALS SCHLIEßUNGSEINGANG
Wenn dieser Eingang betätigt wird, schließt die Steuereinheit. Wenn die Automation schon geschlossen war, so bleibt dieser Befehl ohne
Wirkung.
18
EINGANG DES ANEMOMETERS
Alles in allem ist der Eingang des Anemometers wie eine Steuertaste für die Betätigung der Schließung. Um Klarheit zu verschaffen,
versteht man unter:
- ÖFFNUNG: der Öffnungsvorgang des Sonnendachs
- SCHLIEßUNG: der Vorgang der Aufwicklung und der daran folgenden Schließung des Sonnendachs.
PROGRAMMIERUNG DES EINGANG KONFIGURIERBARE ALS EINGANG DES ANEMOMETERS
Wenn man diesen Eingang betätigt, schließt die Steuereinheit.
PROGRAMMIERUNG DES EINGANG KONFIGURIERBARE ALS AUTOMATISCHER EINGANG DES
ANEMOMETERS
Wenn man diesen Eingang betätigt, schließt die Steuereinheit. Nachdem dieser Eingang 10 Minuten lang nicht mehr betätigt wird, öffnet
die Steuereinheit.
PROGRAMMIERUNG DES EINGANG KONFIGURIERBARE ALS STOP
Als der Eingang geöffnet wird, stoppt die Steuereinheit die Bewegung und setzt bis zur Wiederschließung des Stopeingangs keinen Befehl mehr um.
Der konfigurierbare Eingang muss N.C. (negative Logik) sein, wenn er als Stop oder Fotozelle programmiert wird.
IMPULSO
PROGRAMMAZIONE
LED LA
LED LB
ON
OFF
Langsames Blinken
OFF
Schnelles Blinken
OFF
OFF
ON
Konfiguration des Stopeingangs: als Photozelle bei der Schließung
Konfiguration des Stopeingangs: als Photozelle bei der Öffnung und bei der
Schließung
(bei der Öffnung wird die Bewegung bis zur Entfernung des Gegenstandes
gestoppt, der
sie verhindert)
OFF
Langsames Blinken
OFF
Schnelles Blinken
7
Konfiguration des Stopeingangs: als Schließungseingang
ON
ON
8
Konfiguration des Stopeingangs: als Eingang des Anemometers
(automatische Schließung, wenn es windig ist)
Langsames Blinken
Langsames Blinken
9
Konfiguration des Stopeingangs: als automatischer Eingang des
Anemometers
(Schließung: wenn es windig ist. Automatische Wiederöffnung: X Minuten
nachdem es
nicht mehr windig ist)
Schnelles Blinken
Schnelles Blinken
10
Konfiguration des Stopeingangs: als Eingang “Stop”
Langsames Blinken
Schnelles Blinken
11
MannAnwesend
Schnelles Blinken
ON
12
Man springt aus der Programmierung aus
OFF
OFF
1
Öffnen – schließen ohne automatische Wiederschließung
2
Öffnen – Stop – schließen ohne automatische Wiederschließung
3
Öffnen – schließen mit automatischer Wiederschließung
4
Öffnen – Stop – schließen mit automatischer Wiederschließung
5
6
IMPULSE VON 1 BIS 4
Wählt man eine der Betriebsweisen (vom Impuls 1 bis 4), ist es klar, dass die anderen Betriebsweisen damit ausgeschlossen werden.
Um die anderen Punkte (von 5 bis 10) zu wählen, nachdem man einen der vier Punkten programmiert hat, braucht man die
Steuertaste 5 Sekunden lang erneut gedrückt zu halten, und den gewünschten Punkt zu erreichen.
IMPULSE VON 5 BIS 10
Wählt man eine der Betriebsweisen (vom Impuls 5 bis 10), ist es klar, dass die anderen Betriebsweisen damit ausgeschlossen werden.
Rolling Code Funktion nur fuer CB7221 RN ST
VOLLSTÄNDIGE LÖSCHUNG
Vor der Installation durchführen
Die Taste P 12 Sekunden lang gedrückt halten. Zu diesem Punkt leuchten sie gleichzeitig für etwa 4 Sekunden.
Damit ist die Löschung der Codes beendet.
19
MODALITÄT FREE
Die Taste P für 6 Sekunden, nachdem alles led beginnen werden, langsam aufzublinken, den Knopf zu lassen. In dieser Modalität ist er mehr
Funksteuerungen mit demselben Benutzercode möglich, zu speichern. Um diese Modalität herauszukommen P zu pressen. Die Funktion easy
ist aktiv. Um einen Benutzer zu streichen aus der Modalität herauszukommen
MODALITÄT FULL TIME
Nach der vollständigen Löschung der Codes lassen Sie den Empfänger einen jenem System zugewiesenen Funkensender aufnehmen:
die Steuertaste P dann für 9 Sekunden gedrückt halten und sicherstellen, dass alle LED blinken. Zu diesem Punkt bleibt die
Steuereinheit bei der programmiert, indem sie all die Steuerungen desselben Systems wieder speichert. Diese Funktion kann nützlich
sein, wenn man einen Empfänger in einem System mit mehreren Benutzern ersetzt.
Zwecks die Modalität herausnehmen, den P Druckknopf zu betätigen
NB: Diese Programmierung kann nur in der Modalität MOSTABIL des Relais 1 geschehen
Druck auf
dem P
Druckknopf
Modalität
Led LA
Led LB
3 sec.
Programmierung Betriebsweisen
Gewechselt zum LB
Gewechselt zum LA
6 sec.
Modalität FREE
Langsames Blinken
Langsames Blinken
9 sec.
Modalität FULL TIME
Schnelles Blinken
Schnelles Blinken
12 sec.
Vollständige Löschung
Ich blitze am schnellsten
Ich blitze am schnellsten
VOR DER PROGRAMMIERUNG ZU LESEN
1. Der Benutzercode ist eine Nummer, die den Funksender identifiziert. Es muss ein einziger sein, auch wenn der Funksender
mehrere Systemscodes hat.
2. Jeder Funksender sollte einen anderen Benutzercode haben und zwei Funksender mit demselben Benutzercode dürfen nicht in
demselben System angewendet sein werden.
3. Der Systemcode ist eine Nummer, die den Empfänger identifiziert. Es ist wichtig, zwei Empfänger mit dem selben Systemcode nah
beieinander zu installieren (Reichweite der Empfänger).
4. Der Installiercode ist eine Nummer, die den Installateur identifiziert. Er wird automatisch in die Funksender eingegeben, wenn die
InfrarotProgrammierung durchgeführt wird. Diese Nummer bleibt in dem Programmierer/Anzeiger PC042 und kann nicht geändert
werden.
5. Wenn man einen TR04 Funksender programmieren will, der die 4 (vier) Relais eines 4 - Kanal Empfängers aktiviert, muss man
folgendendes ausführen: die vier Steuertasten des Funksenders mit einem (und immer demselben, s. Punkt 1) Benutzercode und
mit demselben Systemcode für jede Taste (s. Punkt 3) programmieren. Jede Steuertaste des Senders muss mit einem Relais des
Empfängers gekoppelt werden.
6. Die Programmierung Easy kann nur für die ersten zwei Relais durchgeführt werden.
7. Wenn man die Funktion FULLTIME aktiviert hat, bleibt diese. Während dieser Zeit aktiviert der Empfänger alle Funksender mit seinem
selben Systemcode. Bevor man die Funktion Full-Time einschaltet, ist es wichtig, mindestens einen Funksender in dem üblichen Speicher
zu speichern. Das erlaubt dem Empfänger den Systemcode aufzunehmen.
VORSICHT
In der Modalität Mann anwesend ist es wichtig, die “gestaltbare Taste” als Taste “Schliessen“ zu programmieren.
Die Firma FERPORT S.a.s. steht nicht für falsche Verbindungen und/oder Verletzungen der Steuereinheiten ein und wird sie auf jeden Fall nicht in der
Garantie einbeziehen.
Die Firma FERPORT S.a.s. gibt genau an, dass sie das Modell CB7220 RN ST und CB7221 RN ST hat patentieren lassen. Dieselbe
Steuereinheit und all ihre Teile werden deswegen auf Grund des Gesetzes geschützt. Man darf kein Teil dieses Handbuchs ohne die schriftliche
Genehmigung der Firma FERPORT S.a.s. vervielfältigen.
Die Anschlüsse an die Steuereinheit müssen nur von Fachleuten ausgeführt werden, nachdem sie die obengenannten Anweisungen
aufmerksam gelesen haben.
NB: Man braucht, einen allpoligen Schalter an die Steuereinheit mit mindestem Öffnungsabstand zwischen den Kontakten von 3 mm einzusetzen, der
die Steuereinheit vor der Instandhaltungsöffnung ausschaltet. (CEI 64-8)
GEFAHR 230 V Ws
20