1
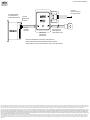
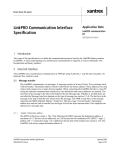
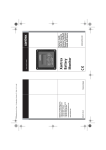
973-0027-01-01 Revision B November 2008
Xantrex LinkPRO Battery Monitor Communication Interface Kit
Xantrex LinkPRO Akku-Monitor-Kommunikationsschnittstellenkit
Kit d’interface de communication du moniteur de batterie Xantrex LinkPRO
WARNING: Fire hazard
WARNUNG: Brandgefährdung
AVERTISSEMENT : risque d'incendie
Read, follow, and save these instructions to reduce the risk of fire hazard, equipment damage, or
malfunction. Refer to the LinkPRO Installation Instructions that shipped with your battery monitor in
addition to this document.
Bitte lesen, befolgen und bewahren Sie die Instruktionen und reduzieren Sie damit die Brandgefahr,
einen Geräteschaden oder die Funktionsstörung. Beziehen Sie sich die auf LinkPRO
Montagevorschriften, die mit Ihrem Batteriemonitor versendeten.
Veuillez lire, suivre et garder ce manuel d'utilisation pour réduire les risques d'incendie, de dommages
à l'équipement ou de mauvais fonctionnement. Référez-vous aux instructions d'installation de
LinkPRO qui se sont transportées avec votre moniteur de batterie.
WARNING
WARNUNG
AVERTISSEMENT :
Do not use LinkPRO in connection with life support systems, medical equipment, or where human life
or medical property may be at stake.
Der LinkPRO ist nicht zur Verwendung im Zusammenhang mit Lebenserhaltungssystemen oder
sonstigen medizinischen Anlagen oder Geräten vorgesehen.
Les modèles LinkPRO ne sont pas étudiés pour être branchés sur des appareils de maintien des
fonctions vitales ou d’autres équipements ou appareils médicaux.
This kit includes:
1. Isolated LinkPRO to RS232 interface box, including interface cable
2. 1.8m SD09M-SD09F serial cable
3. CD-ROM containing Xantrex LinkPRO Battery Monitor software for Windows XP/Vista
Anmerkung: Die Datenübertragungssoftware ist auf englisch nur vorhanden.
Note : La logiciel de transmission est disponible en anglais seulement.
Dieses Kit enthält:
Ce kit contient :
1. LinkPRO für die RS232-Anschlussbox, einschließlich Anschlusskabel
2. Serielles Kabel SD09M-SD09F (1,80 m)
3. CD-ROM mit Software Xantrex LinkPRO Battery Monitor für Windows XP/Vista
Using the kit
1. Boîte d'interface LinkPRO vers RS232 isolée, y compris le câble d'interface
2. Câble série 1,8 m SD09M-SD09F
3. CD-Rom contenant le logiciel Xantrex LinkPRO Battery Monitor pour Windows XP/Vista
Verwenden des Kits
Utilisation du kit
Installing the software
Die Anschlussbox muss am RJ12-Erweiterungsanschluss des Xantrex LinkPRO Akku-Monitors
angeschlossen werden (siehe Abbildung). Wenn Ihre Akku-Überwachungssystem über einen optionalen
Temperaturfühler verfügt, muss dieser mit dem Anschluss TEMP. SENSOR der Anschlussbox verbunden
werden. Über das beiliegende serielle Kabel wird der RS232-Eingang/Ausgang der Anschlussbox mit dem
Kommunikationsanschluss des PC verbunden.
Um den Stromverbrauch des Akkuüberwachungssystems zu verringern, wird empfohlen, die Anschlussbox
vom LinkPRO zu trennen, wenn keine Kommunikation erforderlich ist. Ziehen Sie hierzu das LinkPROAnschlusskabel vom Erweiterungsanschluss des LinkPROs ab.
La boîte d'interface doit être connectée au port d'expansion du moniteur de batterie Xantrex LinkPRO RJ12 tel
qu'illustré ci-dessous. Si votre moniteur de batterie contient également un capteur de température en option, ce
capteur doit être connecté à l'entrée TEMP. SENSOR de la boîte d'interface. Le câble série joint se branche à la
prise entrée/sortie RS232 de la boîte d'interface du port de communication de votre ordinateur.
Pour réduire la consommation électrique totale de votre LinkPRO, il est conseillé de déconnecter la boîte
d'interface du moniteur lorsqu'aucune communication n'est nécessaire. Cela se réalise en retirant le câble
d'interface du LinkPRO du port d'expansion du système.
To install the LinkPRO software on your computer system:
Installieren der Software
The interface box must be connected to the Xantrex LinkPRO Battery Monitor RJ12 expansion port as
displayed below. If your battery monitoring system contains an optional temperature sensor too, then this
sensor must be connected to the TEMP. SENSOR input of the interface box. The enclosed serial cable
connects the RS232 input/output of the interface box to your PC’s communication port.
To reduce the total power consumption of your battery monitoring system, it is advisable to disconnect the
interface box from your LinkPRO when no communication is neccesary. This is accomplished by removing
the LinkPRO interface cable from the LinkPRO expansion port.
1. Exit all running Windows programs.
2. Insert the LinkPRO CD-Rom into your drive. The Autorun capability of Windows will start the setup process
automatically. If it does not, select [START] [RUN] and type : D:\setup.exe where D: is your CD-Rom
drive.
3. Follow the step-by-step instructions on your screen to complete the software installation.
NOTE: When you are not logged on with administrator privileges, Windows may ask you for an administrator
password a few times.
4. During installation, you may be asked to acknowledge installation of USB drivers twice.
5. After the software installation is complete, you can connect the RS232 interface box to a free RS232 port on your
PC.
Getting started with the LinkPRO software
To start the LinkPRO software after installing:
1. Click the Windows START button.
2. Click PROGRAMS then click LinkPRO.
3. Click the LinkPRO icon to launch the software. When your battery monitor is connected to the PC, a
corresponding icon will appear in the Device Manager.
If you need any further help with the LinkPRO software, please consult the Readme file.
Technical specifications interface box
Technical Specifications full duplex isolated interface box
Input voltage range
+9...35 VDC
Input current range
16...25 mA
Isolation value
1500 Vrms for 1 sec.
Operating ambient temperature
0...50 °C
Dimensions (L×W×H)
3 3/8 × 2 9/16 × 1 1/16 in. / 86 × 66 × 27 mm
Installation du logiciel
Für eine ordnungsgemäße Installation der Software LinkPRO auf dem Computersystem Führen Sie bitte die
folgenden Schritte durch:
1. Beenden Sie alle ausgeführten Windows-Programme.
2. Legen Sie die LinkPRO CD-ROM in das Laufwerk ein. Der Installationsvorgang wird von Windows automatisch
gestartet. Sollte dies nicht der Fall sein, wählen Sie [START] [AUSFÜHREN] aus, und geben Sie Folgendes ein:
„D:\setup.exe“, sofern das CD-ROM-Laufwerk den Buchstaben D: trägt.
3. Folgen Sie den Anweisungen auf dem Bildschirm, um die Installation der Software abzuschließen.
ANMERKUNG: Wenn Sie nicht mit Administratorberechtigungen angemeldet sind, werden Sie von Windows
möglicherweise mehrfach aufgefordert, ein Administratorkennwort einzugeben.
4. Während der Installation werden Sie möglicherweise aufgefordert, die Installation von USB-Treibern zweimal zu
bestätigen.
5. Nachdem die Softwareinstallation abgeschlossen ist, können Sie die RS232-Anschlussbox an einen freien RS232Anschluss Ihres Computer anschließen.
Erste Schritte mit der Software LinkPRO
Führen Sie folgende Schritte durch, um Software LinkPRO nach der Installation zu starten:
1. Klicken Sie auf die Windows-Schaltfläche [START].
2. Wählen Sie [PROGRAMME] und anschließend [LinkPRO] aus.
3. Wählen Sie das Symbol für LinkPRO aus, um die Software zu starten.
Lesen Sie die Info-Datei, wenn Sie weitere Hilfe bei Ihrer LinkPRO-Software benötigen.
Technische Daten der Anschlussbox
Technische Daten der isolierten Vollduplex-Anschlussbox
Eingangsspannungsbereich
+9...35 V Gleichstrom
Eingangsstrombereich
16...25 mA
Isolationswert
1500 Vrms über 1 Sekunde
Betriebsumgebungstemperatur
0...50 °C
Abmessungen (T × B × H)
3 3/8 × 2 9/16 × 1 1/16 Zoll / 86 × 66 × 27 mm
Veuillez suivre les étapes ci-dessous pour vous assurer d'une installation correcte du logiciel LinkPRO sur
votre ordinateur :
1. Quittez tous les programmes Windows ouverts.
2. Insérez le CD-Rom LinkPRO dans votre lecteur. La fonctionnalité d'exécution automatique de Windows démarre
le processus d'installation automatiquement. Dans le cas contraire, sélectionnez [Démarrer] [Exécuter] puis
tapez : D:\setup.exe où D: représente votre lecteur de CD-Rom.
3. Suivez les instructions pas à pas sur votre écran afin de terminer l'installation du logiciel.
REMARQUE : si vous n'êtes pas connecté avec des privilèges administrateur, il se peut que Windows vous
demande un mot de passe administrateur plusieurs fois.
4. Durant l'installation, le système vous demandera peut-être de confirmer l'installation des pilotes USB deux fois.
5. Une fois l'installation du logiciel terminée, vous pouvez connecter la boîte d'interface RS232 à un port RS232
libre de votre ordinateur.
Mise en route du logiciel LinkPRO
Pour démarrer le logiciel LinkPRO après l'installation, suivez la procédure ci-dessous :
1. Cliquez sur le bouton [Démarrer] de Windows.
2. Sélectionnez [PROGRAMS] puis [LinkPRO].
3. Choisissez l'icône LinkPRO pour lancer le logiciel. Une fois votre moniteur de batterie connecté à l'ordinateur,
une icône correspondante apparaît dans le Gestionnaire de périphériques.
Si vous avez besoin d'aide supplémentaire avec le logiciel LinkPRO, consultez le fichier Lisez-moi.
Spécifications techniques - Boîte d'interface
Spécifications techniques - Boîte d'interface isolée en duplex intégral
Gamme des tensions d'entrée
+9…35 V c.c.
Gamme de courant d'entrée
16...25 mA
Valeur d'isolation
1500 Vrms pour 1 s
Température ambiante de fonctionnement
0...50 °C
Dimensions (L × L × H)
3 3/8 × 2 9/16 × 1 1/16 po / 86 × 66 × 27 mm
973-0027-01-01 Revision B November 2008
Xantrex LinkPRO Battery Monitor
Xantrex LinkPRO Akku-Monitor
Moniteur de batterie Xantrex LinkPRO
To PC serial port
Zum seriellen Anschluss des PC
Vers le port série de l'ordinateur
Expansion port
Erweiterunganschluss
Port d'expansion
Interface cable
Anschlusskabel
Câble d'interface
Isolated interface box
Isolierte Anschlussbox
Boîte d'interface isolée
Optional temperature sensor
Optionaler Temperaturfühler
Capteur de température (en option)
Complete Xantrex LinkPRO Battery Monitor communication setup, including temperature sensor
Vollständige Xantrex LinkPRO Akku-Monitor-Kommunikationsinstallation einschließlich Temperaturfühler
Configuration complète des communications du moniteur de batterie Xantrex LinkPRO, y compris le capteur de température
Xantrex and Smart Choice For Power are trademarks of Schneider Electric Services International sprl, registered in the U.S. and other countries. Other trademarks, registered trademarks, and product names are the property of their respective owners and are used herein for identification purposes only. LinkPRO Battery Monitor Communication Kit Installation Instructions © November 2008 Xantrex Technology Inc..
All rights reserved.Unless specifically agreed to in writing, Xantrex Technology Inc. (“Xantrex”): (a) makes no warranty as to the accuracy, sufficiency or suitability of any technical or other information provided in its manuals or other documentation. (b) assumes no responsibility or liability for losses, damages, costs or expenses, whether special, direct, indirect, consequential or incidental, which might arise out of
the use of such information. The use of any such information will be entirely at the user’s risk; and (c) reminds you that if this manual is in any language other than English, although steps have been taken to maintain the accuracy of the translation, the accuracy cannot be guaranteed. Approved Xantrex content is contained with the English language version which is posted at www.xantrex.com.
Xantrex and Smart Choice For Power ist eine Marke von Schneider Electric Services International sprl. Andere Marken, eingetragene Marken und Produktbezeichnungen sind Eigentum der jeweiligen Eigentümer und werden in diesem Handbuch lediglich zur eindeutigen Identifikation verwendet. LinkPRO Akku-Monitor -Kommunikationsschnittstellenkit © November 2008 Xantrex Technology Inc.. Alle Rechte
vorbehalten. WENN NICHT AUSDRÜCKLICH SCHRIFTLICH FESTGELEGT, TRIFFT FOLGENDES AUF XANTREX TECHNOLOGY INC.. (IM FOLGENDEN KURZ "XANTREX" GENANNT) ZU. XANTREX: (A) GIBT KEINE GEWÄHRLEISTUNG HINSICHTLICH DER GENAUIGKEIT, VOLLSTÄNDIGKEIT ODER EIGNUNG DER IN DEN HANDBÜCHERN ODER ANDEREN UNTERLAGEN
ENTHALTENEN TECHNISCHEN ODER ANDEREN INFORMATIONEN. (B) ÜBERNIMMT KEINE VERANTWORTUNG ODER HAFTUNG FÜR SICH AUS DER NUTZUNG SOLCHER INFORMATIONEN ERGEBENDE SPEZIELLE, DIREKTE, INDIREKTE, ZUFÄLLIGE ODER FOLGESCHÄDEN, VERLUSTE, KOSTEN ODER AUSGABEN. DIE NUTZUNG DIESER INFORMATIONEN
ERFOLGT AUF ALLEINIGE GEFAHR DES ANWENDERS. (C) WEIST DARAUF HIN, DASS FÜR DIESES HANDBUCH, WENN ES IN EINER ANDEREN SPRACHE ALS ENGLISCH VORLIEGT, ZWAR ALLE SCHRITTE ZUR SICHERSTELLUNG DER GENAUIGKEIT DER ÜBERSETZUNG ERGRIFFEN WURDEN, DIE GENAUIGKEIT ABER NICHT GARANTIERT WERDEN KANN. DER
VON XANTREX GENEHMIGTE INHALT IN ENGLISCHER SPRACHE IST UNTER WWW.XANTREX.COM VERÖFFENTLICHT.
Xantrex and Smart Choice For Power sont marques de commerce de Schneider Electric Services International sprl. Les autres marques de commerce, marques déposées et noms de produit sont la propriété de leurs propriétaires respectifs et sont utilisés ici dans le seul but d’être identifiés. Kit d’interface de communication du moniteur de batterie Xantrex LinkPRO © November 2008 Xantrex Technology Inc.. Tous
droits réservés. Sauf accord écrit explicite, Xantrex Technology Inc.. (« Xantrex ») (a) ne garantit pas que les informations techniques ou autres fournies dans ses manuels ou autre documentation sont exactes, exhaustives ou appropriées; (b)ne saurait être tenu responsable des pertes, dommages, des coûts ou des dépenses de quelque nature que ce soit (spéciaux, directs, indirects, consécutifs ou accidentels), qui
pourraient découler de l'utilisation de ces informations; l'utilisation de toute information se fait aux risques et périls de l'utilisateur; (c)vous rappelle que si ce manuel est dans une langue autre que l'anglais, sa précision ne peut être garantie bien que toutes les mesures nécessaires aient été prises pour assurer l'exactitude de la traduction. le contenu approuvé par xantrex en version anglaise est disponible sur le site
www.xantrex.com.