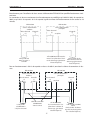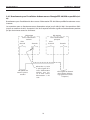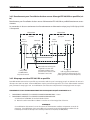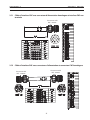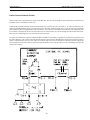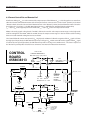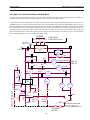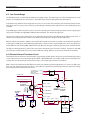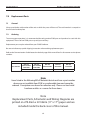
1
Source d’énergie pour découpe au plasma
EPP-450
Manuel d’instructions - FR
055800794906/2012
ASSUREZ-VOUS QUE CETTE INFORMATION EST DISTRIBUÉE À L'OPÉRATEUR.
VOUS POUVEZ OBTENIR DES COPIES SUPPLÉMENTAIRES CHEZ VOTRE FOURNISSEUR.
ATTENTION
Les INSTRUCTIONS suivantes sont destinées aux opérateurs qualifiés seulement. Si
vous n’avez pas une connaissance approfondie des principes de fonctionnement et des
règles de sécurité pour le soudage à l’arc et l’équipement de coupage, nous vous
suggérons de lire notre brochure « Precautions and Safe Practices for Arc Welding, Cutting and Gouging, » Formulaire 52-529. Ne permettez PAS aux personnes non qualifiées
d’installer, d’opérer ou de faire l’entretien de cet équipement. Ne tentez PAS d’installer
ou d’opérer cet équipement avant de lire et de bien comprendre ces instructions. Si vous
ne comprenez pas bien les instructions, communiquez avec votre fournisseur pour plus
de renseignements. Assurez-vous de lire les Règles de Sécurité avant d’installer ou
d’opérer cet équipement.
RESPONSABILITÉS DE L'UTILISATEUR
Cet équipement opérera conformément à la description contenue dans ce manuel, les étiquettes
d’accompagnement et/ou les feuillets d’information si l’équipement est installé, opéré, entretenu
et réparé selon les instructions fournies. Vous devez faire une vérification périodique de
l’équipement. Ne jamais utiliser un équipement qui ne fonctionne pas bien ou n’est pas bien
entretenu. Les pièces qui sont brisées, usées, déformées ou contaminées doivent être remplacées
immédiatement. Dans le cas où une réparation ou un remplacement est nécessaire, il est
recommandé par le fabricant de faire une demande de conseil de service écrite ou par téléphone
chez le Distributeur Autorisé de votre équipement.
Cet équipement ou ses pièces ne doivent pas être modifiés sans permission préalable écrite par
le fabricant. L’utilisateur de l’équipement sera le seul responsable de toute défaillance résultant
d’une utilisation incorrecte, un entretien fautif, des dommages, une réparation incorrecte ou une
modification par une personne autre que le fabricant ou un centre de service désigné par le
fabricant.
ASSUREZ-VOUS DE LIRE ET DE COMPRENDRE LE MANUEL D'UTILISATION AVANT
D'INSTALLER OU D'OPÉRER L'UNITÉ.
PROTÉGEZ-VOUS ET LES AUTRES !
4
TABLE DES MATIÈRES
Section / Titre
Page
1.0 Mesures de sécurité . . . . . . . . . . . . . . . . . . . . . . . . . . . . . . . . . . . . . . . . . . . . . . . . . . . . . . . . . . . . . . . . . . . . . . . . . . . . . . . . . . 7
2.0Description . . . . . . . . . . . . . . . . . . . . . . . . . . . . . . . . . . . . . . . . . . . . . . . . . . . . . . . . . . . . . . . . . . . . . . . . . . . . . . . . . . . . . . . . . . . 9
2.1 Introduction . . . . . . . . . . . . . . . . . . . . . . . . . . . . . . . . . . . . . . . . . . . . . . . . . . . . . . . . . . . . . . . . . . . . . . . . . . . . . . . . . . . . . . 9
2.2 Caractéristiques générales . . . . . . . . . . . . . . . . . . . . . . . . . . . . . . . . . . . . . . . . . . . . . . . . . . . . . . . . . . . . . . . . . . . . . . . . 9
2.3 Dimensions et poids . . . . . . . . . . . . . . . . . . . . . . . . . . . . . . . . . . . . . . . . . . . . . . . . . . . . . . . . . . . . . . . . . . . . . . . . . . . . 10
3.0Installation . . . . . . . . . . . . . . . . . . . . . . . . . . . . . . . . . . . . . . . . . . . . . . . . . . . . . . . . . . . . . . . . . . . . . . . . . . . . . . . . . . . . . . . . . . 11
3.1 Généralités . . . . . . . . . . . . . . . . . . . . . . . . . . . . . . . . . . . . . . . . . . . . . . . . . . . . . . . . . . . . . . . . . . . . . . . . . . . . . . . . . . . . . . 11
3.2 Déballage . . . . . . . . . . . . . . . . . . . . . . . . . . . . . . . . . . . . . . . . . . . . . . . . . . . . . . . . . . . . . . . . . . . . . . . . . . . . . . . . . . . . . . . 11
3.3 Emplacement . . . . . . . . . . . . . . . . . . . . . . . . . . . . . . . . . . . . . . . . . . . . . . . . . . . . . . . . . . . . . . . . . . . . . . . . . . . . . . . . . . . 11
3.4 Branchement de l’alimentation . . . . . . . . . . . . . . . . . . . . . . . . . . . . . . . . . . . . . . . . . . . . . . . . . . . . . . . . . . . . . . . . . . 12
3.4.1 Alimentation principale . . . . . . . . . . . . . . . . . . . . . . . . . . . . . . . . . . . . . . . . . . . . . . . . . . . . . . . . . . . . . . . . . . . 12
3.4.2 Conducteurs d’entrée . . . . . . . . . . . . . . . . . . . . . . . . . . . . . . . . . . . . . . . . . . . . . . . . . . . . . . . . . . . . . . . . . . . . . 13
3.4.3 Procédure de branchement de l’arrivée . . . . . . . . . . . . . . . . . . . . . . . . . . . . . . . . . . . . . . . . . . . . . . . . . . . . 13
3.5 Branchements de sortie . . . . . . . . . . . . . . . . . . . . . . . . . . . . . . . . . . . . . . . . . . . . . . . . . . . . . . . . . . . . . . . . . . . . . . . . . . 14
3.5.1 Câbles de sortie (fournis par le client) . . . . . . . . . . . . . . . . . . . . . . . . . . . . . . . . . . . . . . . . . . . . . . . . . . . . . . 14
3.5.2 Procédure de branchements de sortie - Alimentation simple . . . . . . . . . . . . . . . . . . . . . . . . . . . . . . . 14
3.6 Installation en parallèle . . . . . . . . . . . . . . . . . . . . . . . . . . . . . . . . . . . . . . . . . . . . . . . . . . . . . . . . . . . . . . . . . . . . . . . . . . 15
3.6.1 Branchements pour l’installation de deux sources d’énergie EPP-401/450 en parallèle . . . . . . . . 16
3.6.2 Marquage avec deux EPP-401/450 en parallèle . . . . . . . . . . . . . . . . . . . . . . . . . . . . . . . . . . . . . . . . . . . . . 19
3.7 Câbles d’interface . . . . . . . . . . . . . . . . . . . . . . . . . . . . . . . . . . . . . . . . . . . . . . . . . . . . . . . . . . . . . . . . . . . . . . . . . . . . . . . 20
3.7.1 Câbles d’interface CNC avec connecteur d’alimentation homologue et
interface CNC non terminée . . . . . . . . . . . . . . . . . . . . . . . . . . . . . . . . . . . . . . . . . . . . . . . . . . . . . . . . . . . . . . 21
3.7.2 Câbles d’interface CNC avec connecteurs d’alimentation homologues
à chaque extrémité . . . . . . . . . . . . . . . . . . . . . . . . . . . . . . . . . . . . . . . . . . . . . . . . . . . . . . . . . . . . . . . . . . . . . . . 21
3.7.3 Câbles d’interface de refroidisseur d’eau avec connecteurs d’alimentation
homologues à chaque extrémité . . . . . . . . . . . . . . . . . . . . . . . . . . . . . . . . . . . . . . . . . . . . . . . . . . . . . . . . . . 22
4.0Fonctionnement . . . . . . . . . . . . . . . . . . . . . . . . . . . . . . . . . . . . . . . . . . . . . . . . . . . . . . . . . . . . . . . . . . . . . . . . . . . . . . . . . . . . 23
4.1 Description des circuits du schéma fonctionnel . . . . . . . . . . . . . . . . . . . . . . . . . . . . . . . . . . . . . . . . . . . . . . . . . . . 23
4.2 Panneau de commande . . . . . . . . . . . . . . . . . . . . . . . . . . . . . . . . . . . . . . . . . . . . . . . . . . . . . . . . . . . . . . . . . . . . . . . . . . 26
4.2.1 Modes de fonctionnement : Mode de découpe et de marquage . . . . . . . . . . . . . . . . . . . . . . . . . . . . 29
4.3 Séquence du fonctionnement . . . . . . . . . . . . . . . . . . . . . . . . . . . . . . . . . . . . . . . . . . . . . . . . . . . . . . . . . . . . . . . . . . . 30
4.4 Paramètres de l’amorçage de l’arc . . . . . . . . . . . . . . . . . . . . . . . . . . . . . . . . . . . . . . . . . . . . . . . . . . . . . . . . . . . . . . . . 31
4.4.1 Conditions d’activation / désactivation de l’amorçage de l’arc . . . . . . . . . . . . . . . . . . . . . . . . . . . . . . . 32
4.4.2 Réglage de la minuterie de l’amorçage de l’arc . . . . . . . . . . . . . . . . . . . . . . . . . . . . . . . . . . . . . . . . . . . . . 32
4.4.3 Réglage du courant de démarrage minimum . . . . . . . . . . . . . . . . . . . . . . . . . . . . . . . . . . . . . . . . . . . . . . 32
4.4.4 Commandes de l’amorçage de l’arc . . . . . . . . . . . . . . . . . . . . . . . . . . . . . . . . . . . . . . . . . . . . . . . . . . . . . . . . 33
4.4.5 Courant de démarrage et minuteur de croissance . . . . . . . . . . . . . . . . . . . . . . . . . . . . . . . . . . . . . . . . . . . 33
4.5 Courbes tension-intensité de l’EPP-401/450 . . . . . . . . . . . . . . . . . . . . . . . . . . . . . . . . . . . . . . . . . . . . . . . . . . . . . . 34
4.5.1 Courbes tension-intensité de l’EPP-401/450 pour tous les modèles . . . . . . . . . . . . . . . . . . . . . . . . . . 34
5.0Maintenance . . . . . . . . . . . . . . . . . . . . . . . . . . . . . . . . . . . . . . . . . . . . . . . . . . . . . . . . . . . . . . . . . . . . . . . . . . . . . . . . . . . . . . . . 35
5.1 Généralités . . . . . . . . . . . . . . . . . . . . . . . . . . . . . . . . . . . . . . . . . . . . . . . . . . . . . . . . . . . . . . . . . . . . . . . . . . . . . . . . . . . . . . 35
5.2 Nettoyage . . . . . . . . . . . . . . . . . . . . . . . . . . . . . . . . . . . . . . . . . . . . . . . . . . . . . . . . . . . . . . . . . . . . . . . . . . . . . . . . . . . . . . 35
5.3 Lubrification . . . . . . . . . . . . . . . . . . . . . . . . . . . . . . . . . . . . . . . . . . . . . . . . . . . . . . . . . . . . . . . . . . . . . . . . . . . . . . . . . . . . 36
5
TABLE DES MATIÈRES
Section / Titre
Page
6.0Dépannage . . . . . . . . . . . . . . . . . . . . . . . . . . . . . . . . . . . . . . . . . . . . . . . . . . . . . . . . . . . . . . . . . . . . . . . . . . . . . . . . . . . . . . . . . 37
6.1 Généralités . . . . . . . . . . . . . . . . . . . . . . . . . . . . . . . . . . . . . . . . . . . . . . . . . . . . . . . . . . . . . . . . . . . . . . . . . . . . . . . . . . . . . . 37
6.2 Témoins de défaillance . . . . . . . . . . . . . . . . . . . . . . . . . . . . . . . . . . . . . . . . . . . . . . . . . . . . . . . . . . . . . . . . . . . . . . . . . . 37
6.3 Mise en évidence des défaillances . . . . . . . . . . . . . . . . . . . . . . . . . . . . . . . . . . . . . . . . . . . . . . . . . . . . . . . . . . . . . . . 40
6.3.1 Aucune sortie avec signal de contacteur appliqué . . . . . . . . . . . . . . . . . . . . . . . . . . . . . . . . . . . . . . . . . . 40
6.3.2 Sortie limitée à 100 A . . . . . . . . . . . . . . . . . . . . . . . . . . . . . . . . . . . . . . . . . . . . . . . . . . . . . . . . . . . . . . . . . . . . . 40
6.3.3 Les ventilateurs ne fonctionnent pas . . . . . . . . . . . . . . . . . . . . . . . . . . . . . . . . . . . . . . . . . . . . . . . . . . . . . . 40
6.3.4 Pas de courant ou faible intensité . . . . . . . . . . . . . . . . . . . . . . . . . . . . . . . . . . . . . . . . . . . . . . . . . . . . . . . . . . 41
6.3.5 Le témoin de défaillance est allumé . . . . . . . . . . . . . . . . . . . . . . . . . . . . . . . . . . . . . . . . . . . . . . . . . . . . . . . 41
6.3.6 La torche ne s’allume pas . . . . . . . . . . . . . . . . . . . . . . . . . . . . . . . . . . . . . . . . . . . . . . . . . . . . . . . . . . . . . . . . . . 45
6.3.7 Les fusibles F1 et F2 ont grillé . . . . . . . . . . . . . . . . . . . . . . . . . . . . . . . . . . . . . . . . . . . . . . . . . . . . . . . . . . . . . . 46
6.3.8 Fonctionnement intermittent, interrompu ou partiel . . . . . . . . . . . . . . . . . . . . . . . . . . . . . . . . . . . . . . . 46
6.4 Test et remplacement des composants . . . . . . . . . . . . . . . . . . . . . . . . . . . . . . . . . . . . . . . . . . . . . . . . . . . . . . . . . . . 48
6.4.1 Redresseurs de puissance . . . . . . . . . . . . . . . . . . . . . . . . . . . . . . . . . . . . . . . . . . . . . . . . . . . . . . . . . . . . . . . . . 49
6.4.2 Remplacement de la diode à roue libre et des IGBT (transistors bipolaires à porte isolée) . . . . . . 51
6.4.3 Installation du shunt de l’alimentation . . . . . . . . . . . . . . . . . . . . . . . . . . . . . . . . . . . . . . . . . . . . . . . . . . . . . 53
6.4.4 Procédure de vérification de l’étalonnage des jauges numériques . . . . . . . . . . . . . . . . . . . . . . . . . . . 54
6.5 Interface du circuit de commande à l’aide des connecteurs J1 et J6 . . . . . . . . . . . . . . . . . . . . . . . . . . . . . . . . 54
6.6 Contacteur principal auxiliaire (K3) et circuits des contacteurs statiques . . . . . . . . . . . . . . . . . . . . . . . . . . . 56
6.7 Circuit d’activation des contacteurs principaux (K1A, K1B et K1C) . . . . . . . . . . . . . . . . . . . . . . . . . . . . . . . . . . 57
6.8 Circuit de détection du courant de l’arc . . . . . . . . . . . . . . . . . . . . . . . . . . . . . . . . . . . . . . . . . . . . . . . . . . . . . . . . . . 58
6.9 Potentiomètre de contrôle du courant et Vref à distance . . . . . . . . . . . . . . . . . . . . . . . . . . . . . . . . . . . . . . . . . . 59
6.10 Circuits haute / basse tension (HI/LO) et découpe / marquage (Cut/Mark) de l’arc pilote . . . . . . . . . . . . 60
6.11 Amplitude de courant à faible intensité . . . . . . . . . . . . . . . . . . . . . . . . . . . . . . . . . . . . . . . . . . . . . . . . . . . . . . . . . 61
7.0 Pièces de rechange . . . . . . . . . . . . . . . . . . . . . . . . . . . . . . . . . . . . . . . . . . . . . . . . . . . . . . . . . . . . . . . . . . . . . . . . . . . . . . . . . . 63
7.1 Généralités . . . . . . . . . . . . . . . . . . . . . . . . . . . . . . . . . . . . . . . . . . . . . . . . . . . . . . . . . . . . . . . . . . . . . . . . . . . . . . . . . . . . . . 63
7.2 Passer une commande . . . . . . . . . . . . . . . . . . . . . . . . . . . . . . . . . . . . . . . . . . . . . . . . . . . . . . . . . . . . . . . . . . . . . . . . . . 63
6
SECTION 1
1.0
PRÉCAUTIONS DE SÉCURITÉ
Précautions de sécurité
Les utilisateurs du matériel de soudage et de coupage plasma ESAB ont la responsabilité ultime d'assurer que
toute personne qui opère ou qui se trouve dans l'aire de travail observe les précautions de sécurité pertinentes. Les
précautions de sécurité doivent répondre aux exigences applicables à ce type de matériel de soudage ou de coupage
plasma. Les recommandations suivantes doivent être observées en plus des règles standard qui s'appliquent au lieu
de travail.
Tous les travaux doivent être effectués par un personnel qualifié possédant de bonnes connaissances par rapport
au fonctionnement du matériel de soudage et de coupage plasma. Un fontionnement incorrect du matériel peut
produire des situations dangereuses qui peuvent causer des blessures à l'opérateur ou des dommages au matériel.
1.
Toute personne travaillant avec le matériel de soudage ou de coupage plasma doit connaître :
- son fonctionnement;
- l'emplacement des interrupteurs d'arrêt d'urgence;
- sa fonction;
- les précautions de sécurité pertinentes;
- les procédures de soudage et/ou de coupage plasma.
2. L'opérateur doit assurer que :
- seules les personnes autorisées à travailler sur l'équipement se trouvent dans l'aire de travail lors de la mise en marche de l'équipement;
- toutes les personnes dans l'aire de travail sont protégées lorsque l'arc est amorcé.
3. Le lieu de travail doit être :
- aménagé convenablement pour acquérir le matériel en toute sécurité;
- libre de courants d'air.
4. Équipement de sécurité personnelle
- Vous devez toujours utiliser un équipement de sécurité convenable tels que les lunettes de protection, les vêtement ininflammables et des gants de protection.
- Vous ne devez jamais porter de vêtements amples, tels que foulards, bracelets, bagues, etc., qui pourraient se prendre dans l'appareil ou causer des brûlures.
5. Précautions générales :
- Assurez-vous que le câble de retour est bien branché.
- La réparation d'un équipement de haute tension doit être effectuée par un électricien qualifié seulement.
- Un équipement d'extinction d'incendie approprié doit être à proximité de l'appareil et l'emplacement doit être clairement indiqué.
- Vous ne devez jamais procéder à la lubrification ou l'entretien du matériel lorsque l'appareil est en marche.
Classe de boîtier
Le code IP indique la classe du boîtier, à savoir le niveau de protection offert contre toute pénétration par
des objets solides ou de l’eau. La protection est fournie contre le contact d’un doigt, la pénétration d’objets
solides d’une taille supérieure à 12 mm et contre l’eau pulvérisée jusqu’à 60 degrés de la verticale. L’équipement
marqué IP23S peut être stocké mais ne doit pas être utilisé à l’extérieur quand il pleut à moins d’être sous abri.
ATTENTION
Inclinaison
maximum
autorisée
Si l’équipement est placé sur une surface
inclinée de plus de 15°, il y a danger de basculement et en conséquence, des blessures
personnelles et/ou des dommages importants à l’équipement.
15°
7
SECTION 1
PRÉCAUTIONS DE SÉCURITÉ
AVERTISSEMENT
LE SOUDAGE ET LE COUPAGE À L'ARC PEUVENT CAUSER DES
BLESSURES À L'OPÉRATEUR OU LES AUTRES PERSONNES
SE TROUVANT DANS L'AIRE DE TRAVAIL. ASSUREZ-VOUS
DE PRENDRE TOUTES LES PRÉCAUTIONS NÉCESSAIRES
LORS D'UNE OPÉRATION DE SOUDAGE OU DE COUPAGE.
DEMANDEZ À VOTRE EMPLOYEUR UNE COPIE DES
MESURES DE SÉCURITÉ QUI DOIVENT ÊTRE ÉLABORÉES À
PARTIR DES DONNÉES DES RISQUE DU FABRICANT.
CHOC ÉLECTRIQUE - peut être mortel.
- Assurez-vous que l'unité de soudage ou de coupage plasma est installée et mise à la terre conformément aux normes applicables.
- Ne touchez pas aux pièces électriques sous tension ou les électrodes si vos mains ne sont pas bien protégées ou si vos gants ou vos vêtements sont humides.
- Assurez-vous que votre corps est bien isolé de la mise à la terre et de la pièce à traiter.
- Assurez-vous que votre position de travail est sécure.
VAPEURS ET GAZ - peuvent être danereux pour la santé.
- Gardez votre tête éloignée des vapeurs.
- Utilisez un système de ventilation et/ou d'extraction à l'arc pour évacuer les vapeurs et les gaz de votre zone respiratoire.
RAYONS DE L'ARC - peuvent endommager la vue ou brûler la peau.
- Protégez vos yeux et votre corps. Utilisez un écran de soudage/coupage plasma convenable équipé de lentilles teintées et portez des vêtements de protection.
- Protégez les personnes se trouvant dans l'aire de travail à l'aide d'un écran ou d'un rideau protecteur convenable.
RISQUE D'INCENDIE
- Les étincelles (projections) peuvent causer un incendie. Assurez-vous qu'il n'y a pas de matériel inflammable à proximité de l'appareil.
BRUIT - un bruit excessif peut endommager la capacité auditive.
- Protégez vos oreilles. Utilisez des protecteurs d'oreilles ou un autre type de protection auditive.
- Avertissez les personnes se trouvant dans l'aire de travail de ce risque.
FONCTIONNEMENT DÉFECTUEUX - Dans le cas d'un fonctionnement défectueux demandez l'aide d'une personne qualifiée.
ASSUREZ-VOUS DE LIRE ET DE COMPRENDRE LE MANUEL D'UTILISATION AVANT
D'INSTALLER OU D'OPÉRER L'UNITÉ. PROTÉGEZ-VOUS ET LES AUTRES !
ATTENTION
Ce produit est uniquement destiné à la découpe du plasma.
Toute autre utilisation peut entraîner des blessures ou
endommager l’équipement.
ATTENTION
Pour éviter toute blessure personnelle et/
ou endommagement à l’équipement, soulever à l’aide de la méthode et des points d’attache indiqués ici.
8
SECTION 2
DESCRIPTION
2.1 Introduction
La source d’énergie de l’EPP est conçue pour des applications mécanisées de marquage et de découpe au plasma à haut débit. Elle peut être utilisée avec d’autres produits ESAB tels que les torches PT-15, PT-19XLS, PT-600 et
PT-36, ainsi qu’avec le système informatisé régulateur de gaz et de commutation Smart Flow II.
•
•
•
•
•
•
•
•
•
•
10 à 100 ampères pour le marquage avec une amplitude de courant à faible intensité
50 à 450 ampères de découpe avec une amplitude de courant à haute intensité
35 à 100 ampères pour la découpe avec une amplitude de courant à faible intensité
Refroidissement forcé à l’air
Circuit d’alimentation en courant continu (c.c.) à semi-conducteurs
Protection de la tension d’entrée
Commande locale ou à distance sur le panneau avant
Protection du transformateur principal et des composants des semi-conducteurs de l’alimentation par
interrupteur thermique
Anneaux supérieurs de soulèvement ou socle adapté à la manutention par chariot élévateur
Capacité d’alimentation secondaire en parallèle pour élargir l’amplitude du courant de sortie.
2.2 Caractéristiques générales
Informations d’entrée/sortie de l’EPP-401/450
EPP-401/450
380 V 50/60 HZ
380 V TAPS
Réf. de la pièce
EPP-401/450
380 V 50/60 HZ
400 V TAPS
EPP-401/450
400 V 50/60 HZ
0558007730
EPP-401/450
460 V 60 HZ
EPP-401/450
575 V 60 HZ
0558007731
0558007732
Tension d'arrivée (triphasée)
380 V c.a.
380 V c.a.
400 V c.a.
460 V c.a.
575 V c.a.
Courant d'arrivée (triphasé)
167 A d'intensité
efficace
167 A d'intensité
efficace
159 A d'intensité
efficace
138 A d'intensité
efficace
110 A d'intensité
efficace
Fréquence d'arrivée
50 / 60 Hz
50 / 60 Hz
50 / 60 Hz
60 Hz
60 Hz
Kilovoltampères d'arrivée
109,9 KVA
109,9 KVA
110,2 KVA
110,0 KVA
109,6 KVA
98,9 kW
98,9 kW
99,1 kW
99,0 kW
98,6 kW
90 %
90 %
90 %
90 %
90 %
*2/0 AWG
*2/0 AWG
*2/0 AWG
*1/0 AWG
*2/0 AWG
Fusible d'arrivée (recommandé)
200 A
200 A
200 A
200 A
150 A
Tension de circuit ouvert (OCV)
d'arrivée (découpe à haute
intensité)
430 V c.c.
406 V c.c.
427 V c.c.
431 V c.c.
431 V c.c.
Tension de circuit ouvert (OCV)
d'arrivée (découpe à faible intensité)
414 V c.c.
393 V c.c.
413 V c.c.
415 V c.c.
415 V c.c.
Tension de circuit ouvert (OCV) marquage
360 V c.c.
342 V c.c.
369 V c.c.
360 V c.c.
360 V c.c.
Puissance de l'alimentation
Facteur de puissance de
l'alimentation
Câble d'alimentation recommandé
Sortie de découpe en haute intensité (100 % de la capacité)
entre 50 A à 100 V et 450 A à 200 V
Sortie de découpe en faible intensité (100 % de la capacité)
entre 35 A à 94 V et 100 A à 120 V
Sortie de marquage en faible
intensité (100 % de la capacité)
entre 10 A à 84 V et 100 A à 120 V
Puissance de sortie (100 % de la
capacité)
90 kW
* Tailles de fusibles provenant du Code national de l’électricité pour des conducteurs en cuivre testés à 90 °C (194 °F) avec
une température ambiante de 40 °C (104 °F). Pas plus de trois conducteurs par conduit ou câble. Les codes électriques
locaux doivent être respectés s’ils indiquent des tailles autres que celles énumérées ci-dessus.
9
SECTION 2
DESCRIPTION
2.3 Poids et dimensions
1143 mm
45 po.
946 mm
37,25 po
1022 mm
40,25 po
Poids = 850 kg (1870 livres)
10
SECTION 3
INSTALLATION
3.1 Généralités
DANGER
LE NON RESPECT DES INSTRUCTIONS PEUT ENTRAÎNER LA MORT,
DES BLESSURES CORPORELLES OU DES DÉGÂTS MATÉRIELS. SUIVEZ
CES INSTRUCTIONS POUR ÉVITER TOUTE BLESSURE OU TOUT DOMMAGE MATÉRIEL. VEILLEZ À BIEN RESPECTER LES CODES DE SÉCURITÉ ET ÉLECTRIQUES EN VIGUEUR POUR VOTRE LOCALITÉ, VOTRE
PROVINCE OU AU NIVEAU NATIONAL.
3.2 Déballage
ATTENTION
CAUTION
•
•
•
L’utilisation d’un seul œilleton va endommager la tôle et l’armature.
Utilisez les deux œilletons de levage lors du transport par la méthode
de suspension.
Dès réception, inspectez immédiatement l’unité pour noter tout dégât éventuel.
Sortez tous les composants du conteneur d’expédition et vérifier la présence éventuelle de pièces isolées.
Vérifiez le dégagement des bouches d’aération.
3.3 Emplacement
Remarque :
Utilisez les deux œilletons de levage lors du transport par suspension.
•
•
•
•
•
Un dégagement minimum de 1 m (3 pieds) est nécessaire à l’avant et à l’arrière pour permettre une
bonne circulation de l’air de refroidissement.
Prévoyez également le retrait du panneau supérieur et des panneaux latéraux à des fins d’entretien, de
nettoyage et d’inspections.
Placez l’EPP-401/450 à proximité d’une source d’alimentation électrique équipée de fusibles appropriés.
Conservez une zone dégagée sous la source d’alimentation pour permettre à l’air de refroidissement
de circuler.
L’endroit doit être peu propice à l’accumulation de poussière, d’émanations ou de chaleur excessives.
Ces facteurs auront une conséquence directe sur l’efficacité du refroidissement.
ATTENTION
La présence de poussière ou de saleté conductrices à l’intérieur de la
source d’énergie peut entraîner un contournement de l’arc.
Des dégâts matériels peuvent en résulter. Une accumulation de poussière à l’intérieur de la source d’énergie peut entraîner des courts-circuits électriques. Voir la section sur l’entretien.
11
SECTION 3
INSTALLATION
3.4 Branchement de l’alimentation
DANGER
TOUTE DÉCHARGE ÉLECTRIQUE PEUT ÊTRE MORTELLE !
ASSUREZ UNE PROTECTION MAXIMUM CONTRE LES ÉLECTROCUTIONS.
AVANT DE PROCÉDER À UNE CONNEXION QUELCONQUE À L’INTÉRIEUR DE LA MACHINE, OUVREZ LE COUPE-CIRCUIT MURAL POUR
COUPER L’ALIMENTATION.
3.4.1 Alimentation principale
L’alimentation de l’EPP-401/450 est triphasée. Elle doit provenir d’un coupe-circuit mural contenant les fusibles
ou les disjoncteurs imposés par les codes en vigueur dans votre localité.
Remarque :
Pour plus d’informations, veuillez consulter le document « Caractéristiques générales »
dans la sous-section 2.2 pour voir les tailles de câbles et de fusibles d’entrée recommandées.
Pour estimer le courant d’entrée sous plusieurs conditions de sortie, utilisez la formule ci-dessous.
Courant d’entrée =
AVIS
(arc V) × (arc I) × 0,688 (ligne V)
(ligne V)
Un circuit d’alimentation spécialisé peut être nécessaire.
Bien que l’EPP-401/450 soit équipé d’un compensateur de tension,
un circuit d’alimentation spécialisée peut être nécessaire pour éviter toute panne résultant d’une surcharge du circuit électrique.
12
SECTION 3
INSTALLATION
3.4.2 Conducteurs d’entrée
•
•
•
Fourni par le client
Peut être composé de conducteurs en cuivre recouverts d’un épais caoutchouc (3 pour l’alimentation
et 1 pour la prise de terre) ou passer par une conduite rigide ou flexible.
Les tailles peuvent être consultées dans le tableau de la rubrique « Caractéristiques générales » dans la
sous-section 2.2.
AVIS
Les conducteurs d’entrée doivent être équipés d’une terminaison
par bornes à bague.
Les conducteurs d’entrée doivent être équipés d’une terminaison par
bornes à bague pour un matériel de 12,7 mm (0,50 po.) avant d’être
attachés à l’EPP-401/450.
ATTENTION
Inspectez l’espace entre les bornes à bague du fil d’alimentation et le
panneau latéral. Les cylindres de certaines grosses bornes peuvent
se rapprocher ou toucher le panneau latéral si elles ne sont pas installées correctement. Les cylindres des bornes qui sont installées
sur TB4 et TB6 doivent être tournés pour ne pas faire face au panneau latéral.
3.4.3 Procédure de branchement de l’arrivée
1
2
1. Retirez le panneau gauche de l’EPP-401/450
2. Faites passer les câbles par l’ouverture d’accès située sur le
panneau arrière.
3. Fixez les câbles avec un serre-câble au niveau de l’ouverture
d’accès.
4. Branchez le fil de terre au goujon de la base du châssis.
5. Branchez les bornes à bague du fil d’alimentation aux bornes
principales à l’aide des boulons, rondelles et écrous fournis.
6. Branchez les conducteurs d’arrivée à l’interrupteur mural.
3
1 = bornes principales
2 = prise de terre du châssis
3 = ouverture d’accès du câble d’entrée de l’alimentation (panneau arrière)
13
SECTION 3
INSTALLATION
DANGER
TOUTE DÉCHARGE ÉLECTRIQUE PEUT ÊTRE MORTELLE !
VÉRIFIEZ DE LAISSER UN ESPACE ENTRE LES BORNES À BAGUE, LE
PANNEAU LATÉRAL ET LE TRANSFORMATEUR PRINCIPAL. CET ESPACE DOIT ÊTRE SUFFISANT POUR ÉVITER TOUT ARC ÉLECTRIQUE ÉVENTUEL. VÉRIFIEZ QUE LES CÂBLES NE GÊNENT PAS LA ROTATION DU
VENTILATEUR DE REFROIDISSEMENT.
DANGER
UNE PRISE DE TERRE INCORRECTE PEUT ENTRAÎNER DE GRAVES BLESSURES POUVANT MÊME ÊTRE MORTELLES.
LE CHÂSSIS DOIT ÊTRE CONNECTÉ À UNE PRISE DE TERRE HOMOLOGUÉE. ASSUREZ-VOUS QUE LE FIL DE TERRE N’EST PAS BRANCHÉ À
UNE BORNE PRINCIPALE.
3.5 Branchements de sortie
DANGER
TOUTE DÉCHARGE ÉLECTRIQUE PEUT ÊTRE MORTELLE ! TENSION ET
COURANT DANGEREUX !
AVANT DE TRAVAILLER SUR UNE SOURCE D’ÉNERGIE POUR DÉCOUPE
AU PLASMA AVEC LES COUVERCLES RETIRÉS :
•
•
DÉBRANCHEZ L’ALIMENTATION AU NIVEAU DE L’INTERRUPTEUR
MURAL.
DEMANDEZ À UN TECHNICIEN QUALIFIÉ DE VÉRIFIER LES BARRES
OMNIBUS DE SORTIE (POSITIVES ET NÉGATIVES) AVEC UN VOLTMÈTRE.
3.5.1 Câbles de sortie (fournis par le client)
Sélectionnez les câbles de sortie de découpe au plasma (fournis par le client) sur la base d’un câble en cuivre
isolé de 4/0 AWG, 600 V pour chaque 400 A de courant en sortie. Pour 450 ampères à 100 % de la capacité de
découpe, deux cables en parallèle de taille 2/0 AWG de 600 volts devraient être utilisés.
Remarque :
N’utilisez aucun câble de soudure isolé de 100 V.
3.5.2 Procédure de branchements de sortie - Alimentation simple
1. Retirez le panneau d’accès sur la partie inférieure avant de la source d’énergie.
2. Faites passer les câbles de sortie par les ouvertures situées sur la partie inférieure du panneau avant ou à la base de la
source d’alimentation située directement derrière le panneau avant.
3. Branchez les câbles aux bornes appropriées situées à l’intérieur de la source d’alimentation à l’aide de connecteurs à
pression pour câbles portants le label UL.
4. Remettez en place le panneau retiré dans la première étape.
14
SECTION 3
INSTALLATION
Ouvrir le panneau d’accès
EPP-401/450
Alimentation
Pièce de
travail
(+)
électrode(-)
* 2 fils en parallèle 2/0 AWG 600 V sont conseillés pour
un fonctionnement à 100 % de la capacité en 450 A.
Pour un fonctionnement à 100 % de la capacité jusqu’à
400 A, un fil de 4/0 peut être utilisé. Également, pour
un fonctionnement à 450 A jusqu’à 80 % de la capacité, un fil de 4/0 peut être utilisé. 80 % de la capacité
maximum signifie un fonctionnement pendant pas
plus de 8 minutes toutes les 10 minutes.
arc pilote
* 2 fils positifs
2/0 AWG 600 V
à la pièce de travail
1 fil 14 AWG 600 V
de branchement à l’arc
pilote dans le boîtier de
démarrage (générateur
à haute fréquence)
* 2 fils negatifs 2/0
AWG 600 V
dans le boîtier de
démarrage de l’arc
pilote (générateur à
haute fréquence)
3.6 Installation en parallèle
Deux sources d’énergie EPP-401/450 A peuvent être connectées en parallèle pour augmenter l’amplitude du
courant de sortie.
ATTENTION
Utilisez une seule source d’alimentation pour les courants inférieurs
à 100 A.
Il est recommandé de débrancher le fil négatif de la source d’alimentation auxiliaire lorsque vous passez à des courants inférieurs à 100
A. Ce fil doit être équipé d’une isolation appropriée pour garantir
une protection contre les décharges électriques.
15
SECTION 3
INSTALLATION
3.6.1 Branchements pour l’installation de deux sources d’énergie EPP-401/450 en parallèle
Remarque :
Le conducteur de l’électrode (-) de la source d’alimentation principale est équipé d’un cavalier.
Le câble de masse (+) de la source d’alimentation auxiliaire est également équipé d’un cavalier.
1.
2.
3.
4.
Branchez les câbles de sortie négatifs (-) au boîtier de démarrage de l’arc (le générateur à haute fréquence).
Branchez les câbles de sorties positifs (+) à la pièce à travailler.
Branchez les conducteurs positifs (+) et négatifs (-) entre les sources d’alimentation.
Branchez le câble de l’arc pilote à sa borne au niveau de la source d’alimentation. Le branchement de l’arc pilote à la
source d’alimentation auxiliaire n’est pas utilisé. Le circuit de l’arc pilote n’est pas branché en parallèle.
5. Placez le commutateur HIGH / LOW de l’arc pilote de la source d’alimentation auxiliaire sur la position « LOW ».
6. Placez le commutateur HIGH / LOW de l’arc pilote de la source d’alimentation principale sur la position « HIGH » (haute).
7. Si un signal de référence de courant continu de 0 à +10 est utilisé pour régler le courant de sortie, faites-le suivre dans
les deux sources d’énergie. Interconnectez J1-G (0 à 10 V cc) des deux sources d’énergie et faites de même pour J1-P
(négatif ). Avec les deux sources d’énergie en fonctionnement, le courant de sortie peut être calculé à l’aide de la
formule suivante : [courant de sortie (ampères)] = [tension de référence] x [100] dans l’amplitude de courant à haute
intensité
L’EPP-401/450 n’est pas équipé d’un interrupteur de marche/arrêt. L’alimentation principale est contrôlée par le coupecircuit mural.
NE DÉMARREZ PAS L’EPP-401/450 SANS COUVERCLE.
LES COMPOSANTS À HAUTE TENSION NE SONT PAS PROTÉGÉS ET AUGMENTENT AINSI LES RISQUES D’ÉLECTROCUTION.
DÛ À LA PERTE D’EFFICACITÉ DES VENTILATEURS DE REFROIDISSEMENT,
DES COMPOSANTS INTERNES PEUVENT ÊTRE ENDOMMAGÉS.
TOUTE DÉCHARGE ÉLECTRIQUE PEUT ÊTRE MORTELLE !
DANGER
TOUT CONDUCTEUR ÉLECTRIQUE EXPOSÉ PEUT PRÉSENTER UN RISQUE !
VEILLEZ À NE LAISSER AUCUN CONDUCTEUR SOUS TENSION EXPOSÉ.
LORSQUE VOUS DÉBRANCHEZ LA SOURCE D’ALIMENTATION AUXILIAIRE
DE LA SOURCE PRINCIPALE, VÉRIFIEZ QU’IL S’AGIT DES BONS CÂBLES.
ISOLEZ LES EXTRÉMITÉS DÉCONNECTÉES.
LORS DE L’UTILISATION D’UNE SEULE SOURCE D’ÉNERGIE DANS UNE
CONFIGURATION EN PARALLÈLE, LE CONDUCTEUR DE L’ÉLECTRODE NÉGATIVE DOIT ÊTRE DÉCONNECTÉ DE LA SOURCE D’ÉNERGIE AUXILIAIRE
ET DU BOÎTIER DE PLOMBERIE. LE NON-RESPECT DE CETTE PROCÉDURE
VA PERMETTRE À LA SOURCE D’ÉNERGIE AUXILIAIRE DE RESTER SOUS
TENSION.
16
SECTION 3
INSTALLATION
Branchements pour l’installation de deux sources d’alimentation EPP-401/450 en parallèle fonctionnant simultanément.
Les connexions ci-dessous conviennent à un fonctionnement en parallèle jusqu’à 800 A à 100 % de capacité ou
900 A jusqu’à 80 % de capacité. 80 % de capacité signifie 8 minutes de fonctionnement de l’arc toutes les 10
minutes.
EPP-401/450
Source d’alimentation
auxiliaire
électrode
Pièce de travail
(-)
(+)
EPP-401/450
Source d’alimentation
principale
Pièce de travail
électrode
(+)
(-)
arc pilote
1 fil 14 AWG 600 V de branchement à l’arc pilote dans le boîtier de démarrage (générateur
à haute fréquence)
2 fils positifs 4/0
600 V à la pièce à
travailler
2 fils négatifs 4/0 de
600 V dans le boîtier de
démarrage (générateur à
haute fréquence)
Pour un fonctionnement à 100 % de capacité au-dessus de 800 A, consultez le schéma de connexions ci-dessous.
EPP-401/450
Source d’alimentation
auxiliaire
électrode
Pièce de travail
(-)
(+)
* 3 fils positifs
2/0 AWG 600 V
à la pièce de travail
EPP-401/450
Source d’alimentation
principale
électrode
Pièce de travail
(-)
(+)
arc pilote
câbles de connexion
2/0 AWG 600V
entre les unités
1 fil 14 AWG 600 V
de branchement à l’arc
pilote dans le boîtier de
démarrage (générateur
à haute fréquence)
17
* 3 fils negatifs 2/0 AWG
600 V
dans le boîtier de démarrage de l’arc pilote (générateur à haute fréquence)
SECTION 3
INSTALLATION
3.6.1 Branchements pour l’installation de deux sources d’énergie EPP-401/450 en parallèle (suite)
Branchements pour l’installation de deux sources d’alimentation EPP-401/450 en parallèle fonctionnant successivement.
Les connexions pour un fonctionnement en alimentation unique jusqu’à 400 A à 100 % de capacité ou 450 A
jusqu’à un maximum de 80 % de capacité. 80% de la capacité maximum signifie un fonctionnement pendant
pas plus de 8 minutes toutes les 10 minutes.
EPP-401/450
EPP-401/450
Source d’alimentation
auxiliaire
Pièce
de travail
2 fils positifs 4/0
600 V à la pièce à
travailler
Source d’alimentation
principale
Pièce
de travail
électrode
Débranchez et isolez
le pôle négatif de la
source d’alimentation
auxiliaire pour passer de deux sources
d’alimentation à une
seule.
18
électrode
2 fils négatifs 4/0 de 600 V
dans le boîtier de démarrage (générateur à haute
fréquence)
SECTION 3
INSTALLATION
3.6.1 Branchements pour l’installation de deux sources d’énergie EPP-401/450 en parallèle (suite)
Branchements pour l’installation de deux sources d’alimentation EPP-401/450 en parallèle fonctionnant successivement.
Les connexions ci-dessous conviennent à un fonctionnement en alimentation unique jusqu’à 450 A jusqu’à 100
% de capacité.
EPP-401/450
EPP-401/450
Source d’alimentation
auxiliaire
Source d’alimentation
principale
Pièce
de travail
* 3 fils positifs
2/0 AWG 600 V
à la pièce de travail
Pièce
de travail
électrode
Débranchez et isolez le pôle
négatif de la source d’alimentation auxiliaire pour
passer de deux sources d’alimentation à une seule.
électrode
* 3 fils negatifs 2/0 AWG 600 V
dans le boîtier de démarrage de l’arc
pilote (générateur à haute fréquence)
3.6.2 Marquage avec deux EPP-401/450 en parallèle
Deux EPP-401/450 connectées en parallèle et pouvant être utilisées pour le marquage jusqu’à un minimum de 20 A et la
découpe entre 100 A et 900 A. Deux modifications simples peuvent être apportées à la source d’alimentation auxiliaire
pour permettre le marquage à 10 A. Les modifications sont nécessaires uniquement si le marquage à 20 A est requis.
CHANGEMENTS SUR LE CHAMP POUR PERMETTRE LE MARQUAGE JUSQU’À UN MINIMUM 10 A :
1. CHANGEMENTS APPORTÉS À LA SOURCE D’ALIMENTATION PRINCIPALE : Aucun
2. CHANGEMENTS APPORTÉS À LA SOURCE D’ALIMENTATION AUXILIAIRE :
A. Débranchez le fil BLANC du cordon hélicoïdal de K12
B. Retirez le cavalier entre TB7-7 et TB7-8. Le cavalier est un lien intégré dans le bornier.
REMARQUE :
Ces modifications désactivent la sortie de courant de l’alimentation auxiliaire uniquement en mode de
marquage. Ces modifications n’ont aucun effet sur le courant de sortie de l’alimentation auxiliaire lors de
la découpe en mode de découpe avec courant positionné sur HI (élevé) ou LOW (faible).
19
SECTION 3
INSTALLATION
3.6.2 Marquage avec deux EPP-401/450 en parallèle (suite)
FONCTIONNEMENT DE DEUX EPP-401/450 EN PARALLÈLE :
1. Fournir les commandes de Marche/Arrêt, de Découpe/Marquage et les signaux d’amplitude Haute/Basse du courant
aux unités d’alimentation principale et auxiliaire. Alimentez le même signal VREF aux deux sources d’énergie.
2. En cas de marquage avec des sources d’alimentation en parallèle et si la source d’alimentation auxiliaire n’a pas été
modifiée, la fonction de transfert du courant de sortie est égale à la somme des fonctions de transfert de chacune des
sources : IOUT = 20 x VREF. Chaque source d’alimentation fournira le même courant de sortie.
Pour le marquage avec des sources d’alimentation en parallèle et si la source d’alimentation auxiliaire est modifiée, la
fonction du transfert de courant devient celle de la source d’alimentation principale. IOUT = 10 x VREF. Quand le signal du
contacteur est appliqué, les deux sources d’alimentation s’allument, mais la sortie de courant d’une source d’alimentation modifiée est désactivée en mode de marquage.
3. Lors de la découpe en mode de courant faible, la fonction de transfert de courant est égale à la somme des fonctions
de transfert de chacune des sources : IOUT = 20 x VREF. Pour la découpe avec des courants inférieurs à 100 A, déconnectez le(s) câble(s) négatif(s) de la source d’alimentation auxiliaire et assurez-vous que leurs terminaisons sont équipées
d’une isolation appropriée pour garantir une protection contre les décharges électriques. Lorsque la source d’alimentation auxiliaire est déconnectée, la fonction de transfert de courant devient celle de la source d’alimentation principale. IOUT = 10 x VREF.
4. Lors de la découpe en mode de courant élevé, la fonction de transfert de courant est égale à la somme des fonctions
de transfert de chacune des sources : IOUT = 100 x VREF. Pour la découpe avec des courants inférieurs à 100 A, déconnectez le(s) câble(s) négatif(s) de la source d’alimentation auxiliaire et assurez vous que leurs terminaisons sont équipées
d’une isolation appropriée pour garantir une protection contre les décharges électriques. Utilisez le mode de découpe
à faible courant.
3.7 Câbles d’interface
Interface CNC (24 conducteurs)
Interface de refroidisseur d’eau (8 conducteurs)
20
SECTION 3
INSTALLATION
3.7.1 Câbles d’interface CNC avec connecteur d’alimentation homologue et interface CNC non
terminée
Connecteur mâle
Réf. : 647032
VERT/JAU
ROUGE n°4
3.7.2 Câbles d’interface CNC avec connecteurs d’alimentation et connecteur CNC homologues
Connecteur mâle
Réf. : 647032
Connecteur CNC
Réf. : 2010549
VERT/JAU
ROUGE n°4
21
SECTION 3
INSTALLATION
3.7.3 Câbles d’interface de refroidisseur d’eau avec connecteurs d’alimentation homologues à
chaque extrémité
Connecteur femelle
Réf. : 2062105
Connecteur mâle
Réf. : 647257
22
(d’asservissement)
MID
23
CNC commun
(flottant)
S
Circuit de commande
Redresseurs de bus
300U120
T
Sectionneur
galvanique
Voir Note
T
Modules
IGBT de droite
Paire torsadée
Rétroaction de servo
du courant constant
Rangée de
condensateurs
Modules IGBT
de gauche
Voir Note
L2
T
L1
425 V en
crête
T1
Diodes antiretour
250 V en
crête
T1
R
(amplificateur)
Remarque
Les IGBT et les diodes à roue libre se trouvent dans le
même module.
PIÈCE DE
TRAVAIL
TUYÈRE
ÉLECTRODE
Shunt de
précision
Circuit de
l’arc pilote
R
(atténuateur)
Diodes antiretour
Circuit d’amplification Atténuateur polarisé
de démarrage
Contact situé sur
le contacteur de l’arc pilote
Capteur
Hall
de droite
Diodes à
roue libre
(voir Note)
Capteur Hall
de gauche
“T” commun connecté à la prise de terre de la pièce à travailler par la sortie positive “+”
Amplificateurs
d’erreur
Rétroaction de servos intégrés
rapides
Transformateur
principal T1
0,0 – 10,0 V c.c. VREF
IOUT = (VREF) x (50)
(amplitude de
courant à haute
intensité)
Entrée
triphasée
H
Bus -300 V - 375
V CC
Schéma fonctionnel
de l’EPP-401/450
4.1 Description des circuits
du schéma fonctionnel
Voir Note
Signal de synchronisme
pour une commutation
alternée
Commande de grille
MID
Sectionneur
Commande de grille
galvanique
MID droit / carte de commande de grille
2
(principal)
Sectionneur
galvanique
MID gauche / carte de commande de grille
SECTION 4
FONCTIONNEMENT
SECTION 4
FONCTIONNEMENT
4.1 Description des circuits du schéma fonctionnel (suite)
Le circuit d’alimentation utilisé par l’EPP-401/450 est généralement appelé le convertisseur-abaisseur de tension ou le relais
modulateur. Les commutateurs électroniques ultra-rapides s’allument et s’éteignent plusieurs milliers de fois par seconde
fournissant ainsi des impulsions d’énergie à la sortie. Un circuit de filtrage, principalement composé d’un inducteur (parfois
appelé bobine), convertit les impulsions en courant relativement continu.
Bien que l’inducteur de filtrage supprime la plupart des fluctuations de la tension de sortie « coupée » des commutateurs
électroniques, des petites fluctuations, appelées ondulations sont toujours présentes. L’EPP-401/450 utilise un circuit d’alimentation breveté qui permet de réduire ce phénomène d’ondulations en associant la tension de sortie de deux relais modulateurs, chacun fournissant approximativement la moitié de la tension totale. Ces relais sont synchronisés de façon à ce
que toute augmentation de la tension causée par le premier soit compensée par une réduction de tension par le deuxième.
Les ondulations d’un relais sont ainsi partiellement annulées par les ondulations de l’autre. Cela permet d’obtenir un très
faible niveau d’ondulations et une tension de sortie à la fois très constante et très fiable. Un faible niveau d’ondulations est
fortement souhaitable de façon à rallonger la durée de vie des consommables.
Le graphique ci-dessous illustre les effets du système ESAB breveté de réduction des ondulations à l’aide de deux relais
modulateurs synchronisés agissant successivement comme interrupteurs. Comparez ces résultats à ceux obtenus par deux
relais fonctionnant simultanément, la méthode successive permet généralement de réduire les ondulations de 4 à 10 fois.
Ondulations RMS
de tension
efficace (ampères)
Ripple d’intensité
Current (Amperes)
Ondulations de tension de sortie d’intensité efficace 10/20 KHz
EPP-600 10/20KHz Output RMS Ripple Current Versus Output Voltage
par rapport à la tension de sortie pour l’EPP-401/450
9.0
Relais synchronisés
et agissant
simultanément
(ondulation
de 10Ripple)
kHz)
Choppers
Synchronized
and Switchng
in Unison
(10KHz
8.0
7.0
6.0
5.0
4.0
RelaisSynchronized
synchronisés et agissant
successivement
(ondulation
de 20
kHz)
Choppers
and Switching
Alternately
(20KHz
Ripple)
3.0
2.0
1.0
0.0
0
50
100
150
200
Tension
de sortie
(volts)
Output
Voltage
(Volts)
P. K. Higgins: Current_Ripple_ESP-600C; RMS CURRENT RIPPLE Chart 17
24
250
300
350
SECTION 4
FONCTIONNEMENT
4.1 Description des circuits du schéma fonctionnel (suite)
Le schéma fonctionnel de l’EPP-401/450 (suivant la sous-section 4.1) illustre les principaux éléments fonctionnels de la
source d’alimentation. Le transformateur principal (T1) offre une isolation de la ligne principale d’alimentation ainsi que
la tension appropriée au bus c.c. de *375 V. Les redresseurs de bus convertissent la sortie triphasée du T1 à une tension
de *375 V du bus. Une batterie de condensateurs permet le filtrage et le stockage de l’énergie nécessaire pour activer les
commutateurs électroniques ultra-rapides. Ces commutateurs sont des IGBT (transistors bipolaires à porte isolée). Le bus
de *375 V alimente le relais principal de gauche et le relais d’asservissement de droite.
Chaque relais contient les IGBT, les diodes à roue libre, un capteur Hall, un inducteur de filtrage et des diodes anti-retour.
Les IGBT sont les commutateurs électroniques de l’EPP-401/450 qui s’allument et s’éteignent 10 000 fois par seconde (25
000 fois par seconde en mode de marquage avec une amplitude de courant à faible intensité). Ils fournissent les impulsions
d’énergie filtrées par l’inducteur. Les diodes à roue libre fournissent le trajet que le courant doit suivre lorsque les IGBT sont
éteints. Les capteurs Hall sont des transducteurs de courant qui contrôlent les courants de sortie et apportent les signaux
de rétroaction au circuit de commande.
Les diodes anti-retour ont deux fonctions. En premier lieu, elles évitent que le courant continu de 430 V c.c. délivré par le
circuit d’amplification de démarrage ne soit renvoyé vers les IGBT et vers le bus de *375 V. Deuxièmement, elles permettent
d’isoler les deux relais l’un de l’autre. Ceci permet le fonctionnement de chaque relais indépendamment de l’autre.
Le circuit de commande contient des servo-régulateurs pour les deux relais. Il contient également un servomécanisme qui
contrôle le signal de la tension totale de sortie renvoyé par le shunt de précision. Ce troisième servo règle les servos des
deux relais afin de maintenir une tension de sortie précisément contrôlée et commandée par le signal VREF.
Le montage des circuits VREF est équipé d’une protection galvanique contre le reste de la source d’alimentation. Cette isolation permet d’éviter les problèmes éventuels entraînés par les boucles de mise à la terre.
Chaque relais, principal de gauche et d’asservissement de droite, contient son propre MID / carte PC de commande de
grille installés directement sur les modules IGBT. Ce montage de circuit permet de fournir les signaux de marche et d’arrêt
aux MID nécessaires au fonctionnement des IGBT. Le MID gauche (principal) fournit un signal d’horloge synchronisé à son
propre circuit de commande de grille, ainsi qu’au circuit du MID droit (d’asservissement). C’est par le biais de ce signal synchronisé que les IGBT des deux côtés vont successivement réduire les ondulations de tension de sortie.
L’EPP-401/450 contient un amplificateur de tension pour fournir approximativement 430 V c.c. de courant continu nécessaire à l’amorçage de l’arc. Une fois l’arc établi, cet amplificateur est désactivé par des contacts situés sur le contacteur (K10).
Un atténuateur polarisé reduit la tension transitoire engendrée lors de l’extinction de l’arc de découpe. Cela permet également de réduire la tension transitoire provenant d’une source d’alimentation en parallèle et évitant ainsi d’endommager
cette dernière.
Le circuit de l’arc pilote est constitué des composants nécessaires à l’activation d’un arc pilote. Ce circuit est automatiquement désactivé lorsque l’arc de découpe ou de marquage est établi.
* La tension de bus pour le modèle 380/400 V, 50Hz est d’environ 360 V c.c avec une tension d’entrée de 380 V.
25
SECTION 4
FONCTIONNEMENT
4.2 Panneau de commande
J
I
H
F
G
A
B
C
D
E
K
N
L
M
A - Alimentation principale
Le témoin s’allume lorsque la source d’alimentation est mise sous tension.
B - Contacteur allumé
Le témoin s’allume lorsque le contacteur principal est mis sous tension.
C - Surchauffe
Le témoin s’allume en cas de surchauffe de la source d’alimentation.
D - Défaillance
Le témoin s’allume en cas d’anomalies du processus de découpe ou lorsque la tension de la ligne d’entrée s’écarte de plus
de ±10 % de la valeur nominale requise.
E - Erreur de rétablissement de l’énergie
Le témoin s’allume en cas de défaillance sérieuse. L’alimentation doit être débranchée pendant au moins 5 secondes
avant d’être rebranchée.
F - Commande de sélection de courant (potentiomètre)
Commande de l’EPP-401/450 illustrée. L’EPP-401/450 s’échelonne entre 10 et 100 A avec une amplitude de courant à
faible intensité et entre 50 et 400 A avec une amplitude de courant à haute intensité. Le potentiomètre est utilisé uniquement en mode panneau.
G - Commutateur à distance du panneau
Permet de contrôler l’emplacement des commandes de courant.
• Mettre en position PANEL (panneau) pour permettre un contrôle par le biais du potentiomètre de courant.
• Mettre en position REMOTE (à distance) pour permettre un contrôle par le biais d’un signal externe (CNC).
26
SECTION 4
FONCTIONNEMENT
4.2 Panneau de commande (suite)
H et L - Connexions à distance
H - Connecteur à 24 broches pour brancher l’alimentation au CNC (commande à distance)
L - Connecteur à 8 broches pour brancher l’alimentation au circulateur de liquide de refroidissement
I - Commutateur HIGH / LOW (Haute/Faible) de l’arc pilote
Utilisé pour sélectionner la tension souhaitée de l’arc pilote. En règle générale, la position LOW est utilisée pour toute tension égale ou inférieure à 100 A. En fonction du type de gaz, de matériau et de torche utilisés. Le détail de ces positions
est précisé dans les données de découpe présentées dans le manuel de la torche. Lorsque l’EPP-401/450 est en mode de
marquage, ce sélecteur doit être en position faible (LOW).
M - Connecteur d’arrêt d’urgence (E-Stop)
Le connecteur d’arrêt d’urgence fournit un contact normal fermé sur l’interrupteur d’arrêt d’urgence. Le contact est connecté
aux prises J4-A et J4-B. Il s’ouvre à la suite d’une pression sur le bouton d’arrêt d’urgence. Ceci permet de fournir un signal
à la commande de plasma pour indiquer que la source d’énergie est sous condition d’arrêt d’urgence.
N - Bouton d’arrêt d’urgence (E-Stop)
Le bouton d’arrêt d’urgence actionne l’interrupteur d’arrêt d’urgence. Lorsque poussé, une condition d’arrêt d’urgence est
déclenchée pour empêcher la source d’énergie de fournir une alimentation, même en cas de signal de démarrage.
Remarque :
L’alimentation de l’EPP-401/450 est normalement en amplitude de courant à faible intensité avec 100 A maximum. L’unité de commande externe doit fournir une connexion (fermeture de contact) entre J1-R et J1-T
pour mettre l’alimentation en amplitude de courant à haute intensité à 450 A maximum. Si l’EPP-401/450 sera
connecté de facon permanente en amplitude de courant à haute intensité, débranchez le fil rouge de TB8-1
et branchez-le sur TB8-2. TB8 se trouve à proximité du bord supérieur de l’alimentation à l’arrière de la boîte
en tôle contenant la carte PC de commande.
J
I
H
F
G
A
B
C
D
E
K
N
L
27
M
SECTION 4
FONCTIONNEMENT
4.2 Panneau de commande (suite)
J - Jauges
Affiche la tension et l’intensité lors de la découpe. L’ampèremètre peut être
activé avec le bouton <Actual / Preset> (Effectif/Prédéfini) avant la découpe
pour afficher une estimation du courant de découpe nécessaire.
K - Commutateur Actual/Preset (Effectif/Prédéfini)
Le commutateur à bascule automatique ACTUAL AMPS / PRESET AMPS S4,
se remet en position ACTUAL (effectif ) par défaut. Dans la position ACTUAL,
l’ampèremètre de sortie (OUTPUT AMMETER) affiche la tension de sortie de
découpe.
En position PRESET (prédéfini), l’ampèremètre de sortie affiche une estimation
de la tension de sortie de découpe en contrôlant le signal de référence du
courant continu de sortie entre 0 et 10 V c.c. (VREF). Le signal de référence
provient du potentiomètre de courant (CURRENT POTENTIOMETER) avec le
commutateur PANEL/REMOTE en position PANEL (vers le haut) et d’un signal
de référence à distance (J1-J / J1-L(+)) avec le commutateur PANEL/REMOTE
en position REMOTE (vers le bas). La valeur affichée dans l’ampèremètre de
sortie (OUTPUT AMMETER) sera égale à la valeur estimée du courant effectif
de sortie en modes de courant élevé (Hi) et de courant faible (Lo).
Le commutateur peut-être basculé entre les positions ACTUAL et PRESET à
tout moment sans avoir de conséquences sur le processus de découpe.
DANGER
TENSION ET COURANT DANGEREUX !
TOUTE DÉCHARGE ÉLECTRIQUE PEUT ÊTRE MORTELLE !
AVANT TOUTE MISE EN ROUTE, ASSUREZ-VOUS QUE LES PROCÉDURES D’INSTALLATION ET DE MISE À LA TERRE ONT ÉTÉ RESPECTÉES.
NE DÉMARREZ PAS CET ÉQUIPEMENT SANS COUVERCLE
28
SECTION 4
FONCTIONNEMENT
4.2.1 Modes de fonctionnement : modes de découpe et de marquage avec courant
élevé (HI) ou faible (LOW)
1. L’EPP-401/450 fonctionne en mode de découpe en deux amplitudes de courant. L’amplitude de courant à faible
intensité se situe entre 35 et 100 A qui correspond au signal VREF de 3,50 à 10,00 V. En amplitude de courant à haute
intensité, le courant de sortie est continuellement réglé entre 50 A et 450 A à l’aide du potentiomètre situé sur le panneau avant, ou par l’intermédiaire d’un signal électrique de référence à distance qui alimente le connecteur J1. Par
défaut, l’EPP-401/450 est en mode de découpe faible (LOW). Pour un fonctionnement en mode élevé (HI), apportez
une alimentation de 115 Vca à la fiche J1-T en la connectant à la fiche J1-R par le biais d’un contact isolé.
Lors de l’utilisation du signal à distance, 50 A correspond à un signal de référence de 1,00 c.c. et 450 A correspond à un
signal de 9 V c.c. Pour les signaux supérieurs à 9,00 V, la source d’alimentation limite généralement le courant interne
de sortie à 475 A.
Le mode de découpe de l’EPP-401/450 est automatiquement sélectionné, à moins que le signal de commande à distance du mode de marquage soit sélectionné.
2. La source d’alimentation est activée en mode de marquage par un relais isolé externe ou un contacteur de commutateur assurant la connexion entre J1-R (115 V c.a.) et J1-M. Voir le schéma de circuits situés à l’intérieur du couvercle
arrière. La fermeture de ce contact doit avoir lieu (50 ms ou plus) avant de fournir une commande de Marche.
En mode de marquage, le courant de sortie est continuellement réglé entre 10 A et 100 A à l’aide du potentiomètre
situé sur le panneau avant, ou par l’intermédiaire d’un signal électrique de référence à distance qui alimente le connecteur J1. L’EPP-401/450 passe automatiquement en amplitude de courant de faible intensité en mode de marquage.
Lors de l’utilisation du signal à distance, 10 A correspond à un signal de référence de 1,00 V c.c. et 100 A correspond à un
signal de 10,00 V c.c. En amplitude de courant de haute intensité, lors de l’utilisation du signal de référence du courant
à distance (VREF), le courant de sortie entre 50 et 450 A correspond à un signal de référence de 1,00 à 9,00 V c.c. Pour les
signaux de référence supérieurs à 9,00 V, la source d’alimentation limite généralement le courant de sortie à 475 A.
En mode de marquage, l’amplificateur de puissance utilisé pour l’amorçage de l’arc en mode de découpe est désactivé.
La tension de circuit ouvert résultante est égale à environ 360 V pour une tension d’alimentation nominale*. De plus,
K12 ferme les connexions R60 à R67 dans le circuit de sortie. Ces résistances permettent de réguler la sortie pour les
faibles intensités de marquage. La source d’alimentation est capable de fournir la totalité de ses 10 à 100 A à 100 % de
sa capacité en mode de marquage.
Les résistances R60-R67 fournissent un courant de sortie de 10 ampères. L’intensité d’amorçage minimum SW2 sélectionnée en usine est de 3 A. Les réglages de l’interrupteur nº 2 SW2 situé sur la carte PC de contrôle installée derrière
le couvercle d’accès sur le coin supérieur droit du panneau avant, présentent les positions 5, 6, 7 et 8 désactivées par
défaut (vers le bas).
* Approximativement 345 V pour le modèle 380/400 V fonctionnant à 380 V.
29
SECTION 4
FONCTIONNEMENT
4.3 Séquence du fonctionnement
SECTION 4
Operation
4.3 Sequence of Operation
SECTION 4
Apply Power
4.3 Sequence of Operation
PANEL
REMOTE
Apply Power
PILOT
ARC
HIGH
PANEL
LOW
REMOTE
ACTUAL AMPS
PILOT
HIGH
ARC
PRESET AMPS
LOW
Begin
Cutting
ACTUAL AMPS
PRESET AMPS
Operation
1. Apply power by closing the line (wall)
switch.
1. Mettez
sousESP-400C
tension en fermant
l’interrupteur
de la ligne.
(The
does not
have anmural
on/off
(L’EPP-401/450
n’est
pas
équipé
d’un
interrupteur
de
marche/
switch). The main power light will illuminate
arrêt). Le témoin d’alimentation principale va s’éclairer et le
and the fault light will flash and then go out.
témoin de défaillance va clignoter avant de s’éteindre.
2. Le
d’arrêt
d’urgence est tiré.
2.bouton
Select
the Panel/Remote
setting.
3. Positionner l’interrupteur Panel / Remote (panneau / à dis3. Set pilot arc High/Low switch. (Refer to cutting
tance).
4. Positonner
le commutateur
HIGH / LOW (Haute / Basse) de l’arc
data in
the torch manual.)
pilote.
Si ce dernier
parline
commande
à distance,
1. Apply
powerest
bysélectionné
closing the
(wall) switch.
using
panel
mode,
view
preset
the
il4.
doitIf
se
trouver
en position
(Consultez
leswith
données
(The
ESP-400C
doesbasse.
not have
anamps
on/off
ACTUAL/PRESET
AMPS
switch.
Adjust
current
de découpe
présentées
dans
le manuel
la illuminate
torche.)
switch).
The main
power
lightde
will
until
the
approximate
desired
value
on
5. En mode
de
panneau,
contrôlez
la
tension
préétablie
par l’inand the fault light will flash and thenisgoshown
out.
termédiaire
du commutateur ACTUAL / PRESET AMPS. Réglez
the ammeter.
l’intensité
jusqu’à
ce que la valeur désirée
approximative soit
2. Select
the Panel/Remote
setting.
5. Begin
plasma cutting
operation.
This may
visible
sur l’ampèremètre.
En mode
de commande
à distance,
include
manually
setting
up
other
options,
3.
Set
pilot
arc
High/Low
switch.
(Refer
to cutting
le positionnement du commutateur à bascule
ACTUAL
AMPS
depending
on
themanual.)
total
plasma
package.
data
in the
/ PRESET
AMPS
surtorch
la position
PRESET
AMPS
fournira la sortie
initiale de courant commandée à distance.
4.
view
preset
with peut
the
6. If using lapanel
mode,
cutting
has
begun,
6. Commencez
découpe
au after
plasma.
Cetteamps
opération
adjust
current
to
desired
amount.
ACTUAL/PRESET
AMPS
switch.
Adjust
current
inclure le paramétrage manuel d’autres options en fonction
until the du
approximate
de l’ensemble
kit plasma. desired value is shown on
7. Check
for
fault
light. If a fault light illuminates,
the ammeter.
7. En mode
de panneau, réglez l’intensité du courant désirée
refer to troubleshooting section.
après le démarrage du processus de découpe.
5.
Begin
plasma
cutting operation.
This ou
may
8. En
cas
de
panne
de
démarrage
de la découpe
du marNote:
The
fault
light
flashes
when
the options,
contactor
is
include
manually
setting
up
other
quage, vérifiez le témoin de défaillance. Si l’un d’eux s’allume,
first depending
turned on signifying
the
DC
Bus
powered
up
onrelative
the total
plasma package.
consultez la section
au dépannage.
normally.
6. If using panel mode, after cutting has begun,
adjust current to desired amount.
Remarque :
Le7.
témoin
de défaillance
clignote
delight
la première
Check
for fault light.
If alors
fault
illuminates,
mise sous
tension
du
contacteur
signifiant
refer to troubleshooting section. que le
bus c.c. a été normalement alimenté.
Note: The fault light flashes when the contactor is
first turned on signifying the DC Bus powered up
normally.
The time to achieve full current can be adjusted to
suit your particular system. This feature uses 50%
of the cutting current to start, dwell and then
gradually (less than a second) achieve full current.
The ESP-400C is factory shipped with this feature
enabled. The default settings are:
Begin
Cutting
4.4 Arc Initiation Settings
4.4 Arc Initiation Settings
Minimum Start Current
30
40A
Starttime
Current
50%
cut current
The
to achieve full current can
beofadjusted
to
suit
your
system.
feature
uses 50%
Timing
toparticular
achieve full
currentThis 800
msec
of the cutting current to start, dwell and then
SECTION 4
FONCTIONNEMENT
4.4 Paramètres de l’amorçage de l’arc
La durée d’obtention d’intensité maximale peut être réglée pour un démarrage en douceur. Cette fonctionnalité utilise une
intensité réduite pour le démarrage qui augmente progressivement jusqu’à l’intensité maximale. L’EPP-401/450 est livré
avec cette fonction activée. Les réglages par défaut sont :
Courant de démarrage minimum . . . . . . . . . . . . . . 3 A
Courant de démarrage . . . . . . . . . . . . . . . . . . . . . . . . . 50 % du courant de découpe
Durée d’obtention d’intensité maximale . . . . . . . . 800 msec
Temps d’arrêt . . . . . . . . . . . . . . . . . . . . . . . . . . . . . . . . . . 2 msec min.
Ces fonctions de temporisation peuvent être désactivées ou réglées selon les besoins individuels de chacun.
Forme d’onde du courant de démarrage avec la fonction
de démarrage en douceur activée (ON)
Courant continu de sortie
Courant continu de sortie
Forme d’onde du courant de démarrage avec la fonction
de démarrage en douceur désactivée (OFF)
Courant de découpe
IOUT = 50 VREF (High)
IOUT = 10 VREF (Low)
Environ 2 msec pour atteindre
l’intensité maximale
Fréquence
DANGER
Courant de découpe
IOUT = 50 VREF (High)
IOUT = 10 VREF (Low)
Courant de
démarrage
Temps
d’arrêt
Durée d’obtention de l’intensité
maximale
800 msec
Fréquence
TOUTE DÉCHARGE ÉLECTRIQUE PEUT ÊTRE MORTELLE !
ÉTEIGNEZ L’ALIMENTATION AU NIVEAU DE L’INTERRUPTEUR MURAL
AVANT DE RETIRER N’IMPORTE QUEL COUVERCLE OU DE PROCÉDER
À UN QUELCONQUE RÉGLAGE DE LA SOURCE ALIMENTATION.
31
SECTION 4
FONCTIONNEMENT
4.4.1 Conditions d’activation / désactivation de l’amorçage de l’arc
Paramètre d’usine par défaut illustré.
SW2
1
2
3
4
5
6
7
allumé
éteint
2
3
4
5
6
8
7
4
1
3
SW1
1. Retirez le panneau d’accès sur le coin droit supérieur du panneau avant. Assurez-vous de remettre en place ce panneau
SW2
une fois tous les réglages terminés.
2. Abaissez les commutateurs à bascule de l’interrupteur nº 1 (SW1) et de la carte de contrôle nº 1 (PCB1) pour les désactiver. Pour les activer, remettez-les en position haute. (Dans le cas d’un interrupteur abaissé et l’autre remonté, la durée
d’amorçage de l’arc est considéré activée).
Paramètre d’usine par défaut illustré.
1
2
5
6
7
8
allumé
éteint
SW2
4.4.2 Réglage de la minuterie de l’amorçage de l’arc
Contrôlé par la sélection des positions 1 à 4 de l’interrupteur nº 2 (SW2) sur la carte de contrôle nº 1 (PCB1). Lorsqu’un interrupteur est activé par pression, sa valeur s’ajoute au temps d’arrêt minimum de 2 msec.
Interrupteur nº 1 = 2 msec de temps d’arrêt
Interrupteur nº 2 = 4 msec de temps d’arrêt
Interrupteur nº 3 = 8 msec de temps d’arrêt
Interrupteur nº 4 = 16 msec de temps d’arrêt
Tous les interrupteurs désactivés. Le temps d’arrêt par défaut en usine est de 2 msec.
4.4.3 Réglage du courant de démarrage minimum
Le courant de démarrage minimum est contrôlé par la sélection des positions 5 à 8 de l’interrupteur nº 2 (SW2). Lorsqu’un
interrupteur est activé par pression, sa valeur s’ajoute à la valeur minimum d’usine de 3 A.
Interrupteur nº 5 = 25 A min. courant de démarrage
Interrupteur nº 6 = 12 A min. courant de démarrage
Interrupteur nº 7 = 6 A min. courant de démarrage
Interrupteur nº 8 = 3 A min. courant de démarrage
Le réglage par défaut est défini les positions 5, 6, 7 et 8 désactivées (ves le bas) 0 A + 0 A + 0 A + 0 A + 3 A = 3 A
32
8
SECTION 4
FONCTIONNEMENT
4.4.4 Commandes de l’amorçage de l’arc
Potentiomètre de courant
de démarrage
Minuteur de croissance
SW1
SW2
4.4.5 Courant de démarrage et minuteur de croissance
Pourcentage (%) du courant de découpe
Rapport entre le courant de démarrage (%)
et le réglage du potentiomètre
90%
80%
70%
60%
Minuteur de croissance
Commutateur à trois positions situé à proximité du potentiomètre de courant de démarrage. La durée est calculée à partir du
courant de démarrage (en fin de temps d’arrêt) jusqu’à intensité
maximale. Valeur usine par défaut = 800 msec.
50%
40%
30%
20%
En position gauche = 250 msec
En position centrale = 800 msec
En position droite = 1200 msec
10%
0%
Courant de démarrage
Réglez à l’aide du potentiomètre situé au-dessus et à gauche du
centre de la carte PCB1. Un réglage d’usine par défaut de 7 va
entraîner un courant de démarrage 50 % inférieur au courant
de découpe.
0
1
2
3
4
5
6
7
8
9
10
Réglage du potentiomètre de courant de démarrage
MAX
33
38
SECTION 4
FONCTIONNEMENT
400
300
200
0
100
Tension de sortie (volts)
OUTPUT
VOLTAGE (Volts)
0
V REF= =1.00
1,00MIN
min.LOW
Marquage
en faible intensité *
VREF
RANGE MARKING*
100
V REF==10.00
10,00MAX
max.LOW
faibleRANGE
intensité
VREF
V REF==2.000
2,00 HIGH
haute RANGE
intensité VREF
V REF = 9,000
VREF
= 9.000
500
Limite
de tension
interne
INTERNAL
CURRENT
LIMIT
34
Max Outputde
Voltage
Tension
max.
sortie
à la ligne nominale
@ Nominal
Line
Plaque
DATAsignalétique
PLATE
Courant nominal
MAX
RATING
maximum
400
V REF ==8,000
VREF
8.000
I
= (50) x (V ) High Range
OUT
REF
I
=
(50)
x
(
V
)
haute intensité
OUT
REF
= (10)
x ( VRange
) faible intensité
REF
IOUT = (10) xI OUT
(VREF
) Low
300
V REF ==6,000
VREF
6.000
EPP-450 V-I CURVES
200
V REF ==4,000
VREF
4.000
Circuit
ouvertCircuit
431 V
431V
Open
V VREF
= 5,00
haute
intensité
= 5.00
HIGH
RANGE
REF
Sortie du circuit
amplificateur / de démarrage
Output
of Boost/Start
Circuit
VREF
1.000min.
MIN
HIGH
RANGE
V REF == 1,00
haute
intensité
OUTPUT
CURRENT
(Amperes)
Courant
de sortie (ampères)
PKH: VI_Curves_EPP-450-600_Bus; EPP-450 VI Curves
4.5.1 Courbes tension-intensité approximatives de l’EPP-401/450 pour tous les modèles
section 5
maintenance
5.1 General
WARNING
WARNING
caution
Electric Shock Can Kill!
Shut off power at the line (wall) disconnect before attempting any maintenance.
Eye Hazard When Using Compressed Air To Clean.
•
•
Wear approved eye protection with side shields when cleaning the
power source.
Use only low pressure air.
Maintenance On This Equipment Should Only Be Performed By
Trained Personnel.
5.2 Cleaning
Regularly scheduled cleaning of the power source is required to help keep the unit running trouble free. The frequency of
cleaning depends on environment and use.
1. Turn power off at wall disconnect.
2. Remove side panels. 3. Use low pressure compressed dry air, remove dust from all air passages and components. Pay particular attention to
heat sinks in the front of the unit. Dust insulates, reducing heat dissipation. Be sure to wear eye protection.
35
section 5
caution
maintenance
Air restrictions may cause EPP-450 to over heat.
Thermal Switches may be activated causing interruption of function.
Do not use air filters on this unit.
Keep air passages clear of dust and other obstructions.
5.3 Lubrication
•
•
Some units are equipped with oil tubes on the fans. These fans should be oiled after 1 year of service.
All other EPP-450s have fan motors that are permanently lubricated and require no regular maintenance.
WARNING
Electric Shock Hazard!
Be sure to replace any covers removed during cleaning
before turning power back on.
36
section 6TROUBLESHOOTING
6.1 General
WARNING
caution
Electric Shock Can Kill!
Do not permit untrained persons to inspect or repair this
equipment. Electrical work must be performed by an experienced electrician.
Stop work immediately if power source does not work properly.
Have only trained personnel investigate the cause.
Use only recommended replacement parts.
6.2 Fault Indicators
Front Panel Fault
Indicators
Fault indicators are found on the front panel Used with
the LEDs on PCB1 (located behind the cover with the
EPP label) problems can be diagnosed. NOTE:
It is normal for momentary lighting (flashing) of the fault indicator
and LED 3 when a “contactor on”
signal is applied at the beginning
of each cut start.
PCB1 Located behind
this panel.
Fault Indicator used with:
LED 3 - Bus Ripple
LED 4 - High Bus
LED 5 - Low Bus
LED 7 - Arc Voltage Saturation
LED 8 - Arc Voltage Cutoff
Power Reset Fault Indicator used with:
LED 6 - Right Overcurrent
LED 9 - Left Overcurrent
LED 10 - Left IGBT Unsaturated
LED 11 - Right IGBT Unsaturated
LED 12 - Left -12V Bias Supply
LED 13 - Right -12V Bias Supply
37
section 6TROUBLESHOOTING
Fault Indicator (Front Panel)
Illuminates when there are abnormalities in the cutting process or when the input
voltage falls ±10% outside the normal value. Momentary illumination is normal. If
continuously lit, check LEDs 3, 4, 5, 7, and 8 on PCB1 for further diagnosis.
LED 3 – (yellow) Bus Ripple Fault - Momentarily illuminates at the beginning of
each cut. Continuously lit during single-phasing or imbalanced line-to-line voltages of the three phase input line (Excessive Ripple). Power Source is shut down.
LED 4 – (yellow) High Bus Fault – Illuminates when input line voltage is too high
for proper operation (approximately 20% above nominal line voltage rating). Power source is shut down.
LED 5 – (yellow) Low Bus Fault – Illuminates when input line
voltage is lower than 10% below nominal line voltage rating. Power Source is shut down. 38
LED 7 – (yellow) Arc Voltage Saturation Fault – Illuminates
when the cutting arc voltage is too high and cutting current drops below preset level. LED will extinguish after voltage
decreases and current rises.
LED 8 – (yellow) Arc Voltage Cutoff Fault – Illuminates when
arc voltage increases over the preset value. PS is shut down.
38
section 6TROUBLESHOOTING
Power Reset Fault Indicator (on front panel)
Illuminates when a serious fault is detected. Input power must be disconnected for a
least 5 seconds to clear this fault. Check PCB1 Red LEDs 6, 9, 10, 11, 12, and 13 if this
fault is illuminated for further diagnosis.
LED 6 – (red) Right Overcurrent Fault – Illuminates when the current out of the right
side chopper is too high (300 amps). This current is measured by the right-side hall
sensor. The power source is shut down.
LED 9 – (red) Left Overcurrent Fault – Illuminates when the current from the left side
chopper is too high (300 amps). Measured by the left hall sensor. Power source is
shut down.
LED 10 _ (red) Left IGBT Unsaturated Fault – Illuminates when left IGBT is not fully
conducting. PS (PS) is shut down.
LED 11 – (red) Right IGBT Unsaturated Fault – Illuminates
when right IGBT is not fully conducting. Power Source (PS)
is shut down.
LED 12 – (red) Left -(neg) 12V Bias Supply Fault – Illuminates
when negative 12 V bias supply to the left side IGBT gate
drive circuit (located on PWM-drive board PCB2) is missing. PS is shut down.
LED 13 – (red) Right –(neg) 12V Bias Supply Fault - Illuminates when negative 12 V bias
supply to the right side IGBT gate drive circuit (located on PWM drive board PCB3) is
missing. PS is shut down.
39
section 6TROUBLESHOOTING
6.3 Fault Isolation
Many of the most common problems are listed by symptom.
6.3.1
6.3.2
6.3.3
6.3.4
6.3.5
6.3.6
6.3.7
6.3.8
No output with contactor signal applied
Output limited to 100A
Fans not working
Power not on or low voltage
Fault light illumination
Torch won’t fire
Fusses blown - F1 and F2
Intermittent, interrupted or partial operation
6.3.1 No output with contactor signal applied
Problem
Contactor signal is applied,
contactor lamp on front
panel is illuminated, K2 and
K3 contactors do not close
and low bus fault light, LED
5 illuminates.
Possible Cause
Action
External emergency stop (E-stop) is Connect isolated contact of E-stop switch to proopen.
vide connection between J1-E and J1-F.
E-stop button on front panel is pushed
Twist and pull out to reset E-stop condition.
in.
Power reset lamp on front panel indiRefer to section under fault light illumination.
cates a serious fault condition.
6.3.2 Output limited to 100A
Problem
Possible Cause
Action
Power source will not go over
High current range signal missing.
100A.
External control should connect J1-R to J1-T. As
an alternative, in the power source, move the red
wire on TB8-1 to TB8-2.
6.3.3 Fans Not Working
Problem
All 4 fans do not run
1, 2 or 3 fans do not run.
Possible Cause
Action
This is normal when not cutting.
Fans run only when “Contactor On” None
signal is received.
Broken or disconnected wire in fan
Repair wire.
motor circuit.
Faulty fan(s)
Replace fans
40
section 6TROUBLESHOOTING
6.3.4 Power Not On or LOW Voltage
Problem
Power source inoperable:
Main power lamp is off.
Low open circuit voltage
Possible Cause
Action
Missing 3-phase input voltage
Restore all 3 phases of input voltage to within
±10% of nominal line.
Missing 1 of 3-phase input voltage
Restore all 3 phases of input voltage to within
±10% of nominal line.
Fuse F3/F4 blown
Replace F3/F4
Pilot arc Contactor (K4) faulty
Replace K4
Faulty Control PCB1
Replace Control PCB1 (P/N 0558038312)
6.3.5 Fault Light Illumination
Problem
Fault light illuminates at the end of
cut but goes off at the start of the
next.
LED 3 – (amber) Bus Ripple
LED 4 – (amber) High Bus
LED 5 – (amber) Low Bus
Possible Cause
Action
Normal condition caused when terminating the arc by running the torch
off the work or the arc being attached
to a part that falls away.
Reprogram cutting process to
ensure arc is terminated only by
removing the “Contactor On” signal.
Imbalance of 3-phase input power
Maintain phase voltage imbalance
of less than 5%.
Momentary loss of one phase of
input power
Restore and maintain input power
within ±10% nominal
Faulty control PCB1
Replace PCB1 P/N 0558038312
One or more phases of input voltage
exceed nominal line voltage by more
than 15%.
Restore and maintain line voltage
within ±10%
Faulty control PCB1
Replace PCB1 P/N 0558038312
One or more shorted diode rectifiers
(D25-D28) on the “Electrode Plate”
Replace shorted diode rectifiers
One or more phases of input voltage are lower than nominal by more
than 15%.
Restore and maintain within
±10% of nominal
Blown F1 and F2 fuses
See F1 and F2 in Blown
Fuses Section
Over temp Light comes on.
See over temp in Fault Light Section
Imbalanced 3-phase input
power
Maintain phase voltage imbalance
of less than 5%
Momentary loss of one phase of
input power
Restore and maintain within
±10% of nominal
Faulty Main Contactor (K1)
Replace K1
FAULTY Control PCB1
Replace PCB1 P/N 0558038312
41
section 6TROUBLESHOOTING
Problem
Possible Cause
Action
Cutting at over 275A with a faulty left side
See faulty left or right side
(left side output = 0)
Right current transducer connector loose
Secure connections
or unplugged. PCB loose.
LED 6 – (red) Right Over Cur- Loose or unplugged connector at right
Secure connection
rent
PWM/Drive Printed circuit board.
Note:
If operation at 275A or less is
possible, then the LEFT side is
not working.
P2 at left of PWM / Drive PCB loose or unSecure connection
plugged.
Check voltage between P7-6 and P7-7. A
voltage in either polarity of greater than Replace right current transducer
0.01 V indicates a faulty right current trans- (TD2)
ducer (TD2).
Faulty PCB1
Replace PCB1 P/N 0558038312
Faulty right PWM / Drive PCB
Replace right PWM / Drive PCB P/N 0558038324
Cutting at over 275A with a faulty right side
See faulty right side
(right side output = 0)
Left current transducer connector loose or
Secure connections
unplugged. PCB loose.
LED 9 – (red) Left Over Current Loose or unplugged connector at left PWM Secure connection
/ Drive Printed circuit board.
Note:
If operation at 275A or less is
possible, then the Right side is
not working.
caution
P2 at right of PWM / Drive PCB loose or
Secure connection
unplugged.
Check voltage between P7-2 and P7-3. A
voltage in either polarity of greater than
Replace left current transducer (TD1)
0.01 V indicates a faulty left current transducer (TD1).
Faulty PCB1
Replace PCB1 P/N 0558038312
Faulty left PWM / Drive PCB
Replace left PWM / Drive PCB P/N 0558038324
NEVER attempt to power-up or operate the power source with any
Gate / Emitter IGBT Plug disconnected from it’s PWM / Gate Drive
Board. Attempting to operate the power source with any open (unplugged) IGBT Gate / Emitter Connector may damage the IGBT and
the plasma cutting torch.
42
section 6TROUBLESHOOTING
Problem
Possible Cause
Shorted IGBT
Action
Replace the IGBTs
Very high Output current ac- Current pot set too high
companied by either a left or Faulty left PWM / Drive PCB
right over current (LED 6)
High remote current signal
Lower the current setting
Replace left PWM / Drive PCB
Decrease remote current signal
Faulty PCB1
Replace PCB1 P/N 0558038312
Black wire connecting IGBT (Q2) collector to P3 of the
Secure connector
left PWM / Drive PCB (PCB2) is disconnected.
Shorted Freewheeling Diode(s)
Replace freewheeling diode(s)
LED 10 - (red) Left IGBT Un- Loose or unplugged P1 connector at the left PWM / Secure P1
Drive PCB
saturated
Loose or unplugged P10 connector at PCB1
Secure P10
Faulty PCB1
Replace PCB1 P/N 0558038312
Faulty left PWM / Drive PCB
Replace PCB2 P/N 0558038324
Black wire connecting IGBT (Q5) collector to P3 of the
Secure connector
right PWM / Drive PCB (PCB3) is disconnected.
Shorted Freewheeling Diode(s)
Replace freewheeling diode(s)
LED 11 - (red) Right IGBT Loose or unplugged P1 connector at the left PWM / Secure P1
Drive PCB
Unsaturated
Loose or unplugged P10 connector at PCB1
Secure P11
Faulty PCB1
Replace PCB1 P/N 0558038312
Faulty right PWM / Drive PCB
Replace PCB3 P/N 0558038324
43
section 6TROUBLESHOOTING
Problem
Possible Cause
Action
Loose or unplugged P1 connector at
Secure P1 connector
the left PWM / Drive PCB
LED 12 – (red) Left –12V Missing
Loose or unplugged P10 connector
Secure P10 connector
at PCB1
Faulty left PWM / Drive PCB
Replace left PWM / Drive PCB P/N 0558038324
Loose or unplugged P1 connector at
Secure P1 connector
the right PWM / Drive PCB
LED 12 – (red) Right –12V Missing
Loose or unplugged P11 connector
Secure P11 connector
at PCB1
Faulty right PWM / Drive PCB
Replace right PWM / Drive PCB P/N 0558038324
Shorted IGBT
Replace the IGBTs
Current pot set too high
Very high Output current accompanied by either a left or right over cur- Faulty left PWM / Drive PCB
rent (LED 9 or LED 6 respectively)
High remote current signal
Lower the current setting
Replace left PWM / Drive PCB P/N
0558038324
Decrease remote current signal
Faulty PCB1
Replace PCB1 P/N 0558038312
One or more fans inoperable
Repair or replace fan(s)
Broken wire or unplugged connector Repair broken wires and unplugged conat thermal switch.
nector
Allow 3 ft. (1 m) minimum between the rear
Obstruction to air flow closer than 3 feet
of the power source and any object that may
(1 m) to rear of power source.
restrict air flow.
Over Temp Lamp illuminates
Clean out excessive dirt, especially in the
extrusions for the IGBTs and freewheeling
Excessive dirt restricting cooling air
diodes, the POS, NEG and Electrode Plates,
flow
the main transformer (T1) and the filter
inductors (L1 and L2).
Obstructed air intake
44
Check and clear any obstructions from the
bottom, front, and top rear of the Power
Source.
section 6TROUBLESHOOTING
6.3.6 Torch Will Not Fire
Problem
Possible Cause
Action
Remote control removes the start
signal when the main arc transfers to
the work.
Place Panel/Remote switch in “Panel”
position
Panel/Remote switch in “Remote” with
no remote control of the current
Main Arc Transfers to the work with a
short “pop”, placing only a small dimple Remote current control present but Check for current reference signal at TB14(+) and TB1-5(-). See Signal vs. Output
in the work.
signal missing.
Current Curve this section.
Current pot set too low.
Increase current pot setting.
Start current pot, located behind the
Increase the start current post setting
cover for the control PCB is set too
to “7”.
low.
Open connection between the power
Repair connection
source positive output and the work.
Fuse F6 in the Pilot arc circuit is blown. Replace F6
Fuse F7 in the pilot arc circuit is blown. Replace F7
Arc does not start. There is no arc at the Pilot arc High/Low switch is in the ”LOW”
Change Pilot arc to “High” position. torch. Open circuit voltage is OK.
position when using consumables for
(Refer to process data included in torch
100A or higher (Refer to process data
manuals)
included in torch manuals)
Pilot arc contactor (K4) faulty.
Replace K4
Faulty PCB1
Replace PCB1 P/N 0558038312
45
section 6TROUBLESHOOTING
6.3.7 Fuses F1 and F2 Blown
Problem
Possible Cause
Action
Process controller must allow at least
Process controller ignites pilot arc too 300MS to lapse between the applicasoon after providing the “Contactor tion of the “Contactor On” signal and
On” signal
the ignition of the pilot arc. Fix process
controller logic and replace diodes.
Fuses F1 and F2 blown.
Faulty negative (Electrode) output cable
Repair cable
shorting to earth ground.
Shorted freewheeling diode.
Replace shorted freewheeling diode
and F1-F2
One or more shorted diode rectifiers Replace all diode rectifiers on the “POS
(D13-D18) on “POS Plate”.
Plate”.
One or more shorted diode rectifiers Replace all diode rectifiers on the “NEG
(D7-D12) on “NEG Plate”.
Plate”.
6.3.8 Intermittent, Interrupted or Partial Operation
Problem
Possible Cause
Action
Loose or unplugged connector at left PWM /
Secure connector
Drive PCB (PCB2)
Works OK at 275A or less - Over
Replace right PWM / Drive PCB P/N
Faulty left PWM / Drive PCB
current right side when cutting
0558038324
over 275A. LED 6 on control board Check voltage between P5-1 and P5-2 at the
illuminated.
left PWM / Drive PCB (PCB2). Should be 20V
Replace control transformer T5
AC. Between P5-1 and P5-3 should be 40V AC. If not the control transformer (T5) is faulty.
Loose or unplugged connector at Right PWM
Secure connector
/ Drive PCB (PCB3)
Works OK at 275A or less - Over
Replace right PWM / Drive PCB P/N
Faulty Right PWM / Drive PCB
current left side when cutting
0558038324
over 275A. LED 9 on control board Check voltage between P5-1 and P5-2 at the
illuminated.
right PWM / Drive PCB (PCB3). Should be 20V
Replace control transformer T7
AC. Between P5-1 and P5-3 should be 40V AC. If not the control transformer (T7) is faulty.
caution
NEVER attempt to power-up or operate the power source with any
Gate / Emitter IGBT Plug disconnected from it’s PWM / Gate Drive
Board. Attempting to operate the power source with any open (unplugged) IGBT Gate / Emitter Connector may damage the IGBT and
the plasma cutting torch.
46
section 6TROUBLESHOOTING
Problem
Possible Cause
Action
“Contactor On” signal is removed from unit.
Power source is OK. Trouble shoot process controller.
Momentary loss of primary input power.
Restore and maintain input voltage
within ±10% of nominal.
Remove control PCB (PCB1) access panel
Faulty condition, indicated by illumination to determine the fault causing the shutdown. Refer to fault light illumination
Power Supply turns off prema- of the fault lamp.
section.
turely in the middle of the cut.
Remove control PCB (PCB1) access panel
Faulty condition, indicated by the illumination to determine the fault causing the shutof the power reset fault lamp.
down. Refer to fault light illumination
section.
Problem
Current setting too low.
Increase current setting
Remote current signal removed during cut.
Fix remote current signal
Possible Cause
Action
Place the PANEL / REMOTE switch in the“PANEL”
Fix the remote current control signal to
position. Adjust current control pot. If current
operate the PANEL / REMOTE switch in
no longer drifts, the remote current control
the “PANEL” position.
signal is faulty.
Output current is unstable and Select “PANEL” on the PANEL / REMOTE switch
drifts above or below the set- and adjust the current control pot. The cur- Replace the current control pot.
ting.
rent still drifts, measure the current reference
signal at TB1-4 (+) and TB1-5 (-). If the signal
drifts, the current control pot is faulty. If the
Replace the control PCB (PCB1) P/N signal does not drift, the Control PCB (PCB1)
0558038312
is faulty.
47
section 6TROUBLESHOOTING
6.4 Testing and Replacing Components
NOTICE
•
•
•
•
•
•
Replace a PC board only when a problem is isolated to that board. Always disconnect power before removing or installing a PC board. Do not grasp or pull on board components.
Always place a removed board on a static free surface.
If a PC board is found to be a problem, check with your ESAB distributor for a replacement. Provide the distributor with the part number of
the board as well as the serial number of the power source.
Do not attempt to repair the board yourself. Warranty will be voided if
repaired by the customer or an unauthorized repair shop.
Power Semiconductor Components
Categories of power semiconductors include;
•
•
Power Rectifiers
Modules containing the free wheeling diodes and IGBTs
48
section 6TROUBLESHOOTING
6.4.1 Power Rectifiers and Blocking Diodes
Power Rectifiers
Power Rectifiers
Procedure to access behind the front panel
Blocking Diodes
1. Remove top cover and side panels
2. Locate and disconnect plug in rear of ammeter (attached
tone red and one black wire)
3. Remove pilot arc switch
4. Disconnect voltmeter
5. Disconnect orange and yellow wires from relay K4.
6. Remove two bolts holding the left side of the front panel
to the base.
7. Remove three bolts holding across the center base of the
front panel. These are accessed from underneath.
8. Remove one of the bolts holding the right side of the
front panel to the base. Loosen the second bolt. Of
these two bolts, remove the bolt on the left and loosen
the bold on the right.
9. Swing the front panel out to gain access to power rectifier components.
Troubleshooting Procedures –Negative Plate
Location of Neg. Plate
1. Visually inspect fuses F8 and F9. Replace if they show signs
of being blown or melted. Inspect diodes. If ruptured
or burned, replace all diodes on the NEG Plate. If diodes
appear to be OK, proceed to next step.
Location of fuses F8 and F9
49
section 6TROUBLESHOOTING
NEG Plate
Diode Rectifier
1. Check ohms between NEG Plate and BR “A” Bus. A reading
of 2 ohms or less indicates one or more shorted diodes. Replace all Diodes on NEG Plate.
2. If fuses F8 and/or F9 were open in the first step, make two
more ohmmeter readings.
A. Measure resistance between the NEG Plate and BR “B” bus.
Electrode Plate
POS Plate
B. Measure between NEG Plate and BR “C” bus.
If resistance is 2 ohms or less in either case, replace all the
diodes on the NEG Plate.
Troubleshooting POS Plate
1. Check ohms between POS Plate and BR “A” Bus. A reading
of 2 ohms or less indicates one or more shorted diodes. Replace all Diodes on POS Plate.
Location of Pos. Plate
2. If fuses F8 and/or F9 were open in the first step, make two
more ohmmeter readings.
A. Measure resistance between the POS Plate and BR
“B” bus.
Location of fuses F8 and F9
B. Measure between POS Plate and BR “C” bus.
If resistance is 2 ohms or less in either case, replace all the
diodes on the POS Plate.
Troubleshooting Electrode Plate
Bus
Cathode Leads
1. Visually inspect for ruptured or burned diodes. Replace
only those damaged.
2. Check resistance between Electrode Plate and the parallel
pig tails (cathode leads) of D25 and D26. If reading is 2
ohms or less, disconnect leads from bus and check each
diode. Replace only shorted diodes.
Repeat procedure for D27 and D28. Replace only shorted
diodes.
Blocking Diodes D25, D26, D27 and D-28
50
section 6TROUBLESHOOTING
6.4.2 IGBT / Freewheeling Diode (FWD) Replacement
caution
caution
The emitter and the gate of each affected IGBT must be jumpered together to prevent electrostatic damage. Each power
source is supplied with six jumper plugs that mate to the IGBT
Gate / Emitter Plug.
Electrostatic Discharge Hazard
Electrostatic discharge may damage these components.
•
•
•
Damage is accumulative and may only appear as shortened component life and not as a catastrophic failure. Wear a protective ground strap when handling to prevent damage
to PCB components.
Always place a pc board in a static-free bag when not installed.
Removal:
A. Insure that input power is removed by two actions such as a disconnect switch and removal of fuses. Tag and lock any
disconnect switch to prevent accidental activation.
B. Remove the top panel to gain access to the modules located in the top rear of the power source.
C. Clean the compartment containing the modules with dry, oil-free compressed air.
D. Unplug the gate drive leads connecting the IGBT Gates to the PWM/Gate Drive PC Board. In order to prevent damage
to the IGBT, install jumper plugs into the IGBT Gate Drive Connector. See Caution below. Jumper plugs are supplied
with each power source.
E. Remove the copper buss plates and bars connected to the IGBT’s. Save the M6 hardware connecting the bus structure
to the module terminals. You may need to re-use the hardware. Longer hardware can damage the module by contacting the circuitry directly below the terminals.
F. Remove the M6 hardware mounting the modules to the heat sink. Save the hardware because you may need to re-use
it. Hardware too short can strip the threads in the Aluminum heat sink. Hardware too long can hit the bottom of the
holes causing the modules to have insufficient thermal contact to the heat sink. Hardware too long or too short can
cause module damage due to over heating.
caution
The module gate plugs must be plugged into the PWM/Gate
Drive PC Board whenever the power source is in operation.
Failure to plug them in will result in damage to the module and
possible damage to the torch.
51
section 6TROUBLESHOOTING
Replacement:
A. Thoroughly clean any thermal compound from the heat sink and the modules. Any foreign material trapped between
the module and heat sink, other than an appropriate thermal interface, can cause module damage due to over heating.
B. Inspect the thermal (interface) pad, P/N 951833, for damage. A crease or deformity can prevent the module from seating properly, impeding the heat transfer from the module to the heat sink. The result can be module damage due to
over heating.
If a thermal pad is not available, a heat sink compound such as Dow Corning® 340 Heat Sink Compound may be used. It’s
a good idea to mount all paralleled modules located on the same heat sink using the same thermal interface. Different
interfaces can cause the modules to operate at different temperatures resulting in un-equal current sharing. The imbalance can shorten module life.
C. Place a thermal pad, and an IGBT module on the heat sink. Carefully align the holes in the thermal pad with the heatsink and module holes. If heat sink compound is used in place of a thermal pad, apply a thin coat of even thickness to
the metal bottom of the module. A thickness of 0.002” – 0.003” (0.050mm – 0.075mm) is optimum. Too much compound impedes heat transfer from the module to the heat sink resulting in short module life due to over heating.
D. Insert the four M6 mounting bolts, but do not tighten. Leave them loose a few turns. Be certain that the threads from
the mounting bolts do not bend the edges of the thermal pad clearance holes. A bent thermal pad can prevent the
module from seating properly, impeding the heat transfer from the module to the heat sink. The result can be module
damage due to over heating.
E. Partially tighten the four mounting bolts a little more than finger tight in the order: A-B-C-D. See figure below.
F. Fully tighten, in the same order above, to a torque of 35 – 44 in-lbs (4.0 – 5.0 N-M). See figure below.
G. Install the bus plates and bus bars. Be careful that the sheets of insulation separating the bus plates are still in their
original positions. It’s a good idea to tighten the mounting hardware only after getting it all started. Torque the M6
module terminal hardware to 35 – 44 in-lbs (4.0 – 5.0 N-M).
H. Remove the jumper plugs from the module gate lead plugs, and plug into the appropriate plugs from the PWM/Gate
Drive PC Board. See Caution below.
I. Replace the top panel.
caution
The module gate plugs must be plugged into the PWM/Gate
Drive PC Board whenever the power source is in operation.
Failure to plug them in will result in damage to the module and
possible damage to the torch.
A
1 - IBGT Collector, Free Wheeling
Diode (FWD) Anode
2 - IGBT Emitter
3 - FWD Cathode
6 - IGBT Gate
Four-Point Mounting Type
Partial tightening - A-B-C-D
Fully tightening - A-B-C-D
C
D
Key Plug
Position 1 (RED)
B
1
2
7 - IGBT Emitter
3
6 (RED)
7 (WHT)
52
section 6TROUBLESHOOTING
6.4.3 Power Shunt Installation
caution
Instability or oscillation in cutting current can be caused by improper dressing of shunt pick-up leads.
Poor torch consumable life will be the result.
There are two cables that attach to the shunt pick-up points: a two conductor cable drives the ammeter
a three conductor which provides the current feedback signal to PCB1 (control PCB).
Dressing of the 2 conductor cable is not critical.
The following is the dressing procedure for the 3 conductor cable.
•
•
•
The breakout point should be physically at the middle of the shunt. The breakout point is the place
where the conductors exit from the outer insulation jacket.
The black and clear insulated wires must be kept next to the shunt and under the cable ties.
The wire terminals for the black and clear insulated wires should be oriented in parallel with bus bars
as shown.
Terminals parallel
to bus bars
clear insulation
three leads
two leads
53
•
It is important to have the barrels of the black
and clear insulated wires, from the three lead
cable, be pointing in opposite directions.
•
The third wire attaches to the bus bar on the left
with the shunt mounting hardware. Orientation
of this wire is not critical.
section 6TROUBLESHOOTING
6.4.4 Procedure For Verifying Calibration Of Digital Meters.
Voltmeter
1. Connect a digital meter known to be calibrated to the positive and negative output bus bars. 2. Compare the power source voltmeter reading to the calibrated meter reading. Readings should match within
±0.75%.
Ammeter
1. External to the power source, connect a precision shunt in series with the work lead(s). The best shunt is one with a
value of 100 micro-ohms (50mV / 500A or 100mV / 1000A) and a calibrated tolerance of 0.25%. 2. Use a calibrated 4 ½ digit meter to measure the output of the shunt. The amperage indicated with the external shunt
and meter should match power source ammeter to within 0.75%.
6.5 Control Circuit Interface Using J1, J4 and J6 Connectors
Interface to the EPP-450 control circuitry is made with connectors J1, J4 and J6 on the front panel. J1 has 24 conductors, J4
has 2 and J6 has 10.
J1-P and J1-G provide access to the galvanically isolated transistor output signal indicating an “Arc On” condition. See
Subsection 6.8, Arc Current Detector Circuits. J1-L and J1-J are the inputs for the remote Voltage Reference Signal that
commands the EPP-450 output current Subsection 6.9, Current Control Pot & Remote Vref. J1-R and J1-Z supply 115V AC for
remote controls. See Subsection 6.6, Auxiliary Main Contactor (K3 and K33) & Solid State Contactor Circuits and Subsection
6.10, Pilot Arc Hi/lo & Cut/mark Circuits.
J1-E and J1-F are the input connections for the Emergency Stop function. For Emergency Stop to operate, the Jumper
between TB8-18 and TB8-19 must be removed.
J1-S is the input to K8 that parallels S1 switch contact. When 115V AC from J1-R is fed into J1-S, K8 activates placing the Pilot
Arc in High.
J4-A and J4-B are from an isolated contact on the emergency stop (E-stop) switch. This signal can be used by the plasma
control to indicate the state of the E-stop switch on the power source.
Cut / Mark selection: The power source defaults to Cutting mode when there is no signal fed into J1-C. When 115V AC from
J1-R is fed into J1-C, K11 is activated placing the EPP-450 in the Marking mode. For more details concerning the operation
of K11 and the Cut / Mark modes, refer to Subsection 6.10, High / Low Cut Current Modes and Mark Mode.
High / Low current ranges: The power source defaults to low cutting current range (35-100A) when no signal is fed into
J1-T. High range (50A to maximum current rating) is selected whenever 115VAC is fed into J1-T by connecting J1-R to J1-T.
J6 connects to the water cooler. J6-A and J6-B are 115VAC hot and neutral respectively. This 115VAC activates the contactor for the pump. J6-C and J6-D connect to the flow switch. The flow switch is closed when coolant is flowing. J6-E and
J6-H connect to the coolant level switch. The switch is closed when the coolant reservoir contains sufficient coolant and
it is open when the reservoir is low.
54
section 6TROUBLESHOOTING
CONTROL CIRCUIT INTERFACE USING J1, J4, & J6 CONNECTORS
EPP-450
POWER
SOURCE
EPP-450
POWER
SOURCE
CONTROL
J4-A
ISOLATED CONTACT
22
21
J4-B
REMOTE EMERGENCY STOP
J1-F
ISOLATED CONTACT
RED 06
E-STOP LOOP MUST BE
CLOSED FOR POWER
SOURCE TO FUNCTION
RED 05
TB8-19
E-STOP RELAY
S5
K15
12
J1-E
TB8-18
CHASSIS
J1-Z
115V AC NEUTRAL
RED 04
PILOT ARC HI/LO
3A
CB2
T2
GRN/YEL
RED 16
11
24 VAC
J1-D
J1-R
E-STOP BUTTON
H
115V AC HOT
S1
HI
T2
115 VAC
OFF: PILOT ARC LOW
ON: PILOT ARC HIGH
LO
J1-S
K8
RED 17
J1-M
PLASMA START
RED 12
115V AC CONTACTOR INPUT
MARK
J1-C
RED 03
115V AC MARK MODE INPUT
HI/LO CURRENT RANGE
LO
HI
K3
K33
CUT/MARK MODE SELECT
CUT
IN MARK MODE, K11 FORCES
K13
J1-T
K11
J1-B
115 VAC HI
RANGE
INPUT
RED 18
K11
K14 THE LO CURRENT RANGE
J6-B
J1-B
115 VAC
H
COOLANT LEVEL
J1-K
RED 10
COOLANT FLOW
RED 02
15 - 50 VDC
+
-
CUT/MARK
CURRENT DETECT
J1-G
J1-P
J1-Y
RED 23
100V
50mA
MAX
CURRENT
DETECTOR
+
-
J1-J
RED 09
J1-A
J6-H
J1-H
J6-C
J1-C
J6-D
J1-D
J6-E
J1-E
100 OHMS
OK
55
OK
LO
LO
COOLANT CIRCULATOR
+ ELECTRODE CURRENT SIGNAL 1.0V = 100A
200K
Ohms
K1
LEVEL
SWITCH
10 OHMS
J1-L
RED 11
J6-A
CONTACTOR FOR
PUMP & FAN
FLOW
SWITCH
RED 07
RED 14
REMOTE
0 - 10V Vref
NOTE: Panel S1
MUST BE in LOW
position for remote
contact to function
REMOTE CUTTING CURRENT
REMOTE CUTTING
CURRENT
REFERENCE
VOLTAGE (Vref)
REFERENCE VOLTAGE (Vref)
Icut
Icut==(Vref)
(Vref)x x(50)
(50)hi current range
Icut = (Vref) x (10) lo current range
section 6TROUBLESHOOTING
6.6 Auxiliary Main Contactor (K3 & K33) and Solid State Contactor Circuits
K3 and K33, activated by supplying a Contactor Signal, initiate and controls the operation of K2 (Starting Contactor) and
K4 (Pilot Arc Contactor). K3/K33 are called the Auxiliary Main Contactors because they must be activated before the
Main Contactor (K1) power-up sequence can occur. The Contactor Signal is supplied through a remote contact connecting 115VAC from J1-R to J1-M. If K6 is closed (no fault), K3 will activate. The closing of K3(6, 9) activates K2, the Starting
Contactor, and K4, the Pilot Arc Contactor, provided the power source is not over heated. See Subsection 6.7, E-stop and
Main Contactor Circuits for more information on the operation of K2. K4 is turned off when the Current Detector senses arc
current and opens the contact connecting P2-5 to P2-6 on the Control PC Board.
In addition to operating K3/K33, the Contactor Signal also activates the Solid State Contactor. The Solid State Contactor is
a logic and interlock circuit permitting the IGBT’s to conduct whenever the remote Contactor Signal is present. The 115V
AC Contactor Signal is fed to TB1-9, TB7-8, and resistors R45 and R45A. These resistors reduce the 115V to approximately
16V AC fed into the Control PC Board at P6-1 and P6-2. The Control PC Board sends a signal to both the Left and Right PWM
/ Gate Drive PC Boards. Illumination of LED3 on both of the PWM / Gate Drive PC Boards is indication that the Solid State
Contactor is functioning.
AUXILLARY MAIN CONTACTOR (K3 & K33) & SOLID STATE CONTACTOR CIRCUITS
LEFT PWM/GATE RIGHT PWM/GATE
DRIVE PC BOARD DRIVE PC BOARD
115V AC
IGBT DRIVE
ON/OFF
P2-6
K4
LED3
Current Detector
Contact on
Control PCB
3
1
9
K2
6
J1-R
H
TB9-18
9
STARTING
Over Heat Relay - Closed
during normal operation CONTACTOR
K3
2
J1-Z
N
Solid State Contactor
K33
T
CONTROL
PC BOARD
(AMC)
TB8-7
115V
AC
P6-2
+15V
680
FN4 4
J1-H
TB1-7
P1-10
TB9-13
K15
6
P1-9
P11-5
6
LED3
P10-6
9
K33
P10-5
HOT
6
K7
TB9-16 P1-9 P1-10
NEUTRAL
K3
IGBT DRIVE
ON/OFF
P11-6
PILOT ARC
I
CONTACTOR
P2-5
TB7-8
P6-1
TB1-8
K6
J1-M
CONTACTOR SIGNAL
Fault Relay
9 6
Open with fault or
main line power off
56
TB1-9
TB7-9
R45A
R45B
10K
10K
8W
8W
TB7-8
section 6TROUBLESHOOTING
6.7 E-Stop (Emergency Stop) and Main Contactor (K1A, K1B and K1C) Circuits
A power-up sequence takes place before the Main Contactor (K1) activates. K1 is actually three separate contactors – one
for each primary input phase. Thus, K1A, K1B, and K1C switch phases A, B, and C respectively to the Main Transformer, T1.
The power-up sequence begins with a remote Contactor Signal activating K3 and K33. Refer to the description entitled,
Section 6.6, Auxiliary Main Contactor (K3 and K33) & Solid State Contactor Circuits for more information. K3 and K33 activates K2 closing the three contacts of K2. K2 bypasses K1 contacts providing primary input power to the Main Transformer,
T1. This current is limited by three one Ohm resistors, R1, R2, and R3. The resistors eliminate the high surge currents typical
of the turn-on inrush transients associated with large transformers. The high current surge of charging the Bus Capacitor
Bank is also eliminated by initially powering the Main Transformer through K2 and the resistors.
The discharged Bus Capacitor Bank initially prevents the output of the Main transformer from reaching its normal value. As the Bus Capacitor Bank charges, the Main Transformer output voltage rises and becomes high enough for K1A, K1B, and
K1C to close. Once the K1’s are closed, the contacts of the Starting Contactor, K2, are bypassed, and full primary line power
is supplied to the Main Transformer through the contacts of the K1’s.
Because the starting sequence takes time, it is important at least 300 mS lapse between applying the Contactor Signal
and applying load to the power source. Applying load too soon will prevent the K1’s from closing and fuses F1 and F2 will
open.
K15, the E-Stop relay must be closed for the power-up sequence to take place. K15 contains one contact in the K2 coil circuit
and another contact in the K1A, K1B, & K1C circuits. There is no power supplied to the Main Transformer, T1, until K15 is activated. For K15 to activate, S5, the E-Stop switch on the front panel must be closed. Also, the Plasma Control must complete
the E-stop loop by closing an isolated contact between J1-E and J1-F.
The E-Stop switch is closed whenever the E-Stop button, on the front panel, is pulled out. For troubleshooting purposes
only, a jumper can be connected between TB8-18 and TB8-19. If a jumper is installed, it MUST be removed before placing
the power source back into service. If the jumper is not removed, the power source E-Stop condition will not function when
the E-Stop button for the Plasma Control is pushed.
J4-A and J4-B are connected together whenever the E-Stop button on the power source is pulled out. This signal can be
sent to the Plasma Control so that the control senses the state of the power source E-Stop switch.
57
58
H
K1A
T2
T1
T3
L3
T1
L1
K2
1
300W
R1
T1
L1
K1B
(MC)
TB5
T2
L2
T3
L3
F1
15A
T2
L2
9
A
K2
22
J1-E TB8-18
A
K15
12
S5
9 6
9
K15
TO T2-X3
F
11
24 VAC
TO CB2-2
M
E-STOP BUTTON
21
6
STARTING
K33
CONTACTOR
E-STOP RELAY
J1-F TB8-19
J4-B
J4-A
6
K3
115 VAC
K2
1
300W
R2
3 PHASE INPUT POWER
MAIN TRANSFORMER (T1) ASSY
L2
L1
(MC)
TB4
E-STOP LOOP MUST BE
CLOSED FOR POWER
SOURCE TO FUNCTION
E-STOP
N
T2
L2
T3
L3
F2
15A
T3
L3
K2
1
300W
R3
7
7
4
4
A
A
A
K1C
K1B
K1A
K15
K3
K33
K7
7
7
4
4
115 VAC WINDING ON
"A" COIL OF MAIN
TRANSFORMER
T1
L1
K1C
(MC)
TB6
E-STOP (EMERGENCY STOP) & MAIN
CONTACTOR (K1A, K1B, & K1C) CIRCUITS
section 6TROUBLESHOOTING
6.7 E-Stop (Emergency Stop) and Main Contactor (K1A, K1B and K1C) Circuits (continued)
section 6TROUBLESHOOTING
6.8 Arc Current Detector Circuits
There are three Arc Current Detector circuits in the EPP-450. One is used internally to control the Pilot Arc Contactor, K4. The other two are available for remote use.
A galvanically isolated transistor Current Detector Output is accessible at J1-G (-) and J1-P (+). J1 is the 24 conductor connector on the EPP-450 front panel. The transistor is best suited for switching small relays or low current logic signals like
those utilized by PLC’s (Programmable Logic Controllers). The transistor can withstand a maximum peak voltage of 150V. It can switch a maximum of 50 mA. The transistor turns on whenever the arc current through the Work Lead exceeds 3A. Pilot arcs not establishing main arcs will not turn on the transistor.
A second current detector output is available at TB8-3 and TB8-4. This output is supplied by an isolated relay contact rated
for 150V, 3 Amperes. This contact is closed when the primary input power to the EPP-450 is off. It opens whenever primary
power is supplied to the power source, and it closes when main arc current is established. Like the transistor output, the
relay contact closes whenever the arc current through the Work Lead exceeds 3A. Pilot arcs not establishing main arcs will
not close the contact.
J6-D J6-E J1-G J1-P
59
section 6TROUBLESHOOTING
6.9 Current Control Pot and Remote Vref
A Reference Voltage, VREF, is used to command the output current of the EPP-450. VREF is a DC voltage that can come from
either the Current Control Potentiometer on the front panel or from a remote source. In the “Panel” position, S2, the Panel
/ Remote switch selects the Current Control Potentiometer. In the “Remote” position, the Panel/Remote switch selects the
VREF fed into J1-L (+) and J1-J (-). The EPP-450 Output Current, IOUT, will follow VREF with the following relationship:
IOUT = (50) x (VREF) in the high output current mode and IOUT = (10) x (VREF) in the low output current mode.
PCB10 is the analog signal scaling board. If 115VAC is fed into P1-2 and P1-3 the output current range is in the high mode
used for cutting from 50 to 450A. With the 115VAC absent, the output current range is in the low mode used for marking
between 10 and 100A and cutting between 35 and 100A.
The Control PC Board contains two inputs for VREF: High Speed; and Normal. When the negative of the VREF signal is fed into
the High Speed input (P8-3), the EPP-450 will respond to a change in VREF within 10 mS. When the negative of the VREF signal
is fed into the Low Speed input (P8-1), the EPP-450 will respond to a change in VREF within 50 mS. The slower response of
the “Normal” input helps filter electrical noise sometimes encountered in industrial environments.
0.00-10.00V
CURRENT REFERENCE
EPP-600: I(out) = (80) X Vref
EPP-450: I(out) = (50) X Vref
200K
-
P8-3
NRM
+10T
PRECISION P5-8
REFERENCE
S
P8-1
-
+
P8-2
P4-8
-
+
P4-7
JUMPER FOR
EPP-600
JUMPER
P4-9
220
P4-11 P4-10
220
P4-12
50
S
P3-4
20V
P3-5
NRM
-
P4-2
2
PRI: 120V
SEC: 40VCT
H1
H2
H
PCB10
ANALOG
SCALING
BOARD
0558038326
200K
S
20V
T10
120V
50
P2-2
SEE PAGE 1, K13-6
D
N
200K
S BIAS
P3-3
P2-1
S
SIGNAL:
LO: 10V = 100A
HI EPP-450: 1V = 50A
HI EPP-600: 1V = 80A
+15S
TB1-3
P1-2
HIGH
SPEED
115VAC = HIGH RANGE
200K
P1-3
CONTROL
BOARD
0558038313
REMOTE
1
P4-1
TB1-4
J1-L
3
4
PANEL
6
TB1-6
TB8-12
+
CURRENT
CONTROL
POT
R50
10K
P4-3
5
S2
TB8-11
N
+-
HIGH
SPEED
-
0-10V
60
TB1-5
J1-J
J1-J, DC SIGNAL
COMMON (NEG)
ALSO SHOWN
ON PAGE 1
T
section 6TROUBLESHOOTING
6.10 High / Low Cut Current Modes and Mark Mode
A remote contact connecting 115V AC from J1-R to J1-S places the Pilot Arc in High by operating K8. Note, that for this function to operate, the Pilot Arc Hi/Lo switch on the front panel must be in the “LO” position.
The EPP-450 is placed in the Marking mode when a remote contact connecting 115V AC from J1-R to J1-C operates K11. In
the Marking mode, a normally closed contact on K11 opens turning off K10. When K10 turns off, the Boost supply is disconnected lowering the normal Cutting Mode 430V DC Open Circuit Voltage to 360VDC for Marking. A normally open contact
on K11 activates K12. K12 connects the I (min) resistors necessary for stabilizing the low currents required for marking. In
the Cutting mode, the minimum stable output current is 50A in the high current range, 35A in the low current range and
10A in the marking mode. In the marking mode, the normally closed contacts K11(3, 9) and K11(1, 7) open. This deactivates
HIGH/LOW
CUT
CURRENT
MODES & MARK MODE
K13 and K14 placing
the power source
in the
low current range.
Z BIAS
PCB3 Right
PWM/Gate Drive
P5-3 P5-2 P5-1
H
115 VAC
9
20V 20V
D
SEC 40VCT
PRI 120V
6
T7
K13
9
K11
9
3
J1-M
3
1
FN4
L3
10 2W
600V
I(min) RESISTORS
K12
WHT
K10
TB9-18
TB9-13
BOOST
5
K8
N
8
K11
A
K14
J6-B
LO
PILOT
TB1-7 ARC
K13
J1-C
J1-S
7
TB8-7
H
1µF
K13
TB1-8
J1-Z
R70
A
PILOT ARC
HI/LO
N
J1-R
J6-A
CONTACTOR SIGNAL
A
8
2
TB8-7
TB1-7
T3
4
115V
AC
TB8-8
K3
K4
K11
S1 LO 5
6
HI
N
5
6
9
PL2
FAN
M5
3
K13
G
N
HI
CUT
CUT/
MARK
TB8-2
MARK
LO
TB8-1
CUT HI J1-T
CURRENT
RANGE
61
1
K11
RED
SEE PAGE 2
PCB10 P1-2
MOVE RED WIRE FROM
TB8-1 TO TB8-2 FOR
FOR HI CURRENT RANGE
section 6TROUBLESHOOTING
6.11 Low Current Range
The EPP-450 operates in either LOW or HIGH current output ranges. The LOW range is used for marking from 10 to 100
amperes and cutting from 35 to 100 amperes. The HIGH range is used for cutting from 50 to 450 amperes.
In the HIGH range, both the left and right power sources are used. Each side contributes 50% of the total output current. The left side acts as a master power source by synchronizing the switching of the right side to its own switching frequency
of 10 KHz.
In the LOW range, only the left power source is used. The normally open contact, K13(6, 9) prevents T7 from supplying bias
supply power to PCB-3, the right PWM / IGBT Gate Drive PC Board. This disables the right side.
The same K13 contact (square labeled “D” on the schematic diagrams) places the EPP-450 in the HIGH current mode. In
addition to providing bias power to PCB-3 in the HIGH current mode, this 115 VAC is fed into PCB-10 P1-2.
PCB-10 performs two functions. With no input on PCB-10 P1-2, PCB-10 scales the 0 to 10 VDC current reference signal for 0
to 100 amperes (LOW range). In the LOW range, PCB-10 P4-11 / P4-12 provides a signal to PCB-2 P4-1 / P4-2. This signal commands PCB-2, the left (master) PWM / IGBT Gate Drive PC Board to change the switching frequency from 10 KHz to 25 KHz.
The higher switching frequency results in the more power dissipation by the heat sinks on PCB-3. Therefore, in the LOW
current mode, a small fan, M5, turns on to provide additional cooling. M5 does not operate in the HIGH current mode.
6.12 Electrode Current Transducer Circuit
The Electrode Current Transducer Circuit provides a galvanically isolated signal to the plasma control indicating the power
source output current. The scaling of the signal is: VOUT = IELECTRODE/100. For example, 200A results in 2.0V output. The
scaling is the same for both high and low current ranges. The output signal resistance is 100 Ohms.
PCB11 receives the signal from the Hall Effect Transducer and sends the signal through FN5 to J1-Y (+) and J1-J (-). PCB11 supplies +15V and -15V to operate the transducer. It also buffers the signal to prevent damage to the transducer from voltage
ELECTRODE
transients generated outside the
power source. CURRENT TRANSDUCER CIRCUIT
J1-J & TB1-5, DC
SIGNAL COMMON
(NEG), ALSO
SHOWN ON PAGE 2
TO SHUNT NEG.
2
J1-Y
J1-J
1V=100A
+
-
4
FN5
TB1-5 1
3
P4-8
TO PILOT ARC CONTACTOR, K4-T1
50
(TB10)
P4-2 SIGNAL +
P1-2
P1-2
1
BOARD
S BIAS
P1-1
P3-1 P3-2
P3-5
3
+
P4-1 SIGNAL -
ANALOG
PCB11 SCALING
P4-4 +15S
WORK
2
FN1
TD3
S
P3-4
1
P1-3
P4-7
50
P4-6 -15S
P4-5 S COM
+
P3-3
ELECTRODE
P1-4
P1-1
HALL
ARROW
ELECTRODE
CURRENT
TRANSDUCER
NOZZLE
-
2
20V
FN2
3
20V
H2
T11
PRI: 120V
SEC: 40VCT
H1
62
N
120V
H
section 6TROUBLESHOOTING
63
section 7
replacement parts
7.0Replacement Parts
7.1General
Always provide the serial number of the unit on which the parts will be used. The serial number is stamped on
the unit serial number plate.
7.2Ordering
To ensure proper operation, it is recommended that only genuine ESAB parts and products be used with this
equipment. The use of non-ESAB parts may void your warranty.
Replacement parts may be ordered from your ESAB Distributor.
Be sure to indicate any special shipping instructions when ordering replacement parts.
Refer to the Communications Guide located on the back page of this manual for a list of customer service phone
numbers.
EPP-450 Information
Part Number
EPP-450
380V 50/60HZ
380V TAPS
EPP-450
380V 50/60HZ
400V TAPS
EPP-450
400V 50/60HZ
0558007730
EPP-450
460V 60HZ
EPP-450
575V 60HZ
0558007731
0558007732
Note
Items listed in the following Bill of Materials that do not have a part number
shown are not available from ESAB as a replaceable item and cannot be
ordered. Descriptions are shown for reference only. Please use local retail
hardware outlets as a source for these items.
Note
Replacement Parts, Schematics and Wiring Diagrams are
printed on 279.4mm x 431.8mm (11” x 17”) paper and are
included inside the back cover of this manual.
64
notes
65
notes
66
revision history
1. Original release - 02/2008.
2. Revision 05/2008 - added E-stop information throughout manual. Included Replacement Parts section in Schematic / Wiring Diagram package.
3. Revision 08/2010 - Added new DOC form.
4. Revision 09/2010 - Removed 401 references.
5. Revision 06/2012 - dimensions changes section 2.3.
67
ESAB subsidiaries and representative offices
Europe
AUSTRIA
ESAB Ges.m.b.H
Vienna-Liesing
Tel: +43 1 888 25 11
Fax: +43 1 888 25 11 85
BELGIUM
S.A. ESAB N.V.
Brussels
Tel: +32 2 745 11 00
Fax: +32 2 745 11 28
THE CZECH REPUBLIC
ESAB VAMBERK s.r.o.
Prague
Tel: +420 2 819 40 885
Fax: +420 2 819 40 120
DENMARK
Aktieselskabet ESAB
Copenhagen-Valby
Tel: +45 36 30 01 11
Fax: +45 36 30 40 03
FINLAND
ESAB Oy
Helsinki
Tel: +358 9 547 761
Fax: +358 9 547 77 71
FRANCE
ESAB France S.A.
Cergy Pontoise
Tel: +33 1 30 75 55 00
Fax: +33 1 30 75 55 24
GERMANY
ESAB GmbH
Solingen
Tel: +49 212 298 0
Fax: +49 212 298 218
GREAT BRITAIN
ESAB Group (UK) Ltd
Waltham Cross
Tel: +44 1992 76 85 15
Fax: +44 1992 71 58 03
ESAB Automation Ltd
Andover
Tel: +44 1264 33 22 33
Fax: +44 1264 33 20 74
HUNGARY
ESAB Kft
Budapest
Tel: +36 1 20 44 182
Fax: +36 1 20 44 186
ITALY
ESAB Saldatura S.p.A.
Mesero (Mi)
Tel: +39 02 97 96 81
Fax: +39 02 97 28 91 81
THE NETHERLANDS
ESAB Nederland B.V.
Utrecht
Tel: +31 30 2485 377
Fax: +31 30 2485 260
NORWAY
AS ESAB
Larvik
Tel: +47 33 12 10 00
Fax: +47 33 11 52 03
POLAND
ESAB Sp.zo.o.
Katowice
Tel: +48 32 351 11 00
Fax: +48 32 351 11 20
PORTUGAL
ESAB Lda
Lisbon
Tel: +351 8 310 960
Fax: +351 1 859 1277
SLOVAKIA
ESAB SIovakia s.r.o.
Bratislava
Tel: +421 7 44 88 24 26
Fax: +421 7 44 88 87 41
SPAIN
ESAB Ibérica S.A.
Alcalá de Henares (MADRID)
Tel: +34 91 878 3600
Fax: +34 91 802 3461
SWEDEN
ESAB Sverige AB
Gothenburg
Tel: +46 31 50 95 00
Fax: +46 31 50 92 22
ESAB International AB
Gothenburg
Tel: +46 31 50 90 00
Fax: +46 31 50 93 60
SWITZERLAND
ESAB AG
Dietikon
Tel: +41 1 741 25 25
Fax: +41 1 740 30 55
ESAB AB
SE-695 81 LAXÅ
SWEDEN
Phone: +46 584 81 000
www.esab.com
North and South America
ARGENTINA
CONARCO
Buenos Aires
Tel: +54 11 4 753 4039
Fax: +54 11 4 753 6313
BRAZIL
ESAB S.A.
Contagem-MG
Tel: +55 31 2191 4333
Fax: +55 31 2191 4440
CANADA
ESAB Group Canada Inc.
Missisauga, Ontario
Tel: +1 905 670 02 20
Fax: +1 905 670 48 79
MEXICO
ESAB Mexico S.A.
Monterrey
Tel: +52 8 350 5959
Fax: +52 8 350 7554
USA
ESAB Welding and
Cutting Products
Florence, SC
Tel: +1 843 669 44 11
Fax: +1 843 664 57 48
Asia/Pacific
CHINA
Shanghai ESAB A/P
Shanghai
Tel: +86 21 5308 9922
Fax: +86 21 6566 6622
INDIA
ESAB India Ltd
Calcutta
Tel: +91 33 478 45 17
Fax: +91 33 468 18 80
INDONESIA
P.T. ESABindo Pratama
Jakarta
Tel: +62 21 460 0188
Fax: +62 21 461 2929
JAPAN
ESAB Japan
Tokyo
Tel: +81 3 5296 7371
Fax: +81 3 5296 8080
MALAYSIA
ESAB (Malaysia) Snd Bhd
Shah Alam Selangor
Tel: +60 3 5511 3615
Fax: +60 3 5512 3552
SINGAPORE
ESAB Asia/Pacific Pte Ltd
Singapore
Tel: +65 6861 43 22
Fax: +65 6861 31 95
SOUTH KOREA
ESAB SeAH Corporation
Kyungnam
Tel: +82 55 269 8170
Fax: +82 55 289 8864
UNITED ARAB EMIRATES
ESAB Middle East FZE
Dubai
Tel: +971 4 887 21 11
Fax: +971 4 887 22 63
Representative Offices
BULGARIA
ESAB Representative Office
Sofia
Tel/Fax: +359 2 974 42 88
EGYPT
ESAB Egypt
Dokki-Cairo
Tel: +20 2 390 96 69
Fax:+20 2 393 32 13
ROMANIA
ESAB Representative Office
Bucharest
Tel/Fax: +40 1 322 36 74
RUSSIA-CIS
ESAB Representative Office
Moscow
Tel: +7 095 937 98 20
Fax: +7 095 937 95 80
ESAB Representative Office
St Petersburg
Tel: +7 812 325 43 62
Fax: +7 812 325 66 85
Distributors
For addresses and phone numbers to our distributors in other
countries, please visit our home
page
www.esab.com