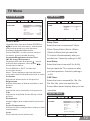
1
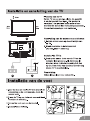
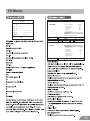
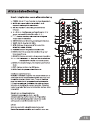
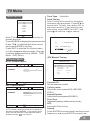
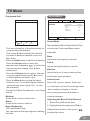
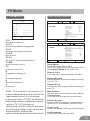
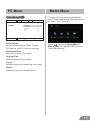
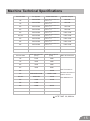
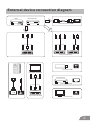
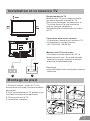
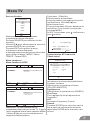
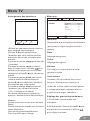
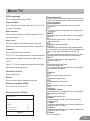
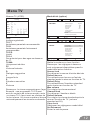
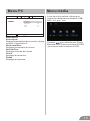
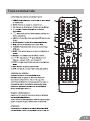
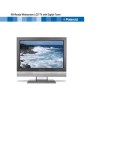
32” HD LED TV
MODEL NR.:32LED1500
1
2
3
VOL+
VOL -
CH+
CH -
MENU
SOURCE
4
3
2
1
4
TV Buttons
INPUT
VIDEO
R
L
OUTPUT
VIDEO
R
L
INPUT
Y
Pb
Pr
HDMI
5
DVD
Set top boxen
HDMI
HDMI
HDMI ingang aansluiting
R
INPUT
INPUT
INPUT
VIDEO
Y
L
AV ingang aansluiting
Pb
Pr
VIDEO
R
L
AV ingang aansluiting
USB aansluiting
AV ingang aansluiting
Set top boxes
SCART aansluiting
OUTPUT
VIDEO
R
L
AV uitgang aansluiting
TV aansluiting
6
3
FM ANT
TV ANT
TV signal output
2
1
1
2
3
4
7
TV Menu
Input Source
Met auto tuning worden de zenders
automatisch opgezocht. Gebruik / om
Auto Tuning aan te duiden en druk op OK om
het zoeken te starten. Als u het zoeken wil
stoppen, druk op MENU of EXIT en druk op
om te bevestigen of op om te annuleren.
TV
AV
YPbPr
SCART
HDMI
PC
Media
ENTER
Channel Tuning
Enter
Opmerking: afbeelding hierboven alleen
als referentie.
Druk op SOURCE om de ingangslijst weer
te geven.
Gebruik / om de gewenste bron te kiezen
en druk op ENTER om te bevestigen.
Druk op EXIT om het menu te sluiten,
of het gaat automatisch na een bepaalde
tijd uit (om de tijd in te stellen:
MENU – Tijdmenu – OSD timer).
TV
:
5 Programme(s)
44%... 433.75MHZ (TV)
Menu
ATV Manual Tuning
-
Current CH
1
Color System
Sound System
Fine-Tune
AFC
CHANNEL
Tune Type
Air
+
PAL
DK
49.75MHZ
Off
Search
Auto Tuning
Menu
Move
Menu
ENTER
Enter
Exit
Sound System
CHANNEL
Auto Tuning
ATV Manual Tuning
Programme Edit
Move
Menu
ENTER
Enter
Exit
Opmerking: het zendermenu is alleen
beschikbaarin TV-modus en is het
standaardmenu wanneerop MENU gedrukt
wordt. Om andere menu's(beeld/geluid/tijd/
opties) op te roepen: gebruik / .
8
TV Menu
Programm Edit
SOUND
Sound Mode
Standard
Treble
50
Bass
50
Balance
0
Auto Volume
Move
Delete
ENTER
Rename
Enter
Enter
FAV
Fav
Fav
Move
Menu
ENTER
Enter
Off
Exit
Skip
Menu
Menu
9
TV Menu
PICTURE
Move
Picture Mode
Contrast
Brightness
Color
Tint
Sharpness
Color Temperature
Noise Reduction
Menu
ENTER
Enter
Standard
50
50
50
50
50
Medium
Middle
Exit
TIME
Mo ve
Sleep Timer
Me nu
OP TION
Off
Auto Sleep
Off
OSD Timer
10s
EN TE R
En ter
Ex it
OS D La nguage
En glish
As pect Ra tio
16 :9
Bl ue Sc reen
Off
Ke y Lo ck
Off
Ca ption
Off
Pa rent Co ntrol
Re set
So ftwa re Up date(US B)
Mo ve
Me nu
EN TE R
En ter
Ex it
10
TV Menu
Set Password
Lock System
ON
TV
MPAA
R
Canada English
PG
Canada French
G
Menu
11
TV Menu
TV rating
TV-Y
ALL
TV-Y7
ALL
TV-G
ALL
TV-PG
ALL
V
S
L
D
TV-14
ALL
V
S
L
D
TV-MA
ALL
V
S
L
OPTION
OSD Language
Aspect Ratio
Blue Screen
Key Lock
Caption
Parent Control
Hotel Mode
Reset
Software Update(USB)
FV
English
16:9
Off
Off
Off
Menu
Move
Menu
HOTEL
Move
ENTER
Enter
Exit
Hotel Mode
Source Lock
Default Source
Default Prog
Max Volume
Channel lock
Default Volume
Clear Lock
Set Password
Menu
ENTER
Enter
On
Off
1
100
Off
20
Exit
12
Media Menu
PC Menu
SCREEN
Aut o Adj us t
Hor izo nt al Pos .
Move
Menu
50
Ver tica l Pos .
50
Cl oc k
50
Pha se
99
ENTER
Enter
Exit
13
Hulp
14
TV System
Preset Channel s
Speaker Output
PAL/NTSC
PAL:0-199,NTSC:AIR 2-69
CABLE1-125
5W+5W
PAL/NTSC
PAL:0-199,NTSC:AIR 2-69
CABLE1-125
5W+5W
PAL/NTSC
PAL:0-199,NTSC:AIR 2-69
CABLE1-125
5W+5W
24”
PAL/NTSC
PAL:0-199,NTSC:AIR 2-69
CABLE1-125
5W+5W
32”
PAL/NTSC
PAL:0-199,NTSC:AIR 2-69
CABLE1-125
10W+10W
39”/40”
PAL/NTSC
PAL:0-199 NTSC:AIR 2-69
CABLE1-125
10W+10W
PAL/NTSC
PAL:0-199,NTSC:AIR 2-69
CABLE1-125
10W+10W
PAL/NTSC
PAL:0-199,NTSC:AIR 2-69
CABLE1-125
10W+10W
50”
PAL/NTSC
PAL:0-199,NTSC:AIR 2-69
CABLE1-125
10W+10W
Screen Size
po wer Con sump tion
(LE D)
16”
24W
36W
19”
36W
48W
22”
36W
48W
24”
48W
60W
Screen Size
16”
19”
22”
42”
46”
po wer Con sump tion
(LCD)
100W
26”
32”
56W/65W/100W
100W/135W
39”/40”
70W/75W
135W
42”
70W
175W
46”
110W
50”
135W
Main accessories
User's manual x1
Remote controller x1
Power cord x1
AAA Batteries x2
280W
LIFE TIME 60.000 Hrs
15
P.MODE
S.MODE
MENU
SLEEP
SOURCE
ENTER
EXIT
INFO
15
MTS
ASPECT
REPEAT
ROOT
GOTO
FAV
FAV-
FAV+
FREEZE
INDEX
CANCEL
SUB .PG
ON/OFF
REVEAL
SIZE
HOLD
MIX
RED
GREEN
YELLOW
CYAN
16
P.MODE
S.MODE
MENU
SLEEP
SOURCE
ENTER
EXIT
INFO
MTS
16
24
34
ASPECT
18
26
REPEAT
ROOT
GOTO
27
FAV
FAV-
FAV+
FREEZE
19
20
21
29
INDEX
CANCEL
SUB .PG
ON/OFF
REVEAL
SIZE
HOLD
MIX
RED
GREEN
YELLOW
CYAN
28
35
22
31
32
23
25
30
17
36
33
17
32” HD LED TV
USER MANUAL
MODEL NO.:32LED1500
IMPORTANT
Please read this manual carefully before installing
and operating the TV.
Keep this manual handy for further reference
Table Of Contents
Preparations Guide
Safety Information.................................................................................................................2
Important Safety Precautions.................................................................................................3
Installed And Connected TV
TV Bracket assemble.............................................................................................................4
TV Buttons And Terminal Interface........................................................................................ 5
External device connection diagram................................................................... 6
Install And Connect TV...........................................................................................................7
TV Stand installation Instructions.......................................................................7
TV Menu
Select Input Source................................................................................................................8
Channel Menu........................................................................................................................8
Picture Menu..........................................................................................................................8
Sound Menu.......................................................................................................................... 9
Time Menu............................................................................................................................. 9
Option Menu.........................................................................................................................10
Parent Control................................................................................................ 10
TV rating.........................................................................................................1 2
Hotel Menu.....................................................................................................1 2
PC Menu
Screen Menu........................................................................................................................13
Media Menu
Media Menu......................................................................................................................... 13
Other Information
Help......................................................................................................................................14
Specifications.......................................................................................................................15
Remote controller.................................................................................................................16
This user manual for reference only
1
Safety Information
MAY HAVE RISK OF ELECTRIC SHOCK ,IF DO ANY CHANGE OR
ADJUST.DO NOT OPEN THE BACK CABINET.PLEASE CONTACT
SERVICE CENTER FOR ANY PROBLEM
THIS MARK REMIND AND ALERT USER MUST
OPERATE THE TV SET CORRECTLY
ACCORDING TO THE USER MUANAL.
IN CASE ANY DAMAGE.
THIS MARK IS INDIACATE THE TV SET IS
SENSITIVE ELECTRONIC PRODUCT.
PLEASE AVOID WATER OR WET, INCASE
OF FIRE OR ELECTIC SHOCK.DO NOT
OPEN THE BACK CABINET. IF ANY
PROBLEM.PLEASE CALL NEAREST
SERVICE CENTER.
2
Important Safety Precautions
1. Read these instructions.
2. Keep these instructions.
3. Heed all warnings.
4. Follow all instructions.
5. Do not use this apparatus near water.
6. Clean only with dry cloth.
7. Do not block any ventilation openings. Install in accordance with the
manufacturer’s instructions.
8. Do not install near any heat sources such as radiators, heat registers, stoves, or
other apparatus (including amplifiers) that produce heat.
9. Do not defeat the safety purpose of the polarized or grounding-type plug. A
polarized plug has two blades with one wider than the other. A grounding type plug
has two blades and third grounding prong. The wide blade or third prong are
provided for your safety. When the provided plug does not fit into your outlet,
consult an electrician for replacement of the obsolete outlet.
10. Protect the power cord from being walked on or pinched, particularly at plugs,
convenience receptacles, and the point where they exit from the apparatus.
11. Only use attachments/accessories specified by the manufacturer.
12.
Use only with the cart, stand, tripod, bracket, or table specified by the
manufacturer, or sold with the apparatus. When a cart is used caution when
moving the cart/apparatus combination to avoid injury tip-over.
13. Unplug this apparatus during lightning storms or when unused for long periods
of time.
14. Refer all servicing to qualified service personnel. Servicing is required when the
apparatus has been damaged in any way, such as power-supply cord or plug is
damaged, liquid has been spilled or objects have fallen into the apparatus, the
apparatus has been exposed to rain or moisture, does not operate normally, or has
been dropped. Warning to reduce the risk of fire or electric shock, do not expose
this apparatus to rain or moisture.
15. The apparatus shall be disconnected from the mains by placing the power/standby
switch in the standby position and unplugging the power cord of the apparatus from
the AC mains receptacle.
16. The socket-out shall be installed near the equipment and shall be easily accessible.
17. This product should never be placed in a built-in installation such as a bookcase
or rack unless proper ventilation is provided or the manufacturer's instructions have
been adhered to.
18. Apparatus shall not be exposed to dripping or splashing.
19. Do not place any sources of danger on the apparatus (e.g. liquid filled objects,
lighted candles).
20. Wall or Ceiling Mounting - The appliance should be mounted to a wall or ceiling
only as recommended by the manufacturer.
21.
Never place the TV, remote control or batteries near naked flames or other
heat sources, including direct sunlight. To prevent the spread of fire, keep
candles or other flames away from the TV, remote control and batteries at
all times.
22. The USB terminal should be loaded with 0.5 A under normal operation.
3
TV Bracket assemble
Fix the TV on the wall
1.First,put the TV on the table smoothly and put some soft cloth on the table to avoid
scratching the screen.
2.User the screw driver to take off the screws which are fixed on the bottom stand
(the direction of the arrow, refer to the ptoto1).And take off the bottom stand(please
take off the screws and bottom stand carefully).
3.Make one bracket which can fix on the wall according to the size of arrow direction
of photo2 and photo3.
4.Drill four holes properly on the wall (the size only for reference) and put into four
screws.(optional parts) Drill four holes properly on the wall (the size only for reference)
and put into four screws.(optional parts)
5.according to the step 4,use the screwdriver to lock the screw on the back of the TV.
then hang the TV on the wall.
1
2
VOL+
VOL CH+
CH MENU
SOURCE
3
4
Note:
1.The bracket fixed on the wall is optional part.
2.when you assemble the TV, there should be no other articles on the around and front
and please keep the distance from other articles.
3.When assemble the TV, please ask the career man to fix in order to avoid the danger.
4.The fixing picture is only for reference.
5.Please follow the use manual about bracket assemble to fix the TV.
6.Attach the mounting bracket from the VESA compatible wall mounting kit.
4
TV Buttons And Terminal Interface
TV Buttons
Note: The following is only functional schematic, And the actual position and
arrangement of different models may be different.
:Turn ON/OFF Power.
SOURCE:External Signal Input Selection.
MENU:Display Main MENU And Confirm MENU Item Selection.
CH+/-:Selecting Channel.
VOL+/-:Adjusting Volume.
Terminal Interface
Note: The following are the various terminal interface, the actual position and
arrangement, the number of different models may be different.
L
AV input
External AV Signal Input And
Relevant Rith/Left Sound Channel
L
AV output
External AV Signal output And
Relevant Right/Left Sound Channel
(Some models without this interface)
USB input
Connect a USB device here to play
its media files.
Pr
Y Pb Pr input
Connect to the composite terminal of
your DVD/VCR
(Some models without this interface)
SCART input
standard,it supports composite and
RGBsignal input.lt is a connection
for european
(Some models without this interface)
INPUT
VIDEO
R
OUTPUT
VIDEO
R
INPUT
Y
Pb
HDMI
EARPHONE output
When earphones are plugged in,
speakers are disabled
HDMI input
Digital signal input from HDMI video
connector.
ANT 75
Connect the antennal/cadle tv input
(75/VHF/UHF)
VGA input
PC analog signal input
PC AUDIO INPUT
VGA input and audio input when VGA
input
5
External device connection diagram
DVD
Set-top boxes
HDMI
HDMI
HDMI input connection
R
INPUT
INPUT
INPUT
VIDEO
Y
L
AV input connection
Pb
Pr
VIDEO
R
L
AV input connection
USB connection
AV input connection
Set-top boxes
SCART connection
OUTPUT
VIDEO
R
L
AV output connection
TV connection
6
Install And Connect TV
Set your TV
To put your TV in a firm place which can
bear the weight of the TV.
To avoid danger, please don’t expose the
TV near water or heating place (such as
light, candle, heating machine),do not block
the ventilation at the back of TV.
Connect antenna and power
1.Connect the antenna cable to the antenna
socket on the back of the TV.
2.To plug the power cord of TV (AC 100240V~ 50/60Hz).
3
Turn on TV
3.Press the power button of the TV the
indication light will turn to green. if it is
on standby mode (the light is red),press
the power button on the remote control
to turn on the TV.
FM ANT
TV ANT
TV signal output
2
1
Note:
Picture for reference purposes only.
TV Stand Installation Instructions
1.Open the carton and remove the TV
and scattered accessories and base
1
2
3
4
(some models without base).
2.to avoid the injury of the TV, covered
with a soft mattress, put it on the table, face
down on a soft mattress, the base of the
neck is fixed on the TV with screws.
3.screw the base and connected to the TV.
4. the installation is complete.
7
TV Menu
Tune Type
Cable/Air
Auto Tuning
Auto Tuning will search for available
channels and programs. Press▼/▲ to
select Auto Tuning, then press OK to
start auto search. If you want to stop
searching, press MENU or EXIT, and
press to confirm or to cancel.
Input Source
Input Source
TV
AV
YPbPr
SCART
HDMI
PC
Media
ENTER
Enter
Note: The above is for reference only, to
prevail any kind
Press SOURCE to display the input source list.
Press ▼/▲ to highlight the input source
and press ENTER to confirm.
Press EXIT to hide the On-Screen menu,
or it will disappear after seconds. (The way
to set the disappeared time: MENU - TIME
Menu - OSD Timer)
Channel Tuning
TV
:
5 Programme(s)
44%... 433.75MHZ (TV)
Menu
ATV Manual Tuning
Channel Menu
NTSC Channel Menu
ATV Manual Tuning
-
Current CH
1
Color System
CHANNEL
Tune Type
Air
Sound System
Fine-Tune
Auto Tuning
AFC
+
PAL
DK
49.75MHZ
Off
Search
Menu
Move
Menu
ENTER
Enter
Exit
PAL Channel Menu
CHANNEL
Auto Tuning
ATV Manual Tuning
Programme Edit
Move
Menu
ENTER
Enter
Exit
Note: The Channel Menu is available only
in TV mode, and the item is the default
when pressing MENU, if you want view
the Picture/Sound/Time/Option Menu,
please press
to select.
Current CH
Set the channel number
Color system
Select the color system(PAL/SECAM/
NTSC)
Sound System
Select the sound system(DK/BG/I)
Fine-Turn
Adjust the frequency of the channel finely.
AFC
Automatic Fine tuning.
Search
Press ENTER to search down from the current
frequency, and press ENTER to search up.
8
TV Menu
Programm Edit
Sound Menu
Programm Edit
SOUND
Sound Mode
Standard
Treble
50
Bass
50
Balance
0
Auto Volume
Move
Delete
ENTER
Rename
Enter
Enter
FAV
Fav
Fav
Move
Skip
Menu
ENTER
Enter
Off
Exit
Sound Mode
Menu
Menu
Standard/Music/Movie/Sports/User/Only
The four colored key is the shortcut key for
programming the channel.
First press ▼/▲ to highlight the channel
you want to delete or rename or mo ve or
skip, then:
Press the Red button to delete the channel.
Press the Green button to enter the
rename state, thenpress
to select the
word you want to change, and ▼/▲ to
select word.
Press the Yellow button to set the channel
to mo ving state.then press ▼/▲ to mo ve
it to the position you want to put.
Press the Blue button to skip the select
channel. (Your TV set will skip the channel
automatically when using CH+/- to view
the channels.)
Fav Add or Delete the channel to your faver
ate list.
Medium
Gives white colors a neutral tint.
Warm
Gives white colors a red tint.
Noise Reduction
Off/Low/Middle/High
You can clear up the input signal by setting
the item.
in this mode, Treble and Bass can be
adjusted.)
Bass
Adjust the low frequency sounds.
Treble
Adjust the high frequency sounds.
Balance
Adjust the level of sound coming from
the left and right speakers.
Auto Volume
Press L/R to set or cancel. When set
on, it will level out the sound being heard
when sudden changes in volume
occur during commercial breaks or
channel changes.
Adjusting the Bass/Treble/Balance
1 Select Sound Mode as User.
2 Highlight the item and press ▼/▲ to
display the sub-menu, then press
to adjust the value.
9
TV Menu
Time Menu
Picture Menu
PICTURE
Move
Picture Mode
Contrast
Brightness
Color
Tint
Sharpness
Color Temperature
Noise Reduction
Menu
ENTER
Enter
Standard
50
50
50
50
50
Medium
Middle
Exit
Picture Mode
Highlight the item and Press ENTER or
to enter the sub-menu, that shows
the picture mode you can choose:
Dynamic/Standard/Mild/User
Press PMODE on the remote control
to select picture mode directly.
Contrast/Brightness/Color/Tint
(NTSC only)/Sharpness
Highlight the item and press , and a
process bar appears, then press
to adjust the value.
Press MENU or EXIT to hide the
on-screen menu.
Note: Those settings can be adjusted
only when the Picture Mode is set to User.
Contrast
Adjust the white level of the picture .
Brightness
Adjust darkness of black sections in the
picture.
Color
Adjust the color intensity of the picture.
Tint
Adjust the hue(Red,Green,Blue) of the
picture.
Sharpness
Object edges are enhanced for picture d
etail.
Color Temperature
Select the color temperature that you feel
comfortable.
Cool
Gives white colors a blue tint.
TIME
Mo ve
Sleep Timer
Me nu
Off
Auto Sleep
Off
OSD Timer
10s
EN TE R
En ter
Ex it
Sleep Time r
Select the time in minutes(off,10min,
20min,30min,60min,90min,120min,
180min,240min) that you want the
TV to shut off automatically after you
set the time. Cancel by setting it to Off
Auto Sleep
Select the time in hours(off,3h,4h,5h)
that you want the TV to remain on after
your last operation. Cancel by setting it
to Off.
OSD Time r
Select the time in seconds(5s,10s,15s,
20s,25s,30s,) that you want the OnScreen Men remain display after your last
operation.
Option Menu
OP TION
OS D La nguage
En glish
As pect Ra tio
16 :9
Bl ue Sc reen
Off
Ke y Lo ck
Off
Ca ption
Off
Pa rent Co ntrol
Re set
So ftwa re Up date(US B)
Mo ve
Me nu
EN TE R
En ter
Ex it
10
TV Menu
OSD Language
Set the OSD display language.
Aspect Ratio
Select the suitable aspect Ration. (4:3/
16:9/Zoom1/Zoom2).
Blue Screen
Set the background color to blue or black
when having no input signal.
Key Lock
Set to prevent it from being used by young
children, or other unexpected using.
Caption
Select from below closed-caption modes.
CC1,2,3,4 Displays corresponding caption
channels of a analog program. (Usually
be set to Cc1 for most programs.)
Text1,2,3,4 Displays corresponding text
service channel of a analog program.
Parent Control
For detail please refer to page 7.
Reset
Recall the default setting.
Software Update(USB)
Update your TV set. Select the software in
the root of your USB memory, and press
ENTERl.
Parent Control(NTSC)
Set Password
Lock System
ON
TV
MPAA
R
Canada English
PG
Canada French
G
Menu
Set Password First you should enter
the correct old password then enter new
password twice.
Lock System
Set the lock system ON or OFF.
TV
The TV rating compose of two aspects:
age-based and content-based. Page 9
MAPP
This system defines the rating control
which come from MPAA rules.
G
General audience. All ages admitted
PG
Parental guidance
PG-13
Parents strongly cautioned. Some
material may be inappropriate for
children under 13.
R
Restricted. Children under 17 require
accompanying parent or adult guardian.
NC-17
No one 17 and under a admitted.
X
Adult audience only
Canada English The ratings are for
programs which are using English rating
system.
C
Children
C8+
Children 8 years and older
G
General programming
PG
Parental guidance
14+
Viewers 14 and older
18+
Adult programming
Canada French
The ratings are for programs which are
using French rating system.
G
General
8 ans+
Not recommended for younger children
13 ans+
Not recommended for children under
age 13
16 ans+
Not recommended for ages under 16
18 ans+
This program is restricted to adults
11
TV Menu
TV rating(NTSC)
Hotel Menu(Optional)
TV rating
TV-Y
ALL
TV-Y7
ALL
TV-G
ALL
OPTION
FV
TV-PG
ALL
V
S
L
D
TV-14
ALL
V
S
L
D
TV-MA
ALL
V
S
L
OSD Language
Aspect Ratio
Blue Screen
Key Lock
Caption
Parent Control
Hotel Mode
Reset
Software Update(USB)
Menu
TV-Y
General audience
TV-Y7
Parental guidance suggested
TV-G
Parents strongly cautioned
TV-PG
Restricted
TV-14
No one 17 and under admitted
TV-MA
Adult audience only
FV
Fantasy violence
D
Suggestive dialogue
L
Strong language
S
Sexual situations
V
Violence
N o t e : T h e c o n t e n t r a t i n g s w i l l i ncrease depending on the level of the
age-based rating. For example,
a program with a TV-PG V(violence)
rating may contain moderate violence,
while a TV-14 V(violence)
rating may contain intense violence.
So locking a higher level option will
automatically locking the
options that has more sensitive level.
Move
Menu
HOTEL
Move
ENTER
Enter
Exit
Hotel Mode
Source Lock
Default Source
Default Prog
Max Volume
Channel lock
Default Volume
Clear Lock
Set Password
Menu
ENTER
Enter
English
16:9
Off
Off
Off
On
Off
1
100
Off
20
Exit
Hotel Mode
Set hotel mode ON or OFF.
Note: The following settings work only
when Hotel Mode is set to be ON.
Source Lock
Lock the input source which you want.
Default Source
Set the default input source when turning
on your TV.
Default Prog
Set the default program when turning on
your TV.
Max Volume
Set the max volume that you can adjust.
Channel lock
Lock the channel which you prefered.
Default Volume
Set the default volume for every time you
open the TV, the default volume is 20.
Clear Lock
Recall the default settings in hotel mode.
Set Password
Set the password as you like.
12
Media Menu
PC Menu
Screen Menu
SCREEN
The color of the icon means whether
your TV has detected a USB memory or
not. Bule: Yes; Gray: No;
Aut o Adj us t
Hor izo nt al Pos .
Move
Menu
50
Ver tica l Pos .
50
Cl oc k
50
Pha se
99
ENTER
Enter
Exit
Auto Adjust
Automatically adjust Clock, Phase,
H-Position, and V-Position settings.
to select Photo/Music/
Press
Movie/Text icon and ENTER to enter
the USB memory.
Horizontal Pos.
Shift the screen up or down.
Vertical Pos.
Shift the screen left or right.
Clock
Adjust the internal sampling clock rate.
Phase
Adjust the internal signal phase.
13
Help
14
Machine Technical Specifications
TV System
Preset Channel s
Speaker Output
PAL/NTSC
PAL:0-199,NTSC:AIR 2-69
CABLE1-125
5W+5W
PAL/NTSC
PAL:0-199,NTSC:AIR 2-69
CABLE1-125
5W+5W
PAL/NTSC
PAL:0-199,NTSC:AIR 2-69
CABLE1-125
5W+5W
24”
PAL/NTSC
PAL:0-199,NTSC:AIR 2-69
CABLE1-125
5W+5W
32”
PAL/NTSC
PAL:0-199,NTSC:AIR 2-69
CABLE1-125
10W+10W
39”/40”
PAL/NTSC
PAL:0-199 NTSC:AIR 2-69
CABLE1-125
10W+10W
PAL/NTSC
PAL:0-199,NTSC:AIR 2-69
CABLE1-125
10W+10W
PAL/NTSC
PAL:0-199,NTSC:AIR 2-69
CABLE1-125
10W+10W
50”
PAL/NTSC
PAL:0-199,NTSC:AIR 2-69
CABLE1-125
10W+10W
Screen Size
po wer Con sump tion
(LE D)
16”
24W
36W
19”
36W
48W
22”
36W
48W
24”
48W
60W
Screen Size
16”
19”
22”
42”
46”
po wer Con sump tion
(LCD)
User's manual x1
100W
26”
Main accessories
32”
56W/65W/100W
100W/135W
39”/40”
70W/75W
135W
42”
70W
175W
46”
110W
50”
135W
Remote controller x1
Power cord x1
AAA Batteries x2
280W
LIFE TIME 60,000 Hrs
15
Remote Controller
1.POWER:
2.MUTE:
3.0-9:
4.
5.
P.MODE
6.S.MODE:
S.MODE
MENU
SLEEP
SOURCE
7.SLEEP:
8. MTS: Press to select the MTS mode.(for example,
MTS , BTSC,MONO,STEREO .eg )
ENTER
9.P.MODE:
10.MENU:
EXIT
INFO
15
11.SOURCE:
MTS
12.
ASPECT
13.ENTER:
14.EXIT:
15.INFO:
REPEAT
ROOT
GOTO
FAV
FAV-
FAV+
FREEZE
INDEX
CANCEL
SUB .PG
ON/OFF
REVEAL
SIZE
HOLD
MIX
RED
GREEN
YELLOW
CYAN
CAUTION:
Batteries installed in the unit should not be exposed to excessive heat such as sunshine,fire and the like.
16
Remote Controller
16.VOL+:
17.ROOT: When playing the photo or VIDEO,if you
press ROOT,then it will stop playing and return
to the current catalogue,in USB mode.
18.VOL-:
USB mode.
19.FR:
FAV: Press to add or remove your favorite
channels under TV menu
USB mode.
20.PLAY/PAUSE:
,in USB mode.
P.MODE
S.MODE
MENU
SLEEP
SOURCE
ENTER
USB mode.
21.PREV:
FAV+: Press to switch your favorite channels
under TV menu
22.STOP:
USB mode.
EXIT
INFO
MTS
16
24
34
ASPECT
23.GREEN/RED/YELLOW/CYAN:
18
26
REPEAT
ROOT
Under the menu corresponding to the TV,
press the button according to the color display to enter
RED:Exchange
GREEN:Insert
YELLOW:Copy
BLUE:Delete
24.CH+:
25.REPEAT: Repeat
26.CH-:
USB mode.
27.FF:
FAV-: Press to switch your favorite channels
under TV menu
28.
29.NEXT:
FREEZE:Image still
GOTO
27
FAV
FAV-
FAV+
FREEZE
19
20
21
29
INDEX
CANCEL
SUB .PG
ON/OFF
REVEAL
SIZE
HOLD
MIX
RED
GREEN
YELLOW
CYAN
28
35
22
31
32
23
25
30
17
36
33
30.GOTO:Skip
31.
32.
33.
34. ASPECT:
35. ON/OFF
36.
17
TV HD LED 32”
MANUEL D'UTILISATION
MODELE NO:32LED1500
IMPORTANT
Lisez ce manuel d'utilisation avant d'installer et
d'utiliser le TV.
Gardez le manuel pour consultation ultérieure.
Sommaire
Guide de préparation
Information de sécurité......................................................................................2
Précautions de sécurité importantes...................................................................3
Installation et connexion du TV
Fixation murale.................................................................................................4
Boutons et affichage connexions........................................................................5
Schéma des connexions externes.......................................................................6
Installation et connexion TV...............................................................................7
Montage du pied............................................................................................... 7
Menu TV
Sélection d'entrée.............................................................................................8
Menu émetteurs................................................................................................8
Arrangement les émetteurs................................................................................9
Menu son......................................................................................................... 9
Menu image/menu temps................................................................................. 10
Menu option....................................................................................................10
Contrôle parental.............................................................................................11
Niveaux de contrôle.........................................................................................12
Menu hôtel......................................................................................................12
Menu PC
Menu écran.....................................................................................................13
Menu média
Menu média....................................................................................................13
Autres informations
Aide...............................................................................................................14
Spécifications...............................................................................................15
Télécommande..............................................................................................16
Ce manuel d'utilisation est uniquement pour référence.
1
Information de sécurité
ATTENTION
RISQUE POUR CHOCS
ELECTRIQUES NE PAS OUVRIR
Des hautes voltages sont utilisés pour l'opération
de ce produit. Afin d'éviter le risque pour chocs
électriques, ne pas ouvrir l'appareil.Contactez
une personne qualifiée pour service.
Si le TV est changé ou mal réparé, il existe le risque pour chocs
électriques. N'essayez pas d'ouvrir l'appareil. Consultez un
spécialiste pour entretien.
Le point d'exclamation dans un triangle isocèle
sert à prévenir l'utilisateur que des documents
importants accompagnent l'appareil.
Le symbole d'éclair dans un triangle isocèle
sert à prévenir l'utilisateur qu'à l'intérieur de
l'appareil se trouvent des hautes voltages non
isolés avec une puissance importante pour
causer des risques pour chocs électriques aux
personnes.
2
Précautions de sécurité importantes
1.Lisez les instructions.
2.Gardez les instructions.
3.Suivez tous les avertissements.
4.Suivez toutes les instructions.
5.Ne pas utiliser l'appareil à côté d'eau.
6.Nettoyez uniquement avec un chiffon sec.
7.Ne pas bloquer les ouverture de ventilation. Installez en suivant les instructions
du fabricant.
8.Ne pas installer à côté des sources de chaleurs telles que radiateurs, poêle, ou
d'autres appareils (y compris un amplificateur) qui produisent du chaleur.
9.Consultez votre revendeur quand la prise courant secteur ne correspond pas avec
votre réseau secteur.
10.Faites attention à ne pas marcher sur le câble courant secteur. Faites attention à
l'endroit ou le câble sort de l'appareil.
11.Utilisez uniquement les accessoires recommandées par le fabricant.
12.
Utilisez uniquement un support, tripod, fixation ou table spécifiée ou livrée
par le fabricant. Quand vous déplacez l'appareil, faites attention qu'il ne
peut pas tomber et causer des blessures.
13.Déconnectez le courant secteur en cas d'orage ou quand vous n'utlisez pas
l'appareil pendant un certain temps.
14.Conctactez du personnel qualifié pour réparation. Ceci est nécessaire quand
l'appareil est endommagé, quand le câble courant secteur est endommagé, quand
une liquide ou un autre objet est pénétré dans l'appareil, quand l'appareil a été
exposé à la pluie ou l'humidité, quand l'appareil ne fonctionne pas bien ou est
tombé. Afin d'éviter les risques pour chocs électriques, ne pas exposer l'appareil
à la pluie ou l'humidité.
15.L'appareil est complètement déconnecté du courant secteur quand le bouton
power est mis en position standby et quand la prise courant secteur est déconnectée.
16.La prise courant secteur doit se trouver près de l'appareil et doit être accessible
facilement.
17.Ne pas placer l'appreil dans des endroits fermés comme une bibliothèque, sauf
s'il y a assez de place libre pour ventilation, comme indiqué par le fabricant.
18.Ne pas exposer l'appareil aux goutes et giclures.
19.Ne pas placez des objets dangereux (p.e. vase ou bougie) au-dessus de l'appareil.
20.L'appareil doit être fixé au mur ou au plafond selon les instructions du fabricant.
21.
Ne jamais placer le TV, la télécommande et les piles à côté d'une flemme
ouverte ou des sources de chaleur, y compris la lumière du soleil. Afin
d'éviter le risque du feu, ne pas placer des bougies ou des flemmes à côté
du TV, la télécommande etles piles.
22.L'entrée USB doit être chargée avec 0.5A (opération normale).
3
Fixation murale
Fixer le TV au mur
1.Mettez d'abord le TV à plat sur une table couverte d'un tapis doux, afin d'éviter des
rayures sur l'écran.
2.Utilisez un tournevis pour démonter le pied (figure 1). Eloignez prudement le pied.
3.Indiquez sur le mur l'endroit où la fixations murale doit venir (figure 3).
4.Forez quatre trous dans le mur.
5.Montez la fixation murale au mur et suspendez le TV dans la fixation (figure 4)
1
2
VOL+
VOL CH+
CH MENU
SOURCE
3
4
Remarques
1.La fixation murale est une option.
2.Faites attention qu'il n'y a pas d'autres objets autour du TV quand vous effectuez
le montage.
3.Faites attention de respecter l'ordre du travail.
4.Les figures sont uniquement pour référence.
5.Suivez le manuel d'instructions de la fixation murale.
6.Utilisez une fixation compatible avec VESA.
4
Boutons et affichages connexions
Boutons TV
Remarque : ce qui suit est uniquement schématique. L'arrengement peut être
différent selon le modèle.
:Pour mettre EN/HORS fonction
SOURCE : sélection de source d'entrée.
MENU : afficher le menu principal et confirmer la sélection.
CH+/- : choisir l'émetteur
VOL+/- : réglage du volume
Affichage des connexions
Remarque : ce qui suit est uniquement schématique. L'arrengement peut être
différent selon le modèle.
L
AV input
Signal d'entrée AV externe et
canaux G/D
EARPHONE output
Connexions casque d'écoute et
haut-parleurs hors fonction
L
AV output
Signal de sortie AV externe et
canaux G/D (pas disponible sur
tous les modèles)
USB input
Connexion d'un appareil USB,
lecture et enregistrement par
fonction PVR
Pr
Y Pb Pr input
Connexion de la sortie composite
du DVD/VCR (pas disponible sur
tous les modèles).
SCART input
Connexion standard, signal
composite et RGB (pas disponible
sur tous les modèles).
INPUT
VIDEO
R
OUTPUT
VIDEO
R
INPUT
Y
Pb
HDMI
HDMI input
Signal d'entrée vidéo digital
ANT 75
Connexion de l'antenne
(75/VHF/UHF)
VGA input
Signal d'entrée analogique PC
PC AUDIO INPUT
Signal d'entrée audio PC (en
combinaison avec VGA)
5
External device connection diagram
Setp top boxes
DVD
HDMI
HDMI
Connexion entrée HDMI
R
INPUT
INPUT
INPUT
VIDEO
Y
L
Connexion entrée AV
Pb
Pr
VIDEO
R
L
Connexion entrée AV
Connexion USB
Connexion entrée AV
Set top boxes
Connexion SCART
OUTPUT
VIDEO
R
L
Connexion entrée AV
Connexion TV
6
Installation et connexion TV
Emplacement du TV
Mettez votre TV sur un support stable
qui peut supporter le poids du TV.
Pour éviter le danger, ne pas placer le
TV à côté d'eau ou d'une source de
chaleur (bougie, radiateur).
Ne pas bloquer la ventilation sur le dos
du TV.
3
Connexion antenne et courant
1.Connectez l'antenne sur le dos du TV.
2.Connectez le courant secteur
(AC 100-240V ~50/60 Hz)
Mettez votre TV en fonction
3.Poussez le bouton power du TV, le
témoin devient vert. En mode standby
(témoin en rouge), poussez le bouton
power de la télécommande.
FM ANT
TV ANT
TV signal output
2
Remarque
Les illustrations sont uniquement comme
référence.
1
Montage du pied
1.Ouvrez le carton ; sortez le TV, les
accessoires et le pied (certains modèles
sans pied).
2.Pour ne pas abimer le TV, placez le sur
une table couverte d'un tapis doux.
3.Fixez le pied sur le TV.
4.Installation complète.
1
2
3
4
7
Menu TV
Source d'entrée
Type tuner : Câble/Air
Syntonisation automatique
La syntonisation automatique cherche
les émetteurs. Utilisez▼/▲pour
sélectionner Auto
Tuning et poussez OK pour démarrer la
recherche. Pour arrêter la recherche
poussez MENU
ou EXIT et poussez pour confirmer ou
pour annuler.
Input Source
TV
AV
YPbPr
SCART
HDMI
PC
Media
ENTER
Enter
Remarque : l'illustration ci-dessus
uniquement comme référence.
Poussez SOURCE pour afficher la liste
d'entrée.
Utilisez ▼/▲ pour sélectionner la source et
poussez ENTER pour confirmer.
Poussez EXIT pour quitter le menu,
autrement le menu disparraît
automatiquement après quelqes secondes
(pour régler le temps : MENU – Menu
TEMPS – Temps OSD).
Menu émetteurs
Menu émetteurs NTSC
Channel Tuning
TV
:
5 Programme(s)
44%... 433.75MHZ (TV)
Menu
Syntonisation ATV manuelle
Canal actuel
ATV Manual Tuning
-
Current CH
1
Color System
Sound System
Fine-Tune
CHANNEL
Tune Type
Air
Auto Tuning
AFC
+
PAL
DK
49.75MHZ
Off
Search
Menu
Introduisez le numéro de présélection.
Système couleurs
Menu émetteurs PAL
Sélectionnez le système couleurs
(PAL/SECAM/NTSC).
Système son
Sélectionnez
le système son (DK/BG/I)
CHANNEL
Auto Tuning
Fine Tune
ATV Manual Tuning
Programme Edit
Pour réglage fin de la fréquence de
l'émetteur
AFC
Automatic Frequency Control
Search
Move
Menu
Enter
Exit
Poussez ENTER pour chercher vers le
Remarque : le menu émetteurs est
bas à partir de la fréquence actuelle,
uniquement disponible en mode TV. C'est le repoussez ENTER pour chercher vers
menu standard quand vous poussez MENu. le haut.
Utilisez ▼/▲ pour voir les autres menus
image/son/temps/options.
Move
Menu
ENTER
Enter
Exit
ENTER
8
Menu TV
Arrangement des émetteurs
Menu son
Programm Edit
SOUND
Sound Mode
Standard
Treble
50
Bass
50
Balance
0
Auto Volume
Move
Menu
ENTER
Enter
Off
Exit
Mode son
Delete
ENTER
Rename
Enter
Enter
FAV
Fav
Fav
Move
Skip
Menu
Menu
Standard/musique/film/sports/utilisateur
(pour pouvoir régler les graves et leis
Utilisez les quatres boutons couleurs
pour arranger les émetteurs.
Utilisez ▼/▲ pour sélectionner
l'émetteur que vous voulez annuler,
donner un autre nom ou déplacer et
ensuite :
Poussez le bouton rouge pour annuler
l'émetteur.
Poussez le bouton vert pour entrer
dans le mode 'nom' ; utilisez
pour
sélectionner le mot que vous voulez
changer et utilisez▼/▲pour choisir les
lettres.
Poussez le bouton jaune pour entrer
dans le mode de déplacement et
utilisez▼/▲ pour déplacer l'émetteur
à la position que vous voulez.
Poussez le bouton bleu pour sauter
l'émetteur (en utilisant le bouton
CH+/- l'émetteur est sauté).
Fav Add ou Delete pour ajouter ou
annuler l'émetteur de la liste préférée.
Medium
Donne une teinte neutre aux couleurs
Warm
Donne une teinte chaude aux couleurs.
Noise Reduction
Hors fonction/bas/medium/haut.
Pour le souffle dans l'image.
aigües).
Bass
Réglage des graves
Treble
Réglage des aigües
Balance
Pour régler le niveau entre le canal
gauche et droite.
Auto Volume
Poussez L/R pour mettre en ou hors
fonction. Quand mis en fonction le
niveau du volume reste constant quand
il y a des messages commerciales ou
quand vous changez l'émetteur.
Réglage des graves/aigües/balance
1.Choisissez comme mode son :
utilisateur
2.Sélectionnez l'item et utilisez▼/▲pour
entrer dans le sousmenu et utilisez
pour régler le niveau.
9
Menu TV
Menu temps
Men u imag e
TIME
PI CTUR E
Picture Mode
Contrast
Brightness
Color
Tint
Sharpness
Color Temperature
Noise Reduction
Mo ve
Mov e
Men u
ENTER
Ent er
Sleep Timer
Standard
50
50
50
50
50
Medium
Middle
Me nu
Off
Auto Sleep
Off
OSD Timer
10s
EN TE R
En ter
Ex it
Ex it
Mod e imag e
Sé lectionnez l'item et poussez ENT ER ou
utilisez
pour entrer dans le sousmen u :
dynami que/standard/doux/utilisateur.
Po ussez PMODE sur la télécomman de pour
entrer directemen t dans le mod e imag e.
Co nt raste/lumi no sité/cou leur s/teint e
(un iqe men t NT SC) /ne tteté
Sé lectionnez l'item et poussez ; l'indication
du niveau apparaît. Ut ilisez
pour régler
le niveau.
Po ussez MENU ou EX IT pour quitter le men u.
Re mar que : ces réglages ne peuvent être
utlisés que quand vous avez choisi utilisateur.
Co nt rast
Po ur régler le niveau blanc dans l'imag e.
Br igh tne ss
Po ur régler la lumi nosité.
Co lor
Po ur régler l'intensité des couleurs.
Tint
Po ur régler la teinte (rouge,vert,bleu).
Sh arpn ess
Po ur régler la netteté (les bords dans l'imag e).
Co lor tge mpe ratur e
Po ur régler la tempé rature des couleurs
comme vous voulez.
Co ol
Do nne une teinte bleue aux blancs.
Sleep timer
Pour régler le temps après lequel
l'appareil doit se mettre
automatiquement hors fonction(hors
fonction/10min/20min/30min/60min/
120min/180min/240min). Pour annuler
mettre en position hors fonction.
Auto Sleep
Pour régler le temps en heurs après
lequel l'appareil doit rester en fonction
après votre dernière commande (hors
fonction/3h/4h/5h). Pour annuler mettre
en position hors fonction.
OSD Timer
Pour régler le temps en secondes (5s,
10s, 15s, 20s, 25s, 30s) après lequel
l'affichage OSD doit disparraître.
Menu option
OP TION
OS D La nguage
En glish
As pect Ra tio
16 :9
Bl ue Sc reen
Off
Ke y Lo ck
Off
Ca ption
Off
Pa rent Co ntrol
Re set
So ftwa re Up date(US B)
Mo ve
Me nu
EN TE R
En ter
Ex it
10
Menu TV
OSD language
Pour choisir la langue OSD.
Aspect Ratio
Pour choisir le format d'écran (4 :3/ 16 :9/
Zoom1/ Zoom2).
Blue screen
Pour mettre l'écran en bleu quand il n'y a
pas de signal.
Key Lock
Pour bloquer les boutons pour que les
enfants ne peuvent pas utiliser l'appareil.
Caption
Pour sélectionner le texte.
CC1,2,3,4 correspond avec les émetteurs
analogiques (dans la plupart des cas en
CC1).
Text1 ;2,3,4 correspond avec le texte des
émetteurs analogiques.
Parantal control
Voyez plus loin.
Reset
Pour revenir aux réglages d'usine.
Software update (USB)
Pour mettre à jour le TV.
Parent control (NTSC)
Set Password
Lock System
ON
TV
MPAA
R
Canada English
PG
Canada French
G
Menu
Set password
Pour entrer le mot de passe correct ou
pour introduire deux fois un nouveau
mot de passe.
Lock system
Pour mettre le sytème en ou hors f
onction.
TV
Les niveaux sont basés sur l'age et le
contenu.
MAPP
Les niveaux sont basés sur les règles
MAPP
G
Audience générale. Tous les ages
sont permis.
PG
Assistance parentale
PG-13
Assistance parentale recommandée.
Le contenu ne peut pas être approprié
pour des ages en dessous de 13.
R
Limité. Enfants en dessous de 17 ans
nécéssistent assistance parentale.
NC-17
Pas autorisé pour des ages en
dessous de 17.
X
Uniquement adultes.
Canada English
Les niveaux sont basés sur les règles
canadiens anglais.
C
Enfants
C8+
Enfants de 8 ans ou plus.
G
Audience générale
PG
Assistance parentale
14+
Enfants de 14 ans ou plus
18+
Adultes
Canada French
Les niveaux sont basés sur les règles
canadiens français.
G
Audience générale
8ans+
Pas recommandé pour des enfants
très jeunes
13ans+
Pas recommandé pour des enfants en
dessous de 13 ans.
16ans+
Pas recommandé pour des enfants en
dessous de 16 ans.
18ans+
Pour adultes
11
Menu TV
Niveaux TV (NTSC)
Mode hôtel (option)
TV rating
TV-Y
ALL
TV-Y7
ALL
TV-G
ALL
OPTION
FV
TV-PG
ALL
V
S
L
D
TV-14
ALL
V
S
L
D
TV-MA
ALL
V
S
L
OSD Language
Aspect Ratio
Blue Screen
Key Lock
Caption
Parent Control
Hotel Mode
Reset
Software Update(USB)
Menu
Move
TV-Y
Audience générale
TV-Y7
Assistance parentale recommandée
TV-G
Assistance parentale fortemment
recommandée
TV-PG
Limité
TV-14
Pas autorisé pour des ages en dessous
de 17.
TV-MA
Uniquement adultes
FV
Violence fantaste
D
Dialogue suggestive
L
Langue forte
S
Situations sexuelles
V
Violence
Menu
HOTEL
Move
ENTER
Enter
Exit
Hotel Mode
Source Lock
Default Source
Default Prog
Max Volume
Channel lock
Default Volume
Clear Lock
Set Password
Menu
ENTER
Enter
English
16:9
Off
Off
Off
On
Off
1
100
Off
20
Exit
Mode hôtel
Mettre le mode en ou hors fonction
Remarque : les réglages ci-dessous
sont uniquement disponibles quand le
mode hôtel est en fonction.
Source lock
Pour bloquer la source d'entrée désirée
Default source
Pour sélectionner la source d'entrée
standard après la mise en fonction du TV.
Default Prog
Pour sélectionner l'émetteur standard
après la mise en fonction du TV.
Max volume
Remarque : le niveau augmente avec l'age. Pour régler le volume maximal.
Exemple : une programme TV-PG peut
Channel lock
avoir un contenu de violence moyen, mais Pour bloquer l'émetteur désiré.
un niveau TV-14 peut avoir en contenu de Default volume
forte violence. Un niveau supérieur bloque Pour régler le volume standard après la
automatiquement les niveaux en dessous. mise en fonction du TV. (volume
standard est 20).
Clear Lock
Débloquer les réglages en mode hôtel.
Set Password
Entrer le mot de passe.
12
Menu PC
SCREEN
Menu média
La couleur du symbole indique que
l'appareil a détecté une mémoire USB.
Bleu : oui, gris : non.
Aut o Adj us t
Hor izo nt al Pos .
Move
Menu
50
Ver tica l Pos .
50
Cl oc k
50
Pha se
99
ENTER
Enter
Exit
Menu écran
Auto adjust
Réglage automatique de la montre, phase,
position H et position V.
Horizontal Pos.
Réglage horizontale de l'écran
Vertical Pos.
Réglage verticale de l'écran
Clock
Réglage de la montre.
Phase
Réglage de la phase.
Poussez
pour sélectionner Photo/
Musique/Film/Texte et poussez ENTER
pour entrer dans la mémoire USB.
13
Aide
14
Spécifications
TV System
Preset Channel s
Speaker Output
PAL/NTSC
PAL:0-199,NTSC:AIR 2-69
CABLE1-125
5W+5W
PAL/NTSC
PAL:0-199,NTSC:AIR 2-69
CABLE1-125
5W+5W
PAL/NTSC
PAL:0-199,NTSC:AIR 2-69
CABLE1-125
5W+5W
24”
PAL/NTSC
PAL:0-199,NTSC:AIR 2-69
CABLE1-125
5W+5W
32”
PAL/NTSC
PAL:0-199,NTSC:AIR 2-69
CABLE1-125
10W+10W
39”/40”
PAL/NTSC
PAL:0-199 NTSC:AIR 2-69
CABLE1-125
10W+10W
PAL/NTSC
PAL:0-199,NTSC:AIR 2-69
CABLE1-125
10W+10W
PAL/NTSC
PAL:0-199,NTSC:AIR 2-69
CABLE1-125
10W+10W
50”
PAL/NTSC
PAL:0-199,NTSC:AIR 2-69
CABLE1-125
10W+10W
Screen Size
po wer Con sump tion
(LE D)
16”
24W
36W
19”
36W
48W
22”
36W
48W
24”
48W
60W
Screen Size
16”
19”
22”
42”
46”
po wer Con sump tion
(LCD)
User's manual x1
100W
26”
Main accessories
32”
56W/65W/100W
100W/135W
39”/40”
70W/75W
135W
42”
70W
175W
46”
110W
50”
135W
Remote controller x1
Power cord x1
AAA Batteries x2
280W
60 000 heures la durée de vie
15
Télécommande
P.MODE
S.MODE
MENU
SLEEP
SOURCE
ENTER
EXIT
INFO
15
MTS
ASPECT
REPEAT
ROOT
GOTO
FAV
FAV-
FAV+
FREEZE
INDEX
CANCEL
SUB .PG
ON/OFF
REVEAL
SIZE
HOLD
MIX
RED
GREEN
YELLOW
CYAN
16
Télécommande
P.MODE
S.MODE
MENU
SLEEP
SOURCE
ENTER
EXIT
INFO
MTS
16
24
34
ASPECT
18
26
REPEAT
ROOT
GOTO
30
17
27
FAV
FAV-
FAV+
FREEZE
19
20
21
29
INDEX
CANCEL
SUB .PG
ON/OFF
REVEAL
SIZE
HOLD
MIX
RED
GREEN
YELLOW
CYAN
28
35
22
31
32
23
25
36
33
17