1
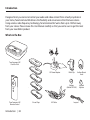
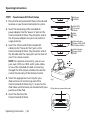
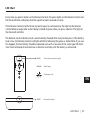
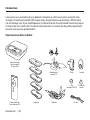
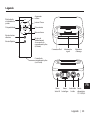
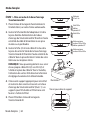
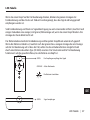
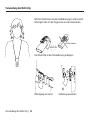
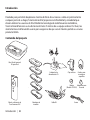
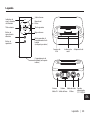
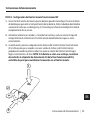
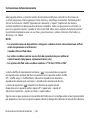
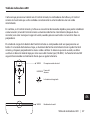
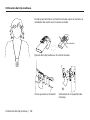
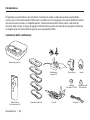
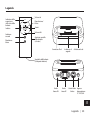
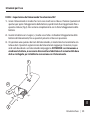
EN
FR
DE
User Manual
®
TuneCommand™ AV for iPod
Introduction
ES
IT
Introduction
Designed to let you roam and control your audio and video content from virtually anywhere in
your home, TuneCommand AV delivers the flexibility and convenience that iPod users desire.
Using wireless radio frequency technology, TuneCommand AV works from up to 120 feet away
from your stereo. Please review this User Manual carefully so that you can be sure to get the most
from your new Belkin product.
What’s in the Box
TuneCommand AV
Dock for iPod
AC Power Adapter
TuneCommand AV
Remote Control
Introduction | 02
5 Insert Trays
AV Cable
Multi-Clip
Surface-Mount
Hook
Battery
(Model CR 2032)
Lanyard
Adjuster
Lanyard
Legend
Battery-life and
range indicator
Skip backward
Volume up
Play/pause
Skip forward
Volume down
Shuffle button
Repeat button
Battery door
release button
(on the back)
iPod connector
Signal indicator
Dock adapter
Battery door
(on the bottom)
EN
Stereo
AV out
Stereo
line out
Video out Power in
S-video DC 12V/0.8A
Legend | 03
Operating Instructions
STEP 1 - TuneCommand AV Dock Setup
iPod mini
4GB 6GB
1. Place the TuneCommand AV Dock in the desired
location on your home entertainment system.
�������������������������������������
iPod 20GB
U2 Special
Edition
iPod
40GB
2. Insert the barrel plug of the included AC
power adapter into the “power in” port on the
TuneCommand AV Dock. Plug the other end of
the AC power adapter into your wall socket or
surge protector.
�������������������������������������
����������������������������������������������������
�������������������������������������
����������������������������������������������������
iPod with color
display, 20GB 30GB,
U2 Special Edition
3. Insert the 3.5mm end of the included AV
cable into the “Stereo AV Out” port on the
TuneCommand AV Dock. Plug the other end of
the AV cable into the input ports on the back of
your TV or stereo receiver.
�������������������������������������
����������������������������������������������������
iPod with color
display, 40GB
60GB
����������������������������������������������������
NOTE: For optional connectivity, you can use
your own 2-RCA-to-2-RCA and S-video cables
in lieu of the included AV cable. Connecting
through the RCA outputs disables the volumecontrol functionality of the Remote Control.
4. Select the appropriate insert tray for your
iPod and insert it into the top well of the
TuneCommand AV Dock (Fig. 1). Inserts for the
iPod video and iPod nano are included with your
purchase of the iPod.
5. Insert the iPod into the
TuneCommand AV Dock.
Operating Instructions | 04
SNAP
Fig. 1
Pull up here to remove the insert
Operating Instructions
STEP 2 - TuneCommand AV Remote Control Setup
1. Turn the Remote Control so that the buttons are facing down. Press the release button to
open the battery tray, and gently pull it out of the housing until it stops (Fig. 2). Please do
not force the battery tray completely out of the housing.
2. Insert the battery with the (+) side facing up and push the battery cover back into the
Remote Control until the button snaps back into place and the battery tray is securely
shut.
3. Now press any of the Remote Control’s buttons for the TuneCommand AV Remote Control
and Dock to pair up. The green lights on the Dock and the Remote Control blink when the
first button-press command from the Remote Control reaches the Dock correctly. NOTE:
If the battery is removed or replaced, you will need to unplug the AC power adapter
from the TuneCommand AV Dock and plug it back in to re-establish connection with
the Remote Control.
1
EN
2
Fig. 2
3
Operating Instructions | 05
Operating Instructions
You can now use your TuneCommand AV Remote Control to control the iPod’s play/pause, skip
forward, skip backward, and volume up/down functions. In addition, you can conveniently
control the shuffle and repeat functions, using the two small round buttons. Each press of
a button advances the setting to the next stage. When used with the iPod video, nano, or
photo, TuneCommand AV lets you scroll through your videos (iPod video only), slideshows, or
presentations, wirelessly!
NOTE:
• Slideshows must be started manually on the iPod before the TV will display them
When using the iPod video:
• Videos must be placed in a playlist in order to use the
Remote Control (play/pause, forward/back, etc.)
• The iPod video settings need to be switched to “TV Out > NTSC or PAL”
) advances the iPod’s shuffle settings as follows:
The shuffle key (
shuffle off > shuffle songs > shuffle albums.
) advances the iPod’s repeat settings like this:
The repeat button (
repeat off > repeat one > repeat all.
Follow the icons on the iPod’s screen to see the current settings, represented by small icons on the
upper right, below the battery-status indicator.
Operating Instructions | 06
LED Chart
Every time you push a button on the Remote Control, the green lights on the Remote Control and
the Dock will blink, indicating that the signal has been received correctly.
If the Remote Control and the Dock are too far apart to communicate, the light on the Remote
Control blinks orange (after a short delay) instead of green when you press a button. The light on
the Dock will not blink.
The Remote Control’s battery level is automatically checked after every button press. If the battery
level is low, the Remote Control’s red light will blink, following the green or amber blink. If you see
this happen, the low battery should be replaced soon with a new one of the same type (CR 2032).
Your TuneCommand AV will continue to function normally until the battery is exhausted.
GREEN
The receiver receives the signal
ORANGE
Out of range
The battery is out
EN
GREEN
Received the signal
LED Chart | 07
Using the Multi-Clip
The clip allows you to wear the Remote Control on a belt, or
around your neck with the lanyard.
Do not slide on
SNAP
Attaching the multi-clip to the Remote Control
1
2
How to wear on a belt
Using the Multi-Clip | 08
Using the surface mount
Troubleshooting
•
Dock is not powering on when plugged in.
Ensure the AC power adapter is completely plugged into the wall and “power in” port on the
TuneCommand AV Dock. Ensure your iPod is fully inserted into the connector on the top of
the Dock.
•
Remote Control is not powering on.
Ensure that the Remote Control’s battery is inserted correctly, with the (+) facing up, that the
battery tray is fully pushed in, and the release button is snapped
back into position.
• After connecting the Dock and Remote Control, there is no sound.
- Select a song on the iPod and press “PLAY”.
- Make sure the audio cable is correctly plugged into the
TuneCommand AV Dock and the back of the entertainment system.
- When connected to a stereo system, ensure the
stereo system is set to the correct input channel.
- Make sure the iPod and stereo system are powered on.
- Turn up the volume using the TuneCommand AV Remote Control.
- Repeat STEP 1 and STEP 2 of the setup section.
•
The Remote Control does not work after replacing the battery.
After replacing the battery, unplug the power adapter from the TuneCommand AV Dock and
plug it back in to re-establish connection with the Remote Control.
•
The video is playing on my iPod but there is no video on the TV screen.
Make sure the iPod video setting is set to “TV Out > NTSC or PAL”.
•
The normal function of the product may be disturbed by Strong Electro Magnetic
Interference. If so, simply reset the product to resume normal operation by following the
instruction manual. In case the function could not resume, please use the product in other
location.
Troubleshooting | 09
EN
Specifications
Operating Range: Up to 120 ft. (36.6m)
Transmission Method: Radio frequency
Frequency: 2.44GHz
Remote Battery: CR 2032 3V
Remote Dimensions: 3.5” x 1.5” x 0.5” (8.9cm x 3.8cm x 1.3cm)
(not including belt clip; 0.75” (1.9cm) max depth including belt clip)
Remote Weight (including battery): 0.8 oz. (22.6g)
Dock Dimensions: 3.5” x 3.5” x 1.00” (8.9cm x 8.9cm x 2.5cm)
Dock Weight: 3.4 oz. (96.4g)
Clip/Surface Mount/Lanyard: 0.47oz. (13.2g)
Specifications | 010
Information
FCC Statement
DECLARATION OF CONFORMITY WITH FCC RULES FOR ELECTROMAGNETIC COMPATIBILITY
We, Belkin Corporation, of 501 West Walnut Street, Compton, CA 90220, declare under our sole
responsibility that the product:
F8Z065ea
to which this declaration relates:
Has been tested and found to comply with the limits for a Class B digital device, pursuant to part 15 of
the FCC Rules. These limits are designed to provide reasonable protection against harmful interference
in a residential installation. This equipment generates, uses, and can radiate radio frequency energy
and, if not installed and used in accordance with the instructions, may cause harmful interference to
radio communications. However, there is no guarantee that interference will not occur in a particular
installation. If this equipment does cause harmful interference to radio or television reception, which
can be determined by turning the equipment off and on, the user is encouraged to try to correct the
interference by one or more of the following measures:
.
Re-orient or relocate the receiving antenna.
.
Increase the separation between the equipment and receiver.
.
Connect the equipment into an outlet on a circuit different from that to
which the receiver is connected.
.
Consult the dealer or an experienced radio/TV technician for help.
ICES
This Class B digital apparatus complies with Canadian ICES-003. Cet appareil numérique de la classe Best
conforme á la norme NMB-003 du Canada.
Information | 11
EN
Belkin Corporation Limited 3-Year Product Warranty
What this warranty covers.
Belkin Corporation warrants to the original purchaser of this Belkin product that the product shall be free of defects
in design, assembly, material, or workmanship.
What the period of coverage is.
Belkin Corporation warrants the Belkin product for three years.
What will we do to correct problems?
Product Warranty.
Belkin will repair or replace, at its option, any defective product free of charge (except for shipping charges for the
product).
What is not covered by this warranty?
All above warranties are null and void if the Belkin product is not provided to Belkin Corporation for inspection
upon Belkin’s request at the sole expense of the purchaser, or if Belkin Corporation determines that the Belkin
product has been improperly installed, altered in any way, or tampered with. The Belkin Product Warranty does not
protect against acts of God (other than lightning) such as flood, earthquake, war, vandalism, theft, normal-use wear
and tear, erosion, depletion, obsolescence, abuse, damage due to low voltage disturbances (i.e. brownouts or sags),
non-authorized program, or system equipment modification or alteration.
How to get service.
To get service for your Belkin product you must take the following steps:
1. Contact Belkin Corporation at 501 W. Walnut St., Compton CA 90220, Attn: Customer Service, or call
(800)-223-5546, within 15 days of the Occurrence. Be prepared to provide the following information:
a. The part number of the Belkin product.
b. Where you purchased the product.
c. When you purchased the product.
d. Copy of original receipt.
2. Your Belkin Customer Service Representative will then instruct you on how to forward your receipt
and Belkin product and how to proceed with your claim.
Warranty | 12
Belkin Corporation Limited 3-Year Product Warranty
Belkin Corporation reserves the right to review the damaged Belkin product. All costs of shipping the Belkin
product to Belkin Corporation for inspection shall be borne solely by the purchaser. If Belkin determines, in its
sole discretion, that it is impractical to ship the damaged equipment to Belkin Corporation, Belkin may designate,
in its sole discretion, an equipment repair facility to inspect and estimate the cost to repair such equipment. The
cost, if any, of shipping the equipment to and from such repair facility and of such estimate shall be borne solely
by the purchaser. Damaged equipment must remain available for inspection until the claim is finalized. Whenever
claims are settled, Belkin Corporation reserves the right to be subrogated under any existing insurance policies the
purchaser may have.
How state law relates to the warranty.
THIS WARRANTY CONTAINS THE SOLE WARRANTY OF BELKIN CORPORATION, THERE ARE NO OTHER WARRANTIES,
EXPRESSED OR, EXCEPT AS REQUIRED BY LAW, IMPLIED, INCLUDING THE IMPLIED WARRANTY OR CONDITION OF
QUALITY, MERCHANTABILITY OR FITNESS FOR A PARTICULAR PURPOSE, AND SUCH IMPLIED WARRANTIES, IF ANY,
ARE LIMITED IN DURATION TO THE TERM OF THIS WARRANTY.
Some states do not allow limitations on how long an implied warranty lasts, so the above limitations may not apply
to you.
IN NO EVENT SHALL BELKIN CORPORATION BE LIABLE FOR INCIDENTAL, SPECIAL, DIRECT, INDIRECT,
CONSEQUENTIAL OR MULTIPLE DAMAGES SUCH AS, BUT NOT LIMITED TO, LOST BUSINESS OR PROFITS ARISING OUT
OF THE SALE OR USE OF ANY BELKIN PRODUCT, EVEN IF ADVISED OF THE POSSIBILITY OF SUCH DAMAGES.
This warranty gives you specific legal rights, and you may also have other rights, which may vary from state to state.
Some states do not allow the exclusion or limitation of incidental, consequential, or other damages, so the above
limitations may not apply to you.
Warranty | 13
EN
EN
Belkin Corporation
501 West Walnut Street
Los Angeles, CA 90220, USA
310-898-1100
310-898-1111 fax
Belkin Ltd.
Express Business Park, Shipton Way
Rushden, NN10 6GL, United Kingdom
+44 (0) 1933 35 2000
+44 (0) 1933 31 2000 fax
Belkin B.V.
Boeing Avenue 333
1119 PH Schiphol-Rijk, The Netherlands
+31 (0) 20 654 7300
+31 (0) 20 654 7349 fax
Belkin Ltd.
7 Bowen Crescent, West Gosford
NSW 2250, Australia
+61 (0) 2 4372 8600
+61 (0) 2 4372 8603 fax
Tech Support
US: 310-898-1100 ext. 2263
800-223-5546 ext. 2263
Europe: 00 800 223 55 460
Australia: 1800 235 546
New Zealand: 0800 235 546
© 2006 Belkin Corporation. All rights reserved.
All trade names are registered trademarks of respective manufacturers listed. iPod is a trademark of
Apple Computer, Inc., registered in the U.S. and other countries.
F8Z065ea
P75047ea
FR
Manuel de l’utilisateur
®
TuneCommand™ AV pour iPod
Introduction
Introduction
Conçu pour vous permettre de vous déplacer n’importe où chez nous tout en écoutant votre
musique, le TuneCommand AV offre toujours plus de polyvalence aux utilisateurs d’iPod. Grâce
à la technologie sans fil par radiofréquences, la télécommande TuneCommand fonctionne jusqu’à
35 mètres de votre chaîne HiFi. Veuillez lire attentivement ce manuel afin de profiter pleinement
de votre tout nouveau produit Belkin.
Vous trouverez dans la boîte :
Base d’ancrage
TuneCommand
AV pour iPod
Adaptateur de
courant CA
Télécommande
TuneCommand AV
Introduction | 02
5 supports
Câble AV
Pince
Crochet
Pile
(modèle CR 2032)
Boucle du
cordon
Cordon
Légende
État de la pile
et indicateur de
portée
Piste précédente
Augmenter
volume
Lecture / Pause
Piste suivante
Baisser volume
Bouton Lecture
aléatoire
Bouton Répéter
Bouton de
déclenchement
du couvercle du
compartiment à piles
(à l’arrière)
Connecteur iPod
Indicateur de
signal
Adaptateur
d’ancrage
Couvercle du
compartiment à piles
(sous l’unité)
FR
Stéréo
Stéréo Sortie vidéo Entrée
Sortie AV Sortie ligne S-vidéo
alimentation
CC 12 V/0,8 A
Légende | 03
Mode d’emploi
ÉTAPE 1 – Mise en route de la base d’ancrage
TuneCommand AV
iPod mini
4 Go 6 Go
�������������������������������������
1. Placez la base d’ancrage du TuneCommand à
l’endroit désiré, sur votre chaîne audiovisuelle.
iPod 20 Go
édition
spéciale U2
iPod 40 Go
�������������������������������������
2. Insérez le fiche barillet de l’adaptateur CA dans
la prise d’entrée d’alimentation de la base
d’ancrage du TuneCommand AV. Branchez l’autre
extrémité du câble d’alimentation à une prise
murale ou un parafoudre.
����������������������������������������������������
�������������������������������������
����������������������������������������������������
iPod avec écran
couleur 20 Go 30 Go
édition spéciale U2®
�������������������������������������
3. Insérez la fiche 3,5 mm du câble AV inclus dans
la prise de sortie AV stéréo de la base d’ancrage
TuneCommand AV. Branchez l’autre extrémité du
câble AV dans la prise d’entrée à l’arrière de votre
téléviseur ou récepteur stéréo.
����������������������������������������������������
iPod avec écran
couleur 40 Go 60 Go
����������������������������������������������������
PRESSER
REMARQUE : Vous pouvez également vous servir
de vos propres câbles RCA (2) vers RCA (2) et
S-Vidéo à la place du câble AV fourni. Toutefois,
l’utilisation des sorties RCA désactive la fonction
de réglage du volume de la télécommande.
4. Choisissez le support approprié pour votre iPod
et insérez-le dans cavité se trouvant sur la base
d’ancrage du TuneCommand AV (illustr. 1). Les
supports pour l’iPod vidéo et l’iPod nano sont
fournis à l’achat de l’iPod.
5. Placez l’iPod dans la base d’ancrage du
TuneCommand AV.
Mode d’emploi | 04
Illustration 1
Tirer ici pour retirer le support
Mode d’emploi
ÉTAPE 2 – Mise en route de la télécommande TuneCommand AV
1. Retournez la télécommande de sorte que ses boutons font face au sol. Appuyez sur le bouton
de déclenchement pour ouvrir le couvercle du compartiment de la pile. Glissez celui-ci vers
l’extérieur jusqu’à ce qu’il se bloque (illustr. 2). Ne forcez pas le couvercle de la pile hors de son
logement.
2. Insérez la pile, côté (+) vers le haut (Illustration 2), et replacez le couvercle du compartiment de
la pile de la télécommande jusqu’à ce qu’il s’enclenche et qu’il soit bien en place.
3. Appuyez maintenant sur n’importe quel bouton de la télécommande, afin que la
télécommande TuneCommand AV et la base d’ancrage communiquent entre eux. Les
témoins de la base et de la télécommande clignotent lorsque la première commande de la
télécommande parvient à la base. NOTE : Si vous retirez ou remplacez la pile, vous devez
débrancher l’adaptateur secteur de la base TuneCommand AV et le rebrancher afin
d’établir une nouvelle connexion avec la télécommande.
1
2
FR
Illustration 2
3
Mode d’emploi | 05
Mode d’emploi
Vous pouvez maintenant utiliser votre télécommande TuneCommand AV pour commander les
fonctions lecture/pause, piste suivante, piste précédente et augmenter/diminuer le volume de
votre iPod. Vous pouvez en outre commander les fonctions de lecture aléatoire et répétée à l’aide
des deux petits boutons. Chaque pression sur le bouton permet d’avancer au réglage suivant.
Lorsque vous l’utilisez avec l’iPod video, nano ou photo, le TuneCommand AV vous permet de
faire défiler vos vidéos (iPod vidéo seulement), photos ou présentations, le tout sans fil !
NOTE :
• Les diaporamas doivent être démarrés manuellement sur
l’iPod avant d’être affichés sur le téléviseur.
Lorsque vous utilisez l’iPod vidéo :
• Les clips vidéo doivent être placés sur une liste d’écoute pour vous
servir de la télécommande (lecture/pause, avancer/reculer, etc.).
• Les paramètres de l’iPod vidéo doivent être réglés à « TV Out > NTSC or PAL ».
Le bouton de lecture aléatoire (
) permet de faire défiler les réglages comme suit :
Shuffle off [aléatoire off] > Shuffle songs [aléatoire chansons] > Shuffle albums [aléatoire albums].
) permet de faire défiler les réglages comme suit :
La touche de lecture répétée (
Repeat off [répéter off] > Repeat one [répéter une seule chanson] > Repeat all [répéter tous].
Jetez un œil sur les icônes à l’écran de votre iPod pour voir les paramètres actuels. Les icônes sont
situées dans le coin supérieur droit, sous l’indicateur de l’état de la pile.
Mode d’emploi | 06
Témoins
Chaque fois que vous appuyez sur un bouton de la télécommande, les témoins verts de la
télécommande et de la base clignotent, indiquant une bonne réception du signal.
Si la télécommande et la base sont trop éloignés pour communiquer entre eux, le témoin DEL de
la télécommande est ambré (au lieu de vert) lorsque vous appuyez sur un bouton. Le témoin de la
base ne clignote pas.
Le niveau de la pile de la télécommande se vérifie automatiquement après chaque pression
des boutons. Si le niveau de la pile est faible, le témoin rouge de la télécommande clignote,
après que le témoin vert ou ambré ait clignoté. Si tel est le cas, la pile faible doit être remplacée
promptement par une nouvelle pile de même type (CR 2032). Le TuneCommand fonctionne
toutefois normalement jusqu’à épuisement de la pile.
VERT
Le récepteur reçoit le signal
AMBRÉ
Hors de portée
La pile est épuisée
FR
VERT
Signal reçu
Témoins | 07
Utilisation de la pince
La pince vous permet de porter la télécommande à la
ceinture, ou autour de votre cou grâce au cordon.
Ne pas glisser
PRESSER
Comment poser la pince sur la télécommande
1
2
Comment fixer à la ceinture
Utilisation de la pince | 08
Utilisation du support de montage
Dépannage
•
La base d’ancrage ne s’allume pas lorsqu’il est branché.
Assurez-vous que l’adaptateur secteur est bien branché à la prise murale et dans la prise
d’alimentation de la base TuneCommand AV. Assurez-vous que l’iPod est correctement placé
sur le connecteur se trouvant sur la base.
•
La télécommande ne s’allume pas..
Assurez-vous que la pile est insérée correctement, avec le symbole (+) vers le haut. Assurezvous également que le couvercle du compartiment de la pile est bien en place et que le
bouton de déclenchement est bien enclenché.
• Après connexion de la base et de la télécommande, il n’y a aucun son.
- Choisissez une piste sur l’iPod et appuyez sur « Play [Lecture] ».
- Assurez-vous que le câble audio est correctement branché à la
base du TuneCommand et à l’arrière de la chaîne HiFi.
- Lorsque branché à une chaîne HiFi, assurez-vous que la
chaîne est réglée au bon canal de sortie.
- Assurez-vous que l’iPod et la chaîne HiFi sont allumés.
- Augmentez le volume au moyen de la télécommande TuneCommand AV.
- Répétez les ÉTAPES 1 et 2 de mise en route.
•
La télécommande ne fonctionne pas après le remplacement de la pile.
Après avoir remplacé la pile, débranchez l’adaptateur secteur de la base TuneCommand AV et
rebranchez-le afin d’établir une nouvelle connexion avec la télécommande.
•
Le clip vidéo joue sur mon iPod, mais n’apparaît pas à l’écran de mon téléviseur.
Assurez-vous que les paramètres de l’iPod vidéo sont réglés à « TV Out > NTSC or PAL ».
•
Le fonctionnement normal du produit peut être perturbé par la présence de fortes
interférences électromagnétiques. Si c’est le cas, effectuez un redémarrage de l’appareil
selon la procédure appraissant dans le manuel de l’utilisateur. Si l’appareil ne fonctionne
toujours pas de façon normale, essayez de l’utiliser à un autre endroit.
Dépannage | 09
FR
Caractéristiques techniques
Portée de fonctionnement : Jusqu’à to 36,6 mètres
Mode de transmission : Fréquences radio
Fréquence : 2,44 GHz
Pile de la télécommande : CR 2032, 3 V
Dimensions de la télécommande : 8,9 cm x 3,8 cm x 1,3 cm
(sans pince de ceinture ; épaisseur maximale de 1,9 cm avec la pince)
Poids de la télécommande (avec pile) : 22,6 g
Dimensions de la base : 8,9 cm x 8,9 cm x 2,5 cm
Poids de la base : 96,4 grammes
Pince/Crochet/Cordon : 13,2 grammes
Spécifications | 010
Information
Déclaration FCC
DÉCLARATION DE CONFORMITÉ À LA RÉGLEMENTATION FCC EN MATIÈRE DE COMPATIBILITÉ
ÉLECTROMAGNÉTIQUE
Nous, Belkin Corporation, sis au 501 West Walnut Street , Compton CA, 90220, États-Unis, déclarons sous
notre seule responsabilité que le produit :
F8Z065ea
auquel se réfère la présente déclaration :
a été testé et satisfait aux limites de la classe B des appareils numériques, conformément à l’alinéa 15 de
la réglementation de la FCC. Ces limites sont conçues de manière à assurer une protection raisonnable
contre les interférences nuisibles au sein d’une installation domestique. L’appareil génère, utilise et peut
irradier une énergie de fréquence radio. S’il n’est pas installé et utilisé conformément aux instructions,
il peut causer des interférences nuisibles sur le plan de la réception radio ou télévision. Toutefois, il
n’est nullement garanti que des interférences ne se produiront pas dans certaines installations. Si cet
équipement cause des interférences nuisibles sur le plan de la réception radio ou télévision, pouvant
être déterminées en mettant l’appareil sous et hors tension, l’utilisateur est invité à tester et à corriger
l’interférence en prenant une des mesures suivantes :
•
Réorienter ou changer de place l’antenne de réception.
.
Augmenter la distance entre l’appareil et le récepteur.
.
Connecter l’appareil à une prise située sur un circuit différent
de celui sur lequel le récepteur est connecté.
.
Consulter le revendeur ou un technicien en radio/TV pour obtenir de l’aide.
ICES
This Class B digital apparatus complies with Canadian ICES-003. Cet appareil numérique de la classe B est
conforme à la norme NMB-003 du Canada.
Information | 11
FR
Garantie limitée de 3 ans du produit de Belkin Corporation
Couverture offerte par la garantie.
Belkin Corporation garantit à l’acheteur initial de ce produit Belkin que le produit est exempt de défauts de
conception, de montage, de matériau et de fabrication.
Période de couverture
Belkin Corporation garantit ce produit Belkin pour une période de trois ans.
En cas de problème
Garantie du produit
Belkin s’engage à réparer ou à remplacer gratuitement, à sa convenance, tout produit défectueux (à l’exception des
frais d’expédition du produit).
Limites de la couverture offerte par la garantie
Toutes les garanties susmentionnées sont caduques si le produit Belkin n’est pas retourné à Belkin Corporation à
la demande expresse de celui-ci, l’acheteur étant responsable de l’acquittement des frais d’expédition, ou si Belkin
Corporation détermine que le produit Belkin a été installé de façon inadéquate, a été modifié d’une quelconque façon
ou falsifié. La garantie du produit Belkin ne protège pas contre des calamités naturelles (autre que la foudre) comme
les inondations, les tremblements de terre ou la guerre, le vandalisme, le vol, l’usure normale, l’érosion, l’épuisement,
l’obsolescence, l’abus, les dommages provoqués par des perturbations de basse tension (baisses ou affaissements
de tension, par exemple), un programme non autorisé ou une modification de l’équipement du système.
Pour une réclamation :
Vous devez prendre les mesures suivantes pour faire réparer ou entretenir votre produit Belkin :
1. Écrivez à Belkin Corporation au 501 W. Walnut St., Compton CA 90220, États-Unis, à l’attention de : Service Client,
ou appelez au (800)-223-5545 dans les 15 suivant l’événement. Préparez-vous à fournir les informations suivantes :
a. Référence du produit Belkin.
b. Lieu d’achat du produit.
c. Date d’achat du produit.
d. Copie de la facture d’origine.
2. Le représentant du service client Belkin vous donnera alors toutes les instructions sur la façon d’expédier votre
facture et le produit Belkin et la façon de présenter votre réclamation.
Garantie | 12
Garantie limitée de 3 ans du produit de Belkin Corporation
Belkin Corporation se réserve le droit d’examiner le produit Belkin endommagé. Tous les frais d’expédition du
produit Belkin à Belkin Corporation pour inspection seront entièrement à la charge de l’acheteur. Si Belkin
détermine, à son entière discrétion, qu’il est peu pratique d’expédier l’équipement endommagé à Belkin
Corporation, elle peut désigner, à son entière discrétion, un atelier de réparation pour inspecter l’équipement et
évaluer le coût des réparations. Les coûts, s’il en est, pour l’expédition de l’équipement jusqu’à l’atelier de réparation
et le retour, et pour l’estimation, seront entièrement assumés par l’acheteur. L’équipement endommagé doit être
disponible pour inspection jusqu’à ce que la demande de réclamation soit réglée. Lorsqu’un règlement intervient,
Belkin Corporation se réserve le droit d’être subrogé en vertu de quelque police d’assurance que l’acheteur pourrait
avoir.
Relation entre le Droit national et la garantie.
BELKIN REJETTE PAR LE PRÉSENT DOCUMENT TOUTES LES AUTRES GARANTIES, EXPLICITES OU IMPLICITES, Y
COMPRIS MAIS SANS S’Y LIMITER, LES GARANTIES IMPLICITES AFFÉRENTES À LA QUALITÉ LOYALE ET MARCHANDE
ET À L’ADÉQUATION À UNE FIN DONNÉE, ET CES GARANTIES IMPLICITES, S’IL Y A LIEU, SONT D’UNE DURÉE LIMITÉE
AU CONDITIONS DE LA PRÉSENTE GARANTIE.
Certains pays ne permettent pas d’imposer de limite à la durée de validité des garanties implicites. Il se peut donc
que les limites ci-dessus ne s’appliquent pas dans votre cas.
BELKIN COMPONENTS NE PEUT EN AUCUN CAS ÊTRE TENU RESPONSABLE DE DOMMAGES ACCESSOIRES, DIRECTS,
INDIRECTS OU MULTIPLES, Y COMPRIS, MAIS SANS S’Y LIMITER, LA PERTE DE REVENUS OU D’AFFAIRES DÉCOULANT
DE LA VENTE OU DE L’UTILISATION DE TOUT PRODUIT BELKIN, MÊME LORSQU’IL A ÉTÉ AVISÉ DE LA PROBABILITÉ
DES DITS DOMMAGES.
La garantie vous confère des droits légaux spécifiques. Vous pouvez également bénéficier d’autres droits qui varient
d’un pays à l’autre. Some states do not allow limitations on how long an implied warranty lasts, so the above
limitations may not apply to you.
Garantie | 13
FR
FR
Belkin Corporation
501 West Walnut Street
Los Angeles, CA 90220, États-Unis
310-898-1100
310-898-1111 Fax
Belkin Ltd.
Express Business Park, Shipton Way
Rushden, NN10 6GL, Royaume-Uni
+44 (0) 1933 35 2000
+44 (0) 1933 31 2000 Fax
Belkin B.V.
Boeing Avenue 333
1119 PH Schiphol-Rijk, Pays-Bas
+31 (0) 20 654 7300
+31 (0) 20 654 7349 Fax
Belkin Ltd.
7 Bowen Crescent, West Gosford
NSW 2250, Australie
+61 (0) 2 4372 8600
+61 (0) 2 4372 8603 Fax
Assistance technique
États-Unis : 310-898-1100 poste 2263
800-223-5546 poste 2263
Europe : 00 800 223 55 460
Australie : 1800 235 546
Nouvelle-Zélande : 0800 235 546
© 2006 Belkin Corporation. Tous droits réservés.
Toutes les raisons commerciales sont des marques déposées de leurs fabricants respectifs. IPod est
une marque de commerce d’Apple Computer, Inc. enregistrée aux États-Unis et dans d’autres pays.
F8Z065ea
P75047ea
DE
Benutzerhandbuch
®
TuneCommand™ AV für iPod
Einleitung
Einleitung
Mit dem TuneCommand AV können Sie die Wiedergabe von Musik und Videos praktisch von
überall in Ihrer Wohnung aus steuern. Dieses praktische Gerät bietet iPod-Benutzern genau die
Flexibilität, die sie sich wünschen. Durch die Verwendung von Funktechnologie funktioniert
die TuneCommand AV Fernbedienung in einer Reichweite von bis zu 40 Metern von Ihrer
Stereoanlage. Bitte lesen Sie dieses Benutzerhandbuch genau durch, um sicherzustellen, dass Sie
dieses Belkin-Produkt wirklich optimal nutzen.
Verpackungsinhalt:
TuneCommand AV
Dock für iPod
Netzteil
Multi-Clip
Befestigungshaken
Batterie
Längenverstellung
(Typ CR 2032) für die Trageschnur
TuneCommand AV
Fernbedienung
Einleitung | 02
5 Einsätze
Audio-/Videokabel
Trageschnur
Übersicht
Anzeige für
Batterielaufzeit
und Reichweite
Vorheriger Titel
(zurück)
Lautstärke +
Wiedergabe/
Pause
Nächster Titel
(vorwärts)
Lautstärke -
Shuffle-Knopf
(Zufallsauswahl)
Repeat-Knopf
(Wiederholen)
BatteriefachAuslöseknopf
(auf der Rückseite)
iPod-Anschluss
Signal-Anzeige
Dock-Adapter
Batteriefachdeckel
(an der Unterseite)
Stereo AV-Ausgang
Stereo LineNetzeingang
Ausgang Videoausgang DC 12 V /
S-Video 0,8 A
(Hosidenanschluss)
Übersicht | 03
DE
Bedienungsanweisungen
iPod mini
4 GB 6 GB
SCHRITT 1 – Einrichtung des TuneCommand AV Docks
1. Stellen Sie das TuneCommand AV Dock an einem
geeigneten Platz auf Ihrer Heimkinoanlage auf.
�������������������������������������
iPod
20 GB, U2Sonderausführung
iPod
40 GB
2. Stecken Sie den runden Stecker des mitgelieferten
Netzteils in die Netzeingang des TuneCommand
AV Docks. Stecken Sie den Netzstecker
des Netzteils in eine Steckdose oder einen
Überspannungsschutz.
�������������������������������������
����������������������������������������������������
�������������������������������������
����������������������������������������������������
iPod mit FarbDisplay, 20
GB 30 GB, U2Sonderausführung
iPod mit FarbDisplay, 40 GB
60 GB
3. Stecken Sie den 3,5-mm-Klinkenstecker des mitgelieferten AV-Kabels in den Stereo-AV-Ausgang
(Stereo AV Out) desTuneCommand AV Docks.
Stecken Sie das andere Ende des AV-Kabels in die
Eingänge an der Rückseite des Fernsehers oder
Stereo-Empfängers.
HINWEIS: Sie können auch Ihre eigenen 2x Cinch /
2x Cinch-Kabel und S-Video-Kabel (Hosidenkabel)
anstelle des mitgelieferten AV-Kabels verwenden. Wenn Sie über die Cinchausgänge eine
Verbindung herstellen, wird die Funktion des
Lautstärkereglers der Fernbedienung deaktiviert.
4. Wählen Sie den jeweils passenden Einsatz für
Ihren iPod und setzen Sie ihn an der Oberseite des
TuneCommand AV Docks ein (Abb. 1). Einsätze für
iPod video und iPod nano sind im Lieferumfang
des jeweiligen iPod enthalten.
5. Setzen Sie den iPod in das
TuneCommand AV Dock ein.
Bedienungsanweisungen | 04
�������������������������������������
����������������������������������������������������
����������������������������������������������������
EINRASTEN
Abb. 1
Ziehen Sie hier, um den
Einsatz zu entfernen
Bedienungsanweisungen
SCHRITT 2 – Einrichtung der TuneCommand AV Fernbedienung
1. Drehen Sie die Fernbedienung so, dass die Knöpfe nach unten ausgerichtet sind. Drücken
Sie den Auslöseknopf, um das Batteriefach zu öffnen und ziehen Sie es vorsichtig bis
zum Anschlag aus dem Gehäuse (Abb. 2). Ziehen Sie das Batteriefach nicht gewaltsam
vollständig aus dem Gehäuse.
2. Legen Sie die Batterie mit dem Pluspol (+) nach oben ein und schieben Sie die
Batterieabdeckung wieder auf die Fernbedienung, bis der Knopf wieder einrastet.
3. Drücken Sie jetzt einen beliebigen Knopf der Fernbedienung, damit sich die
TuneCommand AV Fernbedienung und das Dock aufeinander abstimmen. Die grünen
Anzeigen des Docks und der Fernbedienung blinken auf, wenn der erste KnopfdruckBefehl der Fernbedienung ordnungsgemäß beim Dock ankommt. HINWEIS: Wenn
die Batterie ausgetauscht oder entfernt wird, müssen Sie das AC-Netzteil vom
TuneCommand AV Dock entfernen und wieder anschließen, um erneut eine
Verbindung mit der Fernbedienung herzustellen.
1
2
DE
Abb. 2
3
Bedienungsanweisungen | 05
Bedienungsanweisungen
Jetzt können Sie mit der TuneCommand AV Fernbedienung folgende Funktionen des iPod-Geräts
bedienen: Wiedergabe/Pause, vorwärts (nächster Titel) / zurück (vorheriger Titel) sowie die
Lautstärkeregulierung. Außerdem können Sie Wiederholung und Zufallsauswahl mit den beiden
kleinen runden Knöpfen bedienen. Jeder Knopfdruck bringt die Einstellung auf die nächste
Ebene. Wenn Sie Tune Command AV mit iPod video, nano oder photo verwenden, können Sie Ihre
Videos (nur bei iPod video), Diashows oder Präsentationen durchsehen - ohne Kabelverbindung.
HINWEIS:
• Diashows müssen manuell auf dem iPod gestartet werden,
bevor Sie auf dem Fernseher wiedergegeben werden
Bei Verwendung des iPod video:
• Videos müssen auf einer Wiedergabeliste eingetragen werden, damit
die Fernbedienung Funktionen wie Wiedergabe/Pause, vor/zurück, usw. ausführen kann
• Die Videoeinstellungen des iPod müssen auf „TV out > NTSC or
PAL” (TV-Ausgang > NTSC oder PAL) eingestellt sein
Mit dem Shuffle-Knopf (
) (Zufallsauswahl) werden die die Einstellungen des iPod
folgendermaßen festgelegt:
Shuffle off (aus) > Shuffle songs (Lieder) > Shuffle albums (Alben).
) (Wiederholung) werden Wiederholungseinstellungen des iPod
Mit dem Repeat-Knopf (
folgendermaßen festgelegt:
Repeat off (Wiederholung aus) > Repeat one (Einen Titel Wiederholen) > Repeat all (Alles
Wiederholen).
Die kleinen Symbole oben rechts unter der Batterie-Statusanzeige auf dem Display des iPod
zeigen Ihnen die aktuellen Einstellungen an.
Bedienungsanweisungen | 06
LED-Tabelle
Wenn Sie einen Knopf auf der Fernbedienung drücken, blinken die grünen Anzeigen der
Fernbedienung und des Docks auf. Dadurch wird angezeigt, dass das Signal ordnungsgemäß
empfangen worden ist.
Sind Fernbedienung und Dock zur Signalübertragung zu weit voneinander entfernt, leuchtet nach
einigen Sekunden eine orange (statt grüne) Blinkanzeige auf, wenn Sie einen Knopf drücken. Die
Anzeige des Docks blinkt nicht auf.
Der Batterieladezustand der Fernbedienung wird bei jedem Knopfdruck automatisch geprüft.
Wenn die Batterie entladen ist, leuchtet nach der grünen bzw. orangen Anzeige die rote Anzeige
auf der Fernbedienung auf. Ist dies der Fall, sollten Sie die entladene Batterie möglichst bald
durch eine Batterie desselben Typs (CR 2032) ersetzen. Die TuneCommand AV Fernbedienung
funktioniert auf die gewohnte Weise, bis die Batterie erschöpft ist.
GRÜN
Der Empfänger empfängt das Signal
ORANGE
Außer Reichweite
Die Batterie ist entladen
DE
GRÜN
Signal empfangen
LED-Tabelle | 07
Verwendung des Multi-Clip
Mit dem Clip können Sie die Fernbedienung an einem Gürtel
befestigen oder mit der Trageschnur um den Hals binden.
Nicht schieben
EINRASTEN
Den Multi-Clip an der Fernbedienung anbringen
1
2
Befestigung am Gürtel
Verwendung des Multi-Clip | 08
Halterung verwenden
Fehlerbehebung
•
Dock schaltet sich nach Anschluss nicht ein.
Überprüfen Sie, ob das Netzteil ordnungsgemäß an die Steckdose und an den Netzeingang
(power in) des TuneCommand AV Docks angeschlossen ist. Stellen Sie sicher, dass der iPod fest
an den Anschluss an der Oberseite des Docks angeschlossen ist.
•
Die Fernbedienung schaltet sich nicht ein.
Stellen Sie sicher, dass die Batterie ordungsgemäß mit dem Pluspol (+) nach oben eingelegt
ist, dass das Batteriefach vollständig eingeschoben ist, und dass der Auslöseknopf eingerastet
ist.
• Nach Anschluss von Dock und Fernbedienung erfolgt keine Wiedergabe
- Wählen Sie auf dem iPod einen Titel aus und drücken Sie „PLAY” (Wiedergabe).
- Stellen Sie sicher, dass das Audiokabel ordnungsgemäß an das
TuneCommand AV Dock und den Anschluss Ihrer Heimkinoanlage angeschlossen ist.
- Stellen Sie beim Anschluss an eine Stereoanlage sicher, dass die Stereoanlage auf den
korrekten Eingangskanal eingestellt ist.
-
Stellen Sie sicher, dass der iPod und die Stereoanlage eingeschaltet sind.
Erhöhen Sie die Lautstärke mit der TuneCommand AV Fernbedienung.
Wiederholen Sie SCHRITT 1 und SCHRITT 2 aus dem Abschnitt Einrichtung.
•
Die Fernbedienung funktioniert nach dem Batterieaustausch nicht mehr.
Entfernen Sie nach dem Batterieaustausch das Netzteil vom TuneCommand AV Dock
und schließen Sie es dann wieder an, um die Verbindung mit der Fernbedienung erneut
herzustellen.
•
Die Videowiedergabe funktioniert auf dem iPod, aber nicht auf dem Fernseher.
Stellen Sie sicher, dass die iPod-Videoeinstellung wie folgt ist „TV Out > NTSC or PAL” (TVAusgang > NTSC oder PAL)
•
Der normale Betrieb des Geräts kann durch starke elektromagnetische Störungen
beeinflusst werden. In diesem Fall sollten Sie das Gerät entsprechend den Anweisungen
im Benutzerhandbuch zurücksetzen. Wenn das Gerät trotz dieser Maßnahmen nicht
ordnungsgemäß funktioniert, sollten Sie das Produkt an einem anderen Ort verwenden.
Fehlerbehebung | 09
DE
Technische Daten
Reichweite: Bis zu 36,6 m
Übertragungsmethode: Funk
Frequenz: 2,44 GHz
Fernbedienungsbatterie: CR 2032 3 V
Abmessungen der Fernbedienung: 8,9 cm x 3,8 cm x 1,3 cm
(ohne Gürtelclip; max. Tiefe mit Gürtel-Clip: 1,9 cm)
Gewicht der Fernbedienung (mit Batterie): 22,6 g
Abmessungen des Docks: 8,9 cm x 8,9 cm x 2,5 cm
Gewicht des Docks: 96,4 g
Clip/Halterung/Trageschnur: 13,2 g
Technische Daten | 010
Informationen
FCC-Erklärung
KONFORMITÄTSERKLÄRUNG ZUR EINHALTUNG DER FCC-BESTIMMUNGEN ÜBER DIE
ELEKTROMAGNETISCHE VERTRÄGLICHKEIT
Wir, Belkin Corporation, eine Gesellschaft mit Sitz in 501 West Walnut Street, Compton, CA 90220, USA,
erklären hiermit in alleiniger Verantwortung, dass dieses Produkt mit der Artikel-Nr.
F8Z065ea
, auf das sich diese Erklärung bezieht,
nachweislich den Grenzwerten für digitale Geräte der Klasse B gemäß Teil 15 der FCC-Vorgaben
entspricht. Diese Grenzwerte dienen dem angemessenen Schutz vor schädlicher Strahlung beim
Betrieb von Geräten im Wohnbereich. Durch dieses Gerät wird hochfrequente Energie erzeugt, genutzt
und unter Umständen abgestrahlt, und es kann daher bei nicht vorschriftsgemäßer Installation und
Nutzung Funkstörungen verursachen. Eine Garantie dafür, dass entsprechende Störungen am konkreten
Installationsort ausgeschlossen sind, kann nicht abgegeben werden. Verursacht das Gerät Störungen
des Radio- oder Fernsehempfangs (was sich durch Ein- und Ausschalten des Geräts feststellen lässt), so
können Sie versuchen, die Störung auf folgende Weise zu beseitigen:
.
Neuausrichtung oder Standortänderung der Empfangsantenne.
.
Vergrößerung des Abstands zwischen Gerät und Empfänger.
.
Anschluss des Geräts an eine Steckdose in einem anderen Stromkreis als dem des Empfängers.
.
Den Händler oder einen erfahrenen Rundfunk- und Fernsehtechniker hinzuziehen.
ICES-Erklärung
Dieses Digitalgerät der Klasse B entspricht der kanadischen Richtlinie ICES-003. Cet appareil numérique de
la classe B est conforme á la norme NMB-003 du Canada.
Informationen | 11
DE
Drei Jahre beschränkte Produktgarantie von Belkin Corporation
Garantieleistung.
Belkin Corporation garantiert dem ursprünglichen Käufer dieses Belkin-Produkts, dass dieses Produkt frei von
Material-, Verarbeitungs-, und Konstruktionsfehlern ist.
Garantiedauer.
Belkin gewährt für dieses Belkin-Produkt drei Jahre Garantie.
Problembehebung.
Produktgarantie
Belkin wird das Produkt nach eigenem Ermessen entweder kostenlos (abgesehen von den Versandkosten)
reparieren oder austauschen.
Garantieausschluss.
Alle oben genannten Garantien verlieren ihre Gültigkeit, wenn das Belkin-Produkt der Belkin Corporation
auf Anfrage nicht auf Kosten des Käufers zur Überprüfung zur Verfügung gestellt wird oder wenn die Belkin
Corporation feststellt, dass das Belkin-Produkt nicht ordnungsgemäß installiert worden ist, und dass unerlaubte
Änderungen daran vorgenommen worden sind. Die Produktgarantie von Belkin gilt nicht für (Natur)gewalten (mit
Ausnahme von Blitzeinschlägen) wie Überschwemmungen und Erdbeben sowie Krieg, Vandalismus, Diebstahl,
normalen Verschleiß, Erosion, Wertminderung, Veralterung, schlechte Behandlung, Beschädigung durch Störungen
aufgrund von Unterspannung (z. B. Spannungsabfall oder -Senkung) oder nicht erlaubten Programm- oder
Systemänderungen.
Service.
Um Unterstützung von Belkin zu bekommen, gehen Sie nach folgenden Schritten vor:
1. Nehmen Sie Kontakt mit Belkin Corporation, 501 W. Walnut St., Compton CA 90220, Attn: Customer Service auf
oder wenden Sie sich telefonisch
innerhalb von 15 Tagen nach dem Vorfall an Belkin: (800)-2235546. Halten Sie die folgenden Informationen bereit:
a. Die Artikelnummer des Belkin-Produkts.
b. Wo Sie das Produkt erworben haben.
c. Das Kaufdatum.
d. Kopie der Originalquittung.
Garantie | 12
Drei Jahre eingeschränkte Produktgarantie von Belkin Corporation
2. Der/die Kundendienstmitarbeiter/in von Belkin erläutert Ihnen dann, wie Sie den Kaufbeleg und das BelkinProdukt verschicken können und wie in Ihrem Fall verfahren wird.
Belkin Corporation behält sich vor, das beschädigte Belkin-Produkt zu überprüfen. Alle Kosten, die beim Versand
des Belkin-Produkts an die Belkin Corporation zum Zweck der Überprüfung entstehen, sind vollständig durch den
Käufer zu tragen. Wenn Belkin nach eigenem Ermessen entscheidet, dass es unpraktisch ist, das beschädigte Gerät
an die Belkin Corporation zu schicken, kann Belkin nach eigenem Ermessen eine Reparaturstelle damit beauftragen,
das Gerät zu überprüfen und einen Kostenvoranschlag für die Reparaturkosten des Gerätes zu machen. Die Kosten
für den Versand zu einer solchen Reparaturstelle und die eventuellen Kosten für einen Kostenvoranschlag gehen
vollständig zu Lasten des Käufers. Beschädigte Geräte müssen zur Überprüfung zur Verfügung stehen, bis das
Reklamationsverfahren abgeschlossen ist. Wenn Ansprüche beglichen werden, behält sich die Belkin Corporation
das Recht vor, Ersatzansprüche an eine bestehende Versicherung des Käufers zu übertragen.
Garantiegesetze.
DIESE GARANTIE BILDET DIE ALLEINIGE GARANTIE DER BELKIN CORPORATION. WEITERE AUSDRÜCKLICHE
ODER KONKLUDENTE GEWÄHRLEISTUNGEN WERDEN NICHT GEGEBEN, SOWEIT NICHT GESETZLICH
VORGESCHRIEBEN, EINSCHLIESSLICH DER KONKLUDENTEN ZUSICHERUNG DER QUALITÄT, DER ALLGEMEINEN
GEBRAUCHSTAUGLICHKEIT ODER EIGNUNG FÜR EINEN BESTIMMTEN ZWECK, WOBEI ETWAIGE DERARTIGE
KONKLUDENTE GEWÄHRLEISTUNGEN AUF DIE LAUFZEIT DIESER GARANTIE BESCHRÄNKT SIND.
In manchen Ländern sind Einschränkungen bezüglich der Dauer der Garantie nicht zulässig. Die oben erwähnten
Einschränkungen treffen für Sie dementsprechend nicht zu.
UNTER KEINEN UMSTÄNDEN HAFTET DIE BELKIN CORPORATION FÜR ZUFÄLLIGEN, BESONDEREN, DIREKTEN,
INDIREKTEN, MEHRFACHEN SCHADEN ODER FOLGESCHÄDEN WIE, ABER NICHT AUSSCHLIESSLICH, ENTGANGENES
GESCHÄFT ODER PROFITE, DIE IHNEN DURCH DEN VERKAUF ODER DIE BENUTZUNG VON EINEM BELKIN-PRODUKT
ENTGANGEN SIND, AUCH WENN SIE AUF DIE MÖGLICHKEIT SOLCHER BESCHÄDIGUNGEN AUFMERKSAM GEMACHT
WORDEN SIND.
Diese Garantie räumt Ihnen spezifische Rechte ein, die von Land zu Land unterschiedlich ausgestaltet sein können.
Da in manchen Ländern der Ausschluss oder die Beschränkung der Haftung für durch Zufall eingetretene oder
Folgeschäden nicht zulässig ist, haben die vorstehenden Beschränkungen und Ausschlussregelungen für Sie
möglicherweise keine Gültigkeit.
Garantie | 13
DE
DE
Belkin Corporation
501 West Walnut Street
Los Angeles, CA 90220, USA
310-898-1100
310-898-1111 Fax
Belkin Ltd.
Express Business Park, Shipton Way
Rushden, NN10 6GL, Großbritannien
+44 (0) 1933 35 2000
+44 (0) 1933 31 2000 Fax
Belkin B.V.
Boeing Avenue 333
1119 PH Schiphol-Rijk, Niederlande
+31 (0) 20 654 7300
+31 (0) 20 654 7349 Fax
Belkin Ltd.
7 Bowen Crescent, West Gosford
NSW 2250, Australien
+61 (0) 2 4372 8600
+61 (0) 2 4372 8603 Fax
Technischer Support
USA: +1 310-898-1100, Durchwahl 2263
800-223-5546 Durchwahl 2263
Europa: 00 800 223 55 460
Australien: 1800 235 546
Neuseeland: 0800 235 546
© 2006 Belkin Corporation. Alle Rechte vorbehalten.
Alle Produktnamen sind eingetragene Marken der angegebenen Hersteller. iPod ist eine Marke der
Apple Computer, Inc, die in den USA und anderen Ländern eingetragen ist.
F8Z065ea
P75047ea
Manual del usuario
®
TuneCommand™ AV para iPod
Introducción
ES
Introducción
Diseñado para permitirle desplazarse mientras disfruta de su música o vídeo en prácticamente
cualquier parte de su hogar, TuneCommand AV proporciona la flexibilidad y comodidad que
desean obtener los usuarios de iPod. Mediante tecnología de radiofrecuencia inalámbrica,
TuneCommand funciona a una distancia de hasta 35 metros de su equipo estéreo. Por favor, lea
atentamente este Manual del usuario para asegurarse de que saca el máximo partido a su nuevo
producto Belkin.
Contenido del paquete
Base TuneCommand
AV para iPod
Adaptador de
alimentación CA
Clip multiuso
Gancho para
montaje en
superficie
Batería
Adaptador para
(Modelo CR 2032) la correa
Mando a distancia de
TuneCommand AV
Introducción | 02
5 bandejas de
inserción
Cable AV
Correa
Leyenda
Indicador de
nivel y duración
de la batería
Subir volumen
Reproducir/
Pausa
Título anterior
Título siguiente
Botón de
reproducción
aleatoria
Bajar volumen
Botón de
repetición
Botón para abrir el
compartimento de la
batería
(en la parte posterior)
Conector de
iPod
Indicador de
señal
Adaptador dock
Compartimento de
la batería (en la parte
inferior)
Estéreo
Estéreo Salida de vídeo Entrada
alimentación
Salida AV Salida de línea S-Vídeo
CC 12 V/0,8 A
ES
Leyenda | 03
Instrucciones de funcionamiento
PASO 1 - Configuración de la base de
TuneCommand AV
iPod mini
4 GB 6 GB
�������������������������������������
1. Coloque la base de TuneCommand AV sobre su
sistema de entretenimiento en casa, donde prefiera.
iPod
20 GB, U2
Special Edition
�������������������������������������
2. Introduzca el conector cilíndrico del adaptador
de alimentación CA en el puerto de entrada de
alimentación de la base de TuneCommand AV.
Introduzca el otro extremo del adaptador de
alimentación CA en el enchufe de la pared o un
protector contra subidas de tensión.
����������������������������������������������������
iPod
40 GB
�������������������������������������
iPod con pantalla
de color, 20 GB
30 GB, U2 Special
Edition
����������������������������������������������������
�������������������������������������
����������������������������������������������������
iPod con pantalla
de color, 40 GB
60 GB
3. Conecte el extremo de 3,5 mm del cable AV
incluido en el puerto de salida AV estéreo
“Stereo AV Out” de la base de TuneCommand AV.
Introduzca el otro extremo del cable AV en los
puertos de entrada de la parte posterior de su
receptor estéreo o su televisor.
NOTA: De forma opcional, puede conectar
utilizando sus propios cables 2 RCA a 2 RCA y
S-Vídeo en lugar del cable AV que se incluye. La
conexión a través de las salidas RCA desactiva la
función de control de volumen del Control remoto.
4. Seleccione la bandeja de inserción apropiada para
su iPod e introdúzcala en el hueco superior de la
base de TuneCommand AV (Fig. 1). Las inserciones
para iPod vídeo y para iPod nano se incluyen al
comprar el iPod.
5. Coloque el iPod en la
base de TuneCommand AV.
Instrucciones de funcionamiento | 04
����������������������������������������������������
ENGÁNCHELO
Fig. 1
Tire hacia arriba para
eliminar al inserción
Instrucciones de funcionamiento
PASO 2 - Configuración del Control remoto TuneCommand AV
1. Gire el Control remoto de manera que los botones queden hacia abajo. Presione el botón
de desbloqueo para abrir el compartimento de las baterías. Retire la bandeja deslizándola
suavemente hasta que se detenga (Fig. 2). No extraiga a la fuerza la bandeja de la batería
completamente de su carcasa.
2. Introduzca la batería con el lado (+) mirando hacia arriba y vuelva a colocar la tapa del
compartimento de la batería en el Control remoto deslizándola hasta que se cierre
correctamente.
3. A continuación, presione cualquiera de los botones del Control remoto TuneCommand
AV y la Base para que se acoplen. Las luces verdes de la Base y del Control remoto
parpadearán cuando la primera orden tras pulsar un botón del Control remoto logre
llegar correctamente a la Base. NOTA: Si la batería se retira o se sustituye, necesitará
desenchufar el adaptador de alimentación CA de la Base TuneCommand AV y
enchúfelo después para reestablecer la conexión con el Control remoto.
1
2
ES
Fig. 2
3
Instrucciones de funcionamiento | 05
Instrucciones de funcionamiento
Ahora podrá utilizar su Control remoto TuneCommand AV para controlar las funciones de
su iPod, play/pause, título siguiente, título anterior y subir/bajar el volumen. También podrá
activar las funciones “shuffle” (reproducción aleatoria) y “repeat” (repetición) de manera
cómoda mediante los dos pequeños botones redondos. Cada vez que presiona un botón, se
pasa a la siguiente opción. Cuando lo utilice con iPod vídeo, nano o photo, TuneCommand AV
le permitirá desplazarse para ver sus fotos, presentaciones y vídeos (sólo con iPod vídeo), ¡a
distancia y sin cables!
NOTA:
• Las presentaciones de diapositivas o imágenes se deben iniciar manualmente en el iPod
antes de aparezcan en el televisor.
Cuando utilice el iPod vídeo:
• Los vídeos se deben colocar en una lista de reproducción para utilizar el
Control remoto (play/pause, siguiente/anterior, etc.)
• Los ajustes del iPod vídeo se deben cambiar a “TV Out > NTSC or PAL”
) va pasando de una opción
La tecla shuffle, de reproducción aleatoria, (
de reproducción aleatoria del iPod a la próxima en el siguiente orden: shuffle
off > shuffle songs > shuffle albums (desactivar reproducción aleatoria >
reproducción aleatoria de canciones > reproducción aleatoria de discos).
La tecla de repetición (
) determina la función de repetición del
dispositivo en el siguiente orden: repeat off > repeat one > repeat all
(desactivar repetición > repetir un título > repetir todos).
Siga los iconos que aparecen en la pantalla del iPod para ver la configuración actual, representada
por pequeños iconos en la esquina superior derecha, debajo del indicador de estado de la batería.
Instrucciones de funcionamiento | 06
Tabla de indicadores LED
Cada vez que presione un botón en el Control remoto, los indicadores de la Base y el Control
remoto le mostrarán que se ha recibido correctamente la señal mediante una luz verde
intermitente.
En cambio, si el Control remoto y la Base se encuentran demasiado alejados para poder establecer
comunicación, la luz del Control remoto se iluminará de forma intermitente (después de un
instante) con color naranja en lugar de verde, cuando presione un botón. La luz de la Base no
parpadeará.
El estado de carga de la batería del Control remoto se comprueba cada vez que presiona un
botón. Si el estado de batería es bajo, se iluminará de forma intermitente la luz roja del Control
remoto, y después parpadearán las luces verde o ámbar. Si observa que esto sucede, se debe
sustituir en breve la batería baja por otra nueva del mismo tipo (CR 2032). Su TuneCommand AV
seguirá funcionando normalmente hasta que se agote la batería.
VERDE
El receptor recibe la señal
del
NARANJA Fuera
alcance
La batería está agotada
ES
VERDE
Recibiendo la señal
Tabla de indicadores LED | 07
Utilización del clip multiuso
El clip le permite llevar el Control remoto sujeto al cinturón o
alrededor del cuello con la correa incluida.
No lo deslice
Fijación del clip multiusos al Control remoto
1
2
Cómo ajustarlo al cinturón
Utilización del clip multiuso | 08
Utilización de la superficie de
montaje
Resolución de problemas
•
La Base no se activa cuando se enchufa.
Asegúrese de que el adaptador de alimentación CA está completamente insertado en el
enchufe y en el puerto de entrada de alimentación de la Base TuneCommand AV. Asegúrese
de que su iPod esté correctamente insertado en el conector de la parte superior de la Base.
•
El Control remoto nose activa.
Asegúrese de que la batería del Control remoto se ha introducido correctamente, con el polo
(+) hacia arriba, que el compartimento de la batería está completamente cerrado, y que el
botón de apertura ha vuelto a
su posición.
• Después haber conectado la Base y el Control remoto, no hay sonido.
- Seleccione una canción en el iPod y pulse “PLAY”.
- Asegúrese de que el cable de audio está correctamente insertado en la
Base TuneCommand AV y la parte trasera de su sistema de entretenimiento.
- Si está conectado a un equipo de estéreo, asegúrese de que se encuentre en el canal de
entrada correcto.
- Asegúrese de que el iPod y el equipo estéreo estén encendidos.
- Suba el volumen utilizando el Control remoto TuneCommand AV.
- Repita el PASO 1 y el PASO 2 de la sección de configuración.
•
El Control remoto no funciona después de haber sustituido la batería.
Después de haber sustituido la batería, desconecte el adaptador de alimentación de la Base
TuneCommand AV y enchúfelo después para reestablecer la conexión con el Control remoto.
•
Se está reproduciendo vídeo en mi iPod pero no hay vídeo en la pantalla del televisor.
Asegúrese de que el ajuste de vídeo de su iPod se cambia a “TV Out > NTSC or PAL”.
•
El funcionamiento normal del producto puede verse afectado si existen fuertes
interferencias electromagnéticas. Si esto sucede, reinicie el producto para que se reanude
el funcionamiento normal, siguiendo el manual de instrucciones. En caso de que siga sin
funcionar correctamente, utilice el producto en otro lugar.
Resolución de problemas | 09
ES
Especificaciones
Distancia operativa: Hasta 36,6 m
Método de transmisión: Radiofrecuencia
Frecuencia: 2,44 GHz
Batería del control remoto: CR 2032, 3 V
Dimensiones del control remoto: 8,9 cm x 3,8 cm x 1,3 cm
(sin incluir el clip para cinturón; profundidad máxima con el clip: 1,9 cm)
Peso del control remoto (batería incl.): 22,6 g
Dimensiones de la Base: 8,9 cm x 8,9 cm x 2,5 cm
Peso de la Base: 96,4 g
Clip/Gancho para montaje/Correa: 13,2 g
Especificaciones | 010
Información
Declaración de la FCC (Comisión de comunicaciones de EE.UU.)
DECLARACIÓN DE CONFORMIDAD CON LAS NORMATIVAS DE LA FCC SOBRE COMPATIBILIDAD
ELECTROMAGNÉTICA
Nosotros, Belkin Corporation, con sede en 501 West Walnut Street, Compton, CA 90220 (EE.UU.),
declaramos bajo nuestra sola responsabilidad que el producto:
F8Z065ea
al que hace referencia la presente declaración:
Las pruebas realizadas con este equipo dan como resultado el cumplimiento con los límites establecidos
para un dispositivo digital de la Clase B, de acuerdo a la sección 15 de las Normas de la FCC. Estos límites
se han establecido con el fin de proporcionar una protección suficiente contra interferencias nocivas en
zonas residenciales. Este equipo genera, utiliza y puede emitir energía de radiofrecuencia y, si no se instala
y se usa siguiendo las instrucciones, puede causar interferencias nocivas a las comunicaciones de radio. De
todos modos, no existen garantías de que las interferencias no ocurrirán en una instalación en particular.
Si este equipo provoca interferencias nocivas en la recepción de radio y televisión, las cuales se pueden
determinar encendiendo y apagando seguidamente el dispositivo, el propio usuario puede intentar
corregir dichas interferencias tomando una o más de las siguientes medidas:
.
Reorientar o colocar en otro lugar la antena de recepción.
.
Incrementar la distancia entre el equipo y el receptor.
.
Conectar el equipo a la toma de un circuito distinto de aquel al que está conectado el receptor.
.
Solicitar la ayuda del vendedor o de un técnico experto en radio / televisión.
ICES
This Class B digital apparatus complies with Canadian ICES-003. Cet appareil numérique de la classe B
est conforme á la norme NMB-003 du Canada. Este aparato digital de la clase B cumple con la norma
canadiense ICES-003.
Información | 11
ES
Garantía del producto de 3 años de Belkin Corporation Limited
La cobertura de la presente garantía.
Belkin Corporation otorga una garantía al comprador original según la cual el producto no tendrá defectos en
cuanto a diseño, montaje, materiales o mano de obra.
El período de cobertura.
Belkin Corporation garantiza el producto Belkin durante tres años.
¿Qué haremos para corregir problemas?
Garantía del producto.
Belkin reparará o sustituirá, según decida, cualquier producto defectuoso sin ningún tipo de cargo (excepto los
gastos de envío del producto).
¿Qué excluye la presente garantía?
Todas las garantías mencionadas anteriormente resultarán nulas y sin valor alguno si el producto Belkin no se
le proporciona a Belkin Corporation para su inspección bajo requerimiento de Belkin con cargo al comprador
únicamente, o si Belkin Corporation determina que el producto Belkin se ha instalado de un modo inadecuado,
alterado de algún modo o forzado. La garantía del producto de Belkin no lo protege de los desastres naturales (que
no sean relámpagos) tales como inundaciones, terremotos, guerras, vandalismo, robo, desgaste natural debido al
uso normal, desgaste, agotamiento, obsolescencia, mal uso, daños a causa de alteraciones la alimentación (p. ej..
apagones, bajadas de tensión), modificación o alteración no autorizadas de programas o sistemas.
Para obtener asistencia.
Para obtener asistencia sobre algún producto de Belkin, debe seguir los siguientes pasos:
1. Póngase en contacto con Belkin Corporation en 501 W. Walnut St., Compton CA 90220, a la atención de: Servicio
de atención al cliente, o llame a
(800) 223 800, en el plazo de 15 desde el momento de la
incidencia. Tenga preparada la siguiente información:
a. El número de artículo del producto Belkin.
b. El lugar de compra del producto.
c. Cuándo compró el producto.
d. Copia de la factura original.
Garantía | 12
Garantía limitada de 3 años para los productos de Belkin Corporation
2. El servicio de atención al cliente de Belkin le informará sobre cómo enviar la factura y el producto Belkin y sobre
cómo proceder con su reclamación.
Belkin Corporation se reserva el derecho de revisar el producto Belkin dañado. Todos los costes de envío del
producto Belkin a Belkin Corporation para su inspección correrán a cargo del comprador exclusivamente. Si Belkin
determina, según su propio criterio, que resulta poco práctico el envío de los equipos dañados a Belkin Corporation,
Belkin podrá designar, según su propio criterio, una empresa de reparación de equipos para que inspeccione y
estime el coste de la reparación de dichos equipos. El coste, si existe, del envío de los equipos hacia y desde dicha
empresa de reparaciones, y de la estimación correspondiente, correrá exclusivamente a cargo del comprador.
Los equipos dañados deberán permanecer disponibles para su inspección hasta que haya finalizado la demanda.
Siempre que se solucionen las demandas por negociación, Belkin Corporation se reserva el derecho de ser
subrogada en cualquier póliza de seguros existente de la que pueda disponer el comprador.
Relación de la garantía con la legislación estatal.
ESTA GARANTÍA CONTIENE LA GARANTÍA EXCLUSIVA DE BELKIN CORPORATION, NO EXISTE NINGÚN OTRO TIPO
DE GARANTÍAS, EXPRESAS O, EXCEPTO LAS REQUERIDAS POR LA LEY, IMPLÍCITAS, INCLUYENDO LA GARANTÍA
O CONDICIÓN IMPLÍCITA DE CALIDAD, COMERCIABILIDAD E IDONEIDAD PARA UN FIN PARTICULAR, Y TALES
GARANTÍAS, EN CASO DE EXISTIR, ESTÁN LIMITADAS EN DURACIÓN A LOS TÉRMINOS DE LA PRESENTE GARANTÍA.
Algunas jurisdicciones no permiten la limitación de la duración de las garantías implícitas, por lo que cabe la
posibilidad de que las anteriores limitaciones no le afecten.
EN NINGÚN CASO BELKIN CORPORATION SERÁ RESPONSABLE DE LOS DAÑOS IMPREVISTOS, ESPECIALES,
DIRECTOS, INDIRECTOS, CONSECUENTES O MÚLTIPLES, INCLUYENDO, AUNQUE NO EXCLUSIVAMENTE, LA PÉRDIDA
DE NEGOCIO O BENEFICIOS QUE PUEDA SURGIR DE LA VENTA O EL EMPLEO DE CUALQUIER PRODUCTO BELKIN,
INCLUSO SI BELKIN HA SIDO INFORMADA DE LA POSIBILIDAD DE DICHOS DAÑOS.
Esta garantía le proporciona derechos legales específicos y también podría beneficiarse de otros derechos que
pueden variar entre las distintas jurisdicciones. Algunas jurisdicciones no permiten la exclusión o limitación de los
daños fortuitos, consecuentes, o de otro tipo, por lo que puede que las limitaciones mencionadas anteriormente
no le afecten.
Garantía | 13
ES
ES
Belkin Corporation
501 West Walnut Street
Los Ángeles, CA 90220, EE.UU
310-898-1100
310-898-1111 fax
Belkin Ltd.
Express Business Park, Shipton Way
Rushden, NN10 6GL, Reino Unido
+44 (0) 1933 35 2000
+44 (0) 1933 31 2000 fax
Belkin B.V.
Boeing Avenue 333
1119 PH Schiphol-Rijk, Los Países Bajos
+31 (0) 20 654 7300
+31 (0) 20 654 7349 fax
Belkin Ltd.
7 Bowen Crescent, West Gosford
NSW 2250, Australia
+61 (0) 2 4372 8600
+61 (0) 2 4372 8603 fax
Asistencia técnica
EE.UU.: 310-898-1100 ext. 2263
800-223-5546 ext. 2263
Europa: 00 800 223 55 460
Australia: 1800 235 546
Nueva Zelanda: 0800 235 546
© 2006 Belkin Corporation. Todos los derechos reservados.
Todos los nombres comerciales son marcas registradas de los respectivos fabricantes enumerados.
iPod es una marca registrada de Apple Computer, Inc., registrada en EE.UU. y en otros países.
F8Z065ea
P75047ea
Manuale d’uso
®
TuneCommand™ AV per iPod
Introduzione
IT
Introduzione
Progettato per permettervi di controllare il contenuto audio e video da qualsiasi punto della
vostra casa, il TuneCommand AV offre tutti i comfort di cui ha bisogno un amante dell’iPod. Grazie
alla trasmissione wireless in radiofrequenza, il TuneCommand AV funziona fino a 40 metri di
distanza dallo stereo. Si prega di leggere attentamente questo manuale d’uso per poter utilizzare
al meglio tutte le funzionalità di questo nuovo prodotto Belkin.
Contenuto della confezione:
Base dock per iPod
Adattatore di
corrente CA
Clip multiuso
Gancio
Batteria
Regolatore per
(Modello CR 2032) il cordoncino
Telecomando
TuneCommand AV
Introduzione | 02
5 adattatori per iPod
Cavo AV
Cordoncino
Legenda
Indicatore della
copertura e
dello stato delle
batterie
Indietro
Selezione
casuale
Ripetizione
brano
Volume Su
Riproduzione/
Pausa
Avanti
Volume Giù
Apertura sportello
della batteria
(sul retro)
Connettore iPod
Indicatore di
segnale
Adattatore dock
Sportello della batteria
(sulla parte inferiore)
Uscita
Stereo AV
Uscita
Linea AV
Uscita Video Ingresso
S-video
alimentazione
CC 12V/0.8A
IT
Legenda | 03
Istruzioni per l’uso
FASE 1 - Installazione della base dock
iPod mini
4GB 6GB
1. Collocare la base dock nelle vicinanze
dell’impianto hi-fi o home cinema.
�������������������������������������
iPod
20GB, U2 Special
Edition
2. Inserire lo spinotto d’uscita dell’adattatore di
corrente incluso nella presa d’ingresso sulla base
dock del TuneCommand AV. Collegare l’altra
estremità dell’adattatore di corrente nella presa a
muro o nella presa filtrata.
�������������������������������������
����������������������������������������������������
iPod
40GB
�������������������������������������
����������������������������������������������������
iPod con display a
colori, 20GB, 30GB,
U2 Special Edition
3. Inserire la spina da 3,5 mm del cavo AV incluso
nella presa di uscita stereo AV sulla base dock
del TuneCommand. Collegare l’altra estremità
del cavo AV nella porta d’ingresso sul retro del
televisore o del ricevitore stereo.
NOTA BENE: In alternativa, è possibile anche
utilizzare cavi 2-RCA/2-RCA e S-video (non
inclusi) invece del cavo AV in dotazione. La
connessione tramite prese RCA disattiva
la funzione di regolazione del volume del
telecomando.
4. Scegliere l’adattatore corrispondente al proprio
iPod e inserire nell’apposito alloggiamento
sulla base dock del TuneCommand (Fig. 1). Gli
adattatori per iPod video e iPod nano sono
compresi nella confezione dell’iPod acquistato.
5. Inserire l’iPod nella
base dock.
Istruzioni per l’uso | 04
�������������������������������������
����������������������������������������������������
iPod con display
a colori, 40GB
60GB
����������������������������������������������������
CHIUSURA A SCATTO
Fig. 1
Aprire e rimuovere l’adattatore
Istruzioni per l’uso
FASE 2 - Impostazione del telecomando TuneCommand AV
1. Girare il telecomando in modo che i tasti siano rivolti verso il basso. Premere il pulsante di
apertura per aprire l’alloggiamento della batteria; quindi tirarlo fuori leggermente fino a
quando si blocca (Fig.2). Non estrarre completamente con la forza l’alloggiamento delle
batterie.
2. Inserire la batteria con il segno (+) rivolto verso l’alto e richiudere l’alloggiamento delle
batterie del telecomando, fino a quando il pulsante si blocca in posizione.
3. Ora premere uno qualsiasi dei tasti del telecomando, in modo tale da sincronizzarlo con
la base dock. Quando il segnale inviato dal telecomando raggiunge il ricevitore, le spie
verdi sulla base dock e sul telecomando lampeggiano. NOTA BENE: se si rimuovono o
cambiano le batterie, è necessario disconnettere l’adattatore di corrente dalla base
dock e ricollegarlo per ristabilire la connessione con il telecomando.
1
2
Fig. 2
IT
3
Istruzioni d’uso | 05
Istruzioni d’uso
Ora è possibile utilizzare il telecomando TuneCommand AV per controllare le seguenti funzioni
dell’iPod: riproduzione/pausa, avanti, indietro e abbassa/alza volume. Inoltre è possibile
controllare comodamente le funzioni per la selezione casuale e la ripetizione dei brani, usando i
due tasti rotondi. Ogni volta che si preme un tasto, il dispositivo passa alla funzione successiva.
Quando viene utilizzato con iPod video, nano o photo, il TuneCommand AV consente di scorrere
tra i video, le fotografie o le presentazioni in modalità wireless!
NOTA BENE:
• Le presentazioni di fotografie devono essere eseguite
manualmente dall’iPod per essere visualizzate sulla TV
Quando viene utilizzato con l’iPod video:
• È necessario creare una playlist per i video in modo
da utilizzare le funzioni del telecomando
• Modificare le impostazioni dell’iPod video come segue: “TV Out > NTSC or PAL”
Il tasto per la selezione casuale dei brani (
) funziona nel seguente ordine:
Shuffle off (Selezione casuale spenta) > Shuffle songs (Selezione casuale dei brani) > Shuffle
albums (Selezione casuale album).
) funziona nel seguente ordine:
Il tasto per la ripetizione dei brani (
Repeat off (Ripetizione spenta) > Repeat one (Ripetizione di un brano) > Repeat all (Ripetizione di
tutti i brani).
Seguire le icone riportate sullo schermo dell’iPod (piccole icone in alto a destra, sotto l’indicatore
di stato della batteria) per vedere le impostazioni attuali.
Istruzioni per l’uso | 06
Tabella LED
Ogni volta che si preme un tasto sul telecomando, le spie verdi sul telecomando e sulla base dock
lampeggiano per indicare che il segnale è stato ricevuto.
Se la base remota e il telecomando sono troppo lontani tra loro per comunicare, quando si preme
un tasto la spia sul telecomando diventerà arancione (dopo una breve pausa), anziché verde. Il
LED sulla base dock non lampeggerà.
Ogni volta che si preme un tasto, il livello di carica della batteria viene automaticamente
controllato. Se la batteria è scarica, la spia sul telecomando continua a lampeggiare, cambiando
colore: da verde o arancione a rosso. Se ciò si verifica, sostituire le batterie scariche con una
batteria dello stesso tipo (CR 2032). Il TuneCommand AV continuerà a funzionare normalmente
fino a quando la batteria sarà completamente scarica.
VERDE
Il ricevitore riceve il segnale
ARANCIONEFuori copertura
La batteria è fuori posto
VERDE
Segnale ricevuto
IT
Tabella LED | 07
Utilizzo della clip multiuso
La clip consente di portare il telecomando intorno alla cintura
o intorno al collo utilizzando il cordoncino.
Non farla scorrere
CHIUSURA A SCATTO
Come agganciare la clip multiuso al telecomando
1
2
Come agganciarla alla
cintura
Utilizzo della clip multiuso | 08
Come effettuare l’aggancio
Risoluzione delle anomalie
•
La base dock non è alimentata quando viene connessa.
Verificare che l’adattatore di corrente è inserito correttamente nella presa a muro e nella preso
d’ingresso alimentazione CC della base dock. Verificare che l’iPod sia completamente inserito
nel connettore sul lato superiore della base dock.
•
Il telecomando non è alimentato.
Assicurarsi che la batteria sia inserita in modo corretto, con il segno (+) rivolto verso l’alto; che
l’alloggiamento della batteria sia completamente inserito e che il pulsante di sblocco
sia in posizione.
• Dopo aver connesso la base dock e il telecomando non c’è più audio.
- Selezionare un brano sull’iPod e premere su “PLAY”.
- Verificare che il cavo audio sia collegato correttamente
alla base dock del TuneCommand AV e all’impianto stereo / home cinema.
- Se collegato a un impianto stereo, assicurarsi che
il canale audio di entrata dell’impianto stereo sia impostato correttamente.
- Assicurarsi che l’iPod e l’impianto stereo siano accesi.
- Aumentare il volume usando il telecomando del TuneCommand AV.
- Ripetere la FASE 1 e FASE 2 dell’impostazione.
•
Il telecomando non funziona dopo aver sostituito la batteria.
Dopo aver sostituito la batteria, scollegare l’adattatore di corrente dalla base dock e
ricollegarlo per ristabilire la connessione con il telecomando.
•
Il video è riprodotto sull’iPod ma non sullo schermo della TV.
Verificare che le impostazioni dell’iPod video siano le seguenti: “TV Out > NTSC or PAL”.
•
Le interferenze elettromagnetiche di forte intensità potrebbero compromettere il
normale funzionamento del prodotto. In tal caso, resettare il dispositivo in modo che
torni a funzionare normalmente seguendo le indicazioni del manuale. Qualora non dovesse
funzionare, utilizzare il prodotto in un altro luogo.
Risoluzione delle anomalie | 09
IT
Specifiche
Raggio di copertura: Fino a 35 metri
Metodo di trasmissione Radiofrequenza
Frequenza: 2.44 GHz
Batteria del telecomando: CR 2032 3V
Dimensioni del telecomando: 8,9 cm x 3,8 cm x 1,3 cm
(senza la clip da cintura; profondità massima con la clip: 1,9 cm)
Peso del telecomando (batteria inclusa): 22,6 g
Dimensioni della base dock: 8,9 cm x 8,9 cm x 2,5 cm
Peso della base dock: 96,4 g
Clip/Gancio/Cordoncino: 13,2 g
Specifiche | 010
Informazioni
Dichiarazione FCC
DICHIARAZIONE DI CONFORMITÀ CON LE LEGGI FCC PER LA COMPATIBILITÀ ELETTROMAGNETICA
Belkin Corporation, con sede al 501 West Walnut Street, Compton, CA 90220, dichiara sotto la propria
piena responsabilità che il prodotto,
F8Z065ea
cui questa dichiarazione fa riferimento,
Questa apparecchiatura è stata testata ed è risultata conforme ai limiti previsti per i dispositivi digitali
di classe B, in conformità alla Sezione 15 delle Regole FCC. Questi limiti hanno lo scopo di offrire una
protezione ragionevole dalle interferenze dannose in un’installazione domestica. Questo dispositivo
genera, utilizza e può emettere energia in radiofrequenza e, se non installato ed utilizzato in conformità
alle istruzioni, può causare interferenze dannose alla ricezione radiotelevisiva. Tuttavia, non esiste alcuna
garanzia che in una particolare installazione non possano verificarsi interferenze. Se questo apparecchio
causasse interferenze dannose per la ricezione delle trasmissioni radiotelevisive determinabile spegnendo
o riaccendendo l’apparecchio stesso si suggerisce all’utente di cercare di rimediare all’interferenza
adottando una o più delle seguenti misure:
.
Cambiare l’orientamento o la posizione dell’antenna ricevente.
.
Aumentare la distanza tra il dispositivo e il ricevitore.
.
Collegare l’apparecchio a una presa di corrente inserita in un circuito
diverso da quello a cui è collegato il ricevitore.
.
Consultare il rivenditore o un tecnico radio/TV specializzato.
ICES
Questo apparecchio digitale di classe B è conforme allo standard canadese ICES-003. Cet appareil
numérique de la classe B est conforme á la norme NMB-003 du Canada.
IT
Informazioni | 11
Garanzia di 3 anni offerta da Belkin Corporation
Cosa copre questa garanzia.
Belkin Corporation garantisce all’acquirente questo prodotto Belkin che tale prodotto è esente da difetti di
progettazione, montaggio, materiale e lavorazione.
Periodo di copertura della garanzia
Belkin Corporation garantisce il prodotto Belkin per tre anni.
Provvedimenti contro eventuali problemi
Garanzia sul prodotto
Belkin provvederà a riparare o sostituire gratuitamente, a sua discrezione, qualsiasi prodotto che dovesse risultare
difettoso (escluse le spese di trasporto).
Condizioni non coperte dalla garanzia
Tutte le garanzie di cui sopra saranno rese nulle qualora il prodotto Belkin non fosse fornito alla Belkin Corporation
per essere sottoposto alle necessarie verifiche dietro espressa richiesta di Belkin e a spese del cliente, oppure nel
caso la Belkin Corporation dovesse stabilire che il prodotto non è stato correttamente installato o che sia stato in
qualche modo alterato o manomesso. La Garanzia sul prodotto Belkin non copre danni da imputarsi a calamità
naturali (tranne i fulmini), tra cui allagamenti o terremoti, da guerre, atti di vandalismo, furti, usura, erosione,
assottigliamento, obsolescenza, abusi, danni dovuti ad interferenze di bassa tensione (tra cui parziali oscuramenti
o abbassamenti di tensione), programmazione non autorizzata oppure modifiche o alterazioni all’apparecchiatura
dell’impianto.
Come usufruire della garanzia
Per usufruire dell’assistenza per il proprio prodotto Belkin, è necessario:
1. Contattare la Belkin Corporation all’indirizzo 501 W. Walnut St., Compton CA 90220, att.: Customer Service, o
chiamare il numero
(800)-223-5546, entro 15 giorni dall’evento. Avere a disposizione
le seguenti informazioni:
a. Il codice del prodotto Belkin.
b. Il luogo di acquisto del prodotto.
c. La data di acquisto del prodotto.
d. Copia della ricevuta originale.
Garanzia | 12
Garanzia di 3 anni sul prodotto offerta da Belkin Corporation
2. Il rappresentante del Servizio Clienti Belkin vi spiegherà come inviare la ricevuta e il prodotto Belkin e
come procedere con il reclamo.
Belkin Corporation si riserva il diritto di riesaminare il prodotto Belkin danneggiato. Tutte le spese di spedizione
per il prodotto Belkin restituito alla Belkin Corporation sono a carico dell’acquirente. Se Belkin determina, a sua
discrezione, che inviare l’apparecchio danneggiato non è pratico, Belkin potrebbe decidere, a sua discrezione di
farlo ispezionare e determinare il costo della riparazione. In caso ci fossero delle spese di spedizione per inviare e
ricevere l’apparecchio dopo l’ispezione, queste saranno a carico dell’acquirente. Eventuali apparecchi danneggiati
dovranno essere mantenuti disponibili per eventuali verifiche fino alla risoluzione della richiesta di indennizzo.
Al raggiungimento dell’accordo, Belkin Corporation si riserva il diritto di essere surrogato da eventuali polizze
assicurative dell’acquirente.
Indicazioni legali relative alla garanzia
LA PRESENTE GARANZIA COSTITUISCE L’UNICA GARANZIA, ESPLICITA O IMPLICITA, DELLA BELKIN CORPORATION.
SI ESCLUDE QUALSIASI GARANZIA IMPLICITA, DI COMMERCIABILITÀ E DI ATTITUDINE PER SCOPI PARTICOLARI CHE
VADANO OLTRE LA PRESENTE GARANZIA ESPLICITA SCRITTA.
Alcune giurisdizioni non consentono l’esclusione o la limitazione delle garanzie implicite o della responsabilità per i
danni accidentali, pertanto i limiti di esclusione di cui sopra potrebbero non fare al caso vostro.
IN NESSUN CASO BELKIN CORPORATION POTRÀ ESSERE CONSIDERATA RESPONSABILE DI ALCUN DANNO DIRETTO,
INDIRETTO, ACCIDENTALE, SPECIFICO O DANNI MULTIPLI TRA I QUALI, MA NON SOLO, EVENTUALI DANNI DI
MANCATI AFFARI O MANCATO GUADAGNO DERIVATI DALLA VENDITA O UTILIZZO DELL’ADATTATORE DI CORRENTE
BELKIN, ANCHE NEL CASO IN CUI BELKIN FOSSE STATA INFORMATA DELLA POSSIBILITÀ DI TALI DANNI.
Questa garanzia consente di godere di diritti legali specifici e di eventuali altri diritti che possono variare di stato in
stato. Alcune giurisdizioni non consentono l’esclusione o la limitazione delle garanzie implicite o della responsabilità
per i danni accidentali, pertanto i limiti di esclusione di cui sopra potrebbero non fare al caso vostro.
IT
Garanzia | 13
IT
Belkin Corporation
501 West Walnut Street
Los Angeles, CA 90220, USA
310-898-1100
310-898-1111 fax
Belkin Ltd.
Express Business Park, Shipton Way
Rushden, NN10 6GL, Regno Unito
+44 (0) 1933 35 2000
+44 (0) 1933 31 2000 fax
Belkin B.V.
Boeing Avenue 333
1119 PH Schiphol-Rijk, Paesi Bassi
+31 (0) 20 654 7300
+31 (0) 20 654 7349 fax
Belkin Ltd.
7 Bowen Crescent, West Gosford
NSW 2250, Australia
+61 (0) 2 4372 8600
+61 (0) 2 4372 8603 fax
Assistenza tecnica
USA: 310-898-1100 int. 2263
800-223-5546 int. 2263
Europa: 00 800 223 55 460
Australia: 1800 235 546
Nuova Zelanda: 0800 235 546
© 2006 Belkin Corporation. Tutti i diritti riservati.
Tutti i nomi commerciali sono marchi registrati dei rispettivi produttori. iPod è un marchio della Apple
Computer, Inc. registrato negli USA e in altri Paesi.
F8Z065ea
P75047ea