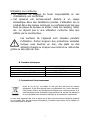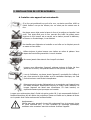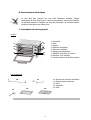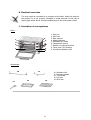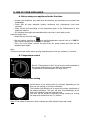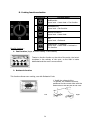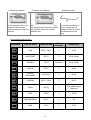
1
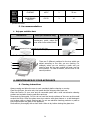
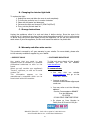
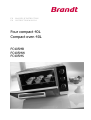
FR
EN
MANUEL D’INSTRUCTION
INSTRUCTION MANUAL
Four compact 40L
Compact oven 40L
FC405MB
FC405MW
FC405MS
Chère Cliente, Cher Client,
Vous venez d’acquérir un four compact BRANDT et nous vous en remercions.
Nous avons mis dans cet appareil toute notre passion, notre savoir-faire pour qu’il réponde
au mieux à vos besoins. Innovant, performant, nous l’avons conçu pour qu’il soit aussi
toujours facile à utiliser.
Vous trouverez également dans la gamme des produits BRANDT, un vaste choix de petit
électroménager que vous pourrez coordonner à votre four compact BRANDT.
Bien entendu, dans un souci permanent de satisfaire le mieux possible vos exigences vis-àvis de nos produits, notre service consommateurs est à votre disposition et à votre écoute
pour répondre à toutes vos questions ou suggestions.
Et connectez-vous aussi sur notre site www.brandt.com où vous trouverez tous nos produits,
ainsi que des informations utiles et complémentaires.
BRANDT
Dans le souci d’une amélioration constante de nos produits, nous nous réservons le droit
d’apporter à leurs caractéristiques techniques, fonctionnelles ou esthétiques toutes
modifications liées à leur évolution.
Important : Avant de mettre votre appareil en marche, veuillez lire
attentivement ce guide d’installation et d’utilisation afin de vous
familiariser plus rapidement avec son fonctionnement.
2
SOMMAIRE
1.
A L’ATTENTION DE L’UTILISATEUR .......................................................... 4
A.
Consignes de sécurité................................................................................. 4
B.
Données techniques ................................................................................... 7
C.
Protection de l’environnement..................................................................... 7
2.
INSTALLATION DE VOTRE APPAREIL ....................................................... 8
A.
Installer votre appareil en toute sécurité...................................................... 8
B.
Branchements électriques ........................................................................... 9
C.
Description de votre appareil....................................................................... 9
3.
UTILISATION DE VOTRE FOUR ............................................................... 10
A.
Avant d’utiliser votre appareil pour la première fois .................................... 10
B.
Réglage de la température........................................................................ 10
C.
Séléction de la durée de cuisson................................................................ 10
D.
Réglage du mode de cuisson ................................................................................... 11
E.
Conseils d’utilisation ................................................................................. 13
4.
ENTRETIEN DE VOTRE APPAREIL ........................................................... 13
A.
Consignes de nettoyage............................................................................ 13
B.
Changement de l’ampoule intérieure ......................................................... 13
C.
Consignes de stockage ............................................................................. 14
D.
Garantie et service après-vente ................................................................. 14
ENGLISH INSTRUCTION MANUAL ................................................................. 15
3
1. A L’ATTENTION DE L’UTILISATEUR
Conservez ce mode d’emploi avec votre appareil. En
cas de vente ou de cession de cet appareil à une
autre personne, assurez vous de transmettre ce
mode d’emploi au nouveau propriétaire. Merci de
prendre connaissance de ces conseils avant d’installer et
d’utiliser votre appareil. Ils ont été rédigés pour votre sécurité
et celle d’autrui.
A. Consignes de sécurité
Installation
• Cet appareil est exclusivement destiné à un usage
domestique pour la cuisson, le réchauffage d’aliments. Il ne
peut être utilisé qu’en milieu couvert, fermé et chauffé tel
qu’une cuisine ou toute autre pièce répondant aux mêmes
spécifications.
• Avant d’utiliser cet appareil, placez-le sur une surface plane,
sèche et résistante aux échauffements telle qu’un plan de
travail de cuisine. Laissez un espace d’au moins 10
centimètres de chaque côté de l’appareil pour permettre une
bonne circulation de l’air.
• Gardez l'appareil et son cordon d’alimentation hors de portée
d'enfants de moins de 8 ans.
• Cet appareil n’est pas destiné à être mis en fonctionnement
au moyen d’une minuterie extérieure ou par un système de
commande à distance séparé.
• Ne tirez jamais sur le cordon mais débranchez l’appareil en
tenant la prise.
• Si cet appareil est recouvert ou en contact avec un matériau
inflammable y compris rideaux, tentures et éléments
similaires, il existe un risque d’incendie lors de son
fonctionnement.
• Les enfants ne doivent pas jouer avec l’appareil.
4
Utilisation
• Cet appareil peut être utilisé par des enfants âgés de 8 ans
et plus ainsi que par des personnes à capacités physiques,
sensorielles ou mentales réduites, seulement après leur avoir
donné les informations nécessaires concernant l'utilisation de
l'appareil, afin qu’ils aient conscience des dangers.
• Les parties accessibles de cet appareil peuvent devenir
chaudes pendant son fonctionnement.
• Les jeunes enfants doivent être tenus à l’écart à moins qu’ils
ne soient continuellement surveillés.
• Ne touchez pas les surfaces chaudes de cet appareil pendant
son fonctionnement.
• Ne placez aucun élément sur l’appareil lorsqu’il est en
fonctionnement.
• Ne recouvrez pas une partie du four avec du papier
aluminium. Cela peut entrainer des dysfonctionnements et un
risque d’incendie.
• Ne laissez pas le cordon d’alimentation entrer en contact
avec des surfaces chaudes.
• Ne mettez aucun des matériaux suivants dans le four :
carton, plastique, papier ou matériaux similaires sensibles
aux échauffements.
• Veillez à ne pas insérer des ustensiles ou des aliments trop
volumineux. Les ustensiles et aliments ne doivent pas être en
contact avec les éléments chauffants.
• Cet appareil n’est pas destiné à un autre usage que celui de
cuire ou réchauffer des aliments. Le séchage d’aliments, de
serviettes, le réchauffage de serviettes humides ou toute
autre utilisation similaire peut entrainer un risque d’incendie
ou des blessures.
• L’utilisation d’accessoires non recommandée par le fabricant
de l’appareil peut entraîner des dangers ou des blessures.
5
Entretien
• Le nettoyage et l’entretien de l’appareil ne doivent pas être
faits par des enfants à moins qu’ils aient plus de 8 ans et
qu’ils soient surveillés.
• Débranchez l’appareil lorsque vous ne l’utilisez pas ou avant
de le nettoyer. Attendez le refroidissement de l’appareil avant
de mettre des objets dans le four ou de les enlever, ou bien
avant de le nettoyer.
• Pour vous protéger des risques de choc électrique,
n’immergez aucune partie du four dans de l’eau ou dans un
autre liquide.
• Ne nettoyez pas l’appareil avec une éponge abrasive ou
grattoir métallique.
• Le câble d'alimentation ne peut pas être remplacé. Si le câble
est endommagé, il convient de mettre l'appareil au rebut.
Cependant, ce produit est garanti 2 ans après la date de
votre achat. Pour plus de détails, veuillez vous reporter aux
conditions de garantie fournies par votre distributeur.
• Cet appareil est équipé d’une porte en verre trempé qui ne
se fend pas mais se brise en minuscule morceaux non
coupants. Evitez de rayer le verre ou de déformer le cadre de
porte. Si la porte présente des rayures ou des chocs,
contactez le service client avant d’utiliser le four.
• La lampe doit être exclusivement utilisée pour l’éclairage du
four. Elle ne doit pas être utilisée sur des luminaires pour
éclairer des locaux.
• Pour le nettoyage des surfaces en contact avec des aliments,
référez vous à la section ‘consignes de nettoyage’.
6
Utilisation non conforme
• Le fabricant se dégage de toute responsabilité en cas
d’utilisations non conformes.
• Cet appareil est exclusivement destiné à un usage
domestique dans des habitations privées. L’utilisation de ce
produit dans des locaux communs ou professionnels tels que
local de pause de bureau ou atelier, local de camping, hôtel,
etc. ne répond pas à une utilisation conforme telle que
définie par le constructeur.
Les surfaces de l’appareil sont chaudes pendant
l’utilisation. Portez toujours des protections isolantes
lorsque vous touchez un four, des plats ou des
aliments chauds ou lorsque vous insérez ou retirez des
grilles ou des plats du four.
B. Données techniques
Modèle
Alimentation
Consommation d’énergie
Dimensions (HxLxP)
Poids net
FC405MB / FC405MW / FC405MS
220-240 V~50/60 Hz
2100W
373 x 578 x 435 mm
12,7 kg
C. Protection de l’environnement
Arrivé en fin de vie, ce produit ne doit pas être jeté avec les ordures
ménagères. Il doit être apporté dans une déchetterie ou à votre revendeur.
Cela permet d’éviter les conséquences néfastes pour l’environnement et la
santé découlant d’une élimination inappropriée et de recycler les matériaux
en vue de réaliser des économies d’énergie et de ressources significatives.
Un logo vous rappelant que vous ne devez pas le jeter avec les ordures ménagères apparaît
sur le produit. Pour de plus amples informations, contactez votre mairie ou le magasin où
vous avez acheté ce produit.
7
2. INSTALLATION DE VOTRE APPAREIL
A. Installer votre appareil en toute sécurité
Si le four est positionné trop près d’un mur, ce dernier peut être brûlé ou
tâché. Veillez à ce que les rideaux, etc. ne soient pas en contact avec le
four.
Ne placez aucun objet entre la base du four et la surface sur laquelle il est
posé. Tout objet situé sous le four pourrait être brûlé. Ne placez aucun
objet sur le four lorsqu’il est en service car la chaleur pourrait le déformer,
le fissurer ou l’endommager, le cas échéant.
Ne chauffez pas d’aliments en bouteille ou en boîte car le récipient pourrait
se casser et vous brûler.
Utilisez toujours la pince lorsque vous insérez ou retirez le plateau. Vous
risquez de vous brûlez gravement si vous le touchez.
Ne versez jamais d’eau dans le four lorsqu’il est chaud.
Lorsque vous débranchez l’appareil, saisissez toujours la fiche. Ne tirez
jamais sur le cordon, cela pourrait casser les fils qui sont à l’intérieur.
Lors de l’utilisation, ne placez jamais l’appareil à proximité d’un brûleur à
gaz, d’une source de forte chaleur ou d’un ventilateur électrique, etc. Cela
pourrait nuire au contrôle de la température.
N’aspergez pas le cordon d’alimentation et ne manipulez pas l’appareil avec
les mains mouillées. Débranchez toujours le cordon après utilisation ou
lorsque l’appareil est laissé sans surveillance. S’il reste branché, un
dysfonctionnement peut provoquer un incendie.
Lorsque vous cuisinez des plats à l’huile tels qu’un poulet rôti, il est recommandé d’utiliser 2
feuilles d’aluminium afin de réduire les projections. Placez une feuille sur le plateau et l’autre
sur le poulet. Ainsi l’huile coulera entre les deux feuilles.
Avertissement :
Vérifiez que votre appareil n’a pas été endommagé lors du transport (porte
ou joints déformés etc.). Si vous constatez un dommage quelconque,
contactez votre revendeur avant de continuer à utiliser l’appareil.
8
B. Branchements électriques
Le four doit être branché sur une prise électrique adaptée. Insérez
entièrement la fiche dans la prise. Dans le cas contraire, elle pourrait chauffer
de manière excessive. N’utilisez pas de prise d’éclairage. Ne branchez jamais
plusieurs fiches dans une même prise.
C. Description de votre appareil
Le four :
5
6
1
2
3
7
4
8
9
1.
2.
3.
4.
5.
6.
7.
8.
9.
Lèchefrite
Grille
Gradins
Eléments chauffants
Ouïes de ventilation
Réglage de température
Sélecteur de modes de cuisson
Minuteur (120 minutes)
Voyant lumineux de fonctionnement
Les accessoires :
10
12
11
13
14
9
10.
11.
12.
13.
14.
Broche avec fourches amovibles
Poignée de tournebroche
Pince
Lèchefrite
Grille
3. UTILISATION DE VOTRE FOUR
A. Avant d’utiliser votre appareil pour la première fois
• Déballez l’appareil et vérifiez que les pièces et accessoires sont présents et non
endommagés.
• Vérifiez que tous les éléments d’emballage (plastique, carton, polystyrène) aient été
retirés à l’intérieur de l’appareil.
• Nettoyez toutes les pièces conformément à la section « Entretien de votre appareil ».
• Séchez minutieusement toutes les pièces et assemblez-les, l’appareil peut maintenant
être utilisé
Chauffez le four à vide :
• Insérez la lèchefrite et la grille de cuisson
• Réglez le sélecteur de mode de cuisson sur
et le thermostat sur « 250°C » puis
chauffez le four à vide pendant environ 10 minutes.
• Après avoir laissé refroidir, débranchez la prise électrique et nettoyez à nouveau toutes
les pièces détachées.
Remarque :
Il se peut qu’il y ait une odeur de fumée et de brûlé, toutefois cela reste normal.
B. Réglage de la température
Réglez la « commande de la température » en la tournant
dans le sens des aiguilles d’une montre pour sélectionner la
température appropriée en fonction du plat que vous allez
cuisiner
(Températures entre 70°C et 250°C).
C. Réglage de la durée de cuisson
Réglez le minuteur sur la durée de cuisson (en minutes)
appropriée pour le plat que vous allez cuisiner en le tournant
dans le sens des aiguilles d’une montre.
Le voyant lumineux vous permet de vérifier le bon
fonctionnement des éléments chauffants. Le four s’éteindra
automatiquement à la fin de la durée de cuisson sélectionnée
et une alarme sonnera.
Vous pouvez éteindre le four manuellement pendant la
cuisson en tournant le minuteur dans le sens inverse des
aiguilles d’une montre jusqu’à la position « 0 ».
Remarque : Si l’intérieur du four est sale, il se peut que la cuisson soit légèrement plus
longue que d’habitude.
10
D. Sélection du mode de cuisson
Séquences
Mode de cuisson
Multifonction :
Voûte + Sole + Ventilation
Gril ventilé :
Voûte + Ventilation
Convection naturelle :
Voûte + Sole
Gril :
Voûte + Tournebroche
Multifonction + tournebroche :
Voûte + Sole + Tournebroche +
Ventilation
Fonctions spécifiques :
1. Fonction chaleur brassée (Voûte + Sole + Ventilation)
Grâce au ventilateur situé sur le côté de la cavité, l’air chaud
circule dans la totalité du four, la chaleur est donc mieux
répartie et la cuisson est plus uniforme.
2. Fonction tournebroche
Cette fonction permet de réaliser des pièces rôties à la broche.
1. Installer les fourches du tournebroche
Pour fonctionner, le tournebroche doit
être positionné du bon côté : avec le
petit crochet sur la gauche du four
Gauche
11
Droite
2. Installer le tournebroche
Insérez les fourches du
tournebroche dans l’orifice du
tournebroche, puis installez la
lèchefrite sous le tournebroche
3. Retirer le tournebroche
Poignée du tournebroche
Retirer les fourches du
tournebroche à l’aide de la
poignée du tournebroche, puis
retirez la lèchefrite
Pour éviter de vous brûler,
utilisez toujours la poignée
du tournebroche pour retirer
le tournebroche du four
Temps de cuisson conseillé :
SEQUENCE
PLATS
TEMPERATURE
GRADIN
DUREE (en min)
POISSON
180°C / 200°C
2
15-20
ROTI DE BŒUF
230°C*
2
30 pour 1000g
POULET
220°C
Tournebroche
55 pour 1500g
QUICHE
200°C
2
40/45
GRATIN DAUPHINOIS
180°/200°C
2
40-45
LASAGNES
180°C / 200°C
2
40-45
PIZZA
220°C*
2
15-20 selon épaisseur
TARTES
200°C
2
30-35
TOASTS GRILLES
180°C
4
5-8 sur grille
GATEAU
170°C
2
45-55 selon épaisseur
CUPCAKES
160°C
2
25
SABLES
170°C*
3
10
* faire préchauffer le four 5 mn
12
E. Conseils d’utilisation
1. Lèchefrite et grille
Accessoires
Lèchefrite
Aliments (à titre informatif
uniquement)
Ailes de poulet grillées, steak
haché,
gratin,
gâteau et
presque
tous
les
autres
aliments préparés au four
Comment utiliser la pince ?
Remarque :
Nous vous recommandons de l’utiliser comme tiroir à miettes
Grille
Pommes de terre au four,
aliments secs
2. Gradins
3
2
1
Vous pouvez régler la hauteur du plateau sur 3 niveaux
différents en fonction des plats que vous souhaitez
cuisiner. Par exemple, lorsque vous préparez un gratin
et que vous voulez que la partie supérieure soit plus
cuite, utilisez le troisième gradin. Pour rôtir un poulet,
utilisez le premier ou le deuxième gradin.
4. ENTRETIEN DE VOTRE APPAREIL
A. Consignes de nettoyage
Débranchez toujours l’appareil et laissez-le refroidir totalement avant de le nettoyer ou de le
déplacer. Nettoyer le plat, la grille, la poignée du plat et la lèchefrite après chaque utilisation.
Nettoyer l’intérieur du four électrique et l’ensemble des parties amovibles avec un nettoyant
doux non abrasif et un tampon à récurer en plastique après chaque utilisation. Rincez et
séchez avec soin. Ne frottez pas trop fort sur les surfaces internes du four qui pourraient se
rayer. Nettoyer la porte vitrée extérieure du four électrique avec un nettoyant pour surfaces
vitrées ou un détergent doux et un chiffon humide ou un tampon à récurer en plastique.
N’utilisez pas de nettoyant ou de tampon abrasif qui pourraient rayer la vitre de l’appareil.
Rincez et séchez avec soin à l’aide d’un chiffon propre. Laissez sécher le four avant de
refermer la porte vitrée.
B. Changement de l’ampoule intérieure
Pour remplacer l’ampoule :
1. Débranchez le four et laissez-le refroidir
2. Tournez le hublot dans le sens inverse des aiguilles d’une montre
3. Nettoyer-le à l’eau chaude additionnée de détergent
4. Dévissez l’ampoule et remplacez-la (25W E14/25x17)
5. Remettez le hublot en place
13
C. Consignes de stockage
Débranchez le four, laissez-le refroidir et nettoyez-le avant de le ranger. Rangez le four
électrique dans sa boîte et conservez-le dans un endroit frais et sec. Ne rangez jamais
l’appareil lorsqu’il est chaud ou encore branché. Ne serrez jamais le cordon d’alimentation
autour de l’appareil. N’exercer aucune tension sur le cordon d’alimentation à l’endroit où
celui-ci entre dans l’appareil. Il pourrait s’endommager et se rompre.
D. Garantie et service après-vente
Ce produit est garanti 2 ans par votre distributeur après la date de votre achat. Pour plus de
détails, veuillez vous reporter aux conditions de garantie fournies par votre distributeur.
• INTERVENTIONS
•
Les éventuelles interventions sur votre
appareil doivent être effectuées par un
professionnel qualifié dépositaire de la
marque.
Lors de votre appel, mentionnez la
référence de votre appareil ainsi que le
numéro de série en dessous (S/N).
Ces renseignements figurent sur la plaque
signalétique collée sur l'appareil.
RELATIONS CONSOMMATEURS
Pour en savoir plus sur nos produits
vous pouvez consulter notre site :
www.brandt.com
Vous pouvez nous contacter :
Via notre site, www.brandt.com
rubrique « CONTACT ».
Par e-mail a l’adresse suivante :
relations.consommateurs@groupe
brandt.com
Par courrier à l’adresse postale
suivante :
Service Consommateurs BRANDT
5 av des Béthunes,
CS 69 526
95 060 CERGY PONTOISE CEDEX
Par téléphone du lundi
vendredi de 8h30 à 18h00 au
.
BRANDT France – SAS au capital de 1.000.000 euros –
89 bd Franklin Roosevelt – 92500 Rueil-Malmaison
14
au
Dear Customer,
You have just purchased a BRANDT compact oven and we would like to thank you.
We have placed in this appliance all our passion and know-how in order to meet at best your
need. Innovative and efficient: we designed it to be always easy to use.
In the BRANDT products line, you will also find a wide range of small domestic appliances
that can be coordinated to your new BRANDT compact oven.
Of course, in a permanent wish to satisfy as best as possible your expectations toward our
products, our after-sales service is at your disposal and at your listening to answer to all your
questions and suggestions.
You can also visit our website www.brandt.com where you will find all our products, as well
as additional and useful information.
BRANDT
As part of our commitment to constantly improve our products, we reserve the right to make
technical, functional or esthetical properties modifications linked to their technological
development.
Caution: Before installing and using your appliance, please read
carefully this installation and user’s guide to quickly familiarise yourself
with its functioning.
15
TABLE OF CONTENTS
1.
INFORMATION FOR THE USER ............................................................... 17
A.
Safety recommendations .......................................................................... 17
B.
Technical data.......................................................................................... 20
C.
Protecting the environment....................................................................... 20
2.
SETTING UP YOUR APPLIANCE............................................................... 21
A.
Installing your oven in complete safety...................................................... 21
B.
Electrical connection ................................................................................. 22
C.
Description of your appliance .................................................................... 22
3.
USE OF YOUR APPLIANCE ....................................................................... 23
A.
Before using your appliance for the first time ............................................. 23
B.
Temperature control................................................................................. 23
C.
Cooking time setting................................................................................. 23
D.
Cooking function selection ........................................................................ 24
E.
Use recommandations .............................................................................. 26
4.
MAINTENANCE OF YOUR APPLIANCE..................................................... 26
A.
Cleaning instructions ................................................................................ 26
B.
Changing the interior light bulb ................................................................. 27
C.
Storage instructions.................................................................................. 27
D.
Warranty and after-sales service ............................................................... 27
16
1. INFORMATION FOR THE USER
Keep this guide with your appliance. If the appliance
is sold or given to another person, ensure that the
new owner receives this user’s guide. Please
familiarise yourself with these recommendations
before installing and using your appliance. They were written
for your own safety as well as the safety of others.
A. Safety recommendations
Installation
• Your appliance is designed for standard household use for
cooking, reheating and defrosting foods and beverages. Use
this appliance only for its intended uses as described in
manual. It shall be used only in covered, closed and warmed
environment such as a kitchen or a room with the same
specifications.
• Before using this appliance, it must be placed on a flat and
dry surface resistant to heating like a kitchen counter. Keep
at least four inches of clear space around all sides of the
oven to allow adequate air circulation.
• Keep the appliance and its cord out of reach of children
under 8 years.
• The appliance is not intended to be operated by an external
timer or separate remote-control system.
• Always hold the plug itself, rather than pulling on the power
cable.
• A fire may occurs during its functioning if the oven is covered
or is in contact with flammable materials such as curtains,
drapes, walls, etc.. Do not store any item on the top of the
oven during the functioning.
• Children shall not play with the appliance.
17
Use
• This appliance can be used by children aged from 8 years old
and above and persons with reduced physical, sensory or
mental capabilities or lack of experience and knowledge if
they have been given supervision or instruction concerning
use of the appliance in a safe way and understand the
hazards involved.
• The temperature of accessible surfaces may be high when
the appliance is operating.
• Children under 8 years old shall be kept away unless
continuously supervised.
• Care should be taken to avoid touching heating elements
during the use.
• Do not store any item on top of the oven during operation.
• Do not cover any part of the oven with metal foil. This may
cause overheating of the oven. A fear or some dysfunctions
may occur.
• Keep cord away from heated surface and do not cover any
events on the oven.
• Do not place any of the following materials in the oven;
cardboard, plastic, paper or other similar materials.
• Large food items and metal utensils must not be placed in
the oven as they may lead to a fire or create a risk of electric
shock. Keep away utensils and food items from heated
surfaces.
• Your appliance is designed for standard household use for
cooking, reheating and defrosting foods and beverages. The
drying of food or linen and the heating of heating pillows,
slippers, sponges, wet linen and other similar goods could
bring risks of wounds, inflammation or fire.
• The use of accessory attachments not recommended by the
appliance’s manufacturer may cause hazard or injury.
18
Maintenance
• Cleaning and user maintenance shall not be made by children
unless they are older than 8 and supervised.
• Unplug the appliance when not in use or before cleaning.
Allow the appliance to cool down before adding or removing
any parts and before cleaning.
• To protect against electric shock, do not place any part of
this oven in water or other liquid.
• Do not use harsh abrasive cleaners or sharp metal scrapers
to clean the oven door glass since they can scratch the
surface, which may result in shattering of the glass.
• The supply cord cannot be replaced. If the cord is damaged
the appliance should be scrapped.
However, this product is covered by a 2-year warranty. For
more details, please refer to the warranty conditions supplied
by your retailor.
• This appliance has been tempered, safety glass door.
Tempered glass does not split but break in pieces will not
have sharp edges. Avoid scratching the door surface or
nicking edges. Call the service Center before any use.
• The light is only for the oven. Do not use it to enlighten
rooms.
• For cleaning surfaces in contact with food, please refer
“Cleaning instructions” section.
Improper use
• The appliance is intended for domestic use only in private
housing. The use of thiss appliance in common or
professional’s area such as a room for a break for work, a
premise in a campsite or hotel are not a proper use as
defined by the manufacturer.
• The manufacturer accepts no responsibility in case of
improper use.
• Use this appliance only for its intended uses as described in
manual.
• Please become familiar with these recommendations before
installing and using your appliance.
19
Caution: External surfaces may become very hot
during operation of the appliance. Always wear
protective insulated oven gloves when touching the
hot oven or hot dishes and food, or when inserting or
removing racks, pans…
B. Technical data
Model no
Power supply
Energy consumption
Dimensions (HxLxD)
Net weight
FC405MB / FC405MW / FC405MS
220-240 V~50/60 Hz
2100W
373 x 578 x 435 mm
12,7 kg
C. Protecting the environment
Arrived in end of life, this product should not be thrown with household
waste. It must be brought in a recycling center or to your retailer. It allows
avoiding negative effects on the environment and health of the
inappropriate elimination. By respecting this process, materials can be
recycled with a view to realise significant resources and energy savings.
A symbol reminds you that you must not throw your appliance with the household waste
appars on the product. For further information, contact your city council or the shop where
you bought the product.
20
2. SETTING UP YOUR APPLIANCE
A. Installing your oven in complete safety
If the oven is positioned too close to a wall, this wall can be burned or
discoloured. Ensure that curtains, etc. are not in contact with the oven.
Do not put anything between the base of the oven and the surface on
which it is set. Any object placed under the oven may be burned. Do
not put anything on the top of the oven when it is in use because the
heat can deform, crack or otherwise damage the item.
Do not heat food directly in the bottle or tin because the container may
break and the content can burn the user.
Always use the handle when inserting or removing the tray. Touching
the tray may cause severe burns.
Never pour water in the oven door when it is hot.
When unplugging the oven, always take hold of the plug itself. Never
pull on the cord; this could break the wires inside the cord.
During the use, do not position the oven near a gas burner or any other
heat source. Doing this could affect the temperature control.
Do not touch the power cable or unit with wet hands. Always unplug the
cord after use and whenever the unit is left unattended. A malfunction
while the plug is inserted into the mains could cause a fire.
When cooking fat-spitting dishes such as roast chicken, it is recommended to use 2 sheets of
aluminium foil in order to reduce face spitting. Place one sheet on the tray and the other
over the food. The oil will drip into the gap between the sheets of foil.
Caution :
Ensure that your appliance had not suffered any damage during
transportation (deformed seal or door, etc.). If you see any kind of damage,
contact your retailer before doing anything further with the appliance.
21
B. Electrical connection
The oven must be connected to a property wired outlet. Insert the plug into
the socket. If it is not properly connected, it could overheat. Do not use an
electric light outlet. Never connect multiple plugs to the same power outlet.
C. Description of your appliance
Oven :
5
6
1
2
3
7
4
8
9
1.
2.
3.
4.
5.
6.
7.
8.
9.
Drip pan
Wire rack
Rack support
Heating element
Ventilation air intake
Temperature control
Selector of cooking functions
Timer knob (120 minutes)
Functioning indicator light
Accessories :
10
12
11
13
14
22
10.
11.
12.
13.
14.
Rotisserie fork
Rotisserie handle
Tray handle
Drip pan
Wire rack
3. USE OF YOUR APPLIANCE
A. Before using your appliance for the first time
• Unpack your appliance and check that all elements and accessories are present and
undamaged.
• Check that all wrap elements (plastic, cardboard box, polystyrene) have been
removed.
• Clean all the parts according to the instructions given in the “Maintenance of your
appliance” section.
• Dry all parts thoroughly and assemble them, the oven is now ready to use.
Heat the empty oven :
• Insert the tray and wire track.
and set the temperature control knob to « 250°C »
• Set the cooking function on
then heat the empty oven for about 10 minutes.
• Then, let it cool down, remove the plug from the power socket and clean all the
detached parts again.
Note:
There may be some smoke and a burning smell during the first use, however it is normal.
B. Temperature control
Set the “Temperature Control” by turning the knob clockwise to
the suitable temperature for the dish you are cooking.
(Temperature Control between 70°C and 250°C)
C. Cooking time setting
Set the timer to the cooking time (in minutes) depending on the
dish you are cooking by turning it clockwise.
The indicator light allows you to ensure the orderly functioning of
the heating elements. The oven will turn off automatically at the
end of the selected time and a bell will ring.
The oven can be turned off manually during cooking by turning
the timer anti-clockwise to the “0” position.
Note: If the inside of the oven is dirty, cooking may take slightly longer than usual.
23
D. Cooking function selection
Séquences
Cooking mode
Multifunction
Upper heat + Lower heat + Fan function
Ventilated Grill
Upper heat + Fan function
Natural convection
Upper heat + Lower heat
Grill
Upper heat + Rotisserie
Multifunction + Rotisserie
Upper heat + Lower heat + Rotisserie +
Fan function
Specific functions :
1. Fan Function (Upper & Lower Heating + Fan function)
Thanks to the fan function on the side of the cavity, the hot air
circulates in the entirety of the oven, so the heat is better
distributed and the cook is more uniform.
2. Rotisserie function
This function allows even cooking, use with Rotisserie Forks.
1. Install the rotisserie forks
To operate, the rotisserie must be
positioned on the correct side: with the
small hook on the left side of the oven
Left
24
Right
2. Install the rotisserie
3. Remove the rotisserie
Fit the rotisserie forks in the
rotisserie holes and then
install the drip pan under the
rotisserie
Rotisserie handle
Use the rotisserie handle to remove
the rotisserie forks from the rotisserie
tray and then remove it from the
rotisserie hole
To avoid the possibility of
a burn, always use the
rotisserie handle to remove
the rotisserie from the
oven
Recommended baking time :
SEQUENCE
TYPE OF FOOD
TEMPERATURE
RACK
SUPPORT
TIMER (min)
FISH
180°C / 200°C
2
15-20
ROAST BEEF
230°C*
2
30 for 1000g
CHICKEN
220°C
Rotisserie
55 for 1500g
QUICHE
200°C
2
40-45
GRATIN
DAUPHINOIS
180°/200°C
2
40-45
LASAGNA
180°C / 200°C
2
40-45
PIZZA
220°C*
2
15-20 depending on
thickness
PIES
200°C
2
30-35
TOASTED BREAD
180°C*
4
5-8
CAKE
170°C
2
45-55
25
CUPCAKE
160°C
2
25 mn
SHORTBREAD
BISCUIT
170°C*
3
10
* preheat the oven
E. Use recommandations
1. Drip pan and Wire Rack
Accessories
Drip pan
Food (for reference only)
How to use Tray handle ?
Roast
chicken
wings,
hamburgers, gratin, cakes and
most other oven-cooked foods
Note :
We recommend you to use it as a crumb tray.
Wire rack
Baked potatoes, dry food
2. Rack support
3
2
1
There are 3 different positions for the tray which can
adjust according to the dish you are cooking. For
example, when you are cooking a gratin and you
want to have the top part cooked the most, use the
third position. To roast a chicken, use the first or the
second position.
4. MAINTENANCE OF YOUR APPLIANCE
A. Cleaning instructions
Always unplug and allow the oven to cool completely before cleaning or moving.
Clean the grill pan, the wire rack, the handle and the drip pan after each use.
Clean the interior of your oven and all removable parts with a mild non-abrasive cleaning
product and a plastic scouring pad after each use.
Rinse and dry thoroughly. Do not rub too hard the interior surfaces of the oven as this could
scratch the finish. Clean the glass oven door exterior with glass cleaner or a mild detergent
and a damp cloth or plastic scouring pad. Do not use abrasive cleaning products or pads as
they might scratch the glass of the appliance.
Rinse and dry thoroughly with a clean cloth. Allow to dry before closing the glass door.
26
B. Changing the interior light bulb
To replace the light :
1. Unplug the oven and allow the oven to cool completely
2. To move the porthole, turn it counter clockwise
3. Clean with hot water and detergent
4. Converse the light and change it (25W E14/25x17)
4. Then, put the porthole back on
C. Storage instructions
Unplug the appliance, allow it to cool and clean it before storing. Store the oven in its
original box in a clean and dry place. Never store the appliance while it is hot or still plugged
in. Never wrap the power cable tightly around the appliance. Do not put any stress on the
cable where it joins the appliance, as this could cause the cable to fray and break.
D. Warranty and after-sales service
This product is covered by a 2-year warranty by your retailer. For more details, please refer
to the warranty conditions supplied by your retailer.
•
SERVICE CALLS
•
Any repairs that are made to your
appliance must be handled by a qualified
professional authorised to work on the
brand.
When you call, mention your appliance’s
“Service” reference, as well as its serial
number “Nr”.
This
information
appears
on
the
manufacturer’s nameplate which can be
found stuck behind the machine.
CUSTOMER RELATIONS
To find out more about all the brand’s
products you can visit our website:
www.brandt.com
To communicate:
You may visit our website
www.brandt.com and go to the
“CONTACT” section
You may e-mail us:
relations.consommateurs@groupeb
randt.com
You may write us at the following
address:
Service Consommateurs BRANDT
5 av des Béthunes,
CS 69 526
95 060 CERGY PONTOISE CEDEX
Or phone us from Monday to
Friday from 8:30 am to 6:00 pm :
BRANDT FRANCE – SAS with a capital of 1.000.000 euros
89 bd Franklin Roosevelt – 92500 Rueil-Malmaison
27