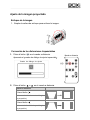
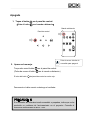
1
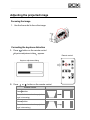
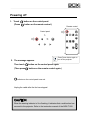
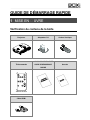
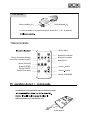
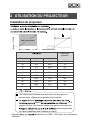
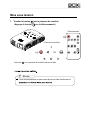
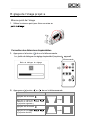
ENGLISH
IMPORTANT SAFEGUARDS
QUICK START GUIDE
P5 P10
P11 P18
Please read the IMPORTANT SAFEGUARDS carefully before using this product. Keep for
future reference.
Please download the BOXi Instruction Manual from the following website and read carefully to
ensure safe and proper use
BOXi Product Website: http://www.elmoboxi.com/
FRAN AIS
CONSIGNES DE SÉCURITÉ
GUIDE DE DÉMARRAGE RAPIDE
P21 P26
P27 P34
Lire les consignes de sécurité ava
utilisation ultérieure.
Téléchargez
truction depuis le site BOXi suivant.
Site du produit BOXi
http://www.elmoboxi.com/
Deutsch
WICHTIGE SICHERHEITSHINWEISE
Kurzanleitung
P37 P42
P43 P50
Bitte lesen Sie diese WICHTIGEN SICHERHEITSHINWEISE sorgfältig durch, bevor Sie das
Gerät benutzen und bewahren Sie sie für eine zukünftige Bezugnahme auf.
Laden Sie die Bedienungsanleitung von der folgenden BOXi Webseite herunter.
BOXi Produktwebseite http://www.elmoboxi.com/
ESPAÑOL
CONTROLES DE SEGURIDAD IMPORTANTES
GUÍA DE INICIO RÁPIDO
P53 P58
P59 P66
Lea atentamente este manual de instrucciones antes de usar el producto y guárdelo para
realizar futuras consultas.
Descargue este manual de instrucciones de la siguiente página web de BOXi.
Página web de productos de BOXi http://www.elmoboxi.com/
ENGLISH
Please read this
the projector. Keep for future reference.
and this guide carefully before using
This guide describes the basic operation of the projector with a connection to a
DVD player as an example. Refer to the instruction manual of the BOXi T-200 for
any other operations and detailed information.
BOXi T-200 Instruction manual
Download the instruction manual from the following BOXi website.
BOXi Product Website http://www.elmoboxi.com/
©2013 Copyright ELMO Co., Ltd. All rights reserved.
Any names, company names and product names referred to in this guide are trademarks
or registered trademarks of the respective companies.
TABLE OF CONTENTS
TABLE OF CONTENTS ................................................................................................. 4
IM POR TANT S AFEG U AR DS ................................ ................................ .. 5
B EFOR E YOU USE .. ................................... .................................. ....... 9
QU ICK START GUI DE ................................. ................................. ....... 11
1 GETTI N G STARTED ................................ ................................. ....... 11
Checking the package contents ................................................................................. 11
Part names and functions ...........................................................................................12
Preparing the remote control ......................................................................................13
2 USIN G THE PROJECTO R ............................... ................................ 14
Installing the projector ................................................................................................14
Connecting to a device ...............................................................................................15
Powering on .................................................................................................................16
Adjusting the projected image....................................................................................17
Powering off .................................................................................................................18
IMPORTANT SAFEGUARDS
Read Instructions
All the safety and operating instructions should be read before the appliance is operated.
Retain Instructions
The safety and operating instructions should be retained for future reference.
Heed Warnings
All warnings on the product and in the operating instructions should be adhered to.
Follow Instructions
All operating and use instructions should be followed.
Cleaning
Unplug this product from the power source before cleaning. Do not use liquid cleaners or
aerosol cleaners. Use a damp cloth for cleaning.
Attachments
Do not use attachments not recommended by the product manufacturer as they may
cause hazards.
Water and Moisture
Do not use this product near water - for example, near a bath tub, wash bowl, kitchen sink,
or laundry tub, in a wet basement, or near a swimming pool, and the like.
Placement
Do not place this product on an unstable cart, stand, tripod, bracket, or table. The product
may fall, causing serious injury to a child or adult, and serious damage to the product. Use
only with a cart, stand, tripod, bracket, or table recommended by the manufacturer, or sold
with the product.
Any mounting of the product sh
a mounting accessory recommended by the manufacturer.
Ventilation
Slots and openings in the cabinet are provided for ventilation and to ensure reliable
operation of the product and to protect it from overheating, and these openings must not
be blocked or covered.
The openings should never be blocked by placing the product on a bed, sofa, rug, or other
similar surface. This product should not be placed in a built-in installation such as a
bookcase o
have been adhered to.
Power Sources
This product should be operated only from the type of power source indicated on the
marking label. If you are not sure of the type of power supply to your home consult your
appliance dealer or local power company. For products intended to operate from battery
power, or other sources, refer to the operating instructions.
Grounding or Polarization
This product may be equipped with either a polarized 2-wire AC line plug (a plug having
one blade wider than the other) or a 3-wire grounding type plug, a plug having a third
(grounding) pin.
If the 2-wire polarized plug fails to fit in the outlet scoket, try reversing the plug . If the plug
still fails to fit, contact your electrician to replace your obsolete outlet. For safety reasons
do not force the polarized plug into the outlet socket. The 3-wire grounding type plug will fit
into a grounding type power outlet socket. This is a safety feature. If you are unable to
insert the plug into the outlet socket, contact your electrician to replace your obsolete
outlet socket. For safety reasons do not force the grounding type plug into the outlet
socket.
Power-Cord Protection
Power-supply cords should be routed so that they are not walked on or pinched by items
placed upon or against them, pay particular attention to cords and plugs, convenience
receptacles, and the point where they exit from the product.
Lightning
For added protection for this product during a lightning storm, or when it is left unattended
and unused for long periods of time, unplug it from the wall outlet and disconnect the
antenna or cable system. This will prevent damage to the product due to lightning and
power-line surges.
Overloading
Do not overload wall outlets, extension cords, or integral convenience receptacles as this
can result in a risk of fire or electric shock.
A product and cart combination should be moved with care.
Quick stops, excessive force, and uneven surfaces may cause the
product and cart combination to overturn.
Object and Liquid Entry
Never push objects of any kind into this product through openings as they may touch
dangerous voltage points or short-out parts that could result in a fire or electric shock.
Never spill liquid of any kind on the product.
Servicing
Do not attempt to service this product yourself as opening or removing covers may expose
you to dangerous voltage or other hazards. Refer all servicing to qualified service
personnel.
Damage Requiring Service
Unplug this product from the wall outlet and refer servicing to qualified service personnel
under the following conditions:
-supply cord or plug is damaged.
he product has been exposed to rain or water.
only those controls that are covered by the operating instructions as improper
adjustment of other controls may result in damage and may require extensive work by
a qualified technician to restore the product to its normal operation.
d or damaged in any way.
- this indicates a need for
service.
Replacement Parts
When replacement parts are required, be sure the service technician has used
replacement parts specified by the manufacturer or have the same characteristics as the
original part. Unauthorized substitutions may result in fire, electric shock or other hazards.
Safety Check
Upon completion of any service or repairs to this product, ask the service technician to
perform safety checks to determine that the product is in proper operating condition.
Heat
The product should be situated away from heat sources such as radiators, heat registers,
stoves, or other products (including amplifiers) that produce heat.
CAUTION
RISK OF
ELECTRIC SHOCK
DO NOT OPEN
CAUTION:
TO REDUCE THE RISK OF
ELECTRIC SHOCK, DO NOT
REMOVE COVER (OR BACK).
NO USER-SERVICEABLE
PARTS INSIDE.
REFER SERVICING TO
QUALIFIED SERVICE
PERSONNEL.
The lightning flash with arrowhead symbol, within an equilateral
triangle, is intended to alert the user to the presence of uninsulated
dangerous voltage within the product s enclosure that may be of
SA 1965
sufficient magnitude to constitute a risk of electric shock to persons.
The exclamation mark within an equilateral triangle is intended to
alert the user to the presence of important operating and
maintenance (servicing) instructions in the literature accompanying
SA 1966
the product.
This symbol [crossed-out wheeled bin WEEE Annex IV] indicates
separate collection of waste electrical and electronic equipment in the
EU countries.
Please do not throw the equipment into the domestic refuse.
Please use the return and collection systems available in your country
for the disposal of this product.
This symbol [crossed-out wheeled bin Directive 2006/66/EC Annex II]
indicates separate collection of waste batteries in the EU countries.
Please do not throw the batteries into the domestic refuse. Please use
the return and collection systems available in your country for the
disposal of the waste batteries.
BEFORE YOU USE
To use this product, please be sure to use the supplied power cord and AC adapter.
The supplied power cord and AC adapter are designed for exclusive use with this product. Do not
use them with other equipment.
Be sure to use the power cord applicable to your local power specifications. If the product was sold
in Japan, use the AC adapter sold with the product with 100VAC and 50 or 60 Hz.
Do not knot or coil the power cord or AC adapter cord or wrap them around the AC adapter. Doing
so may damage the cords, causing fire or electric shock.
Carry this product by holding the lower part of the main unit in both hands. Do not apply excessive
vibration or shock to the product. Doing so may damage parts causing malfunction.
Do not apply vibration or shock during projection. Do not use this product in a car or ship where
vibration or shock is applied to the product. Vibration or shock may damage parts causing
malfunction.
Do not use this product near high-voltage power lines or power source. The product may receive
harmful interference.
Do not use this product in locations subject to humidity, dust, smoke, oil smoke or steam. Dirt may
attach to the optical parts, such as the lens, causing reduced image quality.
Do not use this product in locations exposed to extreme temperature or locations where the
temperature changes too quickly.
Use this product under the following environmental conditions:
Temperature 5
35
Humidity less than 85 (No condensation)
When the product is suddenly brought into a warm place from a cold place or when the room
temperature is quickly raised, condensation may occur to the surface of the lens causing reduced
image quality. Wait until the condensation is completely gone and the image becomes clear.
Do not touch the lens. It may leave fingerprint marks which can result in a blurred image.
Important notes when connecting an HDMI cable.
Use a HIGH SPEED HDMI cable with the HDMI logo.
HDMI cables that are not compliant with HDMI standards should not be used.
Do not apply excessive force to the HDMI terminal while the cable is connected as it could
damage the HDMI terminal, leading to a malfunction.
Follow the guidelines below to prevent the product from dropping or overturning.
e base, desk, or table. Do not place the product on an unstable base or
sloping location.
Secure and tidy all cables to prevent accidentally pulling the projector off any surface.
Luminescent spot and black spot
There may be some pixels that do not operate properly due to the use of an image pick-up device
made-up of many pixels. Though luminescent or black spots may be found on the screen, it is a
phenomenon peculiar to the image pick-up device and is not a malfunction.
There may be some flickering on the screen when shooting a pattern image with gradual changes
in brightness. It is a phenomenon peculiar to the image pick-up device and is not a malfunction.
This product is not designed to display such kind of images.
There may be some image distortion for a moment when the output resolution of the connected
device is changed while the image is projected. This is because the product automatically adjusts
the projection settings according to the input signal. It is not a malfunction.
Lifetime of the parts
Avoid using the projector in severe conditions such as high temperature, dusty or smoky
environments as well as long-continuous use in excess of eight hours.
Doing so may shorten the life of critical components such as the optical engine and cooling fan
which may lead to degraded image quality. Please note, warranty repair may not apply if unit is
deemed to be subjected to such abuse. Regarding paid component replacement, please contact
the distributor the product was purchased from or our service office.
QUICK START GUIDE
1 GETTING STARTED
Checking the package contents
Projector
Remote control
*Battery included
HDMI cable
AC adapter
IMPORTANT SAFEGUARD
QUICK START GUIDE
Power cord
WARRANTY CARD
Part names and functions
TOP/FRONT
BOTTOM /BACK
Intake vents
Speaker
Control panel
Rear panel
Remote sensor
Lens
Exhaust vent
Focus dial
Tilt stand
Security slot
Control
panel
* Touch switch
Warning indicator
Power button
Power indicator
Keystone button
Menu button
Volume button
Enter button
LEFT button
RIGHT button
Rear panel
DC5V Out
DC IN
AUDIO
(Headphone/External Speakers)
HDMI
Tilt stand
Tilt stand 10°
Tilt stand 5°
*The tilt stand allows you to make a front inclination angle of 5° or 10° to
raise the projected image.
Remote control
Power button
Display mode button
Keystone button
LEFT button
ENTER button
Menu button
Brightness button
Contrast button
ECO button
Volume button
RIGHT button
Blank screen button
Volume
button
MUTE button
Preparing the remote control
A battery is pre-installed in the remote control
at the time of shipment (with insulation sheet).
Remove the insulation sheet before using the
remote control for the first time.
Insulation sheet
2 USING THE PROJECTOR
Installing the projector
Decide on the position to place the projector.
The distance between the projector and the screen should be between 48cm (screen
size: 25 inch) and 133cm (screen size: 68 inch).
L
Height
Screen size (inch)
Width
Screen size
Projection distance
Inch
Width (cm)
Height (cm)
L(cm)
25
53.8
33.7
48
30
64.6
40.4
58
35
75.4
48.0
68
40
86.1
53.8
78
45
96.9
60.6
88
50
107.7
67.3
98
55
118.5
74.0
108
60
129.2
80.8
118
65
140.0
87.5
128
68
146.5
91.5
133
Note
The values in the table are design values and may vary. Use them
as an indication only.
The aspect ratio of the projected image in full screen is 16:10. When
the aspect ratio of the input signal is different from 16:10 (such as
16:9 or 4:3), top and bottom or left and right of the image will not be
displayed and the screen size becomes smaller than those specified
in the above table.
Refer to the instruction manual of the BOXi T-200 for detailed information.
Connecting to a device
-Connecting using an HDMI terminal
1. Connect the power supply (AC adapter and power cord) to the projector.
2. Connect the projector to the device such as a DVD player using the HDMI cable.
BACK
HDMI cable
AC adapter
Device (such as a DVD player)
Power cord
When using HDMI, use the HDMI terminal and HDMI cable .
Powering on
1. Touch
(Press
button on the control panel.
button on the remote control.)
Remote control
Control panel
indicator on the control panel turns blue.
The opening screen appears.
Note
It will take some time before you can operate the projector after the
power is on.
Adjusting the projected image
Focusing the image
1. Use the focus dial to focus the image.
Correcting the keystone distortion
1. Press
button on the remote control.
Keystone adjustment dialog appears.
Remote control
Keystone adjustment dialog
2. Press
or
button on the remote control.
Remote control
Press>button
(Press this button when the projection
angle is increasing.)
Press
button
(Press this button when the projection
angle is decreasing.)
Powering off
1. Touch
(Press
button on the control panel.
button on the remote control.)
Remote control
Control panel
Press Power button again to
2. The message appears.
turn off the projector.
Then touch
button on the control panel again.
(Then press
button on the remote control again.)
indicator on the control panel turns red.
Unplug the cable after the fan has stopped.
CAUTION
When the warning indicator is lit or flashing, it indicates that a malfunction has
occurred to the projector. Refer to the instruction manual of the BOXi T-200.
CONSIGNES DE SÉCURITÉ
GUIDE DE DÉMARRAGE RAPIDE
FRAN AIS
Lisez attentivement ce guide et les « CONSIGNES DE SÉCURITÉ » avant
Ce guide décrit le fonctionnement de base du projecteur en prenant pour exemple
la connexion à un lecteur de DVD. ReportezBOXi T-200 pour toutes autres opérations et informations détaillées.
BOXi T-200
ci-dessous.
Site du produit BOXi
http://www.elmoboxi.com/
©2012 Copyright ELMO Co., Ltd. Tous droits réservés.
Tous les noms, les noms de sociétés et de produits mentionnés dans ce guide sont des
marques commerciales ou déposées des sociétés respectives.
TABLE DES MATIÈRES
TABLE DES MATIÈRES ...............................................................................................20
C ON SIGN ES DE SÉ CURI TÉ ................................ ................................ 21
AVAN T L A PREMIÈ RE UTI LI S ATIO N ................................................... 25
GU ID E D E DÉM AR RAGE R API DE ...................... ................................. 27
1 M ISE EN
UVRE . ................................... .................................. ..... 27
Vérification du contenu de la boîte ............................................................................27
Noms des pièces et fonctions ....................................................................................28
Préparation de la télécommande ................................................................................29
2 UTILISATI ON DU PROJEC TEU R .................... ................................. 30
Installation du projecteur ............................................................................................30
Connexion à un dispositif ...........................................................................................31
Mise sous tension .......................................................................................................32
R glage de l’image projet e .......................................................................................33
Mise hors tension ........................................................................................................34
CONSIGNES DE SÉCURITÉ
Lire les instructions
avant de le mettre en marche.
Conserver les instructions
Conserver ce manuel pour référence ultérieure.
Tenir compte des avertissements
Suivre les instructions
Nettoyage
procéder au nettoyage. Ne pas
utiliser de nettoyants liquides ou en aérosol. Utiliser un chiffon humide pour le nettoyage.
Accessoires
panne.
Eau et humidité
Ne pas ut
piscine ou autres endroits similaires.
Support
Ne pas placer cet appareil sur un support, table, étagère, trépied ou chariot instable. Il
pourrait tomber et causer une blessure grave à un enfant ou à un adulte, ou être
une table recommandé(e) par le fabricant ou vendu(e) avec le produit. Tout montage doit
être conforme aux instructions du fabricant et doit être réalisé avec les accessoires
recommandés par le fabricant.
Alimentation
doute sur la
nature du courant électrique, demander conseil à un électricien ou à la compagnie
Mise à la terre et polarisation
servant à la mise à la terre. Pour des raisons de sécurité, la fiche à 2 broches ne peut
essayer de la retourner. Si le branchement reste impossible, contacter un électricien pour
remplacer la prise de secteur murale. Ne pas essayer de passer outre le système de
sécurité de la prise polarisée. Pour des raisons de sécurité, la fiche à 3 conducteurs se
branche sur une prise de secteur reliée à la terre. Si le branchement reste impossible,
contacter un électricien pour remplacer la prise de secteur murale. Ne pas essayer de
passer outre le système de sécurité de la prise reliée à la terre.
écrasés par des objets
Foudre
pendant une longue période, il faut le débra
de câble. Cela permet de prévenir les problèmes liés à la foudre et aux surtensions.
Surcharge
isante.
Les arrêts brutaux, une force excessive et une surface inégale peuvent
pourraient entrer en contact avec les points de surtension et créer un court-circuit ou un
incendie.
Réparation
reil soi-même. Ouvrir et enlever les panneaux de
appel à du personnel qualifié.
appareil et faire appel à un réparateur qualifié dans les
cas suivants :
régler que les commandes spécifiées dans le manuel. Un mauvais réglage des autres
, ce qui demandera encore plus de travail au
technicien.
Remplacement des pièces
Veiller à ce que les pièces utilisées par le réparateur soient celles spécifiées par le
de pièces non autorisées peut causer un incendie, un risque électrique ou un autre
incident.
Contrôle de sécurité
technicien, confirmant son parfait fonctionnement.
Chaleur
autre appareil (incluant les amplificateurs) produisant de la chaleur.
Ce produit comporte parmi ses composants une lampe fluorescente qui contient du
mercure.
Veuillez vous adresser à votre préfecture ou mairie au sujet des moyens de destruction ou
de recyclage appropriés et ne pas jeter tel quel.
AVERTISSEMENT
RISQUE DE CHOC
ÉLECTRIQUE
NE PAS OUVRIR
AVERTISSEMENT :
AFIN D’ VITER TOUT RISQUE
DE CHOC ÉLECTRIQUE, NE
PAS OUVRIR I’APPAREIL
(CAPOTS OU PANNEAU
ARRIÈRE).
L’UTILISATEUR NE PEUT
INTERVENIR SUR AUCUN DES
ÉLÉMENTS INTÉRIEURS.
NE FAIRE APPEL QU’ UN
RÉPARATEUR AUTORISÉ ET
QUALIFIÉ.
-isolé de forte
SA 1965
amplitude
électrique potentiellement dangereux pour les personnes.
pareil comporte
SA 1966
Le symbole (de la poubelle sur roues barrée DEEE Annexe IV ) indique
que les équipements électriques et électroniques, piles et accumulateurs
font l'objet d'u
Veuillez à ne pas jeter l'équipement dans les ordures domestiques.
A utiliser pour la mise en rebut de ces types d'équipements
conformément aux systèmes de traitement et de collecte disponible
dans votre pays.
Le symbole (poubelle sur roue barrée d'une croix et la Directive sur les
piles et batteries 2006/66/EC Annexe II) indique une collecte séparée
des piles dans les pays de l'UE.
Veuillez à ne pas jeter les piles dans les ordures domestiques. A utiliser
pour la mise en rebut de ces types d'équipements conformément aux
systèmes de traitement et de collecte disponible dans votre pays.
AVANT LA PREMIÈRE UTILISATION
ts.
Veillez à bien utiliser le cordon électrique applicable à vos spécifications électriques
avec 100 VAC et 50 ou 60 Hz.
provoquer un incendie ou une décharge électrique.
avec les deux
mains. Ne provoquez pas de vibration excessive ou de choc sur le produit car cela
pourrait endommager des pièces et entraîner un dysfonctionnement.
dans une voiture ou un bateau avec des vibrations ou un choc appliqué au produit. Les
vibrations ou les chocs peuvent endommager des pièces et entraîner un
dysfonctionnement.
électrique. Le produit peut recevoir des interférences nuisibles.
fumée grasse ou la vapeur. De la saleté peut se fixer aux parties optiques comme la
lentille et produire une image floue.
lieux où la température change trop rapidement.
Utilisez ce produit dans les conditions environnementales suivantes :
Température 5℃
35℃
Humidité
moins de 85
(sans condensation)
ambiante augmente rapidement, de la condensation peut se produire à la surface de la
lentille, produisant une image floue. Attendez que la condensation disparaisse
Ne touchez pas la lentille. Cela peut laisser des traces de doigts ce qui produirait des
images floues.
.
Notes importantes lors de la connexion du câble HDMI.
Utiliser un câble HDMI GRANDE VITESSE avec un logo HDMI.
connecté au terminal HDMI. Cela pourrait endommager le terminal HDMI, provoquant
un dysfonctionnement.
Suivez les instructions ci-dessous pour éviter de faire tomber ou renverser le produit.
sur une base instable ou un endroit incliné.
ou le câble vidéo.
Tâche luminescente ou noire
ixels. Bien que des tâches
Il peut se prod
que le produit règle automatiquement les paramètres de projection sur le signal entrant. Il
Durée de vie des pièces
environnement à la température élevée, poussiéreux et/ou enfumé (des cigarettes par
exemple), ou bien de longues heures d'utilisation continue pendant plus de huit heures. Il
peut abréger la vie du ventilateur, des pièces optiques et/ou autres pièces annexes, ainsi
détériorer les performances et de la qualité du projecteur. Veuillez noter que, suivant la
sit
pendant la période de garantie. Concernant le remplacement d'un composant payant,
réseaux de service après-vente.
GUIDE DE DÉMARRAGE RAPIDE
1 MISE EN
UVRE
Vérification du contenu de la boîte
Projecteur
Adaptateur CA
Cordon électrique
CONSIGNES DE SÉCURITÉ
Télécommande
GUIDE DE DÉMARRAGE
RAPIDE
*Batterie incluse
Câble HDMI
Garantie
Noms des pièces et fonctions
FACE / DESSUS
FACE / DESSOUS
Panneau de contrôle
Haut-parleur
Panneau arrière
Télécapteur
Lentille
air
Mise au point
Panneau de
contrôle
Emplacement de sécurité
Socle inclinable
* Commutateur tactile
Bouton de correction keystone
Bouton menu
Bouton de volume
Bouton GAUCHE
Bouton DROITE
AUDIO
Panneau
arrière
Sortie DC5V
(Ecouteur/Haut-parleurs Externes)
HDMI
DC IN
Socle inclinable
Socle inclinable 10°
Socle inclinable 5°
*Le socle inclinable vous permet d'incliner la façade de 5 ° à 10 ° et remonter
Télécommande
Bouton Menu
Bouton de luminosité
Bouton de contraste
Bouton de mode d'affichage
Bouton de correction keystone
Bouton ECO
Bouton GAUCHE
Bouton ENTRÉE
Bouton DROITE
Volume bouton
Bouton Écran blanc
Volume bouton
Bouton SOURDINE
Pr paration de la t l commande
Une batterie est préinstallée dans la télécommande
télécommande pour la première fois.
Feuille isolante
2 UTILISATION DU PROJECTEUR
Installation du projecteur
L
Hauteur
Taille écran (pouce)
Largeur
Distance de
projection
Pouce
Largeur (cm)
Hauteur (cm)
L (cm)
25
53.8
33.7
48
30
64.6
40.4
58
35
75.4
48.0
68
40
86.1
53.8
78
45
96.9
60.6
88
50
107.7
67.3
98
55
118.5
74.0
108
60
129.2
80.8
118
65
140.0
87.5
128
68
146.5
91.5
133
Note
Les valeurs dans le tableau sont des valeurs de conception et
peuvent varier. Utilisez-les uniquement à titre indicatif
aspect
aspect
16:10
(comme 16:9 ou 4:3), le haut et le bas ou la gauche ou la droite de
sera plus petite que
les valeurs spécifiées dans le tableau ci-dessus.
→Reportezdétaillées.
instructions du BOXi T-200 pour des informations
Connexion à un dispositif
-Connexion
l’aide du terminal HDMI
1. Connect
projecteur.
2. Connectez le projecteur au dispositif comme un lecteur de DVD
HDMI.
) au
ARRIÈRE
Câble HDMI
Adaptateur CA
Dispositif (comme un lecteur de DVD)
Alimentation
électrique
Avec un HDMI, utilisez le terminal HDMI et le câble HDMI .
Mise sous tension
1. Toucher le bouton
(Appuyer le bouton
sur le panneau de contrôle.
sur la télécommande.)
Télécommande
Panneau de contrôle
Le bouton
sur le panneau de contrôle s'allume en bleu.
Note
Vous devrez patienter un peu avant de pouvoir faire fonctionner le
.
R glage de l’image projet e
Mise au point de l’image
1. Utiliser la mise au point pour faire une mise au
.
Correction des distorsions trapézoïdales
1. Appuyez sur la bouton
de sur la télécommande.
La boîte de dialogue de réglage trapézoïdal (keystone)
apparaît.
Télécommande
Boîte de dialogue du réglage
2. Appuyez sur la bouton
ou
Télécommande
Appuyez sur le bouton
(
de projection augmente.)
Appuyez sur le bouton
(Appuyez sur ce b
de projection diminue.)
de sur la télécommande.
Mise hors tension
1. Toucher le bouton
(Appuyer le bouton
sur le panneau de contrôle.
sur la télécommande.)
Télécommande
Panneau de contrôle
Appuyez
nouveau sur le bouton
d alimentation pour teindre le
projecteur.
2. Le message apparaît.
Toucher encore une fois le bouton
(Toucher encore une fois le bouton
La couleur du bouton
sur le panneau de contrôle.
sur la télécommande.)
sur le panneau de contrôle change vers rouge.
.
ATTENTION
dysfonctionnement du projecteur. ReportezBOXi T-200.
instructions du
WICHTIGE SICHERHEITSHINWEISE
Kurzanleitung
Deutsch
Lesen Sie sich diese Anleitung und das separate
SICHERHEITSHINWEISE
In dieser Anleitung wird die grundlegende Bedienung des Projektors beschrieben,
beispielsweise der Anschluss an einen DVD-Player. Lesen Sie zu weiteren
Funktionen und für ausführliche Informationen die Bedienungsanleitung des BOXi
T-200.
BOXi T-200 Bedienungsanleitung
Laden Sie die Bedienungsanleitung von der folgenden BOXi
Webseite herunter.
BOXi Produktwebseite http://www.elmoboxi.com/
©2013 Copyright ELMO Co., Ltd. Alle Rechte vorbehalten.
Alle Namen, Firmennamen und Produktnamen, auf die in dieser Anleitung verwiesen wird,
sind Warenzeichen oder eingetragene Warenzeichen der jeweiligen Unternehmen.
INHALTSVERZEICHNIS
INHALTSVERZEICHNIS ...............................................................................................36
WICHTIGE SI CHER HEI TSHINWEISE ................................................... 37
VOR DEM GEBR AU CH ................................ ................................. ...... 41
Ku rz an lei tung ................ ................................................................... 43
1 ER ST E SCHRI TTE .................................. ................................. ...... 43
Überprüfung des Packungsinhalts .............................................................................43
Bezeichnung und Funktion der Einzelteile ................................................................44
Vorbereitung der Fernbedienung ...............................................................................45
2 BED IEN UNG DES PRO JE KTO RS .................... ................................. 46
Installierung des Projektors ........................................................................................46
Einschalten ..................................................................................................................48
Anpassung des projizierten Bildes ............................................................................49
Ausschalten .................................................................................................................50
WICHTIGE SICHERHEITSHINWEISE
Lesen Sie die Anleitung
Alle Sicherheits- und Bedienungsanleitungen müssen vor der Inbetriebnahme des
Apparates gelesen werden.
Bewahren Sie die Anleitung auf
Die Sicherheitshinweise und Bedienungsanleitungen sollten für eine zukünftige
Bezugnahme aufbewahrt werden.
Beachten Sie die Warnhinweise
Beachten Sie alle Warnhinweise auf dem Produkt und in der Bedienungsanleitung.
Befolgen Sie die Anleitung
Alle Bedienungs- und Gebrauchsanleitungen sollten befolgt werden.
Reinigung
Trennen Sie das Produkt von der Stromversorgung bevor Sie es reinigen. Verwenden
Sie keine flüssigen Reinigungsmittel oder Sprays. Verwenden Sie zur Reinigung ein
feuchtes Tuch.
Zubehör
Verwenden Sie kein Zubehör, das nicht durch den Gerätehersteller empfohlen wurde,
da dadurch Gefahren entstehen können.
Wasser und Feuchtigkeit
Verwenden Sie dieses Produkt nicht in der Nähe von Wasser - zum Beispiel in der Nähe
einer Badewanne, eines Waschbeckens, einer Küchenspüle oder einer Waschmaschine,
in einem feuchten Keller oder in der Nähe eines Schwimmbeckens usw.
Platzierung
Platzieren Sie dieses Produkt nicht auf einem instabilen Wagen, Ständer, Stativ, Halter
oder Tisch. Das Produkt könnte herunterfallen und Verletzungen bei Kindern oder
Erwachsenen verursachen; ebenso können Produktbeschädigungen entstehen.
Verwenden Sie nur einen Wagen, Ständer, Halter, Tisch oder Stativ, der/das vom
Hersteller empfohlen oder mit dem Produkt verkauft wurde. Bei der Montage des
Produktes müssen die Herstelleranweisungen befolgt und das vom Hersteller
empfohlene Zubehör verwendet werden.
Stromquelle
Dieses Produkt sollte nur von der Art Stromquelle betrieben werden, die auf dem
Markierungsschild angegeben ist. Wenn Sie sich über die Art der Stromversorgung bei
Ihnen zu Hause nicht sicher sind, wenden Sie sich an Ihren Geräteverkäufer oder das
örtliche Energieversorgungsunternehmen. Für Produkte, die über einen Akku oder andere
Stromquellen mit Energie versorgt werden, ziehen Sie die Bedienungsanleitung heran.
Belüftung
Schlitze und Öffnungen im Gehäuse dienen der Belüftung. Sie stellen einen
zuverlässigen Betrieb des Produktes sicher und schützen es vor Überhitzung. Diese
Öffnungen dürfen daher nicht blockiert oder abgedeckt werden. Die Öffnungen dürfen
niemals durch die Produktplatzierung auf einem Bett, einem Sofa, einem Teppich oder
einer ähnlichen Oberfläche blockiert werden. Dieses Produkt sollte nicht in einer
integrierten Installation wie einem Bücherregal oder Schrank platziert werden; es sei
denn, es ist für eine ausreichende Belüftung gesorgt und die Anweisungen des
Herstellers wurden eingehalten.
Erdung oder Polarisierung
Dieses Produkt kann entweder mit einem gepolten zweiadrigen Netzstecker (ein Stecker,
bei dem ein Stift dicker ist als der andere) oder einem geerdeten dreiadrigen
Netzstecker mit einem dritten (Erdungs-)Kontakt ausgestattet werden. Der gepolte
Netzstecker passt nur auf eine bestimmte Weise in die Steckdose. Dies ist ein
Sicherheitsmerkmal. Wenn Sie den Netzstecker nicht in die Steckdose hineinstecken
können, wenden Sie sich an Ihren Elektriker, um Ihre veraltete Steckdose zu ersetzen.
Umgehen Sie nicht die Sicherheitsvorkehrungen eines geerdeten Netzsteckers.
Netzkabelschutz
Netzstromkabel müssen so verlegt werden, dass sie möglichst nicht begehbar sind oder
durch Gegenstände, die darauf abgestellt bzw. die gegen sie gestellt werden, nicht
eingeklemmt werden. Insbesondere an den Netzsteckern, Netzsteckerbuchsen und
Ausgangsstellen am Produkt ist darauf zu achten.
Blitzschlag
Für zusätzlichen Schutz dieses Produktes während eines Gewitters oder wenn es über
einen längeren Zeitraum unbeaufsichtigt oder unbenutzt bleibt, ziehen Sie den
Netzstecker aus der Steckdose und trennen Sie die Antenne oder das Kabelsystem ab.
So wird verhindert, dass das Produkt durch Blitze oder Stromschwankungen Schaden
nimmt.
Überlastung
Überlasten Sie keine Steckdosen, Verlängerungskabel oder Netzsteckerbuchsen, da
dies zu einer Brand- oder Stromschlaggefahr führen kann.
Eine Produkt-Wagen-Kombination sollte mit Vorsicht bewegt werden.
Plötzliches Anhalten, übermäßige Gewalt und unebene Oberflächen
können das Umstürzen der Produkt-Wagen-Kombination zur Folge haben.
Eindringen von Flüssigkeiten und Gegenständen
Stecken Sie niemals Gegenstände irgendwelcher Art durch die Öffnungen in das
Produkt, weil dadurch die Hochspannungsteile berührt werden können und somit Brandoder Stromschlaggefahr verursacht wird. Verschütten Sie niemals Flüssigkeiten
irgendeiner Art auf das Produkt.
Wartung
Versuchen Sie nicht, dieses Produkt selbst zu warten, da Sie durch das Öffnen oder
Abtrennen des Gehäuses gefährlichen Spannungen und anderen Gefahren ausgesetzt
werden. Wenden Sie sich für alle Wartungsarbeiten immer an qualifiziertes
Wartungspersonal.
Beschädigungen, die Wartung erfordern
In folgenden Fällen ziehen Sie den Netzstecker des Produktes aus der Steckdose und
überlassen Sie die Wartungsarbeiten qualifiziertem Wartungspersonal:
Wenn Flüssigkeit auf das Produkt verschüttet wurde oder Gegenstände in das
Produkt eingedrungen sind.
funktioniert. Stellen Sie nur die Regler ein, die in der Bedienungsanleitung behandelt
werden. Eine unsachgemäße Einstellung von anderen Reglern kann zu Schäden
führen und oft aufwändige Reparaturen durch einen qualifizierten Techniker erfordern,
um den normalen Produktbetrieb wieder herzustellen.
fallengelassen oder auf andere Weise beschädigt wurde.
erforderliche Wartung hinweist.
Ersatzteile
Wenn Ersatzteile erforderlich sind, sollten Sie sicherstellen, dass der Wartungstechniker
Ersatzteile verwendet, die vom Hersteller festgelegt sind oder die gleichen
Eigenschaften wie das Original aufweisen. Nicht zugelassene Ersatzteile können zu
Brand, einem elektrischen Schlag oder anderen Gefahren führen.
Sicherheitsprüfung
Bitten Sie nach Beendigung einer Wartung oder Reparatur dieses Produktes den
Wartungstechniker eine Sicherheitsprüfung durchzuführen, um festzustellen, dass sich
das Produkt in einem sicheren Betriebszustand befindet.
Hitze
Das Produkt sollte nicht in der Nähe von Hitzequellen wie Heizkörpern,
Wärmespeichern, Öfen oder anderen Produkten (einschließlich Verstärkern), die Hitze
erzeugen, platziert werden.
ACHTUNG
GEFAHR EINES
ELEKTRISCHEN
SCHLAGES
NICHT ÖFFNEN
ACHTUNG:
UM DIE GEFAHR EINES
ELEKTRISCHEN SCHLAGES ZU
REDUZIEREN, ENTFERNEN SIE
NICHT DIE ABDECKUNG (ODER
RÜCKSEITE). KEINE DURCH
DEN BENUTZER WARTBAREN
TEILE IM INNEREN. WENDEN
SIE SICH FÜR
WARTUNGSARBEITEN IMMER
AN QUALIFIZIERTES
WARTUNGSPERSONAL.
Das Blitzsymbol mit einem Pfeil in einem gleichschenkligen Dreieck
soll den Benutzer auf das Vorhandensein einer nicht isolierten
"gefährlichen Spannung" im Gehäuse des Gerätes hinweisen, die
SA 1965
stark genug sein kann, um die Gefahr eines elektrischen Schlages
für Personen darstellen zu können.
Das Ausrufezeichen in einem gleichschenkligen Dreieck soll den
Benutzer auf das Vorhandensein wichtiger Betriebs- und
Wartungsanweisungen in der begleitenden Dokumentation des
SA 1966
Produktes hinweisen.
Dieses Symbol [durchgestrichene Mülltonne nach WEEE Anhang IV]
weist auf die getrennte Rücknahme elektrischer und elektronischer
Geräte in EU-Ländern hin.
Bitte werfen Sie das Gerät nicht in den Hausmüll.
Informieren Sie sich über das in Ihrem Land gültige Rücknahmesystem
und nutzen dieses zur Entsorgung.
Dieses Symbol [durchgestrichene Mülltonne nach Direktive
2006/66/EU Anhang II] weist auf die getrennte Rücknahme von
Batterien und Akkumulatoren in EU-Ländern hin.
Bitte werfen Sie Batterien und Akkumulatoren nicht in den Hausmüll.
Informieren Sie sich über das in Ihrem Land gültige Rücknahmesystem
und nutzen Sie dieses zur Entsorgung.
VOR DEM GEBRAUCH
Das mitgelieferte Netzkabel und das Netzteil sind ausschließlich für den Gebrauch mit
diesem Produkt vorgesehen. Verwenden Sie sie nicht mit anderen Geräten.
Stellen Sie sicher, dass Sie das passende Netzkabel für die Leistung Ihres lokalen
Stromnetzes verwenden. Wenn das Produkt in Japan erworben wurde, verwenden Sie
bitte das mit dem Produkt verkaufte Netzteil mit 100V AC und 50 oder 60 Hz.
Bitte nicht das Netzkabel knoten, aufwickeln oder um das Netzteil wickeln. Dies kann das
Kabel beschädigen und zu Bränden und Stromschlägen führen.
Tragen Sie dieses Produkt, indem Sie den unteren Teil der Basiseinheit mit beiden
Händen festhalten. Setzen Sie das Gerät keinen starken Vibrationen oder
Erschütterungen aus. Dadurch könnten Teile beschädigt und Defekte verursacht werden.
Setzen Sie das Gerät während des Betriebs keinen Vibrationen oder Erschütterungen aus.
Verwenden Sie dieses Produkt nicht in einem Auto oder auf einem Schiff, wo es
Vibrationen oder Erschütterungen ausgesetzt ist. Durch die Vibrationen oder
Erschütterungen können Teile beschädigt und Defekte verursacht werden.
Verwenden Sie dieses Produkt nicht in der Nähe von Hochspannungsleitungen oder
Stromquellen. Das Produkt könnte schädigende Interferenzen empfangen.
Verwenden Sie dieses Produkt nicht an Orten, an denen Feuchtigkeit, Staub, Rauch,
Ölrauch oder Dampf vorkommen. Schmutz kann sich auf den Optikteilen wie der Linse
absetzen und ein trübes Bild verursachen.
Verwenden Sie dieses Produkt nicht an Orten mit extremen Temperaturen oder Orten, an
denen sich die Temperatur zu schnell ändert.
Verwenden Sie dieses Produkt unter den folgenden Umweltbedingungen:
Temperatur 5℃ - 35℃ Feuchtigkeit: weniger als 85% (Keine Kondensation)
Wird das Produkt plötzlich von einem warmen Ort an einen kalten Ort gebracht oder steigt
die Raumtemperatur schnell an, kann sich auf der Oberfläche der Linse Kondenswasser
bilden und zu einem undeutlichen Bild führen. Warten Sie, bis das Kondenswasser ganz
weg ist und das Bild klar wird.
Berühren Sie nicht die Linse. Dadurch können Sie Fingerabdrücke hinterlassen, die ein
verschwommenes Bild verursachen.
Wichtige Hinweise bei Anschluss eines HDMI-Kabels.
Verwenden Sie ein Hochgeschwindigkeits-HDMI-Kabel mit HDMI-Logo.
Es darf kein HDMI-Kabel verwendet werden, dass nicht den HDMI-Normen entspricht.
Üben Sie beim Anschließen des Kabels an den HDMI-Anschluss nicht zu viel Kraft auf
den HDMI-Anschluss aus. Dadurch könnte der HDMI-Anschluss beschädigt und ein
Defekt verursacht werden.
Befolgen Sie die unten angegebenen Hinweise, damit das Produkt nicht herunterfällt oder
kippt.
Verwenden Sie das Produkt auf einer stabilen Grundlage, einem Pult oder einem Tisch.
Stellen Sie das Produkt nicht auf eine instabile Grundlage oder schräge Oberfläche.
• Platzieren Sie das Produkt so und schließen Sie es so an, dass das Netzteil oder das
Videokabel nicht gespannt sind.
Leuchtende oder schwarze Punkte
Es kann sein, dass einige Pixel nicht richtig funktionieren, da eine Bildaufnahmeeinheit
verwendet wird, die sich aus vielen Pixeln zusammensetzt. Auf der Leinwand können
leuchtende oder schwarze Punkte sichtbar sein. Dies ist jedoch typisch für die
Bildaufnahmeeinheit und stellt keinen Defekt dar.
Es kann auf der Leinwand ein Flackern zu sehen sein, wenn ein Bild mit graduell ab- oder
zunehmender Helligkeit projiziert wird. Dies ist ein für die Bildaufnahmeeinheit typisches
Phänomen und stellt keinen Defekt dar.
Das Produkt wurde nicht für die Wiedergabe solcher Bilder entwickelt.
Es
kann
vorübergehend
zu
leichten
Bildverzerrungen
kommen,
wenn
die
Ausgabeauflösung des angeschlossenen Geräts geändert wird, während das Bild
projiziert wird. Der Grund dafür ist, dass das Produkt die Projektionseinstellungen
automatisch anhand des Eingabesignals anpasst. Dies ist kein Defekt.
Lebensdauer der einzelnen Teile
Der Projektor eignet sich nicht für den Einsatz bei hohen Temperaturen oder an staubigen
bzw. verrauchten Orten. Auch ist er nicht für einen Dauerbetrieb von mehr als 8 Stunden
am Stück geeignet. Wird der Projektor dennoch wie oben beschrieben verwendet, kann
sich die Lebensdauer von Teilen der Optik, der Belüftung und weiteren Komponenten
verkürzen; die Leistung des Projektors kann abnehmen.
Bitte beachten Sie, dass eine Reparatur in solchen Fällen nicht unter Garantie fällt.
Wenden Sie sich für eine kostenpflichtige Reparatur an unseren Vertriebspartner, über
den Sie das Produkt erworben haben, oder an unsere Niederlassung vor Ort.
Kurzanleitung
1 ERSTE SCHRITTE
Überprüfung des Packungsinhalts
Projektor
Netzteil
Netzkabel
WICHTIGE
Fernbedienung
SICHERHEITSHINWEISE
&
Kurzanleitung
*Batterie mitgeliefert
HDMI-Kabel
Garantiekarte
Bezeichnung und Funktion der Einzelteile
OBER-/VORDERSEITE
BODEN-/RÜCKSEITE
Ansaugöffnung
Lautsprecher
Bedienfeld
Rückwand
Fernbedienungssensor
Linse
Abzugsöffnung
Fokus-Rädchen
Kippständer
Sicherheitsschlitz
Bedienfeld
Warnanzeige
* Drucktaster
An-/Aus-Taste
Trapez -Taste
Betriebsanzeige
Menütaste
Lautstärke -Taste
Eingabetaste
Links-Taste
Rückseite
DC5V Ausgang
Rechts-Taste
AUDIO
(Kopfhörer/Externe Lautsprecher)
HDMI
DC EIN
Kippständer
Kippständer (10°)
Kippständer (5°)
*Mit dem Kippständer kann der BOXi vorne in einem Winkel 5° oder 10°
angehoben werden, um die Höhe der Projektion zu ändern.
Fernbedienung
An-/Aus-Taste
Menütaste
Helligkeit-Taste
Kontrast-Taste
Trapez-Taste
Links-Taste
Eingabetaste
ECO-Taste
Lautstärke + Taste
Rechts-Taste
Blank-Screen-Taste
Lautstärke - Taste
Stummtaste
Vorbereitung der Fernbedienung
Bei Versand ist eine Batterie in der
Fernbedienung eingesetzt (mit Isolierstreifen).
Entfernen Sie den Isolierstreifen
vor dem ersten Gebrauch der Fernbedienung.
Isolierstreifen
2 BEDIENUNG DES PROJEKTORS
Installierung des Projektors
Entscheiden Sie, wo Sie den Projektor aufstellen wollen.
Der Abstand zwischen Projektor und Leinwand sollte zwischen 48 cm (Bildgröße: 25
Zoll) und 133 cm (Bildgröße: 68 Zoll) betragen.
L
Höhe
Bildgröße (Zoll)
Breite
Bildgröße
Projektionsabstand
Zoll
Breite (cm)
Höhe (cm)
L (cm)
25
53,8
33,7
48
30
64,6
40,4
58
35
75,4
48,0
68
40
86,1
53,8
78
45
96,9
60,6
88
50
107,7
67,3
98
55
118,5
74,0
108
60
129,2
80,8
118
65
140,0
87,5
128
68
146,5
91,5
133
Hinweis
Die Werte in der Tabelle sind Bemessungswerte und können abweichen.
Verwenden Sie sie nur als Anhaltspunkt.
Das Seitenverhältnis des projizierten Bildes beträgt beim Vollbild 16:10.
Ist das Bildseitenverhältnis nicht 16:10 (z.B. 16:9 oder 4:3), wird am
Ober- und Unterrand bzw. am rechten und linken Rand nichts angezeigt.
Die Bildgröße ist kleiner als in der Tabelle angegeben.
eitere Informationen finden Sie in der Bedienungsanleitung des BOXi
T-200.
Anschluss an ein Gerät
-Verbindung über HDMI-Anschluss
1. Schließen Sie den Projektor an eine Steckdose an (Netzteil und Netzkabel).
2. Schließen Sie den Projektor mit einem HDMI-Kabel an das Gerät an,
beispielsweise an einen DVD-Player.
RÜCKSEITE
HDMI-Kabel
Netzteil
Gerät (z.B. DVD-player)
Netzkabel
Benutzen Sie bei Verwendung von HDMI den HDMI-Anschluss und ein HDMI-Kabel.
Einschalten
1.
Drücken Sie die
(Drücken Sie die
Taste auf dem Bedienfeldfeld.
Taste auf der Fernbedienung.)
Fernbedienung
Bedienfeld
Anzeige auf dem Bedienfeld wechselt zu Blau.
Der Startbildschirm erscheint.
Hinweis
Nach dem Einschalten dauert es eine Weile, bis Sie den Projektor
bedienen können.
Anpassung des projizierten Bildes
Scharfstellen des Bildes
1. Stellen Sie das Bild mit dem Fokus-Rädchen
scharf.
Korrektur der Trapezverzerrung
1. Drücken Sie die
Der
Taste an der Fernbedienung.
Dialog zur Trapezkorrektur
erscheint.
Dialog zur Trapezkorrektur
2. Drücken Sie die
oder
Taste an der Fernbedienung.
Fernbedienung
Taste drücken
(Drücken Sie diese Taste bei einem
zunehmenden Winkel.)
Taste drücken
(Drücken Sie diese Taste bei einem
abnehmenden Winkel.)
Fernbedienung
Ausschalten
1.
Drücken Sie die
(Drücken Sie die
Taste auf dem Bedienfeldfeld.
Taste auf der Fernbedienung.)
Fernbedienung
Bedienfeld
2. Die folgende Nachricht erscheint.
Drücken Sie erneut den
An-/Aus-Schalter, um den
Projektor auszuschalten.
Drücken Sie die
(Drücken Sie die
Taste am Projektor erneut.
Taste auf der Fernbedienung erneut)
Anzeige auf dem Bedienfeld wechselt zu Rot.
Ziehen Sie den Stecker heraus, nachdem sich die Lüftung abgeschaltet hat.
ACHTUNG
Wenn die Warnanzeige leuchtet oder blinkt, zeigt dies einen Defekt am
Projektor an. Schlagen Sie in der Bedienungsanleitung des BOXi T-200 nach.
CONTROLES DE SEGURIDAD
IMPORTANTES
GUÍA DE INICIO RÁPIDO
ESPAÑOL
detenimiento antes de utilizar el proyector.
Esta guía describe el funcionamiento básico del proyector, por ejemplo la
conexión a un reproductor de DVD. Consulte el manual de instrucciones de BOXi
T-200 para ver otras operaciones e información detallada.
Manual de instrucciones de BOXi T-200
Descargue este manual de instrucciones de la siguiente
página web de BOXi.
Página web de productos de BOXi
http://www.elmoboxi.com/
©2012 Copyright ELMO Co., Ltd. Todos los derechos reservados.
Todos los nombres, nombres de empresas y nombres de productos a los que se hace
referencia en esta guía son marcas comerciales o marcas comerciales registradas de sus
respectivas compañías.
ÍNDICE
ÍNDICE ..........................................................................................................................52
CO N TR O LES D E S EG U R I DAD IMPO RTA NTE S ................................................. 53
ANT ES DEL USO ........... ............................................................... ..... 57
GU ÍA D E I NI CIO RÁPI DO ................................ ................................ .... 59
1 PR IMER OS PA SOS.................................. ................................. ...... 59
Comprobación del contenido del paquete ......................................................................59
Nombres de piezas y funciones .....................................................................................60
Preparación del mando a distancia ................................................................................61
2 U SO D EL P ROYECTO R ................................................................ .. 62
Instalación del proyector ................................................................................................62
Conexión de un dispositivo ............................................................................................63
Encendido .....................................................................................................................64
Ajuste de la imagen proyectada .....................................................................................65
Apagado ........................................................................................................................66
CONTROLES DE SEGURIDAD IMPORTANTES
■ Lea las instrucciones
Todas las instrucciones de seguridad y funcionamiento deben leerse antes de utilizar el
aparato.
■ Conserve las instrucciones
Las instrucciones de seguridad y funcionamiento deben conservarse para futuras
referencias.
■ Preste atención a las advertencias
Todas las advertencias en el producto y en las instrucciones de funcionamiento deben
tenerse en cuenta.
■ Siga las instrucciones
Todas las instrucciones de funcionamiento y utilización deben seguirse.
■ Limpieza
Desenchufe este producto de la toma de energía antes de limpiarlo. No utilice detergentes
líquidos ni aerosoles.
Utilice un paño húmedo para su limpieza.
■ Accesorios
No utilice accesorios que no sean los recomendados por el fabricante del producto ya que
podrían causar daños.
■ Agua y humedad
No utilice este producto cerca del agua, por ejemplo, cerca de una bañera, fregadero o
lavadero, en un sótano húmedo, o cerca de una piscina, u otros sitios parecidos.
■ Ubicación
No coloque este producto sobre una mesa, soporte, trípode, estante o carrito inestable. El
producto podría caerse y causar lesiones graves en niños y adultos, así como daños en el
producto mismo. Utilice solamente una mesa, soporte, trípode, estante o carrito
recomendados por el fabricante o que se vendan con el producto. Cualquier montaje del
producto debería realizarse según las instrucciones del fabricante y debería utilizarse un
accesorio de montaje recomendado por el mismo.
■ Ventilación
Las ranuras y aberturas en el equipo que sirven a modo de ventilación, garantizan un
funcionamiento adecuado del producto y lo protegen del sobrecalentamiento, por lo que
dichas aberturas no deben bloquearse ni cubrirse.
Las aberturas nunca deben bloquearse colocando el producto sobre una cama, sofá,
alfombra u otra superficie similar. Este producto no debe colocarse en una instalación
integrada, como una estantería o librería, a menos que se proporcione una ventilación
adecuada o se cumplan las instrucciones del fabricante.
■ Fuentes de alimentación
Este producto debe utilizarse solamente con el tipo de fuente de alimentación indicado en
la etiqueta de marcado.
Si no está seguro del tipo de fuente de alimentación de su hogar, consulte al distribuidor
de su aparato o a la empresa de suministro eléctrico local. Para los productos destinados
a funcionar con alimentación a batería, u otras fuentes, consulte las instrucciones de
funcionamiento.
■ Toma a tierra y polarización
Este producto puede incorporar un enchufe de línea de CA polarizado de 2 cuchillas (un
enchufe con una clavija más ancha que la otra) o un enchufe de toma a tierra de 3
cuchillas (un enchufe con una tercera clavija de toma a tierra). El enchufe polarizado de 2
cuchillas sólo podrá insertarse en la toma de corriente de una forma. Se trata de un
método de seguridad. Si no puede insertar e enchufe totalmente en la toma, gírelo y
vuelva a intentarlo. Si sigue sin poder insertar correctamente el enchufe, póngase en
contacto con un técnico para que cambie la toma obsoleta. No altere el método de
seguridad del enchufe polarizado. El enchufe de toma a tierra de 3 cuchillas podrá
insertarse en una toma de corriente con toma a tierra. Se trata de un método de seguridad.
Si no puede insertar el enchufe en la toma, póngase en contacto con un técnico para que
cambie la toma obsoleta. No altere o cambie el método de seguridad del enchufe con
toma a tierra.
■ Protección de los cables de alimentación
Los cables de alimentación deberán colocarse de modo que no puedan pisarse o
pellizcarse con otros elementos, especialmente cerca de los enchufes, en los
receptáculos adecuados y en el punto de salida del producto.
■ Rayos
Para mayor protección de este producto durante una tormenta eléctrica, o cuando no vaya
a utilizarlo durante largos periodos de tiempo, desenchúfelo de la salida de la pared y
desconecte la antena o el sistema de cables.
Esto evitará daños en el producto debido a rayos y subidas de tensión.
■ Sobrecarga
No sobrecargue las salidas de corriente, los cables de extensión o los receptáculos
adecuados integrales ya que esto podría provocar un incendio o una descarga eléctrica.
■ La combinación del producto y el carro trasportador debería desplazarse con cuidado.
Las paradas rápidas, la fuerza excesiva y las superficies irregulares o su combinación
podrían provocar el vuelco del producto y el carro trasportador.
■ Entrada de objetos y líquidos
Nunca introduzca objetos de ningún tipo en este producto a través de las aberturas ya que
pueden tocar puntos peligrosos de voltaje o causar cortocircuitos que podrían provocar un
incendio o una descarga eléctrica. Nunca derrame líquido de ningún tipo sobre el
producto.
Reparación
No intente reparar este producto usted mismo ya que abrir o retirar cubiertas puede
exponerlo a voltaje peligroso u otros peligros. Confíe las reparaciones a personal
cualificado.
Daños que requieren reparación
Desenchufe este producto de la salida de la pared y consulte al personal de servicio
cualificado en los siguientes casos:
Cuando el cable de alimentación o el enchufe están dañados.
Si se ha derramado líquido o se han caído objetos dentro del producto.
Si el producto se ha expuesto a la lluvia o al agua.
Si el producto no funciona con normalidad según las instrucciones de funcionamiento.
Ajuste sólo los controles especificados en las instrucciones de funcionamiento ya que un
ajuste incorrecto de otros controles puede provocar daños y con frecuencia requieren
trabajo adicional por parte de un técnico cualificado para devolver el producto a su
funcionamiento normal.
Si el producto se ha caído o ha sufrido algún tipo de daño.
Cuando el producto muestra signos importantes de cambio en su rendimiento,
normalmente requerirá algún tipo de reparación.
Partes para repuestos
Cuando se requieren piezas de reemplazo, asegúrese de que el técnico de servicio utilice
piezas de reemplazo especificadas por el fabricante o que tengan las mismas
características que las piezas originales. Las sustituciones no autorizadas pueden causar
incendios, descargas eléctricas u otros peligros.
Comprobación de seguridad
Al terminar cualquier trabajo de mantenimiento o reparación de este producto, pida al
técnico de servicio que realice comprobaciones de seguridad para determinar que el
producto presenta las condiciones idóneas de funcionamiento.
Calor
El producto debe colocarse lejos de fuentes de calor tales como radiadores,
acumuladores de calor, estufas u otros productos (incluyendo amplificadores) que
produzcan calor.
PRECAUCIÓN
RIESGO DE
DESCARGA
ELÉCTRICA
NO ABRIR
PRECAUCIÓN:
PARA REDUCIR EL RIESGO DE
DESCARGA ELÉCTRICA, NO
RETIRE LA CUBIERTA
(O PARTE POSTERIOR). EN EL
INTERIOR NO HAY PIEZAS QUE
PUEDAN SER REPARADAS
POR EL USUARIO. DIRIJA LAS
REPARACIONES A PERSONAL
DE SERVICIO CALIFICADO.
El símbolo del rayo con punta de flecha, dentro de un triángulo
equilátero, sirve para alertar
SA 1965
SA 1966
caja del producto que puede
tener la magnitud suficiente como para constituir un riesgo de
descarga eléctrica para las
personas. Esta marca se encuentra en la parte inferior del producto.
El signo de exclamación dentro de un triángulo equilátero sirve para
alertar al usuario de la
presencia de instrucciones importantes de funcionamiento
(servicio) y mantenimiento en la
documentación que acompaña al producto.
Este símbolo [un contenedor de basura tachado con una X en el
Anexo IV de WEEE] indica que la recogida de basura de equipos
eléctricos y electrónicos deberá tratarse por separado en los países
de la Unión Europea.
No tire este equipo a la basura doméstica.
Para el desecho de este tipo de equipos utilice los sistemas de
devolución al vendedor y de recogida que se encuentren disponibles.
Este símbolo [Directiva 2006/66/EC Anexo II sobre contenedores]
indica que se deben separar las pilas usadas en los países de
la UE.
Por favor no tire las pilas en la basura normal.
Por favor utilice los sistemas de reciclaje que existan en su país para
tirar las pilas.
ANTES DEL USO
El cable de alimentación suministrado y el adaptador de CA se han diseñado para su uso
exclusivo con este producto. No los emplee con otros equipos.
Asegúrese de emplear un cable de alimentación adecuado a sus especificaciones locales.
Si el producto se ha vendido en Japón, emplee el adaptador CA vendido con el producto,
con 100V CA y 50 o 60 Hz.
No anude ni enrolle el cable de alimentación ni el adaptador CA, ni tampoco los lie
alrededor del adaptador CA. Si lo hace podrá dañar los cables, lo que podría provocar un
incendio o una descarga eléctrica.
Transporte el producto sujetando la parte inferior de la unidad principal con ambas manos.
No aplique una vibración excesiva ni golpes al producto. Si lo hace, podrán resultar
dañadas algunas piezas, lo que provocará un problema de funcionamiento.
No aplique una vibración excesiva ni golpes durante la proyección. No utilice este
producto en un coche o barco donde pueda someterse a vibraciones o golpes. La
vibración o el golpe puede provocar daños en las piezas y dar lugar a fallos de
funcionamiento.
No utilice este producto cerca de conductos o fuentes de alimentación de alto voltaje. El
producto podría recibir interferencias dañinas.
No utilice este producto en ubicaciones con humedad, polvo, humo, aditivos o vapor.
Podría adherirse suciedad a algunas piezas ópticas como las lentes, lo que podría
provocar imágenes poco nítidas.
No emplee este producto en ubicaciones expuestas a temperaturas extremas ni en las
que la temperatura cambie con excesiva rapidez.
Emplee este producto con las siguientes condiciones ambientales:
Temperatura 5
35
Humedad inferior a 85
(sin condensación)
Si el producto se coloca repentinamente en un espacio cálido desde uno frío o si aumenta
la temperatura rápidamente, puede producirse condensación en la superficie de la lente,
lo que podría provocar imágenes poco nítidas. Espere a que la condensación
desaparezca completamente y a que la imagen se vea nítida.
No toque la lente. Puede dejar huellas que emborronarían la imagen.
Notas importantes sobre la conexión del cable HDMI.
Emplee un cable HDMI DE ALTA VELOCIDAD con el logotipo HDMI.
Los cables HDMI que no cumplan el estándar HDMI no deberán utilizarse.
No ejerza una fuerza excesiva en el terminal HDMI mientras el cable esté conectado al
terminal HDMI. Podría dañar el terminal HDMI, lo que podría provocar fallos de
funcionamiento.
Las siguientes directrices deberán seguirse para evitar que el producto se caiga o
vuelque.
en una base inestable o en una ubicación inclinada.
cto de forma que evite que el cable adaptador CA o el cable
de vídeo se arrastren.
Puntos de luminiscencia y puntos negros
Es posible que existan píxeles que no funcionen correctamente debido al uso de un
dispositivo de captura de imágenes con muchos píxeles. Aunque encuentre luminiscencia
o puntos negros en la pantalla, se trata de un fenómeno intrínseco de los dispositivos de
captura de imágenes y no se deberá considerar un fallo.
Es posible que se generen destellos en la pantalla al proyectar un patrón de imagen con
cambios graduales en el brillo. Se trata de un fenómeno intrínseco al dispositivo de
captura de imágenes y no se deberá considerar un fallo de funcionamiento.
Este producto no se ha diseñado para proyectar ese tipo de imágenes.
Puede producirse cierta distorsión de las imágenes de forma provisional cuando se
cambie la resolución de salida del dispositivo conectado mientras se proyecta la imagen.
Se debe a que el producto ajusta automáticamente los ajustes de proyección conforme a
la señal de entrada. No se trata de un fallo de funcionamiento.
Vida útil de las piezas
El uso de este producto a altas temperaturas o en ubicaciones con mucho polvo o humo,
o bien el uso continuo del producto durante un periodo prolongado con fines comerciales
puede mermar el rendimiento o la calidad del producto incluso en menos de un año, a
causa de la vida útil de las piezas. Para adquirir piezas de repuesto o reparaciones con
cargo, póngase en contacto con el distribuidor al que adquirió este producto o con la
oficina/sucursal cerca de su ubicación.
GUÍA DE INICIO RÁPIDO
1 PRIMEROS PASOS
Comprobación del contenido del paquete
Proyector
Adaptador CA
Cable de alimentación
CONTROLES DE
Mando a distancia
SEGURIDAD IMPORTANTES
GUÍA DE INICIO RÁPIDO
*Batería incluida
Cable HDMI
Garantía
Nombres de piezas y funciones
PARTE SUPERIOR/FRONTAL
PARTE SUPERIOR/POSTERIOR
Orificios de
Panel de control
Altavoz
Panel posterior
Sensor remoto
Orificio de ventilación
de escape
Lente
Esfera de enfoque
Ranura de seguridad
Inclinación del Soporte
Panel de control
*Interruptor táctil
Indicador de advertencia
Botón de encendido
Indicador de encendido
Botón de distorsión trapezoidal
Botón de menú
Botón de volumen
Botón Intro
Botón IZQUIERDA
Botón DERECHA
AUDIO
Panel
Salida DC5V
CC IN
(Auriculares/Altavoces Externos)
HDMI
Inclinación del Soporte
Inclinación del Soporte (10°)
Inclinación del Soporte (5°)
*Permite una inclinación de 5º o 10º y desplazar la imagen proyectada hacia arriba.
Mando a distancia
Botón de encendido
Botón modo de Visualización
Botón de distorsión trapezoidal
Botón de menú
Botón de Brillo
Botón de Contraste
Botón de ECO
Botón IZQUIERDA
Botón Intro
Botón DERECHA
Botón de pantalla en blanco
Botón de volumen +
Botón de volumen Botón de SILENCIO
Preparación del mando a distancia
El mando a distancia tiene una batería preinstalada
en el momento de su entrega (con lámina de aislamiento).
Retire la lámina de aislamiento antes de usar el
mando a distancia por primera vez.
Lámina de aislamiento
2 USO DEL PROYECTOR
Instalación del proyector
Decida la posición en la que desea colocar el proyector.
La distancia entre el proyector y la pantalla debe ser de 48 cm (tamaño de pantalla:
25 pulgadas) y 133 cm (tamaño de pantalla: 68 pulgadas).
L
Peso
Tamaño de pantalla
Ancho
Tamaño de pantalla
Distancia de proyección
Pulgadas
Ancho (cm)
Alto (cm)
L (cm)
25
53.8
33.7
48
30
64.6
40.4
58
35
75.4
48.0
68
40
86.1
53.8
78
45
96.9
60.6
88
50
107.7
67.3
98
55
118.5
74.0
108
60
129.2
80.8
118
65
140.0
87.5
128
68
146.5
91.5
133
Nota
Los valores en la tabla son relativos al diseño y pueden variar.
Utilícelos solo como indicación.
La proporción de las dimensiones de la imagen proyectada en
pantalla completa es 16:10. Si la proporción de las dimensiones de
la señal de entrada es diferente de 16:10 (como 16:9 o 4:3), no se
mostrará la parte superior e inferior, o bien la parte izquierda o
derecha, de la imagen y el tamaño de la pantalla será inferior al
especificado en la tabla de arriba.
Consulte el manual de instrucciones de BOXi T-200 para obtener
información detallada.
Conexión de un dispositivo
-Conexión con un terminal HDMI
1. Conecte la fuente de alimentación (adaptador CA y cable de alimentación) al
proyector.
2. Conecte el proyector al dispositivo, por ejemplo a un reproductor de DVD, con el
cable HDMI.
PARTE POSTERIOR
Cable HDMI
Adaptador CA
Cable de
alimentación
Dispositivo (reproductor de DVD )
Si usa HDMI, emplee el terminal HDMI y el cable HDMI .
Encendido
1.
Toque el botón
en el panel de control.
Pulse el botón
en el mando a distancia.
Mando a distancia
Panel de control
El botón
en el panel de control se enciende en azul.
Aparecerá la pantalla inicial.
Nota
Trascurrirán unos segundos hasta que pueda emplear el proyector
tras encenderlo.
Ajuste de la imagen proyectada
Enfoque de la imagen
1. Emplee la esfera de enfoque para enfocar la imagen.
Corrección de las distorsiones trapezoidales
1. Pulse el botón
Aparecerá el
en el mando a distancia.
cuadro de diálogo de ajuste trapezoidal .
Cuadro de diálogo de ajuste
2. Pulse el botón
o
en el mando a distancia.
Mando a distancia
Pulse el botón
(pulse este botón si aumenta el ángulo
de proyección.)
Pulse el botón
(pulse este botón si disminuye el ángulo
de proyección.)
Mando a distancia
Apagado
1. Toque el botón
en el panel de control.
Pulse el botón
en el mando a distancia.
Mando a distancia
Panel de control
Pulse de nuevo el botón de
encendido para apagar el
2. Aparece el mensaje.
Toque otra vez el botón
(Pulse de nuevo el botón
El color del botón
en el panel de control.
en el mando a distancia.)
del panel de control se vuelve rojo.
Desconecte el cable cuando se detenga el ventilador.
Si el indicador de advertencia está encendido o parpadea, indica que se ha
producido un problema de funcionamiento en el proyector. Consulte el
manual de instrucciones de BOXi T-200.
6-14, Meizen-cho, Mizuho-ku
Nagoya, 467-8567, Japan
EMPRESAS SUBSIDIARIAS
ELMO USA CORP.
ELMO Europe SAS
1478 Old Country Road
Immeuble Elys es La D fense,
Plainview, NY 11803, U.S.A.
7C, Place du Dôme,
Tel. (516) 501-1400 Fax.(516) 501-0429
92056 Paris La Défense, France
E-mail: [email protected]
Tel. 33 (0) 1 73 02 67 06
Web: http://www.elmousa.com
Fax. 33 (0) 1 73 02 67 10
E-mail: [email protected]
Web: http://www.elmoeurope.com
West Coast Branch
German Branch
5676 Corporate Avenue
Hansaallee 201, Haus 1
Cypress, CA 90630, U.S.A.
40549 Düsseldorf Germany
Tel. (714) 828-8457 Fax. (714) 823-8429
Tel. 49 (0) 211 544756 40
Fax. 49 (0) 211 544756 60
6X1SPJE12(en+fr+de+es) R3-Xfx